

Page 1
DV1200 Instruction Manual
00
12
DV
4 IN 1 WALLMOUNT ENTERTAINMENT SYSTEM
WITH DVD/CD/USB/BLUETOOTH/AM/FM/WEATHERBAND
Page 2
1
PRECAUTION
30
CAUTION
RISK OF ELE CT RIC SHO CK
DO NOT OP EN
CAUTION: TO R ED UC E THE RISK OF ELECTRIC SHOCK, DO NOT REMOVE
COVER (OR BACK). NO USER SERVICEABLE PARTS INSIDE. REFER
SERVICING TO QUALIFIED SERVICE PERSONNEL.
The lightni ng f la sh w ith arrowhead s ym bo l, within an equi la te ra l triangle, i s
intended to a le rt t he u ser to the presen ce o f un insulated dan ge ro us v oltage
within the pr od uc ts e nclosure that m ay b e of s ufficie nt m ag nitude to const it ut e
a risk of elect ri c sh oc k to persons.
The exclama ti on p oi nt within an equi la te ral triangle is i nt en de d to alert user t o
the presenc e of i mp or tant operatin g an d ma intenance (se rv ic in g) instruct io ns
!
in the litera tu re a cc ompanying the a pp li ance.
WAR NING: TO REDUC E THE
RISK OF F IR E OR ELECTR IC
SHOCK , DO N OT EXPO SE
!
THIS APP LI AN CE TO R AIN OR
MOIST UR E.
CLAS S 1 LASER PRODU CT
Laser produ ct s ym bo l: located on the r ea r pa nel of the unit, in di ca te t his player is a c la ss
laser produ ct , on ly u se weak laser and n o ha za rdous radiati on o ut si de of the unit.
1.Read thro ug h th is i nstruction ma nu al b efore install at io n an d use.
2.Do not touc h th e po we r plug with wet han d.
3.Switch of f th e main power wh en t he u ni t is not in use. (Dis co nn ect the power plu g fr om
the power out le t wh en y ou do not intend to u se t he u nit for a prolong ed p er io d of time.)
Before movi ng t he u ni t, remove the dis c fr om t he unit/ tray fir st .
4.Do not open t he c ov er o r touch any of the co mp on ents exposed ou t of t he u ni t, only for
qualified t ec hn ic ians.
5.Do not expo se t he u ni t under direct su nl ig ht or nearby obje ct s th at r adiate heat t o av oi d
damage the un it .
6.Do not plac e th e un it i n moist and humid c on di tions, which ef fect the pick-u p of t he u nit
lead to out of wo rk .
7.Place the u ni t on a f la t surface and ven ti la tive conditio n. P le as e ensure the ve nt il at ion
holes are not c ov er ed t o avoid overhea ti ng a nd malfunctio n.
8.Clear the p an el a nd c ase with soft dry c lo th o nly, do not ap pl y an y kind of thinner,
alcohol or sp ra ys .
9.The appar at us s ha ll not be exposed t o dr ip ping or splashi ng a nd t ha t no objects fi ll ed
with liquid s, s uc h as v ases, shall be pl ac ed o n the apparatus .
Page 3

29
2
Content s
1. Before Operation.. .. .. .. .. .. ................. .. .. .. .. .. ................. .. .. .. .. .. ................. .. .. .. .. 3
1.1 Feature........ .. .. .. .. ................... .. .. .. .. ................... .. .. .. .. ................... .. .. .. .. 3
1.2 Precautions.... .. .. .. .. .. ................. .. .. .. .. .. ................. .. .. .. .. .. ................. .. .. .. .3
1.3 Maintenance and Cle an in g of D is cs ................... .. .. .. .. .. ................. .. .. .. .. .. ..4
1.4 Battery Informati on o f th e Re mo te C ontrol............. .. .. .. .. ................... .. .. .. .. .4
1.5 The Rem ot e Co nt ro l De sc ription.......... .. .. .. .. .. ................. .. .. .. .. .. ................5
1.6 Locations and Names o f th e Co nt ro ls ................... .. .. .. .. ................... .. .. .. .. ...6
1.7 Wiring Diagram... .. .. .. .. .. ................. .. .. .. .. .. ....... ........... .. .. .. .. .. ................. .. 7
1.8 Mouting Installat io n. .. .. .. ................. .. .. .. .. .. ................. .. .. .. .. .. ................. .. .. 7
2. Common Operation.. .. .. .. .. .. ................. .. .. .. .. .. ................. .. .. .. .. .. ................. .. .. 8
3. Radio Operation... .. .. .. .. .. ................. .. .. .. .. .. ................. .. .. .. .. .. ................. .. .. .. 10
4. Basic Disc, USB Operat io n. .. .. .. ................. .. .. .. .. .. ................. .. .. .. .. .. ..............12
4.1 Begin Playback... .. .. .. .. .. ................. .. .. .. .. .. ................. .. .. .. .. .. ................. .. 12
4.2 Pause Playback... .. .. .. .. .. ................. .. .. .. .. .. ................. .. .. .. .. .. ................. .1 3
4.3 Stop Playback ..... .. .. .. .. ................... .. .. .. .. ................... .. .. .. .. .. ................. .1 3
4.4 Select Chapter/Track with the the >> |/ |< < Bu tt on s................ .. .. .. .. .. ...........13
4.5 Select Chapter/Track with the Numb er B ut to ns .. ................. .. .. .. .. .. ............13
4.6 Select Chapter/Track with the Root /P BC M en u. .. ................. .. .. .. .. .. ...........13
4.7 Termina te t he P la yb ac k. ................. .. .. .. .. .. ................. .. .. .. .. .. ................. .. 14
5. Advanced Disc, USB Oper at io n. .. .. ................... .. .. .. .. ................... .. .. .. .. .........14
5.1 Playback with Speed .. .. .. .. .. ................. .. .. .. .. .. ................. .. .. .. .. .. ..............14
5.2 Playback with Slow Sp ee d. .. .. .. ................. .. .. .. .. .. ................. .. .. .. .. .. .........14
5.3 Playback with Still F ra me . .. .. .. ................. .. .. .. .. .. ................. .. .. .. .. .. ...........15
5.4 Playback Repeated ly. ................. .. .. .. .. .. ................. .. .. .. .. .. ................. .. .. .1 5
5.4.1 One/All Repeat. .. .. .. .. .. ................. .. .. .. .. .. ................. .. .. .. .. .. ................. .1 5
5.4.2 A-B Repeat...... .. .. .. .. ................... .. .. .. .. .. ................. .. .. .. .. .. ................. .. 15
5.5 Playback from a speci fi ed C ha pt er /Tr ac k or a S pe ci fied Time............. .. .. .. .1 6
5.6 Playback in Random. .. .. .. .. .. ................. .. .. .. .. .. ................. .. .. .. .. .. .............16
5.7 Playback in Diffe re nt An gle.............. .. .. .. .. .. ................. .. .. .. .. .. ................. .1 6
5.8 Playback in Zoom Mode .. .. .. .. .. ................. .. .. .. .. .. ................. .. .. .. .. .. .........16
5.9 Change the Caption La ng ua ge .. .. ................... .. .. .. .. ................... .. .. .. .. .....17
5.10 Change the Audio Lang ua ge .. .. .. ................... .. .. .. .. ................... .. .. .. .. .. ...17
5.11 Look ov er t he P la yb ac k Status..... ......... .. .. .. .. .. ................. .. .. .. .. .. ............17
5.12 Program Playback .. .. .. .. .. ......... ......... .. .. .. .. .. ................. .. .. .. .. .. ...............18
5.13 Playback the Pictu re C D in J PE G Fo rm at............... .. .. .. .. .. ................... .. .. 18
5.14 Mp4 OPERATI ON .. .. ................. .. .. .. .. .. ................. .. .. .. .. .. ................. .. .. .1 9
5.15 ESP an d ID 3 Fu nc ti on ................... .. .. .. .. .. ................. .. .. .. .. .. ................. .1 9
5.16 USB Operation .... .. .. .. .. .. ................. .. .. .. .. .. ................. .. .. .. .. .. ................. 19
5.17 The DV D Sy st em M en u Se tup Operation........ .. .. .. .. .. ................. .. .. .. .. .. ...19
5.18 The Pa re nt al C on tr ol ................. .. .. .. .. .. ................. .. .. .. .. .. ................. .. .. .2 3
5.19 The Re gi on C od e. .. .. ................. .. .. .. .. .. ................. .. .. .. .. .. ................. .. .. .2 4
6. Bluetooth Handfree S ys te m. .. .. ................. .. .. .. .. .. ................... .. .. .. .. ...............25
7. The Troub le S ho ot in g. .. ................. .. .. .. .. .. ................. .. .. .. .. .. ................. .. .. .. .. .2 7
8. Specification... .. .. .. .. .. ................. .. .. .. .. .. ................. .. .. .. .. .. ................. .. .. .. .. .. .28
Page 4
3
28
1.Be fore Operat ion
Than k you for purch asing a Fur rion Produc t, we hope yo u will enjoy us ing our
prod uct. For maxi mum enjoy ment please l ook throu gh the follow ing manua l
to lea rn about all th e feature s of your Furri on Stereo .
1.1 Fe atures:
Digi tal AM / FM Tuner w ith Weath er band (WB)
DVD/ CD-R/RW/M P3/MP4/ WMA Compati ble
Auxi liary input s on front an d rear
USB in put with char ging func tion*
3 Zone o utput with bu ilt in Subw oofer outpu t in Zone A
Back lit control s with Slee p Tight light f unction
Cloc k/Alarm Clo ck
1 x HDMI o utput for HD vi ewing
2 x RCA Au dio/Video o utputs fo r connectin g 2 additio nal Tv’s
Coax ial and Optic al Audio in put connect ions on the r ear of the unit
*not a ll products c an be charg ed from the uni t.
1.2 Pr ecautions
Ensu re to connect t his produ ct to a 12V DC nega tive grou nd battery sy stem
whic h is standard i n North Ame rica and Euro pean Vehi cles.
Ensu re when insta lling the S tereo all wir e ends whic h are not being u sed are
term inated with a i nsulate d end to avoid wi res short ing or earthi ng which
can le ad to the risk of f ire or elec trical shoc k.
Avoi d inserting f oreign ob jects into th e disk load ing slot of the S tereo as th is
will c ause malfun ction.
Do not e xpose this pr oduct in mo ist or wet envi ronment s, if condens ation is
pres ent in the scre en, wait fo r 1 hour or more fo r the moist ure to evapor ate
If the i nterior of th e vehicle i s extremely h ot, do not us e the player un til the
vehi cle interna l tempera ture has cool ed down.
Do not u se cleaning p roducts o n the front fac e of the prod uct, only use a
slig htly damp clo th for clea ning.
Do Not a ttempt to dis assembl e or adjust thi s product , contact a ser vice cente
for as sistance
8. Spe cificatio n
Gene ral Specifi cation
Powe r Supply Requ irement ......... ....... .. ....... ......... ......... ....... DC 12V
Maxi mum Power Out put.... ......... ......6 x 25W (measur ed at DC 14.4 V)
Maxi mum Sub woofe r Power Out put...... ......... ....... ......... ......1 x 50W
Dime nsions(w x h x d) ....... ......... ......... ....... ......... ..281 x 173 x 175 mm
DVD De ck Specific ation
Form at....... ....... ......... ......... .....DVD/ VCD/JPE G/MP4/MP3 /WMA/CD
Video Sy stem..... ......... ......NTS C/PAL/PAL-M/PAL-N/AU TO (optional )
Audi o System... ....... ......... ......... ....... .. ....... ......... ......... 24 bit/96 KHz
Load ing System. ....... ......... ......... ....... ......... ......... ....... Auto L oading
Moun ting Angle .. ....... ......... ......... ....... ......... ......... ......... ....0 to +/ -30
Video Sp ecificati on
Video Type... ......... ....... ......... ......... ......... ....... ......... .....16:9 a nd 4:3
Vide o Output leve l...... ......... ......... ....... .......Co mposite:1 .0± 0.2Vp- p
Load imp edance: 75 oh ms
Hori zontal Reso lution. ......... ......... ....... ......... ......... ....... ......... ....600
Audi o Specifica tion
Audi o Output(An alog audi o)....... ....... .. ....... ......... ......... .2.0 -1.0Vr ms
Freq uency Respo nse.... ......... ......... ....... 20Hz ~ 20KHz( at 1KHz 0 dB)
S/N Ra tio(Audio )...... ......... ......... ....... ......... .....≥90dB( at 1KHz 0 dB)
Radi o Specifica tion
FM Sec tion
Freq uency range ....... ......... ......... ....... ......... ..87.5MHz - 1 07.9MHz (US)
87.5MH z -108.0MHz (EU)
Usab le sensitiv ity......... ....... .. ....... ......... ......... ....... ......... ......... ..3uV
I.F Fr equency..... ......... ......... ....... ......... ......... ......... ....... ....10.7M Hz
AM Sec tion
Freq uency....... ......... ......... ....... ......... ......... .....53 0KHz - 1710KH z(US)
522KHz - 1 620KHz(EU )
+0
Page 5
27
4
7. The Trou bl e Shootin g
Please re ad t he user s m an ual car ef ully befo re u sing th e DV D player. If y ou h ave any p ro blems
with th is p ro duct pl ea se refe r to t he bellow Tr ou ble sho ot ing guide t o he lp you re so lve the iss ue .
NO PICT UR E, S OUND AND I ND ICATIO N
* Ensur e th at t he powe r sw itch is o n.
* Ensur e th at t he wall i nl et is ok.
* Ensur e th at t he powe r co rd is not d am aged or the f us e is not bl ow n.
* Ensur e th at t he powe r pl ug is con ne cted to the i nl et tigh tl y.
NO SOUN D BU T PICTU RE O K
* Ensur e th at t he play er s a udio ou tp ut has a good c on necti on w ith TV s au di o input .
* Check w he th er the au di o conne ct or is damag ed .
* Check w he th er you ha ve t urned d ow n the volum e.
* Ensur e th at y ou have s et t he righ t AUD IO setup of t he p layer.
* Ensur e th at t he audi o is n ot unde r mu te.
NO PICT UR E BU T SOU ND O K
* Ensur e th at t he play er s v ideo ou tp ut has a good c on necti on w ith TV s vi de o input .
* Ensur e th at y ou have t ur ned you r TV to the AV input cha nn el conn ec ting to you r pl ayer.
* Check w he th er the vi de o conne ct or is damag ed .
* Ensur e th at y ou have s et t he righ t VI DEO setti ng s of the pl ay er.
BLACK AND WH IT E PICTU RE O R SCREE N RO LLING
* Ensur e th at y ou have s et t he righ t TV SYSTEM ( e. g. PAL , NT SC) set ti ng.
FLAWS OF PICTU RE O R SOUND
* Check w he th er the se tt ing of AUD IO i s right.
* Check w he th er the di sc i s scrat ch ed or stain ed .
* Check w he th er the AV con necto r an d the outpu t te rmina l is s tained.
* Check w he th er ther e is c onden sa tion insi de t he Lens . If s o, leave th e pl ayer of f for an ho ur
or so, th en t ry again.
* Check w he th er the in st allat io n angle is le ss t han 30.
DISPL AY NO DISC O R BA D DISC
* Ensur e th at y ou have p ut t he disc o n th e tray.
* Check w he th er the di sc i s put in th e re verse sid e.
* Check w he th er the di sc i s disto rt ed.
* Check w he th er the di sc i s stain ed o r scratch ed b adly.
* Ensur e th at t he disc f or mat is co mp atible to t he p layer.
* Ensur e th at t he temp er ature i ns ide the car i s no t too hig h. I f so, cool of f until t he a mbien t
tempe ra tu re retu rn s to norm al .
* Repla ce a no ther di sc t o inser t it i nto the dis c co mpart me nt.
REMOT E CO NT ROL IS INSEN SI TIVE OR D OE S NOT WOR K
* Check t he b at terie s of r emote c on trol and ma ke s ure tha t th ey are not fl at .
* Direc t th e re mote co nt rol to th e IR s ensor of th e pl ayer.
* Check w he th er ther e ar e some ob st acles bet we en the re mo te contro l an d IR sens or.
SOME FU NC TI ON BUTT ONS DO NO T WORK
* Turn off t he power, th en t urn on ag ai n.
* Reset t he u ni t to zero , th en turn o n ag ain.
* Remov e th e fr ont pan el f rom the u ni t, then ins ta ll it aga in a nd then tur n on a gain.
THE RAD IO D OE S NOT WOR K
* Check w he th er the an te nna cab le i s connect ed f irmly. O r manuall y tu ne for a st at ion.
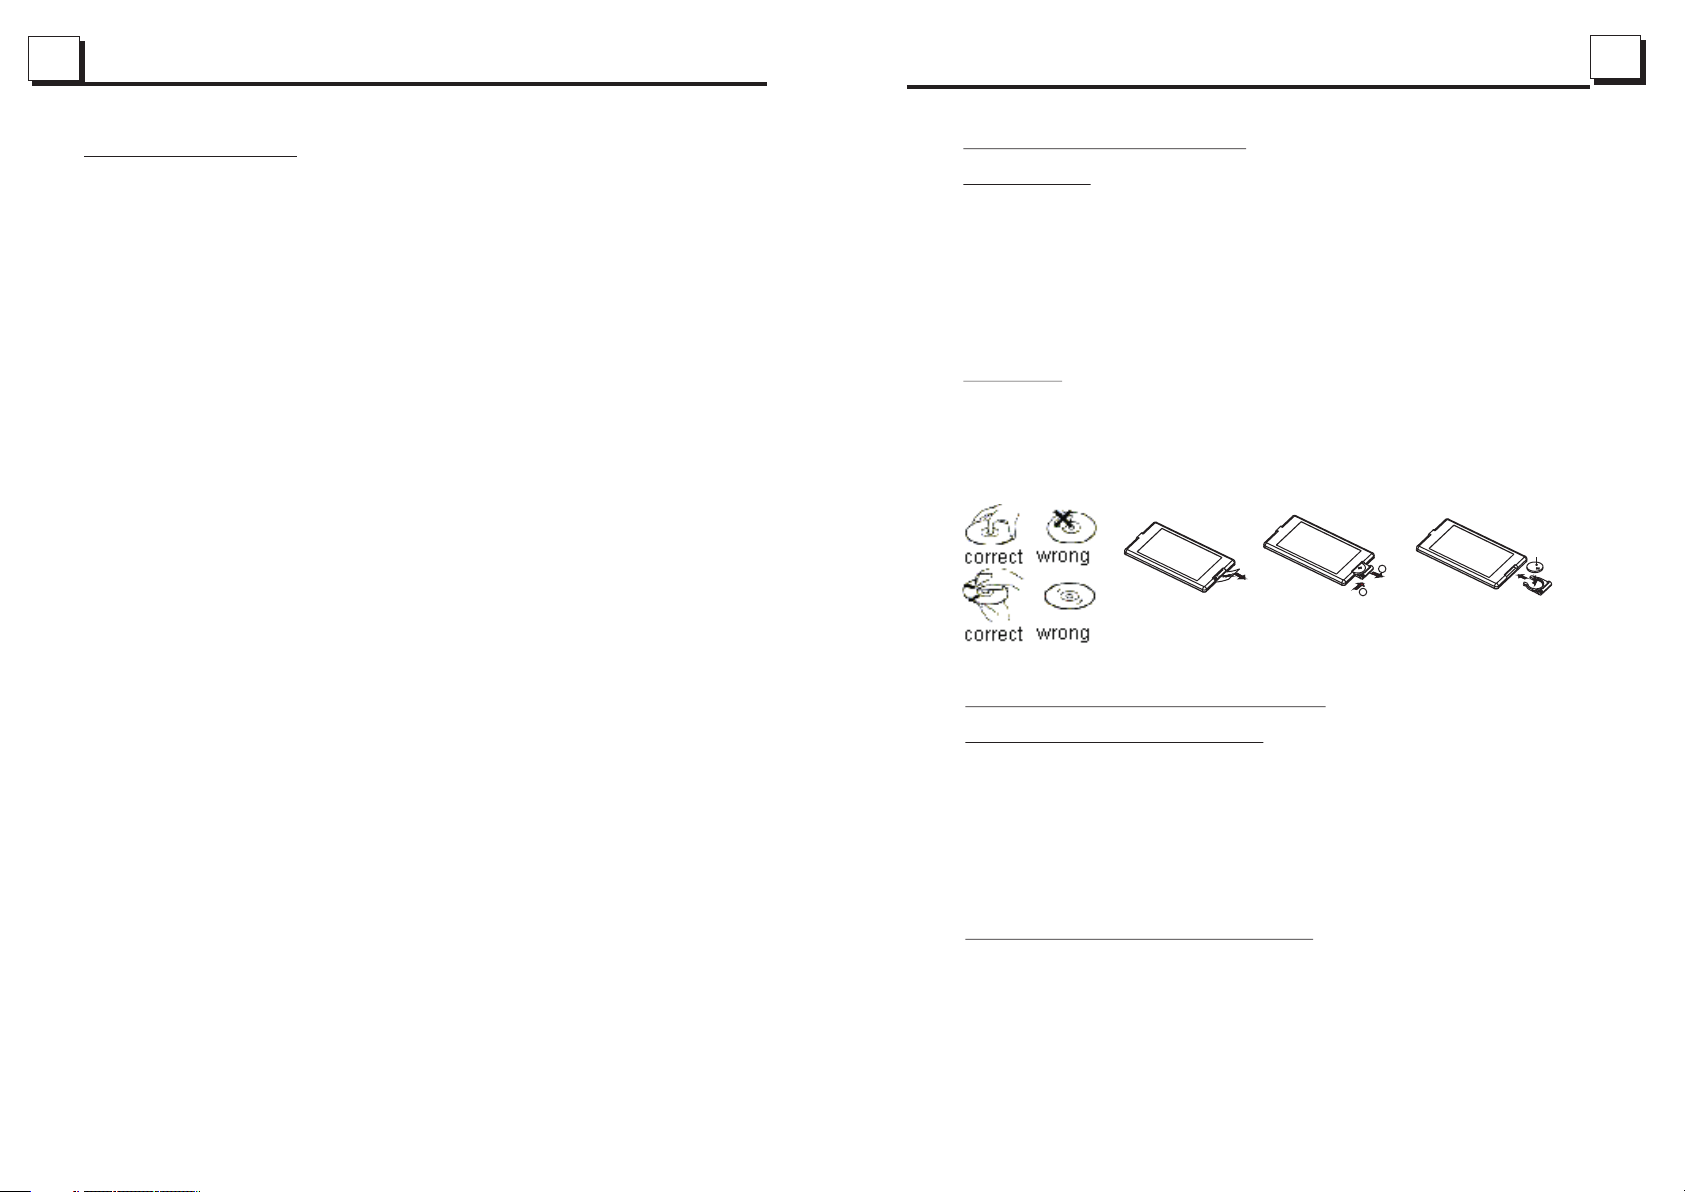
1.3 Maintenance and Cleaning of Discs
Disc Maintenance
1. To keep the disc clean, handle the disc by its edge, do not touch the disc
surface of the play side.
2. Do not stick paper or tape on the disc. If there is glue (or analog) on the
disc surface, must wipe it up before using.
3. Do not expose the disc to direct sunlight, or nearby heat sources such as
caliduct, or leave it in a car parked in direct sunlight where there can be a
considerable rise in temperature.
4. Put the disc inside disc case to keep temperature after finishing playback.
Disc Cleaning
1. Before playing, wipe the disc with a clean lint. wipe the disc outwards from
the disc center.
Do not use petrol, thinners, commercially available cleaners or anti-static
2.
sprays for plastic LP's to wipe discs
.
B
A
Fig .1
Fig .2
Fig .3
1.4 Battery Information of the Remote Control
Replace Battery in the Remote Control:
1.Before using the remote control for the first time, pull the insulating
sheet out of the remote control as the direction indicated by the
arrow.(see fig.1)
2.Press the movable block hold as the direction indicated by the A arrow
(See fig.2), then pull the battery holder out of the remote control as
the direction indicated by the B arrow(see fig.2).
3.Replace the old battery by a new battery with (+) polarity side upward.
(See fig.3).
4.Insert the battery holder to the original position in remote control.
(See fig.3).
Note about the Battery of the Remote Control:
1.Improper use of battery may cause overheating or explosion. so that
Result in injury or fire .
2.Battery leakage may cause damage to the remote control(Battery
Life: 6 months with normal use in normal room temperature).
3.Do not short the battery.
4.Do not throw the battery into the fire.
5.To avoid the risk of accident, keep the battery out of reach of children.
+ side up
Page 6
5
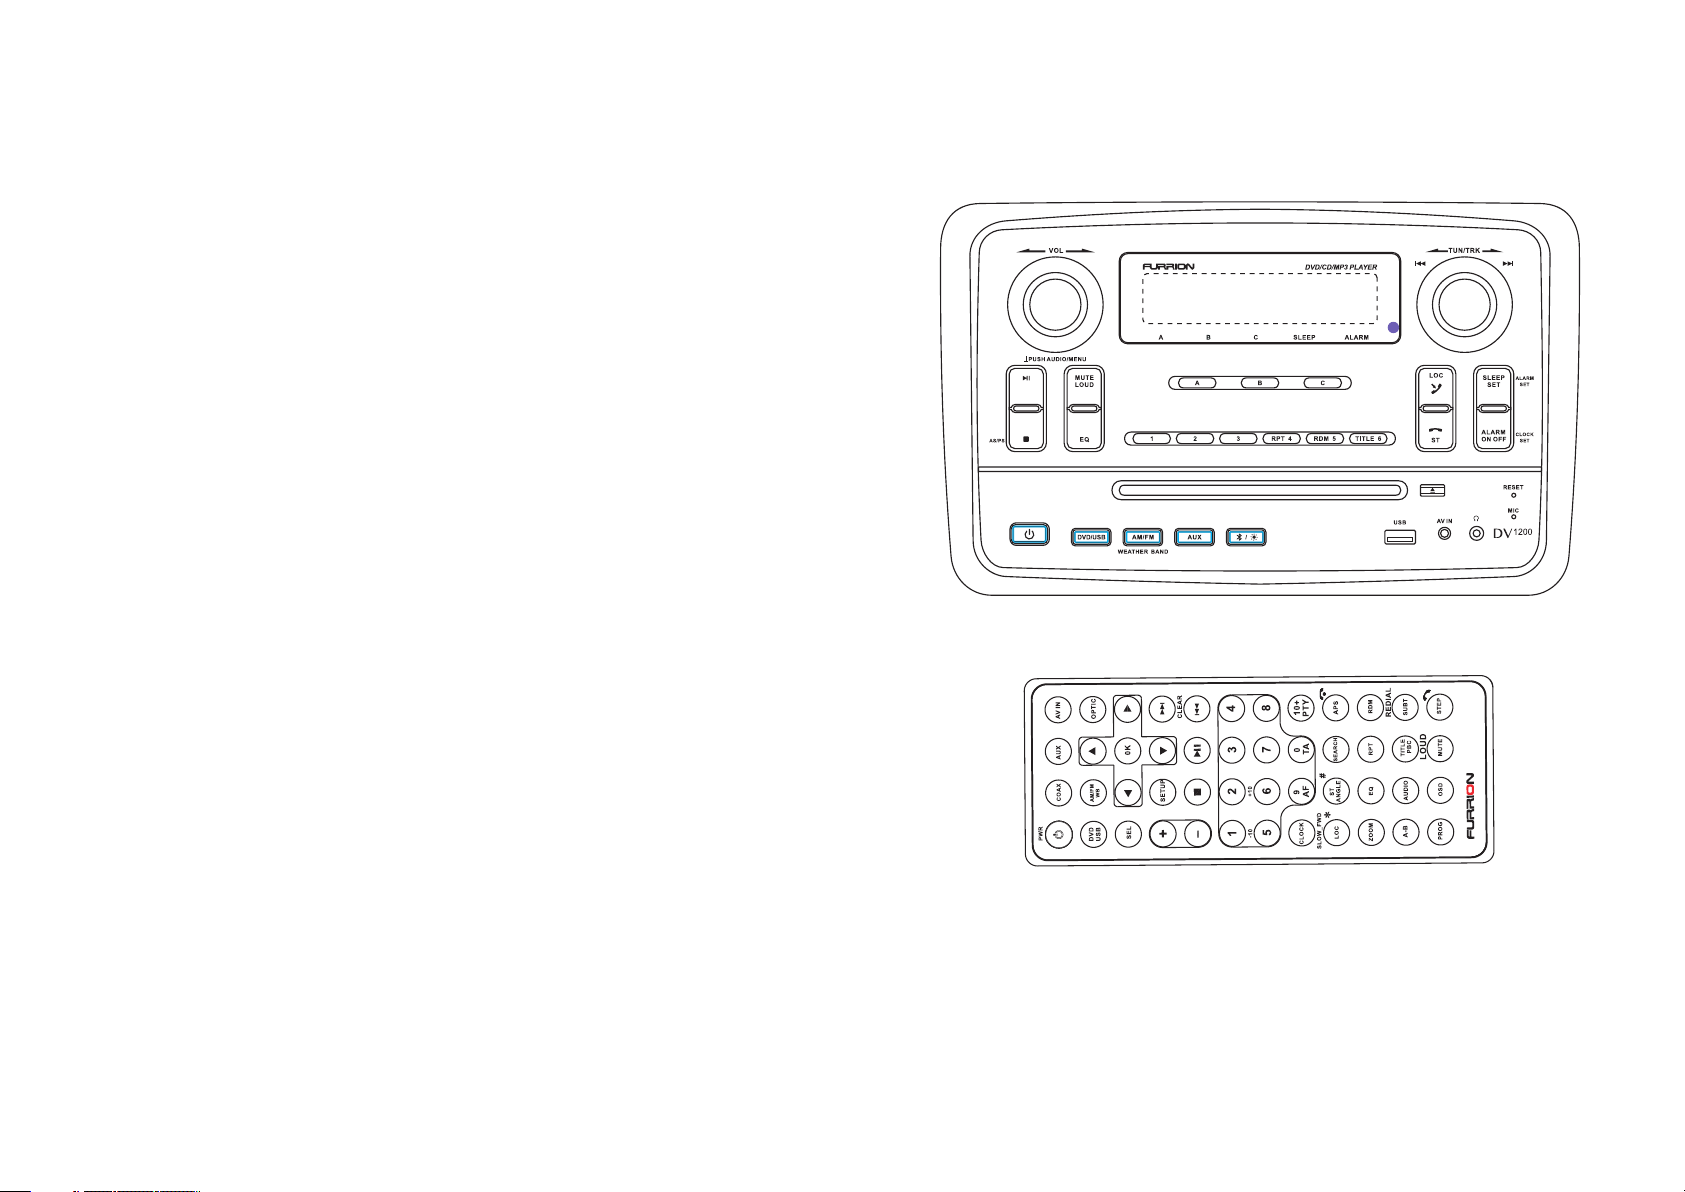
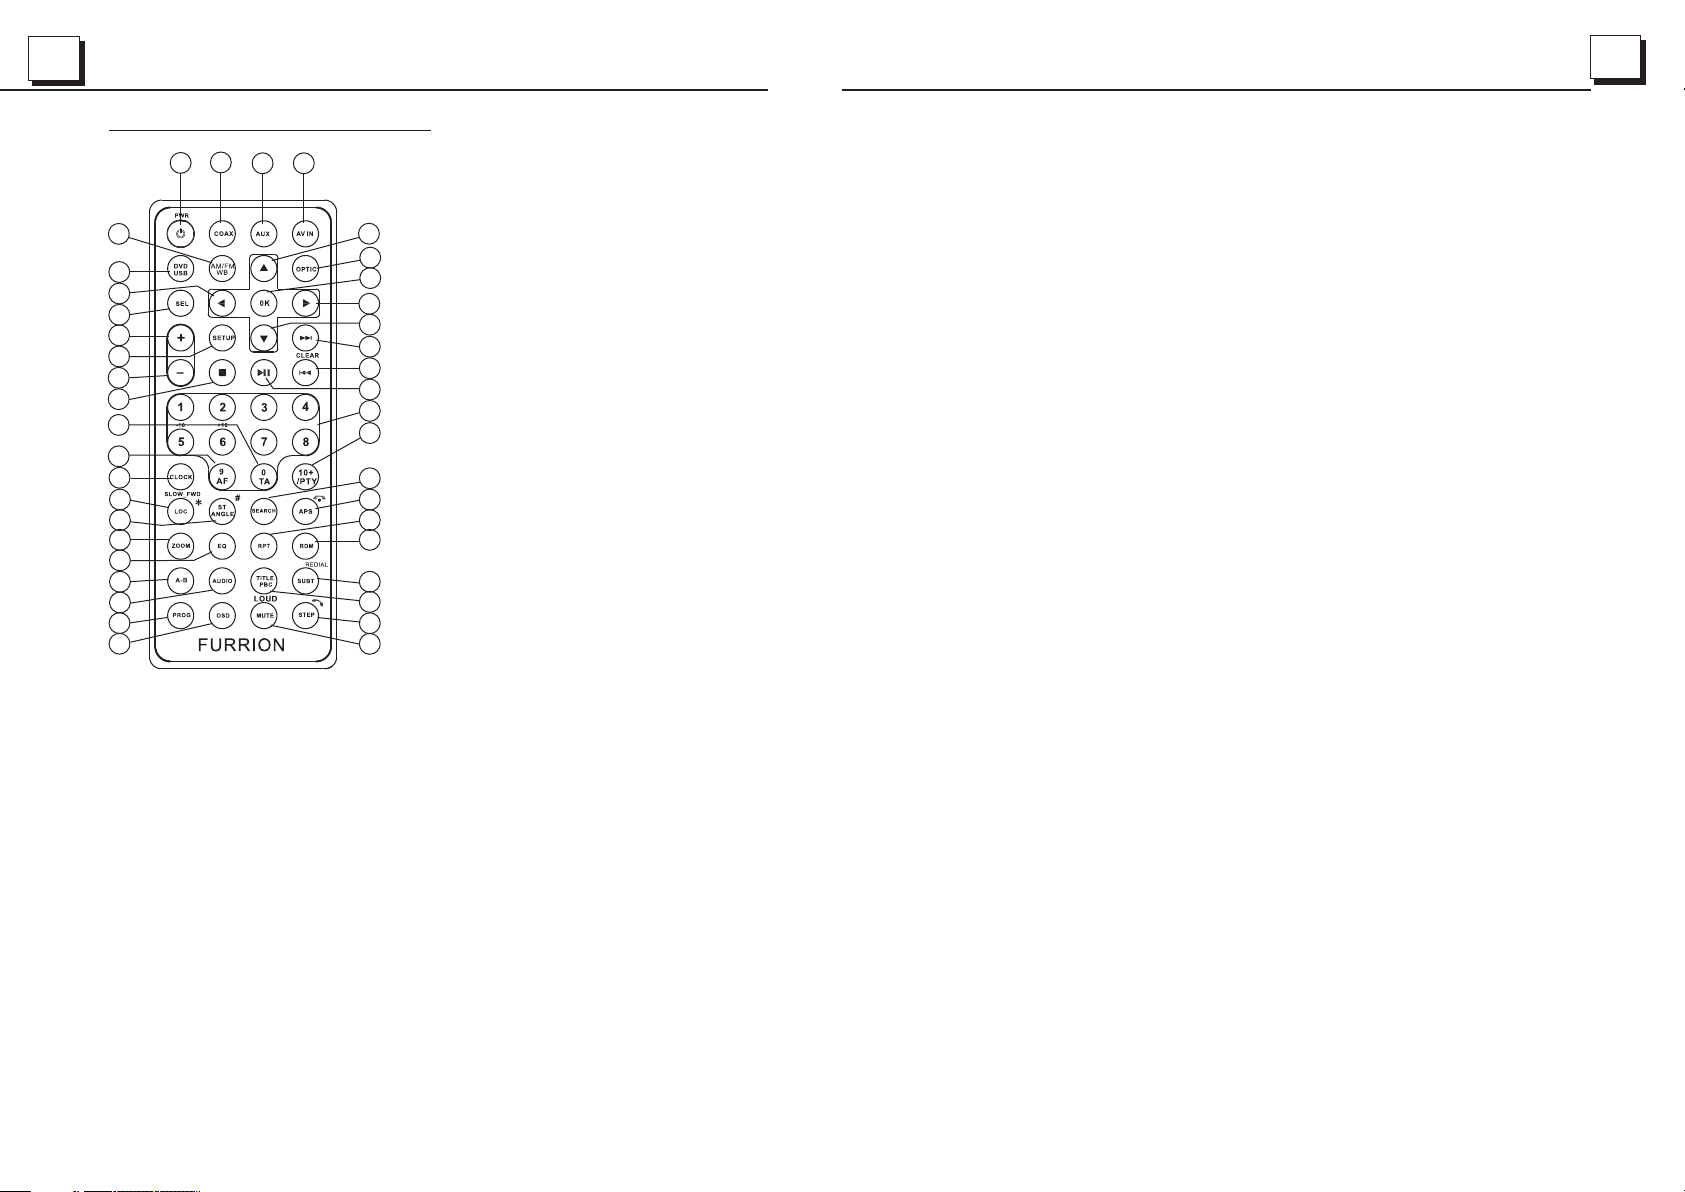
1.5 The Remo te Contro l Descripti on
3
27
14
29
32
9
34
13
31
30
40
41
24
28
21
22
26
25
23
36
37
1
35
4
2
33
6
8
5
7
10
11
12
16
15
18
17
19
20
39
38
1. AV IN BUTT ON
2. OPTICAL BUTTO N
3. POWER BUTT ON
4. ^ BUTTON
5. >>| BUTTON
6. > BUTTON
7. |<</CLEA R BU TTON
8. v BUTTON
9. SEL BU TTON
10. PLAY/PAUSE BUTTO N
11. NUMB ER (0 ~1 0,+10
-10) BUTTON S
12. 10+/PTY B UT TON
13. SETUP BUT TON
14. AM/FM WB BUT TON
15. APS/Hang U p BU TTON
26
4.3 To redial the last phone number dialled
(1) Short press TEL button ,it will show last phone number on LCD, then it will
execute the dialling
(2) Short press REDIAL button, It will dial the last phone number.
5. Accept/Reject/End Call
5.1 Incoming call Ringing, short press TEL button to accept the call
5.2 To reject incoming call, short press HANG UP button to reject the call
5.3 During a phone call, short press HANG UP button to end the call
Note: When a incoming call is present the caller’s phone number will be displayed
on the screen.
6. Dialling or receiving call when the unit is in standby (while your phone is paired)
When the Stereo is in sleep mode (Acc on and standby), to execute a dialling
(with mobile phone) or recieving a call, the car audio will temporarily wake up.
16. SEARCH BU TT ON
17. RDM BUTTO N
18. RPT BUT TON
19. SUBTITL E/ RE DI AL BU TTON
20. TIT LE /P BC BUTTON
21.ST/ANG EL /# B UT TON
22. ZOOM BUTT ON
23. AUDIO BUTT ON
24. CLOCK BUT TON
25. A-B BUTTON
26. EQ BUTTON
27. COAXIAL BUTTON
28. LOC/SLO W- FWD/* BUTTO N
29. DVD/USB M OD E BU TTON
30. STO P BUTTO N
31. VOLUME- B UT TON
32. < BUTTO N
33. OK BUTTON
34. VOLUME+ B UT TON
35. AUX MODE BUT TO N
36. PROG BUTT ON
37. OSD BUTTO N
38. MUTE/LO UD B UT TON
39. STEP /T EL BU TTON
40. TA BUTTO N
41. AF BUTTO N
7. To play a AUDIO le from a external bluetooth device (mobile phone) on the Wall
mount Stereo
After the device has been paired sucessfully and the Wall mount Stereo screen displays
LINK OK.
If your mobile device supports A2DP you will then we able to stream music from
your Blue Tooth device so it can be played by the stereo speaker.
You must select on your mobile blue tooth device to play the audio through bluetooth.
If your mobile device supports AVRCP then you will be able to control the basic phone audio
output functions by the Wall mount Stereo controls. Eg. Play Pause.
Page 7

25
6
6. BLUE TOOTH HANDFREE SYSTEM
1. Pairing and connection
1) Turn on the Bluetooth mode of the mobile phone;
2) Select the item of Finding the Bluetooth Device and enter it. After finishing the finding,
it will show the name of the Bluetooth Device if finding a Bluetooth Device. Select it
and enter it, then it will show a interface that ask you to input a password, input the
password 0000 and then enter it. Then it will tell you pair OK.
3) For some mobile phones, they can automatically connect with the BT device of the
car audio system after pairing is ok; for some mobile phones, they need to select the
paired BT device and press the CONNECTION button . When connection is ok, the
LCD of the car audio system will show LINK OK.
2. Use the mobile phone to do connection or disconnection
In the connection status, find the paired and connected Bluetooth Device, then press
the disconnection button to do disconnection.
In the disconnection status, find the paired and disconnected Bluetooth Device, then
press the connection button to do connection.
3. In the connection status: Mobile phone transfers to the car audio whenever a dialling
takes place; Mobile phone transfers to the car audio whenever receiving a call.
4. Dialling when in connection status
4.1 Dial with the mobile phone directly.
4.2 Dial with remote control with the following procedures:
(1) Input telephone number with number buttons 0-9
* Short press CLEAR button to cancel the wrongly input number if necessary
(2) Short press TEL to execute the dialling.
1.6 Locations and Names of the Controls
22
21
25
26
3
28
1
SW ADJ
2
29
27
4
23. SPEAKER SELECTION BUTTON
24. LCD DISPLAY
25. MUTE/LOUD BUTTON
26.>|| PLAY/PAU SE B UT TON
27.EQ BUTTON
28.STOP BUT TON
29. DISC SLOT
30. SUBWOORER VOLUME ADJUSTER
24
5
6
7
8
23
20
19
18
17
16
14
13
9
10
12
15
11
1. POWER BUTTON
2. DVD/USB MODE BUTTON
3. AM/FM MODE BUTTON
4. AUX MODE BUTTON
5. BT MODE /BACKLIGHT BUT TON
6. 1/2/3 BUTTON
7. 4/RPT BUTTON
8. 5/RDM BUTTON
9. 6/TITLE BUTTON
10. USB SOCKET
11. AV IN SO CK ET
12. HEADPHONE SOCKET
13.MICROPHONE
14.RESET BUTTON
15. EJECT BUTTO N
16. HANG UP/ST BUTTON
17. ALARM ON OFF BUTTON
18. SLEEP SET BUT TON
19. TEL /LOC BUTTON
20. >>|/|<< KNOB
21. VOL KNO B/ SE L BUTTO N
22. INDICATO R LI GH T
Page 8

7
1.7 Wi ring Diagra m
1.8 Mount ing Instal lation
Choose a mounting location away from humid areas, water sources, appliances or any
equipment that can radiate heat.
Select an area on a wall or cabinet which is free from cable, fuel or brake lines and ensure
the area behind the wall mount stereo has a vent hole or if it is an enclosed box and has
adaquate room around the rear of the unit for cooling.
Ensure when the stereo is mounted in the cut out that the wires at the rear of the unit are not
pressed against the heat sink.
Where possible leave around 1 to 2 inches of space inside the cabinet around the sides and
rear of the stereo housing tohelp with airow and ventilation.
24
5.19 The Region Code
Q: No DVD pl ay ba ck . Screen displays REGION ER RO R af te r inserting disc into
disc com pa rt me nt. Why ?
A: B ec ause th e DVD playe r and disc ha ve d ifferen t re gion co des. If the y do not
ma tc h, the DV D player ca nn ot play t he d isc.
Appendi x: The regio n co de o f DV D:
The Motion Picture As so ci at ion of Amereca (MPAA) divided the world int o 6
region s, a nd n am ed every region a code, namel y re gi on c ode. The r eg ion codes
and the co un tr ie s or areas represented by the r eg io n co des are as follows:
Region 1 : Ame ri ca , Canada, East-Pacific In la nd s;
Region 2 : Ja pa n, Wes t Eu ro pe , North Europe, Egypt, Sout h Afr ic a, M iddle East;
Region 3 : So ut h- east Asian countries inclu de Taiwan, Hon g Ko ng , So uth Corea,
Thailand, indonesi a, e tc .;
Region 4 : Aus tr al ia, New Zealand, Central So ut h Ame ri ca, South Pacific Inlan ds ;
Region 5 : Ru ss ia , Mongolia, Indian Penins ul a, M id dle Asia, East Europe, Nor th
Corea, Nor th Af ri ca , North-west Asia etc.;
Region 6 : Ch in a ma inland.
PLAST IC FRAM E
Page 9

23
5.18 The Parental Control
Q:After inserting DVD disc into disc compartment, a dialogue window will appear
asking for a password of 4 digits. Why ?
A:This is because that the disc movie you are playing was rated with the Parental
Control, and the current rating level of DVD player is lower than one of current
disc. You must input right password and enter it to entry Parental Control setup
menu and then set a equal or higher rating level than one of current disc. So that
you can playback the disc.
! NOTE
* If you have not changed the password, the factory preset password for the DVD
player will be empty. So that you should input a desired password and input it
again to verify it to enter the Parental Control setup menu.
* For the rating level setup of Parental Control of the DVD player, please refer to
the relative content of LOCK setup menu for details.
Accessories: Parental Control
The Parental Control function of a DVD player can control the playback of movie
rated level in a disc. Can set the DVD player(include software player in PC) to be a
certain rating level with SETUP MENU on TV sc re en .I f th e ra ti ng l ev el s et i n th e
disc is higher than one set in the DVD player, the DVD player can not playback the
disc. Sometimes the Parental Control sequences in some discs are different from
each other. The rating level setup can be protected by the password. The re in , if y ou
select Unlock item, the Parental Control function will be invalid, the content of disc
will be played totally.
The disc movie can be designed as that the DVD player will playback the diffe re nt
version of content of a same movie according to the different rating level set by
Parental Control. Depend on the DVD feature of seamless switching described above,
the scenes that are not fitting for children will be cleared or replaced by the other
fitting scene automatically.
All rating levels of Parental Control are as follows:
Unlock
1 Kid Safe
2 G
3 PG
4 PG 13
5 PG R
6 R
7 NC 17
8 Adult
8
2. Com mon Operati on
1.Turning On a nd Off t he unit
By pressing the power button will turn on or enter standby mode
Sleep Tight function
By holding the power button for 5 seconds while the unit is in standby mode will enable
Sleep Tight mode, this is were all illumination on the front panel will turn off on the unit.
2.Selecting a Source:
DVD / USB - once a DVD or USB is inserted into the unit, the unit will automatically switch
to display this source menu. Press this function button to select DVD if a disk is already
installed and the unit is playing from another source.
AM/FM/WB - by pressing this button will scroll through the FM1, FM2, FM3, AM1, AM2,
WB (weather band). To switch this units AM/FM reciever between USA and Europe
frequencies press and hold the AM/FM button for 10 seconds untill the region is displayed
on the screen.
AUX-this button allows you to scroll through the AUX inputs fitted to the strereo
COAXIAL inp ut - c on ne ct io n on t he r ea r of t he s te re o
AUX input - connection on the rear of the unit, (normally used to connect TV sound input)
AV IN - connection on front of unit to connect a external audio source
OPTICAL - con ne ct io n is o n th e re ar o f th e un it
BLUETOOTH / DIMMER - by pressing this button will enable bluetooth connection, if the
button is held in forover 2 seconds it will then dim the face illumination by 1 of the 3 stages
each time pressed.
3.Volume Adjust
Rotate the volume knob clockwise to increase volume, rotate anticlockwise to reduce volume.
4. Mute
Press MUTE button to mute what ever source is playing and display mute on the screen.
Press the mute button again to release unit from mute.
5. Clo ck and Alarm Se t
1) To di sp lay the clo ck on the LCD dis play, press Cloc k botton on t he remote con trol
2) To Adjust or s et t he clock, p ress and hold t he Clock Se t button on the f ront of the
unit o r hold the Cloc k button on t he remote con trol unti l the clock set f eature is
disp layed on the LC D display o f the stereo th en use the vo lume knob on th e unit
or + and - b uttons on the r emote con trol to adjus t the time, p ush in the volu me knob
on the s tereo or pres s the SEL bu tton on the r emote contr ol to chang e from settin g
hour s to minutes. O nce time is s et the stereo w ill autom atically se t after a few sec ond
of not p ressing any f unction s.
3) To set the Ala rm C lock the St ereo must be in AM /FM mode wh en the Alarm Set
butt ois held in. The al arm clock is se t in the same w ay as above for t he clock se t.
Once t he alarm cloc k is set, you w ill see the ALAR M light ill uminated un der the LCD
disp lay.
Pres s the alarm on /o ff b utton to turn o n or cancel t he alarm sett ing.
Page 10

9
22
6. To select a pre set EQ mode
Pres s the EQ button t o select th e preset musi c equaliz er curves: MO VIE,
MUSI C, CLASSIC, C ONCERT .The sound e ffec t will be cha nged.
7. To turn on/off LO UD mode
Pres s and hold LOUD b utton on th e front panel t o turn on/o ff LOU D
mode .
8.To adj ust the sound e qualize r curves
To ad just the soun d equaliz er curves, br iefly and r epeatedly p ress the SEL
butt on to select th e sound equ alizer curv es of VOL, BA S(without p reset EQ),
TRE (witho ut preset E Q), BAL, FAD,B EEP(ON/ OFF), then ro tate the VOL knob
on the f ront panel or p ress the + or - b utton to adju st level.
9.To pre set the unit to s leep mode
Pres s the SLEEP SET button to s elect the t ime you want to m ake the uni t go
slee p mode in. There ar e four modes fo r select.
00: The slee p mode off
15: The NDIC ATOR ligh t SLEEP will be lig hted, The unit wi ll go to slee p mode
in 15 mi nutes
30: The INDI CATOR lig ht SLEEP will be li ghted, The unit w ill go to sle ep mode
in 30 mi nutes
60: The INDI CATOR lig ht SLEEP will be li ghted, The unit w ill go to sle ep mode
in 60 mi nutes
NOTE : Only the ALARM O N mode is sel ected, the ab ove prese t fu nction
can effect .
10.To pr eset the unit f rom sleep m ode to turnin g on
Pres s and hold the SL EEP SET to p op up the pre set clock int erface. a djust the
time y ou want the uni t to turn on in .
NOTE : Only the ALARM O N mode is sel ected, the ab ove prese t fu nction
can effect .
11.ALARM ON O FF BUTTON
Pres s the ALARM ON OFF B UTTON to select t he ALARM ON or AL ARM OFF
mode .
ALARM O N: The I NDICATO R light ALAR M will be on.
ALARM O FF:The INDI CATOR lig ht ALARM wil l be off .
12. SP EAKER SELEC TION BUTTON
Pres s the SPEAKER S ELECTIO N BUTTON A/ B/C to selec t the speak er.
If the s peakers are s elected t he light of the I NDICATO R light wil l be turn on.
13.A DJUST TH E BACKLIGHT BRI GHTNESS
Long p ress the BACK LIGHT button to a djust the b acklight br ightnes s.
14.To re set the unit
when t he butt ons are not effec tive or
soun d is distorte d, then
disp lay is incorr ect, or the f unction
use a sh arp point to pr ess the RES ET but ton, that
will m ake the unit be r eset to fac tory defaul t and re-in state the cor rect functi ons
CONT RAST
It is fo r adjusting t he contra st of the video o utput
HUE
It is for ad ju st ing the hue of the video outp ut .
SATURATION
It is for ad ju st ing the saturation of the v id eo o utput.
SHARPN ES S
It is for ad ju st ing the sharpness of the vi de o ou tput.
5.17.5 S PE AK ER SETUP
DOWNM IX
It is for se le ct ing your desired soun d effect whe n th er e is no center speaker
and subw oo fe r. Th er e ar e 3 modes: LT/RT, STE RE O, V SS .
LT/RT: Whe n playing a disc with PRO L OG IC D olby stereo effect, choose the
item, so i t wi ll o utput audio signal with v iv id t heatre effect.
STEREO : If y ou c hoose the item, when outp ut ti ng audio signal with 5. 1 ch an ne ls,
it will ou tp ut t he left and right channel s of s ig nal ; when outputting a ud io s ig nal
with 2 cha nn el s, it will output the commo n 2 ch an nels of stereo signal .
VSS: If yo u ch oo se the item, when playing a d is c re corded with 5.1 chann el s,
the main c ha nn el speakers can outpu t au di o si gnal with VSS effect.
5.l7.6 O UT PU T SETUP
DYNAMI C RA NG E
After se le ct ing the compression mod e of L IN E OUT, set the item, so you can
adjust t he l in ear compression rat io . If y ou s et it to be FULL, the Peak- to -P ea k
value of t he a ud io signal is the minimu m; i f yo u se t it to be OFF, the Peak-toPeak val ue i s th e maximum.
DUAL MONO
It is for se le ct ing a desired audio out pu t mo de f or the left and right way s of s ig na l.
It is main ly f or K araoke of Ac3. There are 4 modes in all as f ol lo ws:
STEREO , MO NO L , MONO R, MIX MONO.
.
Page 11

21
10
5.17 .2 L AN GUAGE SETUP
OSD LANG UA GE
This i te m is f or selecting the la ng ua ge of the SYSTEM MENU a nd a ll o perating
prom pt i nt erface displaye d du ri ng playback.
AUDI O LA NG
This i te m is f or selecting a audi o la ng uage.
SUBT IT LE L ANG
This i te m is f or selecting a subt it le l anguage.
MENU L AN G
This i te m is f or selecting a disc m en u la nguage.
5.l7 .3 AUDIO SETUP
AUDI O OU T
ther e is o nl y ANALOG mode, i.e. SP DI F/ OFF, not optional.
KEY
It is for se le cting your desire d ba si c music tone(from l ow t o hi gh).
5.17 .4 V ID EO SETUP
3. Radio Operation
1. FREQUENCY SELECT
In RADIO mode. Press and hold the AM/FM button to select your desired frequency EUROPE ,USA1
or USA2.
2. AM/FM BUTTON
In RADIO mode, press the AM/FM WB button on the remote control or AM/FM button on the front
panel to select your desired radio band of FM1, FM2, FM3, AM1, AM2 and WB, and the selected band
will be displayed on the small monitor of the front panel.
Note: In weather band (WB) mode,press number button from 1 to 7 to select your desired station.
3. TUNE/SEEK UP/DOWN
In RADIO mode:
1) Rotate the TUN/TRK KNOB to the right or left limit position stopping for about 1 second or Press
and hold the >>|/ |<< button on the remote control to automatically search up/down for a available
station from the current frequency.
2) Rotate the TUN/TRK KNOB or the press the >>| / |<< button on the remote control
to manually search up or down with step by step for your desired station from the current
frequency.
4. AS/PS BUTTON
In RADIO mode:
1) When pressing and holding the AS/PS button on the front panel or APS button on the remote
control, the radio searches from the lowest frequency and checks the signal strength level until 1
cycle search is finished. And then the 6 strongest stations are preset to the corresponding preset
number memory bank. The AS operation is implemented in each bank of the selected band.
When the AS operation is finished, it will resume broadcasting
on the M1.(It can store 3x6 stations for FM and 2x6 stations for AM in all)
2) When briefly pressing the AS/PS button on the front panel or APS button on the remote control,
the radio searches for each preset station from the M1. When the field strength level is more than
the threshold level of the stop level, the radio holds at that preset number for a few seconds with
releasing mute, and then searches again. After finishing a circle of searching, it will stop
searching on the M1.
NOTE: In FM band, FM1,FM2,FM3 is checked one at a time.
In AM band, AM1, AM2 is checked one at a time.
5. PRESET STATION [ 1-6 ] BUTTONS
In RADIO mode:
1) To memorize the current frequency on the current band, press and hold any one of the six preset
buttons (1-6) .
2) To recall the preset memory on the current band, press one of the preset buttons [1-6] .
BRIG HT NE SS
It is for ad ju sting the brightn es s of t he video output.
6. STEREO/MONO BUTTON
Press the ST button to select the STEREO or MONO sound mode in FM mode.
7. LOC BUTTON
1) In RADIO mode, when the signal of the distance radio station are very weak and the receiving
effect is bad during tuning, check whether there is the word LOC on LCD. If there is the word
LOC on LCD, press this button to turn off the LOC function, then tune again for the distance
radio station;
2) In RADIO mode, when the signals from the local radio stations are too strong, this could lead
to interference. press this button to turn on the LOC function, and the LOC icon will be lit up on
the LCD. Re-tune for the local station required.
Page 12

11
20
8. PTY (PROG RAM TYPE) BUTTON
Long p ress the SEL button on th e front pan el or press the PTY butto n on r emote
shor tl y to select one of the fo ll owing mode.
When P TY gro up i s on, press the V OL+ or VOL- b utton on the re mote
cont roller or rot ate the VOL knob on the f ront panel to s elect one o f PT Y
prog rams: <-->N EWS<--> AFFAIRS<-- >INFO<--> SPORT<-->ED UCATE
<--> DRAMA<--> CULTURE <-->SC IENCE<- -> VARI ED<-->WEATHE R<-->
FINA NCE<-->CH ILDREN< -->SOCIAL <-->REL IGION<--> PHONE IN<-- >
TRAVEL<-->L EISURE<-- >DOCUME NT< -->PTY NONE <-->POP M< -->
ROCK M <-->EASY M<-- >LIGHT M<--> CL ASSICS<-- >OTHER M<-- >
JAZZ <-->COUNT RY <-->NATION M<- ->OLDIES< -->FOLK M<- ->
When P TY gro up i s on, pressing th e 6 nu mber buttons al so c an select one of
PTY programs a s ab ove.
Afte r selecting o ne of the PTY progr ams, it wil l display SEE K PTY and
auto matically s earch for t he station of t he PTY program. I f the station o f
the PT Y prog ram does no t exist, it wil l display P TY NON E and then re turn
back t o the normal st ation.
Note : Press and hol d the SPEAK ER SELECTIO N BUTTON B on the fro nt panel for
5 seco nds can turn on /off RDS mode.
9. AF [ALTERNATIV E FREQUENCI ES] BUTTON
Long p ress the SEL button on th e front pan el or press the AF b utton on th e
remo t control bri efly, the AF switch ingmode i s selected an d the state o f th e AF
swit ching mode is d isplaye d by AF s egment.
Segm ent off: AF switch ing mode off.
Segm ent on: AF switc hing mode o n, and has RDS in formati on.
Segm ent flashin g: AF switch ing mode on, bu t RDS infor mation is not r eceived yet .
When t he AF s witching mo de is selec ted, the radi o checks the si gnal stre ngth
of the AF a ll the time. The in terval of che cking tim e of each AFs depe nds on
the si gnal streng th of the cur rent statio n, from a few m inute for the s trong
stat ion to a few seco nds for the w eak station . Every tim e that a new AF is
stro nger than the c urrent st ation, it swi tches ove r to that frequ ency for very
shor t time, and the N EW FREQUE NCY is d isplaye d for 1-2 secon d. Becaus e
the mu te time of the AF sw itching o r the checkin g time is ver y short, it is
almo st inaudibl e in case of no rmal progra m. (When AF fl ash on LCD, it wi ll
sear ch for the stro nger RDS st ation. If AF and TP flash on L CD, it can on ly
sear ch for the traffi c announcem ent stati on).
In FM mo de, when AF is on, S EEK, (SCA N), AUTO-MEMORY functi on can
only r eceive and sa ve the RDS pr ogram.
10. TA [TRA FFIC ANNOU NCEMENT] BU TTON
Long p ress SEL button on the fr ont panel t hen rotate it o r press the TA button on
remo te shortly to t urn on/off TA sear ch mode.
When t raff ic announ cement is tra nsmitte d:
1).I f the unit is in Di sc Play mod e, it will swit ch to radio m ode tempora rily.
2).Tem porarily sw itch over t o an EON linked s tation wh en EON detect s a
traffic an nouncem ent on that oth er progra m, and TA, TP will be dis played
on LCD
* TA interr uption fu nction:
The curren t traffic annou ncement i s cancelled b y pressin g TA button
shor tly.
* When TA is on, SEEK, ( SCAN), AUTO MEMO RY funct ion can be rece ived
or sav ed only when tr affic program i dentifi cation code h as been rec eived.
For the DV D Sy st em Menu, there are 6 se tu p pa ges in all. They display as follo ws :
5.17 .1 S YS TEM SETUP
TV SYSTE M
This pro du ct supports output of v ar io us TV sy st em.
If your TV set has onl y NT SC o r PAL system, the screen wi ll b li nk and become
colo rl es s when a wrong TV system is selecte d. I n th is case, press the dire ct io n button
to switc h th e ri ght TV s ys tem to match the TV color system.
RESOLU TI ON
The setu p it em i s for setting the res ol ut ion in TV mod
TV TYPE
The setu p it em i s for matching TV screen size .
4:3 PS: Ch oo se t he item when connec ti ng a TV se t wi th 4 :3 screen. When playi ng
the pict ur es w ith 16:9 size, the le ft a nd r ight parts of the video w il l be c ut out,
and disp la y in f ull screen.
4:3 LB: Ch oo se t he item when connec ti ng a TV se t wi th 4 :3 screen. When playi ng
the pict ur es w ith 16:9 size, the to p an d bo ttom parts of the TV screen will be
turned i nt o a bl ack square respec ti ve ly.
16:9: Ch oo se t he item when connec ti ng a TV se t wi th 1 6:9 wide screen.
PASSWORD
This set up i te m is for locking or unl oc ki ng the rating level of th e Pa re ntal Control.
The defa ul te d state is locked. The defaul te d pa ssword is 0000.
You ca n set a new password that y ou l ik e: Select the PASSWORD item and th en
press th e > bu tt on to enter it, then in pu t th e original password 0 00 0, a nd then
press th e OK b ut ton to unlock it. Pre ss t he > b utton to enter it again , th en i nput
a new pa ss wo rd that you like and then p re ss t he OK button to make it effective .
Before t he o th er persons see the Ma nu al , you should get the pass wo rd i n mind
and cu t ou t th e pa rt of PAS SW ORD in the Manual.
RATING
The item i s fo r se tting a new rating le ve l of t he Parental Control .
1. Selec t th e PASSW OR D it em and then press the > but to n to e nter it, then input
the pass wo rd m entioned above, a nd t he n press the OK button to un lo ck t he
settin g of t he r ating level of the Pa re nt al Control.
2. Selec t th e RATIN G it em a nd then press the > butto n to e nt er it, then use the
direct io n bu ttons to select you r de si red rating level, the n pr es s the OK button
to confi rm .
3. Selec t th e PASSW OR D it em again and then pre ss t he > b utton to enter it, then
input th e pa ss word, and then pres s th e OK b utton to lock the new set ti ng o f
the rati ng l ev el of the Parental Co nt ro l.
DEFAU LT
This ite m is f or m aking all setup ite ms c ha nge back to original st at us .
e
Page 13

19
3. During JPEG playback, press one of the >/</^/v buttons to change the angle of
viewing picture that is displaying as follows:
>: 90 deg cw; <: 90deg ccw; ^:UP<-->DOWN; v: LEFT<-->RIGHT
During JPEG playback, press the PROG button to change the mode of refresh picture.
During JPEG playback, press the STOP bu tt on t o st op p la yi ng a nd r et ur n to t he r oo t
menu.
* During JPEG playback, the following buttons are not available: SLOW-FWD,
SUBTITLE, TITLE, ANGLE, STEP, AUDIO, RDM, INT and A-B.
* In JPEG mode,the other operations are same as ones in MP3/WMA mode.
5.14 MP4 Operation
1. The root menu is displayed on TV w he n be gi nn in g to s wi tc h on D IS C mo de , th en i t wi ll
automatically play the first file.
During playback, press the STOP but to n to s to p pl ay in g an d re tu rn t o th e ro ot m en u.
2. When displaying the root menu, press the direction buttons to select your desired
FOLDER or file, then press the OK or PLAY bu tt on t o op en t he F OL DE R, o r pl ay t he
selected file.
When displaying the root menu, you can also use the number buttons to select the
serial number of the file and play the file.
* The ANGLE, PROG, RDM and TIT LE /P BC b ut to n ar e no t va li d.
* The other functions are same as ones in DVD disc; but the RPT fun ct io n is s am e as
one in MP3/WMA.
5.15 ESP and ID3 Function
There is ESP fu nc ti on f or a ll f or ma ts o f di sc s.
In MP3/WMA mode, during playback, the information of the file name, folder name,
song s title, artist and album will be scrolling on the LCD display. As long as the
current playing MP3 music contains relevant ID3 tag information in version 1.0/2.0
format, the 3 items underlined above will be scrolling on the LCD display; otherwise,
they will not.
12
4.Di sc, USB Opera tion
4.1 Be gin playbac k
1. Pre ss the POWER bu tton brie fly to turn on th e DVD player.
After t urning on the D VD player, p lease turn on t he monito r, and ensure th at
the vi deo output of t he monito r is the video in put from th e DVD player
conn ected with th e monitor.
? Comm on Question
Q: There is no t anythin g is displaye d on TV screen when t he DVD play er is
turn ed on. How to sol ve the prob lem?
A: Ens ure that the TV was s et to right vid eo input( not TV c hannel) ; for
exam ple, if you mak e VIDEO1 IN PUT of TV an d DVD player co nnected
with e ach other, the n you need se t TV to VI DEO1.
2. Ins ert a disc into t he DISC SLO T(Label sur face up).
! NOTE
1. For s ome discs tha t are serio usly scratc hed or poor m anufactur ing or
reco rding quali ty, it may not play.
5.16 USB Operation
Power on the DVD player, then insert the USB storage, then the monitor will display
the root menu of the USB storage.
This device support picture(JPG format),audio(MP3 or WMA format) and Vid eo (M P4 f or ma t) ,
all the operations are same as ones of the corresponding format.
Note:The USB input with charging function ( not all products can be charged from the unit)
5.17 The DVD System Menu Setup Operation
1. Press the SETUP button on the remote controller to access the DVD System Menu on
the monitor.
2. There are 6 setup pages in all for the System Menu. Press the > or < button to select
an desired setup page.
3. Press the ^ or v button to select an setup item in the selected setup page.
4. Press the > button to enter the setup item. Then press the v or ^ button to select a
desired mode of the setup item, finally press the OK button to confirm it.
* Press the < button to return to the upper level.
* Press the SETUP button again or use the direction buttons to highlight the item of the
EXIT SETUP an d th en p re ss t he O K bu tt on t o ex it t he S ys te m Me nu .
2. If th e player can no t read disc u nder normal c onditio n, please try t o
ejec t and reload th e disc agai n.
3. Rem ark:
1) In ad dition to nor mal CD and DV D, this unit su pports to p lay CD-R,
CD-R /W, DVD-R and DV D-R/W as we ll; however, d ependin g on the
cond itions of the r ecordin g equipment , recordi ng program or t he disc
itse lf, some CD-R , CD-R/W, DV D-R or DVD-R/ W may not pla y.
2) Whe n dealing wit h CD-R, CD- R/W, DVD-R or DV D-R/W rec ording,
too hi gh recordin g speed may r esult in poor s ignal qua lity and ther efore,
it is re commendab le to selec t as lower as pos sible rec ording spee d.
Page 14

13
18
5.12 P ro gram Playba ck
4.2 Paus e Pl ay back
When pla yi ng D VD/VCD/CD/MP4 /M P3 /W MA discs, press the PAUSE/PLAY
button o n th e fr ont panel or remote con tr ol t o pause the playbac k, p re ss the
PAUSE/PLAY bu tt on again to resume norm al p la yback.
4.3 Stop P la yb ack
When pla yi ng D VD/VCD/MP3/WMA/ CD d is cs, press the STOP button once to
pause th e pl ay back, then press the PL AY button to resume t he n or mal playback;
press th e STOP button twic e to s to p the playback, then pr es s th e PLAY button
to start p la yb ack from the beginnin g of t he f irst chapter/trac k.
4.4 Sele ct C ha pter/Tra ck w it h the TU N/ TR K KNOB or the >>| / |<< Butto n
Rotate t he TUN/T RK K NO B on the front panel or the > >| / | << b utton on the
remote c on tr ol during playbac k to s el ect the next or last chap te r/ track to
playba ck .
Note: Ro ta te t he TUN /T RK KNOB or press the >>|/ |< < bu tton multiple times t o
advanc e mu lt iple chapters/tra ck s fo rward or backward .
4.5 Sele ct C ha pter/Tra ck w it h the Number Buttons
When pla yi ng D VD/VCD(PBC OFF)/M P3 /W MA/CD discs, press on e of t he
1~9 and th e 0/ 10 n umber buttons to dire ct ly s elect and play the 1s t to 1 0t h track /
chapte r (t he 0 /10 button is used as the 1 0 bu tt on).
If you wan t to p la y the track/chapter w it h se rial number bigge r th an 1 0,
use the 10 +, 1 ~9 a nd 0/TA button . Fo r ex ample 1, to play the 13th t ra ck /
chapte r, fi rs tly press the 10+ butto n on ce , then press the 3 button . Fo r
exampl e 2, t o pl ay the 34th track/cha pt er, f irstly press the 10 + bu tt on f or 3
times, t he n pr ess the 4 button.(the 0 /TA button i s us ed a s the 0 button)
Note: pr es si ng and holding the +1 0 or - 10 b uttons will allow you t o pl ay t he next
10 or last 1 0 ch ap ter/track(only fo r MP 3/ WMA).
4.6 Sele ct C ha pter/Tra ck w it h the Root/PBC Menu (If t he d is c includes the
root/P BC m en u)
When pla yi ng D VD discs:
1. Press t he TITLE b ut to n on the remote control t o di sp lay the title list.
2. Press t he d ir ection buttons to sel ec t yo ur desired title, a nd t he n press the OK
or PLAY button to open the root m en u of t he selected title.
3. Press t he d ir ection buttons to sel ec t yo ur desired chapte r, fi na lly press the
OK or PLAY button to play the sel ec te d chapter.
During p la yb ack,pressing th e TITLE butt on o n fr ont panel or long pre ss t he
TITLE button on th e re mo te can directly displ ay th e root menu of the title
that is pl ay in g.
It all ow s you to enter the or der in which you wa nt s ome chapter s/ tracks in
DVD/ VC D/MP3/WMA/C D disc to play.
1 Duri ng p layback, pr es s the PROG button t o en ter a program i nt erface as
foll ow s:
for DV D di scs for VCD/MP3 /W MA/CD discs
2 Use th e di rection butto ns to move cursor o nt o the desired p la ce for inputtin g
the se qu ence number.
3 Use th e nu mber button to in put desired seq ue nce number of t it le/chapte r/
trac k wi th desired sequ ence.
4 Use th e di rection butto n to move cursor on to P lay item, the n pr ess the OK
butt on t o play the progra mmed titles/c ha pters/tra ck s in programmed o rder;
only p re ssing the PLAY button also can p lay the program me d titles/ch ap ters
/tra ck s in programmed o rder.
* To exit progra m pl ayback, first ly press the STOP button, the n pr ess the PLAY
butt on t o enter sequenc e playback; or pr es s the PROG butt on t wice again.
* To remove the al l pr ogrammed sequ ence numbers, m ov e the cursor on to
Clea r it em, then press th e OK button.
* To change the pr og rammed sequ en ce, move the curs or onto the item yo u
want t o ch ange, input the d esired sequen ce n umber.
* Duri ng V CD playback , if i t is in PBC ON mode, at t he s ame time of ent er ing
the st at e of program play back, it turns off PBC mo de .
5.13 P la yback the Pic tu re CD in JPEG Forma t
1. The root me nu i s displayed on th e monitor when be gi nning to swit ch o n DISC
mode . At th e time, it plays MP 3/WMA file.(th e TITL E or M ENU button is not
avai la ble).
In the r oo t menu, the left fi le sort icon is for M P3 /WMA file; the m id dle file sort
icon i s fo r JPEG file; the ri ght file sort ico n is f or VIDEO file . If o ne of these 3
file s or t does not exist, y ou can not move cur so r onto the file s or t icon.
2. Whe n di splaying th e ro ot menu, press th e di rection but to ns to select yo ur
desi re d FOLDER, file or f ile sort icon, th en p ress the OK or PL AY button to
open t he F OLDER, or play th e selected file , or p lay only this s or t of file.
When d is playing the roo t menu, you can als o us e the number bu tt ons to
sele ct t he serial numbe r of the file and pla y th e file.
When y ou s elect a JPEG file s ort icon, press t he ^ o r > button to sel ec t the
firs t JP EG file, then pre ss the v button to se le ct the desire d JP EG file, finall y
pres s th e OK or PLAY/PAU SE button to disp la y the JPEG pict ur e in full screen
from t he s elected JPEG pi cture.
Page 15

17
ZOOMx2 ,Z OOMx3,ZOOMx4,ZO OM x1 /2,ZOOMx1/3,Z OO Mx 1/4,ZOOM OFF.
Press on e of t he ^/v/>/< buttons to s el ect the area you want t o en la rge.
5.9 Ch an ge t he Caption Langua ge
When pla yi ng DVD discs, press t he S UB TITLE button repe at ed ly to select
the lang ua ge of the caption or tu rn o ff the c ap ti on.(depend on the d is c us ed.)
When pla yi ng VCD/MP3/WMA/ CD d is cs, the button is not a va il able.
5.10 C ha ng e the Audio Language
1. When pl ay ing DVD discs, pres s th e AUD IO button repeate dl y on t he IR
remote c on trol to select the de si re d language type(d ep en d on the disc used)
2. When pl ay ing VCD discs, pres s th e AUD IO button repeate dl y to s elect the
sound mo de o f the MONO L, MONO R, and Ste re o, no language func ti on .
3. When pl ay ing CD/WMA/MP3 di sc s, t he AU DI O button is invalid .
5.11 Look over th e Pl ay back Status
1. When pl ay ing DVD discs, pres s th e OS D button repeated ly o n th e remote
contro l to t urn on/off the playback sta tu s. W hen it is on, it will dis pl ay t he
inform at ion such as: the seri al n um ber of the playing ti tl e, t he serial number
of the pla yi ng chapter, the elap se d ti me of the playing cha pt er, t he remaining
time of th e pl aying chapter, the e la ps ed time of the playin g ti tl e, the remaining
time of th e pl aying title, etc.
2. When pl ay ing VCD/CD discs, p re ss t he OSD button repea te dl y on the remote
contro l to t urn on/off the playback sta tu s. W hen it is on, it will dis pl ay t he
inform at ion such as: the seri al n um ber of the playing tr ac k, t he elapsed time
of the pla yi ng track, the remai ni ng t ime of the playing tr ac k, t he elapsted time
of the dis c, t he remaining time o f th e di sc.
3. When pl ay ing MP3/WMA discs , pr es s th e OSD button repeat ed ly o n the
remote c on trol to turn on/off the playb ac k st atus. When it is on, it w il l
displa y th e information suc h as : th e serial number of th e pl ay ing track, the
elapse d ti me of the playing tra ck , th e remaining time of t he p la ying track.
14
In VCD m ode
1. Whe n starting to t urn on the PB C function, i t will play f rom the begin ning of
the di sc till it disp lay the PBC m enu on TV screen if t he disc inclu de the PBC
menu .
2. Pre ss the number b uttons to s elect your de sired tra ck to play.
In MP3 /WMA mode
1. The root me nu is displ ayed on the mon itor scre en all the time (and the TITLE
or MEN U button is not a vailabl e).
2. Pre ss the direct ion butto ns to select yo ur desire d FOLDER, the n press the
OK or PL AY button t o open the FOLD ER, and the n press the dir ection bu ttons
to sel ect your desi red file, f inally pres s the OK butt on to play the se lected file .
In CD mo de, the TITLE, PB C, MENU butto ns are disa bled.
4.7 Termin ate the Playb ack
1. Pre ss the EJECT butt on to eject dis c.
2. Pre ss and hold the P OWER butt on on the front p anel or bri efly press th e
POWE R button on the r emote con troller to tu rn off the DVD play er.
5. Ad vanced Di sc, USB Opera tion
5.1 Pl ayback with S peed
Duri ng normal pla yback, Ro tate the TUN/TR K to the right or l eft limit p os ition
stop ping for abou t 1 second or p ress and hold t he >>|/|< < button on the r emote
cont roller cont inuousl y to fast forwa rds or back wards at the fo llowing
spee ds: x2, x4, x8, x16, x20, n ormal.
Duri ng speed play back, pre ss the PLAY button to resu me normal p layback.
5.2 Pl ayback with S low Speed
Duri ng playback , p ress the SL OW_FWD butt on to execu te the Slow
Forw ard functio n.
With e ach consecu tive pres sing of the SLO W_FWD but ton, the play back
spee d decreases . Th e speed level s in Slow For ward as follo ws:
x1/2 ,,x1/3,x1 /4,x1/5 ,x1/6,1/7 ,normal .
Page 16

15
16
Duri ng slow forwa rd, press t he PLAY but ton to resume n ormal pla yback.
The functi on is only fo r video.
5.3. P layback wit h still fra me
If the u nit is curren tly runni ng DVD.VCD di sc,pres s the STEP button
cons ecutively t o display t he still fram e forward w ith step by ste p.
Pres s the PLAY bu tton to resum e normal pl ayback.
5.4 Pl ayback Repe atedly
5.4. 1 ONE/ALL Repeat
1. In th e mode of DVD dis c playbac k:
Pres s the RPT button to s elect REP CHAPT ER, REP TI TLE, REP ALL
or REP OFF.
2. In th e mode of VCD(P BC OFF)/C D disc playba ck:
pres s the RPT button to s elect REP ONE, RE P ALL or OFF.
When i t is in the state o f PBC ON, dur ing VCD disc pl aying, th e RPT
butt on are not avai lable.
3. In th e mode of MP3/W MA disc play back:
Pres s the RPT button to s elect REP ONE, RE P DIR, R EP ALL or OFF.
5.4. 2 A-B Repeat
Pres s the A-B butto n if you want t o repeat a spec ific segm ent on a disc
that y ou define:
1. Pre ss the A-B butt on at a point ( A) where you wa nt it to be the s tart point
of the r epeat segme nt. Press t he A-B button a gain at a poi nt (B) where yo u
want i t to be the termi nal point o f the repeat se gment. Then it wi ll play the
segm ent repeate dly.
2. To cancel the A- B repeat mo de and resume n ormal pla yback, pres s the A-B
butt on for the thir d time.
Note :
Duri ng VCD/MP3/ WMA/CD pl ayback, poi nts A and B must be w ithin the
same t rack.
5.5 Pl ayback from a s pecifie d chapter/t rack or a spe cified time
1. Whe n playing DVD d iscs, pre ss the SEARCH b utton to di splay a inter face
and hi ghlight the t itle item , then use the nu mber butt ons to input th e serial
numb er of the title ; use the dir ection butt ons to high light the cha pter item,
then u se the number b uttons to i nput the seri al number o f the chapter ; you
can st ill use the dir ection bu ttons to high light the t ime item, the n use the
numb er buttons to i nput the de sired time to s tart play back; final ly press the
OK or PL AY button t o play the sele cted chap ter or play fro m the selec ted time.
2. Whe n playing VCD /MP3/WM A/CD discs, p ress the SE ARCH button t o display
a inte rface and hig hlight th e track item, t hen use the n umber butto ns to input
the se rial number o f the track ; you can still u se the dire ction butto ns to high ligh t the time item , then use th e number butt ons to inpu t the desired t ime to
star t playback; f inally pr ess the OK or PLAY button to p lay the sel ected track
or pla y from the sele cted time .
5.6 Pl ayback in Ran dom
When p laying DVD/ VCD(PBC O FF)/MP3/W MA/CD dis cs, press the R DM
butt on to switch be tween RAN DOM (ON)/RA NDOM OFF. Whe n in RANDOM
(ON) m ode, it will pl ay in rando m.
5.7 Pl ayback in Diffe rent Angle
1. Whe n playing VCD /MP3/WM A/CD discs, t he ANGLE but ton on the IR rem ote
cont rol is not avai lable.
2. Whe n playing DVD d iscs, pre ss the ANGLE but ton repea tedly on the IR
remo te control to v iew in differen t angle.( This functi on is only fo r the DVD
disc s with ANGLE fun ction)
5.8 Pl ayback in Zoo m Mode
In DVD /VCD mode, du ring play back, press t he ZOOM but ton continu ously
to enl arge a certai n area of the i mages on the sc reen with t hese multip les:
Duri ng DVD playba ck, point s A and B ca n be selected f rom different c hapters.
Page 17

FCC STATEMENT
This device complies with Part 15 of the FCC Rules. Operation is subject to the
1.
following two conditions:
(1) This device may not cause harmful interference.
(2) This device must accept any interference received, including interference that may
cause undesired operation.
Changes or modifications not expressly approved by the party responsible for compliance
could void the user's authority to operate the equipment.
NOTE: This equipment has been tested and found to comply with the limits for a Class B
digital device, pursuant to Part 15 of the FCC Rules. These limits are designed to provide
reasonable protection against harmful interference in a residential installation.
This equipment generates uses and can radiate radio frequency energy and, if not
installed and used in accordance with the instructions, may cause harmful interference to
radio communications. However, there is no guarantee that interference will not occur in a
particular installation. If this equipment does cause harmful interference to radio or
television reception, which can be determined by turning the equipment off and on, the
user is encouraged to try to correct the interference by one or more of the following
measures:
Reorient or relocate the receiving antenna.
Increase the separation between the equipment and receiver.
Connect the equipment into an outlet on a circuit different from that to which the
receiver is connected.
Consult the dealer or an e xperienced radio/TV technician for help.
 Loading...