


Mini WiFi Camera
Quick Start Guide

1Getting to know your camera
1 |
Status Light |
6 |
Adjustable Stand |
2 |
HD Camera |
7 |
Speaker |
3 |
Infrared(IR) LED |
8 |
Reset Pinhole |
4 |
Light Sensor |
9 |
Power Port |
5 |
Microphone |
|
|
To reset the camera, use a pin or a thin object to press and hold the reset pinhole on the back of the camera for 10 seconds. The LED Status Light will off and then start blinking green when the camera is ready to be set up again.
What’s in the box:
|
|
|
|
Mini WiFi Camera |
|
|
|
|
Quick Start Guide |
|
|
|
|
|
Camera |
Screws & |
Mounting |
Power |
Quick |
|
Anchors (x3) |
Bracket |
Adapter |
Guide |
1

2 Mobile Setup
This quick start guide will help you configure your camera for initial use.
Before you begin:
Place your camera within range of your wireless router. Make sure that you have a strong WiFi connection.
Make sure you know the SSID (WiFi network name) and password of the 2.4GHz WPA/WPA2 WiFi network that you want your camera to connect to. Your network cannot be hidden.
Make sure your network has at least 1Mbps upload speed to view and 2Mbps upload speed when using the Cloud Service for each camera.
Download and install the “Funlux” app from Google PlayTM or the App StoreTM (compatibility: iOS ® 7.0+ or Android TM 4.0+). Launch the app and sign up for a free Funlux account. All of your devices will be bound to this account.
Power on your camera with the supplied power adapter.
2
|
This device can be set up with a Funlux Beam. If you own a Beam, |
|
please follow the instructions in your Beam quick guide to connect |
|
your device instead. Note: When selecting the number of devices, |
|
follow Step 3 in this guide. |
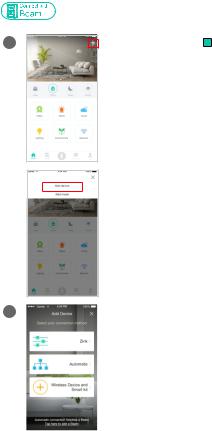
1 |
Log in and press + in the upper right |
|
corner. Select "Add Device". |
2 |
|
Select the “Zink” connection method |
|
|
to connect your camera. Your camera |
|
|
will be added to your Funlux account. |
|
|
|
3
 Loading...