

Page 1
Nexgen Mediatech Inc.
DATE 03/08 /2005
TITLE
NLC30C2-1B Level 1 Service Manual
VER V1.0
PAGE 1/34
T30002-1D LCD / TV
Model No:T30002-1D
Brand: Funai
Service Manual
Page 2
TITLE
Nexgen Mediatech Inc.
NLC30C2-1B Level 1 Service Manual
LCD TV Maintance Manual Hand book
Title:
Level 1 Service Manual
DATE 03/08 /2005
VER V1.0
PAGE 2/34
Approved by:
Eric Ma
Prepared by:
Midas Shieh
Doc. No.
ASQA_Funai_30”_01
Preparation Date
2005/03 /08
Model
T30002-1D
Version
V1.0
Version Date of new version Contents (Revision)
V1.0 2005/03 /08 New release
Page
2 of 34
Page 1 2 3 4 5 6 7 8 9 10 11 12 13 14 15 16 17 18 19 20
Version
Date
Page 21 22 23 24 25 26 27 28 29 30 31 32 33 34
Version
Date
V1.0 V1.0 V1.0 V1.0 V1.0 V1.0 V1.0 V1.0 V1.0 V1.0 V1.0 V1.0 V1.0 V1.0 V1.0 V1.0 V1.0 V1.0 V1.0 V1.0
03/08 03/08 03/08 03/08 03/08 03/08 03/08 03/08 03/08 03/08 03/08 03/08 03/08 03/08 03/08 03/08 03/08 03/08 03/08 03/08
V1.0 V1.0 V1.0 V1.0 V1.0 V1.0 V1.0 V1.0 V1.0 V1.0 V1.0 V1.0 V1.0 V1.0
03/08 03/08 03/08 03/08 03/08 03/08 03/08 03/08 03/08 03/08 03/08 03/08 03/08 03/08
Page 3
Nexgen Mediatech Inc.
DATE 03/08 /2005
TITLE
NLC30C2-1B Level 1 Service Manual
Table of content
1. Attention During Servicing 4
2. Purpose 5
3. Definition of level 1 service 5
4. Appearance Description 5
VER V1.0
PAGE 3/34
4.1 Front View 5
4.2 Side View 6
5. Block Diagram 7
6. Disassembly/Assembly Procedures 8
7. Trouble Shooting Analysis 18
8. Update BIOS 25
9. Explosion Diagram s 31
10. Level 1 Spare Parts List 32
Page 4

Nexgen Mediatech Inc.
DATE 03/08 /2005
TITLE
NLC30C2-1B Level 1 Service Manual
1. Attention During Servicing
1-1. This TV should be operated from the type of power indicated on the
using label. If you are not sure of the type of power available, consult
your dealer or local power company..
1-2. The TV shall be placed at low humidity and low dust.
1-3. Place the TV on firm flat surface carefully. The surface of the TV is
plastic material and thin glass, drop or sharp impact will cause damage
to the TV monitor.
1-4. Do not use alcohol or ammonia-based liquid to clean the monitor. If
necessary, clean with a slightly damp cloth. Disconnect the TV from
the power supply before cleaning.
1-5. Remove the power supply immediately in case of abnormality occurred
in the TV, especially strange noise of smell
1-6. Turn on power for testing only after completing the assembly of the TV
include casing and tighten the screw while servicing the TV to prevent
hazard.
VER V1.0
PAGE 4/34
Page 5
Nexgen Mediatech Inc.
DATE 03/08 /2005
TITLE
NLC30C2-1B Level 1 Service Manual
2. Purpose
The purpose of this service manual is for the reference of authorized repair
center (ASP) while proceeding level 1 service for the product mentioned in
this manual.
3. Definition of level 1 service
The definition of “level 1 service” is defined by Service Center (CS hereafter)
based on service efficiency and effectiveness considerations. Normally
level 1 means PCBA、Mechanical Parts、Internal Cable、Accessory
VER V1.0
PAGE 5/34
Component、Packing Material for LCD TV, The concrete composition of
level 1 spare parts will be mentioned in item 10, to show the level 1 list of
materials.
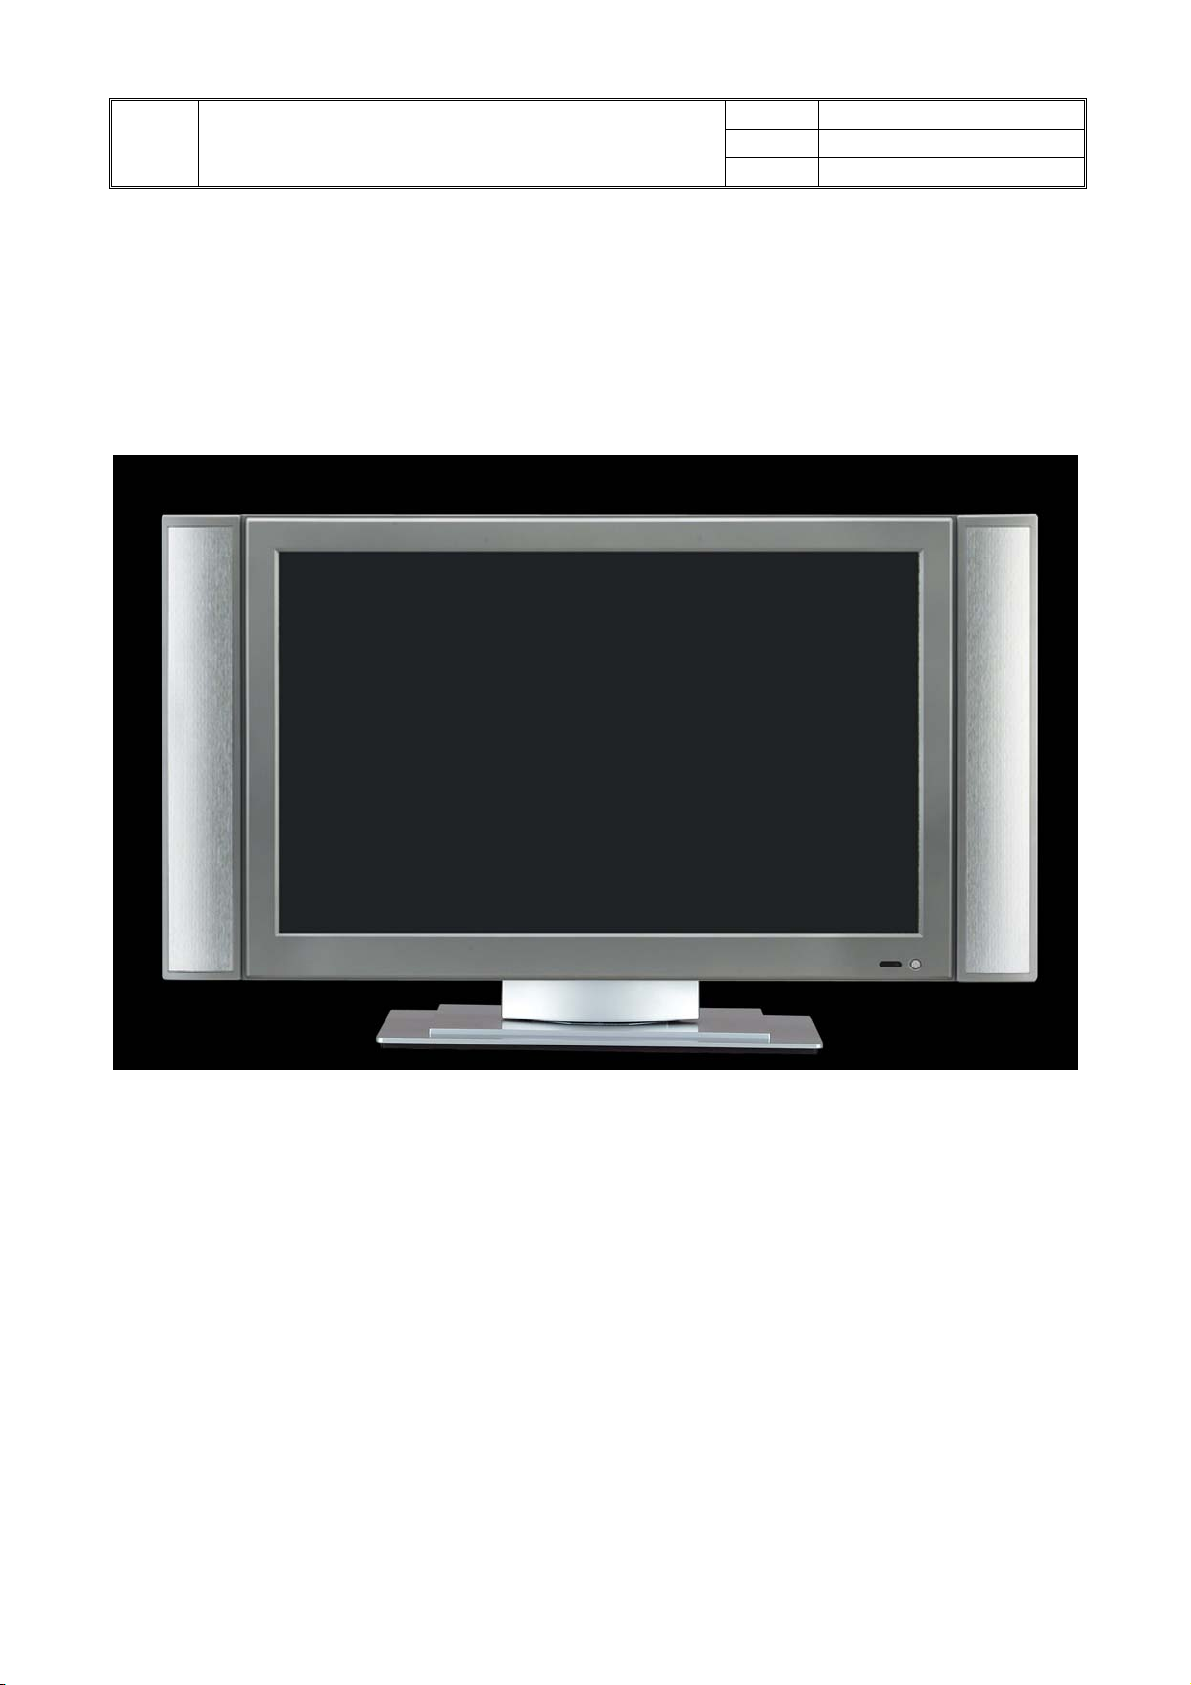
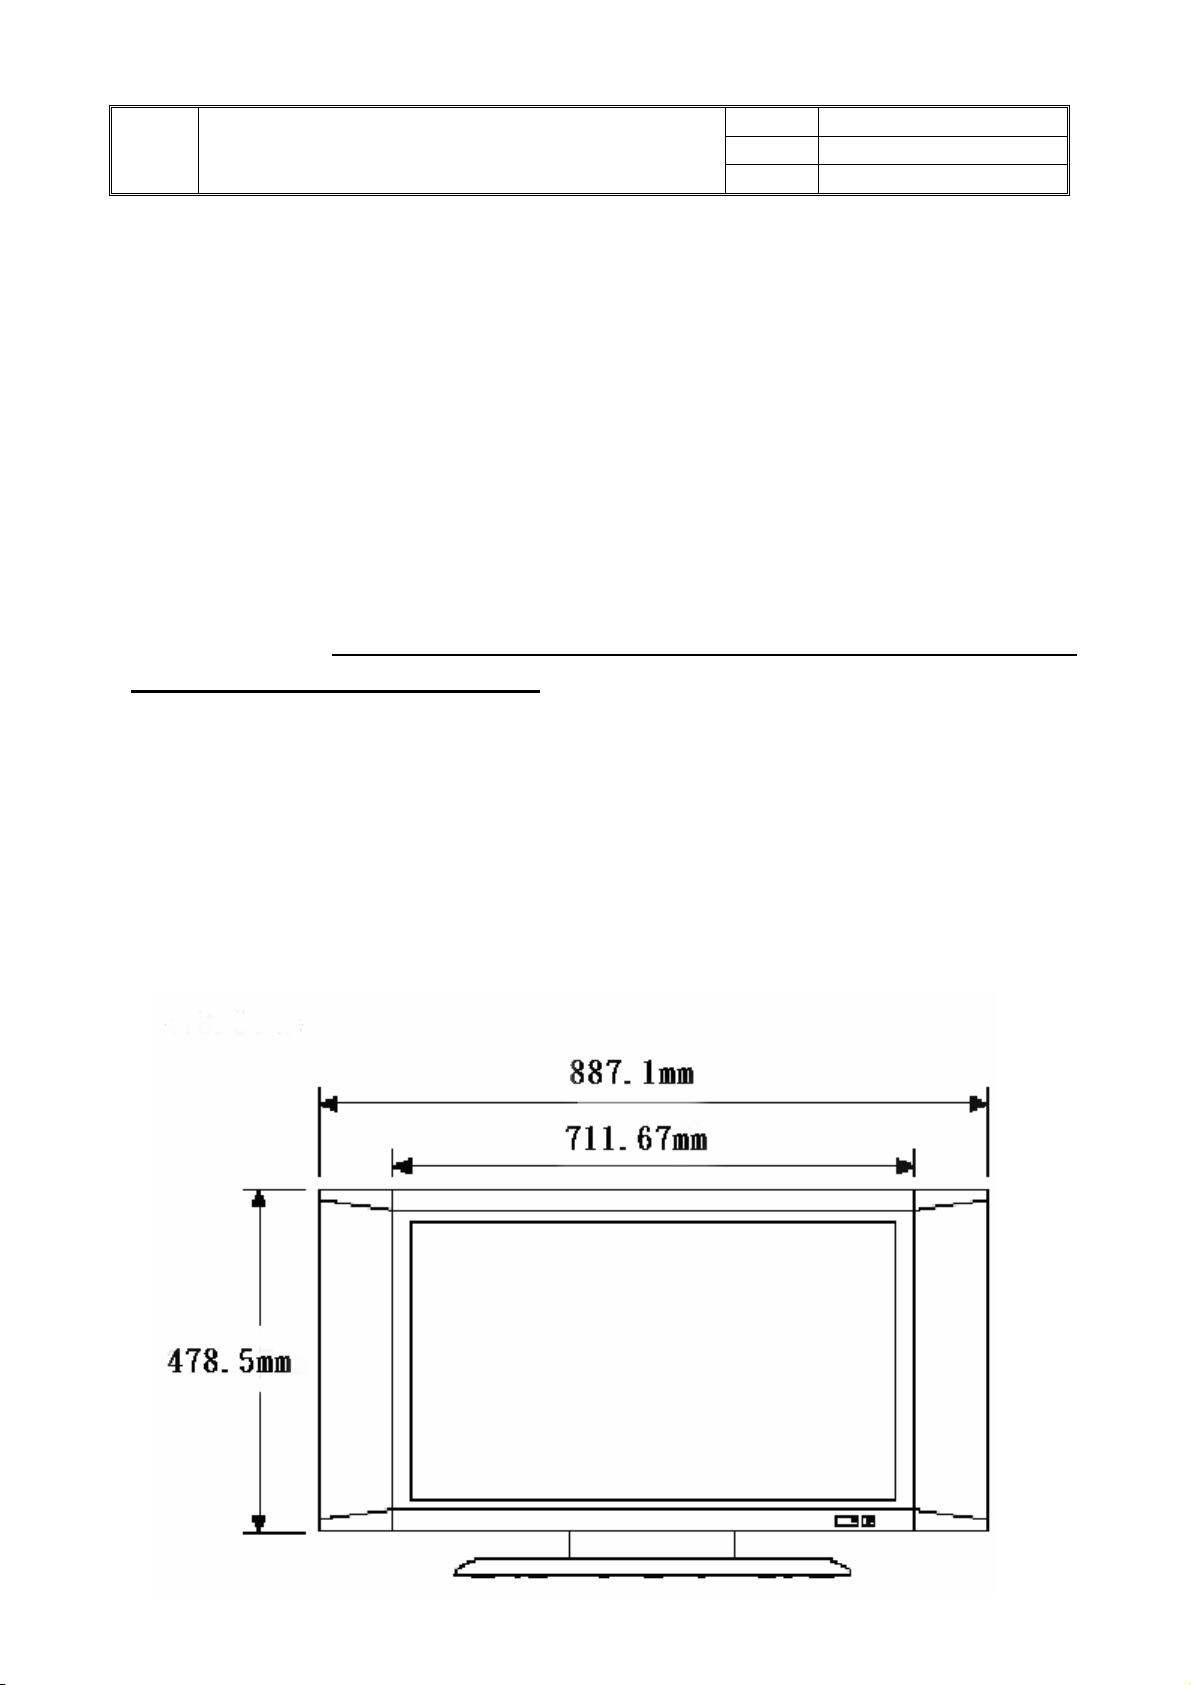
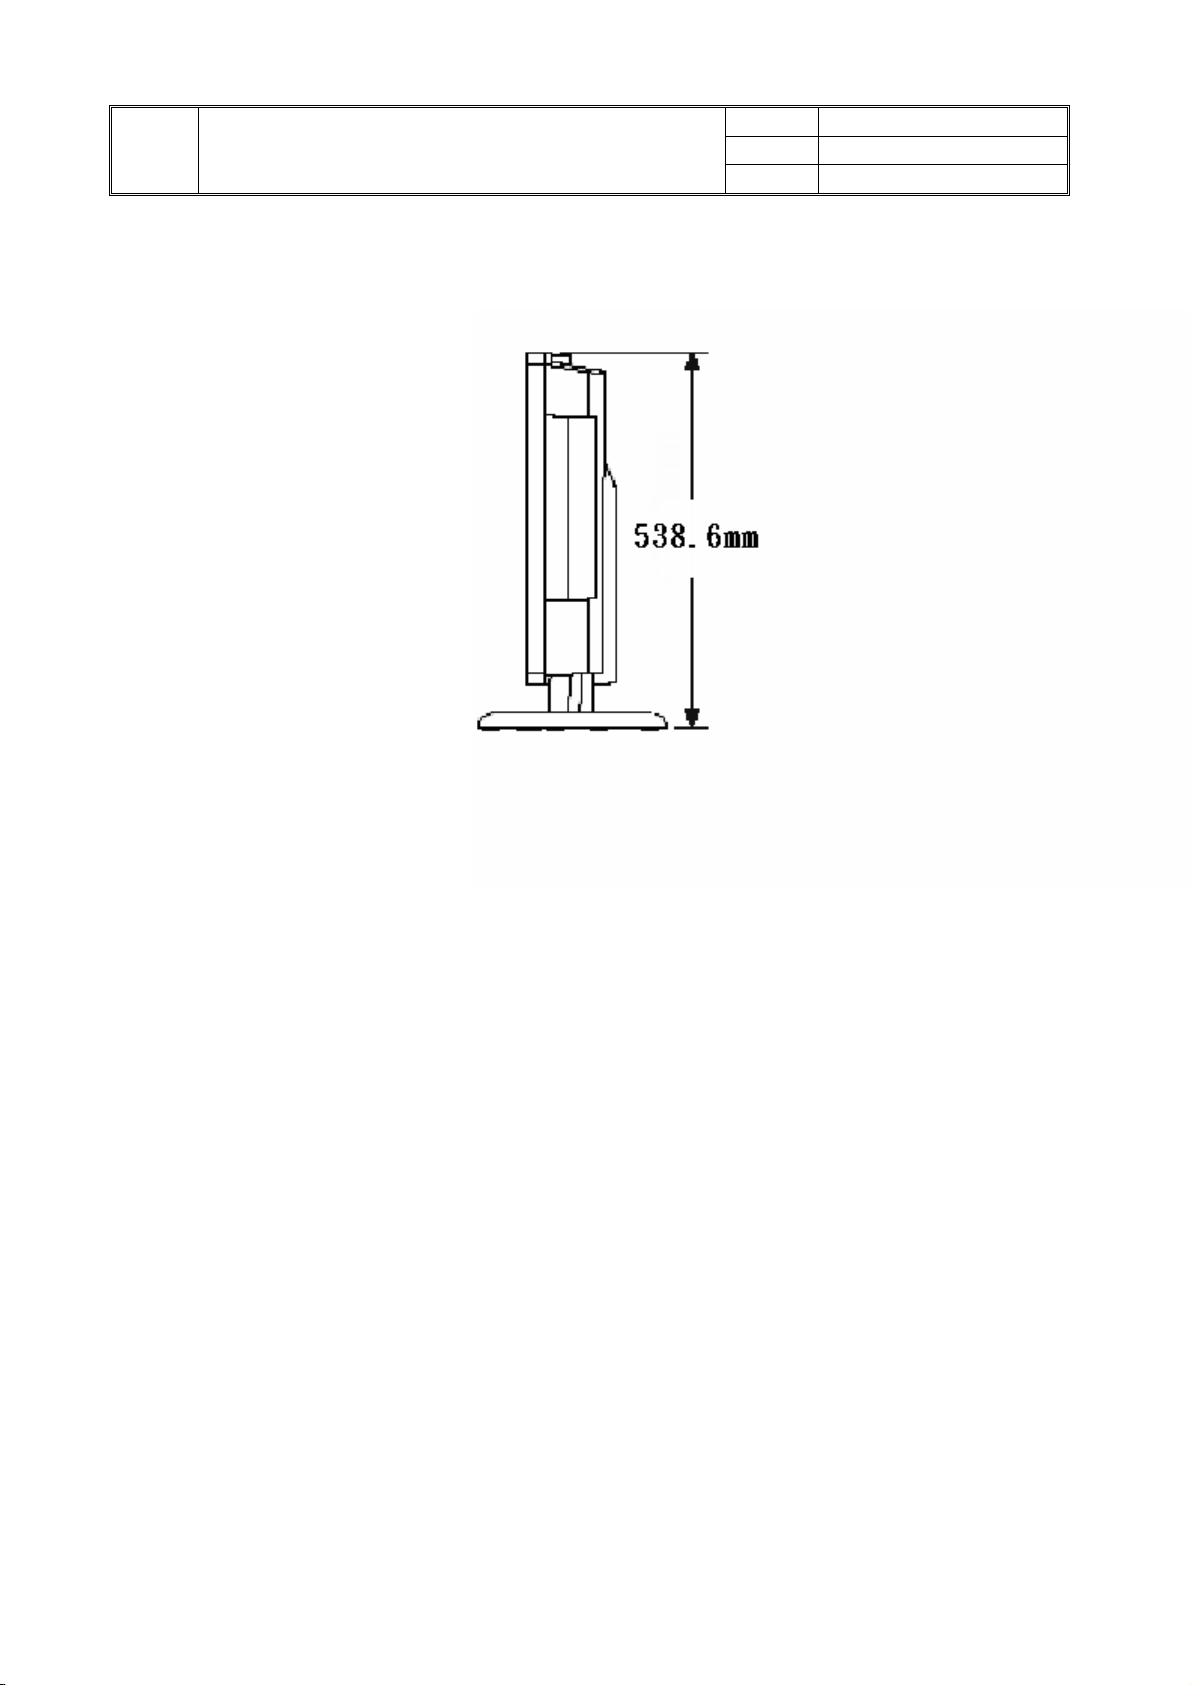
4. Appearance Description of TV
4.1 Front view
Page 6
TITLE
NLC30C2-1B Level 1 Service Manual
4.2 Side View
Nexgen Mediatech Inc.
DATE 03/08 /2005
VER V1.0
PAGE 6/34
Page 7
Nexgen Mediatech Inc.
TITLE
5. Block Diagram
NLC30C2-1B Level 1 Service Manual
DATE 03/08 /2005
VER V1.0
PAGE 7/34
Inverter
LCD Panel
MCU
A/D Converter Video Decoder
Graphic Interface
LCD Panel Interface
LCD
Controller
SDRAM
DC/DC Converter
Audio
Processor
&
Amplifier
TV Module
TV
Interface
Audio & Power Interface
OSD Keypad & Indicate LED
&Speaker Connector
Speaker-R
Speaker-L
Power
Adapter
To CATV
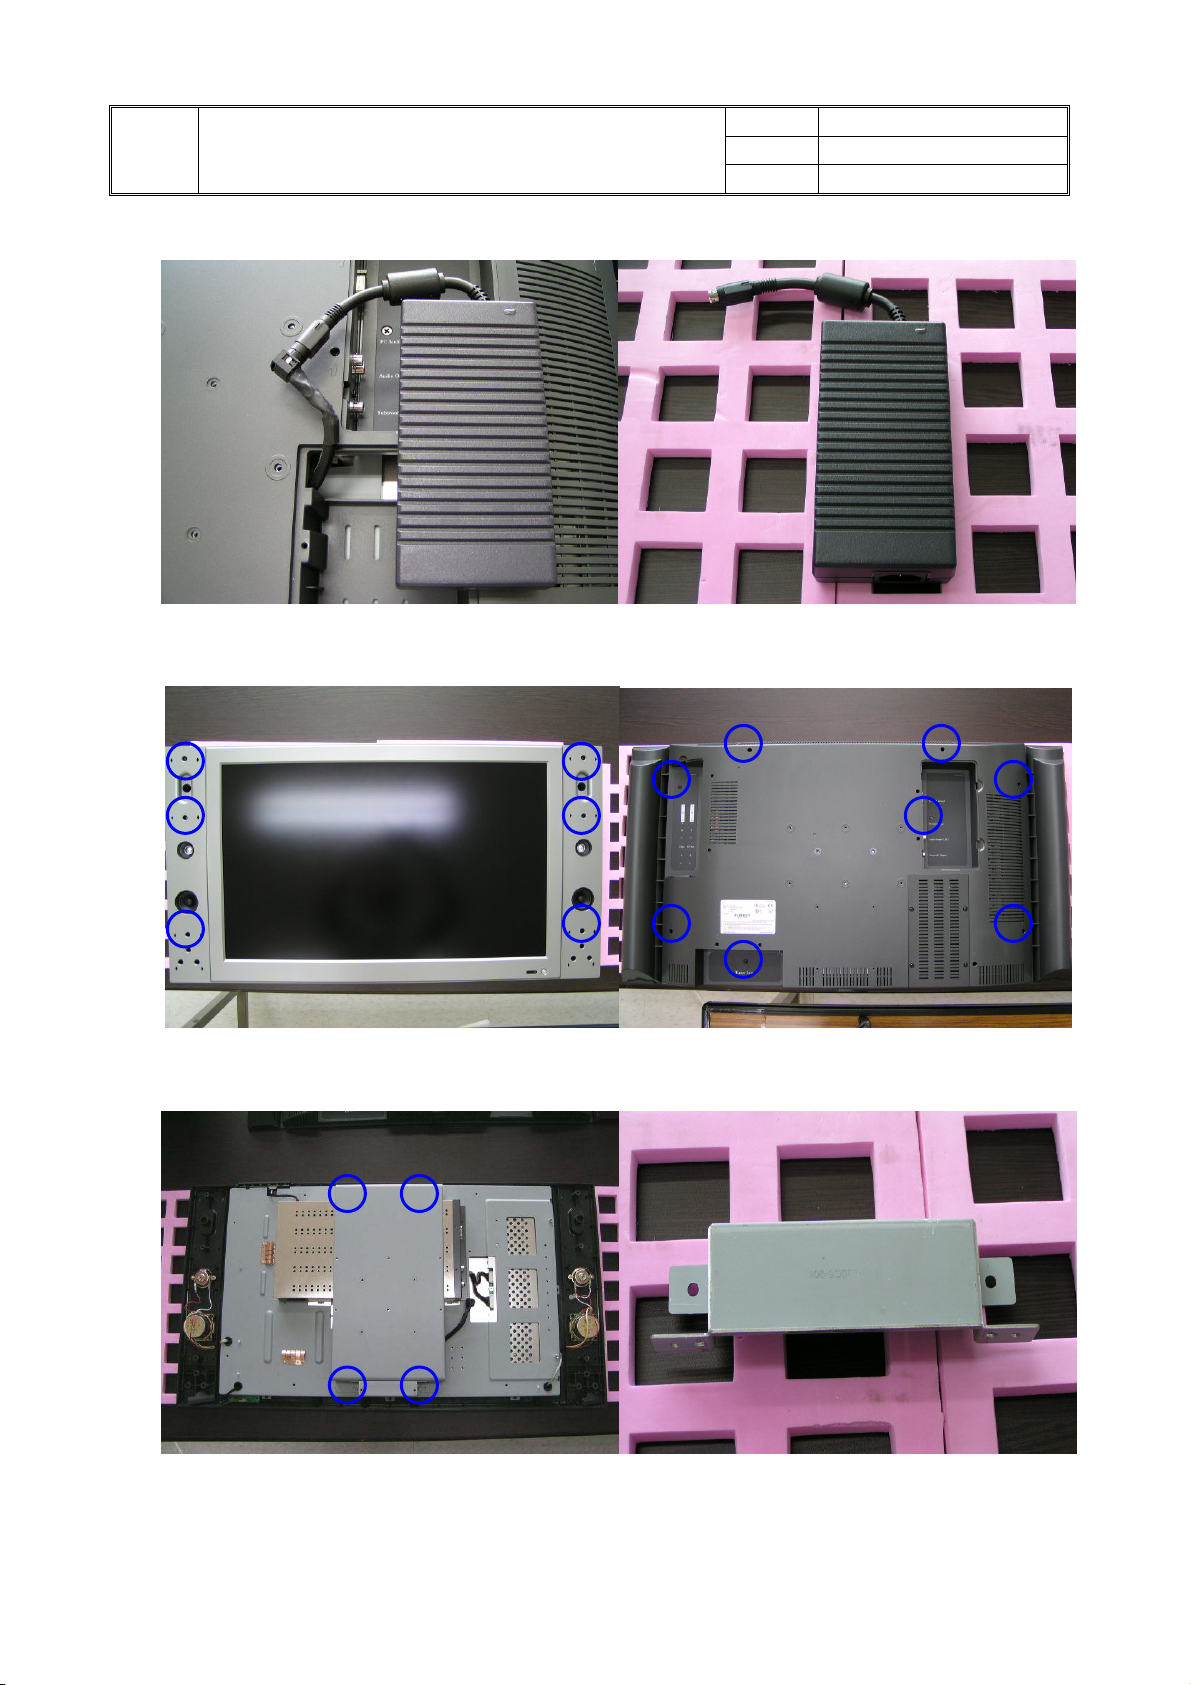
Page 8
Nexgen Mediatech Inc.
TITLE
NLC30C2-1B Level 1 Service Manual
6. Disassembly/Assembly procedures
Tools T30002-1D
DATE 03/08 /2005
VER V1.0
PAGE 8/34
Release speaker panel & screws as circle Speaker panel
Take off AV & PC cover
Page 9

TITLE
NLC30C2-1B Level 1 Service Manual
AV cover PC cover
Nexgen Mediatech Inc.
DATE 03/08 /2005
VER V1.0
PAGE 9/34
Take off 6 screws of AV Box & Tuner Box Take off AV Box
Take off AV Box AV Box
Page 10
Nexgen Mediatech Inc.
TITLE
NLC30C2-1B Level 1 Service Manual
Take off Tuner Box Tuner Box
DATE 03/08 /2005
VER V1.0
PAGE 10/34
Release 6 screws of stand Take off 4 screws of adapter cover
Take off adapter Adapter cover
Page 11
Nexgen Mediatech Inc.
TITLE
NLC30C2-1B Level 1 Service Manual
Take off adapter Adapter
DATE 03/08 /2005
VER V1.0
PAGE 11/34
Release 6 screws of front bezel Release 8 screws & take off back cover
Release 4 screws of wall mount
Page 12

TITLE
Nexgen Mediatech Inc.
DATE 03/08 /2005
NLC30C2-1B Level 1 Service Manual
Wall mount Release 5 screws of M/B cover bracket
VER V1.0
PAGE 12/34
Release 4 screws of PC panel bracket Take off PC panel bracket
PC panel bracket Take off M/B cover bracket as circle
Page 13

Nexgen Mediatech Inc.
DATE 03/08 /2005
TITLE
NLC30C2-1B Level 1 Service Manual
Take off M/B cover bracket picture Release 10 screws of M/B
VER V1.0
PAGE 13/34
Take off 8 cable of M/B M/B picture
Take off 2 cable & SPK cable of inverter board Use tool to take off left SPK 4 cable
Page 14

Nexgen Mediatech Inc.
DATE 03/08 /2005
TITLE
NLC30C2-1B Level 1 Service Manual
Use tool to take off 4 cable of right SPK Release 6 screws of right SPK
VER V1.0
PAGE 14/34
Release 6 screws of left SPK SPK 5W 8R, SPK 5W 4R
SPK 5W 8R, SPK 5W 4R Take off IR/B
Page 15

Nexgen Mediatech Inc.
TITLE
NLC30C2-1B Level 1 Service Manual
Take off IR cable & 2 screws IR board
DATE 03/08 /2005
VER V1.0
PAGE 15/34
IR board Take off keypad
Release 2 screws Release 2 screws & cable of keypad
Page 16

Nexgen Mediatech Inc.
DATE 03/08 /2005
TITLE
NLC30C2-1B Level 1 Service Manual
Take off key board as arrow Function key & Function panel
VER V1.0
PAGE 16/34
Key board Release 8 screws of LCD panel
Front bezel Release 4 screws of panel bracket
Page 17

Nexgen Mediatech Inc.
TITLE
NLC30C2-1B Level 1 Service Manual
Panel bracket Panel bracket
DATE 03/08 /2005
VER V1.0
PAGE 17/34
Attention panel bezel Attention
Attention: don’t adjust Attention
Page 18

Nexgen Mediatech Inc.
g
t
N
DATE 03/08 /2005
TITLE
NLC30C2-1B Level 1 Service Manual
7. Trouble Shooting Analysis
Defect Mode Failure Analysis Repair Testing
VER V1.0
PAGE 18/34
Light On Test
Abnormal
Display
Missing Line
Bright Dot
Dark Dot
Backlight
Light Leakage
Mura
Image Stickin
Brightness spo
Check PCB
Check Panel
Check Panel
M/B Change
Panel Change
Panel Change
Particle
Dot Defect
No display
Check PCB
M/B Change
Inverter Change
Check Panel
Panel Change
A
Check PCB
Check Panel
Next Step
M/B Change
Panel Change
G
TEST
Complete
Page 19

Nexgen Mediatech Inc.
DATE 03/08 /2005
TITLE
NLC30C2-1B Level 1 Service Manual
Defect Mode Failure Analysis Repair Testing
VER V1.0
PAGE 19/34
Flicker Check PCB M/B Change
Image is
too dark
Inverter Change
Gray value
display
Check PCB
M/B Change
Check Panel
Panel Change
R. G. B
display
abnormal
Check PCB
Check Panel Cable Panel Cable Change
M/B Change
Display
Shut Down
Check PCB
M/B Change
Inverter Change
Check Panel
Panel Change
VGA No
Image
Check PCB
Check D-sub Cable D-sub Cable Change
M/B Change
Power on
Display
abnormal
Check PCB M/B Change
Next Step
TEST
A
Complete
Page 20

Nexgen Mediatech Inc.
N
DATE 03/08 /2005
TITLE
NLC30C2-1B Level 1 Service Manual
Defect Mode Failure Analysis Repair Testing
ON/OFF
Abnormal
o Power
Check PCB M/B Change
VER V1.0
PAGE 20/34
LED
display
abnormal
LED off
LED Dark
LED Abnormal
LED Flicker
Keypad/B Change
Check FFC
Check PCB
Check FFC FFC Change
Power Saving Mode
in VGA
FFC Change
M/B Change
Keypad/B Change
Push Any Key
to Restart
Abnormal
Keyboard
Unavailable Check PCB
Check FFC
Next Step
M/B Change
Keypad/B Change
FFC Change
TEST
Completed
Page 21

Nexgen Mediatech Inc.
DATE 03/08 /2005
TITLE
NLC30C2-1B Level 1 Service Manual
Defect Mode Failure Analysis Repair Testing
Other
Abnormal
Display
Display flicker
(tapping )
Check PCB
VER V1.0
PAGE 21/34
M/B Change
Check Panel
Inverter Change
Cannot use
remote control
Check keypad board
Keypad Change
Check remote
Remote Control or
Battery Change
Check FFC FFC Change
Next Step
TEST
Completed
Page 22

Nexgen Mediatech Inc.
N
r
DATE 03/08 /2005
TITLE
NLC30C2-1B Level 1 Service Manual
Defect Mode Failure Analysis Repair Testing
Audio
Abnormal
Sound adjust
abnormal
Check PCB M/B Change
o sound Speaker Change
Check Speake
VER V1.0
PAGE 22/34
Check FFC
FFC Change
Check PCBSingle sound
M/B Change
Keypad/B Change
Hear phone
defect
Check hear phone
Jack
M/B Change
Check FFC
FFC Change
Check PCB
M/B Change
TEST
Completed
Page 23

Nexgen Mediatech Inc.
DATE 03/08 /2005
TITLE
NLC30C2-1B Level 1 Service Manual
Defect Mode Failure Analysis Repair Testing
VER V1.0
PAGE 23/34
Video
Abnormal
( AV , SV ,
CV , TV )
AV , SV , CV
No Image
TV No Image
TV No Sound
TV No Close
Caption
or V-Chip
(NTSC)
Check PCB M/B Change
Check Cable Cable Change
Check PCB M/B Change
Check RF Cable RF Cable Change
Check TV Module TV Module Change
Check PCB M/B Change
Check TV Module TV Module Change
TV No
Teletext
( PAL ,
SECAM )
TEST
Completed
Page 24

Nexgen Mediatech Inc.
DATE 03/08 /2005
TITLE
NLC30C2-1B Level 1 Service Manual
Defect Mode Failure Analysis Repair Testing
Abnormal
BIOS
Upgrade
Can’t Upgrade
BIOS
Check PCB M/B Change
VER V1.0
PAGE 24/34
TEST
Completed
Page 25

Nexgen Mediatech Inc.
TITLE
8. Update BIOS
Use designed ISP tool to upgrade system BIOS
NLC30C2-1B Level 1 Service Manual
DATE 03/08 /2005
VER V1.0
PAGE 25/34
1. Preparation before upgrade
Power switch
DC12 (V)
RS232 port
ISP port
(D-Sub15)
2. Use RS-232 signal line to connect RS 232 out port of PC and the RS 232 in port of ISP
tool. Use RGB signal line to connect VGA out port of ISP tool and VGA in port of LCD
TV. Power on ISP tool, shown as below:
4. Power on
2. Connect to
VGA IN port
of LCD TV
3. The CPU used for processing ISP need to burn LD0415.BIN to the LDROM of CPU.
(Hburned before shipping)
3. Plug in
DC power
supply
1. Connect to
RS232 OUT
port of PC
Page 26

TITLE
Nexgen Mediatech Inc.
NLC30C2-1B Level 1 Service Manual
DATE 03/08 /2005
VER V1.0
PAGE 26/34
4. Need to enter factory mode by press ( + + ) buttons on
OSD to execute ISP mode.
1.Push Menu 2.Push “►” button to access Factory Mode
MENU
VOL+
VOL-
3. Press”
▼” button to “ISP” item. 4. When press “Vol+” TV will be locked.
Page 27

Nexgen Mediatech Inc.
TITLE
5. Execute ispwriter.exe file
NLC30C2-1B Level 1 Service Manual
To execute CPU ispwriter.exe file on your PC, and the below screen appears:
DATE 03/08 /2005
VER V1.0
PAGE 27/34
6. Move the cursor to click “Select Chip” button and select the type of CPU (W78E65).
W78E65
Page 28

Nexgen Mediatech Inc.
DATE 03/08 /2005
TITLE
7. Move the cursor to click “5Program Start at APROM” to cancel the selection.
8. Move the cursor to click “Select Bank0” button to select the wanted burning program.
The file format is binary format instead of hex format.
NLC30C2-1B Level 1 Service Manual
W78E65
VER V1.0
PAGE 28/34
W78E65
9. Select the Port Name on Communication Setting screen.
Page 29

Nexgen Mediatech Inc.
DATE 03/08 /2005
TITLE
10. Move the cursor to click “Connect” button to link. If the linking succeeds, below screen
NLC30C2-1B Level 1 Service Manual
will appear.
W78E65
VER V1.0
PAGE 29/34
11. Click “Program All” button to auto-execute erase and program function. After execution
below screen will appear. Click “confirm” button to finish the execution.
Page 30

Nexgen Mediatech Inc.
DATE 03/08 /2005
TITLE
12. To click “verify” button to execute verify function. After verification, below screen will
NLC30C2-1B Level 1 Service Manual
appear. Click “confirm” button to finish the verify function.
VER V1.0
PAGE 30/34
13. After updating APROM program, disconnect ISP tool. Power on LCD TV again.
Page 31

TITLE
Nexgen Mediatech Inc.
NLC30C2-1B Level 1 Service Manual
DATE 03/08 /2005
VER V1.0
PAGE 31/34
Page 32

Nexgen Mediatech Inc.
TITLE
10. Level 1 Spare Parts list
NLC30C2-1B Level 1 Service Manual
DATE 03/08 /2005
VER V1.0
PAGE 32/34
810-300020-014
Material P/N English Description STD Usage
PCBA
Internal cable 220-300005-011 WIRE SADDLE NYLON 94V2 NLC30C1 4
Accessory
555-300006-001
510-302007-021 NLC30CX KEY_B PCBA VER.2 1
510-271010-021 NLC27C1 MAIN BOARD PCBA VER2.0 1
510-302008-021 NLC30CX IR_B PCBA VER.A 1
174-300001-101 WIRE M/B-SPEAKER 1
174-300002-101 WIRE M/B-SPEAKER 1
174-300601-101 WIRE IR-MB 6PIN 1
174-301001-101 WIRE KEYPAD-MB 10PIN 1
174-302201-101 WIRE INVERTER-MB 22PIN 1
174-303001-101 WIRE PANEL-MB 30PIN 1
174-300602-201 WIRE POWER-MB 6PIN+CORE 1
480-300001-141 T30002 USER'S MANUAL STD(V4) 1
481-300024-011 T30002 QUICK GUIDE STD XD 1
171-081802-101 CAB AV 3RCA Y/R/W 1.8M 1
AV Box
526-270001-001
TV Box
526-270002-001
404-000004-011 MANUAL'S BAG 1
151-051503-001 BATTERY ALKALINE AAA 1.5V 2
170-041804-101 P-CORD H05VV-F 3*0.75 BLK 1.8M 1
403-300006-011 NLC30C1 EPE BAG 1
401-300005-021 NLC30C1 10 IN 1 CARTON 1
403-300003-011 NLC30C1 PE CUSHION 2
510-271001-011 NLC27C1 CONN BOARD PCBA VER.1 1
250-270017-011 T27001 AV TOP BRACKET 1
250-300007-011 NLC30C1 AV BOTTOM BRACKET 1
602-030006-110 SCREW WH7 M3-0.5*6 C2 3
601-430008-040 SCREW BH D3*8 C2 4
603-030006-040 SCREW IH M3-0.5*6 C2 2
510-271002-011 NLC27C1 TV BOARD PCBA VER.1 1
250-300004-011 NLC30C1 TUNER TOP BRACKET 1
250-270001-011 T27001 TUNER BOTTOM BRACKET 1
603-030006-040 SCREW IH M3-0.5*6 C2 4
602-030006-110 SCREW WH7 M3-0.5*6 C2 4
Front Bezel 200-300001-0101 NLC30C1 FRONT BEZEL 1
531-300030-001
462-000010-011 T27001/T30002 LOGO FUNAI 1
154-050401-101 SPK 5W 4R 41*13 TWEETER 2
154-050809-101 SPK 5W 8R FULL RANGE + SPONGE 2
200-300003-0101 NLC30C1 POWER BUTTON 1
Page 33

TITLE
NLC30C2-1B Level 1 Service Manual
Stand 200-270075-0101 T27001 STAND BASE PLASTIC D 1
527-300012-001
Nexgen Mediatech Inc.
DATE 03/08 /2005
VER V1.0
PAGE 33/34
200-220020-0101 NLC22P1 IR LED COVER 1
200-220021-0101 NLC22P1 LENS IR_LED 1
230-300003-011 T30002 MYLAR SHEET 1
600-440008-040 SCREW PH D4*8 C2 8
608-430008-030 SCREW BHTW T3*8 4
601-730008-140 SCREW BH D3*8 C2 4
200-270022-0101 27" STAND FRAME BC 1
200-270024-0101 27" STAND FRAME NECK BC 30 1
250-270021-011 27" STAND FRAME BKT BC 1
250-270022-011 27" STAND BASE SUPPORT BKT BC 1
250-270045-011 T27001 STAND BASE BKT D 1
250-270027-011 NLC27C1 HINGE MODULE 1
Mechanical Part
220-270002-011 NLC27C1 RUBBER FOOT 5
220-270010-011 NLC27C1 RUBBER FOOT 1
220-300001-011 NLC30CX-X1 STAND RUBBER 7
609-040010-010 SCREW PH+SW+W(10) M4-0.7*10 C2 4
603-740008-110 SCREW IH D4*8 C2 8
602-430008-010 SCREW WH D3*8 C2 6
600-040012-010 SCREW PH M4-0.7*12 C2 4
250-300003-011 NLC30CX PANEL BRACKET 1
250-300010-011 NLC30C1 MAIN COVER BRACKET 1
250-270042-011 NLC27C1 PC PANEL BRKT FOR 24V 1
250-300009-021 NLC30CX WALL MOUNT BKT VER.B 1
250-300002-011 NLC30C1 STAND SUPPORT 1
200-300006-0101 NLC30CX AV COVER 1
200-300007-0101 NLC30CX PC COVER 1
200-300002-0203 NLC30C1 BACK COVER 1
210-300021-011 NLC30C2 PC PLATE FOR 24V 1
210-300009-011 NLC30CX TUNER PLATE 1
210-300001-011 T30001 NAME PLATE FOR AV 1
231-270003-011 NLC27C1 SPEAKER SPONGE 5
231-300001-011 NLC30CX SPK SPONGE 301 4
231-300002-011 NLC30CX SPK SPONGE 302 4
200-300005-0101 NLC30CX ADAPTER COVER 1
220-300003-011 NLC30CX ADAPTER COVER RUBBER 4
200-300015-0101 NLC30CX FUNCTION PANEL 1
200-300024-0101 CMLC30C1 FUNCTION KEY 1
200-300053-0201 T30002 SPEAKER PANEL MODULE 1
220-300002-011 NLC30CX SPEAKER RUBBER 2
Page 34

TITLE
Nexgen Mediatech Inc.
NLC30C2-1B Level 1 Service Manual
220-300004-011 NLC30C1 STAND COVER 2
220-270004-011 NLC27C1 RUBBER FOOT 4
460-300036-011 T30002 SAFETY LABEL-FUNAI 1
DATE 03/08 /2005
VER V1.0
PAGE 34/34
Packing Material
Screw
401-300045-011 T30002 MAIN CARTON-FUNAI 1
403-300010-011 NLC30CX EPE BAG 1
403-300023-011 T30002 EPE CUSHION TOP 1
403-000006-011 30" EPE CUSHION BOTTOM 1
240-420001-011 CARTON LOCK 2
602-030006-110 SCREW WH7 M3-0.5*6 C2 9
609-040010-030 SCREW PH+SW+W(10) M4-0.7*10 C2 4
600-740012-040 SCREW PH D4*12 C2 2
600-040008-040 SCREW PH M4-0.7*8 C2 8
609-040015-140 SCREW PH+W+SW M4-0.7*15 C2 6
602-430006-050 SCREW WH7 D3*6 C2 2
605-204007-011 SCREW HH UNC4#-40*7 H5 6
600-040012-010 SCREW PH M4-0.7*12 C2 4
604-040008-140 SCREW FH M4-0.7*8 C2 3
600-030008-141 SCREW PH M3-0.5*8 C2 6
602-030006-110 SCREW WH7 M3-0.5*6 C2 16
609-040015-040 SCREW PH+SW+W M4-0.7*15 C2 6
600-040008-040 SCREW PH M4-0.7*8 C2 6
601-430008-040 SCREW BH D3*8 C2 2
Others
600-740012-040 SCREW PH D4*12 C2 2
185-118001-401 ADAPTER 180W 24V DELTA 1
290-000008-011 T27001/T30002 REMOTE-FUNAI 1
 Loading...