

Page 1

©
d.
V220FX
5
g
O
ual
DVD Player/VCR with Line-in Recordin
wner’s Man
PRECAUTIONS PREPARATION ADVANCED PLAYBACKBASIC OPERATIONS
RECORDING
OPTIONAL SETTINGS TROUBLESHOOTING INFORMATION
2014 Funai Electric Co., Lt
Page 2
N
Safety Instructions
T
.
ecord and reta
ose numbers for future reference.
Serial No.:
odel No.:
W
:
TO
TO
.
.
CAUTION:
C
S
O
Q
.
CAUTION
Th
.
T
.
T
.
UC
S
ead these
uctions.
.
.
ollow all
uctions.
.
.
ufacturer’s
uctions.
.
.
.
acturer.
.
.
.
G
T
g
.
CE
T
t
y
d
g
l
y
:
.
.
.
p.
.
PRECAUTIONS
PRECAUTIONS
he model and serial numbers of this unit may be found on the cabinet
You should r
ARNING
in th
REDUCE THE RISK OF FIRE OR ELECTRIC SHOCK, DO NOT EXPOSE THIS APPARATUS
RAIN OR MOISTURE
APPARATUS SHALL NOT BE EXPOSED TO DRIPPING OR SPLASHING AND NO OBJECTS
FILLED WITH LIQUIDS, SUCH AS VASES, SHALL BE PLACED ON THE APPARATUS
he lightning flash with arrowhead symbol, within an
RISK OF ELECTRIC SHOCK
DO NOT OPEN
TO REDUCE THE RISK OF ELECTRI
SHOCK, DO NOT REMOVE COVER (OR BACK). NO USER
ERVICEABLE PARTS INSIDE. REFER SERVICING T
UALIFIED SERVICE PERSONNEL
he important note and rating are located on the rear or bottom of the cabinet
equilateral triangle, is intended to alert the user to the
presence of uninsulated “dangerous voltage” within the
product’s enclosure that may be of sufficient magnitude
to constitute a risk of electric shock to persons
intended to alert the user to the presence of important
operating and maintenance (servicing) instructions in
the literature accompanying the appliance
IMPORTANT SAFETY INSTR
R
2.Keep these instructions
Heed all warnings
4.F
Do not use this apparatus near water
Clean only with dry cloth
Do not block any ventilation openings. Install in
Do not install near any heat sources such as radiators, heat
registers, stoves, or other apparatus (including amplifiers)
that produce heat
Do not defeat the safety purpose of the polarized or
rounding-type plug. A polarized plug has two blades
with one wider than the other. A grounding type plug
as two blades and a third grounding prong. The wide
blade or the third prong are provided for your safety. If
the provided plug does not fit into your outlet, consult an
lectrician for replacement of the obsolete outlet
instr
instr
rdance with the man
instr
10. Protect the power cord from being walked on or
pinched particularly at plugs, convenience receptacles,
and the point where they exit from the apparatus
11. Only use attachments/accessories specified by the
manuf
12. Use only with the cart, stand, tripod,
bracket, or table specified by the
manufacturer, or sold with the apparatus
When a cart is used, use caution when
moving the cart/apparatus combination to
avoid injury from tip-over
13. Unplug this apparatus during lightning storms or when
unused for long periods of time
Refer all servicing to qualified service personnel.
Servicing is required when the apparatus has been
amaged in any way, such as power-supply cord or
plug is damaged, liquid has been spilled or objects
have fallen into the apparatus, the apparatus has been
xposed to rain or moisture, does not operate normally,
r has been dropped.
M
e exclamation point within an equilateral triangle is
TION
FCC WARNIN
his equipment may generate or use radio frequency energy. Changes or modifications to this equipment may cause
armful interference unless the modifications are expressly approved in the manual. The user could lose the authority to
operate this equipment if an unauthorized chan
RADIO-TV INTERFEREN
his equipment has been tested and found to comply with the limits for a Class B digital device, pursuant to Par
15 of the FCC Rules. These limits are designed to provide reasonable protection against harmful interference in a
residential installation. This equipment generates, uses, and can radiate radio frequenc
and used in accordance with the instructions, may cause harmful interference to radio communications. However,
there is no
interference to radio or television reception, which can be determined by turning the equipment off and on, the user
is encouraged to tr
Disconnect the mains plug to shut off when find trouble or not in use. The mains plug shall remain readily operable
2
e or modification is made
energy and, if not installe
uarantee that interference will not occur in a particular installation. If this equipment does cause harmfu
to correct the interference by one or more of the following measures
1) Reorient or relocate the receiving antenna
2) Increase the separation between the equipment and receiver
3) Connect the equipment into an outlet on a circuit different from that to which the receiver is connected
4) Consult the dealer or an experienced radio/TV technician for hel
E
Page 3
N
PRECAUTIONS
.
.
Y
T
T
y.
.
ON
y
bly
d.
.
.
T
.
.
.
g
.
.
.
.
g
y.
.
y.
T
.
.
m
t
y
,
s
.
on
.
AUTION:Danger of explosion if battery is incorrectly replaced. Replace only with the same or equivalent type
ARNING:Batteries (Battery pack or battery installed) shall not be exposed to excessive heat such as sunshine, fire, or the like
LASER SAFET
his apparatus is classified as a CLASS 1 LASER PRODUCT.
his apparatus employs a laser. Only a qualified service person should remove the cover or attempt to
service this apparatus, due to possible eye injur
AUTION: Use of controls or adjustments or performance of procedures other than those specified herein may result
IMPORTANT COPYRIGHT INFORMATI
Unauthorized copying, broadcasting, public performance and lending of discs are prohibited. This item incorporates cop
protection technology that is protected by U.S. patents and other intellectual property rights of Rovi Corporation. Reverse
ngineering and disassem
Do not place the unit on the furniture that is capable of being tilted by a child and an adult leaning, pulling, standing
r climbing on it. A falling unit can cause serious injury or even death
Never use a gas duster on this unit
he gas trapped inside of this unit may cause ignition and explosion
in hazardous radiation exposure
are prohibite
PRECAUTIONS
PREPARATION
To Avoid the Hazards of Electrical Shock and Fire
Do not handle the power cord with wet hands.
Do not pull on the power cord when disconnecting it from an AC outlet. Grasp it by the plug
Do not put your ngers or objects into the unit
Location and Handlin
Do not install the unit in direct sunlight, near strong magnetic elds, or in a place subject to dust or strong vibration
Avoid a place with drastic temperature changes
Install the unit in a horizontal and stable position. Do not place anything directly on top or bottom of the unit.
Depending on your external devices, noise or disturbance of the picture and/or sound may be generated if the unit is
placed too close to them. In this case, please ensure enough space between the external devices and the unit
Depending on the environment, the temperature of this unit may increase slightly. This is not a malfunction
Be sure to remove the disc and unplug the AC power cord from the outlet before carrying the unit.
Dew Condensation Warnin
Dew condensation may form inside the unit in the following conditions. If so, do not use this unit at least for a few
ours until its inside gets dr
- The unit is moved from a cold place to a warm place
- Under conditions of high humidit
- After heating a cold room.
Note about Recycling
his unit’s packaging materials are recyclable and can be reused. Please dispose of any materials in
accordance with your local recycling regulations
Batteries should never be thrown away or incinerated but disposed of in accordance with your local
regulations concerning chemical wastes
For product recycling information, please visit - www.funaiamerica.co
Notice for Progressive Scan Outpu
Consumers should note that not all high de nition television sets are fully compatible with this product and ma
cause artifacts to be displayed in the picture. In case of picture problems with 525(480) progressive scan output
it is recommended that the user switch the connection to the ‘standard de nition’ output. If there are question
regarding your TV set compatibility with this 525p(480p) DVD player, please contact our customer service center
ADVANCED PLAYBACKBASIC OPERATIONS RECORDING OPTIONAL SETTINGS TROUBLESHOOTING INFORMATION
Trademark Informati
anufactured under license from Dolby Laboratories. Dolby and the double-D symbol are
trademarks of Dolby Laboratories.
• is a trademark of DVD Format/Logo Licensing Corporation
E
3
Page 4
·
ppl
·························
·····························
·
·
·······························
l
·
l
ections
0
ps
3
g
······························
·
k
···························
k
·······················
k
· · · · · · · · · ·
k
··············
k
······················
·
)
····························
lly
)
· · · · · · · · · · · · · · · · · · · · · · · · · · · · · · · ·
6
6
k
6
6
6
6
6
6
k
k
8
k
8
gs
· · · · · · · · · · · · · · · · · · · · · · · · · · · · · · · · · · ·
8
8
8
9
OTR (O
g
· · · · · · · · · · · · · · · · · · · · · · · · · · ·
1
OTR
··············
k
······························
e
· · · · · · · · · · · · · · · · · · · · · · ·
Y
···················
er
ontent
s
s
l
s
l
Start Guide
2
SANYO El
SANYO El
SANYO p
SANYO p
y
PREPARATION
PREPARATION
afety Instructions · · · · · · · · · · · · · · · · · · · · · · · · · ·
u
ied Accessories
bout Cassette Tapes and Discs···············
ayable Media
nplayable Disc· · · · · · · · · · · · · · · · · · · · · · · · · · · ·
egion Code · · · · · · · · · · · · · · · · · · · · · · · · · · · · · ·
olor System
Function Overview··························
emote Contro
Front Panel
ear Panel · · · · · · · · · · · · · · · · · · · · · · · · · · · · · · · ·
nstalling the Batteries in the Remote Contro
nn
onnection to a TV
onnection to an Audio System
Initial Setu
urning On Unit for the First Time · · · · · · · · · · · · ·13
ock Settin
For VCR Playback · · · · · · · · · · · · · · · · · · · · · · · · ·
For Disc Playbac
int for Disc Playbac
Fast Forward / Fast Reverse Playbac
ause and Step-by-step Playbac
ow Forward Playbac
o Skip Titles, Chapters, Tracks or Files· · · · · · · ·
o Reset the Cassette Tape Counter
ounter Reset
o Rewind the Cassette Tape automatica
uto Rewind
································ 1
· · · · · · · · · · · · · · · · · · · · · · · · · · · · · · ·1
sc Menu 1
alling Up a Menu Screen During Playback · · · · · · 1
esume Playbac
oom
amera Angles 1
rack / File Search· · · · · · · · · · · · · · · · · · · · · · · · · · 1
itle / Chapter Search
utton Select Search 1
ndex Search
ime Search
epeat Playbac
epeat A-B Playback
10
12
13
uto Repeat Playback · · · · · · · · · · · · · · · · · · · · · · ·
JPEG Playbac
andom Playbac
ettin
ubtitle Language 1
udio Language
On-Screen Display··························· 1
ecording &
mer Recordin
ote for Timer Recording &
atellite Lin
ubbing a Cassette Tape· · · · · · · · · · · · · · · · · · · · 22
hanging the DVD Settings (in the setup menu)·
Troubleshooting Guid
ne-touch Timer Recording)· · · 20
1
1
1
1
1
1
1
2
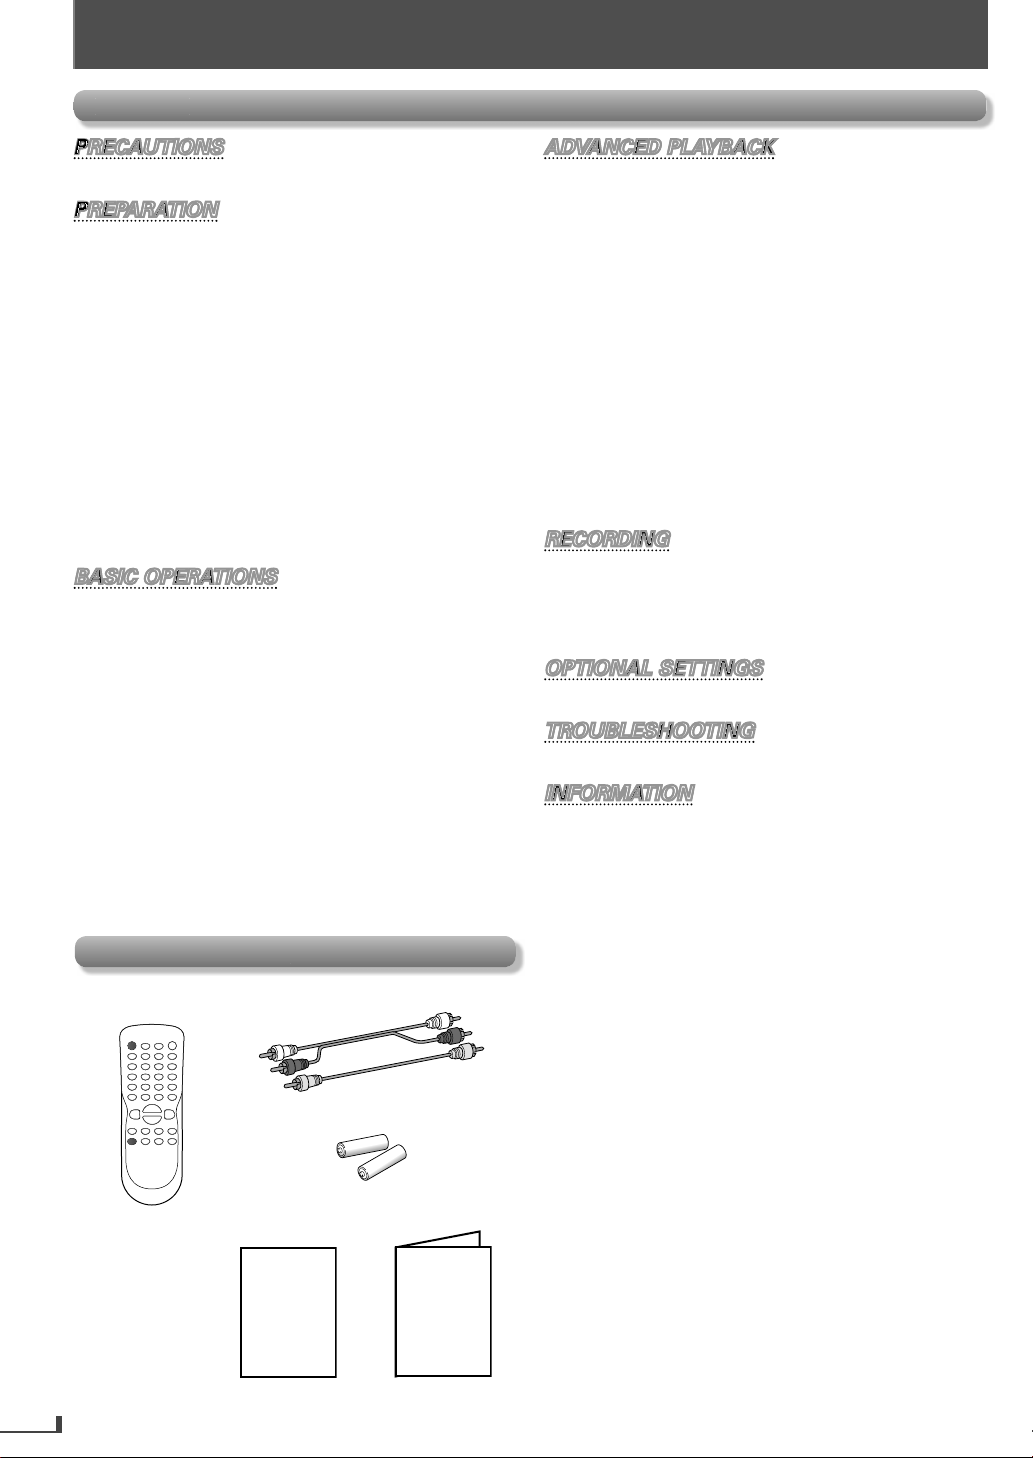
upplied Accessorie
Remote Contro
ick
Quick Start Guide
RCA audio/video cable
A (1.5 V DC) battery ×
Owner’s Manua
Owner’s Manual
Maintenance·······························
pecifications·······························
IMITED WARRANT
is a registered trademark of
td. and is used by Funai Electric Co., Ltd. and Funai
orporation, Inc. under license from
td.
ny liability related to
nd quality, is the sole responsibility of Funai Electric Co.,
td. and Funai Corporation, Inc.
ease contact Funai Corporation, Inc. for any questions
r claims related to
1 866 212 0436 san
o-av.com
roducts, including design
roducts:
k cov
ectric Co.,
ectric Co.,
4
Page 5
PREPARATION
e
Th
y
y
y
y
t.
T
.
.
O
RWVD-R
A
WD-R
e
VHS
VHS
)
G
o
G
c
aution:
.
M
audio
i
D
deo C
L
CD
s
s
.
D
c
.
d.
s
ote:
.
k.
prop
.
.
y.
em
y
.
Th
y
ded
.
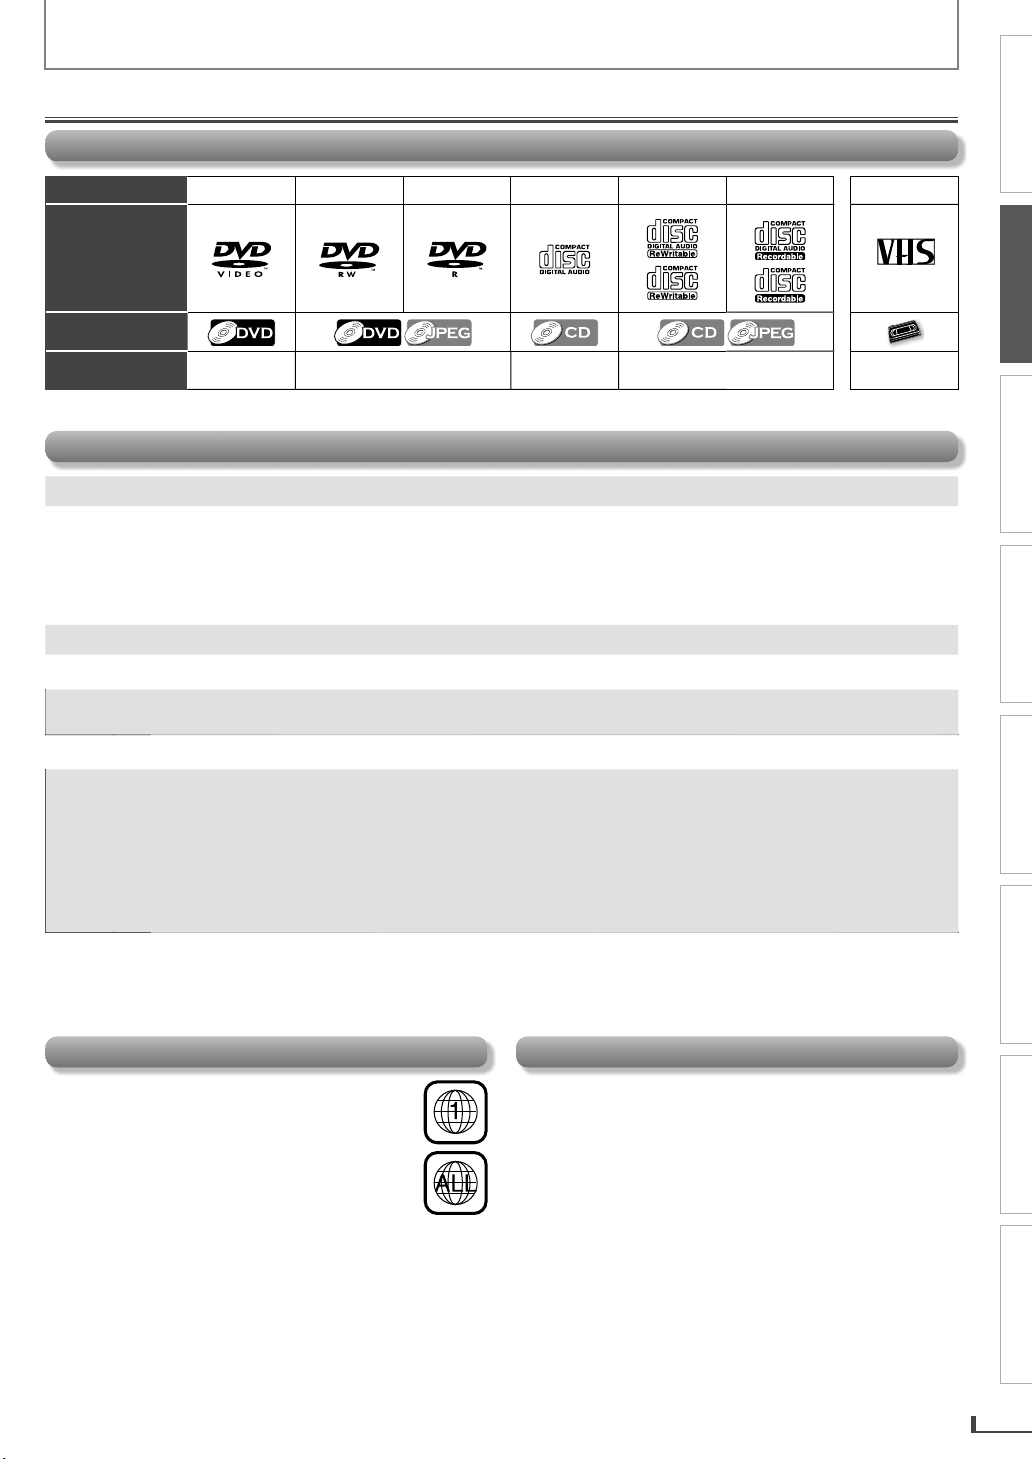
About Cassette Tapes and Discs
Playable Media
PRECAUTIONS
Media Type DVD-VIDE
Logo
Symbols used in
this manual
Recorded Signal
igital video
MPEG2
VD-
igital video (MPEG2) or JPE
D-D
igital audi
Unplayable Dis
C
DVD-
D-
•
• vi
VD-RA
Never play the following discs
DVD with region codes other than 1 or AL
DTS-
DVD-ROM for personal computer
oto C
D
• CD-ROM for personal computer
• the discs with labels, scratches, stains, blemishes, etc
Caution: The sound may not be heard on the following disc
uper audio CD
Only the sound recorded on the normal CD layer can be delivered. The sound recorded on the high density super audio
CD layer cannot be delivere
Any other discs without compatibility indication
N
Unfinalized discs cannot be played back
or DVD-RW/R, discs recorded in the VR (video recording) format cannot be played back. Only the finalized video format
iscs can be played bac
ome discs cannot be played back because of incompatible recording conditions, characteristics of the recorder or special
erties of discs
ou can play back discs which bear the marks listed in “Playable Media”. If you use nonstandardized discs, this unit may
not play them back. Even if they are played back, the sound or video quality will be compromised
If the recorded portion of the disc is too small (less than 2-3/16 inches (55 mm) across), it may not play back properl
D-R
igital audio or JPE
HD DV
Blu-ray dis
assette Tap
VHS
VHS
VHS
analog video
PREPARATION
BASIC OPERATIONS RECORDING OPTIONAL SETTINGS TROUBLESHOOTING INFORMATION
ADVANCED PLAYBACK
Region Cod
is unit has been designed to play back DVD
with region 1. DVD must be labeled for ALL
regions or for region 1 in order to pla
the unit. You cannot pla
back DVD that are
abeled for other regions. Look for the symbols
on
our DVD. If these region symbols do not
appear on
our DVD, you cannot play back the
DVD in this uni
he number inside the globe refers to region of the world
A DVD labeled for a specific region can only be played
back on the unit with the same region code
back on
Color Syst
VD is recorded in different color systems throughout the
world. The most common color s
sed primarily in the United States and Canada)
is unit uses NTSC, so DVD you play back must be
recorded in the NTSC s
recor
in PAL color systems
stem. You cannot play back DVD
stem is NTSC (which is
5
Page 6
8
)
8
)
R
3
y
l
)
6
)
6
) (
)
6
)
17
(
)
R
3
ess to exit the VC
u.
.
7
dly
)
9
.
,
PUT
20
.
3
ess to activate VC
ode.
E
/
D
D
5
.
ess
)
ess
.
14
ol
ual
.
Function Overview
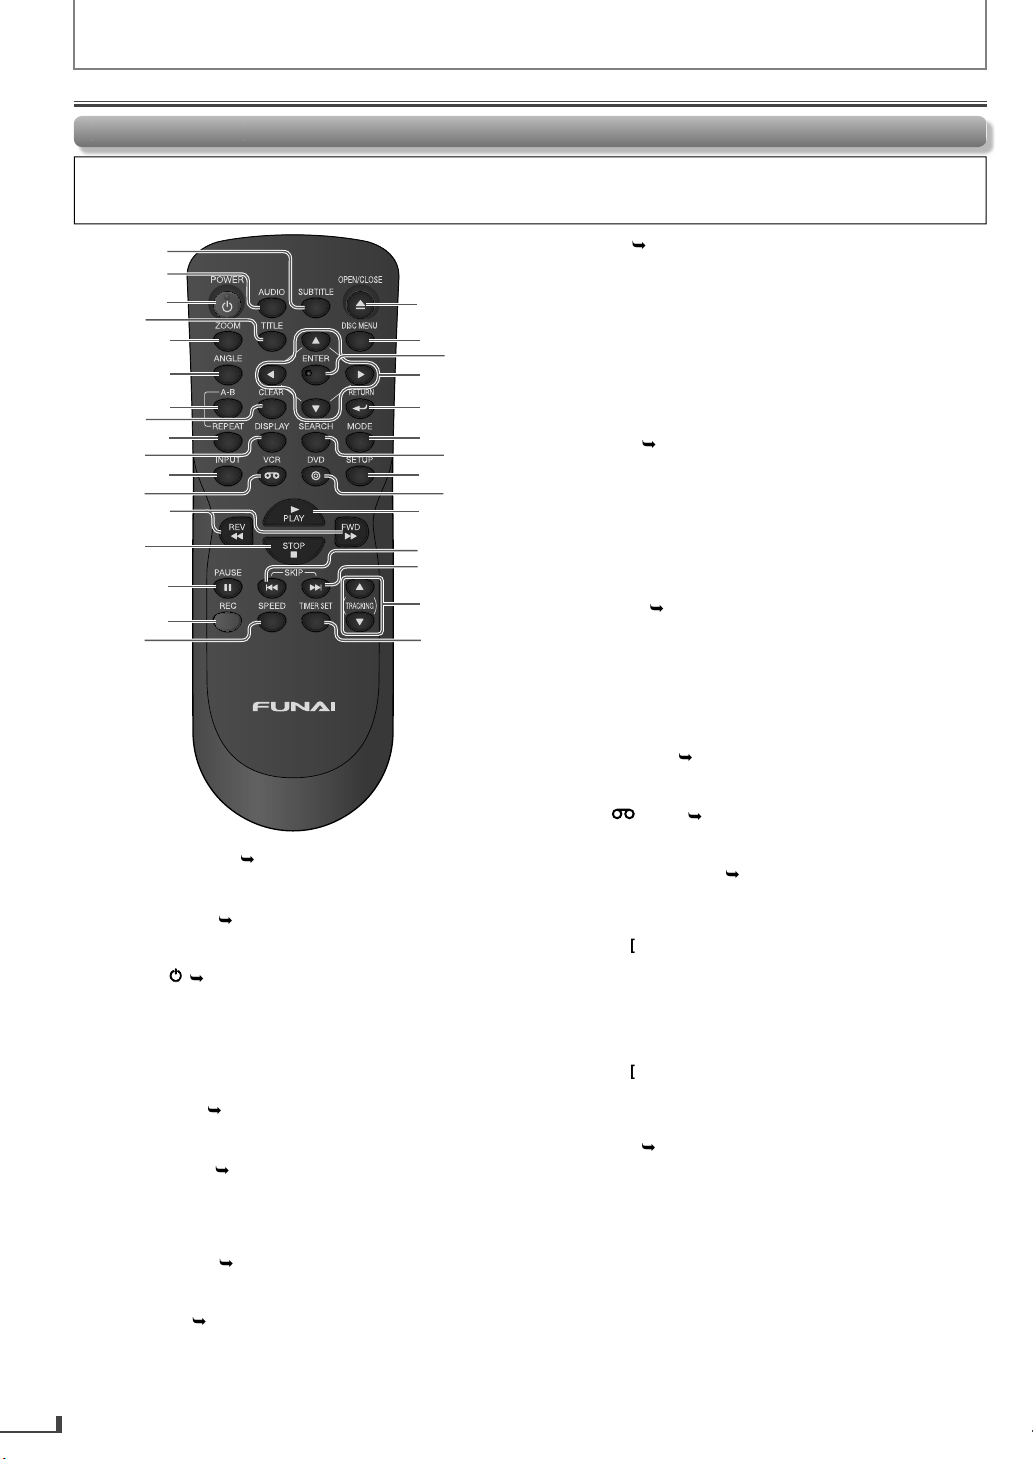
Remote Contr
Button names described in this Owner’s Man
The instructions in this manual rest primarily on the premise that you will operate using the remote control (Please be
nformed that some operations can only be made on the front panel of the unit)
.
6
PREPARATION
1
2
3
4
5
6
7
8
9
10
11
12
13
14
15
16
17
SUBTITLEDVD)p.1
Press to select subtitles on a disc. (DVD
Pulse para seleccionar subtítulos en un disco. (DVD)
UDIO (DVD)p.1
• Press to select audio languages on a disc. (DVD
Pulse para seleccionar idiomas de audio en un disco. (DVD)
POWE
Press to turn on the unit, or to turn the unit into the
standb
must unp
Pulse el boton para encender la unidad, o para pasar la
unidad al modo de espera. (Para apagar completamente la
unidad, debe desconectar el cable de alimentacion de CA.)
TITLE (DVD)p.1
Press to call up the top menu on disc. (DVD
Pulse para visualizar el menú principal del disco. (DVD)
ZOOM (DVD).1
Press repeatedly to magnify part of a picture. (1.5x, 2x,
2.5x
Pulse para amplificar parte de una imagen. (1.5x, 2x, 2.5x) (DVD,
JPEG)
NGLE (DVD)p.1
Press to select camera angles on a disc. (DVD
Pulse para seleccionar ángulos de la cámara en un disco. (DVD)
-B (DVD).
Press to repeat between your chosen point of A and
DVD, CD
B.
Pulse para repetir entre los puntos de A y B que seleccionó. (DVD,
CD)
p.1
mode. (To completely turn off the unit, you
ug the AC power cord.
DVD, JPEG
18
19
20
21
22
23
24
25
26
27
28
29
30
31
LEA
DVD mode:
Press to clear numbers entered incorrectly.
P
ulse para borrar los números ingresados incorrectamente.
Press to cancel the point for A-B repeat. (DVD, CD)
Pulse para cancelar el punto para repetición de A-B. (DVD, CD)
VCR mode:
• Pr
Pulse para salir del menú de VCR.
• Press to reset the cassette tape counter
Pulse para restaurar el contador del casete.
DVD mode:
Press to play back a chapter / title repeate
Pulse para reproducir un capítulo o título reiteradamente. (DVD)
• Press to play back repeatedly. (CD, JPEG
Pulse para reproducir repetidamente. (CD, JPEG)
VCR mode:
• Press to select the repeat mode ON / OFF.
Pulse para encender o apagar el modo de repetición.
.
ISPLAYp.1
DVD mode:
Press to display the current disc mode
Pulse para visualizar el modo de disco actual.
VCR mode:
Press to display the current time, cassette tape
counter
Pulse para visualizar la hora actual, el contador del casete y L1 o L2.
N
Press to select input “L1” / “L2”
Pulse para seleccionar entrada “L1” o “L2”.
2.VCR(VCR).1
Pr
Pulse para activar el modo de VCR.
E
DVD mode:
• Press to search forward / backward through a disc
Pulse para buscar hacia adelante o hacia atrás en el disco.
Pr
Pulse [ D] para iniciar la reproducción lenta hacia adelante en el
modo pausa. (DVD)
VCR mode:
• Press to forward / backward a cassette tape.
Pulse para adelantar o retroceder un casete.
Pr
Pulse [ D] para iniciar la reproducción lenta hacia adelante en
el modo pausa.
TOPCp.
DVD mode:
• Press to stop disc playback.
Pulse para detener la reproducción del disco.
VCR mode:
• Press to stop the playback / recording of a cassette tape.
Pulse para detener la reproducción o grabación de un casete.
.1
R men
p.1
and L1 / L2.
VCR).
R m
FW
D]to begin slow forward playback in the
ause mode. (DVD
D] to begin slow forward playback in the
ause mode
.1
Continued on Next Page.
. (DVD)
Page 7

PREPARATION
USE
F
15
)
.
.
20
h
.
20
.
E
A
20
p
.
6
)
)
6
ess to conf
s.
.
K
1
6
.
)
K
/
L
:
ess to select a
u.
:
g.
:
.
URN
9
)
ess to retu
s
)
8
)
CH
6
UP
3
.
.
D
(
14
ess to activate
ode.
.
B
14
H
15
)
)
y
)
5
)
)
)
15
lly
lly
.
21
g.
y.
dby
y.
PRECAUTIONS
PA
DVD mode:
p.
• Press to pause disc playback.
Pulse para pausar la reproducción del disco.
• Press to advance the playback one frame at a time. (DVD
Pulse para avanzar la reproducción un cuadro por vez. (DVD)
VCR mode:
Press to pause the playback / recording of a cassette tape
Pulse para pausar la reproducción o grabación de un casete.
Press to advance the playback one frame at a time
Pulse para avanzar la reproducción un cuadro por vez.
REC (VCR).
Press to start recording or press repeatedly to activate
e One-touch Timer Recording
t
Pulse para comenzar a grabar o pulse reiteradamente para activar
la grabación rápida con temporizador.
PEED (VCR).
• Press to select the recording speed
Pulse para seleccionar la velocidad de grabación.
PEN/CLOS
DVD mode:
.
• Press to open or close the disc tray.
Pulse para abrir o cerrar la bandeja del disco.
VCR mode:
Press to remove the videotape from the cassette
artment
com
Presiónelo para retirar la cinta de video del compartimiento del
casete.
9.DISC MENU (DVD)p.1
Press to call up the disc menu on a disc. (DVD
Pulse para visualizar el menú del disco en un disco. (DVD)
Press to display the thumbnail when a disc with JPEG
iles is inserted and the file is highlighted. (JPEG
Pulse para visualizar la miniatura cuando insertó un disco con
archivos JPEG y algún archivo está resaltado. (JPEG)
ENTER (DVD).1
Pr
Pulse para confirmar los ítems.
1
/ L / 0 /
DVD mode:
irm the item
.1
Press to select items / settings.
Pulse para seleccionar ítems o ajustes.
Press to enter values in the input field
Pulse para especificar valores en el campo de entrada.
Press to rotate the picture during playback of JPEG
iles. (JPEG
Pulse para girar la imagen en la reproducción de archivos JPEG.
(JPEG)
VCR mode:
•Pr
Pulse para seleccionar un ítem en el menú de la VCR.
n item on the VCR men
0
• Press to go back one step during clock and timer
rogrammin
Pulse para retroceder un paso durante la programación del reloj y
el temporizador.
1
• Press to proceed to the next VCR menu item / step
Pulse para ir al siguiente menú de VCR.
22.ET
DVD)p.1
• Press to call up the menu when playing back a disc.
DVD
Pulse para volver al menú o pantalla anteriormente visualizado.
(DVD)
•Pr
rn to the file list when thumbnail i
displayed. (JPEG
Pulse para volver a la lista de archivos mientras se visualiza la
miniatura. (JPEG)
MODE (DVD).1
• Press to play back randomly. (CD
Pulse para reproducir al azar. (CD)
4.SEAR
DVD mode:
.1
• Press to search chapter / title. (DVD)
Pulse para buscar un capítulo o título. (DVD)
Press to search tracks or files. (CD, JPEG)
Pulse para buscar pistas o archivos. (CD, JPEG)
• Press to search time. (DVD, CD)
Pulse para buscar la hora. (DVD, CD)
VCR mode:
• Press to call up the index or time search menu.
Pulse para visualizar el menú de búsqueda de hora o el índice.
ET
DVD mode:
p.2
Press to call up the DVD menu
Pulse para visualizar el menú de DVD.
VCR mode:
Press to call up the VCR menu
Pulse para visualizar el menú de VCR.
V
• Pr
7
DVD)p.
DVD m
Pulse para activar el modo de DVD.
p.
Press to begin the playback of a disc / a cassette tape.
Pulse para comenzar la reproducción de un disco o casete.
KIP
DVD)p.
Press to go back to the previous chapters / titles. (DVD
Pulse para volver a los capítulos o títulos anteriores. (DVD)
• Press to skip tracks or files. (CD, JPEG
Pulse para saltar pistas o archivos. (CD, JPEG)
• Press to switch between pages when thumbnail is
ed. (JPEG
displa
Cuando se visualice la miniatura, presione el interruptor entre
páginas. (JPEG)
KIP GDVD).1
• Press to skip chapters / titles. (DVD
Pulse para saltar capítulos o títulos. (DVD)
• Press to skip tracks or files. (CD, JPEG
Pulse para saltar pistas o archivos. (CD, JPEG)
• Press to switch between pages when thumbnail is
isplayed. (JPEG
Cuando se visualice la miniatura, presione el interruptor entre
páginas. (JPEG)
TRACKINGK LVCR)p.
• Press either one of the buttons to stabilize the picture
manua
or the picture begins to vibrate vertica
uring the pause mode
Pulse cualquiera de los botones para estabilizar la imagen de
forma manual si ésta comienza a vibrar de forma vertical durante
el modo pausa.
1.TIMER SETVCR).
• Press to put the VCR into standby mode for a timer
recordin
Pulse para colocar el VCR en modo espera para una grabación con
temporizador.
This unit will automatically turn on the screen saver
after 5 minutes of inactivit
Only when the timer stan
the unit will automatically turn into the standby
mode after 25 minutes of inactivit
mode has been set,
PREPARATION
BASIC OPERATIONS RECORDING OPTIONAL SETTINGS TROUBLESHOOTING INFORMATION
ADVANCED PLAYBACK
7
Page 8

Front Pane
l
.
4
lug th
.PO
or
.
14
.
)
ding
g.
.
21
g
.
g
l
.
A
14
.
)
.
)
.
)
.
)
.
4
.
2
f y
.
2
ect
audio cable
audio
f y
other such devices
e
.
E
5
dl
D
5
dly ad
).
6.
C
A
4
C
.
A
:
part
t.
B
(
14
.
0
g.
dly
ding
9
9
stance.
K
L
(
5
y
.
CE
H
15
T
k.
C
(
14
.
B
(
14
k.
G
5
h.
[
]
on the Remote Control
[
]
[A]
on the unit.
1
PREPARATION
2345 67891011
POWER ON
VIDEO
AUDIO
12 13 14 15 17 18 20
L2 input jacks
1
.1
REC
TIMER REC
REC
1916 2221 24 2523
• Press to turn On the unit, or to turn the unit into the
Standby mode. (To completely turn Off the unit, you
must unp
WER ON indicat
2
e AC power cord.)
•Lights up when the unit is turned On
assette Compartment (VCR).
• Insert a cassette tape here
REC indicator (VCR
Lights up during a Recording, OTR (One-touch Timer
Recor
) or Timer Recordin
• Blinks when a Recording is paused
IMER REC indicator (VCR).
Lights up when a Timer Recording or OTR (One-touch
Timer Recordin
) has been set
Blinks when a Timer Recording or OTR (One-touch
Timer Recordin
not comp
) has been finished or if the unit could
ete the Recording due to some error
DVD)p.
Press to Open / Close the disc tray
7.CR output indicator (VCR
Lights up when the unit is in the VCR mode
DVD output indicator (DVD
•Lights up when the unit is in the DVD mode
DISC IN indicator (DVD
Lights up when the disc is in the disc tray
10. PLAY indicator (DVD
Lights up when the inserted disc is being played back.
Disc tray (DVD).1
11
• Place a disc when it is open
12.IDEO IN jackVCR).2
•
onnect an RCA video cable from the video output jack
o
our camcorder and other such devices here
13.AUDIO IN jackVCR).2
•
nn
n RCA
output jack o
monaural
our
mcorder and
from the
r
14
(VCR).1
Press to rewind the cassette tape or to view the picture
rapi
y in reverse during playback (rewind search).
(VCR).1
15.
Press to rapi
vance the cassette tape or view the
picture rapidly in forward during playback (forward
search
DVDVCR
TRACKING
1
SOURCE
(VCR).1
•
Press to Stop the Playback / Recording of a cassette tape
Press to remove the cassette tape from the cassette
com
men
VCR)p.
Press to Start the Playback of a cassette tape
18.REC (VCR).2
• Press once to Start a Recordin
Press repeate
Recor
. Infrared Sensor Windowp.
1
).
Receive signals from the Remote Control so that you
n control the unit from a di
. TRACKING
Press either one of the buttons to stabilize the picture
if the picture begins to vibrate vertically during the
cassette tape pla
1.SOUR
• Press to switch to either DVD / VCR mode.
(DVD)p.
Press to go back to the Previous Chapters / Titles /
racks during Playbac
• Press and hold it to begin Fast Reverse Search.
DVD).
• Press once to Stop disc playback temporarily
4.
DVD)p.
Press to Start / Resume Playbac
(DVD).1
• Press to Skip Chapters / Titles / Tracks during Playback.
Press and hold it to begin Fast Forward Searc
You can turn On the unit by pressing the buttons 6
or 24 (circled ones) or by inserting a cassette tape.
If you turn Off this unit,
s not available. Be sure to use
DISC IN
PLAY
to activate an OTR (One-touch Timer
VCR)p.1
back
or
8
Page 9
0
ect a
audio cable fro
audio
f
.
k
22
y
.
2
g
eceiver.
k
11
ect a
audio cable fro
audio
.
11
d
0
ect a
deo cable fro
O
f
.
22
ect a
deo cable fro
deo
k
.
.
audio and
deo cables are
uded for bo
e
p
store.
)
Rear Pan
el
ol.
:
obstacles between the
ote control and the
e
it.
:
r
°
e
°
low
°
batterie
ote:
.
g
p
.
.
.
l
PREPARATION
1 2
PRECAUTIONS
DVD VCR
AUDIO OUT
L
R
COMPONENT
VIDEO OUT
Y
CB
CR
DIGITAL
AUDIO OUT
COAXIAL
3 4 5 6 7
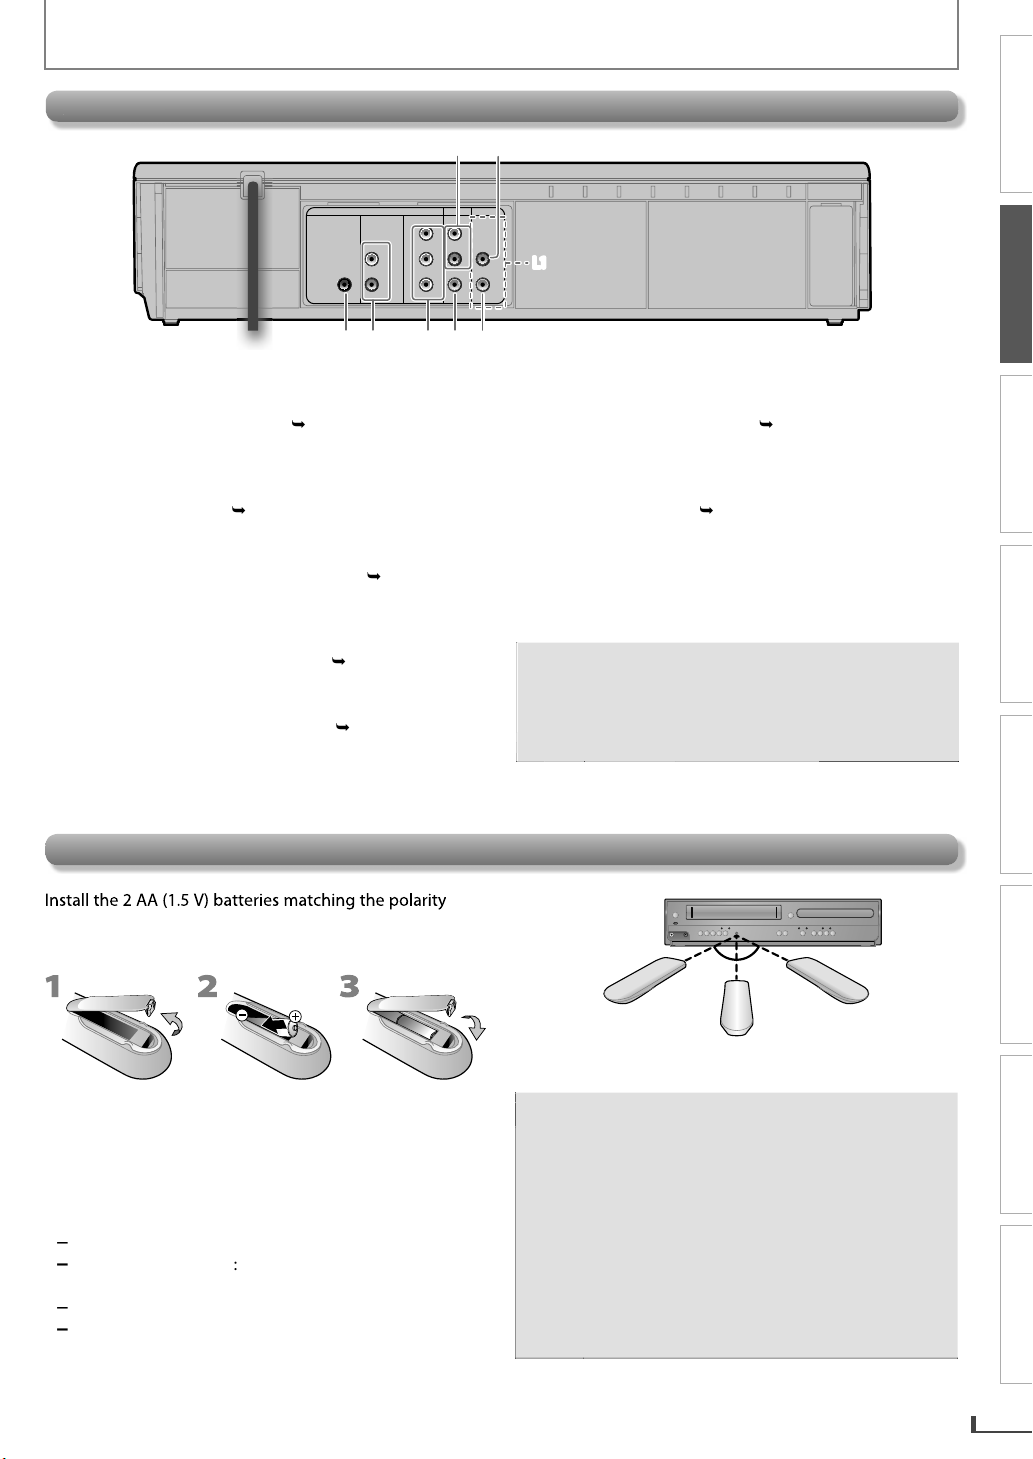
DVD/VCR AUDIO OUT jackp.1
•
nn
n RCA
input jack on your television or audio device. Standard
connection
or DVD/VCR use
VCR AUDIO IN jac
•
Connect an RCA audio cable from the audio output jack
on
our camcorder, VCR, etc. to here
DIGITAL AUDIO OUT COAXIAL* jackp.1
Connect a digital audio coaxial cable from here to
the di
ital audio coaxial in jack on a decoder or audio
r
DVD AUDIO OUT* (analog) jac
•
nn
n RCA
input jack on your television or audio device
COMPONENT VIDEO OUT* jacksp.
Connect component video cables from here to the
component vi
eo input jacks on your television.
m here to the
.
.
m here to the
DVD/VCR
AUDIO OUT
VIDEO OUT
L
AUDIO IN
R
VIDEO IN
L1
L1
DVD/VCR VIDEO OUT jackp.1
•
nn
input jack of your television or audio device. Standard
connection
7.VCR VIDEO IN jack.
•
nn
output jac
or enhanced DVD viewing. DVD/VCR video and audio
onnection required to view cassette tapes
CA
VCR and DVD viewing. You can enhance your DVD
picture and sound quality with component video
cables or a digital audio coaxial cable. Pleas
n RCA vi
m here to the VIDE
or DVD/VCR use
n RCA vi
m here to the vi
on your camcorder, VCR, etc
vi
incl
urchase the necessary cables at your local
(Refer to pages 11-12.
PREPARATION
BASIC OPERATIONS RECORDING OPTIONAL SETTINGS TROUBLESHOOTING INFORMATION
ADVANCED PLAYBACK
th
Installing the Batteries in the Remote Contro
indicated inside battery compartment of the remote
ntr
Keep the following in mind when using the remote
ntrol
ke sure that there are no
rem
n
The maximum operable ranges of the unit are
Line of sight: approx. 23 feet (7m)
Either side of cente
Abov
e
infrared sensor window on th
approx. 16 feet (5m) within 30
approx. 16 feet (5m) within 15
approx.
10 feet (3m) within 30
30˚30˚
16 feet (5m)
16 feet (5m)
23 feet (7m)
ion:
N
ver throw
s into a fire.
Do not mix different types of batteries together
e.g., Alkaline and Carbon-Zinc) or old batteries
with fresh ones. Although they may look similar,
ifferent batteries may have different voltages
If the remote control is not to be used for a lon
eriod of time, remove the batteries to prevent
amage or injury from possible battery leakage
Do not try to recharge batteries; they can overheat
and rupture
Batteries should always be disposed of with the
environment in mind. Always dispose of batteries in
accordance with applicable laws and regulations
9
Page 10

PREPARATION
V
If Your TV Has an Antenna In Jack Only
ff.
cable
i
cabl
e
;
.
.
ote:
.
VCR and Basic DVD Connection
deo cable
:
.
Connections
Connection to a T
If Your TV Has an Antenna In Jack Only
Before connecting, make sure the Power on the devices is turned O
this unit TV
DIGITAL
AUDIO OUT
DVD VCR
AUDIO OUT
To audio R
output jack
COAXIAL
L
R
To video
output jack
DVD VCR
DIGITAL
AUDIO OUT
AUDIO OUT
COAXIAL
COMPONENT
VIDEO OUT
CB
CR
L
R
Y
DVD/VCR
COMPONENT
AUDIO OUT
VIDEO OUT
Y
CB
VIDEO OUT
CR
DVD/VCR
DVD/VCR
AUDIO OUT
AUDIO OUT
VIDEO OUT
VIDEO OUT
L
AUDIO IN
R
VIDEO IN
L
L
R
R
(Yellow)
(Yellow)
(White)
(White)
AUDIO IN
(Red)
(Red)
VIDEO IN
To audio L
output jack
rear of your RF modulator
(not supplied)
No Antenna (RF) Output!
If your TV only has an Antenna Input
(no A/V inputs), you will need an
RF modulator (NOT INCLUDED) to
connect this player
to the TV.
RF modulator
CHANNEL
43
VIDEO IN
AUDIO IN
ANT. IN
TV
RL
TO TV
ANT. IN
io
ANT. IN
RF coaxial cable
RF modulator (not supplied)
43
Set channel
3 or 4
To audio L
To audio L
input jack
input jack
VHF / UHF
antenna
cable TV company
RF coaxial
AUDIO IN ANT. INvTO TVRLCHANNEL
(White) (Red)
(White) (Red)
To audio R
To audio R
input jack
input jack
VIDEO IN
(Yellow)
(Yellow)
or
cable
To video
To video
input jack
input jack
After making the connection illustrated above
1) Set your RF modulator’s channel 3/4 switch to either 3 or 4, whichever the TV channel is least used in your area
2) Turn on your TV and choose the same channel as you set the RF modulator’s channel 3/4 switch to
N
• The quality of picture may become poor if this unit is connected to an RF modulator
10
VCR and Basic DVD Connection
Note
this unit
DIGITAL
AUDIO OUT
COAXIAL
DVD VCR
AUDIO OUT
L
To video
R
output jack
Connect this unit directly to your TV. If an RCA audio/video cables are connected to a VCR, pictures may be distorted due
to the copy protection system
DVD VCR
DIGITAL
AUDIO OUT
AUDIO OUT
COAXIAL
COMPONENT
VIDEO OUT
CB
CR
L
R
Y
DVD/VCR
COMPONENT
AUDIO OUT
VIDEO OUT
Y
CB
VIDEO OUT
CR
DVD/VCR
DVD/VCR
AUDIO OUT
AUDIO OUT
VIDEO OUT
VIDEO OUT
L
AUDIO IN
R
VIDEO IN
L
L
R
R
(Yellow)
(Yellow)
(White)
(White)
AUDIO IN
(Red)
(Red)
VIDEO IN
To audio L
output jack
Supplied cables used in this connection are as follows:
• RCA audio cable (L/R) x 1
• RCA video cable x 1
Please purchase the rest of the necessary cables at your local store.
TV
audio cable
To audio L
input jack
input jack
To audio R
To audio R
input jack
input jack
(White) (Red)
(White) (Red)
To video
To video
input jack
input jack
(Yellow)
(Yellow)
To audio L
To audio R
output jack
RCAvi
AUDIO IN
RL
VIDEO
IN
Page 11

PREPARATION
:
.
:
.
U
h
,
,
3
,
O3
es:
00
UX C
L
O
92, 93
O
O
00
3
T
00
Available on DVD Only
CAio cable
After connecting to your TV
You will need to switch to video input on your TV. This is usually marked TV/VIDEO, INPUT or AUX
Please refer to your TV’s owner’s manual for details.
Input modes for common TV brands
Listed below are inputs for common brand name TV’s
Admiral: A
Curtis Mat
00, 90, 91, 92, 93
GE: INPUT
92, 9
HITACHI: INPUT, AUX
JVC: VIDEO, VIDEO1, VIDEO2
VIDE
Available on DVD Only
X
is: LINE1, LINE2
TV/VCR, 00, 90, 91,
KENWOOD: AUX
LXI-Seri
Funai: A
HANNE
Panasonic: TV/VIDE
RCA: INPUT, TV/VCR, 00, 90, 91,
AUDIO IN
RL
amsung: TV/VIDE
ANYO: VIDE
HARP:
ONY: VIDEO1, VIDEO2, VIDEO
OSHIBA: TV/GAME
Zenith:
this unitTV
DIGITAL
AUDIO OUT
DVD VCR
AUDIO OUT
L
COAXIAL
R
COMPONENT
VIDEO OUT
PRECAUTIONS
PREPARATION
BASIC OPERATIONS RECORDING OPTIONAL SETTINGS TROUBLESHOOTING INFORMATION
DVD/VCR
AUDIO OUT
L
Y
AUDIO IN
R
CB
VIDEO IN
VIDEO OUT
CR
A
U
D
I
O
To audio L
To audio L
input jack
input jack
(White)
(Red)(White) (Red)
To audio R
To audio R
input jack
input jack
To audio L
output jack
R
To audio R
output jack
COMPONENT
VIDEO IN
To component
V
I
D
E
O
video Y input jack
Y
(Green)
(Green)
CB
(Blue)
(Blue)
CR
(Red)(Red)
To component
video CR input jack
video CB output jack
component video cable
To component
To component
video CB input jack
video CB input jack
video CR output jack
Supplied cables used in this connection are as follows:
• RCA audio cable (L/R) x 1
Please purchase a component video cable at your local store.
DIGITAL
AUDIO OUT
COAXIAL
and
To component
video Y output jack
DIGITAL
AUDIO OUT
To component
COAXIAL
To component
DVD
DVD VCR
AUDIO OUT
AUDIO OUT
(White)
(White)
(Red)
(Red)
DVD VCR
DVD
AUDIO OUT
COMPONENT
VIDEO OUT
Y
L
L
R
R
(Green)
(Green)
L
(Blue)
(Blue)
(Red)(Red)
R
COMPONENT
COMPONENT
VIDEO OUT
VIDEO OUT
Y
Y
CB
CB
CR
CR
CB
CR
DVD/VCR
AUDIO OUT
VIDEO OUT
DVD/VCR
AUDIO OUT
L
R
VIDEO OUT
ADVANCED PLAYBACK
L
AUDIO IN
R
VIDEO IN
AUDIO IN
VIDEO IN
11
Page 12

Connection to an Audio System
Playing Analog Audio
Playing Digital Audio
e
igitl
a
u
ioppn
p
ja
pj
ital audio input jackpj
igitl
a
u
ioin
p
ja
)
lby
t
t
deo
l
CMnnel PCM
M
l
CM
CM
M
:
.
.
Playing Analog Audio
PREPARATION
analog audio
input jacks
AUDIO IN
RL
(White)
(Red)(White) (Red)
To audio R
To audio L
To audio L
input jack
input jack
To audio R
input jack
input jack
RCAaudio cable
Playing Digital Audio
Dolby Digital decoder digital audio receiver
DIGITAL AUDIO
COAXIAL IN
To coaxial
input jack
or
DIGITAL AUDIO
COAXIAL IN
To coaxial
input jack
digital audio coaxial cabl
or
DVD VCR
DIGITAL
AUDIO OUT
AUDIO OUT
L
COAXIAL
R
DIGITAL
AUDIO OUT
COAXIAL
this unit
DIGITAL
DIGITAL
AUDIO OUT
AUDIO OUT
COMPONENT
VIDEO OUT
DVD/VCR
AUDIO OUT
L
Y
AUDIO IN
R
CB
VIDEO IN
VIDEO OUT
CR
this unitstereo system
To audio L
output jack
DVD
DVD VCR
AUDIO OUT
AUDIO OUT
(White)
(White)
(Red)
(Red)
L
L
R
R
COMPONENT
VIDEO OUT
(White)
(White)
To audio R
output jack
DIGITAL
AUDIO OUT
DVD VCR
DVD
AUDIO OUT
COMPONENT
VIDEO OUT
To coaxial
output jack
COAXIAL
COAXIAL
L
R
Y
(Red)
(Red)
CB
CR
DVD VCR
AUDIO OUT
COAXIAL
Y
CB
CR
DVD/VCR
DVD/VCR
AUDIO OUT
AUDIO OUT
L
L
R
R
VIDEO OUT
COMPONENT
VIDEO OUT
Y
L
CB
R
CR
DVD/VCR
AUDIO OUT
VIDEO OUT
DVD/VCR
AUDIO OUT
VIDEO OUT
AUDIO IN
VIDEO IN
L
AUDIO IN
R
VIDEO IN
L
AUDIO IN
R
VIDEO IN
You must select “BITSTREAM” or “PCM” in “DOLBY DIGITAL” setting. (Refer to page 24.
Audio recording format of the disc “Do
VD-vi
Note
Supplied cables used in this connection are as follows:
• RCA audio cable (L/R) x 1
Please purchase a digital audio coaxial cable at your local store.
12
Dolby Digita
LPCM
Digital” setting on this uni
P
BITSTREA
P
BITSTREA
Actual outpu
olby Digita
nnel P
• The audio source on a disc in a Dolby Digital multi channel surround format cannot be recorded as digital sound by an
MD or DAT deck
laying back a DVD using incorrect settings may generate noise distortion and may also damage the speakers
Page 13

Initial Setups
g
ess
Use
to select “CLOCK S
.
.
]
B
CT
y
/
to select
.
.
T MO
R
/
to select
.
T
R
M
B
ess
the “CLOCK S
u.
0
d
o
.
e
ease note: most
uctions
efer to
ote control use.
)
ess
.
.
ue.
CT
B
]
S
L
.
To Change the Selected On-screen Language
ess
.
to select
.
.
to select
S
.
h:
]
and
lly
]
PREPARATION
PRECAUTIONS
urning On Unit for the First Tim
Pl
rem
Be sure your TV’s input is set to VIDEO. (Name
1
may vary with TV manufacturer. See your TV
manual for details.
r
2
• “LANGUAGE SELECT” menu appears
3
Then press to contin
When “CLOCK SET” menu appears,
4
go to step
To Change the Selected On-screen Language
Press first.
r
1
instr
in this manual r
/ to select your on-screen language
ANGUAGE SELE
ENGLISH [ON
FRANCAI
ESPAÑO
in “Clock Setting” on this page
2
SETUP
until the main menu appears
Clock Settin
Press first.
SETUP
r
1
and
Then press to go to next step
If the clock is not set yet, the “CLOCK SET” menu appears
ou press
when
2
preference
Then press to go to the next item
3
/
- M E N U -
TIMER PROGRAMMING
SATELLITE LINK
AUTO REPEAT [OFF
CLOCK SET
LANGUAGE SELE
SETUP
In this case, go to step
the contents to suit your
NTH DAY YEA
1 0 / - - - - - -
HOUR MINUTE AM/PM
- - : - - - -
“AM ” or “PM”
MONTH DAY YEA
1 0 / 0 7 TUE 2 0 1 4
HOUR MINUTE AM/P
0 5 : 4 0 P M AM
LOCK SE
LOCK SE
ET”
PREPARATION
BASIC OPERATIONS RECORDING OPTIONAL SETTINGS TROUBLESHOOTING INFORMATION
2
ADVANCED PLAYBACK
2
/
“LANGUAGE SELECT”
Then press to go to next step
3
“E
/
PA ÑOL”
ENGLISH”, “FRANCAIS” or
Then press
If you accidentally select Spanish or French and
need Englis
ress
SETUP
ELECTION LANGUE”. Press cursor 1 and select
“ENGLISH”. Fina
choose “SELEC. IDIOMA” or
, press
CLEAR
4
SETUP
r
to exit
To go back, press
Clock setting will be lost after a power failure or this
unit has been unplugged for more than 30 seconds
ET” men
uring steps 2 t
3
13
Page 14

BASIC OPERATIONS
2
3
.
Search
17
Search
17
t
17
.
te tape so
the unit wi
a cassette tape so th
a
se
rt a cassette tape so th
atattt
e tape s
o
ta
pe s
ooetta
se
.
turned on automatical
lyd on automatic
omat
cton aon
a
ess
twto swto switch to the VCR mode.
to start
to start
4
to stop the
to stop the
VCR
TRACKING
ll
lly
5
k
to turn on the
to turn on the
k
2
3
sc w d
e
to switch to
to switch to
4
to start
to start
to stop the
to stop the
.
u
6
k
6
ause Mode
15
k
15
oom
6
k
7
s
6
e
6
k
8
k
8
s
es.
y
eatures.
g
.
.
BASIC OPERATIONS
For VCR Playbac
1
Inserte un casete para que la unidad se encienda
automáticamente.
f the protection tab has
removed, playback wi
start automatica
Para cambiar al modo de VCR, pulse .
2
POWER ON
VIDEO
AUDIO
.
M
M
E
E
M
M
E
E
R
R
You need to press first ever
ime you operate any of VCR
f
When using DVD AUDIO OUT jack,
DIGITAL AUDIO OUT COAXIAL jack
nd COMPONENT VIDEO OUT jack,
no VCR audio / video will be output.
REC
TIMER REC
REC
R
R
E
E
B
B
BASIC PLAYBACK
For Disc Playbac
DISC IN
DVDVCR
PLAY
SOURCE
TRACKING
without pressin
In case the DVD is recorded on both sides, make sure the
label of the side you want to playback is facing up
1
efore: Turn on the TV.
Para encender la unidad, pulse .
Luego pulse .
2
Inserte un disco con el lado
de la etiqueta hacia arriba.
3
4
For advanced playback, refer to the following pages
• Time
Auto Repea
14
Pulse para detener la
reproducción.
o prevent damage to the cassette tape, pause or
slow mode will automatically stop after 5 minutes
o return to playback from the picture search,
pause or slow mode, press
3
Pulse para comenzar la
reproducción.
Pulse para comenzar
la reproducción.
•
p.
p.
ndex
p.
5
For advanced playback, refer to the following pages
isc Men
P
Z
JPEG Playbac
Pulse para detener la
reproducción.
rch Function
M
E
R
• You need to pres
ou operate any of DVD functions /
Pulse para cambiar al modo
de DVD.
R
E
B
M
E
r
4
Resume Playbac
.1
• Step-by-step Playbac
p.
Repeat Playbac
.1
Angl
p.1
Random Playbac
.1
.1
p.
.1
p.1
.1
Page 15

BASIC OPERATIONS
T
T
.
The audio CD contains “tracks”.
ideo
2
h
2
1
2
CD
ack 1rack
ack 3rack 4rack 5
k
ess
W
g
o
h
r
k
.
H
[
G
t
g
g
H
G
on this unit
.
f
k
o
press
B
VHS
VHS
Press
g
or
h
g
h
on this
k.
B
A
.
.
k
ess
F
d
y
e
.
B
VHS
VHS
Press
.
.
.
press
B
p
k
ess
g
.
g
G
t
G
f
y
B
VHS
VHS
Press
)
ess
g
o
h(g
h
on this
g
.
K
L
Press
k.
.
App
.
s
ess
G
f
H
[
G
t
H
G
)
VHS
VHS
ess
]
to reset the counte
“0:00:00”.
lly
d)
VHS
VHS
y
-
.
PRECAUTIONS PREPARATION ADVANCED PLAYBACK
Hint for Disc Playback
he contents of DVD are generally divided into “titles”.
itles may be further subdivided into “chapters”
-v
1
apter
r
apter
audio
2
r
apter
apter 3
Fast Forward / Fast Reverse Playbac
Press first.
Pr
playbac
Using
Pressin
change
Return t
VHS
VHS
VHS
unit) during playbac
Return to the normal playback, press
D
F
to select the desi
and holdin
r
REV
on this uni
repeatedly during
d forward or reverse speed
or
orward or reverse playback speed
the normal playbac
,
Press first.
FWD
REV
or
PLAY
For DVD and audio CD, fast forward or fast
reverse speed is different depending on the disc.
pproximate speed is x2, x4, x8 and x20
For VCR, press
search at higher-speed (in the SLP mode only)
FWDg again so the unit will
will also
LA
Slow Forward Playbac
Press first.
Pr
PAUSEF during playback, then press
repeatedly to select the desired forward speed
Usin
Pressing and holding
mode will also change
Return to the normal pla
VHS
VHS
VHS
on this uni
on this unit in the pause
orward playback speed.
back, press
Press first.
PAUSEF during playback, then press
PLAY
FWDg. ( g on this unit.
r
FWD
unit) to chan
r
REV
e the speed
or
•If the distorting picture appears, you can adjust it by
using
TRACKING
PLAYBo return to the normal playbac
For DVD,slow forward speed is different depending
n the disc
roximate speed is x1/2, x1/4 and 1/8
For VCR, to prevent damage to the cassette tape,
slow mode will automatically stop after 5 minutes.
To Skip Titles, Chapters, Tracks or File
r
SKIPH orSKIP
titles, chapters, tracks or
Using
ressing
on this uni
or
hapters, tracks or files to a desired point.
Press first.
uring playback to skip
iles to a desired point.
on this unit will also skip titles,
To Reset the Cassette Tape Counter
Counter Reset
FWD
BASIC OPERATIONS
RECORDING
Pause and Step-by-step Playbac
r
PAUSE
The picture goes forward by one frame each
time
Return to the normal playback, press
VHS
VHS
VHS
Press first.
PAUSEF during playback
The picture goes forward by one frame each time you
PAUSEFin the pause mode
If the picture is distorted or rolling vertically, adjust the
ertical hold control on your TV if equipped
Return to the normal playback,
For VCR, to prevent damage to the cassette tape,
uring playback.
ou pr
ause mode will automatically stop after 5 minutes.
Press first.
AUSEF in the pause mode
PLAY
PLAY
VHS
VHS
VHS
Press first.
r
DISPLAY]to display the cassette tape counter on
the TV screen. Then, press
CLEAR
This function is not available if the unit begins the
timer recording or one-touch timer recording.
To Rewind the Cassette Tape automatica
Auto Rewin
VHS
VHS
VHS
Press first.
When a cassette tape ends during pla
orward or normal recording, the unit will automatically
rewind to the beginning of the cassette tape. After
rewinding finishes, the unit will eject the cassette tape
back, fast
OPTIONAL SETTINGS TROUBLESHOOTING INFORMATION
r
15
Page 16

ADVANCED PLAYBACK
u
layback
/L/
0
]
k
ess
.
ess
.
ote:
.
k
.
p-
h
ote:
.
.
)
dly d
,
(
K/L
/
.
ff)”.
Zoom fu
doe
u
.
.
s
f
.
]
h
)
]
labl
ode
t
Track Searc
Search
l
T
ed.
ess
0
hange.
ess
K
)
]
.
h
)
]
.
h
.
d
.
ess
0
or
1
h
.
)
]
.
h
h
h
y
.
]
.
ess
0
ge.
ess
K
]
.
ADVANCED PLAYBACK
Disc Men
Press first.
Some discs contain menus which allow you to customize
DVD p
ENTER
. Use K
/ 1 to select an item, then
Calling Up a Menu Screen During Playbac
Press first.
r
DISC MENU] to call up the disc menu
r
TITLE]to call up the title menu
N
Menu operations may vary depending on the disc.
efer to the manual accompanying the disc for
tails
Resume Playbac
Press first.
STOPC during playback. PRE STOP icon will
ppear on the TV screen
Press
N
PLAYB, RESUME icon will appear at the to
eft on the TV screen and playback will resume from
t
e point at which playback was stopped.
• To cancel resume, press
the stop mode
• The resume playback information stays on even
hen the power is turned off, as long as the disc
stays in the unit
STOPC one more time in
Track / File Searc
1
Press [SEARCH
vai
2) Enter the desired track or file number.
•
isplayed digit differs depending on the contents.
he same number of digits that are stored on the disc
be enter
r
c
r
3
Press
ENTER
Press first.
e Search M
h
File
or1 to move the digit that you wish to
or L] to change the number.
e random playback will be cleared when you
select track search during random playback (for CD
only)
Displayed lis
File List / Thumbnai
CD TRK 00 : 00 : 3102 / 10
Title / Chapter Searc
Press first.
Press
1
2) Enter the desired title or chapter number
SEARCH
01 / 06 Chapter
Title 00 : 08 : 10003 / 039
16
1
Press
Use
3) To exit zoom mode, press
ZOOM]repeate
the desired zoom factor: ZOOM 2(x1.5)
ZOOM 4
TV screen
elect “ZOOM 1(O
•
• Some part of the picture may not be zoomed
Press first.
uring playback to select
ZOOM 3(x2),
x2.5).
0 / 1 to slide the zoomed picture across
ZOOM] repeatedly to
nction
is displayed
epending on the Disc or playback status
s not work while the disc men
Camera Angle
Some DVD may contain scenes which have been shot
imultaneously from the various angles. You can change
the camera angle i
Press first.
1) During playback, press
Each time you press
appears on the TV screen
ANGLE
ANGLE] camera angle changes.
or the chapter search, press cursor1to highlight
e chapter number
t
Title number is displayed with 2-digit, Chapter number
isplayed with 3-digit
is
•
r
ange
c
•
ressK or L to change the number.
3
Press [ENTER
ome discs only allow you to search by a chapter
number
to move the digit that you wish to
tton Select Searc
Press first.
Some DVD-videos have button menus to jump to eac
utton displayed scene. During playback the scenes whic
have the button menu, you can enter the button number
b
using the Button Select Menu of 3-digit
1) Press
2) Enter the number you want to jump to
3) Press
Playback of the selected scene will start
•
r
chan
r
SEARCH
Select 001 / 005
or1 to move the digit that you wish to
or L to change the number.
ENTER
Page 17

ADVANCED PLAYBACK
KorL
0
1
]
.
h
VHS
VHS
)
]
KorL
to select a desired
.
g.
layback
lly.
ode.
g.
.
o
.
h
)
]
.
.
ess
0
or
1
ge.
essKo
.
]
VHS
VHS
)
]
twice.
1
0
to Fast Re
y
y.
ote:
.
playback.
elled and the u
.
.
.
ple below.
ff)
)
)
)
ff)
)
ff)
R
)
k
.
.
.
k
Th
lly
lly
.
VHS
VHS
p
]
KorL
select
.
1
to “AUTO
set “ON”.
it.
p
ol.
p
.
y
.
PRECAUTIONS PREPARATION
Use
to enter the number you want to jump
•To move the digit that you wish to change, press
r
) After all digit numbers are entered, press
ENTER
Playback of the selected scene will start
Index Searc
VHS
VHS
VHS
Press first.
1
Press
Use
SEARCH
index number
Press0to Fast Rewinding or1to Fast Forwardin
) When the cassette tape has reached an index mark,
p
will start automatica
The time gap between index marks must be more
than 1 minute for SP mode, 2 minutes for LP mode
nd 3 minutes for SLP m
The index search is not available during recordin
ress
STOPCto stop the search
If a cassette tape ends during a search, the index
search will be cancelled and the unit will rewind t
the beginning of the cassette tape
ime Searc
Press first.
1
Press
Press cursor1to highlight the time
Enter the desired time
SEARCH
01 / 06 Chapter 003 / 039 00 : 08 : 10
Title
Repeat Playbac
epeat function is available only during playback
Each time you press [REPEAT], repeat function changes as
exam
REP OFF (Repeat O
REP CHAPTER(Current Chapter Repeat
(Current Title Repeat
E
AL
REP OFF (Repeat O
E
E
AL
FF (Repeat O
E
EP DI
(Entire Disc Repeat
( Current Track Repeat)
Entire Disc Repeat
( Current Track Repeat)
( Current Folder Repeat)
(Entire Disc Repeat
Press first.
Repeat A-B Playbac
BASIC OPERATIONS
ADVANCED PLAYBACK
RECORDING OPTIONAL SETTINGS TROUBLESHOOTING INFORMATION
•
r
] to move the digit that you wish to
chan
r
Press
VHS
VHS
VHS
Press first.
1
Press
rL to change the number
ENTER
SEARCH
Use K / L to select a desired time. Then, press cursor
to Fast Forward, or press
the cassette tape is reaches to the selected time,
pla
back will start automaticall
N
For DVD and audio CD, press
ncorrect input at step 3
For audio CD, the random playback will be cleared
when you select time search during random
For VCR, press
For VCR, if a cassette tape ends during a search,
the time search will be canc
rewind to the beginning of the cassette tape
The time search is not available during recording of
the VCR
STOPC to stop the search.
CLEAR] to erase the
wind. When
nit will
Press first.
A-B] at your desired starting
oint as point A
2) Press [A-B] at your desired ending point as point B.
3) Press
A-B] to exit the sequence so that “A-B CANCEL”
Point B should be in the same title or track as point A
To cancel point A, press
Repeat A-B playback is not available with some
iscs
CLEAR]at step 1.
Auto Repeat Playbac
e unit will automatica
as reached the end and will automatica
nless you press
VHS
VHS
VHS
Press first.
1) In sto
STOP C] or you turn off the unit
mode, press
2) Use
3) Press cursor
Press
SETUP] to ex
The auto repeat can also be set to “ON” or “OFF” by
ressingREPEAT] on the remote contr
• To cancel auto repeat, follow step 1 above. Then,
ress cursor 1 so that “OFF” appears beside
“AUTO REPEAT”. Press
The auto repeat playback will start automatically if
ou select “AUTO REPEAT” to “ON” in the stop mode
rewind the cassette tape when it
start playback
SETUP
to
“AUTO REPEAT“
REPEAT” to
SETUP] to exit
17
Page 18

ADVANCED PLAYBACK
e
T
lable)
)
.
:
(No Subtitle)
:
:
)
:
)
appears on the TV screen, it
ded o
e.
ual
.
e
Th
y
.
.
:
)
:
)
:
)
.
J
k
y
y
f
lly
h
y)
ect the desired
e.
K/L
/
0
]
]
or
B
g
e
k
l
l
ks
.
.
.
)
.
.
k
T
.
layback
]
ote:
P
G
y.
PEG Playbac
JPEG is a method of compressing data in files.
You can cop
computer and pla
JPEG files on DVD or CD-R/-RW from a
back the files on this unit.
Press first.
Insert a JPEG
automatica
ormatted disc, then the File List will
appear on the TV screen. (For a disc wit
JPEG files onl
1) UseK or L
•
se
sel
fil
/ 1to select another folder, press
ENTER
[
jpg9999 ] Jpeg01.jpg
01.JPEG1
02.JPEG2
03.JPEG3
04.JPEG4
05.JPEG5
2) Press [ENTER
Jpeg01.jpg
Jpeg02.jpg
Jpeg03.jpg
Jpeg04.jpg
Jpeg05.jpg
Jpeg06.jpg
Jpeg07.jpg
Jpeg09.jpg
Jpeg10.jpg
[PLAY
Playback will start from the file you selected.
t is recommended that the files are recorded under
the followin
licable JPEG fil
ormal playbac
ixel upper limit: 6,000 × 6,000 pixe
ixel lower limit: 96 × 96 pixe
emar
JPEG image that extends beyond the screen is reduced so that it
ill be displayed within the screen
conditions :
Some selections may take a while to be recognized
•
efer to “On-Screen Display” on page 19 for more
tails
• A maximum of 40 folders or 9,999 files may be
recognized on one disc. (ISO9660 format files
For UDF format files recorded on DVD media,
maximum of 2,000 files may be recognized
t may take a while to switch between pages for a
To rotate the picture, press the cursor buttons
uring playback of JPEG files
Random Playbac
his function shuffles the playing order of tracks instead of
playing back in sequence
Press first.
1) During p
N
• During random playback, you cannot go back to
the previous track. Pressing [SKI
to search tracks randoml
, press [MODE
allows you
Settings
Subtitle Languag
Press first.
his unit allows you to select a subtitle language
avai
Each time you press
1
during DVD Playback.
SUBTITLE], subtitle language
anges as example below
1 English(English Subtitle)
French (French Subtitle
• If your language is not shown after pressing
ote
SUBTITLE] several times, the disc may not have
at language. However, some discs allow subtitle
anguage setting on the disc menu. (Operation
varies depending on the disc, so refer to the manual
along with the disc.
When
means no subtitle is recor
n the scen
ome discs will only allow you to change the
subtitle from the disc menu. Refer to the man
accompanying the discs for details
Audio Languag
Press first.
is unit allows you to select an audio language
ultiple languages are available on a disc)during DVD
Pla
back
1) Each time you press
hanges as example below
1 English(English Audio
French (French Audio
Spanish(Spanish Audio)
If your language is not shown after pressing
AUDIO] several times, the disc may not have
at language. However, some discs allow audio
anguage setting on the disc menu. (Operation
varies depending on the disc, so refer to the manual
along with the disc.
•
ome discs will only allow you to change the audio
setting from the disc menu. Refer to the manual
accompanying the discs for details
AUDIO], audio language
if
if
18
Page 19

s
e
2
o
s
s
e
T
e
lly
.
olde
e
ess
f
.
Thumbnail
e
ess
.
ess
N
.
On-Screen Display
ADVANCED PLAYBACK
PRECAUTIONS PREPARATION
You can check the information about the current disc by pressing
nsert a JPEG formatted disc, then the Folder/File List will
automatica
Title 00 : 08 : 101 / 6 Chapter 3 / 39
urrent Title Number / Total Titles
:
urrent Chapter Number / Total Chapter
Elapsed Time of the Current Tim
1 / 1 Eng 1 / 9D 5.1CH 1 / 2 Eng
urrently Selected Language / Total Languages
rrent Audi
F:urrently Selected Subtitle / Total Subtitle
urrently Selected Angle / Total Angle
an available
DISPLAY] Press first.
appear on the TV screen
Folder List
F
r Nam
[
jpg9999 ] Jpeg01.jpg
01.JPEG1
02.JPEG2
03.JPEG3
04.JPEG4
05.JPEG5
r
DISC MENU] to display the Thumbnail screen while
Jpeg01.jpg
Jpeg02.jpg
Jpeg03.jpg
Jpeg04.jpg
Jpeg05.jpg
Jpeg06.jpg
Jpeg07.jpg
Jpeg09.jpg
Jpeg10.jpg
ile is highlighted
1. 007_7 [388K] 2. 008_8 [306K] 3. 009_9 [368K]
4. 010_10 [338K] 5. 011_11 [367K] 6. 012_12 [389K]
BASIC OPERATIONS
ADVANCED PLAYBACK
CD TRK 2 / 10 00 : 00 : 31
Current Track Number / Total Tracks
Current Repeat Mod
Off ;
rack Repeat ;
Repeat All ;
Elapsed Time of the Current Tim
r
SKIPH ] or
r
RETUR
RECORDING OPTIONAL SETTINGS TROUBLESHOOTING INFORMATION
File Nam
SKIPG ]to switch between pages
to go back to the File List
EN
• The current disc information will automatically
appear on the TV screen when a CD disc is inserted.
19
Page 20

RECORDING
1
G
e
e un
t
on ttuttu oto turn on the unit.
a
recordable tape.
a
en i
ns
ns
2
3
until “L1” or “L2” is displayed
until “L1” or “L2” is displayed
4
to select the desired tape speed.
to select the desired tape speed.
.
.
d
e
T60
0
T160
hour2hours
shours
k.
until desired
until desired
U
CR
TRAC
G
ess
to switch to the VCR mode.
to switch to the VCR mode.
6
7
to stop recording.
to stop recording.
8
to eject the recorded
to eject the recorded
C
asu
on
To p
l
-
.
5
nnot receive TV broadcas
This unit has
t
er system so it
ca
t
uner system so it ca
m
somso
i
ote:
.
e.
VCR features.
ect camcorders and other such devices to the
.
.
.
RECORDING
AS
N
Recording & OTR (One-touch Timer Recording)
1
4
ou can also set the external tuner for timer recording. Refer to “Satellite Link”
on page 22
ANNOT dub a DVD to a video cassette tape.
Do not change the external tuner’s channel while you are recording. You
CANNOT watch one channel and record another at the same tim
Para encender la unidad, pulse .
Luego inserte una cinta grabable.
Para cambiar al modo de VCR, pulse .
2
R
E
B
M
E
M
E
R
You need to press first
Pulse para seleccionar la velocidad deseada
de la cinta.
ape spee
pe of tape
P mode 1
LP mode
LP mode cannot be Recorded, LP mode can be Played bac
Recording / playback tim
T12
hourshour
3
P
2-2/3hours
Pulse hasta que se visualice “L1” o “L2” en la
pantalla de la TV. Seleccione “L1” para activar los
conectores posteriores de entrada. Seleccione “L2”
para activar los conectores frontales de entrada.
Connect your external tuner to the L1 (rear panel) jacks of the
nit. Conn
(front panel) jacks. Refer to pages 8, 9
I
TV
Before:Turn on the TV
this unit
REC
TIMER REC
REC
external tuner
TRACKING
KIN
L2
V
VCR
SO
E
Pulse hasta que se seleccione el
tiempo de duración de grabación
deseado.
REC OTR (0:30) OTR (1:00).....
(normal recording)
OTR (8:00) OTR (7:30)
6
20
Para detener la grabación temporalmente, pulse .
• During the recording in the pause mode, 5C marks appear on
he TV screen. Each Cmark represents 1 minute
ress again to resume recording.
• Pause mode will be automatically cancelled after 5 minutes to
prevent damage to the cassette tape and the video head
5
7
8
Pulse para detener la grabación.
Pulse
Accidental Er
revent accidenta
recording, remove erase
protection tab of the cassette
tape. To record again, cover
the hole with adhesive tape
How to set the timer recording or satellite link,
efer to pages 21-22
para expulsar el casete grabado.
re Preventi
erase-protection tab
Page 21

RECORDING
g
VHS
VHS
ess
/
select
t
.
8
E
2
B
S
CLOCK SET
T
ks
to select
.
–
,
t
.
B
CE
Y
Y
to select
.
O
M
–
U.
O
M
/
E
/
1
P
B
P
press
.
ess
dby
.
.
o
y.
To Check, Correct or Cancel a Timer Program
the
emote control.
.
Use
0
/
.
Then,
K
/
the correct numbers.
0
.
t.
dby
ode.
To Cancel a Timer Recording in Progress
ess
C
A
the unit.
R
b,
r
blink
f
.
gg
ll
.
f
.
After an OTR or a Timer Recording Has
Been Set, This Unit Operates as Follows:
ess
]
on the remote control o
C
A
on
activate the VC
.
dby
on remote control o
C
A
When an OTR or a Timer Recording is Completed.
h
dby
p
y
.
dby
.
e
.
ess
C
A
]
on the remote
use the VC
.
To Use the DVD Player During Timer
Recording or While the [TIMER REC]
Indicator is On or Blinking.
ess
the unit.
ess
on
ote Control to choose
ode.
th the othe
features as described
.
imer Recordin
VHS
VHS
VHS
Press first.
SETUP
r
1
Use
TIMER PROGRAMMING”.
Then, press
2
/
empty program number. Then,
to go to next step
3
/ to select “ONCE“
“DAILY“ (Mon-Fri), or “WEEKLY“.
Then, press
4
/
esired month. Then, press
to go to the next step
Then, repeat procedures above to select the day,
start time, end time, and “L1” or “L2” as well.
5
/ to select recording
speed. Then, press to remove
MEN
To set another program after step5,
Then, repeat procedures from steps 2through
5
ou can program the unit to record up to 8
programs, and up to 1 year in advance
r
6
to set the timer stan
The
TIMER REC] indicatoron this unit lights up
and the unit goes to the DVD mode
To go back one step, press0 during steps3 t
elect “L1” or “L2” to activate rear input jacks or
ront input jacks accordingl
to
o go to next step
- M E N U -
TIMER PROGRAMMING
ATELLITE LINK
AUTO REPEAT [OFF]
LANGUAGE SELEC
o go to next step
TIMER PROGRAMMING
PROG. 1234567
DAT
START TIME
END TIME
L1/L
REC SPEED
Available program
number
PROGRAM NUMBER 1
DATE – – / –
START TIME – – : – – – –
END TIME – – : – – – –
L1/L2 – –
REC SPEED – –
PROGRAM NUMBER 1
DAIL
WEEKL
NE TIME PROGRA
PROGRAM NUMBER 1
DATE 1 0 / 0 2 TUE
START TIME – – : – – – –
END TIME – – : – – –
L1/L2 – –
REC SPEED – –
NE TIME PROGRA
PROGRAM NUMBER 1
DATE 1 0
START TIME 0 7 : 3 0 PM
END TIME 0 8 : 3 0 PM
L1
L2 L
REC SPEED S
SL
mode
PRECAUTIONS PREPARATION ADVANCED PLAYBACKBASIC OPERATIONS
To Check, Correct or Cancel a Timer Program
TIMER SET], and then press
VCR ] on
r
2) Repeat procedures in step 1 above.
3) UseK / L to select the program number you want
to check. The details of the program you select will
appear on the TV screen
1 to go to the digit you want to change
use
L to enter
You can cancel the entire program by pressing
while the program number blinks
Press
in
5) Press
CLEAR] to exi
TIMER SET]to return to the timer stan
m
To Cancel a Timer Recording in Progress
r
on
Note for Timer Recording & OT
N
0 2 TU
5
If a power failure occurs or the cassette tape does not
ave the erase-protection ta
TIMER REC] indicato
cannot be per
ormed
s and timer recording
• If there is a power failure occurred or the unit is
unplu
a
ed for more than 30 seconds, clock setting and
programmed timer recordings will be lost
If a cassette tape runs out before an OTR or a timer
recording is
After an OTR or a Timer Recording Has
Been Set, This Unit Operates as Follows:
r
the unit, then press
inished, the unit ejects the cassette tape
TIMER SET
VCR ] to
r
R
unction again
To cancel the timer stan
mode, press
r
on the unit, then press
TIMER SET]
VCR] to activate the VCR function again.
When an OTR or a Timer Recording is Completed.
If timer programs are left on the VCR, the unit will switch
to t
e DVD mode and then the VCR will go stan
or the next timer recording. (All the VCR functions will
be unavailable.) If auto
however, both DVD and VCR will go to standb
ower off has been in effect,
mode
ll the DVD functions are available while the VCR is in
OTR, Timer stan
, or Timer Recording mode
TheTIMER REC] indicator blinks if there are no mor
timer programs
r
ntrol to
To Use the DVD Player During Timer
Recording or While the [TIMER REC]
Indicator is On or Blinking.
•
r
he Rem
wi
POWER
n this unit or
TIMER SET
R when the unit is turned off
to turn On
DVD m
r DVD
Pr
DVD ]
Then continue
in this manual
RECORDING
OPTIONAL SETTINGS
TROUBLESHOOTING INFORMATION
21
Page 22

RECORDING
k
f
.
:
y
.
f
g
y
y
.
.
VHS
VHS
ess
select the desired
d.
.
B
K
]
T
to select the
to
K
M
the
ute
ell.
ected fro
.
ess
set satellite
link
dby
.
K
PM
]
ust be turned O
start.
set
dby
.
To Cancel the Satellite Link on Standby:
r
C
A
on this unit.
To Cancel the Satellite Link in Progress:
ess
C
A
t.
:
k.
.
)
In case of the satellite link is overlapped on the exist-
ing timer recording.
g
ecord
l
)
In case of the timer recording is programmed in the
middle of the satellite link.
g
g
ecord
l
k
e
.
VHS
VHS
)
]
on the remote control to select
.
hichever Jack the external device is connected to.
ce.
C
A
.
.
.
Satellite Lin
You can set the unit to start recording whenever it detects
a video signal
reparing for the Satellite Link
Only L1 (rear) is available for satellite link and be sure
that this L1 needs to be connected b
The external tuner should be equipped with some kind
o
timer function. Using timer function of the tuner, set it
to the output audio/video si
time
when it comes to the time
Refer to the tuner’s manual on how to set the timer
VHS
VHS
VHS
Press first.
r
1
ape spee
In the stop mode, press
2
se / to select
3
“SATELLITE LINK”. Then, press
4
esired hour. Then, press
go to the next step.
Then, repeat procedures above to
The hour can be sel
M
When the external tuner signal is stopped,
recording will be stopped.
r
5
TIMER REC] indicator: lights up and the unit
goes to the DVD mode. If you do not use DVD
unction, turn OFF the unit.
n external tuner m
o output signals, satellite link will remain in
tan
rom the external tuner
the external tuner
nals when it comes to the
ou want to start recording, and stop those signals
ou want to finish recording
L1
VCR
DVD VCR
COMPONENT
DIGITAL
VIDEO OUT
AUDIO OUT
AUDIO OUT
L
COAXIAL
R
to
DVD/VCR
AUDIO OUT
AUDIO IN
L
Y
AUDIO IN
R
CB
VIDEO IN
VIDEO OUT
CR
To video out jack
VIDEO IN
To audio(L)out jack
RCA audio/video cables
SETUP
external tuner
P
- M E N U -
TIMER PROGRAMMING
SATELLITE LIN
AUTO REPEAT [OFF
CLOCK SET
LANGUAGE SELEC
to go to the next step
/
min
as w
ATELLITE LIN
0 1 : 0 0 P
m 1-12 with AM or
to
stan
mode
ATELLITE LIN
1 : 3 0
N
N for
llite link to
If external tuner is not
mode
To Cancel the Satellite Link on Standby:
ress
TIMER SET] on the remote control o
To Cancel the Satellite Link in Progress:
r
ote
on this uni
Recording picture will be distorted if the copy
protection signal is being detected during satellite
in
When the timer recording and the satellite link
are overlapped, those recordings are recorded as
llustrated below
e.g.
imer r
recording resu
e.g.
timer recording
ecording result
e.g.) In case of the timer recording is overlapped on the
existing satellite link.
imer r
recording resu
llite
llite
ite
in
ink
in
in
ubbing a Cassette Tap
Warning: Unauthorized recordings of copyrighted
assette tapes may be an infringement of
opyright laws.
front of the unit
output jacks of
external device
or
You can use a video disc player, cable/satellite box or
other devices with Audio/Video output jacks
VHS
VHS
VHS
1
Press [SPEED
recording speed (SP or SLP)
2) Press
w
3) Press
) To stop recording, press
5) Stop playback of the external device
VIDEO OUT
RCA video cable
AUDIO OUT
L
R
RCA audio cable
L2
Press first.
INPUT] on the remote control to select L1 or L2
REC]on the unit, and then start playback of the
xternal devi
on this unit
For best results during dubbing, use buttons on this
unit whenever possible. The remote control might
affect another device’s operation
AUDIOVIDEO
22
Page 23

OPTIONAL SETTINGS
.
.
000
/
/
1
to select a setup item.
to select a setup item.
LLL
to access the highlighted item.
to access the highlighted item.
KLL
to go up or down in the menu list.
to go up or down in the menu list.
to access the sub contents.
to access the sub contents.
KLL
to select a setting.
to select a setting.
to enter.
to enter.
to exit
to exit
.
ff.
S
TV Aspect
Scan
etterbox
descreen
e
.
.
j
.
pp
TV screen.
ect
descree
de-
ected to this unit.
p
g
]
]
] [PG]
]
]7 [
]
]
.
.
use.
b
d.
assword
.
.
TV Aspect
Movie Rating
Password
Default
-
- - -
.
ess curso
1
.
]
p
)
TV Aspect
Movie Rating
Password
Default
-
- - -
.
ess curso
b
1
ess curso
ect number.
]
p
d.
f
k.
This function is available only when
efaultre
g.
y
the menu at
u
ts
st
u
u
u
OPTIONAL SETTINGS
Changing the DVD Settings (in the setup menu)
In the setup menu, you can customize the various kinds of settings as you prefer
Refer to the following instructions to navigate through the setup menus
1
2
3
4
ANGUAGE Men
YSTEM Men
TV Aspect
Movie Rating
Password
Default
AUDIO Men
VIDEO Men
4:3 Pan & Scan
4:3 Letterbox
16:9 Widescreen
16:9 Squeeze
5
6
7
nu li
conten
8
The following table is the contents which you can set and the default settings. Refer to the table for useful operation
our change to each setting stays activated even when the unit is turned o
Setup menu (highlight is the default)
Pan &
L
16:9 Wi
6:9 Squeez
ovie Ratin
P
TEM
Y
[ALL
2 [NR
3 [G
5 [PG-13
6 [R
NC-17
[X-Adult
Contents Notes
Sets the aspect ratio of the playback image to
it your TV
See the note on the right
Sets the rating level for the disc playback
Rating settings allows you to set the rating
evels of your DVD
Playback will stop if the ratings exceed the
evels you set.
Sets the password for “Movie Rating” and
“Default” settings
– For the first time use
Enter any 4-digit number(except for 4737)
r
number, then press cursor
ress0] to erase if you input the incorrect
number
When 4-digit numbers are entered, press
ENTER
r
K or L to change the
Select “4:3 Pan & Scan” for a full height
picture with both sides ad
Select “4:3 Letterbox”, black bars may
a
l
reen TV is conn
Select “16:9 Squeeze” to display 4:3
as
creen when playing back 4:3 images.
The rating level can be changed when
a password has not been set yet for
he first time
f you have set a password already,
“Movie Rating“ cannot
you forget the password, enter
4737“ at ste
asswor
Playback will stop if the ratings exceed
the levels you set, it will require you to
enter a password be
play bac
usted
ear on the top and bottom of the
“16:9 Wi
ect ratio in the center of the 16:9
is displayed.
n” if a wi
e selecte
, then enter your new
6
ore the disc will
PRECAUTIONS PREPARATION ADVANCED PLAYBACKBASIC OPERATIONS RECORDING
OPTIONAL SETTINGS
TROUBLESHOOTING
D
is displayed.
Enter your 4-digit password
r
num
Pr
incorr
When 4-digit numbers are entered, press
ENTER
Reset to default settin
r
K or L to change the
er, then press cursor
r 0 to erase if you input the
INFORMATION
“Default“ is not selected if you have set
a password alread
When you do not wish to initialize,
SETUP] to exit
tep
7
.
23
Page 24

N
OPTIONAL SETTINGS
U
E
u
h
is
l
y.
o
h
ch
h
.
th some discs.
selected.
scs. If
select the
.
tle
f
h
ch
h
.
scs.
selected.
scs. If
]
to select
he d
.
u
h
ch
h
.
scs.
selected.
U
O
Out
tstreem
CM
tstrea
the unit is connected
lby
.
tstream:
lby
.
:
lby
l).
tstream:
lby
.
:
lby
lby
eed
set this unit to
tstrea
the
Out
also need
l.
n
Audi
AG
i
LANG
VD Men
Audio
DI
A
namic Range
nglis
rança
spaño
nglis
Fren
Spanis
f
Englis
Fren
Spanis
nglis
Fren
Spanis
i
P
ets the Language for the On-screen Displa
Sets the Audio Language
Sets the Subtitle Language
Sets the Language in DVD Menu
to “Bi
to a Do
– Bi
outputs a Do
– PCM
convert the Do
channe
Adjusts for Clarity even when the Volume is
ow, by Compressing the Range of the lowest
sound level and the highest sound leve
m” when
Digital decoder
Digital signals
Digital into PCM (2
•
anguage options are not available
wi
nly the Languages supported by the
isc can be
“LANGUAGE” setting for “Audio”
re not available with some di
Multiple Languages are available on
isc, then select
esired Language
anguage options are not available
with some di
nly the Languages supported by the
isc can be
“LANGUAGE” setting for “Subtitle”
re not available with some di
Multiple Languages are available on
isc, then select [SUBTITLE
esired Language
t
anguage options are not available
with some di
nly the Languages supported by the
isc can be
– Bi
onnecting to a Do
or Dolby Digital Audio output
– PCM
onnecting to another device (an MD
eck or DAT deck etc.) without a Do
Digital Decoder.
onvert the Do
channel).
This unit does not support DTS audio.
This is not a malfunction. You n
“Audio
to Connect to a TV or Amplifier that
supports DTS, then the audio will be
output as DTS.
t is only available when connected via
the Coaxial jack.
AUDIO] to
Digital decoder
Digital into LPCM (2
“Bi
“ Menu and
m” in
24
E
Page 25

N
OPTIONAL SETTINGS
O
s
0
.
f
ode.
.
ast
0
.
Colo
0
dj
t
harp
s
dj
.
PRECAUTIONS PREPARATION ADVANCED PLAYBACKBASIC OPERATIONS RECORDING
Set Brightnes
Contr
VIDE
Tin
Set S
1
Adjusts the Brightness
The Settings will remain effective even
i
the unit is switched into the Standby
m
The effect of Picture Adjustment may
differ depending on the connected TV
12
Adjusts the Contrast
1
r
usts the Color Saturation.
A
1
Adjusts the Color Tone.
nes
usts the Sharpness
A
E
OPTIONAL SETTINGS
TROUBLESHOOTING
INFORMATION
25
Page 26

N
TROUBLESHOOTING
:
.
.
.
Th
ote control.
.
.
.
.
.
sc.
]
on the remote
tch the mode.
T
dly
.
.
T
g.
d
.
T
.
y.
]
ly.
.
ate this unit
ode.
ess
the remote control so that the
]
ate.
lly
y.
L
.
.
.
L
deo or color fades
out
.
.
.
.
.
ess
ote control. Chec
features.
k.
the disc.
the disc.
.
.
ace.
sound.
y.
T
.
T
.
Th
eed to set this unit to
tstrea
Out
also need to connect
y
k.
.
.
T
.
.
g.
T
.
T
h
T
.
ged.
Th
.
Th
.
.
.
.
TROUBLESHOOTING
Troubleshooting Guide
If this unit does not perform properly when operated as instructed in this manual. Refer to the following
Symptom Remedy
No power
is unit does not respond to the
rem
DVD • VCR
oor picture or noise
Cannot remove the cassette tape or
i
Cannot record a TV program
imer recording is impossible
Cannot go into record mode.
VCR
Playback picture is partia
Cannot view a picture but the audio
is OK
No or poor, playback picture
Vi
making a copy of a cassette tape
No picture and sound.
No picture
Disc cannot be played bac
No
No DTS audio is output
DVD
Distorted picture
Audio or subtitle language does not
match the settin
he camera angle cannot be
anged.
c
Audio or subtitle language
cannot be chan
“INVALID ENTRY” appears on the TV
screen, prohibiting an operation
in and
nois
when
ake sure the power plug is connected to an AC outlet
ake sure the power is turned on
Check if the power plug is connected to an AC outlet
You have to be within 23 feet (7m) of this unit
Check if a cassette tape or disc is in this unit.
ake sure nothing is blocking the unit’s IR receiver window.
Inspect and/or replace the batteries in the remote control.
Check if the Remote Control is sending out an IR signal, refer to page 27
Interference signal may be received. Change the position and direction of the unit
Check if this unit is in the DVD or VCR mode. If not, press
ntrol to swi
urn Power Off. Turn Power back On and immediately press the DVD or VCR Eject Button
repeate
his unit does not have a tuner to receive TV broadcastin
You must connect this unit to TV with audio/video output jacks or an external tuner to
record TV programs. Refer to “Recording & OTR (One -touch Timer Recording)” on page 20
an
Activ
indicator will illumin
Adjust tracking control for a better picture by pressing [TRACKINGK /
Head cleaning may be necessary. Refer to “Auto Head Cleaning” (page 27)
Adjust tracking control for a better picture by pressing
Connect the video cable firmly.
You cannot copy a copyrighted cassette tape
Please confirm to connect to DVD / VCR AUDIO OUT and DVD / VCR VIDEO OUT
Connect the video cable firmly.
Insert a correct video disc that can be played back on this unit
r
Insert
Place the disc correctly with the label side up
Change the movie rating, refer to page 23
Handle a disc with special care so that it does not have fingerprints, scratches, or dusts on
its surf
Connect the audio cables firml
urn on the power of the audio component.
• Correct the audio output settings
Correct the input settings on the audio component.
urn up Sound on TV or remove Mute function from the TV.
You n
to the TV or amplifier that supports DTS, then the audio will be output as DTS. It is onl
available when connected via coaxial jac
Connect this unit directly to the TV
here are some cases where pictures may be slightly distorted, and those are not a sign of
malfunction
• Although pictures may stop for a moment, this is not a malfunction
he selected language is not available for audio or subtitles on the DVD
he DVD does not always contain sequences recorded from different camera angles
•The operation is prohibited by this unit or the disc
to Eject the Disc or Cassette
“Satellite Link” on page 22
ake sure the timer program is set correctl
ke sure [TIMER REC] indicator on this unit lights up. If not, press
ake sure the VCR clock is set correct
ake sure the cassette tape has a record tab. If needed, cover the hole with tape
DVD ] on the rem
her DVD
n
is unit does not support DTS audio.
e DVD does not always contain audio source or subtitles in the selected language
e DVD Audio or subtitle language may only be changed using the disc Menu.
in VCR m
“Bi
Pr
m” in “Audio
VCR] on
k if the
DVD] orVCR
TIMER SET
TRACKINGK /
DVD] indicator will illuminate. Then try
“ Menu and
VCR
Some functions are not available in specific modes, but this is not a malfunction. Read the description in this manual
or details on correct operations
Some functions are prohibited on some discs
26
E
Page 27

N
Servicing
g
y y
ff
f
ual to locate an autho
.
Cleaning the Cabinet
soft cloth.
h
y
it.
Cleaning Discs
p
a circula
.
y
y
.
Cleaning the Disc Lens
g
k
f
he l
.
Disc Handling
touch the surface of the disc.
.
y
ly.
Auto Head Cleaning
lly cl
y
.
h
f
f
ky
d
d.
d
.
ocate an autho
ed
ice center.
deo head
before use.
.
IR Signal Check
g
gnal
f
alfunction.
g
:
f
g.
olor
ads :
d
:
)
:
)
.
)
:
)
:
3
)
)
)
l dig
)
s
)
s
:
m
)
:
%
:
(
)
sions :
)
)
)
:
kg)
.
h.
Maintenance
INFORMATION
INFORMATION
PRECAUTIONS PREPARATION ADVANCED PLAYBACKBASIC OPERATIONS RECORDING OPTIONAL SETTINGS
Servicing
Please refer to relevant topics on the “Troubleshootin
Guide” on page 26 before returning the product.
f this unit becomes inoperative, do not try to correct the
problem b
inside. Turn o
our toll
is man
Cleaning the Cabinet
Wipe the front panel and other exterior surfaces of the
nit with a
Never use a solvent, thinner, benzene or alcohol to clean
t
e unit. Do not spray insecticide liquid near the unit.
Such chemicals ma
n
Cleaning Discs
When a disc becomes dirty, clean it with a cleaning
cloth. Wi
in
Do not use solvents such as benzine, thinner, commerciall
available cleaners, detergent, abrasive cleaning agents or
antistatic spra
Cleaning the Disc Lens
this unit continues to perform improperly even after
ou have referred to the relevant sections and to the
“Troubleshootin
pic
up unit may be dirty. Consult your dealer or an
authorized service center
t
aser optical pickup unit
Disc Handling
When you handle a disc, hold it by its edge and try not
Always store the disc in its protective case when not in use
Do not glue paper or put stickers onto the disc. This ma
amage the disc, and the unit may not read it correct
ourself. There are no user-serviceable parts
, unplug the power plug, and please call
ree customer support line found on the cover of
rized service center
discolor the surface or damage the
e the disc from the center to out. Do not wipe
r motion
intended for analog records
Guide” in this manual, the laser optical
or inspection and cleaning of
Auto Head Cleaning
Automatica
remove a cassette tape, so
If the playback picture is blurred or interrupted while
t
e TV broadcast is showing clear, the dirt may have
accumulated on the video heads, or the usage o
or worn cassette tapes can cause this problem. I
strea
or snowy picture appears during playback, the
vi
eo heads in your unit may need to be cleane
1. Please visit your local audio/video store and purchase
a goo
2. If a Video head cleaner does not solve the problem,
lease call our toll free customer support line found
n the cover of this manual to l
rv
IR Signal Check
If the remote control does not work properly, you can
test if the remote control is sendin
si
with a digital camera (including built-in camera
o
cellular phone). It will help to define the cause of
m
With a digital camera
(includin
Direct a digital camera to remote control,
ress and hold a button on remote control.
I
infrared light appears through digital
camera, the remote control is workin
eans video heads as you insert or
ou can see a clear picture
rental
a
quality VHS video head cleaner
riz
Remember to read the instructions along with the
vi
ean video heads only when problems occur
built-in camera of cellular phone)
cleaner
out the infrared
Specifications
Output signal format :NTSC c
Video he
Tape width
Tape speeds
Disc media size
Terminals
Component video output :RCA jack x
Video output : RCA jack x 1 1 Vp-p (75 Ω)
Coaxia
Audio output : RCA jack x 4 2 V rm
Video input : RCA jack x 2 1 Vp-p (75 Ω
Audio input : RCA jack x 2 2 V rm
E
ital audio output : RCA jack x 1 500 mVp-p (75 Ω
Rotary four-hea
1/2 inch (12.65 mm
P : 1-5/16 inch/sec. (33.40 mm/sec.
LP : 16.67 mm/sec
LP : 7/16 inch/sec. (11.12 mm/sec.
5 inches (12 cm) / 3 inches (8 cm
Y : 1 Vp-p (75 Ω
Pb : 700 mVp-p (75 Ω
r :700 mVp-p (75 Ω
Remote control
Operating temperature :41 °F (5 °C) to 104 °F (40 °C
Power requirements
Power consumption (maximum)
Dimen
Weight
• Designs and specifications are subject to change without notice
• If there is a discrepancy between languages, the default language will
e Englis
Digital encoded infrared light syste
20 V AC +/- 10 %, 60 Hz +/- 0.5
6 W
: 17 3/16” (435 mm
: 3 3/4” (94 mm
: 9 3/16” (233 mm
Approx. 5.63 lbs
standby : 2.8 W
2.55
TROUBLESHOOTING
INFORMATION
27
Page 28

8R6AUH
ted
LIMITED WARRANTY
NINETY (90) DAY LABOR / ONE (1) YEAR PARTS
WARRANTY COVERAGE:
This warranty obligation is limited to the terms as set forth
below.
WHO IS COVERED:
This product warranty is issued to the original purchaser or the
person receiving the product as a gift against defects in materials
and workmanship as based on the date of original purchase
(“Warranty Period”) from an Authorized Dealer. The original
sales receipt showing the product name and the purchase date
from an authorized retailer is considered such proof.
WHAT IS COVERED:
This warranty covers new products if a defect in material or
workmanship occurs and a valid claim is received within the
Warranty Period. At its option, the company will either (1)
repair the product at no charge, using new or refurbished
replacement parts, or (2) exchange the product with a product
that is new or which has been manufactured from new, or serviceable used parts and is at least functionally equivalent or most
comparable to the original product in current inventory, or (3)
refund the original purchase price of the product.
Replacement products or parts provided under this warranty are
covered against defects in materials and workmanship from the
date of the replacement or repair for ninety (90) days or for the
remaining portion of the original product’s warranty, whichever
provides longer coverage
exchanged, any replacement item becomes your property and the
replaced item becomes company property. When a refund is
given, your product becomes company property.
Note: Any product sold and identified as refurbished or
renewed carries a ninety (90) day limited warranty.
Replacement product can only be sent if all warranty
requirements are met. Failure to follow all requirements
can result in delay.
WHAT IS NOT COVERED - EXCLUSIONS AND LIMITATIONS:
This Limited Warranty applies only to new company manufactured products that can be identified by the trademark, trade
name, or logo affixed to it. This Limited Warranty does not apply
to any hardware product or any software, even if packaged or
sold with the product, as manufacturers, suppliers, or publishers
may provide a separate warranty for their own products packaged with the bundled product.
for you. When a product or part is
or a part that has been modified without written company permission, or (d) if any serial number has been removed or defaced,
or (e) product, accessories or consumables sold “AS IS” without
warranty of any kind by including refurbished product sold “AS
IS” by some retailers.
This Limited Warranty does not cover:
Shipping charges to return defective product.
Labor charges for installation or setup of the product, adjustment of customer controls on the product, and installation or
repair of antenna/signal source systems outside of the product.
Product repair and/or part replacement because of improper
installation or maintenance, connections to improper voltage
supply, power line surge, lightning damage, retained images or
screen markings resulting from viewing fixed stationary content for extended periods, product cosmetic appearance items
due to normal wear and tear, unauthorized repair or other
cause not within the control of the company.
Damage or claims for products not being available for use, or
for lost data or lost software.
Damage from mishandled shipments or transit accidents when
returning product.
A product that requires modification or adaptation to enable
it to
operate in any country other than the country for which
it was designed, manufactured, approved and/or authorized, or
repair of products damaged by these modifications.
A product used for commercial or institutional purposes
(including but not limited to rental purposes).
Product lost in shipment and no signature verification receipt
can be provided.
Failure to operate per Owner’s Manual.
TO OBTAIN ASSISTANCE…
Contact the Customer Care Center at:
REPAIR OR REPLACEMENT AS PROVIDED UNDER THIS
WARRANTY IS THE EXCLUSIVE REMEDY FOR THE CONSUMER, WITH THE ISSUING COMPANY NOT LIABLE FOR
ANY INCIDENTAL OR CONSEQUENTIAL DAMAGES FOR
BREACH OF ANY EXPRESS OR IMPLIED WARRANTY ON
THIS PRODUCT. EXCEPT TO THE EXTENT PROHIBITED BY
APPLICABLE LAW, ANY IMPLIED WARRANTY OF MERCHANTABILITY OR FITNESS FOR A PARTICULAR PURPOSE
ON THIS PRODUCT IS LIMITED IN DURATION TO THE
DURATION OF THIS WARRANTY.
1 877 393 8624
The company is not liable for any damage to or loss of any programs, data, or other information stored on any media contained
within the product, or other additional product or part not covered by this warranty. Recovery or reinstallation of programs,
data or other information is not covered under this Limited
Warranty.
This warranty does not apply (a) to damage caused by accident,
abuse, misuse,
(b) to damage caused by service performed by anyone other than
company approved Authorized Service Location, (c) to a product
neglect, misapplication, or non-supplied product,
This warranty gives you specific legal rights. You may have other rights which vary from state/province to state/province.
FUNAI CORPORATION, Inc. 19900 Van Ness Avenue, Torrance, CA 90501
E
2VMN00176
Prin
in China
Some states do not allow the exclusions or limitation of incidental or consequential damages, or allow limitations on how long an
implied warranty lasts, so the above limitations or exclusions may
not apply to you.
 Loading...