

Page 1

46FD753P
39FL753P
32FL553P / 32FL553
29FL553P / 29FL553
24FL553P / 24FL553
LED LCD HD Television
Instruction Manual
English
Page 2

Contents
UNIT INFORMATION ...................................2
Trademark Information ..............................2
Servicing.................................................... 2
Cabinet Cleaning.......................................2
Panel Cleaning ..........................................2
Remote Control .........................................3
Control panel ............................................. 4
Terminal ....................................................5
INITIAL SETUP ............................................6
OPERATIONS ..............................................7
Watching a TV Programme .......................7
Favourite ...................................................7
EPG(Electronic Programme Guide) .......... 7
Sleep Timer ............................................... 8
Sound Select .............................................8
Subtitle Settings ........................................8
Teletext Settings........................................8
Switching the Input Source Mode.............. 9
SmartConnect ...........................................9
Recording ................................................ 10
Photo / Music / Video Playback...............11
OTHER SETTINGS ....................................15
Channel Settings .....................................15
PC Settings .............................................18
Picture Adjustment ..................................18
Sound Adjustment ...................................19
Time Settings ..........................................20
Lock Settings...........................................21
Setup Adjustment ....................................23
Hotel Mode Settings ................................26
TROUBLESHOOTING GUIDE...................28
SPECIFICATIONS......................................30
Input Resolution ......................................32
Multimedia Format...................................32
UNIT INFORMATION
Trademark Information
• Manufactured under license from Dolby Laboratories.
Dolby and the double-D symbol are trademarks of
Dolby Laboratories.
• The terms HDMI and HDMI High-Definition
Multimedia Interface, and the HDMI Logo are
trademarks or registered trademarks of HDMI
Licensing LLC in the United States and other
countries.
• DVB is a registered trademark of the DVB Project.
• The “HD TV” Logo is a trademark of
DIGITALEUROPE.
Servicing
• Should your unit become inoperative, do not try to
correct the problem by yourself. There are no userserviceable parts inside. Take the unit to a Service
Centre for servicing.
Cabinet Cleaning
• Gently wipe the front panel and other exterior
surfaces of the unit with a soft cloth.
• Never use a solvent or alcohol. Do not spray
insecticide liquid near the unit. Such chemicals may
cause damage and discoloration to the exposed
surfaces.
Panel Cleaning
• If the LCD panel should require cleaning, wipe it with
a cotton or soft cloth. Before cleaning the panel,
disconnect the power cord.
EN
2
Page 3

Remote Control
1
2
3
4
5
6
7
8
9
10
11
12
1. (Power)
Turn the unit on and go into the standby mode.
2. SLEEP
Refer to “Sleep Timer” (p. 8).
3. Number buttons
Select the desired channel in TV mode and enters
the password in the PIN code input field.
4. EXIT
Returns to the previous display.
5. Ÿ / ź / Ż / Ź (Cursor)
6. OK
7. MENU
Displays the menu.
8. AUDIO
Select audio language/ mode.
Refer to “Sound Select” (p. 8).
9. /
Adjust the audio volume.
Refer to “To adjust the volume” (p. 7).
13
14
15
16
17
18
19
20
21
22
23
10. (Mute)
Turn off the sound.
Refer to “To adjust the volume” (p. 7).
11. RED / GREEN / YELLOW / BLUE
Use for “EPG(Electronic Programme Guide)”
(p. 7) / “[Programme Edit]” (p. 16)
12. DISPLAY
Displays the channel number or input source.
13. SOURCE
Switch the input source mode.
Refer to “Switching the Input Source Mode” (p. 9).
14. PICTURE MODE
Change the picture mode.
Refer to “[Picture Mode]” (p. 18).
15. SOUND MODE
Change the sound mode.
Refer to “[Sound Mode]” (p. 19).
16. FAV / FAV
Use for “Favourite” (p. 7).
17. FAV
Use for “Favourite” (p. 7).
18. EPG
Use for “EPG(Electronic Programme Guide)”
(p. 7).
19.
Select a channel.
Refer to “To select a channel” (p. 7).
20. (Play / Pause) / (Skip backward) /
(Skip forward) / (Stop) / (Rewind) /
(Fast-forward)
Use for “Recording” (p. 10) / “Photo / Music /
Video Playback” (p. 11).
21. REC (Record)
Use for “Recording” (p. 10).
22. (Subtitle)
Displays the subtitle list.
Refer to “Subtitle Settings” (p. 8).
23. (Expand) / (Subpage) / (Hold) /
(Text) / (Reveal) / (Index)
Use for “Teletext Settings” (p. 8).
.
EN
3
Page 4
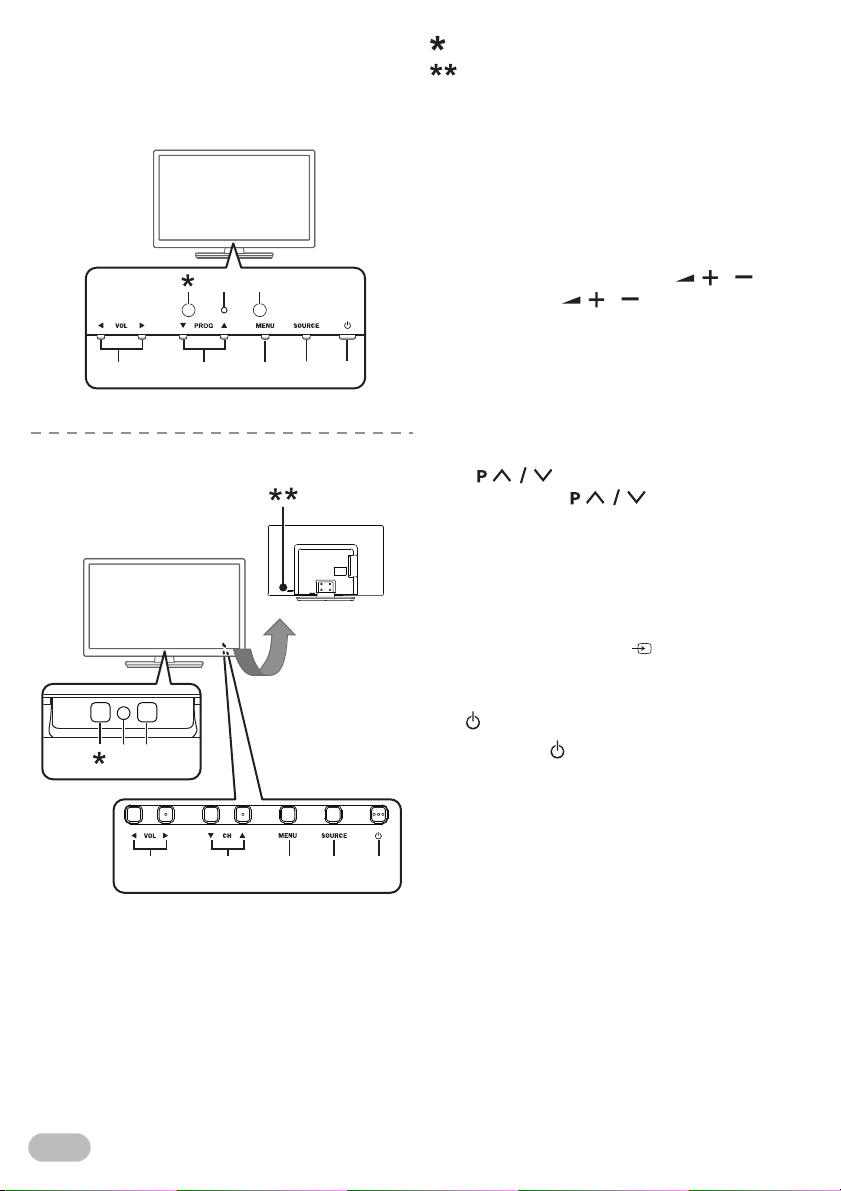
Control panel
21
76543
76543
2
1
39FL753P/32FL553P/32FL553/
29FL553P/29FL553/24FL553P/24FL553
46FD753P
This window has no function.
Keys on Rear.
Control Keys are located on the Rear side of the
TV.
1. Standby / Power indicator
(Power on : no light, Standby : red)
2. Infrared sensor window
Receive the infrared rays transmitted from the
remote control.
3. VOL Ż / Ź
• Watching TV, VOL Ż / Ź on the front panel
works the same function as / .
Refer to “9. / ” (p. 3).
• On the menu, VOL Ż / Ź on the front panel
works the same function as Ż / Ź (cursor).
4. CH Ÿ / ź (46FD753P)
PROG Ÿ / ź (39FL753P/32FL553P/32FL553/
29FL553P/29FL553/24FL553P/24FL553)
• Watching TV, PROG Ÿ / ź and CH Ÿ / ź on
the front panel works the same function as
.
Refer to “19. ” (p. 3).
• On the menu, PROG Ÿ / ź and CH Ÿ / ź on
the front panel works the same function as Ÿ /
ź (cursor).
5. MENU
Refer to “7. MENU” (p. 3).
6. SOURCE
Refer to “13. SOURCE ” (p. 3).
• On the menu, SOURCE on the front panel
works the same function as OK.
7. (Power)
Refer to “1. (Power)” (p. 3).
EN
4
Page 5
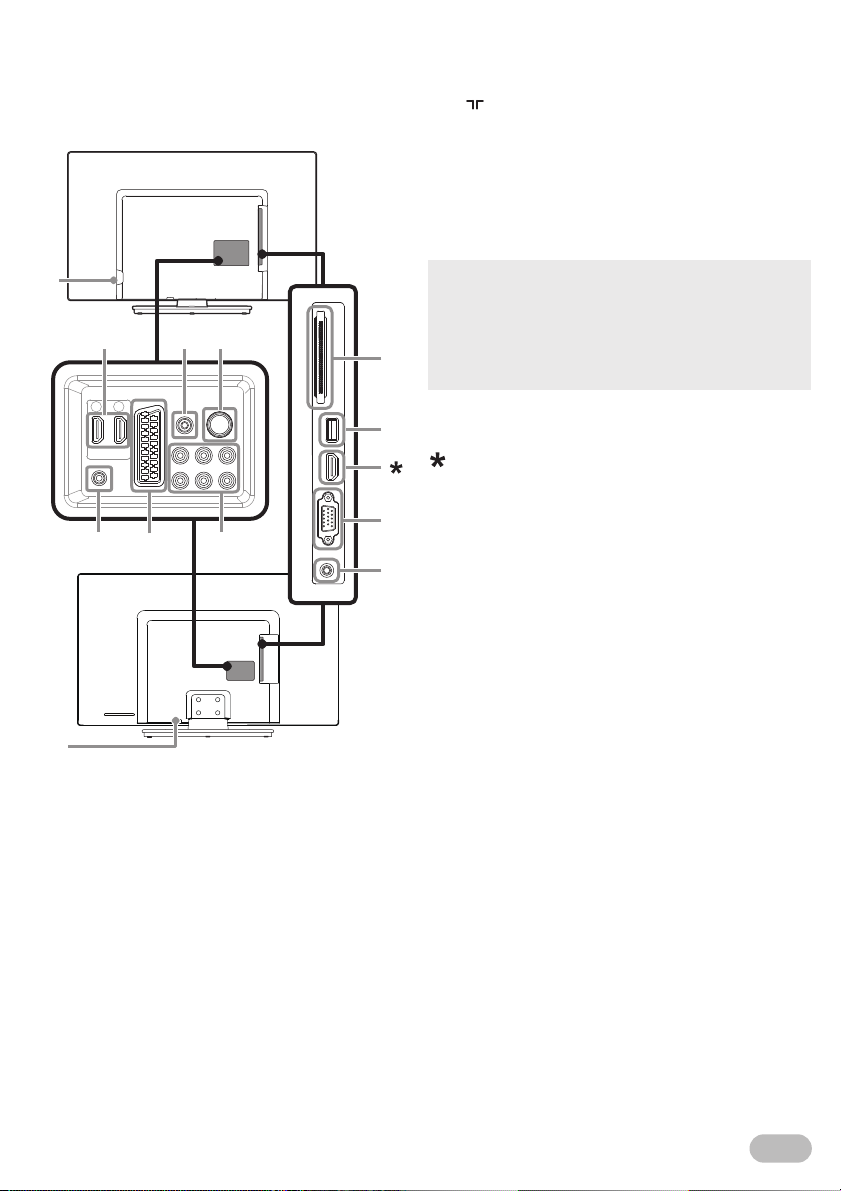
Terminal
1
1
4
3
2
765
11
10
9
8
39FL753P/32FL553P/32FL553/
29FL553P/29FL553/24FL553P/24FL553
46FD753P
1. AC power cord inlet
2. HDMI (HDMI 1 / HDMI 2) input jacks
3. Coaxial digital audio output jack
4. (Aerial) input jack
5. Headphone audio output jack
6. SCART jack
7. Component video, Composite video and
Audio (L/R) input jacks
8. CI slot
9. USB terminal (p. 10, 11)
• Data input from USB flash memory only.
• User should not connect any devices to the USB terminal
such as digital camera, keyboard, mouse, etc. (because
these will not work.)
• The software update is, in most cases, handled by an
authorised service person or in some circumstances the
user may be asked to do the software update themselves.
10. PC (VGA) input jack
11. Audio input jack for PC connection
HDMI (HDMI 3) input jack for MHL function
P series only - (46FD753P/39FL753P/32FL553P/
29FL553P/24FL553P)
5
EN
Page 6
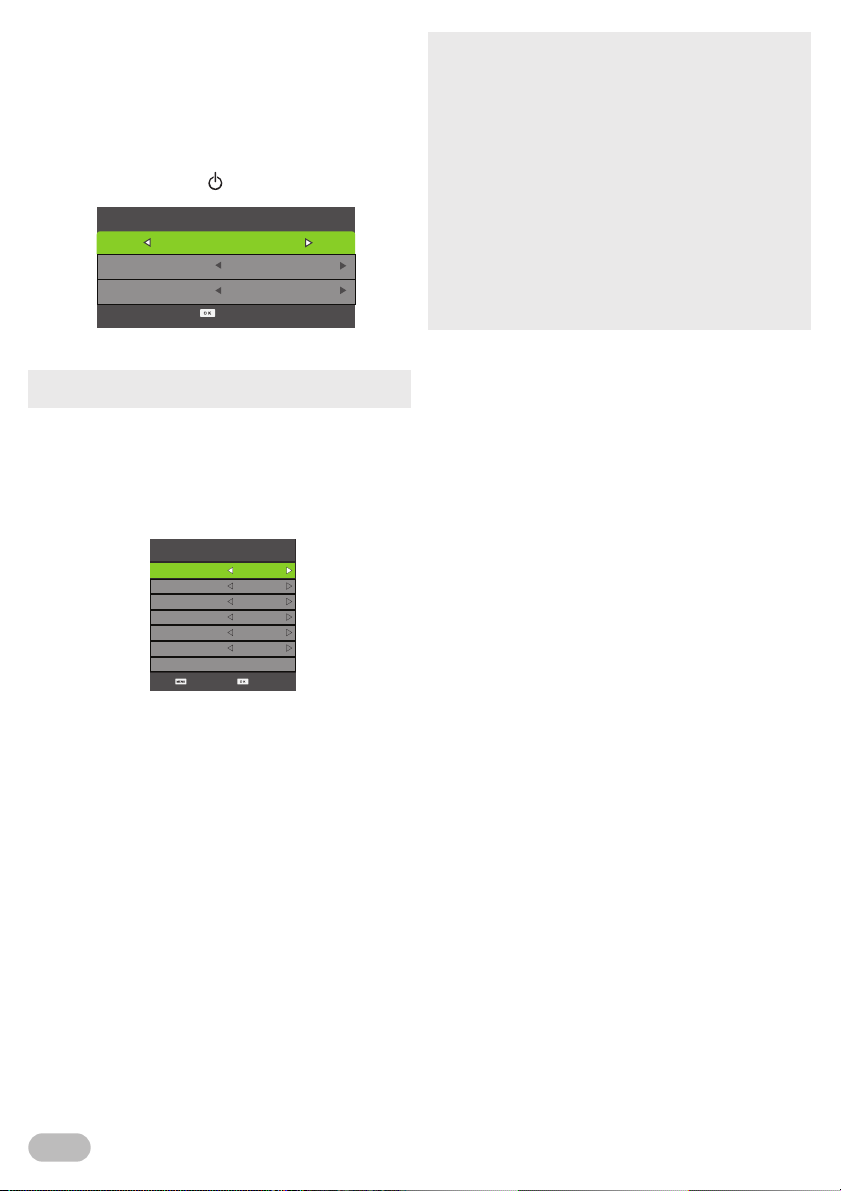
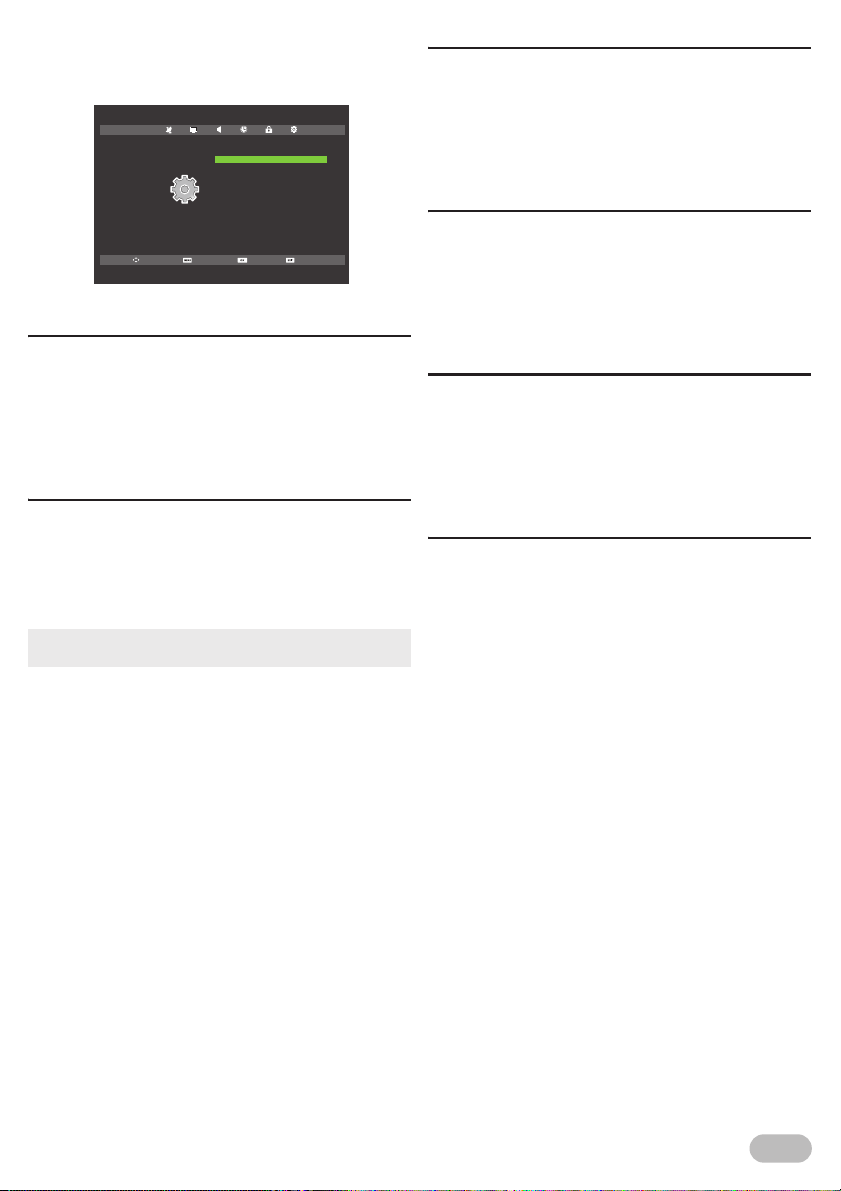
INITIAL SETUP
This section will guide you through the unit's initial
setup which includes selecting a language for your onscreen menu and auto scan, which automatically
scans and memorises viewable channels.
1 After making all the necessary connections, turn
on the unit pressing .
First Time Installation
Home Mode
OSD Language
Country
2 Use Ż / Ź to select the location.
• If you select [Retail Mode], the confirm message will
appear.
3
Use
Ÿ / ź
to select
[OSD Language]
the language you want, using Ż / Ź.
4 Use Ÿ / ź to select [Country], then select the
country you want, using Ż / Ź.
5 Press OK to enter [Auto Tuning].
Auto Tuning
Tune Type
Digital Type
Scan Type
Network ID
Frequency
Symbol Rate
Back Start
6 Use Ÿ / ź to select [Tune Type], then select
[DTV], [ATV] or both channels, using Ż / Ź.
7 Use Ÿ / ź to select [Digital Type], then select
[DVB-T] or [DVB-C], using Ż / Ź.
8 Use Ÿ / ź to select [Scan Type], then select
[Full] or [Quick], using Ż / Ź.
9 Use Ÿ / ź to select the item you want, and then
adjust the setting, using Ż / Ź.
10 Press OK to start scanning.
Auto Tuning
ATV + DTV
DVB-T
Quick
Auto
Auto
Auto
English
Germany
, the
n select
• When scanning starts, confirmation menu will appear.
• To turn back previous page, pressing MENU button in
[Auto Tuning] menu.
• In case when not all available cable channels are found
through [Full] scanning mode, these programs can be
scanned by selecting [Quick] mode. Please note, that
[Quick] mode scanning can take additional time.
• Depending on cable TV provider specification, correct
subscription to cable signals cannot be guaranteed.
• When the scanning is completed, the lowest memorised
digital or analogue channel will be displayed.
• If you press MENU during channel scanning, this operation
will be paused, then press MENU again to exit the initial
setup.
• You can set the setup again. Refer to “[First Time
Installation]” (p. 25)
EN
6
Page 7
OPERATIONS
Read this first
These operations are accessible by remote control.
Some may also be accessible by controls on the main
unit.
EPG(Electronic Programme Guide)
For Digital TV operation
You can easily find a channel or see the detailed
channel information. EPG gives you scheduled
information of the TV programme.
1 Press EPG to display [PROGRAMME GUIDE]
menu and use Ÿ / ź to select a channel.
Watching a TV Programme
To select a channel
Use repeatedly to select your desired
channel, or use the Number buttons to enter a
channel number, then press OK for quicker access.
(e.g.) If you want to select the channel 24 without
pressing OK, press 2 first, then press 4 within 3
seconds.
To adjust the volume
Use / to adjust the audio volume.
Press to turn on or off the sound right away.
• You can recover the original volume by pressing again
or / .
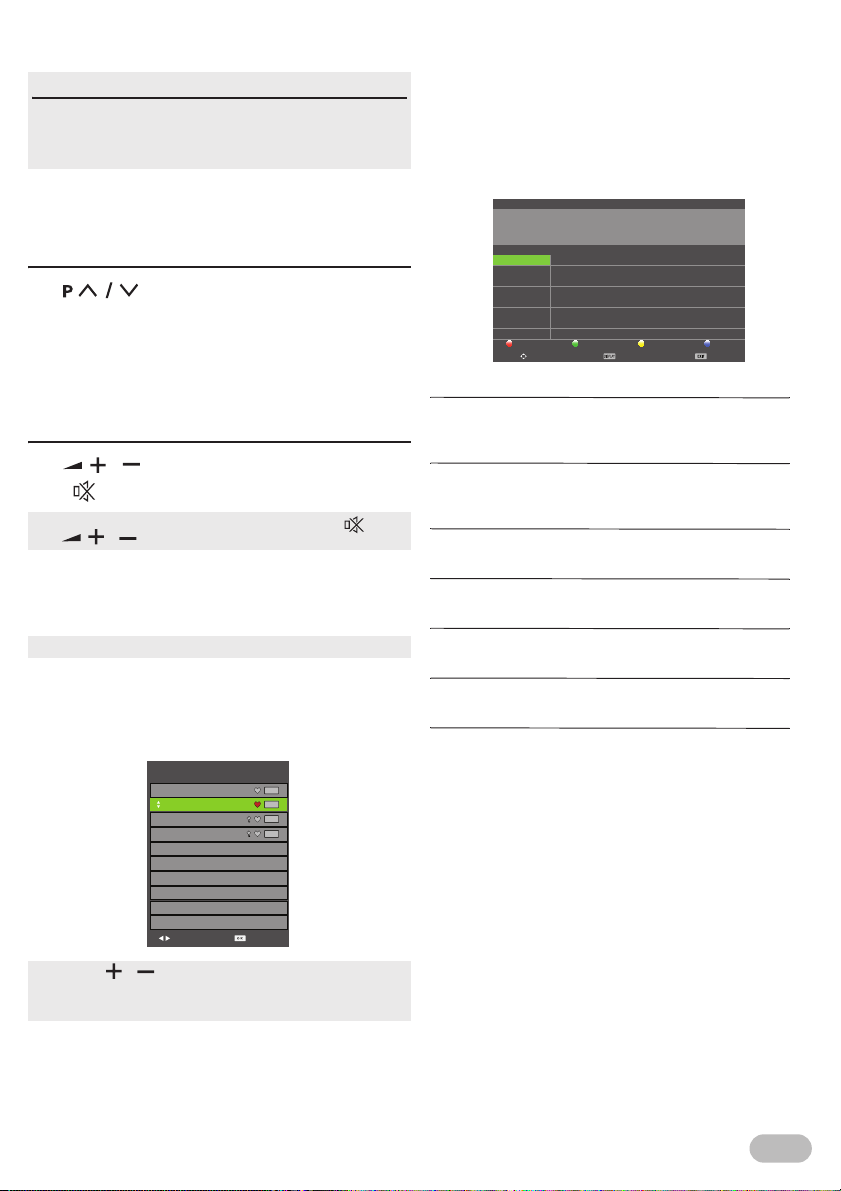
Favourite
You can easily find a favourite channel.
• You can set favourite channel at “[Programme Edit]” (p. 16).
1 Press FAV while watching a programme to show
the favourite channel list.
2 Use Ÿ / ź to select the channel you want, then
press OK.
Favorite List
1 TF1 HD
2 France 2 HD
3 European sport
4 LCI4
DTV
DTV
DTV
DTV
DTV
06:45 - 08:25 20 Jan 2013
The Wing in the sky/ The cherry tree/ The Road of flower
20 Jan 2013 08:17:51 20 Jan 2013
1 TF1 HD
2 France 2 HD
3 European Sport
4 LCI 4
5 AFC
PROGRAMME GUIDE
06:45-07:00
07:00-09:00
09:00-10:00
10:00-10:55
10:55-11:15
Weather
NNN News
Sports News
Japanese Cartoon
Traffic and Weather
Prev Day Next DayRecord Remind
DetailsMove View Exit
[Record] : RED
Select the programme you want and press RED to reserve
the recording.
[Remind] : GREEN
Select the programme you want and press GREEN to
remind the reservation.
[Prev Day] : YELLOW
Press YELLOW to move to the page of previous day.
[Next Day] : BLUE
Press BLUE to move to the page of next day.
[Move View] : Ÿ / ź / Ż / Ź
It is possible to use Ÿ / ź / Ż / Ź (Cursor).
[Details] : DISPLAY
Press DISPLAY to display the detail information.
[Exit] : EXIT
Press to exit the menu.
Page Up/Down Select
• Use FAV / to select the favourite channel while
watching a programme.
• Use Ż / Ź to move to the previous or next page.
3 Press EXIT to exit.
EN
7
Page 8
Sleep Timer
The sleep timer can be set the unit to go to the standby
mode after an incremental period of time.
1 Press SLEEP repeatedly to change the sleep
time period.
• Available options are; Off / 10min / 20min / 30min / 60min /
90min / 120min / 180min / 240min.
• Press SLEEP repeatedly until [Off] appears to cancel the
sleep timer.
• If the unit goes into standby mode, the sleep timer will be
cancelled.
Sound Select
For Digital TV operation
Press AUDIO to display currently selected audio
language with the number of available ones and press
repeatedly to cycle through them.
Dolby D : Dolby Digital sound
Dolby D+ : Dolby Digital Plus sound
AAC : HE-AAC sound
MPEG : MPEG sound
For Analogue TV operation
Press AUDIO to display currently selected audio mode
and press repeatedly to cycle through the available
audio mode.
(e.g.)
Subtitle Settings
You can change the subtitle settings used for TV
programmes.
1 Press (Subtitle) to display the subtitle
language list.
2 Use Ÿ / ź to select the subtitle language you
want, then press OK.
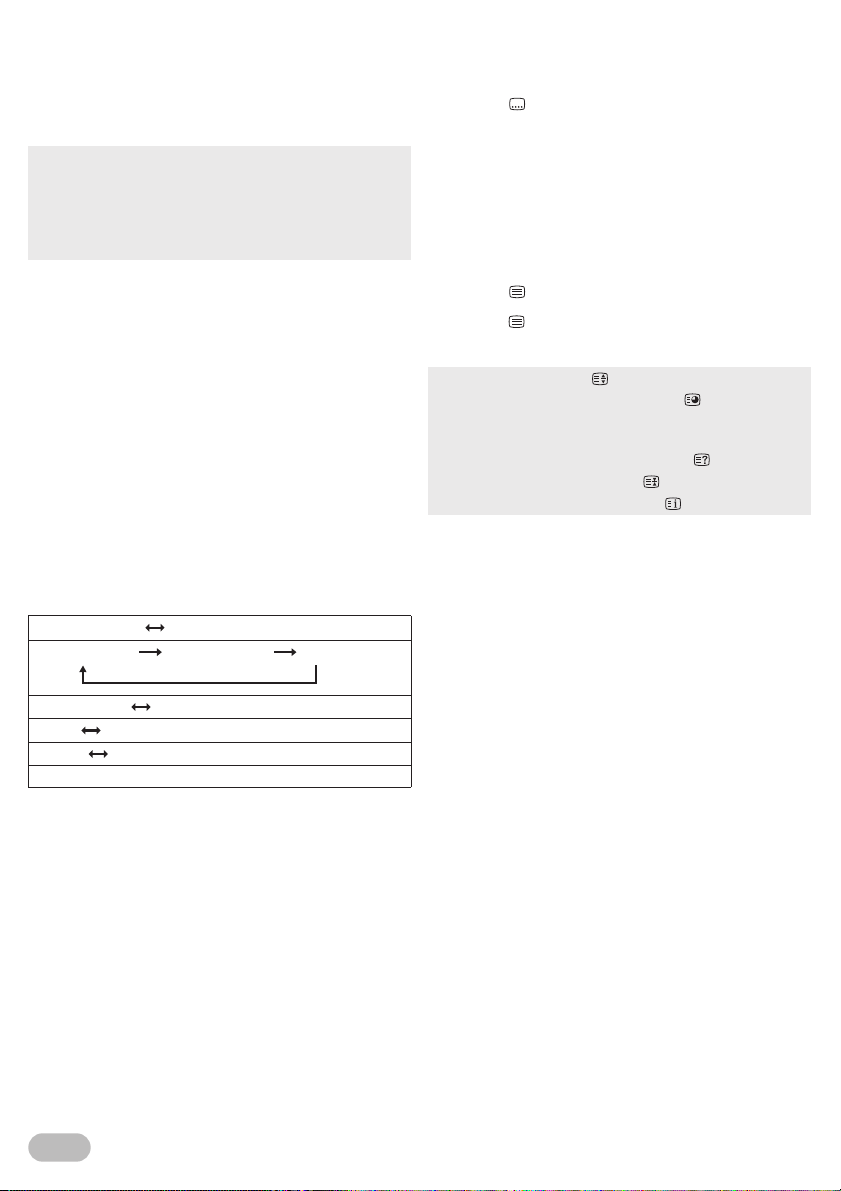
Teletext Settings
You can change the teletext settings used for TV
programmes.
1 Press (Text) to turn on the teletext decoder.
2 Press (Text) repeatedly to show the teletext in
transparent mode.
• To enlarge fonts, press .
• To select the teletext subpages, press .
• To directly select the page numbers shown at the bottom of
the TV screen, use RED / GREEN / YELLOW / BLUE.
• To call up the hidden information, press .
• To hold the current page, press .
• To go back to the start page, press .
3 Press EXIT to turn off the teletext decoder.
NICAM STEREO Mono
[NICAM DUAL I NICAM DUAL II Mono
NICAM MONO Mono
Stereo Mono
DUAL I DUAL II
Mono
8
EN
Page 9
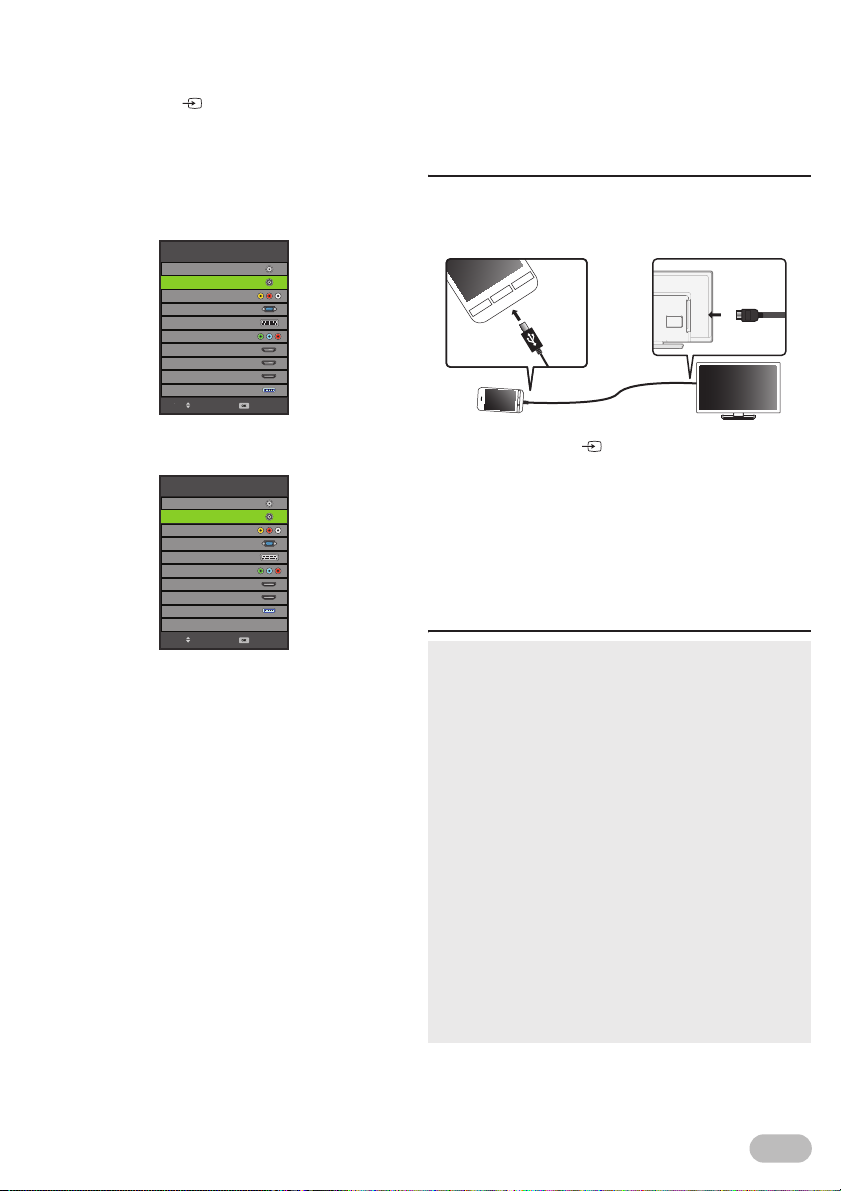
Switching the Input Source Mode
You can switch the input source mode to TV mode or
external input mode.
1 Press SOURCE .
2 Use Ÿ / ź to select the input mode you want,
then press OK.
46FD753P/39FL753P/32FL553P/29FL553P/
24FL553P
Input Source
DTV
ATV
AV
PC
SCART
YPbPr
HDMI1
HDMI2
HDMI3/MHL
Media
Move Select
SmartConnect
This unit can display the screen of other device with
MHL function and use the remote control of this unit to
operate it.
During the connection, the device is charged up.
Setup for SmartConnect
You must connect the HDMI cable to HDMI3/MHL input
jack of this unit and micro USB cable to the device with
MHL function (shown below).
32FL553/29FL553/24FL553
Input Source
DTV
ATV
AV
PC
SCART
YPbPr
HDMI1
HDMI2
Media
Move Select
1 Press SOURCE to display the input source
mode.
2 Use Ÿ / ź to select [HDMI3/MHL] on the list,
then press OK to display the screen of the
connected device.
3 Release the lock of the connected device and
use remote control to operate it.
Note for SmartConnect
• If you want to exit this mode, select any other input source
mode. Refer to “Switching the Input Source Mode” (p. 9).
• HDMI1 and HDMI 2 input jacks do not accept the function.
• Available features are limited on remote control operation.
• Use HDMI and micro USB cable. If you use any other cable,
we cannot guarantee.
• The connected cable between the unit and a device is not
supplied with this unit.
• We do not guarantee the device with all MHL function can
be supported on this unit.
• Funai cannot be held responsible if your device is not
supported, nor will Funai accept any liability for damage or
loss of stored data.
• Be sure to keep a backup copy of the original files on your
device before you play them back on this unit. We have no
responsibilities for damage or loss of your stored data.
• To avoid damaging the connecting device and the unit
always turn off the unit before you unconnect the cable.
• When the unit does not recognise the connected device, try
reconnecting it.
• For details, please access: http://www.mhlconsortium.org/
EN
9
Page 10
Recording
This unit can record a TV programme. Use a USB flash
memory for saving the data.
Setup for Recording / Playback
You must connect the USB flash memory to USB
terminal of this unit (shown below).
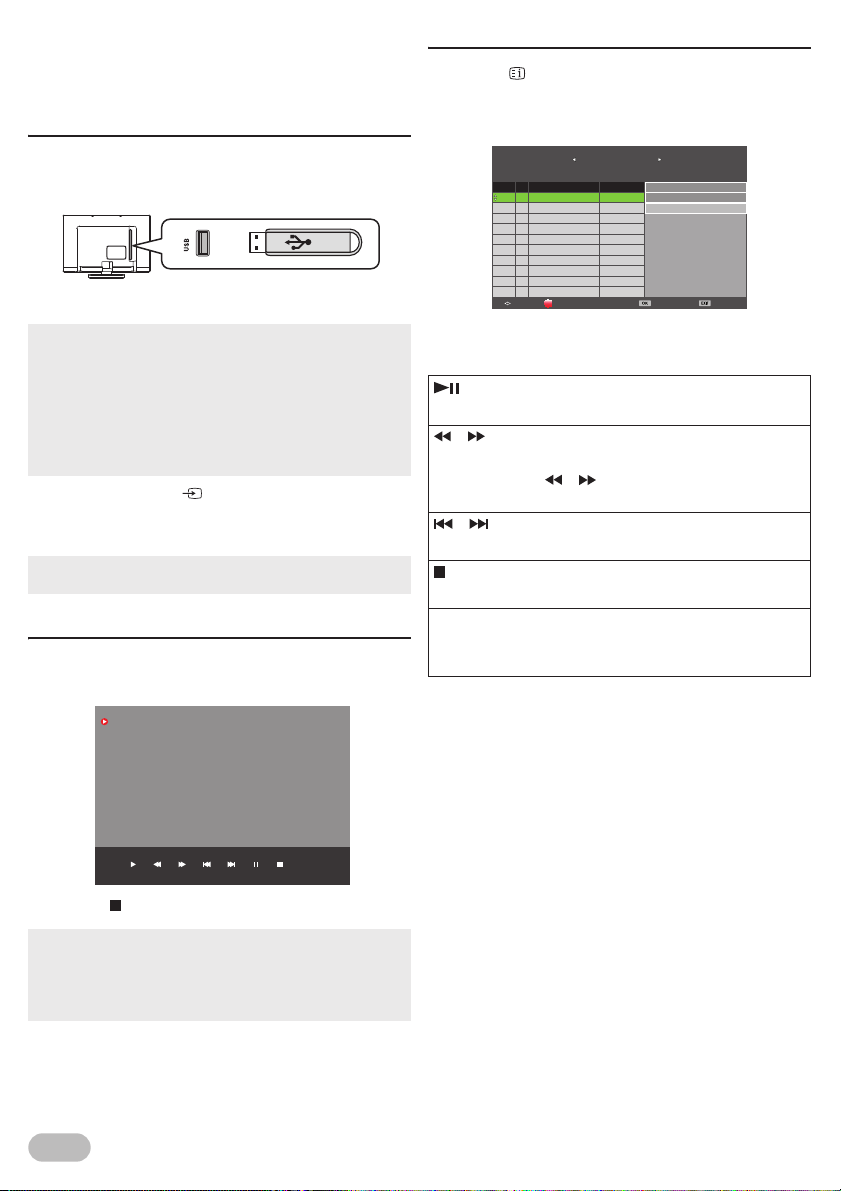
Playback
2 Press (Index) to call up the recorded list.
3 Use Ÿ / ź to select the desired file, then press
OK to start the playback.
Recorded List
1/1
Programme Title Date
Movie: The player
1 30/01/2013
2
Today’s news
30/01/2013
[6% Used]
01:05:01 Jan
01:08:31 (00:01:20)
Movie: The player
01:08:31 (00:01:20)
A player starts his carrer in new
school. He founds great competitions
and face off against them. He gets
better rapidly and his team will make
the legend...
• The USB flash memory is not supplied with this unit.
• USB 2.0 High speed flash memory is recommended.
• The unit recognise a USB flash memory only.
Do not use a USB hub and an extension cord between the
USB flash memory and the unit.
Always connect the USB flash memory to this unit directly.
• We do not guarantee the all USB flash memory can be
supported on this unit.
1 Press SOURCE to display the input source
mode and use Ÿ / ź to select [DTV], then press
OK.
• If you want to exit this mode, select any other input source
mode. Refer to “Switching the Input Source Mode” (p. 9).
Record
2 Select the channel you want, then press REC to
start recording the current programme.
[00:00:40]
Play FB FF Prev. Next Pause Stop
2 France 2 HD
3 Press to stop the recording.
• When you stop the recording, it will return to normal
broadcast television.
• When the storage space of disk is shortage, it will appear a
warning message. Then it stops recording automatically
and returns to normal broadcast television.
(0002:50:19)
08:31
DeleteMove
Play Exit
Operation in Playback
Press OK to display the menu.
:
Press to play or pause the playback.
/ :
Press to rewind or fast-forward the playback.
Every press on / will rewind or fast-forward
faster up to five.
/ :
Press to skip backward or forward the file.
:
Press to stop the playback.
EXIT:
Press to disappear the menu during the menu
appears.
10
EN
Page 11

Photo / Music / Video Playback
This unit can play picture, music and video files. Use
the USB flash memory that contains the files.
Setup for Playback
You must connect the USB flash memory to USB
terminal of this unit (shown below).
1 Press SOURCE to display the input source
mode and use Ÿ / ź to select [Media], then
press OK.
• If you want to exit this mode, select any other input source
mode. Refer to “Switching the Input Source Mode” (p. 9).
Note for Playback
• You can check Multimedia Specification. Refer to
“Multimedia Format” (p. 32).
• The USB flash memory is not supplied with this unit.
• The unit recognise a USB flash memory only.
Do not use a USB hub and an extension cord between the
USB flash memory and the unit.
Always connect the USB flash memory to this unit directly.
• We do not guarantee the all USB flash memory can be
supported on this unit.
• Funai cannot be held responsible if your USB flash memory
is not supported, nor will Funai accept any liability for
damage or loss of stored data.
• A USB flash memory that required its own driver or the
device with a special system such as fingerprint recognition
are not supported.
• Be sure to keep a backup copy of the original files on your
device before you play them back on this unit. We have no
responsibilities for damage or loss of your stored data.
• To avoid damaging the USB flash memory and the unit
always turn off the unit before you remove the USB flash
memory.
• This unit is not allowed to use the USB flash memory which
requires external power supply (500 mA or more).
• This unit can be recognised up to 60,000 files in the USB
flash memory.
• This unit may not be recognised if the length of the file
names is too long. Only English characters can be
recognised.
• This unit does not support NTFS or the file other than
FAT16 and FAT32 file system. If the file is not supported,
error message appears.
• When the unit does not recognise the USB flash memory,
try reconnecting it.
• This unit cannot play back a file which go over the limit of
file restriction.
11
EN
Page 12
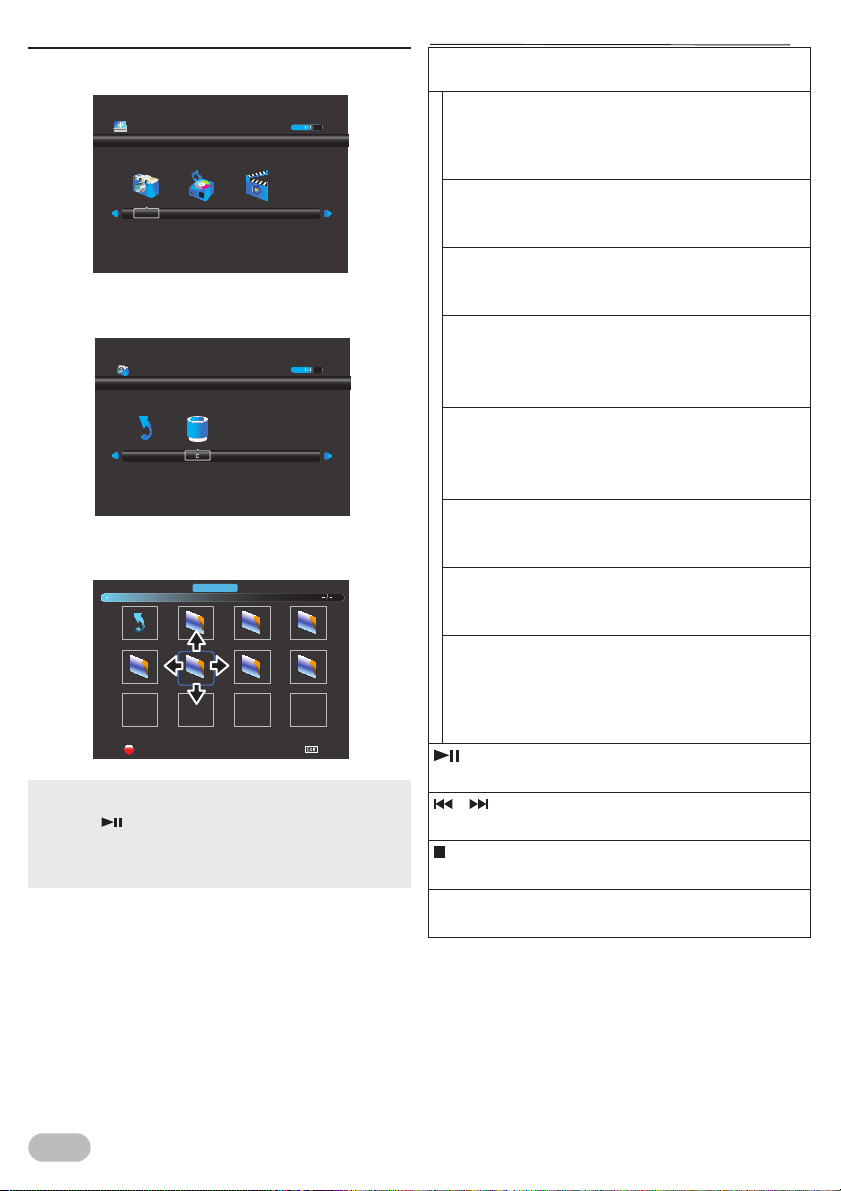
[PHOTO]
2 Use Ż / Ź to select [PHOTO], then press OK.
USB 2.0
MOVIEMUSICPHOTO
3 Use Ż / Ź to select [C], then press OK to enter
the file.
PHOTO
Return
4 Use Ÿ / ź / Ż / Ź to select the desired file, then
press OK.
PHOTO
Live 2011. 1..
Return
Kyoto 2010...
Delete
• The check box is displayed at the right bottom by pressing
the OK. The files having the check box are played by
pressing . If they are not selected, then all playable files
in the folder are played.
• If you put audio files into the folder of picture files, you can
play music during the slideshow.
Memory 20...
Marriage cel..
Aniversary ...
Exit
Operation in Slideshow
OK / DISPLAY :
Press to display the menu.
[Repeat]:
Use Ż / Ź to select [Repeat] and press OK to
switch the repeat mode: [Repeat None], [Repeat
1] and [Repeat All] in order.
[Music]:
Use Ż / Ź to select [Music] and press OK to play
the music file in the same folder.
[Rotate](right-handed or left-handed rotate):
Use Ż / Ź to select [Rotate] and press OK to turn
the picture clockwise by 90 degrees.
[Zoom In]:
Use Ż / Ź to select [Zoom In] and press OK to
zoom in the display.
The zoom factor: 2x, 4x and 8x
[Zoom Out]:
Use Ż / Ź to select [Zoom Out] and press OK to
zoom out the display.
The zoom factor: 1x, 2x and 4x
[Playlist]:
Use Ż / Ź to select [Playlist] and press OK to
display the playlist.
[Info.]:
Use Ż / Ź to select [Info.] and press OK to
display the information of the current file.
[Move View]:
Use Ż / Ź to select [Move View] and press OK to
enter the move view mode, and use Ÿ / ź / Ż /
to move the picture, if the picture big enough to
surpass the screen.
:
Press to play or pause the slideshow.
/ :
Press to skip backward or forward the file.
:
Press to stop the slideshow.
EXIT:
Press to go back to the previous screen.
Ź
12
EN
Page 13

[MUSIC]
2 Use Ż / Ź to select [MUSIC], then press OK.
USB 2.0
MOVIEMUSICPHOTO
3 Use Ż / Ź to select [C], then press OK to enter
the file.
MUSIC
Return
4 Use Ÿ / ź / Ż / Ź to select the desired file, then
press OK.
MUSIC
Return
Ferdinand F..
Reeeed
New songs ...
Mercury feat...
Operation in Playback
OK / DISPLAY :
Press to display the menu.
[Repeat]:
Use Ż / Ź to select [Repeat] and press OK to
switch the repeat mode: [Repeat None], [Repeat
1] and [Repeat All] in order.
[MUTE]:
Use Ż / Ź to select [MUTE] and press OK.
[Playlist]:
Use Ż / Ź to select [Playlist] and press OK to
display the playlist.
[Info.]:
Use Ż / Ź to select [Info.] and press OK to
display the information of the current file.
[Goto Time]:
Use Ż / Ź to select [Goto Time] and press OK to
move the time you want in the playback.
:
Press to play or pause the playback.
/ :
Press to rewind or fast-forward the playback.
/ :
Press to skip backward or forward the file.
:
Press to stop the playback.
EXIT:
Press to go back to the previous screen.
Delete
Exit
• The check box is displayed at the right bottom by pressing
the OK. The files having the check box are played by
pressing . If they are not selected, then all playable files
in the folder are played.
13
EN
Page 14

[MOVIE]
2 Use Ż / Ź to select [MOVIE], then press OK.
USB 2.0
MOVIEMUSICPHOTO
3 Use Ż / Ź to select [C], then press OK to enter
the file.
MOVIE
Return
4 Use Ÿ / ź / Ż / Ź to select the desired file, then
press OK.
MOVIE
La camis...
Une Nouv...
La vida de...
Exit
Return
El coche...
How to use fu...
Delete
Osaka footba...
• The check box is displayed at the right bottom by pressing
the OK. The files having the check box are played by
pressing . If they are not selected, then all playable files
in the folder are played.
Operation in Playback
OK / DISPLAY :
Press to display the menu.
[Repeat]:
Use Ż / Ź to select [Repeat] and press OK to
switch the repeat mode: [Repeat None], [Repeat
1] and [Repeat All] in order.
A-B Repeat:
Use Ż / Ź to select A-B Repeat and press OK to
switch the limited repeat mode: [Set A], [Set B]
and [None] in order.
[Playlist]:
Use Ż / Ź to select [Playlist] and press OK to
display the playlist.
[Info.]:
Use Ż / Ź to select [Info.] and press OK to
display the information of the current file.
[Slow Forward]:
Use Ż / Ź to select [Slow Forward] and press OK
to play slow.
[Step Forward]:
Use Ż / Ź to select [Step Forward] and press OK
to play frame-by-frame playback.
[Goto Time]:
Use Ż / Ź to select [Goto Time] and press OK to
move the time you want in the playback.
:
Press to play or pause the playback.
/ :
Press to rewind or fast-forward the playback.
/ :
Press to skip backward or forward the file.
:
Press to stop the playback.
EXIT:
Press to go back to the previous screen.
14
EN
Page 15

OTHER SETTINGS
Read this first
Before adjust each setting, press MENU to display the
menu.
To exit the menu, press MENU.
Some settings need to enter PIN code.
Refer to “Lock Settings” (p. 21).
Channel Settings
You can edit the channel settings.
1 Use Ż / Ź to select [CHANNEL].
Auto Tuning
ATV Manual Tuning
DTV Manual Tuning
CHANNEL
Move SelectReturn Exit
[Auto Tuning]
You can scan the DTV, ATV or both channel in your
area automatically.
2 Use Ÿ / ź to select [Auto Tuning], then press
OK.
• If you set [Lock System] to [On], you have to enter the 6-
digit PIN code you set using the Number buttons.
Tune Type
Digital Type
Scan Type
Network ID
Frequency
Symbol Rate
3 Use Ÿ / ź to select [Tune Type], then select
[DTV], [ATV] or both channels, using Ż / Ź.
4 Use Ÿ / ź to select [Digital Type], then select
[DVB-T] or [DVB-C], using Ż / Ź.
5 Use Ÿ / ź to select [Scan Type], then select
[Full] or [Quick], using Ż / Ź.
6 Use Ÿ / ź to select the item you want, and then
adjust the setting, using Ż / Ź.
7 Press OK to start scanning.
Programme Edit
Schedule List
Signal Information
CI Information
Auto Tuning
ATV + DTV
Back Start
DVB-T
Quick
Auto
Auto
Auto
• When scanning starts, confirmation menu will appear.
• To turn back previous page, pressing MENU button in
[Auto Tuning] menu.
• In case when not all available cable channels are found
through [Full] scanning mode, these programs can be
scanned by selecting [Quick] mode. Please note, that
[Quick] mode scanning can take additional time.
• Depending on cable TV provider specification, correct
subscription to cable signals cannot be guaranteed.
• When the scanning is completed, the lowest memorised
digital or analogue channel will be displayed.
• If you press MENU during channel scanning, this operation
will be paused, then press MENU again to exit the initial
setup.
< For DVB-T scanning >
[ATV Manual Tuning]
For Analogue TV operation
You can search ATV channel manually in your area.
2 Use Ÿ / ź to select [ATV Manual Tuning], then
press OK.
• If you set [Lock System] to [On], you have to enter the 6-
digit PIN code you set using the Number buttons.
3 Use Ÿ / ź to select [Current CH], then use Ż /
Ź to select the channel you want.
4 Use Ÿ / ź to select [Color System], then use Ż
/ Ź to select the system you want.
5 Use Ÿ / ź to select [Sound System], then use
Ż / Ź to select the system you want.
6 Use Ÿ / ź to select [Fine-Tune], then use Ż / Ź
to adjust the setting.
7 Use Ÿ / ź to select [AFC], then use Ż / Ź to
select [On] or [Off].
• If you set to [On], this unit adjust tuning to near channel
automatically.
8 Use Ÿ / ź to select [Search], then use Ż or Ź
to start scanning.
15
EN
Page 16

[DTV Manual Tuning]
For Digital TV operation
You can search DTV channel manually in your area.
2 Use Ÿ / ź to select [DTV Manual Tuning], then
press OK.
• If you set [Lock System] to [On], you have to enter the 6-
digit PIN code you set using the Number buttons.
3 Use Ż / Ź to select the channel you want, then
press OK to start scanning.
< For DVB-C scanning >
[CADTV Manual Tuning]
For Digital TV operation
You can search CADTV channel manually in your area.
2 Use Ÿ / ź to select [CADTV Manual Tuning],
then press OK.
CADTV Manual Tuning
Frequency
Symbol(ks/s)
QAM Type
Bad GoodNormal
3 Use Ÿ / ź to select [Frequency] and press OK,
then use Ÿ / ź to adjust.
4 Use Ÿ / ź to select [Symbol(ks/s)] and press
OK, then use Ÿ / ź to adjust.
5 Use Ÿ / ź to select [QAM Type] and press OK,
then use Ÿ / ź to select the type.
6 After the settings, press OK to start scanning.
474.000 MHz
6900
QAM 16
NO SIGNAL
[Programme Edit]
For Digital TV operation
You can edit the programme settings.
• You can check favourite channel list at “Favourite” (p. 7).
2 Use Ÿ / ź to select [Programme Edit], then
press OK to show programme edit list.
Delete channels : [Delete]
3 Use Ÿ / ź to select the channel you want,
then press RED to delete the current channel.
Setting unshown channels : [Skip]
3 Use Ÿ / ź to select the channel you want,
then press BLUE to set the current channel as
unshown channel.
Setting favourite channels : [Fav]
Using Favourite function. Refer to “Favourite” (p. 7).
3 Use Ÿ / ź to select the channel you want,
then press FAV to set the current channel as
favourite.
Switching channel number : [Move]
You can switch the current programme with the other
channel number.
3 Use Ÿ / ź to select the channel you want,
then press YELLOW, and use the Number
buttons to enter the other channel number you
want to set, then press OK.
New channel number : [Move]
You can place the current programme to new
channel number.
3 Use Ÿ / ź to select the channel you want,
then press YELLOW, and use the Number
buttons to enter the unused channel number
you want to set, then press OK.
16
EN
Page 17

[Schedule List]
For Digital TV operation
You can see the detailed channel information and
reserve TV programme.
2 Use Ÿ / ź to select [Schedule List], then press
OK to display the list.
Schedule List
1/1
Programme Title Date
Movie: The player
1 30/01/2013
2
Today’s news
30/01/2013
[6% Used]
01:05:01 Jan
01:08:31 (00:01:20)
Movie: The player
01:08:31 (00:01:20)
A player starts his carrer in new
school. He founds great competitions
and face off against them. He gets
better rapidly and his team will make
the legend...
[Signal Information]
For Digital TV operation
You can see the detail information about the signal.
2 Use Ÿ / ź to select [Signal Information], then
press OK to display the detail.
Signal Information
Channel: 21 (474.00MHz)
Quality: 100
Strength: 100
Network: NEOTION NETWORK
Modulation: QAM 64
Delete EditAddMove
Exit
Add new reservasion
3 Press YELLOW to display reservation menu.
Schedule Setup
40 B_LCN40d
Type
Mode
Start Time
End Time 01:06 01 Jan
Modulation: QAM 64
Reminder
Everyday
01:06 01 Jan
BackSelect
4 Use Ÿ / ź to select service selection, use Ż / Ź
to select the service you want.
5 Use Ÿ / ź to select [Type], use Ż / Ź to select
[Reminder] or [Recorder].
6 Use Ÿ / ź to select [Mode], use Ż / Ź to select
[Once], [Everyday] or [Weekly].
[Once] : on any day you choose, up to 12 months
[Everyday] : at the same time on the same channel
[Weekly] : at the same time on the same channel
away
every day
every week; for example, every Monday
7 Use Ÿ / ź to select [Start Time], use Ż / Ź to
select the date/time and use Ÿ / ź to adjust.
8 Use Ÿ / ź to select [End Time], use Ż / Ź to
select the date/time and use Ÿ / ź to adjust.
9 After the adjustment, press OK to save it.
[CI Information]
For Digital TV operation
You can see the detail information about the Common
Interface, if you have inserted the CI card.
2 Use Ÿ / ź to select [CI Information], then press
OK to display the detail.
• We do not guarantee the all cards can be supported on this
unit.
Delete a reservation
3 Use Ÿ / ź to select the item you want in
[Schedule List], and then press RED to delete
the reservation.
Edit a reservation
3 Use Ÿ / ź to select the item you want in
[Schedule List], and then press BLUE to edit
the reservation.
• To edit a reservation, refer to "Add new reservasion".
17
EN
Page 18

PC Settings
You can adjust the PC screen position, size and phase.
Before you begin
You must connect your PC to this unit and select [PC]
at [Input Source]. Refer to “Switching the Input
Source Mode” (p. 9).
1 Use Ż / Ź to select [SCREEN].
Auto Adjust
SCREEN
H-Offset
V-Offset
Size
Phase
Position Reset
50
50
50
69
Picture Adjustment
You can adjust the picture settings according to your
personal preference.
These settings are automatically stored after exiting
the picture menu.
1 Use Ż / Ź to select [PICTURE].
Picture Mode
Contrast
Brightness 50
PICTURE
Move SelectReturn Exit
Colour
Tint
Sharpness
Backlight
Colour Temp
Noise Reduction
Standard
Normal
50
50
50
30
40
Middle
Move SelectReturn Exit
[Auto Adjust]
Each setting will be adjusted automatically.
2 Use Ÿ / ź to select [Auto Adjust], then press
OK.
[H-Offset] / [V-Offset] / [Size] / [Phase]
Each setting can be adjusted manually.
[H-Offset] : horizontal picture adjustment
[V-Offset] : vertical picture adjustment
[Size] : clock adjustment
[Phase] : phase adjustment
2 Use Ÿ / ź to select the item you want, then
adjust the settings according to your personal
preference.
• After press OK and appear the settings display, you can
adjust them.
[Position Reset]
2 Use Ÿ / ź to select [Position Reset], then press
OK.
[Picture Mode]
Each setting will be adjusted manually.
[Dynamic] :higher contrast
[Standard] : standard
[Mild] : lower contrast
[Personal] : manual setting
2 Use Ÿ / ź to select [Picture Mode], then press
OK.
3 Use Ÿ / ź to select [Dynamic], [Standard],
[Mild] or [Personal], then press OK.
• You can change picture mode easily using PICTURE
MODE.
• Press PICTURE MODE repeatedly to select picture mode
you want. In this function, you can set also assign the
picture mode individually to each input mode.
18
EN
Page 19

[Contrast] / [Brightness] / [Colour] / [Tint] /
[Sharpness]
Each setting can be adjusted manually.
[Contrast] : contrast adjustment
[Brightness] : brightness adjustment
[Colour] : colour adjustment
[Tint] : redness/greenness adjustment
[Sharpness] : sharpness adjustment
2 Use Ÿ / ź to select the item you want, then
press OK, and then appear the setting display,
adjust the setting, using Ż / Ź.
• You can adjust the settings, if you set [Personal] in
[Picture Mode].
[Backlight]
You can adjust backlight brightness.
2 Use Ÿ / ź to select [Backlight], then press OK,
and then appear the setting display, adjust the
setting, using Ż / Ź.
[Colour Temp]
You can change the colour tone of the picture.
[Cold] : bluer tone
[Normal] : average tone
[Warm] : redder tone
2 Use Ÿ / ź to select [Colour Temp], then press
OK.
3 Use Ÿ / ź to select [Cold], [Normal] or [Warm],
then press OK.
Sound Adjustment
You can adjust the sound settings according to your
personal preferences.
1 Use Ż / Ź to select [SOUND].
Sound Mode
Treble
Bass
SOUND
Move SelectReturn Exit
Balance
SPDIF Mode
AD Switch
[Sound Mode]
Each setting can be adjusted manually.
[Standard] : standard
[Music] : appropriate for listening to music
[Movie] : appropriate for watching a movie
[Sports] :
[Personal] : manual setting
2 Use Ÿ / ź to select [Sound Mode], then press
OK.
3 Use Ÿ / ź to select [Standard], [Music],
[Movie], [Sports] or [Personal], then press OK.
• You can change sound mode easily using SOUND MODE.
• Press SOUND MODE repeatedly to select sound mode you
want.
appropriate for watching a sport programme
Standard
50
50
0
PCM
Off
[Noise Reduction]
You can adjust to reduce the appearance of digitising
error caused by the compression.
2 Use Ÿ / ź to select [Noise Reduction], then
press OK.
3 Use Ÿ / ź to select [Off], [Low], [Middle] or
[High], then press OK.
19
EN
Page 20

[Treble] / [Bass] / [Balance]
You can set left / right speaker setting.
[Treble] : high pitched tone adjustment
[Bass] : low pitched tone adjustment
[Balance] : volume balance setting for left and right
2 Use Ÿ / ź to select the item you want, then
press OK, and then appear the setting display,
adjust the setting, using Ż / Ź.
• You can adjust [Treble] and [Bass] settings, if you set
[Personal] in [Sound Mode].
speakers
Time Settings
You can change Time setting.
1 Use Ż / Ź to select [TIME].
Clock
Time Zone
Sleep Timer
TIME
Move SelectReturn Exit
Auto Standby
OSD Timer
20 / Jan 13:12
Berlin GMT+1
Off
4 H
15 S
[SPDIF Mode]
If this unit is connected with coaxial digital audio
output jack to your device, you can set this mode.
[PCM] :
[Auto] : The SPDIF output is the same with the input
[Off] : Turn OFF the SPDIF output.
The SPDIF output is PCM format, regardless
of the input sound format.
sound format.
2 Use Ÿ / ź to select [SPDIF Mode], then select
[PCM], [Auto] or [Off], using Ż / Ź.
[AD Switch]
For Digital TV operation
You can adjust audio output setting and volume for
visually impaired.
2 Use Ÿ / ź to select [AD Switch], then select
[On] or [Off], using Ż / Ź.
.
• Only MPEG sound is available for this function.
[Clock]
For Digital TV operation
[Clock] will change with the area which you have
selected in the Time Zone.
• It is not available to adjust the time.
[Time Zone]
You can set the time zone according to the resident
area.
2 Use Ÿ / ź to select [Time Zone], then press OK.
3 Use Ÿ / ź / Ż / Ź to select the time you want,
then press OK.
20
EN
Page 21

[Sleep Timer]
The sleep timer can be set the unit to go to the standby
mode after an incremental period of time.
2 Use Ÿ / ź to select [Sleep Timer], then press
OK.
3 Use Ÿ / ź to select the time you want, then
press OK.
• You can set also SLEEP button on Remote Control, refer to
“Sleep Timer” (p. 8).
[Auto Standby]
You can set the time to go into standby mode
automatically as no activity is detected after power is
turned on.
In spite of this setting, the unit goes into standby mode
automatically if there is no signal input from the
antenna terminal and no user operation for 15 minutes.
2 Use Ÿ / ź to select [Auto Standby], then press
OK.
3 Use Ÿ / ź to select the time you want, then
press OK.
[OSD Timer]
You can set the OSD displaying time during no activity
is detected after press MENU.
2 Use Ÿ / ź to select [OSD Timer], then press
OK.
3 Use Ÿ / ź to select the time you want, then
press OK.
Lock Settings
You can set following lock settings.
Before you change the lock settings
You must remember your own PIN code.
Every lock settings need PIN code.
1 Use Ż / Ź to select [LOCK].
Lock System
Set Password
Block Program
Parental Guidance
LOCK
Move SelectReturn Exit
Key Lock
Hotel Mode
[Lock System]
You can set all lock settings.
If you set to [On], all lock settings work.
2 Use Ÿ / ź to select [Lock System], then press
OK to set to [On].
3 Use the Number buttons to enter the 6-digit PIN
code you set.
• If you have not set up your PIN code, enter 111111.
• When you enter correct PIN code, you can change following
settings.
• After you move to other settings, you have to enter your PIN
code again to proceed Parental setting.
• If you set to [On], below settings need to enter PIN code
due to change the settings.
: [Auto Tuning], [ATV Manual Tuning], [DTV Manual
Tuning], [Programme Edit], [First Time Installation] and
[Reset].
Off
Off
21
EN
Page 22

[Set Password]
You can set your own PIN code.
2 Use Ÿ / ź to select [Set Password], then press
OK.
Please enter old password
Please enter new password
Confirm new password
Clear Cancel
3 Use the Number buttons to enter the 6-digit PIN
code you set.
4 Use the Number buttons to enter the new 6-digit
number.
5 Use the Number buttons to enter the same
6-digit number again.
[Block Program]
2 Use Ÿ / ź to select [Block Program], then
press OK.
3 Press GREEN to lock the current channel.
• To unlock programme, input the PIN code you set.
[Parental Guidance]
You can set the parental rating to avoid watching an
inappropriate programme for your children.
2 Use Ÿ / ź to select [Parental Guidance], then
press OK.
3 Use Ÿ / ź to select the age restriction, then
press OK.
[Key Lock]
You can set [Key Lock] and unlock with PIN code.
2 Use Ÿ / ź to select [Key Lock], then select [On]
or [Off], using Ż / Ź.
• If you set to [On], you cannot use the buttons on the unit.
[Hotel Mode]
2 Use Ÿ / ź to select [Hotel Mode], then press
OK to enter [Hotel Mode] menu.
• Refer to “Hotel Mode Settings” (p. 26).
22
EN
Page 23
Setup Adjustment
You can change other setting.
1 Use Ż / Ź to select [SETUP].
OSD Language
TT Language
Audio Languages
SETUP
Move SelectReturn Exit
[OSD Language]
You can select the preferred on-screen language.
2 Use Ÿ / ź to select [OSD Language], then
press OK.
3 Use Ÿ / ź / Ż / Ź to select the language you
want, then press OK.
[TT Language]
You can select the preferred teletext language.
2 Use Ÿ / ź to select [TT Language], then press
OK.
3 Use Ÿ / ź / Ż / Ź to select the language you
want, then press OK.
• You can set also buttons on Remote Control, refer to
“Teletext Settings” (p. 8).
Subtitle Language
Hearing Impaired
PVR File System
Aspect Ratio
First Time Installation
Reset
Software Update(USB)
HDMI CEC
Off
16:9
[Audio Languages]
You can select the preferred audio language.
2 Use Ÿ / ź to select [Audio Languages], then
press OK.
3 Use Ÿ / ź / Ż / Ź to select the language you
want, then press OK.
[Subtitle Language]
You can select the preferred subtitle language.
2 Use Ÿ / ź to select [Subtitle Language], then
press OK.
3 Use Ÿ / ź / Ż / Ź to select the language you
want, then press OK.
[Hearing Impaired]
You can set Hearing Impaired mode.
2 Use Ÿ / ź to select [Hearing Impaired], then
select [On] or [Off] using Ż / Ź.
[Hearing Impaired]:
Provides audio service for hearing impaired.
[PVR File System]
You can check the USB speed.
2 Use Ÿ / ź to select [PVR File System], then
press OK.
23
EN
Page 24

[Aspect Ratio]
[4:3] [16:9][Auto]*
[Zoom2] [Zoom1][Full Screen]*
[4:3] [16:9][Auto]*
[Zoom2] [Zoom1][Full Screen]*
Display modes can be selected when your TV receives
a 16:9 or 4:3 video signal. Three types of display
modes can be selected for a PC Input signal.
2 Use Ÿ / ź to select [Aspect Ratio], then press
OK.
3 Use Ÿ / ź to select the TV screen display mode
you want, then press OK.
• You cannot set screen display mode in playback mode.
For 16:9 video signal
[Auto]
*D TV, ATV, AV, SCART on ly
[4:3]
[16:9]
[Zoom1]
[Zoom2]
[Full Screen]
*DTV, HDMI only
: Displays a proportionally stretched picture
automatically.
: Displays a 16:9 picture at a 4:3 size.
The picture is shortened horizontally. Sidebars
appear on both edge of the TV screen.
: Displays a 16:9 picture at its original size.
: Displays a picture at its enlarged size without
changing its horizontal and vertical ratio. This
crops out all sides of the picture.
: Displays a picture at its enlarged bigger size
without changing its horizontal and vertical ratio.
This crops out all sides of the picture.
: Displays a picture at its original size.
For 4:3 video signal
[Auto]
*DTV, ATV, AV, SCART only
[4:3]
[16:9]
[Zoom1]
[Zoom2]
[Full Screen]
*DTV, HDMI only
: Displays a proportionally stretched picture
automatically.
: Displays a 4:3 picture at its original size.
Sidebars appear on both edge of the TV screen.
: Displays a 4:3 picture at a 16:9 size; the picture
is stretched more horizontally.
: Displays a 4:3 picture at a 16:9 size; at its
enlarged size without changing its horizontal
and vertical ratio. This crops out all sides of the
picture.
: Displays a 4:3 picture at a 16:9 size. At its
enlarged size bigger than
changing its horizontal and vertical ratio. This
crops out all sides of the picture.
: Displays a picture at its original size.
For PC Input signal
[4:3]
[16:9]
: Displays a picture at a 4:3 size. Sidebars appear
on both edges of the TV screen.
: Displays a picture at a 16:9 size; the picture is
stretched more horizontally.
[Zoom1]
[16:9][4:3]
without
24
EN
• This unit can also be connected to your PC that has a DVI
terminal. Use an HDMI-DVI conversion cable for this video
connection and it requires stereo mini plug conversion
cable for analog audio signal as well.
• Refer to 16:9 video signal on this page if PC has HDMI
Output.
• PC resolution standards: 753P series - 1920 x 1080
For details, refer to “Input Resolution” (p. 32)
553/553P series - 1360 x 768
Page 25

[First Time Installation]
You can set initial setup again. Refer to “INITIAL
SETUP” (p. 6).
2 Use Ÿ / ź to select [First Time Installation],
then press OK.
3 Follow steps 2 to 10 in “INITIAL SETUP” (p. 6).
[Reset]
You can restore the all settings except channel setting
and parental lock settings.
2 Use Ÿ / ź to select [Reset], then press OK.
3 Press Ż to select [Yes] to reset to default
settings.
• After you select [Yes], the unit go into standby and turns on
automatically.
[Software Update(USB)]
It is available to update software using USB.
2 Use Ÿ / ź to select [Software Update(USB)],
then press OK.
[HDMI CEC]
This function allows you to operate the linked functions
between devices with HDMI CEC feature and this unit
connecting through an HDMI cable.
• Your device must be compatible with HDMI CEC in order to
use this function.
• We do not guarantee the all devices can be supported on
this unit.
[HDMI CEC]
If you set to [On], HDMI CEC function allows your
device to act in conjunction with this unit.
2 Use Ÿ / ź to select [HDMI CEC], and then
select [On] or [Off], using Ż / Ź.
[Auto Power]
If you set to [On], when your device turns on, this
unit also turns on automatically.
2 Use Ÿ / ź to select [Auto Power], and then
select [On] or [Off], using Ż / Ź.
[Device Menu]
You can see the device title menu of your device.
2 Use Ÿ / ź to select [Device Menu], then
press OK to display the detail.
25
EN
Page 26

Hotel Mode Settings
You must enter [Lock System] due to proceed Hotel
Mode setting. For details, refer to “Lock Settings”
(p. 21).
1 Use Ż / Ź to select [LOCK].
2 Use Ÿ / ź to select [Lock System], then press
OK.
[Source Lock]
You can lock the source one by one. If you set to [On],
the source does not appear on the display.
5 Use Ÿ / ź to select [Source Lock], then press
OK.
6 Use Ÿ / ź to select the source you want, then
press OK to set to [On].
Lock System
Set Password
Block Program
Parental Guidance
LOCK
Move SelectReturn Exit
Key Lock
Hotel Mode
Off
Off
3 Use the Number buttons to enter the 6-digit PIN
code you set.
[Hotel Mode]
4 Use Ÿ / ź to select [Hotel Mode], then press
OK to enter [Hotel Mode] menu.
5 Use Ÿ / ź to select [Hotel Mode], then press Ż
/ Ź to select [On] to adjust following settings.
Hotel Mode
Source Lock
Default Source
Default Prog
HOTEL
Move SelectReturn Exit
Default Volume
Max Volume
Import Database
Export Database
Clear Lock
On
Off
1
Off
100
DTV Off
ATV
AV
PC
SOURCE LOCK
Move SelectReturn Exit
SCART
YPbPr
HDMI1
HDMI2
HDMI
HDMI3 / MHL Off
Media
Off
Off
Off
Off
Off
Off
Off
Off
Off
Off
[Default Source]
You can set the first displaying source as the unit turns
on.
5 Use Ÿ / ź to select [Default Source], then
press OK.
6 Use Ÿ / ź to select the source you want, then
press OK to set the default.
[Default Prog]
If you set [ATV] in [Default Source], you can set the
the first displaying ATV programme number as the unit
turns on.
5 Use Ÿ / ź to select [Default Prog], then press
OK.
6 Use Ÿ / ź to select the programme you want,
then press OK to set the default.
[Default Volume]
You can set default audio volume as the unit turns on.
5 Use Ÿ / ź to select [Default Volume], then
press Ż / Ź to adjust the audio volume.
26
EN
Page 27

[Max Volume]
You can set maximum limit of audio volume.
5 Use Ÿ / ź to select [Max Volume], then press Ż
/ Ź to adjust the audio volume.
• If you set to [On] in [Lock System], you cannot turn the
volume up over setup volume.
[Import Database]
You can import the Hotel Mode settings from USB flash
memory.
5 Use Ÿ / ź to select [Import Database], then
press OK.
• After importing, the unit will go into the standby mode
automatically.
• If a USB flash memory does not insert, an error message
will appear.
[Export Database]
You can export the current menu settings to USB flash
memory.
5 Use Ÿ / ź to select [Export Database], then
press OK.
• During exporting, LED on front panel will turn into red. (It’ll
take about 5 - 10sec.)
• After exporting, no message will appear.
• It takes about 10 seconds to complete the exporting the
data.
• If a USB flash memory does not insert, an error message
will appear.
[Clear Lock]
You can restore the Hotel Mode settings.
5 Use Ÿ / ź to select [Clear Lock], then press
OK.
27
EN
Page 28

TROUBLESHOOTING GUIDE
Sometimes a performance problem can be easily solved by checking seemingly apparent but often overlooked
possibilities. Before arranging for service, check these items. It could save you time and money.
Problem Possible Remedy
• Is unit plugged in?
Remote control does not work
Bars on TV screen
Picture distorted
Picture rolls vertically
No colour
Ghosts in picture
or
Poor reception on some channels
Weak picture
Lines or streaks in picture
Picture blurred
Sound OK, picture poor
Picture OK, sound poor
No picture or sound
Different colour marks on TV
screen
• Power at outlet?
• Check batteries in remote control.
• If outside antenna is being used, check for broken wire.
• Check for local interference.
• Try a new channel, if OK, then possibly due to poor channel reception.
• If outside antenna is being used, check for broken wire.
• Surrounding temperature is too low.
• Try a new channel, if OK, then possibly due to poor channel reception.
• If outside antenna is being used, check for broken wire.
• Check for local interference.
• Try a new channel, if OK, then possibly due to poor channel reception.
• Is antenna connected to terminal on the back of the unit?
• If outside antenna is being used, check for broken wire.
• Adjust [Colour] control.
• Try a new channel, if OK, then possibly due to poor channel reception.
• Is antenna connected to terminal on the back of the unit?
• If outside antenna is being used, check for broken wire.
• Check for local interference.
• Try a new channel, if OK, then possibly due to poor channel reception.
• Is antenna connected to terminal on the back of the unit?
• If outside antenna is being used, check for broken wire.
• Adjust [Contrast] and [Brightness] control.
• Surrounding temperature is too low.
• Try a new channel, if OK, then possibly due to poor channel reception.
• If outside antenna is being used, check for broken wire.
• Check for local interference.
• Try a new channel, if OK, then possibly due to poor channel reception.
• If outside antenna is being used, check for broken wire.
• Try a new channel, if OK, then possibly due to poor channel reception.
• Is antenna connected to terminal on the back of the unit?
• If outside antenna is being used, check for broken wire.
• Check for local interference.
• Adjust [Contrast] and
• Try a new channel, if OK, then possibly due to poor channel reception.
• Check for local interference.
• Try a new channel, if OK, then possibly due to poor channel reception.
• Is unit plugged in?
• Power at outlet?
• Is unit’s power on?
• Is antenna connected to terminal on the back of the unit?
• If outside antenna is being used, check for broken wire.
• Unplug the AC power cord and wait for about 1 minute, then plug the AC
power cord and turn on the unit again.
• Try a new channel, if OK, then possibly due to poor channel reception.
[Brightness] control.
28
EN
Page 29

Problem Possible Remedy
Black or luminous point on TV
screen
• It is quality of the LCD Panel.
29
EN
Page 30

SPECIFICATIONS
46.0 inches / 116.80cm (46FD753P)
38.6 inches / 98.04cm (39FL753P)
Panel size
Television system DVB-T/C(MPEG2/MPEG4-H.264), PAL-B/G, D/K, SECAM-B/G, D/K, L
Sound output
Remote control Digital encoded infrared light system
Operating temperature 0 °C to 40 °C
Power requirements AC 220-240 V ~ , 50 Hz
Power consumption
- Energy class A
31.5 inches / 80.01cm (32FL553P, 32FL553)
28.5 inches / 72.39cm (29FL553P, 29FL553)
23.6 inches / 59.94cm (24FL553P, 24FL553)
10 W, 8 ȍ × 2 (46FD753P)
8 W, 8 ȍ × 2 (39FL753P)
8 W, 8 ȍ × 2 (32FL553P, 32FL553)
8 W, 8 ȍ × 2 (29FL553P, 29FL553)
5 W, 8 ȍ × 2 (24FL553P, 24FL553)
90 W / stand by: less than 0.5W (46FD753P)
62 W / stand by: less than 0.5W (39FL753P)
52 W / stand by: less than 0.5W (32FL553P)
44 W / stand by: less than 0.5W (32FL553)
50 W / stand by: less than 0.5W (29FL553P)
42 W / stand by: less than 0.5W (29FL553)
35 W / stand by: less than 0.5W (24FL553P)
30 W / stand by: less than 0.5W (24FL553)
Ter min als
Antenna UHF/VHF 75 ȍ
Audio input RCA jack x 2 (L/R)
Composite video input RCA jack ×1
Component video input RCA jack ×3 (Y/Pb/Pr)
HDMI input (19 pin) HDMI x 2
HDMI input (with MHL function) HDMI x 1 (46FD753P, 39FL753P, 32FL553P, 29FL553P, 24FL553P)
PC input D-Sub 15pin x 1 (RGB) / Mini jack Ø3.5 mm x 1 (Audio)
SCART SCART x 1
Headphone audio output Mini jack Ø3.5 mm x 1
Coaxial digital audio output RCA jack × 1
30
EN
Page 31

USB terminal
Common Interface CI slot × 1
Dimensions
without base
Dimensions
with base
USB × 1
H: 657.5 mm / W: 1088.8 mm / D: 122.0 mm (46FD753P)
H: 542.0 mm / W: 912.0 mm / D: 60.0 mm (39FL753P)
H: 451.5 mm / W: 754.6 mm / D: 57.0 mm (32FL553P, 32FL553)
H: 412.0 mm / W: 686.5 mm / D: 57.0 mm (29FL553P, 29FL553)
H: 350.8 mm / W: 576.9 mm / D: 53.7 mm (24FL553P, 24FL553)
H: 707.9 mm / W: 1088.8 mm / D: 270.3 mm (46FD753P)
H: 587.5 mm / W: 912.0 mm / D: 214.0 mm (39FL753P)
H: 494.7 mm / W: 754.6 mm / D: 180.0 mm (32FL553P, 32FL553)
H: 456.0 mm / W: 686.5 mm / D: 180.0 mm (29FL553P, 29FL553)
H: 389.4 mm / W: 576.9 mm / D: 139.8 mm (24FL553P, 24FL553)
• Protruding parts excluded.
12.40 kg (46FD753P)
Weight
without base
Weight
with base
8.68 kg (39FL753P)
5.61 kg (32FL553P, 32FL553)
4.80 kg (29FL553P, 29FL553)
3.35 kg (24FL553P, 24FL553)
14.40 kg (46FD753P)
10.00 kg (39FL753P)
5.85 kg (32FL553P, 32FL553)
5.04 kg (29FL553P, 29FL553)
3.53 kg (24FL553P, 24FL553)
31
EN
Page 32
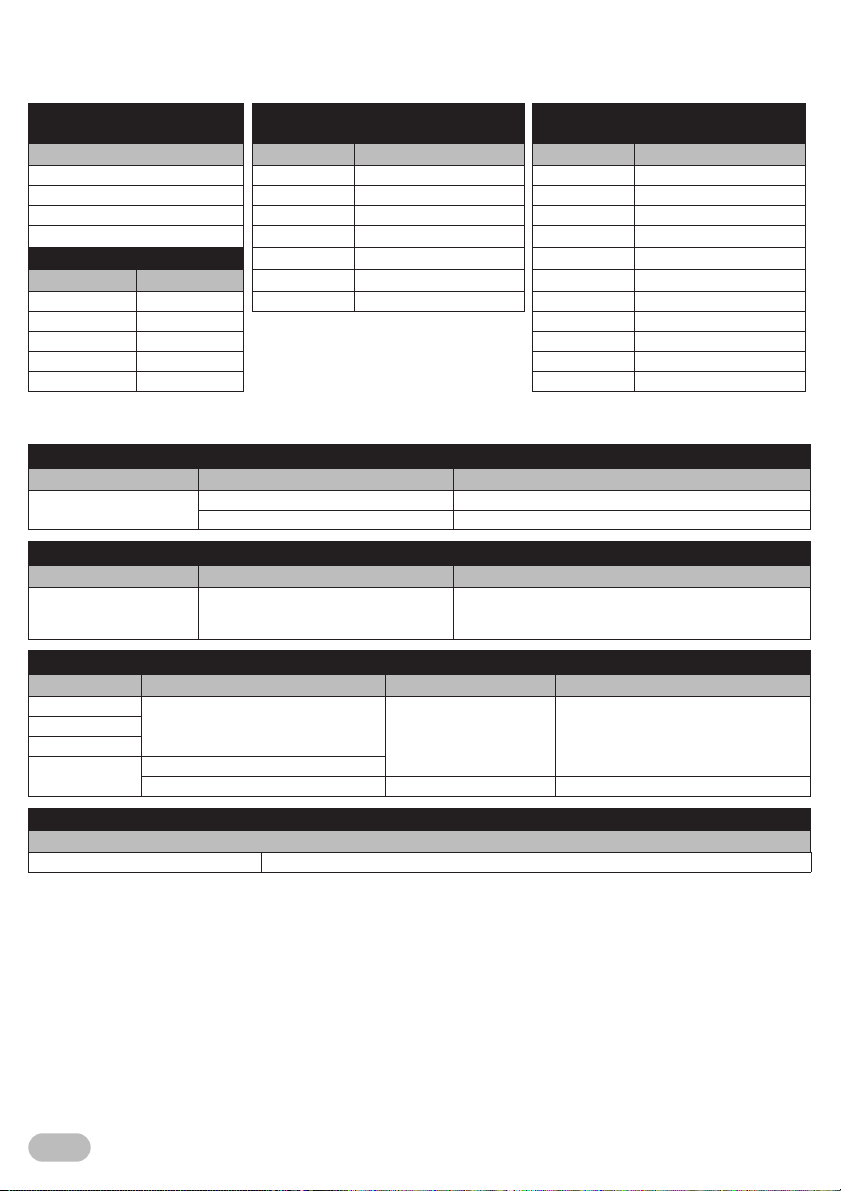
Input Resolution
• HD models: 32FL553P/32FL553/29FL553P/29FL553/24FL553P/24FL553
• Full HD models: 46FL753P/39FL753P
YPbPr IN
(Component video)
PC(VGA) IN
HD models
PC(VGA) IN
Full HD models
Resolution Resolution Refresh rate Resolution Refresh rate
480i/p 640 x 480 60Hz / 72Hz / 75Hz 640 x 480 60Hz / 72Hz / 75Hz
576i/p 720 x 400 70Hz 720 x 400 70Hz
720p 800 x 600 60Hz / 72Hz / 75Hz 800 x 600 60Hz / 72Hz / 75Hz
1080i 1024 x 768 60Hz / 70Hz / 75Hz 1024 x 768 60Hz / 70Hz / 75Hz
HDMI
Resolution Refresh rate
480i/p 60Hz 1360 x 768 60Hz 1280 x 960 60Hz
576i/p 50Hz 1280 x 1024 60Hz
720p 50Hz / 60Hz 1360 x 768 60Hz
1080i/p 50Hz / 60Hz 1680 x 1050 60Hz
1080p 24Hz 1920 x 1080 60Hz
1280 x 768 60Hz / 75Hz 1280 x 768 60Hz / 75Hz
1280 x 800 60Hz 1280 x 800 60Hz
Multimedia Format
[PHOTO]
File Ext. Codec Remark
.jpg/.jpeg
File Ext. AUDIO Codec Remark
.mp3 MP3
Container VIDEO Codec AUDIO Codec Max Resolution
.avi
.mkv
.mov
.mp4
Format FAT32 / FAT16
Progressive JPEG Max Resolution: 1024 x 768
Baseline JPEG Max Resolution: 8192 x 8192
[MUSIC]
Sample rate: 32k - 48kHz
Bit rate: 32k - 320kbps
Channel: Mono / Stereo
[MOVIE]
H.264
H.264
MPEG 2 MP3, Dolby Digital, AAC 720 x 576
MP3, Dolby Digital, AAC 1920 x 1080
File system
File Format
32
EN
Page 33

A39Q1EP/A33T1EP/A33F1EP/A33F0EP/A33M1EP/A33M0EP/A33L1EP/A33L0EP
★★★★★
 Loading...