

Page 1
EnglishDeutschFrançaisEspañolItalianoEλληvIkάPortuguêsРусскийTϋrkçe
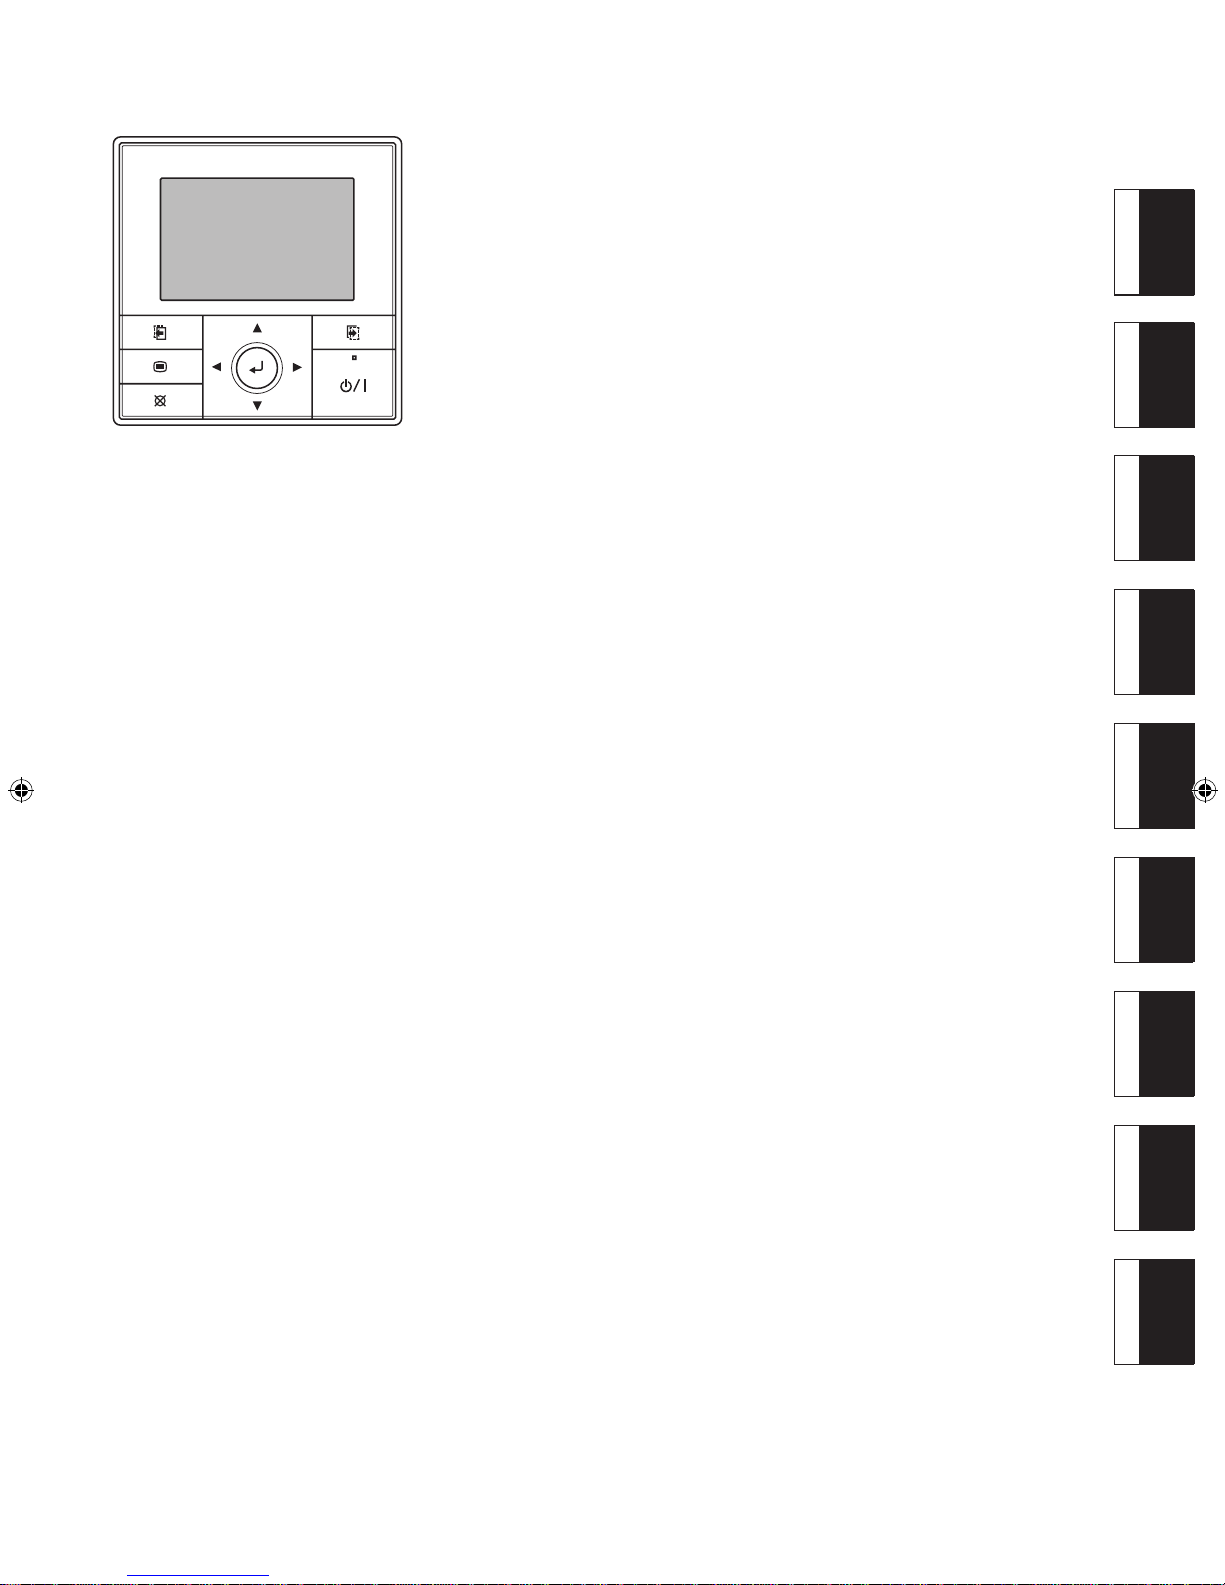
REMOTE CONTROLLER (WIRED TYPE)
UTY-RVN*M
OPERATING MANUAL
KEEP THIS MANUAL FOR FUTURE REFERENCE
BEDIENUNGSANLEITUNG
BEWAHREN SIE DIESES HANDBUCH ZUM SPÄTEREN NACHSCHLAGEN AUF
MODE D’EMPLOI
CONSERVEZ CE MANUEL POUR RÉFÉRENCE ULTÉRIEURE
MANUAL DE FUNCIONAMIENTO
CONSERVE ESTE MANUAL PARA SU FUTURA CONSULTA
MANUALE DI ISTRUZIONI
CONSERVARE IL PRESENTE MANUALE PER FUTURE CONSULTAZIONI
ΕΓΧΕΙΡΙΔΙΟ ΛΕΙΤΟΥΡΓΙΑΣ
ΦΥΛΑΞΤΕ ΤΟ ΕΓΧΕΙΡΙΔΙΟ ΓΙΑ ΜΕΛΛΟΝΤΙΚΗ ΑΝΑΦΟΡΑ
MANUAL DE INSTRUÇÕES
GUARDE ESTE MANUAL PARA REFERÊNCIA FUTURA
РУКОВОДСТВО ПО ЭКСПЛУАТАЦИИ
РУКОВОДСТВО ДЛЯ СПРАВОК В БУДУЩЕМ
KULLANIM KILAVUZU
BU KILAVUZU, DAHA SONRA BAŞVURMAK ÜZERE SAKLAYIN
PART No. 9380221043
Page 2
En-1
OPERATING MANUAL
PART No. 9380221043
REMOTE CONTROLLER (WIRED TYPE)
This product uses a Bitmap font made and developed by
Ricoh Co.,Ltd.
Contents
1. INTRODUCTION ............................................................ 2
1-1. Safety precautions ................................................... 2
1-2. Remote controller overview .................................... 3
1-3. About “Monitor” screen ........................................... 4
2. BASIC OPERATIONS.................................................... 5
2-1. Starting the operation .............................................. 5
2-1-1. On/Off setting .........................................................5
2-1-2. Operation mode setting .......................................... 5
2-1-3. Set temperature adjustment ................................... 5
2-1-4. Fan speed setting ................................................... 5
2-2. Setting items in Menu ............................................. 6
2-3. Setting items in Submenu ....................................... 7
3. FUNCTION SETTING .................................................... 8
3-1. Switching to the “Function” screen ....................... 8
3-2. Function setting items ............................................. 8
3-2-1. Air ow direction setting .......................................... 8
3-2-2. Economy setting ..................................................... 9
3-2-3. Set temp. auto return setting .................................. 9
3-2-4. Set temp. range limitation setting ......................... 10
4. TIMER SETTING ......................................................... 11
4-1. Switching to the “Timer” screen ........................... 11
4-2. Timer setting items ................................................ 11
4-2-1. On timer setting .................................................... 11
4-2-2. Off timer setting .................................................... 12
4-2-3. Weekly timer setting ............................................. 13
4-2-4. Auto-off timer setting ............................................15
5. SUBMENU SETTING .................................................. 17
5-1. Switching to the “Submenu” screen .................... 17
5-2. Date/Time setting ...................................................17
5-2-1. Date setting ..........................................................17
5-2-2. Time setting .......................................................... 17
5-2-3. Summer time (Daylight saving time) setting ......... 18
5-2-4. Change display format setting .............................. 18
5-3. Screen setting ......................................................... 19
5-3-1. Automatic off time setting ..................................... 19
5-3-2. Brightness setting ................................................. 19
5-3-3. Contrast setting ....................................................19
5-4. Filter sign setting ...................................................19
5-4-1. Filter sign reset setting .........................................20
5-4-2. Display setting ...................................................... 20
5-5. R.C. sensor control setting ................................... 21
5-6. Room temp. display setting .................................. 21
5-7. Key lock select setting ........................................... 21
5-8. Initial setting ........................................................... 22
5-8-1. Language setting ..................................................22
5-8-2. Temperature unit setting ....................................... 23
6. CLEANING AND CARE .............................................. 23
7. SPECIFICATION ..........................................................23
8. OTHERS ...................................................................... 23
8-1. Error code ............................................................... 23
8-2. Troubleshooting ..................................................... 24
Page 3
En-2
CAUTION
Do not touch the switches with sharp objects. Doing so will
cause injury, trouble, or electric shock.
Do not insert articles into the slit parts of this unit. Doing so
will cause trouble, heating, or electric shock.
This appliance is not intended for use by persons (including
children) with reduced physical, sensory or mental
capabilities, or lack of experience and knowledge, unless
they have been given supervision or instruction concerning
use of the appliance by a person responsible for their
safety.
Children should be supervised to ensure that they do not
play with the appliance.
]
1
1. INTRODUCTION
1-1. Safety precautions
The “SAFETY PRECAUTIONS” indicated in the manual con-•
tain important information pertaining to your safety. Be sure
to observe them.
For how to operate each indoor unit, refer to the operating •
manual attached with the relevant indoor unit.
Request the user to keep the manual on hand for future use, •
such as for relocating or repairing the unit.
WARNING
This mark indicates procedures which,
if improperly performed, might lead to
the death or serious injury of the user.
CAUTION
This mark indicates procedures which,
if improperly performed, might possibly
result in personal harm to the user, or
damage to property.
WARNING
In the event of a malfunction (burning smell, etc.),
immediately stop operation, turn off the electrical breaker,
and consult authorized service personnel.
Do not repair or modify any damaged cable by yourself.
Let the authorized service personnel to do it. Improper work
will cause an electric shock or a fire.
This unit contains no user-serviceable parts. Always consult
authorized service personnel for repairing, installation, and
relocation of this product.
Improper installation or handling will cause a product
malfunction, an electric shock, or a fire.
Do not touch with wet hands. It may cause an electric
shock.
If children may approach the unit, take preventive measures
so that they cannot reach the unit.
Lack of preventive measures may cause an accident.
Do not use ammable gases near the unit. It may cause a
fire from leaking gas.
CAUTION
Do not set vessels containing a liquid on this unit. Doing so
will cause heating, fire or electric shock.
Do not expose this unit directly to water. Doing so will
cause trouble, electric shock or heating.
Dispose of the packing materials safely. Tear and dispose
of the plastic packing bags so that children cannot play with
them. There is the danger of suffocation if children play with
the original plastic bags.
Do not place electrical devices within 1 m (3.3 ft) of this
unit. It may cause malfunction or failure.
Do not use fire near this unit or place a heating apparatus
nearby. It may cause malfunction.
Page 4
En-3
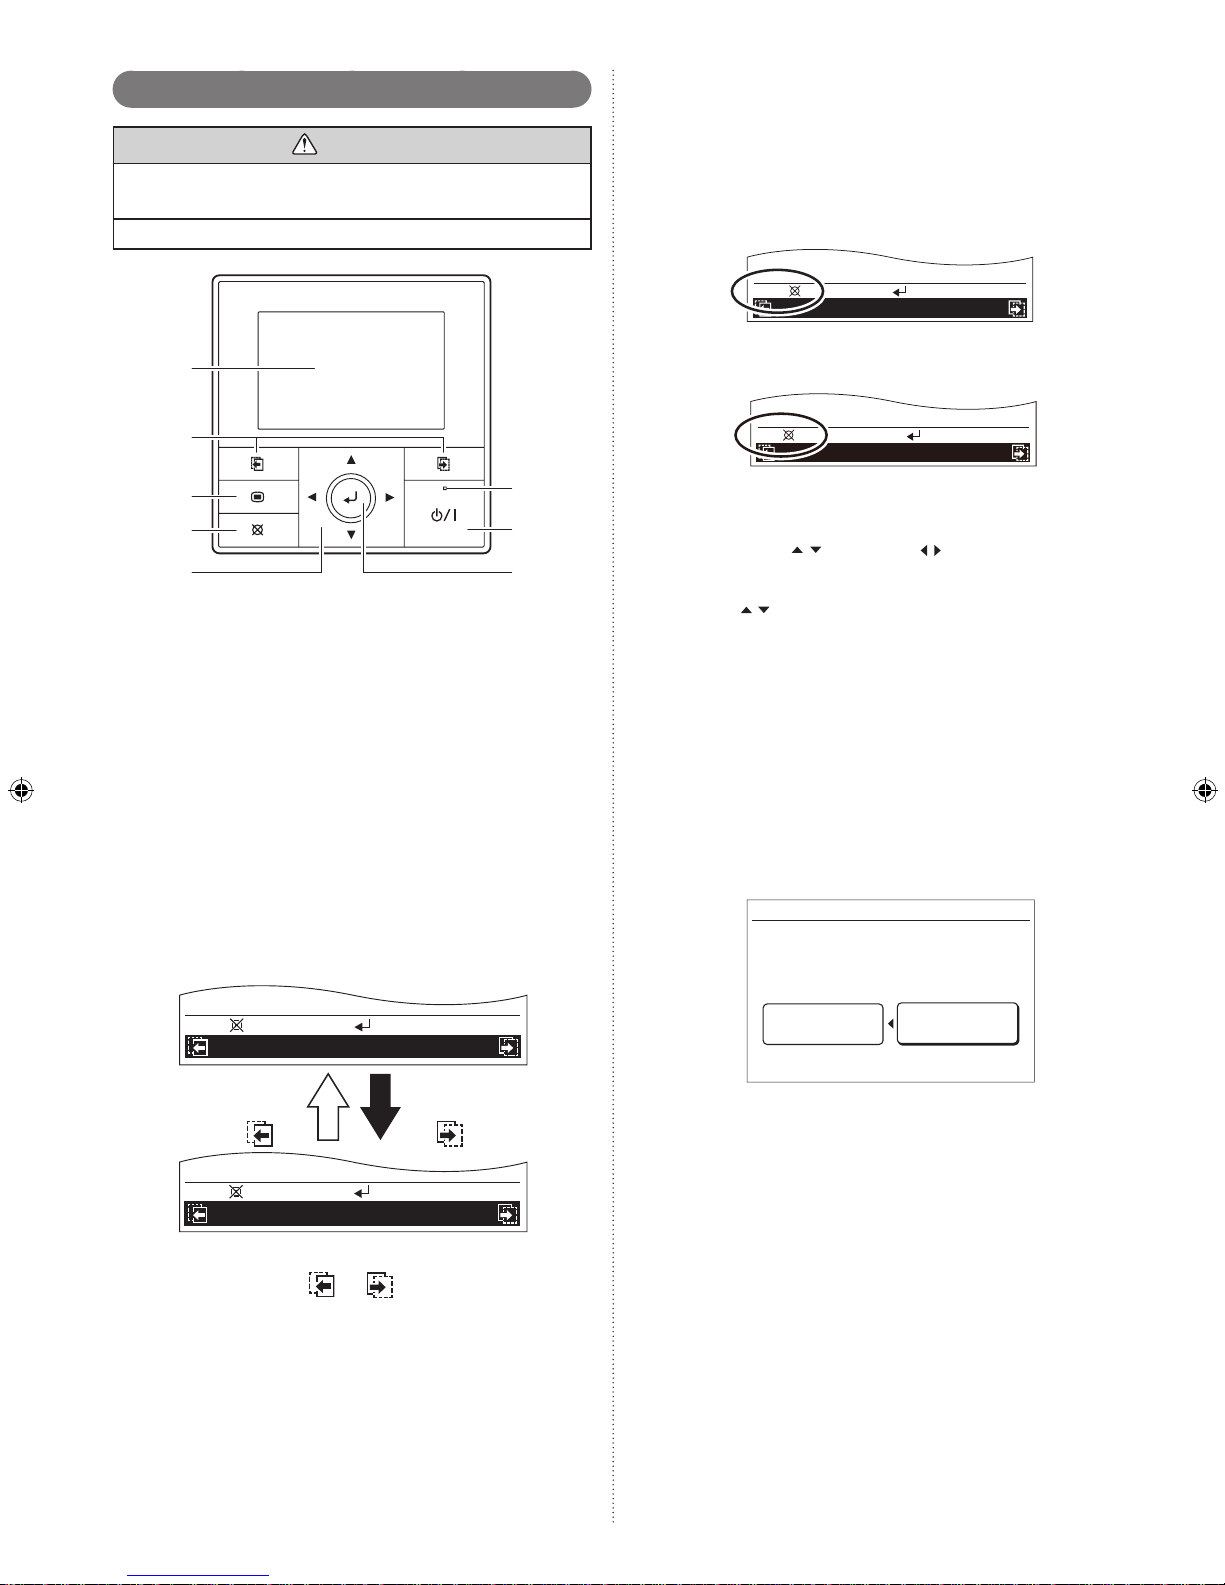
(4) Cancel button
Cancels the current selection and return to previous
screen.
Operable control at the setting is displayed in the lower
left of each setting screen as follows:
When you press this button while setting, the setting is •
canceled and returns to the previous screen.
XXXXXX XXXXXX
Cancel:
OK:
When this button is pressed after setting (or before set-•
ting), it returns to the previous screen.
XXXXXX XXXXXX
Back:
Setting:
(5) Cursor button
When up/down
or left/right arrows are displayed
on the screen, you can move the cursor to change the
selected items.
Up/down arrows are also displayed when the setting
item is adjustable or changeable.
NOTE: Press the marked part on the [Cursor button]. It
does not respond correctly when diagonally operating it.
(6) Enter button
Selects the highlighted item or finalize the setting.
NOTE:
When switching to another setting screen before
the setting is completed, the cancel confirmation
screen is displayed. When canceling the setting,
select [Yes] with the [Cursor button (Left/Right)]
and press the [Enter button].
Setting change will be canceled. OK?
No
Yes
(7) Power indicator
Lights green when the unit is turned on, and goes off
when the unit is turned off.
NOTE: It blinks when an error occurs.
(8) On/Off button
Starts or stops the operation.
1-2. Remote controller overview
CAUTION
Press the button lightly with a finger. It may cause a failure
if pressed with excessive force.
Do not press the screen too hard. It may cause a failure.
(1)
(2)
(3)
(4)
(5)(6)
(8)
(7)
(1) Display panel (with backlight)
Backlights when you press any button.•
Depending on the operation or setting, the content •
changes.
The brightness, contrast, and automatic light-off setting •
of the backlight can be adjusted.
Refer to “5. SUBMENU SETTING”.
NOTE: While the backlight is off by the automatic light-
off, the first button operation does not work, and
the backlight illuminates. (The On/Off button is
excluded.)
While the backlight is set to [Off], it is effective
from the first button operation.
(2) Screen switch button (Left/Right)
Backwards the screen to previous setting item or forwards
the screen to next setting item.
Ex.) “Date” screen
Change display format
Time
OK:
Cancel:
OK:
Cancel:
Change display format
Date
Screen switch
button (Right)
Screen switch
button (Left)
NOTE: These buttons are active only when any com-
binations of or and the relevant screen
names are displayed in the black field at the bot-
tom of the screen.
(3) Menu button
When you press this button while the “Monitor” screen is
displayed, it switches to the “Menu” screen.
If you press the button again “Menu” screen, it switches to
the “Submenu” screen.
Page 5
En-4
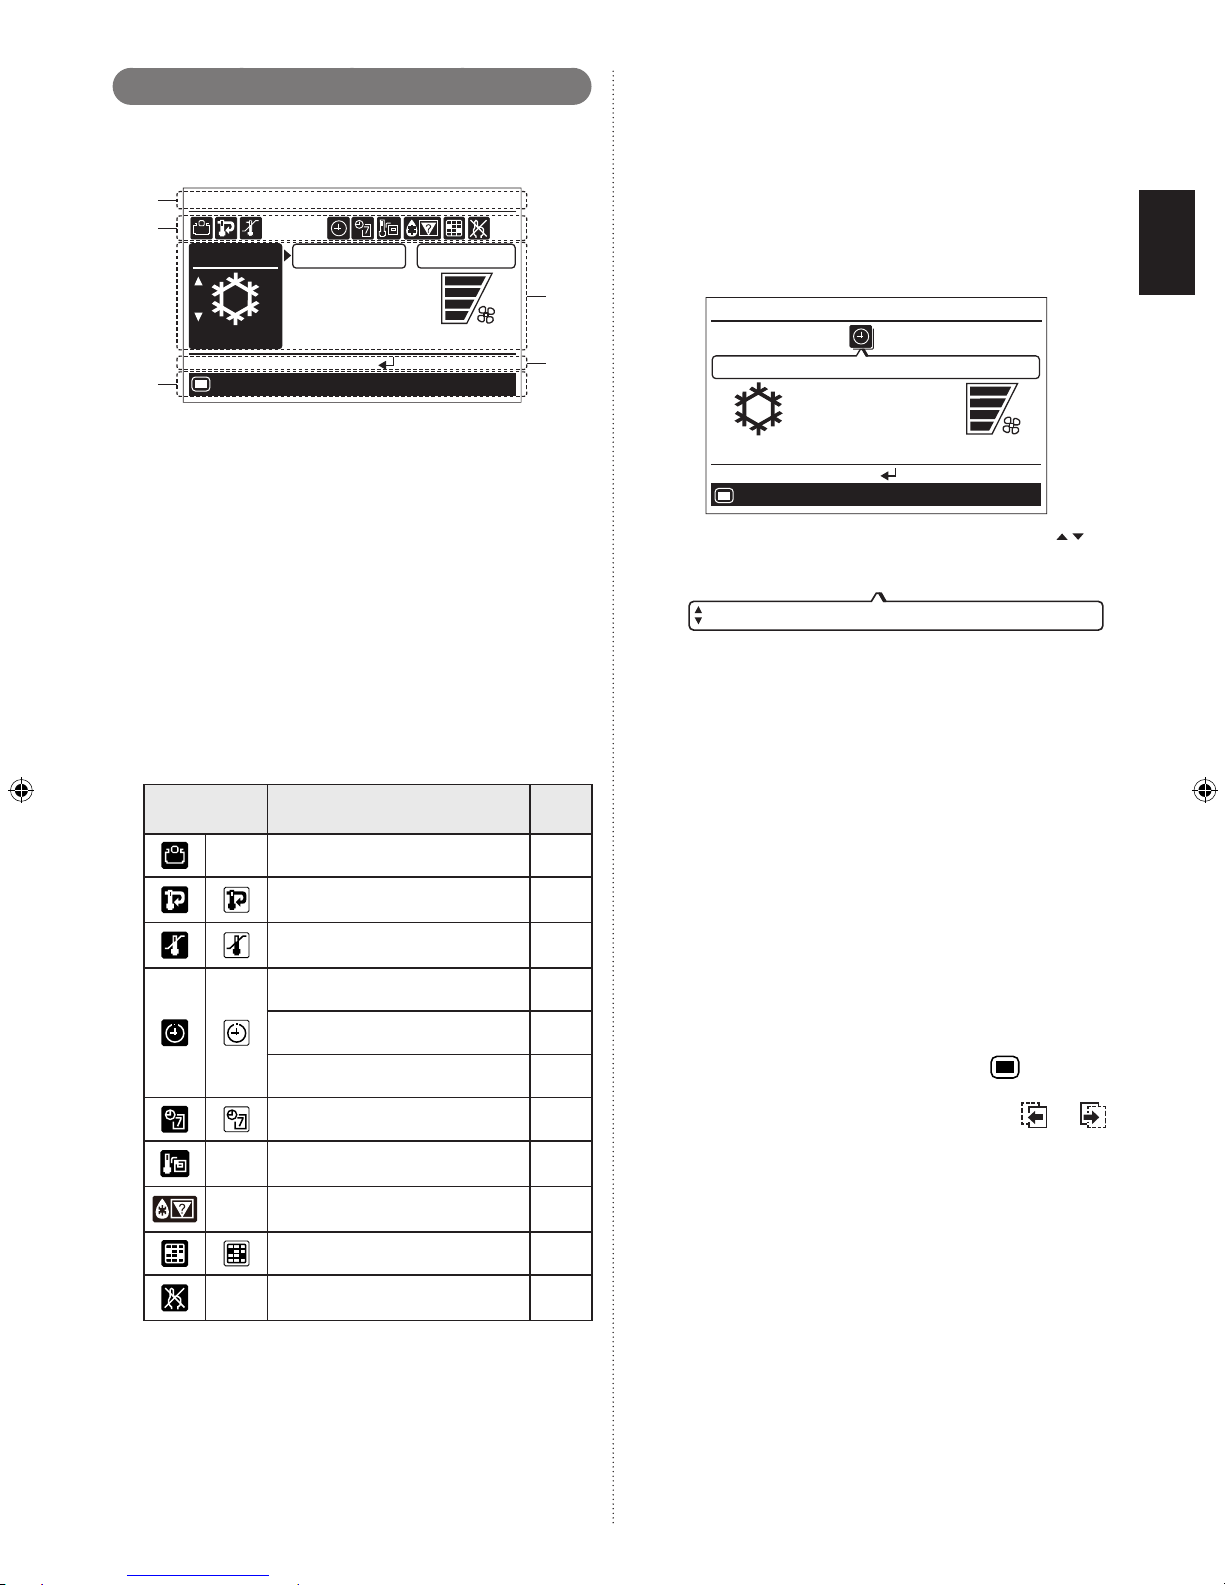
1-3. About “Monitor” screen
“Monitor” screen shows several statuses such as the operating status of the air conditioner, function setting, or other current operating conditions.
Mode
Menu
Cool
Monitor
Room 28˚
C
Set temp.
Fan
High
°
C
26
Mo
10:00
Icon check:
(1)
(2)
(5)
(3)
(4)
(1) Screen status and current conditions
Shows the current screen name, room temperature, day
of the week, and clock.
NOTES:
The clock can be changed to 24-hour clock, AM/PM •
(12-hour: 12:00–11:59 or 0:00–11:59) clock. (Refer
to “5-2-4. Change display format setting” on
page 18.)
Room temperature indication is available only if the •
“Room temp. display” function is enabled. (Refer to
“5-6. Room temp. display setting” on page 21.)
(2) Icon display
Shows the function that is currently working or set.
NOTE: In this section, all the possible icons are dis-
played for description.
Icon
Function name
See
page
- Economy 9
Set temp. (temperature) auto
return
9
Set temp. (temperature) range
limitation
10
On timer 11
Off timer 12
Auto-off timer 15
Weekly timer 13
-
R.C. (Remote Controller) sensor
control
21
-
Automatic defrosting, oil
recovery, or mode mismatch
24
Filter cleaning notification 20
-
R.C. (Remote Controller)
prohibition
-
White icon on a black background:
Indicates that the function is valid and performing the
function or standby state.
Black icon on a white background:
Indicates that the controller is in non-operating state be-
cause R.C. prohibition on the primary unit is working, or
timer has been set, though the function is valid.
About “Icon check” function:
In “Monitor” screen, you can check the name of the icon
that indicates function currently set.
NOTE: This function is only available when at least 1 icon
is displayed on the icon display.
Message balloon with the function name appears when •
you press the [Enter button] and select the icon by using
the [Cursor button].
Item that has a timer function, remaining time until the •
timer expires is also displayed.
Cool
Monitor
Mo
10:00
High
°
C
26
Menu
Off timer: Remaining 1.0 hour
End:
If multiple timers have been set, up/down arrows • are
displayed in the message balloon. To check the target
timer function, press the [Cursor button (Up/Down)].
Off timer: Remaining 1.0 hour
With pressing the [Cursor button (Left/Right)], you can •
check the other icon functions when several icons are
displayed on the “Monitor” screen.
When you press the [Enter button] again, the message •
balloon is closed.
If there is no additional button operation for 3 seconds, •
the icon check function is finished.
(3) Operating condition display
Shows the operating mode, set temperature, and fan
speed that are currently working or set.
Mode display: Operating mode is displayed.•
Set temp. display: Set temperature is displayed.•
Fan display: Fan speed is displayed.•
(4) Operation guidance display
Shows the current operable items and the button to be
pressed.
(5) Screen switch guidance display
Any combination of [Menu button] mark (
) with name
of switchable screen by pressing the [Menu button] or
[Screen switch button (Left /Right)] mark (
or )
with name of switchable screen by pressing the [Screen
switch button (Left/Right)] is displayed.
Page 6
En-5
2. BASIC OPERATIONS
2-1. Starting the operation
PREPARATION:
Check whether the current time is displayed correctly on the
screen. When changing the time or switching the setting for
summer time (daylight saving time), follow the instructions in
“5-2. Date/Time setting”.
Menu
Monitor
Mo
10:00
O f f
2-1-1. On/Off setting
Press the [On/Off button].
The power indicator (green) lights, and the air
conditioner starts the operation.
When you press the button again, the opera-
tion is stopped, and the power indicator is
turned off.
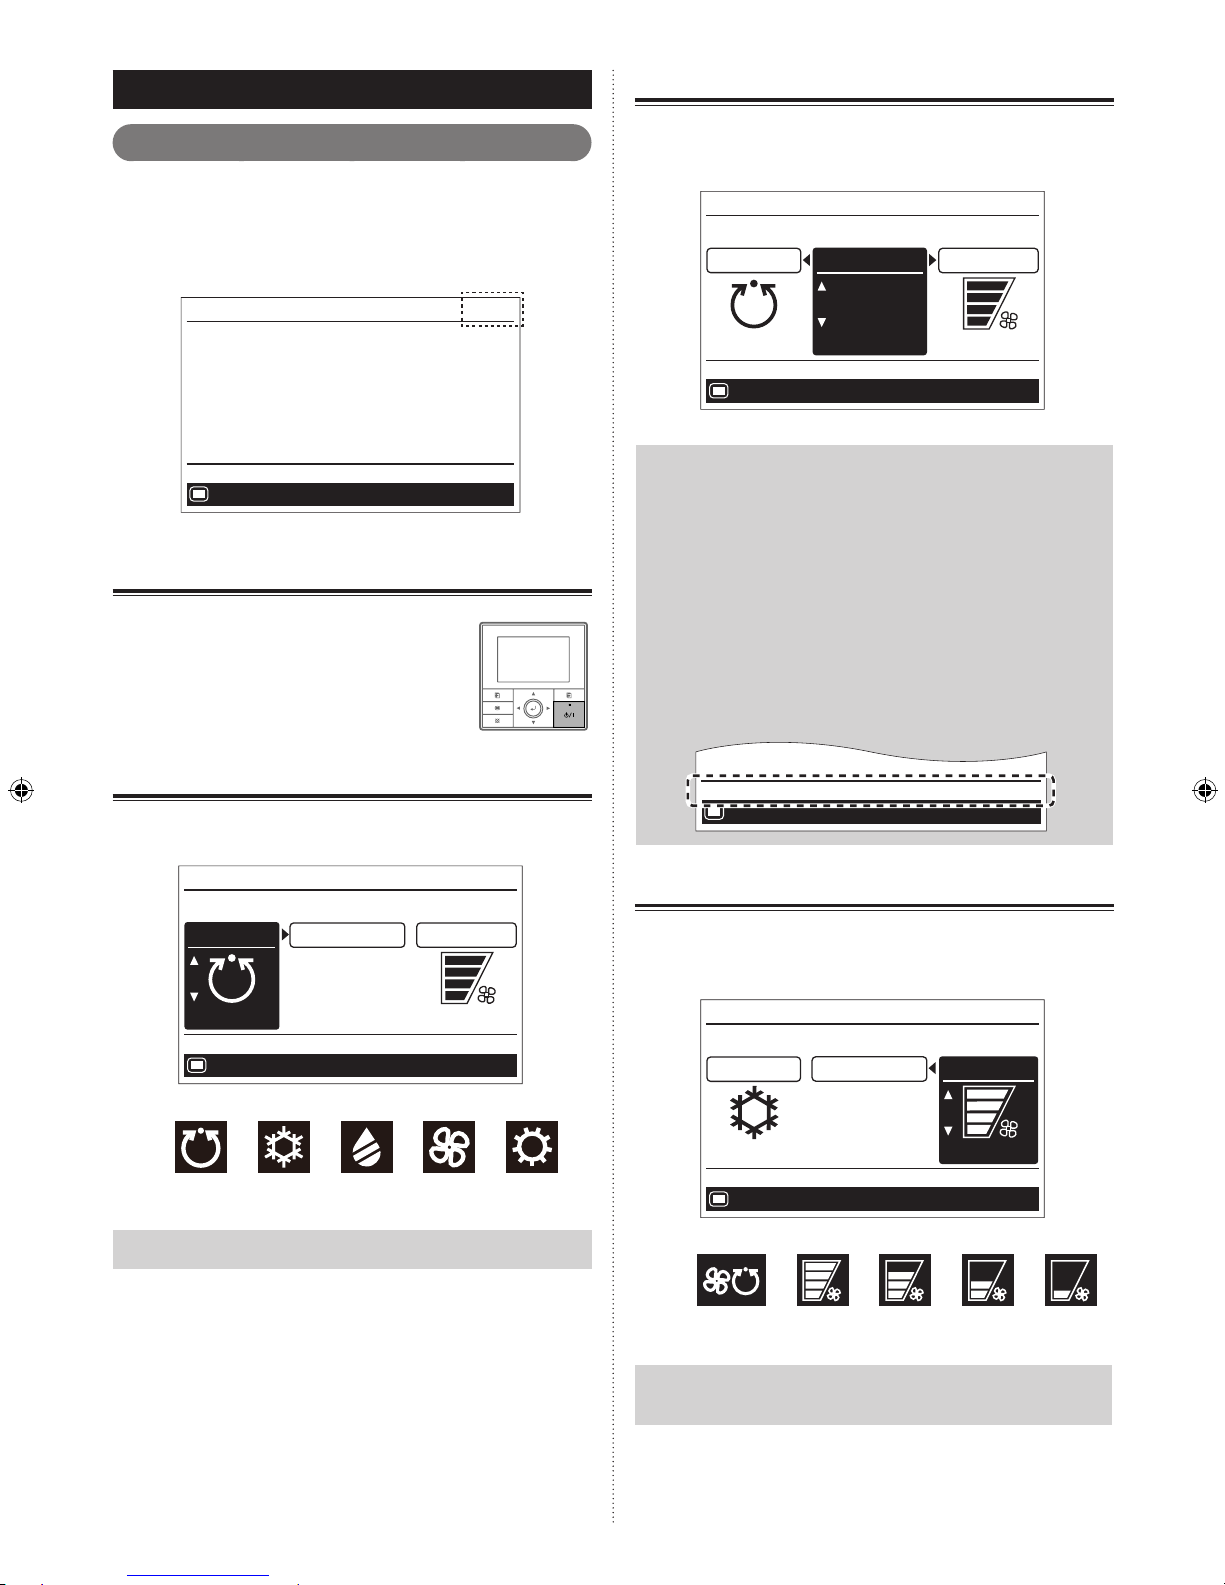
2-1-2. Operation mode setting
In “Monitor” screen, select [Mode], and switch to the desired
operation mode with the [Cursor button (Up/Down)].
Mode
Menu
Auto
Monitor
Set temp.
Fan
High
°
C
26
Mo
10:00
Operation mode marks
Auto Cool Dry Fan Heat
Note
Only the adjustable operation mode is displayed.
If there is another operation setting to be changed, you can
continue the configuration. Move to desired item by using
[Cursor button (Left/Right)].
2-1-3. Set temperature adjustment
In “Monitor” screen, select [Set temp.] with the [Cursor button
(Left/Right)], and adjust the room temperature with the [Cursor
button (Up/Down)].
Mode
Menu
Auto
Monitor
Set temp.
Fan
High
°
C
26
Mo
10:00
Notes
• Possible temperature setting ranges in the operation
mode are as follows:
Cool, Dry, Auto ................ 18 to 30 °C (64 to 88 °F)
Heat ................................. 16 to 30 °C (60 to 88 °F)
• Wh en operation mode is set to [Fan], th e s et
temperature cannot be adjusted. ([Set temp.] cannot
be selected.)
• If the temperature is being out of the range configured
in [Set temp. range] setting, message indicating
that the temperature is restricted is displayed on the
screen.
Menu
Restricted by the set temperature range restriction
11
2-1-4. Fan speed setting
In “Monitor” screen, select [Fan] with the [Cursor button
(Left/Right)], and adjust the fan speed with the [Cursor button
(Up/Down)].
Mode
Menu
Cool
Monitor
Set temp.
Fan
High
°
C
26
Mo
10:00
Fan speed marks
Auto High Medium Low Quiet
Note
When the operation mode is set to [Dry], Fan speed
switches to [Auto]. (Fan speed cannot be selected.)
Page 7
En-6
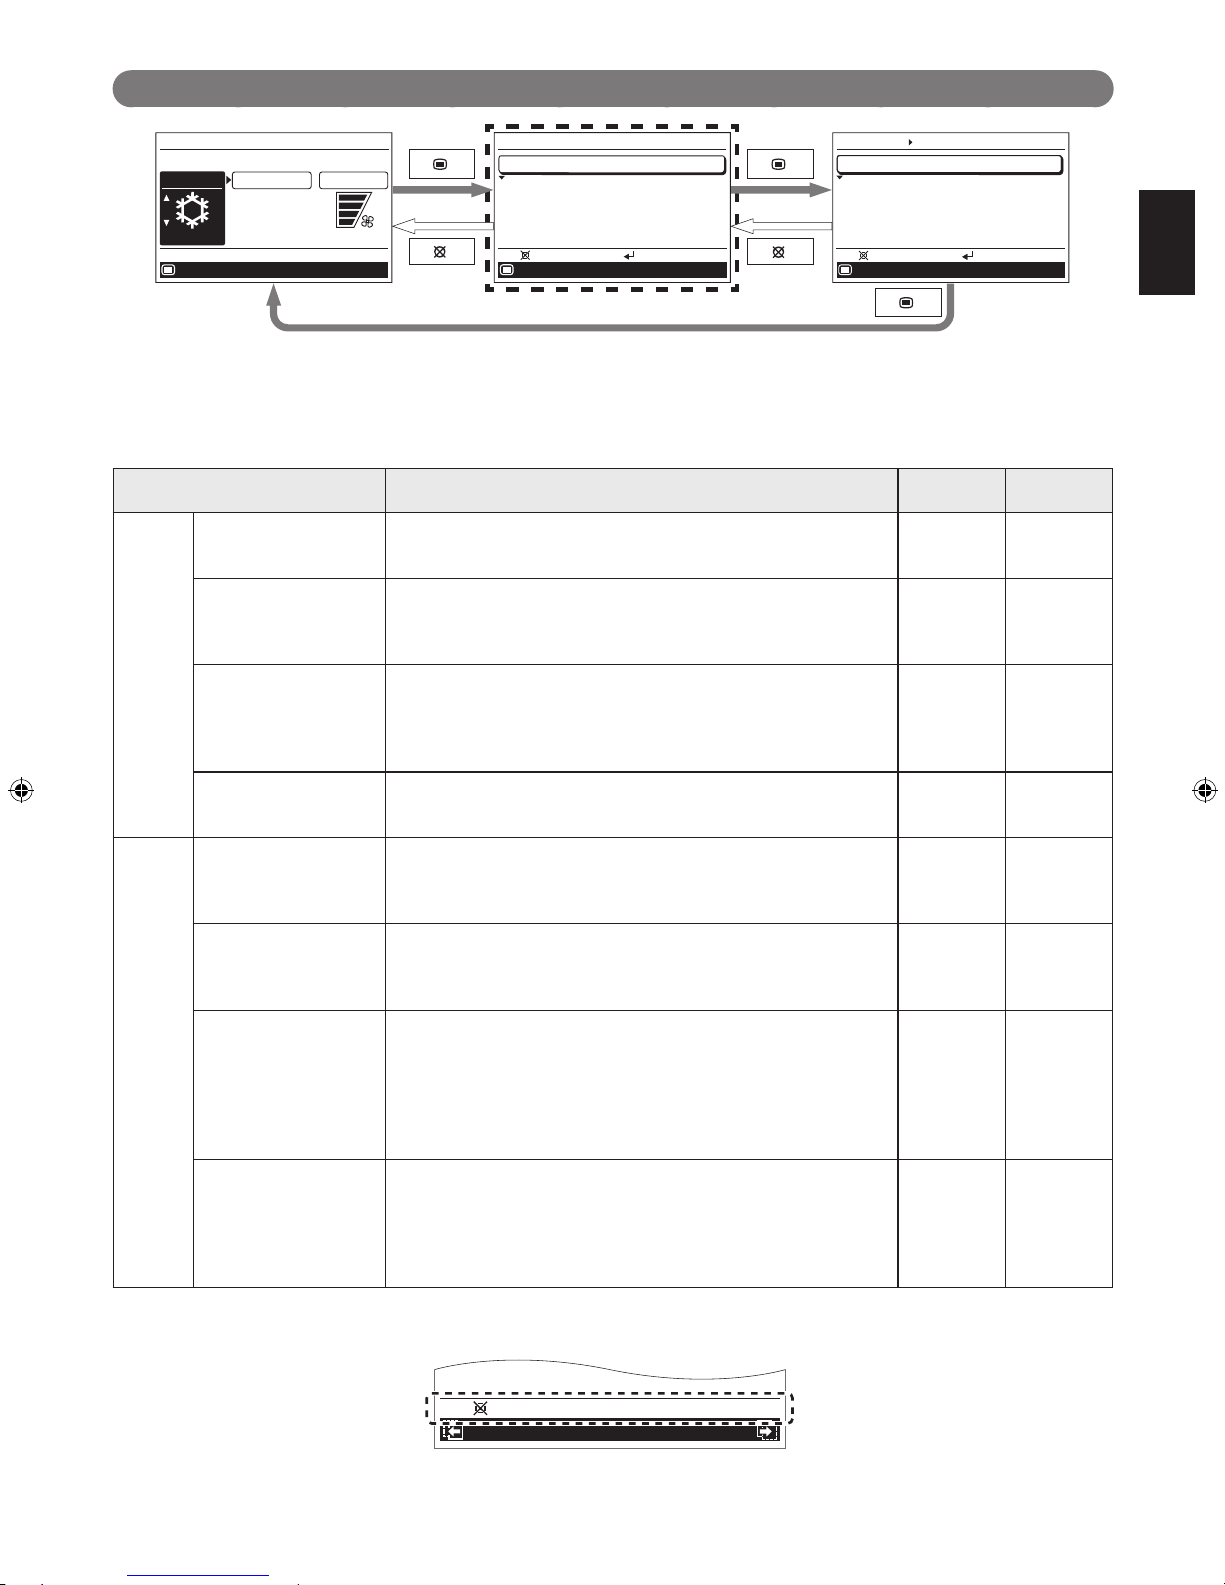
2-2. Setting items in Menu
°
C
26
Mode
Menu
Cool
Monitor
Set temp.
Fan
High
Mo
10:00
Menu
Function
Timer
Submenu
Mo
10:00
Setting:
Back:
Date and time
Monitor
Screen
Filter sign
R.C. sensor control
Room temp. display
Off
Off
Mo
10:00
Setting:
Back:
Submenu
[
1/2
]
Following items can be adjusted in Menu.
NOTES:
Items marked “–” in “Secondary unit” column cannot be adjusted from the remote controller that is specified as the second-•
ary control unit. Adjust the function on the primary unit.
Depending on the type of the indoor unit, some features cannot be set. •
Settings and Display Items Details
Operation
(See page)
Secondary
unit
Function Air ow direction Sets the airow direction.
The airow direction position adjustment and the swing can be
set.
8 O
Economy The room temperature will be little higher than the set-temp
under cooling mode and lower than set-temp under heating
mode. Therefore, the economy mode is able to save more
energy than other normal mode.
9 O
Set temp. (tempera-
ture) auto return
The temperature automatically returns to the preset value after a
certain period of time has elapsed since the set temperature was
changed.
The set time can be set from 30 to 120 minutes in units of 10
minutes.
9 –
Set temp. (tempera-
ture) range limitation
Limits the range of the set temperature.
The temperature range can be limited through the operation
mode.
10 –
Timer On timer Use this timer function to start air conditioner operation. The tim-
er operates and air condition operation starts after the set time
has passed. The timer can be set up to 24 hours in advance.
Can be set up to 24 hours in units of 30 minutes.
11 –
Off timer Use this timer function to stop air conditioner operation. The tim-
er operates and air conditioner operation stops after the set time
has passed. The timer can be set up to 24 hours in advance.
Can be set up to 24 hours in units of 30 minutes.
12 –
Weekly timer Operation start and end times can be set to 1 week.
Up to 8 patterns of On/Off, operation mode, and temperature setting can be set in 1 day.
2 sets of the weekly timer, [Weekly 1] and [Weekly 2], can be set.
For example, you can assign the [Weekly 1] for summer and
[Weekly 2] for winter. Then you only need to switch [Weekly 1]
and [Weekly 2] by the season.
13 –
Auto-off timer Operation end time can be set if the air conditioning operation
has been started with the [On/Off button] of this remote
controller.
The set time can be set from 30 to 240 minutes in units of 10
minutes.
You can also specify the valid hour in a day for this timer.
15 –
NOTE: If the function you are selecting is restricted by [Management] function, following message is displayed in the operation
guidance display.
XXXXXX
XXXXXX
Restricted by the management function
Back:
Page 8

2-3. Setting items in Submenu
°
C
26
Mode
Menu
Cool
Monitor
Set temp.
Fan
High
Mo
10:00
Menu
Function
Timer
Submenu
Mo
10:00
Setting:
Back:
Date and time
Monitor
Screen
Filter sign
R.C. sensor control
Room temp. display
Off
Off
Mo
10:00
Setting:
Back:
Submenu
[
1/2
]
Initial
Management
Key lock select
Child lock
Monitor
Submenu
2/2
Mo
10:00
Back:
Setting:
Following items can be adjusted in Submenu.
NOTE: Depending on the type of the indoor unit, some features cannot be set.
Settings and Display Items Details
Operation
(See page)
Secondary
unit
Date and
time
Date Sets and corrects the date.
17 O
Time Sets and corrects the time. 17 O
Summer time
Daylight saving time
Sets or cancels daylight saving time.
18 O
Change display format The display format for the date and time can be changed. 18 O
Screen The LCD backlight time, backlight brightness, and LCD
contrast can be changed.
19 O
Filter sign* Filter sign reset Removes the filter sign. 20 O
Display Switches between displaying and non-displaying the filter sign. 20 O
R.C. (Remote Controller) sensor
control*
The room temperature sensor of the indoor unit can be
switched to the room temperature sensor that is built into this
remote controller.
NOTE: This setting can be set on either of one of the primary
unit or the secondary unit.
21 O
Room temp. (temperature) display Switches between displaying and non-displaying the room
temperature.
The displayed room temperature is the temperature around
the remote control.
21 O
Key lock
select
Child lock Restricts all the button operation. 21 O
Part lock Restricts the [Menu button] operation. 21 O
Initial Language Switches the display language of the remote control.
The following languages can be selected: English, German,
French, Spanish, Italian, Greek, Russian, Portuguese, and
Turkish.
22 O
Temp. (Temperature)
unit
Switches the set temperature and the room temperature
display between Celsius and Fahrenheit.
22 O
Password setting Password for “Management” function setting can be set.
(Refer to the installation manual.)
- O
Management Restricts the operations of some functions by non-authorized
person.
With the password control, only the administrator can get access to the function setting.
(Refer to the installation manual.)
- O
*: Functions set to inactive at the factory, and they are not displayed on the “Submenu” screen. To activate these functions, con-
sult authorized service personnel.
En-7
Page 9

En-8
2
“Air ow direction” screen opens. In “Air ow direction”
screen, adjustable airflow direction on the relevant
indoor unit and its current specified movement are dis-
played.
Select [Vertical] or [Horizontal] with the [Cursor button
(Left/Right)].
Air flow direction
Horizontal
Swing
Vertical
Position adjust
Mo
10:00
Set temp. range
Set temp. au...
Back:
Adjust:
Note
Adjustable airflow direction varies according to the
indoor unit.
3
Select [Swing] (Swing On) or [Position adjust] (Swing
Off) with the [Cursor button (Up/Down)], and press the
[Enter button].
Air flow direction
Vertical
Horizontal
Swing
Swing
On
Mo
10:00
Air flow direction
Vertical
Horizontal
Swing
Mo
10:00
Swing
Off
When [Swing] is selected:
Starts swing operation.
Air flow direction
Horizontal
Swing
Vertical
Swing
Back:
Mo
10:00
Set temp. range
Set temp. au...
When [Position adjust] is selected:
With pressing the [Enter button], adjust the desired air-
ow direction.
When the [Enter button] is pressed, Position adjust indication blinks and the arrow indicates the airow direction moves one step.
Air flow direction
Horizontal
Swing
Vertical
Position adjust
Mo
10:00
Set temp. range
Set temp. au...
Back:
Adjust:
If you press the [Cancel button], the screen returns to
the “Function” screen.
3. FUNCTION SETTING
3-1. Switching to the “Function” screen
1
In “Menu” screen, select [Function] with the [Cursor
button (Up/Down)], and press the [Enter button].
Menu
Function
Timer
Submenu
Mo
10:00
Setting:
Back:
2
“Function” screen is displayed. To return to the “Menu”
screen, press the [Cancel button].
Function
Air flow direction
Economy
Set temp. auto return
Set temp. range
Off
Disable
Disable
Timer
Mo
10:00
Setting:
Back:
3-2. Function setting items
In “Function” screen, select the target function with the [Cursor
button (Up/Down)], and press the [Enter button]. Then the set-
ting screen of the selected function is displayed.
3-2-1. Air ow direction setting
1
In [Function] screen, select [Air ow direction] with the
[Cursor button (Up/Down)], and press the [Enter but-
ton].
Function
Air flow direction
Economy
Set temp. auto return
Set temp. range
Off
Disable
Disable
Timer
Mo
10:00
Setting:
Back:
Page 10

En-9
2
“Set temp. auto return” screen is displayed.
Set temp. auto return
Enable/Disable setting
Disable
Return time and temp. setting
Time
Temp.
/
//
Cool/Dry
26
°
C
30min.
/
26
°
C
30min.
Heat
Mo
10:00
Setting:
Back:
Air flow dire...
Set temp. range
Select the item with the [Cursor button (Up/Down)], and
press the [Enter button].
3
For [Enable/Disable setting], select [Enable] or [Disable]
with the [Cursor button (Up/Down)], and press the [Enter
button] to complete the setting.
Set temp. auto return
Enable/Disable setting
Enable
Return time and temp. setting
Time
Temp.
/
//
Cool/Dry
26
°
C
30min.
/
26
°
C
30min.
Heat
Mo
10:00
OK:
Cancel:
Air flow dire...
Set temp. range
4
For [Return time and temp. setting], select operation
mode with the [Cursor button (Up/Down)], and press
the [Enter button]. Adjust the value with the [Cursor button (Up/Down)].
With the [Cursor button (Left/Right)], the cursor can be
switched [Time] and [Temp].
/
Set temp. auto return
Enable/Disable setting
Enable
Return time and temp. setting
Time
Temp.
Cool/Dry
26
°
C
30min.
26
°
C
30min.
Heat
Mo
10:00
Air flow dire...
Set temp. range
OK:
Cancel:
To complete the setting, press the [Enter button]. To re-
turn to the “Function” screen, press the [Cancel button].
Notes
• The set time can be set from 30 to 120 minutes in
units of 10 minutes.
• Possible temperature setting ranges in the operation
mode are as follows:
Cool, Dry .......................... 18 to 30 °C (64 to 88 °F)
Heat .................................. 16 to 30 °C (60 to 88 °F)
• If any ranges have been set in [Set temp. range]
setting, adjustable temperature range in this setting
follows the restricted range.
• If you set any ranges in the [Set temp. range] setting
after setting of [Set temp. auto return], the restricted
range set in the [Set temp. range] also overrides [Set
temp. auto return] setting.
• Even if the temperature setting change is done on
the secondary remote controller, it returns to the set
value in [Set temp. auto return] on the primary remote
controller.
3-2-2. Economy setting
1
In “Function” screen, select [Economy] with the [Cursor
button (Up/Down)].
Function
Air flow direction
Economy
Set temp. auto return
Set temp. range
Off
Disable
Disable
Timer
Mo
10:00
Setting:
Back:
To change the setting, press the [Enter button].
2
Select [On] or [Off] by pressing the [Cursor button
(Up/Down)], and press the [Enter button] to complete
the setting.
Function
Air flow direction
Economy
Set temp. auto return
Set temp. range
On
Disable
Timer
Mo
10:00
Disable
OK:
Cancel:
When you return to the “Monitor” screen, the icon is displayed.
To check the function, press the [Enter button] and select the
icon.
Cool
Monitor
High
°
C
26
Menu
Economy
Mo
10:00
End:
3-2-3. Set temp. auto return setting
1
In “Function” screen, select [Set temp. auto return] with
the [Cursor button (Up/Down)].
Function
Air flow direction
Economy
Set temp. auto return
Set temp. range
Off
Timer
Disable
Disable
Mo
10:00
Setting:
Back:
To change the setting, press the [Enter button].
Page 11

En-10
When you return to the “Monitor” screen, the icon is displayed.
To check the function, press the [Enter button] and select the
icon.
Cool
Monitor
High
°
C
24
Menu
Set temp. auto return: Remaining 30 minutes
Mo
10:00
End:
3-2-4. Set temp. range limitation setting
1
In “Function” screen, select [Set temp. range] with the
[Cursor button (Up/Down)].
Function
Air flow direction
Economy
Set temp. auto return
Set temp. range
Off
Disable
Timer
Mo
10:00
Disable
Setting:
Back:
To change the setting, press the [Enter button].
2
“Set temp. range” screen is displayed.
Set temp. range
Enable/Disable setting
Temp. setting
Cool/Dry
Heat
Auto
Lower
Upper
18
°
C
30
°
C
30
°
C
30
°
C
16
°
C
18
°
C
Disable
Mo
10:00
Setting:
Back:
Set temp. au...
Air flow dire...
Select the item with the [Cursor button (Up/Down)], and
press the [Enter button].
3
For [Enable/Disable setting], select [Enable] or [Disable]
with the [Cursor button (Up/Down)], and press the [Enter
button] to complete the setting.
Enable/Disable setting
Enable
Set temp. range
Temp. setting
Cool/Dry
Heat
Auto
Lower
Upper
18
°
C
30
°
C
30
°
C
30
°
C
16
°
C
18
°
C
Mo
10:00
OK:
Cancel:
Set temp. au...
Air flow dire...
4
For [Temp. setting], select mode with the [Cursor but-
ton (Up/Down)] and press the [Enter button].
Adjust [Lower] and [Upper] value with the [Cursor but-
ton (Up/Down)].
With the [Cursor button (Left/Right)], the cursor can be
switched [Lower] and [Upper].
To complete the setting, press the [Enter button].
Set temp. range
Enable/Disable setting
Temp. setting
Cool/Dry
Heat
Auto
Lower
Upper
18
°
C
30
°
C
30
°
C
30
°
C
16
°
C
18
°
C
Enable
Mo
10:00
Set temp. au...
Air flow dire...
OK:
Cancel:
Notes
• Possible temperature setting ranges in the operation
mode are as follows:
Cool, Dry, Auto ................ 18 to 30 °C (64 to 88 °F)
Heat ................................. 16 to 30 °C (60 to 88 °F)
• If the temperature out of the Set temp. range limitation
is set, it will be reset at the nearest temperature within
the range.
• Even if the temperature setting change is done on the
secondary remote controller, it returns to temperature
within the range set in [Set temp. range] on the
primary remote controller.
When you return to the “Monitor” screen, the icon is displayed.
To check the function, press the [Enter button] and select the
icon.
Menu
Cool
Monitor
Mo
10:00
High
°
C
26
Set temp. range
End
:
Page 12

En-11
4. TIMER SETTING
4-1. Switching to the “Timer” screen
1
In “Menu” screen, select [Timer] with the [Cursor button
(Up/Down)], and press the [Enter button].
Menu
Function
Timer
Submenu
Mo
10:00
Setting:
Back:
2
“Timer” screen is displayed. To return to the “Menu”
screen, press the [Cancel button].
Function
Timer
On timer
Off timer
Weekly timer
Auto-off timer
Disable
Disable
Disable
Mo
10:00
Disable
Setting:
Back:
4-2. Timer setting items
4-2-1. On timer setting
1
In “Timer” screen, select [On timer] with the [Cursor
button (Up/Down)], and press the [Enter button].
Function
Timer
On timer
Off timer
Weekly timer
Auto-off timer
Disable
Disable
Disable
Mo
10:00
Disable
Setting:
Back:
2
“On timer” screen is displayed.
On timer
Enable/Disable setting
Time setting
Disable
0.5 hour later
Mo
10:00
Auto-off timer
Off timer
Setting:
Back:
To change the setting, select the item with the [Cursor
button (Up/Down)], and press the [Enter button].
3
For [Enable/Disable setting], select [Enable] or [Disable]
with the [Cursor button (Up/Down)], and press the [Enter
button] to complete the setting.
On timer
Enable/Disable setting
Time setting
Enable
0.5 hour later
Mo
10:00
Auto-off timer
Off timer
OK:
Cancel:
4
For [Time setting], adjust the time with the [Cursor but-
ton (Up/Down)], and press the [Enter button] to com-
plete the setting.
On timer
Enable/Disable setting
Time setting
Enable
hour later
Mo
10:00
Auto-off timer
Off timer
OK:
Cancel:
6.0
Note
The [Time setting] can be set up to 24 hours in units of
30 minutes.
When you return to the “Monitor” screen, the icon is displayed.
When the timer is enabled, the remaining time until the timer
expires is displayed in the message balloon.
To check the function, press the [Enter button] and select the
icon.
Menu
Monitor
Mo
10:00
O f f
On timer: Remaining 6.0 hour
End:
Page 13

En-12
4-2-2. Off timer setting
1
In “Timer” screen, select [Off timer] with the [Cursor
button (Up/Down)], and press the [Enter button].
Function
Timer
On timer
Off timer
Weekly timer
Auto-off timer
Disable
Disable
Disable
Mo
10:00
Disable
Setting:
Back:
2
“Off timer” screen is displayed.
Off timer
Enable/Disable setting
Time setting
Disable
1.0 hour later
Mo
10:00
On timer
Weekly timer
Setting:
Back:
To change the setting, select the item with the [Cursor
button (Up/Down)], and press the [Enter button].
3
For [Enable/Disable setting], select [Enable] or [Disable]
with the [Cursor button (Up/Down)], and press the [Enter
button] to complete the setting.
Off timer
Enable/Disable setting
Time setting
1.0 hour later
Enable
Mo
10:00
Weekly timer
On timer
OK:
Cancel:
4
For [Time setting], adjust the time with the [Cursor but-
ton (Up/Down)], and press the [Enter button] to com-
plete the setting.
Off timer
Enable/Disable setting
Time setting
hour later
1.0
Enable
Mo
10:00
Weekly timer
On timer
OK:
Cancel:
Note
The [Time setting] can be set up to 24 hours in units of
30 minutes.
When you return to the “Monitor” screen, the icon is displayed.
When the timer is enabled, the remaining time until the timer
expires is displayed in the message balloon.
To check the function, press the [Enter button] and select the
icon.
Cool
Monitor
Mo
10:00
High
°
C
26
Menu
Off timer: Remaining 1.0 hour
End:
Page 14

En-13
4-2-3. Weekly timer setting
1
In “Timer” screen, select [Weekly timer] with the [Cursor
button (Up/Down)], and press the [Enter button].
Function
Timer
On timer
Off timer
Weekly timer
Auto-off timer
Disable
Disable
Disable
Mo
10:00
Disable
Setting:
Back:
2
“Weekly timer” screen is displayed.
Weekly timer
Weekly timer setting
Weekly timer select
Day off
Su
MoTu
Th
Fr
Sa
We
Disable
Mo
10:00
Auto-off timer
Off timer
Setting:
Back:
To change the setting, select the item with the [Cursor
button (Up/Down)], and press the [Enter button].
3
To set up and activate the weekly timer, you need to
configure following 2 items at least:
Weekly timer select•
Weekly timer setting•
Weekly timer select:
In [Weekly timer select] setting, you can select [Weekly 1],
[Weekly 2], or [Disable].
Each of [Weekly 1] and [Weekly 2] has scheduled timer set-
ting configured in [Weekly timer setting].
1. Select [Weekly timer select] with the [Cursor button (Up/
Down)], and press the [Enter button].
Weekly timer
Weekly timer setting
Weekly timer select
Day off
Su
MoTu
Th
Fr
Sa
We
Disable
Mo
10:00
Auto-off timer
Off timer
Setting:
Back:
2. Select any of [Weekly 1], [Weekly 2], or [Disable] with the
[Cursor button (Up/Down)], and press the [Enter button].
Weekly timer
Weekly timer setting
Weekly timer select
Day off
Su
Mo
Tu
Th
Fr
Sa
We
Weekly 1
Mo
10:00
Auto-off timer
Off timer
OK:
Cancel:
Day off setting:
In [Day off] setting, select the inapplicable days of the week if
there are any days that you want to skip the weekly timer op-
eration.
1. Select [Day off] with the [Cursor button (Up/Down)], and
press the [Enter button].
Weekly timer
Weekly timer setting
Weekly timer select
Day off
Su
Mo
Tu
Th
Fr
Sa
We
Weekly 1
Mo
10:00
Auto-off timer
Off timer
Setting:
Back:
2. Select the day of the week with the [Cursor button (Left/
Right)] and enter check mark with the [Cursor button (Up/
Down)].
To confirm the setting, press the [Enter button].
Weekly timer
Weekly timer setting
Weekly timer select
Day off
Su
Mo
Tu
Th
Fr
Sa
We
Weekly 1
Mo
10:00
Auto-off timer
Off timer
OK:
Cancel:
Note
Weekly timer skips the checked day of the week only
once.
From the next week, it will perform the scheduled weekly timer that is configured in [Weekly timer setting].
Weekly timer setting:
In “Weekly timer setting” screen, you can setup the schedule
for each of [Weekly 1] and [Weekly 2].
1. Select [Weekly timer setting] with the [Cursor button (Up/
Down)], and press the [Enter button].
Weekly timer
Weekly timer setting
Weekly timer select
Day off
Su
Mo
Tu
Th
Fr
Sa
We
Weekly 1
Mo
10:00
Auto-off timer
Off timer
Setting:
Back:
2. “Weekly timer setting” screen (Time 1-4) opens.
1
2
3
4
Weekly 1
Day
Time
End
Su Mo
Tu Fr SaTh
We
Weekly timer setting
Time 5-8
Mo
10:00
Back:
Setting:
Page 15

En-14
Note
“Weekly timer setting” screen consists of 2 pages “Time
1-4” and “Time 5-8”. You can set 4 patterns per page,
and with pressing the [Screen switch button (Left/
Right)], the screen switches between “Time 1-4” and
“Time 5-8” during the setting.
5
6
7
8
Weekly 1
Day
Time
End
Su Mo Tu Fr SaThWe
Weekly timer setting
Time 1-4
Mo
10:00
Back:
Setting:
3.
Press the [Enter button]. Then select [Weekly 1] or [Weekly 2]
with the [Cursor button (Up/Down)], and press the [Enter
button].
1
2
3
4
Weekly 1
Day
Time
End
Su Mo Tu Fr
Sa
ThWe
Weekly timer setting
Time 5-8
Cancel:
Mo
10:00
OK:
4. Select applicable days of the week as follows:
(1) Select [Day] with the [Cursor button (Up/Down)] and
press the [Enter button].
1
2
3
4
Weekly 1
Day
Time
End
Su Mo
Tu Fr SaTh
We
Weekly timer setting
Time 5-8
Mo
10:00
Back:
Setting:
(2) Setting screen for the current day of the week opens.
1
2
3
4
Weekly 1
Day
Time
End
Su
Mo
Tu
Fr
Sa
Th
We
Weekly timer setting
Time 5-8
Mo
10:00
Cancel:
OK:
(3) Select applicable day of the week with the [Cursor
button (Left/Right)], and press the [Cursor button (Up/
Down)]. Selected day of the week is highlighted.
1
2
3
4
Weekly 1
Day
Time
End
Su Mo
Tu
Fr
Sa
Th
We
Weekly timer setting
Time 5-8
Mo
10:00
OK :
Cancel:
Only the selected days of the week are displayed when
you press the [Enter button].
1
2
3
4
Weekly 1
Day
Time
End
Su
M
o
Weekly timer setting
Time 5-8
Mo
10:00
Setting:
Back:
If you press the [Cancel button] here, the selection of
the day will be canceled.
5. Set the desired conditions on the timer, such as time set-
ting of On/Off timer, On/Off, operating mode (only for the
On timer), and temperature (only for the On timer), up to 8
patterns per selected day as follows:
(1) Select [Time] with the [Cursor button (Up/Down)] and
press the [Enter button].
1
2
3
4
Weekly 1
Day
Time
End
Su
M
o
Weekly timer setting
Time 5-8
Mo
10:00
Setting:
Back:
(2) Move the cursor between each pattern number with the
[Cursor button (Up/Down)], and press the [Cursor button
(Left/Right)] to set the time setting of On/Off timer, On/
Off, operating mode and temperature for each pattern.
1
2
3
4
Weekly 1
Day
Time
End
Su
M
o
Weekly timer setting
Time 5-8
Mo
10:00
Delete:Push
for two seconds
OK:
Notes
To delete the setting, move the cursor to the pattern
number, and press the [Cancel button] for 2 seconds.
Page 16

En-15
(3) Adjust time setting of On/Off timer with the [Cursor but-
ton (Up/Down)].
1
2
3
4
Weekly 1
Day
Time
End
Su
Mo
00
5
Weekly timer setting
Time 5-8
Mo
10:00
OK:
Cancel:
(4) Select [On] (On timer) or [Off] (Off timer) with the [Cursor
button (Up/Down)]. When you selected [Off] (Off timer)
here, skip following step (5) and (6).
1
2
3
4
Weekly 1
Day
Time
End
Su
Mo
5:00
On
Weekly timer setting
Time 5-8
Mo
10:00
OK:
Cancel:
(5) When you selected On timer, select the operating mode
with the [Cursor button (Up/Down)].
1
2
3
4
Weekly 1
Day
Time
End
Su
Mo
5:00
On
Heat
Weekly timer setting
Time 5-8
°
C
Mo
10:00
OK:
Cancel:
(6) When you selected On timer, adjust the desired tem-
perature with the [Cursor button (Up/Down)].
1
2
3
4
Weekly 1
Day
Time
End
Su
Mo
5:00
On
Heat
20
Weekly timer setting
Time 5-8
°
C
Mo
10:00
OK:
Cancel:
Notes
When you set "On timer", you need to set both of the •
operating mode and the temperature firmly.
Without these configurations, the timer will not work.
Possible temperature setting ranges in the operation •
mode are as follows:
Cool, Dry, Auto ............... 18 to 30 °C (64 to 88 °F)
Heat ............................... 16 to 30 °C (60 to 88 °F)
If the temperature out of the Set temp. range limitation •
is set, it will be reset at the nearest temperature within
the range. However, the adjusted temperature value
in this setting will not be corrected automatically.
(7) To complete the [Time] setting, press the [Enter button].
When setting the other days of the week continually,
perform procedures in step 4 and 5.
6.
To confirm the setting you have set in step 5, select [End] with
the [Cursor button (Up/Down)] and press the [Enter button].
1
2
3
4
Weekly 1
Day
Time
End
Su
Mo
5:00
On
10:00
Off
17:00
Heat
20
Weekly timer setting
Time 5-8
°
C
On
Heat
23
°
C
Mo
10:00
Setting:
Back:
If you press the [Cancel button] here, the selection of the
day will be canceled. If you have added any changes to the
setting in step 5, and press the [Cancel button] again, fol-
lowing cancel confirmation screen is displayed.
Select [Yes] or [No] with the [Cursor button (Left/Right)],
and press the [Enter button].
Setting change will be canceled. OK?
No
Yes
Note
If you press the [Cancel button] before confirmation of
the “Weekly timer setting”, all the set items in step 5 will
be canceled.
When you return to the “Monitor” screen, the icon is displayed.
To check the function, press the [Enter button] and select the icon.
Cool
Monitor
High
°
C
26
Menu
Weekly timer : Weekly 1
Mo
10:00
End
:
4-2-4. Auto-off timer setting
1
In “Timer” screen, select [Auto-off timer] with the [Cursor
button (Up/Down)], and press the [Enter button].
Function
Timer
On timer
Off timer
Weekly timer
Auto-off timer
Disable
Disable
Disable
Mo
10:00
Disable
Setting:
Back:
Page 17

En-16
2
“Auto-off timer” screen is displayed.
Auto-off timer
Enable/Disable setting
Stop in
Valid hour
Disable
30min.
Start
End
Mo
10:00
0:00 0:00
Back:
Setting:
Weekly timer
On timer
To change the setting, select the item with the [Cursor
button (Up/Down)], and press the [Enter button].
3
For [Enable/Disable setting], select [Enable] or [Disable]
with the [Cursor button (Up/Down)], and press the [Enter
button] to complete the setting.
Auto-off timer
Enable/Disable setting
Stop in
Valid hour
Enable
30min.
Start
End
Mo
10:00
0:00 0:00
Weekly timer
On timer
Cancel:
OK:
4
For [Stop in], adjust the timer with the [Cursor button
(Up/Down)]. To complete the setting, press the [Enter
button].
On timer
Weekly timer
Auto-off timer
Enable/Disable setting
Stop in
Valid hour
Enable
120 min.
End
Mo
10:00
0:00
0:00
OK:
Cancel:
Start
Note
The set time can be set from 30 to 240 minutes in units
of 10 minutes.
5
For [Valid hour], applicable time slot for the Auto-off
timer can be set.
Set the time with the [Cursor button (Up/Down)], and
press the [Enter button].
Auto-off timer
Enable/Disable setting
Stop in
Valid hour
Enable
120 min.
Start
End
Mo
10:00
00
6
0:00
Weekly timer
On timer
Cancel:
OK:
Notes
Counting down of the Auto-off timer is valid only if the •
air conditioning operation has been started with the
[On/Off button] of this remote controller. When Auto-off
timer become active, following message is displayed
on the screen.
Menu
Auto-off timer start
Even if the valid hour is ended during Auto-off timer is •
working, the function will work after the set time in [Stop
in] elapsed.
The timer started counting down within the valid hour •
of the function, even if the current time is being out of
the valid hour during the counting down, the function
works.
If the air conditioning operation is On by Weekly timer •
after counting down of Auto-off timer has started, the
Auto-off timer will not work.
When you return to the “Monitor” screen, and current time is
within the valid hour, the icon is displayed as follows.
To check the function, press the [Enter button] and select the
icon.
Cool
Monitor
High
°
C
26
Menu
Auto-off timer
Mo
10:00
End:
If the current time is out of the valid hour, the icon will be displayed as follows:
Monitor
Auto-off timer
Mo
10:00
Displayed icon color and the message differs by the condition
as follows:
Current time is within the valid hour, and the operation has •
been started by pressing the [On/Off button]:
When the Auto-off timer is enabled, white icon on black background and the message balloon with the remaining time until
the timer expires are displayed.
Cool
Monitor
High
°
C
26
Menu
Auto-off timer: Remaining 120 minutes
Mo
10:00
End:
Page 18

En-17
5. SUBMENU SETTING
5-1. Switching to the “Submenu” screen
When [Menu button] is pressed twice while “Monitor” screen
is displayed, it switches to the “Submenu” screen. (If [Menu
button] is pressed while the “Submenu” screen is displayed,
the display returns to the “Monitor” screen.)
Date and time
Monitor
Screen
Filter sign
R.C. sensor control
Room temp. display
Off
Off
Mo
10:00
Setting:
Back:
Submenu
[
1/2
]
5-2. Date/Time setting
In “Submenu” screen, select [Date and time] with the [Cursor
button (Up/Down)], and press the [Enter button].
Date and time
Monitor
Screen
Filter sign
R.C. sensor control
Room temp. display
Off
Off
Mo
10:00
Setting:
Back:
Submenu
[
1/2
]
“Date and time” screen is displayed.
Date and time
Date
Mo, 20/08/2012
10:00
Time
Summer time
Daylight saving time
Change display format
On
Mo
10:00
Management
Screen
Back:
Setting:
5-2-1. Date setting
1
In “Date and time” screen, select [Date] with the [Cursor
button (Up/Down)], and press the [Enter button].
Date and time
Date
Mo, 20/08/2012
10:00
Time
Summer time
Daylight saving time
Change display format
On
Mo
10:00
Management
Screen
Back:
Setting:
2
“Date” screen is displayed.
Year
Day
Monday
08 2012
Month
Date
20
Mo
10:00
Change display format
Time
OK:
Cancel:
Select the setting items (Day, Month, or Year) with the
[Cursor button (Left/Right)] and set the value with the
[Cursor button (Up/Down)].
To complete the setting, press the [Enter button]. The
screen returns to the “Date and Time” screen.
Note
Display format of date depends on the setting. Refer to
“5-2-4. Change display format setting”.
5-2-2. Time setting
1
In “Date and time” screen, select [Time] with the [Cursor
button (Up/Down)], and press the [Enter button].
Date and time
Date
Mo, 20/08/2012
10:00
Time
Summer time
Daylight saving time
Change display format
On
Mo
10:00
Management
Screen
Back:
Setting:
2
“Time“ screen is displayed. Select the setting items
(hour, min., or AM/PM) with the [Cursor button (Left/
Right)] and set with the [Cursor button (Up/Down)].
When setting the minutes, setting can be completed
quickly if the button is pressed continuously.
min
hour
Time
0010:
Mo
10:00
OK:
Cancel:
Change display format
Date
To complete the setting, press the [Enter button]. The
screen returns to the “Date and Time” screen.
Notes
• Display format of time depends on the setting. Refer
to “5-2-4. Change display format setting”.
• Even when summer time (daylight saving time) is
applied, set the standard time here.
Set On/Off with “5-2-3. Summer time (Daylight
saving time) setting”.
Page 19

En-18
5-2-3. Summer time (Daylight saving time)
setting
Note
Set only for users in an area where summer time (daylight
saving time) is applicable.
1
In “Date and time” screen, select [Summer time (daylight
saving time)] with the [Cursor button (Up/Down)], and
press the [Enter button].
Date and time
Date
Su, 31/03/2013
10:00
Time
Summer time
Daylight saving time
Change display format
Off
Su
10:00
Management
Screen
Back:
Setting:
2
Select [On] or [Off] with the [Cursor button (Up/Down)].
Date and time
Date
Su, 31/03/2013
Time
Summer time
Daylight saving time
Change display format
10:00
Su
10:00
On
Management
Screen
Cancel:
OK:
To complete the setting, press the [Enter button].
When confirmed, the screen returns to the “Date and
Time” screen.
Note
When it is set to [On], the time 1-hour in advance from
the standard time is displayed. When it is set to [Off],
the standard time is displayed.
5-2-4. Change display format setting
1
In “Date and time” screen, select [Change display for-
mat] with the [Cursor button (Up/Down)], and press the
[Enter button].
Date and time
Date
Time
Summer time
Daylight saving time
Change display format
Mo, 20/08/2012
10:00
On
Mo
10:00
Management
Screen
Back:
Setting:
2
“Change display format” screen is displayed. Select
the setting items (Date format or Time format) with the
[Cursor button (Left/Right)] and set with the [Cursor
button (Up/Down)].
Time
Date format
Change display format
Day/Month/Year
0:00–23:59
Time format
Date
Mo
10:00
Cancel:
OK:
Available display formats are as follows:
Date format: Time format:
• Day/Month/Year • 0:00-23:59
• Month/Day/Year • 0:00-11:59 AM/PM
• Year/Month/Day • 12:00-11:59 AM/PM
To complete the setting, press the [Enter button].
The screen returns to the “Date and Time” screen.
Page 20

En-19
5-3. Screen setting
In “Submenu” screen, select [Screen] with the [Cursor button
(Up/Down)], and press the [Enter button].
Date and time
Monitor
Screen
Filter sign
R.C. sensor control
Room temp. display
Off
Off
Mo
10:00
Setting:
Back:
Submenu
[
1/2
]
“Screen” screen is displayed.
Automatic
off time
30S
Screen
Brightness
Contrast
Mo
10:00
Date and time
Filter sign
OK:
Cancel:
5-3-1. Automatic off time setting
1
In “Screen” screen, select [Automatic off time] with the
[Cursor button (Left/Right)], and set with the [Cursor
button (Up/Down)].
Automatic
off time
30S
Screen
Brightness
Contrast
Mo
10:00
Date and time
Filter sign
OK:
Cancel:
Configurable values of [Automatic off time] are as follows:
• 30s
• 60s
• Off (No illumination)
Note
When the backlight is turned off by the [Automatic off
time], the first button operation is not effective, and illuminates the backlight.
If [Automatic off time] is set to [Off], it is effective from
the first button operation.
2
Other screen setting items can be set continually. To
complete the setting, confirm it by pressing the [Enter
button].
When confirmed, screen returns to the “Submenu” screen.
5-3-2. Brightness setting
1
In “Screen” screen, select [Brightness] with the [Cursor
button (Left/Right)], and set with the [Cursor button (Up/
Down)].
30S
Screen
Automatic
off time
Brightness
Contrast
Mo
10:00
Date and time
Filter sign
Cancel:
OK:
Notes
The set is reected while setting it.•
W• hen the automatic off time setting is set in “Off”,
Brightness setting is not displayed (It is not possible
to set it).
2
Other screen setting items can be set continually. To
complete the setting, confirm it by pressing the [Enter
button].
When confirmed, screen returns to the “Submenu” screen.
5-3-3. Contrast setting
1
In “Screen” screen, select [Contrast] with the [Cursor
button (Left/Right)], and set with the [Cursor button (Up/
Down)].
30S
Screen
Automatic
off time
Brightness
Contrast
Mo
10:00
Date and time
Filter sign
Cancel:
OK:
Note
The set is reected while setting it.
2
Other screen setting items can be set continually. To
complete the setting, confirm it by pressing the [Enter
button].
When confirmed, screen returns to the “Submenu” screen.
5-4. Filter sign setting
Note
This function can be used only if the setting is activated
in the installation. To activate this function, consult
authorized service personnel.
Page 21

En-20
In “Submenu” screen, select [Filter sign] with the [Cursor button (Up/Down)], and press the [Enter button].
Date and time
Monitor
Screen
Filter sign
R.C. sensor control
Room temp. display
Off
Off
Mo
10:00
Setting:
Back:
Submenu
[
1/2
]
“Filter sign” screen is displayed.
Screen
Display
Filter sign reset
Filter sign
Initial
Off
Mo
10:00
Setting:
Back:
5-4-1. Filter sign reset setting
If filter sign icon is displayed on the “Monitor” screen,
clean the air filter on the relevant indoor unit first, and then
reset the filter sign as follows:
Note
Before resetting the filter sign on this remote controller,
clean the air filter on the relevant indoor unit by referring
the operating manual.
1
In the “Filter sign” screen, select [Filter sign reset] with
the [Cursor button (Up/Down)], and press the [Enter
button].
Screen
Display
Filter sign reset
Filter sign
Initial
On
Mo
10:00
Setting:
Back:
Following screen is displayed.
The filter sign will be reset. OK?
No
Yes
2
Select [Yes] or [No] with the [Cursor button (Left/Right)],
and press the [Enter button].
When [Yes] is selected, the filter sign icon on the dis-
play is turned off.
11
5-4-2. Display setting
You can select [On] (display) or [Off] (non-display) for the filter
sign icon indication.
Note
When you set this setting to [Off], the filter sign icon
will not be displayed regardless of the necessity of filter
cleaning on the indoor unit.
1
In the “Filter sign” screen, select [Display] with the [Cur-
sor button (Up/Down)], and press the [Enter button].
Following screen is displayed.
Screen
Display
Filter sign reset
Filter sign
Initial
Off
Mo
10:00
Setting:
Back:
2
Select [On] or [Off] with the [Cursor button (Up/Down)],
and press the [Enter button].
Screen
Display
Filter sign reset
Filter sign
Initial
On
Mo
10:00
Cancel:
OK:
When you set this setting to [On], and air filter cleaning on the
indoor unit is required, the icon is displayed on the “Monitor”
screen.
To check the function, press the [Enter button] and select the
icon.
Cool
Monitor
High
°
C
26
Menu
Filter sign
Mo
10:00
End:
Page 22

En-21
5-5. R.C. sensor control setting
Note
This function can be used only if the setting is activated
in the installation. To activate this function, consult authorized service personnel.
1
In “Submenu” screen, select [R.C. sensor control] with
the [Cursor button (Up/Down)], and press the [Enter
button].
Date and time
Monitor
Screen
Filter sign
R.C. sensor control
Room temp. display
Off
Off
Mo
10:00
Setting:
Back:
Submenu
[
1/2
]
2
Select [On] or [Off] with the [Cursor button (Up/Down)],
and press the [Enter button].
Screen
Filter sign
R.C. sensor control
Room temp. display
Date and time
On
Off
Monitor
Mo
10:00
OK:
Cancel:
Submenu
[
1/2
]
When you set this setting to [On], the icon is displayed on the
“Monitor” screen.
To check the function, press the [Enter button] and select the
icon.
Cool
Monitor
High
°
C
26
Menu
R.C. sensor control
Mo
10:00
End:
11
5-6. Room temp. display setting
1
In “Submenu” screen, select [Room temp. display] with
the [Cursor button (Up/Down)], and press the [Enter
button].
Date and time
Monitor
Screen
Filter sign
R.C. sensor control
Room temp. display
Off
Off
Mo
10:00
Setting:
Back:
Submenu
[
1/2
]
2
Select [On] or [Off] with the [Cursor button (Up/Down)],
and press the [Enter button].
Screen
Filter sign
R.C. sensor control
Room temp. display
Date and time
On
Off
Cancel:
Monitor
Mo
10:00
OK:
Submenu
[
1/2
]
When you set this setting to [On], the room temperature is
displayed on the screen.
Mode
Menu
Cool
Monitor
Room 28˚
C
Set temp.
Fan
High
°
C
26
Mo
10:00
Note
Displayed room temperature is the approximate temperature detected around this remote controller, and it
could be different from the actual room temperature. It
also be inuenced by the installation environment of the
remote controller.
5-7. Key lock select setting
A locking function is provided to prevent careless operation by
children or outsiders. Release the lock on the “Monitor” screen
when operating.
To lock up:
When the [Cancel button] is pressed for about 3 seconds or
more continuously on the “Monitor” screen
.
To release the lock:
When the [Cancel button] is pressed for about 3 seconds or
more continuously on the “Monitor” screen, the lock is released, and each applicable lock name on the screen turns
off.
Page 23

En-22
5-8. Initial setting
In “Submenu” screen, select [Initial] with the [Cursor button
(Up/Down)], and press the [Enter button].
Initial
Management
Key lock select
Child lock
Monitor
Mo
10:00
Setting:
Back:
Submenu
[
2/2
]
“Initial” screen is displayed.
Back:
Initial
Language
English
Temp. unit
Password setting (Management
)
°C
Filter sign
Management
Mo
10:00
Setting:
5-8-1. Language setting
1
In “Initial” screen, select [Language] with the [Cursor
button (Up/Down)], and press the [Enter button].
Back:
Initial
Language
English
Temp. unit
Password setting (Management
)
°C
Filter sign
Management
Mo
10:00
Setting:
2
Select the desired language with the [Cursor button]
and press the [Enter button].
The screen returns to the “Initial” screen and displays
the selected language.
Language
Italiano
Español
English
Ελληνικά
Português
Русский
Deutsch
Français
Türkçe
Temp. unit
Cancel:
OK:
Mo
10:00
Following key lock functions are available:
•Child lock: Restricts all the button operation
•Part lock: Restricts the [Menu button] operation
When [Child lock] is set
Mode
Child lock
Auto
Monitor
Set temp.
Fan
High
°
C
26
Mo
10:00
When [Part lock] is set
Mode
Part lock
Auto
Monitor
Set temp.
Fan
High
°
C
26
Mo
10:00
Note
[Child lock] or [Part lock] indicator blinks when the restricted button operation is performed.
When switching [Child lock] and [Part lock]:
1
In “Submenu” screen, select [Key lock select] with the
[Cursor button (Up/Down)], and press the [Enter but-
ton].
Initial
Management
Key lock select
Child lock
Monitor
Submenu
2/2
Mo
10:00
Back:
Setting:
2
Select [Child lock] or [Part lock] with the [Cursor button
(Up/Down)], and press the [Enter button].
Initial
Management
Key lock select
Child lock
Monitor
Mo
10:00
OK:
Cancel:
Submenu
[
2/2
]
Page 24

En-23
5-8-2. Temperature unit setting
1
In “Initial” screen, select [Temp. unit] with the [Cursor
button (Up/Down)], and press the [Enter button].
Initial
Language
English
Temp. unit
Password setting (Management
)
°C
Filter sign
Management
Mo
10:00
Setting:
Back:
2
Select [°C] or [°F] with the [Cursor button (Up/Down)]
and press the [Enter button].
The screen returns to the “Initial” screen.
Language
Temp. unit
Temp. unit
°
c
Mo
10:00
OK:
Cancel:
6. CLEANING AND CARE
CAUTION
Before cleaning the unit, be sure to stop the operation and
disconnect the power supply.
Do not pour water or cleaning solvent on the unit directly,
or wash the unit with them.
Do not expose the unit body to liquid insecticides or hair
sprays.
Wipe the unit gently by using soft dry cloth.
Note
Do not use scouring cleanser, volatile solvents such as
benzene or thinner.
7. SPECIFICATION
Operating temperature range
Indoor temperature 0 °C to 46 °C (32 °F to 114 °F)
Indoor humidity
(Relative Humidity)
90 % or less
8. OTHERS
8-1. Error code
If an error occurs, the power indicator (green) blinks and the
following screen will be shown.
If “Error” is displayed, immediately stop the air conditioner
operation, and consult authorized service personnel.
When there is an error on this remote controller:•
Code : XXXXXX
Remote controller
Error
Mo
10:00
Error
code
Error code Contents
Er 12.1
EE 1c
Wired remote controller communication
error
Er 15.4
EE 1d
Indoor unit data acquisition error
Er CC.1
EE CC.1
Remote controller sensor error
When there is an error on the indoor unit:•
Code : XXXXXX
R.C. address : 00
Error
Mo
10:00
Monitor
Address number of the relevant indoor unit
Error
code
Page 25

En-24
8-2. Troubleshooting
WARNING
In the event of a malfunction (burning smell, etc.), immediately stop operation, turn off the electrical breaker and consult
authorized service personnel.
Merely turning off the unit’s power switch will not completely disconnect the unit from the power source. Always be sure to turn
off the electrical breaker to ensure that power is completely off.
Before requesting service, perform the following checks:
Symptom Items to check
See
Page
CHECK ONCE
MORE
Does not operate at all: • Has the circuit breaker been turned off?
• Has there been a power failure?
• Has a fuse blown out, or a circuit breaker been tripped?
─
Is the timer operating? ─
Is key lock enabled? 21
Following functions
cannot be set:
•Economy
•Set temp. auto return
• Set temp. range limita-
tion
•On timer
•Off timer
•Weekly timer
•Auto-off timer
If the function you are selecting is restricted by [Management] function,
following message is displayed in the operation guidance display.
XXXXXX
XXXXXX
Restricted by the management function
Back:
7
Has the function setting been set to [Enable] or [On]?
─
On timer or Off timer
does not work:
Has there been a power outage? Any power outage cancels the On or
Off timer.
After the power supply is resumed, set the [Enable/Disable setting] to
[Enable] again.
11, 12
Operation is automati-
cally stopped:
Has off timer been set? 12
Has weekly timer been set? 13
Has auto-off timer been set? 16
Operation does not
stopped even if auto-off
timer has been set:
Has the operation been started by pressing the [On/Off button] on this
remote controller?
16
Has the operation been started by weekly timer or on timer? 16
Has the weekly timer been on during the counting down of the Auto-off
timer?
16
Has it been within the valid hour? 16
Has there been a power outage? Any power outage cancels the Auto-off
timer.
─
Is message [R.C. prohition (All, on/off)] and
icon displayed? 4
Set temperature is
changed automatically:
Has set temp. auto return been set?
9
Does not return to the set
temperature:
Has set temp. range limitation been set?
10
Set temperature cannot
be changed:
Has set temp. range limitation been set?
10
Is message [R.C. prohition (Set temp. all)] and
icon displayed?
4
NORMAL
FUNCTION
Airow is stopped and
is displayed on the
icon display of the “Moni-
tor” screen:
Airflow is stopped due to the automatic defrosting, oil recovery, or
mode mismatch. Refer to the operating manual of the relevant indoor
unit.
─
 Loading...