

Page 1

System
Operating Manual
FUJITSU Tablet STYLISTIC Q736
Page 2

Contact address in North America
FUJITSU AM
ERICA INC.
1250 East Arques Avenue, Sunnyvale,
CA 94085-3470, U.S.A.
Telephon
e: 800 831 3183 or 408 746 6000
"
http://solutions.us.fujitsu.com"
"http://solutions.us .fujitsu.com/contact"
Have a qu
estion? Email us at: "
AskFujitsu@us.fujitsu.com"
Copyright
©2016F
ujitsu America, Inc. All rights reserved
B5FK-7111-01ENZ0-00
Page 3

FUJITSU Tablet STYLISTIC Q736
Operating Manual
Declarations of conformity 9
Fujitsu Contact Information 10
Ports and controls 12
Important notes 16
First-time setup of your device 20
WorkingwiththeTabletPC 25
Accessories for your Tablet PC
(optional) 43
Security functions 69
Connecting external devices 79
Settings in BIOS Setup Utility 83
Troubleshooting and tips 86
Technical data 96
Manufacturer’s notes 104
Declarations of conformity 107
FCC Regulatory Information 108
Canada, Industry Canada (IC) 111
Appendix 113
Index 129
Page 4

Copyright and Trademark Information
Fujitsu America, Incorporated has made every effort to ensure the accuracy and completeness
of this document; however, as ongoing development efforts are continually improving the
capabilities of our products, we cannot guarantee the accuracy of the contents of this
document. We disclaim liability for errors, omissions, or future changes.
Fujitsu, the Fujitsu logo and STYLISTIC are registered trademarks of Fujitsu Limited
or its subsidiaries in the United States and other countries.
Intel and Intel Core are trademarks or registered trademarks of Intel Corporation or
its subsidiaries in the United States and other countries.
Microsoft and Windows are either registered trademarks or trademarks of Microsoft
Corporation in the United States and/or other countries.
The ExpressCard word mark and logo are owned by the Personal Computer
Memory Card International Association (PCMCIA) and any use of such marks by
Fujitsu America, Incorporated is under license.
Google is a trademark or registered trademark of Google In corporated.
Bluetooth is a trademark of Bluetooth SIG, Inc., USA.
OmniPass is a trademark of Softex, Inc.
Roxio is a trademark of Roxio, a division of Sonic Solutions.
Adobe, Acrobat, and Adobe Reader are either registered trademarks or tra demarks of Adobe
Systems Incorporated in the United States a nd/or ot her countries.
Page 5

Contents
Contents
Declarationsofconformity ............................................................. 9
Fujitsu Contact Informatio
n ............................................................
10
Notational conventions .................................................................. 11
Ports andcontrols ..................................................................... 12
Importantnotes ........................................................................ 16
Safetyinstructions ...................................................................... 16
Additional safety note
s for devices with w ireless components . . .............................
17
Protecting the displa
yscreen ............................................................
17
Energysaving .......................................................................... 17
Energy saving under W
indows .......................................................
17
Traveling with your T
ablet PC ............................................................
18
Beforeyoutravel ................................................................... 18
Transporting the T
ablet PC ...........................................................
19
Cleaning the Table
tPC ..................................................................
19
First-time setupofyourdevice ......................................................... 20
Unpacking and checking the device . . . ................................................... 20
Choose a location . ...................................................................... 21
Mounting the feet (only device versions with palm vein sensor) ............................. 21
Connecting the AC adapter . . . ........................................................... 22
Switching on the device for the firsttime .................................................. 23
Installing Bonus Apps . . . . . ........................................................... 24
Working with
the TabletPC ............................................................
25
Status indic
ators ........................................................................
25
Switching th
eTablet PCon ..............................................................
27
Programmin
gthe ON/OFFbutton .....................................................
28
Switching t
heTabletPCoff ..............................................................
28
Handwritin
g r ecognition ..................................................................
28
Touchscre
en ............................................................................
28
Select di
splay orientation (portrait orlandscape format) ....................................
30
Using fing
ers ...........................................................................
31
Calibrat
e the Dual Digitizer for finger-based operation of the device. .....................
31
Using th
estylus .........................................................................
31
Stylus l
ocation ......................................................................
33
Adjusti
ngthestylus ..................................................................
33
Calibr
ating thestylus ................................................................
33
Securi
ngthestylus tether(optional) ...................................................
34
Tab le t
buttons ..........................................................................
35
Webca
m ...............................................................................
35
Recha
rgeablebattery ...................................................................
36
Charg
ingandmaintainingthebattery .................................................
36
Usin
g the energy saving functions . .......................................................
37
Memo
rycards ..........................................................................
37
Supp
orted formats ..................................................................
37
Ins
ertingthe memorycard ...........................................................
38
Rem
oving thememorycard ..........................................................
38
SIM
card ...............................................................................
39
In
sertinga SIMcard .................................................................
39
Fujitsu 3
Page 6

Contents
RemovingaSIM card ............................................................... 40
WirelessLAN/Bluetooth/4G/LTE/NFCwirelesscomponents ................................. 40
Switching the wireless components on and off ......................................... 40
ConfiguringWLANaccess ........................................................... 40
Furtherinformation onWLANandBluetooth ........................................... 40
AccessviaUMTS ................................................................... 41
AccessviaWirelessWAN ............................................................ 41
Accessvia4G ...................................................................... 41
NFC (Near Field Communication, optional) . . . ......................................... 41
Ethernet and LAN (only cradle, keyboard docking station and power keyboard docking
station) ................................................................................. 42
GPS ................................................................................... 42
Accessories for you r Tablet PC (optional) . ............................................. 43
Yourdockingcradle (optional) ............................................................ 44
Cradle components . . ................................................................ 44
Settingupthecradle ................................................................ 44
Connecting the Tablet PC to the cradle . . ............................................. 45
Disconnecting the Tablet PC from the cradle . ......................................... 46
Keyboard docking station or power keyboard docking station (optional) . . . ................... 47
Ports on the keyboard docking station or power keyboard docking station . ............... 48
Connecting the tablet PC to the keyboard docking station or power keyboard docking
station .............................................................................. 50
Disconnecting the tablet PC from the keyboard docking station or power keyboard docking
station ............................................................................. 51
Removable rechargeable battery for the power keyboard docking station (optional) . . . .... 52
Intermediary VESA Mount Plate (optional) . . . ............................................. 55
Hand strap (optional) . . . . ................................................................ 57
Shoulder strap (optional) ................................................................ 59
Folio case (optional) . . . . . ................................................................ 61
Protective TPU cover with hand strap (optional) . . ......................................... 62
Prepare installation . . ................................................................ 62
InserttheTablet PCin theprotective TPUcover ....................................... 63
Connecting the Tablet PC to the keyboard docking station or cradle . . ................... 65
Folio Cover Kit (optional) ................................................................ 66
Insertingthe systemintothefoliocover ............................................... 66
Caretipsfor thefolio cover ........................................................... 68
Security functions ..................................................................... 69
Configuring the fingerprint sensor ........................................................ 70
Using the palm vein sensor (device-depe ndent) . . ......................................... 71
Using theSecurity Lock ................................................................. 73
ConfiguringpasswordprotectioninBIOSSetupUtility ...................................... 73
Protecting BIOS Setup Utility (supervisor password and user password) . . ............... 74
Password prote ction for booting the operating system .................................. 75
Password protection fortheharddisk ................................................. 75
SmartCard reader (optional) . ............................................................ 77
Insertingthe SmartCard ............................................................. 77
Trusted Platform Module - TPM (device dependent) . . . . . . .................................. 78
EnablingTPM ....................................................................... 78
DisablingTPM ...................................................................... 78
Connectingexternaldevices ........................................................... 79
Connecting an external monitor . . ........................................................ 79
4 Fujitsu
Page 7

Contents
Micro HDMI port .................................................................... 79
HDMI port (only with docking cradle, keyboard docking station and power keyboard docking
station) ............................................................................. 80
External monitor port (VGA) (only cradle, keyboard docking station and power keyboa rd
dockingstation) ..................................................................... 80
Connecting USB devices . . . . . ........................................................... 81
Howtoremove USBdevicescorrectly ................................................ 81
Connecting external audio devices ....................................................... 82
Connecting head phones or other audio output devices . . . . ............................. 82
Connecting a microphone or other audio input devices . . . . ............................. 82
Settings in BIO S Setup Utility . . . ....................................................... 83
StartingtheBIOSSetupUtility ........................................................... 83
BIOSSetupUtilityoperation ............................................................. 84
ExitingBIOS Setup Utility ................................................................ 85
Exit Saving Changes - save changes and exit BIOS Setup Utility . . ..................... 85
Exit Discarding Changes - Reject changes and exit BIOS Setup Utility . . . . . .............. 85
Load Setup Defaults – load default values . ............................................ 85
Discard Changes - Discard Changes without exiting BIOS Setup Utility . . . . .............. 85
Save Changes - save changes without exiting the BIOS Setup Utility . . . . . . .............. 85
Savechangesand power off ........................................................ 85
Troubleshooting andtips .............................................................. 86
Executingareset ....................................................................... 87
Forcedshutdown .................................................................... 87
Resetting the rechargeable battery . ................................................... 87
Helpifproblems occur ................................................................... 87
RecoveringyourFactoryImage .......................................................... 87
TheTabletPC’sdateortimeisincorrect .................................................. 87
Batterychargingindicatornot lit .......................................................... 88
TheTabletPC’stouchscreenremains dark ................................................ 88
The display on the Tablet PC’s touchscreen is difficult to read. . ............................. 88
Theexternalmonitorremainsblank ...................................................... 89
Theexternalmonitorisblankortheimageisunstable ..................................... 89
The cursor does not correctly follow the stylus movements . . . . ............................. 89
Stylusinputnotworking ................................................................. 90
TheTabletPCdoesnot startafterswitchon ............................................... 90
TheTabletPCstopsworking ............................................................. 90
The printer does not p rint . . . . . ........................................................... 91
The wireless connection to a network does not work . . . .................................... 91
Thebattery dischargestooquickly ........................................................ 91
Smart Card reader is not recognized . . . ................................................... 92
Smart Card PINforgotten ................................................................ 92
User and/or supervisor Smart Card lost . . . . . . ............................................ 92
Smart Card lost ......................................................................... 92
Acousticwarning ........................................................................ 93
Error messagesonthescreen ........................................................... 94
Technical data ......................................................................... 96
TabletPC .............................................................................. 96
WLAN specifications .................................................................... 97
Screenresolutions forintegrated screenandexternalscreens .............................. 99
Rechargeablebattery ................................................................... 100
AC adapter 65 W for the Tablet PC ....................................................... 100
Fujitsu 5
Page 8

Contents
Dockingcradle(optional) ................................................................ 100
AC adapter 65 W for the cradle (optional) ............................................. 101
Keyboard docking station or power keyboard docking station (optional) . . . ................... 101
Rechargeable battery for power keyboard docking station (device-dependent) . ........... 101
Intermediary VESA Mount Plate (optional) . . . ............................................. 102
Hand strap (optional) . . . . ................................................................ 102
Shoulder strap (optional) ................................................................ 102
Folio case (optional) . . . . . ................................................................ 102
Protective TPU cover with hand strap (optional) . . ......................................... 102
Folio Cover Kit for palm vein sensor (optional) ............................................. 103
Manufacturer’snotes .................................................................. 104
Disposalandrecycling .................................................................. 104
Recyclingyourbattery ............................................................... 104
DOC (Industry CANADA) Notices ........................................................ 104
ULNotice ........................................................................... 105
ENERGYSTARCompliance ............................................................. 106
Declarationsofconformity ............................................................. 107
FCC Regulatory Information ........................................................... 108
Regulatory NotesandStatements ........................................................ 108
WirelessLAN,HealthandAuthorizationforuse ........................................ 108
Regulatory Information/Disclaimers . . ................................................. 109
Federal C ommunica tions Commission and Industry Canada statement: . . . ............... 109
FCCInterferenceStatement ......................................................... 109
FCC Radio Frequency Exposure statement . . . ......................................... 110
Exportrestrictions ................................................................... 110
Restrictions concernant l’exportation . ................................................. 110
Canada,Industry Canada(IC) .......................................................... 111
Canadian Notice . ....................................................................... 111
Avis pour le Canada . . . . . ................................................................ 112
Appendix .............................................................................. 113
Before Using the Optional Wireless LAN . ................................................. 113
WirelessLANDevicesCoveredbythisDocument ...................................... 113
Characteristics oftheWLAN Device .................................................. 113
Wireless LAN Modes Using this Device . . ............................................. 113
Deactivating/DisconnectingtheWLANDevice ......................................... 116
ConfiguringtheWirelessLAN ............................................................ 116
Connection to the network . . . ........................................................ 116
TroubleshootingtheWLAN ........................................................... 116
Image Backup and Recovery Procedures ................................................. 118
Windows® 7 Procedures ................................................................ 118
Creating a Backup of Bootable Disc and Recovery Image for Windows 7 . ............... 119
Creating a backup of the System-SpecificSoftwareDrivers ............................. 119
WINDOWS 7 RECOVER YOUR SYSTEM WHEN THE HARD DRIVE IS STILL
ACCESSIBLE ....................................................................... 119
RECOVER YOUR SYSTEM WHEN THE HARD DRIVE IS NOT BOOTABLE FOR
WINDOWS7 ....................................................................... 122
Recovering Your Recovery Image Using Recovery and Utility (for new hard drive or
non-bootableharddrive) ............................................................. 123
Installing theSoftwareaftertheRecoveryImageisRestored ............................ 124
6 Fujitsu
Page 9

Contents
Windows 10 Procedures . . . . . . ........................................................... 124
Createa RecoveryDrive ............................................................. 125
Recovery options in Windows 10 . . ................................................... 125
Downloading driver updates . . ........................................................... 128
Index .................................................................................. 129
Fujitsu 7
Page 10

Contents
8 Fujitsu
Page 11

Declarations of conformity
Declarations of conformity
DECLARATION OF CONFORMITY
according to FCC Part 15
Responsible Party Name: Fujitsu America, Inc.
Address: 1250 E. Arques Avenue
Sunnyvale, CA 94085
Telephone: (408) 746-6000
Declares that product: Base Model Configuration: STYLISTIC Q736
Complies with Part 15 of the FCC Rules.
This device complies with Part 15 of the FCC rules. Operations are subject to the
following two conditions: (1) This device may not cause harmful interference. (2) This
device must accept any interference received, including interference that may cause
undesired operation.
The FCC ID and IC ID Label information is available on the inside of the removable
back cover of the tablet PC. No tools required, the back cover can be removed by
carefully unclipping from the tablet PC.
Fujitsu 9
Page 12

Fujitsu Contact Information
Fujitsu Contact Information
Service and Support
You can co ntact Fu jitsu Service and Support in the following ways:
• Toll free phone: 1-800-8Fujitsu (1-800-838-5487)
• Website: "
http://solutions.us.fujitsu.com/www/content/support/contact/index.php"
Before you place the call, have the following information ready so that the customer
support representative can provide you with the fastest possible solution:
• Product name
• Product configuration number
• Product serial number
• Purchase date
• Conditions under which the problem occurred
• Any error messages that have occurred
• Type of device connected, if any
Fujitsu Shopping Online
Please go to "
http://www.shopfujitsu.com/store/ ".
Maintaining Latest Configuration
To ensure that you alw ays have the most current driver updates related to your system, you should
occasionally access the Fujitsu Software Download Manager (FSDM) utility. The FSDM utility is
available from the F ujitsu Support site. FSDM will allow you to view a list of the most current
drivers, utilities and applications to determine whether you have the latest versions. If you have a
Windows 7 or Windows 10 operating system, you will need to go to the Support Site to download
the FSDM Utility: "
http://support.fujitsupc.com/ CS/Portal/support.do?srch=DOWNLOADS".
Limited Warranty
Your STYLISTIC Tablet PC is backed by a Fujitsu International Limited Warranty. Check the
Limited Warranty Terms and C onditions Booklet that came with your Tablet PC.
10 Fujitsu
Page 13
Fujitsu Contact Information
Notational conventions
Pay particular attention to text marked w ith this symbol. Failure to observe
this warning will endanger your life, will da m age the device or lead to loss
of data. The warranty will be invalidated if the device becomes defective
through failure to observe these w arnings.
Indicates important informa
tion which is required to use the device properly.
►
indicates an activity that must be performed
indicates a result
This style
indicates data entered
using the keyboard in a program dialogue or at
the command line, e.g.
your password (Name123)oracommandusedto
start a program (star
t.exe)
This style
indicates information that is displayed on the screen by a program, e.g.:
Installation is complete.
This style
indicates
• terms and tex ts used in a software interface, e.g.: Click on Save.
• names of programs or files, e.g. Windows or setup.exe.
"This style" indicates
• Cross-references to anothe r section, e.g. "Safety information"
• cross-references to an external source, e.g. a web address: For m ore
information, go to "
http://solutions.us.fujitsu.com/"
• names of CDs, DVDs and titles or designations of other materials, e.g.:
"CD/DVD Drivers & Utilities" or "Safety/Regulations" manual
Key
indicates a key on the keyboard, e.g:
F10
This style indicates terms and text that are emphasized or highlighted, e.g.: Do not
switch off the device
Fujitsu 11
Page 14
Ports and controls
Ports and controls
This chapter presents the individual hardware components of your device. It gives an
overview of the indicators and connections of the device. Please familiarize yourself
with these items before you start to work with the device.
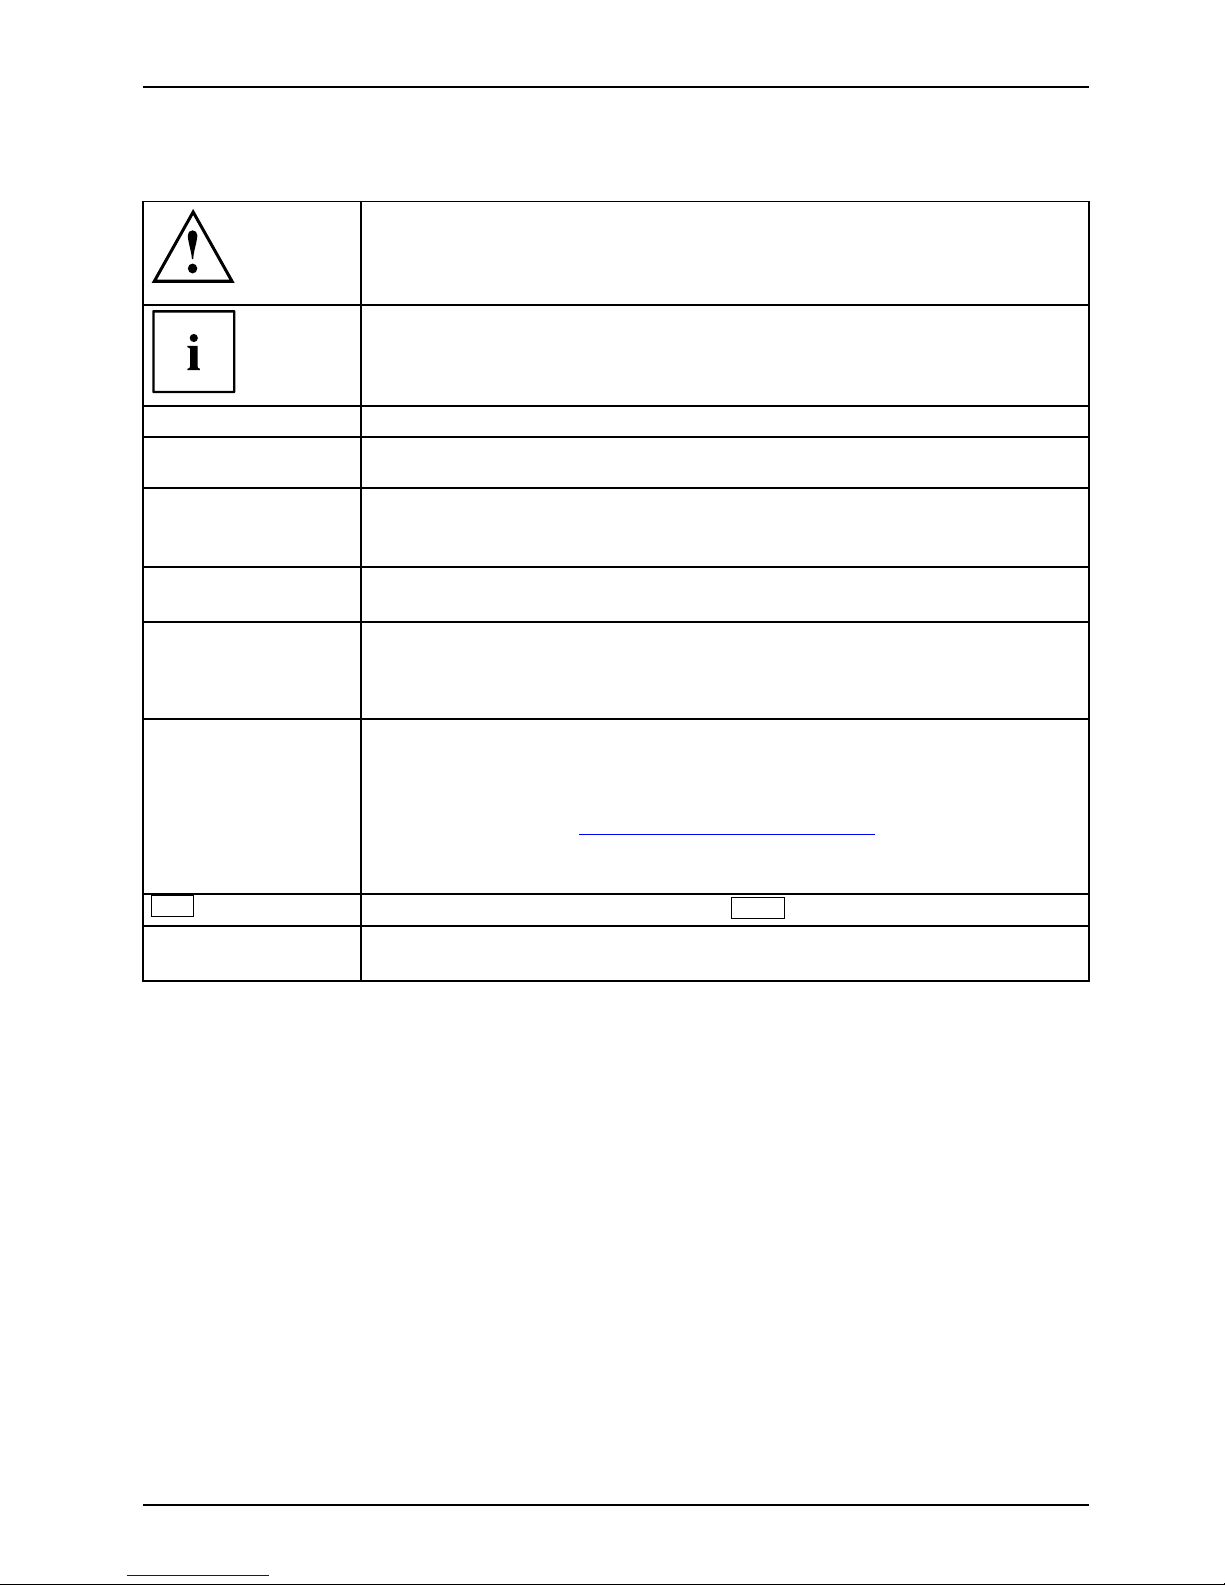
Front (d evice version withou t palm vein sensor)
Depending on your selected device version, your tablet PC may be equipped with a palm
vein sensor on the right-hand side, see "Right side" sub-section on the following pages.
1
2
3
4
5
5
4
7
9
8
6
1 = Touch screen
2 = Webcam
3 = Webcam LED
4 = Speaker
5 = Mechanical mounting for (power) keyboard
docking station / cradle
6 = Power-on indicator
7 = Docking port
8 = Windows button
9 = Ambient light sensor
12 Fujitsu
Page 15
Ports and controls
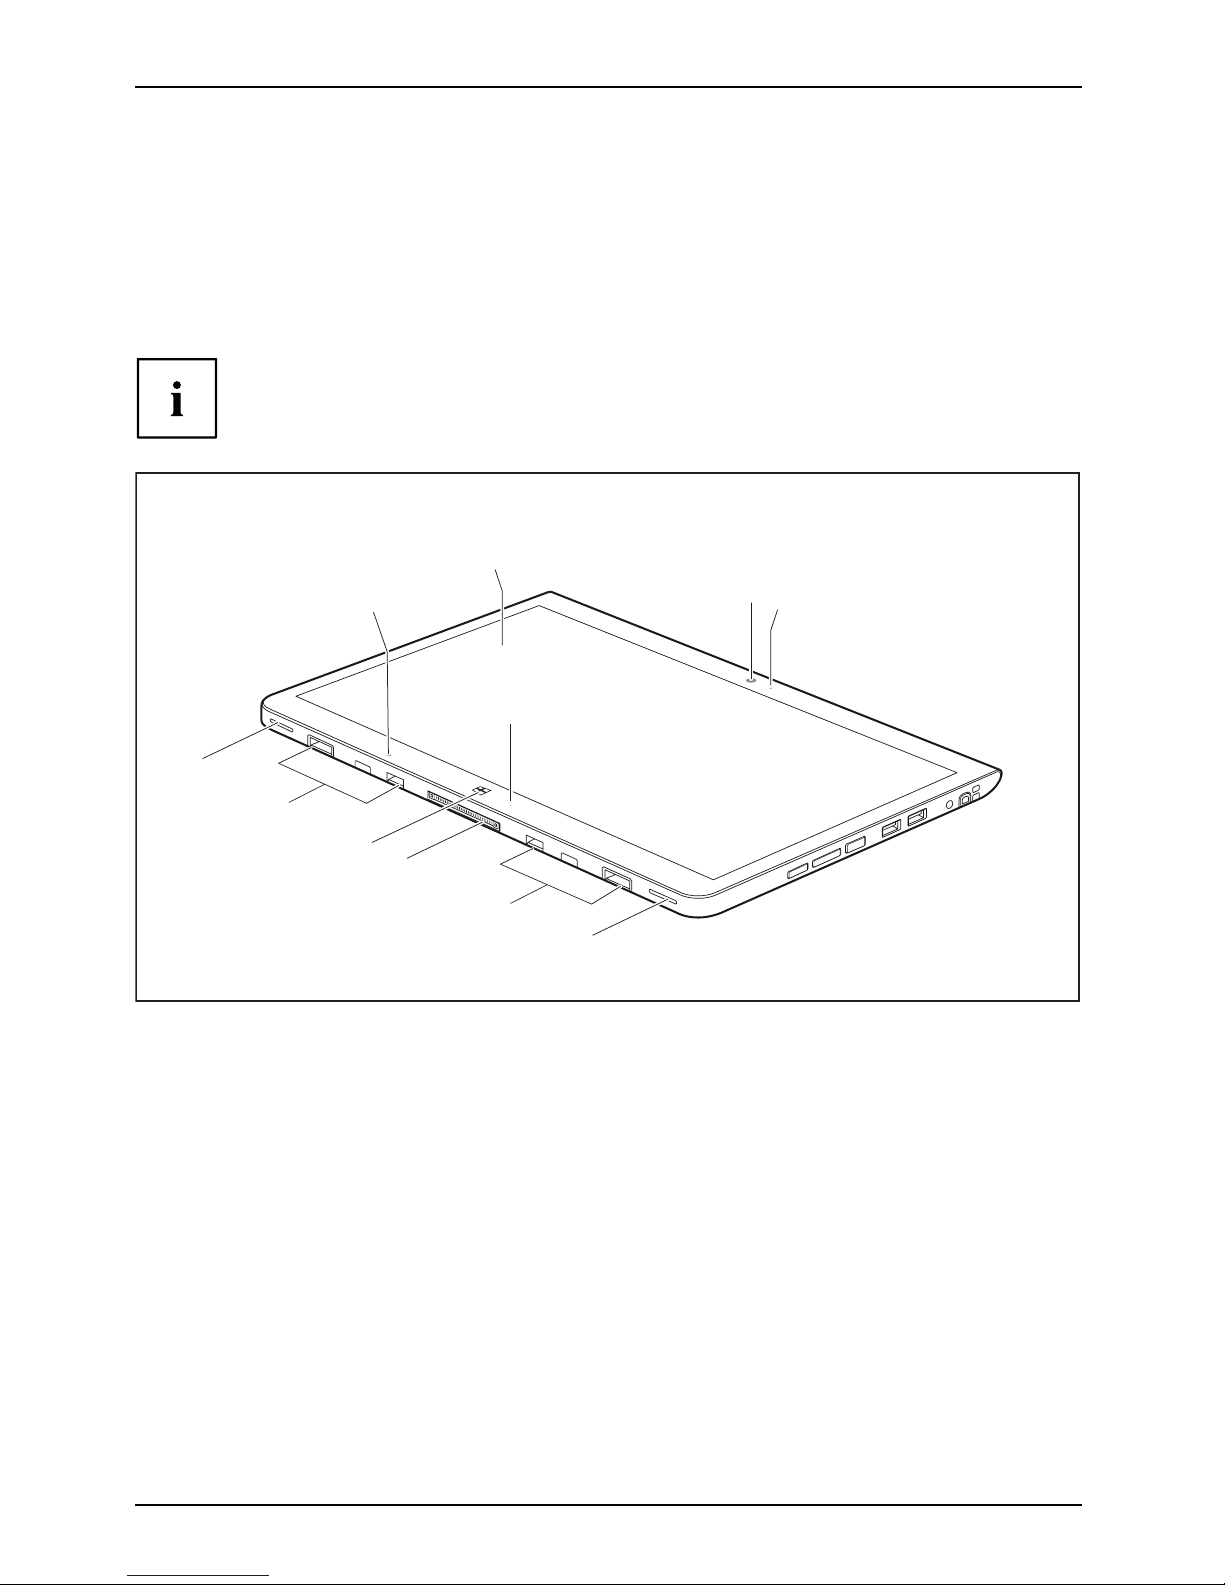
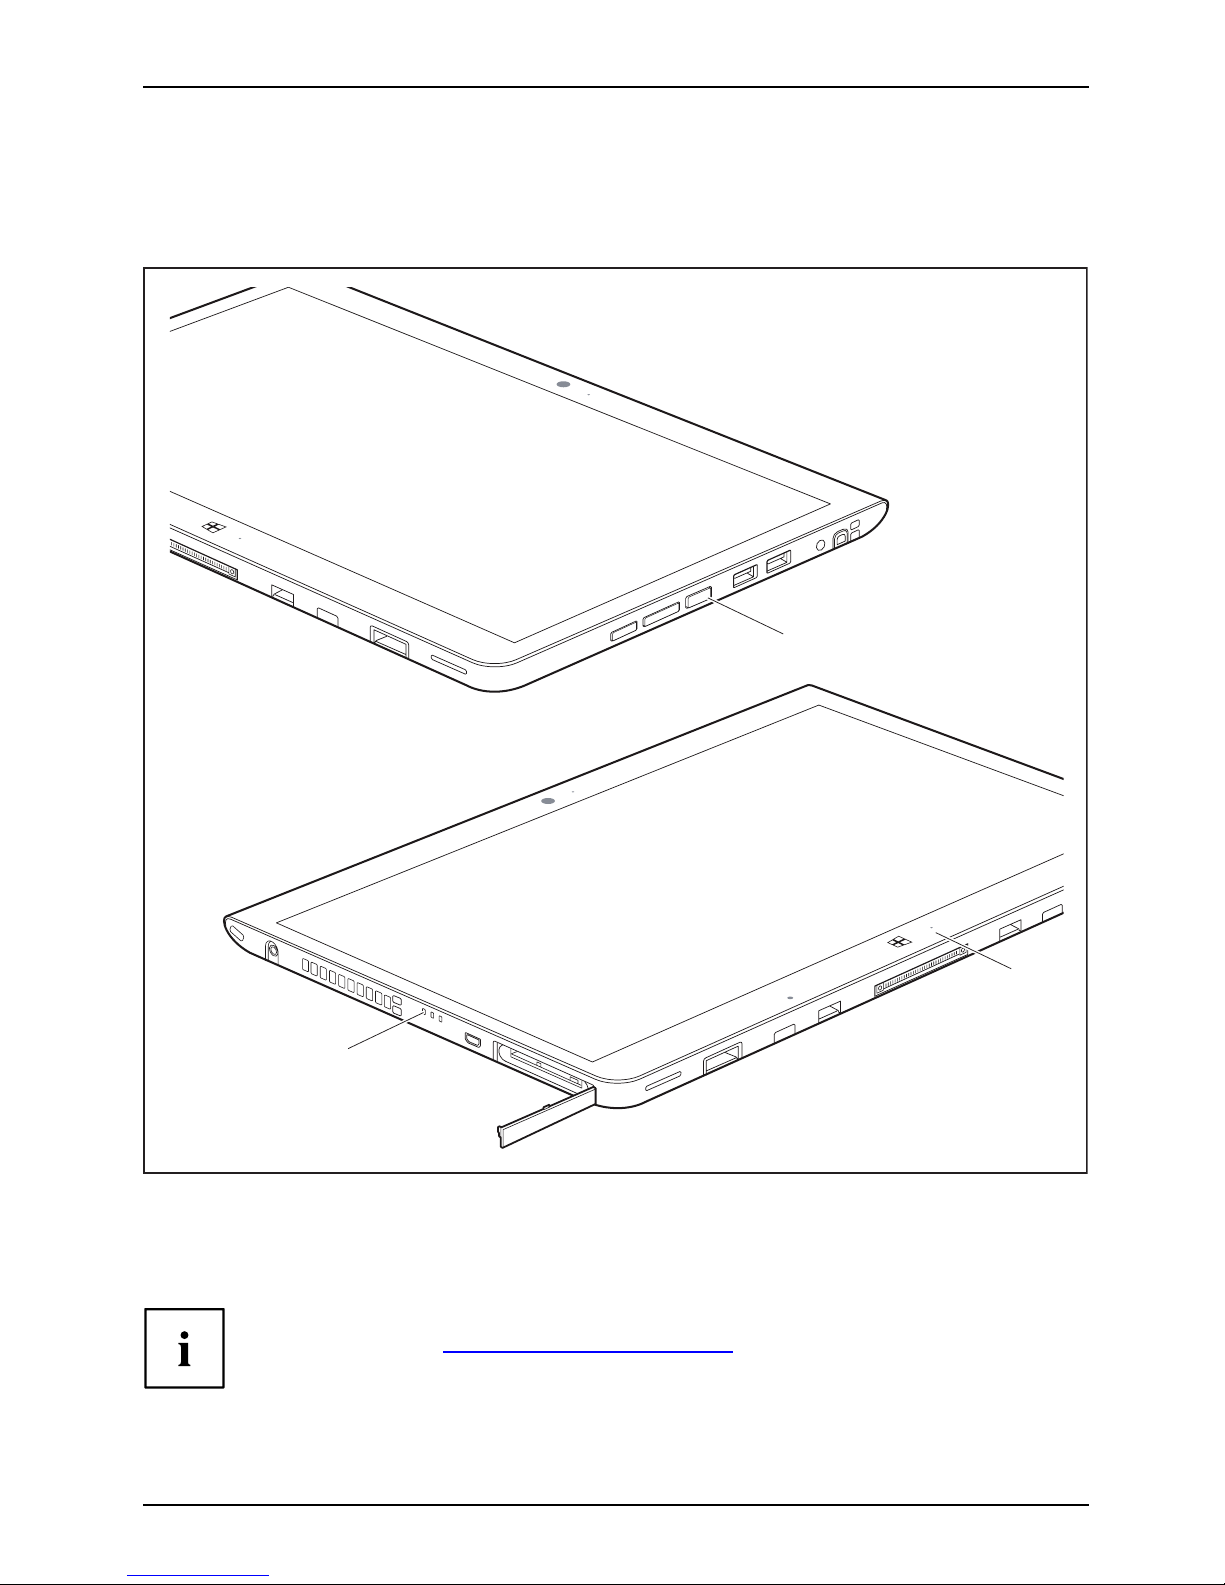
Left side
1 2 3 9
7 84 56
1 = Security Lock device
2 = DC jack (DC IN)
3 = Eyelet for stylus cor
d
4 = Power-on indicator
5 = Battery charging in
dicator
6 = Wireless indicator
7 = Micro HDMI port
8 = Storage card slot (microSD, protected
by cover)
9=SIMcardslot(micro
SIM, protected
by cover)
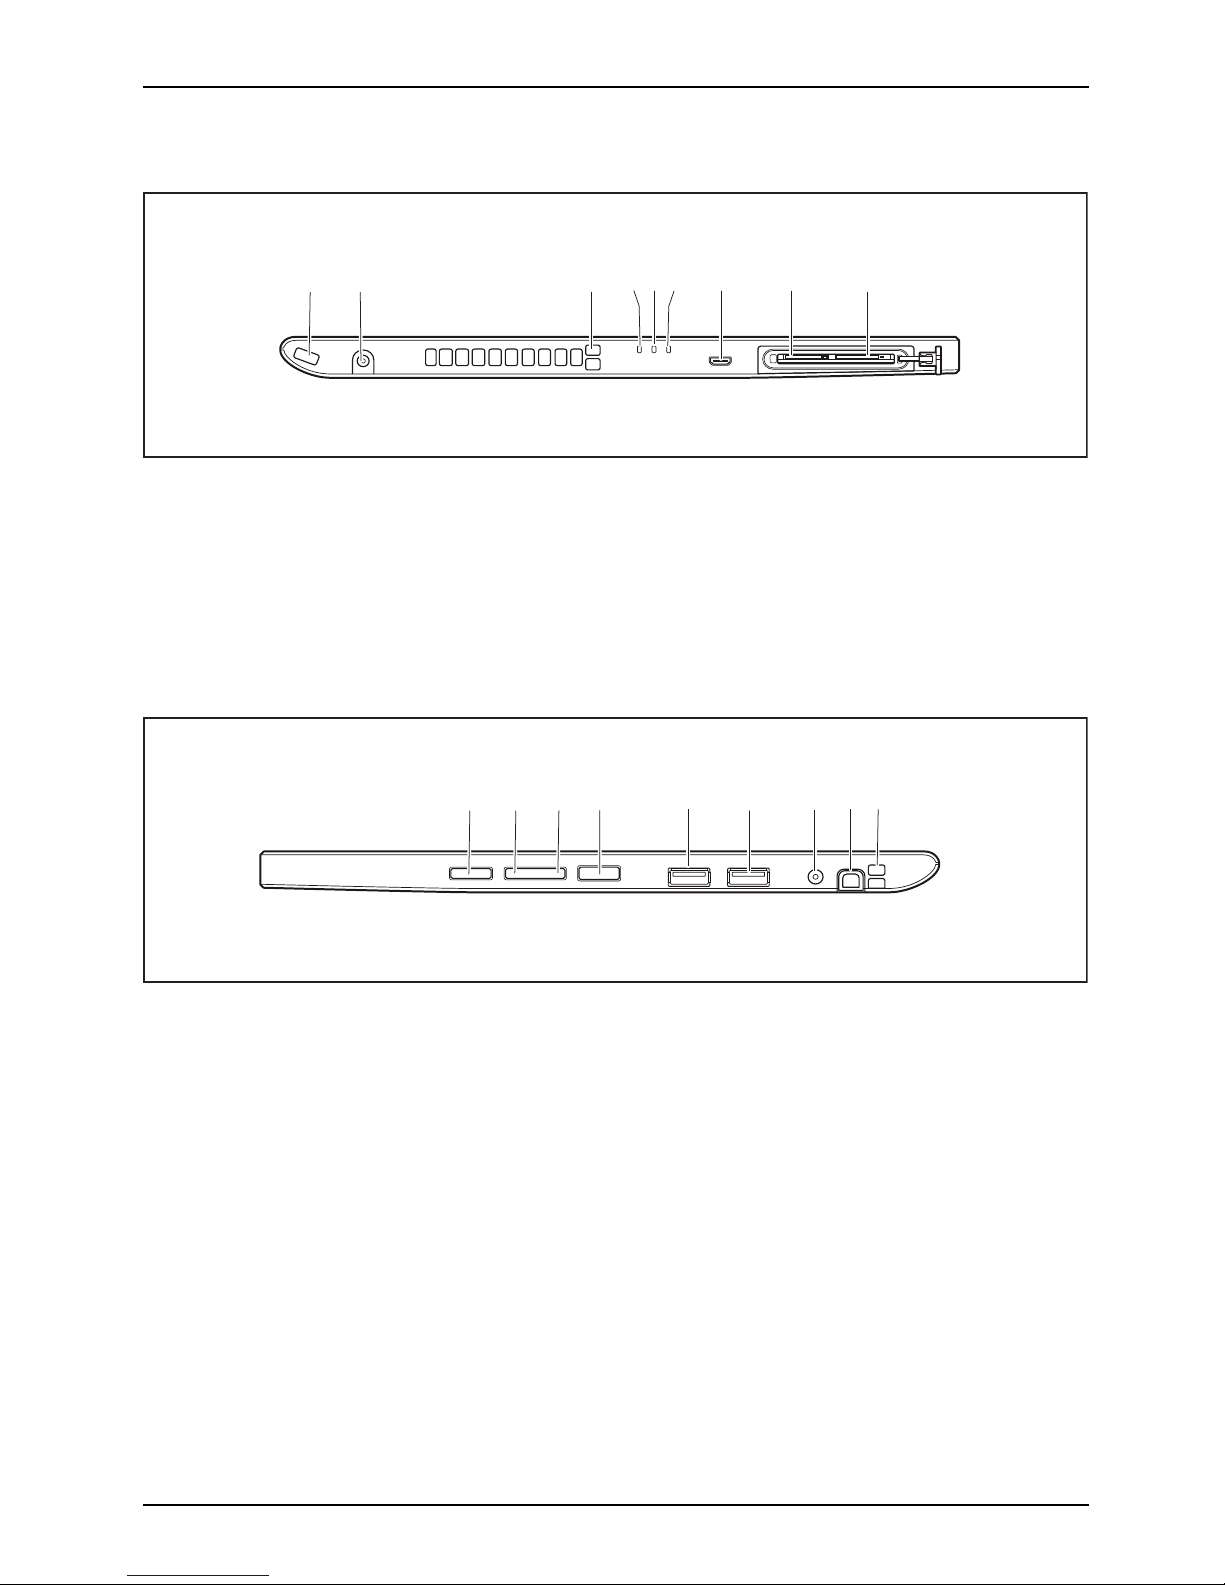
Right side (device version with out palm vein sen sor)
1 2 6
4
5
8
9
7
3
1 = Shortcut button
2=VolumeDo
wn button
3 = Volume Up button
4 = ON/OFF bu
tton
5=USBport(USB2.0)
6 = USB port (USB 3.0)
7 = Combined
headphones and
micropho
ne port
8 = Stylus slot
9 = Tether e
yelet for stylus tether
Fujitsu 13
Page 16
Ports and controls
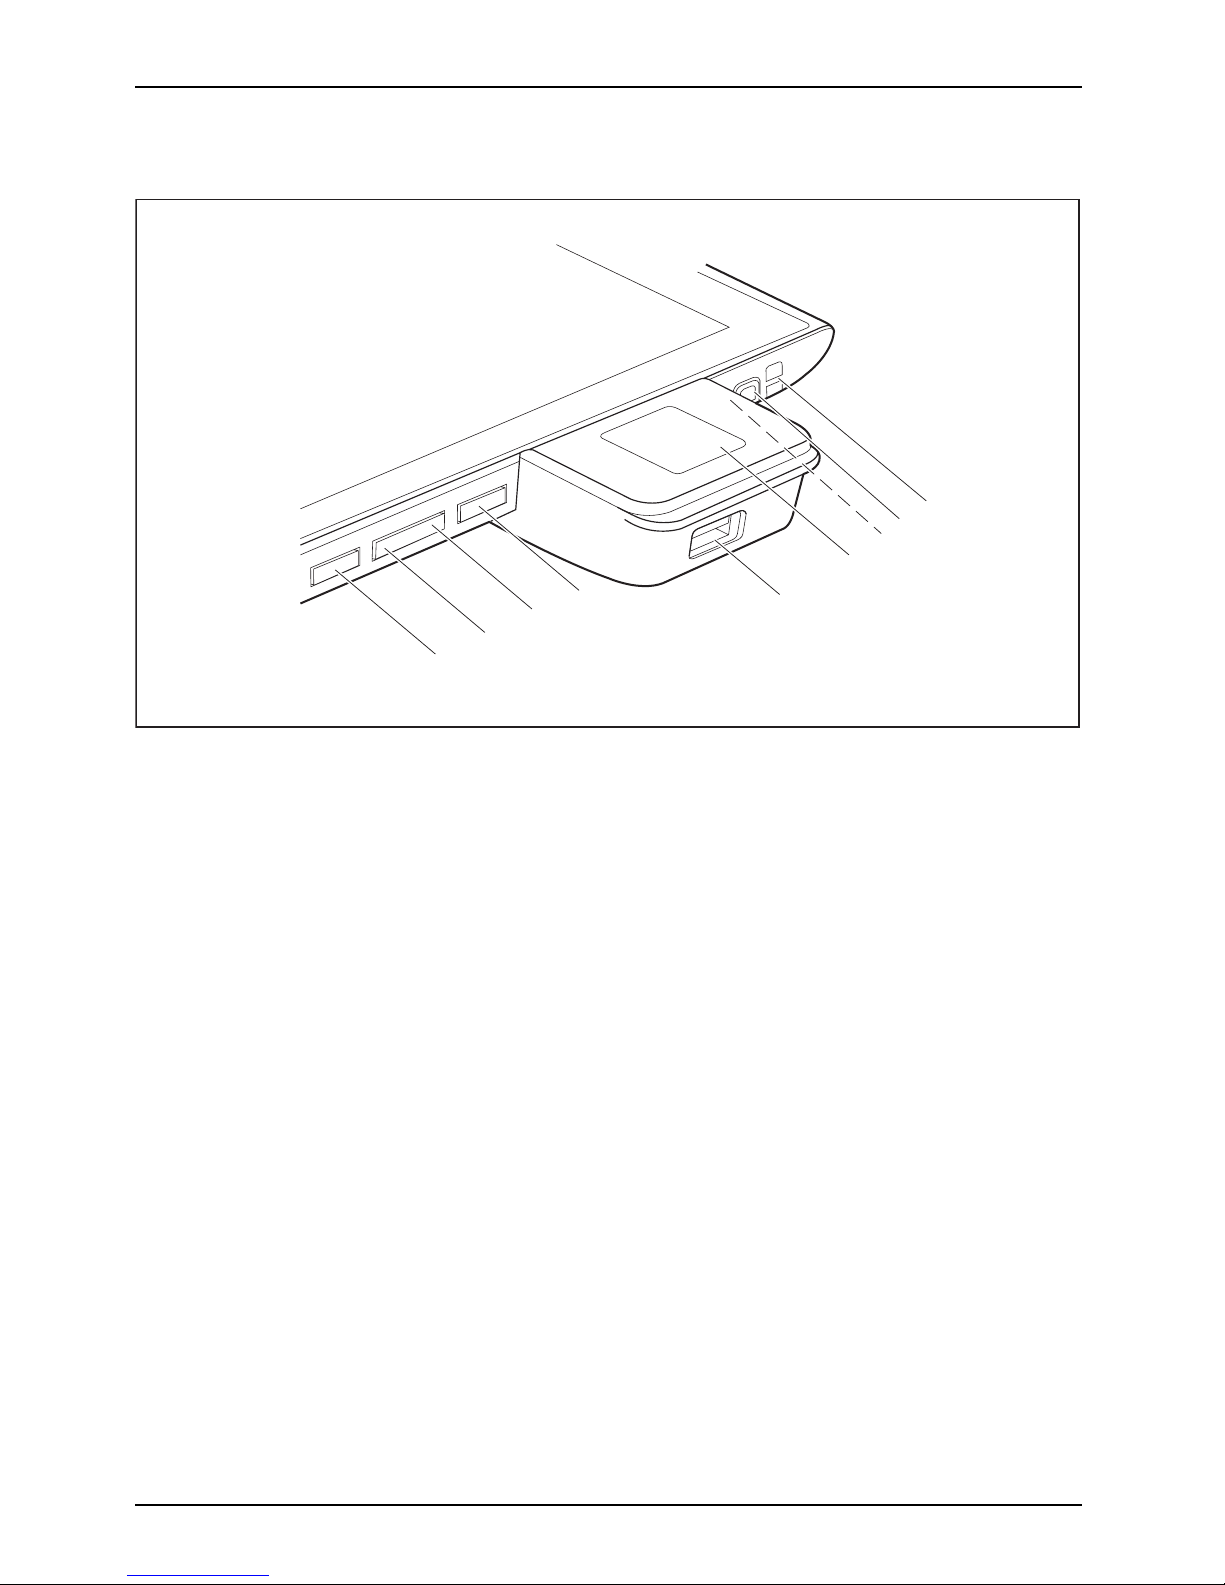
Right side (device version with palm vein sensor)
1
5
6
2
3
7
4
8
9
1 = Shortcut button
2 = Volume Down button
3 = Volume Up button
4 = ON/OFF button
5 = USB port ( USB 2.0)
6 = Palm vein sensor
7 = Combined headphone a nd microphone
port (not visible in diagram)
8 = Stylus slot
9 = Tether eyelet for stylus tether
14 Fujitsu
Page 17
Ports and controls
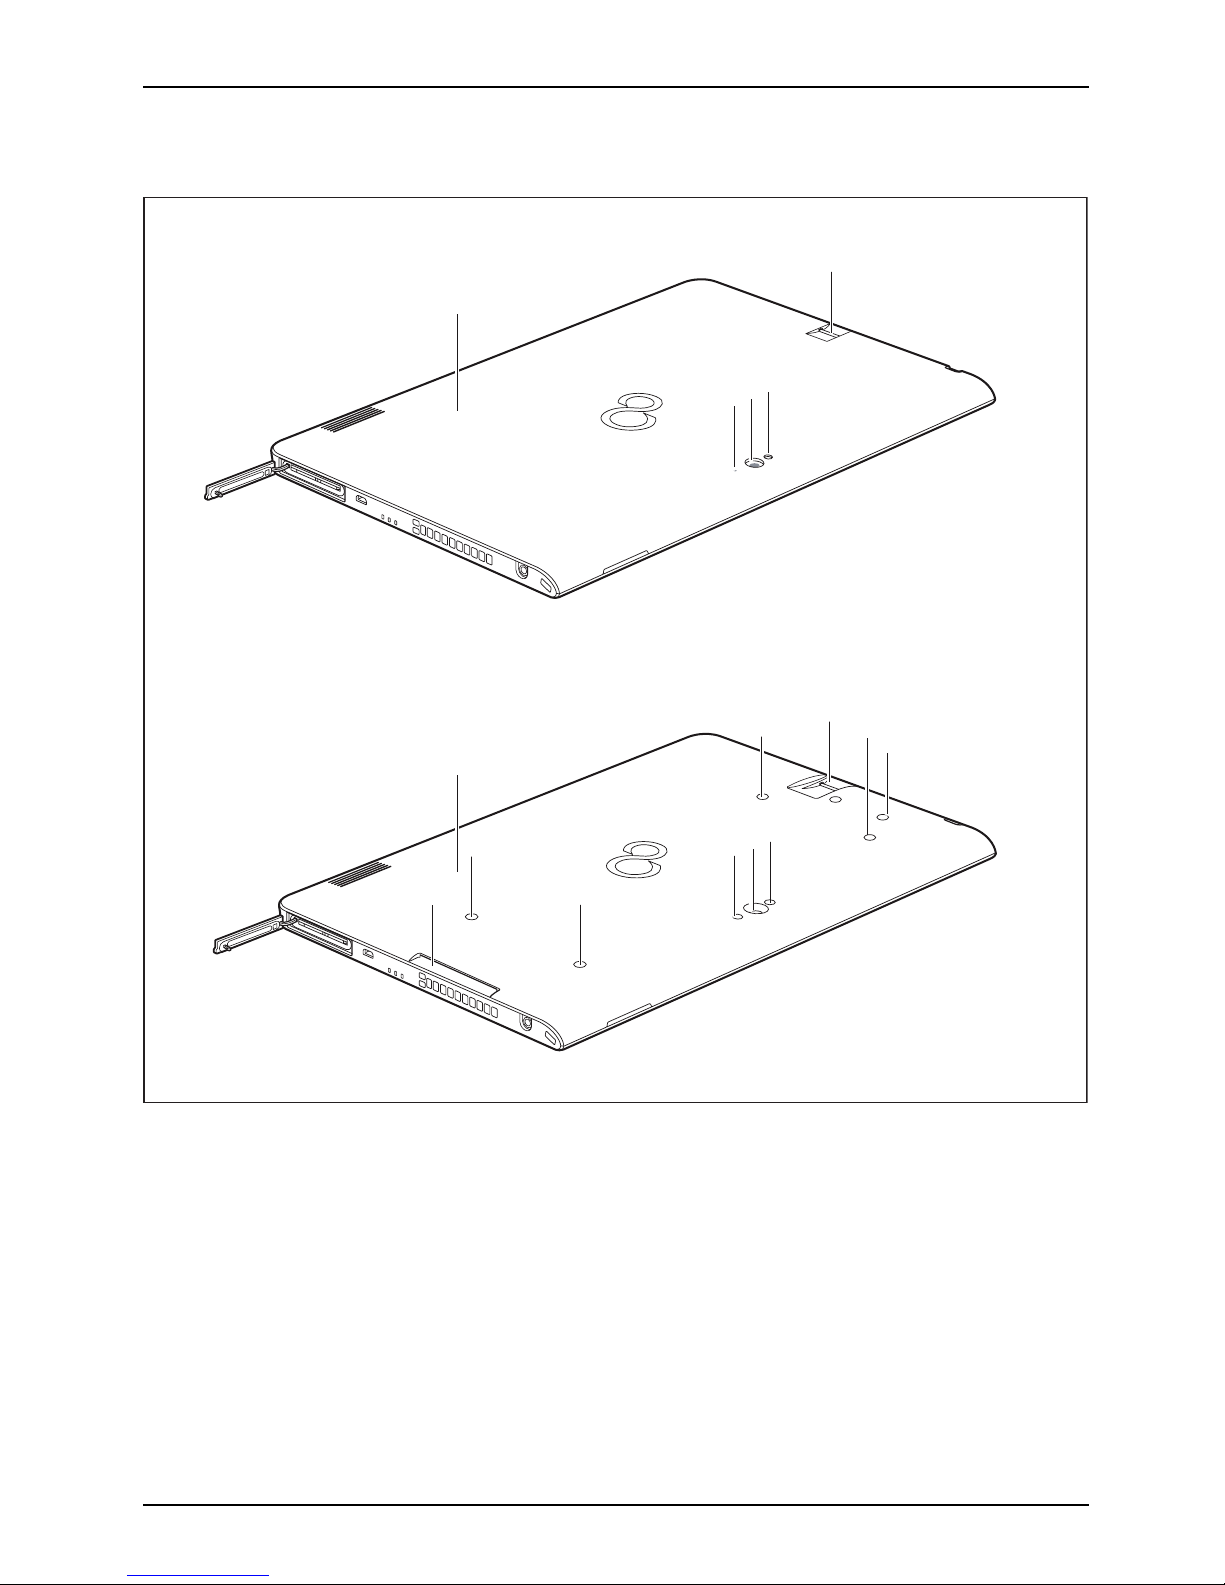
Back (2 variants: without screw holes or with screw holes and Smart Card reader)
4
3
2
1
6
4
3
2
1
5
5
5
5
5
7
7
1 = Fingerprint sensor
2 = Camera light
3 = Webcam
4 = Webcam LED
5 = Screw holes (device-dependent) fo r
securing accessories
6 = SmartCard reader (device dependent)
7 = NFC (Near Field Communication)
(device-dependent)
Fujitsu 15
Page 18

Important notes
Important notes
ImportantnotesNotes
This chapter contains essential safe ty information which must be followed when working
with your Tablet PC. The other notes provide useful information a bout your Tablet PC.
Safety instructions
SafetyinformationInformation,
Please follow the safety notes provided in the "Safety/Regulations" manual
as well as the safety notes given below.
Please pay special attention to the sections in the manual m arked
with the symbol on the left.
When connecting and disconnecting cables, observe the relevant
notes in this operating manual.
Read the information on the ambient conditions in the "
Tec hnical data", Page 96 chapter
and the information in the "
First-time setup of your device", Page 20 chapter before
preparing your Tablet PC for use and switching it on for the first time.
When cleaning the device, please observe the r elevant notes in the
section "
Cleaning the Tablet PC", Page 19.
Pay attention to the additional safety notes for devices with wireless components
provided in the "Safety/Regulations" manua l.
When handling this device, you come into contact with lead, a chemical which in
California is held to be a possible cause of birth defects and other damage to fertility.
Wash your hands after using the device.
This Ta blet P
C complies with the relevant safety regulations for data processing equipment. If
you have ques
tions as to whether you can set up the Tablet PC in the intended environment,
please conta
ct your sales outlet or our hotline/service desk.
16 Fujitsu
Page 19

Important notes
Additional safety notes for devices with
wireless components
WirelesscomponentsWirelessLANBluetooth,Safetynotes
If a wireless component (Wireless LAN, Bluetooth, 4G) is integrated in your Tablet PC, you must
be sure to observe the following safety precautions when using your Tablet PC:
• Switch off the wireless components when you are in an aircraft or driving in a car.
• Switch off the wireless components when you are in a hospital, a n operating
room or near a medical electronics system. The transmitted radio waves
can impair the operation of medical devices.
• Switch off the wireless components, when you let the device get near flammable
gases or into hazardous environments (e.g. gas station, paint stores), as the
transmitted radio waves can cause an explosion or a fire.
For further information on how to switch the wireless components on a nd off, refer
to section "
Switching the wireless components on and off", Page 40.
Protecting the display screen
Do not pour liquid
s on the system or wash it with a heavily soaked cloth. Do not place
itemsonthetopo
f the monitor in order to prevent it from being damaged.
During normal u
se of the device, small particles from the environment
can become embe
dded in the stylus tip and scratch the screen. The
warranty doe s
not cover a scratched screen.
Energy savin
g
NotesEnergyPowersavin
g
If you will not be using your Tablet PC, switch it off. Switch off any connected external devices when
they are not in use. If you use the energy-saving functions, the Tablet PC uses less power. If you do
this, you will be a ble to work longer with the Tablet PC before having to recharge the battery.
The energy efficiency is increased and en vironmental pollution is reduced.
You save money and help protect the environment.
Energy saving under Windows
► Make use of the available energy-saving functions as described in chapter
"
Using the energy saving func tions", Page 37.
Fujitsu 17
Page 20
Important notes
Traveling with your Tablet PC
MobileoperationNotesTr ansportationTabletPC
Please follow the instructions below when traveling with your Tablet PC.
Before you travel
► Back up important data stored o n your hard disk.
beforeyoutravelTravel
► Switch off the wireless c
omponent for data security reasons. With data traffic via a wireless
connection, it is also po
ssible for unauthorized third parties to receive data.
Information on activat
ing data encryption is provided in the documentation
for your w ireless compo
nent.
► If you want to use your Tablet PC during a flight, ask the flight attendants to seeit is safe t o use it.
When traveling in other countries
► If you are traveling abroad, check that the AC adapter can be operated with the
local AC voltage. If this is not the case, obtain the appropriate AC adapter for
your Tablet PC. Do not use any other voltage converter!
► Check whether the local AC voltage and the AC cable are compatible. If this is not
the case, buy an AC cable that suits the local conditions.
► Enquire with the appropriate government office of the country you will be traveling in as to
whether you may there operate the wireless component integrated in your Tablet PC.
► Take the n ece ssary travel adapters with you when traveling abroad. Check in the following
table for which travel adapters you will need, or ask your travel organizer.
Power connection Trave l destination
United States, Canada, Mexico, parts of Latin
America, Japa n, Korea, Philippines, Taiwan
Russia and the Commonwealth of Independent
States (CIS), much of Europe, parts of Latin
America, the M iddle East, parts of Africa, Hong
Kong, India, much of south-east Asia
United Kingdom, Ireland, Malaya, Singapore,
parts of Africa
China, Australia, New Zealand
18 Fujitsu
Page 21
Important notes
Transporting the Tablet PC
Protect the Tablet PC from severe shocks and extreme temperatures
(e.g. direct sunlight in a car).
• Do not transport your Tablet PC while it is turned on.
• Carry your Tablet PC with you while traveling. Do not check it in as baggage.
• Never put your Tablet PC through a met al detector. Have it han d-inspect ed by
security personnel. You can however put your Tablet PC through a properly
tuned X-ray machine. To avoid problems, place it close to the entrance of
the machine an d remove it as soon a s possible or have it ha nd-inspected by
security personnel. Security officials may require you to turn your Tablet PC
on. So make sure you have a charged battery on hand for this.
► Switch the Tablet PC off
.
► Unplug the AC plug of the AC adapter and all external devices from the power outlets.
► Disconnect the AC ad
apter cable and the data cables for all external devices.
► To prot ect against damaging jolts and bumps, use a suitable Tablet PC
carrying case to transpo rt your Tablet PC.
Cleaning the Tablet PC
Do not clean any in
terior parts yourself; leave this job to a service technician.
Only use deterg
ents designed for computers. Normal hou seh old cleaners
and polishes ca
n damage the labels on the keyboard and t he Tablet
PC, the paintw
ork or the Tablet PC itself.
Ensure that n o
liquid enters the Tablet PC.
The touchscr
een is very sensitive to scratches! Only clean the display
surface with
a very soft, slightly damp cloth.
► Switch the Tablet PC off.
CleaningInstructi
ons
Table tPCKeyboardTouchpadTouchscreenCrystalVi
ewscreen
► To prevent the device from being switched on unintentionally, remove the AC
plug of th e AC adapter from the power outlet.
The surfaces may be cleaned with a dry cloth. If particularly dirty, use a cloth which h as
been moistened in mild domestic detergent and then carefully wrung out.
Fujitsu 19
Page 22
First-time s etu p of your device
First-time setup of your devic
e
First-timese tupGettingstarted
Please read the chapter "Important notes", Page 16.
If your device is equipped with a Windows operating system, the necessary
hardware drivers an d supplied software are already pre-installed.
Beforeswitchingitonforthefirst time, connect the device to the AC voltage using
the AC adapter, see "
Connecting the AC ada pter", Page 22. The AC adapter must
remain co nnected during the whole of the installation process.
A system test is performed when your device is first switched on. Various messages
can appear. The display may remain dark for a short time or may flicker.
Please follow the instructions on the screen.
NEVER switch off your device during the first-time setup process.
The battery must be charged if you want to operate your device using the battery.
When used on the move, the built-in battery provides the device with the ne cessary power. You
can increase the operating time by using the available energy-saving functions.
For instructions on how to connect external devices (e.g. mouse, printer) to your Tablet
PC, please refer to the operating manual for your device.
Unpacking and c
hecking the device
If you find that damage has occurred during transport, please notify
your local sales outlet immediately!
► Unpack all the individual parts.
PackagingTransport
► Check your d
evice for any visible damage which may have occurred during transportation.
You may nee
d to reuse the packaging in the future, for example if
you need t
o ship your device.
20 Fujitsu
Page 23

First-time setup of your device
Choosealocation
ChoosealocationSetupACadapter
Choose a suitable location for the device before setting it up. In doing
so, please follow these instructions:
• Never place the device or the AC adapter on a heat-sensitive surface.
The surface could be damaged as a resu lt.
• Never place the device on a soft surface (e.g. ca rpeting, upholstered furniture,
bed). This can result in damage caused by overheating.
• The back of the device heats up during normal operation. Prolonged contact
with skin can become unp leasant or even result in burns.
• Place the device on a stable, flat, non-slippery surface. Please note that the
rubber feet of the device may mark certain types of delicate surfa ces.
• Keep other objects at least 100 mm / 4 inches away from the device
and its AC adapter to ensure adequate ventilation.
• Do not expose the device to extreme environmental conditions. Protect
the device against dust, humidity and heat.
Mounting the feet (only device versions
with palm vein sensor)
FeetFeet
Before initial startup of the above-mentioned device versions, Fujitsu reco mmends
that you mount the supplied feet.
► For how to install the feet, see section "
Using the palm vein sensor (device-dependent)", Page 71.
Fujitsu 21
Page 24
First-time s etu p of your device
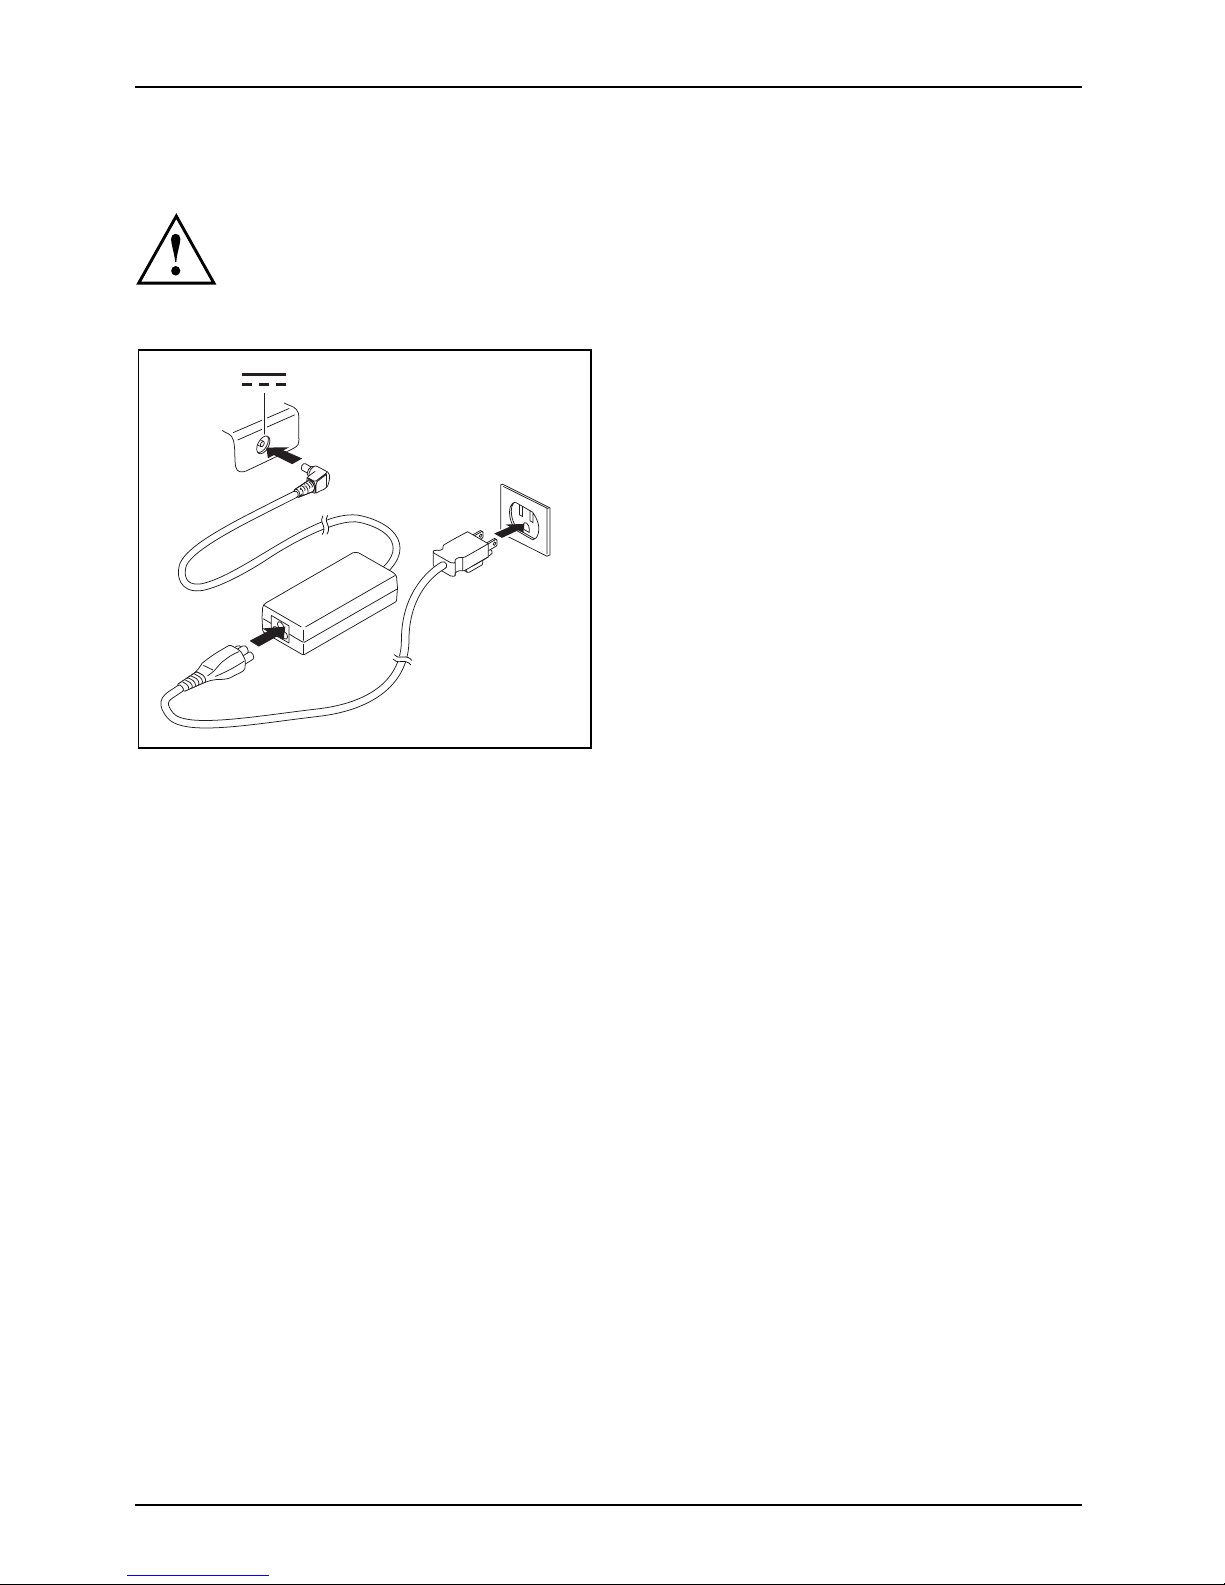
Connecting the AC adapter
MakingreadytouseACada pter
Observe the safety notes in the enclosed "Safety/Regulations" manual.
The supplied A C cable conforms to the requirements of the country in which
you purchased your device. Make sure tha t the AC cable is approved for
use in the coun try in which you intend to use it.
3
1
2
► Connect the AC cable ( 1) t
o the AC adapter.
► Plug the A C cable (2) into a power outlet.
► Connect the AC adapter c
able (3) to the
DC jack (DC IN) of the dev
ice.
22 Fujitsu
Page 25
First-time setup of your device
Switching on the device for the first time
Switchingonforthefirsttime
To make it easier to use your device for the first time, the operating system
is pre-installed on the hard disk.
2
1
2
► Press the ON/OFF button (1) for about one second to switch the device on.
The power-on indicators (2) light up whenever the system is switched on.
► During the installation process, follow the on-screen instructions.
You can fin d information and help on the Windows operating system
functions online at "
http://windows.microsoft.com".
Fujitsu 23
Page 26

First-time s etu p of your device
Installing Bonus Apps
BonusApps
After you have started your system the first time, you will see a Bonus Apps icon on your desktop.
► Click on the icon to see which additional applications are available for you to install.
Applications that are already installed appear in grey, those that are
available for installation appear in blue.
► Select the applications you wish to install by selecting the checkbox adjacent to your selection.
or
► Click Select All if you would like to install all available applications.
► To c on firm your selection, click Install.
Note that in some cases (depending upon which application was selected for
installation) after installation completes, the system will prompt you to reboot.
There are also cases in which if multiple applications are selected to install
but one of them needs a reboot, the system will reboot and continue
installing the rest of th e selected applications.
24 Fujitsu
Page 27
Working with the Tablet PC
Working with the Tablet PC
Tablet,operationTablet
This chap ter describes the basics for operating your Tablet PC. You can fi nd instructions
on how to connect external devices (e.g. mouse, flash storage) to the Tablet PC in
the chapter "
Connecting external device s", Page 79.
Please refer to the notes in the chapter "Importa nt notes", Page 16.
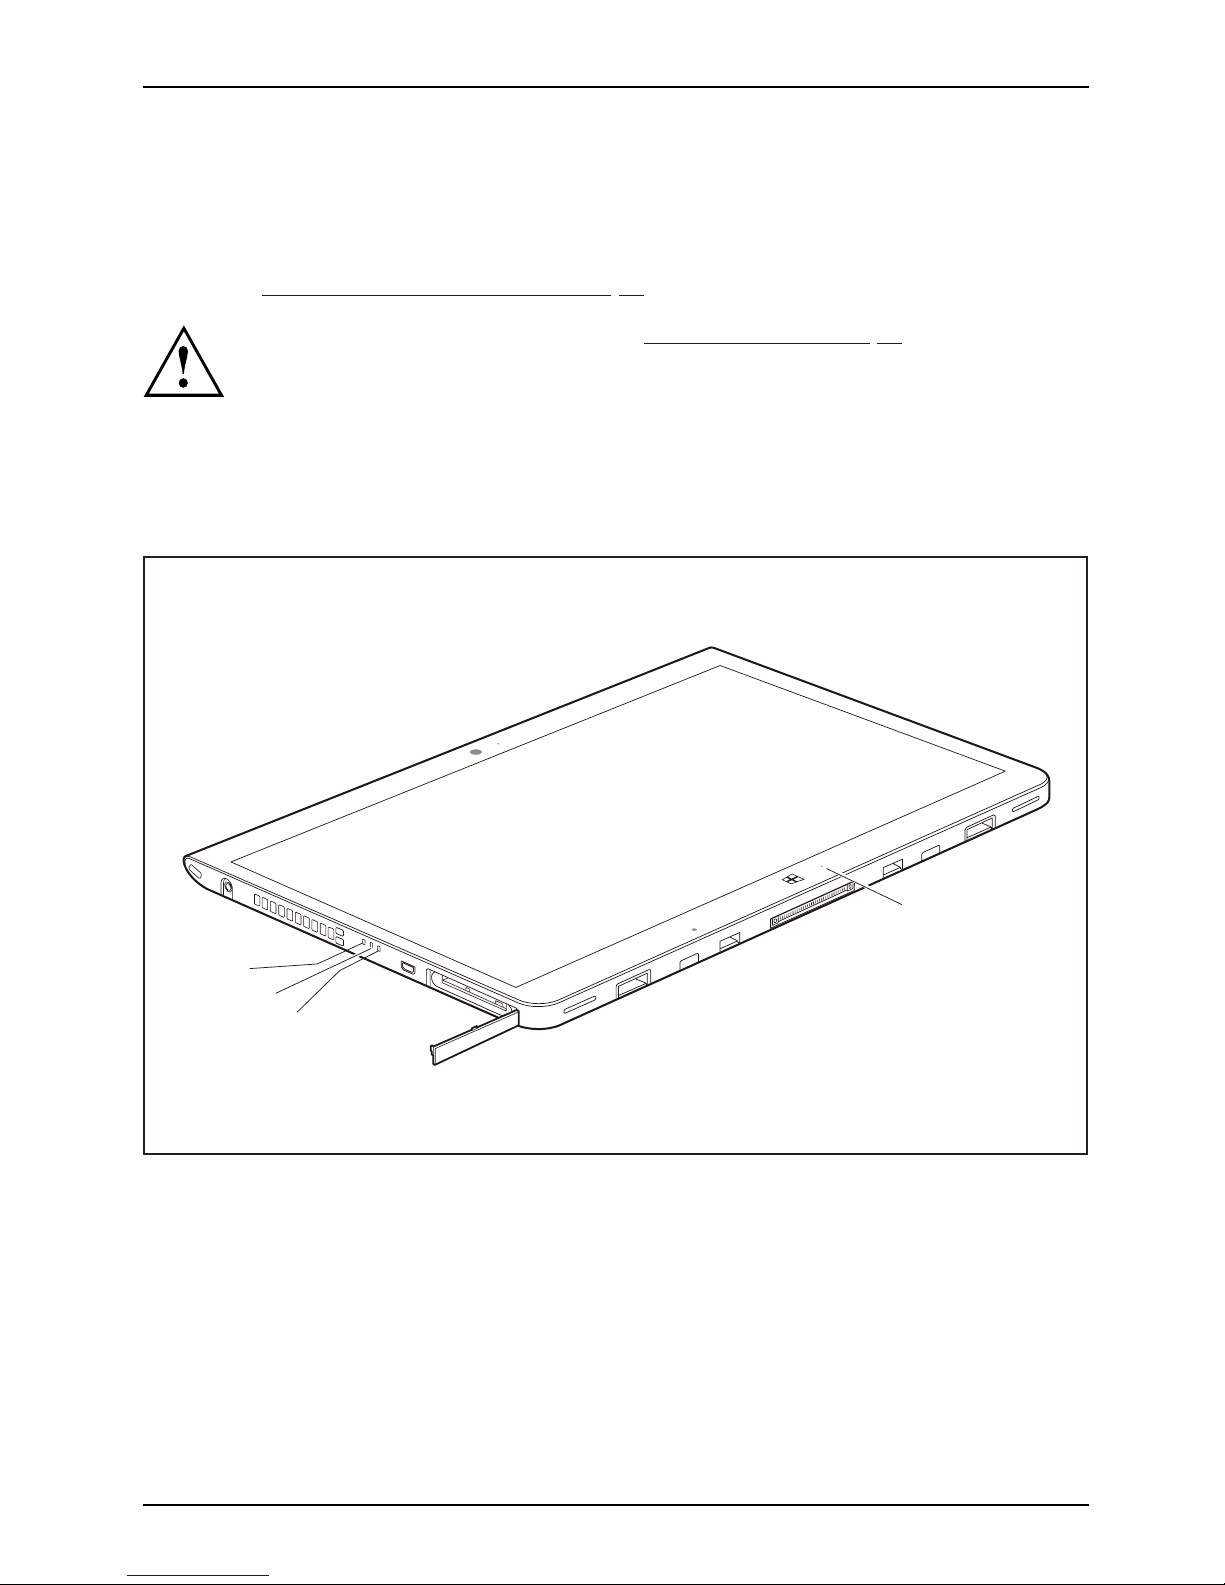
Status indicators
StatusindicatorsSymbols
The status indicators (1, 2, 3) provide information about the statuses of the power supply,
the rechargeable batteries and the w ireless components.
2
1
1
3
Fujitsu 25
Page 28
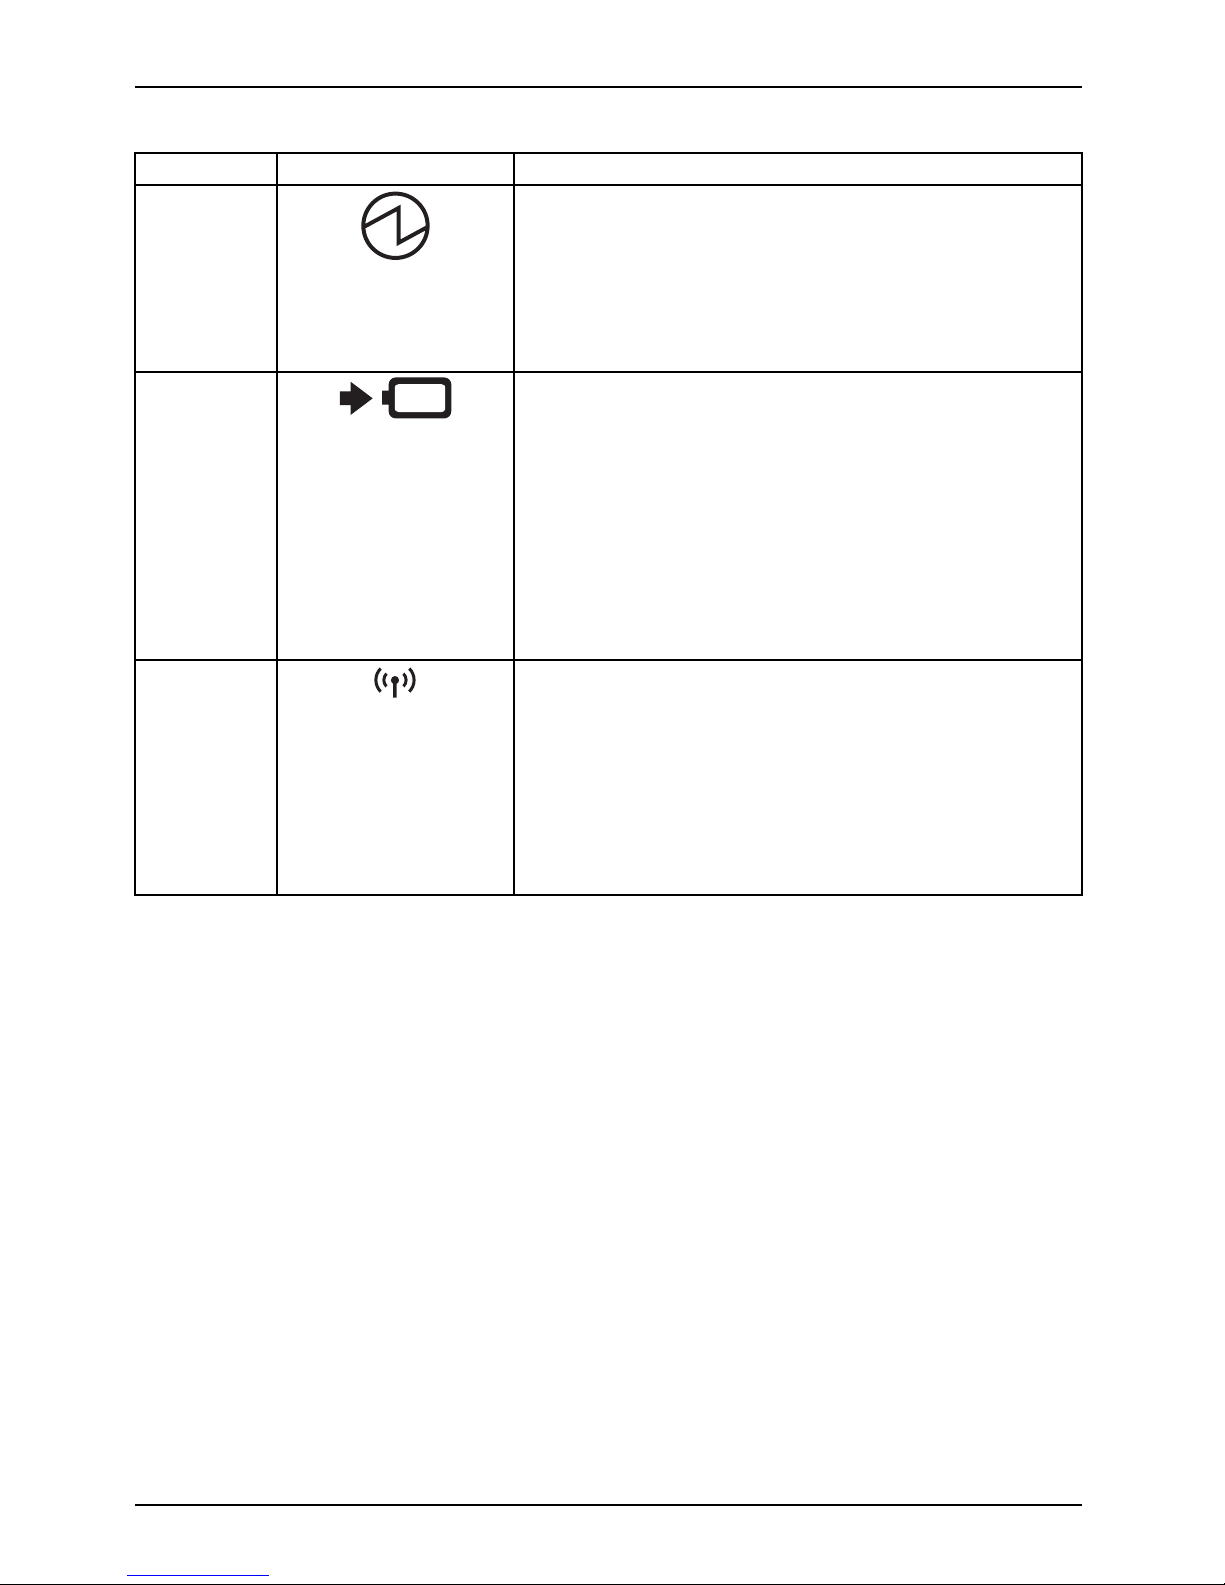
Working wit h the Tablet PC
No. Status indicator Description
1 Power-on indicator
• The indicator lights up white: The Tablet PC is
switched on.
• The indicator flashes: The Tablet PC is in sleep mode
(Save-to-RAM).
• The indicator is not lit up: The Tablet PC is switched
off or in Save-to-Disk mode.
2 Battery charging indicator
Please note: If the AC adapter is connected when the
state of charge of the battery is more than 90%, charging
will not be started. When the state of charge of the battery
is less than 90%, the battery will be charged to 100% as
soon as the AC adapter is connected.
• The indicator lights up orange: The rechargeable
battery is charging.
• The indicator is not lit up: The battery is not charging
(the battery is already fully charged or the AC adapter
is not connected).
3 Wireless indicator
• The indicator lights up white: The wireless components
are switched on while the Tablet PC is switched on.
• The indicator flashes: The wire less components are
switched on while the Tablet PC is in Sleep mode or
Save-to-Disk m ode, or while the Tablet PC is switched
off.
• The indicator is not lit up: The wireless components
are switched off.
26 Fujitsu
Page 29

Working with the Tablet PC
Switching the Tablet PC on
Tablet:SwitchingonPower-onPower-onindicator
2
1
2
► Press the ON/OFF button (1) for about one second to switch the device on.
The power-on indicators (2) light up whenever the system is switched on.
Fujitsu 27
Page 30

Working wit h the Tablet PC
Programming the ON/OFF button
You can program the ON/OFF button:
Operating system Menu
Windows 7
Start - (Settings) - Control Panel - System and
Security - Power Options
Windows 10
Control Panel - Hardware and Sound - Power
Options
If you have assigned a password, you must enter this when requested to
do so, in order to start the operating system. De tailed information can be
found in the chapter "
Security functions", Page 69.
Switching the Tablet PC off
Back up your data and close all applications before you switch off your
device. Otherwise data might be lost.
► Shut down the ope
rating system correctly.
Switchingoffthe
► If the Tablet PC does not switch itself off automatically, press the ON/OFF
button for approx. five seconds.
Handwriting recognition
For detailed
information on handwriting recognition, see the documentation for your operating system.
At present,
handwriting recognition under Windows 7 and Windows 10
supports th
e following languages:
English, G
erman, French, Italian, Japanese, Korean, Chinese (traditional and simplified), Dutch,
Portugues
e, Spanish, Bra zilian, Norwegian (Bokmål and Nynorsk), Swedish, F innish, Danish,
Polish, R
umanian, Serbian (Cyrillic and Latin script), Ca talan, Russian, C zech and Croatian.
Under Win
dows 10 you can set the required language under Control Panel –
Time, La n
guage and Region – Language.
Touchscreen
Touch scre enNotes
Information on screen resolution can be found in the section "Screen resolu tions
for integrated scree n and external screens", Page 99.
High-quality LCD screens (TFT) are installed in Fujitsu Tablet PCs. For tech nical reasons,
these screens are manufactured for a specific resolution. An optimal, clear picture can
only be ensured in the resolution intended for the particular screen. A screen resolution
which differs from the specification can result in an unclear picture.
28 Fujitsu
Page 31

Working with the Tablet PC
The screen resolution of your Tablet PC’s touchscreen is optimally set at the factory.
Current production technology cannot guarantee an absolutely fault-free screen display. A few
isolated constantly lit or unlit pixels may be present. The maximum permitted number of such
faulty pixels is specified in the international stan dard ISO 9241-307 (Class II).
Example:
A screen with an HD resolution of 1280 x 1024 has 1366 x 768 = 1,310,720 pixels. Each
pixel consists of three subpixels (red, green and blue), so there are almost 3.9 million
subpixels in total. According to ISO 9241-307 (class II), a maximum of 3 light and 3
dark pixels and, in addition, 7 light or 13 dark subpixels or an equivalent mix (1 light
subpixel counts as 2 dark subpixels) are allowed to be defective.
Pixel
A pixel consists of 3 subp
ixels, normally red, green and
blue. A pixel is the small
est element that can be generated
by complete functional
ity of the display.
Subpixel
A subpixel is a separat
ely addressable internal structure
within a pixel that en
hances the pixel function.
Cluster A cluster contains two or more defective pixels or
subpixels in a 5 x 5 pixel block.
Background lighti
ng
LCD screens are op
erated with background lighting. The luminosity of the background
lighting ca n decr
ease over the period of use of the Tablet PC. However, you
cansetthebrigh
tness of your screen yourself.
Ambient light s
ensor
If your Tablet
PC was shipped with the Windows operating system, the screen brightness is
regulated by m
eans of the ambient light s ensor and depending on the respective light conditions.
This results i
n optimum readability and longer battery life at the same time.
If your Table
t PC was shipped with Windows 10, the adaptive brightness setting is activated. To
change the am
bient light sensor settings, select Control Panel - System and Security - Power Options -
Change plan
settings - Change advanced power settin gs - Disp lay - Activate adaptive brightness setting..
Synchroni
zing the display on the touchscreen and an external monitor
In Windows
7, you can switch between touchscreen and external mon itor, if you open
Control P
anel - Windows Mobility Center, section External Display.
In Window
s 10 you can proceed as follows to set the output type:
► Wipe your finger over the screen starting from the right-hand edge.
► Select All settings.
► Look for the keyword "project".
► Select the required function.
Fujitsu 29
Page 32

Working wit h the Tablet PC
Select display orientation (portrait or
landscape format)
LandscapeformatPortraitformatDisplayorientation
You can choose to use either portrait or landscape for the display, or whethe r the screen
orientation should automatically adjust to the orientation of the ta blet PC.
If you have a device with installed wireless WAN module, do not operate WWAN with
the antenna folded out when holding the device horizontally w ith the camera pointing
downwards (in the tablet position in landscape format (rotated) (secondary landscape)).
Operating the device in that position can result in damage to the antenna.
Windows 7
You can change these setting s in the Fujitsu menu or under Start -(Settings -)
Control Panel - Hardware and Sound - Display - Settings.
Windows 10
You can change these settings under Control Panel - H ardware and Sound
- Windows Mobility Center / Rotate screen.
In the Fujitsu Tablet Controls settings there are profiles saved for operation
with different screen orientations. These profiles have preset standa rd
configurations that can be modified as desired.
These settings do not just affect the screen settings on the Tablet PC, but
also on external monitors that are connected.
30 Fujitsu
Page 33

Working with the Tablet PC
Using fingers
You can execute certain commands by using your finger tip on the touchscreen of your device.
Alternatively, everything which you can select or activate using your finger
tip can also be selected or activated using the stylus.
Calibrate the Dual Digitizer for finger-based
operation of the device
.
Before the first finger-based operation, you must calibrate your Tablet PC via the
operating system, so that it recognizes your fingertips as accurately as possible.
As soon as you notice that the accuracy is becoming worse, you
must recalibrate the device .
Please note: There are separate calibration programs available for calibrating
the stylus and for calibrating finger-based operation. Do not use the calibration
tool for the stylus to calibrate finger-based operation.
Operating system Menu
Windows 7 / W indows10To calibrate, run the Hardware and Sound / Tablet PC Settings function in the
Control Panel. You need to calibrate both portrait and landscape formats.
Using the stylus
Pen
1
2
3
1 = stylus tip
2 = stylus button ( right mouse button)
3 = eyelet for optional stylus tether
You can use the stylus on your Tablet PC as an electronic writing tool, to select menu items and to
navigate through the programs. Programs that support handwriting recognition also allow you to
write directly on the screen with the stylus. You can also use the stylus as a drawing tool.
A stylus tether is available as an optional extra and you can use this to tie the
eyelet on the stylus to the eyelet on the Tablet PC.
Fujitsu 31
Page 34

Working wit h the Tablet PC
Use only the stylus that was provided with your Tablet PC. Do not use any other pointed
object as a substitute, that was not specially designed for your Tablet PC . Replace
the stylus tip if it is worn. The warranty does not cover a scratched screen.
While writing, take care that you do not scratch the surface of the
display (e.g. with a wristwatch or bracelet).
The stylus of the Tablet PC is
an electronic instrument that can be damaged
if used improperly. Handl
e the stylus with care.
Our recommendations for p
roper handling of the stylus are a s follows:
• Do not gesture with the st
ylus.
• Do not use the stylus as a pointer.
• Do not use the stylus on s
urfaces other than the screen of the Tablet PC.
• Do not try to turn the grip of the stylus. The grip is used to put the
stylus into its slot or to take it out of its slot.
• Never store the styl
us with its weight on the tip (e.g. with the tip down in a stylus
container). If the s
tylus is stored with the tip pointing down, this may have an
adverse effect on th
e stylus mechanism (particularly in high temperatures). In this
case, the stylus ti
p may react as though it is constantly being pressed down. To
avoid damage, the s
tylus should be store d in the slot when not in use.
The stylus can be influenced by electromagnetic fields (cursor quivers or
jumps). There may be a few areas on the screen where the cursor quivers
slightly in spite of pressing the stylus down firmly.
The screen responds to entries made with the tip of the finger or the stylus when the
tip of the finger or the stylus directly touches the screen.
You can use the stylus to perform almost all functions for which you would otherwise use a mouse.
Delete functions are not supported by the stylus.
Action Mouse
Stylus
Selecting menu
items
Click with the left mouse button. Tap on the menu entry with the tip of
the stylus.
Starting pro grams Double-click with the left mouse
button.
Tap on the program symbol twice in
rapid succession using the stylus tip.
Moving an object
or window
Drag with the left mouse button
pressed.
Place the stylus tip directly on the
object or window. Keep the stylus tip
held against the screen. Drag the
desired object or window.
Opening a context
menu
Click with the right mouse button.
Tap on the desired element with the
stylus and keep the stylus pressed
against the screen.
Moving the cursor Move the mouse
Place the tip of the stylus directly on
the screen.
32 Fujitsu
Page 35

Working with the Tablet PC
Stylus location
To prevent the stylus from jamming in its slot, always make sure that you insert the stylus
correctly into its slot (flat part of the stylus points towards the bottom of the Tablet PC).
On delivery, the stylus (1) is
locatedinthestylus
slot:
1
Adjusting the stylus
Operating system Menu
Windows 7 Under Hardware and Sound - Pen and Input Devices, you can make various
settings for the stylus in the control panel (assignment and function of
the stylus button).
Windows 10 Under System Control - Hardware and Sound - Pen and Touch you can make
various settings for the stylus.
Calibrating the stylus
Before first
use with the stylus, you must calibrate your Tablet PC via the o perating
system, so t
hat it recognizes the stylus as accurately as possible.
You should a
lso always repeat the calibration if th e co-ord ination between the
stylus and
the cursor movement deteriorates.
Operating system Menu
Windows 7 / Windows10To calibrate, run the Hardware and Sound / Tablet PC Settings function in the
Control Panel. You need to calibrate both portrait and landscape formats.
Fujitsu 33
Page 36

Working wit h the Tablet PC
Securing the s tylus tether (optional)
To prevent accidentally dropping or losing the stylus, you should secure it
with th e optional stylus tether.
► Attach one end of the stylus cord to the stylus and the other end of the s tylus cord to the Tablet PC.
34 Fujitsu
Page 37

Working with the Tablet PC
Tablet buttons
In addition to the ON/OFF button (4), your Tablet PC is fitted with three tablet buttons.
1 2
4
3
No. Description Functions
1
Shortcut button Start function manager or screen shot function
2 Volume Down button Decrease volume
3 Volume Up button Increase volume
If the Windows but
ton on the Tablet PC is pressed in combination with the ON /O FF button
(4), this is equi
valent to pressing the
Ctrl+Alt+Del
key combination on a keyboard.
Webcam
Webcam
Your device has two webcams: one on the front of the device and one on the rear.
The webcam has its own status indicator. The indicator lights up when the webcam is active.
Depending on the software use d, you can use your webcam to take pictures,
record video clips or take part in web chats.
• The picture quality depends on the lighting conditions and the software being used.
• You can only operate the webcam with a particular application (e.g. an Internet telephony
program or a video conferencing p rogram which supports a webcam).
• When using the webcam the support of the Tablet PC must not wobble.
• The webcam automatically adjusts itself to the current light level. For this reason,
the touchscreen may flicker while the light level is adjusted.
Further information on use of the webcam and additional settings for your webcam
can be found in the help function of the program using the webcam.
Fujitsu 35
Page 38

Working wit h the Tablet PC
Rechargeable battery
BatteryBatteryServicelife,batteryRechargeablebatteryBattery
The built-in battery provides the Tablet PC with the necessary power for use on the move.
You can increase the service life of the battery by caring for the battery properly. The
average battery service life is around 500 charge/discharge cycles.
You can extend the battery service life by taking advantage of the available energy-saving functions.
Charging and maintaining the battery
BatteryBattery
The Tablet PC battery can only be charged wh en the ambient temperature is
between 5°C / 41 °F and max. 35°C / 95°F.
You can charge the battery by connect ing the Tablet PC to the AC adapter
(see "
Connecting the AC adapter", Page 22).
If the AC ada pter is connected when the state of charge of the battery is more than 90%,
charging will not be started. When the state of charge of the battery is less than 90%, the
battery w ill be charged to 100% as soon as the AC adapter is connected.
If the battery is running low you will hear a warning alarm. If you do not connect the AC adapter
within five minutes of hearing the warning alarm, your Tablet PC will switch off automatically.
Monitoring the battery state of charge
Batterybatterychargemeter
A battery symbol for mon itoring the battery capacity is displayed in th e system bar /
status indicator. The battery symbol shows you the battery charge.
36 Fujitsu
Page 39

Working with the Tablet PC
Using the energy saving functions
EnergyEnergyBattery
The Tablet PC uses less power when the energy saving features are enabled. You will then
be able to work longer when using the battery before having to recharge it.
The energy efficiency is increased and en vironmental pollution is reduced.
By choosing the best power options, you can make significant savings and
at the same time help protect the environment.
► Set the energy saving fun
ctions in your Control Panel.
The recommended settings for the Windows energy saving functions are prede fined as "Fujitsu
Computer EcoSettings" in the Power Options of the Control Panel and can be displayed there.
When the Tablet P C is in a power-saving mode, you must remember the follow in g:
During power-saving mode, open data is held in main memory or
in a swap file on the hard disk.
Never switch off the Tablet PC while it is in a power-saving mode. If the built-in battery
is nearly flat, close a ll open files and do not go into power-saving mode.
If you do not intend to use your Tablet PC for a long period of time :
► Exit the power-sav
ing mode if necessary by touching the screen or by switching the Tablet
PC on.
► Close all opened programs and completely shut down the Tablet PC.
Memory cards
Slot
Your Ta blet PC is equipped with an integrated storage card reader. Use storage
cards to enlarge the storage of your Tablet PC.
Follow the manufacturer’s instructions when handling the memo ry cards.
Memorycard
Supported formats
The following formats are supported:
• Micro Secure Digital (microSD
TM
Card)
•microSDHC
•microSDXC
Fujitsu 37
Page 40

Working wit h the Tablet PC
Inserting the memory card
1
3
2
► Open the slot cover (1).
► Carefully slide the storage card into
the slot (2). The label area must be
facing downward. Do not apply any
force, otherw ise the delicate contact
surfaces could be damaged.
Memorycard
► Close the slot cover.
Removing the memory card
Memorycard
To avoid any loss of
data, always follow the correct procedure for removing the
card (see the docu
mentation for your operating system).
1
a
3
2
► Open the slot cover (1).
► Press the edge of the memory card so
that the memory card jumps (2) slightly
out of the slot (a).
► Pull the memory card out of the slot (a)
in the direction of the arrow (3).
► Close the slot cover.
38 Fujitsu
Page 41

Working with the Tablet PC
SIM card
A SIM Card (Subscriber Identity Module) is a chip card which is inserted in a cellular phone or Tablet
PC and, together with an integrated 4G module, enables access to a cellular radio netw ork.
Follow the instructions supplied by the provider of the SIM card. If you do not feel the
the SIM card engage as you insert it, use a pointed object to insert the SIM card.
Please note that the SIM card format must be micro-SIM (3FF). Othe r SIM
card formats, such as full-size (1FF), mini-SIM (2FF) or nano-SIM (4FF) do
not fit in the SIM ca rd slot of your Tablet PC.
Please do not insert any other format of SIM card as they may become
twisted, they could even damage the system.
Inserting a SIM card
1
2
4
3
► Open the slot cover
(1).
► Remove the SIM card carrier from
its location (2).
► Insert the SIM ca
rd (3) as shown on
the SIM card carr
ier.
► Push the SIM card carrier back into
its location (4).
► Close the slot
cover.
Fujitsu 39
Page 42

Working wit h the Tablet PC
Removing a SIM card
1
2
4
3
► Open the slot cover (1).
► Remove the SIM card carrier from
its location (2).
► Remove the SIM card from the SIM
card carrier (3).
► Push the SIM card carrier back into
its location (4).
► Close the slot cover.
Wireless LAN/Bluetooth/4G/LTE/NFC wireless
components
The installation of wireless components not approved by Fujitsu will
invalidate the certifications issued for this device.
Switching the wireless components on and off
The wireless components are switched on and off using the appropriate
functions of the opera ting system.
► To switch wireless c ompo nents on and off individually, select Settings – C hange
PC settings – Network – Airplane mode.
Configuring WLAN access
• Requirement: A WLAN is available and you have the necessary access data to hand.
Informationonconfiguring W LAN access can be found in the
documentation for your operating system.
Further information on WLAN and Bluetooth
For furth er information about W LAN or Bluetooth, please refer to the
appendix of this Operating Manual.
For W LAN specification s, see chapter "
WLAN specifications", Page 97.
40 Fujitsu
Page 43

Working with the Tablet PC
Access via UMTS
If you ordered an integrated UMTS module with your system, you can enjoy optimum
reception and maximum energy efficiency without awkward cables or antennas. The
optional UMTS module is ready for use immediately.
You wil l find information on establishing the connection with the UMTS network
in the documentation for the hardware u sed.
Your device can connect to the Interne t via UMTS. To do this, use one of
the following types of connection:
• Integrated UMTS module (availability dependent on your configuration)
• USB dongle (a USB stick containing a SIM card from your cellular phone network provider)
• A mobile end-device (e.g. cellular phone with Bluetooth or cable connection)
Access via Wireless WAN
You can purchase the
accessories for Wireless WAN reception from your Fujitsu dealer.
If you have ordered
a Wireless WAN module, your device w ill already
be prepared when yo
ureceiveit.
You will find inform
ation on establishing the connection with th e Wireless WAN
network in the doc
umentation for the hardware you plan to use.
Access via 4G
You can order the accessories for 4G reception from your Fujitsu dea ler.
If you have ordered an integrated 4G module with your system, the 4G
module is ready for use straight away.
You ca n find information on establishing the connection with the 4G network
in the documentation for the hardware u sed.
NFC (Near Field Communication, optional)
Your Table
t PC can be equipped with an optional built-in NFC chip. Near Field Communication is
used for c
ontactless exchange of data via radio over short distances (a few centimeters).
Fujitsu 41
Page 44

Working wit h the Tablet PC
Ethernet and LAN (only cradle, keyboard docking
station and power keyboard do
cking station)
EthernetLAN
The internal network module of your Tablet PC supports Ethe rnet LAN. You can use it to
establish a connection to a local network (LAN = Local Area Network).
2
1
► Connect the network cable to the L A N
port of the cradle (1).
or
► Connect the network cab
le to the LAN
port of the keyboard doc
king station or
power keyboard docking
station (1).
► Connect the network cable to your
network connection (2).
Your network administrator can help you to configure and use the LAN connections.
The network cable is not included in the delivery scope. This type of
cable can be obtained from a specialist dealer.
GPS
GPS
Whether your device has this function depends on the chosen equipment level.
42 Fujitsu
Page 45

Accessories for your Tablet PC (opti
onal)
Accessories for your Tablet PC
(optional)
The following accessories are available for your Tablet PC:
• Docking cradle for c harg ing the Tablet PC and with additional ports
• Keyboard docking station with additional ports (without re movable battery)
• Power keyboard docking station with additional ports (with removable bat tery)
• Intermediary VESA Mount Plate
• Hand strap
• Shoulder strap
• Folio case
• Protective TPU cover with hand strap
• Folio Cover Kit
The following sections provide more information on handling the accessories.
Fujitsu 43
Page 46

Accessories for your Tablet PC (opti
onal)
Your docking cradle (optional)
As well as fast charging, your docking cradle is a device that also allows you to quickly connect
your Tablet PC to your peripherals, such as a monitor, keyboard, mouse, etc. You only need
to dock the Tablet PC to be able to work with your peripheral devices.
Cradle components
PortsPortsCradle
1
2
3
4
5
6
12
7
8
9
10
11
1 = Dock release button
2 = Docking port
3 = USB port 3.0
4 = USB port 3.0
5 = USB port 3.0
6 = Microphone port
7 = Headphones port
8 = VGA monitor port
9 = HDMI port
10 = LAN port
11 = Security Lo ck device
12 = DC jack socket (DC IN)
Setting up the cradle
Select a suitable location for the cradle before setting it up. In doing
so, please follow these instructions:
• Placethecradleonaflat, stable, non-slippery surface.
• Never place the cradle or the AC adapter on a heat-sensitive surface.
• Do not expose the cradle to extreme environmental conditions.
• Protect the cradle from dust, mo isture and heat.
44 Fujitsu
Page 47

Accessories for your Tablet PC (opti
onal)
Connecting the Tablet PC to the cradle
It is possible to connect the Tablet PC to the cradle while it is running.
Disconnect the AC adapter from the Tablet PC before connecting
the Tablet PC to the cradle.
When the Tablet PC is connected to the cradle, you must connect the AC adapter
to the cradle, to be able to use all the cradle’s functions.
Cradle
► Remove the AC plug of the AC ada pter from the power outlet.
► Remove the AC adapter cable from the DC jack (DC IN) of t he Tablet PC.
1
2
4
3
Your cradle is supplied with a separate AC adapter (19 V, 3.42 A). Make
sure that you only use this AC adapter for the cradle.
► Position the Tablet PC so that it lies against the storage surface of the cradle.
Fujitsu 45
Page 48

Accessories for your Tablet PC (opti
onal)
► Push the Tablet PC onto the cradle in the direction of the arrow (1) until you feel it engage
on the c onnector and until the slide-out position returns to its original position.
► Plug the AC adapter cable into the DC jack (DC IN) on the cradle (2).
► Connect the AC cable to the AC adapter (3).
► Plug the AC cable into the power o utlet (4).
Disconnecting the Tablet PC from the cradle
It is possible to separat
e the Tablet PC from the cradle while it is running.
2
1
► Press the s
lide-out button in the direction of the arrow (1) until it firmly
remains i
n pressed position (red marking visible).
► While holding down the lower part of the cradle, lift the Tablet PC off the
cradle in the direction of the arrow (2).
46 Fujitsu
Page 49

Accessories for your Tablet PC (opti
onal)
Keyboard docking station or pow
er keyboard
docking station (optional)
The keyboard docking station i
s available in two versions:
• standard keyb oard docking st
ation without removable battery
• power keyboard docking station with removable battery
The (power) keyboard docking station is a device which has been optimized for convenient input of
texts and allows external devices to be connected. It only needs to be d ocked with the tablet PC.
Fujitsu 47
Page 50

Accessories for your Tablet PC (opti
onal)
Ports on the keyboard docking station or power
keyboard docking station
KeyboardDockPorts
7
1
5
6
10
12
11
13
8
9
2
3
4
1 = Release b
utton
2 = Num Lock indicator (to switch virtual
numeric keypad on and off)
3 = Caps Lo
ck indicator (to switch
capita
lization function on and off)
4 = Scroll Lock indicator (function dependent
on the application program)
5 = Batte
ry indicator of the battery in the
power
keyboard docking station (optional)
6 = Battery charging indicator of the
battery in the power keyboard docking
station (optional)
7 = Docking p
ort for the Tablet PC
8 = DC jack (DC IN)
9 = Securit
y Lo ck device
10 = LAN port
11 = HDMI po
rt
12 = VGA monitor port
13 = USB po
rts (3 x USB 3.0)
48 Fujitsu
Page 51

Accessories for your Tablet PC (opti
onal)
Status indicators of the power keyboard docking station
with removable battery
This section does not apply to the standard keyboard docking station
without removable battery!
Status indicator Description
Battery indicator
The battery indicator shows the state of charge of the battery.
• The indicator lights up white: The battery is between 50% and
100% charged.
• The indicator lights up orange: The battery is between 13 %
and 49 % charged.
• The indicator lights up red: The battery is charged betw een 0
% and 12 %.
Battery charging indicator The battery charging indicator shows whether the battery is being
charged.
• The indicator lights up orange: The AC adapter has been
connected; the battery is charging.
• The indicator lights up white: The AC adapter is connected a n d
the battery is fully charge d / is not being charged.
• The indicator is not lit up: The AC adapter is not connected.
Fujitsu 49
Page 52

Accessories for your Tablet PC (opti
onal)
Connecting the tablet PC to the keyboard docking station
or power keyboard docking stat
ion
If the tablet PC is connected to the keyboard docking station or power
keyboard docking station, you can connect the AC adapter either to the
keyboard docking station or to the tablet PC.
Keyboarddockingstation
► Position the keyboard docking station as shown.
1
2
3
4
► Push the Tablet PC onto the keyboard docking station in the direction of the
arrow ( 1) until you feel it engage with the plug.
► Connect the AC adapter cable to the DC input connector (DC IN) o f
the keyboard docking station (2).
► Connect the AC cable to the AC adapter (3).
► Plug the AC cable into the power o utlet (4).
50 Fujitsu
Page 53

Accessories for your Tablet PC (opti
onal)
Disconnecting the tablet PC from the keyboard docking
station or power keyboard dock
ing station
It is possible to separate the tablet PC from the keyboard docking sta tion
or power keyboard docking station while it is running. How ever, to prevent
any problems, we recommend that you execute the appropriate undocking
function pro vided by the operating system.
2
1
► Press the sli
de-out b utton down (1) until it remains in the pressed position (red marking visible).
► Lift the Tablet PC away from the keyboard docking station in the direction of the arrow (2).
Fujitsu 51
Page 54

Accessories for your Tablet PC (opti
onal)
Removable rechargeable battery for the power keyboard
docking station (optional)
BatteryBatteryServicelife,batteryRechargeablebatteryBattery
This section does not apply to the standard keyboard docking station
without removable battery!
Removing and installing the battery
Only use rechargeable bat
teries approved by Fujitsu for your Tablet PC.
Never use force when fitti
ng or removing a battery.
Make sure that no fo reig
n bodies get into the battery connections.
Never store a battery fo
r long periods in the discharged state. This
can make it impossibl
e to recharge.
Removing the rechargeable battery
Please observe the safety information in chapter "Important notes", Page 16.
Remove th e AC plug from the power outlet!
► Switch the Table
tPCoff.
The device must
not be in energy saving mode.
► Disconnect al
l cables from the k eyb oard docking station.
► Turn the keyboard docking station over and place it on a stable, flat and clean
surface. If necessary, lay an anti-slip cloth on this surface to preve nt the
keyboard docking station from being scratched.
52 Fujitsu
Page 55

Accessories for your Tablet PC (opti
onal)
1
1
2
► Disconnect the catches of the battery compartment cover and open the
battery compartment cover (1).
► Lift the battery at the deep point in the middle of the battery compartment and
take the battery out of the battery compartment ( 2).
Fujitsu 53
Page 56

Accessories for your Tablet PC (opti
onal)
Installing a rechargeable battery
1
3
3
2
2
► Position the rechargeable battery on the edge of the battery compartment and insert
the rechargeable battery into the battery compartment (1).
► Insert the catches of the battery compartment cover in the openings on the device (2).
► Close the battery compartmen t cover (3).
54 Fujitsu
Page 57

Accessories for your Tablet PC (opti
onal)
Intermediary VESA Mount Plate (optional)
For models w ith screw holes, Smart Card readers or palm vein scanners, an optional VESA
mounting attachment, the Intermediary VESA Mount Plate, can be attached to th e rear.
Use the Intermediary VESA Mount Plate to secure the Tablet PC to a cart, counter
or stand with the corresponding screw holes, for example.
The Inte rmediary VESA Mount Plate cannot be used in combination
with hand or shoulder straps.
The Intermediary VESA Mount Plate kit contains the following components:
Intermediary VESA Mount Plate, two M2x8 screws and two spacers.
Fujitsu 55
Page 58

Accessories for your Tablet PC (opti
onal)
• Use the appropriate tool of the correct size when securing the screws.
• Keep the screws out of the reach of children.
4
4
4
4
3
1
1
1
1
2
2
2
2
► Remove the covers from the screw holes on the rear o f the Tablet PC (1).
► Position the spacers between the Tablet PC and Intermediary VESA Mount Plate (2).
56 Fujitsu
Page 59

Accessories for your Tablet PC (opti
onal)
► Position the Intermediary VESA Mount Plate on the Tablet PC (3). Make sure that the screw
holes of the Intermediary VESA Mount Plate and of the Tablet PC lie exactly on top of each other.
► Secure the Inte rmediary VESA Mount Plate using the screws (4).
Hand strap (optional)
For models with screw holes, Smart C ard readers or palm vein sensors, an
optional hand strap can be attached to the rear.
The hand strap cannot be used in combination w ith the Intermediary
VESA Mount Plate or shoulder strap.
The hand strap accessory contains the following components: Hand straps,
two M2x6 screws, two M 2x8 screws and two spacers.
Fujitsu 57
Page 60

Accessories for your Tablet PC (opti
onal)
• Use the appropriate tool of the correct size when securing the screws.
• Keep the screws out of the reach of children.
• Do not shake the device too much when you are holding it on the
hand strap, otherwise it m ay fall down.
1
1
2
2
4
4
3
► Remo
ve the caps from the screw holes on the rear of the Tablet PC (1).
► Position the spacers between the Ta blet PC and the hand strap (2).
► Pos
ition the hand strap on the Tablet PC (3). Make sure that the screw holes of the
han
d strap and of the Tablet PC lie exactly on top of each oth er.
58 Fujitsu
Page 61

Accessories for your Tablet PC (opti
onal)
Only use M2x8 screws to secure the hand strap.
► Secure the hand strap with th e screws (4).
Shoulder strap (optional
)
For models with screw holes, Smart Card readers or palm vein sensors, an optional
shoulder strap can be attached t o the rear.
The shoulder strap cannot be used in combination with the Intermediary
VESA Mount Plate or hand strap.
The shoulder strap accessory contains the follow ing components: Shoulder strap,
two mountings, two M2x6 screws, two M2x8 screws and two spacers.
Fujitsu 59
Page 62

Accessories for your Tablet PC (opti
onal)
• Use the appropriate tool of the correct size when securing the screws.
• Keep the screws and mountings out of the reach of children.
• To prevent damaging the screws, do not use a motorized screwdriver.
1
1
2
3
3
2
► Remov
e the caps from the screw holes on the rear of the Tablet PC (1).
60 Fujitsu
Page 63

Accessories for your Tablet PC (opti
onal)
Only use M2x8 screw s to secure the mountings.
► Position t he spacers beneath the mountings, position the mountings on the re ar of
the Tablet PC and secure the mountings with the screws (2).
► Secure th e shoulder strap on the mountings (3).
Folio case (optional)
When using the cover, we do not recommend connecting the tablet PC to the keyboard
docking station or power keyboard docking station. Please note that the device cannot
be placed into the docking station in clamshell mode if t he tablet still has its cover on.
• This folio case cont
ains magnets. Keep it away from objects that may be easily
affected by the influ
ence of magnetism, e.g. pacemakers and magnetic cards.
• Make sure the device is firmly fitted into the folio case fasteners in
order to prevent it f rom falling out.
• The folio case is o
nly designed to safely store and transport the device.
Do not use the foli
o case for any othe r purpose.
• Keep the folio case away from fire or heaters.
• Neither put the
folio case in direct sunlight nor expose it to
high temperatu
re or humidity.
► Position the Tablet PC on the folio case as shown.
The following illustration shows you the many ways in which the folio case can be used:
Fujitsu 61
Page 64

Accessories for your Tablet PC (opti
onal)
Protective TPU cover with hand strap (optional)
Prepare installation
1
2
3
4
► Remove the soft pad from the hand strap belt (2).
► Loosen and remove the hand strap belt (1).
► Separate the rigid cover (3) from the soft cover (4).
62 Fujitsu
Page 65

Accessories for your Tablet PC (opti
onal)
Insert the Tablet PC in the protective TPU cover
► Lay the soft co ver on the table.
1
2
► Place the Tablet PC with the connection side
(1) forwards into the corners of the soft cover.
► Allow the Tablet PC to click into place
in the soft cover (2).
3
► Turn over the Tablet PC and soft cover.
► Allow the rigid cover to click into place
on the soft cover (3).
4
► Fit the hand strap belt on the rigid cover,
align it and pull it tight (4).
Fujitsu 63
Page 66

Accessories for your Tablet PC (opti
onal)
5
► Install the soft pad on the hand strap belt (5).
a
a
a
a
► If required, secure the optional shoulder
strap at the four holders ( a).
64 Fujitsu
Page 67

Accessories for your Tablet PC (opti
onal)
Connecting the Tablet PC to the keyboard docking
station or cradle
1
2
► Push the Tablet PC
onto the keyboard docking station in the direction of the
arrow (1) until y
ou feel it engage with the plug.
or
► Press the Tablet PC onto the cradle in the direction of the arro w (2).
To prevent damage to the system, never fold the Tablet PC on the keyboard
docking station if the Tablet PC is in the TPU cover.
Fujitsu 65
Page 68

Accessories for your Tablet PC (opti
onal)
Folio Cover Kit (optional)
This protective folio cover is a rugged, lightweight case for protecting your Tablet. The
folio cover can also be used in two different standing positions to make it easier to
view and use y our Tablet when it is on a flat surface.
Kit contents
The kit includes the following items:
• Folio cover with handstrap attached
• Cover attachmen ts screws, 4 ea.
The folio cover consists of two parts, cover (1) and holder (2), connected by
Velcro® (3) and snap buttons (4). The left image shows the inside of the fo lio
cover, the right image the outside of the folio cover.
2
1
3
4
4
Inside of fol
io cover
Outside of fo
lio cover
Inserting
the system into the folio cover
The folio cover is designed to provide a secure fit for the system. In order to ensure your
system is installed correctly, please perform the following steps.
► Turn the device over and place it on a stable, flat and clean surface. If necessary, lay an
anti-slip cloth on this surface to prevent the device from being scratched.
► Locate t
he four inserts on the bottom of the system (1):
66 Fujitsu
Page 69

Accessories for your Tablet PC (opti
onal)
1
1
1
1
► Note that there may be round adhesive covers over the inserts; if they are present, remove them.
► Position the folio cover on a on a stable, flat and clean surface, with the
inside of the folio cover pointing down.
► Disengage the Velcro and snap buttons.
► Detach the cover part from the holder part.
► Turn over the system and align the palm vein sensor (a) with the corresponding
indent on the right side (b) of the holder:
a
b
2
► Carefully press the system into the holder (2).
Be sure that you do not over-tighten the screws. Overtightening the
screws could damage the unit.
► Turn over the folio cover and attach the system to the folio cover using the four screws
(3) provided in the k it. Use Phillips screwdriver with bit #0:
Fujitsu 67
Page 70

Accessories for your Tablet PC (opti
onal)
3
3
3
3
► Reattach the cover part to the holder part using the Velcro® and the snap button s.
► If require d, adjust
the handstrap on the back and use steel D-rings for the optional
shoulder strap atta
chment (not provided in this kit).
The cover can be used in two different orientations as a stand for your Tablet:
Care tips for the folio cover
The foli
o cover is made of top-quality materials and is designed to withst and daily use.
•Treatth
e folio cover as you would a briefcase or purse.
• Occasionally, the folio cover may become soiled. To clean it, use a commercially available
cleaner and follow the instructions con tained with the cleaner.
•Never
submerge the folio cover in water.
68 Fujitsu
Page 71

Security functions
Security functions
Securityfunctions
Your Tablet PC has several security features that you can use to secure your system
and your personal data from unauthorized access.
This chapter explains how to use these functions, and what the benefits are.
Please remember that in some cases, for example, forgetting your password,
you may be locked out of the system and unable to access y our data.
Therefore, please note the following information:
• Back up your data on external dat a carriers at regular intervals.
• Some security functio
ns need you to choose passwords. Make a note
of the passwords and ke
eptheminasafeplace.
If you forget your passwords you will need to contact our Service Desk.
Deletion or resetting of passwords are not covered b y your warranty
and a charge will be made for assistance.
Fujitsu 69
Page 72

Security functions
Configuring the fingerprint sensor
FingerprintsensorFinger printsensor
The fingerprint sensor can record the image of a fingerprint. With additional fingerprint
software, this image can be processed and used instead of a password.
1
1
► Install the fingerprint s oftware to be able to use the fingerprint sensor (1).
70 Fujitsu
Page 73

Security functions
Using the palm vein sensor (device-dependent)
PalmveinsensorPalmveinsensor
Whether your device has a palm vein sensor or not depends on the
device configuration which you ordered,
The palm vein sensor (1) can record the image of the veins on the palm of your hand. This
image is evaluated with additional software and can b e used in place of a password.
1
Before initial startup, Fujitsu recommends that you mount the supplied feet:
► Turn the device over and place it on a stable, flat and clean surface. If necessary, lay an
anti-slip cloth on this surface to prevent the device from being scratched.
Fujitsu 71
Page 74

Security functions
2
2
► Secure the feet with the screws (2).
► Install the software to use the palm vein sensor.
You can obtain further information on the palm vein sensor in the
"appendix: Miscellaneous Information".
72 Fujitsu
Page 75

Security functions
Using the Security Lock
SecurityLockAnti-theftprotectionSecurityLock
Your device comes with a Security Lock device for the Kensington Lock Cable. With the
Kensington Lock Cable, a sturdy steel cable, you can protect your device and the port replicator
against theft. The Kensington Lock Cable is available as an a ccessory.
► Fit the Kensington Lock Cable to the
corresponding mechanism on your device.
Attach another Kensington Lock Cable to your cradle, keyboard docking station or
power keyboard docking to protect your port replicator from theft as well.
Configuring pass
word protection in BIOS Setup Utility
Before using the various options for password protection in the BIOS Setup
Utility, please proceed as follows to increase data security:
Make a note of the passwords and keep them in a safe place. If you forget your
supervisor password you will not be able to access your Tablet PC. Passwords are
not covered by your warranty and a charge will be made for assistance.
Passwordprotection
Your passw ord can be up to 32 characters long and can contain letters, numbers and
special characters. A distinction is made between upper and lower case.
When using special characters, please note that these are dependent on
the country-specifi c variant of the keyboard used.
Fujitsu 73
Page 76

Security functions
Protecting BIOS Setup Utility (supervisor password
and user password)
If you have ope ned these operating instructions on the screen, we recommend
that you print them out. You cannot call up the instructions on the screen
while you are setting up the pa ssword.
BIOSSetupUtility
The supervisor password and the user password both prevent unauthorized use of the BIOS
Setup Utility. The supervisor password allows you to access all of the functions of the BIOS Setup
Utility, while the user password will only give you access to some o f the functions. You can
only set up a user password if a supervisor password has already been assigned.
Calling and using the BIOS Setup Utility is described in the chapter
"
Settings in BIOS Setup Utility", Page 83.
Assigning the supervisor and user passwords
► Start the BIOS Setup Utility and go to the Security menu.
► Select the Set Supervisor Password field and press the Enter key.
With Enter new Password: you are asked to enter a password.
► Enter the password and press the Enter key.
Confirm new Password requires you to confirm the password.
► Enter the password again and press the Enter key.
Changes have been saved is displayed as a confirmat ion that the new password has been saved.
► To set the user password, select Set User Password and proceed exactly as
when configuring the supervisor password.
If you do not want to change any other settings, you can exit BIOS Setup Utility.
► In the Exit menu, select the option Save Changes & Exit.
► Select Yes and press the Enter key.
PasswordSupervisorpas swordUserpassword
The Tablet PC is rebooted and the new password is effective. It will now be necessary to
first enter your supervisor or user password in order to open the BIOS Setup Utility. Please
note that the user password only provides access to a few of the BIOS settings.
Changing the supervisor password or user password
You can only change the supervisor password when you have logged into the
BIOS Setup Utility with the supervisor password.
PasswordSupervisorpasswordUserpassword
► Start the BIOS Setup Utility and go to the Security menu.
► When changing the password, proceed exactly as when assigning a password.
74 Fujitsu
Page 77

Security functions
Removing passwords
To remove a password (without setting a new password) perform the following s teps:
PasswordSupervisorpasswordUserpassword
► Start the B IOS Setup Utility and go to the Security menu.
► Highlight the Set Supervisor Password or Set User Password field and press the Enter key.
Yo u will be requested to enter the current password by the Enter Current Password prompt.
Enter New Password will appear and you will be requested to enter a new password.
► Press the Enter key twice at this request.
► In the Exit menu, select the option Save Changes & Exit.
► Select Yes and press the Enter key.
The Tablet PC is rebooted and the password is removed.
Removing the supervisor password s imultane ously deactivates the user password.
Password protectio
n for booting the operating system
With the supervisor password you have set in the BIOS Setup Utility (see
section "
Assigning the supervisor and user passwords", Page 74), you can
also prevent booting of the operating system.
Operatingsystem
Activating system protection
► Start the B IOS Setup Utility and go to the Security menu.
Operatingsystem
► Select the PasswordonBootoption and press the Enter key.
► Select the option you require (First Boot or Every Boot) and press the enter key
► Select the Save Changes & Exit option under Exit.
The Tablet PC reboots. You will be prompted to enter your password (the supervisor password).
Deactivating system protection
► Start the B IOS Setup Utility and go to the Security menu.
Operatingsystem
► Select the PasswordonBootoption and press the Enter key.
► Select the Disabled option and press the Enter key.
If you do not want to change any other settings, you can exit BIOS Setup Utility.
► Select the Save Changes & Exit option under Exit.
The Tablet PC re boots. T he system is no longer password-protected.
Password protection for the hard disk
Passw
ordprotection
The har
d disk password prevents unauthorized access to the hard disk drives
and is c
hecked internally ea ch time the system is booted. The condition for th is
is that
you have assigned at least the supervisor password.
Fujitsu 75
Page 78

Security functions
Activating hard disk protection
► Call up the BIOS Setup and select the Security menu.
If you have not assigned BIOS passwords yet, define the supervisor and the user
password now, if desired (see "
Security functions", Page 69).
► Mark the Hard Disk Security field and press the Enter key.
► In the area Drive0, m ark the field Set Master Password and press the Enter key.
Enter new Password then appears a nd you are asked to enter a password.
► Enter the password and press the Enter key.
Confirm new Password requires you to confirm the password.
► Enter the password again and press the Enter key.
With Setup Notice: Changes have been saved you receive confirmation that
the new password has been saved.
► If you wish to enter a password for a second hard disk (Drive1), in the area
Drive1 mark the field Set Master Password and proceed in exactly the same way
as for the set up of the first hard disk (Drive0).
The field Password Entry on Boot is set to Enabled by default. You can exit the BIOS
Setup once you have finished changing the settings.
► From the Exit menu, choose the option Exit Saving Changes.
► Press the Ent er key and select Yes .
The Tablet PC reboots and your hard disk is now protected with a password. The
password prompt is enabled as soon as the Tablet PC has rebooted.
Deactivating hard disk protection
To cancel a passw ord (without setting a new password) proceed as follows:
► Call up the BIOS Setup and select the Security menu.
► Mark the Hard Disk Security field and press the Enter key.
► In the area Drive0, m ark the field Set Master Password and press the Enter key.
With the prompt Enter current Password you are first asked to enter the old password again.
With Enter new Password you are then prompted to enter a new password.
► After the request, press the Enter key three times.
► From the Exit menu, choose the option Exit Saving Changes.
► Press the Ent er key and select Yes .
The Tablet PC reboots and there is no longer any password protection for this hard disk.
► If you wish to remove a password for a second hard disk (Drive1), in the area
Drive1 mark the field Set Master Password and proceed in exactly the same way
as for the removal of the first hard dis k (Drive0).
76 Fujitsu
Page 79

Security functions
SmartCard reader (optional)
Your de vice may be fitted with a SmartCard reader depending on your chosen model
(only available in models with screw holes and SmartCard reader).
SecurityfunctionsSecurityfunctions
SmartCards are not supplied as standard equipment. You can use all SmartCards that comply with
the ISO sta ndard 7816-1, -2 or -3. These SmartCards are available from various manufacturers.
With the appropriate software you can use your SmartCard as an alternative to password protection,
but also as a digital signature, for encrypting your e-mails or for home banking.
We recommend that you always use two SmartCards. Always keep one of the SmartCards
in a safe place if you are carrying the other SmartCard with you.
Inserting the SmartCard
Your de vice may be fitted with a SmartCard reader depending on your chosen model
(only available in models with screw holes and SmartCard reader).
Do not use force when inserting and removing the SmartCard.
Make sure that foreign objects do not fall into the SmartCard reader.
1
► Push the SmartCard into the SmartCard reader with the chip facing the rear of the Tablet PC.
Fujitsu 77
Page 80

Security functions
Trusted Platform Module - TPM (device dependent)
TPMTrustedPlatformModule
To use the TPM, you must enable t he TPM in the BIOS Setup before the software is
installed. The requirement for this is that you have assigned at least the supervisor
HDD password (see "
Security functions", Page 69).
Enabling TPM
• Requirement: You have assigned a supervisor password (see "Security functions", Page 69).
► Call BIOS Setup and sele
ct the Security menu.
► Mark the TPM Security Chip Se ttin g field and press the Enter key.
► Select the entry Enabl
ed to enable the TPM
Once you have enabled the TPM the Clear Security Chip menu item appears.
You can clear the hold
er in the TPM using Clear Security Chip.WithEnabled,
all secret keys (e.g
. SRK - S torage Root Keys, AIK - Attestation Identity Keys
etc.) generated by
applications are deleted.
Take note that you c
an the n no longer access the data you have
encrypted o n the h
older-based keys!
► Select the Exit Sa
ving Changes option in the Exit menu.
► Press the Ent er key and select Yes .
The Tablet PC res
tarts and the TPM is enabled after the reboot.
Disabling TPM
• Requirement: You have assigned a supervisor password (see "Security functions", Page 69).
► Call BIOS Setup and select the Security menu.
► Mark the TPM Security Chip Se ttin g field and press the Enter key.
► Select the entry Disabled to disable the TPM.
► From the Exit menu, choose the option Exit Saving Changes.
► Press the Ent er key and select Yes .
The Tablet PC is rebooted and the TPM is disabled.
78 Fujitsu
Page 81

Connecting external devices
Connecting external devices
Under all circumstances, please observe the safety notes provided in the
"
Important notes", Page 16 chapter before connecting or disconnecting
any devices to or from your Tablet PC.
Always read the documentation supplied with the device you wish to connect.
Never connect or disconnect cables during a thunderstorm.
Never pull at a cable wh en disconnecting it. Always grasp the plug.
With some devices, such as USB devices, it is not necessary to switch off
the Tablet PC and the device before connecting/disconnecting. For more
information about whether or not devices need to be switched off, please refer
to the documentation supplied with your external device.
Some of the external devices require special drivers (see the operating
system and external d evice documentation).
Connecting an external m onitor
Micro HDMI port
HDMIport
The micro HDMI port on your device can be used to connect an external amplifier,
LCD TV or a plasma TV with an HDMI connection.
► Connect the data cable to the
external device.
► Connect the data cable to the micro
HDMI port.
Some LCD televisions have only two speakers/speaker ports and therefore
cannot reproduce Dolby Digital or DTS. To play back HDMI sound, you
must change th e HDMI sound settings accordingly.
You c an find the settings under Control Panel - Hardware and Sound. Deactivate the
settings for DTS Audio and Dolby Digital to enable playback of HDMI sound.
Fujitsu 79
Page 82

Connecting external d evices
HDMI port (only with docking cradle, keyboard docking
station and power keyboard doc
king station)
HDMIport
The HDMI port can be used to connect an external amplifier, LCD TV or a
plasma TV with an HD MI connection.
► Connect the data cable to the
external device.
► Connect the data cable to t
he HDMI port.
Some LCD televisions have only two speakers/speaker ports and therefore
cannot reproduce Dolby Digital or DTS. To play back HDMI sound, you
must change the HDMI sound settings accordingly.
You c an find the settings under Control Panel - Hardware and Sound. Deactivate the
settings for DTS Audio and D olby Digital to enable playback of HDMI sound.
External monitor port (VGA) (only cradle, keyboard docking
station and power keyboard docking station)
An analog monitor is connected to the analog VGA monitor port. Screen output is
limited to a maximum of two screens at the same time.
MonitorVGAportScreenc onn ectionMonitorconnection
► Switch off the Tablet PC and the
external monitor.
► Plug the data c able of the external
monitor into the monitor port.
► First switch on the external monitor and
then switch on the Tablet PC.
You can also switch back and forth between the extern al monitor and the LCD
screen of the Tablet PC, see "
Touchscreen", Page 28.
You c an display the same image on the external monitor and on the LCD
screen of the Tablet PC at the same time.
80 Fujitsu
Page 83

Connecting external devices
Connecting USB devices
USBports
On the USB ports you can connect external devices that also have a USB port
(e.g. a DVD drive, a printer, a scann er or a mod em).
USB devices are hot-pluggable. This means you can connect and disconnect the
cables of USB devices while the operating system is running.
USB 1.x has a maximum data transfer rate of 12 Mbps.
USB 2.0 has a data transfer rate of up to 480 Mbps.
USB 3.0 has a data transfer rate of up to 5 Gbps.
Additional information can be found in the documentation for the USB devices.
► Connect the data cable
to the
external device.
► Connect the data cable to the USB
port on the Tablet PC.
or
► Connect the data cable to a USB
portoftheCradle.
or
► Connect the data cable to a USB port
of the keyboard docking station.
or
► Connect the data cable to a USB port of
the power keyboard docking station.
Device driv
ers
USB device
s will be automatically recognized and installed by your operating system.
How to remove USB devices correctly
Always correctly remove the device according to the rules described below,
to ensure that none of your data is lost.
► Tap the symbol for safe removal of the hard ware.
► Select the device you wish to shut down and remove.
► Tap OK.
Wait for the dialog box which tells you that it is now safe to remove the device.
Fujitsu 81
Page 84

Connecting external d evices
Connecting external audio devices
Your Tablet PC has a combined headphone and microphone port, yo ur (optional) docking
cradle has separate ports for headphones and a microphone.
Connecting headphones or o
ther audio output devices
ConnectingaudiodevicesAudioconnectionsConnectingheadphones
The combined headphones and microphone port of the Tablet PC or the headphones
port of the docking cradle (optional) allows you to connect output devices, such as
headphones, external speakers, etc., to your Tablet PC.
► Connect the audio cable to the
external device.
► Connect the audio cabl
etothecombined
headphones and microp
hone port of the
Tablet PC or to the hea
dphone port of
the docking cradle (
optional).
The internal speakers are disabled.
If you buy a cable from a retailer, please note the following:
The combined headphone and microphone port on your Tablet PC
is a "3.5 mm jack socket".
If you want to connect headphones or speakers you will need a "3.5 mm jack plug".
Connecting a microphone or other audio input devices
ConnectingaudiodevicesAudioconnectionsConnectingmicrophone
The combine
d headphones and microphone port of the Tablet PC or the microphone port
of the docki
ng cradle (optional) allows you to connect an external microphone, a MiniDisc
player, MP
3 player, CD player or a tape deck to your Tablet PC.
► Connect th
e audio cable to the
external
device.
► Connect the audio cable to the combined
headphones and microphone port of the
Tablet PC or to the microphone port of
the docking cradle (optional).
82 Fujitsu
Page 85

Settings in BIOS Setup Utility
Settings in BIOS Setup Utility
BIOSSetupUtilitySystemsettings,BIOSSetupUtilityConfiguration,BIOSSetupUtilitySetupConfigur ingsystemConfiguringhardware
To navigate more easily in the BIOS Setup Utility, you can use an external USB keyboard.
The BIOS Setup Utility allows you to set the system functions and the hardware
configuration for the Tablet PC.
When the Tablet PC is delivered, the default settings are effective. You can change
these settings in the menus of the BIOS Setup Utility. Any changes you make take
effect as so on as you save and exit the BIOS Setup Utility.
The BIOS Setup Utility program contains the following menus:
Info
Displays information relating to the BIOS, proce ssor and Tab let PC
System
Advanced system settings
Advanced
Configuration of various hardware components, such as mouse, keyboard,
processor
Security
Password settings and security functions
Boot
Configuration of the s tart-up sequence
Exit
Exits the BIOS Setup Utility
Starting the BIOS Setup Utility
► Keep the Volume Down button pressed and switch on the Tablet PC.
BIOSSetupUtility
► If a password has been assigned, enter the password and press the Enter key.
If you have forgott en the password, contact your system administrator
or contact our customer service centre.
The BIOS Setup Utility starts.
Fujitsu 83
Page 86

Settings in BIOS Setup Utility
BIOS Setup Utility operation
BIOSSetupUtility
Press the
F1
key to display help about operation of the BIOS Setup Utility. The description
of the individual settings is shown in the right-hand window of the BIOS Setup Utility.
With the
F9
key you can load the default settings of the BIOS Setup Utility.
► Use the cursor keys
←
or
→
to select the menu you wish to access to make changes.
The menu is displayed on the screen.
► Select the option you want to change with the cursor keys
↑
or↓.
► Press the "Enter" key.
► Press the
ESC
key to exit the selected menu.
► For future reference, make a note of the changes you have made (for example, in this manual).
84 Fujitsu
Page 87

Settings in BIOS Setup Utility
Exiting BIOS Setup Utility
BIOSSetupUtility
You need to select the desired option in the Exit menu and activate it by pressing the Enter key:
Exit Saving Changes - save ch
anges and exit BIOS Setup Utility
► To save th e current menu settings and exit the BIOS Setup Utility,selectExit Saving Changes and Yes .
The Tablet PC is rebooted
and the new settings come into effect.
Exit Discarding Changes - Reject changes an d
exit BIOS Setup Utility
► To discard the changes, select Exit D iscarding Changes and Yes .
The settings which were valid when BIOS Setup Utility was called remain effective.
The BIOS Setup Utility ends an d the Tablet PC is rebooted.
Load Setup Defaul
ts – load default values
► To copy the standard entries for all menus of the BIOS Setup Utility ,
choose Load Setup Defaults and Ye s .
Discard Changes - Discard Changes without
exiting BIOS Setup Utility
► To discard the changes you have made, select Discard Changes and Yes .
ThesettingsinplacewhenBIOS Setup Utility was called remain effective.
Yo u can now make additional settings in the BIOS Setup Utility.
► If you want to exit the BIOS Setu p Utility withthesesettings,selectExit Saving Changes and Ye s.
Save Chan
ges - save changes without exiting
the BIOS Setup Utility
► To save the changes, select Save Changes and Ye s .
The changes are saved. You can now make additional settings in the BIOS Setup Utility.
► If you want to exit BIOS Setup Utility with these settings, choose Exit Saving Changes and Yes .
Save changes and power off
► To save the changes and switch off your device, select Save Changes and Power Off and Yes.
The changes are saved. Your device is shut down.
Fujitsu 85
Page 88

Troubleshooting and tips
Troubleshooting and tips
TroubleshootingTipsFaultPro bl emsolving
If a fault occurs, try to correct it as described. If you fail to correct the problem, proceed as follows:
► Make a note of the steps and the circumstances that led to the fault. Also
make a note of any error messages displayed.
► Switch the Tablet PC off.
► Please contact the Hotline/Service Desk.
You can contact Fujitsu Service and Support in the following ways:
• Toll free phone: 1-800-8Fujitsu (1-800-838-5487)
• Website: "
http://solu
tions.us.fujitsu.com/www/content/support/contact/index.php"
Before you place the call, have the following information ready so that the customer
support representative can provide you with the fastest possible solution:
• The model name and serial number of the Tablet PC. The serial number
is located on a sticker on the underside of the Tablet PC.
• Notes with the mess
ages that appeared on the scree n and
informationonaco
ustic signals.
• All changes you have made to the hardware or software afte r rece iving the Tablet PC.
• All changes you ha
ve made to the BIOS Setup settings after receiving the Tablet PC.
• Your system configuration an d all peripheral devices connected to your system.
• Your sales cont
ract.
Our Tablet PCs have been designed primarily with mobile applications in mind.
This means tha t considerable effort has been made to optimize components and
equipment in terms of weight, space and energy requirements. Depending on the
particular configuration you have purchased, it is possible that functionality may be
slightly reduced compared to a desktop PC if you are running processor-intensive
gaming software, e.g. games with intensive 3D graphics. Updating your hardware with
drivers which have not been approved by Fujitsu may result in performance losses,
data losses or malfunction of the equipment. A list of approved drivers and current
BIOS versions can be downloade d from: "
http://solutions.us.fujitsu.com"
86 Fujitsu
Page 89

Troubleshooting and tips
Executing a reset
If the device no longer responds to your inputs, choose one of the f ollowing options:
Forced shutdown
► Press and hold the ON/OFF button for at least 4 seconds.
The device will be shut down. Yo u can then restart it.
Resetting the rechargea
ble battery
► Shut down the device.
If the device does not respond, you may have to force the shutdown, as described above.
► Disconnect the AC adapter from the device.
► Press the Volume Up button and the Shortcut button at the same time.
The device resets in a similar way to the removal of the rechargeable
battery. You can then restart it.
Help if problems occur
Should you encounter a problem with your computer that you cannot resolve yourself:
► Note the ID number of your device. The ID number is found on the type rating
plate on the back or underside of the casing.
► For further clarification of the problem, contact the Fujitsu Service Desk. When you do
this, please have r eady the ID number and serial number of your system.
Recovering your Factory Image
In t he even t you need to restore your original Factory Image, please refer to
the appendix of this Operating M anual.
The Tablet PC’s date or time is incorrect
SummertimeWintertimeIncorrecttimeTimenotcorrectWrongdate/ timeDate not correct
Cause Troubleshooting
Time and date are incorrect. ► With the BIOS-Setup-Utility, you can set the
date and time in the Main menu.
Date and time are still set incorrectly after
switchingontheTabletPC.
► Please contact your sales outlet or our
hotline/service desk.
Fujitsu 87
Page 90

Troubleshooting and tips
Battery charging indicator not
lit
Cause
Troubleshooting
The battery is not being charge
d.
► Connect the Tablet PC to a power outlet
using the AC adapter.
Note: The battery w ill only be charged again
when the battery capacity is less than 90%.
The Tablet PC’s touchscreen remains dark
Touch scre endarktouchscreen
Cause Troubleshooting
Touchscreen is switch ed
off.
► Press a key (external key
board) or tap on
the touchscreen.
External monitor or t
elevision set connected.
► Check whether the graphics driver settings
are correct or whether an external monitor
has been detected in "Intel Graphics Media
Accelerator Driver for mobile".
The display on the Tablet PC’s touchscreen
is difficult to read.
Touch scre enTouc hscr een
Cause Troubleshooting
Reflected glare ► Move the Tablet PC into a different position.
► Increase the brightness of the screen.
88 Fujitsu
Page 91

Troubleshooting and tips
The external monitor remains bl
ank
Monitor
Cause Troubleshooting
Monitor is switched off. ► Switch the external monitor on.
Power saving has been activated (monitor is
blank).
► Press a key (external keyboard) or tap on
the touchscreen.
Brightness is set to dark.
► Adjust the brightness of the
monitor.
Screen output is set to the Tablet PC
touchscreen.
► Check whether the graphics driver se ttings
are correct or whether an external monitor
has been detected in "Intel Graphics Media
Accelerator Driver for mobile".
The external monitor ’s AC cable or data cable is
not connected properly.
► Switch off the Tablet PC and the external
monitor.
► Check whether the AC cable is plugged
properly into the external monitor and into
the power outlet.
► Check that the data cable is properly
connected to the Tablet PC and the external
monitor (if it is plugged in with a connecto r).
► Switch on the external monitor and the
Tab le t PC .
The external mo
nitor is blank or the image is unstable
MonitorMonitor
Cause Troubleshooti
ng
The wrong exte
rnal monitor has been selected
or the w rong sc
reen resolution has been set for
the applicat
ion program.
► Shut down the application program in
Windows. If the error persists after s hutting
down the program, use the key combination
for switching the screen output in order to
switch to the touchscreen of the Tablet PC.
Change the following setting:
► Set the screen resolution: Set the screen
resolution as described in the documentation
for your operating system.
► Select monitor: Select m onitor 1 or 2 as
described in the documenta tion for your
operating system.
The cursor does not correctly follow the
stylus movements
Cause
Troubleshooting
Stylus incorrectly calibrated. ► Calibrate the stylus as described in chapters
"
Adjusting the stylus", Page 33 and
"
Calibrating the stylus", Page 33.
Fujitsu 89
Page 92

Troubleshooting and tips
Stylus input not working
Cause
Troubleshooting
Incorrect driver installed.
► If your device is one which can only be
operated using the stylus, install the driver
for the standard model.
or
► If yo ur device is one which can be
operated using the stylus and by finger,
install the driver for the "Dual Digitizer"
model.
The Tablet PC does not start after switch on
TabletPC
Cause Troubleshooting
The battery is dead.
► Charge the battery.
or
► Connect the AC adapter to the Tablet
PC.
The AC adapt er is not connected properly. ► Check whether the AC adapter is properly
connected to the Tablet PC.
► Switch the Tabl
et PC on.
The Tablet PC stops working
TabletPCEnding
Cause Troubleshooting
The Tablet PC is in energy saving mode.
► End energy saving mode.
An application progra m has caused the
malfunction.
► Close the application program or resta rt
the Tablet PC (by restarting the operating
system or switching the device off and back
on again).
The battery is dead.
► Charge the battery.
or
► Connect the AC adapter to the Tablet
PC.
90 Fujitsu
Page 93

Troubleshooting and tips
The printer does not print
Printerdoesnotprint
Cause Troubleshooting
The printer is not switched on. ► Make sure that the printer is sw
itched
on and ready for operation (ref
er to the
documentation supplied with t
he printer).
The printer is not connected c
orrectly.
► Check that the data cable between the Tablet
PC and the printer is properly c onnected.
The printer driver is fa ulty or not correctly
installed, or it is the wrong printer driver.
► Check that the data cable between the Tablet
PC and the printer is properly c onnected.
► Check whether the correct printer driver is
loaded (refer to the printer documentation).
The wireless connect
ion to a network does not work
Thewirelessconne
ctiontoanetworkdoes notwork
Cause Troubleshooting
The wireless component is switched off. ► Switch the wireless compon ent on (see
"
Switching the wireless components on and
off", Page 40).
The wireless component is switched on. Despite
this, the wireless connection to a network does
not work.
► Check whether the wireless connection is
enabled by the software.
► Further information o n using the wireless
component can be found in t he help files.
The battery di
scharges too quickly
Battery
Cause
Troubleshooting
The battery i
s either too hot or too cold. In this
case the batt
ery indicator flashes.
► Bring the Tablet PC up/down to a normal
operating temperature again.
► If the o perating time of the battery life is
extremely short, the battery is probably too
old. Replace the battery if necessary.
You may have an application running that
consumes a great deal of power due to frequent
accessing of the hard disk or optical drive.
► Use the AC adapter whenever possible.
The maximum brightness may have been set
for the screen.
► Reduce the brightness of the screen to
lower energy consumption: You will find the
setting under Control Panel – Hardware and
Sounds – Windows Mobility Center.
Fujitsu 91
Page 94

Troubleshooting and tips
Smart Card reader is not recognized
Cause
Troubleshooting
Smart Card inserted incorrectly. ► Make sure you have inserted your Smart
Card into the Smart Ca rd reader with
the chip facing upwards / downwards
(device-dependent).
► Check whether the Smart Card you are
using is supported. Your Smart Card must
comply with the ISO standard 7816-1, -2,
-3 and -4.
Smart Card PIN forgott
en
Cause
Troubleshooting
PIN forgotten ► If you work in a network, contact your
system administrator, who can unlock your
Tablet PC using a supervisor PIN.
User and/or supervisor Smart Card lost
Cause
Troubleshooting
User and/or Supervisor Smart Ca rd lost. ► If you have lost your user Smart Card, you
can continue working with the Supervisor
Smart Card and initialize a new user Smart
Card.
► If you have los
t the Supervisor Smart Card,
you can also c
ontinue working, but you no
longer have a
ll rights and cannot initialize
another Sup
ervisor Smart Card.
► If you have lost both Smart Cards, you
cannot boot your system. Please contact our
customer service center. You must provide
proof of ownership for the device. The
customer service center will then refer you
to our service partner, who will unlock your
device (for a ch arge).
Smart Card lost
Cause
Troubl
eshooting
Smart Card lost. ► If you work in a network, contact your
system administrator, who can boot your
Tablet PC with a supervisor Smart Card.
92 Fujitsu
Page 95

Troubleshooting and tips
Acoustic warning
Acousticw arningsErrors
Cause
Troubleshooting
A beep sounds every few seconds.
The battery is almost dead.
► Charge the battery.
Fujitsu 93
Page 96

Troubleshooting and tips
Error messages on the screen
Errormessagesonthes creenErrors
This section describes the error messages generated by the BIOS Setup. Error messages displayed
by the operating system or programs are described in the documentation for these programs.
If the error message appears repeatedly despite troubleshooting measures,
contact the place o f purchase or our customer service center.
94 Fujitsu
Page 97

Troubleshooting and tips
Error message/cause Troubleshooting
CMOS battery bad
If the error message occurs repeatedly, the
buffer battery in the Tablet PC is flat.
► Contact your sales outlet or our
customer
service center.
System CMOS checksum bad - Default configuration
used
The system confi guration information is
incorrect.
► Switch the Tablet PC off.
► Switch the Tablet PC on.
► In the BIOS Setup, select t
he Exit menu.
► Select th e entry Load Setup Defaults.
► Select OK and press the En
ter key.
Extended memory failed
at offset: xxxx Failin g Bits:
zzzz zzzz
When testing the exten
ded memory. an error
has resulted at the ad
dress xxxx.
► Contact your sales outlet or our customer
service center.
Failure Fixed Disk
n
The settings of th
e hard disk drive are i ncorrect.
► Start the BIOS Setup (Primary Master
submenu) and select the correct settings.
Keyboard contro
ller error
► Switch your Tablet PC off with the ON/OFF
button.
► Wait 3 - 5 seconds and switch the Tablet PC
on again.
Keyboard error
If you use an external keyboard:
► Check the connection and reboot the Tablet
PC.
nn Stuck key
► Make sure that no key is pressed.
Operating system not found
► Check in the BIOS Setup whether your hard
disk has been set correctly.
► Make sure t
hat the operating system is
installe
d on the corresponding drive.
Press <F1> to resume, <F2> to SETUP
This error message appears if an error occurs
during the self-test before starting the operating
system.
► Press th
e volume up button to start the
BIOS Set
up.
or
► If you are working with an external
keyboard, press the
F1
key or the
F2
key on the keyboard.
Real time c lock error
► Cont
act your sales outlet or our customer
serv
ice center.
nnn
nK Shadow RAM failed at offset: xxxx Failing
Bi
ts: zzzz
► Contact your sales outlet or our customer
service center.
System battery is dead - Replace and run SETUP
► Contact your sales outlet or our customer
service center.
System cache error - Cache disabled
► C
ontact your sales outlet or our customer
s
ervice center.
System timer error
► Contact your sales outlet or our customer
service center.
Fujitsu 95
Page 98

Technical data
Technical data
Tablet PC
General
Processor
6th Generation Intel® Core™ with vPro™
technology ( vPro, depending on configuration)
Main memory (SO DIMM) 4 GB / 8 GB DIMM onboard
Electrical data
Safety regulations complied with CE, cULus
Protection class III
Maximum power consumption (when the
tablet PC is switched on, connected to the
keyboard docking station and the battery is
being charged):
65 W
Touch screen
Size
13.3" Full HD Wide View
Screen resolution 1920 x 1080 / 16 million colors
Pixel cla ss II
Brightness control 11 levels
Technology Wide-View High-Bright Display with LED
background lighting
Digitizer and glass panel
Dual Digitizer with Anti-Glare Touchscreen
Cameras
• Front: HD cam era
• Back: 5 me
gapixels, auto focu s, mobile light
Graphics card
Chip Intel (c) HD Graphics 5 20
Maxim
um resolution of external display:
4096 x 2160
Dime
nsions
Widt
h x Depth x Height
• Standard housing only: 12.56 x 8.19 x 0.5
inches (319 x 208 x 12.7 mm)
• Standard housing with keyboard docking
station without battery: 12.56 x 9.76 x 1.17
inches (319 x 248 x 29.6 mm)
• Standard housing with power keyboard
docking station with battery: 12.56 x 9.76 x
1.33 inches (319 x 248 x 33.8 mm)
96 Fujitsu
Page 99

Technical data
Weight depending on configuration • Standard housing only: 2.15 lbs / 0.98 kg
• Standard housing with keyboard docking
station without battery: 4.13 lbs / 1.87 kg
• Standard housing with power keyboard
docking station with battery: 4.56 lbs / 2.07
kg
Depending on th e respective configuration
(including battery), the weight may differ from
the above-mentioned values.
Input devices
Tablet buttons 3 keys
Stylus Stylus with a pressure button
Slots
Memory card slot
1xmicroSD
SIM card slot 1 x Micro-SIM
Smart Card slot (optional housing)
1x
Ports
Combined headphones and microphone port
3.5mmstereominijack
Docking port 1 x
Micro HDMI port 1 x
USB (Universal Serial Bus) 1 x USB 2.0, 1 x USB 3.0
Security Lock device
1x
Ambient conditions
Environment class DIN IEC 721
7K1
Mechanism class DIN IEC 721
7M2
Operating temperature 41 °F .... 95 °F / 5 °C .... 35 °C
Transport temperature (2K2) 5 °F .... 140 °F / -15 °C .... 60 °C
WLAN s
pecifications
Type of
network
Intel®
Dual Band Wireless 8260NG (Snowfield
Peak –
11a/b/g/n/11ac), Wi-Fi based*
Transfer rate (Automatic switching) IEEE802.11 a and g: 54
Mbps max. data rate; IEEE802.11n: 300 Mbps
max. data rate, IEEE802.11ac: 867 Mbps max.
data rate
Active frequency • 802.11n: 2.4 GHz or 5 GHz
• 802.11b/g: 2400~2473 MHz
• 802.11a: 4900~5850 MHz
• 802.11ac: 2.4 GHz / 5 GHz
Fujitsu 97
Page 100

Technical data
Typical operating distances** • 802.11a: 40 ft. (12 m) @ 54 Mbps; 300 ft.
(91m)@6Mbps
• 802.11ac: 40 ft. (12 m) @ 54 Mbps; 300
ft.(91 m) @ 6 Mbps
• 802.11b: 100 ft. (30 m) @ 11 Mbps; 300 ft.
(91m)@1Mbps
• 802.11g: 100 ft. (30 m) @ 54 Mbps; 300 ft.
(91m)@1Mbps
• 802.11n: Estimated double the operating
distance of 802 .11g and 802.11a in their
respective frequencies
Number of channels
• 802.11a: 8 independent channels
• 802.11b/g: 11 channels, 3 non-overlapping
channels
• 802.11n: Channel bonding takes t wo of
the non-overlapping 20MHz channels and
combines it into one 40MHz channel. It is
actually 12 non-overlapping channels with
channel bonding and 24 without. Also it is 1
non-overlapping channel in 2.4GHz when
channel bonding is used.
• 802.11ac: 5 independent channels
Security
Encryption types: compatible with WEP, TKIP,
AES***, WPA 1.0 and WPA 2.0
Encryption key, lengths supported: 64 bits and
128 bits
Maximum recommended number of computers
to be connected over wireless LAN (during ad
hoc connection)
10 units or less ****
* “Wi-Fi based” indicates that the interconnectivity test of the organization which guarantees the
interconnectivity of wireless LANs (Wi-Fi Alliance) was passed.
** The operating distances given above increase or decrease depending on factors such as the
number of walls, reflecting material or interference b y external RF sources.
*** Network ke y encryption (WEP) occurs with the number of bits given above, after dedu ction of
the fixed length of 24 bits the user may however also set 40 or 104 bits.
**** Depending on the particular practical application, the number of computers which can be
networked is reduced if necessary.
98 Fujitsu
 Loading...