

Page 1

Operating manual
System
FUJITSU Tablet
STYLISTIC Q7310
Page 2

Congratulations on your pu
product from Fujitsu.
rchase of an innovative
The latest information about our products, tips, updates etc. can be found
on the Internet at: "
You can find driver updates at: "http://s upport.ts.fujitsu.com /download"
Should you have any technical questions, please contact:
• our Hotline/Service Desk ("
• Your sales partner
• Your sales office
We hope you enjoy working with your new Fujitsu system!
http://www.fujitsu.com/fts/"
http://support.ts.fujitsu.com/contact/servicedesk")
Page 3

Page 4

Issued by / EU importer
chnology Solutions GmbH
Fujitsu Te
Mies-van-der-Rohe-Straße 8
80807 Munich, Germany
www.fujitsu.com/fts/"
http://
"
Copyright
© Fujitsu Technology Solutions GmbH2020. All rights reserved.
tion Date
Publica
06/2020
o.: A26391-K497-Z320-1-7619, edition 1
Order N
Page 5

FUJITSU Tablet
STYLISTIC Q7310
Operating manual
Innovative technology 7
Ports and controls 9
Important notes 13
First-time setup of your device 17
WorkingwiththeTabletPC 20
Accessories for your Tablet PC
(optional) 38
Security functions 54
Connecting external devices 64
Settings in BIOS Setup Utility 70
Troubleshooting and tips 75
Technical data 84
Manufacturer’s notes 90
Index 91
Page 6

Remarks
Information on the product description meets the design specifications of Fujitsu and
is provided for comparison purposes. Several factors may cause the actual results to
differ. Technical data is subject to change without prior notification. Fujitsu rejects any
responsibility with regard to technical or editorial mistakes or omissions.
Trademarks
Fujitsu, the Fujitsu logo and STYLISTIC are registered trademarks of F ujitsu Limited
or its subsidiaries in the USA and other countries.
Microsoft and Windows are trademarks or registered trademarks of Microsoft
Corporation in the USA and/or other countries.
HDMI and High-Definition Multimedia Interface are trademarks or registered
trademarks of HDMI Licensing, LLC.s.
Bluetooth® and the Bluetooth logo are registered trademarks of Bluetooth SIG , Inc.
Adobe Reader is a trademark of Adobe Systems Incorporated.
USB Type-C™ and USB-C™ are trademarks of the USB Implementers Forum
in the USA and other countries.
All other trademarks specified here are the property of their respective owners.
Copyright
No part of this publication may be copied, reproduced or translated without
the prior written consent of Fujitsu.
No part of this publication may be saved or transferred by any electronic means
without the written approval of Fujitsu.
Page 7

Contents
Contents
Innovativetechnology ................................................................. 7
Further information ...................................................................... 7
Notational conventions .................................................................. 8
Portsand controls ..................................................................... 9
Importantnotes ........................................................................ 13
Safety notes ............................................................................ 13
Additional safety notes for d evices with wireless components . . ............................. 13
Protecting thedisplay screen ............................................................ 14
Energy saving .......................................................................... 14
Energy saving under Windows ....................................................... 14
Travelling with your Tablet PC ............................................................ 15
Before youtravel ................................................................... 15
Transporting theTablet PC ........................................................... 15
Cleaningthe Tablet PC .................................................................. 16
First-time setup
Unpacking and che
Selectingalocat
Mains adapter co
Switchingonthe
Working with theTabletPC ............................................................ 20
Status indicators ........................................................................ 21
Switchingon theTablet PC .............................................................. 22
Programming the ON/OFF button ..................................................... 22
Switchingthe TabletPC off .............................................................. 23
Handwriting recognition .................................................................. 23
Touchscreen ........................................................................... 23
Select displayorientation(portraitorlandscape orientation) ................................. 25
Use thetouchscreen .................................................................... 25
Using fingers ....................................................................... 25
Usingthe styluspen ................................................................. 26
Tablet buttons .......................................................................... 30
Camera andInfrared Camera ............................................................ 31
Rechargeablebattery ................................................................... 32
Chargingand maintainingthe battery ................................................. 32
Usingthe power-management features ................................................... 33
Memory cards .......................................................................... 33
Supported formats .................................................................. 33
Inserting thememorycard ........................................................... 34
Removingthe memory card .......................................................... 34
SIM card (configuration dependent) ....................................................... 35
Inserting theSIM card ............................................................... 35
Removingthe SIMcard .............................................................. 35
Wireless LAN / Bluetooth / LTE radio components (configuration dependent) . . . .............. 36
Switching the wireless components on and off . ........................................ 36
Setting upWLAN access ............................................................ 36
Access via LTE (configuration dependent) . ............................................ 36
Ethernet and LAN (optional, only with crad le, keyboard dock or adapter cable) . .............. 37
GPS ................................................................................... 37
of yourdevice .........................................................
ckingthe device ......................................................
ion .....................................................................
nnecting . . . . ...........................................................
device for the firsttime ..................................................
17
17
18
18
19
Fujitsu 3
Page 8

Contents
Accessories for your Tablet PC (optional) . ............................................. 38
Your cradle (optional) . . . . ................................................................ 39
Cradle components . . ................................................................ 39
Setting upthe cradle ................................................................ 40
Connecting the Tablet PC to the cradle . . . ............................................. 41
Disconnecting the Tablet PC from the cradle . . ......................................... 42
Keyboard dock (optional) ................................................................ 43
Components of the keyboard dock . . . ................................................. 43
Connecting the Tablet PC to the keyboard dock . . . . . . .................................. 44
Disconnecting the Tablet PC from the keyboard dock .................................. 45
Touchpad and touchpad buttons . . . . . ................................................. 46
Keyboard ........................................................................... 48
Securityfunctions ..................................................................... 54
Setting up t he fingerprint sen sor (configuration dependent) . . . .............................. 55
Usingthe Security Lock ................................................................. 56
Configuring password protection inBIOS Setup Utility ...................................... 56
Protecting BIOS Setup Utility (supervisor and user password) . .......................... 57
Password protection for booting of the operating system . .............................. 58
Passwordprotection forthe harddisk ................................................. 59
SmartCard reader (depending on configuration) ........................................... 60
Inserting theSmartCard ............................................................. 61
Trusted Platform Module - TPM (depending on configuration) ............................... 62
EnablingTPM ....................................................................... 62
Disabling TPM ...................................................................... 62
Enable password entry using the on-screen keyboard (on-screen ke yboard for BitLocker
password) .......................................................................... 63
Connecting external devices ........................................................... 64
Connecting an external monitor . . ........................................................ 64
HDMI port .......................................................................... 64
Display port (cradle only) ............................................................ 65
VGA monitorport(cradle only) ....................................................... 66
Connecting USB devices ................................................................ 67
USB port with charging function (USBType-C) ......................................... 68
How to removeUSB devicescorrectly ................................................ 68
Headphones/microphone/Line-In/Line-Out/headset combination port . . . . . ................... 69
Settings in BIOS Setup Utility . . ........................................................ 70
Startingthe BIOS Setup Utility ........................................................... 70
Operating the BIOS Setup Utility ......................................................... 71
Exiting BIOS Setup Utility ................................................................ 72
Exit Saving Ch anges - save changes and exit BIOS Setup Utility . . . . ................... 72
Exit Discarding Changes – Discard changes and exit BIOS Setup Utility . . ............... 72
Load Setup Defaults – Copy Standard Entries ......................................... 72
Discard Changes – Discard changes without exiting the BIOS Setup Utility ............... 72
Save Changes - save changes without exiting the BIO S Setup Utility . ................... 72
Save Changes and Power Off ........................................................ 72
EraseDisk ............................................................................. 73
Troubleshooting andtips .............................................................. 75
Executing areset ....................................................................... 76
Forced shut down ................................................................... 76
Carryout abattery reset ............................................................. 76
4 Fujitsu
Page 9

Contents
Help ifproblemsoccur ................................................................... 76
The Tablet PC’s date ortime isincorrect .................................................. 76
Battery charging indicatornot lit .......................................................... 77
The Tablet PC’s touchscreen remainsdark ................................................ 77
The display on the Tablet PC’s touchscreen is difficult to read. . ............................. 77
The external monitorremainsblank ...................................................... 78
The external monitoris blank orthe image isunstable ..................................... 78
The cursor does not correctly follow the pen movemen ts . . . . . . ............................. 79
Pen input not working ................................................................... 79
The Tablet PCdoes notstart after switchon ............................................... 79
The Tablet PCstopsworking ............................................................. 79
The printer does not print . . . . . ........................................................... 80
The wireless connection to a network does not work . . . .................................... 80
The battery discharges too quickly ........................................................ 80
SmartCard reader is not recogn ised. . . . ................................................... 81
SmartCardPIN forgotten ................................................................ 81
SmartCardlost ......................................................................... 81
Acousticwarnings ....................................................................... 81
Errormessagesonthe screen ........................................................... 81
Restoring the system under Windows 10 . . . . . . ............................................ 83
Technicaldata ......................................................................... 84
Tablet PC .............................................................................. 84
Screen resolutionsfor integrated screen and externalscreens .............................. 86
Rechargeablebattery ................................................................... 87
Mains adapter (65 W) for the Tablet PC with/without the keyboard dock ..................... 87
Mains adapter (90 W) for the Tablet PC with cradle ........................................ 88
Cradle (optional) ........................................................................ 89
Keyboard dock (optional) . . . . . ........................................................... 89
Manufacturer’s notes .................................................................. 90
Disposaland recycling .................................................................. 90
TCO Certified ........................................................................... 90
SAR limit value (Specific Absorption Rate) ................................................ 90
Other certification markings .............................................................. 90
Index .................................................................................. 91
Fujitsu 5
Page 10

Contents
6 Fujitsu
Page 11

Innovative technology
Innovative technology
... and ergonomic design make your device a reliable and convenient companion.
The device boots very quickly, is ready for immediate use and offers a particularly
long operating time because of its high capacity battery.
The user-friendly "BIOS Setup Utility" offers powerful password protection functions which can be
used to control your Tablet PC’s hardware and protect your system better against unauthorised use.
Information on the connections and controls for your Tablet PC can be
found in chapter "
Ports and controls", Page 9.
Further information
The Windows drivers for your device can be found on our Internet site.
The factory installation of your device does not support any other operating
system. Fujitsu Technology Solutions accepts no liability whatsoever
if any other operating system is used.
Software oriented components of the se instructions refer to Microso ft products,
if they come within the scope of the delivery.
If you install other software products, pay attention to the operating
instructions of the manufacturer.
Fujitsu 7
Page 12
Innovative technology
Notational conventions
Pay particular attention to text marked with this symbol. Failure to observe
these warnings could pose a risk to h ealth, damage the device or lead
to loss of data. The warra nty will be invalidated if the device becomes
defective throu gh failure to observe these warnings.
Indicates important informa
tion for the proper use of the device.
►
This font
This font
This font
"This font"
Key
This font
Indicates an activity that must be performed
Indicates a result
indicates data entered
the command line, e.g.
start a program (star
indicates information that is displayed on the screen by a program, e.g.:
Installation is complete.
indicates
• terms and texts used in a software interface, e.g.: Click on Save
• names of programs or files, e. g. Windows or setup.exe.
indicates
• cross-references to another section, e.g. "Safety information"
• cross-references to an external source, e.g. a web address: For more
information, go to "
• Names of CDs, DVDs and titles or designations for other materials,
e.g.: "CD/DVD Drivers & Utilities" or "Safety/Regulations" manual
indicates a key on the keyboard, e.g:
indicates terms and texts that are emphasised or highlighted, e.g.: Do
not switch off the device
using the keyboard in a program dialogue or at
your password (Name123) or a command used to
t.exe)
http://www.fujitsu.com/fts/"
F10
8 Fujitsu
Page 13
Ports and controls
Ports and controls
This chapter presents the ind ividual hardware components of your device. It gives you
an overview of the device’s indicators and connections. Please familiarise yourself with
these components before you start to work with the device.
Front
7
8
1 = Touchscreen
2 = Microphone
3=Camera
4 = Infrared c
5=CameraLED
6=Power-on
7 = Loudspeaker
amera
indicator
1
11
10
9
8
7
2
3
4
5
2
6
8 = Mechanical fixture for keyboard
dock/cradle
9 = Ambient li
10 = S lots for SIM card (depending on
configuration) and memory card
(protected by cover)
11 = Docking p
ght sensor
ort
Fujitsu 9
Page 14
Ports and controls
Left side
All connections are protected by covers.
43
2
1
5
1 = USB port 3.2 Gen1 (USB Type-A)
2 = USB 3.2 Gen2 port (USB Type-C) with
charging function and DisplayPort
3 = HDMI port
Right side
1 2 3 4 5 6
1 = Security Lock device
2 = Combined Headphone and Microphone
Port (protected by cover)
3 = USB 2.0 port (USB Type-A, protected
by cover)
4 = Battery charging indicato r
5 = DC input connector (DC IN)
4 = SmartCard reader (con figuration
dependent)
5 = Eyelet for the optional pen cord
6=Penslot
10 Fujitsu
Page 15

Top side view
Ports and controls
1 2 3 4
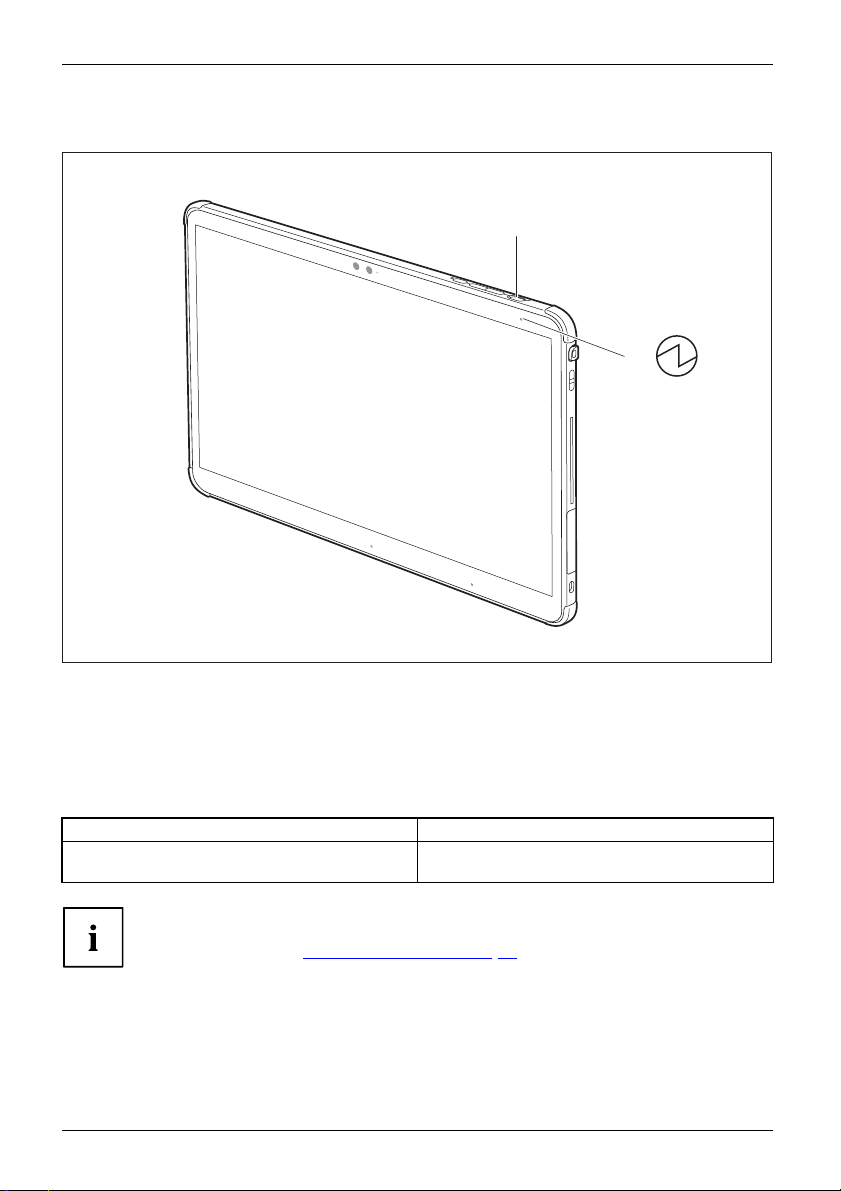
1 = ON/OFF button
2 = Volume up button
Bottom
The card slots are protected by a cover.
1 3 4 12
1=Mechanicalfixture for keyboard
dock/cradle
2 = Docking port
3 = Volume down button
4 = Shortcut bu tton
3=SIMcardslot(configura tion-dependent)
4 = Memory card slot
Fujitsu 11
Page 16
Ports and controls
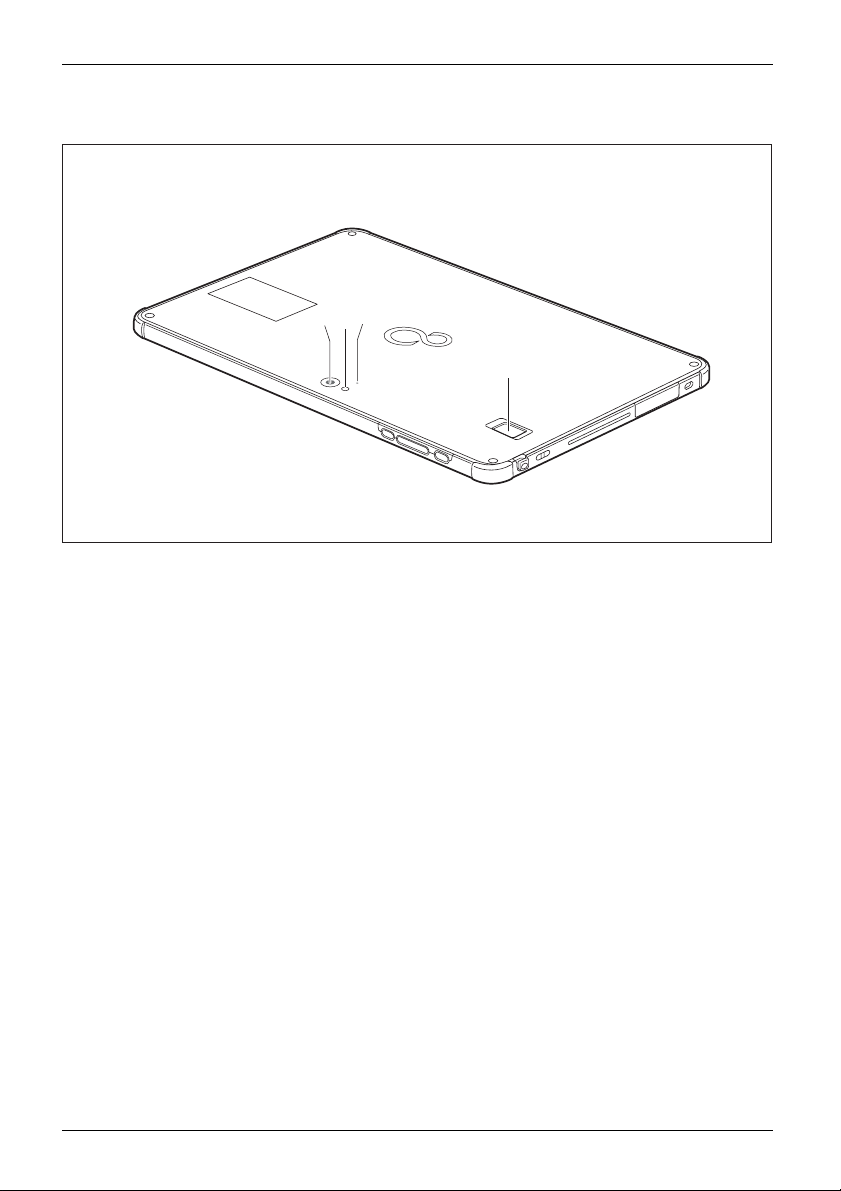
Rear
3
1
2
4
1=Camera
2 = Camera light
3=CameraLED
12 Fujitsu
4 = Fingerprint scanner (depending on
the configuration)
Page 17

Important notes
ImportantnotesNotes
Safety notes
SafetynotesNotes
This chapter co ntains essential safety information which must be followed when working
with your Tablet PC. The other notes provide useful information on your Tablet PC.
Please follow the safety notes provided in the "Safety/Regulations" manual
as well as the safety notes given below.
Please pay special attention to the sections in the manual marked
with the symbol on the left.
When connecting and disconnecting cables, observe the relevant
notes in this operating manual.
Read the information on the ambient conditions in the "
chapter and the information in the "First-time setup of your device", Page 17 chapter
before preparing your Tablet PC for use and switching it on for the first time.
When cleaning the device, please observe the relevant notes in the
section "
Pay attention to the additional safety notes for devices with wire less components
provided in the "Safety/Regulations" manual.
Cleaning the Tablet PC", Page 16.
Important notes
Technical data", Pag e 84
This Tablet PC c
If you have que
environment,
omplies with the relevant safety regulations for da ta processing equipment.
stions as to whether you can set up the Tablet PC in the intended
please contact your sales point or our hotline/help desk.
Additional safety notes for devices with wireless components
Wirelesscomponent:WirelessLAN:Bluetooth,safetynotes
If a wireless component (Wireless LAN/ Bluetooth, UMTS/LTE) is integrated in your Tablet PC, you
must be sure to observe the following safety precautions when using your Tablet PC:
• Switch off the wire less components when you are in an aircraft or driving in a car.
• Switch off the wireless components when you are in a hospital, an operating
room or near a medical electronics system. The transmitted radio waves
can impair the operation of medical devices.
• Switch off the wireless components when yo u let the device get n ear flammable
gases or into hazardous environments (e.g. petro l station, paintshops), as the
transmitted radio waves can cause an explosion or a fire.
For information on how to switch wireless components on and off, see chapter
Switching the wireless components on and off", Page 36.
"
Fujitsu 13
Page 18
Important notes
Protecting the display screen
Do not pour liquids on the device or wash it with a heavily soaked cloth. Do not
place items on the top of the screen, or damage may occur.
During normal use of the device, sm all particles from the environment
can become embedded in the pen tip and scratch the screen. The
warranty does not cover a scratched screen.
Energy saving
NotesEnergyEnergysaving
Switch off your Tablet PC if you do not need to use it. Switch off connected external devices
if you are not using them. If you use the energy saving functions, the Tablet PC uses less
power. You will then be able to work for longer before having to recharge the battery.
Power efficiency is increased and environmental pollution reduced. You
save money and help protect the environment.
Energy saving under Windows
► Make use of the power management features (see ""Using the power-management features",
Page 33").
14 Fujitsu
Page 19
Travelling with y our Tablet PC
MobileoperationNotesTransportationTabletPC
Please observe the points listed below when travelling with your Tablet PC.
Before you travel
► Back up important data stored on your hard disk.
BeforeyoutravelTravel
► Switch off the wireless c
connection, it is also po
omponent for data security reasons. With data trafficviaawireless
ssible for unauthorised third parties to receive data.
Important notes
Information on activat
for your wireless compo
► If you wish to use your Tablet PC during a flight, check with the airline whether this is allowed.
ing data encryption is provided in the documentation
nent.
When travelling in other countries
► If you are travelling a broad, check that the mains adapter can be operated with the
local mains voltage. If this is not the case, obtain the appropriate mains adapte r
for your Tablet PC. Do not use any other voltage converter!
► Check whethe r the local mains voltage and the power cable are compatible. If this is
not the case, buy a power cable that matches the local conditions.
► Ask the appropriate government office for your travel destination, whether you may use your
Tablet PC with its installed r adio component. Please observe the additional safety instructions
for devices with radio components, fo und in the handbook “Safety/formalities”.
Transportin
► Switch off the Tablet PC.
► Unplug the mains adapter and all external devices from the power socket.
► Disconnect the mains adapter cable and the data cables for all external devices.
► To protect aga inst damaging jolts and bumps, use a Tablet PC carrying
case to transport your Tablet PC.
gtheTabletPC
Protect the Tablet PC from severe shocks and extreme temperatures
(e.g., direct sunlight in a car).
Fujitsu 15
Page 20

Important notes
Cleaning the Tablet PC
Do not clean any interior parts yourself; leave this job to a service technician.
Only use cleaning products designed for computers. Normal household
cleaners and polishes can damage the markings on the keyboard and the
Tablet, the paintwork or the Tablet PC itself.
Please ensure that no liquid enters the Tablet PC.
The touchscreen is very sensitive to scratches! Only clean the display
surface with a very soft, slightly damp cloth.
► Switch the Tablet PC off
CleaningNotesTabletPCKeyboardTouchpadTouchscreen
The casing surfaces may be cleaned with a dry cloth. If particularly dirty, use a damp cloth that
has been dipped in water mixed with mild domestic detergent and then carefully wrung out.
.
16 Fujitsu
Page 21
First-time setup of your device
First-time setup of your devic
First-timesetu pGettingstarted
The battery must be charged if you want to operate your device using the battery.
When used on the move, the built-in battery pro vides the device with the necessary power. You
can increase the operating time by using the available energy-saving functions.
For instructions on how to connect external devices (e.g. mouse, printer) to your Tablet
PC, please refer to the operating manual for your device.
Unpacking and c
► Unpack all the individual parts.
► Check your d
Please read the chapter "Important notes", Page 13.
If your device is equipped with a Windows operating system, the necessary
hardware drivers and supplied software are already pre-installed.
Beforeyouswitchonthedeviceforthefirst time, connect it to the mains voltage
using the mains adapter, see "
adapter must be connected during the entire installation process.
A system test is performed when your device is first switched on. Various messages
can appear. The display may remain dark for a short time o r m ay flicker.
Please follow the instructions on the screen.
NEVER switch off your device during the first-time setup process.
Mains adapter connecting", Page 18.Themains
hecking the device
Should you discover any damage that occurred during transportation,
notify your local sales outlet immediately!
PackagingTransport
evice for any visible damage which may have occurred during transp ortation.
e
You m a y n e e
Fujitsu 17
d the packaging in the future, if you need to transport your device.
Page 22

First-time setup of your device
Selecting a location
SelectingalocationDeviceMainsadapter
Select a suitable location for the device before setting it up. Follow
the instructions below when doing so:
• Never place the device or the mains adapter on a heat-sensitive surface.
The surface could be dama ged as a result.
• Never place the device on a soft surface (e.g. carpeting, upholstered furniture,
bed). This can result in damage caused by overheating.
• The underside of the device heats up during normal operation. Prolonged contact
with the skin may become unpleasant or even result in burns.
• Place the device on a stable, flat, non-slippery surface. Please note that the
rubber feet of the device may mark certain types of delicate surfaces.
• Keep other objects at least 100 mm / 4 inches away from the de vice and
its mains adapter to ensure adequate ventilation.
• Do not expose the device to extreme environmental conditions. Protect
the device against dust, moisture and heat.
Mains adapter connecting
PreparingforoperationMainsadapter
Observe the safet
The supplied pow
which you purcha
for use in the co
3
y notes in the enclosed "Safety/Regulations" m an ual.
er cable conforms to the requirements of the country in
sed your device. Make sure that the po wer cable is approved
untry in which you intend to use it.
► Connect the power cable ( 1) to the power
adapter provided for the device, see
chapter "
Technical data", Page 84.
► Plug the mains cable (2) into a mains outlet.
► Connect the mains adapter cable (3) to
the DC jack (DC IN) of the device.
2
1
18 Fujitsu
Page 23
First-time setup of your device
Switching on the device for the first time
Switchingonforthefirsttime
When you switch on the device for the first time, the supplied software is
installed and configured. Because this procedure must n ot be interrupted,
you should set aside enough time for it to be fully completed and connect
the device to the mains using the mains adapter.
During the installation process, DO NOT restart the device unless
you are requested to do so!
To make it easier to use yo
is pre-installed on the
ur device for the first time, the operating system
hard disk.
1
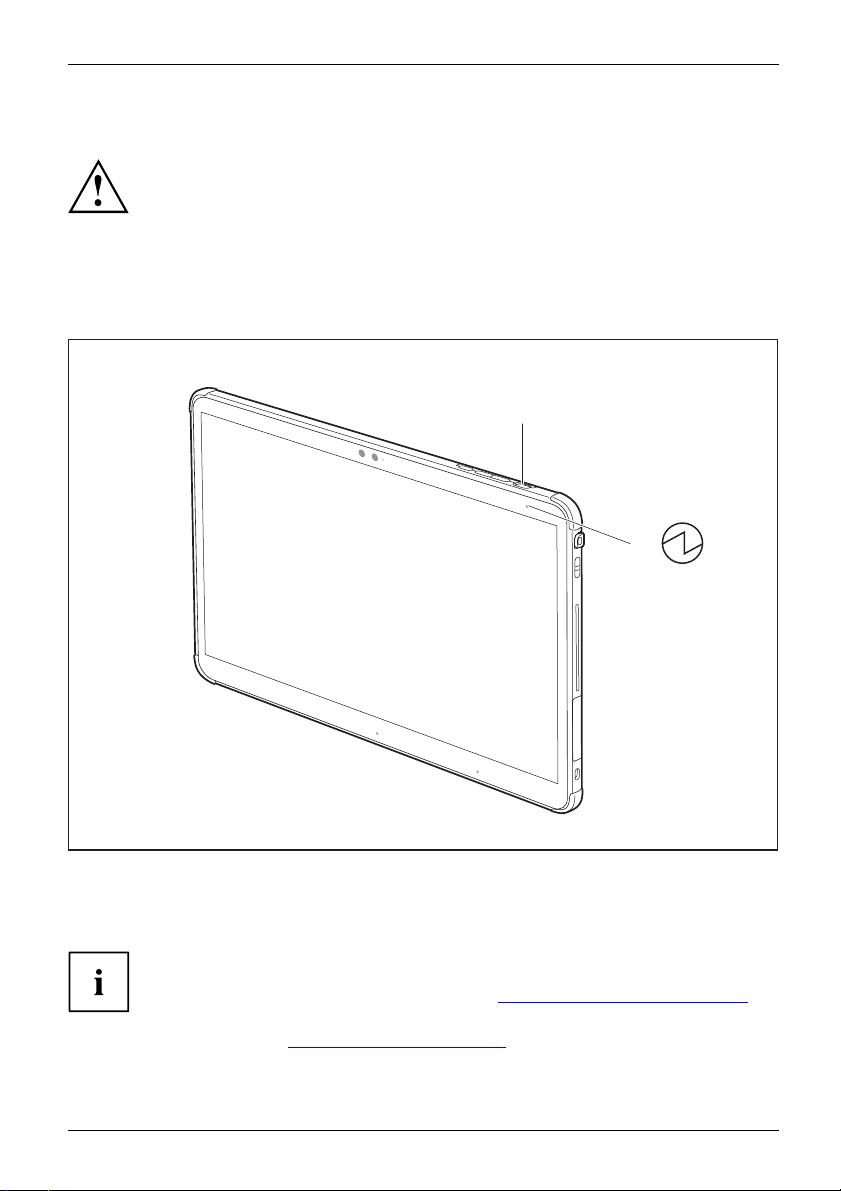
► Press the ON/OFF button (1) for about one second to switch the device on.
The power-on indicator (2 ) lights up as long as the system is switched on.
► During installation, follow the instructions on screen.
2
If a Window s operating system is installed on your device, you will find more information
on the system and d rivers, help programmes, updates, manuals etc. on the device. This
information can also be found on the Internet at "
You can find information and help on the Windows operating system functions
on the Internet at "
Fujitsu 19
http://windows.microsoft.com".
http://www.fujitsu.com/fts/support/".
Page 24

Working with the Tablet PC
Working with the Tablet PC
TabletPC,operationTabletPC
This chapter describes the basics for ope rating your Tablet PC. You can find instructions
on how to connect external devices (e.g. mouse, flash memory) to the Tablet PC
in the chapter "
Connecting external devices", Page 64.
Please refer to the notes in "Important notes", Page 1 3.
20 Fujitsu
Page 25

Working with the Tablet PC
Status indicators
StatusindicatorsSymbols
The status indicators provide information about the s tatus of the power supply and the battery.
1
2
No. Status displays Description
1 Power-on indicator
2 Battery charging indicator
• The indicator lights up white: The tablet PC is switched
on.
•Theindicatorflashes: The tablet PC is in Sleep mode
(save-to-RAM) or in Modern Standby mode.
• The indicator is not lit: The Tablet PC is switched off
or in Save-to-Disk mode.
Please note: If the mains adapter is connected when the
state of charge of the battery is more than 90 %, charging
will not be started. When the state of charge of the battery
is less than 90 %, the battery will be charged to 100 % as
soon as the mains adapter is co nnected.
• The indicator light is orange: The battery is being
charged.
• The indicator is not lit: The ba ttery is not being charged
(the battery is already more than 90% charged or the
mains adapter is not connected).
Fujitsu 21
Page 26
Working with the Tablet PC
Switching on the Tablet PC
TabletPC:switchingonPower-onindicator
1
2
► Press the ON
The power-on indicator (2) lights up as long as the system is switched on.
/OFF button (1) for about one second to switch the device on.
Programming the ON/OFF button
You can program the ON/OF F button:
Operating system Menu
Windows 10
If you have assigned a password, you must enter this when requested to
do so, in order to start the operating system. Detailed information can be
found in the chapter "
22 Fujitsu
Security functions", Page 54.
Control Panel - Hardware and Sound - Power
Options
Page 27
Working with the Tablet PC
Switching the Tablet PC off
Back up your data and close all applications before you switch off your
device. Otherwise data might be lost.
► Shut down the operating system correctly.
Switchingoff
► If the Tablet PC does not switch off automatically, press the ON/OFF button for about five seconds.
Handwriting recognition
For detailed information on handwriting recognition, see the documentation on yo ur operating system.
At present, handwriting recognition under Windows supports the following languages:
English, German, French, Italian, Japanese, Korean, Chinese (traditional and simplified), Dutch,
Portuguese, Spanish, Brazilian, Norwegian (Bokmål and Nynorsk), Swedish, Finnish, Da nish,
Polish, Rumanian, Serbian (Cyrillic and Latin script), Catalan, Russian, Czech and Croatian.
Under Windows you can set the required language under Control Panel –
Time, Language and Region – Language.
Touch screen
Touchsc reenNotes
Information on screen resolution can be found in the section "Screen resolutions
for integrated screen and external screens", Page 86.
High-qualit
these scree
only be ensu
which diff
The screen
With the p
cannot be
elements
specifie
Exampl
A monit
subpix
9241or an e
Fujitsu 23
y LCD screens (TFT ) are installed in Fujitsu Tablet PCs. For technical reason s,
ns are manufactured for a certain resolution. An optimum and s harp image can
red with the resolution intended for the particular screen. A screen resolution
ers from the specification can result in an unclear image.
resolution of your Tablet PC’s touchscreen is optimally set at the factory.
resent standards of production technology, a bsolutely flawless screen images
guaranteed. T here may be a few constantly light or dark pixels (picture
) on the screen. The maximum permitted number of such faulty pixels is
d in the international standard ISO 9241-307 (Class II).
e:
or with an HD resolution of 1280 x 1024 has 1,310,720 pixels. Each pixel consists of three
els (red, green and blue), so there are a lmost 3.9 million subpixels in total. According to ISO
307 (class II), a maximum of 3 light and 3 dark pixels and in add ition 7 light or 13 dark subpixels
quivalent mix (1 light subpixel counts as 2 dark subpixels) are allowed to be defective.
Page 28

Working with the Tablet PC
Pixel
A pixel consists of 3 subpixels, normally red, green and
blue. A pixel is the smallest element that can be generated
by comple te functionality of the display.
Subpixel
A subpixel is a separately addressable internal structure
within a pixel that enhances the pixel function.
Cluster A cluster contains two or more
subpixels in a 5 x 5 pixel bloc
defective pixels or
k.
Background lighting
LCD screens are operated with background lighting. The luminosity of the background
lighting can decrease over the period of use of the Tablet PC. However, yo u can
set the brightness of your screen individually.
Ambient light sensor
If your Tablet PC was shipped with the Windows operating system, the screen brightness
is regulated by the ambient light sensor according to the particular light conditions. This
results in optimum readability and longer battery life at the same time.
If your Tablet PC was shipped with Windows 10, the adaptive brightness setting is enabled. To
change the ambient light sensor settings, select Control Panel - System and Security - Power Options -
Change plan settings - C hange advanced power options - Display - Activate adap tive brightness setting.
Synchronising the display on the touchscreen and an external monitor
In Windows 10 you can proceed as follows to set the output type:
► Wipe your finger o
ver the screen starting from the right-hand edge.
► Select All settings.
► Select Setting
s - System - Display - Multiple screens.
24 Fujitsu
Page 29
Working with the Tablet PC
Select display orientation (portrait or landscape orientation)
LandscapeorientationPortraitorientationDisplayorientation
You can choose to use either portrait or landscape orientation for the display, or whether the
display orientation should automatically adapt to the orientation of the Tablet PC.
You can change these settings under Control Panel - Hardware and Sound
- Windows Mobility Center / Rotate screen.
In Settings there are profiles saved for operation with different screen orientations.
These profiles have preset standard configurations that can be modified as desired.
These settings do not just affect the screen settings on the Tablet PC, but
also those on externally connected m on itors.
Use the touch screen
You can execute commands as follows:
• using the stylus pen (supplied with your device).
• using your fingers
Using fingers
You can execut
e certain commands by using your finger tip on the touchscreen of your device.
Everything w
also be selec
hich you can select or activate using your finger tip can
ted or activated using the pen.
Calibrate the monitor for finger input
For instructions on how to calibrate your device to use the touch screen,
please refer to chapter "
Please note: There are separate calibration programs available for calibrating
the pen and for calibrating finger tip operation. Do not use the calibration
tool for the pen to calibrate finger tip operation.
Fujitsu 25
Calibrating the pen", P age 29.
Page 30
Working with the Tablet PC
Using the stylus pen
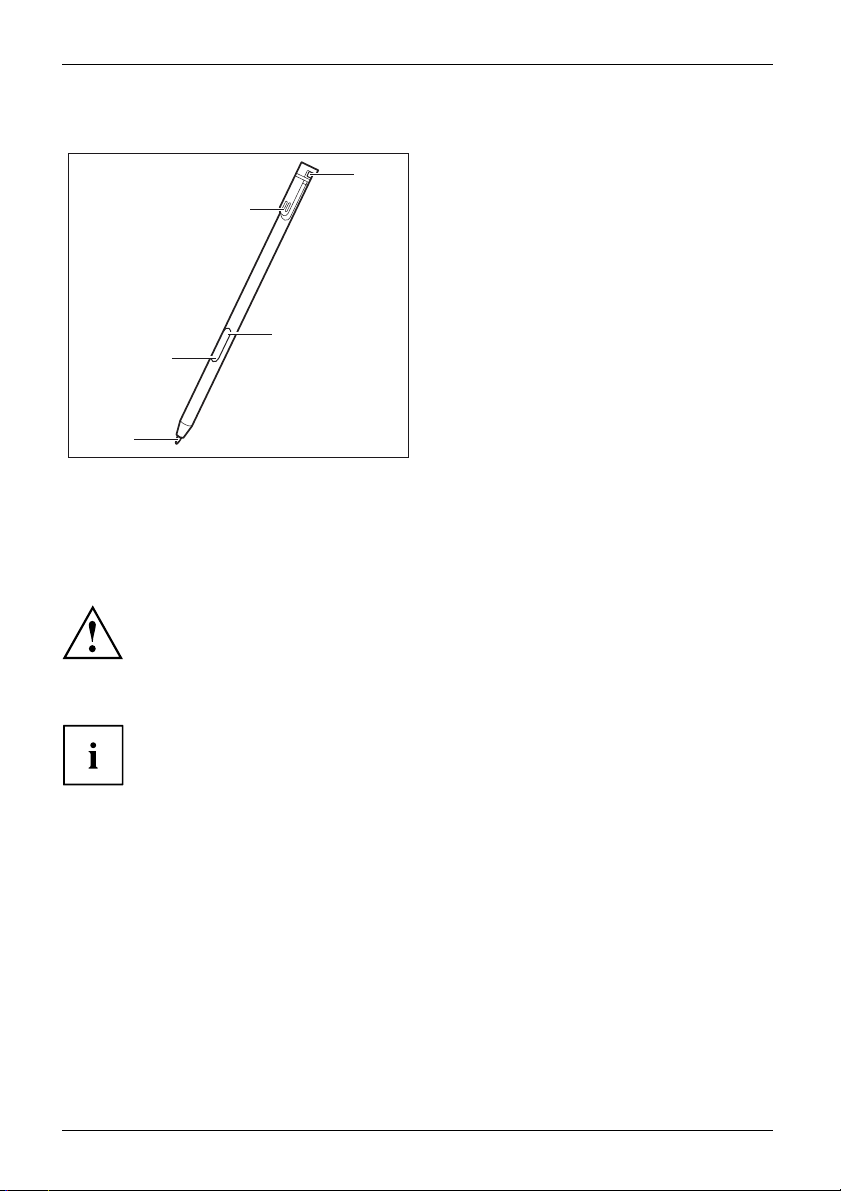
Pen
5
4
1 = pen tip
2 = pen button (= right mouse button)
3 = pen button (= delete function)
4 = charging contacts
5 = eyelet for optional pen stra p
3
2
1
You can use the pen on your Tablet PC a s an electronic writing implement to select items, and to
navigate through programs on it. Pro grams that support handwriting recognition also allow you to
write characters directly on the screen with the pen. You can also use the pen as a drawing tool.
A pen tether is available as an optional extra and you can use this to tie the
eyelet on the pen to the eyelet on the Tablet PC.
Use only the pen provided with your Tablet PC. Do not use substitutes that
were not designed for your Tablet PC. Replace the stylus tip if it is worn.
The warranty does not cover a scratched screen.
While writing, you should take care not to scratch the surface of the
display (e.g. with a wristwatch or bracelet).
The Tablet PC’s pen is an electronic instrument that can be damaged if
used improperly. Handle the pen with care.
The following list contains guidelines for proper pen handling:
• Do not gesture with the pen.
• Do not use the pen as a pointer.
• Do not use the pen on surfaces other than the screen of t he Tablet PC.
• Do not try to turn the thumb grip on the pen. Th e grip is used to place
the pen in its slot or to remove it from the slot.
• Never store the pen with the tip bearing the weight of the pen (e.g. with the tip
down in a pen holder). If the pen is stored with the tip pointing down, this may
have an adverse effect on the pen mechanism (particularly at high temperatures).
In this case the pen tip may react as though it is constantly being pressed down.
To avoid damage, the pen should be stored in the slot when not in use.
Thepencanbeinfluenced by electromagnetic fields (cursor quive rs or
jumps). There may be a few areas on the screen where the cursor quivers
slightly in spite of pressing the pen down firmly.
26 Fujitsu
Page 31

Working with the Tablet PC
The screen responds to entries made with the tip of the finger or the pen when the tip
of the finger or the pen is in direct contact with the screen.
You c an use the pen to run all functions for which you would otherwise use a mouse.
Handling Mouse Pen
Selecting menu
Click with the left-hand mous
e button.
Touch the menu entry with the pen tip.
items
Starting programs Double c lick with the left-hand mouse
button.
Moving an
object/window
Drag with the left-hand mouse button
held pressed.
Briefly touch the program icon twice
with the pen tip.
Place the pen tip directly on the
object/window. Hold the pen tip
pressed against the screen. Move the
desired object/window.
Opening a context
menu
Click with the right-hand mouse
button.
Place the pen directly on the required
element and hold the pen pressed
against the screen.
Moving the cursor Place the pen tip directly on the
screen.
Fujitsu 27
Page 32

Working with the Tablet PC
Pen position
To prevent the pen from becoming jammed in its slot (1), make sure that you
always insert the pen into its slot the correct way round (the charging contacts
on the pen point towards the eyelet for the pen cord).
1
Energy saving functions of the pen
To save energy, the pen automatically switches off after 10 minutes of inactivity
and is then in power saving mode.
The pen automatically returns to normal operating mode after the next contact with the pen tip.
Charging the pen battery
The pen contains an integrated battery, which is automatically charged when the
pen is fully inserted into its slot. The pen is also charged when the Tablet PC is in
power saving mode or is switched off. A charging time of approximately 15 seconds
is sufficient to enable to pen to be used for 90 minutes again.
► Insert the pen fully in t he slot.
After a charging period of a pproximately 5
minutes, the pen battery is fully charged.
28 Fujitsu
Page 33

Working with the Tablet PC
Setting the pen
Operating system Menu
Windows 10
You can make various settings for the pen under System Control -
Hardware and Sound - Pen and Touch.
Calibrating the pen
Via the operating system, you must calibrate your tablet PC before first use with the
pen, so that it recognises the pen as accurately as possible.
You should also always repeat the calibration if the co-ordination between the
pen and cursor movement deteriorates.
Operating system Menu
Windows 10
To calibrate, call up the Hardware and Sound / Tablet PC Settings function
in the Control Panel. You need to calibrate both portrait and landscape
formats.
Installing a pen tether
You should attach the pen with a pen tether to prevent accidentally dropping or losing it.
► Secure one end of the pen tether to the pen and the other end of the pen tether to the Tablet PC.
Fujitsu 29
Page 34

Working with the Tablet PC
Tablet buttons
In addition to t he ON/OFF switch (1), your Tablet PC is also equipped with three tablet buttons.
1 2 3 4
No. Description Functions
2 Volume up button Increase the volume
3 Volume down button Decrease the volume
4
Shortcut button Start function m
If the O N/OF F switch of the Tablet PC is pressed in combination w ith
the volume-down button, this corresponds to the function of the key
combination
Ctrl+Alt+Del
on a keyboard.
anager or screen shot function
30 Fujitsu
Page 35

Working with the Tablet PC
Camera and Infrared Camera
Camera
Depending on the software used, you can use your camera to take pictures,
record video clips or take part in web chats.
• The picture quality depends on the lighting conditions and the software being used.
• You can only use the camera with a particular application (e.g. an Internet telephony
• When using the camera, the Tablet PC support must not shake.
• The camera automatically adjusts itse lf to the current light level. For this reason the
Your device has two cameras: one on the front of the device and one on the back.
Depending on the variant, the device contains an infrared camera instead of the
camera, enabling authentication with Microsoft Windows H e llo.
program or a video conferencing program which supports a camera).
touchscreen may flicker while the light level is adjusted.
Further information on use of the camera and additional settings can be found
in the Help function of the program which uses the camera.
Fujitsu 31
Page 36

Working with the Tablet PC
Rechargeable battery
RechargeablebatteryBatteryLife,batteryRechargeablebatteryRechargeablebattery
For mobile use, the built-in battery provides the Tablet PC with the necessary power.
You can increase the life of the battery by caring for the battery properly. The average
battery life is around 500 charge/discharge cycles.
You can extend the battery life by taking ad vantage of the available energy saving functions.
Charging and maintaining the battery
BatteryBattery
The rechargeable battery of the Tablet PC can only be charged when the ambient temperature
is between 5 °C / 41 °F and a maximum temperature of 35 °C / 95 °F.
You can charge the battery by co nnecting the Tablet PC to the mains adapter
Mains adapter connecting", Page 18).
(see "
If the mains adapter is connected when the state of charge of the battery is more than 90%,
charging will not be started. When the state of charge of the battery is less than 90%, the
battery will be charg ed to 100% as soon as the mains a dapter is connected.
If the battery is running low you will hear a warning alarm. If yo u do not connect the mains adapter
within five minutes of the warning alarm described above, your Tablet PC will switch off automatically.
monitoring the b attery charging level
BatteryBatterystatusmeter
In the system bar / status display there is a battery symbol shown for monitoring the
battery capacity. The b attery symbol show s you the battery cha rge.
32 Fujitsu
Page 37

Working with the Tablet PC
Using the power-management features
PowerPowerBattery
The Tablet PC uses less power when the power management features are enabled. You will
then be able to work longer when using the battery before having to recharge it.
Power efficiency is increased and environmental pollution reduced. By
choosing the best power options, you can make significant savings and
at the s ame time help protect the environment.
► Select the power managem
ent functions in your Control Panel.
When the Tablet PC is in power saving mode, you must remember the following:
During power saving mode, open files are held in the main memory
orinaswapfile on the hard disk.
Never switch off the Tablet PC while it is in a power saving mode. If the built-in battery is
nearly flat, close the open files and do not go into power saving mode.
If you do not int end to use your Tablet PC for a long period of time:
► Exit the power savi
ng mode if necessary via touching the screen or by switching on the
Tablet PC.
► Close all opened programs and completely shut down the Tablet PC.
Memory cards
Slot
Your Tablet PC is equipped with an integrated memory card reader. You can use
memory cards to increase the storage of your Tablet PC.
Observe the manufacturer’s instructions when handling the memory cards.
Memorycard
Supported formats
It supports the following formats:
• Micro Secure Digital (microSD
•microSDHC
•microSDXC
TM
Card)
Fujitsu 33
Page 38

Working with the Tablet PC
Inserting the memory card
2
1
1
Removing the memory card
Memorycard
To avoid any loss of d
card (see the docume
2
1
a
ata, always follow the correct procedure for removing the
ntation for your operating system).
a
► Open the slot cover (1).
► Carefully push the memory card into the slot
(a) until you feel it click into place (2). The
label area must face the front of the Tablet
PC. Do not apply any force, otherwise th e
delicate contact surfaces could be damaged.
Memorycard
► Close the s lot cover again.
► Open the slot cover (1).
► Press the edge of the memory card
so that the memory card jumps (2)
slightly out of the slot (a).
► Pull the m emory card out of the slot (a)
in the direction of the arrow (3).
► Close the s lot cover again.
3
34 Fujitsu
Page 39

Working with the Tablet PC
SIM card (configuration dependent)
A SIM card (Subscriber Identity Module) is a chip card which is inserted in a mobile telephone or
Tablet PC and, together with an integrated UMTS/LTE module, enables access to a mobile network.
Please note that the SIM card format must be micro-SIM (3FF). Other SIM
card formats, such as full-size (1FF), mini-SIM (2FF) or nano-SIM (4FF )
do not fit in the SIM card slot of your tablet PC.
Please do not insert any other format of SIM card as they could
jam or could even damage the system.
The device also supports the eSIM function. For information, please
contact your network pro vider.
Inserting the SIM card
► Open the slot cover (1).
► Pull t he SIM card holder out of the slot (2).
► Insert the SIM card (3) in the SIM
card holder as shown.
► Push the SIM ca rd holder back
into the slot (4).
1
2
4
► Close the slot cover again.
3
Removing the SIM card
► Open the slot cover (1).
► Pull t he SIM card holder out of the slot (2).
► Remove the SIM card from the SIM
card holder (3).
► Push the SIM ca rd holder back
into the slot (4).
1
Fujitsu 35
2
4
3
► Close the slot cover again.
Page 40

Working with the Tablet PC
Wireless LAN / Bluetooth / LTE radio components
(configuration dependent)
The installation of radio components not approved by Fujitsu will invalidate
the certifications issued for this device.
Switching the wireless components on and off
wireless components are switched on and off via the corresponding functions of the operating system.
► To switch wireless components on and off individually, se lect Settings – Change
PC settings – Network – Airplane mode.
Setting up WLAN access
• Requirement: A WLAN must be available and you must have the
corresponding access information.
Information on configuring the WLAN access can be found in the
documentation for your operating system.
Access via LTE (configuration dependent)
If you ordered an integrated LTE module with your system, you can enjoy optim um
reception and maximum energy efficiency without awkward cables or antennas. An
installed LTE module is ready for immediate use.
If you did not order an LTE module, you can purchase the accessories for LTE reception
from your retailer or your Fujitsu Technology Solutions dealer.
For information about connecting with the LTE network, please see the documentation
for the hardware that you w ill be using.
You can connect your device to the internet via LTE. To do this, use one
of the following connection types:
• Integrated LTE module (the type depends on your model variant)
• a USB dongle (a USB stick with your mobile phone provider’s SIM card)
• a mobile end-device (e.g. mobile phone with Bluetooth or cable connection)
36 Fujitsu
Page 41

Working with the Tablet PC
Ethernet and LAN (optional, only with cradle,
keyboard dock or adapter cabl
EthernetLAN
With optionally available accessories, you can establish a connection to a local
network (LAN = Local Area Network).
1
2
Your network administrator can help you to configure and use the LAN connections.
The network cable is not included in the delivery scope. This type of
cable can be obtained from a specialist dealer.
Use a shielded network cable (CAT 5e).
e)
► Connect the network cable to the LAN
port of the accessory (1).
► Connect the network cable to your
network connection (2).
GPS
GPS
Whether your device has this function or not depends on the device configuration chosen.
Fujitsu 37
Page 42

Accessories for your Tablet PC (opti
onal)
Accessories for your Tablet PC
The following accessories are available for your Tablet PC:
• Cradle for charging the Tablet PC and with additional ports
• Keyboard dock (with LAN port and keyboard with background lighting)
• Protective TPU folio case with shoulder and hand s traps
• Folio protective cover
• USB - LAN adapter cable
The following sections provide more information on handling th e accessories.
(optional)
38 Fujitsu
Page 43

Accessories for your Tablet PC (opti
Your cradle (optional)
As well as providing rapid charging, your cradle is a device which helps you to quickly connect
your tablet PC to your peripheral devices, such as a display, keyboard, mouse, etc. You only
need to dock the tablet PC in order to work with your peripheral devices.
When the Tablet PC is mounted on the cradle, only USB cables with a length
of up to 3 m are supported at all the USB ports.
Cradle components
PortsPortsCradle
1
2
3
4
5
6
7
8
9
onal)
1 = Release button
2 = Status LED
3 = Connector on the cradle for the docking
port of the Tablet PC
4 = USB 3.2 Gen1 port (Type-A)
5 = VGA monitor port
The status LED (2) of the cradle lights up as soon as the Tablet PC is connected
to the cradle, even if the Tablet PC is switched off.
Fujitsu 39
6 = Display port
7 = LAN port
8 = Security Lock device
9 = DC input connector (DC IN)
Page 44

Accessories for your Tablet PC (opti
onal)
Setting up the cradle
Select a suitable location for the cradle before setting it up. Follow
the instructions below when doing so:
• Placethecradleonaflat, stable, nonslippery surface.
• Never place the cradle and the mains adap ter on a heat-sensitive surface.
• Do not expose the cradle to extreme environmental conditions.
• Protect the cradle from dust, humidity and heat.
40 Fujitsu
Page 45

Accessories for your Tablet PC (opti
Connecting the Ta blet PC to the cradle
It is possible to connect the Tablet PC to the cradle while it is operating.
Unplug the mains adapter from the Tablet PC before you connect
the Tablet PC to the cradle.
If the tablet PC is conn ected to the cradle, you must c onnect the mains adapter
to the cradle in o rd er to be able to use all of the cradle’s functions.
cradle
► Remove the power plug of the mains adapter from th e mains socket.
► Pull the mains adapter cable out of the DC jack (DC IN) of the Tablet PC.
2
onal)
1
4
3
► Position the Tablet PC so that it lies on the surface of the tray on the cradle.
► Push the tablet PC onto the cradle in the direction of the arrow (1) until you feel it engage
in the connector and until the release button has returned to its original position.
► Plug the DC output connector on the mains adapter into the DC input
connector (DC IN) on the cradle (2).
► Connect the power cable to the power adapter provided for the cradle (3),
see chapter "
Technical data", Page 84.
► Plug the power cable into the mains socket (4).
Fujitsu 41
Page 46

Accessories for your Tablet PC (opti
onal)
Disconnecting the Tablet PC from the cradle
It is possible to separate the Tablet PC from the cradle during operation.
2
1
► Push the release button in the direction of the arrow (1) until it remains in the
pressed position (red marking becomes visible).
► While holding the bottom part of the cradle, lift the Tablet PC aw ay from
the cradle in the direction of the arrow (2).
42 Fujitsu
Page 47

Accessories for your Tablet PC (opti
Keyboard dock (optional)
The keyboard dock is a device which has been optimised for convenient input of texts and
allows connection to an Ethernet/LAN. You only need to dock the Tablet PC.
onal)
Components of the keyboard
KeyboarddockPorts
8
7
dock
1
2
4
3
5
6
1 = Release button
2 = Docking port for the Tablet PC
3 = F Lock display (run Fn functions by
pressing the keys directly)
4 = Num Lock indicator (switch virtual
keypad on and off)
Amicrofibre cloth is provided with your keyboard dock. To protect your Tablet
PC’s touchscreen, we recomm end placing the microfibre cloth between the
keyboard and the touchscreen when the device is folded closed.
Fujitsu 43
5 = Caps Lock indicator (switch upper case
writing function on and off)
6 = Scroll Lock display (roles, function
application dependant)
7 = DC input connector (DC IN)
8 = LAN port
Page 48

Accessories for your Tablet PC (opti
Connecting the Tablet PC to the keyboard dock
Keyboarddock
onal)
The recommended maximum opening angle of the Tablet PC and keyboard dock is 120
degrees. If the opening angle is greater than 120 degrees, we recommend holding the
keyboard dock with your free hand while operating the Tablet PC with the pen or by
touch. This will prevent the Tablet PC from accidentally tipping backwards.
► Position the keyboard dock as shown.
2
1
4
3
► Press the tablet PC onto the keyboard dock in the direction of the arrow (1),
until you feel it engage on the connector.
► Plug the
the bac
mains adapter cable into the DC input connector (DC IN) on
k of the keyboard dock (2).
► Connect the p ower cable to the power adapter provided for the keyboard dock
(3), see chapter "
► Plug t
he power cable into the mains socket ( 4).
If th
main
Technical data", Page 84.
e Tablet PC is connected to the keyboard dock, you can also connect the
s adapter to the Tablet PC instead of to the keyboard dock.
44 Fujitsu
Page 49

Accessories for your Tablet PC (opti
Disconnecting the Tablet PC from the keyb oard dock
It is possible to disconnect the Tablet PC from the keyboard dock during
operation. To prevent problems, we recommend that you undock the Tablet
PC using the appropriate function in the operating system.
2
1
onal)
► Press an d hold the release button (1) until it remains in the pressed
position (red marking becomes visible).
► Lift the Tab
Fujitsu 45
let PC away from the keyboard dock in the direction of the arrow (2).
Page 50

Accessories for your Tablet PC (opti
onal)
Touchpad and touchpad buttons
Keep the touchpad clean. Protect it from dirt, liquids and grease.
TouchpadTouchpad
Never use the touchpad if your fingers are dirty.
Do not rest heavy objects (e.g. books) on the touchpad or the touchpad buttons.
1
1 = Touchpad
2 = Touchpad buttons
2
You can move the cursor using the touchpa d.
The touchpad buttons allow you to select and execute commands. They correspond
to the buttons on a conventional mouse.
You can also deactivate the touchpad via the keyboard, so that you can not move
the cursor unintentionally (see chapter "
Key combinations", Page 51).
Moving the pointer
► Move your finge
Touchpad
The pointer will move.
Selecting a
► Move the pointer to the item you wish to select.
d
Touchpa
► Tap the touc
The item is selected.
r on the touchpad.
nitem
hpad once or press the left button once.
Executin
► Move the pointer to the field you wish to select.
► Ta p t h e t
g commands
Touchpad
ouchpad twice or press the left button twice.
The command is executed.
46 Fujitsu
Page 51

Accessories for your Tablet PC (opti
Dragging items
► Select the desired item.
Touchpad
► Press and hold the left button and, with your finger on the touchpad, drag
the item to the desired position.
The item will be moved.
Switching the Touchpad on and off
You can switch the to uchpad on and off using the keyboard, see
Key combinations", Page 51.
"
onal)
Fujitsu 47
Page 52

Accessories for your Tablet PC (opti
Keyboard
KeyboardNumerickeypadNumerickey padButtons
The keyboard has been designed to provide all the functions of an enhanced keyboard.
Some enhanced keyboard functions are mapped with key combinations.
The following description of keys refers to Windows. Additional functions supported by the keys
are described in the relevant manuals supplied with your application pro grams.
The figure below shows how to access the different characters on keys with overlaid functions.
The example applies when the Caps Lock key has not been activated.
The keyboard of the keyboard dock is subj ect t o continuous wear through normal
use. The key markings are especially prone to wear. The keyboard markings
can wear off in the course of using the keyboard dock.
The illustrations shown below may differ from your actual device.
onal)
Key Description
=
+
}
0
=
}
0
Backspace key
The Backspace key deletes the character to the left of the cursor.
pace
pace
Backs
Backs
Tab key
The Tab key moves the cursor to the next tab stop.
Tabkey
=
0
Num
=
}
0
+
0
=
}
}
Alt Gr
48 Fujitsu
Page 53

Key Description
Enter key (return)
The Enter key terminates a command line. The command you have entered
is e xecuted when you press this key.
EnterkeyReturnEnterLinefeed
Caps Lock key
The Caps Lock key activates uppercase mode. In Caps Lock mode, all of
the characters you typ e appear in upper case. In the case of overlay keys,
the character printed on the upper left of the k ey will appear when that
key is pressed. To cancel the Caps Lock function, simply press the Caps
Lock key again.
ShiftkeyCapsLock
Shift key
The Shift key causes uppercase characters to appear. In the case of overlay
keys, the character printed on the upper left of the key appears when that
keyispressed.
ShiftkeyShift
Fn key
Fn
The
Key combinations", Page 51).
"
Fnkey
key enables the special functions indicated on o verlay keys (see
Cursor keys
The cursor keys move the cursor in the d irection of the arrow, i.e. up, down,
left, or right.
CursorkeysCursorcontrol
Accessories for your Tablet PC (opti
onal)
Windows key
The Windows key switches between the start screen and the last used
application.
Windowskey
Menu key
The Menu key
opens the menu for the active application.
Fujitsu 49
Page 54

Accessories for your Tablet PC (opti
Virtual numeric keypad
NumerickeypadVirtualnumerickeypadNumLock
onal)
To provide the convenience of a numeric keypad, your keyboard is equipped with a virtual
numeric keypad. The special k eys of the virtual numeric keypad are recognisable by the numbers
and symbols printed in the upper right corner of each key. If you have switched on the virtual
numeric keypad, you can output the characters shown on the upper right of the keys.
The keyboard layout shown below may differ from your actual device.
1 = Valid characters when the
Num
2 = Valid characters when the
key is not activated
r information about the status indicators can be found in chapter "
Furthe
keyisactivated
Status indicators", Page 21.
Num
Country and keyboard settings
► Chan
50 Fujitsu
ge the country and keyboard settings as described in the documentation for your operating
em.
syst
Page 55

Accessories for your Tablet PC (opti
Status indicators
StatusindicatorsSymbols
The status indicators provide information about the status of the keyboard functions etc.
Status displays Description
F-Lock (function lock) indicator
F
IndicatorFLock
The indicator lights up: The key combination
Fn
F
+
(Fn: function key)
has been pressed. The s pecial functions of the Fn (function) keys (see
section "
directly, without having to press the
Key combinations", Page 51) can be executed by pressing the keys
Fn
key.
Num Lock indicator
Num
Indicator is lit: The
key has been pressed. The virtual numerical
keypad is activated. You can output the characters indicated on the upper
rightofthekeys.
Caps Lock indicator
Indicator is lit: Th
as uppercase letter
printed on the uppe
e Caps Lock key has been pressed. All letters will be output
s. In the case of keys labelled several times, the character
r left of the key will appear when that key is pressed.
Scroll Lock indicator
Indicator is lit: The key combination
Fn+Scr
has been pressed. The effect
that this key has varies between applications.
Key combinations
ons
Keycombinati
The following
following key
Other key com
with your app
Key combina
► Press the fi
► While holding the first key down, press the oth er key or keys in the combination.
description of key combinations applies to Windows operating systems. Some of the
combinations may not fun ction in other operating systems or with certain device drivers.
binations are de scribed in the relevant manuals supplied
lication programs.
tions are entered as follows:
rst key in the combination and keep it pressed.
onal)
F
If the ke y combination
Fn
+
is pressed: The special functions of the Fn keys can
be executed by pressing the keys directly without also having to press the Fn key.
Combination Description
Switching the microphone on/off
This key combination enables and disables the microphone.
phone
phone
Fn+F1Micro
Micro
Switching the loudspeakers on and off
This key combination switches your Tablet PC’s loudsp eakers
off and on.
Fn+F2LoudspeakersLoudspeakers
Fujitsu 51
Page 56

Accessories for your Tablet PC (opti
onal)
Combination Description
Decrease volume
This key combination reduces the volume of the internal
loudspeakers.
Fn+F3Volume
Increase volume
This key c ombination increases the volume of the internal
loudspeakers.
Fn+F4Volume
Switching the wireless compon ents on / off
This key combination switches the wireless co m ponents off or on.
Fn+F5Wirelesscompone nt sWirelesscomponents
Switching the touchpad
This key com bina tion sw
buttons on or off.
Fn+F6TouchpadTouchpadbuttonsTouchpad
and touchpad buttons on/off
itches the touchpad and the touchpad
Decrease screen brightness
This key combination decreases the brightness of the screen.
Fn+F7LCDscreenScreenbrightness
Increase screen b
This key combina
ess
Fn+F8Screenbrightn
Energy saving f
Use this key com
functions (se
Page 33).
Fn+F9Energysavingf unct ions
Toggle outpu
Use this key
display i f a
Screen out
n external monitor is connected.
put is possible:
•justtheTa
rightness
tion increases the brightness of the screen.
unctions
bination to activate the power management
e chapter "
Using the power-management features",
t screen
combination to select which screen(s) is/are used for
blet PC’s LCD screen
• both the Ta blet PC’s LCD screen and the external monitor
• only on th
e external monitor
This setting is useful if you would like a high resolution and a
high refresh rate on an external monitor.
Fn+F10Toggleo utputscreen
Activate/deactivate ke y bo ard backlight
On b acklit keyboards, this key combination activates or deactivates
the backlight.
Fn+spacekeyActivate/deactivatekeyboardbacklight
Switch between open applications
Use this k ey combination to switch between se veral open
applications.
Alt+Tab
52 Fujitsu
Page 57

Combination Description
AltCtrl
++
Del
Windows security/Task-Manage
This key combination ope ns the W
window.
Ctrl+Alt+Del
Back tab
This key combination moves th
stop.
Shift+TabBacktab
Key combinations using the Windows keys are detailed in the manual
for your operating system.
In addition, the following non-labelled key combinations are supported:
Fn
Fn
Fn
+
+
+
S
= Pause
B
= Break
R
=SysRq
•
•
•
Keyboard with backlight
ing
KeyboardBackgroundlight
On this version of the keyboard, repeated pressing of the key combination
space bar
allows the background lighting to be switched on an d off and also
a choice to be made between two levels of brightness.
In battery mode, it is recommended to turn on the backlight only when needed
and to use the lower brightness level to maximize b attery life.
Accessories for your Tablet PC (opti
r
indows security/Task-Manager
e cursor back to the previous tab
Fn
onal)
+
Fujitsu 53
Page 58

Security functions
Security functions
Securityfunctions
Your Tablet PC has several security features that you can use to secure your
system from unauthorised access.
This chapter explains how to use e ach function, and what the benefits are.
Please remember tha t in some cases, for example, forgetting your password,
you may be locked out and unable to access your data. Therefore,
please note the following information:
• Back up your data on external data carriers at regular intervals.
• Some security functio
of the passwords and ke
If you forget your passwords you will need to contact the our Service
Desk. Deletion or resetting of passwords is not c overe d by your warranty
and a charge will be made for assistance.
If you change the P a ssword Severity setting from Strong to Stringent in the Security
BIOS Setup Utility menu, the Fujitsu Service Desk can no longer reset the password.
In this case, the system can remain permanently unusable.
Therefore, Fujitsu recommends to generally set up a supervisor password
with the setting Password Severity = Strong.
ns need you to choose passwords. Make a note
ep them in a safe place.
54 Fujitsu
Page 59

Settingupthefingerprint sensor
(configuration dependent)
FingerprintsensorFingerprintsensor
Whether or not your device has a fingerprint sensor depends on the
device configuration you have ordered.
Security functions
The fingerprint sensor ca
software, this image can
► You must install the fingerprint software in order to be able to use the fingerprint sensor (1).
The current AuthConductor Basic software for the fingerprint se nsor
is available on the Internet at:
"
https://www.fujitsu.com/emeia/solutions/business-technology/security/product/secure/"
n record an image of a fingerprint. With additional fingerprint
be processed and used instead of a password.
1
Fujitsu 55
Page 60

Security functions
Using the Security Lock
SecurityLockAnti-theftprotectionSecurityLock
Your device comes with a Security Lock mechanism for the Kensington Lock Cable. With
the Kensington Lock Cable, a s turdy steel cable, you can protect your device and your Port
Replicator from theft. The Kensington Lock Cable is available as an accessory.
► Fit the Kensington Lock Cable to the
corresponding device on your equipment.
Attach another Kensington Lock Cable to your cradle to protect this from theft as well.
Configuring pass
Before using the various options for password protection in the BIOS Setup ut ility
to increase data security, please observe the following:
Make a note of the passwords a nd keep them in a safe place. If you forg et your
supervisor password you will no t be able to access your Tablet PC. Deletion of the
password is not covered by your warranty and a charge will be made for assistance.
Passwordprotection
Your password can be up to 32 characters long and can contain
letters, numbers and spe cial characters.
When using special chara cters, please remember that they depend on the
country version of the keyboard being used.
If you cha
BIOS Setu
In this ca
Therefo
with th
nge the Password Severity setting from Strong to Stringent in the Security
p Utility menu, the Fujitsu Service Desk can no longer reset the password.
se, the system can remain permanently unusable.
re, Fujitsu recommends to generally set up a supervisor password
e setting Password Severity = Strong.
wordprotectioninBIOSSetupUtility
56 Fujitsu
Page 61

Security functions
Protecting BIOS Setup Utility (supervisor and user password)
If you have opened these operating instructions on the screen, we
recommend that you print them out. You cannot call the instructions onto
the screen while you are setting up the password.
BIOSSetupUtility
The supervisor password and the user password both prevent unauthorised use of the BIOS Setup
Utility. With the aid of the supervisor password you can access all of the functions of the BIOS
Setup Utility, while the user password will only give you access to some of the functions. You
can only set up a user password if a supervisor password has already been assigned.
Please refer to section "Settings in B IOS Setup Utility", Page 70 for a description
of how to call up an d operate the BIOS-Setup-Utility.
Setting supervisor and user password
► Start the BIOS Setup
► Select the Set Supervisor Password field and press the Enter key.
With Enter new Pass
► Enter the password and press the Enter key.
Confirm new Passwo
► Enter the password again and press the Enter key.
Changes have be
► To set the user password, select Set User Password and proceed exactly as
when configuring the supervisor password.
Ifyoudonotwa
► In the Exit menu, select the option Save Changes & Exit.
► Select Yes an
PasswordSupervisorpasswordUserpassword
The Tablet PC is reboot ed and the new password is effective. It will now be necessary to
first enter your sup ervisor or user password in order to open the BIOS Setup Utility. Please
note that the user password only provides access to a few of the BIOS settings.
Utility and go to the Security menu.
word: you are asked to enter a password.
rd requires you to confirm the password.
en saved is a confirmation that the new password has been saved.
nt to change any other settings, you can exit BIOS S etup Utility.
d press the Enter key.
Changing t
he supervisor or user password
You can only change the supervisor password when you have logged into the
BIOS Setup Utility with the supervisor password.
isorpassword
ssword
PasswordSuperv
Userpa
► Call the BIOS Setup Utility and go to the Security menu.
► When cha
nging the password, proceed exactly as for password assignment.
Fujitsu 57
Page 62

Security functions
Removing passwords
To remove a password (without setting a new password) perform the following steps:
PasswordSupervisorpasswordUserpassword
► Start the BIOS Setup Utility and go to the Security menu.
► Highlight the Set Supervisor Password or Set User Password field and press the Enter key.
You will be requested to enter the current password by the Enter Current Password prompt.
You will be requested to enter a new password by the Enter New Password prompt.
► Press the Enter key twice.
► In the Exit menu, select the option Save Changes & E xit.
► Select Yes and press the Enter key.
The Tablet PC is rebooted and the password is cancelled.
Removing the supervisor password simultaneously deactivates the user password.
Password protectio
n for booting of the op erating system
With the supervisor password you have set in the BIOS Setup Utility (see
section "
prevent starting of the operating system.
Operatingsystem
Setting supervisor and user password", Page 57), you can also
Activating system protection
► Start the BIOS Setup Utility and go to the Security menu.
Operatingsystem
► Select the Password on Boot option and press the Enter key.
► Select the desired option (First Boot or Every Boot) and press Enter
► Select the Save Changes & Exit option under Exit.
The Tablet PC reboots. You will be prompted to enter your password (the supervisor password).
Deactivating system protection
► Start the BIOS Setup Utility and go to the Security menu.
Operatingsystem
► Select the Password on Boot option and press the Enter key.
► Select the Disabled option and press the Enter key.
If you do not want to change any other settings, you can exit BIOS Setup Utility.
► Select the Save Changes & Exit option under Exit.
The Tablet PC reboots. The system is no longer password-protected.
58 Fujitsu
Page 63

Security functions
Password protection for the ha rd disk
Passwordprotection:
The hard disk password prevents unauthorised access to the hard disk drives
and is checked internally each time the system is booted. The prerequisite for
this is that you have assigned at least the supervisor password.
Activating hard disk protection
► Call up the BIOS Setup and select the Security menu.
If you have not assigned BIOS passwords yet, define the supervisor and the user
password now, if desired (see "
► Mark the Hard Disk Security field and press the Enter key.
► In the Dr ive0 area mark the Set Master Password field and p ress the Enter k ey.
Enter new Password then appears and you are asked to enter a password.
► Enter the password and press the Enter key.
Confirm new Password requires you to confirm the password.
► Enter the password again and press the Enter key.
Setup Notice: Changes have been saved is displayed to confirm that t he
new password has been saved.
The field Password E ntry on Boot is set to Enabled by default. You can exit the BIOS
Setup once you have finished changing the settings.
► From the Exit menu, choose the option Exit Saving Changes.
► Press th e Enter key and select Yes.
The Table PC reboots and your hard disk is now protected with a password. The
password prompt is enabled as soon as the Tablet PC has rebooted.
Security functions", Page 54).
Deactivating hard disk protection
To cancel a password without setting a new one, proceed as follows:
► Call up the BIOS Setup and select the Security menu.
► Mark the Hard Disk Security field and press the Enter key.
► In the Dr ive0 area mark the Set Master Password field and p ress the Enter k ey.
Yo u will be initially requested to enter the old password by the Enter current Password prompt.
Yo u will then be requested to enter a new password by the Enter new Password prompt.
► After providing the input, press the Enter key three times.
► From the Exit menu, choose the option Exit Saving Changes.
► Press th e Enter key and select Yes.
The Tablet PC reboots and there is no longer any password protection for this hard disk.
Fujitsu 59
Page 64

Security functions
SmartCard reader (depending on configuration)
Depending on the selected model, your device may be equipped with a SmartCard reader.
Securityfunctions,Securityfunctions
SmartCards are not supplied as s tand ard equipment. You can use all SmartCards that comply with
the ISO standard 7816-1, -2 or -3. These SmartCards are available from various manufacturers.
With the appropriate software you can use your SmartCard as an alternative to password protection,
but also as a digital signature, for encrypting your e-mails or for home banking.
We recommend that you always use two SmartCards. Always keep one of the SmartCard s
in a safe place if you are carrying the other SmartCard with you.
In order to be able to take advantage of all the security features of your Tablet
PC, you will need a CardOS SmartCard from Fujitsu.
The SmartCard can only be used with a PIN, offering maximum protection even if
you lose the SmartCard. In order to maximise your security, the CardOS SmartCard
is disabled if three incorrect attempts are made to enter the PIN.
When you use the CardOS SmartCard for the first time, you will either need to enter the
preset PIN "12345678" or the PIN given to you by your systems administrator.
60 Fujitsu
Page 65

Inserting the SmartCard
Depending on the selected model, your device may be equipped with a SmartCard reader.
Do not use force when inserting and removing the SmartCard.
Make sure that foreign o bjects do not fall into the SmartCard reader.
Security functions
1
► Push the SmartCard into the SmartCard reader (1) with the chip towards th e front of the Tablet PC.
Fujitsu 61
Page 66

Security functions
Trusted Platform Module - TPM (depending
on configuration)
TPMTrustedPlatformModule
To use the TPM, you must activate the TPM in the BIOS Setup before the software
is installed. The condition for this is that you have assigned at least the supervisor
password (see "
Enabling TPM
• Requirement: You have set a supervisor password, see "Security functions", Page 54.
► Call up the BIOS Setup and select the Security menu.
► Mark the TPM Security Chip Setting field and press the Enter key.
► Select Enabled to activate the TPM.
Once you have activated the TPM the Clear Security Chip option appears.
Select Clear Security Chip to delete the holder in the TPM. By clicking on Enabled,
all secret keys (e.g. SRK - Storage Root Keys, AIK - Attestation Identity Keys
etc.) generated by applications are deleted.
Please note that you will then no longer be able to access the data you have
encrypted with the keys based on that holder.
► In the Exit menu, choose the option Exit Saving Changes.
► Press the enter key and select Yes.
The tablet PC restarts and the TPM is switched on after the reboot.
Security functions", Page 54).
Disabling TP
• Requirement: You have set a supervisor password, see "Security functions", Page 54.
► Call up the B
► Mark the TPM Security Chip Setting field and press the Enter key.
► Select Dis
► From the Exit menu, choose the option Exit Saving Changes.
► Press the
The tablet PC is rebooted and the TPM is disabled.
62 Fujitsu
M
IOS Setup and select the Security menu.
abled to deactivate the TPM.
Enter key and select Yes.
Page 67

Security functions
Enable password entry using the on-screen keyboard
(on-screen keyboard for BitLo
If TPM is enabled, you can ena ble an OnScreen keyboard for the internal
touchscreen in the BIOS Setup.
► Call BIOS Setup and select the Advanced menu.
► Mark Boot Configurations a
► From the UEFI Boot On-Screen Keyboard selection, choose the option Enabled.
► In the Exit menu, choose t
► Press the enter key and select Yes.
The tablet PC is reboote
Taponthepasswordfield to enable the on-screen keyboard.
nd press the enter key.
he option Exit Saving Changes.
d and the password dialogue is displayed.
cker password)
Fujitsu 63
Page 68

Connecting external devices
Connecting external devices
Under all circumstances, please observe the safety notes provided in the
Important notes", Page 13 chapter before co nnecting or disconnecting
"
any devices to or from your Tablet PC.
Always read the documentation supplied with the device you wish to connect.
Never connect or disconnect cables during a thunderstorm.
Never pull at a cable when disconnecting it. Always grasp the plug.
With some devices, such as USB devices, it is not necessary to switch off
the Tablet PC and the device before conne cting/disconnecting. For more
information about whether or not devices need to be switched off, please refer
to the documentation supplied with the external device.
Some of the external devices require special drivers (see the o perating
system and external device documentation).
Connecting an external monitor
HDMI port
HDMIport
The HDMI port of your device can be used to connect an external amplifier, LCD
TV or a plasma TV with an HDMI connection.
► Connect the data cable to the
external device.
► Connect the data cable to the HDMI port.
Some LCD televisions have only two loudspeaker ports and therefore
cannot reproduce Dolby Digital or DTS. To play back HD M I sound, you
must change the HDMI sound settings accordingly.
You ca n find the settings under Control Panel - Hardware and Sound. Deactivate the
settings for DTS Audio and Dolby Digital to enable playback of HDMI sound.
64 Fujitsu
Page 69

Connecting external devices
Display port (cradle only)
Displayport
The display port of the cradle can be used to connect a display, LCD TV or a plasma TV with an
appropriate port. The screen output is limited to a maximum of two external screens at the same time.
► Connect the data cable to the
external device.
► Connect the data cable to the display
port of the cradle.
Some LCD televisions have only two loudspeaker connections and therefore
cannot reproduce Dolby Digital or DTS. In order to reproduce the sound, you
must go into Windows and adjust the sound settings.
► To do this, deactivate the DTS A udio and Dolby Digital settings in the contro l
panel for the Realtek HDMI Output.
Fujitsu 65
Page 70

Connecting external devices
VGA monitor port (cradle only)
An analogue monitor is connected to the analogue VGA monitor port. The screen output
is limited to a maximum of two external screens at the same time.
MonitorVGA connectionsocketScreenportMonitorport
► Switch off the Tablet PC and the
external monitor.
► Plug the data cable of the external
monitor into the monitor port.
► First switch on external monitor and
then the Tablet PC.
You can also switch back and forth between the external m onitor and the LCD
screen of the Tablet PC, see "
Touch screen", Page 23.
You can display the same p icture on the external monitor and the LCD
screen of the Tablet PC simultaneously.
66 Fujitsu
Page 71

Connecting external devices
Connecting USB devices
USBports
On the USB ports, you can connect external devices that also have a USB port
(e.g. a DVD drive, a printer, a scanner or a modem).
USB devices are hot-pluggable. This means yo u can connect and disconnect
devices while your operating system is running.
USB 1.x has a maximum data transfer rate of 12 Mbit/s.
USB 2.0 has a data transfer rate of up to 480 Mbit/s.
USB 3.0 has a data trans
USB 3.2 (Gen1) has a dat
With USB 3.2 (generat
Additional informat
fer r ate of up to 5 Gbit/s.
a transfer rate of up to 5 Gbit/s.
ion 2), the data transfer rate is up to 10 Gbit/s.
ion can be found in the documentation for the U SB devices.
► Connect the data cable to the
external device.
► Connect the data cable to the USB
port on the Tablet PC.
or
► Connect the data cable to a USB
port of the cradle.
Device drivers
USB devices will be automatically reco gnised and installed by your operating system.
Fujitsu 67
Page 72

Connecting external devices
USBportwithchargingfunction(USBType-C)
USBconnectionwithchargingfunction(USBType-C™)
At this USB port, you can charge a connected U SB device or operate devices
without additional power supply.
This is also possible w ith the Tablet PC switched off, by activating the USB Type-C Power
Delivery on System Off function in the Advanced - Miscellaneous Configura tions menu of the
BIOS Setup Utility. Instructions on how to call up and use the BIOS Setup Utility can be
found in the "
Settings in BIOS Setup Utility", Page 70 section.
USB devices are hot-pluggable. This means you can connect and disconnect
the cables of USB devices while the system is running.
Additional information can be found in the documentation for the USB devices.
► Connect the data cable to the
+
external device.
► Connect the data cable to a USB port
(USB Type-C) of the Tablet PC.
How to remove USB devices correctly
Always correctly remove the device according to the rules described below,
to ensure that none of your data is lost.
► Tap the symbol for safe removal of the hardware.
► Select the device which you want to shut down and remove.
► Ta p OK.
Wait for the dialogue box which tells you that it is now safe to remove the device.
68 Fujitsu
Page 73

Connecting external devices
Headphones/microphone/Line-In/Line-Out/headset combination port
ConnectingaudiodevicesAudioportsC onne ctingheadphones
Using the headphones/microphone/Line-In/Line-Out/headset-combi port, you can connect a
headset, headphones, a microphone or external loudspeakers to your Tablet PC.
► Connect the audio cable to the
external device.
► Connect the audio cable to the headphon e
port of the Tablet PC.
The internal loudspeakers are disabled.
If you buy a cable from a ret ailer, please note the following information:
The headphones/microphone/ Line -In/Line- Out /headset-combi port on your
Tablet PC is a "3.5 mm jack socket".
If you want to connect headphones or a speaker you will need a "3.5 mm jack plug".
Fujitsu 69
Page 74

Settings in BIOS Setup Utility
Settings in BIOS Setup Utility
BIOSSetupUtilitySystemsettings,BIOSSetupUtilityConfiguration,BIOSSetupUtilitySetupSystemconfigurationHardwareconfiguration
The BIOS Setup Utility allows you to set the system functions and the hardware
configuration for the Tablet PC.
When it is delivered, the Ta blet PC is set to factory default settings. You can
change these settings in BIOS Setup Utility. Any changes you make take effect as
soon as you save and exit the BIOS Setup Utility.
The BIOS Setup Utility pro g ram contains the following menus:
About
System
Advanced
Security
Boot
Exit
Starting the BIOS Setup Utility
► Press an d hold the volume down button and switch the tablet PC on.
► If a password has been assigned, enter the password and press the Enter key.
To navigate more easily in the BIOS S etup Utility, you can use an external USB keyboard.
Displays information relating to the BIOS, processor and Tablet PC
Advanced system settings
Configuration of various hardware components, such as mouse, keyboard,
processor
Password settings and security functions
Configuration of the start-up sequence
Exits the BIOS Setup Utility
BIOSSetupUtility
If you have forgotten the password, contact your system administrator
or contact our customer service centre.
The BIOS Setup Utility starts.
70 Fujitsu
Page 75

Operating the BIOS Setup Utility
BIOSSetupUtility
Press theF1key to display help on the operation of the BIOS Setup Utility. The description
of the individual settings is shown in the right-hand w indo w of the BIOS Setup Utility.
With the
F9
key yo u can load the default settings of the BIOS Setup Utility.
Settings in BIOS Setup Utility
► Use the cursor keys
The menu is displayed on the screen.
► Select the option that you want to change with the cursor keys
←
or→to select the menu in which you would like to configure settings.
↑
or↓.
► Press the Enter key.
► Press the
ESC
key to exit the selected menu.
► For future reference, make a note of the changes you have made (e.g. in this manual).
Fujitsu 71
Page 76

Settings in BIOS Setup Utility
Exiting BIOS Setup Utility
BIOSSetupUtility
You need to select the desired option in the Exit menu and activate it by pressing the Enter key:
Exit Saving Changes - save ch
► To save the current menu settings and exit the BIOS Setup Utility, select Exit Saving Changes and Yes.
The Tablet PC is rebooted
and the new settings come into effect.
anges and exit BIOS Setup Utility
Exit Discarding Changes – Discard changes and exit BIOS Setup Utility
► To discard the changes, select Exit Discarding Changes and Yes.
The settings in place when BIOS Setup Utility was called remain effective. The BIOS
Setup Utility is terminated and the Tablet PC is rebooted.
Load Setup Defaul
► To copy the standard entries for all menus of the BIOS Setup Utility,
choose Load Setup Defaults and Yes.
ts – Copy Standard Entries
Discard C hanges – Discard changes without exiting the BIOS Setup Utility
► To discard the changes you have made, select Discard Changes and Yes.
The settings in place when BIOS Setup Utility was called remain effective.
You can now make additional settings in the BIOS Setup Utility.
► IfyouwanttoexitBIOS Setup Utilitywith these settings, select Exit Saving Changes and Yes.
Save Chan
ges - save changes without exiting
the BIOS Setup Utility
► To save the changes, select Save Changes an d Yes.
The changes are saved. You can now make additional settings in the BIOS Setup Utility.
► If you want to exit BIOS Setup Utility with these settings, choose Exit Saving Changes and Yes.
Save Changes and Power Off
► To save the changes and switch off your device, s elect Save Changes and Power Off and Yes.
The changes are saved. Your device is shut down.
72 Fujitsu
Page 77

Settings in BIOS Setup Utility
Erase Disk
Erase Disk is a Fujitsu Technology Solutions feature emb edded in the syste m firmware (UEFI:
Unified Extensible Firmware Interface), to erase all data from SATA hard disk(s) or SSDs.
This function can be used to delete all data from internal or external hard disks or SSDs
connected via the eSATA port, before the hard disks are discarded or the complete
computer system is disposed of. The function can also be used if hard disks are to be
completely deleted, e.g. before installing a new operating system.
The application can only be selected and run if an administrator/supervisor
password has been assigned (Menu BIOS Setup - Security).
To erase data from SATA h
► Call the BIOS Setup wi
► To start the application, select Erase Disk (BIOS Setup - Advanced or BIOS
Setup - Security)andsetStart after Reboot.
► Then select Save Cha
a reboot and start E
Because of the rebo
to interrupt the p
► After the application starts, the Administrator/Supervisor password must
be entered for security reasons.
A dialogue field appears in which a particular, several or all the hard disks can be selected
for deletion. This depends on the number of hard disks in your system.
► Select the hard disk(s) to be deleted. The s elected hard disk(s) will be deleted one-by-one.
Erase Disk offers four deletion options, from fast (with one de letion pass) to very
secure (with 35 deletion passes). Depending on the algorithm chosen, the process
can take between ~10 seconds and ~10 minutes per GB:
• Zero Pattern (1 pass)
• German BSI /VSITR (7 passes)
• DoD 5220.22-M ECE (7 passes)
• Guttmann (35 passes)
SSD driv
comman
ard disks or SSDs, proceed as follows:
th the Administrator/Supervisor p assword.
nges and Exit in the menu Save & Exit / Exit to initiate
rase Disk.
ot, the Erase Disk will be started. You have the option
rocess during the user selection.
es are securely erased with the Enhanced Secure Erase ATA
d integrated in the firmware.
► Select the desired de letion algorithm for the selected hard disks.
Fujitsu 73
Page 78

Settings in BIOS Setup Utility
The complete deletion process can be recorded as an audit-compliant log
and copied to an external USB stick, which must be formatted as FAT32.
Please connect only one external USB stick.
► Select w hether a status report should be written to the USB stick.
The user can select the following tasks which should be run by the
system after the deletion process:
• Reset administrator and user password
• Load BIOS setup defaults
• Shutdown the Computer
• Exit E r ase Disk with no additional o ptions upon completion
► Select the function which you require.
The deletion process starts.
74 Fujitsu
Page 79

Troubleshooting and tips
Troubleshooting and tips
TroubleshootingTipsFaultTroubleshooting
If a fault occurs, try to correct it as described. If you fail to correct the problem, proceed as follows:
► Make a note of the steps and the circumstances that led to the fault. Also
► Switch the Tablet PC off.
► Please contact the Hotline/Service Desk.
Follow the safety note s in the "Safety/Regulations" manual when
connecting or disconnecting cables.
make a note of any error messages displayed.
You will find the telepho ne numbers at "http://support.ts.fujitsu.com/ contact/servicedesk"
Have the following information ready w hen you call:
• The model name and serial number of the Tablet PC. The serial number
is located on a sticker on the underside of the Tablet PC.
• Notes of any messages that appear on the screen and information on acoustic signals.
• Any changes you have made to t he hardware or software after
receiving the Tablet PC.
• Any changes you have made to the BIOS Setup settings after receiving the Tablet PC.
• Your system configuration and all peripheral devices connected to your system.
• Your sales contract.
Our Tablet PCs
means that con
in terms of we
configuratio
compared to a
games with i
been appro
losses or m
versions c
Fujitsu 75
have been designed primarily with mobile applications in mind. This
siderable effort has been made to optimise components and equipment
ight, space and energy requirements. Depending on the particular
n you have purchased, it is possible that functionality may be slightly reduced
desktop PC if you are running processor-intensive gaming software, e.g.
ntensive 3D graphics. Updating your hardware with drivers which have not
ved by Fujitsu Technology Solutions may result in performance l osses, data
alfunction of the equipment. A list of approved drivers and current BIOS
an be downloaded from: "
http://support.ts.fujitsu.com/Download/Index.asp"
Page 80

Troubleshooting and tips
Executing a reset
If the device no longer responds to your inputs, select one of the following options:
Forced shut down
► Keep the ON/OFF button pressed for at least 5-10 seconds.
The device will shut down. You can then restart it.
Carry out a battery reset
► Shut down the device.
If the device does not respond, you may have to force the shutdown,
as described in the previous section.
► Disconnect the mains adapter from the device.
► Press the volume up button and the shortcut button at the same time.
The device performs a reset, comparable to removing the battery. You can then restart it.
Help if problems occur
Should you encounter a problem with your computer that you cannot resolve yourself:
► Note the ID number of your device. The ID number is found on the type rating
plate on the back or underside of the casing.
► Contact the Service Desk responsible for your country for clarification of the problem:
"
http://support.ts.fujitsu.com/contact/servicedesk". When you do this, please have
ready the ID number and serial number of your system.
TheTabletPC’sdateortimeisincorrect
lightsavings
orrect
orrect
tdate/time
correct
SummertimeTime,day
Timenotc
Timenotc
Incorrec
Dateisin
Cause Troubleshooting
Time and date are incorrect. ► With the BIOS-Setup-Utility, you can set the
Date and time are still set incorrectly after
switching o n the Tablet PC.
76 Fujitsu
date and time in the main menu.
► Please contact your sales outlet or our
Hotline/Service Desk.
Page 81

Troubleshooting and tips
Battery charging indicator not
Cause
The battery is not being charge
d.
Fault elimination
► Connect the Tablet PC to a mains outlet
Note: The battery will only be charged again
when the battery capacity is less than 90%.
lit
using th e mains adapter.
The Tablet PC’s touchscreen remains dark
Touchsc reentouchscreenistoo dark
Cause Troubleshooting
Touchscreen is switched
External monitor or t
elevision set connected.
off.
► Press a key (external key
the touchscreen.
► Check whether the graphics driver settings
are correct or whether an external monitor
has been detected in "Intel Graphics Media
Accelerator Driver for m obile".
board) or ta p on
The display on the Tablet PC’s touchscreen
is difficult to read.
Touchsc reenTouc hscre en
Cause Troubleshooting
Reflected glare ► Move the Tablet PC into a different position.
► Increase the brightness of the screen.
Fujitsu 77
Page 82

Troubleshooting and tips
The external monitor remains bl
Monitor
Cause Troubleshooting
Monitor is switched off. ► Switch the external monitor on.
Power saving has been activated (monitor is
blank).
Brightness is set to dark.
Screen output is set on the Tablet PC’s
touchscreen.
The external monitor’s power cable or data
cable is not connected properly.
The external mo
ScreenMonitor
Cause Troubleshooti
The wrong exte
or the wrong sc
the applicat
rnal monitor has been selected
reen resolution has been set for
ion program.
nitor is blank or the image is unstable
► Press a key (external keyboard) or tap on
► Adjust the brightness of the
► Check whether the graphics driver settings
► Switch off the Tablet PC and the external
► Check whether the pow er cable is plugged
► Check whether the data cable is properly
► Switch on the Tablet PC and the external
► Terminate the
► Set the screen resolution: Set the screen
► Select mo
ank
the touchscreen.
are correct or whether an external monitor
has been detected in "Intel Graphics Media
Accelerator Driver for mobile".
monitor.
properly into the external monitor and into
the power socket.
connected to the Tablet PC and the external
monitor (if it is plugged in with a connector).
monitor.
ng
application program in
Windows. If th
terminating
combination
in order to s
tablet PC. C
resolution as described in the documentation
foryouroperatingsystem.
describe
operatin
e error persists after
the program, use the key
for switching the screen output
witch to the touchscreen of the
hange the following sett ing:
nitor: Select monitor 1 or 2 as
d in the documentation for your
gsystem.
monitor.
78 Fujitsu
Page 83

Troubleshooting and tips
The cursor does not correctly follow the pen movements
Cause
Pen incorrectly calibrated
Fault elimination
► Calibrate the pen as described in chapters
Setting the pe n", Page 29 and "Calibrating
"
the pen", Page 2 9.
Pen input not working
Cause
The pen is in power-saving mode. ► Press the pen button gently to wake the pen
The pen battery is completely discharged.
Troubleshooting
from sleep mode.
► Insert the pen fully into its slot o n the Tab let
PC to charge the pen battery.
The Tablet PC does not start after switch on
TheTabletPC
Cause Troubleshooting
The battery is dead.
The power adapter is not connected correctly.
► Charge the battery.
or
► Connect the mains adapter to the Tablet
PC.
► Check whether the mains adapter is
connected correctly to the Tablet PC.
► Switch on the Tablet PC.
The Tablet
tPC
vingmode
TheTable
Energysa
Cause Troublesh
The Tablet PC is in en ergy saving mode.
An application programme has caused the
malfunction.
The battery is dead.
Fujitsu 79
PC stops working
► Leave ene
► Close the application program or restart
► Charge
or
ooting
rgy saving mode.
the Tablet PC (by restarting the operating
system or switching the device off and back
on again).
the battery.
► Connect the mains adapter to the Tablet
PC.
Page 84

Troubleshooting and tips
The printer does not print
Printerdoesnotprint
Cause Troubleshooting
The printer is not switched on. ► Make sure that the printer is sw
The printer is not connected c
The printer driver is faulty or not correctly
installed, or it is the wrong printer driver.
orrectly.
on and ready for operation (ref
documentation supplied with t
► Check that the data cable connecting
the Table PC to the printer is properly
connected.
► Check that the data cable connecting
the Tablet PC to the printer is properly
connected.
► Check whether the correct printer driver is
loaded (refer to the printer documentation).
itched
er to the
he printer).
The w ireless connec
ctiontoanetworkdoesnotw or k
Thewirelessconne
Cause Troubleshooting
The wireless compo
The wireless component is enabled. Despite
this, the wireless connection to a network does
not work.
The battery d
Battery:
Cause
The batte ry
case the bat
You may have an application running that
consumes a great deal of power due to frequent
accessing of the hard disk or optical drive.
The maximum brightness may have been set
for the screen.
nent is disabled.
ischarges too quickly
is either too hot or too cold. In this
tery indica tor flashes.
tiontoanetworkdoesnotwork
► Switch the wireless component on ( see
"
Switching the wireless components on an d
off", Page 36).
► Check whether the wireless connection is
switched on via the software.
► Further information on using the wireless
component can be found in the help files.
Troubleshooting
► Bring the Tablet PC up/down to a normal
temperature again.
► If the ope rating time of the battery life is
extremely short, the battery is probably too
old. Replace battery if necessary.
► Use the mains adapter as frequently as
possible.
► Reduce the brightness of the screen to
lower energy consumption: You will find the
setting under Control Panel – Hardware and
Sounds – Windows Mobility Center.
80 Fujitsu
Page 85

Troubleshooting and tips
SmartCard reader is not recognised.
Cause
Chip card inserted incorrectly. ► Check if you inserted your SmartCard into
Troubleshooting
the SmartCard reader correctly.
► Check whether the SmartCard you are using
is supported. Your SmartCard must comply
with the ISO standard 7816-1, -2, -3 and -4.
SmartCard PIN forgotte
Cause
PIN forgotten ► If you work in a network, contact your
n
Troubleshooting
system administrator, who can unlock your
Tablet PC with a supervisor PIN.
SmartCard lost
Cause
SmartCard lost ► If you work in a network, contact your
Troubleshooting
system administrator, wh o can boot your
Tablet PC with a Supervisor SmartCard.
Acoustic warnings
AcousticerrormessagesErrors
Cause
A beep sounds every few seconds.
The battery is almost flat.
Troubleshoot
► Charge the battery.
ing
Error messages on the screen
ErrormessagesonthescreenErrormessage:
This section describes the error messages generated by the BIOS Setup. Error messages displayed
by the operating system or programmes are described in the relevant documentation.
If the error message appears repeatedly, despite troubleshooting measures, please
contact the place of purchase or our customer service centre.
Fujitsu 81
Page 86

Troubleshooting and tips
Error message/cause Resolution
CMOS battery bad
If the error message occurs repeatedly, the
► Contact your sales outlet or our
service centre.
buffer battery in the Tablet PC is flat.
System CMOS checksum bad - default configuration
used
The system configuration information is
incorrect.
► Switch off the Tablet PC.
► Switch on the Tablet PC.
► In the BIOS Setup, select t
► Select the entry Load Setup Defaults.
► Select OK and press the En
Extended memory failed
zzzz zzzz
When testing the exten
resulted at the addre
Failure Fixed Disk
The settings of th
Keyboard contro
at offset: xxxx Failing Bits:
ded memory an error has
ss xxxx.
n
eharddiskdriveareincorrect.
ller error
► Contact your sales outlet or our customer
service centre.
► Start the BIOS Setup (Primary Master
submenu) and select the correct settings.
► Switch off your Tablet PC using the ON/OFF
button.
► Wait 3 - 5 seconds and switch on the Tab let
PC again.
Keyboard error
If you are using an external keyboard:
► Check the connection and reboot the Tablet
PC.
nn Stuck key
Operating system not found
► Make sure that no key is pressed.
► Check in the BIOS Setup whether your hard
disk has been set correctly.
► Make sure t
installe
Press <F1> to resume, <F2> to SETUP
This error message appears if an error occurs
during the self-test before starting the operating
system.
time clock error
Real
► Press the volume up button to start BIOS
Setup.
or
► If you a
► Contact your sales outlet or our customer
service centre.
nnnnK Shadow RAM failed at offset: xxxx Failing
Bits: zzzz
System battery is dead - Replace and run SETUP
ystem cache error - Cache disabled
S
► Contact your sales outlet or our customer
service centre.
ntact your sales outlet or our customer
► Co
rvice centre.
se
► Contact your sales outlet or our customer
service centre.
ystem timer error
S
► Contact your sales outlet or our customer
service centre.
he Exit menu.
ter key.
hat the operating system is
d on the corresponding drive.
re working with an external
keybo
the ke
ard, press the
yboard.
F1
customer
F2
or
key on
82 Fujitsu
Page 87

Troubleshooting and tips
Restoring the system under Wind
If necessary, you can reset your system to the original state of the hard disk.
► Select Settings from the Start menu.
► Select Update & security.
► Select Recovery.
► Select according to your requirements from the options given.
ows 10
Fujitsu 83
Page 88

Technical data
Technical data
Tablet PC
General
Processor
Main memory
Electrical data
Protection class II
Maximum power consumption (when the Tablet
PC is switched on and the battery is being
charged):
Touchscreen
Size
Resolution
Pixel class II
Brightness control 12 levels
Cameras • Front: HD camera / infrared camera
Graphics c
Chip Intel® UHD Graphics
Maximum resolution on externa l display: HDMI: 4096 x 2160
Dimensions
Width x depth x height 315 x 200.9 x 10.65 mm
Weight depending on configuration from 800 g / 1.76 lbs
Input devices
Tablet b uttons 4 keys
Pen Pen with 2 pen buttons
lots
S
emory card slot
M
SIM card slot (configuration-dependent) 1 x MicroSIM
SmartCard reader (configuration dependent)
Ports
Combined headphone and m icrophone port
Docking port 1 x
Micro HDMI port 1 x
ard
10th generation Intel® Core
8 GB / 16 GB on-board
with keyboard dock: 65 W
with cradle: 90 W
13.3" Full HD Antiglare
1920 x 1080 / 16 million colours
(depending on configuration) with status
display
• Back: 5 megapixels, autofocus, mobile light,
with status indicator
12.40 x 7.91 x 0.42 inch
1xmicroSD
1x
3.5mmstereominijack
TM
processor
84 Fujitsu
Page 89

USB (Universal Serial Bus) 1 x USB 2.0 (Type-A)
1xUSB3.2Gen1(TypeA)
1 x USB 3.2 Gen2 (Type-C) with charging
function and DisplayPort
Security Lock device
1x
Ambient conditions
Environment class DIN IEC 7
Mechanism class DIN IEC 721
21
7K1
7M2
Operating temperature 5 °C .... 35 °C / 41 °F .... 95 °F
Transport temperature
Relative humidity
Operating height
(2K2)
–15°C....60°C/5°F...
20 % ... 80 % (no condensation)
up to 3048 m
.140°F
Technical data
Fujitsu 85
Page 90

Technical data
Screen resolutions for integrated screen and external screens
Max.
number
of
screens
Only
Tablet PC
with
cradle
Number
of
external
screens
21
32
21
32
33
Integrated
screen HDMI
1920x1080
@60Hz
1920x1080
@60Hz
1920x1080
@60Hz
1920x1080
@60Hz
1920x1080
@60Hz
1920x1080
@60Hz
1920x1080
@60Hz
1920x1080
@60Hz
System interface Ports on the cradle
Display
port / USB
Type-C VGA
---
3840x2160
-
--
---
@60Hz
3840x2160
@60Hz
1920x1200
1920x1200
-
--
1024x768
-
1024x768
-
-
port
4096x2160
@24Hz
3840x2160
@30Hz
4096x2160
@24Hz
3840x2160
@30Hz
4096x2160
@24Hz
3840x2160
@30Hz
4096x2160
@24Hz
3840x2160
@30Hz
-
4096x2160
@24Hz
3840x2160
@30Hz
Display
Port
--
--
@60Hz*
@60Hz*
@60Hz
@60Hz
-
1920x1200
@60Hz*
-
1920x1200
@60Hz*
1024x768
@60Hz
1024x768
@60Hz
th Reduced Blanking
*wi
86 Fujitsu
Page 91

Rechargeable battery
You c a n find information on the batteries used in your device on the
Internet at "
Rated voltage 11.1 V
Rated capacity 38 Wh
Type Lithium ions
Interchangeability By au thorized service provider
Type Lithium metal
Interchangeability By au thorized service provider
http://www.fujitsu.com/fts/support/".
3-cell lithium-ion rechargeab le battery 3420
mAh
Battery Button Cell CR2032 0.24 Wh
Mainsadapter(65W)fortheTabletPC with/without the keyboard dock
Technicaldata
Primary
Nominal voltage
Nominal frequency 50 Hz to 60 Hz (automatic)
Maximum rated current 1 A
Secondary
Nominal power 65 W
Nominal voltage 19 V
Max. rat ed current 3.42 A
100 V to 240 V (automatic)
Technical data
An additional mains adapter or power cable can be ordered at any time.
Fujitsu 87
Page 92

Technical data
Mains adapter (90 W) for the Tablet PC with cradle
Technicaldata
Primary
Nominal voltage
Nominal frequency 50 Hz to 60 Hz (automatic)
Maximum rated current 1.5 A
Secondary
Nominal power 90 W
Nominal voltage 19 V
Max. rated current 4.74 A
An additional mains adapter or p ower cable can be ordered at any time.
100 V to 240 V (automatic)
88 Fujitsu
Page 93

Cradle (optional)
Electrical data
Protection class
Ports
Docking port 7-pin
Display port 1 x
VGA monitor port
Maximum resolution on an external monitor
USB (Universal Seria
LAN port 1 x
Security Lock device
Ambient conditions
Environment class DIN IEC 721
Mechanism clas
Operating temperature 5 °C .... 35 °C /41 °F .... 95 °F
Transport temperature
Relative humidity
Operating height
lBus)
s DIN IEC 721
1x
1920 x 1200 (VGA or display port)
3xUSB3.2Gen1(TypeA
1x
7K1
7M2
-10 °C .... 60 °C / 5 °F .... 140 °F
20 % ... 80 % (
up to 3048 m
no cond ensation)
)
Keyboard dock (optional)
Electrical data
Protection class II
Ports
Docking port 7-pin
LAN port 1 x
Environmental conditions
Environment class DIN IEC 721
Mechanism class DIN IEC 721
Operating temperature 5 °C .... 35 °C / 41 °F .... 95 °F
Temperature during transportation
Relative humidity
Operating height
7K1
7M2
-10 °C .... 60 °C / 5 °F .... 140 °F
20 % ... 80 % (no condensation)
up to 3048 m
Technical data
Fujitsu 89
Page 94

Manufacturer’s notes
Manufacturer’s notes
Disposal and recycling
Notes
If the battery is not replaceable by the user, have it replaced and disposed
of by an authorized service provider.
You can find information on this subject on your notebook or on our website
https://www.fujitsu.com/emeia/about/local/csr/recycling/").
("
TCO Certified
TCOCertified
Please note that TCO-c
in the "TCO certified"
Electrical safety i
Please refer to the
your device has GS c
"
http://www.fuj
itsu.com/fts/products/computing/pc/tablets/datasheets".
ertified systems bear the "TCO certified" logo. Further information is given
manual appendix at "
ncluding ergonomic requirements (GS, depending on the device)
associated data sheet to establish whether the model variant of
ertification. You can find further information on the Internet at
Intended viewing d
http://support.ts.fujitsu.com/Manuals/".
istance
300 mm as a hand-hel
product.
A monitor and a key
should be conne
for use in an offi
d
board
cted externally
ce.
SAR limit value (Specific Absorption Rate)
SAR
Body SAR value < 2W/kg
Other cert
ationmarkings
Certific
Any other certification markings are listed in the "Manu al Appendix Additional Certifications" supplement.
If such markings are available, you can find the supplement on the Internet at
http://support.ts.fujitsu.com/Manuals/" with the Operating Manu al for your device.
"
90 Fujitsu
ification markings
Page 95

Index
Index
A
Acoustic error messages 81
Activate/deactivate keyboard backlight 52
Alt + Tab 52
Anti-theft protection 56
Audio ports 69
B
Back tab 53
Background lighting 53
Backspace 48
Battery
battery life 32
caring for and maintaining 32
charge level 32–33
charging 32
Battery status meter 32
Battery:
discharges too quickly 80
Before you travel 15
BIOS Setup Utility
calling 70
exiting 72
operating 71
protecting with password 57
settings 70
Bluetooth, safety notes 13
Buttons 48
C
Camera 31
Caps Lock 49
Certification markings 90
Cleaning 16
Configuration, BIOS Setup Utility 70
Connecting audio devices 69
Connecting headphones 69
cradle
Connecting a Tablet PC 41
Cradle 39
Ctrl+Alt+Del 53
Cursor control 49
Cursor keys 49
selecting 25
Display port 65
E
Energy
energy saving 14
Energy saving 14
Energy saving functions 52
Energy saving mode
leaving 79
Enter 49
Enter key 49
Error message:
on the screen 81
Error messages on the screen 81
Errors
Acoustic warnings 81
Ethernet LAN 37
F
F Lock
Indicator 51
Fault
correction 75
Fingerprint sensor 55
configure 55
First-time setup 17
Fn key 49
Fn+F1 5 1
Fn+F10 52
Fn+F2 5 1
Fn+F3 5 2
Fn+F4 5 2
Fn+F5 5 2
Fn+F6 5 2
Fn+F7 5 2
Fn+F8 5 2
Fn+F9 5 2
Fn+space key 52
G
Getting started 17
GPS 37
D
Date is incorrect 76
Device
setting up 18
Display orientation
Fujitsu 91
H
Hardware configuration 70
HDMI port 64
Page 96

Index
I
Important notes 13
Incorrect date/time 76
Indicator
F Lock 51
K
Key combinations 51
Keyboard 48
Background lighting 53
cleaning 16
Keyboard dock
connecting the Tablet PC 44
Ports 43
L
Landscape orientation
screen 25
LCD screen
decrease brightness 52
Life, battery 32
Line feed 49
Loudspeakers
switch off 51
switch on 51
M
Mains adapter
connecting 18
setting up 18
Memory card
handling 33
inserting 34
removing 34
Microphone
switch off 51
switch on 51
Mobile operation 15
Monitor
connecting 66
drifting display 78
remains blank 78
Monitor port
see VGA connection socket 66
N
Notes 13
cleaning 16
disposal / recycling 90
energy saving 14
Safety 13
touchscreen 23
transport 15
Num Lock
indicator 50
Numeric keypad 48
see Virtual numeric keypad 50
O
Operating system
activating system protection 58
cancel system protection 58
protecting with password 58
P
Packaging 17
Password
changing 57
entering 57
removing 58
Password protection 56
Password protection:
hard disk 59
Pen 26
Portrait orientation
screen 25
Ports 39
Keyboard dock 43
Power
power consumption 33
power-management features 33
Power-on indicator 22
Preparing for operation 18
Printer does not print 80
R
Rechargeable battery 32
see Battery 32
Return 49
S
Safety notes 13
SAR 90
Screen
no screen display 78
Screen brightness
decrease 52
increase 52
Screen port
see VGA connection socket 66
Security functions 54
SystemLock 60
92 Fujitsu
Page 97

Index
Security functions,
SmartCard 60
Security Lock
anti-theft protection 56
Using 56
Selecting a location 18
Setup
see B IOS Setup Utility 70
Shift 49
Shift + Tab 53
Shift key 49
Slot
Memory cards 33
Status indicators 21, 51
Summer time 76
Supervisor password
changing 57
entering 57
removing 58
Switching off
Tablet PC 23
Switchingonforthefirst time 19
Symbols
indicators 21, 51
System configuration 70
System settings, BIOS Setup Utility 70
T
Tab key 48
Tab l e t P C
cleaning 16
transporting 15
using 20
Tablet PC, operation 20
Tablet PC: switching on 22
TCO Certified 90
Technical data
Mains adapter 87–88
The Tablet PC
cannot be started 79
doesn’t work. 79
The wireless connection to a network
does not work 80
Time not correct 76
Time, daylight savings 76
Tips 75
Toggle output screen 52
Touchpad 46, 52
buttons 46
cleaning 16
dragging items 47
executing commands 46
moving the pointer 46
selectinganitem 46
switch off 52
Touchpad buttons 52
Touchscreen
cleaning 16
difficult to read 77
notes 23
reflected glare 77
remains blank 77
touchscreen is too dark 77
TPM 62
Transport
Transport damage 17
Transportation 15
Travel 15
Troubleshooting 75
Trusted Platform Module 62
U
USB connection with charging function
(USB Type-C™) 68
USB ports 67
User password
changing 57
entering 57
removing 58
V
VGA connection socket 66
Virtual numeric keypad 50
Volume
decrease 52
increase 52
W
Windows key 49
Wireless component:
safety notes 13
Wireless components
switch off 52
switch on 52
Wireless LAN:
safety notes 13
Fujitsu 93
 Loading...