


Getting Started
Get Started with your
Fujitsu STYLISTIC® Q702 Hybrid Tablet
This guide will lead you through the start-up process for your new LIFEBOOK tablet and will also provide some
valuable tips. To learn about all the exciting features that your new LIFEBOOK tablet has to offer, please see the
User’s Guide that can be accessed after completing the start-up procedure.
ENGLISH
This convenient guide will lead you through the start-up
process and will also offer some valuable tips.
What’s in the Box
Check to see that all of the following items are in the box:
■ STYLISTIC Hybrid Tablet
■ Lithium Polymer battery, pre-installed
■ AC adapter with power cord
Depending upon your conguration, the following
items may also be shipped with your tablet:
■ Microsoft Product Identier (bi-fold paper contains
Microsoft Ofce product key for activation
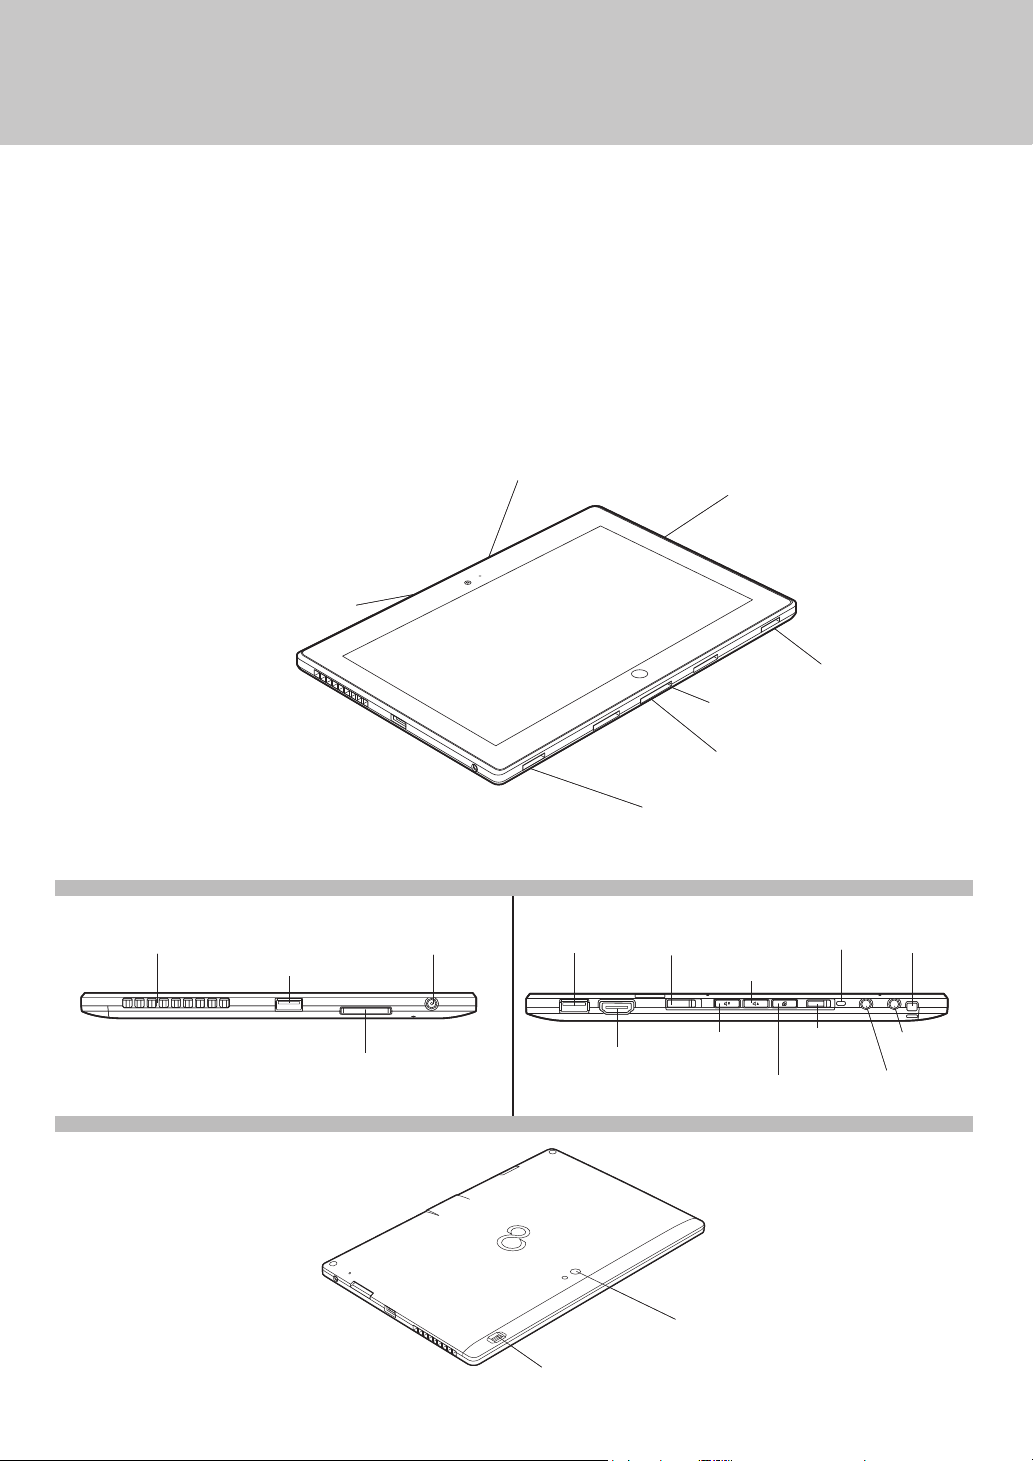
Controls, Connectors, and
Web Cam Access LED
Access Points
Front Web Camera
LEFT PANEL RIGHT PANEL
LEFT PANEL RIGHT PANEL
Air Vents
USB 3.0 Connector
SD Card Slot
DC In Jack
BOTTOM PANEL
BOTTOM PANEL
USB 2.0
Connector
Connector
Speaker
Power/
Suspend/
Resume Switch
HDMI
Display
Windows Button
Docking Cradle
Connector
Volume Up Button
Volume Down
Button
Rotate Display
Button
Speaker
Pen holder
mounting hole
Wireless
Device Switch
Pen Tether
Attachment
Point
Microphone/
Line In Jack
Headphone/
Line Out Jack
Page 2 of 5
Rear Web Camera
Fingerprint Sensor

AAAA-battery
Pen Cap
Pen Barrel
AC Adapter
Wireless
Device
Switch
Power/Suspend/
Resume Switch
DC Power Jack
Initial Start Up
1. Install the Pen Battery
■ Remove the cap from the end of the pen and insert a AAA A-battery positive end rst.
Reinstall the pen cap.
2. Attach the Pen Tether
■ Take the smaller loop on the pen tether and insert it about half way into the slot in the pen cap.
Thread the tether through the end of the loop extending through the slot. Now take the larger loop
on the tether and insert in the same manner through the attachment point on the right side of your
tablet. Thread the pen through the end of the loop extending through the attachment point.
3. Connect AC Power
■ Plug the power cord into the AC adapter.
■ Plug the AC adapter into your STYLISTIC Hybrid Tablet.
■ Connect the power cord to an electrical outlet.
4. Booting the System
■ We strongly recommend that you do not attach any external devices until you have gone through
the initial power on sequence.
■ Slide and release the Power/Suspend Resume switch.
■ Your tablet is now on and the battery is being charged.
■ When you turn on your tablet for the rst time, it will display a Fujitsu logo on the screen. If you
do nothing the system will load the operating system, and then the Windows Welcome will begin.
5. Starting Windows® for the First Time
■ After you boot up the system the rst time and follow the instructions on the screen, you will
eventually come to the Welcome window. After the Welcome window appears, the screen will black
out for up to several minutes. This is normal. DO NOT ATTEMPT TO POWER DOWN THE SYSTEM
AT THIS POINT. While the screen is blacked out, your system conguration is being set up and the
necessary les are being installed.
■ During the course of the rst start up, you will need to read and accept the End User License
Agreements (EULAs) for Microsoft and Fujitsu.
If you reject the terms of the license agreement you will be asked to review the license agreement for
information on returning Windows® or to shut dow n your tablet.
You cannot us e your tablet. until y ou have accepted the license agreement. If you stop the process your tablet. will
return to the beginning of the W indows® Welcome Process, even if you shut your tablet . down and start it up again.
LIFEBOOK
Get Started with your
®
AH532 Notebook
6.
Connect to the Internet or Network
■ Move the Wireless Device switch to on.
an active network by clicking on the Wireless Network icon in the system tray
■ Register your STYLISTIC Q702 with Fujitsu Service and Support via our website (http://solutions.
us.fujitsu.com/www/content/support/). This helps us to better serve you.
7.
Activate Additional Utilities, Applications, & Drivers
■ You can launch desktop icon “Fujitsu Bonus Apps” to see if there are any additional applications
available for the system. Bonus Apps contains optional applications. You can select individual or all
software that is available. BonusApps will automatically install for you.
8.
Calibrating the Display
In order to ensure accurate tracking between the stylus and cursor, you must run the Calibration
Utility before you use the system for the rst time, or after you change the display resolution.
To run the calibration utility:
■ Go to Start -> Control Panel.
■ Double-click the Tablet Settings icon and select the Display tab
■ Click the [Calibrate] button, then select whether you want to calibrate pen input or touch input.
■ Adjust the display of your tablet to a comfortable angle and nd the (+) symbol in the upper-left
corner of the display.
DO NOT USE E XCESSIVE F ORCE WHEN TAPPING ON THE SCREEN DURING CALIBRATION. US E OF EXCESSIVE FORCE
COULD RE SULT IN DAMAGE TO THE LED AND/OR TOUCH PANEL
■ Using the stylus or your nger (depending upon which type of input you are calibrating), rmly
touch the screen directly on the (+) symbol. Lift the stylus from the screen and the target will move
to a different location on the screen.
■ Repeat the previous step until you have selected all of the (+) symbols.
■ Once you have selected all the symbols, press the [OK] button.
■ Touch the stylus to various points on the screen to verify that the screen is correctly calibrated. If
you are not satised with the screen’s calibration, press the [Calibrate]) button to begin again.
After you have congured your computer, you can connect to
9. Create backup media with MyRecovery
■ Click on the [MyRecovery] icon to create backup recovery media discs. (You will need to use an
external optical drive.)
■ Look in the User’s Guide (Troubleshooting Your STYLISTIC Q702) for more detailed instructions.
Page 3 of 5

10. User’s Guide
■ Your electronic User’s Guide contains important detailed information about your new computer. You
can access your User’s Guide by selecting its icon from the desktop. (You will need to be connected
to the Internet.)
Common Indicators
Status Display Panel
The Status Display Panel is located below the
keyboard. The indicators are only visible when the
unit is on.
Battery
Level
Volume Up Button
Battery
Charge
Rotation Button
Power
SSD
Access
Volume Down
Button
Quick Tips
It takes approximately 3 hours to charge a fully discharged single battery with unit off or in
suspend mode.
Optimizing Battery Life
• Set power management setting for best battery life.
• Adjust display brightness levels to lowest comfortable setting.
• Utilize Suspend mode when not using your tablet.
• Read the Power Management section in your User’s Guide for additional features.
Heat damage to your Lithium ion battery
• Extended exposure to heat will have a negative impact on your batter y. Do not expose your
tablet to excessive heat such as leaving it in the car on a hot summer day. If you are near an
outlet and playing a graphicsfrom the unit to avoid exposing it to excessive heat.
Discharging your battery
• Full battery discharges (to unit shutdown or 0%) should be avoided. It is recommended that
batteries only be partially discharged to levels of 20-30% before recharging.
Prolonged storage
• If your tablet isn’t going to be used for a while, you should remove its Lithium ion battery. To
store a battery for long periods of time, its charge capacity should be around 40% and store
it in a cool dry place.
Purchasing a replacement battery
• Only purchase a replacement battery from Fujitsu. Ensure that you purchase a battery that
is specically designed for your model computer. It is recommended that you purchase
a replacement battery only when the current batter y has noticeably degraded; unused
batteries will
Button Name
Volume Down Button Volume Down When you press the Rotation Button, the
Volume UP Button Volume Up
Rotation Button Rotate Lock
Windows Button Quick access to the
still suffer degradation when stored.
intensive game, it is recommended
Primary Function (Press)
Start menu
that you remove the battery
Description
autorotation feature is turned off or turned
on, depending on its previous state. If you
press the Rotation button while the Fujitsu
logo appears during system boot, the BIOS
Setup Utilit y will open. While you are in the
BIOS Setup utility, the Volume up button
functions as a up arrow key and volume down
button functions as a down arrow key.
When you press and hold the Windows
button, then slide the power button, the
CTRL+ALT+DEL screen is brought up.
Page 4 of 5
Windows Button
Important Safety Instructions
This unit requires a n AC adapter to operate. Use only UL Listed I. T .E. Adapters with an output rating o
f 19 VDC, with a current of 3.16A (60 W).
AC adapter output polarity:
When using y our Hybrid Tablet , basic safet y precautions should always be followed to reduce the risk
of re, electric shock and injury t o persons, including the following:
CAUTION: HOT SURFACE: THE BOTTOM OF THIS COMPUTER CAN BECOME HOT WHEN USED FOR
LONG PERIODS OF TIME. WHEN USING THIS DE VICE, TAKE C AUTION TO LIMIT LONG TERM OR
CONTINUOUS USE WHILE RESTING IT ON EXPOSED SKIN, SUCH AS T HE LAP.
• Do not use this product near water for example, near a bathtub, washbowl, kitchen sink or
laundry tub, in a wet basement or near a swimming pool.
• Uses only the power cord and batteries indicated in the User’s Guide for this product. Do not
dispose of batteries in a re. They may explode. Check with local codes for possible special
disposal instructions.
Save These Instructions
For Authorized Repair Technicians Only
DANGER OF EXPLOSION IF LITHIUM (CLO CK) BATTER Y IS INCORRECT LY REPL ACED. REPLACE ONLY WITH
THE SA ME OR EQUIVALEN T TYPE RECOM MENDED BY THE MA NUFACTURER. DISPOSE OF USED BATTERIES
ACCORDING TO THE MANUFACTURER ’S INSTRUC TION.
FOR CONTINUED PROTEC TION AGAINST RISK OF FIRE, REPLACE ONLY WITH THE SAME TYPE AND
RATING FUSE.

B5FK-0711-01EN-00
Popular Accessories
Additional Main Lithium Polymer Battery
(For optional Keyboard docking station)
Auto/Airline Power Adapter
Additional AC Adapter
Carrying Cases
Keyboard docking station
Have questions or need help?
• Visit our website at solutions.us.fujitsu.com
• Call us anytime at 1.800.8FUJITSU
• Email us at 8fujitsu@us.fujitsu.com
Want more information on Fujitsu products?
• Visit our website at www.shopfujitsu.com
• Call us anytime at 1.800.FUJITSU
Fujitsu Extended Service Plans available.
Visit us.fujitsu.com/computers
to purchase any of these accessories
or to get more information.
Record your tablet serial number here:
Serial #______________________
(see bottom of computer)
Fujitsu America, Inc.
1250 E. Arques Avenue
Sunnyvale, CA 94085
Fujitsu, the Fujitsu logo, and S TYLISTIC are registered trademarks of Fujitsu Limited.
Microsoft and Window s are registered trademarks or trademark s of Microsoft
Corporation in the United States and/or other countries. All other trademar ks
mentioned herein are the property of their respective owners. Product description
data represents Fujitsu design objecti ves and is provide d for comparative purposes;
actual results may vary based on a variety of factors. Specications are subject to
change without notice.
©2012 Fujitsu Amer ica, Inc. All right s reserved.
Page 5 of 5
 Loading...