

Page 1
Page 2
Copyright & Trademark Information
Fujitsu Computer Systems Corporation has made every
effort to ensure the accuracy and completeness of this
document. Because ongoing development efforts are
continually being made to improve the capabilities of our
products, however, the data contained herein represents
Fujitsu design objectives and is provided for comparative
purposes; actual results may vary based on a variety of
factors. This product data does not constitute a warranty.
Specifications are subject to change without knowledge.
Fujitsu and the Fujitsu logo are registered trademarks of
Fujitsu Limited; Stylistic is a registered trademark of
Fujitsu Computer Systems Corporation.
Microsoft and Windows are either registered trademarks
or trademarks of Microsoft Corporation in the United
States and/or other countries.
PCMCIA is a registered trademarks of the Personal
Computer Memory Card International Association.
PRISM is a registered trademark of GlobeSpan Virata,
Inc.
DECLARATION OF CONFORMITY
All other products are trademarks or registered trademarks of their respective companies.
Warning
Handling the cord on this product will expose
you to lead, a chemical known to the State of
California to cause birth defects or other
reproductive harm.
Wash hands after handling.
Copyright 2004 - Fujitsu Computer Systems
Corporation. All rights reserved. No part of this
publication may be copied, reproduced, or translated,
without the prior written consent of Fujitsu Computer
Systems Corporation. No part of this publication may be
stored or transmitted in any electronic form without the
prior consent of Fujitsu Computer Systems Corporation.
FPC58-1078-04
according to FCC Part 15
Responsible Party Name: Fujitsu Computer Systems Corporation
Address: 1250 E. Arques Avenue, MS 122,
Sunnyvale, CA 94085
Telephone: 408-746-6000
Declares that product: Model Series: Stylistic® CT2000 Series CE Tablet
Complies with Part 15 of the FCC Rules
This device complies with Part 15 of the FCC rules. Operation is subject to the following two conditions:
(1) This device may not cause harmful interference, and, (2) This device must accept any interference
received, including interference that may cause undesired operation.
Page 3
Stylistic CT2000 Series CE Tablet - User’s Guide
NOTICE
Changes or modifications not expressly approved by
Fujitsu could void this user’s authority to operate the
equipment.
FCC NOTICES
Notice to Users of Radios and Television
These limits are designed to provide reasonable protection against harmful interference in a residential installation. This equipment generates, uses, and can radiate
radio frequency energy and, if not installed and used in
accordance with the instructions, may cause harmful
interference to radio communications. However, there is
no guarantee that interference will not occur in a particular installation. If this equipment does cause harmful
interference to radio or television reception, which can
be determined by turning the equipment off and on, the
user is encouraged to try to correct the interference by
one or more of the following measures:
■
Reorient or relocate the receiving antenna.
■
Increase the separation between the equipment and
receiver.
■
Connect the equipment into an outlet that is on a
different circuit than the receiver.
■
Consult the dealer or an experienced radio/TV
technician for help.
Shielded interconnect cables must be employed with this
equipment to ensure compliance with the pertinent RF
emission limits governing this device.
DOC (INDUSTRY CANADA) NOTICES
Notice to Users of Radios and Television
This Class B digital apparatus meets all requirements of
Canadian Interference-Causing Equipment Regulations.
CET appareil numérique de la class B respecte toutes les
exigence du Réglement sur le matérial brouilleur du
Canada.
IMPORTANT SAFETY INSTRUCTIONS
■
This product requires an AC adapter to operate. Use
only a UL Listed I.T.E. AC Adapter with an output rating of 12V DC, and a current of 2.5A.
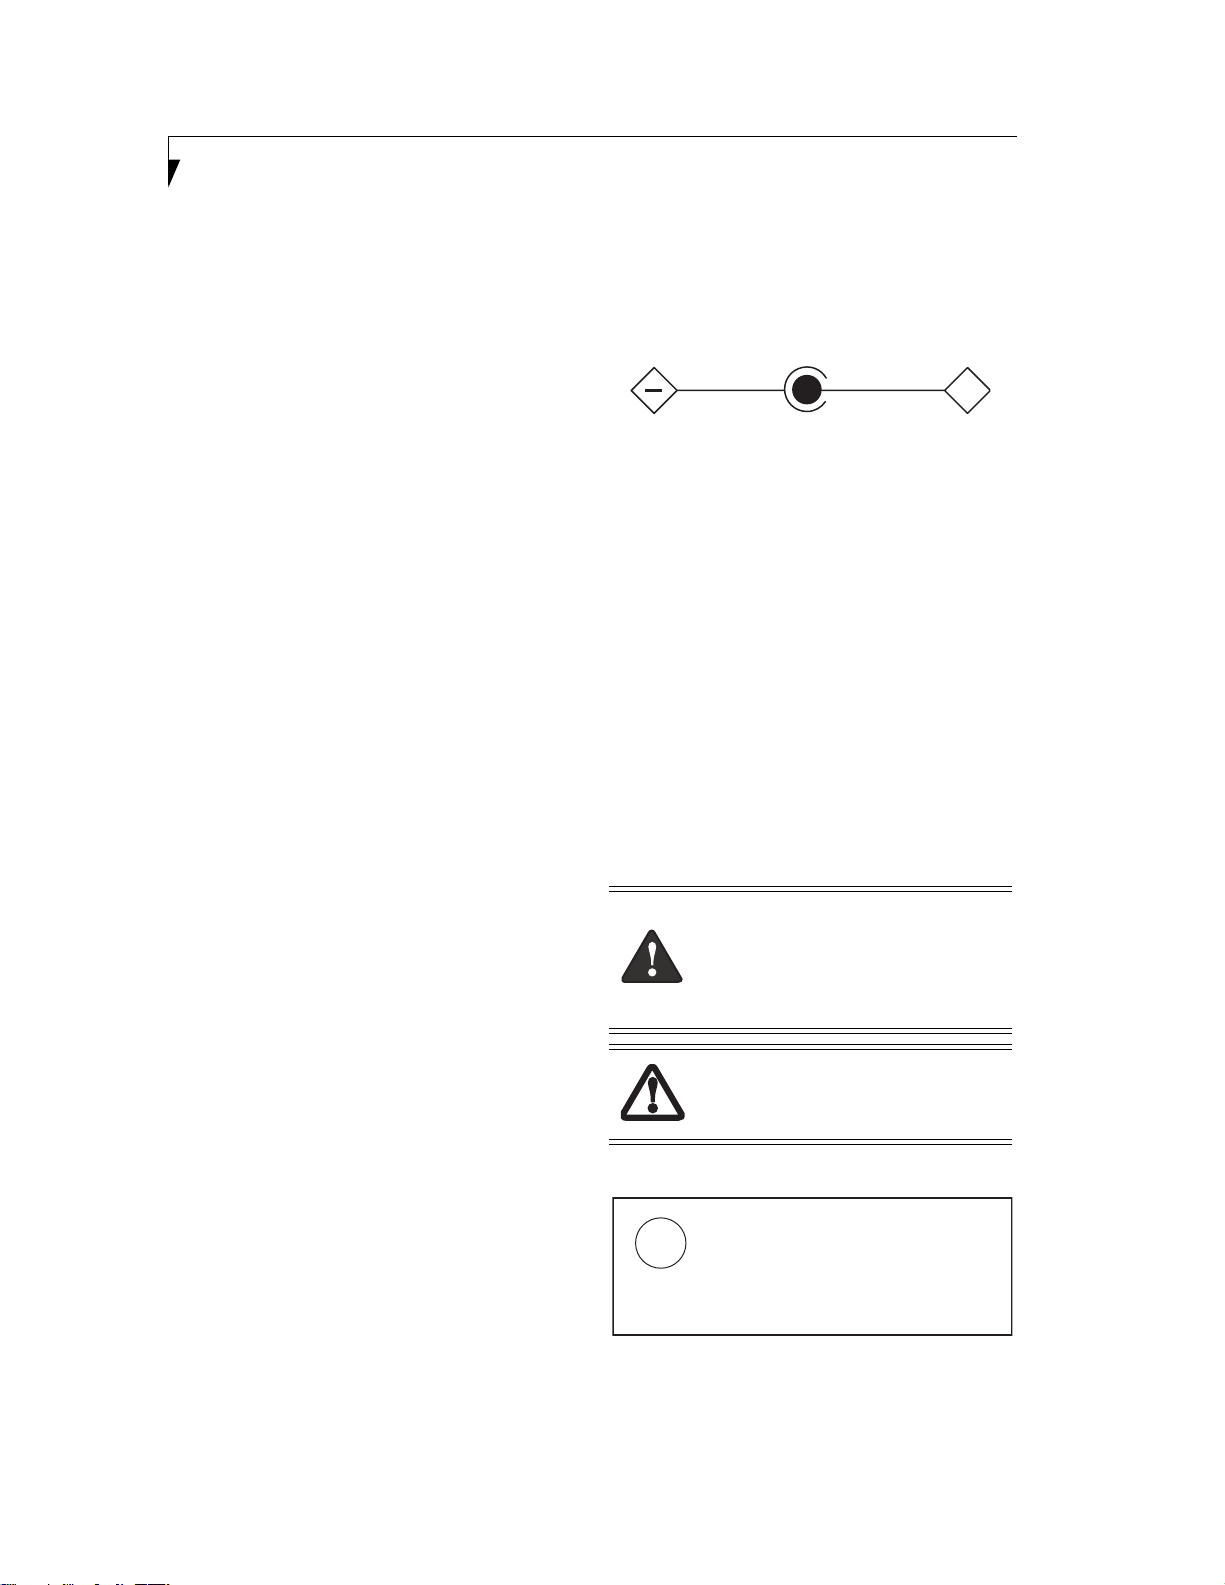
■
AC adapter output polarity:
+
■
When using your notebook equipment, basic safety
precautions should always be followed to reduce the
risk of fire, electric shock and injury to persons,
including the following:
■
Do not use this product near water for example,
near a bathtub, washbowl, kitchen sink or laundry
tub, in a wet basement or near a swimming pool.
■
Avoid using a modem during an electrical storm.
There may be a remote risk of electric shock from
lightning.
■
Do not use the modem to report a gas leak in the
vicinity of the leak.
■
Use only the power cord and batteries indicated in
this manual. Do not dispose of batteries in a fire.
They may explode. Check with local codes for
possible special disposal instructions.
SAVE THESE INSTRUCTIONS
For Authorized Repair Technicians Only
Danger of explosion if Lithium (clock) battery is incorrectly replaced. Replace only
with the same or equivalent type recommended by the manufacturer. Dispose of
used batteries according to the manufacturer’s instruction.
For continued protection against risk of
fire, replace only with the same type and
rating fuse.
System Disposal
LAMP(S) INSIDE THIS PRODUCT
CONTAIN MERCURY AND MUST
Hg
BE RECYCLED OR DISPOSED OF
ACCORDING TO LOCAL, STATE, OR
FEDERAL LAWS.
Page 4

Tab l e of Con t ent s
Stylistic® CT2000 Series CE Tablet
Table of Contents
PREFACE
About This Guide . . . . . . . . . . . . . . . . . . . . . . . . . 4
Fujitsu Contact Information . . . . . . . . . . . . . . . . . 4
Warranty Information . . . . . . . . . . . . . . . . . . . . . 4
1
GETTING STARTED
Getting Started with Your
Stylistic CT2000 Series CE Tablet
In-Box Items for the CE Tablet . . . . . . . . . . . . . . 6
Optional Accessories . . . . . . . . . . . . . . . . . . . . . . 7
Stylistic CT2000 Series CE Tablet Features . . . . . . 8
Key/Button Pad . . . . . . . . . . . . . . . . . . . . . . . . . 12
Function Buttons . . . . . . . . . . . . . . . . . . . . . . . . 12
Connectors, Buttons, and Peripheral Interfaces. . 13
2
USING YOUR CE TABLET
Using the Stylistic
CT2000 Series CE Tablet
Before Setting Up the Tablet . . . . . . . . . . . . . . . 15
Powering Up the Tablet . . . . . . . . . . . . . . . . . . . 15
“No application has been installed” . . . . . . . . . . 15
“Contents of Memory Has Been Lost” . . . . . . . . 15
Shutting Down the System. . . . . . . . . . . . . . . . . 15
Suspending/Resuming the System . . . . . . . . . . . 16
Resetting the System . . . . . . . . . . . . . . . . . . . . . 16
Using the Pen. . . . . . . . . . . . . . . . . . . . . . . . . . . 16
Calibrating the Pen. . . . . . . . . . . . . . . . . . . . . . . 16
Changing Display Resolution . . . . . . . . . . . . . . . 17
Adjusting the Display Brightness. . . . . . . . . . . . . 17
Programming the Function Buttons . . . . . . . . . . 17
Powering the Tablet. . . . . . . . . . . . . . . . . . . . . . 18
Charging the Battery Pack . . . . . . . . . . . . . . . . . 18
Conserving Battery Power . . . . . . . . . . . . . . . . . 18
Using a Keyboard or Mouse. . . . . . . . . . . . . . . . 19
PC Card Slot. . . . . . . . . . . . . . . . . . . . . . . . . . . . 19
Compact Flash Slot . . . . . . . . . . . . . . . . . . . . . . 19
Installing a Handstrap . . . . . . . . . . . . . . . . . . . . 20
3
USING THE TABLET SOFTWARE
Using the Stylistic
CT2000 Series CE Tablet Software
Windows CE .NET applications . . . . . . . . . . . . . 22
ActiveSync application . . . . . . . . . . . . . . . . . . . . 22
Add-on Applications and Utilities . . . . . . . . . . . . 23
Using the Fujitsu Setup Menu . . . . . . . . . . . . . . 24
Installing Applications . . . . . . . . . . . . . . . . . . . . 24
4
WIRELESS LAN USER’S GUIDE
Before Using the Wireless LAN
For better communications . . . . . . . . . . . . . . . . 28
Starting Transmission . . . . . . . . . . . . . . . . . . . . . 28
Stopping transmission . . . . . . . . . . . . . . . . . . . . 28
Disabling/Re-Enabling the WLAN . . . . . . . . . . . 29
Connection using Windows CE .NET
Flow of operations . . . . . . . . . . . . . . . . . . . . . . . 30
Preparation for A New Wireless LAN Connection 30
Connecting to the network . . . . . . . . . . . . . . . . 31
5
CARE AND MAINTENANCE
Caring for your Stylistic
CT2000 Series CE Tablet
Caring for Your Tablet . . . . . . . . . . . . . . . . . . . . 33
Protecting the Display . . . . . . . . . . . . . . . . . . . . 33
Storing the Tablet . . . . . . . . . . . . . . . . . . . . . . . 34
Avoiding Overheating . . . . . . . . . . . . . . . . . . . . 34
Cleaning the Display . . . . . . . . . . . . . . . . . . . . . 34
1
Page 5

Stylistic CT2000 Series CE Tablet User’s Guide
6
TROUBLESHOOTING/FAQS
Troubleshooting
User Response to Messages . . . . . . . . . . . . . . . . 37
Error Codes . . . . . . . . . . . . . . . . . . . . . . . . . . . . 38
FAQs
Frequently Asked Questions (FAQs). . . . . . . . . . 40
7
SPECIFICATIONS
Stylistic CT2000 Series
CE Tablet Hardware Specifications
Physical Specifications . . . . . . . . . . . . . . . . . . . . 43
Processor Specifications . . . . . . . . . . . . . . . . . . . 43
Memory/Storage Specifications . . . . . . . . . . . . . 43
Display Specifications . . . . . . . . . . . . . . . . . . . . . 43
Interface Specifications. . . . . . . . . . . . . . . . . . . . 43
Power Specifications. . . . . . . . . . . . . . . . . . . . . . 43
Environmental Specifications . . . . . . . . . . . . . . . 44
Agency Approval Specifications . . . . . . . . . . . . . 44
Additional Specifications. . . . . . . . . . . . . . . . . . . 44
8
GLOSSARY
Glossary. . . . . . . . . . . . . . . . . . . . . . . . . . . . . . . 45
APPENDIX:
INSTALLING/USING SOFTWARE
Installing and Using the Stylistic
CT2000 Series CE Tablet Software
Installation . . . . . . . . . . . . . . . . . . . . . . . . . . . . . 51
Creating an installation setup file . . . . . . . . . . . . 51
Installing applications. . . . . . . . . . . . . . . . . . . . . 52
Device Properties . . . . . . . . . . . . . . . . . . . . . . . . 54
Registry editor . . . . . . . . . . . . . . . . . . . . . . . . . . 54
File manager . . . . . . . . . . . . . . . . . . . . . . . . . . . 55
Run a program. . . . . . . . . . . . . . . . . . . . . . . . . . 55
Entering DeskTop . . . . . . . . . . . . . . . . . . . . . . . 56
Application backup and restoration . . . . . . . . . . 56
Terminal service setting . . . . . . . . . . . . . . . . . . . 57
Index
Index . . . . . . . . . . . . . . . . . . . . . . . . . . . . . . . . . 58
2
Page 6

Preface
3
Page 7
Stylistic CT2000 Series CE Tablet User’s Guide – Preface
Preface
ABOUT THIS GUIDE
The Stylistic® CT2000 Series CE Tablet is a versatile,
pen-based computer that has been designed to run the
Microsoft
This manual explains how to operate your Fujitsu
Stylistic CT2000 Series CE Tablet’s hardware and builtin system software.
The Stylistic CT2000 Series CE Tablet is a completely
self-contained unit with an active-matrix (TFT) color
LCD display and a passive digitizer. It has a powerful
interface that enables it to support a variety of optional
features. The system employs “palm-rejection” technology that lets it distinguish between the pressure of a
pen tip and that of your hand. This means you can safely
rest your hand on the screen in a natural writing position without the risk of the system interpreting the pressure as that of the pen. (Always use care, however, when
resting your hand on the screen. If you press a knuckle
on the screen, it may be interpreted as pen pressure.)
Conventions Used in the Guide
Keyboard keys appear in brackets.
Example: [Fn], [F1], [ESC], [ENTER] and [CTRL].
Pages with additional information about a specific topic
are cross-referenced within the text.
Example: (See page xx.)
On screen buttons or menu items appear in bold
Example: Click OK to restart your system.
®
Windows® CE .NET, v4.2 operating system.
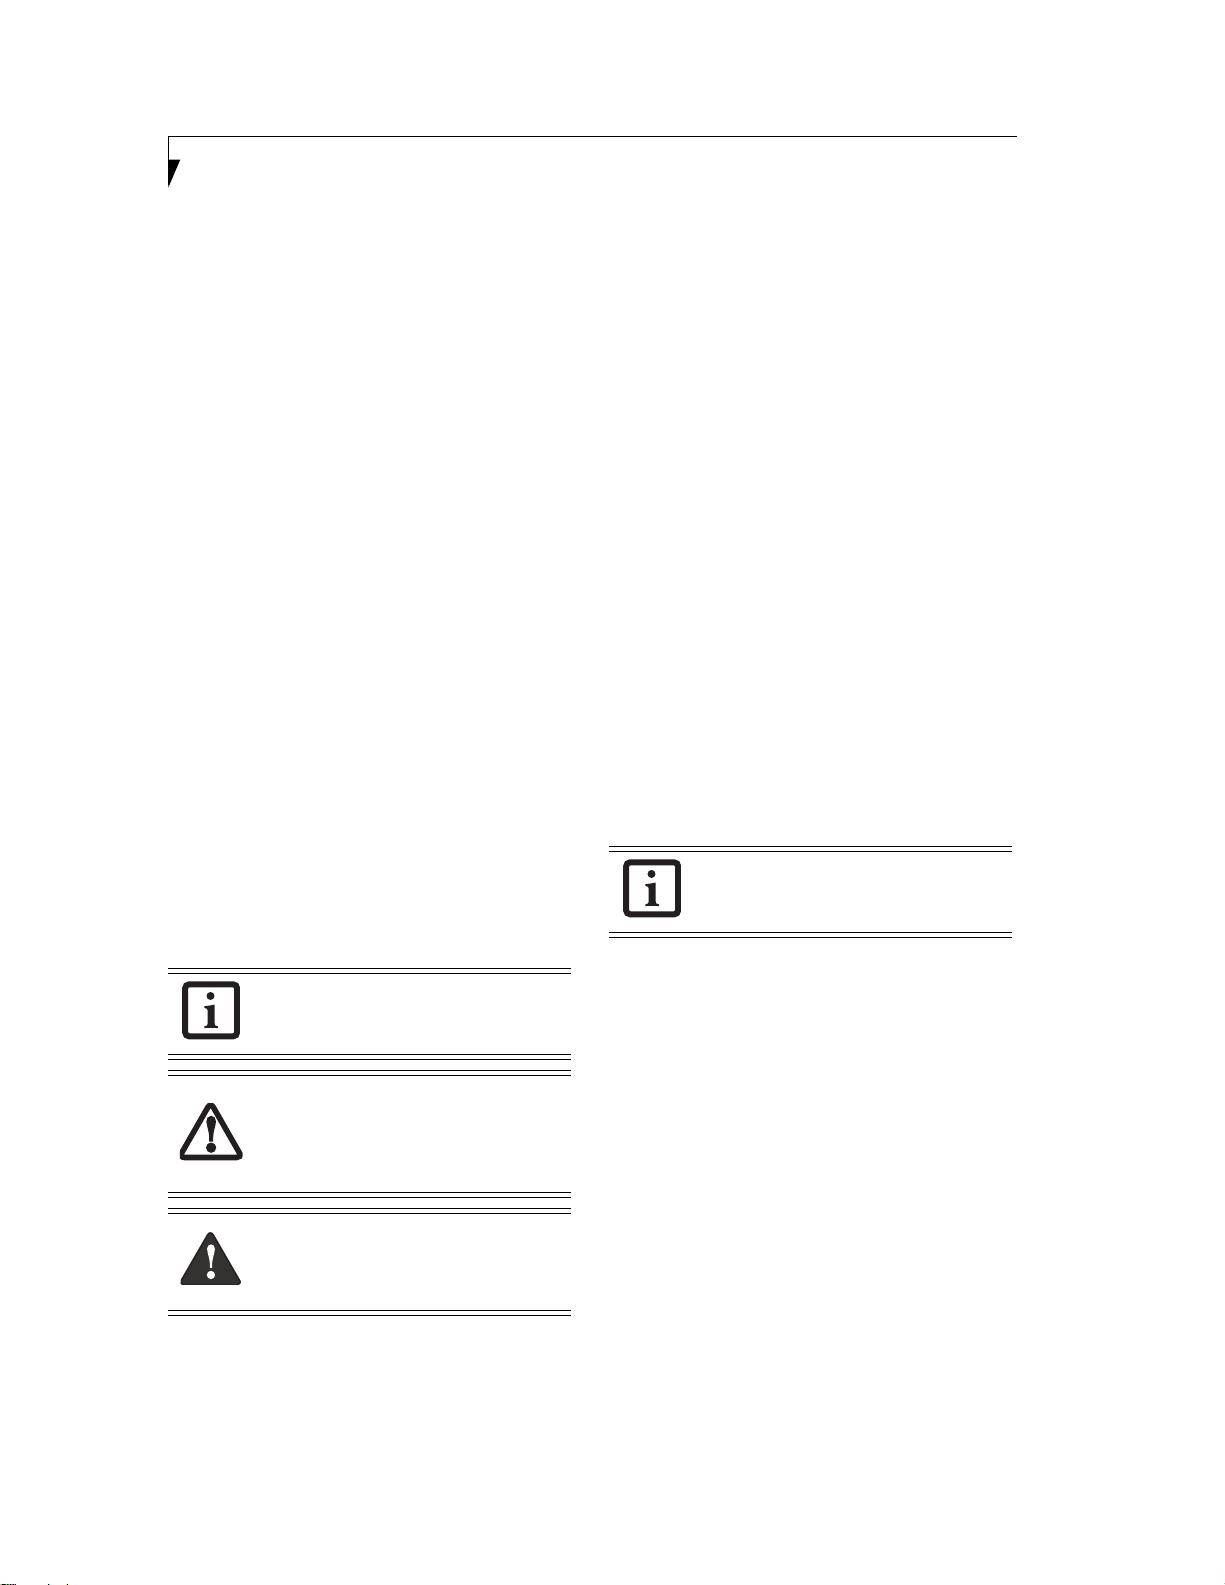
The information icon highlights
information that will enhance your
understanding of the subject material.
FUJITSU CONTACT INFORMATION
Service and Support
You can contact Fujitsu Service and Support in the
following ways:
■
Toll free: 1-800-8Fujitsu (1-800-838-5487)
■
Fax: 408-764-2724
■
E-mail: 8fujitsu@us.fujitsu.com
■
Web site: us.fujitsu.com/computers
Before you place the call, you should have the following
information ready so the customer support representative can provide you with the fastest possible solution:
■
Product name
■
Product configuration number
■
Product serial number
■
Purchase date
■
Conditions under which the problem occurred
■
Any error messages that have occurred
■
Type of device connected, if any
Fujitsu Online
You can go directly to the online Fujitsu product catalog
for your system by going to the Fujitsu Web site at:
us.fujitsu.com/computers
You must have an active internet
connection to use the online URL links.
.
WARRANTY INFORMATION
Your Stylistic CT2000 Series CE Tablet is backed by a
limited warranty. Check the service kit that came with
your system for warranty terms and conditions.
The caution icon highlights information
that is important to the safe operation of
your computer, or to the integrity of your
files. Please read all caution information
carefully.
The warning icon highlights information
that can be hazardous to either you, your
computer, or your files. Please read all
warning information carefully.
4
Page 8

1
Getting Started
with Your Stylistic
CT2000 Series CE Tablet
5
Page 9
Stylistic CT2000 Series CE Tablet User’s Guide – Section One
PWR
CLR
BKS
F1
F2
F3
F4
Getting Started with Your Stylistic CT2000 Series CE Tablet
PWR
PWR
1
0
2
ENT
3
4
7
5
8
9
6
CLR
CLR
BKS
BKS
F1
F2
F2
F1
F3
F4
F3 F4
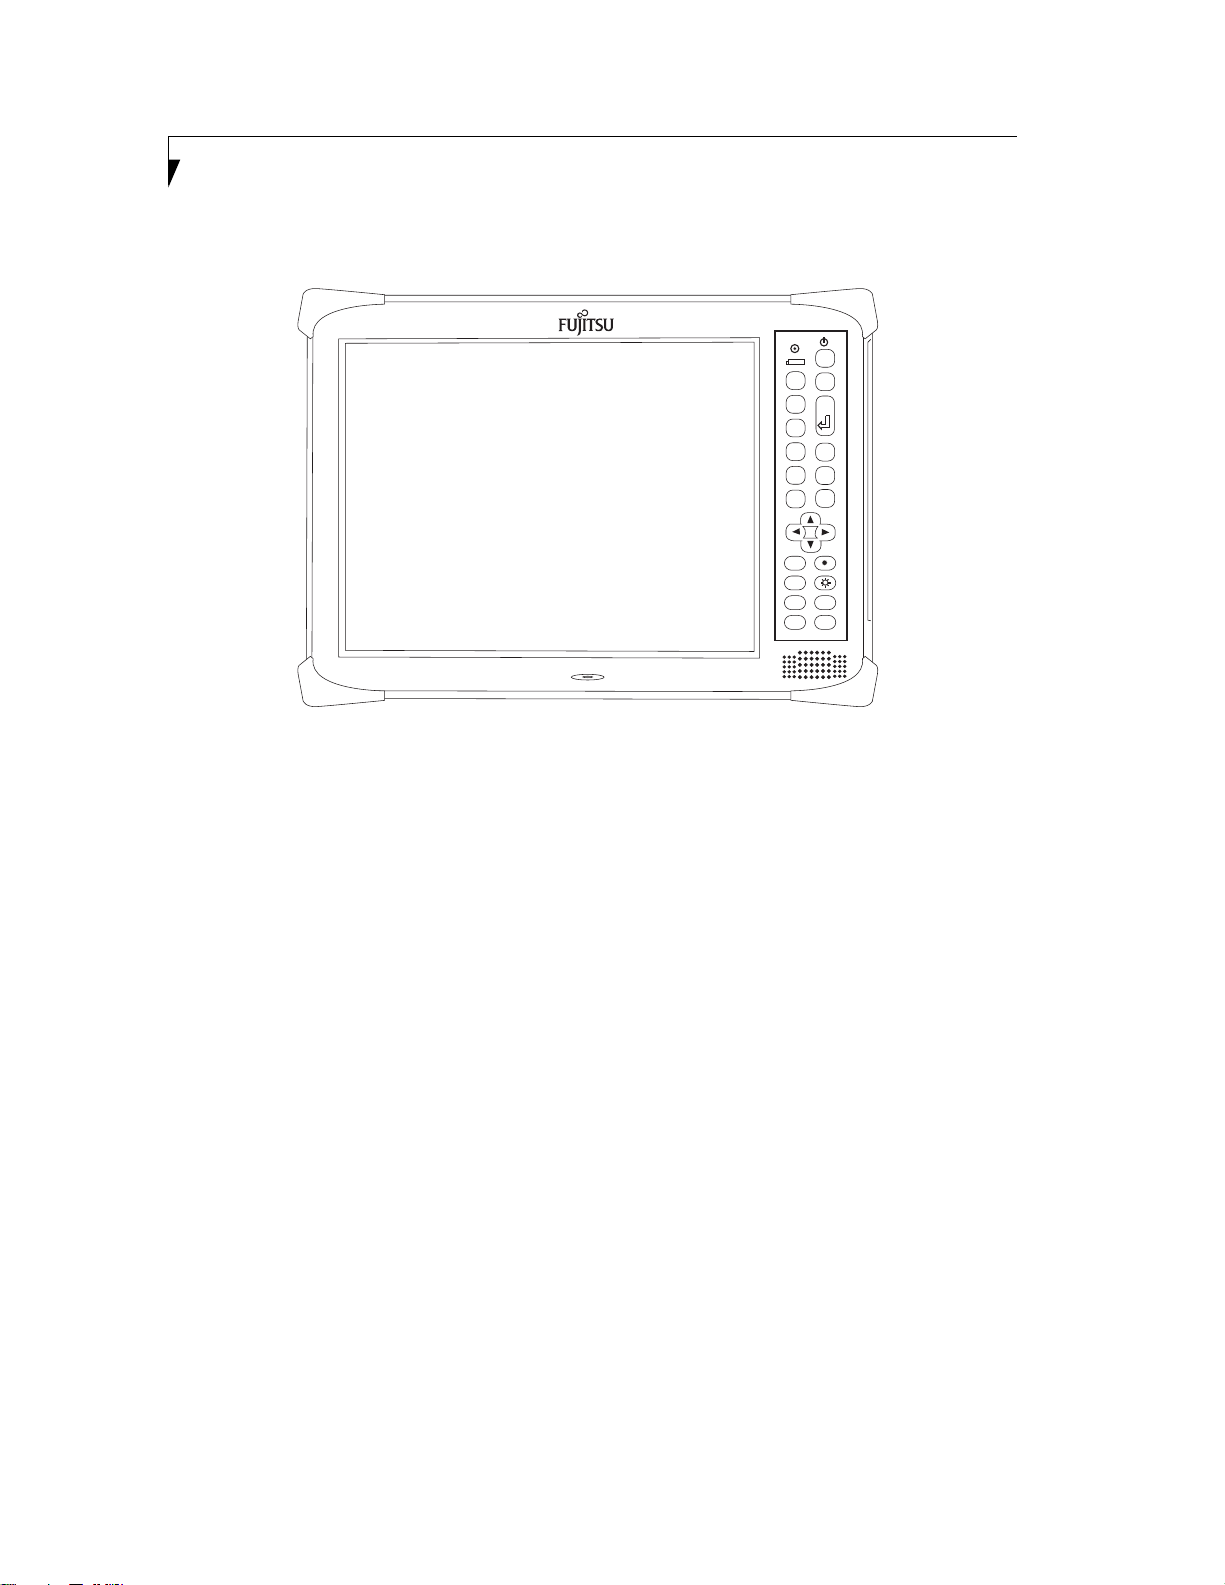
Figure 1-1. Stylistic CT2000 Series CE Tablet
The Stylistic® CT2000 Series CE Tablet is a versatile,
pen-based computer that has been designed to run the
Microsoft
®
Windows® CE .NET V4.2 operating system.
This chapter provides an overview of the Stylistic
CT2000 Series CE Tablet and its features.
IN-BOX ITEMS FOR THE STYLISTIC
CT2000 SERIES CE TABLET
Verify that the following items are included in the box
with your Stylistic CT2000 Series CE Tablet:
• Stylistic CT2000 Series pen
• Main battery
• Power cord
•AC adapter
•Hand strap
• Adhesive “H” tabs (quantity 2). (See Installing CF
Cards on page 19 for more information.)
6
Page 10

Getting Started
OPTIONAL ACCESSORIES
The following optional accessories can be used with the Stylistic CT2000 Series CE Tablet. For part numbers and
ordering information, go to the Fujitsu Web site at: us.fujitsu.com/computers; the list is updated frequently.
Refer to the instructions provided with these accessories for details on their use.
Docking Options
■
Stylistic CT2000 Cradle
■
Folding Desk Stand
Power Options
■
AC Adapter (with US Cord)
■
Auto Adapter
■
Additional Main Battery
Compact Flash (CF) Add-ons
■
CF Modem Card
■
PC-to-CF Card Adapter
Carrying Cases/Accessories
■
Bump Case
■
Harsh Environment Case (HEC)
Additional Accessories
■
Mobile USB Keyboard
■
Screen Protectors
■
Stylus Pen (5-pack)
7
Page 11
Stylistic CT2000 Series CE Tablet User’s Guide – Section One
PWR
CLR
BKS
F1
F2
F3
F4
STYLISTIC CT2000 SERIES CE TABLET FEATURES
Features and controls that you use to operate the Stylistic CT2000 Series CE Tablet are outlined below and illustrated
in Figures 1-2 through 1-8. Details on using these features and controls are provided later in this manual.
WLAN Antenna
(inside system)
PWR
1
2
3
4
5
6
CLR
CLR
BKS
BKS
F1
F1
F3
F3 F4
PWR
ENT
0
7
8
9
F2
F2
F4
Color
LCD Display
Key/Button Pad
Speaker
Microphone
Built-in
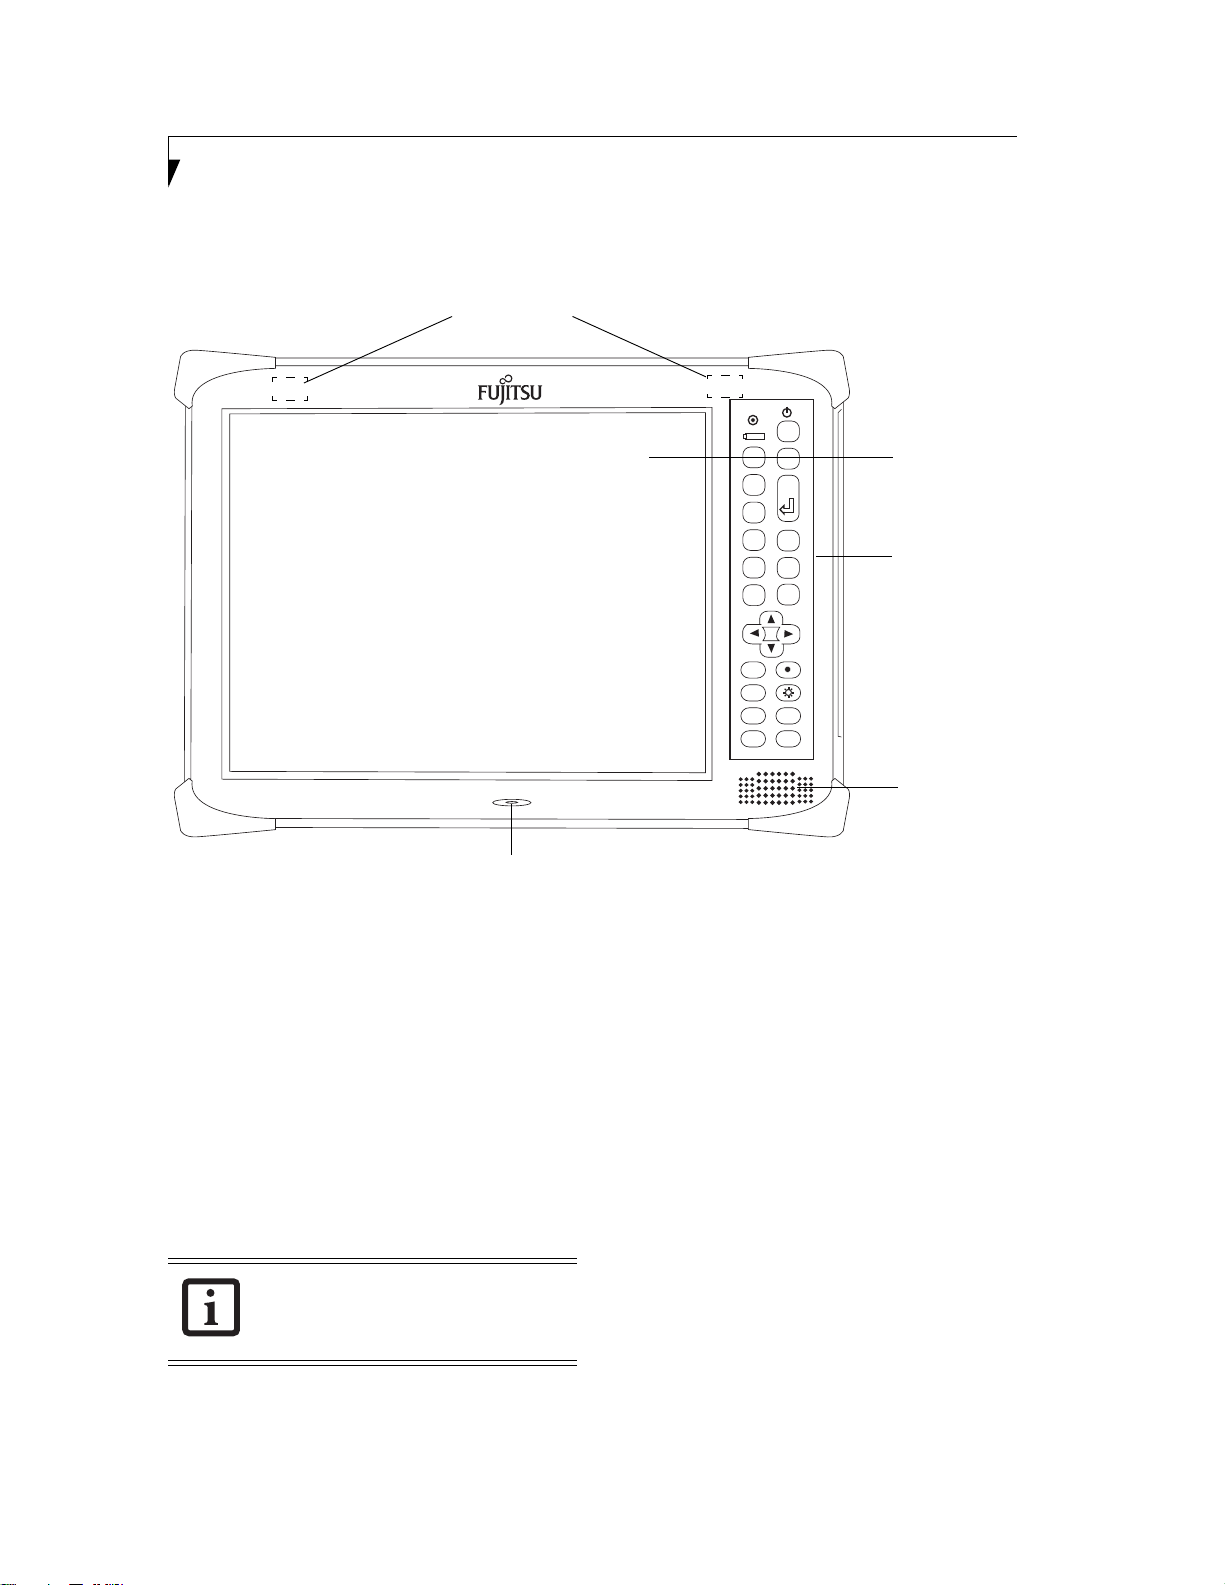
Figure 1-2. Stylistic CT2000 Series CE Tablet Features (Front View)
Front Features: 1
• WLAN Antenna: Diversity antenna located within
the system chassis.
• Color LCD Display: Provides viewing area.
• Key/Button Pad: Provides several functions for the
system, including a power button, keypad,
navigation keys, and function keys. For detailed
information, see “Key/Button Pad” on page 12.
• Speaker: Allows you to listen to audio files in mono.
•Built-in Microphone: The built-in microphone
allows you to input mono audio.
There is no microphone application installed
in the system; the built-in microphone
supports third-party applications that
employ a built-in microphone.)
8
Page 12
Getting Started
Battery
Release
Latch
Power On/Off
Switch
(Under
Battery)
Removable
Battery
Spring-loaded
Battery Release
Latch
Pen Holder
(inside system)
RESET
Reset Button
Bridge Battery
Handstrap
Attachment
Points
CF
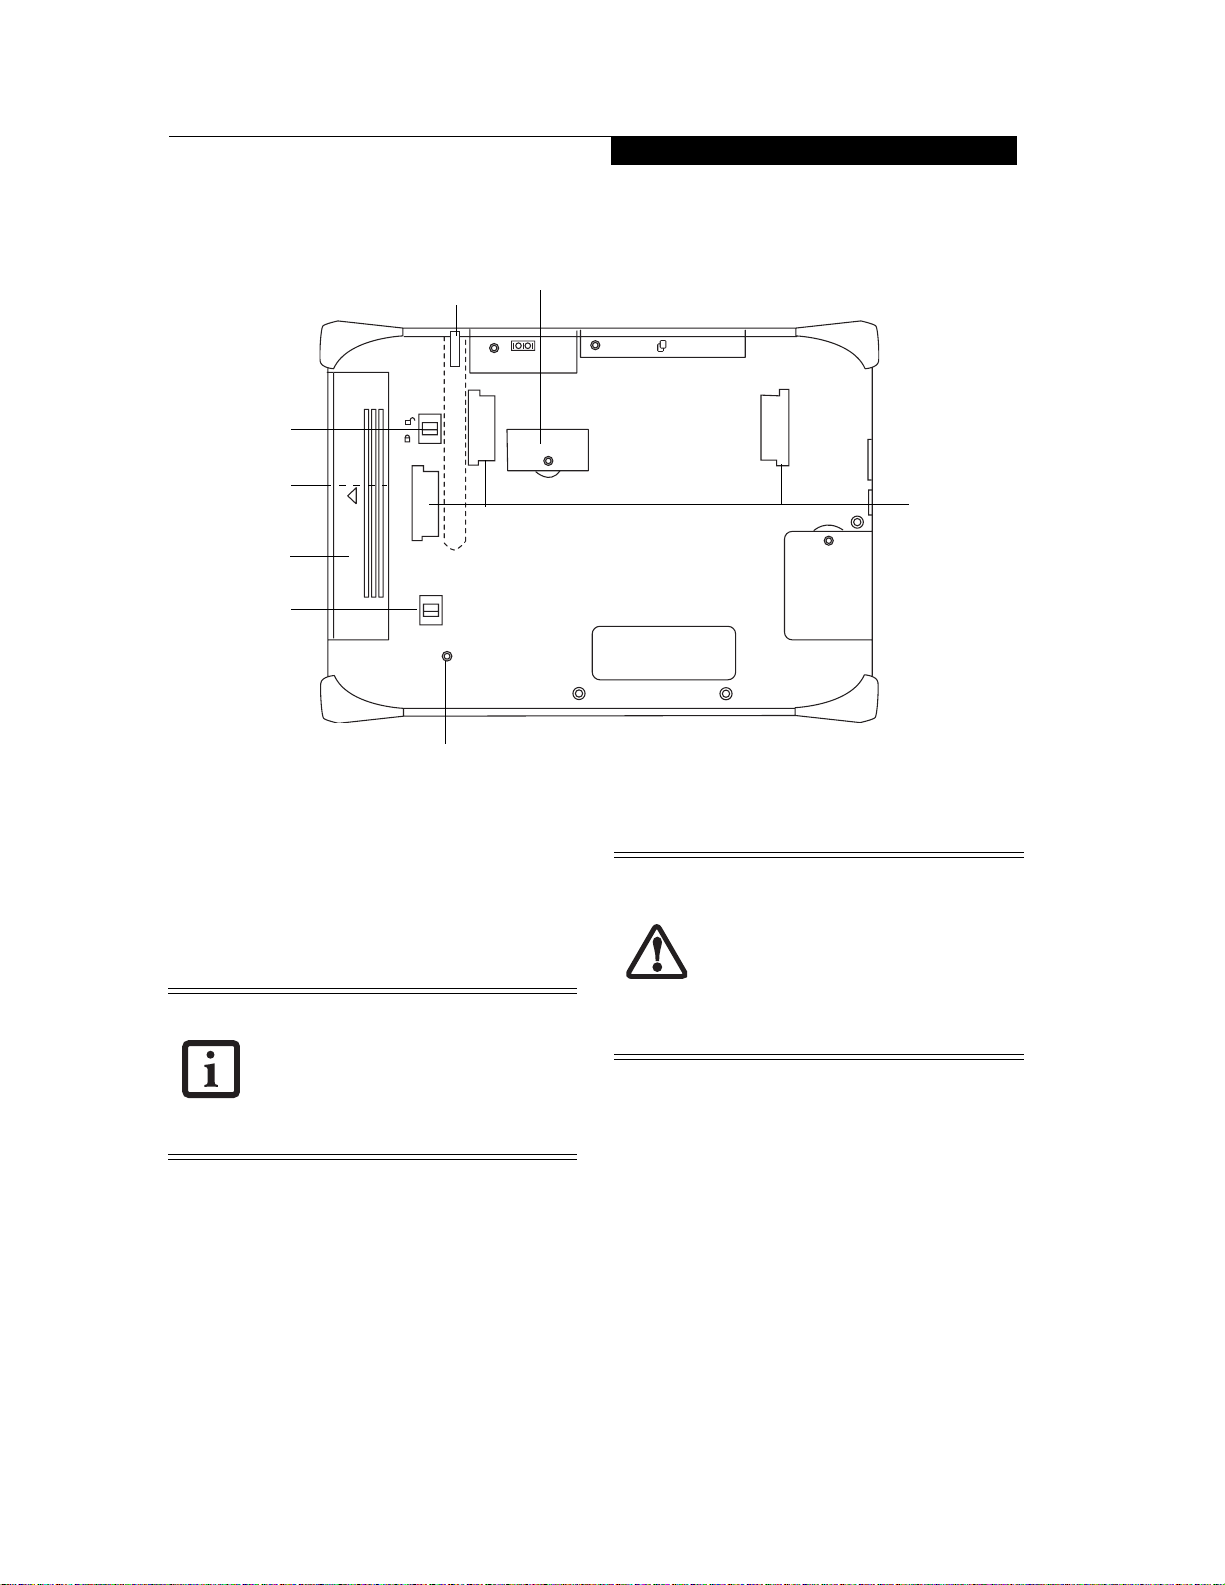
Figure 1-3. Stylistic CT2000 Series CE Tablet Features (Back View)
Back Features: 1
• Removable battery: Can be removed and replaced
with a charged battery. (See Removing a Battery Pack
on page 18 for more information.)
• Battery release latches: Used to release the removable
battery.
Note that the lower battery release latch is
spring loaded, but the upper latch must be
locked manually. If you do not manually
lock the battery, the system will not
recognize the battery and the system will
not turn on.
(See Installing a Battery Pack
on page 18 for more information.)
• Bridge battery cover: Removable cover over the
bridge (or “backup”) battery. (See Operation of the
Bridge Battery on page 19 for more information.)
• Power On/Off Switch: Located underneath the
battery, this switch is used for powering on or off the
system. This switch is typically not used.
• Use the Power ON/Off switch to shut off
the system only if you have no alternative.
• If the system is shut down using the
Power On/Off switch, data and programs
that are stored in RAM will be lost. If you
can, you may want to back up the data in
RAM to an external flash memory card or
to the FlashDisk store in the system prior
to shutting down.
•Reset button: This recessed button is used for doing a
warm reset of the system.
• Handstrap attachment points: These are used for
attaching the handstrap to the back of your system.
(See Installing a Handstrap on page 20 for more
information.)
9
Page 13
Stylistic CT2000 Series CE Tablet User’s Guide – Section One
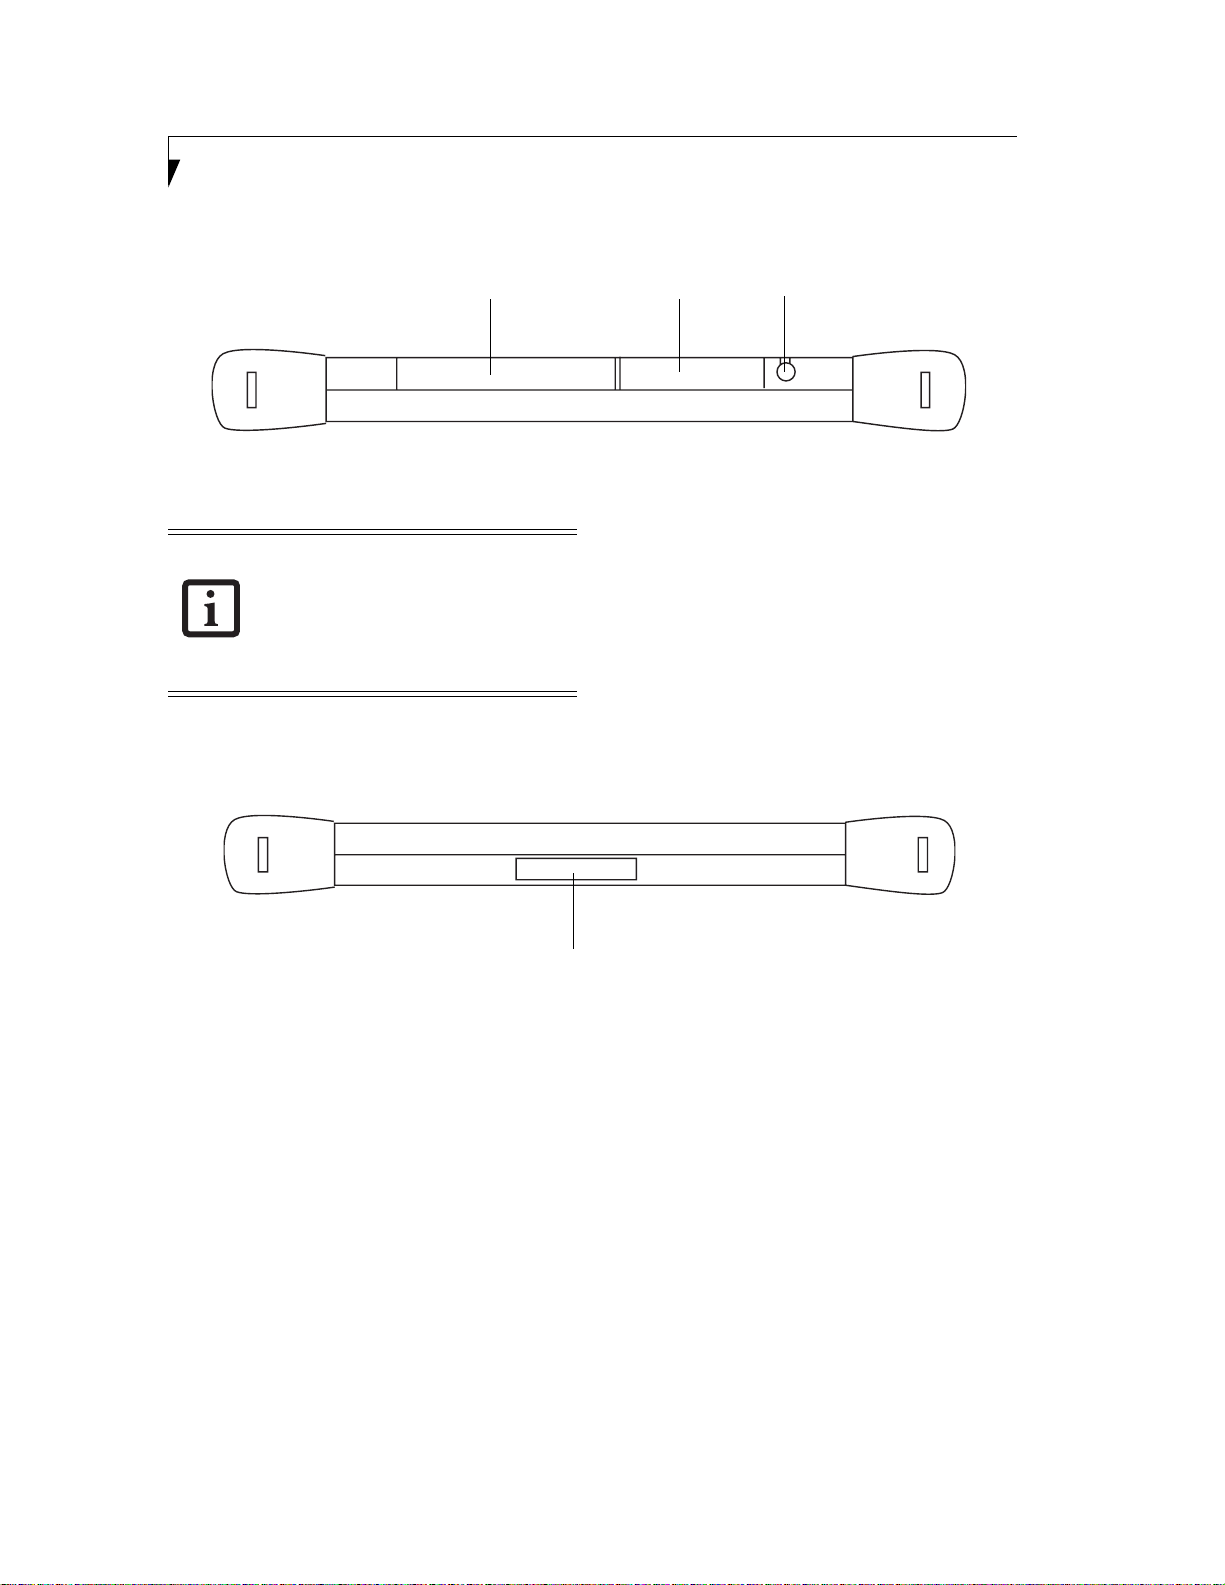
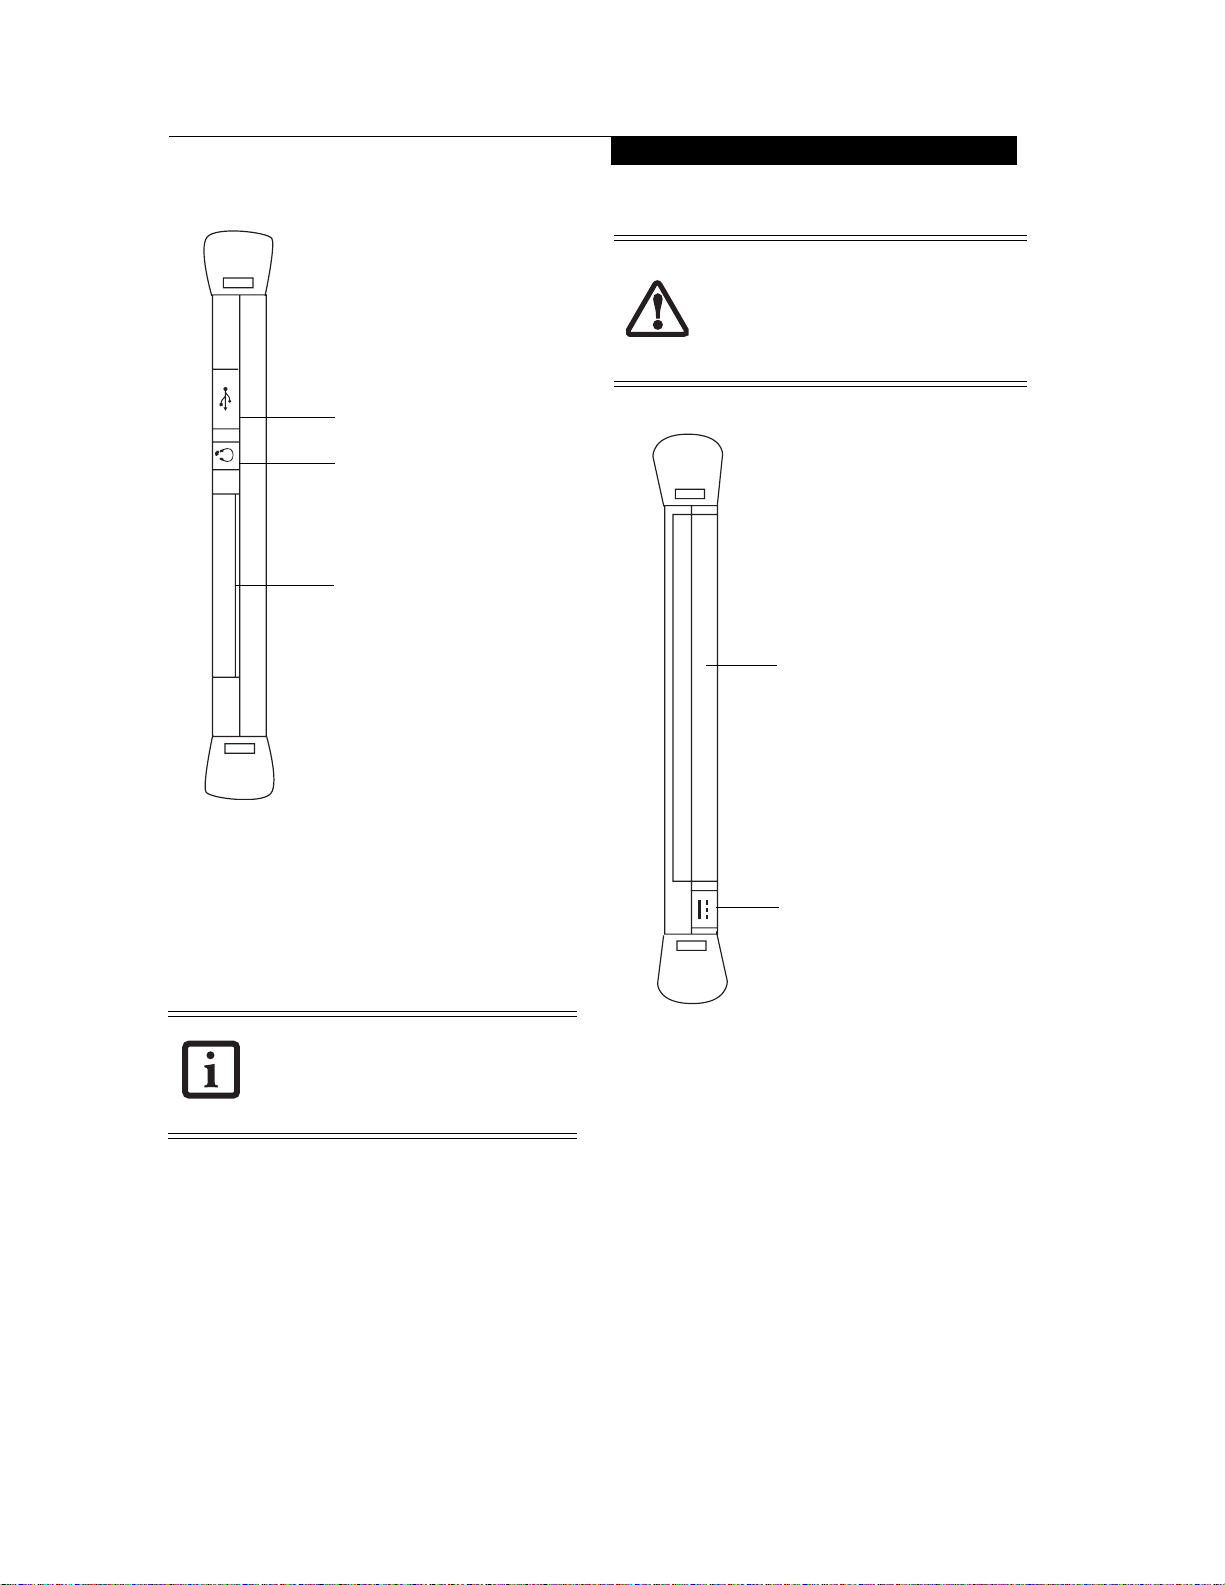
Figure 1-4. Stylistic CT2000 Series CE Tablet Features (Top Side View)
Pen HolderPC Card Slot Barcode Scanner Port
Top Side Features: 1
The ports and connectors on the sides of the
tablet are protected by covers. Some of the
covers are secured with small Philips screws;
the others are protected by rubber flaps. If
you remove a cover that is secured with a
screw, retain the cover and hardware in a
safe place for later reinstallation.
Tablet Cradle Interface
Figure 1-5. Stylistic CT2000 Series CE Tablet (Bottom Side View)
Bottom Side Features: 1
• Tablet Cradle Interface: Twenty-two pin connector
for docking the tablet with the optional tablet cradle.
Note that a cradle is required in order to
synchronize your tablet with another computer with
ActiveSync.
• Pen: The main input device that you use to execute
programs and enter data. A pen holder is built into
the tablet to store the pen when not in use.
• Barcode Scanner Port: Allows you to connect a serial
device when using an adapter. Note that this is not a
standard RS-232 connector, and must be used with a
device that has a compatible connector. This allows
you to use the system with devices such as barcode
scanners.
• PC Card slot: Allows you to install a Type I or Type II
PCMCIA Card in the system.
10
Page 14
Getting Started
The CF card slot does not have an eject
button, so be sure to only use cards that are
long enough to extend from the CF card slot
or to use an adhesive “H” tab included with
the system.
page 19 for more information.)
(See Compact Flash Slot on
USB Port
Audio Jack
Compact Flash (CF) Slot
Figure 1-6. Left Side View
Left-Side Features: 1
• USB port: Allows you to connect Universal Serial Bus
devices (USB Standard Revision 1.1) to the tablet.
Additional USB ports are located on the optional
tablet cradle.
Battery Pack
DC Jack
Note that due to power constraints, there is
a possibility that certain USB 1.1 devices will
not operate properly with this port. If your
device has its own power adapter, it is
recommended that you use it.
• Audio Jack: The 2.5mm audio jack allows you to
connect an external combination headphone/
microphone. Note that a typical 3.5 mm audio plug
will not fit because this jack is specifically designed for
a telephone headphone/microphone hands-free set.
• Compact Flash (CF) Slot: Allows you to insert a
Compact Flash card.
Figure 1-7. Right Side View
Right-Side Features: 1
• Battery Pack: The battery pack can be removed for
replacement.
• DC Jack: Allows you to connect the AC Adapter to
power the system and charge the battery. (See
Charging the Battery Pack on page 18 for more
information.)
11
Page 15
Stylistic CT2000 Series CE Tablet User’s Guide – Section One
PWR
CLR
BKS
F1
F2
F3
F4
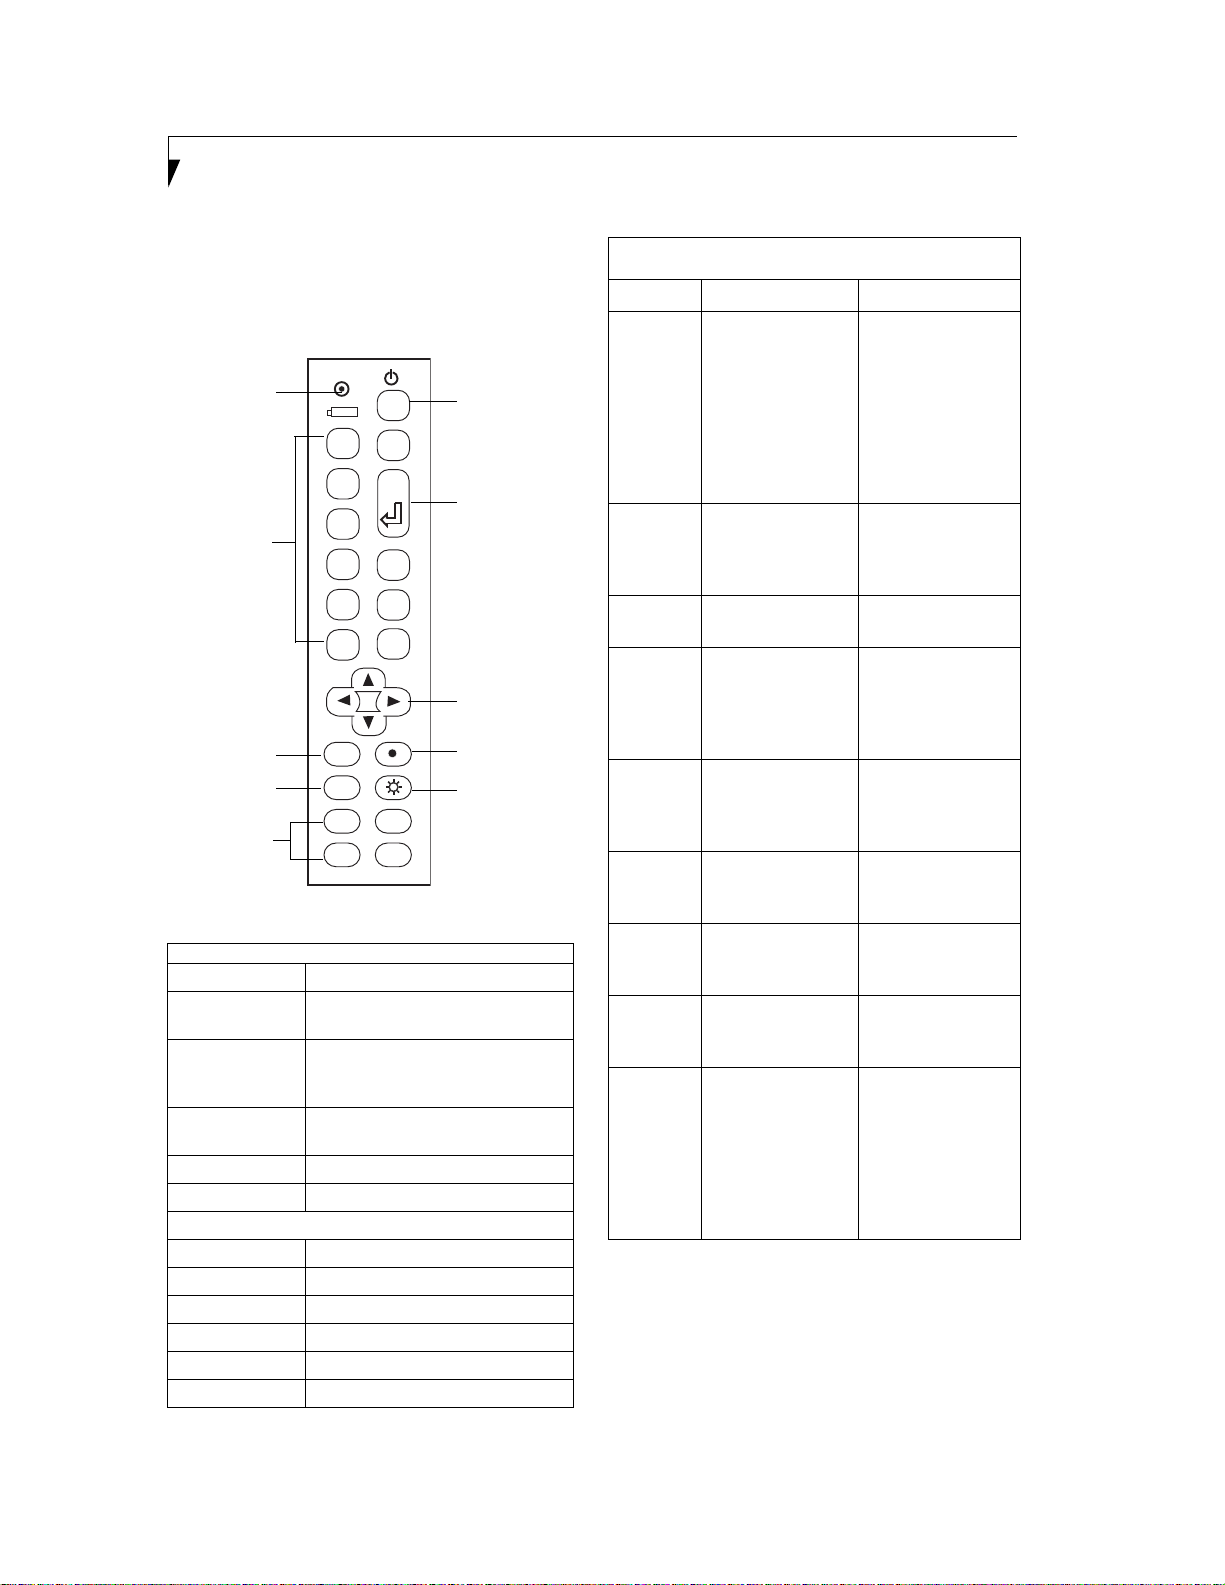
KEY/BUTTON PAD
The Stylistic CT2000 Series CE Tablet has a handy key/
button pad that can be used for performing a variety of
functions. Reference Figure 1-8. for the location of the
various indicators, keys, and buttons; reference Table 1-
1. and Table 1-2. for a description of each item.
Power/
Charging
LED
10-Key
Numeric
Keypad
Clear
Button
Backspace
Button
Function
Buttons
(F1 - F4)
1
2
3
4
5
6
CLR
CLR
BKS
BKS
F1
F1
F3
F3 F4
PWR
PWR
0
ENT
7
8
9
F2
F2
F4
Figure 1-8. Key/Button Pad
Power/Charging LED - Battery Power
System State LED State
Going into
Suspend
Resuming from
Suspend
Booting up Green, continuous until boot
Battery Fault Red, continuous
Off The LED is off.
On, charging Off
On, fully charged Off
Off, charging Green, continuous
Off, fully charged Off
Battery error Red, continuous
Charging error Red, blinking
Green while the power button is
pressed, then the system suspends.
Green, continuous while Power
button depressed, then system
resumes
complete
Power/Charging LED - AC Power
Table 1-1. Power/Charging LED
12
Power
Button
Enter Key
4-Way
Navigation
Keys
Decimal Point
Brightness
Button
Keys/Buttons
Name Function Remarks
Power
Button
10-Key
Numeric
Keypad
Enter Key Acts like an Enter
Clear
Button
4-Way
Navigation
Keys
Decimal
Point
Backspace
Button
Brightness
Buttons
Function
Buttons
Puts the system into
suspend mode, and
wakes it up.
Acts like a standard
10-key numeric
keypad for doing
calculations.
key on a keyboard.
Acts like a fullscreen eraser when
you are entering
data with
Tra nscri ber.
Allow you to move
the cursor up or
down and left or
right.
Used in conjunction
with the numeric
keypad
Acts like the
Backspace key on a
keyboard.
Allows you to adjust
the brightness of the
display.
Enables quicklaunch of the
assigned
applications.
System never goes
into a true power-off
state unless the
power on/off switch
is used (Figure 1-3.).
By suspending the
system, it remains
ready for “instant
on”.
For use in an open
editor, such as
WordPad.
Cycles through four
levels.
The function buttons
are pre-programmed
to launch certain
applications. Refer to
“Programming the
Function Buttons”
on page 17 for the
assigned defaults.
Table 1-2. Keys and Buttons
FUNCTION BUTTONS
The four function buttons are located on bottom of the
key/button pad (See Figure 1-8.).
For details on using and programming the function
buttons, refer to “Programming the Function Buttons”
on page 17.
Page 16
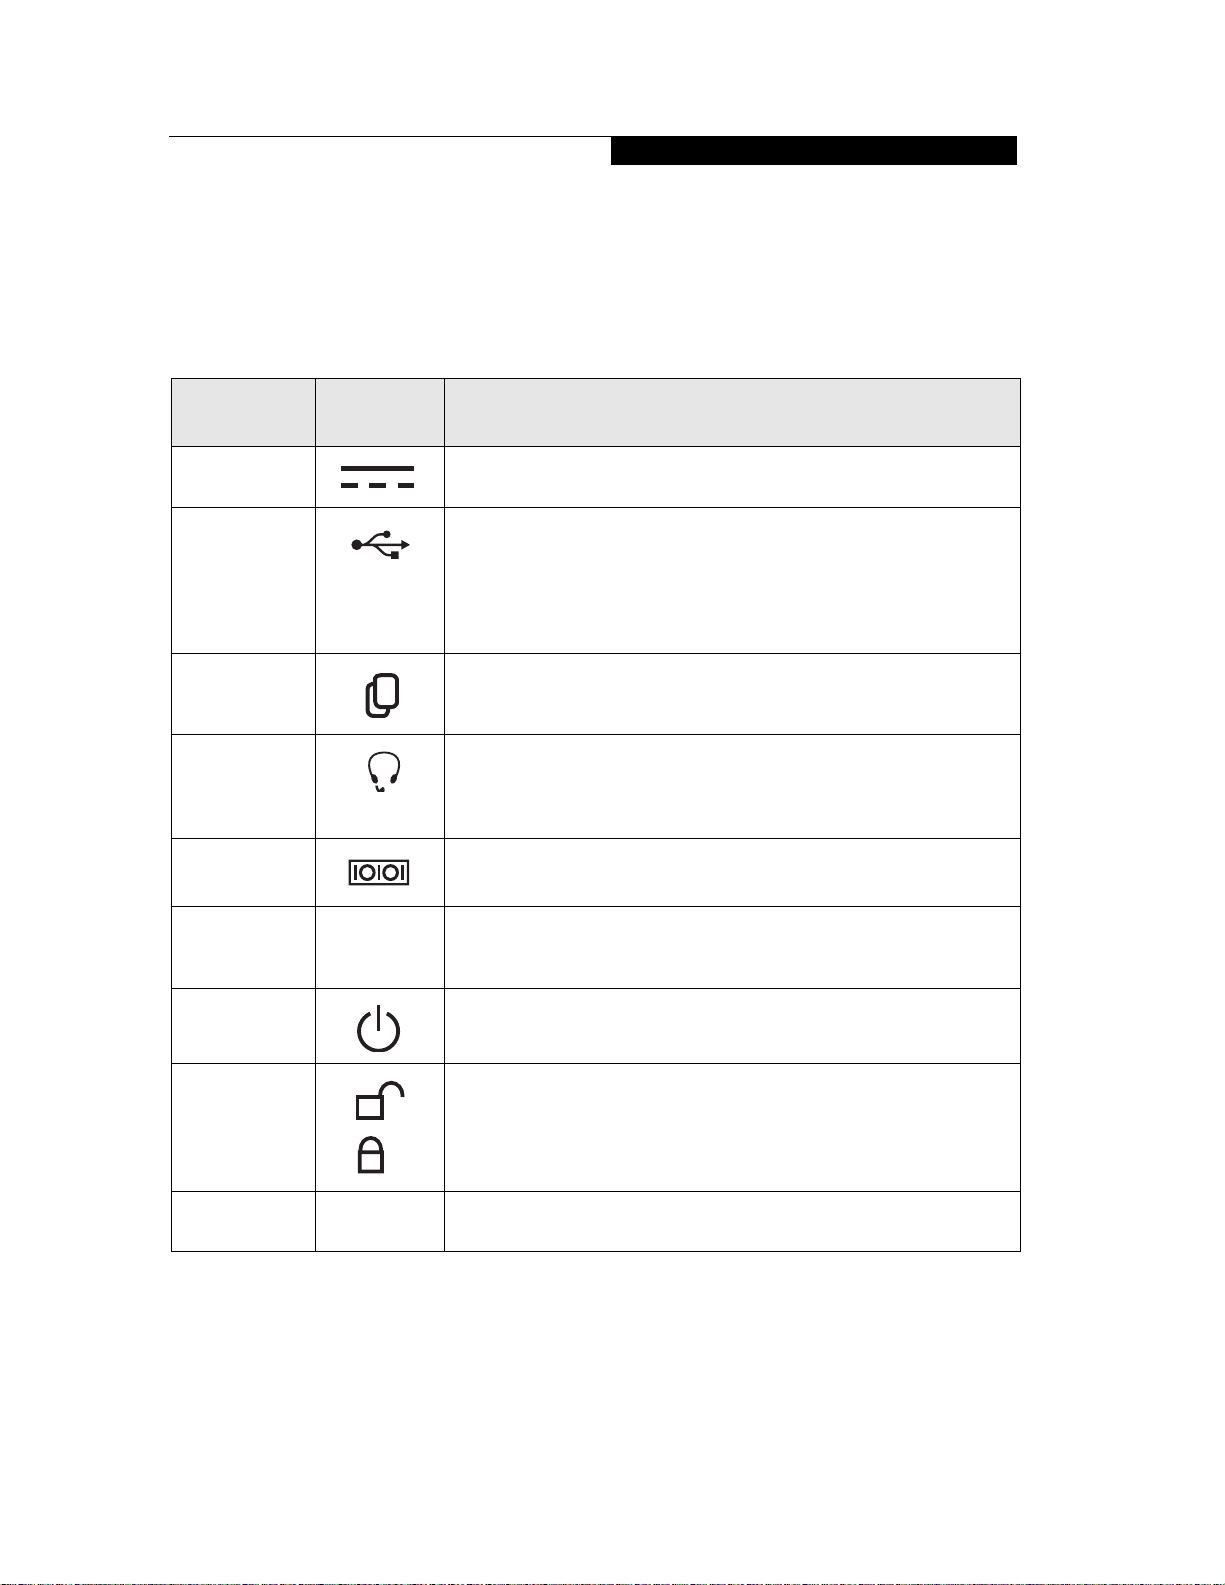
CONNECTORS, BUTTONS, AND PERIPHERAL INTERFACES
Getting Started
Connectors and peripheral interfaces on the Stylistic
CT2000 Series CE Tablet allow the connection of a
variety of devices. Specific locations are illustrated in
Figures 1-2 through 1-5.
Connector/
Peripheral
DC input
Tablet Icon Purpose
Connect the AC adapter to power the system and charge the battery.
Table 1-3 provides a description of each peripheral
connector and buttons on the Stylistic CT2000 Series CE
Tablet. Each of the illustrated icons is either molded into
or printed on the tablet chassis.
connector
USB Port
Connect Universal Serial Bus 1.1 devices to the Stylistic CT2000 Series
CE Tablet.
(Note that due to power constraints, there is a possibility that certain USB 1.1
devices will not operate properly with this port. If your device has its own power
adapter, it is recommended that you use it.)
PCMCIA
Install a Type I or Type II PC Card.
Card slot
Audio jack Connect an external combination 2.5 mm microphone/headphone.
Note that a typical 3.5 mm audio plug will not fit this jack because it is
specifically designed for a telephone headphone/microphone handsfree set.
Barcode
Scanner Port
Cradle
Interface Port No icon
Connect a device such as a bar code scanner. Note that this is a
specialized unit, and does not use a standard RS-232 port.
Connect the Stylistic CT2000 Series CE Cradle or other approved
docking device. Refer to documentation accompanying the docking
device for more information.
Power button The Power button allows you to suspend tablet activity and resume
your tablet from suspend mode.
Battery Release
Lock/Latch
The battery release lock/latch allows you to remove the battery from
your system for external charging, storage, or replacement, and to lock
it into place when installed.
Reset Button RESET The recessed Reset button allows you to perform a warm boot of the
system.
Table 1-3. Peripheral Connectors/Interfaces
13
Page 17

2
Using Your Stylistic
CT2000 Series CE Tablet
14
Page 18
Using Your Stylistic CT2000
Using the Stylistic CT2000 Series CE Tablet
This chapter covers the fundamental concepts, basic
system operation and use, and system functions of the
Stylistic CT2000 Series CE Tablet. You should familiarize
yourself with this information before you attempt to
operate the system.
BEFORE SETTING UP THE TABLET
Before you set up your tablet, there are two important
steps to perform:
• The display can be damaged with improper use. We
highly recommend that you install a screen protector
on your system. Screen protectors are available as
optional accessories for your tablet. (For part
numbers and ordering information, go to the Fujitsu
Web site at: us.fujitsu.com/computers.) To install a
screen protector, refer to “Protecting the Display” on
page 33.
• The system should be charged for a full 24 hours
prior to first using it. The 24-hour period ensures
that the main and backup batteries are fully charged.
POWERING UP THE TABLET
Follow the procedure below to start the Stylistic CT2000
Series CE Tablet if it is in the Off state. When you first
receive your system, it may or may not be in the Off
state. Under normal circumstances, the system should
not be in the Off state.
Before you begin, confirm whether the system is in the
Off state. To do so, perform the following steps:
1. Ensure that a charged battery is installed.
2. Press the Power button at the top left of the keypad
for one to two seconds. If the LED is not lit, the
system is in the Off state and it is safe to perform this
procedure. If it is lit, do not perform this procedure.
3. Remove the battery pack from your system by sliding
the two battery release latches toward the unlatch
icon , and sliding the battery out of the bay.
4. Using the tip of your pen, slide the Power switch
located inside the battery bay into On position.
5. Slide the battery back into the bay. The battery
release latch at the bottom will click into place, but
you must manually lock the upper latch, otherwise
the battery will be unusable and the system will not
power on.
6. Press the Power button on the keypad for one to two
seconds.
After performing initialization, the system starts the
operating system.
“NO APPLICATION HAS BEEN INSTALLED”
If you have not added any new programs using the
backup utility since the system was new , you will receive
a message the next time you power the system on after
having reset the system with the Power switch. (See
Using the Stylistic CT2000 Series CE Tablet on page 15 for
more information.) The message will state “No applica-
tion has been installed.” When this occurs, press the
keypad [BKS] key.
After pressing the [BKS] key, you will be prompted to
calibrate the pen and set the date and time. When the
setting menu appears, tap on “Desktop” in the menu.
“CONTENTS OF MEMORY HAS BEEN LOST”
If you have added any new programs using the backup
utility, you will receive a message the next time you
power the system on after having reset the system with
the Power switch. (See Using the Stylistic CT2000 Series
CE Tablet on page 15 for more information.) The message
will state “The contents of memory has been lost”.
Click [Restore] to recover the application program.
SHUTTING DOWN THE SYSTEM
Note that shutting down the system is not recommended
under normal circumstances, and should only be
performed if the system is to be stored for a long period
of time. If the system freezes up, use the procedure for
“Resetting the System”, below.
• Use the Power switch to shut off the
system only if you have no alternative.
• If the system is shut down using the
Power switch, data and programs that are
stored in RAM will be lost.
Follow these steps to turn off your system:
1. If possible, save your work and close all running
programs.
2. Remove the battery pack from your system by
sliding the two battery release latches toward the
unlatch icon , and sliding the battery pack out
of the bay.
3. Using the tip of your pen, slide the Power switch
located inside the battery bay into Off position. The
system is now in the Off state.
4. When you are ready to restart your tablet, follow the
steps for “Powering Up the Tablet”.
15
Page 19
Stylistic CT2000 Series CE Tablet User’s Guide – Section Two
SUSPENDING/RESUMING THE SYSTEM
The Power button on the keypad is used to stop and start
the operation of your tablet. Suspending system operation with this button does not shut the system down, it
simply “puts it to sleep” until you’re ready to use it.
To resume system operation, press the Power button on
the top of the keypad for one to two seconds (see Figure
1-8.) When you press the button, the system “wakes up”
and resumes at the same point as when you suspended
operation.
When you have finished working with your tablet, or
when you will not be using it for an extended period, you
should suspend operation to conserve battery power.
It is good practice to always save your open
documents before suspending the system.
To suspend your system, save your work, then press the
Power button for one to two seconds. When you resume
operation, the system will resume at the point at which
you suspended operation.
RESETTING THE SYSTEM
In the event your system freezes up and does not respond
to pen taps or keystrokes, it may become necessary to
reset the system. To reset the system, lightly press the
Reset button on the back of the system (see Figure 1-3.)
using the tip of your pen. When the Reset button is
pressed, the system will reboot.
Resetting the system using the Reset button
will not result in loss of data or programs
that are stored in RAM.
USING THE PEN
You can use the tablet pen to generate and capture electronic “ink”, to select items, and to navigate through
programs on the tablet. Programs that support handwriting recognition allow you to write characters directly
on the screen with the pen.
By default the pen is in “pointing” mode; to select
“inking” mode, click Start -> Programs -> Transcriber.
The Transcriber icons will be created in the system tray at
the bottom right of the screen. Click on the icon that
looks like a hand holding a pen to change the mode. To
change back to pointing mode from inking mode, click
on the icon again.
.
• The warranty does not cover a screen
that is scratched as a result of not using a
screen protector. We strongly
recommend that you install a screen
protector on your system. Screen
protectors are available as optional
accessories for your tablet. (For part
numbers and ordering information, go to
the Fujitsu Web site at: us.fujitsu.com/
computers.)
• Do not use a ballpoint pen or any sharp
object on the tablet. Doing so can scratch
the screen surface. The warranty does
not cover a screen that is scratched as a
result of using a device other than the
pen that was designed for the system.
The tablet uses “palm-rejection” technology that helps it
distinguish between the pressure of a pen tip and that of
your hand. This means you can safely rest your hand on
the screen in a natural writing position without the risk
of the system interpreting the pressure as that of the pen.
(Always use care, however, when resting your hand on
the screen.
Use care when resting your hand on the
screen. If you press a knuckle on the screen,
it may be interpreted as pen pressure.
Here are some hints on using the pen like a two-button
mouse on a desktop system:
■
To select an object, tap the pen tip on the object once.
This functions like a mouse button click with the left
mouse button.
■
To “double-click” an object, tap twice on the object
quickly.
■
To “right-click”, touch the desired object with the pen
tip until a small circle of dashes appears.
For example, to invoke the Desktop properties with the
desktop active, simply touch the pen tip to the screen
for approximately two seconds, and the properties
menu will appear.
■
To move, or “drag”, an object on the screen, place the
pen tip directly over the object, then as you hold the
pen tip against the screen, move the pen.
CALIBRATING THE PEN
You calibrate the pen to ensure that the point where the
pen actually touches the screen and where the system
“thinks” the pen is touching on the screen are the same. If
the event you wish to invoke is not displayed under the
pen tip when you use the pen, you should calibrate the
pen.
16
Page 20
Using Your Stylistic CT2000
Pen calibration may be required due to the following
situations:
• The pen is being used for the first time.
• The previous user of the tablet writes with the
opposite hand or at a different pen angle.
• The system has been in use for some time and the
pen has not been calibrated.
• The system has not been used for a long time and all
stored information is lost due to battery power loss.
When you first power up your system, the pen will need
to be calibrated. The calibration screen will appear automatically in that case.
It may be necessary to calibrate the pen
more than once until the system
recognizes it as a satisfactory calibration.
In the event you want to calibrate your pen, there are
three different methods you can use to open the calibration utility.
■
Using the Control Panel. Click [Start] -> Settings ->
Control Panel, and double-click the Stylus icon. Select
the Calibration tab and click the [Recalibrate] button.
(NOTE: If calibration is so far off that the Stylus icon
can’t be seen, use one of the two alternate methods to
open the utility.) Proceed to “Calibration Procedure”,
below.
■
Use the Calibration Utility. Open the Fujitsu Menu
(See “Using the Fujitsu Setup Menu” on page 24).
Select “Run a Program” and in the window that
appears, type in “\Windows\Calibration.exe”, or
browse to the location of the file. Click [OK] and the
calibration utility will start. Proceed to “Calibration
Procedure”, below.
■
Using the System Dialog window. Press the F2 button
to open the System Dialog window. Tap the [Touch
Panel Calibration] button. Proceed to “Calibration
Procedure”, below.
Calibration Procedure
Press the pen tip to the center of the target in the middle
of the screen. The target will move to a new corner each
time you press it. After you have pressed the target in the
center and the four corners, the pen will be calibrated.
CHANGING DISPLAY RESOLUTION
By default, your display is set to XGA resolution (1024 x
768). To change the resolution to SVGA (800 x 600),
perform the following steps:
1. Go to Start -> Settings -> Control Panel -> Display
DPI.
2. Select either 800x600 or 1024x768, depending upon
your preference.
3. If you change the settings, you will be prompted that
you must reboot your system. Click [Yes].
ADJUSTING THE DISPLAY BRIGHTNESS
Depending upon the ambient lighting, or to conserve
power, you may want to adjust the display brightness.
Depending upon whether you are running
your system on battery or AC power, the
default screen brightness settings may be
different.
There are two ways to adjust the display brightness:
■
Press the Brightness button on the keypad to
adjust the brightness level of your display. There are
four levels of brightness; once you have pressed the
brightness button to the highest level, the next press of
the button will start the four-level cycle again.
■
Click [Start] -> Settings -> Control Panel and doubleclick the BackLight icon.When Backlight Properties
window opens, adjust the brightness with the slider.
PROGRAMMING THE FUNCTION BUTTONS
At the bottom of the keypad are four buttons labeled
“F1”, “F2”, “F3”, and “F4”. Each of these buttons can be
programmed to open commonly used programs or utilities simply by pressing the button.
When you receive your tablet the buttons have been preprogrammed to default to the following:
F1 (Button1): On-Screen Keyboard
F2 (Button2): System Dialog
F3 (Button3): WLAN/Battery Indicator
F4 (Button4): Unassigned
To change the program or utility assigned to any button,
perform the following steps:
1. Click [Start] -> Settings -> Control Panel and
double-click the Buttons icon. The Button Property
window will appear.
2. Select the ellipsis (“...”) adjacent to the button you
want to change. A directory appears from which you
can navigate to the program you want the button to
launch. In CE .NET, many of the .exe files are located
in the \Windows\ directory. (Note that .exe files can
also be located in other folders, depending upon
where you choose to save them.)
3. In the selected folder, click on the .exe you want to
associate with the button, and click the [OK] button.
Click the [OK] button on the Button Property
screen. The program you selected will now be
invoked by pressing the associated function button.
17
Page 21

Stylistic CT2000 Series CE Tablet User’s Guide – Section Two
If the program file you want to launch is
hidden, go to Start -> Program -> Explorer
-> View -> Options to see the options
selected in the Folder Options dialog.
For example, if you want to open WordPad whenever
you press [F4], first you would open the Button
Property window by clicking [Start] -> Settings ->
Control Panel and double-clicking the Buttons icon.
Next, you would click the [...] on the Button4 line.
Double-click on Windows and tap on “pword.exe” in
the window that appears. (Note: If it appears that the
program file is hidden, check Start -> Program ->
Explorer -> View -> Options to verify the options
selected in the Folder Options dialog.)
Click [OK], then click [OK] again. From now on,
every time you press the F4 button, the WordPad
program will start unless you go back and assign a
new application to the button.
POWERING THE TABLET
The Stylistic CT2000 Series CE Tablet can be powered by
either its rechargeable battery pack or by its AC power
adapter.
Removing a Battery Pack
To install a new battery pack, perform the following
steps:
1. Save any open documents and suspend your system.
2. Hold the system face down, with the battery
compartment pointing towards you (see Figure 2-1).
The latch/lock must be locked/unlocked
manually. If you do not lock the battery in
place, the system will not run from the
battery.
3. With the system oriented as shown in Figure 2-1,
slide the latches to the left. Note that the latch on the
left doubles as a latch and battery lock. It is not
spring-loaded; it must be manipulated manually.
4. While continuing to hold the spring-loaded latch on
the left, slide the battery pack out of the battery tray
by pulling it towards you. When the battery is clear of
the latch mechanism, release the battery latch.
Installing a Battery Pack
1. To install a new or recharged battery pack, first make
sure the lock/latch on the left is in unlatched position
then slide the battery pack into the battery
tray and firmly push it in until it is seated. Slide the
left latch into locked position.
2. Resume system operation.
CHARGING THE BATTERY PACK
An installed battery can be recharged
while the system is running or suspended.
To recharge the battery pack while it is installed in the
system, plug the AC adapter into the DC input jack on
the right side of the system. Insert the AC adapter’s electrical plug into a wall socket. When DC power is
connected to the system and the system is suspended, the
LED on the front of the system is lit if charging, otherwise it is off (reference the “Key/Button Pad” on page 12
for more information).
The battery can also be recharged when the system is
installed in the optional cradle with cradle power applied.
CONSERVING BATTERY POWER
You can extend the charge life of your battery pack by
conserving battery power. Your results may vary,
depending upon the applications you use. Here are some
suggestions to help you conserve battery power:
• Click Control Panel and double-click the Power icon.
Select the Schemes tab. From the Power Scheme:
dropdown, select whether you want to change the
settings for battery power or AC power. Set the length
of time before you want the system to automatically
go to the next power state.
Latch/lock
Spring-loaded latch
Figure 2-1 Removing/Installing the Battery
18
The system will first go into User Idle state, then
System Idle state, and finally to Suspend state. The
shorter the periods, the longer your battery will
remain charged. Note that these periods are
cumulative, not exclusive. For example, if User Idle is
set to 1 minute, System Idle is set to 3 minutes, and
Suspend is set to 2 minutes, the system won’t go into
Suspend until 6 minutes have passed (the total of the
three settings).
Page 22

Using Your Stylistic CT2000
Note that if any of the three states is set
to “Never”, the system will never
suspend automatically.
• Reduce the backlight brightness using the brightness
button or using the Backlight selection in the Control
Panel (reference the section of this chapter entitled
“Adjusting the Display Brightness” on page 17.)
• Shorten the amount of time before the backlight
decreases in the Control Panel -> Display ->
Backlight window.
• When you know you won’t be using the system for a
long period of time, manually suspend the tablet by
pressing the Power button.
Operation of the Bridge Battery
When installed in the tablet, the main battery provides
power to some system components—even when the
system is in the Off state. When the battery is removed,
power is supplied to these components by a “bridge”
battery that is built into the tablet.
The bridge battery is not designed for long-term operation; it will support the main memory for only approximately 3 minutes.
The system arrives with the bridge battery
discharged. Be sure to charge it for at least
24 hours before relying upon it to support
the system in the event of battery removal.
To prevent draining the bridge battery, always store the
system with a charged battery installed.
USING A KEYBOARD OR MOUSE
Although the pen, on-screen keyboard, and handwriting
recognition applications allow you to enter any type of
data into your system, there may be occasions when you
prefer to use a mouse or an optional keyboard.
Some external keyboards and mice are not
compatible with the Stylistic CT2000 Series
CE Tablet (e.g., multifunction devices).
PC CARD SLOT
The Stylistic CT2000 Series CE Tablet Card slot allows
you to install a Type I or Type II PCMCIA Card.
Note that the software that accompanies
some PC Cards is not compatible with the
ARMV4I processor used in the Stylistic
CT2000 Series CE Tablet. Check the PC
Card specifications for compatibility before
attempting to use the card in your system.
Installing a PC Card
First remove the protective cover by unscrewing the
Philips screw that secures the cover to the system. Save
the cover and hardware for later reinstallation.
Position the PC Card side with the arrow on the card
facing up (i.e., when looking at the tablet’s display side,
the arrow on the card should be visible.) Slide the card
into the PC Card slot, and press it firmly to ensure
proper seating. (See Figure 1-4 for location)
Removing a PC Card
To remove a PC Card, first save any active data and press
the Power button.
Firmly press the PC Card eject button that is adjacent to
the PC Card slot. The card will be ejected.
COMPACT FLASH SLOT
Your tablet supports Compact Flash (CF) cards, which
can perform a variety of functions. For further information on a particular CF card, refer to the instructions
supplied with the card.
Installing CF Cards
CF Cards are installed in the CF Card slot. To install a
CF Card, follow these steps:
Note that the software that accompanies
some CF Cards is not compatible with the
ARMV4I processor used in the Stylistic
CT2000 Series CE Tablet. Check the CF
Card specifications for compatibility before
attempting to use the card in your system.
Attaching a Keyboard or Mouse
1. Before attaching a USB 1.1 keyboard or mouse to
your tablet, save all active data, then suspend system
operation by pressing the Power button on the
keypad.
2. Plug the keyboard or mouse plug into the USB port
on the left-hand side of the tablet or on the rear of
the cradle.
3. If you are using the cradle, connect an AC adapter to
the cradle to supply power.
4. Resume system operation.
Do not insert a CF Card into a slot if there
is water or any other substance on the
card as you may permanently damage the
card, your tablet, or both.
19
Page 23

Stylistic CT2000 Series CE Tablet User’s Guide – Section Two
The CF card slot does not have an eject
button, so try to use cards that are long
enough to extend from the CF card slot.
In the event that is not possible, use one of
the adhesive “H” tabs that were included
with the system. To use an “H” tab,
perform the following steps:
• Make sure you apply the tab to the
end of the card that will be held when
the card is inserted (i.e, the end
without the connector).
CF Card
(connector end)
H Tab
• Remove the adhesive cover from one
end of the tab and position it so that it
is flush with the edge of the CF card;
apply it to the card.
• Remove the other two pieces of
adhesive cover and apply the second
end to the other side of the CF card.
• Squeeze the two sides of the tab
together.
When you insert the card from now on,
use the tab to pull the card from the slot.
INSTALLING A HANDSTRAP
The handstrap that came with your system provides a
secure, comfortable method for holding the tablet.
To attach the handstrap, perform the following steps:
1. Locate the handstrap attachment points on the rear
of the system (See Figure 1-3 on page 9 for location).
Note that there are three attachment points so that
the strap can be installed either horizontally or diagonally, depending upon your preference.
2. Slide the metal strip at one end of the strap into the
slot in one of the attachment points (Figure 2-2).
Figure 2-2 Inserting the Handstrap
3. Press the spring into the slot to secure the metal strip
in the slot (Figure 2-4).
Spring
Slot
1. See your CF Card manual for instructions on installation of your card. Some CF Cards may require the
system be suspended during card installation.
2. First remove the protective cover by unscrewing the
Philips screw that secures the cover to the system.
Save the cover and hardware for later reinstallation.
3. Position the CF Card side with the arrow on the card
facing up (i.e., when looking at the tablet’s display
side, the arrow on the card should be visible.) Slide
the card into the CF Card slot, and press it firmly to
ensure proper seating. (See Figure 1-6 for location)
Removing a CF Card
1. To remove a CF Card, first save any active data and
press the Power button.
2. If the cover is installed over the card, remove it and
save it for reinstallation.
3. Pull the CF Card from the slot.
20
Figure 2-4. Securing the Handstrap
4. Repeat steps 2 and 3 to install the other end of the
strap to a second attachment point.
To remove the handstrap, pull the spring back and up
out of the slot, then slide the metal strip out of the slot.
Page 24

3
Using Your Stylistic
CT2000 Series
CE Tablet Software
21
Page 25

Stylistic CT2000 Series CE Tablet User’s Guide – Section Three
Using the Stylistic CT2000 Series CE Tablet Software
Your Stylistic CT2000 Series CE Tablet comes pre-loaded
with a variety of valuable software. This chapter provides
an overview of the CE Tablet software; for detailed information about installing and using the software, refer to
Appendix A of this document.
WINDOWS CE .NET APPLICATIONS
The Microsoft® Windows CE .NET operating system
consists of:
■
Microsoft Transcriber
Transcriber is a handwriting recognition tool that
allows you to print or write in cursive. You can
customize Transcriber to recognize your personal
handwriting more readily by using the Letter Shapes
Selector utility.
■
Microsoft Excel Viewer
A file viewer that displays documents created in Excel
97, Excel 2000, and Excel XP.
■
Microsoft Image Viewer
Image Viewer allows you to manipulate your images
to create a slide show. Image Viewer lets you sort,
rotate, or zoom your photos, and create transition
effects for slide shows.
■
Microsoft PDF Viewer
Allows you to display documents authored in
Portable Document Format (PDF), version 1.3.
■
Microsoft PowerPoint Viewer
A file viewer that displays presentations created in
Microsoft PowerPoint 97, PowerPoint 2000, and
PowerPoint XP.
■
Microsoft WordPad
A basic word processing application.
■
Microsoft Word Viewer
Allows you to display documents created in Microsoft
Word 97, Word 2000, and Word XP.
■
Remote Desktop Protocol
RDP allows you to use your tablet to communicate
with a terminal server across a LAN, WAN, or by a
dial-up, ISDN, DSL, or virtual private network
(VPN) connection.
• Prior to using the Remote Desktop
Protocol, you must first configure the
Terminal Service Settings which can be
accessed by double-clicking on the
Terminal Service Setting icon in the
Control Panel.
(See Terminal service
setting on page 57 for more information.)
• If the server is not configured, the
system will suspend.
■
To open RDP, go to Start -> Programs -> Remote
Desktop. Follow the prompts and enter the password
when prompted.
■
Windows Messenger
This utility detects the presence of contacts and
provides text and voice messaging and file transfers
using Hotmail and Communications Service
protocols.
■
Customized Internet Explorer 6.0 for Windows CE
Internet Explorer allows you to navigate and view
Internet pages on your tablet when you are connected
to an Internet Service Provider (ISP) though a
modem, Ethernet, or wireless LAN.
■
Windows Media Player
Standalone application for playing various multimedia data formats.
To learn how to use the Windows CE .NET applications
and utilities, click the [Start] button and select Help
from the menu. A multi-layered help menu will appear.
Navigate down to the specific application, and a detailed
description of how to use the application will appear.
ACTIVESYNC APPLICATION
ActiveSync is software that allows you to easily synchronize data between your tablet and a remote host
computer.
In order to use ActiveSync, you must have
the optional tablet cradle. To purchase a
tablet cradle, go to the Fujitsu Web site at:
http://us.fujitsu.com/computers, and
navigate to the accessories section.
To install ActiveSync, you must first download it from
the Microsoft Web site to the host computer. The download is available at:
http://www.microsoft.com/downloads
Install ActiveSync by following the instructions that
appear on the screen.
22
Page 26
Using Your Tablet Software
• Before attempting to synchronize the
tablet with the host computer, you must
power up the tablet before inserting it
into the tablet dock.
• Be sure to insert the tablet carefully in the
dock. Failure to align the interface
connectors could result in synchronization
problems.
First-Time ActiveSync
The first time you use ActiveSync, you must first set up a
partnership between your tablet and the host computer.
To do so, perform the following steps.
1. Be sure that you have downloaded ActiveSync from
the Microsoft web site, as detailed above.
2. Before attempting to synchronize the systems, be sure
to connect the USB cable that came with the cradle
between the host computer and the tablet, as
instructed in the cradle manual.
3. Turn on the tablet prior to inserting it in the tablet
dock, otherwise you will fail to synchronize.
4. A few seconds after you insert the tablet in the dock,
you will hear a beep, indicating that the tablet and
remote computer are communicating
If the tablet and the remote system fail to
synchronize, undock and redock the system;
the interface connector on the bottom of the
system may be misaligned with the
connector on the dock.
.
5. A message appears asking if you want to set up a
partnership. Click [Yes], then click [Next].
6. When asked for a device name, enter a name for the
tablet and click [Next]. In the event that the name
you enter has already been used, you will receive a
message stating “Device name not unique”. If that
occurs, enter a new name and click [Next].
7. Select Synchronization Settings and click [Next].
8. When you receive a message stating that setup is
complete, click [Finish]. An ActiveSync window will
appear telling you that you are connected and
sychronized.
When ActiveSync is disconnected, the CE
Tablet may shut down. Before closing the
ActiveSync connection, be sure to save all
active data.
To Launch ActiveSync Automatically
On the tablet desktop go to Start -> Settings -> Control
Panel and click on the PC Connection icon. Verify that
the “Enable direct connections to the desktop computer”
checkbox is checked. If you do not want to sync automatically, uncheck the box. In the future, ActiveSync will
start automatically when you install the running system
in the dock.
Undocking and re-docking the tablet too
quickly will cause a loss of connection.
ADD-ON APPLICATIONS AND UTILITIES
In addition to the Windows applications listed above,
there are several third-party applications and utilities
included on your tablet. Details on their use can be found
in the appropriate sections of this manual.
Control Panel
The Control Panel provides several helpful utilities,
including:
■
Backlight: The Backlight utility lets you adjust the
backlight level using a slider bar.
■
Buttons: The Buttons applet allows you to assign
different applications to the four function buttons.
■
ClearType: This applet lets you enable ClearType
font.
■
Display: The Display applet allows you to change the
color or image in the background and to set the
amount of time for the backlight to stay on when the
system is not in use (this is for battery conservation).
■
Display DPI: Allows you change the resolution of the
display from 1024 x 768 to 800 x 600 pixels.
■
Input Panel: The Input Panel allows you to select the
size of the on-screen keyboard.
■
PC Connection: This applet allows you to select the
method for synchronizing with your desktop
computer. PC Connection also allows you to specify
whether the system will ActiveSync automatically at
startup.
■
Power: The Power utility displays information about
battery and device status, and allows you to change
the power schemes for battery power and AC power
to maximize your battery life.
■
Stylus: The Stylus applet allows you to change the
double-tap actions and to calibrate the pen.
■
System: The System applet provides information
about the system, device name, and copyright infor-
23
Page 27

Stylistic CT2000 Series CE Tablet User’s Guide – Section Three
mation. This icon also allows you to allocate the
amount of memory used for storage and for
programs.
■
System Information: The System Information utility
provides detailed information about your tablet’s
Bootloader, CPU, and system image.
Additional Applications and Utilities
■
Calibration Direct Launch: Calibration Direct
Launch allows you to open the calibration utility
without using the Control Panel. This can be helpful
if the calibration is so far off that you can’t click on
the icon. To open the calibration utility, first open
the Fujitsu Menu (See “Using the Fujitsu Setup
Menu” on page 24). Select “Run a Program” and
type in “\windows\calibration.exe”, or browse to the
location of the file. Click [OK] and the calibration
utility will start.
■
Screen Keyboard: The on-screen keyboard allows
you to input text from a graphical on-screen
keyboard. By default, the keyboard can be invoked
by pressing the [F1] function button.
■
WLAN/Battery Indicator: Shows Signal-to-Noise
Ratio (SNR) and battery charge level periodically. By
default, this indicator can be invoked by pressing the
[F3] function button.
USING THE FUJITSU SETUP MENU
The Fujitsu Setup menu provides a central location for
you to find helpful utilities when using your system.
To access the Setup menu, first reset the system by lightly
pressing the Reset button on the back of the system
using the tip of your pen (see Figure 1-3.) While the
system is rebooting, press and hold the [CLR] button on
the keypad.
The Fujitsu Setup menu contains the following selections:
1. Control Panel
2. Install an Application
3. Device Property
4. Registry Editor
5. File Manager
6. Run a Program
7. Desktop
Each of these selections provides a separate window
containing additional instructions.
Additionally, you can invoke a Diagnostics selection
button by clicking the [BKS] and [9] buttons simultaneously while the menu is open. Ordinarily, you will not
need to use the diagnostics selection.
INSTALLING APPLICATIONS
You can install new applications using ActiveSync, a
wireless LAN, or a storage card. Detailed information
about installing applications can be found in the
Appendix of this document. (See Installing and Using the
CE Tablet Software on page 51 for more information.)
24
Page 28

4
Wireless LAN
User’s Guide
25
Page 29

Stylistic CT2000 Series CE Tablet User’s Guide – Section Four
FCC REGULATORY INFORMATION
Please note the following regulatory information related to the
wireless LAN module.
Regulatory Notes and Statements
Wireless LAN, Health and Authorization for use
Radio frequency electromagnetic energy is emitted from wireless LAN devices. The energy levels of these emissions, however,
are far much less than the electromagnetic energy emissions
from wireless devices such as mobile phones. Wireless LAN
devices are safe for use by consumers because they operate
within the guidelines found in radio frequency safety standards
and recommendations. The use of wireless LAN devices may be
restricted in some situations or environments, such as:
■
On board an airplane, or
■
In an explosive environment, or
■
In situations where the interference risk to other devices or
services is perceived or identified as harmful.
In cases in which the policy regarding use of wireless LAN
devices in specific environments is not clear (e.g., airports,
hospitals, chemical/oil/gas industrial plants, private buildings),
obtain authorization to use these devices prior to operating the
equipment.
Regulatory Information/Disclaimers
Installation and use of this wireless LAN device must be in strict
accordance with the instructions included in the user documentation provided with the product. Any changes or modifications made to this device that are not expressly approved by
the manufacturer may void the user’s authority to operate the
equipment. The manufacturer is not responsible for any radio
or television interference caused by unauthorized modification
of this device, or the substitution or attachment of connecting
cables and equipment other than those specified by the manufacturer. It is the responsibility of the user to correct any interference caused by such unauthorized modification, substitution
or attachment. The manufacturer and its authorized resellers or
distributors will assume no liability for any damage or violation
of government regulations arising from failure to comply with
these guidelines.
This device must not be co-located or operating in conjunction
with any other antenna or transmitter.
frequency energy. If not installed and used in accordance with
the instructions, it may cause harmful interference to radio
communications. However, there is no guarantee that interference will not occur in a particular installation.
If this equipment does cause harmful interference to radio or
television reception, which can be determined by turning the
equipment off and on, the user is encouraged to try and correct
the interference by one or more of the following measures:
1. Reorient or relocate the receiving antenna.
2. Increase the distance between the equipment and the
receiver.
3. Connect the equipment to an outlet on a circuit different
from the one the receiver is connected to.
4. Consult the dealer or an experienced radio/TV technician
for help.
FCC Radio Frequency Exposure statement
This wireless LAN radio device has been evaluated under FCC
Bulletin OET 65C and found compliant with the requirements
as set forth in CFR 47 Sections 2.1091, 2.1093, and 15.247 (b)
(4) addressing RF Exposure from radio frequency devices. The
radiated output power of this wireless LAN device is far below
the FCC radio frequency exposure limits.
Export restrictions
This product or software contains encryption code which may
not be exported or transferred from the US or Canada without
an approved US Department of Commerce export license. This
device complies with Part 15 of FCC Rules., as well as ICES 003
B / NMB 003 B. Operation is subject to the following two
conditions: (1) this device may not cause harmful interference,
and (2) this device must accept any interference received,
including interference that may cause undesirable operation.
Modifications not expressly authorized by Fujitsu Computer
Systems Corporation may invalidate the user's right to operate
this equipment.
Canadian Notice
To prevent radio interference to the licensed service, this device
is intended to be operated indoors and away from windows to
provide maximum shielding. Equipment (or its transmit
antenna) that is installed outdoors is subject to licensing.
Federal Communications Commission statement
This device complies with Part 15 of FCC Rules.
Operation is subject to the following two conditions: (1) This
device may not cause interference, and, (2) This device must
accept any interference, including interference that may cause
undesired operation of this device.
FCC Interference Statement
This equipment has been tested and found to comply with the
limits for a Class B digital device, pursuant to Part 15 of the
FCC Rules. These limits are designed to provide reasonable
protection against harmful interference in a residential installation. This equipment generates, uses, and can radiate radio
26
Page 30

Before Using the Wireless LAN
PWR
CLR
BKS
F1
F2
F3
F4
Wireless LAN User’s Guide
This manual describes the basic operating procedures for
the wireless LAN (referred to as the “device” in this
manual) and how to set up a wireless LAN network.
Before using this device, read this manual carefully to
ensure correct operation of the device. Keep this manual
in a safe place for reference while using the device.
Characteristics of the Device
The main characteristics are as follows:
■
It operates in the 2.4 GHz Industrial, Scientific, and
Medical (ISM) RF band.
■
It does not require the procurement of an FCC license
to operate.
■
It uses two different RF modulation schemes, depending on the operating mode: 802.11b or 802.11g. Direct
Sequence Spread Spectrum (DSSS) is used in 802.11b
mode; Orthogonal Frequency Division Multiplexing
(OFDM) is used in 802.11g mode.
■
This device is designed to the IEEE 802.11b/g standard,
which states that the maximum rate of data transfer is
54 Mbps in 802.11g mode and 11 Mbps in 802.11b
mode; this computer’s actual data transfer speed can be
much lower depending on a variety of factors, including the Windows CE device capability.
■
The maximum communication range is approximately
80 feet (25 meters) inside a building. The
range may be shorter depending upon the installation
factors, such as walls and columns.
■
Unauthorized viewing of data can be prevented with
the use of an encryption key. The wireless LAN module
used in this computer supports WEP and TKIP
encryption.
Wireless LAN Modes Using this Device
Ad Hoc Mode (See Figure 4-1)
“Ad Hoc Mode” refers to a type of wireless network that
involves connecting multiple computers without the use
of an Access Point. Network connectivity between
computers can be established using only wireless LAN
cards in a peer-to-peer fashion.
Ad Hoc networks are an easy and inexpensive method for
establishing network connectivity between multiple
computers.
In the Ad Hoc mode, you can use the function supported
by Microsoft Network, such as File and Print Sharing to
exchange files and share a printer or other peripheral
devices.
To use the Ad Hoc Mode, you must set the same SSID
and the same encryption key for all the computers that
are connected. All connected computers can communicate with each other within the communication range.
Access Point (Infrastructure) Mode (See Figure 4-2)
“Access Point” or “Infrastructure” Mode refers to a wireless network in which devices communicate with each
other by first going through an Access Point (AP). In
infrastructure mode, wireless devices can communicate
with each other or with a wired network. Most corporate
wireless LANs operate in infrastructure mode because
they require access to the wired LAN in order to use
services such as file servers or printers.
How to Handle This Device
The integrated wireless LAN device is already installed in
your mobile computer. Under normal circumstances, it
should not be necessary for you to remove or re-install it.
The wireless LAN has been configured to support the
operating system with which your system shipped.
Figure 4-1. Ad Hoc Mode Network
PWR
PWR
1
0
2
ENT
3
4
7
5
8
9
6
CLR
CLR
BKS
BS
F1
F2
F2
F1
F3
F4
F3 F4
27
Page 31

Stylistic CT2000 Series CE Tablet User’s Guide – Section Four
Figure 4-2. Access Point (Infrastructure) Mode Network
Internet
ADSL modem,
cable modem,
or similar
Wireless LAN
FOR BETTER COMMUNICATIONS
This personal computer may not operate properly due to
the operating environment. Strictly observe the
following precautions when installing the main unit of
the computer:
■
Since this personal computer is compliant only with
IEEE802.11b/g devices, it is not possible to communicate with IEEE802.11a devices.
■
The recommended wireless communications distance
is within a line-of-sight radius of 25 meters. For reasons related to the characteristics of the wireless LAN,
however, the actual communications distance depends
on the structure of the building in which the wireless
LAN function is to be used, the presence/absence of
obstructions, the types of software to be used, installation status, radio-wave status, or other operating conditions. Decreases in communications speed or a
communications failure may also occur.
■
If a broadcasting station or wireless communications
equipment is present nearby and this prevents the
computer from communicating properly, moving the
main unit of the computer is suggested. Radio interference may also occur if the intensity of ambient
radio waves is too high.
Wired LAN
Access Point*
* An optional hub for a wired
LAN may be required depending
upon the type of access point used.
STARTING TRANSMISSION
To communicate using the wireless LAN function, set
the computer to a status from which it can transmit, as
follows:
To activate the transmission:
1. Double-click the Wireless Network icon in the sys-
tem tray (it looks like two overlapping monitors).
2. Click on the Wireless Information tab. Wait for the
network list to appear, and select the one you want
to use. Click [Connect]. The radio will be turned
on.
Access Point Mode: Transmission is enabled.
Ad Hoc Mode: Restart your computer to enable the
radio.
STOPPING TRANSMISSION
To use this product inside hospitals, clinics, or airplanes,
or in other places where the use of electronic equipment
is regulated, stop the transmission of radio waves from
the wireless LAN beforehand.
Deactivation using Windows
1. Click on [Start] -> Settings -> Network and Dial-
up Connection.
2. Tap PCI-PRISM1, then click File in the toolbar at
the top of the screen.
3. Click Disable; wireless communications switching
will be deactivated and the transmission of radio
waves from the wireless LAN will be stoppe
28
d.
Page 32

DISABLING/RE-ENABLING THE WLAN
If you do not intend to use the wireless LAN device in
your tablet, it is recommended that you disable it.
Do not disable the WLAN unless you have
no intention of using it. In the process of reenabling it, you will lose any RAM-based
data and applications.
Disabling the WLAN
To disable the wireless LAN device, go to Start ->
Programs -> Explorer and double-click on the Windows
icon. The double-click on the NoWLAN.exe file to run it.
After executing the file, perform a warm reset of the
system by pressing the recessed reset button on the back
of the tablet.
Re-Enabling the Wireless LAN
There are two ways to re-enable the WLAN after having
disabled it. Note that both of these methods will result in
any RAM-based data and applications being lost. Be sure
to back up any data and applications to external media
before proceeding.
To re-enable the WLAN, the user needs to needs to
initialize the system. The first method is to perform a
cold reset of the system. See “Shutting Down the System”
on page 15 for information on performing a cold reset.
The second method of re-enabling the WLAN follows:
1. Open the Fujitsu setup menu by holding the [CLR]
button while warm-booting the system (i.e., pressing
the small recessed reset button on the back of the
system).
2) Select Device Property, then select the Initialize tab.
3) Select “Initialize all settings” or “Initialize selected
items”, then press the Initialize button.
4) Restart the system.
Wireless LAN User’s Guide
29
Page 33

Stylistic CT2000 Series CE Tablet User’s Guide – Section Four
Connection using Windows CE .NET
FLOW OF OPERATIONS
The wireless LAN connection procedure contained in
this section is outlined below.
1. Make sure the mobile computer is ready for the
transmission of radio waves from the wireless LAN.
For further details, see (See Starting Transmission on
page 28 for more information.).
2. Assign the parameters required for wireless LAN
connection. (See Preparation for a New Wireless
LAN Connection, below.)
■
Enter the network name (SSID) and other data.
■
Enter the network key if your network uses a
static WEP (Wireless Equivalent Privacy) key.
3. Perform setting operations relating to network con-
nection. (See Connecting to the network on page 31
for more information.)
PREPARATION FOR A NEW
WIRELESS LAN CONNECTION
This section explains the preparations required for the
use of the wireless LAN.
Assigning parameters
Enter the network name (SSID), the network key, and
other data required for wireless LAN connection. If there
is an administrator of the network, contact the network
administrator for data settings.
■
To use access point (infrastructure) connection, refer to the access point manual
for the access point-setting procedure.
■
You do not need to set the channel when
using access point (infrastructure) mode.
Channel selection is controlled by the
access point. In ad hoc networks, channel
selection defaults to channel 11; however,
channel selection can be manually
changed if desired. This can be accomplished only when using the client utility.
If it is necessary to change the channel,
change the setting of the access point. For
the setting procedure, refer to the manual
of the access point.
1. Click on [Start] -> Settings -> Network and Dial-up
Connections.
2. Tap PCI-PRISM1, then click File in the toolbar at the
top of the screen.
3. Click Enable.
4. Double-click the Wireless Network icon in the
system tray (it looks like two overlapping monitors).
5. Click on the Wireless Information tab. Wait for the
network list to appear, and double-click “Add
New...” in the network list
The following steps require the use of the
on-screen keyboard. Open the on-screen
keyboard either by tapping on the keyboard
icon at the bottom of the screen or tapping
the [F1] button (if it has been programmed
to open the on-screen keyboard).
.
6. Enter the information required for connection to the
wireless LAN.
a. Enter the network name (SSID). (i.e., Enter the
name of the desired network in less than 33
ASCII characters).
For ad hoc connection: Assign the same network
name to all the personal computers to be
connected.
For access point (infrastructure) connection:
Assign the appropriate SSID. The SSID must be
identical to the SSID of the access point. Refer to
the access point manual, or contact your network
administrator.
b. For ad hoc connection, check the following box.
“This is a computer-to-computer (ad hoc)
network; wireless access points are not used.”
7. Enter the Network key for encoding communications data
.
It is strongly recommended that you enter
the network key for encoding
communications data. If the network key is
not entered, since the network can be
accessed from all personal computers with a
wireless LAN module or card, there is the
danger of your data being stolen or
damaged by other users.
a. For ad hoc connection: When the “This is a
computer-to-computer (ad hoc) network; wireless access points are not used.” box is checked,
the Encryption automatically goes to TKIP.
b. For access point (infrastructure) connection: If
the access point to be accessed has acquired
shared-key authentication, select Shared from
the Authentication drop-down menu.
30
Page 34

Wireless LAN User’s Guide
If checked, clear the check mark from the [The key
is provided automatically] check box.
c. Enter data in Network key: Depending on the
number of entered characters or digits, whether
the key is an ASCII character code or a hexadecimal code will be identified automatically.
■
Use five or thirteen characters to enter the key
in the ASCII character code format. The characters that can be used as the “network key” are
as follows: 0 - 9, A - Z, _ (underscore), or,
■
Use 10 or 26 characters to enter the key in the
hexadecimal character code format. The characters that can be used as the “network key” in
this case are as follows: 0- 9, A - F, a - f
For ad hoc connection: Assign the same network key to all the personal computers to be
connected.
For access point (infrastructure) connection:
Assign the identical network key that is programmed into the access point. For this setting,
refer to the access point manual or contact your
network administrator.
d. Make sure that Key index: is set to “1”. (Any value
from “1” to “4” can be assigned to Key index:
(advanced)]. “1” is usually assigned, however).
7. After completion of setting operations, click the
[OK] button.
8. Verify that the network name entered above is added
to the list of networks
.
9. Close the wireless LAN window.
CONNECTING TO THE NETWORK
This section explains connection to the network.
addresses, consult with your network administrator for the correct IP address settings.
5. Click the [OK] button. Processing will return to the
[Network and Dial-up Connection] window.
6. Close the [Network and Dial-up Connection]
window.
Following this operation, confirm the names of the
computer and the workgroup as follows.
Confirming the computer names
1. Click Start -> Settings -> Control Panel.
2. Double-click the [System] icon. The [System Properties] window will be displayed.
3. Click the [Device Name] tab.
4. Confirm the settings of [Device name:] and [Device
Description:].
a. The setting of [Device name:] denotes the name
for identifying the computer. Any name can be
assigned for each personal computer.
Enter the desired name in less than 15 ASCII
character code format. Identifiability can be
enhanced by entering the model number, the user
name, and other factors.
b. [Device Description:] provides additional infor-
mation about the system. Enter the desired
description in less than 15 ASCII character code
format.
5. Click the [OK] button. If a message is displayed that
requests you to restart the tablet, click [Yes] to
restart the computer.
If there is an administrator of the network, contact the
network administrator for data settings.
1. Click [Start] -> Settings -> Network and Dial-up
Connections.
2. Double-click the PCI-PRISM1 icon. The Settings
window will appear.
3. Select the IP Address tab if it is not already selected.
4. Set the IP address as follows:
■
For ad hoc connection: Select [Specify an IP
address:] and then enter data for [IP address] and
[Subnet mask]. Consult with your network
administrator for the correct IP address settings.
■
For access point (infrastructure) connection: If
your network uses DHCP, select [Obtain an IP
address via DHCP]. If your network uses static IP
31
Page 35

5
Care and
Maintenance
32
Page 36

Care and Maintenance
Care and Maintenance
This chapter gives you pointers on how to care for and
maintain your Stylistic CT2000 Series CE Tablet.
CARING FOR YOUR TABLET
Please note the following information regarding proper
treatment of your tablet:
■
Your tablet is a durable but sensitive electronic device.
Treat it with care.
■
Make a habit of transporting the system in a suitable
carrying case.
■
Do not attempt to service the computer yourself.
Always follow installation and operation instructions
closely.
■
If you accidentally spill liquid on your tablet:
1. Turn it off.
2. Position it so that the liquid can run out.
3. Let it dry out for 24 hours, or longer if needed.
4. If your tablet will not boot up after it has dried out,
call your support representative.
■
Do not use your tablet in a wet environment (e.g., near
a bathtub or swimming pool).
■
Always use the AC adapter and batteries that are
approved for your system.
■
Avoid exposure to sand, dust and other environmental
hazards.
■
Do not expose your tablet to direct sunlight for long
periods of time as excessive temperatures may damage
your system.
■
Do not put heavy or sharp objects on the computer.
■
If you are carrying your system in a briefcase, or any
other carrying case, make sure that there are no objects
in the case pressing on the display.
■
Do not drop your tablet or touch the screen with any
sharp objects.
■
If using the Stylistic CT2000 Series CE Tablet with an
optional cradle, clean the cradle interface occasionally
with a dry cotton swab or gauze. Dirty contacts can
result in loss of communication through the cradle.
We highly recommend that you install a screen protector
on your tablet. Screen protectors are available as optional
accessories for your tablet. (For part numbers and
ordering information, go to the Fujitsu Web site at:
us.fujitsu.com/computers.) Be sure to use only screen
protectors that are designed for your tablet.
During normal use of the tablet, small
particles from the environment can become
embedded in the pen tip and scratch the
screen. To prevent scratching the screen,
we recommend that a screen protector be
installed before using your tablet. The
warranty does not cover a scratched screen.
To install a new screen protector on your tablet:
1. If a screen protector is already installed on the
display, remove it before installing the new screen
protector.
The screen protector is held onto the display surface
by a thin strip of adhesive around the edges. A notch
in one corner of the screen protector allows you to
slide your fingernail under the screen protector for
easy removal.
2. Clean the display by wiping the screen gently using a
soft cotton cloth dampened with isopropyl alcohol.
Ensure that all residue has been removed from the
screen before applying a new screen protector.
Remove the protective coating from the adhesive side
of the screen protector first, as shown in Figure 5-1.
■
The Stylistic CT2000 Series CE Tablet is
not waterproof. Do not pour liquids on
the system or wash it with a heavily
soaked cloth.
■
Do not place items on the top of the display, or damage may occur.
.
PROTECTING THE DISPLAY
The Stylistic CT2000 Series CE Tablet is designed to
provide you with years of service. Using a screen
protector will help ensure the screen remains as clear as
possible. When installed, the screen protector becomes a
durable, replaceable writing surface that protects the
display from abrasion.
Figure 5-1. Removing the Protective Sheet
33
Page 37

Stylistic CT2000 Series CE Tablet User’s Guide – Section Five
PWR
CLR
BKS
F1
F2
F3
F4
PWR
CLR
BKS
F1
F2
F3
F4
3. Apply the screen protector to the display surface.
When doing so, orient the screen protector with the
adhesive side of the screen protector facing the
display and the notched corner of the screen
protector oriented as shown in Figure 5-2.
PWR
PWR
1
0
2
ENT
3
4
7
5
8
9
6
CLR
CLR
BKS
BS
F1
F2
F2
F1
F3
F4
F3 F4
Figure 5-2. Installing the screen protector
4. Apply pressure to the screen protector with your
finger using a continuous wiping motion along the
edges. The adhesive sets completely within 48 hours.
To ensure a good seal between the screen protector
and the display, do not lift the screen protector from
the display once it has been applied.
5. Remove the protective plastic cover from the face of
the screen protector, as shown in Figure 5-3.
STORING THE TABLET
Store the tablet where it will not be exposed to vibration,
dust, extreme temperatures (high and low), high
humidity, and direct sunlight.
Store the Stylistic CT2000 Series CE Tablet in the Off
state with a fully charged battery installed.
If you intend to store the tablet for an extensive period of
time, the battery that maintains system time may need to
be replaced. Replacement of the clock battery should
only be performed by authorized technicians.
For long term storage, it is recommended that you save
all programs, shut down the system, and remove the
battery. When restarting, reset the device completely.
AVOIDING OVERHEATING
Do not expose your Stylistic CT2000 Series
CE Tablet to direct sunlight for extended
periods of time as excessive temperatures
may damage your tablet.
The tablet monitors its internal temperature. As the
internal temperature approaches the tolerable limits of
heat-sensitive components, system functions are automatically limited or turned off to prevent damage.
PWR
PWR
1
0
2
ENT
3
4
7
5
8
9
6
CLR
CLR
BKS
BS
F1
F2
F2
F1
F3
F4
F3 F4
Figure 5-3. Removing the protective cover
6. Clean any residue left behind by the protective
coating from the exposed surface of the screen
protector by wiping gently with a soft cotton cloth
dampened with isopropyl alcohol. Wipe the screen
protector with a soft dry cloth to remove any lowtack adhesive; this will help prevent the pen tip from
squeaking.
The screen protector is now installed.
CLEANING THE DISPLAY
To clean the tablet display, wipe the screen surface gently
using a soft, dry cotton cloth or one slightly dampened
with a diluted neutral detergent solution. If you use a
dampened cloth, be sure to wring out all excessive solution in order to prevent any of the solution from getting
into the device.
• The Stylistic CT2000 Series CE Tablet
is not waterproof. Do not pour liquids
on the tablet or wash the tablet with a
heavily soaked cloth.
• When cleaning the display, use care to
avoid pushing foreign matter between
the display and the edge that frames
the display.
• Do not wipe the tablet with thinner,
benzine, or other volatile substance.
Such solutions can damage the device
or erase printed letters and icons.
34
Page 38

6
Troubleshooting
and FAQs
35
Page 39

Stylistic CT2000 Series CE Tablet User’s Guide – Section Six
Troubleshooting
Solutions to some common problems are described in the following sections. If you are experiencing a problem with
your Stylistic CT2000 Series CE Tablet that you cannot solve by taking the actions described, contact your local help
desk or reseller, or call Fujitsu Service and Support at 1-800-8Fujitsu (1-800-838-5487) for further assistance.
Problem User Response
System will not start or
resume operation
Display Is Blank or
Difficult to Read
Screen appears for a
moment, then turns black
when power key is
pressed
If the system will not resume operation after system operation has been suspended,
check the following possible causes:
• The battery may either be discharged to a critically low level. To correct this
problem, either connect the AC adapter or install a charged battery in the tablet.
• The system may be at the critical thermal limit. System operation cannot be
resumed until the tablet cools off to a tolerable temperature. Move the tablet to
a cooler location.
• The service life of the battery may have expired or the battery is faulty. If this is
the case, install a new battery.
• The battery lock switch may be unlocked. To lock the switch, refer to “Powering
Up the Tablet” on page 15.
If the display on your tablet appears blank or is unreadable, confirm that the system
is running (the Power icon is displayed continuously), and check the following:
• The system brightness may be set too low, causing the screen to appear too
dark. To change system brightness, press the brightness button on the keypad
once or more to adjust the brightness.
• The video timeout may have expired. Tap on the screen to reactivate the display.
Note that this is a normal, power-saving feature.
The main battery may be discharged. Either plug in the AC Adapter to charge the
main battery or replace with a charged battery.
Cursor is not tracking pen If the cursor on the screen appears to be misaligned with the pen or is not accurately
tracking the pen, calibrate the pen. See “Calibrating the Pen” on page 16 for more
information.
Tablet is not responding
to the pen
Speaker/Headphone
silent or volume is too low
36
If the tablet does not respond to the pen, connect an external keyboard to the
system to see if it responds to keyboard commands. If the system doesn’t respond
to a keyboard, the application or system may have crashed, and it may be necessary
to reboot the system by pressing the reset button on the back of the system.
If the audio volume on your tablet speaker or external headphones is too low, check
the following:
• Ensure the speaker (or headphone output if using headphones) is enabled. To
do so, open the Control Panel and double-click on the Volume & Sounds icon.
Select the Volume tab, and increase the volume using the slider bar.
• Ensure any volume control in your audio software is set to an audible level.
Page 40

Troubleshooting and FAQs
USER RESPONSE TO MESSAGES
If at any time you receive one of the following messages, take the action described in the following table.
Message Cause User Response
“Main batteries very low” The main battery charge is
too low.
“Low backup battery” The backup battery charge is
too low.
“No application has been installed.
Press ‘BKS’ to continue.”
“The contents of memory has been
lost. Touch ‘Restore’ to recover the
application program.”
No application programs
have been installed.
The memory data was
deleted because (for
example) the battery charge
was too low.
“System has detected an error in
your data.”
An error occurred in the
system information storage
area of the flash disk.
Either replace the main battery or charge
the main battery using the battery
charger or cradle. See “Charging the
Battery Pack” on page 18.
Charge the backup battery. The backup
battery should be charged for twentyfour hours to be fully charged.
Refer to installation procedure in the
Appendix of this document.
Refer to restoration procedure in the
Appendix of this document.
Tap the [OK] key to initialize the flash
disk, then reinstall the application
programs.
37
Page 41

Stylistic CT2000 Series CE Tablet User’s Guide – Section Six
ERROR CODES
Occasionally, it may be necessary to restore specific
applications. Ordinarily, the restored operating environment become effective after the system is restarted. If for
some reason the application program cannot be restored
automatically, you may receive a restoration failure error
message (Figure 5-1). For the cause of the error, see the
table that follows.
Figure 5-1 Example of Error Code Message
Error code Name Error
0 or above Standard Windows error code.See WinError.h.
0 RETURN_OK Normal or successful
-101 FILE_NOTHING The specified file was not found.
-102 FILE_ALWAYS The specified file already exists.
-103 FILE_READ_ERROR File read error
-104 FILE_WRITE_ERROR File write error
-105 FILE_COPY_ERROR File copy error
-106 REGFILE_COPY_ERROR WIN32API:RegCopyFile error
-107 REGFILE_RESTORE_ERROR WIN32API:RegRestoreFile error
-108 FILE_DELETE_ERROR File deletion error
-109 DIR_CREATE_ERROR Folder creation error
-110 FILE_RUN_ERROR File execution error
-111 REG_OPEN_ERROR Registry key open error
-112 REG_READ_ERROR Registry value read error
-113 REG_WRITE_ERROR Registry value write error
-114 REG_CREAT_ERROR Registry creation error
-115 REG_DELETE_ERROR Registry deletion error
-116 NOT_IMPORT_REGFILE Registry file import error
-117 NOT_EXPORT_REGFILE Registry file export error
-121 NOT_FIND_SECTION The section name was not found.
-122 NOT_FIND_ENTRY The entry name was not found.
-123 NOT_FIND_HKEY HKEY was not found in the file.
-124 NOT_FIND_SUBKEY The registry subkey was not found in the file.
-125 VALUE_STATUS_ERROR The registry format that was read is invalid.
38
Page 42

Troubleshooting and FAQs
Error code Name Error
-126 VALUE_NAME_ERROR The registry name that was read is invalid.
-127 VALUE_DATA_ERROR The registry information that was read is invalid.
-131 NOT_FIND_CONFIG The setting file was not found.
-132 NOT_FIND_SYSTEMREG The system registry file was not found.
-133 NOT_CREATE_STARTUP Startup shortcut cannot be created.
-134 NOT_BACKUP_FILE The file cannot be backed up.
-141 NOT_APP_INSTALL No applications are installed.
-999 SYSTEM_ERROR System error
39
Page 43

Stylistic CT2000 Series CE Tablet User’s Guide – Section Six
FREQUENTLY ASKED QUESTIONS (FAQS)
The following list contains answers to some of the most
frequently-asked questions pertaining to the Stylistic
CT2000 Series CE Tablet.
What is the difference between CE .NET 4.2, Pocket PC
2002 and Windows for Mobile 2003?
CE .NET 4.2 is the version of the Windows CE operating
system installed on the Stylistic CT2000 Series CE Tablet.
Pocket PC 2002 is based on the older version of CE,
version 3.0. Windows for Mobile 2003 for Pocket PC is
also based on CE .NET 4.2.
What is ActiveSync and what functions does it provide?
Microsoft ActiveSync is used to synchronize data between
the desktop and the CE device. In addition, it provides
the following functionalities: Installs and removes
programs on a CE device, backs-up and restores
programs, performs file conversions from desktop to CE
version, imports and exports database tables, and
prepares desktop for remote connections.
What is the latest version of the Microsoft ActiveSync
software and where can I get a copy?
The latest version of ActiveSync is 3.7.1 and it can be
downloaded from the mobile section of Microsoft's
website. www.microsoft.com/
downloads
Do I need the optional docking station to establish an
ActiveSync connection?
Yes. The USB port B is only on the docking station. The
dock is required to establish a ActiveSync connection
through the USB port.
What development options are available for CE.NET
4.2?
Applications can be developed for CE .NET 4.2 using the
Microsoft Visual Studio .NET 2003 IDE. This includes
languages such as VB.NET, C# and C++. For developing
native 32-bit applications for CE.NET you can also use
eMbedded Visual C++ 4.0.
Can I use eMbedded Visual Basic to develop
applications for CE .NET 4.2?
No, eMbedded Visual Basic is not supported in CE.NET
4.2. You will have to use VB.NET which is part of Visual
Studio 2003.
What is the .NET Compact Framework and do I need to
install it to my device?
The Microsoft .NET Compact Framework is a subset of
the desktop .NET Framework that runs on smart devices,
providing support for managed code and XML web
services. The latest version of the .NET Compact
Framework is pre-installed on the Stylistic CT2000 Series
CE Tablet.
What are the CE .NET File Viewers?
File Viewers are included on the OS and they enable you
to view Microsoft Word, Excel, PowerPoint, Adobe
Acrobat and JPEG/GIF/BMP image files. The File
Viewers support PowerPoint transitions and animations,
Excel charts & Word images and tables. You do not need
to convert your original files to view them using the CE
.NET File Viewers.
What is the difference between the ARMV4I and
ARMV4T processors?
ARMV4I is the processor on the Stylistic CT2000 Series
CE Tablet. Visual Studio 2003 treats the ARMV4I as the
ARMV4T processor. As a result, applications that are
compiled for the ARMV4T can run on the Stylistic
CT2000 Series CE Tablet.
Why can’t I install my software or driver on the ARMV4I
processor?
The software that accompanies some PC and CF Cards is
not compatible with the ARMV4I processor used in the
Stylistic CT2000 Series CE Tablet. Check the card specifications for compatibility before attempting to use the
card in your system. You can also contact the card vendor
to inquire if a workaround or software patch is available.
How do I install applications on the Stylistic CT2000
Series CE Tablet?
There are two ways to install applications on the Stylistic
CT2000 Series CE Tablet. You can install directly from
your desktop through an ActiveSync connection or you
can run a CE CAB file directly from the device. You can
copy the CAB file to the local storage or run it directly
from a removable media such as a PCMCIA flash card.
Does the Stylistic CT2000 Series CE Tablet come
standard with any handwriting recognition software?
Yes. The Microsoft Transcriber is pre-installed on the
device and it recognizes cursive, print and mixed
handwriting. It supports multiple languages as well as
editing gestures such as cut, paste, enter, etc. You can
select between pointing mode (arrow) and writing mode
(ink) by tapping on the icons in the System Tray. The
Letter Shape Selector is a tool that helps improve the
recognition results by allowing users to define how they
write certain characters.
Is an on-screen keyboard available on the Stylistic
CT2000 Series CE Tablet?
Yes. The Microsoft Transcriber also has a on-screen
keyboard which contains special symbols, punctuation
and function keys.
40
Page 44

Do I need to download any additional software to
develop applications using Visual Studio 2003?
Yes. You need to download and install the CE Utilities for
VS. NET 2003 Add-on Pack v.1.1. This updates the files
for smart device development and adds an option for
connecting to the ARMV4I processor through the
VS.NET IDE using ActiveSync.
Can I use Visual Studio 2002 to develop CE.NET
applications?
No. VS 2002 does not support smart device development.
You will have to upgraded to VS 2003 or use eMbedded
Visual C++ 4.0.
When I go to the Memory tab on System Properties, it
indicates that I only have 64 MB of memory. I thought I
had 128 MB.
Your system has two types of memory: RAM and Flash
ROM. There are 128 MB of RAM and 128 MB of flash
ROM in the CT2000 tablet.
Of the 128 MB of RAM, 64 MB are used to store data and
applications; the other 64 MB are used to store the system
ROM image while the system is in operation. This design
speeds up system operation considerably. The 64 MB
used for user-accessible storage are reflected in the
memory properties.
Flash ROM is “non-volatile memory”. Flash ROM is used
to permanently store the system image (i.e., the operating
system and CE applications) along with any backup
applications and data that you create. There are 128 MB
of flash ROM. Approximately 64 MB are used for the
system image, while the other 64 MB of ROM are used as
an area to store your backup files and applications.
The important thing to remember about the two types of
memory is that RAM is volatile. That is, if you perform a
cold boot or initialize the system, all data and programs
in RAM will be lost. ROM, on the other hand, is not
affected by a cold boot or re-initialization. That’s why it’s
a good place to backup your data and applications.
Troubleshooting and FAQs
41
Page 45

7
Specifications
42
Page 46

System Specifications
Stylistic CT2000 Series CE Tablet Hardware Specifications
The following table provides hardware specifications of
the Stylistic CT2000 Series CE Tablet by category.
Stylistic CT2000 Specifications
Physical Specifications
Dimensions 8.07" w x 11.4" h x 0.98" d
(205 mm x 290 mm x 25 mm)
Weight 2.20 lbs. (1000 g) (with battery)
Processor Specifications
CPU Intel PXA255 processor with Intel
XScale Technology (ARMV4I)
Processor
Speed
Main RAM 128 MB SDRAM on board: 64 MB
Flash ROM 128 MB Flash memory on board:
XGA LCD • Ty pe: 10.4" XGA TFT Color
Digitizer Resistive touch panel with palm
Video
Controller
Card Slots • PCMCIA: One Type I or Type II,
400 MHz
Memory/Storage Specifications
used for new application and data
storage (as allocated by user by
going to Control Panel -> System ->
Memory), 64 MB used for loading
operating system components.
64 MB used for storing master OS
file image, 64 MB used for backing
up applications and data (nonvolatile)
Display Specifications
• Dot Composition: 1024 x 768
• Dot Pitch: 0.2055 x 0.2055 mm
• Active Area: 210.4 x 157.8 mm
• Colors: 18 bit
• Backlight: Single CCFL side-light
• Luminescence: Typ 170 cd/m
• Weight: Typ 195g
rejection technology
SM501, 8 MB VRAM on board
Interface Specifications
both 3.3V and 5V support
• Compact Flash Type II (3.3V/
500mA)
2
Stylistic CT2000 Specifications (Continued)
Audio • AC’97-compliant with internal
Integrated
Interfaces
User Controls • Keypad containing 0-9 keys, Ent,
Status
Indicators
(LEDs)
Optional
Cradle
Interface
Main Battery • 4-cell
speaker and microphone
• Audio jack: 2.5 mm diameter, 3
pole, for external headset
• Wireless LAN. Mini-PCI.
802.11b/g support. Internal
diversity antenna.
• One USB 1.1, Type A (Due to
power constraints, there is a
possibility that certain USB 1.1
devices will not operate properly
with this port. If your device has
its own power adapter, it is
recommended that you use it.
• Proprietary serial barcode scanner
port with +5V/500 mA DC power
supply. (Note that this is not a
standard RS-232 connector with
standard connectivity, but
requires an adapter or a device
with a compatible connector.)
• Docking connector
Clr, Bks, and decimal point
• Power button
• Four function buttons (F1 - F4)
• Backlight key
• Four-way cursor navigation
button
• Reset button for warm boot
One LED to indicate power and
charge status (red and green)
• Three USB ports: Two type A (for
keyboard and mouse) and one
type B (for ActiveSync)
•DC-in
Power Specifications
• Removable, Lithium ion
• 7.2V @ 4400 mAh
• Warm-swappable
• Approximate Recharge Time: 2.5
hours
43
Page 47

Stylistic CT2000 Series CE Tablet User’s Guide – Section Seven
Stylistic CT2000 Specifications (Continued)
Bridge Battery
• Manganese Dioxide Lithium
• 3.0V, 65 mAh
• Life (with Suspend-to-RAM on
bridge battery only):
approximately 10 minutes
from full charge
AC Adapter
Autosensing 100 - 240V, 50/60 Hz,
supplying 12 VDC, with a current of
2.5 A
WLAN Module
Typ e
Interface
Standard
Mini PCI type III-A card
32-bit PCI bus
IEEE 802.11b/g
Wi-Fi Alliance
Medium
CSMA/CA with ACK
Access
Protocol
Frequency
Band
Number of
Channels
Modulation
Support Rates
Output Power
2.400 - 2.497 GHz (2.4 GHz ISM
band)
11 channels, 3 non-overlapping
channels
BPSK, QPSK, OFDM, CCK
1.2, 5.5, 11, 6, 9, 12, 18, 24, 36, 48,
54 mbps
11.5 dBm +/- 1 dBm @ 54 mbps
Transfer rate (Automatic switching)
802.11g: 54 Mbps* maximum data
rate
802.11b: 11 Mbps maximum data
rate
*The computer's actual data transfer
speed can be much lower depending
on a variety of factors, including the
Windows CE device capability.
Stylistic CT2000 Specifications (Continued)
Environmental Specifications
- 60o C)
o
- 104o F (0o - 40o C)
Temperature
Humidity
Operating: 32
Non-operational: -4o - 140o F
o
(-20
Operating: 10 - 90% noncondensing
Non-operating: 8 - 95% noncondensing
Agency Approval Specifications
• EN55022 (1998+ Amendment A1
Emissions
2000
• FCC 15, Class B
• VCCI CLass B
Immunity
• EN55024 1998 (CISPR24)
• UL 60950
• CAN/CSA C22.2 No. 60950
• CE Mark: 93/68/EEC
Safety
• Low voltage directive: 72/23/EEC
• R&TTE Directive: 1999/5/EC
(involving WLAN approval)
• JEIDA (JISC6950)
• IEEE802.11b/g
• ARIB STD-T33, T66 (TELEC)
Wireless
• R&TTE Directive: 1999/5/EC
• FCC Part 15.247 Class B
• IC RSS-210, RS139
Additional Specifications
Operating
systems
Microsoft
®
Windows® CE .NET, v4.2
Authentication WPA-PSK
Security Network name (SSID)
Network key (64 bits/128 bits)*
WPA 1.0 compliant; supports TKIP
and WEP encryption algorithms.
* Encryption with network key (WEP) is performed using the
above number of bits, however, users can set 40 bits/104 bits
after subtracting the fixed length of 24 bits.
44
Page 48

8
Glossary
45
Page 49

Stylistic CT2000 Series CE Tablet User’s Guide – Section Eight
Glossary
AC adapter
An adapter that provides external power (not battery
power) to your Stylistic CT2000 Series CE Tablet.
Access point
A designation of wireless LAN network configurations.
It indicates a form of communication using an Access
Point. For details, refer to “access point connection” on
page 27.
ActiveSync
A component of Windows CE Services that manages
data synchronization between your Stylistic CT2000
Series CE Tablet and desktop computer when you are
working remotely. You can specify the type of data you
want to synchronize.
Ad hoc
A designation for wireless LAN network configuration.
It indicates a form of communication limited to those
personal computers which have wireless LAN function.
For details, refer to “Ad hoc connection” on page 27.
Application Manager
The Windows CE Services feature that enables you to
add and remove software on your tablet. In the Mobile
Devices window, click Tools and then click Application
Manager.
appointment
An entry in Calendar.
attachment
An item included with an e-mail message.
backup file
A duplicate copy of the program data on your Stylistic
CT2000 Series CE Tablet. This file does not include
settings and information stored in ROM, such as
factory-installed software. Use your backup file to return
your tablet to its previous state if your system data is
damaged or destroyed, or if you have performed a full
reset.
baud rate
The speed at which a modem transmits data. This is set
at 19200 Kb/sec by default on your tablet.
BPSK
Binary Phase Shift Keying
A type of digital modulation used to transmit data over
cable networks.
CCK
Complementary Code Keying
a set of 64 eight-bit code words for encoding 5.5 and 11
Mbps data rates in the 2.4 GHz band. Used for IEEE
802.11b networking.
calibrate
The process that determines how the stylus and touch
screen interact. You can calibrate both the screen alignment and the stylus double-tap settings.
Channel
The frequency band of wireless LAN to be used in
communications over wireless LAN or at the access
point.
command bar
The combination toolbar and menu bar used in
Windows CE.
communications port
A serial communications port used to connect equipment, such as mobile devices, modems, and printers.
connection
The ability to interact with another device, computer, or
the Internet by means of a serial, Ethernet, or dial-up
connection.
data
Information that is stored in any of your Windows CE
program files.
desktop computer
A computer running Microsoft Windows to which you
connect your Stylistic CT2000 Series CE Tablet.
DHCP (Dynamic Host Configuration Protocol)
A protocol used for automatically fetching communication parameters such as IP addresses. The side which
assigns IP address is called DHCP server and the side
that is assigned it is called DHCP client.
dial-up connection
A connection between your tablet and a remote
computer by means of a modem. You can connect to an
ISP, a network, or a modem attached to a PC.
direct connection
A connection between your tablet and another computer
by means of a serial cable.
DNS (Domain Name System)
A function that controls the correspondence of IP
addresses assigned to a computer with the name. Even
46
Page 50

GLossary
for those computers whose IP addresses are unknown, if
their names are known, it is possible to communicate
with them.
download
The process of transferring data from your desktop
computer to your Stylistic CT2000 Series CE Tablet.
e-mail
Messages and other items that you send and receive with
Inbox.
Explorer window
The window that appears when you double-click a device
icon in the Mobile Devices window. In the Explorer
window, which is part of Windows CE Services, you can
view and copy files between your Stylistic CT2000 Series
CE Tablet and your desktop computer.
file conversion
The process of converting Windows-compatible files on
your desktop computer to Windows CE-compatible files
on your tablet, and vice versa.
FCA
Fujitsu Computer Systems Corporation (us.fujitsu.com/
computers).
full reset
See reset.
IEEE802.11b
One of the wireless LAN standards prescribed by the
802.11 committee in charge of establishing standards of
LAN technology in IEEE (Institute of Electrical and Electronic Engineers). It allows communications at the
maximum speed of 11Mbps by a band of 2.4 GHz (ISM
band) which can freely be used without radio communication license.
IMAP4
(Internet Message Access Protocol) An e-mail protocol
supported by some mail servers. When using IMAP4, the
folders you create on your desktop computer or Stylistic
CT2000 Series CE Tablet are mirrored on the mail server
so that the contents of the folders are available from any
computer with access to your mail server.
Internet connection
A communications method used to establish a link
between your Stylistic CT2000 Series CE Tablet and a
server that provides access to the Internet, typically, an
ISP.
Internet service provider (ISP)
A company that provides access to the Internet.
intranet
A network designed for information sharing within a
company or organization.
IP address
An address used by computers for communicating in
TCP/IP environment. IP addresses have global and
private addresses. A global address is a unique address in
the world. A private address is a unique address within a
closed network.
LAN (Local Area Network)
An environment connecting computers within a relatively small range, such as the same floor and building.
local folder
A folder that is available only from the location in which
it was created. In POP3, any folder you create on your
tablet is a local folder, and any messages it contains can
only be viewed from the Stylistic CT2000 Series CE
Tablet.
MAC address (Media Access Control Address)
A physical address inherent to a network card. For
Ethernet, the top three bytes are controlled/assigned as a
vendor code. The remaining three bytes comprise the
code uniquely (to avoid duplication) controlled by each
vendor. As a result, there is no Ethernet card with the
same physical address in the world. In Ethernet, the
frame transmission/reception is performed based on this
address.
message header
A line of summary information, such as sender and
subject, for an e-mail message.
mobile device
A computer that runs Microsoft Windows CE.
Inbox synchronization
A feature in Windows CE Services that enables you to
synchronize mail between your tablet and desktop
computer.
Inbox Transfer
A feature in Microsoft Outlook and Microsoft Exchange
that enables you to transfer specific e-mail messages
between your tablet and desktop computer.
Mobile Devices folder
The folder on the desktop computer that contains the
Windows CE Services components.
modem card
See PC Card.
MTU (Maximum Transmission Unit)
The maximum size of data which can be transmitted at
one time in networks including the Internet. In an environment whose maximum size of data is too large to
47
Page 51

Stylistic CT2000 Series CE Tablet User’s Guide – Section Eight
correctly receive data, normal communications can be
restored by setting the size of MTU to a smaller value.
My Documents folder
The folder that stores files you create on your tablet. You
can view the contents of this folder in the Explorer
window in Windows CE Services.
Network authentication
The method of authentication performed by wireless
LAN clients to connect with the access point. There are
two types: open system authentication and shared key
authentication. The type of authentication must be set
to each client and also coincide with the setting of access
point with which to communicate. Network authentication is sometimes called authentication mode.
network connection
A connection between your Stylistic CT2000 Series CE
Tablet and a network by means of an Ethernet card
inserted into your tablet.
Network key
Data that is used for encrypting data in data communication. The personal computer uses the same network
key both for data encryption and decryption, therefore,
it is necessary to set the same network key as the other
side of communication.
Network name (SSID: Service Set Identifier)
The network name is a unique identifier attached to the
WLAN packet header that acts as a password when the
client attempts to connect to a WLAN. The SSID differentiates one WLAN from another so all WLAN devices
attempting to connect to a specific WLAN must use the
same SSID.SSID’s are transmitted in cleartext, thus
supplying no security to the WLAN.
offline folder
When using IMAP4, a folder that contains messages that
are available when working online or offline.
Open system authentication
An 802.11 wireless LAN authentication method. Open
System does not exchange any key or other information,
it is a simple request by the mobile station to be authenticated without verifying identity.
partnership
The process of establishing a connection between your
desktop computer and your Stylistic CT2000 Series CE
Tablet for the purpose of synchronizing and transferring
data. Your tablet can have partnerships with up to two
desktop computers.
PC Card
A removable card, such as modem, Ethernet, or storage
card, that conforms to the PCMCIA specification.
PC Link
The program on your tablet that you use to connect and
synchronize with your desktop computer when using a
serial cable or IR.
POP3
(Post Office Protocol) An e-mail protocol supported by
most mail servers.
port settings
The settings used to configure a communications port
on a computer.
PPPoE (Point to Point Protocol over Ethernet)
A method of allowing the authentication protocol
adopted in telephone line connection (PPP) to be used
over an Ethernet.
PPP
(Point-to-Point Protocol) The protocol that your tablet
uses to communicate with your Internet service
provider’s network server.
Protocol
A procedure or rule of delivering data among
computers. Ordered data communication is allowed by
making all conditions required for communication
including the method of data transmission/reception
and actions upon communication errors into procedures.
QPSK
Quadriphase Shift Keying
A type of digital modulation used with cable networks to
send information from a subscriber to the Internet or
Internet provider.
RAM
Random Access Memory
ROM
Read-only Memory
RAS (Remote Access Service) account
A network account that enables your Stylistic CT2000
Series CE Tablet to remotely access your corporate
network.
remote connection
A connection between your tablet and a remote
computer. You make a remote connection by using a
modem or an Ethernet card.
Remote Networking
The Windows CE folder where you establish a dial-up
connection between a mobile device and a remote
computer.
48
Page 52

GLossary
reset
Depending on the state of your Stylistic CT2000 Series
CE Tablet, a process that either causes the system to
reboot or erases all data stored in RAM.
restore
To return your Stylistic CT2000 Series CE Tablet to the
state it was in when it was backed up. This involves
copying your backup data to your tablet.
serial cable
A cable to connect your tablet to your desktop computer.
Shared key authentication
An 802.11 wireless LAN authentication method. When a
client attempts to associate to an access point, the access
point will send a challenge to the client. The client
encrypts the challenge with the network key and sends it
back to the access point. If the access point can decrypt
the challenge, then authentication has succeeded.
slider
The vertical double bar on the command bar used to
switch between displaying toolbar buttons and menu
names.
SSID (Service Set Identifier)
See “Network name”
toolbar
A bar at the top of the screen that contains buttons that
perform specific tasks.
touch screen
A touch-sensitive screen on your tablet that can recognize
the location of a touch on its surface (typically done by
using a stylus) and translate that touch into a desired
action (such as making a selection or moving the cursor).
Windows CE Services
The desktop computer program used to synchronize,
transfer, and manage data and files between your Stylistic
CT2000 Series CE Tablet and desktop computer. You
open Windows CE Services by double-clicking the
Mobile Devices folder.
stylus
A pointing device, similar to a pen, used to make selections (tap) and enter information on the touch screen.
Subnet mask
TCP-IP network is controlled by being divided into
multiple smaller networks (subnets). IP address consists
of the subnet address and the address of each computer.
Subnet mask defines how many bits of IP address
comprise the subnet address. The same value shall be set
among computers communicating with each other.
synchronization
The process of comparing the data on your tablet with
the corresponding data on your desktop computer and
updating either computer with the most up-to-date data.
synchronization service
A service in Windows CE Services that allows for
synchronization of specific items between the Stylistic
CT2000 Series CE Tablet and desktop computer. You can
synchronize appointments, contacts, tasks, e-mail
messages, and files.
TCP/IP
(Transmission Control Protocol/Internet Protocol)
The protocol that your Stylistic CT2000 Series CE Tablet
uses to communicate remotely.
49
Page 53

Appendix
Installing and
Using the Software
50
Page 54

Using Your Tablet Software
Installing and Using the CE Tablet Software
INSTALLATION
The instructions contained in this section are
designed for implementation by advanced
users, administrators, and/or IT personnel.
Preparations for installation
The following preparations are required before
programs can be installed in this device.
1. Create an installation setup file
Before programs are installed, definitions for them
must be created. Define the installation setting
(Config.hht): files to be installed in this device and
the operating environment to be automatically set
for installation.
2. Set up cradle (for installation that uses a wireless
LAN or ActiveSync with USB)
• When setup menu has ended after
installation of an application, the
operating environment designated will
be saved in the system information
storage area. "Restore processing when
memory erased" is a function that
enables restoration of the operating
environment saved in the system
information storage area. For
information about restoration, see
“Application backup and restoration”
on page 56.
• When installing new applications, be
sure to store the .hht files and
installation files to the root directory.
• Applications installed from the Fujitsu
menu are stored in a Flash Disk
subdirectory.
• If you do a cold reset, all new
applications that have been installed will
disappear. If you want to reinstall
multiple programs, they must be
installed at the same time (i.e., in the
same session).
DirectoryName=name-of-folder-to-beinitialized [name-of-folder-to-be-initialized …]
END
Example:
[Initialize]
DirectoryName=\Storage Card1\Temp
END
2. Specify the installation destination and installation
source.
Format:
[Install File]
installation-source-file-name=installationdestination-file-name
[installation-source-file-name=installationdestination-file-name]
■
■
END
■
Do not insert any blank characters (space, tab)
before or after '='.
■
For installation by folder, specify '*.*' as the installa-
tion source file name and installation destination file
name.
■
On the tablet, the StorageCard slot is allocated to the
'Storage Card'1 folder.
■
If the installation source file name does not begin
with '\', file installation starts on the relative path
from the folder containing the installation setup file.
Example:
[Install File]
\Storage Card 1\ HhtApp\ *.*= \ HhtApp\*.*
(Specification using the absolute path)
Libs\MyLib.dll=\Windows \My Lib.DLL
(Specification using a relative path)
END
CREATING AN INSTALLATION SETUP FILE
Create an installation setup file with a text editor such as
Notepad on the desktop PC.
1. Initializing installation folders
Before starting installation, specify any folders that
must be initialized.
Format:
[Initialize]
• For installation using wireless LAN,
specify the installation destination with a
relative path without adding '\' before the
installation source folder. Specifying a
relative path eliminates the need to
specify a shared folder name.
• The setup file in which a relative path is
specified can be used for all installations
using card/LAN/ActiveSync.
51
Page 55

Stylistic CT2000 Series CE Tablet User’s Guide – Appendix
3. Specify the name of the application program to be
started in Startup.
A shortcut for the program specified here is created
in Startup.
Format:
[StartUp]
FileName=startup-program-file-name
[parameter]
END
Be sure to specify the name of the application
program to be started in Startup with an installation
destination path name.
If the program file name and its path name contain
any spaces, specify them enclosed in double quotation marks ("").
Example:
[StartUp]
FileName="\Hht App\HhtApp.Exe"
END
• If a startup application program is
specified, a shortcut is created in the
"\Windows\startup" folder.
• Only one startup application program
can be specified.
4. Specify the Cab file that must be extracted on the
tablet.
Format:
[WceLoad]CabFile=cab-file-name [cab-filename...]
END
Example:
[WceLoad]
CabFile="\Storage Card1\HHTApp.CAB"
END
To install more than one application, use the following
format:
Example:
[WceLoad]
CabFile=”\Storage Card1\HHTApp.CAB”,
“Storage Card1\*.CAB”
Saving the installation setup file
When the installation setup file has been created, save it
with file name "Config.hht." The folders in which the
setup file can be saved are as follows:
For setup from card media
(See Structure of card media for installation on page 52 for
more information.)
Root folder for the card media (for example,
StorageCard1) created for installation
For setup using ActiveSync communication, which uses
the cradle.
(See Installing programs using ActiveSync on page 53 for
more information.)
Root folder for CAB files when an installation CAB file is
created (\Install)
Highest-order folder of copy source folders (for manual
copy)
For setup using wireless LAN communication
(See Installing programs using ActiveSync on page 53 for
more information.)
Highest-order folder of shared folders for installation
(\\Servername\Install)
INSTALLING APPLICATIONS
After creating the setup file, start installation of the applications.
Do a warm reset and hold the [CLR] button down while
the system boots up. The Fujitsu setup menu will appear.
Tap [Install an application] on the menu to start installation.
If an application program is installed from
StorageCard, the setup file must be stored in
the root folder for your installation media. If
the setup file is stored in another folder, the
location of the setup file must be specified.
Installing programs using a storage card
Structure of card media for installation
When an installation setup file is created and saved, copy
the application program to the installation media, such
as StorageCard.
Copy the application program to the folder coded as the
installation source in the installation setup file. An
example of creating installation media is shown below.
Example:
Memor y Card <DIR>
HHTApp<DIR>
XXXXXX
XXXXXX
HHTApp.DLL
Config.hht
(Complete set of application and data files)
52
Page 56

Using Your Tablet Software
Installing the program from a storage card
1. Verify that the Fujitsu Setup menu is open
2. Tap the [Install an Application] button.
3. Check the Storage Card checkbox, then click [Next].
4. Enter the name of the folder where you placed the
installation file (config.hht) in the Folder box. You
can use [Browse] to navigate to the location.
5. Tap [Next] to start installation. If the message
“Cannot find the server or files” is displayed, make
sure that the server name and folder name are
correct, then tap the [Retry] button.
Installing programs using ActiveSync
1. Installing a program using ActiveSync requires a
cradle and USB cable. Connect the cradle to the
desktop PC with the USB cable.
2. Power up the CT2000 CE Tablet and place it on the
cradle.
3. If you receive a message on your desktop asking if
you want to set up a partnership, click [No], then
[Next].
4. Verify that the Fujitsu Setup menu is open on the
tablet.
5. Tap the [Install an Application] button.
6. Check Active Sync (USB) box, then click [Next].
7. In the Select Connection box, verify that USB
Default is selected.
8. In the ActiveSync window on the desktop computer,
select Explore. Create a new folder and name the
folder “Install”.
9. Place the config.hht file and the application files in
the Install folder (See Creating an installation setup
file on page 51 for more information.).
10. Copy the files from the desktop PC to the tablet.
11. After copying the files, tap the [Disconnect] button
on the CT2000 CE Tablet.
12. Open the Install folder on the tablet and choose the
“config.hht” file to install it.
When the CT2000 CE Tablet is connected to
the desktop PC with ActiveSync, do not turn
off the tablet power. If power is turned off,
ActiveSync on the desktop PC side may not
terminate normally. If termination is not
normal, remove the tablet from the cradle,
make sure that ActiveSync on the desktop
PC side has terminated normally, and then
reconnect the CT2000 CE Tablet to the
desktop PC.
Repeatedly docking and undocking the
tablet may also make the desktop PC
unstable. Do not connect then disconnect
this device within a short period of time.
Installing an application via WLAN
If a wireless LAN is used between the CT2000 CE Tablet
and the desktop PC, the application can be installed
using the wireless LAN.
Prior to attempting to install an application
via WLAN, ensure that you have created an
“Install” folder on the desktop computer,
and that it is used as the repository for all
config.hht, application, and CAB files.
1. Double-tap the “Network and Dial-up
Connections” icon.
2 . S in g le - ta p th e “P CI - PR I SM 1 ” i co n .
3. Tap the File menu and select Enable from the pull
down menu.
4. Double-tap the PCI PRISM1 icon. The Settings
window will open.
5. Verify that the information in the window is correct
and complete. If it is not, fill in the information.
6. Tap [OK] to close the window.
7. Close the Control Panel and return to the Fujitsu
Setup menu.
8. Tap the [Install an Application] button.
9. Check the Wireless LAN checkbox, then click
[Next].
10. If you would like to verify your WLAN settings, click
the [Network Properties...] button, otherwise, click
[Next].
11. The name of your tablet should appear in the Device
Name box. If it doesn’t enter it.
In the following step, in order to determine
the server name, right-click My Computer
on the desktop computer and select
Properties. Click the Computer Name tab to
see the computer name.
12. Enter the name of the server (i.e., the name of the
computer from which you are installing the application) in the Server box. Be sure to enter a doublebackslash (“\\”) before the server name. You can use
the [Browse] button to navigate to the location.
13. Enter the name of the folder where you placed the
installation file (config.hht) in the Folder box on the
desktop computer.
14. Tap [Next] to start installation. If the message
“Cannot find the server or files” is displayed, make
sure that the server name and folder name are
correct, then tap the [Retry] button.
53
Page 57

Stylistic CT2000 Series CE Tablet User’s Guide – Appendix
DEVICE PROPERTIES
Initializing the Tablet
1. Open the Fujitsu setup menu by holding the [CLR]
button while warm-booting the system (i.e.,
pressing the small recessed reset button on the back
of the system).
2. Tap the [Device Property] button, then select the
Initialize tab.
3. Check whether you want to initialize all settings or
only selected items (Flash Disk or RAM).
4. Press the [Initialize] button. When initialization
starts, a message appears asking if you want to
proceed. Tap the [Yes] button to perform initialization. A screen indicating the progress of initialization is displayed during initialization.
If initialization is done with "Initialize all setting" or
"RAM" specified, power is automatically turned off
after initialization. Restarting the tablet returns the
CT2000 CE Tablet to its factory setting. However, if
an application has already been installed, restoration
automatically starts when you initialize only RAM.
Backup and Restore
This item describes how to save and restore the current
registry.
1. Open the Fujitsu setup menu by holding the [CLR]
button while warm-booting the system (i.e.,
pressing the small recessed reset button on the back
of the system).
2. Tap the [Device Property] button, then select the
Registry tab.
3. Press the [Select Backup or Restore] button. To save
the registry, select the [Backup] tab. To restore the
registry, select the [Restore] tab.
4. Enter the name of the file to be saved or restored.
Tapping the [Browse] button opens a dialog box for
selecting a file for [File name].
5. Tapping the [x] button cancels the process and
opens to the Properties dialog box. Tapping the
[OK] button executes saving or restoration. When
the processing is complete, the Properties dialog box
reappears.
Setting the system font
This item describes how to change the system font used
by the CT2000 CE Tablet.
1. Open the Fujitsu setup menu by holding the [CLR]
button while warm-booting the system (i.e.,
pressing the small recessed reset button on the back
of the system).
2. Tap the [Device Property] button, then select the
Font tab.
3. Make any changes to the font that you wish, then tap
the [OK] button to register the font changes.
If the system font is changed, the font used
by the system is changed. Normal operation
could be disabled (for example, the display
position is skewed), depending on the
specified font.This setting takes effect after
restart.
Setting the restoration process
This item describes how to skip certain items in the
restoration process.
1. Open the Fujitsu setup menu by holding the [CLR]
button while warm-booting the system (i.e.,
pressing the small recessed reset button on the back
of the system).
2. Tap the [Device Property] button, then select the
Restoration tab.
3. Select whether you want to skip touch panel calibration and/or date and time entry whenever you
restore the system.
4. Tap the [OK] button to register the restoration
changes.
REGISTRY EDITOR
The CT2000 CE Tablet includes a function for editing
the registry; however, the following restrictions apply to
this device’s registry editor:
Accessing the registry
1. Open the Fujitsu setup menu by holding the [CLR]
button while warm-booting the system (i.e.,
pressing the small recessed reset button on the back
of the system).
2. Tap the [Registry Editor] button. The Registry information window opens.
3. Navigate to the registry value you want to change.
This may require opening several sub-folder until
you get to the desired values. When you reach the
registry value level, they will appear in the lower
pane of the window.
Creating a registry key
The registry editor can be used to create a new registry
key.
1. Select where you want to create the key (main key)
in the upper pane, and tap the New Key icon (it
looks like a folder) at the top of the window.
2. Enter the name of the registry key you want to
create, then tap the [OK] button to create the key.
54
Page 58

Using Your Tablet Software
Creating a registry value
The registry editor can be used to create a new registry
value.
1. Select the key for which a value is to be created in the
upper pane and tap the [New Value] icon (it looks
like a checkbox) on the menu bar.
2. Enter the name and content of the value to be
created.
3. Select the format of the value to be created.
4. Tap the [OK] button to create the new value.
Exporting and importing registry information
This registry editor provides a function for exporting the
registry information for the selected registry key to a file
and a function for fetching the registry information
from the registry file.
Exporting
1. Select the key whose information you want to export
in the upper pane.
2. Select [File] -> [Export] on the menu bar.
A dialog box for writing the file name opens.
Specify the name of the destination file and the
name of the destination folder.
3. A message requesting confirmation appears. Tap the
[Yes] button. The information for the specified
registry key is written to the file.
Importing
1. Select [File] -> [Import] on the menu bar.
2. A box for specifying the file name appears. Select the
file to be imported.
3. Import the specified file to the current registry.
Deleting a registry key or value
The registry editor can be used to delete a registry key or
value.
1. First select the key or value to be deleted.
2. Tap the [Delete] button on the menu bar. A message
requesting confirmation appears.
3. Tap [Yes] to delete the registry key or value.
FILE MANAGER
The CT2000 CE Tablet Explorer enables files to be
copied, deleted or the like.
Referencing a file and folder
1. Open the Fujitsu setup menu by holding the [CLR]
button while warm-booting the system (i.e.,
pressing the small recessed reset button on the back
of the system).
2. Tap the [File Manager] button.
3. Double-tap the folder name in the file list to switch
the list to the contents of that folder.
Copying files and folders
The CT2000 CE Tablet Explorer enables selected files
and folders to be copied to the current file list in the
other pane.
1. Select the files and folders to be copied from the file
list in one pane to the other pane then tap the
[Copy] button on the menu bar. The selected files
and folders are copied to the other pane. If a folder is
selected for copying, all files and folders in that
folder are copied.
If the copy destination contains a file having the
same name, a dialog box appears asking you to
confirm the file replacement.
Deleting files and folders
Explorer menu can delete selected files and folders.
Select a file or folder from the file list and tap the delete
button on the menu bar.
Tap the [Yes] button to delete the specified file or folder.
Tap the [No] button to cancel the deletion.
Creating a folder
The CT2000 CE Tablet allows you to create a new folder
at the current location in the selected file list.
1. Open the location where you want to create the new
folder, then tap the [Create Folders] button on the
menu bar.
2. Enter the name of the folder to be created, then tap
[Yes] to create the folder.
Other functions
The File Manager also supports the following functions:
Displaying file properties
Select [File] -> [Properties] on the menu bar.
Displaying available space
Select [File] -> [Free Space] on the menu bar.
• Do not use the File manager to delete
installed files.If a file is deleted, no
application program may operate and may
be able to be saved.
• The files on the device copied using the
File manager are not files that are saved
together with application programs.
RUN A PROGRAM
A file can be executed by specifying its name in setting
menu.
1. Open the Fujitsu setup menu by holding the [CLR]
button while warm-booting the system (i.e.,
pressing the small recessed reset button on the back
of the system).
55
Page 59

Stylistic CT2000 Series CE Tablet User’s Guide – Appendix
2. Tap the [Run a program] button.
3. Enter the file name of the file to be executed. You can
also navigate to the file using the [Browse] button.
4. Tap the [OK] button to execute the specified file.
• To execute a file with parameters,
separate a file name and the parameters
with a space. If a folder name contains a
space (for example, Storage Card or
Program Files), enclose the folder name
with double quotation marks (""). (To
differentiate the folder name from the
parameters).
• The setting menu is designed to install
application programs and/or set
environments.As such, it has no
desktop, task bar, or task tray. Some
programs may not be able to start
normally depending on the program
specification
ENTERING DESKTOP
CT2000 CE Tablet has a Desktop function. Desktop
mode enables you to operate the tablet without installing
an application program.
1. Open the Fujitsu setup menu by holding the [CLR]
button while warm-booting the system (i.e., pressing
the small recessed reset button on the back of the
system).
2. Tap the [Desktop] button. You will be asked if you
want to enter Desktop.
3. If you tap [Yes], the system will be set to debug mode
and is automatically restarted.
Setting debug mode sets the following
states:
• Display of desktop only (nothing is
started.)
• Display of the task bar in the foreground.
Release debug mode by starting the setting
menu and performing initialization.
APPLICATION BACKUP AND RESTORATION
If memory has been erased
CT2000 CE Tablet is designed so that it normally operates with battery power. Since that is the case, memory
can be erased due to a dead battery.
Memory is generally backed up with a backup battery
even if the main battery is dead. However, if the device is
left in this condition, power can be lost and memory is
erased.
When memory has been erased after installing an application, a dialog appears notifying you that the contents of
memory has been lost.
This device supports an automatic restore function for
programs to guard against erasing memory (RAM)
caused by a dead battery or another reason.
Applications must have already been installed according
to the standard installation procedure. For more information about the standard installation procedure, see
(See Installation on page 51 for more information.)
The following are not restored when the
Restore tool is used:
Applications and data copied into the object
store using a method other than the ordinary
installation procedure.
Start of restoration
When an application program has been installed with the
ordinary procedure, it can be automatically restored as
follows:
1. Confirming erasing of memory:
If memory has been erased, a screen appears
informing you.
Tap [Restore] button on display. Touch panel calibration starts.
2. Calibrating the touch panel:
When touch panel correction has started, tap the
center of the target (+) with the stylus according to
the instructions on the screen.
When the touch panel has been calibrated, the date
and time properties dialog box appears.
3. Setting the date and time:
If memory has been erased, date and time setting is
returned to the default setting.
Set the current date and time.
When the date and time have been set, the restore
tool starts.
4. Starting restoration:
Automatic restoration for the application program
and operating environment is executed
5. Completing restoration:
When application has been restored, the this device is
automatically restarted.
After restart, the application program is started as the
startup application.
56
Page 60

TERMINAL SERVICE SETTING
• Prior to using the Remote Desktop
Protocol, you must first configure the
Terminal Service Settings which can be
accessed by double-clicking on the
Terminal Service Setting icon in the
Control Panel.
• If the server is not configured, the
system will suspend.
Double tapping the “Terminal service setting” icon in the
system control panel opens the Terminal Service Setting
Properties window.
When the window opens, verify that the settings are
correct, or enter the correct information.
“Logon settings”, “Remote computer
sound”, “Local devices”, “Reconnect if
connection is dropped” are supported only
by Windows 2003 server.
Using only the Backup Server, “Enable settings for the
backup server” check box is displayed. If there is no check
mark in this box, all controls for this server are greyed
out.
Using Your Tablet Software
57
Page 61

Stylistic CT2000 Series CE Tablet
Index
Symbols
.NET Compact Framework . . . . . . . . . . . . . . . . . . . . 40
A
About This Guide . . . . . . . . . . . . . . . . . . . . . . . . . . . . . 4
ActiveSync . . . . . . . . . . . . . . . . . . . . . . . . . . . . . . . . . . 40
adjusting the display brightness . . . . . . . . . . . . . . . . . 16
Application backup and restoration . . . . . . . . . . . . . 56
ARMV4I . . . . . . . . . . . . . . . . . . . . . . . . . . . . . . . . . . . . 40
ARMV4T . . . . . . . . . . . . . . . . . . . . . . . . . . . . . . . . . . . 40
audio jack . . . . . . . . . . . . . . . . . . . . . . . . . . . . . . . . 11, 13
B
Backup and Restore . . . . . . . . . . . . . . . . . . . . . . . . . . . 54
barcode scanner port . . . . . . . . . . . . . . . . . . . . . . . . . 13
battery
charging . . . . . . . . . . . . . . . . . . . . . . . . . . . . . . . . . . 18
conserving battery power . . . . . . . . . . . . . . . . . . . . 18
removing and installing . . . . . . . . . . . . . . . . . . . . . 18
battery pack . . . . . . . . . . . . . . . . . . . . . . . . . . . . . . . . . 11
battery release latches . . . . . . . . . . . . . . . . . . . . . . . 9, 13
Before setting up the CT2000 CE tablet . . . . . . . . . . 15
bridge battery . . . . . . . . . . . . . . . . . . . . . . . . . . . . . . . . 19
bridge battery cover . . . . . . . . . . . . . . . . . . . . . . . . . . . 9
built-in microphone . . . . . . . . . . . . . . . . . . . . . . . . . . . 8
C
calibrating the pen . . . . . . . . . . . . . . . . . . . . . . . . . . . . 16
care and maintenance . . . . . . . . . . . . . . . . . . . . . . 33, 36
CE.NET File Viewers . . . . . . . . . . . . . . . . . . . . . . . . . . 40
CF Card
installing . . . . . . . . . . . . . . . . . . . . . . . . . . . . . . . . . . 19
cleaning the display screen . . . . . . . . . . . . . . . . . . . . . 34
Color LCD display . . . . . . . . . . . . . . . . . . . . . . . . . . . . . 8
Compact Flash (CF) slot . . . . . . . . . . . . . . . . . . . . . . . 11
configuring peripherals interface . . . . . . . . . . . . . 34, 36
connectors and peripheral interfaces . . . . . . . . . . . . . 13
conventions used in the guide . . . . . . . . . . . . . . . . . . . 4
cradle interface port . . . . . . . . . . . . . . . . . . . . . . . . . . 13
Creating an installation setup file . . . . . . . . . . . . . . . .51
CT2000
powering . . . . . . . . . . . . . . . . . . . . . . . . . . . . . . . . . .18
resetting the system . . . . . . . . . . . . . . . . . . . . . . . . .16
cursor
not tracking pen . . . . . . . . . . . . . . . . . . . . . . . . . . . .36
D
DC input connector . . . . . . . . . . . . . . . . . . . . . . . . . . .13
DC jack . . . . . . . . . . . . . . . . . . . . . . . . . . . . . . . . . . . . .11
Device Properties . . . . . . . . . . . . . . . . . . . . . . . . . . . . .54
display
screen is blank . . . . . . . . . . . . . . . . . . . . . . . . . . . . . .36
screen, cleaning . . . . . . . . . . . . . . . . . . . . . . . . . . . . .34
E
eMbedded Visual Basic . . . . . . . . . . . . . . . . . . . . . . . . .40
F
FAQs . . . . . . . . . . . . . . . . . . . . . . . . . . . . . . . . . . . . . . .40
File Manager
Copying files and folders . . . . . . . . . . . . . . . . . . . . .55
Creating a folder . . . . . . . . . . . . . . . . . . . . . . . . . . . .55
Deleting files and folders . . . . . . . . . . . . . . . . . . . . .55
Referencing a file and folder . . . . . . . . . . . . . . . . . .55
File manager . . . . . . . . . . . . . . . . . . . . . . . . . . . . . . . . .55
Frequently Asked Questions . . . . . . . . . . . . . . . . . . . .40
Fujitsu contact information . . . . . . . . . . . . . . . . . . . . . .4
Fujitsu online . . . . . . . . . . . . . . . . . . . . . . . . . . . . . . . . .4
function buttons
programming . . . . . . . . . . . . . . . . . . . . . . . . . . . . . .17
I
If memory has been erased . . . . . . . . . . . . . . . . . . . . . .56
Initializing the Tablet . . . . . . . . . . . . . . . . . . . . . . . . . .54
Installing and Using the Software . . . . . . . . . . . . . . . .51
interfaces
connectors and peripherals . . . . . . . . . . . . . . . . . . .13
K
key/button pad . . . . . . . . . . . . . . . . . . . . . . . . . . . . . . . .8
58
Page 62

Index
M
Meory erased . . . . . . . . . . . . . . . . . . . . . . . . . . . . . . . . 56
Microsoft Transcriber . . . . . . . . . . . . . . . . . . . . . . . . . 40
Microsoft Visual Studio .NET 2003 IDE . . . . . . . . . . 40
N
No application has been installed. . . . . . . . . . . . . . . . 15
O
Off state . . . . . . . . . . . . . . . . . . . . . . . . . . . . . . . . . . . . 15
optional accessories . . . . . . . . . . . . . . . . . . . . . . . . . . . . 7
overheating, avoiding . . . . . . . . . . . . . . . . . . . . . . . . . 34
P
PC card slot . . . . . . . . . . . . . . . . . . . . . . . . . . . 10, 13, 19
pen . . . . . . . . . . . . . . . . . . . . . . . . . . . . . . . . . . . . . . . . 10
not responding . . . . . . . . . . . . . . . . . . . . . . . . . . . . 36
using . . . . . . . . . . . . . . . . . . . . . . . . . . . . . . . . . . . . . 16
peripheral connectors . . . . . . . . . . . . . . . . . . . . . . . . . 13
Pocket PC 2002 . . . . . . . . . . . . . . . . . . . . . . . . . . . . . . 40
power button . . . . . . . . . . . . . . . . . . . . . . . . . . . . . 13, 16
Power Off switch . . . . . . . . . . . . . . . . . . . . . . . . . . . . . . 9
powering the CT2000 . . . . . . . . . . . . . . . . . . . . . . . . . 18
powering up the tablet . . . . . . . . . . . . . . . . . . . . . . . . 15
Preparation for wireless LAN connection . . . . . . . . . 30
problems, solving . . . . . . . . . . . . . . . . . . . . . . . . . . . . 34
programming the function buttons . . . . . . . . . . . . . . 17
protecting the display . . . . . . . . . . . . . . . . . . . . . . . . . 33
R
Registry
Accessing . . . . . . . . . . . . . . . . . . . . . . . . . . . . . . . . . 54
Creating a registry key . . . . . . . . . . . . . . . . . . . . . . 54
Creating a registry value . . . . . . . . . . . . . . . . . . . . . 55
Deleting a registry key or value . . . . . . . . . . . . . . . 55
Exporting and importing registry information . . 55
Other functions . . . . . . . . . . . . . . . . . . . . . . . . . . . . 55
Registry editor . . . . . . . . . . . . . . . . . . . . . . . . . . . . . . . 54
removable battery pack . . . . . . . . . . . . . . . . . . . . . . . . . 9
reset switch . . . . . . . . . . . . . . . . . . . . . . . . . . . . . . . . . . . 9
resetting the system . . . . . . . . . . . . . . . . . . . . . . . . . . . 16
resuming system operation . . . . . . . . . . . . . . . . . . . . 36
Running a program . . . . . . . . . . . . . . . . . . . . . . . . . . . 55
S
serial port . . . . . . . . . . . . . . . . . . . . . . . . . . . . . . . . . . . .10
Setting the restoration process . . . . . . . . . . . . . . . . . . .54
Setting the system font . . . . . . . . . . . . . . . . . . . . . . . . .54
shutting down the system . . . . . . . . . . . . . . . . . . . . . .15
Software
Creating an installation setup file . . . . . . . . . . . . . .51
Installing an application via WLAN . . . . . . . . . . . .53
Installing applications . . . . . . . . . . . . . . . . . . . . . . .52
Installing programs using a storage card . . . . . . . .52
solving problems . . . . . . . . . . . . . . . . . . . . . . . . . . . . . .34
speaker . . . . . . . . . . . . . . . . . . . . . . . . . . . . . . . . . . . . . . .8
speaker/headphone volume too low . . . . . . . . . . . . . .36
Start of restoration . . . . . . . . . . . . . . . . . . . . . . . . . . . .56
storing the system unit . . . . . . . . . . . . . . . . . . . . . . . . .34
Stylistic CT2000
care and maintenance . . . . . . . . . . . . . . . . . . . .33, 36
features . . . . . . . . . . . . . . . . . . . . . . . . . . . 8, 9, 10, 11
items included with . . . . . . . . . . . . . . . . . . . . . . . . . .6
storing . . . . . . . . . . . . . . . . . . . . . . . . . . . . . . . . . . . .34
Stylistic CT2000 specifications
additional . . . . . . . . . . . . . . . . . . . . . . . . . . . . . . . . .44
agency approval . . . . . . . . . . . . . . . . . . . . . . . . . . . .44
display specifications . . . . . . . . . . . . . . . . . . . . . . . .43
environmental . . . . . . . . . . . . . . . . . . . . . . . . . . . . . .44
memory/storage specifications . . . . . . . . . . . . . . . .43
physical specifications . . . . . . . . . . . . . . . . . . . .43, 44
power . . . . . . . . . . . . . . . . . . . . . . . . . . . . . . . . . . . . .43
system will not resume operation . . . . . . . . . . . . . . . .36
T
Terminal service setting . . . . . . . . . . . . . . . . . . . . . . . .57
troubleshooting . . . . . . . . . . . . . . . . . . . . . . . . . . . . . . .34
turning off the system . . . . . . . . . . . . . . . . . . . . . . . . . .15
U
Universal Serial Bus . . . . . . . . . . . . . . . . . . . . . . . . . . .11
USB port . . . . . . . . . . . . . . . . . . . . . . . . . . . . . . . . .11, 13
using the pen . . . . . . . . . . . . . . . . . . . . . . . . . . . . . . . . .16
V
Visual Studio 2002 . . . . . . . . . . . . . . . . . . . . . . . . . . . .41
Visual Studio 2003 . . . . . . . . . . . . . . . . . . . . . . . . . . . .41
59
Page 63

Stylistic CT2000 Series CE Tablet
W
warranty information . . . . . . . . . . . . . . . . . . . . . . . . . . 4
Windows CE.NET Edition . . . . . . . . . . . . . . . . . 4, 6, 44
Windows for Mobile 2003 . . . . . . . . . . . . . . . . . . . . . 40
Wireless LAN
Ad Hoc Mode . . . . . . . . . . . . . . . . . . . . . . . . . . . . . 27
before using . . . . . . . . . . . . . . . . . . . . . . . . . . . . . . . 27
characteristics . . . . . . . . . . . . . . . . . . . . . . . . . . . . . 27
connection using Windows XP . . . . . . . . . . . . . . . 30
for better communications . . . . . . . . . . . . . . . . . . 28
Infrastructure Mode . . . . . . . . . . . . . . . . . . . . . . . . 27
preparation for connection . . . . . . . . . . . . . . . . . . 30
starting transmission . . . . . . . . . . . . . . . . . . . . . . . 28
stopping transmission . . . . . . . . . . . . . . . . . . . . . . 28
WLAN antenna . . . . . . . . . . . . . . . . . . . . . . . . . . . . . . . 8
60
Page 64

 Loading...