

Page 1

ISDN
Digital Set User's Guide
SRS-2100
National ISDN
Delivering on the promise of ISDN
Fujitsu
Page 2

Fujitsu SRS -2100 (
Page 2
Page 3

( Fujitsu SRS-2100
Fujitsu Network Switching of America, Inc.
4403 Bland Road, Somerset Park
Raleigh, NC 27609
U.S.A.
Part Number P-UG -2100V
Revision 1.1
Copyright 1994 Fujitsu Network Switching of America, Inc. All rights
reserved. Printed in the United States of America.
This publication may be replaced by a revised edition. To find out if a
revision exists, or to order copies of publ ications, write to 4403 Bland
Road, Somerset Park, Raleigh, NC 27609, or call 1-800-228-ISDN. Please
direct all communications to Fujitsu Network Switching of America, Inc.
No part of this publication may be reproduced or translated, stored in a
databas e or retrieval system, or transmitted in any form or by any means,
electronic, mechanical, photocopying, recording, or otherwise, without
the prior written permission of Fujitsu Network Switching of America, Inc.
The information contained in this document is subject to change without
notice.
Page 3
Page 4

Fujitsu SRS -2100 (
Warning:
This equipment has been tested and found to comply with the limits for a
Class B digital device, pursuant to Part 15 of the FCC rules. These limits
are designed to provide reasonable protection agai nst harmful
interference in a residential installation. This equipment generates, uses,
and can radiate radio frequency energy and, if not installed and used in
accordance with the instructions, may cause harmful interference with
radio communications. However, there is no guarantee that interference
will not occur in a particular installation. If this equipment does cause
harmful interference with radio or television reception, which can be
determined by unplugging the equipment to turn it off, the user is
encouraged to try to correct the interference by one of the following
measures:
• Reorient or relocate the receiving antenna of the affected receiver.
• Increase the separation between the equipment and the affected
receiver.
• Connect the equipment to an outlet on a circuit different from the
one to which the affected receiver is connected.
• Consult a dealer or experienced radio or television technician for
help.
Cable Notice: The use of standard shielded cables to connect external
data devices is required to ensure compliance with FCC Part 15 Rules for
Class B devices.
Page 4
Page 5

( Fujitsu SRS-2100
FCC Notice
This equipment complies with Part 68 of the FCC Rules. The FCC Part 68
Label is located on the bottom of the enclosure. This label contains the
FCC Registration Number for this equipment. If requested, the FCC
Registration Number and the following information must be provided to
your telephone company.
If this telephone equipment causes harm to the telephone network, the
telephone company will notify you in advance that temporary
discontinuous of service may be required. But, if advance notice is not
practical, the telephone company will notify the customer as soon as
possible. Also, you will be advised of your right to file a complaint with
the FCC if you believe it is necessary.
The telephone company may make changes in its facilities, equipment,
operations, or procedures that could affect the proper functioning of your
equipment. If changes are made, you will be notified in advance to order
to make necessary modifications to maintain uninterrupted service.
This equipment may not be used on coin service provided by the
telephone company. Connection to party lines is subject to state tariffs.
Repairs to this equipment can only be made by the manufacturer or its
authorized agents. If this equipment is causing harm to the telephone
network, the telephone company may request that it be unplugged from
the modular outlet until the problem has been corrected. To obtain repair
service or warranty information, contact:
Technical Assistance Center
Fujitsu Network Communications, Inc.
4403 Bland Road, Somerset Park
Raleigh, NC 27609
Phone: (919) 790-2211 or 800-228-4736
FCC Warning
Changes or modifications not expressly approved by the party
responsible for compliance could void the user’s authority to operate this
equipment.
Page 5
Page 6

Fujitsu SRS -2100 (
PREFACE
This guide provides descriptions and procedures for using Fujitsu's
Digital Set, the SRS-2100, when it is attached to a switch supporting
National ISDN (NISDN).
This guide is for anyone interested in using the SRS-2100 to gain the
benefits of the combined voice and data network capabilities of ISDN
technolo gy.
Read the sections that follow for information on:
• Using this guide efficiently
• Special features of your ISDN telephone
• Background on ISDN technology
USING THIS GUIDE
This section can help you make the most efficient use of this guide. The
section describes the overall organization, aids to finding information,
and conventions.
Organization
This guide is organized in the following chapters:
Chap ter Content
Chapter 1 Has illustrations to introduce the physical layout of the
SRS-2100. It also describes the features and functions of
its components.
Chapter 2 Describes the use of the basic voice services, such as
placing and receiving calls and using the
speaker/microphone (handsfree mode). It also explains
how to use one-touch calling, the unanswered-call
feature, and the function buttons SPEAKER, MIC-OFF,
REDIAL, HOLD, CONFERENCE, TRANSFER, and DROP.
Page 6
Page 7

( Fujitsu SRS-2100
Chapter Content
Chapter 3 Explains how to set up SRS-2100 features such as one-
touch buttons, unanswered call logging, and the
calendar/clock.
Chapter 4 Explains how to use the optional data terminal adapter to
place or receive data calls.
Conventions and Layout
In procedures, the required actions are noted, with the buttons you press
in capital letters, such as HOLD or REDIAL.
Other important words, such as messages that appear on the display, also
appear in CAPITAL LETTERS.
Actions that pertain to only a specific phone system have the following
symbols inserted. These symbols appear in the section heading when the
information applies entirely to that system, or they appear adjacent to a
command where only a specific action applies to that system.
(5ESS Required for Lucent Systems.
(DMS-100 Required for Nortel Systems.
(EWSD Required for Siemens Systems.
Note: 5ESS, DMS -100, and EWSD are registered trademarks of
Lucent, Nortel, and Siemens Telecom Networks
respectively.
Menus or screen displays appear as text in boxes.
. . . . . . . . . . . . . . . . . . . . . . . . . . . . . . . . . . . . . . . .
. . . . . . .
. . . . . . . . . . . . . . . . . . . . . . . . . . . . . . . . . . . . . . . .
. . . . . . .
12:55PM SATURDAY May
10
Page 7
Page 8

Fujitsu SRS -2100 (
UNA-LIST DATA CLEAR
DIR-LIST
Page 8
Page 9
( Fujitsu SRS-2100
Helpful Tips About Your SRS-2100
Because ISDN technology is new, some features of your SRS-2100 may
be unfamiliar.
Softkeys
Softkeys are a way of simplifying the phone and still supporting the
richness of ISDN features. These keys assume different functions
depending on the feature you are using, thus avoiding the need for a
large number of permanent function keys.
The SRS-2100 softkeys are the four keys located just below the display.
When you press the SERVICE button to their right, the display changes
and REGISTER appears over the fourth softkey.
5:20 PM Tuesday January 4
UNA-LIST DATA CLEAR DIR-LIST
Service
1 2 3 4
Standard Softkey Layout
Page 9
Page 10

Fujitsu SRS -2100 (
Timeouts
When you are setting up local features as described in Chapter 3, some of
the data entry displays have built-in timers. If you do not enter
information within fifteen seconds, the display reverts to the menu for
selecting the feature you were setting up. You must reselect the feature
and start again.
Starting Over
If for any reason you become confused while setting up a local feature in
menu mode, you can always press REGISTER, softkey number 4, to return
to the setup menus and start over.
Phone Operation
The following two features of ISDN phones may be different from what
you are used to:
Dialing 9. When you dial for an outside line (usually by pressing 9), you
do not hear a pause and a second dial tone. You can begin dialing the
telephone number immediately.
Onhook dialing. You can dial a number before you get a dial tone. The
number you dial appears on the display and remains there for three
minutes. When you lift the handset and press an idle Call Appearance
button, or press the SPEAKER button for handsfree mode, the phone
initiates the call automatically.
ISDN CONCEPTS: INTEGRATED VOICE AND DATA
ISDN stands for Integrated Services Digital Network, which provides
many voice and communication features. (The SRS-2100 data features,
available with the voice/data version are described in Chapter 4. For more
information, please see the Data User's Guide.)
Page 10
Page 11

( Fujitsu SRS-2100
The basic ISDN service provides two 64,000 bits per second "B" channels
for voice or data communications. Each B-channel can support circuitswitched or packet-switched data services. There is also one "D"
channel, at 16,000 bits per second, for network signaling and packetswitched data service. The combination is often referred to as "2B+D", or
the Basic Rate Interface (BRI).
Voice Features
The voice features of an ISDN telephone have several advantages:
• They allow your telephone to handle multiple calls simultaneously,
receiving calls while keeping others on hold.
• They also permit a call coming in to a single directory number to ring
more than one physical telephone. This feature facilitates call
handling within a group.
• They provide easy-to-use-access to powerful features such as call
conferencing and call transfer, to enhance your productivity.
• They allow the incoming directory number to be displayed if it is
available.
Data Features
The voice/data version of the SRS-2100 includes the following data
capabilities:
• Communication on the D-channel using packet switching with an
asynchronous RS-232 terminal at terminal speeds up to 19,200 bits
per second
• Communication on the B-channel using circuit switching with an
asynchronous RS-232C terminal at speeds up to 38,400 bits per
second
• Communications on the B-channel using circuit switching via an RS-
232 connector for synchronous data transmission at speeds of
56,000 or 64,000 bits per second.
The supporting network data features must also be assigned to the
line.
Page 11
Page 12

Fujitsu SRS -2100 (
Multipoint Configurations
In older ISDN installations, most phone connections are point-to-point.
Each phone in a point-to-point configuration requires a separate line into
your building. However, most service providers now offer multipoint
configurations as a subscription option. In a multipoint configuration, up
to eight devices (digital sets and/or terminal adapters) can be connected
to a single line. For example, your company could connect two digital
sets and two data terminal adapters to a single line. The two digital sets
could each use one B-channel for voice communication, and the data
terminal adapters could use the D-channel for packet-switched data calls.
SPID
For your SRS-2100 to work, it must have a valid Service Profile Identifier
(SPID). (If your SRS-2100 is the voice/data version, you need two SPIDs,
one for voice and one for data.) The SPID number is usually entered
when the SRS-2100 is installed. So if your digital set already has a SPID
number, you don't have to reenter it. If you do need to enter a SPID
number, you can find out what it should be from your System
Administrator or service provider. For the procedure to enter a SPID, see
Appendix B.
CAUTION: Once the SPID number is entered, don't change it unless
your System Administrator tells you to do so. Your SRS-2100 won't
work without the correct SPID number. If the SPID number is wrong,
the set displays the message SPID NG. (The message is redisplayed a
second time if the data terminal adapter SPID is also invalid.) Enter the
correct SPID number and you'll get the normal dial tone.
Page 12
Page 13

( Fujitsu SRS-2100
System Administrator
ISDN is very flexible in allowing businesses to customize how it works to
meet their specific needs. This User's Guide refers you to your System
Administrator if a customized option may have been chosen during
installation.
Your System Administrator may be your phone company representative
or a member of your telecommunications department.
Call Appearance Preference
The SRS-2100 allows you to specify which Call Appearance button it
selects when you go offhook (lift the receiver or press SPEAKER). You
have four choices:
• Primary line preference. The SRS-2100 always selects button
number 1, the Call Appearance associated with your primary
directory number .
• No preference. The SRS-2100 does not automatically select any Call
Appearance button when you go offhook. You must press the
button you wish to be connected to either before or after you go
offhook.
• Ringing line preference. The SRS-2100 selects the Call Appearance
button that is ringing with an incoming call. You are immediately
connected to the call.
• Idle preference. The SRS-2100 selects an idle Call Appearance.
For more detai ls about Call Appearance preference, see "Selecting CA
Preference," in Chapter 3.
Page 13
Page 14

Fujitsu SRS -2100 (
TABLE OF CONTENTS
Section Page
Chapter 1
Getting Acquainted With Your Digital Set................................................1-1
Digital Set Components .........................................................................1-1
Telephone Components.........................................................................1-2
Switches and Connectors...................................................................... 1-3
Function Buttons....................................................................................1-4
Indicators .................................................................................................1-4
MULTIFUNCTION BUTTONS.............................................................1-5
CALL INFORMATION DISPLAYS .....................................................1-7
SOFTKEYS AND SERVICE...................................................................1-8
Chapter 2
INTRODUCTION TO VOICE FEATURES.................................................2-1
PLACING AND RECEIVING CALLS ...................................................2-1
Switching Between Handset and Handsfree Modes .....................2-2
Placing Handse t Calls .........................................................................2-2
Receiving Handset Calls..................................................................... 2-4
Placing Handsfree Calls ......................................................................2-4
Receiving Handsfree Calls .................................................................2-7
Placing Headset Calls.......................................................................... 2-8
Receiving Headset Calls .....................................................................2-9
FUNCTION BUTTONS........................................................................2-10
REDIAL..................................................................................................2-11
HOLD...................................................................................................... 2-12
CONFERENCE.......................................................................................2-13
DROP...................................................................................................... 2-14
TRANSFER ( 5ESS.......................................................................2-15
TRANSFER (DMS-100...............................................................2-16
TRANSFER (EWSD......................................................................2-17
ONE -TOUCH CALLING.......................................................................2-17
Using a One Touch Button to Make a Call....................................2-18
Dialing Special Codes Using One-touch Buttons........................ 2-18
UNANSWERED CALL LOGGING (UNA-LIST)...............................2-19
Using the UNA-LIST Feature..........................................................2-19
Returning a Call..................................................................................2-20
Deleting a Record from the UNA-LIST..........................................2-21
Placing a Call Using the Personal Directory.................................. 2-21
Page 14
Page 15

( Fujitsu SRS-2100
Section Page
Chapter 3
LOCAL FEATURES ......................................................................................3-1
SERVICE MODE OPERATIONS...........................................................3-1
Selecting a Menu Option....................................................................3-2
PROGRAMMING A BUTTON FOR ONE -TOUCH DIALING..........3-3
Programming a One-Touch Button...................................................3-4
Changing or Canceling the Number Stored in a One-Touch
Button ....................................................................................................3-5
SETTING THE CALENDAR/CLOCK...................................................3-6
Setting Calendar and Clock Values ...................................................3-6
REINITIALIZING THE PHONE .............................................................3-8
UNANSWERED CALL LOGGING (UNA-LIST).................................3-9
Enabling the UNA-LIST Feature .......................................................3-9
Disabling the UNA-LIST Feature....................................................3-11
HANDSFREE, HANDSET, AND HEADSET MODES.....................3-11
Operating the Set with a Headset....................................................3-12
Switching from Headset Back to Handset Mode..........................3-13
Selecting Handsfree Operation (using the speaker and
microphone)........................................................................................3-13
Switching Back to Handset-Only Operation..................................3-14
CHANGING RINGER MODE...............................................................3-14
Setting Ringer Volume.......................................................................3-15
Setting Ringer Tone...........................................................................3-15
Selecting Ringer Mode......................................................................3-16
Selecting Ringer Pattern....................................................................3-17
USING Q.931 MESSAGE LOGGING...................................................3-17
Starting or Stopping Message Logging.........................................3-18
Reviewing Logged Messages..........................................................3-18
CALL ANNOUNCE INTERCOM........................................................3-20
Call Announce Intercom on Selected Buttons..............................3-21
Specifying the Directory Numbers for Intercom...........................3-22
Announcing a Call by Intercom.......................................................3-24
ACTIVATING AND DEACTIVATING THE MIC-OFF
BUTTON.................................................................................................3-25
SELECTING CALL APPEARANCE PREFERENCE..........................3-26
PERSONAL DIRECTORY....................................................................3-27
Setting Up the Personal Directory...................................................3-28
Using Network Data in the Personal Directory .............................3-29
Page 15
Page 16

Fujitsu SRS -2100 (
Section Page
Chapter 4
DATA OPERATION..................................................................................4-1
USING THE TERMINAL ADAPTER................................................4-1
MAKING AND TERMINATING A DATA CALL.........................4-1
Using the DATA Key......................................................................4-1
Using AT Commands.......................................................................4-2
Using X.28 Commands.....................................................................4-3
Appendix A ISDN Ordering
Appendix B Installation
Appendix C Testing
Appendix D ISDN Call Identification Displays
Appendix E Error Messages
Appendix F Interpreting Q.931. Message Logging Codes
Page 16
Page 17

( Fujitsu SRS-2100
Notes
Page 17
Page 18

SRS -2100 ( Index
SRS 2100 SUBJECT INDEX
Subject Page
AT Commands.........................................................................................4-2
Calendar/Clock settings.........................................................................3-6
Call Announce Intercom......................................................................3-20
Call Appearance Preference.................................................................3-26
Call Identification Displays...................................................................D-1
Call Status Code Table ..........................................................................F-7
Conference.............................................................................................2-13
Connection Status Messages - BCS................................................... E-1
Connection Status Messages - DPS................................................... E-4
Data Calls..................................................................................................4-1
Data key....................................................................................................4-1
D-Channel TEI ........................................................................................B-4
Directory Number Appearances ...........................................................1-6
DROP.......................................................................................................2-14
Function buttons...................................................................................2-10
Handset calls............................................................................................2-2
Handset mode........................................................................................3-12
Headset mode........................................................................................3-11
HOLD ......................................................................................................2-12
Idle line preference................................................................................3-26
Information Displays..............................................................................1-7
Information Element Code Table..........................................................F-6
Installation Diagrams .............................................................................B-2
Installation...............................................................................................B-1
Key Attribute Configuration................................................................B-8
Key Test Table .......................................................................................C-2
Page 1
Page 19

Index SRS-2100 (
Subject Page
LCD Test.................................................................................................C-3
LED Test ..................................................................................................C-2
Memory Tests ........................................................................................C-3
Menu options..........................................................................................3-2
Message Abbreviation Table ...............................................................F-4
Message logging - starting/stopping................................................3-18
Message Logging Codes - interpretation...........................................F-1
Message Logging.................................................................................3-17
MIC-OFF button...................................................................................3-25
Multifunction Buttons...........................................................................1-5
National Standardized Cause Values ...................................................E-5
Network connection.............................................................................. B-4
Network data...........................................................................................B-7
Network Specific Cause Values ............................................................E-6
One touch calling..................................................................................2-17
One-touch button changes ...................................................................3-5
One-touch button codes......................................................................2-18
One-Touch button programming..........................................................3-4
Package D................................................................................................A-3
Package E................................................................................................A-4
Package EZ 1...........................................................................................A-6
Package EZ 1A .......................................................................................A-6
Package G................................................................................................A-5
Permanent functions...............................................................................1-4
Personal Directory - placing calls .......................................................2-21
Personal Directory Entry Table...........................................................3-31
Personal directory set-up.....................................................................3-28
Personal Directory ................................................................................3-27
Physical Installation.............................................................................. B-2
Placing calls .............................................................................................2-1
Primary line preference.........................................................................3-26
Program and Loop Switch Test ............................................................C-4
Programming and labeling the set..................................................... B-19
Page 2
Page 20

SRS -2100 ( Index
Subject Page
Receiving calls .........................................................................................2-1
Receiving handset calls..........................................................................2-4
Redial.......................................................................................................2-11
Reinitializing your phone.......................................................................3-8
Ringer mode selection..........................................................................3-16
Ringer mode settings............................................................................3-14
Ringer pattern selection.......................................................................3-17
Ringer tone - set-up..............................................................................3-15
Ringer volume - set-up.........................................................................3-15
Ringing line preference.........................................................................3-27
Self-Test Result Code Table.................................................................C-5
Service key...............................................................................................1-8
Service mode............................................................................................3-1
Softkey layout..........................................................................................1-8
SPID..........................................................................................................B-4
Switching between handset and handsfree modes............................2-2
Terminal adapter......................................................................................4-1
Terminal resistors.................................................................................B-20
Test Mode...............................................................................................C-1
Tone Test................................................................................................C-3
TRANSFER............................................................................................2-15
Transferring a call..................................................................................2-16
UNA-LIST - Unanswered call logging.................................................3-9
Unanswered call logging description.................................................2-19
User-assigned functions........................................................................1-4
X.28 Commands.......................................................................................4-3
Page 3
Page 21

Index SRS-2100 (
Notes
Page 4
Page 22

Chapter 1 ( SRS-2100 Overview
CHAPTER 1
GETTING ACQUAINTED WITH YOUR DIGITAL SET
This introductory chapter describes the set's parts, connectors, switches,
and screen displays. It also explains how the functions and features
operate. Chapter 2 explains how to use the set for basic telephone
functions.
Digital Set Components
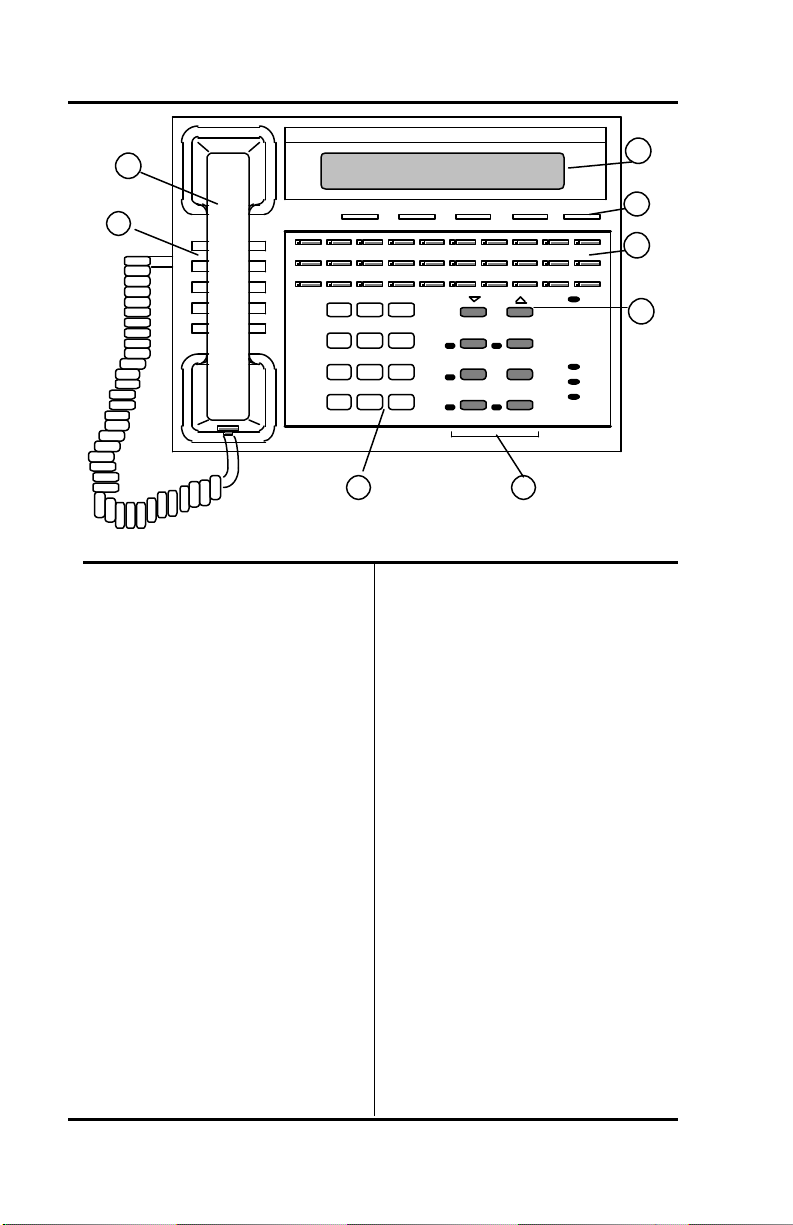
Figures 1-1 and 1-2 show, respectively, the front panel and the rear of the
digital set. The major components of the SRS-2100 are labeled and
described in the accompanying text.
Page 1-1
Page 23
SRS -2100 Overview ( Chapter 1
1
2
Figure 1-1 SRS -2100 Front Panel
Telephone Components
1) Handset/Headset. You pick -up
the handset to speak or listen
while making or answering calls,
except when using a headset or
the speaker and microphone.
2) Speaker. The speaker is
located directly under the
handset. In handsfree operation,
it lets you hear the other parties in
a telephone call.
3) Numeric Keypad. You use
these twelve keys to enter the
number you are calling or the
special characters *(asterisk) or
#(pound sign).
4) Display. The display shows
call information, the
calendar/clock, messages, and
menus used to set up local
features.
ABC DEF
1 2 3
GHI JKL MNO
4 5 6
PRS TUV WXY
7 8 9
* 0 #
3
5) Softkeys/SERVICE. The
softkeys below the display
control changeable functions.
Pressing SERVICE displays the
REGISTER label on line 4 of the
display. Pressing REGISTER
displays the menu functions of
the softkeys.
6) Multifunction buttons. These
buttons are assigned to Call
Appearances, one-touch
numbers, and network features.
7) Volume/Contrast buttons. If no
Call Appearance is active, these
buttons control display contrast.
If a CA is active, they control
speaker or handset volume.
8) Function buttons. These
buttons provide single-touch
access to ISDN features.
Drop
Conference
Transfer Redial
Speaker Hold
8
Service
MIC-OFF
MSG
Fujitsu
DTR
TXD
RXD
4
5
6
7
Page 1-2
Page 24
Chapter 1 ( SRS-2100 Overview
LOOP
NOR
PRG
TEST
7
TR
Off On
40V DC
Line
+ -
1 2
3 4 5
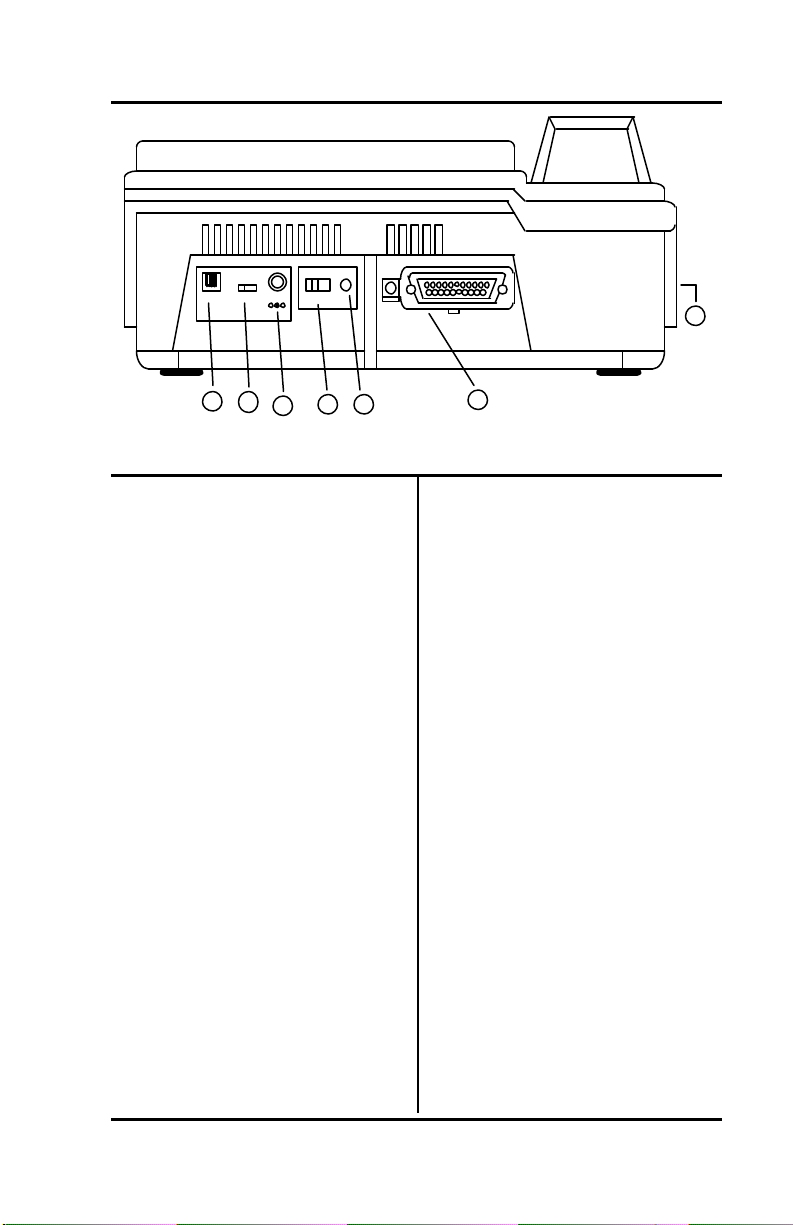
Figure 1-2 SRS -2100 Rear View
Switches and Connectors
1) ISDN line connector. Use this
RJ-45 connector to plug in the
telephone line. Normally, the line
also provides AC power for the
set.
2) Terminating resistor. This
built-in resistor, labeled "TR",
provides a standard termination
to the ISDN line.
3) DC power connector. This
connector, labeled "40 V DC",
provides an alternative to power
delivered through the ISDN line.
4) Loopback test switch. This
switch, labeled "LOOP", places
the set in DATA loopback mode.
Loopback is a test for data
transmission, so this switch is
available only if you have a data
terminal adapter in your phone.
6
5) Program switch for data setup.
This switch, labeled "PRG",
places the set in programming
mode when you are setting up
parameters for the data terminal
adapter.
6) Data connector. This 25-pin
female connector (DB25) appears
only on voice/data terminals.
This connector, labeled "DTE", is
the interface connector for data
transmission.
7) Handset/Headset connector.
This jack, located on the set's left
side, allows you to connect either
a handset or a headset.
Page 1-3
Page 25

SRS -2100 Overview ( Chapter 1
Function Buttons
The SRS-2100 has six function
buttons. Three of these are
permanently assigned to local
functions: SPEAKER, HOLD, and
REDIAL. For ease of operation,
Fujitsu supports two sets of
telephone company assignments
for network based features. On
the labeled function buttons for
CONFERENCE, DROP, and
TRANSFER, Fujitsu sets accept
the following values or feature
activators:
CONFERENCE Button 30
DROP Button 31
TRANSFER Button 32
Permanent Functions
SPEAKER
Enables/disables handsfree
operation
HOLD
Holds an active call
REDIAL
Redials the last number you
dialed
Activator 30 or 60
Activator 31 or 62
Activator 32 or 61
User-assigned Functions
CONFERENCE
(Button 30, Activator 30 or 60)
Adds parties to an existing call.
DROP
(Button 31, Activator 31 or 62)
Disconnects last party added to
a conference call. With a 5ESS
switch, disconnects a two-party
call.
TRANSFER
(Button 32, Activator 32 or 61)
Transfers a call to a third party
you dial or select.
Indicators
The SRS-2100 has four labeled
front panel indicators:
MSG........Message Waiting
DTR.........Data Terminal Ready
TXD........Transmit Data
RXD........Receive Data
When the MSG indicator is lit,
you have either messages or call
requests waiting to be picked up.
The other three indicators relate
to data transmission if your set is
a voice/data set. (see Chapter 4).
Each function button and
multifunction button also has an
indicator. These indicators serve
one of two purposes:
Page 1-4
Page 26

Chapter 1 ( SRS-2100 Overview
Page 1-5
Page 27
SRS -2100 Overview ( Chapter 1
For Features
If the button is assigned to a
local or network feature, the
indicator lights when certain
features are activated.
21 22 28 29 MIC-OFF
11
1 2
..........
12 18 19 20
..........
8 9 10
..........
For Calls
If the button is assigned to a
Directory Number or a Call
Appearance on your phone,
the indicator slowly flashes
green for incoming calls,
flashes red if a call is on hold
at your phone, and is steady
red when a call is active on
your phone.
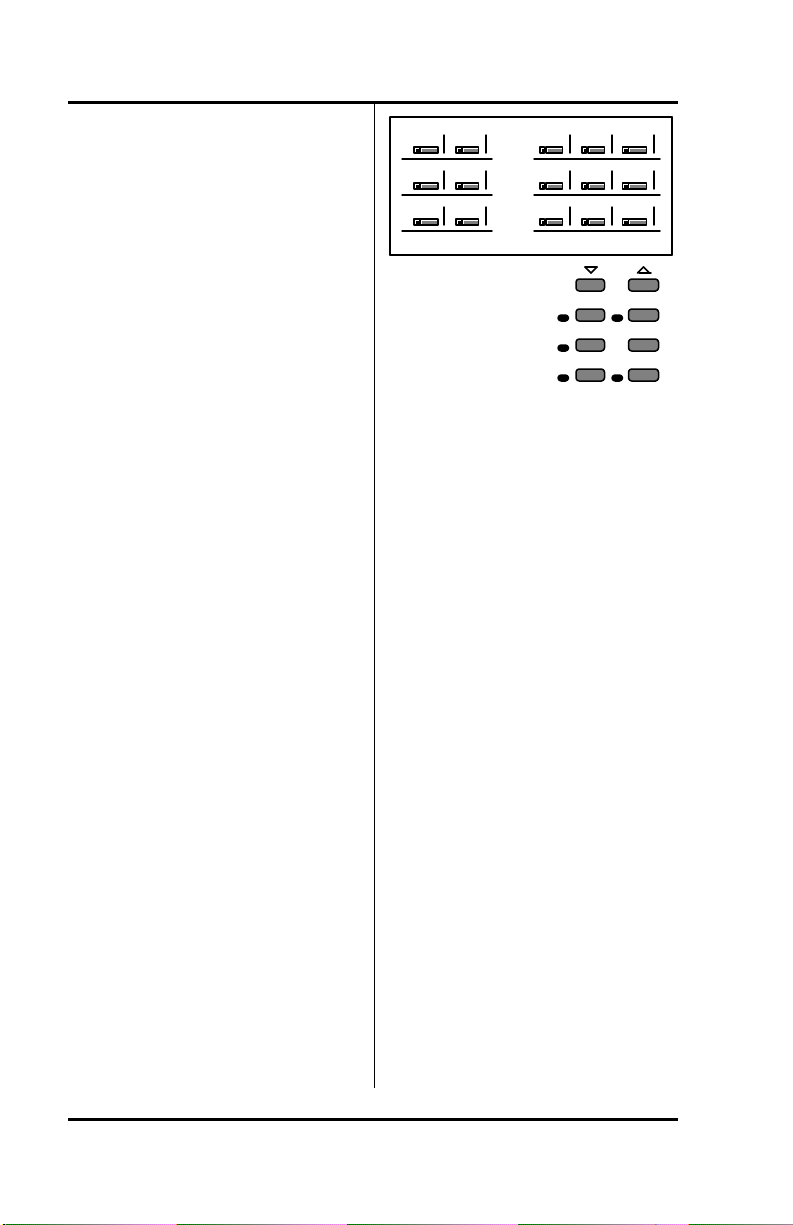
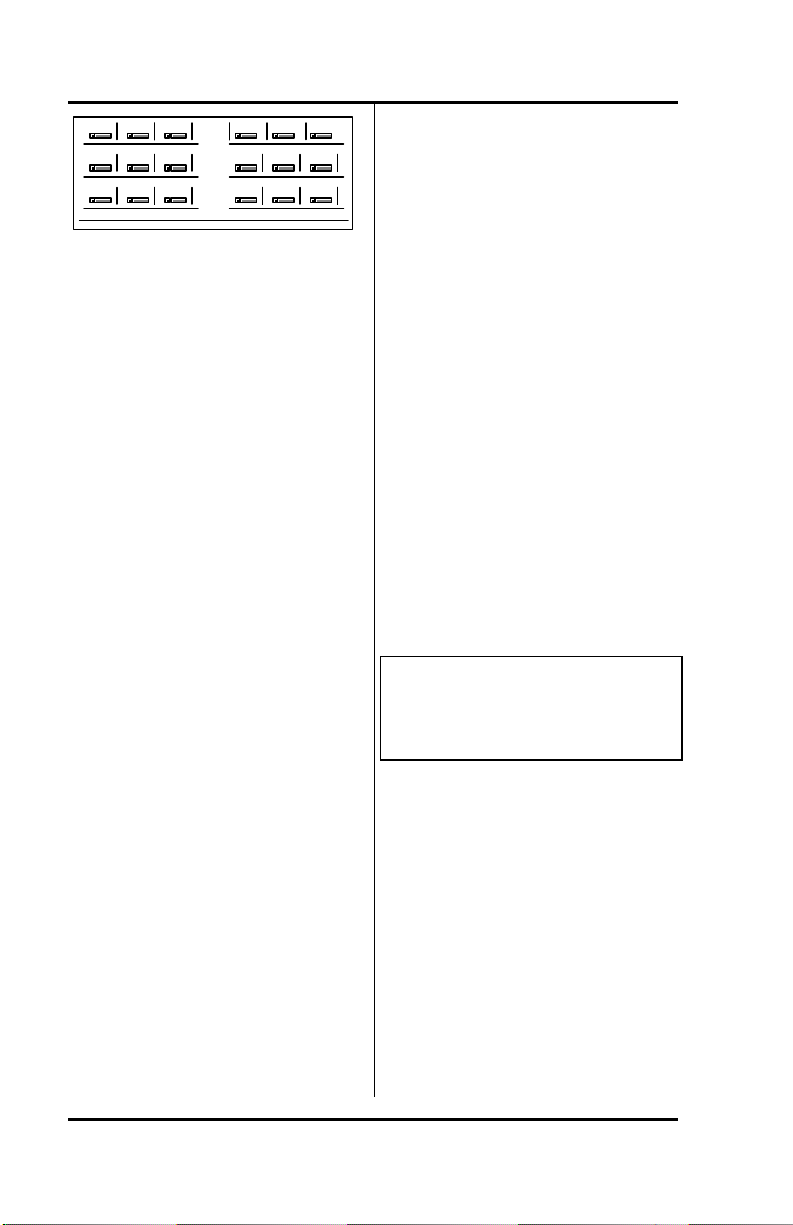
MULTIFUNCTION BUTTONS
The 32 multifunction buttons on
your SRS-2100 are in three rows
of 10 buttons each along the top
of the front panel (excluding the
button assigned to MIC-OFF),
plus the three unassigned
function buttons to the right of
the numeric keypad. (The
recommended feature
assignments for these function
buttons are CONFERENCE,
DROP, and TRANSFER.) Figure
1-3 shows the numbering of the
multifunction buttons. (The
numbers in the figure are
illustrative only. They do not
appear on the phone.)
Figure 1-3 Multifunction
Button Layout
Mulifunction buttons have three
uses:
One-touch
Dial a number you stored there.
Network feature
Activate/deactivate a special
network feature, such as call
forwarding.
Directory Number (DN) or
Call Appearance (CA)
Handle incoming and outgoing
calls.
Using one-touch dialing buttons
is described in Chapter 2. Chapter
3 shows how to set-up the
buttons.
Special features, such as call
forwarding, are provided by the
ISDN network. These featur es are
selected by your System
Administrator and assigned to
31
32 Redial
Speaker Hold
30
buttons on your phone during
installation. Your System
Administrator will provide details.
Page 1-6
Page 28

Chapter 1 ( SRS-2100 Overview
In order to simplify ordering and
line installation, Fujitsu has
included pre-set assignments for
some of the most frequently used
network based features. See
Appendix A for these
assignments.
You use DN or CA buttons to
handle your calls, as described in
the next two sections. Pressing a
Call Appearance button connects
you to a phone line. This line can
be idle with dial tone for making
an outgoing call, a line containing
an incoming call, or a call on hold.
If you are on an active call,
pressing another Call Appearance
button automatically puts the call
on hold. This feature is called
autohold.
Multiple Directory Number
Appearances
Each SRS-2100 associates its
primary directory number with
multifunction button 1. Multiple
appearances of the same directory
number are always on adjacent
Call Appearance buttons. (The
button at the end of a row is
"adjacent to" the button
beginning the next row up.)
Note: This Guide uses the term
directory number appearances
to refer to directory numbers
that appear on more than one
Call Appearance button. The
Nortel term for multiple Call
Appearances is Additional
Functional Calls.
A telephone can also be
assigned additional directory
numbers. Each such number
can then be assigned to
adjacent buttons as well to
allow multiple call handling on
that line.
Any directory number assigned
to one phone can also appear on
another phone, which can then
share the use of that line.
Figure 1-4 shows an SRS-2100
whose primary directory number
is 747-3456, with two additional
Call Appearance buttons
assigned that same number. The
telephone's secondary line is 7477890, which has two appearances.
In the illustration, this set also
has buttons assigned to the
number 747-3482. This could, for
example, be a shared line using
someone else's primary directory
number.
Page 1-7
Page 29
SRS -2100 Overview ( Chapter 1
3482
3456 3456 7890 78903456
..........
..........
..........
MIC-OFF
Figure 1-4 Example Line
Assignment
Call Handling Example
Suppose your directory number is
747-3456, and the first three
multifunction buttons on your
SRS-2100 have been assigned
that number.
What does it mean to have three
Call Appearance buttons
assigned to one directory
number? It means you can have
up to three calls at the same time
using that single directory
number, though you can talk on
only one at a time.
For example, if you have no calls
in progress and someone dials
747-3456, your telephone rings
and the LED for the first Call
Appearance button associated
with 747-3456 flashes green. You
can answer the call by pressing
that Call Appearance button and
picking up the handset. (The LED
turns steady red.)
After answering the call, you can
press the second 747-3456 Call
Appearance button to originate
another call. The first call is
automatically put on hold. (The
LED flashes red.) If another call
comes in, you can press the third
Call Appearance button
representing 747-3456 to answer
the third call. The second call is
also placed on hold.
You would then have three calls
on your 747-3456 directory
number. Only then is your 3456
number "busy", that is, when all
three assigned Call Appearance
buttons are in use.
CALL INFORMATION
DISPLAYS
1=747-3456 (Line 1)
(Line 2)
12:55PM TUESDAY MAY 5 (Line 3)
(Line 4)
When you make a call, the
number you dialed, including any
prefix, appears on line 1 of the
display, along with an ISDN Call
Identifier (ICI) code if provided at
your installation. (See Appendix
D for a partial list of ICI codes.)
For an incoming call, the calling
party's number appears if the
network supplies the digital set
with the Calling Line
Identification (CLID).
Page 1-8
Page 30
Chapter 1 ( SRS-2100 Overview
When your party answers, the
end of line 3 shows call duration
timing as minutes and seconds in
the form mm:ss. This timer will
record for an hour, up to 59:59,
and then it restarts at 00:00. If the
call cannot go through, line 3
shows a message such as "Busy"
or "NOT ANSWERED".
1=919 555-2345 (Line 1)
(Line 2)
12:55 PM TUESDAY MAY 5mm:ss (Line 3)
(Line 4)
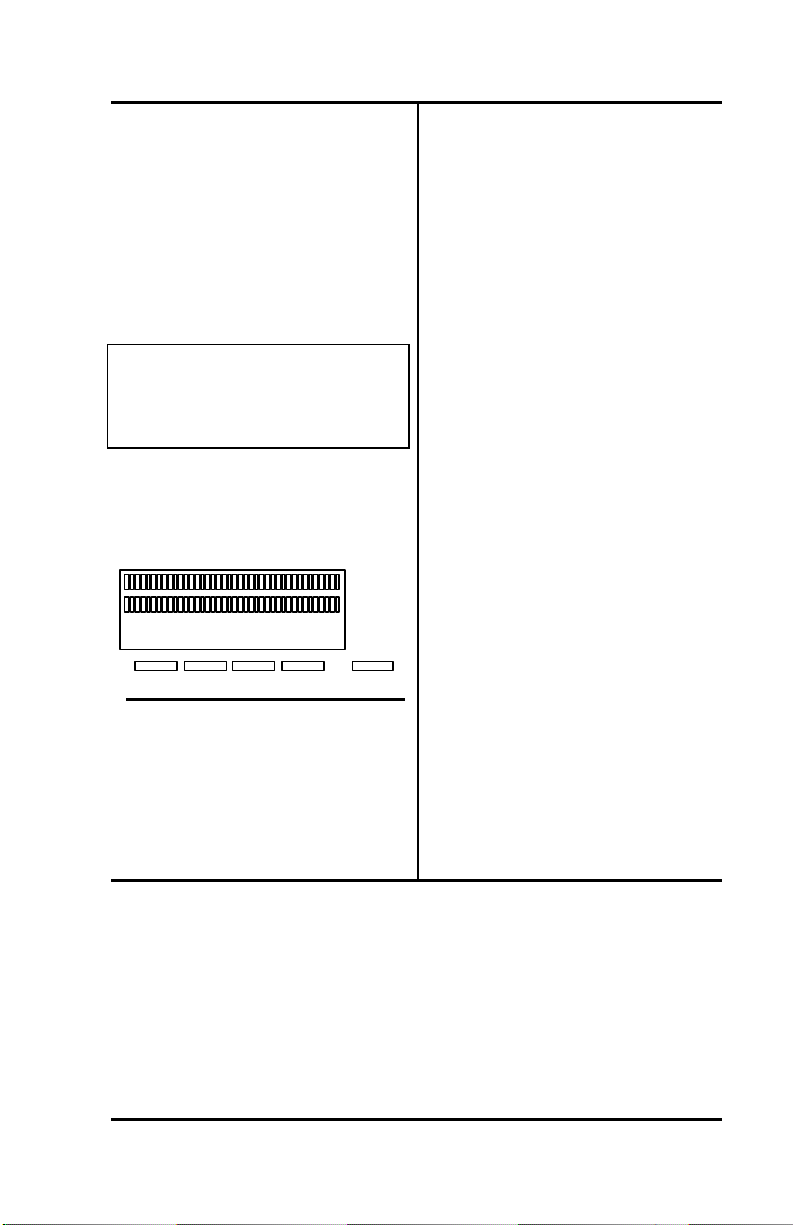
SOFTKEYS AND SERVICE
When you press SERVICE, line 4
of the display changes to show
REGISTER above softkey 4.
Pressing REGISTER displays the
menu function of the SRS-2100.
These keys are called softkeys
because the functions they
control change as you use the
menus to set up different features.
Note: In the Menu mode,
displayed by pressing SERVICE,
and then REGISTER, softkey 1
also serves as the ENTER key
(for entering information as
indicated in this User's Guide).
These basic softkey functions are
explained in the indicated
chapters:
5:20 PM Tuesday January 4
UNA-LIST DATA CLEAR DIR-LIST
1 2 3 4
Service
Standard Softkey Layout
(The DATA softkey label appears
only if you have a voice/data
terminal.)
UNA-LIST Chapter 2
DATA Chapter 4
CLEAR Chapter 3
DIR-LIST Chapter 3
ENTER Chapter 3
REGISTER Chapter 3
Other names and functions for
these keys are explained in
various contexts throughout the
text.
Notes
Page 1-9
Page 31

SRS -2100 Overview ( Chapter 1
................................
................................
..............................
.............................
................................
................................
..........................
................................
................................
................................
Chapter 1................................................................................................................................
Getting Acquainted With Your Digital Set................................................................
Digital Set Components................................................................................................
Telephone Components................................................................................................
Function Buttons................................................................................................
Indicators................................................................................................
Switches and Connectors ................................................................................................
MULTIFUNCTION BUTTONS................................................................
CALL INFORMATION DISPLAYS................................................................
SOFTKEYS AND SERVICE................................................................
Directory Number Appearances ........................................................................1-6
Information Displays...........................................................................................1-7
Multifunction Buttons.........................................................................................1-5
Permanent functions............................................................................................1-4
Service key............................................................................................................1-8
Softkey layout.......................................................................................................1-8
User-assigned functions.....................................................................................1-4
Page 1-10
Page 32

Chapter 2 ( SRS-2100 Voice Features
PLACING AND RECEIVING
CHAPTER 2
INTRODUCTION TO VOICE
FEATURES
The Fujitsu SRS-2100 provides
superior call-handling and
simultaneous voice/data
communications. It is one of the
family of Fujitsu Integrated
Services Digital Network (ISDN)
terminals.
For the familiar tasks of dialing,
holding, and answering calls, this
phone operates like others you
have used. However, it also
includes many custom features
explained in later chapters.
CALLS
This section describes how to
make and answer calls with your
SRS-2100 using the handset,
speaker, or a headset. (Headset
setup is described in Chapter 3.)
Each of the set of directions listed
below has two subsections: what
to do if you are not talking on
another call, and what to do if you
are talking on another call.
• Switching between handset and
handsfree modes
• Placing a call using the handset
• Receiving a call using the
handset
• Placing a handsfree call
• Receiving a handsfree call
• Placing a call using the headset
• Receiving a call using the
5:20 PM Tuesday January 4
UNA-LIST DATA CLEAR DIR-LIST
1 2 3 4
Service
Standard Softkey Layout
(The DATA softkey label appear s
only if you have a voice/data
terminal.)
Note: Softkey 1 also serves as
the ENTER key (for entering
information as indicated in this
User's Guide).
headset
The procedures in this chapter
assume that MIC-OFF is active on
the upper -right button of the
multifunction button array. This
feature is active by default when
you receive your SRS-2100. If for
some reason MIC-OFF is not
active, see "Activating the MICOFF Button", in Chapter 3. The
procedures also assume the
phone is set to ringing line
preference or primary line
preference.
Page 2-1
Page 33

SRS -2100 Voice Features ( Chapt er 2
Switching Between Handset
and Handsfree Modes
If you are using the handset
and want to use handsfree
mode
1. Press SPEAKER and then
replace the handset in its cradle.
You now hear the other parties
through the speaker.
2. If the MIC-OFF LED is red, the
microphone has been turned off.
Press MIC-OFF to turn it back
on (the LED goes dark). The
microphone now picks up your
voice.
3. You can turn off the microphone
by pressing MIC-OFF, allowing
you to hold a private
conversation with others in the
room. Pressing MIC-OFF again
turns the microphone back on.
If you are using handsfree
mode and want to use the
handset
Pick up the handset. Your call
continues without interruption.
The handsfree speaker and
microphone are turned off. (You
can turn off the microphone in the
handset by pressing the MICOFF button while using the
handset.)
Page 2-2
Placing Handset Calls
If you are not talking on
another call
1. Pick up the handset. This
should automatically give you a
dial tone, if not press an idle Call
Appearance (CA).
• If this connects you with a
ringing call, follow the
procedure described on page
2-4.
• If you want to place the call
from a Call Appearance other
than the one automatically
selected, press its CA button.
2. Dial the desired number by
pressing the keys on the
numeric keypad.
3. If your call is not answered, you
can hang up as follows:
a. Replace the handset in its
cradle.
b. Press the button in the
handset cradle to get a dial
tone.
c. Press DROP.
(5ESS
4. If your call is answered,
converse with the called party.
or
or
Page 34

Chapter 2 ( SRS-2100 Voice Features
5. When your conversation ends,
hang up by replacing the handset
in its cradle. Note the displayed
call duration vanishes after about
three seconds.
Note: Onhook dialing. In place
of steps 1 and 2, you can dial
the number first and then pick
up the handset. The phone
automatically dials the number.
The number you enter remains
available for dialing for about
three minutes.
You can also use a one-touch
button, which automatically
selects an idle CA and dials the
number. Steps 1 and 2 are
therefore unnecessary when
you use a one-touch button.
Once the call is dialed, you can
pick up the handset.
If you are already talking on
another call
1. Handle the active call in one of
the following ways:
a. End the call by pressing the
button in the handset cradle
to get a dial tone. (You can
also hang up the handset and
pick it up again.)
b. Retain the call by pressing an
idle Call Appearance button to
get a dial tone. (The call is
automatically put on hold.)
or
c. Press DROP. (5ESS
2. To make your call, dial the
desired number by pressing the
keys on the numeric keypad.
3. If your call is not answered, you
can hang up as follows:
a. Replace the handset in its
cradle.
b. Press the button in the
handset cradle to get a dial
tone.
4. If your call is answered,
converse with the called party.
5. When your conversation ends,
you have these choices:
• Hang up by replacing the
handset in its cradle. Note
the displayed call duration; it
vanishes after about three
seconds.
• If you put your original call
on hold, pick up the call by
pressing its red-flashing Call
Appearance button.
Note: You can also use a one-
touch button after handling the
active call. This automatically
dials the number. Skip step 2.
or
or
or
Page 2-3
Page 35

SRS -2100 Voice Features ( Chapt er 2
Receiving Handset Calls
An incoming call makes the
phone ring and the Call
Appearance's LED flash green.
If you are not talking on
another call
1. Pick up the handset. (Press the
ringing CA if necessary.) The
LED changes to steady red.
2. Converse with the calling party.
3. When your conversation ends,
hang up by replacing the
handset in its cradle. Note the
displayed call duration; it
vanishes after about three
seconds.
If you are already talking on
another call
1. Handle the active call in one of
the following ways:
a. End the call by pressing the
button in the handset cradle.
Then press the green-flashing
Call Appearance button to
answer the incoming call.
b. Retain the call by pressing the
green-flashing Call
Appearance button to answer
the incoming call. (The first
call is automatically put on
hold.)
or
2. Converse with the calling party.
3. When your conversation ends,
you have the following choices:
• Hang up by replacing the
handset in its cradle. Note the
displayed call duration; it
vanishes after about three
seconds.
• If you put your original call on
hold, pick up the call by
pressing its red-flashing Call
Appearance button.
• Press DROP. (5ESS
Note: You can turn off the
microphone in the handset by
pressing the MIC-OFF button;
its LED turns red. Sound will
not be transmitted to the called
party, allowing you to hold a
private conversation with others
in the room. To turn the
microphone back on, press
MIC-OFF again; the red LED is
turned off.
Placing Handsfree Calls
A handsfree call uses the
integrated microphone and
speaker instead of the handset.
or
or
Page 2-4
Page 36

Chapter 2 ( SRS-2100 Voice Features
If you are not talking on
another call
1. Press the SPEAKER button. Its
LED will light red and you will
hear a dial tone (if not, press an
idle Call Appearance). If this
connects you with a ringing call,
follow the procedure "If you are
already talking on another call".
2. Dial the desired number by
pressing the keys on the
numeric keypad.
3. If your call is not answered,
press SPEAKER to hang up.
4. If your call is answered,
converse with the called party.
(If the MIC-OFF LED is red, the
microphone has been turned off.
Press MIC-OFF to turn it back
on.)
You can turn off the microphone
by pressing the MIC-OFF button;
its LED will turn red. No sound
will then be transmitted to the
called party, allowing you to hold
a private conversation with others
in the room. To turn the
microphone back on, press MICOFF again; its red LED will go
dark.
5. When the conversation is over,
hang up by pressing the
SPEAKER key. Note the call
duration vanishes after about
three seconds.
Press DROP. (5ESS
Note: Onhook dialing. In place
of steps 1 and 2, you can dial
the number first and then press
SPEAKER. The phone
automatically dials the number.
The number you enter remains
available for dialing for about
three minutes.
You can also use a one-touch
button, which automatically
selects handsfree operation on
an idle CA and dials the number.
Steps 1 and 2 are therefore
unnecessary when you use a
one-touch button.
(See also "Handsfree, Handset,
and Headset Modes", in Chapter
3, "Local Features".)
If you are already talking on
another call
1. Handle the active call in one of
the following ways:
a. End the call by pressing
SPEAKER. Press SPEAKER
again to get a dial tone.
b. Retain the call by pressing an
idle Call Appearance button,
which gives you a dial tone.
(The call is automatically put
on hold.) "Continued"
or
or
Page 2-5
Page 37

SRS -2100 Voice Features ( Chapt er 2
c. Press DROP. (5ESS
2. Dial the desired number by
pressing the buttons on the
numeric keypad.
3. If your call is not answered, you
can:
a. Hang up by pressing the
SPEAKER button.
b. Retrieve the original call, if it
was held, by pressing its redflashing Call Appearance
button.
4. If your call is answered,
converse with the called party.
(If the MIC-OFF LED is red, the
microphone has been turned off.
Press MIC-OFF to turn it back
on.)
You can turn off the microphone
by pressing the MIC-OFF
button; its LED will turn red. No
sound will then be transmitted
to the called party, allowing you
to have a private conversation
with others in the room. To turn
the microphone back on, press
MIC-OFF again; its red LED will
go dark.
or
or
5. When the conversation is over,
hang up by pressing the
SPEAKER button. Note the
displayed call duration; it
vanishes after about three
seconds.
Press DROP. (5ESS
You may then pick up the call
you were originally talking on, if
it was held, by pressing its redflashing Call Appearance button
and then SPEAKER.
Note: Onhook dialing. In place
of steps 1 and 2, you can dial
the number first and then press
SPEAKER. The phone
automatically dials the number.
The number you enter remains
available for dialing for about
three minutes.
You can also use a one-touch
button, after handling the
existing call. This automatically
selects handsfree operation on
an idle CA and dials the number.
Skip step 2.
(See also "Handsf ree, Handset,
and Headset Modes", in Chapter
3, "Local Features".)
or
Page 2-6
Page 38

Chapter 2 ( SRS-2100 Voice Features
Receiving Handsfree Calls
A handsfree call uses the
integrated microphone and
speaker instead of the handset.
An incoming call makes the
phone ring and the Call
Appearance's LED flash green.
If you are not talking on
another call
1. Press SPEAKER and, if
necessary, the green-flashing
Call Appearance button.
2. Converse with the calling party.
(If the MIC-OFF LED is red, the
microphone has been turned off.
Press MIC-OFF to tur n it back
on.)
You can turn off the microphone
by pressing the MIC-OFF
button; its LED will turn red. No
sound will then be transmitted
to the called party, allowing you
to have a private conversation
with others in the room. To turn
the microphone back on, press
MIC-OFF again; its red LED will
go dark.
3. When your conversation ends,
hang up by pressing SPEAKER.
Note the call duration; it
vanishes after about three
seconds.
Press DROP. (5ESS
or
(See also "Handsfree, Handset,
and Headset Modes", in Chapter
3, "Local Features".)
If you are already talking on
another call
1. Dispose of the active call in one
of the following ways:
a. End the call by pressing
SPEAKER. Then press
SPEAKER and, if necessary,
press the green-flashing Call
Appearance button to answer
the incoming call.
b. Retain the call by pressing the
green-flashing Call
Appearance button to answer
the incoming call. (The first
call is automatically put on
hold.)
2. Converse with the calling party.
(If the MIC-OFF LED is red, the
microphone has been turned off.
Press MIC-OFF to turn it back
on.) You can turn off the
microphone by pressing the
MIC-OFF button; its LED will
turn red. No sound will then be
transmitted to the called party,
allowing you to have a private
conversation with others in the
room. To turn the microphone
back on, press MIC-OFF again;
its red LED will go dark.
or
Page 2-7
Page 39

SRS -2100 Voice Features ( Chapt er 2
3. When your conversation ends,
hang up by pressing SPEAKER.
Note the displayed call
duration; it vanishes after about
three seconds. You may then
pick up the call you were
originally talking on, if it was
held, by pressing its redflashing Call Appearance button
and then pressing SPEAKER.
(See also "Handsfree, Handset,
and Headset Modes", in Chapter
3, "Local Features".)
Placing Headset Calls
If you are not talking on
another call
Place the headset on your head in
a position comfortable for hearing
and talking. If necessary, unplug
the handset from the jack on the
phone's left side. Plug the
headset into the same jack. Also
check that headset mode is
activated. (See Chapter 3 for
details.) The speaker and
microphone will be disabled. All
dialing tones and telephone
conversation will be audible only
through the headse t. Your voice
and any other transmitted sounds
will go through the headset
microphone only.
1. Press SPEAKER. Its LED will
light red and you will hear a dial
tone. (If this connects you with
a ringing call, follow the
directions in Receiving Headset
Calls.)
2. Dial the desired number by
pressing the buttons on the
numeric keypad.
3. If your call is not answered,
press SPEAKER to hang up.
4. If your call is answered,
converse with the called party.
5. When your conversation ends,
hang up by pressing SPEAKER.
Note the call duration; it
vanishes after about three
seconds.
Note: Onhook dialing. In place
of steps 1 and 2, you can dial
the number first and then press
SPEAKER. The phone
automatically dials the number.
The number you enter remains
available for dialing for about
three minutes.
You can also use a one-touch
button, which automatically
selects an idle CA and dials the
number. Steps 1 and 2 are
therefore unnecessary when
you use a one-touch button.
(See also "Handsfree, Handset,
and Headset Modes", in Chapter
3, "Local Features".)
Page 2-8
Page 40

Chapter 2 ( SRS-2100 Voice Features
If you are already using the
headset and talking on
another call
1. Handle the existing call in one of
the following ways:
a. End the call by pressing
SPEAKER. Then press
SPEAKER again to get a dial
tone.
b. Retain the call by pressing an
idle Call Appearance button,
which gives you a dial tone.
(The call is automatically put
on hold.)
2. Dial the desired number by
pressing the keys on the
numeric keypad.
3. If your call is not answered,
hang up by pressing SPEAKER.
4. If your call is answered,
converse with the called party.
5. When the conversation is over,
hang up by pressing SPEAKER.
Note the displayed call
duration; it vanishes after about
three seconds.
You may then pick up your
original call, if it was held, by
pressing SPEAKER and, if
necessary, the call's CA button.
or
Note: Onhook dialing. In place
of steps 1 and 2, you can dial
the number first and then press
SPEAKER. The phone
automatically dials the number.
The number you enter rem ains
available for dialing for about
three minutes.
You can also use a one-touch
button after handling the
existing call. This automatically
selects an idle CA and dials the
number. Skip step 2.
(See also "Handsfree, Handset,
and Headset Modes", in Chapter
3, "Local Features".)
Receiving Headset Calls
An incoming call makes the Call
Appearance's LED flash green.
If you are not talking on
another call
Place the headset on your head in
a position comfortable for hearing
and talking. If necessary, unplug
the handset from the jack on the
phone's left side. Plug the
headset into the same jack. Also
check that headset mode is
activated. (See Chapter 3 for
details.)
Page 2-9
Page 41

SRS -2100 Voice Features ( Chapt er 2
The handset, speaker, and
microphone will be disabled. All
dialing tones and telephone
conversation will be audible only
through the headset. Your voice
and any other transmitted sounds
will go through the headset
microphone only.
1. Press SPEAKER and, if
necessary, press the greenflashing Call Appearance
button.
2. Converse with the calling party.
3. When your conversation ends,
hang up by pressing SPEAKER.
Note the displayed call
duration; it vanishes after about
three seconds.
(See also "Handsfree, Handset,
and Headset Modes", in Chapter
3, "Local Features".)
If you are al ready using the
headset and talking on
another call
1. Dispose of the active call in one
of the following ways:
a. End the call by pressing
SPEAKER. Then press the
green-flashing Call
Appearance button to answer
the incoming call.
or
b. Retain the cal l by pressing the
green-flashing Call
Appearance button to answer
the incoming call. (The first
call is automatically put on
hold.)
2. Converse with the calling party.
3. When your conversation ends,
hang up by pressing SPEAKER.
Note the displayed call
duration; it vanishes after about
three seconds.
You may then pick up the call you
were originally talking on, if it was
held, by pressing its red-flashing
Call Appearance button and then
pressing SPEAKER.
(See also "Handsfree, Handset,
and Headset Modes", in Chapter
3, "Local Features".)
FUNCTION BUTTONS
The SRS-2100 has six function
buttons, located to the right of
the numeric keypad. The
REDIAL, SPEAKER, and HOLD
buttons are permanently assigned
to local functions, as shown in
Figure 2-1. The other three
buttons are multifunction buttons
you can assign to any feature,
one-touch button, or Call
Appearance.
Page 2-10
Page 42

Chapter 2 ( SRS-2100 Voice Features
DROP
CONFERENCE
For ease of operation, Fujitsu
supports two sets of telephone
company assignments for
network based features. On the
labeled function buttons for
CONFERENCE, DROP, and
TRANSFER, Fujitsu sets accept
the following values or feature
activators:
CONFERENCE Button 30
Activator 30 or 60
DROP Button 31
Activator 31 or 62
TRANSFER Button 32
Activator 32 or 61
SPEAKER
Enables/disables handsfree
operation
MIC-OFF
Turns microphone off/on during
handsfree operation
REDIAL
Redials the last number you
dialed
HOLD
Holds an active call
CONFERENCE
Adds additional parties to an
existing call
DROP
31 30
TRANSFER
32
HOLD SPEAKER
REDIAL
Disconnects last party added to a
conference call
TRANSFER
Transfers a call to a third party
you dial or select
Figure 2-1 Function Buttons
Another function button, MICOFF, is typically active on the
upper-right button of the
multifunction button array.
The descriptions below briefly
identify each function button.
The following pages explain the
buttons in more detail. SPEAKER
and MIC-OFF are explained earlier
in this chapter in the sections on
placing and receiving handsfree
calls.
REDIAL
Dials the last number dialed
on this phone
This feature is useful if you need
to call someone back a second
time, perhaps because their line
was busy the first time.
Page 2-11
Page 43

SRS -2100 Voice Features ( Chapt er 2
Page 2-12
Page 44

Chapter 2 ( SRS-2100 Voice Features
Using REDIAL Before Lifting
the Handset or Pressing
SPEAKER
1. Press REDIAL. The last number
dialed appears on the display
and is redialed automatically
through the speakerphone. Pick
up the handset if you want this
to be a handset call.
2. If there are no idle Call
Appearances available, pressing
REDIAL brings the number to
the screen but does not dial.
When an idle Call Appearance
later becomes available,
pressing the CA button dials
the number in handsfree mode.
(Lift the handset, if you prefer.)
Using REDIAL after Lifting
the Handset or Pressing
SPEAKER
1. If you don't hear a tone, press an
idle Call Appearance button.
2. Press REDIAL. The last number
dialed appears on the display
and is dialed automatically.
HOLD
Retains connection with an
existing call until you can
return to it
HOLD lets you keep a call active
even though you are no longer
directly connected with it. This
feature is useful if you need to
perform some action away from
your phone, such as looking up
some information.
The autohold feature
automatically puts an active cal l
on hold whenever you press
another Call Appearance. You
can also press HOLD to manually
put a call on hold.
1. To manually put a call on hold,
press HOLD while you have an
active call in progress. The Call
Appearance LED changes from
steady red to flashing-red.
The phone retains each call you
place on hold until you
reconnect with it (or the other
party hangs up). You are now
free to take other actions,
including making and receiving
other calls.
2. To reconnect with a call on hold,
press its flashi ng Call
Appearance button. Its LED
changes from flashing-red to
steady red, and you are
reconnected to the call.
Page 2-13
Page 45

SRS -2100 Voice Features ( Chapt er 2
CONFERENCE
Telephone conferences with
multiple participants
Conference is a network-based
feature that you must subscribe
to from your telephone company.
This description assumes that
you have assigned the
Conference feature to one of your
SRS-2100 function buttons.
The number of conference call
participants allowed depends on
the number specified when you
subscribe to the feature. Ask
your System Administrator how
many participants are allowed on
your Conference feature.
Setting Up a Conference Call
After establishing the initial call,
add participants to the conference
call by following these steps:
1. Press CONFERENCE.
The CONFERENCE button
lights up. The initial call is
placed on hold, and the next
available CA is selected.
2. Dial the number of the person
you want to add to the
conference.
Select any CA that is ringing or
on hold.
or
• If the person answers, you
can talk privately before
joining the conference.
• If the line is busy or the
person does not answer, press
DROP. Then press the
flashing Call Appearance
button to return to the initial
call.
• To retain the second party
without having a conference,
press HOLD and then press
the flashing Call Appearance.
This allows you to speak to
the initial caller while keeping
the second call on hold. To
make thi s a Conference call,
press the CONFERENCE
button and go to step 3.
3. Press CONFERENCE.
The CONFERENCE button stays
lit to indicate that a conference
call is in progress.
If you have a conference feature
for more than three parties, you
may add more par ticipants to the
conference, repeating the
preceding three steps as many
times as required up to the
maximum number of participants.
Page 2-14
Page 46

Chapter 2 ( SRS-2100 Voice Features
To add more participants to the
conference, repeat the preceding
three steps as many times as
required up to the maximum
number of participants.
Dropping Other People from
a Conference Call
To drop the last person added,
either press DROP or ask the last
person added to hang up.
Pressing DROP when only two
participants are connected
disconnects the call.
Dropping Out of the
Conference Call Yourself
Some installations leave the other
conference participants
connected if you disconnect.
Ask your System Administrator
whether your Conference feature
works this way.
Otherwise, when you disconnect,
all other conference participants
are disconnected also.
DROP
Cancels connection with last
party added to a conference
call, or disconnects call if
only two participants are
connected (5ESS)
Drop is a network-based feature
that you must subscribe to from
your telephone company. This
description assumes that you
have assigned the Drop feature to
one of your SRS-2100 function
buttons.
Pressing DROP at the end of a
regular call does nothing.
(DMS-100
Pressing DROP at the end of a
regular two-party call disconnects
the call. (5ESS
During a conference call, the
DROP feature allows the
originator of the call to drop the
last participant added. Other
participants can drop out of the
call simply by hanging up.
You can use the DROP button
repeatedly until you have
dropped everyone but the
participant of the original twoparty call. To end the call, hang
up normally. (
DMS-100
Page 2-15
Page 47

SRS -2100 Voice Features ( Chapt er 2
Warning: Pressing DROP at the
end of a conference call drops
both participants.
Using DROP on a Conference
Call
Press the DROP button. This
ends your connection with the
last party you added to the call,
but any others on the call stay
connected. If only two parties
remain, the call is disconnected.
The display of the call's duration
continues until the call is over .
TRANSFER (5ESS
Transfers a call to another
phone and announces the
transfer privately
To transfer a call, follow these
steps:
1. Press TRANSFER while on an
active call.
The LED of the Call Appearance
in use flashes red; the called or
calling party is automatically
placed on hold.
An idle Call Appearance is
selected. Its LED lights steady
red and a dial tone sounds.
If that directory number has no
idle Call Appearance, you must
select a Call Appearance of
another directory number.
2. Dial the third party.
3. Once connected, announce the
transfer to the person who
answers and converse privately.
4. Press TRANSFER again, and
hang up.
The third party, just called, is
connected to the party held for
transfer. You are dropped from
the call, and the other two
parties remain connected.
Note: A "blind" transfer is where
you do not talk to the person
you are transferring the call to.
To perform a blind transfer, wait
for the person's phone to ring,
press the TRANSFER key, and
hang up.
Questions, Details, or
Alternatives
If no one answers the destination
number, hang up. Press the
SPEAKER button, the Switch
Hook, or, with a Lucent switch,
press DROP. Then press the Call
Appearance holding the original
call. This cancels the attempted
transfer and returns you to the
call.
Page 2-16
Page 48

Chapter 2 ( SRS-2100 Voice Features
TRANSFER (DMS-100
Transfers a call to another
phone and announces the
transfer privately
Transfer is a network-based
feature that you must subscribe
to from your telephone company.
This description assumes that
you have assigned the Transfer
feature to one of your SRS-2100
function buttons.
Note: In some installations,
transferring calls is
accomplished without a
TRANSFER button. If your set
lacks a TRANSFER button, ask
your System Administrator how
to transfer a call.
To transfer a call, follow these
steps:
1. While still on the call, press
TRANSFER.
The TRANSFER button indicator
lights up.
The call is put on hold and its Call
Appearance indicator flashes red.
2. An idle CA is selected. Dial the
number of the person you want
to transfer the call to.
• If the person answers, you
can talk privately before
completing the transfer. To
place this person on hold
without transferring the call,
press HOLD. To reconnect
with this person, press HOLD
again.
• If the line is busy or the
person does not answer, press
the button in the handset
cradle (press SPEAKER if you
are using handsfree mode).
Then press the flashing Call
Appearance button to return
to the original call.
Note: A "blind" transfer is where
you do not talk to the person
you are transferring the call to.
To perform a blind transfer, wait
for the person's phone to ring,
press the TRANSFER key, and
hang up.
3. You can complete the transfer
these two ways:
a. After announcing the transfer,
just press TRANSFER.
b. To allow all three parties to
talk together, press the
flashing Call Appearance
button again; then press
TRANSFER when you want
to drop out.
or
Page 2-17
Page 49

SRS -2100 Voice Features ( Chapt er 2
4. Hang up the handset or, in
handsfree mode, press
SPEAKER.
You are disconnected from the call,
leaving the other two parties
connected.
TRANSFER ( EWSD
Transfers a call to another
phone and announces the
transfer privately
Transfer is a network-based
feature that you must subscribe
to from your telephone company.
Note: In Siemens installations,
transferring calls is
accomplished without a
TRANSFER button.
To transfer a call, follow these
steps:
1. Answer the incoming call, then
while still on the call, press
CONFERENCE.
The CONFERENCE button
indicator lights up.
2. An idle CA is selected. Dial the
number of the person you want
to transfer the call to.
The call is put on hold and its Call
Appearance indicator flashes red.
• If the person answers, you
can talk privately before
completing the transfer. To
place this person on hold
without transferring the call,
press HOLD.
• If the line is busy or the
person does not answer, press
the button in the handset
cradle (press SPEAKER if you
are using handsfree mode).
Then press the flashing Call
Appearance button to return
to the original call. To make
this a conference call, press
the CONFERENCE button and
go to step 3.
3. Hang up the handset, or, in
handsfree mode, press
SPEAKER.
You are disconnected from the
call, leaving the other two parties
connected.
ONE-TOUCH CALLING
Pressing a one-touch button
causes the phone to dial the
stored number just as if you were
pressing the keys on the numeric
keypad. (Chapter 3 explains how
to set up one-touch buttons.)
Page 2-18
Page 50

Chapter 2 ( SRS-2100 Voice Features
Using a One Touch Button to
Make a Call
Just press it. If no other call is
active, the SRS-2100 selects an
idle Directory Number, turns on
the speaker and microphone, and
dials the number. (If the MICOFF LED is red, the microphone
has been turned off, so press
MIC-OFF to turn it back on.)
If you already have a dial tone,
then pressing the one-touch
button plays back the stored
number as if you were dialing.
Dialing Special Codes Using
One-touch Buttons
The one-touch feature provides
two ways of supplying special
codes such as credit card
numbers, passwords, personal ID
numbers, and voice mail access
codes. You can st ore a code on
its own one-touch button or you
can include special codes as part
of a single one-touch number.
Storing a Code on a OneTouch Button
You can store a special code on
its own one-touch button just as
you do an ordinary telephone
number. Once you establish an
active call, you can press the onetouch button to send the special
code. These numbers are sent
using the standard DTMF tones
that these systems normally
require.
Including Codes in a OneTouch Number
You can code both telephone
numbers and one or more special
code numbers on a single onetouch button, with appropriate
pauses between numbers to allow
for system response. You can
code up to 30 digits, with each
pause character counting as one
digit.
The following example illustrates
the sequence for accessing voice
mail. The SRS-2100 sends the
numbers up to the first pause,
represented by a comma, as an
out-of-band, D-channel call
request. When the call connects,
the digital set waits one second
and then begins sending the
additional numbers as tones on
the B-channel, with a two-second
pause for each additional comma.
Page 2-19
Page 51

SRS -2100 Voice Features ( Chapt er 2
In the example, the digital set
sends the voice mail access code,
pauses for two seconds while the
system switches to voice mail,
and then sends the caller's voice
mail password.
8 2 4 7 6 2 9 , 9 9 , , 2 5 0 2
Calling Number
1st pause (1 second)
Voice mail access
Use this feature for any call
requiring multiple number entry.
For example, use the feature to:
• Connect to an alternative
public network using the
access number and then send
the number of the person you
want to call
or
• Send the sometimes
complicated sequence of
numbers needed to connect to
a private network number
or
• Navigate your way through a
call answering system that
requires you to respond to a
number of voice menu options
4 second pause
Voice mail
password
UNANSWERED CALL
LOGGING (UNA -LIST)
Once enabled, this feature
records information about
incoming calls that were not
answered at this phone.
The UNA-LIST feature records
information from the eight most
recent unanswered calls, showing
the date, the time, and the
telephone number and name (if
provided) of the calling party.
The ninth and later unanswered
calls replace the first, second, and
so forth, in order, so that your
UNA-LIST always has the eight
most recent calls. If the caller
gets a busy signal, the call is not
considered "unanswered".
Multiple calls from the same
number are listed only once.
Chapter 3 explains how to
program your phone to support or
suppress the UNA-LIST feature.
Using the UNA -LIST Feature
If you have unanswered calls, a
black dot appears next to the
word UNA-LIST on line 4 of your
SRS-2100 display. If the dot is
blinking, there have been eight or
more such calls, and the
information from the next
unanswered call will record over
the oldest call in the list.
Page 2-20
Page 52

Chapter 2 ( SRS-2100 Voice Features
. . . . . . . . . . . . . . . . . . . . . . . . . . . . . . . .
. . . .
. . . . . . . . . . . . . . . . . . . . . . . . . . . . . . . .
. . . .
12:15PM WEDNESDAY APR 5
.
UNA-LIST DATA CLEAR DIR -LIST
To see the data for each
unanswered call, press UNA-LIST
(softkey 1). The resulting screen
looks something like this:
777-1111
4-05 12:15PM
11:10AM SATURDAY MARCH 2
UNA-LIST DATA CLEAR DIR -LIST
The 777-1111 is the number of the
calling party.
Note: The call time indication is
based on the phone's
calendar/clock. To ensure
accurate reporting, be sure the
calendar/clock is set properly
(see Chapter 3).
Each time you press UNA-LIST
(softkey 1), the data for the next
unanswered call is displayed.
The list cycles. The first display
is information from the oldest call,
then the next oldest call, and so
forth. After the data for the most
recent unanswered call is
displayed, pressing UNA-LIST
again shows the oldest call's data.
If a new unanswered call is from
the same party as one already in
the UNA-LIST, only the new call's
data is retained. This feature
prevents filling all eight available
positions with calls made from the
same phone.
Each record is retained until you
follow the deletion procedure
described below, or until another
unanswered call stores new
information over it.
Returning a Call
To return a call displayed by
unanswered call logging, follow
these steps:
1. Press any idle Call Appearance
button. (Handsfree mode is
automatic. For handset use, lift
the handset.)
You can also dial the number
while onhook, and then lift the
handset or press SPEAKER after
dialing all the digits.
2. Dial the number shown on the
UNA-LIST display.
As soon as you go offhook or
begin dialing the number while
onhook, the unanswered call
number shifts to the second line
for reference. The first line shows
the digits you ar e dialing.
Page 2-21
Page 53

SRS -2100 Voice Features ( Chapt er 2
If the call is answered, you can
converse with the party reached.
If not, hang up by replacing the
handset in its cradle or, in
handsfree mode, hang up by
pressing the SPEAKER button.
If the UNA-LIST dot on the
display is flashing, you shoul d
delete at least one entry to
prevent the loss of the oldest
entry.
Deleting a Record from the
UNA-LIST
To delete a record, press UNALIST (softkey 1) until the record is
displayed, and then press # and
CLEAR (softkey 3). To see or
delete the next UNA-LIST record,
you must press UNA-LIST again.
Placing a Call Using the
Personal Directory
1. Press DIR-LIST (softkey 1).
2. Scroll to the name of the person
you want to call, or enter the
Directory Address (01, 02, etc.)
for that person.
3. Press ENTER.
4. Lift the handset or press the
speaker key to place your call.
Notes
Page 2-22
Page 54

Chapter 2 ( SRS-2100 Voice Features
Notes
Page 2-23
Page 55

SRS -2100 Voice Features ( Chapt er 2
................................
................................
................................
................................
................................
............................
..............................
.........................
................................
.............................
..............................
.........................
............................
...........................
...........................
.............................
................................
..............................
.............................
.............................
................................
................................
................................
................................
................................
Chapter 2................................................................................................................................
INTRODUCTION TO VOICE FEATURES................................................................
PLACING AND RECEIVING CALLS................................................................
Switching Between Handset and Handsfree Modes................................
Placing Handset Calls ................................................................................................
Receiving Handset Calls ................................................................................................
Placing Handsfree Calls................................................................................................
Receiving Handsfree Calls ................................................................................................
Placing Headset Calls ................................................................................................
Receiving Headset Calls................................................................................................
FUNCTION BUTTONS................................................................................................
REDIAL................................................................................................................................
HOLD ................................................................................................................................
CONFERENCE ( DMS-100................................................................
CONFERENCE (5ESS................................................................................................
DROP................................................................................................................................
TRANSFER ( DMS-100................................................................
TRANSFER (5ESS................................................................................................
ONE -TOUCH CALLING................................................................................................
Using a One Touch Button to Make a Call................................................................
Dialing Special Codes Using One-touch Buttons................................
UNANSWERED CALL LOGGING (UNA-LIST)................................
Using the UNA-LIST Feature................................................................
Returning a Call................................................................................................
Deleting a Record from the UNA-LIST................................................................
Conference..........................................................................................................2-13
DROP....................................................................................................................2-14
Function buttons................................................................................................2-10
Handset calls.........................................................................................................2-2
HOLD ...................................................................................................................2-12
One touch calling...............................................................................................2-17
One-touch button codes...................................................................................2-18
Personal Directory - placing calls ....................................................................2-21
Placing cal ls...........................................................................................................2-1
Receiving calls ......................................................................................................2-1
Receiving handset calls.......................................................................................2-4
Redial....................................................................................................................2-11
Switching between handset and handsfree modes.........................................2-2
TRANSFER.........................................................................................................2-15
Transferring a call...............................................................................................2-16
Unanswered call logging description..............................................................2-19
Page 2-24
Page 56

Chapter 2 ( SRS-2100 Voice Features
Page 2-25
Page 57

Chapter 3 ( SRS-2100 Local Features
Note: Options 8 (SPID) and 10
CHAPTER 3
LOCAL FEATURES
This chapter explains how to use
the display and softkeys to set
the features controlled by the
(KEY-ATTR) in Service Mode
are installation functions
usually performed by your
System Administrator or phone
maintenance personnel. (See
Appendix B.)
SRS-2100. The first section
describes the Service Mode, from
which you make all changes to
local features. Subsequent
sections desc ribe how to set each
feature, in the following order:
• Setting ringer volume, tone, and
operating modes
• Programming one-touch buttons
• Setting the calendar/clock
• Reinitializing the phone
• Enabling unanswered call
logging (UNA-LIST)
• Selecting handsfree (speaker),
handset, or headset operation
• Using Call Announce Intercom
• Using Q.931 message logging
• Activating or deactivating the
MIC-OFF button
• Choosing an option for how the
SRS-2100 selects a Call
Appearance button when you
go offhook
• Setting-up the Personal
Directory
A final section gives an example
of how to correct mistakes while
setting local options in Service
Mode.
5:20 PM Tuesday January 4
UNA-LIST DATA CLEAR DIR-LIST
1 2 3 4
Service
Standard Softkey Layout
(The DATA softkey label appears
only if you have a voice/data
terminal.)
Note: Softkey 1 also serves as
the ENTER key (for entering
information as indicated in this
User's Guide).
SERVICE MODE OPERATIONS
The SRS-2100 has a 13-item menu
from which you select options to
change SRS-2100 local features.
Note: Anytime you are in the
normal display mode and wish
to enter service mode, you must
first press the SERVICE key.
This will change softkey 4 to the
REGISTER function. Pressing
REGISTER at this time selects
the menu for the service mode.
Page 3-1
Page 58

SRS -2100 Local Features ( Chapter 3
Note: The procedures to set local
features require extensive use of
the softkeys located below the
display.
Some of the data entry screens in
Service Mode procedures have
built-in timers. If you do not enter
information withi n 15 seconds,
the display reverts back to the
menu for selecting the feature you
were using. You must reselect the
feature and start over.
If for any reason you become
confused while working in Service
Mode, you can always press
REGISTER (softkey 4) to return to
the menu selections and start
over.
Selecting a Menu Option
You can display and choose
among the thirteen menu options
at any time, as follows:
1. Press SERVICE, then REGISTER
(softkey 4) to display the menu
options. The screen looks like
this:
SELECT ITEM (1-13)
1: ONE-TOUCH 2: CALENDAR/CLOCK
3: INITIAL 4: UNA-LIST SERVICE
MODE
ENTER NEXT CLEAR
REGISTER
SELECT ITEM (1-13)
5: HANDS-FREE MODE 6: HANDSET/HEAD-SET
7: RINGER MODE 8: SPID/TEI ASSIGN
ENTER NEXT CLEAR
REGISTER
Press NEXT again to see the third
menu:
SELECT ITEM (1-13)
9: MESSAGE LOGGING 10: KEY
ATTRIBUTE
11: INTERCOM FEATURE 12: MIC MUTE
MODE
ENTER NEXT CLEAR
REGISTER
Press NEXT again to see the
fourth and final menu:
SELECT ITEM (1-13)
13: PREFERENCE MODE
. . . . . . . . . . . . . . . . . . . . . . . . . . . . . . . .
. . . . .
ENTER NEXT CLEAR
REGISTER
Press NEXT repeatedly to cycle
through these four menus.
To see the next menu screen,
press NEXT (softkey 2):
Page 3-2
Page 59

Chapter 3 ( SRS-2100 Local Features
2. To select the option you want,
press the appropriate key(s) on
the numeric keypad to dial 1 to
13 (do not press one of the four
buttons under the screen) and
then press ENTER (softkey 1).
If you notice a mistake after
pressing ENTER and want to
cancel the keypad entry, press
asterisk (*). To clear an entry
before pressing ENTER, press
CLEAR (softkey 3).
3. To exit Service Mode, press
REGISTER (softkey 4). If you
forget to exit, Service Mode is
automatically canceled after four
minutes, or whenever you pick
up the handset or press
SPEAKER.
Whenever REGISTER is pressed,
it either enters or exits Service
Mode, no matter what else may be
in progress.
Note: If you enter Service Mode
during a call, special features
such as Call Pickup and Call
Forwarding are temporarily
disabled. However, regular
calling controls such as HOLD,
SPEAKER, MIC-OFF, and call
disconnection remain available.
Once you are familiar with the
menu choice numbers, you can
go directly to the one you want
after pressing REGISTER. For
example, you can abbreviate the
key sequence REGISTER NEXT
7 ENTER to REGISTER 7
ENTER, getting to the RINGER
screen without displaying the
other menus shown in this
section.
Notes on Entering
Information
When the displayed entry is
acceptable, press ENTER to retain
it and display the next parameter
screen.
To change a numerical entry
before you press ENTER, press
CLEAR (softkey 3) and enter the
desired value.
To change a menu selection or a
numerical entry after you press
ENTER, press asterisk (*). In
some cases, this returns you to
the preceding data entry screen,
where you can enter the correct
information. In other cases, you
return to the Service Mode main
menu and must redo the
procedure from there.
PROGRAMMING A BUTTON
FOR ONE -TOUCH DIALING
Page 3-3
Page 60

SRS -2100 Local Features ( Chapter 3
SRS-2100 multifunction buttons
can be set to automatically dial
numbers you enter (up to 30
digits each).
The numbers you program can be
any of the following:
• Standard telephone numbers,
including the outside line
access code (usually 9) if
required
• Special codes such as a
personal ID number or a voice
mail access code, including *
and #
• A combination of a standard
telephone number plus one or
more special codes, with
pauses between the elements
to allow for system response
time
Page 3-4
Page 61

Chapter 3 ( SRS-2100 Local Features
The one-touch featur e overview
in Chapter 2 discusses these
possibilities in greater detail and
explains how to dial using a onetouch button.
Programming a One-Touch
Button
To program a multifunction
button for a one-touch number,
follow these steps:
1. Press Service, then REGISTER
(softkey 4), 1, ENTER (softkey
1). This screen appears:
ONE-TOUCH
SELECT ASSIGN KEY
. . . . . . . . . . . . . . . . . . . . . . . . . . . . . . . .
. . . .
ENTER NEXT CLEAR
REGISTER
The indicators for previously
assigned one-touch buttons will
be green.
The indicators for buttons
assigned to Directory Numbers,
Call Appearances, and features
will be red. You cannot program
the buttons with red indicators for
one-touch dialing.
2. Press the unassigned button
you want as your one-touch
button. This screen appears:
ENTER DIRECTORY NUMBER
(12)
. . . . . . . . . . . . . . . . . . . . . . . . . . . . . . . .
. . . .
. . . . . . . . . . . . . . . . . . . . . . . . . . . . . . . .
. . . .
ENTER NEXT CLEAR
REGISTER
The multifunction button's
number is at the far right of line 1.
In this example it is 12.
3. To program a standard
telephone number or a special
code, press the keypad digits
for the number you want
recorded. Include the outside
access code (such as 9) and
area code for long distance.
The digits show on the second
line:
ENTER DIRECTORY NUMBER
(12)
942229876543
. . . . . . . . . . . . . . . . . . . . . . . . . . . . . . . .
. . . .
ENTER NEXT CLEAR
REGISTER
To program a number that
includes pauses and special
codes, use the keypad to enter
the digits and the HOLD button
to enter pauses, which appear on
the display as commas. The
example shows a standard
telephone number followed by a
voice mail access code and a
voice mail password.
Page 3-5
Page 62

SRS -2100 Local Features ( Chapter 3
ENTER DIRECTORY NUMBER (12)
8247629,99,,2502
. . . . . . . . . . . . . . . . . . . . . . . . . . . . . . . .
. . . .
ENTER NEXT CLEAR
REGISTER
Note: If you try to exceed the 30-
digit limit, the set refuses the
input and the display remains
unchanged.
4. Press ENTER (softkey 1). The
associated LED turns green, and
the word COMPLETED appears,
remaining for 15 seconds:
ENTER DIRECTORY NUMBER (12)
942229876543
COMPLETED
ENTER NEXT CLEAR
REGISTER
5. Complete the procedure in one
of these ways:
To return to the normal display,
press REGISTER (softkey 4).
To program another one-touch
number, press an unassigned
multifunction button. (You can
also press a currently assigned
one-touch button to change or
cancel its one-touch number.)
To return to the Service Mode
main menu, press asterisk (*).
Correcting Mistakes
How you correct a mistake
depends on where you are in the
programming procedure:
• Before pressing ENTER - to
record the number, press
CLEAR (softkey 3) to erase the
number. Then enter the correct
number.
• After pressing ENTER - if the
number on the COMPLETED
screen is incorrect, press the
multifunction button again.
The ENTER DIRECTORY
NUMBER screen appears
showing the incorrect number.
Enter the correct number and
then press ENTER. The correct
number appears on the display
as you enter it and replaces the
incorrect number.
Changing or Canceling the
Number Stored in a OneTouch Button
To change or cancel the onetouch number currently stored on
a one-touch button, follow these
steps:
1. Press SERVICE, then REGISTER
(softkey 4), 1, ENTER (softkey
1). This screen appears:
ONE-TOUCH
SELECT ASSIGN KEY
. . . . . . . . . . . . . . . . . . . . . . . . . . . . . . . .
. . . .
Page 3-6
Page 63

Chapter 3 ( SRS-2100 Local Features
ENTER NEXT CLEAR
REGISTER
The indicators for previously
assigned one-touch buttons will
be green.
Page 3-7
Page 64

SRS -2100 Local Features ( Chapter 3
2. Press the one-touch button
whose number you wish to
change or cancel. The ENTER
DIRECTORY NUMBER screen
appears showing the currently
assigned number:
ENTER DIRECTORY NUMBER (12)
8247629,99,2502
. . . . . . . . . . . . . . . . . . . . . . . . . . . . . . . .
. . . .
ENTER NEXT CLEAR
REGISTER
The normal SRS-2100 display
includes the date, time, and day of
the week. You can set the date
and time by using the procedure
described below.
3. Complete the procedure in one
of these ways:
• To change the number, enter a
new number . Then press
ENTER (softkey 1).
• The new number appears on
the display as you enter it, and
replaces the old number.
• To cancel the number, press
CLEAR (softkey 3) and then
ENTER.
• The button is canceled as a
one-touch button, and the
green indicator goes dark.
• To leave the number
unchanged, press REGISTER
(softkey 4) to return to the
normal display.
SETTING THE
CALENDAR/CLOCK
Page 3-8
Page 65

Chapter 3 ( SRS-2100 Local Features
Notes on Entering
Information
If the value you have entered is
acceptable, press ENTER to
record it and display the next
parameter screen. To retain the
currently displayed
calendar/clock value for a
parameter, you can press ENTER
without bothering to reenter the
value.
To change a numerical entry
before you press ENTER, press
CLEAR (softkey 3) and enter the
desired value.
To change a menu selection or a
numerical entry after you press
ENTER, press asterisk (*). This
returns you to the preceding data
entry screen, where you can enter
the correct information.
Setting Calendar and Clock
Values
To set the calendar/clock, follow
these steps:
1. Press Service, then REGISTER
(softkey 4), 2, ENTER (softkey
1). This screen appears:
ENTER CALENDAR/CLOCK
. . . . . . . . . . . . . . . . . . . . . . . . . . . . . . . .
. . . .
8: 06PM SUNDAY APR 30
ENTER NEXT CLEAR
REGISTER
Page 3-9
Page 66

SRS -2100 Local Features ( Chapter 3
2. Press ENTER again. The first
input screen appears:
ENTER CALENDAR/CLOCK
INPUT HOUR ->
8: 06PM '94 APR 30
ENTER NEXT CLEAR
REGISTER
12: 55PM '94 APR 30
ENTER NEXT CLEAR
REGISTER
3. Enter the present hour (1-12)
using the numeric keypad and
then press ENTER.
The screen changes to reflect
your entry and to prompt for the
minute. In this example, assume
you entered 12.
ENTER CALENDAR/CLOCK
INPUT MINUTE ->
12: 06PM '94 APR 30
ENTER NEXT CLEAR
REGISTER
Note: If you enter #, *, or too
large a value, such as 33, for the
hour, it is ignored, and you must
supply a valid entry.
4. Enter the present minute using
the numeric keypad and then
press ENTER (softkey 1).
The screen changes to reflect
your entry and to prompt for AM
or PM. In this example, assume
you entered 55.
ENTER CALENDAR/CLOCK
INPUT 0: AM 1: PM ->
Page 3-10
Page 67

Chapter 3 ( SRS-2100 Local Features
5. Press keypad 0 for AM or 1 for
PM and then press ENTER.
The screen changes to reflect
your entry and to prompt for the
year. In this example, assume you
entered 1 for PM.
ENTER CALENDAR/CLOCK
INPUT YEAR ->
12: 55PM '94 APR 30
ENTER NEXT CLEAR
REGISTER
6. To accept the year displayed,
'94, press ENTER.
or
To change the year, press two
numbers on the numeric keypad
for the year you want and then
press ENTER.
The screen changes to reflect
your entry and to prompt for the
month. In this example, assume
you accepted the displayed year.
ENTER CALENDAR/CLOCK
INPUT MONTH ->
12: 55PM '94 APR 30
ENTER NEXT CLEAR
REGISTER
7. Enter the present month (1 to 12)
using the numeric keypad and
then press ENTER.
The screen changes to reflect
your entry and to prompt for the
date. In this example, assume you
entered 5 for May.
Page 3-11
Page 68

SRS -2100 Local Features ( Chapter 3
ENTER CALENDAR/CLOCK
INPUT DAY ->
12: 55PM '94 MAY 30
ENTER NEXT CLEAR
REGISTER
8. Enter the present date (1 to 31)
using the numeric keypad and
then press ENTER.
The screen changes to reflect
your entry and to display the
message COMPLETED. In this
example, assume you entered 1 for
the date.
COMPLETED
. . . . . . . . . . . . . . . . . . . . . . . . . . . . . . . .
. . . .
12: 55PM TUESDAY FEB 1
ENTER NEXT CLEAR
REGISTER
Note: If you enter 31 for a month
having only 30 days, the display
shows ILLEGAL. Press * to
enter a valid date. This also
applies to entering 29 (except for
leap year) or 30 for February.
9. Press REGISTER (softkey 4) to
return to the normal display.
The phone automatically inserts
the correct day (in this case
Tuesday) for the date you entered
in the procedure.
REINITIALIZING THE PHONE
This process removes all your
one-touch numbers and networkdetermined key assignments.
Clearing all your one-touch
numbers and key assignments is
useful when the phone is
assigned to a new user.
Warning: If you reinitialize your
phone accidentally, see
Appendix B for the network or
manual key assignment
download procedure, or ask
your System Administrator for
help.
To reinitialize your phone,
complete the following steps:
1. Press Service, then REGISTER
(softkey 4), 3, ENTER (softkey
1). This screen appears:
PRIVATE DATA CLEAR
(1: YES 2: NO) ->
ARE YOU SURE?
ENTER NEXT CLEAR
REGISTER
2. You can choose one of the
following options:
a. To clear all data, press 1 and
ENTER.
or
b. To retain all data, press 2 and
ENTER. This screen appears:
Page 3-12
Page 69

Chapter 3 ( SRS-2100 Local Features
Page 3-13
Page 70

SRS -2100 Local Features ( Chapter 3
PRIVATE DATA CLEAR
COMPLETED
. . . . . . . . . . . . . . . . . . . . . . . . . . . . . . . .
. . . .
ENTER NEXT CLEAR
REGISTER
3. To return to normal operation,
press REGISTER (softkey 4).
UNANSWERED CALL
LOGGING (UNA -LIST)
Once enabled, this feature
records information about
incoming calls that were not
answered at this phone.
For each unanswered call (up to
eight), the set records the date
and time of the call plus the
telephone number of the calling
party. The ninth and later
unanswered calls replace the first,
second, and so forth, in order, so
your UNA-LIST always has the
most recent eight. (If the caller
gets a busy signal, the call is not
considered "unanswered".) If the
set receives a call from a number
already on the UNA-LIST, the
latest call is recorded and the
earlier call is dropped from the list.
The set can be configured to
record unanswered calls for all
lines, designated lines, or no lines
(Not Activated).
Some of the data entry displays
have built-in timers. If you do not
enter information within fifteen
seconds, the display reverts to
the menu for selecting the feature
you were setting up. You must
reselect the feature and start
again.
If for any reason you become
confused, you can always press
REGISTER (softkey 4) to return to
the menus and start over.
Enabling the UNA -LIST
Feature
To enable unanswered call
logging and select the type of
UNA-LIST to be used, follow
these steps:
1. Press Service, then REGISTER
(softkey 4), 4, ENTER (softkey
1).
If the following screen appears,
the UNA-LIST feature is disabled:
UNA-LIST SERVICE MODE
NON SUPPORTED
. . . . . . . . . . . . . . . . . . . . . . . . . . . . . . . .
. . . .
ENTER NEXT CLEAR
REGISTER
To leave it as is, press REGISTER
again.
Page 3-14
Page 71

Chapter 3 ( SRS-2100 Local Features
2. To enable UNA-LIST, press
ENTER again. This screen
appears:
Page 3-15
Page 72

SRS -2100 Local Features ( Chapter 3
SELECT ITEM (1-3)
1: ALL MODE 2: SELECT MODE
3: NO SUPPORT MODE
ENTER NEXT CLEAR
REGISTER
3. Press the number shown beside
the mode you want to select,
then press ENTER. The
following sections describe
each mode.
UNA-LIST on All Call
Appearances
To support UNA-LIST on all Call
Appearances, follow these steps:
1. Press 1, ENTER, and this screen
appears:
UNA-LIST SERVICE MODE
SUPPORTED (ALL)
COMPLETED
ENTER NEXT CLEAR
REGISTER
After about 15 seconds, or if you
press asterisk (*), the display
returns to the first Service Mode
screen:
SELECT ITEM (1-13)
4: UNA-LIST 5: H-FREE
6: HAND/HEAD
ENTER NEXT CLEAR
REGISTER
2. You can now select a different
menu function, or press
REGISTER (softkey 4) to return
to the normal display.
UNA-LIST on Selected Call
Appearances
To support UNA-LIST on
selected Call Appearances, follow
these steps:
1. Press REGISTER, then ENTER
(two times).
2. Press 2, ENTER, and this screen
appears:
UNA-LIST SERVICE MODE
SUPPORTED (SELECT)
SELECT ASSIGN KEY
ENTER NEXT CLEAR
REGISTER
If ALL (default) was previously
set, all feature buttons light green.
Only Call Appearances with lit
LEDs will log unanswered calls.
Press the buttons to turn the
LEDs on or off to select the Call
Appearances for which you want
to log unanswered calls.
3. Press ENTER when done, and
this screen appears:
UNA-LIST SERVICE MODE
SUPPORTED (SELECT)
COMPLETED
Page 3-16
Page 73

Chapter 3 ( SRS-2100 Local Features
ENTER NEXT CLEAR
REGISTER
Page 3-17
Page 74

SRS -2100 Local Features ( Chapter 3
After about 15 seconds, or if you
press asterisk (*), the display
returns to the first Service Mode
screen.
4. You can now select a different
menu function, or press
REGISTER (softkey 4) to return
to the normal display.
Disabling the UNA -LIST
Feature
To disable unanswered call
logging, follow these steps:
1. Press REGISTER (softkey 4), 4,
ENTER (softkey 1).
If the following screen appears,
the feature is enabled:
UNA-LIST SERVICE MODE
SUPPORTED (ALL)
. . . . . . . . . . . . . . . . . . . . . . . . . . . . . . . .
. . . .
ENTER NEXT CLEAR
REGISTER
To leave it as is, press REGISTER
again.
2. To disable UNA-LIST, press
ENTER. This screen appears:
SELECT ITEM (1-3)
1: ALL MODE 2: SELECT MODE
3: NO SUPPORT MODE
ENTER NEXT CLEAR
REGISTER
3. Now press 3, ENTER, and this
screen appears:
UNA-LIST SERVICE MODE
NON SUPPORTED
COMPLETED
ENTER NEXT CLEAR
REGISTER
After about 15 seconds, or if you
press asterisk (*), the display
returns to the first Service Mode
screen.
4. You can then select a different
menu function, or press
REGISTER (softkey 4) to return
to the normal display.
Deleting a Record from the
UNA-LIST
To delete a record, press UNALIST until the record is displayed
and then press # and CLEAR. To
see or delete the next UNA
record, you must press UNALIST again.
HANDSFREE, HANDSET, AND
HEADSET MODES
You can set up the Digital Set to
use the handset, the speaker, or a
headset by selecting from the
following modes:
Headset Mode
Page 3-18
Page 75

Chapter 3 ( SRS-2100 Local Features
Enables use as a headset-only
phone. You must disconnect the
handset from the jack on the
phone's left side and plug the
headset into the same jack.
Page 3-19
Page 76

SRS -2100 Local Features ( Chapter 3
Calls are connected and
disconnected only by your
pressing the SPEAKER button.
In headset mode, the handsfree
mode, including the
speaker/microphone, is not
supported.
Handset Mode
Enables normal use as a handset
phone. While in this mode, the
speaker can be enabled or
disabled as follows:
Handsfree Supported - allows
speaker use, controlled by
SPEAKER button.
Handsfree Non Supported -
disallows speaker use. The
SPEAKER button is disabled.
Picking up a call and hanging up
on calls is by handset only.
Notes:
• Some of the data entry displays
have built-in timers. If you do
not enter information within
fifteen seconds, the display
reverts to the menu for selecting
the feature you were setting up.
You must reselect the feature
and start again.
• If for any reason you become
confused, you can always press
REGISTER (softkey 4) to return
to the menus and start over.
Operating the Set with a
Headset
To operate the set with a headset,
follow these steps:
1. Press REGISTER (softkey 4), 6,
ENTER (softkey 1). This screen
appears:
HAND-SET/HEAD-SET SERVICE MODE
CURRENT MODE IS HAND-SET
. . . . . . . . . . . . . . . . . . . . . . . . . . . . . . . .
. . . .
ENTER NEXT CLEAR
REGISTER
2. Press ENTER, and this screen
appears:
SELECT ITEM (1-2)
1: HAND-SET MODE 2: HEAD-SET MODE
. . . . . . . . . . . . . . . . . . . . . . . . . . . . . . . .
. . . .
ENTER NEXT CLEAR
REGISTER
3. Press 2. Line 2 changes to
(SELECT=2).
4. Press ENTER. This screen
appears:
HAND-SET/HEAD-SET SERVICE MODE
CURRENT MODE IS HEAD-SET
COMPLETED
ENTER NEXT CLEAR
REGISTER
Page 3-20
Page 77

Chapter 3 ( SRS-2100 Local Features
You now can operate the SRS2100 using only your headset.
The SPEAKER button controls
picking up and hanging up calls,
and the MIC-OFF button is not
operational. The sounds that are
usually audible through the
speaker, such as the key tones,
are now audible only through the
headset.
Switching from Headset Back
to Handset Mode
Do steps 1 through 4 in the
previous section, but in step 3,
press 1 instead of 2. The final
screen will look like this instead:
HAND-SET/HEAD-SET SERVICE MODE
CURRENT MODE IS HAND-SET
COMPLETED
ENTER NEXT CLEAR
REGISTER
The MIC-OFF button (if active)
controls the microphone in the
handset so that you can have
private conversati ons with others
in the room and the connected
party cannot hear. Depress the
MIC-OFF button to resume the
telephone conversation.
When the display shows the
selection you prefer, press
REGISTER (softkey 4) to return to
the normal display.
Selecting Handsfree Operation
(using the speaker and
microphone)
To select handsfree operation
while in handset mode, follow
these steps:
1. Press REGISTER (softkey 4), 5,
ENTER (softkey 1). This screen
appears:
HANDS-FREE SERVICE MODE
NON SUPPORTED
. . . . . . . . . . . . . . . . . . . . . . . . . . . . . . . .
. . . .
ENTER NEXT CLEAR
REGISTER
2. Press ENTER, and this screen
appears:
SELECT ITEM (1-2)
1: SUPPORT MODE 2: NO SUPPORT
MODE
. . . . . . . . . . . . . . . . . . . . . . . . . . . . . . . .
. . . .
ENTER NEXT CLEAR
REGISTER
3. Press 1. Line 2 changes to
(SELECT=1).
4. Press ENTER. This screen
appears:
Page 3-21
Page 78

SRS -2100 Local Features ( Chapter 3
HANDSFREE SERVICE MODE
SUPPORTED
COMPLETED
ENTER NEXT CLEAR
REGISTER
You now can use the speaker.
The SPEAKER button can control
call pickup or hang-up if the
handset is in its cradle. The MICOFF button (if active) controls the
microphone if the speaker is in
use. If MIC-OFF is pressed, key
tones can be heard, but no other
sounds are transmitted until MICOFF is pressed again.
Switching Back to HandsetOnly Operation
Do steps 1 through 4 in the
previous section, but in steps 3,
press 2 instead of 1. The final
screen will look like this instead:
HANDSFREE SERVICE MODE
NON SUPPORTED
COMPLETED
ENTER NEXT CLEAR
REGISTER
When the display shows the
selection you prefer, press
REGISTER (softkey 4) to return to
the normal display.
Page 3-22
Page 79

Chapter 3 ( SRS-2100 Local Features
CHANGING RINGER MODE
This local feature allows you to:
• Change the volume and tone
of the ringer
• Select the ringer mode, either
normal ring or silent ring.
Silent ring flashes the LED of
the receiving Directory
Number or Call Appearance
button without ringing the
bell
• Select the ringing pattern you
will hear when you are
conversing on another line
All settings are made from item 7,
RINGER, in Service Mode. After
completing a setting, you can
press asterisk (*) to return to the
Service Mode options and
change another setting, or you
can press REGISTER (softkey 4)
to return to the normal display.
Notes:
• Some of the data entry displays
have built-in timers. If you do
not enter information within
fifteen seconds, the display
reverts to the menu for selecting
the feature you were setting up.
You must reselect the feature
and start again.
• If for any reason you become
confused, you can always press
REGISTER (softkey 4) to return
to the menus and start over.
Page 3-23
Page 80

SRS -2100 Local Features ( Chapter 3
Setting Ringer Volume
To set the ringer volume, follow
these steps:
1. Press SERVICE, then REGISTER
(softkey 4), 7, ENTER (softkey
1). This screen appears:
RINGER SERVICE - SELECT ITEM (1-4)
1: RINGER VOLUME 2: RINGER TONE
3: RINGING 4: RINGER
PATTERN
ENTER NEXT CLEAR
REGISTER
2. Press 1, ENTER. A screen
appears showing you the
current volume setting:
RINGER VOLUME MODE
CURRENT MODE IS MEDIUM
. . . . . . . . . . . . . . . . . . . . . . . . . . . . . . . .
. . . . .
ENTER NEXT CLEAR
REGISTER
3. Press ENTER again and this
menu appears:
SELECT ITEM (1-3)
1: SOFT 2: MEDIUM
3: HIGH
ENTER NEXT CLEAR
REGISTER
4. Press the number for the desired
volume.
The phone rings once at the
selected volume. If the volume is
too loud or too soft, try a different
option.
5. When you hear a volume you
like, press ENTER.
The screen shows your selection
plus the word COMPLETED:
RINGER VOLUME MODE
CURRENT MODE IS SOFT
COMPLETED
ENTER NEXT CLEAR
REGISTER
6. To return to the normal display,
press REGISTER (softkey 4).
To change another setting, you
can press asterisk (*) to return to
the Service Mode options.
Setting Ringer Tone
To set the ringer tone, follow
these steps:
1. Press SERVICE, then REGISTER
(softkey 4), 7, ENTER (softkey
1). This screen appears:
RINGER SERVICE - SELECT ITEM (1-4)
1: RINGER VOLUME 2: RINGER TONE
3: RINGING 4: RINGER
PATTERN
ENTER NEXT CLEAR
REGISTER
Page 3-24
Page 81

Chapter 3 ( SRS-2100 Local Features
2. Press 2, ENTER (softkey 1) and
this screen appears:
RINGER TONE MODE
CURRENT MODE IS MEDIUM
. . . . . . . . . . . . . . . . . . . . . . . . . . . . . . . .
. . . .
ENTER NEXT CLEAR
REGISTER
Page 3-25
Page 82

SRS -2100 Local Features ( Chapter 3
3. Press ENTER again and this
menu appears:
SELECT ITEM (1-3)
1: LOW 2: MEDIUM
3: HIGH
ENTER NEXT CLEAR
REGISTER
Select either normal ring or silent
ring. Silent ring flashes the LED
of the receiving Directory Number
or Call Appearance button
without ringing the bell.
4. Press the number for the desired
tone.
The phone rings once at the
selected tone. If you don't like
the tone, try a different option.
5. When you hear a tone you like,
press ENTER.
The screen shows your selection
plus the word COMPLETED:
RINGER TONE MODE
CURRENT MODE IS HIGH
COMPLETED
ENTER NEXT CLEAR
REGISTER
6. To return to the normal display,
press REGISTER (softkey 4).
To change another setting, you
can press asterisk (*) to return to
the Service Mode options.
Selecting Ringer Mode
Page 3-26
Page 83

Chapter 3 ( SRS-2100 Local Features
1. Press SERVICE, then REGISTER
(softkey 4), 7, ENTER (softkey
1). This screen appears:
RINGER SERVICE - SELECT ITEM (1-4)
1: RINGER VOLUME 2: RINGER TONE
3: RINGING 4: RINGER
PATTERN
ENTER NEXT CLEAR
REGISTER
2. Press 3, ENTER (softkey 1) again
and this screen appears:
RINGING MODE
CURRENT MODE IS BELL
. . . . . . . . . . . . . . . . . . . . . . . . . . . . . . . .
. . . . .
ENTER NEXT CLEAR
REGISTER
3. Press ENTER again and this
m enu appears:
SELECT ITEM (1-2)
1: BELL 2: SILENT
. . . . . . . . . . . . . . . . . . . . . . . . . . . . . . . .
. . . .
ENTER NEXT CLEAR
REGISTER
4. Select 1 for a normal ring or 2 for
a silent ring and then press
ENTER. The screen shows your
selection plus the word
COMPLETED:
RINGING MODE
CURRENT MODE IS BELL
COMPLETED
ENTER NEXT CLEAR
REGISTER
5. To return to the normal display,
press REGISTER (softkey 4).
To change another setting, you
can press asterisk (*) to return to
the Service Mode options.
Selecting Ringer Pattern
This selection determines the
type of ring that announces an
incoming call when you are
conversing on another line.
1. Press SERVICE, then REGISTER
(softkey 4), 7, ENTER (softkey
1). This screen appears:
RINGER SERVICE MODE - SELECT ITEM
(1-4)
1: RINGER VOLUME 2: RINGER TONE
3: RINGING 4: RINGER
PATTERN
ENTER NEXT CLEAR
REGISTER
2. Press 4, ENTER. A screen
appears showing you the
current ringer pattern setting:
RINGER PATTERN MODE
CURRENT MODE IS MUTE RING
. . . . . . . . . . . . . . . . . . . . . . . . . . . . . . . .
. . . .
ENTER NEXT CLEAR
REGISTER
Page 3-27
Page 84

SRS -2100 Local Features ( Chapter 3
3. Press ENTER again and this
menu appears:
SELECT ITEM (1-2)
1: MUTE RING 2: ONE RING
. . . . . . . . . . . . . . . . . . . . . . . . . . . . . . . .
. . . .
ENTER NEXT CLEAR
REGISTER
4. Select 1 for a m ute ring, a normal
ring pattern at reduced volume,
or 2 for one ring, which rings
Q.931 message logging is an SRS2100 feature that lets you store
and retrieve call control messages
sent and received by your digital
set. These messages can help the
System Administrator or service
technician verify the operation of
the digital set and phone lines.
The average user would use the
message logging feature only to
collect messages for a service
person in case of phone
problems.
once at normal volume. The
LED for the incoming Call
Appearance will continue to
flash. Then press ENTER. The
screen shows your selection
plus the word COMPLETED:
RINGER PATTERN MODES
CURRENT MODE IS ONE RING
COMPLETED
ENTER NEXT CLEAR
REGISTER
5. To return to the normal display,
press REGISTER (softkey 4).
To change another setting, you
can press asterisk (*) to return to
the Service Mode options.
USING Q.931 MESSAGE
LOGGING
Page 3-28
Page 85

Chapter 3 ( SRS-2100 Local Features
Message logging works in two
modes:
• The Logging mode, which
stores messages in a history
file without displaying them
• The History mode, which
displays messages stored in
the history file. The history file
can hold up to 24 messages at
a time.
This section covers the
procedures to:
• Start and stop message
logging
• Review logged messages
Note: When you stop message
logging, all messages stored in
the history file are saved and
can be reviewed at a later time.
Appendix F provides the System
Administrator or service
technician with information useful
in decoding messages. (Because
of the limited space on your
display, messages appear as a set
of codes and abbreviations.)
Starting or Stopping Message
Logging
You go through the same
sequence of menus to start or
stop message logging.
1. Press REGISTER (softkey 4), 9,
ENTER (softkey 1).
The following screen appears:
MESSAGE LOGGING - SELECT ITEM (1-
3)
1: LOGGING-START 2: LOGGING-STOP
3: HISTORY MODE
ENTER NEXT CLEAR
REGISTER
2. Make your selection.
To start message logging, press 1,
then press ENTER.
The message MESSAGE
LOGGING START SELECTED
appears.
To st op message logging, press 2,
then press ENTER.
The message MESSAGE
LOGGING STOP SELECTED
appears.
3. To return to normal operations,
press REGISTER.
The standard display screen
reappears.
Reviewing Logged Messages
To review messages in History
mode, complete the following
steps:
1. Press REGISTER (softkey 4), 9,
ENTER (softkey 1). This screen
appears:
Page 3-29
Page 86

SRS -2100 Local Features ( Chapter 3
MESSAGE LOGGING - SELECT ITEM (1-
3)
1: LOGGING-START 2: LOGGING-STOP
3: HISTORY MODE
ENTER NEXT CLEAR
REGISTER
2. To sel ect the History mode,
press 3, ENTER (softkey 1).
The messages appear on a screen
like this:
1T>N: SETUP CR=18
1N>T: CALL-PROC CR=98
1N>T: PROGRESS CR=98
HEX ROLL-UP ROLL-DOWN EXIT
The history file holds up to 24
messages. Scroll through
messages by pressing ROLL-UP
(softkey 2) or ROLL-DOWN
(softkey 3).
3. To display the full message text
in hexadecimal:
• Press ROLL-UP or ROLL-
DOWN to select a message.
• Press HEX.
The message appears on a screen
like this:
08 01 CR: 01 SETUP: 05
KP: 2C 07 35
AI: 39 31 39
NORMAL ROLL-UP ROLL-DOWN EXIT
The hexadecimal message may
take up more than one screen.
Scroll through the rest of the
message by pressing ROLL-UP or
ROLL-DOWN. To return to a
normal display (non-hexadecimal),
press NORMAL.
4. To quit the History mode, press
EXIT.
The menu of message logging
options appears again.
To stop message logging and
save all messages in the history
file before returning to normal
operations, press 2, then press
ENTER. The screen displays the
message MESSAGE LOGGING
STOP.
5. To return to normal operations,
press REGISTER (softkey 4).
The standard display screen
reappears.
Page 3-30
Page 87

Chapter 3 ( SRS-2100 Local Features
CALL ANNOUNCE INTERCOM
The Call Announce Intercom
feature is a convenient way for a
person screening incoming calls
to announce the call to the
intended recipient. The screener
places the incoming call on hold,
uses a designated Directory
Number to announce the call to
the recipient via intercom, and
may then transfer the call. The
screener can also use this feature
to deliver a message.
The Call Announce Intercom
operates in one of two modes,
two-way or one-way intercom.
Two-way intercom immediately
activates the speaker and
Ringer Always On
The Call Announce feature
utilizes a Ringer Always On mode.
Ringer Always On sends a tone
to users each time a Call Screener
activates Call Announce Intercom
(regardless of the ringer mode).
Note: Call Announce Intercom is
distinct from the network-based
intercom feature.
Figure 3-1 shows a typical
application of Call Announce
Intercom.
Call Screeners Call Recipient
microphone of the called digital
set, allowing two-way
communication. One-way
intercom activates only the
speaker, leaving the microphone
of the recipient's digital set turned
off in the interest of privacy. The
recipient must press the MIC-OFF
button to respond to the call
screener.
Call Announce Intercom allows
you to specify which call buttons
are activated by Call Announce
Intercom Call Screeners, and
allows you to select up to three
Call Screeners.
í
Directory Numbers Call Announce
Intercom setup:
3110 Activating
Directory
3111 Number = 3112
3112* Intercom mode =
1-way or 2-way
*Designated for intercom
Figure 3-1 Call Announce
Intercom Application
Page 3-31
Page 88

SRS -2100 Local Features ( Chapter 3
This section describes the
requirements for setting up Call
Announce Intercom followed by
the procedures to use Call
Announce Intercom to announce
a call.
Call Announce Intercom on
Selected Buttons
Before selecting Directory
Numbers for call screeners, you
may specify the Call Appearance
buttons that are to be answered
automatically. You may select
"ALL" buttons or select the
desired Call Appearances.
To enable or disable Call
Announce Intercom on selected
buttons, follow these steps:
1. Press REGISTER (softkey 4), 11,
ENTER (softkey 1). A screen
appears showing the current
status of the intercom feature:
INTERCOM FEATURE
SUPPORTED (ALL, SELECT,
NONSUPPORTED)
. . . . . . . . . . . . . . . . . . . . . . . . . . . . . . . .
. . . .
ENTER NEXT CLEAR
REGISTER
2. Press ENTER again.
The Call Announce Intercom
button selection screen appears:
SELECT ITEM (1-3)
1: ALL MODE 2: SELECT MODE
3: NO SUPPORT MODE
ENTER NEXT CLEAR
REGISTER
3. To make your choice, dial 1 or 2
and press ENTER. If you
selected 2, the following screen
appears:
INTERCOM FEATURE
SUPPORTED (SELECT)
SELECT ASSIGN KEY
ENTER NEXT CLEAR
REGISTER
4. All LEDs will light green if "All"
was previously selected. Only
Call Appearances with lit LEDs
will activate on Call Announce.
Press the buttons to turn the
LEDs on or off to select the
desired Call Appearance
button(s).
5. Press ENTER. The following
screen appears:
INTERCOM FEATURE
SUPPORTED (SELECT/ALL)
COMPLETED
ENTER NEXT CLEAR
REGISTER
After selecting the Call
Appearance buttons that are to
be auto answered, you may
proceed to select Directory
Numbers for Call Screeners.
Page 3-32
Page 89

Chapter 3 ( SRS-2100 Local Features
Specifying the Directory
Number for Intercom
When enabling the feature, you
must specify a Directory Number,
which when used by the screener
to call the recipient activates the
intercom automatically. All
recipients can specify the same
Directory Number, for all Call
Appearance Intercom calls.
Normal calls can still be made
from this Directory Number to
numbers not set up for intercom.
Up to three Directory Numbers
may be programmed.
When specifying the Directory
Number for intercom, you can
enter just the extension number of
the call screener or the complete
number. For example, for a call
screener at 926-3112, you could
enter:
3112 or 926*3112
The extension number alone
works because the recipient
digital set matches the specified
and incoming numbers from right
to left, stopping after the number
of digits entered during the setup.
Entering the full number negates
the possibility that an outside call
with the same last four digits in
the calling number (for example,
422-3112) could activate the
intercom.
The asterisk in the number
926*3112 is a wild card. The
digital set accepts any character
in this position. You need the
wild card to represent the dash () if a dash is included in the
number delivered with an
incoming call. If you are in doubt,
have the person who will be
screening calls call you, and note
the number displayed on the first
line of the LCD.
The set supports up to three
numbers for screeners. To have
more than three screeners, use *
as a wild card. For example,
entering 311* allows both the
Directory Numbers 3112 and 3115
to activate the intercom.
Remember, however, that all other
Directory Numbers from 3110 to
3119 would also activate the
intercom.
Required Support from Your
System Administrator
To guarantee that Directory
Numbers are always available for
Call Announce Intercom, the
System Administrator should:
• Allocate one Directory Number
on the digital sets of both
recipients and screener for
outgoing calls.
Page 3-33
Page 90

SRS -2100 Local Features ( Chapter 3
Page 3-34
Page 91

Chapter 3 ( SRS-2100 Local Features
Specifying the Directory
Numbers of Call Screeners
At the conclusion of selecting
buttons for Call Announce
Intercom, this screen appears:
INTERCOM FEATURE
SUPPORTED (SELECT/ALL)
COMPLETED
ENTER NEXT CLEAR
REGISTER
1. Press ENTER. If one or two way
intercom is enabled, the screen
displays the enabled mode plus
the authorized Directory
Number, as shown below:
INTERCOM FEATURE (1)
TWO WAY INTERCOM SUPPORTED
985*3112
. . . . . . . . . . . . . . . . . . . . . . . . . . . . . . . .
. . . .
ENTER NEXT CLEAR
REGISTER
If no telephone numbers have
been programmed in, the Call
Announce Intercom feature is
disabled, and the screen displays
NON SUPPORTED:
INTERCOM FEATURE (1)
NONSUPPORTED
. . . . . . . . . . . . . . . . . . . . . . . . . . . . . . . .
. . . .
ENTER NEXT CLEAR
REGISTER
To progr am the first number and
enable Call Announce Intercom,
go to step 2.
2. Press ENTER. The Call
Announce Intercom selection
screen appears:
INTERCOM FEATURE - SELECT ITEM (1-
3)
1:ONE WAY INTERCOM 2:TWO WAY
INTERCOM
3: TURN OFF INTERCOM FEATURE
ENTER NEXT CLEAR
REGISTER
3. To enable the intercom feature,
dial 1 or 2 and press ENTER. A
screen appears showing your
choice and prompting for an
authorized Directory Number:
TWO WAY SELECTED (1)
ENTER AUTHORIZED TELEPHONE
NUMBER
. . . . . . . . . . . . . . . . . . . . . . . . . . . . . . . .
. . . .
ENTER NEXT CLEAR
REGISTER
To disable the intercom feature,
dial 3 and press ENTER. When
the screen displays the message
INTERCOM TURNED OFF, press
REGISTER (softkey 4) to return to
normal operation.
Page 3-35
Page 92

SRS -2100 Local Features ( Chapter 3
4. Dial a telephone number of up to
ten digits (including wild cards)
and press ENTER (softkey 1).
When you press ENTER, a
screen appears announcing
ONE (or TWO) WAY TURNED
ON and showing the number
you entered:
TWO WAY TURNED ON
985*3112
. . . . . . . . . . . . . . . . . . . . . . . . . . . . . . . .
. . . .
ENTER NEXT CLEAR
REGISTER
Page 3-36
Page 93

Chapter 3 ( SRS-2100 Local Features
If a Call Screener has Directory
Numbers identified by three, four,
or five digit extension numbers,
you can dial either the extension
number only or the full number.
You can also dial an asterisk as a
wild card character. See the
section introduction for a
complete explanation of these
choices.
Three Call Screeners can be
entered. To program the second
or third number, se e step 5.
5. Press (*), 11, ENTER, repeat
steps 2,3, and 4 as needed until
this screen appears:
INTERCOM FEATURE (1)
(ONE OR TWO WAY) 2345
. . . . . . . . . . . . . . . . . . . . . . . . . . . . . . . .
. . . .
ENTER NEXT CLEAR
REGISTER
6. Press NEXT (softkey 2) and this
screen appears:
INTERCOM FEATURE (2)
NONSUPPORTED
. . . . . . . . . . . . . . . . . . . . . . . . . . . . . . . .
. . . .
ENTER NEXT CLEAR
REGISTER
Note the number (2) on the first
line indicating you are about to
program your second call
screener number. Pressing NEXT
repetitively at this prompt will
cycle you through all three call
screener selections to the one
you want to program or change.
Follow steps starting at # 2 to
program the last two numbers.
7. Press REGISTER (softkey 4) to
return to normal operation.
Announcing a Call by
Intercom
This procedure describes a
typical sequence for announcing
a call by intercom. The procedure
addresses the call screener since
the call recipient has little to do.
The only action possibly required
of the recipient is described in
step 3.
The procedure also assumes that
both the screener and the call
recipient have an SRS-2100 digital
set, although only the recipient
must have one. If the call
screener has some other
telephone set, the exact procedure
may be different.
This procedure is by no means
the only way that you can use
Call Announce Intercom.
Page 3-37
Page 94

SRS -2100 Local Features ( Chapter 3
To announce a call by intercom,
follow these steps:
1. Press the Directory Number
designated for Call Announce
Intercom. The intercom
Directory Number indicator
lights normally.
2. Dial the extension of the call
recipient.
The recipient's SRS-2100 sounds
an alert tone, immediately answers
the call, and activates the
intercom feature.
3. Talk to the recipient.
If the recipient is set up for oneway intercom, pause a few
seconds to give the recipient time
to press the MIC-OFF button and
respond. With two-way intercom,
the recipient can respond
immediately just by speaking.
Note: To transfer the call at the
same time you announce it, use
the conference call transfer
procedure.
ACTIVATING AND
DEACTIVATING THE MIC-OFF
BUTTON
The MIC-OFF button (the button
at the upper right of the
multifunction button array)
controls the microphone during
handset and handsfree operation.
With this button activated as the
MIC-0FF button, you can turn off
the microphone while on a call to
talk privately to people around
you, and then press MIC-OFF
again to continue your phone
conversation.
Page 3-38
Page 95

Chapter 3 ( SRS-2100 Local Features
If the button is deactivated as
MIC-OFF, it can be used as a one-
ENTER NEXT CLEAR
REGISTER
touch button.
MIC-OFF is active by default
when your SRS-2100 is delivered.
If you deactivate MIC-OFF,
assign its button as a one-touch
button, and then try to reactivate
MIC-OFF, the button's LED turns
red as a warning. You must quit
the procedure (press * to return
to the Service Mode main menus)
and cancel the one-touch number
on the button before you can
reactivate MIC-OFF. If you try to
reactivate MIC-OFF without
doing this, the message INVALID
SELECTION appears and your
attempt fails.
If you are deactivating the MICOFF button, make sure the
function is turned off (the LED is
unlit) before beginning the
procedure.
To activate or deactivate MICOFF, follow these steps:
1. Press Service, then REGISTER
(softkey 4), 12, ENTER (softkey
1). A screen appears showing
you the current status of MICOFF:
MIC MUTE MODE
. . . . . . . . . . . . . . . . . . . . . . . . . . . . . . . .
. . . .
NON SUPPORTED
Page 3-39
Page 96

SRS -2100 Local Features ( Chapter 3
2. Press ENTER again and this
menu appears:
SELECT ITEM (1-2)
1: SUPPORT MODE 2: NO SUPPORT
MODE
. . . . . . . . . . . . . . . . . . . . . . . . . . . . . . . .
. . . .
ENTER NEXT CLEAR
REGISTER
The LED next to the button
indicates its current state:
Off: Unassigned
Green: Already active as
MIC-OFF
Red: Assigned as a one-
touch button
If you wish to reactivate MICOFF, you must first cancel the
one-touch assignment on this
button.
3. To activate MIC-OFF, pr ess 1,
ENTER.
To deactivate MIC-OFF, press 2,
ENTER. The screen shows your
choice:
MIC MUTE MODE
SUPPORTED
COMPLETED
ENTER NEXT CLEAR
REGISTER
4. To return to normal operations,
press REGISTER (softkey 4).
The standard display screen
appears.
SELECTING CALL
APPEARANCE PREFERENCE
The preference options determine
which Call Appearance button the
SRS-2100 selects when you go
offhook (lift the receiver or press
SPEAKER). You have four
choices.
• Primary line preference. The
SRS-2100 always selects
button number 1, the Call
Appearance associated with
your primary directory number.
If you have an incoming call on
button number 1, you are
immediately connected to the
call. If button number 1 is idle,
you get a dial tone.
If you are going offhook to
retrieve a call on hold on
button number 1, you must
press the button to reconnect
to the call.
To be connected to an
incoming call on another
button, or to get a dial tone on
an idle button, press the button
either before or after you go
offhook.
Page 3-40
Page 97

Chapter 3 ( SRS-2100 Local Features
• Idle preference. The SRS-2100
selects a Call Appearance
button that is idle, if one is
available.
• No preference. The SRS-2100
does not automatically select
any Call Appearance button
when you go offhook. You
must press the button you
wish to be connected to either
before or after you go offhook.
• Ringing line preference. The
SRS-2100 selects the Call
Appearance button that is
ringing with an incoming call.
If you have more than one
incoming call, the SRS-2100
selects any ringing Intercom or
Intercom Group feature button
first, and then selects the
button with the call that has
been ringing the longest. You
are immediately connected to
the call.
If you have no incoming calls, the
SRS-2100 selects the idle Call
Appearance with the lowest
button number and gives you a
dial tone.
To select a Call Appearance
preference, follow these steps:
1. Press REGISTER (softkey 4), 13,
and ENTER (softkey 1). A
screen appears showing you the
current preference:
PREFERENCE SERVICE MODE
CURRENT MODE IS PRIMARY
PREFERENCE
. . . . . . . . . . . . . . . . . . . . . . . . . . . . . . . .
. . . .
ENTER NEXT CLEAR
REGISTER
2. Press ENTER again to display
the preference menu:
SELECT ITEM (1-4)
1: RINGING PREFERENCE 2: IDLE
PREFERENCE
3: PRIMARY PREFERENCE 4: NO
PREFERENCE
ENTER NEXT CLEAR
REGISTER
3. Press the number of the
preference option you want and
then press ENTER. A screen
appears showing your selection
and the message COMPLETED:
PREFERENCE SER VICE MODE
CURRENT MODE IS RINGING
PREFERENCE
COMPLETED
ENTER NEXT CLEAR
REGISTER
4. To return to normal operations,
press REGISTER (softkey 4).
The standard display screen
appears.
PERSONAL DIRECTORY
Page 3-41
Page 98

SRS -2100 Local Features ( Chapter 3
Your SRS-2100 has a Personal
Directory feature that allows you
to store names and associated
telephone numbers in the set.
The Personal Directory can hold
up to 32 items. Names may be up
to 15 characters long, and
telephone numbers may be up to
30 characters long.
Page 3-42
Page 99

Chapter 3 ( SRS-2100 Local Features
Setting Up the Personal
Directory
1. To access the directory, press
DIR-LIST (softkey 4). This
screen appears:
01= . . . . . . . . . . . . . . . . . . . . . . . . . . . . .
. . . . .
02= . . . . . . . . . . . . . . . . . . . . . . . . . . . . .
. . . . .
03= . . . . . . . . . . . . . . . . . . . . . . . . . . . . .
. . . . .
ENTER ROLL-UP ROLL-DOWN
EXIT
2. Press ENTER (softkey 1) to
display this screen. Enter the
telephone number.
ENTER DIREC TORY NUMBER
01 =
. . . . . . . . . . . . . . . . . . . . . . . . . . . . . . . .
. . . .
ENTER NUMERIC CLEAR EXIT
3. Press ENTER (softkey 1) to
display the next screen. Enter the
name according to these
instructions.
Letters
Press the keypad numbers
corresponding to the letters in the
name.
The first press of a keypad digit
displays the first letter from the
group of letters represented by
that key, such as 2 for ABC, 3 for
DEF, etc. The first letter of the
group appears on the display.
The second press of that key
displays the second letter, such
as B or E. The third press shows
the third letter.
The two exceptions are the letters
Q and Z. Although they are not
shown on the key labels, the SRS2100 displays them in their proper
alphabetic order. To use the letter
Q, press 77, to use Z, press 9999.
(To get R and S, press 777 and
7777 respectively.)
Since alphabetic entries can
require multiple key-presses, you
must press the # key when the
display shows the letter you
want. Alpha entries are not
recorded until you press the #
key. After pressing the # key, the
next press applies to the name's
next display position.
For each space you want, press *
followed by #. (You must be in
the ALPHA mode to enter
spaces.)
Page 3-43
Page 100

SRS -2100 Local Features ( Chapter 3
Numbers
For numbers, NUMERIC must
show in line 4 as the label for the
second softkey. If ALPHA
shows instead, press the second
softkey and it turns into
NUMERIC. then press the
numbers you want in your name.
The # key is not needed for
numeric entry. Numeric entries
are recorded immediately, and the
next key press applies to the
number's next character position.
To insert pauses in the telephone
number, press the HOLD key. A
"," indicates the pause in the
telephone number. For example,
99198503481,*4250.
ENTER NAME
01 = 8501055
. . . . . . . . . . . . . . . . . . . . . . . . . . . . . . . .
. . . .
ENTER ALPHA CLEAR EXIT
4. Press ENTER (softkey 1) to
display this screen:
COMPLETED
01 = 8501055 John Smith
. . . . . . . . . . . . . . . . . . . . . . . . . . . . . . . .
. . . .
ENTER ALPHA CLEAR EXIT
Using Network Data in the
Personal Directory
When you receive an incoming
call, and the "Caller ID" or other
caller information is displayed,
you may use this as an entry in
your Personal Directory.
Note: If the directory is full, the
message DIRECTORY FULL will
be displayed.
1. While on the active call, press
DIR-LIST (softkey 4). The
following screen appears:
REGISTER DIRECTORY NUMBER & NAME?
(NN)
919 850-1553
. . . . . . . . . . . . . . . . . . . . . . . . . . . . . . . .
. . . .
ENTER ALPHA CLEAR EXIT
(NN) is the next available
directory entry number. The
number is the calling party
information.
5. Press EXIT (softkey 4) to return
to the initial screen.
See Personal Directory Entry
Table, page 3-31.
Page 3-44
 Loading...