

Fujitsu SRS-12i, SRS-24i User Manual


Fujitsu Network Communications, Inc.
1000 Saint Albans Drive
Raleigh, NC 27609
U.S.A.
Part Number: P-UG-IP
Revision 1.0
© Copyright 2003 Fujitsu Network Communications, Inc. All rights reserved.
Printed in the United States of America
This publication may be changed in a revised edition. To find out if a revision
exists, or to order copies of publications, write to Fujitsu Network
Communications, Inc., 1000 Saint Albans Drive, Raleigh, NC 27609, or call
1-800-228-ISDN. Please direct all communications to End User Products.
No part of this publication may be reproduced or translated, stored in a
database or retrieval system, or transmitted in any form or by any means,
electronic, mechanical, photocopying, recording, or otherwise, without the
prior written permission of Fujitsu Network Communications, Inc.
The information contained in this document is subject to change without
notice.
PREFACE
Thank you for using Fujitsu’s IP Centrex Telephone. This guide provides
descriptions and procedures for the Fujitsu SRS 12i / 24i IP Centrex Telephone.
You may find it helpful to read the instructions before you start using the
product. Please keep this guide for future reference.
1
Fujitsu IP Centrex Telephone Table of Contents & Intro

Fujitsu IP Centrex Telephone Table of Contents & Intro
CHAPTER 1 - PART NAMES AND FUNCTIONS ................................ 1-1
CHAPTER 2 – OPERATION ............................................................ 2-1
PLACING HANDSET CALLS ................................................................ 2-1
RECEIVING HANDSET CALLS ............................................................ 2-1
PLACING HANDSFREE CALLS ............................................................ 2-1
RECEIVING HANDSFREE CALLS (OPTION) ......................................... 2-1
PLACING HEADSET CALLS (HEADSET MODE SELECTED IN OPTION) .. 2-1
RECEIVING HEADSET CALLS (HEADSET MODE SELECTED IN OPTION)2-2
SWITCHING BETWEEN HANDSET AND HANDSFREEMODES.............. 2-2
LAST NUMBER REDIAL ...................................................................... 2-2
HOLD. ............................................................................................. 2-2
CONFERENCE .................................................................................. 2-2
DROP .............................................................................................. 2-3
TRANSFER ........................................................................................ 2-3
ONE-TOUCH CALLING ..................................................................... 2-4
CALL ANNOUNCE INTERCOM .......................................................... 2-4
ANNOUNCING A CALL BY INTERCOM .............................................. 2-4
CALL LOG ........................................................................................ 2-4
ADDRESS BOOK (PERSONAL DIRECTORY) ......................................... 2-6
NETWORK FEATURES ....................................................................... 2-8
TABLE OF CONTENTS
CHAPTER 3 – USER OPERATION SETTINGS ................................... 3-1
CHAPTER 3 – USER OPERATION SETTINGS ........................................ 3-1
PROGRAMMING ONE-TOUCH (OPTION 1) ....................................... 3-3
SETTING THE CALENDAR / CLOCK (OPTION 2) ................................. 3-7
INITIALIZING THE PHONE (OPTION 3) .............................................. 3-9
CALL LOG (OPTION 4) ................................................................... 3-10
ENABLING AND DISABLING THE SPEAKER FUNCTION (OPTION 5) .. 3-11
HANDSFREE, HANDSET, AND HEADSETMODES (OPTION 6) ........... 3-12
CHANGING RINGERMODE (OPTION 7) .......................................... 3-13
CALL ANNOUNCE INTERCOM (OPTION 10).................................... 3-16
CALL APPEARANCE PREFERENCE (OPTION 11) ............................... 3-20
MIC-OFF (OPTION 12) .................................................................... 3-21
2

MAC ADDRESS (OPTION 25) .......................................................... 3-22
SOFTWARE VERSION DISPLAY (OPTION 29) .................................... 3-22
CHAPTER 4 – ACCESSORIES ......................................................... 4-1
LABELING THE SET ........................................................................... 4-1
SRS-12I AND SRS-24I COVER REMOVAL ............................................ 4-1
SRS-12I AND SRS-24I HANDSET ........................................................ 4-2
WALLMOUNT KIT ............................................................................. 4-2
APPENDIX A – MISCELLANEOUS ................................................... A-1
GLOSSARY ....................................................................................... A-2
Fujitsu IP Centrex Telephone Table of Contents & Intro
3

Fujitsu IP Centrex Telephone Table of Contents & Intro
WARNING
The Fujitsu SRS-12i / 24i IP Centrex Telephone(s) has been tested and found
to comply with the limits for a Class B digital device, pursuant to Part 15 of
the FCC rules. These limits are designed to provide reasonable protection
against harmful interference in a residential installation. This equipment
generates, uses, and can radiate radio frequency energy and, if not installed
and used in accordance with the instructions, may cause harmful interference
with radio communications. However, there is no guarantee that interference
will not occur in a particular installation. If this equipment does cause harmful
interference with radio or television reception, which can be determined by
unplugging the equipment to turn it off, the user is encouraged to try to
correct the interference by one of the following measures:
• Reorient or relocate the receiving antenna of the affected receiver.
• Increase the separation between the equipment and the affected
receiver.
• Consult a dealer or experienced radio or television technician for help.
Changes or modifications not expressly approved by the party responsible
for compliance could void the user’s authority to operate the equipment.
FCC REQUIREMENTS
The Fujitsu SRS-12i / 24i IP Centrex Telephone complies with Part 68 of the
FCC Rules. The FCC Part 68 Label is located on the bottom of the enclosure.
This label contains the FCC Registration Number for this equipment. If
requested, this information must be provided to your telephone company.
Your telephone company may make changes in its facilities, equipment,
operations or procedures that could affect the proper functioning of your
equipment. If they do, you will be notified in advance to give you an
opportunity to maintain uninterrupted telephone service.
The Fujitsu SRS-12i / 24i IP Centrex Telephone handset is hearing-aid
compatible (HAC) per Section 68.316, FCC Rules and Regulations.
4

REPAIRS
Repairs to this equipment may only be made by the manufacturer or its
authorized agents. If this equipment is causing harm to the telephone
network, the telephone company may request that it be unplugged from
the modular outlet until the problem has been corrected. To obtain repair
service or warranty information, contact:
Repair Center
Fujitsu Network Communications, Inc.
1000 Saint Albans Drive,
Raleigh, NC 27609
1-800-298-9007
IMPORTANT SAFETY INFORMATION
The Fujitsu SRS-12i / 24i IP Centrex Telephone should be used in accordance
with all instructions and precautions provided in this guide.
• Read and understand all instructions.
• Install cords where they cannot be a hazard to anyone walking nearby.
•Use only the line cable included with the telephone.
• Do not use this product near water, for example, near a bathtub,
washbowl, kitchen sink, laundry tub, in a wet basement, or in a
swimming pool.
•Avoid using the telephone during an electrical storm. There may be a
remote risk of electrical shock from lightning.
•Do not use the telephone to report a gas leak in the vicinity of the leak.
•Do not open the telephone or the warranty will be voided.
•Only authorized personnel should perform service on hardware
components.
•Use your one-touch numbers for storing emergency numbers.
•Do not use liquid cleaners or aerosol cleaners on the telephone; use a
damp cloth with rubbing alcohol for cleaning.
•Do not place the telephone on an unstable cart, stand, or table. The
telephone may fall causing serious damage to the telephone.
•Never push objects of any kind into this telephone as they may touch
dangerous voltage points or short out parts that could result in a risk of
fire or electric shock. Never pour liquid of any kind on the telephone.
Fujitsu IP Centrex Telephone Table of Contents & Intro
5

Fujitsu IP Centrex Telephone Table of Contents & Intro
GENERAL INFORMATION
The Fujitsu SRS-12i / 24i IP Centrex Telephone offers enhanced digital Centrex
features. Following is the list of some of the popular features (some of which
may need to be supported by your service provider as well):
• Auto SPID and parameter download Support
• Full key system functionality
• Call preferences
• Call appearance reservation
• Simplified conference and transfer
• Hold
• Address book function for 50 items
• Intercom voice announce/auto answer
•One-button access to advanced Centrex features
•Hearing aid compatible handset
•Headset/handset operation
•Handset volume control (ADA compliant)
• Speakerphone for hands-free operation
• Local one-touch speed dialing
• Fully automatic last number redial capability
•Unanswered/Incoming call logging (52 calls max.)
•Out going call logging (52 calls max.)
• Call duration display
•Programmable smart-pause feature
• LCD display of 2 lines by 24 characters
•Tilt set for improved viewing angle
•Outbound signaling over DTMF
• Remote software update
•Message waiting indication
• Ringer volume options, including “extra high”
• Ringer mode options, including mute ring or one ring
CONTENTS OF FUJITSU IP CENTREX TELEPHONE SHIPMENT
The Fujitsu SRS-12i / 24i IP Centrex Telephone comes with the following
parts necessary for operation of your telephone. Verify that all are included
prior to beginning installation.
1 – IP Centrex Telephone (SRS-12i / 24i), 1 – Handset, 1 – Handset Cord, 1 –
Category 5 Ethernet Line Cord, 1 – User Guide (CD), 1 – Quick Reference
Card, 1 – Telephone Clear Cover, and Paper Template(s). AC Adaptor (Power
Supply) is sold separately.
6
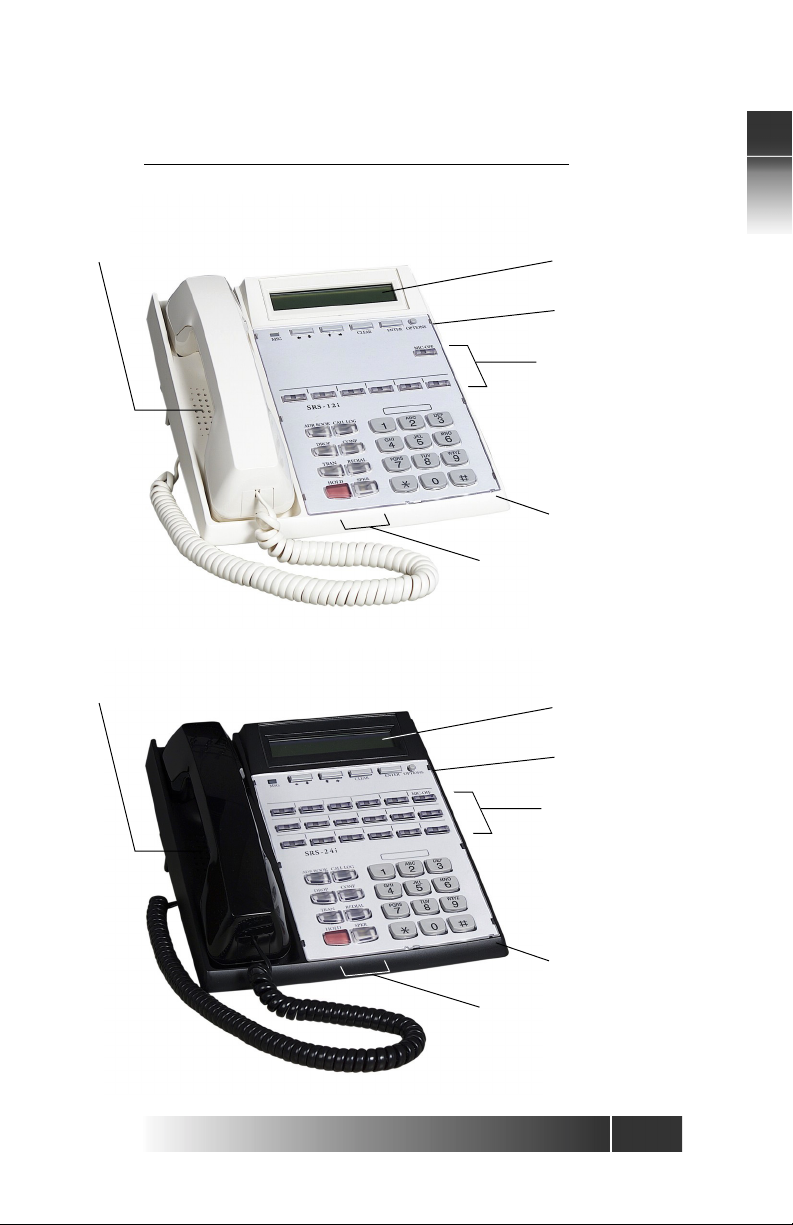
CHAPTER 1 – PART NAMES AND FUNCTIONS
SRS-12i (front view)
1
Speaker
Speaker
Display
Softkeys
Multi-function
Buttons
Microphone
Function
Buttons
SRS-24i (front view)
Display
Softkeys
Multi-function
Buttons
Function
Buttons
Fujitsu IP Centrex Telephone Part Names and Functions
Microphone
1-1
1
Fujitsu IP Centrex Telephone Part Names and Functions
Product
Label
FCC
Label
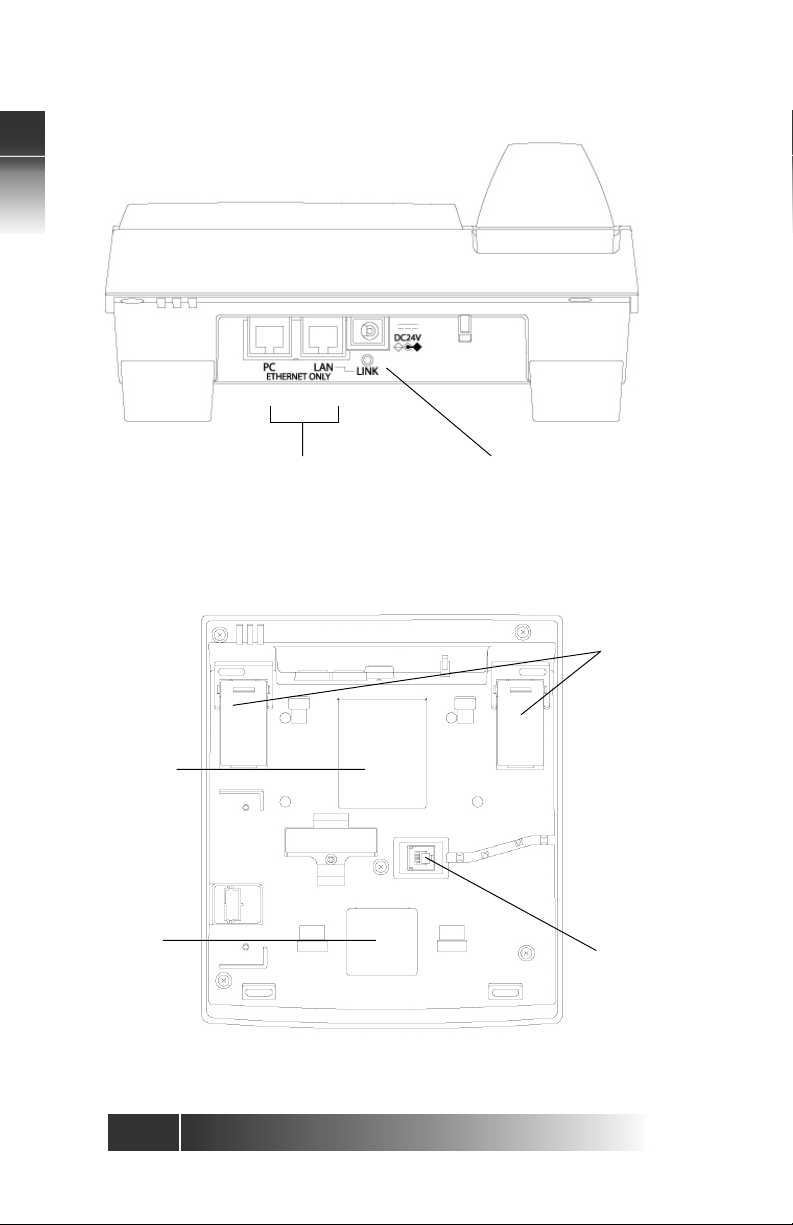
LAN & PC Connection
(10/100 Ethernet)
SRS-12i / 24i (rear view)
DC Power
Connection
Rear
Leg
Hand/headset
Connection
1-2
SRS-12i / 24i (botom view)

Display – Shows the call state, caller ID, dialed digits, network call control
messages, and elapsed time during calls. When not on a call, the date and
time of day are displayed.
Multifunction Buttons – These buttons are assigned to call appearances or
network features or one-touch numbers. Dual assignments such as OneTouch and Call Appearance are not supported.
Function Buttons – Single-touch buttons for features, consisting of ADR
BOOK, CALL LOG, DROP, CONF, TRAN, REDIAL, HOLD, and SPKR.
•ADR BOOK – Allows access to store/retrieve phone numbers stored in
the telephone.
• CALL LOG – Shows lists of calls for both unanswered / answered
incoming and outgoing calls.
• DROP – Disconnects the last party added to a conference call, or
disconnects from a call when not in conference mode on some C.O.
Switches.
•CONF – Enables multiple parties (3 typically) to be on one call.
• TRAN – Places the current call on hold, selects an idle call appearance
for dialing another number so a call can be transferred.
• REDIAL – Dials the last number dialed on the phone.
• HOLD – Places existing call on hold.
• SPKR – Enables / disables the hands-free mode. When the speaker is in
use, a red indicator on the key is lit
Volume/Contrast Buttons – Increase or decrease display contrast (when
no call is active), or speaker / handset volume (when a call is active).
Message Indicator – A bright red indicator is lit when messages are waiting;
controlled by the network.
Numeric Keypad – Allows the user to dial telephone numbers, and send
DTMF tones to external equipment such as voice mail systems.
MIC-OFF Button – When pressed, the MIC-OFF key turns red and mutes the
handset and speaker MIC, this allows user to hold a private conversation.
MIC-OFF is de-activated as the default state.
Buttons – Used for volume control, LCD contrast, and toggling
up and down the option menu.
LAN Connector – Connector for the LAN cable.
PC Connector – Connector for a cable to a PC.
Power Connector – Connector for the AC Adaptor. UL listed AC Adaptor
marked “Class 2” and rated 24V DC, 500mA should be used for this product.
LAN Lamp – A green indicator is lit when the telephone is successfully
connected to the LAN.
1
Fujitsu IP Centrex Telephone Part Names and Functions
1-3

1
Fujitsu IP Centrex Telephone Part Names and Functions
Rear Legs – Adjusts height of the set.
Handset/Headset Connector – Connects the Handset/Headset cord to the
telephone.
Product Label – Product Model, Part Number, Serial Number, MAC Address,
and UL Certification information.
FCC Label – Information on FCC Part 68 and HAC compliance.
1-4

CHAPTER 2 – OPERATION
Placing Handset Calls
1. Pick up the handset. This will normally provide dial tone. If not, press the desired
idle Call Appearance button.
2. Dial the desired number.
3. Converse with the called party, then hang up.
Notes:
• The displayed call duration vanishes about three seconds after hang up.
• On hook dialing can be used to place calls. Dial the number first, then pick
up the handset or press the SPKR button. The phone automatically dials the
number. The number entered remains in effect for dialing for approximately
three minutes.
Receiving Handset Calls
1. Pick up the handset, and if necessary, press the green flashing Call Appearance.
The LED changes to steady red.
2. Converse with the calling party.
3. When your conversation ends, hang up by replacing the handset in its cradle.
Placing Handsfree Calls
A hands free call uses the integrated microphone and speaker of the telephone.
1. Press the SPKR button. Its LED will light red (if not, press an idle Call Appearance
button) and a dial tone will be provided.
2. Dial the desired number.
3. Converse with the called party.
4. Hang up by pressing the SPKR key.
(See also “Handsfree, Handset, and Headset Modes”)
Receiving Handsfree Calls (option)
1. Press SPKR and, if necessary, the green-flashing Call Appearance button.
2. Converse with the calling party. When your conversation ends, hang up by
pressing SPKR.
Placing Headset Calls (Headset mode selected in option)
Check to ensure that headset mode is activated on your telephone. The handset,
speaker, and microphone will be disabled. All dialing tones and telephone
conversation will be audible only through the headset. Your voice and any other
transmitted sounds will go through the headset microphone only. Refer to Chapter
3 for instructions on how to set-up headset mode.
1. Press SPKR. Its LED will light red and a dial tone will be provided.
2. Dial the desired number.
3. Converse with the calling party.
4. When your conversation ends, hang up by pressing SPKR.
We have tested headsets from the following manufacturers on our phones:
Plantronics (Model M12 controller), ACS, GNNetcom, and Hello Direct.
2
Fujitsu IP Centrex Telephone Operation
2-1

2
Fujitsu IP Centrex Telephone Operation
Receiving Headset Calls (Headset mode selected in option)
1. Press SPKR, and if necessary, press the green-flashing Call Appearance button.
2. Converse with the calling party.
3. When your conversation ends, hang up by pressing SPKR.
Note:
These procedures assume that the phone is set to ringing line preference or primary
line preference.
Switching between Handset and Handsfree Modes
1. Press SPKR and then replace the handset in its cradle. The other parties on the
call can now be heard through the speaker.
2. If the MIC-OFF LED is red, the microphone has been turned off. Press MIC-OFF to
turn it back on (the LED goes dark). The microphone now picks up your voice.
Note:
If the MIC-OFF feature is deactivated in the options the microphone is always on.
If handsfree mode is in use and want to use the handset, pick up the handset. The call
continues without interruption. The handsfree speaker and microphone are turned
off.
Last Number Redial
The Redial feature dials the last number that was dialed using the dial pad or a Speed
Dial key. Digits dialed will be saved in Outgoing Call Log.
Hold
Places caller on hold.
1. Press HOLD while active call is in progress. The Call Appearance LED changes
from steady red to rapidly flashing red.
2. To reconnect with a call on hold, press its flashing Call Appearance button. Its
LED changes from flashing red to steady red.
Note:
The Central office auto-hold feature automatically puts an active call on hold whenever
another Call Appearance is pressed.
Conference
This feature allows a telephone conference with multiple participants.
Note:
Conference is a network-based feature that is provided by your telephone company.
Conference size depends on your network configuration.
Conference by dialing the phone number
1. Press CONF while on an active call. The CONF button lights up. The initial call is
placed on hold, and the next available Call Appearance is selected.
2. Dial the party you want to add to the conference. Or press any Call Appearance
button that is ringing or on hold.
3. After the added party answers, press the CONF key to conference all parties
together.
4. Repeat the above steps to add another party. (If enabled for your phone)
2-2

Conference by using Address Book
1. In order to add the third party for conference call, press ADR BOOK while you
are on the active call.
2. Select the phone number to be called from Address Book display on top line.
3. Press CONF button. The initial call is placed on hold, and the next available Call
Appearance is selected. The number selected from the ADR BOOK will be dialed
automatically.
4. Press CONF again to complete the conference call.
Drop
This feature allows dropping the last party added to a conference.
Note:
DROP is a network-based feature that is provided by your telephone company. Some
installations leave the other conference participants connected if you disconnect. Ask
your System Administrator whether your conference feature works this way.
Press the DROP key to remove the last party added to a conference. Other participants
can drop out of the call simply by hanging up.
Transfer
Allows transferring an active call to another party.
Note:
TRANSFER is a network-based feature that is provided by your telephone company.
Transfer the call using the dial pad or Speed Dial Key
1. Press the TRAN key while in an active call.
2. Dial the desired phone number using the dial pad or a Speed Dial key.
3. Press the TRAN key again to transfer the call.
Transfer the call using the Address Book
1. Press ADR BOOK and select the party to transfer the call to while in an active
call.
2. Select the phone number to be called from Address Book display on top line.
3. Press TRAN key. The initial call is placed on hold, and the next available Call
Appearance is selected. The number selected from the ADR BOOK will be
dialed automatically.
4. Press TRAN again to complete the transfer call.
A “blind” transfer is where no conversation takes place with the transferee before the
transfer is completed. To perform a blind transfer, press TRAN and wait for the person’s
phone to ring and then press TRAN to transfer the call.
2
Fujitsu IP Centrex Telephone Operation
2-3
 Loading...