

Page 1

ServerView Resource Orchestrator
Cloud Edition V3.0.0
User's Guide
for Tenant Users
Windows/Linux
J2X1-7615-01ENZ0(05)
April 2012
Page 2

Preface
Purpose
This document explains how to operate the ROR Console provided by ServerView Resource Orchestrator (hereafter referred to as "this
product").
Target Readers
This document is intended for users who use the resources of a tenant that they own.
Organization
This manual is composed as follows:
Chapter 1 Overview
Explains an overview of the ROR Console ROR
Chapter 2 Home
Explains the ROR Console Home window
Chapter 3 System Condition
Explains how to monitor system condition
Chapter 4 L-Platform
Explains how to use the L-Platform
Chapter 5 Request
Explains how to operate the application list
Chapter 6 Account
Explains how to perform account operations
Glossary
Explains terms used in this document. Refer to the glossary as required.
Notational Conventions
The notation in this manual conforms to the following conventions.
- When using Resource Orchestrator and the functions necessary differ due to the necessary basic software (OS), it is indicated as
follows:
[Windows]
[Linux] Sections related to Linux
Sections related to Windows
- Reference destinations are shown enclosed by quotation marks (" ").
- Window, dialog, menu, tab, and button names are indicated using bold text.
Documentation Road Map
The following manuals are provided with Resource Orchestrator. Please refer to them when necessary:
- i -
Page 3
Manual Name Abbreviated Form Purpose
ServerView Resource Orchestrator Cloud Edition
V3.0.0 Setup Guide
Setup Guide CE
Please read this first.
Read this when you want information about the
purposes and uses of basic functions, and how to
install Resource Orchestrator.
ServerView Resource Orchestrator Cloud Edition
V3.0.0 Installation Guide
ServerView Resource Orchestrator Cloud Edition
V3.0.0 Operation Guide
ServerView Resource Orchestrator Cloud Edition
V3.0.0 User's Guide for Infrastructure
Administrators (Resource Management)
ServerView Resource Orchestrator Cloud Edition
V3.0.0 User's Guide for Infrastructure
Administrators
ServerView Resource Orchestrator Cloud Edition
V3.0.0 User's Guide for Tenant Administrators
ServerView Resource Orchestrator Cloud Edition
V3.0.0 User's Guide for Tenant Users
ServerView Resource Orchestrator Cloud Edition
V3.0.0 Reference Guide for Infrastructure
Administrators (Resource Management)
ServerView Resource Orchestrator Cloud Edition
V3.0.0 Reference Guide for Infrastructure
Administrators
Installation Guide CE
Operation Guide CE
User's Guide for
Infrastructure
Administrators (Resource
Management) CE
User's Guide for
Infrastructure
Administrators CE
User's Guide for Tenant
Administrators CE
User's Guide for Tenant
Users CE
Reference Guide (Resource
Management) CE
Reference Guide CE
Read this when you want information about how
to install Resource Orchestrator.
Read this when you want information about how
to operate systems that you have configured.
Read this when you want information about how
to operate the GUI (resource management) used
by infrastructure administrators and dual-role
administrators.
Read this when you want information about how
to operate the GUI (for operations other than
resource management) used by infrastructure
administrators and dual-role administrators.
Read this when you want information about how
to operate the GUI used by tenant administrators.
Read this when you want information about how
to operate the GUI used by tenant users.
Read this when you want information about
commands used by infrastructure administrators
and dual-role administrators to manage
resources, messages output by the system, and
how to perform troubleshooting.
Read this when you want information about
commands used by infrastructure administrators
and dual-role administrators for purposes other
than resource management.
ServerView Resource Orchestrator Cloud Edition
V3.0.0 Messages
In some cases, this document may refer to the Virtual Edition manuals shown below. Please refer to them when necessary:
Messages CE
Read this when you want detailed information
about the corrective actions for displayed
messages.
Manual Name Abbreviated Form Purpose
ServerView Resource Orchestrator Virtual Edition
V3.0.0 Setup Guide
ServerView Resource Orchestrator Virtual Edition
V3.0.0 Installation Guide
ServerView Resource Orchestrator Virtual Edition
V3.0.0 Operation Guide
ServerView Resource Orchestrator Virtual Edition
V3.0.0 User's Guide
ServerView Resource Orchestrator Virtual Edition
V3.0.0 Command Reference
Setup Guide VE
Installation Guide VE
Operation Guide VE
User's Guide VE
Command Reference
Read this when you want information about the
purposes and uses of basic functions, and how to
install Resource Orchestrator.
Read this when you want information about how
to install Resource Orchestrator.
Read this when you want information about how
to operate systems that you have configured.
Read this when you want information about how
to operate the GUI.
Read this when you want information about how
to use commands.
- ii -
Page 4
Manual Name Abbreviated Form Purpose
ServerView Resource Orchestrator Virtual Edition
V3.0.0 Messages
Abbreviations
The following abbreviations are used in this manual:
Abbreviation Products
Microsoft(R) Windows Server(R) 2008 Standard
Microsoft(R) Windows Server(R) 2008 Enterprise
Microsoft(R) Windows Server(R) 2008 R2 Standard
Microsoft(R) Windows Server(R) 2008 R2 Enterprise
Microsoft(R) Windows Server(R) 2008 R2 Datacenter
Microsoft(R) Windows Server(R) 2003 R2, Standard Edition
Microsoft(R) Windows Server(R) 2003 R2, Enterprise Edition
Windows
Microsoft(R) Windows Server(R) 2003 R2, Standard x64 Edition
Microsoft(R) Windows Server(R) 2003 R2, Enterprise x64 Edition
Windows(R) 7 Professional
Windows(R) 7 Ultimate
Windows Vista(R) Business
Windows Vista(R) Enterprise
Windows Vista(R) Ultimate
Microsoft(R) Windows(R) XP Professional operating system
Messages VE
Read this when you want detailed information
about the corrective actions for displayed
messages.
Windows Server 2003
Linux
VMware
Microsoft(R) Windows Server(R) 2003 R2, Standard Edition
Microsoft(R) Windows Server(R) 2003 R2, Enterprise Edition
Microsoft(R) Windows Server(R) 2003 R2, Standard x64 Edition
Microsoft(R) Windows Server(R) 2003 R2, Enterprise x64 Edition
Red Hat(R) Enterprise Linux(R) 5 (for x86)
Red Hat(R) Enterprise Linux(R) 5 (for Intel64)
Red Hat(R) Enterprise Linux(R) 5.1 (for x86)
Red Hat(R) Enterprise Linux(R) 5.1 (for Intel64)
Red Hat(R) Enterprise Linux(R) 5.2 (for x86)
Red Hat(R) Enterprise Linux(R) 5.2 (for Intel64)
Red Hat(R) Enterprise Linux(R) 5.3 (for x86)
Red Hat(R) Enterprise Linux(R) 5.3 (for Intel64)
Red Hat(R) Enterprise Linux(R) 5.4 (for x86)
Red Hat(R) Enterprise Linux(R) 5.4 (for Intel64)
Red Hat(R) Enterprise Linux(R) 5.5 (for x86)
Red Hat(R) Enterprise Linux(R) 5.5 (for Intel64)
Red Hat(R) Enterprise Linux(R) 5.6 (for x86)
Red Hat(R) Enterprise Linux(R) 5.6 (for Intel64)
Red Hat(R) Enterprise Linux(R) 5.7 (for x86)
Red Hat(R) Enterprise Linux(R) 5.7 (for Intel64)
Red Hat(R) Enterprise Linux(R) 6.2 (for x86)
Red Hat(R) Enterprise Linux(R) 6.2 (for Intel64)
VMware vSphere(R) 4
VMware vSphere(R) 4.1
VMware vSphere(R) 5
RHEL5-Xen
Red Hat(R) Enterprise Linux(R) 5.4 (for x86) Linux Virtual Machine Function
Red Hat(R) Enterprise Linux(R) 5.4 (for Intel64) Linux Virtual Machine Function
- iii -
Page 5
Abbreviation Products
RHEL-KVM
Red Hat(R) Enterprise Linux(R) 6.2 (for x86) Virtual Machine Function
Red Hat(R) Enterprise Linux(R) 6.2 (for Intel64) Virtual Machine Function
Export Administration Regulation Declaration
Documents produced by FUJITSU may contain technology controlled under the Foreign Exchange and Foreign Trade Control Law of
Japan. Documents which contain such technology should not be exported from Japan or transferred to non-residents of Japan without first
obtaining authorization from the Ministry of Economy, Trade and Industry of Japan in accordance with the above law.
Trademark Information
- Linux is a registered trademark of Linus Torvalds.
- Microsoft, Internet Explorer, Windows, and Windows Server are either registered trademarks or trademarks of Microsoft Corporation
in the United States and/or other countries.
- Red Hat, RPM, and all Red Hat-based trademarks and logos are trademarks or registered trademarks of Red Hat, Inc. in the United
States and other countries.
- VMware, the VMware logo, Virtual SMP, and VMotion are registered trademarks or trademarks of VMware, Inc. in the United States
and/or other jurisdictions.
- ServerView and Systemwalker are registered trademarks of FUJITSU LIMITED.
- All other brand and product names are trademarks or registered trademarks of their respective owners.
Notices
- The contents of this manual shall not be reproduced without express written permission from FUJITSU LIMITED.
- The contents of this manual are subject to change without notice.
Month/Year Issued, Edition Manual Code
November 2011, First Edition J2X1-7615-01ENZ0(00)
January 2012, 1.1 Edition J2X1-7615-01ENZ0(01)
January 2012, 1.2 Edition J2X1-7615-01ENZ0(02)
February 2012, 1.3 Edition J2X1-7615-01ENZ0(03)
March 2012, 1.4 Edition J2X1-7615-01ENZ0(04)
April 2012, 1.5 Edition J2X1-7615-01ENZ0(05)
Copyright 2011-2012 FUJITSU LIMITED
Editing Record
Additions and changes Section Edition
An article relating to the display name of configuration
information was modified.
3.4 1.1 Edition
The term "logical node" was changed to "L-Server". 3.4
An article relating to RHEL-KVM was added. Chapter 3, Chapter 4
An article relating to the priority of the task was added. 5.2
- iv -
Page 6
Additions and changes Section Edition
The configuration for sections and sub-sections was
modified.
A table for description of CI list item was added. 3.2
An article relating to usage fee (the estimated price) was
added.
An article relating to batch power supply operations was
added.
An article relating to overcommit (Hyper-V) was added or
modified.
A 'note' relating to CPU performance, CPU reserve
performance, memory size, or memory reserve size was
added.
An article relating to status confirmation of subscriptions was
added.
The window and article for the Form panel was added. 5.1, 5.2
Red Hat(R) Enterprise Linux(R) 6.2 was added as product for
the abbreviations Linux and RHEL-KVM.
A 'note' relating to L-Platform cancellation was added. 4.3.10
A 'note' relating to pop-up blocker was added. 4.5
An article relating to user ID information was modified. 1.6 1.4 Edition
Chapter 3 1.2 Edition
4.2.1, 4.2.2, 4.3.9, 4.3.11
4.3.2, 4.3.9, 4.3.11
4.3.11
4.3.13
5.1
Preface 1.3 Edition
A 'note' relating to L-Platform reconfiguration was modified. 4.3.9
An article relating to user ID information was modified. 1.6 1.5 Edition
A note was added to the explanation of "sdattim" which was
added on the CSV output table.
The term "LDAP operation settings" was changed to
"directory services operation settings".
An explanation on "Migration" was added. Glossary
3.2.1
6.1
- v -
Page 7

Contents
Chapter 1 Overview..................................................................................................................................................................1
1.1 Users....................................................................................................................................................................................................1
1.2 Function List........................................................................................................................................................................................1
1.3 Flow of Operations..............................................................................................................................................................................2
1.4 Display.................................................................................................................................................................................................3
1.5 Notes on Use of the ROR Console......................................................................................................................................................5
1.5.1 Surrogate Pair Characters.............................................................................................................................................................5
1.5.2 Web Browser Settings..................................................................................................................................................................5
1.5.3 ROR Console Operations..............................................................................................................................................................5
1.5.4 Notification of User Password Setting..........................................................................................................................................6
1.6 New User Registration Tasks..............................................................................................................................................................6
Chapter 2 Home.....................................................................................................................................................................11
2.1 Home Window Display.....................................................................................................................................................................11
Chapter 3 System Condition...................................................................................................................................................12
3.1 System Condition Display Range......................................................................................................................................................12
3.2 L-Platform System Condition Display..............................................................................................................................................12
3.2.1 System Condition Display..........................................................................................................................................................14
3.2.2 Configuration Information Display............................................................................................................................................21
Chapter 4 L-Platform..............................................................................................................................................................23
4.1 Display L-Platform............................................................................................................................................................................23
4.2 Subscribe to an L-Platform................................................................................................................................................................24
4.2.1 Subscribe to a New L-Platform..................................................................................................................................................24
4.2.2 L-Platform Subscription after Saving Configuration..................................................................................................................36
4.3 L-Platform Management....................................................................................................................................................................40
4.3.1 L-Platform Management Display Page.......................................................................................................................................40
4.3.2 L-Platform Detailed Information Display...................................................................................................................................44
4.3.3 Display Details on a Disk...........................................................................................................................................................46
4.3.4 Start and Stop the Server............................................................................................................................................................47
4.3.5 Manage Patch Information..........................................................................................................................................................47
4.3.6 Take and Restore Snapshot.........................................................................................................................................................49
4.3.7 Physical Server Backup and Restore..........................................................................................................................................51
4.3.8 Setup Firewall.............................................................................................................................................................................53
4.3.9 L-Platform Reconfiguration........................................................................................................................................................54
4.3.10 Cancel an L-Platform................................................................................................................................................................57
4.3.11 Reconfiguration Page................................................................................................................................................................60
4.4 Display Event Logs............................................................................................................................................................................78
4.5 Select Forward Destination of Application Process..........................................................................................................................79
4.6 How to Use the L-Platform................................................................................................................................................................81
Chapter 5 Request.................................................................................................................................................................82
5.1 Checking an Application Status.........................................................................................................................................................82
5.2 Cancelling an Application ................................................................................................................................................................85
Chapter 6 Account..................................................................................................................................................................88
6.1 Referencing User Information...........................................................................................................................................................88
6.2 Changing User Information...............................................................................................................................................................89
6.3 Changing Passwords..........................................................................................................................................................................90
Glossary.................................................................................................................................................................................91
- vi -
Page 8
Chapter 1 Overview
This chapter explains the ROR Console.
1.1 Users
The ROR Console has the following users:
- Infrastructure Administrator
- Tenant Administrator
- Tenant user
Refer to "Glossary" for details on these roles.
1.2 Function List
This section explains the functions provided by ROR Console.
ROR Console has two parts: "operation windows for tenant administrators and tenant users" and "operation windows for infrastructure
administrators".
Windows intended for Tenant Administrators and tenant users are provided for L-Platform and user information operations. These windows
are configured by Tenant Administrators themselves, and have been provided to reduce the Infrastructure Administrator workload.
Operation windows and dashboard windows intended for Infrastructure Administrators are also provided for L-Platform and user
information operations. These windows are provided to enable Infrastructure Administrators to display and operate all L-Platform and
tenant information and to access important information quickly.
The ROR Console displays are customized for the user's role, to provide appropriate functions to each user. For example, tabs that the
current user cannot operate are not displayed.
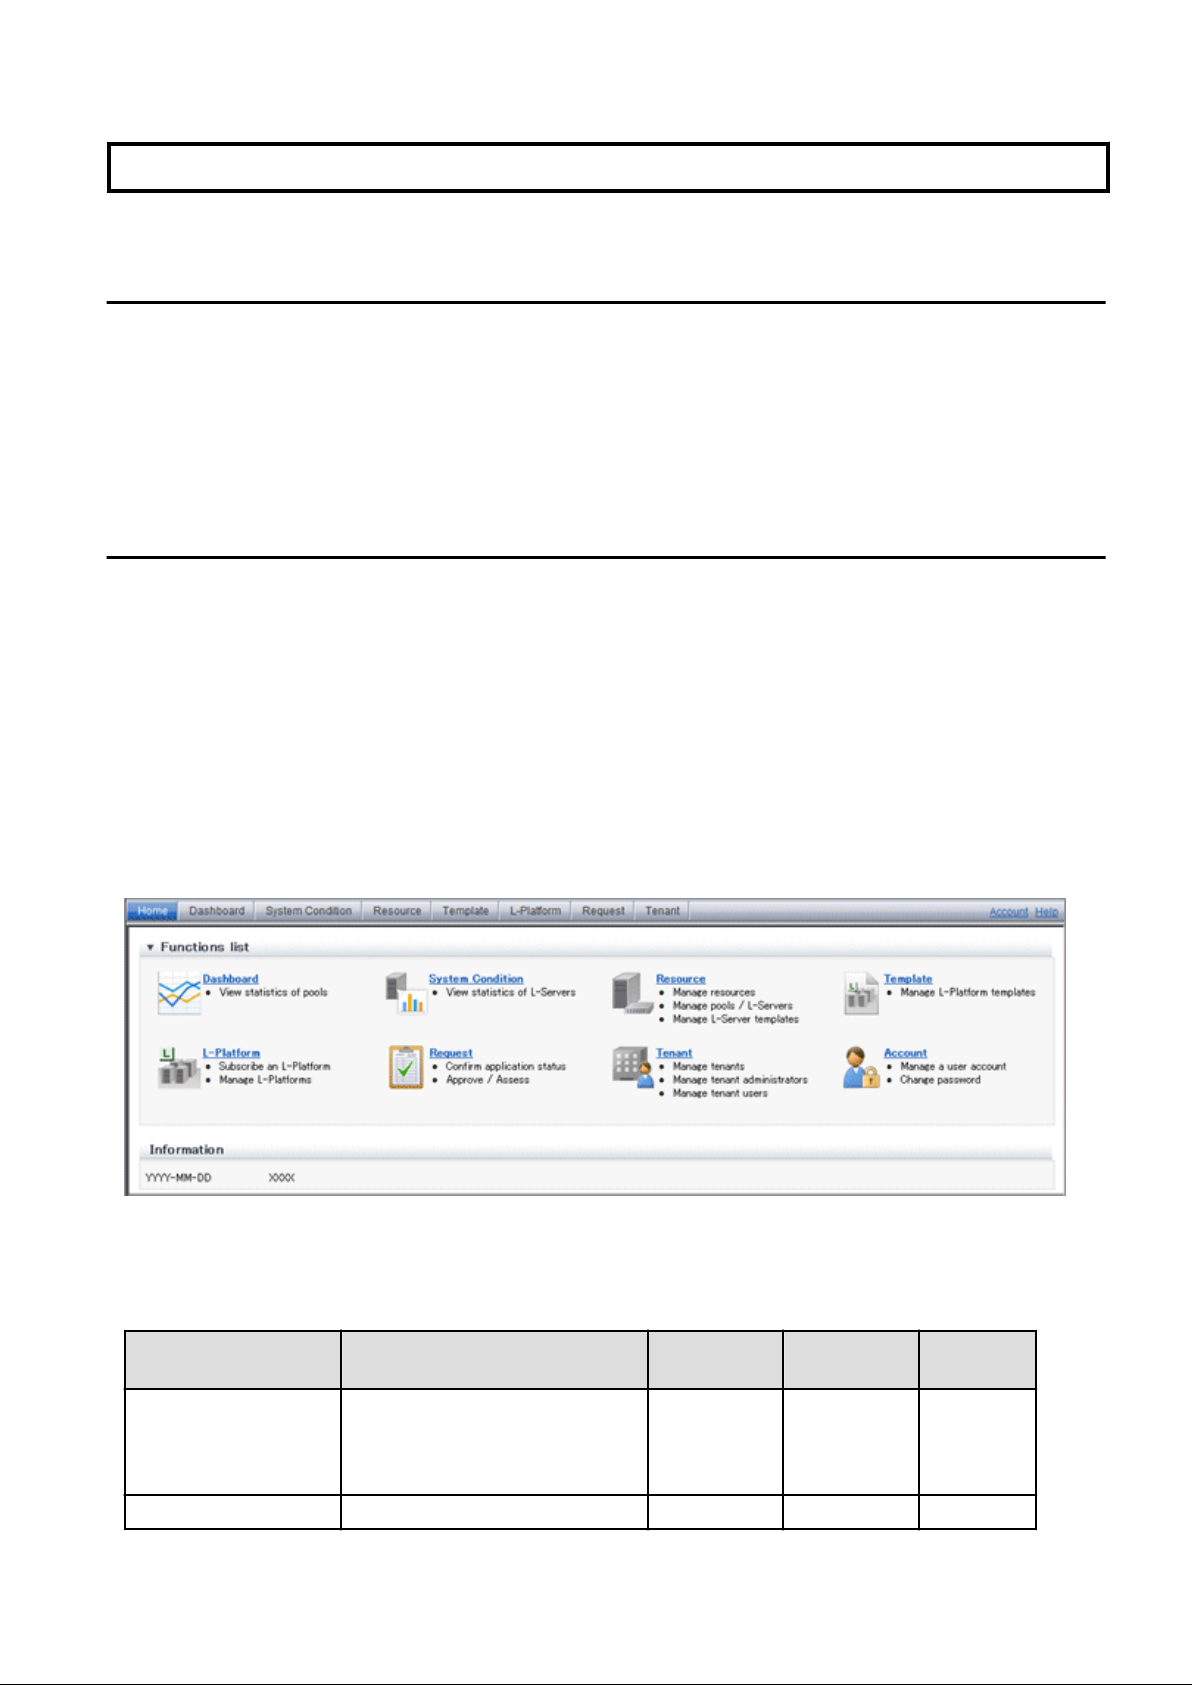
Figure 1.1 ROR Console
The table below shows the functions provided by the ROR Console.
These functions correspond to the tabs displayed at the top of the ROR Console.
Function Overview Infrastructure
Administrator
Tenant
Administrator
Tenant user
Home The window displayed immediately
after login to the ROR Console. A
function list and notifications are
displayed.
Dashboard Displays the resource pool usage status Yes Yes No
- 1 -
Yes Yes Yes
Page 9
Function Overview Infrastructure
Administrator
Tenant
Administrator
Tenant user
System Condition Displays L-Server performance
information and configuration
information
Resource A window for managing the resource
pool and the relationship of resources to
L-Server
Template A window for managing L-Platform
Templates
L-Platform A window for managing L-Platform Yes Yes Yes
Request A window for assessing and approving
L-Platform usage applications and other
applications from tenant users
Tenant A window for managing tenants and
users belonging to tenants
Account A window for changing a logged in
user's information and password
Help Displays this product's manual Yes Yes Yes
Yes: Displayed (However, some functions may not be displayed according to the user's access rights.)
No: Not displayed
Refer to Chapter 2, "Home", and subsequent chapters for details on these functions.
Yes Yes Yes
Yes No No
Yes Yes No
Yes Yes Yes
Yes Yes No
Yes Yes Yes
However, refer to the "User's Guide for Infrastructure Administrators (Resource Management) CE" for information on the "Resource"
function.
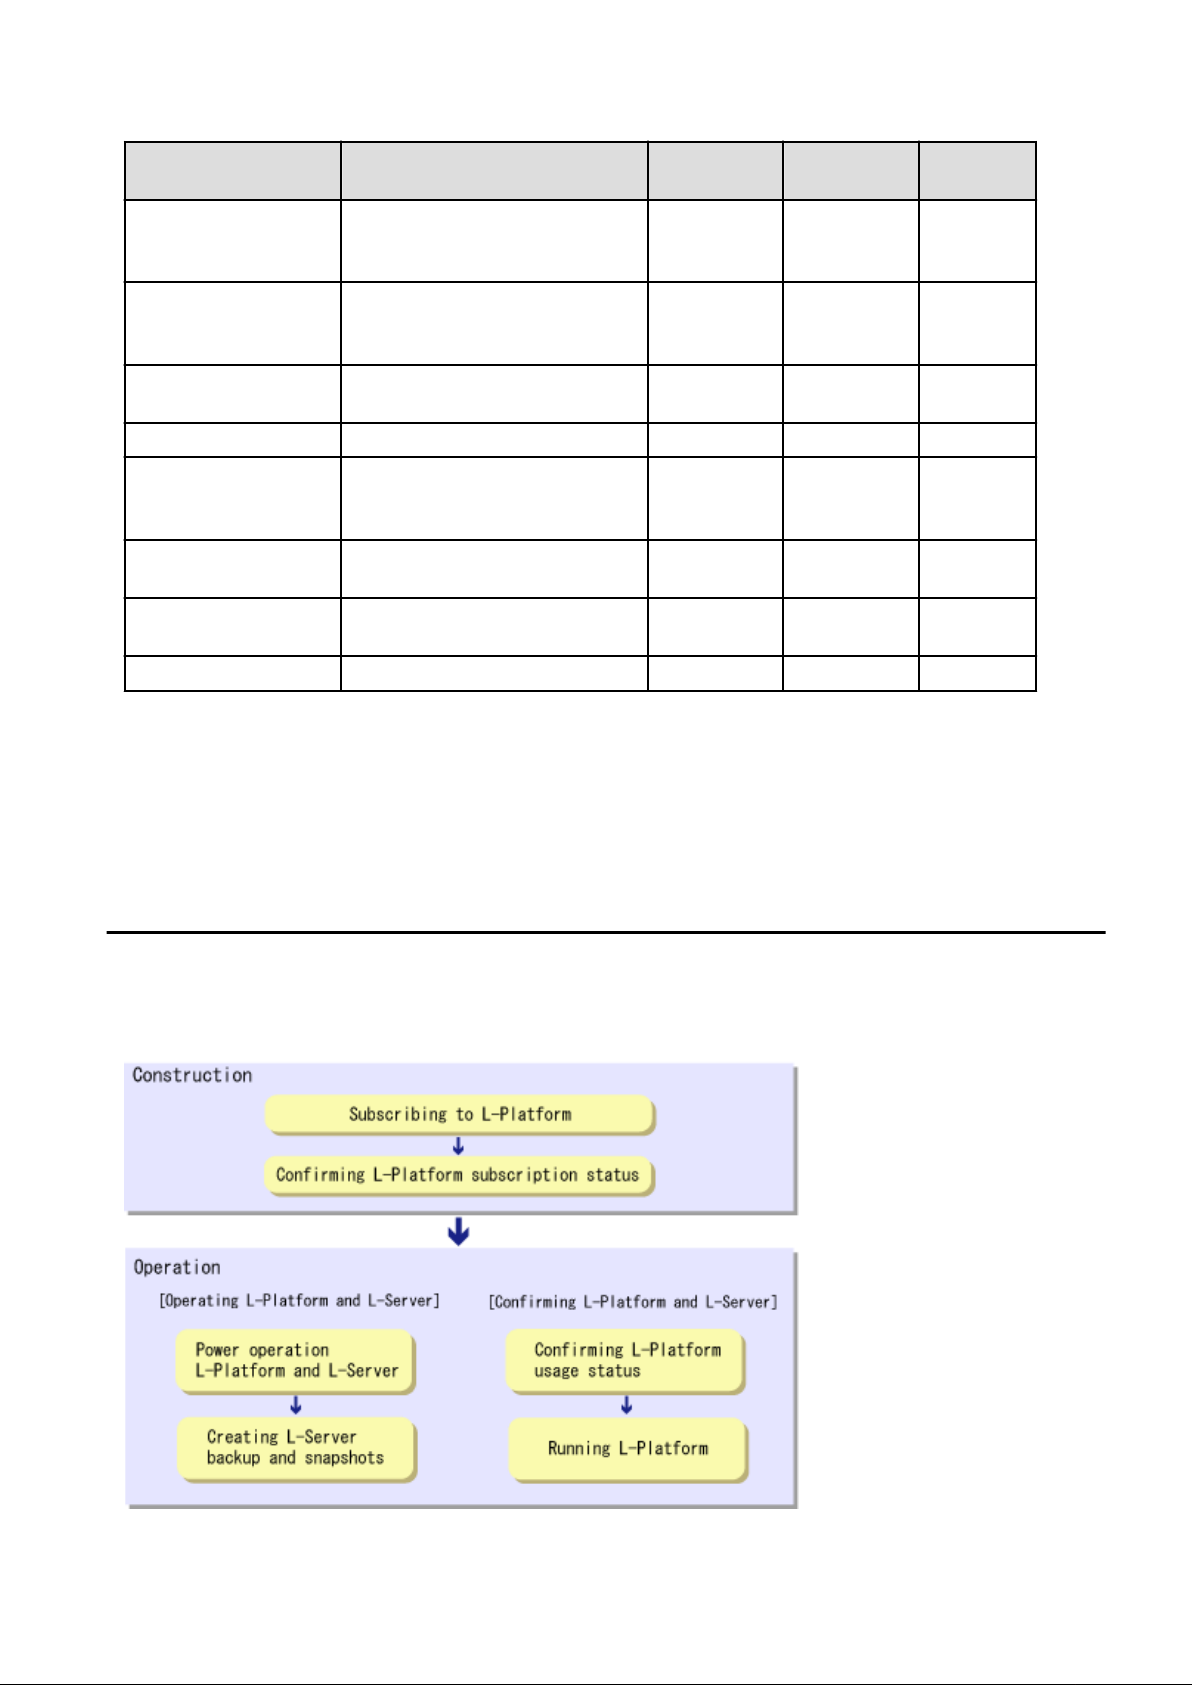
1.3 Flow of Operations
This section explains the flow of operations using the ROR Console, from construction to operation, maintenance, and monitoring.
Flow from Construction to Operation (Tenant User)
- 2 -
Page 10

Construction
1. Subscribing to L-Platform
Subscribe to L-Platform usage.
Refer to "4.2 Subscribe to an L-Platform" for details.
2. Confirming L-Platform subscription status
Check the L-Platform subscription status.
Refer to "4.3 L-Platform Management" for details.
Operation
[Operating L-Platform and L-Server]
1. Power operation L-Platform and L-Server
Perform L-Platform and L-Server power and other operations.
Refer to "4.3.4 Start and Stop the Server" and "Power Operations" in the "User's Guide for Infrastructure Administrators (Resource
Management) CE" for details.
2. Creating L-Server backup and snapshots
If required, create an L-Server backup snapshot.
Refer to "4.3.6 Take and Restore Snapshot" and "4.3.7 Physical Server Backup and Restore" for details.
[Confirming L-Platform and L-Server]
1. Confirming L-Platform usage status
Check the status of L-Platform disk usage and other usage.
Refer to "Chapter 3 System Condition" for details.
2. Running L-Platform
If required, add servers and disks for the L-Platform.
Refer to "4.3.9 L-Platform Reconfiguration" for details.
1.4 Display
This section explains how to display the ROR Console.
Point
The ROR Console runs on any of the following browsers:
- Windows(R) Internet Explorer(R) 8
- Windows(R) Internet Explorer(R) 9
How to Display the ROR Console
Follow the steps below to display the ROR Console:
1. Start the Web browser.
2. Specify the URL of the ROR Console. Check the URL of the ROR Console with your system administrator.
The following shows the format of the URL.
https://<host name of admin server>:<port number>/
- 3 -
Page 11
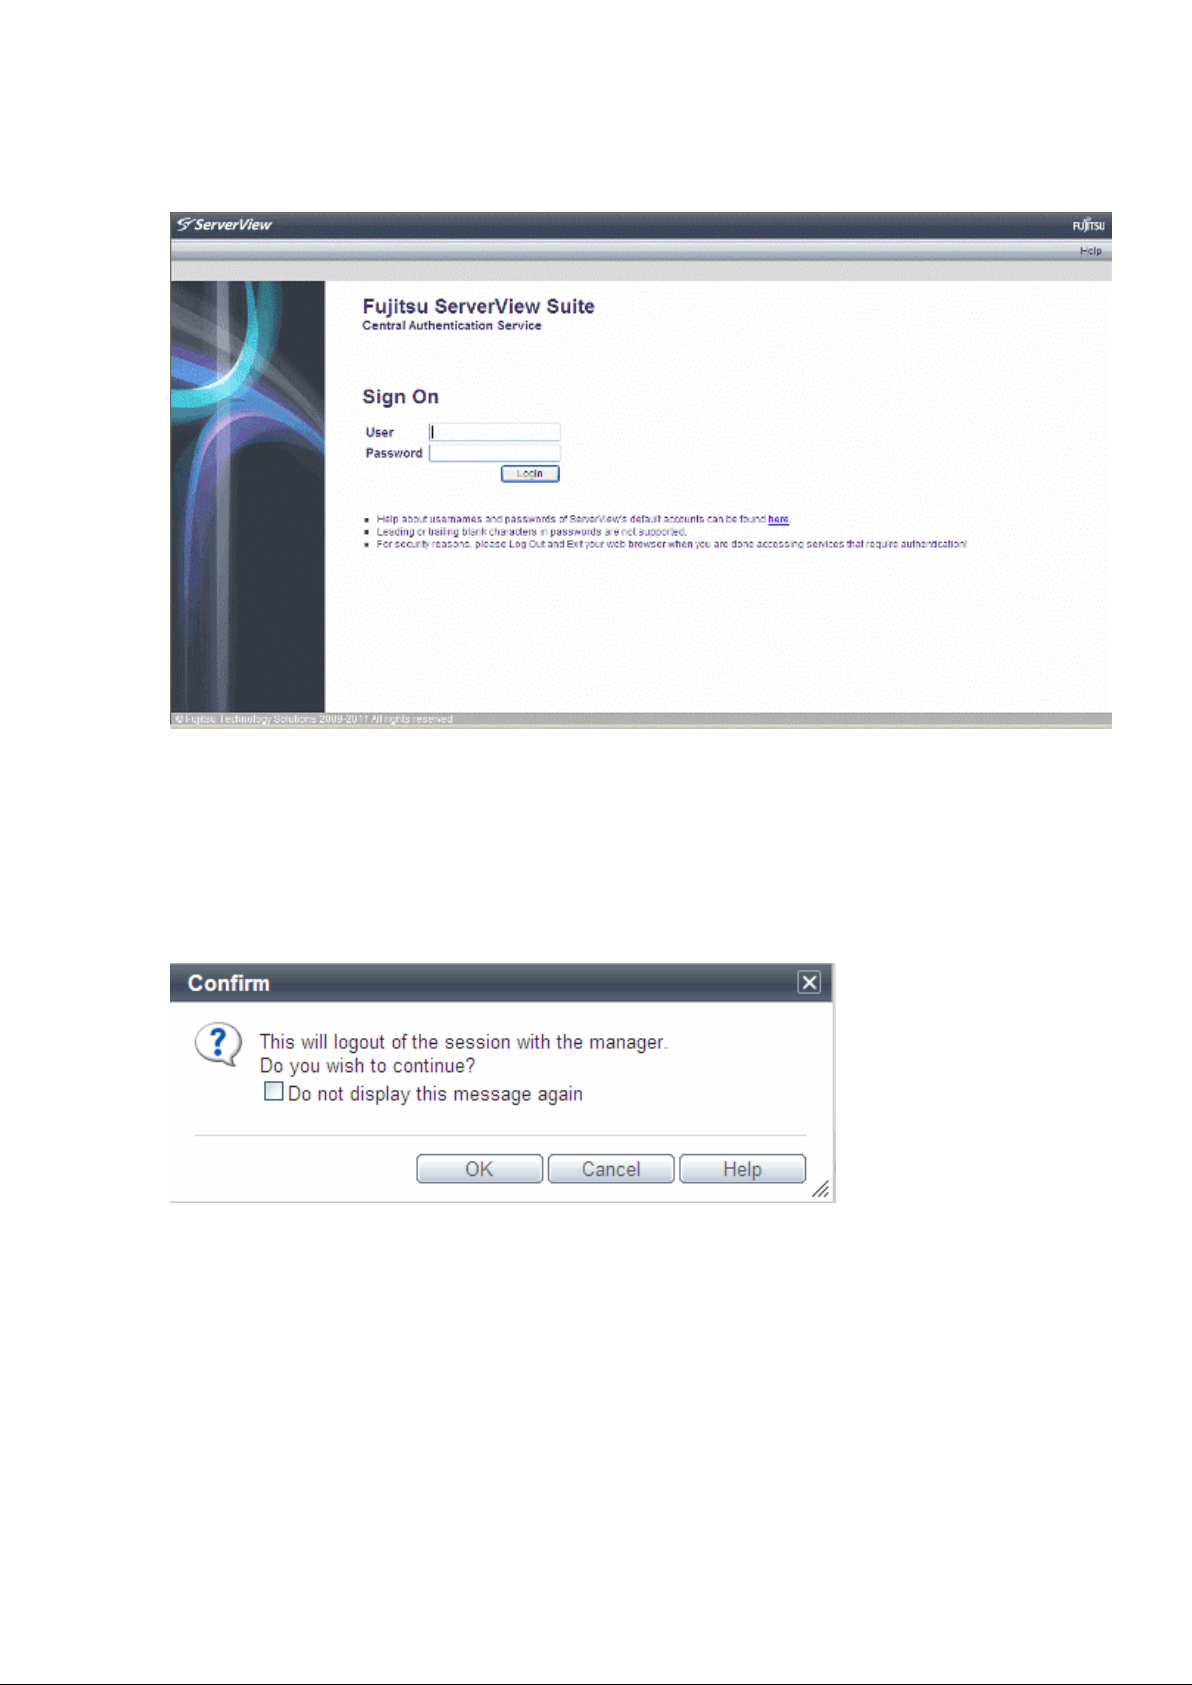
3. The login window is displayed. Enter your user ID and password to log in.
Figure 1.2 Login Window
4. The ROR Console is displayed.
Logout
Follow the steps below to logout.
1. Click the Logout link at the upper-right of the ROR Console to log out. A window is displayed, confirming log out from ROR
Console. Click the OK button to log out.
Figure 1.3 Logout Confirm Window
- 4 -
Page 12
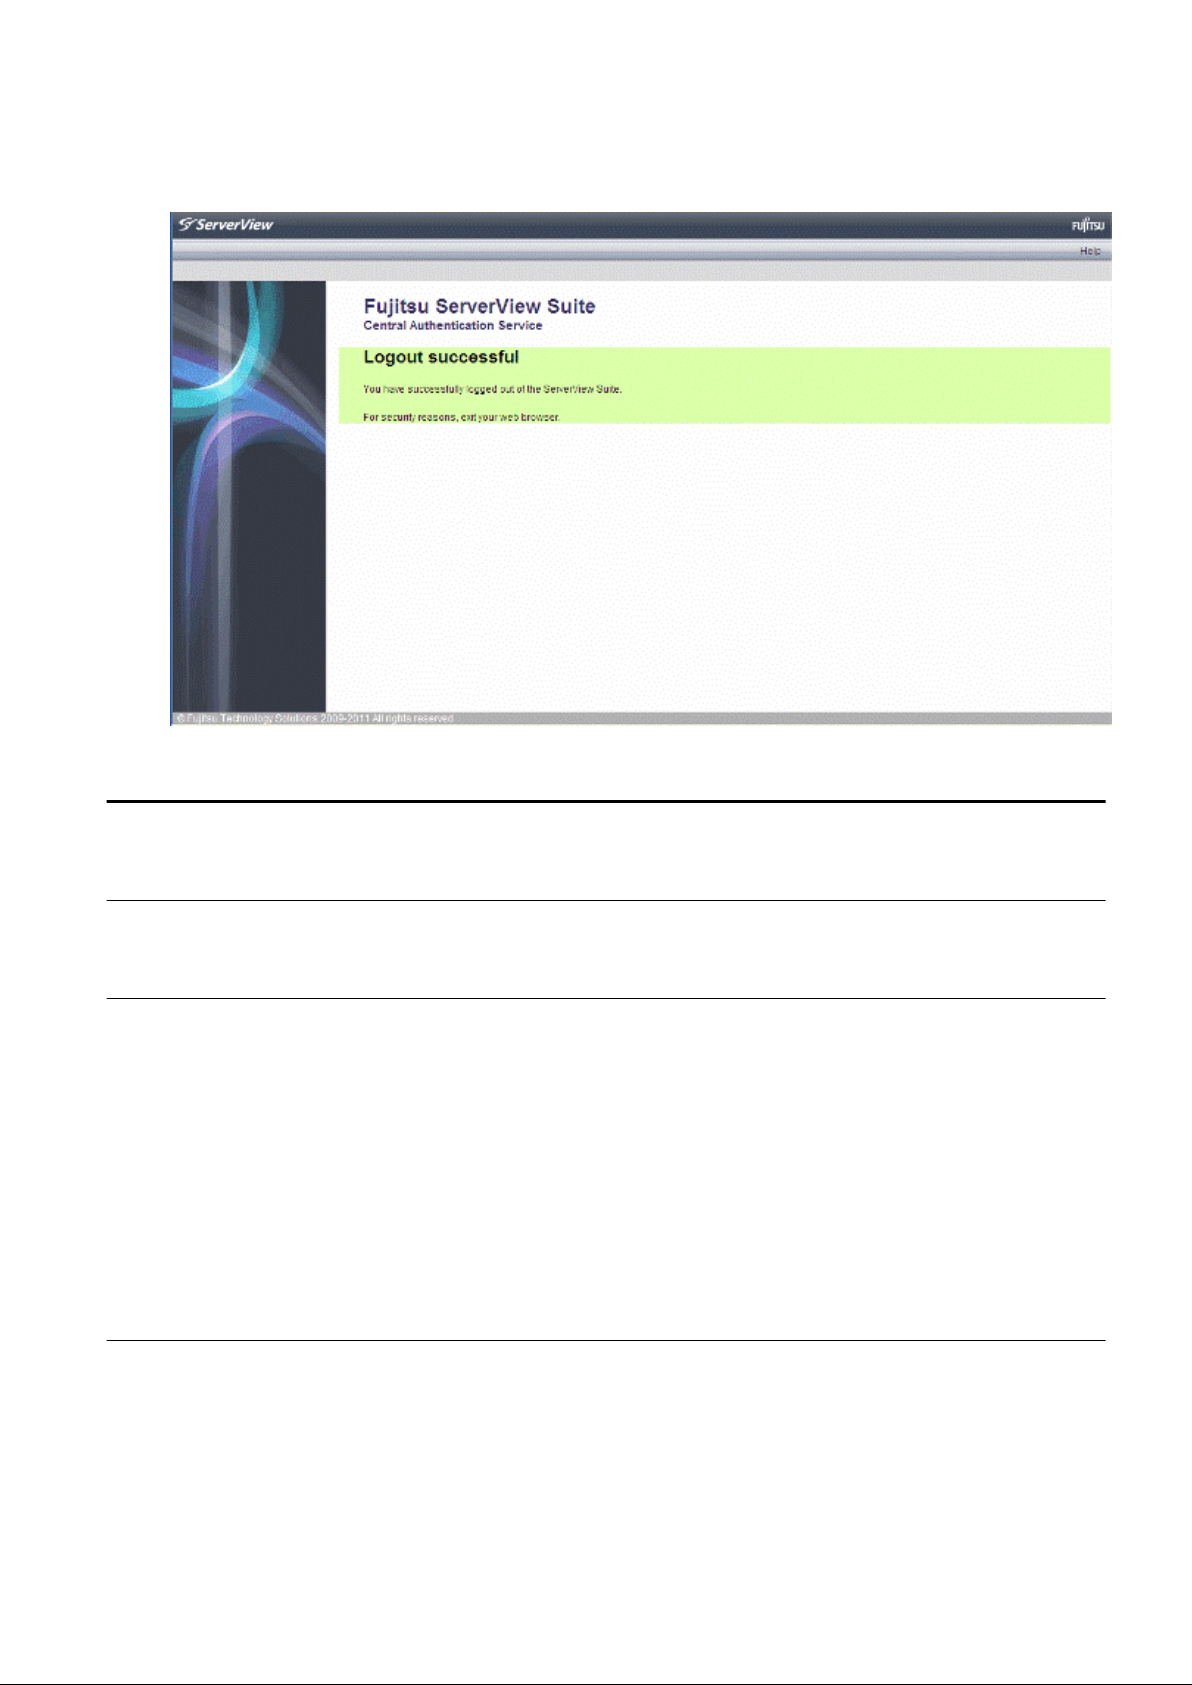
2. The logout window is displayed, close the browser.
Figure 1.4 Logout Window
1.5 Notes on Use of the ROR Console
This section explains the notes on the use of the ROR Console.
1.5.1 Surrogate Pair Characters
Surrogate pair characters cannot be used on the ROR Console.
1.5.2 Web Browser Settings
The following settings must be specified for the Web browser before using the ROR Console:
- Enable cookies.
- Enable JavaScript
- Use SSL 3.0 and TLS 1.0
- Specify either one of the following for the Web browser pop-up blocker:
- Disable the pop-up blocker
- Add the URL of the ROR Console to the Address of web site to allow setting.
Check with the system administrator for the URL of the ROR Console.
1.5.3 ROR Console Operations
When logging in to the ROR console, a window displaying the message
"Internet Explorer cannot display the webpage" may be displayed.
Description
This problem can occur as a result of the following combinations of OS and web browsers being used.
Windows XP SP3 + Internet Explorer 8
- 5 -
Page 13
Windows Server 2003 + Internet Explorer 8
Windows Server 2008 + Internet Explorer 8
Corrective Action
Take one of the following corrective actions.
- Connect using a combination of OS and web browser not listed above
- When this problem occurs, reload the page on your web browser
- Specify the IP address, not an FQDN, in the URL used for connection
1.5.4 Notification of User Password Setting
If the password is changed by tenant administrator, changed password will be sent to the user by E-mail with the title below. In this case,
it is recommended to set a different password immediately.
Title of mail : [Important information]Setting of user password
1.6 New User Registration Tasks
Point
The following two methods are available for registering a tenant user:
- The tenant users perform user registration themselves using a virtual account that the Tenant Administrator has registered from the
Register User window
- The Tenant Administrator registers a tenant user from the Register User window
The tenant user registration method is set by the system administrator.
This section explains the registration tasks that should be performed by a user who has applied via the Tenant Administrator for new
registration. A registration instruction email is sent to such a user.
Follow the registration procedures given in the instruction email.
Note that the registration application becomes invalid if the registration procedure is not performed within 24 hours of receiving the
instruction email.
Follow the procedure below to register a new user:
- 6 -
Page 14
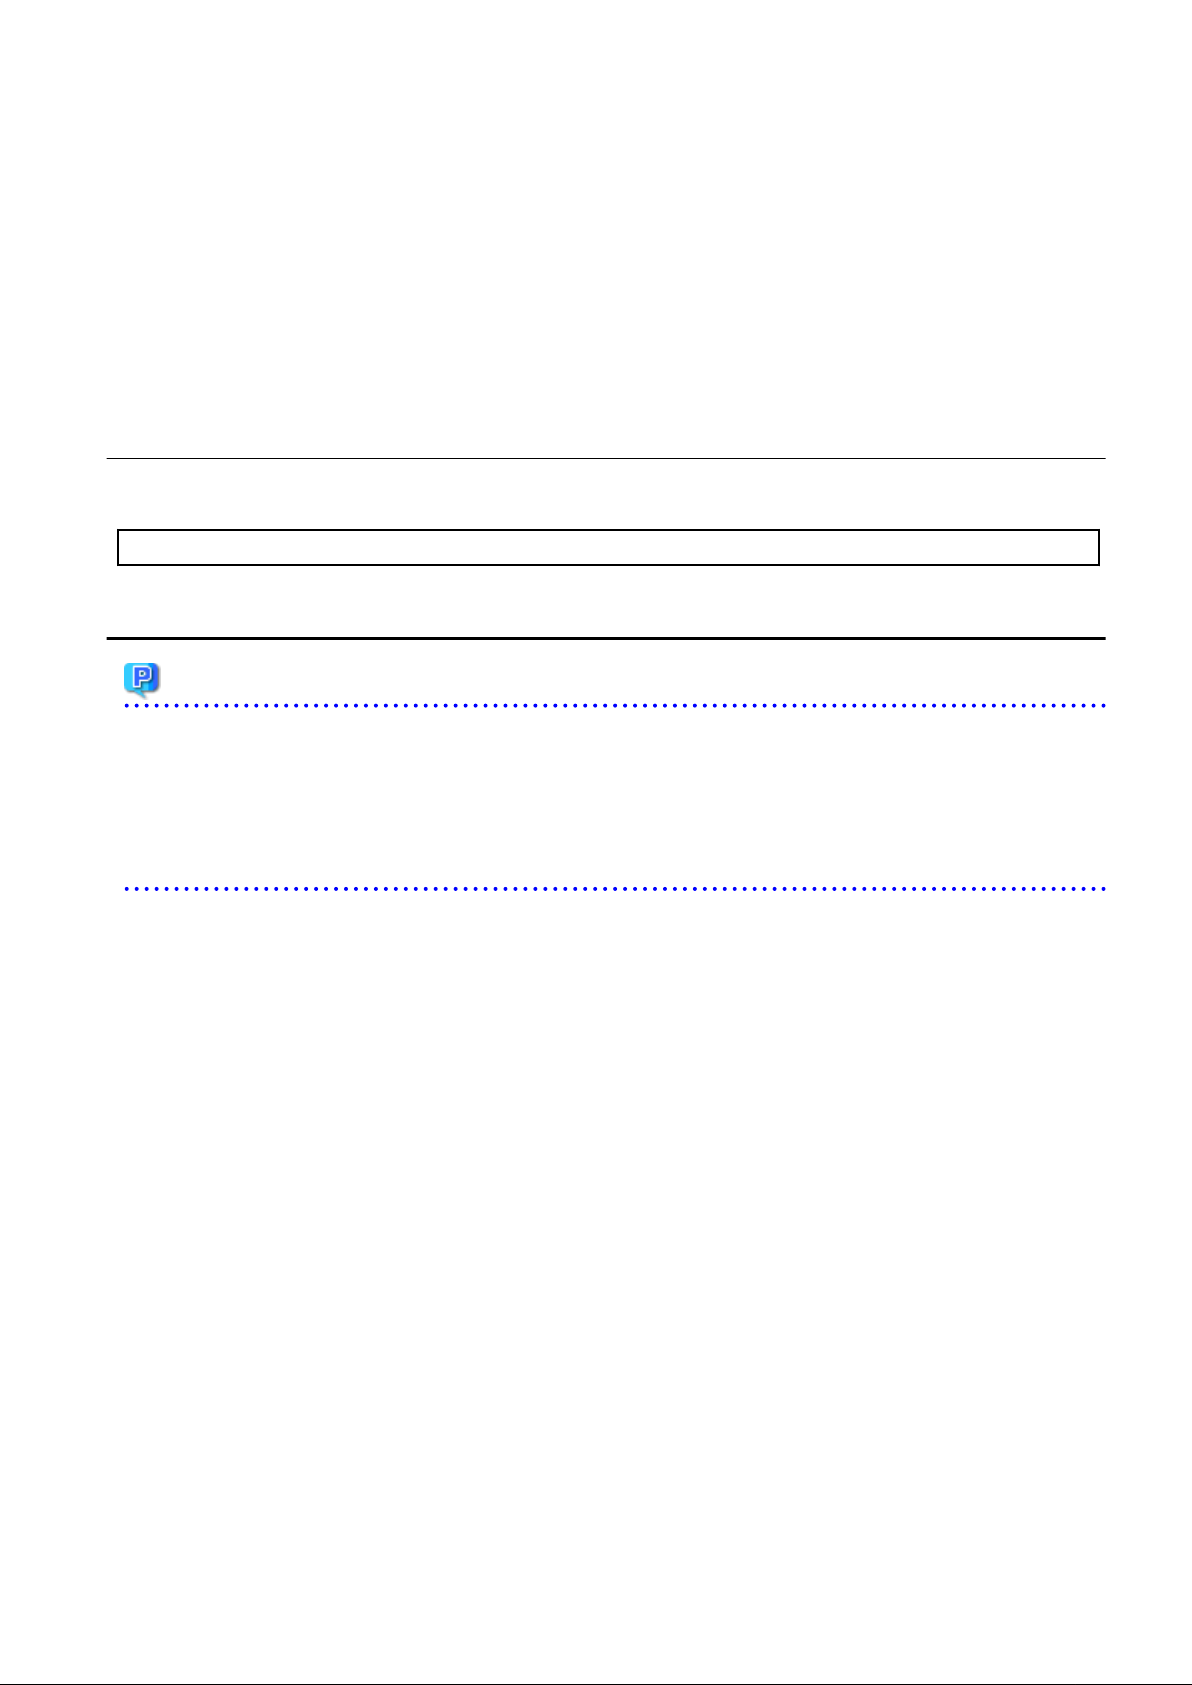
1. Click the URL in the user registration mail.
The Register User page will be displayed.
Item
Temporary password Specify the temporary password given in the tenant user registration mail.
Description
2. Enter in the Temporary password field the temporary password given in the user registration mail. Review and agree with the
license agreement, and click the Advance to registration procedure button.
- 7 -
Page 15
The input window for the user information will be displayed.
The window below is the sample of using OpenDS for the directory service.
Item Description
E-Mail address User's E-mail address registered at a temporary account is displayed. It is not
possible to change.
User ID [When using OpenDS for the directory service]
Specify a registration user ID. Specify a character string of 4 to 31 characters
consisting of single-byte lower-case alphabetics and numerics, hyphens (-),
underscores (_), and periods (.), and starting with a single-byte alphanumeric.
This specification is mandatory.
[When using Active Directory for the directory service]
Specify a registration user ID. Specify a character string of 4 to 20 characters
consisting of single-byte lower-case alphabetics and numerics, hyphens (-),
underscores (_), and periods (.), and starting with a single-byte alphanumeric.
Period cannot be used as the last character. This specification is mandatory.
Description Specify a description for the user ID of the user, using up to 256 characters.
Password Specify the user password. Specify between 8 and 64 characters, using single-
byte alphanumerics and symbols.
The specification is case sensitive. This field cannot be omitted.
- 8 -
Page 16
Password (confirm) Re-enter a user password for confirmation. This field cannot be omitted.
Personal information
Name Specify the first name and last name separately for the user. Use up to 15
characters for each name. Be sure to specify this item.
Company name or
organization name
Emergency contact details
E-mail address Specify an email address for receiving emergency contact notifications, using
E-mail address (confirm) Re-enter an email address for receiving emergency contact notifications.
Telephone number Specify an emergency contact phone number.
Specify the company name or organization name, using up to 30 characters.
up to 64 characters.
3. Enter the user information and click the Next button.
The confirmation window of the registration information will be displayed.
- 9 -
Page 17
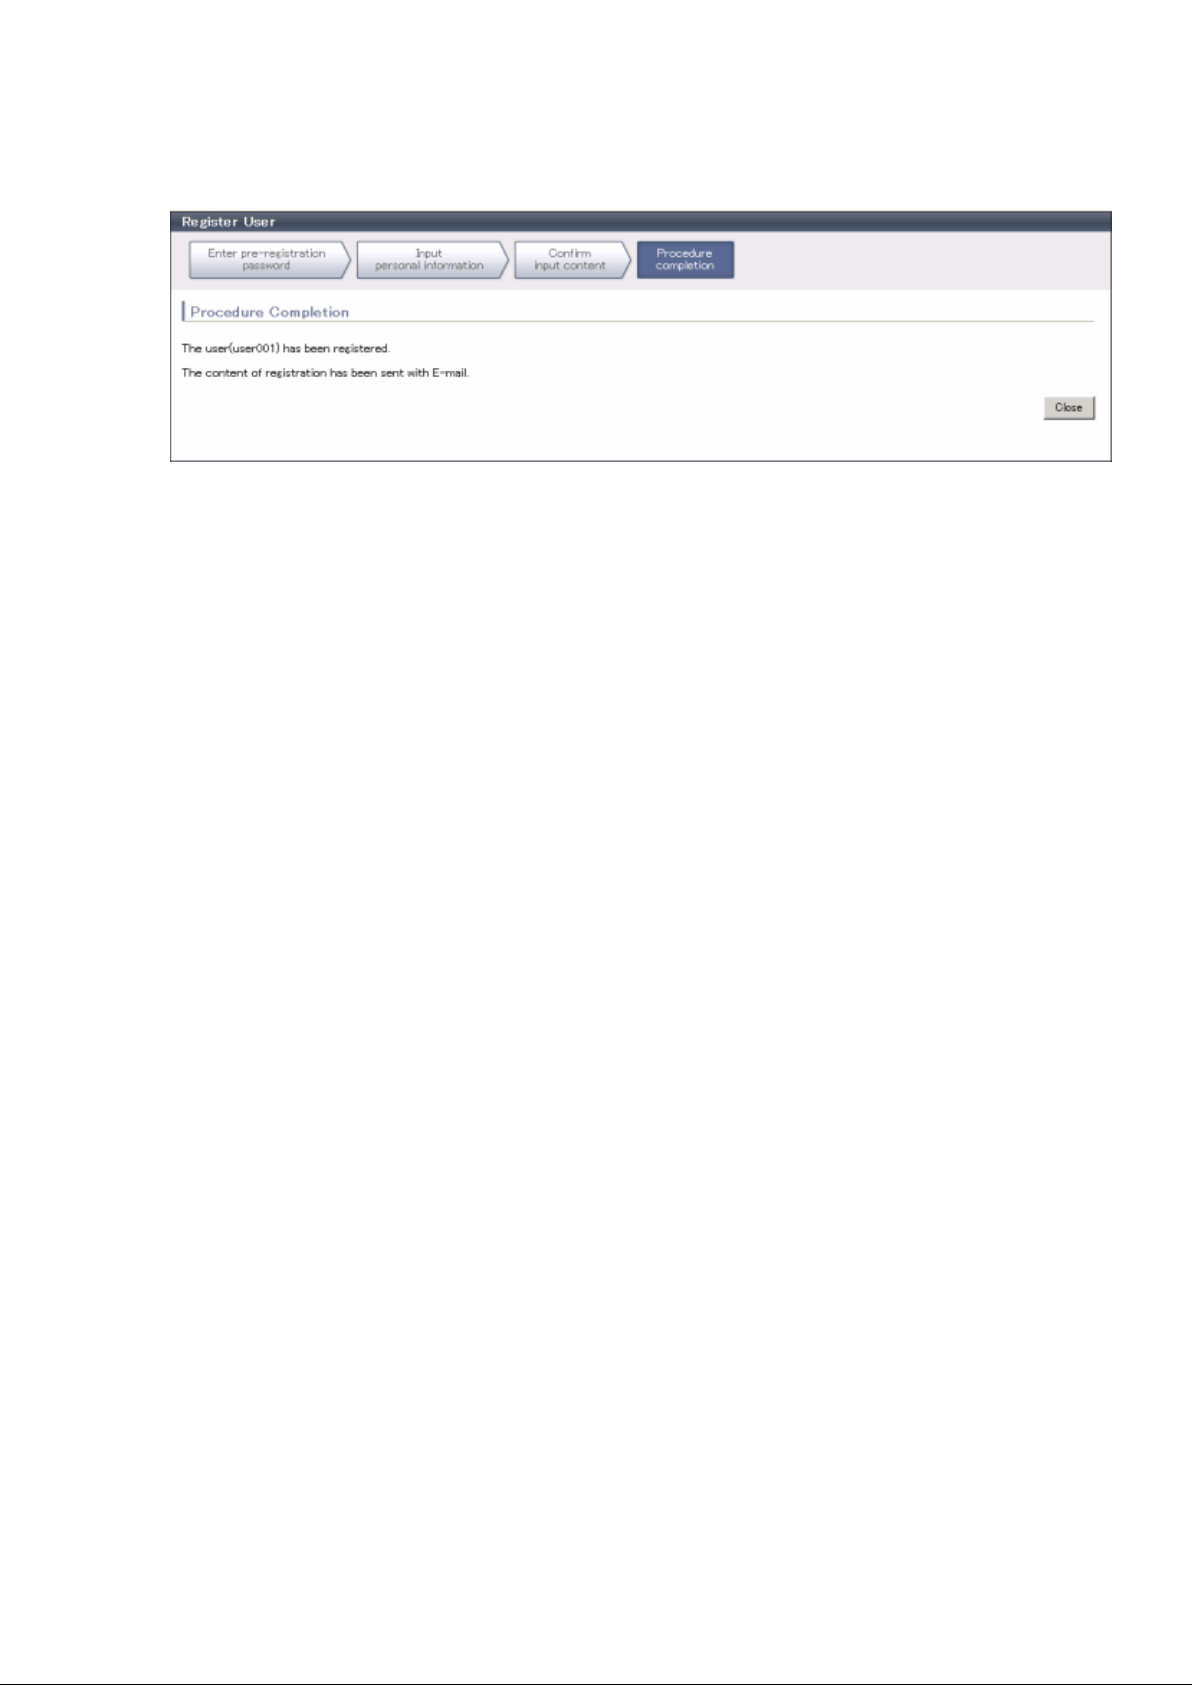
4. Confirm the registration information, and click the Register button.
The registration completion window will be displayed.
5. Click the Close button, processing is ended.
When user registration is completed, the registration content is sent to the registered user, the Tenant Administrator, and the tenant Email
address.
- 10 -
Page 18
Chapter 2 Home
This chapter explains the ROR Console Home window.
2.1 Home Window Display
This section explains the ROR Console Home window display.
When the ROR Console is started, the Home window is displayed. Refer to section "1.4 Display" for information on how to start the ROR
Console.
The elements of the Home window are explained below.
- Functions list
The functions list displays the items that can be operated using ROR Console tabs.
Click the icon or the icon to toggle Display/Hide.
- Information
Information from the System Administrator and Infrastructure Administrator is displayed.
- 11 -
Page 19
Chapter 3 System Condition
This chapter explains how to monitor system condition.
Note
The following message may be displayed during monitoring of system condition:
The authority error occurred. Closing the browser.
This error occurs if, for example, the same user ID is used to log in from a different client. In this case, log in again correctly.
3.1 System Condition Display Range
The system condition can display the following information for L-Platforms used by a tenant user:
- CPU utilization
- Disk R/W Usage
- Disk R/W count
- Memory usage
- Network usage
Note
For tenants
- The above information is not displayed for L-Servers incorporated in the system using the L-Server import function of this product.
- Disk R/W usage, disk R/W count, memory usage, and network usage are not displayed if the virtualization software is Hyper-V.
However, if the dynamic memory setting is enabled, memory usage is displayed.
- Disk R/W usage is not displayed if the virtualization software is RHEL5-Xen.
- Disk R/W usage is not displayed if the virtualization software is RHEL-KVM.
- Network usage is not displayed if the physical L-Server is Linux.
For VM hosts
- Network usage is not displayed if the VM host virtualization software used is either RHEL5-Xen or RHEL-KVM.
3.2 L-Platform System Condition Display
Perform the following steps to display the L-Platform system condition:
1. From the ROR Console, select the System Condition tab.
The System Condition window is displayed.
- 12 -
Page 20
2. In the System Condition window, select the Tree Display tab.
The configuration of L-Platforms used by tenant users is displayed in the tree at the left.
At View, the "L-Platform" showing a tree configuration is displayed as fixed. At Record, "Observed" - indicating the record type
- is displayed as fixed.
3. From the tree at the left, select the L-Platform for which to display the system condition.
The selected L-Platform is displayed in the CI list on the right.
If the "L-Platform" folder is selected in the tree, all L-Platforms under the folder are displayed in the CI list.
If an L-Server is selected in the tree, information about the selected server is displayed in the CI list.
The L-Platforms and L-Servers under each folder in the tree are displayed in descending order based on their update date and
time.
4. Select an L-Platform in the CI list, and then click the Show Graph button.
The system condition is displayed in the lower part of the CI list. Refer to "3.2.1 System Condition Display" for details on the
displayed system condition.
The table below explains the displayed items.
Item
GID Displays the identifier set by the system to identify the configuration item.
If the CI list GID link is clicked, the configuration information of the target tenant,
L-Platform or L-Server is displayed in a separate window. Refer to 3.2.2
Configuration Information Display" for the displayed configuration information.
CI Type The CI types are as follows:
Explanation
- Tenant: If a tenant is selected
- L-Platform: If an L-Platform is selected
- L-Server: If an L-Server is selected
Nickname Displays the display name of the configuration item.
The following display names are displayed in accordance with the CI type:
- For the tenant CI type: The tenant name determined during tenant registration
("tenant name (tenant ID)")
- For the L-Platform CI type: The L-Platform subscription name set during L-
Platform subscription
- 13 -
Page 21
Item Explanation
- For the L-Server CI type: The L-Server name set during L-Platform subscription
or L-Platform reconfiguration ("server name (host name)")
Record Displays the type of records held by the configuration item.
[0], indicating the actual information, is displayed.
Note
Clicking the CI list column headers to sort the columns is effective only for the range displayed in that page. The sorting specification is
reset when the next or previous page is displayed. Sorting spanning multiple pages is not available.
3.2.1 System Condition Display
The system condition of the L-Platforms selected in the system condition window CI list is displayed as a graph at System Condition in
the lower part of the window. Up to five L-Servers can be displayed at once in the graphs. If more than five L-Servers are selected, the
first five are displayed.
The system condition contents can be switched by clicking the System Condition tabs.
The table below shows the contents under the System Condition tabs.
Tab name Display content (*1) Graph type Display interval Display
interval
switching (*2)
Total Totals for each status Vertical bar graph 30 minutes, starting from the current time Not possible
CPU CPU utilization Horizontal
polyline graph
Disk Disk R/W Usage (*3) Horizontal
polyline graph
Disk R/W count (*4) Horizontal
polyline graph
Memory Memory usage (*5) Horizontal
polyline graph
Network Network usage (*6) Horizontal
polyline graph
All Overview of all the above
statuses
*1: Information is displayed using a different color for each L-Server.
*2: The display interval can be switched to a shorter interval by clicking the data plotting area of a horizontal polyline graph, or switched
to a longer interval by clicking outside the data plotting area.
*3: Disk usage and network usage are not displayed if the virtualization software is Hyper-V and RHEL5-Xen.
*4: The disk R/W count is not displayed if the virtualization software is Hyper-V and RHEL-KVM.
*5: The memory usage is not displayed if the virtualization software is Hyper-V. However, it is displayed if the dynamic memory
setting is enabled.
Horizontal
polyline graph
One hour/day/month/year from the current
time
One hour/day/month/year from the current
time
One hour/day/month/year from the current
time
One hour/day/month/year from the current
time
One hour/day/month/year from the current
time
One hour/day/month/year from the current
time
Possible
Possible
Possible
Possible
Possible
Possible
*6: The network usage is not displayed if the virtualization software is Hyper-V and the physical L-Server is Linux.
Note
- Information obtained from virtualization software is displayed in the system condition. Virtual Memory usage is not included.
- 14 -
Page 22
- The system condition data is not reflected in the display until collection at the fixed intervals shown below is completed.
Check the display after the fixed intervals shown below.
Note that, if the contents are empty after a fixed interval, the connection destination L-Platform may be stopped. Contact the Tenant
Administrator.
Tab name Display period (*) Collection time required before displaying
Total 30 days one whole day (from 0:00 to 23:59)
CPU
Disk
Memory
Network
*: The display period in each tab except for Total tab can be selected from one hour, one day, one month, or one year.
one hour ten whole minutes (from 0 minutes to 9 minutes)
one day one whole hour (from 0 minutes to 59 minutes)
one month/one year one whole day (from 0:00 to 23:59)
- System condition data is not displayed if the power is off at the monitored L-Server.
- If the CPU utilization status continues at 100% at the monitored L-Server, data collection timing may be delayed and an error of about
one second may occur. This may cause CPU utilization (average value for a specified unit of time) to exceed 100%.
Take into account the possibility of data errors when using this display.
Example:
If a monitored L-Server has one CPU and is displayed in units of one hour, the value in the system condition graphs and CSV file data
may be displayed as 100.03% (60.02 minutes (near equal 3601 seconds)/60 minutes) even though the upper limit for CPU utilization
is 100%.
Display examples for the Total tab and the All tab are shown below.
- Total tab
- 15 -
Page 23
- All tab
At each tab, the following icons displayed in the title bar can be used:
Icon Tool tip Explanation
Update Updates the displayed contents
Download CSV file Downloads the graph data in CSV format
Minimize Minimizes the specified window
Maximize Maximizes the specified window
Restore Restores the maximized window
The table below shows the CSV file items if data is downloaded from each graph.
Note that the CSV file encoding is Shift-JIS.
Graph type Column name Explanation Unit Description
CPU utilization
sdattim Collection start time (*1) yyyy/MM/dd HH:mm:ss
- in case of physical servers and
Windows:
"#" + CPU number or _Total
- in case of physical servers and
resrcid Resource ID
Linux:
CPU number or _Total
- in case of Hyper-V:
VM name + ":Hv VP" + virtual
Processer number
recid Record ID
Output any of the following
- WIN_CPUBUSY
- UX_CPUBUSY
- VMW_GCPU
- 16 -
Page 24
Graph type Column name Explanation Unit Description
- HV_VCPU
- XEN_CPU
- KVM_CPU
- in case of interval time is 10
minutes: 600
consintl Interval time second
- in case of 1 hour: 3600
- in case of 24 hour: 86400
coverage
cpupcent CPU utilization %
vmgcused CPU utilization %
physres
ptrtim CPU utilization %
xenpcused CPU utilization %
xencpun
Nickname VM name
Data coverage (0 to 1)
Physical CPU
information or virtual
CPU information
Number of virtual CPUs
in the domain
Output only in case of physical
servers and Windows/Linux
Processer utilization
Output only for VMware
Physical CPU utilization consumed
per resource pool or a virtual
machine
Output only for VMware
Output only for Hyper-V
Utilization of virtual processors
allocated to a virtual machine and
consumed by hypervisor code
Output only for RHEL5-Xen
CPU utilization (total utilization of
virtual CPUs set in the domain)
number Output only for RHEL5-Xen
Output only for VMware/Hyper-V/
RHEL5-Xen
Disk R/W Usage
Output only for RHEL-KVM
kvmcpupcent CPU utilization %
kvmcpus
sdattim Collection start time (*1) yyyy/MM/dd HH:mm:ss
Number of virtual CPUs
in the domain
CPU utilization (total utilization of
virtual CPUs set in the domain)
Output only for RHEL-KVM
- in case of physical servers and
Windows: drive name or
resrcid Resource ID
_Total
- in case of physical servers and
Linux: device name
Output any of the following
- WIN_PHYDISKBUSY
recid Record ID
- UX_DISKBUSY
- VMW_DISK
- KVM_DISK
- 17 -
Page 25
Graph type Column name Explanation Unit Description
- in case of interval time is 10
minutes: 600
consintl Interval time second
- in case of 1 hour: 3600
- in case of 24 hour: 86400
Disk R/W count
coverage
preadbyt Disk read usage bytes Output only for Windows
pwritbyt Disk write usage bytes Output only for Windows
iokreads Disk read usage Kbytes Output only for Linux
iokwrite Disk write usage Kbytes Output only for Linux
vmdmbread Disk read usage Mbytes
vmdmbwrt Disk write usage Mbytes
Nickname
kvmdiskblockrdby Disk read usage bytes
kvmdiskblockwrby Disk write usage bytes
sdattim Collection start time (*1) yyyy/MM/dd HH:mm:ss
Data coverage (0 to 1)
VM name
Output only for VMware
Disk read usage for virtual machine
and storage device units
Output only for VMware
Disk write usage for virtual
machine and storage device units
Output only for VMware/Hyper-V/
RHEL5-Xen
Output only for RHEL-KVM
Disk read usage in the domain
Output only for RHEL-KVM
Disk write usage in the domain
- in case of physical servers and
Windows: drive name or
resrcid Resource ID
_Total
- in case of physical servers and
Linux: device name
recid Record ID
consintl Interval time second
coverage
preadsec Disk read count
pwritsec Disk write count
ioreads Disk read count
iowrite Disk write count
Data coverage (0 to 1)
Output any of the following
- WIN_PHYDISKBUSY
- UX_DISKBUSY
- VMW_DISK
- in case of interval time is 10
minutes: 600
- in case of 1 hour: 3600
- in case of 24 hour: 86400
Output only for Windows
Physical disk read operation count
Output only for Windows
Physical disk write operation count
Output only for Linux
read count
Output only for Linux
write count
- 18 -
Page 26
Graph type Column name Explanation Unit Description
Output only for VMware
vmdreads Disk read count
vmdwrites Disk write count
Disk read count for virtual machine
and storage device units
Output only for VMware
Disk write count for virtual
machine and storage device units
Memory usage
vbdrd
vbdwr Disk write count
Nickname VM name
sdattim Collection start time (*1) yyyy/MM/dd HH:mm:ss
Disk read count
Output only for RHEL5-Xen
Virtual block device read count
Output only for RHEL5-Xen
Virtual block device write count
Output only for VMware/Hyper-V/
RHEL5-Xen
- in case of physical servers and
resrcid Resource ID
Windows: MEMORY
- in case of physical servers and
Linux: FREEMEM
Output any of the following
- WIN_MEMORY
- UX_MEMFREE
recid Record ID
- VMW_MEM
- HV_DMEM_VM
- XEN_MEM
- KVM-MEM
consintl Interval time
coverage
comtot Memory usage bytes
freememp Memory usage bytes
memuse
Vmgmtm Memory usage Mbytes
ppmemdmvm Memory usage Mbytes
xenavm Memory usage Mbytes
Data coverage (0 to 1)
Memory usage percent Output only for Linux
- in case of interval time is 10
minutes: 600
- in case of 1 hour: 3600
- in case of 24 hour: 86400
Output only for Windows
Commit size
Output only for Linux
Memory size utilization for user
processes
Output only for VMware
Estimated working set size of
resource pool and virtual machine
units
Output only for Hyper-V
Current memory capacity of virtual
machine
Output only for RHEL5-Xen
Memory capacity allocated to
domain
- 19 -
Page 27
Graph type Column name Explanation Unit Description
Network
utilization
Nickname VM name
kvmmemused Memory usage Mbytes
sdattim Collection start time (*1) yyyy/MM/dd HH:mm:ss
resrcid Resource ID
Output for VMware/Hyper-V/
RHEL5-Xen
Output only for RHEL-KVM
Memory capacity allocated to
domain
Output only for Windows
Network device name
Output any of the following
- WIN_NET_INTERFACE
recid Record ID
- VMW_NET
- XEN_NET
- KVM-NET
- in case of interval time is 10
minutes: 600
consintl Interval time
- in case of 1 hour: 3600
- in case of 24 hour: 86400
coverage
Data coverage (0 to 1)
ifbytin Network usage (received) bytes
ifbytot Network usage (sent) bytes
vmnpmvtr Network usage (sent) Mbits
vmnpmbrecv Network usage (received) Mbits
xenkbtx Network usage (sent) Kbytes
xenkbrx Network usage (received) Kbytes
Nickname
kvmnetrxby Network usage (received) bytes
VM name
Output only for Windows
Amount of received data(byte)
Output only for Windows
Amount of sent data(byte)
Output only for VMware
Amount of data transferred by
virtual network device port unit
Output only for VMware
Amount of data received by virtual
network device port unit
Output only for RHEL5-Xen
Amount of data sent by virtual
network interface
Output only for RHEL5-Xen
Amount of data received by virtual
network interface
Output only for VMware/Hyper-V/
RHEL5-Xen
Output only for RHEL-KVM
Amount of data sent by virtual
network interface
Output only for RHEL-KVM
kvmnettxby Network usage (sent) bytes
*1: When the information from the virtual L-server where the live migration was performed is output to CSV, the following phenomena
may occur:
Amount of data received by virtual
network interface
- Information for a certain point of time is output twice
- 20 -
Page 28
- Information for a certain point of time is not output
If there is a large difference in the time and date in the VM host where the live migration was performed, the above phenomena will be
more likely to occur.
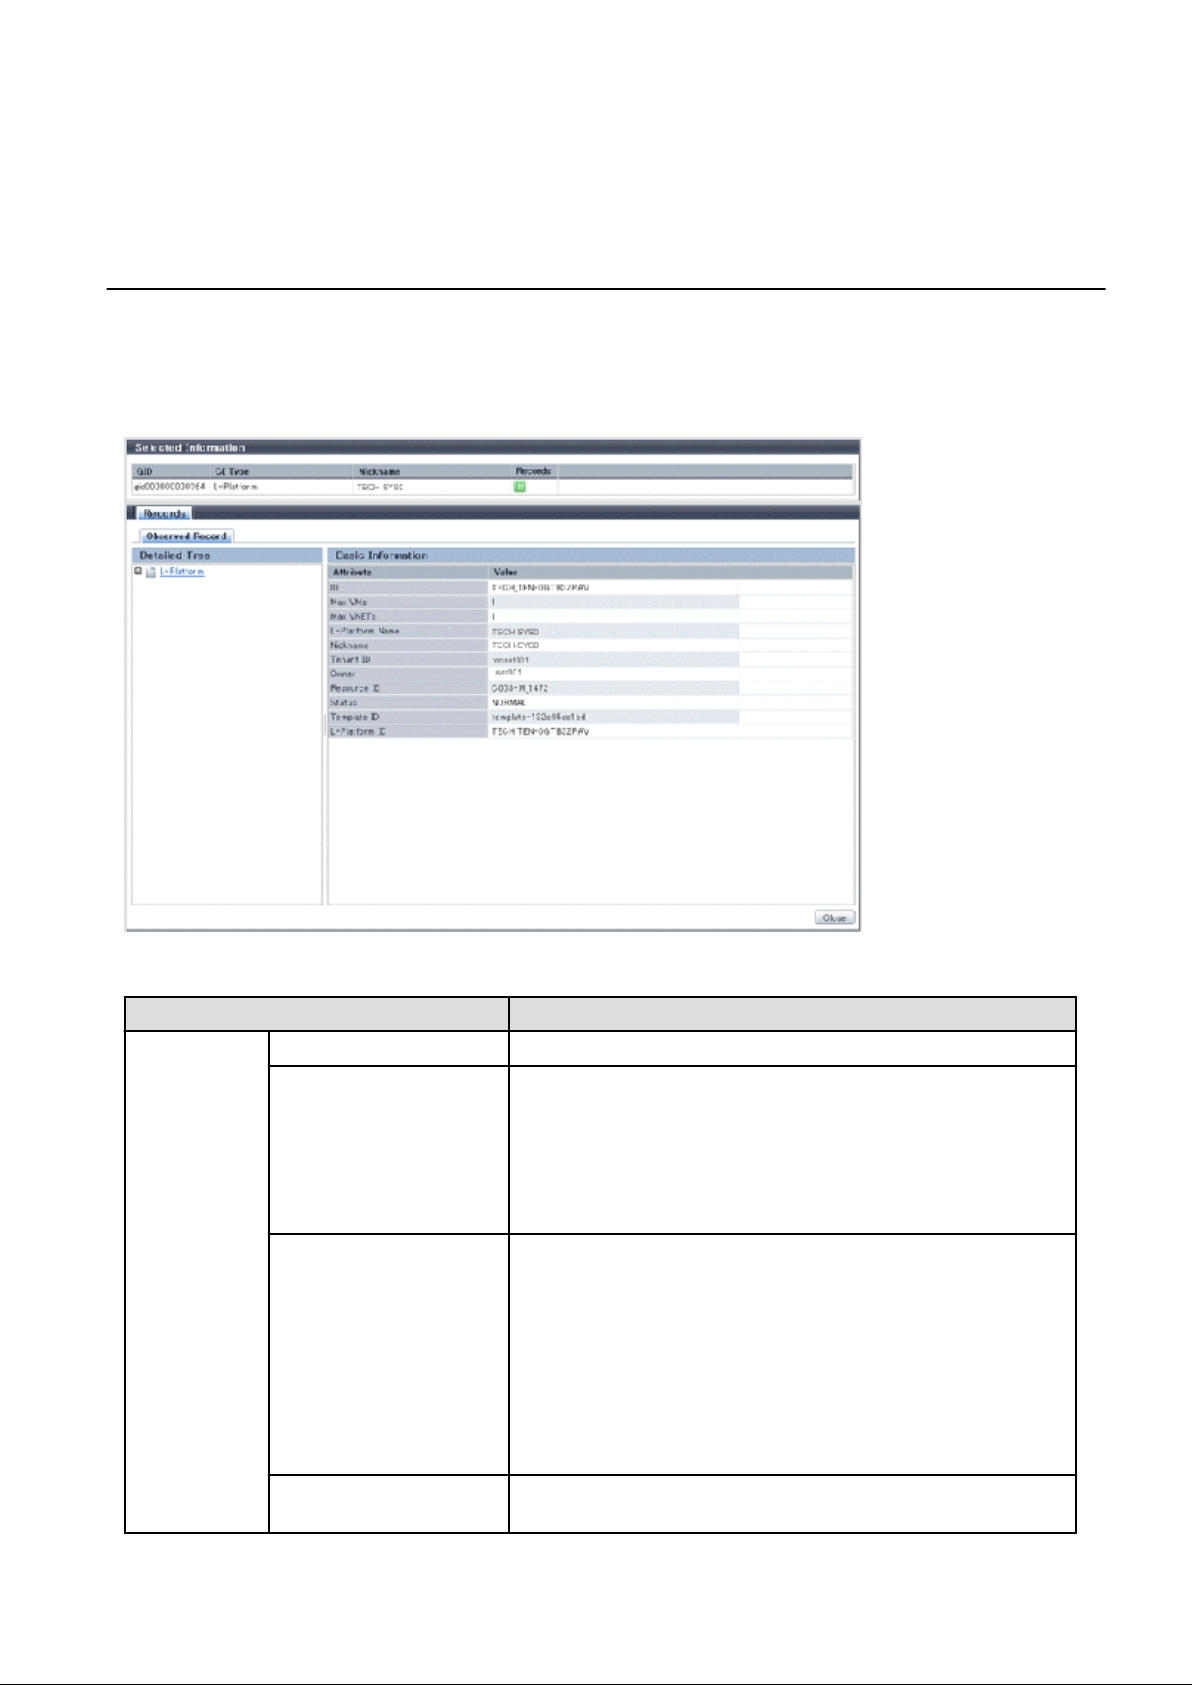
3.2.2 Configuration Information Display
The tenant, L-Platforms and L-Servers displayed in the CI list of the system condition window are managed as configuration items (CIs).
When the GID link in the CI list of the system condition window is clicked, the configuration information of the target tenant, L-Platform
or L-Server is displayed in a separate window.
A display example is shown below.
The table below explains the displayed items.
Item
Selected
Information
GID Displays the identifier set by the system to identify the configuration item.
CI Type Displays the configuration item type.
Nickname Displays the display name of the configuration item.
Record Displays the type of records held by the configuration item.
Explanation
The CI types are as follows:
- Tenant: If a tenant is selected
- L-Platform: If an L-Platform is selected
- L-Server: If an L-Server is selected
The following display names are displayed in accordance with the CI type:
- For the tenant CI type: The tenant name determined during tenant
registration ("tenant name (tenant ID)")
- For the L-Platform CI type: The L-Platform subscription name set during
L-Platform subscription
- For the L-Server CI type: The L-Server name set during L-Platform
subscription or L-Platform reconfiguration ("server name (host name)")
[0], indicating the actual information, is displayed.
- 21 -
Page 29
Item Explanation
Record Detailed Tree This is a tree of the elements comprising the configuration item.
The following elements are displayed in accordance with the CI type:
- For the tenant CI type: Tenants
- For the L-Platform CI type: Instances
- For the L-Server CI type: L-Server node information
When an element is selected, the element attribute values are displayed in the
basic information.
Values are displayed as attribute values, and differ depending on the element:
-
If the element is a tenant: The value determined during tenant registration
- If the element is an instance: The value set during L-Platform
subscription
- If the element is L-Server node information: The value set during L-
Platform subscription or L-Platform reconfiguration
Basic
Information
Close button When this button is clicked, the window closes.
Attribute Displays the attribute name. When the label in the upper part is clicked, items
can be sorted by attribute name.
Value Displays the attribute value. When the label in the upper part is clicked, items
can be sorted by attribute value.
- 22 -
Page 30
Chapter 4 L-Platform
This chapter explains how to use the L-Platform.
4.1 Display L-Platform
This section explains how to display the L-Platform and describes the top page.
How to display the L-Platform
To display the L-Platform:
- On the ROR Console after login, select the L-Platform tab.
L-Platform Top Page
An example of the L-Platform home page is shown below.
The following section explains the contents of the L-Platform operation menu:
- L-Platform Subscription
When Subscription is selected, the page used to subscribe to a service will be displayed.
Refer to "4.2 Subscribe to an L-Platform" for the L-Platform management method.
- L-Platform Management
When Management is selected, a list of created L-Platforms is displayed.
Refer to "4.3 L-Platform Management" for the L-Platform management method.
- Event logs
When Event Log is selected, logs of information about errors that have occurred while using the L-Platform functions will be displayed.
Refer to "4.4 Display Event Logs" for the event log display method.
- Startup
When Startup is selected, major functions of L-Platform and their overview will be displayed.
- 23 -
Page 31

Point
The Startup page is displayed as the home page of L-Platform. To prevent the Startup page from being displayed as the home page,
select the Do not show this window again at startup check box.
- Close link
When Close link is clicked, the confirmation window for closing the window will be displayed. Click Yes on the confirmation window
to close the L-Platform window.
Note
- If it becomes impossible to connect by the management server stop and etc. when L-Platform is being operated, the lamp in the menu
becomes gray and the message "Not Operating" is displayed. In this case, contact the system administrator. According to the displayed
window and the performed operation, an error message like the following may be displayed.
- Failed to get system configuration.
- Failed to get the access right.
4.2 Subscribe to an L-Platform
This section explains how to subscribe to an L-Platform
4.2.1 Subscribe to a New L-Platform
On the Subscription page of L-Platform, the user can subscribe to an L-Platform on the basis of the specification that has been registered.
Two methods are available to subscribe to a new L-Platform. The method to be used is determined by the method of subscription that the
Infra administrator department has specified.
- L-Platform Template reconfiguration not possible
Changes to registered L-Platform Templates are not permitted.
- L-Platform Template reconfiguration possible
Changes to registered L-Platform Templates are permitted.
The procedure for each method is shown below.
L-Platform Template Reconfiguration not Possible
Follow the steps below to subscribe to a new L-Platform:
1. Select Subscription on the operation menu of New L-Platform page.
The Subscription page will be displayed.
- 24 -
Page 32

2. Confirm the procedures on the Subscription page, and click the Subscribe a new L-Platform button.
- 25 -
Page 33

3. Confirm the contents of the L-Platform template on the Select Template page, and select L-Platform template to be used.
All the L-Platform templates that are registered in the L-Platform and enabled are displayed on the Select Template page.
For each L-Platform template, the corresponding estimated fees will also be displayed.
L-Platform templates are displayed by the L-Platform template name in ascending order. The sequence in the specification display
can be switched by clicking Sorted by followed by the Ascending order or Descending order button.
To search an L-Platform template using the keyword search function, enter Keyword and then click the Search button. Specify a
character string in Keyword that is the keyword for the L-Platform template the user wants to use. When a keyword is specified, a
search takes place based on the keywords that the Infra administrator set in the specifications. The keyword search function cannot
be used if the Infra Administrator did not set keywords.
For example, to search a specification where Red Hat Linux 5.1 is installed as the operating system, specify "Linux 5.1".
Point
Estimated fees for the L-Platform template will only be displayed when the charges display is set to enabled.
- 26 -
Page 34

4. Select the L-Platform template to be used and click the Next button.
The Set Basic Info page will be displayed.
The L-Platform Name displays the L-Platform template name.
To change to an arbitrary name, the new name must be no more than 85 characters long, be unique within the organization and not
include the following characters:
< > & ' " and control characters
However, the strings and the number of characters that can be specified may vary depending on the L-Platform settings.
It is recommended that the name be specified using no more than 23 of the following characters:
Alphanumeric characters, underscores ("_") and hyphens ("-")
- 27 -
Page 35

5. Enter a name to L-Platform Name, and click the Next button.
The Confirm page will be displayed.
Point
CSV output
When the Save as CSV button is clicked, the Select the destination to save window is displayed where the L-Platform Template
configuration can be saved as a CSV file.
The CSV file name is in the following format:
SystemConfiguration (+ <L-Platform name >+)_ <date> + .csv
Save configuration
By clicking the Save Configuration button, the L-Platform template is saved, and the display returns to the Subscription page.
The saved L-Platform template can be subscribed by clicking the Create from saved L-Platforms button on the Subscription
page.
- 28 -
Page 36

6. Check the displayed contents of the L-Platform template, and click the Next button.
When the Next button is clicked, the Agreement page will be displayed.
7. Check the license agreement displayed. Select the Agree the license check box, then, click the Subscribe button.
Point
When the application process is enabled, clicking of the Subscribe button on the Agreement page displays the Forward screen
window. Refer to "4.5 Select Forward Destination of Application Process" for details.
The Complete page will be displayed when the subscription to the L-Platform is accepted.
- 29 -
Page 37

- When the application process is disabled
The following message will be displayed:
"A request to subscribe the L-Platform has been completed. The deployment may take some time to complete."
- When the application process is enabled
The following message will be displayed:
"The request to subscribe the L-Platform has been completed. The L-Platform will be deployed after approval and/or judgement
procedures."
8. Click the Close button. The display returns to the Subscription page.
Point
When a subscribed L-Platform is deployed, a subscription completion notification email is sent to the subscriber. This email contains the
information necessary to access the L-Platform.
If deployment of the subscribed L-Platform fails, a subscription failure notification email is sent to the subscriber and the Infrastructure
Administrator. In this case, check with the Infrastructure Administrator, and then subscribe again.
- 30 -
Page 38

L-Platform Template Reconfiguration Possible
Follow the steps below to subscribe to a new L-Platform:
1. Select Subscription on the operation menu of the Subscription page.
The Subscription page will be displayed.
2. Confirm the procedures on the Subscription page, and click the Subscribe a new L-Platform button.
3. Confirm the contents of the L-Platform templates on the Select Template page, and select the L-Platform template to be used.
All the L-Platform templates that are registered in the L-Platform and enabled are displayed on the Select Template page.
For each L-Platform template, the corresponding estimated fees will also be displayed.
L-Platform templates are displayed by the L-Platform template name in ascending order. The sequence in the specification display
can be switched by clicking Sorted by followed by the Ascending order or Descending order button.
To search a specification using the keyword search function, enter Keyword and then click the Search button.
- 31 -
Page 39

Specify a character string in Keyword that is the keyword for the L-Platform template the user wants to use. When a keyword is
specified, a search takes place based on the keywords that the infra administrator set in the specifications. The keyword search
function cannot be used if the infra administrator did not set keywords.
For example, to search an L-Platform template where Red Hat Linux 5.1 is installed as the operating system, specify "Linux 5.1".
Point
Estimated fees for the L-Platform template will only be displayed when the charges display is set to enabled.
4. Select the L-Platform template to be used and click the Next button.
The Set Basic Info page will be displayed.
The L-Platform Name is displayed by the L-Platform template name.
To change to an arbitrary name, the new name must be no more than 85 characters long, be unique within the organization and not
include the following characters:
<, >, &, ', " and control characters
However, the strings and the number of characters that can be specified may vary depending on the L-Platform settings.
It is recommended that the name be specified using no more than 23 of the following characters.
Alphanumeric characters, underscores ("_") and hyphens ("-")
- 32 -
Page 40

5. Enter a name to L-Platform Name, and click the Next button.
The Reconfigure page will be displayed.
6. This will display the configuration of the L-Platform template selected on the Reconfigure page. Change the configuration as
required.
For the items that can be changed on the Reconfigure page, refer to "4.3.11 Reconfiguration Page".
7. When modification of the L-Platform template has completed, click the Next button.
The Confirm page will be displayed.
Item Display format
Item changed The values of changed items are displayed in red. The value before the change
is displayed as "changed from
the old value".
Item added "* added" is displayed after added elements.
The values of added items are displayed in red. The background of added items
is also displayed in red.
Item deleted "* deleted" is displayed after deleted items.
The background of deleted items is displayed in grey.
- 33 -
Page 41

Point
CSV output
When the Save as CSV button is clicked, the Select the destination to save window is displayed where the L-Platform Template
configuration can be saved as a CSV file.
The CSV file name is in the following format:
SystemConfiguration (+ <L-Platform name> +)_ <date> + .csv
Save configuration
By clicking the Save Configuration button, the L-Platform template is saved, and the display returns to the Subscription page.
The saved L-Platform template can be subscribed by clicking the Create from saved L-Platforms button on the Subscription
page.
8. Check the displayed contents of the specification, and click the Next button.
When the Next button is clicked, the Agreement page will be displayed.
9. Review and agree with the license agreement displayed. Select the Agree the license check box, then, click the Subscribe
button.
Point
When the application process is enabled, clicking of the Subscribe button on the Agreement page displays the Forward screen
window. Refer to "4.5 Select Forward Destination of Application Process" for details.
The Complete page will be displayed when the subscription to the L-Platform is accepted.
- 34 -
Page 42

- When the application process is disabled
The following message will be displayed:
"A request to subscribe the L-Platform has been completed. The deployment may take some time to complete."
- When the application process is enabled
The following message will be displayed:
"The request to subscribe the L-Platform has been completed. The L-Platform will be deployed after approval and/or judgement
procedures."
10. Click the Close button. The display returns to the Subscription page.
Point
When a subscribed L-Platform is deployed, a subscription completion notification email is sent to the subscriber. This email contains the
information necessary to access the L-Platform.
If deployment of the subscribed L-Platform fails, a subscription failure notification email is sent to the subscriber and the Infrastructure
Administrator.
- 35 -
Page 43

4.2.2 L-Platform Subscription after Saving Configuration
An L-Platform subscription can be submitted on the basis of an L-Platform Template for which the configuration is currently being saved.
Perform the following steps to submit an L-Platform subscription from this type of L-Platform Template:
1. Select Subscription on the operation menu of the Subscription page.
This will display the procedures required to subscribe to an L-Platform.
2. After confirming the procedure, select Subscribe from saved data.
The Select Template page will be displayed.
The time limit for estimating is displayed in each L-Platform templates.
When an L-Platform Template is selected from the L-Platform Template list, detailed information about the estimated fees and L-
Platform Template at the time when the L-Platform Template was saved is displayed.
When the application process is enabled, the following status will be displayed before the L-Platform template names in the list of
L-Platform templates:
- 36 -
Page 44

- SAVED: Specification being saved
The Next button will become available after selecting this item.
- UNAPPROVAL: Not approved
The Next button will not become available even after selecting this item.
- REJECTION: Subscription rejected
The Next button will not become available even after selecting this item.
Note
In the application process, the L-Platform templates waiting to approve or to assess become the UNAPPROVAL state.
If you want to delete the L-Platform templates which state is UNAPPROVAL, cancel the corresponding application from application
list of L-Platform. After canceling, it is deleted automatically.
When you delete the L-Platform templates which state is UNAPPROVAL on L-Platform template, errors occurs because there is
no L-Platform template in processing the application process.
The L-Platform template which is rejected or dismissed at application process becomes REJECTTION state.
Delete it from L-Platform after the confirmation if necessary.
Point
Estimated fees and quotation expiry dates for the L-Platform template will only be displayed when the charges display is set to
enabled.
Note also that the estimated fees will display the price at the time the L-Platform template was saved. In particular, please be aware
that this display will not change even if the price of the L-Platform is modified.
Furthermore, the displayed quotation expiry date is based on the validity period of estimated fees for the L-Platform template, and
indicates the 30th day after the L-Platform template was saved.
3. Select the L-Platform template to be used and click the Next button
The Confirm page will be displayed.
- 37 -
Page 45

Point
CSV output
When the Save as CSV button is clicked, the Select the destination to save window is displayed where the L-Platform template
can be saved as a CSV file.
The CSV file name is in the following format:
SystemConfiguration (+ <L-Platform name> +)_ <date> + .csv
4. Check the displayed contents of the L-Platform template, and click the Next button.
When the Next button is clicked, the Agreement page will be displayed.
5. Review and agree with the license agreement displayed. Select the Agree the license check box, then, click the Subscribe button.
Point
- When the application process is enabled, clicking of the Subscribe button on the Agreement page displays the Forward
screen window. Refer to "4.5 Select Forward Destination of Application Process" for details.
- The saved specification will be removed if the Subscribe button on the Agreement page is clicked. To keep the specification,
click the Cancel button.
The Complete page will be displayed when the subscription to the L-Platform is accepted.
- 38 -
Page 46

- When the application process is disabled
The following message will be displayed.
"A request to subscribe the L-Platform has been completed. The deployment may take some time to complete."
- When the application process is enabled
The following message will be displayed.
"The request to subscribe the L-Platform has been completed. The L-Platform will be deployed after approval and/or judgement
procedures."
6. Click the Close button. The display returns to the Subscription page.
Point
When a subscribed L-Platform is deployed, a subscription completion notification email is sent to the subscriber. This email contains the
information necessary to access the L-Platform.
- 39 -
Page 47
If deployment of the subscribed L-Platform fails, a subscription failure notification email is sent to the subscriber and the Infrastructure
Administrator. In this case, check with the Infrastructure Administrator, and then subscribe again.
4.3 L-Platform Management
This section explains how to use the Management page to manage L-Platforms that are in use.
The L-Platforms targeted by L-Platform management vary in accordance with the user, as follows:
- Infrastructure Administrator
All L-Platforms.
- Tenant Administrator
All L-Platforms being used by owned tenants.
- Tenant users
Only L-Platforms in use by the user.
The Management page can be used to display a list of the L-Platforms currently being used.
The following L-Platform operations can also be performed:
- L-Platform detailed information display
- Disk detailed information display
- Server start and stop
- L-Platform reconfiguration
- Taking snapshots of and restoring virtual servers
- Physical server backup and restore
- L-Platform cancellation
4.3.1 L-Platform Management Display Page
This section explains how to display the L-Platform management page and explains the display format.
L-Platform Management Page Display Method
From the operation menu on the L-Platform page, select Management.
L-Platform Management Page Display Format
The L-Platform management page has the following three types of display format.
Display format Description
L-Platform Management Displays the L-Platform configuration images in a list
L-Platform Management (list) Displays the L-Platform list
Server List The list displays virtual servers.
It can display all servers or inactive servers.
The buttons in the upper-left section of the page can be used to switch between the "L-Platform Management" and "Server List" display
formats.
The display can be switched between the "configuration" format and the "list" format using the button located on the top right hand side
of the page ( ).
Examples of each display format are shown below:
- 40 -
Page 48

- L-Platform Management
Click the Management button on the top left hand side of the page and then click the button ( ) on the top right hand side
of the page to display an L-Platform list in a configuration image.
The following information can be checked on the Management page:
The following information can be checked using the Management page:
- L-Platform name: The L-Platform name set during L-Platform subscription
- L-Platform ID: The ID that identifies the L-Platform
- L-Platform Template name: The name of the L-Platform Template
- L-Platform configuration: The L-Platform configuration image
The sequence of the L-Platforms displayed can be switched by clicking Sorted by followed by the Ascending order or Descending
order button for the following items:
- Update date
- L-Platform name
- L-Platform ID
Point
Using the Details button, details of the L-Platform can be displayed on the Management page. Refer to "4.3.2 L-Platform Detailed
Information Display" for information on displaying the L-Platform details.
- 41 -
Page 49

- L-Platform Management (list)
Click the Management button on the top left hand side of the page and then click the button ( ) on the top right hand side
of the page to display a list of information on the L-Platforms.
The following information can be checked on the L-Platform Management (list) page.
- L-Platform name: The L-Platform name set during L-Platform subscription
- L-Platform ID: An ID to identify the L-Platform
- Organization information: Identification number for the organization
- L-Platform template name: Name of the L-Platform template
The sequence of the L-Platforms displayed can be switched between ascending order and descending order by clicking the column
headers (L-Platform name, L-Platform ID, etc).
Point
Using the Details button, details on the L-Platform can be displayed on the L-Platform Management (list) page. Refer to "4.3.2 L-
Platform Detailed Information Display" for information on displaying the L-Platform details.
- 42 -
Page 50

- Server List
Click the Server List button on the top left hand side of the page to display a list of information on servers included in an L-Platform.
The following shows an example of all servers being displayed. To display inactive servers, click the Stopped tab.
The following information can be checked on the Server List page.
- Status: Server status (Running, Stopped)
- Type: Server type
- Server name: Server name
- Host name: The server host name. However, this is not displayed for a physical server
- L-Platform name: The L-Platform name set during L-Platform subscription
- IP address: IP address of the server
- Backup/Snapshot: Status of taking and restoring the backup and snapshots
- Generation: Number of snapshots or backup stored
- Number of snapshots: Number of snapshots or number of executed backups
The sequence of the servers displayed can be switched between ascending order and descending order by clicking the column headers
(status, type, etc).
Point
The following buttons can be used to operate on the Server List page.
- ON button: Start the server
Refer to "4.3.4 Start and Stop the Server" for information on starting the server.
- OFF button: Stop the server
Refer to "4.3.4 Start and Stop the Server" for information on stopping the server.
- Details button: Display details on an L-Platform or a disk.
Refer to "4.3.2 L-Platform Detailed Information Display" for information on displaying L-Platform details. Refer to "4.3.3 Display
Details on a Disk" for information on displaying details on a disk.
- Snapshot button: Take and restore snapshots Refer to "4.3.6 Take and Restore Snapshot" for information on taking and restoring
snapshots.
- 43 -
Page 51

- Backup button: Backup and restore.
This button is displayed for physical servers.
Refer to "4.3.7 Physical Server Backup and Restore" for information on backup and restore.
Note
The Running icon for a server indicates that the power has been turned on.
Even if the Running icon is displayed, login to the L-Platform may fail if logged in immediately after deployment or starting the virtual
server. In this case, allow a few minutes before trying to log in again.
4.3.2 L-Platform Detailed Information Display
Follow the steps below to display the details of L-Platform:
1. Display the L-Platform Management, L-Platform Management (list), or Server List page.
Refer to "4.3.1 L-Platform Management Display Page" for information on how to display the page.
2. Click the Details button after selecting the L-Platform or the server required.
The L-Platform Details page will be displayed.
There are two types of display format for the L-Platform Details page below. The display format can be switched using the button
( ) located on the top right hand side of the page.
- L-Platform configuration image
By clicking the button (
an image.
) located on the top right hand side of the page, the L-Platform configuration is displayed as
- 44 -
Page 52

- Server List
By clicking the button ( ) located on the top right hand side of the page, a list of all virtual servers included in the LPlatform is displayed. The server List also displays the extended disks included in the virtual servers.
Point
The following buttons can be used on the L-Platform Details page:
- start all button: Turns the power on for all servers in the L-Platform as a group.
- stop all button: Turns the power off for all servers in the L-Platform as a group.
- Reconfigure button: Changes the L-Platform Template
Refer to "4.3.9 L-Platform Reconfiguration" for information on changing L-Platform Templates.
- Unsubscribe button: Cancels the L-Platform
Refer to "4.3.10 Cancel an L-Platform" for information on cancelling L-Platforms.
- ON button: Start the server
Refer to "4.3.4 Start and Stop the Server" for information on starting the server.
- OFF button: Stop the server
Refer to "4.3.4 Start and Stop the Server" for information on stopping the virtual server.
- Snapshot button: Take and restore snapshots
This button is displayed for virtual servers.
Refer to "4.3.6 Take and Restore Snapshot " for information on taking and restoring snapshots.
- Backup button: Backup and restore
This button is displayed for physical servers.
Refer to "4.3.7 Physical Server Backup and Restore" for information on backup and restore.
- Setting button:Setup firewall
This button is displayed for firewall.
Refer to "4.3.8 Setup Firewall" for information on setup firewall.
- Software Details button: Display software information
- 45 -
Page 53

- Initial PWD button: Confirm the initial password
Depending on the L-Platform settings, the "Initial password" is " ". Sometimes it is displayed as ".
The initial password is set after L-Platform deployment.
- Add Patch Information button: Register the patch information
Refer to "4.3.5 Manage Patch Information" for information on registering patch information.
- Delete Patch Information button: Delete the patch information
Refer to "4.3.5 Manage Patch Information" for information on deleting the patch information.
Note
If 'start all' or 'stop all' button is clicked while another user is reconfiguring the L-Platform, the start or stop operation fails with the error
code VSYS10051.
If this error occurs when no user is reconfiguring the L-Platform, perform the following operation before starting or stopping all servers.
1. Click the Reconfigure button on the L-Platform Details page.
2. After the following message is displayed, click the 'Obtain the lock on a mandatory basis' button, and then cancel the reconfiguration.
The L-Platform is locked by another user.
After obtaining the lock on a mandatory basis, the operation can be continued.
4.3.3 Display Details on a Disk
Follow the steps below to display the details of a disk located on the virtual server:
1. Display the L-Platform Details page.
Refer to "4.3.2 L-Platform Detailed Information Display" for information on how to display the page.
2. After selecting the virtual server to which the disk is added, select Disk from the list box.
The details of the disk will be displayed on the L-Platform Details page.
- 46 -
Page 54

Point
The following buttons can be used on the L-Platform Details page displaying the details of the disk.
- Reconfigure button: Modify an L-Platform template
Refer to "4.3.9 L-Platform Reconfiguration" for information on modifying an L-Platform template.
- Unsubscribe button: Cancel an L-Platform
Refer to "4.3.10 Cancel an L-Platform" for information on canceling an L-Platform.
4.3.4 Start and Stop the Server
Follow the steps below to start or stop a server:
1. Display the Server List page.
Refer to "4.3.1 L-Platform Management Display Page" for information on how to display the page.
Alternatively, display the L-Platform Details page.
Refer to "4.3.2 L-Platform Detailed Information Display" for information on how to display the page.
2. After selecting a required server, click the ON button to start it or the OFF button to stop it.
Note
Even if the server is stopped using the OFF button, sometimes the server may not stop, due to a problem with the server. In this case, the
ON button and OFF button act as Forced stop buttons. When a Forced stop button is clicked, the server will stop forcibly.
The Forced stop button is designed to shut down the power to the server.
Therefore, the recommendations for virtual servers is to use remote desktop connection to connect to the virtual server, and then to shut
down the operating system.
4.3.5 Manage Patch Information
Patch information can be managed after it is applied to or deleted from a server that has been deployed.
Register Patch Information
Follow the steps below to register patch information:
1. Display the L-Platform Details page.
Refer to "4.3.2 L-Platform Detailed Information Display" for information on how to display the page.
- 47 -
Page 55

2. After selecting the required server, select the Others tab.
The following page will be displayed if the patch information has not been registered.
3. Click the Add Patch Information button.
The Add Patch Information page will be displayed.
Item Description
Patch ID Specify the patch ID that has been applied.
The patch ID must be no more than 32 bytes of alpha-numeric one-byte characters.
Component name Specify the name of the component where the patch is to be applied.
The name must be no more than 85 characters long and not include the following
characters:
<, >, &, ', " and control characters
- 48 -
Page 56

Item Description
Description Specify the description related to the patch information that has been applied.
The description must be no more than 85 characters long and not include the
following characters:
<, >, &, ', " and control characters
4. Enter the required fields and click the OK button.
Delete Patch Information
Follow the steps below to delete patch information that has been registered:
1. After selecting the required server on the L-Platform Details page, select the Others tab.
The following page will be displayed if the patch information has been registered.
2. Click the Delete patch information button of the patch information to be deleted.
A message confirming the deletion will be displayed. Click the OK button.
4.3.6 Take and Restore Snapshot
Using the Snapshot page, snapshots can be taken and restored for the virtual server.
To take the snapshots and restore them, the target virtual server must be inactive.
Snapshot is managed by the generation. Snapshots of older generations will be deleted if snapshots that are older than three generations
are to be taken.
Contact the system administrator if it is necessary to take snapshots over 4 or more generations.
Note
- The function for taking and restoring snapshots is supported if the virtualization software is either VMware or Hyper-V. If the
virtualization software is RHEL5-Xen or RHEL-KVM, there is no function for taking and restoring snapshots.
- 49 -
Page 57

- The server will enter an error state if an error occurs while taking or restoring snapshots.
When this occurs, a character string "Error" and x button will be displayed on the Snapshot column of the relevant row on the Server
List page. To clear the error state, click the X button.
- The backup products that support the virtual server backup operations located on the virtualization software must be used to back up
the virtual server to a disk or tape device that is not the disk device the virtual server is running on.
- When the configuration is modified after taking the snapshots and those snapshots are restored, the server may be restored to the state
before the configuration was modified. It is recommended that new snapshots be taken after the configuration is modified.
- Even if a created snapshot is not deleted, contact the System Administrator if it is not displayed in the Snapshort window.
Take Snapshots
Follow the steps below to take snapshots:
1. Display the Server List page.
Refer to "4.3.1 L-Platform Management Display Page" for information on how to display the page.
Alternatively, display the L-Platform Details page.
Refer to "4.3.2 L-Platform Detailed Information Display" for information on how to display the page.
2. After selecting a required server, click the Snapshot button.
The Snapshot page will be displayed.
3. Click the Start to Take Snapshot button.
- 50 -
Page 58

4. A pop-up window will be displayed. Enter a comment of less than 128 characters.
This will display the comment entered on the snapshot list.
5. Click the Take Snapshot button to start taking the snapshot.
Restore Snapshots
Follow the steps below to restore the taken snapshots:
1.
Select the required snapshot from the snapshot list on the Snapshot page.
2. When the Restore button is clicked, the restore processing of the snapshot will start.
Point
To delete the snapshots taken, select the snapshot to be deleted from the snapshot list, and click the Delete button.
Note
Only the operation of taking of the snapshot and restoring is displayed in the history on the Snapshot page.
4.3.7 Physical Server Backup and Restore
The Backup page can be used to back up and restore a physical server.
The target physical server must be stopped before performing backup and restore.
Backup is managed by the generation. Backups of older generations will be deleted if snapshots that are older than three generations are
to be taken.
Contact the system administrator if it is necessary to take backups over 4 or more generations.
Note
- If an error occurs during backup or restore processing, an error state occurs for the server.
At this time, the character string "Error" and an X button are displayed in the Backup column of the relevant row of the Server List
page. The error status can be cancelled by clicking this X button.
- If a server is reconfigured after backup, when the server is restored it may revert to the configuration prior to the reconfiguration. It
is recommended to make a new backup after reconfiguration.
Backup
Follow the steps below to backup:
- 51 -
Page 59

1. Display the Server List page.
Refer to "4.3.1 L-Platform Management Display Page" for information on how to display the page.
Alternatively, display the L-Platform Details page.
Refer to "4.3.2 L-Platform Detailed Information Display" for information on how to display the page.
2. After selecting a required server, click the Backup button,
The Backup page will be displayed.
3. Click the Take Backup button.
4. A pop-up window will be displayed. Enter a comment of less than 128 characters.
This will display the comment entered on the backup list.
5. Click the Take Backup button to start backup.
Restore
Perform the following operations to restore a backed up server:
- 52 -
Page 60

1. In the backup list in the Backup page, select the target backup.
2. Click the Restore button to start the restore.
4.3.8 Setup Firewall
Change the firewall settings.
The firewall rule set parameter values can be changed in the firewall settings.
Perform the following steps to change the firewall settings:
1. Display the L-Platform Details page
Refer to "4.3.2 L-Platform Detailed Information Display" for the display method.
2. Select the firewall, and then click the Setting button.
3. A pop-up window is displayed.
- Label: Displays the parameter label
- Description: Displays an explanation of the parameter
- Value: Enter the value to be set for the parameter
4. When the Update button is clicked, a confirmation message is displayed.
Click the OK button to save and apply the firewall settings.
Point
Firewall settings cannot be set by L-Platform subscription or L-Platform reconfiguration.
- 53 -
Page 61

After an L-Platform is deployed, check the IP addresses of the servers included in the L-Platform and the port numbers used by the installed
middleware. Then, set the allowed IP addresses and port numbers in the relevant rule set parameters in the firewall settings.
4.3.9 L-Platform Reconfiguration
The system configuration that configures the L-Platform in use can be modified on the Reconfigure page.
Note
- The Reconfigure page can be used only if the Infrastructure Administrator is permitted to change the L-Platform Template.
- Before changing the L-Platform, stop the server. If the virtual server is running when you try to change it, an error will occur. However,
the following operations are executable even if the virtual server is running.
- Change the system name
- Change the server name
- Change the disk name
- Add a server
- Add a disk
- Change CPU performance (*) (virtual servers only)
*: This operation can only be executed with RHEL5-Xen.
- Setting the startup priority level
- Regardless of whether or not an L-Platform reconfiguration completion notification email is received, check with the Infrastructure
Administrator if an L-Platform Template is not changed. In this case, the change processing may have failed at the virtual server.
Follow the steps below to modify the system configuration that configures the L-Platform in use:
1. Display the L-Platform Details page.
Refer to "4.3.2 L-Platform Detailed Information Display" for information on how to display the page.
2. Click the Reconfigure button and display the Reconfigure page.
3. Modify the system configuration as required on the Reconfigure page.
Estimated charges corresponding to the system reconfiguration will be displayed in the top-right of the window.
- 54 -
Page 62

The following items cannot be modified when a system that has been deployed.
- VM pool
- System disk
- Subnet
- NIC extension and reduction (virtual servers only)
Refer to "4.3.11 Reconfiguration Page " for information on the other items.
Note
For both system disks and extended disks that have been deployed, neither the size nor the pool can be modified. Extended disks
that have been deployed can be deleted.
Point
Estimated fees for the L-Platform template will only be displayed when the charges display is set to enabled.
The displayed estimated charges will be calculated according to current prices, and not according to prices at the time of deployment.
4. When the L-Platform is modified, click the Next button.
The Confirm page will be displayed.
The difference between the old L-Platform template and the new L-Platform template is displayed as follows:
Item Display format
Item changed The values of the changed items are displayed in red. The old value is displayed
as "Changed from
Item added "*Added" is displayed after items that have been added.
The values of the added items are displayed in red. The background of the
added item is displayed in red.
Item deleted "*Deleted" is displayed after items that have been deleted.
The background of the deleted item is displayed in gray.
the old value
".
- 55 -
Page 63

Point
CSV output
When the Save as CSV button is clicked, the Select the destination to save window is displayed where the L-Platform template
can be saved as a CSV file.
The CSV file name is in the following format:
SystemConfiguration (+ <L-Platform name> +)_ <date> + .csv
Save specification
Click the Save Configuration button to save the L-Platform template, and the display returns to the Management page.
When the L-Platform template is saved, an icon ( ) will be displayed after the L-Platform template name.
5. Check the displayed contents of the L-Platform template, and click the Next button.
The Agreement page will be displayed.
6. Check the license agreement displayed. Select the Agree the license check box, and then, click the Reconfigure button.
Point
When the application process is enabled, clicking of the Reconfigure button on the Agreement page displays the Forward
screen window. Refer to "4.5 Select Forward Destination of Application Process" for details.
The Complete page will be displayed when an application for modification of an L-Platform template is accepted.
- 56 -
Page 64

- When the application process is disabled
The following message will be displayed:
"The request to reconfigure the L-Platform has been completed. The reconfiguration take some time to complete."
- When the application process is enabled
The following message will be displayed:
"The request to reconfigure the L-Platform has been completed. The L-Platform will be reconfigured after approval and/or
judgement procedures."
Point
When an L-Platform Template is changed, an L-Platform reconfiguration completion notification email is sent to the subscriber.
If an L-Platform Template change fails, an L-Platform reconfiguration failure notification email is sent to the subscriber and the
Infrastructure Administrator. In this case, check with the Infrastructure Administrator about the action required.
4.3.10 Cancel an L-Platform
Follow the steps below to cancel an L-Platform:
- 57 -
Page 65

1. Display the L-Platform Details page.
Refer to "4.3.2 L-Platform Detailed Information Display" for information on how to display the page.
2. Stop all the servers of the system that configures the L-Platform to be canceled.
Refer to "4.3.4 Start and Stop the Server" on information on how to stop a server.
3. Click the Unsubscribe button.
The Confirm page will be displayed.
4. Confirm that the correct L-Platform is being canceled, and click the Next button.
The Agreement page will be displayed.
5. Select the Agree the license check box to cancel the subscription, and click the Unsubscribe button.
Point
When the application process is enabled, clicking of the Unsubscribe button on the Unsubscribe page displays the Forward
screen window. Refer to "4.5 Select Forward Destination of Application Process " for details.
- 58 -
Page 66

The Complete page will be displayed when the L-Platform is canceled.
- When the application process is disabled
The following message will be displayed.
"The L-Platform has been unsubscribed."
- When the application process is enabled
The following message will be displayed.
"The L-Platform to unsubscribe the L-Platform has been completed. The L-Platform will undeployed after approval and/or
judgement procedures."
Note
When the following events occur, cancellation application may become impossible.
Notify the Infrastructure Administrator of the content displayed on the window.
- The pop-up blocker has been enabled and the 'Forward screen' window is not displayed.
- 59 -
Page 67

- An error message is displayed on the 'Forward screen' window.
Point
When an L-Platform is cancelled, a cancellation completion notification email is sent to the subscriber.
If an L-Platform cancellation fails, a cancellation failure notification email is sent to the subscriber and the Infrastructure Administrator.
In this case, check with the Infrastructure Administrator about the action required.
4.3.11 Reconfiguration Page
The following configuration can be defined on the Reconfigure page.
- Segment: Represents a network segment located on the L-Platform
- Virtual server: Represents a server on the L-Platform
- Physical server: Represents a physical server.
- Disk: Represents an extended disk that is not a system disk but can be added to the virtual server or physical server.
An example of the Reconfigure page display is shown below.
- 60 -
Page 68

The configuration of the Reconfigure page is shown below:
Part Description
L-Platform configuration Located on the top of the page, this area expresses the L-Platform in terms of the elements of
firewall, segment, virtual server, physical server and disk.
When an element is selected, the element is displayed in the Details of configuration element.
Add options Located on the right hand side of the page, this area lists the elements of, the virtual server,
physical server and disk that can be added to the L-Platform
The listed elements can be dragged and dropped into the L-Platform using a mouse and added
to the virtual system configuration as elements.
Details of L-Platform element Located at the bottom of the page, this area allows the details of a selected L-Platform element
to be edited
By clicking the Delete button, the elements such as a virtual server or physical server or a disk
can be deleted from the L-Platform.
Software information can be checked in a new window by clicking the Software details button.
Click the Add NIC button to add NICs. The Add NIC button is enabled only if NICs can be
added.
Click the Delete NIC button to delete selected NICs.
Point
Estimated fees for the L-Platform template will only be displayed when the charges display is set to enabled. The displayed estimated fees
will be calculated according to current prices each time the specs are changed.
Edit the L-Platform
The L-Platform can be edited on the Reconfigure page.
The L-Platform name entered on the Basic info page can be modified.
Only the segments described in the L-Platform template specification are available. They cannot be added or deleted.
To add a virtual server or physical server, a virtual server or physical server listed in Servers tab of Additional options can be dragged
and dropped into the segments.
To add a disk, a disk listed in Others tab of Additional options can be dragged and dropped into the virtual server or physical server.
- 61 -
Page 69

The types of disks that can be added are new disks and existing disks. New disks can be added to virtual servers and physical servers.
Existing disks are displayed if an Infrastructure Administrator has registered them to a storage pool that can reference already created disk
resources, and can be added to physical servers.
Firewall
When the firewall is selected, its rule set can be checked. The firewall cannot be deleted.
The Reconfigure page example below shows the page when the firewall is clicked. The window below is the Subscribe L-Platform
Reconfigure page.
Firewall tab
Part Description
rule set Displays the name of the 'rule set' set for the firewall. The rule set name cannot be changed.
Click Setting button to check the parameter values in the rule set. The values set as the default are the values specified in the L-Platform
template.
The window below is the rule set confirmation window.
- 62 -
Page 70

Note
- The firewall for a server added by a new L-Platform subscription or L-Platform reconfiguration is set after the L-Platform is deployed.
Refer to "4.3.8 Setup Firewall" for details.
Edit a Segment
A segment can be edited by selecting the segment to be edited.
It is possible to select whether a subnet allocated to the segment can be set automatically or manually in the segment editing. Note, however,
that subnets cannot be modified in the L-Platform configuration after the system has been deployed.
If the network to be connected to is specified in the L-Platform template, the specified network remains selected.
The following window displays an example of the Reconfigure page when a segment name is clicked. The following window shows the
Reconfigure page used to subscribe to an L-Platform.
- 63 -
Page 71

Details of configuration element Segment tab
Part Description
Category Specify the category if segments are selected automatically when additions are made by
network extension. The default is "Business segment".
- Business segment: A segment where business servers are deployed
- Management segment: A segment where servers that monitor business or similar are
deployed
Segment type Specify the segment identification information used if segments are selected automatically
when additions are made by network extension.
Maximum number of NICs Specify the maximum number of servers that can be deployed in a segment.
Subnet setting Specify the IP address of the virtual server to be deployed. The default value is "Automatic
setting".
- Automatic setting: Set automatically from the subnet
- Manual setting: The user specifies a subnet address or selects it from a network resource
list
Note
- If the maximum number of segments in the L-Platform template is one, the IP addresses of virtual servers being deployed can be
specified in the subnet settings.
Additional options Segment tab
Part Description
Segment
- Extend or reduce a network.
Note
Network extension and reduction
- A network can be extended to the maximum number of segments for an L-Platform Template.
- 64 -
Page 72

- Since at least one segment is required, it is not possible to delete all segments.
- When a segment is deleted, the connected NIC is also deleted. Since at least one NIC is also required, it is not possible to delete all
NICs.
- Reduction is not possible while a server is operating.
Edit a Virtual Server
By clicking a virtual server, the virtual server can be edited by selecting the tabs displayed.
Details tab
The virtual server type can be selected using the Details tab.
An example of the Details tab display is shown below.
Part Description
Host name Sets the virtual server name specified in the L-Platform template.
"usage + (no. of servers + 1)" is set automatically for the virtual server that has been added
as an option.
To rename, the name must be no more than 85 characters long and not include the
following characters:
<, >, &, ', " and control characters
However, the strings and the number of characters that can be specified may vary
depending on the system settings. It is recommended that the name be specified using no
more than 15 of the following characters. The value specified for this item cannot consist
of only numbers. Hyphens cannot be used for the first character.
Alphanumeric characters, underscores ("_") and hyphens ("-")
A pre-existing name cannot be specified.
Type From the drop-down menu, select the type (specifications) of the registered server.
The CPU, memory size, and System Disk will be set according to the type of the server
selected.
However, a message may appear indicating that the server type cannot be changed with
some types of virtualization software.
- 65 -
Page 73

Part Description
VM pool From the drop-down menu, select the resource name of the VM pool that is the server
deployment destination.
Contact the infra administrator in the event that an error message is displayed indicating
that no existing pool can be selected as the server deployment destination.
Number of CPUs Set the number of CPUs of the virtual server.
Specify the lesser of the two values: Enter either the maximum value entered for image
information or enter the maximum value of the VM pool, number of cores of VM hosts
with the most numbers of cores.
A value outside the range cannot be set.
Performance Specify CPU performance of the virtual server in GHz.
Specify the lesser of the two values: Enter either the maximum value entered for image
information or enter the maximum value of the VM pool, value of operational frequency
of VM hosts with the most value of operational frequency.
A value outside the range cannot be set.
Reserved Specify the reserved CPU performance for the virtual server, in GHz.
The minimum value for the reserved clock speed that is guaranteed to be allocated to the
CPU
virtual server can be specified. It is not possible to specify a value that is greater than the
operating clock speed.
Any value outside the allowable range cannot be specified.
This is not displayed and cannot be specified if the virtualization software is RHEL-KVM.
[VMware]
Shares
[Hyper-V]
Weight
Specify the relative allotment ratio for determining the allotment of memory size when
multiple virtual machines are competing for memory resources. Specify an integer up to
1,000,000.
If the reconfiguration simplification function is disabled and the easy selection method
is set, set values are as follows:
- Low (500)
- Standard (1,000)
- High (2,000)
This is not displayed and cannot be specified if the virtualization software is RHEL-KVM.
Memory Size Specify the memory size of the virtual server in GB.
Specify the lesser of the two values: Enter either the maximum value entered for image
information or enter the maximum value of the VM pool, free memory size of VM hosts
with the most free memory size.
A value outside the range cannot be set.
[VMware]
Reserved
[Hyper-V]
RAM
Specify the reserved memory size for the virtual server, in GB.
The minimum value for the reserved memory size that is guaranteed to be allocated to
the virtual server can be specified. It is not possible to specify a value that is greater than
the memory size.
Any value outside the allowable range cannot be specified.
This is not displayed and cannot be specified if the virtualization software is RHEL-KVM.
[VMware]
Shares
[Hyper-V]
Weight
Specify the relative allotment ratio for determining the allotment of memory size when
multiple virtual machines are competing for memory resources. Specify an integer up to
1,000,000.
If the reconfiguration simplification function is disabled and the easy selection method
is set, set values are as follows:
- Low (500)
- 66 -
Page 74

Part Description
- Standard (1,000)
- High (2,000)
This is not displayed and cannot be specified if the virtualization software is RHEL-KVM.
System Disk Storage pool From the drop-down menu, select the storage pool to be used.
Size The disk capacity of the virtual server is displayed in GB.
The capacity of the system disk cannot be modified.
Boot priority Sets the priority order when performing batched power supply operations in either the L-
Platform or the tenant. The smaller the value, the higher the priority order.
Set to 0 when power supply operations are not carried out in a single batch. Note however
that this value cannot be set to 0 at the time of new deployment.
Point
The icons displayed in front of the virtual server names correspond to the usage of the virtual servers described in the specification.
- WEB: Web server
- AP: Application server
- DB: Database server
When a virtual server has multiple usages, an icon showing each usage separated by "/" will be displayed.
Example: WEB/AP, AP/WEB/DB etc.
Note
- The server type cannot be changed with some types of virtualization software.
- When the value 0 or no valid value is specified for CPU frequency, CPU reserve clock rate, memory size, or memory reserve size, it
is treated as if the value 0.1 were specified. This modification is included in the changed items.
NICs tab
An IP address to be allocated to NIC can be set using the NICs tab.
An IP address can be set only when "manual setting" was specified when the segment was edited for a subnet. Note, however, that a subnet
cannot be modified when modifying the configuration of a system that has been deployed, and so the IP address cannot be modified either.
The following example displays the NICs tab. The following window shows the Reconfigure page used to subscribe to an L-Platform.
- 67 -
Page 75

There are two ways of specifying an IP address as follows:
Automatic
-
Sets an IP address automatically from a subnet.
- Manual
Enters an IP address directly.
When there is a conflict between the specified IP address and network resources, an error message will be displayed.
An MNG icon is displayed for the control NIC.
The following window displays an example of an L-Platform where multiple NICs exist. The following window shows the Reconfigure
page used to subscribe to an L-Platform.
Each NIC is represented by one server. When a server is selected, the same server in each segment is selected.
When a server is selected an icon is displayed showing a number at its lower left hand corner. The number represents an NIC number.
Dark-colored servers are the NICs for administration, and light-colored servers are NICs for business.
When a server is dragged from the Add options and dropped on a segment, as many servers as the number of NICs specified for the segment
in the image information are displayed.
- 68 -
Page 76

NIC Extension and Reduction
This section explains NIC extension and reduction.
Click the Add NIC button to add a business NIC to the same segment as the control NIC.
Click the Delete NIC button deletes an NIC.
Note
- This is possible only during L-Platform subscription. NIC extension and reduction are not possible after deployment.
- NICs cannot be added if they would exceed the maximum number of connections for the segment.
- Control NICs cannot be deleted.
- Since at least one NIC is required, it is not possible to delete all NICs.
- When extending or reducing NICs for a physical server, configure the number of NICs after settings are made to match the number
of NICs of the physical server being used.
Others tab
The Others tab can be used to check the operating system installed at a virtual server, the middleware and other software, and information
on the patches applied to the software.
A display example of the Others tab is shown below.
- 69 -
Page 77

Editing a Physical Server
When a physical server is selected, the allowed physical server depends on the displayed tab.
Details tab
The Details tab can be used to select a virtual server type.
A display example of the Details tab is shown below.
- 70 -
Page 78

Part Description
Host name Sets the name of a physical server that is in the L-Platform Template.
This setting cannot be changed.
Type From the drop-down menu, select the type (specifications) of the registered server.
The CPU, memory size, and System Disk are set according to the selected server type.
Server pool From the drop-down menu, select the resource name of the server pool that is the server
deployment destination.
Contact the infra administrator in the event that an error message is displayed indicating
that no existing pool can be selected as the server deployment destination.
Reserve server pool From the drop-down menu, select the resource name of the reserve server pool.
Contact the infra administrator in the event that an error message is displayed indicating
that no existing pool can be selected as the server deployment destination.
Number of CPUs Set the number of CPUs in the physical server. (*)
If the upper limit value recorded in the image information differs from the VM pool upper
limit value (the number of cores in the VM host with the most cores), a value up to the
smaller value can be set.
CPU
performance Specify the CPU performance of the physical server in GHz units. (*)If the upper limit
Values outside that range cannot be set.
value recorded in the image information differs from the VM pool upper limit value (the
frequency of the VM host with the highest frequency), a value up to the smaller value
can be set.
Values outside that range cannot be set.
- 71 -
Page 79
Part Description
Memory Size Specify the memory size of the physical server in GB units. (*)
If the upper limit value recorded in the image information differs from the VM pool upper
limit value (the free size of the VM host with the largest free memory size), a value up
to the smaller value can be set.
Values outside that range cannot be set.
System Disk Storage pool From the drop-down menu, select the storage pool to be used.
Size The disk capacity of the physical server is displayed in GB.
The capacity of the system disk cannot be modified.
Boot priority Sets the priority order when performing batched power supply operations in either the L-
Platform or the tenant. Range:1-256.The smaller the value, the higher the priority order.
Set to 0 when power supply operations are not carried out in a single batch. Note however
that this value cannot be set to 0 at the time of new deployment.
*: The server pool physical server with details closest to the specified CPU and memory information is allocated.
Estimated charges are calculated according to the values entered for the CPU performance and memory capacity when newly deploying
a physical server. The performance of the actual server deployed will be the closest possible to the entered values. For this reason, the
estimated charges displayed may differ to actual charges. Estimated charges for physical servers that have already been deployed will be
calculated according to the actual CPU performance and memory capacity.
NICs tab
Use the NICs tab to set the IP address allocated to an NIC.
Note that the IP address can be set only if "manual setting" is specified for the subnet during segment editing. However, since the subnet
cannot be changed by reconfiguration after a system is deployed, IP address changes are also not possible.
A display example of the NICs tab is shown below. Note that the window shown below is the L-Platform subscription Reconfigure page.
- 72 -
Page 80

The following two methods are available for specifying an IP address:
- Automatic
The IP address is set automatically from the subnet.
- Manual
Enter the IP address directly.
An error message is displayed if the specified IP address is inconsistent with the network resources.
The MNG icon is displayed for the control NIC.
The window below is an example of the display when there are multiple NICs. Note that the window shown below is the L-Platform
subscription Reconfigure page.
- 73 -
Page 81

NIC1 is represented by one physical server. When a server is selected, the selected state occurs for all the same servers. A numeric icon
is displayed to the bottom left of selected servers. It indicates the NIC number.
Dark-colored servers indicate management NICs, and light-colored servers indicate business NICs.
If a segment is dragged and dropped from the addition option, the number of servers displayed matches the number of NICs specified in
the image information of the segment.
NIC Grouping (for Physical Servers)
This section explains NIC grouping.
- 74 -
Page 82

- Making a group
Select multiple checkboxes, and then click the Form NIC Group button. However, Multidata input NIC cannot be grouped. (Control
NICs are okay.)
- Cancelling a grouping
Select multiple checkboxes, and then click the Delete NIC Group button.
Note
- This is possible only during L-Platform subscription. NIC groups cannot be made or cancelled after deployment.
- Two NICs can be grouped. Three or more NICs cannot be grouped.
Others tab
The Others tab can be used to check the operating system installed at a physical server, the middleware and other software, and information
on the patches applied to the software.
An example of the Others tab is shown below.
- 75 -
Page 83

Edit a Disk (for a Virtual Server)
A virtual server to which a disk has been added can be selected. By clicking the button (
a selection list of virtual servers and disks is displayed. Select a disk on the list.
Only extended disks can be modified when editing a disk. System disks cannot be edited.
The following example displays the Reconfigure page when a disk is selected. The following window shows the Reconfigure page used
to subscribe to an L-Platform.
) located to the right of the virtual server name,
- 76 -
Page 84

Part Description
Disk name "disk + serial number" is set automatically as the disk name.
The serial number is allocated according to the following rules.
- Allocation of serial number starts from 0 for the disks registered in the L-Platform template.
- "Number of disks + 1" is allocated to a disk added using Add options.
To rename a disk, the new name must be no more than 85 characters long and not include the following
characters:
<, >, &, ', " and control characters
A pre-existing name cannot be specified.
Storage pool From the drop-down menu, select the deployment destination resource pool.
Size Specify the disk capacity of the virtual server in GB.
Specify the lesser of the two values: Enter either the maximum value entered for image information or
enter the maximum value of the storage pool, free space size of storages with the most free space size.
A value outside the range cannot be set.
Note
- If the virtualization software is Hyper-V, the maximum number of disks after addition is four, including the system disk.
- Only existing disks can be added or deleted if the virtualization software is RHEL-KVM. New disks cannot be added.
Edit a disk (for a physical server)
Note
When extending disks, a physical server must be stopped.
A physical server to which a disk has been added can be selected. By clicking the button ( ) located to the right of the physical server
name, a selection list of physical server and disks is displayed. Select a disk on the list.
Only extended disks can be modified when editing a disk. System disks cannot be edited.
The following example displays the Reconfigure page when a disk is selected. The following window shows the Reconfigure page used
to subscribe to a service.
- 77 -
Page 85

Part Description
Disk name "disk + serial number" is set automatically as the disk name.
The serial number is allocated according to the following rules.
- Allocation of serial number starts from 0 for the disks registered in the L-Platform template.
- "Number of disks + 1" is allocated to a disk added using Add options.
To rename a disk, the new name must be no more than 85 characters long and not include the following
characters:
<, >, &, ', " and control characters
A pre-existing name cannot be specified.
Storage pool From the drop-down menu, select the deployment destination resource pool.If an existing disk is selected,
modification is not possible.
Size Specify the disk capacity of the virtual server in GB.
Specify the lesser of the two values: Enter either the maximum value entered for image information or
enter the maximum value of the storage pool, free space size of storages with the most free space size.
A value outside the range cannot be set.
Server tab
"Physical server" and "Virtual server" can be selected from Type, enabling only servers of the selected type to be displayed.
4.4 Display Event Logs
Event logs of the errors that occurred while using the L-Platform functions can be displayed on the Event Log page.
- 78 -
Page 86

Follow the steps below to display event logs:
1. Select Event Log from the operation menu of the L-Platform page.
A list of event logs will be displayed.
Up to 100 logs are displayed on the Event log page for duration of up to 14 days starting from the most recent log.
Refer to "Message Stating with VSYS" in "Messages CE" for information on the messages displayed in the event log.
4.5 Select Forward Destination of Application Process
When the application process is enabled, the forward destination of the application process must be selected to use the following functions:
- L-Platform subscription
- L-Platform reconfiguration
- Cancel L-Platform
Point
The application process is set by the infra administrator.
Note
If the pop-up blocker is enabled and the URL of the ROR Console is not registered with the 'Address of web site to allow' list, the 'Forward
screen' window will not be displayed.
Follow the steps below to select the forward destination of the application process:
- 79 -
Page 87

1. A Forward screen window like the one below is displayed when L-Platform subscription, L-Platform reconfiguration, or L-Platform
cancellation is performed.
Item
Forward destination Select an approver who is the forward destination of the application process.
If the process has been set to require no approval, the field will be displayed
in grey and cannot be selected.
Description
Reason for application Specify the reason for application using 100 or less characters.
2. Specify the item and click the Forward button.
A message notifying the forward result will be displayed.
When forwarding is successful, the subscriber will receive an application acceptance email.
3. Confirm the message, click the Close button, and close the Forward screen window.
Note
If an error message is displayed on the Forward screen, notify the infra administrator of the contents displayed on the window. After
closing the Forward screen, close the L-Platform window also.
If an error message is displayed on the forward screen when a service is subscribed to or modified, that subscription will be saved.
Point
Approving the application process
When an application process is forwarded, an email requesting an approval will be sent to the approver at the forward destination. An
approval for the application must be obtained from the approver.
Refer to "Chapter 5 Request " for information on how to approve an application process.
If the process has not been approved, an email requesting an assessment will be sent to the infra administrator.
Action when the mail is not sent
When the email is not sent to the subscriber or the approver, confirm whether the email address registered in the ROR Console is correct.
If it is correct, contact the system administrator to report the user ID and the process instance name for subscription.
When the assessment request email is not sent to the infra administrator, contact the system administrator to report the user ID and the
process instance name.
Check the application process status
The subscriber and the approver can check the status of application process.
Refer to "Chapter 5 Request " for information on how to check the status of application process.
- 80 -
Page 88

4.6 How to Use the L-Platform
This section explains how to use the L-Platform after it is deployed.
Based on the information below, a deployed L-Platform can be accessed using the remote desktop function.
Item Value
IP address
1. The IP address can be confirmed using the following procedures.
2. Select Server List on the Management page of L-Platform Management.
3. Check IP address of the target server from the list displayed.
User ID [Windows] Administrator
[Linux] Root
Password The initial password can be confirmed using the following procedures:
1. Select Service List on the Management page of L-Platform Management.
2. Select the target L-Platform and click the Details button.
3. Select the target virtual server from the list displayed and click the Initial PWD button.
Note
The initial password is already set up after the L-Platform is deployed. Be sure to change the password when the L-Platform starts to
operate.
- 81 -
Page 89

Chapter 5 Request
This chapter explains how to operate the application list.
Note
- Application processes are determined by the Infrastructure Administrator and set by the System Administrator. The application list
can be used only if an application process is set.
- If Internet Explorer enhanced security (IE ESC) is enabled, the X button on popup windows does not operate correctly.
Refer to the following website for information on how to disable Internet Explorer enhanced security:
http://www.microsoft.com
5.1 Checking an Application Status
The application status and past application results can be checked for the following applications:
- Subscribe L-Platform
- L-Platform reconfiguration
- Cancel L-Platform
Perform the following steps to check the status of an application process:
1. Select Request from the ROR console
2. Select either My Tasks or My Completed Tasks from the Task Filters drop-down list on the My Task window.
- To check the status of applications in progress
Select My Tasks from the Task Filters drop-down list on the My Task window. A list of tasks with the status Active will be
displayed.
- 82 -
Page 90

- To check past application results
Select My Completed Tasks from the Task Filters drop-down list on the My Task window. A list of tasks with the status
Completed will be displayed.
The priority level of a task can be specified on the Summary tab under My Tasks using numerals from 0 to 2147483647. The
default value is 8.
The higher the number of a task, the higher its priority level. Setting the priority level of tasks also enables them to be sorted in
order of priority in task lists.
3. Select the process instance task to be checked and click on the Details tab.
Select the tasks with the following activity names:
- When checking the status of applications in progress
- Cancel
- When checking past application results
- Apply or cancel
4. Select the Status tab on the Form panel.
A list of either application statuses or past application results will be displayed in chronological order.
Application results are displayed as shown in the image below. It indicates that approval was given to an application which was
then dismissed upon assessment.
Item
Activity Name The task activities will be displayed.
Application, Approve, Assess, Pending or Cancel will be displayed.
Approve will only be displayed when the application process is set to
'ApproverOnly', while Assess will only be displayed when the
application process is set to 'JudgeOnly'.
Status Application Accepted
Approve One of the following responses will be displayed:
Description
- Approval waiting
- Approved
- Approved (Error)
- Rejected
- _ (*1)
- 83 -
Page 91
Item Description
Assess One of the following responses will be displayed:
- Approval waiting
- Accepted
- Accepted (Error)
- Dismissed
- _ (*1)
- Blank (*2)
Pending One of the following responses will be displayed:
- Pending
- Cancel
- _ (*1)
- Blank (*2)
Cancel One of the following responses will be displayed:
- Cancel
- _ (*1)
- Blank (*2)
Date The date and time of execution will be output in the following format:
YYYY-MM-DD HH:MM:SS
Responsible Displays the executor.
Comment Displays any comments that were input at the time of Application,
Approve, Assess or Pending.
*1: Displayed when the process was not executed.
*2: Displayed when the process has not been executed.
The following illustrates an example of the application status confirmation window:
- When the application process is set to 'Default'
Indicates that the application has been accepted and the task is complete.
- When the application process is set to 'ApproverOnly'
Indicates that the application is awaiting approval.
- 84 -
Page 92

- When the application process is set to 'JudgeOnly'
Indicates that an error has occurred with the application during acceptance of the assessment and the task has been reserved.
5.2 Cancelling an Application
Subscribers can cancel an application that they have issued.
A subscriber is a user who issued any of the following applications:
- Subscribe use L-Platform
- L-Platform reconfiguration
- Cancel L-Platform
Perform the following steps to cancel an application process:
1. From the ROR Console, select Request tab.
2. In the Task Filters drop-down list on the My Tasks window, select My Tasks.
A list of tasks with the status Active is displayed.
In the Priority field in My Tasks under the Summary tab, give the tasks a priority using a number between 0 and 2147483647.
The default value is 8.
The higher the number of a task, the higher its priority level. Setting the priority level of tasks also enables them to be sorted in
order of priority in task lists.
3. Select the task with the activity name "Cancel" on the process instance that you want to cancel, and then click the Details tab.
- 85 -
Page 93
4. Select the Application tab on the Form panel.
Check the content of the application.
5. Click the 0: Cancel button on the Make Choice panel.
The selected application process is cancelled.
Note
- If the 0: Cancel button on the Make Choice panel is clicked without the Details tab being selected or without the Status tab
on the Details tab being selected, the following message is displayed:
All the forms are not accessed in Details Tab. Do you want to continue?
To continue processing without checking the form, click the OK button. To check the form, click the Cancel button, and then
select the Details tab or select the Status tab on the Details tab.
- 86 -
Page 94

- If the error below is issued when cancelling an application, provide the Tenant Administrator with the name of the process
instance that issued the error and the error details, and ask for the error to be investigated and fixed.
When the Details button is clicked on the window shown below, error details are displayed.
- 87 -
Page 95

Chapter 6 Account
This chapter explains account operations.
6.1 Referencing User Information
The Account window can be used to display the user information of logged in users. Perform the following operations to view user
information.
1. Select the Account link on the ROR Console.
The Account window is displayed in a new window.
Item
User ID Displays the user ID of the user
Description Displays an explanation of the user
Role Displays the user's role
Personal Information
E-mail address Displays the user's email address
Name Displays the user's name
Company name or
organization name
Emergency Contact
Information
E-mail address Displays the email address that receives emergency notifications
Telephone number Displays the phone number for emergency contact
Modify account button When clicked, displays the Modiry account window used to change user
Change password button When clicked, displays the Change password window used to change a
Displays the company name or organization name
information
password
Explanation
- 88 -
Page 96

Note
With some directory services operation settings, the Modify account and Change password buttons may not be displayed. Directory
services operation settings are set by the System Administrator.
2. Click the Close button to close the Account window.
6.2 Changing User Information
The Modify account window can be used to change the user information of a logged in user. Perform the following operations to change
the user information:
1. Click the Modify account button on the Account window.
The Modify account window is displayed.
2. On the Modify account window, edit the values of the items to be changed.
Item
User ID Displays the user ID of the user. This cannot be changed.
Description Enter an explanation of the user in up to 256 characters.
Role Displays the user's role. This cannot be changed.
Personal Information
E-mail address Specify the user's email address in up to 64 characters.
This specification is mandatory.
Name Specify the user's name (first name, middle name and last name) using a
maximum of 15 characters for each name.
This specification is mandatory, but the middle name can be omitted.
Company name or
organization name
Specify the company name or organization name in up to 30 characters.
Explanation
- 89 -
Page 97

Item Explanation
Emergency Contact
Information
E-mail address Specify the email address that receives emergency notifications, using up
to 64 characters.
Telephone number Specify the phone number to be used for emergency contact.
3. Click the Confirm button.
4. The window for confirming changed content is displayed. Check the values, and then click the Modify button.
To change the values again, click the Back button to return to the Modify account window.
5. Once the Modify button is clicked, the user information is updated and the modification completion window is displayed.
6. Click the Back to Account button to return to the Account window.
6.3 Changing Passwords
The Change password window can be used to change the password of a logged in user. Perform the following operations to change a
password:
1. Click the Change password button on the Account window.
The Change password window is displayed.
Item
Current password Enter the current password. This specification is mandatory.
New password Enter the new password. Specify between 8 and 64 characters using single-
byte alphanumerics and symbols. The password is case-sensitive. This
specification is mandatory.
New password (confirm) Re-enter the new password for confirmation purposes. This input is
mandatory.
Explanation
2. Enter the current password and the new password, and then click the Change button.
The password is changed and the modification completion window is displayed.
3. Click the Back to Account button to return to the Account window.
- 90 -
Page 98

Glossary
admin client
A terminal (PC) connected to an admin server, which is used to operate the GUI.
admin LAN
A LAN used to manage resources from admin servers.
It connects managed servers, storage, and network devices.
admin server
A server used to operate the manager software of Resource Orchestrator.
agent
The section (program) of Resource Orchestrator that operates on managed servers.
cloning
Creation of a copy of a system disk.
cloning image
A backup of a system disk, which does not contain server-specific information (system node name, IP address, etc.), made during
cloning.
When deploying a cloning image to the system disk of another server, Resource Orchestrator automatically changes server-specific
information to that of the target server.
Cloud Edition
The edition which can be used to provide private cloud environments.
directory service
A service for updating and viewing the names (and associated attributes) of physical/logical resource names scattered across networks,
based on organizational structures and geographical groups using a systematic (tree-shaped structure) management methodology.
Domain
A system that is divided into individual systems using partitioning. Also used to indicate a partition.
Dual-Role Administrators
The administrators with both infrastructure administrator's and tenant administrator's role.
dynamic memory
A function that optimizes physical memory allocation for virtual machines, depending on their execution status on Hyper-V.
global pool
A resource pool that contains resources that can be used by multiple tenants.
It is located in a different location from the tenants.
By configuring a global pool with the attributes of a tenant, it becomes possible for tenant administrators to use the pool.
GUI (Graphical User Interface)
A user interface that displays pictures and icons (pictographic characters), enabling intuitive and easily understandable operation.
Hyper-V
Virtualization software from Microsoft Corporation.
- 91 -
Page 99

Provides a virtualized infrastructure on PC servers, enabling flexible management of operations.
image file
A system image or a cloning image. Also a collective term for them both.
infrastructure administrator
A user who manages the resources comprising a data center.
infra_admin is the role that corresponds to the users who manage resources.
Infrastructure administrators manage all of the resources comprising a resource pool (the global pool and local pools), provide tenant
administrators with resources, and review applications by tenant users to use resources.
LDAP (Lightweight Directory Access Protocol)
A protocol used for accessing Internet standard directories operated using TCP/IP.
LDAP provides functions such as direct searching and viewing of directory services using a web browser.
license
The rights to use specific functions.
Users can use specific functions by purchasing a license for the function and registering it on the manager.
local pool
A resource pool that contains resources that can only be used by a specific tenant.
They are located in tenants.
L-Platform
A resource used for the consolidated operation and management of systems such as multiple-layer systems (Web/AP/DB) comprised
of multiple L-Servers, storage, and network devices.
L-Platform template
A template that contains the specifications for servers, storage, network devices, and images that are configured for an L-Platform.
L-Server
A resource defined using the logical specifications (number of CPUs, amount of memory, disk capacity, number of NICs, etc.) of the
servers, and storage and network devices connected to those servers.
An abbreviation of Logical Server.
L-Server template
A template that defines the number of CPUs, memory capacity, disk capacity, and other specifications for resources to deploy to an
L-Server.
LUN (Logical Unit Number)
A logical unit defined in the channel adapter of a storage unit.
MAC address (Media Access Control address)
A unique identifier that is assigned to Ethernet cards (hardware).
Also referred to as a physical address.
Transmission of data is performed based on this identifier. Described using a combination of the unique identifying numbers managed
by/assigned to each maker by the IEEE, and the numbers that each maker assigns to their hardware.
managed server
A collective term referring to a server that is managed as a component of a system.
- 92 -
Page 100

manager
The section (program) of Resource Orchestrator that operates on admin servers.
It manages and controls resources registered with Resource Orchestrator.
migration
The migration of a VM guest to a different VM host. The following two types of migration are available:
- Cold migration
Migration of an inactive (powered-off) VM guest.
- Live migration
Migration of an active (powered-on) VM guest.
network device
The unit used for registration of network devices.
L2 switches and firewalls fit into this category.
NIC (Network Interface Card)
An interface used to connect a server to a network.
OS
The OS used by an operating server (a physical OS or VM guest).
overcommit
A function to virtually allocate more resources than the actual amount of resources (CPUs and memory) of a server.
This function is used to enable allocation of more disk resources than are mounted in the target server.
physical network adapter
An adapter, such as a LAN, to connect physical servers or VM hosts to a network.
physical OS
An OS that operates directly on a physical server without the use of server virtualization software.
physical server
The same as a "server". Used when it is necessary to distinguish actual servers from virtual servers.
primary server
The physical server that is switched from when performing server switchover.
private cloud
A private form of cloud computing that provides ICT services exclusively within a corporation or organization.
public LAN
A LAN used for operations by managed servers.
Public LANs are established separately from admin LANs.
resource
General term referring to the logical definition of the hardware (such as servers, storage, and network devices) and software that
comprise a system.
- 93 -
 Loading...