

Page 1

Professional Monitor English
Operating Manual
SCENICVIEW P17-3P/P19-3/P19-3P
Page 2

Are there ...
... any technical problems or other questions that you would like help with?
Please contact:
• our Hotline/Help Desk (refer to the enclosed Help Desk List or go to:
"
www.fujitsu-siemens.com/support/")
• your sales partner
• your sales office
The latest information on our products, tips, updates etc. can be found on
our website at: "
www.fujitsu-siemens.com"
Page 3

Page 4

This manual was p roduced by Xerox Global Services
Published by
Fujitsu Siemen s Computers GmbH
AG 12/07
Edition 1
Order no.: A26361-K1240-Z120-7619
Page 5

SCENICVIEW P17-3P/P19-3/P19-3P
Operating Manual
Your LCD screen... 1
Important notes
Getting started
Operation
Notes on ergonomic colour adjustment 27
Troubleshoo
Notes regarding the DIN EN ISO
13406-2 standard
Technica
ting
ldata
18
28
30
31
3
9
Page 6

VESA, DDC and DPMS are registered trademarks of Video Electronics Standards Association.
Copyright © Fujitsu Siemens Computers GmbH 2007
All rights reserved, including in particular rights of translation, reproduction by printing,
copying or similar methods, in part or in whole.
Non-compliance is subject to compensation for damages.
All rights reserved, including rights created by patent grant or registration of a utility model or desig n.
Subject to availability and technical modifications.
No liability for content or printing errors.
Page 7

Contents
Contents
YourLCDscreen... ..................................................................... 1
Target group ............................................................................ 1
Further information ...................................................................... 2
Notational conventions .................................................................. 2
Importantnotes ........................................................................ 3
Safety instructions ...................................................................... 3
Powercable ............................................................................ 4
Transporting the devic
Cleaning the device ..................................................................... 4
FCC Class B Compliance
Declaration of Confor
CE marking ............................................................................ 6
Energy Star ............................................................................ 7
Disposal and recyc
Getting started ......................................................................... 9
Unpacking and checking the delivery . . ................................................... 9
Setting upthe device .................................................................... 10
Setting up an ergonomic video workstation ............................................ 10
Assembly and disassembly of the monitor base ........................................ 12
Adjusting theheight ................................................................. 14
Adjusting theinclination .............................................................. 15
Adjusting therotation ................................................................ 15
Adjusting portrait format ............................................................. 15
Connecting the device . .................................................................. 16
Connecting cables to the monitor . . ................................................... 16
Connecting cables to the computer ................................................... 17
Operation .............................................................................. 18
Switching t
Notes on po
Changing t
Noteson ergonomic colour adjustment ................................................ 27
Trouble
Notes regarding the DIN EN ISO 13406-2 standard . . .................................... 30
Techn
VESAPrese
SUB D
DVI-
he device onand off ..........................................................
wer management ............................................................
he monitorsettings ............................................................
Changing
Changing
shooting .......................................................................
ical data .........................................................................
DDC-compatible VGA interface . ...................................................
t operating modes . . . . . . ...........................................................
frequent operating modes .......................................................
Most
port .............................................................................
Dport ..............................................................................
e ..................................................................
Statement .....................................................
mity ................................................................
ling ..................................................................
the monitor settings with the buttons of the control panel . .....................
the monitor settings using the OSDmenu ....................................
18
20
21
21
22
28
31
32
32
32
33
34
4
5
6
8
A26361-K1240-Z120-7619, edition 1
Page 8

Contents
A26361-K1240-Z120-7619, edition 1
Page 9

Your LCD screen...
Your LCD screen...
has a whole range of useful features and functions, e.g.:
• TFT display (Thin Film Transistor; active matrix)
• minimal space requirements tha
• optimum ergonomic cha racteristics (totally distortion-free, excellent picture
definition and colour purity right into the corners)
• high degree of brightness and g
• high resolution (1280 x 1024)
• presentation of up to 16.7 milli
• automatic scanning of horizontal frequencies from 30 to 82 kHz and refresh rates
(vertical frequencies) from 56 to 76 Hz (absolutely flicker-free )
• digital screen controller with m
• freely adjustable colour alignment for matching the screen colours to the
colours of various input and output devices
• convenient operation via integ
• VESA-DDC compatibility
• Auto pivot function
• VESA-FPMPMI compatibility (Flat Panel Monitor Physical Mounting Interface) –
Mounting device for swivel arm and wall bracket
• Plug&Play capability
• Digital video input (DVI)
• power management f or reducing po
• Compliance with the reco mmendations according to TCO ’03
• the monitor fulfills all GS ("Geprü
This operating manual contains important information you require to start up and run your LCD monitor.
A graphics card (display adapter) with VGA interface or a digital display ada pter with DVI interface
or video signal source with HDMI interface is required to control the LCD monitor. The monitor
processes the data supplied to it by the display adapter. The display adapter or the associated
driver software is responsible for setting the modes (resolution and refresh rate).
When putting the monitor into o peration for the first time, the screen display should be
optimally adapted to the display adapter used and adjusted in accordance with your
needs (see chapter "
Changing the monitor settings", Page 21.
nks to slim casing
ood contrast
on colours (in conjunction with an appropriate display a dapter)
icroprocessor for storing 34 different display modes
rated OSD (O n-S c reen-display) menu
wer consumption when the computer is not in use
fte Sicherheit", Certified Security) requirements.
Target group
You don’t need to be an "expert"
the safety information given i
In the event of any problems occ
A26361-K1240-Z120-7619, edition 1 1
to perform the operations described here. However, please observe
n the operating instructions for the computer and in this manual.
urring, please co ntact your sales outlet or our Help Desk.
Page 10
Your LCD screen...
Further information
Details of how you set the resolution and refresh rate are provided in the documentation
for your display adapter and the associated driver soft ware.
For ergonomic reasons, a screen resolution of 1280 x 1024 pixels is recommended.
Because of the technology used (active matrix) an LCD monitor provides a totally
flicker-free picture even with a refresh rate of 60 Hz.
Notational conventions
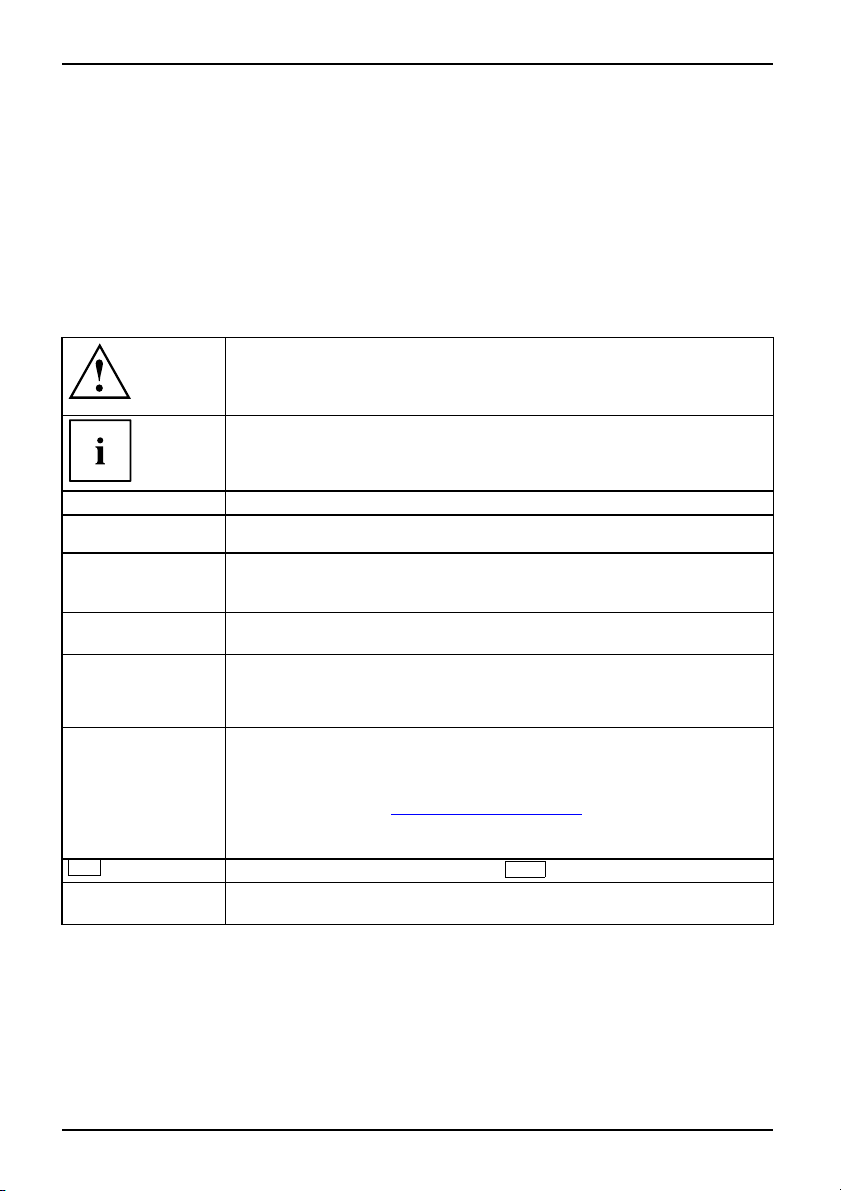
Pay particular attention to text ma rked with this symbol. Failure to observe
this warning will endanger your life, will damage the device or lead to loss
of data. The warranty will be invalidated if you c ause defects in the device
through failure to take notice of this warning
indicates important information that is required to use the device properly.
►
This style
This style
This style
"This style"
Abc
This style
indicates an activity that mu st be pe rformed in the order shown
indicates a result
flags data entered using the keyboard in a program dialog or command
line, e.g. your password (Name123) or a command to launch a program
(start.exe)
refers to information displayed by a program on the screen, e.g.:
Installation is completed
is for
• terms and texts in a software user interface, e.g.: Click Save.
• names of programs or files, e.g. Windows or setup.exe.
is for
• cross-references to another section, e.g. "Safety information"
• cross-references to an external source , e.g. a web address: F o r more
information, go to "
• indicates names of CDs and DVDs as well as names and titles of other
materials, e.g.: "CD/DVD Drivers & Utilities" or "Safety" manual
refers to a key on the keyb
flags concepts and text that are emphasised or highlighted, e.g.: Do not
switch o ff device
www.fujitsu-siemens.com"
oard, e.g.:
F10
2 A26361-K1240-Z120-7619, edition 1
Page 11

Important notes
Important notes
ImportantnotesNotes
In this chapter you will find information regarding safety which it is essential to
take note of when working with your device.
Safety instructions
This device complies with the re
including electronic office ma
questions, contact your sales
• The display surface of the devi
be careful with the display sur
• If the device is brought into the installation site from a cold environment, condensation
can form. Before operating the device, wait until it is absolutely dry and has reached
approximately the same temperature as the installation site.
• When installing and operatin
conditions in Chapter "
"
Setting up an ergonomic vid
• To ensu re sufficient ventilation, the air inlet and outlet openings of the device must be kept clear.
• The device automatically set
Make sure t hat the local mains
• Ensure that the power socket on t he device and the mains outlet are freely acce ssible.
• The ON/OFF switch does not fu
fully from the mains supply,
• The device is equipped with a power cable that complies with safety standards.
• Use the supplied power cable o
• Lay the cables in such a way that they do not create a hazard (danger of tripping)
and cannot be damaged. When connecting the device, observe the relevant
notes in chapter "
• No data transfer cables shou
• Make sure that no objects (e.g. jewellery chains, paper clips, etc.) or liquids get
inside the device (danger of electric shock, short circuit).
• The device is not waterproof!
it from spray water (rain, se
• In emergencies (e.g. damaged casing, elements or cables, penetration of
liquids or foreign matter), switch off the device, disconnect the po wer plug and
contact your sales outlet or our H elp Desk.
• Repairs to the device must o
and incorrect repair may gr
• Only use the screen resolution settings and refresh rates specified in Chapter
"
Technical data", Page 31. Otherwise you may damage the device. If you are in
any doubt, contact your sales outlet or our Help Desk.
Connecting the device", Page 16.
levant safety regulations for data processing equipment,
chines for use in an office environment. If you have any
outlet or our Help Desk.
ce is sensitive to pressure and scratches. You should therefore
face in order to avoid lasting damage (scratches).
g the device, please observe the notes on environmental
nical data", Page 31 as well as the instructions in Chapter
Tech
eo workstation", Page 10.
s itself to the correct voltage within the range from 10 0 V to 240 V.
voltage is neither higher nor lower than this range.
lly disconnect the TV from the mains voltage. To disconnect
remove the power plug from the socket.
nly.
ld be connected or disconnected during a thunderstorm.
Never immerse the device in water and protect
a water).
nly be performed by qualified technicians. Unauthorised opening
eatly endanger the user (electric shock, fire risk).
A26361-K1240-Z120-7619, edition 1 3
Page 12
Important notes
• Use a screen saver with moving images and activa te the power management for
your monitor to prevent still images from "burning in".
• If you operate the device with the swivel arm or wall bracket, it may not be turned by 180°.
• The device must only be operated in landscape mode (0°) and portrait mode (90°). The
control buttons are located in the middle of the bottom of the monitor in landscap e mode
(0°) and at the left-hand side of the monitor in portrait mode (90°).
• Store this manual close to the device. If you pass the device on to third
parties, you should pass this manual on with it.
Power cable
Use the supplied power cable only.
Use the following guidelines if it is necessary to replace the original cable set.
• The female/male receptacles of the cord set must meet IEC 60320/CEE-22 requirements.
• The cable has to be HAR-certified or VDE-certi fied. The mark HAR or
VDE will appear on the outer sheath.
• For devices which are mounted on a desk or table, type SVT or SJT cable sets may be
used. For devices which sit on the floor, only S JT type cable sets may be used.
• The cable set must be selected according to the rated current for your device.
• If necessary, replace the original power cable with a regular grounded 3-core mains lead.
Transporting the device
Device,Monitor,TransportationRetransportation
Transport all parts separately in their original packaging or in a packaging w hich
protects them from knocks and jolts, to t he new site.
Do not unpack them until all transportation manoeuvres are completed.
Cleaning the device
Switch off the device and unplug the power plug.
Do not clean any interior parts yourself, leave this job to a service technician.
Do not use any cleaning agents that contain abrasives o r may corrode plastic.
Ensure that no liquid enters the device.
The display surface of the device is sensitive to pressure and scratches. Clean
it only using a soft, slightly moistened cloth.
The surface of the casing can be cleaned with a dry cloth. If particularly dirty, use a cloth that
has been moistened in mild domestic detergent and then carefully wrung out.
4 A26361-K1240-Z120-7619, edition 1
Page 13

Important notes
FCC Class B Compliance Statement
The following statement applies to the products covered in this manual, unless otherwise speci fied
herein. The statement for other products will appear in the accompanying documentation.
NOTE:
This equipment has bee n tested and found to comply with the limits for a "Class B" digital
device, pursuant to Part 15 of the FCC ru les and meets all requirements of the Canadian
Interference-Causing Equipment Standard ICES-003 for digital apparatus. These limits are
designed to provide reasonable protection against harmful interference i n a residential installation.
This equipment generates, uses and can radiate radio frequency energy and, if not installed
and used in strict accordance with the instructions, may cause harmful interference to radio
communications. How ever, there is no guarantee that interference will not occur in a particular
installation. If this equipment does cause harmful interference to radio or television reception,
which c an be determined by turning the equipment off and on, the user is encouraged to
try to correct the interference by one or more of the following measures:
• Reorient or relocate the receiving antenna.
• Increase the separation between equipment and the receiver.
• Connect the equipment into an outlet on a circuit different from that to
which the receiver is connected.
• Consult the dealer or an experienced radio/TV technician for help.
Fujitsu Siemens Computers GmbH is not responsible for any radio or television interference
caused b y unauthorized modifications of this equipmen t or the substitution or attachment
of connecting cables and eq uipment other than those specified by Fujitsu Siemens
Computers GmbH. The correction of interferences caused by such unauthorized modification,
substitution or attachment w ill be the responsibility of the user.
The use of shielded I/O cables is required when connecting this equipment to any an d all optional
peripheral or host devices. Failure to do so may violate FCC and ICES rules.
A26361-K1240-Z120-7619, edition 1 5
Page 14
Important notes
Declaration of C onformity
This device complies with Part 15 of the FCC Rules. Operation is subject to the following two
conditions: (1 ) this device may not cause harmful interference, and (2) this device must accept
any interference received, including interference that may cause undesired operation.
Product name:
Trade name:
Model number(s): SCENICVIEW P17-3P/P19-3/P19-3P
Name of responsible party: Fujitsu Siemens Computers In
Contact person: Schroettle-Henning, Bernd
Phone No.:
Fax No.:
We, Fujitsu Siemens Computers Inc., hereby declare that the equipment bearing the trade
name and model number specified above was tested confirming to the applicable FCC
Rules under the most accurate measurement st anda rds possible, and that all the necessary
steps have been taken and are in force to assure that production units of the s ame
equipment will continue to comply with the Commissions requirements.
Colour LCD Monitor
Fujitsu Siemens Computers Inc.
c.
1250E. Arques Avenue
Sunnyvale, CA 94 085 U.S.A.
(408) 834-0306
(408) 746-8299
CE marking
The shipped version of this device complies with the requirements of EEC
directives 2004/108/EC "Electromagnetic compatibility" and 2006/95/EC
"Low voltage directive".
6 A26361-K1240-Z120-7619, edition 1
Page 15

Important notes
Energy Star
EnergyStar
The EPA estimates that computer equipment uses 5 % percent of all business electricity
and that this is growing rapidly. If all d esktop PCs and peripherals enter a low-power mode
when not in use, the overall savings in electricity could amount to $2 billion annually.
These savings could also prevent the emission of 20 million tons of carb on dioxide into
the atmosphere - the equivalent of 5 million automobiles.
As an Energy Star Partner, Fujitsu Siemens Computers GmbH has determined that this
product meets the Energy Star guidelines for energy efficiency.
The Fujitsu Siemens LCD colour monitor is equipped with
a power management system which reduces the power
draw in OFF mode to less than 1 W. With this new power
management the LCD monitor satisfies the requirements for
the U.S. Environmental Protection Agency’s ( EPA) Energy Star
Computers awa rd.
A26361-K1240-Z120-7619, edition 1 7
Page 16
Important notes
Disposal and recycling
This device has been manufactured to the highest possible degree from materials which
can be recycled or disposed of in a manner that is not environmentally damaging. The
device may be taken back after use to be recycled, provided that it is returned in a
condition that is the result of normal use. Any components which cannot be recycled
will be disposed of in an environmentally acceptable manner.
The device must be disposed of in accordance with the local regulations for dispo sal of
special wa ste. The screen background lighting contains mercury. You must observe the
applicable handling and disposal safety regulations for fluorescent tubes.
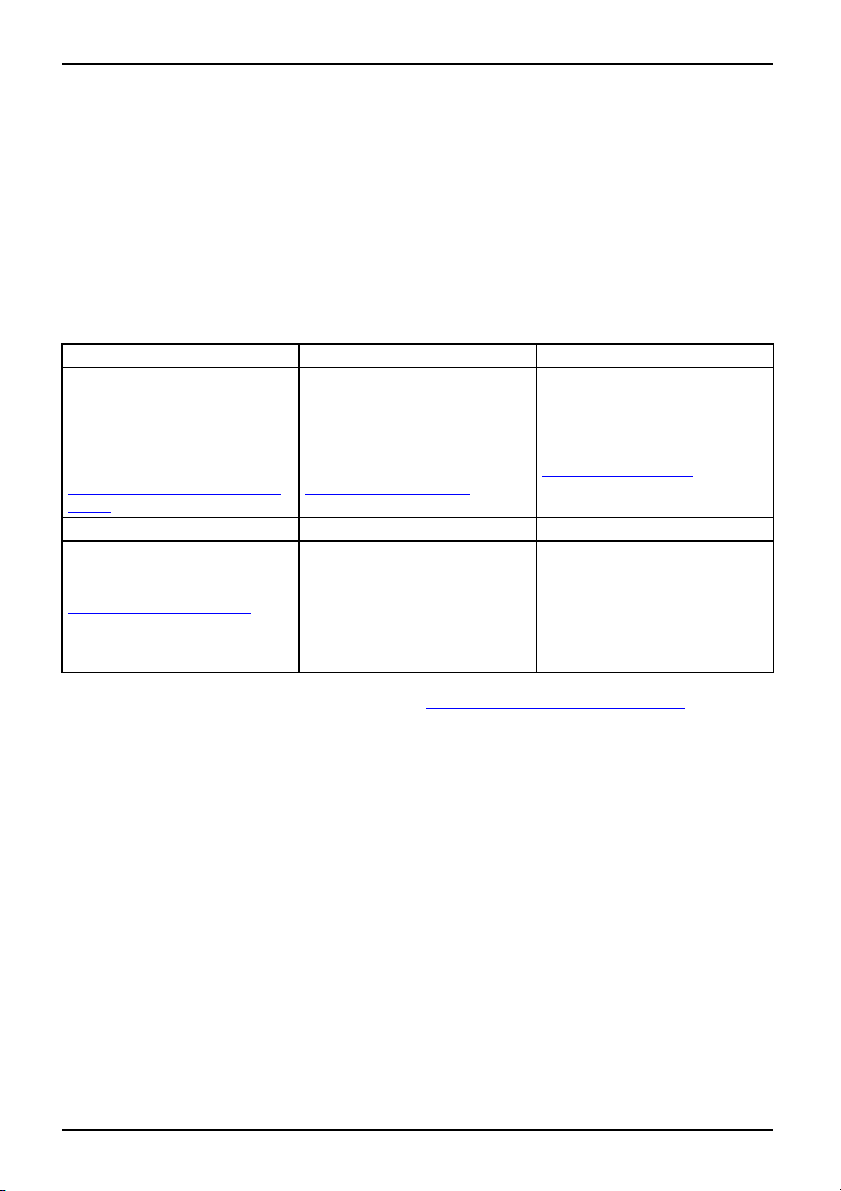
If you have any questions on disp osal, please contact your local office, our Help Desk, or:
Germany
Fujitsu Siemens
Computers GmbH
Remarketing and Recyclin
D-33106 Paderborn
Tel.: +49 5251 / 81 80 10
Fax: +49 5251 / 81 80 15
http://www.fujitsu-s
"
/wvm"
Asia
Taiwan: Environmental
Protection Administration
Executive Yuan R.O.C.
http://recycle.epa. gov.tw"
"
iemens.de
Belgium
RECUPEL
Boulevard Reyers, 80
g
B-1030 Brussels
Tel.: +32 2 / 706 86 16
Fax: +322/7068613
E-mail: [email protected]
http://www.recupel.b
"
USA
Fujitsu Siemens Computers
Inc.1250E. Arques Avenue
Sunnyvale, CA 94085 U.S.A.
Contact: Schroettle-Henning,
Bernd
Phone No.: (408) 834-0306
Fax No.: (408) 746-8299
Switzerland
SWICO Swiss Association for
Information, Communicatio
and Organization Technol
For a list of SWICO
e
e"
collection points, see:
"
http://www.swico.ch"
ns
ogy
.
For more informatio
8 A26361-K1240-Z120-7619, edition 1
n on this subject, please go to "
www.fujitsu-siemens.com/recyc ling".
Page 17
Getting started
Unpacking and checking the delivery
The display surface of the device is sensitive to pressure and scratches.
Always hold the device by the casing!
The complete device package includes:
• one monitor
• one data cable (D-SUB)
• one data c able (DVI-D)
• one audio cable
• one power cable
• one CD with software and docum
• one Warranty Booklet
• one "Quick Start Guide"
• one "Safety" manual
entation
Getting started
► Unpack all the individual part
► Check the contents of the package for any visible damage caused during transport.
► Check whether the delivery conf
► Should you discover that the delivery does not correspond to the delivery
note, notify your local sales outlet immediately.
Do not discard the original packing material of the devices. You may need the
packaging in the future if you need to transport your device.
A26361-K1240-Z120-7619, edition 1 9
s.
orms to the details in the delivery note.
Page 18
Getting started
Setting up the device
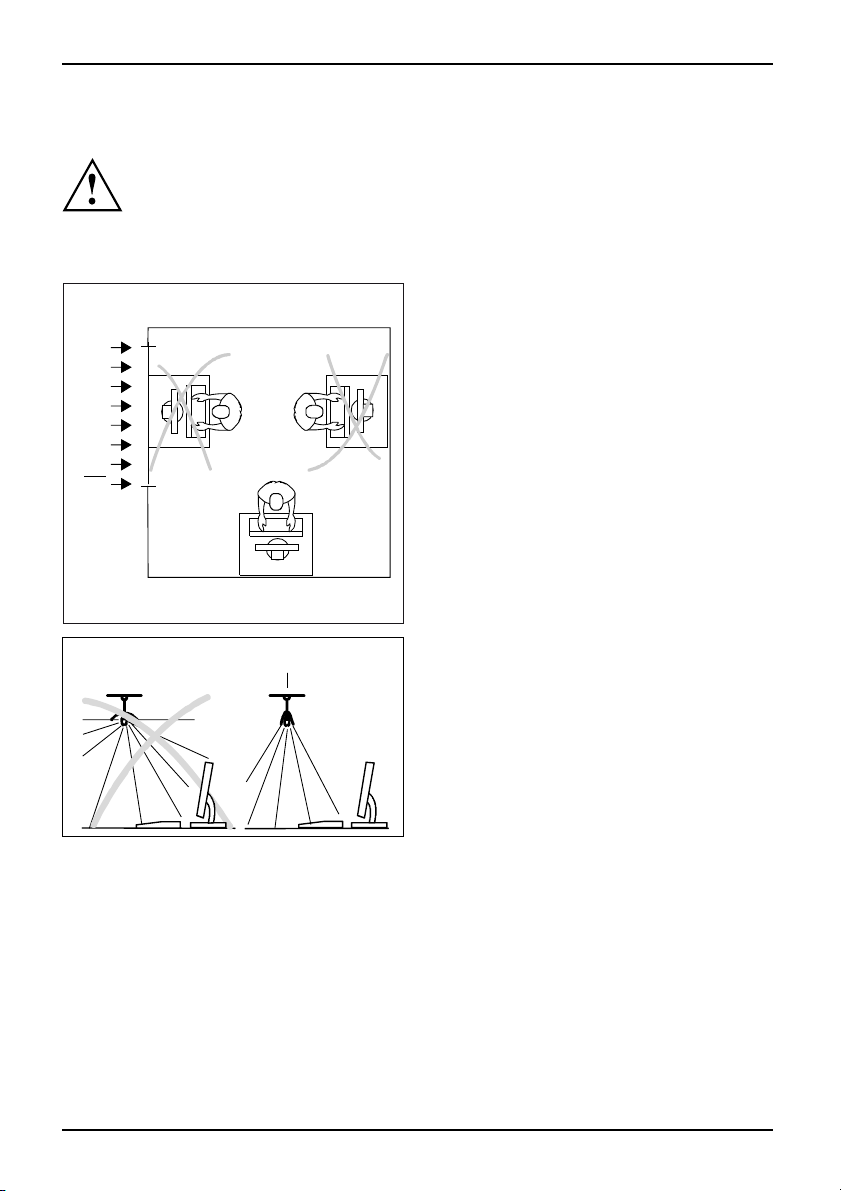
To ensure sufficient ventilation, the air inlet and outlet openings of
the device must be kept clear.
Settingupanergonomicvid
1
1
eo workstation
► Do not position the video workstation
opposite a window (1).
► Position the mon
of a light sourc
itor outside the reach
e(1).
10 A26361-K1240-Z120-7619, edition 1
Page 19
Getting started
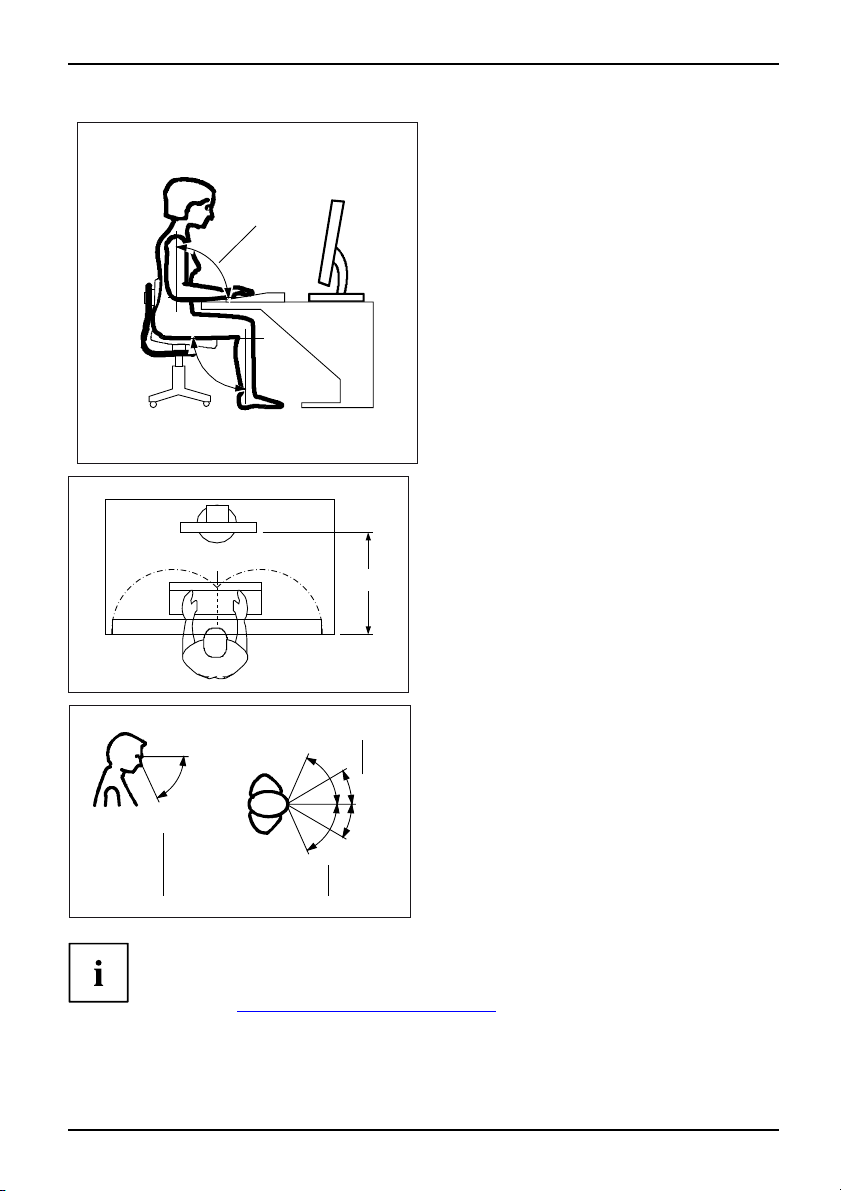
► Position the keyboard where it is
easiest to reach (1).
1
► Position the monitor so that the eye distance
to the screen (1) is around 50 cm.
1
50 cm
1
0
65
► Position the monitor for optimum viewing
(1). The monitor should under no
circumstances fall outside the permissible
viewing space (2).
30
60
30
65
22
Depending on the situation, it may be advisable to use a swivel arm or wall
bracket (VESA FPMPMI), which are available from specialist dealers. For
this purpose the monitor base must be removed beforehand as described
in Chapter "
A26361-K1240-Z120-7619, edition 1 11
Removing monitor base", Page 14.
Page 20
Getting started
Assembly and disassembly of the monitor base
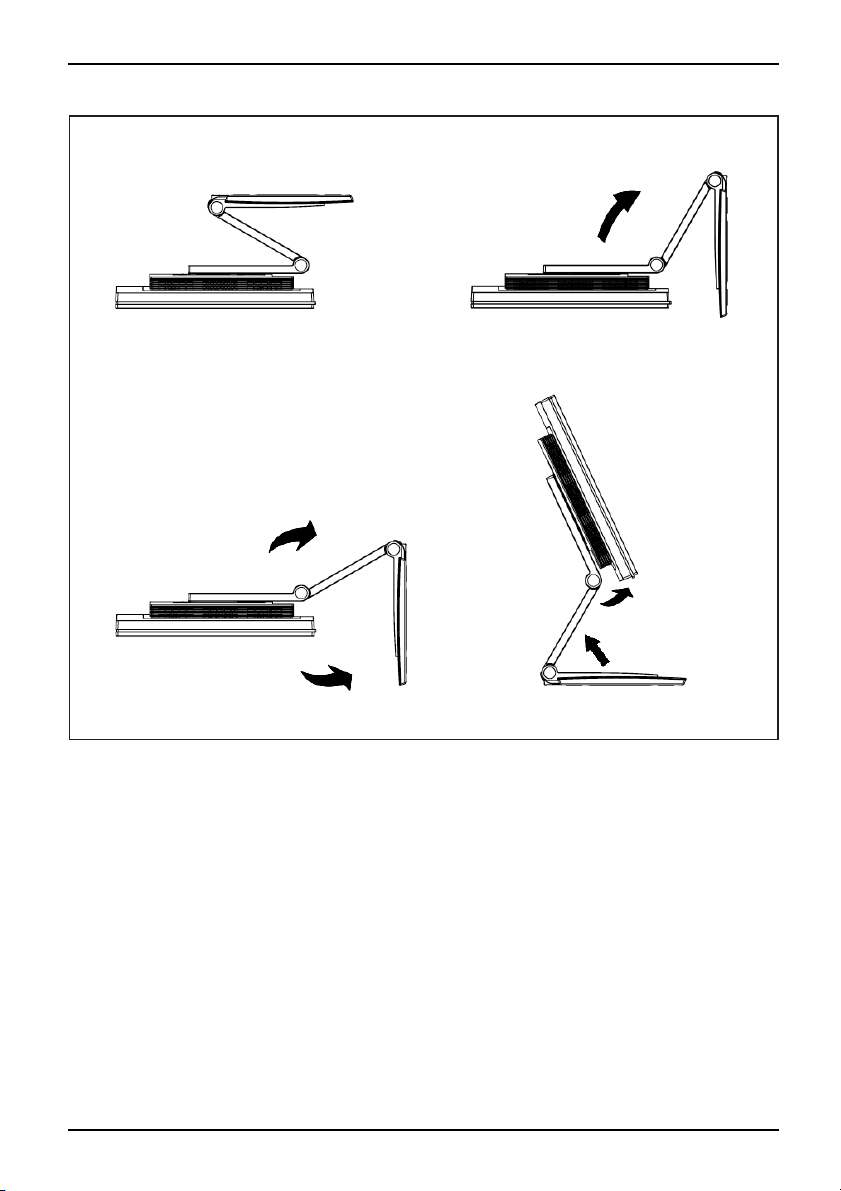
Folding out the m onitor base
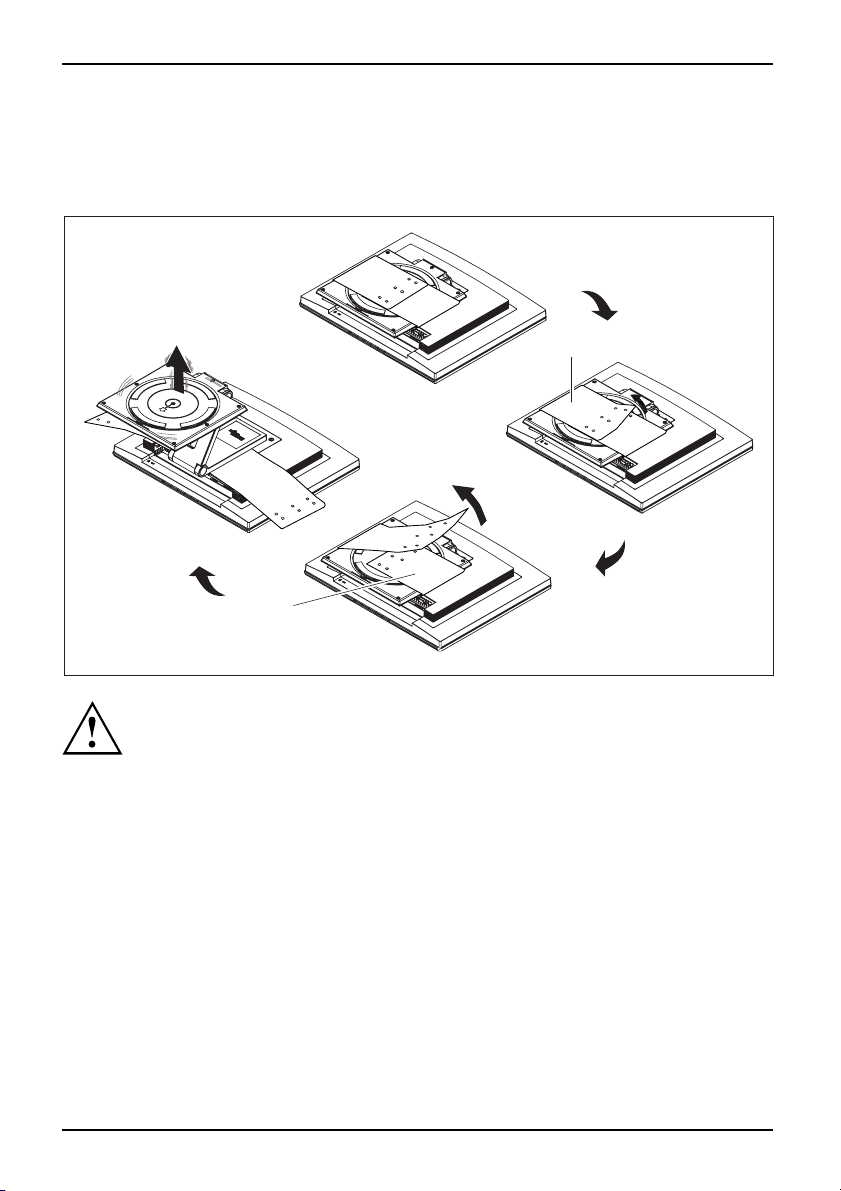
On delivery, the lower part of the monitor base is folded up and secured to the monitor by a co llar.
1
2
The monitor bas
► Lay the monitor on its face on a soft surface.
► First release one of the collar fasteners (1).
► Carefully release the second collar fastener (2).
The monitor base can now be folded out.
12 A26361-K1240-Z120-7619, edition 1
e springs up about 5 cm when the collar is released.
Page 21
Getting started
► Proceed according to the four steps (1-4) shown in the illustrations to fold out the monitor base.
A26361-K1240-Z120-7619, edition 1 13
Page 22
Getting started
Removing monitor base
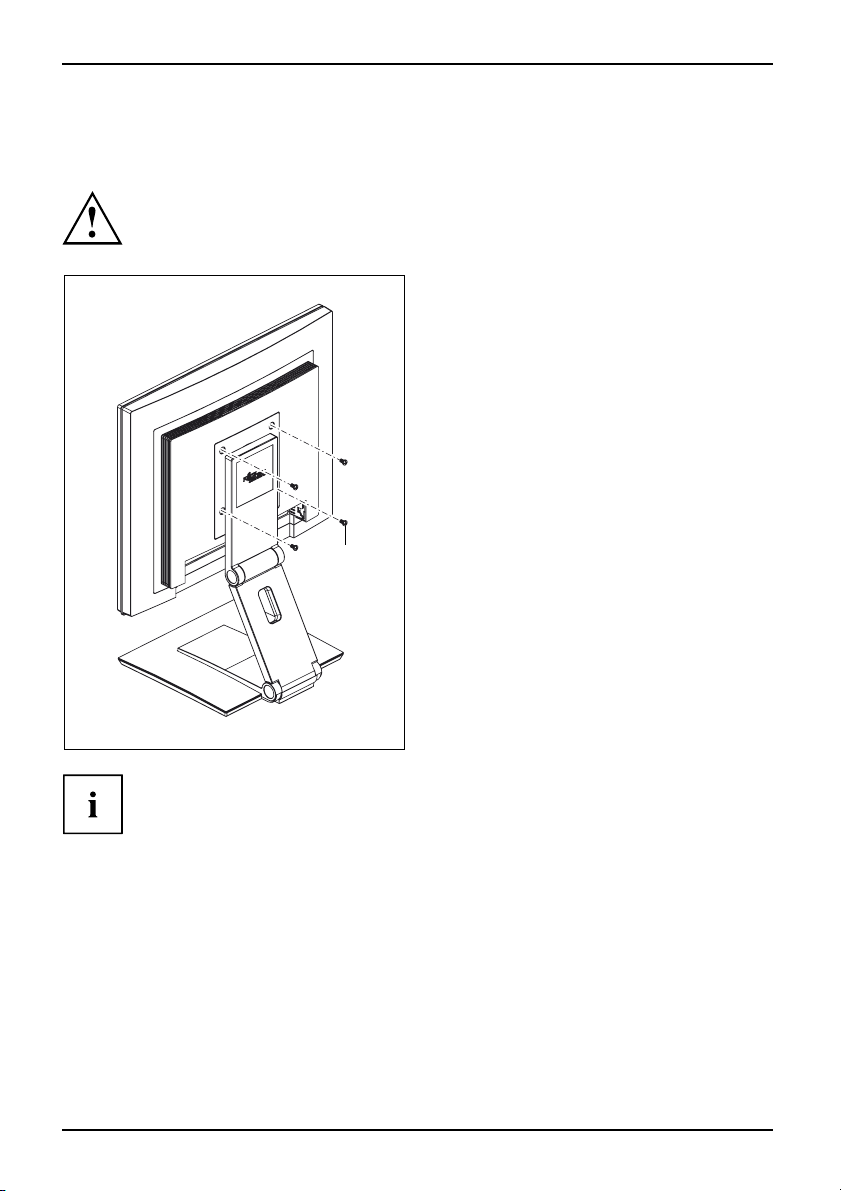
Before you c an use a swivel arm or a wall bracket, you must remove the monitor base.
The display surface is susceptible to scratching!
► Switch off the monitor and pull the power
plug out of the power socket.
► Lay the monitor on its face on a soft surface.
► Remove the cover and disconn ect all cables.
► Remove the screws (1) on the rear
of the monitor.
You can now mount a swivel arm or
a wall bracket as per VESA FPMPMI
with 100 mm hole spacing.
1
For instructions on how to mount the swivel arm or wall bracket, please see
the documentation for the swivel arm or wall bracket.
Adjusting the height
The height of the monitor can be adjusted by approximately 120 mm.
► Grasp the monitor w ith both hands on the right and left edge of the casing
and move it upward or downward .
14 A26361-K1240-Z120-7619, edition 1
Page 23
Getting started
Adjusting the inclination
The inclination of the monitor can be adjusted by –2° (forward) and +35° (to
the back) from its vertical position.
► Hold the monitor with both hands on the left and right sides of the casing
and move it to the desired angle.
Adjusting the rotation
The monitor can be rotated by ± 9
► Grasp the monitor with both han
and turn it to the desired posit
0° from its centre position.
ds on the right and left edge of the casing
ion.
Adjusting portrait format
The monitor can be rotated from horizontal format (landscape mode) into
vertical format (portrait mode).
► Grasp the monitor with both hands on the right and left edge of the casing, move it into
the highest position and turn it clockwise until it is in the portrait position.
► To set the screen back into landscape mode, rotate it back anti-clockwise.
The screen supports the "Auto pivot" function with the associated software
(DisplayView Click, Pivot), which is used to adapt the screen display to
the orientation of the screen. This software is included in the delivery
(CD-ROM) and must be installed on your computer.
A26361-K1240-Z120-7619, edition 1 15
Page 24
Getting started
Connecting the device
Please obse rve the safety information in "Important notes", Page 3.
CE conformance and optimum picture quality are guaranteed only if
you use the data cables supplied.
► Switch off the monitor and the computer.
► Disconnect the power plug from the computer.
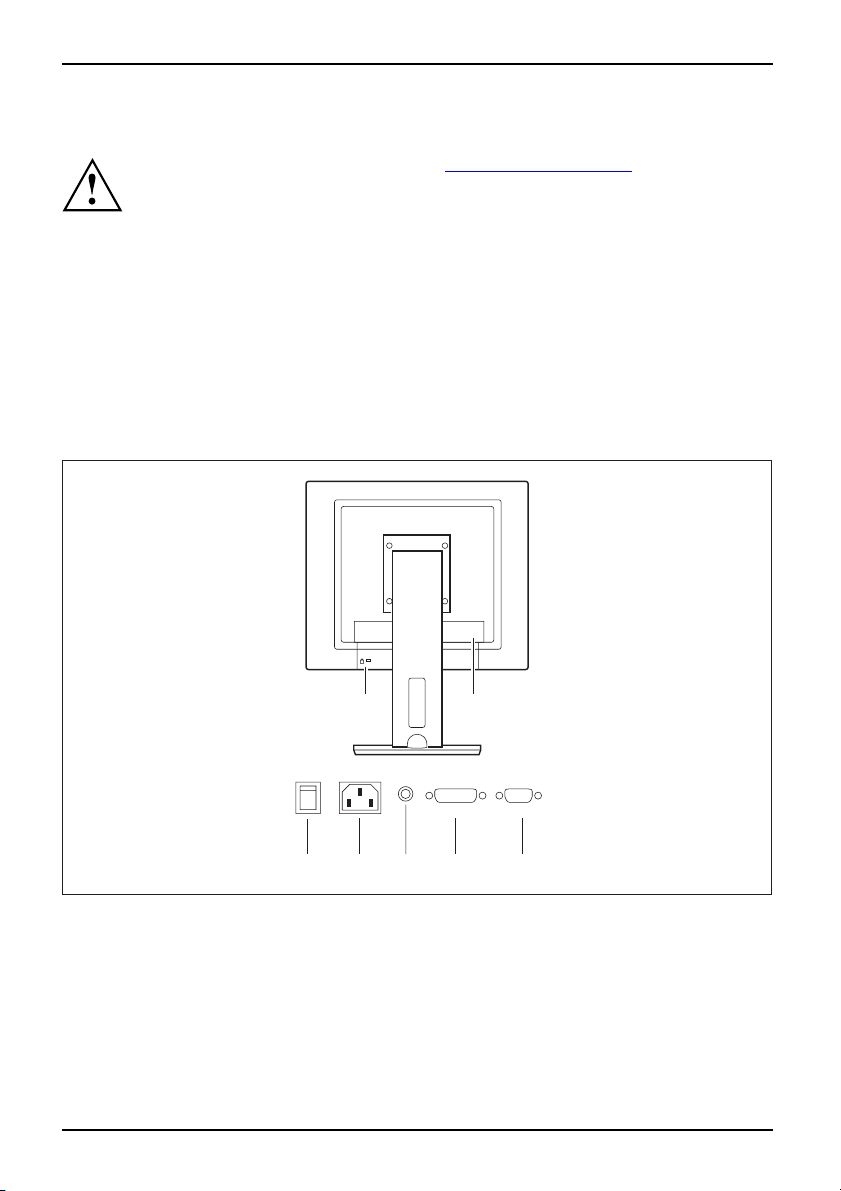
Connecting cables to the mon
The monitor ports are protected by a cover.
The data cables supplied have two 15-pin D-SUB connectors or two 24-pin DVI
connectors for connection to the monitor and to the computer.
Information on the computer connections and interfaces is contained in the
operating manua l for the computer.
3 4 6 75
itor
K
21
1 = Security slot for "Kensington Lock" 2 = Cover position
► Remove the cover (2).
► Select the appropriate data cable for your computer.
16 A26361-K1240-Z120-7619, edition 1
Page 25
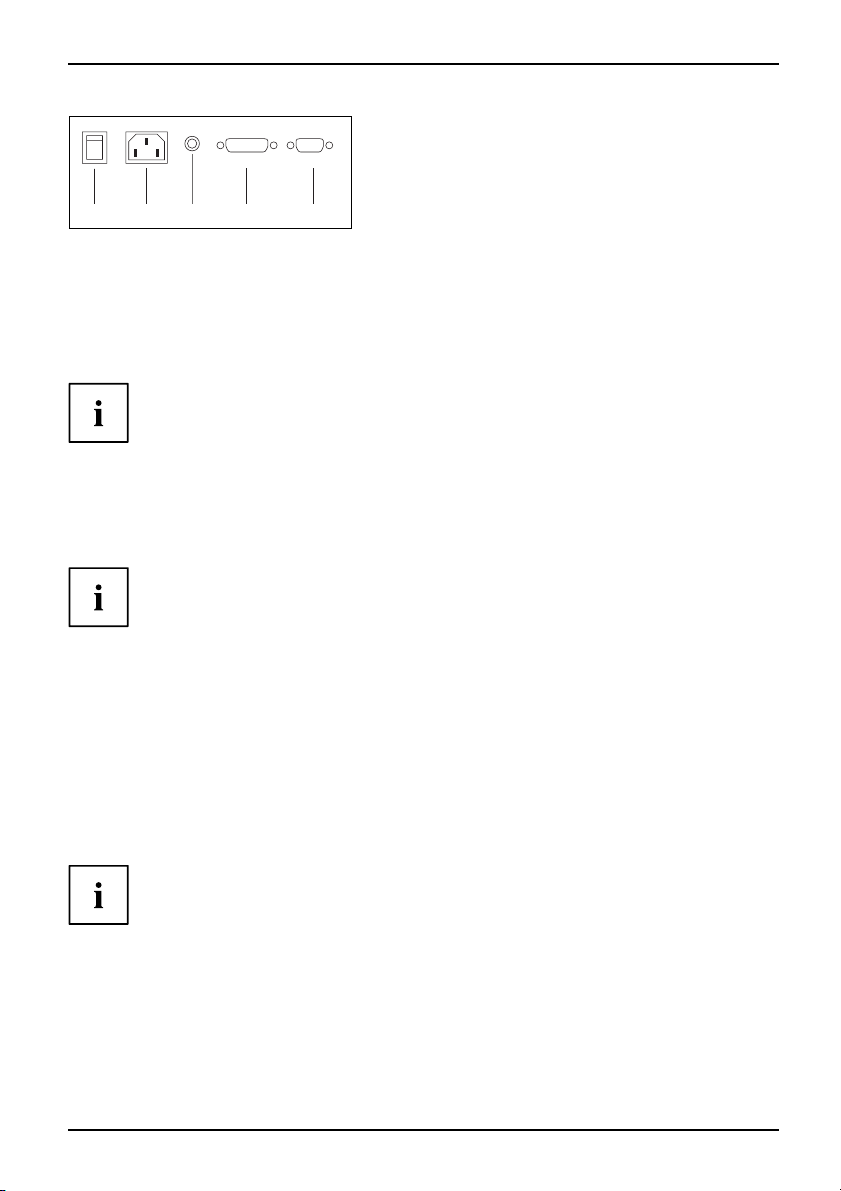
3 4 6 75
Getting started
3 = Main switch
4=Powersocket
5 = AUDIO-IN socket
► Connect one of the connectors of the data cable to the D-SUB connector (9) or the DVI-D
connector (8) on the monitor and secure the plug-in connect ion by tightening the safety scre ws.
The monitor automatically detects the input when only one signal source is connected.
► Insert one connector of the audio cable in the AUDIO IN (6) socket on the
monitor and make su re it is properly engaged.
► Plug the power cable supplied into the power socket (5) of the monitor.
► Mount the cover (2) over the connections.
A Kensington lock can be mounted in the security slot (1) to prevent the monitor
from being stolen. A Kensington lock is not supplied with the monitor.
6 = DVI-D socket (DVI)
7 = D-SUB socket (VGA)
Connecting cables to the computer
Information on th e computer connections and interfaces is contained in the
operating manual for your computer.
► Connect the data cable to the (active) monitor port on the computer and secure
the plug-in connection by tightening the safety screws.
► Insert the other plug of the audio cable in the audio output of the computer.
► Plug the power co nnector of the monitor into a properly grounded mains outlet.
► Plug the power connector of the computer into a properly grounded mains outlet.
If your computer has two monitor ports ("onboard" screen controller and separate
display adapter), the monitor port for the separate display adap ter is active as standard.
A26361-K1240-Z120-7619, edition 1 17
Page 26
Operation
Operation
Switching the device on and off
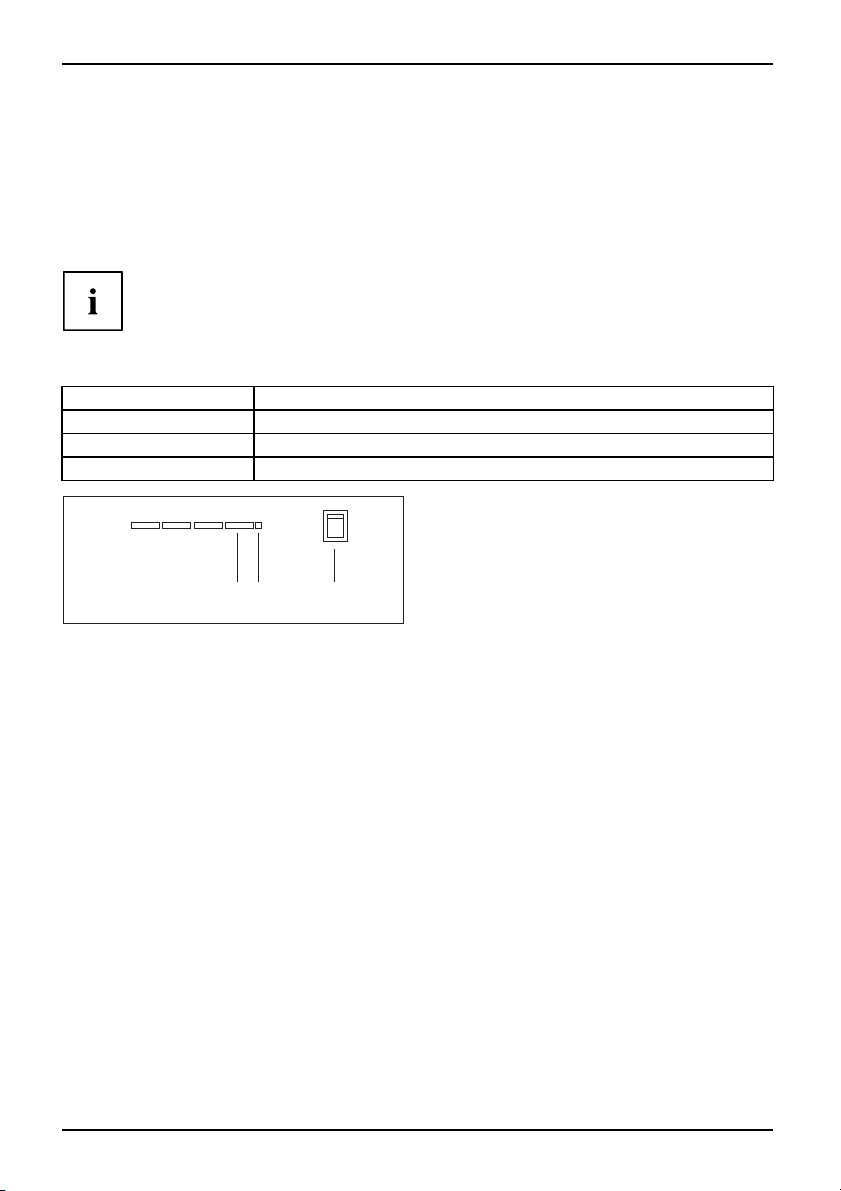
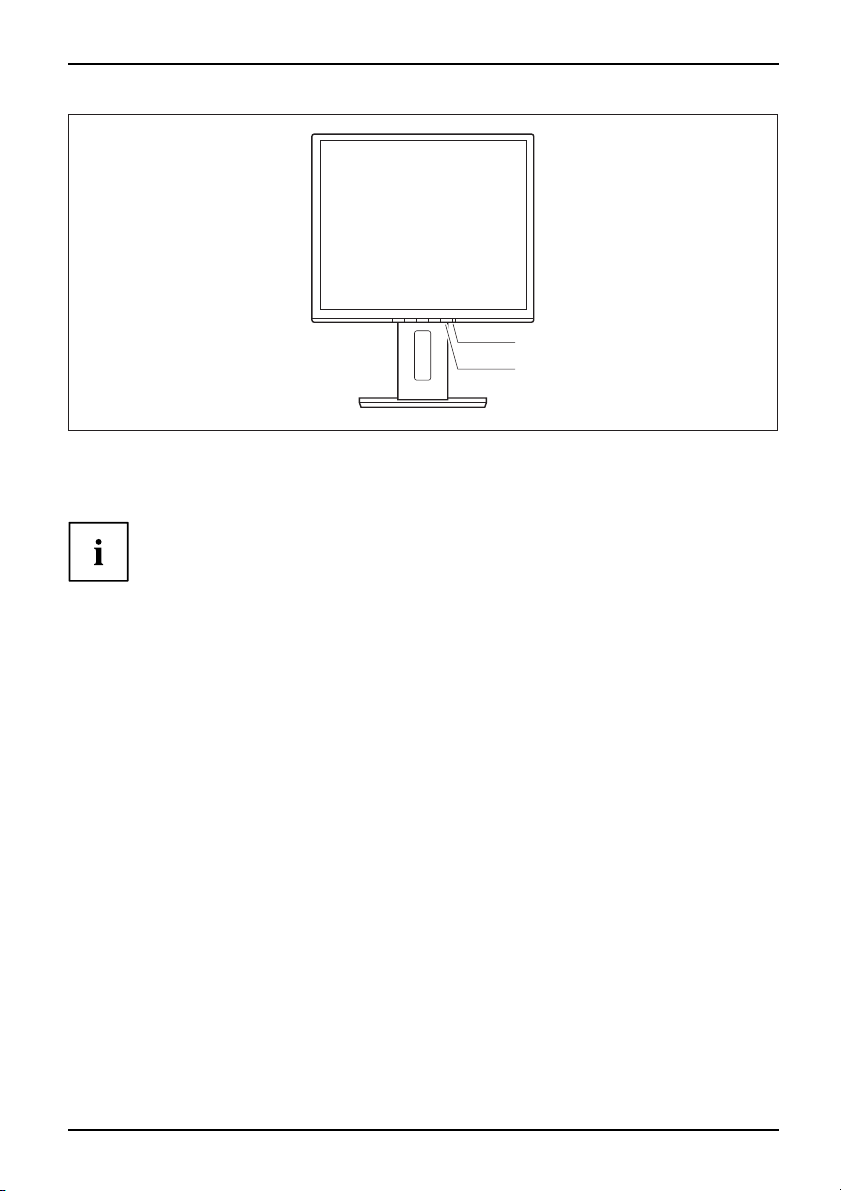
The main switch (3) at the rear and the ON/OFF switch (1) at the front are
used for switching the monitor on and off.
Press the button s from the bottom up.
The colour of the LED indicator changes as follows:
LED indicator Status
blue Monitor and computer are switched on.
orange
does not light up
Monitor is not receiving a video signal or is in power saving mode.
Monitor is switched off.
321
1 = ON/OFF switch
2 = Power indicator
► First switch the device off at the main switch (3).
18 A26361-K1240-Z120-7619, edition 1
3 = Main switch
Page 27
2
1
1 = ON/OFF switch 2 = Power indicator
► Switch the device on again with the ON/OFF switch (1).
Only switch the computer on once you have switched the monito r on.
Operation
A26361-K1240-Z120-7619, edition 1 19
Page 28
Operation
Notes on power management
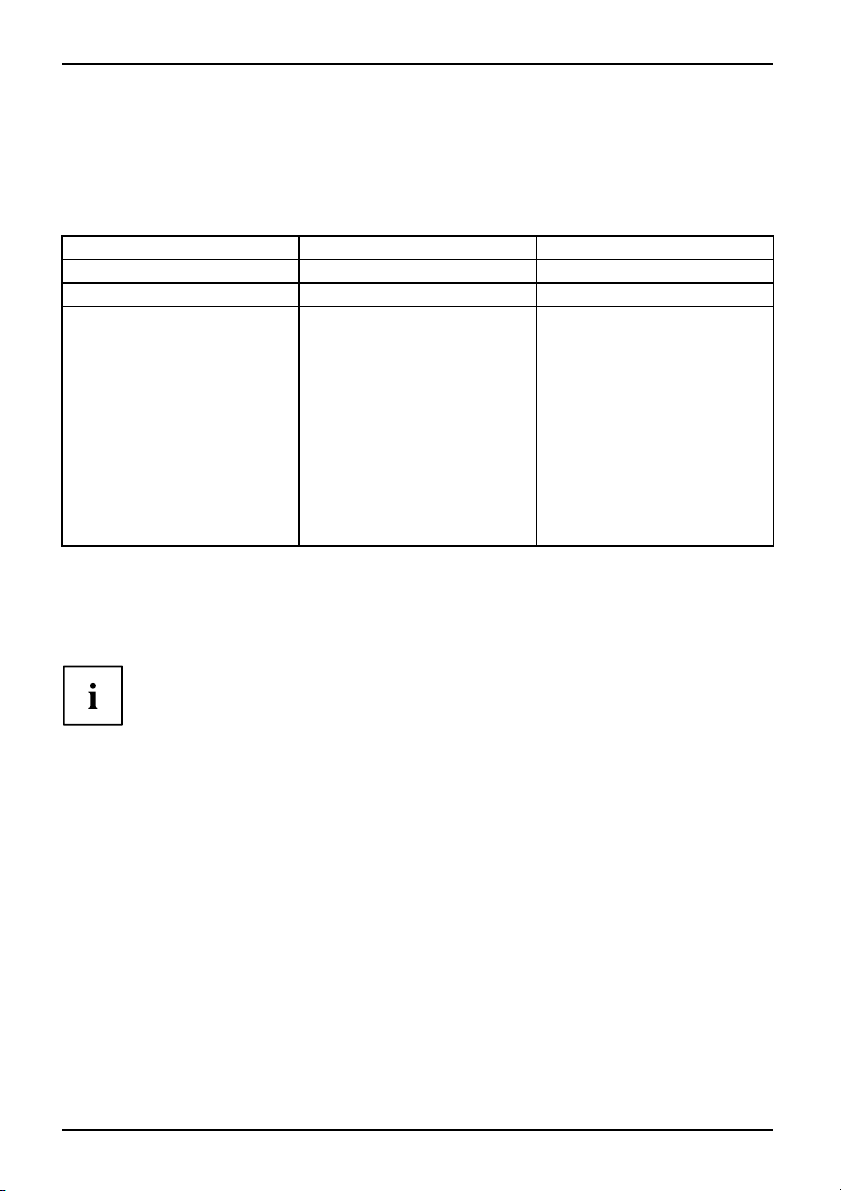
If your computer is equipped with power management, the monitor can support this function
fully. The monitor does not distinguish between the individual power management modes of
the computer (standby mode, s usp end mode and OFF mode), as it is capable of immediately
switching into the mode with the highest energy-saving effect.
Stage ON Power management mode
Power indicator lights up blue lights up orange
Function the monitor is working normally the screen is dark
Power consumption (typical)
P17-3P
Max. brightness 34 W
acc. to EPA 29 W
P19-3
Max. brightness 38 W
acc. to EPA 26 W
P19-3P
Max. brightness 38 W
acc. to EPA 31 W
reducedto<1W
If your computer detects inac
to reduce the power consumpti
the monitor changes colour t
Once an input is made at the com
For detailed information on
the operating manual or tech
When the monitor is switched
management system a power
feed the circuit for redra
To completely switch off t
with the main switch at the
20 A26361-K1240-Z120-7619, edition 1
tivity (no input) it sends an appropriate signal to the monitor
on (power management mode). The power indicator of
o indicate the status change.
puter t h e screen contents are redrawn.
how power management mode operates refer to
nical manual of the computer.
to the power management mode by the power
consumption of up to 1 W is maintained to
wing the screen contents.
he power consumption, switch off the monitor
rear.
Page 29
Changing the monitor settings
When putting the monitor into operation for the first time, the screen display should
be optimally adapted to the display adapter used.
Operation
Changing the monitor settings
with the buttons
of the control panel
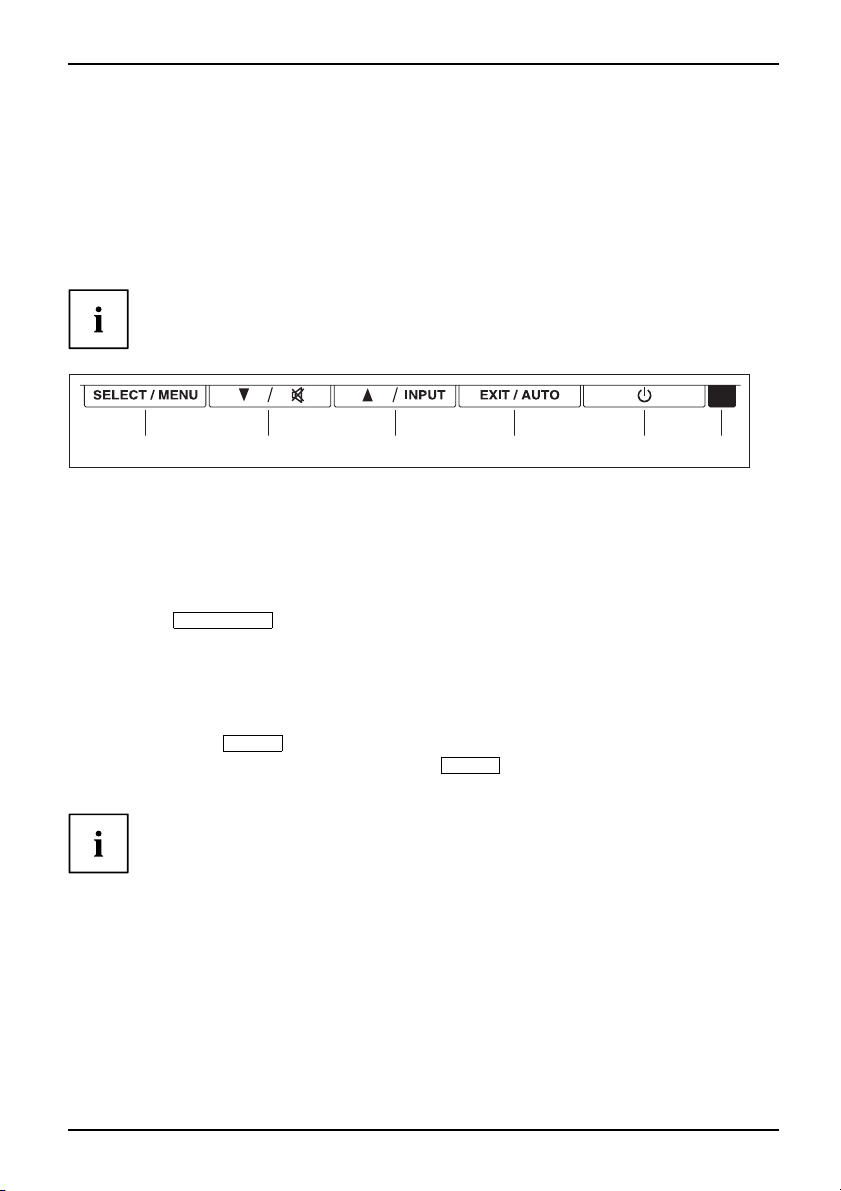
The buttons of the control panel have tw o functions. With the OSD menu not
activated, you can make the following settings directly:
1 = SELECT / MENU button
2 = Forward / Mute button
3 = Back / INPUT button
Performing auto-adjustment of the monitor
► Press the
The Auto Processing message appears
Picture quality and position are set to optimum values for your system.
EXIT / AUTO
button for about 1 second.
Selecting the input signal (D-SUB/DVI_D)
► Press the Back /
► Press the Forward / Mute button or the Back /
monitor connection (analog D-SUB or digital DVI-D).
INPUT
button to open the Input select setting window.
4 = EXIT / AUTO button
5 = ON/OFF switch
6 = Power indicator
INPUT
button to select the desired
643215
This setting window can also be called when the OSD menu is locked.
Activating/deactivating muting
► Press the Mute button to switch the sound off and on ag ain.
The Action w as executed message appears.
A26361-K1240-Z120-7619, edition 1 21
Page 30
Operation
Locking the OSD menu
The OSD menu can be locked to prevent accidental or unauthorised changes to the monitor settings.
► Press and hold the
on the monitor with the ON/OFF switch.
The Action was executed message appears.
Please proceed in the same m ann er to release the locked OSD menu again.
SELECT/MENU
button for a few seconds while you switch
Locking the ON/OFF button
The ON/OFF switch can be locked to prevent accidental or unauthorised
changes to the monitor settings.
► Press and hold the Forwards / Mute button and the B ack /
at the same time for a few seconds.
The Action was executed message appears.
Please proceed in the same manner to release the locked ON/OFF switch again.
INPUT
button
Changing the monitor setti
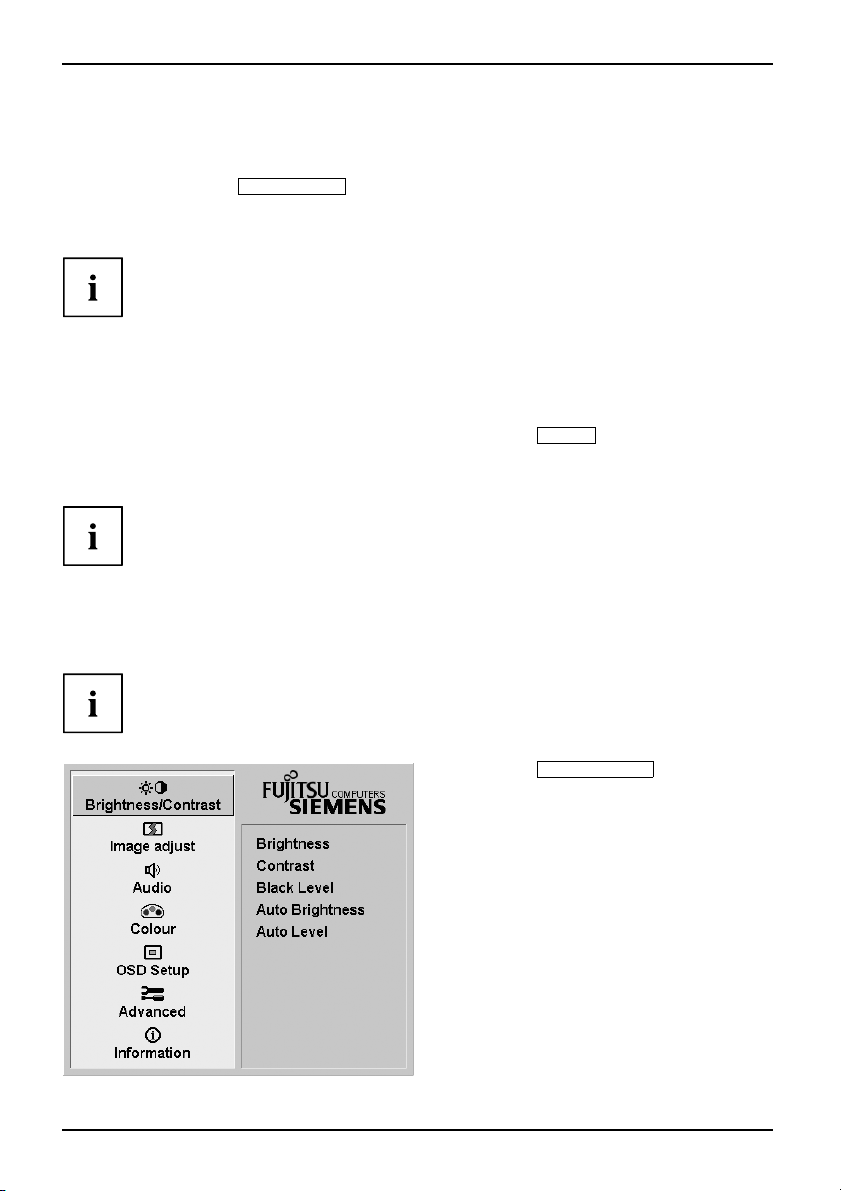
With the buttons on the control panel, call up and use the integrated OSD (On-Screen display) menu.
The OSD menu is available in different languages. The English menu name s
are used in the following description (default setting). You can select a different
language using the Language OSD function in the OSD Setup.
22 A26361-K1240-Z120-7619, edition 1
ngs using the OSD menu
► Press the
activate the OSD menu.
The main menu appears wit
for the setting function
The first icon (Brightness/Contrast)is
highlighted and the associated functions are
displayed in the right-hand menu field.
SELECT / MENU
s.
button to
h icons
Page 31
Operation
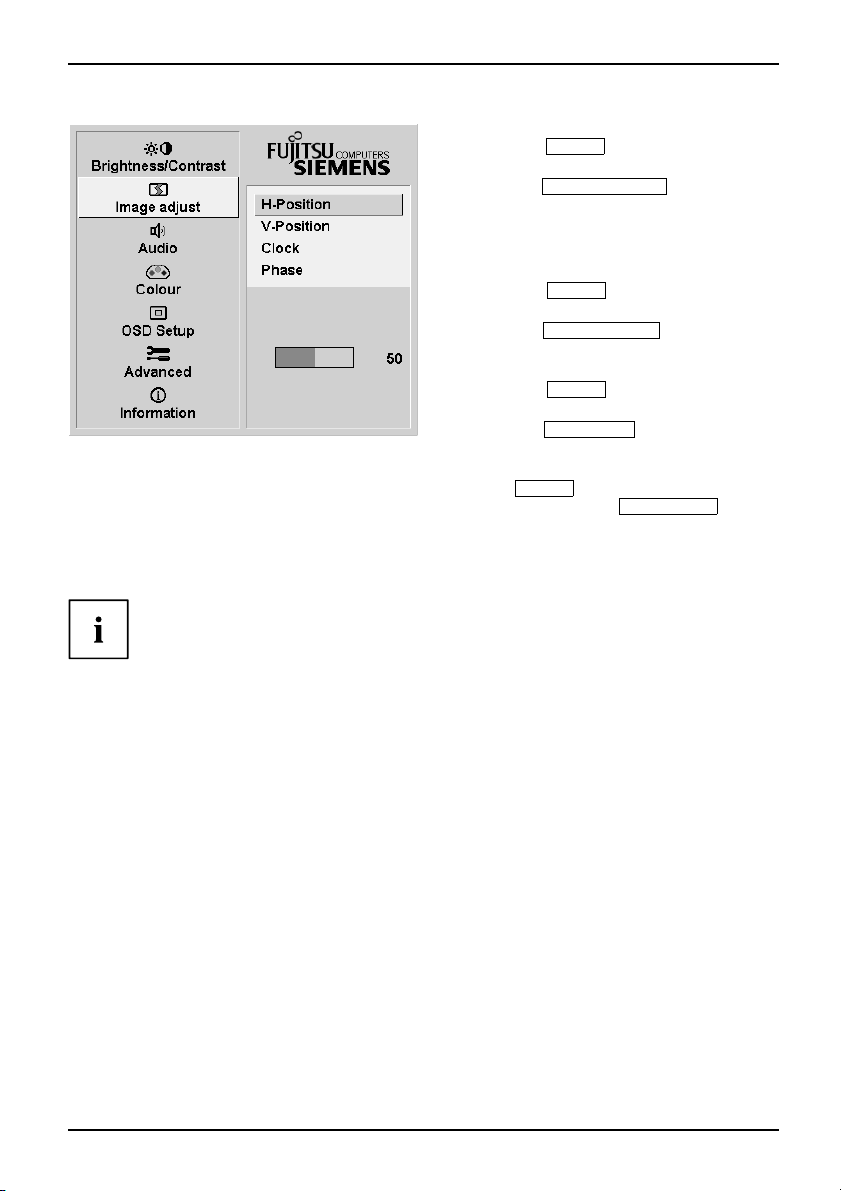
► Press the Forwards / Mute button or
INPUT
the Back /
button to highlight a
different icon (e.g. Image adjust).
► Press the
SELECT / MENU
button to
select the highlighted icon.
The Image adjust setting window is displayed.
The first function H-position is selected.
► Press the Forwards / Mute button or
INPUT
the Back /
button to highlight
a different fun ction.
► Press the
SELECT / MENU
button to
select the highlighted function.
► Press the Forwards / Mute button or
INPUT
the Back /
button to highlight
a different fun ction.
► Press the
EXIT / AUTO
button to
exit the function.
► Press the Forwards / Mute button or the
INPUT
Back /
function or press the
button to highlight a different
EXIT / AUTO
button
to return to the main menu.
All changes are stored automatically.
If you want to change other settings, select the corresponding function from the OSD
main menu. All possible adjustments of the main menu are described in the following.
A26361-K1240-Z120-7619, edition 1 23
Page 32
Operation
OSD menu functions
The OSD menu for analog monitor operation is described below. During
digital operation some functions are not available, as they are not required
due to the digital transmission technology used.
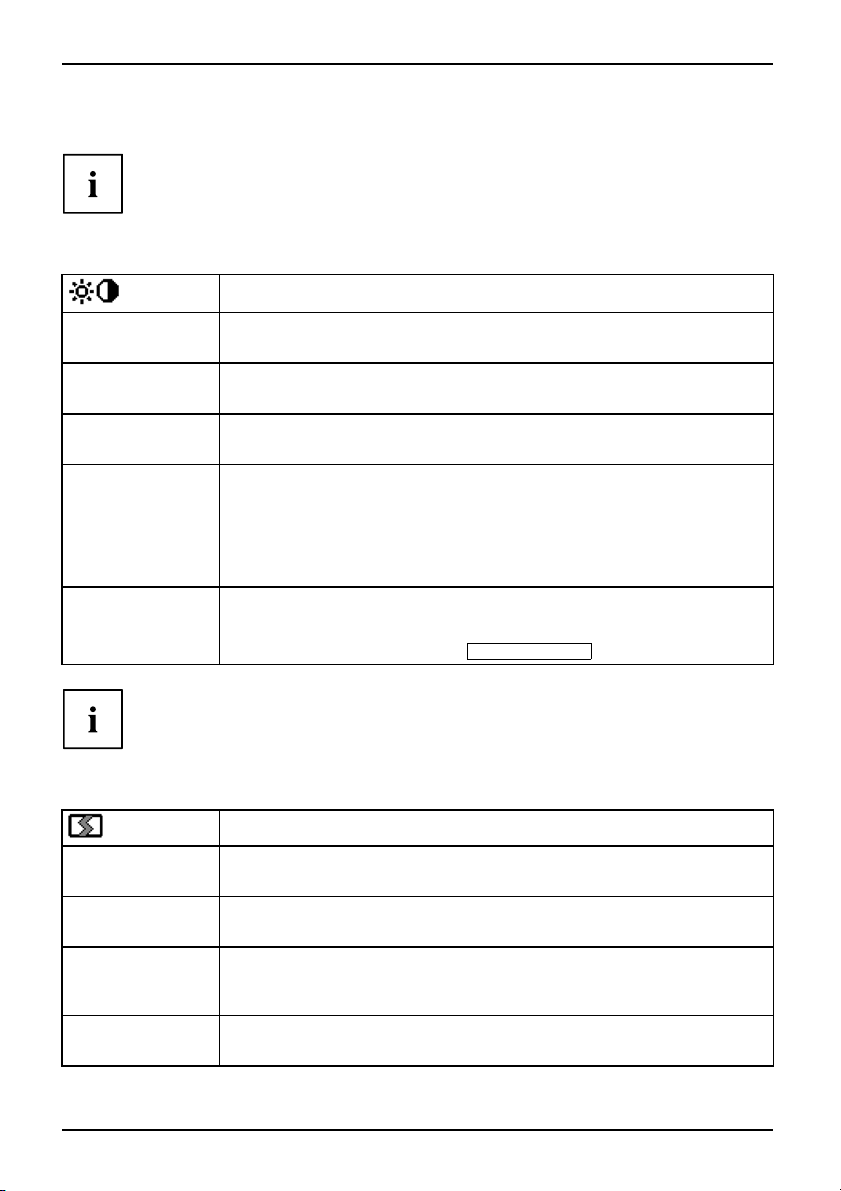
Adjusting the brightness and contrast
Call up the Brightness/Contrast setting window
Brightness
Contrast
Black level
Auto brightness
Auto level
If the contrast is set too high, bright surfaces can no longer be distinguished from very
bright surfaces. If the contrast is set too low, the maximum brightness will not be achieved.
Set the brightness of the disp
With this function you change t
Set the contrast of the display
With this function you modify the contrast of bright colour tones.
Set the brightness of the display
With this function you modify the contrast of dark colour tones.
Automatic brightness control
This function is used to automatically control the brightne ss of the
background lighting using the light sensor.
On = The brightness is adjusted according to the ambient brightness
Off = The brightness is adjusted manually by the user.
Adjust the signal level
With this function you can automatically set the contrast.
The function is exe cute d with the
Adjusting the picture size and position
Open the Image adjust window
H-position
V-position
Clock
Phase
Adjusting the horizontal position
With this function you ca n move the picture to the left or to the right.
Adjusting the vertical position
With this function you can move the picture up or down.
Adjusting the synchronisation
With this function you can adjust the picture width in order to eliminate
vertical picture faults.
Eliminating picture faults
With this function you fine-tune your monitor to eliminate picture faults.
lay
he brightness of the background lighting.
SELECT / MENU
button.
24 A26361-K1240-Z120-7619, edition 1
Page 33
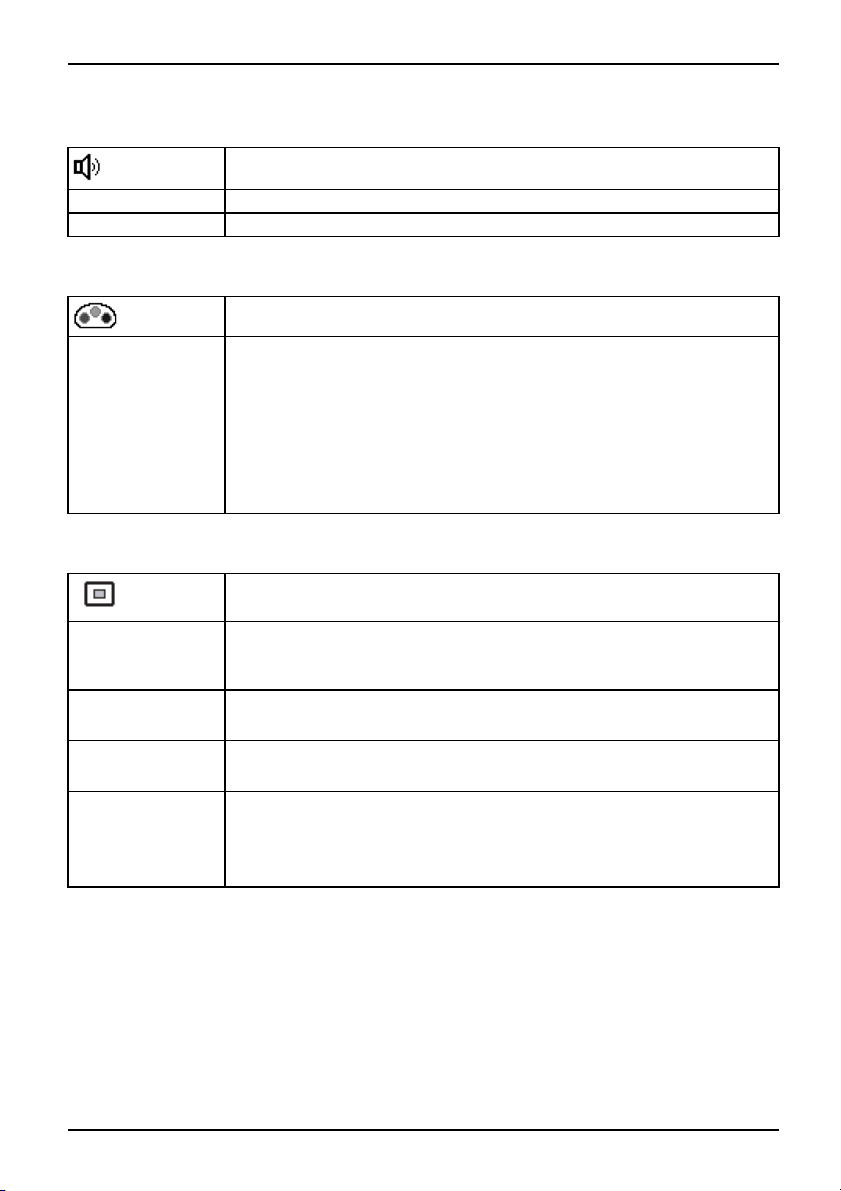
Adjusting the volume
Call the Audio setting window
Operation
Volume
Mute
Set the volume for playback with the integrated loudspeakers
Switch the loudspeakers off or on
Setting colour temperature and colours
Call the Colour setting window
Select the colour temperature
The "warmth" of the screen colours is set using the colour temperature. The
colour temperature is measured in K (= Kelvin). You can choose between
sRGB, 6500 K, 9300 K, Native and Custom Colour.
The options sRGB, Native and Custom colour are only available in the Office
setting mode.
In the user-defined setting you can change the colour ratios of the basic
colours (red, green, blue) as required.
Adjusting the display of t
Calling the OSD Setup adjustment window
Language
OSDH position
OSDV position
OSDTimeout
Selecting the langu age for the OSD menu
With this function you choose between English (default setting), French,
German, Italian and Spanish as the langu age for the OSD menu.
Setting the horizontal position of the OSD menu
With this function you can move the OSD menu to the left or to the right.
Setting the v ertical position of the OSD menu
With this function you can move the O SD menu up or down.
Setting the display duration of the OSD menu
With this function you can select a v alue from 10 to 120 s econds.
If the set time expires without a setting being made, the OSD menu is
automatically hidden.
he OSD menu
A26361-K1240-Z120-7619, edition 1 25
Page 34
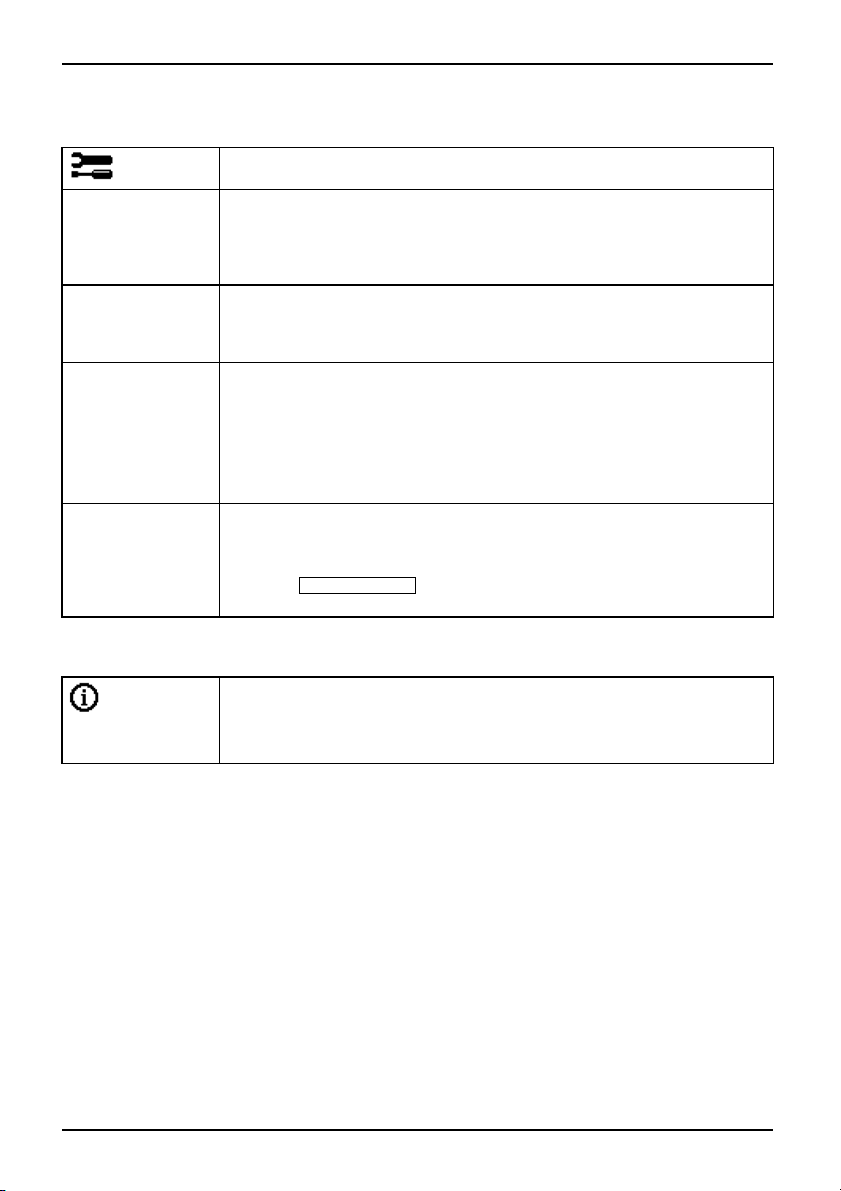
Operation
Adjusting the functions in the Advanced menu
Calling up the Advanced window
Input select
DDC-CI
ResolutionNotifier
Factory Recall
Selecting the input signal
This function allows you to switch the monitor from analog to digital mode
and vice versa when two signal sources are conne cted,
provided the grap hics card supports this function.
Activate/deactivate the DDC-CI function
On = DDC-CI function is activated (default setting)
Off = DDC-CI function is deactivated
Displaying screen information
The optimum resolution for this monitor is 1280 x 1024 pixels. With the
function activated (On), a m essa ge appears on the screen after approx. 30
seconds if a different resolution is set.
Change the resolution to 1280 x 1024 to achieve optimum picture quality.
With the function deactivated (Off), no message appears.
Activates the factory settings
This function is used to reset all settings to the factory settings. The user is
not prompted to confirm the changes.
Press the
Auto Processing is displayed.
Displaying information
Call the Information setting window
With this function the model designation, serial numbe r, resolution, H/V
frequency, input signal and polarity of the synchronisation signal are
displayed.
SELECT/MENU
button to execute this function. The message
26 A26361-K1240-Z120-7619, edition 1
Page 35
Notes on ergonomic colour adjustmen
t
Notes on ergonomic colour adju
If you select colours for the monitor in your application programmes,
take note of the information below.
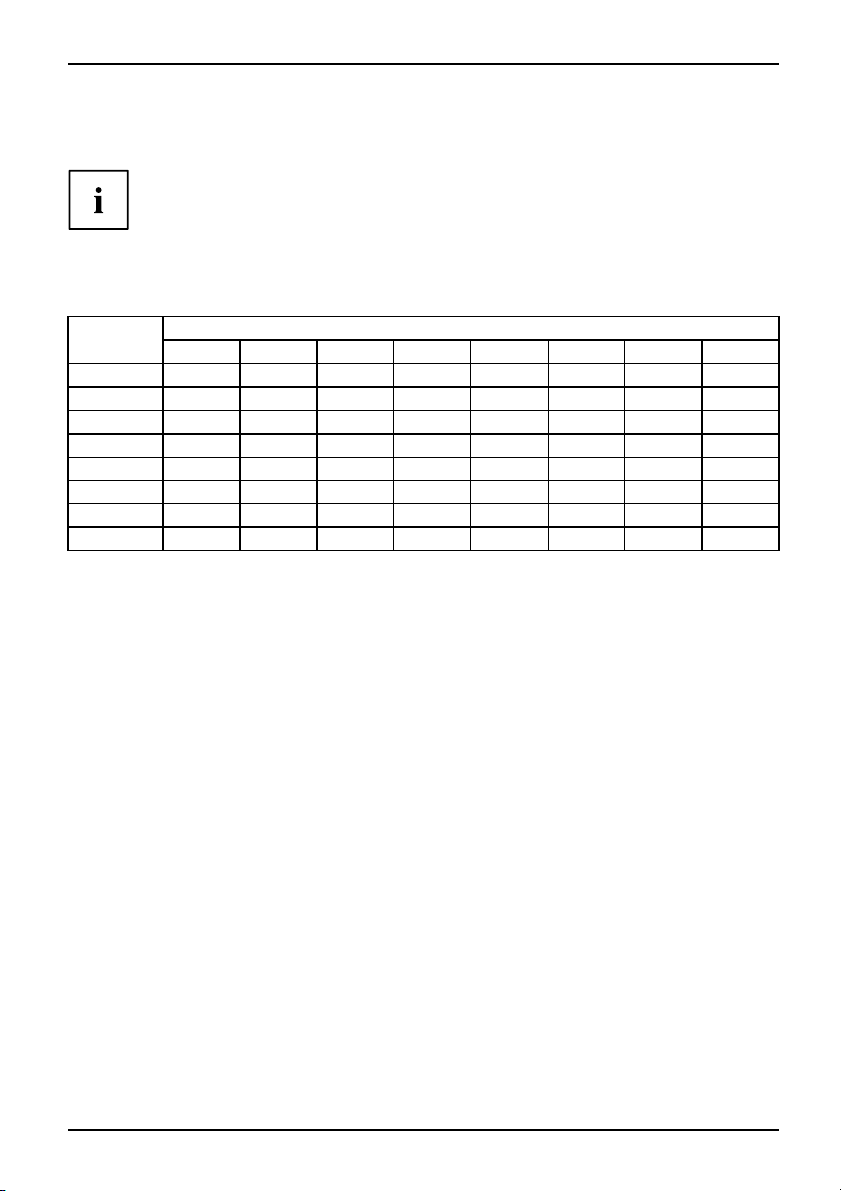
The primary colours blue and red on a dark background do not produce the minimum
required contrast of 3:1 and are therefore not suitable for continuous text and data entry.
When using several colours for characters and background and giving the primary colours full
modulation, you can obtain very suitable colour combinations (see the following table):
Background
black white purple blue
black
white
purple
blue
cyan
green
yellow
red
+ Colour combination v ery suitable
- Colour combination not suitable because colour hues are too close together, thin characters
are not identifiable or rigorous focusing is demanded of the human eye.
+++
++
-
+
+
+
-
++
+
--
--
-
+
-
++
----
Characters
cyan green
-
-----
+
+
+++
---
+
---
--
-
---
stment
yellow red
-
+
+
+
-
+
A26361-K1240-Z120-7619, edition 1 27
Page 36
Troubleshooting
Troubleshooting
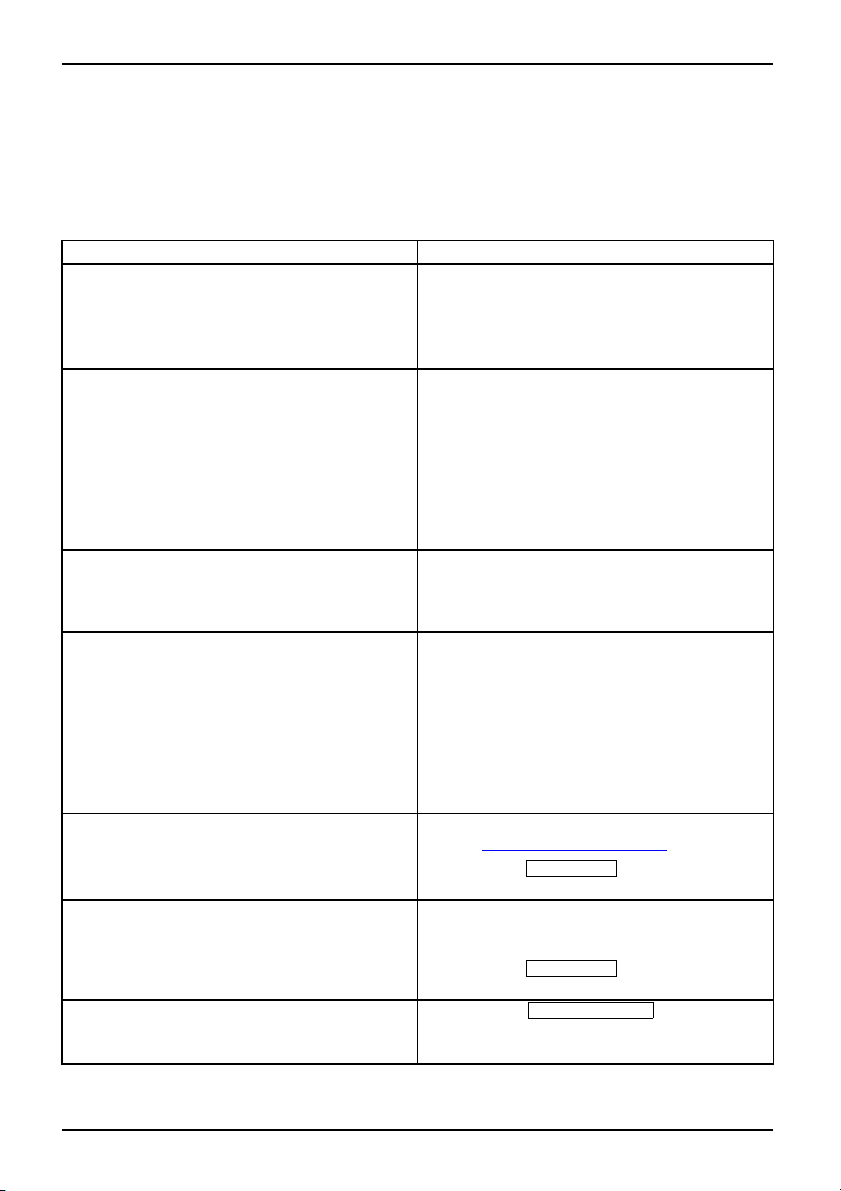
Should an error occur, first check the following points. If the distortion is still not eliminated,
the monitor should, if possible, be checked on another compute r.
If you are unable to solve the problem, please inform our help desk.
Having this problem? Check the following points:
No screen display
Power indicator does not light up
No screen display
Power indicator is lit
Message: No Signal
Message: Frequency out of range:## kHz
/ ## Hz Please change the display mode
to 1280 x 1024 with 60 Hz
Picture position not cor
Picture is shaking
Picture is wrongly adjusted ► Press the
rect
► Check whethe r the main switch at the rear
of the monitor is switched on.
► Check whether the power cable
monitor is connected correct
► Check whether the computer is switched on.
► Check whether the computer is switched on.
► Check whether the data cable for the
monitor is correctly attached to the monitor
port on the computer.
► Press any key on the computer keyboard.
The computer may be in power saving
mode.
► Alter the brightness and/or contrast until you
get a picture.
► Check whether the data cable for the
monitor is correctly attached to the monitor
port on the computer.
► Check whether the computer is switched on.
The input signal (horizontal frequency and
refresh rate) at the displayed input does not
correspond to the technical data for the monitor.
► Adjust the video frequency range using the
computer software (see documentation for
the computer or display adapter).
► Set a different screen re
computer software (see d
the computer or display
The monitor recognises an undefined mode (see
chapter "
► Press the
► Check whether the data cable for the
► Press the
The Auto Processing message appears.
Technical data", Page 31).
EXIT / AUTO
auto-adjustment of the screen.
monitor is correctly attached to the monitor
port on the computer.
EXIT / AUTO
auto-adjustment of the screen.
SELECT / MENU
activate the Factory Recall function.
solution using the
adapter).
button to perform
button to perform
on the
ly.
ocumentation for
button to
28 A26361-K1240-Z120-7619, edition 1
Page 37
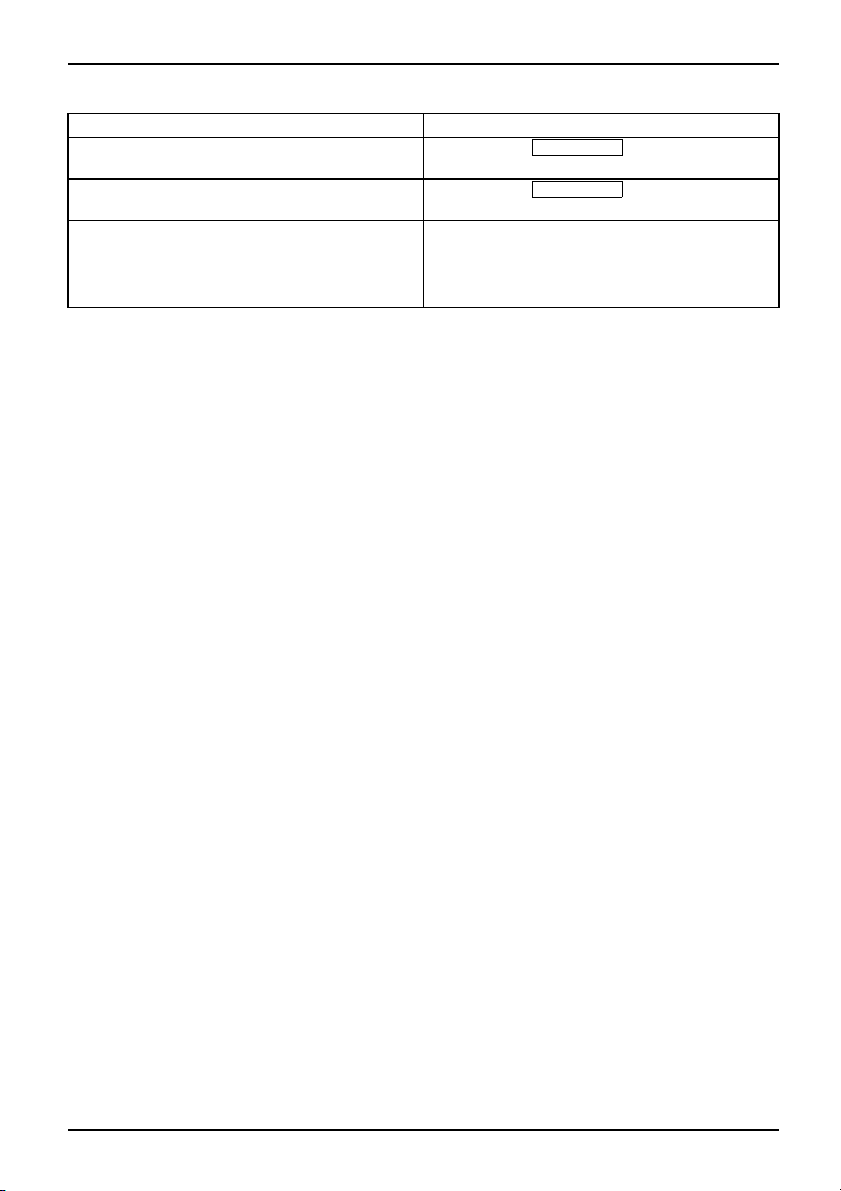
Having this problem? Check the following points:
Picture disturbances (vertical
lines)
► Press the
EXIT / AUTO
auto-adjustment of the screen.
Picture disturbances (horizontal lines, picture
noise)
The screen becomes darker
► Press the
auto-adjustment of the screen.
The background lighting has a limited lifetime.
EXIT / AUTO
If your monitor display should be come too dark,
the background lighting will have to be replaced.
► Please contact our help desk.
Troubleshooting
button to perform
button to perform
A26361-K1240-Z120-7619, edition 1 29
Page 38
Notes regarding the DIN EN ISO 13406-
2standard
Notes regarding the DIN EN ISO 13406-2 standard
Permanently unlit or lit pixels
The standard of production techniques today cannot guarantee an absolutely fault-free screen
display. A few isolated constant lit or unlit pixels (picture elements) may be present. The maximum
permitted number of pixels faults is stipulated in the international standard ISO 13406-2 (Class II).
Examples:
A 17" or 19" flat-screen monitor with a resolution of 1280 x 1024 has 1280 x 1024 =
1310720 pixels. Each pixel consists of three s ubpixels (red, green and blue), so there
are almost 6.9 million subpixels in total. In accordance with ISO 13406-2 (Class II),
a maximum of 6 pixels and 7 subpixels may be faulty.
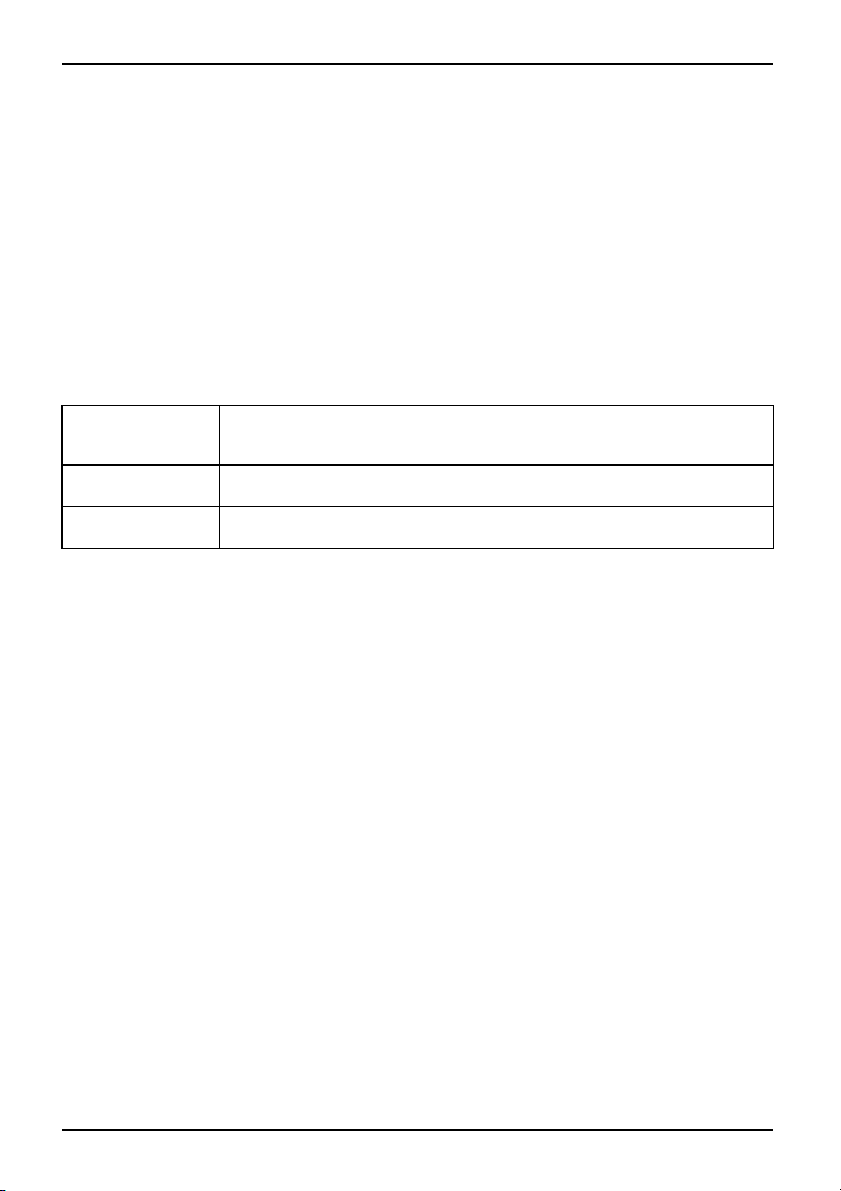
Pixel
Subpixel
Cluster A cluster contains two or more defective pixels or subpixels in a 5 x 5
A pixel consists of 3 subpixels, normally red, green and blue. A pixel is
the smallest element that can be generated by complete functionality of
the dis play.
A subpixel is a separately addressable internal structu re within a pixel that
enhances the pixel function.
pixel b loc k.
30 A26361-K1240-Z120-7619, edition 1
Page 39
Technical data
Condensation is not permissible either in the rated range of operation
or in the limit range of ope ration.
Technical da ta
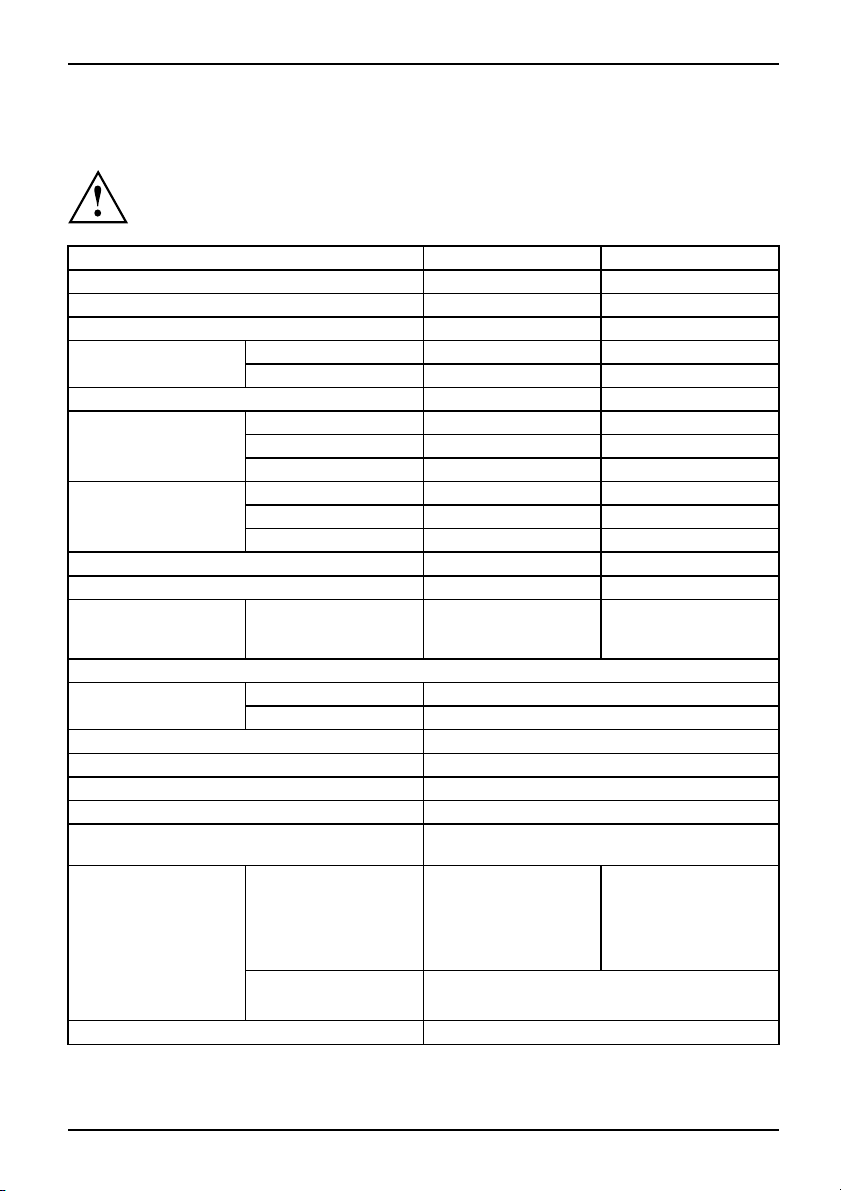
P17-3P
Dimensions and weight
Visible diagonals 43 cm 48 cm
Dot pitch 0.264 mm 0.294 cm
Width 337.9 mm 376.3 mmImage size
Height 270.3 mm 301 mm
Maximum resolution 1280 x 1024 1280 x 1024
Dimensions incl.
monitor base
Dimensions of box
Weight (without packaging)
Storable display modes
Pixel error classes
accordingtoISO
13406-2
Electrical data
Video
Synchronisation Separate Sync. TTL, positive or negative
Horizontal frequency 30 kHz .... 82 kHz (multi-scanning)
Refresh rate
Maximum pixel rate 135 MHz
Power supply switches automatically, 100 V – 240 V, 50 Hz
Overall power draw
Sound output 2.0 W left; 2.0 W right
Width 375 mm 412 mm
Height 469 mm 497 mm
Depth 249 mm 249 mm
Width 438 mm 484 mm
Height 418 mm 452 mm
Depth 176 mm 176 mm
approx. 6.8 kg approx. 7.5 kg
25 25
Class
Analog
Digital DVI-D
Normal operation Max. brightness 34 W
Power saving mode < 1 W in power saving mode
II II
Positive, 0.7 V
56 Hz .... 76 Hz
–60Hz
acc. to EPA 29 W
(Standby mode, Suspend mode and OFF mode)
,75Ω
ss
P19-3/P19-3P
P19-3 max. brightness
38 W acc. to EPA 26 W
P19-3P max.
brightness 38 W acc.
to EPA 31 W
A26361-K1240-Z120-7619, edition 1 31
Page 40
Technical da ta
Ambient conditions
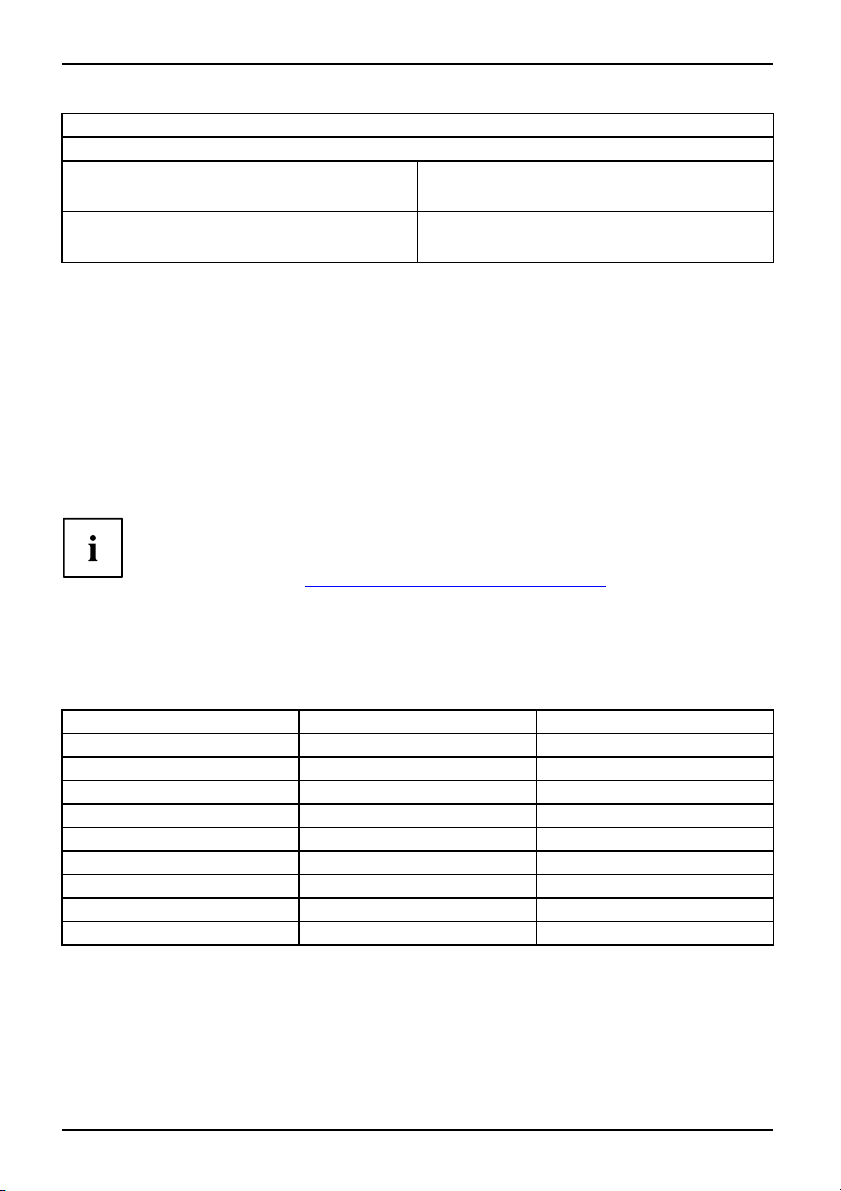
Environment class 3K2, IEC 721
Rated range of operation
Humidity
Limit range of operation
Humidity
15 °C .... 35 °C
20 % .... 85 %
5 °C .... 35 °C
20 % .... 85 %
VESA-DDC-compatible VGA interface
Your monitor is equipped with a VESA-DDC-compatible VGA interface. VESA-DDC (Video
Electronics Standard Association, Display Data Channel) is used as the communications
interface between the m onitor and the computer. If the computer is eq uipp ed with a
VESA-DDC-compatible VGA interface, it can automatically read the data for ensuring
optimum operation from the monitor and select the appropriate settings.
Preset operating modes
The picture position and s
modes listed above. Depen
to adjust the display posi
settings (see chapter "
For ergonomic reasons,
Due to the technology us
flicker-free picture ev
ize have been optimised at the factory for the operating
ding on the graphics card used, it may be necessary
tion or size. In this case you can change and save the
Changing the monitor settings", Page 21).
a screen resolution of 1280 x 1024 pixels is recommended.
ed (active matrix) an L CD monitor provides a totally
en with a refresh rate of 60 Hz.
Most frequent operating modes
Horizontal frequency Refresh rate Screen resolution
31.5 kHz 70 Hz 720 x 400
31.5 kHz 60 Hz 640 x 480
37.5 kHz 75 Hz 640 x 480
37.9 kHz 60 Hz 800 x 600
46.9 kHz 75 Hz 800 x 600
48.4 kHz 60 Hz 1024 x 768
60.0 kHz 75 Hz 1024 x 768
64.0 kHz 60 Hz 1280 x 1024
80.0 kHz 75 Hz 1280 x 1024
32 A26361-K1240-Z120-7619, edition 1
Page 41

SUB D port
51
Pin Meaning
1 Video input red
2 Video input green
3 Video input blue
4
5
6 Video ground red
7
8 Video ground blue
9
10
11
12
13 H. sync
14 V. sync
15
Ground
Ground
Video ground green
+5 V (DDC)
Sync. ground
Ground
DDC Data
DDC Clock
Technical da ta
610
1115
A26361-K1240-Z120-7619, edition 1 33
Page 42
Technical da ta
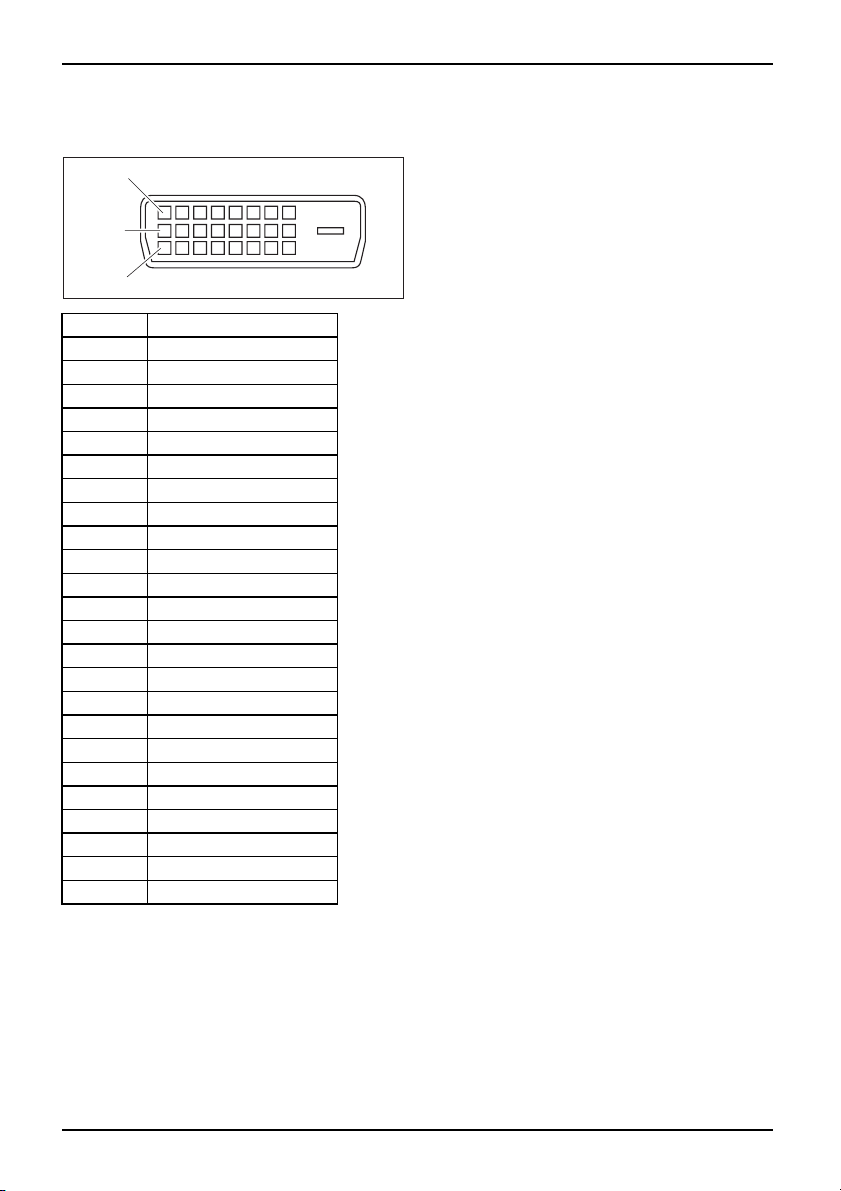
DVI-D port
1
9
17
Pin Meaning
1
2
3
4 not connected
5
6
7
8
9
10
11
12 not connected
13 not connected
14 +5V Power
15
16 Hot Plug D etect
17
18
19
20 not connected
21 not connected
22
23
24
TMDS Data2–
TMDS Data2+
TMDS Data 2/4 Shield
not connected
DDC Clock
DDC Data
Analog Vertical Syn c
TMDS Data1–
TMDS Data1+
TMDS Data 1/3 Shield
Ground
TMDS Data0–
TMDS Data0+
TMDS Data 0/5 Shield
TMDS Clock Shield
TMDS Clock+
TMDS Clock–
34 A26361-K1240-Z120-7619, edition 1
 Loading...