

Page 1
Rack2-Filer
Exporting to a Cloud Service/Mobile Device (Page 301)
Support Added for Cloud/Mobile Link!
NEW!
NEW!
Creating a Photo Album (Page 339)
Photo Album Function Added!
No part of a "Rack2 Binder with embedded Viewer (*.exe)"
file produced by the Rack2-Filer export function may be
reproduced (unless for personal use), or distributed in any
form via a network, without permission.
User's Guide
Page 2

Page 3

Preface
Thank you for buying Rack2-Filer.
Rack2-Filer is application software that makes the management and viewing of
document data on your computer possible.
This manual provides an overview and operation instructions of Rack2-Filer.
First of all, read "How to Use this Manual".
Microsoft, Windows, Windows Vista, Windows Server, Excel, and PowerPoint
are either registered trademarks or trademarks of Microsoft Corporation
in the United States and/or other countries.
Word is the product of Microsoft Corporation in the United States.
Adobe, the Adobe logo, Acrobat, the Adobe PDF logo, and Adobe Reader are
either registered trademarks or trade names of Adobe Systems Incorporated in
the United States and/or other countries.
Pentium is a trademark or registered trademark of Intel Corporation in the
United Sates and other countries.
ScanSnap, the ScanSnap logo, and Rack2-Filer are registered trademarks or
trademarks of PFU LIMITED in Japan.
ABBYY
ABBYY and FineReader are trademarks of ABBYY.
Evernote is a registered trademarks or trademarks of Evernote Corporation.
Google and Google Docs are registered trademarks or trademarks of Google
Inc.
Salesforce, the Salesforce logo, and Salesforce CRM are registered trademarks
or trademarks of salesforce.com, inc. in the United States and other countries.
Other company names and product names are the trademarks or registered
trademarks of the respective companies.
TM
FineReaderTM Engine ©2011 ABBYY. OCR by ABBYY
September, 2011
Rack2-Filer User's Guide |3
Page 4

Preface
Screenshots reprinted with permission from Microsoft Corporation.
This product utilizes PFU's "EasyFlip" viewer technology.
© PFU LIMITED 2011
4| Rack2-Filer User's Guide
Page 5

How to Use this Manual
This manual explains how to use Rack2-Filer.
Structure of this manual
The structure is as follows:
Chapter 1 Introduction to Rack2-Filer
An overview and the windows of Rack2-Filer are described.
Chapter 2 Operating Environment
This chapter describes the operating environment.
Chapter 3 Installation and Uninstallation
This chapter describes installation, uninstallation, and updates.
Chapter 4 Launching/Closing Rack2-Filer
This chapter describes the starting and closing methods for the
windows of Rack2-Filer (Rack2-Filer window/Rack2-Viewer
window/Rack2-WorkArea window).
Chapter 5 Using the ScanSnap with Rack2-Filer
This chapter describes how to enable the use of the ScanSnap
with Rack2-Filer. These steps only need to be performed once.
Chapter 6 Rack2-Filer Window Operations
This chapter describes the operations for the Rack2-Filer window.
Chapter 7 Rack2-Viewer Window Operations
This chapter describes the operations for the Rack2-Viewer
window.
Chapter 8 Exporting to a Cloud Service/Mobile Device
This chapter describes how to export Rack2-Filer data to a cloud
storage or mobile device as PDF files.
Chapter 9 Creating a Photo Album
This chapter describes the photo album function.
Rack2-Filer User's Guide |5
Page 6
Preface
Chapter 10 Other Functions
This chapter describes other functions.
Chapter 11 Rack2-Filer Backup & Restore Tool
This chapter describes Rack2-Filer Backup & Restore Tool.
Chapter 12 Troubleshooting
This chapter describes solutions to problems that may arise during
operation of Rack2-Filer.
Chapter 13 Messages
This chapter describes the messages displayed during the
operation of Rack2-Filer, and appropriate responses.
Read Chapter 1 - Chapter 11 to understand the operations of this application.
Also, read Chapter 12 and Chapter 13 as necessary.
®
Vista
Windows and images from Windows
operations in this manual.
is used for the description of
Symbols used in this manual
The following symbols are used in this manual.
Symbols Descriptions
This symbol indicates points that require your attention, or
advice to be followed. Make sure to read the text which
follows this symbol.
This symbol indicates suggestions related to operations.
This symbol indicates procedure(s) of operations.
6| Rack2-Filer User's Guide
Page 7

Abbreviations for the operating systems in this
manual
The abbreviations for the operating systems in the manual are listed below:
Windows Server 2008
Windows Server® 2008 Standard
Windows Server® 2008 Enterprise
Windows Server® 2008 Foundation
Windows Server 2003
Windows Server® 2003
Windows Server® 2003 R2
Windows 2000 Server
Windows® 2000 Server operating system
Windows 2000 Professional
Windows® 2000 Professional operating system
Windows XP Home Edition
Windows® XP Home Edition operating system
Windows XP Professional
Windows® XP Professional operating system (32-bit version)
Windows Vista Home Basic
Windows Vista® Home Basic operating system (32-bit and 64-bit version)
operating system (32-bit version)
operating system (32-bit version)
Windows Vista Home Premium
Windows Vista® Home Premium operating system (32-bit and 64-bit version)
Windows Vista Business
Windows Vista® Business operating system (32-bit and 64-bit version)
Windows Vista Enterprise
Windows Vista® Enterprise operating system (32-bit and 64-bit version)
Windows Vista Ultimate
Windows Vista® Ultimate operating system (32-bit and 64-bit version)
Windows 7 Starter
Windows® 7 Starter operating system (32-bit version)
Windows 7 Home Premium
Windows® 7 Home Premium operating system (32-bit and 64-bit version)
Windows 7 Professional
Windows® 7 Professional operating system (32-bit and 64-bit version)
Windows 7 Enterprise
Windows® 7 Enterprise operating system (32-bit and 64-bit version)
Windows 7 Ultimate
Windows® 7 Ultimate operating system (32-bit and 64-bit version)
Rack2-Filer User's Guide |7
Page 8

Preface
The following operating systems are called Windows XP if there is no need to
distinguish between them.
• Windows XP Home Edition
• Windows XP Professional
The following operating systems are called Windows Vista if there is no need to
distinguish between them.
• Windows Vista Home Basic
• Windows Vista Home Premium
• Windows Vista Business
• Windows Vista Enterprise
• Windows Vista Ultimate
The following operating systems are called Windows 7 if there is no need to
distinguish between them.
• Windows 7 Starter
• Windows 7 Home Premium
• Windows 7 Professional
• Windows 7 Enterprise
• Windows 7 Ultimate
All the above systems are collectively called Windows.
8| Rack2-Filer User's Guide
Page 9

Terms in this manual
• "Rack2-Viewer" is called "Rack2-Viewer window" in the manual.
• "Rack2-WorkArea" is called "Rack2-WorkArea window" in the manual.
• There is a distinction between "Page" and "Sheet" in this manual.
Page: Front or back of a sheet.
Sheet: Both the front and back page.
Pages in which the icons of applications associated with files appear at
the bottom, are referred to as "Pages with Source Files" ("Sheets with
Source Files").
• The following functions in "Rack2-Filer" are called "Annotation" in this
manual.
Sticky notes, highlights, stamps, and hyperlinks
• "Adobe® Acrobat®" is called "Adobe Acrobat" in this manual.
• "Adobe® Reader®" is called "Adobe Reader" in this manual.
• "Microsoft® Office®" is called "Microsoft Office" in this manual.
• "Microsoft® Word" is called "Microsoft Word" in this manual.
• "Microsoft® Excel®" is called "Microsoft Excel" in this manual.
• "Microsoft® PowerPoint®" is called "Microsoft PowerPoint" in this
manual.
• "Microsoft® .NET Framework" is called ".NET Framework" in this
manual.
TM
• "Google Docs
• The collection of cloud services (Evernote, Google Docs, Salesforce
Chatter, and SugarSync) is called "Cloud service" in this manual.
• Mobile devices such as the iPad/iPhone/iPod touch are called "Mobile"
and "Mobile device" in this manual.
" is called "Google Docs" in this manual.
Rack2-Filer User's Guide |9
Page 10
Preface
Instructions for all
Rack2-Viewer Window operations
Instructions for all
Rack2-
Work
Area Window
User’s Guide
(This Manual)
(PDF)
Instructions for
Rack2-Filer operations
(HTML help)
WorkArea Help
(HTML help)
Rack2-Viewer Help
(HTML help)
Rack2-Filer Help
Getting Started
(Binder)
(PDF)
Instructions for
installation and
basic operations
Instructions for all
Rack2-Filer Window
operations
operations
Screen examples in this manual
On the screen examples in this manual, icons of products from other companies
are shown in mosaic.
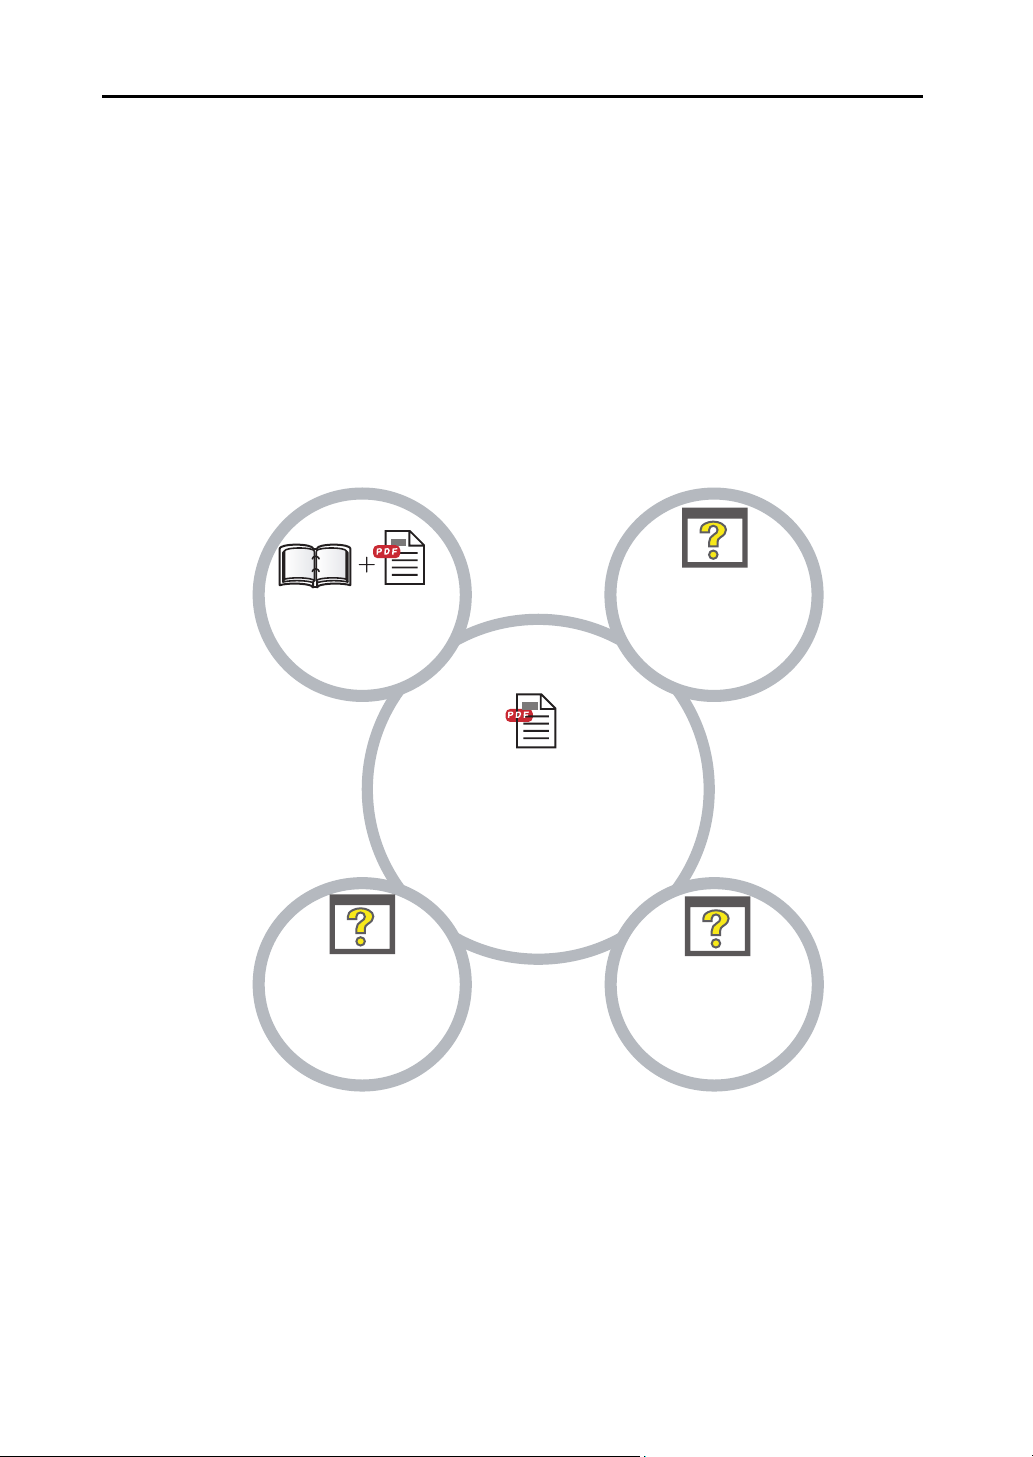
About the manuals
The manuals of Rack2-Filer include "Rack2-Filer Getting Started", "Rack2-Filer
Help", "Rack2-Viewer Help", and "WorkArea Help", in addition to this manual.
10 | Rack2-Filer User's Guide
Page 11

Choose the necessary manuals as follows:
Getting Started
Read this guide to learn about installation and basic operation workflow
of Rack2-Filer.
A "Rack2-Filer Getting Started" help file is provided in binder and PDF
formats in the \Rack2-Filer\Docs\ENU of the setup CD-ROM.You can
read "Rack2-Filer Getting Started" in binder format by starting Rack2-
Filer and double-clicking "Default Cabinet" under "Default Library".
Adobe Acrobat or Adobe Reader is necessary to read "Rack2-Filer
Getting Started" in PDF format.
User's Guide (this manual)
Read this manual to learn about the operations of Rack2-Filer.
The "Rack2-Filer User's Guide" is provided in PDF format.
You can read the "Rack2-Filer User's Guide" in PDF format by following
one of the steps below.
• Select [Start] - [All Programs] - [Rack2-Filer] - [User's Guide].
• Start Rack2-Filer, and select [Help] - [User’s Guide].
• Open the "UsersGuide.pdf" under the \Rack2-Filer\Docs\ENU of
the setup CD-ROM.
Adobe Acrobat or Adobe Reader is necessary to read "Rack2-Filer
User's Guide" in PDF format.
Rack2-Filer Help
Read this Help to learn about the operations of Rack2-Filer in the
Rack2-Filer window, and when you have questions about the operations
of the Rack2-Filer window.
Help is opened when the [Help] button in Rack2-Filer window is clicked.
Also, an explanation of the dialog box appears when you click the [Help]
button in the dialog box.
Rack2-Filer User's Guide |11
Page 12

Preface
Rack2-Viewer Help
Read this Help to learn about the operations of Rack2-Filer in the
Rack2-Viewer window, and when you have questions about the
operations of the Rack2-Viewer window.
Help is opened when the [Help] button in Rack2-Viewer window is
clicked.
Also, an explanation of the dialog box appears when you click the [Help]
button in the dialog box.
WorkArea Help
Read this Help to learn about the operations of Rack2-Filer in the
Rack2-WorkArea window, and when you have questions about the
operations of the Rack2-WorkArea window.
Help is opened when the [Help] button in Rack2-WorkArea window is
clicked.
12 | Rack2-Filer User's Guide
Page 13

Contents
Chapter 1 Introduction to Rack2-Filer 23
1.1 Features ............................................................................24
1.2 Data Management .............................................................25
1.3 Rack2-Filer Windows ........................................................27
1.4 The Window Structure of Rack2-Filer
(Rack2-Filer Window) ........................................................29
1.5 The Window Structure of Rack2-Filer
(Rack2-Viewer Window) .................................................... 31
1.6 The Window Structure of Rack2-Filer
(Rack2-WorkArea Window) ............................................... 35
1.7 Basic Operation Workflow .................................................38
Chapter 2 Operating Environment 39
2.1 Operating Environment .....................................................40
Hardware environment .................................................40
Software environment ................................................... 41
Scanner environment .................................................... 41
Software required for using a cloud service/mobile
device ..........................................................42
Other notes ...................................................................42
2.2 Limitations on Operations on Shared Data
in the Network ...................................................................43
2.3 Limitation on WorkArea ..................................................... 45
Rack2-Filer User's Guide |13
Page 14

Contents
Chapter 3 Installation and Uninstallation 47
3.1 Installing Rack2-Filer ........................................................ 48
3.2 Uninstalling Rack2-Filer .................................................... 53
3.3 Upgrading Rack2-Filer ...................................................... 55
3.4 Updating Rack2-Filer ........................................................ 56
Chapter 4 Launching/Closing Rack2-Filer 59
4.1 Launching/Closing
the Rack2-Filer Window .................................................... 60
Launching the Rack2-Filer window ............................... 60
Closing the Rack2-Filer window ................................... 60
4.2 Opening/Closing
the Rack2-Viewer Window ................................................ 61
Opening the Rack2-Viewer window .............................. 61
Closing the Rack2-Viewer Window ............................... 61
4.3 Launching/Closing
the Rack2-WorkArea Window ........................................... 62
Launching the Rack2-WorkArea window ...................... 62
Closing the Rack2-WorkArea window .......................... 64
Chapter 5 Using the ScanSnap
with Rack2-Filer 65
5.1 Using S1100/S1300/S1500 with Rack2-Filer .................... 66
Specifying the application in ScanSnap Manager ........ 67
Using the Quick Menu .................................................. 70
5.2 Using S300/S510/S500 with Rack2-Filer .......................... 75
Specifying the application in ScanSnap Manager ........ 75
Using the Quick Menu .................................................. 78
14 | Rack2-Filer User's Guide
Page 15

Chapter 6 Rack2-Filer Window
Operations 83
6.1 Setting a LibRoot Folder ...................................................84
6.2 Rearranging the LibRoot Folders ......................................87
6.3 Creating a Library ..............................................................88
6.4 Renaming a Library ...........................................................89
6.5 Deleting a Library .............................................................. 91
6.6 Rearranging Libraries ........................................................93
6.7 Creating a Cabinet ............................................................94
6.8 Renaming a Cabinet .........................................................96
6.9 Deleting a Cabinet .............................................................98
6.10 Rearranging Cabinets .....................................................100
6.11 Switching the Cabinet Display Mode ............................... 101
6.12 Changing the Background Style of a Cabinet ................. 103
6.13 Creating a Binder ............................................................105
6.14 Creating a Card Binder ................................................... 106
6.15 Changing Binder Settings ...............................................109
6.16 Adding an Image Imported from ScanSnap
to a Binder Spine ............................................................112
6.17 Adding an Image to a Binder Spine ................................115
6.18 Deleting a Binder .............................................................117
6.19 Moving a Binder ..............................................................119
Moving a binder using drag and drop ......................... 119
Moving a binder using
the [Move Binder] dialog box ..................... 120
6.20 Copying (Duplicating) a Binder .......................................123
Copying a binder using drag and drop ........................123
Copying a binder using
the [Duplicate Binder] dialog box ............... 125
Rack2-Filer User's Guide |15
Page 16

Contents
6.21 Arranging Binders in Order of Last Access ..................... 128
6.22 Running OCR on a Binder to Create Key Text Blocks .... 129
6.23 Checking Binder-Related Information ............................. 130
6.24 Exporting a Binder .......................................................... 132
6.25 Importing a Binder ........................................................... 134
6.26 Searching for a Binder .................................................... 136
6.27 Displaying Search Results in a Binder ............................ 140
6.28 Searching for a Page ...................................................... 145
6.29 Moving Pages to the WorkArea ...................................... 147
6.30 Copying Pages to the WorkArea ..................................... 148
6.31 Setting the Rack2-Filer Options ...................................... 149
[LibRoot Folders] tab settings ..................................... 150
[ScanSnap -> Rack2] tab settings .............................. 152
6.32 Data Backup ................................................................... 154
6.33 Moving Data to Another Computer ................................. 155
Chapter 7 Rack2-Viewer Window
Operations 157
7.1 Scanning Documents Using
an Image Scanner fi Series Scanner .............................. 158
7.2 Scanning Documents Using the ScanSnap .................... 161
7.3 Importing Source Files .................................................... 163
7.4 Flipping the Pages One by One ...................................... 170
7.5 Flipping Continuously ...................................................... 171
7.6 Turning a Page Upside-down ......................................... 172
7.7 Rotating a Page 90 Degrees ........................................... 173
7.8 Exchanging Opposite Pages ........................................... 174
7.9 Deskewing Page Contents .............................................. 175
7.10 Changing Page Window Mode ....................................... 176
16 | Rack2-Filer User's Guide
Page 17

Changing the page window mode ..............................176
Rotating a page display .............................................. 179
7.11 Changing Page Display Region ...................................... 181
7.12 Zooming a Selected Area ................................................182
7.13 Checking Unread Files Page .......................................... 184
7.14 Adding a Sticky Note to a Page ...................................... 185
7.15 Adding a Highlight to a Page ...........................................187
7.16 Setting a Hyperlink to a Page ..........................................189
7.17 Affixing a Stamp to a Page ..............................................192
7.18 Editing the Contents List ................................................. 195
7.19 Creating Key Text Blocks by OCR .................................. 198
Run OCR on a specified region of a page .................. 202
Run OCR on a specified sheet ................................... 203
Run OCR when inserting files ..................................... 204
Run OCR via the ScanSnap S1100/S1300/S1500
marked keyword function ........................... 206
Run OCR on all pages of a binder .............................. 207
7.20 Searching for a Page ......................................................208
Setting a search string ................................................209
Searching for a page ..................................................211
Highlighting search results .......................................... 212
7.21 Printing a Page ...............................................................215
Printing a page ............................................................ 215
Printing in 2-page spread mode .................................. 217
Printing a contents page .............................................217
7.22 Overwriting a Binder ........................................................ 219
7.23 Saving All Pages in a Binder as a New File ....................220
7.24 Saving Sheets as a New File ..........................................223
Saving a single sheet as a new file ............................. 223
Saving multiple sheets as a new file ........................... 226
Rack2-Filer User's Guide |17
Page 18

Contents
7.25 Adding Divider Sheets .................................................... 228
7.26 Displaying Thumbnails .................................................... 230
7.27 Rearranging the Order of Sheets .................................... 232
7.28 Rearranging the Order of Sheets in Units of Contents ... 234
7.29 Deleting Sheets ............................................................... 237
Deleting a single sheet ............................................... 237
Deleting multiple sheets .............................................. 238
Deleting sheets on one side all at once ...................... 240
7.30 Cutting Sheets ................................................................ 242
Moving sheets into another binder .............................. 242
Moving a single sheet to the clipboard ....................... 243
Moving multiple sheets to the clipboard ...................... 245
Moving to the WorkArea ............................................. 247
7.31 Copying Sheets ............................................................... 248
Copying a single sheet to the clipboard ...................... 248
Copying multiple sheets to the clipboard .................... 250
Copying a single sheet to the WorkArea .................... 251
Copying multiple sheets to the WorkArea ................... 251
7.32 Pasting Sheets ................................................................ 252
7.33 Specifying Multiple Sheets .............................................. 253
7.34 Allocating Sheets into One Page .................................... 258
Allocating two pages into one page ............................ 258
Allocated page display ................................................ 260
7.35 Copying Pages ................................................................ 265
Copying pages to the clipboard .................................. 265
Copying pages to the WorkArea ................................. 266
7.36 Pasting Pages ................................................................. 267
7.37 Emptying a Page (Making it Blank) ................................. 268
7.38 Deleting Pages ................................................................ 269
7.39 Adding Blank Pages ........................................................ 270
18 | Rack2-Filer User's Guide
Page 19

7.40 Sending Mail with Page(s) .............................................. 271
7.41 Outputting Pages to
Microsoft Word/Excel/PowerPoint ...................................274
7.42 Modifying a Source File ................................................... 279
7.43 Deleting a Source File .....................................................281
7.44 Creating a Card Sheet .................................................... 282
7.45 Turning a Card Upside-down .......................................... 283
7.46 Cutting a Card ................................................................. 284
7.47 Copying Cards ................................................................ 285
7.48 Pasting Cards ..................................................................286
7.49 Deleting Cards ................................................................ 287
7.50 Saving Cards ...................................................................288
7.51 Printing Cards ................................................................. 289
7.52 Sending Cards as e-Mail .................................................290
7.53 Configuring Viewer Settings ............................................291
Chapter 8 Exporting to a Cloud Service/
Mobile Device 301
8.1 Selecting Data to Be Exported ........................................ 302
Selecting a binder and exporting it ............................. 302
Exporting a page ......................................................... 303
Exporting a stack ........................................................ 304
8.2 Exporting to Cloud Service ..............................................306
Exporting to Evernote ................................................. 306
Exporting to Google Docs ........................................... 309
Exporting to Salesforce Chatter .................................. 313
Exporting to SugarSync ..............................................317
8.3 Exporting to Mobile ......................................................... 321
Presets ........................................................................321
Rack2-Filer User's Guide |19
Page 20

Contents
Rack2 Mobile Link icons and the right-click menu ...... 324
Exporting to mobile ..................................................... 327
Solutions to problems ................................................. 331
When exporting data to a mobile device
from a computer where Rack2-Filer and
ScanSnap are installed .............................. 336
Chapter 9 Creating a Photo Album 339
9.1 Introduction to Photo Album Function ............................. 340
Features of photo album function ............................... 341
Workflow of creating a photo album ........................... 342
9.2 Creating a Photo Album .................................................. 346
Creating a photo binder .............................................. 346
Importing a photo and document ................................ 347
Editing a page ............................................................. 351
9.3 Exporting photos or documents from a photo binder ...... 363
Selecting a photo or document and saving it .............. 363
Selecting multiple photos or documents and
saving them ............................................... 364
9.4 Notes for Using Photo Binder ......................................... 366
Operations that require caution .................................. 366
Operations that cannot be performed ......................... 368
Chapter 10 Other Functions 371
10.1 Sending Data from Other Applications ............................ 372
10.2 Inserting Files using Rack2 Folder Monitor Software ..... 376
Installing Rack2 Folder Monitor Software ................... 377
Uninstalling Rack2 Folder Monitor Software .............. 380
Configuring Rack2 Folder Monitor Software ............... 380
Importing data ............................................................. 385
20 | Rack2-Filer User's Guide
Page 21

Chapter 11 Rack2-Filer
Backup & Restore Tool 389
11.1 Launching/Closing Rack2-Filer
Backup & Restore Tool ...................................................390
Launching Rack2-Filer Backup & Restore Tool .......... 390
Closing Rack2-Filer Backup & Restore Tool .............. 390
11.2 Opening the Backup Settings Window ............................ 391
11.3 Adding a Backup Schema ...............................................393
11.4 Running a Backup Schema ............................................. 397
11.5 Opening the Restore Window .........................................399
11.6 Restoring the Data in LibRoot Folder .............................. 401
11.7 Restoring a Specified Binder ...........................................402
11.8 Viewing a Restored Binder ..............................................406
11.9 Viewing the Logfile Settings Window .............................. 407
Chapter 12 Troubleshooting 409
Chapter 13 Messages 419
13.1 Rack2-Filer Window Messages ....................................... 420
13.2 Rack2-Viewer Window Messages ................................... 427
13.3 Rack2-WorkArea Window Messages .............................. 442
Index 457
Rack2-Filer User's Guide |21
Page 22

Contents
22 | Rack2-Filer User's Guide
Page 23

Chapter 1
Introduction to Rack2-Filer
This chapter describes features of Rack2-Filer, how the data is managed in
Rack2-Filer, the layout of windows in Rack2-Filer, and the basic operation
workflow of Rack2-Filer.
Rack2-Filer User's Guide |23
Page 24

Chapter 1 Introduction to Rack2-Filer
1.1 Features
Rack2-Filer is application software that makes the management(*) and viewing
of document data on your computer possible.
(*) The data in Rack2-Filer is managed in PDF files.
The features of Rack2-Filer:
• Easy to understand and operate
The user interface makes you feel as if you are taking paper files from a
bookshelf, and allows you to turn pages and add sticky notes directly
and naturally.
• Easy to search for information
You can effectively and efficiently find specific files based on search
conditions such as the "Title" or "Sticky Note" contents.
• No space is needed for keeping paper work
Since the software allows you to scan files and documents as source
files for management and sorting, no space is needed for storing large
quantities of paper and files.
• Information can be shared between groups
You can place data in a network folder and share it between multiple
users.
24 | Rack2-Filer User's Guide
Page 25
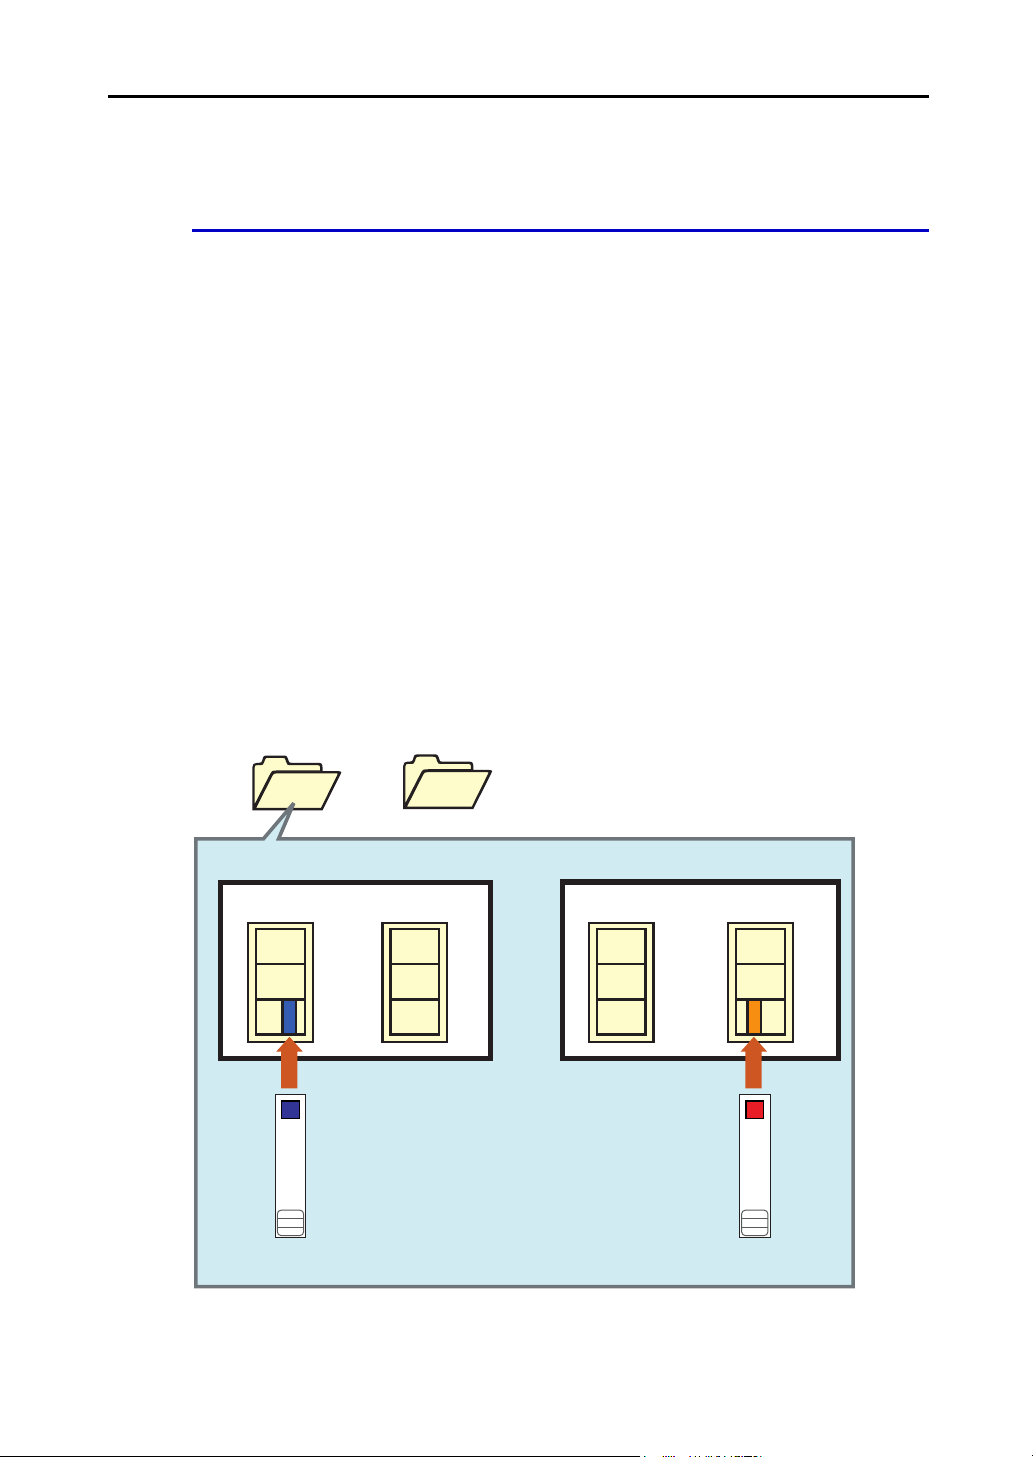
1.2 Data Management
<Manage the files in this product>
LibRoot folder1
. . . .
LibRoot folder3 (Max)
Cabinet1 Cabinet20 (Max)
Binder
Library1
Cabinet1 Cabinet20 (Max)
Library6 (Max)
. . . .
. . . .. . . .
New Binder
2004/04/20
Binder
Plan
2004/08/03
Rack2-Filer uses the terms "Library", "Cabinet", and "Binder" for the
management of data, so as to facilitate intuitive and easy file management on
the computer.
The data storage areas of the "Libraries", "Cabinets" and "Binders" are called
"LibRoot" (Library Root). LibRoot folders can be set to any folder.
• You can set up to 3 LibRoot folders.
• In one LibRoot folder, you can create up to 6 libraries.
• In one library, you can create up to 20 cabinets.
• In one cabinet, you can create up to 21 binders.
In total, up to 2,520 (6 x 20 x 21) binders can be managed per LibRoot folder in
Rack2-Filer.
Up to 1,000 pages can be managed in a "Binder".
The relationship between the three terms is illustrated as follows:
Rack2-Filer User's Guide |25
Page 26
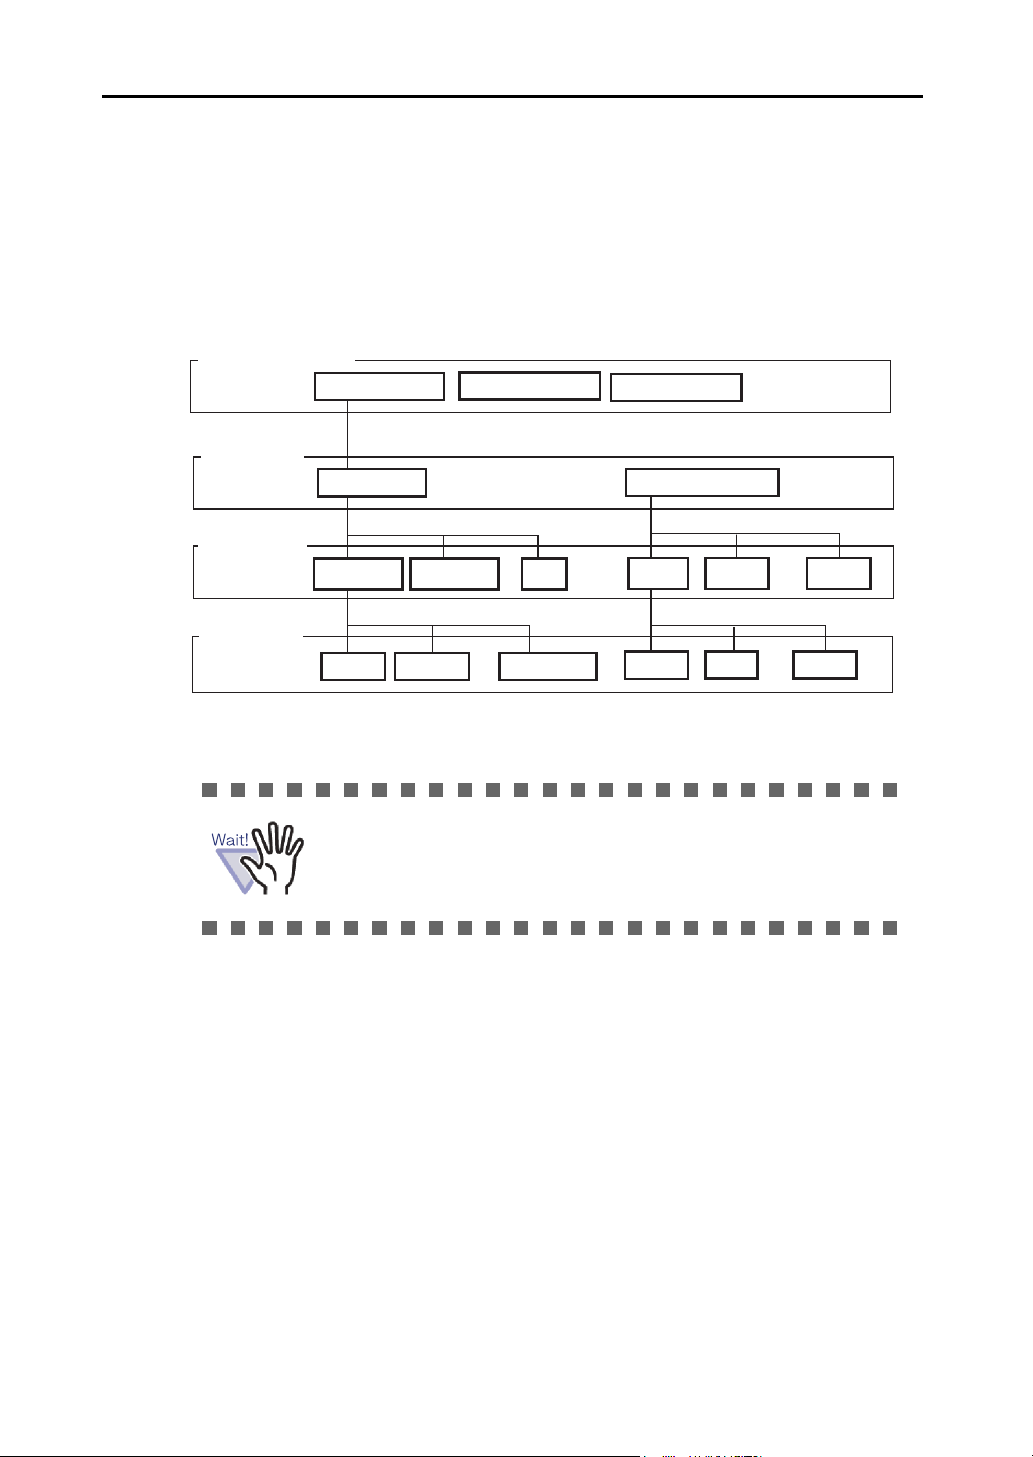
Chapter 1 Introduction to Rack2-Filer
Library Name
Admin. Dept.
Personnel Accounting Job
Rules
System Recruitment
Development Dept.
Dept.1 Dept.2 Dept.5
Specs Plan Project
Binder Name
. . . . .
. .
. . .
. .
. .
Cabinet Name
LibRoot Folder Name
In-house server
Department server
John’s computer
You can set any names for the "LibRoot folders", "Libraries", "Cabinets", and
"Binders".
For instance, it is easy for companies to understand and to manage libraries,
etc. by naming them with names from their organization.
The following is an example:
26 | Rack2-Filer User's Guide
Do not directly edit the data (rename or move the file or the
folder) stored in a LibRoot folder using other applications.
The data may not be shown correctly in Rack2-Filer.
Page 27

1.3 Rack2-Filer Windows
The windows in Rack2-Filer include the following:
• Rack2-Filer window
This is used to manage libraries, cabinets, and binders.
The Rack2-Filer window appears when you double-click the program
icon on the desktop, or when you start Rack2-Filer on the [Start] menu.
• Rack2-Viewer window
This is used to view and edit binders.
The Rack2-Viewer window appears when you double-click a binder in
the Rack2-Filer window.
• Rack2-WorkArea window
This is used as a temporary storage area when moving sheets between
the binders. The following operations can be performed:
- Insert files
- Change the page order
- Delete pages
To open the Rack2-WorkArea window, on the Rack2-Filer or Rack2Viewer window, click the [WorkArea] button.
For versions later than Rack2-Filer version 3.0, the following
function uses a "WorkArea" for the same purpose.
• "Temporary Binder" function
• Insert files to a "Temporary Binder" from ScanSnap
To move all data from a temporary binder (created with a
previous version of Rack2-Filer) to the "WorkArea", right-click
on the temporary binder and select [Move Pages to
WorkArea].
Rack2-Filer User's Guide |27
Page 28
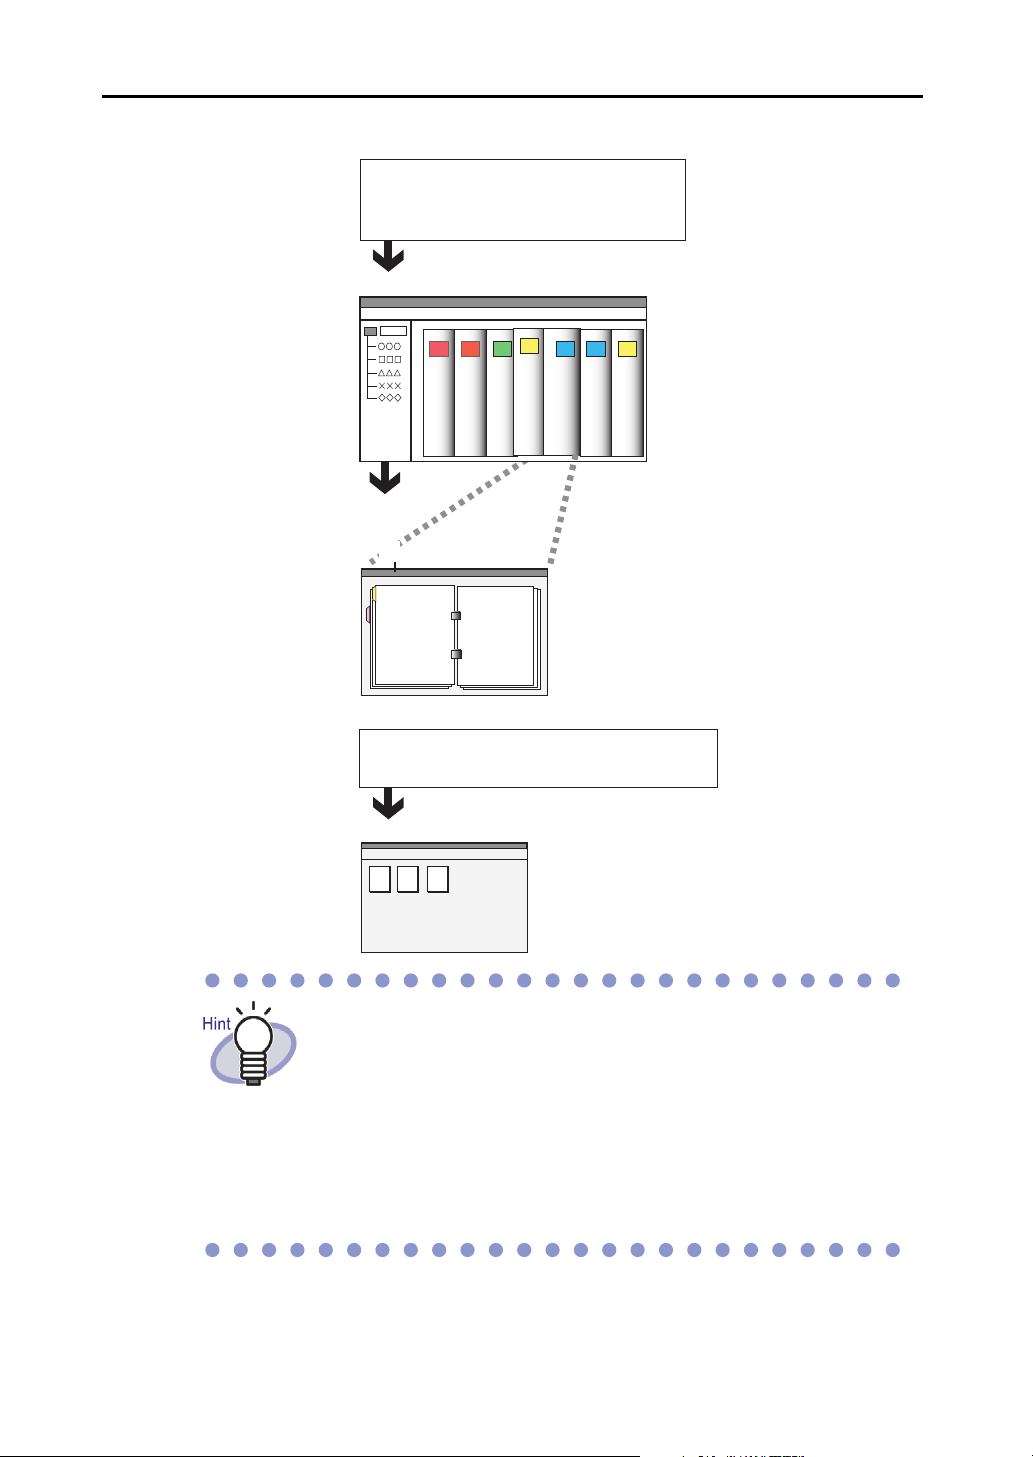
Chapter 1 Introduction to Rack2-Filer
Double-click the program icon created
the desktop or run the program from
Start menu.
Rack2-Filer Window
Double click the binder
you want to read
Rack2-Viewer Window
Rack2-WorkArea Window
plan
Communication
Report
Catalog2
Catalog1
Click the [WorkArea] button in the
Rack2-Filer window or Rack2-Viewer window.
The workflow of displaying windows is illustrated below.
For details of the buttons in each window, refer to the following
sections:
• "1.4 The Window Structure of Rack2-Filer (Rack2-Filer
Window)" (Page 29)
• "1.5 The Window Structure of Rack2-Filer (Rack2-Viewer
Window)" (Page 31)
• "1.6 The Window Structure of Rack2-Filer (Rack2-
WorkArea Window)" (Page 35)
28 | Rack2-Filer User's Guide
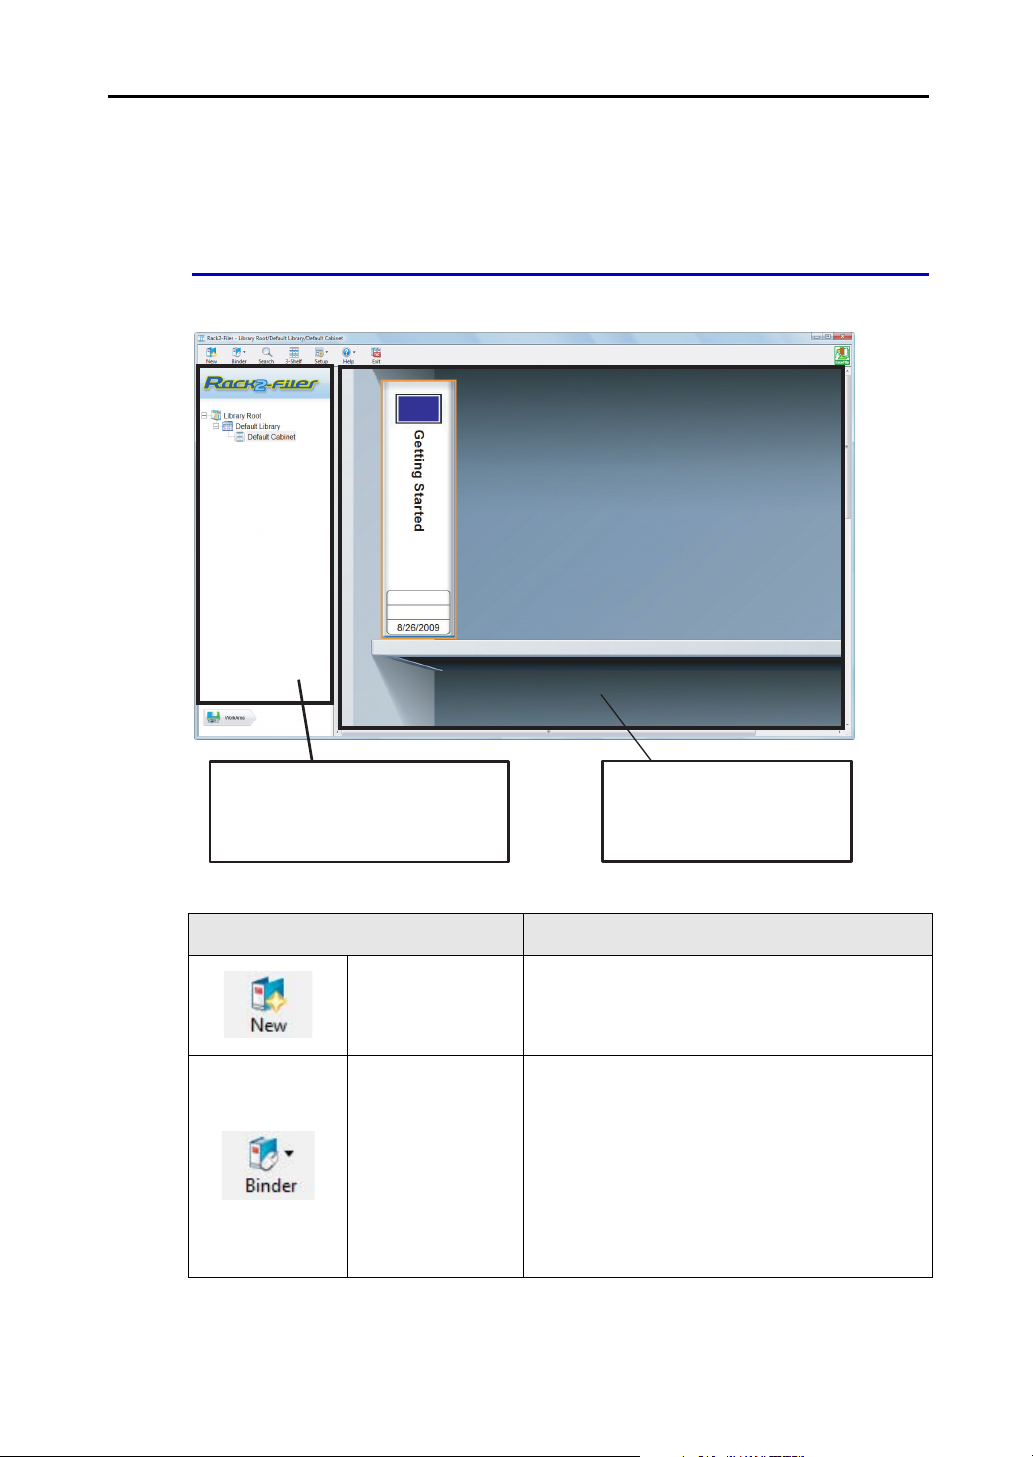
Page 29
1.4 The Window Structure of Rack2-
Folder View
Libraries and cabinets, which
manage binders, appear here
Binder View
Binders managed in
cabinets appear here
Filer (Rack2-Filer Window)
The following is a description of the structure of the Rack2-Filer window.
Rack2-Filer window button Button description
[New Binder]
button
[Operate Binder]
button
Used to create a new binder.
Used to perform the following operations:
- Binder Settings
- Move Binder
- Delete Binder
- Duplicate Binder
- Copy Pages to WorkArea
- Move Pages to WorkArea
- Import Binder
- Export Binder
Rack2-Filer User's Guide |29
Page 30
Chapter 1 Introduction to Rack2-Filer
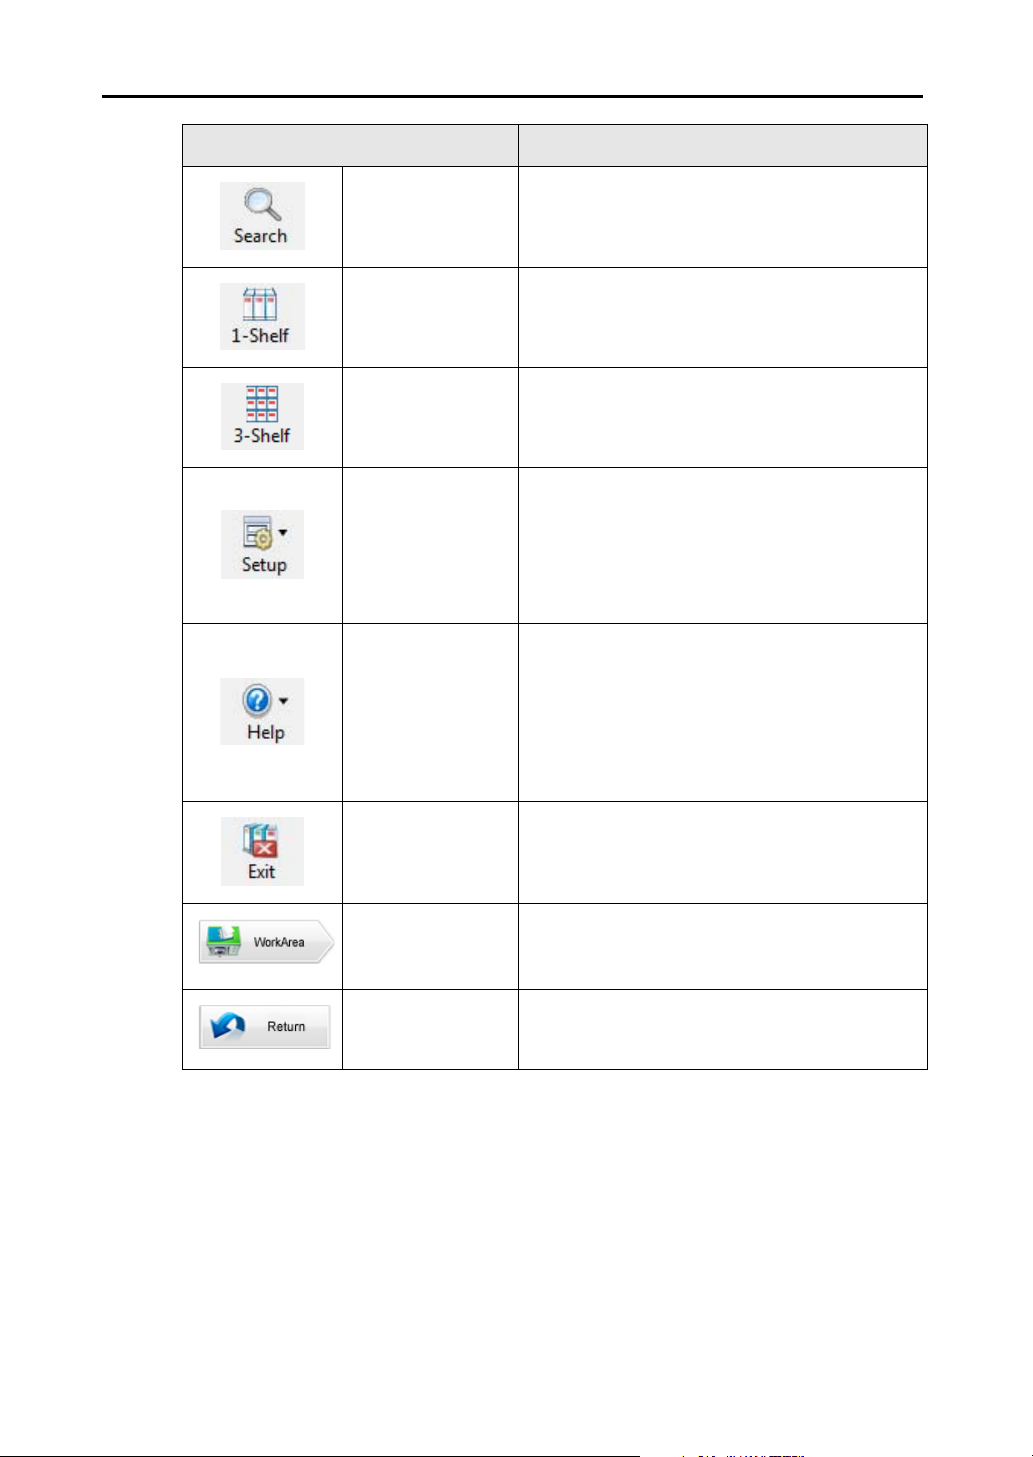
Rack2-Filer window button Button description
[Search] button
Used to search for a binder.
If a binder is selected, used to search for pages
in the binder.
[1-Shelf View]
button
[3-Shelf View]
button
[Setup] button
[Help] button
[Exit] button
Used to show one row of cabinet at a time.
Used to show three rows of cabinet at a time.
Used to perform the following operations:
- Library Setup
- Cabinet Setup
- Change Cabinet Background Style
- Rearrange LibRoot Folders/Libraries/Cabinets
- Options
Used to open the following:
- Rack2-Filer User's Guide (PDF)
- Topic Search (Rack2-Filer Help)
- License Agreement
- About Rack2-Filer
(Version Information)
In addition, online update can be performed.
Used to exit the Rack2-Filer window.
30 | Rack2-Filer User's Guide
[WorkArea]
button
[Return] button
Used to open the Rack2-WorkArea window.
Used to close the search results display.
This is displayed for a multi binder search.
Page 31

1.5 The Window Structure of Rack2-
Page Range Input Field
Shows the number of pages as "current page total pages".
Directly inputting a page number is also possible.
Page range input field will be highlighted in green for the
selected page.
Filer (Rack2-Viewer Window)
The following is a description of the structure of the Rack2-Viewer window.
Rack2-Viewer window button Button description
Displays one page at a time (page width mode).
The button is displayed in 2-page spread mode.
[Width] button
The button changes to after the button is
clicked, and the window mode is changed to the
page width mode.
Rack2-Filer User's Guide |31
Page 32

Chapter 1 Introduction to Rack2-Filer
Rack2-Viewer window button Button description
[Spread] button
Used to display two pages at a time (2-page spread
mode).
The button is displayed in page width mode.
The button changes to after the button is
clicked, and the window mode is changed to the 2page spread mode.
[Left Rotated]
button
[Right Rotated]
button
[Select] button
[Sticky] button
[Highlight]
button
[Stamp]
button
Used to rotate a page display 90 degrees left.
Used to rotate a page display 90 degrees right.
Used to switch the selection mode of photos,
documents and comments.
The button changes to after the button is
clicked, and the selection mode is enabled.
Displayed for a photo binder.
Used to add sticky notes to pages.
Used to add highlights to pages.
Used to add stamps to pages.
[Divider]
button
[Contents]
button
[Search] button
[File]
button
32 | Rack2-Filer User's Guide
Used to insert divider sheets to classify pages in a
binder.
Used to insert contents into the contents pages.
Contents can be inserted after the content page is
created in a binder.
Search the target page.
Used to insert source files and add pages in a
binder.
Page 33

Rack2-Viewer window button Button description
Used to display the [Layout Settings] dialog box.
[Layout] button
Displayed for a photo binder.
[Scanner]
button
[Print] button
[Save] button
[Export]
button
[WorkArea]
button
[Select]
button
[Copy]
button
[Move] button
Used to add sheets to a binder.
Image Scanner fi Series can use this function.
Used to print a page.
Used to overwrite a binder.
Used to export and save all pages in a binder in
PDF format.
Used to open the Rack2-WorkArea window.
Used to select multiple sheets.
Used to copy the selected sheet(s) to the clipboard.
Used to cut the selected sheet(s) and move it to the
clipboard.
[Paste]
button
[Delete] button
[Edit Source]
button
[Cancel] button
[<<] button
[<] button
Used to paste the sheet(s) or page(s) copied or
moved to the clipboard to the front of the currently
displayed page.
Used to delete the selected sheet(s).
Used to edit the inserted source file.
Used to cancel the multi-sheet selection state.
This is displayed when multiple sheets are selected.
Used to flip pages to the left continuously.
Used to flip one page to the left.
Rack2-Filer User's Guide |33
Page 34

Chapter 1 Introduction to Rack2-Filer
Rack2-Viewer window button Button description
[] button
[>] button
[>>] button
[Settings]
button
[Help] button
[Close] button
[Left arrow]
button
[Right arrow]
button
[Up arrow]
button
Used to stop continuous flipping.
Used to flip one page to the right.
Used to flip pages to the right continuously.
Used to set viewer configuration.
Used to open the "Rack2-Viewer Help" pages.
Used to close the Rack2-Viewer window.
Used to go to the previous page in page width
mode.
Used to go to the next page in page width mode.
Used to show the upper part of the currently shown
page.
When this button is clicked on a page in which the
page display is rotated, the previous page is
displayed.
This is displayed in page width mode or when the
page has been rotated right or left 90 degrees.
[Down arrow]
button
[Return] button
[Open Source
Binder] button
34 | Rack2-Filer User's Guide
Used to show the lower part of the currently shown
page.
When this button is clicked on a page in which the
page display is rotated, the next page is displayed.
This is displayed in page width mode or when the
page has been rotated right or left 90 degrees.
Used to return to the page display before the page
rotated.
This is displayed after a page has been rotated.
Used to display the search source binder.
This is displayed for a search results binder.
Page 35

1.6 The Window Structure of Rack2-
Filer (Rack2-WorkArea Window)
The following is a description of the structure of the Rack2-WorkArea window.
Rack2-WorkArea window
button
[Rack2-Filer]
button
[Stack] button
Button description
Used to switch to the Rack2-Filer window.
Used to perform the following operations:
•Get File
•Save As
•Print
• Send As e-Mail
Rack2-Filer User's Guide |35
Page 36

Chapter 1 Introduction to Rack2-Filer
Rack2-WorkArea window
button
[Edit] button
[Delete]
button
[Merge]
button
[Split All]
button
Button description
Used to perform the following operations:
•Undo
•Duplicate
• Delete Source Files
• Crop Marked Section
• Output to Office
•Select All
• Jump to Page
• Edit Stack Name
•Settings
Used to delete the selected pages.
Used to merge the selected pages into a single
stack.
Used to split stack into single pages.
[Detach]
button
[View] button
[Help] button
[Close] button
[Previous
Page] button
Used to detach current page from stack.
Used to perform the following operations:
• Sort Stacks By
• Thumbnail Size
• Show ScanSnap Mark
• View Stack Pages
•Reload
Used to open the "WorkArea Help" pages.
Used to close the Rack2-WorkArea window.
Used to display the previous page.
This is displayed when a specified page has been
expanded.
36 | Rack2-Filer User's Guide
Page 37

Rack2-WorkArea window
button
Button description
[Next Page]
button
[Annotations]
button
[Close] button
Used to display the next page.
This is displayed when a specified page has been
expanded.
Used to display the annotations.
This is displayed when a specified page has been
expanded.
Used to close the specified page display.
This is displayed when a specified page has been
expanded.
Rack2-Filer User's Guide |37
Page 38

Chapter 1 Introduction to Rack2-Filer
1.7 Basic Operation Workflow
The following is an example of creating a binder and viewing an inserted file.
Select a cabinet in which to create
a binder, from the tree.
The [Binder Settings] dialog box appears.
⇒
name, and click the [OK] button
⇒
A binder is created.
⇒
The Rack2-Viewer window appears.
⇒The PDF file is created by using the
"Raku2 ImageWriter" printer driver,
and the file is inserted into the binder.
6
6. Drag on an area to zoom
Parts of a page can be zoomed.
7.C
li
c
k
Flip through
pages of the binder.
The operation mentioned above is an example.
Besides inserting files (as in Step 5), you can also scan
documents using an Image Scanner fi Series scanner or
ScanSnap.
For more details, refer to "Chapter 7 Rack2-Viewer Window
Operations" (Page 157).
38 | Rack2-Filer User's Guide
Page 39

Chapter 2
Operating Environment
This chapter describes the operating environment of Rack2-Filer, and
limitations in network sharing and WorkArea.
Rack2-Filer User’s Guide |39
Page 40

Chapter 2 Operating Environment
2.1 Operating Environment
The following hardware, software, and scanner environments are required for
the operation of Rack2-Filer and the scanning of documents.
Hardware environment
Item Requirements
Operating system
(OS)
CPU Pentium III
Memory 256 MB or more
Disk
volume
Monitor resolution 800 x 600 pixels or more (*1)
System
drive
Installatio
n drive
• Windows 2000
Professional
• Windows XP
600 MHz or more
(5 12 MB or more is
recommended)
10 MB or more disk space
(When using color data, it is necessary to specify
approximately 400 MB or more disk space and virtual memory
(paging file size))
450 MB or more disk space
(Additional space is required for the data created by Rack2-
Filer)
Windows Vista Windows 7
Pentium 4 1.8 GHz or more
512 MB or more
(1 GB or more is
recommended)
For 32-bit version:
1 GB or more
For 64-bit version:
2 GB or more
Monitor colors High color (16-bit) or more
*1: 1024 x 768 pixels or more if the size of the characters are set to be zoomed
in by the Windows settings.
40 | Rack2-Filer User’s Guide
Page 41

Software environment
This product supports operations when Rack2-Filer’s regional and language
settings are same as the installed OS.
Item Requirements
Operating system
.NET Framework .NET Framework 3.0 or 3.5
*1:
Service Pack 2 or later is required for using the following functions on
Windows XP. Operation of the following is not supported for Windows 2000
Professional.
• Evernote
• Google Docs
• Salesforce Chatter
• SugarSync
• iPad/iPhone/iPod touch
• Windows 2000 Professional(
• Windows XP(
• Windows Vista
• Windows 7
(Required for using Google Docs, Salesforce
Chatter, and iPad/iPhone/iPod touch)
Scanner environment
*1
*1
)
)
Item Requirements
Scanner
*1: This also includes ScanSnap S1500M. In this manual, "S1500" refers to
S1500 and S1500M.
• Image Scanner fi Series
• Color Image Scanner ScanSnap (S1100,
S1300, S1500 (*1), S300, S510, S500)
In this manual, all the models mentioned
above are referred to as "ScanSnap".
Rack2-Filer User’s Guide |41
Page 42

Chapter 2 Operating Environment
Software required for using a cloud service/
mobile device
• Evernote for Windows 3.5 or later is required for exporting Rack2-Filer
data to Evernote.
• .NET Framework 3.0 is required for exporting Rack2-Filer data to
Google Docs, Salesforce Chatter or a mobile device.
The relationship between each operating system and .NET Framework
is as follows:
Windows 7 Windows Vista Windows XP (*2)
.NET Framework 3.0 is already installed. (*1)
*1: .NET Framework 3.0 is included in .NET Framework 3.5.
*2: Even when .NET Framework 4 or later is already installed, .NET
Framework 3.0 must also be installed, because it is not included in
.NET Framework 4 or later.
• You need to have ScanSnap Connect Application installed on the mobile
device in order to export Rack2-Filer data to it. Download ScanSnap
Connect Application for mobile devices from an application store such
as the App Store.
Other notes
• This product does not support the use of Unicode. If Unicode characters
are used, they may not be displayed correctly, or the product may not
work properly.
• If Windows "System Restore" is performed and a problem occurs with
the hard disk integrity, Rack2-Filer Libraries/Cabinets/Binders may
become unusable.
It is recommended that all Rack2-Filer Libraries/Cabinets/Binders are
backed up. For more details about backing up data, refer to "6.32 Data
Backup" (Page 154).
• Rack2-Filer may not operate correctly under virtual environments or on
remote desktop.
.NET Framework 3.0
is not installed. (*1)
42 | Rack2-Filer User’s Guide
Page 43

2.2 Limitations on Operations on
Shared Data in the Network
Rack2-Filer allows you to store data in a shared folder on the network and then
perform operations using this data. However, operations are limited regarding
data currently in use by others.
• To specify a network folder as a LibRoot folder, use a
Windows server. A Windows server is an environment
where the OS installed is one of the following, and is
operating as a file server.
-Windows Server
- Windows Server 2003
- Windows 2000 Server
- Windows 7 Professional
- Windows 7 Enterprise
- Windows 7 Ultimate
- Windows Vista Ultimate
- Windows Vista Enterprise
- Windows Vista Business
- Windows XP Professional
- Windows 2000 Professional
• Specify the LibRoot folder for Rack2-Filer installed in the
PC as a network shared folder, and then also specify as a
LibRoot folder for another PC.
2008
Rack2-Filer User’s Guide |43
Page 44

Chapter 2 Operating Environment
The limitations on operations on shared data are listed as follows:
• Forbidden when another user is using the same library
(including opening a binder in the same library)
- Setting up the library
• Forbidden when another user is using the same cabinet
(including opening a binder in the same cabinet)
- Setting up the library
- Setting up the cabinet
- Changing the background style of a cabinet
- Arranging binders
• Forbidden when another user is using the same binder
- Setting up the library
- Setting up the cabinet
- Changing the background style of a cabinet
- Changing binder settings
- Deleting the binder
- Moving/copying (duplicating) the binder
- Moving/copying the sheet(s) to the WorkArea
- Exporting the binder
- Arranging binders
When you attempt to open a binder that has already been opened by
another user, the message "The selected binder is in use. Do you want
to open the binder in read-only mode?" appears. Clicking the [OK]
button opens the binder in read-only mode.
• In read-only mode, settings cannot be changed, no
source file or sheet operations can be performed.
• In read-only mode, annotations can be added, but
cannot be overwritten. To save any changes, use the
"Export Binder" function.
44 | Rack2-Filer User’s Guide
Page 45

2.3 Limitation on WorkArea
The limitations on WorkArea are listed below:
Moving data
Binder type
Normal binder Available Available
Card binder Not available Available (*1)
Photo binder Available Available
*1: Card size data only (approximately 91mm x 55mm)
from the binder
to WorkArea
Moving data
from WorkArea
to the binder
Rack2-Filer User’s Guide |45
Page 46

Chapter 2 Operating Environment
46 | Rack2-Filer User’s Guide
Page 47

Chapter 3
Installation and Uninstallation
This chapter describes the following operations.
• Installation of Rack2-Filer
• Uninstallation of Rack2-Filer
• Upgrading Rack2-Filer
• Updating Rack2-Filer
Rack2-Filer User's Guide |47
Page 48

Chapter 3 Installation and Uninstallation
Insert
3.1 Installing Rack2-Filer
Installation is conducted in two steps, i.e., first install Rack2-Filer (Rack2-Filer
window), and then install Rack2-Viewer (Rack2-Viewer window).
Install Rack2-Filer before Rack2-Viewer.
• Close all applications before installation.
• A user must login with Administrators privileges or with
computer administrator privileges.
1.Insert the setup CD-ROM into the CD-ROM drive.
D The Rack2-Filer setup main window appears.
2.Click the [Install Product] button.
D The installation wizard appears.
48 | Rack2-Filer User's Guide
Page 49

3.Click the [Next] button.
D The "License Agreement" window appears.
4.Confirm the content of the "License Agreement" and click the
[Yes] button.
If you click the [No] button, the installation will be terminated.
To install Rack2-Filer, you must accept the terms of the license agreement.
D The "Information" window appears once you click the [Yes] button.
5.Confirm the content of "Information" and click the [Next]
button.
The "Information" contains content not included in the manual, such as
important notices for installation and reference information. Make sure to
confirm it.
D The "Choose Destination Location" window appears.
Rack2-Filer User's Guide |49
Page 50

Chapter 3 Installation and Uninstallation
6. Confirm the installation directory and click the [Next] button.
In most cases, you do not need to change the installation directory. Click
the [Next] button.
D The "Start Copying Files" window appears.
To change the installation directory, click the [Browse] button.
The [Choose Folder] dialog box appears. Choose the
installation folder using this dialog box.
7.Confirm the installation content and click the [Next] button.
D Rack2-Filer is installed.
The Rack2-Viewer installation window appears.
8.Click the [Next] button.
D The "License Agreement" window appears.
50 | Rack2-Filer User's Guide
Page 51

9.Confirm the terms and conditions of the "License
Agreement", and click the [Yes] button if you accept the
terms of the license agreement.
If you click the [No] button, the installation will be terminated.
To install Rack2-Viewer, you must accept the terms of the license
agreement.
DThe "Information" window appears once you click the [Yes] button.
10.Confirm the content of "Information" and click the [Next]
button.
The "Information" contains content not included in the manual, such as
important notices for installation and reference information. Make sure to
confirm it.
DThe "Choose Destination Location" window appears.
11.Confirm the installation directory and click the [Next] button.
In most cases, you do not need to change the installation directory. Click
the [Next] button.
DThe "Start Copying Files" window appears.
To change the installation directory, click the [Browse] button.
The [Choose Folder] dialog box appears. Choose the
installation folder using this dialog box.
12.Confirm the installation content and click the [Next]
button.
DThe Rack2-Viewer window is installed.
The "Install Shield Wizard Complete" window appears when the
installation is complete.
Rack2-Filer User's Guide |51
Page 52

Chapter 3 Installation and Uninstallation
13.Click the [Finish] button.
DThis product is fully installed.
If only installing the Rack2-Viewer window, use the following
steps:
1. Insert the setup CD-ROM into the CD-ROM drive.
2. Double-click "Setup.exe" in the "View" folder under the
"Rack2-Filer" folder.
3. The installation window appears. Follow the prompts of
the installation windows. For more information, refer to "8.
Click the [Next] button." on Page 50.
52 | Rack2-Filer User's Guide
Page 53

3.2 Uninstalling Rack2-Filer
This section uses Windows Vista as an example in providing the instructions.
Select buttons and items according to the operating system you use, because
the buttons and other items vary depending on the operating system.
If "Rack2 Folder Monitor Software" is already installed, first
uninstall "Rack2 Folder Monitor Software", and then uninstall
Rack2-Filer.
For the procedure to uninstall "Rack2 Folder Monitor Software",
refer to "Uninstalling Rack2 Folder Monitor Software" (Page 380).
The "Find Shared Files" message appears. Click the [Yes] button.
1.On the [Start] menu, click [Control Panel].
D The control panel is displayed.
2.Click [Uninstall a program].
D The [Uninstall or change a program] dialog box appears.
3.
Select "Rack2-Filer" from the list of installed programs.
Rack2-Filer User's Guide |53
Page 54

Chapter 3 Installation and Uninstallation
4.Click the [Uninstall] button.
D The message to confirm file deletion appears.
5.Click the [OK] button.
D Rack2-Filer is uninstalled.
6.Click the [OK] button.
D The Rack2-Viewer is uninstalled.
The window showing that uninstallation is complete appears when
finished.
7.Choose to restart your computer right away or later, and click
the [Finish] button.
D Uninstallation is complete.
54 | Rack2-Filer User's Guide
Page 55

3.3 Upgrading Rack2-Filer
Follow the steps below to upgrade Rack2-Filer.
• If a previous version of "Rack2 Folder Monitor Software" is
installed, first uninstall the previous version of "Rack2 Folder
Monitor Software", and then upgrade. For the procedure to
uninstall "Rack2 Folder Monitor Software", refer to
"Uninstalling Rack2 Folder Monitor Software" (Page 380). To
upgrade "Rack2 Folder Monitor Software", first upgrade
Rack2-Filer, and then install the latest version of "Rack2
Folder Monitor Software". (Previous settings information will
be preserved.)
• Close all applications before the installation.
• Log in with Administrator or System Administrator privileges.
1.Install the new product.
For details about installation, refer to "3.1 Installing Rack2-Filer" (Page 48).
D Rack2-Filer is upgraded.
Rack2-Filer User's Guide |55
Page 56

Chapter 3 Installation and Uninstallation
3.4 Updating Rack2-Filer
In order to improve the security and operation of Rack2-Filer, maintenance
programs (Update Packs
You can check for available maintenance programs to update Rack2-Filer.
• In order to update Rack2-Filer, an operating environment
where the internet is available is required.
• A user must login with Administrators privileges or with
computer administrator privileges.
and Service Packs) are provided free of charge.
The maintenance programs are released without prior
announcement. Therefore, it is recommend that you check for
updates on a regular basis.
1. From the Windows [Start] menu, select [All Programs] -
[Rack2-Filer] - [Online Update].
Or, in the Rack2-Filer window, click and select
[Online Update].
D If a new update is available, an update confirmation message will appear.
56 | Rack2-Filer User's Guide
Page 57

2.Click the [OK] button.
D The update installer for the latest program is downloaded and started.
Install the update according to the instructions displayed on the screen.
Exit all running programs before installing the update.
If the latest maintenance program is already applied, "The
latest version of the program is already installed. There is
no need to update." message appears.
Rack2-Filer User's Guide |57
Page 58

Chapter 3 Installation and Uninstallation
58 | Rack2-Filer User's Guide
Page 59

Chapter 4
Launching/Closing Rack2-Filer
This chapter describes how to launch and close windows for Rack2-Filer
(Rack2-Filer window/Rack2-Viewer window/Rack2-WorkArea window).
Rack2-Filer User's Guide |59
Page 60

Chapter 4 Launching/Closing Rack2-Filer
4.1 Launching/Closing
the Rack2-Filer Window
This section describes how to launch and close the Rack2-Filer window.
Launching the Rack2-Filer window
1. Double-click the program icon ( ) on the desktop.
When launching from the [Start] menu, click the [Start]
button, point to [All Programs], and then click [Rack2-Filer] [Rack2-Filer] in this order.
Closing the Rack2-Filer window
1. Click in the Rack2-Filer window.
60 | Rack2-Filer User's Guide
Page 61

4.2 Opening/Closing
the Rack2-Viewer Window
This section describes how to open and close the Rack2-Viewer window.
Opening the Rack2-Viewer window
1. In the Rack2-Filer window, double-click the binder you want
to view. You can also right-click on the spine of the binder
and select [Open Binder].
D The binder can be viewed right after the Rack2-Viewer window is opened.
Closing the Rack2-Viewer Window
1. Click in the Rack2-Viewer window.
After having edited or added a page, a message
confirming whether to update the binder or not is
displayed. To update, click the [Yes] button.
Rack2-Filer User's Guide |61
Page 62

Chapter 4 Launching/Closing Rack2-Filer
4.3 Launching/Closing
the Rack2-WorkArea Window
This section describes how to launch and close the Rack2-WorkArea window.
Launching the Rack2-WorkArea window
1. Click in the Rack2-Filer window or Rack2-
Viewer window.
62 | Rack2-Filer User's Guide
Page 63

The following procedures can be used:
• In the Rack2-Filer window
- Click and select [Move Pages to WorkArea]
- Click and select [Copy Pages to WorkArea]
- Right-click and select [Move Pages to WorkArea]
- Right-click and select [Copy Pages to WorkArea]
• In the Rack2-Viewer window:
- Right-click to select [Multi-Sheet Selection]. Then,
right-click to select [Move] - [Move Pages x-xx (to
WorkArea)].
- Right-click and point to [Cut/Move], and select [Sheet
(to WorkArea)]
- Right-click and point to [Cut/Move], and select [Divider
Section (to WorkArea)]
- Right-click to select [Multi-Sheet Selection]. Then,
right-click to select [Copy] - [Copy Pages x-xx (to
WorkArea)]
.
- Right-click and point to [Copy], and select [Page (to
WorkArea)]
- Right-click and point to [Copy], and select [Sheet (to
WorkArea)]
- Right-click and point to [Copy], and select [Divider
Section (to WorkArea)]
Rack2-Filer User's Guide |63
Page 64

Chapter 4 Launching/Closing Rack2-Filer
Closing the Rack2-WorkArea window
1. Click in the Rack2-WorkArea window.
64 | Rack2-Filer User's Guide
Page 65

Chapter 5
• S1100
• S300
• S1300
• S510
• S1500
• S500
• fi-5110EOX2
• fi-5110EOX
• fi-4110EOX2
Using the ScanSnap
with Rack2-Filer
This chapter describes how to enable the use of the ScanSnap with Rack2-
Filer.
The steps in this chapter only need to be performed once.
• The ScanSnap is a color scanner for documents.
When using the ScanSnap, documents can be imported to
a binder simply by pressing the scan button on the
ScanSnap.
The ScanSnap must be purchased separately from Rack2-
Filer.
• A data storage destination from ScanSnap can be
specified. For more details, refer to "[ScanSnap -> Rack2]
tab settings" (Page 152).
The following ScanSnap models can be used with Rack2-Filer.
Support services are no longer available for the following
scanner models.
Rack2-Filer User's Guide |65
Page 66

Chapter 5 Using the ScanSnap with Rack2-Filer
5.1 Using S1100/S1300/S1500 with
Rack2-Filer
There are two ways to enable the use of ScanSnap S1100/S1300/S1500 with
Rack2-Filer.
• Specifying the application in ScanSnap Manager
• Using the Quick Menu
Documents scanned with S1100/S1300/S1500 have the
following features when using with Rack2-Filer.
• A section outlined with a highlight pen can be cut in the
WorkArea.
• A section marked with a highlight pen can be considered
as a keyword and automatically extracted, when
performing a search. For details about settings, refer to the
ScanSnap S1100/S1300/S1500 Help, or "Run OCR via the
ScanSnap S1100/S1300/S1500 marked keyword function"
(Page 206).
66 | Rack2-Filer User's Guide
Page 67

Specifying the application in ScanSnap
Manager
This section describes how to enable the use of ScanSnap S1100/S1300/
S1500 by specifying the application in ScanSnap Manager.
• The following settings in the ScanSnap setup dialog box will
be disabled.
- "Rename file after scanning" checkbox on the [Save] tab
- "Color high compression" in the [Color mode] setting on
the [Scanning] tab
• If scanning with S1100/S1300/S1500, the following setting is
recommended. On the [Scanning] tab, select the [Option]
button. Then on the [Read mode option] dialog box that
appears, uncheck the "Allow automatic image rotation"
checkbox.
• It is recommended that you right-click the "ScanSnap
Manager" icon
results".
on the taskbar and uncheck "Show scanning
• When the operating system is Windows 7, clicking on the
taskbar displays the "ScanSnap Manager" icon.
Rack2-Filer User's Guide |67
Page 68

Chapter 5 Using the ScanSnap with Rack2-Filer
1. Double-click the "ScanSnap Manager" icon on the taskbar.
Or right-click the "ScanSnap Manager" icon on the taskbar,
and select "Scan Button Settings".
When the operating system is Windows 7, clicking on
the taskbar displays the "ScanSnap Manager" icon.
2. If selected, clear the "Use Quick Menu" checkbox.
3. Click the [Detail] button.
68 | Rack2-Filer User's Guide
Page 69

4. On the [Application] tab, select "Rack2-Filer" for
"Application".
Rack2-Filer User's Guide |69
Page 70

Chapter 5 Using the ScanSnap with Rack2-Filer
5. Click the [OK] button.
D The ScanSnap can now be used with Rack2-Filer.
Using the Quick Menu
This section describes how to enable the use of ScanSnap S1100/S1300/
S1500 with Rack2-Filer by using the ScanSnap S1100/S1300/S1500 Quick
Menu.
For more details about scanning with ScanSnap S1100/S1300/S1500, refer to
ScanSnap Operator's Guide provided with ScanSnap S1100/S1300/S1500.
1. Double-click the "ScanSnap Manager" icon on the taskbar.
Or right-click the "ScanSnap Manager" icon on the taskbar,
and select "Scan Button Settings".
When the operating system is Windows 7, clicking on
the taskbar displays the "ScanSnap Manager" icon.
70 | Rack2-Filer User's Guide
Page 71

2. Check that the "Use Quick Menu" checkbox is selected.
3. Load the documents onto the ScanSnap S1100/S1300/
S1500, and then press the scan button.
D Scanning starts. When scanning is completed, the Quick Menu appears.
When using ScanSnap S1100, press the scan button after
scanning is complete to display the Quick Menu.
4. Select "Scan to Rack2-Filer" from the Quick Menu.
Rack2-Filer User's Guide |71
Page 72

Chapter 5 Using the ScanSnap with Rack2-Filer
5. To change the settings in "Scan to Rack2-Filer", select
[Settings] from .
If the settings do not need to be changed, proceed to Step 8.
D The following settings window appears.
6. Specify the scanned data storage destination.
-WorkArea
Saves scanned data into the WorkArea of Rack2-Filer.
"Request confirmation each time" checkbox
A confirmation window appears when saving the data in the
WorkArea.
[OK] button: Saves the data in the WorkArea.
[Cancel] button: Cancels saving the data.
- Binder currently selected in the Rack2-Filer window
Saves the scanned data into the binder selected in the Rack2-Filer
window.
- Binder selection dialog for individual assignment every time
Binder selection dialog box for individual assignment is displayed
every time.
72 | Rack2-Filer User's Guide
Page 73

Specify the data storage destination binder and click the [OK]
button. The scanned data is saved to the specified binder.
Clicking the [Cancel] button cancels saving the data.
• For a LibRoot folder that is not shown in the Rack2-
Filer window, [Hidden] is displayed before the LibRoot
Alias.
• For a card binder, [CARD] is displayed before the title.
• For a photo binder, [Photo] is displayed before the
title.
Rack2-Filer User's Guide |73
Page 74

Chapter 5 Using the ScanSnap with Rack2-Filer
7. Click the [OK] button.
D The "ScanSnap -> Rack2" window is closed, and the screen returns to the
Quick Menu.
8. Click [Scan to Rack2-Filer].
D A PDF file is created from the scanned data, and the file is saved to the
storage destination specified in Step 6.
74 | Rack2-Filer User's Guide
Page 75

5.2 Using S300/S510/S500 with
Rack2-Filer
There are two ways to enable the use of ScanSnap S300/S510 with Rack2-
Filer.
• Specifying the application in ScanSnap Manager
• Using the Quick Menu
To enable the use of ScanSnap S500 with Rack2-Filer, specify the application
in ScanSnap Manager.
Specifying the application in ScanSnap
Manager
This section describes how to enable the use of ScanSnap S300/S510/S500 by
specifying the application in ScanSnap Manager.
• The following settings in the "ScanSnap Manager - Scan
and Save Settings" window will be disabled.
- Rename file after scanning
- "Color high compression" in the [Color mode] setting on
the [Scanning] tab
• If scanning with S300/S510/S500, the following setting is
recommended. On the [Scanning] tab, select the [Option]
button. Then on the [Read mode option] dialog box that
appears, uncheck the "Allow automatic image rotation"
checkbox.
Rack2-Filer User's Guide |75
Page 76

Chapter 5 Using the ScanSnap with Rack2-Filer
It is recommended that you right-click the "ScanSnap Manager"
icon on the taskbar and uncheck "Show scanning results".
When the operating system is Windows 7, clicking on the
taskbar displays the "ScanSnap Manager" icon.
76 | Rack2-Filer User's Guide
Page 77

For ScanSnap S300 or ScanSnap S510, first, right-click the
"ScanSnap Manager" icon on the taskbar. If there is a check
mark on the left side of the "Use Quick Menu", select "Use Quick
Menu" again to clear the check.
Perform operations without the check mark on the left side of the
"Use Quick Menu".
1. Right-click the "ScanSnap Manager" icon on the taskbar,
and select "SCAN Button Settings".
Rack2-Filer User's Guide |77
Page 78

Chapter 5 Using the ScanSnap with Rack2-Filer
2. On the [Application] tab, select "Rack2-Filer" for
"Application".
3. Click the [OK] button.
D The ScanSnap can now be used with Rack2-Filer.
Using the Quick Menu
This section describes how to enable the use of ScanSnap S300/S510 with
Rack2-Filer by using the ScanSnap Quick Menu.
For more details about scanning with ScanSnap S300/S510, refer to
"ScanSnap S300 Operator's Guide" or "ScanSnap S510 Operator’s Guide".
78 | Rack2-Filer User's Guide
Page 79

1. Right-click on the ScanSnap Manager icon in the taskbar,
and check that the check mark to the left side of [Use Quick
Menu] is selected.
2. Load the documents onto the ScanSnap S300/S510, and
press the scan button.
D Scanning starts.
When scanning is completed, the "ScanSnap Quick Menu" appears.
3. Place the mouse pointer on "Scan to Rack2-Filer" in the
Actions List on the left side of the ScanSnap Quick Menu.
D A description of the selected action is displayed on the right side of the
window.
4. To change the settings in "Scan to Rack2-Filer", place the
mouse pointer on to display the [Settings] button, and
click the button.
If the settings do not need to be changed, proceed to Step 6.
Rack2-Filer User's Guide |79
Page 80

Chapter 5 Using the ScanSnap with Rack2-Filer
D The following settings window appears.
D Specify the scanned data storage destination.
-WorkArea
Saves scanned data into the WorkArea of Rack2-Filer.
"Request confirmation each time" checkbox
A confirmation window appears when saving the data in the
WorkArea.
[OK] button: Saves the data in the WorkArea.
[Cancel] button: Cancels saving the data.
- Binder currently selected in the Rack2-Filer window
Saves the scanned data into the binder selected in the Rack2-Filer
window.
80 | Rack2-Filer User's Guide
Page 81

- Binder selection dialog for individual assignment every time
Binder selection dialog box for individual assignment is displayed
every time.
Specify the data storage destination binder and click the [OK]
button. The scanned data is saved to the specified binder.
Clicking the [Cancel] button cancels saving the data.
• For a LibRoot folder that is not shown in the Rack2-
Filer window, [Hidden] is displayed before the LibRoot
Alias.
• For a card binder, [CARD] is displayed before the title.
• For a photo binder, [Photo] is displayed before the
title.
Rack2-Filer User's Guide |81
Page 82

Chapter 5 Using the ScanSnap with Rack2-Filer
5. Click the [OK] button.
D The "ScanSnap -> Rack2" window is closed, and the screen returns to the
Quick Menu.
6. Click [Scan to Rack2-Filer].
D A PDF file is created from the scanned data, and the file is saved to the
location that was specified in Step 4.
82 | Rack2-Filer User's Guide
Page 83

Chapter 6
Rack2-Filer Window Operations
This chapter describes operations using the Rack2-Filer window.
Rack2-Filer User’s Guide |83
Page 84

Chapter 6 Rack2-Filer Window Operations
6.1 Setting a LibRoot Folder
This section explains how to set the LibRoot folder so that libraries, cabinets
and binders can be saved.
Up to three LibRoot folders can be set.
By setting a network folder as a LibRoot folder, Rack2-Filer
data can be shared between multiple users.
However, operations are restricted for data that is being
accessed by another user. For details, refer to "2.2 Limitations
on Operations on Shared Data in the Network" (Page 43).
When a folder in the local computer is specified as a LibRoot
folder, the folder must be in the local hard disk drive or external
hard disk drive.
If a folder in removable disk drives such as USB flash drives or
MOs is specified as a LibRoot folder, Rack2-Filer may not
operate correctly.
1. Select a LibRoot folder, click , and select [Options].
D The [Rack2-Filer Options] dialog box appears.
84 | Rack2-Filer User’s Guide
Page 85

2. On the [LibRoot Folders] tab, click the [Browse] button.
D The [Browse For Folder] dialog box appears.
3. Enter the LibRoot folder settings, and click the [OK] button.
D The [Browse For Folder] dialog box is closed, and the LibRoot path
shown in the input field.
4. To show the contents of the LibRoot folder on the Rack2-
Filer window, select [Show contents of the LibRoot].
Select [Show contents of the LibRoot] for at least one
LibRoot folder.
5. Specify the LibRoot Alias in [LibRoot Alias] within 30
characters.
If [Show contents of the LibRoot] is selected in Step 4, the LibRoot Alias
specified here is shown on the Rack2-Filer window.
Rack2-Filer User’s Guide |85
Page 86

Chapter 6 Rack2-Filer Window Operations
6. Click the [OK] button.
D The LibRoot folder is set.
86 | Rack2-Filer User’s Guide
Page 87

6.2 Rearranging the LibRoot Folders
This section describes how to rearrange the LibRoot folders in the Folder View.
1. Click and select [Rearrange] - [LibRoot Folders].
Or right-click on the LibRoot tree and select [Rearrange
LibRoot Folders].
D The [Rearrange LibRoot Folders] dialog box appears.
2. Select a LibRoot folder to be rearranged in "LibRoot".
3. Use the [Up] and [Down] buttons to change the display
order.
4. Click the [OK] button.
D The LibRoot folders are rearranged.
Rack2-Filer User’s Guide |87
Page 88

Chapter 6 Rack2-Filer Window Operations
6.3 Creating a Library
This section describes how to create a library to manage cabinets.
Up to six libraries can be created for one LibRoot folder.
1. Click and select [Libraries].
Or right-click on the LibRoot folder tree and select [New
Library].
D The [Library Setup] dialog box appears.
2. Enter a new library name within 40 characters.
3. Click the [Add New Library] button.
D A library is created.
88 | Rack2-Filer User’s Guide
Page 89

6.4 Renaming a Library
This section explains how to rename a library.
1. Select a library that you want rename from the directory
tree.
2. Click and select [Libraries].
Or right-click on the library tree and select [Rename
Library].
D The [Library Setup] dialog box appears with the name of the selected
library.
3. Enter a new name for the library within 40 characters.
Rack2-Filer User’s Guide |89
Page 90

Chapter 6 Rack2-Filer Window Operations
4. Click the [Rename Library] button.
D The library name is changed.
90 | Rack2-Filer User’s Guide
Page 91

6.5 Deleting a Library
This section explains how to delete a library.
A library containing cabinets cannot be deleted.
Delete the cabinets in the library before deleting the library.
1. Select a library that you want to delete from the directory
tree.
Rack2-Filer User’s Guide |91
Page 92

Chapter 6 Rack2-Filer Window Operations
2. Click and select [Libraries].
D The [Library Setup] dialog box appears with the name of the selected
library.
A library can also be deleted by right-clicking on the library
tree and selecting [Delete Library]. In this case, the
message in Step 4 appears right away.
3. Click the [Delete Library] button.
D A message dialog box appears.
4. Click the [OK] button.
D The library is deleted.
92 | Rack2-Filer User’s Guide
Page 93

6.6 Rearranging Libraries
This section explains how to rearrange the libraries displayed in the folder view.
1. Select the library, click , and select [Rearrange] -
[Libraries].
Or right-click on the library tree and select [Rearrange
Libraries].
D The [Rearrange Libraries] dialog box appears.
2. Select a library to be rearranged in "Library".
3. The order of the libraries can be rearranged using the [Up]
and [Down] buttons.
4. Click the [OK] button.
D The libraries are rearranged.
Rack2-Filer User’s Guide |93
Page 94

Chapter 6 Rack2-Filer Window Operations
p
6.7 Creating a Cabinet
This section explains how to create a cabinet in the library to manage binders.
Up to 20 cabinets in a library can be created.
1. Select a library in which you want to create a cabinet from
the directory tree.
D The content of the selected library appears.
2. Click and select [Cabinets].
Or right-click on the library tree and select [New Cabinet].
D The [Cabinet Setup] dialog box appears.
3. Enter a cabinet name within 32 characters.
94 | Rack2-Filer User’s Guide
Page 95

4. Click the [Add New Cabinet] button.
D The cabinet is created.
Rack2-Filer User’s Guide |95
Page 96

Chapter 6 Rack2-Filer Window Operations
6.8 Renaming a Cabinet
This section explains how to rename an existing cabinet.
1. Select a cabinet that you want to rename from the directory
tree.
D The content of the selected cabinet appears.
2. Click and select [Cabinets].
Or right-click on the cabinet tree and select [Rename
Cabinet].
D The [Cabinet Setup] dialog box appears with the name of the selected
cabinet.
3. Enter a new name for the cabinet within 32 characters.
96 | Rack2-Filer User’s Guide
Page 97

4. Click the [Rename Cabinet] button.
D The cabinet is renamed.
Rack2-Filer User’s Guide |97
Page 98

Chapter 6 Rack2-Filer Window Operations
6.9 Deleting a Cabinet
This section explains how to delete a cabinet from a library.
A cabinet containing binders cannot be deleted.
Delete the cabinet after deleting all binders in the cabinet.
1. Select a cabinet that you want to delete from the directory
tree.
98 | Rack2-Filer User’s Guide
Page 99

2. Click and select [Cabinets].
D The [Cabinet Setup] dialog box appears with the name of the selected
cabinet.
The cabinet can also be deleted by right-clicking on the
cabinet tree and selecting [Delete Cabinet]. In this case,
the message in Step 4 appears right away.
3. Click the [Delete Cabinet] button.
D A message dialog box appears.
4. Click the [OK] button.
D The cabinet is deleted from the library.
Rack2-Filer User’s Guide |99
Page 100

Chapter 6 Rack2-Filer Window Operations
6.10 Rearranging Cabinets
This section explains how to rearrange cabinets displayed in folder view.
1. Select the cabinet, click , and select [Rearrange] -
[Cabinets].
Or right-click on the cabinet tree and select [Rearrange
Cabinets].
D The [Rearrange Cabinets] dialog box appears.
2. Select a cabinet to be rearranged in "Cabinet".
3. The order can be changed using the [Up] and [Down]
buttons.
4. Click the [OK] button.
D Cabinets are rearranged.
100 | Rack2-Filer User’s Guide
 Loading...