

Page 1
User’s Guide
Manual d' Utilisation
Benutzerhandbuch
Manual del Usuario
Manuale Utente
Page 2

Page 3

User’s Guide
Manual d' Utilisation
Benutzerhandbuch
Manual del Usuario
Manuale Utente
Page 4

Fujitsu Personal Systems, Inc. has made every effort to ensure the accuracy and
completeness of this document; however, because ongoing development efforts are
made to continually improve the capabilities of our products, we cannot guarantee
the accuracy of the contents of this document. We disclaim liability for errors,
omissions, or future changes herein.
Fujitsu® is a registered trademark of Fujitsu, Ltd.
PenCentra™ 130 and Working Mobility™ are trademarks of Fujitsu Personal
Systems, Inc.
QuickNotes™, JOT®, InkTools™, PenX™, CIC Speller™, and Handwriter®
Recognition Software are trademarks or registered trademarks of Communication
Intelligence Corporation.
bFIND
bFAX® are trademarks or registered trademarks of bSQUARE®
™ and
Corporation.
ActiveSync™, ActiveX®, Microsoft®, Microsoft InkWriter®, Microsoft Outlook™,
Microsoft PowerPoint®, Microsoft Windows®, Microsoft Windows NT®, MSN™,
Visual Basic®, Visual C++®, and the Windows logo are either registered trademarks or
trademarks of Microsoft Corporation in the United States and/or other countries.
Microsoft products are licensed to OEMs by Microsoft Licensing, Inc., a wholly owned
subsidiary of Microsoft Corporation.
All other products are trademarks or registered trademarks of their respective
companies.
Copyright 1999 Fujitsu Personal Systems, Inc.
No part of this publication may be copied, reproduced, or translated, without the prior written consent
of Fujitsu Personal Systems, Inc. No part of this publication may be stored or transmitted in any
electronic form without the prior consent of Fujitsu Personal Systems, Inc.
Page 5

Agency Compliance
UL Notices
• For continued protection against the risk of fire, replace
only with the same type and rating of fuse.
• There is a danger of explosion if the backup battery is
incorrectly replaced. Replace only with the same or
equivalent type recommended by the manufacturer.
Dispose of used batteries according to manufacturer's
instruction.
• Changes or modifications not expressly approved by
Fujitsu Personal Systems, Inc. could void this user’s
authority to operate the equipment.
• The backup battery may explode if mistreated. Do not
recharge, disassemble, or dispose of in fire.
Cautions
Warnings
• For a spare battery pack, order only Fujitsu Model
FMW51BP1.
• To charge the battery pack FMW51BP1 externally, use
only a PenCentra external battery charger FMW51BC1.
i
Page 6
FCC Notices
DECLARATION OF CONFORMITY
according to FCC Part 15
Responsible Party Name:
Address:
Fujitsu Personal Systems, Inc.
5200 Patrick Henry Drive
Santa Clara, CA 95054
Telephone:
Declares that product:
408-982-9500
Model: PenCentra 130
Complies with Part 15 of the FCC Rules
This device complies with Part 15 of the FCC rules. Operation is subject to
the following two conditions: (1) This device may not cause harmful
interference, and (2) This device must accept any interference received,
including interference that may cause undesired operation.
David Woo - Mgr. Agency Compliance 6-15-99
Full Name / Title Date
Note: For more detailed information about the FCC rules and their applicability to the
PenCentra 130 pen tablet, refer to Appendix C of this document. The following
table provides the part numbers for each of the PenCentra 130 configurations.
Screen Type Modem? Country/Cord Part Number
CRF YES US/US FMW5100FA01
CRF NO UK/UK FMW5101FB01
CRF NO Germany/Euro FMW5101FD01
CRF NO France/Euro FMW5101FF01
CTM YES US/US FMW5100SA01
CTM NO UK/UK FMW5101SB01
CTM NO Germany/Euro FMW5101SD01
CTM NO France/Euro FMW5101SF01
ii
Page 7

Table of Contents
Before You Get Started ................................................................... vii
Welcome....................................................................................................... vii
About this Guide......................................................................................... vii
Where to Find Information........................................................................ ix
Chapter 1
Introducing the PenCentra 130 H/PC Pro .................................... 1-1
Included with the PenCentra 130 ............................................................. 1-1
Options Available for the PenCentra 130................................................ 1-2
PenCentra 130 Hardware Features........................................................... 1-3
Front / Left / Top Features........................................................... 1-3
Rear / Right / Bottom Features:................................................... 1-5
Status Indicators.............................................................................. 1-7
Connectors and Peripheral Interfaces.......................................... 1-8
PenCentra 130 Software ............................................................................. 1-10
Windows CE Applications............................................................ 1-10
Productivity Package Applications.............................................. 1-11
Chapter 2
Using the PenCentra 130 ................................................................. 2-1
Before Setting Up the PenCentra 130 ....................................................... 2-1
Setting Up the PenCentra 130 ................................................................... 2-1
Turning the device off and on (suspending/resuming) ........... 2-1
Resetting the system....................................................................... 2-2
Using the Pen............................................................................................... 2-3
Calibrating the pen......................................................................... 2-3
Replacing the Pen............................................................................ 2-5
Inserting/Removing PC Cards................................................................. 2-5
Powering the PenCentra 130 ..................................................................... 2-5
Removing and Installing a Battery Pack ..................................... 2-6
Charging the Battery Pack............................................................. 2-7
Conserving Power / Optimizing Power Management............. 2-7
Using a Keyboard or Mouse with the PenCentra 130 ............... 2-7
Attaching a Keyboard or Mouse............................................... 2-8
Using the Keyboard Function Keys ......................................... 2-8
Using the Hotpads...................................................................................... 2-9
Chapter 3
Using Microsoft CE Applications ................................................. 3-1
Windows CE Applications ........................................................................ 3-1
Microsoft Pocket Office.................................................................. 3-1
Pocket Word: Creating Documents.............................................. 3-2
iii
Page 8

Taking notes using Pocket Word.............................................. 3-3
Pocket Excel: Creating Workbooks .............................................. 3-4
To log expenses using Pocket Excel: ........................................ 3-4
Pocket Access: Viewing and Creating Data................................ 3-6
To create a new database and table on your PenCentra 130: 3-7
Pocket PowerPoint: Showing Presentations ............................... 3-8
To show a presentation: ............................................................. 3-8
Voice Recorder and InkWriter ...................................................... 3-10
Voice Recorder: Capturing Ideas and Thoughts.................... 3-10
InkWriter: Creating Notes and Drawings................................... 3-12
To create an InkWriter document:............................................ 3-12
Microsoft Pocket Outlook.......................................................................... 3-13
Calendar: Scheduling Meetings and Appointments.................. 3-14
To create a new appointment:................................................... 3-15
To create a meeting request:...................................................... 3-16
Contacts: Tracking Friends and Colleagues................................ 3-17
To create a new contact:............................................................. 3-17
Tasks: Keeping a To Do List .......................................................... 3-18
To create a new task: .................................................................. 3-19
Inbox: Sending and Receiving E-mail Messages........................ 3-20
Connecting to a mail server....................................................... 3-21
Setting up Inbox for connecting to a mail server ................... 3-21
Downloading messages ............................................................. 3-22
Disconnecting from the server.................................................. 3-22
Managing messages and folders............................................... 3-22
ActiveSync: Synchronizing E-mail............................................... 3-24
Downloading messages ............................................................. 3-24
Managing messages and folders............................................... 3-25
Sending a message.......................................................................... 3-25
To send a message: ..................................................................... 3-25
Getting Connected Remotely.................................................................... 3-26
Connecting to an ISP ...................................................................... 3-27
To create a dial-up connection to an ISP: ................................ 3-27
Connecting to Your Network........................................................ 3-28
To create a dial-up connection to a network:.......................... 3-28
To create a network (Ethernet) connection: ............................ 3-28
Connecting to Your Desktop to Synchronize Remotely............ 3-29
To create a dial-up connection to a desktop modem............. 3-31
Getting Help on Connecting Remotely........................................ 3-31
Microsoft Windows CE Services............................................................... 3-31
Installing Windows CE Services and Setting up a Partnership 3-32
Synchronizing Files and File Conversion.................................... 3-33
Remote Synchronization................................................................ 3-34
Getting Help on Windows CE Services....................................... 3-34
Chapter 4
Using the PenCentra 130 Productivity Package ......................... 4-1
iv
Page 9

CIC QuickNotes .......................................................................................... 4-1
Using QuickNotes........................................................................... 4-1
Working with Books................................................................... 4-2
Setting the Basic Options. .......................................................... 4-2
Putting Contact Information into Notes.................................. 4-2
Using stamps with QuickNotes................................................ 4-2
Setting Ink Preferences............................................................... 4-3
Erasing Ink................................................................................... 4-3
Recording a Voice Note ............................................................. 4-3
Using Find.................................................................................... 4-4
Using Ink Snap............................................................................ 4-4
Editing and Manipulating Objects. .......................................... 4-4
Sending a Fax............................................................................... 4-5
Sending an Email with QuickNotes......................................... 4-5
Browsing your Notes.................................................................. 4-5
CIC Speller ................................................................................................... 4-5
Check spelling in a window.......................................................... 4-5
Using the Quick Text / Macro feature......................................... 4-6
Looking up the spelling of a word ............................................... 4-6
Getting statistics of a document.................................................... 4-6
Finding and replacing text in a window ..................................... 4-7
Managing your custom dictionary............................................... 4-7
CIC Jot........................................................................................................... 4-7
Jot Tutorial ....................................................................................... 4-8
Jot Trainer......................................................................................... 4-8
CIC Handwriter .......................................................................................... 4-8
Using the Online Help ................................................................... 4-8
Getting to Know Handwriter........................................................ 4-8
Getting to Know the Recognizer................................................... 4-9
Writing Case-identical Letters .................................................. 4-9
Writing Punctuation Marks....................................................... 4-10
Spacing Between Characters and Words................................. 4-10
Tips for Using the Recognizer................................................... 4-10
Distinguish Letters from Numbers .......................................... 4-11
Other Tips .................................................................................... 4-11
Customizing Handwriter Settings............................................ 4-11
Choosing the Recognizer........................................................... 4-11
Customizing Ink Settings........................................................... 4-12
Timeout ........................................................................................ 4-12
Customizing Recognition .......................................................... 4-12
Using the Macro Editor.............................................................. 4-13
Using the Trainer ........................................................................ 4-14
CIC On-Screen Keyboard........................................................................... 4-14
CIC InkTools................................................................................................ 4-14
bFAX ............................................................................................................. 4-14
Creating a New Fax ........................................................................ 4-14
Adding/Removing Recipients...................................................... 4-14
Adding/Removing Documents.................................................... 4-15
v
Page 10

Sending a Fax................................................................................... 4-15
Adding/Removing Documents.................................................... 4-16
bFIND ........................................................................................................... 4-16
Creating a Search ............................................................................ 4-16
Choosing Search Locations............................................................ 4-17
Chapter 5
Care and Maintenance of the PenCentra 130 .............................. 5-1
Protecting the Display Screen ................................................................... 5-1
Installing a Screen Protector.......................................................... 5-1
Storing the PenCentra 130 ......................................................................... 5-2
Protecting the PenCentra 130 Pen Tablet in Harsh Environments...... 5-3
Avoiding Overheating ............................................................................... 5-3
Cleaning the Display Screen...................................................................... 5-3
Chapter 6
Troubleshooting the PenCentra 130 ............................................. 6-1
System Will Not Resume Operation ............................................ 6-1
Display Screen Is Blank or Difficult to Read............................... 6-1
Infrared Data Transfer Is Not Working....................................... 6-2
Pen Tablet Is Not Responding to the Pen.................................... 6-2
Pen Tablet is Not Responding to the Keyboard......................... 6-2
Pen Not Calibrated ......................................................................... 6-3
Audio Volume Too Low ................................................................ 6-3
Remote connection problems.................................................................... 6-3
Can’t dial out with the device modem ........................................ 6-3
Can dial out but can’t make a proper connection ...................... 6-4
The connection is unreliable.......................................................... 6-4
Network connection is not listed in the ActiveSync dialog box 6-4
Appendix A
PenCentra 130 H/PC Pro Hardware Specifications .................... A-1
Appendix B
Glossary ............................................................................................. B-1
Appendix C
Agency Notices ................................................................................. C-1
FCC Notices ................................................................................................. C-1
DOC (Industry Canada) Compliance Notices ........................................ C-3
vi
Notice to Users of Radios and Television.................................... C-1
Notice to Users of the US Telephone Network........................... C-1
Notice to Users of Radios and Television.................................... C-3
Notice to Users of the Canadian Telephone Network............... C-3
Avis Aux Utilisateurs Du Réseau Téléphonique Canadien...... C-4
Page 11

Before You Get Started
Welcome 0
Congratulations on purchasing a PenCentra 130 Handheld Personal Computer Pro
(H/PC Pro) powered by the Microsoft® Windows® CE operating system. This
enterprise-level pen computer provides a rugged ergonomic design, high
performance, and minimal weight. The PenCentra 130 delivers Working Mobility
by putting the power of information in the palm of your hand.
About this Guide 0
This guide provides an introduction to your PenCentra 130, the Microsoft Windows
CE operating system, and the installed applications. The following chapters are
contained in this document:
Chapter 1: Introducing the PenCentra 130
This chapter introduces you to the features of your PenCentra 130. Included are
descriptions of the material included with your system and optional peripherals
specially designed for the PenCentra 130.
Chapter 2: Using the PenCentra 130
This chapter provides steps for the initial setup of your system, as well as a brief
description of the software loaded on the system. Also included are instructions for a
variety of procedures, such as printing and customizing your PenCentra 130.
TM
Chapter 3: Using Microsoft CE Applications
This chapter offers details on the various Windows CE applications, such as Pocket
Word, Pocket Access, and Pocket Excel. Included are instructions for setting up the
Windows CE Services software on your desktop or laptop computer to allow
synchronization of data between the PenCentra 130 and your desktop or laptop.
Chapter 4: Using the PenCentra 130 Productivity Package
This chapter provides instructions on using additional programs such as
handwriting recognition, productivity, and FPSI-developed applications.
Chapter 5: Care and Maintenance of the PenCentra 130
The PenCentra 130 is a high-quality electronic device, and should be treated as such.
This chapter instructs you in the proper care and maintenance of your system.
Welcome
vii
Page 12

Chapter 6: Troubleshooting the PenCentra 130
This chapter offers troubleshooting tips and techniques in the event you run into a
problem when operating your pen tablet.
Appendix A: Glossary
The Glossary contains a description of Microsoft and Fujitsu Personal Systems, Inc.
terms used throughout this guide.
Appendix B: Hardware Specifications
This appendix contains detailed information about your PenCentra 130
specifications.
Appendix C: Agency Notices
This appendix contains notices required by the Federal Communications
Commission.
viii
Before You Get Started
Page 13

Where to Find Information 0
This guide describes your PenCentra 130 hardware, provides an overview of the
programs included, and describes how to set up communications between your
PenCentra 130, your desktop computer, and the Internet. The following table is a
guide to the different types of information available to help you use your PenCentra
130. For more information, see the comprehensive on-line Help for each program.
For Information On... Use This Reference...
PenCentra 130 H/PC Pro
Hardware
Windows CE Programs This User’s Guide
CIC Programs This User’s Guide
bSQUARE Programs This User’s Guide
Synchronizing and
exchanging files with a
desktop computer (including
information on connecting
while traveling)
This User’s Guide
Fujitsu Personal Systems Inc. web site:
http://www.fpsi.fujitsu.com/
On-line Help on your device. Select
Help
then
On-line Help on your device. Select
then
Communication Intelligence Corp. web site:
www.cic.com
On-line Help on your device. Select
then
bSQUARE web site:
www.bsquare.com
This User’s Guide
On-line Help on your device. Select
then
Windows CE Services on-line Help on your
desktop computer. In the Mobile Devices window,
click
Topics
Help
Help
Help
Help
.
.
.
.
.
, then
Start
and
Start
and
Start
and
Start
and
Windows CE Services Help
Where to Find Information
ix
Page 14

For Information On... Use This Reference...
Toolbar buttons Tap or click and hold on a toolbar button to see its
name. Drag off the toolbar button before lifting to
avoid activating the button.
Troubleshooting information
on connections
Up-to-date information on
Windows CE-based devices
Information on this release of
Windows CE
The Communications Troubleshooter on your
desktop computer. In the Mobile Devices window,
Help
click
Troubleshooter
Communications
, then
.
Microsoft Windows CE web site:
http://www.microsoft.com/windowsce/
Readme.doc file (located in the Windows CE
Services folder on your desktop computer).
x
Before You Get Started
Page 15

Chapter 1
Introducing the PenCentra 130 H/PC Pro
The PenCentra 130 is a high-performance, pen-based computer designed to support
Microsoft Windows CE. This chapter provides an overview of the PenCentra and its
features.
Included with the PenCentra 130 1
The following items are included with your PenCentra 130:
• Lithium ion battery pack
• AC Adapter
• Microsoft Windows CE Services CD-ROM
• Screen Protectors (quantity: 2)
• PenCentra 130 Pen
• Internal 56 Kbps* fax/modem (V.90): 53 Kbps receive/33.6 Kbps send/14.4 Kbps
fax
* The internal modem is available in North America only. The 56 Kbps rate is
nominal; due to FCC restrictions, actual rates are limited to 53 Kbps.
1-1
Page 16

Options Available for the PenCentra 130 1
The following optional peripherals and accessories items are available to support
your PenCentra 130:
• Auto Adapter (FMWCB2)
• Spare Pen (FMW51PN1)
• Pen Tether (FMW51ST1)
• Docking Station (FMW51DS1)
• 16MB RAM Expansion Module (FMW51EM16)
• 32MB RAM Expansion Module (FMW51EM32)
• 8MB Flash ROM Expansion Module (FMW51FL8)
• Harsh Environment Case (FMWCC36)
• Spare Battery Pack (FMW51BP1)
• External Battery Charger (FMW51BC1)
• Handstrap (FMWHS3)
• Screen Protectors, 12-pack (FMWSP6)
• Compact Folding Deskstand (FMWDS4)
• System Holster (FMWCC34)
• Harsh Environment Case Holster (FMWCC37)
• Slipcase (FMWCC33)
• Portfolio Case (FMWCC35)
• Mobile Keyboard:
• US (FMWKB3A)
• UK (FMWKB3B)
• France (FMWKB3F)
• Germany (FMWKB3D)
1-2
Introducing the PenCentra 130 H/PC Pro
Page 17

PenCentra 130 Hardware Features 1
Features and controls that you use to operate the PenCentra 130 are described below
and illustrated in Figures 1-1 and 1-2. Additional details on using these features and
controls are provided later in this manual.
Front / Left / Top Features 1
• Screen
The screen is the area in which your applications and data are displayed. The
screen is also the area in which you enter data with the pen.
• Status Indicators
There are three status indicators that provide event notification and power status.
• Pen/Pen Holder
The pen -- or stylus -- is the main pointing device used for navigation and entering
data. When not in use, it should be stored in the PenCentra 130 pen holder or
optional carrying case.
• Record Button
The Record button is used to initiate recording of sound on the system via the
microphone.
• Microphone
The microphone allows you to record sound files, such as voice memos.
• Hotpads
Hotpads allow you to change settings for the display, sound, and mouse button
emulation. Three programmable hotpads are also available for customization.
• IrDA Port
Provides an infrared interface for communication with devices compliant with
IrDA Standard Revision 1.1.
• Suspend/Resume Button
Allows you to suspend and resume system operation in order to extend battery
life.
• Modem Jack *
Allows you to connect a standard telephone plug to the PenCentra’s internal 56
Kbps modem.
* The internal modem is available in North America only.
PenCentra 130 Hardware Features
1-3
Page 18
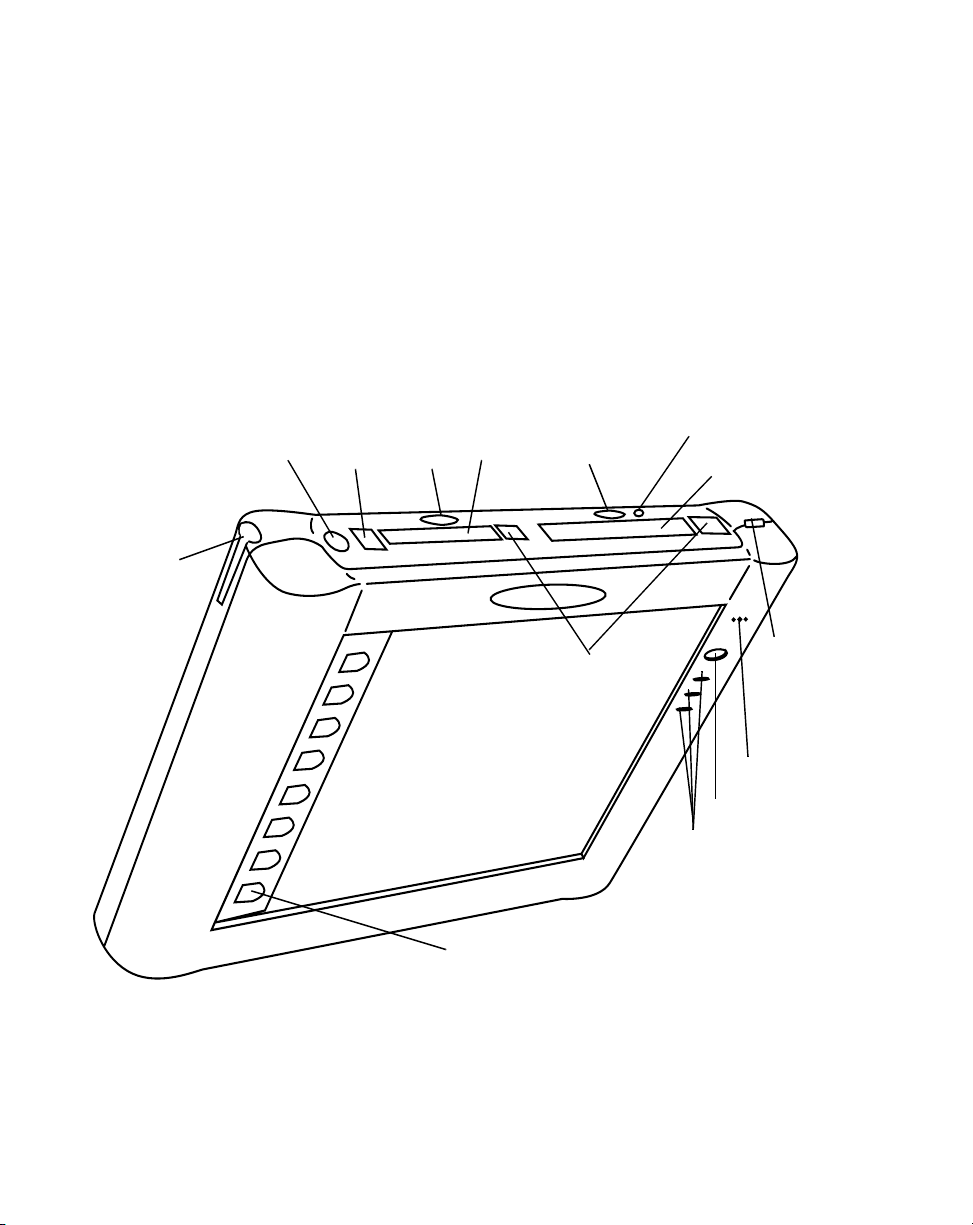
• Reset Button
The Reset button restarts the PenCentra 130.
• PC Card Doors
These doors allow you to access the PC Cards installed in the PC Card slots.
• Kensington
TM
Lock Attachment Point
The lock attachment point lets you attach an optional Kensington-type security
cable.
• Notification Button
The Notification button is used to acknowledge a notification from the system,
such as a meeting reminder.
Suspend/
Resume
Button
Pen Holder
Modem
Jack*
IrDA
Por t
PC Card
Slot 1
Button
Reset Button Notification
Ejector
Buttons
PC Card Slot 2
Kensington
Lock Port
Microphone
Hotpads (8 places)
Figure 1-1 PenCentra Front/Left/Top View
* The internal modem is available in North America only.
1-4
Introducing the PenCentra 130 H/PC Pro
Record Button
Status Indicators
Page 19

Rear / Right / Bottom Features: 1
• Removable Battery Pack
The battery pack can be removed for replacement or charging in an optional
external charger.
• Battery Pack Latch
Secures the removable battery in position.
• Pen Tether Attachment Slot
The pen tether slots allow you to attach an optional pen tether.
• Handstrap Attachment Points
These are used to attach an optional handstrap.
• Speaker
The built-in speaker allows you to play back audio files without external
hardware.
• Memory Access Door
Allows you to gain access to the RAM, ROM, and flash memory modules inside
your PenCentra.
• Microphone Jack
Allows you to connect an external microphone
• Headphone Jack
Allows you to connect headphones to your PenCentra 130.
• Serial Port
This port is used for connecting the synchronization cable between your
PenCentra 130 and a desktop computer. This port can also be used as a standard
serial port.
• USB Port
Allows you to connect Universal Serial Bus-compliant devices to the PenCentra
130. Note that only USB devices with Windows CE 2.11-compliant drivers will
work in this port.
• DC Input
Allows you to connect the AC Adapter or an optional Auto Adapter.
• PS/2-Style Keyboard/Mouse Port
The PS/2-style port lets you attach a PS/2-style keyboard or mouse. This port
only supports a 5V keyboard or mouse.
PenCentra 130 Hardware Features
1-5
Page 20
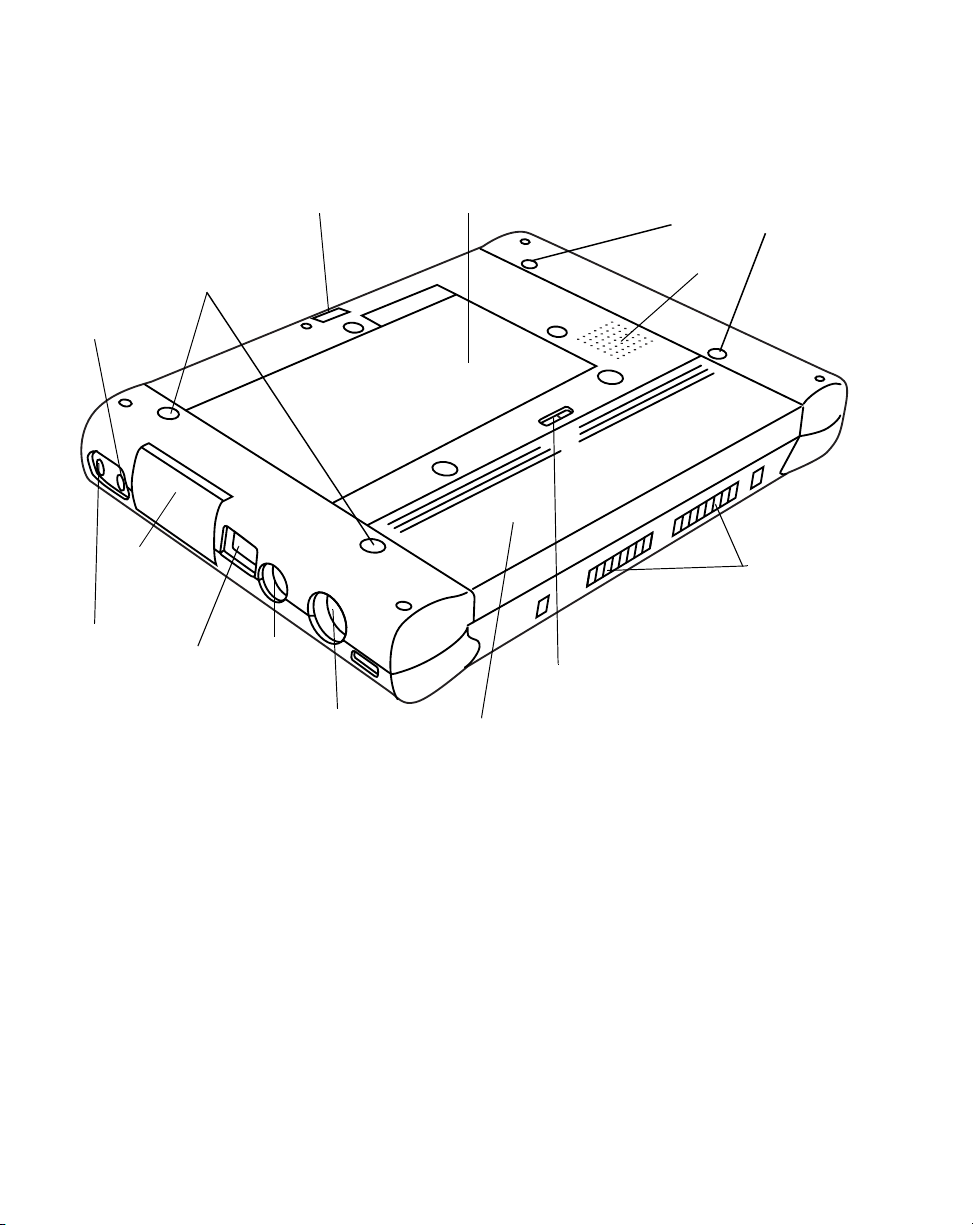
• High-Usage Docking Contacts
These contacts allow you to use the pen tablet in an optional docking station.
Headphone
Jack
Serial
Por t
Door
Microphone
Jack
Handstrap
Attachment
Points
USB
Por t
Pen Tether Slot
DC
Input
PS/2-style
Keyboard/Mouse Port
Memory Access Door
Battery Pack Latch
Removable Battery Pack
Handstrap
Attachment Points
Speaker
High-Usage
Docking
Contacts
1-6
Figure 1-2 PenCentra Rear/Right/Bottom View
Introducing the PenCentra 130 H/PC Pro
Page 21

Status Indicators 1
There are three status indicators located on the front of the system, adjacent to the
right-hand side of the screen. These lights indicate the information about system
status:
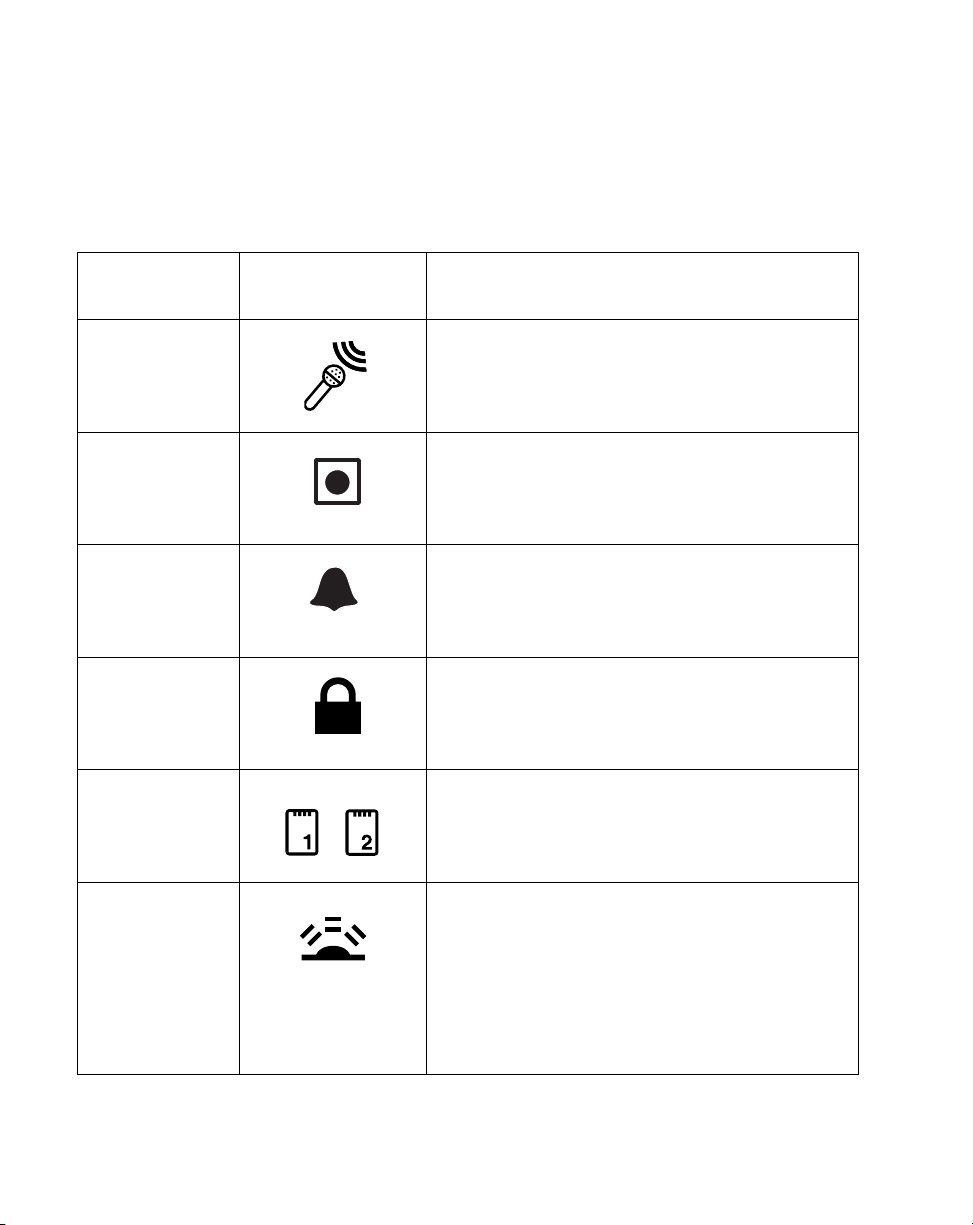
Table 1-1 System Status Indicators
Display
Icon
Name LED State (Significance) Description
Notification
Indicator
DC Input Off
Battery Off
Orange
(Notification of event)
(No battery, no DC Input)
Orange
(Charging)
Green
(Charge complete)
Ye l l o w
(Thermal Alarm)
(Battery is between 20% and 100%
charged)
The notification
indicator flashes when a
pre-determined event is
detected by the system
(such as a meeting
reminder). The
notification indicator is
reset by pressing the
notification button on
the top of the system.
When this indicator is lit,
the system is running
on external DC power.
This LED indicates low
battery conditions.
Orange, blink (every 2-4 seconds)
(Between 5% and 20%)
Orange, no blink
(Between 0% and 5%)
PenCentra 130 Hardware Features
1-7
Page 22
Connectors and Peripheral Interfaces 1
The connectors and peripheral interfaces on the PenCentra 130 can accommodate a
variety of different devices. Figures 1-1 and 1-2 show the locations of the connectors
and interfaces on the PenCentra 130, as described in Table 1-2.
Table 1-2 Peripheral Connectors
Connector/
Peripheral
Microphone Jack Connect an external microphone. The internal
Record Button Initiates the recording of audio files (such as voice
Notification
Button
Kensington Lock
PC Cards Install one or two Type II PCMCIA Cards. If only
PenCentra 130
Icons
Purpose
microphone is disabled when you plug in an
external microphone.
memos) on the PenCentra.
The notification button is used to turn off the
notification indicator, and launch the message that
generated the notification.
TM
The Kensington
you to secure the PenCentra using
Kensington-compatible locking devices.
one card is installed, either slot can be used.
Microsaver security slot allows
IrDA Port The infrared transceiver built into the PenCentra
allows you to communicate with other devices that
are compliant with IrDA Standard Revision 1.0 or
1.1. Effective range for infrared communication is
about three feet, and within 15 degrees off of
center. A clear line-of-sight path must exist between
the IrDA port on the PenCentra and the IrDA
transceiver on the other device.
1-8
Introducing the PenCentra 130 H/PC Pro
Page 23
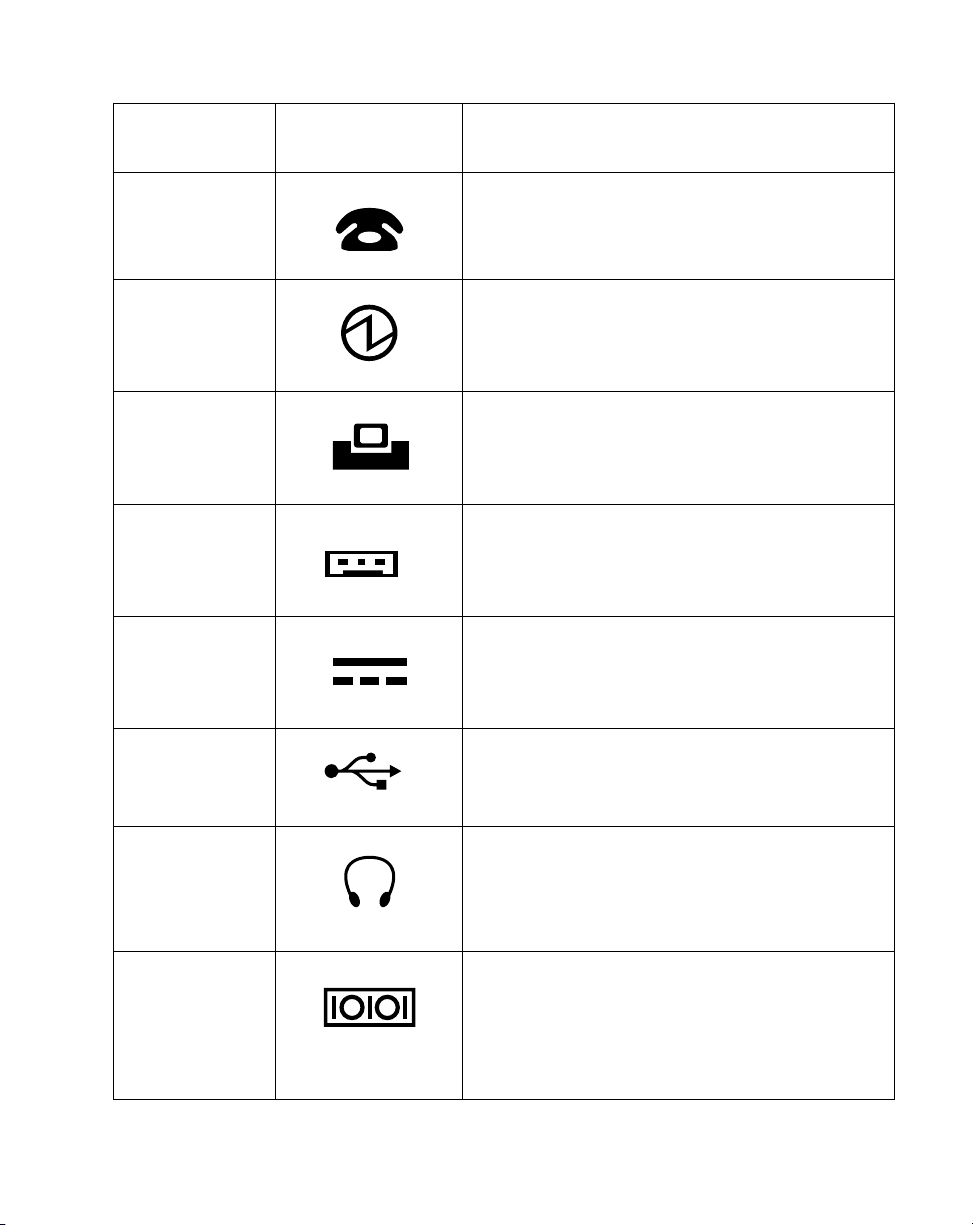
Table 1-2 Peripheral Connectors (Continued)
Connector/
Peripheral
Modem Jack Connect a telephone line to the internal modem
Suspend/
Resume Button
High-Usage
Contacts
PS/2-Style Port Allows the connection of a 5-volt PS/2-style
DC Input Connect an external power source such as the AC
PenCentra 130
Icons
Purpose
using a standard RJ-11 telephone plug. The
modem is only available on North American models
of the PenCentra 130.
Allows you to suspend and resume system
operation.
Used when the PenCentra is installed in an
approved optional docking device. The contacts
allow system access via PS/2 keyboard, USB-Host,
RS-232C serial input, and DC input.
keyboard, mouse, or barcode reader. Note that the
system must be suspended prior to installing a
device to this port.
Adapter or the optional Auto Adapter.
USB Port Connect Universal Serial Bus-compliant devices
Headphone Jack Connect mono headphones or powered external
speakers. The internal speaker is disabled when
you plug in external headphones or speakers.
Serial Port Connect an external device with a serial interface.
Primarily used to connect the synchronization cable
between the PenCentra 130 and your desktop
system. (Note that this icon appears on the inside
of the serial port door). Pin 9 of the serial port
supports 5-volt, 500 mA maximum current.
PenCentra 130 Hardware Features
1-9
Page 24
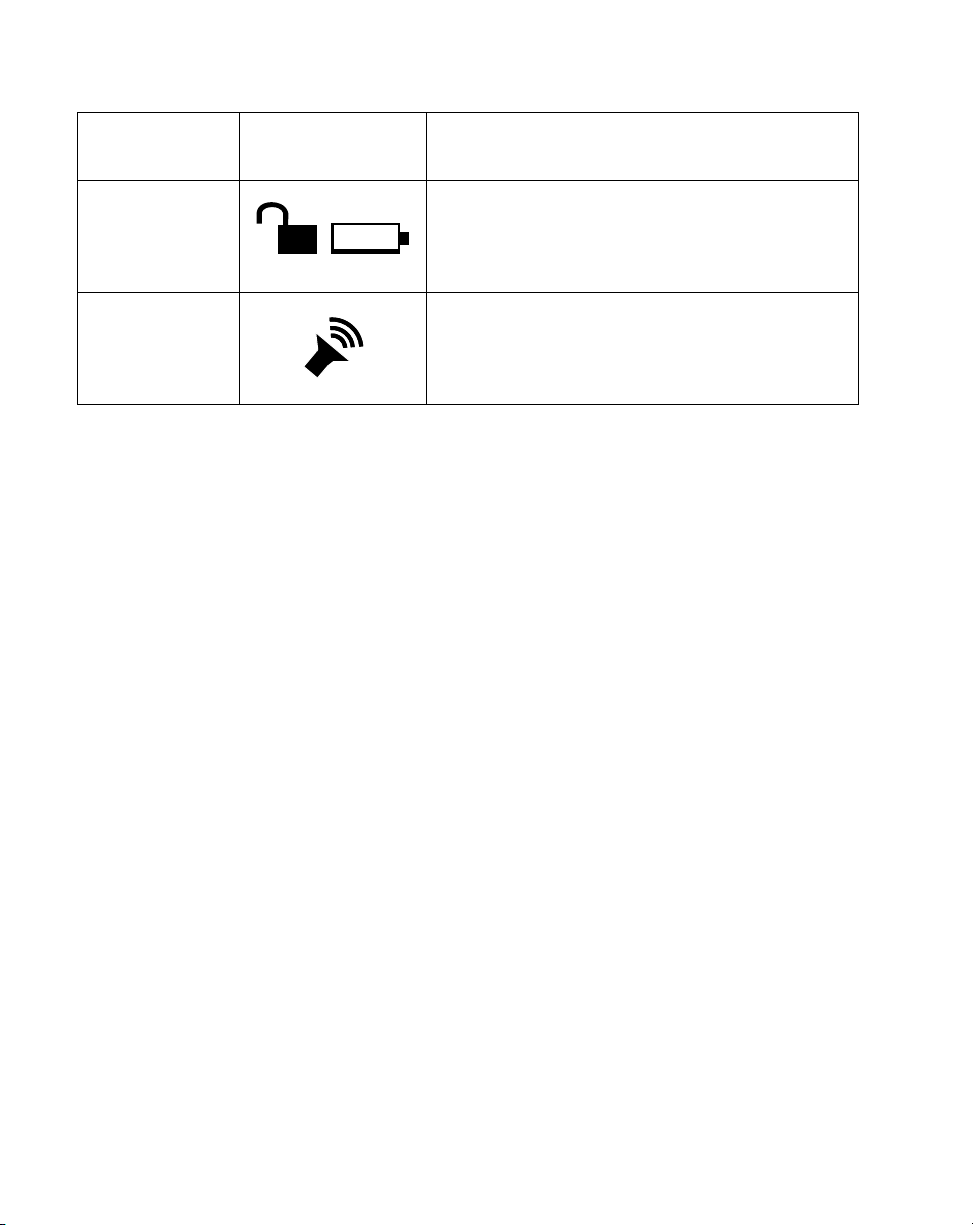
Table 1-2 Peripheral Connectors (Continued)
Connector/
Peripheral
Battery Latch This spring-loaded latch/switch secures the
Speaker Allows you to hear audio files.
PenCentra 130
Icons
Purpose
removable battery in its slot.
PenCentra 130 Software 1
The PenCentra 130 contains a number of Microsoft Windows CE and third-party
applications. A summarized description of each is provided below. Detailed
information about these programs is located in Chapter 3 of this manual.
Windows CE Applications 1
The PenCentra 130 is a Microsoft Windows CE /PC Pro-compliant system. Windows
CE consists of three general elements: thw Windows CE operating system, the
Windows CE Pocket Office, and Microsoft Windows CE Services.
1. Windows CE Operating System. The operating system installed on your
PenCentra 130.
2. Microsoft Windows CE Pocket Office, consisting of:
• Microsoft Pocket Access
View ODBC databases and create Access information.
• Microsoft Pocket Excel
Create and view Excel documents.
• Microsoft Pocket PowerPoint
Allows you to present PowerPoint presentations.
• Microsoft Pocket Word
Lets you create and view Word documents.
1-10
Introducing the PenCentra 130 H/PC Pro
Page 25

• Microsoft Pocket Outlook
Pocket Outlook consists of the Calendar, Contacts, Tasks, and Inbox
applications. These help you to manage your day-to-day information,
including appointments, email, and personal data.
• Microsoft Pocket Internet Explorer
Allows you to set up connections with other computers or the Internet.
• Microsoft InkWriter
Lets you create handwritten or typed notes and drawings.
• ActiveSync
Initiates synchronization with your desktop computer from your
PenCentra 130.
• Microsoft Voice Recorder
Records your spoken words.
• PC Link
Initiates a connection with your desktop computer.
• Te r m i n al
Lets you view and download files from a bulletin board or send and receive
email.
• Wor l d Clock
Sets the date, time, and alarm for your home city and the city you are
visiting.
• Calculator
Lets you perform calculations
3. Microsoft Windows CE Services is included on CD-ROM for installation on your
desktop system. Windows CE Services allows you to synchronize your data
between the PenCentra 130 and your desktop.
Productivity Package Applications 1
Along with the Microsoft Windows CE applications, FPSI has included a number of
programs that enhance the operation and usability of the PenCentra 130. These are
collectively known as the “Productivity Package”.
• CIC QuickNotes
QuickNotes allows you to take notes on your PenCentra. QuickNotes
automatically timestamps, compresses, and saves your notes for future retrieval.
PenCentra 130 Software
1-11
Page 26

• CIC Speller
CIC Speller is a utility that checks your spelling, finds unfamiliar words, retrieves
document statistics, and performs a Find and Replace function.
• CIC Jot
Jot is a character recognizer for your PenCentra 130 that recognizes each character
immediately after it is written. Jot recognizes two different character sets: Full
character set and natural character set.
• CIC Handwriter
Handwriter is a full context-sensitive word recognizer. Handwriter allows you to
write whole words or sentences before recognition.
• CIC On-Screen Keyboard
The on-screen keyboard allows you to enter data using an on-screen, “virtual
keyboard”.
• CIC InkTools
InkTools provides signature capture and verification.
• bSQUARE bFAX
The bFAX utility allows you to send faxes from your PenCentra 130.
• bSQUARE bFIND
The bFIND utility allows you to quickly and easily find information on your
PenCentra 130.
1-12
Introducing the PenCentra 130 H/PC Pro
Page 27

Chapter 2
Using the PenCentra 130
This chapter covers the fundamental concepts, basic system operation and use, and
system functions of your PenCentra 130. You should familiarize yourself with this
information before you attempt to operate the system.
Before Setting Up the PenCentra 130 2
Before you set up your PenCentra 130, there are two very important steps to perform:
• The display screen can be damaged with improper use. Be sure to install one of
the included screen protectors on your system. Reference the data sheet that
accompanies the screen protector for installation instructions.
• The system should be charged for a full 48 hours prior to first using it. The
48-hour period ensures that the main battery pack and the backup battery are
fully charged.
Setting Up the PenCentra 130 2
Turning the device off and on (suspending/resuming) 2
The suspend/resume button is used to stop and start the operation of your
PenCentra 130. Suspending system operation with this button does not shut the
system down, it simply “puts it to sleep” until you’re ready to use it.
To resume system operation, press the suspend/resume button on the top of the
system (see Figure 2-1). When you press the button, the system immediately “wakes
up” and resumes at the same point as when you suspended operation.
Before Setting Up the PenCentra 130
2-1
Page 28
PC Card Slots
Reset Button
Suspend/Resume Button
Figure 2-1 Location of Suspend/Resume Button
When you have finished working with your PenCentra, or when you will not be
using it for an extended period, you should suspend operation to conserve battery
power. There are two ways to suspend the system:
Note: It is good practice to always save your active data before suspending the system.
Doing so ensures that no data is lost in the event of power interruption.
• Save your work, then press the suspend/resume button. The system operation
will immediately suspend. When you resume operation, the system will resume
at the point at which you suspended operation, or,
• Save your work, then click the Start icon on your desktop. Click on Suspend from
the Start menu. The system operation will immediately suspend. When you
resume operation, the system will resume at the point at which you suspended
operation.
Resetting the system 2
Note: • Pressing the reset button while there is active data on your screen will result in
that data being lost.
• It is not necessary to use excessive pressure when depressing the reset button.
Excessive pressure could result in damage to the system.
In the event your system freezes up and does not respond to pen taps or keystrokes,
it may become necessary to reset the system. To reset the system, lightly press the
reset button (see Figure 2-1) using the tip of your PenCentra pen. When the reset
button is pressed, the system reboots.
2-2
Using the PenCentra 130
Page 29

Using the Pen 2
You can use the PenCentra pen to generate and capture electronic “ink”, to select
items, and to navigate through programs on the pen tablet. The pen can be used like
a two button mouse when used in conjunction with the right-mouse button hotpad.
Programs that support handwriting recognition allow you to write characters
directly on the screen with the pen.
Caution
• Ensure that a screen protector is installed on the pen
tablet screen before you use the pen. The warranty does
not cover a screen that is scratched as a result of not using
a screen protector.
• Do not use a ballpoint pen or any sharp object on the pen
tablet. Doing so can mar or scratch the screen surface.
To toggle between using the pen for inking and using it as a mouse, click on the
small pen icon in the system tray at the bottom right of the screen.
Here are some hints on using the pen like a two-button mouse on a desktop system:
• To select an object, tap the mouse tip on the object once. This functions like a
mouse button click with the left mouse button.
• To “double-click” an object, tap twice on the object quickly.
• To “right-click”, tap the pen tip once on the right-mouse button hotpad, then tap
the desired object. (Hotpads are described in the section of this chapter entitled
“Using the Hotpads”). The right mouse function is only valid for a single tap.
• To move, or “drag”, an object on the screen, place the pen tip directly over the
object, then as you hold the pen tip against the screen, move the pen.
Calibrating the pen 2
You calibrate the pen to adjust the distance error between where the pen actually
touches the screen and where the system “thinks” the pen is touching. position on
the screen relative to the position of the pen tip. If the event you wish to invoke is not
displayed under the pen tip when you use the pen, you should calibrate the pen.
Using the Pen
2-3
Page 30

Pen calibration may be required due to the following situations:
• The pen is being used for the first time.
• The previous user of the PenCentra 130 pen tablet writes with the opposite hand
or at a different pen angle.
• The system has been in use for some time and the pen has not been recalibrated.
To Calibrate the Pen 2
1. Open the Control Panel from the Start menu, and double-tap the Stylus icon.
Select the Calibration property sheet, then click on Recalibrate.
2. Position the PenCentra 130 pen tablet as you normally would during use. Be sure
to hold the pen at the angle that you regularly use. Touch the screen only with the
pen tip; if you inadvertently touch the screen with your finger or hand during the
calibration process, faulty calibration may result.
3. Perform the calibration steps according to the instructions on the screen. The
calibration utility displays a cross-hair symbol in the middle and corners of the
screen, one corner at a time. Hold the pen as you normally would while using the
system and, as accurately as possible, tap the center of each crosshair as it is
displayed.
A dialog box is displayed after you tap the last of the four cross-hair symbols. Tap
the screen within 30 seconds if you wish to save your new calibration settings. If
you don’t tap the screen within 30 seconds, the default calibration settings will be
used.
4. When the Stylus Properties window reappears, choose one of the following steps.
• If you are satisfied that you tapped the cross-hairs accurately, tap OK. The
taps that you performed in step 3 are then used to calibrate the screen.
• If you do not want to use the new calibration, tap the cancel box (X).
• If you want to enter a new calibration, tap Recalibrate. The calibration
instructions reappear.
If you have successfully performed the procedure above, the pen is now calibrated,
and you can use the system as you normally would.
2-4
Using the PenCentra 130
Page 31

Replacing the Pen 2
With use, the pen tip may become worn or may pick up abrasive particles that can
scratch the screen. A damaged or warped tip may not move freely, causing
unpredictable results when using the pen. If your pen exhibits these problems,
replace the pen.
Inserting/Removing PC Cards 2
There are two PC Card slots in your PenCentra 130. With the system display facing
you, slot 1 is located on the left and slot 2 is on the right (see Figure 2-2). To install a
PC Card, insert it into the selected slot with the label facing towards the screen. The
shutter covering the slot folds into the system as you insert the card. Ensure that the
card is properly seated by firmly pushing it in until it stops. When the card is
properly seated, the ejector button rises to be flush with the system surface.
To remove a PC Card, first ensure that it is not running. Using the back end of your
PenCentra pen, press the ejector button for the card you are removing. When the
button is pressed, the PC Card is ejected from the slot. Gently pull the card from the
slot.
Ejector
Button
PC Card Slot 2
Ejector
Button
PC Card
Slot 1
Figure 2-2 Inserting/Removing PC Cards
Powering the PenCentra 130 2
The PenCentra 130 can be powered by either its rechargeable battery pack or by AC
power adapter.
Inserting/Removing PC Cards
2-5
Page 32

Removing and Installing a Battery Pack 2
To remove the PenCentra 130 battery pack, perform the following steps:
1. Save any active data and suspend your system.
2. Hold the system face down, with the arrow on the battery compartment pointing
towards you (see Figure 2-3).
Battery Pack
Latch
PS/2-style
Port
Battery Pack
Figure 2-3 Removing/Installing the Battery Pack
3. Using the system pen, push the spring-loaded battery latch to the left.
4. While the battery latch is pushed to the left, slide the battery pack out of the
battery tray by pulling it towards you. When the battery is clear of the latch
mechanism, release the battery latch.
5. Resume system operation.
To install a new or recharged battery pack, slide it into the battery tray and firmly
push it in until the latch clicks into place.
2-6
Using the PenCentra 130
Page 33

Charging the Battery Pack 2
There are two ways to charge your battery pack: while it is installed in the system or
with an optional battery charger (FPSI part number FMW51BC1). To use the optional
external battery charger, refer to the literature included with the unit.
Note: An installed battery can be recharged while the system is running or suspended. If
the system is running, the amount of time required to charge the battery is
determined by the number and type of applications being used.
To recharge the battery pack while it is installed in the system, plug the AC adapter
into the DC input jack on the right side of the system. Insert the AC adapter’s
electrical plug into a wall socket. When DC power is connected to the system, the DC
Input LED on the front of the system is lit (reference the “Status Indicators” section of
Chapter 1 for more information).
Conserving Power / Optimizing Power Management 2
You can extend the charge life of your battery pack by conserving battery power. A
fully charged battery pack can run the system under normal use for approximately 8
hours. Your results may vary, depending upon the applications you use. Here are
some suggestions to help you conserve battery power:
Note: Certain power optimization features may have been disabled by your reseller when
the pen tablet was customized.
• Open the Power Properties screen from the Control Panel. Click on the Power Off
tab, and set the length of idle time before you want the system to automatically
suspend. The shorter the period, the longer your battery will remain charged.
• Use an external power source such as the AC adapter to power the system
whenever possible.
• Reduce the backlight brightness using the backlight brightness hotpad (reference
the section of this chapter entitled “Using the Hotpads”).
• When you know you won’t be using the system for a long period of time,
manually suspend the pen tablet by pressing the suspend/resume button.
Using a Keyboard or Mouse with the PenCentra 130 2
Although the pen, on-screen keyboard, and handwriting recognition applications
allow you to enter any type of data into your PenCentra 130, there may be occasions
when you prefer to use a mouse or an optional PenCentra 130 keyboard.
Powering the PenCentra 130
2-7
Page 34

Attaching a Keyboard or Mouse 2
1. Before attaching a keyboard or mouse to your PenCentra 130, suspend system
operation by either pressing the suspend/resume button, or clicking on Start/
Suspend.
2. Plug the keyboard or mouse plug into the PS/2-style port on the right-hand side
of the pen tablet (see Figure 2-3 for the port location).
Note: When a mouse is installed, the mouse icon on the control panel appears in the place
of the Stylus icon. When a mouse is not installed, the Stylus icon appears. When a
mouse is installed, the stylus is still functional.
3. Resume system operation.
Using the Keyboard Function Keys 2
When a PenCentra 130 keyboard is attached to your pen tablet, you can use the
function keys as shortcut keys to the most commonly-used Windows CE
applications. The following table lists the function keys and the application that is
invoked when you press the key.
Table 2-1 Default Application Shortcut Keys
Function Key Application Shortcut
2-8
F1 Inbox
F2 Microsoft Internet Explorer
F3 Calendar
F4 Contacts
F5 Tasks
F6 Microsoft Pocket Word
F7 Microsoft Pocket Excel
F8 Microsoft Pocket PowerPoint
F9 Microsoft Pocket Access
F10 Calculator
F11 World Clock
F12 Connecting to Port
Using the PenCentra 130
Page 35

Using the Hotpads 2
The PenCentra 130 hotpads are arranged vertically on the left-hand side of the
screen. The following table identifies each hotpad on the PenCentra 130, and offers a
description of its use.
Table 2-2 PenCentra 130 Hotpads
Icon Name Description
This hotpad changes the LCD backlight brightness by
cycling through the following states:
Color Reflective LCD (outdoor/indoor display):
Backlight
Brightness
Hotpad
Low ->Medium ->High ->Off -> Low...
Color Transmissive LCD (indoor display):
Very Low -> Low -> Medium -> High -> Very Low...
The hotpad defaults to whatever level was set when the
system was suspended. This hotpad does not repeat if
held down.
Increase
Contrast
Hotpad
Decrease
Contrast
Hotpad
Right Mouse
Button Hotpad
Vol um e
Hotpad
When tapped, LCD contrast becomes lighter by one
step. The contrast range is 16 steps.
This hotpad repeats if held down.
When tapped, LCD contrast becomes darker by one
step. The contrast range is 16 steps.
This hotpad repeats if held down.
Tapping this hotpad causes the next pen tap to be
interpreted by the system as a right-mouse click. All
subsequent taps are interpreted as left-mouse clicks,
unless preceded by a tap of this hotpad.
This hotpad adjusts the volume of the signal fed to the
internal speaker and the headphone jack. This hotpad
cycles through the following states:
High -> Medium -> Low -> Off -> High...
This hotpad does not repeat if held down.
Using the Hotpads
2-9
Page 36

Table 2-2 PenCentra 130 Hotpads (Continued)
Icon Name Description
When one of the programmable hotpads is tapped, it
causes an associated application to be launched. If the
associated application is already running when the
hotpad is pressed, that application is brought to the
foreground (a second instance of the application is not
Programmable
Hotpads
#1, 2, and 3
started).
You can define which application will be launched by
configuring the Application Launcher utility located in the
Control Panel. Each programmable hotpad can represent
up to five different programs.
These hotpads do not repeat; pressing them more than
once has the same effect as pressing them once.
2-10
Using the PenCentra 130
Page 37

Chapter 3
Using Microsoft CE Applications
The wide variety of programs delivered with the PenCentra 130 can be divided into
three general categories: Windows CE applications, Windows CE Services, and
Productivity Package applications. The Windows CE applications and CE Services
are covered in this chapter; the Productivity Package applications are covered in
Chapter 4.
Note: Some of the applications covered in this chapter may not be applicable, depending
upon the customization performed by your reseller or IS department.
Windows CE Applications 3
Microsoft Pocket Office 3
The Microsoft Office companion programs consist of Microsoft Pocket Word,
Microsoft Pocket Excel, Microsoft Pocket Access, and Microsoft Pocket PowerPoint.
These programs work with the Windows versions of the same programs on your
desktop computer to give you easy access to up-to-date copies of your documents.
You can create or edit Excel and Word files, PowerPoint presentation notes, and
Access databases and tables on your PenCentra 130. Word and Excel templates are
available to help you quickly create documents. Once you have created or edited a
document on your PenCentra 130, synchronize it with your desktop computer to
copy the new document to your desktop computer. For more information on
synchronization, see the section of this chapter entitled “Sychronizing Files and File
Conversion”.
To access the Office companion programs, select Start, Programs, Office, and then
the program you want to open.
Note: More information on the procedures described in this chapter, as well as
information on additional procedures, can be found in online Help on your
PenCentra 130. Select Start, Help, and then the program you want information
on. Because Windows CE programs work similarly to their counterparts on the
desktop computer, online Help covers basic procedures and the differences between
the companion programs and desktop programs. If you need more information on
using an Office program, see the documentation that came with the desktop version
of the program.
Windows CE Applications
3-1
Page 38

Pocket Word: Creating Documents 3
You use Pocket Word to create documents, such as letters, meeting minutes, and
reports. You can also use Pocket Word to open and edit documents created in the
desktop version of Word. When you are ready to save a document you created or
edited, you can save it in a variety of formats, including Pocket Word (.pwd), Rich
Text Format (.rtf), and Word (.doc). If you plan to send the document through e-mail
to someone who will be using Word, not Pocket Word, be sure to save it in the Word
(.doc) format.
There are three ways to enter text in Pocket Word
• Using the on-screen keyboard. To open the on-screen keyboard, double-click on
the on-screen keyboard icon at the bottom of the display screen. Enter data with
the on-screen keyboard as you would with a regular keyboard.
• Using a keyboard. Install a PS/2-style keyboard to the system’s PS/2 plug, and
enter data using that device.
• Using Handwriting Recognition. Refer to the section of Chapter 4 entitled “CIC
Handwriter” for details on using the handwriter recognition software supplied
with your PenCentra 130.
You can type text in either Outline view (see Figure 3-1) or Normal view, and you
can easily switch from one view to the other, using the View menu. Work in Outline
view when taking notes in meetings; use headings to highlight the main points and
body text to add details.
3-2
Using Microsoft CE Applications
Page 39

Figure 3-1 Pocket Word Outline View
Taking notes using Pocket Word 3
1. Select File, New, and then Document from Template.
2. Select Meeting Notes and then OK.
3. Select File and then Save.
4. Enter a name, choose a storage location, and then select OK.
5. Replace the text in the Template.
Note: To see more of your document, select Full Screen on the View menu.
Windows CE Applications
3-3
Page 40

Pocket Excel: Creating Workbooks 3
You can use Pocket Excel to create workbooks, such as expense reports (see Figure
3-2) and mileage logs. You can also use Pocket Excel to open and edit workbooks
created in the desktop version of Excel. When you are ready to save a workbook you
created or edited, you can save it in a variety of formats, including Pocket Excel (.pxl)
and Excel (.xls). If you plan to send the document through e-mail to someone who
will be using Excel, not Pocket Excel, be sure to save it in the Excel (.xls) format.
Pocket Excel provides fundamental spreadsheet tools, such as formulas, functions,
sorting, and filtering. You can split panes to easily view different areas of a large
worksheet. You can also “freeze” the top and left-most panes in a worksheet to keep
row and column labels or other data visible as you scroll through a sheet.
To log expenses using Pocket Excel: 3
1. Select File, New, and then Workbook from Template.
2. Select Expense Report and then OK.
3. Select File and then Save.
4. Enter a name, choose a storage location, and then select OK.
5. Replace the text in the template.
3-4
Using Microsoft CE Applications
Page 41

Figure 3-2 Pocket Excel Spreadsheet
Windows CE Applications
3-5
Page 42

Pocket Access: Viewing and Creating Data 3
Use Pocket Access to view and update data derived from Microsoft Access, Microsoft
SQL Server, and other ODBC databases you have created on the desktop computer.
Simply create the database on your desktop computer and then transfer the data to
your PenCentra 130. For example, a sales organization might use Access on the
desktop computer to create a master database of products and order forms (see
Figure 3-3). The sales force can synchronize their PenCentra 130s with the master
database to get up-to-date product information and to upload completed client order
information. For more information on synchronizing, see the section of this chapter
entitled “Microsoft Windows CE Services.”
You can also use Pocket Access to create new databases, tables, and SQL procedures
directly on your PenCentra 130.
3-6
Figure 3-3 Pocket Access Database
Using Microsoft CE Applications
Page 43

To create a new database and table on your PenCentra 130: 3
1. Select Start, Programs, Office, and then Microsoft Pocket Access. If Access is
already running, select File and then Open/New Database. If you do not see
this command on the menu, select View and then Database View.
2. Enter a name for the database and select OK.
3. Double-tap or double-click the Create a new table icon.
4. In the Field Name box, enter a name.
5. From the Data Type list, select a data type. A field's data type cannot be
changed after the table is saved.
6. Text boxes have a size limit of 255 characters. To enter longer notes, select the
Memo data type.
7. To enter numbers with decimal points, select the Float data type.
8. To enter numbers between -32,768 and +32,767, select the Integer data type.
9. To enter smaller numbers, select the Small Integer data type.
10. To set the size limit of a field, enter an amount in the Field Size box. A field's
size cannot be changed after the table is saved.
11. To index the field, select Yes from the Indexed list. Indexing a field allows
Pocket Access to find and sort information faster for that field.
12. Repeat these steps until you have created all the fields you want for your table.
13. Select File and then Save Table.
Note: If you have tables that you don’t want to keep updated on your PenCentra 130,
mark them as read-only when transferring them from the desktop to save time
during future synchronization sessions. Windows CE Services will not check for
updates the next time you synchronize.
Windows CE Applications
3-7
Page 44

Pocket PowerPoint: Showing Presentations 3
Use Pocket PowerPoint to quickly and easily deliver a professional presentation on
your PenCentra 130 (for one-on-one presentations). Simply create the presentation in
Microsoft PowerPoint on your desktop computer and then transfer the presentation
to your PenCentra 130. Your Pocket PowerPoint file will include the text, pictures,
notes, and layout position of the original Microsoft PowerPoint presentation, but will
not include animations or slide transitions.
Figure 3-4 Pocket Power Point Display
To show a presentation: 3
1. Using Windows CE Services, copy the presentation from your desktop computer to your PenCentra 130. For more information, see the section of this chapter entitled “Microsoft Windows CE Services.”
2. Select Start, Programs, Office, and then Microsoft Pocket PowerPoint.
3. In the Open Presentation dialog box, select the presentation you want to show,
and then OK.
4. To change the presentation display and slide advance options, select To o l s and
then Set Up Show.
3-8
Using Microsoft CE Applications
Page 45

5. To start the show, select View and then View Show. If you chose Manual in
step 4, use the Previous and Next buttons to control the slides.
6. You can tailor a presentation while on the road by adding a new title slide to
your presentation. To do so, select To o l s and then Title Slide.
Windows CE Applications
3-9
Page 46

Voice Recorder and InkWriter 3
Voice Recorder and InkWriter are programs for quickly capturing your ideas, notes,
and thoughts. With Voice Recorder, you can record reminders and ideas. With
InkWriter, you can take handwritten and typed notes and create drawings.
Note: More information on the procedures described in this chapter, as well as
information on additional procedures, can be found in online Help on your
PenCentra 130. Select Start, Help, and then the program on which you want
information.
Voice Recorder: Capturing Ideas and Thoughts 3
You can quickly capture ideas, reminders, and phone numbers with Voice Recorder.
Record button
Stop button
Play/pause button
3-10
Figure 3-5 Voice Recorder Player
Using Microsoft CE Applications
Page 47

To record and play a recording:
1. Select Start, Programs, Accessories, and then Microsoft Voice Recorder.
2. Hold your PenCentra 130’s microphone near your mouth or other sound
source.
3. Select the Record button. You’ll hear a beep when recording begins.
4. To stop recording, select the Stop button. The new recording appears in the
recording list.
5. To play a recording, double-tap or double-click it in the recording list. To pause
playback, select the Play/Pause button. Select Play/Pause again to resume
playback.
Note: You can play all of your recordings, one after another. Select the recording you
want to play first, select Control and then Play Sequential. The selected
recording and following recordings will be played. A short beep will sound between
recordings.
Windows CE Applications
3-11
Page 48

InkWriter: Creating Notes and Drawings 3
InkWriter, a text, graphics, and ink processor with Rich Ink technology, makes it easy
to write and draw the way you do on paper, but with the benefit of being able to edit
and format what you've written and drawn. With InkWriter, you can enter
information in the way that's easiest for you. You can type using the keyboard, or
you can write and draw directly on the screen using your stylus or pointing device.
Writing button
Select button
Insert/Remove Space
Typed text
Drawing
Written Text
Figure 3-6 Using InkWriter to Create Drawings
To create an InkWriter document: 3
1. Select Start, Programs, Accessories, and then InkWriter.
2. Create your document:
3-12
Using Microsoft CE Applications
Page 49

• To write, select View and then Writing and use the stylus like a pen. If you are
using a pointing device, click and drag to write on the screen.
• To t ype , se le ct View and then Typing and use the keyboard.
• To d raw, sel ec t View and then Drawing and use the stylus like a pen. If you
are using a pointing device, click and drag to draw on the screen. You can also
create a drawing in Writing view by crossing three of the ruled lines on the
first stroke of the drawing.
3. When you are finished, select File and then Save.
Note: InkWriter can help you draw perfect circles, rectangles, triangles, and lines. In
Drawing view, draw the shape you want and use the Select tool to select it. Then,
tap on the shape. When the four-headed arrow appears, click on it. Select Choose
Shapes, and select the shape to which you want to convert the shape.
Microsoft Pocket Outlook 3
The Microsoft Pocket Outlook program includes Calendar, Contacts, Tasks, and
Inbox. Using Windows CE Services, you can synchronize information in Microsoft
Outlook
with your PenCentra 130. Each time you synchronize, Windows CE Services
compares the changes you made on your PenCentra 130 and desktop computer and
updates both computers. For more information, see the section of this chapter
entitled “Microsoft Windows CE Services.”
, Microsoft Schedule+, or Microsoft Exchange on your desktop computer
Calendar, Contacts, and Tasks each consists of a card view and list view. The card
view is where you enter or view the details for each entry. The list view is where you
view all entries. With Inbox, you can send and receive e-mail messages, either
through synchronization with Outlook or Exchange on your desktop computer or by
connecting directly to your mail server through an Internet or network account.
You can access Pocket Outlook by selecting Start, Programs, Pocket Outlook, and
then the tool you are interested in.
Note: More information on the procedures described in this chapter, as well as
information on additional procedures, can be found in online Help on your
PenCentra 130. Select Start, Help, and then the program on which you want
information.
Microsoft Pocket Outlook
3-13
Page 50

Calendar: Scheduling Meetings and Appointments 3
Use Calendar to schedule appointments, meetings, and other events. You can check
your appointments in one of several views (Day, Week, Month, Year, and Agenda)
and easily switch among the views by selecting the corresponding toolbar button.
New Appointment Button View Buttons
3-14
Figure 3-7 Pocket Outlook Calendar (Weekly View)
Using Microsoft CE Applications
Page 51

To create a new appointment: 3
1. From any view, select the New Appointment button.
2. Enter a description and a location.
3. Select the time and date.
Notes Button
Categories Button
Attendees Button
Notes Area
Figure 3-8 Pocket Outlook Appointment Screen
4. To add notes, select the Notes button, and then select the notes area. Enter your
notes.
5. To assign the appointment to a category, select the Categories button and select
a category from the list.
6. Select other desired options and then OK when finished.
Note: To quickly add an appointment in Day or Week view, select the time and type the
description and location. Enter the location in parentheses if you want Calendar to
recognize it as the location. For example, “Lunch (Cafeteria).”
Microsoft Pocket Outlook
3-15
Page 52

If you need to schedule a meeting with people who use Outlook, Pocket Outlook, or
Schedule+, you can use Calendar to schedule the meeting. When attendees receive a
meeting request, they can choose to accept or decline the meeting. If they accept, the
meeting is automatically added to their schedule. In addition, their response is
automatically sent back to you, and your calendar is updated.
Before you can send a meeting request, you will need to enter e-mail addresses in
Contacts and set up Inbox to send and receive messages. For information on using
Contacts and Inbox, see “Contacts: Tracking Friends and Colleagues” and “Inbox:
Sending and Receiving E-mail Messages” later in this chapter.
To create a meeting request: 3
1. Select To o l s, Options, and then choose a mail transport. If you send and receive
messages using synchronization, select ActiveSync. If you connect to an ISP or
network, select the service you set up in Inbox.
2. Select File and then Make Meeting.
3. Enter the meeting information.
4. Select the contacts you want to invite.
5. Select other desired options and then OK.
Inbox automatically creates a meeting request and sends it to the attendees the next
time you connect to your mail server or synchronize with your desktop computer.
Note: Your PenCentra 130 will remind you about your appointments and meetings by
sounding an alarm, flashing the notification light, or displaying a message on the
screen. To change how your are notified, select Tools and then Options. Select the
Alarm button and then Reminder Options.
3-16
Using Microsoft CE Applications
Page 53

Contacts: Tracking Friends and Colleagues 3
Contacts maintains a list of your friends and colleagues so that you can easily find
the information you’re looking for, whether you’re at home or on the road. Using the
PenCentra 130’s infrared port, you can also quickly share Contacts information with
other Windows CE-based mobile device users.
Figure 3-9 Pocket Outlook Contacts Screen
To create a new contact: 3
1. Select File, then New Contact.
2. Enter a name.
3. Select the Business or Personal button and enter information in the appropriate
fields. Supply an e-mail address if you want to send meeting requests and
e-mail messages to this contact.
4. To add a note or assign the contact to a category, select the Notes/Categories
button. Then select the notes area and enter your notes, or select a category
from the list.
Note: You can send up to 25 contact cards at a time to another Windows CE-based
device. Line up the infrared ports on the two devices so that they are within three
feet (one meter) of one another and that the viewing angle between the devices is
not more than 15 degrees from center line. Be sure that there is a clear line-of-sight
path between the devices. In the Contacts list, select the item(s) you want to send,
then File, and then Send. If you are receiving items(s), select File and then
Receive.
Microsoft Pocket Outlook
3-17
Page 54

Notes/Categories Button
Personal Button
Business Button
Figure 3-10 Adding a New Contact
Tasks: Keeping a To Do List 3
Use Tasks to keep track of what you have to do. Overdue tasks are displayed in bold
(and in red on color devices).
3-18
New Task Button
Double-tap or double-click to
display or edit a task card.
Figure 3-11 Keeping a To Do List
Using Microsoft CE Applications
Page 55

To create a new task: 3
1. Select the New Task button.
2. Enter a description.
3. Select the start date, due date, and other information.
4. To add notes, select the Notes button and then the notes area. Enter your notes.
5. To assign the task to a category, select the Categories button and select a
category from the list.
6. Select other desired options and then OK.
Note: To mark a task as complete, in the task list, select the check box in the Status
column. To delete all completed tasks, select Edit and then Delete Completed
Tasks.
Notes Button
Categories Button
Notes Area
Figure 3-12 Creating a New Task
Microsoft Pocket Outlook
3-19
Page 56

Inbox: Sending and Receiving E-mail Messages 3
Use Inbox to send and receive e-mail messages. You can access your e-mail by
connecting to a mail server through an Internet or network account or by
synchronizing with your desktop computer.
Email messages you send and receive
through synchronization are stored here.
When you set up the Inbox, a service is added
to the Inbox window. Mail folders are stored
under the service name.
The double-arrow icon marks offline
folders. Messages in these folders
can be viewed even when you are
not connected.
Connect Button
3-20
Figure 3-13 Sending and Receiving E-mail
Using Microsoft CE Applications
Page 57

Connecting to a mail server 3
You can send and receive messages by connecting directly to your mail server. Use a
modem to connect to your Internet service provider (ISP), or use a modem or
Ethernet card to connect to the local area network that your mail server is connected
to. In addition to creating a connection to your ISP or network, you must give Inbox
the information it needs to communicate with your mail server.
Note:
Inbox does not currently support connecting with proprietary mail protocols such
as AOL and MSN
. However, you can still gain access to the Internet through
these services. There may be third-party programs available that would enable you
to send and receive mail through proprietary protocols. Try searching the Internet
on the keyword “Windows CE” to find third-party programs for your PenCentra
130.
Setting up Inbox for connecting to a mail server 3
1. Get the following information from your ISP or network administrator: POP3
or IMAP4 server name, SMTP host name, user name, password, and domain
name (for network connections only).
2. Select Start, Programs, Pocket Outlook, and then Inbox.
3. Select Services and then Options.
4. On the Services tab, select Add.
5. Choose IMAP4 Mail or POP3 Mail, enter a name for the connection, and then
select OK.
6. In the Mail Service Definition dialog box, enter the information from step 1. In
Connection, choose the remote connection you want to use. (If you are
receiving e-mail through a network connection, Select Network Connection.) If
you have not created a connection, select Create new connection, double-tap or
double-click the Make New Connection icon, and follow the instructions in the
wizard. When finished, select Inbox in the Taskbar and continue setting up
Inbox. For more information, see “Chapter 6: Getting Connected Remotely.”
7. In the Mail General Preferences dialog box, select desired options.
8. In the Mail Inbox Preferences dialog box, select desired options.
• In When Getting Messages, choose how you want messages downloaded by
default. Choosing Get full copy of messages will take up more storage space
on your PenCentra 130. Choosing Only synchronize Inbox folder hierarchy
(IMAP4 only) will speed up the time it takes to download your messages.
Microsoft Pocket Outlook
3-21
Page 58

• In When Getting Full Copy, choose whether you want to download file
attachments and meeting requests when you get full copies of messages. This
setting applies whether you have chosen to download full copies of messages
by default, or if you selectively download full copies of messages by opening
the message and selecting the Get Full Copy button. In addition, if you want
to receive meeting requests, your Exchange Server administrator must enable
support for Rich Text Format for your account. Ask your administrator if this
feature is enabled for you.
Downloading messages 3
To send and receive e-mail, select the Services menu and make sure that the service
you want to use is selected (the selected service has a bullet next to it.) Then, select
the Connect button. When you connect to the mail server, the messages on your
PenCentra 130 and mail server are synchronized: new messages are downloaded to
the PenCentra 130 Inbox folder, messages in the Outbox folder are sent, and
messages that have been deleted on the server are removed from the Inbox. These
folders are stored under the service you created when setting up Inbox. Double-tap
or double-click a message in the message list to open it. If you read a message and
decide that you need the full copy, select the Get Full Copy button.
Disconnecting from the server 3
To disconnect Inbox from your mail server, select the Connect button again. You also
need to disconnect your dial-up connection by double-tapping or double-clicking the
icon in the status bar and selecting Disconnect.
Managing messages and folders 3
By default, messages are displayed in one of four folders in the service you created:
Inbox, Deleted (local), Outbox, and Sent. The Deleted (local) folder contains messages
that have been deleted on the PenCentra 130. If you are using IMAP4, you may see a
Deleted Items folder. This folder is for deleted messages on the server. The behavior
of the Deleted and Sent folders depends on the Inbox options you have chosen.
If you want to organize messages into additional folders, select File, Folder, and then
New Folder. Then, drag messages into the folder you created. The behavior of the
folders you create depends on whether you are using POP3 or IMAP4.
3-22
Using Microsoft CE Applications
Page 59

Show Attachments Button
Select the Get Full Copy button to download
the rest of the message the next time you connect.
Double-tap or double-click an attachment to mark it
for downloading the next time you connect. If it has
already been downloaded, double-tap or doubleclick it to open it.
Figure 3-14 Downloading E-mail Messages
If you are using POP3, when you drag messages to a folder you created, the link is
broken between the messages and their copies on the mail server. The next time you
connect, the mail server will see that the messages are missing from the PenCentra
130 Inbox and delete them from the server. This prevents you from having duplicate
copies of a message, but it also means that you will no longer have access to the
messages you move to the folders you create from anywhere except your PenCentra
130.
If you are using IMAP4, the folders you create and the messages you move are
mirrored on the server. For example, if you move two messages from the Inbox
folder to a folder called Family, the server will create a copy of the Family folder and
copy the messages into that folder. Therefore, messages are available to you anytime
you connect to your mail server, whether it is from your PenCentra 130, laptop
Microsoft Pocket Outlook
3-23
Page 60

computer, or desktop computer. This synchronization of folders occurs when you
create a new folder, move messages into a folder, exit the Inbox program, or select
Synchronize Folders on the Services menu. If you want to view the messages in a
folder while disconnected from your mail server, select the folder and then Offline
Folder on the Services menu.
ActiveSync: Synchronizing E-mail 3
Another way to access your e-mail is by synchronizing your PenCentra 130 and
desktop computer. Using Windows CE Services on your desktop computer, you can
send and receive e-mail messages by exchanging information between Inbox on your
PenCentra 130 and Inbox in either Outlook or Exchange on your desktop computer.
When you synchronize, any changes made on either computer are transferred to the
other. If you have received new messages in Inbox on your desktop computer, the
messages are copied to your PenCentra 130. If you delete a message on the
PenCentra 130, it is deleted from the desktop the next time you synchronize. If you
compose and send new e-mail messages on your PenCentra 130, the messages are
moved to the desktop computer and sent the next time you synchronize. In addition,
changes you’ve made to Calendar, Contacts, and Tasks are updated.
If you are receiving e-mail by synchronizing with your desktop computer, the
PenCentra 130 Inbox is set up by default. However, because e-mail messages are not
synchronized by default, you will need to set up Windows CE Services on your
desktop computer to include e-mail messages when synchronizing. To do so, select
your PenCentra 130 icon in the Mobile Devices folder on the desktop and then click
ActiveSync Options on the Tools menu. Click the Options button to set options such
as how much of a message to download and whether you want attachments
included. You will not be able to change these settings from your PenCentra 130. For
specific instructions on setting up and using synchronization, see “Chapter 7:
Microsoft Windows CE Services.”
Downloading messages 3
To send and receive e-mail, connect to your desktop computer and initiate
synchronization. The way you initiate synchronization depends on how you are
connected to your desktop computer and the settings you have chosen in Windows
CE Services. For more information, see “Chapter 7: Microsoft Windows CE Services.”
When you synchronize, the first 50 lines of new messages in Inbox on the desktop
computer are copied to the Inbox folder on your PenCentra 130, and messages in the
Outbox folder are sent. These folders are stored under the ActiveSync service in
Inbox. Double-tap or double-click a message in the message list to open it.
3-24
Using Microsoft CE Applications
Page 61

Managing messages and folders 3
Messages are stored in one of four folders in the ActiveSync service: Inbox, Deleted
(local), Outbox, and Sent. The behavior of the Deleted and Sent folders depends on
the Inbox options you have chosen.
If you want to store messages in a folder other than Inbox, select File, Folder, and
then New Folder. Create the folder and then drag messages into it. Doing so breaks
the link between these messages and their copies on the desktop computer. When
you synchronize next, the messages in the folder you created will not be
synchronized. In addition, the desktop computer will see that the messages are
missing from the PenCentra 130 Inbox folder and delete them from the Inbox folder
on the desktop so that both Inbox folders match. This prevents you from getting
duplicate copies of a message, but it also means that you will no longer have access
to the messages you move out of Inbox except from your PenCentra 130.
Sending a message 3
To send a message: 3
1. Select Compose and then New Message.
2. Select the To field and enter the address of one or more recipients, or select
Address Book to select addresses from the Contacts list or an address service.
3. Select the Subject field and enter a title for the message.
4. Select the message body and type your message.
5. To attach a file, select the Add Attachment button.
6. Select the Send button.
If you are not connected to your mail server, the message is moved to the Outbox
folder and will be sent the next time you connect or synchronize.
Microsoft Pocket Outlook
3-25
Page 62

Send Button
Add Attachments Button
Address Book Button
Figure 3-15 Sending an E-mail Message
Getting Connected Remotely 3
If you want to use your PenCentra 130 to connect to your desktop computer, a
network, or the Internet while away from your office, you must create a dial-up
connection. This is called remote networking. You have the following remote
networking options:
• Connect to your Internet service provider (ISP). Once connected, you can send
and receive e-mail messages and view Web pages. If this is the method you want
to use, see “Connecting to an ISP.”
• Connect to the network at your company or organization. Once connected, you
can send and receive e-mail messages, view intranet Web pages, and access files
on the network. If this is the method you want to use, see “Connecting to Your
Network.”
3-26
Using Microsoft CE Applications
Page 63

• Connect to your desktop computer to synchronize remotely. Once connected, you
can synchronize information such as your Pocket Outlook data. If this is the
method you want to use, see “Connecting to Your Desktop Computer to
Synchronize Remotely.” For more information on synchronization, see “Windo ws
CE Services.”
Connecting to an ISP 3
You can connect to your ISP by creating a dial-up connection. Once connected, you
can send and receive e-mail messages and view Web pages.
To create a dial-up connection to an ISP: 3
1. If your PenCentra 130 does not have a built-in modem, install a modem card.
2. Get the following information from your ISP: ISP dial-up access telephone
number, user name, and password.
3. Select Start, Programs, Communications, and then Remote Networking.
4. Double-tap or double-click the Make New Connection icon.
5. Enter a name for the connection, such as “ISP Dial-Up,” select Dial-Up
Connection, and then select Next.
6. Select your modem type.
7. You should not need to change any settings in the Configure or TCP/IP
Settings dialog boxes. Most ISPs now use server-assigned addresses. If the ISP
you are connecting to does not use server-assigned addresses, enter the
addresses in the TCP/IP Settings dialog box. When finished, select Next.
8. Enter the access phone number and select Finish.
Once you have created the dial-up connection, you simply double-tap or
double-click the connection, enter your user name and password, and select
Connect any time you want to connect. Once connected, you can use Pocket
Internet Explorer to visit Web pages or Inbox to send and receive e-mail. Before
you can use Inbox, you need to provide the information it needs to communicate
with the mail server. For specific instructions, see “Inbox: Sending and Receiving
E-mail Messages” in Chapter 5.
Getting Connected Remotely
3-27
Page 64

Connecting to Your Network 3
If you have access to a network, you can send e-mail, access file servers, view
intranet pages, and possibly access the Internet. You can connect to your network in
one of two ways:
• Create a dial-up connection using a RAS account. Before you can create this
dial-up connection, your network administrator will need to set up a RAS account
for you. If this is the method you want to use, see “To create a dial-up connection
to a network.”
• Use an Ethernet card and a net tap to connect to the network. If this is the method
you want to use, see “To create a network (Ethernet) connection.”
To create a dial-up connection to a network: 3
1. If your PenCentra 130 does not have a built-in modem, install a modem card.
2. Get the following information from your network administrator: corporate
dial-up access telephone number, user name, password, and domain name.
3. Select Start, Programs, Communications, and then Remote Networking.
4. Double-tap or double-click the Make New Connection icon.
5. Enter a name for the connection, such as “Corporate Dial-Up,” select Dial-Up
Connection, and then select Next.
6. Select your modem type. You should not need to change settings in the
Configure or TCP/IP Settings dialog boxes. When finished, select Next.
7. Enter the access phone number and select Finish.
Once you have created the dial-up connection, you simply double-tap or
double-click the connection, enter your user name, password, and domain, and
select Connect any time you want to connect. Once connected, you can use Pocket
Internet Explorer to visit intranet Web pages and Inbox to send and receive
e-mail. Before you can use Inbox, you need to provide the information it needs to
communicate with the mail server. For specific instructions, see “Inbox: Sending
and Receiving E-mail Messages” earlier in this chapter.
To create a network (Ethernet) connection: 3
You do not need to create a new connection in Remote Networking on your
PenCentra 130 for a network connection. Instead, you must install and configure an
3-28
Using Microsoft CE Applications
Page 65

Ethernet card. You must have an NE2000-compatible Ethernet card. The drivers for
the card already exist on your PenCentra 130.
1. Insert the Ethernet card into your PenCentra 130 and connect it to your network
cable.
2. You may see a message warning about battery power. If you have an A/C
Adapter, plug it into your PenCentra 130.
3. Perform one of the following steps, depending upon whether the Settings
dialog box opens automatically.
• If the Settings dialog box is displayed automatically, enter the information
for your server. See your network administrator if you need assistance. You
should not have to change these settings.
• If the Settings dialog box is not displayed automatically, go to Start,
Settings, Control Panel, and double-tap or double-click Network. Select
your Ethernet driver and select Properties.
4. Select Start, Settings, Control Panel, and double-tap or double-click Network.
In the Identification tab, enter your name, password, and domain.
Once connected, you can use Pocket Internet Explorer to visit intranet Web pages
and Inbox to send and receive e-mail. Before you can use Inbox, you need to
provide the information it needs to communicate with the mail server. For specific
instructions, see “Inbox: Sending and Receiving E-mail Messages” in Chapter 5.
Connecting to Your Desktop to Synchronize Remotely 3
To synchronize remotely, the following conditions must be met:
• You must first establish a partnership between your PenCentra 130 and desktop
computer while at your desktop computer.
• The desktop computer must be turned on and you must be logged in. Schedule+,
Exchange, or Outlook must be running with your user profile.
• In the lower-right corner of the Mobile Devices window, the connection status
must show Waiting for mobile device to connect.
• In the ActiveSync Options dialog box in Windows CE Services, synchronization
must be enabled. (Or you can select Automatically synchronize if data is
out-of-date.)
Getting Connected Remotely
3-29
Page 66

• If you are communicating through a modem connected to the desktop computer,
the modem must be turned on. Also, the Auto Connect should be set to At all
times in Windows CE Services. Otherwise, a Mobile Devices window must be
open.
• If you are communicating with the desktop computer through a dial-up or
network connection, you must be logged on to the network on the desktop
computer. Before you leave, select Enable a network connection in the Windows
CE Services Properties dialog box.
If your computer must be turned off while you are away from your office, you
cannot synchronize remotely. However, you can dial in directly to your network to
receive your e-mail. For more information, see “Connecting to Your Network.”
If the above conditions are met, you can synchronize with your desktop computer
while away from the office in one of three ways:
• Create a dial-up connection using a RAS account. Before you can create this
dial-up connection, your network administrator will need to set up a RAS account
for you. Once connected to the network, your PenCentra 130 will find your
desktop computer and initiate synchronization. If this is the method you want to
use, see “To create a dial-up connection to a network.” Once the connection has
been created and you are connected, select Start, Programs, Communications,
and then ActiveSync on your PenCentra 130. In the ActiveSync dialog box, select
the dial-up connection you created as the method to connect and the name of the
computer you want to connect to.
• Use an Ethernet card to connect to the network. Once connected to the network,
your PenCentra 130 will find your desktop computer and initiate
synchronization. If this is the method you want to use, see “To create a network
(Ethernet) connection.” Once the connection has been created and you are
connected, select Start, Programs, Communications, and then ActiveSync on
your PenCentra 130. In the ActiveSync dialog box, select Network Connection as
the method to connect and the name of the computer you want to connect to.
• Create a dial-up connection to a modem connected directly to your computer. The
modem must be set up to answer incoming calls. If this is the method you want to
use, see “To create a dial-up connection to a modem attached to your desktop
computer.” Once the connection has been created and you are connected, select
Start, Programs, Communications, and then ActiveSync on your PenCentra 130.
In the ActiveSync dialog box, select the dial-up connection you created as the
method to connect and the name of the computer from the Connect to list.
3-30
Using Microsoft CE Applications
Page 67

To create a dial-up connection to a desktop modem 3
Note: If you are a Windows 95 user, you will need to install the Dial-Up Networking
Upgrade 1.2 and create a user account if User Level Access is enabled in Dial-Up
Networking. If you are a Windows 98 user, you will need to add a second dial-up
adapter. For more information, see Windows CE Services Help.
1. Follow the modem manufacturer's directions to install a modem on your desktop computer.
2. Note the telephone number for your desktop computer modem.
3. On your desktop computer, open the Mobile Device folder. Click File and then
Communications.
4. Under Device Connections via Serial Port, click your modem in the Ports list.
5. Click Enable mobile device connection.
6. Click Enabled in both Device Connections via Serial Port and Device
Connections via Network.
7. Follow the steps in “To create a dial-up connection to an ISP” to create the
connection. Substitute the phone number you noted in step 2 for the ISP dial-in
number.
Getting Help on Connecting Remotely 3
More information on the procedures described here, as well as information on
additional procedures, can be found in the following locations:
•“Inbox: Sending and Receiving E-mail Messages” in this chapter.
•“Microsoft Windows CE Services” in this chapter.
• Online Help on your PenCentra 130. Select Start, Help, and then Inbox, Remote
Connections, or Synchronization.
• Windows CE Services online Help on the desktop computer. Open the Mobile
Devices folder and then click Windows CE Services Help Topics on the Help
menu. Troubleshooting information is also contained here.
Microsoft Windows CE Services 3
Microsoft Windows CE Services with ActiveSync enables you to synchronize the
information on your desktop computer with the information on your PenCentra 130.
Microsoft Windows CE Services
3-31
Page 68

Synchronization is the process of comparing the data on your PenCentra 130 with
your desktop computer and updating both computers with the most recent
information. For example:
• Keep Pocket Outlook data up-to-date by synchronizing your PenCentra 130 with
your choice of Microsoft Outlook (Inbox synchronization with Outlook Express is
not currently supported), Microsoft Schedule+, or Microsoft Exchange on your
desktop computer.
• Synchronize Word and Excel documents, Access and other ODBC databases and
tables, and InkWriter documents between your PenCentra 130 and desktop
computer. Your files are automatically converted to the correct format.
• With Windows CE Services, you can also:
• Back up and restore your PenCentra 130 data.
• Add and remove programs on your PenCentra 130.
• Copy (rather than synchronize) files between your PenCentra 130 and your
desktop computer.
Installing Windows CE Services and Setting up a Partnership 3
1. If you want to upgrade to Microsoft Outlook 98, install it first.
2. Use a standard serial cable to connect your PenCentra 130 to your desktop
computer.
3. Insert the Desktop Software for Microsoft Windows CE CD-ROM into your
CD-ROM drive.
4. The Windows CE Services Setup Wizard should start automatically. If it doesn’t,
click the Start button, then select Run. In the Open box, type d:\setup, where d
is your CD-ROM drive. Click the OK button.
5. Follow the directions on your screen.
Once installation is complete, a wizard will instruct you to connect your PenCentra
130 and desktop computer and guide you through setting up a partnership and
performing your first synchronization. Some items, such as messages, are not
synchronized by default. To change the type of items that get synchronized after
you’ve completed the wizard, select your device icon in the Mobile Devices folder
and then click ActiveSync Options on the Tools menu.
3-32
Using Microsoft CE Applications
Page 69

If you are synchronizing with a computer running Windows 95/98, you can also use
an infrared connection to synchronize. For more information, see Windows CE
Services Help.
Note: Regularly back up your PenCentra 130 data on your desktop computer using
Windows CE Services in case information on your PenCentra 130 is ever
corrupted or lost. Connect your PenCentra 130 and then click Backup/Restore on
the Tools menu in the Mobile Devices folder on your desktop computer. Your first
back up may take some time, depending on how much information you have on
your PenCentra 130. Subsequent backups will be faster if you select Incremental.
Synchronizing Files and File Conversion 3
One way to move documents to your PenCentra 130 is to simply connect your device
and desktop computer, open your device icon in the Mobile Devices folder, and drag
the files. Copies of the files will be placed on your PenCentra 130, and files will be
automatically converted to a format that the PenCentra 130 can read. However, if
you have documents that you update frequently on both your PenCentra 130 and
desktop computer, you may want to synchronize the copy on your desktop computer
with the one on your PenCentra 130 so that you always have an up-to-date copy on
both computers. To do so, store the files you want to synchronize in the
Synchronized Files folder on the PenCentra 130 and desktop computer. During
synchronization, files are updated in both locations.
Note: On the PenCentra 130, the Synchronized Files folder is in the My Documents
folder. On the desktop computer, the Synchronized Files folder is called “device
Synchronized Files”, where “device” is the name of your PenCentra 130. If you are
using Windows 95/98, the folder is located in the My Documents folder (c:\My
Documents\device Synchronized Files). If you are using Windows NT, the folder
is located in the Personal folder (c:\Winnt\Profiles\your
username\Personal\device Synchronized Files).
When you transfer a file from your desktop computer to your PenCentra 130, the file
is converted to a format that the PenCentra 130 can read. During file conversion,
some of the file’s attributes may be changed or removed, and the file extension is
changed. For example, when you transfer a Microsoft Word file to your PenCentra
130, some of the file’s formatting may be removed or changed, and the file extension
is changed to.pwd (Pocket Word). When this file is transferred back to the desktop
computer, the file extension is converted back to .doc, but any changed or removed
formatting will still be lost. Therefore, if you are using the Synchronized Files folder
to transfer files and you want to preserve all formatting in the original document,
keep a copy of the original file in another folder. See Windows CE Services Help for
specific information on how file attributes are affected during conversion.
Microsoft Windows CE Services
3-33
Page 70

Note: If you have password protection on an Excel or Word file on your PenCentra 130,
you must first turn off the password protection before the file is synchronized with
the desktop computer. To do so, open the file, select File, select Password, and
clear the Password field
Remote Synchronization 3
Note: Be sure to log out of CE Services prior to removing the serial cable. If you do not
log out, CE Services will continue to look for a connection when the cable is not
installed.
You can synchronize with your desktop computer while away from the office by
connecting to your network or directly to your computer via a modem attached to
your computer. For more information, see “Connecting to Your Desktop Computer
to Synchronize Remotely” earlier in this chapter.
Getting Help on Windows CE Services 3
For additional setup, usage, and troubleshooting information, see online Help on the
desktop computer by choosing Windows CE Services Help Topics on the Help
menu in the Mobile Devices folder.
3-34
Using Microsoft CE Applications
Page 71

Chapter 4
Using the PenCentra 130 Productivity Package
This chapter contains information about the additional applications on your
PenCentra 130 -- collectively known as the Productivity Package. The Productivity
Package consists of applications that allow you to take notes, send faxes, perform
handwriting recognition, use an on-screen keyboard, search for files, and check your
spelling, along with several other system refinements. The Windows CE-based
programs that are loaded on your PenCentra 130 are discussed in Chapter 3.
CIC QuickNotes 4
CIC QuickNotes allows you to take notes on your PenCentra 130, while
automatically compressing the file and timestamping each note. Using QuickNotes
also allows you to search by text or stamp; you can add your own text or stamps for a
variety of data classifications.
Using QuickNotes 4
To open the QuickNotes program, click on the Start button and select QuickNotes
from Start menu. The QuickNotes screen opens immediately.
Figure 4-1 QuickNotes Start Screen
CIC QuickNotes
4-1
Page 72

Working with Books 4
The pages of notes that you take are kept in books. There can be up to four books on
your PenCentra 130. To select the book you are working in go to the Tools menu and
select Options. From Options you can also delete a book, this will erase its contents,
or you can rename the book from the default name by just highlighting the name and
typing a new one.
Setting the Basic Options. 4
When working in QuickNotes there are some basic options that you can configure to
customize the look of your note taking interface.
Smoothing is a technique wherein the program will process the ink input so as to
make it appear smoother. This can be toggled on and off in the Options menu.
Having information Stamps displayed is a handy way to visually assess the contents
of a note page with a glance. Stamps can be turned on and off in the options menu.
At the bottom of every note page is the Status line telling you the time and date the
note was created, and which book it is in. The status line can be turned on or off in
the Options menu.
Ink Snap speed is the time period for which QuickNotes waits after you finish
writing and pick up your stylus. Once this time period is up QuickNotes will resize
the ink and put it in the correct position. Redraw Timing can also be changed here.
Grid lines will lay a square grid of lines on the screen as a reference when inking.
This can be very helpful when writing to keep ink objects uniform and aligned.
Text and Background Color can be set in the Options menu. You can choose one of
the predefined colors or create a custom color.
Putting Contact Information into Notes 4
To insert a reference to a contact into your Contact Database go to the Tools menu
and select Contact Database. The Contact Dialog box will appear, select a contact
from your list and press the OK button. The contact will appear at the bottom of the
note.
Using stamps with QuickNotes 4
Stamps are small icons that QuickNotes will insert in a note page to help organize
and differentiate each note in a book. To insert a Stamp go to the Tools menu and
4-2
Using the PenCentra 130 Productivity Package
Page 73

select Stamps or use the Stamp button on the Toolbar. There are three different types
of stamps and five different individual stamps within each type. Simply select the
type, then the stamp itself and hit OK. To remove a stamp go to the page you want to
remove the stamp from, open the stamps dialog and from the type you selected
choose None. Stamps can be turned on and off in the Options menu by checking the
Stamps box.
Setting Ink Preferences 4
QuickNotes gives you the option of setting different parameters for the displayed ink
to suit your preferences.
1. To enable inking select the pen button on the Toolbar.
2. You can change the ink color, and ink width from the Pen menu.
3. Ink color can also be set from the Color Toolbar button.
4. You can insert three different shapes: line, rectangle, and circle. These shapes
are completely scalable giving you the exact shape you desire. To access the
shapes dialog go to the Pen menu and select Draw.
Erasing Ink 4
Ink is easily removed from the note page by using the eraser. Select the eraser button
from the Toolbar. If you need to erase a larger area or be very precise with the ink
you are erasing, the eraser size can be altered in the Pen menu. The eraser will only
erase standard ink, it will not erase Ink Snap objects.
You can also use the Remove Last Stroke command from the Pen menu. This
command can be used multiple times to remove all strokes in reverse sequence.
Recording a Voice Note 4
QuickNotes will also allow you to record a Voice Note to go with a note page. To
record a voice note, go to the Tools menu and select Voice Note. Press the circle
button to begin recording, you will hear a tone signaling that recording has begun.
When you are finished press the square button, you will hear another tone signaling
that recording has stopped.
To delete a voice note make the note page with the voice note you wish to delete the
current page then select Delete Voice Note from the Tools menu.
Note: You can only record one voice note per note page if you want to replace the voice
note you must close and reopen the Voice Recorder and record another voice note.
CIC QuickNotes
4-3
Page 74

Using Find 4
You can use the Find command to search for text or stamps in your notes for quicker
access. Select Find from the Tools menu or use the Find button on the Toolbar and
either select the stamp to search for or enter the text you wish to find. Find searches
for text entered in InkSnap mode with the keyboard.
Using Ink Snap 4
QuickNotes has a powerful and innovative feature called Ink Snap. Ink Snap allows
you to write anywhere on the display and have the ink scaled down to a more usable
size and placed in uniform rows greatly saving display space.
To enable Ink Snap press the Ink Snap button on the Toolbar or select it from the
Tools menu. When Ink Snap has been enabled the Ink Snap toolbar will be displayed
at the top of the screen.
Ink Snap objects can be manipulated like any other QuickNotes object by using the
cut, copy, and paste controls. You can also make an object bold or underline it by
selecting it with your stylus and selecting the command from the InkSnap menu.
To select an InkSnap object place the pen tip on the object and hold until the object is
highlighted. The object can be dragged and dropped by lifting the pen then touching
and holding on the selected object while dragging to the new desired location.
Ink Snap speed can also be adjusted from the Options dialog in the File menu.
Editing and Manipulating Objects. 4
Ink objects can be manipulated in a number of different ways to facilitate their
organization and help make the content more readable.
To select ink, select Edit from the Tools menu or press the Select button on the
Toolbar, this puts you in select mode (note that the toolbar and menu changes in this
mode). Drag a selection box around the desired ink using your stylus. Once the ink is
selected it can be cut, copied or pasted on any page in any book or even in another
application.
A selected object can also be moved by dragging the selection box with your stylus. It
can also be scaled in the same manner by dragging the scaling box in the lower right
hand corner of the selection box.
You can alter the thickness of the ink object by first selecting it then from the Edit
menu select the Change Thickness item. You can also copy an object to bitmap for
4-4
Using the PenCentra 130 Productivity Package
Page 75

use in another application, by selecting the copy to bitmap option in the InkSnap
menu.
Sending a Fax 4
QuickNotes gives devices with modems and bFAX software the ability to fax a note
directly from the application. To fax a page first make that page the current page and
from the file menu select send fax. Your fax software will then take over and
complete the task.
Sending an Email with QuickNotes 4
If you should desire to send your note page as an e-mail QuickNotes allows this by
simply going to the file menu and selecting send e-mail. If there are multiple e-mail
protocols installed on the device a dialog box will be displayed asking you to select
the e-mail system you wish to use. The page that is selected will be e-mailed when
the PenCentra 130 is next docked to a system with e-mail capabilities.
Browsing your Notes 4
To browse through your current book use the arrow buttons on the toolbar. To view
the entire note page press the zoom button or select zoom from the edit menu. This is
also handy for moving around the note page quickly. You can also jump directly to
the page of your choice. Select Jump to Page from the Tools menu. Enter the page
you wish to jump to and press OK.
CIC Speller 4
CIC Speller is a utility program that checks for spelling errors, finds unfamiliar
words, gets document statistics, enters text using a macro feature and finds or
replaces strings in a document. Speller works in text windows where you can type in
characters. Speller works with most applications running under Windows CE.
Check spelling in a window 4
• Choose Check Spelling from Speller's menu. You will be prompted to select the
text window that you wish to spell check. Tap to select the text window for spell
checking. Speller begins spell checking in the window. If the window is not
supported, a message box appears. If spelling errors are found, Speller shows the
spelling error and suggests corrections.
• Select Ignore to skip over the spelling error.
• Select Change to replace the spelling error with the suggested correction.
CIC Speller
4-5
Page 76

• Select Undo to go back to the last error.
• Select Add to add the word to the custom dictionary.
Note: You can edit the displayed text directly and press Change to put it back to the
document window.
Using the Quick Text / Macro feature 4
Macros are shortcuts to enter long words or phrases. For example, you can type sf
followed by SPACE and Speller replaces it with San Francisco if it is so defined.
To activate this feature, choose Quick Text/Macro from the Speller's menu. Once
turned on, it works with most Windows CE applications.
To create macros: Choose More - My Macros from Speller's menu. My Macros
window appears.
To add a new macro: Enter the macro name and the macro text, then press Save.
Note that you can only enter lowercase letters for a macro name.
To delete a macro: Select it from the list and press Delete.
To edit a macro: Double tap it from the list or select it and press Edit.
Looking up the spelling of a word 4
Choose Lookup Word from Speller's menu. The Lookup Word window appears. You
can lookup a word in one of two ways:
• By typing your best guess of the word, and pressing Similar Words button.
• By typing the first few characters of the word and pressing Completion button.
Press More to get more words, and press Copy to copy the selected word and paste it
to other windows.
Getting statistics of a document 4
Choose More/Document Statistics from Speller's menu. You are prompted to select
the text window to gather statistics. The Document Statistics window appears with
statistics such as character and word count.
4-6
Using the PenCentra 130 Productivity Package
Page 77

Finding and replacing text in a window 4
Choose More then Find/Replace from Speller's menu. You are prompted to select the
text window in which to find or replace text. The Find/Replace window appears.
Enter the text string you want to find. If you want to replace it with another string,
check the Replace with label and enter the string. Press Find to start the search.
Managing your custom dictionary 4
Choose More/My Dictionary from Speller's menu. My Dictionary window appears.
To add a new word, enter the word and press Add. To delete a word, select the word
from the list and press Delete. To change the custom dictionary, press Change.
Note: Speller's custom dictionary is shared with Microsoft Pocket Word's custom
dictionary.
CIC Jot 4
Jot is a fast and easy to use handwriting recognition system for your PenCentra 130.
It is designed for maximum speed and accuracy while using a minimal amount of
memory. Jot has a patented user interface that allows convenient and natural
handwritten input on small devices.
You get fast, accurate recognition with Jot’s natural character set and unique user
interface.
You can write anywhere on the screen. Jot recognizes characters - uppercase letters,
lowercase letters, numbers, gestures and macros - according to where you write
them. The Mode Mark - pointers that appear on the side of your PenCentra 130's
display and form an imaginary line across the screen - act as your reference.
• Letters written below the Mode Mark are recognized as lower case.
• Letters that extend from the lower half of the screen to the upper half (across the
imaginary line) are recognized as upper case.
• Write numbers above the Mode Mark.
• Write most characters with a single stroke.
• Mode Mark is adjustable.
You can enter the same character shape to write an upper and a lower case letter,
depending on where you write on the screen.
CIC Jot
4-7
Page 78

Jot Tutorial 4
g
g
The best way to learn about using Jot 2.0 is to walk through the Jot tutorial. Jot 2.0
provides an animated tutorial with detailed demonstrations of character shapes and
placement. To open the Jot tutorial, click on Start/Programs, then select Jot/Jot
Tutorial.
Jot Trainer 4
You can customize Jot to suit your writing style by enabling character shapes that
you use. To start the Trainer, click Start/Programs, then select Jot/Jot Trainer.
CIC Handwriter 4
CIC Handwriter is a full context-sensitive word recognizer. Handwriter allows you
to write whole words or sentences before recognition. The recognizer includes almost
all types of character shapes.
Using the Online Help 4
Open the online help by tapping the ? button in Recognizer Properties (Recognizer
Properties can be opened from the Control Panel window or by double-tapping the
pen icon in the System Tray).
Getting to Know Handwriter 4
To use the pen for pointing instead of writing, tap the pen icon in the System Tray.
The pen icon changes depending on whether writing or mouse mode is active. When
the pen is active only for pointing, the pen icon changes to an arrow.
Clickin
You can “click” with the pen, just as you would with a mouse.
• Tapping the tip of the pen on the tablet is the same as clicking the left mouse
button.
• Double-tapping the pen’s tip is the same as double-clicking the left mouse button.
Writin
Before writing with the pen, first verify that the Pen icon on the Taskbar has been
selected. Then follow these steps:
4-8
Using the PenCentra 130 Productivity Package
4
4
Page 79

1. Place the insertion point where you want the new text to appear.
g
g
2. With the pen’s tip touching the surface, move the pen across the screen of the
device. What you write appears on-screen as ink, and after a moment the ink
changes to printed text.
Erasin
You can erase text by selecting the text, then tapping the Delete or Backspace key.
You can also use the erase gesture on the selected text.
Selectin
Select any amount of text by dragging the pen over it, with the pen tip touching the
tablet. Note that if the pen is active only for pointing (the pen icon in the System Tray
is an arrow), you can directly move the pen over the text area to select it. However, if
the pen is active for writing (a pen icon is present in the System Tray), you must first
hold down the pen for a moment before dragging it (holding down the pen changes
it to selecting mode from within writing mode).
Getting to Know the Recognizer 4
Following these suggestions helps Handwriter recognize the characters you write.
Handwriter is a discrete character recognizer, which means it easily accepts
unconnected letters.
However, since people often connect adjacent letters, even when they are printing,
Handwriter has built-in recognition for many commonly connected pairs.
Writing Case-identical Letters 4
4
4
Writing with Handwriter is the same as writing on a blank sheet of paper: there are
no lines to provide a frame of reference for the recognizer. For example:
• Without any other information, the recognizer cannot determine whether a “c” is
an upper- or lowercase letter.
• The only way to identify the case is to write the letter in context. For many letters,
size is the only difference between upper- and lowercase (Cc, Mm, Oo, Pp, Ss, Uu,
Vv, Ww, Xx, Yy, Zz). If you write one of these case-identical letters by itself,
Handwriter recognizes it as lowercase. For accuracy, write case-identical letters
next to at least one other letter, and make capital letters larger.
CIC Handwriter
4-9
Page 80

Writing Punctuation Marks 4
g
When you write a character, you are aware — and can see on-screen — exactly what
you intended to write. Handwriter however, might interpret what you wrote
differently. This is especially likely with punctuation marks, if you write them alone.
For example, a comma by itself could look like a right parenthesis. Ensure correct
recognition of punctuation marks by writing them in the context of other characters.
Spacin
Between Characters and Words
By default, Handwriter automatically inserts a space between words as they are
recognized.
To manually insert a space after words have been recognized, position the cursor
where you want the space, then write the space gesture (-).
Stop Handwriter from automatically inserting a space by turning off this feature in
the Advanced section in Recognizer Properties dialog box.
Tips for Using the Recognizer 4
Use the following tips to help ensure that Handwriter recognizes all of your
characters.
Be distinct: Some characters resemble one another. For example, a “5” can look like
an “S”, a “U” can look like a “V”, etc. When you write characters, pay special
attention to the order and direction of your strokes; this is one of the ways
Handwriter recognizes what you write.
Separate your characters: Handwriter recognizes upper- and lowercase printed
characters. Except for the connected pairs, write each character separately.
Distinguish uppercase from lowercase: When you write case-identical letters, make
uppercase letters twice as big as lowercase letters. Handwriter uses a dictionary that
favors lowercase letters. If you are using a string of characters with an unusual mix of
upper- and lowercase letters, you can improve recognition by turning off the spell
checker. For instructions, see “Customizing Recognition”.
4
When writing an uppercase “K”, draw the height of the right stroke even with or
higher than the left stroke.
4-10
Using the PenCentra 130 Productivity Package
Page 81

Distinguish Letters from Numbers 4
Letters and numbers may look alike. For example, when writing the number “1055”,
differentiate your “5” from an “S” by either making the top corners of the “5”
sharper, or by writing a two-stroke “5”. A two-stroke “5” may look like an “S” on
paper, but Handwriter never confuses them because an “S” is written with only one
stroke:
Distinguish a “one” from a lowercase letter “l” by placing a tail on the number.
Distinguish “+” from “t” by making the crossbar considerably longer than the
vertical stroke.
Other Tips 4
• Make sure that loops are fully closed. An open “g” might be recognized as a “y”,
and an open “a” might be recognized as a “u”.
• Handwriter recognizes normal retraces, such as you might make when writing a
“B” with a single stroke. However excessively retraced characters might not be
recognized.
Customizing Handwriter Settings 4
By changing its settings, you can customize Handwriter’s appearance and operation.
To do this, select Recognizer Properties from the Control Panel icon. Recognizer
Properties dialog box appears with the General tab displayed. Alternately, you can
access Recognizer Properties by double-tapping the pen icon in the System Tray.
Choosing the Recognizer 4
In the General tab you have the option of selecting which recognizer to use.
You can select only the Recognizers that have been installed. If only Handwriter is
installed you can only select Full Character Set. If Jot is installed then you will also
have the choice of selecting either Natural Character Set or the Simplified Uppercase
Character Set. For Jot, see section 2.
Handwriter is a full context sensitive word recognizer. Jot is a character recognizer.
Jot begins recognition after each character is written. Handwriter will allow you to
write whole words or sentences before recognition.
CIC Handwriter
4-11
Page 82

Customizing Ink Settings 4
In the Appearance tab you can control ink width and color:
• To customize the width of the ink stroke, select a size, then tap OK.
• To customize the color of the ink, select Change Color, then select a color box, then
tap OK.
Select another tab, or tap OK to return to your document.
Timeout 4
From the Timeout tab there are two kinds of timeout you can control: Recognition
Timeout and Selection Timeout.
Recognition Timeout 4
Sometimes, particularly as a new user, when you write a multistroke character (a
character made up of more than one stroke, such as an “A”), Handwriter might
interpret each stroke as a separate character:
This occurs when the recognition timeout is set faster than you write. Handwriter
interpreted what you wrote before you finished all the strokes.
As you gain more experience with Handwriter, you can reset this feature to improve
the response time.
Selection Timeout 4
When you pen down Handwriter will try to take the ink and recognize it. If you need
to select something or drag and drop an item you must hold the pen down a certain
amount of time without moving so Handwriter knows you do not want recognition.
Move this slider until you select a time you feel comfortable with.
Customizing Recognition 4
Select the Advanced tab to customize character recognition and start the Macro
Editor and Trainer:
• To turn the spell checker on or off, select the box next to Enable Recognition
Dictionary.
• The spell checker uses a dictionary that favors the recognition of real words. For
example, if you write “fovr”, Handwriter recognizes it as “four”.
4-12
Using the PenCentra 130 Productivity Package
Page 83

• To control spacing between words, tap the box next to Automatically insert a
Space after a pause (complete words only).
Note: This feature only works with Spell Checking. Be sure to check the Enable
Recognition Dictionary box. However, if you pause after writing fewer than three
characters (such as “an...”), you will have to insert a space manually after the last
character.
Select another tab, or tap OK to return to your document.
Using the Macro Editor 4
Speed up your work by creating and editing circle gestures with the Macro Editor.
Circle gestures are short-cuts for writing phrases or performing actions. Use them
anywhere you’d insert text, including standard edit fields of any Windows
application.
To start the Macro Editor, tap Macro Editor on the Advanced tab. The Circle Gesture
Macro Editor dialog box opens:
You are presented with a list of circle gestures, some of which have pre-assigned
functions.
You can create your own circle gestures as well as change the pre-defined ones.
• To create a new circle gesture:
1. Select an unused circle gesture, then tap Edit.
2. Select an action or enter text in the large box.
3. Tap Save, then tap OK, to return to the Recognizer Properties dialog box.
To change a circle gesture:
1. Select the circle gesture, then tap Edit.
2. Change the text or action in the appropriate boxes.
Note: If you clear the macro by mistake, close the Macro Editor without saving, then
re-open it and start over.
3. Tap Save, then tap OK, to return to the Recognizer Properties dialog box.
CIC Handwriter
4-13
Page 84

To write a circle gesture, write the letter, then immediately draw a circle around it.
Using the Trainer 4
You can personalize the way Handwriter interprets what you write, by using the Recognition Tuner.
When you tap Trainer on the Advanced tab, the Handwriter Trainer appears:
• To fine-tune a particular character, tap that character’s tab.
• To fine-tune all the characters in sequence, tap next.
• To reset the Trainer to its defaults, tap Reset to Default.
Tap OK to return to the Recognizer Properties dialog box.
CIC On-Screen Keyboard 4
The On-Screen Keyboard allows you to enter data into your PenCentra 130 using a
virtual keyboard.
CIC InkTools 4
Provides signature capture and verification. For instructions in using InkTools, refer
to the online help by clicking Start/Help, then selecting InkTools.
bFAX 4
Creating a New Fax 4
To create a new fax, tap the New Fax button, or choose New Fax from the Fax menu.
An item named “New Fax” appears in the Fax Workspace. Type a new name for
your fax and press Enter.
Adding/Removing Recipients 4
After creating or selecting a fax, either from the Fax Workspace or from the Outbox,
you can add recipients. With bFAX you can make use of the integrated PenCentra
130 Contacts list and fax to multiple recipients.
Adding a Recipient 4
Tap the Add Recipient button, tap Add Recipient from the Fax menu, or double tap
the empty area of the Recipient window. The Add Recipient dialog box will appear.
4-14
Using the PenCentra 130 Productivity Package
Page 85

With bFAX you can either enter the information or tap the Contacts box and scroll to
select one or more recipients from your PenCentra 130 Contacts list.
The new recipient appears in the Recipient list for the selected fax.
Removing a Recipient 4
Select the recipient you wish to delete from the Recipient list and tap the delete
button, or choose Delete from the Edit menu. Note: This will delete recipients only
from the Recipient window. They will remain in your PenCentra 130 Contacts list.
Adding/Removing Documents 4
After creating or selecting a fax, either from the Fax Workspace or from the Outbox,
you can add documents to it. bFAX allows you to send as many documents as you
wish.
Adding a Document 4
Tap the Add Document button, choose Add Document from the Fax menu, or double
tap in an empty area of the Document window. A dialog box will appear, allowing
you to browse for the file you wish to send. Select the desired file and choose Open to
add it to the Document window. Note: Once added to the fax, documents will remain
in the Document window until removed.
Removing a Document 4
In the Document window, tap the document you wish to delete. Then tap the delete
button, or choose Delete from the Edit window. Note: This will delete documents
only from the Document window. They will remain in your PenCentra 130 Contacts
list.
Sending a Fax 4
Once you have created or selected a fax from the Fax Workspace or Outbox list and
ensured that it has at least one document and one recipient, you are ready to send it.
Sending a Fax 4
Tap the Send Fax button, or choose Send Fax from the Fax menu. Confirm that the
Dialing preferences are set correctly on the confirmation dialog box that appears, and
tap the Dial button. To omit the confirmation screen from future faxing operations,
tap the check-box labeled “Don’t show this again.”
bFAX
4-15
Page 86

To change settings or to reactivate the confirmation screen, choose Communications
from the Options menu and tap Dialing.
Note: To send a fax, the fax/modem must be correctly inserted and connected to a live
phone line.
Adding/Removing Documents 4
After creating or selecting a fax, either from the Fax Workspace or from the Outbox,
you can add documents to it. bFAX allows you to send as many documents as you
wish.
Adding a Document
Tap the Add Document button, choose Add Document from the Fax menu, or double
tap in an empty area of the Document window. A dialog box will appear, allowing
you to browse for the file you wish to send. Select the desired file and choose Open to
add it to the Document window. Note: Once added to the fax, documents will remain
in the Document window until removed.
Removing a Document 4
In the Document window, tap the document you wish to delete. Then tap the delete
button, or choose Delete from the Edit window. Note: This will delete documents
only from the Document window. They will remain in your PenCentra 130 Contacts
list.
bFIND 4
bFIND is a search utility that searches for files, file contents, databases, contacts, and
more.
Creating a Search 4
1. To begin a search, enter the item that you are searching for into the Look For
field. You can choose to ignore letter case by checking the Ignore Case checkbox.
Check Whole Word if you want to search for an exact match of what is typed in
the Look For field.
2. In the Search Location group box, check the locations in which you want to
search.
4-16
Using the PenCentra 130 Productivity Package
Page 87

If you enter a file name in the Look For field, bFIND searches for it using the default
filter filename *.* as the file filter. If the Look For text contains an extension delimiter
such as “.”, bFIND will use the text as is.
Due to memory considerations, bFIND will abort the current search after it has found
more than 50 items. If bFIND does not find the item you are looking for within the
current 50 items, create a more specific search by modifying the search string or
locations.
Note: The default search searches through the root directory (My Handheld PC). If you
want to run a search of the entire PenCentra 130, choose Include Subfolders by
checking it or by using Alt-I.
Choosing Search Locations 4
You have the option of selecting one or more search locations by placing a check
mark in the check box next to your choice. Default script files have been provided for
the standard Windows CE applications, databases, and file types. These script files
help interpret search results and drive other third-party applications to complete
searches that are started within bFIND.
Appointments Database: bFIND searches the database used by the Windows CE
Appointments (Calendar) application.
Contacts Database: bFIND searches the database used by the Windows CE Contacts
application.
Email Messages: bFIND searches the email messages stored on the PenCentra 130.
File Contents: bFIND searches the contents of all files that match the File Filter.
File Names: bFIND will search the names of all files and folders to see if the file
name or folder name matches the search text.
Pocket Word Documents: This is a customized File Contents search. It searches only
for Pocket Word files (*.pwd).
Pocket Excel Documents: This is a customized File Contents search. It searches only
for Pocket Excel files (*.pxl).
Tasks Database: bFIND searches the database used by the Windows CE Tasks
application.
bFAX Packages: bFIND searches the database used by the bFAX applications.
bFIND
4-17
Page 88

Other: Depending on the user’s configuration, other search locations may be
displayed.
Any database that is found on the PenCentra 130 without a script will still appear in
the Search Location group box. For example, if you use Pocket Internet Explorer,
“Cookies” and “URL Cache” will appear.
For additional information on using the bSQUARE products, go to the bSQUARE
web site: www.bsquare.com.
4-18
Using the PenCentra 130 Productivity Package
Page 89

Chapter 5
Care and Maintenance of the PenCentra 130
This chapter provides pointers on how to care for and maintain your PenCentra 130
pen tablet.
Protecting the Display Screen 5
The PenCentra 130 pen tablet is designed to provide you with years of service. Using
a screen protector will help ensure that the screen remains as clear as possible. When
installed, the screen protector becomes a durable, replaceable, antiglare writing
surface that protects the display screen from abrasion.
To obtain additional screen protectors use Fujitsu part number FMWSP6 (12-pack)
when ordering. Additional information about installation is included with the screen
protectors.
Caution
During normal use of the pen tablet, small particles from the
environment can become embedded in the pen tip and
scratch the screen. To prevent scratching the screen, ensure
that a screen protector is installed before using your pen
tablet. The warranty does not cover a screen that is scratched
as a result of not using a screen protector.
Installing a Screen Protector 5
To install a new screen protector on your pen tablet:
1. If a screen protector is already installed on the display screen, remove it before
installing the new screen protector. The screen protector is held onto the display
screen surface by a thin strip of adhesive around the edges. A notch in one corner
of the screen protector allows you to slide your fingernail under the screen
protector for easy removal.
2. Clean the adhesive residue from the screen surface by gently wiping the residue
using a soft cotton cloth dampened with denatured alcohol. Ensure that all film
has been removed from the screen before applying a new screen protector.
Protecting the Display Screen
5-1
Page 90

Cautions
• Cleaning the screen surface with denatured alcohol may
result in streaking. If streaking occurs, buff the screen
surface lightly with a soft, dry cloth.
• The PenCentra 130 pen tablet is
pour liquids on the system or wash it with a soaked cloth.
not waterproof
. Do not
3. Remove the protective coating from the adhesive side of the new screen protector
first.
4. Apply the screen protector to the display screen surface. When doing so, orient
the screen protector with the adhesive side of the screen protector facing the
display screen and the notched corner of the screen protector toward the lower
left corner of the display screen.
5. Remove the protective plastic cover from the face of the screen protector.
6. Apply pressure to the screen protector with your finger using a continuous
wiping motion along the edges. The adhesive sets completely within 48 hours. To
ensure a good seal between the screen protector and the display, do not lift the
screen protector from the display once it has been applied.
7. Clean any residue left behind by the protective coating from the exposed surface
of the screen protector by wiping gently with a soft cotton cloth dampened with
denatured alcohol. Wipe the screen protector with a soft dry cloth to remove any
low-tack adhesive; this will help to prevent the pen tip from squeaking.
The screen protector is now installed.
Storing the PenCentra 130 5
Store the PenCentra 130 pen tablet in Suspended state with a fully charged battery
pack installed. The PenCentra 130 battery pack always provides power to some
system components, even when the system is in the Suspended state. If you plan to
store the system with the battery pack removed, be sure to save any active data prior
to storing; failure to do so could result in lost data.
5-2
Care and Maintenance of the PenCentra 130
Page 91

Protecting the PenCentra 130 Pen Tablet in Harsh Environments 5
The PenCentra 130 pen tablet is designed for use in environments where there is no
direct exposure to rain, mist, sprays, dirt, or other abrasive particles. The optional
PenCentra 130 harsh environment case (FMWCC36) and the PenCentra 130 screen
protector (FMWSP6) provide some protection in these environments, as well as from
physical damage due to shock or vibration.
Note that the harsh environment case does not render the pen tablet waterproof,
dustproof, or submersible.
The pen tablet is easily used while installed in the harsh environment case. For
additional information on the PenCentra 130 harsh environment case as well as
additional carrying cases and holsters, contact your reseller.
Avoiding Overheating 5
Excessive heat can damage internal components of the pen tablet over a period of
time. To avoid overheating your PenCentra 130, do not charge the pen tablet while it
is in the harsh environment case unless the system is either suspended or off.
Cleaning the Display Screen 5
To clean the pen tablet display screen, wipe the screen surface gently using a soft
cotton cloth slightly dampened with water or denatured alcohol. Using denatured
alcohol may result in streaking. If this occurs, gently buff the surface with a soft, dry
cloth.
Caution
The PenCentra 130 pen tablet is not waterproof. Do not pour
liquids on the pen tablet or wash the pen tablet with a heavily
soaked cloth.
Protecting the PenCentra 130 Pen Tablet in Harsh Environments
5-3
Page 92

5-4
Care and Maintenance of the PenCentra 130
Page 93

Chapter 6
Troubleshooting the PenCentra 130
Solutions to some common problems are described in the following sections. If you
are experiencing a problem with your PenCentra 130 pen tablet that you cannot solve
by taking the actions described, contact your local help desk or your reseller for
further assistance. If you need troubleshooting information for Windows CE
Services, click Windows CE Services Help Topics on the Help menu in the Mobile
Devices folder.
System Will Not Resume Operation 6
If the system will not resume operation after system operation has been suspended,
the battery pack may either be discharged to a critically low level or there is the
much less likely possibility that the battery pack is defective. To correct this problem,
either connect an external power supply (such as the AC adapter), or install a
charged battery pack in the pen tablet.
Display Screen Is Blank or Difficult to Read 6
If the display screen on your PenCentra 130 pen tablet appears blank or is
unreadable, check the following:
• The backlight time-out may have expired. Tap on the display screen to reactivate
the display. Note that this is a normal, power-saving feature.
• The system brightness may be set too low, causing the screen to appear too dark.
Use the backlight brightness hotpad to adjust the screen brightness.
• Color Reflective systems only: The display contrast settings may be set to extreme
high or low level causing the screen to appear blank. Try adjusting the contrast
setting using the hotpads. Note that the ambient temperature will affect the
display contrast. You may need to adjust the contrast periodically to compensate
for changes in temperature.
• If the device doesn’t respond when you briefly press the suspend/resume button,
try holding the button down for a full second.
• Make sure your battery cover is locked.
6-1
Page 94

Infrared Data Transfer Is Not Working 6
If you are experiencing problems transferring data between Windows CE-based
devices, note the following:
• Transfer only one file, or no more than 25 contact cards at a time. For more
information on contact cards, reference the section of Chapter 3 entitled
“Contacts: Tracking Friends and Colleagues”.
• Can the IrDA port on the pen tablet “see” the IrDA port on the other device? A
direct line-of-sight path must exist between the IrDA port on the pen tablet and
the IrDA port on the other device.
• The distance between the two devices must be less than 3 feet (1 meter), but more
than two inches.
• The viewing angle from the IrDA port on the pen tablet must not be more than 15
degrees from a center line between the IrDA port on the pen tablet and the IrDA
port on the other device.
• Adjust the room lighting. Some types of light interfere with infrared
communication (including direct sunlight). Try moving to a different location or
turning off some lights.
Pen Tablet Is Not Responding to the Pen 6
If your pen tablet is not responding to the pen, check the following:
Note: A quick way to tell if the pen is responding is to try to adjust the volume hotpad.
This will help determine if the system is not responding or if the application is
locked up.
• Ensure that the pen tip is clean. Replace the pen if it is damaged.
• If available, connect a USB-style mouse to the system to see if it responds to click
commands. If the system doesn’t respond to the mouse, the application or system
may have crashed, and it may be necessary to reset the system.
Pen Tablet is Not Responding to the Keyboard 6
If the pen tablet is not responding to the keyboard, make sure that you suspend and
then resume the system before attempting to use the keyboard. It must be suspended
and resumed before the keyboard will be recognized.
6-2
Troubleshooting the PenCentra 130
Page 95

Pen Not Calibrated 6
If the pen appears to be selecting an area of the screen other than the location at
which you tap, you should calibrate the pen. See “Calibrating the Pen” in Chapter 2
for details.
Audio Volume Too Low 6
If the audio volume on your pen tablet speaker or external headphones is too low,
check the following:
• Ensure that the volume level set with the Volume hotpads is set to an audible
level. There are four different levels at which the Volume hotpad can be set. Tap it
a few times to see if there is an increase in volume.
• Ensure that the volume level in the Control Panel/Volume and Sounds properties
window are set to the maximum levels.
Remote connection problems 6
This section covers situations you may encounter when trying to connect your
PenCentra to other sources of information. For problems with communicating with
your desktop, see Windows CE Services Help.
Can’t dial out with the device modem 6
• If using a PC Card modem, verify that the modem is firmly seated and connected
to your PenCentra and the telephone jack.
• Make sure the telephone line is analog. (Analog telephone lines transmit data in
analog instead of digital form. Your home telephone line is most likely analog,
while office telephone lines are often digital.)
• Make sure you’ve correctly set dialing properties for this connection.
• Make sure the modem is waiting for a dial tone. Select Start, Programs,
Communication, and then Remote Networking. Tap or click your connection
once to select it, and then select Properties on the File menu. In the Dial-Up
Connection dialog box, select the Configure button and then select the Call
Options tab. Select Wait for dial tone before dialing.
• For international calls, allow more time for the call to go through. On the Call
Options tab described in the previous bullet, clear the Cancel the call if not
connected within option or increase the number of seconds allowed.
Remote connection problems
6-3
Page 96

Can dial out but can’t make a proper connection 6
• Make sure the network to which you are trying to connect supports Point-to-Point
Protocol (PPP). PPTP connections are not currently supported. Your Internet
service provider or network administrator can verify this.
• Verify that the location is correct. Select Start, Settings, Control Panel, and then
double-tap or double-click the Dialing icon. Make sure that the location settings
reflect your current location, that the location’s dialing pattern is appropriate, and
that the local country and area code are correct.
The connection is unreliable 6
• If using a PC Card modem, make sure the modem is firmly seated and connected
to your PenCentra and the telephone jack.
• Disable call waiting. Select Start, Settings, Control Panel, and then double-tap or
double-click the Dialing icon. Select Disable call waiting by dialing and enter
the disable code specified by your telephone company.
Network connection is not listed in the ActiveSync dialog box 6
• Close the dialog box, wait a few minutes, and try again.
6-4
Troubleshooting the PenCentra 130
Page 97

Appendix A
PenCentra 130 H/PC Pro Hardware Specifications
The following table provides general hardware specifications of the PenCentra 130
H/PC Pro by category.
PenCentra 130 Specifications
Physical Specifications
Dimensions 8.9” x 6.5” x 1.3” (226mm x 165.5mm x 33.6mm)
Weight 2 lbs. with battery (.91 kg)
Processing Specifications
CPU NEC VR4121-131
Processor Speed 131 MHz
Memory / Storage Specifications
Main RAM 16 MB on main board
(48 MB maximum)
Masked ROM 24 MB
Flash ROM (non-volatile
storage)
Display • Indoor/Outdoor Color Display
Digitizer • Resistive, 10-bit resolution touchscreen
8 MB on main board
(16 MB maximum)
Input/Output Specifications
8” VGA (640 x 480), 256 colors
Color-reflective DSTN with frontlight
• Indoor-Only Color Display
8” VGA (640 x 480), 256 colors
Color transmissive DSTN with backlight
• One-million-character durability rating
PenCentra 130 H/PC Pro Hardware Specifications
A-1
Page 98

PenCentra 130 Specifications (Continued)
Backlight Control Color Reflective Display (indoor/outdoor):
Low-Medium-High-Off (via hotpad)
Color Transmissive Display (indoor only):
Very Low-Low-Medium-High (via hotpad)
The backlight control defaults to last setting used.
VGA Controller 16-bit with hardware acceleration
VRAM 2 MB SDRAM
Interface Specifications
PC Card Slots • Tw o Typ e -I I
• PCMCIA version 2.1
• 5 V/3.3 V, 500 mA maximum power
•“Radio Ready” for WAN PC Card radios
Modem • Rockwell internal 56 Kbps (V.90/K56 Flex) controllerless
data/fax modem (North America only)
• RJ-11 jack on top of system
• Ring wakeup (internal or PC Card modem)
Integrated Interfaces • USB-Host (Type-A connector)
5 V, 500 mA maximum current
• PS/2-style keyboard (full-size, 6-pin DIN connector)
5 V, 500 mA maximum current
• RS-232C serial port (full-size DB-9 connector)
Note that Pin 9 on this serial port has 5 V, 500 mA
maximum current support; Pin 9 on the optional docking
station serial port does not support 5 V.
• RJ-11 modem jack
• DC Power
Infrared IrDA version 1.1 (FIR, 4 Mbps)
Audio • PCM voice recording and playback (half-duplex)
• Internal microphone and speaker
• Microphone and headphone jacks (3.5 mm)
A-2
Appendix
Page 99

PenCentra 130 Specifications (Continued)
High-Usage Docking
Contacts
User Controls • Hotpads: Brightness, contrast, volume, right mouse,
Status Indicators (LEDs)
• USB-Host
(5 V, 500 mA maximum current)
• RS-232C serial
Note that Pin 9 on this serial port does not support 5 V
current.
• PS/2-style keyboard
(5 V, 500 mA maximum current)
• DC-in
programmable (3)
• Suspend/Resume (on/off) button
• Record button
• Reset button
• Notification button
• Notification
• Charging
• Low battery
Power Specifications
Main Battery • Removable, lithium ion
• 10.8 V @ 1300 mAh
• Dimensions: 6.3” x 1.0” x 0.5”
• Weight: 5.25 oz. (150 g)
• Warm-swappable
• Recharge time: 90 minutes (90%)
• Life: Up to 10 hours operation, depending on backlight
and application usage
• Suspend Life: 5 days
PenCentra 130 H/PC Pro Hardware Specifications
A-3
Page 100

PenCentra 130 Specifications (Continued)
Backup Battery • Internal NiMH, 3.6 V @ 70 mAh
• Charge time: 90% - 2 days, 100% - 4 days
• Automatically recharges from main battery when the
system is on.
• Suspend life (fully charged backup battery, no main
battery): 2 days
Additional Specifications
Reliability • 50,000 hours MTBF
• Heavy-duty Lexan housing with rubber handgrips
• Breakaway serial port door hinges
Security Features • Kensington lock slot
• Owner password capability
A-4
Appendix
 Loading...