

Page 1
Fujitsu Computer Systems Corporation has made every effort to ensure the accuracy and
completeness of this document. However, as ongoing development efforts are continually
improving the capabilities of our products, we cannot guarantee the accuracy of the contents of
this document. We disclaim liability for errors, omissions, or future changes. The absence of a
product or service name, slogan, or logo does not constitute a waiver of any trademark or other
intellectual property rights relating to that name, slogan, or logo owned by Fujitsu Computer
Systems Corporation, its parent, subsidiaries, and affiliated companies.
Fujitsu and the Fujitsu logo are registered trademarks and Instant MyMedia is a trademark of
Fujitsu Ltd. WinDVD and InterVideo are registered trademarks and WinDVR is a trademark of
InterVideo, Inc. All other trademarks mentioned herein are the property of their respective
owners.
© Copyright 2004 Fujitsu Computer Systems Corporation. All rights reserved. No part of this
publication may be copied, reproduced, translated, stored or transmitted in any electronic
form without the written consent of Fujitsu Computer Systems Corporation.
visit our Web site at: http://us.fujitsu.com/computers. For technical support
call:1-800-8fujitsu (1-800-838-5487) or e-mail us at: 8fujitsu@us.fujitsu.com
Fujitsu Computer Systems Corporation
1250 E. Arques Avenue, (M/S 122),
Sunnyvale, California 94085
For more information, call 1-877-372-3473 or
B6FH-3381-01EN-00
Page 2

DECLARATION OF CONFORMITY
according to FCC Part 15
Responsible Party Name:
Address:
Telephone:
Declares that product:
Fujitsu Computer Systems Corporation
1250 E. Arques Avenue, M/S 122, Sunnyvale, CA 94085
(408) 746-6000
TV Tuner Module PIXX-NTTN/U3W-XA
This equipment has been tested and found to comply with the limits for a Class B digital
device, pursuant to Part 15 of the FCC Rules. These limits are designed to provide
reasonable protection against harmful interference in a residential installation. The
equipment generates, uses and can radiate radio frequency energy and, if not installed
and used in accordance with the instructions, may cause harmful interference to radio
communications. However, there is no guarantee that interference will not occur in a
particular installation. If this equipment does cause harmful interference to radio or
television reception, which can be determined by turning the equipment on and off, the
user is encouraged to try to correct the interference by one or more of the following
measures:
• Reorient or relocate the receiving antenna.
• Increase the separation between the equipment and the receiver.
• Connect the equipment to an outlet on a circuit different from that to which the
receiver is connected.
• Consult the dealer or an experienced radio/TV technician for help.
Changes or modifications not expressly approved by the party responsible for compliance
could void the user’s authority to operate the equipment.
This device complies with Part 15 of the FCC rules. Operation is subject to the following
two conditions: (1) This device may not cause harmful interference, (2) This device must
accept any interference received, including interference that may cause undesired
operation.
Page 3

Table of Contents
TV Tuner Applications . . . . . . . . . . . . . . . . . . . . . . . . . . . . . . . . . . 5
Introducing the TV Tuner . . . . . . . . . . . . . . . . . . . . . . . . . . . . . . . . 6
TV Tuner Features . . . . . . . . . . . . . . . . . . . . . . . . . . . . . . . . . . . . . 7
Top/Front Features . . . . . . . . . . . . . . . . . . . . . . . . . . . . . . . . . . . . 7
Left Side Features . . . . . . . . . . . . . . . . . . . . . . . . . . . . . . . . . . . . . . 8
Right Side Features . . . . . . . . . . . . . . . . . . . . . . . . . . . . . . . . . . . . 9
Rear Panel Features . . . . . . . . . . . . . . . . . . . . . . . . . . . . . . . . . . . . 9
Remote Control Features . . . . . . . . . . . . . . . . . . . . . . . . . . . . . . . 10
Connecting the TV tuner . . . . . . . . . . . . . . . . . . . . . . . . . . . . . . . 13
Connecting an Antenna . . . . . . . . . . . . . . . . . . . . . . . . . . . . . . . . 13
Connecting an External Audio Device . . . . . . . . . . . . . . . . . . . . . 14
Connecting an External Video Device . . . . . . . . . . . . . . . . . . . . . . 15
Composite Video Cable Connection . . . . . . . . . . . . . . . . . 15
S-Video Cable Connection . . . . . . . . . . . . . . . . . . . . . . . . . 15
Setting up Instant MyMedia . . . . . . . . . . . . . . . . . . . . . . . . . . . . . 16
Setting Up/Skipping Channels . . . . . . . . . . . . . . . . . . . . . . . . . . . 17
Setting Up Channels . . . . . . . . . . . . . . . . . . . . . . . . . . . . . . . . . . 17
Skipping Channels . . . . . . . . . . . . . . . . . . . . . . . . . . . . . . . . . . . . 17
Starting/closing Instant MyMedia . . . . . . . . . . . . . . . . . . . . . . . . 18
Starting Instant MyMedia . . . . . . . . . . . . . . . . . . . . . . . . . . . . . . 18
Starting with one button . . . . . . . . . . . . . . . . . . . . . . . . . . . . . . . 18
Exiting Instant MyMedia . . . . . . . . . . . . . . . . . . . . . . . . . . . . . . . 18
1
Page 4

Watching TV and External Video without Booting Up . . . . . . . . . 19
Watching Television . . . . . . . . . . . . . . . . . . . . . . . . . . . . . . . . . . 19
Switching to TV Mode . . . . . . . . . . . . . . . . . . . . . . . . . . . 19
Selecting Channels . . . . . . . . . . . . . . . . . . . . . . . . . . . . . . 19
Adjusting the Volume . . . . . . . . . . . . . . . . . . . . . . . . . . . . 19
Muting the Volume . . . . . . . . . . . . . . . . . . . . . . . . . . . . . . 19
Changing Audio Mode . . . . . . . . . . . . . . . . . . . . . . . . . . . 19
Watching Video from External Devices . . . . . . . . . . . . . . . . . . . . 20
Copying from an External Device to DVD . . . . . . . . . . . . . . . . . . 20
Recording TV Programs on a DVD . . . . . . . . . . . . . . . . . . . . . . . . 21
Usable Disc Formats . . . . . . . . . . . . . . . . . . . . . . . . . . . . . . . . . . 21
Before recording . . . . . . . . . . . . . . . . . . . . . . . . . . . . . . . . . . . . . 21
Initializing a DVD disc . . . . . . . . . . . . . . . . . . . . . . . . . . . . 22
Setting the recording mode . . . . . . . . . . . . . . . . . . . . . . . . 22
Recording TV programs . . . . . . . . . . . . . . . . . . . . . . . . . . . . . . . . 23
Watching Recorded TV Programs or Videos . . . . . . . . . . . . . . . . 23
Playing TV programs or videos recorded on the notebook . . . . . . 23
Operations during play . . . . . . . . . . . . . . . . . . . . . . . . . . . 24
Playing CD/DVDs . . . . . . . . . . . . . . . . . . . . . . . . . . . . . . . . . . . . 25
Playing CDs . . . . . . . . . . . . . . . . . . . . . . . . . . . . . . . . . . . . . . . . . 25
Operations during play . . . . . . . . . . . . . . . . . . . . . . . . . . . 25
Playing DVDs . . . . . . . . . . . . . . . . . . . . . . . . . . . . . . . . . . . . . . . 26
Operations during play . . . . . . . . . . . . . . . . . . . . . . . . . . . 26
Using the DVD menu . . . . . . . . . . . . . . . . . . . . . . . . . . . . 28
Playing the TV programs or videos recorded on a DVD . . . . . . . . 28
Playing TV programs recorded by Instant MyMedia . . . . . 28
Playing TV programs/videos recorded on other recorders . 28
Changing the play settings for DVDs . . . . . . . . . . . . . . . . . . . . . 29
Changing the region code . . . . . . . . . . . . . . . . . . . . . . . . . 29
Setting the play start position . . . . . . . . . . . . . . . . . . . . . . 29
Changing a language used in audio and captions . . . . . . . 29
Using bookmarks . . . . . . . . . . . . . . . . . . . . . . . . . . . . . . . 30
2
Page 5

Changing the setting to Karaoke . . . . . . . . . . . . . . . . . . . . 30
Adjusting the display quality . . . . . . . . . . . . . . . . . . . . . . . 30
Changing the parental lock settings . . . . . . . . . . . . . . . . . . . . . . . 31
DVD/Movie Standards . . . . . . . . . . . . . . . . . . . . . . . . . . . 31
Television V-Chip Standards . . . . . . . . . . . . . . . . . . . . . . . 31
Setting the parental lock for DVD/CD mode . . . . . . . . . . . 32
Setting the parental lock for TV mode . . . . . . . . . . . . . . . . 32
Changing a password . . . . . . . . . . . . . . . . . . . . . . . . . . . . 33
Adjusting the Display Setting . . . . . . . . . . . . . . . . . . . . . . . . . . . . 34
Changing display types . . . . . . . . . . . . . . . . . . . . . . . . . . . . . . . . 34
Setting the Timer . . . . . . . . . . . . . . . . . . . . . . . . . . . . . . . . . . . . . 34
Adjusting the display quality . . . . . . . . . . . . . . . . . . . . . . . . . . . . 34
Returning to the initial state . . . . . . . . . . . . . . . . . . . . . . . . . . . . . 35
Troubleshooting and Recovery . . . . . . . . . . . . . . . . . . . . . . . . . . . 36
Troubleshooting . . . . . . . . . . . . . . . . . . . . . . . . . . . . . . . . . . . . . . 36
The screen does not appear . . . . . . . . . . . . . . . . . . . . . . . . 36
The screen image is distorted . . . . . . . . . . . . . . . . . . . . . . . 36
Audio does not come on, or doesn’t sound right . . . . . . . . 37
Certain procedures don’t work properly . . . . . . . . . . . . . . . 37
Recording can’t be performed . . . . . . . . . . . . . . . . . . . . . . 38
Recovery of Instant MyMedia . . . . . . . . . . . . . . . . . . . . . . . . . . . 39
Execute the recovery of Instant MyMedia . . . . . . . . . . . . . 39
Specifications . . . . . . . . . . . . . . . . . . . . . . . . . . . . . . . . . . . . . . . . 40
Tuner Specifications . . . . . . . . . . . . . . . . . . . . . . . . . . . . . . . . . . 40
Remote Control Specifications . . . . . . . . . . . . . . . . . . . . . . . . . . . 41
Technical Support . . . . . . . . . . . . . . . . . . . . . . . . . . . . . . . . . . . . . 41
Fujitsu Computer Systems Contact Information . . . . . . . . . . . . . . 41
3
Page 6

4
Page 7
TV Tuner User’s Guide
This user’s guide contains information on connecting the TV Tuner and using the related
applications on your Fujitsu LifeBook notebook. We strongly recommend that you read this
guide before using the TV tuner.
• Before proceeding with the TV tuner connection, you should install WinDVR
from the TV Tuner Application Disc included with the notebook.
• This manual deals primarily with using Instant MyMedia with the TV Tuner. For
detailed information about the WinDVD and WinDVR applications, please see
the associated Help files by opening the application, right-clicking on the
application screen, then selecting Help from the dropdown menu. Note that the
WinDVD and WinDVR manuals are written generically, and some features may
not apply to your TV Tuner.
Depending upon which application you employ, you can use the notebook to play media
whether the notebook is booted up or not. If the notebook is not booted up (pre-boot) you can
use Instant MyMedia. If the notebook is booted up (post-boot), you can use WinDVR,
WinDVD, or Microsoft Media Player. The following table illustrates the capabilities of the
applications.
TV TUNER APPLICATIONS
Purpose (Pre-boot) (Post-boot)
Watch television
Record programs on DVD-RAM IM WinDVR
Record programs on DVD-R and DVD+/-RW
discs
Record programs on the notebook’s hard drive --- WinDVR
Watch videos from an external device IM
Listen to audio CDs IM Media Player
Watch commercial DVDs IM WinDVD
Play back programs recorded on a DVD IM WinDVR, WinDVD
Instant
MyMedia (IM)
--- WinDVR
---
WinDVD Creator
Plus
Play back programs recorded on hard drive --- WinDVR, WinDVD
5
Page 8
INTRODUCING THE TV TUNER
When you receive your notebook, the TV Tuner is pre-installed. Along with the TV Tuner, you
should have received the following items:
• Remote Control
• AA Batteries (quantity: 2)
• Antenna Cable Adapter (Coaxial-to-75 ohm F-Type)
• TV Tuner Applications Disc
• Instant MyMedia Disc
• TV Tuner Getting Started Guide (this manual)
4
5
8
9
10
12
6
7
11
3
11
6
12
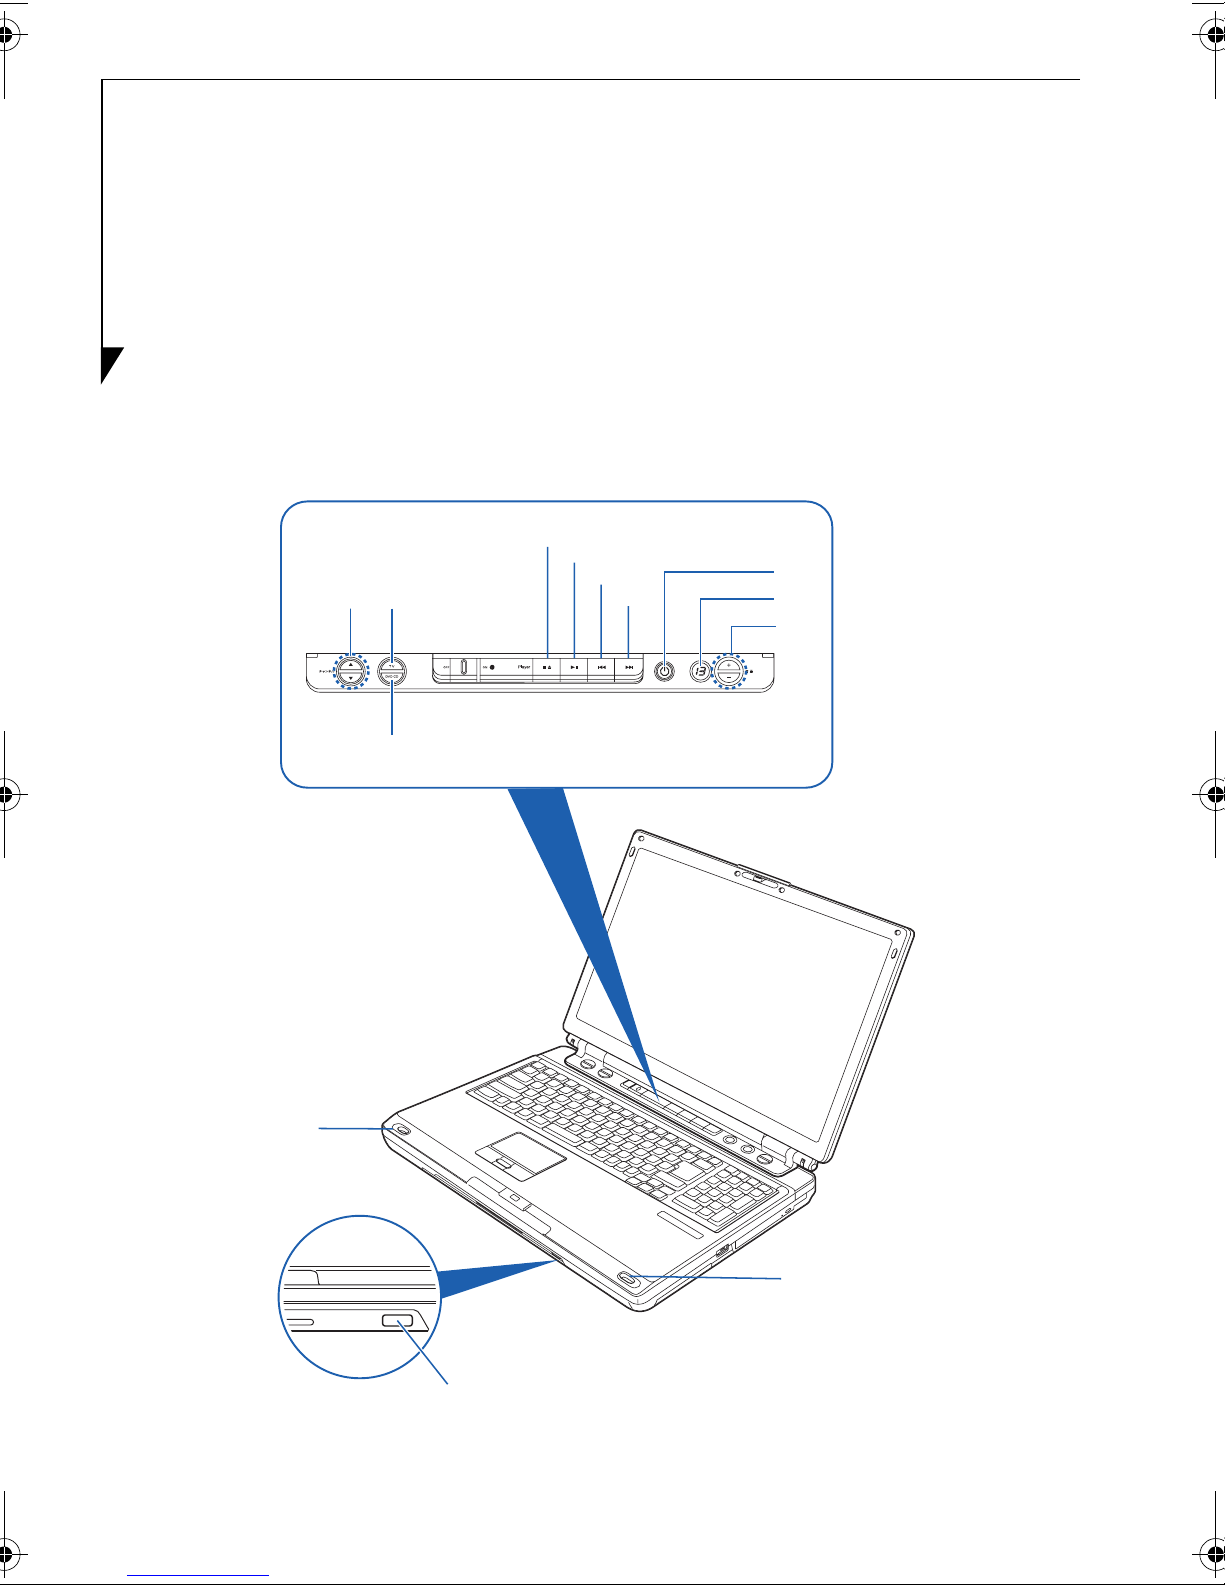
Figure 1. TV Tuner and Features (Top/Front)
Page 9
TV TUNER FEATURES
The TV Tuner can be run either with the remote control or using buttons located in the Fujitsu
LifeBook Media Player Panel above the keyboard. The features of the Fujitsu LifeBook that are
related to the TV Tuner, including Media Player Panel, are itemized in the table below.
Note that only features related to the TV Tuner are detailed in the
following tables and illustrations; see the notebook User’s Guide for
information about other features
Top/Front Features
For top and front features related to the TV Tuner, refer to Figure 1.
Item Name Description
.
1 Channel
2TV
3DVD/CD
4Stop/Eject
5Play/
Pause
This button is used to change the TV channels.
When this button is pressed and the notebook has not been booted up,
Instant MyMedia will be automatically activated, switching the notebook
into TV mode. If the notebook is in DVD/CD or Video mode when the
button is pressed, it will be switched into TV mode.
When this button is pressed and the notebook has not been booted up,
Instant MyMedia will be automatically activated, switching the notebook
into DVD/CD mode. If the notebook is in TV or Video mode when the
button is pressed, it will be switched into DVD/CD mode.
If this button is pressed while recording a DVD in TV mode, or while an
audio CD or DVD video is being played, record/play will be stopped. If you
press the button a second time, the media tray will be ejected so that you
can remove the disc. If this button is pressed while video pictures on the
hard disc are being played in video mode, play is stopped and a list of
playable videos is displayed.
If you press this button while play has been stopped or paused in DVD/CD
or video mode, play will restart. If you press the button while a DVD or
video is playing, play will stop temporarily.
6Back
7Next
When you press this button while an audio CD or a DVD is being played in
DVD/CD mode, the player will return to the previous track if the current
track hasn’t yet started. If the track has already started, you will return to
the beginning of the current track.
When you press this button while an audio CD or a DVD is being played in
DVD/CD mode, the player will advance to the next track.
7
Page 10
Item Name Description
8 Power/
Suspend/
Resume
9Volume
Level
10 Volume
Control
11 Stereo
Speakers
12 Remote
Control
IR Port
Used to turn the notebook on and off, to put the notebook into suspend
mode, or to resume from suspend mode.
The current volume level is displayed. The volume levels range from 1 to
15.
Use this button to adjust the volume while watching or listening to a DVD/
CD or TV. Press the upper half of the button (“+”) to increase the volume,
and the lower half (“-”) to lower the volume.
Speakers used for listening to output from TV, DVD, or CD. Note that in
addition to the two stereo speakers, there is a subwoofer underneath the
notebook which supplements the stereo speakers with bass tones to
provide a true multi-range audio experience.
The Remote Control IR Port is used to receive signals from the TV Tuner
remote control device. The remote control must be within line-of-sight of
the IR port in order to function properly. Be sure not to obstruct the IR port
when using the remote control.
1
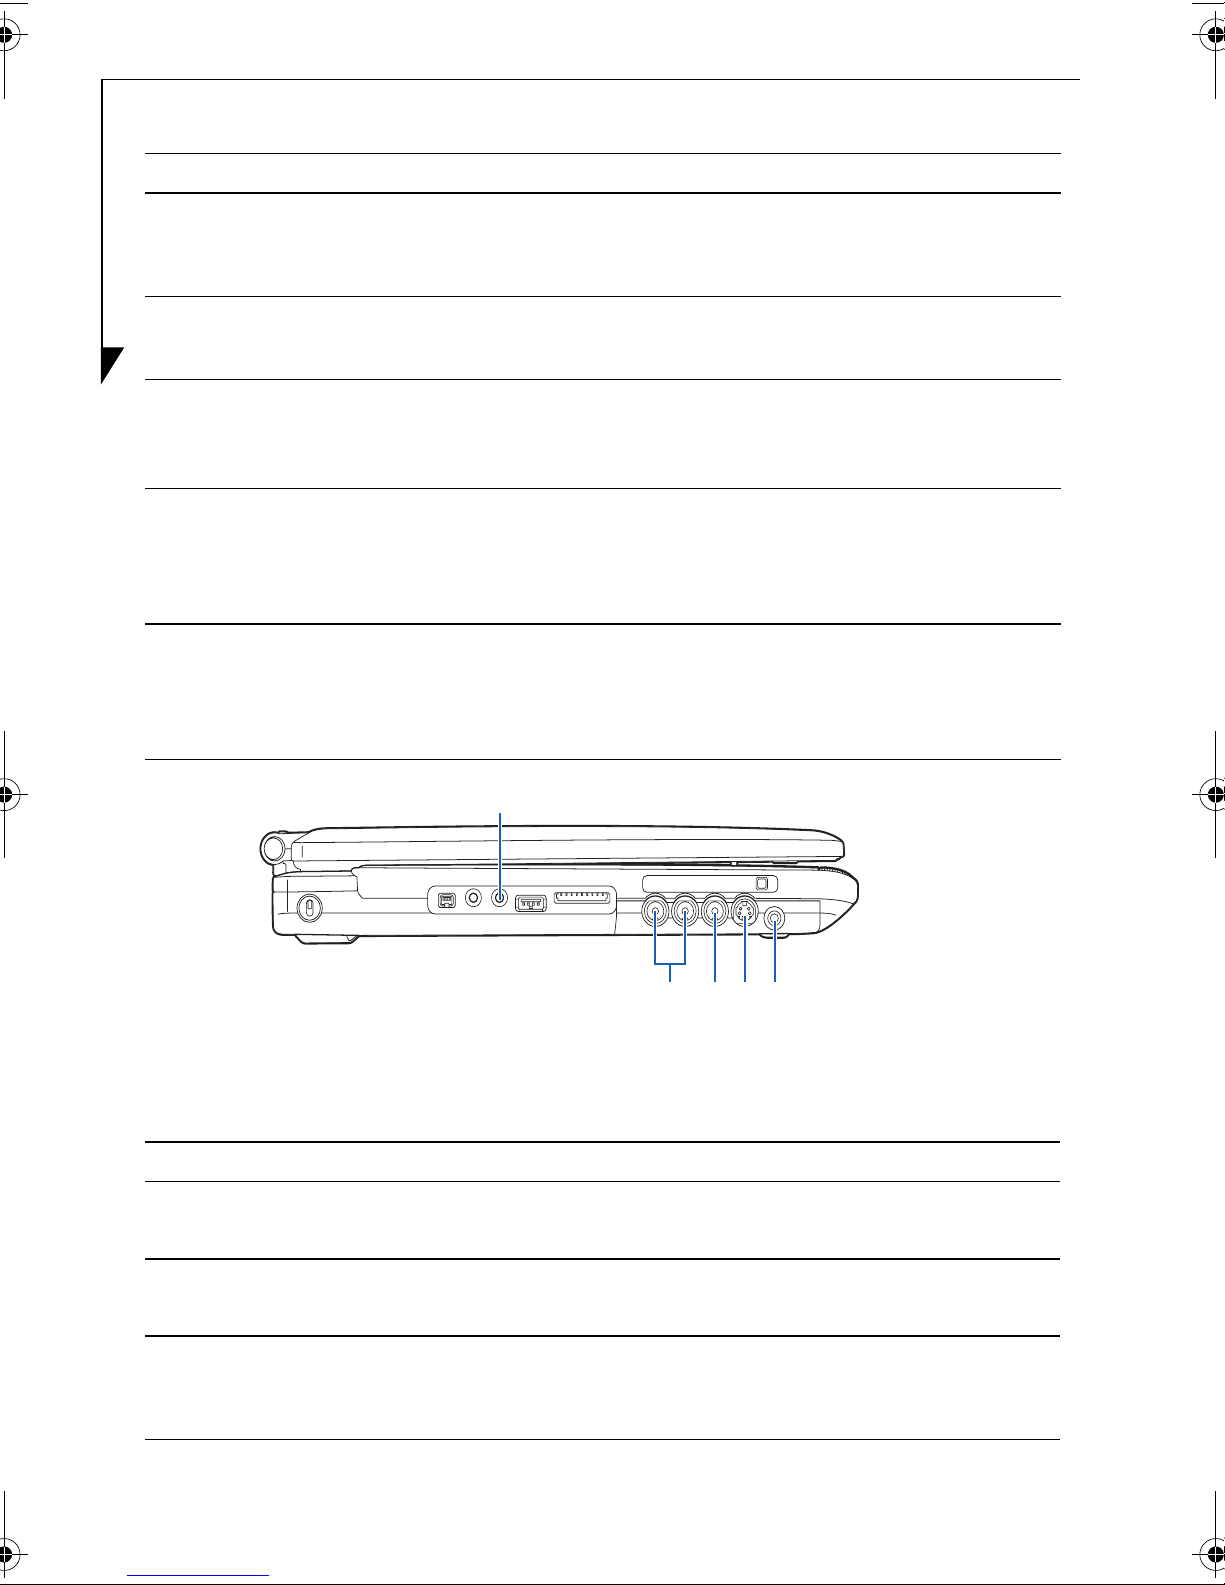
Left Side Features
For left side features related to the TV Tuner, refer to Figure 2.
Item Name Description
1 Headphone
Jack
2 Audio Input
Jacks
3 Video Input
Jack
(Composite)
8
Used to connect to commercially available headphones.
Used to connect to the audio output of external devices such as video
decks or set top boxes.
Used to connect to the video output port of external video devices. The
image input from a device connected to this jack is displayed when
“Composite” input is selected.
2345
Figure 2. Left Side Features
Page 11
Item Name Description
4S-Video
Input Port
5 Antenna
Mini-Jack
Used to connect to the S-video output port of external video devices.
The image input from a device connected to this jack is displayed when
“S-Video” input is selected.
Used to connect a TV or cable TV antenna using the RF adapter cable
included with the kit.
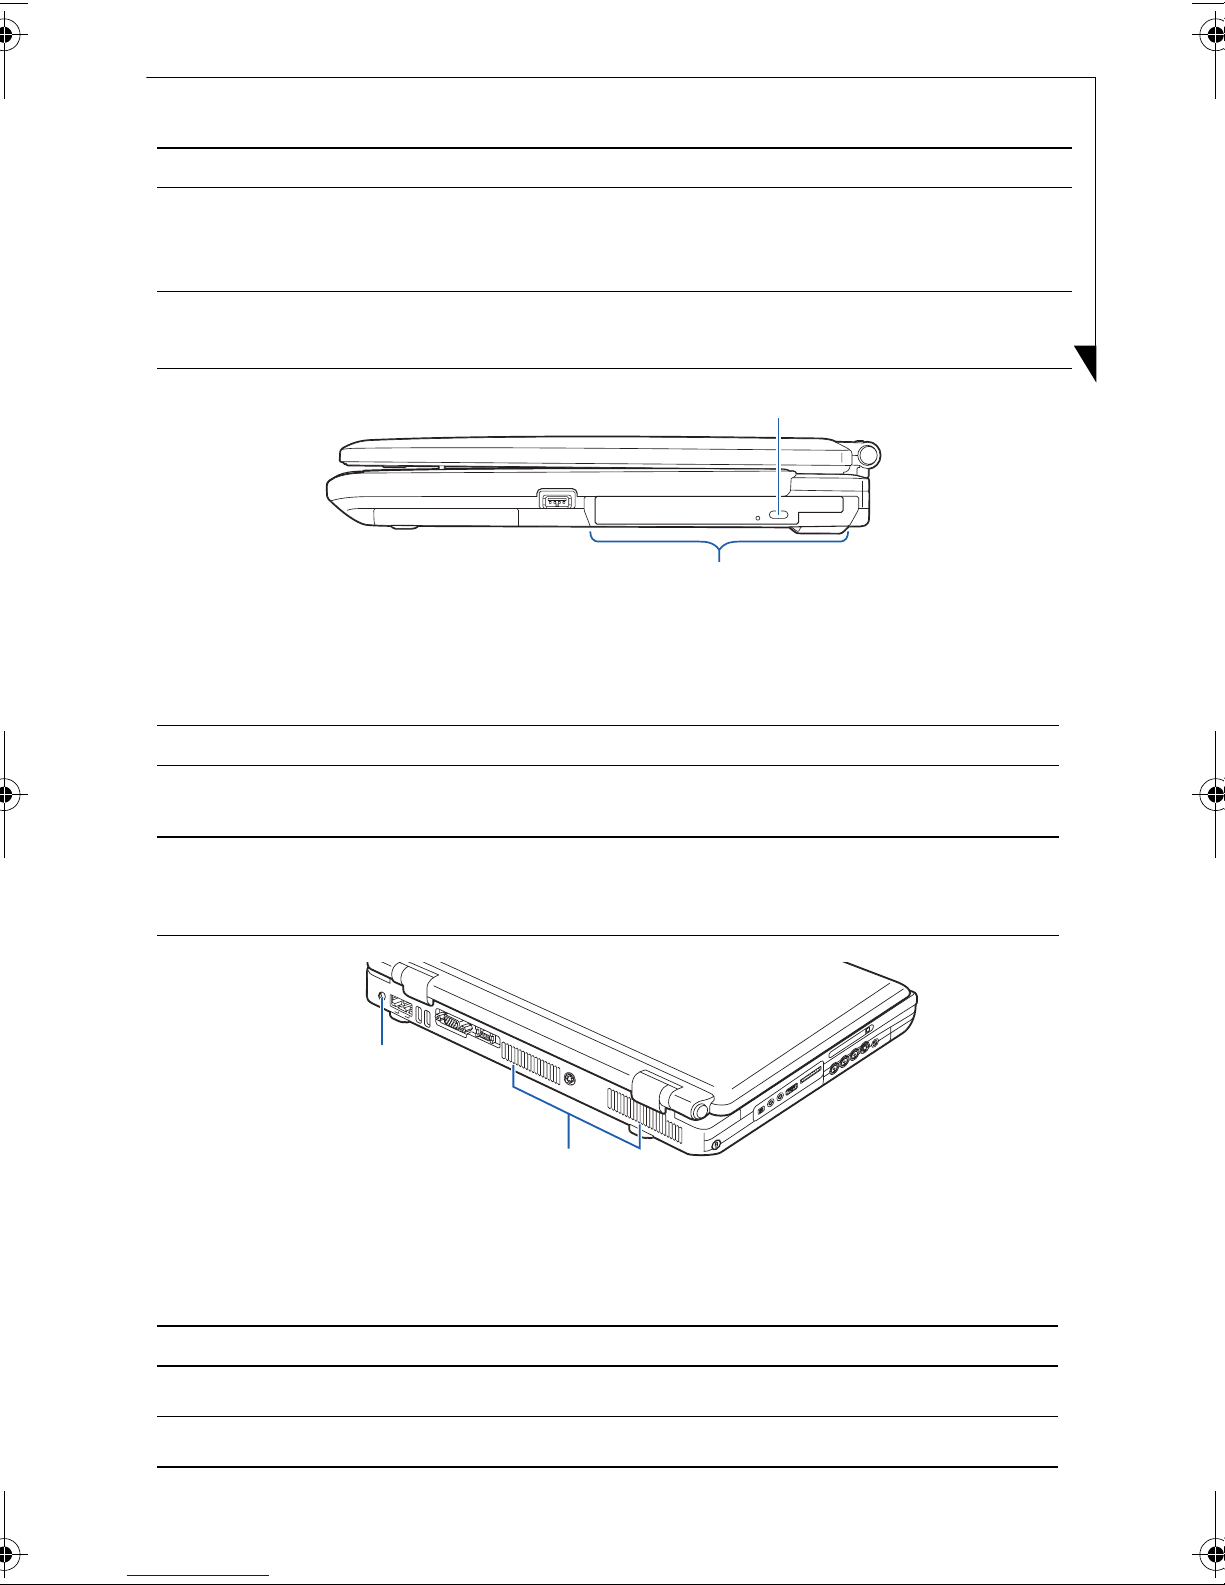
2
Figure 3. Right Side Features
Right Side Features
For right side features related to the TV Tuner, refer to Figure 3.
Item Name Description
1 Media Tray
Eject Button
Used to eject the media tray so you can insert or remove a disc.
1
2Optical
Drive
Depending upon the configuration of your notebook, this drive can
be used to play audio CDs, DVD videos, or to record a TV program on
DVD-RAM, or DVD-R.
1
2
Figure 4. Rear Panel Features
Rear Panel Features
For rear panel features related to the TV Tuner, refer to Figure 4.
Item Name Description
1 DC In Jack
2 Air Vents
Used to connect the AC Adapter to the notebook.
The air vents allow the fan to draw in outside air to cool the notebook.
9
Page 12
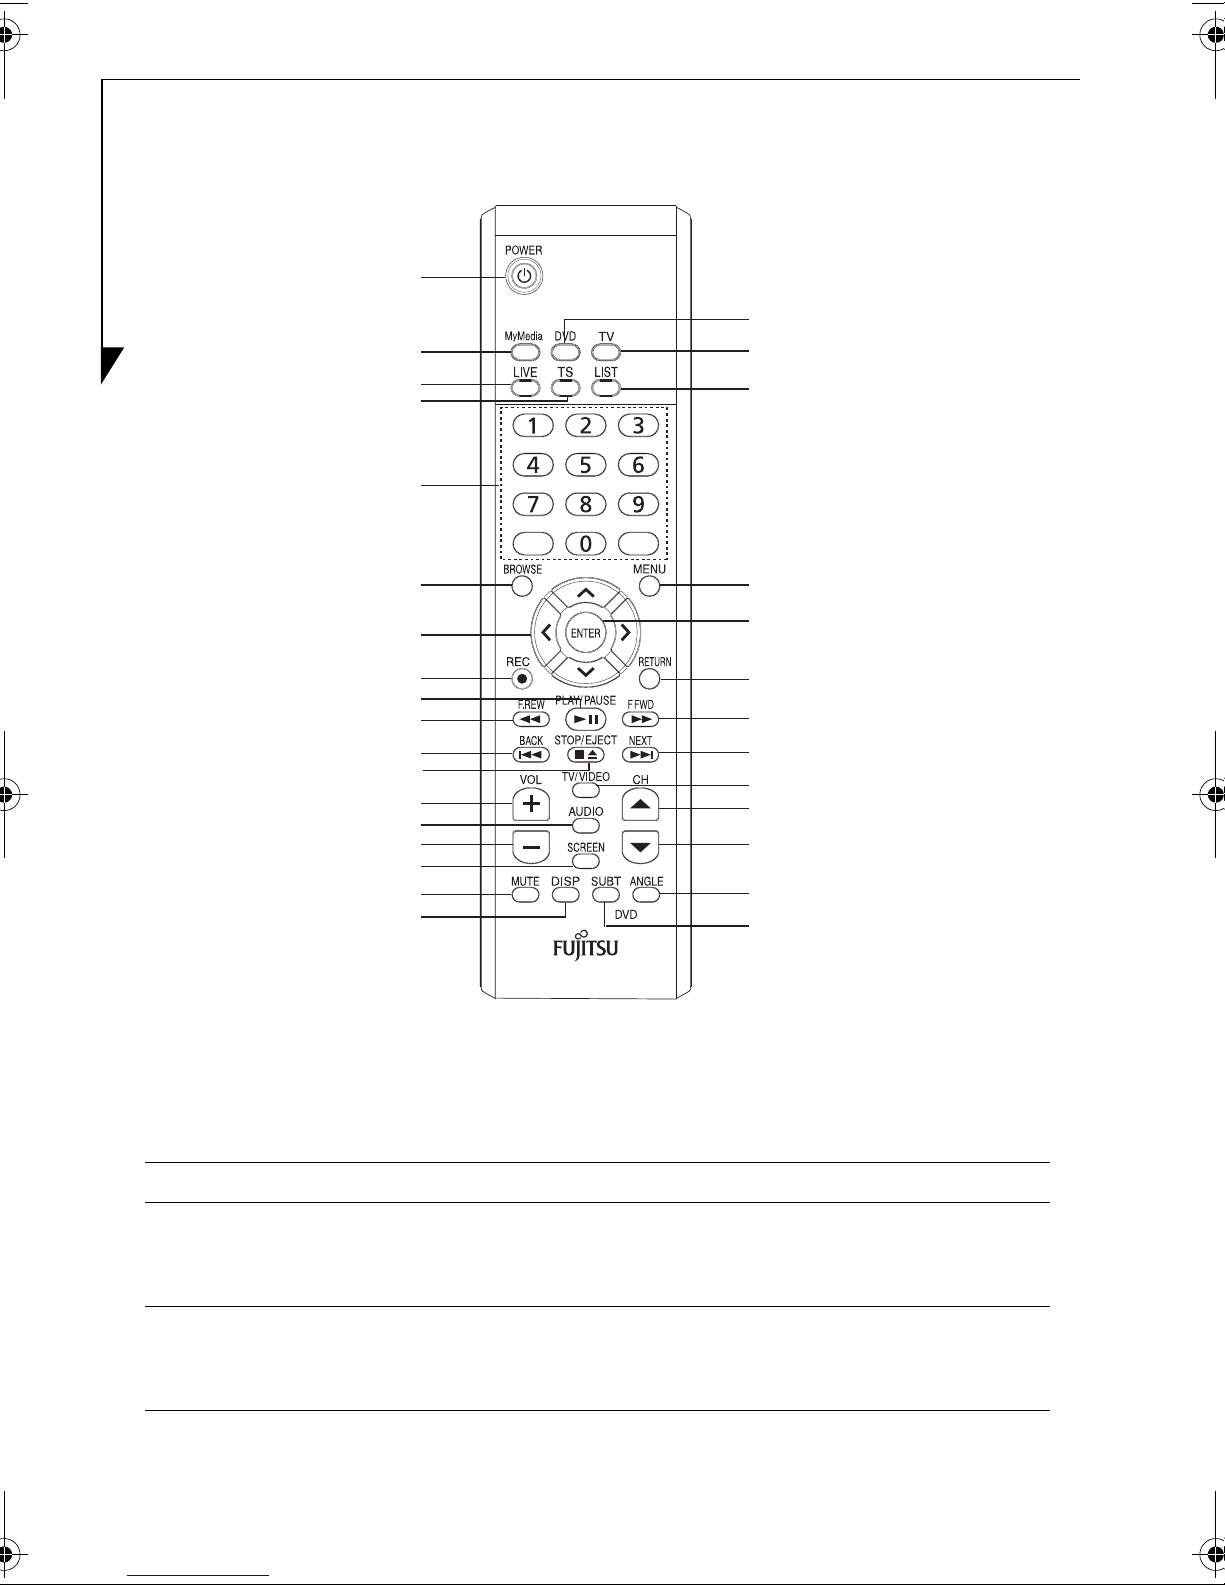
REMOTE CONTROL FEATURES
1
2
3
4
5
19
20
21
6
7
8
9
10
11
12
13
14
15
16
17
18
Figure 5. Remote Control Layout
22
23
24
25
26
27
28
29
30
31
This section describes the buttons on the remote control device that came with your TV Tuner.
For more information on the remote control, read this entire document. For features listed
below, reference Figure 5.
Item Name Description
1PowerPressing this button while media is running will terminate the media
and power down the notebook. If the notebook is powered down,
pressing this button will power it up.
2MyMediaIf power to the notebook is off, pressing this button will activate
Instant MyMedia and the main menu will be displayed. Note that this
button is not active if the notebook has been booted up.
10
Page 13
Item Name Description
3Live This button is only used with the WinDVR application (post-boot).
Pressing this button allows you to exit Time Shift (TS) mode.
4TS Time Shift (TS) allows you to pause a live TV broadcast while running
WinDVR (post-boot)
5Numeric
Pad
Pressing the buttons while in TV mode allows you to select channels
directly. Pressing the buttons while in CD/DVD mode allows you to
move to the chapter that corresponds to the number pressed.
6BrowseWhen using WinDVR, pressing the Browse button causes thumbnail
images of all available channels to be arrayed on the screen.
7Cursor
Move
The cursor move buttons allow you to move the cursor Up, Down,
Left, or Right.
8 Record Pressing the Record button while you are in MyMedia TV mode will
start the recording on DVD-RAM. Pressing this button while in
WinDVR (post-boot) allows you to record to the notebook’s hard drive
or any of the applicable disc media.
9Play/
Pause
If you press this button while play has been stopped or paused in
DVD/CD or video mode, play will restart. If you press the button while
a DVD or video is playing, play will stop temporarily.
10 Fast
Rewind
When this button is pressed while a DVD or video is being played, the
video pictures or audio are rewound. The button can be pressed
repeatedly to increase the speed of the rewind.
11 Back
12 Stop/Eject
13 Volume
Up
14 Audio
Switch
When you press this button while an audio CD or a DVD is being
played in DVD/CD mode, the player will return to the previous track if
the current track hasn’t yet started. If the track has already started,
you will return to the beginning of the current track.
If this button is pressed while recording a DVD or while an audio CD
or DVD video is being played, record/play will be stopped. If you press
the button a second time, the media tray will be ejected so that you
can remove the disc. If pressed while video pictures on the hard disc
are being played in video mode, play is stopped and a list of playable
videos is displayed.
Pressing this button increases the volume.
When you press the Audio Switch button while sound multiplex
broadcasting is being watched in TV mode or a DVD video with
multiple audio (i.e., multiple languages) is playing, the audio output is
switched.
11
Page 14
Item Name Description
15 Volume
Pressing this button decreases the volume.
Down
16 Screen When using the WinDVR application, pressing this button toggles
between full screen display and the Window size.
17 Mute Pressing the Mute button disables the speakers temporarily. No audio
is heard until you press the Mute button again.
18 Display When pressed while in TV mode, the current channel will be
displayed.
19 DVD When this button is pressed and the notebook has not been booted
up, Instant MyMedia will be automatically activated, switching the
notebook into DVD/CD mode. If the notebook is in TV or Video mode
when the button is pressed, it will be switched into DVD/CD mode.
20 TV
When this button is pressed, power to the notebook is deactivated,
Instant MyMedia is activated, and the notebook is automatically
switched to TV mode.
21 List When using Instant MyMedia, press the List button to display a list of
video files on the hard disk drive.
22 Menu When using Instant MyMedia, press this button to view the menu
screen while in TV or DVD/CD mode.
23 Enter Used to choose selections and values from the main menu or the
submenu screens.
24 Return When in TV mode, pressing the Return button returns you to the
previously viewed channel.
25 Fast
Forward
When this button is pressed while a DVD or video is being played, the
video pictures or audio will advance. The button can be pressed
repeatedly to increase the speed of the advance.
26 Next While playing media in DVD/CD mode, pressing this button will skip
to the next track or chapter.
27 TV/Video When pressed while in TV mode, display on the screen is switched.
Each time the button is pressed, the displays cycle from TV to S-Video
input to Composite Video.
28 Channel
Up
If pressed while in TV mode, the channel will switch to the next higher
channel.
12
Page 15

Item Name Description
29 Channel
Down
30 Angle When pressed while viewing a DVD for which there are multiple
31 Subtitle When pressed while viewing a DVD for which there are multiple
If pressed while in TV mode, the channel will switch to the next lower
channel.
shooting angles, the angle will switch.
subtitles, the subtitle will switch.
CONNECTING THE TV TUNER
Your TV Tuner and Instant MyMedia will work “out-of-the-box”, but if you want to connect
your notebook to an external device, follow the instructions in this section.
• The WinDVR application located on the TV Tuner Application Disc should be
installed before connecting the TV tuner.
• If you are connecting external devices to your notebook, be sure to read the
instructions that accompany them before connecting them.
The following external devices can be connected to the notebook to work with Instant
MyMedia:
• Image devices such as video decks and video cameras. These can be connected either with
composite cables or S-Video cables.
• Audio devices can be connected via the video audio input jack on the notebook.
Connecting an Antenna
In order to receive television signals, you must first hook up an antenna to your notebook. An
RF antenna adapter was included with the notebook for hooking up the antenna. Note that this
requires an antenna (either cable or standalone) with a coaxial connection.
Antenna Jack
To antenna
Antenna Adapter
Figure 6. Connecting the Antenna
13
Page 16

To connect an antenna to your notebook:
1. Connect the wide coaxial connector end of the RF antenna adapter to the coaxial connector
on the antenna (this includes cable TV antennas).
2. Connect the other end of the adapter to the antenna jack on the left side of the notebook, as
shown in Figure 6.
Connecting an External Audio Device
You can listen to media from an external device such as an external CD player by connecting it
to your notebook. In order to connect an audio device, you will first need to purchase a standard
RCA cable harness (red/white, max 1Vrms), as shown in Figure 7.
Figure 7. Audio Cable
To connect the audio cable:
1. Connect the cable to the audio output jacks on the external device by matching the colors
of the cable with the colors of the jacks.
2. Connect the cable to the audio input jacks on the notebook by matching the colors of the
cable with the colors of the jacks (See Figure 8).
Audio Jacks
14
Audio Cable
Figure 8. Audio Input Connection
Page 17

Connecting an External Video Device
You can view videos and images from an external device on your notebook. Depending upon
the configuration of the device, you will need to purchase either a composite RCA video cable
(Figure 9) or an S-Video 4-pin cable (Figure 11). You will also need to connect an audio cable,
as described in “Connecting an External Audio Device” on page 14. The video cables use
different ports, as described below.
Composite Video Cable Connection
Figure 9. Composite Video Cable
To connect a composite video cable:
1. Connect the cable to the video output jack on the external device.
2. Connect the cable to the video input jack on the notebook (See Figure 10).
3. Connect the audio cable between the external device and the notebook, as described in
“Connecting an External Audio Device” on page 14.
Video Jack
Video Cable
Figure 10. Video Cable (Composite) Connection
S-Video Cable Connection
Figure 11. S-Video Cable
15
Page 18

To connect an S-Video cable:
The S-Video connector is keyed so that it can only be inserted when it is aligned
properly with the port. Be sure to examine the orientation of the connector with
the port before inserting it. Forcible insertion may cause damage to the connector
and/or port.
1. Connect the cable to the video output jack on the external device.
2. Connect the cable to the video input jack on the notebook (See Figure 12).
3. Connect the audio cable between the external device and the notebook, as described in
“Connecting an External Audio Device” on page 14.
S-Video Port
S-Video Cable
Figure 12. S-Video Cable Connection
SETTING UP INSTANT MYMEDIA
When using Instant MyMedia for the first time, setup will begin automatically after Instant
MyMedia is activated. Follow the steps below to complete installation.
When performing the installation, do not wear headphones initially; the volume
may be greater than expected.
Be sure to follow the steps indicated below. Attempting to install Instant MyMedia
using different steps could result in failure to start. Note that Instant MyMedia will
cause the system to reboot twice during this installation procedure. If Instant
MyMedia fails to start after following these steps, refer to the Troubleshooting
section of this manual.
1. Verify that the system is not powered on, then press the MyMedia button on the remote
control. During the first portion of the installation, the notebook will cycle through several
16
Page 19

screens as different portions of the installation take place. At the end of this portion, the
notebook will turn off.
2. Verify that the power indicator is not lit.
3. Press the MyMedia button on the remote control again. The last portion of the installation will begin. At the completion of installation, the notebook will turn off.
4. Press the MyMedia button on the remote control again. The Instant MyMedia main menu
will appear. Instant MyMedia is now ready to use.
SETTING UP/SKIPPING CHANNELS
Setting Up Channels
1. Press the MyMedia button on the remote control to display the main menu.
2. If it’s not already selected, select TV with the cursor buttons, then press the [Enter] button
on the remote control. Instant MyMedia enters TV mode.
3. Press the [Menu] button to display the menu.
4. Select Antenna or Cable, depending upon how your tuner is connected. Press [Enter].
5. In the left hand panel, select Favorite Channel List. To automatically assign a broadcast
station to unassigned channels, set the selection to On.
6. Select Auto Scan with the cursor buttons, select Run, then press [Enter].
7. A channel search will begin. During the channel search, channels are switched one after
another; this could take some time. Each time a channel search is performed, different
channels may be detected due to changing reception conditions.
Skipping Channels
You can determine which detected channels are displayed and which are skipped using the
remote control or the channel button on the notebook.
1. Press the Menu button to display the menu and select TV Channel using the Cursor Move
buttons.
2. Press the right-cursor move button to enter the list of channels. Select a channel and press
the [Enter] button. Channels with a circle to the left are the channels that are set; they will
not be skipped.
3. If you want to skip a detected channel, select the channel you want to skip and press the
[Enter] button. The circle will disappear, indicating that the channel will be skipped.
Channels can still be selected using the numbered buttons on the remote control,
even if they have been selected to skip.
4. When you have finished setting the skip status of the channels, press the left-cursor button, select [Exit], and press the [Enter] button.
17
Page 20

STARTING/CLOSING INSTANT MYMEDIA
Starting Instant MyMedia
1. Start Instant MyMedia by pressing MyMedia on the remote control.
2. Select the mode you want using the cursor buttons, then press the [Enter] button.
• TV Mode
In TV mode, you can watch television, record the program you are watching on DVD, or
watch videos from an external device connected to your notebook.
• DVD/CD Mode
In DVD/CD mode, you can watch DVDs or listen to CDs.
• Playback Mode
When in Playback mode, you can watch TV programs that have been recorded on the
notebook hard disk and videos stored in the My Video folder.
• PC Boot
PC Boot closes Instant MyMedia and boots up the notebook.
Starting with one button
When the notebook is powered off, you can start the TV mode by pressing the [TV] button on
the remote control. Similarly, when the notebook is powered off, you can start the DVD/CD
mode by pressing the [DVD] button on the remote control
.
• When the notebook is being used, Instant MyMedia cannot be activated.
• When the Instant MyMedia main menu is displayed, the volume and [Mute]
buttons on the remote control and the volume control button on the notebook
cannot be used.
Exiting Instant MyMedia
1. Press the MyMedia button to display the main menu.
2. Select Power Off, then press the [Enter] button. Instant MyMedia will be terminated and
the notebook will be powered off.
Pressing the notebook power button will also terminate Instant MyMedia and
power off the notebook.
18
Page 21

WATCHING TV AND EXTERNAL VIDEO WITHOUT BOOTING UP
Instant MyMedia allows you to watch television and view video from an external device
without activating the notebook’s operating system (also called “booting up” the notebook).
Watching Television
Switching to TV Mode
1. Display the main menu of Instant MyMedia (“Starting Instant MyMedia” on page 18).
2. Select TV using the cursor buttons on the remote control, then press the [Enter] button
When Instant MyMedia is switched to TV mode with a DVD-RAM disc inserted in
the notebook, a message confirming the initialization of the disc may be displayed.
If this occurs, select [No], then press [OK]. If you select [Yes], all programs and data
on the disc will be deleted.
3. If the TV is not selected, press the [TV/Video] button on the remote control to switch to
TV mode. Each time the button is pressed, the input signals will cycle from TV -> SVideo -> Composite Video.
Selecting Channels
1. To select channels with the remote control, use the numeric buttons (0 - 9).
2. To select a channel, press the number of the channel. For channels above 9, press the
sequence of buttons (e.g., channel 42: press [4] + [2]; channel 156: press [1] + [5] + [6].)
3. To select channels using the Channel Up and Channel Down buttons, press Channel Up
for the next highest channel, or Channel Down for the next lowest. Note that if you have
selected to skip certain channels (See “Skipping Channels” on page 17), they will be
skipped when using the Channel Up and Down buttons.
.
Adjusting the Volume
1. Use the [Vol +] and [Vol -] buttons on the remote control to increase and decrease the
volume. Note that when changing the volume, the screen display may temporarily stop.
2. Adjust the volume to a comfortable level. Do not raise the volume to the point that the
sound is distorted. Doing so could damage the speakers.
Muting the Volume
1. To mute the sound completely, press the [Mute] button on the remote control.
2. To un-mute the volume, press the [Mute] button again.
Changing Audio Mode
Audio mode is selected when sound multiplex broadcasting (such as bilingual broadcasts) is
received through the TV input.
Press the [Audio] button on the remote control to select the audio mode you want. Each time
the button is pressed, the audio will toggle between Mono-SAP, Mono-Main, and Stereo.
19
Page 22

Watching Video from External Devices
1. Press the [TV/Video] button on the remote control. Each time the button is pressed, the
input signals will cycle from TV -> S-Video -> Composite Video. Select the input type corresponding to the input port that is connected to the external device.
2. For instructions on operating the external device, refer to the manufacturer’s user guide.
• The screen image may blink when playing videos on fast forward or fast reverse.
• The screen image may be distorted, depending upon the external device being
used (e.g., video tapes, laserdiscs.)
COPYING FROM AN EXTERNAL DEVICE TO DVD
To copy video from an external device, such as a VCR or DVD player, perform the following
steps:
Be aware that many videotapes and DVD discs are copy-protected to prevent
duplication. Attempting to copy such media will be unsuccessful.
1. Connect the external device in accordance with “Connecting the TV tuner” on page 13.
2. Start Instant MyMedia by pressing the TV button on the remote control.
3. Insert a blank DVD-RAM disc in the notebook media player.
4. Press the TV/Video button on the remote control and select Composite or S-Video,
depending upon which type of cable is connected to the external device. (See “Connecting
the TV tuner” on page 13).
5. Insert the tape or disc in the external device and start playing it.
6. Press the [REC] button on the remote control. If it is not copy-protected, the program
being viewed will be copied to the DVD-RAM in the notebook.
20
Page 23

RECORDING TV PROGRAMS ON A DVD
This section describes how to record a TV broadcast on a DVD.
Usable Disc Formats
Depending upon whether you are using Instant MyMedia (pre-boot) to play or record, certain
types of discs can and cannot be used. See the following table to determine appropriate
formats.
Disc Type Play Record
Audio CD
CD-R ---
CR-RW ---
DVD Video (VCD)
DVD Audio ---
DVD-R (4.7 GB)**
DVD-RW
DVD+R ---
DVD+RW
DVD-RAM
!
!*
!
!
!
!!***
---
---
---
---
---
---
---
---
---
* Only DVDs with the correct region code can be used.
** DVD-Rs with a capacity of 3.95 GB cannot be used.
*** You may not be able to play DVD-RAMs recorded in Instant MyMedia on other DVD
players.
Before recording
Instant MyMedia can record the TV program being viewed on a DVD-RAM disc
• The procedures in this section assume that you are in TV mode.
• If in a pre-boot environment, you can only record to DVD-RAM discs.
• Instant MyMedia cannot record TV programs to a hard disk or using a timer. For
recording to the hard disk or recording using the timer, refer to the WinDVR
manual.
21
Page 24

Initializing a DVD disc
If you use a new DVD-RAM disc or a DVD-RAM disc used in other applications, it must be
initialized before recording.
If you want to record on a disc after deleting old programs recorded with Instant MyMedia, the
disc must be initialized.
For double-sided DVD-RAM discs, initialize one side first, then the second side.
If data is written on a DVD-RAM disc, it will be deleted when the disc is initialized.
1. Insert the DVD-RAM disc you want to format into the notebook’s multi-format drive.
If a disc for PC data is installed, a message stating so will appear. Follow the instructions on
the screen to format the disc.
2. Press the [Menu] button while in TV mode.
3. Using the cursor control buttons, select the Disc Management tab.
4. Select “Quick format” or “Full format” and press the [Enter] button. Formatting will start.
Perform “Full format” in the following cases:
• When Instant MyMedia does not identify the disc even though “Quick Format”
has already been performed previously.
• When recording has failed
• When using a new disc
• When using a disc used in writing data on the notebook
It takes about 75 minutes for “Full Format.”
5. When formatting has been completed, recordable time for the disc is indicated. Note that
the percentage indicator showing progress status may abruptly accelerate at around 80%.
In this case, initialization may have terminated, but the disc has been initialized without
any problem. During the initialization, all operations become ineffective.
Setting the recording mode
There are three different recording modes: High Quality, Good Quality, and Extended Play.
Recording Mode Recording Time* Quality
DVD HQ: High Quality Approximately 1 hour Best
DVD GQ: Good Quality Approximately 2 hours Better
DVD EP: Extended Play Approximately 3 hours Good
*1: For a 4.7 GB-capacity, single-sided DVD-RAM
22
Page 25

1. Press the [Menu] button to display the menu and select the Video tab.
2. Select “Recording modes” press the right cursor button.
3. Select the recording mode you like with the up and down cursor buttons and press the
[Enter] button.
Recording TV programs
1. Display the channel to be recorded. See “Watching TV and External Video without Booting Up” on page 19
2. Insert a formatted DVD-RAM disc into the optical drive of the notebook. Wait until
“Loading a disc...” disappears. You cannot start the recording until “Loading a disc...” disappears.
3. Press the [REC] button. Recording starts.
• During recording, buttons other than the [Stop/Eject] button of the remote controller, the Volume (+)/(-) buttons, or the [Stop/Eject] button and the volume
adjusting button of the notebook become ineffective. When a setting time for an
off-timer is reached during the recording, the off-timer will be canceled.
• Even if data is recorded on a dual-sided DVD-RAM, continuous recording on
both sides of the disc cannot be performed.
4. Press the Stop/Eject button on the remote control or the Stop/Eject button on the notebook when the recording has been completed. The notebook stops recording and the disc
stops. When pressing the Stop/Eject button on the remote control or the Stop/Eject button on the notebook again, the tray emerges from the drive to eject the disc.
To play the recorded DVD, use the DVD/CD mode of Instant MyMedia. See “Playing CD/
DVDs” on page 25
The notebook’s DVD play mode can also be used to play the recording.
WATCHING RECORDED TV PROGRAMS OR VIDEOS
This section describes how to play TV programs that were recorded on the notebook’s hard
disk with WinDVR.
Playing TV programs or videos recorded on the notebook
1. Press the [MyMedia] button on the remote control to display the main menu.
2. Select “Playback” from the menu and press the [Enter] button.
3. Select the folder in which TV programs or videos to be played are stored and press the
[Enter] button.
4. Select the TV program or video you want to play and press the [Enter] button. The TV
programs or videos selected start to play.
23
Page 26

Operations during play
• Pause
When you press the [Play/Pause] button on the remote control during the play, play is temporally stopped. When you press the [Play/Pause] button again, play is resumed. (The [Play/Pause]
button on the notebook can also be used.)
• Fast-forward/Rewind
Forward can be performed if you press the [F.FWD] button, and rewind can be performed if you
press the [F.REW] button during the play. Each time the button is pressed, the speed cycles
through four stages. When you press the [Play/Pause] button, normal play speed is resumed.
Fast-Forward and Rewind speeds are double speed, x 4 speed, x 8 speed, x 20 speed.
At double speed, audio is played along with pictures; however, in some cases the sound may
jump.
• Stop
When the [Stop/Eject] button is pressed during the play, play is stopped, and the list of playable
videos will appear.
The [Stop/Eject] button on the notebook can be used instead of the Stop/Eject button on the
remote control.
•Adjusting the volume
The volume increases when the (+) button is pressed, while it decreases when the (-) button is
pressed. Pressing the [Mute] button will temporarily turn off audio. Pressing it again turn audio
back on.
The volume adjusting button of the main unit of the notebook can be used instead of the
(+)/(-) button. The volume increases when the upper button is pressed, while it decreases when
the lower button is pressed.
• Changing the screen setting
Adjusting the brightness, colors, and contrast of the screen, setting an off-timer, and changing
screen types can be performed. See “Adjusting the Display Setting” on page 34”.
24
Page 27

PLAYING CD/DVDS
This section describes how to play an audio CD and a DVD video, and how to play TV
programs recorded on a DVD in the TV mode.
Playing CDs
To play a CD, perform the following steps:
1. Press the [MyMedia] button to display the main menu.
2. Insert a CD disc you want to play into the optical drive of the notebook.
3. Select “DVD/CD” and press the [Enter] button.
4. The CD play screen appears and the first track automatically starts to play.
Operations during play
•Pause
When you press the [Play/Pause] button while a CD is playing, play is temporarily stopped.
When you press the button again, play is resumed.
The [Play/Pause] button on the notebook can be used instead of the Play/Pause button on the
remote control.
• Fast-Forward/Rewind
Forward can be performed if you press [F.FWD], and rewind can be performed if you press
[F.REW] during the play. Each time the button is pressed, the speed cycles through four stages.
When you press the [Play/Pause] button, normal play speed is resumed.
Fast-Forward and rewind speeds are double speed, x 4 speed, x 8 speed, x 20 speed.
•Track skip
When you press the [Next] button during the play, the track being played is skipped and the
head of the next track is started to play. If you press the [Back] button immediately after a track
is started to play, the play position is returned to a track one before that track to play. If you
press the [Back] button 10 seconds or more after the play is started, a track one before that
track is started to play.
The [Back] button of the notebook can be used instead of the [Back] button on the remote
control.
The [Next] button on the notebook can be used instead of the [Next] button on the remote
control.
• Stop/Eject
When you press the [Stop/Eject] button during the play of a CD, play is temporarily stopped.
When pressing the [Stop/Eject] button again in this condition, the tray slightly comes up out of
the super multi-drive to eject the CD.
The [Stop/Eject] button on the notebook can be used instead of the [Stop/Eject] button on the
remote control.
25
Page 28

•Adjusting the volume
When the (+) button is pressed, the volume increases, while the (-) button is pressed, it
decreases.
Pressing the [Mute] button temporarily turns off audio. Pressing it again turns audio back on.
The volume adjusting button on the notebook can be used instead of the (+)/(-) button. When
the upper button is pressed, the volume increases, while the lower button is pressed, it decreases.
Adjust the volume so that the sound from the speaker is not distorted. Failure to do
so could result in damage to the speaker.
Playing DVDs
1. Press the [MyMedia] button to display the main menu.
2. Insert the DVD you want to play into the optical drive of the notebook. Refer to the notebook user’s guide for additional information on using the optical drive and caring for discs.
3. Select “DVD/CD” from the menu and press the [Enter] button. The DVD will start playing
automatically.
When playing a DVD that you were watching earlier, it will start to play from the position determined by the Auto Resume setting. See “Changing the play settings for DVDs” on page 29.
When “Start from beginning” is set, the disc will always restart at the beginning. When “Start
from last position” is set, the disc will start playing at the location where it previously stopped.
See “Changing the play settings for DVDs” on page 29
• Each region code is recorded on a DVD, so discs having region codes different from the codes set by Instant MyMedia cannot be played. If you want to
play discs having different region codes, change the setting of region codes of
Instant MyMedia. See “Changing the region code” on page 29.
• If you want to play a DVD having a region codes different from the present
one, a message is displayed showing that play is not performed, or a warning
screen appears. If you want to play this DVD, eject the disc and change the
setting of region codes. When a message is displayed, press [Enter] to get rid
of the message, and perform the above operation for changing a region code.
Operations during play
• Pause
When you press the [Play/Pause] button during the play, play is temporarily stopped. When you
press the button again, play resumes.
The [Play/Pause] button on the notebook can be used instead of the Play/Pause button on the
remote control.
26
Page 29

Fast-Forward and Rewind speeds are double speed, x 4 speed, x 8 speed, x 20 speed.
At double speed, audio is played along with pictures; however, in some cases the sound may
jump.
• Fast-forward/Rewind
Forward can be performed if you press the [F.FWD] button, and rewind can be performed if
you press the [F.REW] button during play. Each time the button is pressed, the speed switches
at four stages. When you press the [Play/Pause] button, normal play is resumed.
• Transfer of Chapter
If multiple chapters are set to a DVD, the chapter being played is skipped and the head of the
next chapter is started to play when you press the [Next] button during the play.
If you press the [Back] button immediately after that Chapter has started to play, the play position is returned to the first chapter before that track to play. If you press the [Back] button 10
seconds or more after the play is started, the track before that track starts to play.
The [Back] button on the notebook can be used instead of the [Back] button on the remote
control.
The [Next] button on the main unit on the notebook can be used instead of the [Next] button
on the remote control.
• Stop/Eject
When you press the [Stop/Eject] button during the play, play is temporarily stopped. Pressing
[Stop/Eject] again causes the tray to eject slightly from the optical drive to eject the disc.
The [Stop/Eject] button on the notebook can be used instead of the [Stop/Eject] button on the
remote control.
•Changing angles
Pressing the [Angle] button if multiple angles are set to a DVD, the next angle switched is
displayed. If only one kind of angles is set to the DVD being played, the angle is not switched.
•Changing audio
When pressing the [Audio] button if multiple audio types are set to a DVD, the next audio type
is displayed. If only one kind of audio is set to the DVD being played, the audio is not switched.
• Changing captions
If you press the [Subt] button if multiple caption types are set to a DVD, the next caption type
is displayed. If only one kind of caption is set to the DVD being played, caption is not switched.
• Stop/Eject
When you press the [Stop/Eject] button during DVD play, play is temporarily stopped.
Pressing the [Stop/Eject] button again causes the tray to emerge slightly to eject the DVD.
The [Stop/Eject] button on the notebook can be used instead of the [Stop/Eject] button on the
remote control.
27
Page 30

•Adjusting the volume
The volume increases when the (+) button is pressed, while it decreases when the (-) button is
pressed. Pressing the [Mute] button will temporarily turn off audio. Pressing it again allows
audio to come out.
The volume adjusting button of the main unit of the notebook can be used instead of the +/buttons. When the upper button is pressed, the volume increases, while when the lower button
is pressed, it decreases
Adjust the volume so that the sound from the speaker is not distorted. Failure to do
so could result in damage to the speaker.
.
• Changing the screen setting
Adjusting the brightness, colors, and contrast of the screen, setting an off-timer, and changing
screen types can be performed. See “Adjusting the display quality” on page 30.
Using the DVD menu
Some discs may have special menus. With such DVDs, the disc can be operated by reading its
special menu from the menu screen.
Some DVDs may automatically display the title menu when set, but there may be some cases
which are not operated by the remote controller even if the title menu is displayed. In this case,
read the title menu from the menu screen by following the steps below.
1. Press the [Menu] button and select Menu from the screen.
2. Select “Root menu” or “Title menu” and press the [Enter] button. The menu screen unique
to the disc is displayed.
Playing the TV programs or videos recorded on a DVD
Playing TV programs recorded by Instant MyMedia
DVDs on which TV programs were recorded in Instant MyMedia, can be played in the DVD/CD
mode in the same way as commercially available DVDs. See “Playing DVDs” on page 26.
Playing TV programs or videos recorded on other DVD recorders
DVDs recorded in a DVD video format can be played. See“Playing DVDs” on page 26.
• DVD+R discs cannot be played.
• DVD discs on which digital broadcasts are recorded cannot be played.
28
Page 31

Changing the play settings for DVDs
The status of DVDs to play may be determined by the intention of software
designers. In that case, functions may not work as operated, because Instant
MyMedia is played according to the contents of the disc which the software
designer intended. Refer to the instruction manual for the DVD to be played.
Changing the region code
Each playable region code is set to each DVD, so it cannot be played if this code is not matched
with the region code of playing devices.
If you want to play DVDs with different region codes, the region code of Instant MyMedia can
be changed.
• The change to the region code can be made up to 4 times including changes to
“WinDVR” on the notebook. When changes to the region code are made 4
times, the code is fixed to the last one, disabling DVDs having other region codes
to be played. Note that there is no way to change the fixed region code.
• Region codes can’t be changed while playing DVDs. Press [Stop/Eject] first.
1. Press the [Menu] button to display the menu.
2. Confirm the current region code. The item with a “O” attached on the left side is the
region code that is currently set.
3. Select a new region and press the [Enter] button. Only the DVDs having the region code
newly set can be played.
Setting the play start position
Set the position for starting the play of DVDs.
1. Press the [Menu] button to display the menu and select Auto Resume from the list.
2. In the right column, select the setting you would like and press the [Enter] button.
Start from the beginning: Play from the start of the disc regardless of the position where it
was previously stopped.
Start from last position: Play from the position where the disc was previously stopped.
The change to the setting of auto resume becomes effective after the notebook has
been powered off.
Changing a language used in audio and captions
Audio and captions can be selected from multiple languages depending on the DVD. To change
a language for audio/captions during the play, use the [Audio] button on the remote control.
29
Page 32

1. Press the [Menu] button to display the menu and select Audio Language or Subtitle Language from the list. The language for audio can be changed if the “Audio Language” is
selected, and the language for captions can be changed if the “Subtitle Language” is
selected.
2. Select a language you would like from the right column and press the [Enter] button.
The change to the setting of audio languages and subtitle languages becomes
effective after the notebook has been powered off.
Using bookmarks
Scenes that you like can be recorded in bookmarks and DVDs can be played from the recorded
points.
• Recording Bookmarks
1. Pause at the scene to be recorded by pressing the [Play/Pause] button.
2. Press the [Menu] button to display the menu and select Menu from the list.
3. Select “Bookmark” in the right column and press the [Enter] button.
4. Select “Add Bookmark” and press the [Enter] button.
• Selecting a bookmark
1. Press the [Menu] button and select “Menu”.
2. Select “Bookmark” and press the [Enter] button.
3. Select a bookmark you want to read and press the [Enter] button. Pressing the [Enter] button after selecting “Preview” enables you to view thumbnails of the scenes bookmarked.
4. Select the scene you would like to view and press the [Enter] button. Play is started from
the position of the bookmark.
5. Select “Delete” and press the [Enter] button to delete the bookmark.
Changing the setting to Karaoke
Some DVDs can delete only vocal parts from the track and play it as Karaoke. With DVDs like
this, the presence and absence of vocals can be selected.
• Changing the setting to the presence of vocal:
1. Press the [Menu] button and select the “Audio” tab.
2. Select the Vocal option you prefer and press the [Enter] button.
Adjusting the display quality
The brightness, colors, and contrast of the screen can be adjusted as you like. See “Adjusting the
display quality” on page 34 for details.
30
Page 33

Changing the parental lock settings
Parental lock levels may be set for the DVD player as well as for the television. The DVD player
setting is determined by the movie’s rating; the TV settings are determined by the V-Chip standards. Registering passwords and setting parental lock levels prevents children from seeing
violent or adult scenes.
Protection levels and passwords cannot be changed during the play of DVDs. Press the [Stop/
Eject] button to operate.
DVD/Movie Standards
G: General Audiences. All Ages Admitted
Contains nothing which would, in the view of the rating board, be offensive to parents whose
younger children view the film.
PG: Parental Guidance Suggested. Some Material May Not Be Suitable For Children
This is a film which clearly needs to be examined by parents before they let their children
watch. The label PG indicates that some parents may consider some material unsuitable for
their children, but the parent must make the decision.
PG-13: Parents Strongly Cautioned. May Be Inappropriate For Children Under 13
PG-13 is a stronger warning to parents to determine the viewing by their younger children,
since some material might not be suited for them.
R: Restricted. Under 17 Requires Accompanying Parent Or Adult Guardian
In the opinion of the rating board, this film contains some adult material and parents are urged
to find out more about this film before they allow their children to view it.
NC-17: No One 17 And Under Admitted
This rating declares that the Rating Board believes that this is a film that most parents will
consider too adult for their youngsters under 17. No children should be allowed to view an
NC-17 film. The reasons for an NC-17 rating can be violence, sex, aberrational behavior, drug
abuse, or any other element which most parents would consider too strong for viewing by their
children.
Television V-Chip Standards
TV-Y (All Children. This program is designed to be appropriate for all children.) Whether
animated or live-action, the themes and elements in this program are specifically designed for
a very young audience, including children from ages 2-6. This program is not expected to
frighten younger children.
TV-Y7 (Directed to Older Children. This program is designed for children age 7 and above.)
May be more appropriate for children who have acquired the developmental skills needed to
distinguish between make-believe and reality. Themes and elements in this program may
include mild fantasy or comedic violence, or may frighten children under the age of 7. Therefore, parents may wish to consider the suitability of this program for their very young children.
TV-Y7-FV (For those programs where fantasy violence may be more intense or more
combative than other programs in this category.
31
Page 34

For programs designed for the entire audience, the general categories are:
TV-G (General Audience. Most parents would find this program suitable for all ages.) Although
this rating does not signify a program designed specifically for children, most parents may let
younger children watch this program unattended.
TV-PG (Parental Guidance Suggested. This program contains material that parents may find
unsuitable for younger children.) Many parents may want to watch it with their younger children. The theme itself may call for parental guidance or the program contains one or more of
the following: moderate violence (V), some sexual situations (S), infrequent coarse language
(L), or some suggestive dialogue (D).
TV-14 (Parents Strongly Cautioned. This program contains some material that many parents
would find unsuitable for children under 14 years of age.) Parents are urged to exercise greater
care in monitoring this program and are cautioned against letting children under the age of 14
watch unattended. This program contains one or more of the following: intense violence (V),
intense sexual situations (S), strong coarse language (L), or intensely suggestive dialogue (D).
TV-MA (Mature Audience Only. This program is specifically designed to be viewed by adults
and therefore may be unsuitable for children under 17.) This program contains one or more of
the following: graphic violence (V), explicit sexual activity (S), or crude indecent language (L).
Setting the parental lock for DVD/CD mode
1. While in DVD/CD mode, press the [Menu] button to display the menu. Select the Parental
Control tab.
2. If you have already set a password, go to Password Change and enter the password in Input
Password. Press the [Enter] button.
3. If you have not yet set a password, select Password change, select New Password and press
the [Enter] button.
4. Input a password with the (1)-(9) buttons and press the [Enter] button.
5. Select “Confirm new password”, enter the password again, and press the [Enter] button. If
the passwords entered in the two steps do not match each other, you will receive a message.
Press the [Enter] button to erase the message, then start again.
6. Once the password has been successfully entered, press the [Enter] button. A password is
set, making the parental lock effective. After this, to cancel the parental lock or change the
protection levels, this password is required.
7. Select “Level change” and select the level you would like. Press the [Enter] key. A green dot
will appear next to the selected level.
8. Select “Exit” and press the [Enter] button.
Setting the parental lock for TV mode
1. While in TV mode, press the [Menu] button to display the menu and select the Parental
Control tab.
2. If you have already set a password, go to Password Change and enter the password in Input
Password. Press the [Enter] button.
32
Page 35

3. If you have not yet set a password, select “Password change” and select “New password”
and press the [Enter] button.
4. Input a password with the (1)-(9) buttons and press the [Enter] button.
5. Select “Confirm new password”, enter the password again, and press the [Enter] button. If
the passwords entered in the two steps do not match each other, you will receive a message. Press the [Enter] button to erase the message, then start again.
6. Once the password has been successfully entered, press the [Enter] button. A password is
set, making the parental lock effective. After this, to cancel the parental lock or change the
protection levels, this password is required.
7. Select “Level change” and select the level you would like. An “X” indicates that a level is
unlocked. To lock a level, highlight the desired box and press the [Enter] key. The symbol
will change from “X” to “\/”, indicating that the level is locked.
8. Select “Exit” and press the [Enter] button.
Instant MyMedia does not support the DVDs that have been set to enter a
password at the time of play. When playing these DVD-s, set the parental level of
Instant MyMedia to “Disabled.”
Changing a password
The password necessary for changing the parental lock level can be changed.
1. Press the [Menu] button to display the menu and select “Parental Control”.
2. Select “Password change”. When “****” is displayed in the column, an effective password
has already been entered.
3. If a password has not been selected, select “Input password” and press the [Enter] button.
4. Input password with the (1)-(9) buttons of the remote control and press the [Enter] button.
—The password entered here is effective until the menu screen is closed.
—If a wrong password is entered, a message is displayed. Press the [Enter] button to erase
the message, then proceed again from Step 1.
5. Select the “New password” and press the [Enter] button.
6. Input a new password with the (1)-(9) buttons of the remote control and press the [Enter]
button.
7. Select “Confirm new password” and press the [Enter] button.
8. Input a new password again with the (1)-(9) buttons of the remote control and press the
[Enter] button. The password is changed. After this, the new password is required to
change the parental lock level. If the passwords entered in the two steps do not match, a
message is displayed. Press the [Enter] button to erase the message, then return to step 1.
9. Press the [Enter] button to erase the message.
33
Page 36

ADJUSTING THE DISPLAY SETTING
This section describes how to adjust the setting of display quality when watching TV, a DVD, or
a video, how to change screen types, and how to set an off-timer.
Changing display types
When you display pictures of vertically and horizontally different sizes from the LCD display of
this notebook, display types can be selected.
Display Type Display Method
Normal Displays the image so that the vertical edges of the picture can be seen.
When a picture is entered with a screen ratio of 4:3, a black strip is displayed on the left and right corners of the screen.
Pan & Scan The picture is enlarged so the left and right edges extend to the edge of
the screen. When the picture is displayed with a screen ratio of 4:3, the
vertical sides of the picture are cut.
1. Press the [Menu] button to display the menu and select “Display Type”.
2. Select the screen type you like and press the [Enter] button.
Setting the Timer
With use of the timer, Instant MyMedia can be automatically terminated and the power to this
notebook is turned off when the set time has been reached.
The timer can be set to one, two, or three hours.
1. Press the [Menu] button to display the menu and select “Off-timer”.
2. Select the duration for the power to be turned off and press the [Enter] button. The offtimer is set and the menu screen disappears.
—To change the setting to the off-timer, perform the same steps again.
—To cancel the off-timer, select “Disable”.
3. When the time specified has elapsed, Instant MyMedia is automatically terminated, powering off the notebook
When recording on a DVD is being performed at the time when the power is
turned off using the off-timer, the off-timer is canceled, with the recording to be
continued. When Instant MyMedia is terminated before the setting time, the offtimer is canceled.
.
Adjusting the display quality
The brightness and colors of the picture can be adjusted as you like. Each video adjustment is
applied to all TV, DVD/CD and video play modes. The setting cannot be changed by each mode.
1. Press the [Menu] button to display the menu and select the “Video” tab.
34
Page 37

2. Select an item you would like to adjust from “Brightness,” “Color1” or “Color2” and press
the [Enter] button. A bar is indicated below the screen.
3. Adjust to a value you like using the up and down cursor buttons.
Returning to the initial state
The following procedure returns the display to state it was in when purchased.
1. Press the [Menu] button to display the menu and select the “Video” tab.
2. Select “Reset to default setting” and press the [Enter] button.
35
Page 38

TROUBLESHOOTING AND RECOVERY
Troubleshooting
Read this section if you encounter problems during the operation of this notebook. This section
lists questions most frequently asked about troubles, and answers to each question that include
causes and remedies.
If problems are not resolved, contact Fujitsu Computer Systems Service and Support. See “Technical Support” on page 41 for more information.
Symptom Possible Cause Remedies Reference
The screen does not appear
The power supply
indicator does not light
The power supply
indicator light blue.
The AC adapter is not
connected properly.
The power supply is turned
off
The power to the external
device connected to the video input port is turned off.
The video cable or the
S-Video cable are not properly connected.
The screen image is distorted
Light or dark dots are
displayed.
TV broadcast does not
work.
This is a characteristic of the
LCD display, and is not a
problem.
The antenna cable is not connected properly.
Connect the AC
adapter properly.
Turn on the power to
the notebook.
Turn on the device. See manufactur-
Properly connect the
video cable or S-Video cable.
--- ---
Connect the antenna
cable correctly.
Refer to your
notebook’s user
guide.
Refer to your
notebook’s user
guide.
er’s instructions.
“Connecting the
TV tuner” on
page 13
“Connecting an
Antenna” on
page 13
Channels are not set. Set the channels. “Setting Up/
TV broadcast pictures
are not clear
The TV image appears
as double or triple images
36
The antenna cable is not connected properly.
Objects in the environment
(e.g., buildings or mountains)
could have an influence on
the broadcast quality.
Connect the antenna
cable correctly.
Adjust the position
and direction of the
antenna.
Skipping Channels” on page 17
“Connecting an
Antenna” on
page 13
---
Page 39

Symptom Possible Cause Remedies Reference
Stripes and dots appear
during the TV broadcast.
DVDs cannot be played
or the DVD picture is
distorted.
The image can be affected by
high-voltage cables, automobiles, or electric appliances such as hair dryers.
The disc is upside down. Check the orientation
The disc is dirty. Gently wipe off the
The disc is scratched or
warped.
Change the location
of the notebook.
of the disc.
disc.
Do not use the disc. ---
Audio does not come on, or doesn’t sound right
No sound comes out of
the speakers
The speaker settings are
turned off.
The volume is set too low. Adjust the volume
Headphones are connected
to the notebook.
Press the [Mute] button on the remote
control.
with the volume button on the remote
control.
The notebook’s
speakers are disabled
when headphones
are plugged in. Unplug the headphones.
---
---
---
“Remote Control
Features” on
page 10
“Remote Control
Features” on
page 10
“Left Side Features” on page 8
The audio cable for video input is not connected.
Noise comes out of the
speakers
Noise momentarily
switches while channels
are changed.
Devices such as cell phones
that generate radio waves
are being used near the notebook.
The channels being selected
cannot be received.
Certain procedures don’t work properly
The remote control
doesn’t work
The remote control batteries
are dead.
The battery polarities (+, -) in
the remote control are reversed.
Connect the audio
cable properly.
Use the interfering
device away from the
notebook.
Select other channels. “Setting Up/
Change the batteries. ---
Insert the batteries
properly.
“Connecting an
External Audio
Device” on
page 14
---
Skipping Channels” on page 17
---
37
Page 40

Symptom Possible Cause Remedies Reference
The remote control
doesn’t work
(Continued)
When you attempt to
start Instant MyMedia,
the notebook starts instead
Only certain remote
control buttons respond
AC adapter for the notebook
is not connected properly.
Strong irradiated light from
fluorescent lamps are exposed to the IR port.
The signals from the remote
control do not reach the IR
port on the notebook.
The notebook is in Standby
mode.
The BIOS setting for Instant
MyMedia is disabled.
TV broadcasts are being recorded.
Properly connect the
AC adapter.
Change the orientation or location of the
notebook.
Position the remote
control so it is in lineof-sight of the IR
port.
Power down the
notebook.
Change the BIOS setting of Instant MyMedia.
During recording,
most buttons are disabled, with the exceptions of volume
and pause.
Refer to your
notebook’s user
guide.
---
“Top/Front Features” on page 7
Refer to your
notebook’s user
guide.
Refer to your
notebook’s user
guide.
---
Recording can’t be performed
Recording does not
start, even when the
[REC] button on the remote control is pressed.
A message indicating
that no disc is inserted is
displayed when the
[REC] button on the remote control is pressed.
The DVD-RAM disc is not
recognized.
A disc other than a DVDRAM disc is installed.
The disc is not inserted
correctly.
The drive tray is not closed. Check that the disc is
It takes time for the
notebook to identify
a DVD-RAM disc.
Press the [REC] button again after the
“loading the disc”
message or the recordable time indicator has disappeared
Instant MyMedia will
only record on DVDRAM discs. Use a
DVD-RAM disc.
Verify that the disc is
inserted properly
lying flat in the media
tray and close the
tray.
---
“Recording TV
programs” on
page 23
Refer to your
notebook’s user
guide.
Refer to your
notebook’s user
guide.
38
Page 41

Recovery of Instant MyMedia
If Instant MyMedia does not start, or does not work properly, the problems may be solved by
returning the notebook to the status when purchased by means of performing an Instant
MyMedia recovery.
• Use of the recovery of Instant MyMedia enables the setting of current channels
to be deleted.
• To recover Instant MyMedia, you will need to use the Restore DVD and the
Instant MyMedia recovery disc.
Execute the recovery of Instant MyMedia
1. Turn off your notebook and locate the [F12] key on the keyboard. Be ready to press this
key immediately after you turn on the notebook.
2. Press the power button and press the [F12] key as soon as the Fujitsu logo appears. The
Boot Menu will appear.
If you don’t press the [F12] at the proper time, Windows will start. Turn off the
notebook, and proceed again from step 1.
3. Insert the Restore DVD in your drive. Wait approximately 10 seconds so the disc can be
identified, then proceed to the next step.
4. Press the cursor down key to select “CD-ROM drive” and press the [Enter] key.
If the recovery menu is not displayed, eject the disc to check that a proper disc is
installed. After checking, press the [Delete] key while pressing the [Ctrl] key and
the [Alt] key to restart the notebook.
5. Using the cursor keys, select “Restore the Instant MyMedia” and press the [Enter] key.
If you select “Restore Hard Disk to Original State” or “Delete All Data on the Hard
Disk,” the data saved in the notebook will be erased. If you mistakenly select these,
press the [N] on the following screen to stop the recovery.
6. Following the instruction in the screen, eject the Restore DVD and insert the Instant
MyMedia Restore disc.
7. Press the [Y] key. A message showing “Restore is in process” is displayed, and your notebook will start copying files.
8. When restore is complete, a message appears prompting you to remove the Restore disc.
Remove the disc and press the [Y] key. The system will reboot.
39
Page 42

SPECIFICATIONS
Tuner Specifications
Item Specifications
Monitor 17” WXGA+
Sound Function Built-in stereo speakers plus subwoofer
Remote Control* Infrared system, with IR port built into front of notebook.
TV Tuner** VHF channels 2-13/A-5 - W+28
UHF channels 14-69/W+29 - W+28
CATV channels
Audio Output Stereo, US voice multiplex output support
Interface Headphones 3.5mm stereo, mini-jack (output 1 mW or more, load
impedance 32 Ohm)
Antenna Input Mini-jack (RF adapter cable included), 75 ohm
Video Input S-Video(4 pins) x 1 and Composite Video x 1
NTSC 525line/60 Hz
Audio Input Left (white)/Right (red) RCA-type x 1 each, max 1 Vrms
Encoder Video compression method: MPEG2
Bit rate: 2/4/6/8 Mbps selectable.
Resolution 720 x 480
Audio compression method: MPEG-Audio Layer 2
Bit rate: Stereo 224 kbps required
Resolution: 16 bit
Sampling rate: 48 kHz required (32/44.1k)
Power +5.0V, +5%
* BS/CS broadcasting channels cannot be received.
** See table on next page for remote control specifications.
40
Page 43

Remote Control Specifications
Remote Control Feature Specifications
Communications Scheme Infrared rays
Effective Distance/location (see figure below)
o
30
3 m
3 m
IR Receiver
30
o
o
30
Battery AA dry battery x 2
Battery Life Approximately 6 months (when using dry manganese batteries)
TECHNICAL SUPPORT
Fujitsu Computer Systems Contact Information
If you have problems you are unable to resolve, consult your support representative at:
• 1-800-8FUJITSU (1-800-838-5487)
• E-mail: 8fujitsu@us.fujitsu.com
• Web Site: http://www.computers.us.fujitsu.com/support
41
Page 44

42
Page 45

Index
A
Adjusting the display quality . . . . . . . . . . . . . . . . . . . . . . . . . . . . . . . . . . . . . . . . . 30
Adjusting the Display Setting . . . . . . . . . . . . . . . . . . . . . . . . . . . . . . . . . . . . . . . . . 34
Adjusting the Volume . . . . . . . . . . . . . . . . . . . . . . . . . . . . . . . . . . . . . . . . . . . . . . 19
Adjusting the volume . . . . . . . . . . . . . . . . . . . . . . . . . . . . . . . . . . . . . . . . . . . . . . . 28
Air Vents . . . . . . . . . . . . . . . . . . . . . . . . . . . . . . . . . . . . . . . . . . . . . . . . . . . . . . . . . 9
Antenna Cable Adapter . . . . . . . . . . . . . . . . . . . . . . . . . . . . . . . . . . . . . . . . . . . . . . 6
Antenna Mini-Jack . . . . . . . . . . . . . . . . . . . . . . . . . . . . . . . . . . . . . . . . . . . . . . . . . . 9
Audio Input Jacks . . . . . . . . . . . . . . . . . . . . . . . . . . . . . . . . . . . . . . . . . . . . . . . . . . . 8
B
Back button . . . . . . . . . . . . . . . . . . . . . . . . . . . . . . . . . . . . . . . . . . . . . . . . . . . . . . . 7
Batteries . . . . . . . . . . . . . . . . . . . . . . . . . . . . . . . . . . . . . . . . . . . . . . . . . . . . . . . . . . 6
Bookmarks . . . . . . . . . . . . . . . . . . . . . . . . . . . . . . . . . . . . . . . . . . . . . . . . . . . . . . . 30
C
Changing a language used in audio and captions . . . . . . . . . . . . . . . . . . . . . . . . . . 29
Changing a password . . . . . . . . . . . . . . . . . . . . . . . . . . . . . . . . . . . . . . . . . . . . . . 33
Changing angles . . . . . . . . . . . . . . . . . . . . . . . . . . . . . . . . . . . . . . . . . . . . . . . . . . 27
Changing audio . . . . . . . . . . . . . . . . . . . . . . . . . . . . . . . . . . . . . . . . . . . . . . . . . . . 27
Changing Audio Mode . . . . . . . . . . . . . . . . . . . . . . . . . . . . . . . . . . . . . . . . . . . . . 19
Changing captions . . . . . . . . . . . . . . . . . . . . . . . . . . . . . . . . . . . . . . . . . . . . . . . . . 27
Changing display types . . . . . . . . . . . . . . . . . . . . . . . . . . . . . . . . . . . . . . . . . . . . . 34
Changing the parental lock setting . . . . . . . . . . . . . . . . . . . . . . . . . . . . . . . . . . . . . 31
Changing the play settings for DVDs . . . . . . . . . . . . . . . . . . . . . . . . . . . . . . . . . . . 29
Changing the region code . . . . . . . . . . . . . . . . . . . . . . . . . . . . . . . . . . . . . . . . . . . 29
Changing the screen setting . . . . . . . . . . . . . . . . . . . . . . . . . . . . . . . . . . . . . . . . . . 28
Changing the setting to Karaoke . . . . . . . . . . . . . . . . . . . . . . . . . . . . . . . . . . . . . . 30
Channel button . . . . . . . . . . . . . . . . . . . . . . . . . . . . . . . . . . . . . . . . . . . . . . . . . . . . 7
Composite Video Cable Connection . . . . . . . . . . . . . . . . . . . . . . . . . . . . . . . . . . . . 15
Connecting an Antenna . . . . . . . . . . . . . . . . . . . . . . . . . . . . . . . . . . . . . . . . . . . . . 13
Connecting an External Audio Device . . . . . . . . . . . . . . . . . . . . . . . . . . . . . . . . . . 14
Connecting an External Video Device . . . . . . . . . . . . . . . . . . . . . . . . . . . . . . . . . . 15
Copying from an External Device to DVD . . . . . . . . . . . . . . . . . . . . . . . . . . . . . . . 20
D
DC In Jack . . . . . . . . . . . . . . . . . . . . . . . . . . . . . . . . . . . . . . . . . . . . . . . . . . . . . . . . 9
Discs . . . . . . . . . . . . . . . . . . . . . . . . . . . . . . . . . . . . . . . . . . . . . . . . . . . . . . . . . . . 21
Display quality . . . . . . . . . . . . . . . . . . . . . . . . . . . . . . . . . . . . . . . . . . . . . . . . . . . . 30
Display types . . . . . . . . . . . . . . . . . . . . . . . . . . . . . . . . . . . . . . . . . . . . . . . . . . . . . 34
DVD/CD button . . . . . . . . . . . . . . . . . . . . . . . . . . . . . . . . . . . . . . . . . . . . . . . . . . . 7
43
Page 46

F
Fast-forward/Rewind . . . . . . . . . . . . . . . . . . . . . . . . . . . . . . . . . . . . . . . . . . . . . . . 27
Full format . . . . . . . . . . . . . . . . . . . . . . . . . . . . . . . . . . . . . . . . . . . . . . . . . . . . . . . 22
H
Headphone Jack . . . . . . . . . . . . . . . . . . . . . . . . . . . . . . . . . . . . . . . . . . . . . . . . . . . 8
I
Initializing a DVD disc . . . . . . . . . . . . . . . . . . . . . . . . . . . . . . . . . . . . . . . . . . . . . . 22
Instant MyMedia
Exiting . . . . . . . . . . . . . . . . . . . . . . . . . . . . . . . . . . . . . . . . . . . . . . . . . . . . . . 18
Setting up . . . . . . . . . . . . . . . . . . . . . . . . . . . . . . . . . . . . . . . . . . . . . . . . . . . 16
Setting up Channels . . . . . . . . . . . . . . . . . . . . . . . . . . . . . . . . . . . . . . . . . . 17
Skipping Channels . . . . . . . . . . . . . . . . . . . . . . . . . . . . . . . . . . . . . . . . . . . . 17
Starting with one button . . . . . . . . . . . . . . . . . . . . . . . . . . . . . . . . . . . . . . 18
Starting/closing . . . . . . . . . . . . . . . . . . . . . . . . . . . . . . . . . . . . . . . . . . . . . . 18
Instant MyMedia Disc . . . . . . . . . . . . . . . . . . . . . . . . . . . . . . . . . . . . . . . . . . . . . . . 6
Introducing the TV Tuner . . . . . . . . . . . . . . . . . . . . . . . . . . . . . . . . . . . . . . . . . . . . 6
K
Karoake . . . . . . . . . . . . . . . . . . . . . . . . . . . . . . . . . . . . . . . . . . . . . . . . . . . . . . . . . 30
M
Media Tray Eject Button . . . . . . . . . . . . . . . . . . . . . . . . . . . . . . . . . . . . . . . . . . . . . 9
Muting the Volume . . . . . . . . . . . . . . . . . . . . . . . . . . . . . . . . . . . . . . . . . . . . . . . . 19
N
Next button . . . . . . . . . . . . . . . . . . . . . . . . . . . . . . . . . . . . . . . . . . . . . . . . . . . . . . . 7
O
Optical Drive . . . . . . . . . . . . . . . . . . . . . . . . . . . . . . . . . . . . . . . . . . . . . . . . . . . . . . 9
P
Parental Control . . . . . . . . . . . . . . . . . . . . . . . . . . . . . . . . . . . . . . . . . . . . . . . . . . 31
Passwords . . . . . . . . . . . . . . . . . . . . . . . . . . . . . . . . . . . . . . . . . . . . . . . . . . . . . . . 33
Pause . . . . . . . . . . . . . . . . . . . . . . . . . . . . . . . . . . . . . . . . . . . . . . . . . . . . . . . . . . 26
Play/Pause button . . . . . . . . . . . . . . . . . . . . . . . . . . . . . . . . . . . . . . . . . . . . . . . . . . 7
Playing CD/DVDs . . . . . . . . . . . . . . . . . . . . . . . . . . . . . . . . . . . . . . . . . . . . . . . . . 25
Playing TV programs or videos recorded on other DVD recorders . . . . . . . . . . . . . 28
Playing TV programs or videos recorded on the notebook . . . . . . . . . . . . . . . . . . . 23
Playing TV programs recorded by Instant MyMedia . . . . . . . . . . . . . . . . . . . . . . . 28
Power/Suspend/Resume button . . . . . . . . . . . . . . . . . . . . . . . . . . . . . . . . . . . . . . . 8
Q
Quick Format . . . . . . . . . . . . . . . . . . . . . . . . . . . . . . . . . . . . . . . . . . . . . . . . . . . . 22
44
Page 47

R
Recording TV programs . . . . . . . . . . . . . . . . . . . . . . . . . . . . . . . . . . . . . . . . . . . . . 23
Recording TV Programs on a DVD . . . . . . . . . . . . . . . . . . . . . . . . . . . . . . . . . . . . . 21
Recovery of Instant MyMedia . . . . . . . . . . . . . . . . . . . . . . . . . . . . . . . . . . . . . . . . 39
Region code . . . . . . . . . . . . . . . . . . . . . . . . . . . . . . . . . . . . . . . . . . . . . . . . . . . . . 29
Remote Control . . . . . . . . . . . . . . . . . . . . . . . . . . . . . . . . . . . . . . . . . . . . . . . . . . . . 6
Angle . . . . . . . . . . . . . . . . . . . . . . . . . . . . . . . . . . . . . . . . . . . . . . . . . . . . . . 13
Audio Switch . . . . . . . . . . . . . . . . . . . . . . . . . . . . . . . . . . . . . . . . . . . . . . . . 11
Back . . . . . . . . . . . . . . . . . . . . . . . . . . . . . . . . . . . . . . . . . . . . . . . . . . . . . . . 11
Browse . . . . . . . . . . . . . . . . . . . . . . . . . . . . . . . . . . . . . . . . . . . . . . . . . . . . . 11
Channel Down . . . . . . . . . . . . . . . . . . . . . . . . . . . . . . . . . . . . . . . . . . . . . . . 13
Channel Up . . . . . . . . . . . . . . . . . . . . . . . . . . . . . . . . . . . . . . . . . . . . . . . . . 12
Cursor Move . . . . . . . . . . . . . . . . . . . . . . . . . . . . . . . . . . . . . . . . . . . . . . . . 11
Display . . . . . . . . . . . . . . . . . . . . . . . . . . . . . . . . . . . . . . . . . . . . . . . . . . . . . 12
DVD . . . . . . . . . . . . . . . . . . . . . . . . . . . . . . . . . . . . . . . . . . . . . . . . . . . . . . . 12
Enter . . . . . . . . . . . . . . . . . . . . . . . . . . . . . . . . . . . . . . . . . . . . . . . . . . . . . . . 12
Fast Forward . . . . . . . . . . . . . . . . . . . . . . . . . . . . . . . . . . . . . . . . . . . . . . . . 12
Fast Rewind . . . . . . . . . . . . . . . . . . . . . . . . . . . . . . . . . . . . . . . . . . . . . . . . . 11
List . . . . . . . . . . . . . . . . . . . . . . . . . . . . . . . . . . . . . . . . . . . . . . . . . . . . . . . . . 12
Live . . . . . . . . . . . . . . . . . . . . . . . . . . . . . . . . . . . . . . . . . . . . . . . . . . . . . . . . 11
Menu . . . . . . . . . . . . . . . . . . . . . . . . . . . . . . . . . . . . . . . . . . . . . . . . . . . . . . 12
Mute . . . . . . . . . . . . . . . . . . . . . . . . . . . . . . . . . . . . . . . . . . . . . . . . . . . . . . . 12
MyMedia . . . . . . . . . . . . . . . . . . . . . . . . . . . . . . . . . . . . . . . . . . . . . . . . . . . 10
Next . . . . . . . . . . . . . . . . . . . . . . . . . . . . . . . . . . . . . . . . . . . . . . . . . . . . . . . 12
Numeric Pad . . . . . . . . . . . . . . . . . . . . . . . . . . . . . . . . . . . . . . . . . . . . . . . . 11
Play/Pause . . . . . . . . . . . . . . . . . . . . . . . . . . . . . . . . . . . . . . . . . . . . . . . . . . 11
Power . . . . . . . . . . . . . . . . . . . . . . . . . . . . . . . . . . . . . . . . . . . . . . . . . . . . . . 10
Record . . . . . . . . . . . . . . . . . . . . . . . . . . . . . . . . . . . . . . . . . . . . . . . . . . . . . 11
Return . . . . . . . . . . . . . . . . . . . . . . . . . . . . . . . . . . . . . . . . . . . . . . . . . . . . . . 12
Screen . . . . . . . . . . . . . . . . . . . . . . . . . . . . . . . . . . . . . . . . . . . . . . . . . . . . . . 12
Stop/Eject . . . . . . . . . . . . . . . . . . . . . . . . . . . . . . . . . . . . . . . . . . . . . . . . . . . 11
Subtitle . . . . . . . . . . . . . . . . . . . . . . . . . . . . . . . . . . . . . . . . . . . . . . . . . . . . . 13
TS . . . . . . . . . . . . . . . . . . . . . . . . . . . . . . . . . . . . . . . . . . . . . . . . . . . . . . . . . 11
TV . . . . . . . . . . . . . . . . . . . . . . . . . . . . . . . . . . . . . . . . . . . . . . . . . . . . . . . . . 12
TV/Video . . . . . . . . . . . . . . . . . . . . . . . . . . . . . . . . . . . . . . . . . . . . . . . . . . . 12
Volume Down . . . . . . . . . . . . . . . . . . . . . . . . . . . . . . . . . . . . . . . . . . . . . . . 12
Volume Up . . . . . . . . . . . . . . . . . . . . . . . . . . . . . . . . . . . . . . . . . . . . . . . . . . 11
Remote Control Features . . . . . . . . . . . . . . . . . . . . . . . . . . . . . . . . . . . . . . . . . . . . 10
Remote Control IR Port . . . . . . . . . . . . . . . . . . . . . . . . . . . . . . . . . . . . . . . . . . . . . . 8
S
Selecting Channels . . . . . . . . . . . . . . . . . . . . . . . . . . . . . . . . . . . . . . . . . . . . . . . . . 19
45
Page 48

Setting the play start position . . . . . . . . . . . . . . . . . . . . . . . . . . . . . . . . . . . . . . . . 29
Setting the recording mode . . . . . . . . . . . . . . . . . . . . . . . . . . . . . . . . . . . . . . . . . . 22
Setting the Timer . . . . . . . . . . . . . . . . . . . . . . . . . . . . . . . . . . . . . . . . . . . . . . . . . . 34
Specifications . . . . . . . . . . . . . . . . . . . . . . . . . . . . . . . . . . . . . . . . . . . . . . . . . . . . . 40
Stereo Speakers . . . . . . . . . . . . . . . . . . . . . . . . . . . . . . . . . . . . . . . . . . . . . . . . . . . . 8
Stop/Eject . . . . . . . . . . . . . . . . . . . . . . . . . . . . . . . . . . . . . . . . . . . . . . . . . . . . . . . 27
S-Video Cable Connection . . . . . . . . . . . . . . . . . . . . . . . . . . . . . . . . . . . . . . . . . . . 15
S-Video Input Port . . . . . . . . . . . . . . . . . . . . . . . . . . . . . . . . . . . . . . . . . . . . . . . . . . 9
Switching to TV Mode . . . . . . . . . . . . . . . . . . . . . . . . . . . . . . . . . . . . . . . . . . . . . . 19
T
Timer . . . . . . . . . . . . . . . . . . . . . . . . . . . . . . . . . . . . . . . . . . . . . . . . . . . . . . . . . . . 34
Transfer of Chapter . . . . . . . . . . . . . . . . . . . . . . . . . . . . . . . . . . . . . . . . . . . . . . . . 27
Troubleshooting
Audio does not come on, or doesn’t sound right . . . . . . . . . . . . . . . . . . 37
Certain procedures don’t work properly . . . . . . . . . . . . . . . . . . . . . . . . . 37
Recording can’t be performed . . . . . . . . . . . . . . . . . . . . . . . . . . . . . . . . . . 38
The screen does not appear . . . . . . . . . . . . . . . . . . . . . . . . . . . . . . . . . . . . 36
The screen image is distorted . . . . . . . . . . . . . . . . . . . . . . . . . . . . . . . . . . 36
Troubleshooting and Recovery . . . . . . . . . . . . . . . . . . . . . . . . . . . . . . . . . . . . . . . 36
TV button . . . . . . . . . . . . . . . . . . . . . . . . . . . . . . . . . . . . . . . . . . . . . . . . . . . . . . . . 7
TV Tuner Applications . . . . . . . . . . . . . . . . . . . . . . . . . . . . . . . . . . . . . . . . . . . . . . . 5
Instant MyMedia . . . . . . . . . . . . . . . . . . . . . . . . . . . . . . . . . . . . . . . . . . . . . . 5
TV Tuner Applications Disc . . . . . . . . . . . . . . . . . . . . . . . . . . . . . . . . . . . . . . . . . . . 6
TV Tuner Features . . . . . . . . . . . . . . . . . . . . . . . . . . . . . . . . . . . . . . . . . . . . . . . . . . 7
Rear Panel Features . . . . . . . . . . . . . . . . . . . . . . . . . . . . . . . . . . . . . . . . . . . . 9
Right Side Features . . . . . . . . . . . . . . . . . . . . . . . . . . . . . . . . . . . . . . . . . . . . 9
Top/Front Features . . . . . . . . . . . . . . . . . . . . . . . . . . . . . . . . . . . . . . . . . . . . 7
TV Tuner Getting Started Guide . . . . . . . . . . . . . . . . . . . . . . . . . . . . . . . . . . . . . . . 6
U
Usable Disc Formats . . . . . . . . . . . . . . . . . . . . . . . . . . . . . . . . . . . . . . . . . . . . . . . 21
Using bookmarks . . . . . . . . . . . . . . . . . . . . . . . . . . . . . . . . . . . . . . . . . . . . . . . . . . 30
Using the DVD menu . . . . . . . . . . . . . . . . . . . . . . . . . . . . . . . . . . . . . . . . . . . . . . 28
V
Video Input Jack (Composite) . . . . . . . . . . . . . . . . . . . . . . . . . . . . . . . . . . . . . . . . . 8
Volume Control button . . . . . . . . . . . . . . . . . . . . . . . . . . . . . . . . . . . . . . . . . . . . . . 8
W
Watching Recorded TV Programs or Videos . . . . . . . . . . . . . . . . . . . . . . . . . . . . . 23
Watching Television . . . . . . . . . . . . . . . . . . . . . . . . . . . . . . . . . . . . . . . . . . . . . . . 19
Watching TV and External Video without Booting Up . . . . . . . . . . . . . . . . . . . . . . 19
Watching Video from External Devices . . . . . . . . . . . . . . . . . . . . . . . . . . . . . . . . . 20
46
 Loading...