

Page 1

Getting Started
Get Started with your
®
LifeBook
This guide will lead you through the start-up process for your new LifeBook notebook and will also provide
some valuable tips. To learn about all the exciting features that your new LifeBook notebook has to offer,
please see the User’s Guide that can be accessed after completing the start-up procedure.
P3010 Notebook
Page 2
This convenient guide will lead you through the start-up
process and will also offer some valuable tips.
What’s in the Box
Check to see that all of the following items are in the box:
o LifeBook notebook
o Preinstalled Lithium ion battery
o AC adapter with power cord
o Drivers and Applications disc
o International Limited Warranty document
Depending upon your configuration, the following items may also be shipped with your notebook:
o Additional Lithium ion battery
o Microsof t Applications disc
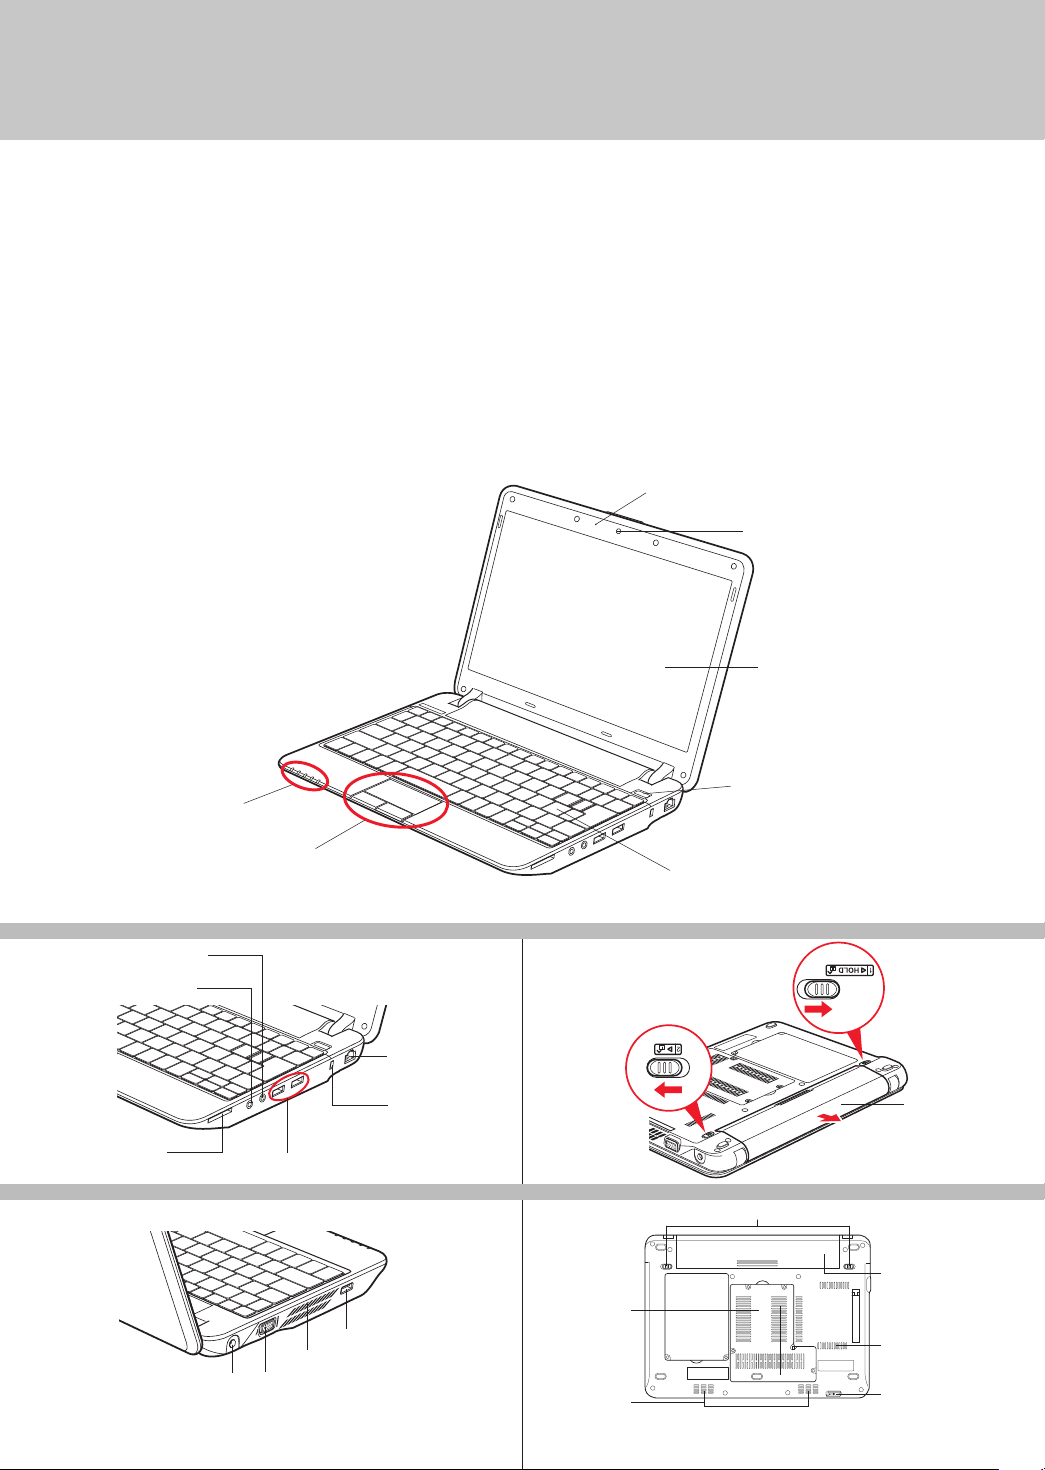
Controls, Connectors,
Built-In Microphone
and Access Points
Status Indicator Panel
Touchpad Pointing Device
Keyboard
RIGHT PANEL BACK PANEL
Microphone Jack
Headphone Jack
LAN (RJ-45) Jack
1.3 Megapixel Web Camera
Display Panel
Power/Suspend/Resume Button
Secure Digital/Memory
Stick Card Slot
LEFT PANEL
DC Power Jack External Video Port
2
USB 2.0 Ports
Air Vents
Anti-Theft Lock Slot
USB 2.0 Port
BOTTOM PANEL
Memory Upgrade
Compartment
Stereo Speakers
Battery
Battery Latches
Lithium ion
Battery
Air Vents
(various locations)
Wireless LAN/
Bluetooth Switch
Page 3
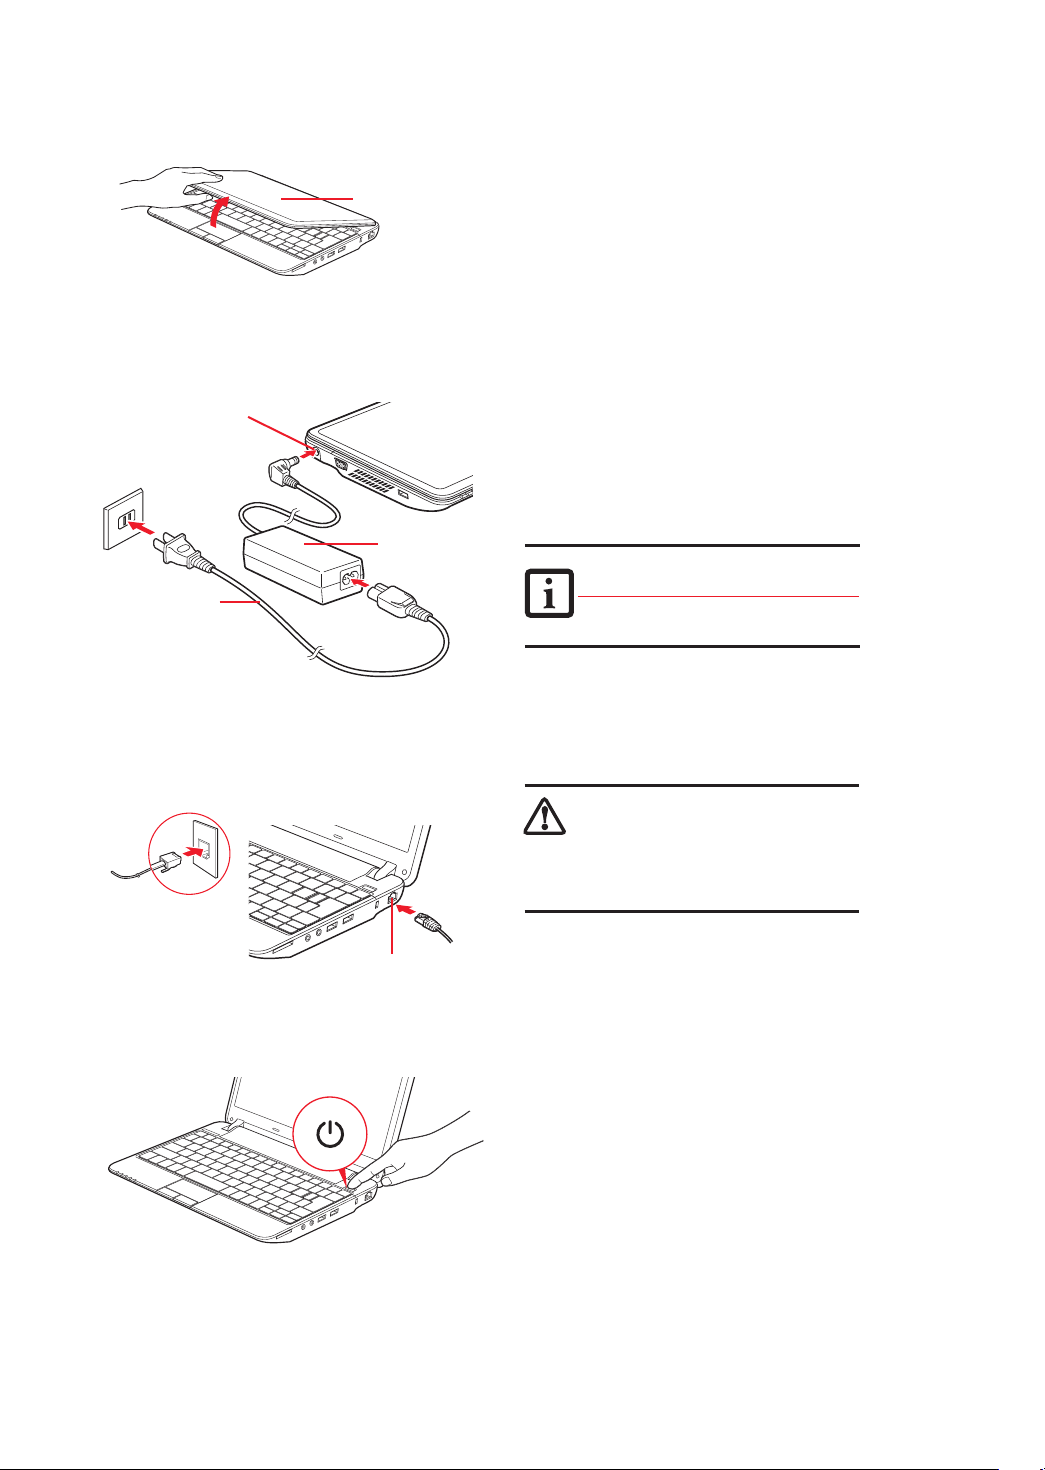
Initial Start Up
DC Power Jack
AC Cable
Display Cover
AC Adapter
1. Open the Display Panel
• Ensure that your LifeBook is on a hard level surface and that
the air vents are not blocked.
• Lift the display, being careful not to touch the screen.
• Adjust the display until it is at a comfortable viewing angle.
2. Connect AC Power
• Plug the AC adapter into your notebook.
• Plug the power cord into the AC adapter.
• Connect the power cord to an electrical outlet.
3. Connect to Internet or Network
• Connect an Ethernet cable (not included) to the LAN jack on
your notebook and to a wall jack or to an Ethernet router.
Important:
During the setup procedure, do not disconnect the power supply,
press any buttons, or use any peripheral devices such as a
remote control.
• You should not attach any external devices and do not put a
DVD/CD in your drive until you have gone through the initial
power on sequence.
4. Booting the System
The Lit hium io n battery is not c harge d upon pu rchase.
Initia lly you will need to c onnec t eithe r the AC adapter
or the Auto/Air line ad apter to use yo ur noteb ook.
Be caref ul when y ou selec t the lan guage.
The onl y way to chan ge the la nguag e
is to do a recovery pr ocess.
LAN or Modem Jack
Connecting a LAN Plug
Power/Suspend/
Resume Button
• Press the Power/Suspend/ Resume but ton (above the
keyboard) to turn on the notebook. When you do this for
the first time, it will display a Fujitsu logo on the screen.
If you do nothing, the system will load the operating
system, and then the Windows Welcome will begin.
DO NOT SHU T DOWN YOUR SYST EM BEFOR E THE
FIRST BOOT IS COMPLETED.
If the sys tem is shu t down befo re the firs t boot is
comple ted and Mi crosof t® Window s® is setup,
there is t he risk that the system will n ot succe ssfull y
boot the n ext tim e you powe r up your notebook.
If this oc curs, you will nee d to use the re store dis c
to recover your syste m
5. Register
•
After the operating system has initialized, the Windows
Welcome screen will appear. Accept the Microsoft
®
Windows
Licensing Agreement and the Fujitsu End
®
User License Agreement to proceed.
• Follow the on-screen directions as prompted. Accepting
the automatic update feature is recommended.
• If connected, you will be able to automatically access the
Internet. If not and plan to register at a later time, click
the Skip button.
• Once connected to the Internet, select Yes to continue
registration,
complete requested information, and click
Next to complete registration.
• Register your notebook with Fujitsu by going to our website
at: us.fujitsu.com/computers. Ensure you are connected
to the Internet.
6. Registering Your LifeBook notebook
• Register your notebook with Fujitsu Service and Support via
our website at us.fujitsu.com/computers.
• You will need to be set up with an Internet Service Provider
(ISP) to register online.
3
Page 4

7.
Activate Additional Utilities & Drivers
• Check to be sure the WL AN switch is on.
• The fi rst time you boot up your system, you will see an icon
called Click Me! in the Start menu. We highly recommend
that you install ClickMe! the fi rst time you boot up.
•
When you click the Click Me! icon, your system will automatically
create the related icons in the system tray in the bottom right
of the screen. These icons provide links to utilities that you
will frequently access.
8. Install Additional Software
• Close any open programs, applications or utilities.
• Insert software application disc into media drive.
• Open the application folder, select the set-up icon,
and load desired software.
• Restart your computer.
9. Refer to the Recovery Manual for
details on making a copy of your
factory image.
10. Access your User’s Guide
• To take advantage of all the features of your new Fujitsu
LifeBook notebook, it is highly recommended that you read
your electronic User’s Guide. It contains important detailed
information about your new computer. You can access your
User’s Guide by selecting its icon from the screen desktop.
(For
Addition al
Utilitie s)
CLICK ME
“Click Me! ”
Wireless LAN/
Bluetooth Switch
Quick Tips
Optimizing Batter y Life
• To conserve batter y life, press
the Fn+Fll keys. To restore the
original power settings, simply
press the Fnt+Fll keys again.
Adjusting display brightness
• Fn + F6 to decrease brightness
• Fn + F7 to increase brightness
Adjusting volume
• Fn + F8 to decrease volume
• Fn + F9 to increase volume
Common Indicators
Status Indicators
Power Indicator
Located on the power button, this indicator
shows whether your system is operational.
When it is solid blue, it mea ns that there
is power to your computer and that it is
ready for use.
Battery Charge /DC-In Indicator
Depending upon whether you have an
AC adapter connected or not, the
batter y indicator will appear in a
variet y of colors and states.
AC Adapter connected
• Solid blue: Charge complete
• Solid orange: Charging in proce ss
• Purple, blinking: Battery malfunction
No AC Adapter connected
• Orange, blink ing: Batter y is charged
12% or less.
• Purple, blinking: Battery malfunction
• Off: Battery charge between 13%
and 100%
– Battery completed discharged
– No batter y installed
Hard Drive Access Indicator
Lights green when your internal hard
drive is being accessed.
CapsLock Indicator
Shows that your keyboard is set to
type in all capital let ters.
NumLk Indicator
Shows that the integral keyboard is set
4
in ten-key numeric keypad mode.
Page 5

SAVE THESE INSTRUCTIONS
IMPORTANT SA FETY I NSTRUCT IONS
This unit requires an AC adapter to operate. Use only UL Listed I.T.E. Class II Adapters with an output rating of 19 VDC,
with a minimum current of 3.16 A (60 W).
AC adapter output polarity:
When using your notebook equipment, basic safety precautions should always be followed to reduce the risk of fire, electric
shock and injury to persons, including the following:
• CAUTION - HOT SURFACE: The bot tom of this notebook computer can become hot when used for long
periods of time. When using this notebook, take caution to limit long term or continuous use while
resting it on exposed skin, such as the lap.
Warning
DANGER OF EXPLOSION IF LITHIUM ( CLOCK) BATTERY IS INCORRECTLY REPLACED. REPLACE ONLY
WITH THE SAME OR EQUIVALENT TYPE RECOMMENDED BY THE MANUFACTURER. DISPOSE OF
USED BATTERIES ACCORDING TO THE MANUFACTURER’S INSTRUCTION.
FOR CONTINUED PROTECTION AGAINST RISK OF FIRE, REPLACE ONLY WITH THE SAME TYPE
Caution
AND RATING FUSE.
• Do not use this product near water, for example, near a bathtub, washbowl, kitchen sink or laundry tub,
in a wet basement or near a swimming pool.
• Avoid using a modem during an electrical storm. There may be a remote risk of electric shock from lightning.
• Use only the power cord and batteries indicated in this manual. Do not dispose of batteries in a fire.
They may explode. Check with local codes for possible special disposal instructions.
• To reduce the risk of re, use only No. 26 AWG or larger UL Listed or CSA Certied Telecommunication
Line Cord.
• For TV tuner use: To protect from overvoltages and transients on the Cable Distribution System, make
sure that the outer shield of the coaxial cable is connected to earth (grounded ) at the building premise
as close to the point of cable entrance as practicable, as required per NEC Article 820.93, ANSI/ NFPA
70: 2005. If you have questions about your CATV installation, contact your ser vice provider.
For Authorized Repair Technicians Only
Recycling your Battery
Over time, the batteries that run your mobile computer will begin to hold a charge for a shorter amount of
time; this is a natural occurrence for all batteries. When this occurs, you may want to replace the bat tery
with a fresh one*. If you replace it, it is important that you dispose of the old battery properly because
batteries contain materials that could cause environmental damage if disposed of improperly
Fujitsu is very concerned with environmental protection, and has enlisted the ser vices of the Rechargeable
Battery Recycling Corporation (RBRC )**, a non-prot public service organization dedicated to protecting
our environment by recycling old batteries at no cost to you.
RBRC has drop-off points at tens of thousands of locations throughout the United States and Canada.
To nd the location nearest you, go to www.RBRC.org or call 1-800-822-8837.
If there are no convenient RBRC locations near you, you can also go to the EIA Consumer Education Initiative
website (http://EIAE.org/) and search for a convenient disposal location.
Remember – protecting the environment is a cooperative ef fort, and you should make ever y effort to protect it
for current and future generations.
* To order a new batter y for your Fujitsu mobile computer, go to the Fujitsu shopping site at www.shopfujitsu.com
in the US or www.fujitsu.ca/products/notebooks in Canada.
** RBRC is an independent third par ty to which Fujitsu provides funding for bat tery recycling; RBRC is in no way
affiliated with Fujitsu.
5
Page 6

Notes:
6
Page 7

Notes:
7
Page 8

Popular Accessories
Memory Modules
• 2 GB DDR2 800 MHz SO-DIMM
Additional Lithium ion Batteries
• Standard Main Batter y
Auto/airline Adapter
Additional AC Adapter
Battery Charger
USB Optical Drive
Carrying Cases
• P Series Slip Case
• Duo Travel Bag
• Protege Case
• Director Leather Case
• Diplomat Nylon Case
Notebook Lock
USB Optical Mouse
Record your notebook serial number here:
Serial #___ ___ ___ ___ ___ ___ ____
(see bottom of computer)
Have questions or need help?
• Visit our website at us.fujitsu.com/computers
• Call us anytime at 1.800.8FUJITSU
• Email us at 8fujitsu@us.fujitsu.com
Want more information on Fujitsu products?
• Visit our website at www.shopfujitsu.com
• Call us anytime at 1.800.FUJITSU
Fujitsu extended service plans available.
Visit us.fujitsu.com/computers
to purchase any of these accessories
or to get more information.
Fujitsu Americ a, Inc.
1250 E. Arques Avenue
Sunnyvale, CA 94085
Fujit su, the Fujit su logo, and Li feBoo k are reg iste red tr adema rks of Fujit su Limi ted.
Micro sof t, Wind ows an d Genui ne Windows V ista a re trademar ks or regist ered
trademar ks of Mic rosoft Cor poration in the United S tate s and /or other cou ntries.
All ot her tr adema rks mentio ned he rein ar e the pro perty of t heir re spec tive
owner s. Product de scri ption data re presents F ujit su des ign obj ecti ves and
is prov ided fo r comp arat ive purpos es; ac tual resul ts may v ary b ased o n a
vari ety of f actors. Spec ification s are su bject t o chan ge wit hout notic e.
©2009 Fu jits u America, Inc. All r ight s reserved.
8
 Loading...