

Page 1
PART NO.9374343072-04
Duct Type
9374343072-04_OM.indb 19374343072-04_OM.indb 1 9/2/2010 2:58:42 PM9/2/2010 2:58:42 PM
Page 2
En-1
CONTENTS
SAFETY PRECAUTIONS ........................................ 1
FEATURES AND FUNCTIONS ............................... 2
NAME OF PARTS ................................................... 3
PREPARATORY OPERATION .................................4
OPERATION ........................................................... 5
TIMER FUNCTIONS ............................................... 7
ON/OFF TIMER ........................................................ 7
SAFETY PRECAUTIONS
Do not attempt to install this air conditioner by yourself.
This unit contains no user-serviceable parts. Always consult authorized service person-
nel for repairs.
When moving, consult authorized service personnel for disconnection and installation
of the air conditioner.
Do not become excessively chilled by staying for many hours in the direct cooling
airflow.
Do not insert fi ngers or objects into the outlet port or intake grilles.
Do not start and stop air conditioner operation by turning off the electrical breaker and so on
.
In the event of a malfunction (burning smell, etc.), immediately stop operation, turn off
the electrical breaker, and consult authorized service personnel.
In the event of refrigerant leakage , be sure to keep away from fi re or any fl ammables
.
(consult an authorized service personnel)
Provide occasional ventilation during use.
Do not direct air fl ow at fi replaces or heating apparatus.
Do not climb on, or place objects on, the air conditioner.
Do not hang objects from the indoor unit.
Do not set fl ower vases or water containers on top of air conditioners.
Do not expose the air conditioner directly to water.
Do not operate the air conditioner with wet hands.
Do not touch the switches with sharp objects.
Turn off power source when not using the unit for extended periods.
Always turn off the electrical breaker whenever cleaning the air conditioner or changing the air fi lter
.
Connection valves become hot during Heating; handle with care.
Check the condition of the installation stand for damage.
Do not place animals or plants in the direct path of the air fl ow.
When restarting after a long period of disuse in the winter, turn the power switch on
at least 12 hours before starting the unit.
Do not drink the water drained from the air conditioner.
Do not use in applications involving the storage of foods, plants or animals, precision
equipment, or art works.
Do not apply any heavy pressure to radiator fi ns.
Operate only with air fi lters installed.
Do not block or cover the intake grille and outlet port.
Ensure that any electronic equipment is at least 40 in. (1m) away from either the indoor
or outdoor units.
Avoid installing the air conditioner near a fi replace or other heating apparatus.
When installing the indoor and outdoor units, take precautions to prevent access by infants
.
Do not use infl ammable gases near the air conditioner.
Install the drain hose so that it drains water properly.
This appliance is not intended for use by persons (including children) with reduced physical,
sensory or mental capabilities, or lack of experience and knowledge, unless they have been
given supervision or instruction concerning use of the appliance by a person responsible for
their safety. Children should be supervised to ensure that they do not play with the appliance.
Before using the appliance, read these “SAFETY PRECAUTIONS” thoroughly and operate in the correct way.
The instructions in this section all relate to safety; be sure to maintain safe operating conditions.
“DANGER”, “WARNING” and “CAUTION” have the following meanings in these instructions:
WEEKLY TIMER ....................................................... 8
TEMPERATURE SET BACK TIMER ...................... 10
ECONOMY OPERATION .......................................11
CLEANING AND CARE .........................................11
TROUBLESHOOTING .......................................... 12
OPERATING TIPS .................................................. 14
SELF-DIAGNOSIS ................................................. 16
DANGER!
This mark indicates procedures which, if improperly performed, are most likely to result
in the death or serious injury to the user or service personnel.
WARNING!
This mark indicates procedures which, if improperly performed, might lead to the death
or serious injury of the user or service personnel.
CAUTION!
This mark indicates procedures which, if improperly performed, might possibly result
in personal harm to the user, or damage to property.
DANGER!
CAUTION!
9374343072-04_OM.indb Sec1:19374343072-04_OM.indb Sec1:1 9/2/2010 2:58:58 PM9/2/2010 2:58:58 PM
Page 3
En-2
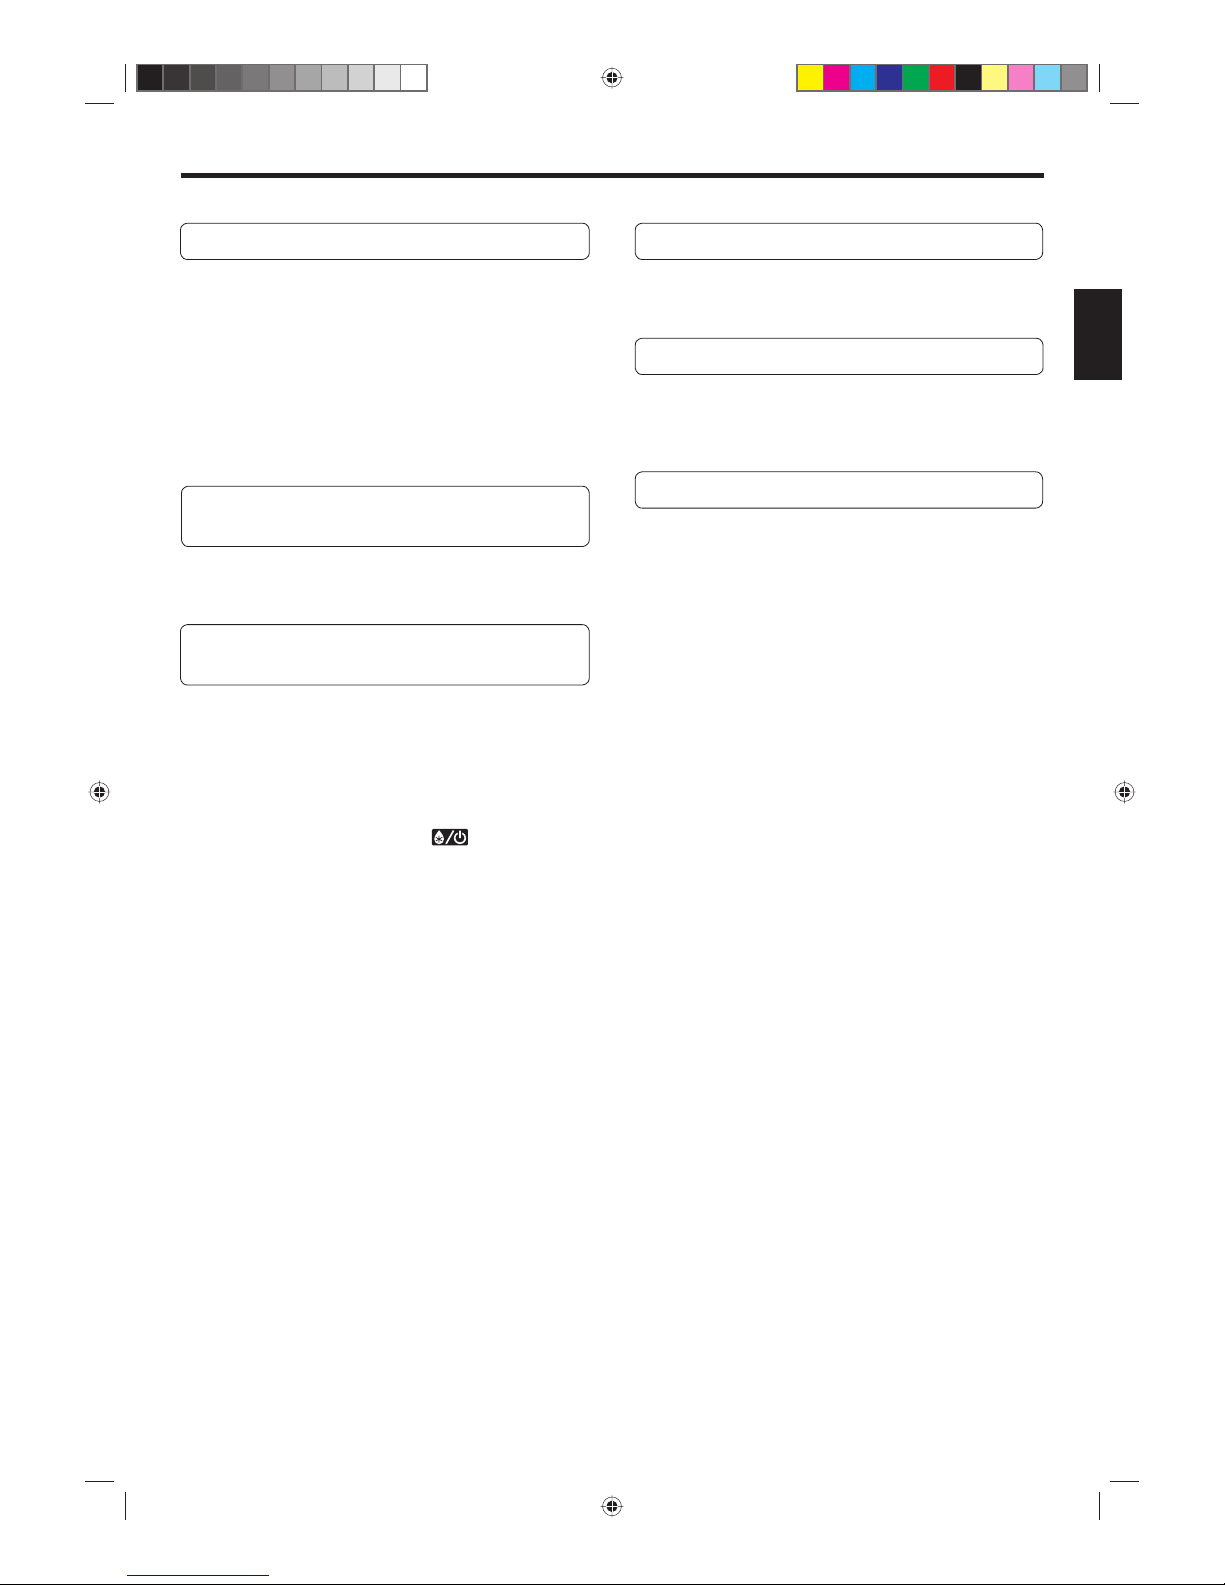
FEATURES AND FUNCTIONS
INVERTER
At the start of operation, large amount of power is used to
bring the room quickly to the desired temperature. Afterwards, the unit automatically switches to a low power setting
for economic and comfortable operation.
ECONOMY OPERATION
When ECONOMY operation mode is operated, the room
temperature will be little higher than the set-temp under
cooling mode and lower than set-temp under heating
mode. Therefore, the ECONOMY mode is able to save
more energy than other normal mode.
SUPER QUIET OPERATION
When the FAN button is used to select QUIET, the indoor
unit begins super-quiet operation; the indoor unit’s airfl ow
is reduced to produce quieter operation.
AUTO CHANGEOVER
The operation mode (cooling, dry, heating) is switched automatically
to maintain the set temperature, and the temperature is kept constant
at all times.
Convenient function
WEEKLY TIMER
Use this timer function to set operating times for each day
of the week. Use the DAY OFF setting to switch off timed
operation for a selected day in the coming week. Because
all days can be set together, the weekly timer can be used
to repeat the timer settings for all of the days.
TEMPERATURE SET BACK TIMER
Use this timer function to change the set temperature in
the operation times set for each day of the week. This can
be used together with other timer settings.
REMOVABLE AIR FILTER
The indoor unit’s air fi lter can be removed for easy cleaning
and maintenance.
MILDEW-RESISTANT FILTER
The AIR FILTER has been treated to resist mildew growth,thus
allowing cleaner use and easier care.
Remote controller
WIRED REMOTE CONTROLLER
The wired remote controller allows convenient control of
indoor unit operation.
WIRELESS REMOTE CONTROLLER (OPTION)
The optional wireless remote controller can be used.When you
use remote controller, there are following different points as
compared with using wired remote controller.
[ The additional function for wireless ones ]
• SLEEP
• TIMER
• MINIMUM HEAT
And you can use both wireless and wired remote controller
simultaneously. (But function is limited.)
[ The restricted functions for wired ones ]
• Weekly timer
• Temperature set back timer
Energy saving and
Comfortable function
Clean function
9374343072-04_OM.indb Sec1:29374343072-04_OM.indb Sec1:2 9/2/2010 2:58:59 PM9/2/2010 2:58:59 PM
Page 4
En-3
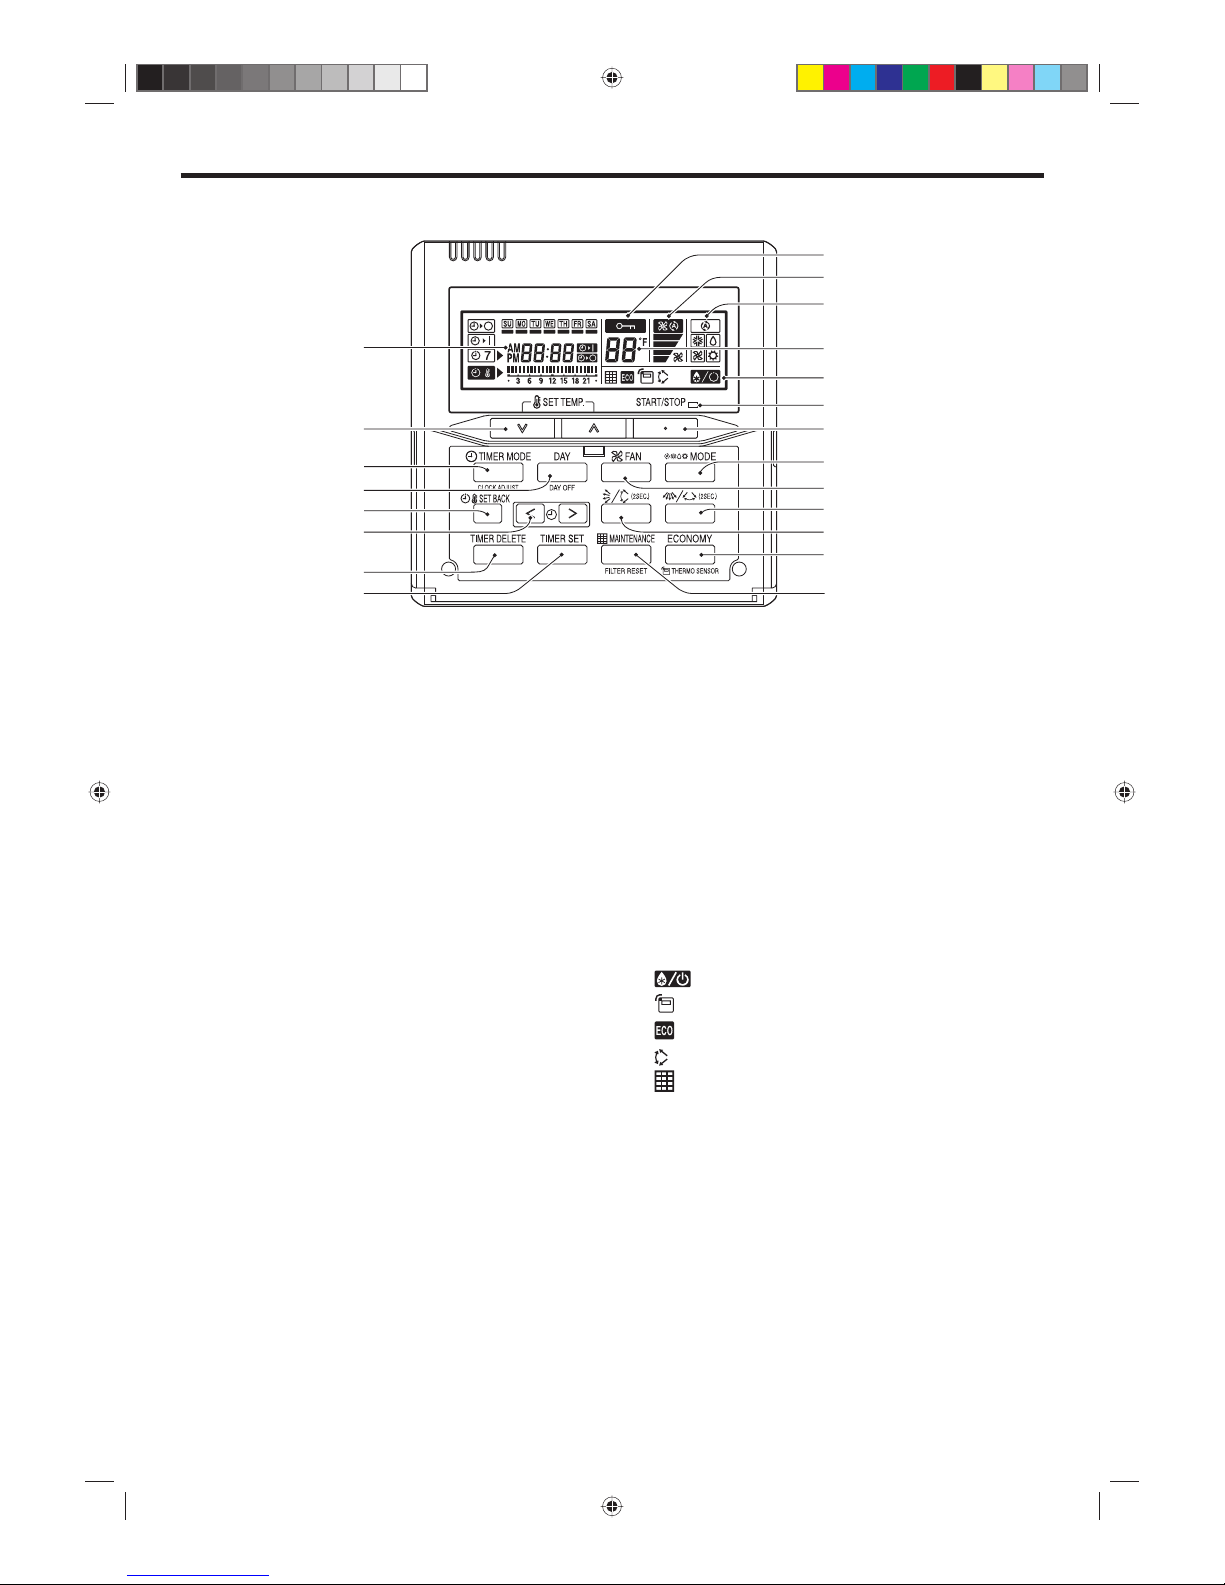
NAME OF PARTS
Remote controller
1
START/STOP Button
2
SET TEMP. (Temperature) Button
3
MODE Button
4
FAN Button
5
ECONOMY Button
6
TIMER MODE (CLOCK ADJUST) Button
7
DAY (DAY OFF) Button
8
SET BACK Button
9
SET TIME ( < > ) Button
0
TIMER DELETE Button
A
TIMER SET Button
B
Vertical Airfl ow Direction and
Swing Button
*1
C
Horizontal Airfl ow Direction and
Swing Button
*2
D
MAINTENANCE(FILTER RESET)
Button
#1
E
Operation Lamp
F
Timer and Clock Display
G
Operation Mode Display
H
Fan Speed Display
I
Operation Lock Display
J
Temperature Display
K
Function Display
Defrost Display
Thermo Sensor Display
ECONOMY Display
Vertical Swing Display
*3
Filter Display
#1
*1~3 These functions cannot be used.
(Please also see the operating manual of
the option when using it with options, etc.)
#1 Can be used if set correctly during
installation. Please consult authorized
serviceman when using this function.
I
H
G
J
K
E
1
C
5
D
A
0
3
4
B
8
6
2
F
9
7
9374343072-04_OM.indb Sec1:39374343072-04_OM.indb Sec1:3 9/2/2010 2:58:59 PM9/2/2010 2:58:59 PM
Page 5
En-4
PREPARATORY OPERATION
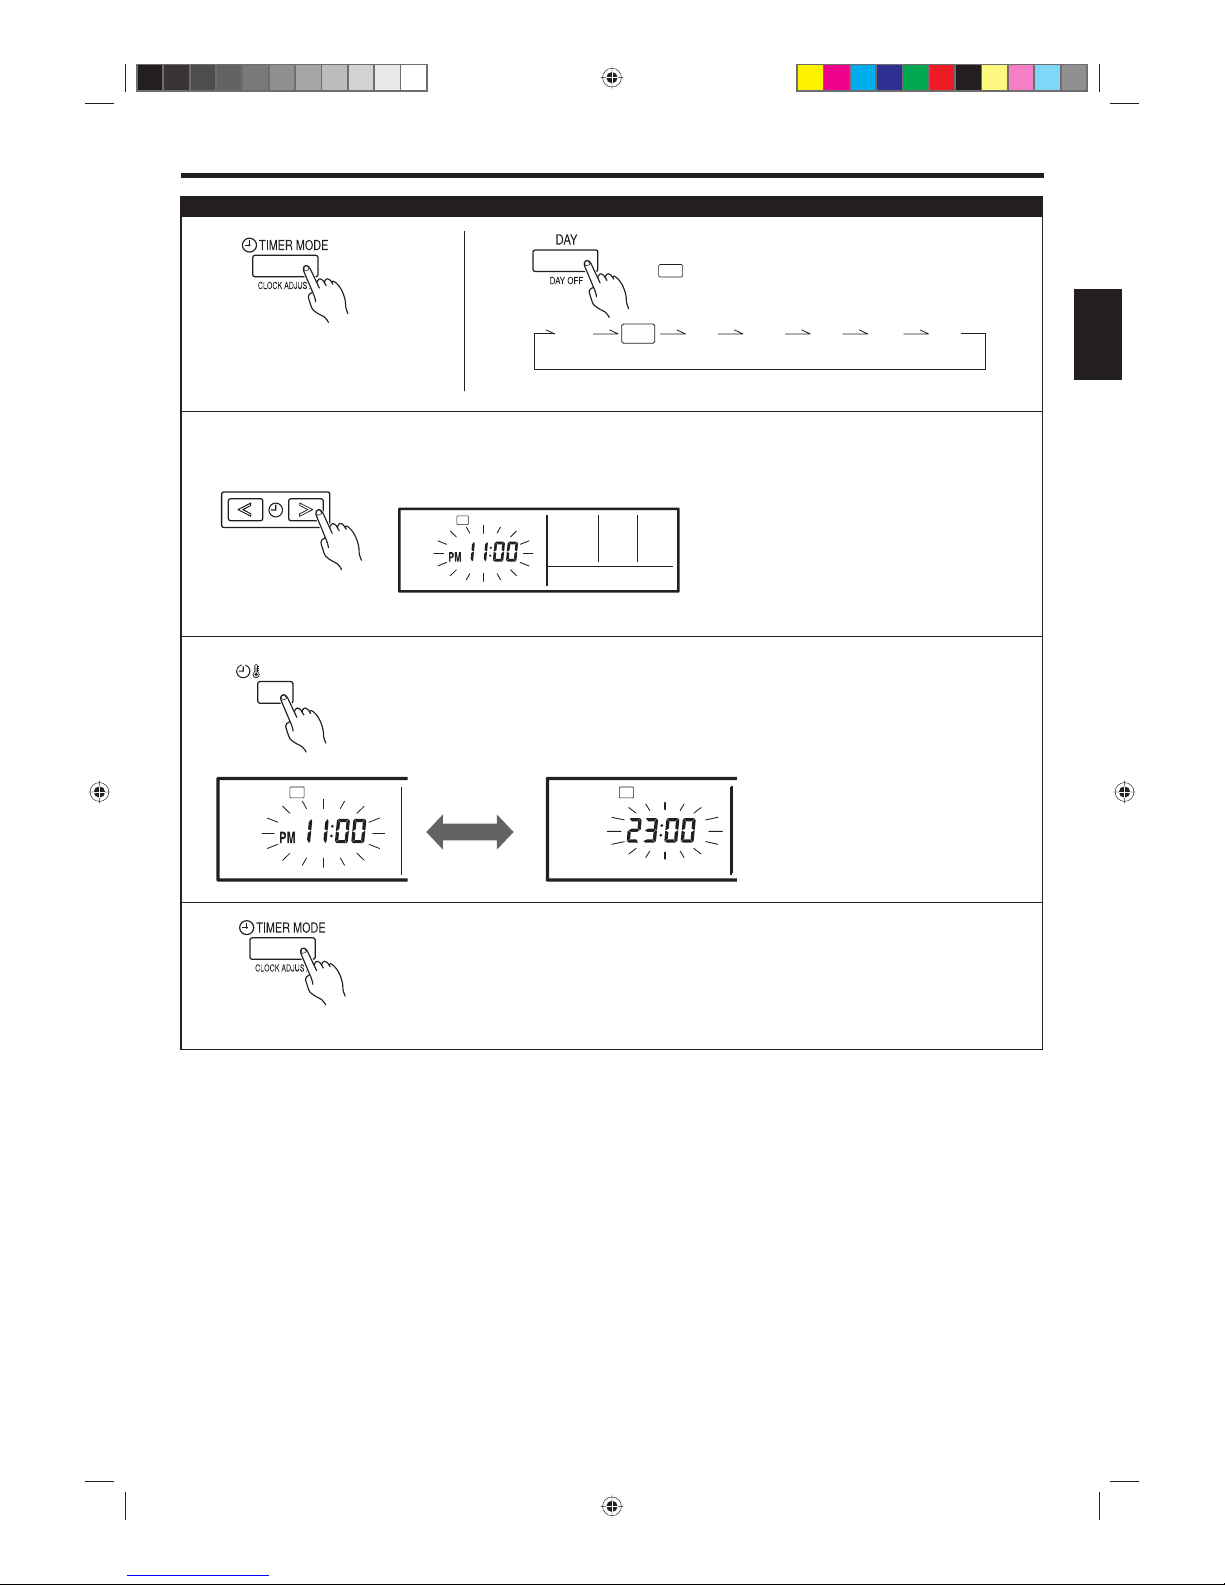
Press the TIMER MODE (CLOCK
ADJUST) button for 2 seconds
or more. The time display on the
remote controller will fl ash.
2
SU MO TU WE TH FR SA
Press the DAY button and select the current day.
A
appears around the selected day.
Press the SET TIME (< >) buttons to set the current time.
Press repeatedly to adjust the current time in 1-minute
increments. Press and hold to adjust the current time in
10-minute increments.
ex. Monday PM11:00
Press again to end.
SUMOTUWETH FR
SA
1
3
5
Press the SET BACK button to switch between the
12- and 24-hour time displays.
3
4
SUMOTUWETH FR
SA
SUMOTUWETH FR
SA
SET BACK
Set the current day and time
9374343072-04_OM.indb Sec1:49374343072-04_OM.indb Sec1:4 9/2/2010 2:59:00 PM9/2/2010 2:59:00 PM
Page 6
En-5
OPERATION
AUTO COOL DRY *HEATFAN
AUTO MEDHIGH LOW QUIET
Temperature setting range
AUTO ............................................... 64 to 88 °F
COOL/DRY ....................................... 64 to 88 °F
* HEAT ................................................ 60 to 88 °F
Lower Rise
Operation lamp
Air conditioner ON: Lit brightly
Air conditioner OFF: Not lit
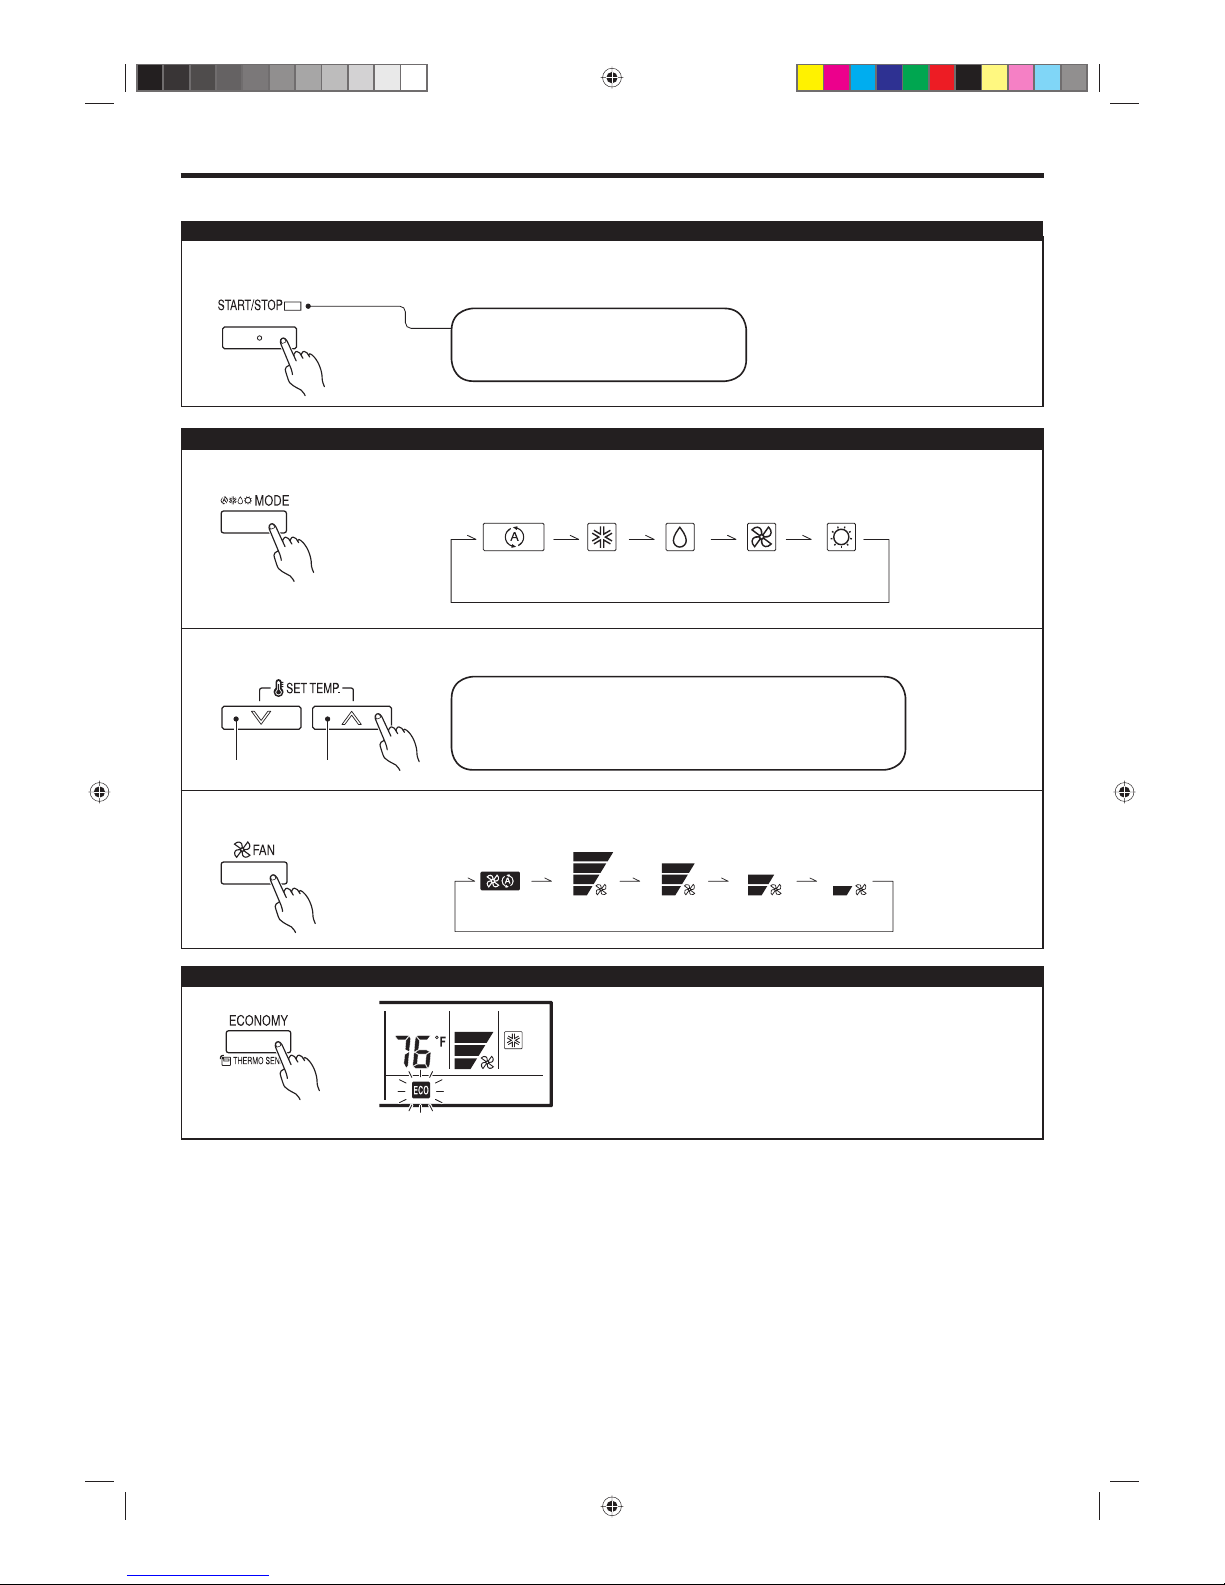
Press the START/STOP button.
Press the MODE button to set the operation mode.
If DRY is selected, the fan speed will be set to AUTO.
Press the SET TEMP. buttons to set the room temperature.
Press the FAN button to set the fan speed.
Press the ECONOMY button to start or stop ECONOMY
OPERATION.
For details on the function, refer to page 11.
Instructions relating to heating (*) are applicable only to “HEAT & COOL MODEL” (Reverse Cycle).
To start/stop operation
To set the operation mode
Operation mode setting
Room temperature setting
Fan speed setting
ECONOMY OPERATION
9374343072-04_OM.indb Sec1:59374343072-04_OM.indb Sec1:5 9/2/2010 2:59:01 PM9/2/2010 2:59:01 PM
Page 7
En-6
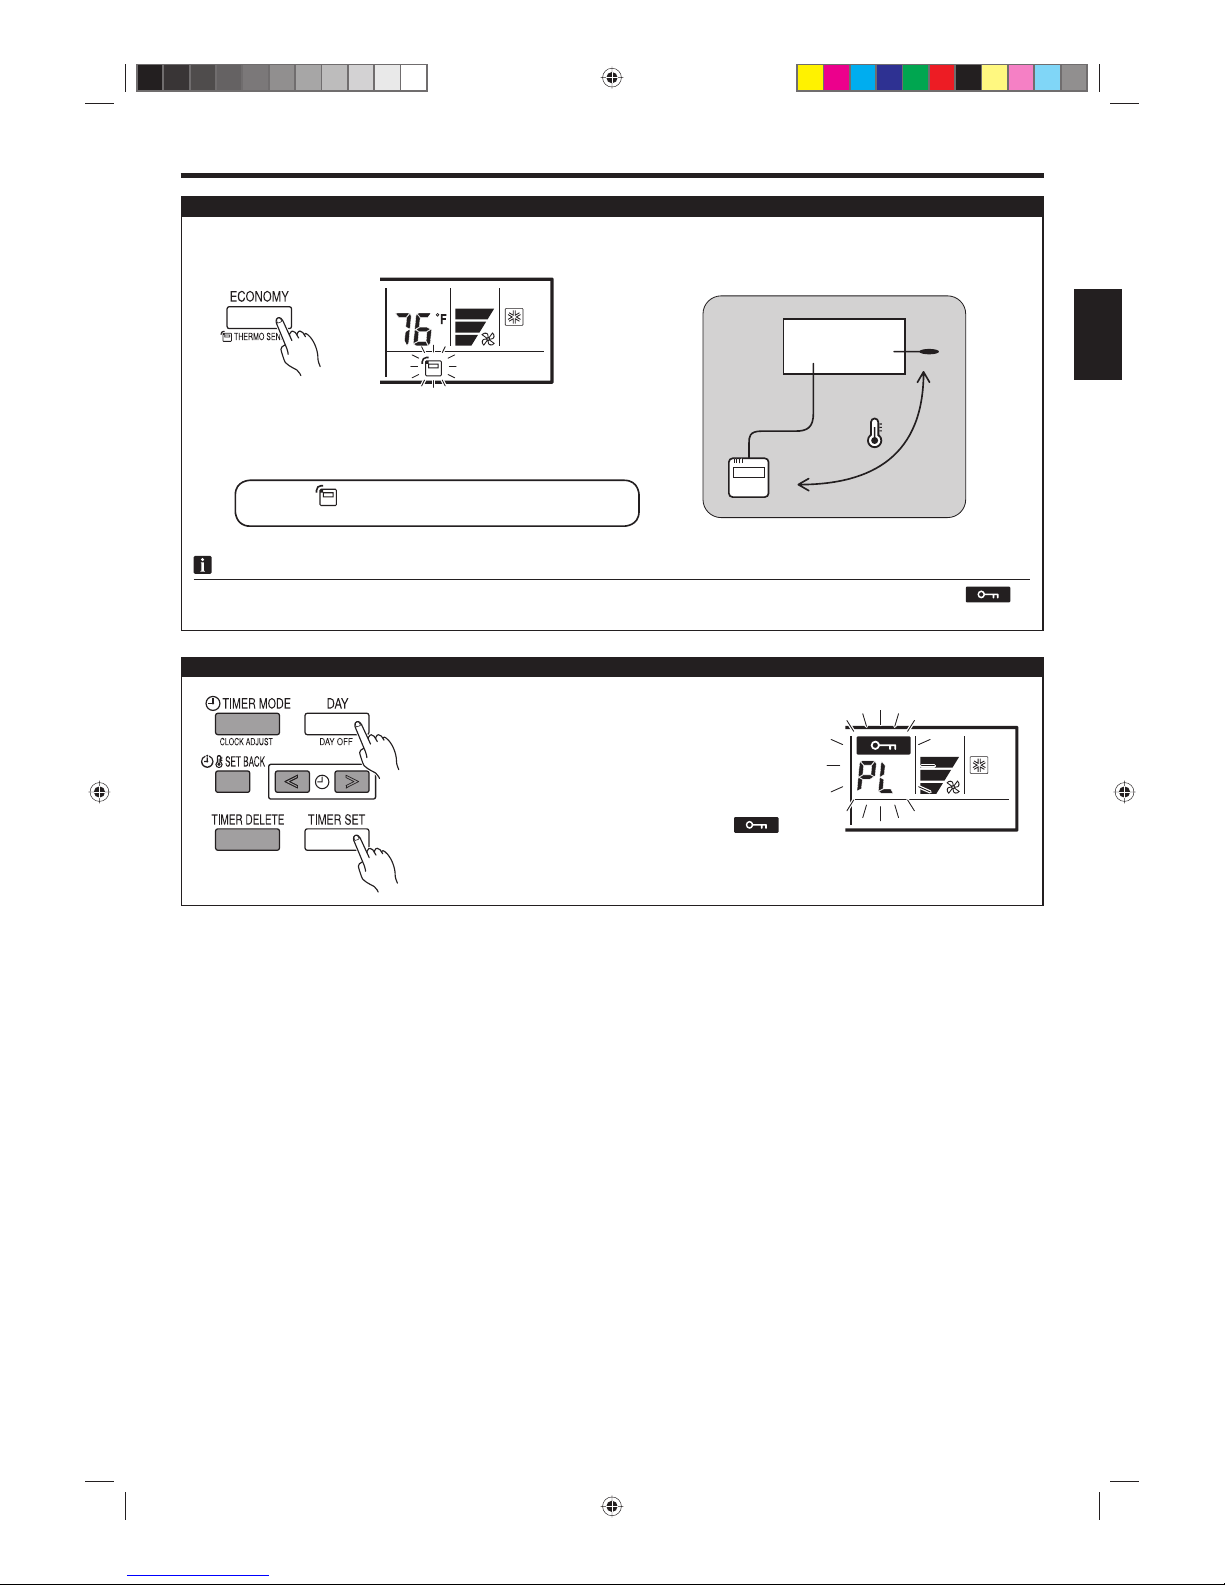
Press the ECONOMY button for more than 2 seconds to
select whether the room temperature is detected at the
indoor unit or the remote controller.
When the
thermo sensor display appears, the room
temperature is detected at the remote controller.
NOTES
• If this function is locked, the location where the room temperature is detected cannot be changed and the
mark fl ashes when the ECONOMY button is pushed for 2 seconds or more.
Indoor unit
Room temperature sensor selection
OPERATION
Part lock function
Press the DAY (DAY OFF) button and TIMER SET button
simultaneously for 2 seconds or more to activate the part
lock function and lock all of the buttons on the remote controller except the START/STOP button, SET TEMP. buttons,
MODE button, and FAN button. Press the buttons again for
2 seconds or more to deactivate the part lock function.
When the part lock function is activated, the
mark
appears. If any button is pressed during the part lock, the
PL
display fl ashes.
• This function is locked at the factory. In order to detect the room temperature correctly, consult authorized service
personnel when using this function.
9374343072-04_OM.indb Sec1:69374343072-04_OM.indb Sec1:6 9/2/2010 2:59:01 PM9/2/2010 2:59:01 PM
Page 8
En-7
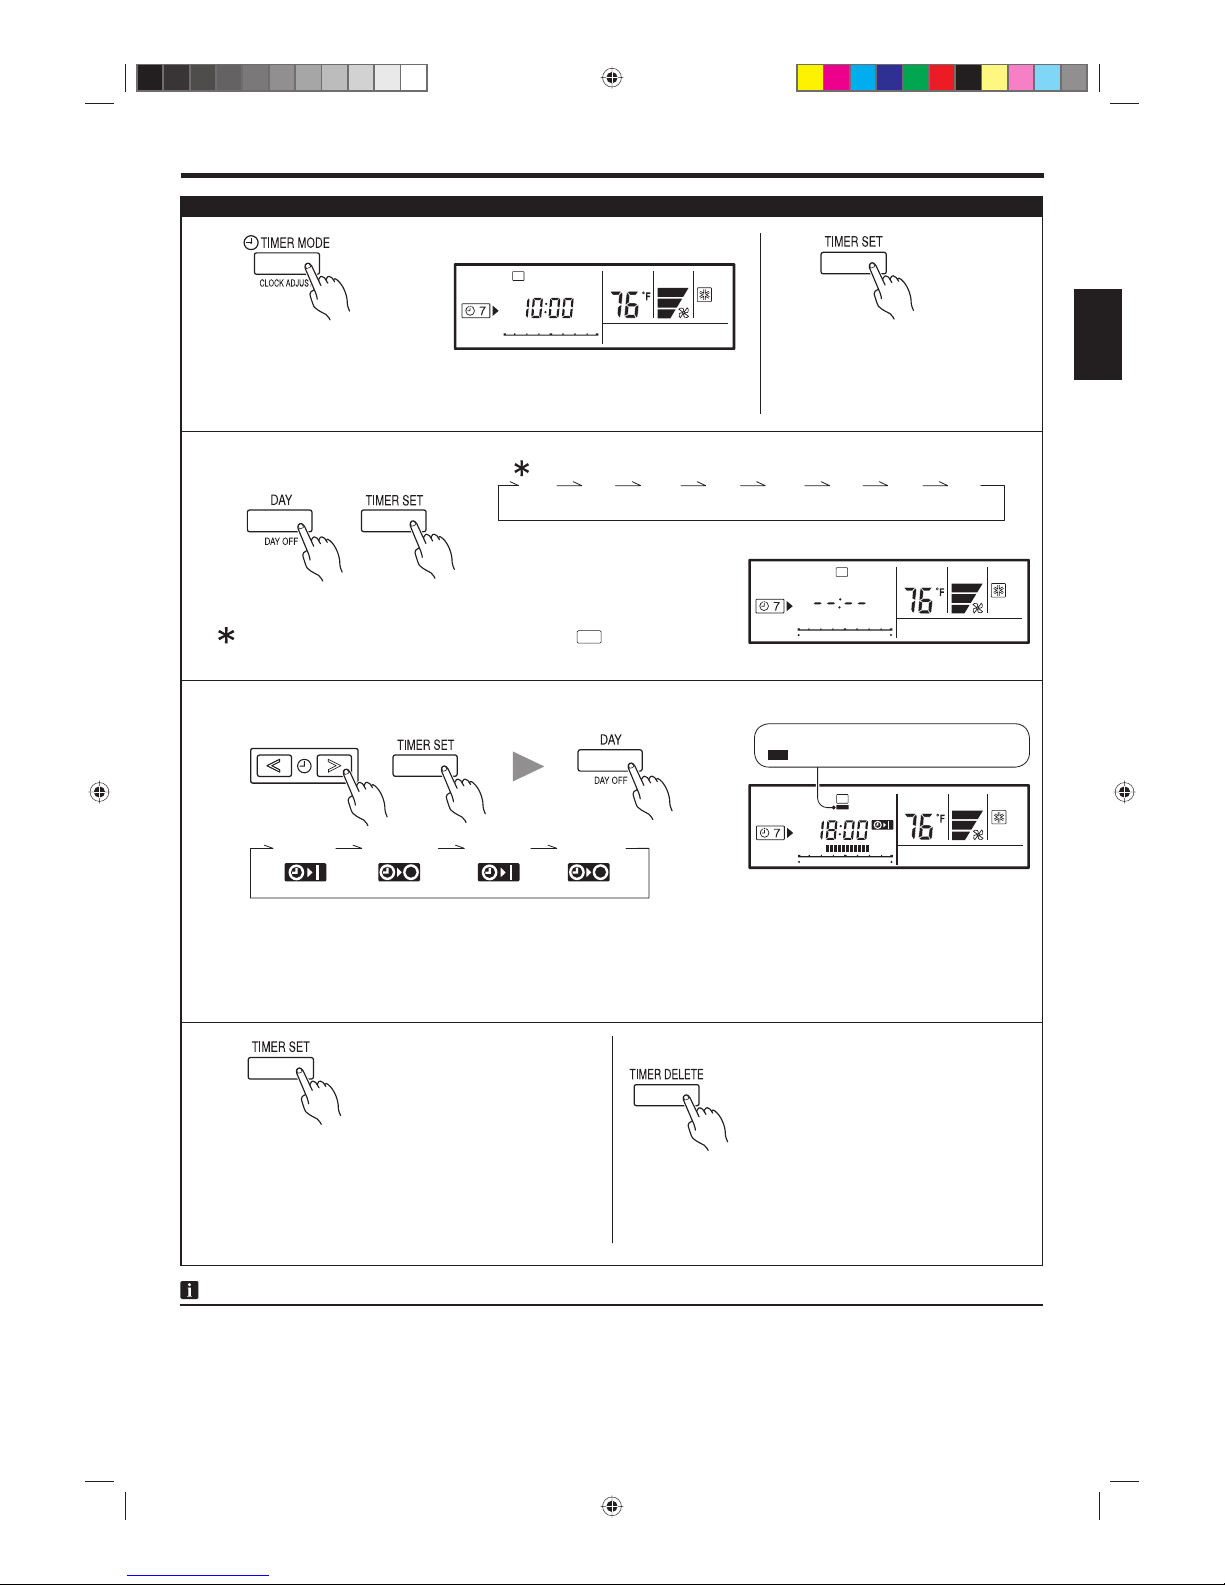
To set the ON/OFF timer
TIMER FUNCTIONS
ON/OFF TIMER
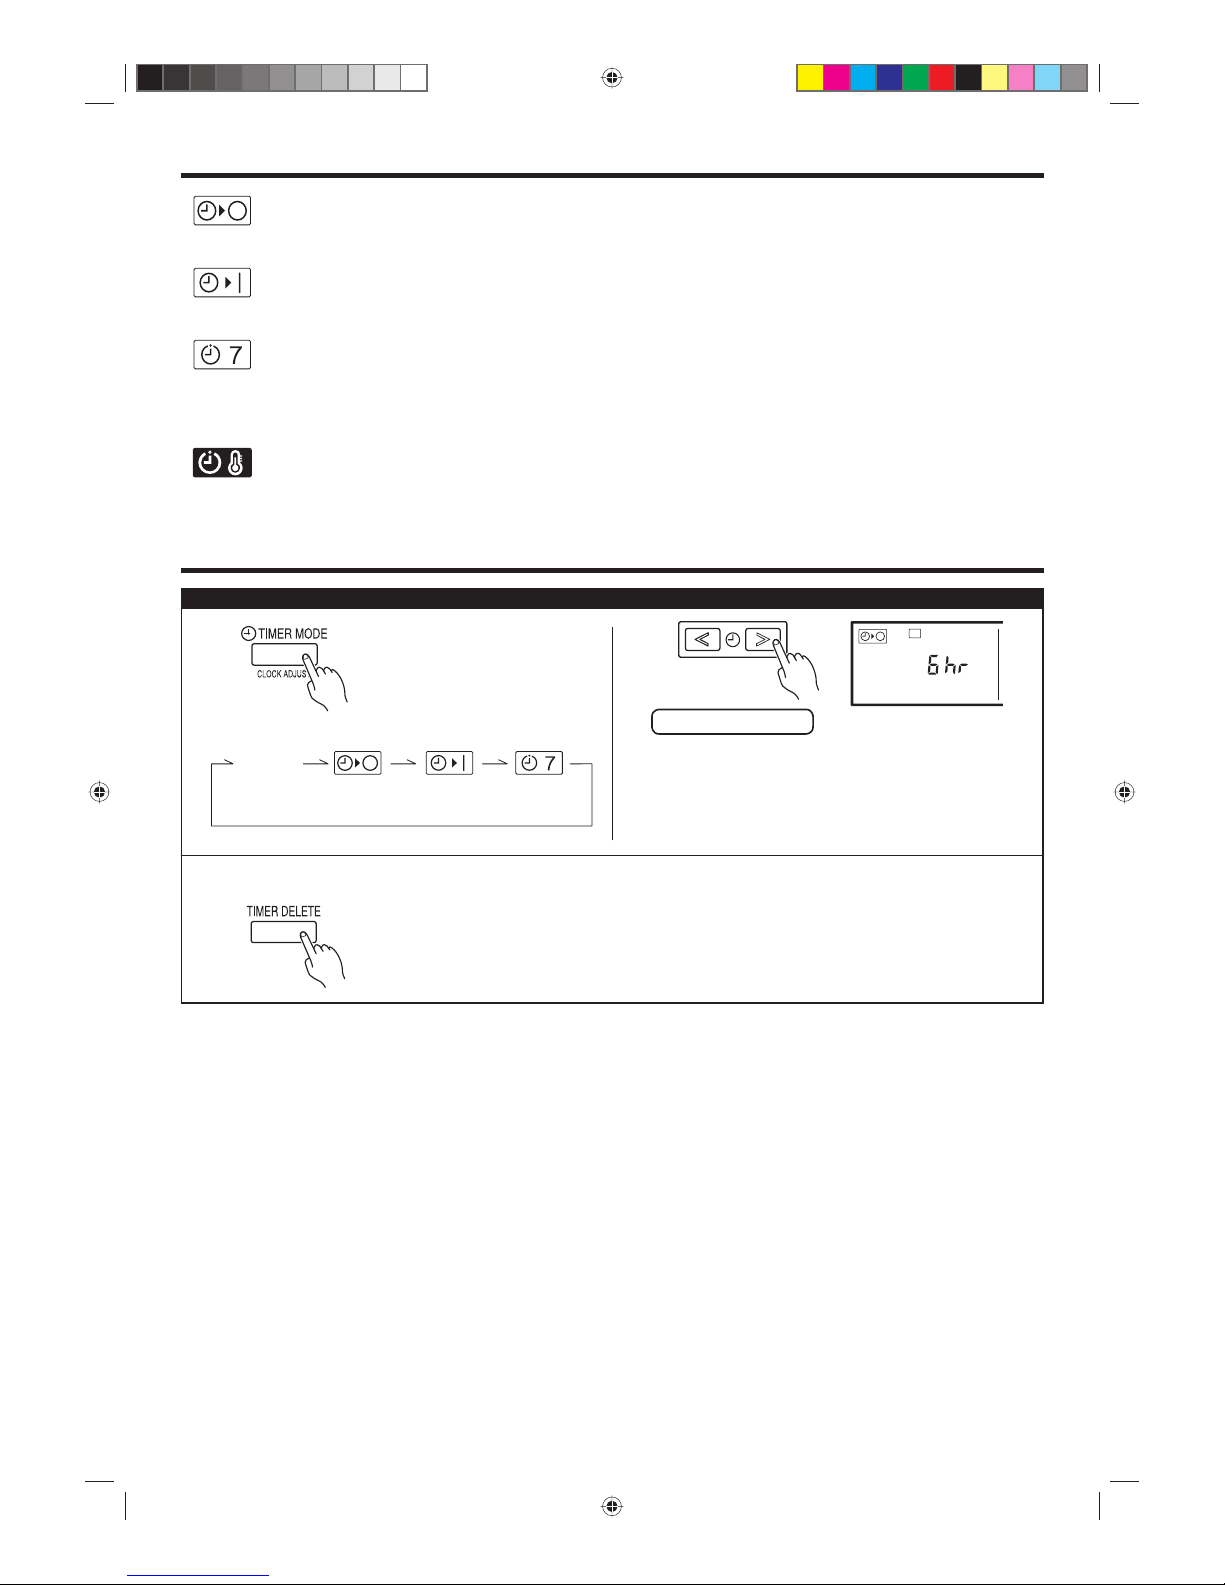
Press the TIMER MODE button to
select the ON timer or OFF timer.
2
• Press the TIMER DELETE button to cancel the timer mode.
•
The timer mode can also be canceled by changing the timer mode using the TIMER MODE button
.
1
NON
STOP
OFF
TIMERONTIMER
WEEKLY
TIMER
No display
SUMOTUWETH FR
SA
Press the SET TIME (< >) buttons to set the time.
After the time is set, the timer will start automatically.
The amount of time until the OFF timer operates that is
displayed on the timer display decreases as time passes.
From 1 to 24 hours
ex. OFF timer set for 6 hours
To cancel
OFF timer (See page 7.)
Use this timer function to stop air conditioner operation. The timer operates and air conditioner operation stops
after the set time has passed. The timer can be set up to 24 hours in advance.
ON timer (See page 7.)
Use this timer function to start air conditioner operation. The timer operates and air conditioner operation starts
after the set time has passed. The timer can be set up to 24 hours in advance.
WEEKLY timer (See page 8.)
Use this timer function to set operating times for each day of the week.
Use the DAY OFF setting to switch off timed operation for a selected day in the coming week.
Because all days can be set together, the weekly timer can be used to repeat the timer settings for all of the
days.
Temperature SET BACK timer (See page 10.)
Use this timer function to change the set temperature in the operation times set for each day of the week.
This can be used together with other timer settings.
9374343072-04_OM.indb Sec1:79374343072-04_OM.indb Sec1:7 9/2/2010 2:59:01 PM9/2/2010 2:59:01 PM
Page 9
En-8
SUMOTUWETH FR
SA
369
12 15 18 21
WEEKLY TIMER
Press the TIMER MODE button to select the weekly timer.
2
Press the TIMER SET button for
2 seconds or more.
1
3
SUMOTUWETH FR
SA
369
12 15 18 21
Day of the week setting
Press the DAY button to select the day of the week, and then press the
TIMER SET button to confi rm the setting.
For ALL, all of the days can be set together when a appears around
each day.
ALL SU MO TU WE TH FR SA
SUMOTUWETH FR
SA
369
12 15 18 21
4
Time setting
Press the SET TIME (< >) buttons to set the time, and then press the TIMER SET
button to confi rm the setting and proceed to the next ON or OFF time setting.
Up to 2 times ON and OFF times can be set per day.
Press the DAY button to complete the time setting and return to the day of the
week setting.
When the operating time is set, the
mark appears.
5
Repeat steps 3 and 4.
To complete the weekly timer settings, press the
TIMER SET button for 2 seconds or more.
To delete the operating time
If the TIMER DELETE button is pressed
during steps
3 or 4, the operating time
for the selected day will be deleted.
If all the days are selected, the operating
times for all of the days will be deleted.
NOTES
• The operating time can be set in 30-minute increments only.
• The OFF time can be carried over to the next day.
• The ON timer and the OFF timer functions cannot be set using the weekly timer. Both an ON and OFF time must be
set.
ON-1 OFF-1 ON-2 OFF-2
ex. The timer is set for 7:00-18:00.
1
2
1
2
3
Weekly timer setting
9374343072-04_OM.indb Sec1:89374343072-04_OM.indb Sec1:8 9/2/2010 2:59:01 PM9/2/2010 2:59:01 PM
Page 10

En-9
SUMOTUWETH FR
SA
369
12 15 18 21
SUMOTUWETH FR
SA
369
12 15 18 21
WEEKLY TIMER
To start
When the weekly timer is selected, the
timer starts automatically.
The operating time for the current
day is displayed.
To cancel
• Press the TIMER DELETE button
to cancel the timer mode.
• The timer mode can also be
canceled by changing the timer
mode using the TIMER MODE
button.
1
During the weekly timer,
press the TIMER SET button
for 2 seconds or more to set
the day.
Select the day to set the
DAY OFF.
Press the DAY (DAY OFF)
button for 2 seconds or
more to set the DAY OFF.
Press the TIMER SET button for 2 seconds or more
to complete the DAY OFF
setting.
243
To cancel
Follow the same procedures as
those for setup.
ex. The DAY OFF is set for Monday.
NOTES
• The DAY OFF setting is only available for days for which weekly settings already exist.
• If the operating time carries over to the next day (during a next day setting), the effective DAY OFF range will be set as
shown below.
Normal
Next day setting
Setting dayPreceding day Next day Setting dayPreceding day Next day
• The DAY OFF setting can only be set 1 time. The DAY OFF setting is cancelled automatically after the set day has
passed.
The
mark fl ashes under a day of the week.
ON OFF ON OFF
DAY OFF
WEEKLY WEEKLY
WEEKLY
WEEKLY
ON
OFF
ON
OFF
DAY OFF
SUMOTUWETH FR
SA
369
12 15 18 21
369
12 15 18 21
ex. Operating time 7:00-18:00
WEEKLY timer operation
To set the DAY OFF (for a holiday)
9374343072-04_OM.indb Sec1:99374343072-04_OM.indb Sec1:9 9/2/2010 2:59:02 PM9/2/2010 2:59:02 PM
Page 11
En-10
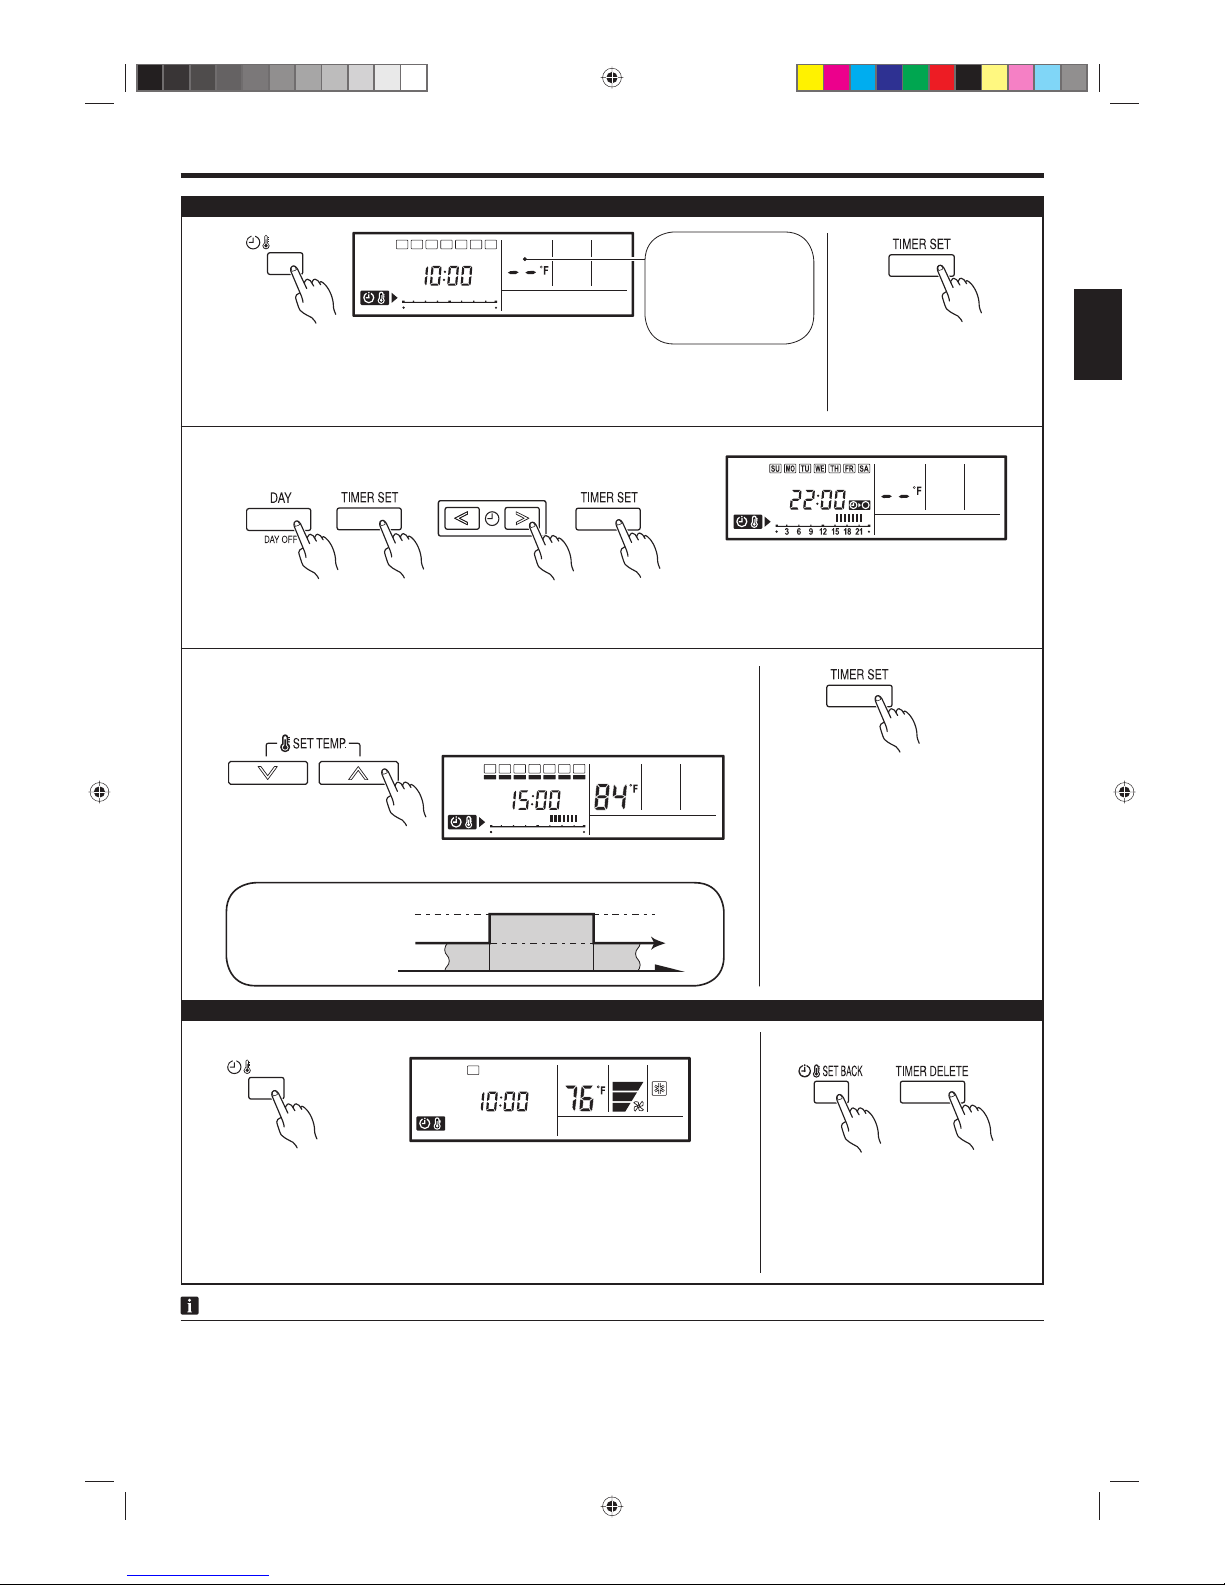
TEMPERATURE SET BACK TIMER
Press the SET BACK button to change to the SET BACK confi rmation display.
The SET BACK operating time and the set temperature will
be displayed.
2
Press the TIMER SET button
for 2 seconds or more.
1
3
Day setting
Operating time setting
Follow the same procedures to set the operating time as those for the weekly timer. The TIMER DELETE button is
also used as described in the procedures for the weekly timer.
4
NOTES
• The SET BACK timer only changes the set temperature, it cannot be used to start or stop air conditioner operation.
• The SET BACK timer can be set to operate up to 2 times per day but only 1 temperature setting can be used.
• The SET BACK timer can be used together with the ON, OFF, and weekly timer functions.
• The SET BACK operating time is displayed only in the SET BACK confi rmation display. (Refer to step 1 for the SET
BACK confi rmation display.)
SET BACK
SUMOTUWETH FR
SA
369
12 15 18 21
ex. When setting all days together
Temperature setting
Press the SET TEMP. buttons to set the
temperature. (The temperature setting
range is the same as the range for the
operation mode.)
ex. Operating time 15:00–22:00
5
Repeat steps 3 and 4.
Press the TIMER SET button for
2 seconds or more to complete
the temperature SET BACK
timer settings.
76˚F
76˚F
84˚F
SET BACK temperature
Normal temperature
To start
SET BACK
Press the SET BACK button. The SET BACK confi rmation display appears
for 5 seconds, and then the timer starts automatically.
ex. Display during SET BACK timer operation
(The operating time will not be displayed.)
To cancel
Press the SET BACK but ton, and then
press th e TIMER DELETE but ton while
the SET BACK confi rmation display is
displayed. Even if the SET BACK button is pressed again, the SET BACK
timer will be cancelled.
SUMOTUWETH FR
SA
369
12 15 18 21
If there is no existing
SET BACK temperature setting, “- -” will
be displayed for the
temperature.
SUMOTUWETH FR
SA
1
3
2
4
1
2
Temperature SET BACK timer setting
Temperature SET BACK timer operation
ON OFF
9374343072-04_OM.indb Sec1:109374343072-04_OM.indb Sec1:10 9/2/2010 2:59:02 PM9/2/2010 2:59:02 PM
Page 12
En-11
CLEANING AND CARE
Cleaning the Air Filter
Before cleaning the unit, be sure to stop the unit and disconnect the power supply.
Turn off the electrical breaker.
A fan operates at high speed inside the unit, and personal injury could result.
When used for extended periods, the unit may accumulate dirt inside, reducing its performance. We recommend that
the unit be inspected regularly, in addition to your own cleaning and care. For more information, consult authorized
service personnel.
When cleaning the unit’s body, do not use water hotter than 104 °F, harsh abrasive cleansers, or volatile agents like
benzene or thinner.
Do not expose the unit body to liquid insecticides or hairsprays.
If the unit will not be operated for a period of 1 month or more, be sure to allow the inner parts of the unit to dry thor-
oughly, in advance, by operating the unit in fan mode for half a day.
Remove the dust from the air fi lters by vacuuming or washing them. After washing, allow the air fi lters to dry thoroughly
in an area protected from sunlight.
Dust can be cleaned from the air fi lter either with a vacuum cleaner, or by washing the fi lter in a solution of mild detergent and warm water. If you wash the fi lter, be sure to allow it to dry thoroughly in a shady place before reinstalling.
If dirt is allowed to accumulate on the air fi lter, air fl ow will be reduced, lowering operating effi ciency and increasing
noise.
CAUTION!
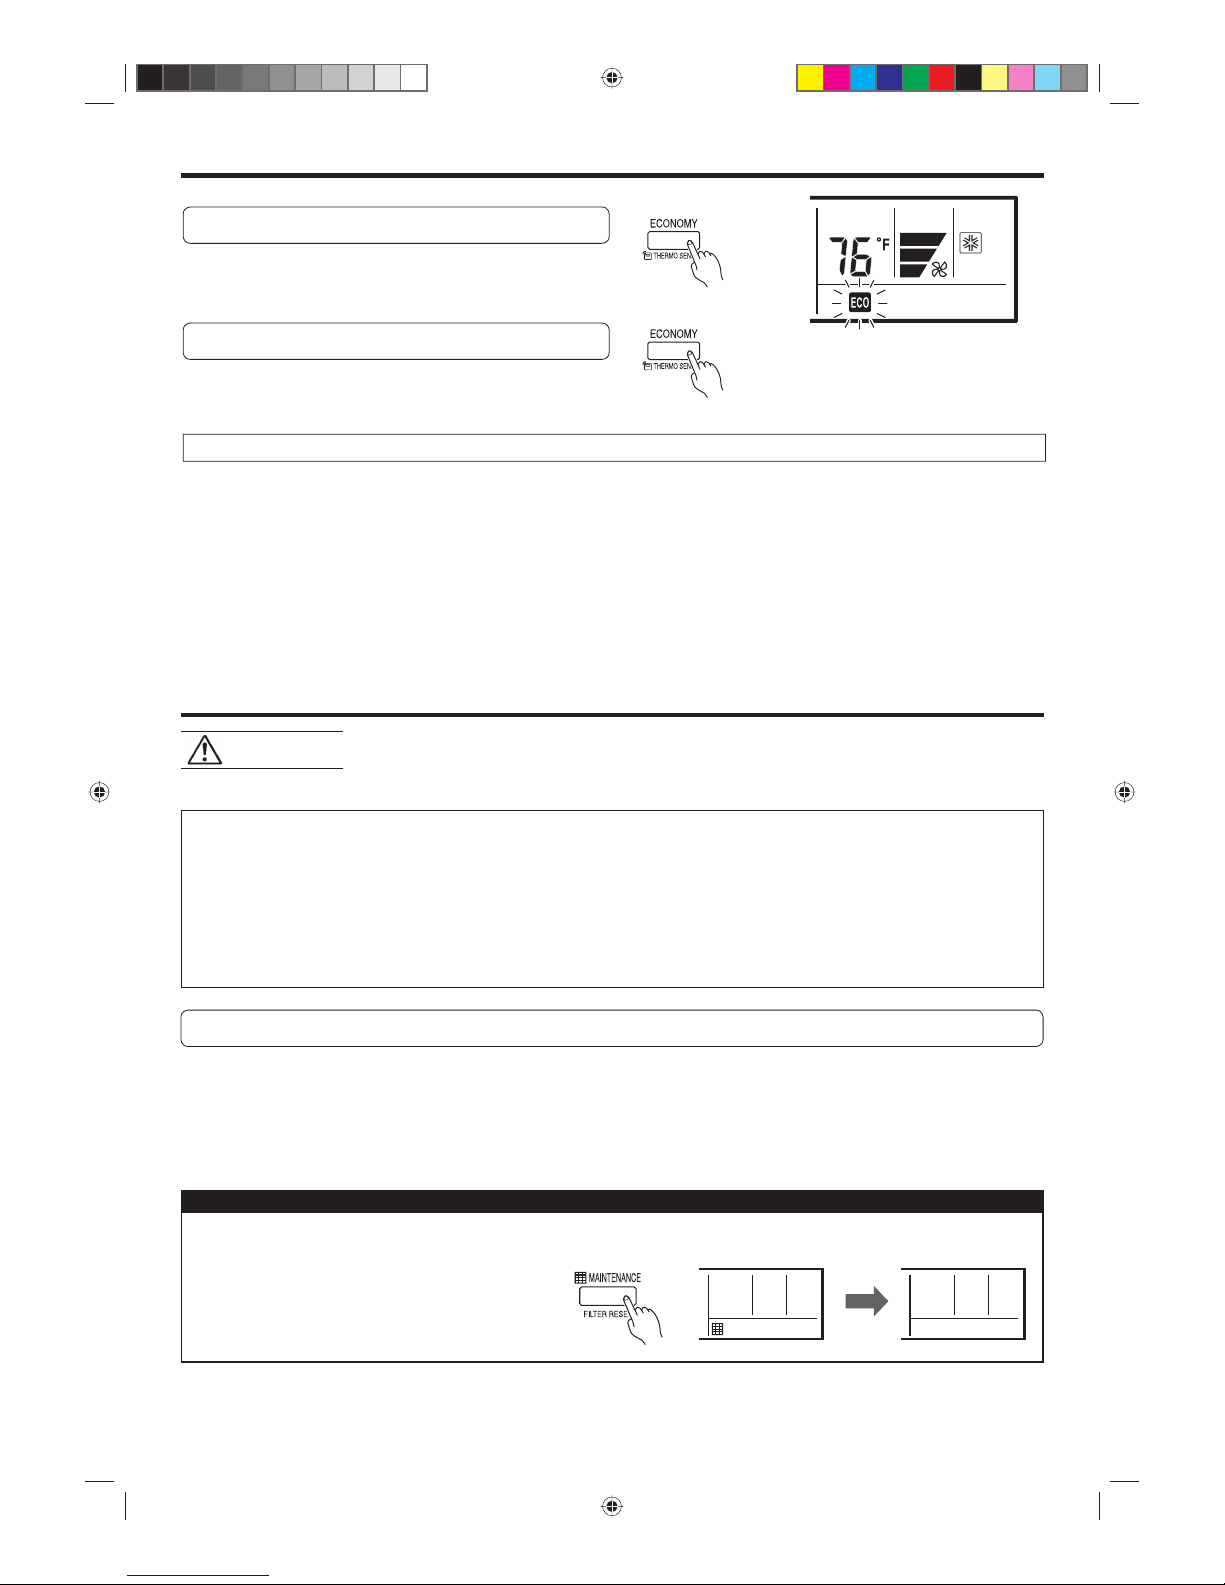
ECONOMY OPERATION
Begin Air Conditioner operation before performing this procedure.
To Use the ECONOMY Operation
Press the ECONOMY button.
The ECONOMY display will light.
ECONOMY operation begins.
To Stop the ECONOMY Operation
Press the ECONOMY button again.
The ECONOMY display will go out.
Normal operation begins.
About ECONOMY Operation
At the maximum output, ECONOMY Operation is approximately 70% of normal air conditioner operation for cooling and
heating.
If the room is not cooled (or heated) well during ECONOMY operation, select normal operation.
During the monitor period in the AUTO mode, the air conditioner operation will not change to ECONOMY operation
even if ECONOMY operation is selected by pressing the ECONOMY operation button.
When ECONOMY operation mode is operated, the room temperature will be little higher than the set-temp under cool-
ing mode and lower than set-temp under heating mode. Therefore, the ECONOMY mode is able to save more energy
than other normal mode.
In case of multi-type air conditioner, the ECONOMY operation mode is only available for the set indoor unit.
Can be used if set correctly during installation. Please consult authorized serviceman when using this
function.
• It lights on when it is time to clean the air fi lters.
After turning the power on.
Press the MAINTENANCE button for
2 seconds or more on the remote control.
The fi lter display will disappear.
Filter indicator Reset (A special setting)
9374343072-04_OM.indb Sec1:119374343072-04_OM.indb Sec1:11 9/2/2010 2:59:03 PM9/2/2010 2:59:03 PM
Page 13
En-12
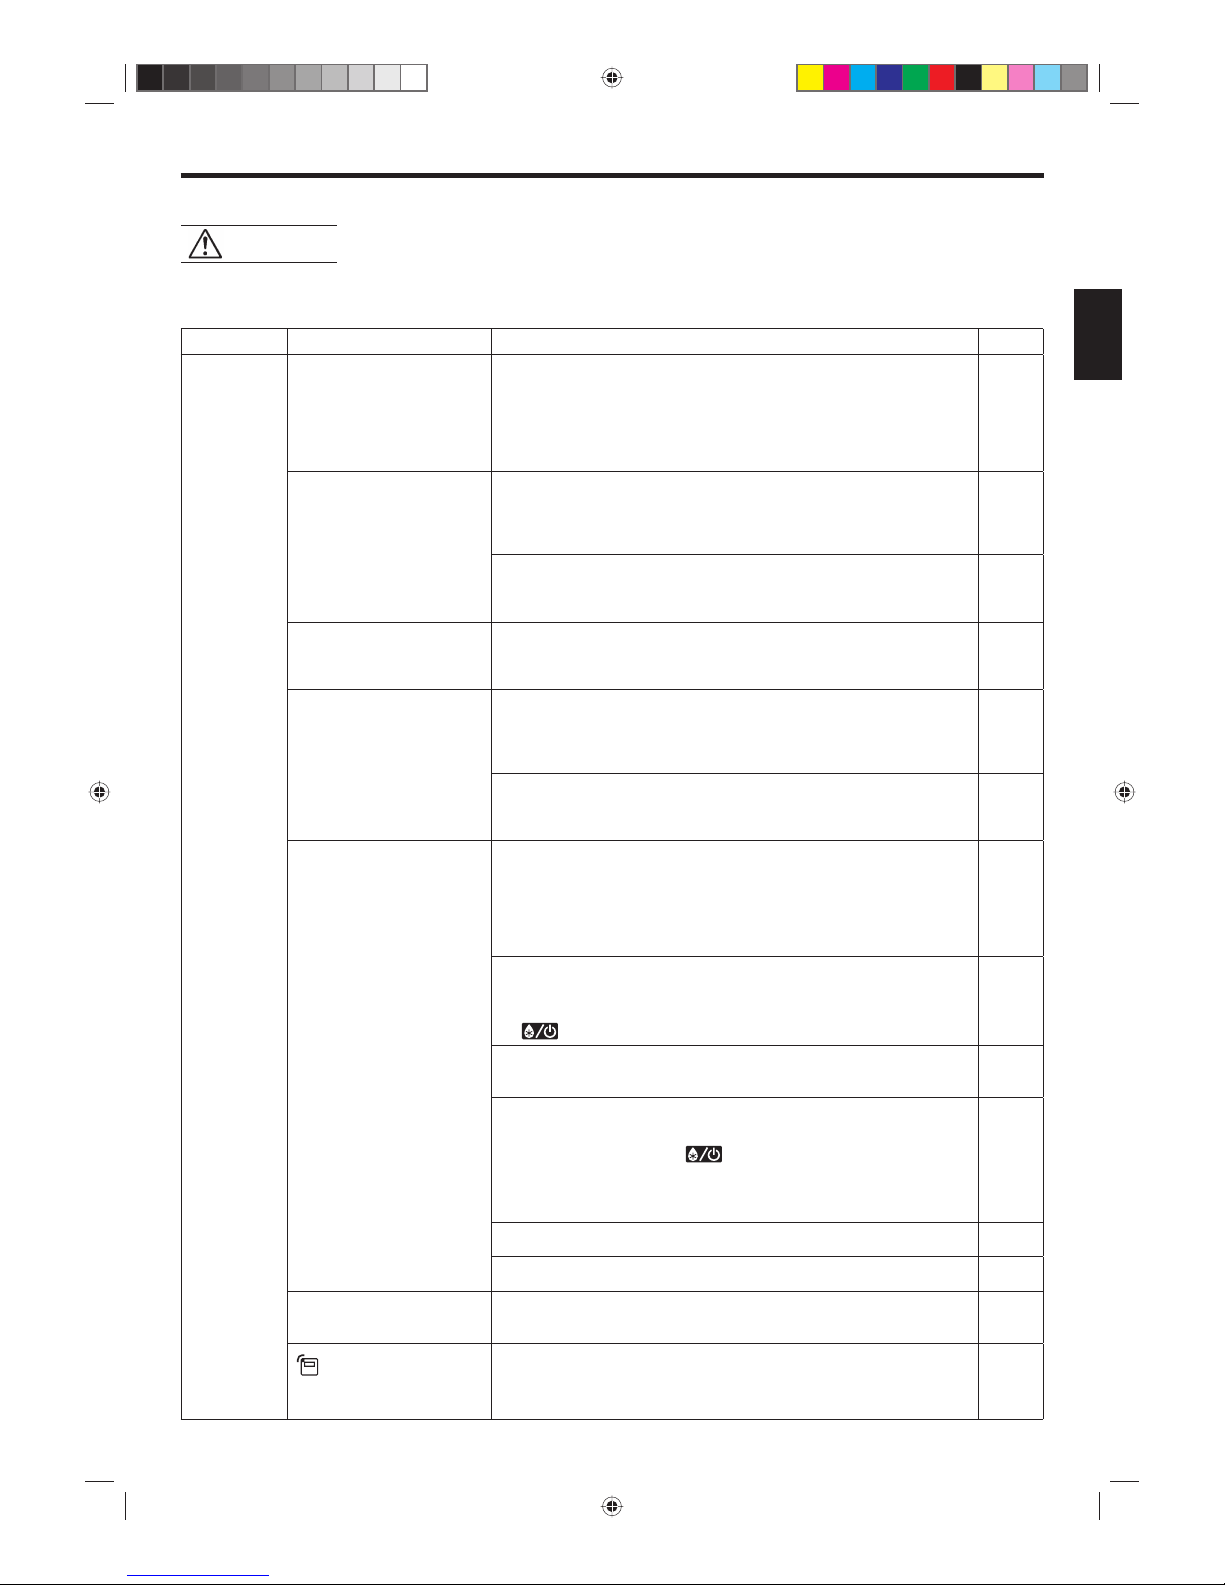
TROUBLESHOOTING
Instructions relating to heating (*) are applicable only to “HEAT & COOL MODEL” (Reverse Cycle).
WARNING!
In the event of a malfunction (burning smell, etc.), immediately stop operation, turn off the
electrical breaker, and consult authorized service personnel.
Merely turning off the unit’s power switch will not completely disconnect the unit from the
power source. Always be sure to turn off the electrical breaker to ensure that power is completely off.
Before requesting service, perform the following checks:
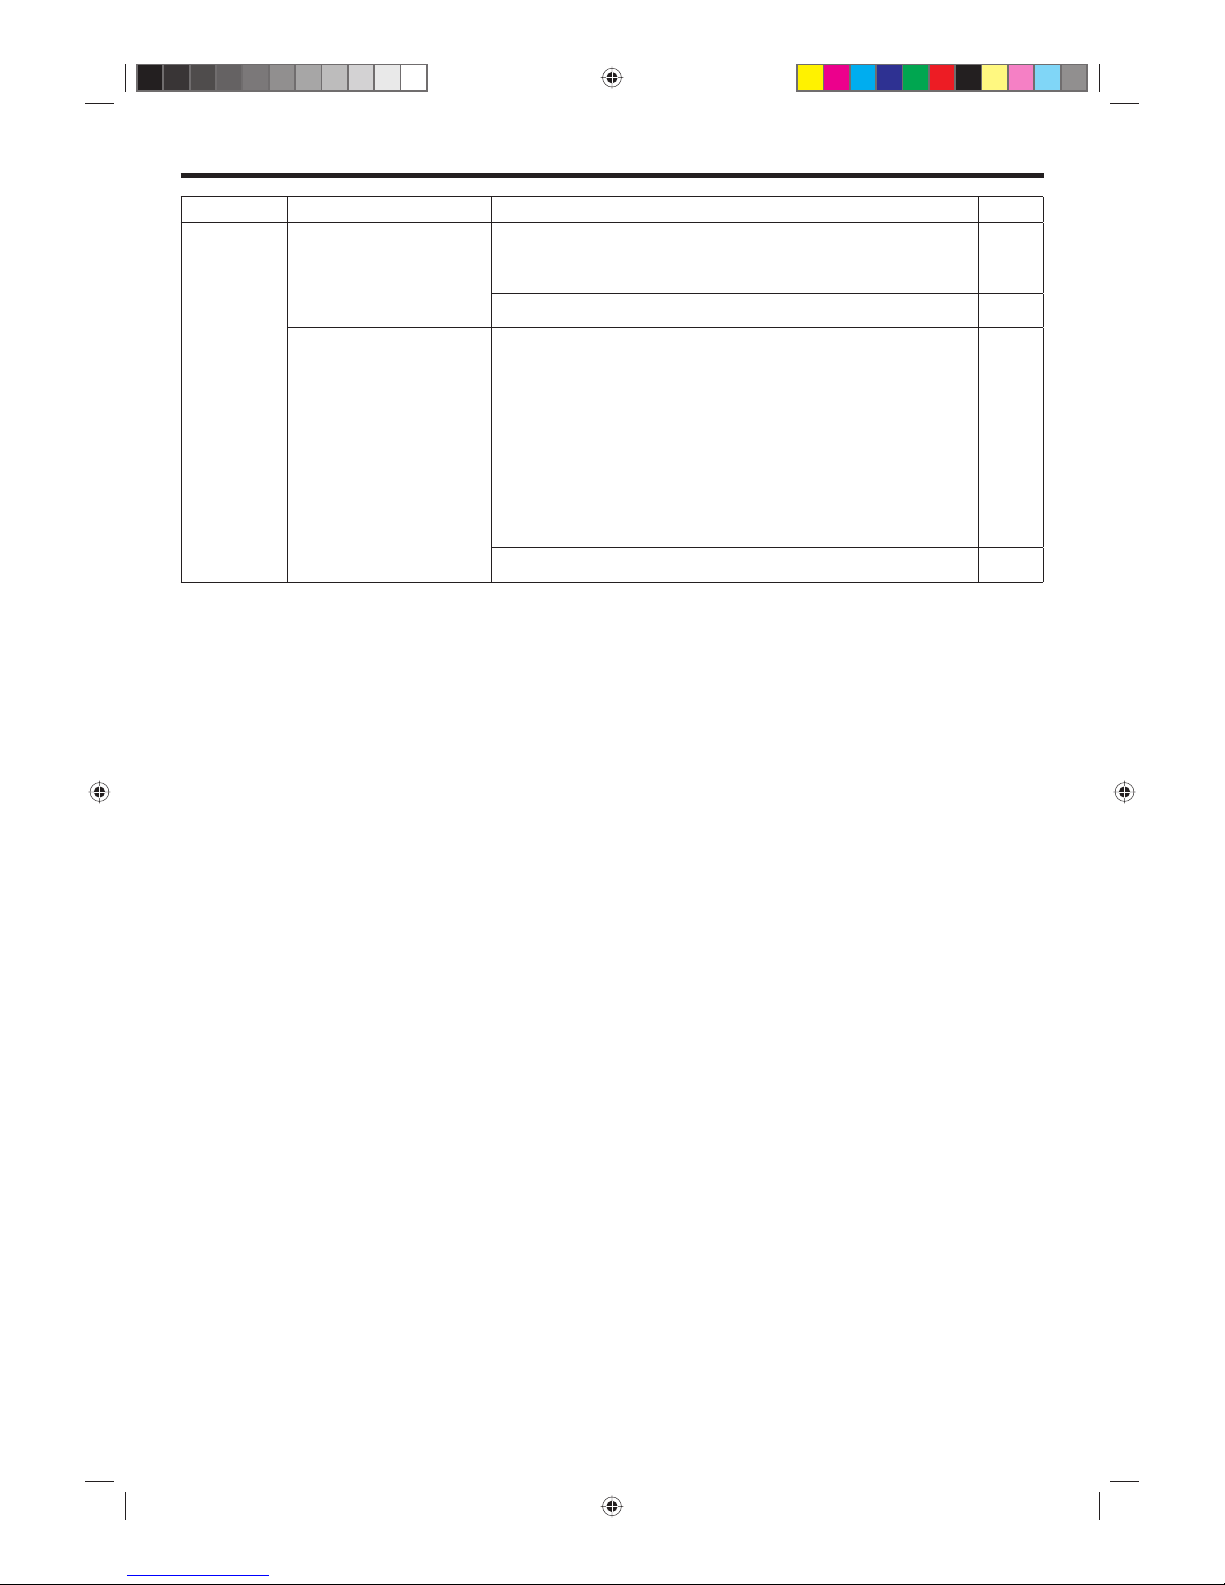
Symptom Problem
See Page
NORMAL
FUNCTION
Doesn’t operate immediately:
If the unit is stopped and then immediately started again, the
compressor will not operate for about 3 minutes, in order to
prevent fuse blowouts.
Whenever the electrical breaker is turned off then on again, the
protection circuit will operate for about 3 minutes, preventing
unit operation during that period.
—
Noise is heard:
During operation and immediately after stopping the unit, the
sound of water fl owing in the air conditioner’s piping may be
heard. Also, noise may be particularly noticeable for about 2 to
3 minutes after starting operation (sound of coolant fl owing)
.
—
* During Heating operation, a sizzling sound may be heard
occasionally. This sound is produced by the Automatic
Defrosting operation.
14
Smells:
Some smell may be emitted from the indoor unit. This smell is
the result of room smells (furniture, tobacco, etc.) which have
been taken into the air conditioner.
—
Mist or steam are
emitted:
During Cooling or Dry operation, a thin mist may be seen emit-
ted from the indoor unit. This results from the sudden Cooling
of room air by the air emitted from the air conditioner, resulting
in condensation and misting.
—
* During Heating operation, the outdoor unit’s fan may stop, and
steam may be seen rising from the unit. This is due to the Automatic Defrosting operation.
14
Airfl ow is weak or stops:
* When Heating operation is started, fan speed is temporarily
very low, to allow internal parts to warm up.
* During Heating operation, if the room temperature rises above
the thermostat setting, the outdoor unit will stop, and the indoor
unit will operate at very low fan speed. If you wish to warm the
room further, set the thermostat to a higher setting.
—
* During Heating operation, the unit will temporarily stop opera-
tion (between 4 and 15 minutes) as the Automatic Defrosting
mode operates. During the Automatic Defrosting operation,
will be shown on the remote controller display.
14
The fan may operate at very low speed during Dry operation or
when the unit is monitoring the room’s temperature.
—
In case of Multi-type unit, if multiple units are operated in
different operation modes as shown below, the units operated
afterward will stop and
will be shown on the remote
controller display of the stopped indoor units.
Heating mode and cooling mode (or dry mode)
Heating mode and fan mode
16
During QUIET operation, the fan will operate at very low speed.
—
In the monitor AUTO operation, the fan will operate at very low speed
.
—
Water is produced from
the outdoor unit:
* During Heating operation, water may be produced from the
outdoor unit due to the Automatic Defrosting operation.
14
thermo sensor
display on the remote
controller is fl ashing:
The room temperature sensor may be malfunctioning. Please
consult authorized service personnel.
—
9374343072-04_OM.indb Sec1:129374343072-04_OM.indb Sec1:12 9/2/2010 2:59:03 PM9/2/2010 2:59:03 PM
Page 14
En-13
TROUBLESHOOTING
Symptom Problem
See Page
CHECK ONCE
MORE
Doesn’t operate at all:
Has the circuit breaker been turned off?
Has there been a power failure?
Has a fuse blown out, or a circuit breaker been tripped?
—
Is the timer operating?
7 to 9
Poor Cooling (or *Heating)
performance:
Is the air fi lter dirty?
Are the air conditioner’s intake grille or outlet port blocked?
Did you adjust the room temperature settings (thermostat)
correctly?
Is there a window or door open?
In the case of Cooling operation, is a window allowing bright
sunlight to enter? (Close the curtains.)
In the case of Cooling operation, are there heating apparatus
and computers inside the room, or are there too many people
in the room?
—
Is the unit set for QUIET operation?
—
If the problem persists after performing these checks, or if you notice burning smells, stop operation immediately, turn off
electric breaker, and consult with authorized service personnel.
9374343072-04_OM.indb Sec1:139374343072-04_OM.indb Sec1:13 9/2/2010 2:59:03 PM9/2/2010 2:59:03 PM
Page 15
En-14
OPERATING TIPS
Instructions relating to heating (*) are applicable only to “HEAT & COOL MODEL” (Reverse Cycle).
Low Ambient Cooling
When the outdoor temperature drops, the outdoor unit’s
fans may switch to Low Speed, or 1 of the fans may stop
intermittently.
Dual Remote Controllers (optional)
An additional remote controller can be added up to the
maximum of 2 remote controllers. Either remote controller
can control the air conditioner. However, the timer functions
cannot be used at the secondary unit.
Group Control
1 remote controller can control up to 16 air conditioners.
All of the air conditioners will be operated with the same
settings.
Group control cannot be used when using it by the multi
type.
*Heating Performance
This air conditioner operates on the heat-pump principle,
absorbing heat from outdoor air and transferring that
heat indoors. As a result, the operating performance is
reduced as outdoor air temperature drops. If you feel that
insuffi cient heating performance is being produced, we
recommend you use this air conditioner in conjunction
with another type of heating appliance.
Heat-pump air conditioners heat your entire room by
recirculating air throughout the room, with the result
that some time may be required after fi rst starting the air
conditioner until the room is heated.
*When Indoor and Outdoor Temperature
are High
When both indoor and outdoor temperatures are high
during use of the heating mode, the outdoor unit’s fan
may stop at times.
*Microcomputer-controlled Automatic
Defrosting
When using the Heating mode under conditions of low
outdoor temperature and high humidity, frost may form
on the outdoor unit, resulting in reduced operating performance.
In order to prevent this kind of reduced performance,
this unit is equipped with a Microcomputer-controlled
Automatic Defrosting function. During the defrost cycle,
the indoor fan will shutdown and
will be displayed
on the remote controller. It will take anywhere from 4 to
15 minutes before the air conditioner starts up again.
After heating operation stops, if frost forms on the outdoor
unit, the unit will start Automatic Defrosting operation.
At this time, the outdoor unit will automatically stop after
operating for a few minutes.
9374343072-04_OM.indb Sec1:149374343072-04_OM.indb Sec1:14 9/2/2010 2:59:03 PM9/2/2010 2:59:03 PM
Page 16
En-15
HEAT & COOL MODEL (Reverse Cycle)
Auto changeover function
When AUTO CHANGEOVER is selected, the air condi-
tioner selects the appropriate operation mode (Cooling
or Heating) according to your room’s present temperature.
When AUTO CHANGEOVER is fi rst selected, the fan will
operate at a very low speed for about a few minutes
while the unit determines the current conditions of the
room and selects the proper operation mode.
If the difference between thermostat setting and actual
room temperature is more than +4 °F
→ Cooling operation
If the difference between thermostat setting and actual
room temperature is within ±4 °F
→
Determined by outdoor temperature
If the difference between thermostat setting and actual
room temperature is more than –4 °F
→
Heating operation
OPERATING TIPS
Mode operation: AUTO
About Mode Operation
During Heating mode:
Set the thermostat to a temperature setting that is higher than the current room
temperature. The Heating mode will not
operate if the thermostat is set lower
than the actual room temperature.
During Cooling/Dry mode:
Set the thermostat to a temperature setting that is lower than the current room
temperature. The Cooling and Dry modes
will not operate if the thermostat is set
higher than the actual room temperature
(in Cooling mode, the fan alone will operate).
During Fan mode:
You can not use the unit to heat and
cool your room.
* Heating:
Use to warm your room.
When Heating mode is selected, the air conditioner will operate at
very low fan speed for about 3 to 5 minutes, after which it will switch
to the selected fan setting. This period of time is provided to allow
the indoor unit to warm up before beginning full operation.
When the room temperature is very low, frost may form on the out-
side unit, and its performance may be reduced. In order to remove
such frost, the unit will automatically enter the defrost cycle from
time to time. During Automatic Defrosting operation, the heat operation will be interrupted.
After the start of heating operation, it takes sometime before the
room gets warmer.
Cooling:
Use to cool your room.
Dry:
Use for gently cooling while dehumidifying your room.
You cannot heat the room during Dry mode.
During Dry mode, the unit will operate at low speed; in order to
adjust room humidity, the indoor unit’s fan may stop from time to
time. Also, the fan may operate at very low speed when adjusting
room humidity.
The fan speed cannot be changed manually when Dry mode has
been selected.
Fan:
Use to circulate the air throughout your room.
COOLING MODEL
When the room temperature is 4 °F higher than the set
temperature, the mode will switch between Cooling and
Drying.
During the Drying mode operation, the FAN setting
should be switched to LOW for a gently cooling effect
during which the fan may temporarily stop rotating.
When the room temperature is near the thermostat set-
ting, the air conditioner will begin monitor operation.
In the monitor operation mode, the fan will operate at a
very low speed. If the room temperature subsequently
changes, the air conditioner will once again select the
appropriate operation (Heating or Cooling) to adjust the
temperature to the value set in the thermostat.
9374343072-04_OM.indb Sec1:159374343072-04_OM.indb Sec1:15 9/2/2010 2:59:03 PM9/2/2010 2:59:03 PM
Page 17

En-16
OPERATING TIPS
Multi-type Air conditioner
This indoor unit can be connected to a multi-type outdoor unit. The multi-type air conditioner allows multiple indoor units to be
operated in multiple locations. The indoor units may be operated simultaneously, in accordance with their respective output.
Simultaneous Use of Multiple Units
Instructions relating to inverter () are applicable only to “INVERTER MODEL”.
If the indoor unit is instructed to do an operating mode
that it cannot perform,
will be shown on the remote controller display and the unit will go into the
standby mode.
Heating mode and cooling mode (or dry mode)
Heating mode and fan mode
Operation can be done in the following different operat-
ing modes.
Cooling mode and dry mode
Cooling mode and fan mode
Dry mode and fan mode
The operating mode (heating mode or cooling (dry)
mode) of the outdoor unit will be determined by the
operating mode of the indoor unit that was operated
fi rst.If the indoor unit was started in fan mode, the operating mode of the outdoor unit will not be determined.
For example, if indoor unit (A) was started in fan mode
and then indoor unit (B) was then operated in heating
mode, indoor unit (A) would temporarily start operation
in fan mode but when indoor unit (B) started operating
in heating mode,
will be shown on the unit (A)
remote controller display and it would go into standby
mode. Indoor unit (B) would continue to operate in heating mode.
When using a multi-type air conditioner, the multiple
indoor units can be operated simultaneously, but when
2 or more indoor units of the same group are oper-ated
simultaneously, the heating and cooling effi ciency will
be less than when a single indoor unit is used alone.
Accordingly, when you wish to use more than 1 indoor
unit for cooling at the same time, the use should be
concentrated at night and other times when less output
is required. In the same way, when multiple units are
used simultaneously for heating, it is recommended that
they be used in conjunction with other auxiliary space
heaters, as required.
Seasonal and outdoor temperature conditions, the struc-
ture of the rooms and the number of persons present
may also result in differences of operating effi ciency.We
recommend that you try various operating patterns in
order to confi rm the level of heating and cooling output
provided by your units, and use the units in the way that
best matches your family's lifestyle.
lf you discover that 1 or more units delivers a low level
of cooling or heating during simultaneous operation,
we recommend that you stop simultaneous operation
of the multiple units.
Operation cannot be done in the following different
operating modes.
Should the power supply to the air conditioner be inter-
rupted by a power failure, the air conditioner will restart
automatically in the previously selected mode once the
power is restored.
Use of other electrical appliances (electric shaver, etc.) or
nearby use of a wireless radio transmitter may cause the
air conditioner to malfunction. In this event, temporarily
disconnect the power supply, reconnect it, and then use
the remote controller to resume operation.
AUTO Restart
In Event of Power Interruption
Notice
* During use of the heating mode, the top of the indoor
unit may become warm, but this is due to the fact that
coolant is circulated through the indoor unit even when
it is stopped; it is not a malfunction.
* During use of the heating mode, the outdoor unit will
occasionally commence the defrost operation for brief
periods. During the defrosting operation, if the user sets
the indoor unit for heating again, the defrosting mode
will continue, and the heating operation will begin after
completion of defrosting, with the result that some time
may be required before warm air is emitted.
SELF-DIAGNOSIS
When “Er” in Temperature Display is displayed, inspection of the air conditioning system is necessary. Please consult
authorized service personnel.
Unit number (usually “00”)
Error code
ex. Self-diagnosis check
9374343072-04_OM.indb Sec1:169374343072-04_OM.indb Sec1:16 9/2/2010 2:59:03 PM9/2/2010 2:59:03 PM
Page 18

Fr-1
SOMMAIRE
PRÉCAUTIONS DE SÉCURITÉ ..............................1
FONCTIONNALITÉS ET FONCTIONS ................... 2
NOMENCLATURE DES ORGANES ....................... 3
PREPARATIFS ......................................................... 4
FONCTIONNEMENT ............................................. 5
FONCTIONS DE LA MINUTERIE ........................... 7
MINUTERIE DE MISE EN MARCHE/ARRET .........7
PRÉCAUTIONS DE SÉCURITÉ
N’essayez pas d’installer ce climatiseur vous-même.
Cette unité ne contient aucune pièce accessible par l’utilisateur. Toujours faire appel à
du personnel technique agréé pour les interventions techniques.
En cas de déménagement, faites appel à votre centre de réparation agréé pour le
débranchement et l'installation du climatiseur.
Veillez à ne pas prendre froid en restant longtemps exposé directement au fl ux d’air
froid.
N’introduisez pas les doigts ni des objets dans l’orifi ce de sortie ou les grilles d’air entrant.
Ne mettez pas le climatiseur sous puis hors tension en coupant le disjoncteur électrique et ainsi de suite.
En cas de dysfonctionnement (odeur de brûlé, etc.), arrêter immédiatement le fonctionnement, couper le disjoncteur puis prendre contact avec du personnel technique agréé.
En cas de fuite du produit réfrigérant, assurez-vous de le garder hors d'atteinte des fl ammes
ou de produit infl ammables. (consultez le centre réparation agréé)
Aérez de temps en temps la pièce lorsque le climatiseur est en marche.
Ne dirigez pas le cheminement de l’air vers des cheminées ou des appareils de chauffage.
Ne grimpez pas sur le climatiseur et ne placez pas des objets dessus.
Ne suspendez pas d’objets depuis l’unité d’intérieur.
Ne placez pas de vases ou de récipients contenant de l’eau sur les climatiseurs.
N’exposez pas le climatiseur au contact direct de l’eau.
Ne mettez pas le climatiseur en marche avec les mains mouillées.
Ne touchez pas les commutateurs avec des objets coupants.
Débranchez l’alimentation électrique lorsque vous n’utilisez pas l’unité pendant des périodes prolongées.
Coupez toujours le disjoncteur électrique lorsque vous nettoyez le climatiseur ou que
vous changez le fi ltre à air.
Les valves de connexion chauffent lors du chauffage du climatiseur ; manipulez-les avec précaution.
Vérifi er la condition du socle d’installation pour voir s’il n’est pas endommagé.
Ne placez pas des animaux ou des plantes dans le cheminement direct de l’air.
Lorsque vous redémarrez le climatiseur après une longue période d’immobilisation hivernale,
mettez l’interrupteur en position marche au moins 12 heures avant de démarrer l’unité.
Ne buvez pas l’eau rejetée par le climatiseur.
N’utilisez pas le climatiseur pour conserver des aliments, des plantes ou des animaux,
des appareils de précision ou des illustrations.
N’exercez pas une pression excessive sur les ailettes de radiateur.
Faites fonctionner l’unité uniquement avec les fi ltres à air installés.
Ne bloquez pas ni ne couvrez la grille d’air entrant et l’orifi ce de sortie.
Veillez à tenir tout équipement électronique à 40 in. (1métre) au moins des appareils
intérieur et extérieur.
Eviter d’installer le climatiseur à proximité d’une cheminée ou de tout autre appareil de chauffage.
Lorsque vous installez les unités d’intérieur et d’extérieur, veillez à ce qu’elles soient
hors de portée des enfants.
N’utilisez pas de gaz infl ammables à proximité du climatiseur.
Installez le tuyau d’évacuation de manière à ce que l’eau s’évacue correctement.
Cet appareil n’est pas conçu pour être utilisé par des personnes (enfants inclus) dont les capacités physiques
ou mentales sont réduites, ou n
’
ayant pas l’expérience ou les connaissances requises, à moins qu’elles soient
supervisées ou aient reçu des instructions concernant l
’
utilisation de l’appareil par une personne responsable
de leur sécurité. Les enfants doivent être surveillés afi n de s’assurer qu’ils ne jouent pas avec l’appareil.
Avant d’utiliser cet appareil, veuillez lire attentivement ces “PRÉCAUTIONS DE SÉCURITÉ” et les respecter correctement.
Les instructions contenues dans la présente section sont toutes liées à la sécurité car vous devez maintenir des conditions de fonction-
nement sûres.
Les symboles “DANGER”, “AVERTISSEMENT” et “ATTENTION” ont le sens suivant dans ce manuel :
MINUTERIE HEBDOMADAIRE ........................................ 8
MINUTERIE D’ABAISSEMENT DE LA TEMPERATURE
.....10
FONCTIONNEMENT ÉCONOMIQUE ............................. 11
NETTOYAGE ET ENTRETIEN .......................................... 11
DEPANNAGE ................................................................... 12
CONSEILS D’UTILISATION ............................................14
AUTO-DIAGNOSTIC ........................................................16
DANGER!
Ce symbole signale une démarche qui, si elle est exécutée de façon incorrecte, peut
entraîner des blessures graves, voire la mort de l’utilisateur ou du personnel technique.
AVERTISSEMENT!
Ce marquage indique des procédures qui, si elles ne sont pas effectuées correctement, peuvent entraîner la mort ou de sérieuses blessures corporelles pour l’utilisateur ou le personnel d'entretien.
ATTENTION!
Ce symbole signale une démarche qui, si elle est exécutée de façon incorrecte, peut
entraîner un dégât pour l’utilisateur ou ses biens.
DANGER!
ATTENTION!
9374343072-04_OM.indb Sec1:19374343072-04_OM.indb Sec1:1 9/2/2010 2:59:03 PM9/2/2010 2:59:03 PM
Page 19

Fr-2
FONCTIONNALITÉS ET FONCTIONS
INVERSEUR
Lors du démarrage de l’opération, une grande quantité
d’électricité est utilisée pour amener rapidement la pièce à
la température souhaitée. Par la suite, l’appareil commute
automatiquement sur un réglage basse consommation
pour un fonctionnement économique et confortable.
FONCTIONNEMENT ÉCONOMIQUE
Quand le mode économique est utilisé, la température
de la pièce sera légèrement supérieure à la température
défi nie en mode refroidissement et légèrement inférieure
en mode chauffage. Par conséquent, le mode économique
permet d'économiser plus d'énergie que le mode normal.
Fonctionnement super silencieux
Quand la touche FAN est utilisée pour sélectionner QUIET
(silencieux), l’appareil commence le fonctionnement super
silencieuxl; le fl ux d’air de l’unité intérieure est réduit pour
assurer un fonctionnement plus silencieux.
FCHANGEMENT AUTOMATIQUE
Le mode de fonctionnement (Refroidissement,
Déshumidifi cation, Chauffage) change automatiquement
afi n de conserver la température programmée de manière
constante.
Fonction pratique
MINUTERIE HEBDOMADAIRE
Utilisez cette fonction de minuterie pour régler les horaires
de fonctionnement pour chaque jour de la semaine. Utilisez le réglage DAY OFF (Jour désactivé) pour désactiver le
fonctionnement programmé pour un jour sélectionné de la
semaine à venir. Comme tous les jours peuvent être réglés
ensemble, la minuterie hebdomadaire peut être utilisée
pour répéter les réglages de la minuterie pour tous les
jours.
MINUTERIE DE PROGRAMMATION DE LA
TEMPÉRATURE
Utilisez cette fonction de minuterie pour modifi er la
température programmée dans les heures de fonctionnement
programmées pour chaque jour de la semaine. Vous pouvez
l
’
utiliser avec d’autres réglages de la minuterie.
FILTRE À AIR AMOVIBLE
Il est possible de retirer le fi ltre à air de l’appareil intérieur
pour un nettoyage et une maintenance faciles.
Filtre résistant àux moisissure
Le Filtre à air a reçu un traitement anti-moisissure, ce qui
assure sa propreté et la facilité de son entretien.
Télécommande
TÉLÉCOMMANDE AVEC FIL
La télécommande avec fi l permet une commande pratique
du fonctionnement de l’appareil intérieur.
TÉLÉCOMMANDE SANS FIL (OPTION)
Il est possible d’utiliser la télécommande sans fi l. Lorsque
vous utilisez la télécommande, les éléments suivants sont
différents de l’utilisation de la télécommande avec fi l.
[ Les fonctions supplémentaires pour les télécommandes
sans fi l ]
• SLEEP (Temporisation)
• TIMER (MINUTERIE)
• MINIMUM HEAT (CHAUFFAGE MINIMUM)
Et vous pouvez utiliser les deux télécommandes avec et
sans fi l simultanément. (Mais les fonctions sont limitées.)
[ Les fonctions restreintes pour les télécommandes avec fi l ]
• Minuterie hebdomadaire
• Minuterie de la programmation de la température
Fonction économie d’énergie
et confortable
Fonction de nettoyage
9374343072-04_OM.indb Sec1:29374343072-04_OM.indb Sec1:2 9/2/2010 2:59:03 PM9/2/2010 2:59:03 PM
Page 20

Fr-3
NOMENCLATURE DES ORGANES
Télécommande
1
Bouton START/STOP (MARCHE/ARRÊT)
2
SET TEMP. (Température)
3
Bouton MODE
4
Bouton FAN (ventilateur)
5
Bouton ECONOMY (Économie
d’énergie)
6
Bouton TIMER MODE (RÉGLAGE DE
L’ H O RL O GE )
7
Bouton DAY (DAY OFF) (JOUR (JOUR
ARRET))
8
Bouton SET BACK (ABAISSER)
9
Bouton Régler l’heure (< >)
0
Bouton TIMER DELETE (SUPPRIMER)
A
Bouton TIMER SET (REGLER)
B
Bouton de direction et d’oscillation
verticale du fl ux d’air
*1
C
Bouton de direction et d’oscillation
horizontale du fl ux d’air
*2
D
Bouton MAINTENANCE (FILTER RESET)
(Maintenance (réinitialisation du fi ltre)
#1
E
Lampe de fonctionnement
F
Affi chage de la minuterie et de l’horloge
G
Affi chage du mode de fonctionnement
H
Affi chage de la vitesse du ventilateur
I
Affi chage du verrou de fonctionnement
J
Affi chage de la température
K
Affi chage des fonctions
Affi chage du dégivrage
Affi chage du capteur thermique
Affi chage de l’ECONOMY
(ÉCONOMIE D’ÉNERGIE)
Affi chage de l’oscillation verticale
*3
Affi chage du fi ltre
#1
*1~3 Ces fonctions sont inutilisables.
(Veuillez aussi consultez le mode d’emploi de
l’option lorsque vous l’utilisez avec des options,
etc.)
#1 Utilisable si correctement paramétré durant
I’installation. Veuillez consulter un dépanneur
agréé en cas d’utilisation de cette fonction.
I
H
G
J
K
E
1
C
5
D
A
0
3
4
B
8
6
2
F
9
7
9374343072-04_OM.indb Sec1:39374343072-04_OM.indb Sec1:3 9/2/2010 2:59:03 PM9/2/2010 2:59:03 PM
Page 21

Fr-4
PREPARATIFS
Appuyez sur le bouton TIMER MODE
(CLOCK ADJUST) (Mode minuterie
(RÉGLAGE DE L’HORLOGE)) pendant
au moins 2 secondes. L’affi chage de
l’heure sur la télécommande clignote.
2
SU MO TU WE TH FR SA
Appuyez sur le bouton DAY (JOUR) et sélectionnez le
jour actuel.
Une
apparaît autour du jour sélectionné.
Appuyez sur les boutons réglage de l’heure (< >)
pour régler l’heure actuelle. Appuyez de façon
répétée pour régler l’heure par incréments de
1 minute. Appuyez et maintenez enfoncé pour régler
l’heure actuelle par incréments de 10 minutes.
par ex. Lundi 23:00.
Appuyez de nouveau pour
terminer le réglage.
SUMOTUWETH FR
SA
1
3
5
Appuyez sur la touche SET BACK (ABAISSER)
pour passer de l’affi chage 12 heures à l’affi chage
24 heures.
3
4
SUMOTUWETH FR
SA
SUMOTUWETH FR
SA
SET BACK
Réglage de l’heure et du jour actuels
9374343072-04_OM.indb Sec1:49374343072-04_OM.indb Sec1:4 9/2/2010 2:59:04 PM9/2/2010 2:59:04 PM
Page 22

Fr-5
FONCTIONNEMENT
AUTO COOL DRY *HEATFAN
AUTO MED HIGH LOW QUIET
Plage de réglage de la température
Automatique .............................................. 64 to 88 °F
Refroidissement/Déshumidifi cation ........ 64 to 88 °F
* Chauffage ................................................... 60 to 88 °F
Diminuer Augmenter
Voyant d’exploitation (de fonctionnement)
Climatiseur MARCHE : Allumé
Climatiseur ARRET : Eteint
Appuyez sur le bouton START/STOP (mise en marche/arrêt.)
Appuyez sur le bouton MODE (mode) pour régler le mode de fonctionnement. Si DRY
(sec) est sélectionné, la vitesse du ventilateur sera réglée sur AUTO.
Appuyez sur les boutons SET TEMP (réglage de la température) pour régler la
température de la pièce.
Appuyez sur FAN (ventilateur) pour régler la vitesse du ventilateur.
Appuyez sur la touche ECONOMY (ÉCONOMIES D’ÉNERGIE) pour
lancer ou arrêter le fonctionnement en mode économique.
Pour de plus amples détails sur cette fonction, reportez-vous
à la page 11.
Les instructions relatives au chauffage (*) ne s’appliquent qu’au “MODELE CHAUFFANT ET REFROIDISSANT” (cycle inverse).
Mise en marche/arrêt
Réglage du mode de fonctionnement
Réglage du mode de fonctionnement
Réglage de la température de la pièce
Réglage de la vitesse du ventilateur
FONCTIONNEMENT ÉCONOMIQUE
(Automatique) (Refroidissement) (Déshumidifi cation)
(Ventilation) (* Chauffage)
(Automatique)
(Rapide) (Moyen) (Lent) (Silencieux)
9374343072-04_OM.indb Sec1:59374343072-04_OM.indb Sec1:5 9/2/2010 2:59:04 PM9/2/2010 2:59:04 PM
Page 23

Fr-6
Appuyez simultanément sur les touches DAY (DAY
OFF) et TIMER SET pendant minimum 2 secondes pour
activer la fonction de blocage partiel et bloquer toutes
les touches de la télécommande, excepté les touches
START/STOP, SET TEMP., MODE et FAN. Pour désactiver la fonction de blocage partiel, appuyez de nouveau
sur ces touches pendant minimum 2 secondes.
Lorsque la fonction de verrouillage de l’appareil est
activée, le symbole
apparaît. Si vous appuyez
sur un bouton alors que la fonction de verrouillage de
l’appareil est activée, l’affi chage
PL clignote.
Appuyez sur le bouton ECONOMY (ÉCONOMIES) pendant plus
de 2 secondes pour indiquer si la température de la pièce doit
être détectée sur l’unité d’intérieur ou sur la télécommande.
Lorsque l’affi chage du capteur thermique apparaît, la
température de la pièce est détectée par la télécommande.
REMARQUES
• Si cette fonction est verrouillée, l’endroit où la température de la pièce est détectée ne peut pas être modifi é et le symbole
clignote lorsque le bouton ECONOMY (ÉCONOMIES) est enfoncé pendant 2 secondes ou plus.
Unité d’intérieur
Sélection du capteur de la température de la pièce
FONCTIONNEMENT
Fonction de verrouillage de l’appareil
• Cette fonction est verrouillée en usine. Afi n de détecter correctement la température de la pièce, consultez le
personnel de service agréé lorsque vous utilisez cette fonction.
9374343072-04_OM.indb Sec1:69374343072-04_OM.indb Sec1:6 9/2/2010 2:59:04 PM9/2/2010 2:59:04 PM
Page 24

Fr-7
Programmation de la minuterie de MISE EN MARCHE/ARRET
FONCTIONS DE LA MINUTERIE
MINUTERIE DE MISE EN MARCHE/ARRET
Appuyez sur TIMER MOD E (mode
minuterie) pour mettre en marche ou arrêter la minuterie.
2
• Appuyez sur le bouton TIMER DELETE (SUPPRIMER) pour annuler le mode minuterie.
• Le mode minuterie peut également être annulé en changeant le mode de la minuterie à l’aide du
bouton TIMER MODE (mode minuterie.)
1
NON
STOP
OFF
TIMER
ON
TIMER
WEEKLY
TIMER
Aucun
affi chage
SUMOTUWETH FR
SA
Appuyez sur les boutons réglage de l'heure (< >) pour
régler l’heure. Une fois l’heure programmée, la minuterie
démarre automatiquement. La durée de temps restant
avant le démarrage de la minuterie ARRÊT est indiquée sur
l’affi chage de la minuterie et diminue au fur et à mesure
que le temps s’écoule.
Entre 1 et 24 heures
par ex. Minuterie ARRET
programmée sur 6 heures
Annulation
OFF timer (minuterie ARRET) (voir page 7.)
Utilisez cette fonction de la minuterie pour arrêter le climatiseur. Le climatiseur s’arrête lorsque le temps défi ni
est écoulé. La minuterie peut être préréglée sur 24 heures maximum.
ON timer (minuterie MARCHE) (voir page 7.)
Utilisez cette fonction de la minuterie pour démarrer le climatiseur. La minuterie se met en marche et le climatiseur
démarre une fois l'heure réglée passée. La minuterie peut être préréglée sur 24 heures maximum.
WEEKLY timer (minuterie HEBDOMADAIRE) (voir page 8.)
Utilisez cette fonction de la minuterie pour régler les durées de fonctionnement de chaque jour de la semaine.
Utilisez le réglage DAY OFF (JOUR ARRET) pour annuler le fonctionnement durant un jour sélectionné de la
semaine suivante.
Etant donné que tous les jours peuvent être défi nis ensemble, la minuterie hebdomadaire peut permettre de
répéter les réglages de la minuterie pour tous les jours.
Temperature SET BACK timer (minuterie d’abaissement de la température) (voir
page 10.)
Utilisez cette fonction de la minuterie pour changer la température défi nie dans les heures de fonctionnement
défi nies pour chaque jour de la semaine. Elle peut être utilisée conjointement avec d’autres réglages de la
minuterie.
(Sans ARRÊT)
(Minuterie
ARRÊT)
(Minuterie
MARCHE)
(Minuterie
HEBDOMADAIRE)
9374343072-04_OM.indb Sec1:79374343072-04_OM.indb Sec1:7 9/2/2010 2:59:04 PM9/2/2010 2:59:04 PM
Page 25

Fr-8
SUMOTUWETH FR
SA
369
12 15 18 21
MINUTERIE HEBDOMADAIRE
Appuyez sur TIMER MODE (mode minuterie) pour sélectionner la minuterie
hebdomadaire.
2
Appuyez sur le bouton TIMER SET
(REGLER) pendant 2 secondes minimum.
1
3
SUMOTUWETH FR
SA
369
12 15 18 21
Programmation du jour de la semaine
Appuyez sur le bouton DAY (JOUR) pour sélectionner le jour de la semaine, puis appuyez sur le bouton TIMER SET (REGLER) pour confi rmer
la programmation.
Le réglage ALL (TOUS) permet de programmer tous les jours simul-
tanément lorsqu’une
apparaît autour de chaque jour.
ALL SU MO TU WE TH FR SA
SUMOTUWETH FR
SA
369
12 15 18 21
4
Réglage de l’heure
Appuyez sur les boutons réglage de l’heure (< >) pour régler l’heure, puis
appuyez sur le bouton TIMER SET (réglage minuterie) pour confi rmer le
réglage et passer au réglage de l’heure de ON (MISE EN MARCHE) ou de
OFF (ARRÊT) suivant. Vous pouvez confi gurer jusqu’à 2 mises en marche
et arrêts par jour.
Appuyez sur le bouton DAY (JOUR) pour terminer de régler l’heure et
revenir au réglage du jour de la semaine.
Lorsque l’heure de fonctionnement est
programmée, le symbole
apparaît.
5
Répétez les étapes 3 et 4.
Pour terminer de programmer la minuterie hebdomadaire, appuyez sur le bouton TIMER SET (REGLER)
pendant 2 secondes minimum.
Pour supprimer l’heure de fonctionnement
Si le bouton TIMER DELETE (SUPPRIMER)
est
enfoncé lors de l’étape
3 ou 4, l’heure
de fonctionnement du jour sélectionné
est supprimée.
Si tous les jours sont sélectionnés, les
heures de fonctionnement de tous les
jours sont supprimées.
REMARQUES
• L’heure de fonctionnement peut être programmée par incréments de 30 minutes uniquement.
• L’heure d’arrêt (OFF) peut être reportée au lendemain.
• Les fonctions de la minuterie de MISE EN MARCHE et d’ARRET ne peuvent pas être réglées à l’aide de la minuterie hebdomadaire. Une heure de MISE EN MARCHE et d’ARRET doit être programmée.
ON-1 OFF-1 ON-2 OFF-2
par ex. La minuterie est réglée de 7:00 à
18:00.
1
2
1
2
3
Réglage de la minuterie hebdomadaire
TOUS
Arrêt-1Marche-1 Arrêt-2Marche-2
9374343072-04_OM.indb Sec1:89374343072-04_OM.indb Sec1:8 9/2/2010 2:59:05 PM9/2/2010 2:59:05 PM
Page 26

Fr-9
SUMOTUWETH FR
SA
369
12 15 18 21
SUMOTUWETH FR
SA
369
12 15 18 21
MINUTERIE HEBDOMADAIRE
Mise en marche
Lorsque la minuterie hebdomadaire
est sélectionnée, la minuterie démarre
automatiquement.
L’heure de fonctionnement du jour
actuel est affi chée.
Annulation
• Appuyez sur le bouton TIMER DELETE (SUPPRIMER) pour annuler
le mode minuterie.
•
Le mode minuterie peut également
être annulé en changeant le mode
de la minuterie à l’aide du bouton
TIMER MODE (mode minuterie.)
1
Lorsque la minuterie hebdomadaire est activée, appuyez sur
le bouton TIMER SET (REGLER)
pendant 2 secondes minimum
pour programmer le jour.
Sélectionnez le jour qui tiendra lieu de JOUR ARRET.
Appuyez sur le bouton DAY
(DAY OFF) (JOUR (JOUR
ARRET) pendant 2 secondes
minimum pour régler le
JOUR ARRET.
Appuyez sur le bouton TIMER SET
(REGLER) pendant 2 secondes
minimum pour terminer le réglage
DAY OFF (JOUR ARRET).
243
Annulation
Suivez les mêmes procédures que
celles effectuées pour la confi guration.
par ex. Le réglage DAY OFF (JOUR
ARRET) est défi ni sur lundi.
REMARQUES
• Le réglage DAY OFF (JOUR ARRET) ne peut être utilisé que les jours pour lesquels il existe déjà des réglages hebdomadaires.
• Si l’heure de fonctionnement court jusqu’au jour suivant (réglage du jour suivant), la plage DAY OFF (JOUR ARRET)
effective est réglée comme indiqué ci-dessous.
Normal
Réglage du jour suivant
Réglage du jourJour précédent Jour suivant Réglage du jourJour précédent Jour suivant
• DAY OFF (désactivation du mode jour) ne peut être confi guré que 1 fois. Le réglage DAY OFF (JOUR ARRET) est annulé
automatiquement une fois le jour défi ni écoulé.
La marque
clignote sous un jour de la
semaine.
DAY OFF
DAY OFF
SUMOTUWETH FR
SA
369
12 15 18 21
369
12 15 18 21
par ex. Heure de fonctionnement 7:00-18:00
Fonctionnement de la minuterie HEBDOMADAIRE
Réglage du JOUR ARRET (pour les vacances)
ArrêtMarche ArrêtMarche ArrêtMarche ArrêtMarche
HEBDOMADAIRE HEBDOMADAIRE
HEBDOMADAIRE HEBDOMADAIRE
9374343072-04_OM.indb Sec1:99374343072-04_OM.indb Sec1:9 9/2/2010 2:59:05 PM9/2/2010 2:59:05 PM
Page 27

Fr-10
MINUTERIE D’ABAISSEMENT DE LA TEMPERATURE
Appuyez sur le bouton SET BACK (ABAISSER) pour revenir
à l’affi chage de confi rmation SET BACK (ABAISSER).
L’heure de fonctionnement SET BACK (ABAISSER) et la température réglée sont affi chées.
2
Appuyez sur le bouton TIMER SET
(REGLER) pendant 2 secondes
minimum.
1
3
Réglage du jour Réglage de l’heure de fonctionnement
Effectuez les mêmes procédures pour régler l’heure de fonctionnement que celles exécutées pour la minuterie
hebdomadaire.
Le bouton TIMER DELETE (SUPPRIMER) est utilisé comme dans les procédures décrites pour la minuterie hebdomadaire.
4
REMARQUES
• La minuterie d’ABAISSEMENT change uniquement la température programmée, elle ne peut pas servir à démarrer ou à
arrêter le climatiseur.
• La minuterie de programmation peut être confi gurée pour fonctionner jusqu’à 2 fois par jour, mais 1 seul réglage peut
être utilisé.
• La minuterie d’ABAISSEMENT peut être utilisée avec les fonctions de la minuterie MISE EN MARCHE (ON), ARRET (OFF)
et hebdomadaire.
• L’heure de fonctionnement de l’ABAISSEMENT est affi chée uniquement dans l’affi chage de confi rmation SET BACK
(ABAISSER). (Reportez-vous à l’étape 1 pour l’affi chage de confi rmation SET BACK (ABAISSER).)
SET BACK
SUMOTUWETH FR
SA
369
12 15 18 21
par ex. Lors du réglage de tous les jours
simultanément
Réglage de la
température
Appuyez sur les boutons SET TEMP (réglage de
la température) pour régler la température. (La
plage de réglage de la température est identique
à la plage du mode de fonctionnement.)
par ex. Heure de fonctionnement 15:00–22:00
5
Répétez les étapes 3 et 4.
Appuyez sur le bouton TIMER SET
(REGLER) pendant 2 secondes minimum pour terminer les réglages
de la minuterie d’ABAISSEMENT.
76˚F
76˚F
84˚F
Température d’ABAISSEMENT
Température normale
Mise en marche
SET BACK
Appuyez sur la touche SET BACK (ABAISSER). L’affi chage de confi rmation
SET BACK (ABAISSER) apparaît pendant 5 secondes, puis la minuterie
démarre automatiquement.
par ex. Affi chage lors du fonctionnement de la
minuterie d’ABAISSEMENT (L’heure de fonctionnement n’est pas affi chée.)
Annulation
Appuyez sur le bouton SET BACK
(ABAISSER), puis appuyez sur le bouton
TIMER DELETE (SUPPRIMER) lorsque
l’affi chage de confi rmation SET BACK
(ABAISSER) apparaît. Même si le bouton
SET BACK (ABAISSER) est enfoncé à
nouveau, la minuterie d’ABAISSEMENT
sera annulée.
SUMOTUWETH FR
SA
369
12 15 18 21
En l’absence de réglage
SET BACK (ABAISSER)
existant, “- -” apparaît
pour la température.
SUMOTUWETH FR
SA
1
3
2
4
1
2
Réglage de la minuterie d’abaissement de la température
Fonctionnement du réglage d’abaissement de la température
ArrêtMarche
9374343072-04_OM.indb Sec1:109374343072-04_OM.indb Sec1:10 9/2/2010 2:59:06 PM9/2/2010 2:59:06 PM
Page 28

Fr-11
NETTOYAGE ET ENTRETIEN
Avant de nettoyer l’unité, veillez à arrêter l’unité et à débrancher l’alimentation.
Désactivez le disjoncteur électrique.
Un ventilateur fonctionne à une vitesse rapide à l’intérieur de l’unité et peut provoquer des
blessures.
Lorsqu’elle est utilisée pendant des périodes prolongées, l’unité peut accumuler de la saleté à l’intérieur, ce qui réduira
ses performances. Nous vous recommandons d’examiner régulièrement l’unité en plus du nettoyage et de l’entretien
que vous effectuez. Pour plus d’informations, consultez le personnel de service agréé.
Lorsque vous nettoyez le châssis de l’unité, n’utilisez pas de l’eau à plus de 104°F, des nettoyants abrasifs ou des
agents volatiles tels que le benzène ou un diluant.
N’exposez pas le châssis de l’unité à des insecticides liquides ou à de la laque.
Si l’appareil n'est pas utilisé pendant une période de 1 mois ou plus, veillez à bien laisser sécher les parties internes de
l’appareil auparavant en le faisant fonctionner en mode ventilateur pendant une demi-journée.
ATTENTION!
FONCTIONNEMENT ÉCONOMIQUE
Mettez le climatiseur en marche avant de procéder aux démarches suivantes.
Utilisation du fonctionnement économique (ECONOMY)
Appuyez sur la touche ECONOMY .
L’affi chage ECONOMY s’allume.
Le fonctionnement ECONOMY commence.
Utilisation du fonctionnement économique (ECONOMY)
Appuyez de nouveau sur la touche ECONOMY.
L’affi chage ECONOMY s’éteint
Le fonctionnement normal commence.
À propos du fonctionnement économique (ECONOMY)
En sortie maximale, le fonctionnement économique (ECONOMY) est environ de 70% du fonctionnement normal du climatiseur pour le refroidissement et le chauffage.
Si la pièce ne se rafraîchit (réchauffe) pas en mode économique ECONOMY, sélectionnez le fonctionnement normal.
Pendant la période de contrôle en mode AUTO, le fonctionnement du climatiseur ne passera pas en mode économique
(ECONOMY) même si le mode économique est sélectionné par l’appui de la touche ECONOMY.
Quand le mode économique ECONOMY est utilisé, la température de la pièce sera légèrement supérieure à la tempéra-
ture défi nie en mode refroidissement et légèrement inférieure en mode chauffage. Par conséquent, le mode économique ECONOMY permet d'économiser plus d'énergie que le mode normal.
En cas d'utilisation de plusieurs climatiseurs, le mode de fonctionnement économique ECONOMY est uniquement
disponible pour l'unité d'intérieur réglée.
Nettoyage du fi ltre à air
Retirez la poussière des fi ltres à air en les aspirant ou en les lavant. Après le lavage, laissez bien sécher les fi ltres à l’abri
de la lumière du soleil.
La poussière peut être retirée du fi ltre à air soit avec un aspirateur, soit en lavant le fi ltre dans une solution d’eau et de
détergent doux. Si vous lavez le fi ltre, veillez à bien le laisser sécher dans un endroit ombragé avant de le réinstaller.
Si vous laissez s’accumuler de la poussière sur le fi ltre à air, le fl ux d’air sera plus faible, ce qui réduira l’effi cacité du fonctionnement et augmentera le bruit.
Utilisable si correctement paramétré durant l’installation. Veuillez consulter un dépanneur pour utiliser
cette fonction.
• S’allume lorsqu’il est temps de nettoyer les fi ltres à air.
Après la mise sous tension.
Appuyez sur le bouton ENTRETIEN sur la
télécommande pendant 2 secondes ou plus.
L’affi chage du fi ltre disparaîtra.
Réinitialisation du voyant du fi ltre (réglage spécial)
9374343072-04_OM.indb Sec1:119374343072-04_OM.indb Sec1:11 9/2/2010 2:59:06 PM9/2/2010 2:59:06 PM
Page 29

Fr-12
DEPANNAGE
Symptômes Problème
Voir la
page
FONCTION-
NEMENT
NORMAL
Ne fonctionne pas
immédiatement:
Si l’unité est arrêtée puis redémarrée immédiatement, le com-
presseur ne fonctionne pas pendant 3 minutes environ afi n
d’empêcher que les fusibles ne sautent.
Chaque fois que le disjoncteur électrique est arrêté puis re-
démarré, le circuit de protection fonctionne pendant environ
3 minutes, empêchant ainsi l’unité de fonctionner pendant ce
laps de temps.
—
Bruit audible:
Au cours du fonctionnement de l’unité et immédiatement après
son arrêt, le bruit de l’eau circulant dans les tuyaux du climatiseur peut être audible. Le bruit peut également être tout particulièrement sensible environ 2 à 3 minutes après le démarrage de
l’unité (son du liquide de refroidissement qui circule)
.
—
* Lors de l’opération de chauffage, un grésillement peut se faire
entendre de temps à autre. Ce son est produit par l’opération
de dégivrage automatique.
14
Odeurs:
Des odeurs peuvent émaner de l’unité d’intérieur. Ces odeurs
sont le résultat des odeurs qui stagnent dans la pièce (meubles,
tabac, etc.) et qui ont été aspirées dans le climatiseur.
—
Emission de buée ou de
vapeur:
Lors de l’opération de refroidissement ou de déshumidifi cation,
une fi ne buée peut être produite par l’unité d’intérieur. Elle résulte
du brusque refroidissement de l’air de la pièce par l’air émis par
le climatiseur, entraînant ainsi une condensation et de la buée.
—
* Lors de l’opération de chauffage, le ventilateur de l’unité d’exté-
rieur peut s’arrêter et de la vapeur peut s’échapper de l’unité. Ceci
est dû à l’opération de dégivrage automatique.
14
Le fl ux d’air est faible ou
s’arrête:
*
Lorsque l’opération de chauffage démarre, la vitesse du ventilateur est
temporairement très lente pour laisser les pièces internes se réchauffer
.
* Lors de l’opération de chauffage, si la température de la pièce
dépasse le réglage du thermostat, l’unité d’extérieur s’arrête et
le ventilateur de l’unité d’intérieur fonctionne très lentement. Si
vous souhaitez augmenter la température de la pièce, réglez le
thermostat sur un paramètre plus élevé.
—
* Lors de l’opération de chauffage, l’unité cesse temporairement
de fonctionner (entre 4 et 15 minutes) en mode de dégivrage
automatique. Lors de l’opération de dégivrage automatique, le
symbole
apparaît sur l’affi chage de la télécommande.
14
Il est possible que le ventilateur fonctionne très lentement au
cours du mode de déshumidifi cation ou lorsque l’unité surveille
la température de la pièce.
—
Dans le cas d’unités multi-type, si plusieurs unités fonctionnent
dans différents modes comme indiqué ci-dessous, les unités
mises en route par la suite s’arrêtent et
s’affi che sur la télécommande des unités intérieures arrêtées.
Mode chauffage et mode refroidissement (ou mode déshumidifi cation)
Mode chauffage et mode souffl erie
16
En mode QUIET (SILENCE), le ventilateur fonctionne très lentement.
—
En mode AUTO de surveillance, le ventilateur fonctionne très lentement
.
—
L’unité d’extérieur rejette
de l’eau:
* Lors de l’opération de chauffage, l’unité d’extérieur peut rejeter
de l’eau suite à l’opération de dégivrage automatique.
14
Le symbole
du capteur
thermique affi ché sur la
télécommande clignote:
Il est possible que le fonctionnement du capteur de température
de la pièce soit perturbé. Veuillez consulter le personnel de service
agréé.
—
Les instructions relatives au chauffage (*) ne s’appliquent qu’au “MODELE CHAUFFANT ET REFROIDISSANT” (cycle inverse).
AVERTISSEMENT!
En cas de dysfonctionnement (odeur de brûlé, etc.), arrêter immédiatement le fonctionnement,
couper le disjoncteur puis prendre contact avec du personnel technique agréé.
La mise en position arrêt de l’interrupteur ne permettra pas de débrancher entièrement l’unité
de sa source d’alimentation. Veillez à toujours couper le disjoncteur électrique pour vous assurer que l’alimentation n’arrive plus.
Avant de vous adresser au personnel de service, effectuez les vérifi cations suivantes:
9374343072-04_OM.indb Sec1:129374343072-04_OM.indb Sec1:12 9/2/2010 2:59:06 PM9/2/2010 2:59:06 PM
Page 30

Fr-13
DEPANNAGE
Symptômes Problème
Voir la
page
VERIFICATION
SUPPLEMEN-
TAIRE
Ne fonctionne pas du
tout:
Le disjoncteur a-t-il été désactivé ?
Y a-t-il eu une panne de courant ?
Un fusible a-t-il sauté ou un disjoncteur s’est-il déclenché ?
—
La minuterie fonctionne-t-elle ?
7 à 9
Performances de
refroidissement
(ou de *chauffage)
médiocres:
Le fi ltre à air est-il encrassé ?
La grille d’air entrant ou l’orifi ce de sortie du climatiseur sont-
ils obstrués ?
Avez-vous correctement paramétré les réglages de la tempé-
rature de la pièce (thermostat) ?
Y a-t-il une fenêtre ou une porte ouverte ?
Lors de l’opération de refroidissement, y a-t-il une fenêtre
ouverte qui laisse la lumière du soleil entrer ? (Fermez les
rideaux dans ce cas.)
Lors de l’opération de refroidissement, la pièce comporte-t-
elle des appareils de chauffage et des ordinateurs ou bien y
a-t-il trop de monde dans la pièce ?
—
L’unité est-elle en mode QUIET (SILENCE) ?
—
Si le problème persiste après que vous ayez effectué toutes ces vérifi cations ou si vous notez une odeur de brûlé, arrêtez
immédiatement le climatiseur, débranchez l’alimentation et consultez le personnel de service agréé.
9374343072-04_OM.indb Sec1:139374343072-04_OM.indb Sec1:13 9/2/2010 2:59:06 PM9/2/2010 2:59:06 PM
Page 31

Fr-14
CONSEILS D’UTILISATION
Les instructions relatives au chauffage (*) ne s’appliquent qu’au “MODELE CHAUFFANT ET REFROIDISSANT” (cycle inverse).
Faible refroidissement ambiant
Lorsque la température extérieure chute, il est possible que
le ventilateur de l’appareil extérieur passe en faible vitesse,
ou que 1 des ventilateurs s’arrête par intermittence.
Deux télécommandes (facultatif)
Il est possible d’ajouter une télécommande supplémentaire,
jusqu’à 2, au maximum. Chaque télécommande peut contrôler le climatiseur. Cependant, les fonctions de minuterie ne
peuvent pas être utilisées sur l’appareil secondaire.
Contrôle de groupe
1 télécommande peut commander jusqu’à 16 climatiseurs.
Tous les climatiseurs fonctionneront selon les mêmes
réglages.
La commande de groupe ne peut pas s’utiliser avec des
types multiples.
*Performances de chauffage
Le principe de fonctionnement de cet appareil est celui
d’une pompe à chaleur : il absorbe la chaleur en provenance
de l’extérieur et la transfère à l’intérieur. Par conséquent,
les performances diminuent au fur et à mesure que la
température extérieure diminue. Si vous pensez que la chaleur
produite est insuffi sante, nous vous recommandons d'utiliser
ce climatiseur avec un autre dispositif de chauffage.
Ce type de climatiseur permet de réchauffer toute la pièce
grâce à une bonne circulation de l’air. Il faut donc parfois
attendre un certain temps avant que la pièce se réchauffe
après avoir mis l’appareil en marche.
*Si les températures intérieures et
extérieures sont élevées
Si les températures intérieures et extérieures sont élevées
au cours de l’utilisation en mode de chauffage, il se peut
que le ventilateur de l’unité d’intérieur s’arrête par intermittences.
*Dégivrage automatique contrôlé par
ordinateur
Si le mode de chauffage est utilisé par basse température
et forte humidité extérieure, il se peut que du givre se
forme sur l’unité d’extérieur et réduise ainsi les performances de fonctionnement.
Afi n d’éviter ce type de performances réduites, cette unité
est équipée d’une fonction de dégivrage automatique
contrôlé par ordinateur. Au cours du cycle de dégivrage,
le ventilateur d’intérieur s’arrête et
s’affi che sur la
télécommande. Le redémarrage du climatiseur intervient
après un intervalle de 4 à 15 minutes.
Si, suite à l’arrêt de l’opération de chauffage, du gel ve-
nait à se former sur l’unité extérieure, elle commencera
l’opération de Dégel automatique. À ce stade, l’appareil
extérieur s’arrêtera automatiquement après avoir fonctionné pendant quelques minutes.
9374343072-04_OM.indb Sec1:149374343072-04_OM.indb Sec1:14 9/2/2010 2:59:06 PM9/2/2010 2:59:06 PM
Page 32

Fr-15
MODELE CHAUFFANT ET REFROIDISSANT (cycle
inverse)
Fonction Auto changeover (changement automatique)
Lorsque AUTO CHANGEOVER (CHANGEMENT AUTO-
MATIQUE) est sélectionnée, le climatiseur sélectionne
le mode de fonctionnement approprié (Cooling (Refroidissement) ou Heating (Chauffage)) en fonction de la
température actuelle de votre pièce.
Si vous sélectionnez d’abord REMPLACEMENT AUTO-
MATOMATIQUE, le ventilateur foncionne à très faible vitesse pendant quelques minutes, le temps que l’appareil
détermine les conditions actuelles de la pièce et sélectionne le mode de fonctionnement approprié.
Si la différence entre le réglage du thermostat et la tem-
pérature réelle de la pièce est supérieure à 4°F
→ Mode refroidissement
Si la différence entre le réglage du thermostat et la tem-
pérature réelle de la pièce est d’environ 4°F
→
Déterminé par la température extérieure
Si la différence entre le réglage du thermostat et la tem-
pérature réelle de la pièce est supérieure à 4°F
→
Fonctionnement de chauffage
CONSEILS D’UTILISATION
Mode de fonctionnement : AUTO
À propos du mode de fonctionnement
En mode de chauffage:
Réglez le thermostat sur une température supérieure à la température actuelle de la pièce. Le mode de chauffage
ne fonctionne pas si la température du
thermostat est plus faible que la température réelle de la pièce.
En mode de refroidissement/déshumidifi cation:
Réglez le thermostat sur une température inférieure à la température actuelle
de la pièce. Les modes de refroidissement et de déshumidification ne fonctionnent pas si la température du thermostat est supérieure à la température
réelle de la pièce (en mode de refroidissement, le ventilateur fonctionne seul).
En mode de ventilation:
Vous ne pouvez pas utiliser l’unité pour
chauffer et refroidir votre pièce.
* Chauffage:
À utiliser pour chauffer votre pièce.
Lorsque le mode de chauffage est sélectionné, le venti-
lateur du climatiseur fonctionne très lentement pendant
environ 3 ou 5 minutes, après quoi il passera au réglage de
ventilateur sélectionné. Cette période de temps permet à
l’unité d’intérieur de chauffer avant de passer en fonctionnement plein.
Lorsque la température de la pièce est très basse, du givre
peut se former sur l’unité d’extérieur, et ses performances
peuvent s’en trouver réduites. Afi n de retirer ce givre, l’unité
entre automatiquement en cycle de dégivrage de temps à
autre. Au cours de l’opération de dégivrage automatique,
l’opération de chauffage est interrompue.
Après le démarrage du fonctionnement de chauffage, la
pièce se réchauffe après un certain temps.
Refroidissement:
À utiliser pour rafraîchir votre pièce.
Déshumidifi cation:
À utiliser pour rafraîchir doucement tout en déshumidifi ant
votre pièce.
Vous ne pouvez pas chauffer la pièce pendant le mode de
déshumidifi cation.
En mode de déshumidifi cation, l’unité fonctionne
lentement; pour ajuster l’humidité de la pièce, le ventilateur
de l’unité d’intérieur peut s’arrêter de temps à autre. Le
ventilateur peut également fonctionner très lentement lors
de l’ajustement de l’humidité de la pièce.
La vitesse du ventilateur ne peut pas être modifi ée manuel-
lement lorsque le mode de déshumidifi cation a été sélectionné.
Ventilation:
À utiliser pour faire circuler l’air dans votre pièce.
MODELE REFROIDISSEMENT
Lorsque la température de la pièce est 4°F plus élevée
que la température programmée, le mode de fonctionnement passe de Déshumidifi cation à Refroidissement.
En mode Déshumidifi cation, le ventilateur passe à la vi-
tesse de ventilation LOW (lent) afi n d’assurer un rafraîchissement en douceur de la pièce, et s’arrête parfois
momentanément de tourner.
Lorsque la température de la pièce approche du ré-
glage du thermostat, le climatiseur passe en mode de
fonctionnement de surveillance. En mode de fonctionnement de surveillance, le ventilateur fonctionne très
lentement. Si la température de la pièce change par la
suite, le climatiseur sélectionne une fois encore le mode
de fonctionnement approprié (Heating (Chauffage) ou
Cooling (Refroidissement)) pour régler la température
sur la valeur programmée dans le thermostat.
9374343072-04_OM.indb Sec1:159374343072-04_OM.indb Sec1:15 9/2/2010 2:59:06 PM9/2/2010 2:59:06 PM
Page 33

Fr-16
CONSEILS D’UTILISATION
Climatiseur multi-type
Cette unité intérieure peut être raccordée à une unité extérieure multi-type. Le climatiseur multi-type permet l’emploi de plusieurs unités
intérieures en plusieurs endroits. Les unités intérieures peuvent fonctionner simultanément, en fonction de leur puissance respective.
Emploi simultané d’unités multiples
Les instructions relatives à l’inverseur () s’appliquent uniquement au “MODELE INVERSEUR”.
Si vous programmez l’appareil intérieur pour fonctionner dans une
combinaison de modes qu’il ne peut pasactiver,
s’affi che
sur la télécommande et l’appareil se met en mode de veille.
Mode chauffage et mode refroidissement (ou mode
déshumidifi cation)
Mode chauffage et mode souffl erie
L’appareil peut fonctionner dans les combinaisons de modes
suivantes.
Mode refroidissement et mode déshumidifi cation
Mode refroidissement et mode souffl erie
Mode déshumidifi cation et mode souffl erie
Le mode de fonctionnement (mode chauffage ou refroidisse-
ment/déshumidifi cation) de l’appareil extérieur sera défi ni par
le mode de fonctionnement du premier appareil intérieur mis
en marche. Cependant, si l’appareil intérieur a été démarré
en mode souffl erie, le mode de fonctionnement de l’appareil
extérieur ne sera pas établi.
Par exemple, si l’appareil intérieur (A) a été démarré en mode
souffl erie puis que l’appareil intérieur (B) a été mis en mode
chauffage, l’appareil intérieur (A) démarre provisoirement en
mode souffl erie mais, lorsque l’appareil intérieur (B) se met
à fonctionner en mode chauffage,
apparaîtra sur l'affi chage de la télécommande de l'appareil (A) et celui-ci se mettra
en mode veille. L’appareil intérieur (B) continue de fonctionner
en mode chauffage.
Lorsque vous utilisez un climatiseur à types multiples, plusieurs
appareils d’intérieur peuvent être utilisés simultanément.
Cependant, lorsque 2 appareils intérieurs ou plus du même
groupe sont utilisés simultanément, la performance du chauffage et du refroidissement sera moins effi cace que lors de
l’utilisation d’un seul appareil d’intérieur. De même, si vous
souhaitez utiliser plus de 1 appareil d’intérieur simultanément
pour le refroidissement, l’utilisation devra être concentrée la
nuit et dans les périodes où une énergie moins importante
est nécessaire. De même, si plusieurs unités sont employées
en même temps pour le chauffage, il est conseillé, selon les
besoins, de leur adjoindre d’autres appareils de chauffage.
Les conditions saisonnières, la température externe, la struc-
ture des salles et le nombre de personnes qui s’y trouvent
font varier l’effi cacité de fonctionnement. Il est donc conseillé
d’essayer différents modèles de fonctionnement pour vérifi er
le niveau de puissance de chauffage et de refroidissement,
fourni par les appareils, et de les utiliser de la manière qui
convient le mieux à votre mode de vie.
Si, au cours de l’utilisation simultanée, vous vous apercevez
que 1 ou plusieurs des appareils fournissent un faible niveau
de refroidissement ou de chauffage, nous vous recommandons
d’arrêter l’utilisation simultanée de plusieurs appareils.
L’appareil ne peut pas fonctionner dans les modes suivants.
Si l’alimentation de l’appareil a été interrompue par une panne
de courant, le climatiseur se remet automatiquement en marche
dès le rétablissement du courant et conserve le mode actif au
moment de la panne de courant.
L’utilisation d’autres appareils électriques (rasoir, etc.) et l’utilisa-
tion à proximité d’un émetteur radio sans fi l peuvent provoquer
le dysfonctionnement du climatiseur. Si cela se produit, débranchez l’alimentation, rebranchez-la, puis utilisez la télécommande
pour relancer le climatiseur.
Redémarrage AUTO
En cas d’interruption de l’alimentation
AUTO-DIAGNOSTIC
Lorsque l’erreur “Er” apparaît, vous devez examiner le climatiseur. Veuillez consulter le personnel de service agréé.
Numéro de l’unité (généralement “00”)
Code d’erreur
par ex. Vérifi cation de l’auto-diagnostic
* Pendant l’emploi en mode chauffage, le dessus de l’unité
intérieure peuvent devenir chaud du fait que du liquide
de refroidissement circule dans l’appareil même quand
il est arrêté, mais il ne s’agit pas d’une défaillance.
* Pendant l’emploi du mode de chauffage, l’unité ex-
térieure commence parfois le dégrivrage pendant de
courtes périodes. Au cours du dégivrage, si vous réglez
à nouveau l’unité intérieure pour le chauffage, le mode
de dégivrage se poursuit et le chauffage commencera
seulement après le dégivrage; un certain temps est donc
requis avant que de l’air chaud ne soit émis.
Notice
9374343072-04_OM.indb Sec1:169374343072-04_OM.indb Sec1:16 9/2/2010 2:59:06 PM9/2/2010 2:59:06 PM
Page 34

Sp-1
ÍNDICE
PRECAUCIONES DE SEGURIDAD
No intente instalar este acondicionador de aire usted mismo.
Esta unidad no contiene componentes que pueda reparar el usuario. Consulte siempre
al personal de servicio autorizado para las reparaciones.
Cuando se esté trasladando, solicite personal de reparaciones autorizado para que éste
efectúe la desconexión e instalación del acondicionador de aire.
No se enfríe excesivamente permaneciendo durante muchas horas en el fl ujo de aire de enfriamiento directo
.
No introduzca los dedos ni otros objetos en el orifi cio de salida ni en las rejillas de entrada.
No debe poner en funcionamiento el acondicionador de aire ni pararlo apagando y
encendiendo el interruptor eléctrico.
En caso de mal funcionamiento (olor a quemado, etc.), pare inmediatamente el aparato,
desconecte la alimentación de corriente y consulte a un servicio técnico autorizado.
En caso de ocurrir una fuga de refrigerante, asegúrese de mantenerla lejos del fuego o
cualquier producto infl amable. (consulte a una persona de servicio autorizado)
Proporcione de vez en cuando ventilación durante el funcionamiento.
No dirija el fl ujo de aire directamente hacia chimeneas ni aparatos de calefacción.
No se suba sobre el acondicionador de aire ni coloque objetos encima.
No cuelgue objetos de la unidad interior.
No coloque fl oreros ni recipientes con agua encima de los dispositivos de aire acondicionado.
No exponga el acondicionador de aire directamente al agua.
No ponga en funcionamiento el acondicionador de aire con las manos mojadas.
No toque los interruptores con objetos puntiagudos.
Desconecte la fuente de alimentación cuando no utilice la unidad durante periodos de tiempo prolongados.
Apague siempre el interruptor eléctrico cuando limpie el acondicionador de aire o cambie el fi ltro de aire.
Las válvulas de conexión se calientan durante el funcionamiento de la calefacción; manipúlelas con cuidado
.
Compruebe si hay daños en el soporte de instalación.
No coloque animales ni plantas en el paso directo del fl ujo de aire.
Cuando reinicie el aparato después de no usarlo durante un periodo de tiempo prolongado en el
invierno, encienda el interruptor de alimentación al menos 12 horas antes de activar la unidad.
No beba el agua que se drena del acondicionador de aire.
No lo utilice para aplicaciones relacionadas con el almacenamiento de alimentos, plantas
o animales, equipos de precisión ni obras de arte.
No aplique una presión fuerte en las aletas del radiador.
Utilícelo únicamente con los fi ltros de aire instalados.
No bloquee ni cubra la rejilla de entrada y el orifi cio de salida.
Asegúrese de que cualquier equipo electrónico esté al menos a 40 in. (1metro) de dis-
tancia tanto de la unidad de interior como de la de exterior
.
No instale el acondicionador de aire cerca de chimeneas ni de otros aparatos de calefacción.
Al instalar la unidad interior y la exterior, tenga cuidado de evitar el acceso a los niños.
No utilice gases infl amables cerca del acondicionador de aire.
Instale la manguera de drenaje de modo que drene el agua correctamente.
Este aparato no se ha diseñado para que lo utilicen personas (incluidos niños) con capacidades físicas, sensoriales o mentales reducidas, o que carezcan de la experiencia y los conocimientos necesarios, a menos que sea
bajo supervisión o hayan recibido formación relativa al uso del aparato a cargo de una persona responsable
de su seguridad. Los niños deben estar bajo supervisión para evitar que jueguen con el aparato.
Antes de utilizar el aparato, lea todas estas “PRECAUCIONES DE SEGURIDAD” y realice el funcionamiento de la forma correcta.
Las instrucciones de esta sección son sobre seguridad; asegúrese de mantener unas condiciones de funcionamiento seguras.
Los símbolos “PELIGRO”, “ADVERTENCIA” y “PRECAUCIÓN” tienen los siguientes signifi cados en estas instrucciones:
¡PELIGRO!
Esta marca indica los procedimientos que, en caso de realizarse inadecuadamente, podrían causar la muerte o producir daños graves al usuario o al personal de servicio.
¡ADVERTENCIA!
Esta marca indica procedimientos que, de ser realizados incorrectamente, podrían
ocasionar la muerte o serias lesiones al usuario o al personal de servicio.
¡PRECAUCIÓN!
Esta marca indica los procedimientos que, de realizarse incorrectamente, pueden
ocasionar daños personales al usuario o daños a la propiedad.
¡PELIGRO!
¡PRECAUCIÓN!
PRECAUCIONES DE SEGURIDAD ........................ 1
CARACTERÍSTICAS Y FUNCIONES .......................2
DENOMINACIÓN DE LOS COMPONENTES ....... 3
PREPARATIVOS ...................................................... 4
FUNCIONAMIENTO .............................................. 5
FUNCIONES DEL TEMPORIZADOR ......................7
TEMPORIZADOR DE CONEXIÓN (ON)/DE
DESCONEXIÓN (OFF) ............................................ 7
TEMPORIZADOR SEMANAL ................................. 8
TEMPORIZADOR DE CAMBIO DE LA TEMPERATURA
..... 10
OPERACIÓN EN MODO AHORRO DE ENERGÍA
.....11
LIMPIEZA Y CUIDADO ..........................................11
LOCALIZACIÓN DE AVERÍAS .............................. 12
CONSEJOS PARA EL FUNCIONAMIENTO ......... 14
AUTODIAGNOSIS ................................................ 16
9374343072-04_OM.indb Sec1:19374343072-04_OM.indb Sec1:1 9/2/2010 2:59:07 PM9/2/2010 2:59:07 PM
Page 35

Sp-2
CARACTERÍSTICAS Y FUNCIONES
INVERSOR
Al inicio del funcionamiento, se utiliza una gran cantidad de
potencia para que la sala adquiera rápidamente la temperatura deseada. Luego, la unidad pasa automáticamente al
ajuste de baja potencia para que el funcionamiento resulte
cómodo y económico.
OPERACIÓN EN MODO ECONÓMICO
Cuando funciona en el modo ahorro de energía, la temperatura
de la sala será un poco mayor que la temperatura defi nida en
el modo refrigeración e inferior a la temperatura defi nida en el
modo calefacción. Por tanto, el modo económico puede ahorrar
más energía que otro modo normal.
FUNCIONAMIENTO SUPERSILENCIOSO
Cuando se usa el botón de control del ventilador (FAN) para
seleccionar el funcionamiento supersilencioso (QUIET), la
unidad inicia el funcionamiento supersilencioso; se reduce
el fl ujo de aire de la unidad interior, permitiendo una
refrigeración más silenciosa.
CAMBIO AUTOMÁTICO (AUTO CHANGEOVER)
El modo de funcionamiento (refrigeración, deshumectación,
calefacción) cambiará automáticamente para mantener la
temperatura ajustada y dicha temperatura se mantendrá
constante en todo momento.
Función conveniente
TEMPORIZADOR SEMANAL
Utilice esta función de temporizador para ajustar los horarios
de funcionamiento para cada día de la semana. Utilice el
ajuste de día libre (DAY OFF) para apagar el funcionamiento
programado para un día seleccionado en la semana entrante.
Debido a que todos los días pueden ser ajustados de manera
conjunta, el temporizador semanal puede ser utilizado para
repetir los ajustes de temporizador para todos los días.
TEMPORIZADOR PARA PRÓRROGA DE
TEMPERATURA
Utilice esta función de temporizador para cambiar la
temperatura ajustada en los horarios de funcionamiento
ajustado para cada día de la semana. Ésta se puede utilizar
junto con otros ajustes del temporizador.
FILTRO DE AIRE EXTRAIBLE
El fi ltro de aire de la unidad de interior puede ser extraído
para que su limpieza y mantenimiento resulten más sencillos.
FILTRO RESISTENTE A LA CONDENSACIÓN DE HUMEDAD
El fi ltro de aire se ha tratado para poder resistir una ligera
condensación de humedad, para facilitar el empleo y los
cuidados del fi ltro.
Mando a distancia
MANDO A DISTANCIA CABLEADO
El mando a distancia cableado permite controlar cómodamente
el funcionamiento de la unidad de interior.
MANDO A DISTANCIA INALÁMBRICO (OPCIÓN)
Se puede utilizar el mando a distancia inalámbrico opcional.
Cuando utilice el mando a distancia, existen los siguientes
puntos diferentes en comparación con usar el mando a
distancia cableado.
[ La función adicional para los inalámbricos ]
• Desconexión automática (SLEEP)
• Temporizador (TIMER)
• Calor mínimo (MINIMUM HEAT)
Y puede utilizar tanto el mando a distancia cableado como el
inalámbrico simultáneamente. (Pero la función es limitada.)
[ Las funciones adicionales para los cableados ]
• Temporizador semanal
• Temporizador para prórroga de temperatura
Función de Ahorro de energía
y Cómodo
Función de limpieza
9374343072-04_OM.indb Sec1:29374343072-04_OM.indb Sec1:2 9/2/2010 2:59:07 PM9/2/2010 2:59:07 PM
Page 36

Sp-3
DENOMINACIÓN DE LOS COMPONENTES
Mando a distancia
1
Botón START/STOP (marcha/paro)
2
Botón SET TEMP. (ajuste de temperatura)
3
Botón MODE
4
Botón FAN (ventilador)
5
Botón ECONOMY (ahorro)
6
Botón TIMER MODE (CLOCK ADJUST)
(modo de temporizador/ajuste del reloj)
7
Botón de ajuste del día y desconexión
de día DAY (DAY OFF)
8
Botón SET BACK (de cambio de la
temperatura)
9
Botón de ajuste de la hora (< >)
0
Botón TIMER DELETE (de borrado)
A
Botón TIMER SET (de ajuste)
B
Botón de giro y dirección vertical del
aire
*1
C
Botón de giro y dirección horizontal
del aire
*2
D
Botón MAINTENANCE(FILTER RESET)
(mantenimiento/reajuste del fi ltro)
#1
E
Lámpara de funcionamiento
F
Indicador del temporizador y del reloj
G
Indicador del modo de funcionamiento
H
Indicador de la velocidad del ventilador
I
Indicador del bloqueo del funcionamiento
J
Indicador de la temperatura
K
Indicador de las funciones
Indicador de la descongelación
Indicador del sensor térmico
Vista de ECONOMY(AHORRO)
Vista de giro vertical
*3
Visualización del fi ltro
#1
*1~3 Estas funciones no se pueden utilizar.
(Por favor, vea también el manual de funcionamiento de la opción cuando se esté usando con
opciones, etc.)
#1 Se puede utilizar si se ajusta correctamente
durante la instalación. Por favor, consulte al personal de servicio autorizado cuando esté usando
esta función.
I
H
G
J
K
E
1
C
5
D
A
0
3
4
B
8
6
2
F
9
7
9374343072-04_OM.indb Sec1:39374343072-04_OM.indb Sec1:3 9/2/2010 2:59:07 PM9/2/2010 2:59:07 PM
Page 37

Sp-4
PREPARATIVOS
Pulse el botón TIMER MODE (CLOCK
ADJUST) (modo de temporizador/
ajuste del reloj) durante 2 segundos
o más. El indicador de la hora en el
mando a distancia parpadeará.
2
SU MO TU WE TH FR SA
Pulse el botón del día (DAY) y seleccione el día en curso.
Aparecerá un
alrededor del día seleccionado.
Pulse los botones ajuste de la hora (< >) para ajustar
la hora actual. Presione el botón varias veces para
ajustar la hora actual en incrementos de 1 minuto.
Mantenga los botones pulsados para ajustar la hora
actual en incrementos de 10 minutos.
ej. Lunes (Mo) 11:00 PM
Para fi nalizar, presione
nuevamente el botón.
SUMOTUWETH FR
SA
1
3
5
Pulse el botón SET BACK para cambiar entre las
visualizaciones de 12 y 24 horas.
3
4
SUMOTUWETH FR
SA
SUMOTUWETH FR
SA
SET BACK
Ajuste la hora y el día actuales
9374343072-04_OM.indb Sec1:49374343072-04_OM.indb Sec1:4 9/2/2010 2:59:07 PM9/2/2010 2:59:07 PM
Page 38

Sp-5
FUNCIONAMIENTO
Lámpara de funcionamiento
Acondicionador de aire ENCENDIDO: Se ilumina intensamente
Acondicionador de aire APAGADO: No se ilumina
Pulse el botón START/STOP (marcha/paro).
Pulse el botón MODE (modo) para ajustar el modo de funcionamiento. Si selecciona
DRY (deshumectación), la velocidad del ventilador se ajustará en AUTO (automático).
Pulse los botones SET TEMP. (ajuste de la temperatura) para ajustar la temperatura de la habitación.
Pulse el botón FAN (ventilador) para ajustar la velocidad del ventilador.
Pulse el botón ECONOMY (ahorro) para iniciar o detener ECONOMY OPERATION (funcionamiento de ahorro).
Si desea más información sobre esta función, consulte la página 11.
Las instrucciones sobre el modo calefacción (*) sólo sirven para el “MODELO DE REFRIGERACIÓN Y CALEFACCIÓN” (Ciclo
inverso).
Activación/desactivación del funcionamiento
Para ajustar el modo de funcionamiento
Ajuste del modo de funcionamiento
Ajuste de la temperatura de la habitación
Ajuste de la velocidad del ventilador
ECONOMY OPERATION (FUNCIONAMIENTO DE AHORRO)
Bajar Subir
AUTO COOL DRY *HEATFAN
AUTO MED HIGH LOW QUIET
(Automático) (Refrigeración) (Deshumectación)
(Ventilación) (*Calefacción)
(Automático)
(Alta) (Media) (Baja) (Silencioso)
Margen de ajuste de la temperatura
Automático .........................................................64 to 88 °F
Refrigeración/Deshumectación .........................64 to 88 °F
* Calefacción .........................................................60 to 88 °F
9374343072-04_OM.indb Sec1:59374343072-04_OM.indb Sec1:5 9/2/2010 2:59:07 PM9/2/2010 2:59:07 PM
Page 39

Sp-6
Presione los botones DAY (DAY OFF) (día [día desactivado]) y TIMER SET (confi gurar) simultáneamente durante
2 segundos o más para activar la función de bloqueo
parcial y bloquear todos los botones del control remoto,
a excepción del botón START/STOP (arranque/parada),
los botones SET TEMP. (ajuste de temperatura), el botón
MODE (modo) y el botón FAN (ventilador). Vuelva a
presionar los botones durante 2 segundos o más para
desactivar la función de bloqueo parcial.
Cuando la función de bloqueo parcial está activada,
aparece la marca
. Si se pulsa un botón durante
el bloqueo parcial, el indicador
PL parpadeará.
Pulse el botón de economía (ECONOMY) durante más de 2
segundos para seleccionar si la temperatura de la sala se
detecta en la unidad interior o en el mando a distancia.
Cuando aparece la pantalla del sensor térmico
, la
temperatura de la habitación se detecta en el mando a
distancia.
NOTAS
• Si esta función está bloqueada, no se puede cambiar el lugar en el que se detecta la temperatura de la habitación y
la marca
parpadea al pulsar el botón de economía (ECONOMY) durante 2 segundos o más.
Unidad interior
Selección del sensor de temperatura de la habitación
FUNCIONAMIENTO
Función de bloqueo parcial
• Esta función viene bloqueada de fábrica. Para detectar correctamente la temperatura de la habitación, cuando utilice
esta función, póngase en contacto con el personal de servicio autorizado.
9374343072-04_OM.indb Sec1:69374343072-04_OM.indb Sec1:6 9/2/2010 2:59:08 PM9/2/2010 2:59:08 PM
Page 40

Sp-7
Ajuste del temporizador de conexión (ON)/de desconexión (OFF)
FUNCIONES DEL TEMPORIZADOR
TEMPORIZADOR DE CONEXIÓN (ON)/DE DESCONEXIÓN (OFF)
Pulse el botón TIMER MODE (modo
de temporizador) y seleccione el
temporizador ON (conexión) o el
temporizador OFF (desconexión).
2
• Pulse el botón TIMER DELETE (de borrado) para cancelar el modo del temporizador.
• El modo de temporizador también se puede cancelar cambiando el modo del mismo mediante
el botón TIMER MODE (modo de temporizador).
1
Sin
indicador
SUMOTUWETH FR
SA
Pulse los botones ajuste de la hora (< >) para ajustar la
hora. Después de ajustarla, el temporizador se activará automáticamente. La cantidad de tiempo hasta que se active
el temporizador OFF (desconexión) disminuye según pasa
el tiempo.
De 1 a 24 horas
ej. Temporizador de desconexión (OFF) ajustado para
6 horas
Cancelación
Temporizador de desconexión (OFF) (Consulte la pág. 7.)
Utilice esta función del temporizador para detener el funcionamiento del acondicionador de aire. El temporizador
se activa y el acondicionador de aire se detiene cuando se supera la hora fi jada. El temporizador puede confi gurarse hasta con 24 horas de adelanto.
Temporizador de conexión (ON) (Consulte la pág. 7.)
Utilice esta función del temporizador para iniciar el funcionamiento del acondicionador de aire. El temporizador
funciona y el acondicionador de aire se pone en funcionamiento después de que ha pasado el tiempo que se ha
fi jado. El temporizador puede confi gurarse hasta con 24 horas de adelanto.
Temporizador SEMANAL (Consulte la pág. 8.)
Utilice esta función del temporizador para ajustar las horas de funcionamiento para cada día de la semana.
Utilice el ajuste de desconexión de día (DAY OFF) para que no se ponga en funcionamiento a la hora programada
para un día concreto de la semana siguiente.
Puesto que se pueden confi gurar todos los días a la vez, el temporizador semanal puede utilizarse para repetir los
ajustes del temporizador para todos los días.
Temporizador de CAMBIO de la temperatura (Consulte la pág. 10.)
Utilice esta función del temporizador para cambiar la temperatura ajustada en las horas de funcionamiento determinadas para cada día de la semana. Esto puede utilizarse junto con otros ajustes del temporizador.
NON
STOP
OFF
TIMER
ON
TIMER
WEEKLY
TIMER
(Sin parar)
(Temporizador de
desconexión)
(Temporizador
de conexión)
(Temporizador
SEMANAL)
9374343072-04_OM.indb Sec1:79374343072-04_OM.indb Sec1:7 9/2/2010 2:59:08 PM9/2/2010 2:59:08 PM
Page 41

Sp-8
SUMOTUWETH FR
SA
369
12 15 18 21
TEMPORIZADOR SEMANAL
Pulse el botón TIMER MODE (modo de temporizador) para seleccionar el
temporizador semanal.
2
Pulse el botón TIMER SET (de ajuste)
durante 2 segundos o más.
1
3
SUMOTUWETH FR
SA
369
12 15 18 21
Ajuste del día de la semana
Pulse el botón DAY (del día) para seleccionar el día de la semana y, a continuación,
pulse el botón TIMER SET (de ajuste) para confi rmar la selección.
Para TODOS, se pueden ajustar a la vez todos los días cuando aparece
un
alrededor de cada día.
SUMOTUWETH FR
SA
369
12 15 18 21
4
Ajuste de la hora
Pulse los botones ajuste de la hora (< >) para fi jar la hora y, a continuación, pulse el botón TIMER SET (ajuste del temporizador) para confi rmar la selección y proceda con el siguiente ajuste de la hora ON (conexión) u OFF (desconexión).
Se pueden ajustar hasta 2 horarios de horas de ON (Encendido) y OFF (Apagado) por día.
Pulse el botón DAY (del día) para fi nalizar el ajuste de la hora y vuelva a la confi guración del día de la semana.
Cuando la hora de funcionamiento
está fi jada, aparece la marca
.
5
Repita los pasos 3 y 4.
Para fi nalizar la confi guración del temporizador semanal,
pulse el botón TIMER SET (de ajuste) durante 2 segundos
o más.
Para borrar la hora de funcionamiento
Si se pulsa el botón TIMER DELETE (de borrado)
durante los pasos
3 o 4, se anulará la hora de
funcionamiento para el día seleccionado.
Si ha seleccionado todos los días, se anularán
las horas de funcionamiento para todos los días
de la semana.
NOTAS
• La hora de funcionamiento solamente puede ajustarse en incrementos de 30 minutos.
• La hora de desconexión (OFF) puede postergarse hasta el día siguiente.
• Las funciones del temporizador de conexión (ON) y el de desconexión (OFF) no se pueden ajustar mediante el temporizador semanal. Hay que ajustar tanto la hora de conexión (ON) como la de desconexión (OFF).
ej. El temporizador está ajustado para
7:00-18:00.
1
2
1
2
3
Ajuste del temporizador semanal
ALL SU MO TU WE TH FR SA
ON-1 OFF-1 ON-2 OFF-2
TODOS
desconnexión-1connexión-1 desconnexión-2connexión-2
9374343072-04_OM.indb Sec1:89374343072-04_OM.indb Sec1:8 9/2/2010 2:59:08 PM9/2/2010 2:59:08 PM
Page 42

Sp-9
DAY OFF
DAY OFF
desconnexión
connexión
desconnexión
connexión
desconnexión
connexión
desconnexión
connexión
SEMANAL SEMANAL
SEMANAL SEMANAL
SUMOTUWETH FR
SA
369
12 15 18 21
SUMOTUWETH FR
SA
369
12 15 18 21
TEMPORIZADOR SEMANAL
Activación
Cuando selecciona el temporizador
semanal, éste se activa automáticamente.
Se muestra el tiempo de funcionamiento del día en curso.
Cancelación
•
Pulse el botón TIMER DELETE (de borrado) para cancelar el modo del temporizador.
•
El modo de temporizador también se
puede cancelar cambiando el modo
del mismo mediante el botón TIMER
MODE (modo de temporizador).
1
En el temporizador semanal,
pulse el botón
TIMER SET
(
de ajuste
) durante 2 segundos
o más para fi jar el día.
Seleccione el día en el que
desea ajustar la desconexión
de día (DAY OFF).
Pulse el botón DAY/DAY
OFF (del día/desconexión de
día) durante dos segundos o
más para ajustar la desconexión de día (DAY OFF).
Pulse el botón TIMER SET
(de ajuste) durante 2 segundos o más para fi nalizar la
confi guración de la desconexión de día (DAY OFF).
243
Cancelación
Siga los mismos procedimientos
dados para la confi guración.
ej. La desconexión de día (DAY OFF)
está determinada para el lunes (Mo).
NOTAS
• La desconexión de día (DAY OFF) sólo puede ajustarse para los días que cuentan ya con ajustes de hora semanales.
• Si la hora de funcionamiento se posterga hasta el día siguiente (en un ajuste del día siguiente), el margen efectivo de
la desconexión de día (DAY OFF) se determinará como se indica a continuación.
Normal
Ajuste del día siguiente
Día del ajusteDía anterior Día siguiente Día del ajusteDía anterior Día siguiente
• El ajuste para DAY OFF (día libre) puede ser ajustado solamente 1 vez. Dicho ajuste se cancela automáticamente cuando pasa el día fi jado.
El signo
se ilumina debajo de un día de
la semana.
SUMOTUWETH FR
SA
369
12 15 18 21
369
12 15 18 21
ej. Tiempo de funcionamiento
7:00-18:00
Funcionamiento del temporizador semanal
Para ajustar la desconexión de día (DAY OFF) (durante un día festivo)
9374343072-04_OM.indb Sec1:99374343072-04_OM.indb Sec1:9 9/2/2010 2:59:09 PM9/2/2010 2:59:09 PM
Page 43

Sp-10
TEMPORIZADOR DE CAMBIO DE LA TEMPERATURA
Pulse el botón SET BACK (de cambio de la temperatura) para
acceder a la pantalla de confi rmación del cambio.
Se mostrará el tiempo de funcionamiento del cambio y la
temperatura fi jada.
2
Pulse el botón TIMER SET
(de ajuste) durante 2 segundos o más.
1
3
Ajuste del día Ajuste de la hora de funcionamiento
Para ajustar la hora de funcionamiento, siga los mismos procedimientos dados para el temporizador semanal. El botón
TIMER DELETE (de borrado) también se utiliza como se describe en los procedimientos para el temporizador semanal.
4
NOTAS
• El temporizador de cambio de la temperatura solamente modifi ca la temperatura ajustada; no puede utilizarse para
conectar o desconectar el acondicionador de aire.
• El temporizador SET BACK (cambio de temperatura) puede ser ajustado para funcionar hasta 2 veces por día pero se
puede usar únicamente 1 ajuste de temperatura.
• El temporizador de cambio de la temperatura puede utilizarse a la vez con las funciones del temporizador de conexión
(ON), de desconexión (OFF) y el semanal.
• La hora de funcionamiento del cambio de la temperatura se muestra únicamente en la pantalla de confi rmación de dicho
cambio. (Consulte el paso 1 para la pantalla de confi rmación del cambio).
SET BACK
SUMOTUWETH FR
SA
369
12 15 18 21
ej. Cuando se ajustan todos los días a la vez
Ajuste de la temperatura
Pulse los botones SET TEMP. (ajuste de la
temperatura) para ajustar la temperatura. (El
margen del ajuste de la temperatura es el mismo que para el modo de funcionamiento.)
ej. Tiempo de funcionamiento 15:00–22:00
5
Repita los pasos 3 y 4.
Pulse el botón TIMER SET (de ajuste)
durante dos segundos o más para
fi nalizar la confi guración del temporizador de cambio de la temperatura.
76˚F
76˚F
84˚F
Temperatura cambiada
Temperatura normal
Activación
SET BACK
Pulse el botón SET BACK (de cambio de la temperatura). Aparece la pantalla
de confi rmación del cambio durante 5 segundos y, a continuación, el
temporizador se inicia automáticamente.
ej. Pantalla durante el funcionamiento del temporizador de cambio de la temperatura
(No se mostrará el tiempo de funcionamiento.)
Cancelación
Pulse de nuevo el botón SET BACK (de
cambio de la temperatura), y luego pulse el botón TIMER DELETE (de borrado)
mientras aparece la pantalla de
confirmación del cambio. Aunque
pulse nuevamente el botón SET BACK
(de cambio de la temperatura), se ca
celará el temporizador del cambio de
la misma.
SUMOTUWETH FR
SA
369
12 15 18 21
Si no existe ningún
ajuste para el cambio
de la temperatura,
aparecerá “- -“ para
la temperatura.
SUMOTUWETH FR
SA
1
3
2
4
1
2
Ajuste del temporizador de cambio de la temperatura
Funcionamiento del temporizador de cambio de la temperatura
desconnexiónconnexión
9374343072-04_OM.indb Sec1:109374343072-04_OM.indb Sec1:10 9/2/2010 2:59:09 PM9/2/2010 2:59:09 PM
Page 44

Sp-11
LIMPIEZA Y CUIDADO
Antes de limpiar la unidad, asegúrese de parar la unidad y desconectar el cable de alimenta-
ción.
Apague el interruptor eléctrico.
Un ventilador funciona a alta velocidad dentro de la unidad, lo que podría causarle lesiones
personales.
Durante periodos de empleo prolongados, la unidad puede acumular suciedad en su interior, reduciendo así la efi cacia
del funcionamiento. Recomendamos que se inspeccione la unidad regularmente, además de limpiarla y cuidarla. Para
más información, póngase en contacto con el personal de servicio autorizado.
Cuando limpie el cuerpo de la unidad, no utilice agua más caliente de 104°F, productos de limpieza abrasivos y ásperos
ni agentes volátiles como benceno o disolventes.
No exponga el cuerpo de la unidad a insecticidas líquidos o pulverizadores capilares.
Si la unidad no será puesta en funcionamiento por un período de 1 mes o más, asegúrese de permitir que las partes internas
de la unidad sequen completamente, por adelantado, haciendo funcionar la unidad en modo de ventilación durante medio día.
¡PRECAUCIÓN!
OPERACIÓN EN MODO AHORRO DE ENERGÍA
Inicie el funcionamiento del acondicionador de aire antes de efectuar este procedimiento.
Empleo de la función AHORRO DE ENERGÍA (ECONOMY)
Presione el botón ahorro de energía (ECONOMY).
El visualizador ECONOMY se iluminará.
Inicia el funcionamiento del modo ahorro de energía (ECONOMY).
Para detener la función ahorro de energía (ECONOMY)
Presione de nuevo el botón ahorro de energía (ECONOMY).
El visualizador ECONOMY se apagará.
Inicia el funcionamiento del modo normal.
Acerca del funcionamiento del modo ahorro de energía (ECONOMY)
En su máximo consumo, el funcionamiento de ahorro de energía (ECONOMY) representa aproximadamente el 70% del rendimiento normal de su aire acondicionado para refrigeración y calefacción.
Si la sala no está bien refrigerada (o calentada) durante el funcionamiento de ahorro de energía ECONOMY, seleccione
el funcionamiento normal.
Durante el período de monitoreo en el modo automático (AUTO), la operación del acondicionador de aire no cambia-
rá al funcionamiento de ahorro de energía (ECONOMY) incluso si selecciona el modo ahorro de energía (ECONOMY)
presionando el botón funcionamiento de ahorro de energía (ECONOMY).
Cuando funciona en el modo ahorro de energía ECONOMY, la temperatura de la sala será un poco mayor que la tempe-
ratura defi nida en el modo refrigeración e inferior a la temperatura defi nida en el modo calefacción. Por tanto, el modo
ahorro de energía ECONOMY puede ahorrar más energía que el otro modo normal.
En el caso del aire acondicionado de tipo múltiple, el modo de funcionamiento de ahorro ECONOMY sólo está
disponible para la unidad interior establecida.
Limpieza del Filtro de Aire
Quite el polvo de los fi ltros de aire aspirándolo o lavándolo. Después de lavarlo, permita que los fi ltros de aire se sequen
totalmente en una zona protegida de la luz solar.
El polvo se puede limpiar del fi ltro de aire con un aspirador, o limpiando el fi ltro con un detergente neutro y agua caliente. Si
lava el fi ltro, asegúrese de permitir que se seque totalmente en un sitio con sombra antes de volverlo a instalar.
Si permite que se acumule suciedad encima del fi ltro de aire, la circulación del aire quedará reducida, bajando el rendimiento y aumentando el ruido de la unidad.
Se puede utilizar si se ajusta correctamente durante la instalación. Por favor consulte con un técnico autorizado cuando esté utilizando esta función.
• Se ilumina cuando es tiempo de limpiar los fi ltros de aire.
Después de encender la energía eléctrica.
Pulse el botón de mantenimiento (MAINTENANCE)
en el mando a distancia durante 2 segundos o mas.
El visualizador del fi ltro desaparecerá.
Restablecimiento del Indicador de Filtro (Un ajuste especial)
9374343072-04_OM.indb Sec1:119374343072-04_OM.indb Sec1:11 9/2/2010 2:59:09 PM9/2/2010 2:59:09 PM
Page 45

Sp-12
LOCALIZACIÓN DE AVERÍAS
Síntoma Problema
Vea la
página
FUNCIÓN
NORMAL
No se pone inmediatamente
en funcionamiento:
Si la unidad se detiene y se vuelve a poner en funcionamiento
inmediatamente, el compresor no se activará durante unos
3 minutos para evitar que se quemen los fusibles.
Siempre que el interruptor eléctrico está apagado y se encien-
de de nuevo, se activa el circuito de protección durante unos
3 minutos, evitando así el funcionamiento de la unidad durante
este periodo de tiempo.
—
Se oye un ruido:
Durante el funcionamiento e inmediatamente después de
detener la unidad, se puede oír el sonido del agua que fl uye
por las tuberías del acondicionador de aire. Además, este
sonido es especialmente perceptible durante unos 2 o 3
segundos después de comenzar el funcionamiento (sonido del
fl ujo del líquido refrigerante).
—
* Durante el funcionamiento de la calefacción, puede oírse un
chisporroteo de forma ocasional. Este sonido es debido a la
función de descongelación automática.
14
Olores:
Es posible que la unidad interior emita algo de olor. Esto se
debe a los olores de la habitación (mobiliario, tabaco, etc.) que
ha absorbido el acondicionador de aire.
—
Aparece vaho o vapor:
Durante la refrigeración o el secado, puede aparecer una fi na nube
de vaho desde la unidad interior. Ésta se debe a un enfriamiento
súbito del aire de la sala por el aire expulsado por el acondicionador de aire, lo que produce condensación y vapor.
—
*
Durante el funcionamiento de la calefacción, puede que se detenga
el ventilador de la unidad exterior, y puede emitirse vapor desde el
aparato. Esto se debe a la función de descongelación automática
.
14
La circulación de aire es
débil o se para:
* Cuando comience a funcionar la calefacción, la velocidad del
ventilador será temporalmente muy baja, para permitir que se
calienten los componentes internos.
* Durante el funcionamiento de la calefacción, si la temperatura
de la sala sube por encima del ajuste del termostato, la unidad
exterior se detendrá, y la unidad interior funcionará a una velocidad de ventilación muy baja. Si desea calentar más la habitación,
confi gure el termostato a un ajuste mayor.
—
* Durante el funcionamiento de la calefacción, la unidad se detiene
temporalmente (entre 4 y 15 minutos) debido al funcionamiento
en el modo de descongelación automática. Durante dicha descongelación,
aparecerá en la pantalla.
14
Puede que el ventilador funcione a muy poca velocidad durante el secado
o cuando la unidad esté controlando la temperatura de la habitación
.
—
En el caso de la unidad Multi-tipo, si varias unidades son ope-
radas en diferentes modalidades de funcionamiento como se
observa abajo,las unidades operadas después se detendrán y
se visualizará
en el display del control remoto de las uni-
dades internas paradas.
Modalidad decalefacción y enfriamiento (o deshumidifi cación)
Modalidad decalefacción y ventilación
16
Durante el funcionamiento QUIET (LENTO), el ventilador funcio-
nará a velocidad muy baja.
—
Durante el funcionamiento AUTO (AUTOMÁTICO) del monitor, el
ventilador funcionará a velocidad muy baja.
—
Se produce agua en la
unidad exterior:
*
Durante el funcionamiento de la calefacción, se puede producir agua en
la unidad exterior debido a la función de descongelación automática
.
14
La pantalla del sensor
térmico
del mando a
distancia está parpadeando:
Puede que el sensor de la temperatura de la habitación funcione de
forma incorrecta. Póngase en contacto con el personal de servicio
autorizado.
—
Las instrucciones sobre el modo calefacción (*) sólo sirven para el “MODELO DE REFRIGERACIÓN Y CALEFACCIÓN” (Ciclo inverso)
.
¡ADVERTENCIA!
En caso de mal funcionamiento (olor a quemado, etc.), pare inmediatamente el aparato, desconecte la alimentación de corriente y consulte a un servicio técnico autorizado.
Si sólo se desconecta el interruptor de alimentación del aparato, no se desconectará completamente de la fuente de alimentación. Asegúrese siempre de desenchufar la clavija de alimentación para asegurarse de que se ha desconectado por completo.
Antes de solicitar el servicio técnico, efectúe las comprobaciones siguientes:
9374343072-04_OM.indb Sec1:129374343072-04_OM.indb Sec1:12 9/2/2010 2:59:09 PM9/2/2010 2:59:09 PM
Page 46

Sp-13
LOCALIZACIÓN DE AVERÍAS
Síntoma Problema
Vea la
página
COMPRUEBE
OTRA VEZ
No funciona:
¿El disyuntor diferencial se ha apagado?
¿Se ha producido un corte en la red de alimentación?
¿Se ha quemado un fusible o se ha disparado el interruptor
automático?
—
¿Está el temporizador en funcionamiento?
7 a 9
Funcionamiento de la
refrigeración (o *calefacción) insufi ciente:
¿Está sucio el fi ltro del aire?
¿Están bloqueados la rejilla de entrada o el orifi cio de salida
del acondicionador de aire?
¿Realizó correctamente los ajustes de la temperatura de la sala
(termostato)?
¿Hay alguna puerta o ventana abierta?
En el caso de la función de refrigeración, ¿hay alguna ventana
que deja entrar la luz del sol? (Cierre las cortinas.)
En el caso de la función de refrigeración, ¿hay aparatos de
calefacción u ordenadores dentro de la sala o hay demasiada
gente en la habitación?
—
¿Se encuentra la unidad en modo QUIET?
—
Si el problema persiste después de realizar estas comprobaciones, o si percibe olor a quemado, detenga inmediatamente el
aparato, apague el interruptor eléctrico, y póngase en contacto con el personal de servicio autorizado.
9374343072-04_OM.indb Sec1:139374343072-04_OM.indb Sec1:13 9/2/2010 2:59:10 PM9/2/2010 2:59:10 PM
Page 47

Sp-14
CONSEJOS PARA EL FUNCIONAMIENTO
Las instrucciones sobre el modo calefacción (*) sólo sirven para el “MODELO DE REFRIGERACIÓN Y CALEFACCIÓN”
(Ciclo inverso).
Baja refrigeración ambiente
Cuando la temperatura exterior baja, los ventiladores de
la unidad de exterior podrían pasar a Baja Velocidad o 1de
los ventiladores podría detenerse intermitentemente.
Mandos a distancia duales (opcional)
Se puede agregar un mando a distancia adicional hasta un
máximo de 2 mandos a distancia. Cada mando a distancia
puede controlar el acondicionador de aire. Sin embargo,
las funciones de temporizador no podrán ser usadas en la
unidad secundaria.
Control en grupo
1 mando a distancia puede controlar hasta un máximo de
16 acondicionadores de aire. Todos estos acondicionadores
funcionarán con los mismos ajustes.
No se podrá usar el control en grupo cuando est
é
en uso por
parte del tipo m
ú
ltiple.
*Funcionamiento de la calefacción
Este acondicionador de aire utiliza un principio de bomba
de calor, que absorbe el calor del aire exterior y lo transporta al interior. Como resultado, su capacidad de calefacción se reduce a medida que la temperatura exterior
baja. Si percibe que se está produciendo un rendimiento
de calefacción insufi ciente, recomendamos que use este
acondicionador de aire en conjunto con otro tipo de aparato de calefacción.
Los acondicionadores del tipo de bomba de calor utilizan
la recirculación del aire caliente para calentar la habitación.
Como resultado, se precisa de cierto tiempo después de
la puesta en funcionamiento para calentar todo el local.
*Cuando las temperaturas interior y
exterior son altas
Cuando ambas temperaturas interior y exterior son altas
durante el uso del modo de calefacción, el ventilador de
la unidad exterior se detendrá algunas veces.
*Descongelación automática controlada
por micro ordenador
Cuando utilice el modo de Calefacción en condiciones de
baja temperatura exterior y alta humeda, se puede formar
hielo en la unidad exterior, resultando en una reducción
del rendimiento.
Para evitar este tipo de reducción del rendimiento, esta
unidad está equipada con una función de descongelación
automática controlada por micro ordenador. Durante
el ciclo de descongelación, el ventilador interior se detendrá y aparecerá
en el control remoto. El aire
acondicionado tardará entre 4 y 15 minutos a funcionar
de nuevo.
Una vez que se detenga la calefacción, si se forma escar-
cha en la unidad exterior, la unidad comenzará a funcionar
en el modo de descongelación automática. En este momento, la unidad exterior se detendrá automáticamente
después de funcionar durante unos minutos.
9374343072-04_OM.indb Sec1:149374343072-04_OM.indb Sec1:14 9/2/2010 2:59:10 PM9/2/2010 2:59:10 PM
Page 48

Sp-15
MODELO DE REFRIGERACIÓN Y CALEFACCIÓN
(Ciclo inverso)
Función de cambio automático
Cuando se elige el CAMBIO AUTOMÁTICO, el acondi-
cionador de aire selecciona el modo de funcionamiento
(refrigeración o calefacción) según sea la temperatura
de la habitación.
Cuando se selecciona cambio automático (AUTO
CHANGEOVER) por primera vez, el ventilador funcionará a una velocidad muy baja durante algunos minutos
mientras la unidad determina las condiciones actuales
de la habitación y selecciona el modo de funcionamiento apropiado
Si la diferencia entre la confi guración del termostato y
la temperatura ambiente actual es superior a 4°F
→ Refrigeración
Si la diferencia entre la confi guración del termostato y
la temperatura ambiente actual es inferior a 4°F
→
Determinado por la temperatura exterior
Si la diferencia entre la confi guración del termostato y
la temperatura ambiente actual es superior a 4°F
→
Calefacción
CONSEJOS PARA EL FUNCIONAMIENTO
Modo de funcionamiento: automático (AUTO)
Acerca del modo de funcionamiento
En el modo de Calefacción:
Establezca el termostato a una temperatura superior a la temperatura ambiente
actual. El modo de Calefacción no funcionará si el termostato está configurado con una temperatura inferior a la
temperatura ambiente actual.
En el modo de Refrigeración/Secado:
Establezca el termostato a una temperatura inferior a la temperatura ambiente
actual. Los modos de Refrigeración y
Secado no funcionarán si el termostato
está confi gurado a una temperatura superior a la temperatura ambiente actual
(en el modo de Refrigeración, el ventilador funcionará solo).
En el modo de Ventilación:
No puede utilizar la unidad para calentar
y refrigerar su habitación.
* Calefacción:
Utilícelo para calentar su habitación.
Cuando se selecciona el modo de Calefacción, el aire acon-
dicionado funcionará a una velocidad de ventilación muy
baja de aproximadamente 3 a 5 minutos, después de los
cuales pasará a la función de ventilación seleccionada. Se
permite este período de tiempo para que la unidad interior
pueda calentarse antes de iniciar su pleno funcionamiento.
Cuando la temperatura ambiente sea muy baja, se puede
formar hielo en la unidad exterior, y su funcionamiento
quedará reducido. Para poder retirar este hielo, la unidad
entrará automáticamente en el ciclo de descongelación
periódicamente. Durante la descongelación automática, la
calefacción se interrumpirá.
Después de iniciar la calefacción, pasará algún tiempo an-
tes de que la habitación se caliente.
Refrigeración:
Utilícelo para calentar su habitación.
Deshumectación:
Utilícelo para refrigerar ligeramente mientras elimine la
humedad de su habitación.
No puede calentar la habitación en el modo de secado.
Durante el modo de secado, la unidad funcionará a poca
velocidad; para ajustar la humedad de la habitación, el
ventilador de la unidad interior se parará periódicamente.
Además, el ventilador funcionará a poca velocidad cuando
ajuste la humedad de la habitación.
La velocidad del ventilador no se puede modifi car manual-
mente mientras el modo de secado esté seleccionado.
Ventilación:
Utilícelo para permitir la circulación del aire por toda la
habitación.
MODELO DE REFRIGERACIÓN
Cuando la temperatura de la habitación sea 4°F más
alta que la temperatura seleccionada, el aparato alternará los modos de refrigeración y deshumectación.
Durante el modo de deshumectación, si se tiene selec-
cionada la función ventilador (FAN), ésta cambiará a refrigeración mínima (LOW), suave y fresca, y es posible
que el ventilador de la habitación deje de girar momentáneamente.
Cuando la temperatura de la sala se acerque a la tempe-
ratura fi jada en el termostato, el acondicionador de aire
comenzará la operación de control. En el modo de la
función de control, el ventilador funcionará a muy poca
velocidad. Si posteriormente la temperatura de la habitación cambia, el acondicionador de aire seleccionará
de nuevo la función apropiada (calefacción (Heating) o
refrigeración (Cooling)) para ajustar la temperatura al
valor determinado en el termostato.
9374343072-04_OM.indb Sec1:159374343072-04_OM.indb Sec1:15 9/2/2010 2:59:10 PM9/2/2010 2:59:10 PM
Page 49

Sp-16
La alimentación del acondicionador de aire ha estado
interrumpida debido a un corte de la red de alimentación.
Luego, el acondicionador de aire se reiniciará automáticamente en su modo anterior al reponerse la alimentación.
Hay funciones que se activan/desactivan mediante ajustes
de interruptor DIP de la unidad interior.
El empleo de otros electrodomésticos (máquinas de
afeitar o dispositivos similares) o el empleo cerca de
un transmisor de radio inalámbrico puede causar un
funcionamiento incorrecto del acondicionador de aire.
En este caso, desenchufe temporalmente el cable de
alimentación, vuélvalo a conectar, y a continuación, utilice
el mando a distancia para reanudar el funcionamiento.
Reinicio automático (AUTO)
CONSEJOS PARA EL FUNCIONAMIENTO
Acondicionador de aire del tipo múltiple
Esta unidad interior puede conectarse a una unidad exterior del tipo múltiple. El acondicionador de aire del tipo múltiple permite que varias unidades interiores funcionen en lugares distintos. Las unidades interiores pueden funcionar simultáneamente de acuerdo con su salida respectiva.
Empleo simultáneo de unidades múltiples
Las instrucciones sobre el modo inversor () sólo sirven para el “MODELO INVERSOR”.
Si la unidad interior recibe la orden de activar un modo de
funcionamiento que no puede llevar a cabo,
se visualizará en el display del control remoto y la unidad pasará al
modo de reserva.
Modo de calefacción y modo de refrigeración
(o modo de deshumectación)
Modo de calefacción y modo de ventilación
El funcionamiento se producirá en los siguientes modos.
Modo de refrigeración y modo de deshumectación
Modo de refrigeración y modo de ventilación
Modo de deshumectación y modo de ventilación
El modo de funcionamiento (modo de calefacción o modo de
refrigeración (deshumectación)) de la unidad exterior estará
determinado por el modo de funcionamiento de la unidad
interior que haya sido activada en primer lugar. Si la unidad
interior fue activada en el modo de ventilación, el modo de
funcionamiento de la unidad exterior no estará determinado.
Por ejemplo, si la unidad interior (A) fue activada en el modo
de ventilación y luego la unidad interior (B) activada en el
modo de calefacción, la unidad interior (A) activaría temporalmente el funcionamiento en el modo de ventilación, pero
cuando la unidad interior (B) active el funcionamiento en el
modo de calefacción, El siguiente se mostrará en la
pantalla del mando a distancia de la unidad (A) y ésta entrará en el modo de espera (standby). La unidad interior (B)
continuaría funcionando en el modo de calefacción.
Cuando se esté usando un acondicionador de aire de tipo múltiple, las múltiples unidades de interior pueden funcionar simultáneamente, pero cuando 2 o más unidades interiores del mismo
grupo funcionan simultáneamente, la efi ciencia de calefacción
y refrigeración será menor que cuando se usa solo una unidad
interior individual. Consecuentemente, cuando desee usar más
de 1 unidad de interior para refrigeración al mismo tiempo, su
uso debería concentrarse en la noche y en otros momentos
cuando se requiera una menor cantidad producida. Del mismo
modo, cuando se emplea unidades múltiples simultáneamente
para calefacción, se recomienda emplearlas en conjunto con
otras estufas auxiliares, según sea necesario.
Las condiciones de las temperaturas del exterior de cada
temporada, la estructura de las habitaciones y el número de
personas presentes pueden ocasionar también diferencias en
la efi cacia del funcionamiento. Recomendamos probar varios
patrones de temperaturas para confi rmar el nivel de salida
de calefacción y refrigeración de sus unidades, y emplear las
unidades de modo que mejor corresponda a la vida cotidiana
de su familia.
Si descubre que 1 o más unidades proporcionan un nivel
bajo de refrigeración o calefacción durante el funcionamiento
simultáneo, recomendamos que detenga el funcionamiento
simultáneo de las unidades múltiples.
El funcionamiento no se producirá en los siguientes modos.
En caso de caída de tensión
Aviso
* Durante el funcionamiento en el modo de calefacción, la parte
superior de la unidad interior puede calentarse, pero esto se
debe a que el refrigerante circula por la unidad interior incluso
cuando está parada, por lo que no implica ningún mal funcionamiento.
* Durante el funcionamiento en el modo de calefacción, la unidad
exterior iniciará de vez en cuando el funcionamiento de desescarche
durante períodos breves. Durante el funcionamiento de desescarche, si el usuario ajusta la unidad interior para calefacción otra
vez, continuará el modo de desescarche, y el funcionamiento de
calefacción se iniciará después de terminar el desescarche, por lo
que se requerirá algo más de tiempo antes de emitir aire caliente.
AUTODIAGNOSIS
Cuando aparece la indicación de error “Er“, se requiere una inspección del sistema acondicionador de aire. Le rogamos que
se ponga en contacto con el personal de servicio autorizado.
Número de unidad (normalmente “00”)
Código de error
ej. Comprobación de la autodiagnosis
9374343072-04_OM.indb Sec1:169374343072-04_OM.indb Sec1:16 9/2/2010 2:59:10 PM9/2/2010 2:59:10 PM
Page 50

9374343072-04_OM.indb Sec1:179374343072-04_OM.indb Sec1:17 9/2/2010 2:59:10 PM9/2/2010 2:59:10 PM
Page 51

9374343072-04_OM.indb Sec1:189374343072-04_OM.indb Sec1:18 9/2/2010 2:59:10 PM9/2/2010 2:59:10 PM
Page 52

9374343072-04_OM.indb Sec1:199374343072-04_OM.indb Sec1:19 9/2/2010 2:59:10 PM9/2/2010 2:59:10 PM
 Loading...