

Page 1
FTP-628WSL-110 Bluetooth®
Conguration Guide
Conguring the Bluetooth Interface with MS Windows XP
Background: The Bluetooth Interface is typically easy to congure, as is the FTP-628 Driver. The
mechanics are simple: the FTP-628 Serial Driver is assigned to a virtual Serial (COM) Port, and the
Bluetooth driver links to the same virtual Serial (COM) Port.
This example was developed using a Fujitsu Lifebook Notebook PC with built-in Toshiba Bluetooth
hardware support.
Bluetooth Interface Conguration:
1. Make sure the FTP-628 printer battery has been fully charged; if your printer has never been
used, allow 3 hours for the initial charge.
2. Turn on the printer (hold down the Power button until the Green LED starts blinking, then re-
lease); place the printer in close proximity to the Bluetooth PC; it is best to ensure there are no
other active Bluetooth devices within range (about 30 feet).
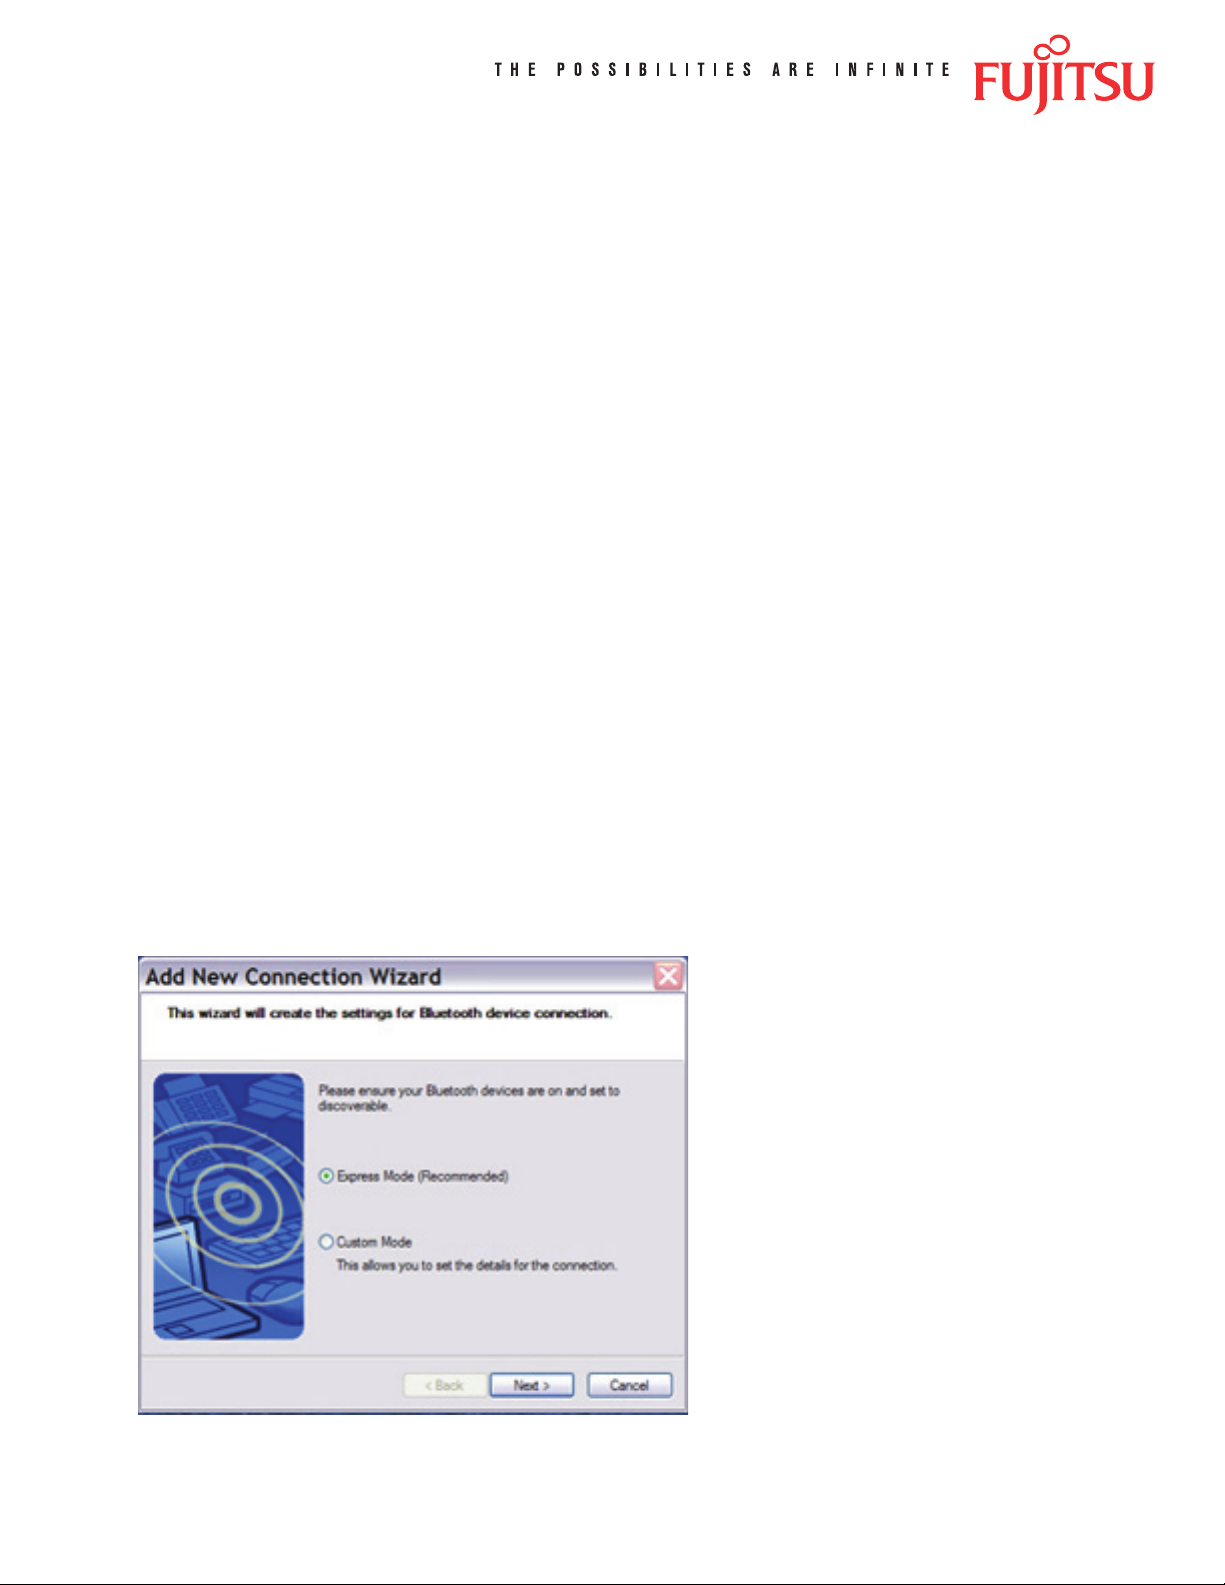
3. Start the Bluetooth Manager on the PC and select the ‘Add New Connection’ function.
[Image 1]
[Image 1]
1
Page 2
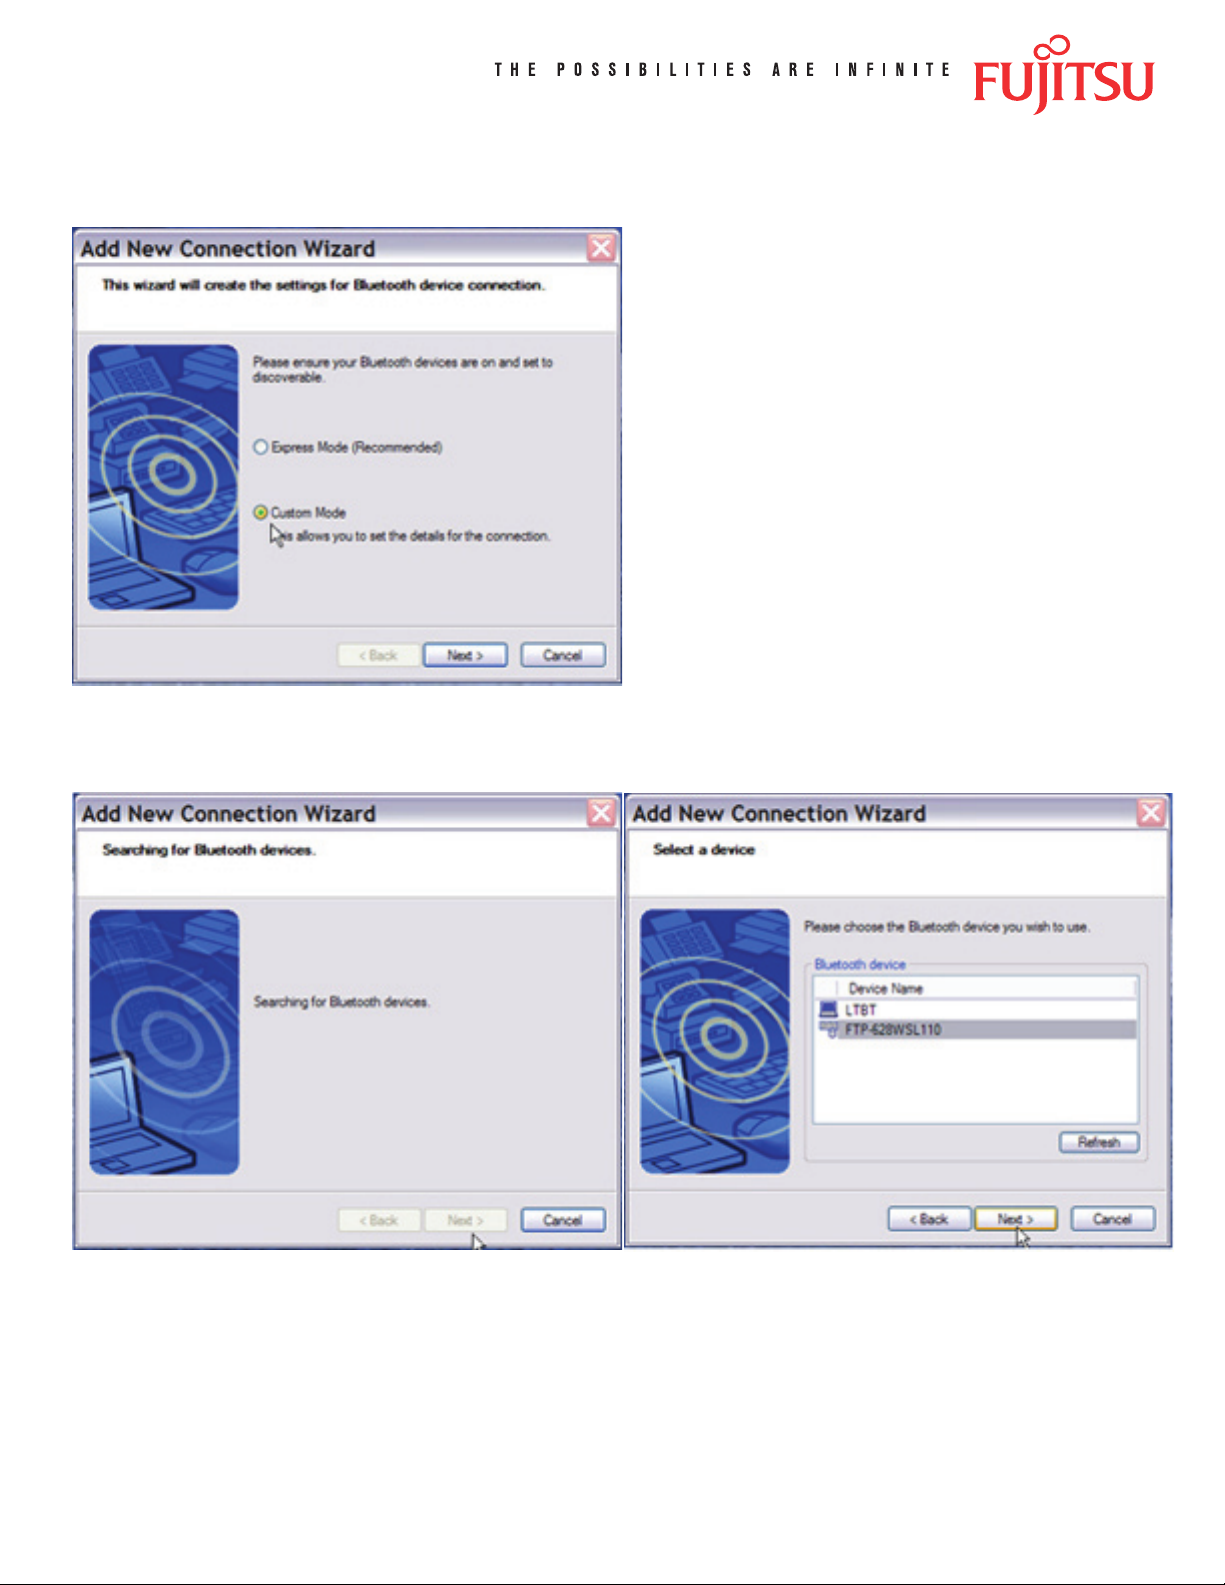
4. The Add New Connection Wizard will pop up; select Custom Mode and click Next. [Image 2]
[Image 2]
5. The Wizard will search for any Bluetooth device within range, and should display the
[Image 3] [Image 4]
highlighted FTP-628WSL100 icon after a few moments; [Image 3] click Next. [Image 4]
2
Page 3
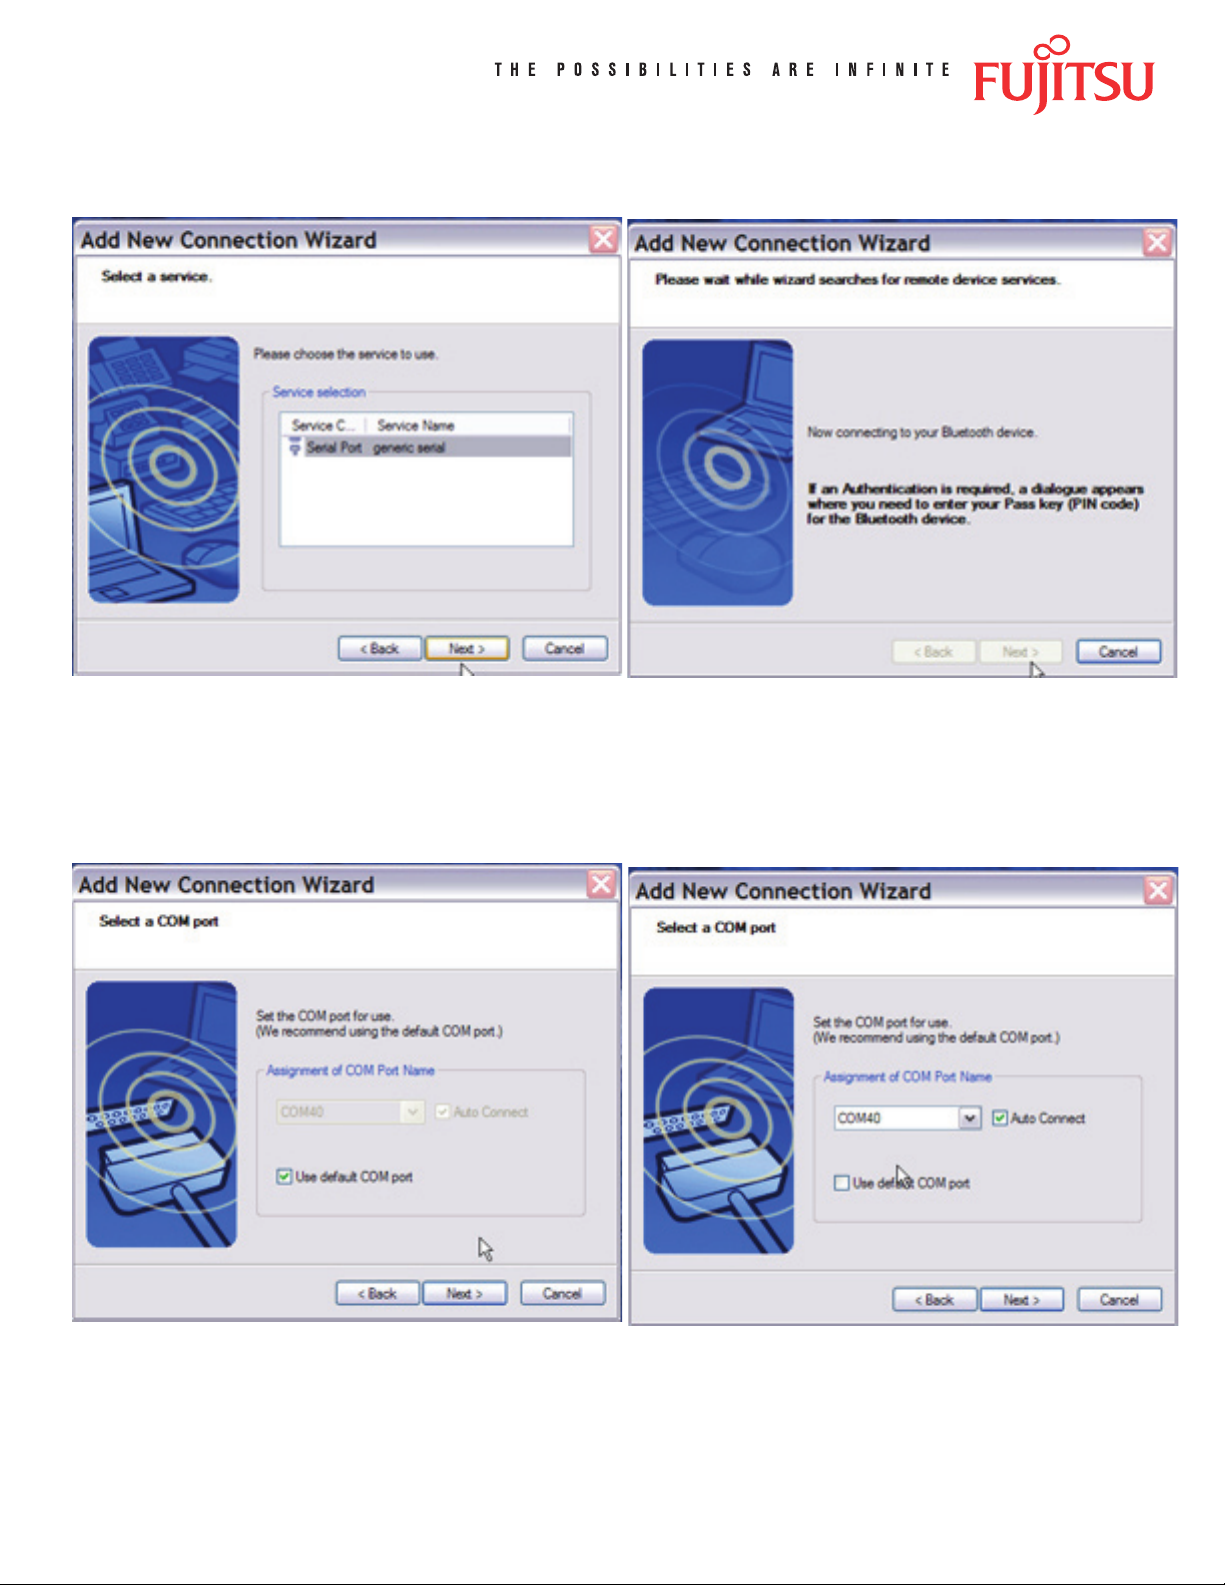
7. Once the Pin is successfully entered, the Bluetooth Manager will display ‘Serial Device’;
[Image 5] click Next. [Image 6]
[Image 5] [Image 6]
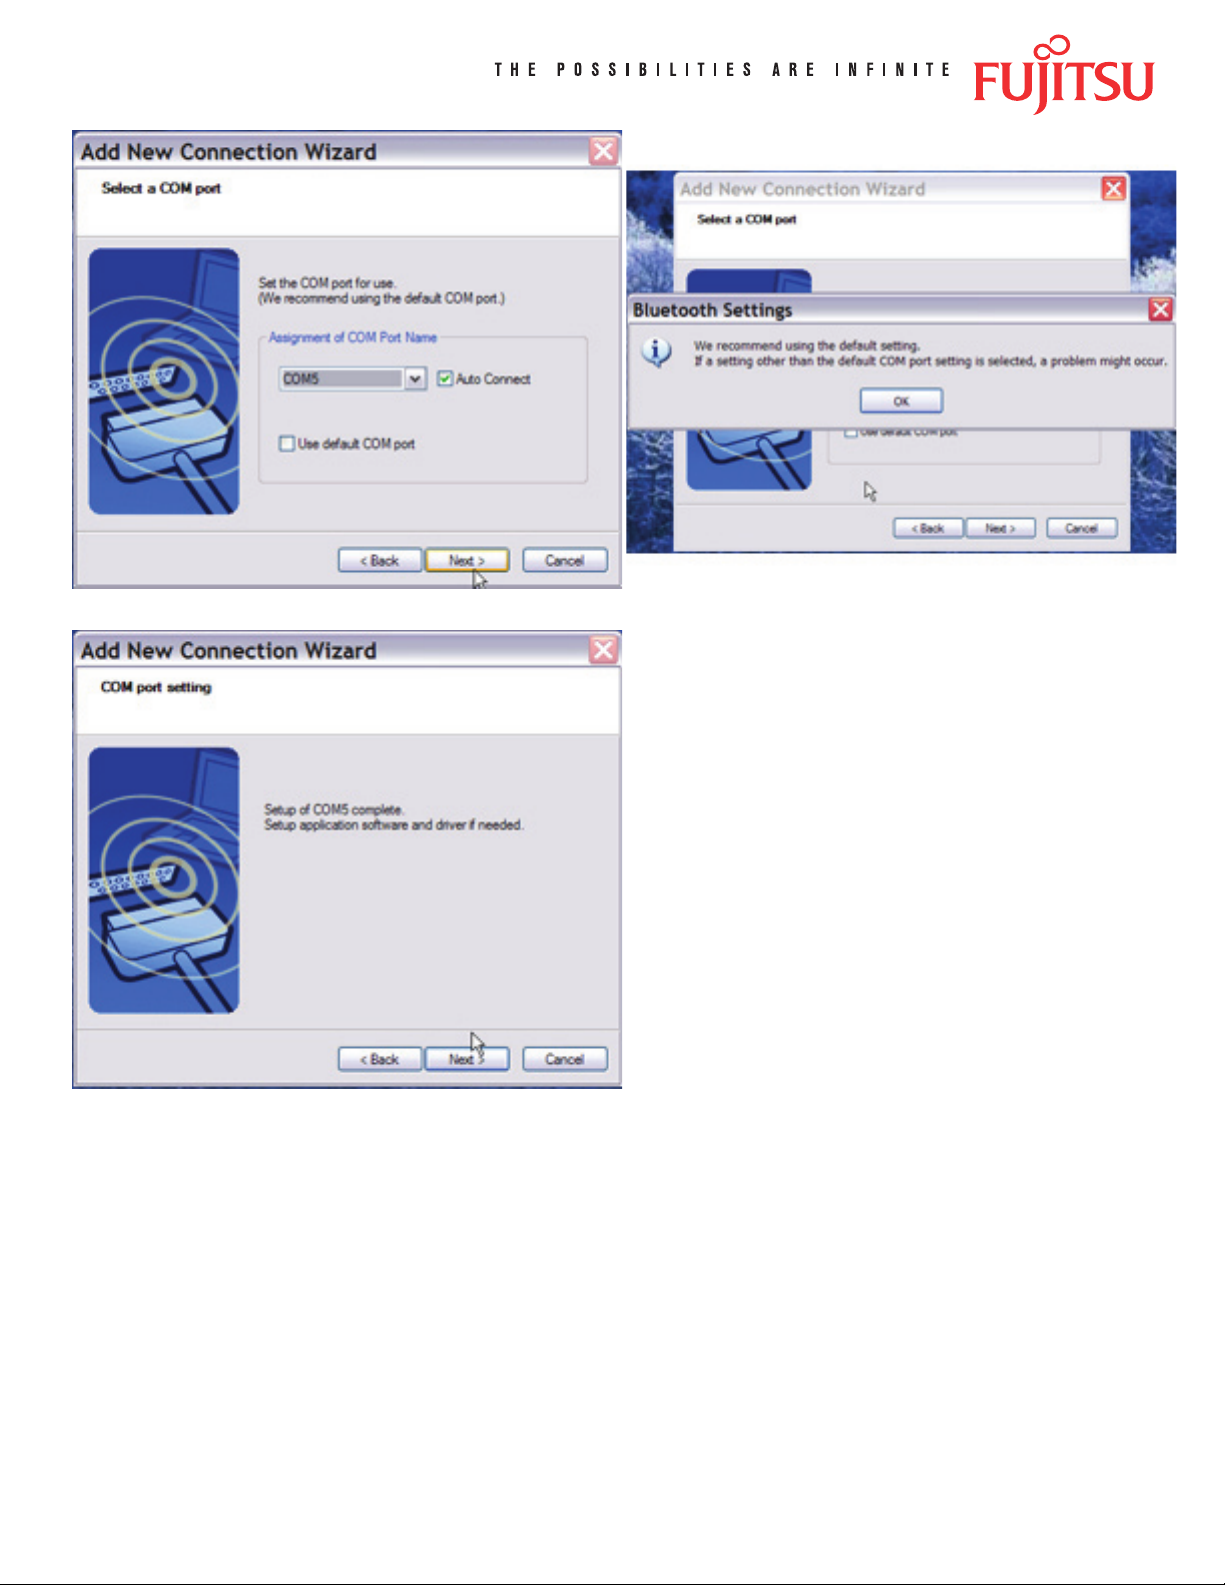
8. Now the Bluetooth Manager will display the COM Port selection dialog; De-Select the “use
default COM port” box, and change the COM port to COM5; [Images 7, 9, 10] ignore the
warning regarding default COM port recommendation, [Image 8] and DO NOT de-select the
Auto Connect box; click Next. [Image 11]
[Image 7] [Image 9]
3
Page 4
[Image 10] [Image 8]
[Image 11]
4
Page 5

9. Now you can select a different icon for the printer if you wish, then click Next and Finish; your
Bluetooth Manager should show the FTP-628WSL-110 as an active device. [Images 12 to 15]
[Image 12] [Image 13]
[Image 14] [Image 15]
5
Page 6

10. Bluetooth conguration is now nished; proceed to FTP-628WSL-110 Serial Driver Installation.
[Images 16 and 17]
[Image 16] [Image 17]
6
Page 7

Serial Driver Installation:
1. Download the latest driver Zip le from the website at: [Images 18 to 22]
http://www.fujitsu.com/us/services/edevices/components/printers/drivers.html
[Image 18]
[Image 20]
[Image 19]
[Image 21]
[Image 22]
7
Page 8

2. Extract all of the les to a folder on your desktop. [Images 23 to 25]
[Image 23] [Image 24]
[Image 25]
3. From the Start menu select Printers and Faxes, and double-click on the Add Printer
icon. [Images 26]
[Image 26]
8
Page 9

4. The Add Printer wizard will pop up on the display; click Next; select ‘Local Printer’ and
DE-SELECT ‘Automatically detect and install my Plug and Play printer’; click Next. [Images 27
and 28]
[Image 27] [Image 28]
5. Select ‘Use the following port’, then use the pull-down menu to select COM5; click Next.
[Images 29 and 30]
[Image 29] [Image 30]
9
Page 10

6. Select FCL, click ‘Have Disk’; when the ‘Install from Disk’ dialog box pops up, Browse to your
Desktop and select the FTP-628WSL and open it; you should see ‘FTP’ in the next dialog box;
select ‘FTP’ and click Next. [Images 31 and 32]
[Image 31] [Image 32]
7. Assign a name for the printer, or use the default provided, click No for default printer and click
Next. [Image 33]
[Image 33]
8. Click ‘Do not Share this printer’ and click
Next. [Image 34]
[Image 34]
10
Page 11

9. Click Yes or No for the Test Page printing as desired; click Next. [Image 35]
[Image 35]
10. The Successful Installation page should appear next; click Finish; a warning box will pop up
regarding Unsigned Drivers, click ‘Continue Anyway’, and wait while the driver is installed.
Once the ‘Copying Files’ dialog box closes, you are ready to use the printer. [Images 36 to 38]
[Image 36]
[Image 37]
[Image 37]
11
Page 12

11. Go to the Start Menu and select Printers and Faxes; when this window opens makes sure you
see FTP-628WSL in the list of printers. [Image 39]
[Image 39]
12. Remember to select and observe the proper settings for the paper size and length (1.9-inch
wide 1/2 letter) in the Printer Setup. You can access the settings from the Printers and Faxes
window by right-clicking on the FTP-628WSL printer name, and selecting Properties.
To change printer behavior, select the General tab, click on Printing Preferences, then click
on Advanced; the variable printing controls will be displayed and may be changed.
[Image 40 to 42]
[Image 40]
[Image 42]
[Image 41]
12
Page 13

13. To test the printer you can either create your own text le, or download and use any of
the test les provided on the web site. If you use the Windows Test Page, the Windows logo
graphic icon should print correctly, but some of the text will be truncated due to the default
margin settings – this is normal operation.
To download the Test Print les go to:
Graphic Demo:
http://www.fujitsu.com/downloads/MICRO/fcai/printers/drivers/ftp-628wsl110-graphic-demo.zip
Receipt Demo:
http://www.fujitsu.com/downloads/MICRO/fcai/printers/drivers/ftp-628wsl110-receipt-demo.zip
Graphic and Text Demo:
http://www.fujitsu.com/downloads/MICRO/fcai/printers/drivers/ftp-628wsl110-graphic-text-demo.zip
Fujitsu Components International Headquarter Ofces
Japan
Fujitsu Component Limited
Gotanda-Chuo Building
3-5, Higashigotanda 2-chome, Shinagawa-ku
Tokyo 141, Japan
Tel: (81-3) 5449-7010
Fax: (81-3) 5449-2626
Email: promothq@ft.ed.fujitsu.com
Web: www.fcl.fujitsu.com
North and South America
Fujitsu Components America, Inc.
250 E. Caribbean Drive
Sunnyvale, CA 94089 U.S.A.
Tel: (1-408) 745-4900
Fax: (1-408) 745-4970
Email: components@us.fujitsu.com
Web: http://www.fujitsu.com/us/services/edevices/components/
©2006 Fujitsu Components America, Inc. All rights reserved. All trademarks or registered trademarks are the property off their respective
owners.
Fujitsu Components America does not warrant that the content of datasheet is error free. In a continuing effort to improve our products Fujitsu
Components America, Inc. reserves the right to change specications/datasheets without prior notice. Rev. 04/07/2006.
Europe
Fujitsu Components Europe B.V.
Diamantlaan 25
2132 WV Hoofddorp
Netherlands
Tel: (31-23) 5560910
Fax: (31-23) 5560950
Email: info@fceu.fujitsu.com
Web: http://www.fujitsu.com/emea/services/components/
Asia Pacic
Fujitsu Components Asia Ltd.
102E Pasir Panjang Road
#04-01 Citilink Warehouse Complex
Singapore 118529
Tel: (65) 6375-8560
Fax: (65) 6273-3021
Email: fcal@fcal.fujitsu.com
Web: http://www.fujitsu.com/sg/services/micro/components/
13
 Loading...