

Page 1

Display
19" LCD Monitor
Page 2

Are there ...
... any technical questions or problems?
Please contact:
● our Service Desk
● your sales partner
● your sales office
The latest information about our products, useful tips, updates etc. is available on our website:
"http://ts.fujitsu.com/support/"
Page 3
OSD-Description
Edition 3
OSD-Description
After you press the MENU button to enter the OSD menu, use
adjust. Then press the AUTO button. After the screen fonts turn from black to blue you may start to
make the adjustments. Just use
taken for 30 seconds (default value but adjustable in OSD setup) after the setting, the system will
automatically save your settings and exit the OSD.
to adjust the screen parameters as required. If no action is
to select the items you want to
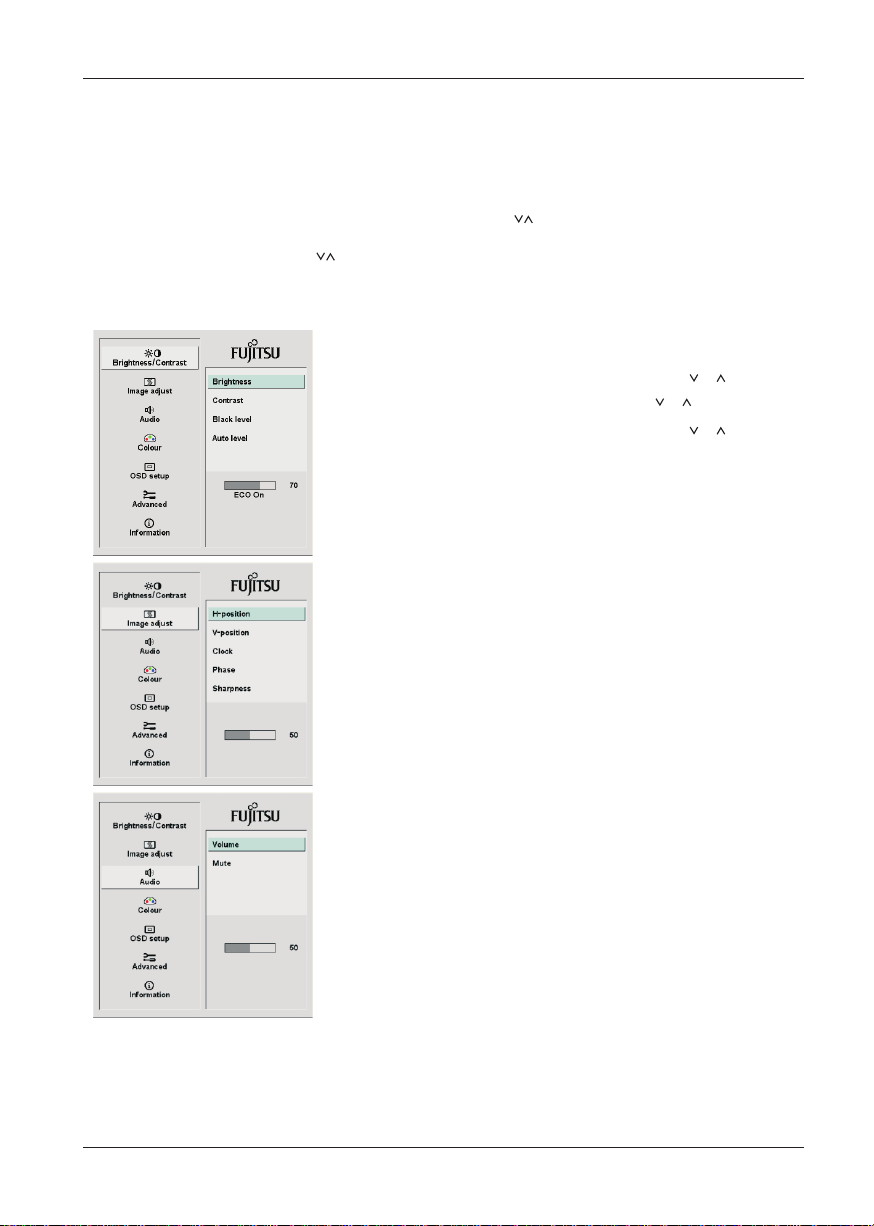
OSD Menu
Brightness/Contrast:
Brightness: Adjusts brightness by using the buttons or
Contrast: Adjusts contrast by using the buttons
Black level: Adjusts black level by using the buttons
Auto level*: Conducts auto level by using the button
MENU (start)
Image Adjust:
H- Position*: Controls the picture’s horizontal position.
V- Position*: Controls the picture’s vertical position.
Clock*: Sets up the internal clock. Larger values make the
displayed image appear wider; smaller values make it appear
compressed.
Phase: Adjusts the internal clock’s time lag in order to optimize
the screen image.
*For VGA only
Sharpness: Adjust sharpness of the picture.
or
or
Audio:
Adjusts the monitor speaker output volume and mute.
Page 4
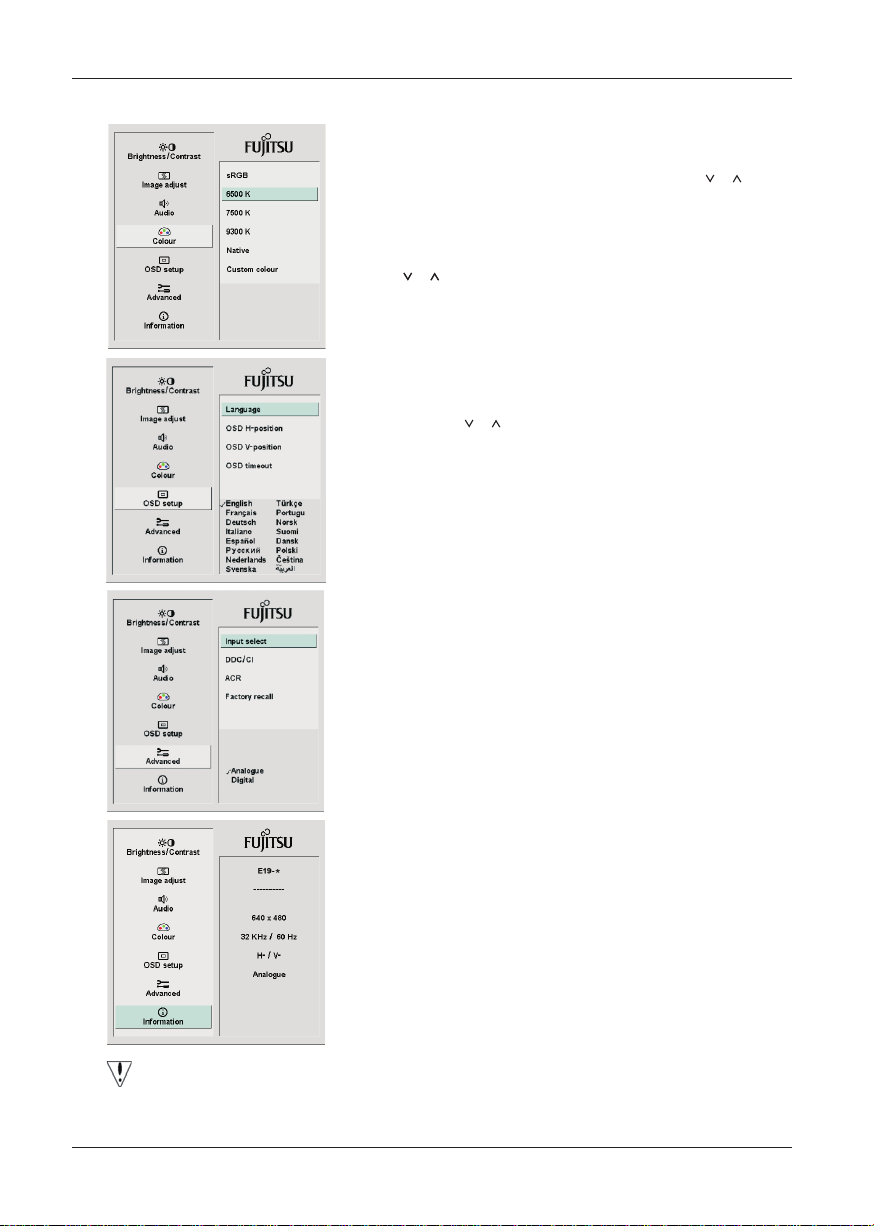
Colour:
This menu lets you select a preset color temperature (sRGB,6500K,
9300K, Native) by pressing the OSD buttons
, changes
to
the color temperature take immediate effect on screen.
If you wish to set individual color values, select the Custom
Colour option, then press the MENU button to select the red,
green and blue settings and set the desired value using the OSD
buttons
.The current settings are automatically saved
when you return to the previous level or exit the OSD menu.
OSD Setup:
Language: selects the language for the OSD menu by pressing
the OSD buttons
.
OSD H- Position: Controls the OSD menu’s horizontal position.
OSD V- Position: Controls the OSD menu’s vertical position.
OSD Timeout: Determines how long (in seconds) the OSD
menu waits before closing automatically after no action has
been performed.
Advanced :
Factory recall:
MENU: Start AUTO: Back
Information: Th e o pt im um re so lu ti on for this monitor is
1280 × 1 02 4 @ 6 0H z
Note: Do not adjust the screen settings when animation is displayed and make sure to adjust the
settings in full screen mode.
DDC-CI:
There is an optional OSD window (On/Off) that applicable
or disable the Displays Viewer.
Input select:
Select the input signal from Analog, or Digital Input
ACR:
Select turn on or off ACR function
(Advanced Contrast Ratio - dynamic)
7500K,
or
or
or
or
OSD-Description
Edition 3
Page 5

48 cm (19 “) LCD Monitor
Technical data
Dimensions and weight (LCD monitor)
Visible diagonals:
Screen size :
Dimensions (W x H x D) incl. monitor base : 412 mm x 402 mm x 200.3 mm
Dimensions box (W x H x D): 484 mm x 151 mm x 454 mm
Weight :
Dot pitch :
Maximal resolution : 1280 x 1024 pixels
Electrical data
Video: analogue, positive, 0.7 Vpp, 75 Ohm, (digital),
Synchronisation :
Horizontal frequency:
Refresh rate:
Maximum pixel rate:
Power supply: 100 V - 240 V, 50 Hz - 60 Hz, 1.5 A max.
Total power consumption:
< 0.5 W (stand by)
Environmental conditions
Environment class 3K2, IEC 721
Operating range: 5 °C .... 35 °C
Humidity: 20 % ... 85 %
Condensation must be avoided.
Preset operating modes
The picture position and size have been set set to optimum values at the factory for the
operating modes listed above.
Display resolution Refresh rate Horizontal frequency
640 x 480
640 x 480
720 x 400
800 x 600
800 x 600
1024 x768
1024 x 768
1280 x 1024
1280 x 1024
60 Hz
75 Hz
70 Hz
60 Hz
75 Hz
60 Hz
75 Hz
60 Hz
75 Hz
48 cm (19”)
376.3 mm x 301 mm
4.6 kg / 6.4kg
0.294 mm
DVI-D)
30 kHz …. 83 kHz
55 Hz ….76 Hz
165 MHz
< 25 W (active)
31.5 kHz
37.5 kHz
31.5 kHz
37.9 kHz
46.9 kHz
48.4 kHz
60 kHz
64 kHz
80 kHz
Edition 3
Page 6

Page 7
48 cm LCD Monitor
Getting Started
Deutsch
Magyar
Русский
English
Български
Norsk
Français
Română
Eesti keel
Español
Türkçe
Ελληνικά
Português
ﻲﺑﺮﻋ
Lietuviškas
Italiano
FCC Statement
Latviski
Svenska
Polski
Nederlands
Slovenščina
Dansk
Slovenčina
Suomi
Česky
August 2009 edition
WEEE
Page 8

Copyright © Fujitsu Technology Solutions GmbH 2009
VESA, DDC and DPMS are registered trademarks of Video Electronics Standards Association.
All rights, including rights of translation, reproduction by printing, copying or similar methods, even of
parts are reserved.
Offenders will be liable for damages.
All rights, including rights created by patent grant or registration of a utility model or design, are
reserved.
Delivery subject to availability. Right of technical modification reserved.
Edition 3
Page 9

Ausgabe 3 Deutsch
Inhalt
Einleitung .............................................................................................................................................. 1
Weitere Informationen .................................................................................................................. 1
Wichtige Hinweise ................................................................................................................................ 2
Sicherheitshinweise ...................................................................................................................... 2
Netzleitung ................................................................................................................................... 3
Transport ...................................................................................................................................... 3
Reinigung ..................................................................................................................................... 4
CE-Kennzeichnung ...................................................................................................................... 4
Überprüfen der Lieferung ..................................................................................................................... 4
Anschließen des Bildschirms ............................................................................................................... 5
Bedienen des Bildschirms .................................................................................................................... 6
Fehlerbehandlung ................................................................................................................................. 7
Erläuterungen zur Norm ISO 9241-3 .................................................................................................... 9
Montage des Bildschirmfußes ............................................................................................................ 10
Page 10

Inhalt
Deutsch Ausgabe 3
Page 11

Ausgabe 3 Deutsch - 1
Einleitung
In diesem Handbuch finden Sie wichtige Informationen, die Sie für die Inbetriebnahme Ihres LCDBildschirms benötigen.
Der LCD-Bildschirm wird vom PC angesteuert. Für die Einstellung der Modi (Auflösung und
Bildwiederholfrequenz) ist die Grafikkarte bzw. die zugehörige Treiber-Software zuständig.
Wenn Sie den Bildschirm das erste Mal in Betrieb nehmen, sollten Sie die Bildschirmanzeige optimal
an die verwendete Grafikkarte anpassen und Ihren Bedürfnissen entsprechend einstellen.
Zielgruppe
Um die beschriebenen Arbeiten auszuführen, müssen Sie kein "Fachmann" sein. Beachten Sie aber
unbedingt die Sicherheitshinweise in der Betriebsanleitung des Computers und in diesem Handbuch!
Bei Problemen wenden Sie sich bitte an Ihre Verkaufsstelle oder unseren Service Desk.
Darstellungsmittel
In diesem Handbuch werden folgende Darstellungsmittel verwendet.
!
kennzeichnet Hinweise, bei deren Nichtbeachtung Ihre Gesundheit, die Funktionsfähigkeit
Ihres Geräts oder die Sicherheit Ihrer Daten gefährdet ist.
i
kennzeichnet zusätzliche Informationen und Tipps.
► kennzeichnet einen Arbeitsschritt, den Sie ausführen müssen.
"Anführungszeichen" kennzeichnen Kapitelnamen und Begriffe, die hervorgehoben werden sollen.
Diese Schrift kennzeichnet Dateinamen und Menüpunkte.
Diese Schrift stellt Bildschirmausgaben dar.
Weitere Informationen
Wie Sie Auflösungen und Bildwiederholfrequenzen einstellen, entnehmen Sie bitte den
Dokumentationen Ihrer Grafikkarte bzw. der dazugehörigen Treiber-Software.
Page 12

LCD-Bildschirm
2 - Deutsch Ausgabe 3
Wichtige Hinweise
!
In diesem Kapitel finden Sie Sicherheitshinweise, die Sie beim Umgang mit Ihrem
Bildschirm unbedingt beachten müssen.
Sicherheitshinweise
Dieses Gerät entspricht den einschlägigen Sicherheitsbestimmungen für Einrichtungen der
Informationstechnik, einschließlich elektrischer Büromaschinen für den Einsatz in Büroumgebung.
Falls Sie Fragen haben, ob Sie das Gerät in der vorgesehenen Umgebung aufstellen können,
wenden Sie sich bitte an Ihre Verkaufsstelle oder an unseren Service Desk.
● Die Display-Oberfläche des LCD-Bildschirms ist druck- und kratzempfindlich. Behandeln Sie
deshalb die Display-Oberfläche vorsichtig, um bleibende Schäden (Newton-Ringe, Kratzer) zu
vermeiden.
● Wenn das Gerät aus kalter Umgebung in den Betriebsraum gebracht wird, kann Betauung
auftreten. Warten Sie, bis das Gerät temperaturangeglichen und absolut trocken ist, bevor Sie
es in Betrieb nehmen.
● Um eine ausreichende Belüftung zu gewährleisten, müssen die Zuluft- und Abluftöffnungen des
Bildschirms unbedingt freigehalten werden.
● Der Bildschirm stellt sich automatisch auf eine Netzspannung im Bereich von 100 V bis 240 V
ein. Stellen Sie sicher, dass die örtliche Netzspannung diesen Bereich weder unter- noch
überschreitet.
● Stellen Sie sicher, dass die Steckdose am Bildschirm oder die Schutzkontakt-Steckdose der
Hausinstallation frei zugänglich ist.
● Der Ein-/Ausschalter trennt das Gerät nicht von der Netzspannung. Zur vollständigen Trennung
von der Netzspannung müssen Sie den Netzstecker ziehen.
● Der Bildschirm ist mit einer sicherheitsgeprüften Netzleitung ausgestattet.
● Verlegen Sie die Leitungen so, dass sie keine Gefahrenquelle (Stolpergefahr) bilden und nicht
beschädigt werden. Beachten Sie beim Anschließen des Geräts die entsprechenden Hinweise
im Kapitel "Anschließen des Bildschirms".
● Wenn Sie eine andere als die mitgelieferte Datenleitung verwenden, achten Sie darauf, dass
die Leitung ausreichend abgeschirmt ist. CE-Konformität sowie eine optimale Bildqualität
werden nur mit der mitgelieferten Datenleitung gewährleistet.
● Während eines Gewitters dürfen Sie Datenübertragungsleitungen weder anschließen noch
lösen.
● Achten Sie darauf, dass keine Gegenstände (z. B. Schmuckkettchen, Büroklammern etc.) oder
Flüssigkeiten in das Innere des Geräts gelangen (Gefahr von elektrischem Schlag,
Kurzschluss).
● Das Gerät ist nicht wasserfest! Tauchen Sie das Gerät nie ins Wasser und schützen Sie es vor
Spritzwasser (Regen, Meerwasser).
● In Notfällen (z. B. bei Beschädigung von Gehäuse, Bedienelementen oder Netzleitung, bei
Eindringen von Flüssigkeiten oder Fremdkörpern) schalten Sie das Gerät sofort aus, ziehen
Sie den Netzstecker und verständigen Sie Ihre Verkaufsstelle oder unseren Service Desk.
Page 13

LCD-Bildschirm
Ausgabe 3 Deutsch - 3
● Der Bildschirm muss nach den örtlichen Vorschriften über Beseitigung von Sondermüll entsorgt
werden. Die Hintergrundbeleuchtung des Bildschirms ist quecksilberhaltig. Bei Handhabung
und Entsorgung sind die für Leuchtstoffröhren geltenden Sicherheitsbestimmungen zu
beachten.
● Reparaturen am Gerät dürfen nur von autorisiertem Fachpersonal durchgeführt werden. Durch
unbefugtes Öffnen und unsachgemäße Reparaturen können erhebliche Gefahren für den
Benutzer entstehen (elektrischer Schlag, Brandgefahr).
● Setzen Sie einen Bildschirmschoner mit bewegten Bildern ein und aktivieren Sie das Power-
Management für Ihren Bildschirm, um ein "Einbrennen" von Standbildern zu vermeiden.
● Der Bildschirm darf nur im Breitformat (0° Landscape-Modus) betrieben werden. Eine Drehung
bei Montage von Schwenkarm oder Wandhalterung ist nicht zulässig.
● Heben Sie dieses Handbuch zusammen mit dem Gerät auf. Wenn Sie das Gerät an Dritte
weitergeben, geben Sie bitte auch dieses Handbuch weiter.
● Wir empfehlen Ihnen, das Gerät auf eine rutschfeste und unempfindliche Unterlage zu stellen.
Bei der Vielfalt der bei Möbeln verwendeten Beschichtungen und Lacke ist es nicht auszuschließen, dass die Gerätefüße Schäden auf der Stellfläche verursachen.
Netzleitung
Verwenden Sie die mitgelieferte Leitung, um sicheren Betrieb zu gewährleisten. Wenn es notwendig
ist, die ursprünglich mitgelieferte Leitung zu ersetzen, sind die folgenden Richtlinien unbedingt zu
beachten.
● Stecker und Buchse der Netzleitung müssen den Vorschriften von IEC60320/CEE-22
entsprechen.
● Die Leitung muss den VDE- bzw. HAR-Bestimmungen entsprechen. Das VDE- bzw. HAR-
Zeichen ist auf der Kabelaußenhülle zu finden.
● Für Geräte, die auf Schreibtischen, Tischen etc. aufgestellt werden, ist die Verwendung von
Netzleitungsausführungen SVT bzw. SJT zulässig.
● Bei der Auswahl der Leitung ist der für das Gerät erforderliche Nennstrom zu beachten.
● Falls notwendig, ersetzen Sie die ursprünglich mitgelieferte Netzleitung durch eine
landesübliche 3-polige Netzleitung mit Schutzkontakt.
Transport
● Transportieren Sie den Bildschirm vorsichtig und nur in der Originalverpackung oder einer
anderen geeigneten Verpackung, die Schutz gegen Stoß und Schlag gewährt.
● Der LCD-Bildschirm darf keinesfalls herunterfallen (Glasbruchgefahr).
Page 14
LCD-Bildschirm
4 - Deutsch Ausgabe 3
Reinigung
● Ziehen Sie den Netzstecker, bevor Sie den Bildschirm reinigen.
● Der Gehäuseinnenraum darf nur von einem Servicetechniker gereinigt werden.
● Verwenden Sie für die Reinigung kein Scheuerpulver und keine Kunststoff lösenden
Reinigungsmittel.
● Lassen Sie keine Flüssigkeit in das Innere des Geräts dringen.
● Achten Sie darauf, dass die Lüftungsschlitze am Bildschirm frei bleiben.
● Reinigen Sie die druck- und kratzempfindliche Display-Oberfläche des LCD-Bildschirms nur mit
einem weichen, leicht angefeuchteten Tuch.
Zur Reinigung der Gehäuseoberfläche des Bildschirms ist ein trockenes Tuch ausreichend. Bei
starker Verschmutzung kann ein feuchtes Tuch verwendet werden, das in Wasser mit mildem
Spülmittel getaucht und gut ausgewrungen wurde.
CE-Kennzeichnung
Dieses Gerät erfüllt in der ausgelieferten Ausführung die Anforderungen der EGRichtlinien 2004/108/EG "Elektromagnetische Verträglichkeit" und 2006/95/EG
"Niederspannungsrichtlinie".
Überprüfen der Lieferung
!
Die Display-Oberfläche des LCD-Bildschirms ist druck- und kratzempfindlich. Bitte fassen
Sie das Gerät deshalb grundsätzlich nur am Gehäuse an.
► Packen Sie alle Teile aus.
► Prüfen Sie den Verpackungsinhalt auf sichtbare Transportschäden.
► Prüfen Sie, ob die Lieferung mit den Angaben auf dem Lieferschein übereinstimmt.
Zur vollständigen Lieferung des LCD-Bildschirms gehören:
– ein Bildschirm
– Datenleitung
– eine Netzleitung
– ein Garantieheft
– dieses Handbuch "Erste Schritte"
Wenn Sie Transportschäden oder Unstimmigkeiten zwischen Verpackungsinhalt und Lieferschein
feststellen, informieren Sie unverzüglich Ihre Verkaufsstelle!
i
Wir empfehlen Ihnen, die Originalverpackung des Geräts nicht wegzuwerfen. Bewahren
Sie die Originalverpackung für einen eventuellen Transport auf.
Page 15
LCD-Bildschirm
Ausgabe 3 Deutsch - 5
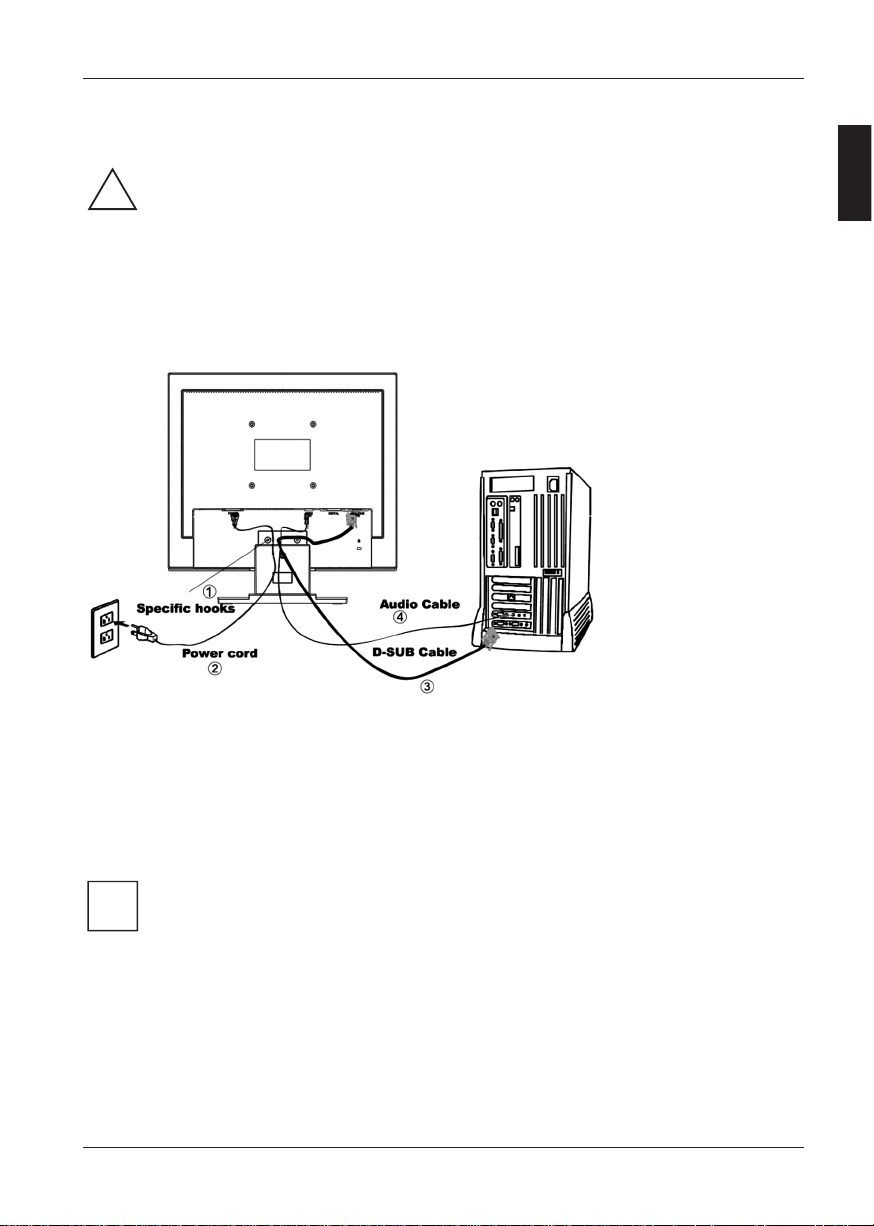
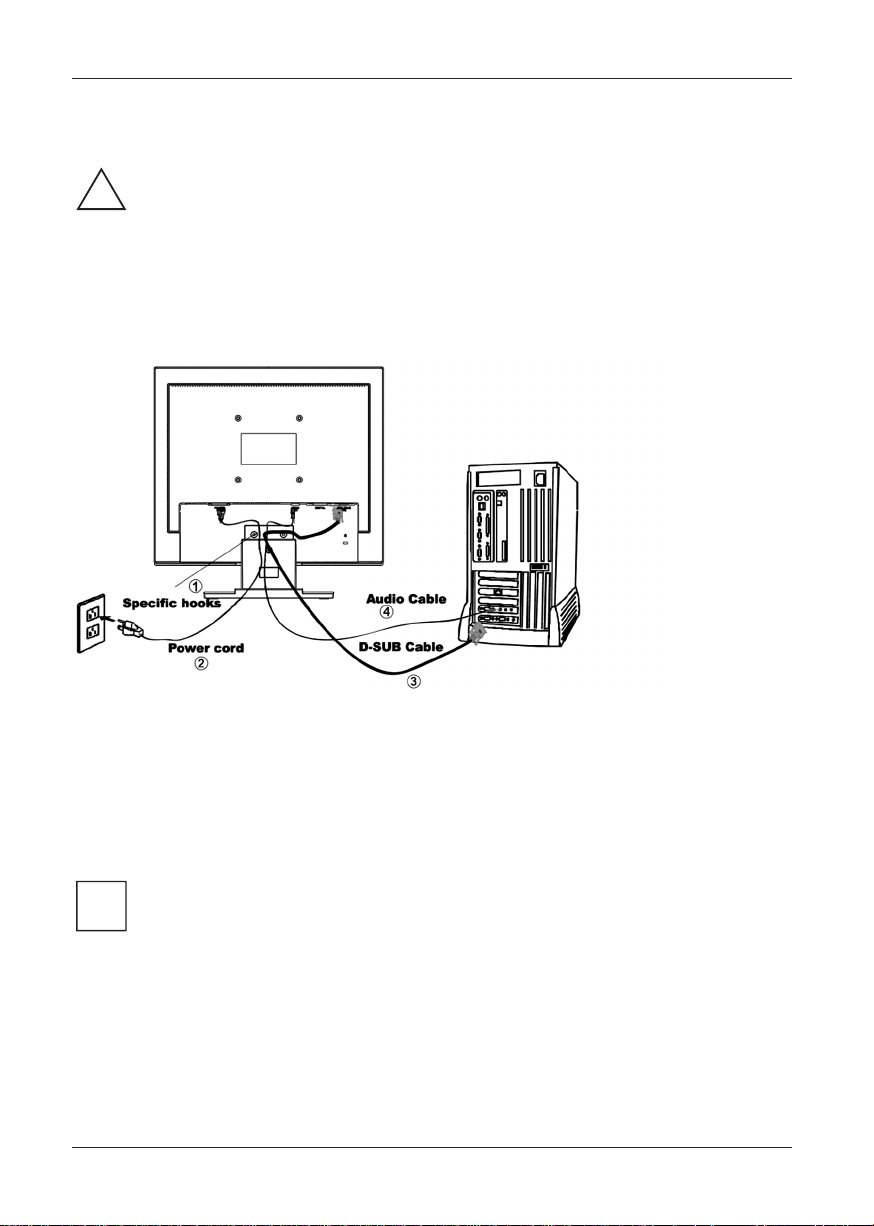
Anschließen des Bildschirms
!
Beachten Sie die Sicherheitshinweise im Kapitel "Wichtige Hinweise".
CE-Konformität sowie eine optimale Bildqualität werden nur mit der mitgelieferten
Datenleitung gewährleistet.
Die Öffnungen für die Zu- und Abluft dürfen nicht verdeckt werden!
Der Netzstecker des Computers muss gezogen sein!
► Stellen Sie sicher, dass der Bildschirm und der Computer ausgeschaltet sind.
Leitungen an den Bildschirm anschließen
► Wenn die Datenleitung nicht fest mit dem Bildschirm verbunden ist:
Stecken Sie einen Stecker der Datenleitung an die D-SUB-Anschlussbuchse des Bildschirms
und sichern Sie die Steckverbindung durch Anziehen der Sicherungsschrauben.
► Stecken Sie die mitgelieferte Netzleitung an die Netzanschlussbuchse des Bildschirms.
Leitungen an den Computer anschließen
Informationen über die Anschlüsse und Schnittstellen des Computers finden Sie in der
Betriebsanleitung Ihres Computers.
i
Wenn Ihr Computer zwei Bildschirmanschlüsse hat (Bildschirm-Controller "onboard" und
separate Grafikkarte), so ist im Allgemeinen der Bildschirmanschluss der separaten
Grafikkarte aktiv.
► Stecken Sie die Datenleitung an den (aktiven) Bildschirmanschluss des Computers und sichern
Sie die Steckverbindung durch Anziehen der Sicherungsschrauben.
► Stecken Sie den Stecker der mitgelieferten Netzleitung in eine ordnungsgemäß geerdete
Schutzkontakt-Steckdose und achten Sie auf sichere Steckverbindung.
Page 16
LCD-Bildschirm
6 - Deutsch Ausgabe 3
► Stecken Sie den Netzstecker des Computers in eine ordnungsgemäß geerdete Schutzkontakt-
Steckdose.
i
Wenn Sie den Bildschirm das erste Mal in Betrieb nehmen, sollten Sie die passenden
Grafiktreiber für Ihre Anwendungsprogramme installieren. Informationen dazu finden Sie in
der Dokumentation Ihrer Grafikkarte bzw. der dazugehörigen Treiber-Software.
Bedienen des Bildschirms
Neigung einstellen
Der Bildschirm kann in seiner Neigung nach vorn und nach hinten aus seiner senkrechten Stellung
verstellt werden.
► Fassen Sie den Bildschirm mit beiden Händen am rechten und linken Gehäuserand und
bewegen Sie ihn in die gewünschte Neigung.
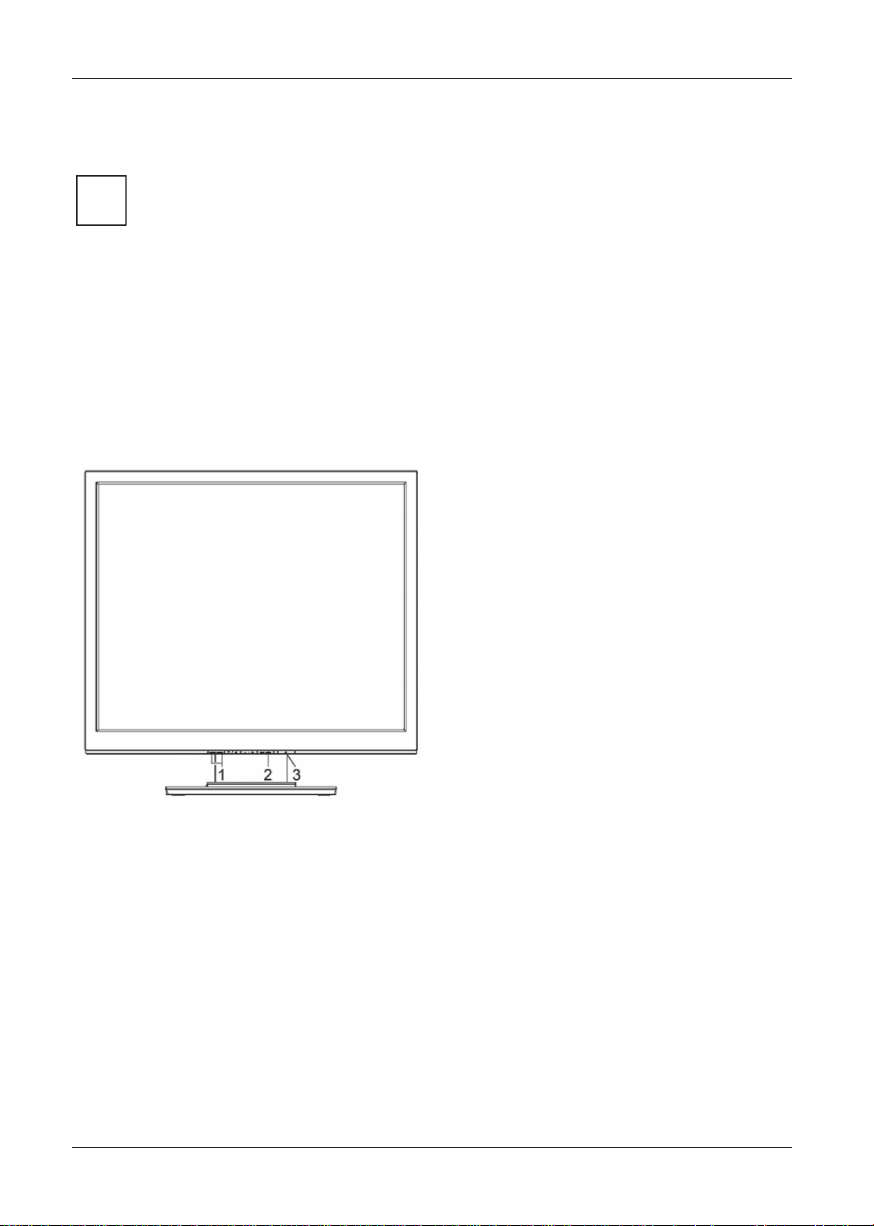
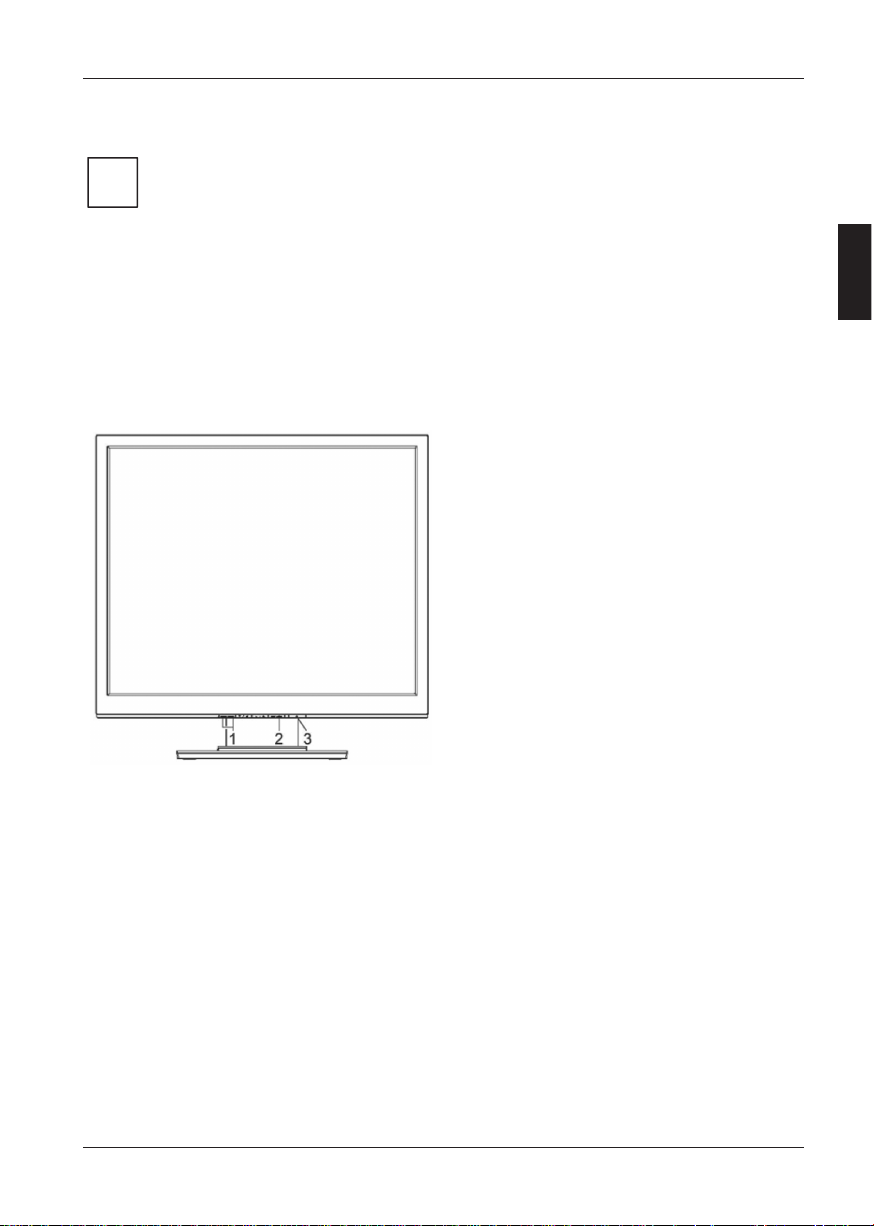
Bildschirm ein-/ausschalten
1 = Tasten für das OSD-Menü
(On-Screen-Display)
2 = Netzanzeige
3 = Ein-/Ausschalter
Zum Ein- und Ausschalten des Bildschirms dient der Ein-/Ausschalter.
Die Netzanzeige leuchtet grün oder blau, wenn der Bildschirm und der Computer eingeschaltet sind.
Die Netzanzeige leuchtet orange, wenn der Bildschirm kein Videosignal erhält bzw. sich im
Energiesparmodus befindet. Die Netzanzeige erlischt, wenn der Bildschirm ausgeschaltet ist.
Bitte beachten Sie beim Einschalten des Computer-Systems die folgende Einschaltreihenfolge:
► Schalten Sie zuerst mit dem Ein-/Ausschalter den LCD-Bildschirm ein.
► Schalten Sie dann den Computer ein.
Page 17
LCD-Bildschirm
Ausgabe 3 Deutsch - 7
Fehlerbehandlung
Bei Auftreten eines Fehlers überprüfen Sie zunächst die im Folgenden genannten Punkte. Falls das
Fehlerbild dadurch noch nicht beseitigt wurde, sollte der Bildschirm nach Möglichkeit an einem
anderen Computer geprüft werden.
Wenn Sie das Problem nicht lösen können, verständigen Sie bitte unseren Service Desk.
Haben Sie dieses Problem? Überprüfen Sie die genannten Punkte:
Keine Bildschirmanzeige
(Netzanzeige leuchtet nicht)
► Prüfen Sie, ob der Bildschirm eingeschaltet ist.
► Prüfen Sie, ob die Netzleitung des Bildschirms richtig
gesteckt ist.
► Prüfen Sie, ob der Computer eingeschaltet ist.
Keine Bildschirmanzeige
(Netzanzeige leuchtet)
► Prüfen Sie, ob der Computer eingeschaltet ist.
► Prüfen Sie, ob die Datenleitung des Bildschirms fest
mit dem Bildschirmanschluss des Computers
verschraubt ist.
► Drücken Sie eine beliebige Taste der Computer-
Tastatur - eventuell ist der Computer im
Energiesparmodus.
► Verändern Sie die Helligkeit und/oder den Kontrast,
bis Sie ein Bild erhalten.
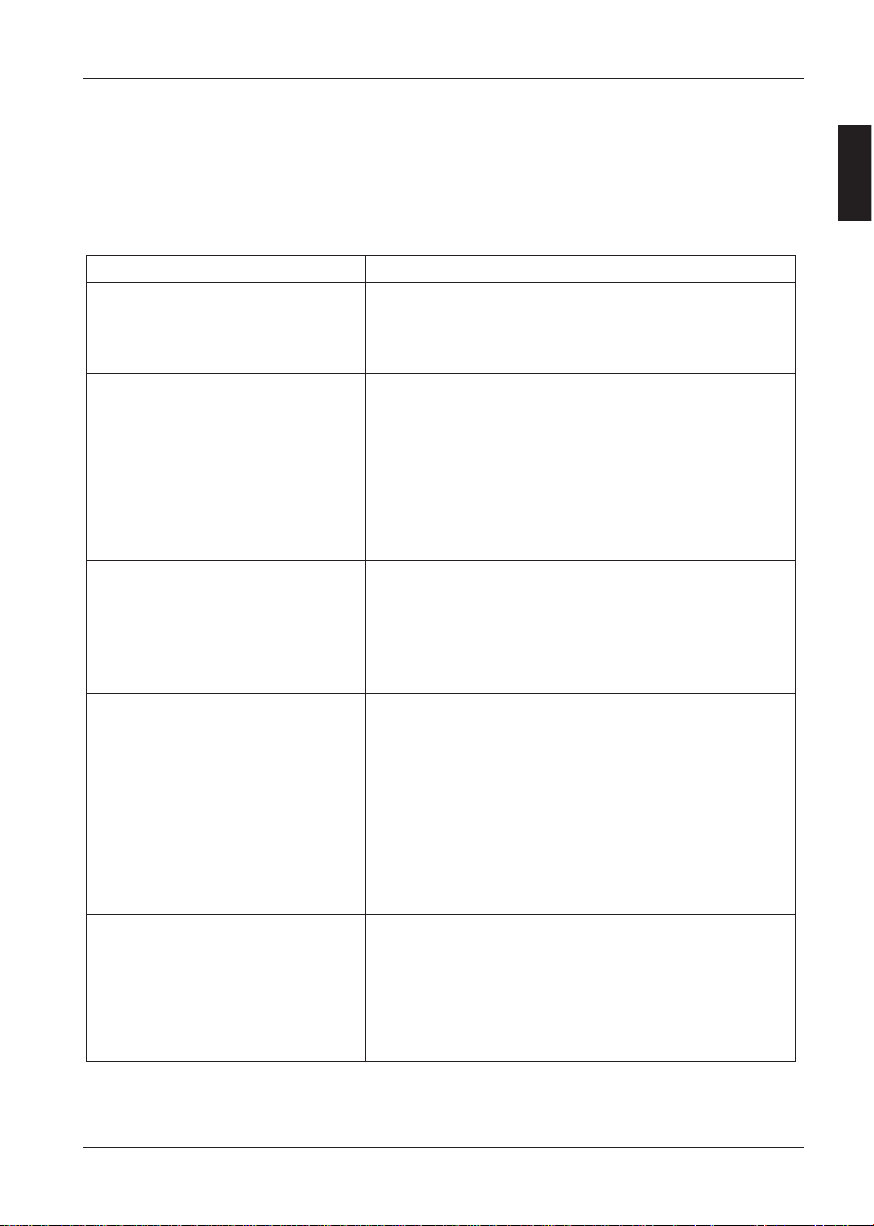
Meldung:
e.g.
No Video Input
Or
No Signal
► Prüfen Sie, ob die Datenleitung des Bildschirms fest
mit dem Bildschirmanschluss des Computers
verschraubt ist.
► Prüfen Sie, ob der Computer eingeschaltet ist.
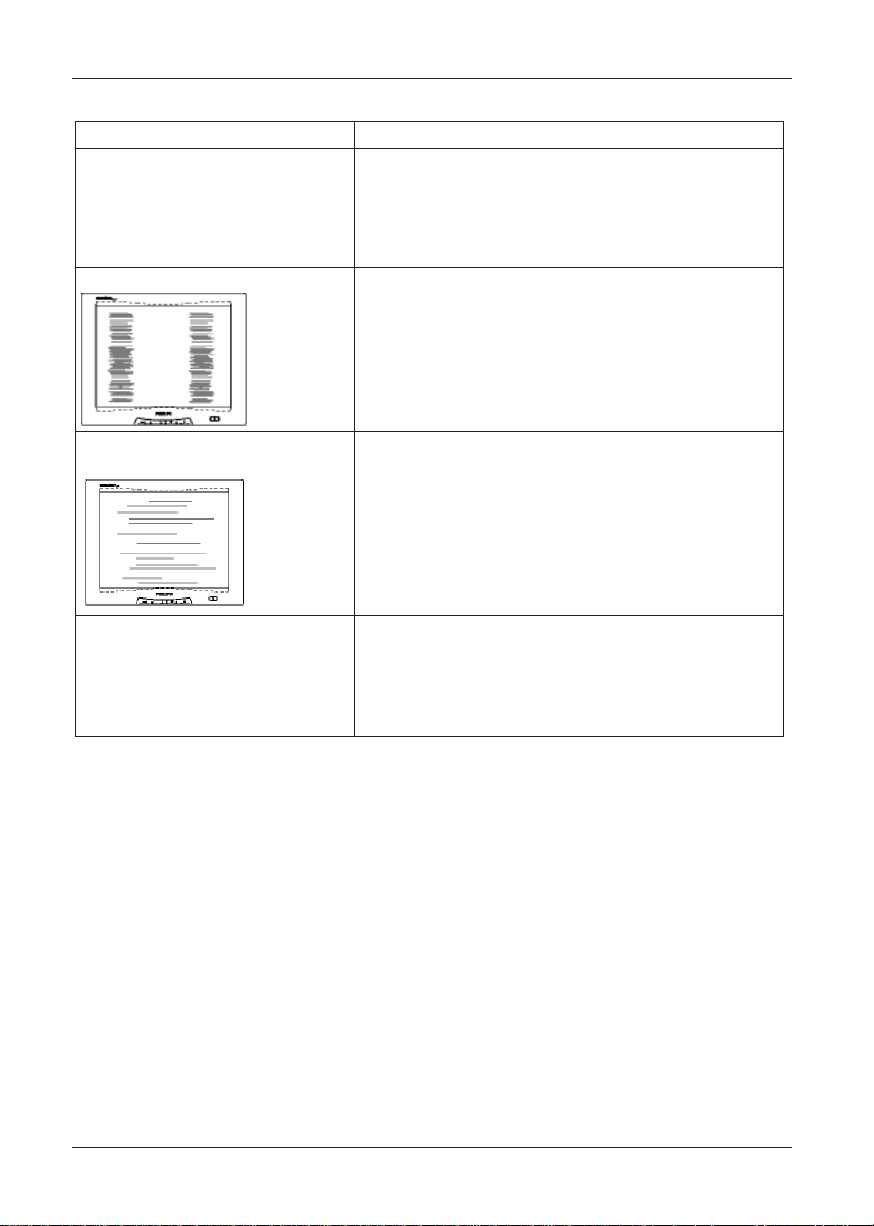
Meldung:
e.g.
This is 85 Hz overdrive.
Change computer display input
to ….. x ….. at 60 Hz.
or
Frequency out of range
Please change the display mode
to …….
Das Eingangssignal (Horizontalfrequenz und
Bildwiederholfrequenz) entspricht nicht den technischen
Daten des Bildschirms.
► Stellen Sie mit Hilfe der Computer-Software gültige
Frequenzen ein (siehe Dokumentation Ihres
Computers oder Ihrer Grafikkarte).
► Stellen Sie mit Hilfe der Computer-Software eine
gültige Auflösung ein (siehe Dokumentation Ihres
Computers oder Ihrer Grafikkarte).
Bildposition nicht korrekt Der Bildschirm erkennt eine noch nicht eingestellte
Betriebsart.
► Führen Sie die Selbstjustage des Bildschirms durch
(mit der Taste AUTO - falls vorhanden - oder über
das OSD-Menü).
► Stellen Sie die Bildlage über das OSD-Menü richtig
ein.
Page 18
LCD-Bildschirm
8 - Deutsch Ausgabe 3
Haben Sie dieses Problem? Überprüfen Sie die genannten Punkte:
Bild zittert ► Prüfen Sie, ob die Datenleitung des Bildschirms fest
mit dem Bildschirmanschluss des Computers
verschraubt ist.
► Führen Sie die Selbstjustage des Bildschirms durch
(mit der Taste AUTO - falls vorhanden - oder über
das OSD-Menü).
Bildstörungen (vertikale Streifen)
► Führen Sie die Selbstjustage des Bildschirms durch
(mit der Taste AUTO - falls vorhanden - oder über
das OSD-Menü).
Bildstörungen
(horizontale Streifen, Grießeln)
► Führen Sie die Selbstjustage des Bildschirms durch
(mit der Taste AUTO - falls vorhanden - oder über
das OSD-Menü).
Bild zu hell oder zu dunkel
► Führen Sie die Selbstjustage des Bildschirms durch
(mit der Taste AUTO - falls vorhanden - oder über
das OSD-Menü).
► Stellen Sie Kontrast und Helligkeit über das OSD-
Menü richtig ein, falls die Selbstjustage kein
befriedigendes Ergebnis liefert.
Page 19
LCD-Bildschirm
Ausgabe 3 Deutsch - 9
Erläuterungen zur Norm ISO 9241-3
Helle oder dunkle Bildpunkte
Nach dem heutigen Stand der Produktionstechnik kann eine absolut fehlerfreie Bildschirmanzeige
nicht garantiert werden. Es können abhängig von der Gesamtanzahl der Pixel (Auflösung) einige
wenige konstant helle oder dunkle Pixel (Bildelemente) oder Subpixel (Bildpunkte) vorhanden sein.
Pixel
(= Bildelement)
Ein Pixel besteht aus 3 Subpixeln, in der Regel Rot, Grün und Blau.
Ein Pixel ist das kleinste Element, das die vollständige Funktionalität der
Anzeige erzeugen kann.
Subpixel
(= Bildpunkt)
Ein Subpixel ist eine gesondert adressierbare interne Struktur in einem
Pixel (Bildelement), die die Bildelementfunktion erweitert.
Die maximal zulässige Anzahl solcher fehlerhaften Pixel wird durch die internationale Norm
ISO 9241-3 festgelegt.
Die LCD Monitore von Fujitsu halten bei niedrigen Auflösungen die Klasse II und bei Auflösungen
von 1680 x 1050 (1764000 Pixel) und höher die Klasse I nach der Norm ISO 9241-3 ein.
Beispiele:
Ein Flachbildschirm mit der Auflösung 1280 x 1024 hat 1280 x 1024 = 1310720 Pixel. Jedes Pixel
besteht aus drei Subpixeln (Rot, Grün und Blau), sodass sich ca. 3.9 Millionen Subpixel ergeben.
Laut ISO 9241-3 (Klasse II) dürfen maximal 3 helle und 3 dunkle Pixel und zusätzlich 7 helle oder 13
dunkle Subpixel oder ein entsprechender Mix defekt sein (1 helles Subpixel zählt wie zwei dunkle
Subpixel).
Ein Flachbildschirm mit der Auflösung 1920 x 1080 hat 1920 x 1080 = 2073600 Pixel. Jedes Pixel
besteht aus drei Subpixeln (Rot, Grün und Blau), sodass sich ca. 6,2 Millionen Subpixel ergeben.
Laut ISO 9241-3 (Klasse I) dürfen maximal 2 helle und 2 dunkle Pixel und zusätzlich 5 helle oder 10
dunkle Subpixel oder ein entsprechender Mix defekt sein (1 helles Subpixel zählt wie zwei dunkle
Subpixel).
Page 20
LCD-Bildschirm
10 - Deutsch Ausgabe 3
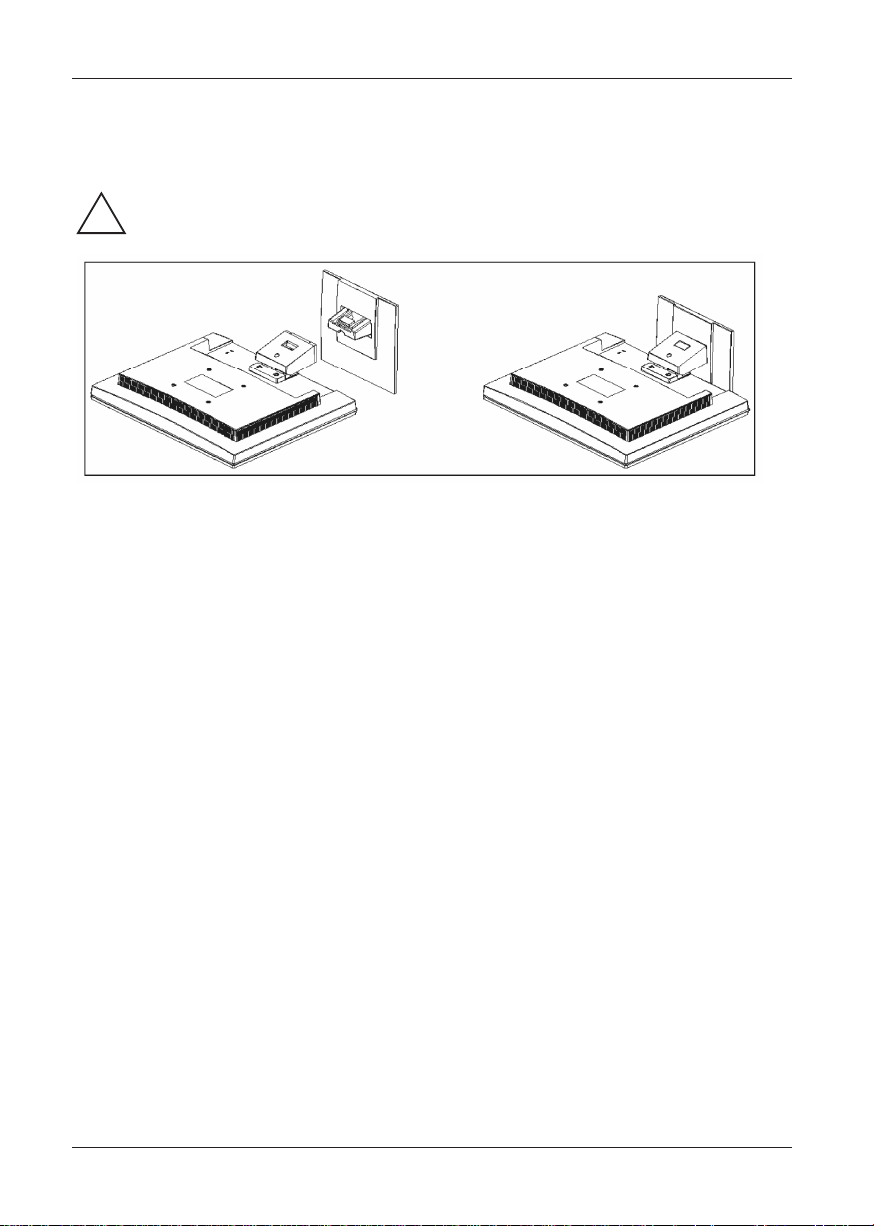
Montage des Bildschirmfußes
!
Die Display-Oberfläche des LCD-Bildschirms ist druck- und kratzempfindlich. Legen Sie
den Bildschirm bei der Montage oder Demontage des Bildschirmfußes deshalb auf eine
weiche Unterlage.
Page 21

Edition 3 English
Contents
Introduction ........................................................................................................................................... 1
Additional information ................................................................................................................... 1
Important notes ..................................................................................................................................... 2
Safety notes.................................................................................................................................. 2
Power cable .................................................................................................................................. 3
Transport ...................................................................................................................................... 3
Cleaning ....................................................................................................................................... 4
CE marking ................................................................................................................................... 4
FCC Class B Compliance Statement ........................................................................................... 4
Checking the contents of the consignment........................................................................................... 5
Connecting the monitor ........................................................................................................................ 6
Operation of the monitor ....................................................................................................................... 7
Troubleshooting .................................................................................................................................... 8
Explanatory information about standard ISO 9241-3 ......................................................................... 10
Assembling the monitor base ............................................................................................................. 10
Page 22

Contents
English Edition 3
Page 23

Edition 3 English - 1
Introduction
This manual contains important information for correct set-up of your LCD monitor.
The LCD monitor is actuated from the PC. The screen controller/the associated driver software is
responsible for setting the modes (resolution and refresh rate).
When putting the monitor into operation for the first time, the screen display should be optimally
adapted to the screen controller used and adjusted in accordance with your needs.
Target group
You don't need to be an "expert" to perform the operations described here. However, please observe
the safety information given in the operating instructions of the computer and in this manual!
In the event of any problems occurring, please contact your sales outlet or our Service desk.
Notational conventions
The meanings of the symbols and fonts used in this manual are as follows:
!
Pay particular attention to text marked with this symbol. Failure to observe this warning
endangers your life, destroys the device, or may lead to loss of data.
i
Supplementary information, remarks, and tips follow this symbol.
► Text which follows this symbol describes activities that must be performed in the order shown.
"Quotation marks" indicate names of chapters or terms.
This font indicates filenames and menu items.
This font indicates screen outputs.
Additional information
Details of how you set the resolution and refresh rate are provided in the documentation on your
screen controller/the associated driver software.
Page 24

LCD monitor
2 - English Edition 3
Important notes
!
In this chapter you will find information regarding safety which is essential to take note of
with your monitor.
Safety notes
This device complies with the relevant safety regulations for data processing equipment, including
electronic office machines for use in an office environment. If you have any questions, contact your
sales outlet or our Service desk.
● The display surface of the LCD monitor is sensitive to pressure and scratches. You should
therefore be careful with the display surface so as to avoid lasting damage (Newton rings,
scratches).
● If the device is brought into the installation site from a cold environment, condensation can form.
Before operating the device, wait until it is absolutely dry and has reached approximately the
same temperature as the installation site.
● To ensure sufficient ventilation, the intake and exhaust air openings of the monitor must never
be blocked.
● The monitor automatically sets itself to a mains voltage in the range of 100 V to 240 V. Ensure
that the local mains voltage lies within these limits.
● Ensure that the power socket on the device or the grounded mains outlet is freely accessible.
● The ON/OFF switch does not disconnect the device from the mains voltage. To completely
disconnect the mains voltage, remove the power plug from the socket.
● The monitor is equipped with a power cable that complies with safety standards.
● Lay all cables so that nobody can stand on them or trip over them. When attaching the device,
observe the relevant notes in the "Connecting the monitor" chapter.
● If you use a different data cable from the one supplied, ensure that it is adequately shielded.
CE conformance and optimum picture quality are guaranteed only if you use the data cable
supplied.
● No data transfer cables should be connected or disconnected during a thunderstorm.
● Make sure that no objects (e.g. jewellery chains, paper clips, etc.) or liquids get inside the
device (danger of electric shock, short circuit).
● The device is not waterproof! Never immerse the device in water and protect it from spray
water (rain, sea water).
● In emergencies (e.g. damaged casing, elements or cables, penetration of liquids or foreign
matter), switch off the unit, disconnect the power plug and contact your sales outlet or our
Service desk.
Page 25

LCD monitor
Edition 3 English - 3
● The monitor must be disposed of in accordance with the local regulations for disposal of
special waste. The screen background lighting contains mercury. You must observe the
applicable handling and disposal safety regulations for fluorescent tubes.
● Only qualified technicians should repair the device. Unauthorised opening and incorrect repair
may greatly endanger the user (electric shock, fire risk).
● Use a screen saver with moving images and activate the power management for your monitor
to prevent still images from "burning in".
● The screen may only be operated in the wide format (0° landscape mode). Turning with a
swivel arm or wall bracket mounted is not permitted.
● Store this manual close to the device. If you pass the device on to third parties, you should
pass this manual on with it.
● We recommend that you place your device on a durable, non-slip surface. In view of the many
different surface coatings and finishes used on furniture, it is possible that the feet of the device
could mark the surface they stand on.
Power cable
To guarantee safe operation, use the cable supplied. Use the following guidelines if it is necessary to
replace the original cable set.
● The female/male receptacles of the cord set must meet IEC60320/CEE-22 requirements.
● The cable has to be HAR-certified or VDE-certified. The mark HAR or VDE will appear on the
outer sheath.
● For devices which are mounted on a desk or table, type SVT or SJT cable sets may be used.
● The cable set must be selected according to the rated current for your device.
● If necessary, replace the original power cable with a regular grounded 3-core mains lead.
Transport
● Transport the monitor with care and only in its original packaging or another corresponding
packaging fit to protect it against knocks and jolts.
● Never drop the LCD monitor (danger of glass breakage).
Page 26

LCD monitor
4 - English Edition 3
Cleaning
● Always pull out the power plug before you clean the monitor.
● Do not clean any interior parts yourself, leave this job to a service technician.
● Do not use any cleaning agents that contain abrasives or may corrode plastic.
● Ensure that no liquid will run into the system.
● Ensure that the ventilation areas of the monitor are free.
● The display surface of the LCD monitor is sensitive to pressure and scratches. Clean it only
using a soft, slightly moistened cloth.
Wipe the monitor casing with a dry cloth. If the monitor is particularly dirty, use a cloth which has
been moistened in mild domestic detergent and then carefully wrung out.
CE marking
The shipped version of this device complies with the requirements of the EC directives
2004/108/EC "Electromagnetic compatibility" and 2006/95/EEC "Low voltage directive".
FCC Class B Compliance Statement
The following statement applies to the products covered in this manual, unless otherwise specified
herein. The statement for other products will appear in the accompanying documentation.
NOTE:
This equipment has been tested and found to comply with the limits for a "Class B" digital device,
pursuant to Part 15 of the FCC rules and meets all requirements of the Canadian InterferenceCausing Equipment Standard ICES-003 for digital apparatus. These limits are designed to provide
reasonable protection against harmful interference in a residential installation. This equipment
generates, uses and can radiate radio frequency energy and, if not installed and used in strict
accordance with the instructions, may cause harmful interference to radio communications. However,
there is no guarantee that interference will not occur in a particular installation. If this equipment does
cause harmful interference to radio or television reception, which can be determined by turning the
equipment off and on, the user is encouraged to try to correct the interference by one or more of the
following measures:
● Reorient or relocate the receiving antenna.
● Increase the separation between equipment and the receiver.
● Connect the equipment into an outlet on a circuit different from that to which the receiver is
connected.
● Consult the dealer or an experienced radio/TV technician for Service.
Fujitsu Technology Solutions GmbH is not responsible for any radio or television interference caused
by unauthorised modifications of this equipment or the substitution or attachment of connecting
cables and equipment other than those specified by Fujitsu Technology Solutions GmbH. The
correction of interferences caused by such unauthorised modification, substitution or attachment will
be the responsibility of the user.
Page 27

LCD monitor
Edition 3 English - 5
Checking the contents of the consignment
!
The display surface of the LCD monitor is sensitive to pressure and scratches. Always hold
the device by the casing!
► Unpack all the individual parts.
► Check the delivery for damage incurred during transportation.
► Check whether the delivery agrees with the details in the delivery note.
The complete LCD monitor package includes:
– one monitor
– data cable
– one power cable
– one Warranty Booklet
– this "Getting Started" manual
Should you discover that the delivery does not correspond to the delivery note, notify your local sales
outlet immediately.
i
We recommend that you keep the original packaging material. You may need the
packaging in the future if you need to transport your device.
Page 28
LCD monitor
6 - English Edition 3
Connecting the monitor
!
Please take note of the safety information in the "Important notes" chapter.
CE conformance and optimum picture quality are guaranteed only if you use the data cable
supplied.
Do not cover the ventilation openings of the monitor.
The computer power plug must be pulled out!
► Be sure that the monitor and the computer are switched off.
Connecting cables to the monitor
► If the data cable is not firmly connected to the monitor:
Connect one of the connectors of the data cable to the D-SUB connector on the monitor and
secure the plug-in connection by tightening the locking screws.
► Plug the power cable supplied into the power connector of the monitor.
Connecting cables to the computer
Information on the computer connections and interfaces is contained in the operating manual for your
computer.
i
If your computer has two monitor ports ("onboard" screen controller and separate
graphics card), the monitor port for the separate graphics card is usually active.
► Connect the data cable to the (active) monitor port on the computer and secure the plug-in
connection by tightening the safety screws.
► Connect the connector of the power cable supplied into a properly earthed mains outlet and
ensure a secure connection.
Page 29
LCD monitor
Edition 3 English - 7
► Plug the power connector of the computer into a properly grounded mains outlet.
i
When you start working with your monitor for the first time you should install the
appropriate graphics drivers for your application software. Details of how to do this are
provided in the documentation on your screen controller/the associated driver software.
Operation of the monitor
Adjusting rake
The rake of the monitor can be adjusted forward and back from its vertical position.
► Grasp the monitor with both hands on the right and left edge of the casing and adjust it to the
desired rake.
Switching the monitor on/off
1 = Buttons for the OSD menu
(On-Screen-display)
2 = Power indicator
3 = ON/OFF switch
The ON/OFF switch is used for switching the monitor on and off.
The power indicator glows green or blue when the monitor and computer are switched on. The power
indicator glows orange when the monitor does not receive a video signal or is in energy-saving mode.
The power indicator goes off when the monitor is switched off.
When you switch the computer system on, you must proceed in the following order:
► First switch the LCD monitor on with the ON/OFF switch.
► Then switch on the computer.
Page 30
LCD monitor
8 - English Edition 3
Troubleshooting
Should an error occur, first check the following points. If the distortion is still not eliminated, the
monitor should, if possible, be checked on another computer.
If you are unable to solve the problem, please inform our Service desk.
Having this problem? Check the following points:
No screen display
(power indicator does not light)
► Check whether the monitor is switched on.
► Check whether the power cable on the monitor is
connected correctly.
► Check whether the computer is switched on.
No screen display
(power indicator lights)
► Check whether the computer is switched on.
► Check whether the data cable for the monitor is
correctly attached to the monitor port on the
computer.
► Press any key on the computer keyboard - the
computer may be in energy saving mode.
► Alter the brightness and/or contrast until you get a
picture.
Message:
No Video Input
Or
No Signal
► Check whether the data cable for the monitor is
correctly attached to the monitor port on the
computer.
► Check whether the computer is switched on.
Message:
e.g.
This is 85 Hz overdrive.
Change computer display input
to ….. x ….. at 60 Hz.
or
Frequency out of range
Please change the display mode
to …….
The input signal (horizontal frequency and refresh rate)
does not correspond to the technical monitor data.
► Adjust the video frequency range using the computer
software (see documentation for your computer or
your graphics card).
► Adjust a different screen resolution using the
computer software (see documentation for your
computer or your screen controller).
Picture position not correct The monitor recognises an undefined mode.
► Carry out the auto-adjustment of the monitor (with
the AUTO button - if present - or via the OSD menu).
► Set the picture position with the OSD menu.
Page 31

LCD monitor
Edition 3 English - 9
Having this problem? Check the following points:
Picture is shaking ► Check whether the data cable for the monitor is
correctly attached to the monitor port on the
computer.
► Carry out the auto-adjustment of the monitor (with
the AUTO button - if present - or via the OSD menu).
Picture disturbances (vertical lines)
► Carry out the auto-adjustment of the monitor (with
the AUTO button - if present - or via the OSD menu).
Picture disturbances
(horizontal lines, picture noise)
► Carry out the auto-adjustment of the monitor (with
the AUTO button - if present - or via the OSD menu).
Picture too light or too dark
► Carry out the auto-adjustment of the monitor (with
the AUTO button - if present - or via the OSD menu).
► Correctly set the contrast and brightness with the
OSD menu if the auto-adjustment function does not
supply satisfactory results.
Page 32

LCD monitor
10 - English Edition 3
Explanatory information about standard ISO 9241-3
Lit or unlit pixels
Today's production techniques cannot guarantee an absolutely fault-free screen display. Depending
on the total number of pixels (resolution), there may be a few constantly lit or unlit pixels or subpixels.
Pixel
Pixel
A pixel consists of 3 subpixels, normally red, green and blue.
A pixel is the smallest element that can be generated by complete
functionality of the display.
Subpixel
Subpixel
A subpixel is a separately addressable internal structure in a pixel which
extends the pixel function.
The maximum permitted number of faulty pixels is stipulated in the international standard
ISO 9241-3.
In accordance with standard ISO 9241-3, LCD monitors by Fujitsu comply with Class II for low
resolutions and Class I for resolutions of 1680 x 1050 (1764000 pixel) and higher.
Examples:
A flat-screen monitor with a resolution of 1280 x 1024 has 1280 x 1024 = 1310720 pixels. Each pixel
consists of three subpixels (red, green and blue), so there are almost 3.9 million subpixels in total.
According to ISO 9241-3 (Class II), a maximum of 3 lit and 3 unlit pixels plus 7 lit or 13 unlit
subpixels, or a corresponding combination, may be faulty (1 lit subpixel counts as two unlit subpixels).
A flat-screen monitor with a resolution of 1920 x 1080 has 1920 x 1080 = 2073600 pixels. Each pixel
consists of three subpixels (red, green and blue), so there are almost 6.2 million subpixels in total.
According to ISO 9241-3 (Class I), a maximum of 2 lit and 2 unlit pixels plus 5 lit or 10 unlit subpixels,
or a corresponding combination, may be faulty (1 lit subpixel counts as two unlit subpixels).
Assembling the monitor base
!
The display surface of the LCD monitor is sensitive to pressure and scratches. Therefore,
lay the monitor on a soft surface when mounting or removing the monitor base.
Page 33

Edition 3 Français
Sommaire
Introduction ........................................................................................................................................... 1
Autres informations ...................................................................................................................... 1
Remarques importantes ....................................................................................................................... 2
Consignes de sécurité .................................................................................................................. 2
Câble secteur ............................................................................................................................... 3
Transport ...................................................................................................................................... 3
Nettoyage ..................................................................................................................................... 4
Marquage CE ............................................................................................................................... 4
Vérification de la livraison ..................................................................................................................... 4
Raccordement du moniteur .................................................................................................................. 5
Utiliser le moniteur ................................................................................................................................ 6
Traitement des incidents ...................................................................................................................... 7
Explication de la norme ISO 9241-3 ..................................................................................................... 9
Montage du pied du moniteur ............................................................................................................. 10
Page 34

Sommaire
Français Edition 3
Page 35

Edition 3 Français - 1
Introduction
Vous trouverez dans ce manuel d’importantes informations dont vous avez besoin pour mettre votre
moniteur LCD en service.
Le moniteur LCD est commandé par le PC. Le paramétrage des modes (résolution et fréquence de
rafraîchissement) est assuré par la carte graphique ou les logiciels de gestion correspondants.
Au moment de la première mise en service du moniteur, nous vous conseillons d’adapter l’affichage
à la carte graphique utilisée et de le régler en fonction de vos besoins.
Groupe-cible
L'exécution des opérations décrites ne nécessite pas de connaissances spéciales. Respectez
impérativement les consignes de sécurité qui figurent dans le manuel d’utilisation de l’ordinateur et
dans le présent manuel !
En cas de problème, veuillez vous adresser à votre point de vente ou à notre groupe d'assistance
(Service Desk).
Symboles
Les symboles suivants sont utilisés dans ce manuel.
!
signale des instructions à respecter impérativement pour votre propre sécurité, celle de
votre appareil et celle de vos données.
i
précède des informations et des conseils complémentaires.
► signale une opération que vous devez exécuter.
"Entre guillemets" sert à identifier des titres de chapitres et différents concepts à mettre en évidence.
Cette police sert à identifier les noms de fichier et les options de menu.
Cette police correspond à des affichages écran.
Autres informations
Le paramétrage des résolutions et des fréquences de rafraîchissement est expliqué dans la
documentation de la carte graphique ou des logiciels de gestion correspondants.
Page 36

Moniteur LCD
2 - Français Edition 3
Remarques importantes
!
Ce chapitre contient des consignes de sécurité que vous devez absolument observer en
utilisant votre moniteur.
Consignes de sécurité
Cet appareil est conforme aux règles de sécurité concernant les matériels informatiques, y compris
les machines de bureau électroniques. En cas de doute sur l'utilisation de l'appareil dans un
environnement donné, veuillez vous adresser à votre point de vente ou à notre groupe d'assistance
(Service Desk).
● La surface de l’écran du moniteur LCD est sensible à la pression et aux griffures. Manipulez
par conséquent la surface de l’écran avec précaution pour éviter les dommages irrémédiables
(anneaux de Newton, griffures).
● Si l'appareil est placé dans un local à température ambiante après un séjour prolongé au froid,
il peut se produire des phénomènes de condensation. Avant de mettre l'appareil en service,
attendez qu'il soit à la température ambiante et absolument sec.
● Afin de garantir une ventilation suffisante, il est impératif de ne pas obstruer les ouïes
d’amenée et d’évacuation d’air du moniteur.
● Le moniteur se règle automatiquement sur la tension secteur correcte dans une plage de 100 V
à 240 V. Assurez-vous que la tension de secteur locale ne dépasse pas cette plage.
● Veillez à ce que la prise d'alimentation du moniteur et la prise de courant soient facilement
accessibles.
● L'interrupteur Marche/Arrêt ne sépare pas l'appareil de la tension de secteur. Pour réaliser une
séparation complète, vous devez débrancher la fiche secteur.
● Le moniteur est livré avec un câble secteur de sécurité.
● Posez les câbles de manière à écarter toute source de danger (risque de trébucher) et à éviter
de les endommager. Pour le branchement des câbles vous devez tenir compte des instructions
correspondantes dans le chapitre "Raccordement du moniteur".
● Lorsque vous utilisez un autre câble de données que celui qui a été fourni, vérifiez qu’il est
suffisamment blindé. La conformité CE et la qualité de l’image sont uniquement garanties avec
le câble de données fourni.
● Par temps d'orage, le branchement ou débranchement de câbles de données doit être évité.
● Veillez à ce qu'aucun objet (par exemple des bracelets, des trombones, etc.) ou aucun liquide
ne s'introduise dans l'intérieur de l'appareil (risque d'électrocution et d'incendie).
● L'appareil n'est pas imperméable ! Ne plongez jamais l'appareil dans l'eau et protégez-le contre
les éclaboussures (pluie, eau de mer).
● En cas d'urgence (boîtier, éléments de commande ou câble secteur endommagés, pénétration
de liquides ou de corps étrangers), arrêtez l'appareil, débranchez la fiche secteur et avisez
votre point de vente ou notre groupe d'assistance (Service Desk).
Page 37

Moniteur LCD
Edition 3 Français - 3
● Le moniteur doit être éliminé conformément à la réglementation locale relative aux déchets
spéciaux. Le rétroéclairage du moniteur contient du mercure. Respectez les consignes de
sécurité applicables aux tubes fluorescents lorsque vous manipulez le moniteur ou lorsque
vous l’éliminez.
● Toute réparation de l'appareil doit être exécutée exclusivement par du personnel qualifié. Les
interventions non conformes et l'ouverture non autorisée du boîtier présentent des risques pour
l'utilisateur (électrocution, risque d'inflammation).
● Utilisez un écran de veille avec des images mobiles et activez les fonctions de gestion de
l'énergie pour votre moniteur afin d'éviter que des images immobiles ne "brûlent" l'écran.
● Le moniteur ne peut fonctionner qu’en position paysage (mode Landscape 0°). Il est interdit de
faire pivoter le moniteur lors du montage d’un bras pivotant ou d’un support mural.
● Emportez cet manuel avec l'appareil. Si vous cédez cet appareil à une autre personne,
donnez-lui aussi cet manuel.
● Nous vous conseillons de poser l’appareil sur un support antidérapant et insensible. Certains
vernis et revêtements de surface utilisés sur les meubles pourraient être endommagés par les
pieds de l'appareil.
Câble secteur
Il est impératif d'utiliser ce câble pour assurer la sécurité de fonctionnement de l'appareil. S'il s'avère
nécessaire de remplacer le câble fourni à l'origine, il faut absolument se conformer aux directives ciaprès.
● Le connecteur et la prise de raccordement du câble secteur doivent être conformes aux
directives de IEC60320/CEE-22.
● Le câble doit être conforme aux prescriptions VDE ou HAR. Le sigle VDE ou HAR doit être
apposé sur la gaine du câble.
● Pour les appareils de table, l'utilisation de modèles de câbles réseau SVT ou SJT est autorisée.
● En choisissant le câble, veuillez prendre en considération le courant nominal requis pour
l'appareil.
● Si nécessaire, remplacez le câble secteur fourni à l’origine par un câble secteur 3 broches
avec terre de protection en usage dans votre pays.
Transport
● Transportez le moniteur avec soin et utilisez l'emballage d'origine (protection contre les chocs
et les vibrations).
● Ne laissez en aucun cas tomber l'écran LCD (risque de bri de verre).
Page 38

Moniteur LCD
4 - Français Edition 3
Nettoyage
● Avant de procéder au nettoyage du moniteur, débranchez la fiche secteur.
● Le nettoyage de l'intérieur du boîtier ne peut être confié qu'à un technicien du service après-
vente.
● N'utilisez pas de poudre abrasive ni de solvant attaquant les matières plastiques.
● Evitez toute pénétration de liquide à l'intérieur du boîtier.
● Veillez à ce que les trous d'aération du moniteur soient toujours dégagés.
● Nettoyez la surface de l’écran (sensible à la pression et aux griffures) de l'écran LCD
uniquement à l’aide d’un chiffon doux légèrement humide.
Un chiffon sec est suffisant pour le nettoyage de la surface du moniteur. En cas de fort
encrassement, on peut utiliser un chiffon préalablement trempé dans de l'eau contenant un
détergent doux pour vaisselle, bien essoré.
Marquage CE
Tel qu’il est livré, cet appareil est conforme aux directives CE 2004/108/CE
"Compatibilité électromagnétique" et 2006/95/CEE "Basse tension".
Vérification de la livraison
!
La surface de l’écran du moniteur LCD est sensible à la pression et aux griffures. Prière de
ne saisir l'appareil que par le boîtier !
► Déballez les différents éléments.
► Vérifiez si le contenu de l'emballage présente des dommages apparents dus au transport.
► Vérifiez si la livraison correspond aux données reprises sur le bon de livraison.
La livraison complète du moniteur LCD comprend :
– un moniteur
– Câble de données
– un câble secteur
– un carnet de garantie
– le présent manuel "Premiers pas"
Si vous constatez des dommages dus au transport ou des divergences entre le contenu de
l'emballage et le bon de livraison, nous vous prions d'informer immédiatement le point de vente
compétent.
i
Nous vous conseillons de ne pas jeter l'emballage d'origine de l'appareil. Conservez
l'emballage d'origine, il pourra vous servir lors d'un transport ultérieur.
Page 39

Moniteur LCD
Edition 3 Français - 5
Raccordement du moniteur
!
Respectez les instructions données dans le chapitre "Remarques importantes".
La conformité CE et la qualité de l’image sont uniquement garanties avec le câble de
données fourni.
N'obturez jamais les trous d'aération !
La fiche secteur de l'ordinateur doit être débranchée !
► Assurez-vous que le moniteur et l'ordinateur sont hors tension.
Brancher les câbles sur le moniteur
► Si le câble de données n'est pas raccordé correctement au moniteur :
Branchez le connecteur du câble de données sur la prise D-SUB du moniteur et fixez-le en
serrant les vis.
► Branchez le câble secteur dans la prise secteur sur la face arrière du moniteur.
Brancher les câbles sur l'ordinateur
Vous trouverez de plus amples informations sur les ports et les interfaces de l’ordinateur dans le
manuel d’utilisation de votre ordinateur.
i
Si votre ordinateur possède deux ports moniteur (contrôleur écran "embarqué" et carte
graphique séparée), le port moniteur actif sera, en règle générale, celui de la carte
graphique séparée.
► Branchez le câble de données sur le port moniteur (actif) de l’ordinateur et fixez-le en serrant
les vis.
► Branchez le connecteur du câble secteur fourni dans une prise d’alimentation à terre de
protection et assurez-vous qu'il s'enfiche correctement.
Page 40

Moniteur LCD
6 - Français Edition 3
► Branchez la fiche secteur de l'ordinateur sur une prise avec terre de protection.
i
A
vant de mettre le moniteur en service pour la première fois, vous devez installer les
pilotes graphiques appropriés à vos programmes d’application. Vous trouverez plus
d’information à ce sujet dans la documentation de votre carte graphique ou des logiciels
de gestion correspondants.
Utiliser le moniteur
Régler l’inclinaison
Le moniteur peut être incliné vers l'avant et vers l'arrière par rapport à sa position verticale.
► Saisissez le moniteur des deux mains sur les bords gauche et droit de son boîtier et déplacez-
le jusqu’à obtenir l’inclinaison souhaitée.
Mettre le moniteur sous/hors tension
1 = Touches pour le menu OSD
(On Screen Display)
2 = Voyant secteur
3 = Interrupteur Marche/Arrêt
Pour mettre le moniteur sous et hors tension, vous utilisez l'interrupteur Marche/Arrêt.
Le voyant secteur s’allume en vert ou bleu lorsque le moniteur et l'ordinateur sont sous tension. Le
voyant secteur s’allume en orange lorsque le moniteur ne reçoit aucun signal vidéo ou lorsqu’il est
passe en mode d’économie d’énergie. Le voyant secteur s’éteint lorsque le moniteur est hors tension.
Au moment de mettre l'ordinateur sous tension, respectez l’ordre suivant :
► Mettez d’abord l'écran LCD sous tension en actionnant l'interrupteur Marche/Arrêt.
► Mettez ensuite l’ordinateur sous tension.
Page 41

Moniteur LCD
Edition 3 Français - 7
Traitement des incidents
En présence d’une erreur, vérifiez tout d’abord les points suivants. Si le problème reste tout entier,
testez le moniteur sur un autre ordinateur.
Si vous êtes dans l’impossibilité de résoudre le problème, contactez notre groupe d'assistance
(Service Desk).
Rencontrez-vous ce problème ? Vérifiez les points ci-dessus :
Le moniteur n'affiche aucune donnée
(voyant secteur éteint)
► Vérifiez si le moniteur est sous tension.
► Vérifiez si le câble secteur du moniteur est
correctement branché.
► Vérifiez si l'ordinateur est sous tension.
Le moniteur n'affiche aucune donnée
(voyant secteur allumé)
► Vérifiez si l'ordinateur est sous tension.
► Vérifiez si le câble de données du moniteur est fixé
correctement sur le port moniteur de l'ordinateur.
► Appuyez sur n'importe quelle touche du clavier de
votre ordinateur - l'ordinateur est peut-être passé en
mode d'économie d'énergie.
► Modifiez la luminosité et/ou le contraste jusqu'à ce
que vous obteniez une image à l'écran.
Message:
No Video Input
Or
No Signal
► Vérifiez si le câble de données du moniteur est fixé
correctement sur le port moniteur de l'ordinateur.
► Vérifiez si l'ordinateur est sous tension.
Message:
e.g.
This is 85 Hz overdrive.
Change computer display input
to ….. x ….. at 60 Hz.
or
Frequency out of range
Please change the display mode
to …….
Le signal d'entrée (fréquence horizontale et fréquence de
rafraîchissement) ne correspond pas aux caractéristiques
techniques du moniteur.
► Utilisez le logiciel de l'ordinateur pour régler
correctement les fréquences (voyez la
documentation de votre ordinateur ou de votre carte
graphique).
► Utilisez le logiciel de l'ordinateur pour régler une
correcte résolution d'écran (voir la documentation de
votre ordinateur ou de votre carte graphique).
Position de l'image incorrecte Le moniteur détecte un mode de fonctionnement non
défini.
► Effectuez les réglages automatiques du moniteur (en
appuyant sur la touche AUTO – si présente – ou
dans le menu OSD).
► Réglez la position de l'image correctement dans le
menu OSD.
Page 42

Moniteur LCD
8 - Français Edition 3
Rencontrez-vous ce problème ? Vérifiez les points ci-dessus :
L’image tremble ► Vérifiez si le câble de données du moniteur est fixé
correctement sur le port moniteur de l'ordinateur.
► Effectuez les réglages automatiques du moniteur (en
appuyant sur la touche AUTO – si présente – ou
dans le menu OSD).
Perturbations de l’image (bandes
verticales)
► Effectuez les réglages automatiques du moniteur (en
appuyant sur la touche AUTO – si présente – ou
dans le menu OSD).
Perturbations de l’image
(bandes horizontales, effet de neige)
► Effectuez les réglages automatiques du moniteur (en
appuyant sur la touche AUTO – si présente – ou
dans le menu OSD).
L'image est trop clair ou trop sombre
► Effectuez les réglages automatiques du moniteur (en
appuyant sur la touche AUTO – si présente – ou
dans le menu OSD).
► Réglez correctement le contraste et la luminosité
dans le menu OSD si le réglage automatique ne
vous satisfait pas.
Page 43

Moniteur LCD
Edition 3 Français - 9
Explication de la norme ISO 9241-3
Points d'image clairs ou sombres
Dans l'état actuel des techniques de production, il n'est pas possible de garantir un affichage écran
absolument irréprochable. En fonction du nombre total de pixels (résolution), quelques rares pixels
(éléments d'image) plus clairs ou plus sombres ou sous-pixels (points d'image) peuvent apparaître
en permanence.
Pixel
(= élément d'image)
Un pixel se compose de 3 sous-pixels, en règle générale rouge, vert et
bleu.
Un pixel est le plus petit élément capable de produire la fonctionnalité
complète de l'image.
Sous-pixel
(= point d’image)
Un sous-pixel est une structure interne adressable séparément d'un pixel
(élément d'image) qui étend la fonction d'élément d'affichage.
Le nombre maximum autorisé de pixels défectueux est défini par la norme internationale
ISO 9241-3.
Conformément à la norme ISO 9241-3, les moniteurs LCD de Fujitsu répondent aux exigences de la
classe II en cas de basse résolution et à celles de la classe I en cas de résolution de 1680 x 1050
(1764000 pixels) ou supérieure.
Exemples :
Un moniteur plat d'une résolution de 1280 x 1024 possède 1280 x 1024 = 1.310.720 pixels. Chaque
pixel se compose de trois sous-pixels (rouge, vert et bleu), pour un total de 3,9 millions de souspixels. La norme ISO 9241-3 (Classe II) autorise jusqu'а 3 pixels clairs et 3 pixels sombres
défectueux ainsi que 7 sous-pixels clairs ou 13 sous-pixels sombres défectueux ou autre
combinaison équivalente (1 sous-pixel clair est équivalent à deux sous-pixels sombres).
Un moniteur plat d'une résolution de 1920 x 1080 possède 1920 x 1080 = 2073600 pixels. Chaque
pixel se compose de trois sous-pixels (rouge, vert et bleu), pour un total de 6,2 millions de souspixels. La norme ISO 9241-3 (Classe I) autorise jusqu'а 2 pixels clairs et 2 pixels sombres
défectueux ainsi que 5 sous-pixels clairs ou 10 sous-pixels sombres défectueux ou autre
combinaison équivalente (1 sous-pixel clair est équivalent à 2 sous-pixels sombres).
Page 44

Moniteur LCD
10 - Français Edition 3
Montage du pied du moniteur
!
La surface de l’écran du moniteur LCD est sensible à la pression et aux griffures. Posez
par conséquent le moniteur sur une surface douce lors du montage ou démontage du pied.
Page 45

Edición 3 Español
Contenido
Introducción .......................................................................................................................................... 1
Más información ........................................................................................................................... 1
Indicaciones importantes ...................................................................................................................... 2
Indicaciones de seguridad ............................................................................................................ 2
Cable de alimentación .................................................................................................................. 3
Transporte .................................................................................................................................... 3
Limpieza ....................................................................................................................................... 4
Marcado CE ................................................................................................................................. 4
Desembalaje del contenido del suministro ........................................................................................... 4
Conexión del monitor ............................................................................................................................ 5
Manejo del monitor ............................................................................................................................... 6
Tratamiento de errores ......................................................................................................................... 7
Aclaraciones sobre la norma ISO 9241-3 ............................................................................................. 9
Montaje de la base del monitor .......................................................................................................... 10
Page 46

Contenido
Español Edición 3
Page 47

Edición 3 Español - 1
Introducción
En este manual encontrará información de interés necesaria para la puesta en funcionamiento de su
pantalla LCD.
La pantalla LCD es controlada por el ordenador. El ajuste de los modos (resolución y frecuencia de
repetición de imagen) corre a cargo de la tarjeta gráfica o del software de controlador
correspondiente.
Si es la primera vez que pone su monitor en servicio, debería adaptar de modo óptimo la
representación de la pantalla al tipo de controlador de pantalla empleado a fin de adaptarla a sus
correspondientes necesidades.
Destinatarios de este manual
Para llevar a cabo las operaciones descritas, no hace falta que sea Ud. un "experto". Observe
necesariamente las indicaciones de seguridad incluidas en el manual de instrucciones del ordenador
y en este manual!
Si surgen problemas, diríjase a su distribuidor o a nuestro Service Desk.
Convenciones
En este manual se han seguido determinadas convenciones tipográficas que se definen a
continuación.
!
Identifica indicaciones que debe tener Ud. en cuenta. Si no las observa, puede poner en
peligro su vida, deteriorar el equipo o sufrir una pérdida de datos.
i
Destaca informaciones adicionales y sugerencias.
► señala una operación que debe Ud. realizar.
Las "comillas" marcan los títulos de los capítulos y los conceptos que deben destacarse.
Esta letra hace referencia a los nombres de archivos y opciones de menú.
Este tipo de letra representa visualizaciones en la pantalla.
Más información
Para obtener información sobre cómo ajustar las resoluciones o las frecuencias de repetición de
imagen, véase la documentación de la tarjeta gráfica o del software de controlador correspondiente.
Page 48

Monitor LCD
2 - Español Edición 3
Indicaciones importantes
!
En este capítulo encontrará las instrucciones de seguridad que debe tener Ud. en cuenta
para manejar el monitor.
Indicaciones de seguridad
Este equipo satisface las normativas de seguridad vigentes para equipos de procesamiento de
datos, incluidas máquinas eléctricas, que se utilizan en el entorno de la oficina. Si tiene dudas sobre
el entorno previsto diríjase a su distribuidor o a nuestro Service Desk.
● La superficie del monitor de pantalla de cristal líquido es sensible al rayado y a la presión. Por
ello, se recomienda que maneje la pantalla del monitor con cuidado a fin de evitar daños
permanentes (anillos Newton, rasguños).
● Si el equipo se transporta de un entorno frío a la sala de servicio, puede producirse
condensación. Antes de poner en servicio el equipo, deje que se adapte a la temperatura
ambiente y espere hasta que esté absolutamente seco.
● Para garantizar una ventilación suficiente, deje las tomas y salidas de aire siempre libres.
● El monitor de red se ajusta automáticamente a la tensión de red correcta en el margen de
100 V a 240 V. Asegúrese de que la tensión de red local no sea superior o inferior a la
indicada.
● Al instalar el monitor, cerciórese de que el enchufe hembra del mismo y la caja de enchufe de
la instalación de la casa sean fácilmente accesibles.
● El interruptor de conexión/desconexión no permite aislar al equipo de la tensión de red. Para
lograr una separación absoluta de la tensión de red, deberá desenchufar el cable de
alimentación.
● El monitor está equipado con un cable de alimentación a prueba de seguridad.
● Coloque los cables de tal manera que no constituyan una fuente de peligro (tropiezo) y no
puedan deteriorarse. Al enchufar los cables, tenga en cuenta las indicaciones
correspondientes en el capítulo "Conexión del monitor".
● Si utiliza un cable diferente al suministrado, asegúrese de que está suficientemente blindado.
Una calidad de imagen óptima y conformidad según la normativa de la CE solo están
garantizadas con el cable de datos suministrado.
● Los cables de transmisión de datos no deben enchufarse ni desenchufarse durante las
tormentas.
● Cuide de que no penetren objetos (p. ej., grapas, clips, etc.) o líquidos al interior del equipo
(peligro de descargas eléctricas y cortocircuitos).
● ¡El equipo no es resistente al agua! No sumerja el equipo en el agua y evite que sea salpicado
por agua (lluvia, agua de mar).
● En casos de emergencia (p. ej., si se dañasen la caja del equipo, los elementos de mando o el
cable de alimentación, si penetrasen líquido u objetos al interior de la caja), apague
inmediatamente el equipo, desenchufe el cable de alimentación e informe a su distribuidor o a
nuestro Service Desk.
Page 49

Monitor LCD
Edición 3 Español - 3
● El monitor debe eliminarse en conformidad con las prescripciones locales para la eliminación
de residuos especiales. La iluminación de fondo de la pantalla contiene mercurio. Al manejar y
eliminar los tubos fluorescentes, tenga en cuenta las normas de seguridad vigentes.
● Las reparaciones del equipo solo deben llevarse a cabo por personal técnico especializado. La
apertura no autorizada del equipo y las reparaciones inadecuadas del mismo pueden exponer
al usuario a graves peligros (descargas eléctricas, peligro de incendio).
● Utilice un salvapantallas con dibujos animados y active el administrador de energía para evitar
que se produzcan marcas de imágenes fijas.
● La pantalla se debe utilizar únicamente en formato ancho (modo apaisado 0°). El brazo
articulado o el soporte de pared no se debe girar durante el montaje.
● Guarde este manual junto con el equipo. Si presta el equipo a terceras personas, entregue
también este manual.
● Recomendamos que coloque el equipo sobre una superficie no resbaladiza e insensible.
Debido a la gran variedad de barnices y lacas aplicadas a los muebles, no se puede descartar
la posibilidad de que los pies del equipo dañen la superficie de colocación.
Cable de alimentación
Utilice el cable suministrado para garantizar un funcionamiento seguro. En caso de ser necesaria la
substitución del cable original, es imprescindible que se tengan en cuenta las siguientes
disposiciones.
● El enchufe y el conector del cable de alimentación deben satisfacer la disposición
IEC60320/CEE-22.
● El cable tiene que satisfacer las disposiciones VDE o HAR. El signo VDE o HAR se encuentra
en la envoltura exterior del cable.
● Para los aparatos de sobremesa pueden utilizarse modelos de cables de alimentación del tipo
SVT o SJT.
● Al seleccionar el cable, tenga en cuenta la corriente nominal requerida por el aparato.
● Si fuera necesario, substituya el cable de alimentación originalmente suministrado por un cable
de alimentación de tres polos con toma a tierra homologado para su país.
Transporte
● Transporte el monitor con cuidado y solo en su embalaje original o en otro adecuado que
ofrezca protección contra golpes.
● Procure que no se caiga nunca el monitor LCD (peligro de rotura de cristal).
Page 50

Monitor LCD
4 - Español Edición 3
Limpieza
● Antes de limpiar el monitor, desconecte siempre el cable de alimentación.
● El interior de la caja solo debe ser limpiado por un técnico de servicio.
● No utilice para la limpieza polvos para fregar ni detergentes que disuelvan material plástico.
● Evite que penetren líquidos en el interior de la caja.
● Cuide de que queden libres las ranuras de ventilación del monitor.
● La superficie de la pantalla de cristal líquido, que es sensible a la presión y puede rayarse, solo
puede limpiarse con un paño suave y ligeramente humedecido.
La superficie de la caja del monitor puede limpiarse con un paño seco. Si la suciedad es mucha,
emplee un paño mojado en agua con detergente suave y bien escurrido.
Marcado CE
Este aparato, en la versión suministrada, cumple todos los requisitos de las directivas
de la CE 2004/108/CE "Compatibilidad electromagnética" y 2006/95/CE "Directiva
sobre baja tensión".
Desembalaje del contenido del suministro
!
La superficie del monitor de pantalla de cristal líquido es sensible al rayado y a la presión.
¡Coja el equipo sólamente por la caja!
► Desembale todos los elementos.
► Verifique el contenido del suministro y cerciórese de que no se han producido daños visibles
debidos al transporte.
► Compruebe que los elementos suministrados coinciden con los datos de la nota de entrega.
Con el monitor de pantalla de cristal líquido se entregan también los siguientes elementos:
– un monitor
– Cable de datos
– un cable de alimentación
– un cuaderno de garantía
– este manual de "Primeros pasos"
Si detecta daños de transporte o divergencias entre el contenido del suministro y la nota de entrega,
informe inmediatamente a su distribuidor.
i
Le recomendamos que guarde el material de embalaje original por si lo necesitara para un
futuro transporte. Guarde el material de embalaje original por si lo necesita para el
transporte.
Page 51

Monitor LCD
Edición 3 Español - 5
Conexión del monitor
!
Observe las instrucciones de seguridad del capítulo "Indicaciones importantes".
Una calidad de imagen óptima y conformidad según la normativa de la CE solo están
garantizadas con el cable de datos suministrado.
No tape las ranuras de ventilación.
El cable de alimentación del ordenador debe estar desenchufado.
► Asegúrese de que el monitor y el ordenador están desconectados.
Conexión de cables en el monitor
► Si el cable de datos no está conectado firmemente al monitor:
Enchufe el conector del cable de datos en el conector hembra D-SUB del monitor y asegure
los conectores apretando los tornillos de seguridad.
► Enchufe el cable de alimentación en el conector de red del monitor.
Conexión de cables en el ordenador
En las instrucciones de servicio del ordenador encontrará información sobre los conectores e
interfaces del mismo.
i
Si su ordenador presenta dos puertos para monitor (uno del controlador de pantalla
integrado y otro de la tarjeta gráfica), probablemente esté activo el puerto de la tarjeta
gráfica.
► Enchufe el cable de datos en el conector hembra (activo) del monitor y en el ordenador y
asegure los conectores apretando los tornillos de seguridad.
► Enchufe el conector del cable de alimentación suministrado en una caja de enchufe con toma
a tierra y asegúrese de que la conexión es correcta.
Page 52

Monitor LCD
6 - Español Edición 3
► Enchufe el cable de alimentación del ordenador en una caja de enchufe con toma a tierra.
i
Si es la primera vez que pone su monitor en servicio, debería instalar los controladores
gráficos adecuados para sus programas de aplicación. En la documentación de su
controlador de pantalla o en el software correspondiente de controlador hallará
información al respecto.
Manejo del monitor
Ajuste de la inclinación
El monitor puede inclinarse hacia delante y hacia atrás con respecto a su posición vertical.
► Coja el monitor por los bordes del lateral izquierdo y del lateral derecho de la caja e inclínelo
hacia adelante o hacia atrás.
Conexión/desconexión de la pantalla
1 = Teclas para el menú OSD
(On-Screen Display)
2 = Indicador de red
3 = Interruptor de conexión/desconexión
Para conectar y desconectar el monitor puede utilizarse el interruptor de conexión/desconexión.
El indicador de red se ilumina en verde o en azul cuando el ordenador y el monitor están conectados.
El indicador de red se ilumina en naranja cuando la pantalla no recibe ninguna señal de vídeo o bien
se encuentra en el modo de ahorro de energía. El indicador de red se apaga cuando el monitor está
desconectado.
Guarde el orden de conexión siguiente cuando proceda a conectar el ordenador:
► Accione primero el interruptor de conexión/desconexión del monitor LCD.
► Conecte a continuación el ordenador.
Page 53

Monitor LCD
Edición 3 Español - 7
Tratamiento de errores
Cuando surja un error, compruebe primero los puntos siguientes. Si aun así no se elimina la imagen
defectuosa, en lo posible, debe probarse el monitor en otro ordenador.
Si no puede solucionar el problema, avise a nuestro Service Desk.
¿Tiene Ud. este problema? Compruebe los puntos mencionados:
Sin representación en pantalla
(el indicador de red está apagado)
► Compruebe si el monitor está encendido.
► Compruebe si el cable de alimentación del monitor
está enchufado correctamente.
► Compruebe si el ordenador está encendido.
Sin representación en pantalla
(el indicador de red está encendido)
► Compruebe si el ordenador está encendido.
► Compruebe si los tornillos del cable de datos del
monitor están bien apretados en la caja de enchufe
para monitor del ordenador.
► Pulse cualquier tecla del teclado del ordenador -
puede ser que el ordenador esté en el modo para
ahorro de energía.
► Varíe el brillo y/o el contraste hasta obtener una
imagen.
Mensajes:
No Video Input
Or
No Signal
► Compruebe si los tornillos del cable de datos del
monitor están bien apretados en la caja de enchufe
para monitor del ordenador.
► Compruebe si el ordenador está encendido.
Mensajes:
e.g.
This is 85 Hz overdrive.
Change computer display input
to ….. x ….. at 60 Hz.
or
Frequency out of range
Please change the display mode
to …….
La señal de entrada (frecuencia horizontal y frecuencia de
repetición de imagen) no se corresponde con los datos
técnicos del monitor.
► Ajuste las frecuencias correctas mediante la ayuda
del software del ordenador (consulte la
documentación de su ordenador o de su tarjeta
gráfica).
► Ajuste una resolución válida con ayuda del software
del ordenador (consulte la documentación de su
ordenador o de su tarjeta gráfica.
Posición de la imagen incorrecta El monitor detecta un modo no definido.
► Efectúe el ajuste automático del monitor (con la tecla
AUTO -si existe- o a través del menú OSD).
► Ajuste la posición de la imagen a través del menú
OSD.
Page 54

Monitor LCD
8 - Español Edición 3
¿Tiene Ud. este problema? Compruebe los puntos mencionados:
La imagen parpadea. ► Compruebe si los tornillos del cable de datos del
monitor están bien apretados en la caja de enchufe
para monitor del ordenador.
► Efectúe el ajuste automático del monitor (con la tecla
AUTO -si existe- o a través del menú OSD).
Interferencias de pantalla (franjas
verticales)
► Efectúe el ajuste automático del monitor (con la tecla
AUTO -si existe- o a través del menú OSD).
Interferencias de pantalla
(franjas horizontales, efecto de
"granulado")
► Efectúe el ajuste automático del monitor (con la tecla
AUTO -si existe- o a través del menú OSD).
Imagen muy brillante o muy oscura
► Efectúe el ajuste automático del monitor (con la tecla
AUTO -si existe- o a través del menú OSD).
► Ajuste el contraste y la luminosidad a través del
menú OSD, si el resultado del ajuste automático no
es satisfactorio.
Page 55

Monitor LCD
Edición 3 Español - 9
Aclaraciones sobre la norma ISO 9241-3
Puntos de imagen claros u oscuros
Dadas las actuales técnicas de producción, no se puede garantizar una visualización de pantalla
totalmente libre de errores. Dependiendo del número total de píxeles (resolución) puede haber
presente un número reducido de píxeles (elementos de imagen) o subpíxeles (puntos de imagen)
permanentemente claros u oscuros.
Píxel
(= elemento de imagen)
Un píxel consta de 3 subpíxeles que, por regla general, son rojo, verde y
azul.
Un píxel es el elemento más pequeño que puede crear la funcionalidad
completa de la representación.
Subpíxel
(= punto de imagen)
Un subpíxel es una estructura interna direccionable por separado en un
píxel (elemento de imagen) que amplía la función del elemento de
imagen.
El número máximo permitido de píxeles defectuosos se determina mediante la norma internacional
ISO 9241-3.
Los monitores LCD de Fujitsu cumplen la clase II para resoluciones bajas y la clase I para
resoluciones de 1680 x 1050 (1 764 000 píxeles) y superiores según la norma ISO 9241-3.
Ejemplos:
Una pantalla plana con una resolución de 1280 x 1024 tiene 1280 x 1024 = 1 310 720 píxeles. Cada
píxel se compone de tres subpíxeles (rojo, verde y azul), de forma que suman cerca de 3,9 millones
de subpíxeles. La norma ISO 9241-3 (clase II) solo permite que estén dañados como máximo 3
píxeles claros y 3 oscuros, y adicionalmente 7 subpíxeles claros o 13 oscuros o una combinación de
ambos (1 subpíxel claro equivale a 2 subpíxeles oscuros).
Una pantalla plana con una resolución de 1920 x 1080 tiene 1920 x 1080 = 2 073 600 píxeles. Cada
píxel se compone de tres subpíxeles (rojo, verde y azul), de forma que suman cerca de 6,2 millones
de subpíxeles. La norma ISO 9241-3 (clase I) solo permite que estén dañados como máximo 2
píxeles claros y 2 oscuros, y adicionalmente 5 subpíxeles claros o 10 oscuros o una combinación de
ambos (1 subpíxel claro equivale a 2 subpíxeles oscuros).
Page 56

Monitor LCD
10 - Español Edición 3
Montaje de la base del monitor
!
La superficie del monitor de pantalla de cristal líquido es sensible al rayado y a la presión.
A
l montar o desmontar la base del monitor, coloque el monitor sobre una superficie
blanda.
Page 57

Edição 3 Português
Índice
Introdução ............................................................................................................................................. 1
Outras informações ...................................................................................................................... 1
Recomendações importantes ............................................................................................................... 2
Recomendações de segurança .................................................................................................... 2
Cabo de rede ................................................................................................................................ 3
Transporte .................................................................................................................................... 3
Limpeza ........................................................................................................................................ 4
Marcação CE ................................................................................................................................ 4
Verificar o conteúdo da embalagem ..................................................................................................... 4
Ligar o monitor ...................................................................................................................................... 5
Trabalhar com o monitor ...................................................................................................................... 6
Localização de erros ............................................................................................................................ 7
Explicações relativas à norma ISO 9241-3 .......................................................................................... 9
Montar o pé do monitor ...................................................................................................................... 10
Page 58

Índice
Português Edição 3
Page 59

Edição 3 Português - 1
Introdução
Este manual fornece informação importante sobre a operação do seu monitor LCD.
O monitor LCD é controlador pelo PC. A regulação dos modos (resolução e frequência de
refrescamento da imagem) é realizada pela carta gráfica ou pelo software de controlador respectivo.
Quando utilizar o monitor pela primeira vez, deve adaptar a imagem do monitor à carta gráfica
instalada e às suas necessidades pessoais.
Grupo alvo
Para realizar os trabalhos descritos não precisa de ser um "especialista". No entanto, siga
escrupulosamente os avisos de segurança constantes das instruções de serviço do computador e
do presente manual!
Em caso de problemas, contacte o seu revendedor ou o nosso Service Desk.
Símbolos e convenções
Neste manual são utilizados os seguintes símbolos e convenções.
!
A
ssinala instruções, cujo incumprimento põe em perigo a sua saúde, a funcionalidade do
seu aparelho ou a segurança dos seus dados.
i
A
ssinala informações e sugestões suplementares.
► Assinala uma operação de execução obrigatória.
As "aspas" assinalam denominações de capítulos e termos que devem ser destacados.
Esta fonte indica o nome de ficheiro e pontos de menu.
Esta fonte indica mensagens no monitor.
Outras informações
Consulte a documentação da sua placa gráfica ou do controlador de software respectivo para saber
como regular resoluções e frequências de refrescamento de imagem.
Page 60

Monitor LCD
2 - Português Edição 3
Recomendações importantes
!
Este capítulo contém avisos de segurança que deve necessariamente ter em conta no
manuseamento do seu monitor.
Recomendações de segurança
Este aparelho cumpre as normas de segurança aplicáveis a equipamentos informáticos, incluindo
máquinas de escritório eléctricas utilizáveis em ambientes de escritório. Se tiver dúvidas se o
aparelho pode ser colocado no ambiente pretendido, contacte o seu revendedor ou o nosso Service
Desk.
● A superfície do ecrã do monitor LCD V é susceptível a impactos e riscos. Portanto, trate a
superfície do ecrã com cuidado para evitar danos permanentes (anéis de Newton, riscos).
● Quando o aparelho é trazido de um ambiente frio para o local de funcionamento, pode ocorrer
condensação. Aguarde que a temperatura do aparelho se adapte à temperatura ambiente e
que ele se encontre completamente seco antes de o pôr a funcionar.
● A fim de garantir uma ventilação suficiente, as grelhas de entrada e saída de ar do monitor
devem estar sempre desimpedidas.
● O monitor ajusta-se automaticamente para uma tensão de rede na gama de 100 V a 240 V.
Assegure-se que a tensão de rede local não fique abaixa nem acima destes valores.
● Certifique-se de que a tomada do monitor e a tomada de corrente com contacto de protecção
permanecem facilmente acessíveis.
● O interruptor ON/OFF não desliga o aparelho da tensão de rede. Para o desligar
completamente, deverá retirar a ficha da tomada de corrente.
● O monitor traz um cabo de rede normalizado.
● Disponha os cabos de forma a que não se possa tropeçar neles nem corram o risco de se
danificar. Consulte as instruções no capítulo "Ligar o monitor" quando ligar o aparelho.
● Se utilizar outro cabo em vez do cabo de dados fornecido junto, assegure-se que o cabo tenha
uma blindagem adequada. A conformidade CE e qualidade optimizada da imagem só podem
ser garantidos se utilizador o cabo de dados fornecido junto.
● Não ligue nem desligue cabos de transmissão de dados durante uma trovoada.
● Tenha cuidado para não deixar cair quaisquer objectos (por ex., pulseiras, fios, clips, etc.) ou
líquidos no interior do aparelho (perigo de choque eléctrico, curto-circuito).
● O aparelho não está à prova de água! Nunca ponha o aparelho dentro de água e proteja-o
contra salpicos (chuva, água do mar).
● Em casos de emergência (por ex. danificação da caixa, elementos de comando ou cabo de
rede, entrada de líquidos ou corpos estranhos) desligue imediatamente o aparelho e contacte
o seu revendedor ou o nosso Service Desk.
Page 61

Monitor LCD
Edição 3 Português - 3
● O monitor tem de ser eliminado de acordo com os regulamentos locais referentes a resíduos
especiais. A iluminação de fundo do monitor LCD contém mercúrio. Manuseamento e
eliminação dos tubos fluorescentes estão sujeitas aos regulamentos de segurança em vigor.
● O aparelho só pode ser reparado por pessoal técnico autorizado. Da abertura por pessoas não
autorizadas e execução de reparações inadequadas podem resultar riscos consideráveis para
o utilizador (choque eléctrico, incêndio).
● Utilize um protector de ecrã animado e active a gestão de energia do seu monitor para não
"queimar" o ecrã com imagens fixas.
● O monitor só deve ser operado em posição horizontal (0° modo paisagem). Qualquer rotação
do braço ou do suporte de parede durante a montagem é interdita.
● Guarde este manual junto do aparelho. Se entregar este aparelho a terceiros, entregue
também este manual.
● Recomendamos a colocação do aparelho sobre uma base antiderrapante e não sensível.
Dada a variedade de acabamentos (revestimentos e envernizamento) dos móveis, não pode
ser excluída a possibilidade de o suporte de plástico poder danificar a superfície onde está
colocado.
Cabo de rede
Utilize o cabo fornecido junto para garantir um funcionamento seguro. Se for necessário substituir o
cabo fornecido junto, deve cumprir as seguintes instruções.
● Ficha e tomada do cabo de rede devem cumprir a norma IEC60320/CEE-22.
● O cabo deve cumprir a norma VDE ou HAR. O símbolo VDE ou HAR está marcado no manto
do cabo.
● Para aparelhos colocados sobre secretárias, mesas, etc. podem ser utilizados cabos de rede
do tipo SVT ou SJT.
● A selecção do cabo deve atender à corrente nominal necessária para o aparelho.
● Se necessário, substitua o cabo de rede fornecido junto por um cabo de rede tripolar
convencional com ligação à terra.
Transporte
● Transporte o monitor com cuidado e somente na embalagem original ou noutra embalagem
adequada que garanta protecção contra choque e impacto.
● O monitor LCD não deve nunca cair no chão (perigo de quebra de vidro).
Page 62

Monitor LCD
4 - Português Edição 3
Limpeza
● Tire a ficha de rede antes de iniciar a limpeza do monitor.
● O interior do aparelho só deve ser limpo por um técnico de assistência.
● Não utilize pós abrasivos e detergentes que corroam o plástico.
● Não deixe entrar líquidos no interior do aparelho.
● Assegure-se que as grelhas de ventilação do monitor estejam desimpedidas.
● Limpe a superfície do ecrã do monitor LCD que é susceptível a impactos e riscos somente
com um pano macio, ligeiramente humedecido.
Para a limpeza da caixa exterior do monitor basta um pano seco. Em caso de forte poluição pode
utilizar um pano húmido, embebido com um detergente não agressivo e devidamente torcido para
eliminar o excesso de água.
Marcação CE
Este aparelho, no modelo fornecido, cumpre os requisitos da directiva comunitária
2004/108/CEE relativa à "Compatibilidade electromagnética" e 2006/95/CEE relativa a
"Baixa tensão".
Verificar o conteúdo da embalagem
!
A
superfície do ecrã do monitor LCD V é susceptível a impactos e riscos. Por isso, segure
o aparelho apenas na caixa.
► Desembale todos os componentes.
► Verifique se ocorreram danos visíveis durante o transporte.
► Verifique se o equipamento fornecido corresponde ao indicado na guia de remessa.
O âmbito de fornecimento completo do monitor LCD inclui:
– um monitor
– Cabo de dados
– um cabo de rede
– uma caderneta de garantia
– este manual "Primeiros passos"
Caso verifique a existência de danos de transporte ou discrepâncias entre o equipamento fornecido
e a guia de remessa, comunique-o imediatamente à empresa vendedora!
i
Recomendamos que não deite fora a embalagem original do aparelho. Guarde a
embalagem original para eventual transporte.
Page 63

Monitor LCD
Edição 3 Português - 5
Ligar o monitor
!
Cumpra as recomendações de segurança contidas no capítulo "Recomendações
importantes".
A
conformidade CE e qualidade optimizada da imagem só podem ser garantidos se
utilizador o cabo de dados fornecido junto.
A
s grelhas de entrada e saída de ar devem estar desimpedidas!
O PC deverá encontrar-se desligado da corrente (com a ficha fora da tomada)!
► Assegure-se que monitor e PC estão desligados.
Ligar os cabos ao monitor
► Quando o cabo de dados não está integrado no monitor:
Ligue uma das fichas do cabo de dados à porta D-SUB (2) do monitor e aperte os parafusos
de segurança para fixar a ficha.
► Ligue o cabo de rede fornecido junto à ficha de rede do monitor.
Ligar os cabos ao PC
Para mais informações sobre portas e interfaces do PC consulte as instruções de serviço do seu PC.
i
Se o seu PC tiver duas tomadas de monitor (controlador de monitor "onboard" e carta
gráfica separada), funcionará geralmente a tomada de monitor da carta gráfica separada.
► Coloque o cabo de dados na tomada (activa) do monitor do PC e aperte os parafusos de
segurança.
► Ligue a ficha do cabo de rede fornecido junto a uma tomada com contacto de terra e verifique
o assento correcto desta ligação.
Page 64

Monitor LCD
6 - Português Edição 3
► Ligue a ficha de rede do PC a uma tomada com contacto de terra.
i
Quando utilizar o monitor pela primeira vez, deve instalar os controladores gráficos
adequados para as suas aplicações. Consulte a documentação da sua carta gráfica ou do
software dos controladores respectivos.
Trabalhar com o monitor
Regular a inclinação
A inclinação do monitor pode ser regulada a partir da sua posição vertical para frente e para trás.
► Coloque uma mão em cada lado do monitor e dê-lhe a inclinação desejada.
Ligar/desligar o monitor
1 = Teclas para o menu OSD
(On-Screen-Display)
2 = Sinalizador de rede
3 = Interruptor ON/OFF
O interruptor on/off permite ligar e desligar o monitor.
O sinalizador de rede apresenta-se verde ou azul quando monitor e PC estão ligados. O indicador
de corrente acende a laranja, quando o monitor não recebe sinal vídeo ou se encontra no modo de
poupança de energia. O sinalizador de rede apaga-se quando o monitor é desligado.
Ao ligar o PC deve cumprir a seguinte sequência de ligação:
► Ligue primeiro o monitor LCD utilizando o interruptor on/off.
► Ligue o PC.
Page 65

Monitor LCD
Edição 3 Português - 7
Localização de erros
Em caso de erro, verifique primeiro os pontos indicados a seguir. Se o erro persistir, o monitor deve
ser ensaiado com outro PC caso seja possível.
Se não for possível resolver o erro, contacte o nosso Service Desk.
Erros possíveis Medidas a tomar:
Sem imagem (sinalizador de rede
escuro)
► Verifique se o monitor está ligado.
► Verifique a correcta ligação do cabo de rede ao
monitor.
► Verifique se o PC está ligado.
Sem imagem (sinalizador de rede
iluminado)
► Verifique se o PC está ligado.
► Verifique se o cabo de dados do monitor está bem
aparafusado à porta vídeo do PC.
► Prima uma qualquer tecla do teclado do PC - o PC
pode estar no modo de poupança de energia.
► Altere brilho e/ou contraste até obter uma imagem.
Mensagem:
No Video Input
Or
No Signal
► Verifique se o cabo de dados do monitor está bem
aparafusado à porta vídeo do PC.
► Verifique se o PC está ligado.
Mensagem:
e.g.
This is 85 Hz overdrive.
Change computer display input
to ….. x ….. at 60 Hz.
or
Frequency out of range
Please change the display mode
to …….
O sinal de entrada (frequência horizontal e de
refrescamento) não corresponde aos dados técnicos do
monitor.
► Com ajuda do software do PC ajuste as frequências
aplicáveis (ver documentação do seu PC ou da carta
gráfica).
► Com ajuda do software do PC ajuste uma resolução
válida (ver documentação do seu PC ou da carta
gráfica)
Posição da imagem incorrecta O monitor detecta um modo de funcionamento que ainda
não foi parametrizado.
► Efectua um ajuste automático do monitor (mediante
tecla AUTO - se existir - ou através do menu OSD).
► Corrija a posição da imagem através do menu OSD.
Page 66

Monitor LCD
8 - Português Edição 3
Erros possíveis Medidas a tomar:
Imagem treme ► Verifique se o cabo de dados do monitor está bem
aparafusado à porta vídeo do PC.
► Efectua um ajuste automático do monitor (mediante
tecla AUTO - se existir - ou através do menu OSD).
Interferências na imagem (riscas
verticais)
► Efectua um ajuste automático do monitor (mediante
tecla AUTO - se existir - ou através do menu OSD).
Interferências na imagem
(riscas horizontais, neve)
► Efectua um ajuste automático do monitor (mediante
tecla AUTO - se existir - ou através do menu OSD).
Imagem clara ou escura demais
► Efectua um ajuste automático do monitor (mediante
tecla AUTO - se existir - ou através do menu OSD).
► Regule contraste e brilho através do menu OSD, se
o ajuste automático não for satisfatório.
Page 67

Monitor LCD
Edição 3 Português - 9
Explicações relativas à norma ISO 9241-3
Pontos claros ou escuros na imagem
No estado actual da técnica de produção não é possível garantir uma imagem absolutamente sem
erros. Em função do número total de pixéis (resolução), podem estar presentes alguns pixéis
(elementos de imagem) ou subpixéis (pontos na imagem) constantemente claros ou escuros.
Pixel
(= elemento de
imagem)
Um pixel é composto por 3 subpixéis, geralmente vermelho, verde e azul.
Um pixel é o elemento mais pequeno capaz de gerar a funcionalidade
plena
da visualização.
Subpixel
(= ponto de imagem)
Um subpixel é uma estrutura interna, endereçável separadamente, num
pixel (elemento de imagem) que alarga a função do elemento de imagem.
A quantidade máxima aceitável desses pixéis com falhas é determinada pela norma internacional
ISO 9241-3.
Os monitores LCD da Fujitsu cumprem a Classe II, no caso de resoluções baixas, e a Classe I no
caso de resoluções iguais ou superiores a 1680 x 1050 (1764000 pixéis), em conformidade com a
norma ISO 9241-3.
Exemplos:
Um ecrã plano com a resolução 1280 x 1024 tem 1280 x 1024 = 1310720 pixéis. Cada pixel
consiste em três subpixéis (vermelho, verde e azul), o que perfaz cerca de 3,9 milhões de subpixéis.
Segundo a norma ISO 9241-3 (Classe II) podem apresentar defeito, no máximo, 3 pixéis claros e 3
pixéis escuros e adicionalmente 7 subpixéis claros ou 13 subpixéis escuros ou uma mistura
correspondente (1 subpixel claro equivale a dois subpixéis escuros).
Um ecrã plano com a resolução 1920 x 1080 tem 1920 x 1080 = 2073600 pixéis. Cada pixel
consiste em três subpixéis (vermelho, verde e azul), o que perfaz cerca de 6,2 milhões de subpixéis.
Segundo a norma ISO 9241-3 (Classe I) podem apresentar defeito, no máximo, 2 pixéis claros e 2
pixéis escuros e adicionalmente 5 subpixéis claros ou 10 subpixéis escuros ou uma mistura
correspondente (1 subpixel claro equivale a dois subpixéis escuros).
Page 68

Monitor LCD
10 - Português Edição 3
Montar o pé do monitor
!
A
superfície do ecrã do monitor LCD V é susceptível a impactos e riscos. Por isso,
coloque o monitor sobre um suporte macio quando monta ou desmonta o pé do monitor.
Page 69

Edizione 3 Italiano
Contenuto
Introduzione .......................................................................................................................................... 1
Ulteriori informazioni ..................................................................................................................... 1
Indicazioni importanti ............................................................................................................................ 2
Norme di sicurezza ....................................................................................................................... 2
Cavo di rete .................................................................................................................................. 3
Trasporto ...................................................................................................................................... 3
Pulizia ........................................................................................................................................... 4
Marcatura CE ............................................................................................................................... 4
Controllo della fornitura ........................................................................................................................ 4
Collegamento del monitor ..................................................................................................................... 5
Utilizzo del monitor ............................................................................................................................... 6
Problemi e soluzioni ............................................................................................................................. 7
Spiegazioni sulla norma ISO 9241-3 .................................................................................................... 9
Montaggio della base del monitor ....................................................................................................... 10
Page 70

Contenuto
Italiano Edizione 3
Page 71

Edizione 3 Italiano - 1
Introduzione
In questo manuale troverete delle informazioni importanti, necessarie per la messa in esercizio del
Vostro monitor LCD.
Lo schermo LCD viene controllato dal PC. La scheda grafica insieme ai relativi driver è responsabile
dell’impostazione dei modi (risoluzione e frequenza verticale).
Se fate funzionare per la prima volta il monitor dovete adeguare l'immagine in modo ottimale alla
scheda grafica utilizzata ed impostarla secondo le Vostre esigenze.
Gruppo target
Per eseguire le operazioni descritte non è necessario essere un "esperto". Tuttavia atteneteVi
strettamente alle norme di sicurezza nelle istruzioni per l’uso del computer e in questo manuale!
In caso di problemi rivolgetevi al vostro rivenditore oppure all'Service Desk.
Spiegazione dei simboli
In questo manuale vengono utilizzati i seguenti simboli.
!
indica suggerimenti il cui mancato rispetto può provocare danni alla Vostra salute, al
funzionamento del Vostro apparecchio o ai Vostri dati.
i
descrive ulteriori informazioni e consigli.
► Indica una fase di lavoro da eseguire.
Le "virgolette" indicano che si tratta di un titolo di un capitolo e concetti che devono essere
sottolineati.
Questa scrittura indica nomi di file o punti di menu.
Ulteriori informazioni
Per l’impostazione delle risoluzioni e delle frequenze verticali consultate le documentazioni della
Vostra scheda grafica e dei relativi driver.
Questa scrittura rappresenta dati che compaiono a video.
Page 72

Monitor LCD
2 - Italiano Edizione 3
Indicazioni importanti
!
Questo capitolo riporta le norme di sicurezza a cui dovete assolutamente attenervi durante
l'utilizzo del vostro monitor.
Norme di sicurezza
Questo apparecchio è conforme alle norme di sicurezza relative per impianti dell'elaborazione dei
dati, inclusi tutti gli strumenti elettronici per ufficio. In caso di dubbio rivolgetevi all'Service Desk
oppure al vostro concessionario.
● La superficie del display del monitor LCD è sensibile alla pressione ed ai graffi. Maneggiate la
superficie del display quindi con cautela per evitare danni permanenti (anelli, graffi).
● Se l'apparecchio viene trasferito nel locale di lavoro da un ambiente freddo potrebbero sorgere
fenomeni di condensamento. Prima dell'accensione è necessario che l'apparecchio sia
assolutamente asciutto e che abbia raggiunto la temperatura ambiente.
● Per garantire una ventilazione sufficiente, i relativi fori per l’entrata e la fuoriuscita dell’aria dal
monitor devono sempre restare liberi.
● Il monitor regola automaticamente una tensione di rete nel campo da 100 V a 240 V.
AssicurateVi che la tensione di rete non sia inferiore né superiore a quella indicata.
● AssicurateVi che la presa del monitor oppure la presa di sicurezza dell'impianto elettrico siano
totalmente accessibili.
● L'interruttore ON/OFF non separa l'apparecchio dalla rete. Per staccare completamente
l'apparecchio dalla tensione di rete è necessario estrarre la spina di terra dalla presa.
● Il monitor è dotato di un cavo di rete omologato.
● Posizionate i cavi in modo che questi non rappresentino una fonte di pericolo (ostacolo per il
passaggio delle persone) e che non vengano danneggiati. Per il collegamento dell'unità
bisogna seguire le indicazioni a riguardo nel capitolo "Collegamento del monitor".
● Se utilizzate un cavo di trasmissione dati diverso da quello fornito fate attenzione che il cavo
sia sufficientemente schermato. La conformità CEE e una ottima qualità dell’immagine sono
garantite solo con il cavo di trasmissione dati originale.
● Evitate in ogni caso di collegare o scollegare i cavi di trasmissione dati durante i temporali.
● Fate attenzione che all'interno dell'apparecchio non penetrino oggetti metallici (per esempio
catenine, graffette, ecc.) o liquidi (pericolo di scosse elettriche o corto circuito).
● L’apparecchio non è resistente all’acqua! Non immergete mai l'apparecchio nell'acqua e
proteggetelo dall’acqua spruzzante (pioggia, acqua marina).
● In casi di emergenza (per esempio rottura del telaio, degli elementi di comando o del cavo di
rete, penetrazione di liquidi o di corpi estranei) spegnete immediatamente l'apparecchio,
staccate la spina dalla corrente ed avvertite il vostro rivenditore o l'Service Desk.
Page 73

Monitor LCD
Edizione 3 Italiano - 3
● Il monitor deve essere smaltito in base alle prescrizioni locali sullo smaltimento dei rifiuti
speciali. La retroilluminazione del monitor contiene mercurio. Per l'uso e per lo smaltimento dei
tubi fluorescenti attenersi alle norme di sicurezza vigenti.
● Le riparazioni dell'apparecchio possono essere eseguite solo da tecnici specializzati.
L'apertura non autorizzata dell'apparecchio e riparazioni non appropriate possono comportare
considerevoli pericoli per l'utente (scossa elettrica, pericolo di incendio).
● Impostate uno screensaver con immagini in movimento e attivate la gestione energia del
monitor per evitare che le immagini si "fissino" sullo schermo.
● Il monitor può funzionare sono con formato orizzontale (modo 0° Landscape). In fase di
montaggio non è ammesso ruotare il braccio orientabile o il supporto per parete.
● Conservate questo manuale insieme all'apparecchio. Se cedete l’apparecchio a terzi,
consegnate anche questo manuale.
● È consigliabile posizionare il dispositivo su una superficie non sdrucciolevole e resistente.
L’enorme varietà dei tipi di rivestimento e delle vernici usati per i mobili non consente di
escludere che i piedini del dispositivo possano danneggiare la superficie di appoggio.
Cavo di rete
Per garantire un funzionamento sicuro dell'apparecchio usate il cavo della fornitura originale. Nel
caso in cui sia necessario sostituire il cavo originale, ci si attenga strettamente alle seguenti
istruzioni.
● La spina del cavo di rete e la presa di corrente devono essere conformi alla normativa
IEC60320/CEE-22.
● Il cavo deve essere conforme alla disposizioni VDE o HAR. Il simbolo VDE o HAR è riportato
sulla guaina esterna del cavo.
● Per apparecchi che vengono usati su scrivanie, tavoli, ecc. è ammesso l'uso di cavi di rete tipo
SVT o SJT.
● Nel scegliere il cavo di rete verificate che questo sia adatto alla tensione nominale
dell'apparecchio.
● Se necessario, sostituite il cavo di rete originale con un cavo di rete a 3 poli con contatto di
protezione di norma nel paese di utilizzo.
Trasporto
● Trasportate il monitor con cautela usando soltanto l'imballaggio originale (protezione contro
urti).
● Il monitor LCD non deve mai cadere (pericolo di rottura del vetro).
Page 74

Monitor LCD
4 - Italiano Edizione 3
Pulizia
● Prima di pulire il monitor estraete la spina della corrente.
● L'interno del telaio può essere pulito solamente da un tecnico del servizio.
● Evitate di usare detergenti abrasivi o detersivi nocivi per i componenti in materiale plastico.
● Non fate penetrare liquidi all'interno dell'apparecchio.
● Fate attenzione che le fessure di ventilazione del monitor restino libere.
● Per pulire la superficie del display sensibile alla pressione ed ai graffi utilizzate un panno
morbido leggermente umido.
Per la pulizia della superficie del monitor è sufficiente un panno asciutto. In presenza di superfici più
sporche potete usare un panno umido intriso di un detergente delicato diluito in acqua e ben
strizzato.
Marcatura CE
Questo dispositivo nella versione consegnata è conforme alle direttive CEE
2004/108/CEE relative alla "compatibilità elettromagnetica" e alla direttiva 2006/95/CEE
sulla "bassa tensione".
Controllo della fornitura
!
La superficie del display del monitor LCD è sensibile alla pressione ed ai graffi. Afferrate il
apparecchio solamente al telaio!
► Togliete tutti i componenti dall'imballaggio.
► Verificate che gli articoli contenuti nell'imballaggio non abbiano subito danni visibili durante il
trasporto.
► Verificate che gli articoli della fornitura corrispondano ai dati indicati sulla bolla di consegna.
Della fornitura completa del monitor LCD fanno parte:
– un monitor
– Cavo di trasmissione dati
– un cavo di rete
– un fascicolo di garanzia
– questo manuale "Primi passi"
Qualora si constatassero danni di trasporto oppure incongruenze tra il contenuto dell'imballaggio e la
bolla di consegna, si prega di informare immediatamente il rivenditore!
i
Si consiglia di non buttare via l'imballaggio originale dell'apparecchio. Conservate
l'imballaggio originale per un eventuale ulteriore trasporto.
Page 75

Monitor LCD
Edizione 3 Italiano - 5
Collegamento del monitor
!
A
tteneteVi alle norme di sicurezza riportate nel capitolo "Indicazioni importanti".
La conformità CEE e una ottima qualità dell’immagine sono garantite solo con il cavo di
trasmissione dati originale.
Le fessure di ventilazione non devono essere coperte!
La spina di rete del computer deve essere staccata!
► AssicurateVi che il monitor e il computer siano spenti.
Collegamento dei cavi al monitor
► Se il cavo dati non è collegate in modo fisso con il monitor:
Collegate una spina del cavo di trasmissione dati al collegamento D-SUB ed assicurate il
connettore ad innesto stringendo le viti di sicurezza.
► Collegate il cavo di rete fornito all'allacciamento alla rete del monitor.
Collegamento dei cavi al computer
Per ulteriori informazioni sui collegamenti e sulle interfacce del computer consultate le istruzioni per
l'uso del vostro computer.
i
Se il Vostro computer dispone di due collegamenti del monitor (controller monitor
"onboard" e scheda grafica separata), in genere è attivo il collegamento del monitor della
scheda grafica separata.
► Collegate il cavo di trasmissione dati al collegamento del monitor (attivo) del computer e fissate
il connettore ad innesto stringendo le viti di sicurezza.
► Collegate il connettore del cavo di rete fornito ad una presa con normale collegamento di terra
assicurandoVi che incastri.
Page 76

Monitor LCD
6 - Italiano Edizione 3
► Inserite la spina di rete del computer in una presa di sicurezza con contatto di terra nella debita
forma.
i
Se usate il monitor per la prima volta, dovete installare i driver grafici adatti per i Vostri
programmi applicativi. Per informazioni al riguardo consultate la documentazione della
Vostra scheda grafica e dei relativi driver.
Utilizzo del monitor
Regolazione dell'inclinazione
L’inclinazione del monitor è variabile in avanti e indietro rispetto alla propria posizione verticale.
► Afferrate il monitor con ambedue le due mani sul bordo destro e sinistro del telaio e
posizionatelo con l’inclinazione desiderata.
Accensione e spegnimento del monitor
1 = Tasti per il menu OSD
(On-Screen-Display)
2 = Spia di rete
3 = Interruttore ON/OFF
Per accendere e spegnere il monitor usate l'apposito interruttore ON/OFF.
La spia di rete s'illumina in verde oppure in blu se il monitor ed il computer sono accesi. La spia di
rete lampeggia in arancione se lo schermo non riceve alcun segnale video oppure se si trova nel
modo di risparmio energetico. La spia di rete si spegne se il monitor è spento.
Per l'accensione del sistema computer atteneteVi alla seguente sequenza di attivazione:
► Accendete dapprima il monitor LCD con l'interruttore ON/OFF.
► Quindi accendete il computer.
Page 77

Monitor LCD
Edizione 3 Italiano - 7
Problemi e soluzioni
Se si presenta un errore verificate dapprima i punti indicati in seguito. Se anche in questo modo
l'errore permane, si dovrebbe provare a collegare il monitor ad un altro computer.
Se non siete riusciti a risolvere il problema, metteteVi in contatto con il nostro Service Desk.
Avete questo problema? Verificate i punti indicati:
Nessuna visualizzazione
(la spia di rete è spenta)
► Verificate che il monitor sia acceso.
► Verificate che il cavo di rete del monitor sia collegato
correttamente.
► Verificate che il computer sia acceso.
Nessuna visualizzazione
(la spia di rete è illuminata)
► Verificate che il computer sia acceso.
► Verificate che il cavo di trasmissione dati del monitor
sia fissato al rispettivo collegamento del monitor del
computer.
► Premete un tasto qualsiasi della tastiera - il computer
potrebbe trovarsi nella modalità di risparmio
energetico.
► Modificate la luminosità e/o il contrasto fino a
quando compare un'immagine.
Messaggi:
No Video Input
Or
No Signal
► Verificate che il cavo di trasmissione dati del monitor
sia fissato al rispettivo collegamento del monitor del
computer.
► Verificate che il computer sia acceso.
Messaggi:
e.g.
This is 85 Hz overdrive.
Change computer display input
to ….. x ….. at 60 Hz.
or
Frequency out of range
Please change the display mode
to …….
Il segnale in ingresso (frequenza orizzontale e frequenza
verticale) non corrisponde ai dati tecnici del monitor.
► Tramite il software del computer impostate le
frequenze valide (cfr. documentazione del computer
o della scheda grafica).
► Tramite il software del computer impostate una
risoluzione valida (cfr. documentazione del computer
o della scheda grafica).
Posizione dell'immagine non corretta Il monitor riconosce un modo operativo non definito.
► Eseguite l’autoregolazione del monitor (con il tasto
AUTO, se presente, oppure tramite il menu OSD).
► Impostate in modo corretto la posizione
dell'immagine tramite il menu OSD.
Page 78

Monitor LCD
8 - Italiano Edizione 3
Avete questo problema? Verificate i punti indicati:
L’immagine trema ► Verificate che il cavo di trasmissione dati del monitor
sia fissato al rispettivo collegamento del monitor del
computer.
► Eseguite l’autoregolazione del monitor (con il tasto
AUTO, se presente, oppure tramite il menu OSD).
Disturbi dell'immagine (strisce
verticali)
► Eseguite l’autoregolazione del monitor (con il tasto
AUTO, se presente, oppure tramite il menu OSD).
Disturbi dell'immagine
(strisce orizzontali, effetto "pepe e
sale")
► Eseguite l’autoregolazione del monitor (con il tasto
AUTO, se presente, oppure tramite il menu OSD).
Immagine troppo chiara o troppo
scura
► Eseguite l’autoregolazione del monitor (con il tasto
AUTO, se presente, oppure tramite il menu OSD).
► Se l’autoregolazione non produce un risultato
soddisfacente, impostate il contrasto e la luminosità
tramite il menu OSD.
Page 79

Monitor LCD
Edizione 3 Italiano - 9
Spiegazioni sulla norma ISO 9241-3
Pixel chiari o scuri
La tecnologia odierna non è in grado di garantire un'immagine perfetta. A seconda del numero
complessivo di pixel (risoluzione), è possibile che siano presenti alcuni pixel (elementi di immagine)
o sottopixel (punti immagine) chiaro o scuri costanti.
Pixel
(= elemento di
immagine)
Un pixel è costituito da 3 sottopixel, di norma rossi, verde e blu.
Il pixel rappresenta l’elemento minimo in grado di generare tutte le
funzioni di visualizzazione.
Sottopixel
(= punto di immagine)
Un sottopixel è una struttura interna, accessibile separatamente, inserita
all’interno di un pixel (elemento di immagine), che amplia la funzione del
pixel stesso.
Il numero massimo consentito di questi pixel errati viene stabilito dalla rigida norma internazionale
ISO 9241-3.
Gli schermi LCD di Fujitsu sono conformi alla classe II a basse risoluzione e alla classe I in caso di
risoluzione di 1680 x 1050 (1764000 pixel) o superiore, secondo la norma ISO 9241-3.
Esempi:
Uno schermo piatto con una risoluzione di 1280 x 1024 ha 1280 x 1024 = 1310720 pixel. Ogni pixel
è composto da tre sottopixel (rosso, verde e blu), per un totale di quasi 3,9 milioni di sottopixel.
Secondo la norma ISO 9241-3 (classe II) vi possono essere al massimo 3 pixel chiari e 3 pixel scuri
e 7 sottopixel chiari o 13 sottopixel scuri o una combinazione corrispondente di pixel e sottopixel
difettosi (1 sottopixel chiaro corrisponde a 2 sottopixel scuri).
Uno schermo piatto con una risoluzione di 1920 x 1080 ha 1920 x 1080 = 2073600 pixel. Ogni pixel
è composto da tre sottopixel (rosso, verde e blu), per un totale di quasi 6,2 milioni di sottopixel.
Secondo la norma ISO 9241-3 (classe I) vi possono essere al massimo 2 pixel chiari e 2 pixel scuri e
5 sottopixel chiari o 10 sottopixel scuri o una combinazione corrispondente di pixel e sottopixel
difettosi (1 sottopixel chiaro corrisponde a 2 sottopixel scuri).
Page 80

Monitor LCD
10 - Italiano Edizione 3
Montaggio della base del monitor
!
La superficie del display del monitor LCD è sensibile alla pressione ed ai graffi. Durante
l'installazione e lo smontaggio della base del monitor appoggiate quindi il monitor su un
supporto morbido.
Page 81

Utgåva 3 Svenska
Innehåll
Inledning ............................................................................................................................................... 1
Ytterligare informationer ............................................................................................................... 1
Viktigt att veta ....................................................................................................................................... 2
Säkerhetsföreskrifter .................................................................................................................... 2
Nätkabel ....................................................................................................................................... 3
Transport ...................................................................................................................................... 3
Rengöring ..................................................................................................................................... 4
CE-märkning ................................................................................................................................ 4
Leveranskontroll ................................................................................................................................... 4
Ansluta skärmen ................................................................................................................................... 5
Hantera bildskärmen ............................................................................................................................ 6
Felhantering .......................................................................................................................................... 7
Förklaring till normen ISO 9241-3 ......................................................................................................... 9
Montering av skärmfoten .................................................................................................................... 10
Page 82

Innehåll
Svenska Utgåva 3
Page 83

Utgåva 3 Svenska - 1
Inledning
I denna handboken hittar du viktig information som du behöver för att ta din LCD-skärm i drift.
LCD-bildskärmen styrs från datorn. Grafikkortet resp. det tillhörande drivrutinprogrammet är
ansvariga för inställningar av olika tillstånd (upplösning och bilduppdateringsfrekvens).
När du tar bildskärmen i drift för första gången, bör du anpassa bildskärmen optimalt till det använda
grafikkortet och ställa in den efter dina behov.
Målgrupp
Du behöver inte vara "fackman" för att kunna utföra operationerna som beskrivs i manualen. Det är
emellertid mycket viktigt att du följer säkerhetsråden i datorns användarmanual och i den här
handboken!
Kontakta din återförsäljare eller vår Service Desk, om det uppstår problem.
Symboler och grafiska attribut
Följande symboler och grafiska attribut används i denna manual.
!
markerar hänvisningar som absolut måste iakttagas - i annat fall finns risk för kroppslig
skada, för skada på datorn eller att data går förlorade.
i
markerar ytterligare information och tips.
► markerar ett arbetsmoment som du måste utföra.
"Citationstecken" markerar sådana kapitelrubriker och begrepp som ska framhävas.
Denna stil markerar filnamn och menyobjekt.
Denna stil representerar text som visas på skärmen.
Ytterligare informationer
Hur du ställer in upplösningar och bilduppdateringsfrekvenser beskrivs i dokumentationen till
grafikkortet resp. till det tillhörande drivrutinprogrammet.
Page 84

LCD-skärm
2 - Svenska Utgåva 3
Viktigt att veta
!
I detta kapitel hittar du säkerhetsföreskrifter som måste iakttagas när du använder
bildskärmen.
Säkerhetsföreskrifter
Denna enhet uppfyller de tillämpliga säkerhetskraven för informationsteknisk utrustning i samband
med användningen i kontorsmiljö, vilka även omfattar elektriska kontorsmaskiner. Om du känner dig
osäker angående uppställningen i den avsedda miljön, kontaktar du din återförsäljare eller vår
Service Desk.
● LCD-skärmens glasyta är känslig för tryck och repor. Hantera därför skärmens glasyta försiktigt
för att undvika permanenta skador (Newton-ringar, repor).
● Förflyttas enheten från kall miljö till det rum där den ska tas i drift kan det bildas kondens på
den. Vänta med att ta enheten i drift tills den har temperaturanpassats och är helt torr.
● För att garantera tillräcklig ventilation, måste bildskärmens till- och frånluftöppningar hållas fria.
● Bildskärmen ställer automatiskt in en nätspänning som ligger mellan 100 V och 240 V.
Kontrollera att det lokala nätets spänning varken över- eller underskrider detta område.
● Säkerställ att uttaget på bildskärmen eller det installerade vägguttaget inte blockeras.
● Till-/Från-strömbrytaren skiljer inte enheten från nätet. För att fullständigt skilja den från nätet
måste du dra ur nätkontakten.
● Bildskärmen är utrustad med en säkerhetstestad nätkabel.
● Lägg alla kablar så att eventuella risker undviks (risk för att snubbla) och så att de inte kan
skadas. Observera hänvisningarna i kapitlet "Ansluta skärmen", när du ansluter enheten.
● Om du använder en annan datakabel, än den som är medlevererad, måste du se till att kabeln
är tillräckligt skärmad. CE-överensstämmelse och optimal bildkvalitet garanteras bara med den
medföljande datakabeln.
● Under pågående åska får du varken ansluta eller lossa dataöverföringskablar.
● Se till att inga föremål (t.ex. smycken, kedjor, gem etc.) eller vätska kommer in i enheten (risk
för elchock, kortslutning).
● Enheten är inte vattentät! Doppa aldrig ner enheten i vatten och skydda den mot vattenstänk
(regn, havsvatten).
● I nödsituationer (t. ex. skadad kåpa, manövreringselement eller nätkabel, inträngande av
vätska eller främmande föremål) måste enheten stängas av omedelbart och nätkabeln dras ut
ur vägguttaget. Kontakta din återförsäljare eller vår Service Desk.
Page 85

LCD-skärm
Utgåva 3 Svenska - 3
● Bildskärmen måste kastas bort i enlighet med de lokala bestämmelserna för särskilt avfall.
Bildskärmens bakgrundsbelysning innehåller kvicksilver. Vid hantering och skrotning ska
samma säkerhetsbestämmelser som för lysrör beaktas.
● Reparationer på enheten får bara genomföras av en auktoriserad fackman. Genom obehörigt
öppnande och icke fackmässiga reparationer kan väsentliga faror uppstå för användaren
(elchock, brandrisk).
● Använd en skärmsläckare med rörliga bilder och aktivera bildskärmens strömsparfunktioner för
att undvika att stillbilder "bränns in".
● Bildskärmen får endast användas i tvärformat (0° landskapsläge). Det är inte tillåtet att vrida
bildskärmen vid montering av vridbar arm eller väggfäste.
● Förvara denna handbok tillsammans med enheten. Om du ger enheten vidare till tredje man,
se till att denna handbok medföljer.
● Vi rekommenderar att enheten placeras på ett halkfritt och okänsligt underlag. Beroende på
uppställningsytans material och ytbehandling kan enhetens fötter eventuellt lämna märken efter
sig.
Nätkabel
Använd den medföljande kabeln för att garantera säker drift. Om det är nödvändigt att byta ut den
medföljande ursprungliga kabeln, måste du iakttaga följande föreskrifter.
● Nätkabelns kontakt och kontaktuttag måste uppfylla föreskrifterna enligt IEC60320/CEE-22.
● Kabeln måste uppfylla kraven enligt VDE- resp. HAR-föreskrifterna. VDE- resp. HAR-symbolen
finns på kabelns ytterhölje.
● För enheter som placeras på skrivbord, bord etc. är det tillåtet att använda nätkabelutföranden
av typ SVT resp. SJT.
● Observera vilken märkström som krävs för enheten när du väljer kabel.
● Om nödvändigt, byter du ut den medföljande ursprungliga nätkabeln mot en sådan 3-polig
nätledning med jordad kontakt som är gängse i ditt land.
Transport
● Transportera skärmen försiktigt och bara i tillhörande originalförpackning eller annan lämplig
förpackning för att skydda den mot stötar och slag.
● LCD-skärmen får aldrig tappas (risk för glasskador).
Page 86

LCD-skärm
4 - Svenska Utgåva 3
Rengöring
● Dra ut nätkabeln, innan du rengör skärmen.
● Kåpans inre delar får bara rengöras av en servicetekniker.
● Använd inte skurpulver eller rengöringsmedel som skadar plastmaterial.
● Se till att ingen vätska rinner in i enheten.
● Se till att skärmens ventilationsöppningar är fria.
● Rengör den tryck- och repkänsliga glasytan på LCD-skärmen med en mjuk, lätt fuktad trasa.
Det räcker med en torr trasa för att rengöra skärmen på utsidan. Vid stark nedsmutsning används en
trasa som har sköljts i vatten med milt handdiskmedel och sedan vridits ur ordentligt.
CE-märkning
Denna enhet uppfyller i leveransutförandet kraven enligt EU-direktiven 2004/108/EG
"Elektromagnetisk kompatibilitet" och 2006/95/EWG "Lågspänningsdirektiv".
Leveranskontroll
!
LCD-skärmens glasyta är känslig för tryck och repor. Håll alltid bara fast enheten i kåpan!
► Packa upp alla delar.
► Kontrollera att inga skador har uppstått under transporten.
► Kontrollera packsedelns uppgifter så att allt finns med.
En komplett leverans av LCD-skärmen omfattar:
– en bildskärm
– Datakabel
– en nätkabel
– ett garantihäfte
– denna handboken "Komma i gång"
Om skador har uppstått under transporten, eller om leveransen inte stämmer med packsedeln, ska
du kontakta återförsäljaren omedelbart!
i
Kasta inte bort originalförpackningen till enheten. Spara originalförpackningen för eventuell
transport.
Page 87

LCD-skärm
Utgåva 3 Svenska - 5
Ansluta skärmen
!
Observera säkerhetsföreskrifterna i kapitlet "Viktigt att veta".
CE-överensstämmelse och optimal bildkvalitet garanteras bara med den medföljande
datakabeln.
Ventilationsöppningarna får inte täckas över!
Datorns nätkontakt måste vara urdragen!
► Se till att bildskärmen och datorn är avstängda.
Ansluta kablar till bildskärmen
► Om datakabeln inte är fastkopplad i bildskärmen:
Sätt i datakabelns ena kontakt i bildskärmens d-sub-uttag och säkra kontaktförbindelsen
genom att dra åt säkerhetsskruvarna.
► Koppla nätkabeln till bildskärmens nätuttag.
Ansluta kablar till datorn
För mer information om datorns kontaktuttag och gränssnitt hänvisas till datorns användarmanual.
i
Om din dator har två bildskärmsuttag (integrerad ("onboard") grafikstyrning och separat
grafikkort), så är i allmänhet det separata grafikkortets bildskärmsuttag aktivt.
► Anslut datakabeln till datorns (aktiva) bildskärmsuttag och säkra kontaktförbindelsen genom att
dra åt säkerhetsskruvarna.
► Sätt in den medföljande nätkabelns kontakt i ett korrekt jordat vägguttag och kontrollera att den
sitter fast ordentligt.
► Anslut datorns nätkontakt till ett jordat vägguttag.
Page 88

LCD-skärm
6 - Svenska Utgåva 3
i
När du tar bildskärmen i drift för första gången, bör du installera passande grafikdrivrutiner
för dina tillämpningsprogram. Informationer om detta hittar du i dokumentationen till
grafikkortet resp. till det tillhörande drivrutinprogrammet.
Hantera bildskärmen
Ställa in lutningen
Bildskärmens lutning kan ställas om framåt och bakåt från lodrätt läge.
► Ta tag i bildskärmen med båda händerna på högra och vänstra sidan av kåpan och ställ den i
önskad lutning.
Till-/frånkoppling av bildskärmen
1 = Knappar för OSD-menyn
(On-Screen-Display)
2 = Nätindikator
3 = Till-/Från-strömbrytare
Till- och frånkoppling av bildskärmen sker med Till-/Från-strömbrytaren.
Nätindikatorn lyser grönt eller blått när bildskärmen och datorn är tillkopplade. Nätindikatorn lyser
orange om bildskärmen inte får någon videosignal resp. är i energisparläge. Nätindikatorn släcks,
när bildskärmen är frånkopplad.
Observera följande ordningsföljd när datorsystemet kopplas på:
► Sätt först på LCD-skärmen med Till-/Från-strömbrytaren.
► Sätt sedan på datorn.
Page 89

LCD-skärm
Utgåva 3 Svenska - 7
Felhantering
Om ett fel uppstår, kontrollera först följande punkter. Om felbilden fortfarande kvarstår, bör
bildskärmen om möjligt kontrolleras tillsammans med en annan dator.
Kontakta vår Service Desk, om du inte kan lösa problemet själv.
Har du detta problem? Kontrollera de angivna möjliga orsakerna:
Ingen skärmbild
(nätindikatorn är släckt)
► Kontrollera att bildskärmen är påknäppt.
► Kontrollera att bildskärmens nätkabel är korrekt
ansluten.
► Kontrollera att datorn är påknäppt.
Ingen skärmbild
(nätindikatorn lyser)
► Kontrollera att datorn är påknäppt.
► Kontrollera att bildskärmens datakabel är
fastskruvad i datorns bildskärmsuttag.
► Tryck på valfri tangent på tangentbordet - eventuellt
är datorn i ett energisparande tillstånd.
► Ändra ljusstyrkan och/eller kontrasten, tills du får
fram en bild.
Meddelande:
No Video Input
Or
No Signal
► Kontrollera att bildskärmens datakabel är
fastskruvad i datorns bildskärmsuttag.
► Kontrollera att datorn är påknäppt.
Meddelande:
e.g.
This is 85 Hz overdrive.
Change computer display input
to ….. x ….. at 60 Hz.
or
Frequency out of range
Please change the display mode
to …….
Insignalen (horisontalfrekvens och
bilduppdateringsfrekvens) motsvarar inte bildskärmens
tekniska data.
► Ställ in giltiga frekvenser via datorns programvara
(se dokumentationen till datorn eller till grafikkortet).
► Ställ in en giltig skärmupplösning via datorns
programvara (se dokumentationen till datorn eller
grafikkortet).
Bildpositionen är inte korrekt Displayen är felinställd.
► Genomför bildskärmens autojustering (med knappen
AUTO - om denna finns - eller via OSD-menyn).
► Ställ in bildpositionen korrekt i OSD-menyn.
Page 90

LCD-skärm
8 - Svenska Utgåva 3
Har du detta problem? Kontrollera de angivna möjliga orsakerna:
Bilden darrar ► Kontrollera att bildskärmens datakabel är
fastskruvad i datorns bildskärmsuttag.
► Genomför bildskärmens autojustering (med knappen
AUTO - om denna finns - eller via OSD-menyn).
Bildstörningar (vertikala ränder)
► Genomför bildskärmens autojustering (med knappen
AUTO - om denna finns - eller via OSD-menyn).
Bildstörningar
(horisontala ränder, snö)
► Genomför bildskärmens autojustering (med knappen
AUTO - om denna finns - eller via OSD-menyn).
Bilden är för ljus eller för mörk
► Genomför bildskärmens autojustering (med knappen
AUTO - om denna finns - eller via OSD-menyn).
► Ställ in kontrasten och ljusstyrkan korrekt via OSD-
menyn, om autojusteringen inte ger något
tillfredsställande resultat.
Page 91

LCD-skärm
Utgåva 3 Svenska - 9
Förklaring till normen ISO 9241-3
Ljusa eller mörka bildpunkter
Med dagens produktionsteknik kan man inte garantera helt felfri visning på bildskärmen. Beroende
på det totala antalet pixlar (upplösning) kan det förekomma några få konstant ljusa eller mörka pixlar
(bildelement) eller subpixlar (bildpunkter).
Pixel
(= bildelement)
En pixel bestеr av 3 subpixlar, i regel röd, grön och blå.
En pixel är det minsta element som kan göra att visningen fungerar helt
korrekt.
Subpixel
(= bildpunkt)
En subpixel är en speciellt adresserbar intern struktur i en pixel
(bildelement) som utökar bildelementfunktionen.
Det högsta tillåtna antalet felaktiga pixlar bestäms av den internationella standarden ISO 9241-3.
LCD-bildskärmar från Fujitsu uppfyller vid låga upplösningar kraven för klass II och vid upplösningar
på 1680 x 1050 (1764000 pixel) och mer kraven för klass I enligt standarden ISO 9241-3.
Exempel:
En 17 tums platt bildskärm med skärmupplösningen 1280 x 1024 har 1280 x 1024 = 1310720 pixlar.
Varje pixel bestеr av tre subpixlar (röd, grön och blå), vilket innebär att det finns ungefär 3,9 miljoner
subpixlar. Enligt ISO 9241-3 (klass II) får högst 3 ljusa och 3 mörka pixlar och därutöver 7 ljusa eller
13 mörka subpixlar eller en motsvarande kombination vara defekta (1 ljus subpixel räknas som 2
mörka subpixlar).
En 17 tums platt bildskärm med skärmupplösningen 1920 x 1080 har 1920 x 1080 = 2073600 pixlar.
Varje pixel bestеr av tre subpixlar (röd, grön och blå), vilket innebär att det finns ungefär 6,2 miljoner
subpixlar. Enligt ISO 9241-3 (klass I) får högst 2 ljusa och 2 mörka pixlar och därutöver 5 ljusa eller
10 mörka subpixlar eller en motsvarande kombination vara defekta (1 ljus subpixel räknas som 2
mörka subpixlar).
Page 92

LCD-skärm
10 - Svenska Utgåva 3
Montering av skärmfoten
!
LCD-skärmens glasyta är känslig för tryck och repor. Lägg därför bildskärmen på ett mjukt
underlag när du monterar eller demonterar skärmfoten.
Page 93

Uitgave 3 Nederlands
Inhoud
Inleiding ................................................................................................................................................ 1
Verder informatie .......................................................................................................................... 1
Belangrijke opmerkingen ...................................................................................................................... 2
Veiligheidsinstructies .................................................................................................................... 2
Netkabel ....................................................................................................................................... 3
Transport ...................................................................................................................................... 3
Reiniging ...................................................................................................................................... 4
CE-certificaat ................................................................................................................................ 4
Controle van de levering ....................................................................................................................... 4
Aansluiten van het beeldscherm .......................................................................................................... 5
Bedienen van het beeldscherm ............................................................................................................ 6
VerServiceen van fouten ...................................................................................................................... 7
Informatie bij de norm ISO 9241-3 ....................................................................................................... 9
Montage van de beeldschermvoet ..................................................................................................... 10
Page 94

Inhoud
Nederlands Uitgave 3
Page 95

Uitgave 3 Nederlands - 1
Inleiding
In deze handleiding vindt u belangrijke informatie die u voor het in dienst stellen van uw LCDbeeldscherm nodig hebt.
Het LCD-beeldscherm wordt door de PC aangestuurd. Voor de instelling van de modi (resolutie en
beeldopfrisfrequentie) zorgt de grafische kaart of de bijbehorende driver-software.
Wanneer u het beeldscherm voor de eerste keer in gebruik neemt, moet u de beeldschermweergave
optimaal aan de gebruikte grafische kaart aanpassen en volgens uw behoeften instellen.
Doelgroep
U hoeft geen "vakman" te zijn om de beschreven handelingen uit te voeren U dient zich echter strikt
te houden aan de veiligheidsinstructies die in de gebruikshandleiding van de computer en in deze
handleiding opgenomen zijn!
Neem als u problemen hebt contact op met uw verkooppunt of onze Service Desk-afdeling.
Verklaring van symbolen
De betekenis van de symbolen en de lettertypen die in deze handleiding worden gebruikt, luidt als
volgt:
!
Besteed in het bijzonder aandacht aan teksten met dit symbool. Als u deze waarschuwing
niet in acht neemt, brengt u uw leven in gevaar, beschadigt u het systeem, of kan er
gegevensverlies optreden.
i
Dit symbool wordt gevolgd door bijkomende informatie, opmerkingen en tips.
► Teksten achter dit symbool beschrijven handelingen die u in de aangegeven volgorde moet
uitvoeren.
"Aanhalingstekens" geven gemarkeerde tekst en namen van hoofdstukken aan.
Deze lettertekens geven bestandsnamen en menupunten aan.
Dit lettertype wordt gebruikt voor uitvoer op het beeldscherm.
Verder informatie
Hoe u de resoluties en beeldfrequenties instelt, is beschreven in de documentatie bij uw grafische
kaart of de bijbehorende driver-software.
Page 96

LCD-beeldscherm
2 - Nederlands Uitgave 3
Belangrijke opmerkingen
!
In dit hoofdstuk vindt u informatie over de veiligheidsinstructies voor uw beeldscherm die u
in acht moet nemen.
Veiligheidsinstructies
Dit toestel is conform de relevante veiligheid van gegevensverwerkingsapparatuur, inclusief
elektrische toestellen voor zakelijk gebruik in kantoren. Als u nog vragen hebt, neemt u contact op
met uw leverancier of uw Service Desk-afdeling.
● Het displayoppervlak van het LCD-beeldscherm is gevoelig voor druk en krassen. Behandel
daarom het displayoppervlak voorzichtig om blijvende schade (Newton-ringen, krassen) te
vermijden.
● Als het toestel vanuit een koude omgeving in de bedrijfsruimte wordt gebracht, kan er
condensvorming optreden. Vooraleer u het in gebruik neemt, moet u wachten tot het toestel
aan de omgevingstemperatuur aangepast is en volledig droog is.
● Om voldoende ventilatie te verzekeren, moeten de luchttoevoer- en -afvoeropeningen van het
beeldscherm altijd vrij blijven.
● Het beeldscherm wordt automatisch op de juiste spanning ingesteld binnen het bereik van
100 V tot 240 V. Wees zeker dat de plaatselijke netspanning niet boven of onder deze waarden
ligt.
● Vergewis u ervan dat de contactdoos op het beeldscherm of het aardingscontact van de
huisinstallatie vrij toegankelijk is.
● De aan-/uitschakelaar sluit het toestel niet van het netwerk af. Hiertoe moet u de stekker uit het
stopcontact halen.
● Het beeldscherm is uitgerust met een gekeurde netkabel.
● Leid de snoeren zodanig dat niemand erop kan staan of erover kan struikelen. Wanneer u de
beeldscherm aansluit, neemt u de relevante opmerkingen in het hoofdstuk "Aansluiten van het
beeldscherm" in acht.
● Als u een andere dan de bijgeleverde datakabel gebruikt, dient u erop te letten dat de kabel
voldoende afgeschermd is. CE-conformiteit en een optimale beeldkwaliteit worden enkel
gewaarborgd met de bijgeleverde datakabel.
● Kabels voor gegevenstransmissie mag u nooit aansluiten of loskoppelen tijdens een
onweersbui.
● Let erop dat er geen voorwerpen (bijvoorbeeld pols- of halskettinkjes, paperclips, enz.) of
vloeistoffen in de toestel geraakt (gevaar voor elektrische schok, kortsluiting).
● Het toestel is niet waterbestendig! Dompel het toestel nooit onder in water en bescherm het
tegen spatwater (regen, zeewater).
● In noodgevallen (bijv.: beschadigde behuizing, elementen of netkabel; aanwezigheid van
vloeistoffen of vreemde substanties) schakelt u de eenheid uit, haalt u de stekker uit het
stopcontact en neemt u contact op met uw leverancier of onze Service Desk-afdeling.
Page 97

LCD-beeldscherm
Uitgave 3 Nederlands - 3
● Het beeldscherm moet worden weggedaan overeenkomstig de plaatselijke voorschriften voor
speciaal afval. De achtergrondverlichting van het beeldscherm bevat kwikzilver. Bij
behandeling en verwijdering moeten de veiligheidsvoorschriften voor TL-buizen in acht
genomen worden.
● Reparaties aan het toestel mogen alleen door bevoegde vakmensen worden uitgevoerd. Als
het toestel niet vakkundig wordt geopend en gerepareerd kunnen er zich ernstige gevaren
voordoen voor de gebruiker (elektrocutie en brandgevaar).
● Gebruik een schermbeveiliging met bewegende beelden en activeer het energiebeheer voor
uw beeldscherm om inbranden van stilstaande beelden te voorkomen.
● Het beeldscherm mag enkel in liggend formaat (0° landscape-modus) worden gebruikt. Bij de
montage van de zwenkarm of muursteun mag het beeldscherm niet worden gedraaid.
● Bewaar dit handboek samen met het toestel. Als u het toestel doorgeeft aan derden, dient u
ook dit handboek door te geven.
● We raden u aan het toestel op een slipvaste en niet-gevoelige ondergrond te plaatsen. Gezien
de diversiteit van de bekledingen en lakken die voor meubels gebruikt worden, is het niet uit te
sluiten dat de voeten van de toestellen schade veroorzaken aan het vlak waarop ze staan.
Netkabel
Gebruik het meegeleverde snoer, om een veilige werking te garanderen. Als het nodig is het
oorspronkelijk meegeleverde snoer te vervangen, moeten de volgende richtlijnen absoluut in acht
genomen worden.
● Stekker en bus van de netkabel moeten aan de voorschriften van IEC60320/CEE-22 voldoen.
● Het snoer moet aan de VDE- of HAR-bepalingen voldoen. Het VDE- of HAR-teken bevindt zich
op het buitenste kabelomhulsel.
● Voor apparaten die op schrijfbureaus, tafels enz. opgesteld worden, is het gebruik van
netkabeluitvoeringen SVT of SJT toegelaten.
● Bij de keuze van het snoer moet de voor het apparaat vereiste nominale stroom in acht
genomen worden.
● Indien nodig vervangt u de oorspronkelijk bijgeleverde netkabel door een in uw land
gebruikelijke 3-polige netkabel met aardingscontact.
Transport
● Vervoer het beeldscherm voorzichtig en alleen in de oorspronkelijke verpakking of een andere
verpakking die het beeldscherm tegen stoten en slagen beschermt.
● Het LCD-beeldscherm mag in geen geval vallen (gevaar voor glasbreuk).
Page 98

LCD-beeldscherm
4 - Nederlands Uitgave 3
Reiniging
● Trek de netstekker eruit voor u het beeldscherm gaat reinigen.
● De beeldschermeenheid mag aan de binnenkant alleen door een service-technicus worden
gereinigd.
● Gebruik geen schuurpoeder of kunststofoplossend schoonmaakmiddel voor het reinigen.
● Zorg ervoor dat er geen vloeistof in het binnenste van het apparaat komt.
● Houd er rekening mee dat de ventilatieopeningen van het beeldscherm onafgedekt blijven.
● Reinig het voor druk en krassen gevoelige displayoppervlak alleen met een zachte, lichtjes
bevochtigde doek.
U kunt de buitenkant van de beeldschermeenheid het best reinigen met een droge doek. Als het
apparaat erg vuil is, kunt u een vochtige doek gebruiken, die u eerst in water met een mild
schoonmaakmiddel nat maakt en daarna goed uitwringt.
CE-certificaat
In de geleverde uitvoering beantwoordt dit toestel aan de eisen van de EG-richtlijnen
2004/108/EEG inzake "Elektromagnetische compatibiliteit" en 2006/95/EEG
"Laagspanningsrichtlijn".
Controle van de levering
!
Het displayoppervlak van het LCD-beeldscherm is gevoelig voor druk en krassen. Neem
het toestel uitsluitend vast aan de behuizing!
► Pak alle delen uit.
► Controleer de inhoud van de verpakking op zichtbare transportschade.
► Controleer of de levering overeenstemt met de gegevens op de leveringsbon.
Het volledige leveringspakket van het LCD-beeldscherm omvat:
– een beeldscherm
– Datakabel
– een stroomkabel
– een garantieboekje
– dit handboek "Eerste stappen"
Als u transportschade of afwijkingen tussen de inhoud van de verpakking en de leveringsbon
vaststelt, dient u de verkoopdienst onmiddellijk te verwittigen!
i
Wij raden u aan de originele verpakking van het toestel niet weg te gooien. Bewaar de
originele verpakking voor een eventueel transport.
Page 99

LCD-beeldscherm
Uitgave 3 Nederlands - 5
Aansluiten van het beeldscherm
!
Houd u aan de veiligheidsinstructies in het hoofdstuk "Belangrijke opmerkingen".
CE-conformiteit en een optimale beeldkwaliteit worden enkel gewaarborgd met de
bijgeleverde datakabel.
De ventilatieopeningen mogen niet worden afgedekt!
De netstekker van de computer moet uitgetrokken zijn!
► Vergewis u ervan dat het beeldscherm en de computer uitgeschakeld zijn.
Kabels aansluiten op het beeldscherm
► Als de datakabel niet degelijk met het beeldscherm verbonden is:
Steek één stekker van de datakabel in de D-SUB-aansluitbus van het beeldscherm en zet de
stekkerverbinding vast door de borgschroeven aan te draaien.
► Steek de netkabel in de stroomaansluitbus van het beeldscherm.
Kabels aansluiten op de computer
Informatie over de aansluitingen en poorten van de computer vindt u in de gebruiksaanwijzing bij uw
computer.
i
A
ls uw computer twee beeldschermaansluitingen heeft (beeldscherm-controller "onboard"
en afzonderlijke grafische kaart), is normaal de beeldschermaansluiting van de
afzonderlijke grafische kaart actief.
► Steek de datakabel in de (actieve) beeldschermaansluiting van de computer en beveilig de
stekkerverbinding door de borgschroeven aan te draaien.
► Steek de stekker van de bijgeleverde netkabel in een behoorlijk geaard stopcontact en zorg
voor een degelijke verbinding.
Page 100

LCD-beeldscherm
6 - Nederlands Uitgave 3
► Steek de netstekker van de computer in een behoorlijk geaard stopcontact.
i
A
ls u het beeldscherm voor het eerst gebruikt, moet u de passende grafische driver voor
uw toepassingsprogramma installeren. Informatie hieromtrent vindt u in de documentatie
bij uw grafische kaart of de bijbehorende driver-software.
Bedienen van het beeldscherm
Neiging instellen
Het beeldscherm kan vanuit zijn verticale stand naar voor en naar achter worden gekanteld.
► Neem het beeldscherm met beide handen vast aan de rechter en linker rand van de behuizing
en zet het in de gewenste neiging.
Beeldscherm in-/uitschakelen
1 = Toetsen voor het OSD-menu
(On-Screen-Display)
2 = Stroomindicator
3 = Aan-/uitschakelaar
Voor het in- en uitschakelen van het beeldscherm dient de aan-/uitschakelaar.
De stroomindicator licht groen of blauw op wanneer het beeldscherm en de computer ingeschakeld
zijn. De stroomindicator licht oranje op, wanneer het beeldscherm geen videosignaal krijgt of zich in
de energiespaarmodus bevindt. Het stroomindicator is uit, als het beeldscherm is uitgeschakeld.
Neemt u bij het inschakelen van computer de hierna aangegeven volgorde in acht:
► Schakel eerst met de aan-/uitschakelaar het LCD-beeldscherm in.
► Schakel dan de computer in.
 Loading...