

Page 1

DESKPOWER C600 Series User’s Manual
Fujitsu endeavours to ensure that the information in this document is correct, but accepts no liability
for any error or omission in the same. Any procedures described in this document for operating Fujitsu
products should be read and understood by the operator before such products are used. To ensure
that Fujitsu products function without risk to safety and health, such procedures should be strictly
observed by the operator. The development of Fujitsu products and services is continuous and
published information may not be up to date. Any particular issue of a product may contain facilities
not described herein. It is important to check the current position with Fujitsu. Specifications and
statements as to performance in this document are Fujitsu estimates intended for general guidance.
They may require adjustment in particular circumstances and should therefore not be taken as formal
offers or commitments.
DESKPOWER is a trademark of Fujitsu Limited. The following are registered trademarks of Microsoft
Corporation: MS, MS-DOS, Windows ® NT, Windows ® 98, Windows Millennium, Window ® 2000 and
Windows XP.
Intel and Pentium are registered trademarks of Intel Corporation in the U.S.
Celeron is a registered trademark of Intel Corporation in the U.S.
Other product names are trademarks or registered trademarks of respective companies.
Other products are copyrighted by individual companies.
All Rights Reserved, Copyright © Fujitsu PC Asia Pacific 2002
We have been authorized by Microsoft Corporation in the U.S. to use Windows screenshots in this
manual.
This device complies with Part 15 Class B of the FCC Rules. Operations are subject to the following
two conditions:
(1) This device may not be allowed to cause harmful interference, (2) This device must accept any
interference received, including interference that may cause undesired operation.
Wesbite: www.fujitsu-pc-asia.com
DECLARATION OF CONFORMITY
according to FCC Part 15 Class B
i
Page 2

IMPORTANT SAFETY INSTRUCTIONS
1. Read these instructions carefully. Save these instructions for future reference.
2. Follow all warnings and instructions marked on the product.
3. Unplug this product from the wall outlet before cleaning. Do not use liquid cleaners or aerosol
cleaners. Use a damp cloth for cleaning.
4. Do not use this product near water.
5. Do not place this product on an unstable cart, stand, or table. The product may fall, causing serious
damage to the product.
6. Slots and openings in the cabinet and the back or bottom are provided for ventilation; to ensure
reliable operation of the product and to protect it from overheating, these openings must not be
blocked or covered. The openings should never be blocked by placing the product on a bed, sofa,
rug, or other similar surface. This product should never be placed near or over a radiator or heat
register, or in a built-in installation unless proper ventilation is provided.
7. This product should be operated from the type of power indicated on the marking label. If you are
not sure of the type of power available, consult your dealer or local power company.
8. This product is equipped with a 3-wire grounding-type plug, a plug having a third (grounding) pin.
This will only plug into a grounding-type power outlet. This is a safety feature. If you are unable to
insert the plug into the outlet, contact your electrician to replace your obsolete outlet. Do not defeat
the purpose of the grounding-type plug.
9. Do not allow anything to rest on the power cord. Do not locate this product where persons will
walk on the cord.
10. If an extension cord is used with this product, make sure that the total ampere rating of the
equipment plugged into the extension cord does not exceed the extension cord ampere rating.
Also, make sure that the total rating of all products plugged into the wall outlet does not exceed
15 amperes.
11. Never push objects of any kind into this product through cabinet slots as they may touch dangerous
voltage points that could result in a fire or electric shock. Never spill liquid of any kind on the product.
12. Do not attempt to service this product yourself, as opening or removing covers may expose you
to dangerous voltage points or other risks. Refer all servicing to qualified service personnel.
ii
Page 3

13. Unplug this product from the wall outlet and refer servicing to qualified service personnel under
the following conditions:
a. When the power cord or plug is damaged or frayed.
b. If liquid has been spilled into the product.
c. If the product has been exposed to rain or water.
d. If the product does not operate normally when the operating instructions are followed. Adjust
only those controls that are covered by the operating instructions since improper adjustment
of other controls may result in damage and will often require extensive work by a qualified
technician to restore the product to normal condition.
e. If the product has been dropped or the cabinet has been damaged.
f. If the product exhibits a distinct change in performance, indicating a need for service.
14. CAUTION. When replacing the battery, be sure to install it with the polarities in the correct
position. There is a danger of explosion if the battery is replaced with an incorrect type or
is mistreated. Do not recharge, disassemble or dispose of in fire. Replace only with the
same or equivalent type recommeded by the manufacturer. Dispose of the used battery
according to the manufacturer’s instructions.
15. Use only the proper type of power supply cord set (provided in your accessories box) for this unit.
It should be a detachable type: UL listed/CSA certified, BS1363,ASTA,SS145 certified, rated 10A
250V minimum, VDE approved or its equivalent. Maximum length is 15 feet (4.6 meters).
16. NOTE:
Please take extra precaution when connecting the LAN cable; do not connect the LAN cable
to the peripheral device’s connector, that might have excessive voltage.
iii
Page 4
Before reading this manual
This section describes safety precautions and convention used in this manual. Be sure to read this.
For Safe Operation
This manual contains important information for using the DESKPOWER personal computer.
Read this manual thoroughly before using your PC. In particular, “Safety Precautions” in this manual
must be read and understood.
This manual including “Safety Precautions” must be readily available at all times.
This equipment is compliant with the PC industry standard (PC-11-1988) of the Japan Electronics
and Information Technology Industries Association.
Note
This product is a Class B Information Technology Equipment and conforms to the standard set by
the Voluntary Control Council for Interference by Technology Equipment (VCCI).This product is
designed to be used in a domestic environment, however, it may cause radio interference when
used in the vicinity of a radio or television receiver.
Make sure that you read the manual when using this product.
Fujitsu, as a member of the International Energy Star Program, recognizes that
this equipment is compliant with the standard of the International Energy Star
Program.
The International Energy Star Program is a worldwide program for promoting
energy saving for computers and other office equipment. The program aims at
promoting the development and use of products equipped with the functions that can effectively
reduce energy consumption and uses a voluntary system that allows enterprises to join at their
own discretion. The target products are office equipment including computers, displays, printers,
facsimiles, and copying machines. The standards for individual types of equipment and the mark
( ) prepared by the Program are used commonly among member countries.
Caution
This equipment is class B information technology equipment based on the standard of the Voluntary
Control Council for Interference by Information Technology Equipment (VCCI). Although the
equipment is intended for use in residential environments, it may create interference if placed near
radio or television.
Handle the equipment in accordance with the manual.
iv
Page 5

Using this Product for High-Safety Applications
This product is for office, personal, home, ordinary industry and other general use. It is not designed
and manufactured for use in high-safety applications.
Do not use this product for such applications without taking measures to satisfy the high-safety
requirements.
High-safety applications require extremely high level of safety, and involve serious hazards to life
and health if the required safety is not assured. High-safety applications include the following.
● Nuclear reaction control in nuclear facilities, automatic aviation control, air traffic control, masstransportation control, life-supporting medical equipment, and missile launch control.
Some parts (including the CRT display, LCD, or hard disk drive) used on this product have a limited
life. When used continuously for a prolonged period, these parts will need earlier replacement.
Backing Up the Data
The customer is responsible for maintaining the integrity of data (including the basic and application
software) stored or installed on the product. We do not warrant the integrity of data stored or installed
on the personal computer the customer sent for repair. Take appropriate measures such as making
a backup.
We assume no responsibility for loss of data and any direct or incidental damage due to any cause
other than those specified in the warranty.
This computer is designed for use within the country. If you are using it abroad, please do so on
your own responsibility.
This equipment may be adversely affected by the momentary drop of the supplied voltage due to
lightning. Use of an AC uninterruptible power supply is recommended for measures against the
momentary drop of the supplied voltage.
(This message is based on the Japan Electronics and Information Technology Industries
Association’s guidelines for measures against momentary voltage drop in PCs.)
Since this equipment contains special materials controlled by the Foreign Exchange and Foreign
Trade Control Law. Authorization under the law may be required to export this equipment.
v
Page 6

Microsoft Service Pack
Microsoft Corp. offers Service Pack to provide the users of Microsoft® Windows® with more stable
system operation (http://www.microsoft.com/).
The latest version of the Service Pack helps you configure the most stable system using Microsoft
Windows® provided at that time by Microsoft Corp.
We recommend you to use the latest version.
In some environments, however, the Service Pack may cause unexpected failure. Read
Readme.txt for the Service Pack before use.
Again, we recommend you to make a system backup in case of failed installation.
Components of this product (motherboard, CD-ROM, hard disk, and floppy disk drive) contain
traces of heavy metals (lead and chrome) and chemical (antimony).
®
vi
Page 7
Conventions Used in This Manual
Warning messages
This manual uses various signs. These signs urge the user to use the equipment safely so as to prevent
personal injury and/or property damage. The following are alert signals and explanations. The signs
should be understood before proceeding to subsequent portions of this manual.
CAUTION
WARNING
In addition to the above signs, the following symbols are used to provide detailed information concerning
personal injury and/or property damage:
Symbols used in the text
This indicates a hazardous situation that could result in death or severe
injury if the user does not perform the procedure correctly.
This indicates a hazardous situation that could result in personal injury or
property damage if the user does not perform the procedure correctly.
The symbol marked with [ ] indicates a warning or caution item. An
explanation of an alert is presented in or beside the symbol.
The symbol marked with [ ] indicates what must not be done (prohibited
action). The meaning of a direction is presented in or beside the symbol.
The symbol marked with [●] indicates what must be observed. The meaning
of a direction is presented in or beside the symbol.
Symbol Meaning
Important
Point
→
Representation of keys and their operation method
Key names used in this manual are not exactly represented with the characters appearing on the
keyboard but are represented with characters needed for explanation as follows:
Example: [Ctrl] key, [Enter] key, [→] key...
Two or more keys that must be pressed simultaneously are represented by combining them with a
“+” sign as follows:
Example: [Ctrl] + [F3] keys, [Shift] + [↑] keys...
The statement provided with this symbol explains cautions on use or what
must not be done. Be sure to read this first!
The statement provided with this symbol explains what is required to
operate hardware or software correctly. Be sure to read this first!
This symbol indicates the page or manual to refer to.
vii
Page 8

Command entry (keying in)
In this manual, a command entry is represented as follows:
diskcopy a: a:
↑↑
• Where character spacing is provided as shown by [↑], press the [Space] key once.
Commands, an example of which is given above in lowercase, can also be entered in uppercase.
• [CD-ROM drive] indicates the name of the CD-ROM drive being used. Enter the drive name in
accordance with your PC environment.
[CD-ROM drive]:\setup.exe
Screenshot example and illustrations
The screenshots and illustrations given in this manual are examples. The screenshots and file names
may be different from those actually shown on your PC and the illustrations may be different from the
actual appearance. For the explanatory purpose, illustration used in this manual may omit cables
connected on the actual PC.
Representation of continuous operation
Continuous operation steps are represented in this manual by combining them with a “•••• ” sign as
shown below:
Example: Sequential operation of clicking the [Start] button, pointing [Program], then clicking
[Accessories]
↓
Click the [Start] button → [Program] → [Accessories].
Representation for BIOS Setup
When the BIOS Setup procedure is explained in this manual, a menu, submenu, and item may be
represented by combining them with a hyphen as shown below:
Example: Set the [Serial Port 1] in [Advanced] to [Disable].
↓
[Advanced] - [Serial Port 1]: Disable
Floppy disk and CD-ROM drives
Users of a model without a floppy or CD-ROM drive should use a separately available drive for operation
with a necessary drive.
For operation of peripheral devices, refer to the relevant manuals.
viii
Page 9
Reference to products
In this manual, the product names are referred to as follows:
This manual includes information on other operating systems.
Product name Description used in the manual
Microsoft® Windows® XP Professional
Microsoft® Windows® XP Home Edition
Microsoft® Windows® 2000 Professional
Windows XP
Professional
Windows XP
Home Edition
Windows 2000
Windows
XP
Windows*
ix
Page 10

Recycling
Disposal of the PC unit
Disposal of the PC unit (including accessories except the LCD unit) is controlled by the Waste Disposal
and Public Cleaning Law.
● To institutional and corporate customers
Personal computers must be disposed of as industrial waste. Institutional and corporate customers
are obliged to entrust an authorized industrial-waste disposer.
● To individual customers
Personal computers should be disposed of as general waste. Individual customers are advised to
follow the disposal rules and regulations set forth by the local municipality.
Disposal of the LCD unit
The fluorescent tubes in the LCD contain mercury.
Disposal of the LCD unit is controlled by the Waste Disposal and Public Cleaning Law.
● To institutional and corporate customers
LCD units must be disposed of as industrial waste. Institutional and corporate customers are obliged
to entrust an authorized industrial-waste disposer.
● To individual customers
LCD units should be disposed of as general waste. Individual customers are advised to follow the
disposal rules and regulations set forth by the local municipality.
Disposal of batteries
The wireless keyboard and mouse use dry batteries. These batteries may explode when plunged
into the flames.
Disposal of the batteries is controlled by the Waste Disposal and Public Cleaning Law.
● To institutional and corporate customers
Dry batteries must be disposed of as industrial waste. Institutional and corporate customers are
advised to entrust an authorized industrial-waste disposer.
● To individual customers
Dry batteries should be disposed of as general waste. Individual customers are advised to follow
the disposal rules and regulations set forth by the local municipality.
x
Page 11

Warning and caution labels
Your PC bears the warning and caution labels as shown below.
The warning and caution labels must not be removed or damaged.
Rear of the PC main unit
DESKPOWER C600
MODEL
DTN1
WARNING
Electric shock
When removing exterior parts in
order to mount option parts or
others inside the cabinet, switch
off the power supply for PC unit
and peripheral devices linked
with it, and disconnect the power
cable from outlet before working
to avoid risk of electric shock.
200-240V
FUJITSU LIMITED
50/60Hz100-127V(6.5A) (3.0A)
MADE IN SINGAPORE
Fujitsu Limited. Japan
By
(M)
Inside the PC main unit
WARNING
Electric shock
ATTENTION
WARNING
To prevent electric
shock and/or fire, do
not remove the cover
of this unit, which
includes a high
voltage section.
115V of voltage switch in the power supply corresponds to 100-127V
230V of voltage switch in the power supply corresponds to 200-240V
• Before mounting or dismounting an optional unit in/from your PC, switch off
the PC and all connected units and unplug all power cords from respective
outlets to prevent electric shock.
xi
Page 12

Organization of This Manual
Before Reading This Manual
This section contains cautions for safe operation, representations and symbols used in this manual.
Be sure to read this first!
Chapter 1 Part Names
This chapter provides the names and functions of individual parts.
Chapter 2 Installation and Connection
This section describes the location of installation and installation of the computer.
Chapter 3 Security
This chapter introduces the security functions available on the PC unit. To prevent
an illegal use and information leakage to another person, take security measures
in routine use.
Chapter 4 Hardware
This chapter provides the basic information on the PC and operation.
Chapter 5 System Expansion
This chapter provides basic information on how to handle the peripherals installed
(or can be installed) on the PC.
Chapter 6 Technical Information
This chapter describes the specifications of this PC.
xii
Page 13

Contents
CHAPTER 1 Part Names
1 Part Names and Functions .............................................................. 2
Front of the PC Unit.......................................................................................... 2
Rear of the PC Unit .......................................................................................... 4
Inside the PC Unit ............................................................................................ 6
Motherboard ..................................................................................................... 7
CHAPTER 2 Installation and Connection
1 Installation .......................................................................................10
Location of Installation ................................................................................... 10
Mounting Feet ................................................................................................ 10
Example of Installation ................................................................................... 12
2 Connection ...................................................................................... 14
Connecting the Display/Keyboard/Mouse ...................................................... 15
Connect the Power Cord ................................................................................ 17
3 Power On ......................................................................................... 19
How to Power On ........................................................................................... 20
4 Setting Up ........................................................................................21
Setting Up Windows XP ................................................................................. 22
Setting Up Windows 2000 .............................................................................. 23
Problem During Setup? .................................................................................. 26
5 Turn Off the Computer ....................................................................27
How to Turn Off .............................................................................................. 27
CHAPTER 3 Security
1 Securities......................................................................................... 30
2 Security during Network Connection ........................................... 31
Computer virus ............................................................................................... 31
Encrypting the communication data ............................................................... 31
Firewall ........................................................................................................... 31
3 Security Against Illegal Use........................................................... 32
Passwords for Windows OS ........................................................................... 32
Administrator Authority and User Accounts ................................................... 32
Access Authority and Encrypting ................................................................... 32
Password for the BIOS ................................................................................... 33
4 Burglary Prevention of The PC ......................................................34
xiii
Page 14

CHAPTER 4 Hardware
1 Mouse ..............................................................................................36
Using the mouse ............................................................................................ 36
2 Keyboard .........................................................................................38
3 CDs................................................................................................... 40
Inserting or Removing a CD ........................................................................... 41
4 Floppy Disks ...................................................................................43
Inserting or Removing a Floppy Disk ............................................................. 43
5 Hard Disk .........................................................................................45
6 Maintenance of the Hardware ........................................................46
Maintenance of the PC Unit ........................................................................... 46
Maintenance of the Mouse ............................................................................. 46
Maintenance of the Keyboard ........................................................................ 47
Cleaning CDs ................................................................................................. 47
Cleaning the Floppy Disk Drive ...................................................................... 47
CHAPTER 5 System Expansion
1 Before Installing a Peripheral Device............................................ 50
2 Removing the Cover .......................................................................52
Removing the Cover....................................................................................... 52
3 Installing Memory Modules............................................................ 53
Location of Memory Modules ......................................................................... 54
Applicable Memory Modules .......................................................................... 54
Installing Memory Modules ............................................................................ 55
4 Installing an Expansion Card ........................................................59
Location of expansion Cards......................................................................... 60
Applicable Expansion Cards .......................................................................... 60
Installing an Expansion Card ......................................................................... 60
CHAPTER 6 Technical Information
1 List of Specifications......................................................................64
PC Specifications ........................................................................................... 64
LAN function ................................................................................................... 66
2 Connector Specifications ..............................................................67
xiv
Page 15

CHAPTER 1
Part Names
Page 16

1 Part Names and Functions
This section explains the names and functions of the parts of the PC unit and the
motherboard.
Point
The remaining part of this manual assumes vertical placement.When you place the PC unit
horizontally, be careful about geometrical difference.
■ Front of the PC Unit
6
1
7
2
8
9
10
11
12
1 Power button
Press this button to turn on the PC or set the system to the standby (energy-saving) mode.
3
4
5
2 Power lamp
This lamp lights up when the PC is on.
It lights in green when the PC is in operation and in orange when the PC is in the standby mode.
2
Page 17

3 Disk access lamp
This lamp lights up while the hard disk is accessed.
4 USB connector
Slide the cover down and connect a USB peripheral device.
5 Foot
Used for placing the PC.
This also prevents the PC in a vertical placement from tipping over.
6 Smart Card bay
Use this bay to install a Smart Card reader/writer.
7 CD access lamp (on models with a CD-ROM drive)
This lamp lights up while data is read from the CD-ROM drive or a music CD is played.
8 CD eject button
Press this button to insert or remove a CD-ROM or music CD. This button can be used when the
PC is on. Do not press this button when the CD access lamp is on.
9 CD-ROM drive (on models with a CD-ROM drive)
Insert a CD-ROM into this drive to read data or programs, or insert a music CD for playback.
10 Floppy disk eject button
Press this button to remove a floppy disk from the floppy disk drive.
Do not press this button when the floppy disk access lamp is on.
11 Floppy disk drive
This drive accommodates a floppy disk for writing and reading data.
12 Floppy disk access lamp
This lamp lights up while the floppy disk drive is accessed.
3
Page 18

■ Rear of the PC Unit
5
6
7
8
9
10
11
12
13
14
15
16
1 Burglarproof lock
Connect a commercial burglarproof cable here.
1
2
3
4
Point
The burglarproof lock supports the Microsaver security system of Kensington.
2 Expansion card slots
Insert an optional expansion card into this slot.
This slot accommodates a PCI card.
3 USB fixing slit
Fix a USB connector cable here.
Put the supplied nylon band through the USB fixing slit to tie the cable.
4 Inlet
Connect the power cable of the PC unit to this connector.
5 Mouse connector
Connect a mouse.
4
Page 19

6 Keyboard connector
Connect the keyboard.
7 Serial connector
Connect the cable of an RS-232C device.
8 Parallel connector
Connect the cable of a printer or scanner.
9 CRT connector
Connect the cable of an analog RGB display.
10 LAN connector
Connect the LAN cable.
If the customer has selected the security LAN card of the custom-made option, the LAN connector
is closed on the PC rear panel. Do not use the occupied USB connector.
11 USB connector
Connect a USB device.
12 Line OUT terminal
A terminal for sound output. Connect the input terminal of an audio equipment to this terminal.
Use speakers having a built-in amp when connecting them directly.
13 Line IN terminal
A terminal for sound input. Connect the output terminal of an audio equipment to this terminal.
14 Microphone jack
Plug a capacitor microphone to this jack.
15 Speaker terminal
Plug a commercial speaker to this jack.
16 Outlet
Connect the power cable of the display to this outlet.
5
Page 20

■ Inside the PC Unit
1 Internal hard disk drive
This is an IDE-compliant hard disk drive.
2 Expansion card slots
Insert optional expansion cards into these slot.
These slots accommodate PCI cards.
A SCSI card allows you to use an external hard disk drive or magneto-optical disk drive.
3 Power supply
6
Page 21

■ Motherboard
1
6
2
5 4 3
1 CPU
2 DIMM slots
Memory modules are inserted into these slots.
If the memory capacity is increased, the amount of data the system can read at one access
increases and, thereby, the PC processing capability increases.
When seen from the front of the PC unit, the near one is DIMM1 slot and the far one is DIMM2 slot.
A standard memory module is seated in the DIMM1 slot.
3 Secondary IDE connector (IDE2)
A standard CD-ROM drive is connected (on models with a CD-ROM drive).
4 Floppy disk drive connector (FDD)
5 Primary IDE connector (IDE1)
A standard hard disk drive is connected.
6 Built-in battery
This battery provides the power to retain the date and time information and the settings made in
BIOS Setup. The life is about 5 years under normal use.
7
Page 22

CHAPTER 2
Installation and
Connection
Page 23

1 Installation
This section describes the location and installation of the PC.
■ Location of Installation
Avoid the following conditions when installing your PC.
● Location with a large amount of humidity, dusts and oily smoke.
● Location with poor ventilation.
● Location with a fire source.
● Bathroom, shower room, and other location with water splashes.
● Location with elevated temperature such as direct sunlight or heating equipment.
● Location at the temperature below 10°C.
● Location with power cords and cables that may catch your foot.
● Location with strong magnetic fields such as TV or speaker.
● On top of unstable surface, such as vibrated or slant surface.
■ Mounting Feet
❒ Vertical Placement
● When using two feet
When installing your PC in the vertical layout away from a wall,use the following installation
procedure.
1 Make sure that feet do not exceed the PC width.
2 Mount the feet onto the PC unit.
Fix all feet by tightening setscrews.
10
Page 24
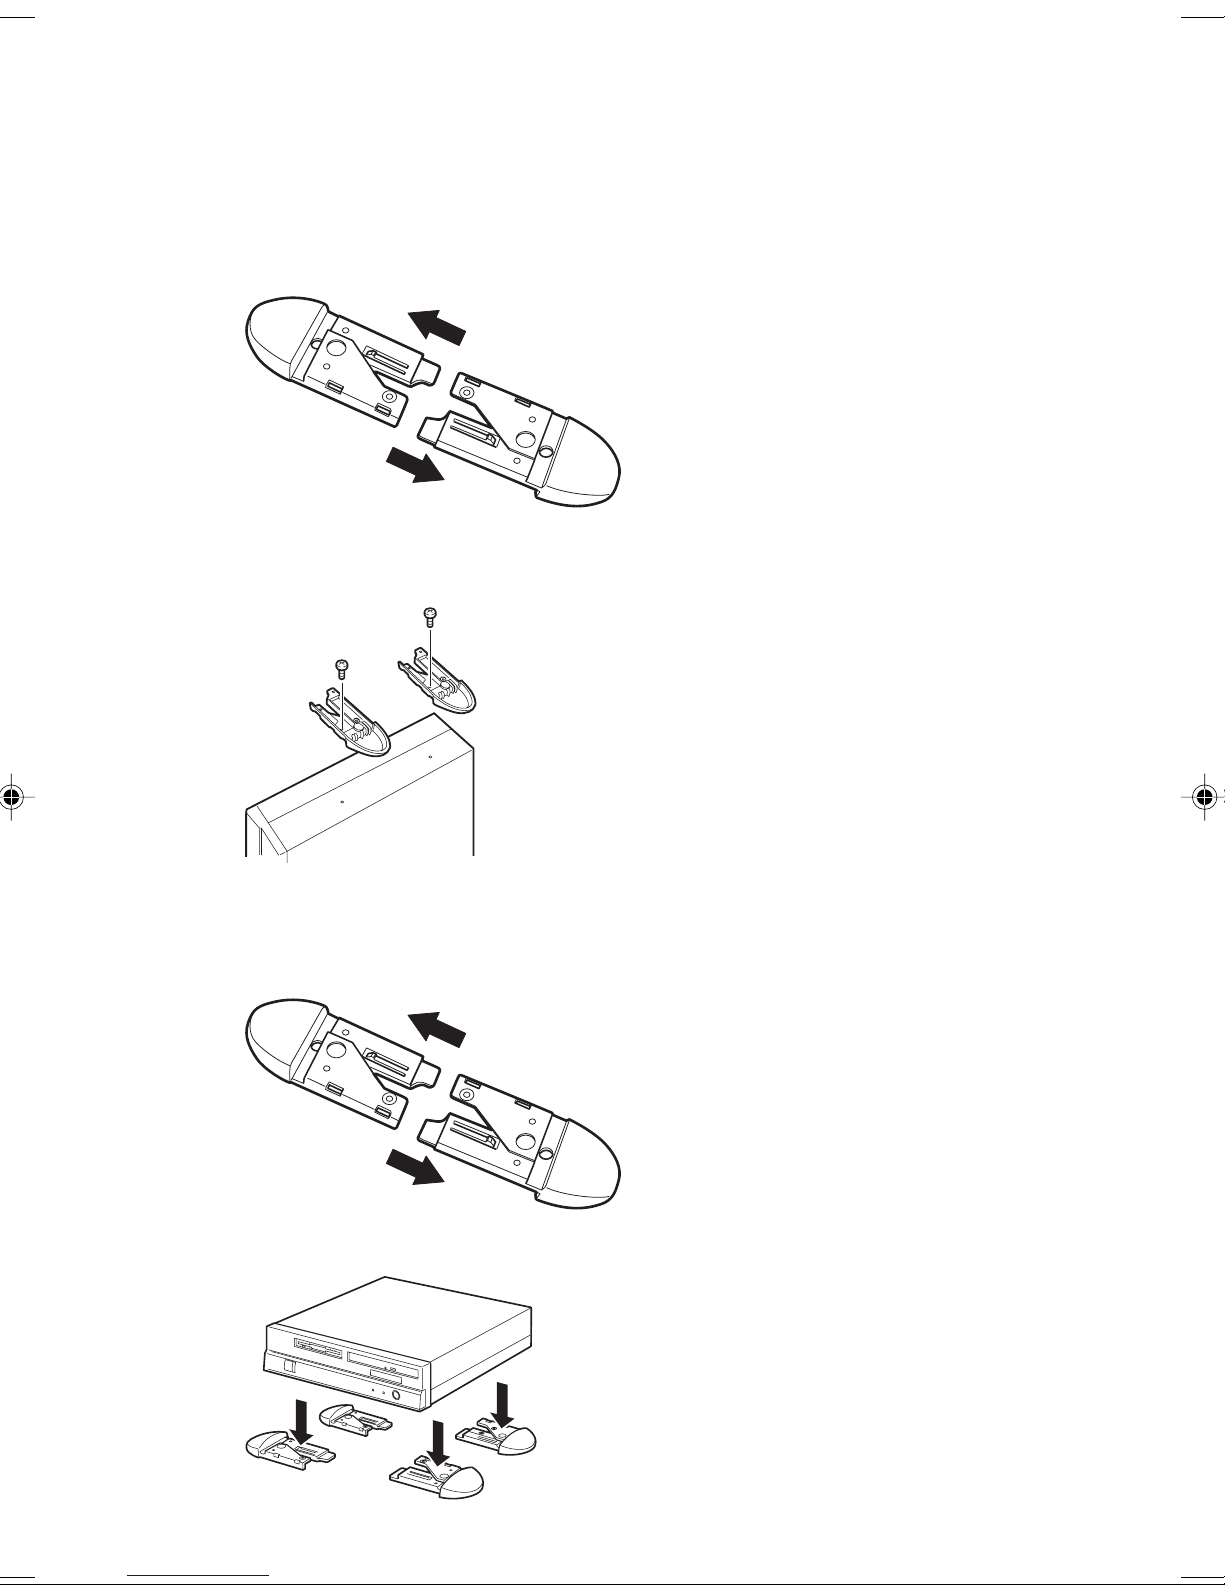
● When using a single foot
When installing your PC in the vertical layout and in contact withthe wall, use the following
installation procedure.
1 Disassemble the foot.
2 Mount the disassembled foot on the PC unit.
Fix the foot by tightening the setscrew.
❒ Horizontal Placement
1 Disassemble the foot.
2 Place the PC on the disassembled foot.
11
Page 25

Point
You can also mount five rubber feet at the center and four corners of the PC bottom plate
during horizontal placement.
Take care not to contact the rubber feet with the foot of PC during vertical placement.
Wipe and clean the mounting surface of the PC when you fix the rubber feed to the PC
housing.
Also, do not slide the PC when you move it if you have already mounted the rubber feet on it.
■ Example of Installation
To locate the PC, follow the procedure below.
The PC can be placed in a vertical or horizontal layout. Install the PC in a place not to cover vent
holes located at the top and rear of the PC.
❒ Vertical Placement
PC unit
Display
Keyboard
Mouse
12
Foot
Page 26

❒ Horizontal Placement
17-inch or less CRT display unit (below 19kg) can be placed on the PC housing in horizontal layout.
Display
PC unit
Foot
Keyboard
Mouse
Point
The remaining part of this manual assumes vertical PC placement. When you place the PC
unit horizontally, be careful about geometrical difference.
13
Page 27

2 Connection
Connect the display, keyboard, and power cord to the PC.
WARNING
● Connect the grounding leads to the device that needs to be grounded
before turning it on.
You may get electrical shock if you do not provide grounding.
Do not connect the grounding wire to the gas pipe.
Otherwise it may cause a fire.
● Turn the PC and attached devices off and unplug power cords from their
power outlet before installing or uninstalling the display, keyboard, mouse
and others.
Otherwise it may cause an electric shock.
CAUTION
● Use the genuine Fujitsu products for display, keyboard and mouse.
Otherwise, it may cause an electric shock or fire.
● Make sure that you connect the cable correctly.
The PC and peripheral devices may be damaged, if they are connected
with wrong cables.
● Do not use the service receptacle for plugging of a peripheral device not
listed on the manual.
Or, it may cause a fire or a failure.
● Hold the PC board by touching the specified sections only.
Otherwise, personal injury or a fault may occur.
14
Page 28

■ Connecting the Display/Keyboard/Mouse
34
5
1
2
1 Plugging the power cord into power receptacle.
Plug the power cord of the display unit into the power outlet of the PC.
2 Plugging the power cord into inlet of display unit.
Plug the other end of power cord into the power inlet at the rear of the display unit.
3 Connecting the mouse.
Plug the mouse cable into the socket at the rear of the PC, by facing the connector mark to
the right and matching the connector color to the mouse label at the rear of the PC.
15
Page 29

4 Connecting the keyboard.
Plug the keyboard cable into the socket at the rear of the PC, by facing the connector mark to
the right and matching the connector color to the keyboard label at the rear of the PC.
5 Connecting the display cable to the PC unit.
Securely plug the signal cable of the display unit into the display socket at the rear of the PC,
and tighten connector setscrews.
16
Page 30

■ Connect the Power Cord
When you attach a peripheral device such as the display to your PC, plug its power cord into socket
by following the instructions given.
● Do not plug or unplug the power cord with wet hands.
● Do not damage or modify the power cord.
● Do not compress, pull, twist, or heat the power cord.
● Do not use the power cord or power outlet if they are damaged or loose.
● Use a dry cloth to clean the plug pins and power outlet, if they are covered with dust. Connect
the power cord to the 230 VAC domestic power.
● Avoid a starburst connection of power cords. Make sure that the power cord is not entangled
with the keyboard or mouse cable.
● Disconnect the power cord from the power outlet during a lightning storm.
● If you use a dual-pin power plug, always use the adapter plug (contained in the PC package)
for grounding.
● To disconnect the power cord, do not pull the cord but hold the plug and pull.
● Insert the plug fully to the end, when inserting it.
● Unplug the PC power cord from the power receptacle if you are not using your PC for an
extended period of time.
1
2
17
Page 31

1 Plug the power cord into the power inlet at the rear of the PC.
2 Connect the power cord to the 230 VAC power source.
Plug the other end of power cord into the 230 VAC power receptacle.
18
Page 32

3 Power On
Cautions
● When turning on the PC for the first time after purchase, do not connect any peripheral
equipment.
● The power lamp shines orange when the PC is in the standby mode.
● Before turning the PC power switch ON, make sure that the display unit has been
connected to the PC. If the display unit is not connected, it is not recognized when you turn
the PC power switch on. In such case, the on-screen display may be abnormal when the
display unit is connected later. If you use an analog display unit, attach it to the PC. Then,
terminate the OS, turn the PC power switch off, and turn it on again.
● If you use a digital display unit by plugging its power cord directly to the power receptacle,
make sure that the power switch of the digital display unit is turned on before you turn the
PC power switch on. If you turn the PC power switch on before turning on the power switch
of digital display unit, nothing appears on the screen. In such case, turn the PC power
switch off first, then turn the display and PC power switches on in the correct sequence.
● If you have connected the display power cord to the PC, the display unit is turned on when
you turn the PC power switch on. Therefore, you need not use the display power button
later once you have pressed it.
The display unit is turned on just when you turn the PC power switch on in the step 2.
● If the window does not appear at the center of screen, check the display frequency for a
setup error and correct it from the Control Panel of the PC. If the error continues, fine-adjust
the window position using the controls of the display unit.
● If you need to turn the PC power switch off immediately after its power-on, wait until the OS
starts up. Then, shut down the PC by following the “Turn off the computer”.
● The PC screen may be distorted or it may show horizontal lines when starting to display the
image or when changing the display mode (for example, when starting up or shutting down
the Windows, or when recovering from the energy saving mode). This is not a fault, you can
continue to operate.
● When the FUJITSU logo continues on the screen after you have turn the PC power switch
on, the PC is checking its built-in devices by running the POST (Power-On, Self-diagnostic
Test). Do not turn the PC power switch off during the POST. If a problem is found during the
POST, its error message is displayed.
● The PC screen may be distorted or it may show horizontal stripes instantaneously when the
system starts up (including unpacking contract) or shut down. This is not a fault, you can
continue to operate.
● If you have added a peripheral device to the PC, do not turn the PC power switch on while
the PC upper cover is open.
● After you have turned the PC power switch off, wait at least 10 seconds before turning it on again.
● Check the following, if the screen is blank.
● The display power switch is turned on.
● The energy saving mode is not set.
Move the mouse or press any key. The PC may be shifted to S3 in the ACPI mode, if the standby
lamp is orange. Press the power button. If the screen remains blank 30 seconds after you press the
power button, then hold down the power button to turn the PC off.
● The display signal cable is connected correctly.
● The display power cord is plugged into the power receptacle.
● The display brightness and contrast controls are adjusted correctly. If not, adjust the screen with the
brightness and contrast controls.
19
Page 33

■ How to Power On
CAUTION
● Do not carry or give impact/vibrations to the PC when it is on.
Or, it may cause a failure.
1 Press the display power button.
Nothing appears on the screen at this time.
2 Press the PC power button.
The green power lamp will light on both the PC and display unit.
When you turn on the PC, it displays a FUJITSU logo, and starts up the system.
Power button
When you turn on the power for the first time, you need to set up Windows.
20
Page 34

4 Setting Up
This section describes how to set up the Windows when you turn on the PC for the first time. Make
sure that you follow the procedure described in this manual.
Read the following Considerations before turning on the PC for setting up the Windows.
Considerations
● Do not perform the following before setting up Windows. If you do the following, Windows
may not be set up correctly, or error messages appear.
● Connecting peripheral devices
● Connecting a LAN cable
● Setting optional cards
● Installing additional memory
❒ Considerations for Windows 2000
● During the setup, you may see messages like "The DHCP client failed to acquire IP address"
or "The DHCP client failed to rewrite IP address lease." In this case, click [Yes] and complete
the setup. After completing the setup, connect and set up the network correctly.
21
Page 35

■ Setting Up Windows XP
1 Turn on the PC.
After a few seconds, [Welcome to Microsoft Windows] appears.
2 Click [Next].
[License Agreement] is displayed.
This License Agreement describes the agreement for using preinstalled Windows on the
computer.
3 Read the [License Agreement] carefully, and click [I agree], and then [Next].
Point
If you select [I do not agree], click [Next] and follow the instruction message.
[Give a name to the Computer] is displayed.
4 Enter [Name of This Computer] and [Description of Computer] and click [Next].
You can skip [Description of Computer].
Point
You can set the name and description of the computer later after completion of setup.
[Set Administrator Password] is displayed for Windows XP Professional.
For Windows XP Home Edition, proceed to step 7.
5 Fill out [Administrator Password] and [Reenter Password], and click [Next].
[Will you have this computer participated in domain?] is displayed.
6 Click [No] and then [Next].
[Specify how to link to the Internet] is displayed.
7 Click [Ignore].
[Are you ready to enter your owner’s registration in Microsoft?] is displayed.
8 Click [No, I am not going to make my owner’s registration this time] and then [Next].
[Setup has been completed] appears.
9 Click [Finish].
The PC may restart.
If the Password is entered in step 5, the Password Entry screen appears.
10 Enter the password and click [ → ].
11 Click [Run this] on the [Start] menu.
[Perform optimum setting for this computer] dialog box appears.
22
Page 36

Important
You need to perform [Run this] to finalize the setup. Be sure to perform the procedure as it is
described here.
12 Click [Perform].
Final setup is performed, and the restart message is displayed.
13 Click [OK].
The PC restarts.
You have completed the Windows setup.
■ Setting Up Windows 2000
Point
While setting up Windows 2000, you will see a message "The file "xxxxx.xxx" is required from
the Windows 2000 Professional CD-ROM" (where "xxxxx.xxx" is replaced with a file name
such as "courf.fon"). In this case, enter "c:\support\i386" in the [Copy from] field, and press
[OK] to start the setup.
After completing the setup, install Windows 2000 Service Pack2.
1 Turn on the computer.
After a few seconds, [Starting the Windows 2000 Setup Wizard] is displayed.
2 Click [Next].
[License Agreement] is displayed.
This License Agreement describes the agreement for using preinstalled Windows on the
computer.
3 Read the [License Agreement] carefully, and click [I agree], and then [Next].
Point
If you select [I do not agree], click [Next] and follow the instruction message.
4 Enter [Name] and [Organization] and click [Next].
You can skip [Organization].
[Computer name and administrator password] is displayed.
23
Page 37

5 Fill out [Computer name], [Administrator password], and [Reenter password], and click
[Next].
[Setting up network] appears.
To set up the network, ask your network administrator to check the setup after completing
the setup, and set it up for your operating environment.
6 Click [Standard setting] and [Next].
Point
With [Standard setting], the following network components are installed.
● Microsoft Network Client
● Microsoft Network File and Printer Share
● Internet Protocol (TCP/IP)
[Work group or domain name] appears.
7 Click [This computer is not on the network, or it is connected to the network without
domain], and click [Next].
[Windows 2000 has been successfully installed] appears.
8 Click [Restart], or wait 15 seconds to restart the computer.
[Starting the Network Identification Wizard] appears.
Important
Do not click [Back] on this screen.
To correct the setting, complete the setup, and then correct the setting.
9 Click [Next].
[Computer user] appears.
10 Click [User for this computer...] and [Next].
24
Page 38

Point
Make sure you select [User for this computer ...]. If you select items other than [User for this
computer ...], the setup may not be carried out correctly.
[Finishing the Network Identification Wizard] appears.
11 Click [Finish].
The [Windows logon] dialog box appears.
12 Enter the password you entered in the step 5, and click [OK].
The [Introducing Windows 2000] dialog box appears.
13 Click [Start] → [Shutdown].
The computer restarts, showing the [Selecting an Operating System] screen.
14 Select [Restart] and click [OK].
After Windows restarts and the [Windows logo] dialog box appears, log on to the computer.
You have completed the Windows setup.
25
Page 39

■ Problem During Setup?
If the computer freezes during setup, or if you have any other problem, see the following items.
❒ The screen does not show anything when the computer is turned on.
● Turn of the computer, and check the connection of display.
❒ I cannot go on with the Windows setup.
● See “Turn off the computer”, turn off the computer, and repeat the setup procedure.
● If you press a key before a dialog box is completely displayed during the Windows setup,
the Windows setup may not be completed successfully. Wait until the dialog box is fully
displayed, and then use the mouse to perform the procedure.
❒ The screen displayed is not centered, or the screen is not clear, after the computer is turned
on.
● If your display has a setting function, see the manual of display.
❒ The computer makes noise when starting up.
● Noise is generated during the Windows setup.Adjust the volume, if the speaker is
connected.
❒ The [Add New Hardware Wizard] dialog box appears.
● Install the driver suitable to your monitor.
26
Page 40

5 Turn Off the Computer
Cautions
● Before turning off the computer, finish the work and save your data.
● Before turning of the computer, make sure that the disk access lamp or floppy disk access
lamp are all off. If you turn off the computer while these lamps are on, your data may not be
saved, or the data stored in the floppy disk or hard disk may be damaged.
● If you have disconnected the power cord or the power has been interrupted while the
computer is on, put the power cord back to the power outlet, or wait until power is restored.
You do not have to press the power switch. The computer turns on and starts
automatically, when power is restored. The computer cannot be turned on, when [Energy
saving setting] – [Actions when AC power is restored] is set [Power OFF] in the BIOS
Setup.
● You cannot turn the power off during POST. Follow the procedure described later, after the
operating system has started up completely.
● If you cannot turn the PC power off or restart the PC, hold down the power button four or
more seconds. The PC will be turned off. However, the internal hard disk unit may be
damaged if you repeat this power-off operation. Use this power-off operation in
emergency only.
■ How to Turn Off
To turn off the computer automatically, perform the following operation:
For Windows XP:
Click [Start], [Turn Off Computer] option and [Turn off].
27
Page 41

For Windows 2000:
Click [Start] and [Shutdown], select [Shutdown] and click [OK].
For Windows Me:
Click [Start] and [Exit Windows], select [Place into mode of readiness for turning off], and click
[OK].
Point
• If the power is not turned off by the above operation, cut the power by following steps below:
1. Press [Ctrl] + [Alt] + [Delete] keys.
2. To turn off the computer automatically, carry out the following steps:
– For Windows XP
Click [Shutdown] and [Turn off computer].
– For Windows 2000
Click [Shutdown], select [Shutdown] and click [OK].
– For Windows Me
Click [Shutdown].
• If you select the menu to restart Windows in the above screen, you can restart the computer.
Use the restart menu, when installing a software, or when the software has stopped for some
reason while in operation. The data stored in the memory is lost, when you restart the computer.
Save important data before restarting the computer.
28
Page 42

CHAPTER 3
Security
Page 43

1 Securities
Connect the display, keyboard, and power cord to the PC.
WARNING
● The security functions do not guarantee the complete check of personal identification.
Fujitsu is not responsible to any damage that is caused by the use of security functions or
no use of them.
The PC owner is responsible to its security.
● The security is not relieved if it is done once. The PC user needs to make his/her PC the
best security environment routinely.
When the PC is used, the danger of system destruction by computer virus, the leakage of
information, illegal use, burglary and others increases. To protect important information from these
danger, the PC has various security functions.
The following briefly explains the danger that may exist and the preparation useful for problem
solution.
● Computer virus
This is a program which was made with the PC to cause a trouble. The virus are infected with the
PC through the Internet and e-mails, and the PC suffers a damage to destroy its data.
● Information leakage
The virus can enter the PC via the network and leak or destroy important data. Also, the information
may be read illegally from the disposed PC by the special software.
Point
Take security measures when disposing floppy disks, CD-R/RW disks and MO disks. We
recommend you to scratch the disk reader head or completely erase the data before
disposal.
● Illegal use
Use a PC having no authority to use. Although the PC data can be protected by password setup
and others, the possibility of illegal PC use increases if you use the password which can easily
imagined.
● Burglary
The PC may be taken out and the data held in the PC may be used illegally.
● Preparing for the trouble
No perfect security of the PC exists. You can minimize the damage by making a backup copy of
data and updating the software to the latest version.
For more information, refer to the “Preparing for the trouble” section of “Troubleshooting.”
30
Page 44

2 Security during Network
Connection
Information is often transferred via the network such as Internet and e-mails. Therefore, the
possibility of infection to the computer virus and information leakage of the PC is increasing.
The following introduces the security functions to protect the PC connected to the network.
■ Computer virus
The computer virus are infected with the PC through the Internet and e-mails, and the PC suffers
a damage to destroy its data or the PC may not start up at all. Also, if you use the PC which a virus
has been infected, you may spread the virus on other PCs without knowing it.
■ Encrypting the communication data
When an important data is exchanged via the network, it may be leaked from the network. The
encrypted data transmission is increasing to avoid such problem.
The Windows XP and 2000 OSs have the standard data encryption function. The following
introduces an example of Internet Protocol Security (IPSec) encryption function.
The IPSec allows you to encrypt data during TCP/IP protocol communication independent from
the applications you are using.
Also, if you use a security LAN card, you can reduce the CPU load as the encrypted data
communication is processed by the card itself. Therefore, you can use the encrypted
communication without affectingon another job.
See the Windows Help for details.
■ Firewall
If the PC is connected to an external network, the PC may be accessed illegally from the external
network and its data may be altered. To prevent such problem, you can make a wall which is called
a firewall between the internal and external networks and control any access from the outside.
The Windows XP has the standard Internet Connection Firewall (ICF).
See the Windows Help for the ICF.
31
Page 45

3 Security Against Illegal Use
It becomes necessary to protect the PC from the danger of which an unauthorized person destroys
or leaks data by using the PC.
The following explains the password and its functions you can set on the PC. The safety of the PC
is increased by combination of multiple passwords and security functions.
WARNING
● You must cancel the password protection when returning the PC for services. The repair
service is charged even within the warrantee period if the PC is password protected.
● Keep the password in a safe place if you have written it down. Use not only digits but also
alphabets and symbols for the password. Also, change your password periodically so as
the password is not to be known by a stranger.
When the PC is used, the danger of system destruction by computer virus, the leakage of
information, illegal use, burglary and others increases. To protect important information from these
danger, the PC has various security functions.
The following briefly explains the danger that may exist and the preparation useful for problem
solution.
■ Passwords for Windows OS
You can set up a password for the time when the OS starts up, when the PC resumes from the
standby mode, and when the PC restores from the screen saver. If a single PC is used by multiple
users, the password can be changed for each user.
For the password setup details, see the Windows Help.
■ Administrator Authority and User Accounts
The Windows XP and 2000 OSs allow you to create a user account having the administrator
authority.
The administrator can set up and control the account of other users. As the administrator controls
the PC users, the PC security is improved.
See the Windows Help for details.
■ Access Authority and Encrypting
If you use the NTFS file system of the Windows XP or Windows 2000 OS, you can:
● Set up an access authority to folders and files.
As the access authority can be set for each user or each group, you can protect files from
being accessed by unauthorized users.
● Encrypt folders and files.
If you have lost the hard disk unit by the accident, the encrypted file contents are hard to be
read byothers.
Important data can be protected from being read by unauthorized users if the access authority of
data hasbeen set or the data has been encrypted.
See the Windows Help for details.
32
Page 46

■ Password for the BIOS
A password can be set for the time when the PC starts up or resumes. There are two types of
BIOS passwords: the administrator password and the user password. If a user enters the user
password, he or she cannot change the PC settings and others. Some PC operations are limited.
A password can also be set for the hard disk of the PC. If you have set a password for the hard
disk unit, only the person who knows the password can read information from the hard disk.
33
Page 47

4 Burglary Prevention Of The PC
The PC may be burglarized. Although you can protect the PC by keeping or installing it in a place
behind the locked door, the PC itself has the burglary prevention function.
The PC can be protected against the theft if the burglarproof cable is tied up at the burglarproof
lock.
The burglarproof lock supports the Microsaver security system of Kensington.
34
Page 48

CHAPTER 4
Hardware
Page 49

1 Mouse
Left button
Scroll button
Right button
Point
Clean the mouse regularly.
■ Using the mouse
● Moving the mouse.
Lightly hold the mouse and place your index and middle fingers on the left and right buttons on
the mouse. Slide and move the mouse over a plane surface, such as a desktop. As you move the
mouse, an arrow (called the mouse pointer) moves in the same way on the screen. Move the
mouse and see how the mouse pointer moves.
● Using the mouse buttons
1 Clicking
Clicking is a series of action of pressing and releasing the left mouse button once.
Clicking the right mouse button is particularly called “right-clicking.”
Click
36
Page 50

● Double-clicking
Double-clicking is a series of action of pressing and releasing the left mouse button twice.
Click-click
● Pointing
Pointing is an action of moving the mouse pointer to an object or item such as a menu. If the pointed
menu item has subordinate items ( is displayed at the right end), the items are displayed.
● Dragging
Dragging is an action of moving the mouse while holding down the left mouse button and release
thebutton at a desired position.
Press
Press
● Scrolling (for mouse with a scroll button)
– The scroll wheel is used to scroll the screen. This wheel can also be used as the third button.
– The scrolling function can be used on applications that support a scroll wheel.
Point
The button operation explained above is applicable when “right-handed use” is selected in the
“Mouse Properties” dialog box.
37
Page 51

2 Keyboard
This section explains the functions of the keys on the keyboard.
Point
Key functions may vary depending on the operating system and applications used.
See manuals attached to the operating system and applications.
1 Esc key
Pressing this key cancels the operation the application program is executing.
2 F keys
These F keys are assigned specific functions for each application.
3 Back space key
Press the Back Space key to move the cursor to the left while deleting characters.
4 Insert key
Press the Insert key to switch between character insert mode and overwrite mode.
5 Print Screen key
Pressing this button copies the screenshot to the clipboard.
6 Home key
Press the Home key to move the cursor all at once to the beginning of the current line or text.
7 Indicators
The indictor lights when you press [Num Lock], [Shift] + [Caps Lock], or [Scroll Lock], indicating
that it is enabled. When the key is pressed again, the indicator turns off and the key function is
disabled.
38
Page 52

8 Caps Lock key
Use the Caps Lock key to type alphabetical characters.
Press [Shift] + [Caps Lock] to switch between uppercase and lowercase.
9 Ctrl key
Use the Ctrl key in combination with another key. Its function varies with each application.
10 Windows key
Press the Windows key to display the Start menu.
11 Alt key
Use the Ctrl key in combination with another key. Its function varies with each application.
12 Application key
This key has the same function as clicking the right mouse button.
Press this key to display the shortcut menu of the selected item.
13 Enter key
The Enter key is also referred to as the Return key.
Press this key to perform line feed or execute a command.
14 Delete key
Press the Delete key to delete a character. Press this key together with [Ctrl] and [Alt] to reset the
computer.
15 End key
Press the End key to move the cursor all at once to the end of the current line or text.
16 Cursor keys
Press each of these keys to move the cursor in the desired direction.
17 Page Down key
Scrolls down the on-screen page when pressed.
18 Page Up key
Scrolls up the on-screen page when pressed.
19 Numeric keypad
Enables you to enter numerals when the [Num Lock] indicator is on.
The function described in the lower part of the numeric key is enabled when the [Num Lock] indicator
is off.
20 Num Lock key
Press the Num Lock key to change the Ten-key pad functions.
Point
To tilt the keyboard, pull up the tilt foot on the both sides of the underside of the keyboard.
Tilt foot
39
Page 53

3 CDs
This section describes how to handle, insert, and remove a CD.
Notes on Handling
Follow the following guidelines to prevent faults when handling a CD.
Guidelines for CD Media
● Apply no label to any side of the disk. Do not use a ballpoint pen or pencil.
● Do not touch or damage the data side.
● Do not bend the disk or put a heavy object on it.
● If the disk has dirt or water droplets, use a damp cloth to wipe them off and clean the disk with
a dry cloth. Always wipe the disk along the radius.
● Keep the disks dry.
● Do not place the disks in an extreme temperature environment.
● Do not place the disks in a humid and dusty environment.
Notes on Using the Drive
● Do not use the CD, if it is not safeguarded according to “Handling guidelines for CD media”
above, or it has bends, cracks, or fissures. Otherwise, a fault may occur. The warranty is not
applied to any failure caused by the use of such CDs.
● This PC accepts only round CDs. Do not use odd-shaped CDs. Otherwise, a fault may occur.
The warranty is not applied to any failure caused by the use of CD in a variant shape.
● Use of a commercially available CD-ROM drive cleaning disk may put dusts on the lens. Do
not use a CD-ROM drive cleaning disk.
Point
• A CD-ROM is the same as a music CD (compact disc) except it has computer information
(characters) instead of sound. ROM stands for Read Only Memory. This PC can read data
from CD-ROMs but cannot write data, except when CD-R/RW is selected .
• This PC accepts any CD that has one of the following marks. Do not use the CD if it does not
carry any of them. Or, it may cause a failure. An additional application may be necessary to
use particular types of CDs.
*1 You can write on the CD if you have a CD-R/RW drive.
*2 If you write data at 8X speed or higher, you need to have a high speed-ready drive.
40
Page 54

■ Inserting or Removing a CD
● Inserting a CD
1 Press the CD eject button.
Press the middle of the CD eject button, and the CD tray pops out.
CD access lamp
CD eject button
2 Pull the tray out with a hand.
As shown in the figure, hold the center of the tray.
Tray
3 Mount the CD by facing its label to the left, and push the CD until it snaps onto the hub
at the center of the tray.
When pressing the CD, hold the tray not to tip over the PC.
Label side
Hub
Point
Be sure to press the CD until it snaps onto the hub at the center of the tray. Otherwise, a fault may
occur.
41
Page 55

4 Manually push the tray until it clicks.
The tray goes into the computer, and sets the CD.
Point
• The CD access lamp lights when the CD is set. Wait until the CD access lamp turns off, and
then do the following.
• The tray is not set correctly, if you press the CD eject button while pushing in the tray.
● Removing the CD
Before ejecting the CD, make sure that the CD access lamp is off. If OK, press the CD eject button.
42
Page 56

4 Floppy Disks
This section explains how to handle, insert, and remove a floppy disk.
Notes on Disk Handling
To prevent faults, note the following when handling floppy disks.
● Keep the disks dry.
● Do not touch the disk inside.
● Do not bend the disk or put a heavy object on it.
● Keep the disks away from magnetism.
● Do not drop the disks.
● Do not place the disks in an extreme temperature environment.
● Do not place the disks in a humid and dusty environment.
● Do not affix two or more labels.
● Keep them free from condensation or moisture.
■ Inserting or Removing a Floppy Disk
Point
Use DOS/V formatted floppy disks. Operation with other types of floppy disks is not guaranteed.
● Inserting a Floppy Disk
1 With the label side on the left and the shutter end on the front, insert a floppy disk into
the drive.
The floppy disk eject button pops out with a snap.
Floppy disk eject button
43
Page 57

● Removing a Floppy Disk
1 Make sure that the floppy disk access lamp is off.
Floppy disk access lamp
Point
Do not press the floppy disk eject button while the floppy disk access lamp is on. Data stored on
the disk may be damaged.
2 Press the Floppy disk eject button.
The floppy disk comes out.
44
Page 58

5 Hard Disk
This section provides cautions on handling the hard disk drive.
Cautions
To prevent faults, note the following.
● Data is read from the hard disk drive or written to it while the internal disk that stores data is
rotating at high speeds. Since it is a very delicate device, do not carry the PC with the power
on or do not apply shock or vibration to the PC.
● Do not use or store the hard disk drive in an area where temperature changes sharply in an
extremely wide range.
● Do not place the hard disk drive in an area exposed to direct sunlight or near a heater.
● Do not use or store the hard disk drive in an area subjected to shock or vibration.
● Do not use or store the hard disk drive in a humid or dusty area.
● Do not use or store the hard disk drive near a magnet or device that generates a strong magnetic
field.
● Do not disassemble or break down the hard disk drive.
● Keep them free from condensation or moisture.
Point
• Improper handling may damage the data stored on the disk. Always make backup copies of
important data.
• Even hard disks of the same type have different capacities. It is recommended to back up data
not in units of hard disks but in units of files or sectors.
45
Page 59

6 Maintenance of the Hardware
■ Maintenance of the PC Unit
CAUTION
● Before starting maintenance work, turn off the PC and all devices
connected to it, and unplug them.
Otherwise, electric shock may occur.
● Clean the PC using a soft dry cloth. Wipe remaining dirt off using a damp cloth, moistened
with neutral detergent and wrung well. Once the dirt is wiped off, remove the neutral detergent
from the PC with a well-wrung cloth moistened with water. Be careful not to let water enter the
PC system.
● Clean the ventholes regularly to prevent dust buildup.
● Do not use solvents. Use neutral detergent only. Otherwise, the PC may be damaged.
■ Maintenance of the Mouse
Clean the surface using a soft dry cloth. If the mouse ball does not roll freely, remove and clean
the ball.
Take the following steps.
1 Remove the mouse bottom cover.
Remove the cover on the bottom of the mouse by turning it in the direction of the arrow.
2 Remove the ball and clean it with water.
Turn over the mouse to remove the ball. Clean the ball with water.
Ball
46
Page 60

3 Clean the inside of the mouse.
Wipe the inside of the mouse, roller, and the bottom cover with a damp cloth.
Roller
4 Reassemble the ball and bottom cover.
When the ball and the inside of the mouse are dry, reassemble the ball and cover.
■ Maintenance of the Keyboard
Clean the PC using a soft dry cloth.
■ Cleaning CDs
● If the disk has dirt or water droplets, use a damp cloth to wipe them off and clean the disk with
a dry cloth. Always wipe the disk along the radius.
● Use of a commercially available CD-ROM drive cleaning disk may put dusts on the lens. Do
not use a CD-ROM drive cleaning disk.
■ Cleaning the Floppy Disk Drive
As the floppy disk drive is used for a prolonged period, the head (the part that reads or writes
data) becomes dirty. A dirty head may affect the data reading and writing operation on floppy
disks. Use the separately sold cleaning floppy (supply item) for about once every three months.
1 Insert a cleaning floppy disk into the floppy disk drive.
2 At the command prompt, run the “dir” or similar command that accesses to the disk.
Example: Enter a command as shown below and press the [Enter] key.
dir a:
3 Make sure that the floppy disk access lamp is off, then remove the cleaning floppy disk.
47
Page 61

CHAPTER 5
System Expansion
Page 62

1 Before Installing a Peripheral
Device
This PC can accommodate various peripheral devices to expand its functions.
CAUTION
● Use only peripheral devices recommended by Fujitsu.
Otherwise, an electric shock, a fire or a fault may occur.
CAUTION
● When installing or removing a peripheral device, do not remove screws
other than those specified in the manual.
Otherwise, a personal injury or a fault may occur.
● Read this manual carefully to ensure correct cable connections.
An incorrect connection can damage the PC or peripheral devices.
Notes on Handling
When installing a peripheral device, note the following.
● Some peripheral devices may not be used on your PC.
Before purchasing a peripheral device, refer to the “System configuration diagram” to
determine whether the peripheral device can be used on your PC.
● Whenever possible, use Fujitsu peripheral devices.
Malfunction or damage caused by the use of a third-party product instead of the Fujitsu device
shall not be covered by the warranty.
Before using a peripheral device in a category for which Fujitsu does not supply genuine
products, contact the third-party manufacturer to ask whether the device is compatible with
the PC.
● Install one peripheral device at a time.
Installing more than one peripheral device at a time may cause driver installation to fail. After
you have installed a peripheral device, install another one.
● Turn off the PC and connected devices.
For safety, be sure to unplug the PC and connected devices. Even if the PC is turned off, an
electric current flows in the PC unit.
● Do not start work immediately after turning off the power.
Components inside the PC may be still hot. After turning off the power and unplugging the
PC, wait for about 10 minutes before starting work.
50
Page 63

● Do not disassemble the power supply unit.
The power supply is a box-shaped component on the back inside the PC. (uPart Names Inside the PC unit (- page 14)
● After removing the feet, place the PC unit on a soft cloth.
Placing the PC directly on a hard surface may cause scratches on the PC.
● Be careful with the cables and components inside.
Do not damage or modify them.
● Be careful of static electricity.
PC boards and electronic parts of internal peripheral devices are exposed. They may be
damaged by static electricity generated on your body. Before handling these parts, touch a
large metallic object to discharge static electricity.
● Do not touch PC board surface, soldered parts or connectors.
Hold PC boards by the brackets or edges.
● Power supply for peripheral devices
Typical peripheral devices should be turned on before turning on the PC, however, some
should be turned on after the PC. See the manual for the peripheral device.
● Use ACPI peripheral devices only.
This PC conforms to the ACPI standard (one of the power supply control standards for power
saving). When you use a peripheral device on an ACPI-conforming OS, ask the device
manufacturer if your device conforms to ACPI. Non-conforming devices may not work properly.
● Use an appropriate screwdriver.
You must use a Phillips screwdriver to install/remove peripheral devices.
Use a screwdriver of an appropriate size not to damage screw heads.
51
Page 64

2 Removing the Cover
When mounting a peripheral device, remove the upper cover so that the inside can be seen.
■ Removing the Cover
Remove the feet, if any, from the PC unit. Place the PC unit in a horizontal position and remove
the upper cover.
1 Remove the two screws on the back of the unit.
2 Remove the upper cover.
Slide the upper cover to the front of the PC unit and lift it for removal.
Point
For installation, use the removal procedure in the reverse order.
52
Page 65

3 Installing Memory Modules
Increasing the memory capacity increases the amount of data that the system can
read at one access, thereby improving the processing capability of the PC.
Point
If you want to install a memory module to the PC you have just purchased, set up Windows,
turn off the PC, and then install the memory module.
CAUTION
● Before installing or removing a memory module, turn off the PC and all devices
connected to it, and unplug them.
Otherwise, an electric shock may occur.
● Use a Fujitsu memory module.
Otherwise, an electric shock, a fire or a fault may occur.
WARNING
● When installing or removing a memory module, do not remove screws other
than those specified.
Otherwise, a personal injury or a fault may occur. Also, a fault may occur.
● When accessing the PC board, touch the specified areas only.
Otherwise, a personal injury may occur. Also, a fault may occur.
53
Page 66

■ Location of Memory Modules
■ Applicable Memory Modules
Use Fujitsu 184-pin SDRAM DIMM (PC2100, ECC-incompatible) memory modules only.
Up to 1G bytes of memory (two 512M-byte memories) can be expanded.
In the standard configuration, slot DIMM1 has a memory module. Insert an additional memory
module into slot DIMM2.
The memory module in slot DIMM1 must be changed depending on the total memory capacity
you want.
● Memory Module Combinations
DIMM1 DIMM2 Total memory capacity
128 MB – 128 MB
128 MB 256 MB 384 MB
128 MB 512 MB 640 MB
256 MB – 256 MB
256 MB 256 MB 512 MB
256 MB 512 MB 768 MB
512 MB – 512 MB
512 MB 256 MB 768 MB
512 MB 512 MB 1 GB
54
Page 67

■ Installing Memory Modules
1 Unplug the PC.
2 Remove the upper cover.
3 Remove the duct.
4 Remove the expansion card mounting bracket and the metal support.
Remove the two screws and pull straight up the expansion card mounting bracket. (Also,
remove the metal support.)
When an expansion card has been installed, remove the cable from the card and remove the
bracket.
55
Page 68

5 Pull the hooks on both sides of the slot outward.
6 Insert a memory module into the slot.
Insert the memory module into the slot while aligning the notch on the memory module with
that on the slot.
When the memory module is inserted correctly, the hooks on both side rise.Make sure that
the hooks hold the memory module securely.
Point
Take extremely care NOT to insert the memory module in the reverse direction. Or a fault
may occur.
56
Page 69

7 Install the expansion card mounting bracket and the metal support.
Secure them with the two screws you have removed in Procedure 4.
8 Install the duct.
Insert four hooks into their holes.
57
Page 70

8 Reinstall the upper cover.
Point
To remove the memory module, pull the hooks on both sides of the slot outward.
Do not pull the hooks too quickly. Otherwise, the memory module may jump out of the slot
and become faulty.
58
Page 71

4 Installing an Expansion Card
Expansion cards are used to enhance the PC functions.
Point
If you want to install an expansion card to the PC you have just purchased, set up the
Windows OS, turn off the PC, and then install the memory module.
CAUTION
● Before installing or removing an expansion card, turn off the PC and all devices
connected to it, and unplug them.
Otherwise, an electric shock may occur.
● Use Fujitsu expansion cards only.
Otherwise, an electric shock, a fire or a fault may occur.
WARNING
● When installing or removing an expansion card, do not remove screws other
than those specified.
Otherwise, a personal injury or a fault may occur. Also, a fault may occur.
● When accessing the PC board, touch the specified areas only.
Otherwise, a personal injury may occur. Also, a fault may occur.
● Do not touch the metal fittings on the back of the motherboard. Otherwise, a
personal injury may occur. Also, a fault may occur.
59
Page 72

■ Location of expansion Cards
■ Applicable Expansion Cards
This PC accommodates a PCI expansion card.
The PCI1 slot holds an expansion card with a maximum length of 176 mm (half size) and the PC2
slot holds an expansion card with a maximum length of 120 mm (half size).
To run the expansion card, the generally called resource necessary for operation must be assured.
The floppy disk drive and hard disk drive inside the PC use pathes predetermined according to
each component to swap data with the CPU, memory module, and so on. As the types of these
paths, the I/O port addresses, DMA channel, and intervention required (IRQ) are provided, which
are generally called “resource”.
The Plug-and-Play expansion card for the PCI bus automatically configures the resource when
it is installed.
■ Installing an Expansion Card
1 Unplug the PC.
2 Remove the upper cover.
60
Page 73

3 Remove the expansion card mounting bracket.
Remove the two screws and pull straight up the expansion card mounting bracket
When an expansion card has been installed previously, remove the cable from the card and
remove the bracket.
4 Remove the slot cover.
Remove one screw from the position where the expansion card is to be installed, and remove
the slot cover.
Point
Keep the removed slot cover.
Use the cover to keep an empty slot from dust.
61
Page 74

5 Insert the expansion card into the slot.
Insert the expansion card into the slot, and secure it with the screw removed in Procedure 4.
6 Install the expansion card mounting bracket.
Secure it with the two screws you have removed in Procedure 3.
7 Reinstall the upper cover.
Point
To remove the expansion card, use the installation procedure in the reverse order.
8 Plug the PC.
9 Turn on the PC.
The system configures the device driver and resource to enable the expansion card.
Point
• The device drivers automatically selected by the Plug & Play functions are those included in
the Windows XP/2000. Device drivers for some of expansion cards and peripherals are not
included. If so, use a CD-ROM containing the device driver supplied with the expansion card
and install it by following the messages.For more information, refer to the manual provided
with the expansion card and peripherals.
• Before using the installed expansion card, use Device Manager to check whether the device
driver is installed.If not, delete the device driver and then reboot the Windows XP/2000.
62
Page 75

CHAPTER 6
Technical Information
Page 76

1 List of Specifications
■ PC Specifications
Product Name
CPU
Secondary Cache
Memory
Dimm Slot
Flash ROM
Chipset
Processor Socket
Architecture
Floppy Disk Drive
Hard Disk Drive (EIDE)
Optical Device
Graphics
Sound
Network Interface
Modem
Advanced Manageability
Diagnostic Software
I/O Interface**
Expansion Slots [Free]
Smartcard R/W bay
Drive Bays [Free]
Display
®
Intel
Pentium® 4 processor 2.0A GHz (FSB: 400MHz)
®
Intel
Pentium® 4 processor 2.26/2.4GHz (FSB: 533MHz)
®
Celeron® 2.0GHz (FSB: 400MHz)
Intel
512KB (Pentium
256MB DDR (PC2100 w/o ECC), max. 1024MB (PC2100 w/o ECC)
2 Slots
512KB Flash Memory
Intel® 845G Chipset
mPG478
AGP/PCI
3.5”, 1.44MB
40/80 GB (5400/7200 rpm) (Ultra ATA/100 and S.M.A.R.T support)
CD-R/RW (32x/8x/4x)
Optional: Combo Drive [DVD: 8x & CD-R-RW (32x/8x/8x)] or CD-ROM (24x)
Integrated Intel
(1)
VRAM)
Analog Devices AD1885 (AC97 codec) on board
Intel® 82562 EX 10/100Mbps BASE-T (Integrated
Supports: Wake-on LAN, Alert-on LAN
Optional: V.90 Compliant 56K Internal Data/Fax Modem Card
DeskView Support (Partial)
Fujitsu Hardware Diagnostics Tool*
1x Serial Port, 1x Parallel Port, 4x USB Ports (rear x2/Front x2),
1x PS/2 Keyboard Port, 1x PS/2 Mouse Port,
1x RJ45, 1x VGA Connector
Audio (Rear): 1x Mic-in, 1x Line-out, 1x Line-in, 1x SPK-Out
2 PCI slots (Half size x1, 120 mm type x1)
1 Bay, USB I/F
Front Access: 2 x 3.5” [0], 5.25” [0]
Internal: 1 x 3.5” [0]
Fujitsu 15” Colour Monitor
Optional: Fujitsu 17” Colour Monitor or Fujitsu 15” XGA TFT LCD Display
® 4
) /128KB (Celeron®)
®
82845G Chipset, Extreme Graphics Feature (up to 64MB
DESKPOWER C600
(2)
64
Page 77

Product Name
Housing Type
OS Bundled
OS Supported
Other Software Bundled
Power Management
Power Supply
Keyboard & Mouse
Dimensions
Weight
* Only applicable to English Microsoft® Windows® Operating System.
** No Audio interface and volume knob in front.
(1) Depending on Chipset and Drivers.
(2) Option to purchase Deskview Manageability Software.
(3) English Version only.
Compact Towerable (Horizontal/Vertical)
Microsoft® Windows® XP Home Edition
Microsoft® Windows® 2000 Professional Edition, Microsoft® Windows® XP
Home Edition, Microsoft® Windows® XP Professional Edition
Norman Virus Control
Norman Personal FireWall
ACPI, STR/STD support
110/230V AC, 50/60Hz (max. 226W)
Internet Keyboard
Approx. 80mm (W) x 325mm (D) x 305mm (H) (Vertical)
Approx. 6.9kg
(3)
and Scroll Mouse
DESKPOWER C600
Point
For improvement, the specifications of products are subject to change without notice.
65
Page 78

■ LAN function
LAN Controller Built-in Intel 82801DB(ICH4) + 82562EX
RAM for send/receive buffer 3 kilobytes each for sending and receiving
External Interface ISO8802-3 100BASE-TX/10BASE-T
Transfer media Twisted-pair cable *1
(100 Mbps: Category 5; 10 Mbps: Categories 3 to 5)
Transfer method Baseband
Access method CSMA/CD
Data transfer speed 100 Mbps, 10 Mbps
Wiring shape Star form
Maximum segment length 100 meter
Maximum number of nodes per segment Depending on the hub unit
*1: To ensure network operation at 100 Mbps, use an unshielded twisted-pair (UTP) cable in Category 5 or higher data grade. Use
of Category-3 cable will cause data loss.
*2: A hub unit is a 100BASE-TX/10BASE-T concentrator.
*2
Point
The LAN installed to the PC as a standard feature adjusts automatically to the network speed.
If the network speed changes due to changes in the hub unit, be sure to use cables of an appropriate
data grade for that speed.
66
Page 79

2 Connector Specifications
The pin assignments and signal names of each connector are shown below.
● CRT connector
Pin number Signal name Direction Description
1 RED Output Red output
2 GREEN Output Green output
3 BLUE Output Blue output
4 NC – Not connected
5 - 8 GND – Ground
9 +5V – +5V
10 GND – Ground
11 NC – Not connected
12 SDA Input and output Data
13 HSYNC Output Horizontal synchronization signal
14 VSYNC Output Vertical synchronization signal
15 SCL Input and output Data clock
67
Page 80

● LAN connector (100BASE-TX/10BASE-T)
Pin number Signal name Direction Description
1 TD+ Output Send data +
2 TD– Output Send data –
3 RD+ Input Receive data +
4 NC – Not connected
5 NC – Not connected
6 RD– Input Receive data –
7 NC – Not connected
8 NC – Not connected
● Parallel connector
Pin number Signal name Direction Description
1 *STROBE Input and output Strobe
2 DATA 0 Input and output Data 0
3 DATA 1 Input and output Data 1
4 DATA 2 Input and output Data 2
5 DATA 3 Input and output Data 3
6 DATA 4 Input and output Data 4
7 DATA 5 Input and output Data 5
8 DATA 6 Input and output Data 6
9 DATA 7 Input and output Data 7
10 *ACK Input Acknowledgment
11 BUSY Input Busy
12 PE Input Paper out
13 SELECT Input Select
14 *AUTOFD Output Automatic feeding
15 *ERROR Input Error
16 *INIT Output Initialization
17 SLCTIN Output Select
18–25 GND – Ground
68
Page 81

● Serial connector
Pin number Signal name Direction Description
1 CD Input Carrier detection
2 RD Input Receive data
3 TD Output Transmit data
4 DTR Output Data terminal ready
5 GND – Ground
6 DST Input Data set ready
7 RTS Output Request to send
8 CTS Input Clear to send
9 RI Input Ring indication
● Mouse connector
Pin number Signal name Direction Description
1 DATA Input and output Data
2 NC – Not connected
3 GND – Ground
4 VCC – Power
5 CLK Input and output Clock
6 NC – Not connected
● Keyboard Connector
Pin number Signal name Direction Description
1 DATA Input and output Data
2 NC – Not connected
3 GND – Ground
4 VCC – Power
5 CLK Input and output Clock
6 NC – Not connected
69
Page 82

● USB connector
Pin number Signal name Direction Description
1 VCC – Cable/power
2 -DATA Input/output Negative data signal
3 +DATA Input/output Positive data signal
4 GND – Cable/ground
70
 Loading...