

Page 1

Mainboard
Short Description
Mainboard D2264
Deutsch – English
Page 2

Sie haben technische Fragen oder Probleme?
Wenden Sie sich bitte an:
● Ihren zuständigen Vertriebspartner oder Ihre Verkaufsstelle
● unsere Hotline über das Kontaktformular unter www.fujitsu-siemens.com/support/contact/
contact.html oder für Kunden, die ein einzelnes Mainboard gekauft haben: +49(0) 180 3777 005
Aktuelle Informationen und Updates (z. B. BIOS-Update) zu unseren Mainboards finden Sie im
Internet: www.fujitsu-siemens.com/mainboards
Are there any technical problems or other questions you need clarified?
Please contact:
● your sales partner or your sales outlet
● unsere Hotline über das Kontaktformular unter www.fujitsu-siemens.com/support/contact/
contact.html oder für Kunden, die ein einzelnes Mainboard gekauft haben: +49(0) 180 3777 005
The latest information and updates (e.g. BIOS update) on our mainboards can be found on the
Internet at: www.fujitsu-siemens.com/mainboards
Page 3

Copyright © Fujitsu Siemens Computers GmbH 2005
Intel, Pentium and Celeron are registered trademarks of Intel Corporation, USA.
Microsoft, MS, MS-DOS and Windows are registered trademarks of Microsoft Corporation.
PS/2 and OS/2 Warp are registered trademarks of International Business Machines, Inc.
All other trademarks referenced are trademarks or registered trademarks of their respective
owners, whose protected rights are acknowledged.
All rights, including rights of translation, reproduction by printing, copying or similar methods,
even of parts are reserved.
Offenders will be liable for damages.
All rights, including rights created by patent grant or registration of a utility model or design,
are reserved. Delivery subject to availability.
Right of technical modification reserved.
Page 4

Dieses Handbuch wurde erstellt von
cognitas. Gesellschaft für Technik-Dokumentation mbH – www.cognitas.de
Dieses Handbuch wurde auf Recycling-Papier gedruckt.
This manual has been printed on recycled paper.
Ce manuel est imprimé sur du papier recyclé.
Este manual ha sido impreso sobre papel reciclado.
Questo manuale è stato stampato su carta da riciclaggio.
Denna handbok är tryckt på recyclingpapper.
Dit handboek werd op recycling-papier gedrukt.
Herausgegeben von/Published by
Fujitsu Siemens Computers GmbH
Printed in the Federal Republic of Germany
AG 08/05
Ausgabe/Edition 2
Bestell-Nr./Order No.: A26361-D2264-Z110-1-7419
A26361-D2264-Z110-1-7419
Page 5
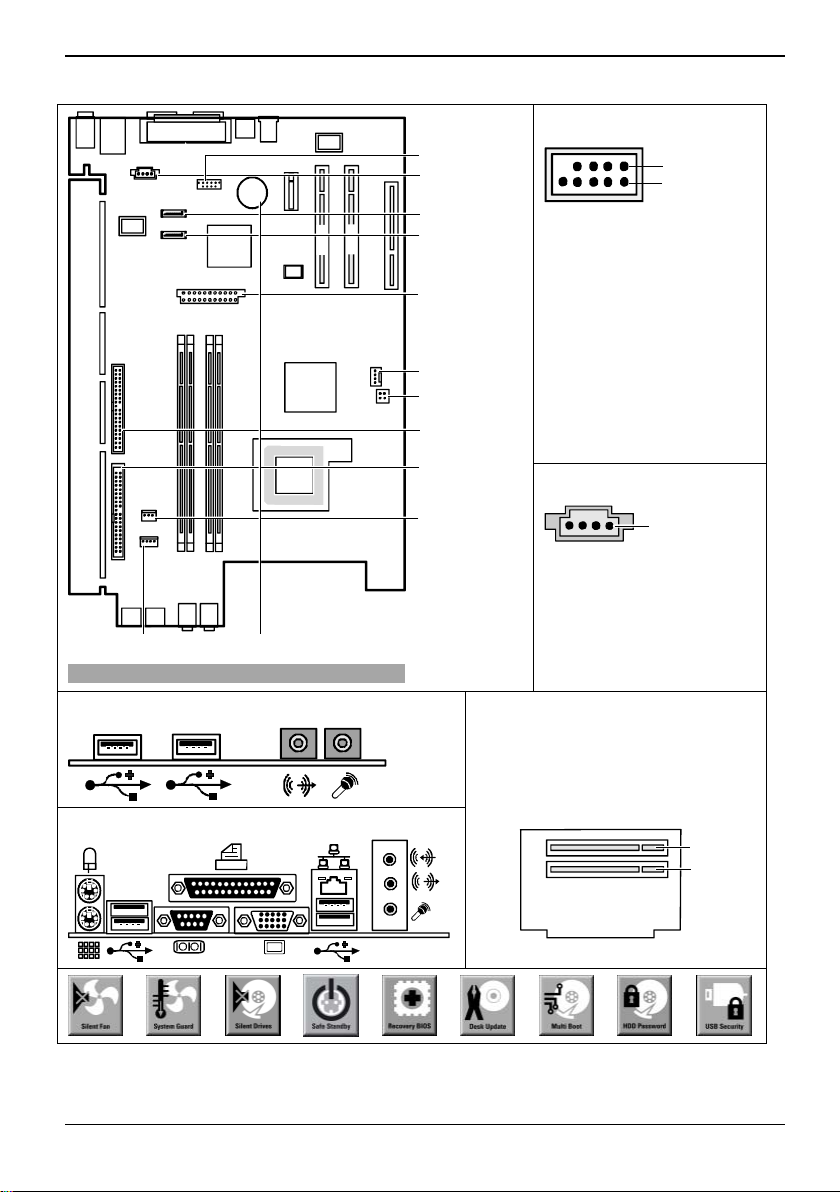
Mainboard D2264 - Internal connectors and slots
USB - dual channel
USB
CD Input
PCI e x1
PCI 2
PCI 1
Slot 1
Slot 2
Slot 4
Slot 3
PCI Express x16
Serial ATA 1
Serial ATA 2
Power supply
1 = VCC C
2 = VCC D
3 = Data negative C
4 = Data negative D
5 = Data positive C
1
2
6 = Data positive D
Fan 2
Additional
Power supply
Floppy disk
drive
IDE-drives 1/2
Fan 1
7 = GND
8 = GND
9 = Key
10 = Not connected
Audio In (optional)
1
1 = Left CD audio input
2 = CD GND
3 = CD GND
SMB1
Optionale Komponenten / Optional components
Battery
External connectors front
RiserCard (optional)
4 = Right CD audio input
1 = PCI slot 1
2 = PCI slot 2
External connectors rear
1
2
E318
A26361-D2264-Z140-1-7419
A26361-D2264-Z110-1-7419, Ausgabe 2
Page 6
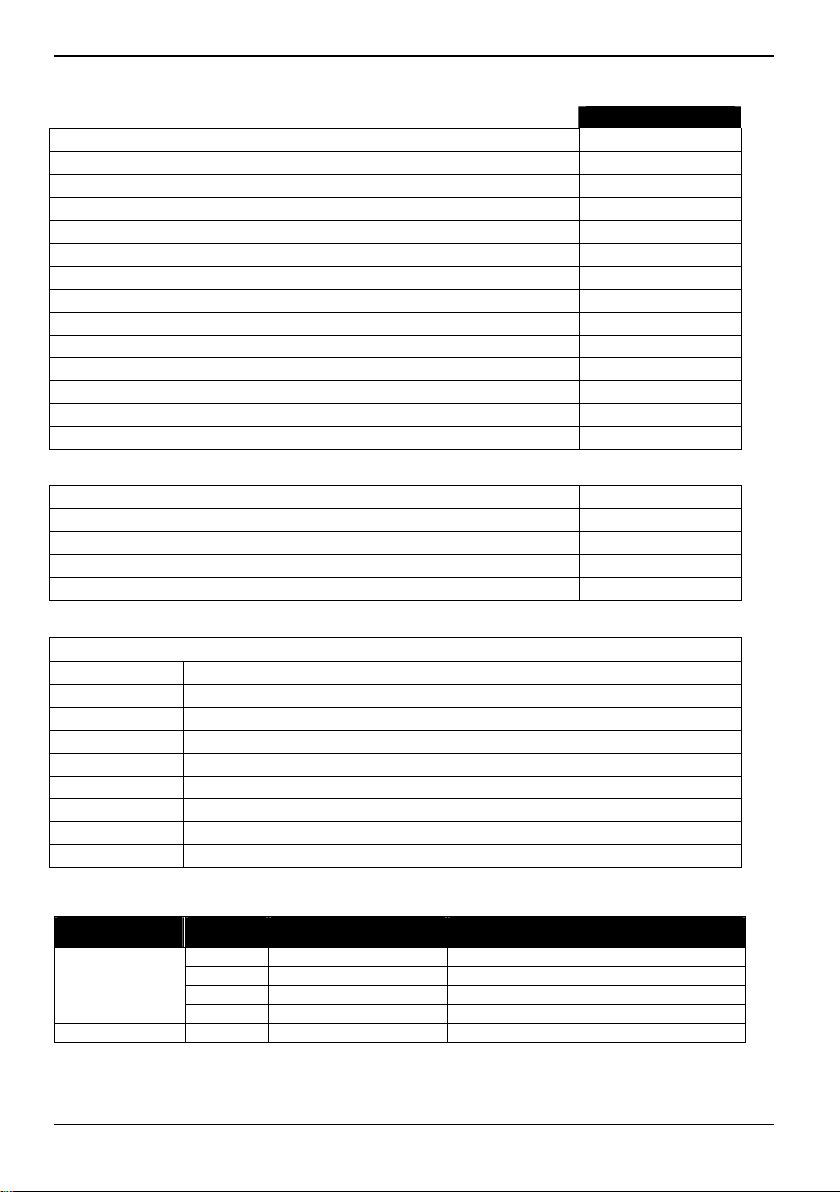
Mainboard D2264
List of onboard features D2264-A
Chipset AMD mPGA939
Board size tbd. 357 / 234 mm
VGA
Audio / 6-channel / S/PDIF / - / Buzzer / int. Speaker Support - /
LAN 1 Gbit / 100 Mbit / 10 Mbit / /
LAN ASF / AoL / WoL / Boot - / - / /
Serial ATA2 / ATA / RAID / /
FireWireTM / USB 2.0 - /
FAN monitored PSU** / CPU (FAN1) / AUX1 (FAN2) / AUX2 (FAN3) / / / FAN controlled PSU** / CPU (FAN1) / AUX1 (FAN2) / AUX2 (FAN3) / / / TEMP monitored CPU/ONB1/ONB2/HDD / / - / SmartCard SystemLock (USB / serial) / Fujitsu Siemens Computers Keyboard Power Button Support
List of special onboard features
Silent Fan / Silent Fan LT / -
System Guard / Silent Drives /
Recovery BIOS / Desk Update / Multi Boot / /
Safe Standby / HDD Password /
Logo Boot / Intel On Screen Branding /
** not supported by standard Power Supplies
Special Features
Green Edition Halogen-free and lead-reduced product
Silent Fan Independent temperature related processor and fan supervision and control
System Guard View and adjust Silent Fan
Silent Drives Noise reduction for optical and hard disk drives
Safe Standby Prevents data loss in S3 (Save-to-RAM)
Recovery BIOS Restores a disrupted BIOS
Desk Update Simple driver update with DU CD
Multi Boot Comfortable boot from any boot device
HDD Password Access protection for ATA5/ATAPI5 hard disk drives
Power Supply Requirements
Source Voltage Maximal variation Mainboard current (Maximal)
+ 12 V +/- 5 % 7.8 (12) A
Main Power - 12 V +/- 10 % 0.05 A
Supply + 5 V +/- 5 % 1.05 (19.5) A
+ 3.3 V +/- 5 % 5.4 (5.90) A
Aux. Power Supply + 5 V +/- 5 % 2 A
- for onboard components (worst case)
A26361-D2264-Z110-1-7419, Ausgabe 2
Page 7
Mainboard D2264
Hinweise zu Baugruppen
Beachten Sie bei Baugruppen mit EGB unbedingt Folgendes:
● Sie müssen sich statisch entladen (z. B. durch Berühren eines geerdeten
Gegenstandes), bevor Sie mit Baugruppen arbeiten.
● Verwendete Geräte und Werkzeuge müssen frei von statischer Aufladung sein.
● Ziehen Sie den Netzstecker, bevor Sie Baugruppen stecken oder ziehen.
● Fassen Sie die Baugruppen nur am Rand an.
● Berühren Sie keine Anschluss-Stifte oder Leiterbahnen auf der Baugruppe.
Eine Übersicht der Leistungsmerkmale finden Sie im Datenblatt!
Besondere Merkmale
Ihr Mainboard ist in verschiedenen Ausbaustufen erhältlich. Abhängig von der Konfiguration Ihres
Mainboards besitzt oder unterstützt das Mainboard bestimmte Merkmale.
In diesem Handbuch finden Sie die wichtigsten Eigenschaften dieses Mainboards beschrieben.
Weitere Informationen zu Mainboards finden Sie im Handbuch "Basisinformationen Mainboard" auf
der CD "User Documentation" oder "OEM Mainboard" bzw. im Internet.
Anschlüsse und Steckverbinder
Die Position der Anschlüsse und Steckverbinder Ihres Mainboards finden Sie am Anfang des
Handbuches.
Die markierten Komponenten und Steckverbinder müssen nicht auf dem Mainboard vorhanden sein.
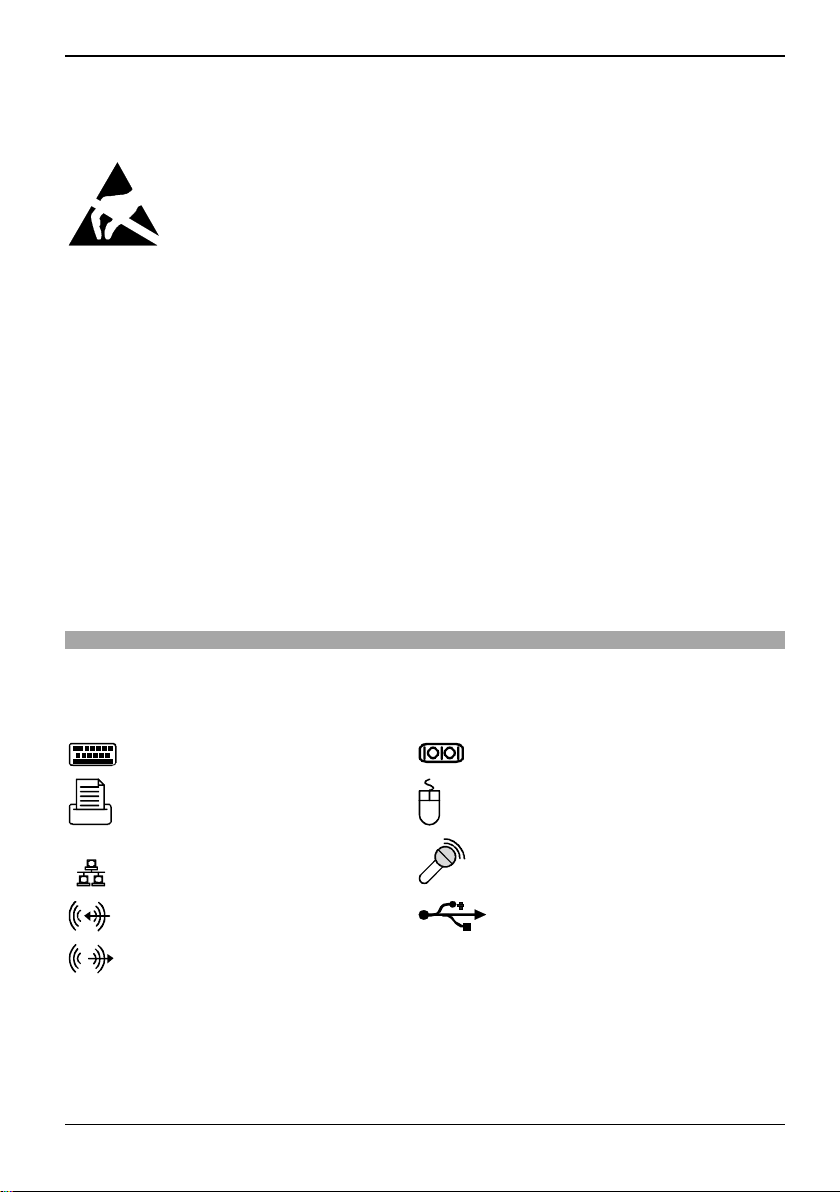
Externe Anschlüsse
Die Position der externen Anschlüsse Ihres Mainboards finden Sie am Anfang des Handbuches.
PS/2-Tastaturanschluss, violett
Parallele Schnittstelle/Drucker,
burgund
LAN
A26361-D2264-Z110-1-7419, Ausgabe 2 Deutsch - 1
LAN-Anschluss (RJ-45)
Audioeingang (Line in), hellblau
Audioausgang (Line out), hellgrün
Serielle Schnittstelle, türkis
PS/2-Mausanschluss, grün
Mikrofonanschluss, rosa
USB - Universal Serial Bus, schwarz
Page 8
Mainboard D2264
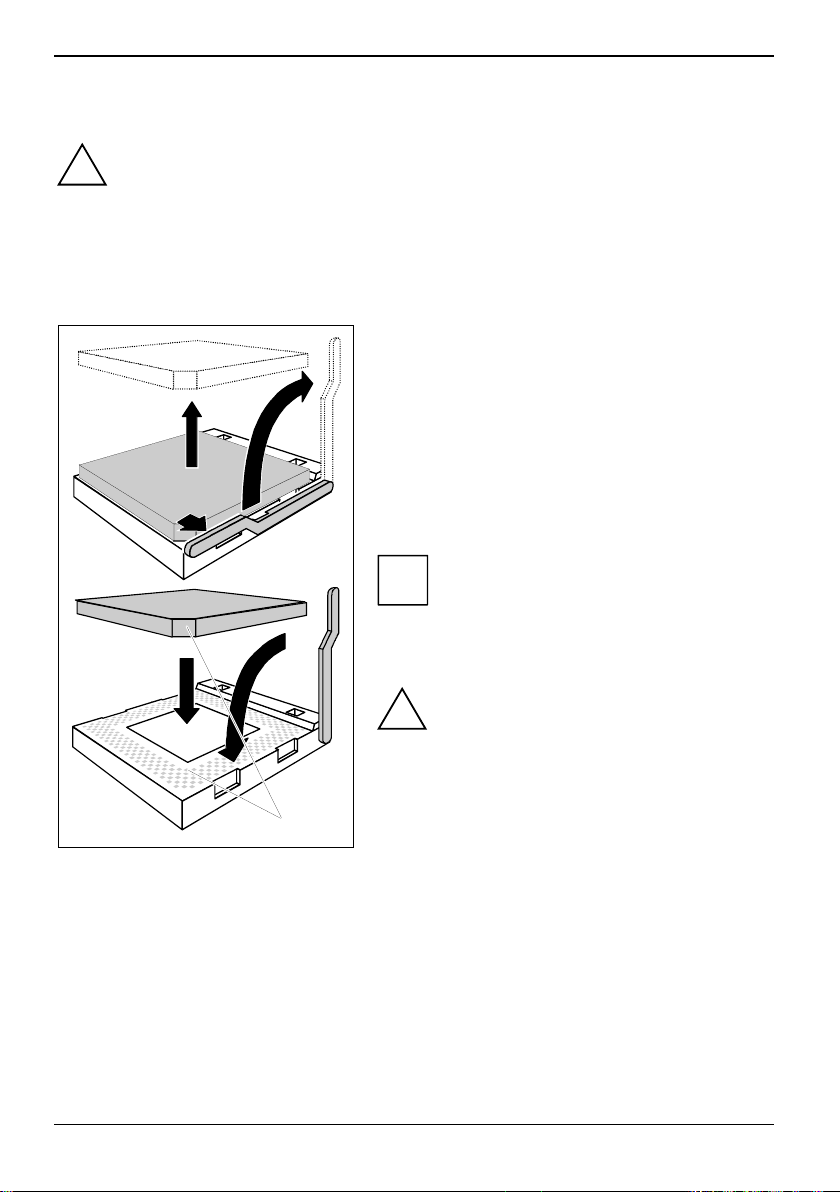
Prozessor ein- / ausbauen oder tauschen (mit Kühlkörper)
Technische Daten
● AMD Athlon 64 mit 800 MHz Front Side Bus in der Bauform mPGA 939
● Eine aktuelle Liste der von diesem Mainboard unterstützten Prozessoren finden Sie im Internet
► Entfernen Sie einen eventuell vorhandenen Lüfter und den Kühlkörper.
► Je nach Prozessor-Variante werden für die Befestigung des Kühlkörpers noch Klammern
Für alle hier beschriebenen Arbeiten muss Ihr System vollständig von der Netzspannung
getrennt sein! Nähere Angaben dazu finden Sie in der Betriebsanleitung Ihres Systems.
!
unter: www.fujitsu-siemens.com/mainboards.
► Drücken Sie den Hebel in Pfeilrichtung (1) und
schwenken Sie ihn bis zum Anschlag nach
oben (2).
► Klappen Sie die Halterung nach oben.
3
2
1
4
5
A
mitgeliefert, die den Kühlkörper fixieren.
► Heben Sie den alten Prozessor aus dem
Steckplatz (3).
► Stecken Sie den neuen Prozessor so in den
Steckplatz, dass die abgeschrägte Ecke des
Prozessors mit der Codierung am Steckplatz (A)
von der Lage her übereinstimmt (4).
► Schwenken Sie den Hebel nach unten, bis er
► Je nach Ausbau-Variante müssen Sie eine
Die abgeschrägte Ecke des Prozessors
kann auch an einer anderen Stelle sein als
i
in der Abbildung dargestellt.
spürbar einrastet (5).
Bitte beachten Sie, dass je nach
verwendetem Kühlkörper unterschiedliche
!
Kühlkörperhalterungen auf dem Mainboard
benötigt werden.
Schutzfolie vom Kühlkörper abziehen oder den
Kühlkörper mit Wärmeleitpaste bestreichen, bevor
Sie ihn aufsetzen.
2 - Deutsch A26361-D2264-Z110-1-7419, Ausgabe 2
Page 9
Mainboard D2264
Hauptspeicher ein-/ausbauen oder tauschen
Technische Daten
Technologie: DDR 200 / DDR 266 / DDR 333 und DDR 400 ungepufferte DIMM Module
Gesamtgröße: 64 Mbytes bis 4 Gbyte DDR
Modulgrößen: 64, 128, 256, 512 oder 1024 Mbyte pro Modul
Eine aktuelle Liste der für dieses Mainboard empfohlenen Speichermodule finden Sie im Internet
unter: www.fujitsu-siemens.com/mainboards.
Es muss mindestens ein Speichermodul eingebaut sein. Speichermodule mit unterschiedlicher
Speicherkapazität können kombiniert werden.
!
i
184-Pin; 2,6 V; 64 Bit oder 72 Bit, mit ECC
Es dürfen nur ungepufferte 2,6 V-Speichermodule mit ECC verwendet werden.
DDR-DIMM-Speichermodule müssen der PC2700- oder PC3200-Spezifikation
entsprechen.
Wenn Sie mehr als ein Speichermodul verwenden, dann achten Sie darauf, die
Speichermodule auf beide Speicherkanäle aufzuteilen. Dadurch nutzen Sie die
Performancevorteile des Dual-Channel-Mode.
Die maximale Systemperformance ist gegeben, wenn in Channel A und Channel B die
gleiche Speichergröße verwendet wird.
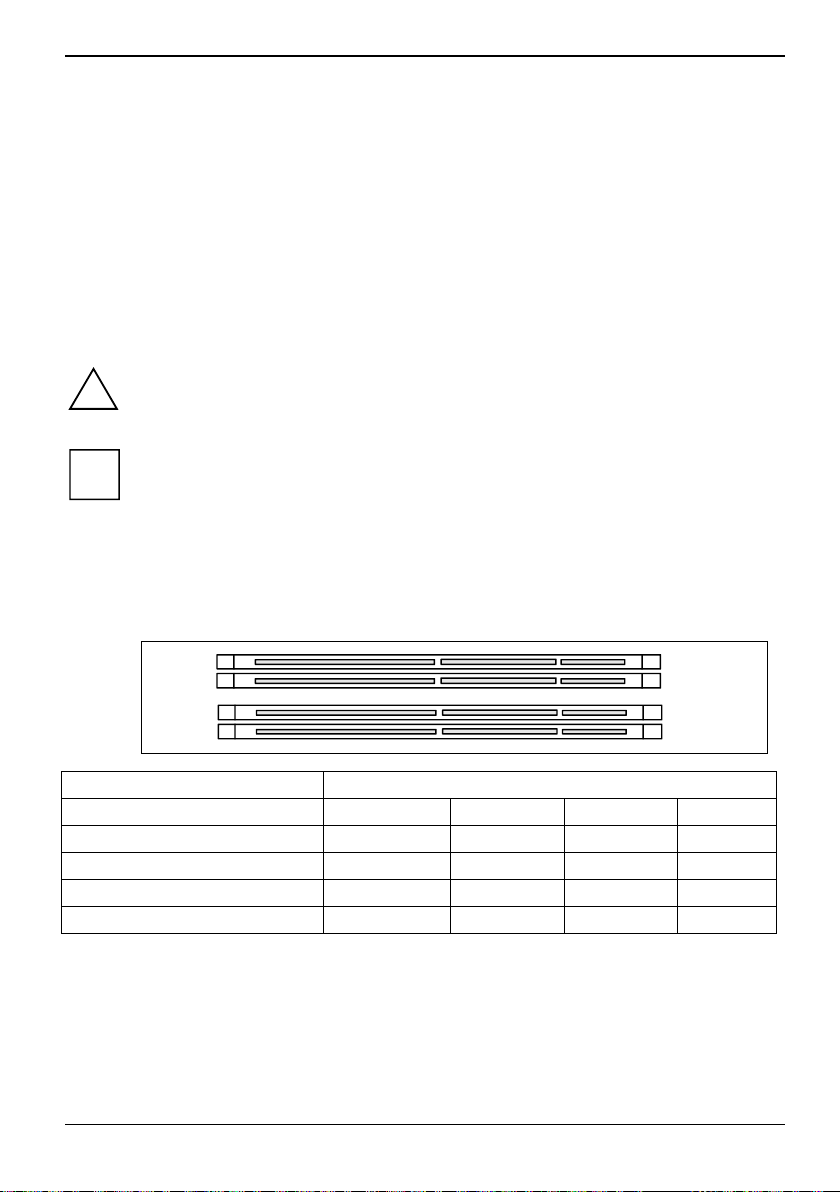
Um die Bestückung zu erleichtern, sind die Steckplätze (Slots) farbig gekennzeichnet.
Bei einer Speicherkonfiguration von 4 Gbyte kann der sichtbare und benutzbare
Hauptspeicher auf bis zu 3,5 Gbyte reduziert sein (abhängig von der Konfiguration des
Systems).
4
3
Slot Channel
2
1
zu verwendender Steckplatz 1 2 3 4
Channel A, Slot 1 X X X X
Channel B, Slot 2 X X X
Channel A, Slot 3 X X
Channel B, Slot 4 X
Der Ein-/Ausbau ist im Handbuch "Basisinformationen Mainboard" beschrieben.
A26361-D2264-Z110-1-7419, Ausgabe 2 Deutsch - 3
Anzahl der gesteckten Speichermodule
B
A
B
A
Page 10

Mainboard D2264
PCI-Bus-Interrupts - Auswahl des richtigen PCI-Steckplatzes
Umfangreiche Informationen zu diesem Abschnitt finden Sie im Handbuch "Basisinformationen
Mainboard".
Welche ISA IRQs den PCI IRQ Lines zugeordnet werden, wird normalerweise automatisch vom
BIOS festgelegt (siehe Beschreibung "BIOS-Setup").
Monofunktionale Erweiterungskarten
PCI-/PCI-Express-Erweiterungskarten benötigen maximal einen Interrupt, der als PCI-Interrupt INT A
bezeichnet wird. Erweiterungskarten, die keinen Interrupt benötigen, können in einen beliebigen
Steckplatz eingebaut werden.
Um optimale Stabilität, Performance und Kompatibilität zu erreichen, vermeiden Sie die
mehrfache Nutzung von ISA IRQs oder PCI IRQ Lines (IRQ Sharing). Sollte IRQ Sharing
i
nicht zu umgehen sein, so müssen alle beteiligten Geräte und deren Treiber IRQ Sharing
unterstützen.
4 - Deutsch A26361-D2264-Z110-1-7419, Ausgabe 2
Page 11
Mainboard D2264
Multifunktionale Erweiterungskarten oder Erweiterungskarten mit integrierter PCI-PCI Bridge
Diese Erweiterungskarten benötigen bis zu vier PCI-Interrupts: INT A, INT B, INT C, INT D. Wie viele
und welche dieser Interrupts verwendet werden, entnehmen Sie der mitgelieferten Dokumentation
der Karte.
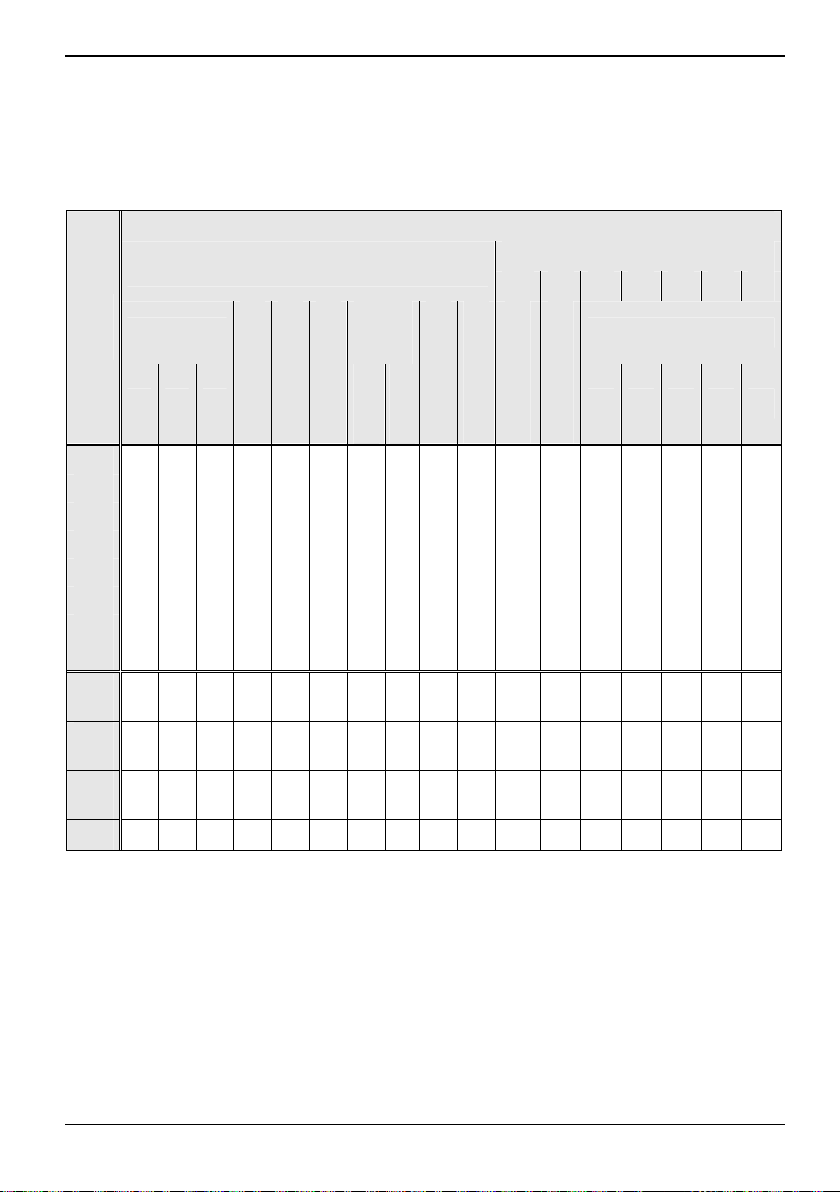
Die Zuordnung der PCI-Interrupts zu den IRQ Lines finden Sie in der folgenden Tabelle:
Controller or slot INT
Mechanical slot
PCI Slot
PCI
INT
LINE
USB 1.1
On board controller
AC97 /
HD
Audio
1 2 2 3 - - -
1st 2n 3rd
USB 2.0
IDE
SATA
Audio
LAN
HD Audio
VGA
PCIe x16
1 2 - - -
PCIe x1
1 (A) - - - - X - - - - X X X D A - - -
2 (B) - - - - - X - - - - - X A B - - -
3 (C) - - - - - - X - - - - X B C - - -
4 (D) - - - - - - - - X - - X C D - - -
5 (E) - - - - - - - - - - - - - - - -
6 (F) - - X - - - - - - - - - - - - -
7 (G) - X - - - - - - - - - - - - - -
8 (H) X - - X - - - - - - - - - - - -
ID
14 14 14 14 13 16 13 - 20 - - 17 21 23 - - -
SEL
Dev
03h 03h 03h 03h 02h 05h 02h - 09h 00h
#
Func
tion#
0 1 2 3 5 0 7 - 0 0 0 0 0 0 - - -
1Fh*
06h 0Ah 0Ch - - -
/ 01h
Bus# 0 0 0 0 0 0 0 - 0 1 0 0 0 0 - - -
* with onboard Grafic
Verwenden Sie zuerst PCI-/PCI-Express-Steckplätze, die über eine einzige PCI IRQ Line verfügen
(kein IRQ Sharing). Wenn Sie einen anderen PCI-/PCI-Express-Steckplatz mit IRQ Sharing
benutzen müssen, überprüfen Sie, ob die Erweiterungskarte IRQ Sharing mit den anderen Geräten
auf dieser PCI IRQ Line einwandfrei unterstützt. Auch die Treiber aller Karten und Komponenten an
dieser PCI IRQ Line müssen IRQ Sharing unterstützen.
A26361-D2264-Z110-1-7419, Ausgabe 2 Deutsch - 5
Page 12

Mainboard D2264
BIOS-Update
Wann sollte ein BIOS-Update durchgeführt werden?
Fujitsu Siemens Computers stellt neue BIOS-Versionen zur Verfügung, um die Kompatibilität zu
neuen Betriebssystemen, zu neuer Software oder zu neuer Hardware zu gewährleisten. Außerdem
können neue BIOS-Funktionen integriert werden.
Ein BIOS-Update sollte auch immer dann durchgeführt werden, wenn ein Problem besteht, das sich
durch neue Treiber oder neue Software nicht beheben lässt.
Wo gibt es BIOS-Updates?
Im Internet unter www.fujitsu-siemens.com/mainboards finden Sie die BIOS-Updates.
Wie funktioniert ein BIOS-Update?
Sie haben zwei Möglichkeiten:
1. BIOS-Update unter DOS mit startfähiger BIOS-Update-Diskette - Kurzbeschreibung
► Laden Sie die Update-Datei von unserer Internet-Seite auf Ihren PC.
► Legen Sie eine leere Diskette (1,44 Mbyte) ein.
► Führen Sie die Update-Datei aus (z. B. 2264103.EXE).
► Es wird eine startfähige Update-Diskette erstellt. Lassen Sie diese Diskette im Laufwerk.
► Starten Sie den PC neu.
► Folgen Sie den Bildschirmanweisungen.
2. BIOS-Update unter Windows mit dem Utility DeskFlash
Ein BIOS-Update kann mit dem Utility DeskFlash auch direkt unter Windows durchgeführt werden.
DeskFlash befindet sich auf der CD "Drivers & Utilities" (unter DeskUpdate).
Detaillierte Informationen zum BIOS-Update unter DOS finden Sie im Handbuch zum
"BIOS-Setup" (CD "Drivers & Utilities").
i
6 - Deutsch A26361-D2264-Z110-1-7419, Ausgabe 2
Page 13
Mainboard D2264
Information about boards
Be sure to observe the following for boards with ESD:
● You must always discharge static build up (e.g. by touching a grounded object)
before working.
● The equipment and tools you use must be free of static charges.
● Remove the power plug from the mains supply before inserting or removing
boards containing ESDs.
● Always hold boards with ESDs by their edges.
● Never touch pins or conductors on boards fitted with ESDs.
An overview of the features is provided in the data sheet.
Special features
Your mainboard is available in different configuration levels. Depending on the configuration, your
mainboard is equipped with or supports special features.
This manual describes the most important properties of this mainboard.
Additional information on mainboards is contained in the manual "Basic information on mainboard"
on the "User Documentation" or "OEM Mainboard" CDs, or on the Internet.
Interfaces and connectors
The location of the interfaces and connectors of your mainboard is specified at the beginning of the
manual.
The components and connectors marked are not necessarily present on the mainboard.
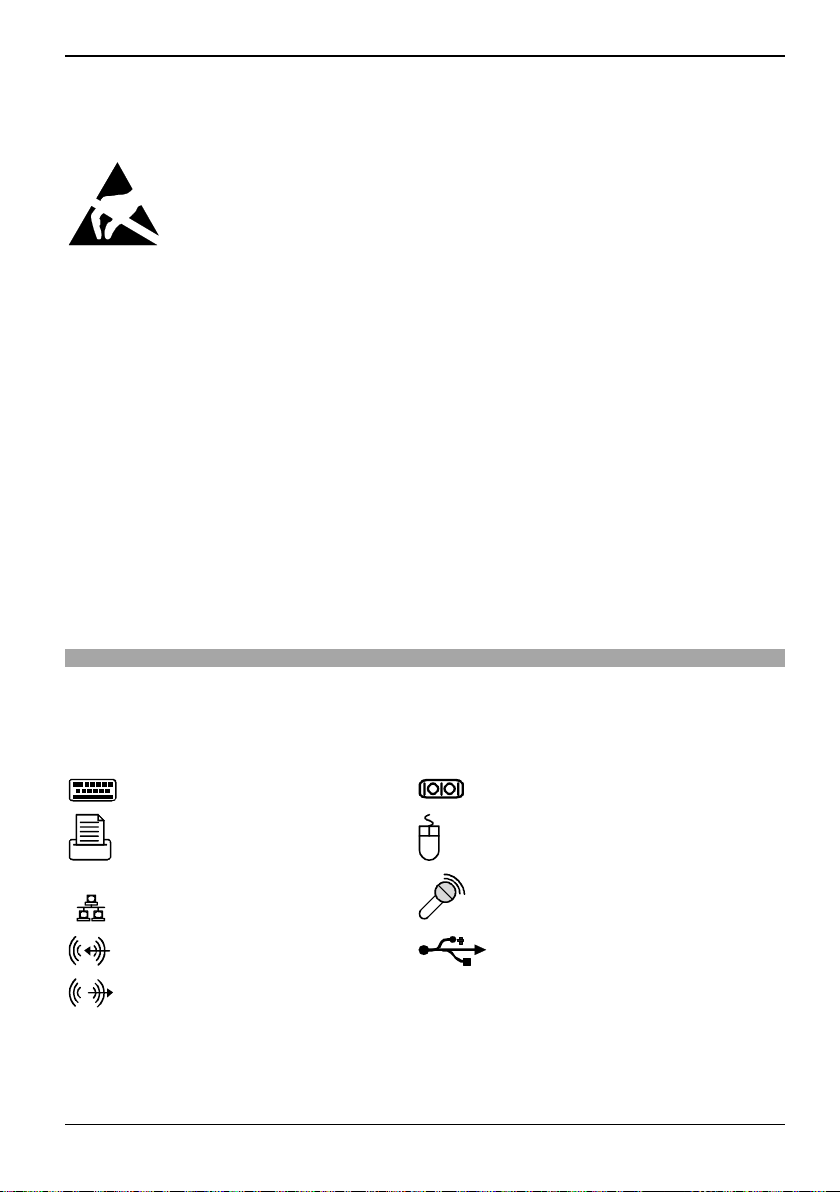
External ports
The location of the external connections of your mainboard is specified at the beginning of the
manual.
PS/2 keyboard port, purple
Parallel port/Printer, burgundy
LAN
A26361-D2264-Z110-1-7419, edition 2 English - 1
LAN port (RJ-45)
Audio input (Line in), light blue
Audio output (Line out), light green
Serial interface, turquoise
PS/2 mouse port, green
Microphone jack (mono), pink
USB - Universal Serial Bus, black
Page 14
Mainboard D2264
Installing/removing or replacing processor (with heat sink)
Technical data
● AMD Athlon 64 with 800 MHz Front Side Bus in the mPGA 939 design
● A current list of the processors supported by this mainboard is available on the Internet at:
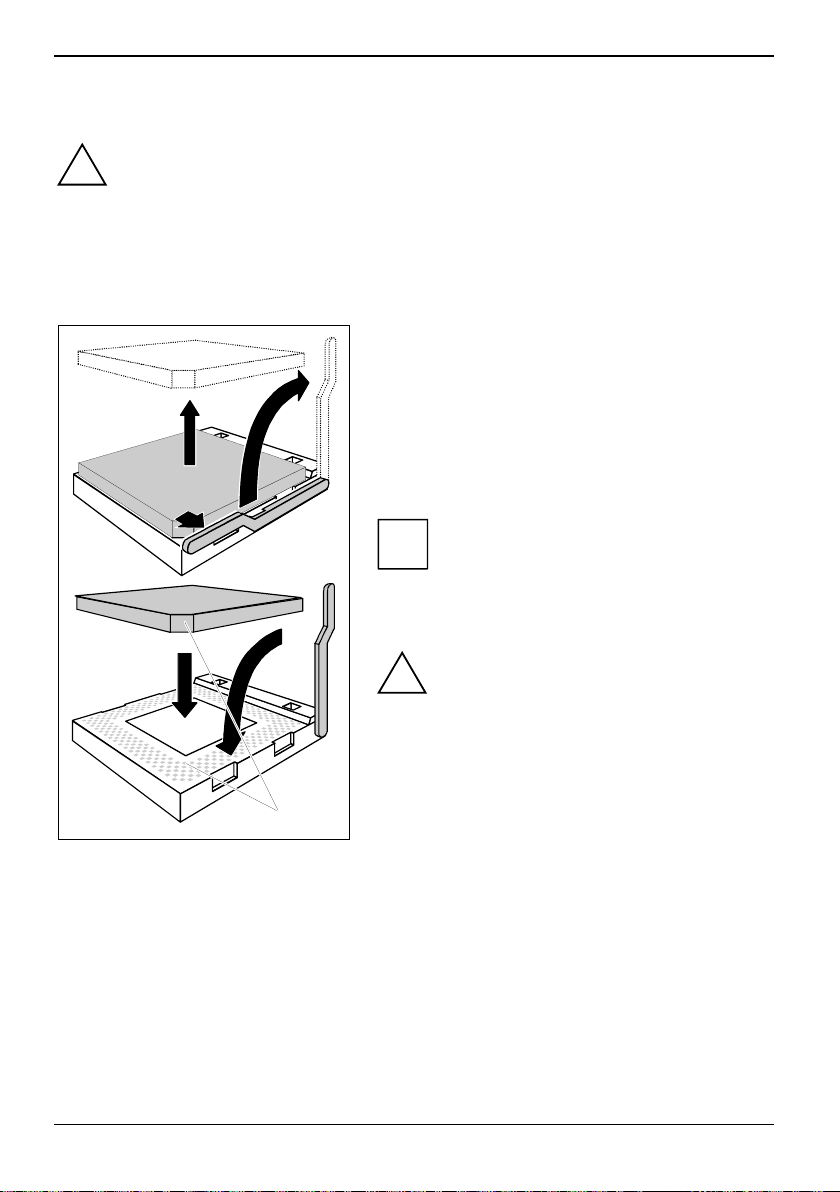
► Remove the fan that there may be and the heat sink.
Disconnect the system from the mains voltage before performing any of the tasks
described below. Details are contained in the operating manual of your system.
!
www.fujitsu-siemens.com/mainboards.
► Pull the lever in the direction of the arrow (1) and
lift it as far as it will go (2).
► Fold up the frame.
► Remove the old processor from the socket (3).
3
2
1
4
5
► Insert the new processor in the socket so that the
angled corner of the processor matches the
coding on the socket (A) with regard to the
position (4).
► Push the lever back down until it clicks into
► Depending on the configuration variant, you must
The angled corner of the processor can also
be at a different location than shown in the
i
illustration.
place (5).
Please note that, depending on the heat
sink used, different heat sink mounts are
!
required on the mainboard.
pull a protective foil off the heat sink or coat the
heat sink with heat conducting paste before fitting
it.
A
► Depending on the processor variant, clips may also be supplied for mounting the heat sink that
fix it in place.
2 - English A26361-D2264-Z110-1-7419, edition 2
Page 15
Mainboard D2264
Installing/removing or replacing main memory
Technical data
Technology: DDR 200 / DDR 266 / DDR 333 and DDR 400 unbuffered DIMM modules
Size: 64 Mbytes to 4 Gbyte DDR
Granularity: 64, 128, 256, 512 or 1024 Mbyte for one socket
A current list of the memory modules recommended for this mainboard is available on the Internet
at: www.fujitsu-siemens.com/mainboards.
At least one memory module must be installed. Memory modules with different memory capacities
can be combined.
!
i
184-Pin; 2.6 V; 64 Bit or 72 Bit, with ECC
You may use only unbuffered 2.6 V memory modules with ECC.
DDR-DRAM memory modules must meet the PC2700 or PC3200 specification.
If you use more than one memory module, then make sure to distribute the memory
modules over both memory channels. By doing this you use the performance advantages
of the dual-channel mode.
The maximum system performance is given when the same memory size is used in
Channel A and Channel B.
To simplify equipping, the slots are colour coded.
With a memory configuration of 4 Gbytes the visible and usable main memory can be
reduced down to 3.5 Gbytes (depending on the system configuration).
4
3
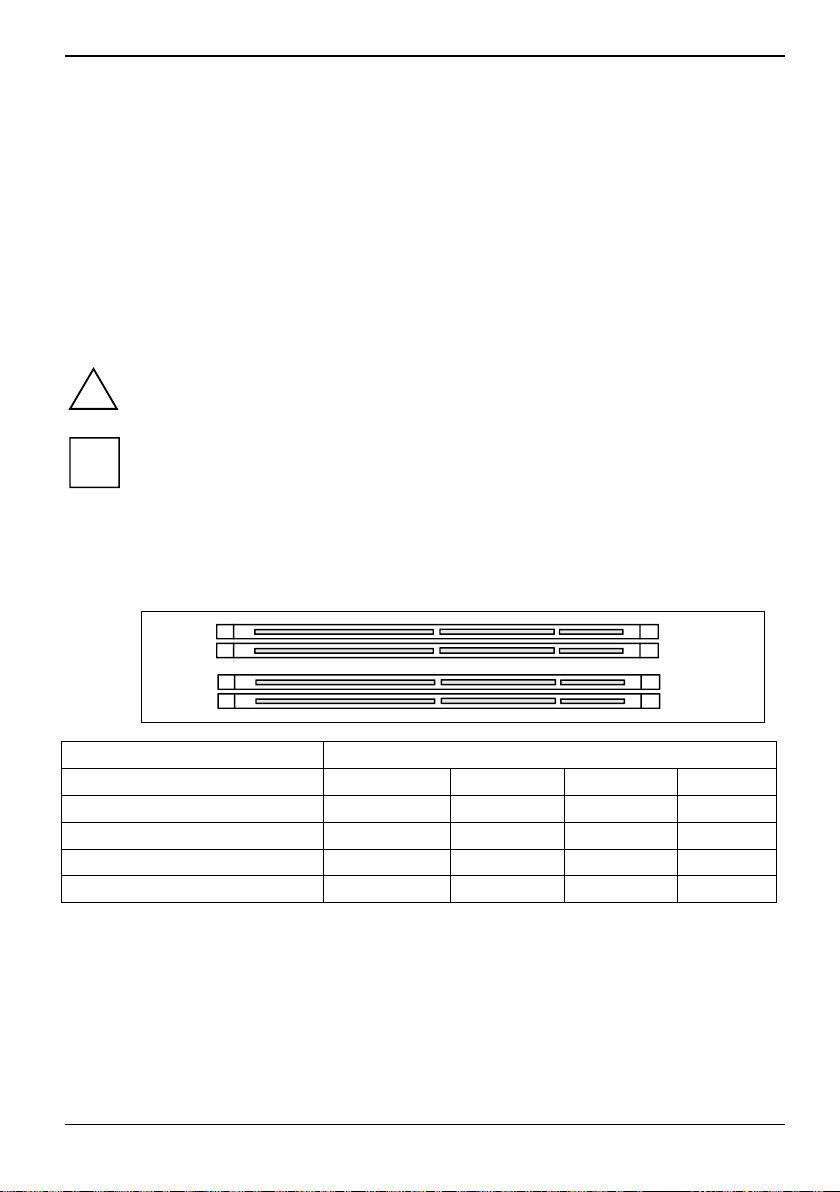
Slot Channel
2
1
slot to be used 1 2 3 4
Channel A, slot 1 X X X X
Channel B, slot 2 X X X
Channel A, slot 3 X X
Channel B, slot 4 X
The installation/removal is described in the "Basic information on mainboard" manual.
A26361-D2264-Z110-1-7419, edition 2 English - 3
Number of inserted memory modules
B
A
B
A
Page 16

Mainboard D2264
PCI bus interrupts - Selecting correct PCI slot
Extensive information on this section is contained in the manual "Basic information on mainboard".
Which ISA IRQs are assigned to the PCI IRQ Lines is normally automatically specified by the BIOS
(see "BIOS Setup" description).
Monofunctional expansions cards
PCI/PCI Express expansion cards require a maximum of one interrupt, which is called the PCI
interrupt INT A. Expansion cards that do not require an interrupt can be installed in any desired slot.
To achieve optimum stability, performance and compatibility, avoid the multiple use of ISA
IRQs or PCI IRQ Lines (IRQ sharing). Should IRQ sharing be unavoidable, then all
i
involved devices and their drivers must support IRQ sharing.
4 - English A26361-D2264-Z110-1-7419, edition 2
Page 17
Mainboard D2264
Multifunctional expansion cards or expansion cards with integrated PCI-PCI bridge
These expansion cards require up to four PCI interrupts: INT A, INT B, INT C, INT D. How many and
which of these interrupts are used is specified in the documentation provided with the card.
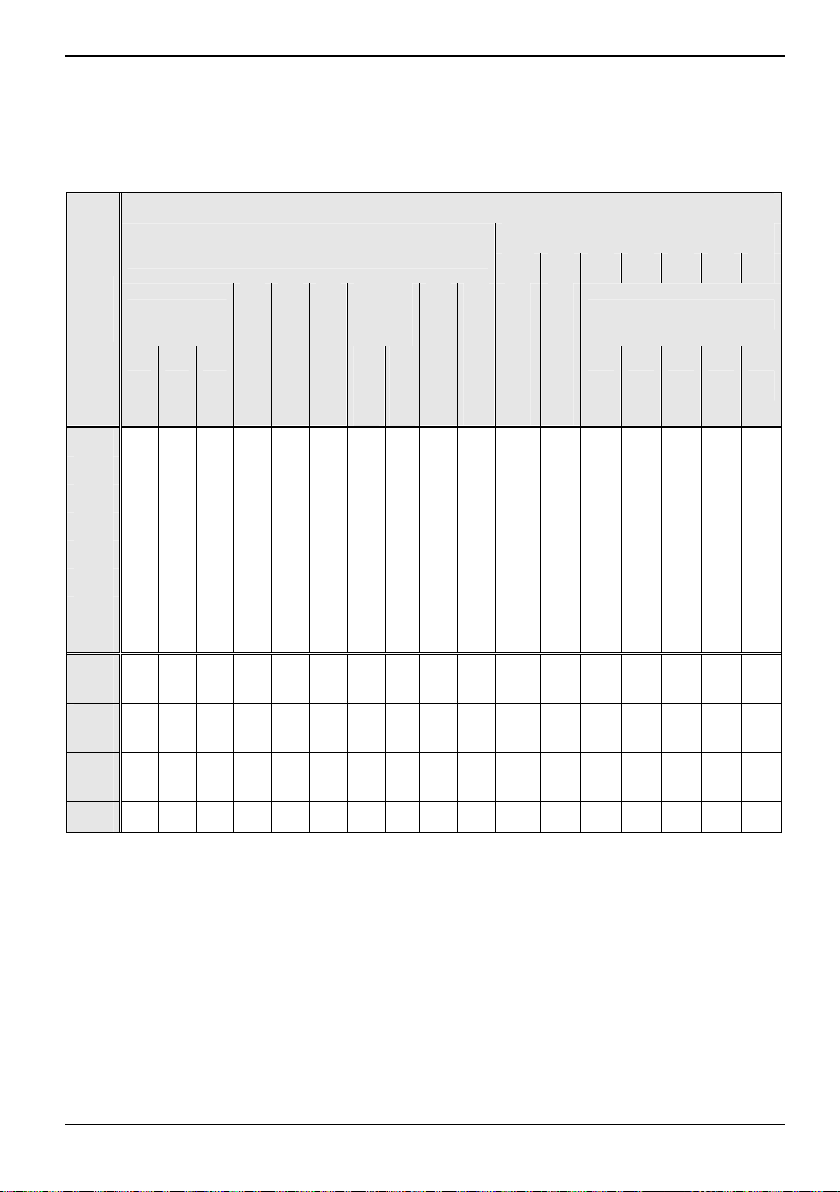
The assignment of the PCI interrupts to the IRQ Lines is shown in the following table:
Controller or slot INT
Mechanical slot
PCI slot
PCI
INT
LINE
USB 1.1
On board controller
AC97 /
HD
Audio
1 2 2 3 - - -
1st 2n 3rd
USB 2.0
IDE
SATA
Audio
LAN
HD Audio
VGA
PCIe x16
1 2 - - -
PCIe x1
1 (A) - - - - X - - - - X X X D A - - -
2 (B) - - - - - X - - - - - X A B - - -
3 (C) - - - - - - X - - - - X B C - - -
4 (D) - - - - - - - - X - - X C D - - -
5 (E) - - - - - - - - - - - - - - - -
6 (F) - - X - - - - - - - - - - - - -
7 (G) - X - - - - - - - - - - - - - -
8 (H) X - - X - - - - - - - - - - - -
ID
14 14 14 14 13 16 13 - 20 - - 17 21 23 - - -
SEL
Dev
03h 03h 03h 03h 02h 05h 02h - 09h 00h
#
Func
tion#
0 1 2 3 5 0 7 - 0 0 0 0 0 0 - - -
1Fh*
06h 0Ah 0Ch - - -
/ 01h
Bus# 0 0 0 0 0 0 0 - 0 1 0 0 0 0 - - -
* with onboard Grafic
Use first PCI/PCI Express slots that have a single PCI IRQ Line (no IRQ sharing). If you must use
another PCI/PCI Express slot with IRQ sharing, check whether the expansion card properly supports
IRQ sharing with the other devices on this PCI IRQ Line. The drivers of all cards and components on
this PCI IRQ Line must also support IRQ sharing.
A26361-D2264-Z110-1-7419, edition 2 English - 5
Page 18

Mainboard D2264
BIOS update
When should a BIOS update be carried out?
Fujitsu Siemens Computers makes new BIOS versions available to ensure compatibility to new
operating systems, new software or new hardware. In addition, new BIOS functions can also be
integrated.
A BIOS update should always also be carried out when a problem exists that cannot be solved with
new drivers or new software.
Where can I obtain BIOS updates?
The BIOS updates are available on the Internet at www.fujitsu-siemens.com/mainboards.
How does a BIOS update work?
You have two ways of doing this:
1. BIOS update under DOS with bootable BIOS update floppy disk - brief description
► Download the update file from out website to your PC.
► Insert an empty floppy disk (1.44 Mbyte).
► Run the update file (e.g. 2264103.EXE).
► A bootable update floppy disk is created. Leave this floppy disk in the drive.
► Restart the PC.
► Follow the instructions on screen.
2. BIOS update under Windows with DeskFlash utility
A BIOS update can also be carried out directly under Windows with the DeskFlash utility. DeskFlash is
contained on the "Drivers & Utilities" CD (under DeskUpdate).
Detailed information on the BIOS update under DOS is provided in the manual on "BIOS
Setup" ("Drivers & Utilities" CD).
i
6 - English A26361-D2264-Z110-1-7419, edition 2
 Loading...