

Page 1

Instruction Manual
Head Mounted Display
Wearable Keyboard
1
Page 2

2
Page 3

Unpacking and checking the device
■Head Mounted Display
■Fitting belt
Unpack all the individual parts. If any of the parts are missing, please notify
your local sales representative immediately. Below is the list of included
items.
□microUSB cable
□mono earphones
□warranty
□instruction manual (This manual)
□Head Mounted Display main unit
(A strap is attached to the battery cap)
□display cushion x1 □knurled screw x4
(Use a flat blade screwdriver or a coin to turn)
These are used when wearing HMD on your head.
□Left head adjuster □Right head adjuster
3
Page 4

■Clip to a helmet
■Battery pack
■Battery charger
□Left belt attachment □Right belt attachment □side cushion x2
□top band □front band
These are used when attaching HMD to a helmet.
□Left helmet clip □Right helmet clip
□battery pack x1
□battery charger x1 □AC adaptor □power cable
4
Page 5
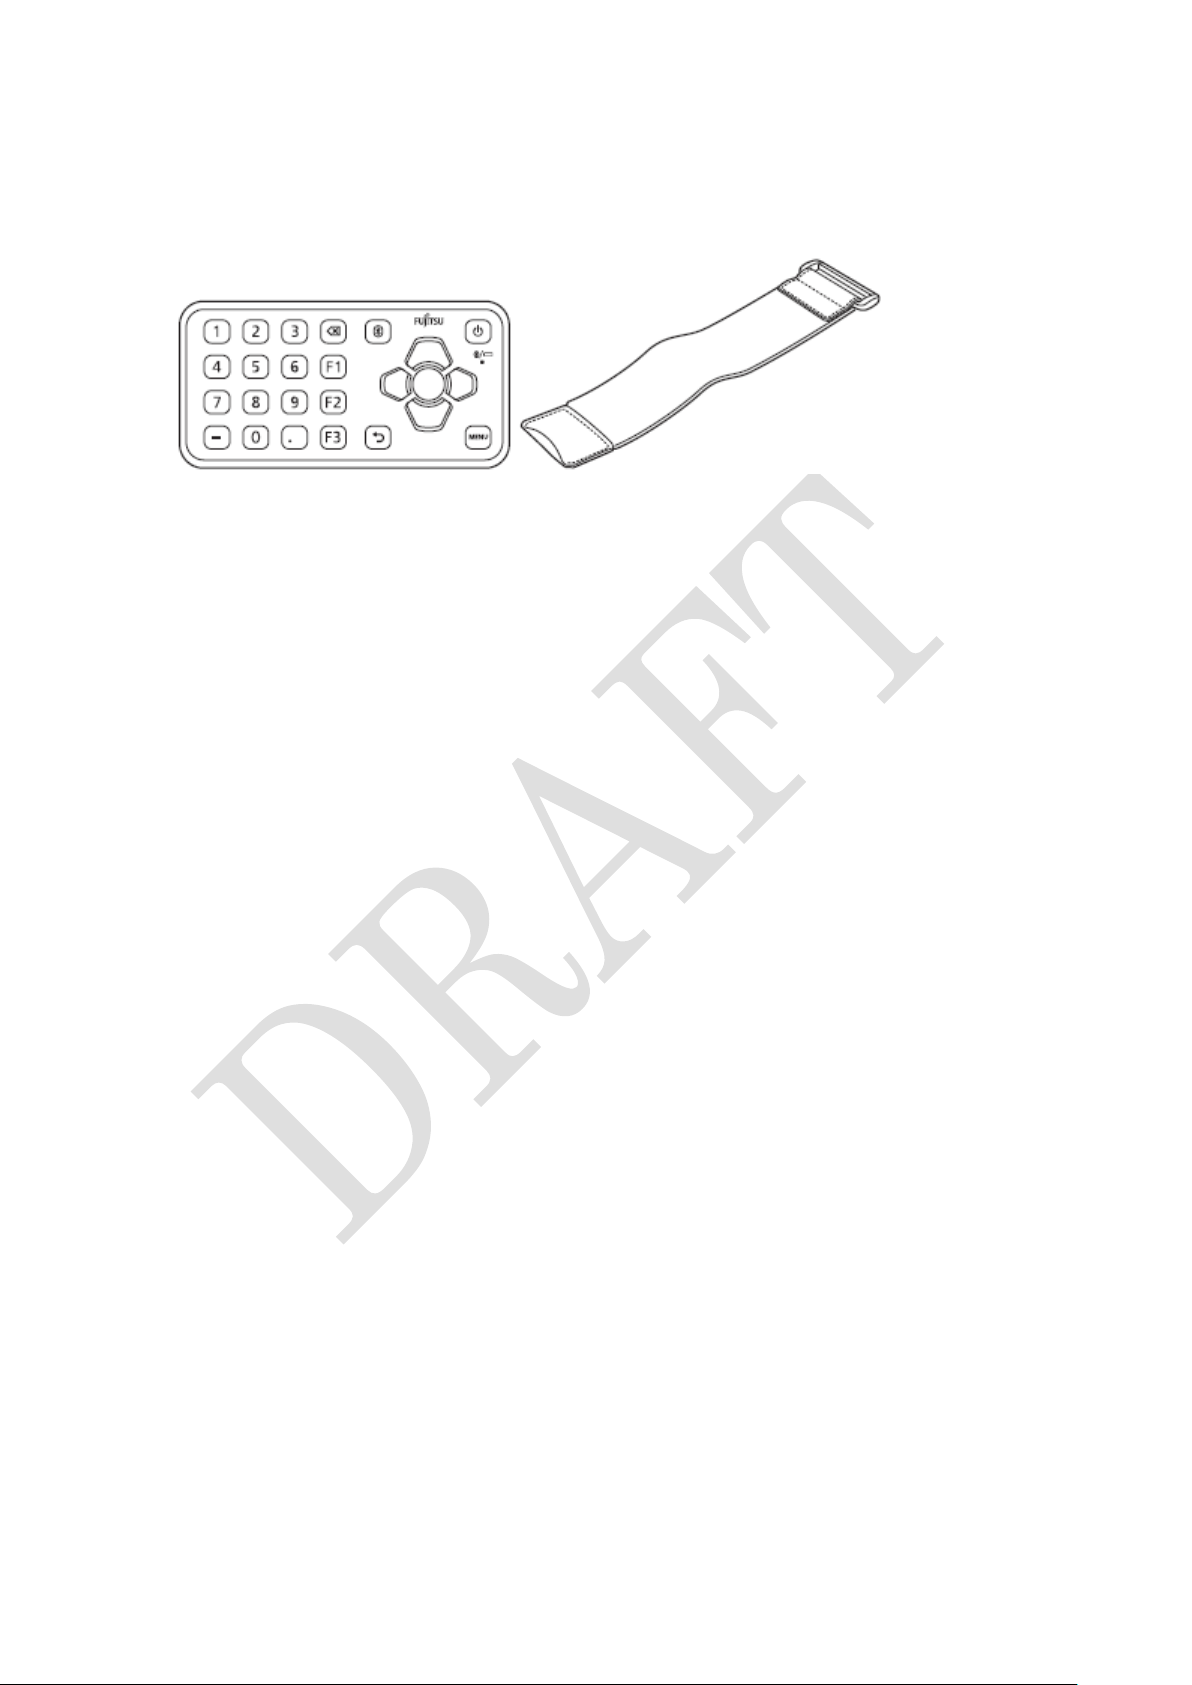
■Wearable keyboard
Before using this product
--------------------------------------------------------------------------------------About the warranty
Using the Product in Applications that Require a High Degree of Safety
□wearable keyboard □wearable keyboard belt
□AAA alkaline battery x2
Be sure to fill in the necessary information on the warranty and read its
contents. After that, keep it in a safe place.
Be sure to have the warranty on hand whenever requesting servicing.
Malfunctions that occur within the warranty period while the product is
being used correctly will be repaired without charge.
Even if malfunction occurs during the warranty period, repair will be
subjected to charges in the case the warranty is not presented, if the
malfunction is due to natural causes, improper use of the product, etc.
Refer to the warranty for details.
This product and its accessories are subject to change, in part or in their
entirety, without notice.
This product is intended for general use, such as general office use, personal use,
household use, and normal industrial use, but it is not designed, manufactured or
intended for applications that require a high degree of safety. Do not use this
product without first adequately ensuring the level of safety required by the
application. An application that requires a high degree of safety is one that is
accompanied by a serious direct risk of death or personal injury unless an extremely
high degree of safety is ensured, such as those applications noted below.
Nuclear reaction control, aircraft auto pilot control, air traffic control,
mass transport system operation control, medical life support, military
weapons system missile launch control, etc.
5
Page 6

About the limited-life components
About the terms "power plug" and "power outlet"
Product License Agreement
Software License Agreement
・The battery pack and dry cell batteries are consumable parts, so they need to be
replaced on a timely basis in order to maintain performance. Furthermore,
purchasing and replacing batteries must be done by yourself regardless of warranty
period.
・The battery pack typically have a lifespan of between 300 and 500 cycles. Battery
pack’s service life will depend on the environment temperature and usage.
The power plug of the AC adapter that comes with the product is a flat-blade 2-pole
plug. The manual refers to such a plug as "power plug." Connect the power plug to a
power outlet that accepts a flat-blade 2-pole plug (125 V, 15 A). The manual refers
to such a power outlet as "outlet."
Fujitsu Limited (hereafter Fujitsu) grants you a limited, non-exclusive license to
use the software installed on this product (Software) provided that you agree to the
"Software Terms of Use" below. By starting to use this Software you are agreeing to
be bound by this End-User License Agreement (this Agreement), so be sure to read
the "Software Terms of Use" before using this Software. However, note that this
Agreement takes priority over any other "Terms of Use," "End-User License
Agreement," or other similar documents that are separately appended to any parts
of this software.
1. License and Copyrights
Fujitsu grants you a limited, non-exclusive license to use this software on this
product only. By purchasing this product, you the purchaser are granted the license
only for the use of this software, and the rights to this software continue to revert to
Fujitsu or third-party developers.
2. Transfer to a Third Party
When transferring the Software (including the manual that comes with this
product) to a third party, you shall transfer the software in its entirety along with
the product on which the software is installed.
3. Modification
You are not allowed to modify or reverse engineer this software, such as by reverse
6
Page 7

compiling, or reverse assembling.
4. Limited Warranty
(1) Fujitsu will not be liable in any way for any damages (including but not
restricted to lost profits, work stoppages, loss of business data, or other monetary
damages) that result from the use of or the inability to use the software. This also
applies even if Fujitsu knew or should have known about the possibility of such
damages.
(2) Even if the Software includes software developed by a third party, the third
party developer makes no guarantees whatsoever about the software.
5. High degree of safety
This software is intended for general use, such as general office use, personal use,
and household use, but it is not designed, manufactured or intended for applications
that require a high degree of safety. The user must adequately implement measures
to ensure the level of safety required by any such applications to use this software.
An application that requires a high level of safety is one that is accompanied by a
serious direct risk of death or personal injury unless safety is temporarily and
appropriately ensured, such as the following examples that require an extremely
high degree of safety.
Nuclear power core control, aircraft control, air traffic control, mass transport
system operation control, medical life support, military weapons launch control, etc.
Fujitsu Limited
7
Page 8

Wireless LAN(Wi-Fi ®)(support IEEE802.11a/b/g/n)
Cautions on using 5GHz band
・The product uses the 2.4 GHz band. DS-SS and OFDM are used as the modulation
schemes. The interference distance is about 40 m or less.
All bandwidths can be used, and that bands of mobile unit identification devices can
be avoided.
・In the frequency band used by Wi-Fi® devices, in addition to home electric
appliances such as a microwave oven and industrial/scientific/medical devices,
in-plant radio stations for identification of mobile objects used in production lines of
a factory (a license is required), specified low power radio stations (a license is not
required), or amateur radio stations (a license is required) can be in operation.
1. Before using this device, confirm that in-plant radio stations for identification of
mobile objects, specified low power radio stations or amateur radio stations are not
in operation in your neighborhood.
2. If this device generates harmful radio wave interference against in-plant radio
stations for identification of mobile objects, change the using frequency promptly or
stop using wireless LAN function, and contact "General Inquiries" on the last page
of this manual, then consult about treatment for prevention of the interference (for
example, installation of partitions etc.).
・The Wi-Fi® function of the product conforms to domestic electrical equipment
technical standards. Available channels vary by countries. To use Wi-Fi® overseas,
check the conditions such as available frequency, regulation, etc. for the country.
・The 2.4 GHz band used by Wi-Fi® device is shared by various other devices. For
this reason, the communication speed and connectable range may be decreased, or
disconnection may occur, due to interference by other devices.
・To use in airplane, confirm with airline company in advance.
Wi-Fi® functions of this product use the 5 GHz band. Using the 5.2 GHz band and
5.3 GHz band outside is prohibited by the Radio Law.
- W52 (5.2GHz band/ 36,38,40,42,44,46,48ch)
- W53 (5.3GHz band/ 52,54,56,58,60,62,64ch)
- W56 (5.6GHz band/ 100,102,104,106,108,110,112,116,132,134,136,140ch)
8
Page 9

Using Bluetooth function
This equipment has been tested and found to comply with the limits for a Class A
digital device. These limits are designed to provide reasonable protection against
harmful interference in a residential installation. This equipment generates, uses
and can radiate radio frequency energy and, if not installed and used in accordance
with the instructions, may cause harmful interference to radio communications.
However, there is no guarantee that interference will not occur in a particular
installation. If this equipment does cause harmful interference to radio or television
reception, which can be determined by turning the equipment off and on, the user is
encouraged to try to correct the interference. VCCI-A
・The product uses the 2.4 GHz band. FH-SS is used as the modulation schemes. The
interference distance is about 10 m or less. All bandwidths can be used, and that
bands of mobile unit identification devices cannot be avoided.
・In the frequency band used by Bluetooth devices, in addition to home electric
appliances such as a microwave oven and industrial/scientific/medical devices,
in-plant radio stations for identification of mobile objects used in production lines of
a factory (a license is required), specified low power radio stations (a license is not
required), or amateur radio stations (a license is required) can be in operation.
1. Before using this device, confirm that in-plant radio stations for identification of
mobile objects, specified low power radio stations or amateur radio stations are not
in operation in your neighborhood.
2. If this device generates harmful radio wave interference against in-plant radio
stations for identification of mobile objects, change the using frequency promptly or
stop using Bluetooth function, and contact "General Inquiries" on the last page of
this manual, then consult about treatment for prevention of the interference (for
example, installation of partitions etc.).
・The Bluetooth function of the product conforms to domestic electrical equipment
technical standards. To use Bluetooth overseas, check the conditions such as
available frequency, regulation, etc. for the country.
・The 2.4 GHz band used by Bluetooth device is shared by various other devices. For
this reason, the communication speed and connectable range may be decreased, or
disconnection may occur, due to interference by other devices.
9
Page 10

About this product
・To use in airplane, confirm with airline company in advance.
・Display is manufactured by taking advantage of highly advanced technology but
some dots may always or never be lit. Note that, this shows characteristics of liquid
crystal displays and not defects in the products.
・The date and time settings will be cleared if the battery pack’s power level reaches
0%.
Perform the operation below to set the current time and date.
On the HMD home screen: → [Settings] → [other settings] → [Date & Time]
Moreover, when this product is connected to a smartphone by using Miracast, the
date and time on this product will be synchronized to the one on the smartphone.
・Fujitsu does not guarantee the compatibility of any commercially available
accessories.
・Do not use a remodeled product. Using a remodeled product violates the Radio
Law/Telecommunications Business Act. The product is certified according to
technical standard conformance of specified wireless equipment based on the Radio
Law/Telecommunications Business Act, and as a proof of it, the "Technical
Compliance Mark" is depicted on the electronic nameplate of the product.
If you remodel the product by removing its screws, your certification of technical
standard conformance becomes invalid.
Do not use the product with its certification of technical standard conformance
invalid as it violates the Radio Law/Telecommunications Business Act.
10
Page 11

Notational conventions
Indicates precaution and should not do for use. Please be sure
to read the information.
Indicates information related to operational points. Read
→
Indicates reference page
Name of items and notations
Name of item
Notation in this manual
Head Mounted Display
product, HMD, terminal, device
Smartphone/Tablet
Smartphone
Wearable keyboard
keyboard
Mono earphone
earphone
microUSB cable, power cable
cable
microUSB connection cap, diopter
connection jack cap
cap
Android™
Android
Bluetooth®
Bluetooth
The images or illustration used in this manual
Key notation and operation procedures
Notation of continuous operations
The meaning of the signs in this manual are described below.
when needed.
adjustment cap, microSD card slot
cap, battery cap, external audio
The images or illustration used in this manual are examples. They may
differ from the actual image, illustration or file name.
Moreover, cables may be omitted or simplified in the illustration.
The key notation in this manual is not the actual key image on the keyboard
but description of the key.
For example, [BackSpace] key, [Bluetooth] key, [Power] key, etc.
Continuous operations in this manual are shown using ‘→’ notation.
For example, to change “Date and Time” by tapping “Settings” in android
11
Page 12

Warning and caution labels
Safety Precautions
Explanation of indications used in this manual
The symbols below show specific directions.
home screen is shown below.
Change by tapping “Settings” → ”Date and Time”
There are warning and caution labels on the product. Do not remove or
damage them.
Before using this product, thoroughly read these safety precautions for
proper use. These "Safety Precautions" describe instructions that should be
observed to prevent damage to property or injury to the customer or others
using the product. These instructions are divided into the following
categories.
※1:Serious injury: This refers to loss of sight, injury, burns (high- and low temperature), electric shock, broken
bones, injuries with residual aftereffects from poisoning, etc. and injuries requiring hospital admission for
treatment or long-term hospital attendance as an outpatient.
※2: Injury: This refers to injuries, burns (high- and low-temperature), electric shock, etc. that do not require
hospital admission for treatment or long-term hospital attendance as an outpatient.
※3: Physical damage: This refers to extended damage to buildings, furniture, livestock, or pets.
12
Page 13

Trademarks, Copyrights and portrait rights
Precautions
■Common precautions of HMD, keyboard, battery charger, AC
adaptor and battery pack
Google, Google logo, Android, Android logo and other trademarks are trademarks or
registered trademarks of Google Inc.
The Bluetooth® smart ready word mark and logo are registered trademarks owned
by the Bluetooth® SIG, Inc., and FUJITSU LIMITED is licensed to use these
trademarks.
The microSD logo, microSDHC logo are trademarks of SD-3C and LLC.
Other company and product names mentioned in this manual are trademarks or
registered trademarks of their respective holders.
Copyright FUJITSU LIMITED 2015
Before using the product, or when necessary, read the precautions below to
ensure safe use and handling.
After reading this manual, keep it carefully.
Be sure to use only the specified peripheral devices. Failure to do so
may cause overheat ignition, rupture, fault or leakage.
Do not short-circuit the connection terminal, earphone terminal,
13
Page 14
charging terminal, etc. Do not allow conductive foreign objects (metal
fragments, pencil leads, etc.) to come into the contact with or get inside of
these items. Doing so may cause fire or a fault.
Before entering an area where flammable gas is generated, be sure
to turn off the product. Do not charge the battery. Failure to do so may cause
the gas to catch fire.
Do not puncture the product with a nail, hit it with a hammer or step
on it. Doing so may cause ignition, damage or injury.
Do not throw the product into fire, apply heat to the product or
short-circuit the product. Doing so might cause ignition, rupture or fire.
When abnormal symptoms occur such as overheat, smoke, odor or
strange noise, please remove the product from your head and turn off the
power. Remove the power plug from wall outlet if it is occurring from the
battery charger or the AC adaptor. Continue to use the product in such
abnormal state may cause fire or electric shock.
Turn off the product if liquid such as water or a metal fragment gets
inside the product. If it is the AC adaptor, remove the power plug from wall
outlet. Continue to use the product in this state may cause fire or electric
shock.
14
Page 15

Turn off the product when you dropped the product or the cover
breaks and request a repair service. Continue to use the product in this state
may cause fire or electric shock.
If you hear thunder, do not touch the power plug or connect cables
until you are safe. If there is a chance of a lightning strike, take off and turn
off the product. If it is the AC adaptor, remove the power plug from wall
outlet and disconnect cables. Lightning may cause fire, fault or damage the
product as well as electric shock.
Do not allow metal objects or burnable items to get inside any of
opening such as slots. Doing so may cause fire or electric shock.
The customer is not allowed to disassemble, modify or repair the
product. Doing so may cause a fault, ignition, electric shock or injury.
Do not operate the product while driving a car, motorbike or riding a
bicycle. May disturb driving and cause an accident. Park the vehicle in a safe
area before using the product.
Do not cover or wrap the product with bedding, place it near the
heater or on an electric carpet, etc. while using the product.
Doing so may cause fire because heat is being accumulated within the
product.
15
Page 16

Do not use other than the AC adaptor included in the product or
designated AC adaptor. Do not use the AC adaptor included in the product
for other devices. Doing so may cause fire or electric shock.
Do not use a cleaning spray that contains flammable chemicals to
clean. Doing so may cause fire or a fault.
Although the product has waterproof property, stop use if liquid such
as water gets inside the product from the cap and the battery cover.
Continue to use the product in this state may cause overheating, ignition or
a fault.
Never change the battery or plug an earphone if the product is wet.
Doing so may cause electric shock or short-circuit resulting in a fault or fire.
If the product is damaged because it was dropped or other reason
and its internal parts are exposed, do not touch the exposed parts with your
hands. Doing so may cause electric shock or injury.
Do not place heavy objects on the product. Doing so may cause injury
or a fault.
16
Page 17

■Precautions to HMD
Do not use or store the product in places subject to direct sunlight or
get extremely hot (e.g. in automobiles), places that get humid. Doing so may
cause electric shock, fire, damage or a fault.
Do not leave the product on unstable places such as shaky places or
tilting surfaces. Doing so may cause injury or damage if the product is
dropped.
Follow the instructions on the manual to dispose the product.
Check with local codes for possible special disposal instructions. A
Lithium-ion battery is used in the product. The keyboard uses dry cell
batteries. Do not dispose of batteries in a fire. They may explode.
Do not use the product if the display cushion is damaged and cannot
be attached. Doing so may cause injury by fall or collision.
Do not bring the product close to magnetized objects such as cash
cards, floppy disks, credit cards and prepaid cards. Doing so may result in
loss of recorded information.
17
Page 18

■Precautions to earphone
■Precautions to wireless
If you feel any abnormality with your skin, immediately consult a
doctor for a medical treatment. Itching, rashes, eczema, etc. sometimes
occurs if you use the product for a long time or depending on your physical
constitution and condition.
See Material List for materials used in the product. (→P.24)
Use the product with the cap and the battery cover closed. If the
covers are open, dirt or water may get inside causing a fault.
Do not place the product directly on sand at a beach etc. Sand or
other small particles may get inside the earphone, microphone or
receiver/speaker, causing the volume to drop. If sand gets inside the product,
it may cause overheating or a fault.
Adjust the volume moderately when using the earphone.
May cause a hearing loss if the volume is too high.
Permanent hearing loss may occur if earphones or headphones are
used at high volume for prolonged period of time.
18
Page 19

■Precautions of battery pack
Warnings for Wi-Fi® and Bluetooth® technologies. The product
should be switched off wherever you are requested to do so in
・hospitals, clinics or health care facilities
Especially in the operating room for surgery, ICU, CCU, etc
・airplane if it is prohibited to use wireless technologies.
・fire alarms, automatic doors and other automatic control equipment.
・Users wearing implanted pacemakers or defibrillators or other electronic
medical equipment
These requests are designed to prevent possible interference with sensitive
equipment using low-power signals.
The battery pack of the product is a lithium-ion battery. The battery pack is
not fully charged at the time of purchase.
Charge the battery pack before using the product.
Do not short-circuit the battery pack’s plus(+) and minus(-).
Do not carry or store the product with objects like a metal necklace.
May cause battery pack to ignite, burst and a fault by short-circuit.
Do not disassemble, remodel or solder.
19
Page 20

If the battery pack's fluid contacts eyes, flush the eyes with clean water
immediately and see a doctor right away. Do not rub the eyes. May cause loss
of sight. The leaking battery pack fluid may ignite, explode or overheat.
Battery pack is not waterproof.
If water or seawater gets on the product, it may cause overheating, ignite,
damage, electric shock or a fault. Do not charge if the battery pack is wet.
If the battery pack's fluid contacts the eyes, clothes, etc., flush with
clean water immediately. If the battery pack’s fluid contacts the eyes, see a
doctor right away. Do not rub the eyes. May cause loss of sight and injuries.
If battery pack’s fluid is on the product, wipe it off without touching the fluid
directly.
Do not use the battery pack if it was dropped, stepped on, damaged
or any liquid leaking from it. Keep the battery pack away from fire if any
liquid was leaking or odor coming out from it. Doing so may cause ignition or
explosion.
Insert the battery pack to the HMD in correct direction.
Connecting incorrectly might cause explode, ignition or overheat.
Do not force the battery pack into the product. If cannot insert, check the
connecting part of the battery and the product.
The battery pack is a consumable item. If the performance of a
battery pack does not recover after charge, the battery pack is at the end of
20
Page 21

■Precautions of battery charger, AC adaptor and cables
its service life.
Failure to do so may cause overheating, ignition, rupture or leakage. Note
that the length of service life varies depending on the usage condition.
Stop charging if charging takes a very long time compare to usual.
Failure to do so may cause overheating, ignition, rupture or leakage.
Follow the instructions on the manual to dispose the product. Check with
local codes for possible special disposal instructions. A Lithium-ion battery is
used in the product. Do not dispose of batteries in a fire. They may explode.
Do not use at other voltages than the specified power supply voltage.
Doing so might cause fire, overheating or electric shock.
・Battery charger
DC-IN connector: DC12V
MicroUSB connector: DC5V
・AC adapter: AC100V to 240V
Insert the power plug of into the wall outlet all they way. Incomplete
insertion of the power plug might result in electric shock or fire caused by
overheating and ignition. Do not use when specified charging equipment is
damaged, or a power outlet is loose.
Do not overload an electrical circuit. Do not use power outlets or
21
Page 22

wiring apparatus beyond its rating. Also, exceeding rating, for example, by
connecting multiple devices to a single power strip may result in electric
shock, injuries, damage or fire.
Do not short the charging jack while it is connected to the outlet. Do
not touch the charging jack with a part of your body such as your hand or
finger. May cause an electric shock, short, fire, injury or fault.
Do not touch the battery charger for a long time while power is being
supplied from an external source. Doing so may cause a low-temperature
burn.
When disconnecting the power plug from the outlet, do not pull the
AC adaptor or cord with an excessive force. Pull the AC adaptor or cord
horizontally to disconnect.
Failure to do so may cause a fire, burns, injury or electric shock.
When disconnecting the power plug from the outlet, do not pull the
cord. Instead, hold the adaptor to disconnect.
Pulling the cord may damage the cord and cause a fire or electric shock.
Do not touch the adapter cord or power plug with wet hands.
May cause an electric shock
22
Page 23

Do not strain the base of the cable by tightly wrapping the cord
around the AC adaptor.
Cable core may be exposed or disconnected. Doing so may result in an
electric shock or fire.
Do not apply a strong force by pulling the AC adaptor strongly while
it is connected to the outlet. May case injury or a fault.
Do not drop or apply a strong force or hard shock to it. Internal
substrate might be damaged. Moreover, do not use if the AC adaptor or cable
is deformed, cracked or damaged. May case a fault, electric shock or fire.
Wipe off any dust or particles that accumulated on the power plug or
the connection between the AC adaptor and a cable by using a dry clean
cloth.
Failure to clean the dust may cause a fire, burns or electric shock.
Do a cleaning inspection once a year.
Always remove the power plug from the outlet when cleaning the
equipment. May cause fire, damage or electric shock.
Battery charger is not waterproof. Use it where any fluid (e.g.
water, seawater, etc.) will not splash. Doing so may cause overheating, fire,
electric shock or short-circuit resulting in a fault. If the fluid is on the battery
23
Page 24

charger, remove the power plug from wall outlet immediately.
Never use the battery charger in humid places such as bathrooms.
Doing so may cause electric shock or a fault.
Always remove the power plug of the battery charger from the outlet
when not using it for an extended period of time. Moreover, remove AC
adaptor from the battery charger. Failure to do so may cause a fire.
Do not use the AC adaptor, cable or power plug if it gets damaged.
May cause an electric shock or fire.
When you insert and remove the power plug of the AC adapter from
power outlet, do not contact a metal strap or other metal objects with the
jack. May cause fire, burns or electric shock.
Do not place heavy objects on the cable. Doing so may cause injury,
fire or electric shock.
Do not damage, modify, heat, twist, pull or place a heavy object on
the cable of the specified charging equipment. Do not use a damaged cable.
Doing so may cause an electric shock, short circuit or fire.
24
Page 25

Part
Material
Surface treatment
Head Mounted Display
Display panel
Acrylate resin
AR coating
Display cushion
Synthetic leather
-
Power key, home key
PC resin
Acrylic UV curable coating
Exterior case
PC resin + ABS resin
Acrylic UV curable coating
microUSB connection
PC resin + Polyester
silicon resin
Acrylic UV curable coating
microSD card slot
PC resin + Polyester
Acrylic UV curable coating
Earphone connection
PC resin + Polyester
silicon resin
Acrylic UV curable coating
Diopter adjuster cap
PC resin + Polyester
Acrylic UV curable coating
Hook-and-loop
fastener
nylon
-
screw
Stainless steel
trivalent chromate coating
label
polyester
-
Fitting belt
Head adjuster
polyethylene
-
Belt attachment
polypropylene
-
Side cushion
polyester
-
Top band(clip)
Polypropylene(POM
-
Front band
synthetic rubber
-
Helmet clip
body
PC resin + ABS resin
-
Shaft & shaft lock
Stainless steel
-
Screw
POM resin +
Stainless steel
-
Material List
cap
cap
elastomer resin +
elastomer resin +
silicon resin
jack cap
elastomer resin +
elastomer resin +
silicon resin
resin)
25
Page 26

Knurling screw
Stainless steel
-
Battery pack
Body
PC resin
-
contacts
Nickel
Gold plating
Label
polyester
-
Battery charger
Body
PC resin + ABS resin
-
contacts
Beryllium copper
Gold plating
Wearable Keyboard
body
PC resin + ABS resin
Acrylic UV curable coating
key
urethane acrylate
UV curable coating
wearable keyboard
Styrene/ Butadiene
-
microUSB connection
cap
thermoplastic
elastomer
Screw
steel
screw
Stainless steel/
trivalent chromate coating
Handling precautions
belt
rubber
This product is to wear on a head and is designed to have the motion space.
Please be careful to have a sufficient distance so that you will not get caught
in a machine such as robot arms while wearing this product.
●Do not put conductive materials (metal pieces, pencil lead, etc.) inside the
product, keyboard and battery charger.
●Do not drop the product, keyboard, battery charger, AC adaptor or subject it
to shocks when carrying. Protect from excessive force or vibration by placing
it in a bag.
●Adjust the arm of the product so that the display will be about 3cm away
from and in front of your eye.
●Adjust the display to left, right, up or down in order to visually recognize
the four corners of displayed image.
●When the display is placed in front of an eye, the eye is blocked by the
26
Page 27

display. When it's necessary to secure the sight, move the display to below
your eye. If you are not looking at the display, shift the arm to the side.
●Do not operate the product while walking, running, driving a car, motorbike
or riding a bicycle. May cause an accident.
●Do not use the product in an intensely shaky or unstable. May cause
dizziness, nausea, headache or motion sickness.
●When you do some work while looking at the screen, be mindful of any
objects in the areas around your feet, hands and overhead. Please be careful
about an accident by fall, an injury by fall and a falling object.
●Seeing an image that has large degree of shaking, an intensive blinking
and intensive movement may cause dizziness, nausea, headache or motion
sickness.
●May cause harm to your eyes if there is a big difference between brightness
of a display and ambient light.
●Be careful with obstacles and other people when there are many vehicles or
people, a crowded place or a narrow place.
●Seeing the display continuously for a long period of time may cause eyes to
fatigue. Please get moderate rest periodically.
●It is recommended to get rest since peripheral visual field narrows by
fatigue after use. Drive or ride safely when driving a car, a motorcycle or a
bicycle after use.
●Those who are 15-year-old or younger should not use the product since
there may be an adverse effect on their visual function.
●Do not use this product if a person had a convulsion, epileptic's attack or
loss of consciousness by flash of lights.
This product may cause similar symptoms.
●Do not use this product if you are in a poor physical condition. Using this
product may worsen your physical condition.
●Do not use this product if you have a disorder or deficiency in your eyes.
May aggravate squint, weak eyesight or anisometropia.
●Stop using the product immediately and rest until you feel better when you
are not feeling well or feel uncomfortable during use.
●People around you may hear your conversation when you talk on the phone
using speakers. If it is not desirable, please use earphones.
27
Page 28

Bluetooth®/Wireless LAN (Wi-Fi®) function
Notes on waterproof/dustproof property
■Waterproof/Dustproof
[Equivalent to IPX5]
●This product supports security features for wireless communications that
are compliant with the Bluetooth® and Wi-Fi® standard specifications, but
the security may not be sufficient depending on the usage environment and
configuration. Be careful when making data communication using
Bluetooth® or wireless LAN (Wi-Fi®) function.
●Wi-Fi® has the advantage that it can be freely connected anywhere within
the radio wave range, as it uses radio waves for exchanging information. At
the same time, there is a risk that a malicious third party may obtain
unauthorized access if security settings have not been configured. You are
recommended to configure security settings before using wireless LAN at
your direction and responsibility.
●The Company assumes no responsibility for leakage of data or information
that may occur during Bluetooth®/ Wi- Fi® communication.
Before using the product, thoroughly read below to ensure correct use.
Failure to follow the contents described in these sections may cause
intrusion of water, sand or other foreign material, resulting in overheating,
ignition, electric shock, injury or a fault.
There are microUSB connector cap, diopter adjustment cap, microSD card
slot cap, battery cap, external audio connection jack cap on this product.
Moreover, there are microUSB connector cap and battery cover on the
keyboard.
The product provides waterproofness of IPX5, IPX7 end dustproof of IP5X
with firmly closing all the caps and a battery cover (based on in-house
testing).
IPX5 equivalent means that the product will maintain its operability as
HMD even if it is sprayed with water from a 6.3 mm diameter nozzle at a
distance of about 3 meters for more than 3 minutes at a rate of about 12.5
liters per minute from any direction.
28
Page 29

[Equivalent to IPX8]
[Equivalent to IP5X]
■Important items to remember before use
IPX8 equivalent means that the product will maintain its performance as
HMD with no water getting inside the main unit when the main unit is
gently submerged in a tank of still tap water at room temperature to a depth
of 1.0 meters and left for about 30 minutes.
IP5X means a protection degree that HMD keeps functioning and safety
after it is placed in a device with dust in diameter 75μ or less for 8 hours,
agitated and then taken out.
However, proper operation of the product in every possible condition during
actual use is not guaranteed. Malfunctions determined to be caused by
mishandling by the customer are not covered by the warranty.
●Do not place the product directly on sand at a beach etc. Sand or other
small particles might get inside the receiver/speaker, microphone, etc.
causing the volume to drop. If sand gets inside the product, it might cause
overheating or a fault.
●Close all the caps and a battery cover firmly and make sure that there are
no spaces between them and the product.
●Waterproofness is only effective when all the caps and the cover are
securely closed.
●Even a small particle (a hair, a grain of sand, fine fiber, etc.) between the
product and the caps or the battery cover and the keyboard could cause
water leakage.
●Do not poke the microphone and the speaker holes shown below with a
sharp object. Damaging waterproof membrane may result in water leakage.
29
Page 30

■Tips for comfortable use
●Do not open/close the cap and the battery cover if the product or your hands
are wet.
●Do not use the product underwater (including button operations).
●Do not leave the product in a humid place for an extended period of time.
●The product main unit is waterproof only against fresh water and tap water
(5°C to 35°C). Do not splash or soak the product into the following liquid. Do
not apply or attach sand or mud to the product. Ex: soap water, detergent
water, seawater, pool water, hot spring water or boiled water.
●Once the product gets wet, water may remain in gaps of the product. Shake
the product well to drain water. Especially make sure to drain water that are
remaining inside the buttons.
●Water may remain on the product after draining. Although you can use the
product, do not place it near things that must not get wet. It may wet your
clothes, bag or contents of the bag.
●Drain water if it becomes temporarily hard to hear the sound due to water
remaining in the microphone. Please see draining section for more details.
(→P.33)
●Although you can hold the product with wet hands, do not immerse the
product into water.
●Do not use the product underwater. Doing so may cause a fault.
●Extreme changes in temperature cause condensation. Wait until the
product reaches room temperature before you bring the product from a cold
place into a warm place.
30
Page 31

■To maintain waterproofness/dustproofness
●Do not splash the product with hot water. The product is not resistant to
hot temperatures.
●Use within an ambient temperature range of 5°C to 35°C and humidity
range of 20% to 80%.
●Do not apply a strong water flow (more than 6 liters per minute).
●Do not drop the product.
●Do not use or leave the product under direct sunlight or in a hot place.
●You can wash the product under a mild flow (up to 6 liters per minute) of
tap water at room temperature (5°C to 35°C) at a distance of about 10 cm
from the faucet or showerhead. Do not spray the product with high-pressure
water or submerge it in water for extended period of time, as the product is
not designed to withstand high water pressure.
●Make sure to hold the caps or the cover so that it does not open. Wash the
product with your hands. Do not use a brush or sponge.
●Do not wash the product in a washing machine or ultrasound bath.
Note the following points to maintain waterproofness/dustproofness.
●To insert/remove the microSD card, use your fingertip to pull the indent of
the microSD card slot cap to open. For more details, please see procedure 1 in
“Inserting/removing microSD card”. (→P.77)
●To use microUSB on the product or the keyboard, use your fingertip to pull
the indent of the microUSB connector cap to open.
- For the product
Please see “Connecting a microUSB cable” for more details. (→P.78)
- For the keyboard
Use your fingertip to pull the indent of the microUSB connector cap to open
shown below.
31
Page 32

●When adjusting visibility, use your fingertip to pull the indent of the
diopter adjustment cap to open. Please see procedure 3 in “Adjusting
visibility/position” for more details. (→P.60)
●To insert/remove the battery pack, turn the battery cap counterclockwise
direction to open. Please see procedure 1 in “Attaching/Removing battery
pack” for more details. (→P.42)
●To attach an earphone, use your fingertip to pull the indent of the earphone
connection jack cap to open shown below.
●To change the dry batteries of the keyboard, unlock the locks and place a
fingertip on a tab of the battery cover on each side to open.
Please see procedure 1 and 2 in “Attach the keyboard” for more details. (→
P.55)
Moreover, close the caps and the battery cover by pushing firmly and make
sure that there are no spaces between them.
The caps (microUSB connector cap, Diopter adjuster cap, microSD card slot
cap and Earphone connection jack cap on the product and microUSB
connector cap on the keyboard) are designed to be removed.
If the cap is removed, place it back to the original position and push it in.
32
Page 33

□Rubber seals
□When liquid other than water are attached on the product
□After the product gets wet
Example: microUSB connector
The rubber seals around the caps are important to maintain
waterproofness/dustproofness. Note the following points.
●Do not remove or damage the rubber seals.
●When closing the cap, be careful not to let the rubber seals get caught.
Forcibly closing the cover with the rubber seals caught may damage them
resulting in loss of waterproofness/dustproofness.
●If any liquid other than fresh water and tap water (hot water, seawater,
detergent, chemical, sweat, etc.) at room temperature (5°C to 35°C) gets on
the product, it may cause deterioration in waterproofness/dustproofness.
●Do not open/close the cap with gloved hands. Do not get dust on the product.
A small particle (a hair, a grain of sand, fine fiber, etc.) on the seals could
cause water leakage. If small particles are attached to the product, make
sure to remove them with a clean dry cloth.
●Do not insert sharp objects into gaps of the cap. Doing so may damage the
rubber seals, causing water leakage.
●It is recommended to replace the rubber seals (charged service) for
maintaining waterproofness/dustproofness once every two years regardless
of whether any abnormality is present. For information on rubber seals
replacement, contact your local sales representative.
If any liquid other than plain water (e.g. seawater, detergent, sand or mud)
attached on the product, immediately rinse it with plain water.
If the product gets wet, drain water and wipe off water drops on the product
with a clean dry cloth.
* Do not leave the product without wiping off water. Doing so may
short-circuit the connector.
33
Page 34

■Draining
* Do not leave the connection jack without wiping off water.
* In cold climates, water on the product may turn to frost. Using the product
with frost may cause a fault. Do not leave the product without wiping off
water.
●If the product gets wet with water or snow, wipe off with a clean dry cloth.
Be careful not to get your clothes or bag get wet with water that could not be
wiped off or water remaining in the gaps.
If you use the product with water drops on its surface, volume of the speaker
may be lower or may wet your clothes or bag.
Also, if water may have gotten into the product through gaps on the button
for example, follow the steps indicated below to remove water from the
product and the keyboard.
□For the product
Water could be collected in the speaker, the microphones(MIC), Home button
and Power button shown below with arrows.
Firmly holding the product and shake it until there is no water as shown
below.
34
Page 35

■Charging precaution
■Cable connecting precaution
□For the keyboard
Water could be collected in the microUSB connector. Open the microUSB
connector cap, firmly holding the keyboard and shake it until there is no
water as shown below.
The battery charger is not waterproof/dustproof. Be sure to check the
following points before and after charging.
●Never charge the wet battery pack. If you charge the battery pack just after
the product gets wet, drain water well and wipe remaining water off with a
clean dry cloth before placing it in the charger.
●Do not touch the battery pack and battery charger with wet hands. Doing so
may cause electric shock.
●Do not splash water over the battery pack and battery charger when using
them. Doing so may cause fire or electric shock.
●Do not use the battery pack and battery charger near water. Doing so may
cause fire or electric shock.
●Do not connect microUSB connector and microUSB cable if water is inside
the connector. Doing so may cause fire or electric shock.
●Do not connect the power cable if water drops are on it. Doing so may cause
fire or electric shock.
35
Page 36

1. Part names and functions
Head mounted display
1 Hook-and-loop fastener
Attach hook-and-loop fastener comes with belt attachment.
2 Display
3 Microphone
4 microphones all together.
4 Camera
5 Home button
Shows the home screen
6 microUSB connector cap, microUSB connector
Connect a microUSB cable. Please see “Connecting a microUSB cable” for
more details. (→P.78)
The battery pack cannot be charged with microUSB that is connected to the
product.
7 Power Indicator light
36
Page 37

Power button operation
Detail of operation
Press the power button once
Turn ON/OFF screen
Hold down the power button for few seconds
Power ON/OFF
Hold down the power button for more than 13 seconds
Reboot
When the power is on after pressing the power button, the green light will
light up but lights off after a period of time.
8 Power button
Following can be done by pressing the power button.
Note: When there is not enough battery, the product will not boot even the power
button is pressed. Red power indicator light will flash 3 times.
37
Page 38

1 microSD card slot cap, microSD card slot
Please see microSD card for more details. (→P.77)
2 Hook-and-loop fastener
Attach hook-and-loop fastener comes with belt attachment.
3 Microphone
4 microphones all together.
4 Diopter adjustment cap, diopter adjustment screw
Diopter adjustment is used when the display is hard to see.
Please see “adjusting visibility” when the display is hard to see. (→P.60)
5 Battery Pack
Rechargeable battery pack.
Please see “Charging the battery pack”. (→P.40)
6 Battery cap
7 Strap
8 Strap hole
38
Page 39

Keyboard
■Front
[Power] key operation
Detail of operation
Press the power key once
Confirm remaining of dry batteries level
Hold down the power key
Power ON/OFF.
indicator light will be on.
9 Earphone connection jack cap, Earphone connection jack
10 Speaker
1 microUSB connector cap, microUSB connector
2 [BackSpace] key
3 [Bluetooth] key
4 [Power] key
Following can be done by pressing the power key.
- If the power is ON,
Bluetooth/Power indicator light will be on.
- If the power is OFF,
Bluetooth/Power indicator light will NOT be
on.
for few seconds
When the power is ON, Bluetooth/Power
39
Page 40

■Back
Keyboard cannot be turned ON if the microUSB is connected. Make sure to
pull the cord out before turning ON.
5 Bluetooth/Power indicator light
Displays status of connection or remaining of dry batteries level.
Please see (→P.76)
6 One-touch button([F1]to[F3])
You can launch apps with a single action of pressing a button by
pre-assigning apps to those buttons.
7 [Back] key
8 cursor key
Move cursor to up/down/left/right
9 [MENU] key
10 [Enter] key
1 Lock button
Slide to open/close the battery box
2 Battery box, battery cover
Use two(2) AAA dry alkaline batteries. Please see “Attach the keyboard”
to change the batteries. (→P.55)
40
Page 41

2. Get started
Charging the battery pack
■Parts name of the battery charger
Please follow the instructions how to prepare the product to be worn.
The battery pack is not fully charged at the time of purchase. Charge the
battery pack before using the product.
The explanation below is using the AC adaptor to charge.
1 Attach the battery pack to the battery charger.
Align the metal contacts of the battery pack with those of
the battery charger.
2 Insert the power cable to the AC adaptor.
3 Insert the power cable to the battery charger’s DC-IN connector.
4 Insert the AC adapter’s power plug into an outlet.
41
Page 42

For microUSB, with the B engraved side facing upwards,
insert the microUSB plug of the microUSB cable straight into the battery
charger.
Be careful not to connect the microUSB in wrong direction. It may damage
the connector.
- When using DC-IN connector to charge, you may charge either 2 batteries
at the same time or one battery at a time using either slot A or B.
- When using microUSB connector to charge, you may charge only 1 battery
at a time using below equipment.
・PC
・smartphone
・tablet
42
Page 43

Indicator light
Status of the battery pack
Lights red
Charging
Lights flashing
- Charging timer expired
times, please contact your local sales representative.
Light turns off
Charge complete
Attaching/Removing battery pack
1 Turn the battery cap counterclockwise direction to open.
・AC adaptor with microUSB for smartphone and tablet
5 To check the status of charging
The state of the battery charger indicator light will be as follows.
If charging is not completed after the specified charging
time, the indicator light flashes. Remove the battery pack
and recharge it.
- Abnormal power voltage of the battery pack
When power voltage of the battery pack is abnormal,
charging error occurs and the indicator light flashes.
Remove the battery pack and recharge it.
If it continues to flash when trying to charge for several
- Charge in a place where an ambient temperature range of 5°C to 35°C
- Indicator light goes off and charging may stop temporarily when the
temperature of the battery pack is out of temperature range. If the battery
pack is hot, wait until it cools down and recharge the battery.
- The battery is a consumable item. If the performance of a battery pack does
not recover (e.g. the usable time after each charge has become extremely
short), the battery pack is at the end of service life. Stop using and replace
with a new battery pack.
Line-up marks on the cap and on the product.
43
Page 44

2 Insert the battery pack to the product.
3 Align and push the battery cap as shown below.
Align the metal contacts of the battery pack with those of the product.
- To remove a battery pack from the product, slowly tilt the product.
If tilt fast, the battery pack may pop out.
44
Page 45

4 Turn the battery cap clockwise direction to close.
Decide the orientation of the product
Line-up a mark on the cap and a mark on the product.
This product can be used on both left and right eyes. Please decide which eye
to see the display. The explanation in this manual is the right eye case.
■use on the right eye ■use on the left eye
45
Page 46

Wearing the product
To use on the left eye,
1 Move the joint with dotted-circles shown below and reverse the
camera and the display positions.
2 Turn the product upside down to use on the left eye.
To adjust the view, move the joint with dotted-circles shown below.
This product is designed to be worn either directly on the head or on a helmet.
46
Page 47

Assemble the fitting belt
1 Attach belt attachments and head adjusters to the product.
The procedures are different depending on how you wear.
■Wear on the head
Please see “Assemble the fitting belt” (→P.46)
■Wear on a helmet
Please see “Attach to a helmet” (→P.52)
Assemble the fitting belt to be attached to the inner side of this product.
The length of the belt can be adjusted at the end so please assemble it first as
explained below.
Attach to the place where circled below.
<Below image shows how the belt attachments and head adjusters
are attached.>
The following explanation is how to attach the belt on this side(right side).
1. A single hook-and-loop fastener on the right belt attachment should
be touching the product and align the positioning holes.
Check to see if the positioning holes are aligned correctly.
If they are not aligned, unstick the hook-and-loop fastener on the back
of the belt attachment by pulling and align the holes.
After the holes are aligned, stick the hook-and-loop fastener.
Hook-and-loop fastener on the
back of the belt attachment by
47
Page 48

pulling and align the holes.
Positioning holes
2. Stack the right head adjuster and right belt attachment and
align the positioning holes. Check to see if the positioning holes
are aligned correctly.
Head adjuster has an orientation so make sure the ratchet part
will be on the back side.
Positioning holes
3. Two places will be set with knurling screws.
Use a flat blade screwdriver or a coin to turn and tighten the screws.
knurled screws
4. Attach left belt attachment and left head adjuster to the left side
as you did to the right side.
48
Page 49

2 Attach the top band to the belt attachments.
You may attach the top band to either side but it will be easier to adjust if
the hook-and-loop fastener is on your dominant hand side.
1. After a side of a top band that is cut roundly is put into a hole on
the belt attachment, the top band is inserted to the adjuster from
the outside to the inside.
2. The top band is inserted into the adjuster as shown in the figure
and fixed.
3. After opposite side of the top band is inserted into a hole on
the belt attachment, pass the top band into a rubber band and
attach the fixed hook-and-loop fastener.
49
Page 50

3 Attach the front band to the belt attachments.
4 Insert the head adjuster.
1. The front band is into a hole on the belt attachment shown below.
2. Do the same for the other side.
<Below image is a condition in which the fitting belt is attached.>
50
Page 51

5 Attach the side cushions to the inner sides of the fitting belt.
6 Attach the display cushion to the display.
1. Attach the hook-and-loop fastener on the side cushion to
the belt attachment.
2. Do the same for the other side.
Start attaching the display cushion to the dotted-circle shown below.
Wrap the projecting part of the display with the cap part and cover
with the display cushion.
When covering, please don't insert the cap part inside.
51
Page 52

Adjust/wear HMD on your head
1 Wear HMD on your head.
2 Adjust the head band first and adjust the front band by setting
the hook-and-loop fastener.
3 Adjust the ratchet on the head adjuster
This is the end of assembly.
If you wear glasses normally, keep wearing glasses and use the HMD. After
wearing, please adjust the length of the band to fit your head.
Adjust so that the speaker will be on top of your ear.
52
Page 53

Attach to a helmet
1 Attach the left and right helmet clips to the product.
Continue to wear the keyboard on your arm. Please see “Attaching the
keyboard”. (→P.55)
You may install and use HMD on a commercially available helmet.
However, some of the helmets may not be compatible with the product.
1. Stack the helmet clip and the product and align the positioning holes.
2 places will be set with knurling screws.
53
Page 54

2 Loosen the screws attached to the helmet clips.
2. Do the same for the other side. Use a flat blade screwdriver or
a coin to turn and tighten the screws.
54
Page 55

3 Decide where to place the product on the helmet and attach the product.
4 Attach the display cushion to the display.
If the helmet has a chin strap, put the strap inside the helmet before
attaching the product.
If the place to attach the product is decided, place the product into
the gap of the helmet clips and tighten the screws.
If the product isn't attached in the proper location of the helmet,
the product may touch your ears when wearing the helmet.
Start attaching the display cushion to the dotted-circle shown below.
Wrap the projecting part of the display with the cap part and cover
with the display cushion.
When covering, please don't insert the cap part inside.
55
Page 56

5 Wear the helmet
Attach the keyboard
1 Slide to unlock the battery box.
2 Open the battery box cover.
How to insert batteries and wear the keyboard to your arm is explained.
Place a fingertip on a tab of the battery cover on each side and
pull with an angle to open.
56
Page 57

3 Two(2) AAA alkaline batteries are placed inside from the right side.
4 Close the battery cover by joining tabs and tab holes.
When putting the first battery, put it from the left side and slide it to
the right side since there is a metal piece on the right side of the
battery box.
- Be careful
- Don't mix battery types and don't mix old batteries with new batteries.
with the orientation of the battery.
Make sure the lock is unlocked and set it firmly.
57
Page 58

5 Slide the lock buttons in the arrow direction shown below and
close the cover.
6 Attach the keyboard belt to back of the keyboard.
The hook-and-loop fastener should be face down.
58
Page 59

7 Wear the keyboard on your arm.
Wrap the keyboard belt around your arm and stick the hook-and-loop
fastener.
Tighten the belt so that the keyboard will not fall off.
You may adjust the length of the keyboard belt by the hook-and-loop
59
Page 60

3. Initial settings
fastener shown below.
When changing the batteries for the second time, you don’t need to take
the keyboard belt off. You can change the batteries as follows.
Before use, initial setting by the following procedure.
“Adjusting visibility/position” (→P.60)
↓
“Launch ”HMD home” screen” (→P.61)
↓
“Decide the orientation of the product” (→P.62)
↓
“Paring(connecting)” (→P.64)
60
Page 61

Adjusting visibility/position
1 Hold down the power button on the product for few seconds
2 Positon the display in front of the eye.
3 Adjusting visibility
A screen will be displayed.
Adjust the arm of the product so that the display will be about 3cm away
from and in front of your eye.
1. Use your fingertip to pull the indent of the diopter adjustment cap
to open.
2. Turn the screw for visibility adjustments and adjust the focus of
the screen. Put your nail on a slit and turn the screw for visibility
adjustments.
61
Page 62

Launch ”HMD home” screen
1 Select “HMD home” in the screen.
- If it is hard to adjust the screw while wearing, take the product off
from your head.
3. Close the diopter adjustment cap
Voice command: “Number one”
- You may select an item by speaking "Number [actual number]"(e.g.
"Number one") when there is a number with a balloon.
Please see terminology list of voice commands for words used in
voice command. (→P.72)
- If voice command cannot be used, you may use the keyboard.
In this case, please connect the keyboard to the microUSB cable. Please
see “connecting a microUSB cable” for more details. (→P.78)
62
Page 63

■Menu in ”HMD home” screen
Decide the orientation of the product
1 Select “settings” in “HMD home” screen.
- This screen will not appear from the second time. If you wish to display
this screen, go to “settings”→”other settings”→”home”→”launcher” in
“HMD home” screen.
If you selected “Android home” instead of “HMD home”, this screen will
appear again.
“HMD home” screen will appear.
1 Camera: Launch camera on the product
2 Select file: Launch file viewer
3 Bluetooth: connect this product and a smartphone with
Bluetooth(HFP)
4 Volumes: set volume for video and notice alarms(→P.70)
5 Settings: brightness of the screen, set left or right eye to see
the display, etc. (→P.71)
6 SWITCH SCREEN: switch screen between the product and
a smartphone during Miracast.
Voice command: “Number five”
63
Page 64

2 Select “Switch eye”
3 Select depending on your situation
You may select by using the keyboard if the keyboard is connected.
Voice command: “Number two”
Voice command: “Number one”, “Number two” or “Number three”.
“Automatic” will rotate the screen automatically depending on your
situation.
64
Page 65

4 Select “OK”
Pairing(connecting)
■Connecting the product and a smartphone(Bluetooth)
Voice command: “Number five”
Connect the product to a smartphone and the keyboard.
■Standard configuration
1 Turn on the smartphone
Hold down the power button.
2 In “HMD home” screen, select “Bluetooth” → “OK”.
Voice command: “Number three” → “Number two”
3 Display menu from the home screen of the smartphone and
65
Page 66

tap “system settings”.
4 Tap “Bluetooth”
Turn “ON” “Bluetooth” if it’s “OFF”.
Wait until the product is recognized.
5 Tap “FHMD001”
6 In “bluetooth pairing request” screen, confirm the passkey is
the same as the product and tap “pair”.
Below screen will be displayed on HMD and screen will switch
if connected.
7 Select “OK” on “HMD home” screen.
Voice command: “number one”
Bluetooth connection is complete.
66
Page 67

■Connecting the product and a smartphone(Miracast)
- Supported profile is HFP only.
- The product will not be reconnected automatically to the smartphone once
the power is off or the communication is lost, even if the connection became
available again. It's necessary to operate from procedure 3 above.
1 Hold down the home button until “Waiting for connection
from smartphone/tablet” displays on ”HMD home” screen.
2 Turn on the smartphone
Hold down the power button.
3 Display menu from the home screen of the smartphone and
tap “system settings”.
4 Tap “Display” → “Miracast”.
Turn “ON” “Miracast” if it’s “OFF”.
5 Tap the device name.
The device name is displayed in “HMD home” screen.
The smartphone screen will change to “connected” and
smartphone’s screen will be displayed on the HMD screen.
Miracast connection is complete.
67
Page 68

■Connecting the keyboard and a smartphone(Bluetooth)
- The product will not be reconnected automatically to the smartphone once
the power is off or the communication is lost, even if the connection became
available again. It's necessary to operate from procedure 3 above.
- Miracast connection uses 2.4GHz band wireless LAN. If you are unable to
use 2.4GHz band wireless LAN or has radio wave interference, use
microUSB cable for wired connection. See page “Connecting a microUSB
cable” for how to connect. (→P.78)
When the product is connected to a smartphone by using Miracast,
the time and date on the product will synchronized to the time and date
on the smartphone.
1 Turn on the keyboard.
Hold down the [Power] key until Bluetooth/power indicator light
turns on.
2 Press [Bluetooth] key on the keyboard.
Hold down the key until Bluetooth/power indicator light starts flashing.
It will change to pairing standby state.
3 Display menu from a home screen of the smartphone and
tap “system settings”.
4 Tap “Bluetooth”
Turn “ON” “Bluetooth” if it’s “OFF”.
Wait until the keyboard is recognized.
68
Page 69

5 Tap the address of the Bluetooth keyboard.
It will say “connected” under the device name.
Once the keyboard is connected to the smartphone, device name
will be shown as “FHMD-WKB****” from the next time.
Bluetooth connection is complete.
69
Page 70

4. How to use
Turning the power on
The product will not be reconnected automatically to the smartphone once
the power is off or the communication is lost, even if the connection became
available again. For this reason, reconnection is needed before use.
- Pairing is only needed during the initial settings.
1 Turn on the product, the smartphone and the keyboard.
2 Display menu from the home screen of the smartphone and
tap “system settings”.
3 Tap “Bluetooth”
Turn “ON” “Bluetooth” if it’s “OFF”.
Wait until the product is recognized.
4 Tap “FHMD001”
5 Tap “pair”.
Bluetooth connection is complete.
6 Tap “system settings” again on the smartphone.
7 Tap “Display” → “Miracast”.
Turn “ON” “Miracast” if it’s “OFF”.
8 Tap the device name.
The device name is displayed in “HMD home” screen.
70
Page 71

Volumes/Brightness settings
1 Select “Volumes” in “HMD home” screen.
2 Select item and change the volume.
The smartphone screen will change to “connected” and smartphone’s screen
will be displayed on the HMD screen. Miracast connection is complete.
■Volume settings
Voice command: “Number four”
You may select by using the keyboard if the keyboard is connected.
Select an item by voice command “number one”, “number two” or
“number three” and use voice command “Volume up” and
”Volume down” to change the volume.
You may change the volume by pressing left or right key
if the keyboard is connected.
71
Page 72

3 Select “OK”.
1 Select “Settings” in “HMD home” screen.
2 Select “brightness”
3 Select item and change the brightness.
Voice command: “Number five”
■Brightness settings
Voice command: “Number one”
You may select by using the keyboard if the keyboard is connected.
Voice command: “Number one”
Select an item by voice command “number one”, “number two” or
“number three” and use voice command “Dark” and ”Bright”
to change the brightness.
You may change the brightness by pressing left or right key
72
Page 73

4 Select “OK”.
Terminology list of voice commands
Displayed on the screen
Voice command
1
Number one
2
Number two
3
Number three
4
Number four
5
Number five
6
Number six
7
Number seven
8
Number eight
9
Number nine
0
Number zero
Settings
Settings
Volume down
Volume down
Volume up
Volume up
Dark
Dark
Bright
Bright
Photo
Photo
Video
Video
Stop
Stop
View
View
Help
Help
Zoom out
Zoom out
Zoom in
Zoom in
Fast rewind
Fast rewind
Fast forward
Fast forward
Go Back
Go Back
if the keyboard is connected.
Voice command: “Number five”
You may select an item by voice command when there is a balloon displayed
on the screen of the product. Please see voice command listed below.
73
Page 74

Cancel
Cancel
OK
OK
Voice command
Voice command
Keyboard operation
Keyboard operation
Switch camera mode
Switch camera mode
Photo resolution
Photo resolution
Video resolution
Video resolution
Location
Location
Storage
Storage
Exit
Exit
Below commands are used in camera
Yes
Yes
No
No
Function
Voice command
Same function as [Back] key on the keyboard
Go Back
Show settings screen
Menu
Move focus up
Up
Move focus down
Down
Move focus, screen or operation of a control bar.
Left
Right
Activate a function where the cursor is located.
Enter
Below commands are used in File viewer
Display previous page
Previous
Display next page
Next
End File viewer
Close
Close a file
Close file
Expand the view
Expand
Reduce the view
Reduce
Return to the first page
Top
Go to the last page
Bottom
When a balloon is not displayed on the screen, you may use below voice
commands and their functions.
74
Page 75

Android home screen
Moving the display
When this product is booted and "Android home" is chosen instead of “HMD
home”, a home screen of Android of this product is displayed.
This is not a smartphone’s home screen.
If you want to move the display from an eye temporarily, move the display up
and down/left and right as shown in the next figure.
75
Page 76

An Indicator light on the keyboard
If you would like to move the display left and right, it’s better not to move B
but move A since it’s more easier to put it back to the original position.
76
Page 77

Status of
keyboard
Key operation
Bluetooth/Pow
light
Status/handling
OFF
Hold down
Lights red
Low battery or internal error.
OFF
Hold down
(3 sec or more)
Lights green
(3 sec)
Enough battery
ON
Press [Power]
ON
Press [Power]
Lights red
Low battery or internal error.
ON
Hold down
Blue light
to 120 second)
Waiting to pair status.
Lights red
Low battery or internal error.
ON
Press
Lights blue
(5 sec)
Bluetooth connecting
Light turns off
Bluetooth unconnected
the
[Power] key
(3 sec or more)
[Power] key
key
key or while
using the
keyboard.
er indicator
(3 sec)
Lights orange
(3 sec)
Lights red
Turn off the power and change 2
batteries. If this problem
continues, please contact your
local sales representative
Battery is getting low
Almost empty
Turn off the power and change 2
batteries. If this problem
continues, please contact your
local sales representative
[Bluetooth] key
(3 sec or more)
flashing (every
second for up
If pairing completes, lights for 5
sec and turns off.
Turn off the power and change 2
batteries. If this problem
continues, please contact your
local sales representative
[Bluetooth] key
Please see “Attaching the keyboard” to change the batteries. (→P.55)
77
Page 78

microSD card
type of microSD card
capacity
microSD card
Up to 2GB
microSDHC card
Up to 32GB
microSDHC UHS-I card
Up to 32GB
■Inserting/removing microSD card
1
2
■Supported microSD cards
Use your fingertip to pull the indent of the microSD card slot cap to open.
Use your fingertip to pull the indent of the microSD card slot cap to open.
Insert a microSD card into the microSD card slot until it clicks.
When removing, push the microSD card lightly and release it, then
pull the microSD card straight out.
When removing the microSD card, follow the procedure below to
unmount it.
On “HMD home” screen: → [Settings] → [Other settings] →
[Storage] → [Unmount SD card]
78
Page 79

3 Close the microSD card slot cap.
Connecting a microUSB cable
This is used when connecting the keyboard or a smartphone directly to the
product.
1 Use your fingertip to pull the indent of the microUSB connector cap
to open in the direction shown below.
2 Connect attached microUSB cable(TypeA connector) to the microUSB
connector.
There are TypeA and TypeB. Please check the engraved letter.
79
Page 80

Be careful not to connect the microUSB in a wrong direction.
It may damage the connector.
3 Connect the other side of the microUSB cable to the keyboard.
Use your fingertip to pull the indent of the microUSB connector cap
to open, insert the microUSB cable in the correct direction.
If connecting the product and the smartphone using the microUSB cable,
- Turn on the product and the smartphone’s power and connect
TypeB microUSB cable to the product.
- If the smartphone’s screen is not displayed on the screen of the product,
remove either side of the cable and insert again.
80
Page 81

FCC and IC Regulatory Information
Regulatory Notes and Statements
Wireless LAN, Health and Authorization for use
Regulatory Information/Disclaimers
Please note the following regulatory information related to the
wireless LAN device.
Radio frequency electromagnetic energy is emitted from Wireless LAN
devices. The energy levels of these emissions, however, are far much less
than the electromagnetic energy emissions from wireless devices such as
mobile phones. Wireless LAN devices are safe for use by consumers because
they operate within the guidelines found in radio frequency safety standards
and recommendations. The use of Wireless LAN devices may be restricted in
some situations or environments, such as:
•On board an airplane, or
•In an explosive environment, or
•In situations where the interference risk to other devices or services is
perceived or identified as harmful.
In cases in which the policy regarding use of Wireless LAN devices in specific
environments is not clear (e.g., airports, hospitals, chemical/oil/gas
industrial plants, private buildings), obtain authorization to use these
devices prior to operating the equipment.
Installation and use of this Wireless LAN device must be in strict accordance
with the instructions included in the user documentation provided with the
product. Any changes or modifications made to this device that are not
expressly approved by the manufacturer may void the user’s authority to
operate the equipment. The manufacturer is not responsible for any radio or
television interference caused by unauthorized modification of this device, or
the substitution or attachment of connecting cables and equipment other
than those specified by the manufacturer. It is the responsibility of the user
to correct any interference caused by such unauthorized modification,
substitution or attachment. The manufacturer and its authorized resellers or
distributors will assume no liability for any damage or violation of
81
Page 82

For IEEE 802.11a Wireless LAN
Federal Communications Commission and Industry Canada statement:
Déclaration d’Industrie Canada
FCC Interference Statement
government regulations arising from failure to comply with these guidelines.
This device must not be co-located or operated in conjunction with any other
antenna or transmitter.
: For operation within 5.15~5.25 GHz
frequency range, it is restricted to indoor environments, and the antenna of
this device must be integral.
This device complies with Part 15 of FCC Rules and Industry Canada license
exempt RSS standard(s).
Operation is subject to the following two conditions: (1) This device may not
cause interference, and, (2) This device must accept any interference,
including interference that may cause undesired operation of this device.
Cet appareil est conforme à la Section 15 des Règles de la FC C et à la ( aux)
norme(s) RSS concernant les appareils exempt s de licence par Industrie
Canada. Son fonctionnement est soumis aux deux condition s suivantes : (1)
cet appareil ne doit pas causer d’interférence nuisib le; (2) cet appareil doit
accepter toutes les interférences reçues, y compris celles pouvan t causer un
mauvais fonctionnement de l’appareil.
FCC WARNING:
Changes or modifications not expressly approved by the party responsible for
compliance could void the user’s authority to operate the equipment.
This equipment has been tested and found to comply with the limits for a
Class A digital device, pursuant to Part 15 of the FCC Rules. These limits
are designed to provide reasonable protection against harmful interference
when the equipment is operated in a commercial environment. This
equipment generates, uses, and can radiate radio frequency energy. If not
installed and used in accordance with the instruction manual, may cause
harmful interference to radio communications.
Operation of this equipment in a residential area is likely to cause harmful
interference in which case the user will be required to correct the
interference at his own expense.
82
Page 83

FCC Radio Frequency Exposure statement
Déclaration de la FCC/d’Industrie Canada sur l’exposition aux
The available scientific evidence does not show that any health problems are
associated with using low power wireless devices. There is no proof, however,
that these low power wireless devices are absolutely safe. Low power
wireless devices emit low levels of radio frequency energy (RF) in the
microwave range while being used. Whereas high levels of RF can produce
health effects (by heating tissue), exposure to low-level RF that does not
produce heating effects causes no known adverse health effects. Many
studies of low-level RF exposure have not found any biological effects. Some
studies have suggested that some biological effects might occur, but such
findings have not been confirmed by additional research.
The wireless LAN radio device has been tested and found to comply with
FCC radiation exposure limits set forth for an uncontrolled equipment and
meets the FCC radio frequency (RF) Exposure Guidelines in Supplement C
to OET65.
The exposure standard for wireless devices employs a unit of measurement
known as the Specific Absorption Rate, or SAR. The SAR limit set by the
FCC is 1.6W/kg, and 1.6W/kg by Industry Canada.
This device is compliant with SAR for general population /uncontrolled
exposure limits in ANSI/IEEE C95.1-1992 and Canada RSS 102, and had
been tested in accordance with the measurement methods and procedures
specified in OET Bulletin 65 Supplement C, and Canada RSS 102. This
device has been tested, and meets the FCC, IC RF exposure guidelines when
tested with the device operating conditions.
radiofréquences
La norme régissant l’exposition des appareils sans fil aux radiofréquences
emploie une unité de mesure dénommée Taux d’absorption spécifique, ou
TAS. La FCC et Industrie Canada ont défini la même limite de TAS : 1,6
W/kg. Cet appareil est conforme au TAS pour les limites d’exposition
générales de la population/non contrôlées définies par les règles C95.1-1992
de l’ANSI/IEEE et RSS 102 d’Industrie Canada ; il a été testé en conformité
avec les méthodes et procédures de mesure spécifiées dans le supplément C
du bulletin 65 de l’OET (Office d’ingénierie et de technologie) et la règle RSS
102 d’Industrie Canada. Cet appareil a été testé selon les directives de la
83
Page 84

Export restrictions
Restrictions à l'exportation
Canadian Notice
FCC et d’IC concernant l’exposition aux radiofréquences et s’est révélé
conforme à ces dernières lorsqu’il a été testé en contact direct avec le corps.
This product or software contains encryption code which may not be exported
or transferred from the US or Canada without an approved US Department
of Commerce export license. This device complies with Part 15 class A of
FCC Rules., as well as ICES 003 B A / NMB 003 B A. Operation is subject to
the following two conditions: (1) this device may not cause harmful
interference, and (2) this device must accept any interference received,
including interference that may cause undesirable operation. Modifications
not expressly authorized by Fujitsu America, Inc. may invalidate the user’s
right to operate this equipment.
Ce produit ou logiciel contient du code de chiffrement qui ne peut être
exporté ou transféré des États-Unis ou au Canada sans une licence
d'exportation département américain du Commerce a approuvé. Cet appareil
est conforme à la partie 15 class A des règles de la FCC., Ainsi que CIEM 003
A / NMB 003 A. Son fonctionnement est soumis aux deux conditions
suivantes: (1) ce dispositif ne peut pas causer nuisibles interférences, et (2)
cet appareil doit accepter toute interférence reçue, y compris les
interférences qui peuvent provoquer un fonctionnement indésirable. Les
modifications non expressément autorisés par Fujitsu America, Inc. peut
annuler le droit de l'utilisateur à utiliser cet équipement.
The device for the 5150 - 5250 MHz band is only for indoor usage to reduce
the potential for harmful interference to co-channel mobile satellite systems.
The maximum antenna gain of 6 dBi permitted (for devices in the 5250 5350 MHz, 5470 - 5725 MHz and 5725 - 5825 MHz bands) to comply with the
e.i.r.p. limit as stated in A9.2 of RSS210.
In addition, users are cautioned to take note that high power radars are
allocated as primary users (meaning they have priority) of 5250 - 5350 MHz
and 5650 - 5850 MHz and these radars could cause interference and/or
damage to LE-LAN devices.
84
Page 85

Avis pour le Canada
Le matériel destiné à un usage sur la bande 5 150 - 5 250 MHz doit être
utilisé uniquement à l’intérieur afin de réduire les risques de brouillage
nuisible causé aux systèmes mobiles par satellite fonctionnant sur un même
canal.
Un gain d’antenne de 6 dBi est autorisé (pour le matériel utilisant les bandes
5 250 - 5 350 MHz, 5 470 - 5 725 MHz et 5 725 - 5 825 MHz), conformément à
la limite p.i.r.e. maximale permise selon l’annexe A9.2 afférent aux
périphériques RSS210.
En outre, les utilisateurs doivent prendre garde au fait que les radars de
grande puissance sont considérés comme des utilisateurs principaux (ce qui
signifie qu’ils sont prioritaires) des bandes 5 250 - 5 350 MHz et 5 650 - 5 850
MHz et qu’ils pourraient causer des interférences et/ou des dommages aux
appareils de réseau exempts de licence.
85
Page 86

5. Appendix
The motion space of a display
The motion space of a camera
■Camera arm
The display can be moved in the following range.
There are three levels of height. You may adjust to 0 degree, about 20
degrees or about 40 degrees.
86
Page 87

■Camera tip
Specification
■Head Mounted Display
Product name
Head Mounted Display
OS
Android4.4.4
CPU
1.2GHz Quad Core
CPU(APQ8026)
Memory(RAM/ROM)
2GB/8GB
Display
Size
0.4 inches
Virtual screen size
11 inches(Virtual viewing
Resolution
854 x 480(FWVGA)
Number of colors
24 bit color(Approx. 16,770,000
Visibility adjustment
+1~-2D
Luminance(min~max)
10~1200cd/㎡
Distance from an eye
30.8mm
Audio
Speaker
Mono speaker
Microphone
built-in microphone
camera
Approx. 8.1M effective pixels
Communication
Wireless LAN
IEEE802.11 a/b/g/n(single),
2.4GHz/5GHz
Bluetooth
Bluetooth V3.0
distance is 609.6mm)
colors)
function
87
Page 88

Interface
microSD card slot
×1 slot
Audio
Headset connection terminal
microUSB connector
×1(TypeAB)
Water proofing, dust proofing
IPX5 / IPX7, IP5X
Battery
capacity
Battery pack
Lithium ion 3,300mAh
Battery life (when using an application
Approx. 4 hours *1
Temperature and humidity conditions
Temperature: 5 to
20 to 80% RH(no condensation)
Chemical resistance
Chemical resistance (ethanol,
Dimensions (W×D×H)
- MIN(arm fold)
Weight
HMD : 315g
that is connected with Wi-Fi Miracast)
3.5φ x1
35°C/Humidity:
(This is a reference since the shape is
variable. Values are approx.)
(Values are approx.)
IPA, sodium hypochlorite)*2
W×D×H = 290mm × 180mm
× 60mm
- MAX(arm extended)
W×D×H = 400mm × 350mm
× 37mm
・
・Fitting belt : 70g
・knurled screws : 4g (4 pcs)
・display cushion : 4g
・helmet clips : 45g (2 pcs)
*1: Based on Fujitsu measurement standards. May differ according to usage environment.
*2: Assumed using an anti-bacterial sheet. This test does not guarantee that a chemical will
not cause discoloration, paint peeling, deformation, etc.
88
Page 89

■Wearable Keyboard
Product name
Wearable Keyboard
Connection modes
Bluetooth®Wireless/USB
Communication
function
Bluetooth
Bluetooth V3.0
Interface
microUSB connector
×1(TypeB)
Water proofing, dust proofing
IPX5 / IPX7, IP5X
Battery
AAA alkaline battery
×2
Battery life (when using AAA alkaline
batteries)
Approx. 5 months *
Dimensions (W×D×H)
W×D×H = 135mm × 68mm ×
Weight
Body : 95g
Wired
(Not containing protrusion)
20mm
・
(Values are approx.)
(without batteries and a belt)
・Keyboard belt : 26g
*: Based on Fujitsu measurement standards. May differ according to usage environment.
89
 Loading...