

Page 1

FCC ID: EJE-BT0001 (IC: 337J-BT0001) Report No. M060108_Cert_EYTF3CSFT
EMC Technologies Report Number: M060108_Cert_EYTF3CSFT
APPENDIX I2
FUJITSU NOTEBOOK USER MANUAL (part 2)
EMC Technologies Pty Ltd – 57 Assembly Drive, Tullamarine VIC 3043 Australia
www.emctech.com.au
Page 2

S7020.book Page 35 Friday, May 13, 2005 3:49 PM
4
User-Installable
Features
35
Page 3

S7020.book Page 36 Friday, May 13, 2005 3:49 PM
LifeBook S7000 Notebook
36
Page 4
S7020.book Page 37 Friday, May 13, 2005 3:49 PM
User Installable Features
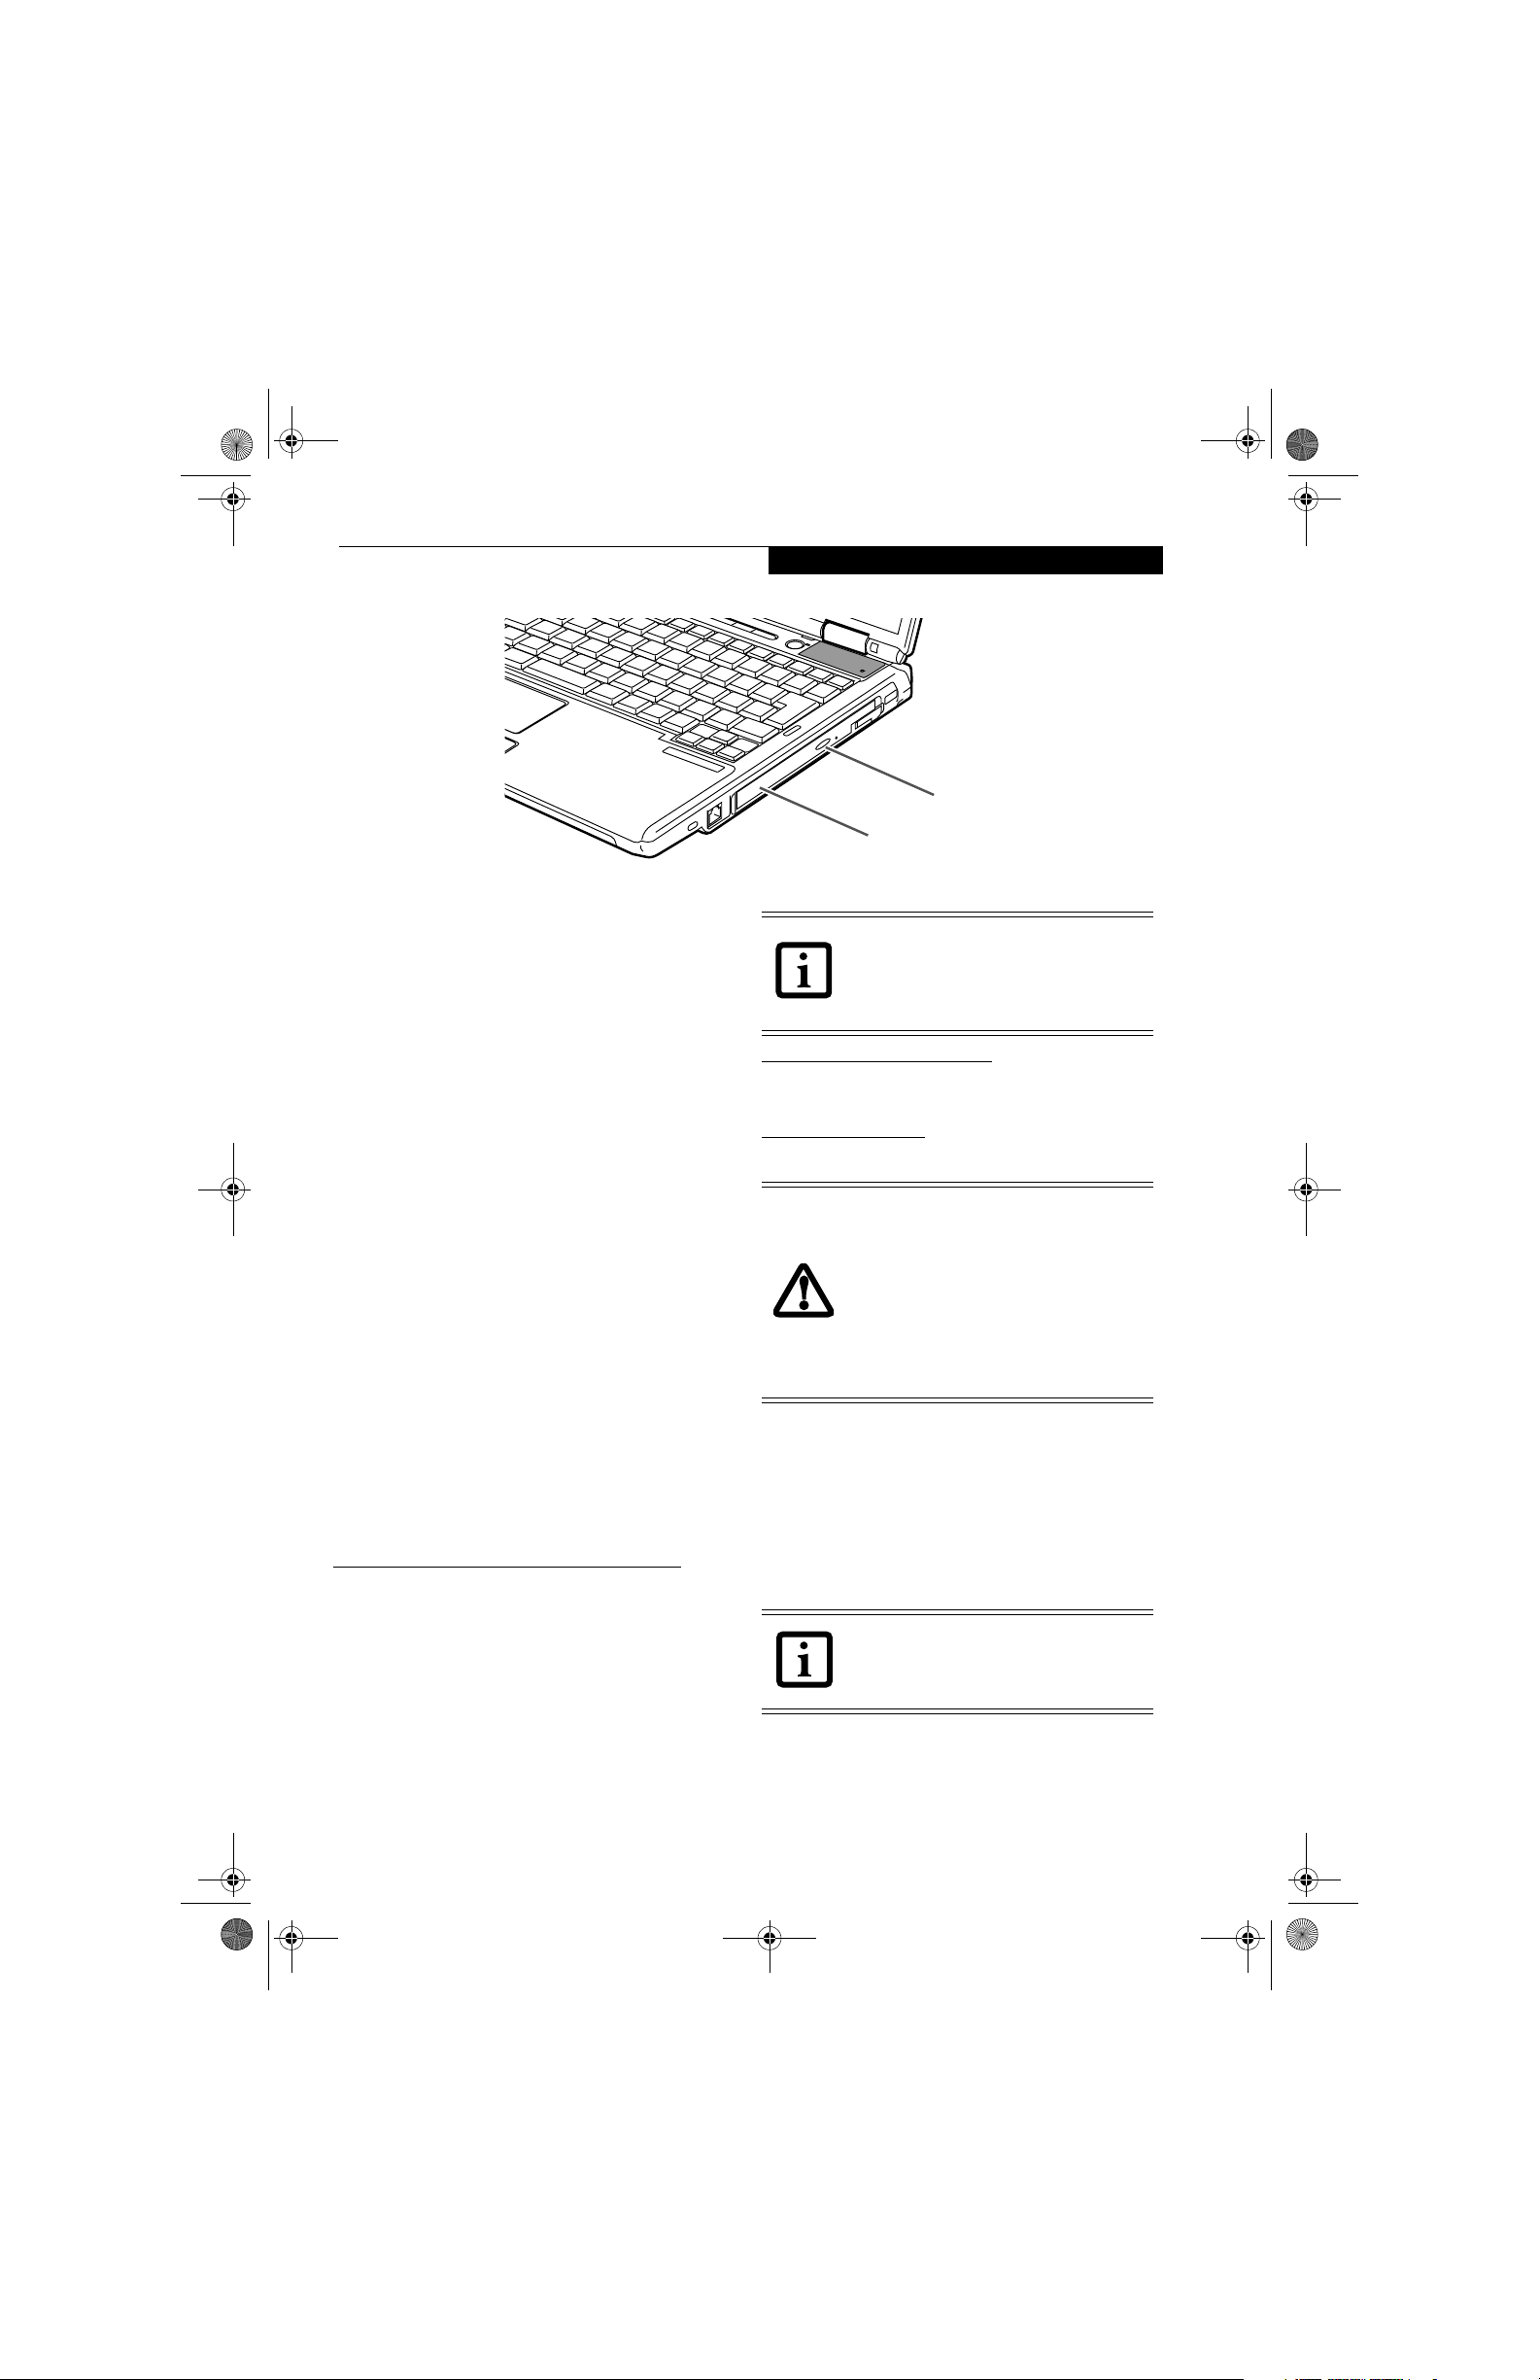
Media Eject Button
Media Holder Tray
Figure 4-1. Optical Drive
Optical Drive
There is a variety of media available to use with your
system, depending upon the system configuration you
have selected. Dual-Layer Multi-Format DVD Writer,
DVD/CD-RW Combo drives, and DVD-ROM drives are
known as “optical drives”.
A CD-R or DVD-R disc can only be written to once;
CD-RW or DVD-RW discs can be written to over and
over. CD-R and CD-RW discs hold up to 700MB of data.
DVD-R and DVD-RW discs hold up to 4.7 GB of data. A
dual-layer (single-sided) DVD+R disc can hold up to 8.5
GB of data.
Depending upon the configuration of your LifeBook
notebook, you may have one of the following drives:
■
Dual-Layer Multi-Format DVD Writer: The DualLayer Multi-Format DVD Writer combines seven
recordable formats in a single drive (DVD-R, DVD+R,
DVD-RW, DVD+RW, DVD-RAM, CD-R, and CDRW), making it the most versatile drive to date.
■
DVD/CD-RW combo: A DVD/CD-RW combo drive
allows you to access movie, software, data, or audio
DVD/CDs, and to write data onto recordable CD-R
and CD-RW discs.
■
DVD-ROM: A DVD-ROM drive allows you to access
software, data, or audio DVDs or CDs.
MEDIA PLAYER SOFTWARE
Dual-Layer Multi-Format DVD Writer model only: With
the Dual-Layer Multi-Format DVD Writer and media
player software you can play DVD movies and music
CDs on your LifeBook notebook. The media player
includes controls which allow you to take full advantage
of the features of a DVD movie, as well as standard
features such as fast forward, fast reverse, pause, etc.
With this drive you can also burn onto recordable duallayer DVD+R, DVD-R/RW, DVD+R/RW, or CD-R/RW
discs.
The Dual-Layer Multi-Format DVD Writer
also supports burning and reading DVDRAM. Windows XP supports burning and
reading of DVD-RAM as a standard
feature.
DVD/CD-RW Combo model only:
With the combo drive,
you can play DVD movies, read audio CDs, and write
data onto recordable CD-R or CD-RW discs.
DVD-ROM model only:
With the DVD-ROM drive, you
can read software, audio, or data CDs or DVDs
■
Do not operate your optical drive
unless your LifeBook notebook is
sitting on a flat surface. Using a drive
when the system is not level may
damage the drive or prevent proper
operation.
■
Prolonged use of the optical drive,
such as watching a DVD movie, will
substantially reduce your battery life if
no other power source is attached.
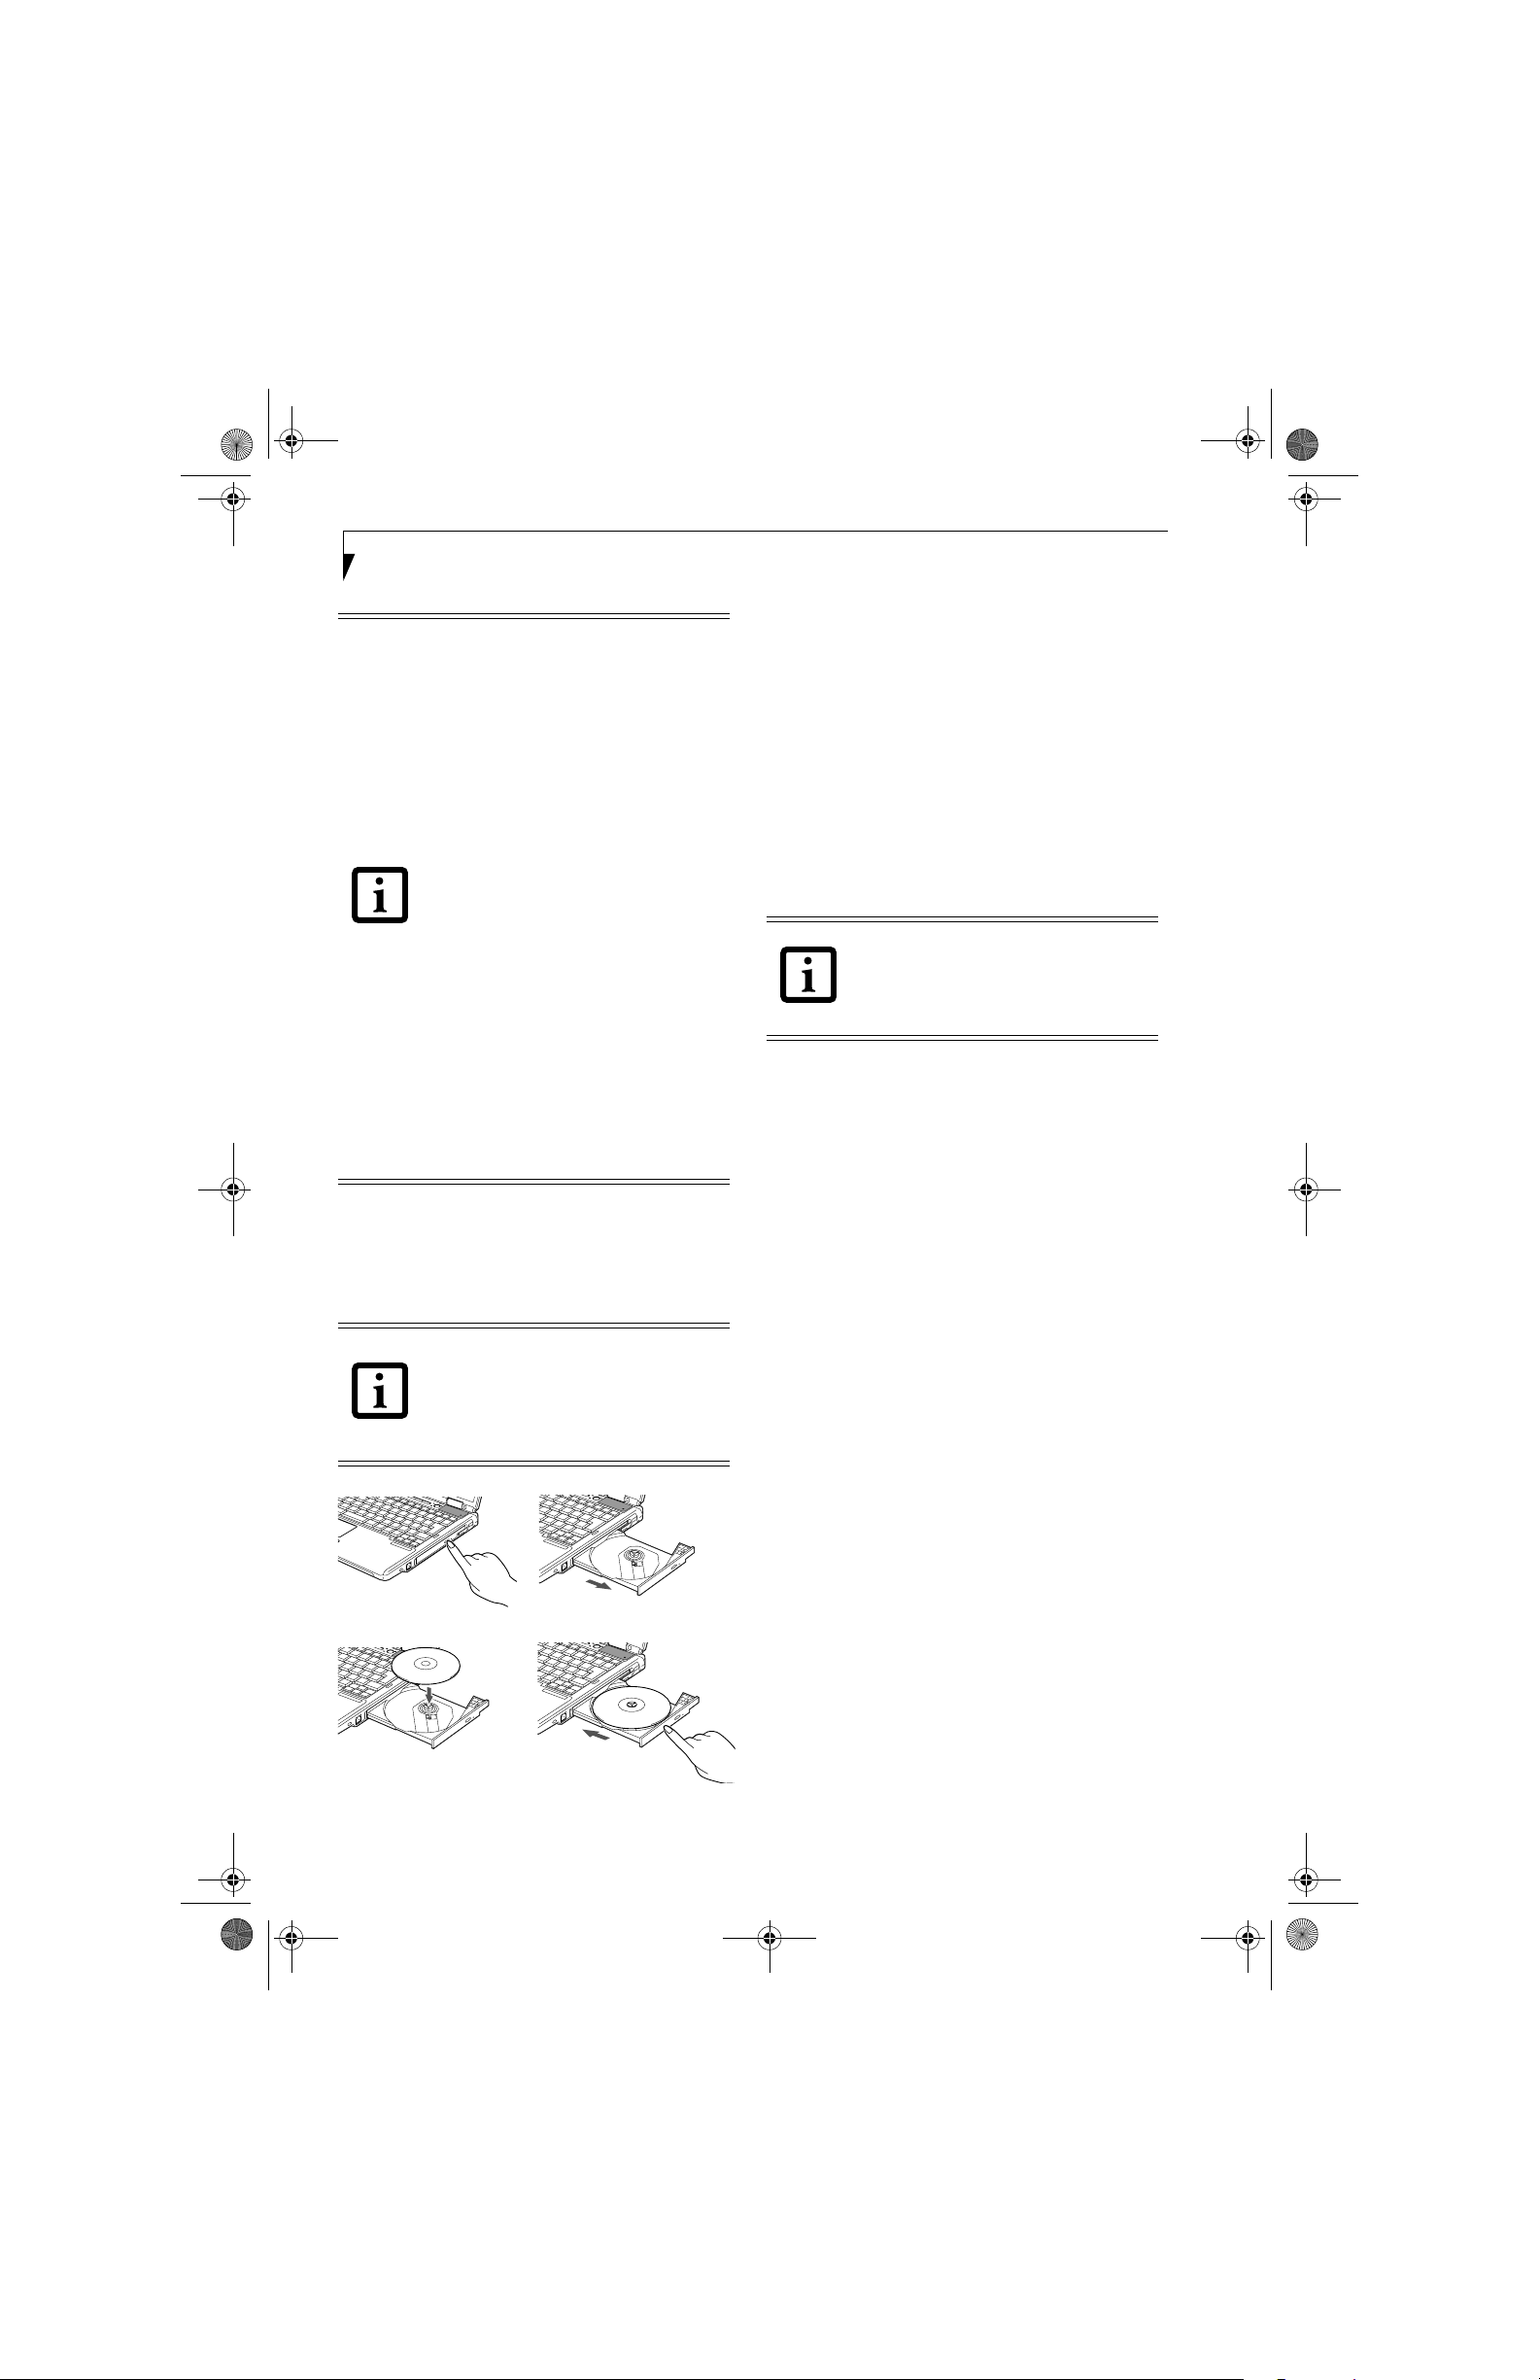
LOADING MEDIA ON YOUR DRIVE
To load a disc into your optical drive:
1. Push and release the eject button on the front of the
optical drive to open the holder tray. The tray will
come out of the LifeBook notebook a short distance.
2. Gently pull the tray out until a media disc can easily
be placed in the tray.
There may be a protective sheet in the tray
from when it was shipped; please make
sure it is removed before operating the
drive.
37
Page 5
S7020.book Page 38 Friday, May 13, 2005 3:49 PM
LifeBook S7000 Notebook
■
You should periodically check for
current updated drivers either by using
the Fujitsu Driver Update utility (See
“Automatically Downloading Driver
Updates” on page 67) or by going to
the Fujitsu web site at us.fujitsu.com/
computers .
■
All LifeBook DVD players are set to play
DVD titles with region code number 1
which is specified for the North American market. The region number is a
regional restriction code defined by the
DVD Forum acting on Hollywood
requirements. Different region codes
are recorded on video DVD titles for
publication in different areas of the
world. If the regional code of the DVD
player does not match the regional
codes on the titles, then playback is
impossible.
■
You can change the region code on the
DVD player using the Properties menu
of the DVD software. Note, however,
that you can only change the region
code up to four times. After the fourth
change, the last region code entered
becomes permanent, and cannot be
changed.
3. Place the media into the tray, label side up, with the
hole in the center of the disc. Snap the disc onto the
raised circle in the center of the tray.
4. Gently push the holder tray back in until you
hear a click. (Figure 4-2)
If you have disabled the Auto Insert
Notification Function, you will have to
start the drive from your desktop, since
your LifeBook notebook will not
automatically recognize that media has
been loaded.
REMOVING MEDIA
1. Push and release the eject button on the front of
the optical drive. This will stop the drive and the
holder tray will come out of the LifeBook notebook
a short distance.
2. Gently pull the tray out until the disc can easily be
removed from the tray.
3. Carefully remove the media disc from the holder
tray.
4. Gently push the holder tray back in until you
hear a click.
USING THE MEDIA PLAYER SOFTWARE
Depending upon its configuration, your
system may not have the media player
software pre-installed. If it is not installed,
reference the documentation that
accompanies the media application.
Starting a DVD Movie (DVD Models only)
1. Insert the DVD movie into the optical drive of your
notebook. If the CD auto run feature activates,
skip Step 2.
2. The first time you insert a movie into the DVD/CDRW tray, you will be prompted to select what you
want the system to do when discs are inserted (e.g.,
start automatically or wait for a prompt). Until you
make a selection, you will receive the same prompt
whenever you insert a disc.
3. Click OK to close the About DVD Player
Performance dialog box and the movie will begin.
Opening the Media Player Control Panel
With most DVD-ROMs, you have the option of altering
how the movie should play and what you wish to view.
You can do this by using the media player control panel
and the mouse.
1. Right-click on the movie screen to open a dropdown
menu for options.
2. Select View, then Player for all the controls available.
This will open the control panel into the bottom of
the screen.
(a) (b)
(c)
Figure 4-2. Loading/Ejecting Media
38
Using the Media Player Control Panel
The media player software allows you to watch the
movie much like a VCR player. You can pause, rewind,
fast-forward and stop the movie at any point.
1. To Pause the movie, click the on-screen button.
2. To Rewind the movie, click the button to rewind
to a specific portion of the movie, or the button
to return to the opening screen.
(d)
Page 6
S7020.book Page 39 Friday, May 13, 2005 3:49 PM
User Installable Features
3. To Fast-forward the movie, click the button to
forward to a specific portion of the movie, or the
button to jump to the ending credits.
4. To Stop the movie, click the button.
Exiting the Media Player
1. Click the U located in the upper right corner of the
title bar. This will open a media player dialog box.
2. Click Yes to stop and exit the movie, or No to close
the media player dialog box and return to the movie.
™
USING DOLBY
HEADPHONE
The Dolby Headphone utility lets you enjoy multichannel sound sources with realistic surround sound
using your conventional stereo headphones.
Dolby Headphone is a signal processing system that
enables your stereo headphones to realistically portray
the sound of a five-speaker playback system.
■
Media discs which do not have the
Dolby Surround 5:1 symbol will not
support Dolby Headphone.
■
After making changes to the Dolby
Headphone feature and clicking OK,
wait at least ten seconds before making
another change in order to allow the
system to stabilize.
To use the Dolby Headphone feature, perform the
following steps:
1. Insert the disc in the media player tray. When you do
so, WinDVD will start automatically.
2. Click on the Fujitsu logo on the WinDVD control
panel. If the disc supports Dolby Surround 5.1, a
drop down menu appears.
3. Verify that Dolby headphones is checked on the
menu. If you do not want it active, select Disable.
USING MEDIA PLAYER ON BATTERY POWER
Since optical drives consume a lot of power, your overall
battery life will be significantly shorter when operating
the optical drive continuously (such as watching a DVD
movie) than during standard operation. Many movies
run-times are longer than your LifeBook notebook can
support on a single charged battery. If you are watching a
DVD movie on battery power you may need to swap in
an additional, charged battery or attach AC power during
the movie to view it in its entirety.
■
Prolonged use of the optical drive, such
as watching a DVD movie, will greatly
reduce your notebook’s battery life.
■
Many movie run-times are longer than
your system can support on a single
battery. If you are watching a DVD
movie on battery power you may need
to swap in an additional, charged
battery or attach AC power during the
movie to view it in its entirety.
■
An additional fully-charged battery is
highly recommended if you will be
watching DVD movies on battery
power. If you don’t have an additional
battery, you may purchase one either
online at us.fujitsu.com/computers or
by calling 1-877-372-3473.
To Watch a Movie on Battery Power:
1. Have an additional full-charged battery or your AC
adapter ready for use.
2. Start watching your DVD movie.
3. When the low battery warning occurs, immediately
stop the movie and exit the media player.
If you do not stop the media player quickly
and the LifeBook notebook attempts to
auto-suspend (critical battery low state)
the LifeBook notebook will shut down
improperly. If this occurs, you will need to
perform a hard reset and follow the
instructions, if any, presented to you
before the system will reboot.
4. Power down your LifeBook notebook and replace
the discharged battery with an additional fullycharged battery. If you do not have an additional
battery, you may attach AC power as soon as you see
the low battery warning.
5. Resume your LifeBook notebook by pressing the
Suspend button again. This is not required if you
attached AC power without entering suspend mode.
6. Restart your media player, locate and skip to the
chapter of the movie you were last watching.
7. Continue watching your DVD movie.
Some shorter DVD movies may not require
you to swap batteries or attach AC power
to complete them. However, it is best to
be prepared since actual battery life while
operating the optical drive cannot be
guaranteed.
39
Page 7
S7020.book Page 40 Friday, May 13, 2005 3:49 PM
LifeBook S7000 Notebook
Lithium ion Battery
Your LifeBook notebook has a Lithium ion battery that
provides power for operating your notebook when no
external power source is available. The battery is durable
and long lasting, but should not be exposed to extreme
temperatures, high voltages, chemicals or other hazards.
The Lithium ion battery operating time may become
shorter if it is used under the following conditions:
■
When used at temperatures that exceeds a low of 5°C
or a high of 35°C. Extreme temperatures not only
reduce charging efficiency, but can also cause battery
deterioration. The Charging icon on the Status Indicator panel will flash when you try to charge a battery
that is outside its operating temperature range.
(See Battery Charging Indicators on page 11 for more
information)
■
When using a high current device such as a modem,
Multi-Format DVD Writer, DVD-ROM drive, DVD/
CD-RW combo drive, or the hard drive, using the AC
adapter will conserve your battery life.
Do not leave a faulty battery in your
LifeBook notebook. It may damage your
AC adapter, optional Auto/Airline adapter,
another battery or your notebook itself. It
may also prevent operation of your
notebook by draining all available current
into the bad battery.
RECHARGING THE BATTERIES
If you want to know the condition of the primary
Lithium ion battery, check the Battery Level indicator
located on the Status Indicator panel. The indicator
changes as the battery level changes.
The Lithium ion battery is recharged internally using
the AC adapter or Auto/Airline adapter. To recharge the
battery make sure the battery that needs to be charged
is installed in your LifeBook notebook and connect the
AC or Auto/Airline adapter
Make sure that the Battery Charging
indicator and the percentage charge is
shown inside the Battery Level icon on the
Status Indicator Panel.
There is no memory effect on the Lithium ion battery
therefore you do not need to discharge the battery
completely before recharging. The charge times will be
significantly longer if your notebook is in use while the
battery is charging. If you want to charge the battery
more quickly, put your notebook into Suspend mode,
or turn it off while the adapter is charging the battery.
(See Power Management on page 32 for more information
on Suspend mode and shutdown procedure)
Using heavy current devices such as
Modem or frequent DVD/CD-RW/CDROM accesses may prevent charging
completely.
.
■
Actual battery life will vary based on
screen brightness, applications, features, power management settings, battery condition and other customer
preferences. CD-ROM drive, Multi-Format DVD Writer, DVD/CD-RW drive
combo, or hard drive usage may also
have a significant impact on battery life.
The battery charging capacity is reduced
as the battery ages. If your battery is
running low quickly, you should replace
it with a new one.
■
Under federal, state, or local law it may
be illegal to dispose of batteries by putting them in the trash. Please take care
of our environment and dispose of batteries properly. Check with your local
government authority for details regarding recycling or disposing of old batteries. If you cannot find this information
elsewhere, contact your support representative at 1-800-8FUJITSU (1-800838-5487)
40
Low Battery State
When the battery is running low, a low battery notification message will appear. If you do not respond to the
low battery message, the batteries will continue to
discharge until they are too low to operate. When this
happens, your notebook will go into Suspend mode.
There is no guarantee that your data will be saved once
the notebook reaches this point.
■
Once the low battery notification message appears, you need to save all your
active data and put your LifeBook notebook into Suspend mode until you can
provide a new power source. You should
provide a charged battery, an AC power
adapter, or Auto/Airline adapter as soon
as possible.
■
When you are in Suspend mode there
must always be at least one power
source active. If you remove all power
sources while your LifeBook notebook is
in Suspend mode, any data that has not
been saved to the hard drive will be lost.
Page 8
S7020.book Page 41 Friday, May 13, 2005 3:49 PM
Dead Battery Suspend mode shows on the Status indicator just like the normal Suspend mode. Once your
notebook goes into Dead Battery Suspend mode you will
be unable to resume operation until you provide a
source of power either from an adapter, or a charged
battery. Once you have provided power, you will need to
press the Power/Suspend/Resume button to resume
operation.
In the Dead Battery Suspend mode, your data can be
maintained for some time, but if a power source is not
provided promptly, the Power indicator will stop
flashing and go out, meaning that you have lost the data
that was not stored. Once you provide power, you can
continue to use your notebook while an adapter is
charging the battery.
Shorted Batteries
The Status Indicator panel uses a symbol inside the
battery outline of the Battery Level indicator to display
the operating level available in that battery. (See figure 2-
10 on page 11) If this display shows a Shorted Battery, it
means the battery is damaged and must be replaced so it
does not damage other parts of your LifeBook notebook.
User Installable Features
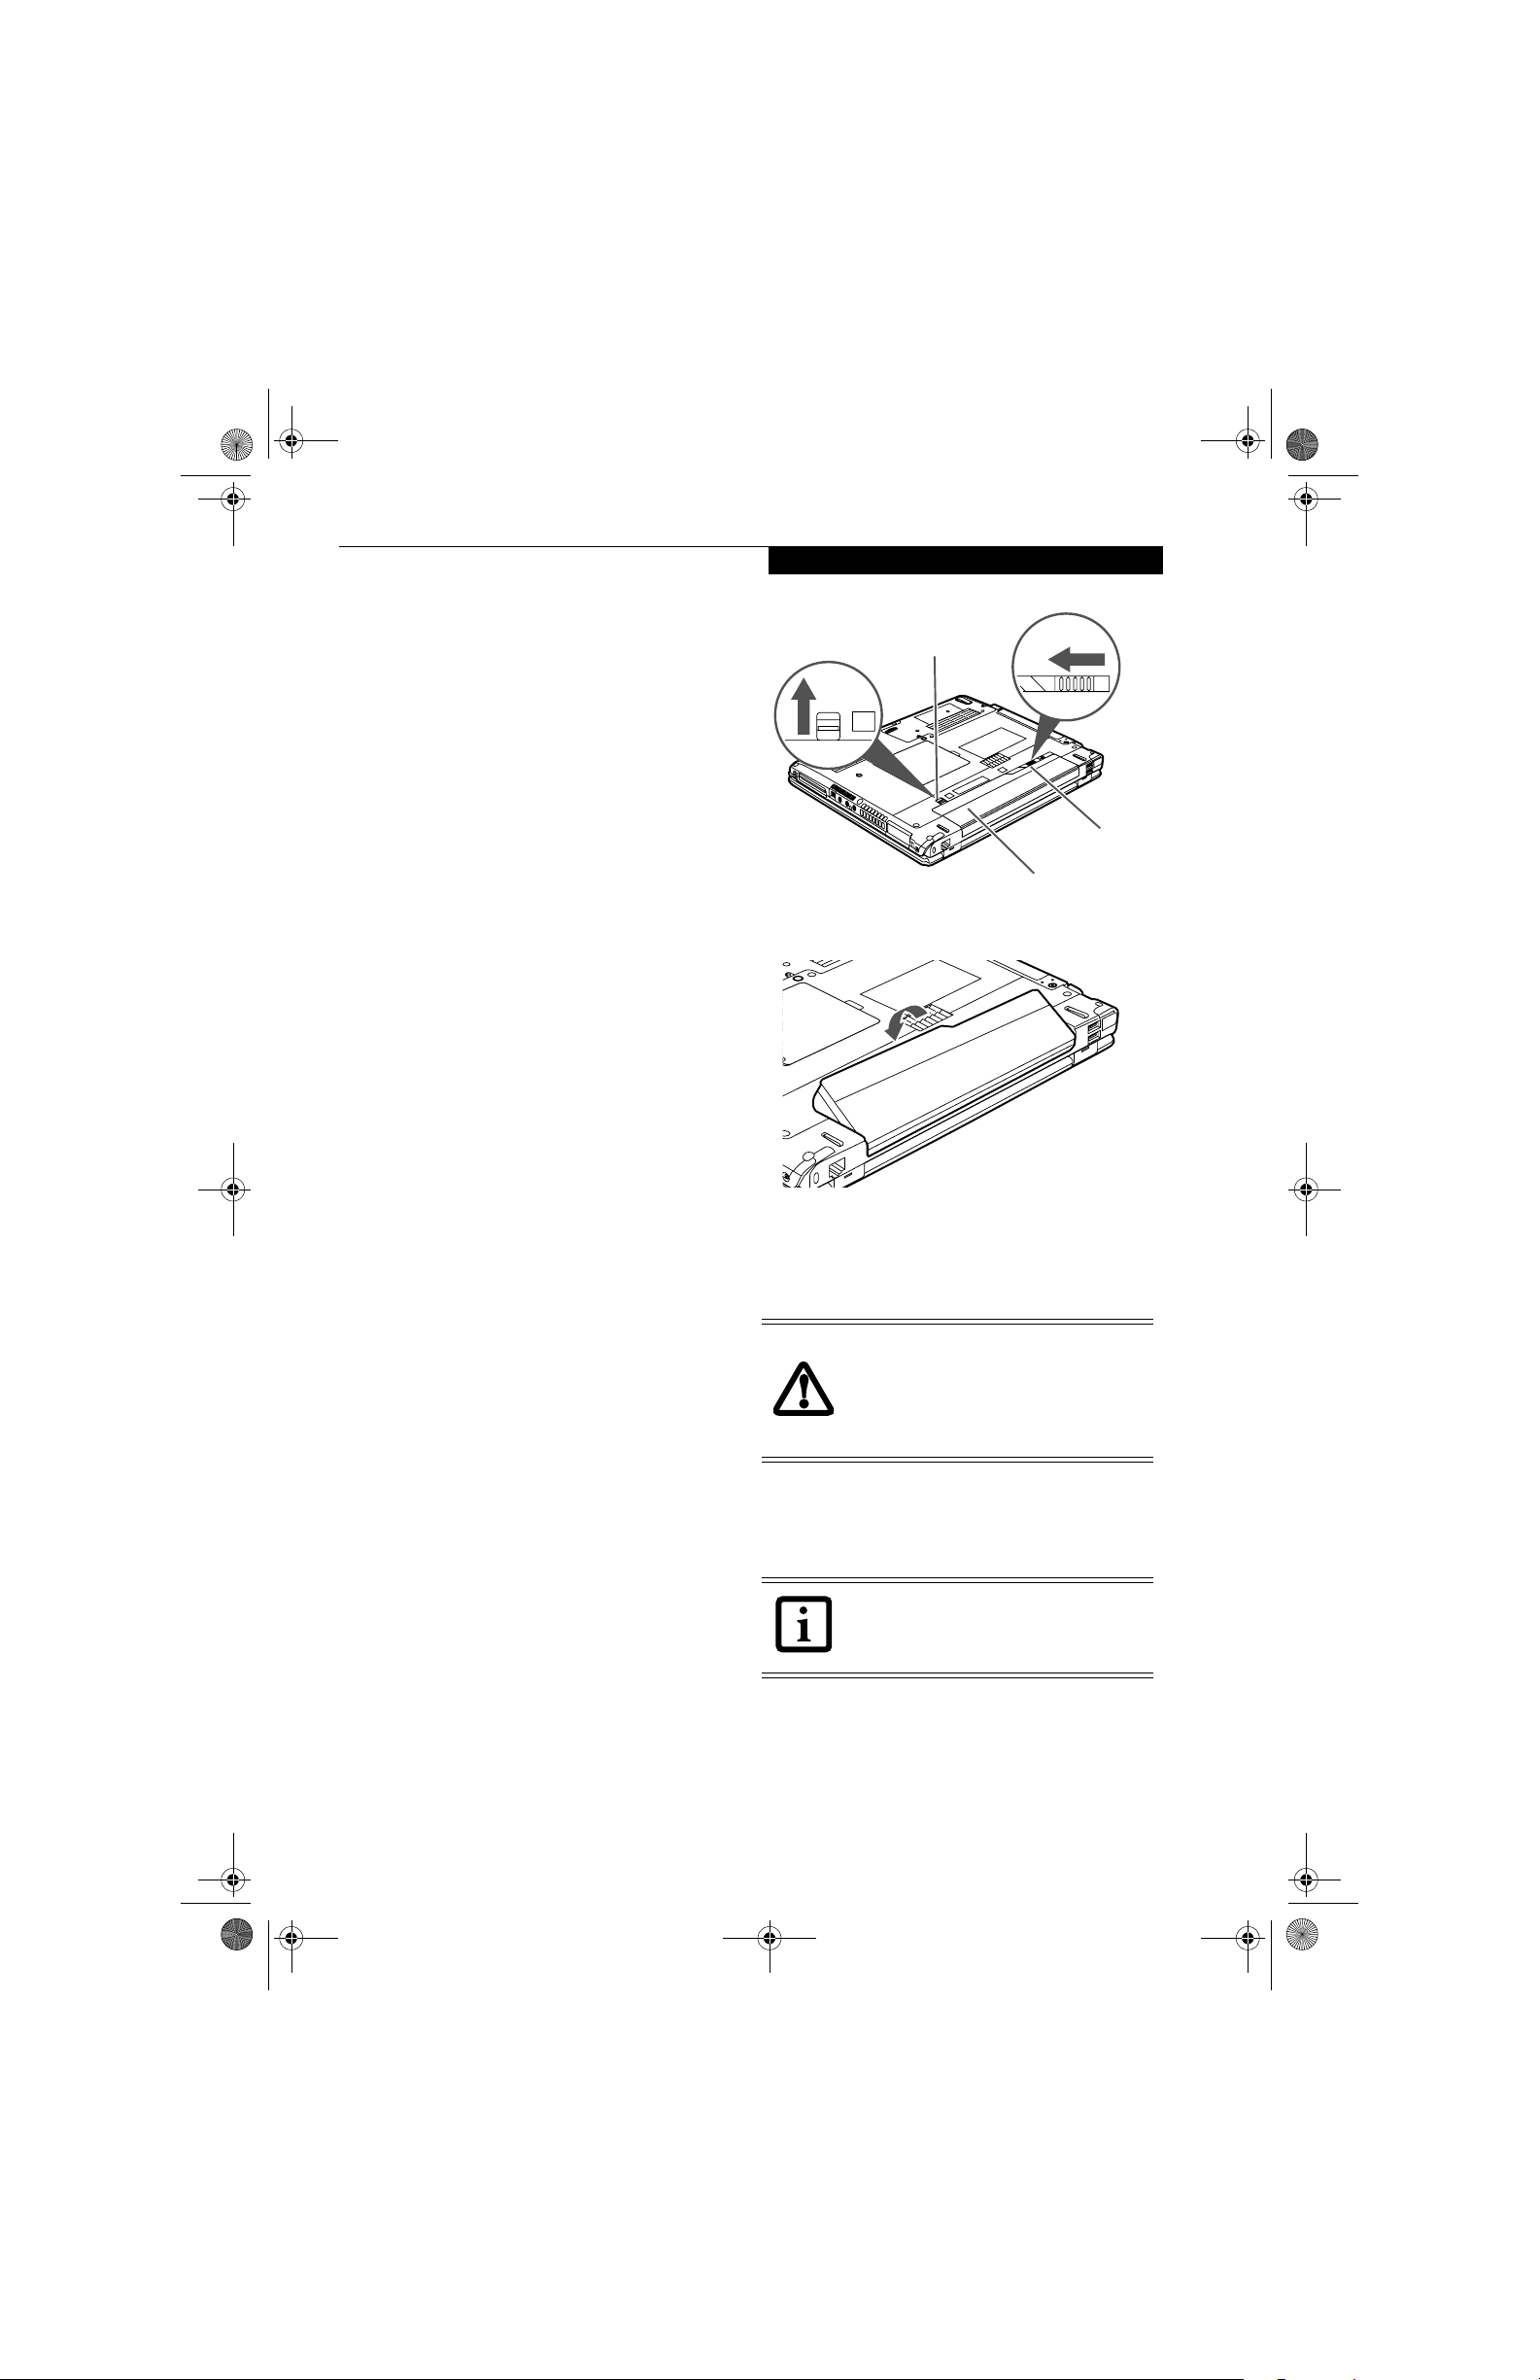
Latch Release
Battery Bay
Release Latch
Battery Pack
Figure 4-3. Removing a Battery
REPLACING THE BATTERY
With the purchase of an additional battery, you can have
a fully charged spare to swap with one that is not
charged. There are two ways to swap batteries, coldswapping and hot-swapping:
Cold-swapping Batteries
To cold-swap batteries in your battery bay follow these
easy steps: (Figure 4-3)
1. Have a charged battery ready to install.
2. Shut down your notebook and disconnect the AC
adapter.
3. Unlock the battery bay release latch by pushing the
latch release away from the battery pack and sliding
the battery bay release latch towards the latch release
(Figure 4-3).
4. Continue to press the latch release button away from
the battery pack, and lift the battery out of the bay.
5. Insert a new battery into the bay. (Figure 4-4)
6. Slide the battery bay release latch back to its original
position to lock the battery into place.
8. Plug in the AC adapter and turn the power on.
Figure 4-4. Installing a Battery
Hot-swapping Batteries
To hot-swap batteries in your battery bay follow these
easy steps:
Be sure to plug in an AC Adapter prior to
removing the battery. There is no bridge
battery present to support the system
while the battery is being replaced. If you
do not use an AC Adapter you will lose
any unsaved files.
1. Plug an AC Adapter into the system and connect it
to a power outlet.
2. Follow steps 3 through 5 in “Cold Swapping
Batteries”.
If the Lithium ion battery connector is not
fully seated, you may not be able to use
your notebook or charge your battery.
41
Page 9

S7020.book Page 42 Friday, May 13, 2005 3:49 PM
LifeBook S7000 Notebook
External USB
Eject Button
Figure 4-5.Loading/Ejecting a 3.5” Floppy Disk
Floppy Disk Drive*
*Optional device
An external USB floppy disk drive is available as an
option for your LifeBook notebook. The external floppy
disk drive can read and write information on removable
1.44MB and 720KB floppy disks.
Your LifeBook notebook is preconfigured
to boot from a USB floppy drive. Reference the BIOS manual for further information on changing the default boot drive.
The BIOS manual can be found on the
Fujitsu Computer Systems web site:
us.fujitsu.com/computers, under Support.
LOADING A DISK
To load a disk into your disk drive, follow these easy
steps:
1. Orient the disk so that its label is facing upwards
and the shutter side is pointing towards the drive.
(Figure 4-5)
2. Push the disk into the drive until the Eject button
pops out and you hear a click.
If you eject the disk while the Floppy Disk
Drive Access indicator is active, there is a
risk of damaging the data on the disk, the
disk itself or even the disk drive.
PREPARING A DISK FOR USE
Before you can use a new disk, it needs to be prepared
so your LifeBook notebook knows where to store information. This preparation is called formatting or initializing a disk. You will need to format new disks, unless
they are preformatted. (Please refer to your operating
system manual for step-by-step instructions on formatting a
disk)
To prevent accidental erasure of the data stored on a
disk, slide the “write protect” tab until a small hole is
exposed. This sets the disk into a protected state where
nothing can be added or removed. If you want to add or
remove data on a protected disk, slide the “write
protect” tab to close the small hole. (Figure 4-6)
Write Enabled
When there is no disk in the drive, the
Eject button is flush with your notebook.
EJECTING A DISK
To eject a disk from the disk drive, follow these easy
steps:
1. Check that the Floppy Disk Drive Access indicator
is inactive.
2. Press the Eject button. This will push your disk
partially out of the drive.
3. Remove the disk.
42
Write Protected
Figure 4-6. Floppy Disk Write Protect
Formatting a floppy disk that already contains data will erase all of the information
on the disk.
Page 10
S7020.book Page 43 Friday, May 13, 2005 3:49 PM
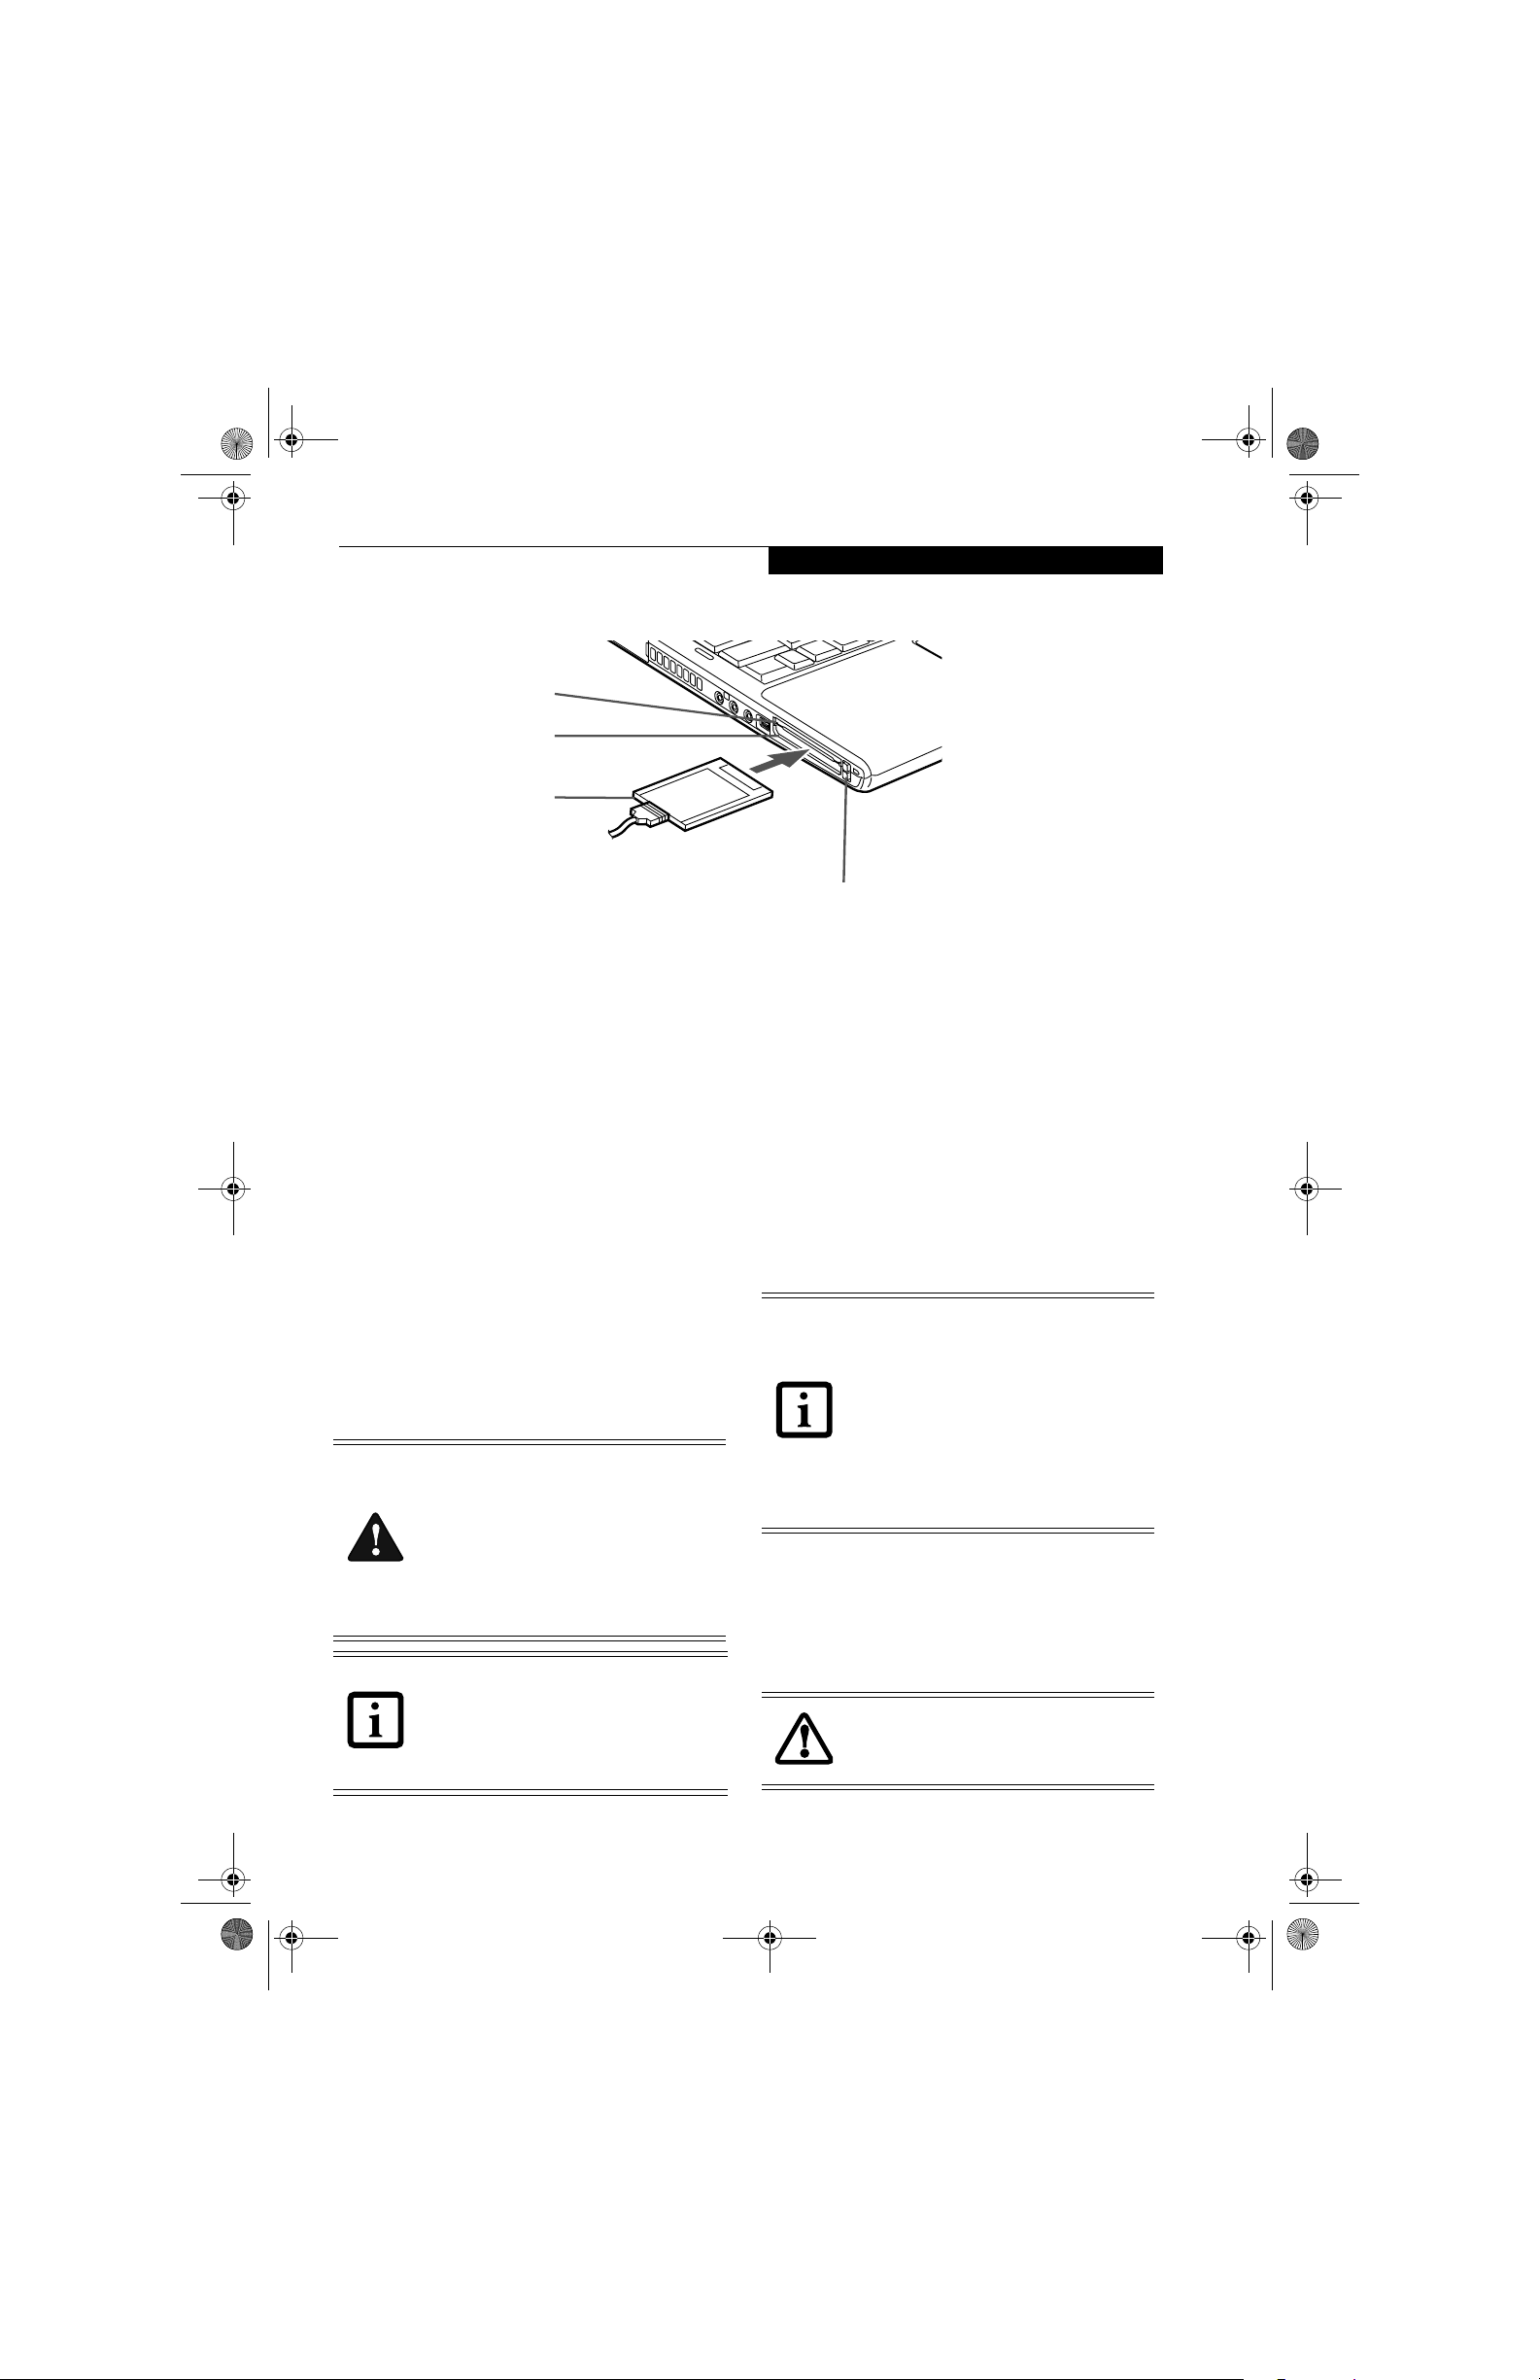
ExpressCard Slot
PC Card Slot
User Installable Features
(bottom slot only)
PC Card
Figure 4-7. Installing/Removing PC Card
PC Cards/ExpressCards™
Your LifeBook notebook supports Type I and Type II PC
Cards and ExpressCardsTM, which can perform a variety
of functions depending on which type of card you
install. You can install one or two cards at a time,
depending on its type. PC Cards should be installed in
the bottom slot, and ExpressCards in the top slot.
Some available PC/ExpressCards:
■
Local area network (LAN) cards (Type II)
■
IDE solid-state disk cards (Type II)
■
SCSI cards (Type II)
■
Other PC Cards that conform to PCMCIA 2.1 or
CardBus standards
For further information, refer to the instructions
supplied with your card(s).
INSTALLING PC CARDS
PC Cards are installed in the PC Card slot (the lower of
the two slots). To install a PC Card, follow these steps:
■
Installing or removing a PC Card during
your LifeBook notebook’s shutdown or
bootup process may damage the card
and/or your LifeBook notebook.
■
Do not insert a PC Card into a slot if
there is water or any other substance on
the card as you may permanently
damage the card, your LifeBook notebook, or both.
You may be required to log on as an
Administrator or member of the Administrator’s Group to complete this procedure.
If the computer is connected to a network,
network policy settings may also prevent
you from completing this procedure.
Eject Buttons
1. See your PC Card manual for instructions on the
installation of your card. Some cards may require
that your notebook is off while installing them.
2. Make sure there is no PC Card currently in the slot.
If there is, see Removing PC Cards.
3. If the eject button is extended, press it until it clicks.
4. Insert the card into the slot with the label facing up.
5. Push the card firmly into the slot until it is seated in
the connector.
REMOVING PC CARDS
See your PC Card manual for specific instructions on
removing your card. Some cards may require your notebook to be in Suspend Mode or Off during removal.
■
Windows has a shutdown procedure for
PC Cards that must be followed before
removing a card. (Review your operating
system manual for the correct procedure.) It is good practice to remove
devices using the Unplug or Eject Hardware icon in the system tray.
■
If the dialog box states that the device
cannot be removed, you must save all of
your open files, close any open applications and shut down your notebook.
2. Unlock the card from the slot by pressing the eject
button associated with the slot in which the card is
located. When pressed, the button will pop out.
3. Firmly press the button again until it is flush with
the notebook. This will eject the card slightly out of
the slot allowing you to remove the card.
If the PC Card has an external connector
and cable, do not pull the cable when
removing the card.
43
Page 11
S7020.book Page 44 Friday, May 13, 2005 3:49 PM
LifeBook S7000 Notebook
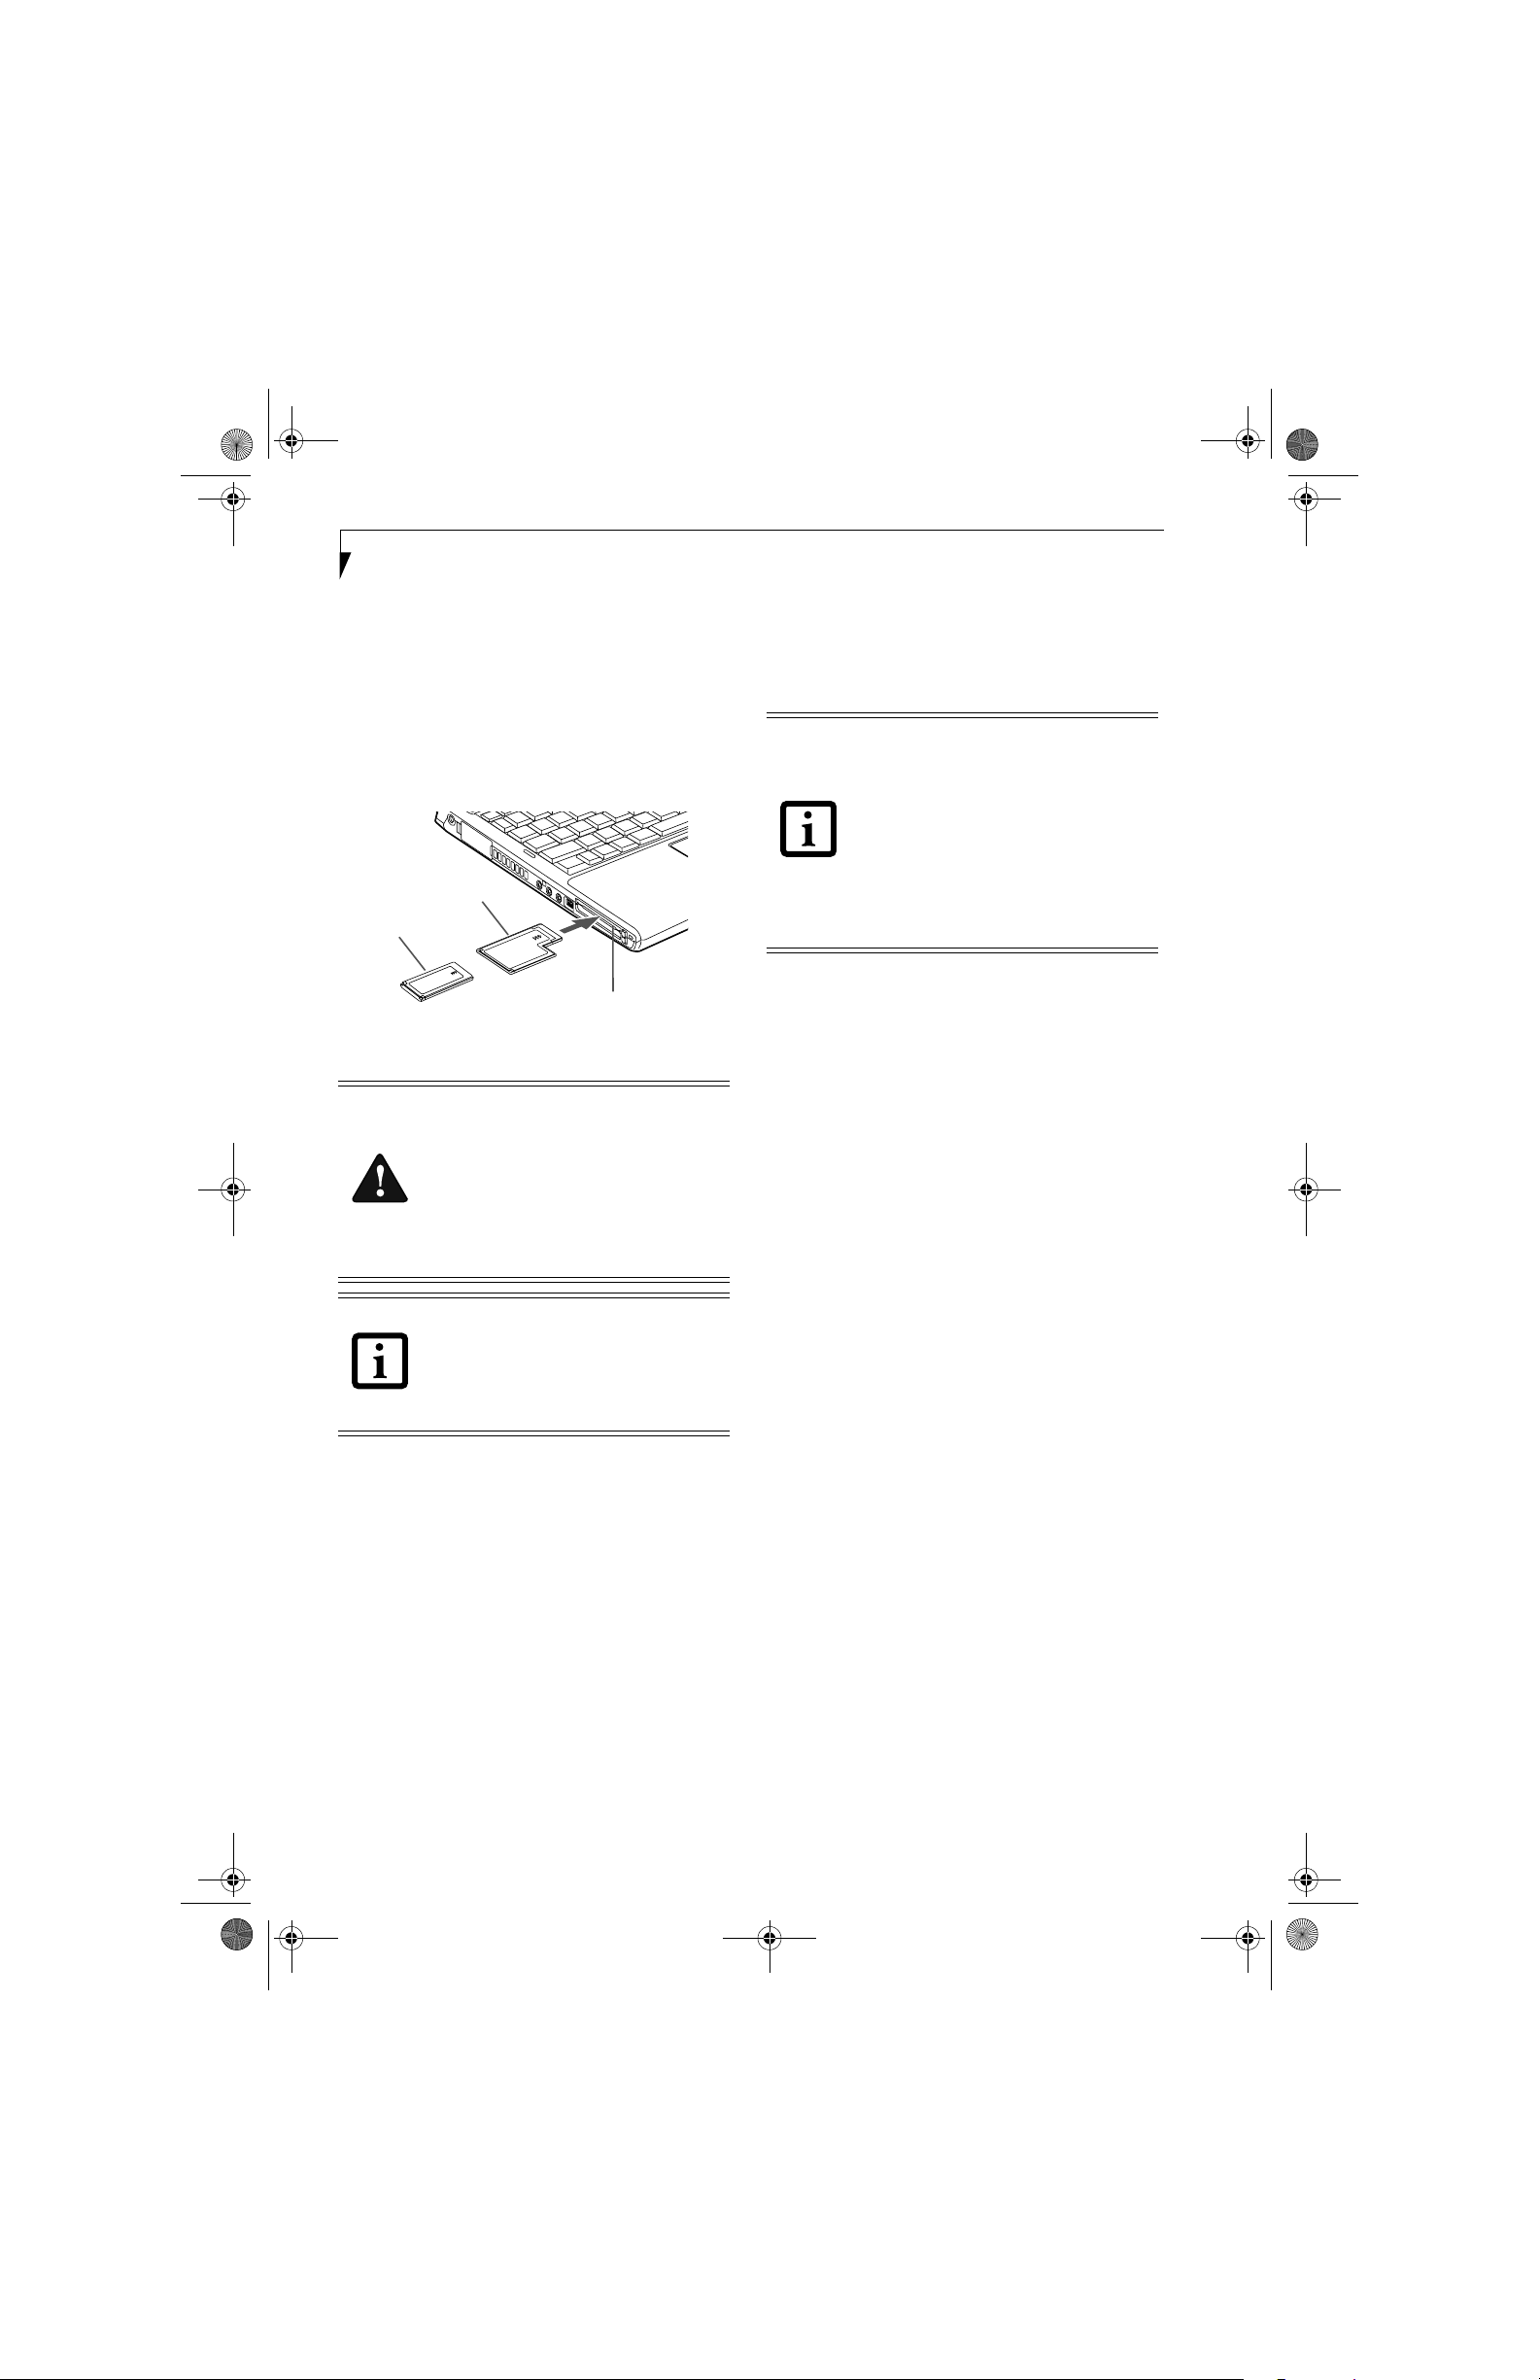
INSTALLING EXPRESSCARDS
There are two different width ExpressCards: 34 mm and
54 mm. The connector inside the slot is located on the
left-hand side of the slot. If you insert a 34 mm card, be
sure to align it with the left side of the slot when
inserting it.
ExpressCards are installed in the ExpressCard slot (the
top slot). (Figure 4-8).
54 mm ExpressCard
34 mm ExpressCard
ExpressCard Slot
(top slot)
Figure 4-8. Installing/Removing ExpressCards
■
Installing or removing an ExpressCard
during your notebook’s shutdown or
bootup process may damage the card
and/or your notebook.
■
Do not insert an ExpressCard into a slot
if there is water or any other substance
on the card as you may permanently
damage the card, your notebook, or
both.
You may be required to log on as Administrator or a member of the Administrator’s
Group to complete this procedure. If your
computer is connected to a network, network policy settings may also prevent you
from completing this procedure.
REMOVING EXPRESSCARDS
See your ExpressCard manual for specific instructions
on removing your card. Some cards may require your
notebook to be in Suspend Mode or Off during removal.
■
Windows has a shutdown procedure for
ExpressCards that must be followed
before removing a card. (Review your
operating system manual for the correct
procedure.) It is good practice to remove
devices using the Unplug or Eject Hardware icon in the system tray.
■
If the dialog box states that the device
cannot be removed, you must save all of
your open files, close any open applications and shut down your notebook.
To remove an ExpressCard, follow these steps:
2. Unlock the card from the slot by pressing the eject
button associated with the slot in which the card is
located. When pressed, the button will pop out.
3. Firmly press the button again until it is flush with
the notebook. This will eject the card slightly out of
the slot allowing you to remove the card.
SMART CARD READER
An embedded Smart Card Reader is provided on your
notebook. Smart Cards are the same size and shape as
credit cards, but they contain an integrated microprocessor chip. The chip can hold a variety of different
information, and provides you with many possible
options, such as allowing you to make secure purchases,
pay for phone calls, store security information, and
provide personal identification and information.
In order to use the embedded Smart Card Reader, you
must purchase an optional Smart Card adapter and
third-party software for installation into an available
Type II PC Card slot.
See your ExpressCard manual for instructions on the
installation of your card. Some cards may require that
your notebook is off while installing them.
To install an ExpressCard, follow these steps:
1. Make sure there is no ExpressCard currently in the
slot. If there is, see Removing ExpressCards.
2. If the eject button is extended, press it in until it
clicks.
3. Insert your ExpressCard into the slot with the
product label facing up. If you are inserting a 34 mm
card, be sure to align it with the left side of the slot
when inserting it.
4. Push the card firmly into the slot until it is seated in
the connector.
44
Page 12

S7020.book Page 45 Friday, May 13, 2005 3:49 PM
User Installable Features
Memory Upgrade Module
Your Fujitsu LifeBook notebook comes with a minimum
of 256 MB of high speed Double Data Rate Synchronous
Dynamic RAM (dual-channel DDR2 533 SDRAM)
factory installed. To increase your LifeBook notebook’s
memory capacity, you may install an additional memory
upgrade module. The memory upgrade must be a DDR2
533 MHz SO-DIMM module. To ensure 100% compatibility, purchase the SDRAM module only from the
Fujitsu web store at us.fujitsu.com/computers
■
Do not remove any screws from the
memory upgrade module compartment
except the ones specifically shown in the
directions for installing and removing the
memory upgrade module.
■
The memory upgrade module can be
severely damaged by electrostatic discharge (ESD). Be sure you are properly
grounded when handling and installing
the module.
INSTALLING MEMORY UPGRADE MODULES
1. Turn off power to your LifeBook notebook, remove
any power adapter (AC or auto/airline), and remove
the battery pack.
2. Make sure that all the connector covers are closed.
3. Turn the notebook bottom side up, and remove the
screws of the memory upgrade module compartment. (Figure 4-9)
4. Remove the cover.
.
retaining clip. You will hear a click when it is properly in place. (Figure 4-10)
Figure 4-10. Installing a Second Memory Module
8. Replace the cover.(Figure 4-11)
9. Replace the screws.
Figure 4-11. Replacing the Memory Compartment Cover
Figure 4-9. Opening the Memory Upgrade Compartment
5. Remove the memory upgrade module from the
static guarded sleeve.
6. Align the memory upgrade module with the part
side up. Align the connector edge of the memory
upgrade module with the connector slot in the
compartment.
7. Insert the memory upgrade module at a 45° angle.
Press the connector edge of the module firmly down
and into the connector until it lodges under the
The memory upgrade module is not
something you routinely remove from
your notebook. Once it is installed, you
can leave it in place unless you want to
change system memory capacity.
TO REMOVE A MEMORY UPGRADE MODULE
1. Perform steps 1 through 4 of Installing a Memory
Upgrade Module.
2. Pull the clips sideways away from each side of the
memory upgrade module at the same time.
3. While holding the clips out, remove the module
from the slot by lifting it up and pulling towards the
rear of your notebook. (Figure 4-12)
45
Page 13

S7020.book Page 46 Friday, May 13, 2005 3:49 PM
LifeBook S7000 Notebook
Figure 4-12. Removing a Memory Upgrade Module
4. Store the memory upgrade module in a static
guarded sleeve.
5. Replace the cover. (Figure 4-11)
6. Replace the screws.
■
Intel shared graphics allocates 8 MB of
the system memory for use as default
video memory. If your system is configured with 512 MB of system memory,
for example, only 504 MB will be displayed in your system information.
■
If the total memory displayed is incorrect, check that your memory upgrade
module is properly installed. (If the mod-
ule is properly installed and the capacity
is still not correctly recognized, see
Troubleshooting on page 55.
CHECKING THE MEMORY CAPACITY
Once you have changed the system memory capacity by
replacing the installed module with a larger one, be sure
to check that your notebook has recognized the change.
Check the memory capacity by clicking [Start] ->
Settings -> Control Panel, then double-clicking the
System icon. Select the General tab and check the
amount of memory under “Computer:”.
There may be a variation between the actual memory
size and what is displayed. This is due to the fact that
your system uses a video graphics chip which dynamically allocates system memory to accelerate graphics
performance. Up to 128 MB of memory is dynamically
shared on an as-needed basis using Dynamic Video
Memor y Technology (DVMT).
46
Page 14

S7020.book Page 47 Friday, May 13, 2005 3:49 PM
Power On/Suspend/Resume Button
USB Ports
PS/2 Port
Parallel Port
External Monitor Port
User Installable Features
Lock Slot
DC
Power
Jack
DVI-D Port
Serial Port
LAN (RJ-45)Port
Figure 4-13. Port Replicator back panel
Port Replicator
An optional port replicator is available for your Fujitsu
LifeBook notebook. The port replicator extends the
functionality of your notebook by providing ports to
connect PS/2 devices, a LAN (RJ-45) cable, USB devices,
an external monitor, a parallel device, a digital video
device, and a serial device. The port replicator connects
to the bottom of your notebook. (See Device Ports on
page 50 for more information)
BACK PANEL COMPONENTS
The following is a brief description of the port replicator’s back panel components. (Figure 4-13)
LAN (RJ-45) Jack
The LAN port allows you to connect a LAN (RJ-45)
cable. Note that when your notebook is connected to the
port replicator, the LAN port on the system is not accessible; the port replicator LAN port is the only one that
can be used when it as attached to the system.
PS/2 Keyboard/Mouse Port
The PS/2 keyboard/mouse port allows you to connect
external PS/2 devices such as an external PS/2 keyboard
or mouse.
USB Ports
There are four USB 2.0 ports on the port replicator. USB
2.0 ports allow you to connect any USB 2.0 device for up
to 480 Mbps transfer rate. USB 2.0 is backward-compatible with USB 1.1 devices.
External Monitor Port
The external monitor port allows you to connect an
external VGA or SVGA CRT monitor.
Parallel Port
The parallel port allows you to connect parallel devices.
(This is sometimes referred to as an LPT port.)
Serial Port
The serial port allows you to connect serial (RS-232C)
devices. (This is sometimes referred to as a COM port.)
DC Power Jack
The DC power jack allows you to plug in the AC adapter
or the optional Auto/Airline adapter to power your notebook.
Port Replicator Lock Slot
The port replicator lock slot allows you to lock the
computer into the port replicator.
Power On/Suspend/Resume Button
The power on/suspend/resume button allows you to
power on or suspend/resume your system via the port
replicator.
Digital Video Interface (DVI-D)
The DVI-D port allows you to connect a flat-panel LCD
monitor or television that is equipped with a DVI-D
port for ultra-crisp digital images and graphics.
Port Replicator Release Button
Slide the port replicator release button to remove the
port replicator from your notebook.
47
Page 15

S7020.book Page 48 Friday, May 13, 2005 3:49 PM
LifeBook S7000 Notebook
Interface
Connector
Port Replicator Release Button
Anti-theft
Lock Slot
Headphone
Jack
Microphone Jack
Adjustable Guide Bar
Figure 4-14. Port Replicator front panel
FRONT PANEL COMPONENTS
The following is a brief description of the optional Port
Replicator’s front panel components.
Interface Connector
The interface connector connects the optional port
replicator to your notebook.
Adjustable Guide Bar
The adjustable guide bar allows you to use the port replicator with different LifeBook models.
Microphone Jack
The microphone jack allows you to attach an external
microphone via the port replicator.
Headphone Jack
The headphone jack allows you to connect headphones
to the port replicator.
Anti-theft Lock Slot
The anti-theft lock slot allows you to secure the port
replicator with an optional security lock/cable.
Do not hold the system by the port
replicator. The port replicator and/or the
system could be damaged if the port
replicator is used as a handle.
To attach the port replicator, follow these easy steps:
1. Unplug the AC adapter from the system if it is connected.
2. Depending upon the configuration of your system,
you may need to change the position of the adjustable guide bar. Note the location of the interface
port on the bottom of your LifeBook:
■
If the interface port is approximately an inch
from the edge of the system, swing the guide bar
backwards until it rests atop the port replicator
base.
■
If the interface port is approximately two inches
away from the edge of the system, swing the guide
bar forward until it snaps into place inside the
positioners. (See the grey arrow in Figure 2).
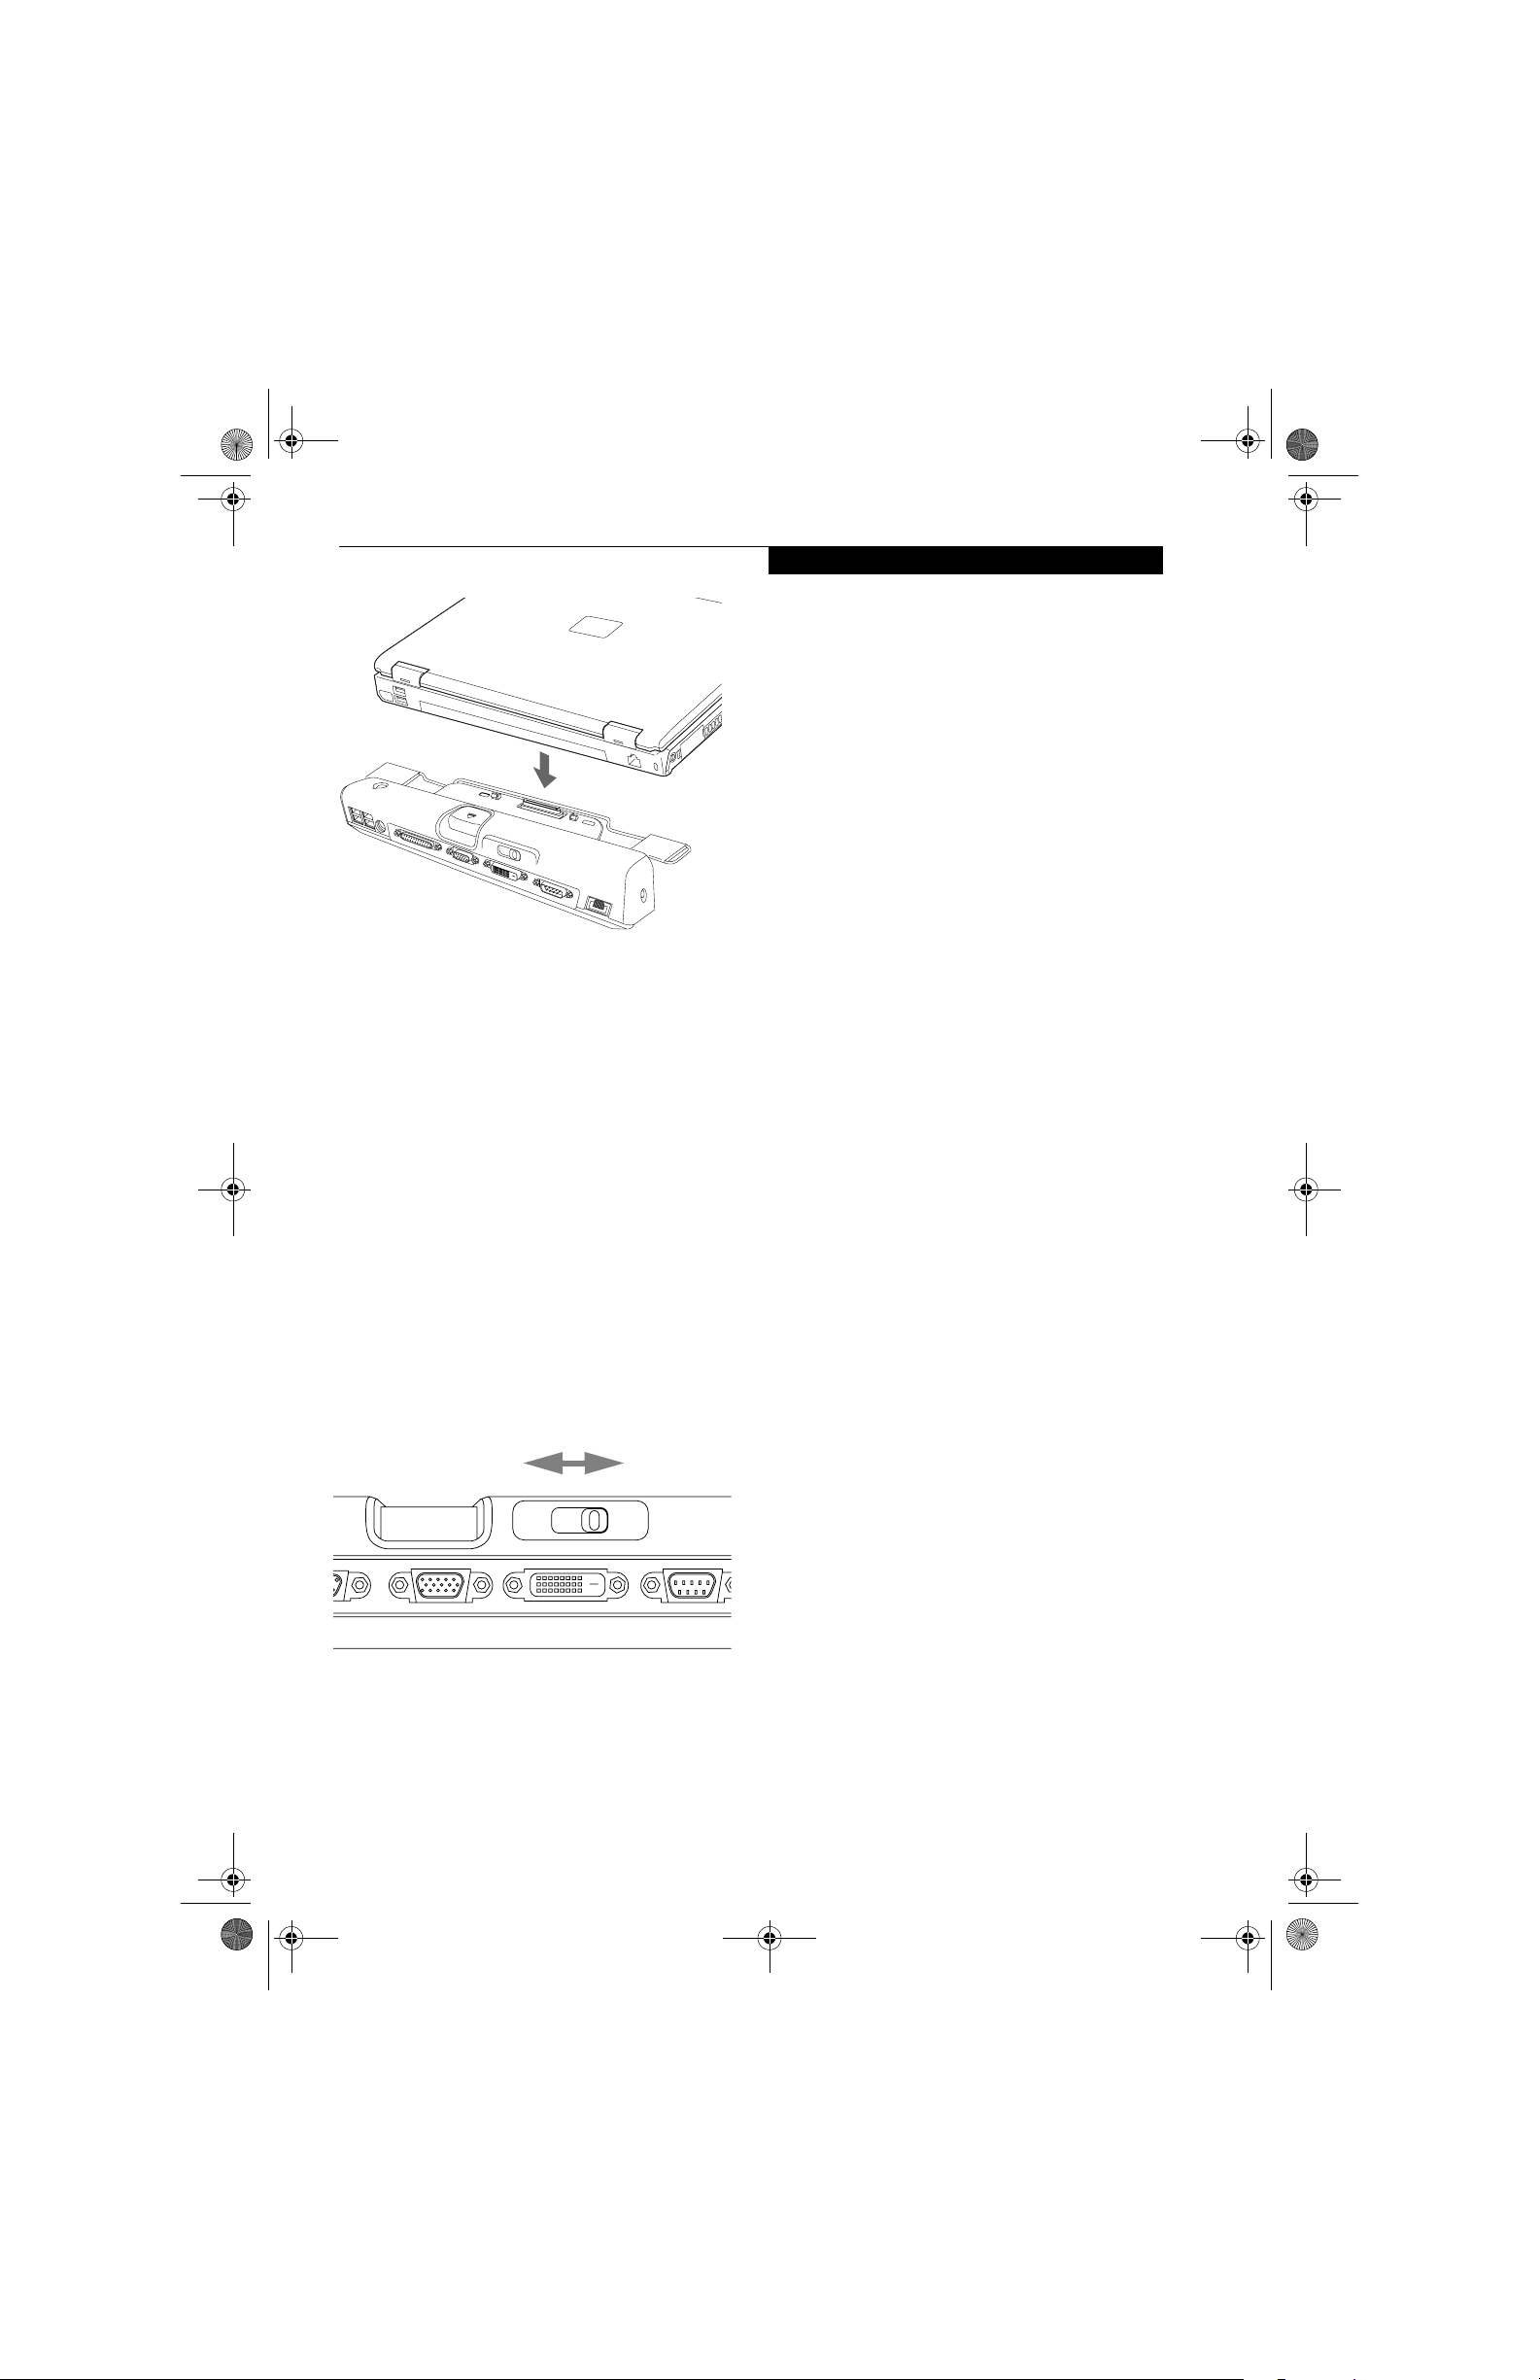
3. Center your notebook over the port replicator so
that the interface connector on the lower surface of
your notebook aligns with the connector on top of
the port replicator (Figure 4-15).
4. Push your notebook down to connect it securely to
the port replicator.
5. Plug the AC adapter into the DC power jack and
plug the other end into a power outlet.
ATTACHING THE PORT REPLICATOR
The port replicator can be attached to your notebook
while the power is on, while in suspend mode, or while
the power is off.
48
The AC adapter must be plugged into the
port replicator in order to use all of the
ports. If the adapter is connected to the
system, the USB and PS/2 ports on the port
replicator will not be usable.
Page 16
S7020.book Page 49 Friday, May 13, 2005 3:49 PM
Figure 4-15. Attaching the Port Replicator
LOCKING THE PORT REPLICATOR
There are two lock slots on the port replicator: one on
the back (Figure 4-13) and one on the end (Figure 4-14).
Either slot can be used to secure the port replicator
alone. The lock slot on the back of the port replicator
can also be used to lock the system into the port replicator.
Follow the instructions that came with the lock/cable
device for information on its use.
To lock the system to the port replicator:
1. Install the system onto the port replicator as detailed
in “Attaching the Port Replicator”.
2. Slide the lock slot on the rear of the port replicator
all the way to the left to lock the system into place
(Figure 4-16).
3. Secure the lock per the instructions that came with
the locking device. Until it is unlocked, the system
and port replicator are locked together.
User Installable Features
DETACHING THE PORT REPLICATOR
The optional port replicator can be detached from your
notebook while the power is on, while in suspend mode,
or while the power is off. To detach the port replicator
follow these easy steps:
1. Unlock the anti-theft lock if the system is locked into
place.
2. Press the port replicator release button to release the
system from the port replicator.
3. While holding the port replicator release button
down, lift your notebook to detach it from the port
replicator.
Lock Unlock
Figure 4-16. Locking the Port Replicator
49
Page 17
S7020.book Page 50 Friday, May 13, 2005 3:49 PM
LifeBook S7000 Notebook
Device Ports
Your Fujitsu LifeBook notebook and the optional Port
Replicator come equipped with multiple ports to which
you can connect external devices including: disk drives,
keyboards, modems, printers, etc.
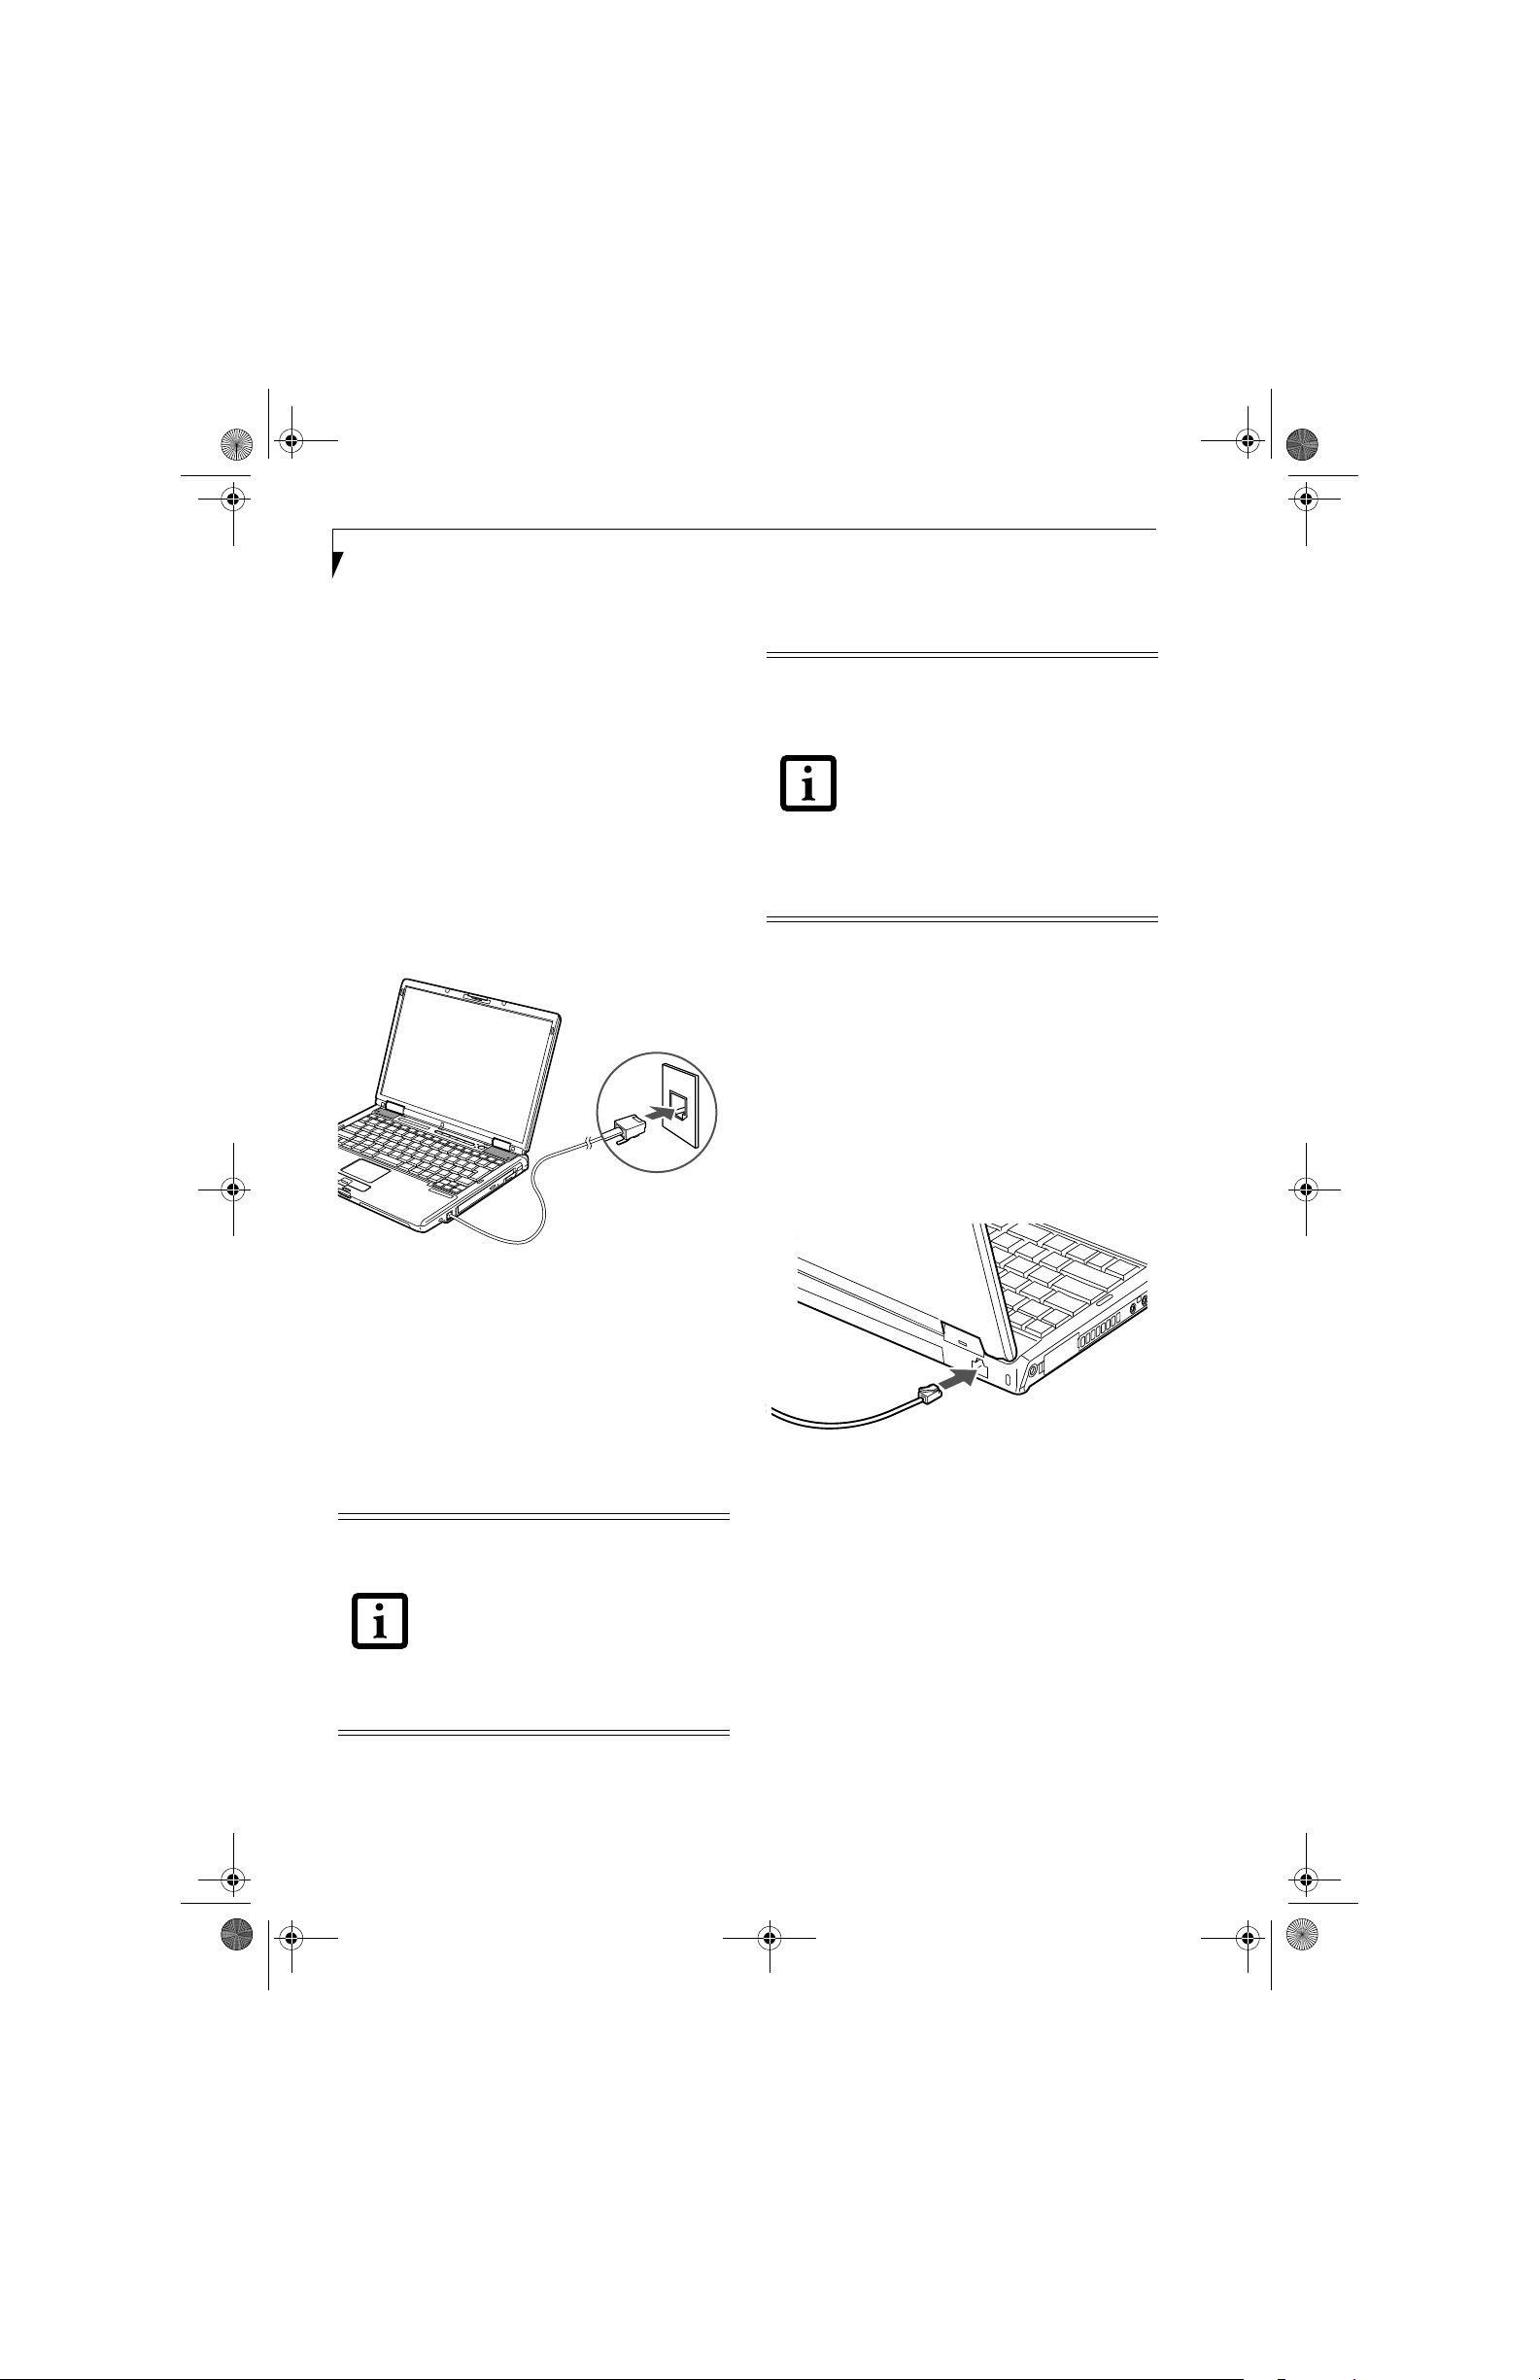
MODEM (RJ-11) TELEPHONE JACK
The modem (RJ-11) telephone jack is used for an
internal modem. To connect the telephone cable follow
these easy steps:
1. Align the connector with the port opening.
2. Push the connector into the port until it is seated.
3. Plug the other end of the telephone cable into a
telephone outlet. (Figure 4-17)
■
The internal modem is designed to the
ITU-T V.90 standard. Its maximum
speed of 53000bps is the highest
allowed by FCC, and its actual connection rate depends on the line conditions.
The maximum speed is 33600bps at
upload.
■
The internal modem on all Fujitsu LifeBook notebooks from Fujitsu are certified for use in the United States and
Canada. The modem may be certified in
other countries.
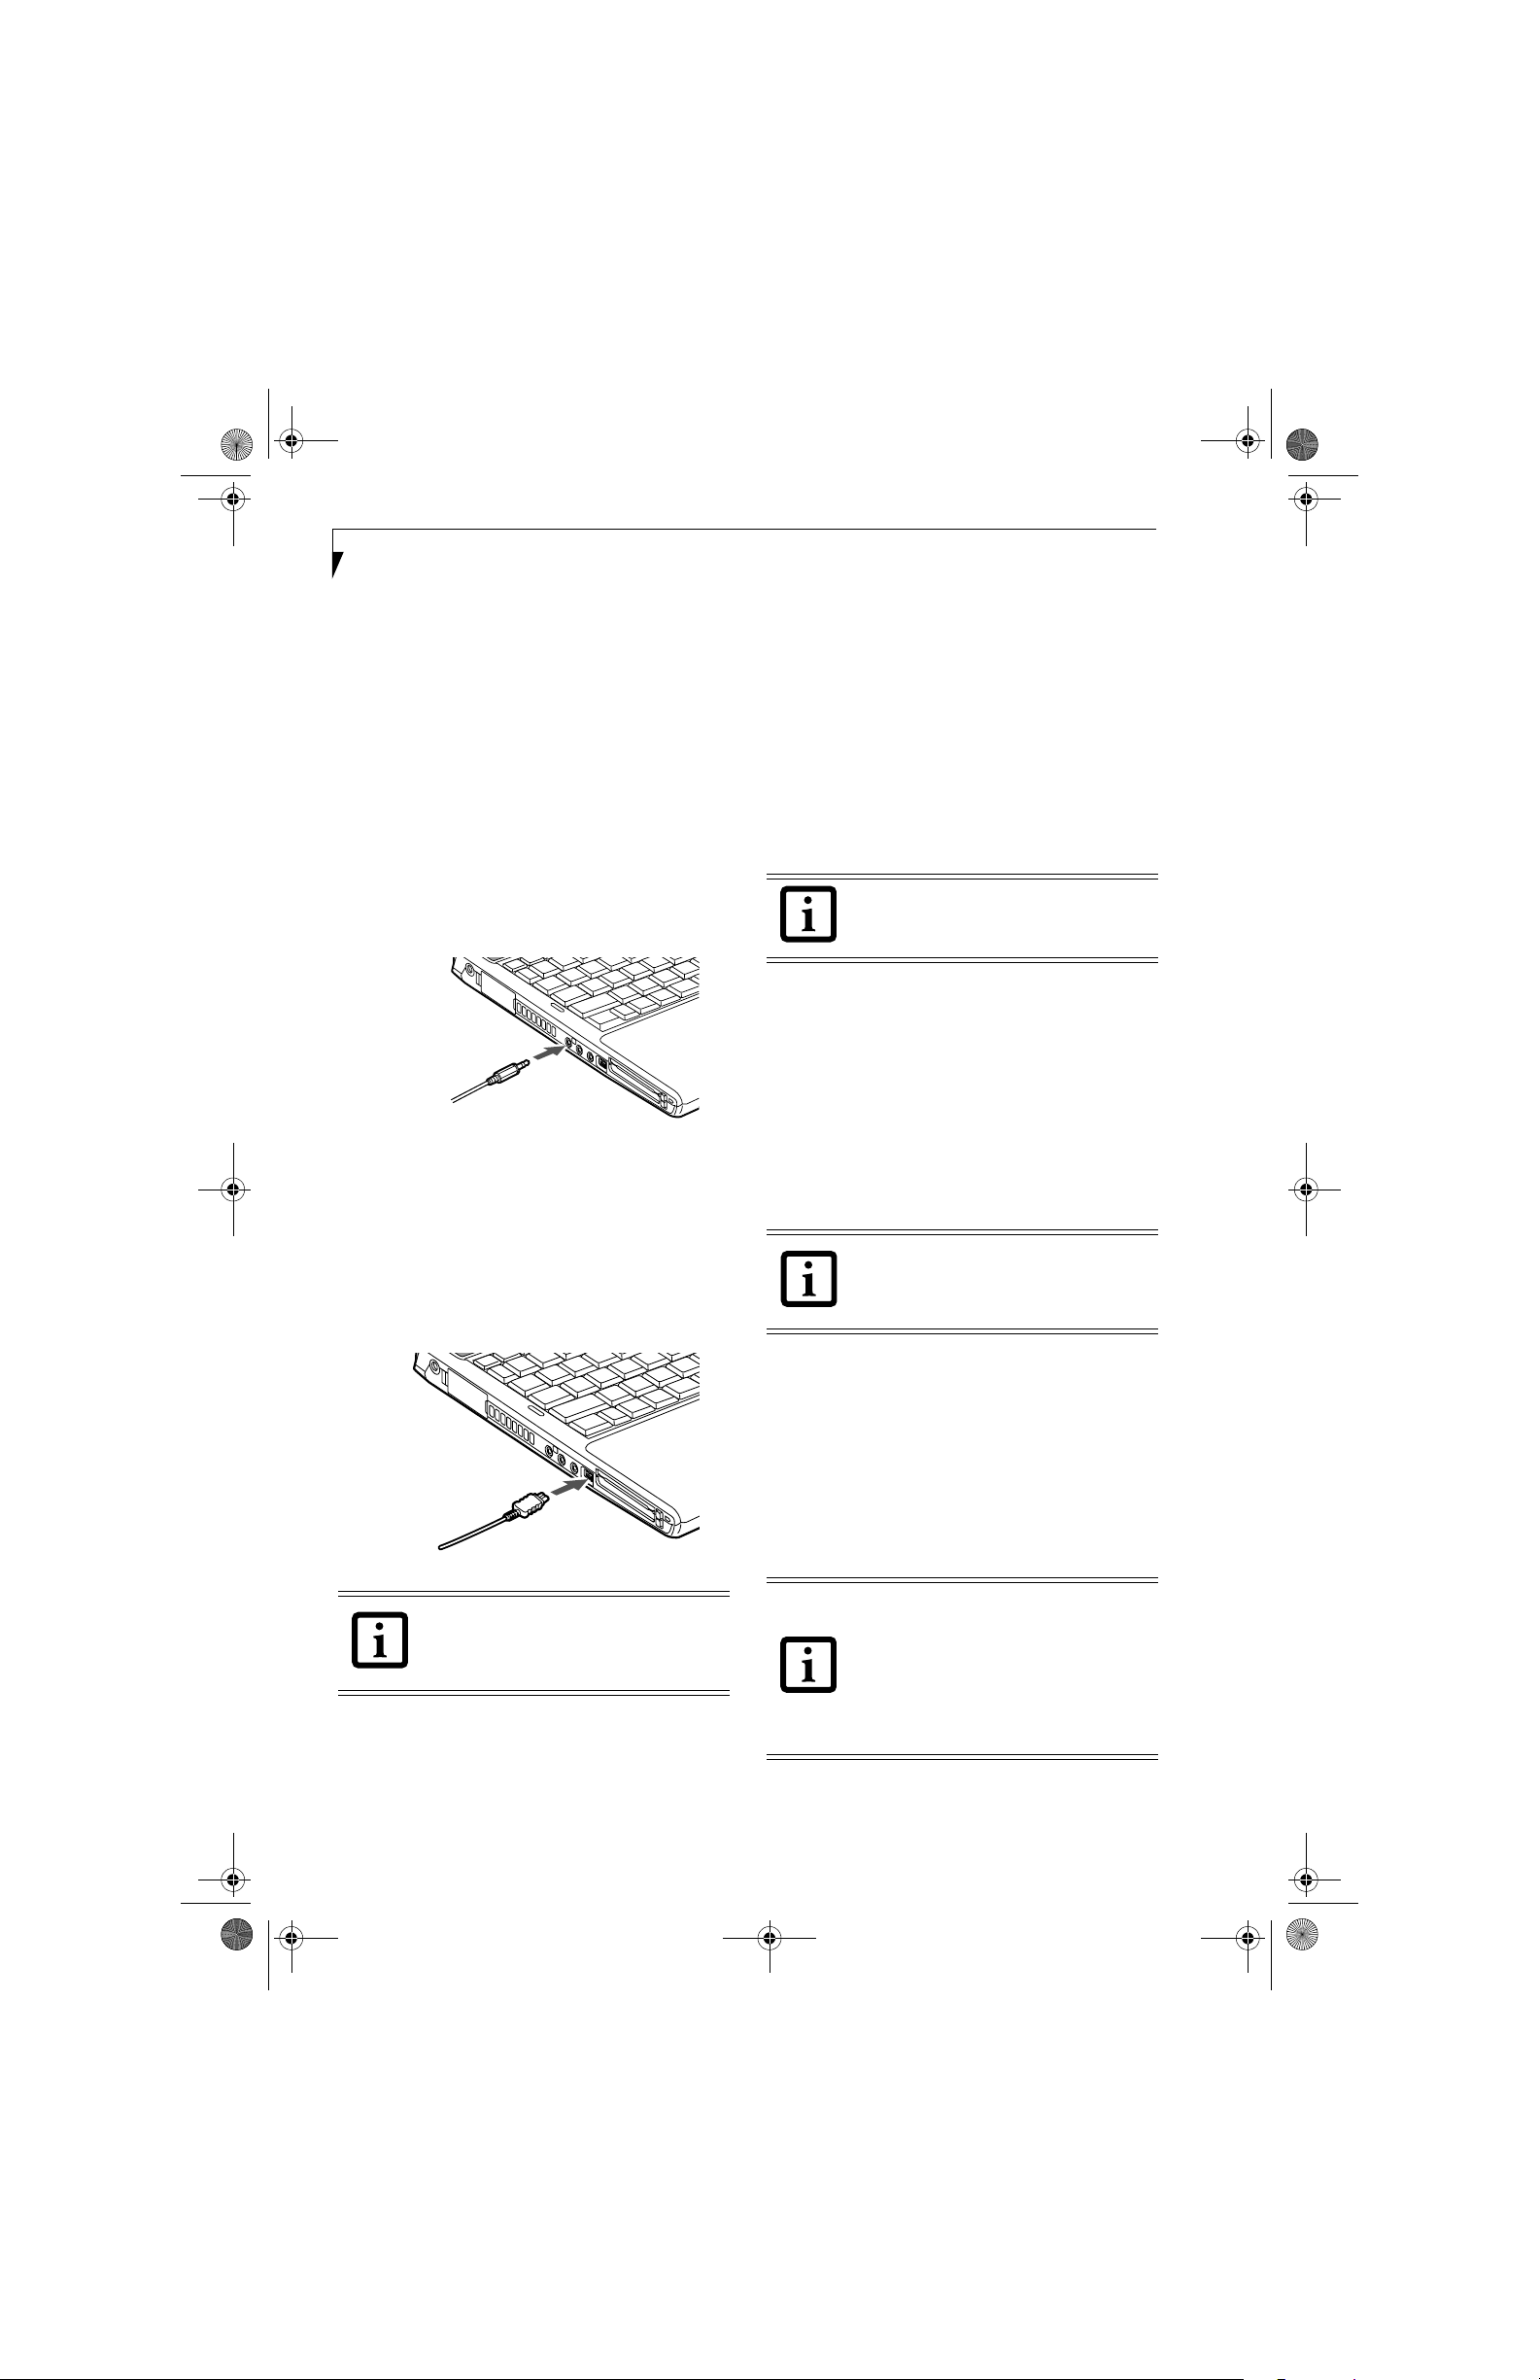
INTERNAL LAN (RJ-45) JACK
The internal LAN (RJ-45) jack is used for a Gigabit
(10Base-T/100Base-Tx/1000Base-T/Tx) Ethernet LAN
connection. You may need to configure your notebook
to work with your particular network. (Please refer to
your network administrator for information on your
network configuration.) To connect the LAN cable
follow these easy steps:
1. Align the connector with the port opening.
2. Push the connector into the port until it is
seated.(Figure 4-18)
3. Plug the other end of the cable into a LAN outlet.
Figure 4-17. Connecting a Modem
The modem sound is deactivated by default, to activate
modem sound follow these easy steps:
1. Right click on the Speaker icon in your system tray.
2. Select Open Volume.
3. Select Option/Properties.
4. Under “Show the following volume controls”, click
on Phone and click OK.
5. Uncheck the Mute box under Phone Balance.
The internal modem is not intended for
use with Digital PBX systems. Do not connect the internal modem to a Digital PBX
as it may cause serious damage to the
internal modem or your entire LifeBook
notebook. Consult your PBX manufacturer’s documentation for details. Some
hotels have Digital PBX systems. Be sure to
find out BEFORE you connect your
modem.
Figure 4-18. Connecting the LAN
PARALLEL PORT
The parallel port, or LPT port, located on the optional
Port Replicator allows you to connect parallel devices,
such as a printer to your notebook. In order to connect a
parallel interface device follow these easy steps:
1. Align the connector with the port opening.
2. Push the connector into the port until it is
seated.(Figure 4-19)
3. Tighten the two hold-down screws, located on each
end of the connector.
50
Page 18

S7020.book Page 51 Friday, May 13, 2005 3:49 PM
User Installable Features
UNIVERSAL SERIAL BUS PORTS
The Universal Serial Bus 2.0 ports (USB) allow you to
connect USB devices such as external game pads,
pointing devices, keyboards and/or speakers.
In order to connect a USB device follow these steps:
1. Align the connector with the port opening.
(Figure 4-21)
2. Push the connector into the port until it is seated.
Figure 4-19. Connecting a Parallel Device to Port Replicator
SERIAL PORT
The serial port, or COM port, located on the optional
Port Replicator allows you to connect serial devices, such
as printers or scanners. In order to connect a serial interface device follow these easy steps:
1. Align the connector with the port opening.
2. Push the connector into the port until it is seated.
3. Tighten the two hold-down screws, located on each
end of the connector.
PS/2 PORT
The PS/2 port located on the optional Port Replicator
allow you to connect an external keyboard or mouse. In
order to connect a PS/2 interface device follow these easy
steps:
1. Align the connector with the port opening.(Figure 4-
20)
2. Push the connector into the port until it is seated.
A mouse or keyboard may be installed and
automatically recognized by your notebook without restarting or changing setups.
Due to the ongoing changes in USB technology and standards, not all USB devices
and/or drivers are guaranteed to work.
Figure 4-21. Connecting a USB Device
INFRARED PORT
The Infrared IrDA (4Mbps) port allows for wireless data
transfer between your notebook and other IrDAcompatible devices, such as another computer or a
printer, without the use of a cable. (See Figure 2-7 on
page 9 for location)
It is important to keep in mind that while carrying out
this form of communication, both devices must be
placed so their infrared ports are directly facing each
other without obstruction. The devices must also be
separated by at least 6" but no more than 36" for
maximum performance.
The following conditions may interfere with infrared
communications:
■
A television, radio remote control unit, or a wireless
headphone is being used nearby.
■
Direct sunlight, fluorescent light, or incandescent light
shines directly on the port.
Figure 4-20. Connecting a PS/2 Device
DOCKING PORT
The docking port is used for the connection of your
notebook to an optional port replicator or docking
station. In order to connect your notebook to one of
these devices follow the instructions that came with your
docking port. (See Figure 2-8 on page 10 for location)
■
Do not move either device while communication is active as it may interrupt
data transmission.
■
Be careful not to scratch the infrared
port lens. Dirt, scratches, or other surface marks can degrade operation.
51
Page 19
S7020.book Page 52 Friday, May 13, 2005 3:49 PM
LifeBook S7000 Notebook
S-VIDEO OUT PORT (TV OUT)
The S-Video port allows you to connect and use directly
any S-Video device, such as a VCR or television. The
S-Video standard provides for a higher quality picture
than NTSC or PAL. In order to connect an S-Video
device, follow these easy steps: (Figure 4-22)
1. Attach the mini S-Video cable adapter (included
with your system accessories) to the S-Video cable
from the device.
2. Align the connector with the port opening.
3. Push the connector into the port until it is seated.
When S-Video is connected, you can toggle the S-Video
device on and off by pressing the [F11] key while
holding down the [Fn] key.
Figure 4-22. Connecting the S-Video Cable Adapter
IEEE 1394 PORT
The 4-pin 1394 port allows you to connect digital
devices that are compliant with IEEE 1394 standard. The
IEEE 1394 standard is easy to use, connect, and disconnect. This port can allow up to 400 Mbps transfer rate. A
third-party application may be required to operate your
digital device with the 1394 port
.
HEADPHONE/LINE OUT JACK
The headphone/line-out jack supports 2-channel High
Definition (HD) audio for greatly a enhanced multimedia experience.
The headphone/line out jack allows you to connect
headphones or powered external speakers. In order to
connect headphones or speakers follow these easy steps:
1. Align the connector (3.5 mm stereo mini-jack) with
the port opening.
2. Push the connector into the port until it is seated.
If you plug headphones into the
headphone jack, you will disable the builtin stereo speakers.
MICROPHONE/STEREO LINE-IN JACK
The microphone/stereo line-in jack allows you to
connect an external microphone or an external audio
source s uch as an audio cassette player to your notebook .
Your audio device must be equipped with a 1/8" (3.5
mm) stereo mini-plug in order to fit into the stereo linein jack of your notebook. To connect a external audio
source: (See Figure 2-5 on page 7 for location)
1. Align the connector with the port opening.
2. Push the connector into the port until it is seated.
Turn down the audio volume when
connecting electronic devices to the line-in
jack. The internal speakers might break if
unexpected large sounds are input.
Figure 4-23. Connecting an IEEE 1394 Device
The 1394 port in this system uses a fourpin configuration. If you want to interface
with devices which use a six-pin configuration, you will need to purchase an adapter.
In order to connect a 1394 device, follow these steps:
1. Align the connector with the port opening.
2. Push the connector into the port until it is seated.
(Figure 4-23)
52
EXTERNAL MONITOR PORT
The external monitor port allows you to connect an
external monitor. In order to connect an external monitor
follow these easy steps: (See Figure 2-7 on page 9 for loca-
tion)
1. Align the connector with the port opening.
2. Push the connector into the port until it is seated.
3. Tighten the two hold-down screws, located on each
end of the connector.
Pressing the [Fn] + [F10] keys allows you
to change your selection of where to send
your display video. Each time you press the
key combination, you will step to the next
choice, starting with the built-in display
panel only, moving to the external monitor
only, finally moving to both the built-in
display panel and an external monitor.
Page 20

S7020.book Page 53 Friday, May 13, 2005 3:49 PM
5
Troubleshooting
53
Page 21

S7020.book Page 54 Friday, May 13, 2005 3:49 PM
LifeBook S7000 Notebook
54
Page 22
S7020.book Page 55 Friday, May 13, 2005 3:49 PM
Troubleshooting
Your Fujitsu LifeBook notebook is sturdy and subject to
few problems in the field. However, you may encounter
simple setup or operating problems that you can solve
on the spot, or problems with peripheral devices, that
you can solve by replacing the device. The information
in this section helps you isolate and resolve some of these
straightforward problems and identify failures that
require service.
IDENTIFYING THE PROBLEM
If you encounter a problem, go through the following
procedure before pursuing complex troubleshooting:
1. Turn off your LifeBook notebook.
2. Make sure the AC adapter is plugged into your notebook and to an active AC power source.
3. Make sure that any card installed in the PC Card slot
is seated properly. You can also remove the card
from the slot, thus eliminating it as a possible cause
of failure.
4. Make sure that any devices connected to the external
connectors are plugged in properly. You can also
disconnect such devices, thus eliminating them as
possible causes of failure.
5. Turn on your notebook. Make sure it has been off at
least 10 seconds before you turn it back on.
6. Go through the boot sequence.
7. If the problem has not been resolved, refer to the
Troubleshooting Table, that follows, for more
detailed troubleshooting information.
If you keep notes about what you have
tried, your support representative may be
able to help you more quickly by giving
additional suggestions over the phone.
Troubleshooting
8. If you have tried the solutions suggested in the Troubleshooting Table without success, contact your
support representative:
Toll free: 1-800-8Fujitsu (1-800-838-5487)
E-mail: 8fujitsu@us.fujitsu.com
Web site:
http://www.computers.us.fujitsu.com/support.
Before you place the call, you should have the following
information ready so that the customer support representative can provide you with the fastest possible solution:
■
Product name
■
Product configuration number
■
Product serial number
■
Purchase date
■
Conditions under which the problem occurred
■
Any error messages that have occurred
■
Hardware configuration
■
Type of device connected, if any
See the Configuration Label on the bottom of your
notebook for configuration and serial numbers. (See
figure 2-8 on page 10 for location)
SPECIFIC PROBLEMS
Using the Troubleshooting Table
When you have problems with your LifeBook notebook,
try to find the symptoms under the Problem column of
the troubleshooting table for the feature giving you
difficulty. You will find a description of common causes
for that symptom under the column Possible Cause and
what, if anything, you can do to correct the condition
under Possible Solutions. All possible causes or solutions
may not apply to your notebook.
55
Page 23
S7020.book Page 56 Friday, May 13, 2005 3:49 PM
LifeBook S7000 Notebook
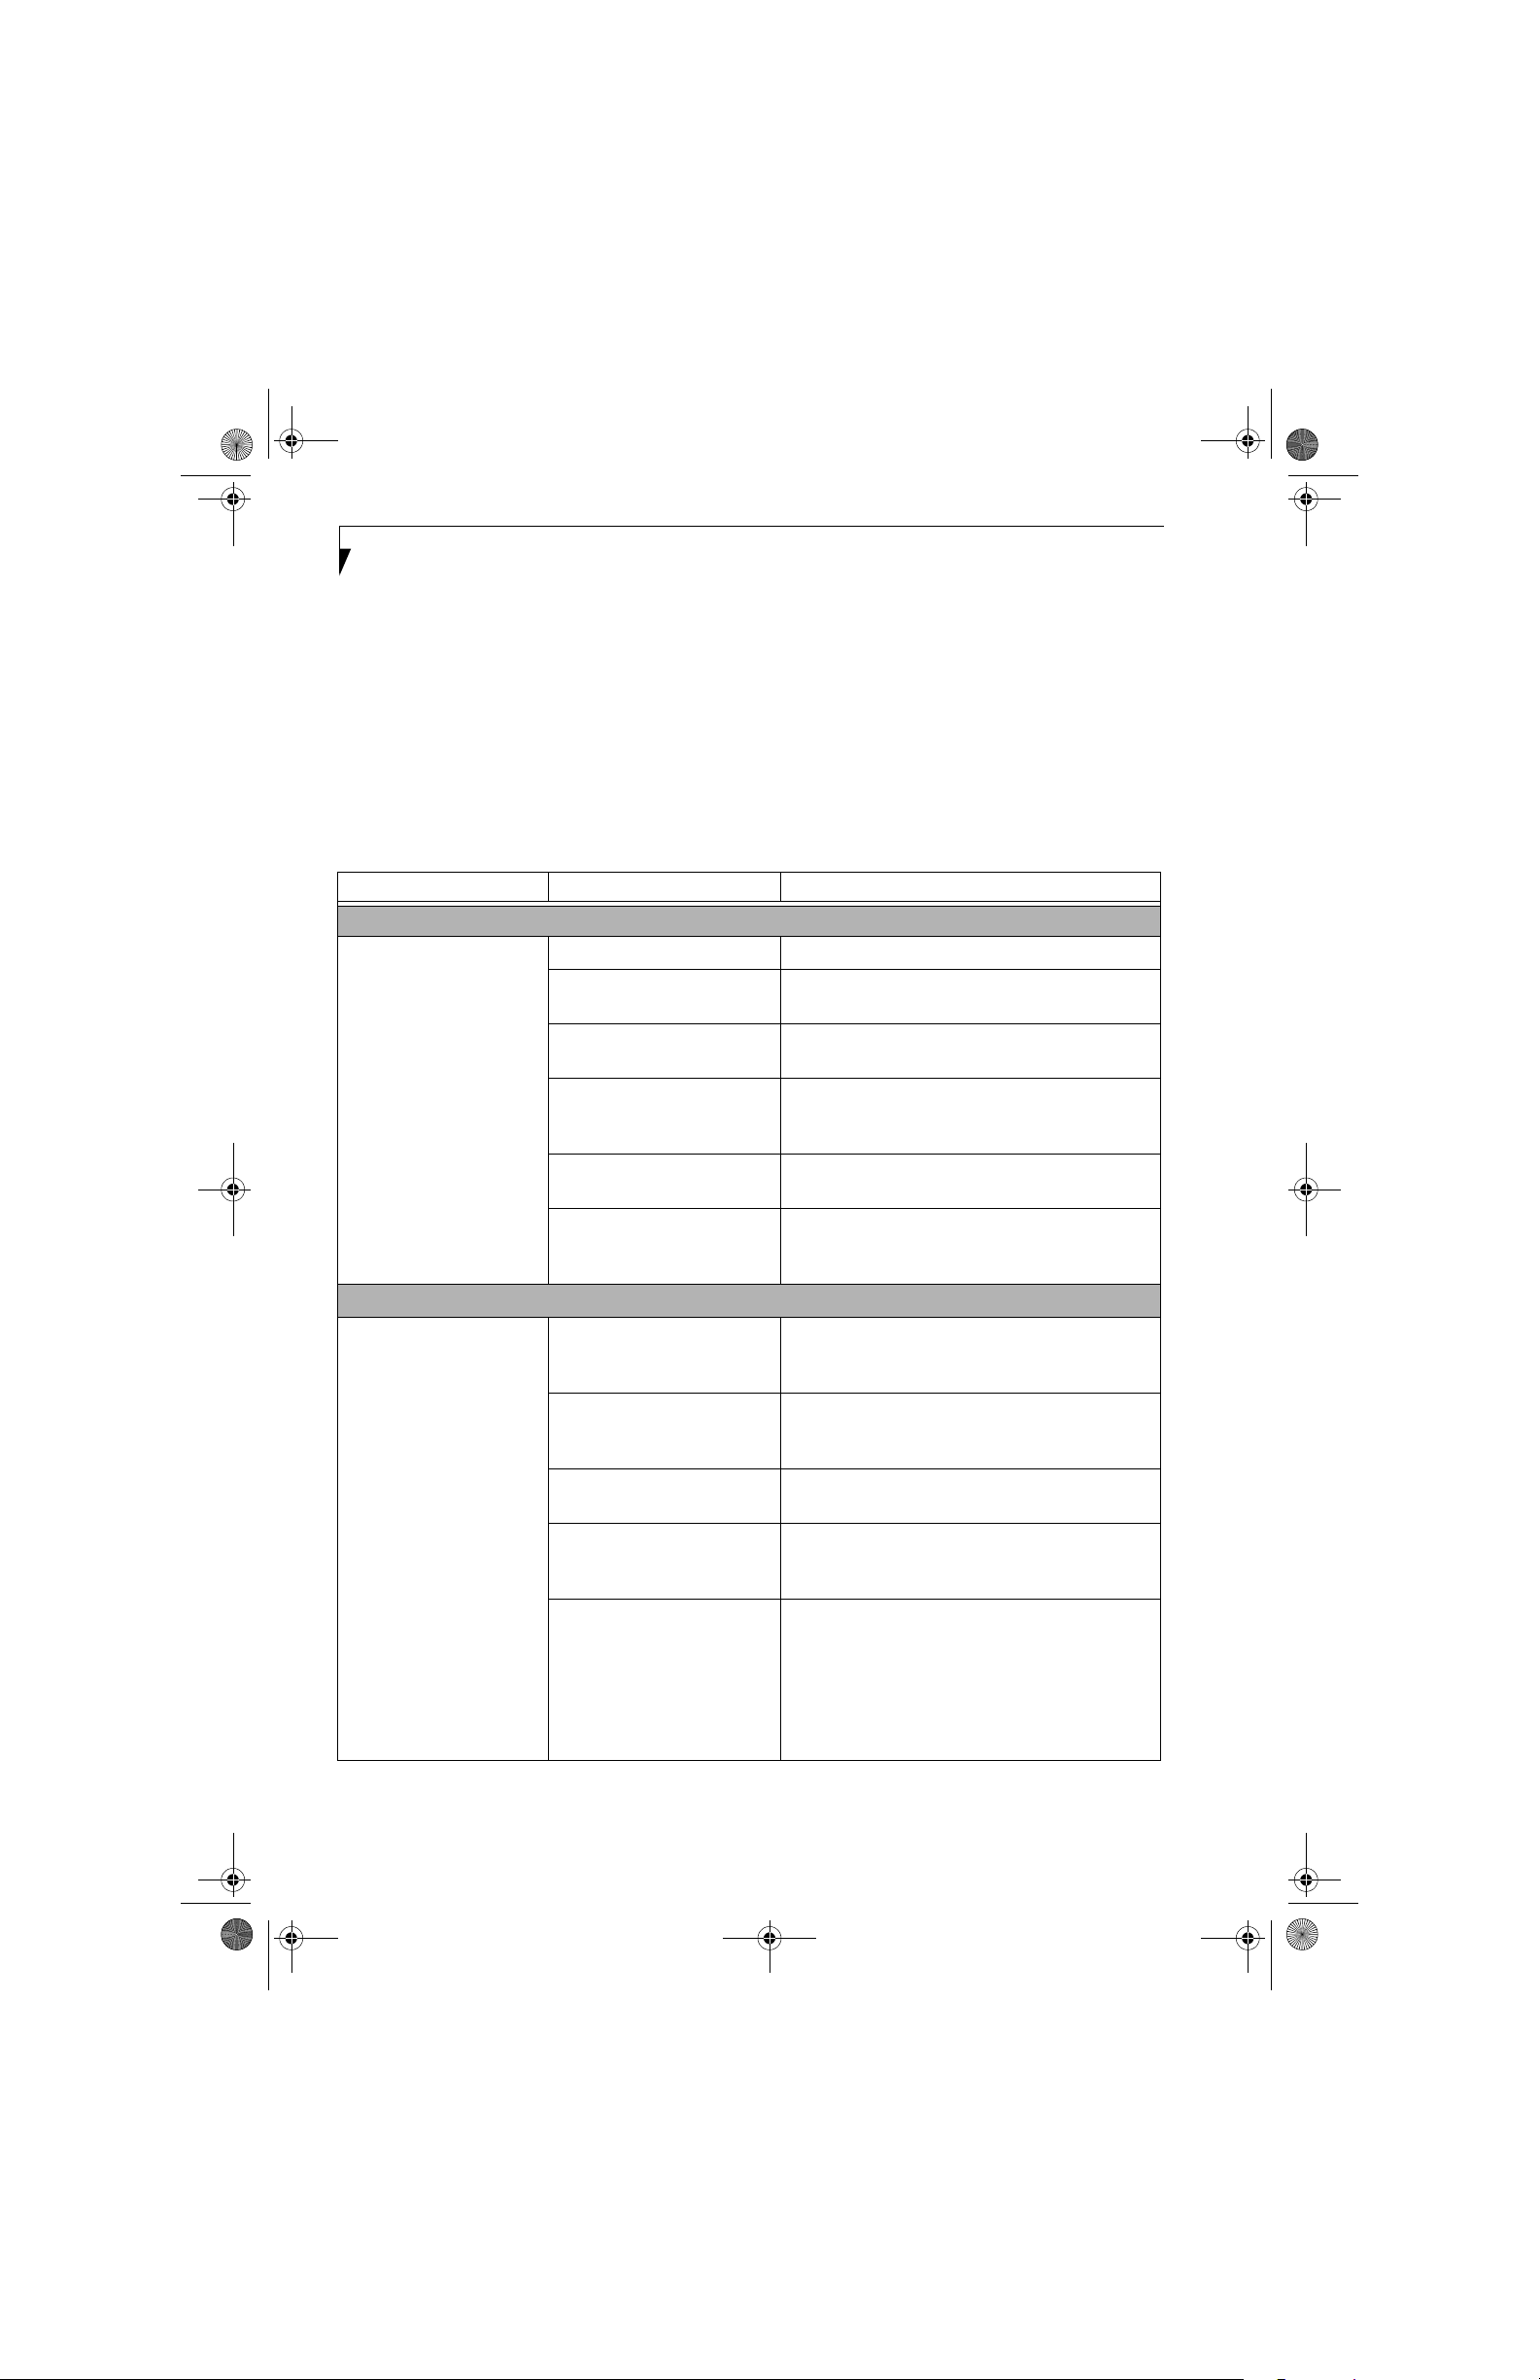
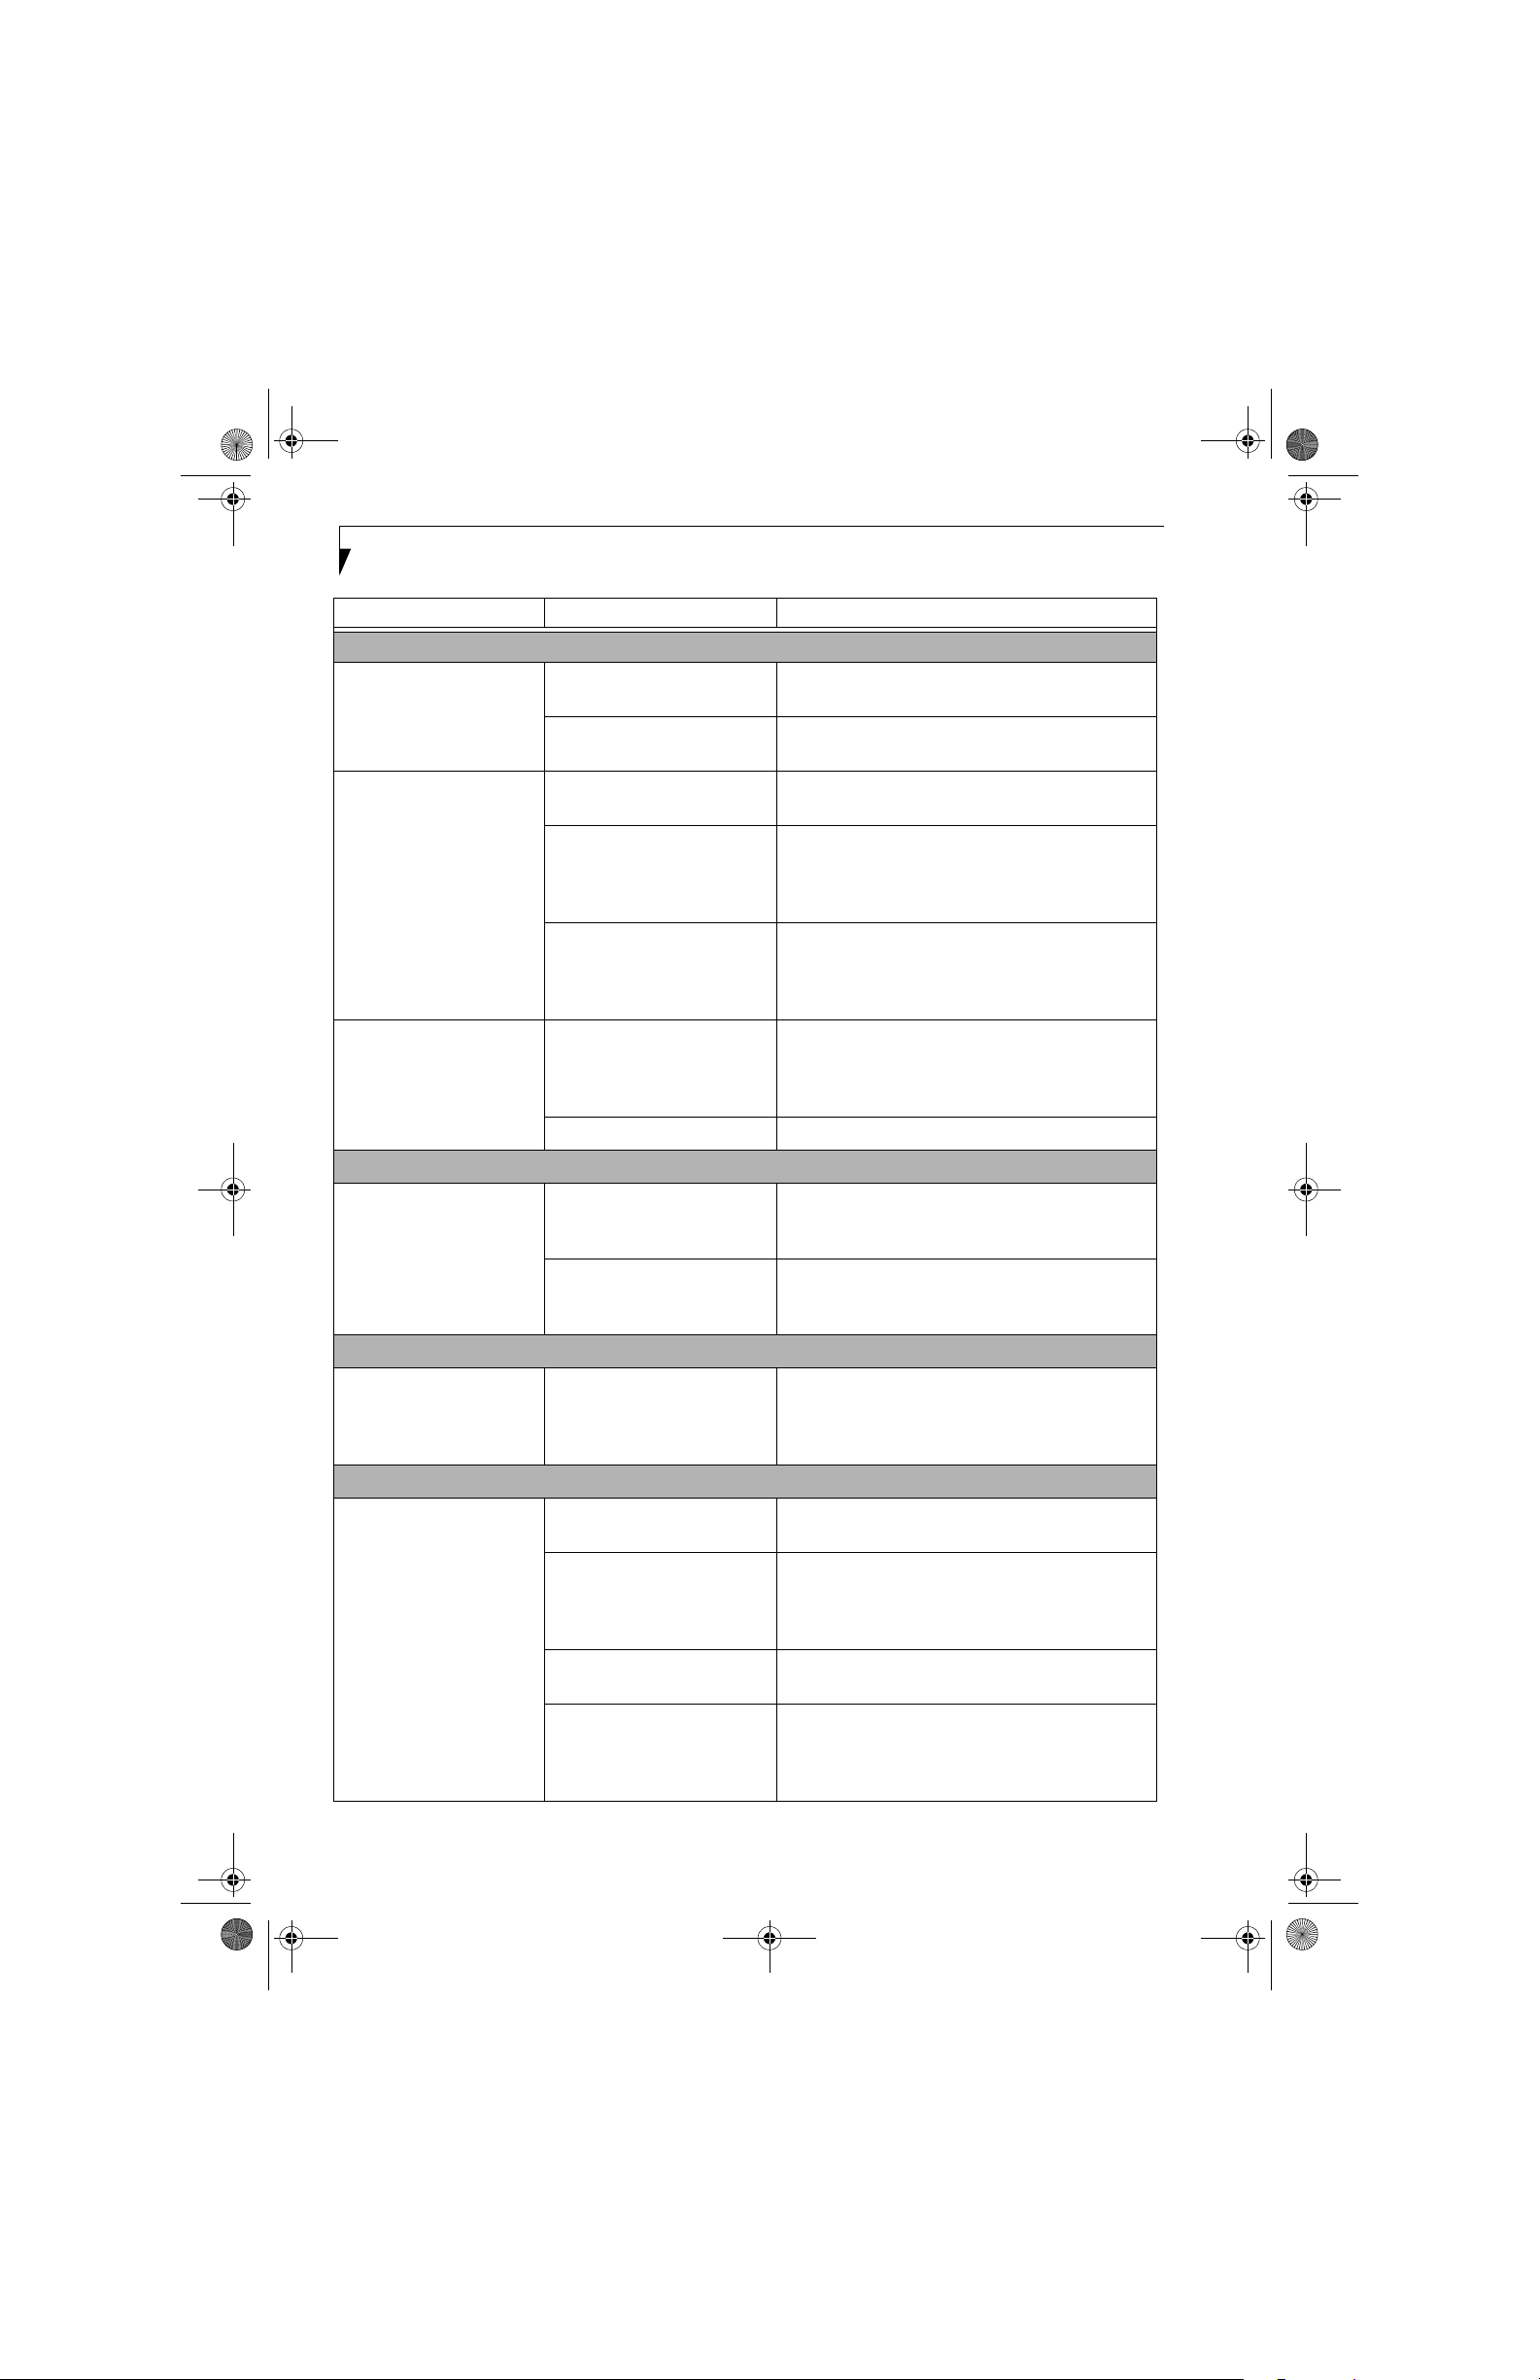
TROU BLE S HO OTI N G TA B LE
Problem Page
Audio Problems . . . . . . . . . . . . . . . . . . . . . . . . . . page 56
DVD/CD-ROM Drive Problems. . . . . . . . . . . . . page 56
Port Replicator Problems. . . . . . . . . . . . . . . . . . . page 57
Floppy Disk Drive Problems . . . . . . . . . . . . . . . . page 57
Hard Drive Problems . . . . . . . . . . . . . . . . . . . . . . page 57
Keyboard or Mouse Problems. . . . . . . . . . . . . . . page 58
Memory Problems . . . . . . . . . . . . . . . . . . . . . . . . page 58
Problem Possible Cause Possible Solutions
Audio Problems
Problem Page
Modem Problems. . . . . . . . . . . . . . . . . . . . . . . . . page 58
Parallel, Serial and USB Device Problems . . . . . page 58
PC Card Problems . . . . . . . . . . . . . . . . . . . . . . . . page 59
Power Failures . . . . . . . . . . . . . . . . . . . . . . . . . . . page 59
Shutdown and Startup Problems . . . . . . . . . . . . page 61
Video Problems . . . . . . . . . . . . . . . . . . . . . . . . . . page 62
Miscellaneous Problems . . . . . . . . . . . . . . . . . . . page 63
There is no sound coming
from the built-in speakers.
The volume is turned too low. Adjust the volume control on your notebook.
The software volume control is
set too low.
Headphones are plugged into
your notebook.
BIOS audio settings
are incorrect.
Software driver is not
configured correctly.
The speakers have been muted
using the Volume icon in the
system tray.
DVD/CD-RW/CD-ROM Drive Problems
LifeBook notebook fails to
recognize DVD/CD-RW/
CD-ROM’s.
Protective sheet is still in the
DVD/CD-RW/CD-ROM
drive tray.
DVD/CD-RW/CD-ROM is
not pushed down onto raised
center circle of the drive.
DVD/CD-RW/CD-ROM tray
is not latched shut.
Incorrect DVD Player or no
DVD Player software is
installed.
Wrong drive designator was
used for DVD/CD-RW/CDROM in the application.
Adjust the sound volume control settings in your
software, operating system and applications.
Plugging in headphones disables the built-in
speakers, remove the headphones.
Set the BIOS setup utility to the default values within
the Multimedia Device Configuration menu. (See
BIOS Setup Utility on page 29 for more information)
Refer to your application and operating system
documentation for help.
Click on the Volume icon in the tool tray on the
bottom right of the screen. (It looks like a speaker).
If the Mute box is checked, click on it to uncheck it.
Replace DVD/CD-RW/CD-ROM in tray.
Open DVD/CD-RW/CD-ROM tray and re-install
DVD/CD-RW/CD-ROM properly.
Push on the front of the DVD/CD-RW/CD-ROM
tray until it latches.
Re-install the DVD player software using the CD
that came with your system. (See “Media Player Soft-
ware” on page 37 for more information.)
Verify the drive designator used by the application is
the same as the one used by the operating system.
When the operating system is booted from a DVD/
CD, drive designations are automatically adjusted.
Note that the drive designation can be changed with
the Disk Management tool located at Administrative
Tools -> Computer Management.
56
Page 24

S7020.book Page 57 Friday, May 13, 2005 3:49 PM
Problem Possible Cause Possible Solutions
LifeBook notebook fails to
recognize DVD/CD-RW/
CD-ROM’s (continued)
Windows DVD/CD-RW/CDROM auto insertion function
is disabled.
Troubleshooting
Start the DVD/CD-RW/CD-ROM from the desktop
or application software or re-enable the Windows
DVD/CD-RW/CD-ROM auto insertion function.
LifeBook notebook fails to
recognize DVD/CD-RW/
CD-ROM’s.
DVD/CD-RW/CD-ROM is
dirty or defective.
Wipe DVD/CD-RW/CD-ROM with a non-abrasive
CD cleaning cloth and reinsert. It if still will not
work try another DVD/CD-RW/CD-ROM in
the drive.
The DVD/CD-RW/CDROM Access indicator on
the Status Indicator Panel
blinks at regular intervals
when no DVD/CD-RW/
The Windows DVD/CD-RW/
CD-ROM auto insertion function is active and is checking to
see if a DVD/CD-RW/CDROM is ready to run.
This is normal. However, you may disable this
feature.
CD-ROM is in the tray or
the DVD/CD-RW/CDROM drive is not installed.
Port Replicator Problems
Note: Be sure to power down your LifeBook notebook before adding a printer to the Port Replicator parallel port.
LifeBook notebook does
not turn on when installed
in the optional Port
Replicator
Port Replicator AC adapter is
not plugged in.
Notebook is not properly
seated in the Port Replicator.
Provide power to the Port Replicator.
Remove and re-dock your LifeBook notebook.
Floppy Disk Drive Problems
You cannot access your
floppy disk.
You tried to write to a write
protected floppy disk.
Eject the floppy disk and set it to write enable.
(See Preparing a Disk for Use on page 42 for more
information)
Floppy disk is not
loaded correctly.
The floppy disk drive may not
Eject floppy disk, check orientation and re-insert.
(See Ejecting a Disk on page 42 for more information)
Remove and re-install your floppy disk drive.
be properly installed.
Hard Drive Problems
You cannot access your
hard drive.
Security is set to protect access
to floppy disk data.
The setup utility is incorrectly
set for your internal (Primary
Master) or optional second
hard drive (Primary Slave).
The wrong drive designator
was used by an application
when a bootable CD-ROM was
used to start the notebook.
Security is set so your operating system cannot be started
without a password.
Verify your password and security settings.
Revise BIOS settings to set both Primary Master
and Primary Slave correctly. (See BIOS Setup Utility
on page 29 for more information)
Verify drive designator used by application is in
use by the operating system. When the operating
system is booted from a CD, drive designations
are automatically adjusted.
Verify your password and security settings.
57
Page 25
S7020.book Page 58 Friday, May 13, 2005 3:49 PM
LifeBook S7000 Notebook
Problem Possible Cause Possible Solutions
Keyboard or Mouse Problems
The built-in keyboard does
not seem to work.
The notebook has gone into
Suspend mode.
Push the Power/Suspend/Resume button.
You have installed an
external keyboard or
mouse, and it does not
seem to work.
You have connected an
external keyboard or a
mouse and it seems to be
locking up the system.
Memory Problems
Your Power On screen, or
Main menu of the BIOS
setup utility information,
does not show the correct
amount of installed
memory.
Modem Problems
Messages about modem
operation.
Your application has locked
out your keyboard.
Your external device is not
properly installed.
Your operating system
software is not setup with the
Try to use your integrated pointing device to restart
your system.
Re-install your device. (See Device Ports on page 50
for more information)
Check your device and operating system docu-
mentation and activate the proper driver.
correct software driver
for that device.
Your mouse or keyboard is
connected to the wrong PS/2
port on the optional Port
Plug the mouse into the PS/2 Mouse port and
the external keyboard into the PS/2 Keyboard port.
(See PS/2 Port on page 51 for more information)
Replicator.
Your operating system
software is not setup with
Check your device and operating system
documentation and activate the proper driver.
the correct software driver
for that device.
Your system has crashed. Try to restart your notebook. I
Your memory upgrade module
is not properly installed.
Remove and re-install your memory upgrade
module. (See Memory Upgrade Module on page 45
for more information)
You have a memory failure. Check for Power On Self Test (POST) messages.
(See Power On Self Test Messages on page 64 for more
information)
Messages about modem
operation are generated by
See your application software documentation for
additional information.
whichever modem application
is in use.
Parallel, Serial, and USB Device Problems
You have installed a parallel
port device, a serial port
device or a USB device.
Your LifeBook notebook
does not recognize the
device, or the device does
not seem to work properly.
The device is not properly
installed.
The device may have been
installed while an application
was running, so your notebook
is not aware of its installation.
Your device may not have the
correct software driver active.
You may have the wrong I/O
address selected for your
device.
58
Remove and re-install the device. (See Device Ports
on page 50 for more information)
Close the application and restart your notebook.
See your software documentation and activate the
correct driver.
See your device documentation and software docu-
mentation to determine the required I/O address.
Change the settings in the BIOS setup utility. (See
BIOS Setup Utility on page 29 for more information)
Page 26

S7020.book Page 59 Friday, May 13, 2005 3:49 PM
Problem Possible Cause Possible Solutions
You have installed a parallel
port device, a serial port
device or a USB device.
Your LifeBook notebook
does not recognize the
device, or the device does
Your device and another device
are assigned the same I/O
address.
Parallel port is set to output
only.
not seem to work properly.
(continued)
PC Card Problems
A card inserted in the PC
Card slot does not work or
is locking up the system.
The card is not properly
installed.
The card may have been
installed while an application
was running, so your notebook
is not aware of its installation.
Your software may not have
the correct software driver
active.
You may have the wrong I/O
address selected for your PC
Card device.
Troubleshooting
Check all I/O addresses located within the BIOS
setup utility and any other installed hardware or
software to make sure there are no duplications.
Check parallel port setting in the BIOS and set to
bi-directional or ECP.
Remove and re-install the card. (See PC Cards/
ExpressCards™ on page 43 for more information)
Close the application and restart your notebook.
See your software documentation and activate the
correct driver.
See your PC Card documentation to determine
the required I/O address. Change the settings in
the BIOS. (See BIOS Setup Utility on page 29 for
more information)
Power Failures
You turn on your
LifeBook notebook and
nothing seems to happen.
Your PC Card device and
another device are assigned the
same I/O address.
The installed primary battery
is completely discharged, there
is no optional second battery
installed or there is no Power
Check all I/O addresses located within the BIOS
setup utility and any other installed hardware or
software to make sure there are no duplications.
Check the Status Indicator Panel to determine the
presence and condition of the batteries. (See Status
Indicator Panel on page 11 for more information)
Install a charged battery or a Power adapter.
adapter (AC or Auto/Airline)
installed.
The primary battery is
installed but is faulty.
Use the Status Indicator panel to verify the presence
and condition of the batteries. (See Status Indicator
Panel on page 11 for more information) If a battery is
indicating a short, remove that battery and operate
from another power source or replace that battery.
The battery or batteries are low. Check the Status Indicator Panel to determine the
presence and condition of the batteries. (See Status
Indicator Panel on page 11 for more information) Use
a Power adapter to operate until a battery is charged
or install a charged battery.
The power adapter (AC or
auto/airline) is not plugged
Verify that your adapter is connected correctly. (See
Power Sources on page 27 for more information)
in properly.
59
Page 27

S7020.book Page 60 Friday, May 13, 2005 3:49 PM
LifeBook S7000 Notebook
Problem Possible Cause Possible Solutions
You turn on your
LifeBook notebook and
nothing seems to happen.
(continued)
The Power adapter (AC or
auto/airline) has no power
from the AC outlet, airplane
seat jack, or the car’s cigarette
lighter.
The Power adapter (AC or
auto/airline) is faulty.
Move the AC cord to a different outlet, check for
a line switch or tripped circuit breaker for the AC
outlet. If you are using an auto/airline adapter in
a car make sure the ignition switch is in the On or
Accessories position.
Try a different Power adapter or install a charged
optional second battery.
Your LifeBook notebook
turns off all by itself.
Your LifeBook notebook
will not work on battery
alone.
The power management
parameters are set for auto
timeouts which are too short
for your operating needs.
Press any button on the keyboard, or move the
mouse to restore operation. If that fails, push the
Power/Suspend/Resume button. Check your power
management settings, or close your applications and
go to the Power Savings menu of the setup utility to
adjust the timeout values to better suit your needs.
You are operating on battery
power only and have ignored a
low battery alarm until the
Install a power adapter and then push the Power/
Suspend/Resume button. (See Power Sources on
page 27 for more information)
batteries are all at the dead
battery state and your machine
has gone into Dead Battery
Suspend mode.
You have a battery failure. Verify the condition of the batteries using the
Status Indicator panel, and replace or remove
any batteries that are shorted. (See Status Indicator
Panel on page 11 for more information)
Your power adapter has failed
or lost its power source.
The installed batteries
are dead.
Make sure the adapter is plugged in and the outlet
has power.
Replace the battery with a charged one or install
a Power adapter.
No batteries are installed. Install a charged battery.
The batteries are improperly
installed.
Verify that the batteries are properly connected
by re-installing them.
The batteries seem to
discharge too quickly.
60
Your installed batteries
are faulty.
Verify the condition of the batteries using the
Status Indicator panel and replace or remove
any batteries that are shorted. (See Status Indicator
Panel on page 11 for more information)
You are running an application
that uses a great deal of power
due to frequent hard drive
Use both the primary battery and an optional
second battery and/or use a power adapter for this
application when at all possible.
access or DVD/CD-ROM
access, use of a modem card
or a LAN PC card.
The power savings features
may be disabled.
Check the power management and/or setup utility
settings in the Power Savings menu and adjust
according to your operating needs.
The brightness is turned all
the way up.
Turn down the brightness adjustment. The higher
the brightness the more power your display uses.
The batteries are very old. Replace the batteries.
Page 28

S7020.book Page 61 Friday, May 13, 2005 3:49 PM
Problem Possible Cause Possible Solutions
The batteries seem to
discharge too quickly.
(continued
The batteries have been
exposed to high temperatures.
The batteries are too hot
or too cold.
Shutdown and Startup Problems
The Suspend/Resume
button does not work.
The Suspend/Resume button
is disabled from the Advanced
submenu of the Power menu
of the setup utility.
You did not hold the button
in long enough.
There may be a conflict with
the application software.
The system powers up, and
displays power on information, but fails to load the
operating system.
The boot sequence settings
of the setup utility are not
compatible with your
configuration.
You have a secured system
requiring a password to load
your operating system.
Internal hard drive was
not detected.
An error message is
displayed on the screen
Power On Self Test (POST) has
detected a problem.
during the notebook
(boot) sequence.
Your notebook appears to
change setup parameters
when you start it.
BIOS setup changes were not
saved when you made them
and exited the BIOS setup
utility returning it to
previous settings.
Troubleshooting
Replace the batteries.
Restore the notebook to normal operating temperature. The Charging icon on the Status Indicator
panel will flash when the battery is outside its
operating range.
Enable the button from the setup utility.
Hold the button longer. This may need to be a few
seconds if your application is preventing the CPU
from checking for button pushes.
Close all applications and try the button again.
Set the operating source by pressing the [ESC] key
while the Fujitsu logo is on screen or use the [F2]
key and enter the setup utility and adjust the source
settings from the Boot menu. (See BIOS Setup
Utility on page 29 for more information)
Make sure you have the right password. Enter the
setup utility and verify the Security settings and
modify them as accordingly. (See BIOS Setup Utility
on page 29 for more information)
Use the BIOS setup utility or Primary Master
submenu, located within the Main menu, to try to
auto detect the internal hard drive.
See the Power On Self Test (POST) messages to
determine the meaning and severity of the problem.
Not all messages are errors; some are simply status
indicators. (See Power On Self Test Messages on
page 64 for more information)
Make sure you select Save Changes And Exit when
exiting the BIOS setup utility.
Your system display won’t
turn on when the system is
turned on or when the
system has resumed.
The BIOS CMOS hold-up
battery has failed.
The system may be password-
protected.
Contact your support representative for repairs.
This is not a user serviceable part but has a normal
life of 3 to 5 years.
Check the status indicator panel to verify that the
Security icon is blinking. If it is blinking, enter your
password.
61
Page 29

S7020.book Page 62 Friday, May 13, 2005 3:49 PM
LifeBook S7000 Notebook
Problem Possible Cause Possible Solutions
Video Problems
The built-in display is
blank when you turn on
your LifeBook notebook.
Something is pushing on the
Closed Cover switch.
The notebook is set for an
external monitor only.
Clear the Closed Cover switch. (See figure 2-4 on
page 6 for location)
Pressing [F10] while holding down the [Fn] key
allows you to change your selection of where to
send your display video. Each time you press the
combination of keys you will step to the next
choice. The choices, in order are: built-in display
only, external monitor only, both built-in display
and external monitor.
The LifeBook notebook
turned on with a series of
beeps and your built-in
display is blank.
The display goes blank by
itself after you have been
using it.
Your system display won’t
turn on when the system is
turned on or when the
system has resumed.
The angle of the display and
the brightness settings are not
adequate for your lighting
conditions.
The power management timeouts may be set for very short
intervals and you failed to
notice the display come on
and go off again.
Power On Self Test (POST)
has detected a failure which
does not allow the display
to operate.
The notebook has gone into
Video timeout, Standby mode,
Suspend mode or Save-to-Disk
mode because you have not
used it for a period of time.
The power management timeouts may be set for very short
intervals and you failed to
notice the display come on
and go off again.
Something is pushing on the
Closed Cover switch.
The system may be passwordprotected.
Move the display and the brightness control until
you have adequate visibility.
Press any button the keyboard, or move the mouse
to restore operation. If that fails, push the Power/
Suspend/Resume button. (The display may be shut
off by Standby mode, Auto Suspend or Video
Timeout)
Contact your support representative.
Press any button on the keyboard, or move the
mouse to restore operation. If that fails, push the
Power/Suspend/Resume button. Check your power
management settings, or close your applications
and go to the Power Savings menu of the setup
utility to adjust the timeout values to better suit
your operation needs. (See BIOS Setup Utility on
page 29 for more information)
Press any button on the keyboard, or move the mouse
to restore operation. If that fails, push the Power/
Suspend/Resume button. (The display may be shut
off by Standby Mode, Auto Suspend or Video
Timeout)
Check the Closed Cover switch. (See figure 2-4 on
page 6 for location)
Check the status indicator panel to verify that the
Security icon is blinking. If it is blinking, enter your
password.
The Built-in Display does
not close.
62
A foreign object, such as a
paper clip, is stuck between the
display and the keyboard.
Remove all foreign objects from the keyboard.
Page 30

S7020.book Page 63 Friday, May 13, 2005 3:49 PM
Problem Possible Cause Possible Solutions
The Built-in Display has
bright or dark spots.
If the spots are very tiny and
few in number, this is normal
for a large LCD display.
Troubleshooting
This is normal; do nothing.
The application display
uses only a portion of your
screen and is surrounded
by a dark frame.
The Display is dark when
on battery power.
You have connected an
external monitor and it
does not display any
information.
If the spots are numerous or
large enough to interfere with
your operation needs.
You are running an application
that does not support 800 x
600/1024 x 768 pixel resolution
display and display compres-
sion is enabled.
The Power Management utility
default is set on low brightness
to conserve power.
Your BIOS setup is not set to
enable your external monitor.
Your external monitor is not
properly installed.
Your operating system soft-
ware is not setup with the
correct software driver for
that device.
Display is faulty; contact your support representative.
Display compression gives a clearer but smaller
display for applications that do not support 800 x
600/1024 x 768 pixel resolution. You can fill the
screen but have less resolution by changing your
display compression setting, (See the Video Features
submenu, located within the Advanced menu of the
BIOS. (See BIOS Setup Utility on page 29 for more
information)
Press [Fn] + [F7] to increase brightness or doubleclick on the battery gauge and adjust Power Control
under battery settings.
Try toggling the video destination by pressing [Fn]
and [F10] together, or check your BIOS setup and
enable your external monitor. (See the Video Features
submenu, located within the Advanced Menu of the
BIOS. (See BIOS Setup Utility on page 29 for more
information)
Reinstall your device. (See External Monitor Port on
page 52 for more information)
Check your device and operating system
documentation and activate the proper driver.
You have connected an
external monitor and it
does not come on.
Miscellaneous Problems
An error message is
displayed on the screen
during the operation of
an application.
Your external monitor is not
compatible with your LifeBook
notebook.
Application software often
has its own set of error
message displays.
See your monitor documentation and the Video
Specifications section. (See Specifications on page 77
for more information)
See your application manual and help displays
screens for more information. Not all messages are
errors some may simply be status.
63
Page 31

S7020.book Page 64 Friday, May 13, 2005 3:49 PM
LifeBook S7000 Notebook
POWER ON SELF TEST MESSAGES
The following is an alphabetic list of error-and-status
messages that Phoenix BIOS and/or your operating
system can generate and an explanation of each message.
Error messages are marked with an *. If an error message
is displayed that is not in this list, write it down and
check your operating system documentation both on
screen and in the manual. If you can find no reference
to the message and its meaning is not clear, contact
your support representative for assistance.
nnnn Cache SRAM Passed
Where nnnn is the amount of system cache in kilobytes
success-fully tested by the Power On Self Test. (This can
only appear if you have an SRAM PC Card installed.)
*Diskette drive A error or Diskette drive B error
Drive A: or B: is present but fails the BIOS Power On Self
Test diskette tests. Check to see that the drive is defined
with the proper diskette type in the Setup Utility, (See
BIOS Setup Utility on page 29 for more information) and
that the diskette drive is installed correctly. If the disk
drive is properly defined and installed, avoid using it and
contact your support representative.
*Extended RAM Failed at offset: nnnn
Extended memory not working or not configured properly. If you have an installed memory upgrade module,
verify that the module is properly installed. If it is properly installed, you may want to check your Windows
Setup to be sure it is not using unavailable memory
until you can contact your support representative.
nnnn Extended RAM Passed
Where nnnn is the amount of memory in kilobytes
successfully tested.
*Failing Bits: nnnn The hex number nnnn
This is a map of the bits at the memory address (in
System, Extended, or Shadow memory) which failed the
memory test. Each 1 (one) in the map indicates a failed
bit. This is a serious fault that may cause you to lose data
if you continue. Contact your support representative.
*Fixed Disk x Failure or Fixed Disk Controller
Failure (where x = 1-4)
The fixed disk is not working or not configured properly.
This may mean that the hard drive type identified in
your setup utility does not agree with the type detected
by the Power On Self Test. Run the setup utility to check
for the hard drive type settings and correct them if
necessary. If the settings are OK and the message appears
when you restart the system, there may be a serious fault
which might cause you to lose data if you continue.
Contact your support representative.
*Incorrect Drive A type – run SETUP
Type of floppy drive A: not correctly identified in Setup.
This means that the floppy disk drive type identified in
your setup utility does not agree with the type detected
by the Power On Self Test. Run the setup utility to
correct the inconsistency.
*Incorrect Drive B type – run SETUP
Type of floppy drive B: not correctly identified in Setup.
This means that the floppy disk drive type identified in
your setup utility does not agree with the type detected
by the Power On Self Test. Run the setup utility to
correct the inconsistency.
*Invalid NVRAM media type
Problem with NVRAM access. In the unlikely case that
you see this message you may have some display problems. You can continue operating but should contact
your support representative for more information.
*Keyboard controller error
The keyboard controller test failed. You may have to
replace your keyboard or keyboard controller but may
be able to use an external keyboard until then. Contact
your support representative.
*Keyboard error
Keyboard not working. You may have to replace your
keyboard or keyboard controller but may be able to
use an external keyboard until then. Contact your
support representative.
*Keyboard error nn
BIOS discovered a stuck key and displays the scan code
for the stuck key. You may have to replace your keyboard
but may be able to use an external keyboard until then.
Contact your support representative.
*Monitor type does not match CMOS – Run SETUP
Monitor type not correctly identified in Setup. This error
probably means your BIOS is corrupted, run the setup
utility and set all settings to the default conditions. If you
still get this error, contact your support representative.
*Operating system not found
Operating system cannot be located on either drive A: or
drive C: Enter the setup utility and see if both the fixed
disk, and drive A: are properly identified and that the
boot sequence is set correctly. Unless you have changed
your installation greatly, the operating system should be
on drive C:. If the setup utility is correctly set, your hard
drive may be corrupted.
*Parity Check 1 nnnn
Parity error found in the system bus. BIOS attempts
to locate the address and display it on the screen. If it
cannot locate the address, it displays ????. This is a
potentially data destroying failure. Contact your
support representative.
64
Page 32

S7020.book Page 65 Friday, May 13, 2005 3:49 PM
Troubleshooting
*Parity Check 2 nnnn
Parity error found in the I/O bus. BIOS attempts to
locate the address and display it on the screen. If it
cannot locate the address, it displays ????. This is a
potentially data-destroying failure. Contact your
support representative.
*Press <F1> to resume, <F2> to SETUP
Displayed after any recoverable error message. Press
the [F1] key to continue the boot process or the [F2]
key to enter Setup and change any settings.
*Previous boot incomplete –
Default configuration used
Previous Power On Self Test did not complete successfully. The Power On Self Test will load default values and
offer to run Setup. If the previous failure was caused by
incorrect values and they are not corrected, the next
boot will likely fail also. If using the default settings does
not allow you to complete a successful boot sequence,
you should turn off the power and contact your support
representative.
*Real time clock error
Real-time clock fails BIOS test. May require board repair.
Contact your support representative.
*Shadow RAM Failed at offset: nnnn
Shadow RAM failed at offset nnnn of the 64k block at
which the error was detected. You are risking data corruption if you continue. Contact your support representative.
nnnn Shadow RAM Passed
Where nnnn is the amount of shadow RAM in kilobytes
successfully tested.
*System battery is dead – Replace and run SETUP
The BIOS CMOS RAM memory hold up battery is dead.
This is part of your BIOS and is a board mounted
battery which requires a support representative to
change. You can continue operating but you will have to
use setup utility default values or reconfigure your setup
utility every time you turn off your notebook. This
battery has an expected life of 2 to 3 years.
System BIOS shadowed
System BIOS copied to shadow RAM.
*System CMOS checksum bad – run SETUP
BIOS CMOS RAM has been corrupted or modified
incorrectly, perhaps by an application program that
changes data stored in BIOS memory. Run Setup and
reconfigure the system.
*System RAM Failed at offset: nnnn
System memory failed at offset nnnn of in the 64k block
at which the error was detected. This means that there is
a fault in your built-in memory. If you continue to
operate, you risk corrupting your data. Contact your
support representative for repairs.
nnnn System RAM Passed
Where nnnn is the amount of system memory in
kilobytes successfully tested.
*System timer error
The timer test failed. The main clock that operates the
computer is faulty. Requires repair of system board.
Contact your support representative for repairs.
UMB upper limit segment address: nnnn
Displays the address of the upper limit of Upper
Memory Blocks, indicating released segments of the
BIOS memory which may be reclaimed by a virtual
memory manager.
Video BIOS shadowed
Video BIOS successfully copied to shadow RAM.
EMERGENCY MEDIA PLAYER
DRIVE TRAY RELEASE
If for some reason the eject button fails, you can open
the DVD/CD-ROM tray with a paper clip or similar tool
inserted into the eject hole in the far right side of the
front of the tray. Straighten one side of a paper clip
and push it gently into the hole. The tray will pop out
a short distance.
MODEM RESULT CODES
The operating system and application software that is
factory installed detects the modem characteristics and
provides the necessary command strings to operate the
modem. The internal modem operation is controlled by
generic AT commands from the operating system and
application software. The standard long form result
codes may, in some cases, be displayed on your screen to
keep you informed of the actions of your modem. The
operating system and application software may suppress
display of the result codes.
Examples of result codes are:
■
OK
■
NO CARRIER
■
NO DIALTONE
■
CONNECT 53000 (Connection complete
at 53,000 bps.)
■
ERROR
■
FAX
■
RING (This means an incoming call.)
■
BUSY
■
NO ANSWER
When using the internal modem with applications
that are not factory installed refer to the
application documentation.
65
Page 33
S7020.book Page 66 Friday, May 13, 2005 3:49 PM
LifeBook S7000 Notebook
Restoring Your
Pre-installed Software
The Drivers and Applications Restore (DAR) DVD
contains sets of device drivers and Fujitsu utilities (in
specific directories) that are unique to your computer
configuration for use as documented below.
In order to install applications and/or
drivers from the DAR DVD, you will need to
connect a DVD drive either in your system
or attached externally.
If you have access to the internet, visit the
Fujitsu Support web site at http://
www.computers.us.fujitsu.com/support to
check for the most current information,
drivers and hints on how to perform
recovery and system updates.
Re-Installing Individual Drivers and Applications
The Drivers and Applications DVD can be used to
selectively re-install drivers and/or applications that may
have been un-installed or corrupted.
There may be certain free third-party
applications pre-installed on your system
that are not on the DAR CD. The latest
versions of the applications can be
downloaded from the third-party’s website.
blue-coded components; you must select grey and
green components separately.
5. Once you have selected the components you wish to
install, click [Install Selected Subsystems]; the
components will be installed.
6. After the components are installed, click [OK], then
click [Yes] when asked if you want to reboot the
system.
RESTORING THE FACTORY IMAGE
The Restore DVD that came with your system contains
two utilities:
■
The Recovery utility allows you to restore the original
contents of the C: drive.
■
The Hard Disk Data Delete utility on this disc is used
to delete all data on your hard disk and prevent it from
being reused. Do not use the Hard Disk Data Delete
utility unless you are absolutely certain that you want
to erase your entire hard disk, including all partitions.
• The use of this disc requires that you
have a device capable of reading DVDs
attached to your system. If you do not
have a built-in DVD player, you will need
to attach an external player. For more
information on available external devices,
visit our Web site at: us.fujitsu.com/
computers.
• This disc can only be used with the
system with which it was purchased.
To re-install drivers and/or applications:
1. Boot up the system and insert the DAR DVD after
Windows has started. A Fujitsu Installer screen is
displayed after the DVD is inserted.
2. After reading the License Agreement, click [I agree].
3. A window will appear containing a list of applications, drivers, and utilities that you can install from
the Drivers and Applications DVD
The components listed are color-coded in
terms of their install status. Blue indicates
that the component can be installed. Green
indicates that the component needs to be
installed separately. Grey indicates a
component that is already installed; grey
items can be reinstalled, but prior to
installation you will receive a reminder that
the component is already installed.
.
4. In the list, check off all the components you want to
install. If you want to install all components, click
[Select All]. Clicking [Select All] will select all of the
66
BOOT Priority Change
Before restoring an image, you must first verify that your
system is set up to boot from the DVD drive. There are
two ways to verify/change the boot-up priority (rather
than booting-up from the hard drive or an external
floppy disk drive):
Changing BOOT priority using the [F12] button:
1. Start your system and press the [F12] key when the
Fujitsu logo appears.
2. Select the drive you want to use for booting.
Changing BOOT priority from the BIOS Setup Utility:
1. Start your system and press the [F2] key when the
Fujitsu logo appears. You will enter the BIOS Setup
Utility.
2. Using the arrow keys, go to the Boot menu.
3. Arrow down to the Boot Device Priority submenu.
Press [Enter].
4. If “Optical Media Drive” or “CD-ROM Drive” is not
at the top of the list, arrow down to the drive in the
list, and press the space bar (or the + key) to move it
Page 34

S7020.book Page 67 Friday, May 13, 2005 3:49 PM
Troubleshooting
to the top of the list. (The system attempts to boot
from the devices in the order in which they are
listed.). Note that the BIOS for some systems will
indicate “CD-ROM Drive”, even when a DVD drive
is connected.
5. If you have an external DVD drive connected,
proceed to the next step; otherwise, proceed to
step 7.
6. If you have an external DVD drive connected:
• Select the Advanced menu in the BIOS window.
• Scroll down to the USB Features submenu and
press the Enter key to open it.
• If Legacy USB Support is disabled, press the space
bar to enable it.
• Scroll down to SCSI SubClass Support and press
the space bar to enable it.
7. Press [F10], then click on [Yes] to exit the BIOS
Setup Utility and return to the boot process.
After you have changed the boot priority, you can restore
a backup image when you are booting up.
Procedure
1. Turn on the power to your system.
2. Ensure that you have a device that can read DVDs
either installed in your system or attached externally to it.
3. Insert the Restore DVD into the drive tray.
4. Reboot your system.
5. After the system reboots, follow the instructions
that appear to either restore your system image or
erase all data from your hard disk.
AUTOMATICALLY DOWNLOADING
DRIVER UPDATES
Your system has a convenient tool called the Fujitsu
Driver Update (FDU) utility. With FDU, you can choose
to automatically or manually go to the Fujitsu site to
check for new updates for your system.
The FDU icon should appear in the system tray at the
bottom right of your screen (roll the cursor over the
icons to find the correct one). If the FDU icon does not
appear in the system tray, it can be started by going to
[Start] -> All Programs, and clicking on Fujitsu Driver
Update; this will create the icon automatically.
To invoke the FDU menu, you can either right-click on
the FDU icon or hold the pen on the icon for a couple of
seconds until the menu appears. The menu contains the
following items:
■
Check for updates now
Allows for manual driver update search. The first
time it is used, you are prompted to agree to a user
agreement. After clicking on the icon, the FDU automatically connects with the Fujitsu site to check for
updates and downloads them. While downloading,
the icon has a red bar through it, indicating that it
cannot be used while the download is in process.
When the update is complete, a message appears
informing you of the fact.
■
Enable Automatic Update Notifications
Automatically searches for new updates on a regular
basis (approximately every 3 days).
■
Show update history
Brings up a screen that displays a history of updates
that have been made via the FDU.
■
About Fujitsu Driver Update
Displays the FDU version number and copyright
information
■
Fujitsu Driver Update Readme
Displays the FDU readme.
67
Page 35

S7020.book Page 68 Friday, May 13, 2005 3:49 PM
LifeBook S7000 Notebook
68
 Loading...