

Page 1

OWNER'SMANUAL
We appreciate your purchase of this receiver.
Please read through this manual for correct operation.
We suggest that after reading it you keep this manual
in a safe place for future reference.
"DVD/MS Multi-Source Receiver with 7" Wide TFT Display"
AVX5000
Page 2
Warnings and cautions signs, illustrated below, are posted throughout this manual as well as
on the device itself. They show safe and correct ways to handle the product so as to prevent
personal injury to you and others, and to avoid damage to property. Before reading through
the manual, take time to read through and learn the important information listed in this section.
Cautions for use
* The images appearing on the screen may differ from those shown in this manual
depending on the type of database used and when it was created.
This sign indicates a situation in which incorrect handling
Warning
Caution
The symbol shown below indicates important instructions or helpful information to keep in
mind.
A point it will be helpful to remember.
Important points.
through disregard of a sign might result in death or serious
personal injury.
This sign indicates a situation in which incorrect handling
through disregard of a sign might result in personal injury or may
result solely in damage to property.
● Please read all materials that come with the product, such as manuals and warranties.
Eclipse will not be liability for unsatisfactory product performance due to failure to follow
these instructions.
● Changes in product specifications may result in differences between the content of the
manual and actual product features.
Please use care in handling the manual.
Forcefully spreading or pulling on pages may result in their falling out of the binding.
Use the manual carefully.
1
Page 3

●Do not modify this system for use other than that specified herein. Also, do not
deviate from the installation procedures described herein; Eclipse will not be held
liable for damages including, but not limited to serious injury, death or property
damage resulting from installations that enable unintended operation.
●This equipment requires 12V DC and should only be installed in a vehicle with a
12V negative ground electrical system. Any other installation may cause a fire or
other severe damage to the equipment and the vehicle.
●Never install this equipment where it will interfere with safe operation of the
vehicle. Never block the drivers’ view. Do not install equipment where it may
interfere with operation of the brakes, the steering or any safety equipment,
including seat belts and air bags.
●Before to drilling holes in a vehicle for installation, you must confirm the locations
of pipes, tanks, electrical wiring, and other vehicle systems and components to
ensure that there will be no interference or contact. In addition, addition, it is
necessary apply rust prevention and leak prevention measures at the drilling
area. Otherwise, fire or electric shock could occur.
●When installing equipment do not remove or alter existing vehicle fasteners,
including nuts, bolts, screws, clips, and fittings. Never detach, move or alter
existing vehicle wiring, including electrical grounds and straps. Alteration of
existing vehicle components may make vehicle unsafe to operate.
●Before installation, remove the negative (-) battery terminal to prevent shocks,
electrical arcing, fires, and damage to vehicle wiring and the equipment you are
installing.
●Secure wiring with tape or plastic ties so that wires do not interfere with vehicle
operation, including brake pedal, gear shifter and steering. Position wires so that
they will not be rubbed, abraded, or damaged by moving vehicle components,
including power seats.
●To avoid equipment and vehicle damage, including fire, never supply power to
installed equipment in a way which will overload the capacity of an existing
vehicle circuit. Never leave a power supply wire or connection uninsulated.
Always install supplied fuses, circuit breakers, and relays.
●Air bags are vital safety equipment. Never install equipment in a way which will
alter air bag wiring or interfere with air bag deployment. Air bags must function
properly in the event of an accident.
●When installation is complete, test all vehicle electrical systems for proper
operation, including lights, horn, brake lights, and emergency flashers.
●For your protection, never use a power drill without safety glasses or goggles.
Debris or broken drill bits may cause severe eye injuries, including blindness.
●Use electrical tape to insulate the ends of all wires, even if not used. Proper
insulation prevents arcs, shocks and fires.
2
Page 4

●Do not damage the camera cable. Any holes in the camera will provide a point of
entry for moisture and water, which may cause malfunctions, fire or electric
shock.
●Some equipment uses batteries. Never install equipment where young children
can get access to batteries. If a battery is swallowed, seek medical attention
immediately.
●When vehicle is moving, never take your eyes off the road to make adjustments
to the equipment. You must pay attention to the road to avoid accidents, do not
let the operation or adjustment of the equipment distract you from proper vehicle
operation.
●The driver should never watch video or television while driving. Displays and
screens should never be used or installed where they can be seen by and
possibly distract the driver. It is against the law in many places to have video or
television screens used where they can be seen by the driver. Driving and
watching video or television is an extremely dangerous thing to do.
●The driver should not look at the screen while driving. Accidents may result if you
are not paying attention to the forward direction.
●DO NOT look at the monitor screen while reversing the vehicle. The rear monitor
is merely to assist in confirming the locations of obstacles, and therefore there is
a limit to the visual range that it provides. Be sure to visually check for safety
while reversing the vehicle. Otherwise, you may hit a person or object in the blind
spot of the camera, resulting in a serious accident.
●Drive slowly while reversing the vehicle. The rear monitor uses a wide angle
lens, and the actual distance is different than how it appears. If you reverse the
vehicle at high speed, you may hit a person or object, resulting in a serious
accident.
●Do not put foreign objects in the loading slot of Memory Stick Duo or disc. Fires
or shocks may result.
●Do not disassemble or alter this equipment. Accidents, fires or shocks may
result.
●Do not let water, dust or foreign objects enter the internal parts of this equipment.
Smoke, fires or shocks may result.
●Pay attention to where the remote control is left. Traffic accidents or problems
with driving may result if the remote control makes its way under the foot pedals
etc. when the vehicle is stopped or when it goes around a corner.
●Do not use when it is broken (the screen is not lit or no sound comes out).
Accidents, fires or shocks may result.
3
Page 5

●Always replace fuses with fuses of identical capacity and characteristics. Never
use a high capacity fuse than the original. Using the wrong type of fuse may
cause a fire or severe damage.
●If foreign objects or water enters the equipment, smoke comes out, or there is a
strange odor, stop using it immediately, and contact your dealer. Accidents, fires,
or shocks may result if you continue to use it in these conditions.
●The driver should not change the Memory Stick Duo or CD while driving. As
accidents may result if you are not paying attention to the forward direction, first
stop the car at a safe location and then proceed.
●Plastic bags and wrappings may cause suffocation and death. Keep away from
babies and children. Never put bag over your head or mouth.
●Wiring and installing this equipment requires expertise and experience.
Professional installation is recommended. Consult with your dealer or a
professional installer. Incorrect wiring may damage the equipment or interfere
with safe vehicle operation.
●Use only the accessory parts as specified. Using other parts may cause damage
to the equipment or cause parts to fall or fly off the equipment.
●Do not install the unit in places where it may get dew condensation on (around
the air conditioning hose, etc.), come in contact with water, or in condition of high
moisture, dust or oily smoke. If water, moisture, dust or oily smoke enters this
unit, smoke, fires or malfunctions may result.
●Avoid installing in places where it cannot be fastened securely or where there are
strong vibrations. Also, if you installed the unit with double-sided tape, first wipe
away dirt and wax from the installation area. Otherwise, the unit may come loose
due to vibration while driving, causing problems for driving and resulting in traffic
accidents or injuries.
●Do not install in places with direct sunlight or where it will be hit directly by hot air
from the heater. This may increase the temperature of the interior of this
equipment, resulting in fires and malfunctions.
●Chose the installation location carefully so that the unit is not installed so that it
can contact pedestrians and injure them.
●Do not install the television antenna in hard-to-install, unstable places, or on
easily peeled surfaces that have been treated with fluorine resin or water
repellent. Accidents may result if the antenna comes off while the can is
traveling, falls or makes contact with pedestrians.
4
Page 6

●When installing a TV antenna on the trunk or similar location, be careful of the tip
of the TV antenna when opening and closing the trunk. Otherwise, it could cause
injury to eyes, etc.
●Tighten the fasteners for the antenna securely so that it will not vibrate loose and
injure a pedestrian or cause an accident.
●Occasionally check the camera installation screws, and tighten any that are
loose. If a screw falls out, it could come into contact with a pedestrian or cause
an accident.
●Be careful when driving into parking garages, under elevated structures, etc.
when the television antenna extends above vehicle height. Accidents may result
if the television antenna makes contact with the elevated structure, breaks off
and falls or makes contact with pedestrians.
●Be careful of the tip of the antenna when opening and closing the trunk if the
television antenna is installed on the trunk. Eye damage or other injuries may
result.
●Do not block the fan, heat sink or vents of this unit. When fan, heat sink or vent is
blocked, the interior overheats, and fires may result.
●Carry out the wiring such that cords are not pinched by movable parts such as
seat rails, and screw parts of the vehicle body. Accidents, fires and shocks may
result from disconnection and electrical shorts.
●Carry out the wiring such that the cord does not make contact with metal parts.
The cord maybe be damaged by contact with metal parts, resulting in fire and
shocks.
●Avoid hot surfaces when wiring equipment. High temperatures may damage
wiring, causing shorts, arcing and fires.
●Seal the antenna lead and other wires into the vehicle body to prevent rain and
water from entering the vehicle. Water leaks may cause shorts and fires.
5
Page 7

●When changing the installation location for this equipment, please consult the
dealer where you bought it for safety reasons. Expertise is necessary for removal
and installation.
●Keep volume to a reasonable level so that you can hear sounds from outside the
vehicle, including warning sounds, voices, and sirens. Failure to do so may
cause an accident.
●Be careful that hands and fingers are not pinched when adjusting the tilting angle
or closing display. Injuries may result.
●Do not put your hands or fingers into the loading slot of Memory Stick Duo or
disc. Injuries may result.
●Do not touch the heat dissipating part of the amp. Burns may result from the heat
of this part.
●Avoid immersing the camera in water or passing it through automated (high
pressure) car washing machines. Otherwise, water will get inside the camera or
the camera may fall off, resulting in an accident.
●Do not recharge dry batteries. Dry batteries may rupture, resulting in injuries.
●Do not use batteries other than those specified. Also, do not mix old and new
batteries. Injuries or pollution to the surroundings may result from battery
ruptures and leakage.
●When inserting batteries into the equipment, be careful with the polarity (positive/
negative), and insert them as indicated. If the battery polarities are incorrect,
injuries and pollution to the surroundings may result from battery ruptures and
leakage.
●Replace used batteries as soon as possible; they may leak and damage
equipment. Battery leakage can burn your skin or your eyes. Wash hands after
handling.
●If alkaline solution from alkaline dry batteries makes contact with your skin or
clothes, flush with clean water. If any of the solution gets in your eyes, also flush
clean with water and then seek medical attention.
●When disposing of lithium dry batteries, affix insulating tape to the positive and
negative terminals, and after they are insulated, dispose of them according to the
"Local municipal ordinances". Shorts, fires and ruptures may result from disposal
when coming contact with other electrically conductive objects such as metal
parts, etc.
●Do not short, disassemble or heat the batteries, or place them in fire or water.
Fire and injuries may result from battery rupture and leakage.
●Store the remote control in a place away from direct sunlight, high temperatures,
and high moisture levels. The case may change shape, and the batteries may
rupture and leak.
6
Page 8

●Do not use this equipment except for in-vehicle use. Shocks or injuries may
result.
●Be careful of the position of the volume when turning the power source ON.
Hearing damage may result if very loud noise is emitted when the power is
turned ON.
●The image from the rear monitor is the same image from the rearview mirror and
side mirrors, with the left and right sides reversed. In addition, the view is
different depending upon the type of vehicle. Pay careful attention.
●Do not operate under abnormal conditions such as when the sound is broken or
distorted. Fires may result.
●This equipment uses invisible laser light. Do not disassemble or alter this
equipment. If trouble occurs, contact the dealer where you bought the
equipment.
Altering this equipment may cause exposure to laser emissions (worsening
eyesight), or result in accidents, fires or shocks.
●If the equipment is dropped or the cosmetics appear broken, turn off the power to
the main unit and contact your dealer. If used in this condition, fires or shocks
may result.
7
Page 9

8
Page 10

Table of Contents
Introduction ............................................................................................... 24
Basic operation ......................................................................................... 40
How to operate the tuner.......................................................................... 80
How to operate the CD player .................................................................. 87
How to operate the MP3/WMA player ...................................................... 92
How to operate the optional CD changer.............................................. 103
How to operate the DVD player.............................................................. 106
How to operate the video CD player (Asia only) .................................. 129
How to operate the Area Shot function (U.S.A./CANADA only).......... 134
ESN security operating procedure ........................................................ 149
How to use the remote control .............................................................. 165
How to operate the optional 5.1ch decoder & AV selector unit.......... 170
How to operate the optional HD radio tuner (U.S.A. only) .................. 202
I
II
III
IV
V
VI
VII
VIII
IX
X
XI
XII
XIII
How to operate the optional SIRIUS satellite radio tuner
(U.S.A. only)... 208
How to operate the optional TV tuner
(U.S.A./CANADA/KOREA/TAIWAN only). ... 214
How to operate the VTR.......................................................................... 219
How to operate the Back-eye Camera................................................... 222
For reference ........................................................................................... 226
Before installation................................................................................... 247
Mounting instruction .............................................................................. 248
XIV
XV
XVI
XVII
XVIII
XIX
XX
9
Page 11

Introduction
How to use this manual . . . . . . . . . . . . . . . . . . . . . . . . . . . . 24
Features . . . . . . . . . . . . . . . . . . . . . . . . . . . . . . . . . . . . . . . . . 26
Before using the deck . . . . . . . . . . . . . . . . . . . . . . . . . . . . . 29
About discs. . . . . . . . . . . . . . . . . . . . . . . . . . . . . . . . . . . . . . . . . . . . . 31
About supported disc types . . . . . . . . . . . . . . . . . . . . . . . . . . 31
About handling discs . . . . . . . . . . . . . . . . . . . . . . . . . . . . . . . 32
About new discs . . . . . . . . . . . . . . . . . . . . . . . . . . . . . . . . . . . 33
About rental discs . . . . . . . . . . . . . . . . . . . . . . . . . . . . . . . . . . 33
About specially shaped discs. . . . . . . . . . . . . . . . . . . . . . . . . 33
About disc accessories. . . . . . . . . . . . . . . . . . . . . . . . . . . . . . 33
About the “Memory Stick Duo” . . . . . . . . . . . . . . . . . . . . . . . . . . . . 34
About supported “Memory Stick Duo” types . . . . . . . . . . . . 34
About handling the “Memory Stick Duo” . . . . . . . . . . . . . . . 35
About the LCD panel . . . . . . . . . . . . . . . . . . . . . . . . . . . . . . . . . . . . . 35
About TV (U.S.A./CANADA/KOREA/TAIWAN only). . . . . . . . . . . . . 36
Name of controls and parts . . . . . . . . . . . . . . . . . . . . . . . . . 37
Panel buttons . . . . . . . . . . . . . . . . . . . . . . . . . . . . . . . . . . . . . . . . . . . 37
Touch switches . . . . . . . . . . . . . . . . . . . . . . . . . . . . . . . . . . . . . . . . . 38
Remote control. . . . . . . . . . . . . . . . . . . . . . . . . . . . . . . . . . . . . . . . . . 39
10
Basic operation
How to turn the power ON or OFF . . . . . . . . . . . . . . . . . . . . 40
Turning the power on and off . . . . . . . . . . . . . . . . . . . . . . . . . . . . . . 40
Display open/tilt/close . . . . . . . . . . . . . . . . . . . . . . . . . . . . . 41
Opening the display. . . . . . . . . . . . . . . . . . . . . . . . . . . . . . . . . . . . . . 41
Adjusting the angle of the display . . . . . . . . . . . . . . . . . . . . . . . . . . 42
Switching the display’s pull-out positions . . . . . . . . . . . . . . . . . . . 43
Closing the display . . . . . . . . . . . . . . . . . . . . . . . . . . . . . . . . . . . . . . 44
Setting the display AUTO CLOSE function . . . . . . . . . . . . . . . . . . . 45
Inserting/Ejecting the disc or “Memory Stick Duo”. . . . . . 46
How to insert disc (CD/DVD) and “Memory Stick Duo” . . . . . . . . . 46
Inserting disc (CD/DVD) or “Memory Stick Duo” . . . . . . . . . 46
Page 12

How to eject disc (CD/DVD) or “Memory Stick Duo” . . . . . . 48
Switching source . . . . . . . . . . . . . . . . . . . . . . . . . . . . . . . . . 49
Switching the source . . . . . . . . . . . . . . . . . . . . . . . . . . . . . . . . . . . . . 49
Switching source using panel buttons . . . . . . . . . . . . . 49
Switching source using touch switches . . . . . . . . . . . . 50
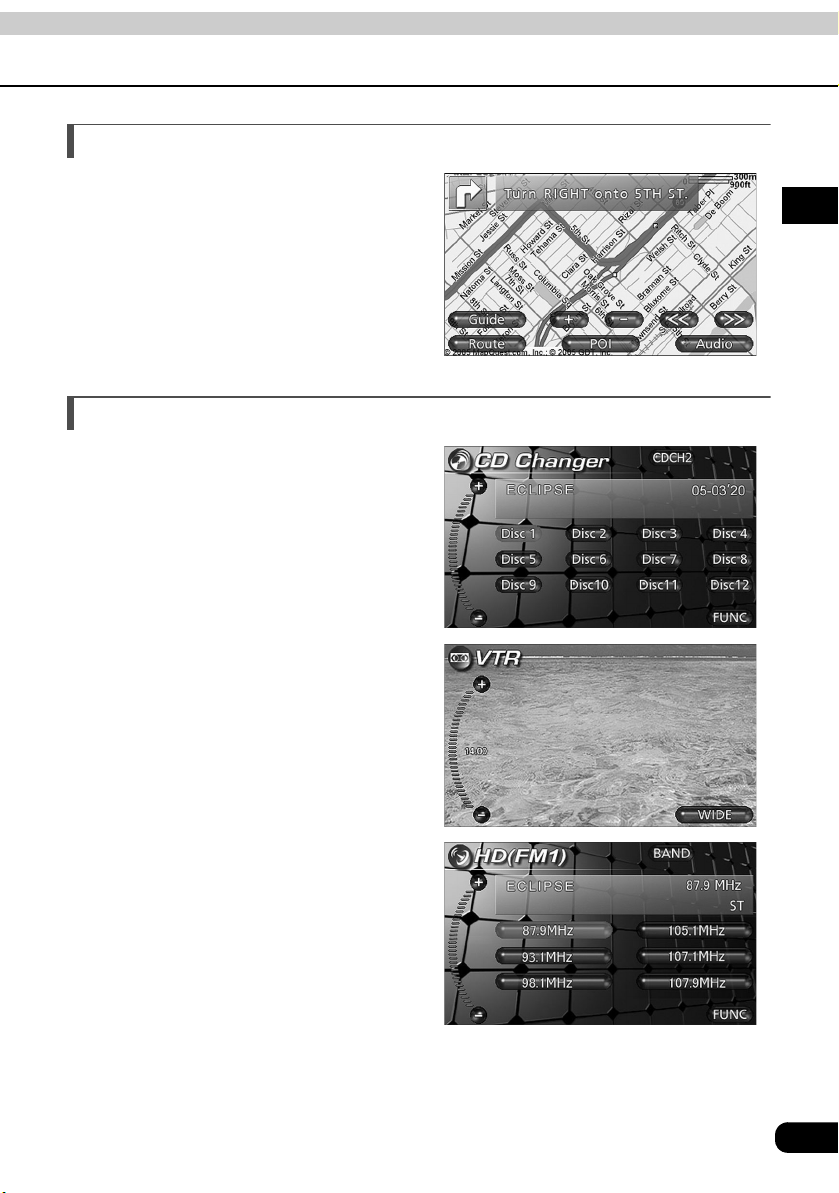
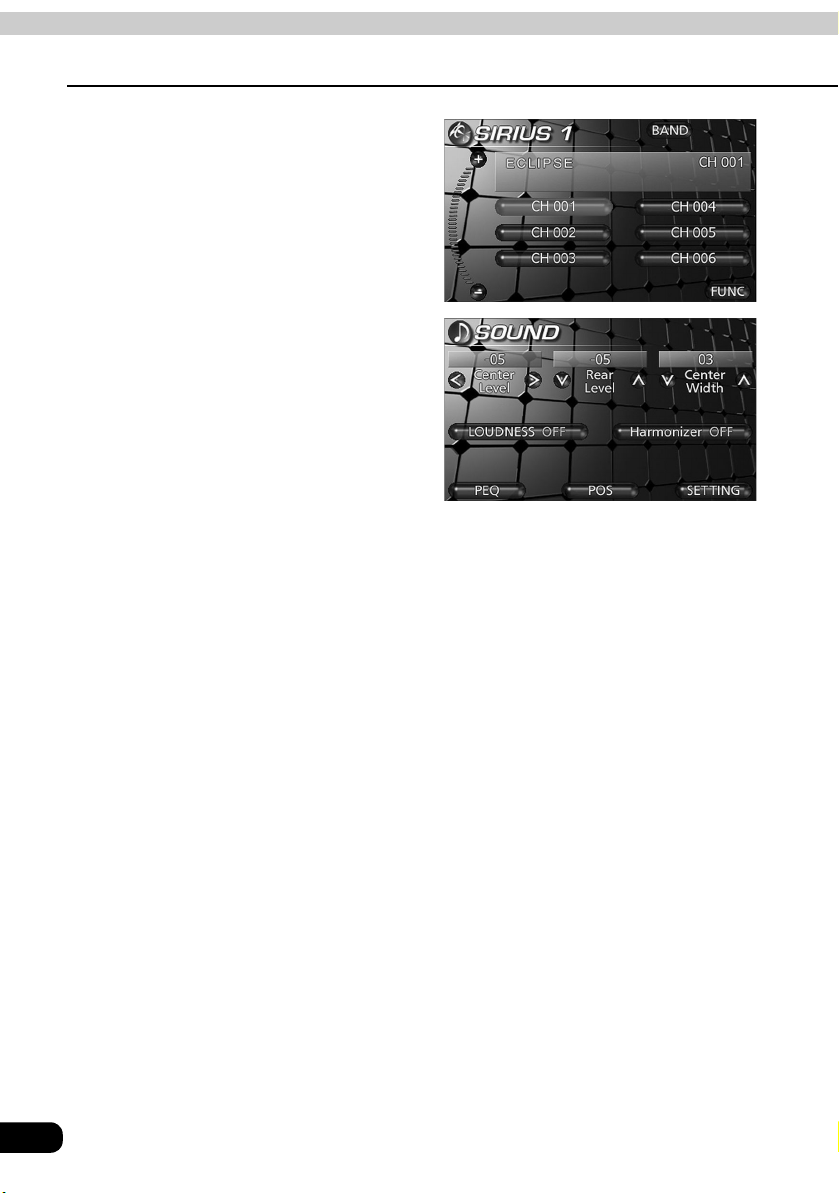
Operational screen for each source . . . . . . . . . . . . . . . . . . 51
Adjusting the volume . . . . . . . . . . . . . . . . . . . . . . . . . . . . . . 52
Adjusting the main volume. . . . . . . . . . . . . . . . . . . . . . . . . . . . . . . . 52
Adjusting main volume using touch switches . . . . . . . 52
Adjusting main volume using panel buttons. . . . . . . . . 52
Adjusting sound quality . . . . . . . . . . . . . . . . . . . . . . . . . . . . 53
Displaying the sound adjustment screen . . . . . . . . . . . . . . . . . . . . 53
Setting Circle Surround II . . . . . . . . . . . . . . . . . . . . . . . . . . . . . . . . . 55
Setting CS II TruBass . . . . . . . . . . . . . . . . . . . . . . . . . . . . . . . 55
Adjusting PEQ (parametric equalizer) . . . . . . . . . . . . . . . . . . . . . . . 56
Adjusting/Saving a PEQ . . . . . . . . . . . . . . . . . . . . . . . . . . . . . 56
Selecting a PEQ pattern from memory . . . . . . . . . . . . . . . . . 57
Adjusting POS (Positioning selector) . . . . . . . . . . . . . . . . . . . . . . . 58
Setting the balance . . . . . . . . . . . . . . . . . . . . . . . . . . . . . . . . . . . . . . 59
Setting LOUDNESS . . . . . . . . . . . . . . . . . . . . . . . . . . . . . . . . . . . . . . 60
Setting the harmonizer . . . . . . . . . . . . . . . . . . . . . . . . . . . . . . . . . . . 60
Simplified time alignment settings (Time Alignment) . . . . . . . . . . 61
Selecting the type of vehicle (Car Type) . . . . . . . . . . . . . . . . 61
Tweeter settings (Tweeter) . . . . . . . . . . . . . . . . . . . . . . . . . . . 62
Rear speaker position selection (Rear SP) . . . . . . . . . . . . . . 62
Setting sub woofer . . . . . . . . . . . . . . . . . . . . . . . . . . . . . . . . . . . . . . . 63
Phase selection (NON-F Phase) . . . . . . . . . . . . . . . . . . . . . . . 63
Woofer output setting . . . . . . . . . . . . . . . . . . . . . . . . . . . . . . . 64
Crossover adjustment (X-Over) . . . . . . . . . . . . . . . . . . . . . . . 64
Woofer output level adjustment . . . . . . . . . . . . . . . . . . . . . . . 65
Setting background screen . . . . . . . . . . . . . . . . . . . . . . . . . 66
Setting the Background. . . . . . . . . . . . . . . . . . . . . . . . . . . . . . . . . . . 66
Importing Background. . . . . . . . . . . . . . . . . . . . . . . . . . . . . . . . . . . . 66
Adjusting/setting the screen . . . . . . . . . . . . . . . . . . . . . . . . 69
Switching the FUNCTION switch display. . . . . . . . . . . . . . . . . . . . . 69
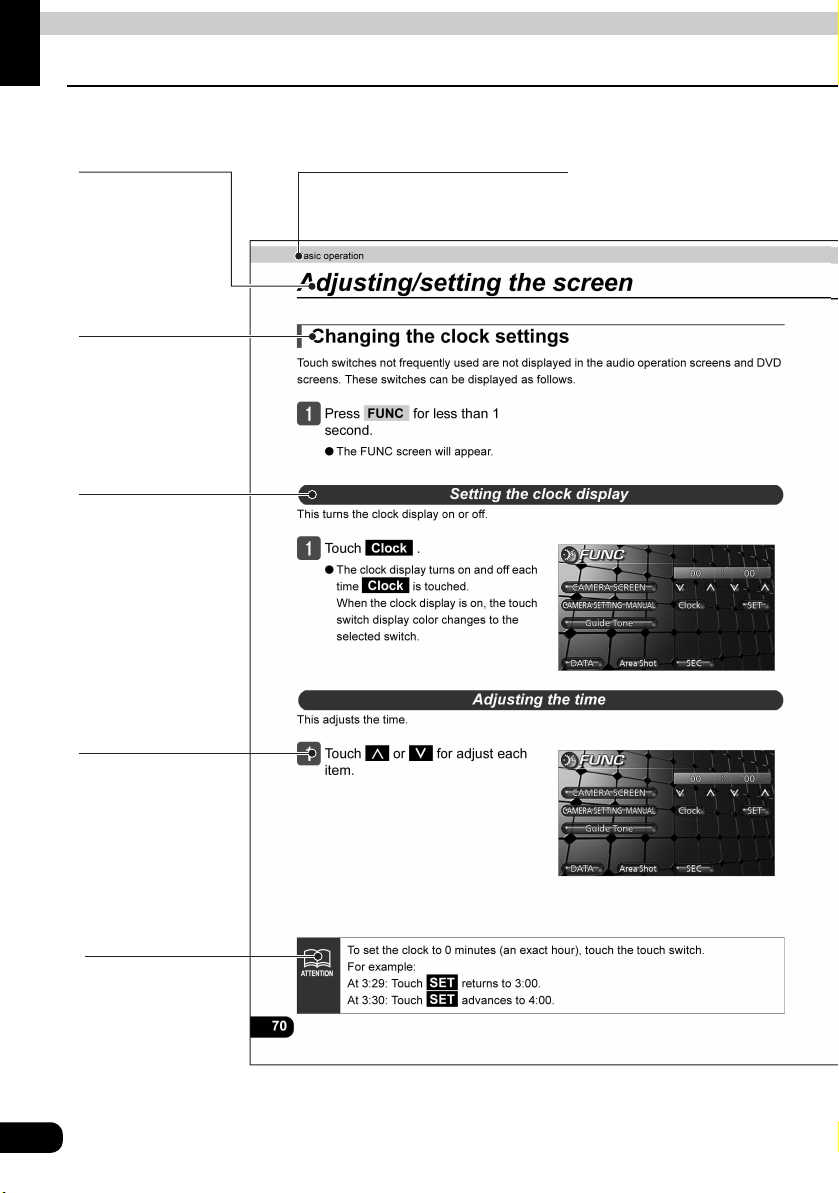
Changing the clock settings . . . . . . . . . . . . . . . . . . . . . . . . . . . . . . . 70
11
Page 13

Setting the clock display. . . . . . . . . . . . . . . . . . . . . . . . . . . . . 70
Adjusting the time . . . . . . . . . . . . . . . . . . . . . . . . . . . . . . . . . . 70
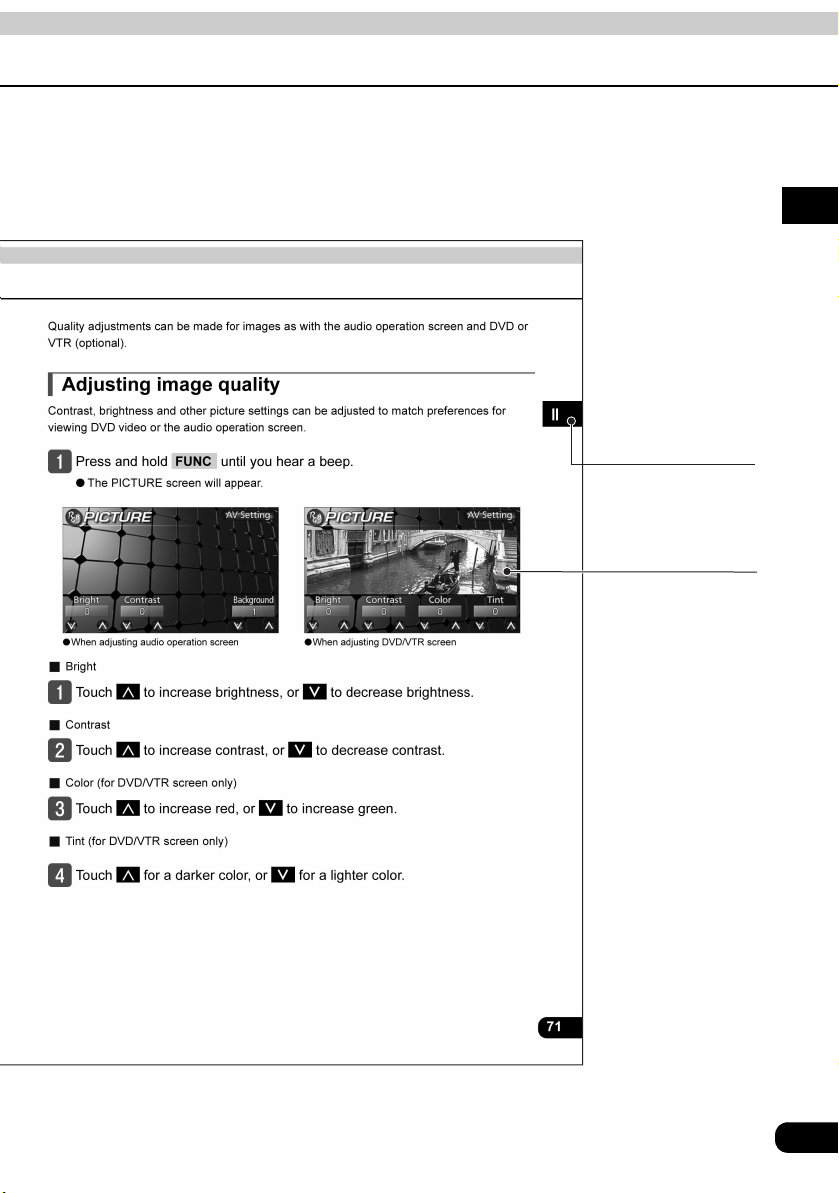
Adjusting image quality. . . . . . . . . . . . . . . . . . . . . . . . . . . . . . . . . . . 71
Switching screen mode. . . . . . . . . . . . . . . . . . . . . . . . . . . . . . . . . . . 72
Others . . . . . . . . . . . . . . . . . . . . . . . . . . . . . . . . . . . . . . . . . . 74
Setting the steering switch function . . . . . . . . . . . . . . . . . . . . . . . . 74
Reading steering switch data . . . . . . . . . . . . . . . . . . . . . . . . . 75
Compatibility with various switches . . . . . . . . . . . . . . . . . . . 76
Setting the Guide tone. . . . . . . . . . . . . . . . . . . . . . . . . . . . . . . . . . . . 77
Displaying Amplifer Status (E-AMP) . . . . . . . . . . . . . . . . . . . . . . . . 78
Screen lock settings . . . . . . . . . . . . . . . . . . . . . . . . . . . . . . . . . . . . . 79
How to operate the tuner
How to use the AM/FM radio . . . . . . . . . . . . . . . . . . . . . . . . 80
Listening to the AM/FM radio . . . . . . . . . . . . . . . . . . . . . . . . . . . . . . 80
Listening to the radio using touch switches. . . . . . . . . 80
Listening to the radio using panel button . . . . . . . . . . . 80
Switching the band . . . . . . . . . . . . . . . . . . . . . . . . . . . . . . . . . . . . . . 80
Selecting radio stations. . . . . . . . . . . . . . . . . . . . . . . . . . . . . . . . . . . 81
Manual selection . . . . . . . . . . . . . . . . . . . . . . . . . . . . . . . . . . . 81
Automatic selection. . . . . . . . . . . . . . . . . . . . . . . . . . . . . . . . . 81
Selection using preset switches . . . . . . . . . . . . . . . . . . . . . . 81
Saving radio stations. . . . . . . . . . . . . . . . . . . . . . . . . . . . . . . . . . . . . 82
Saving manually. . . . . . . . . . . . . . . . . . . . . . . . . . . . . . . . . . . . 82
Saving with ASM . . . . . . . . . . . . . . . . . . . . . . . . . . . . . . . . . . . 82
Changing stations saved by ASM . . . . . . . . . . . . . . . . . . . . . 82
Checking preset stations . . . . . . . . . . . . . . . . . . . . . . . . . . . . . . . . . 83
Creating a station name . . . . . . . . . . . . . . . . . . . . . . . . . . . . . . . . . . 84
Deleting a previously created station name . . . . . . . . . . . . . . . . . . 85
Turning off the radio . . . . . . . . . . . . . . . . . . . . . . . . . . . . . . . . . . . . . 86
12
How to operate the CD player
How to use the CD player. . . . . . . . . . . . . . . . . . . . . . . . . . . 87
Listening to a CD . . . . . . . . . . . . . . . . . . . . . . . . . . . . . . . . . . . . . . . . 87
Listening to a CD using the touch switches . . . . . . . . . 87
Listening to a CD using the panel buttons . . . . . . . . . . 87
Page 14

Selecting a track. . . . . . . . . . . . . . . . . . . . . . . . . . . . . . . . . . . . . . . . . 88
Fast-forwarding/rewinding . . . . . . . . . . . . . . . . . . . . . . . . . . . . . . . . 88
Repeating a track . . . . . . . . . . . . . . . . . . . . . . . . . . . . . . . . . . . . . . . . 88
Playing tracks in random order . . . . . . . . . . . . . . . . . . . . . . . . . . . . 88
Creating a title for a CD . . . . . . . . . . . . . . . . . . . . . . . . . . . . . . . . . . . 89
Deleting a previously created title . . . . . . . . . . . . . . . . . . . . . . . . . . 90
Displaying CD TEXT by scrolling . . . . . . . . . . . . . . . . . . . . . . . . . . . 91
Turning off the CD player . . . . . . . . . . . . . . . . . . . . . . . . . . . . . . . . . 91
How to use the MP3/WMA player
How to use the MP3/WMA player . . . . . . . . . . . . . . . . . . . . 92
Playing MP3/WMA . . . . . . . . . . . . . . . . . . . . . . . . . . . . . . . . . . . . . . . 93
Playing MP3/WMA using the touch switches. . . . . . . . . 93
Playing MP3/WMA using the panel buttons. . . . . . . . . . 93
Selecting a music file. . . . . . . . . . . . . . . . . . . . . . . . . . . . . . . . . . . . . 94
Selecting with file change switches. . . . . . . . . . . . . . . . . . . . 94
Selecting with TUNE/TRACK button . . . . . . . . . . . . . . . . . . . 94
Selecting a folder . . . . . . . . . . . . . . . . . . . . . . . . . . . . . . . . . . . . . . . . 94
Fast-forwarding/rewinding . . . . . . . . . . . . . . . . . . . . . . . . . . . . . . . . 95
Changing display of the current level . . . . . . . . . . . . . . . . . . . . . . . 95
Displaying the current level . . . . . . . . . . . . . . . . . . . . . . . . . . . . . . . 95
Repeating the same music file or folder . . . . . . . . . . . . . . . . . . . . . 96
Repeating the same music file . . . . . . . . . . . . . . . . . . . . . . . . 96
Repeating the same folder . . . . . . . . . . . . . . . . . . . . . . . . . . . 96
Playing music files in random order . . . . . . . . . . . . . . . . . . . . . . . . 97
Playing music files on folder in random order . . . . . . . . . . . 97
Playing music files on CD in random order . . . . . . . . . . . . . 97
Turning off the MP3/WMA player . . . . . . . . . . . . . . . . . . . . . . . . . . . 97
About MP3/WMAs . . . . . . . . . . . . . . . . . . . . . . . . . . . . . . . . . . . . . . . 98
Playable MP3 file standards . . . . . . . . . . . . . . . . . . . . . . . . . . 98
Playable WMA file standards . . . . . . . . . . . . . . . . . . . . . . . . . 98
ID3/WMA tags . . . . . . . . . . . . . . . . . . . . . . . . . . . . . . . . . . . . . . 99
Media. . . . . . . . . . . . . . . . . . . . . . . . . . . . . . . . . . . . . . . . . . . . . 99
Format of discs . . . . . . . . . . . . . . . . . . . . . . . . . . . . . . . . . . . 100
File names . . . . . . . . . . . . . . . . . . . . . . . . . . . . . . . . . . . . . . . 101
Multi-sessions . . . . . . . . . . . . . . . . . . . . . . . . . . . . . . . . . . . . 101
Playing MP3 . . . . . . . . . . . . . . . . . . . . . . . . . . . . . . . . . . . . . . 101
MP3/WMA playing time display . . . . . . . . . . . . . . . . . . . . . . 101
Display order of MP3 file/folder names . . . . . . . . . . . . . . . . 101
Making and playing MP3/WMA files . . . . . . . . . . . . . . . . . . . . . . . . 102
13
Page 15

Downloading MP3/WMA music from internet . . . . . . . . . . . 102
Converting CD music to MP3/WMA files . . . . . . . . . . . . . . . 102
When writing to CD-R/RW. . . . . . . . . . . . . . . . . . . . . . . . . . . 102
When playing back CD-R/RW . . . . . . . . . . . . . . . . . . . . . . . . 102
How to operate the optional CD changer
How to use the CD changer . . . . . . . . . . . . . . . . . . . . . . . . 103
Listening to a CD . . . . . . . . . . . . . . . . . . . . . . . . . . . . . . . . . . . . . . . 103
Listening to a CD using the touch switches . . . . . . . . 103
Listening to a CD using the panel buttons . . . . . . . . . 103
Selecting a track. . . . . . . . . . . . . . . . . . . . . . . . . . . . . . . . . . . . . . . . 104
Fast-forwarding/rewinding . . . . . . . . . . . . . . . . . . . . . . . . . . . . . . . 104
Selecting a CD . . . . . . . . . . . . . . . . . . . . . . . . . . . . . . . . . . . . . . . . . 104
Repeating a track or CD . . . . . . . . . . . . . . . . . . . . . . . . . . . . . . . . . 104
Repeating the current track . . . . . . . . . . . . . . . . . . . . . . . . . 104
Repeating the current CD . . . . . . . . . . . . . . . . . . . . . . . . . . . 104
Playing tracks in random order . . . . . . . . . . . . . . . . . . . . . . . . . . . 105
Playing tracks on current CD in random order . . . . . . . . . . 105
Playing tracks on all CDs in random order . . . . . . . . . . . . . 105
Creating a title for a CD . . . . . . . . . . . . . . . . . . . . . . . . . . . . . . . . . . 105
Deleting a previously created title . . . . . . . . . . . . . . . . . . . . . . . . . 105
Turning off the CD changer. . . . . . . . . . . . . . . . . . . . . . . . . . . . . . . 105
14
How to operate the DVD player
Before using the DVD player . . . . . . . . . . . . . . . . . . . . . . . 106
DVD video characteristics. . . . . . . . . . . . . . . . . . . . . . . . . . . . . . . . 106
About multiple languages . . . . . . . . . . . . . . . . . . . . . . . . . . . 106
About multiple angles . . . . . . . . . . . . . . . . . . . . . . . . . . . . . . 106
About subtitles. . . . . . . . . . . . . . . . . . . . . . . . . . . . . . . . . . . . 107
About discs. . . . . . . . . . . . . . . . . . . . . . . . . . . . . . . . . . . . . . . . . . . . 107
About playable discs . . . . . . . . . . . . . . . . . . . . . . . . . . . . . . . 107
About region codes of playable discs . . . . . . . . . . . . . . . . . 108
About marks displayed on discs . . . . . . . . . . . . . . . . . . . . . 108
About DVD disc structures. . . . . . . . . . . . . . . . . . . . . . . . . . 109
How to use the DVD player . . . . . . . . . . . . . . . . . . . . . . . . 110
Watching a DVD . . . . . . . . . . . . . . . . . . . . . . . . . . . . . . . . . . . . . . . . 110
Watching a DVD using the touch switches . . . . . . . . . 110
Page 16

Watching a DVD using the panel buttons . . . . . . . . . . 111
Waching a DVD using the remote control . . . . . . . . . . 111
Operating the video . . . . . . . . . . . . . . . . . . . . . . . . . . . . . . . . . . . . . 112
Playing the video . . . . . . . . . . . . . . . . . . . . . . . . . . . . . . . . . . 112
Playing the video using the touch switches . . . . . . . . 112
Playing the video using the remote control. . . . . . . . . 112
Fast-forwarding/rewinding . . . . . . . . . . . . . . . . . . . . . . . . . . 112
Fast-forwarding/rewinding using the
panel buttons . . . . . . . . . . . . . . . . . . . . . . . . . . . . . . . . . 112
Fast-forwarding/rewinding using the
touch switches . . . . . . . . . . . . . . . . . . . . . . . . . . . . . . . . 112
Fast-forwarding/rewinding using the
remote control . . . . . . . . . . . . . . . . . . . . . . . . . . . . . . . . 113
Repeating a chapter. . . . . . . . . . . . . . . . . . . . . . . . . . . . . . . . 114
Pausing the video . . . . . . . . . . . . . . . . . . . . . . . . . . . . . . . . . 114
Pausing the video using the touch switches. . . . . . . . 114
Pausing the video using the remote control . . . . . . . . 114
Playing back in slow motion . . . . . . . . . . . . . . . . . . . . . . . . . . . . . . 114
Stopping the video. . . . . . . . . . . . . . . . . . . . . . . . . . . . . . . . . 115
Stopping the video using the touch switches . . . . . . . 115
Stopping the video using the remote control . . . . . . . 115
Operating the disc menu. . . . . . . . . . . . . . . . . . . . . . . . . . . . . . . . . 116
Operating disc menu using the touch switches . . . . . 116
Operating disc menu using the remote control . . . . . 116
Turning off the DVD . . . . . . . . . . . . . . . . . . . . . . . . . . . . . . . . . . . . . 117
Turning off the DVD using the panel buttons . . . . . . . 117
Turning off the DVD using the remote control . . . . . . 117
Searching for a desired chapter . . . . . . . . . . . . . . . . . . . . . . . . . . . 118
Searching by chapter . . . . . . . . . . . . . . . . . . . . . . . . . . . . . . 118
Serching by chapter using the panel buttons . . . . . . . 118
Switching screen display/audio . . . . . . . . . . . . . . . . . . . . . . . . . . . 118
Changing the angle . . . . . . . . . . . . . . . . . . . . . . . . . . . . . . . . 118
Switching subtitle language . . . . . . . . . . . . . . . . . . . . . . . . . 119
Switching dubbed audio language. . . . . . . . . . . . . . . . . . . . 119
Setting the DVD player . . . . . . . . . . . . . . . . . . . . . . . . . . . . . . . . . . 120
Setting the audio language . . . . . . . . . . . . . . . . . . . . . . . . . . 121
Inputting a code . . . . . . . . . . . . . . . . . . . . . . . . . . . . . . . 121
Setting subtitle language . . . . . . . . . . . . . . . . . . . . . . . . . . . 122
Inputting a code . . . . . . . . . . . . . . . . . . . . . . . . . . . . . . . 122
Setting menu language . . . . . . . . . . . . . . . . . . . . . . . . . . . . . 123
Inputting a code . . . . . . . . . . . . . . . . . . . . . . . . . . . . . . . 123
Setting display of multi-angle mark
(angle selection mark) . . . . . . . . . . . . . . . . . . . . . . . . . . . . . . 124
Setting viewer restriction . . . . . . . . . . . . . . . . . . . . . . . . . . . 125
15
Page 17

Changing video output . . . . . . . . . . . . . . . . . . . . . . . . . . . . . 126
Switching dual play . . . . . . . . . . . . . . . . . . . . . . . . . . . . . . . . 127
Table of language codes. . . . . . . . . . . . . . . . . . . . . . . . . . . . . . . . . 128
How to operate the video CD player
(Asia only)
How to use the video CD player . . . . . . . . . . . . . . . . . . . . 129
Watching a video CD . . . . . . . . . . . . . . . . . . . . . . . . . . . . . . . . . . . . 129
Watching a video CD using the touch switch . . . . . . . 129
Watching a video CD using the panel buttons . . . . . . 130
Watching a video CD using the remote control . . . . . 130
Using the menu screen . . . . . . . . . . . . . . . . . . . . . . . . . . . . . . . . . . 130
Displaying menu screen . . . . . . . . . . . . . . . . . . . . . . . . . . . . 130
Selecting menu list . . . . . . . . . . . . . . . . . . . . . . . . . . . . . . . . 130
Advancing to the next scene or returning to the beginning of
the scene being played . . . . . . . . . . . . . . . . . . . . . . . . . . . . . . . . . . 131
Using panel buttons . . . . . . . . . . . . . . . . . . . . . . . . . . . . . . . 131
Using remote control. . . . . . . . . . . . . . . . . . . . . . . . . . . . . . . 131
Fast-forwarding/rewinding . . . . . . . . . . . . . . . . . . . . . . . . . . . . . . . 131
Using panel buttons . . . . . . . . . . . . . . . . . . . . . . . . . . . . . . . 131
Using remote control. . . . . . . . . . . . . . . . . . . . . . . . . . . . . . . 131
Specifying a track to playback . . . . . . . . . . . . . . . . . . . . . . . . . . . . 132
Pausing/Advancing the video . . . . . . . . . . . . . . . . . . . . . . . . . . . . . 132
Stopping playback . . . . . . . . . . . . . . . . . . . . . . . . . . . . . . . . . . . . . . 132
Using slow motion . . . . . . . . . . . . . . . . . . . . . . . . . . . . . . . . . . . . . . 133
Turning off the video CD . . . . . . . . . . . . . . . . . . . . . . . . . . . . . . . . . 133
Turning off the video CD using the panel buttons . . . 133
Turning off the video CD using the remote control . . 133
16
How to operate the Area Shot function
(U.S.A./CANADA only)
Before using the Area Shot . . . . . . . . . . . . . . . . . . . . . . . . 134
About the Area Shot . . . . . . . . . . . . . . . . . . . . . . . . . . . . . . . . . . . . 134
To use the Area Shot function . . . . . . . . . . . . . . . . . . . . . . . 135
Map data . . . . . . . . . . . . . . . . . . . . . . . . . . . . . . . . . . . . . . . . . 136
GPS (Global Positioning System) . . . . . . . . . . . . . . . . . . . . 136
Page 18

How to use the Area Shot function . . . . . . . . . . . . . . . . . . 137
Displaying ePID . . . . . . . . . . . . . . . . . . . . . . . . . . . . . . . . . . . . . . . . 137
Reading Area Shot data. . . . . . . . . . . . . . . . . . . . . . . . . . . . . . . . . . 138
Changing Area Shot screen . . . . . . . . . . . . . . . . . . . . . . . . . . . . . . 140
How to view the Area Shot screen . . . . . . . . . . . . . . . . . . . . . . . . . 141
Displaying touch switch. . . . . . . . . . . . . . . . . . . . . . . . . . . . . . . . . 142
Switching the map reduction scale . . . . . . . . . . . . . . . . . . . . . . . . 143
Displaying the all-route map . . . . . . . . . . . . . . . . . . . . . . . . . . . . . . 143
Switching guidance points . . . . . . . . . . . . . . . . . . . . . . . . . . . . . . . 144
Switching text information . . . . . . . . . . . . . . . . . . . . . . . . . . . . . . . 145
Re-scrolling through text information . . . . . . . . . . . . . . . . . . . . . . 145
Displaying POI vicinity . . . . . . . . . . . . . . . . . . . . . . . . . . . . . . . . . . 146
Selecting POI category . . . . . . . . . . . . . . . . . . . . . . . . . . . . . 146
Displaying POI vicinity information . . . . . . . . . . . . . . . . . . . 147
When an optional GPS unit is connected . . . . . . . . . . . . . . . . . . . 148
To end Area Shot . . . . . . . . . . . . . . . . . . . . . . . . . . . . . . . . . . . . . . . 148
ESN security operating procedure
ESN security operating procedure . . . . . . . . . . . . . . . . . . 149
About ESN . . . . . . . . . . . . . . . . . . . . . . . . . . . . . . . . . . . . . . . . . . . . 149
How to switch the security type
(Key CD security/"Memory Stick" security). . . . . . . . . . . . . . . . . . 150
How to operate the ESN (Key CD) security . . . . . . . . . . . . . . . . . . 151
How to program the Key CD . . . . . . . . . . . . . . . . . . . . . . . . . 151
How to cancel the Key CD. . . . . . . . . . . . . . . . . . . . . . . . . . . 152
How to change the Key CD . . . . . . . . . . . . . . . . . . . . . . . . . . 153
How to resume normal operation
(ESN security lock out) . . . . . . . . . . . . . . . . . . . . . . . . . . . . . 153
What happens if an incorrect CD is inserted? . . . . . . . . . . 154
How to operate the ESN (“Memory Stick”) security . . . . . . . . . . . 155
How to record a security code . . . . . . . . . . . . . . . . . . . . . . . 155
How to cancel the “Memory Stick” security . . . . . . . . . . . . 157
Canceling the security function by entering the
security code . . . . . . . . . . . . . . . . . . . . . . . . . . . . . . . . . 157
Canceling the security function using a
“Memory Stick Duo” . . . . . . . . . . . . . . . . . . . . . . . . . . . 158
How to change the “Memory Stick Duo” . . . . . . . . . . . . . . . 159
How to resume normal operation
(ESN security lock out) . . . . . . . . . . . . . . . . . . . . . . . . . . . . . 159
17
Page 19

Canceling ESN security lock out using security
code entry. . . . . . . . . . . . . . . . . . . . . . . . . . . . . . . . . . . . 159
Canceling ESN security lock using
“Memory Stick Duo” . . . . . . . . . . . . . . . . . . . . . . . . . . . 160
What happens if a “Memory Stick Duo” or security code
is incorrect? . . . . . . . . . . . . . . . . . . . . . . . . . . . . . . . . . . . . . . 162
How to operate the ACC security . . . . . . . . . . . . . . . . . . . . . . . . . . 163
How to turn the security indicator on/off. . . . . . . . . . . . . . . . . . . . 164
How to read the Electronic Serial Number . . . . . . . . . . . . . . . . . . 164
How to use the remote control
Before using remote control . . . . . . . . . . . . . . . . . . . . . . . 165
How to use the remote control . . . . . . . . . . . . . . . . . . . . . 166
Turning the power on/off. . . . . . . . . . . . . . . . . . . . . . . . . . . . . . . . . 166
Adjusting the audio volume . . . . . . . . . . . . . . . . . . . . . . . . . . . . . . 166
Muting the volume . . . . . . . . . . . . . . . . . . . . . . . . . . . . . . . . . 166
Switching playback modes . . . . . . . . . . . . . . . . . . . . . . . . . . . . . . . 166
How to select the tuner . . . . . . . . . . . . . . . . . . . . . . . . . . . . . . . . . . 167
Selecting the FM/AM band . . . . . . . . . . . . . . . . . . . . . . . . . . 167
How to play back CDs . . . . . . . . . . . . . . . . . . . . . . . . . . . . . . . . . . . 168
Switching disc modes. . . . . . . . . . . . . . . . . . . . . . . . . . . . . . 168
Replacing the battery. . . . . . . . . . . . . . . . . . . . . . . . . . . . . . . . . . . . 169
18
How to operate the optional 5.1ch
decoder & AV selector unit
Sound quality information . . . . . . . . . . . . . . . . . . . . . . . . . 170
Functions of the optional 5.1 ch decoder & AV selector
unit is connected . . . . . . . . . . . . . . . . . . . . . . . . . . . . . . . . . . . . . . . 170
About parametric EQ. . . . . . . . . . . . . . . . . . . . . . . . . . . . . . . 171
About time alignment . . . . . . . . . . . . . . . . . . . . . . . . . . . . . . 173
About crossover . . . . . . . . . . . . . . . . . . . . . . . . . . . . . . . . . . 174
About E-iSERV sound effect customizations . . . . . . . . . . . 175
About automatic parametic equalizer . . . . . . . . . . . . . 175
Adjusting sound quality . . . . . . . . . . . . . . . . . . . . . . . . . . . 176
Displaying the sound adjustment screen . . . . . . . . . . . . . . . . . . . 176
Adjusting PEQ (Parametric equalizer) . . . . . . . . . . . . . . . . . . . . . . 178
Page 20

Adjusting/Saving a PEQ . . . . . . . . . . . . . . . . . . . . . . . . . . . . 179
Selecting a PEQ pattern from memory . . . . . . . . . . . . . . . . 181
Measuring/Displaying frequency characteristics . . . . . . . . 181
To avoid writing measurement results to the
“Memory Stick Duo” . . . . . . . . . . . . . . . . . . . . . . . . . . . 181
To write measurement results to a
“Memory Stick Duo” . . . . . . . . . . . . . . . . . . . . . . . . . . . 182
Adjusting POS (Positioning selector) . . . . . . . . . . . . . . . . . . . . . . 183
Setting the balance . . . . . . . . . . . . . . . . . . . . . . . . . . . . . . . . . . . . . 184
Setting LOUDNESS . . . . . . . . . . . . . . . . . . . . . . . . . . . . . . . . . . . . . 185
Setting the harmonizer . . . . . . . . . . . . . . . . . . . . . . . . . . . . . . . . . . 185
Setting/Adjusting surround system . . . . . . . . . . . . . . . . . . . . . . . . 186
Setting the Dolby Pro Logic II. . . . . . . . . . . . . . . . . . . . . . . . 186
Setting the Center Level . . . . . . . . . . . . . . . . . . . . . . . . . . . . 187
Setting the Rear Level . . . . . . . . . . . . . . . . . . . . . . . . . . . . . . 187
Setting the Center Width. . . . . . . . . . . . . . . . . . . . . . . . . . . . 187
Setting the Compression . . . . . . . . . . . . . . . . . . . . . . . . . . . 188
Setting/Adjusting speakers. . . . . . . . . . . . . . . . . . . . . . . . . . . . . . . 189
Adjusting time alignment . . . . . . . . . . . . . . . . . . . . . . . . . . . 189
Manual adjustment. . . . . . . . . . . . . . . . . . . . . . . . . . . . . 189
Automatic adjustment . . . . . . . . . . . . . . . . . . . . . . . . . . 191
Adjusting X-Over . . . . . . . . . . . . . . . . . . . . . . . . . . . . . . . . . . 191
Adjusting sub-woofer output level. . . . . . . . . . . . . . . . . . . . 193
Setting phase control . . . . . . . . . . . . . . . . . . . . . . . . . . . . . . 194
Adjusting speaker level. . . . . . . . . . . . . . . . . . . . . . . . . . . . . 195
Adjusting speaker size . . . . . . . . . . . . . . . . . . . . . . . . . . . . . 196
Importing sound data . . . . . . . . . . . . . . . . . . . . . . . . . . . . . . . . . . . 198
Setting display . . . . . . . . . . . . . . . . . . . . . . . . . . . . . . . . . . 201
Screen settings of the optional 5.1 ch decoder & AV
selector unit . . . . . . . . . . . . . . . . . . . . . . . . . . . . . . . . . . . . . . . . . . . 201
External monitor image settings . . . . . . . . . . . . . . . . . . . . . . . . . . 201
How to operate the optional HD radio
tuner (U.S.A. only)
How to use the HD radio . . . . . . . . . . . . . . . . . . . . . . . . . . 202
About HD Radio . . . . . . . . . . . . . . . . . . . . . . . . . . . . . . . . . . . . . . . . 202
Listening to the HD radio . . . . . . . . . . . . . . . . . . . . . . . . . . . . . . . . 202
Listening to the HD radio using the
touch switches . . . . . . . . . . . . . . . . . . . . . . . . . . . . . . . . 202
19
Page 21

Listening to the HD radio using the
panel buttons . . . . . . . . . . . . . . . . . . . . . . . . . . . . . . . . . 202
Switching the band . . . . . . . . . . . . . . . . . . . . . . . . . . . . . . . . . . . . . 203
Selecting radio stations. . . . . . . . . . . . . . . . . . . . . . . . . . . . . . . . . . 203
Manual selection . . . . . . . . . . . . . . . . . . . . . . . . . . . . . . . . . . 203
Automatic selection. . . . . . . . . . . . . . . . . . . . . . . . . . . . . . . . 203
Selection when using preset switches . . . . . . . . . . . . . . . . 203
Saving radio stations . . . . . . . . . . . . . . . . . . . . . . . . . . . . . . . . . . . . 204
Saving manually. . . . . . . . . . . . . . . . . . . . . . . . . . . . . . . . . . . 204
Saving with ASM . . . . . . . . . . . . . . . . . . . . . . . . . . . . . . . . . . 204
Changing stations saved by ASM . . . . . . . . . . . . . . . . . . . . 204
Checking preset stations . . . . . . . . . . . . . . . . . . . . . . . . . . . . . . . . 205
HD radio information screen display . . . . . . . . . . . . . . . . . . . . . . . 206
HD radio reception settings . . . . . . . . . . . . . . . . . . . . . . . . . . . . . . 207
Turning off the radio . . . . . . . . . . . . . . . . . . . . . . . . . . . . . . . . . . . . 207
How to operate the optional SIRIUS
satellite radio tuner (U.S.A. only)
How to use the SIRIUS satellite radio . . . . . . . . . . . . . . . . 208
About SIRIUS satellite radio . . . . . . . . . . . . . . . . . . . . . . . . . . . . . . 208
Listening to the SIRIUS satellite radio . . . . . . . . . . . . . . . . . . . . . . 209
Listening to SIRIUS satellite radio using the touch
switches . . . . . . . . . . . . . . . . . . . . . . . . . . . . . . . . . . . . . 209
Listening to SIRIUS satellite radio using the panel
buttons . . . . . . . . . . . . . . . . . . . . . . . . . . . . . . . . . . . . . . 209
Selecting SIRIUS channels . . . . . . . . . . . . . . . . . . . . . . . . . . . . . . . 210
Manual selection . . . . . . . . . . . . . . . . . . . . . . . . . . . . . . . . . . 210
Automatic selection. . . . . . . . . . . . . . . . . . . . . . . . . . . . . . . . 210
Selection using preset switches . . . . . . . . . . . . . . . . . . . . . 210
Category selection . . . . . . . . . . . . . . . . . . . . . . . . . . . . . . . . . . . . . . 211
Direct Channel selection . . . . . . . . . . . . . . . . . . . . . . . . . . . . . . . . . 212
Saving SIRIUS channels . . . . . . . . . . . . . . . . . . . . . . . . . . . . . . . . . 213
SIRIUS satellite radio information screen display . . . . . . . . . . . . 213
Turning off the radio . . . . . . . . . . . . . . . . . . . . . . . . . . . . . . . . . . . . 213
20
Page 22

How to operate the optional TV tuner
(U.S.A./CANADA/KOREA/TAIWAN only)
How to use the TV. . . . . . . . . . . . . . . . . . . . . . . . . . . . . . . . 214
Watching TV . . . . . . . . . . . . . . . . . . . . . . . . . . . . . . . . . . . . . . . . . . . 214
Watching TV using the touch switches . . . . . . . . . . . . 214
Watching TV using the panel buttons.. . . . . . . . . . . . . 214
Selecting channel. . . . . . . . . . . . . . . . . . . . . . . . . . . . . . . . . . . . . . . 215
Manual selection . . . . . . . . . . . . . . . . . . . . . . . . . . . . . . . . . . 215
Automatic selection. . . . . . . . . . . . . . . . . . . . . . . . . . . . . . . . 215
Selection when using preset switches . . . . . . . . . . . . . . . . 215
Saving channels. . . . . . . . . . . . . . . . . . . . . . . . . . . . . . . . . . . . . . . . 216
Saving manually. . . . . . . . . . . . . . . . . . . . . . . . . . . . . . . . . . . 216
Saving with AUTO.P . . . . . . . . . . . . . . . . . . . . . . . . . . . . . . . 216
Changing stations saved by AUTO.P. . . . . . . . . . . . . . . . . . 216
Checking preset stations . . . . . . . . . . . . . . . . . . . . . . . . . . . . . . . . 218
Switching to TV/VTR mode . . . . . . . . . . . . . . . . . . . . . . . . . . . . . . . 218
To end TV mode . . . . . . . . . . . . . . . . . . . . . . . . . . . . . . . . . . . . . . . . 218
How to operate the VTR
How to use the VTR . . . . . . . . . . . . . . . . . . . . . . . . . . . . . . 219
Viewing the VTR . . . . . . . . . . . . . . . . . . . . . . . . . . . . . . . . . . . . . . . . 219
Viewing the VTR using the touch switches . . . . . . . . . 219
Viewing the VTR using the panel switches . . . . . . . . . 219
Switching to the TV/VTR . . . . . . . . . . . . . . . . . . . . . . . . . . . . . . . . . 220
Turning off the VTR mode. . . . . . . . . . . . . . . . . . . . . . . . . . . . . . . . 221
How to operate the Back-eye Camera
Back-eye Camera operations. . . . . . . . . . . . . . . . . . . . . . . 222
Back-eye Camera image . . . . . . . . . . . . . . . . . . . . . . . . . . . . . . . . . 224
Automatic back-eye camera image display setting . . . . . . . . . . . 224
21
Page 23

For reference
Important Points . . . . . . . . . . . . . . . . . . . . . . . . . . . . . . . . . 226
If one of these messages appears . . . . . . . . . . . . . . . . . . . . . . . . . 226
Before asking for repairs. . . . . . . . . . . . . . . . . . . . . . . . . . . . . . . . . 228
Other . . . . . . . . . . . . . . . . . . . . . . . . . . . . . . . . . . . . . . . . . . 230
Products equipped with Dolby Digital . . . . . . . . . . . . . . . . . . . . . . 230
Products equipped with Macrovision . . . . . . . . . . . . . . . . . . . . . . 230
Glossary. . . . . . . . . . . . . . . . . . . . . . . . . . . . . . . . . . . . . . . . 231
About care and maintenance. . . . . . . . . . . . . . . . . . . . . . . 233
About care and maintenance - main unit. . . . . . . . . . . . . . . . . . . . 233
Topic index . . . . . . . . . . . . . . . . . . . . . . . . . . . . . . . . . . . . . 234
About screen and sound adjustment . . . . . . . . . . . . . . . . . . . . . . . 234
About using AM/FM radio . . . . . . . . . . . . . . . . . . . . . . . . . . . . . . . . 235
About using the CD player and CD changer . . . . . . . . . . . . . . . . . 235
About using the MP3/WMA player . . . . . . . . . . . . . . . . . . . . . . . . . 236
About using the DVD player . . . . . . . . . . . . . . . . . . . . . . . . . . . . . . 237
About video CD player (Asia only) . . . . . . . . . . . . . . . . . . . . . . . . . 238
About Area Shot (U.S.A./CANADA only) . . . . . . . . . . . . . . . . . . . . 238
About ESN security . . . . . . . . . . . . . . . . . . . . . . . . . . . . . . . . . . . . . 239
About optional 5.1ch decoder & AV selector unit. . . . . . . . . . . . . 239
About optional HD radio (U.S.A. only) . . . . . . . . . . . . . . . . . . . . . . 240
About optional SIRIUS satellite radio (U.S.A. only) . . . . . . . . . . . 240
About optional TV (U.S.A./CANADA/KOREA/TAIWAN only) . . . . 241
About optional Back-eye Camera . . . . . . . . . . . . . . . . . . . . . . . . . . 241
When something isn't clear. . . . . . . . . . . . . . . . . . . . . . . . . . . . . . . 241
22
Index. . . . . . . . . . . . . . . . . . . . . . . . . . . . . . . . . . . . . . . . . . . 242
Specifications . . . . . . . . . . . . . . . . . . . . . . . . . . . . . . . . . . . 243
Display . . . . . . . . . . . . . . . . . . . . . . . . . . . . . . . . . . . . . . . . . . 243
Radio tuner . . . . . . . . . . . . . . . . . . . . . . . . . . . . . . . . . . . . . . . 243
CD . . . . . . . . . . . . . . . . . . . . . . . . . . . . . . . . . . . . . . . . . . . . . . 243
DVD . . . . . . . . . . . . . . . . . . . . . . . . . . . . . . . . . . . . . . . . . . . . . 243
Common component. . . . . . . . . . . . . . . . . . . . . . . . . . . . . . . 244
How to contact customer service . . . . . . . . . . . . . . . . . . . 245
Page 24

Before installation
Before installation. . . . . . . . . . . . . . . . . . . . . . . . . . . . . . . . 247
Components . . . . . . . . . . . . . . . . . . . . . . . . . . . . . . . . . . . . . . . . . . . 247
Installation preparation . . . . . . . . . . . . . . . . . . . . . . . . . . . . . . . . . . 247
Mounting instruction
Mounting instruction . . . . . . . . . . . . . . . . . . . . . . . . . . . . . 248
Mounting the main unit . . . . . . . . . . . . . . . . . . . . . . . . . . . . . . . . . . 248
Names and function of terminals . . . . . . . . . . . . . . . . . . . . . . . . . . 252
Connecting the parking-brake signal and the reverse signal . . . 254
System connection example. . . . . . . . . . . . . . . . . . . . . . . . . . . . . . 256
The Topic Index simplifies searches for explanations about
individual features. When confused by an operation, use the Topic
Index to search for information about the operation.
23
Page 25
Introduction
How to use this manual
Item title
A title is
assigned to
each item.
Operation title
A title is assigned
to each operation.
Detailed operation
title
A title is assigned to
each detailed
operation.
Operation
procedure
Describes the
operation.
Proceed with the
operation according
to the numerical
order.
Section title
A title is assigned to each section.
Attention
Additional points
regarding operation
are given here.
24
Page 26
Section side
heading
The side heading for
the current section.
Operation screen
A screen showing
the operation.
I
II
III
IV
V
VI
VII
VIII
IX
X
XI
XII
XIII
XIV
XV
XVI
XVII
XVIII
XIX
25
Page 27
Introduction
Features
DVD player with sharp video and dynamic sound
(Page 106)
Plays DVD videos recorded with high image
and sound quality.
(DVD media is able to record a movie with high
quality video and digital sound that exceeds
the quality of CD media.)
MP3 player that plays back the equivalent of several albums
of music recorded on a single music disc (Page 92)
MP3 audio compression technology
compresses audio data to one-tenth the
original size. CD-R/RW with recorded MP3s
can be played.
Selection and display of favorite wallpaper (screen
backgrounds) (Page 66)
Wallpaper of your choice can be switched and
displayed for use as the background of the
information screen and audio operation
screens.
The screen from a navigation unit can also be
linked and selected.
26
Page 28
Area Shot for displaying map (U.S.A./CANADA only) (Page 134)
Using Area Shot, maps to destinations and
guidance information can be displayed on
your unit if you have set route using EiSERV (web site).
System upgrade
● CD changer (Page 103)
I
II
III
IV
V
VI
A CD changer enables non-stop playing of
multiple discs, for long drive convenience.
Playing and selecting songs among the
discs can be done with ease.
● VTR (Page 219)
Videos can be watched if a VTR deck is
connected.
● HD Radio tuner (Page 202)
Terrestrial digital broadcasts can be received
if the optional HD Radio tuner unit is
connected.
VII
VIII
IX
X
XI
XII
XIII
XIV
XV
XVI
XVII
XVIII
XIX
27
Page 29
Introduction
Features
● SIRIUS satellite radio tuner (Page 208)
Satellite radio broadcast can be received if
the optional SIRIUS satellite radio tuner unit
is connected.
● 5.1ch decoder & AV selector unit (Page
170)
Fine audio adjustments can be performed by
connecting an optional 5.1ch decoder & AV
selector unit.
28
Page 30
Introduction
Before using the deck
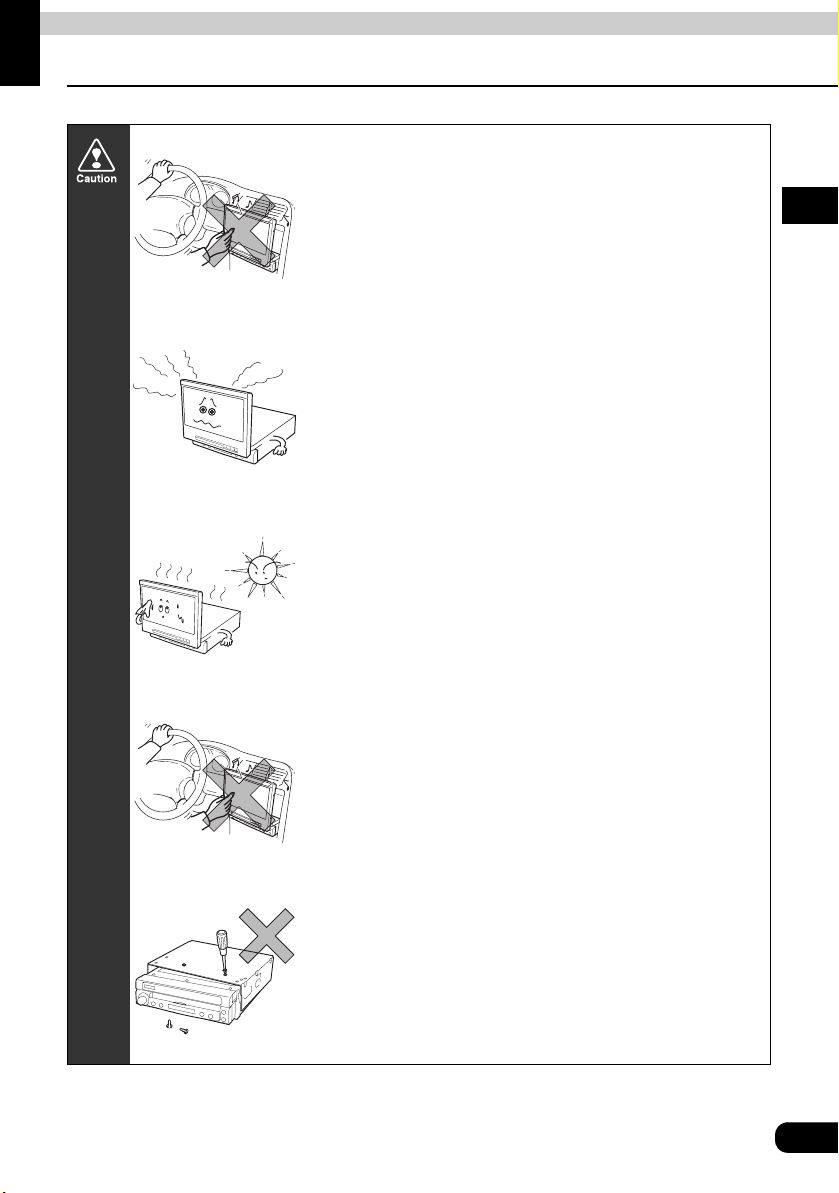
● Be very careful and pay close attention to safety when
operating the audio controls while driving and set the
volume level so that you can still adequately hear sounds
outside the vehicle.
Otherwise accidents may occur.
● Never continue to use the system if it is malfunctioning in
any way. If smoke, abnormal noises or abnormal odors
are noticed, turn off the power immediately.
I
II
III
IV
V
VI
VII
● Exercise caution when experiencing not weather or high
temperature. The temperature inside the vehicle can
increase during hot weather. Wait for the temperature
inside the vehicle to drop before using the unit.
Otherwise damage to equipment may occur.
● Drivers should not operate the DVD while driving. The
volume level should be set to so that you can still
adequately hear sounds outside the vehicle.
Otherwise damage may occur.
● Do not disassemble or modify the deck.
This equipment is designed with a very precise structure.
Contact the store of purchase in the event of any unsatisfactory performance.
VIII
IX
X
XI
XII
XIII
XIV
XV
XVI
XVII
XVIII
XIX
29
Page 31

Introduction
Before using the deck
● Do not apply excessive force to the monitor, or damage to
the equipment may occur.
● Do not insert any objects other than discs or “Memory
Stick Duos” into their respected slots.
Otherwise damage may occur.
● Be careful not to get fingers or other objects caught in the
monitor when it is being extended or retracted into place.
Interference can cause an injury or damage the equipment.
30
● When removing a disc or “Memory Stick Duo” from the
deck, do so in a horizontal direction.
Do not forcibly pull up or press down when removing
them.
Improper removal can scratch the disc, cause deck noise
or damage the “Memory Stick Duo”.
Page 32

About discs
●Water droplets (condensation) can form on the inside of the unit during cold or
rainy weather in the same way car windows can fog up. If this occurs, there may
be a drop in the performance of the equipment. To help reduce this performance
variation, ventilate or dehumidify the vehicle for a short time prior operating the
equipment.
●To safeguard the components of the equipment, this equipment will automatically
stop the player if a malfunction is detected. If the player does not resume normal
operation, it is possible that the unit has been damaged. Contact the store of
purchase.
●It is possible that the sound may seem to skip or cuts out if the vehicle
experiences violent motion on rough roads.
About supported disc types
●An audio or DVD video disc bearing one of the marks shown below can be
played. Only DVD-R/RW (DVD-Recordable/ReWritable) and DVD+R/RW
(DVD+Recordable/ReWritable) discs recorded in Video mode can be played.
Discs recorded in Video mode (VR) cannot be played.
●Depending on the type of disc used, playback may not be possible.
●Supports Dolby Digital. Discs bearing the following mark can be used.
Manufactured under license from Dolby Laboratories, Inc. Dolby and the double-D symbol are
registered trademarks of Dolby Laboratories.
●It is possible that a CD-R (CD-Recordable) or CD-RW (CD-ReWritable) disc will
not play on the unit due to special disc characteristics, scratches, dirt or
deterioration caused by long storage in the vehicle. In addition, an unfinalized
CD-R or CD-RW disc written in CD-R, CD-RW or UDF format will not play in this
equipment.
●It is possible that a DVD-R/RW (DVD-Recordable/ReWritable) or DVD+R/RW
(DVD+Recordable/ReWritable) disc will not play on the unit due to special disc
characteristics, scratches, or dirt or deterioration caused by long storage in the
vehicle. In addition, an unfinalized DVD-R or DVD-RW disc will not play in this
equipment. It is possible that discs recorded using a computer may not play in
this equipment depending on the environment and/or settings of applications.
●The CD-TEXT function requires commercially available CDs which support
CD-TEXT. It is possible that characters in CD-R and CD-RW data may not be
displayed correctly.
I
II
III
IV
V
VI
VII
VIII
IX
X
XI
XII
XIII
XIV
XV
XVI
XVII
XVIII
XIX
31
Page 33

Introduction
Before using the deck
●Do not use discs with transparent or semi-transparent portions within the
recording area, or see through discs, since they cause the equipment to operate
improperly.
●
Super Audio CDs cannot be played.
●CCCDs (Copy Control CD) do not conform to official CD
standards and are not supported.
●CD-EXTRA discs can be played as audio CDs.
●Voice tracks on Mixed Mode CDs cannot be played. Only
music tracks will be played.
●Video-CDs can be played. (Asia only)
About handling discs
● Be sure to store discs in their cases and keep them out of
direct sunlight. Discs can warp and become unusable.
32
● Do not apply paper-based tape to either the recording
side or label side of a disc. Otherwise damage to the disc
or equipment may occur.
● Do not use discs where cracks and/or large warps in the
disc are present. Otherwise damage to the disc or
equipment may occur.
● Do not touch the recorded side of a disc when handling it.
(Iridescent side of the CD) The disc may become dirty
causing skipping type effect to occur.
● Using a disc that has become dirty can scratch the disc
and result in sound having a skipping type effect. Use a
commercially available compact disc cleaner to clean the
CD, wiping lightly from the center to the edge.
Page 34

About new discs
Rough Edges
Recorded surface
Ballpoint pen
Flakes
● You may notice that some brand new discs are rough
around the center hole or outside edge. Remove the
rough edges with the side of a ballpoint pen, etc. Rough
edges may prevent proper loading in the unit. Flakes from
the rough edges may also stick to the recorded surface,
interfere with playback, and/or damage the disc or
equipment.
About rental discs
● Do not use CD discs with attached cellophane tape, rental
CD discs with glue protruding from labels or discs with the
residue of peeled adhesives. Using discs with those
conditions can prevent the player from proper operation
and cause damege to the disc or equipment.
About specially shaped discs
● Specially-shaped CDs cannot be played. Do not attempt
to play them, even with an adapter, since they may
damage the player.
● Please do not use a commercially available lens cleaner,
because it may cause damage to the pickup of the player.
About disc accessories
I
II
III
IV
V
VI
VII
VIII
IX
X
XI
XII
XIII
CD stabilizer ring
● Do not use accessories (stabilizers, protective seals, laser
lens cleaners, etc.) sold for “improving sound
performance” or “protecting CDs.” The changes in CD
thickness or outside dimensions made by these
accessories may cause problems in the player.
● Do NOT attach any ring-shape protector (or other
accessory) to your discs. Those protectors are
commercially available and said to protect discs and to
improve sound quality (and anti vibration effect), but they
can do more harm than good during regular use. The
most common problems are insert/eject related problems
and “No playback” problems due to the protector ring
coming off in the disc mechanism.
XIV
XV
XVI
XVII
XVIII
XIX
33
Page 35

Introduction
Before using the deck
About the “Memory Stick Duo”
●Do not leave the “Memory Stick Duo” in places exposed to static electricity or
electrical noise. Otherwise, data may be lost.
●To safeguard the components of the player, this equipment will automatically
stop the player if a malfunction is detected. If the player does not resume normal
operation, it is possible that the unit has been damaged. Contact the store of
purchase.
●
After uploading of data to the hard drive is complete, promptly remove the “Memory
Stick Duo”.
●
Do not remove the “Memory Stick Duo” while it is being used to upload data to the
this unit. Otherwise, data may be lost. Please be aware that Eclipse will not be held
responsible for lost data.
About supported “Memory Stick Duo” types
●“Memory Stick Duos” with a capacity of up to 128MB are supported.
●“Memory Stick Duo” PRO is not supported.
●“Memory Stick Duos” labeled with the following marks can only be used when
registering a pass code in database update or Eclipse Security Network (ESN).
34
“Memory Stick Duo” are registered trademarks of Sony Corporation.
●The “Memory Stick Duo” cannot be used on this equipment if it has been
formatted using a device other than the dedicated device.
Page 36

About handling the “Memory Stick Duo”
●
Regularly wipe clean
any dust or dirt from the
surface of the cartridge
with a dry cloth.
●
Do not use “Memory Stick
Duos” with tape or peeling
labels.
● Store in a dry place, out
of direct sunlight.
Otherwise, it may
become impossible to
use the “Memory Stick
Duo”.
I
II
III
IV
V
●Always place in the
case provided when
transporting or storing.
● Do not touch terminals
with metal objects or
your bare hands.
About the LCD panel
●The LCD panel can appear to be white or black when seen from certain angles.
●The screen will be difficult to read when external light source (bright lights,
sunlight) falls sunlight falls on the display.
VI
VII
VIII
IX
X
XI
XII
XIII
XIV
XV
XVI
XVII
XVIII
XIX
35
Page 37

Introduction
Before using the deck
About TV (U.S.A./CANADA/KOREA/TAIWAN only)
●When the loss of power is lost due to vehicle battery replacement, replacing
fuses, etc., all preset channels will be erased.
●It may be difficult for the TV to maintain optimal reception due to variation in
signal strength or interference from other objects. The main causes of
interference are listed below.
• Visual or audio static may result when in
close proximity to overhead train wires,
high-tension wires, traffic signals, neon
signs, etc.
• Depending on the signal, buildings and
mountains may adversely affect reception.
• Visual or audio static may result when in
close proximity to radio broadcasting or
ham radio antennas.
• Signal reception will become extremely
weak when driving through a tunnel.
• Signal reception will become weak when
traveling at a great distance from the
broadcasting station.
• In some areas, visual or audio static may
result when in close proximity to TV or radio
towers. This is due to the influence of
electro-magnetic waves outside of the
reception range.
36
Page 38

Introduction
Name of controls and parts
The unit can be operated by pressing buttons on the detachable panel (panel buttons) and by
touching buttons displayed on the screen (touch switches).
Panel buttons
With display retracted Control panel detached
With display opened
VOL button Turn to adjust volume.
PWR button Press to turn deck power ON/OFF
SOURCE button Press to switch source modes.
button
Security indicator Flashes when the ESN security system is in operation.
EJECT button Press to eject DISC.
OPEN·TILT button Press to open the display panel.
button
Detach panel release
button
DISC slot Disc insertion and removal slot
“Memory Stick Duo” slot
FUNC button Press to switch to function mode and display adjustment mode.
SOUND button Press to switch to sound adjustment mode.
MENU button
Area Shot button Press to switch to Area Shot screen.
Press to select radio stations, CD audio tracks and DVD chapters.
Press to select radio stations, CD audio tracks and DVD chapters.
Press to detach the control panel.
Inserts and ejects “Memory Stick Duo”.
Press to display the audio menu screen that enables the switching of
audio modes.
I
II
III
IV
V
VI
VII
VIII
IX
X
XI
XII
XIII
XIV
XV
XVI
XVII
XVIII
XIX
37
Page 39

Introduction
Name of controls and parts
Touch switches
Unit can be operated by touching switches on the screen.
[About the operation of touch switch]
● Touch the switches until you hear a beep.
● Touch the switches lightly to prevent damage to the screen.
● If a switch does not respond, remove your finger and touch it again.
● Unavailable switches are shaded.
● When a function for a switch is active, the color of that switch will change.
38
Touch these switches with your fingers.
Using a pen, pencil or object with a hard or sharp tip to touch the screen may
cause damage to the unit.
Page 40

Remote control
I
II
III
IV
V
VI
PWR button Press to turn unit power ON/OFF.
MODE button Press to switch SOURCE modes.
BAND button Press to switch radio band.
MUTE button Press to mute audio and cancels mute.
VOL button Turn to adjust volume.
MENU button Press to display DVD menu and title menu.
NUMBER button Press to search for video track.
CLEAR button Press to clear numbers currently being input.
SEARCH button Press to switch between search for DVD chapters and DVD title.
SET UP button Press to display DVD operation screen.
ANGLE button Press to switch angle of the DVD.
AUDIO button Press to switch voices during DVD playback.
SUB TITLE button Press to switch during DVD playback.
ENTER button Press to set the content for each setting.
RETURN button Press to return to previous screen.
(cursor) button Press to move the cursor during operation of DVD menu.
STOP button Press to stop video playback.
PLAY button Press to start (restart) video playback.
SLOW button Press to activates slow-motion video playback.
PAUSE button Press to pauses video playback.
< DISC > button Press to select disc in CD changer or select radio preset channels.
CHAPTER button
Press to select DVD chapter and disc track.
VII
VIII
IX
X
XI
XII
XIII
XIV
XV
XVI
XVII
XVIII
XIX
39
Page 41

Basic operation
How to turn the power ON or OFF
Turning the power on and off
When the power is turned on, the last state or mode used prior to power turning off will be
restored.
When power is OFF, press the .
● The power will come ON.
When power is ON, press the .
● The power will go OFF.
40
The display can be set to automatically open and close when the power is
switched ON or OFF. (See “Setting the display AUTO CLOSE function” on
page 45)
Page 42

Basic operation
Display open/tilt/close
Opening the display
Turn the ignition switch ON.
Press .
● Opens the display.
OPEN·TILT
ON
OPEN·TILT
button
I
II
III
IV
V
VI
VII
VIII
IX
X
XI
XII
XIII
Do not force the display to open manually.
Applying excessive force to the display could damage it.
The display can be set to automatically open when the ignition switch is turned ON.
(See “Setting the display AUTO CLOSE function” on page 45)
XIV
XV
XVI
XVII
XVIII
XIX
41
Page 43

Basic operation
Display open/tilt/close
Adjusting the angle of the display
With the display open, press
OPEN·TILT
second.
● The display setting screen will appear.
for less than 1
OPEN·TILT
button
To u ch .
● The display will tilt upwards by one
● The display can be adjusted to 7
TILT
step (5°). Each touch of switch tilts the
panel by another step.
different tilt positions. (Front Position)
(Rear Position: 5 tilt positions)
After completing the adjustment,
OPEN·TILT
press .
OPEN·TILT
button
42
Do not attempt to manually adjust the display.
Applying excessive force to the display could damage it.
The adjusted display angle will be saved. When reopened, the display will
automatically return to this angle.
Page 44

Switching the display’s pull-out positions
With the display open, press
OPEN·TILT
second.
● The display setting screen will appear.
To u ch .
● Each time the switch is touched, the
display pull out positions will be
changed in the following order shown
below.
Rear position (toward the dashboad)
*Front position (toward the viewer)
*: The front position cannot be adjusted
when the screen is in the 6th or 7th
tilt position.
for less than 1
POSITION
OPEN·TILT
button
I
II
III
IV
V
VI
VII
VIII
IX
X
XI
XII
XIII
When adjustment is complete,
OPEN·TILT
press .
OPEN·TILT
button
Do not attempt to manually adjust the pull-out display. Applying excessive force to
the display could damage it.
The pull-out position of the display will be saved once it has been adjusted. The
display will then automatically return to this position when it is reopened.
XIV
XV
XVI
XVII
XVIII
XIX
43
Page 45

Basic operation
Display open/tilt/close
Closing the display
With the display open, press
OPEN·TILT
second.
for less than 1
OPEN·TILT
button
To u ch .
CLOSE
●Do not attempt to close the display manually. Applying excessive force to the
display could damage it.
●When closing the display, check to make sure it has retracted completely. The
display could be damaged if left in a partially closed position.
44
●The display can be closed by pressing the button until a beep
noise is heard (after approx. 1 second).
● If the ignition switch is turned OFF while the display is open, the display can still
be closed if the button is pressed before a beep noise is heard
(within approx. 1 second).
OPEN·TILT
OPEN·TILT
Page 46

Setting the display AUTO CLOSE function
The display can be set to automatically open when the ignition switch is turned ON, and
automatically close when it is turned OFF.
I
With the display open, press
OPEN·TILT
second.
To u ch .
● Touching the switch toggles between
ON and OFF.
When adjustment is complete,
press
for less than 1
AUTO CLOSE
OPEN·TILT
OPEN·TILT
button
OPEN·TILT
button
II
III
IV
V
VI
VII
VIII
IX
X
XI
XII
XIII
XIV
Do not enable the AUTO CLOSE function if the display interferes with the shift
lever position (P range) when it is opening and/or closing.
If the display is closed before the ignition switch is turned OFF, the display will not
automatically open when the ignition switch is turned ON again. Press
OPEN·TILT
to open the display.
XV
XVI
XVII
XVIII
XIX
45
Page 47

Basic operation
Inserting/Ejecting the disc or “Memory Stick Duo”
How to insert disc (CD/DVD) and “Memory Stick Duo”
When you want to listen to music, insert a CD into the disc slot. When playing a DVD video,
insert a DVD video disc into the disc slot. When reading data (ESN recorded data and sound
quality data etc.), insert the “Memory Stick Duo” into the “Memory Stick” slot.
Inserting disc (CD/DVD) or “Memory Stick Duo”
■When inserting a DVD or CD
Insert a DVD or CD by holding it
label up with one finger on the
center rim and another finger on
the edge.
● CD or MP3 playback starts as soon as
a CD is inserted.
● Playback starts as soon as a DVD is
inserted.
■When inserting a “Memory Stick
Duo”
46
Press the detach panel release button and remove the control panel.
Insert the “Memory Stick Duo” in the direction on the mark until a click is
heard.
● Once the “Memory Stick Duo” meets the back stopper, do not continue to apply force.
(Once fully inserted, the “Memory Stick Duo” should still protrude a few millimeters.)
Page 48

Install the control panel.
I
II
III
IV
V
VI
VII
VIII
IX
X
XI
●DVDs and CDs are inserted into the same slot. Only one type of disc can be
inserted at any time.
●Do not remove the “Memory Stick Duo” while reading data. Otherwise, data may
be lost. Please be aware that Eclipse will not be hold responsible for lost data.
XII
XIII
XIV
XV
XVI
XVII
XVIII
XIX
47
Page 49

Basic operation
Inserting/Ejecting the disc or “Memory Stick Duo”
How to eject disc (CD/DVD) or “Memory Stick Duo”
■When ejecting a DVD or CD
Press .
● The disc is automatically ejected.
● If the disc does not eject (is not
released from the internal mechanism),
press and hold for at least five
seconds.
■When ejecting a “Memory Stick Duo”
Press the detach panel release
button and remove the control
panel.
EJECT
button
48
Lightly press the “Memory Stick
Duo” (once) to eject.
Install the control panel.
Page 50

Basic operation
Switching source
The unit can be used when the vehicle's ignition switch is on or in the ACC position.
● This unit supports the use of a remote control. A DVD remote control is included. See page
165 for instructions on operation of the remote control.
I
Switching the source
Switching source using panel buttons
Press .
● Each time the button is pressed, the
● Sources which are not connected to
SOURCE
source will be changed in the order
shown below.
FM AM SIRIUS
DISC (DVD/
CD/MP3·WMA)
VTR TV CDCH
the unit will be skipped.
SOURCE
button
II
III
IV
V
VI
VII
VIII
IX
X
XI
XII
XIII
XIV
XV
XVI
XVII
XVIII
XIX
49
Page 51

Basic operation
Switching source
Switching source using touch switches
Press .
● The SOURCE MENU screen will
MENU
appear.
When the SOURCE MENU switch
is touched, the operation screen for
the available sources is displayed.
MENU
button
50
Page 52

Basic operation
●AM
●FM
Operational screen for each source
The operation screen for each source will appear as shown below.
radio operation screen
radio operation screen
I
●CD player operation screen ●MP3/WMA player operation screen
●DVD player operation screen ●CD changer operation screen (optional)
●
●
HD radio operation screen (optional: U.S.A. only)
SIRIUS satellite radio operation screen (optional: U.S.A. only)
II
III
IV
V
VI
VII
VIII
IX
X
XI
XII
XIII
XIV
●
TV operati on screen (optional: U.S.A./CANADA/KOREA/TAIWAN only)
When the operation screen for the DVD, TV or VTR has not been operated for 6 seconds or
more, it will automatically be canceled.
●VTR operation screen (optional)
XV
XVI
XVII
XVIII
XIX
51
Page 53

Basic operation
Adjusting the volume
Adjusting the main volume
Adjusting main volume using touch switches
Touch or .
● : Volume UP (louder)
: Volume DOWN (quieter)
Adjusting main volume using panel buttons
Turn the VOL button.
● Adjustment levels from 0 to 80 are
available.
Turn to the right :Volume UP (louder)
Turn to the left : Volume DOWN
(quieter)
● Press the VOL button to cut or mute
the volume or restore it instantly. Press
the VOL button again or turn it to the
right to turn the sound ON.
VOL button
52
Page 54

Basic operation
S
Adjusting sound quality
By adjusting the equalizer and the volume balance you can simulate a custom sound
environment within the vehicle.
Displaying the sound adjustment screen
Press .
● The sound adjustment screen will
● Touch any of the following buttons on
●
ound adjustment screen ●Parametric equalizer adjustment screen
SOUND
appear.
the sound adjustment screen to display
the corresponding adjustment screen.
PEQ
●Position setting screen
POS
I
II
III
IV
V
VI
VII
VIII
IX
X
XI
XII
XIII
SETTING
●
Time alignment adjustment screen
XIV
XV
XVI
XVII
XVIII
XIX
53
Page 55

Basic operation
Adjusting sound quality
The following settings/adjustments can be made in the operation screens and setting
screens.
Touch switch/item Function Page
PEQ
Circle Surround II
TruBass
POS
FADER BALANCE
LOUDNESS
HARMONIZER
Time Aligment
Woofer
The parametric equalizer adjusts 7 frequency bands.
Circle surround can easily be simulated using the existing
speaker system in your vehicle (when the vehicle has 4
speakers).
Deep bass sounds can be heard even if a subwoofer is not
connected.
Sound localization can be adjusted according to the
number and position of passengers in order to obtain
optimum acoustic effects.
The left/right/front/rear balance can be adjusted.
To emphasize bass/treble when listening at low volume.
To set the harmonizer level so that compressed data is
played back with a sound quality corrected to a level as
close as possible to that of the original data.
This function corrects the positional characteristics and
frequency characteristics in order to delay the signals
being output from the various speakers so that the signals
from each speaker reach the listening position at the same
time.
The sub woofer output can be adjusted.
56
55
55
58
59
60
60
61
63
54
Page 56

Setting Circle Surround II
The Circle Surround II function enables surround sound and boosts bass even if the center
speaker and sub woofer are not connected. It can also be applied to dialog data when
listening to the radio.
Touch in the sound
adjustment screen.
● Each time the switch is touched, the
CS II
CS II setting will be changed in the
following order shown below.
OFF High Low
I
II
III
IV
V
VI
● High : High re-creation effect
Low : Low re-creation effect
OFF : The function is disabled.
Setting CS II TruBass
CS II TruBass allows for deep bass sounds without the aid of a subwoofer.
Touch in the sound
adjustment screen.
● Touching the switch toggles between
● When CS II is High or Low, TruBass
TruBass
ON and OFF.
can be turned ON/OFF.
●You cannot set Circle Surround II at the same time as POS, or LOUDNESS.
●Circle Surround II, CS II TruBass, SRS, and the (● ) symbol are trademarks of
SRS Labs, Inc.
●Circle Surround II technology is manufactured under license from SRS Labs, Inc.
VII
VIII
IX
X
XI
XII
XIII
XIV
XV
XVI
XVII
XVIII
XIX
55
Page 57

Basic operation
Adjusting sound quality
Adjusting PEQ (parametric equalizer)
The parametric equalizer adjusts 7 frequency bands.
Adjusting/Saving a PEQ
Touch the in the sound
PEQ
adjustment screen.
Touch the to select the
BAND
band to be adjusted.
● Each time the switch is touched, the
band will be changed in the following
order shown below.
Band1 Band2 Band3
Band7 Band6 Band5 Band4
Touch or to select the
frequency to be adjusted.
● : Increase frequency.
: Decrease frequency.
● Each band can be set to the following
frequencies:
Band Frequency (Hz)
1 63, 80, 100
2 125, 160, 200
3 250, 315, 400, 500
4 630, 800, 1k, 1.25k
5 1.6k, 2k, 2.5k, 3.15k
6 4k, 5k, 6.3k, 8k
7 10k, 12.5k, 16k
56
Touch or to adjust the
frequency level.
● : Increase level
: Decrease level
Page 58

Touch the to select the Q
curve pattern.
● Each time the switch is touched, the Q
curve pattern will be changed in the
following order shown below.
Q
SHARPSLOWNORMAL
I
II
III
IV
Repeat the operations in step to
to change the setting for each
channel and band.
● The frequencies that have been
adjusted for either the channel or band
cannot be selected.
Touch the switch you want to use
to save ( to ) until you hear
a beep.
● The saved PEQ setting can be
selected for further customization.
● Touch after making changes.
The PEQ mode adjustments will be
saved and system will return to the
previous operation screen.
1 5
BACK
Selecting a PEQ pattern from memory
Touch the to .
● The preset pattern stored in memory
will be retrieved.
● Touch after making changes.
The PEQ mode adjustments will be
saved and system will return to the
previous operation screen.
1 5
BACK
V
VI
VII
VIII
IX
X
XI
XII
XIII
XIV
XV
XVI
XVII
XVIII
XIX
57
Page 59

Basic operation
Adjusting sound quality
Adjusting POS (Positioning selector)
Sound localization can be adjusted according to the number and position of passengers in
order to obtain optimum acoustic effects.
A seat's sound localization can be adjusted simply by touching the switch.
Touch in the sound
POS
adjustment screen.
Touch each seat image displayed
in the POSITION setting screen to
switch the sound localization for
that seat.
● The selected position will appear in a
green frame. Touch the seat again to
cancel the selection. The four positions
shown by the table below can be set.
● Touch to cancel all settings.
● Touch after making changes.
Touch switch Function Touch switch Function
OFF
BACK
The position will be saved and the
system will return to the previous
operation screen.
Acoustics optimized for
driver's seat
Acoustics optimized for
both front seats
58
Acoustics optimized for
passenger's seat
If the positioning selector has been set (to a setting other OFF), the FAD/BAL
(Fader/Balance) settings cancelled (next page).
Acoustics optimized for
rear seats
Page 60

Setting the balance
The left/right/front/rear balance can be adjusted so that sound from all speakers arrives at the
listener's ears at the same time.
I
Touch in the POSITION
setting screen to display the
volume balance adjustment
screen.
Touch , , or .
● The adjustment level can be set to one
● The adjustment level can be set to one
● Touch to set the volume
● Touch after making changes.
● To set the position again, touch
FAD/BAL
of 15 levels between F (front) and R
(rear).
of 15 levels between L (left) and R
(right).
CENTER
balance to the center position.
BACK
The set volume balance will be saved
and the system will return to the
previous operation screen.
POS
and repeat the steps above.
II
III
IV
V
VI
VII
VIII
IX
X
XI
XII
XIII
XIV
●If the balance has been set (to a setting other CENTER), the positioning selector
setting will be cancelled (previous page).
●Touch and hold
values continuously. Adjustment will lock when it reaches the center value, and
, , or must be touched again to continue adjustment.
, , or while making fine adjustments to adjust
XV
XVI
XVII
XVIII
XIX
59
Page 61

Basic operation
Adjusting sound quality
Setting LOUDNESS
Audio can be modulated to correct for insufficient bass and treble when listening at low
volume.
Touch in the sound
LOUDNESS
adjustment screen.
● Touching the switch toggles between
ON and OFF.
Setting the harmonizer
It is possible to set the sound quality boost level to automatically regenerate harmonics such
as reverberation, depth, and tone lost in compression, producing a much clearer sound.
Touch in the sound
adjustment screen.
● Each time the switch is touched, the
● : Low level of correction
Harmonizer
Harmonizer settings will be changed in
the following order shown below.
OFF Hi Low
LOW
HI
: High level of correction
OFF
: No correction
60
You cannot set LOUDNESS while using Circle Surround II.
Page 62

Simplified time alignment settings (Time Alignment)
This function corrects the position characteristics and frequency characteristics in order to
delay the signals being output from the various speakers so that the signals from each
speaker reach the listening position at the same time.
To u ch .
● The Time Alignment screen will
SETTING
appear.
I
II
III
IV
V
VI
Selecting the type of vehicle (Car Type)
You can select the time alignment settings to match your vehicle from a range of preset
settings for different types of vehicles, allowing you to select the optimum time alignment
settings automatically.
To u ch .
● Each time a car selection is touched,
● Touch after making changes.
Car Type
the Car Type will be changed in the
following order shown below.
Compact Sedan Wagon
Truck SUV Mini Van
BACK
The time alignment settings will be
saved and system will return to the
previous operation screen.
●Time Alignment cannot be operated when the CSII is ON.
●Before selecting a position, make sure that CSII is OFF. (For details about
turning CSII ON/OFF, see page 55.)
VII
VIII
IX
X
XI
XII
XIII
XIV
XV
XVI
XVII
XVIII
XIX
61
Page 63

Basic operation
Adjusting sound quality
Tweeter settings (Tweeter)
You can select the tweeter installation location and whether or not a tweeter is being used or
not, allowing you to select the optimum time alignment settings automatically.
To u ch .
● Each time the switch is touched, the
● Touch after making changes.
Tweeter
tweeter settings will be changed in the
following order shown below.
NO Dash Door
BACK
The time alignment settings will be
saved and system will return to the
previous operation screen.
Rear speaker position selection (Rear SP)
You can select the rear speaker installation location, allowing you to select the optimum time
alignment settings automatically.
To u ch .
● Each time the switch is touched, the
Rear SP
rear speaker position settings will be
changed in the following order shown
below.
Door Others
62
● Touch after making changes.
BACK
The time alignment settings will be
saved and system will return to the
previous operation screen.
If the front speakers have been installed to the dash panel, you can set the tweeter
setting to “Dash” even if no tweeter has been installed.
Page 64

Setting sub woofer
When a sub woofer is connected, the preferred output level for the audio can be set.
Touch in the Time
Alignment screen.
Woofer
I
II
III
IV
V
Phase selection (NON-F Phase)
The merging of sound between the front and rear speakers and the woofer can be improved
by selecting the phase.
Switch to a phase which lets the speakers combine without any disharmony.
Touch to select NORMAL
or REVERSE.
● NORMAL: Normal phase
● Touch after making changes.
Phase
REVERSE: Reverse phase
BACK
The phase selection will be saved and
system will return to the previous
operation screen.
VI
VII
VIII
IX
X
XI
XII
XIII
XIV
XV
XVI
XVII
XVIII
XIX
63
Page 65

Basic operation
Adjusting sound quality
Woofer output setting
Woofer Output can be stereo or mono. Select the method that matches the output method for
the sub-woofer system that is connected to the unit.
Touch to select
Woofer OUT
STEREO or MONO.
● Touch after making changes.
BACK
The woofer output setting will be saved
and system will return to the previous
operation screen.
Crossover adjustment (X-Over)
The frequencies for the front and rear speaker high-pass filter (HPF) and woofer low-pass filter
(LPF) can be set within a range of 63 to 200 Hz. (This is the same as the HPF and LPF cutoff
frequencies.)
Touch to select the cut-off
frequency.
● Each time the switch is touched, the
63Hz 80H z 10 0Hz 125Hz 160 Hz 2 00H z
Freq
frequency will be changed in the
following order shown below.
64
Page 66

To u ch .
● Each time this switch is touched, the
● Touch after making changes.
SLOPE
slope will be changed in the following
order shown below.
PASS 6 dB/oct 12 dB/oct
24 dB/oct 18 dB/oct
BACK
The crossover setting will be saved
and system will return to the previous
operation screen.
Woofer output level adjustment
The output level of the woofer can be adjusted.
I
II
III
IV
V
VI
Touch the or .
● The adjustment level has 6 “+” steps
and 6 “-” steps.
: Increase level.
: Decrease level.
● Touch after making changes.
BACK
The woofer output level adjustment will
be saved and system will return to the
previous operation screen.
If no woofer has been connected, set the slope adjustment to “PASS”. (If slope is
set to a setting other than PASS, the low frequency range will not be outptted from
the speakers.)
VII
VIII
IX
X
XI
XII
XIII
XIV
XV
XVI
XVII
XVIII
XIX
65
Page 67

Basic operation
Setting background screen
The background for the audio operation screen can be changed to a preferred wallpaper.
Setting the Background
Press and hold until you
FUNC
hear a beep.
Touch or for Background.
● Each time switch is touched, the
Background screen will be changed in
following order shown below.
1 2 3
Importing Background
Background provided by the E-iSERV (website) can be downloaded and used instead of the
pre-set Background. To download Background follow the E-iSERV (website) instructions.
After downloading the data to your PC, copy the data to a “Memory Stick Duo” and import the
data into the deck. (URL: http://www.e-iserv.jp)
Access the E-iSERV (web site). (URL: http://www.e-iserv.jp)
Download a background picture available on the E-iSERV website.
(Follow downloading instructions posted on the site.)
Copy the Background to a “Memory Stick Duo”.
66
Import into the unit.
Insert the “Memory Stick Duo”
containing the images to be saved.
Press for less than one
FUNC
second.
Page 68

● The mode will change to function mode.
If you press the button once more, function mode will be exited.
FUNC
To u ch .
● The display will change to the menu
To u ch .
Touch the image file to be read and
saved.
● The image for the selected file will be
DATA
screen for data management mode.
PICTURE
displayed.
If there are more than 7 files on the
media, touch or to search
through the list of image files for the
files you would like to read and save.
I
II
III
IV
V
VI
VII
VIII
IX
X
XI
XII
XIII
To u ch .
DATA READ
XIV
XV
XVI
XVII
XVIII
XIX
67
Page 69

Basic operation
Setting background screen
Touch ,
● The image file that was selected in
● Touch the to cancel data
Background 1
Background 2 Background 3
above will then be saved.
step
If an image file has already been
saved, it will be overwritten.
or .
Cancel
saving.
68
●Do not eject the “Memory Stick Duo” while a file is saved. Otherwise the file data
may become corrupted.
●Data downloaded from the E-iSERV (web site) can be saved in folders on the
“Memory Stick Duo” as follows:
MSFTEN
PIC
●Files that can be imported into the unit are created automatically when
downloaded from the E-iSERV (web site).
●The file name can be changed using 8 alphameric characters (adding a space for
a character cannot be used).
User creation
XXXXXXXX.jpg
Automatic creation
File extension
Page 70

Basic operation
Adjusting/setting the screen
Switching the FUNCTION switch display
Touch switches not frequently used are not displayed in the audio operation screens and DVD
screens. These switches can be displayed as follows.
I
Touch .
● The FUNCTION switches appear.
● The FUNCTION switches are different
● The FUNCTION switches can be
● If the FUNCTION switches are
FUNC
in each audio mode.
hidden by touching .
displayed, operations corresponding to
other switches cannot be performed.
Hide the FUNCTION switches, then try
the operation again.
CLOSE
II
III
IV
V
VI
VII
VIII
IX
X
XI
XII
XIII
XIV
XV
XVI
XVII
XVIII
XIX
69
Page 71

Basic operation
Adjusting/setting the screen
Changing the clock settings
Touch switches not frequently used are not displayed in the audio operation screens and DVD
screens. These switches can be displayed as follows.
Press for less than 1
FUNC
second.
● The FUNC screen will appear.
Setting the clock display
This turns the clock display on or off.
To u ch .
● The clock display turns on and off each
Clock
Clock
time is touched.
When the clock display is on, the touch
switch display color changes to the
selected switch.
Adjusting the time
This adjusts the time.
Touch or for adjust each
item.
70
To set the clock to 0 minutes (an exact hour), touch the touch switch.
For example:
SET
At 3:29: Touch
At 3:30: Touch
returns to 3:00.
SET
advances to 4:00.
Page 72

Quality adjustments can be made for images as with the audio operation screen and DVD or
VTR (optional).
Adjusting image quality
Contrast, brightness and other picture settings can be adjusted to match preferences for
viewing DVD video or the audio operation screen.
Press and hold until you hear a beep.
● The PICTURE screen will appear.
●When adjusting audio operation screen ● When adjusting DVD/VTR screen
Bright
Touch to increase brightness, or to decrease brightness.
Contrast
Touch to increase contrast, or to decrease contrast.
Color (for DVD/VTR screen only)
Touch to increase red, or to increase green.
FUNC
I
II
III
IV
V
VI
VII
VIII
IX
X
XI
XII
XIII
XIV
Tint (for DVD/VTR screen only)
Touch for a darker color, or for a lighter color.
XV
XVI
XVII
XVIII
XIX
71
Page 73

Basic operation
Adjusting/setting the screen
Switching screen mode
Touch .
To uc h
● This selects the wide mode.
WIDE
NORMAL WIDE1
WIDE2 WIDE3
or .
, ,
72
Page 74

NORMAL mode
The screen is shown with a vertical to
horizontal ratio of 3 to 4. The side edges
are black.
WIDE 2 mode
Only the left and right edges of the screen
are stretched out. However, the vertical to
horizontal ratio of 3 to 4 is maintained at
the center of the screen to provide a
comfortable wide screen image.
WIDE 1 mode
The screen is shown with a vertical to
horizontal ratio of 3 to 4 and is expanded
in the left and right directions. A wide
screen effect can be displayed without
any image loss.
WIDE 3 mode
The screen is expanded in both the
vertical and horizontal directions by the
same ratio. The image is clipped slightly
at the top and bottom edges.
I
II
III
IV
V
VI
VII
VIII
IX
X
XI
XII
XIII
XIV
XV
Viewing of wide screen modes is permitted when limited to the personal
entertainment of the user, but exercise caution when using technologies such as
image compression and expansion for the purpose of commercial benefit or public
presentation. This may infringe upon the rights of the copyright holder protected by
applicable copyright law.
XVI
XVII
XVIII
XIX
73
Page 75

Basic operation
Others
Setting the steering switch function
The vehicle’s factory loaded steering switch becomes inoperable when the this unit is
installed. The E-iSERV (web site) provides software that enables steering switch operation.
Import this software into this unit.
For details, contact the store from which you purchased your unit. Depending on your
vehicle’s make and model, material downloaded from the website may not be compatible with
your steering switch.
Software for the steering switch can be downloaded and imported into the deck as follows:
Access The E-iSERV (web site). (URL : http/www.e-iserv.jp)
Download the steering switch software following instructions
provided on the E-iSERV (web site). (Because material available
on the website may not be compatible with the steering switches
found on some automobiles, make sure to check the website for
details about compatibility.)
Copy the downloaded software to “Memory Stick Duo”.
74
Import the data into the deck from the “Memory Stick Duo”.
(For details about importing into the unit, see next page.)
The steering switch can now be operated.
Consult the store from which you purchased this unit about compatibility and setup procedures.
Page 76

Reading steering switch data
The steering switch data that has been downloaded from E-iSERV (web site) to a “Memory
Stick Duo” can be loaded in the this unit.
Insert the “Memory Stick Duo”
containing the steering switch data
to be saved.
Press for less than 1
second.
To u ch .
FUNC
DATA
I
II
III
IV
V
VI
VII
VIII
IX
X
To u ch .
A message will appear to confirm
the data transfer.
● Touch to update the data.
● Touch to return to the screen in
Steering SW
Yes
No
step .
XI
XII
XIII
XIV
XV
XVI
XVII
XVIII
XIX
75
Page 77

Basic operation
Others
Compatibility with various switches
The compatibility of the deck’s various modes and the steering switches installed on your
vehicle are as follows:
Switch*
Tune UP
Tune DOWN
VOL UP VOL UP VOL UP VOL UP
VOL DOWN VOL DOWN VOL DOWN VOL DOWN
Switch*
Tune UP
Tune DOWN
VOL UP VOL UP VOL UP
VOL DOWN VOL DOWN VOL DOWN
Source
MODE Change source Change source Change source
Tune DOWN (Short tap) TRACK DOWN (Short tap)
Source
MODE Change source Change source
Radio
TV
Tune UP (Short tap) TRACK UP (Short tap)
SEEK UP (Hold) FAST UP (Hold)
SEEK DOWN (Hold) FAST DOWN (Hold)
MP3/WMA Others
FILE UP (Short tap)
FAST UP (Hold)
FILE DOWN
(Short tap)
FAST DOWN (Hold)
CD DVD
–
–
*: Switch names may change depending on vehicle make and models.
Chapter UP
Chapter DOWN
76
Page 78

Setting the Guide tone
The guide tone that is emitted when touching a panel switch or touch switch can be set.
Press for less than 1
second.
FUNC
I
II
Touch in the
FUNCTION screen.
● Touching the switch toggles between
Guide Tone
ON and OFF.
III
IV
V
VI
VII
VIII
IX
X
XI
XII
XIII
XIV
XV
●Set the volume at a level which will not adversely affect safety while driving.
●The volume level may change after switching sources. Adjust the volume to
match the source being used.
●A volume adjustment made during DVD playback will not affect other sources.
The volume will return to the level set for the source used prior to the DVD.
XVI
XVII
XVIII
XIX
77
Page 79

Basic operation
Others
Displaying Amplifer Status (E-AMP)
If a DSP Amp is connected, the status of the DSP amp will be displayed.
Press for less than 1
second.
To u ch .
● The DSP Amp status screen will
FUNC
E-AMP
appear.
78
Page 80

Screen lock settings
Screen lock enables the unit to switch to a separate audio source such as radio or CD while
continuing to display a DVD or TV image.
Select the screen lock image settings.
Press until you hear a
beep.
FUNC
I
II
III
To u ch .
Touch to select Lock ON/
OFF.
● Touching the switch toggles between
● Touch after making settings.
Touch to select an image.
● Each time the switch is touched, the
AV Setting
Lock
ON and OFF.
BACK
The screen lock settings will be saved
and system will return to the previous
operation screen.
Picture
image is changed in the following order
shown below.
DVD VTR1 (TV) VTR2 (TV)
IV
V
VI
VII
VIII
IX
X
XI
XII
XIII
XIV
XV
XVI
● The selected image will appear on the
left side of the screen.
● Touch after making changes.
BACK
The screen lock settings will to save
and system will return to the previous
operation screen.
XVII
XVIII
XIX
79
Page 81

How to operate the tuner
How to use the AM/FM radio
BAND switches
Preset switches
POWER
button
SOURCE
button
TUNE·TRACK
button
Listening to the AM/FM radio
Listening to the radio using touch switches
Press .
Touch for AM radio, or for FM radio.
Press the to select the AM or FM.
MENU
AM FM
Listening to the radio using panel button
SOURCE
FUNCTION switch
• Station Name
•ASM
•Info
MENU
button
Switching the band
To u ch .
● Each time the switch is touched, the radio bands will be changed in the following order.
FM1 FM2 FM3 AM
80
BAND
When an optional HD Radio tuner unit is connected, digital broadcasts have
reception priority. (U.S.A. only)
Page 82

Selecting radio stations
Manual selection
Press or .
● Pressing the switch once moves the frequency one step up or down.
● (up) : Raises the frequency
(down) : Lowers the frequency
Automatic selection
Press and hold or until you hear a beep.
● The station that is closest to the current frequency will be searched for automatically,
and searching will stop when the station is received. To stop the search before a
station is found, press the button again.
Selection using preset switches
Touch a preset switch that already has a station recorded.
● See “Saving radio stations” on next page for more information.
I
II
III
IV
V
VI
VII
VIII
IX
X
XI
XII
XIII
If the reception for a particular station is weak in the area you are in, the automatic
selection may not work.
XIV
XV
XVI
XVII
XVIII
XIX
81
Page 83

How to operate the tuner
How to use the AM/FM radio
Saving radio stations
There are two modes for saving radio stations, manual and ASM. These modes operate
independently.
Saving manually
Use manual tuning or automatic tuning to select the station to be saved.
Choose a preset switch and touch it until you hear a beep.
● The radio station (frequency) is set. Touch the preset switch to tune in the selected
station.
Saving with ASM
To u ch .
To uc h
● The ASM function will activate and start automatically selecting stations. You will hear
FUNC
ASM
a beep when the automatic selection of stations is completed. Touch
switch the display back to the broadcast station originally saved.
until you hear a beep.
ASM
again to
Changing stations saved by ASM
Use manual tuning or automatic tuning to select the station to be saved.
Touch the preferred preset switch until you hear a beep.
●ASM may not automatically receive stations if radio waves in the surrounding
area are weak.
●A frequency saved with the tuning switch may not match the frequency saved
with ASM even though the signal is received from the same station.
●Due to conditions for receiving radio waves, saved stations may differ even when
the ASM switch is operated repeatedly in the same location.
●Up to six stations with good signal reception are automatically saved in order of
frequency (low to high).
●When less than six stations capable of reception are found, nothing is saved for
the remaining preset switches.
82
Page 84

Checking preset stations
This recalls all the stations that have been preset either automatically or manually and plays
them each for 5 seconds.
I
To u ch .
To uc h
second.
● “P.SCAN” will be displayed, and the
To uc h
second.
● The station that was being played
FUNC
ASM
preset stations will each be played
back for 5 seconds.
when the switch was touched will then
be played continuously.
for less than 1
ASM
for less than one
II
III
IV
V
VI
VII
VIII
IX
X
XI
XII
XIII
XIV
XV
XVI
XVII
XVIII
XIX
83
Page 85

How to operate the tuner
How to use the AM/FM radio
Creating a station name
A station name can be created and displayed.
To u ch .
To uc h
FUNC
Station Name
for less than
1 second.
● The screen will switch to the station
name setting mode. Default character
type is upper-case alphabet.
Touch one of the switch ,
abc 123 !”#
, , .
ABC
● : Upper-case alphabet
abc
:Lower-case alphabet
123
:Numerical
!”#
:Symbol
ABC
Touch the character touch switch.
84
●To u c h t he
●A maximum of 16 characters may be entered per title.
●The station name entered may not be displayed when an optional HD radio tuner
unit is connected.
RTN
to delete the character that was just entered.
Page 86

U
pper case characters,
L
alphabet characters
Numerical character Symbol
ower case characters,
alphabet characters
I
II
III
IV
V
VI
VII
Touch the touch switch to enter station name setting mode.
The station name is now memorized.
ENTER
Deleting a previously created station name
deleted.
FUNC
Station Name
To u ch .
Press and hold
until you hear 2 beeps in
succession.
● The station name has now been
VIII
IX
X
XI
XII
XIII
XIV
XV
XVI
XVII
XVIII
XIX
85
Page 87

How to operate the tuner
How to use the AM/FM radio
Turning off the radio
Press .
● Press again to turn on the radio
and to resume the radio station
received prior to turning power off.
86
Page 88

How to operate the CD player
How to use the CD player
I
FUNCTION switch
•TITLE
• TEXT
• REPEAT
• RANDOM
MENU
button
SOURCE
button
TUNE·TRACK
button
Listening to a CD
Playback starts when a CD is inserted into the disc slot.
Listening to a CD using the touch switches
Press when a CD has been inserted.
Touch .
● Playback will begin.
Press the to select the CD source when a CD has been inserted.
MENU
CD
Listening to a CD using the panel buttons
SOURCE
II
III
IV
V
VI
VII
VIII
IX
X
XI
XII
XIII
XIV
XV
XVI
●Titles and track names can be displayed when they are recorded on a CD. Up to
16 characters can be shown in the display.
●Only characters recorded by ASCII code can be shown on the CD-TEXT display.
●The CD-TEXT display may not be able to show characters for discs recorded
with many title characters.
●There may be occasions when CD-R/RW CD-TEXT cannot be displayed.
XVII
XVIII
XIX
87
Page 89

How to operate the CD player
How to use the CD player
Selecting a track
You can jump to the opening of a track you want to hear.
Press or .
● (up) : Selects next track
(down) : Selects previous track
Fast-forwarding/rewinding
It is possible to fast-forward/rewind the track being played.
Press and hold or until you hear a beep.
● (up) : Fast-forward
(down) : Rewind
If you hear a beep while rewinding (fast-forwarding), the unit has switched to fastforward (rewind) mode and will continue until you remove your finger from the button.
Repeating a track
To u ch .
Touch .
● Repeats the current track.
● The track will repeat until the function is canceled. Touch
FUNC
REPEAT
Playing tracks in random order
To u ch .
Touch .
● Plays tracks in random order.
● Random playback will continue until the function is canceled. Touch
● At the end of each track the system arbitrarily chooses which track to play next. As a
88
FUNC
RANDOM
again to cancel.
result, it is possible for the same track to be played multiple times in a row.
REPEAT
again to cancel.
RANDOM
Page 90

Creating a title for a CD
A CD title can be created and displayed.
To u ch .
To uc h
second.
● The screen will switch to the disc title
FUNC
TITLE
setting mode. Default character type is
upper-case alphabet.
for less than 1
I
II
III
IV
V
Touch one of the switch ,
abc 123 !”#
, , .
ABC
● : Upper-case alphabet
abc
:Lower-case alphabet
123
:Numerical
!”#
:Default character type is
symbol
Touch the character touch switch.
ABC
VI
VII
VIII
IX
X
XI
XII
XIII
XIV
XV
XVI
XVII
XVIII
●To u c h t he
●A maximum of 16 characters may be entered per title.
●No CD text disc can be set.
RTN
to delete the character that was just entered.
XIX
89
Page 91

How to operate the CD player
U
L
How to use the CD player
pper case characters,
alphabet characters
Numerical character Symbol
Touch the touch switch to exist disc title setting mode.
The disc title is now memorized.
ENTER
ower case characters,
alphabet characters
Deleting a previously created title
To u ch .
FUNC
90
Press and hold
TITLE
until you
hear 2 beeps in succession.
● The title has now been deleted.
Page 92

Displaying CD TEXT by scrolling
CD TEXT (such as disc titles and track titles) stored in the memory can be displayed. A
maximum of 16 characters are displayed on the display area at one time. When the CD TEXT
exceeds 16 characters, it is displayed by scrolling.
After the disc title is displayed by scrolling, track titles are displayed by scrolling.
The title display will be fixed after track titles are scrolled.
To u ch .
To u ch .
FUNC
TEXT
I
II
III
IV
V
VI
VII
VIII
Turning off the CD player
Press .
● Press again to resume playback.
●This function cannot be used when no CD titles or track titles are displayed on
the display screen of this unit.
●Depending on the equipment used for entering titles, the titles may not be
displayed properly.
●Some title characters may not be displayed for some discs.
IX
X
XI
XII
XIII
XIV
XV
XVI
XVII
XVIII
XIX
91
Page 93

How to operate the MP3/WMA player
How to use the MP3/WMA player
For safety considerations, some functions are disabled while the vehicle is in motion.
File change
Folder change
switches
switch
HOME switch
switches
FUNCTION switch
• REPEAT
• RANDOM
MENU
button
POWER
button
SOURCE
button
TUNE·TRACK
button
Example of MP3/WMA file structure
Explanations are based on this example of MP3/WMA file structure.
Folder
MP3/WMA audio file
1st
level
2nd
level
3rd
level
level
It is not possible to playback WMA files protected by a DRM (Digital Rights
Management) system or protected recordings (licensed).
4th
92
Page 94

Playing MP3/WMA
Playback starts automatically when a CD is inserted into the disc slot.
Playing MP3/WMA using the touch switches.
Press when a disc has been inserted.
To u ch .
● Playback will begin.
● The CD player screen will be shown for about 2 seconds as the system checks
● Normally, tracks are played back in the order .
● When multiple MP3/WMA files and folders are on the same level, they are played in
MENU
CD
whether the inserted CD is a music CD or an MP3/WMA.
ascending order by folder and file names.
I
II
III
IV
V
VI
VII
Playing MP3/WMA using the panel buttons
Press the to select the CD source when CD has been inserted.
SOURCE
VIII
IX
X
XI
XII
XIII
XIV
XV
XVI
XVII
XVIII
XIX
93
Page 95

How to operate the MP3/WMA player
How to use the MP3/WMA player
Selecting a music file
A music file located within a folder can be selected.
Selecting with file change switches
Touch the music file.
● The currently selected file name and folder name will be shown in the display.
● When 4 or more music files are located in the same folder, touch or to show
data not currently displayed. (This function is not available when the vehicle is in
motion)
Selecting with TUNE/TRACK button
When several music files are located in the same folder, the next music file or previous music
file can be selected with the track selection (track start point).
Press or .
● (up): Selects next music file
(down): Selects previous music file
Selecting a folder
A folder located within a disc can be selected.
Touch the folder.
● The currently selected folder name will be shown in the display.
● When 4 or more folder are located in the disc, touch or to show data not
currently displayed. (This function is not available when the vehicle is in motion)
If music data and MP3/WMA data have been recorded on the same disc, playback
is not possible.
94
Page 96

Fast-forwarding/rewinding
It is possible to fast-forward/rewind within the current file.
Press and hold or until you hear a beep.
● (up) : Fast-forward
(down): Rewind
If you hear a beep while rewinding (fast-forwarding), the deck has switched to the fastforward (rewind) mode and will continue until you remove your finger from the button.
I
II
III
IV
Changing display of the current level
The folder level can be switched and displayed.
Touch or .
● : Displays the next folder level up.
HOME
● : Displays the level of the file currently being played.
HOME
Displaying the current level
Displays the file currently being played.
To u ch .
HOME
V
VI
VII
VIII
IX
X
XI
XII
XIII
XIV
XV
XVI
XVII
XVIII
XIX
95
Page 97

How to operate the MP3/WMA player
How to use the MP3/WMA player
Repeating the same music file or folder
Repeating the same music file
To u ch .
Touch for less than one second.
● Repeats the current file.
● The file will repeat until the function is canceled. Touch again to cancel.
FUNC
REPEAT
REPEAT
Repeating the same folder
To u ch .
Touch until you hear a beep.
● Repeats the current file.
● The file will repeat until the function is canceled. Touch again to cancel.
FUNC
REPEAT
REPEAT
96
Page 98

Playing music files in random order
Playing music files on folder in random order
To u ch .
Touch for less than one second.
● Files will be randomly selected from among all files at the folder currently being played.
● Plays files in random order.
● Random playback will continue until canceled. Touch again to cancel.
● Touch during random playback to repeat the file currently being played.
● At the end of each file, the system arbitrarily chooses which file to play next. As a
FUNC
RANDOM
RANDOM
REPEAT
REPEAT
Touch again to return to random playback.
result, it is possible for the same file to be played multiple times in a row.
Playing music files on CD in random order
To u ch .
Touch until you hear a beep.
● Randomly selects and plays files using all files on the disc.
● Plays files in random order.
● Random playback will continue until canceled. Touch again to cancel.
● Touch during random playback to repeat the file currently being played.
● At the end of each file, the system arbitrarily chooses which file to play next. As a
FUNC
RANDOM
RANDOM
REPEAT
REPEAT
Touch again to return to random playback.
result, it is possible for the same file to be played multiple times in a row.
I
II
III
IV
V
VI
VII
VIII
IX
X
XI
XII
XIII
XIV
Turning off the MP3/WMA player
Press .
● Press again to resume playback.
See page 92 for an example MP3/WMA file structure.
If of the third level is being played and the display shows the folder and files of
the second level ( , and ), touch to display the folder and file of
the third level ( and
).
HOME
XV
XVI
XVII
XVIII
XIX
97
Page 99

How to operate the MP3/WMA player
How to use the MP3/WMA player
About MP3/WMAs
MP3 (MPEG Audio Layer III) is a standard format for audio compression technology. By using
MP3 a file can be compressed to one-tenth the size of the original.
WMA (Windows Media
be compressed to a size smaller than MP3 files. This unit has limitations on MP3/WMA file
standards and recorded media and formats that can be used.
● Supported standards : MPEG1 Audio Layer III
● Supported sampling frequencies: 44.1, 48 (kHz)
● Supported bit rates : 64, 80, 96, 112, 128, 160, 192, 224, 256, 320 (kbps)
● Supported channel modes : stereo
● Supported standards: WMA Ver. 7
● Supported sampling frequencies: 32, 44.1, 48 (kHz)
TM
Audio) is format for audio compression technology. WMA files can
Playable MP3 file standards
* Supports VBR.
* Does not support free format.
* Bit rates vary for MPEG-1 and MPEG-2.
Playable WMA file standards
WMA Ver. 8
WMA Ver. 9
● Supported bit rate: 48, 64, 80, 96, 128, 160, 192, 256, 320 (kbps)
* Supports VBR (48~192 kbps).
* Does not support lossless compression.
* Does not support WMA files recorded at a frequency of 48 kHz with a bit
rate of 48 kbps.
Use 128 kbps or lower for the MP3 bit rate. If the bit rate exceeds 128 kbps, there
may be a skipping type effect during MP3 playback.
98
Page 100

ID3/WMA tags
MP3/WMA files have an “ID3/WMA Tag” that allows input of information so that data such as
song title and artist can be saved. This unit supports ID3v. 1.0, 1.1 and WMA tags.
I
Media
Media capable of playing MP3 include CD-ROM, CD-R and CD-RW discs.
Compared to CD-ROM media commonly used for music discs, CD-R discs are fragile in high
temperature/high humidity environments and sections of the CD-R may become incapable of
playback. Fingerprints or scratches on the disc may prevent playback or cause skipping.
Sections of a CD-R may deteriorate if left inside a vehicle for long periods of time.
It is also recommended that CD-R discs be kept in a light-blocking case because the discs are
vulnerable to ultra-violet light.
II
III
IV
V
VI
VII
VIII
IX
X
XI
XII
XIII
XIV
XV
XVI
XVII
XVIII
XIX
99
 Loading...