

Fujitsu AVN5495 Installation Manual
We appreciate your purchase of this receiver.
Please read through this manual for correct operation.
We suggest that after reading it you keep this manual
in a safe place for future reference.
AVN5495
ESN E5 6.5” Wide TFT Touch-Panel Display
CD/DVD/MS Multi-Source Receiver with HDD Navigation
Navigation

NAVIGATION SYSTEM
The navigation system uses maps and vocal instructions to guide you while
you are driving. However, depending on accuracy of that guidance, there
may be times when inappropriate advice is given. When driving along the
route set by the navigation system, make sure to follow the actual traffic
regulations at all times (such as one-way streets and other road conditions).
Warnings and caution signs, illustrated below, are posted throughout this manual as well as on
the device itself. They show safe and correct ways to handle the product so as to prevent
personal injury to you and others and avoid damage to property. Before reading through the
manual, take time to read through and learn the important information listed in this section.
Cautions for use
Make sure your positioning is stable prior to starting your trip
● Start driving only after the GPS mark appears. Starting to drive with improper positioning
may lead to vehicle positioning errors.
* The images appearing on the screen may differ from those shown in this manual
depending on the type of database used and when it was created.
This sign indicates a situation in which incorrect handling
Warning
Caution
The symbol shown below indicates important instructions or helpful information to keep in
mind.
through disregard of a sign might result in death or serious
personal injury.
This sign indicates a situation in which incorrect handling
through disregard of a sign might result in personal injury or may
result solely in damage to property.
A point it will be helpful to remember.
Important points.
● Please read all materials that come with the product, such as manuals and warranties.
Fujitsu Ten will not be responsible for unsatisfactory product performance due to failure to
follow these instructions.
● Changes in product specifications may result in differences between the content of the
manual and actual product features.
Please use care in handling the manual.
Forcefully spreading or pulling on pages may result in their falling out of the binding.
Use the manual carefully.
1

Table of Contents
Introduction
How to use this manual . . . . . . . . . . . . . . . . . . . . . . . . . . . . 10
Features . . . . . . . . . . . . . . . . . . . . . . . . . . . . . . . . . . . . . . . . . 12
GPS navigation system . . . . . . . . . . . . . . . . . . . . . . . . . . . . 16
Viewing the Navigation screen. . . . . . . . . . . . . . . . . . . . . . . . . . . . . . . 16
GPS . . . . . . . . . . . . . . . . . . . . . . . . . . . . . . . . . . . . . . . . . . . . 18
Situations when GPS signal reception is impossible . . . . . . . . . . . . . . 18
Basic operation
Menu screen and list screens . . . . . . . . . . . . . . . . . . . . . . . 19
Menu screen . . . . . . . . . . . . . . . . . . . . . . . . . . . . . . . . . . . . . . . . . . . . 19
Switching the list screens. . . . . . . . . . . . . . . . . . . . . . . . . . . . . . . . . . . 20
or switch display. . . . . . . . . . . . . . . . . . . . . . . . . . . . . . . . 20
Page switch display . . . . . . . . . . . . . . . . . . . . . . . . . . . . . . . . . . 20
POI switch display . . . . . . . . . . . . . . . . . . . . . . . . . . . . . . . . . . . 20
Rearranging the list order . . . . . . . . . . . . . . . . . . . . . . . . . . . . . 21
Displaying full titles. . . . . . . . . . . . . . . . . . . . . . . . . . . . . . . . . . . . . . . . 21
Adjusting the screen and setting the sound . . . . . . . . . . . 22
Screen adjustment . . . . . . . . . . . . . . . . . . . . . . . . . . . . . . . . . . . . . . . . 22
How to display the image quality adjustment screen . . . . . . . . . 22
Contrast/Brightness . . . . . . . . . . . . . . . . . . . . . . . . . . . . . . . . . . 23
Setting daytime display when vehicle lights are on . . . . . . . . . . 23
Turning off the screen . . . . . . . . . . . . . . . . . . . . . . . . . . . . . . . . 23
Switching the map display color. . . . . . . . . . . . . . . . . . . . . . . . . . . . . . 24
Setting the screen animation when switching screens. . . . . . . . . . . . . 24
Switching km and miles display . . . . . . . . . . . . . . . . . . . . . . . . . . . . . . 25
Switching the Time zone . . . . . . . . . . . . . . . . . . . . . . . . . . . . . . . . . . . 25
Adjusting the Time zone . . . . . . . . . . . . . . . . . . . . . . . . . . . . . . 25
Setting Daylight saving time. . . . . . . . . . . . . . . . . . . . . . . . . . . . 26
Setting the volume . . . . . . . . . . . . . . . . . . . . . . . . . . . . . . . . . . . . . . . . 27
Adjusting the volume . . . . . . . . . . . . . . . . . . . . . . . . . . . . . . . . . 27
Setting the automatic freeway volume switch function . . . . . . . 27
2

Map displays . . . . . . . . . . . . . . . . . . . . . . . . . . . . . . . . . . . . . 28
Displaying the present location . . . . . . . . . . . . . . . . . . . . . . . . . . . . . . 28
Moving the map (one-touch scroll) . . . . . . . . . . . . . . . . . . . . . . . . . . . . 29
Moving the map . . . . . . . . . . . . . . . . . . . . . . . . . . . . . . . . . . . . . 29
Setting the street name display while scrolling . . . . . . . . . . . . . 30
Switching the touch switch display. . . . . . . . . . . . . . . . . . . . . . . . . . . . 30
Changing the touch switch display. . . . . . . . . . . . . . . . . . . . . . . 30
Setting touch switches to display or not display. . . . . . . . . . . . . 31
Switching the map reduction scale. . . . . . . . . . . . . . . . . . . . . . . . . . . . 32
Switching to the desired reduction scale . . . . . . . . . . . . . . . . . . 32
Switching to reduction scale displaying next destination . . . . . . 33
Switching the map orientation . . . . . . . . . . . . . . . . . . . . . . . . . . . . . . . 34
Switching the map orientation . . . . . . . . . . . . . . . . . . . . . . . . . . 34
Switching to split screen display . . . . . . . . . . . . . . . . . . . . . . . . . . . . . 35
Switching to split screen display . . . . . . . . . . . . . . . . . . . . . . . . 35
Operating the screen on the right . . . . . . . . . . . . . . . . . . . . . . . 35
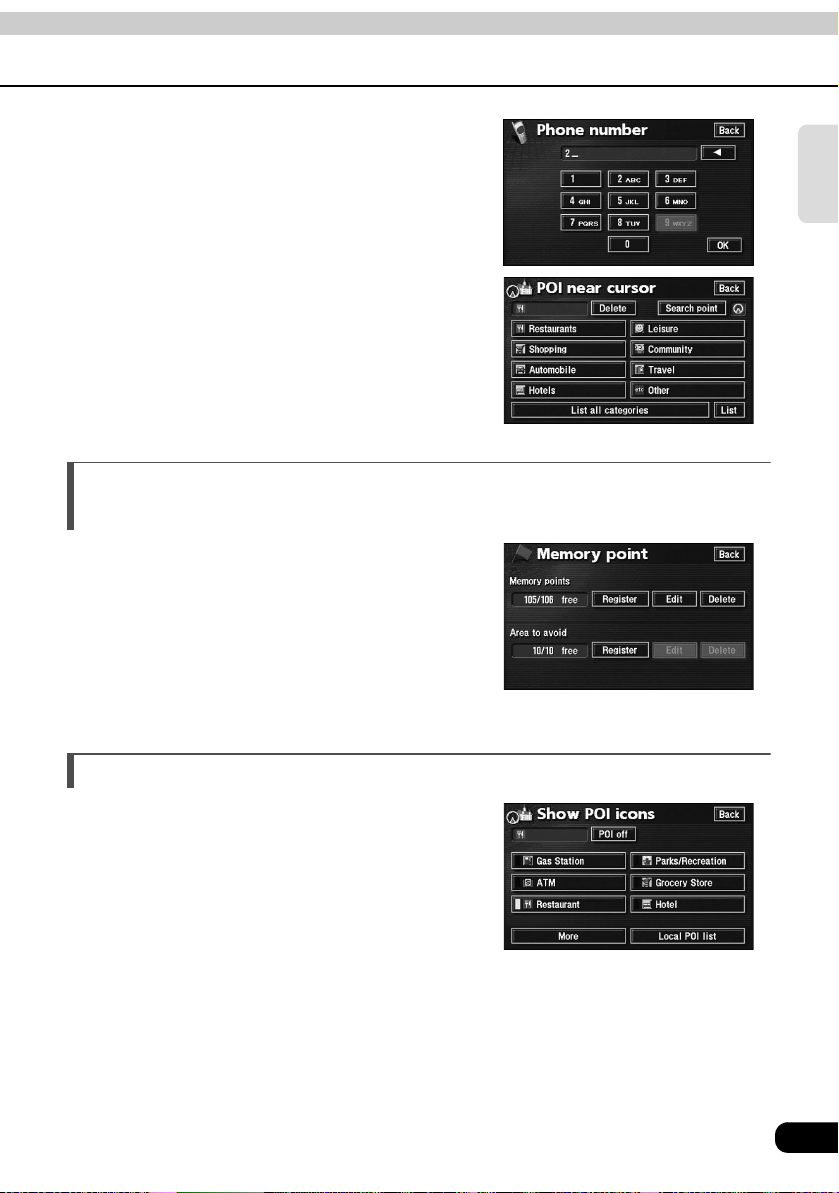
Local POI display. . . . . . . . . . . . . . . . . . . . . . . . . . . . . . . 36
Canceling the split screen display . . . . . . . . . . . . . . . . . . . . . . . 37
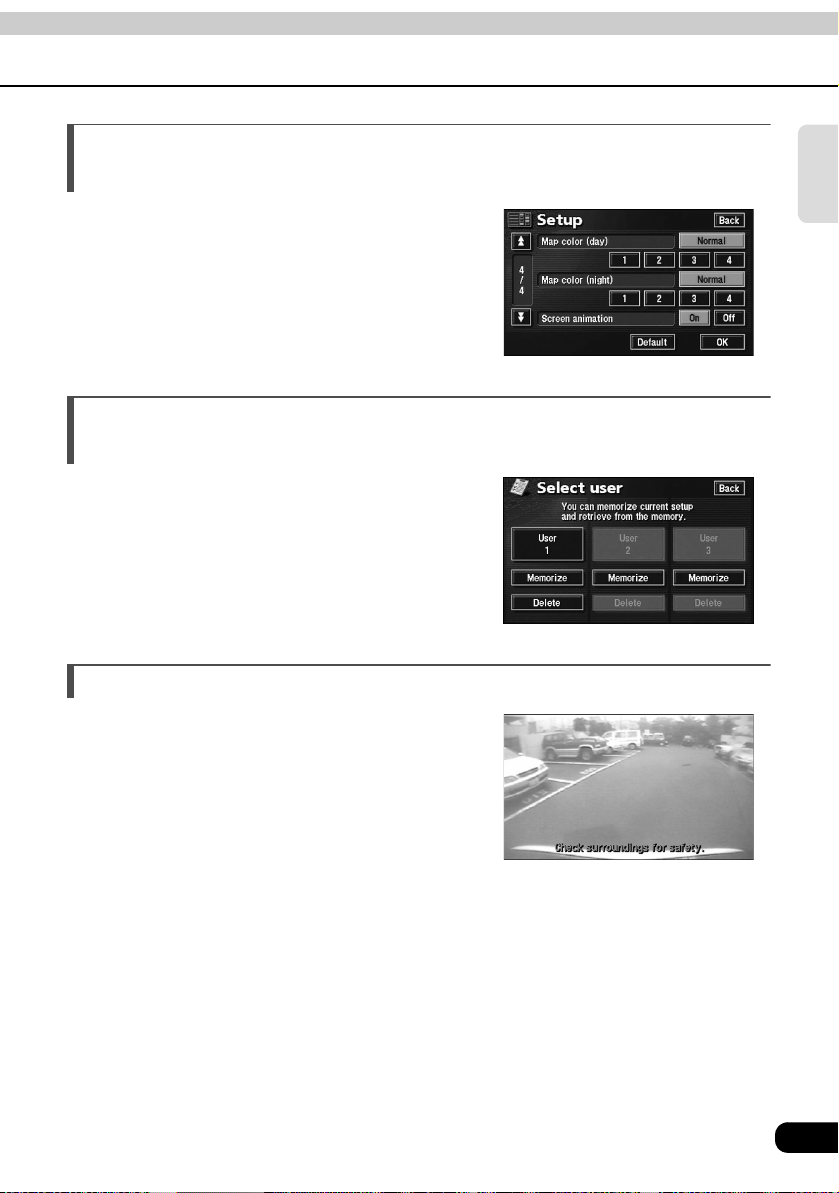
POI display. . . . . . . . . . . . . . . . . . . . . . . . . . . . . . . . . . . . . . . . . . . . . . 38
Displaying landmarks by a simple operation while driving. . . . . 40
Deleting a POI landmark . . . . . . . . . . . . . . . . . . . . . . . . . . . . . . 41
Displaying multiple types . . . . . . . . . . . . . . . . . . . . . . . . . . . . . . 41
Searching for a local POI. . . . . . . . . . . . . . . . . . . . . . . . . . . . . . 42
Displaying a list of POIs along the set route . . . . . . . . . . . . . . . 44
Displaying POI information . . . . . . . . . . . . . . . . . . . . . . . . . . . . 45
Setting the type of local POI to be retrieved while driving . . . . . . . . . . 46
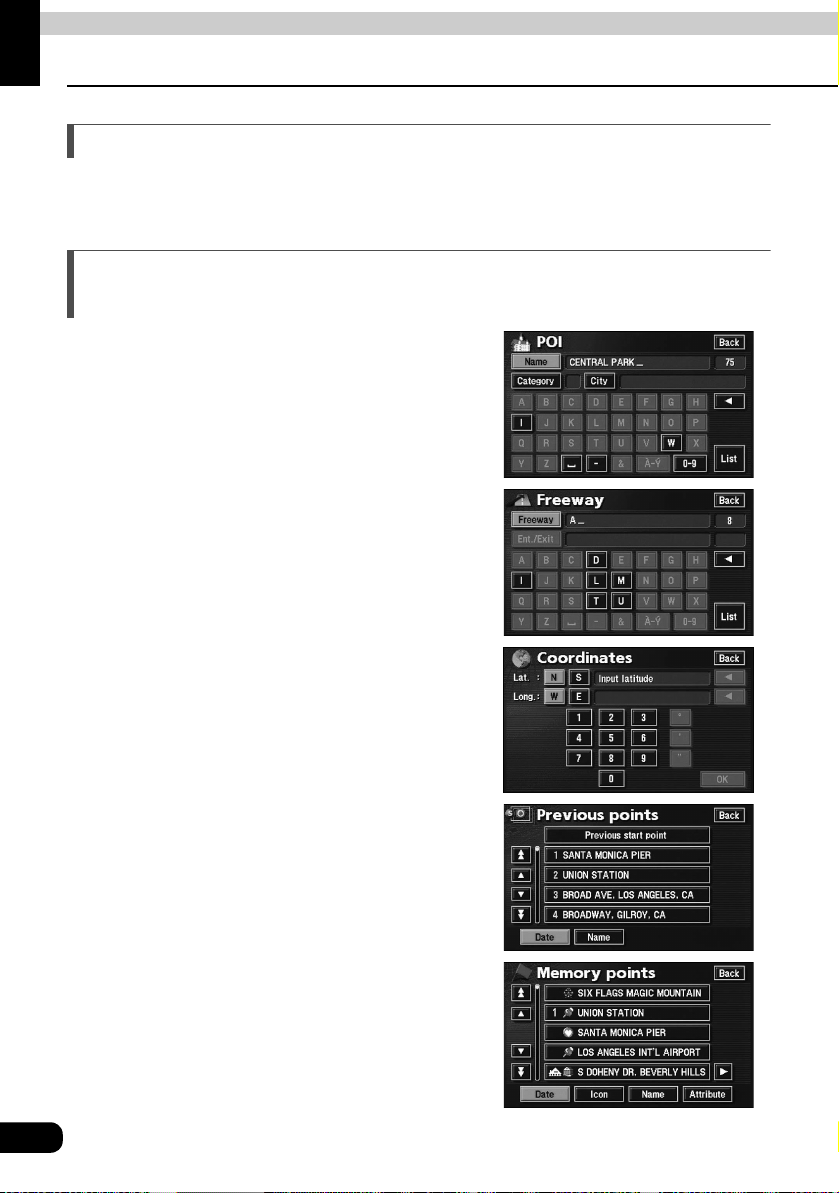
Map retrieval methods . . . . . . . . . . . . . . . . . . . . . . . . . . . . . 48
Changing the search area . . . . . . . . . . . . . . . . . . . . . . . . . . . . . . . . . . 50
Retrieving a map using an address . . . . . . . . . . . . . . . . . . . . . . . . . . . 51
Searching by street name . . . . . . . . . . . . . . . . . . . . . . . . . . . . . 52
Searching by city name . . . . . . . . . . . . . . . . . . . . . . . . . . . . . . . 56
Selecting Nearest 5 cities . . . . . . . . . . . . . . . . . . . . . . . . 57
Select Input city name . . . . . . . . . . . . . . . . . . . . . . . . . . . 59
Searching from the Last 5 cities list . . . . . . . . . . . . . . . . . 60
Retrieving a map using a POI name . . . . . . . . . . . . . . . . . . . . . . . . . . 61
Narrowing down by category . . . . . . . . . . . . . . . . . . . . . . . . . . . 63
Narrowing down by city . . . . . . . . . . . . . . . . . . . . . . . . . . . . . . . 68
Selecting Nearest 5 cities . . . . . . . . . . . . . . . . . . . . . . . . 68
Select Input city name . . . . . . . . . . . . . . . . . . . . . . . . . . . 71
Searching from the Last 5 cities list . . . . . . . . . . . . . . . . . 73
3

Retrieving a map of the vicinity of a POI . . . . . . . . . . . . . . . . . . . . . . . 74
Displaying a POI by specifying a Search point . . . . . . . . . . . . . 75
Designating Input city center . . . . . . . . . . . . . . . . . . . . . . 75
Specifying Current position, Map, or to
(destinations). . . . . . . . . . . . . . . . . . . . . . . . . . . . . . . . . . 77
Retrieving a map using a memory point. . . . . . . . . . . . . . . . . . . . . . . . 79
Retrieving a map using the archive . . . . . . . . . . . . . . . . . . . . . . . . . . . 79
Retrieving a map using an intersection name . . . . . . . . . . . . . . . . . . . 80
Retrieving a map using a freeway entrance/exit name . . . . . . . . . . . . 82
Retrieving a map using the latitude/longitude . . . . . . . . . . . . . . . . . . . 83
Retrieving a map using a telephone number . . . . . . . . . . . . . . . . . . . . 84
Performing operations on a retrieved map . . . . . . . . . . . . 85
Performing operations on a displayed map . . . . . . . . . . . . . . . . . . . . . 85
Changing the position . . . . . . . . . . . . . . . . . . . . . . . . . . . . . . . . . . . . . 85
Displaying point information . . . . . . . . . . . . . . . . . . . . . . . . . . . . . . . . . 86
Setting route search conditions . . . . . . . . . . . . . . . . . . . . . . . . . . . . . . 86
Navigation guidance
Setting the destination and searching for a route . . . . . . . 87
Set a destination and search for a route . . . . . . . . . . . . . . 88
Setting a destination. . . . . . . . . . . . . . . . . . . . . . . . . . . . . . . . . . . . . . . 89
Setting by directly moving the map . . . . . . . . . . . . . . . . . . . . . . 89
Set from a registered point. . . . . . . . . . . . . . . . . . . . . . . . . . . . . 91
Set using a map retrieval method . . . . . . . . . . . . . . . . . . . . . . . 92
Route search . . . . . . . . . . . . . . . . . . . . . . . . . . . . . . . . . . . . . . . . . . . . 93
All-route display . . . . . . . . . . . . . . . . . . . . . . . . . . . . . . . . . . . . . . . . . . 93
Route displays . . . . . . . . . . . . . . . . . . . . . . . . . . . . . . . . . . . . . . 93
All-route display and touch switches . . . . . . . . . . . . . . . . . . . . . 94
Setting route search conditions . . . . . . . . . . . . . . . . . . . . . . . . . . . . . . 96
Displaying or bypassing a restricted segment . . . . . . . . . . . . . . . . . . . 96
Bypassing a restricted segment. . . . . . . . . . . . . . . . . . . . . . . . . 97
Setting the restriction message display . . . . . . . . . . . . . . . . . . . 98
Displaying route data (guidance road information) . . . . . . . . . . . . . . . 99
3-route simultaneous display (3-route search function) . . . . . . . . . . . 100
Changing the search result route . . . . . . . . . . . . . . . . . . . 101
Adding a destination. . . . . . . . . . . . . . . . . . . . . . . . . . . . . . . . . . . . . . 102
4

Changing search conditions per segment . . . . . . . . . . . . . . . . . . . . . 105
Switching the destination order . . . . . . . . . . . . . . . . . . . . . . . . . . . . . 106
Deleting a destination. . . . . . . . . . . . . . . . . . . . . . . . . . . . . . . . . . . . . 108
Indicating a preferred road . . . . . . . . . . . . . . . . . . . . . . . . . . . . . . . . . 109
Canceling the preferred road indication . . . . . . . . . . . . . . . . . . . . . . . 111
Starting, pausing and restarting route guidance. . . . . . . 112
Starting route guidance . . . . . . . . . . . . . . . . . . . . . . . . . . . . . . . . . . . 112
Demonstration . . . . . . . . . . . . . . . . . . . . . . . . . . . . . . . . . . . . . . . . . . 112
Pausing and restarting route guidance . . . . . . . . . . . . . . . . . . . . . . . 113
Route guidance . . . . . . . . . . . . . . . . . . . . . . . . . . . . . . . . . . 114
Route guidance screen . . . . . . . . . . . . . . . . . . . . . . . . . . . . . . . . . . . 114
Arrow screen . . . . . . . . . . . . . . . . . . . . . . . . . . . . . . . . . . . . . . 115
Displaying the Arrow screen . . . . . . . . . . . . . . . . . . . . . 115
Canceling the Arrow screen. . . . . . . . . . . . . . . . . . . . . . 116
Turn list screen . . . . . . . . . . . . . . . . . . . . . . . . . . . . . . . . . . . . 116
Displaying the Turn list screen. . . . . . . . . . . . . . . . . . . . 117
Canceling the Turn list screen . . . . . . . . . . . . . . . . . . . . 117
Compass screen . . . . . . . . . . . . . . . . . . . . . . . . . . . . . . . . . . . 118
Displaying the Compass screen . . . . . . . . . . . . . . . . . . 118
Canceling the Compass screen . . . . . . . . . . . . . . . . . . . 118
Enlarged intersection display screen . . . . . . . . . . . . . . . . . . . . 119
Setting the enlarged intersection display screen . . . . . . 120
Canceling the enlarged intersection
display using . . . . . . . . . . . . . . . . . . . . . . . . . . 120
Canceling the enlarged intersection
display using . . . . . . . . . . . . . . . . . . . . . . . . . . . 121
Freeway junction guidance screen . . . . . . . . . . . . . . . . . . . . . 122
Setting the freeway junction guidance screen . . . . . . . . 122
Canceling the freeway junction guidance
screen using . . . . . . . . . . . . . . . . . . . . . . . . . . 123
Canceling the freeway junction guidance
screen using . . . . . . . . . . . . . . . . . . . . . . . . . . . 123
Ferry crossing guidance. . . . . . . . . . . . . . . . . . . . . . . . . . . . . . . . . . . 124
Setting the estimated travel time . . . . . . . . . . . . . . . . . . . . . . . . . . . . 124
Setting the average speed . . . . . . . . . . . . . . . . . . . . . . . . . . . . 124
Voice guidance. . . . . . . . . . . . . . . . . . . . . . . . . . . . . . . . . . . . . . . . . . 126
Setting automatic voice guidance . . . . . . . . . . . . . . . . . . . . . . 127
Guidance in another mode. . . . . . . . . . . . . . . . . . . . . . . . . . . . . . . . . 128
Setting the guidance when in other modes . . . . . . . . . . . . . . . 128
OFF
OFF
5

Performing operations on the guided route. . . . . . . . . . . 129
Redisplaying the all-route display . . . . . . . . . . . . . . . . . . . . . . . . . . . 129
Switching the required time/remaining distance. . . . . . . . . . . . . . . . . 129
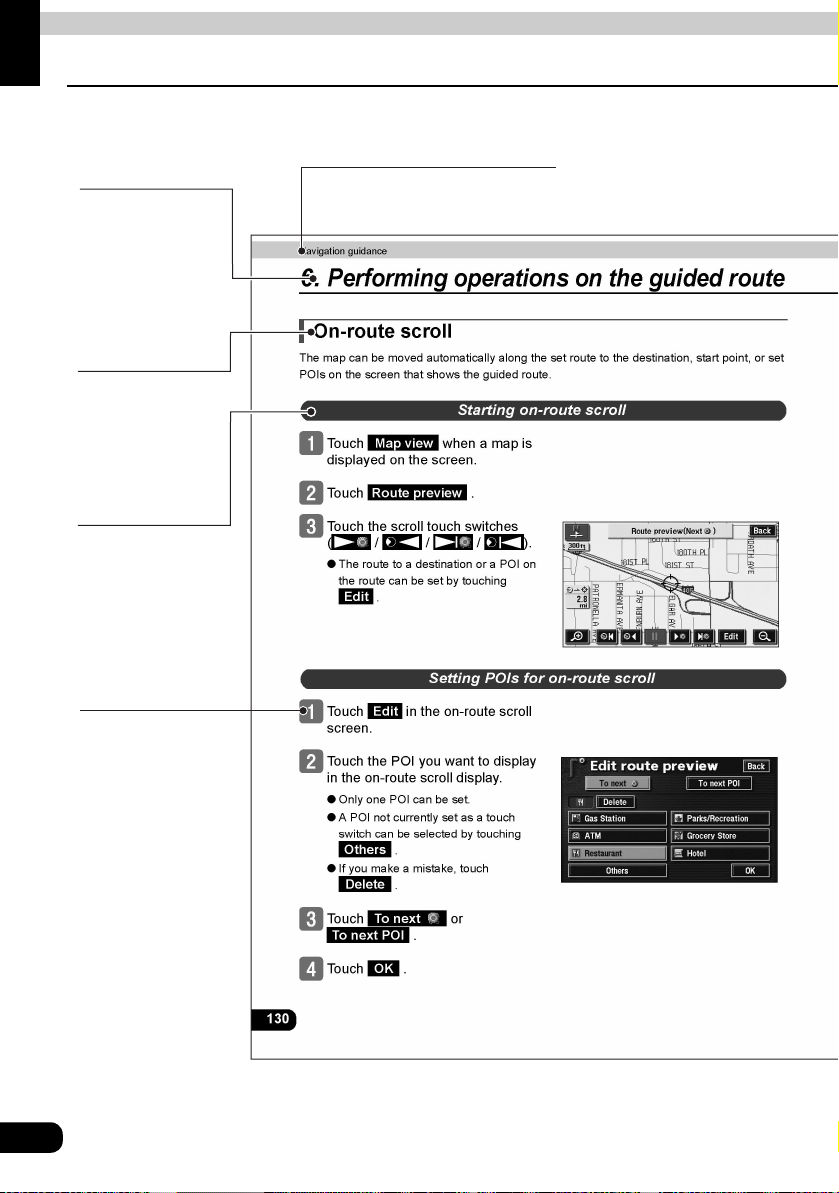
On-route scroll . . . . . . . . . . . . . . . . . . . . . . . . . . . . . . . . . . . . . . . . . . 130
Starting on-route scroll. . . . . . . . . . . . . . . . . . . . . . . . . . . . . . . 130
Setting POIs for on-route scroll . . . . . . . . . . . . . . . . . . . . . . . . 130
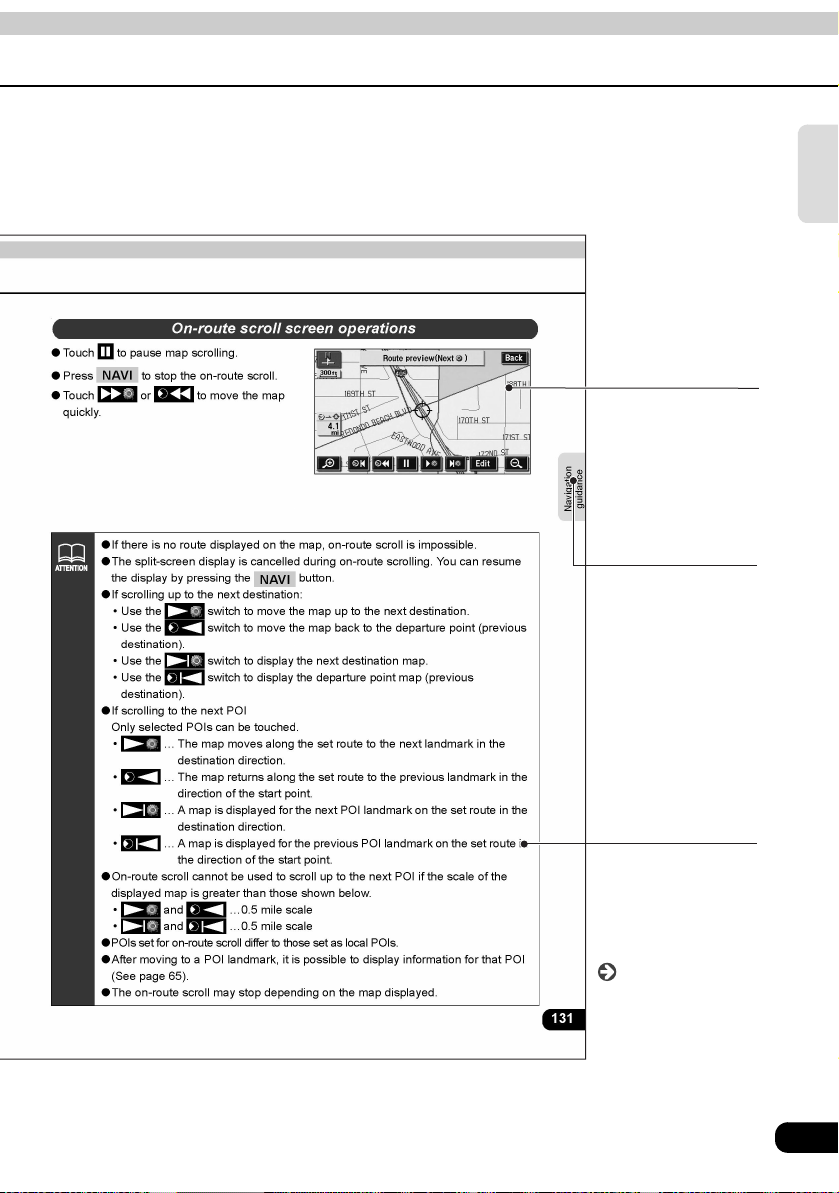
On-route scroll screen operations . . . . . . . . . . . . . . . . . . . . . . 131
Reinitiating a route search . . . . . . . . . . . . . . . . . . . . . . . . . 132
Reinitiating a route search . . . . . . . . . . . . . . . . . . . . . . . . . . . . . . . . . 132
Auto reroute search . . . . . . . . . . . . . . . . . . . . . . . . . . . . . . . . . . . . . . 134
Setting the automatic reroute search . . . . . . . . . . . . . . . . . . . . 134
Adding a detour . . . . . . . . . . . . . . . . . . . . . . . . . . . . . . . . . . . . . . . . . 135
Point registration
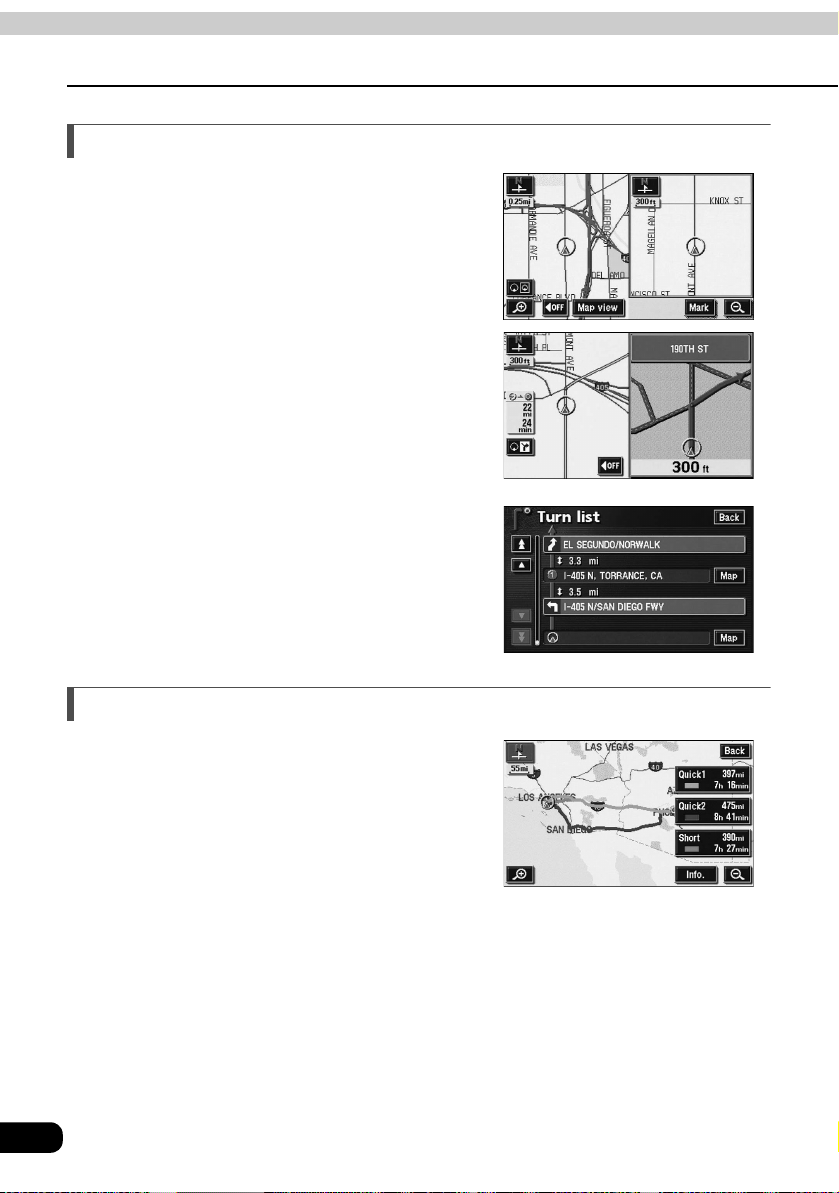
What is point registration? . . . . . . . . . . . . . . . . . . . . . . . . 136
Registering, correcting or deleting a memory point . . . . 137
Registering/correcting/deleting your home. . . . . . . . . . . . . . . . . . . . . 137
Registering your home. . . . . . . . . . . . . . . . . . . . . . . . . . . . . . . 137
Correcting your home . . . . . . . . . . . . . . . . . . . . . . . . . . . . . . . 139
Correcting from Menu screen . . . . . . . . . . . . . . . . . . . . 139
Correcting from the map display . . . . . . . . . . . . . . . . . . 140
Deleting your home . . . . . . . . . . . . . . . . . . . . . . . . . . . . . . . . . 141
Registering memory points . . . . . . . . . . . . . . . . . . . . . . . . . . . . . . . . 142
One-touch registration . . . . . . . . . . . . . . . . . . . . . . . . . . . . . . . 142
Registering a far away point . . . . . . . . . . . . . . . . . . . . . . . . . . 143
Correcting memory points . . . . . . . . . . . . . . . . . . . . . . . . . . . . . . . . . 144
Displaying the memory point editing screen . . . . . . . . . . . . . . 144
Displaying the memory point editing screen
from Menu screen . . . . . . . . . . . . . . . . . . . . . . . . . . . . . 144
Displaying the memory point editing screen
from the map display . . . . . . . . . . . . . . . . . . . . . . . . . . . 145
Correcting memory point location . . . . . . . . . . . . . . . . . . . . . . 147
Changing a memory point icon . . . . . . . . . . . . . . . . . . . . . . . . 148
Entering a telephone number for a memory point . . . . . . . . . . 150
Entering a memory point name . . . . . . . . . . . . . . . . . . . . . . . . 151
Displaying a memory point name. . . . . . . . . . . . . . . . . . . . . . . 152
Deleting a memory point . . . . . . . . . . . . . . . . . . . . . . . . . . . . . . . . . . 153
6

Registering, correcting or deleting a quick access point
Registering quick access points. . . . . . . . . . . . . . . . . . . . . . . . . . . . . 154
Correcting a quick access point . . . . . . . . . . . . . . . . . . . . . . . . . . . . . 156
Deleting a quick access point. . . . . . . . . . . . . . . . . . . . . . . . . . . . . . . 157
. . 154
Registering, correcting or deleting detour memory points
Registering detour memory points . . . . . . . . . . . . . . . . . . . . . . . . . . . 158
Correcting a detour memory point . . . . . . . . . . . . . . . . . . . . . . . . . . . 160
Deleting a detour memory point. . . . . . . . . . . . . . . . . . . . . . . . . . . . . 161
. . . 158
Destination archive. . . . . . . . . . . . . . . . . . . . . . . . . . . . . . . 162
Deleting destination archives . . . . . . . . . . . . . . . . . . . . . . . . . . . . . . . 162
Information function
Information screen . . . . . . . . . . . . . . . . . . . . . . . . . . . . . . . 163
Information screen . . . . . . . . . . . . . . . . . . . . . . . . . . . . . . . . . . . . . . . 163
System check screen . . . . . . . . . . . . . . . . . . . . . . . . . . . . . 164
Optional function
Rear view Camera operations . . . . . . . . . . . . . . . . . . . . . . 165
Rear view Camera image. . . . . . . . . . . . . . . . . . . . . . . . . . . . . . . . . . 167
Displaying the rear view image . . . . . . . . . . . . . . . . . . . . . . . . 167
Helpful tips
Situations when a correction is necessary . . . . . . . . . . . 169
Correcting present location . . . . . . . . . . . . . . . . . . . . . . . . . . . . . . . . 169
Correcting the distance . . . . . . . . . . . . . . . . . . . . . . . . . . . . . . . . . . . 171
Saving Navigation settings . . . . . . . . . . . . . . . . . . . . . . . . 172
Settings that can be saved. . . . . . . . . . . . . . . . . . . . . . . . . . . . . . . . . 172
Saving navigation settings . . . . . . . . . . . . . . . . . . . . . . . . . . . . . . . . . 172
Retrieving saved settings . . . . . . . . . . . . . . . . . . . . . . . . . . . . . . . . . . 173
7

Deleting all saved navigation settings . . . . . . . . . . . . . . . . . . . . . . . . 173
Map data information . . . . . . . . . . . . . . . . . . . . . . . . . . . . . 174
Displaying map data information . . . . . . . . . . . . . . . . . . . . . . . . . . . . 174
Accuracy and errors . . . . . . . . . . . . . . . . . . . . . . . . . . . . . . 175
Positioning accuracy . . . . . . . . . . . . . . . . . . . . . . . . . . . . . . . . . . . . . 175
GPS signal quality and reception conditions . . . . . . . . . . . . . . . . . . . 175
Present location display error. . . . . . . . . . . . . . . . . . . . . . . . . . . . . . . 176
Tire-related errors . . . . . . . . . . . . . . . . . . . . . . . . . . . . . . . . . . . . . . . 176
Correcting the vehicle position sensor using map-matching . . . . . . . 177
Present location display, route guidance accuracy . . . . . . . . . . . . . . 177
Road and geographic name data . . . . . . . . . . . . . . . . . . . . . . . . . . . . 179
Route guidance . . . . . . . . . . . . . . . . . . . . . . . . . . . . . . . . . . . . . . . . . 179
For reference
Important points . . . . . . . . . . . . . . . . . . . . . . . . . . . . . . . . . 181
If one of these messages appears . . . . . . . . . . . . . . . . . . . . . . . . . . . 181
Before asking for repairs . . . . . . . . . . . . . . . . . . . . . . . . . . . . . . . . . . 183
Copyright . . . . . . . . . . . . . . . . . . . . . . . . . . . . . . . . . . . . . . . 184
Topic Index . . . . . . . . . . . . . . . . . . . . . . . . . . . . . . . . . . . . . 187
Information about the maps . . . . . . . . . . . . . . . . . . . . . . . . . . . . . . . . 187
Route guidance . . . . . . . . . . . . . . . . . . . . . . . . . . . . . . . . . . . . . . . . . 189
Other . . . . . . . . . . . . . . . . . . . . . . . . . . . . . . . . . . . . . . . . . . . . . . . . . 191
Index. . . . . . . . . . . . . . . . . . . . . . . . . . . . . . . . . . . . . . . . . . . 192
The Topic Index simplifies searches for explanations about
individual features. When confused by an operation, use the Topic
Index to search for information about the operation.
8

9
Introduction
1. How to use this manual
Section title
Item title
A number and title
is assigned to each
item.
Operation title
A title is assigned
to each operation.
Detailed operation
title
A title is assigned
to each detailed
operation.
A title is assigned to each section.
Operation
procedure
Describes the
operation.
Proceed with the
operation according
to the numerical
order.
10
Operation screen
A screen showing
the operation.
Section side
heading
The side heading for
the current section.
Introduction
Attention
Additional points
regarding operation
are given here.
Continue to the
next page
Indicates that
operation procedures
continue on the next
page.
11
Introduction
2. Features
High-accuracy, high speed response HDD
Employs a high-capacity hard disk for navigation that offers greater operation speed than
conventional DVD-ROM navigation.
Several search methods to choose from (See page 48)
● Search using a POI name (See page 61)
When the name of the POI is known, enter it to
initiate a search. It is also possible to search by
entering only a part of the name.
● Search using a freeway entrance/exit
(See page 82)
A search can be initiated using the name of a
freeway or a freeway entrance/exit.
● Search using latitude/longitude coordinates
(See page 83)
A map can be displayed by directly entering the
latitude and longitude coordinates.
● Search using the destination archive
(See page 79)
A map can be retrieved using entries previously
set in the destination archive.
● Search using a registered point
(See page 79)
A map can be retrieved using your home or a
point registered in the memory.
12
● Search using a telephone number
(See page 84)
A map can be retrieved by entering a telephone
number.
● Search using local POI (See page 74)
A map can be retrieved from a POI at your
present location, in a set city, or a set
destination.
Registering a desired point in the memory (See page 136)
Your home or a geographical point you want to
indicate on a map can be registered in the
memory. Also, when initiating a route search,
points through which you want to make a detour
can be registered in advance.
Introduction
POI icon display (See page 38)
Various types of POIs can be displayed on a map
using icons.
13
Introduction
2. Features
Diverse screen displays (See page 35, 99, 114)
● Split screen display
The screen can be divided into two parts.
● Enlarged intersection display
While route guidance is in progress, an enlarged
illustration of the area around the intersection
where a turn is to be made (junction) is
displayed when approaching that intersection.
● List display
A list is displayed of the distance to intersections
and turning directions to the destination.
3-route simultaneous display (See page 100)
When initiating a route search, three routes (Quick
1, Quick 2 and Short) can be searched for
simultaneously.
14
The map display color can be switched (See page 24)
Five map display colors can be selected for both
the daytime and nighttime screen display.
User Customize Function for saving settings for each user (See page 172)
The settings used for navigation can be saved for
each user and easily retrieved.
System upgrade (See page 165)
● Rear view camera
When the optional Rear view camera is
installed, the rear image can be displayed on the
monitor screen.
Introduction
15
Introduction
3. GPS navigation system
By setting your destination, the device will automatically perform a route search and guide you
through the route using screen displays and voice announcements.
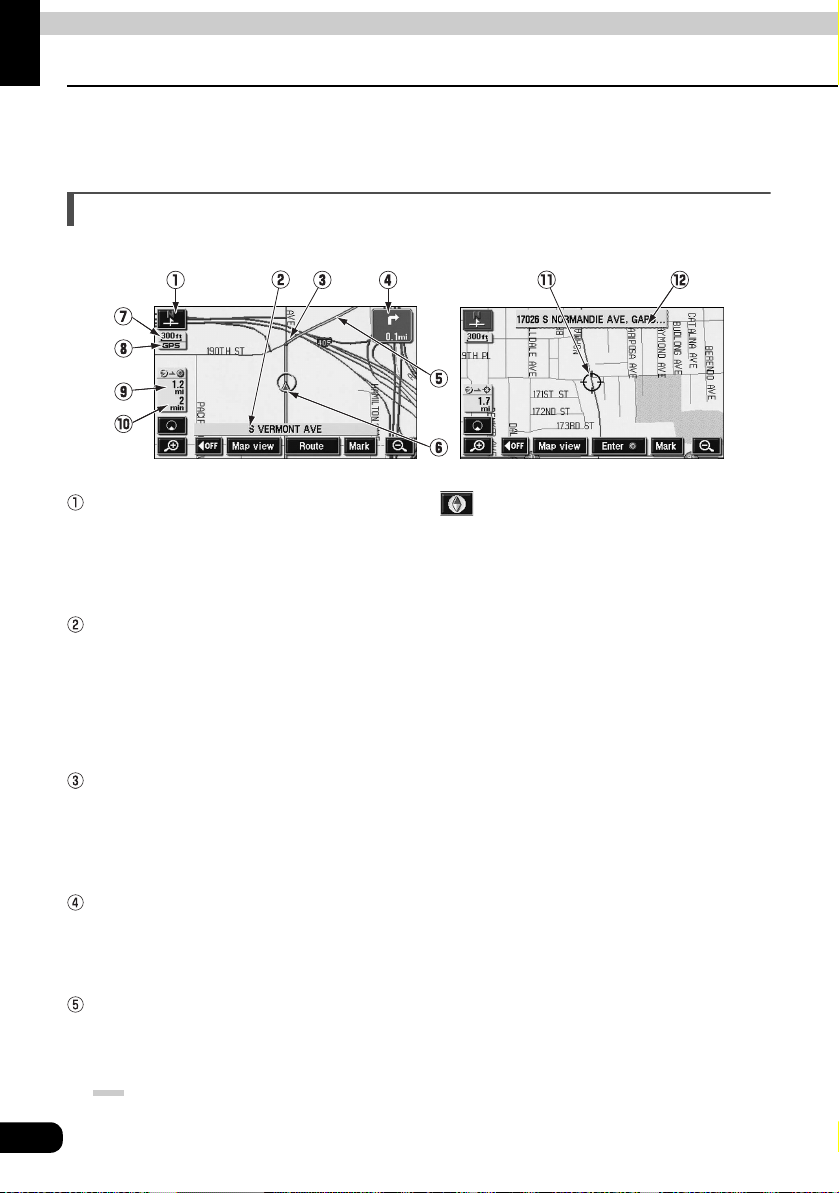
Viewing the Navigation screen
The navigation map display consists of a present location screen and a scrolling map screen.
<Scroll map screen><Present location screen>
Orientation mark (When heading-up display: )
Indicates the orientation of the map.
● Refer to the Section "Switching the map orientation" on page 34 for how to switch the
map direction (north-up or heading-up).
Name display
The following names appear depending on the situation. (Only for geographical points with
information stored in the map data).
● Names of roads taken
● Names of interchange exits
Instruction points
Intersection guidance (intersection name display/enlarged intersection display) will appear.
● Refer to the Section "Route guidance screen" on page 114 for information concerning
intersection guidance.
Direction/Remaining distance display
● The turn to be made at the next intersection will appear.
● The distance up to the next intersection is displayed.
Route display
When setting your destination, the route all the way to that point is displayed.
● Route guidance will occur only when the present location appears on a dark blue line
().
16
Vehicle position mark
The present location and the vehicle direction are displayed.
Scale display
The reduction scale of the map being displayed is indicated.
The length of the appearing in the screen above represents 300 ft.
GPS mark
This mark will appear when utilizing absolute positioning data from GPS satellites.
● See page 18 for information concerning this indication. There may be misalignments
depending on the satellite conditions.
Remaining distance display
The distance from the present location to the destination is indicated.
● While route guidance is in progress, the distance calculated from the route now being taken
to the destination is indicated.
● When deviating from the set route, the distance to the destination in a straight line is
indicated.
● Refer to the Section "Switching the required time/remaining distance" on page 129 for
information on how to switch the remaining distance display.
Required time display/destination mark
The following marks appear depending on the situation.
■Required time display
While route guidance is in progress, the required time up to the destination is indicated.
● Refer to the Section "Setting the estimated travel time" on page 124 for information
concerning the required time.
Introduction
■Destination direction mark
When deviating from the set route, the direction towards the destination is displayed.
Cursor mark
This mark is indicated on the map retrieved by a search or by scrolling.
To scroll, simply touch the map (anywhere except the touch switches).
Cursor position street name display
The name of the street at the current cursor position on the map is displayed for approximately
6 seconds.
Except for some parts describing certain functions, this manual uses north-up map 1
screen illustrations to describe the device's functions.
"Touch the map" refers to touching the map screen directly (anywhere except the touch
switches).
17
Introduction
4. GPS
Global Positioning System (GPS): a system developed and operated by the United States
government that pinpoints your present location by utilizing latitudinal and longitudinal data
received from either 3 or 4 satellites.
Situations when GPS signal reception is impossible
The following are situations when the GPS
signal cannot be received:
● When the GPS signal is obstructed while
driving through building clusters, tunnels or
on overpasses
● When the signal is obstructed because an
object is placed near or on the GPS antenna
● When the GPS satellite is not sending any
signals to the earth (signal emission may be
halted due to modifications or repairs
conducted by the U.S. Tracking Control
Center, the organization responsible for
controlling GPS signals)
Screen with GPS signal reception in progress
● When a digitally formatted cellular telephone
unit is brought near the GPS antenna
Handling the GPS antenna
●Consult a specialist at your local retailer for how to install the GPS antenna.
●Do not apply paint or wax to the GPS antenna. Otherwise, signal reception
sensitivity may be diminished or signal reception may be rendered impossible.
●Do not pull on the cord when uninstalling or moving the GPS antenna.
Otherwise, short circuits or disconnections may result.
●See page 175 for information concerning GPS signal accuracy and errors.
18

Basic operation
1. Menu screen and list screens
Menu screen
Press to display the Menu
MENU
screen.
The following operations can be
performed from the Menu screen.
● Touch the desired item's touch switch
to activate.
Item (touch switch) Function Page
Suspend guidance/
Resume guidance *
Vol ume
Select user Saving, retrieving and deleting all navigation settings 172
Memory
Setup
Map Info Displaying map data information 174
*1: Shaded if a destination is not set.
*2: Including registering, correcting, or deleting quick access points.
1
Registering, correcting or deleting detour memory points
Setting the automatic intersection enlargement display 120
Setting the automatic freeway junction guidance screen 122
Setting the type of POIs in the vicinity retrieved while driving 46
Stopping or restarting route guidance 112
Setting the volume 27
Setting the automatic freeway volume switch 27
Registering, correcting, or deleting your home
Registering, correcting, or deleting memory points *
Setting the navigation system corrections 169
Switching the kilometer/mile display 25
Setting the estimated travel time 124
Setting the auto reroute search 134
Switching the time zone 25
Setting the automatic voice guidance 127
Setting the guidance when in other modes 128
Setting the traffic restriction message display 98
Displaying the street name while scrolling 30
Setting the touch switch display 31
Deleting destination archives 162
Switching the map display color 24
Setting the screen animation when switching screens 24
2
137, 139, 141
142, 144, 153
158, 160, 161
19
Basic
operation

Basic operation
1. Menu screen and list screens
Switching the list screens
or switch display
Touch or switch to move through the list
one item at a time.
Page switch display
Touch or to move through the list one
page at a time.
POI switch display
Restaurants
Touch / /
Automobile Hotels Leisure
Community
display the list for the desired POI.
● The touch switch is shaded for POIs without
corresponding lists. They cannot be
operated even if touched.
/ / /
/ / to
20
Shopping
Travel Other
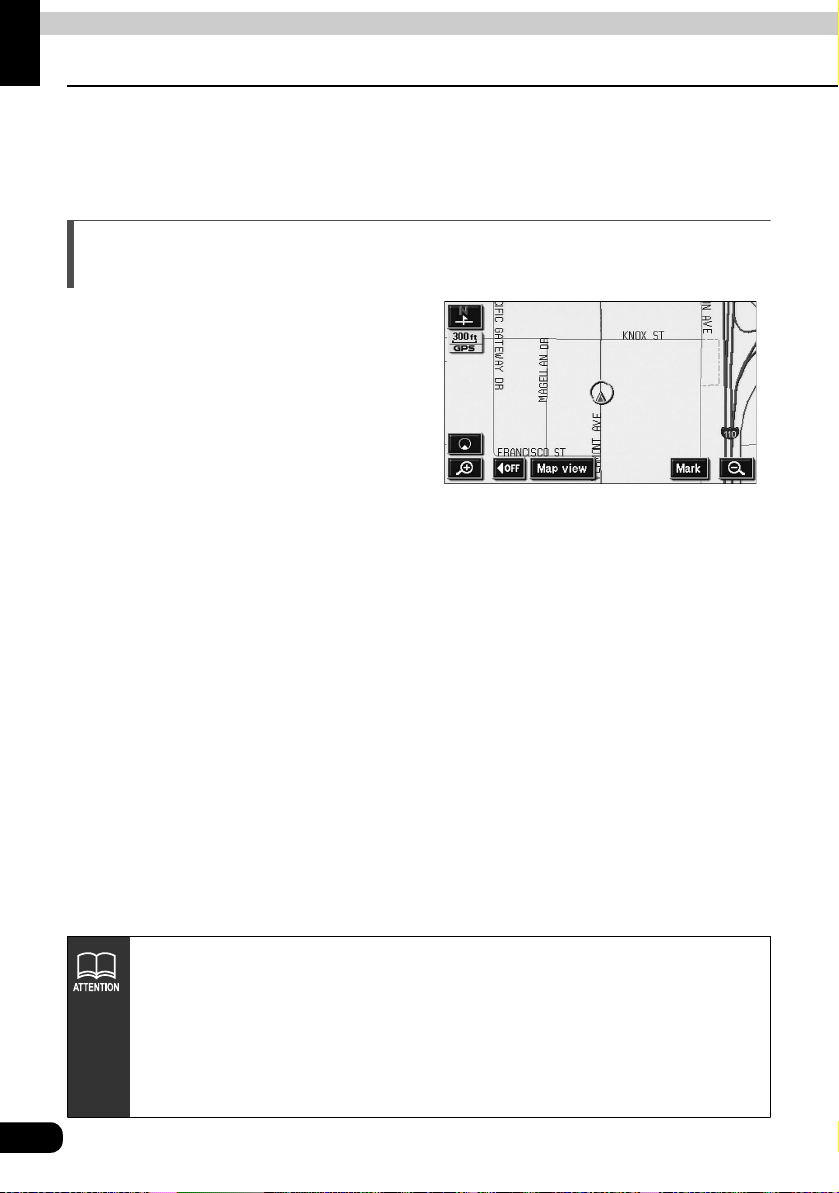
Rearranging the list order
If the following touch switches are displayed at the bottom of the list screen, the list order can
be reordered in terms of the corresponding item.
● Touch to reorder by date.
● Touch to reorder by POI and/or
● Touch to order alphabetically.
● Touch to list memory points in
Date
Icon
memory point type.
Name
Attribute
the following order: home - quick access
points - memory points.
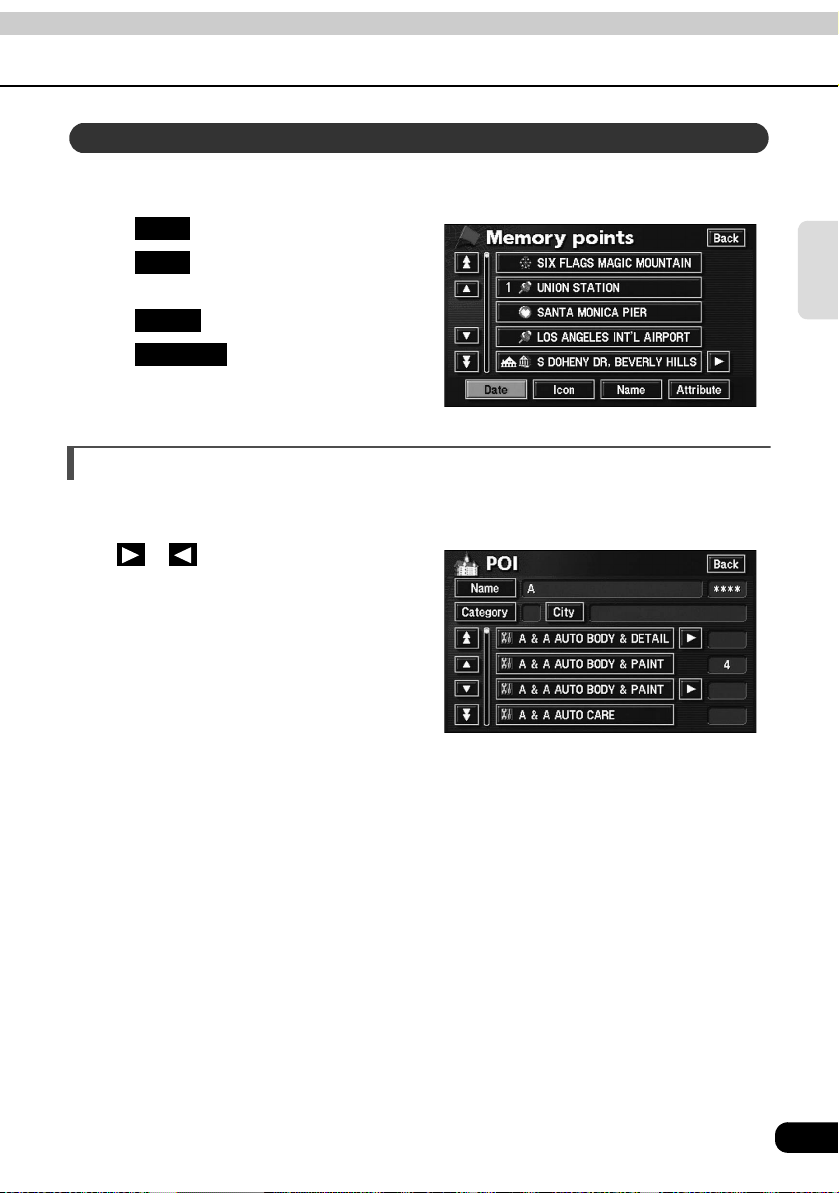
Displaying full titles
Sometimes the name of a location is too long to be fully displayed. Use the following function
to display the full item name.
Touch or to scroll through the name of
a location.
Basic
operation
21
Basic operation
2. Adjusting the screen and setting the sound
Screen adjustment
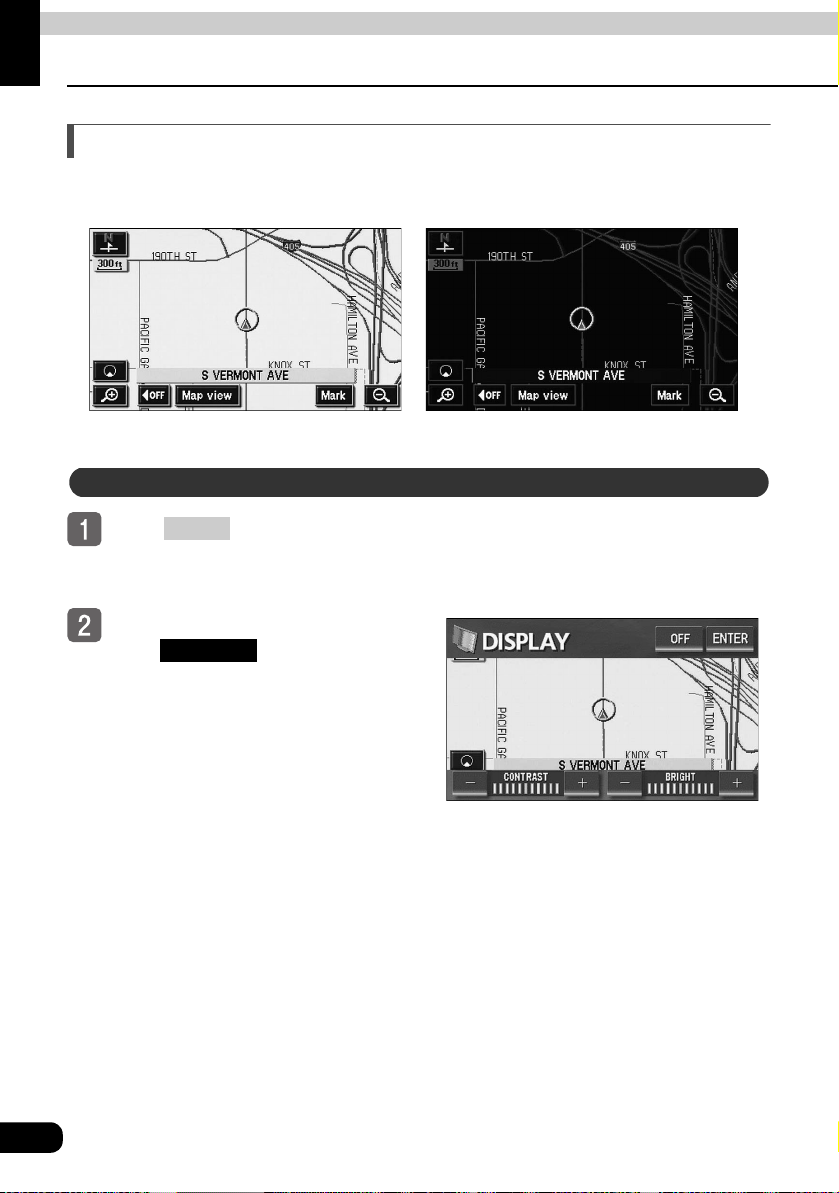
To make the screen easier to view, it can be switched from "daytime display" to "nighttime
display" by turning the vehicle lights (headlights, taillights, license plate lights) ON or OFF.
●Nighttime display (when lights are turned ON)●Daytime display (when lights are turned OFF)
How to display the image quality adjustment screen
Press in the navigation
DISP
screen to display the image quality
adjustment screen.
After completing the adjustment,
touch or wait at least 20
ENTER
seconds and the adjustment will be
automatically set and the display
will return to the original screen.
●Image quality adjustment screen
22
Contrast/Brightness
Contrast
Touch to strengthen contrast, or to weaken contrast.
+ -
Brightness
Touch to increase brightness, or to decrease brightness.
+ -
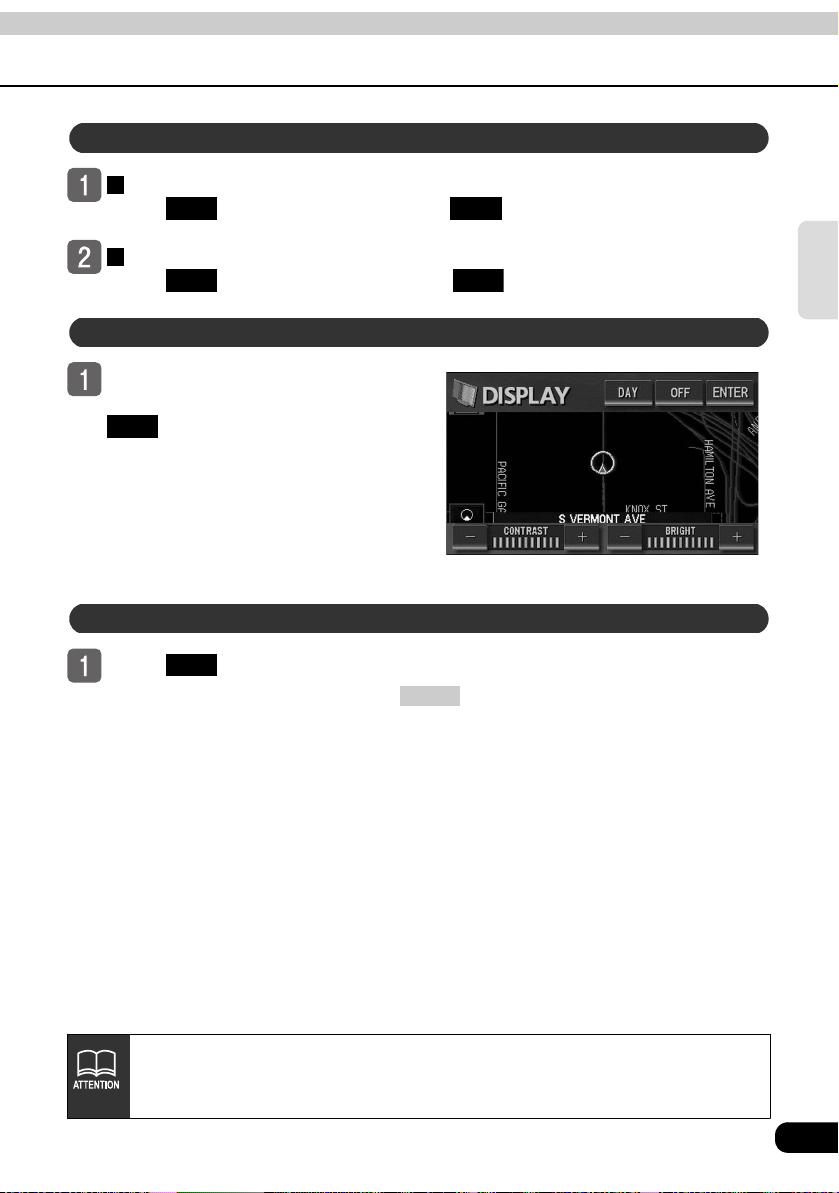
Setting daytime display when vehicle lights are on
The daytime display and nighttime
display will be switched each time
DAY
is touched.
● When in daytime display, the touch
switch appears green.
Turning off the screen
Basic
operation
To u ch .
● To make the screen reappear, press .
OFF
NAVI
●Even with the screen turned OFF, the GPS present location positioning
continues to function.
●The daytime display and nighttime display can be adjusted separately.
23
Basic operation
2.
Adjusting the screen and setting the sound
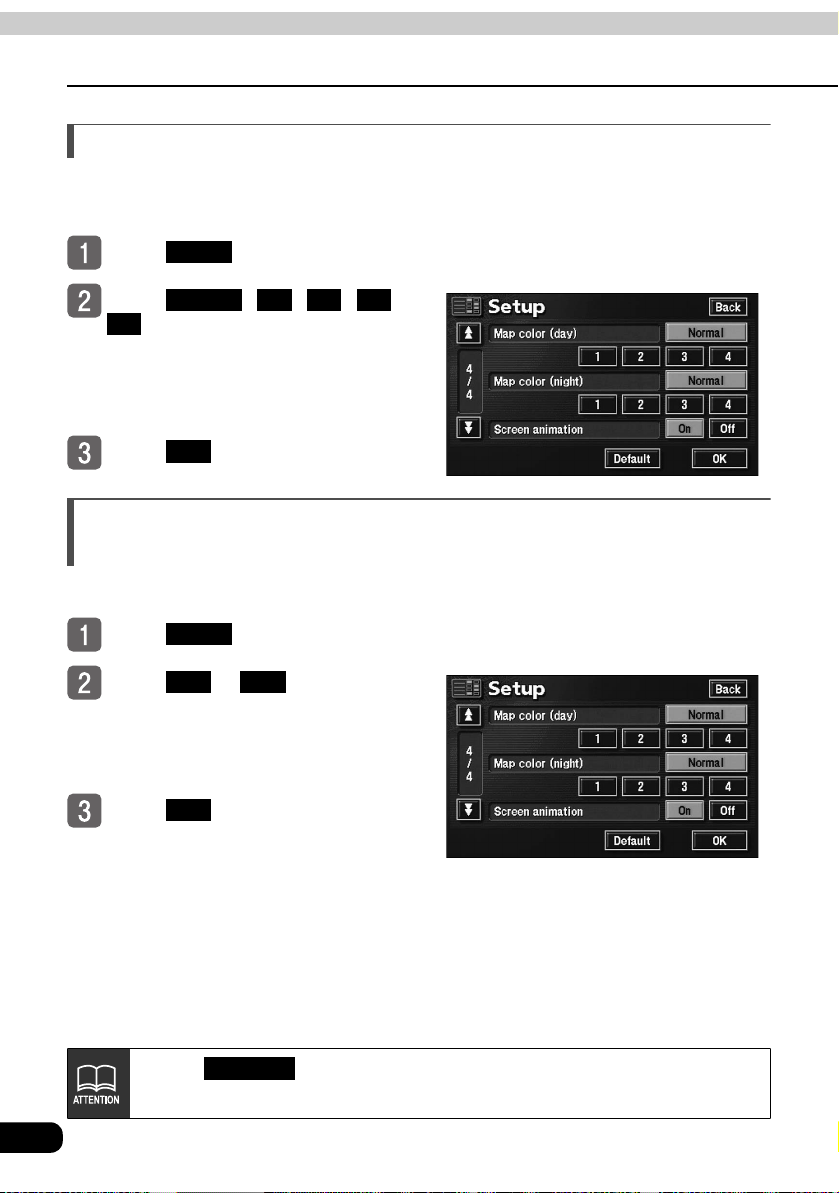
Switching the map display color
The map display color (a 5 color selection) can be switched for the daytime and nighttime
displays independently.
Touch in the Menu screen.
Touch , , , or
color (night) respectively.
● The selected touch switches will turn
To u ch .
Setup
Normal 1 2 3
4
for Map color (day) and Map
green.
OK
Setting the screen animation when switching screens
A slower speed can be set for the switching screen animation.
Touch in the Menu screen.
Touch or for Screen
animation.
● The selected touch switch will turn
To u ch .
Setup
On Off
green.
OK
24
●Touch in the Setup screen to return all items to their default settings.
●There is also a touch switch for disabling animation.
Default
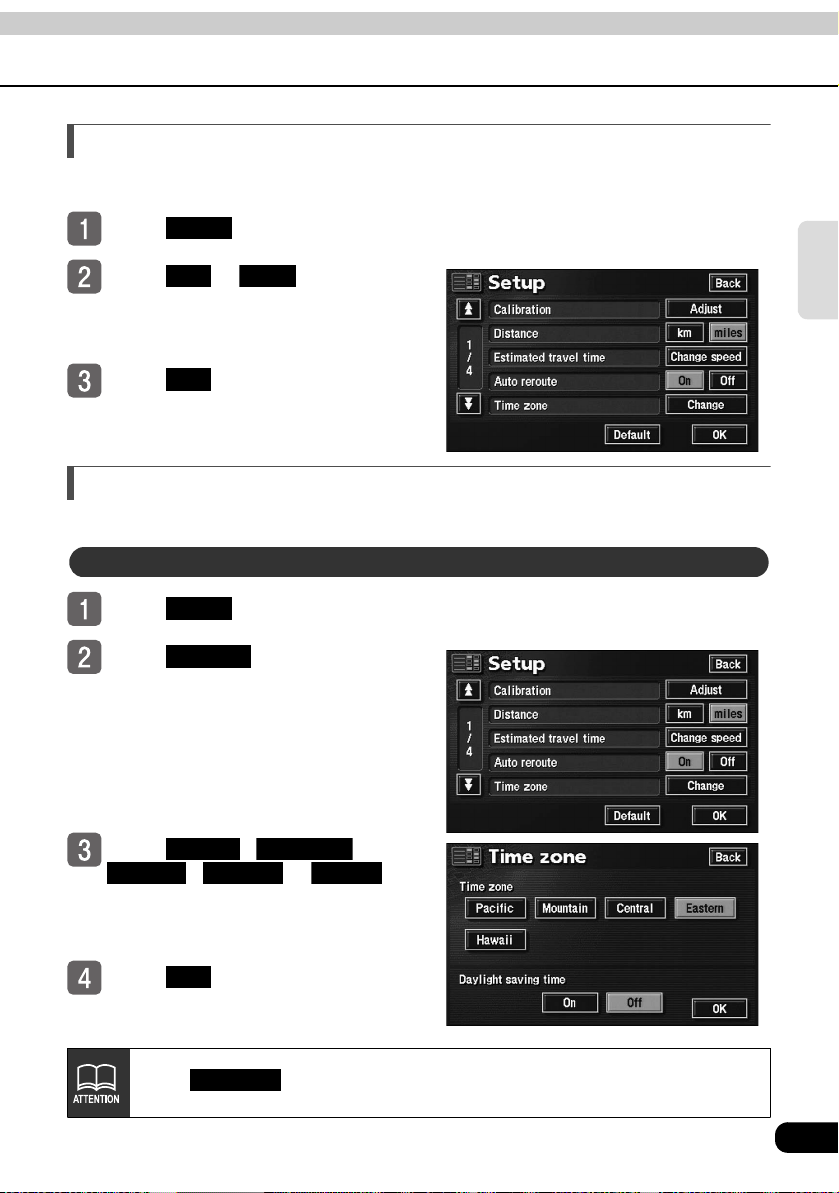
Switching km and miles display
The km and miles display on the map screen can be switched.
Touch in the Menu screen.
Touch or for Distance.
● The selected touch switch will turn
To u ch .
Setup
km miles
green.
OK
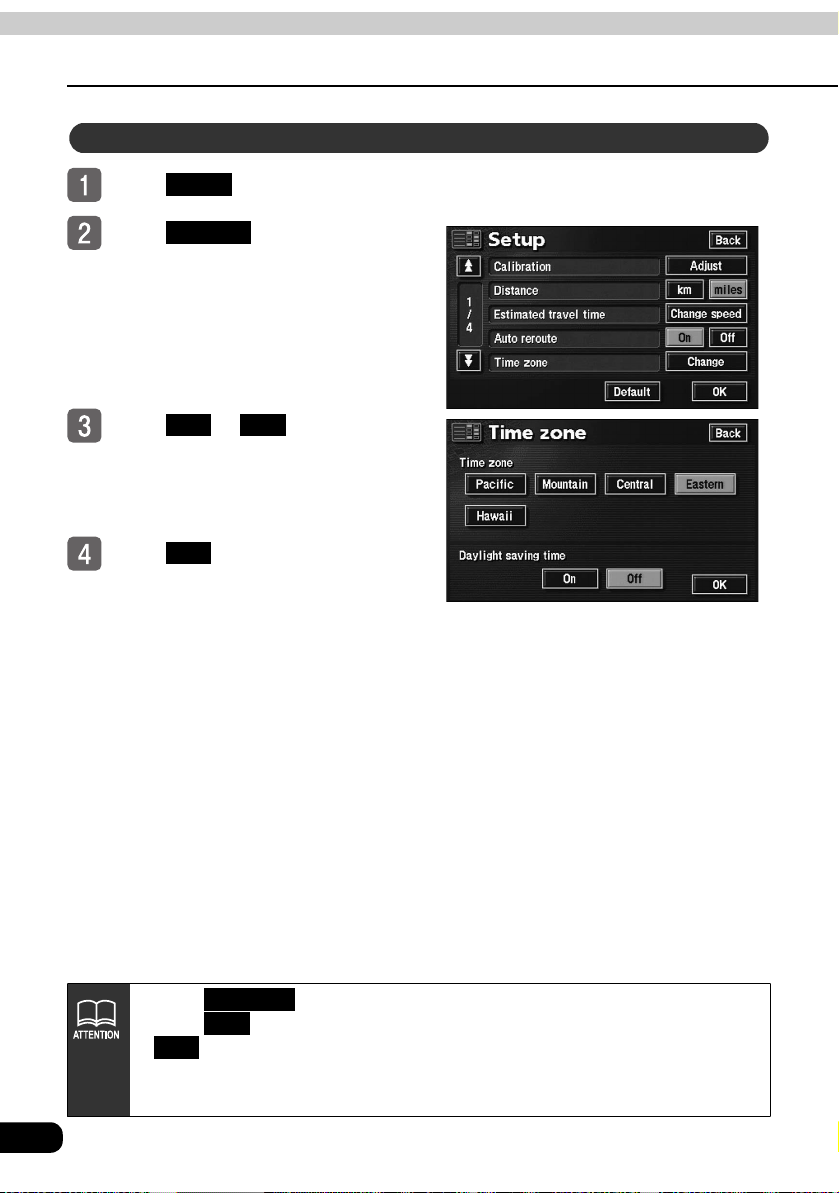
Switching the Time zone
U.S time zones can be selected by region.
Adjusting the Time zone
Touch in the Menu screen.
Touch for Time zone.
Setup
Change
Basic
operation
Touch , ,
● The selected touch switch will turn
To u ch .
Pacific Mountain
Central Eastern Hawaii
green.
, or .
OK
Touch in the Setup screen to return all items to their default settings.
Default
25
Basic operation
2.
Adjusting the screen and setting the sound
Setting Daylight saving time
Touch in the Menu screen.
Touch for Time zone.
Touch or for Daylight
Setup
Change
On Off
saving time.
● The selected touch switch will turn
green.
To u ch .
OK
26
●Touch in the Setup screen to return all items to their default settings.
●Touch to set the clock display on the audio screen one hour ahead. Touch
●The time displayed on the audio screen is automatically adjusted using GPS
signals. (You cannot adjust the time yourself.)
Default
On
Off
to return the clock display to its previous setting.
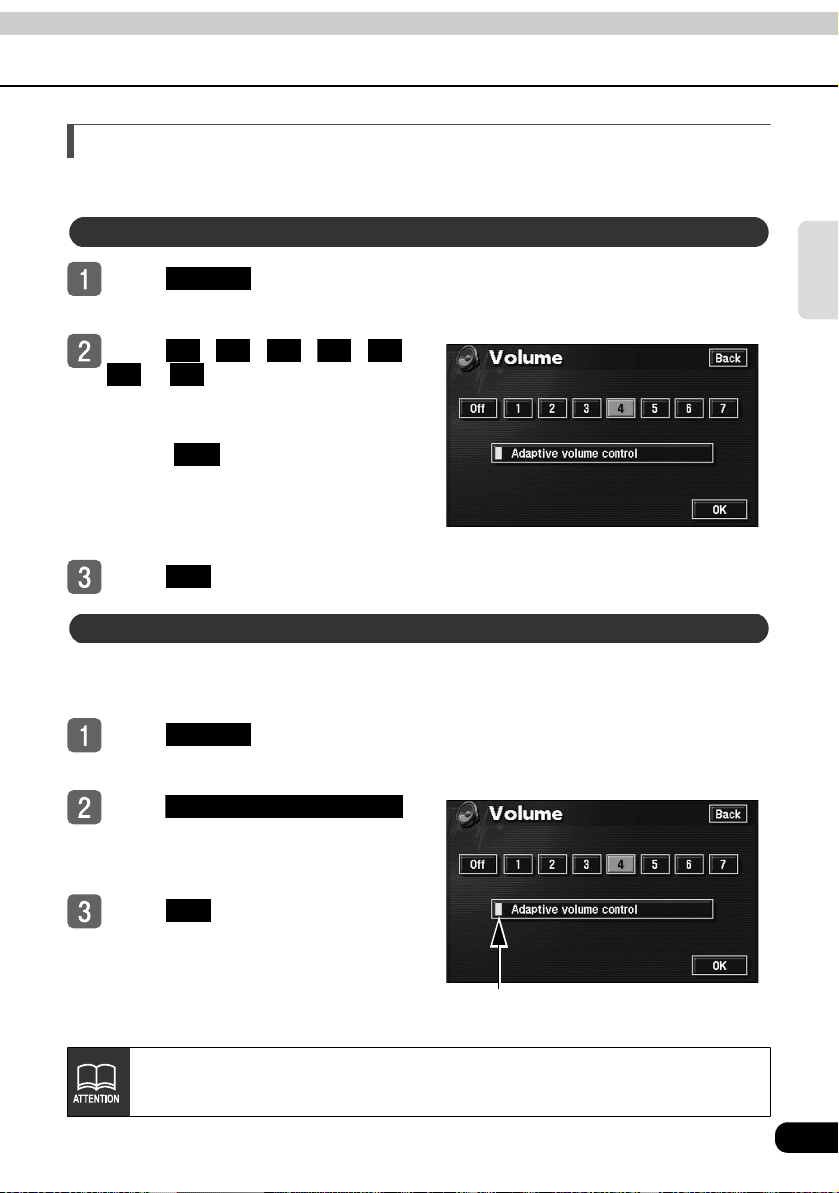
Setting the volume
It is possible to adjust the voice volume during route guidance.
Adjusting the volume
Touch in the Menu
Volum e
screen.
Touch , , , , ,
● The selected touch switch will turn
● Touch to turn the volume OFF.
To u ch .
1 2 3 4 5
6 7
or .
green.
Off
When the volume is OFF, touch any of
the volume switches to turn the volume
back ON.
OK
Setting the automatic freeway volume switch function
When driving at high speeds, the volume can be set to automatically increase one level.
The function can be turned ON (automatically raise) or OFF (do not raise).
Touch in the Menu
screen.
To u ch .
● When turned ON, the movement
Volum e
Adaptive volume control
display light turns yellow.
Basic
operation
To u ch .
OK
Movement display light
When exceeding 50 mph (80 km/h), the volume automatically increases one level.
It returns to its original level when the speed falls below 43 mph (70 km/h).
27
Basic operation
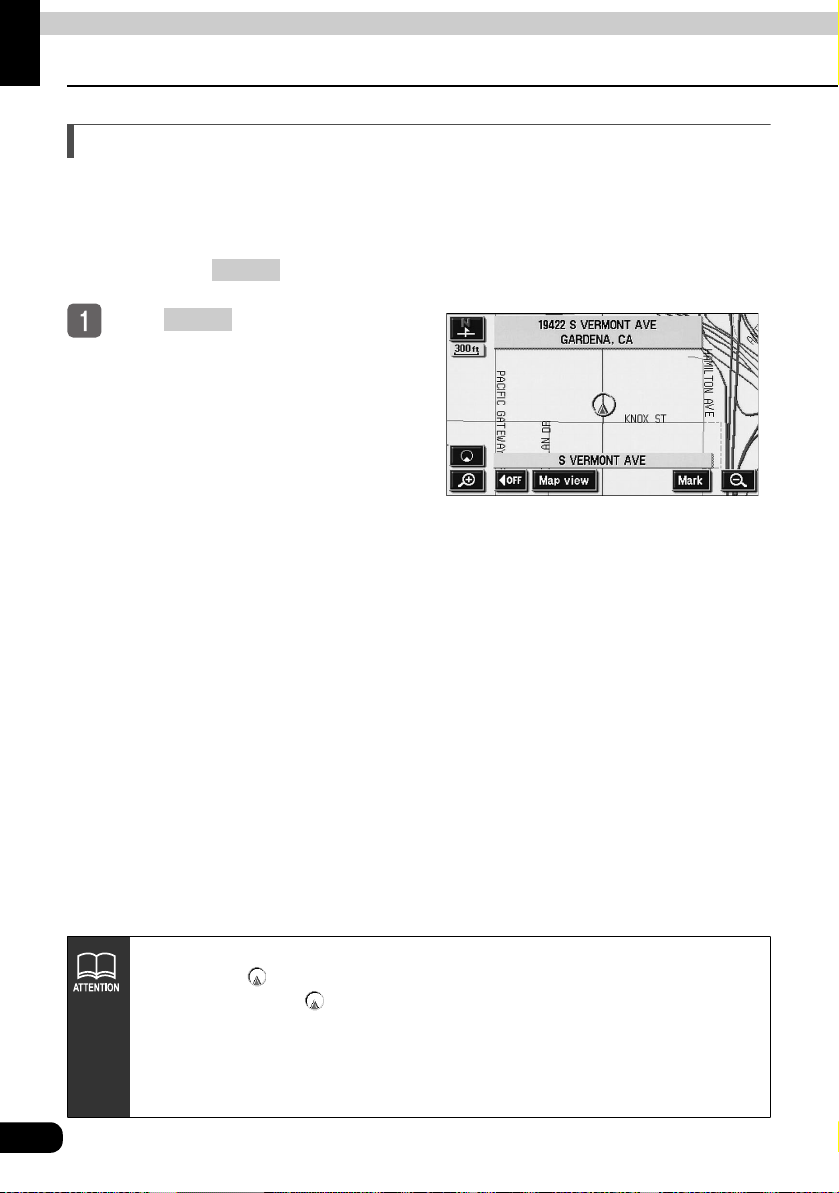
3. Map displays
Displaying the present location
The present location screen appears when switching the engine to ACC or ON.
● The present location of your vehicle is displayed on the map.
● When the menu screen or any other map screen besides the present location map screen is
displayed, press to return to the present location screen.
NAVI
Press in the present
NAVI
location screen to make all place
names near the present location
appear.
28
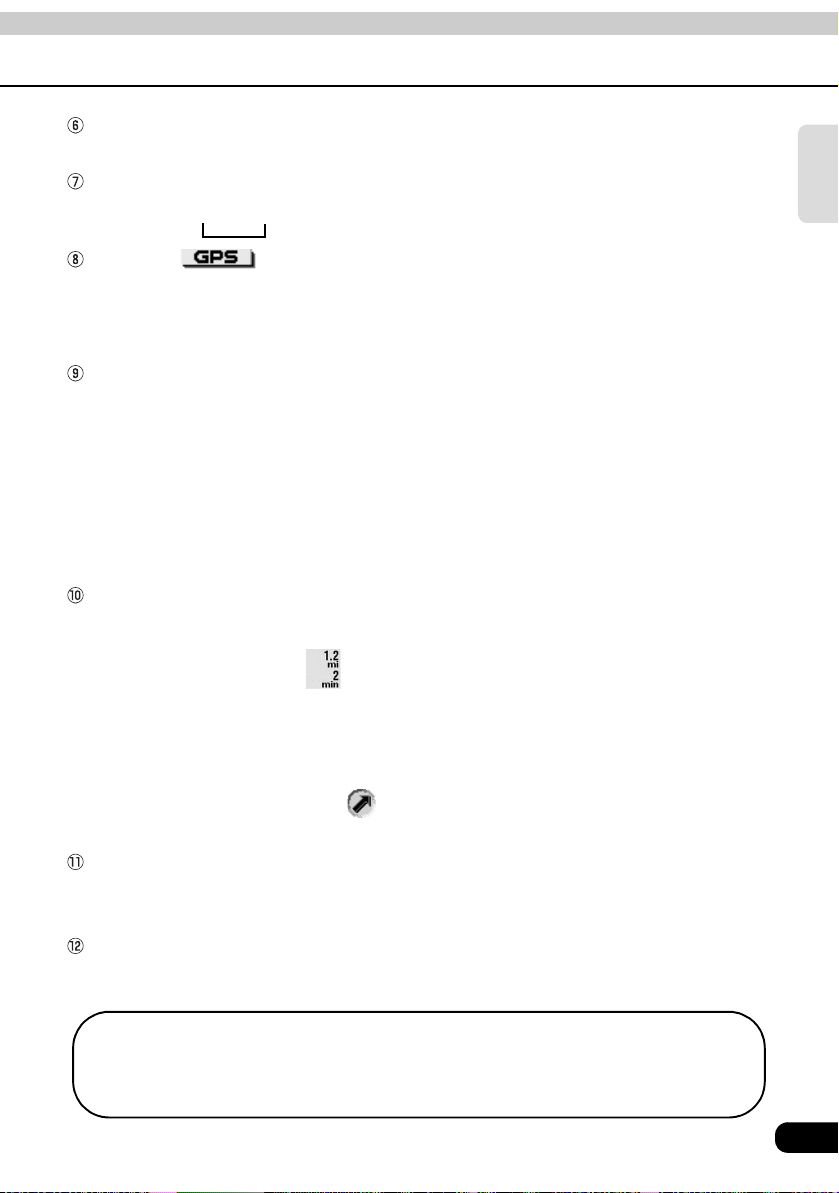
After the device is installed or the battery terminal is reconnected, the vehicle
position mark may differ from the actual present location (misalignment of the
vehicle position mark ). Continue driving and the present location will be
automatically corrected using map-matching and GPS data (in some cases, this
may take several minutes). If GPS data is not used and the present location is not
automatically corrected, stop the vehicle in a safe area and correct the present
location. (See page 169)
 Loading...