

Page 1

AVN2454
6.5" Wide TFT Touch-Panel Display
6.5" Wide TFT Touch-Panel Display
CD/DVD Multi-Source Receiver with DVD NAVIGATION
CD/DVD Multi-Source Receiver with DVD NAVIGATION
OWNER'S MANUAL / Navigation
We appreciate your purchase of this product.
Please read through this manual for correct operation.
We suggest that after reading it you keep this manual
in a safe place for future reference.
Page 2

NAVIGATION SYSTEM
The navigation system uses maps and vocal instructions to guide you while you
are driving. However, depending on accuracy of that guidance, there may be
times when inappropriate advice is given. When driving along the route set by
the navigation system, make sure to follow the actual traffic regulations at all
times (such as one-way streets and other road conditions).
Page 3

1
This sign indicates a situation in which incorrect handling through
disregard of a sign might result in personal injury or may result solely
in damage to property.
This sign indicates a situation in which incorrect handling through
disregard of a sign might result in death or serious personal injury.
The symbol shown below indicates that you should know about the information in order to
carefully follow it or you should remember the information for its helpfulness.
* Please read all materials such as manuals and warranties that have come with the product.
Fujitsu Ten will not be responsible for unsatisfactory product performance due to failure to
follow these instructions.
* Changes to product specifications may result in differences between content of the
manual and features of the product.
Please use care in handling the manual. Forcefully spreading or pulling on pages may
result in their falling out of the binding. Use the manual carefully.
Warnings and caution signs, illustrated below, are posted throughout this manual as well as
on the AVN2454. They show safe and correct ways to handle the product so as to prevent
personal injury to you and others and avoid damage to property.
Before reading through the manual, take time to read through and learn the important
information listed in this section.
Cautions for use
Make sure your positioning is stable prior to starting your
journey
•Start driving only after the GPS mark appears. Starting to drive with improper positioning
may lead to vehicle positioning errors.
While driving, some minor streets will disappear
For safety reasons, minor streets will not be displayed on the map while driving. (Unless
actually driving on a minor street.)
*The images appearing on the screen may differ from those shown in this manual
depending on the type of map DVD-ROM used and when it was created.
Caution
Warning
A point it will be helpful to remember.
A point you should know about.
ATTENTION
Page 4

2
Introduction
How to view this manual ....................................................... 8
Features................................................................................ 10
GPS navigation system....................................................... 14
How to view the navigation screen ................................................... 14
GPS ....................................................................................... 16
Situations when GPS signal reception is impossible ........................ 16
Basic operation
MENU screen and list screens ........................................... 18
MENU SCREEN ............................................................................... 18
How to switch the list screens........................................................... 19
▲ or ▼ switch display ................................................................... 19
Page switch display ....................................................................... 19
POI switch display.......................................................................... 19
Adjusting the screen and setting the sound ..................... 20
Screen adjustment ............................................................................ 20
How to display the image quality adjustment screen ..................... 20
Contrast/Brightness ....................................................................... 21
How to switch to daytime display when the lights are ON ............. 21
How to turn the screen OFF........................................................... 21
Switching the map display color........................................................ 22
Switching the clock display ............................................................... 22
Switching km and miles display ........................................................ 23
Switching the Time Zone .................................................................. 23
Switching the Time Zone ............................................................... 23
Setting the Daylight Saving Time................................................... 24
Map displays ........................................................................ 25
Setting the volume ............................................................................ 25
Adjust the volume .......................................................................... 25
Set the automatic highway volume switch function........................ 25
Present location display ................................................................. 26
Table of Contents
Page 5

3
Moving the map (one-touch scroll).................................................... 27
Moving the map ............................................................................. 27
Setting the Street Name display while scrolling ............................. 28
Switching the touch switch (command) display ................................ 28
Switching the touch switch display................................................. 28
Setting touch switches to display or not display............................. 29
Switching the map reduction scale ................................................... 30
Switching to the desired reduction scale........................................ 30
Switching the map orientation........................................................... 31
Switching the map orientation........................................................ 31
Switching to double screen display................................................... 32
Switching to double screen display................................................ 32
Operating the screen on the right .................................................. 33
POI vicinity display...................................................................... 34
Canceling the double screen display ............................................. 34
POI display........................................................................................ 35
Display landmarks by a simple operation while driving.................. 37
Delete a POI landmark................................................................... 37
Displaying multiple types ............................................................... 38
Search for POI vicinity ................................................................... 39
Displaying a list of POIs along the set route .................................. 41
Displaying POI information ............................................................ 41
Setting the type of POI vicinity to be retrieved while driving .......... 42
How to retrieve maps .......................................................... 44
Changing the search area................................................................. 46
Retrieving a map using an address .................................................. 47
Retrieving a map using a POI name ................................................. 49
If narrowing down candidates per area.......................................... 50
When narrowing down candidates from the nearest 5 cities ...... 50
When narrowing down the list by entering a city name............... 50
When narrowing down the list by POI type .................................... 52
Retrieving a map in the event of an emergency ............................... 55
Retrieving a map using a memory point ........................................... 55
Retrieving a map using the archive................................................... 56
Retrieving a map using an intersection name................................... 56
Retrieving a map using a freeway exit/entrance name ..................... 58
Retrieving a map using the latitude/longitude ................................... 59
Performing operations on a retrieved map ....................... 60
Performing operations on a displayed map ...................................... 60
Displaying POI data .......................................................................... 60
Page 6

4
Navigation guidance
Setting the destination and searching for a route............ 62
Set a destination and search for a route ........................... 64
Setting a destination ......................................................................... 64
One-touch setting........................................................................... 64
Set from a registered point............................................................. 65
Set using a map retrieval method .................................................. 65
Route search..................................................................................... 66
All-route display ................................................................................ 67
Route displays ............................................................................... 67
All-route display and touch switches................................................. 68
Display or bypass a restricted segment ............................................ 70
Bypassing a restricted segment..................................................... 70
Bypass using the all-route display screen................................... 70
Bypass using the present location screen .................................. 71
Set the restriction message display ............................................... 71
Display route data (guided road information).................................... 72
3-route simultaneous display (3-route search function) .................... 73
Changing the search result route ...................................... 74
Adding a destination ......................................................................... 75
Changing the search conditions........................................................ 77
Switching the destination order......................................................... 78
Deleting a destination ....................................................................... 79
Indicating a transit road..................................................................... 80
Canceling a transit road indication.................................................... 81
Starting,pausing and restarting route guidance............... 83
Starting route guidance..................................................................... 83
Pausing and restarting route guidance ............................................. 83
Route guidance.................................................................... 84
Intersection guidance........................................................................ 84
A non-junction intersection............................................................. 84
A junction intersection (enlarged guidance screen for an intersection)
.... 84
Cancel the intersection guidance screen ....................................... 85
Cancel using ................................................................. 85
Cancel using ..................................................................... 85
Set the intersection guidance screen............................................. 86
Ferry crossing guidance.................................................................... 86
Displaying the required time ............................................................. 86
OFF
Page 7

5
Setting the average speed ............................................................. 87
Highway junction guidance ............................................................... 88
Canceling the highway junction guidance screen .......................... 88
Switching the highway junction guidance screen........................... 89
Voice guidance ................................................................................. 90
Setting the voice guidance............................................................. 91
Performing operations on the guided route...................... 92
Guidance in another mode................................................................ 92
Setting the guidance when in another mode.................................. 92
Redisplaying the all-route display ..................................................... 92
Switching the required time/ distance remaining display .................. 93
On-route scroll .................................................................................. 94
Start on-route scroll........................................................................ 94
On-route scroll screen operations.................................................. 94
Reinitiating a route search.................................................. 95
Reinitiating a route search ................................................................ 95
Reinitiating a route search ............................................................. 97
Automatic reroute search.................................................................. 98
Setting the automatic reroute search ............................................. 98
Point registration
What is point registration.................................................. 100
Registering, correcting or deleting a memory point ...... 101
Registering, correcting or deleting your home ................................ 101
Registering your home................................................................. 101
Correcting your home .................................................................. 103
Deleting your home...................................................................... 104
Registering memory points ............................................................. 105
One-touch registration ................................................................. 105
Registering a far away point ........................................................ 106
Correcting the position of a memory point ...................................... 109
Changing the symbol of the memory point ..................................... 110
Enter a telephone number for a memory point ............................... 111
Entering the name of a memory point............................................. 112
Displaying the name of a memory point.......................................... 113
Deleting a memory point ................................................................. 114
Page 8

6
Registering, correcting or deleting a special memory point
... 115
Registering a special memory point................................................ 115
Correcting a special memory point ................................................. 117
Deleting a special memory point..................................................... 118
Registering, correcting or deleting detour memory points
... 119
Registering detour memory points .................................................. 119
Correcting a detour memory point ............................................... 121
Deleting a detour memory point................................................... 122
Destination archive............................................................ 123
Deleting entries from the destination archive.................................. 123
Information function
Information screen ............................................................ 124
Information screen .......................................................................... 124
Optional function
Back monitor function....................................................... 126
Back monitor image ........................................................................ 128
Displaying the rear image ............................................................ 128
Helpful tips
Situations when a correction is necessary ..................... 130
Present location correction ............................................................. 130
Correcting the distance ................................................................... 132
Map DVD-ROM data ........................................................... 133
Map DVD-ROM data display........................................................... 133
Accuracy and error............................................................ 134
Positioning accuracy ....................................................................... 134
GPS signal quality and reception conditions................................... 134
Present location display error ......................................................... 136
Page 9

7
Error due to having changed a tire.................................................. 136
Correcting the map matching vehicle position sensor .................... 136
Present location display, route guidance accuracy......................... 137
Road and geographic name data.................................................... 139
Route guidance............................................................................... 139
For reference
Facts to keep in mind when operating ............................ 142
What to do when messages are displayed ..................................... 142
Messages related to general navigation ...................................... 142
Prior to assuming that a malfunction has occurred......................... 146
Items related to general navigation functions .............................. 146
Copyright............................................................................ 148
Explaining the terms ......................................................... 152
Subject index ..................................................................... 154
Information about the maps ............................................................ 154
Route guidance............................................................................... 156
Other ............................................................................................... 157
Index ................................................................................... 158
The Index by Topic simplifies searches for explanations about
individual features. When confused by an operation, use the Index by
Topic to search for information about the operation.
Page 10

8
1. How to view this manual
Introduction
Item title
A number and title is
assigned for each item.
Operation
procedure
Describes the operation.
Proceed with the
operation as per the
numerical order.
Operation title
A title is assigned for
each operation purpose.
Attention
Additional points regarding the operations are
given here.
Section title
A title is assigned for each section.
Detailed
operation title
A title is assigned for
each detailed operation
purpose.
Page 11

The operation procedures are
continued on the next page.
9
Introduction
Operation screen
A screen showing the operation will
appear.
Section side heading
Only the section side heading will
appear in dark letters.
Go to the next page
Page 12

10
2. Features
Introduction
Several search methods to choose from (P44)
Search using a POI name (P49)
When the name of the POI is known, enter it to initiate a
search. It is also possible to search by entering only a part
of the name.
Search using a freeway exit/entrance (P58)
A search can be initiated using the name of a freeway or an
exit/entrance.
Search using latitude/longitude coordinates (P59)
A map can be displayed by directly entering the latitude
and longitude coordinates.
Emergency search (P55)
In the event of an emergency, a search can be initiated for
the nearest police station or hospital.
Search using the destination archive (P56)
A map can be retrieved using entries previously set in the
destination archive.
Search using a registered point (P55)
A map can be retrieved using your home or a point
registered in the memory.
Page 13
11
Introduction
Registering a desired point in the memory (P100)
POI icon display (P35)
Your home or a geographical point you want to
indicate on a map can be registered in the
memory. Also, when initiating a route search,
points through which you want to make a detour
can also be registered in advance.
Various types of POIs can be displayed on a map
using icons.
Diverse screen displays (P26,84)
Double screen display
The screen can be divided into two parts.
Enlarged intersection display
While route guidance is in progress, an enlarged illustration
of the area around an intersection where turn is to be made
(junction) is displayed when approaching that intersection.
List display
A list is displayed of all the distances up to intersections
and turning directions prior to reaching the destination.
Page 14

12
2. Features
When initiating a route search, three routes (Quick
1, Quick 2 and Short) can be searched for
simultaneously.
3-route simultaneous display (P73)
Four map display colors can be selected for the
daytime and nighttime screen display respectively.
The map display color can be switched (P22)
Back monitor
When the optional back monitor is installed, the
rear image can be appeared on the monitor
screen.
System upgrade (P126)
Introduction
Page 15

13
Introduction
Page 16

14
3. GPS navigation system
Introduction
By setting your destination, the device will automatically perform a route search and guide
you through the route using screen displays and voice announcements.
The navigation map display consists of a present location screen and a scrolled map
screen.
1 Orientation mark ( , when the bearing is pointing upwards)
The map orientation is indicated.
•See P31 for how to switch the map direction (north up or bearing up).
2 Clock display
The present time is indicated.
•See P22 for information concerning this indication.
3 Name display
The following indications will appear while route guidance is in progress. (Only geographical
points represented as data in the map disk)
•Names of junction and non-junction intersections.
•Names of roads taken.
•Names of interchange exits.
4 Instruction points
While route guidance is in progress, instruction points will appear for intersections where
guidance data (lane display, intersection names, intersection guidance screens) is
displayed.
•See P84 for information concerning intersection guidance.
5 Route display
When setting your destination, the route all the way to that point is displayed.
•Route guidance will occur only when the present location appears on a dark blue line
().
How to view the navigation screen
Present location screen Scroll map screen
4
3
2
1
7
8
9
:
A
B
6
5
Page 17

15
Introduction
6
Vehicle position mark
The present location and the vehicle direction are displayed.
7
Scale display
The reduction scale of the map being displayed is indicated.
The length of the appearing in the screen above represents 150ft.
8 GPS mark
This mark will appear when utilizing the absolute positioning data from the GPS satellite.
•See the next page for information concerning this mark's display. There may be
misalignments depending on the satellite conditions.
9 Distance remaining display
The distance from the present location to the destination is indicated.
•While route guidance is in progress, the distance calculated from the route now being
taken to the destination is indicated.
•When deviating from the set route, the distance to the destination in a straight line is
indicated.
•See P93 for information on how to switch the remaining distance display.
: Required time display/destination direction mark
The following marks appear depending on the situation.
Required time display
While route guidance is in progress, the required time up to the destination is indicated.
•See P86 for information concerning the required time.
Destination direction mark
When deviating from the set route, the direction towards the destination is displayed.
A Cursor mark
This mark is indicated on the map retrieved by a search or by scrolling.
To scroll, simply touch the map (on a spot other than the touch switches on the screen).
B Cursor position name display
The name of the cursor position on the map is displayed (approx. 6 seconds).
Except for some parts describing certain functions, this manual uses normal
north-up map screen illustrations to describe the device's functions.
"Map touched" appears signifying that the map was directly touched (on spots
other than touch switches).
Page 18

16
4. GPS
Introduction
Global Positioning System (GPS): a system developed and operated by the United States
Government that pinpoints your present location by utilizing latitudinal and longitudinal data
received from at least 4 satellites (sometimes only 3 are used).
The following are situations when the GPS
signal cannot be received.
•When the GPS signal is obstructed while
driving through building clusters, tunnels or
on overpasses
•When the signal is obstructed because of
having placed an object near or on the GPS
antenna
•When the GPS satellite is not sending any
signals to the earth (signal emission may be
halted due to modifications or repairs
conducted by the U.S. Tracking Control
Center, the organization responsible for
controlling GPS signals)
•When a digitally formatted cellular telephone
unit is brought near the GPS antenna
Situations when GPS signal reception is impossible
Screen with GPS signal reception in
progress
Handling the GPS antenna
•Consult a specialist at the store of purchase for how to install the GPS antenna.
•Do not apply paint or wax onto the GPS antenna. Otherwise, signal reception
sensitivity may be diminished or signal reception may be rendered impossible.
•Do not pull on the cord when uninstalling or moving the GPS antenna. Otherwise,
short circuits or disconnections may result.
•See P134 for information concerning GPS signal accuracy and errors. See P152
for definitions of the terminology employed.
ATTENTION
Page 19

17
Introduction
Page 20

18
1. MENU screen and list screens
Basic operation
MENU SCREEN
1
Press to display the MENU
screen.
MENU
2
The following operations can be
performed from the MENU screen.
Touch the desired item's touch switch to
activate.
Setup
*1 Colors inverted if the destination is not set.
*2 Including registering/correcting/deleting special memory geographical points.
Item (touch switch) Function Page
Suspend guidance/Resume guidance*
1
Stopping or restarting route guidance
Setting the volume
Setting the automatic highway volume switch
Registering/correcting/deleting the geographical data for your home
Registering/correcting/deleting memory geographical points*
2
Registering/correcting/deleting detour memory geographical points
Setting the navigation system corrections
Switching the kilometer/mile display
Setting the estimated arrival time
Setting the automatic repeat search
Switching the time zone
Setting the automatic voice guidance
Setting the guidance when in each mode
Setting the seasonal restriction message display
Setting the automatic intersection enlargement diagram display
Setting the street name display while scrolling
Setting the switch display
Switching the clock display
Setting the type of POIs in the vicinity retrieved while driving
Switching the map display color
Deleting from the destination archive
Map DVD-ROM data display
83
25
25
101,103,104
105,109,118
119,121
130
23
86
98
23
91
92
71
85
28
29
22
42
22
123
133
Volume
My places
Map DVD
Page 21

19
Basic
operation
How to switch the list screens
▲
or ▼switch display
Touch the or switch to move the list
one item at a time.
▼▲
Page switch display
Touch the or switch to move the list
one page at a time.
POI switch display
Touch either , ,
, , ,
, or to
move the list one POI at a time.
The touch switch color is inverted for POIs
without corresponding lists. They cannot be
operated even if touched.
Other
BankingCommunity
RecreationTravelAutomotive
Shopping
Restaurant
Page 22

20
2.
Adjusting the screen and setting the sound
Basic operation
Daytime display
(when lights are turned OFF)
Nighttime display
(when lights are turned ON)
Image quality adjustment screen
Screen adjustment
To make the screen easier to view, it can be switched from "daytime display" to "nighttime
display" by turning the vehicle lights (headlights, taillights, license plate lights) ON or OFF.
(Default status) Lights turned OFF---daytime display
Lights turned ON---nighttime display
How to display the image quality adjustment screen
1
Press to display the image
quality adjustment screen.
DISP
2
After completing the adjustment,
touch or wait at least 20
seconds and the adjustment will be
automatically set and the display
will return to the original screen.
ENTER
Page 23

21
Basic
operation
Contrast/Brightness
1
Contrast
Touch to increase, touch to decrease.
-+
2
Brightness
Touch to increase, touch to increase.
-+
How to switch to daytime display when the lights are ON
1
Every time is touched, the
screen toggles between daytime
and nighttime display.
DAY
How to turn the screen OFF
1
Touch .
OFF
When in daytime display, the touch
switches appear green.
To make the screen reappear, press .
NAVI
•Even with the screen turned OFF, the GPS present location positioning continues
to function.
•Both the daytime display screen and the nighttime display screen can be
adjusted independently.
ATTENTION
Page 24

22
2.
Adjusting the screen and setting the sound
Switching the clock display
The present time display appearing on the map screen can be switched.
3
Touch .
OK
Selected touch switches turn green.
1
Touch in the MENU screen.
Setup
2
Touch or for Clock
Indication.
OffOn
Basic operation
•Touch in the SETUP screen to return all items to the default settings.
•The present time displayed is automatically adjusted using GPS signals. (You
cannot adjust the time yourself.)
Default
Switching the map display color
The map display color (a 5 color selection) can be switched for both the daytime and
nighttime displays independently.
3
Touch .
OK
Selected touch switches turn green.
1
Touch in the MENU screen.
Setup
2
Touch , , , or
for both Map Color (Day) and Map
Color (Night) respectively.
4321
Normal
ATTENTION
Page 25

23
Basic
operation
Switching km and miles display
Km and miles display on the map screen can be switched.
3
Touch .
OK
Selected touch switches turn green.
1
Touch in the MENU screen.
Setup
2
Touch or for Distance.
milesKm
Switching the Time Zone
The time zone for every region in the U.S. can be switched.
Switching the Time Zone
3
Touch either , , ,
or .
43
21
NORMAL
4
Touch .
OK
2
Touch for Time Zone.
Change
Selected touch switches turn green.
Touch in the Setup screen to return all items to the default settings.
The present time displayed is automatically adjusted using GPS signals. (You
cannot adjust the time yourself.)
Default
1
Touch in the MENU screen.
Setup
ATTENTION
Page 26

24
Setting the Daylight Saving Time
3
Touch or for Daylight
Saving Time.
OffOn
4
Touch .
OK
2
Touch for Adjust Time
Zone.
Change
1
Touch in the MENU screen.
Setup
2.
Adjusting the screen and setting the sound
Basic operation
•Touch in the SETUP screen to return all items to the default settings.
•Press to gain the clock display 1 hour ahead.
Press to return the clock display to the previous setting.
•The present time displayed is automatically adjusted using GPS signals. (You
cannot adjust the time yourself.)
Off
On
Default
ATTENTION
Page 27

25
Basic
operation
Setting the volume
Set the volume of the navigation system.
Adjust the volume
1
Touch in the MENU
screen.
Volume
2
Touch either , , , , ,
or .
76
54321
Selected touch switches turn green.
Touch to turn OFF the volume.
When the volume is OFF, touch any of the
volume switches to turn the volume back
ON.
Off
When turned ON, the movement display
light turns yellow.
Set the automatic highway volume switch function
When driving at high speeds, the set volume can be automatically raised one level.
Either automatic switch ON (automatically raise) or OFF (not raised) can be selected.
1
Touch in the MENU
screen.
Volume
2
Touch .
Adaptive Volume Control
Movement display light
3
Touch .
OK
3
Touch .
OK
When exceeding 50mph(80km/h), the volume automatically increases one level
and goes back down to its original level when the speed goes down passed
43mph(70km/h).
ATTENTION
Page 28

26
3. Map displays
Immediately after having installed the device, or after having reconnected the
battery terminal, the vehicle position mark may differ from the actual present
location (misalignment of the vehicle position mark).
Continue driving and, in a moment, the present location will be automatically
corrected using the map matching and GPS data. (Depending on the case, this
may take several minutes.) If signals from the GPS are not utilized and the present
location is left uncorrected, park the vehicle in a safe place and correct the
present location. (See P130)
Present location display
The present location screen appears when switching the engine to ACC or ON.
•The present location of your vehicle is displayed on the map.
•When the menu screen or any other map screen besides the present location map screen
is displayed, press NAVI to return to the present location screen.
•When driving, the road displays are restricted. (Minor roads, etc. are not displayed.)
However, minor roads are displayed while driving when necessary.
1
Press in the present
location screen to make all the
geographical names near the
present location appear.
NAVI
Basic operation
ATTENTION
Page 29

27
Basic
operation
Moving the map (one-touch scroll)
When a map is displayed, touching the map directly (anywhere except the touch switches)
makes the point scroll to the center of the display. The street name around the scrolled point
may appear.
Moving the map
1
Touch the map (anywhere except
the touch switches).
•On the bottom left of the map, the
distance in a direct line from the present
location is displayed.
•Touch continuously around the center of
the screen and the map will move
slowly.
•Touch continuously near the edge of the
screen and the map will move quickly.
While scrolling
Scrolling stopped
•For safety reasons, the map can be moved only up to a predetermined distance
while driving.
•The map orientation can be switched while driving.
*For a scrolled map, you can only switch from "Bearing up" to "North up".
(Switching from "North up" to "Bearing up" impossible)
•Move the map with one-touch scroll and the map will freeze into position and will
not move even if moving the present location. Press to return to the
original status (moving map).
NAVI
ATTENTION
Page 30

28
3. Map displays
Basic operation
Setting the Street Name display while scrolling
You can select between setting the Street Name display ON (display) or OFF (not display)
while scrolling.
1
Touch on the MENU
screen.
Setup
2
Touch or for Street
Name on Scroll Map.
OffOn
3
Touch .
OK
1
Touch .
OFF
Switching the touch switch (command) display
When a map is displayed, the number of touch switches displayed on the screen can be
reduced.
Switching the touch switch display
•If the touch switches are not displayed,
this operation cannot be performed via
a touch switch. First display the touch
switches onto the screen and then
proceed.
•If the touch switches are not displayed,
touch to make them appear on
the screen.
ON
Touch in the SETUP screen to return all items to their default settings.
Default
•Selected touch switches turn green.
ATTENTION
Page 31

29
Basic
operation
Switches can be set to appear or not appear on the map screen.
Setting touch switches to display or not display
1
Touch on the MENU
screen.
Setup
2
Touch for
Function.
OFF
Change
4
Touch .
OK
3
Touch the touch switches desired
for non-display.
•Touch on the map screen and
the touch switches selected here will not
appear.
OFF
•Touch on the switch display setting screen to return the switch
display setting to default status.
•Touch in the SETUP screen to return all items to their default settings.
•To display all touch switches, touch the inverted touch switches. or
are not displayed.
•Only operable touch switches can be set. The map reduction scale display/nondisplay cannot be switched. For details on the clock display, see P22.
ON
OFF
Default
Default
ATTENTION
Page 32

30
3. Map displays
Basic operation
Switching the map reduction scale
The map reduction scale (map range) can be switched to any desired setting from
40,960,000:1 to 2,500:1. Also, if the destination is set, you can switch to the reduction scale
showing the entire route to the next destination with one touch.
Touch switch
Reduction scale
Scale display Touch switch
Reduction scale
Scale display
1/0.01 million
1/0.02 million
1/0.04 million
1/0.08 million
1/0.64 million
1/1.28 million
1/2.56 million
1/5.12 million
1/10.24 million
1/20.48 million
1/0.005 million
150ft
300ft
700ft
0.25mi
0.5mi
4mi
8mi
16mi
30mi
60mi
130mi
1/40.96 million
250mi
1/0.16 million
1/0.32 million
1mi
2mi
Switching to the desired reduction scale
1
To widen the map's range, touch
To shrink it down, touch
−
Scale bar
•The switch will disappear when setting to the maximum range (250 mile
scale diagram).
•For safety reasons, the scale cannot be free zoomed while driving.
−
•Every time the touch switch is touched,
the scale goes up/down one level at a
time.
•After having touched or , touch a
number on the scale bar to switch to the
reduction scale represented by that
number.
•Touch continuously on or for at
least 1 second to switch the scale with no
increments (free zoom).
•The reduction scale switched to will be
indicated with a yellow mark ( ).
−
−
−
+
ATTENTION
+
+
+
Page 33

31
Basic
operation
Switching the map orientation
The orientation of the map being displayed can be switched.
North up display
Heading up display
•North up display
The map appears with north pointing up at all
times regardless of the vehicle's heading. (The
maps appearing in this manual are shown in
north up display form.)
•Heading up display
(indicates north)
The map appears with the heading of the
vehicle pointing up at all times.
Switching the map orientation
1
Touch either or to switch
to either north up or heading up
display.
When in heading up display, maps retrieved by setting the destination and allroute display screens are shown with north up. However, when returning to the
present location screen, the display will switch back to heading up.
ATTENTION
Page 34

32
3. Map displays
Basic operation
Switching to double screen display
Switching to double screen display
When a map is displayed, the screen can be divided into two parts as shown below.
Ex.) Two maps can be displayed with; different reduction scale screens, North up and
Heading up screens, POI display ON and OFF screens.
1
Touch when a map is displayed
on the screen.
2
Touch
The screen on the left can be operated
the same way as when only one screen is
displayed.
Page 35

33
Basic
operation
•When in double screen display, only the map appearing on the left screen can
be moved with one-touch scroll.
•Maps retrieved by the destination setting screen or all-route display screen will
appear as one screen. When returning to the present location screen, the double
screen form will reappear.
If turned ON, the movement display light
will appear yellow.
•Touch or to switch the map
reduction scale.
•Touch or to switch the map
orientation.
−+
Operating the screen on the right
1
Touch the map shown in the screen
on the right.
2
Touch any touch switch.
3
Touch to return to the
double screen map display.
Back
Movement display light
ATTENTION
Page 36

34
3. Map displays
Basic operation
POI vicinity display
When a POI vicinity is displayed in the screen on the left, you can switch it either ON
(display) or OFF (not display) to appear on the right screen.
Please refer to the POIs can be displayed on the next page.
Canceling the double screen display
1
Touch if a map is displayed.
2
Touch
.
Selected touch switches turn green and
the monitor returns to single screen
display.
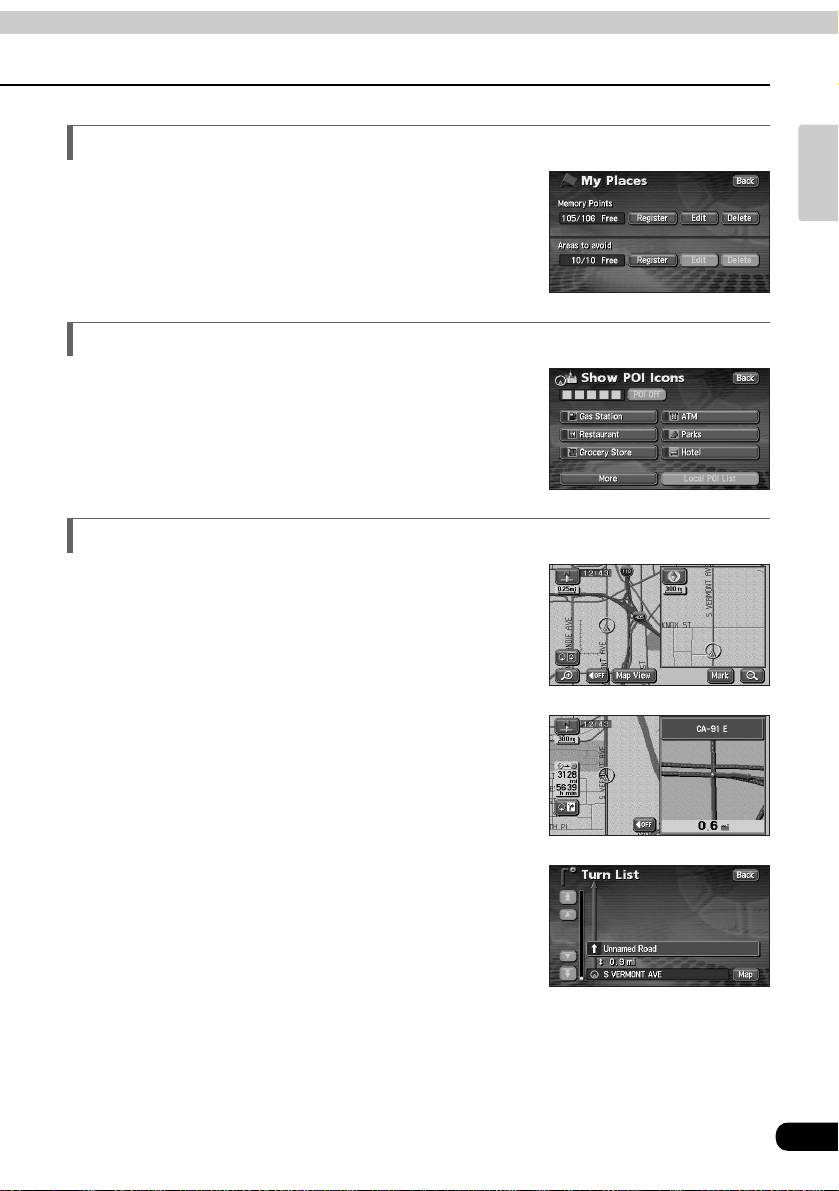
1
Show POI Icons : ON
Touch .
Show POI Icons
The actuation right is lit and turns "Show
POI Icons" to ON.
2
Show POI Icons : OFF
Touch while the
Actuation right is lit.
Show POI Icons
The actuation right is off and turns "Show
POI Icons" to OFF.
•When a POI vicinity is displayed, the settings in the screen on the left and right
are the same. However, POIs not displayed on the left screen cannot be shown
on the right screen.
•If re-displaying the double screen, the reduction scale for the maps shown will
be the same as the previous double screen display scales.
Movementdisplaylight
ATTENTION
Page 37

35
Basic
operation
POI display types
Restaurant Shopping
Horse Racing
Marina
Museum
National and State Parks
Ski Resort
Speedway
Sports Complex
Theater
Tourist Attraction
Tourist Infomation
Video Rental
Winery
City Center
Convention Center
Court House
Government Offices
Higher Education
Hospital
Library
Parks
Police Station
Post Office
School
ATM
Bank
Other Financial Services
Beauty and Barber Shops
Coffee House
Dry Cleaning
Health and Fitness Club
Ice Cream Parlor
Other Business Facilties
Community
Automotive Travel
Banking
Other
Recreation
POI display
POI landmarks can be displayed on the map.
All Restaurant
American
Chinese
Continental
Fast Food
French
Italian
Japanese
Mexican
Other Restaurants
SeaFood
Thai
Convenience Store
Department Store
Grocery Store
Home and Garden
Other Retail Stores
Pharmacy
Shopping Mall
Specialty Food Store
Auto Club
Car Wash
Gas Station
Other Automotive Stores
Parking
Service & Maintenance
Airport
Bus Station
Campground
Ferry Terminal
Hotel
Rental Car Agency
Rest Area
Train Station
Amusement Park
Botanical/Zoological Gardens
Casino
Cinema
Golf Course
Historical Monuments
Go to the next page
Page 38

36
3. Map displays
Basic operation
•A map with a scale diagram more detailed than 1 mile can be displayed.
(Excluding all route display screens.)
•POI landmarks can only be displayed within a 20 mile radius from the or
mark. (Up to 200 landmarks.)
•Move the or mark to switch the POI landmark displays.
ATTENTION
Page 39

37
Basic
operation
Display landmarks by a simple operation while driving
1
If a map is displayed, touch
.
Map View
2
Touch .
Show POI Icon
3
Touch the POI to be displayed
(, , ,
, ,
).
Hotel
Restaurant
Grocery Store
ParksATMGas Station
•The POI landmark touched will appear.
•Touch MORE to display POIs other than
the above switches. Also, multiple POI
landmarks (5 types) can be displayed
simultaneously.
Delete a POI landmark
1
If a map is displayed, touch
.
Map View
2
Touch .
Show POI Icon
3
Touch
POI Off
Page 40

38
3. Map displays
Basic operation
Displaying multiple types
POI landmarks other than those shown in the touch switches can be displayed. Also,
multiple POI landmarks (5 types) can be displayed.
1
If a map is displayed, touch
.
Map View
2
Touch .
Show POI Icon
3
Touch .
More
4
Touch the POI names to be
displayed.
•Up to 5 POI landmarks can be
displayed simultaneously.
•When selecting
for each type of POI, many more POI
landmarks can be displayed.
•If having made an error, touch
to cancel one POI landmark at a time.
•Touch an already selected POI to
cancel that POI.
Delete
List All Categories
5
Touch .
OK
6
Touch .
Back
The selected POI landmark is displayed.
Page 41

39
Basic
operation
Search for POI vicinity
Names of POIs close to the or mark on the map or their distance in a strait line and
direction from the or mark can be displayed.
1
If POI landmarks are displayed on
the map, touch .
Map View
2
Touch .
Show POI Icon
3
Touch .
Local POI List
4
Touch the POI names to be
displayed.
•A map with the selected POI in the
center is displayed with the POI name
and its distance in a straight line to the
present location is displayed.
•If the mark is displayed, POIs ahead
of it are shown with a mark (arrow
pointing upwards). (Position viewable
from the vehicle directional heading.)
•If a destination is set, a list of POIs along
the route can be displayed. See
"Displaying a list of POIs along the
set route" on the next page.
A list of the selected POIs appears.
Go to the next page
Page 42

40
•Only landmarks within a 20 mile radius of the or mark can be searched
for. (Maximum 200 items.)
•POI landmarks can be listed in the order of proximity to the or mark or by
POI icon category.
Distance order display Category order display
•Touch to change
the name listing order.
Name
•Touch to change
the listing order to
proximity to the or
mark.
Dist.
•Touch to change
to a POI icon category
listing order.
Icon
Name order display
3. Map displays
Basic operation
ATTENTION
Page 43

41
Basic
operation
Displaying a list of POIs along the set route
If a destination has been set, a list of POIs whose distance and direction correspond to the
set route. (The distances shown represent distances left to travel to the POIs.)
Display of POIs along
the set route
Movement
display light
Distance display
1
Touch .
On Route
•If a list displaying POIs along the set
route is shown, the movement display
light appears yellow.
•Touch the POI name to display a map
with that POI in the center, its name and
the distance to that POI from the present
location.
Displaying POI information
1
Touch the POI landmark to display
its name and distance from the
present location.
2
If is displayed, touch
to display a description of that POI.
Info.Info.
•If a route is not displayed on the map shown on the screen, a list of POIs along
the set route cannot be displayed.
•There may not be a description available for some POIs.
ATTENTION
Page 44

42
3. Map displays
Basic operation
Setting the type of POI vicinity to be retrieved while driving
The 6 items appearing in the POI vicinity menu screen ( , , ,
, , ) can be set at random.
This POI vicinity menu can be displayed even while driving and POI landmarks can be
displayed on the map screen.
HotelRestaurant
Grocery Store
ParksATMGas Station
1
Touch on the MENU
screen.
Setup
2
Touch for Show POI
Icons.
Change
3
Touch the POI type to be changed.
4
Touch the POI type to be
displayed.
•Touch in screen to return all items to their default settings.
•Touch in screen to return the POI vicinity retrieved while driving to
its default setting.
3
Default
2
Default
ATTENTION
Page 45

43
Basic
operation
5
Touch the name of the POI to be
displayed.
6
Touch .
OK
Page 46

44
4. How to retrieve maps
Basic operation
When setting or adding a destination, setting stores or registering your home, memory
points, special memory points or detour memory points, maps corresponding to these
setting and registration points can be retrieved using various methods. For procedures on
how to select a map retrieval method, see the corresponding page for each item below.
The screens above are examples of screens when setting a destination and when
registering a memory point. Touch the map retrieval method on the displayed MENU screen
to select an item.
Setting a destination (P64)
Adding a destination (P75)
Registering your home (P101)
Registering memory points (P105)
Registering special memory points
(P115)
Registering detour memory points
(P119)
When setting a destination
When registering a memory point
Page 47

45
Basic
operation
Function
The map of the vicinity of a memory point can be displayed.
(See P55) [Only for when memory points are registered. For
information concerning memory points, see P100.]
The map of the vicinity of a previously set destination can be
displayed. (See P56) [Only for when an entry in the
destination archive is registered. For information concerning
the destination archive, see P123.]
The map displayed on the screen before having opened the
MENU screen can be returned.
A map can be displayed by entering latitude and longitude
coordinates. (See P59)
<When setting a destination>
A route search is started for a registered geographical point.
[Only when each respective point is registered.]
<When registering a memory point>
The map for a registered point can be displayed. [Only when
each respective point is registered.]
Registering your home (See P101)
Registering 1 to 5 special memory points (See P115)
Vicinity of special
memory point
///
/
Item (touch switch)
By entering an address, the map corresponding to that point
(or area) can be displayed. (See P47)
By entering the name of a POI, the map corresponding to that
POI's vicinity of can be displayed. Also, enter the name of an
address to display the map of that area. (See P49)
Police stations, hospitals are displayed in the order of
proximity to the present location. (See P55)
Intersections can be displayed by entering the names of two
roads that cross each other. (See P56)
A map can be displayed by indicating a freeway
entrance/exit. (See P58)
Page 48

46
4. How to retrieve maps
Basic operation
Changing the search area
This navigation system divides the U.S. and Canada into 11 block areas. For any search
method employed, the system will conduct a search in the area you are occupying unless
the search area has been changed. To conduct a search in another area, first set the search
area prior to beginning the search.
2
Touch the area where a search is
to be initiated.
For a list of the areas, see the figure on
the right.
1
Touch .
Change
3
Touch .
OK
Idaho
Oregon
Washington
California
Nevada
Arizona
Colorado
Montana
New Mexico
Utah
Wyoming
Iowa
Kansas
Minnesota
Missouri
North Dakota
South Dakota
Oklahoma
Texas
Illinois
Indiana
Kentucky
Michigan
Ohio
Wisconsin
Arkansas
Alabama
Louisiana
Mississippi
Tennessee
Connecticut
Massachusetts
Maine
New Hampshire
New Jersey
New York
Rhode Island
Vermont
Washington,D.C.
Delaware
Maryland
New Jersey
Pennsylvania
West Virginia
Florida
Georgia
North Carolina
South Carolina
All provinces and
regions in Canada
included in this
switch.
CAN
US10
US9
US8
US7
US6
US5
US4
US3
US2
US1
Page 49

47
Basic
operation
Retrieving a map using an address
If the address is known, its corresponding map can be retrieved by selecting that address.
1
Touch and enter one
number at a time.
Street
•If having made a mistake, touch to
delete one letter at a time.
•Lettered touch switches with no
corresponding search result will appear
inverted. Input is not enabled even if
touching them.
2
Touch .
List
3
Touch the street name to be
displayed.
4
Touch the city name to be
displayed.
Go to the next page
Page 50

48
•If having made a mistake, touch to
delete one letter at a time.
5
Touch and enter one
number at a time.
House #
•The map searched for by entering an address is displayed.
•If there is an address that corresponds with the entered house number, the map of the
vicinity of that address will be displayed.
•If there is no address corresponding to the entered house number, a diagram of the vicinity
of the corresponding street will appear.
6
Touch .
OK
4. How to retrieve maps
Basic operation
Page 51

49
Basic
operation
Retrieving a map using a POI name
A map can be retrieved by entering a partial POI name or by narrowing down from a list of
several POI types, regions, street or city names, etc. Also, a map can be retrieved by
entering the name of an address. When the number of candidates is low, a map can be
selected directly from the list screen.
1
Enter the POI name (or address) by
touching one letter at a time.
•Up to 24 letters can be entered.
•If having made a mistake, touch to
delete one letter at a time.
•Lettered touch switches with no
corresponding search result will appear
inverted. Input is not enabled even if
touching them.
A POI list screen containing names
searched for from the entered letters is
displayed.
•If the number of candidates is high,
narrow them down by selecting from
or .
•When indicating the area of the POI to
be displayed in the POI list screen,
touch and then touch
or
. When indicating
the POI type, touch .
Category
Input City Name
Nearest 5cities
City
CategoryCity
2
Touch .
List
3
Touch the name of the POI to be
displayed.
If entering less than 4 search candidates, the list screen will automatically be
displayed.
ATTENTION
Page 52

50
4. How to retrieve maps
Basic operation
When narrowing down candidates from the nearest 5 cities
If narrowing down candidates per area
1
Touch on the list screen.
City
2
Touch .
Nearest 5cities
3
Touch the name of the city when
the desired POI is located.
4
Touch the name of the POI to be
displayed.
•Touch NAME to return to screen 1
shown on the previous page for
"Retrieving a map using a POI name".
•Touch CATEGORY to indicate the type
of POI to be displayed on the POI list
screen. (See the next page.)
•Up to 24 letters can be entered.
•If having made a mistake, touch to
delete one letter at a time.
•Lettered touch switches with no
corresponding search result will appear
inverted. Input is not enabled for them
even if touching them.
•Every time a letter is touched, the
number of POI names searched for is
indicated.
When narrowing down the list by entering a city name
1
Touch on the POI list screen.
City
2
Touch .
Input City Name
3
Touch one letter at a time to enter
the city name.
Page 53

51
Basic
operation
A POI list screen containing names
searched for from the entered letters is
displayed.
•Touch to return to screen
shown on the previous page for
"Retrieving a map using a POI name".
•Touch to indicate the type
of POI to be displayed on the POI list
screen. (See the next page.)
Category
1
Name
4
Touch .
List
5
Touch the name of the POI to be
displayed.
•This constitutes a setting for one area.
•If selecting areas, this constitutes a setting for either or
. Also, the and are
effectuated for the last area set.
•If there is no corresponding POI in the set area, a list will not appear. Set a
different area.
•Touch to display a POI list screen containing search results for all
the cities in that area.
Any City
Input City Name
Nearest 5cities
Input City Name
Nearest 5cities
ATTENTION
Page 54

52
4. How to retrieve maps
Basic operation
When narrowing down the list by POI type
This is one way to narrow down the list of POI types. This is convenient when knowing what
type of POI is the destination. Narrow down a long list of candidates using and start a
search after having eliminated items from the list.
City
1
Touch on the POI list
screen.
Category
2
Touch the POI type to be displayed.
Touch to return
to the POI list screen (P50, ).
3
List All Categories
3
Touch the POI name to be displayed.
•Touch to return to screen
on P50,
"Retrieving a map using a POI
name"
.
•Touch to indicate the POI area to
be displayed on the POI list screen.
(See previous page)
City
1
Name
•POI type indication screen
•POI type selection is set for 1 type. After setting in , can also
be set.
•If there is no corresponding POI for the set type, no list will appear. Set a
different type.
•Depending on the POI, the displayed geographical point is not always the actual
location of that POI but can be a representation of the address of that location.
CityCategory
ATTENTION
Page 55

53
Basic
operation
Go to the next page
POI types
All Restaurant
American
Chinese
Continental
Fast Food
French
Italian
Japanese
Mexican
Other Restaurants
Sea Food
Thai
Convenience Store
Department Store
Grocery Store
Home and Garden
Other Retail Stores
Pharmacy
Shopping Mall
Specialty Food Store
Auto Club
Car Wash
Gas Station
Other Automotive Stores
Parking
Service & Maintenance
Airport
Bus Station
Campground
Ferry Terminal
Hotel
Rental Car Agency
Rest Area
Train Station
Amusement Park
Botanical/Zoological Gardens
Casino
Cinema
Golf Course
Historical Monuments
Restaurant Shopping
Horse Racing
Marina
Museum
National and State Parks
Ski Resort
Speedway
Sports Complex
Theater
Tourist Attraction
Tourist Infomation
Video Rental
Winery
City Center
Convention Center
Court House
Government Offices
Higher Education
Hospital
Library
Parks
Police Station
Post Office
School
ATM
Bank
Other Financial Services
Beauty and Barber Shops
Coffee House
Dry Cleaning
Health and Fitness Club
Ice Cream Parlor
Other Business Facilties
Community
Automotive Travel
Banking
Other
Recreation
Page 56

54
•Depending on the POI, the displayed geographical point is not always the actual
location of that POI. The following cases may result in a search based on data
that differs from general publications.
•Facilities such as art museums in department stores and amusement parks may
be located in areas that differ from their customer service centers. Entering the
telephone number of such facilities will display the map for the location of their
customer service centers.
•The address appearing in maps may contain the geographic name of a
neighboring area. Also, the address may only appear in part or may be
abbreviated.
4. How to retrieve maps
Basic operation
ATTENTION
Page 57

55
Basic
operation
Retrieving a map in the event of an emergency
In the event of a traffic accident, a problem with your vehicle or other emergency, a map for
the nearest police station, hospital can be retrieved. Switch to this mode and the address
and longitudinal/latitudinal coordinates of the present location will be indicated on the upper
part of the screen.
1
Touch or .
Hospital
Police Station
2
Touch the POI to be displayed from
the list.
If at least a few memory points are registered in the device in advance (see P105,
"Registering memory points "), a map can be retrieved using one of these points.
1
Touch the memory point to be
displayed from the list.
Retrieving a map using a memory point
Page 58

56
4. How to retrieve maps
Basic operation
Up to 100 latest previously set destinations are automatically recorded and a map for the
same point can be easily retrieved.
1
Touch the destination archive to be
displayed from the list.
Retrieving a map using the archive
An intersection can be retrieved from 2 intersecting streets.
1
Enter the Street Name by touching
on the letters on the screen one
letter at a time.
Retrieving a map using an intersection name
•Up to 24 letters can be entered.
•If having made a mistake, touch to
delete one letter at a time.
•Lettered touch switches with no
corresponding search result will appear
inverted. Input is not enabled for them
even if touching them.
•Every time a letter is touched, the
number of POI names being searched
for appears.
•Your home and special memory points are not recorded in the destination
archive.
•See P123,
"Deleting entries from the destination archive", for information
concerning the deletion of entries in the destination archive.
ATTENTION
Page 59

57
Basic
operation
3
Enter one more Street Name in the
same manner.
•Up to 24 letters can be entered.
•If having made a mistake, touch to
delete one letter at a time.
•Lettered touch switches with no
corresponding search result will appear
inverted. Input is not enabled for them
even if touching them.
•Every time a letter is touched, the
number of POI names being searched
for appears.
[
4
Touch the Street Name from the
list.
•The map retrieved from the entered
street names appears.
2
Touch Street Name from the list.
Page 60

58
4. How to retrieve maps
Basic operation
A map can be retrieved using the name of a freeway or an exit/entrance.
1
Enter the freeway name one letter
at a time by touching the switches
on the screen.
2
Touch the freeway name to be
displayed.
3
Toucheither or to
specify the freewayentrance or
exit.
ExitEntrance
Retrieving a map using a freeway exit/entrance
name
•UP to 24 letters can be entered.
•If having made a mistake, touch to
delete one letter at a time.
•A letter touch switch for which there are
no searchable items will appear inverted
and cannot be used for entry even if
touched.
•The number of POI names searched for
appears for each letter touched.
[
Page 61

59
Basic
operation
4
Touch the entrance or exit name to
be displayed form the list.
•Touch to enter the
entrance or exit name directly.
•Touch to sort the entries
in order of the distance from the present
location.
Dist.Sort
InputName
•If having made a mistake, touch to
delete one number at a time.
Touch .
OK
•The map retrieved from the entered
latitude and longitude appears.
A map can be retrieved using the latitude/longitude.
Retrieving a map using the latitude / longitude
1
2
Enter the number by touching the
switches on the screen one number
at a time.
Page 62

60
Basic operation
5. Performing operations on a retrieved map
When retrieving a map using a POI name, a telephone number or address or from
Emergency, either a map with a pinpoint search result or without a pinpoint search result
(vicinity) will be displayed. A further search can be made from the map retrieved.
The following conditions are necessary to display a map from a pinpoint
1 When entering a POI name in "Retrieving a map using a POI name"
2 When "Retrieving a map in the event of an emergency"
3 When "Retrieving a map using an intersection name"
4 When a corresponding POL is made available when "Retrieving a map using a freeway
exit/entrance name"
•Only when retrieving a map using methods 1 to 4 above can the POI data be
displayed.
•Some POIs may not display any corresponding data.
Performing operations on a displayed map
•When a search is made using a pinpoint
•
When a search cannot be made using a pinpoint
The following operations are enabled on a retrieved map.
■Changing the position
■
Scroll to change the position.
■
Displaying POI data
■The POI data displayed as per the conditions described in steps 1 to 4 above is shown.
Displaying POI data
1
Touch .
Info.
The data for the POI is displayed.
ATTENTION
Page 63

61
Basic
operation
Page 64

62
1. Setting the destination and searching for a route
Navigation guidance
The following is a flow chart describing the procedure for a route search initiated after
setting the destination (or adding a destination) and setting the route search conditions to
guide you to your destination.
•Display 3 routes
simultaneously •(P73)
•Change search conditions
for •each interval (P77)
•Change the search
conditions for each interval
(P77)
•Reinitiate a route search
(P95)
•Add a destination (P75)
•Indicate a transit road
(P80)
•Add a destination (P75)
•Indicate a transit road
(P80)
Setting a destination (P64)
Initiate route guidance (P83)
Route guidance
Arrival at your destination
All-route display (P67)
Use the search result route Change the search result route
There is a stop to be made along the way
Change the route
When having deviated from the set route
Search for a different route
There is a stop to be made along the way
Drive along the search result route
Search for a different route
Page 65

63
Navigation
guidance
Route guidance begins after setting your destination. The destination is set as per the
following methods:
•One-touch setting
•Set using a registered point (your home, special memory point)
•Set using the map retrieval method
Item
Set using a map
retrieval method
One-touch setting
Set from
a registered point
Setting method
Scroll the map and touch to set the destination.
Enter
Set your home as the destination only if your home is registered.
This cannot be used if your home is not registered. (See P101,
“Registering your home”)
Set an already registered special memory point (up to 5 points) as the
destination. This cannot be used if there are no special memory points
registered. (See P115,
“Registering a special memory point”)
Search using a map retrieval method to set a destination. (See
P44,
“How to retrieve maps”)
Set the destination to automatically start a recommended route search.
When adding a destination or a route other than the recommended route or setting a transit
road, proceed after the route search is complete.
•When setting the destination, use a detailed map with a reduction scale of under
0.5 miles.
•Geographical points on maps representing set destinations are automatically
registered (up to 100 points) and can be used to retrieve a map when setting a
destination. When exceeding 100 points, the oldest entry is deleted every time a
new one is entered. Unnecessary points can be deleted. (See P123,
“Deleting
entries from the destination archive”
)
ATTENTION
Page 66

64
2. Set a destination and search for a route
Navigation guidance
Setting a destination
One-touch setting
1
Touch the map.
2
Touch .
Enter
3
Touch .
Enter
A destination can be set in the map presently displayed.
•A symbol will appear for the
destination point on the position and
a route search will begin.
•Touch to move the map.
•If a destination is already set, touch
to delete the set destination
and set a new one.
•Touch to add a destination. It
will be added as the next destination
after the present location.
Add to
Replace
If a map with a reduction scale wider than 0.5 miles is displayed, switch to a 0.5
mile reduction scale.
ATTENTION
Page 67

65
Navigation
guidance
Set from a registered point
1
Press .
DEST
2
Touch or special memory
points to .
51
•Your home or the special memory point
will appear as the symbol and the
route search will begin.
•If a destination is already set, touch
to delete the set destination
and set a new one.
•Touch to add a destination.
(See
“Adding a destination” on P75,
to )
65
Add to
Replace
Set using a map retrieval method
1
Press .
DEST
2
Select the map retrieval method
and the map corresponding to the
point to be set as the destination
will appear.
•See P44 and 60, “Map retrieval
method”
, “Performing operations on
a retrieved map”.
3
Touch .
Enter
•A symbol will appear for the
destination point on the position and
a route search will begin.
Go to the next page
Page 68

66
2. Set a destination and search for a route
Navigation guidance
Set a destination and a route search will automatically start.
Route search
•A route search will continue even if switching to other screens.
•The route will not appear if the distance to the destination is too short.
•When a route search is complete, an all-route display (all routes from the present location
to the destination) screen will appear.
•If a destination is already set, touch
to delete the set destination and
set a new one.
•Touch to add a destination. (See
“Adding a destination” on P75, to )
65
Add
Replace
•If the destination is on a freeway or in an
inaccessible area, the following screen will
appear. Touch the item corresponding to
the situation.
•If a route search is conducted on a freeway or toll road interchange (IC), the
search result route may start from a nearby local road. In such a case,
reinitiate a route search (see P95).
•Touch to set the destination on the highway.
•Touch to set the destination on another road.
No
Yes
•Touch to set that point as the destination.
•Touch to move the destination.
Yes
No
•If the destination is inaccessible or if there is
a river, railroad or other obstruction in its
vicinity, the following screen may be
displayed.
ATTENTION
Page 69

67
Navigation
guidance
When the route search is complete, an all-route display screen appears.
All-route display
•Press after the all-route appears, or do not operate the device for at least 3
seconds after you start driving, and route guidance will automatically begin.
NAVI
Route displays
The routes will be displayed in the following 3
colors.
•Blue
•The route when only one destination is set or
the present segment up to the first
destination set in case of multiple
destinations appears blue.
•Purple
•All segments other than the present segment
up to the next destination when multiple
destinations are set.
•Orange
•Seasonally restricted segment display (P70).
•Route search complete screen (all-route)
Page 70

68
On the all-route screen, routes from the present location to the destination, the estimated
arrival time and distance are indicated. Also, the search result routes can be changed and
the guidance data can be displayed.Data up to the final destination is displayed.
■
Items displayed
Data up to the final destination is displayed.
2. Set a destination and search for a route
Navigation guidance
All-route display and touch switches
1
1
2
3
4
2
3
4
Distance on toll roads
The distance on all toll roads is displayed.
Distance on freeways
The distance on all freeways is displayed.
Distance
The total distance on all roads including toll roads, freeways, local streets to the
destination (when multiple destinations are set, the final destination) are displayed.
Required time/distance remaining
The required time and the distance to the destination for the route presently taken are
displayed.
1
2
3
4
Page 71

69
Navigation
guidance
■Touch switches
The following operations are enabled using the touch switches appearing on the all-
route display screen.
•The search result route is a reference route to the vicinity of the destination. In no
way is it the shortest, fastest or least congested route.
•The required time is calculated from the average vehicle speed (see P87) and
may have a slight deviation depending on the driving conditions.
•In the following situations, 3 routes cannot be displayed.
•When 2 or more destinations are set
•When a transit road is indicated
•After route guidance has started
•An all-route diagram can be displayed even after route guidance has started.
(See P92)
Different routes are displayed to enable a selection. (See P73)
The route change screen is shown to enable the modification of the search conditions.
Also, indicating an additional transit route to the destination is possible. (See P75, 77, 80)
Route guidance can be initiated. (See P83) After route guidance is started, the display
returns to the present location screen.
Required time/remaining distance
When 2 or more destinations are set, every time the required time/distance remaining is
touched, you can switch displays to the next destination. (See P93) If deviating from the
road after route guidance has started, the distance to the destination in a straight line is
indicated.
Guide
Route
3Routes
1
2
3
4
ATTENTION
Page 72

70
2. Set a destination and search for a route
Navigation guidance
1
Touch in the all route
display screen.
Route
Bypassing a restricted segment
Display or bypass a restricted segment
Bypass using the all-route display screen
Touch
.
Allow Season Restricted Road
•If searching for a route that passes
through a restricted segment, an
indicator will light up.
2
Touch
.
Route Preference
3
Touch to start the route
search.
OK
4
Page 73

71
Navigation
guidance
Touch
.
Allow Season Restricted Road
•If searching for a route that passes
through a restricted segment, an
indicator will light up.
1
Touch if a map is displayed.
Route
2
Touch
.
Route Preference
Bypass using the present location screen
3
Touch to start the route
search
OK
4
Set the restriction message display
The message appearing if a search result route has a restricted segment can be turned ON
(display) or OFF (not display).
Touch .
OK
•Selected touch switches turn green.
1
Touch on the MENU
screen.
Setup
2
Touch either or for
Notify Traffic Restriction.
OffOn
3
Touch in the SETUP screen to return all items to their default settings.
Default
ATTENTION
Page 74

72
The divided route data to the destination by its entrances/exits of interchanges (IC), transit
roads, national roads or local streets can be displayed. The map at the departure or
destination area can also be displayed.
Display route data (guided road information)
1
Touch in the present
location screen.
Map View
2
Touch .
Route Overview
3
Touch .
Turn List
•Route data is divided at entrances/exits
of interchanges (IC), junctions (JCT)
and at the turning points of each
destination, transit and other roads.
•The road name and distance appear for
each piece of divided route data.
•Touch at the departure or
destination area to display a map of
each set point.
Map
2. Set a destination and search for a route
Navigation guidance
•Touch during route guidance and touch to
display the corresponding route data.
•If the present location is on the route, the vehicle position mark will appear in
the route data screen.
•If the present location is not on the route (if having deviated from the route), data
will be displayed from the point the route is displayed.
Route Overview
Map View
ATTENTION
Page 75

73
Navigation
guidance
Set the destination and a recommended route will be searched for resulting in an all-route
display from the present location to the destination. Other than the recommended route
(“Quick 1”), “Quick 2” and “Short” routes will also be displayed to enable a selection.
3-route simultaneous display (3-route search function)
1
Touch in the all-route
display screen.
3 Routes
2
Touch the route name.
•3 routes will be displayed in different
colors along with the distance and
required time.
•The selected route is displayed and the
all-route display screen is shown.
•In the following situations, 3 routes will not appear simultaneously.
•When 2 or more destinations are set
•When transit points (transit roads) are indicated
•After route guidance has started
•See P95,
“Reinitiate a route search”, for the characteristics of each of the 3
routes.
•The required time is calculated from the average vehicle speed (see P87) and
may have a slight deviation depending on the driving conditions.
ATTENTION
Page 76

74
3. Changing the search result route
Navigation guidance
After a route search is complete, the route can be changed by adding a destination or
transit road. The following are methods for changing the route.
•Touch on the all-route display screen or the present location screen (during route
guidance) to display the route modification screen.
•The route modification method is set on the route modification screen.
Route
All-route display screen Present location screen
Route modification screen
•Add a destination ··································································································· Next page
•Change search conditions per segment ·········································································· P77
•Switch the order of destinations ························································································ P78
•Delete a destination ·········································································································· P79
•Indicate a transit road ······································································································· P80
•Cancel the transit road indication ····················································································· P81
RouteRoute
The operations described here cannot be performed if a destination is not set.
ATTENTION
Page 77

75
Navigation
guidance
After having set a destination, more destinations can be added.
In the following situations, set an additional destination.
Adding a destination
1
Touch .
Route
2
Touch for Destination.
Add
•See P44 and 60, “How to retrieve
maps”
and “Performing operations on
a retrieved map”.
•When setting a transit point between the present location and set destination
•When changing the set destination into a transit point and setting a new destination
Using the same method as setting a destination, touch to add a destination. (See
P64,
“One-touch setting”, P65, “Set from a registered point”, or P65, “Set using a map
retrieval method”
)
Add to
3
Select the map retrieval method
and display the map on which a
destination is to be set.
•The destination can be set using a detailed map with a reduction scale smaller
than 1 mile.
•Geographical points on maps representing set destinations are automatically
registered (up to 100 points) and can be used to retrieve a map when setting a
destination. When exceeding 100 points, the oldest entry is deleted every time a
new one is entered. Unnecessary points can be deleted. (See P123,
“Deleting
entries from the destination archive”
)
•When adding a destination with a transit road (see P80 and 81) indicated, that
transit road indication may be cancelled depending on that geographical point.
•When 2 or more destinations are set, appears.
Reorder
ATTENTION
Go to the next page
Page 78

76
6
When a transit road is indicated, a
cancellation screen may appear.
•Touch to cancel the transit road
indication and initiate a route search.
•Touch to set the destination
without canceling the indication.
•Touch to return to the original
screen.
Back
No
Yes
4
Touch .
Enter
5
Touch in the segment to be
set.
Add
•A destination point in the form of the
symbol will appear in the position.
•Up to a maximum of 5 destinations can
be set.
•When 5 destinations are already set,
delete a destination and proceed. (For
information concerning deletion of a
destination, see P79,
“Deleting a
destination”
.)
3. Changing the search result route
Navigation guidance
Page 79

77
Navigation
guidance
The search conditions per segment can be changed and a search reinitiated.
Changing the search conditions
1
Touch in the
route modification screen.
Serch Condition
2
Touch the search conditions (for
each route) per individual segment.
•The route search is started.
3
Touch .
OK
•For search condition characteristics, see P95, “Reinitiating a route search”.
•If there is only one destination, will appear.
Other Route
•After having set the destination, the
following operations are enabled from
this screen:
•Change search conditions per segment
Below
•Switch the order of destinations P78
•Delete a destination P79
•Indicate a transit road P80
•Cancel the transit road indication P81
•When adding more destinations, touch
and the screen in step on
P75 will appear. Repeat steps to
.
6
3
3
Add
ATTENTION
Page 80

78
The setting order of multiple destinations can be switched and a search reinitiated.
Switching the destination order
1
Touch .
Route
2
Touch .
Reorder
•Touch to cancel.
•Touch to return to the original
screen.
No
Yes
3
When a transit road is indicated, a
cancellation screen may appear.
•A new order will appear on the right of
the selected destination names.
•If having made a mistake, touch
to delete the destination
name order selected.
Cancel
4
Touch the name of the destinations
in order starting with the next
destination.
5
Touch .
OK
•When the new destination name order is determined, the route modification screen
will appear automatically after about 3 seconds without having to touch .
•Without touching all the destination names, touch only the destination you want to
change the order of and touch . That selection will move to the top of the
destination order.
OK
OK
If changing the destination order with a transit road indicated (see P80), that
transit road indication may be cancelled.
3. Changing the search result route
Navigation guidance
ATTENTION
Page 81

79
Navigation
guidance
Multiple set destinations can be deleted.
Deleting a destination
1
Touch .
Route
2
Touch for the destinations
or transit points.
Delete
•Touch to delete all the
destinations.
Delete All
3
Touch the destination name to be
cancelled.
•A route search is started and the all-
route display screen appears.
•Touch to return to the original
screen.
•When all destinations are deleted and
only one point is set, the present
location screen appears.
No
4
Touch .
Yes
5
Touch .
OK
•A route search is initiated and an all-
route display screen appears.
•If only one destination is set, the screen
in will appear.
4
When all destinations are deleted, route guidance cannot be restarted. Setting a
destination is necessary to activate route guidance.
ATTENTION
Page 82

80
Indicating a transit road
1
Touch .
Route
2
Touch for Preferred Road.
Add
3
The map will move to the position
of the indicated transit road.
4
Touch .
Enter
5
Touch to select a transit
road.
Next
•To indicate the road displayed, touch
.
Enter
6
Touch and the transit road will
be indicated with a symbol.
OK
7
If 2 or more destinations are set or
if a transit road is indicated, touch
in the segment to be
indicated.
Add
•If only one destination is set and there
are no interchanges or transit roads
indicated, the screen in will appear.
8
• will appear if there is a transit road already indicated.
•If a map with a scale larger than 0.5 miles appears, switch to a map with a scale
less than 0.5 miles.
Delete
3. Changing the search result route
Navigation guidance
ATTENTION
Page 83

81
Navigation
guidance
8
A route search is started.
Canceling a transit road indication
1
Touch .
Route
2
Touch for Preferred Road.
Delete
3
Touch the road name to be
cancelled.
•If only one point is set, the screen in
will appear.
4
Indicated transit roads appear with a
symbol.
•Touch to cancel all transit
roads.
Delete All
•Touch to return to the original
screen.
No
4
Touch .
Yes
Go to the next page
Page 84

82
5
Touch to initiate a route
search.
OK
3. Changing the search result route
Page 85

83
4. Starting, pausing and restarting route guidance
Navigation guidance
Navigation
guidance
Starting route guidance
When the route search is complete, the all-route display screen appears. Touch on
the all-route display screen to start the route guidance. Route guidance can be paused and
restarted.
Guide
•Route guidance is started.
•After the all-route display screen
appears, press to start
guidance or wait at least 3 seconds
without operating any switches and
guidance will start automatically.
NAVI
1
Touch on the all-route
display screen.
Guide
Pausing and restarting route guidance
•Destinations will not be deleted even if
pausing route guidance.
•To restart route guidance, touch
on the menu
screen again.
Resume Guidance
1
Touch on the
MENU screen.
Suspend Guidance
Page 86

84
Navigation guidance
5. Route guidance
When the route search is complete, guidance for the desired route can be started.
Drive towards your destination and the device will guide you along the route all the way to
that destination.
Intersection guidance
When approaching an intersection with a guidance point displayed on the present location
screen (if the present location is located on the route) while route guidance is in progress,
intersection guidance and voice guidance is performed. Also, when approaching a junction
intersection (within about a mile), an enlarged intersection display screen will automatically
appear.
A non-junction intersection
Intersection name display
Names of transit points or junction intersections appear.
Remaining distance display
The distance up to the intersection is indicated.
1
2
A junction intersection (enlarged guidance screen for an intersection)
2
2
1
•Enlarged intersection display screens will appear only if they are set to appear.
(See the next page)
•Lane displays and names will not appear for intersections about which there is
no data in the map disk.
•The intersection name indicated may differ from the actual intersection.
•In the following situations, intersection guidance is not performed:
•Immediately after route guidance is started •In the vicinity of the destination
•Intersection guidance may be early or late.
•When approaching a junction intersection, an enlarged intersection display
screen will appear.
•When an enlarged intersection display screen is displayed, the intersection
name will be displayed for the junction intersection. There is no intersection
guidance prior to junction intersections.
•Immediately before a turn is to be made, a chime will sound. However, the chime
will not sound if the volume is set to .
OFF
ATTENTION
Page 87

85
Navigation
guidance
Cancel the intersection guidance screen
Cancel using
OFF
Cancel using
1
Touch .
OFF
•Press to redisplay the
intersection guidance screen.
NAVI
1
Touch .
2
Touch to display the normal
map.
•Touch again on the screen to
display the intersection guidance
screen.
Touch on the SETUP screen to return all items to their default settings.
Default
ATTENTION
Page 88

86
5. Route guidance
Navigation guidance
Displaying the required time
The required time can be indicated on the left
of the map appearing on the present location
screen (if the present location is on the set
route) while route guidance is in progress. If 2
or more destinations are set, touch the
required time/distance remaining display
touch switch to indicate the required
time/distance remaining for each destination.
•Required time display
3
Touch .
OK
1
Touch in the MENU screen.
Setup
Select either to have the intersection guidance screen turned ON (display) or OFF (not
display).
2
Touch or for Intersection
Guidance.
OffOn
Selected touch switches turn green.
Set the intersection guidance screen
Ferry crossing guidance
Ferry crossings are shown with a dotted line.
•Voice guidance occurs up to the ferry
terminal.
•After having finished the ferry crossing, start
driving and route guidance will resume in a
moment.
The required time include the ferry ride hours.
ATTENTION
Page 89

87
Navigation
guidance
The following times are calculated based on the set average vehicle speed.
•Required time on the present location screen (P15)
•All route display screen required time (P68)
•Required times for the segments list (simultaneous 3 route display) (P73)
Setting the average speed
1
Touch on the MENU
screen.
Setup
2
Touch for the
Estimated Travel Time.
Set Speed
3
Set the speed for each road.
4
Touch .
OK
Touch to raise the speed, touch
to lower it.(Each press raises or lowers
5mph.)
•The required time is calculated using the average speed of your vehicle. There
may be a slight variation depending on the driving conditions.
•When deviating from the set route, the destination direction mark will appear.
•When reaching the maximum speed (75mph freeway, 55mph main streets,
25mph residential), the switch inverts. When reaching the minimum speed
(5mph), the switch inverts. These switches cannot be operated even if
touched.
•
Touch ontheChangeSpeedscreentoreturntoitsdefault
settings(Freeway;55mph/Mainstreet;35mph/Residential;25mph).
Default
ATTENTION
Page 90

88
5. Route guidance
Navigation guidance
When driving on a highway with the present location screen displayed (if the present
location is on the set route) while route guidance is in progress and a junction point
approaches [interchange exits/entrances (IC), junctions (JCT)], the highway junction
guidance screen will appear.
Canceling the highway junction guidance screen
Highway junction guidance
2
1
Junction point name display
The interchange exit/entrance name (IC) or
the junction (JCT) direction name is
displayed.
Distance remaining display
The distance up to the junction point is
displayed. The number decreases.
1
2
Press to redisplay the highway
junction guidance screen.
NAVI
1
Touch .
OFF
•No highway junction guidance display will occur for junction points that do not
have corresponding data in the map disk. Also, the junction point name may not
be displayed even if the highway junction guidance screen is displayed.
•The junction point name displayed may differ from the actual junction name.
•In the following situations, highway junction guidance occurs:
•Immediately after route guidance starts
•In the vicinity of the destination
•The highway junction guidance screen may be early or late.
•When approaching the next junction point, the highway junction guidance
screen will continue to be displayed.
ATTENTION
Page 91

89
Navigation
guidance
Switching the highway junction guidance screen
1
Touch if the highway junction
guidance screen is displayed.
2
Touch the touch switches to be
switched.
•Touch to display the map screen.
Or, touch to display the turn list
screen.
•To redisplay the highway pattern
screen, touch and .
Page 92

90
5. Route guidance
Navigation guidance
If approaching an intersection, junction point, transit point, interchange (ramp) exit/entrance,
junction (JCT) or destination while route guidance is in progress, a voice will announce the
remaining distance to those points and up to 10 turning directions. Voice guidance is
performed in PCM voice (human voice)
•Example of voice guidance while
route guidance is in progress
•Intersection voice guidance (just
guidance)
While route guidance is in progress, a
chime will sound prior to a junction
point.
Example of voice guidance:
In ○○ miles(km), ○○ turn
•Highway junction voice guidance
While driving on a highway, junctions
are shown as an enlarged display and
the direction is announced vocally.
Example of voice guidance:
In ○○ miles(km), the exit ○○,
•Example of voice guidance when
arriving at the destination
Example of voice guidance:
You
have arrived at your destination.
Your route guidance is now finished.
Voice guidance
In six tenths of a
mile, right turn.
1
Press to activate voice
guidance as per the distance up to
the junction intersection.
NAVI
•Use the voice guidance only as a reference.
•After a voice guidance such as "Left turn in about 700m", drive for a moment and
press to change the announcement as per the approaching distance
(ex.: Left turn in about 600m (500m), etc.)
•The intersection voice guidance is activated by turning the Auto Voice
Guidance. (See the next page)
On
NAVI
ATTENTION
Page 93

91
Navigation
guidance
The voice guidance while route guidance is in progress can be turned ON (announce) or
OFF (not announce).
Setting the voice guidance
1
Touch on the MENU
screen.
Setup
2
Touch or for Auto Voice
Guidance.
OffOn
•Selected touch switches turn green.
3
Touch .
OK
•The voice guidance examples mentioned above are the most common to be
announced and may differ depending on the way the roads along your route are
connected.
•If your vehicle position is not precisely specified, voice guidance may not occur
or, in some cases, may be delayed or announce an erroneous instruction.
•The voice guidance volume may be adjusted (see P25). However, selecting
will disable voice guidance.
•Touch on the SETUP screen to return all items to their default settings.
Default
Off
ATTENTION
Page 94

92
6. Performing operations on the guided route
Navigation guidance
Redisplaying the all-route display
The all-route display from the departure point to the destination can be shown.
1
Touch to display the
map.
Map View
2
Touch .
Route Overview
•The all-route display screen appears.
•For details pertaining to the all-route
display screen, see P68,
"All-route
display and touch switches"
.
•Touch to display the present
location screen.
Back
Guidance in another mode
The route guidance continues (no vocal guidance output) even if switching to another mode
(showing a screen other than the navigation screen). The voice guidance can be made to
output even if switching to another mode.
Setting the guidance when in another mode
1
Touch on the MENU
screen.
Setup
2
Touch or for Voice
Guidance in All Modes.
OffOn
•Selected touch switches turn green.
3
Touch .
OK
Touch on the SETUP screen to return all items to their default settings.
Default
ATTENTION
Page 95

93
Navigation
guidance
Switching the required time/ distance remaining display
If 2 or more destinations are set on the present location screen (if the present location is
along the set route) while route guidance is in progress, the required time/ distance
remaining can be switched.
Required time/distance remaining
1
Touch the required time/distance
remaining.
2
Touch the distance remaining
display up to the destination
desired.
•If 2 or more destinations are set, the
required time/distance remaining for
each destination appears.
•Switching is impossible if having
deviated from the set route.
•When the required time is indicated, it
can be switched according to the
destination.
Page 96

94
On-route scroll
The map can be moved automatically along the set route to the destination or to the
departure point on the screen showing the guided route.
Start on-route scroll
1
Touch on the
display modification screen.
Route Preview
2
Touch the scroll touch switches
(,,,)
On-route scroll screen operations
•Touch to pause map scrolling.
•Press to stop the on-route scroll.
•Touch or to move the map
quickly.
NAVI
•If there is no route displayed on the map, on-route scroll is impossible.
•For a double screen display, on-route scrolling will cancel the display. Press
to return the display.
•If scrolling up to the next destination:
•Use the switch to move the map up to the next destination.
•Use the switch to move the map back to the departure point
(previous destination).
•Use the switch to display the next destination map.
•Use the switch to display the departure point map (previous
destination).
•The on-route scroll may stop depending on the map displayed.
NAVI
6. Performing operations on the guided route
Navigation guidance
ATTENTION
Page 97

95
7. Reinitiating a route search
Navigation guidance
Navigation
guidance
Reinitiating a route search
While route guidance is in progress, additional destinations can be set, search conditions
can be changed and a route search can be reinitiated.
To change the route, use either the "Change method using " or the "Change
method using ".
A route search can be reinitiated from the following screens.
•See the next page for information concerning the touch switches appearing on each
screen.
DEST
Route
3
4
5
1 2
Present location screen
Map View
Route Overview Route
Route
Serch Condition
DEST
Go to the next page
Page 98

96
7. Reinitiating a route search
Navigation guidance
Screen No.
Touch switch Function
Page
1
Map retrieval method
Retrieves the destination map
Sets/adds a destination
44
2
Route Overview
Shows the all-route display 67
3
4
Destination, Transit
destination
·
Reorder
DeleteAdd
Adds, switches the order or deletes
destinations
75
78
79
Transit point (transit
road indication)
·
DeleteAdd
Indicates, corrects or deletes transit roads
80
81
Search Condition
Displays the search condition setting screen
5
Search conditions
Sets the search conditions for each segment
77
77
Route
Displays the route modification screen 74
Search conditions Function
Quick 1
A common route from the present location to the next
destination* is searched for.
Quick 2
A route prioritizing toll roads from the present location to the
next destination* is searched for.
Short
A route with the shortest distance from the present location to
the next destination* is searched for.
*When a transit road is indicated between the present location and the next destination, a
route is searched for between the present location and the indicated transit road.
Page 99

97
Navigation
guidance
Reinitiating a route search
1
Touch on the present
location screen while route
guidance is in progress.
Route
2
Touch .
Route Preference
•A route search is reinitiated.
3
Touch the item for which a search
is to be reinitiated.
•Because of the shape of the road, a route search may not be reinitiated and the
same route may result from the reinitialized search due to a change in the
search conditions.
•If having deviated far from the set route, a route to return you to the original route
is not searched for. Rather, a new route search for the set destination
(interchange, transit road) is initiated.
•If driving under an elevated road or along parallel local roads and a route search
is initiated, the search result route may take you along elevated toll roads and
parallel toll roads.
ATTENTION
Page 100

98
Automatic reroute search
If having deviated from the road, a route search may be initiated automatically (vicinity
search or all-route search). The search result route may differ as per the conditions under
which the set route was deviated.
•Vicinity search: a route search returning you to the original route is initiated
•All-route search: a route search is initiated under selected conditions between the present
location to the destination*
*If a transit road is indicated between the present location and the destination, a route
search is initiated for the segment between the present location and the indicated transit
road.
Setting the automatic reroute search
The automatic reroute search function can be turned ON (enable) or OFF (disable).
1
Touch on the MENU
screen.
Setup
2
Touch or for Auto
Reroute.
OffOn
•Selected touch switches turn green.
3
Touch .
OK
•If having deviated from the set route while route guidance is in progress, the
automatic reroute search is activated when the device determines that you are
driving on a guidable road.
•Touch on the SETUP screen to return all items to their default settings.
Default
7. Reinitiating a route search
Navigation guidance
ATTENTION
 Loading...