

Page 1

AIR CONDITIONER
9333003023_OM_EN.indd 1
8/12/2013 8:53:38 AM
Wall Mounted Type
ASTG07 CMCA
R32
REFRIGERANT
This Air Conditioner contains and
operates with refrigerant R32.
THIS PRODUCT MUST ONLY BE INSTALLED OR SERVICED
BY QUALIFIED PERSONNEL.
Refer to Commonwealth, State, Territory and local legislation,
regulations, codes, installation & operation manuals, before
the installation, maintenance or service of this product.
OPERATING MANUAL
Contents
Safety Precautions ..........................................................En-1
Indoor Unit Overview and Operations .............................En-3
Remote Controller Overview and Operations ..................En-4
Timer Operation...............................................................En-6
Human Sensor (Energy Saving) ......................................En-8
Demand Response and Indoor Unit Operation ...............En-8
General Informations on Operation .................................En-9
Care and Cleaning.........................................................En-10
Troubleshooting .............................................................En-12
ASTG09CMCA
ASTG12CMCA
Before using this product, read these instructions thoroughly and keep this manual for future reference.
Safety Precautions
To prevent personal injury, injury to others, or property damage, read this section carefully before you use this product, and be sure to comply to the
following safety precautions.
Incorrect operation due to failure to follow the instructions may cause harm or damage, the seriousness of which is classi¿ ed as follows:
WARNING CAUTION
This mark warns of death or serious injury. This mark warns of injury or damage to property.
This mark denotes an action that is PROHIBITED.
• Explanation of symbols displayed on the indoor unit or outdoor unit.
WARNING
CAUTION
CAUTION
CAUTION
• The appliance contains no user-serviceable parts. Always
consult authorized service personnel for repairing, installation,
and relocation of this product.
Improper installation or handling will cause leakage, electric
shock, or ¿ re.
• In the event of a malfunction such as burning smell,
immediately stop operation of the air conditioner, and
disconnect all the power supply by turning off the electrical
breaker or disconnecting the power plug. Then consult
authorized service personnel.
• Take care not to damage the power supply cable.
If it is damaged, it should only be replaced by authorized
service personnel.
• In the event of refrigerant leakage, be sure to keep away
from ¿ re or any À ammables, and consult authorized service
personnel.
• If you see lightning or hear thunder, there might be a lightning
strike.
To prevent electric shock hazard, turn off the air conditioner
by using the remote controller, and do not touch the unit or
the power plug during thunderstorm.
This symbol shows that this appliance uses a À ammable refrigerant. If the refrigerant is leaked and exposure to an external
ignition source, there is a risk of ¿ re.
This symbol shows that the Operation Manual should be read carefully.
This symbol shows that a service personnel should be handling this equipment with reference to the Installation Manual.
This symbol shows that information is available such as the Operating Manual or Installation Manual.
WARNING
This mark denotes an action that is COMPULSORY.
• The appliance shall be stored in a room without continuously
operating ignition sources (for example: open À ames, an
operating gas appliance or an operating electric heater).
• The appliance shall be stored in a well-ventilated area.
• Be aware that refrigerants may not contain an odour.
• The appliance shall be stored so as to prevent mechanical
damage from occurring.
• Disposing of the product shall be done properly, in
compliance with national or regional regulations.
• During transportation or relocation of the indoor unit, pipes
shall be covered with the wall hook bracket for protection.
Do not move the appliance by holding the indoor unit pipes.
(The stress applied to the pipe joints may cause the
À ammable gas to leak during operation).
• This appliance is not intended for use by persons (including
children) with reduced physical, sensory or mental
capabilities, or lack of experience and knowledge, unless they
have been given supervision or instruction concerning use of
the appliance by a person responsible for their safety.
• Children should be supervised to ensure that they do not play
with the appliance.
(continued)
9333003023_OM_EN.indd 1
En-1PART No. 9333003023
8/12/2013 8:53:38 AM
Page 2
AIR CONDITIONER
Wall Mounted Type
ASTG07CMCA
R32
REFRIGERANT
This Air Conditioner contains and
operates with refrigerant R32.
THIS PRODUCT MUST ONLY BE INSTALLED OR SERVICED
BY QUALIFIED PERSONNEL.
Refer to Commonwealth, State, Territory and local legislation,
regulations, codes, installation & operation manuals, before
the installation, maintenance or service of this product.
OPERATING MANUAL
Contents
Safety Precautions ..........................................................En1
Indoor Unit Overview and Operations .............................En3
Remote Controller Overview and Operations ..................En
Timer Operation...............................................................En
Human Sensor (Energy Saving) ......................................En
Demand Response and Indoor Unit Operation ...............En
General Informations on Operation .................................En9
Care and Cleaning.........................................................En10
Troubleshooting .............................................................En12
ASTG09CMCA
ASTG12CMCA
Before using this product, read these instructions thoroughly and keep this manual for future reference.
Safety Precautions
To prevent personal injury, injury to others, or property damage, read this section carefully before you use this product, and be sure to comply to the
following safety precautions.
Incorrect operation due to failure to follow the instructions may cause harm or damage, the seriousness of which is classi¿ ed as follows:
WARNING CAUTION
This mark warns of death or serious injury. This mark warns of injury or damage to property.
This mark denotes an action that is PROHIBITED.
E[planation of symbols displayed on the indoor unit or outdoor unit.
WARNING
CAUTION
CAUTION
CAUTION
The appliance contains no userserviceable parts. Always
consult authorized service personnel for repairing, installation,
and relocation of this product.
Improper installation or handling will cause leakage, electric
shock, or ¿ re.
In the event of a malfunction such as burning smell,
immediately stop operation of the air conditioner, and
disconnect all the power supply by turning off the electrical
breaker or disconnecting the power plug. Then consult
authorized service personnel.
Take care not to damage the power supply cable.
If it is damaged, it should only be replaced by authorized
service personnel.
In the event of refrigerant leakage, be sure to keep away
from ¿ re or any À ammables, and consult authorized service
personnel.
If you see lightning or hear thunder, there might be a lightning
strike.
To prevent electric shock hazard, turn off the air conditioner
by using the remote controller, and do not touch the unit or
the power plug during thunderstorm.
This symbol shows that this appliance uses a À ammable refrigerant. If the refrigerant is leaked and e[posure to an e[ternal
ignition source, there is a risk of ¿ re.
This symbol shows that the Operation Manual should be read carefully.
This symbol shows that a service personnel should be handling this equipment with reference to the Installation Manual.
This symbol shows that information is available such as the Operating Manual or Installation Manual.
WARNING
This mark denotes an action that is COMPULSORY.
The appliance shall be stored in a room without continuously
operating ignition sources for e[ample: open À ames, an
operating gas appliance or an operating electric heater).
The appliance shall be stored in a wellventilated area.
Be aware that refrigerants may not contain an odour.
The appliance shall be stored so as to prevent mechanical
damage from occurring.
Disposing of the product shall be done properly, in
compliance with national or regional regulations.
During transportation or relocation of the indoor unit, pipes
shall be covered with the wall hook bracket for protection.
Do not move the appliance by holding the indoor unit pipes.
(The stress applied to the pipe joints may cause the
À ammable gas to leak during operation).
This appliance is not intended for use by persons (including
children) with reduced physical, sensory or mental
capabilities, or lack of e[perience and knowledge, unless they
have been given supervision or instruction concerning use of
the appliance by a person responsible for their safety.
Children should be supervised to ensure that they do not play
with the appliance.
(continued)
En-1PART No. 9333003023
9333003023_OM_EN.indd 1 8/12/2013 8:53:38 AM
Page 3

Safety Precautions (continued)
9333003023_OM_EN.indd 2
8/12/2013 8:53:42 AM
• Do not install the unit in area ¿ lled with mineral oil such as a
factory or area containing a large amount of splashed oil or
steam such as a kitchen.
• Do not start or stop the operation of this product by inserting
or pulling out the power plug, or by turning on or off the
circuit breaker.
• Do not use inÀ ammable gases near the unit.
• Do not expose yourself directly to the cooling airÀ ow for
many hours.
• Provide occasional ventilation during use.
• Always operate the unit with air ¿ lters installed.
• Ensure that any electronic equipment is at least 1 meter
away from either the indoor unit or outdoor unit.
• Unplug the power supply cable when not using the indoor
unit for an extended period.
• After long period of use, check whether the installation stand
does not deteriorate to prevent the unit from falling down.
• The airÀ ow direction and the room temperature should be
carefully considered when you use this product in a room
with infants, children, elderly or sick persons.
• Do not direct the airÀ ow at ¿ replaces or heating apparatus.
• Do not block or cover the intake grille and the outlet port.
• Do not apply any heavy pressure to radiator ¿ ns.
• Do not climb on, place objects on, or hang objects from the unit
WARNING
CAUTION
.
• Do not insert your ¿ ngers or any other objects into outlet
port, open panel, or intake grille.
• Do not operate with wet hands.
• Do not use means to accelerate the defrosting process or to
clean the appliance, other than those recommended by the
manufacturer.
• Do not pierce or burn.
• Do not place vase or water container on the unit.
• Do not place any other electrical products or household
belongings under indoor unit or outdoor unit.
Dripping condensation from the unit might get them wet, and
may cause damage or malfunction of your property.
• Do not expose the unit directly to water.
• Do not use this product for preservation of food, plants,
animals, precision equipment, art work, or other objects. This
may cause quality deterioration of those items.
• Do not expose animals or plants to the direct airÀ ow.
• Do not drink the drainage from the air conditioner.
• Do not pull the power supply cable to disconnect the plug.
• Do not touch the aluminum ¿ ns of heat exchanger built-in
the indoor or outdoor unit to avoid personal injury when you
install or maintain the unit.
Indoor unit accessories
Remote
controller
Batteries Air cleaning ¿ lters Filter holders
Remote controller
holder
Tapping screws
(M3 × 12 mm)
Battery (R03/LR03/AAA × 2) loading and remote controller preparation
3
1
2
5
Press CLOCK ADJUST button to start clock setting.
6
Set the day of the week by pressing SELECT button (Monday to
Sunday). *By pressing the TEMP. (∧∨) buttons, the time indicator
can be changed from a 24-hour to a 12-hour clock.
7
Press NEXT button to continue.
8
Set the time by pressing SELECT button.
Pressing U or V changes the value by the minute.
Pressing down on U or V changes the value by 10 minutes.
Remote controller holder installation
321
Slide up
Screws
Take care to prevent infants and young children from accidentally swallowing the batteries.
• Do not attempt to recharge dry batteries.
• Do not use dry batteries that has been recharged.
4
9
5
9
To complete, press the SEND button close to the indoor unit.
Settings may not be properly sent if pressed from a distance.
Notes:
• Use speci¿ ed type of batteries only.
• Do not mix different types or new and used batteries together.
• Batteries can be used about 1 year in ordinary use.
• If the remote control range noticeably shortens, replace the batteries, and press RESET button as shown in page 5.
Insert
WARNING
CAUTION
7
6
8
En-2
9333003023_OM_EN.indd 2
OPERATING MANUAL
8/12/2013 8:53:42 AM
Page 4
7
Indoor Unit Overview and Operations
9333003023_OM_EN.indd 3
8/12/2013 8:53:44 AM
AIR CONDITIONER Wall Mounted Type
1 Intake grille
Before starting operation, make sure that the intake grille has been
shut completely. Incomplete closing may have an effect on the proper
function or performance of the product.
2 MANUAL AUTO button
Use when the remote controller is lost or there is a malfunction.
Status Action Mode or operation
In operation Press more than 3 seconds. Stop
Stopping Press more than 3 seconds and
After cleaning Press less than 3 seconds. Filter indicator reset
*:To stop forced cooling, press this button or START/STOP button on
the remote controller.
less than 10 seconds.
Press more than 10 seconds.
(Only for servicing.*)
AUTO
Forced cooling
3 Front panel
4 Human Sensor
Used for Energy Saving Program. Controls temperature setting by
detecting people in the room.
See page 8
5 Vertical airÀ ow direction louver
Each time you press SET button on the remote controller, the angle
of the vertical airÀ ow direction louver moves as follows:
COOL, DRY or FAN
1
2
3
4
5
6
7
• Do not adjust by hand.
• At the beginning of AUTO mode, they may stay on position 1 for a
while for adjustment.
• If the angle is set to position 4–7 for more than 30 minutes in COOL
or DRY mode, the louver will automatically return to position 3.
• Keeping the position 4-7 during COOL or DRY mode may cause
condensation to form, and the drops may damage your property.
mode**
*
12
* : Default setting in each mode.
**: Suggested setting range
3
4
FAN mode
65
6 Power diffuser
In conjunction with movement of the vertical airÀ ow direction louver,
the angle of the power diffuser moves as follows:
Vertical airÀ ow
direction louver
Power diffuser
• In SWING operation, power diffuser does not move.
2
1
3
5
4
321
76
4
7 Drain hose
1
14
13
12
11
11 OPERATION indicator (green)
Lights in normal operation, and blinks during Demand Response
operation. For details, refer to page 8.
12
Horizontal airÀ ow direction louvers
CAUTION
Before you adjust the horizontal airÀ ow direction, make sure that
the vertical airÀ ow direction louver has been stopped completely
Adjust two knobs by hand.
13
Air ¿ lter
14
Air cleaning ¿ lters
Purify or deodorize the air, and provide fresh airÀ ow.
See page 10
See page 11
2
3
4
5
6
7
8
9
10
.
8 Remote controller signal receiver
CAUTION
For appropriate signal transmission between remote controller and
indoor unit, keep the signal receiver away from the following items
- Direct sunlight or other strong lights
- Flat-panel television screen
In rooms with instantaneous À uorescent lights, such as in-
verter type ones, the signal may not be transmitted properly. In
such a case, consult the store of purchase.
9 ECONOMY indicator (green)
Lights in ECONOMY operation.
10
TIMER indicator (orange)
Lights in TIMER operation, and blinks slowly when the timer setting
error is detected.
For details, refer to “Auto-restart function” on page 9.
9333003023_OM_EN.indd 3
:
OPERATING MANUAL
En-3
8/12/2013 8:53:44 AM
Page 5
Remote Controller Overview and Operations
9333003023_OM_EN.indd 4
8/12/2013 8:53:46 AM
CAUTION
• To prevent malfunction or damage of the remote controller:
- Place remote controller at where will not be exposed to
direct sunlight or excessive heat.
- Remove batteries if the product is not going to be used for
an extended period.
- Exhausted batteries must be removed immediately, and
be disposed according to the local laws and regulations of
your region.
• If leaking battery À uid comes in contact with your skin, eyes,
or mouth, immediately rinse with plenty of clean water, and
consult your physician.
• Obstacles such as a curtain or wall between the remote
controller and the indoor unit may affect the appropriate
signal transmission.
• Do not apply strong shocks to the remote controller.
• Do not pour water on the remote controller.
22
2
8
9
10
21
20
19
18
17
11
12
13
14
15
16
You can quickly start operation with the following 3 steps:
1 START/STOP button
2 MODE button
Switches operation mode in following order.
AUTO COOL DRY FAN
3 TEMP. (temperature) buttons
Sets the desired temperature.
In COOL or DRY mode, the temperature needs to be set lower than
the current room temperature.
Otherwise, corresponding operation mode may not start.
Temperature setting range
AUTO/COOL/DRY 18–30 °C
Notes: Temperature control is not available in FAN mode.
4 Remote controller display
In this section, all the possible indicators are displayed for description.
In actual operation, the display is linked with the button operation, and
only shows the necessary indicators for each setting.
7
4
6
3
5
1
5 POWERFUL button
Activates the POWERFUL operation.
The unit will operate at maximum power and strong airÀ ow to quickly
cool down the room.
When activated, the indoor unit will emit 3 short beeps.
To turn off, press the POWERFUL button again. The indoor unit will
then emit 2 short beeps.
POWERFUL operation is automatically turned off in the following
situations:
• Adjusted room temperature reaches the set temperature in COOL,
DRY mode.
• 20 minutes have passed after the POWERFUL operation mode has been set.
Even in situations above, the POWERFUL operation will not
automatically turn off unless it has run for a certain amount of time.
Notes:
• The airÀ ow direction and the fan speed are controlled automatically.
• This operation cannot be performed simultaneously with ECONOMY
operation.
• POWERFUL operation will override the OUTDOOR UNIT LOW
NOISE, ENERGY SAVING functions. Both functions, if set, will start
after the POWERFUL operation is turned off.
6 ECONOMY button
Starts or stops ECONOMY operation that saves more electricity
than other operation modes by changing the set temperature to a
moderate setting.
By pressing the ECONOMY button, the ECONOMY indicator on the
indoor unit turns on.
• In COOL or DRY mode, the room temperature will be adjusted a few
degrees higher than the set temperature.
Notes:
• In COOL or DRY mode, the maximum output of this operation is
approximately 70 % of usual air conditioning operation.
• This operation cannot be performed during temperature monitoring
by AUTO mode.
En-4
9333003023_OM_EN.indd 4
OPERATING MANUAL
(continued)
8/12/2013 8:53:46 AM
Page 6
AIR CONDITIONER Wall Mounted Type
9333003023_OM_EN.indd 5
8/12/2013 8:53:47 AM
Remote Controller Overview and Operations (continued)
7 Signal transmitter
Aim at the signal receiver of the indoor unit properly.
• Signal transmit indicator
that the signal from the remote controller is being transmitted.
• Operating range is approximately 7 m.
• You will hear a beep if the transmitted signal has been sent properly.
If there is no beep, press the button on the remote controller again.
on the remote controller display shows
8 FAN button
Controls the fan speed.
(AUTO) (HIGH) (MED) (LOW) (QUIET)
• When AUTO is selected, the fan speed is automatically adjusted
according to the operation mode.
9 SWING button
Starts or stops automatic swing of the vertical airÀ ow direction louver.
• The Swing operation range will differ by mode as follows:
COOL, DRY, or FAN
1
2
3
4
5
6
7
Notes:
• SWING operation may stop temporarily when the indoor unit fan is
rotating at very low speed or is stopped.
• In FAN mode, swing operation range of 1 l 3 or 4 l 7 is decided
according to the airÀ ow direction previously set before starting the
swing operation.
mode
12
3
10 SET button
Adjusts the vertical airÀ ow direction.
11
WEEKLY timer button
Activates the WEEKLY timer for a maximum of 4 on or off programs
per day, each day of the week.
12 SLEEP timer button
Activates the SLEEP timer that helps you to fall asleep comfortably
with gradual temperature control.
13 ON/OFF timer button
Activates the ON/OFF timer.
4
FAN mode
765
See page 3
See page 6
See page 6
See page 6
14 NEXT button
Used for adjusting the timer setting.
15 BACK button
Used for adjusting the timer setting.
16 RESET button
When you press the RESET button, press it gently by using the tip of
a ballpoint pen or other small object in correct direction as shown in
this ¿ gure.
20 SELECT button
Used for adjusting the clock or timer.
21
OUTDOOR UNIT LOW NOISE button
Starts or stops OUTDOOR UNIT LOW NOISE operation that lowers
noise generated from the outdoor unit by cutting down the rotation
number of the compressor, and suppressing the fan speed.
Once the operation is set, the setting is preserved until you press this
button again to stop the operation, even if the indoor unit operation is
stopped.
on the remote controller display shows that the unit is in
OUTDOOR UNIT LOW NOISE mode.
Notes:
• This operation cannot be performed simultaneously with FAN, DRY
and POWERFUL operation modes.
22
SENSOR button (ENERGY SAVING PROGRAM)
Activates or deactivates the energy saving program.
* The Energy Saving program is ON at the time of purchase.
: The setting must be done while the setting screen is displayed for
each function.
: The button is controllable only when the air conditioner is on.
See page 8
RESET
17 CLOCK ADJUST button
Used for adjusting the clock.
18 SEND button
Used for sending the timer/clock setting.
19 TIMER SETTING button
Used to enter the timer setting mode.
9333003023_OM_EN.indd 5
See page 2
See page 6
OPERATING MANUAL
En-5
8/12/2013 8:53:47 AM
Page 7
Timer Operation
9333003023_OM_EN.indd 6
8/12/2013 8:53:48 AM
Note for timer settings:
Any interruption of the power supply, such as a blackout or cutting off of a circuit breaker, makes the set internal clock incorrect.
In such a case, the TIMER indicator on the indoor unit blinks, and you need to readjust the setting.
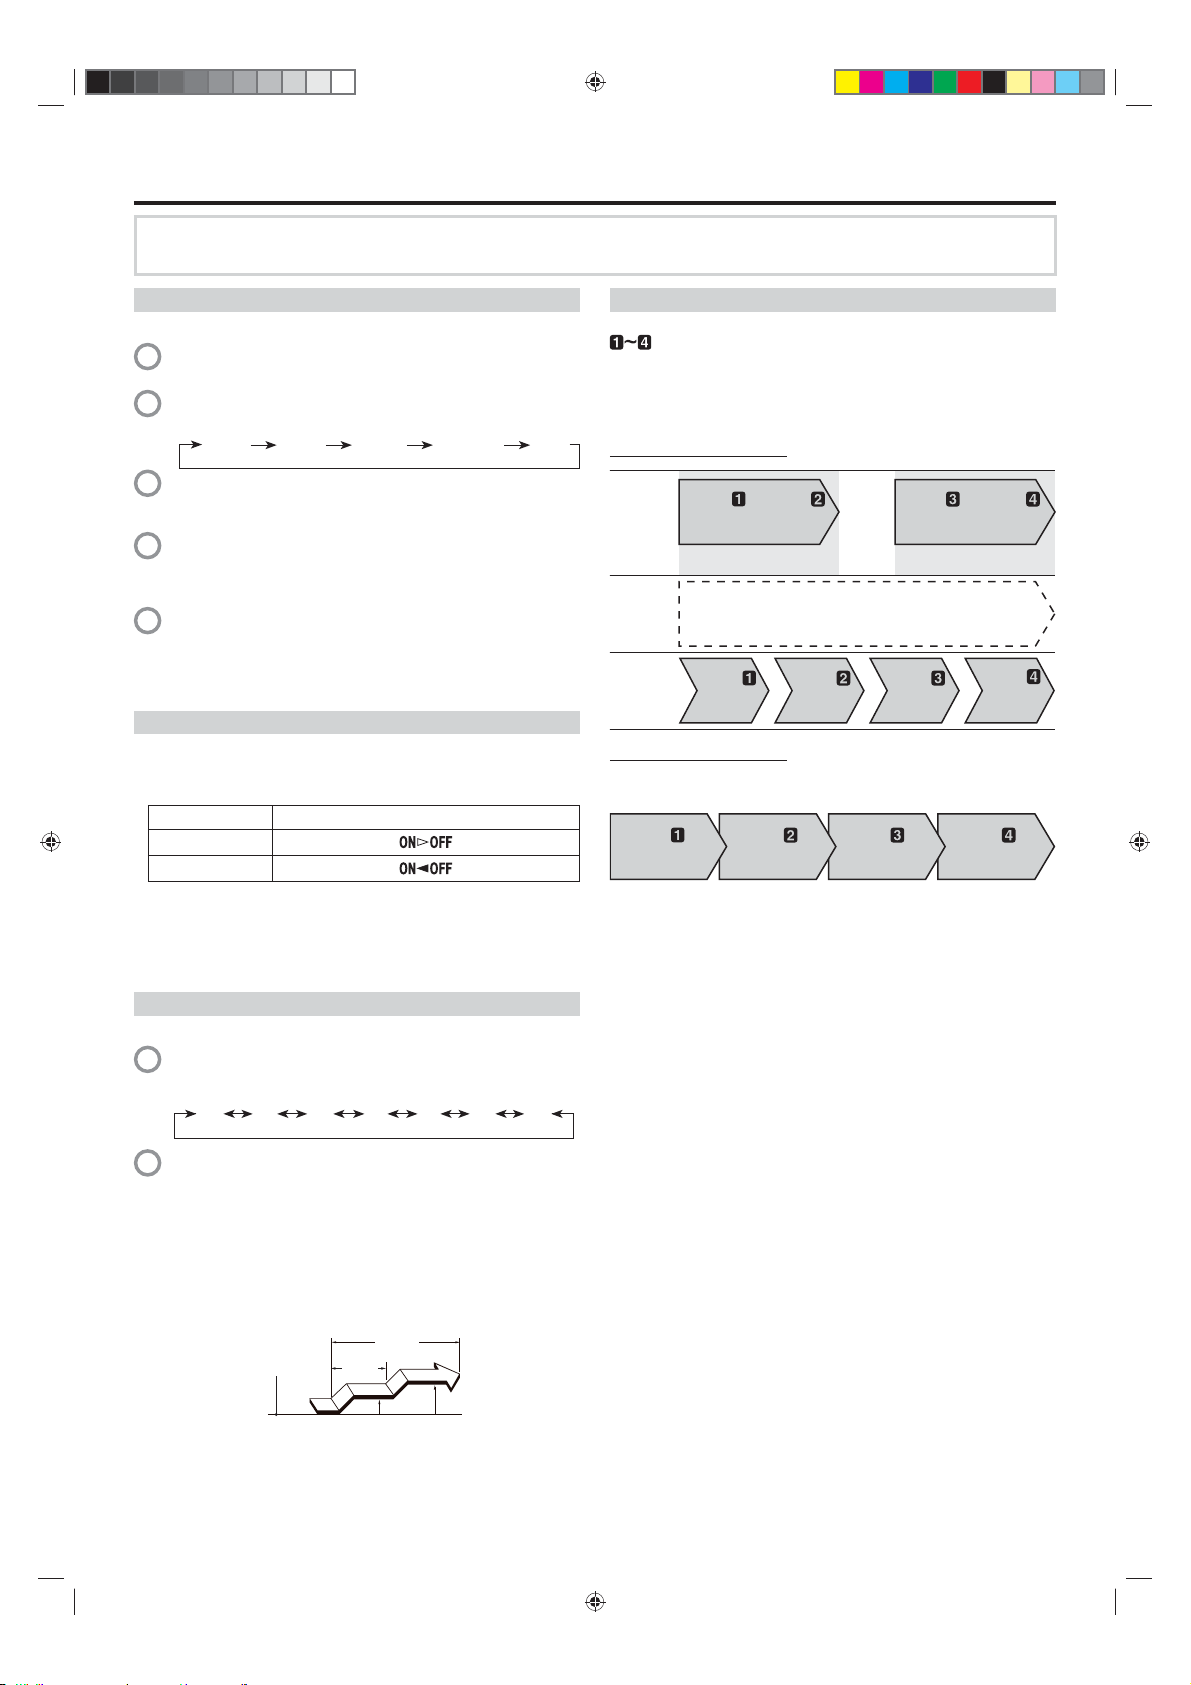
ON timer or OFF timer
You can set the ON timer or OFF timer with the following steps.
Press the TIMER SETTING button to start the setting.
1
The WEEKLY indicator will be À ashing on the remote controller.
Press the SELECT button to choose the desired mode. The mode
2
will change as follows:
WEEKLY
Press the NEXT button. Continue to setting for each mode.
3
* To cancel timer setting during the setting process, press the
TIMER SETTING button again.
Adjust the time by pressing the SELECT button while the clock
4
indicator is blinking. Each time you press the button, the time will
ON/OFF
(ON)
ON/OFF
(OFF)
ON/OFF
⇔
(ON
OFF)
SLEEP
(OFF)
WEEKLY timer
ON and OFF timer can be combined, and up to 4 reservations (program
Before setting the program, please set the week and time of the air
conditioner ¿ rst.
If the week and time are not set, the weekly timer will not operate
correctly at the set time.
Please refer to "remote controller preparation" (page 2).
Example of WEEKLY timer 1
Monday to
Friday
change by +5/-5 minutes. Pressing down will change the time by
+10/-10 minutes.
Press the SEND button.
5
To redo the timer setting, perform step 1 to 5 again.
To cancel the ON/OFF timer, press the ON/OFF button while the ON/
OFF indicator is on. (Erases the indicator)
Saturday
Sunday
Program timer (combined use of the ON timer and the OFF timer)
You can set an integrated ON–OFF or OFF–ON timer.
Either of the timer whose con¿ gured starting time is closer to the
current time works ¿ rst, and the order of timer operation is displayed
as follows:
Timer Indicator on remote controller display
ON–OFF timer
OFF–ON timer
To set the program timer, conduct the same steps 1~5 for the ON/
OFF timer. (Select ON⇔OFF in Step 2)
Notes:
• If you change the setting value for the timer after the program timer
is set, the counting down of the timer will be reset at that moment.
• Time setting for each combination should be within a span of 24 hours
SLEEP timer
To set the SLEEP timer, ¿ rst follow steps 1~3 for the ON/OFF timer.
Adjust the time by pressing the SELECT button while the clock
4
indicator is blinking.
Each time you press the button, the time changes as follows:
0H
00M
30M
(30 min.)
Press the SEND button.
5
00M
00M
00M
5H
3H
2H
1H
To cancel the SLEEP timer, press the SLEEP button while the SLEEP
indicator is on. (Erases the indicator)
7H
00M
9H
00M
hours
Example of WEEKLY timer 2
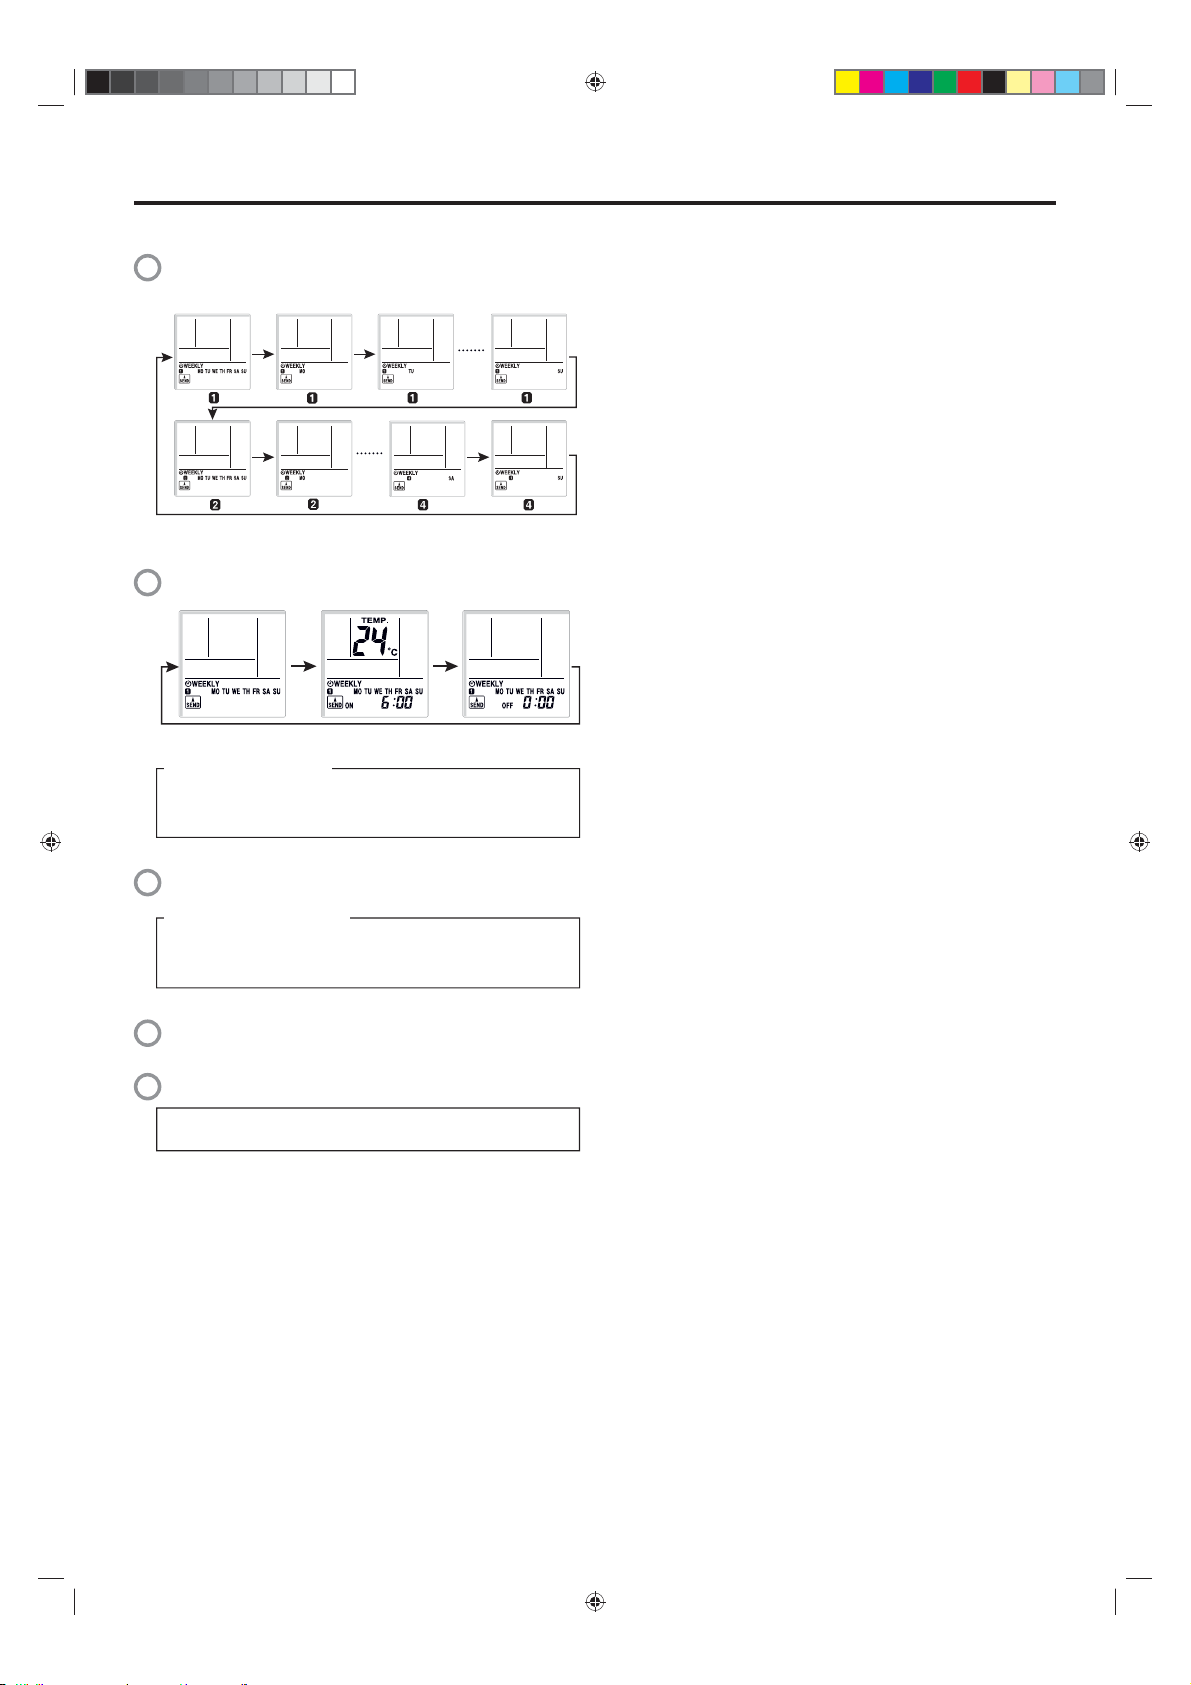
You can specify a given temperature in the ON setting in WEEKLY
timer.
Program
7:00 ON 28°C
* You can set the temperature for AUTO, COOL, and DRY modes within
the range of 18-30°C.
Notes:
• Operations modes other than the temperature setting will be the
same at the last time operation was stopped, so Cooling ĺ Dry ĺ
.
Cooling ĺ Dry type of operations cannot be automatically set.
• If you set the ON timer and OFF timer on the same time, the air
conditioner will run the ON timer. If two ON timer are set at the same
time, the air conditioner will run in the order of the program number.
• If there is a power interruption, such as due to a power outage
during the WEEKLY timer setting or a circuit breaker cutting out,
the internal timer of the air conditioner will be incorrect. (See page
9 "Auto-restart".) In such a case, the main timer lamp will notify you
of this by À ashing, so carry out matching of the time and date. (See
page 2 "remote controller preparation".)
• You cannot use the WEEKLY timer together with the other timers.
If you want to run the product on WEEKLY timer after using the ON/
OFF Timer, Program Timer, or SLEEP Timer while the WEEKLY
timer is running, you need to activate the WEEKLY timer again.
) per day and 28 reservations per week.
Program
7:00 ON 26°C
Wake up
Program
ON ON ON ON
Leave for work
9:00 OFF
Program
9:00 ON 26°C
Program
9:00 OFF
No timer settings
Program
11:00 OFF
Program
17:00 ON 27°C
Program
17:00 ON 28°C
Come back home
Program
17:00 OFF
Program
23:00 OFF
Go to sleep
Program
23:00 OFF
Program
23:00 ON 28°C
To help you to fall asleep comfortably and prevent excessive
cooling in sleep, the SLEEP timer controls the temperature setting
automatically in accordance with the set time shown as follows. The
air conditioner completely turns off after the set time has elapsed.
In COOL or DRY mode
Set time
En-6
9333003023_OM_EN.indd 6
OPERATING MANUAL
Set temperature
1 hour
1 °C
2 °C
(continued)
8/12/2013 8:53:48 AM
Page 8
Timer Operation (continued)
9333003023_OM_EN.indd 7
8/12/2013 8:53:49 AM
To set the WEEKLY timer, ¿ rst follow steps 1~3 on page 6 for the ON/
OFF timer.
Select the program number and the day using the SELECT
4
button.
AIR CONDITIONER Wall Mounted Type
Program 1Week
Program
1Week
Program
Program
Monday
Monday
Program
Tuesday Program Sunday
Saturday Program Sunday
Program
Press the NEXT button, when the program number and day you
want to set are À ashing.
Using the SELECT button select the operation mode(ON timer,
5
OFF timer, or without a timer).
To operate without a timer
1. Press the NEXT button to go back to step 4 and con¿ gure the
next setting.
2. Press the SEND button to ¿ nish
Press the NEXT button.
Press the SELECT button to set the desired ON time or OFF
6
time.
If you selected OFF in step 5
1. Press the NEXT button to go back to step 4 and con¿ gure the
next setting.
2. Press the SEND button.
Press the NEXT button.
Press the SELECT button to set the temperature.
7
If you want to move on to the next setting, press the NEXT button,
return to step 4 and con¿ gure the next setting.
8
To complete the setting, press the SEND button.
If you want to cancel the setting midway, please press the
TIMER SETTING button instead of pressing the SEND button.
Notes:
Ɣ When canceling the WEEKLY timer, select No Timer Operation in
Step 5 in the WEEKLY timer setting.
Ɣ If you want to go back to the previous step when con¿ guring
settings, press the BACK button to return to the previous step.
Ɣ Press the SEND button, when you are close to the main unit. If you
do so when far from the main unit, the signal may not get properly
sent, and the settings may not get properly con¿ gured.
Ɣ To check the schedule, repeat steps 1 to 3 to enter the WEEKLY
timer mode, then use the SELECT button to browse through the
WEEKLY timer settings in the order shown in step 4.
Ɣ To cancel the WEEKLY timer, press the WEEKLY button while the
WEEKLY indicator is on. (Erases the indicator)
9333003023_OM_EN.indd 7
OPERATING MANUAL
En-7
8/12/2013 8:53:49 AM
Page 9

Human Sensor (Energy Saving)
9333003023_OM_EN.indd 8
8/12/2013 8:53:50 AM
To prevent waste of electricity, this function controls the temperature
setting when no one is occupying the room. Energy Saving program is
on at the time of purchase.
To activate the Energy Saving program, press the SENSOR
1
button.
display.
To deactivate the Energy Saving program, press the SENSOR
2
button again.
display.
About the ENERGY SAVING Operation
If no one enters the room for approximately 20 minutes, the set
temperature will be automatically controlled.
(When someone comes back into the room, the human sensor will
detect this, and automatically revert to the original settings.)
Operation
mode
COOL/DRY
AUTO
Ɣ When using together with the SLEEP timer (page 6), the SLEEP
timer will be prioritized.
indicator will be À ashing on the remote controller
will no longer be shown on the remote controller
(if there is no one in the room for a while)
The set temperature will be increased by a maximum of
approximately 2ÛC.
This runs the ENERGY SAVING function automatically
for the selected mode (Cooling/ Drying).
Operating details
Ɣ Application range is follows.
Vertical angle 90° (Side view) Horizontal angle 100° (Top view)
7 m
ENERGY SAVING function may not work when the room temperature is
very different from the temperature de¿ ned in temperature setting, such
as when immediately after starting the operation.
90°
7 m
50° 50°
About the HUMAN SENSOR
Details about detection with the human sensor
z
The human sensor detects whether there are people in the room
•
by looking for movement by people in the room.
Notice
Since the human sensor detects infrared light given out by
z
people, there may be cases where this detection is incorrect.
Situations in which the sensor will detect no people in the
room, even when there is someone there
z
When the temperature is high and the difference with between people’s body temperature is small.
(Such as during the summer when the temperature is 30ÛC
or higher)
z
When there is someone in the room, but they do not move for
a long period of time.
z
When someone is hidden behind a sofa, other furniture,
glass, or in similar situations.
z
When someone is wearing extremely thick clothing and has
their back facing the sensor.
Situations in which the sensor will incorrectly detect people
in the room, even when there is no one there
z
When there is a dog or a cat moving around in the room.
z
When the wind is making curtains or plants move.
z
When there are heating units, humidi¿ ers, or electric appli-
ances such as oscillating electric fans operating.
Demand Response and Indoor Unit Operation
This product is designed to be compatible with Air Conditioning Demand
Response program.
To utilize the function, you need a separate arrangement with your
electricity supplier. Please check availability in the place of use.
When your electricity supplier activates one of the following 3 Demand
Response (DR) modes, the air conditioner switches over to the
appropriate operation, and the OPERATION indicator (green) on the
indoor unit blinks to inform you the unit has entered the DR mode.
OPERATION indicator
(indoor unit)
Blinking pattern and the intervals are as follows :
Ɣ AUTO/COOL/DRY/FAN operations
The indicator will keep blinking until the unit ¿ nishes the function.
ON (4 seconds) OFF (0.5 seconds)
OFF (0.5 seconds) ON (0.5 seconds)
DR mode Description of operation in this mode
DR mode 1 Compressor off.
DR mode 2
DR mode 3
When the unit enters the DR mode, it performs moderate operation so
the cooling effect may be reduced. You cannot override this function by
changing the temperature setting using the remote controller or other
actions unless the unit ¿ nishes the function.
Note: Stopping the operation of the air conditioner by using the remote
controller or by OFF timer are valid in DR mode.
If the timer operation is interfered by an interruption of power
supply such as a blackout and the power supply is resumed, no
indication of the DR mode is performed.
During the DR mode, no indication of "¿ lter sign" is performed.
Powerful operation is performed within the operable range of the
DR mode.
When the unit ¿ nishes the function, it will perform the operation that was
previously performed before entering the DR mode.
If you have operational issues, contact your electricity supplier ¿ rst to
check whether they are activating any of the DR mode described above.
If the air conditioner is under demand controlling, consult the issues with
your electricity supplier.
If they are not demand controlling the air conditioner, refer to your
warranty card for the contact details of Fujitsu General (AUST.) PTY
LIMITED or visit our website : www.fujitsugeneral.com.au
The air conditioner continues to cool during the
Demand Response event, but the electrical energy
consumed by the air conditioner in a half hour period
is not more than 50% of the total electrical energy that
would be consumed if operating at the rated capacity in
a half hour period.
The air conditioner continues to cool during the
Demand Response event, but the electrical energy
consumed by the air conditioner in a half hour period
is not more than 75% of the total electrical energy that
would be consumed if operating at the rated capacity in
a half hour period.
En-8
9333003023_OM_EN.indd 8
OPERATING MANUAL
8/12/2013 8:53:50 AM
Page 10

AIR CONDITIONER Wall Mounted Type
9333003023_OM_EN.indd 9
8/12/2013 8:53:50 AM
General Informations on Operation
Auto-restart function
In event of power interruption such as a blackout, the air
conditioner stops once. But it restarts automatically and
performs previous operation when the power supply is resumed.
If any power interruption occurs after the timer is set, counting
down of the timer will be reset.
After the power supply is resumed, the TIMER indicator on the
indoor unit blinks to notify you that there has been a timer fault.
In such a case, reset the timer for your opportune time.
Malfunctions caused by other electrical devices:
Use of other electrical appliances such as an electric shaver or
nearby use of a wireless radio transmitter may cause the malfunction
of the air conditioner.
If you encounter such a malfunction, turn off the circuit breaker once.
Then turn it on again, and resume operation by using the remote
controller.
Temperature and Humidity Range
Permissible ranges of temperature and humidity are as follows:
COOL/DRY Indoor temperature About 18 °C to 32 °C
Indoor humidity Below approximately 80%.
If the unit is used under higher temperature conditions than those noted here, the automatic protection circuit may operate, interrupting the operation.
If the unit is used under lower temperature conditions than those noted here, the heat exchanger may freeze, causing water leakage or other malfunction.
Ɣ Do not use the air conditioner for any purpose other than room cooling/dry or fan.
If the air conditioner is used continuously for many
hours, water may condense on the surface and drip.
9333003023_OM_EN.indd 9
OPERATING MANUAL
En-9
8/12/2013 8:53:50 AM
Page 11

Care and Cleaning
9333003023_OM_EN.indd 10
8/12/2013 8:53:50 AM
CAUTION
• Before cleaning the indoor unit, be sure to turn it off and all the power supply has been disconnected.
• Before starting operation, make sure that the intake grille has been shut completely. Incomplete closing of the intake grille might have an
effect on the proper working or performance of the air conditioner.
• Do not touch the aluminum ¿ ns of heat exchanger built-in the indoor unit to avoid personal injury when you maintain the unit.
• Do not expose the indoor unit to liquid insecticides or hair sprays.
• Do not stand on slippery, uneven or unstable surfaces when you maintain the unit.
Daily care
When cleaning the indoor unit body, mind the following:
• Do not use water hotter than 40 °C.
• Do not use scouring cleanser, volatile solvents such as benzene or
thinner.
• Wipe the unit gently by using soft cloth.
Cleaning the intake grille
Open the intake grille in direction of the arrow a. While gently
1
pressing the left and right mounting shafts of the intake grille
outward b, remove the intake grille in direction of the arrow c.
c
b
a
Wash the intake grille gently with water or wipe it gently with a
2
soft cloth moisten with warm water.
Then wipe it with a dry and soft cloth.
While holding the grille horizontal, set the left and right mounting
3
shafts into the pillow blocks at the top of the panel a. To latch
each shaft properly, insert the shaft until it snaps.
Then close the intake grille b.
a
b
b
c
b
a
a
Cleaning the air ¿ lters
Mind that you have a periodical cleaning of the air ¿ lters to prevent
reducing the operation ef¿ ciency of the product.
Using of clogged air ¿ lter with dust will lower the product performance,
and may cause airÀ ow reduction or increase of operating noise.
Clean the air ¿ lters once every 2 weeks under normal use.
Open the intake grille.
1
(Refer to a of step 1 in “Cleaning the intake grille”.)
While holding the intake grille with your hand, pull up the handle
2
of the ¿ lter in direction of the arrow and release the 2 claws b.
a
Then pull the ¿ lter out with gently sliding it downward c.
a
b
Filter holder and air cleaning ¿ lter are attached on the rear side
3
of the air ¿ lter. Remove them from the air ¿ lter by unlatching each
corner of the ¿ lter holder d.
d
d
Remove dust by using a vacuum cleaner or by washing the ¿ lter.
4
When you wash the ¿ lter, use neutral household detergent and
warm water.
After rinse the ¿ lter well, dry it throughly in a shaded place before
you reinstall it.
Attach the air cleaning ¿ lter and the ¿ lter holder to each air ¿ lter.
5
Attach the air ¿ lter with aligning both side of the ¿ lter with the front
6
panel, and push in the ¿ lter fully.
Note:
Make sure that 2 claws are ¿ rmly snapped to the guide holes on
the panel.
Close the intake grille ¿ rmly.
7
(Refer to step 4 in “Cleaning the intake grille”.)
c
a
b
d
d
Press 4 places on the intake grille to close it completely.
4
En-10
9333003023_OM_EN.indd 10
OPERATING MANUAL
8/12/2013 8:53:50 AM
Page 12

Care and Cleaning
9333003023_OM_EN.indd 11
8/12/2013 8:53:54 AM
Replacing the air cleaning ¿ lter
Remove the air ¿ lter. (Refer to step 1 in “Replacing the air ¿ lter”.)
1
Release 2 latches a of the ¿ lter holder, and turn over the holder
2
in direction of arrow b.
Remove the soiled air cleaning ¿ lter c.
Note:
Air cleaning ¿ lter is attached on each air ¿ lter.
a
b
c
Attach new or maintained air cleaning ¿ lter d to the ¿ lter holder.
3
New air cleaning ¿ lter can be attached to either of the right holder
or the left holder.
d
Latch 2 corners of the ¿ lter holder e to the air ¿ lter ¿ rmly.
4
e
a
e
AIR CONDITIONER Wall Mounted Type
Following 2 types of air cleaning ¿ lters are used in this product.
When you replace them, purchase dedicated air cleaning ¿ lters for this
product.
Apple-catechin ¿ lter: UTR-FA16
(1 sheet)
The Apple-catechin ¿ lter uses static electricity to clean ¿ ne particles
and dust in the air such as tobacco smoke and plant pollen that are
too small to see.
• This ¿ lter is disposable. Do not wash or reuse it.
• Once you open the package, use it as soon as possible. The
cleaning effect is reduced if the ¿ lter is left with the package opened.
• Replace the ¿ lter once every 3 months under normal use.
• By setting the fan speed high, the air cleaning effect increases.
Ion deodorization ¿ lter: UTR-FA16-2
(Light blue, 1 sheet)
The ¿ lter deodorizes by powerfully decomposing absorbed odors
using the oxidizing and reducing effects of ions generated by the
ultra-¿ ne-particle ceramic.
• To maintain the deodorizing effect, clean the ¿ lter once every 3
months as follows:
1. Remove the ¿ lter.
2. Flush the ¿ lter with high-pressure hot water until the surface of
the ¿ lter is covered with water.
3. Wash the ¿ lter gently with diluent nuetral detergent. Do not wash
it by wringing or rubbing to prevent reducing the deodorizing
effect by damage.
4. Rinse the ¿ lter well with water À ow.
5. Dry the ¿ lter throughly in a shaded place.
6. Reinstall the ¿ lter to the indoor unit.
• Replace the ¿ lter once every 3 years under normal use.
After extended non-use of the unit
If you have shut down the indoor unit for 1 month or more, perform the
FAN operation for half a day to dry the internal parts throughly before
you perform normal operation.
Reinstall the air ¿ lter. (Refer to step 6 in “Cleaning the air ¿ lter”.)
5
Close the intake grille ¿ rmly.
6
(Refer to step 4 in “Cleaning the intake grille” on page 10.)
Additional inspection
After long period of use, accumulated dust inside the indoor unit may
reduce the product performance even if you have maintained the unit
with instructed daily care or cleaning procedures written in this manual.
In such a case, a product inspection is recommended.
For more information, consult authorized service personnel.
9333003023_OM_EN.indd 11
OPERATING MANUAL
En-11
8/12/2013 8:53:54 AM
Page 13

Troubleshooting
9333003023_OM_EN.indd 12
8/12/2013 8:53:56 AM
WARNING
In following events, immediately stop operation of the air conditioner, and disconnect all the power supply by turning off the electrical
breaker or disconnecting the power plug. Then consult your dealer or authorized service personnel.
As long as the unit is connected to the power supply, it is not insulated from the power supply even if the unit is turned off.
• Unit smells of something burning or emits smoke
• Water leaks from the unit
Following symptoms do not indicate product malfunction, but they are normal functions or characteristics of this product.
Symptom Cause See page
Operation is delayed after
restart.
Noise is heard. During operation or immediately after stopping the air conditioner, refrigerant À owing sound may be
Smell coming from the unit. Various smells generated from interior textile, furniture, or cigarette smoke absorbed into the air
Mist or steam is emitted from
the unit.
AirÀ ow is weak or stops. In DRY mode, the indoor unit operates at low fan speed to adjust the room humidity, and may stop
Before you call for or request servicing, troubleshoot a problem by performing following checks:
Symptom Diagnostic See page
Does not operate at all.
Poor cooling performance.
The unit operates differently
from the remote controller
setting.
Immediately stop operation and turn off the electrical breaker in following cases. Then consult authorized service personnel.
• The problem persists even if you perform these checks or diagnostics.
• The OPERATION indicator and TIMER indicator blink while the ECONOMY indicator is blinking fast.
To prevent blowout of the fuse, the compressor will not operate while the protection circuit is working
for about 3 minutes after sudden OFFĺON operation of the power supply.
heard. Also it may be particularly noticeable for 2–3 minutes after starting operation.
During the operation, a slight squeaking sound produced by the minute expansion and contraction of
the front panel caused by temperature change may be heard.
conditioner may be emitted.
In COOL or DRY mode, a thin mist generated by condensation formed with sudden cooling process
may be emitted.
from time to time.
When the fan speed is set to “QUIET”, the fan rotates at very low speed and the airÀ ow is reduced. –
In COOL mode, the indoor unit fan may stop from time to time when the outdoor unit is stopped. 4
When monitoring operation is performed in AUTO mode, the fan rotates at very low speed. –
Has the circuit breaker been turned off?
Has there been a power outage?
Has a fuse blown out or the circuit breaker been tripped?
Is the timer operating?
Is the air ¿ lter dirty?
Is the intake grill or outlet port of indoor unit blocked?
Is the room temperature adjusted appropriately?
Is a window or door left opened?
Is direct or strong sunlight shinning into the room in cooling operation?
Are there other heating apparatus or computers operating, or too many people in the room in cool-
ing operation?
Is the fan speed set to “QUIET”?
When the fan speed setting is set to “QUIET”, noise reduction is prioritized and the air-conditioning
performance may become lower. If the volume of provided airÀ ow is not agreeable to your prefer-
ence, set the fan speed to “LOW” or higher fan speed.
Has the OUTDOOR UNIT LOW NOISE mode been set?
Do you have an arrangement with your electric company for Demand Response?
Are the batteries used in the remote controller exhausted?
Are the batteries used in the remote controller loaded properly?
–
–
–
–
–
–
6
10
–
4
–
5
5
8
2
En-12
9333003023_OM_EN.indd 12
OPERATING MANUAL
8/12/2013 8:53:56 AM
Page 14

Safety Precautions (continued)
Do not install the unit in area ¿ lled with mineral oil such as a
factory or area containing a large amount of splashed oil or
steam such as a kitchen.
Do not start or stop the operation of this product by inserting
or pulling out the power plug, or by turning on or off the
circuit breaker.
Do not use inÀ ammable gases near the unit.
Do not e[pose yourself directly to the cooling airÀ ow for
many hours.
Provide occasional ventilation during use.
Always operate the unit with air ¿ lters installed.
Ensure that any electronic equipment is at least 1 meter
away from either the indoor unit or outdoor unit.
Unplug the power supply cable when not using the indoor
unit for an e[tended period.
After long period of use, check whether the installation stand
does not deteriorate to prevent the unit from falling down.
The airÀ ow direction and the room temperature should be
carefully considered when you use this product in a room
with infants, children, elderly or sick persons.
Do not direct the airÀ ow at ¿ replaces or heating apparatus.
Do not block or cover the intake grille and the outlet port.
Do not apply any heavy pressure to radiator ¿ ns.
Do not climb on, place objects on, or hang objects from the unit
WARNING
CAUTION
.
Do not insert your ¿ ngers or any other objects into outlet
port, open panel, or intake grille.
Do not operate with wet hands.
Do not use means to accelerate the defrosting process or to
clean the appliance, other than those recommended by the
manufacturer.
Do not pierce or burn.
Do not place vase or water container on the unit.
Do not place any other electrical products or household
belongings under indoor unit or outdoor unit.
Dripping condensation from the unit might get them wet, and
may cause damage or malfunction of your property.
Do not e[pose the unit directly to water.
Do not use this product for preservation of food, plants,
animals, precision equipment, art work, or other objects. This
may cause quality deterioration of those items.
Do not e[pose animals or plants to the direct airÀ ow.
Do not drink the drainage from the air conditioner.
Do not pull the power supply cable to disconnect the plug.
Do not touch the aluminum ¿ ns of heat e[changer builtin
the indoor or outdoor unit to avoid personal injury when you
install or maintain the unit.
Indoor unit accessories
Remote
controller
Batteries Air cleaning ¿ lters Filter holders
Remote controller
holder
Tapping screws
(M3 × 12 mm)
Battery (R03/LR03/AAA × 2) loading and remote controller preparation
3
1
2
5
Press CLOCK ADJUST button to start clock setting.
6
Set the day of the week by pressing SELECT button (Monday to
Sunday). *By pressing the TEMP. (∧∨) buttons, the time indicator
can be changed from a 2hour to a 12hour clock.
7
Press NEXT button to continue.
8
Set the time by pressing SELECT button.
Pressing U or V changes the value by the minute.
Pressing down on U or V changes the value by 10 minutes.
Remote controller holder installation
321
Slide up
Screws
Take care to prevent infants and young children from acciden
tally swallowing the batteries.
Do not attempt to recharge dry batteries.
Do not use dry batteries that has been recharged.
4
9
5
9
To complete, press the SEND button close to the indoor unit.
Settings may not be properly sent if pressed from a distance.
Notes:
Use speci¿ ed type of batteries only.
Do not mi[ different types or new and used batteries together.
Batteries can be used about 1 year in ordinary use.
If the remote control range noticeably shortens, replace the batter
ies, and press RESET button as shown in page 5.
Insert
WARNING
CAUTION
7
6
8
En-2
9333003023_OM_EN.indd 2 8/12/2013 8:53:42 AM
OPERATING MANUAL
Page 15

7
Indoor Unit Overview and Operations
AIR CONDITIONER Wall Mounted Type
1 Intake grille
Before starting operation, make sure that the intake grille has been
shut completely. Incomplete closing may have an effect on the proper
function or performance of the product.
2 MANUAL AUTO button
Use when the remote controller is lost or there is a malfunction.
Status Action Mode or operation
In operation Press more than 3 seconds. Stop
Stopping Press more than 3 seconds and
After cleaning Press less than 3 seconds. Filter indicator reset
*:To stop forced cooling, press this button or START/STOP button on
the remote controller.
less than 10 seconds.
Press more than 10 seconds.
(Only for servicing.*)
AUTO
Forced cooling
3 Front panel
4 Human Sensor
Used for Energy Saving Program. Controls temperature setting by
detecting people in the room.
See page
5 Vertical airÀ ow direction louver
Each time you press SET button on the remote controller, the angle
of the vertical airÀ ow direction louver moves as follows:
COOL, DRY or FAN
1
2
3
4
5
6
7
Do not adjust by hand.
At the beginning of AUTO mode, they may stay on position 1 for a
while for adjustment.
If the angle is set to position 4±7 for more than 30 minutes in COOL
or DRY mode, the louver will automatically return to position 3.
Keeping the position 47 during COOL or DRY mode may cause
condensation to form, and the drops may damage your property.
mode**
*
12
* : Default setting in each mode.
**: Suggested setting range
3
4
FAN mode
65
6 Power diffuser
In conjunction with movement of the vertical airÀ ow direction louver,
the angle of the power diffuser moves as follows:
Vertical airÀ ow
direction louver
Power diffuser
In SWING operation, power diffuser does not move.
2
1
3
5
4
321
76
4
7 Drain hose
1
14
13
12
11
11 OPERATION indicator (green)
Lights in normal operation, and blinks during Demand Response
operation. For details, refer to page .
12
Horizontal airÀ ow direction louvers
CAUTION
Before you adjust the horizontal airÀ ow direction, make sure that
the vertical airÀ ow direction louver has been stopped completely
Adjust two knobs by hand.
13
Air ¿ lter
14
Air cleaning ¿ lters
Purify or deodorize the air, and provide fresh airÀ ow.
See page 10
See page 11
2
3
4
5
6
7
8
9
10
.
8 Remote controller signal receiver
CAUTION
For appropriate signal transmission between remote controller and
indoor unit, keep the signal receiver away from the following items
Direct sunlight or other strong lights
Flatpanel television screen
In rooms with instantaneous À uorescent lights, such as in
verter type ones, the signal may not be transmitted properly. In
such a case, consult the store of purchase.
:
9 ECONOMY indicator (green)
Lights in ECONOMY operation.
10
TIMER indicator (orange)
Lights in TIMER operation, and blinks slowly when the timer setting
error is detected.
For details, refer to ³Autorestart function´ on page 9.
OPERATING MANUAL
9333003023_OM_EN.indd 3 8/12/2013 8:53:44 AM
En-3
Page 16

Remote Controller Overview and Operations
CAUTION
To prevent malfunction or damage of the remote controller:
Place remote controller at where will not be e[posed to
direct sunlight or e[cessive heat.
Remove batteries if the product is not going to be used for
an e[tended period.
E[hausted batteries must be removed immediately, and
be disposed according to the local laws and regulations of
your region.
If leaking battery À uid comes in contact with your skin, eyes,
or mouth, immediately rinse with plenty of clean water, and
consult your physician.
Obstacles such as a curtain or wall between the remote
controller and the indoor unit may affect the appropriate
signal transmission.
Do not apply strong shocks to the remote controller.
Do not pour water on the remote controller.
22
2
8
9
10
21
20
19
18
17
11
12
13
14
15
16
You can quickly start operation with the following 3 steps:
1 START/STOP button
2 MODE button
Switches operation mode in following order.
AUTO COOL DRY FAN
3 TEMP. (temperature) buttons
Sets the desired temperature.
In COOL or DRY mode, the temperature needs to be set lower than
the current room temperature.
Otherwise, corresponding operation mode may not start.
Temperature setting range
AUTO/COOL/DRY 1±30 C
Notes: Temperature control is not available in FAN mode.
4 Remote controller display
In this section, all the possible indicators are displayed for description.
In actual operation, the display is linked with the button operation, and
only shows the necessary indicators for each setting.
7
4
6
3
5
1
5 POWERFUL button
Activates the POWERFUL operation.
The unit will operate at ma[imum power and strong airÀ ow to quickly
cool down the room.
When activated, the indoor unit will emit 3 short beeps.
To turn off, press the POWERFUL button again. The indoor unit will
then emit 2 short beeps.
POWERFUL operation is automatically turned off in the following
situations:
Adjusted room temperature reaches the set temperature in COOL,
DRY mode.
20 minutes have passed after the POWERFUL operation mode has been set.
Even in situations above, the POWERFUL operation will not
automatically turn off unless it has run for a certain amount of time.
Notes:
The airÀ ow direction and the fan speed are controlled automatically.
This operation cannot be performed simultaneously with ECONOMY
operation.
POWERFUL operation will override the OUTDOOR UNIT LOW
NOISE, ENERGY SAVING functions. Both functions, if set, will start
after the POWERFUL operation is turned off.
6 ECONOMY button
Starts or stops ECONOMY operation that saves more electricity
than other operation modes by changing the set temperature to a
moderate setting.
By pressing the ECONOMY button, the ECONOMY indicator on the
indoor unit turns on.
In COOL or DRY mode, the room temperature will be adjusted a few
degrees higher than the set temperature.
Notes:
In COOL or DRY mode, the ma[imum output of this operation is
appro[imately 70 of usual air conditioning operation.
This operation cannot be performed during temperature monitoring
by AUTO mode.
(continued)
En-4
9333003023_OM_EN.indd 4 8/12/2013 8:53:46 AM
OPERATING MANUAL
Page 17

AIR CONDITIONER Wall Mounted Type
Remote Controller Overview and Operations (continued)
7 Signal transmitter
Aim at the signal receiver of the indoor unit properly.
Signal transmit indicator
that the signal from the remote controller is being transmitted.
Operating range is appro[imately 7 m.
You will hear a beep if the transmitted signal has been sent properly.
If there is no beep, press the button on the remote controller again.
on the remote controller display shows
8 FAN button
Controls the fan speed.
(AUTO) (HIGH) (MED) (LOW) (QUIET)
When AUTO is selected, the fan speed is automatically adjusted
according to the operation mode.
9 SWING button
Starts or stops automatic swing of the vertical airÀ ow direction louver.
The Swing operation range will differ by mode as follows:
COOL, DRY, or FAN
1
2
3
4
5
6
7
Notes:
SWING operation may stop temporarily when the indoor unit fan is
rotating at very low speed or is stopped.
In FAN mode, swing operation range of 1 l 3 or 4 l 7 is decided
according to the airÀ ow direction previously set before starting the
swing operation.
mode
12
3
10 SET button
Adjusts the vertical airÀ ow direction.
11
WEEKLY timer button
Activates the WEEKLY timer for a ma[imum of 4 on or off programs
per day, each day of the week.
12 SLEEP timer button
Activates the SLEEP timer that helps you to fall asleep comfortably
with gradual temperature control.
13 ON/OFF timer button
Activates the ON/OFF timer.
4
FAN mode
765
See page 3
See page 6
See page 6
See page 6
14 NEXT button
Used for adjusting the timer setting.
15 BACK button
Used for adjusting the timer setting.
16 RESET button
When you press the RESET button, press it gently by using the tip of
a ballpoint pen or other small object in correct direction as shown in
this ¿ gure.
20 SELECT button
Used for adjusting the clock or timer.
21
OUTDOOR UNIT LOW NOISE button
Starts or stops OUTDOOR UNIT LOW NOISE operation that lowers
noise generated from the outdoor unit by cutting down the rotation
number of the compressor, and suppressing the fan speed.
Once the operation is set, the setting is preserved until you press this
button again to stop the operation, even if the indoor unit operation is
stopped.
OUTDOOR UNIT LOW NOISE mode.
Notes:
This operation cannot be performed simultaneously with FAN, DRY
22
Activates or deactivates the energy saving program.
* The Energy Saving program is ON at the time of purchase.
: The button is controllable only when the air conditioner is on.
on the remote controller display shows that the unit is in
and POWERFUL operation modes.
SENSOR button (ENERGY SAVING PROGRAM)
: The setting must be done while the setting screen is displayed for
each function.
See page
RESET
17 CLOCK ADJUST button
Used for adjusting the clock.
See page 2
18 SEND button
Used for sending the timer/clock setting.
19 TIMER SETTING button
Used to enter the timer setting mode.
9333003023_OM_EN.indd 5 8/12/2013 8:53:47 AM
See page 6
OPERATING MANUAL
En-5
Page 18

Timer Operation
Note for timer settings:
Any interruption of the power supply, such as a blackout or cutting off of a circuit breaker, makes the set internal clock incorrect.
In such a case, the TIMER indicator on the indoor unit blinks, and you need to readjust the setting.
ON timer or OFF timer
You can set the ON timer or OFF timer with the following steps.
Press the TIMER SETTING button to start the setting.
1
The WEEKLY indicator will be À ashing on the remote controller.
Press the SELECT button to choose the desired mode. The mode
2
will change as follows:
WEEKLY
Press the NEXT button. Continue to setting for each mode.
3
* To cancel timer setting during the setting process, press the
TIMER SETTING button again.
Adjust the time by pressing the SELECT button while the clock
4
indicator is blinking. Each time you press the button, the time will
ON/OFF
(ON)
ON/OFF
(OFF)
ON/OFF
⇔
(ON
OFF)
SLEEP
(OFF)
WEEKLY timer
ON and OFF timer can be combined, and up to 4 reservations (program
Before setting the program, please set the week and time of the air
conditioner ¿ rst.
If the week and time are not set, the weekly timer will not operate
correctly at the set time.
Please refer to "remote controller preparation" (page 2).
E[ample of WEEKLY timer 1
Monday to
Friday
change by 5/5 minutes. Pressing down will change the time by
10/10 minutes.
Press the SEND button.
5
To redo the timer setting, perform step 1 to 5 again.
To cancel the ON/OFF timer, press the ON/OFF button while the ON/
OFF indicator is on. (Erases the indicator)
Saturday
Sunday
Program timer (combined use of the ON timer and the OFF timer)
You can set an integrated ON±OFF or OFF±ON timer.
Either of the timer whose con¿ gured starting time is closer to the
current time works ¿ rst, and the order of timer operation is displayed
as follows:
Timer Indicator on remote controller display
ON±OFF timer
OFF±ON timer
To set the program timer, conduct the same steps 1~5 for the ON/
OFF timer. (Select ON⇔OFF in Step 2)
Notes:
If you change the setting value for the timer after the program timer
is set, the counting down of the timer will be reset at that moment.
Time setting for each combination should be within a span of 24 hours
SLEEP timer
To set the SLEEP timer, ¿ rst follow steps 1~3 for the ON/OFF timer.
Adjust the time by pressing the SELECT button while the clock
4
indicator is blinking.
Each time you press the button, the time changes as follows:
0H
00M
30M
(30 min.)
Press the SEND button.
5
00M
00M
00M
5H
3H
2H
1H
To cancel the SLEEP timer, press the SLEEP button while the SLEEP
indicator is on. (Erases the indicator)
7H
00M
9H
00M
hours
E[ample of WEEKLY timer 2
You can specify a given temperature in the ON setting in WEEKLY
timer.
Program
7:00 ON 2C
* You can set the temperature for AUTO, COOL, and DRY modes within
the range of 130C.
Notes:
Operations modes other than the temperature setting will be the
same at the last time operation was stopped, so Cooling ĺ Dry ĺ
.
Cooling ĺ Dry type of operations cannot be automatically set.
If you set the ON timer and OFF timer on the same time, the air
conditioner will run the ON timer. If two ON timer are set at the same
time, the air conditioner will run in the order of the program number.
If there is a power interruption, such as due to a power outage
during the WEEKLY timer setting or a circuit breaker cutting out,
the internal timer of the air conditioner will be incorrect. (See page
9 "Autorestart".) In such a case, the main timer lamp will notify you
of this by À ashing, so carry out matching of the time and date. (See
page 2 "remote controller preparation".)
You cannot use the WEEKLY timer together with the other timers.
If you want to run the product on WEEKLY timer after using the ON/
OFF Timer, Program Timer, or SLEEP Timer while the WEEKLY
timer is running, you need to activate the WEEKLY timer again.
) per day and 2 reservations per week.
Program
7:00 ON 26C
Wake u p
Program
ON ON ON ON
Leave for work
9:00 OFF
Program
9:00 ON 26C
Program
9:00 OFF
No timer settings
Program
11:00 OFF
Program
17:00 ON 27C
Program
17:00 ON 2C
Come back home
Program
17:00 OFF
Program
23:00 OFF
Go to sleep
Program
23:00 OFF
Program
23:00 ON 2C
To help you to fall asleep comfortably and prevent e[cessive
cooling in sleep, the SLEEP timer controls the temperature setting
automatically in accordance with the set time shown as follows. The
air conditioner completely turns off after the set time has elapsed.
In COOL or DRY mode
Set time
Set temperature
1 hour
1 C
2 C
(continued)
En-6
9333003023_OM_EN.indd 6 8/12/2013 8:53:48 AM
OPERATING MANUAL
Page 19

Timer Operation (continued)
To set the WEEKLY timer, ¿ rst follow steps 1~3 on page 6 for the ON/
OFF timer.
Select the program number and the day using the SELECT
4
button.
AIR CONDITIONER Wall Mounted Type
Program 1Week
1Week
Program
Program
Program
Monday
Monday
Tuesday Program Sunday
Program
Saturday Program Sunday
Program
Press the NEXT button, when the program number and day you
want to set are À ashing.
Using the SELECT button select the operation mode(ON timer,
5
OFF timer, or without a timer).
To operate without a timer
1. Press the NEXT button to go back to step 4 and con¿ gure the
ne[t setting.
2. Press the SEND button to ¿ nish
Press the NEXT button.
Press the SELECT button to set the desired ON time or OFF
6
time.
If you selected OFF in step 5
1. Press the NEXT button to go back to step 4 and con¿ gure the
ne[t setting.
2. Press the SEND button.
Press the NEXT button.
Press the SELECT button to set the temperature.
7
If you want to move on to the ne[t setting, press the NEXT button,
return to step 4 and con¿ gure the ne[t setting.
8
To complete the setting, press the SEND button.
If you want to cancel the setting midway, please press the
TIMER SETTING button instead of pressing the SEND button.
Notes:
Ɣ When canceling the WEEKLY timer, select No Timer Operation in
Step 5 in the WEEKLY timer setting.
Ɣ If you want to go back to the previous step when con¿ guring
settings, press the BACK button to return to the previous step.
Ɣ Press the SEND button, when you are close to the main unit. If you
do so when far from the main unit, the signal may not get properly
sent, and the settings may not get properly con¿ gured.
Ɣ To check the schedule, repeat steps 1 to 3 to enter the WEEKLY
timer mode, then use the SELECT button to browse through the
WEEKLY timer settings in the order shown in step 4.
Ɣ To cancel the WEEKLY timer, press the WEEKLY button while the
WEEKLY indicator is on. (Erases the indicator)
OPERATING MANUAL
9333003023_OM_EN.indd 7 8/12/2013 8:53:49 AM
En-7
Page 20

Human Sensor (Energy Saving)
To prevent waste of electricity, this function controls the temperature
setting when no one is occupying the room. Energy Saving program is
on at the time of purchase.
To activate the Energy Saving program, press the SENSOR
1
button.
display.
To deactivate the Energy Saving program, press the SENSOR
2
button again.
display.
About the ENERGY SAVING Operation
If no one enters the room for appro[imately 20 minutes, the set
temperature will be automatically controlled.
(When someone comes back into the room, the human sensor will
detect this, and automatically revert to the original settings.)
Operation
mode
COOL/DRY
AUTO
Ɣ When using together with the SLEEP timer (page 6), the SLEEP
timer will be prioritized.
indicator will be À ashing on the remote controller
will no longer be shown on the remote controller
(if there is no one in the room for a while)
The set temperature will be increased by a ma[imum of
appro[imately 2ÛC.
This runs the ENERGY SAVING function automatically
for the selected mode (Cooling/ Drying).
Operating details
Ɣ Application range is follows.
Vertical angle 90 (Side view) Horizontal angle 100 (Top view)
7 m
ENERGY SAVING function may not work when the room temperature is
very different from the temperature de¿ ned in temperature setting, such
as when immediately after starting the operation.
90
7 m
50 50
About the HUMAN SENSOR
Details about detection with the human sensor
z
The human sensor detects whether there are people in the room
by looking for movement by people in the room.
Notice
Since the human sensor detects infrared light given out by
z
people, there may be cases where this detection is incorrect.
Situations in which the sensor will detect no people in the
room, even when there is someone there
z
When the temperature is high and the difference with be
tween people’s body temperature is small.
(Such as during the summer when the temperature is 30ÛC
or higher)
z
When there is someone in the room, but they do not move for
a long period of time.
z
When someone is hidden behind a sofa, other furniture,
glass, or in similar situations.
z
When someone is wearing e[tremely thick clothing and has
their back facing the sensor.
Situations in which the sensor will incorrectly detect people
in the room, even when there is no one there
z
When there is a dog or a cat moving around in the room.
z
When the wind is making curtains or plants move.
z
When there are heating units, humidi¿ ers, or electric appli
ances such as oscillating electric fans operating.
Demand Response and Indoor Unit Operation
This product is designed to be compatible with Air Conditioning Demand
Response program.
To utilize the function, you need a separate arrangement with your
electricity supplier. Please check availability in the place of use.
When your electricity supplier activates one of the following 3 Demand
Response (DR) modes, the air conditioner switches over to the
appropriate operation, and the OPERATION indicator (green) on the
indoor unit blinks to inform you the unit has entered the DR mode.
OPERATION indicator
(indoor unit)
Blinking pattern and the intervals are as follows :
Ɣ AUTO/COOL/DRY/FAN operations
The indicator will keep blinking until the unit ¿ nishes the function.
ON (4 seconds) OFF (0.5 seconds)
OFF (0.5 seconds) ON (0.5 seconds)
DR mode Description of operation in this mode
DR mode 1 Compressor off.
DR mode 2
DR mode 3
When the unit enters the DR mode, it performs moderate operation so
the cooling effect may be reduced. You cannot override this function by
changing the temperature setting using the remote controller or other
actions unless the unit ¿ nishes the function.
Note: Stopping the operation of the air conditioner by using the remote
controller or by OFF timer are valid in DR mode.
If the timer operation is interfered by an interruption of power
supply such as a blackout and the power supply is resumed, no
indication of the DR mode is performed.
During the DR mode, no indication of "¿ lter sign" is performed.
Powerful operation is performed within the operable range of the
DR mode.
When the unit ¿ nishes the function, it will perform the operation that was
previously performed before entering the DR mode.
If you have operational issues, contact your electricity supplier ¿ rst to
check whether they are activating any of the DR mode described above.
If the air conditioner is under demand controlling, consult the issues with
your electricity supplier.
If they are not demand controlling the air conditioner, refer to your
warranty card for the contact details of Fujitsu General (AUST.) PTY
LIMITED or visit our website : www.fujitsugeneral.com.au
The air conditioner continues to cool during the
Demand Response event, but the electrical energy
consumed by the air conditioner in a half hour period
is not more than 50 of the total electrical energy that
would be consumed if operating at the rated capacity in
a half hour period.
The air conditioner continues to cool during the
Demand Response event, but the electrical energy
consumed by the air conditioner in a half hour period
is not more than 75 of the total electrical energy that
would be consumed if operating at the rated capacity in
a half hour period.
En-8
9333003023_OM_EN.indd 8 8/12/2013 8:53:50 AM
OPERATING MANUAL
Page 21

AIR CONDITIONER Wall Mounted Type
General Informations on Operation
Auto-restart function
In event of power interruption such as a blackout, the air
conditioner stops once. But it restarts automatically and
performs previous operation when the power supply is resumed.
If any power interruption occurs after the timer is set, counting
down of the timer will be reset.
After the power supply is resumed, the TIMER indicator on the
indoor unit blinks to notify you that there has been a timer fault.
In such a case, reset the timer for your opportune time.
Malfunctions caused by other electrical devices:
Use of other electrical appliances such as an electric shaver or
nearby use of a wireless radio transmitter may cause the malfunction
of the air conditioner.
If you encounter such a malfunction, turn off the circuit breaker once.
Then turn it on again, and resume operation by using the remote
controller.
Temperature and Humidity Range
Permissible ranges of temperature and humidity are as follows:
COOL/DRY Indoor temperature About 1 C to 32 C
Indoor humidity Below appro[imately 0.
If the unit is used under higher temperature conditions than those noted here, the automatic protection circuit may operate, interrupting the operation.
If the unit is used under lower temperature conditions than those noted here, the heat e[changer may freeze, causing water leakage or other mal
function.
Ɣ Do not use the air conditioner for any purpose other than room cooling/dry or fan.
If the air conditioner is used continuously for many
hours, water may condense on the surface and drip.
OPERATING MANUAL
9333003023_OM_EN.indd 9 8/12/2013 8:53:50 AM
En-9
Page 22

Care and Cleaning
CAUTION
Before cleaning the indoor unit, be sure to turn it off and all the power supply has been disconnected.
Before starting operation, make sure that the intake grille has been shut completely. Incomplete closing of the intake grille might have an
effect on the proper working or performance of the air conditioner.
Do not touch the aluminum ¿ ns of heat e[changer builtin the indoor unit to avoid personal injury when you maintain the unit.
Do not e[pose the indoor unit to liquid insecticides or hair sprays.
Do not stand on slippery, uneven or unstable surfaces when you maintain the unit.
Daily care
When cleaning the indoor unit body, mind the following:
Do not use water hotter than 40 C.
Do not use scouring cleanser, volatile solvents such as benzene or
thinner.
Wipe the unit gently by using soft cloth.
Cleaning the intake grille
Open the intake grille in direction of the arrow a. While gently
1
pressing the left and right mounting shafts of the intake grille
outward b, remove the intake grille in direction of the arrow c.
F
E
D
Wash the intake grille gently with water or wipe it gently with a
2
soft cloth moisten with warm water.
Then wipe it with a dry and soft cloth.
While holding the grille horizontal, set the left and right mounting
3
shafts into the pillow blocks at the top of the panel a. To latch
each shaft properly, insert the shaft until it snaps.
Then close the intake grille b.
a
b
b
F
E
D
a
Cleaning the air ¿ lters
Mind that you have a periodical cleaning of the air ¿ lters to prevent
reducing the operation ef¿ ciency of the product.
Using of clogged air ¿ lter with dust will lower the product performance,
and may cause airÀ ow reduction or increase of operating noise.
Clean the air ¿ lters once every 2 weeks under normal use.
Open the intake grille.
1
(Refer to a of step 1 in ³Cleaning the intake grille´.)
While holding the intake grille with your hand, pull up the handle
2
of the ¿ lter in direction of the arrow and release the 2 claws b.
a
Then pull the ¿ lter out with gently sliding it downward c.
a
b
Filter holder and air cleaning ¿ lter are attached on the rear side
3
of the air ¿ lter. Remove them from the air ¿ lter by unlatching each
corner of the ¿ lter holder d.
d
d
Remove dust by using a vacuum cleaner or by washing the ¿ lter.
4
When you wash the ¿ lter, use neutral household detergent and
warm water.
After rinse the ¿ lter well, dry it throughly in a shaded place before
you reinstall it.
Attach the air cleaning ¿ lter and the ¿ lter holder to each air ¿ lter.
5
Attach the air ¿ lter with aligning both side of the ¿ lter with the front
6
panel, and push in the ¿ lter fully.
Note:
Make sure that 2 claws are ¿ rmly snapped to the guide holes on
the panel.
Close the intake grille ¿ rmly.
7
(Refer to step 4 in ³Cleaning the intake grille´.)
c
a
b
d
d
Press 4 places on the intake grille to close it completely.
4
En-10
9333003023_OM_EN.indd 10 8/12/2013 8:53:50 AM
OPERATING MANUAL
Page 23

Care and Cleaning
Replacing the air cleaning ¿ lter
Remove the air ¿ lter. (Refer to step 1 in “Replacing the air ¿ lter´.)
1
Release 2 latches a of the ¿ lter holder, and turn over the holder
2
in direction of arrow b.
Remove the soiled air cleaning ¿ lter c.
Note:
Air cleaning ¿ lter is attached on each air ¿ lter.
a
b
c
Attach new or maintained air cleaning ¿ lter d to the ¿ lter holder.
3
New air cleaning ¿ lter can be attached to either of the right holder
or the left holder.
d
Latch 2 corners of the ¿ lter holder e to the air ¿ lter ¿ rmly.
4
e
a
e
AIR CONDITIONER Wall Mounted Type
Following 2 types of air cleaning ¿ lters are used in this product.
When you replace them, purchase dedicated air cleaning ¿ lters for this
product.
Apple-catechin ¿ lter: UTR-FA16
(1 sheet)
The Applecatechin ¿ lter uses static electricity to clean ¿ ne particles
and dust in the air such as tobacco smoke and plant pollen that are
too small to see.
This ¿ lter is disposable. Do not wash or reuse it.
Once you open the package, use it as soon as possible. The
cleaning effect is reduced if the ¿ lter is left with the package opened.
Replace the ¿ lter once every 3 months under normal use.
By setting the fan speed high, the air cleaning effect increases.
Ion deodorization ¿ lter: UTR-FA16-2
(Light blue, 1 sheet)
The ¿ lter deodorizes by powerfully decomposing absorbed odors
using the o[idizing and reducing effects of ions generated by the
ultra¿ neparticle ceramic.
To maintain the deodorizing effect, clean the ¿ lter once every 3
months as follows:
1. Remove the ¿ lter.
2. Flush the ¿ lter with highpressure hot water until the surface of
the ¿ lter is covered with water.
3. Wash the ¿ lter gently with diluent nuetral detergent. Do not wash
it by wringing or rubbing to prevent reducing the deodorizing
effect by damage.
4. Rinse the ¿ lter well with water À ow.
5. Dry the ¿ lter throughly in a shaded place.
6. Reinstall the ¿ lter to the indoor unit.
Replace the ¿ lter once every 3 years under normal use.
After extended non-use of the unit
If you have shut down the indoor unit for 1 month or more, perform the
FAN operation for half a day to dry the internal parts throughly before
you perform normal operation.
Reinstall the air ¿ lter. (Refer to step 6 in “Cleaning the air ¿ lter´.)
5
Close the intake grille ¿ rmly.
6
(Refer to step 4 in “Cleaning the intake grille´ on page 10.)
Additional inspection
After long period of use, accumulated dust inside the indoor unit may
reduce the product performance even if you have maintained the unit
with instructed daily care or cleaning procedures written in this manual.
In such a case, a product inspection is recommended.
For more information, consult authorized service personnel.
OPERATING MANUAL
9333003023_OM_EN.indd 11 8/12/2013 8:53:54 AM
En-11
Page 24

Troubleshooting
WARNING
In following events, immediately stop operation of the air conditioner, and disconnect all the power supply by turning off the electrical
breaker or disconnecting the power plug. Then consult your dealer or authorized service personnel.
As long as the unit is connected to the power supply, it is not insulated from the power supply even if the unit is turned off.
Unit smells of something burning or emits smoke
Water leaks from the unit
Following symptoms do not indicate product malfunction, but they are normal functions or characteristics of this product.
Symptom Cause See page
Operation is delayed after
restart.
Noise is heard. During operation or immediately after stopping the air conditioner, refrigerant À owing sound may be
Smell coming from the unit. Various smells generated from interior te[tile, furniture, or cigarette smoke absorbed into the air
Mist or steam is emitted from
the unit.
AirÀ ow is weak or stops. In DRY mode, the indoor unit operates at low fan speed to adjust the room humidity, and may stop
Before you call for or request servicing, troubleshoot a problem by performing following checks:
Symptom Diagnostic See page
Does not operate at all.
Poor cooling performance.
The unit operates differently
from the remote controller
setting.
Immediately stop operation and turn off the electrical breaker in following cases. Then consult authorized service personnel.
The problem persists even if you perform these checks or diagnostics.
The OPERATION indicator and TIMER indicator blink while the ECONOMY indicator is blinking fast.
To prevent blowout of the fuse, the compressor will not operate while the protection circuit is working
for about 3 minutes after sudden OFFĺON operation of the power supply.
heard. Also it may be particularly noticeable for 2±3 minutes after starting operation.
During the operation, a slight squeaking sound produced by the minute e[pansion and contraction of
the front panel caused by temperature change may be heard.
conditioner may be emitted.
In COOL or DRY mode, a thin mist generated by condensation formed with sudden cooling process
may be emitted.
from time to time.
When the fan speed is set to “QUIET´, the fan rotates at very low speed and the airÀ ow is reduced. ±
In COOL mode, the indoor unit fan may stop from time to time when the outdoor unit is stopped. 4
When monitoring operation is performed in AUTO mode, the fan rotates at very low speed. ±
Has the circuit breaker been turned off?
Has there been a power outage?
Has a fuse blown out or the circuit breaker been tripped?
Is the timer operating?
Is the air ¿ lter dirty?
Is the intake grill or outlet port of indoor unit blocked?
Is the room temperature adjusted appropriately?
Is a window or door left opened?
Is direct or strong sunlight shinning into the room in cooling operation?
Are there other heating apparatus or computers operating, or too many people in the room in cool
ing operation?
Is the fan speed set to “QUIET´?
When the fan speed setting is set to “QUIET´, noise reduction is prioritized and the airconditioning
performance may become lower. If the volume of provided airÀ ow is not agreeable to your prefer
ence, set the fan speed to “LOW´ or higher fan speed.
Has the OUTDOOR UNIT LOW NOISE mode been set?
Do you have an arrangement with your electric company for Demand Response?
Are the batteries used in the remote controller e[hausted?
Are the batteries used in the remote controller loaded properly?
±
±
±
±
±
±
6
10
±
4
±
5
5
2
En-12
9333003023_OM_EN.indd 12 8/12/2013 8:53:56 AM
OPERATING MANUAL
 Loading...