

Page 1
COOLING MODEL
ROOM AIR CONDITIONER
WALL MOUNTED TYPE
Indoor Unit
ASU30CLX1
OPERATING MANUAL
MODE D’EMPLOI
MANUAL DE FUNCIONAMIENTO
ASU36CLX1
Outdoor Unit
AOU30CLX1
AOU36CLX1
EnglishFrançaisEspañol
FUJITSU GENERAL LIMITED
9315345363_OM.indb 19315345363_OM.indb 1 9/16/2010 2:48:16 PM9/16/2010 2:48:16 PM
P/N9315345363
Page 2
CONTENTS
SAFETY PRECAUTIONS ......................................En-1
FEATURES AND FUNCTIONS .............................En-2
NAME OF PARTS .................................................En-3
PREPARATION ......................................................En-5
OPERATION ..........................................................En-6
TIMER OPERATION ..............................................En-8
SLEEP TIMER OPERATION ..................................En-9
MANUAL AUTO OPERATION ..............................En-9
ADJUSTING THE DIRECTION OF AIR
CIRCULATION ....................................................En-10
SWING OPERATION .......................................... En-11
CLEANING AND CARE ......................................En-12
TROUBLESHOOTING ........................................En-14
OPERATING TIPS ................................................En-15
SPECIFICATION ..................................................En-16
SAFETY PRECAUTIONS
Before using the appliance, read these “PRECAUTIONS” thoroughly and operate in the correct way.
●
The instructions in this section all relate to safety; be sure to maintain safe operating conditions.
●
“DANGER, “WARNING” and “CAUTION” have the following meanings in these instructions:
●
DANGER!
WARNING!
CAUTION!
DANGER!
This mark indicates procedures which, if improperly performed, are most likely to
result in the death or serious injury to the user or service personnel.
This mark indicates procedures which, if improperly performed, might lead to the
death or serious injury of the user or service personnel.
This mark indicates procedures which, if improperly performed, might possibly result
in personal harm to the user, or damage to property.
● Do not attempt to install this air conditioner by yourself.
●
This air conditioner contains no user-serviceable parts. Always consult authorized service personnel for repairs.
●
When moving, consult authorized service personnel for disconnection and installation of the air conditioner.
●
Do not become excessively chilled by staying for many hours in the direct cooling airfl ow.
● Do not insert fi ngers or objects into the outlet port or intake grille.
●
Do not start and stop air conditioner operation by disconnecting the power supply cord and so on.
● Take care not to damage the power supply cord.
● In the event of a malfunction (burning smell, etc.), immediately stop operation, turn off
the breaker, and consult authorized service personnel.
● In the event of the refrigerant leakage, be sure to keep it away from fi re or any
fl ammables. (consult an authorized service personnel)
●
If the power supply cord of this appliance is damaged, it should only be replaced by the
authorized service personal, since special purpose tools and specifi ed cord are required.
En-1
CAUTION!
● Provide occasional ventilation during use.
● Do not direct air fl ow at fi replaces or heating apparatus.
● Do not climb on, or place objects on, the air conditioner.
● Do not hang objects from the indoor unit.
● Do not set fl ower vases or water containers on top of air conditioners.
● Do not expose the air conditioner directly to water.
● Do not operate the air conditioner with wet hands.
● Do not pull power supply cord.
● Turn off power source when not using the unit for extended periods.
● Check the condition of the installation stand for damage.
● Do not place animals or plants in the direct path of the air fl ow.
● Do not drink the water drained from the air conditioner.
●
Do not use in applications involving the storage of foods, plants or animals, precision equipment, or art works.
● Do not apply any heavy pressure to radiator fi ns.
● Operate only with air fi lters installed.
● Do not block or cover the intake grille and outlet port.
Ensure that any electronic equipment is at least one metre away from either the indoor or outdoor units.
●
● Avoid installing the air conditioner near a fi replace or other heating apparatus.
●
When installing the indoor and outdoor unit, take precautions to prevent access to infants.
● Do not use infl ammable gases near the air conditioner.
●
This appliance is not intended for use by persons (including children) with reduced physical,
sensory or mental capabilities, or lack of experience and knowledge, unless they have been
given supervision or instruction concerning use of the appliance by a person responsible for
their safety. Children should be supervised to ensure that they do not play with the appliance.
9315345363_OM.indb Sec1:19315345363_OM.indb Sec1:1 9/16/2010 2:48:46 PM9/16/2010 2:48:46 PM
Page 3
FEATURES AND FUNCTIONS
INVERTER
At the start of operation, a large power is used to bring the
room quickly to the desired temperature. Afterwards, the unit
automatically switches to a low power setting for economic
and comfortable operation.
AUTO CHANGEOVER
The operation mode (cooling, dry) is switched automatically
to maintain the set temperature, and the temperature is kept
constant at all times.
PROGRAM TIMER
The program timer allows you to integrate OFF timer and
ON timer operations in a single sequence. The sequence can
involve one transition from OFF timer to ON timer, or from
ON timer to OFF timer, within a twenty-four hour period.
SLEEP TIMER
When the SLEEP button is pressed during cooling mode, the
thermostat setting is gradually raised during the period of
operation. When the set time is reached, the unit automatically turns off.
REMOVABLE OPEN PANEL
The indoor unit’s Open Panel can be removed for easy cleaning and maintenance.
MILDEW-RESISTANT FILTER
The AIR FILTER has been treated to resist mildew growth,
thus allowing cleaner use and easier care.
SUPER QUIET OPERATION
When the FAN CONTROL button is used to select QUIET, the
unit begins super-quiet operation; the indoor unit’s airfl ow
is reduced to produce quieter operation.
POLYPHENOL CATECHIN AIR CLEANING FILTER
The polyphenol catechin air cleaning fi lter uses static electricity to clean the air of fi ne particles and dust such as tobacco
smoke and plant pollen that are too small to see.
The fi lter contains catechin, which is highly effective against
various bacteria by suppressing the growth of the bacteria
adsorbed by the fi lter.
Note that when the air cleaning fi lter is installed, the amount
of air produced decreases, causing a slight decrease in the
air conditioner’s performance.
WIRELESS REMOTE CONTROLLER
The Wireless Remote Controller allows convenient control
of air conditioner operation.
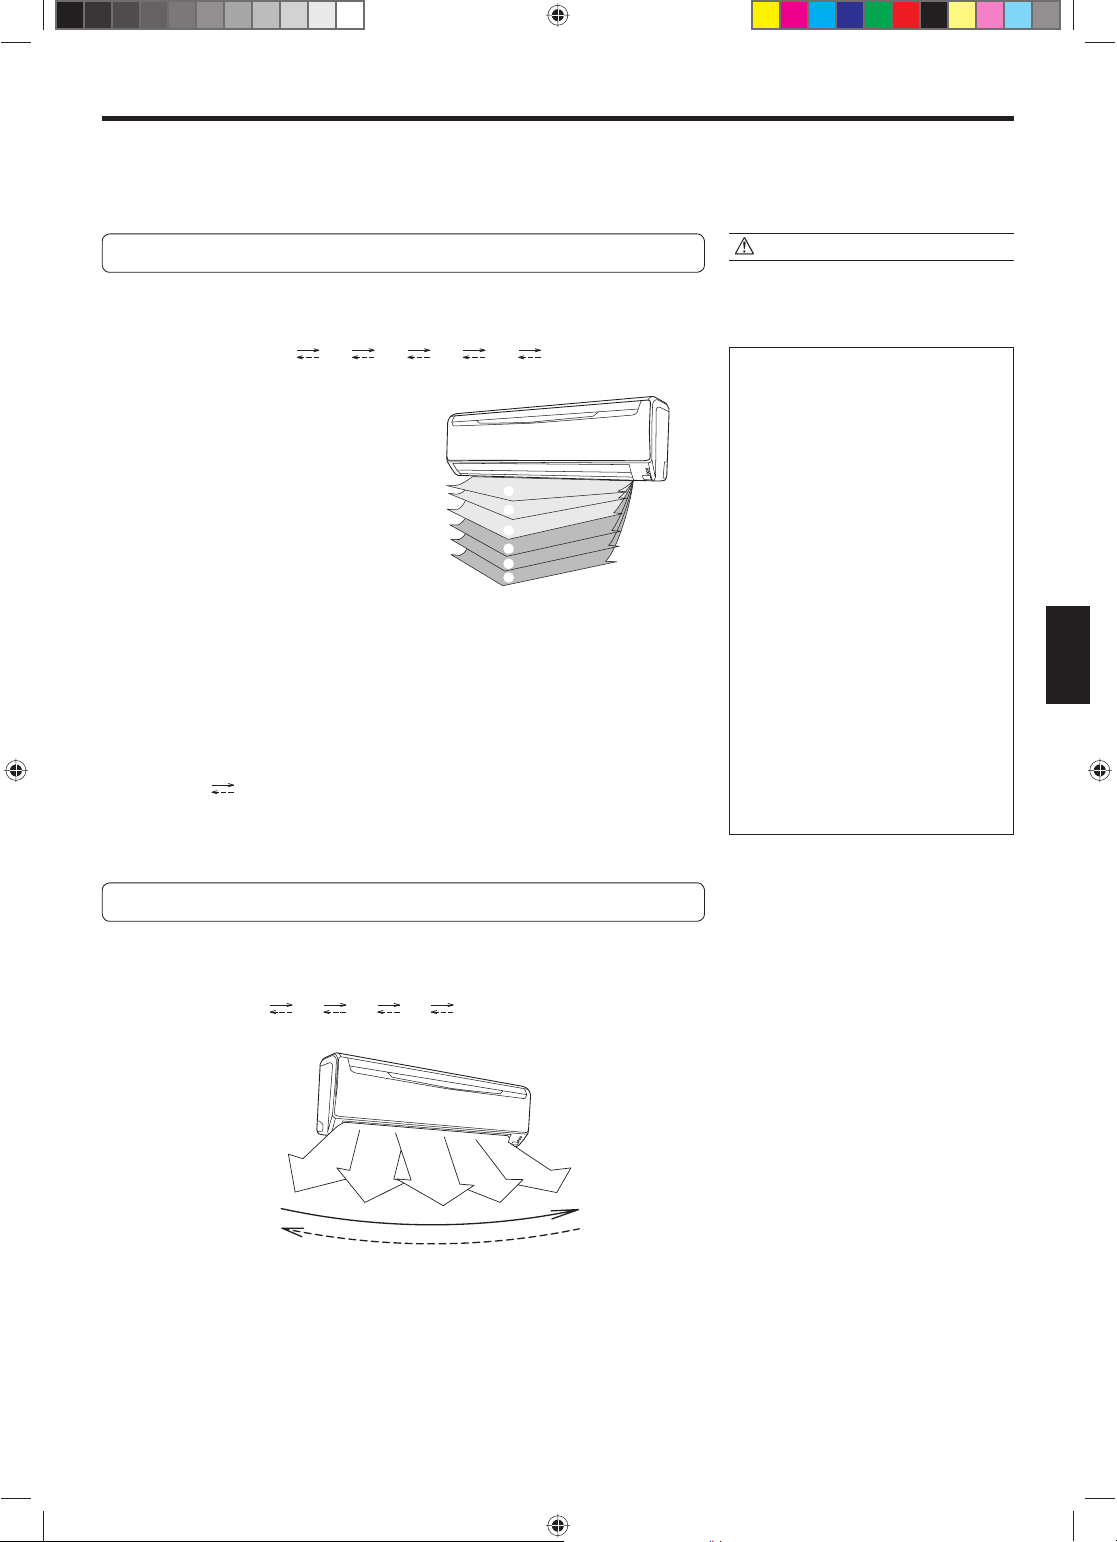
HORIZONTAL AIRFLOW
For cooling, use horizontal airfl ow so the cool air does not
blow directly on the occupants in the room.
OMNI-DIRECTIONAL AIR FLOW
(SWING OPERATION)
Three-dimensional control over air direction swing is possible through dual use of both an UP/DOWN air direction
swing and RIGHT/LEFT air direction swing. Since UP/DOWN
air direction fl aps operate automatically according to the
operating mode of the unit, it is possible to set air direction
based on the operating mode.
NEGATIVE AIR IONS DEODORIZING FILTER
It comprises pottery super micro particles, which can produce
negative air ions having the effect of deodorizing and can
absorb and remit the peculiar smell at home.
WIRED REMOTE CONTROLLER (OPTION)
The optional wired remote controller (model No.: UTY-RNBYU)
can be used
When you use remote controller, there are following different
points as compared with using wireless remote controller.
[The additional functions for wired ones]
• Weekly timer
• Temperature set back timer
[The restricted functions for wired ones]
• MAIN TENANCE (FILTER RESET)
• THERMO SENSOR
And you can’t use both wired remote controller and wireless
simultaneously.
(Only one kind can be selected)
.
En-2
9315345363_OM.indb Sec1:29315345363_OM.indb Sec1:2 9/16/2010 2:48:46 PM9/16/2010 2:48:46 PM
Page 4
NAME OF PARTS
Fig. 1
Fig. 5
Fig. 6
=
F
G
I
A
BC
M
H
E
8
9
1
3
D
X
1
Fig. 2
3
Fig. 3
8
Fig. 4
MANUAL
AUTO
OPERATION
TIMER
SUPER QUIET
2
5
6
7
4
K
L
J
N
W
P
Q
R
S
T
U
O
V
^
[
Y
]
b
a
\
Z
Fig. 7
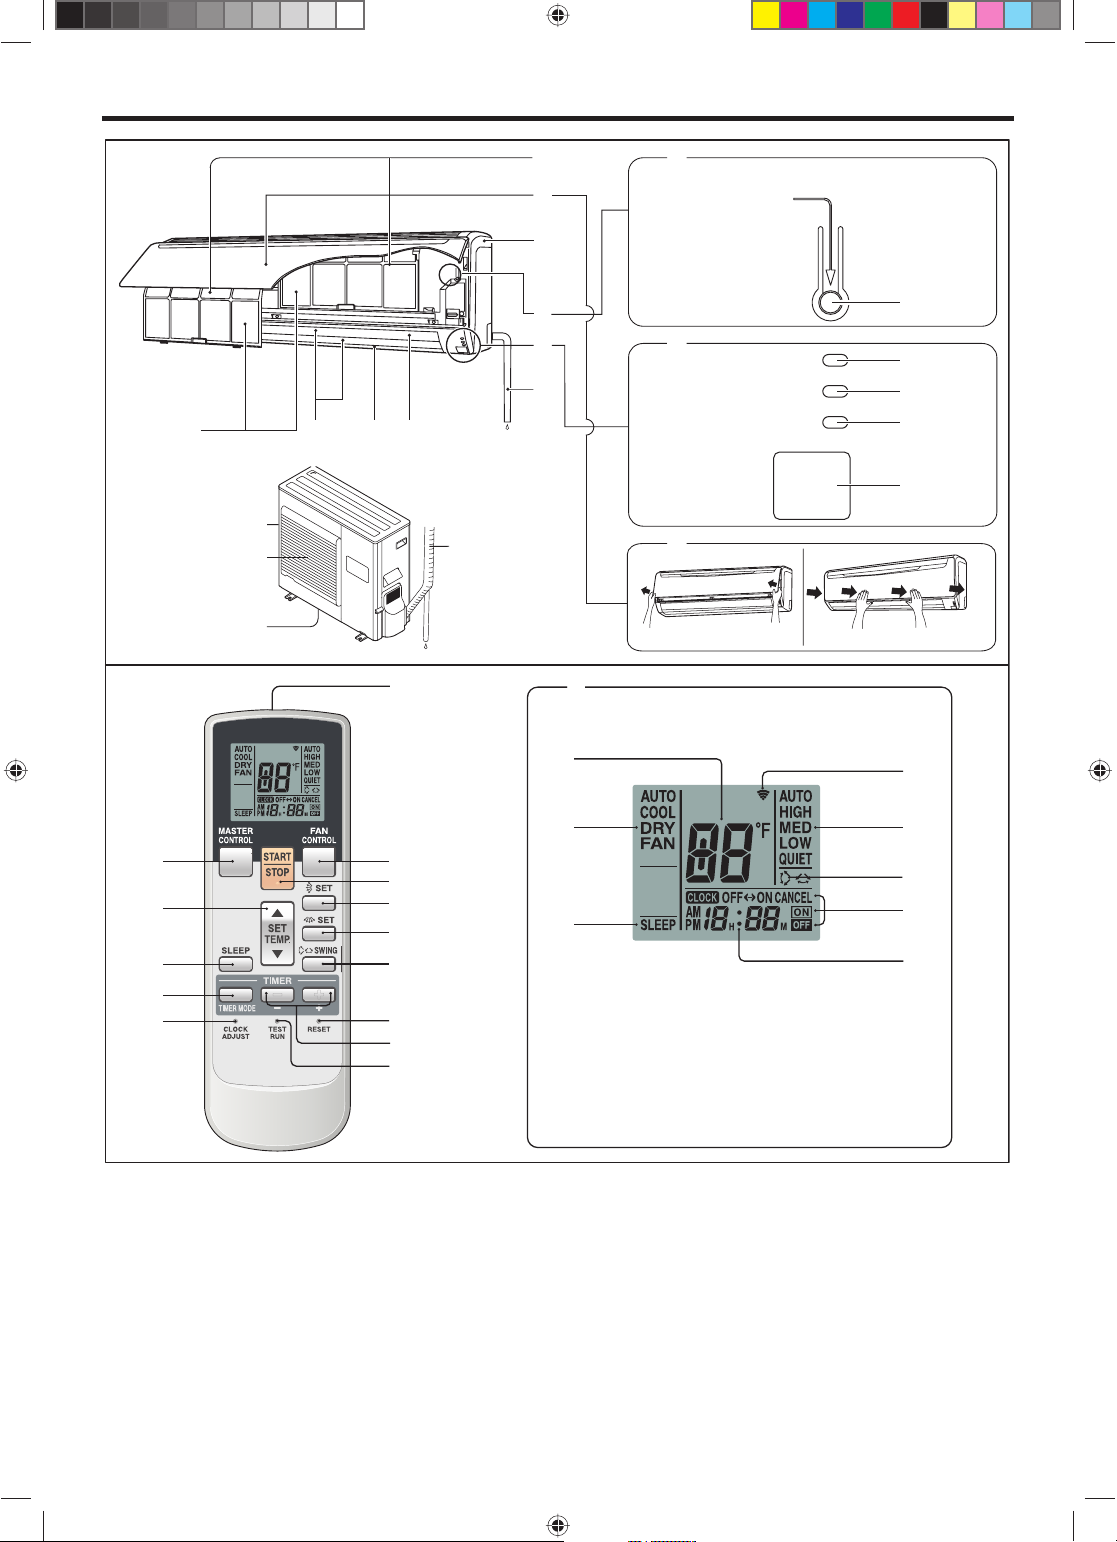
To facilitate explanation, the accompanying illustration has been drawn to show all possible indicators;
in actual operation, however, the display will only
show those indicators appropriate to the current
operation.
En-3
9315345363_OM.indb Sec1:39315345363_OM.indb Sec1:3 9/16/2010 2:48:46 PM9/16/2010 2:48:46 PM
Page 5
Fig. 1 Indoor Unit
1 Operating Control Panel (Fig. 2)
2 MANUAL AUTO button
When kept on pressing the MANUAL
●
AUTO button for more than 10 seconds,
the forced cooling operation will start.
● The forced cooling operation is used at the
time of installation.
Only for authorized service personnel’s
use.
● When the forced cooling operation starts
by any chance, press the START/STOP button to stop the operation.
3 Indicator (Fig. 3)
4 Remote Control Signal Receiver
5 OPERATION Indicator Lamp (red)
6 TIMER Indicator Lamp (green)
●
If the TIMER indicator lamp fl ashes when
the timer is operating, it indicates that a
fault has occurred with the timer setting
(See Page 15 Auto Restart).
7 SUPER QUIET Indicator Lamp (orange)
8 Intake Grille (Fig. 4)
9 Front Panel
0 Air Filter
A Air Flow Direction Louver
B Power Diffuser
C Right-Left Louver
(behind Air Flow Direction Louver)
D Drain Hose
E Air Cleaning Filter
Fig. 5 Outdoor Unit
F Intake Port
G Outlet Port
H Pipe Unit
I Drain port (bottom)
Fig. 6 Remote Controller
J SLEEP button
K MASTER CONTROL button
L SET TEMP. button (
/ )
M Signal Transmitter
N TIMER MODE button
O TIMER SET ( / ) button
P FAN CONTROL button
Q START/STOP button
R SET button (Vertical)
S SET button (Horizontal)
T SWING button
U RESET button
V TEST RUN button
● This button is used when installing the
conditioner, and should not be used under
normal conditions, as it will cause the air
conditioner’s thermostat function to operate incorrectly.
● If this button is pressed during normal
operation, the unit will switch to test operation mode, and the Indoor Unit’s OPERATION Indicator Lamp and TIMER Indicator
Lamp will begin to fl ash simultaneously.
● To stop the test operation mode, press the
START/STOP button to stop the air conditioner.
W CLOCK ADJUST button
X Remote Controller Display (Fig. 7)
Y Transmit Indicator
Z Clock Display
[ Operating Mode Display
\ T imer Mode Display
] Fan Speed Display
` Temperature SET Display
a SLEEP Display
b SWING Display
En-4
9315345363_OM.indb Sec1:49315345363_OM.indb Sec1:4 9/16/2010 2:48:48 PM9/16/2010 2:48:48 PM
Page 6
PREPARATION
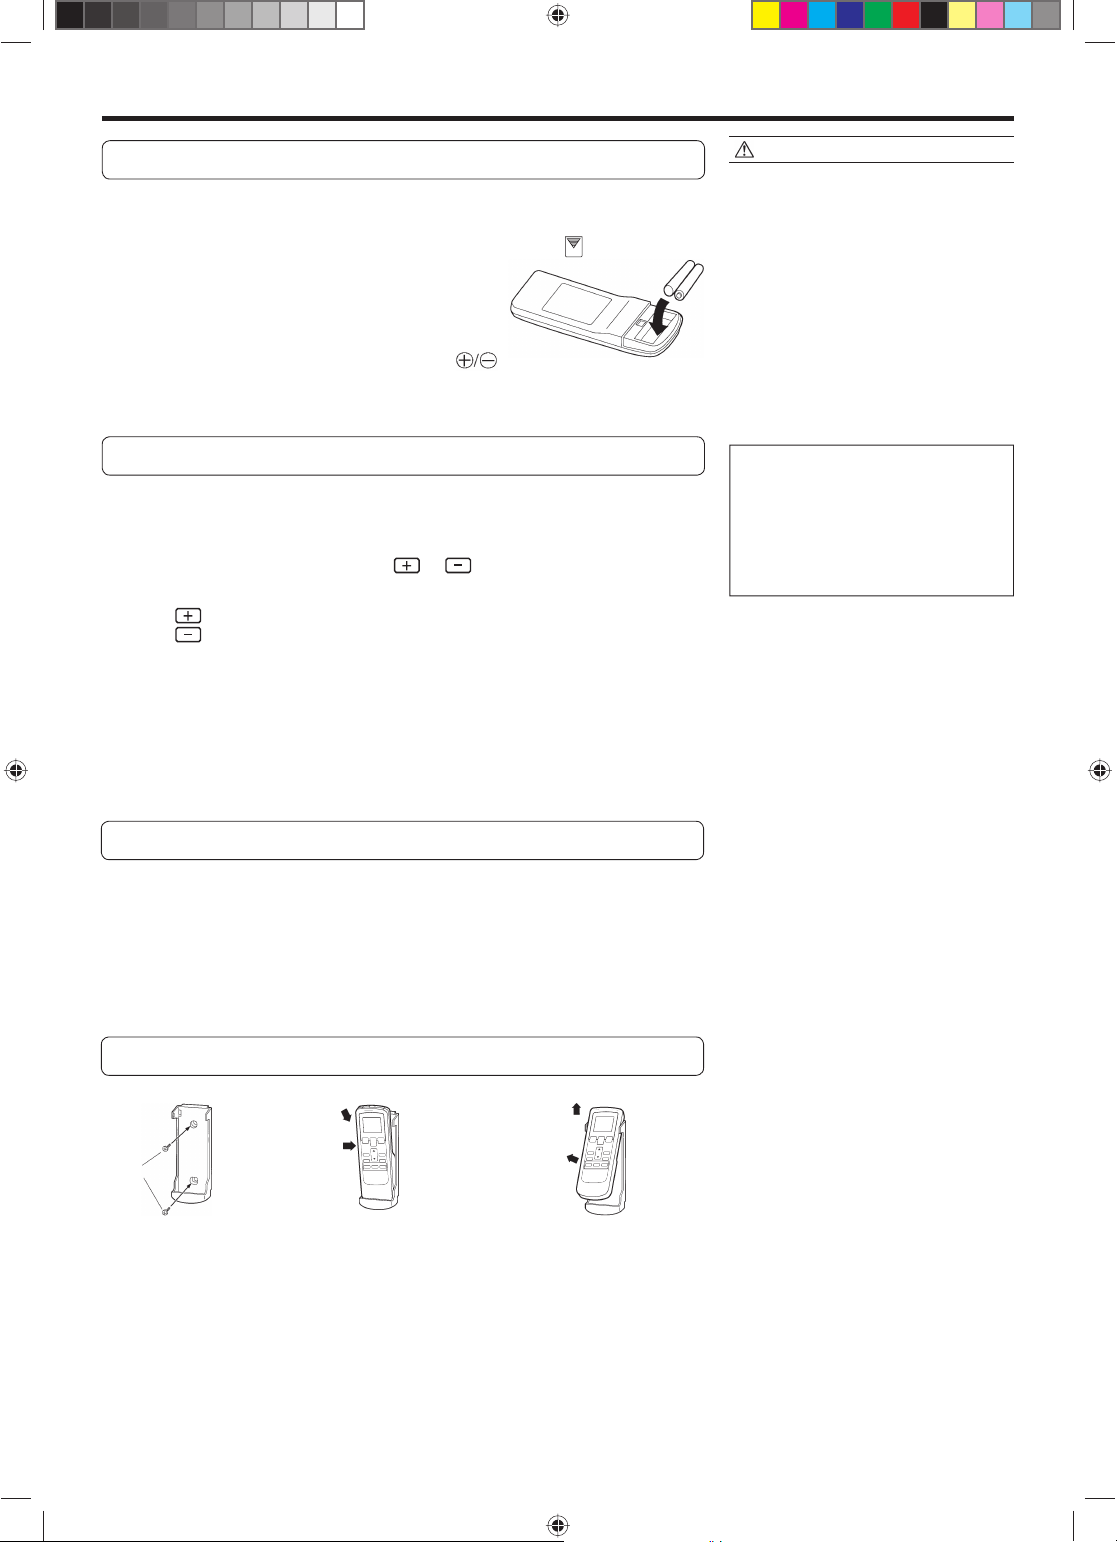
Load Batteries (AAA/R03/LR03 × 2)
Press and slide the battery compartment lid on the
1
reverse side to open it.
Slide in the direction of the arrow while pressing the mark.
Insert batteries.
2
Be sure to align the battery polarities ( ) correctly.
Close the battery compartment lid.
3
Set the Current time
Press the CLOCK ADJUST button (Fig. 6 W).
1
Use the tip of a ball-point pen or other small object to press the button.
Use the TIMER SET ( / ) buttons (Fig. 6 O) to
2
adjust the clock to the current time.
button: Press to advance the time.
(Each time the buttons are pressed, the time will be advanced/reversed in
button: Press to reverse the time.
one-minute increments; hold the buttons depressed to change the time
quickly in ten-minute increments.)
CAUTION!
● Take care to prevent infants from accidentally swallowing batteries.
● When not using the Remote Controller for an extended period, remove the
batteries to avoid possible leakage and
damage to the unit.
● If leaking battery fl uid comes in contact
with your skin, eyes, or mouth, immediately wash with copious amounts of
water, and consult your physician.
● Dead batteries should be removed
immediately and disposed of properly,
either in a battery collection receptacle
or to the appropriate authority.
● Do not attem pt to recharge dry batteries.
Never mix new and used batteries, or
batteries of different types.
Batteries should last about one year
under normal use. If the Remote Controller’s operating range becomes appreciably reduced, replace the batteries and
press the RESET button with the tip of a
ballpoint pen or other small object.
Press the CLOCK ADJUST button (Fig. 6 W) again.
3
This completes the time setting and starts the clock.
To Use the Remote Controller
● The Remote Controller must be pointed at signal receiver (Fig. 3 4) to operate
correctly.
● Operating Range: About 7 meters.
● When a signal is properly received by the air conditioner, a beeping sound will
be heard.
● If no beep is heard, press the Remote Controller button again.
Remote Controller Holder
Insert
Press in
Screws
1 Mount the Holder. 2 Set the Remote Controller.
Slide up
Pull out
3 To remove the Remote Con-
troller (when use at hand).
En-5
9315345363_OM.indb Sec1:59315345363_OM.indb Sec1:5 9/16/2010 2:48:48 PM9/16/2010 2:48:48 PM
Page 7
OPERATION
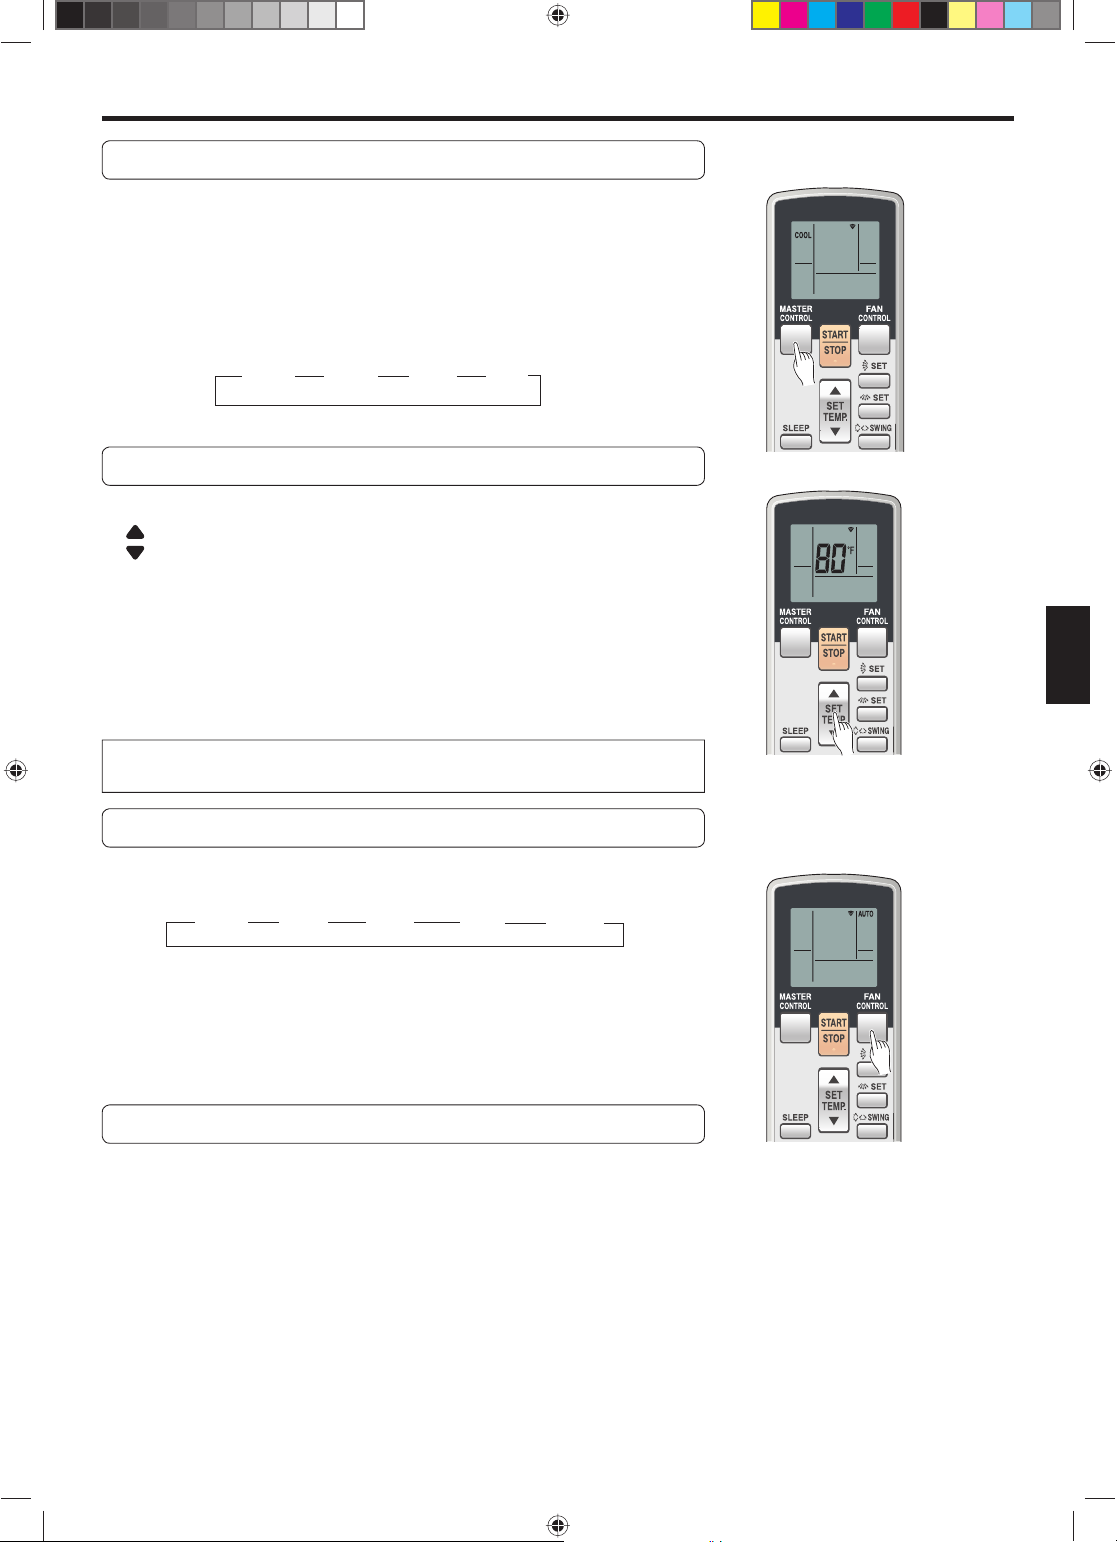
To Select Mode Operation
Press the START/STOP button (Fig.6 Q).
1
The indoor unit’s OPERATION Indicator Lamp (red) (Fig. 3 5) will light.
The air conditioner will start operating.
Press the MASTER CONTROL button (Fig.6 K) to select
2
the desired mode.
Each time the button is pressed, the mode will change in the following
order.
AUTO COOL DRY FAN
About three seconds later, the entire display will reappear.
▲
▲
▲
▲
To Set the Thermostat
Press the SET TEMP. button (Fig. 6 L).
button: Press to raise the thermostat setting.
button: Press to lower the thermostat setting.
● Thermostat setting range:
AUTO ....................................64-88 °F
Cooling/Dry ..........................64-88 °F
The thermostat cannot be used to set room temperature during the FAN mode (the
temperature will not appear on the Remote Controller’s Display).
About three seconds later, the entire display will reappear.
The thermostat setting should be considered a standard value, and may differ
somewhat from the actual room temperature.
To Set the Fan Speed
Press the FAN CONTROL button (Fig. 6 P).
Each time the button is pressed, the fan speed changes in the following order:
AUTO HIGH MED LOW QUIET
About three seconds later, the entire display will reappear.
When set to AUTO:
Cooling : As the room temperature approaches that of the thermostat setting,
Fan : The fan runs at the MED fan speed.
▲
the fan speed becomes slower.
▲
▲
▲
▲
Example: When set to COOL.
Example: When set to 80 °F.
SUPER QUIET Operation
When set to Quiet:
SUPER QUIET Indicator Lamp (orange) (Fig. 3 7) will light.
SUPER QUIET operation begins. The indoor unit’s airfl ow will be reduced for quieter
operation.
● SUPER QUIET operation cannot be used during Dry mode. (The same is true
when dry mode is selected during AUTO mode operation.)
● During Super Quiet operation, Cooling performance will be reduced somewhat. If
the room does not cool down when using SUPER QUIET Operation, please adjust
the air conditioner’s Fan Speed.
Example: When set to AUTO.
En-6
9315345363_OM.indb Sec1:69315345363_OM.indb Sec1:6 9/16/2010 2:48:48 PM9/16/2010 2:48:48 PM
Page 8

To Stop Operation
Press the START/STOP button (Fig. 6 Q).
The OPERATION Indicator Lamp (red) (Fig. 3 5) will go out.
About AUTO CHANGEOVER Operation
AUTO: ● When AUTO CHANGEOVER operation fi rst selected, the fan will oper-
ate at very low speed for about one minute, during which time the unit
detects the room conditions and selects the proper operating mode.
If the difference between thermostat setting and actual room tempera-
ture is more than +4 °F → Cooling or dry operation
If the difference between thermostat setting and actual room tempera-
ture is less than +4 °F → Monitor operation
● When the air conditioner has adjusted your room’s temperature to near
the thermostat setting, it will begin monitor operation. In the monitor
operation mode, the fan will operate at low speed. If the room temperature subsequently changes, the air conditioner will once again select
the appropriate operation (Cooling) to adjust the temperature to the
value set in the thermostat.
(The monitor operation range is +4 °F relative to the thermostat set-
ting.)
● If the mode automatically selected by the unit is not what you wish,
select one of the mode operation (COOL, DRY, FAN).
About Mode Operation
Cooling: ● Use to cool your room.
Dry: ● Use for gently cooling while dehumidifying your room.
● You cannot heat the room during Dry mode.
●
● The fan speed cannot be changed manually when Dry mode has been
Fan: ● Use to circulate the air throughout your room.
During Dry mode, the unit will operate at low speed; in order to adjust
room humidity, the indoor unit’s fan may stop from time to time. Also,
the fan may operate at very low speed when adjusting room humidity.
selected.
During Cooling/Dry mode:
Set the thermostat to a temperature setting that is lower than the current room
temperature. The Cooling and Dry modes
will not operate if the thermostat is set
higher than the actual room temperature
(in Cooling mode, the fan alone will
operate).
During Fan mode:
You can not use the unit to heat and cool
your room.
En-7
9315345363_OM.indb Sec1:79315345363_OM.indb Sec1:7 9/16/2010 2:48:50 PM9/16/2010 2:48:50 PM
Page 9
TIMER OPERATION
Before using the timer function, be sure that the Remote Controller is set to the correct current time (☞ P. 5).
To Use the ON timer or OFF timer
Press the START/STOP button (Fig. 6 Q)
1
(if the unit is already operating, proceed to step 2).
The indoor unit’s OPERATION Indicator Lamp (red) (Fig. 3 5) will light.
Press the TIMER MODE button (Fig. 6 N) to select the
2
OFF timer or ON timer operation.
Each time the button is pressed the timer function changes in the follow-
ing order:
CANCEL OFF ON
PROGRAM(OFF → ON, OFF ← ON)
The indoor unit’s green TIMER Indicator Lamp (Fig. 3 6) will light.
Use the TIMER SET buttons (Fig. 6 O) to adjust the
3
desired OFF time or ON time.
Set the time while the time display is fl ashing (the fl ashing will continue
for about fi ve seconds).
button: Press to advance the time.
button: Press to reverse the time.
About fi ve seconds later, the entire display will reappear.
▲
▲
▲
▲
To Use the Program timer
To Cancel the Timer
Use the TIMER button to select “CANCEL”.
The air conditioner will return to normal
operation.
To Change the Timer Settings
Perform steps 2 and 3.
To Stop Air Conditioner Operation while
the Timer is Operating
Press the START/STOP button.
To Change Operating Conditions
If you wish to change operating conditions
(Mode, Fan Speed, Thermostat Setting,
SUPER QUIET mode), after making the
timer setting wait until the entire display
reappears, then press the appropriate
buttons to change the operating condition
desired.
Press the START/STOP button (Fig. 6 Q).
1
(if the unit is already operating, proceed to step 2).
The indoor unit’s OPERATION Indicator Lamp (red) (Fig. 3 5) will light.
Set the desired times for OFF timer and ON timer.
2
See the section “To Use the ON timer or OFF timer” to set the desired
mode and times.
About three seconds later, the entire display will reappear.
The indoor unit’s TIMER Indicator Lamp (green) (Fig. 3 6) will light.
Press the TIMER MODE button (Fig. 6 N) to select the
3
PROGRAM timer operation (OFF ON or OFF ON
will display).
The display will alternately show “OFF timer” and “ON timer”, then
change to show the time setting for the operation to occur fi rst.
● The program timer will begin operation. (If the ON timer has been
selected to operate fi rst, the unit will stop operating at this point.)
About fi ve seconds later, the entire display will reappear.
About the Program timer
● The program timer allows you to integrate OFF timer and ON timer operations
in a single sequence. The sequence can involve one transition from OFF timer to
ON timer, or from ON timer to OFF timer, within a twenty-four hour period.
● The fi rst timer function to operate will be the one set nearest to the current time.
The order of operation is indicated by the arrow in the Remote Controller’s Display
(OFF → ON, or OFF ← ON).
● One example of Program timer use might be to have the air conditioner automati-
cally stop (OFF timer) after you go to sleep, then start (ON timer) automatically
in the morning before you arise.
To Cancel the Timer
Use the TIMER MODE button to select
“CANCEL”.
The air conditioner will return to normal
operation.
To Change the Timer Settings
Follow the instructions given in the section
1.
“To Use the ON Timer or OFF Timer” to select the timer setting you wish to change.
2. Press the TIMER MODE button to select
either OFF ON or OFF ON.
To Stop Air Conditioner Operation while
the Timer is Operating
Press the START/STOP button.
To Change Operating Conditions
If you wish to change operating conditions
(Mode, Fan Speed, Thermostat Setting, SUPER QUIET mode), after making the timer
setting wait until the entire display reappears, then press the appropriate buttons
to change the operating condition desired.
En-8
9315345363_OM.indb Sec1:89315345363_OM.indb Sec1:8 9/16/2010 2:48:50 PM9/16/2010 2:48:50 PM
Page 10
SLEEP TIMER OPERATION
Unlike other timer functions, the SLEEP timer is used to set the length of time until air conditioner operate is stopped.
To Use the SLEEP Timer
While the air conditioner is operating or stopped, press the
SLEEP button (Fig. 6 J).
The indoor unit’s OPERATION Indicator Lamp (red) (Fig. 3 5) lights and the TIMER
Indicator Lamp (green) (Fig. 3 6) light.
To Change the Timer Settings
Press the SLEEP button (Fig. 6 J) once again and set the time
using the TIMER SET ( / ) buttons (Fig. 6 O).
Set the time while the Timer Mode Display is fl ashing (the fl ashing will continue
about fi ve seconds).
button: Press to advance the time.
button: Press to reverse the time.
About fi ve seconds later, the entire display will reappear.
About the SLEEP Timer
To prevent excessive cooling during sleep, the SLEEP timer function automatically modifi es the thermostat setting in accordance with the set time setting. When the set time has elapsed, the air conditioner completely stops.
To Cancel the Timer:
Use the TIMER MODE button to select
“CANCEL”.
The air conditioner will return to normal
operation.
To Stop the Air Conditioner During
Timer Operation:
Press the START/STOP button.
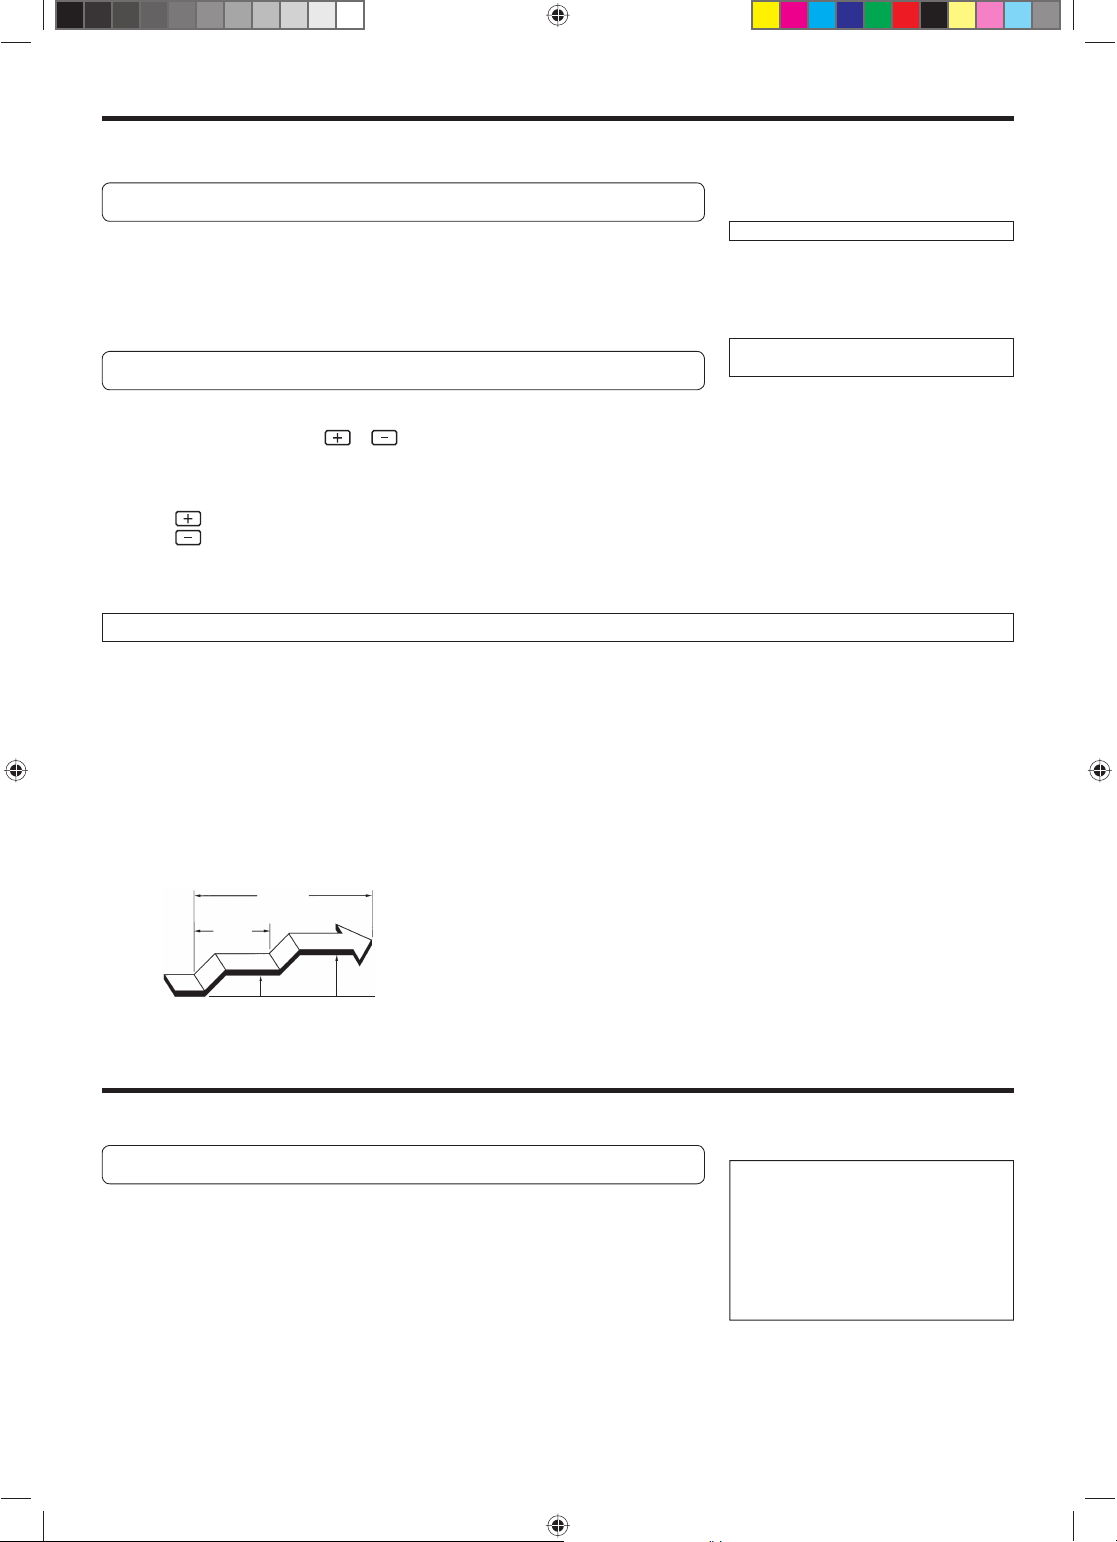
During Cooling/Dry operation:
When the SLEEP timer is set, the thermostat setting is automatically raised 2 °F every sixty minutes. When the thermostat
has been raised a total of 4 °F, the thermostat setting at that
time is maintained until the set time has elapsed, at which
time the air conditioner automatically turns off.
SLEEP timer setting
Set time
1 hour
2 °F
4 °F
MANUAL AUTO OPERATION
Use the MANUAL AUTO operation in the event the Remote Controller is lost or otherwise unavailable.
How To Use the Main Unit Controls
Press the MANUAL AUTO button (Fig. 2 2) on the main unit
control panel.
To stop operation, press the MANUAL AUTO button (Fig. 2 2) once again.
(Controls are located inside the Open Panel)
● When the air conditioner is operated
with the controls on the Main Unit,
it will operate under the same mode
as the AUTO mode selected on the
Remote Controller (see page 7).
● The fan speed selected will be “AUTO”
and the thermostat setting will be
standard. (76
°F)
En-9
9315345363_OM.indb Sec1:99315345363_OM.indb Sec1:9 9/16/2010 2:48:51 PM9/16/2010 2:48:51 PM
Page 11
ADJUSTING THE DIRECTION OF AIR CIRCULATION
● Adjust the up, down, left, and right AIR directions with the AIR DIRECTION buttons on the Remote Controller.
● Use the AIR DIRECTION buttons after the Indoor Unit has started operating and the airfl ow-direction louvers have
stopped moving.
DANGER!
Vertical Air Direction Adjustment
Press the SET button (Vertical) (Fig. 6 R).
Each time the button is pressed, the air direction range will change as follows:
1
Types of Air fl ow Direction Setting:
1,2,3 : During Cooling/Dry modes
1,2,3,4,5,6 : During Fan mode
The Remote Controller’s display does
not change.
● Use the air direction adjustments within the ranges shown above.
● The vertical airfl ow direction is set automatically as shown, in accordance with
the type of operation selected.
During Cooling/Dry/Fan mode : Horizontal fl ow 1
● During AUTO mode operation, for the fi rst minute after beginning operation,
airfl ow will be horizontal 1; the air direction cannot be adjusted during this period.
● Direction 1 2
Only the direction of the Air Flow Direction Louver changes; the direction of the
Power Diffuser does not change.
2 3 4 5 6
1
2
3
4
5
6
● Never place fingers or foreign objects
inside the outlet ports, since the internal
fan operates at high speed and could cause
personal injury.
● Always use the Remote Controller’s
SET button to adjust the vertical airfl ow
louvers. Attempting to move them
manually could result in improper
operation; in this case, stop operation
and restart. The louvers should begin
to operate properly again.
● During Cooling and Dry modes, do not
move the vertical air direction louvers
outside their proper operating range
for the mode (1 - 3) and into the fan
region (4 - 6); using the louvers in
the fan region will cause moisture to
condense near the air outlet, and water
may drop onto the fl oor. During the
Cooling/Dry modes, if the louvers are
operated outside the range 1 - 3 for
more than 20 minutes, they will be automatically returned to the 3 range.
● When used in a room with infants,
children, elderly or sick persons, the
air direction and room temperature
should be considered carefully when
making settings.
Horizontal Air Direction Adjustment
Press the SET button (Horizontal) (Fig. 6 S).
● Each time the button is pressed, the air direction range will change as follows:
1 2 3 4 5
The remote controller’s
display does not change.
1
2
3
5
4
En-10
9315345363_OM.indb Sec1:109315345363_OM.indb Sec1:10 9/16/2010 2:48:51 PM9/16/2010 2:48:51 PM
Page 12
SWING OPERATION
Begin air conditioner operation before performing this procedure.
To select SWING Operation
Press the SWING button (Fig. 6 T).
The SWING Display (Fig. 7 b) will light.
Each time the SWING button is pressed, the swing operation will change in the
following order.
Up/down swing operation Left/right swing operation
Swing operation stops Up/down/left/right swing operation
To stop SWING Operation
Press the SWING button and select STOP.
Airfl ow direction will return to the setting before swing was begun.
About Swing Operation
● Up/down swing: Swing operation begins using the
following range according to the current airfl ow direction.
Airfl ow direction is 1–4 (for cooling, dry).
With the upper airfl ow-direction louver in the horizontal position, the lower airfl ow-direction louver
moves (swings) to direct airfl ow to a wide area.
● Left/right swing: The airfl ow-direction louvers move
(swing) in the left/right airfl ow direction.
● Up/down/left/right swing: The airfl ow-direction louvers
move (swing) in both the up/down and left/right airfl ow
directions.
●
The SWING operation may stop temporarily when the
air conditioner’s fan is not operating, or when operating
at very low speeds.
●
If the SET button (Vertical) is pressed during the up/
down swing operation, the up/down swing operation
will stop and if the SET button (Horizontal) is pressed
during the left/right swing operation, the left/right
swing operation will stop.
En-11
9315345363_OM.indb Sec1:119315345363_OM.indb Sec1:11 9/16/2010 2:48:51 PM9/16/2010 2:48:51 PM
Page 13
CLEANING AND CARE
1
CAUTION!
● Before cleaning the air conditioner, be sure to turn it off and disconnect the Power Supply
Cord.
● Be sure the Intake Grille (Fig. 1 8) is installed securely.
● When removing and replacing the air fi lters, be sure not to touch the heat exchanger, as personal
injury may result.
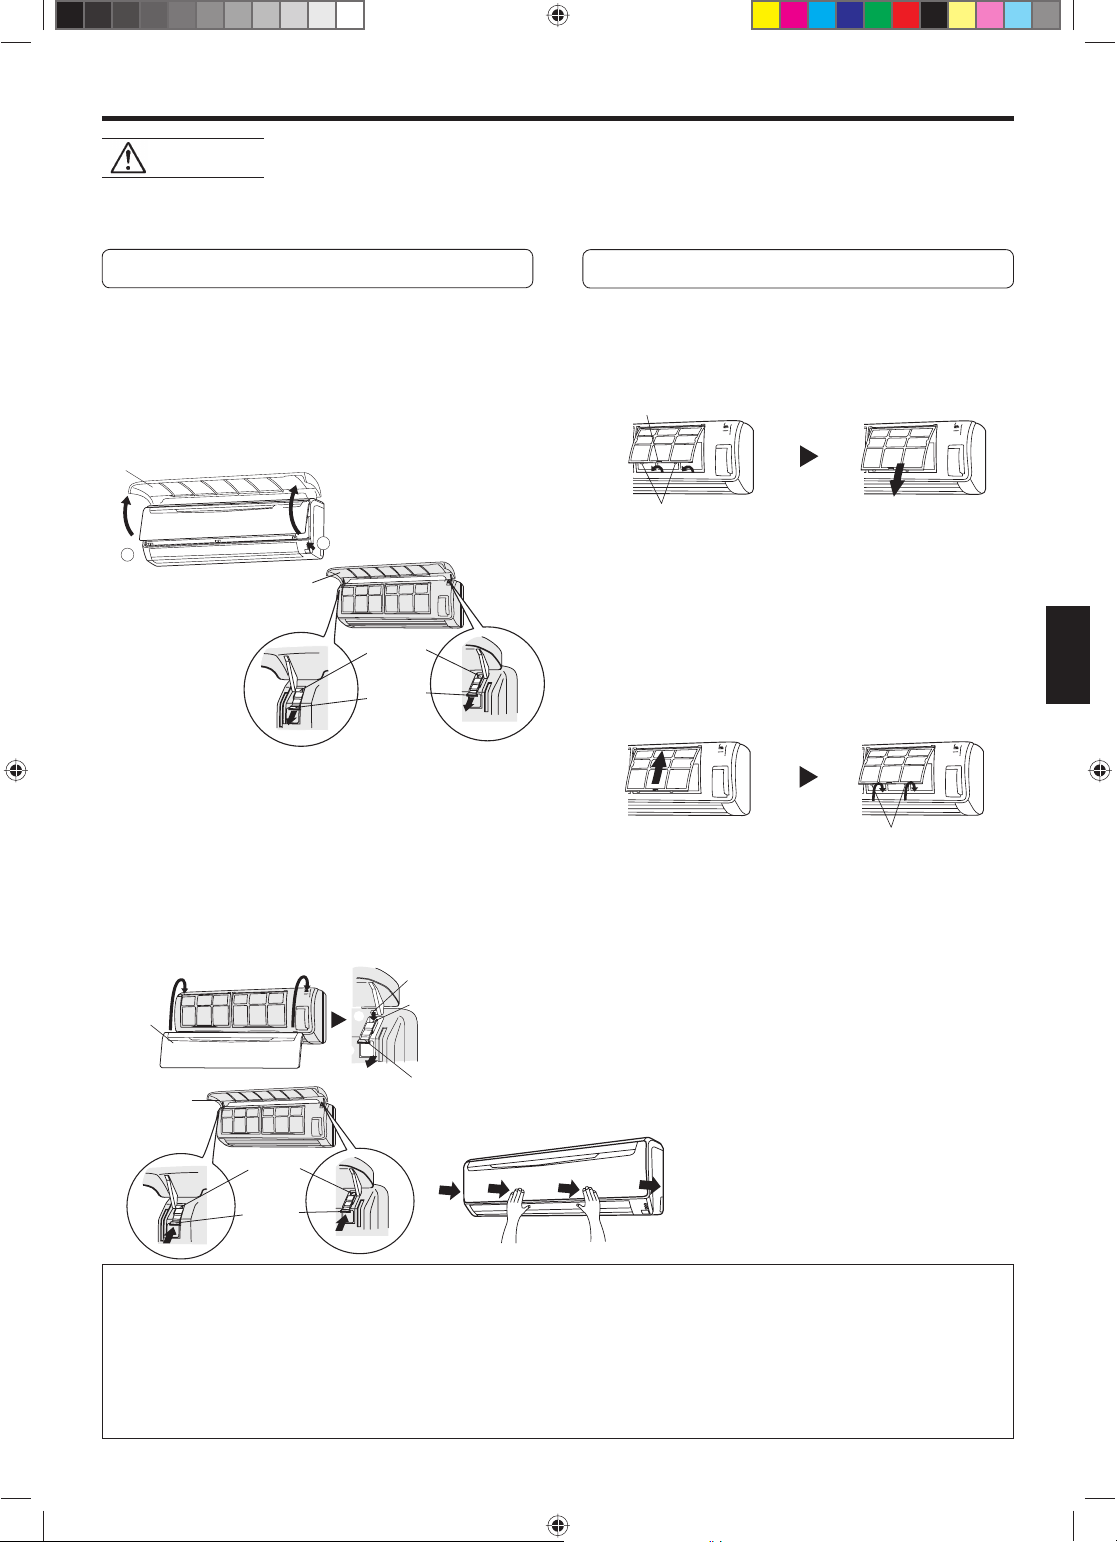
Cleaning the Intake Grille
1. Remove the Intake Grille.
1 Place your fi ngers at both lower ends of the grille
panel, and lift forward; if the grille seems to catch partway through its movement, continue lifting upward to
remove.
2 Pull past the intermediate catch and open the Intake
Grille wide so that it become horizontal.
Intake Grille
2
1
2
Intake Grille
Mounting
shaft
Knob
2. Clean with water.
Remove dust with a vacuum cleaner; wipe the unit with
warm water, then dry with a clean, soft cloth.
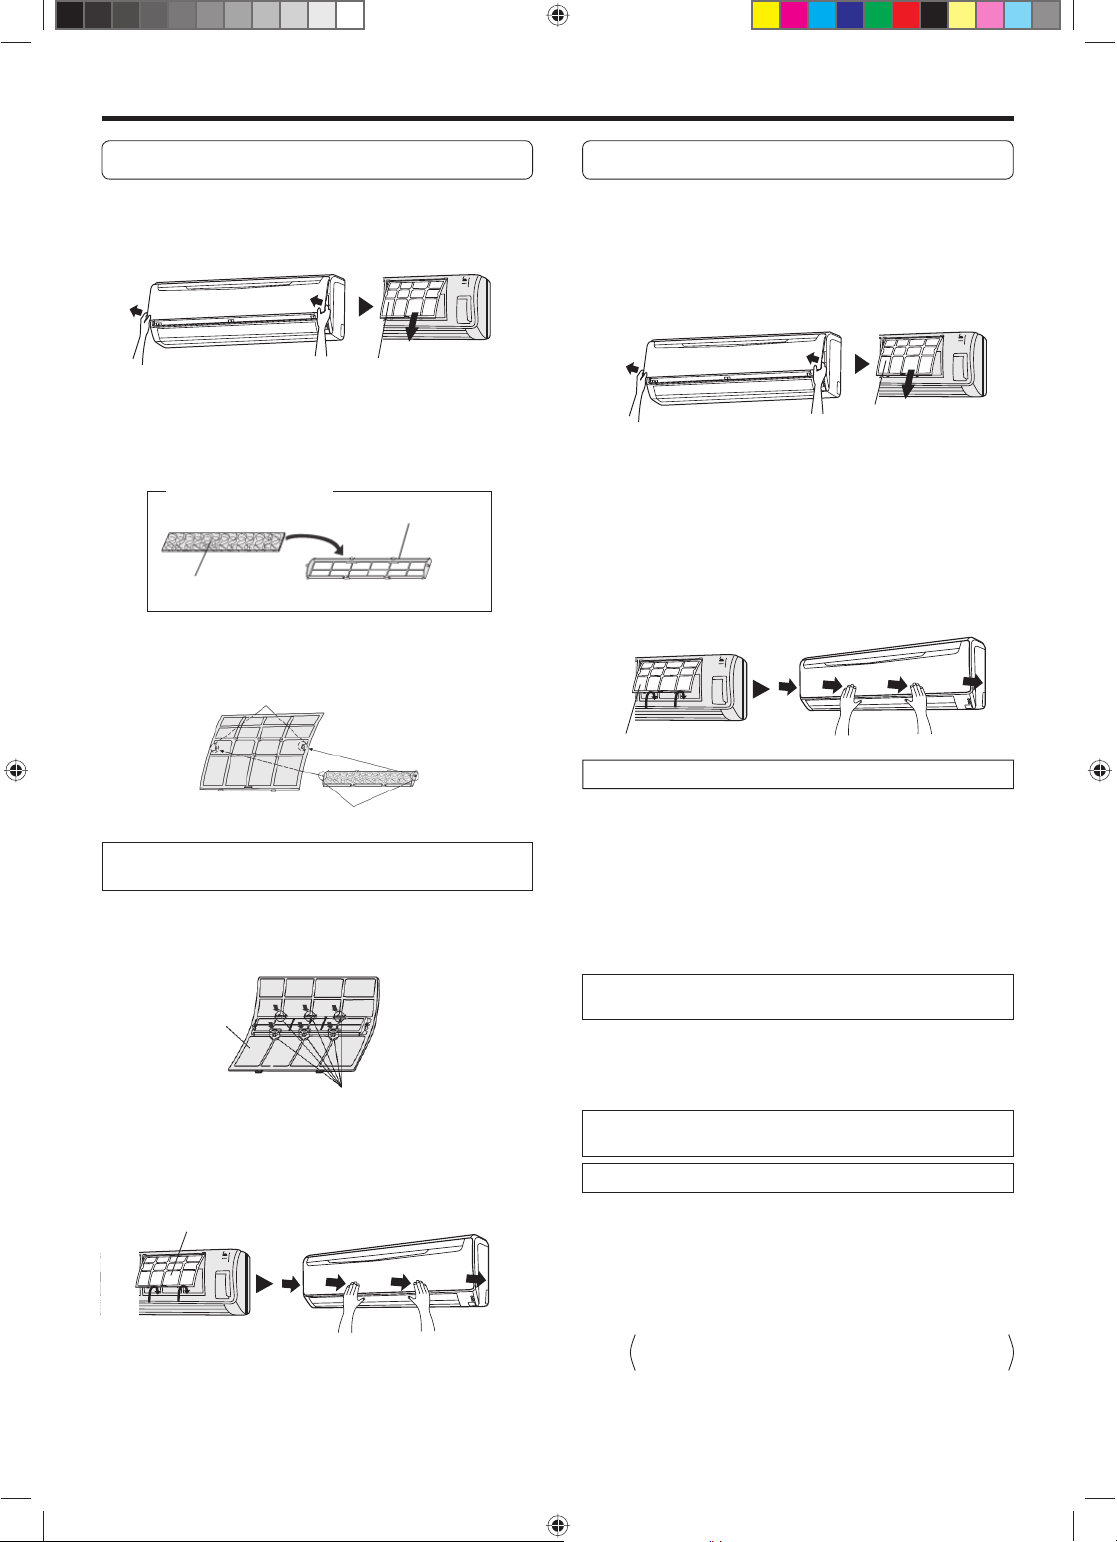
Cleaning the Air Filter
1. Open the Intake Grille, and remove the air
fi lter.
Lift up the air fi lter’s handle, disconnect the two lower
tabs, and pull out.
Air fi lter handle
Hooks (two places)
2. Remove dust with a vacuum cleaner or by
washing.
After washing, allow to dry thoroughly in a shaded
place.
3. Replace the Air Filter and close the Intake
Grille.
1 Align the sides of the air fi lter with the panel, and push
in fully, making sure the two lower tabs are returned
properly to their holes in the panel.
3. Replace the Intake Grille.
1 Pull the knobs all the way.
2 Hold the grille horizontal and set the left and right
mounting shafts into the bearings at the top of the
panel.
3 Press the place where the arrow on the diagram indi-
cates and close the Intake Grille.
Mounting shaft
Intake
Grille
Intake Grille
Mounting
shaft
Knob
● When used for extended periods, the unit may accumulate dirt inside, reducing its performance. We recommend that the
unit be inspected regularly, in addition to your own cleaning and care. For more information, consult authorized service
personnel.
● When cleaning the unit’s body, do not use water hotter than 104 °F, harsh abrasive cleansers, or volatile agents like benzene or thinner.
● Do not expose the unit body to liquid insecticides or hairsprays.
● When shutting down the unit for one month or more, fi rst allow the fan mode to operate continuously for about one-half
day to allow internal parts to dry thoroughly.
2
1
Bearing
Knob
2 Close the Intake Grille.
(For purposes of example, the illustration shows the unit
without Intake Grille installed.)
● Dust can be cleaned from the air fi lter either with a
vacuum cleaner, or by washing the fi lter in a solution of
mild detergent and warm water. If you wash the fi lter, be
sure to allow it to dry thoroughly in a shady place before
reinstalling.
● If dirt is allowed to accumulate on the air fi lter, air fl ow will
be reduced, lowering operating effi ciency and increasing
noise.
● During periods of normal use, the Air Filters should be
cleaned every two weeks.
Hooks (two places)
En-12
9315345363_OM.indb Sec1:129315345363_OM.indb Sec1:12 9/16/2010 2:48:51 PM9/16/2010 2:48:51 PM
Page 14
CLEANING AND CARE
Air Cleaning Filter Installation
1. Open the Intake Grille and remove the Air
fi lters.
Air Filter
(Right & Left)
2. Install the Air cleaning fi lter set (set of 2).
1 Set the air cleaning fi lter into the air cleaning fi lter
frame.
Air cleaning fi lter set
Air cleaning fi lter frame
Air cleaning fi lter
2 Engage the latch at both ends of the fi lter with the two
hooks at the rear of the air cleaning fi lter frame.
Hook (2 places at the rear)
Replacing dirty Air cleaning fi lters
Replace fi lters with the following components (purchased
separately).
POLYPHENOL CATECHIN AIR CLEANING FILTER
●
● Negative air ions deodorizing fi lter: UTR-FA13-2
: UTR-FA13-1
1. Open the Intake Grille and remove the Air
fi lters.
Air Filter
(Right & Left)
2. Replace them by two new Air cleaning
fi lters.
1 Remove the old air cleaning fi lters in reverse order of
their installation.
2 Install in the same way as for installation of the air
cleaning fi lter set.
3. Install the two Air fi lters and close the
Intake Grille.
Latch (2 places)
Take care that the air cleaning fi lter does not project beyond the frame.
3 Engage the four fi xing locations at the top and bottom
of the air cleaning fi lter frame with the hooks of the
air fi lter.
Rear of the fi lter
Fixing location, hook (6 places)
3. Install the two Air fi lters and close the
Intake Grille.
Air Filter
(Right & Left)
● When air cleaning fi lters are used, the effect will increased
by setting the fan speed to “High”.
Air Filter (Right & Left)
In regard to the Air Cleaning Filters
POLYPHENOL CATECHIN AIR CLEANING FILTER
● The Air Cleaning Filters are disposable fi lters. (They can
not be washed and reused.)
● For storage of the Air Cleaning Filters, use the fi lters as
soon as possible after the package has been opened.
(The air cleaning effect decreases when the fi lters are left
in the opened package)
● Generally, the fi lters should be exchanged about every
three months.
Please buy delicated air cleaning fi lters (UTR-FA13-1) (Sold
separately) to exchange the used dirty air cleaning fi lters.
[Negative air ions deodorizing fi lter (one sheet) — light blue]
● The fi lters should be exchanged about every three years
so as to maintain the deodorizing effect.
● Filter frame is not a one-off product.
Please buy delicated deodorizing fi lter (UTR-FA13-2) (Sold
separately) when exchanging the fi lters.
(one sheet)
Maintenance of Deodorizing Filters
In order to maintain the deodorizing effect, please clean the
fi lter in the follow way once three months.
1 Remove the deodorizing fi lter.
2 Clean with water and dry in the air.
1) Flush the fi lters with high-pressure hot water until
the surface of the fi lters are covered with water.
Please fl ush with diluent neutral detergent.
Never wash by reaming or rubbing, otherwise it
will damage the deodorizing effect.
2) Rinse with water fl ow.
3) Dry in shade.
3 Reinstall the deodorizing fi lter.
En-13
9315345363_OM.indb Sec1:139315345363_OM.indb Sec1:13 9/16/2010 2:48:51 PM9/16/2010 2:48:51 PM
Page 15

TROUBLESHOOTING
WARNING!
Before requesting service, perform the following checks:
NORMAL
FUNCTION
Doesn’t operate immediately:
Noise is heard:
Smells:
Mist or steam are
emitted:
In the event of a malfunction (burning smell, etc.), immediately stop operation, turn off the electrical breaker or disconnect the power supply plug, and consult authorized service personnel.
Merely turning off the unit’s power switch will not completely disconnect the unit from the power
source. Always be sure to turn off the electrical breaker or disconnect the power supply plug to
ensure that power is completely off.
Symptom
● If the unit is stopped and then immediately started again, the compressor will not operate for about 3 minutes, in order to prevent
fuse blowouts.
Whenever the Power Supply Plug is disconnected and then recon-
●
nected to a power outlet, the protection circuit will operate for
about 3 minutes, preventing unit operation during that period.
● During operation and immediately after stopping the unit, the
sound of water fl owing in the air conditioner’s piping may be
heard. Also, noise may be particularly noticeable for about 2 to 3
minutes after starting operation (sound of coolant fl owing).
● During operation, a slight squeaking sound may be heard. This is
the result of minute expansion and contraction of the front cover
due to temperature changes.
● Some smell may be emitted from the indoor unit. This smell is the
result of room smells (furniture, tobacco, etc.) which have been
taken into the air conditioner.
● During Cooling or Dry operation, a thin mist may be seen emitted from the indoor unit. This results from the sudden Cooling of
room air by the air emitted from the air conditioner, resulting in
condensation and misting.
Problem
See Page
—
—
—
—
Airfl ow is weak or stops:
● The fan may operate at very low speed during Dry operation or
when the unit is monitoring the room’s temperature.
● During SUPER QUIET operation, the fan will operate at very low
speed.
● In the monitor AUTO operation, the fan will operate at very low
speed.
6
6
6
En-14
9315345363_OM.indb Sec1:149315345363_OM.indb Sec1:14 9/16/2010 2:48:52 PM9/16/2010 2:48:52 PM
Page 16
TROUBLESHOOTING
Symptom
CHECK ONCE
MORE
If the problem persists after performing these checks, or if you notice burning smells, or both the ORERATION Indicator Lamp
(Fig. 3 5) and the TIMER Indicator Lamp (Fig. 3 6) fl ashes, or only the TIMER Indicator Lamp (Fig. 3 6) fl ashes, immediately
stop operation, disconnect the Power Supply, and consult authorized service personnel.
Doesn’t operate at all:
Poor Cooling performance:
The unit operates
differently from the Remote
Controller’s setting:
● Is the Power Supply Plug disconnected its outlet?
● Has there been a power failure?
● Has a fuse blown out, or a circuit breaker been tripped?
● Is the timer operating?
● Is the Air Filter dirty?
● Air the air conditioner’s intake grille or outlet port blocked?
● Did you adjust the room temperature settings (thermostat) cor-
rectly?
● Is there a window or door open?
● In the case of Cooling operation, is a window allowing bright
sunlight to enter? (Close the curtains.)
● In the case of Cooling operation, are there heating apparatus and
computers inside the room, or are there too many people in the
room?
● Is the unit set for SUPER QUIET operation?
● Are the Remote Controller’s batteries dead?
● Are the Remote Controller’s batteries loaded properly?
Items to check
See Page
—
8 - 9
—
6
5
OPERATING TIPS
AUTO Restart
In Event of Power Interruption
● The air conditioner power has been interrupted by a power
failure. The air conditioner will then restart automatically
in its previous mode when the power is restored.
● Operated by setting before the power failure.
●
If a power failure occurs during TIMER operation, the timer
will be reset and the unit will begin (or stop) operation at
the new time setting. In the event that this kind of timer fault
occurs the TIMER Indicator Lamp will fl ash (see Page. 4).
● Use of other electrical appliances (electric shaver, etc.) or
nearby use of a wireless radio transmitter may cause the
air conditioner to malfunction. In this event, temporarily
disconnect the Power Supply Plug, reconnect it, and then
use the Remote Controller to resume operation.
En-15
9315345363_OM.indb Sec1:159315345363_OM.indb Sec1:15 9/16/2010 2:48:52 PM9/16/2010 2:48:52 PM
Page 17

OPERATING TIPS
Temperature and Humidity Range
Cooling Mode
Outdoor temperature
Indoor temperature
● If the air conditioner is used under higher temperature conditioner than those listed, the built-in protection circuit may operate to prevent internal circuit damage. Also, during Cooling and Dry modes, if the unit is used under conditions of lower
temperature than those listed above, the heat-exchanger may freeze, leading to water leakage and other damage.
● Do not use this unit for any purposes other than the Cooling, Dehumidifying, and air-circulation of rooms in ordinary dwellings.
● If the unit is used for long periods under high-humidity conditions, condensation may form on the surface of the indoor
unit, and drip onto the fl oor or other objects underneath. (About 80% or more).
● If the outdoor temperature is lower than the temperature scope in the list above, in order to keep safety operation of device,
the outdoor unit may stop operation for certain period of time.
About 14 to 115 °F
About 64 to 90 °F
Dry Mode
About 14 to 115 °F
About 64 to 90 °F
SPECIFICATION
TYPE COOLING MODEL
MODEL INDOOR UNIT ASU30CLX1 ASU36CLX1
OUTDOOR UNIT AOU30CLX1 AOU36CLX1
POWER 208/230 V 60 Hz
COOLING
CAPACITY 30,700 Btu/h 33,000 Btu/h
INPUT POWER 3.24 kW 3.88 kW
CURRENT 14.2 A 17.0 A
En-16
9315345363_OM.indb Sec1:169315345363_OM.indb Sec1:16 9/16/2010 2:48:52 PM9/16/2010 2:48:52 PM
Page 18

SOMMAIRE
PRÉCAUTIONS DE SÉCURITÉ .............................Fr-1
CARACTÉRISTIQUES ET FONCTIONS ................ Fr-2
NOMENCLATURE DES ORGANES ......................Fr-3
PRÉPARATIFS ........................................................ Fr-5
FONCTIONNEMENT ............................................. Fr-6
FONCTIONNEMENT PAR MINUTERIE
DE PROGRAMMATION ......................................... Fr-8
FONCTIONNEMENT TEMPORISÉ ........................ Fr-9
FONCTIONNEMENT
MANUEL-AUTOMATIQUE .................................... Fr-9
RÉGLAGE DE LA DIRECTION DU FLUX D’AIR
FONCTIONNEMENT OSCILLANT .......................Fr-11
NETTOYAGE ET ENTRETIEN .............................. Fr-12
GUIDE DE DÉPANNAGE ..................................... Fr-14
CONSEILS D’UTILISATION ................................ Fr-15
SPÉCIFICATIONS ................................................Fr-16
...... Fr-10
PRÉCAUTIONS DE SÉCURITÉ
Avant d’utiliser l’appareil, lisez attentivement ces “PRÉCAUTIONS” et utilisez-le de la bonne façon.
●
Dans cette section vous trouverez des instructions de sécurité ; assurez-vous d’utiliser votre appareil en toute sécurité.
●
“DANGER”, “AVERTISSEMENT” et “ATTENTION” ont les signifi cations suivantes :
●
DANGER!
AVERTISSEMENT!
ATTENTION!
DANGER!
Ce marquage indique des procédures qui, si elles ne sont pas effectuées correctement, peuvent
entraîner la mort ou des sérieuses blessures corporelles pour l’utilisateur ou le personnel.
Ce marquage indique des procédures qui, si elles ne sont pas effectuées correctement, peuvent
entraîner la mort ou de sérieuses blessures corporelles pour l’utilisateur ou le personnel d'entretien.
Ce marquage indique des procédures qui, si elles ne sont pas effectuées correctement, peuvent entraîner des blessures corporelles ou des dommages matériels.
● N’essayez pas d’installer vous-même ce climatiseur.
● Cet appareil ne renferme aucune pièce réparable par l’utilisateur. Consultez toujours
le personnel de service compétent en cas de réparation.
● En cas de déménagement, consultez un personnel de service compétent pour effectuer
le débranchement et l’installation de l’appareil.
●
Veillez à ne pas rester trop longtemps dans le passage direct de l’air froid de l’appareil.
●
Ne jamais introduire vos doigts ou des objets dans l’orifi ce de sortie ou la grille d’admission.
● Ne mettez pas le climatiseur en service ou hors service en branchant ou débranchant
son alimentation electrique.
● Prenez soin de ne pas endommager le cordon d’alimentation electrique.
●
En cas de défaillance (odeur de brûlé, etc.), mettez immédiatement l’appareil hors tension, coupez
l’alimentation électrique via le disjoncteur et contactez un centre de réparation agréé.
● En cas de fuite du produit réfrigérant, assurez-vous de le garder hors d’atteinte des
fl ammes ou de produit infl ammables. (consultez le centre réparation agréé)
● Si le cordon d’alimentation de cet appareil est endommagé, il devra être remplacé
uniquement par un personnel de service agréé, car des outils spéciaux et un cordon
adapté sont indispensables.
ATTENTION!
● Assurez une ventilation régulière pendant le fonctionnement de l’appareil.
● Ne dirigez pas le fl ux d’air vers un feu ouvert ou un appareil de chauffage.
● Ne montez pas et ne placez pas d’objets sur le climatiseur.
● Ne suspendez pas des objets à l’appareil intérieur.
●
Ne posez pas de vases de fl eurs ou de récipient contenant de l’eau sur un climatiseur.
● N’exposez pas directement le climatiseur à de l’eau.
● N’utilisez pas le climatiseur avec des mains humides.
● Ne tirez pas sur le cordon d’alimentation.
● Coupez l’alimentation si vous n’utilisez pas le climatiseur pendant longtemps.
● Vérifi ez si le support d’installation est en bon état.
●
Ne placez pas des animaux ou des plantes directement dans le courant d’air de l’appareil.
● Ne buvez pas l’eau de vidange du climatiseur.
● N’utilisez pas le climatiseur pour l’entreposage d’aliments, de plantes, d’animaux,
d’instruments de précision ou d’objets d’art.
● N’appliquez aucune forte pression sur les ailettes du radiateur.
● Utilisez l’appareil uniquement quand les fi ltres à air sont installés.
● N’obstruez pas et ne couvrez pas la grille d’admission et la fente de sortie.
Veillez à tenir tout équipement électronique à un mètre au moins des appareils intérieur et extérieur.
●
●
Évitez d’installer le climatiseur près d’un feu ouvert ou d’autres équipements de chauffage.
●
Lors de l’installation des unités intérieure et extérieure, évitez tout accès par des petits enfants.
● N’utilisez pas de gaz infl ammables à près du climatiseur.
●
L’utilisation de cet appareil n’est pas prévue pour des personnes (y compris les enfants) ayant des
capacités physiques, sensorielles ou mentales réduites, ou un manque d’expérience et de connaissance, à moins qu’ils ne soient supervisés ou instruits par une personne responsable de leur sécurité.
Les enfants doivent être surveillés pour garantir qu’ils ne jouent pas avec l’appareil.
Fr-1
9315345363_OM.indb 19315345363_OM.indb 1 9/16/2010 2:48:52 PM9/16/2010 2:48:52 PM
Page 19

CARACTÉRISTIQUES ET FONCTIONS
INVERSEUR
Lors de la mise en fonctionnement, une grande quantité de
courant est nécessaire pour amener rapidement la température de la pièce à la température souhaitée. Pour des raisons de confort et d’économie d’énergie, la consommation
de l’appareil diminue ensuite automatiquement.
FCHANGEMENT AUTOMATIQUE
Le mode de fonctionnement (Refroidissement, Déshumidifi cation) change automatiquement afi n de conserver la
température programmée de manière constante.
LA PROGRAMMATION COMBINÉE
MARCHE/ARRÊT
La programmation combinée marche/arrêt vous permet
de combiner la mise hors service (OFF) et en service (ON).
Cette combinaison concerne la transition de OFF à ON ou
de ON à OFF pendant une période de 24 heures.
FONCTIONNEMENT TEMPORISÉ
Lorsque la touche SLEEP est enfoncée en mode Refroidissement, le réglage du thermostat augmente progressivement pendant le fonctionnement. Une fois le temps défi ni
atteint, l’unité s’éteint automatiquement.
TÉLÉCOMMANDE À INFRAROUGE
La Télécommande sans fi l autorise un contrôle facile du
fonctionnement du climatiseur.
PANNEAU D’ACCÈS AMOVIBLE
La Panneau d’accès de l’unité intérieur peut être retirée
pour faciliter le nettoyage et l’entretien.
FILTRE RÉSISTANT ÀUX MOISISSURE
Le Filtre à air a reçu un traitement anti-moisissure, ce qui
assure sa propreté et la facilité de son entretien.
FONCTIONNEMENT SUPER SILENCIEUX
Quand la touche FAN CONTROL est utilisée pour sélectionner QUIET (silencieux), l’appareil commence le fonctionnement super silencieuxl; le fl ux d’air de l’unité intérieure est
réduit pour assurer un fonctionnement plus silencieux.
FILTRE DE NETTOYAGE D’AIR À LA
CATÉCHINE (POLYPHÉNOL)
Le fi ltre de nettoyage d’air à la catéchine (polyphénol) utilise
de l’électricité statique pour épurer l’air des fi nes particules
et de la poussière, comme la fumée de tabac et le pollen
des plantes, qui sont trop petites pour être visibles.
Le fi ltre contient de la catéchine qui permet de lutter effi cacement contre diverses bactéries en mettant fi n à la croissance de celles absorbées par le fi ltre.
Une fois le fi ltre de nettoyage d’air installé, la quantité d’air
produite diminue et réduit ainsi légèrement les performances
du climatiseur.
FILTRE D’AIR DÉSODORISANT À IONS
NÉGATIFS
DIRECTION HORIZONTALE DU FLUX
D’AIR
Pour le refroidissement, utilisez le fl ux horizontal pour que
l’air frais ne souffl e pas directement sur les occupants de
la pièce.
FLUX D’AIR OMNIDIRECTIONNEL
(MODE OSCILLANT)
L’oscillation simultanée haut/bas et droite/gauche du fl ux
d’air offre un contrôle optimal de la ventilation. Les clapets
de direction verticale du fl ux d’air oscillent automatiquement selon le mode opératoire sélectionné. Aussi, il est
possible de régler la direction du fl ux d’air en sélectionnant
le mode adapté.
Il se compose de super micro particules de céramique pouvant produire des ions négatifs d’air dont l’effet désodorisant
et le pouvoir d’absorption contribuent à atténuer les odeurs
désagréables à la maison.
TÉLÉCOMMANDE AVEC CORDON
(OPTION)
Vous pouvez utiliser la télécommande avec cordon en option
(modèle no. : UTY-RNBYU).
Quand vous utilisez cette télécommande, il y a quelques
différences comparées à la télécommande sans fi l.
[Les fonctions supplémentaires pour les télécommandes avec
fi l]
• Minuterie hebdomadaire
• Minuterie de la programmation de la température
[Les fonctions restreintes pour les télécommandes avec fi l]
• MAINTENANCE (RÉINITIALISER LE FILTRE) (MAINTENANCE
(FILTER RESET))
• CAPTEUR THERMIQUE (THERMO SENSOR)
Et vous ne pouvez pas utiliser les deux télécommandes, avec
et sans fi l, simultanément. (Vous ne pouvez choisir qu’un seul
type)
Fr-2
9315345363_OM.indb 29315345363_OM.indb 2 9/16/2010 2:48:52 PM9/16/2010 2:48:52 PM
Page 20

NOMENCLATURE DES ORGANES
Fig. 1
Fig. 5
Fig. 6
=
F
G
I
A
BC
M
H
E
8
9
1
3
D
X
1
Fig. 2
3
Fig. 3
8
Fig. 4
MANUAL
AUTO
OPERATION
TIMER
SUPER QUIET
2
5
6
7
4
K
L
J
N
W
P
Q
R
S
T
U
O
V
^
[
Y
]
b
a
\
Z
Fig. 7
Afi n de faciliter l’explication, l’illustration fournie
montre tous les témoins possibles ; cependant, en
fonctionnement réel, l’affi chage ne montre que ceux
relatifs au fonctionnement en cours.
Fr-3
9315345363_OM.indb 39315345363_OM.indb 3 9/16/2010 2:48:52 PM9/16/2010 2:48:52 PM
Page 21

Fig. 1 Unité intérieur
1 Panneau de contrôle de fonctionnement
(Fig. 2)
2 Bouton manuel-automatique
(MANUAL AUTO)
Si vous maintenez le bouton manuel-
●
automatique (MANUAL AUTO) enfoncé
pendant plus de 10 secondes, le système
de refroidissement forcé se déclenche.
● Le système de refroidissement forcé est
utilisé au moment de l’installation
et uniquement par un technicien agréé.
● Si le système de refroidissement forcé se
déclenche par hasard, appuyez sur la touche de marche/arrêt (START/STOP) pour
l’arrêter.
3 Voyant (Fig.3)
4 Récepteur du signal de télécommande
5 Voyant rouge de fonctionnement
(OPERATION) (rouge)
6 Voyant vert de minuterie (TIMER) (vert)
● Si le voyant TIMER clignote en mode de
fonctionnement de la minuterie, le climatiseur vous indique que la minuterie n’a pas
été correctement réglée. (Voir “Remise en
marche automatique” à la page 15.)
7 Voyant orange SUPER SILENCIEUX
8 Grille d’admission (Fig.4)
9 Panneau avant
0 Filtre à air
A Volet de direction du fl ux d’air
B Redresseur de puissance
C Volets Gauche-Droite
(derrière le volet de direction verticale du
fl ux d’air)
D Tuyau de vidange
E Filtre de nettoyage d’air
Fig. 5 Unité extérieur
F Orifi ce d’admission
G Orifi ce de sortie
H Canalisation
I Orifi ce de vidange (fond)
Fig. 6 Télécommande
J Touche de fonctionnement temporisé
(SLEEP)
K Touche de contrôle principal
(MASTER CONTROL)
L Touche SET TEMP (
/ )
M Emetteur du signal
N Touche TIMER MODE
O Touche TIMER SET ( / )
P Touche de contrôle de ventilateur
(FAN CONTROL)
Q Touche de marche/arrêt (START/STOP)
R Touche SET (vertical)
S Touche SET (horizontal)
T Touche SWING
U Touche RESET
V Touche d’essai de fonctionnement
(TEST RUN)
● Cette touche s’emploie lors de l’installation
du climatiseur et elle ne sera pas utilisée
en temps normal car le thermostat du
climatiseur pourrait alors fonctionner de
façon incorrecte.
● Si cette touche est actionnée pendant un
fonctionnement normal, l’appareil passera
au mode d’essai; le voyant de fonctionnement de l’unité intérieure et le voyant de
minuterie commenceront alors à clignoter
de façon simultanée.
● Pour arrêter le mode d’essai de fonctionnement, appuyez sur la touche START/STOP
pour arrêter le climatiseur.
W Touche CLOCK ADJUST
X Affi chage de la télécommande (Fig. 7)
Y Voyant de transmission
Z Affi chage d’horloge
[ Affi chage du mode de fonctionnement
\ Affi chage du mode de minuterie
] Affi chage de vitesse de ventilation
` Affi chage de réglage de température
a Ecran de veille (SLEEP)
b Affi chage d’oscillation
Fr-4
9315345363_OM.indb 49315345363_OM.indb 4 9/16/2010 2:48:54 PM9/16/2010 2:48:54 PM
Page 22

PRÉPARATIFS
Mise en place des Piles (AAA/R03/LR03 × 2)
Appuyez sur le couvercle du logement des Piles à
1
l’arrière et faites le glisser pour l’ouvrir.
Faites glisser dans le sens de la fl èche en appuyant sur le repère ( ).
Installez les Piles.
2
Veillez à respecter la polarité ( ) des piles.
Refermez le couvercle du logement des Piles.
3
Mise à l’heure
Appuyez sur la touche CLOCK ADJUST (Fig. 6 W).
1
Appuyez sur le bouton avec la pointe d’une stylo-bille ou d’un autre objet.
Utilisez les touches TIMER SET ( / ) (Fig. 6 O)
2
Touche : Pour faire avancer les chiffres.
Touche
(A chaque poussée sur la touche, la valeur avance/recule par palier d’une
minute. Elle changera par palier de 10 minutes si la touche est maintenue
enfoncée.)
Rappuyez sur la touche CLOCK ADJUST (Fig. 6 W).
3
Le réglage est ainsi terminé et l’horloge commence à fonctionner.
: Pour faire reculer les chiffres.
ATTENTION!
● Prenez soin de ne pas laisser des piles à
la portée des petits enfants qui pourraient
les avaler par accident.
● Si vous prévoyez de ne pas utiliser la télécommande pendant longtemps, retirez-en
les piles pour éviter un suintement de leur
électrolyte.
● Si de l’électrolyte des piles entre en contact
avec la peau, les yeux ou les muqueuses,
lavez immédiatement avec beaucoup
d’eau fraîche et consultez votre médecin.
● Des piles usagées doivent être retirées rapidement de la télécommande et éliminées
correctement soit en les plaçant dans un
récipient public adhoc, soit en les rendant
à l’autorité compétente.
● N’essayez jamais de recharger des piles.
Ne mélangez jamais de piles neuves
et usagées ou des piles de types différents. La durée de vie des piles est
d’environ une année pour une utilisation normale. Si la plage de fonctionnement de la télécommande diminue
sensiblement, remplacez les piles et
appuyez sur la touche RESET à l’aide de
la pointe d’un stylo à bille ou d’un autre
objet de petite taille.
Utilisation de la Télécommande
● La télécommande doit être dirigée vers le récepteur du signal (Fig. 3 4) du cli-
matiseur pour fonctionner correctement.
● Portée de la télécommande est d’environ 7 mètres.
●
Quand un signal est correctement reçu par le climatiseur, un bip se fait entendre.
● Si aucun bip n’est audible, appuyez à nouveau sur la touche souhaitée de la
Télécommande.
Support de la Télécommande
Insérer
Enfoncer
Vis
1 Fixez le support. 3 Pour retirer la Télécommande
2 Installez la Télécommande.
Glisser vers
le haut
Tirer vers soi
(utilisation séparée).
Fr-5
9315345363_OM.indb 59315345363_OM.indb 5 9/16/2010 2:48:54 PM9/16/2010 2:48:54 PM
Page 23

FONCTIONNEMENT
Sélection du mode de Fonctionnement
Appuyez sur la touche START/STOP (Fig. 6 Q).
1
Le voyant rouge de fonctionnement (OPERATION) de l’appareil intérieur
(Fig. 3 5) s’allume.
Le climatiseur se met en marche.
Appuyez sur la touche MASTER CONTROL (Fig. 6 K)
2
pour choisir le mode souhaité.
A chaque pression de la touche, le mode change dans l’ordre suivant:
AUTO COOL DRY FAN
(Automatique) (Refroidissement) (Déshumidifi cation) (Ventilation)
Après trois secondes environ, l’affi chage entier réapparaît.
Réglage du thermostat
Appuyez sur la touche SET TEMP. (fi g. 6 L).
Touche : Appuyez pour élever le réglage du thermostat.
Touche
● Plage de réglage du thermostat:
Automatique ............................................ 64-88 °F
Refroidissement/Déshumidifi cation ......64-88 °F
Le thermostat ne permet pas de régler la température en mode Ventilation (FAN); la
température n’apparaît pas sur l’affi chage de la télécommande dans ce mode.
Environ 3 secondes plus tard, tout l’affi chage réapparaît.
Le réglage du thermostat doit être considéré comme une valeur indicative et
elle peut être légèrement différente de la température réelle de la pièce en fonction des caractéristiques de cell-ciou de la position de l’appareil.
▲
▲
: Appuyez pour abaisser le réglage du thermostat.
▲
▲
Exemple: réglage sur COOL.
Réglage de la vitesse du ventilateur
Appuyez sur la touche FAN CONTROL (Fig. 6 P).
A chaque pression de la touche, la vitesse du ventilateur change dans l’ordre suivant:
AUTO HIGH MED LOW QUIET
(Automatique) (Rapide) (Moyen) (Lent) (Silencieux)
Environ 3 secondes plus tard, tout l’affi chage réapparaît.
Lors d’un réglage sur AUTO:
Refroidissement
Ventilation : Le ventilateur fonctionne à la vitesse MED (moyen).
▲
: À mesure que la température de la pièce approche du réglage
de thermostat, la vitesse du ventilateur diminue.
▲
▲
▲
▲
Fonctionnement SUPER SILENCIEUX
Lors d’un réglage sur SILENCIEUX (Quiet):
Le voyant orange SUPER SILENCIEUX (fi g. 3 7) s’allume.
Le fonctionnement SUPER SILENCIEUX commence. Le fl ux d’air de l’unité intérieure sera réduit pour rendre plus doux le fonctionnement.
● Le fonctionnement SUPER SILENCIEUX n’est pas utilisable en mode Déshumidifi -
cation. (La même chose est vraie quand le mode Déshumidifi cation est sélectionné
pendant le fonctionnement en mode AUTO.)
● Pendant le fonctionnement Super silencieux, les performances de refroidissement
sont légèrement réduites. Si la pièce n’est pas refroidie lors du fonctionnement
SUPER SILENCIEUX, réglez la vitesse du ventilateur du climatiseur.
Exemple: réglage sur 80 °F.
Exemple: réglage sur AUTO.
Fr-6
9315345363_OM.indb 69315345363_OM.indb 6 9/16/2010 2:48:54 PM9/16/2010 2:48:54 PM
Page 24

Arrêt du climatiseur
Appuyez sur la touche START/STOP (Fig. 6 Q).
Le voyant rouge de fonctionnement (OPERATION) (fi g. 3 5) s’éteint.
A propos du mode de fonctionnement AUTO CHANGEOVER
(changement automatique)
AUTO: ● Lorsque le mode AUTO CHANGEOVER (changement automatique) est
sélectionné, le ventilateur fonctionne dans un premier temps à très
faible vitesse pendant environ une minute. Pendant ce temps, l’appareil
détecte les conditions ambiantes et choisit le mode de fonctionnement
adéquat.
Si la différence entre le réglage du thermostat et la température réelle
de la pièce dépasse +4 °F → Fonctionnement en mode Refroidissement
ou Déshumidifi cation
Si la différence entre le réglage du thermostat et la température réelle
de la pièce est inférieure à +4 °F→ système Surveillance.
● Lorsque le climatiseur a rapproché la température de la pièce du réglage
du thermostat, il commence son opération de surveillance. En mode
d’opération de surveillance, le ventilateur fonctionne à faible vitesse. Si
la température de la pièce change par la suite, le climatiseur sélectionne
le mode de fonctionnement approprié (Refroidissement) pour que la
température corresponde à celle programmée sur le thermostat.
(La plage de fonctionnement de la surveillance est de plus ou moins
+
4 °F en fonction de la programmation du thermostat.)
● Si le mode sélectionné automatiquement par l’appareil ne correspond
pas au mode souhaité, sélectionnez un des modes de fonctionnement
(REFFROIDISSEMENT, DESHUMIDIFICATION, VENTILATION).
A propos du mode de fonctionnement
Refroidissement (COOL):
Déshumidifi cation (DRY):
Ventilation (FAN):
● Utilisé pour rafraichir la pièce.
● Utilisé pour rafraîchir légèrement la pièce en éliminant l’humidité.
● Il n’est pas possible de chauffer la pièce en mode Déshumidifi cation.
● En mode Déshumidifi cation, l’appareil fonctionne à basse vitesse;
pour ajuster l’humidité de la pièce, il arrive que le ventilateur de l’unité
intérieure s’arrête de temps à autre. Le ventilateur risque également
de fonctionner à très basse vitesse pendant l’ajustement du niveau
d’humidité de la pièce.
● La vitesse du ventilateur ne peut pas être changée manuellement quand
le mode Déshumidifi cation est sélectionné.
● A utiliser pour faire circuler l’air dans toute la pièce.
En mode Refroidissement/Déshumidifi cation:
Réglez le thermostat à une valeur
plus basse que la température actuelle de la pièce. Les modes Déshumidification et Refroidissement ne
fonctionneront pas si le thermostat
est réglé plus haut que la température réelle de la pièce (en mode
Refroidissement, seul le ventilateur
fonctionnera).
En mode Ventilation:
L’appareil ne permet pas de réchauffer ou rafraîchir la pièce.
Fr-7
9315345363_OM.indb 79315345363_OM.indb 7 9/16/2010 2:48:56 PM9/16/2010 2:48:56 PM
Page 25

FONCTIONNEMENT PAR MINUTERIE DE PROGRAMMATION
Avant d’utiliser la minuterie, vérifi ez que la Télécommande est réglée sur l’heure exacte (cf. page 5).
Emploi des fonctions de déclenchement ou d’arrêt différé
Appuyez sur la touche START/STOP (marche/arrêt)
1
(Fig. 6 Q).
(Si le climatiseur fonctionne déjà, passez à l’étape 2).
Le voyant OPERATION rouge de l’unité intérieure (Fig. 3 5) s’allume.
Appuyez sur la touche TIMER MODE (Fig. 6 N) pour sélection-
2
ner la minuterie d’arrêt (OFF) ou de marche (ON).
À chaque poussée sur la touche, la fonction de la minuterie change dans
l’ordre suivant:
CANCEL OFF ON
(Annulation) (Arrêt) (Marche)
PROGRAM (OFF → ON, OFF ← ON)
(Programme)
Le voyant vert de minuterie (TIMER) de l’appareil intérieur (Fig. 3 6) s’allume.
Utilisez les touches TIMER SET (Fig. 6 O) pour régler
3
l’heure d’arrêt et de mise en marche souhaitées.
Réglez l’heure pendant que l’affi chage horaire clignote (le clignotement
dure 5 secondes).
Touche
Touche
Environ 5 secondes plus tard, tout l’affi chage réapparaît.
▲
: Appuyez pour avancer l’heure.
: Appuyez pour reculer l’heure.
▲
▲
▲
Annulation de la minuterie
Utilisez la tou che T IMER MOD E pour séle ctionner “CANCEL”.
Le climatiseur repasse au fonctionnement
normal.
Changement du réglage de la minuterie
Effectuez les étapes 2 et 3.
Arrêt du climatiseur pendant due la
minuterie fonctionne
Appuyez sur la touche START/STOP.
Changement des conditions de fonctionnement
Si vous souhaitez changer les conditions
de fonctionnement (Mode, Vitesse de
ventilation, Réglage du thermostat) après
avoir réglé la minuterie, attendez que tout
l’affi chage réapparaisse, puis appuyez sur
les touches appropriées pour changer le
fonctionnement.
Utilisation de la programmation combinée Marche/Arrêt
Appuyez sur la touche START/STOP (Fig. 6 Q) (marche/
1
arrêt).
(Si l’appareil est déjà en service, passez à l’étape 2.)
Le voyant OPERATION rouge de l’unité intérieure (Fig. 3 5) s’allume.
Programmez les heures souhaitées pour la mise à l’arrêt
2
(OFF) et la mise en marche (ON) par minuterie.
Consultez la section “Emploi de la minuterie de marche (ON) ou d”arrêt
(OFF)” pour régler le mode et les heures de fonctionnement souhaités.
Environ 3 secondes plus tard, tout l’affi chage réapparaît.
Le voyant TIMER vert de l’unité intérieure (Fig. 3 6) s’allume.
Appuyez sur la touche TIMER MODE (Fig. 6 N) pour choi-
3
sir PROGRAM (OFF → ON ou OFF ← ON s’affi che).
L’a f fi chage indique alternativement “OFF” et “ON”, puis il change pour
indiquer le réglage horaire de l’opération qui se produira la premiére.
● La programmation se met en service. (Si la mise en service (ON) doit
fonctionner d’abord, l’appareil cesse de fonctionner à ce moment.)
Environ 5 secondes plus tard, tout l’affi chage réapparaît.
À propos de la programmation combinée Marche/Arrêt
● La programmation combinée marche/arrêt vous permet de combiner la mise hors
service (OFF) et en service (ON). Cette combinaison concerne la transition de OFF
à ON ou de ON à OFF pendant une période de 24 heures.
● La première fonction à agir est celle qui est la plus proche de l’heure actuelle.
L’ordre des opérations est indiqué par la fl èche sur l’affi chage de la télécommande
(OFF → ON ou OFF ← ON).
● Un exemple d’utilisation est de faire s’arrêter (OFF) le climatiseur automatiquement après que vous vous êtes endormi et de l’allumer (ON) automatiquement
le matin avant votre réveil.
Annulation de la minuterie
Ut ili sez la tou che TIM ER M ODE pou s sé lec tionner “CANCEL”.
Le climatiseur repasse au mode de fonctionnement normal.
Changement du réglage de la minuterie
1. Effectuez les démarches expliquées à la
section “Emploi de la minuterie de marche
(ON) ou d”arrêt (OFF)” pour choisir les
réglages de minuterie à changer.
2. Appuyez sur la touche TIMER MODE pour
sélectionner OFF → ON ou OFF ← ON.
Arrêt du climatiseur pendant que la
minuterie fonctionne
Appuyez sur la touche START/STOP.
Changement des conditions de fonctionnement
Si vous souhaitez changer les conditions
de fonctionnement (Mode, Vitesse de
ventilation, Réglage du thermostat) après
avoir réglé la minuterie, attendez que tout
l’affi chage réapparaisse, puis appuyez sur
les touches appropriées pour changer le
fonctionnement.
Fr-8
9315345363_OM.indb 89315345363_OM.indb 8 9/16/2010 2:48:56 PM9/16/2010 2:48:56 PM
Page 26

FONCTIONNEMENT TEMPORISÉ
A la différence des autres fonctions de la minuterie, le fonctionnement temporisé permet de programmer une durée pendant
laquelle fonctionnera le climatiseur.
Utilisation de la Minuterie de Temporisation
Pendant que le climatiseur fonctionne ou est arrêté, appuyez
sur la touche SLEEP. (Fig. 6 J)
Le voyant OPERATION (rouge) de l’appareil intérieur (Fig. 3 5) et le témoin (vert)
de la minuterie TIMER (Fig. 3 6) s’allument.
Changement des réglages du minuterie
Appuyez une nouvelle fois sur la touche SLEEP (Fig. 6 J) et réglez l’heure à l’aide des touches TIMER SET ( / ) (Fig. 6 O).
Ajustez l’heure pendant que l’affi chage horaire clignote (pendant 5 secondes environ).
Annulation de la minuterie
Ut ili sez la tou che TIM ER M ODE pou s sé lec tionner “CANCEL”.
Le climatiseur repasse au mode de fonctionnement normal.
Arrêt du climatiseur après le déclenchement du temporisateur
Appuyez sur la touche START/STOP.
Touche
Touche
Environ 5 secondes plus tard, tout l’affi chage réapparaît.
: Pour faire avancer l’heure.
: Pour faire reculer l’heure.
À propos de la minuterie à temporisateur
Pour éviter un refroidissement excessif pendant le sommeil, la minuterie de temporisation modifi e automatiquement le
réglage du thermostat selon le réglage de la durée. Quand la durée programmée est écoulée, le climatiseur s’arrête complètement.
Pendant le Refroidissement/Déshumidifi cation:
Quand le fonctionnement temporisé est programmé, le
réglage du thermostat est automatiquement élevé de 2 °F
toutes les 60 minutes. Quand le thermostat été augmenté de
4 °F en tout, le réglage à ce niveau est maintenu jusqu’à la
fi n de la durée programmée; quand ce moment est atteint, le
climatiseur s’arrête automatiquement.
Réglage du temporisateur (SLEEP)
Durée programmée
1 heure
2 °F
4 °F
FONCTIONNEMENT MANUEL-AUTOMATIQUE
Sélectionnez le mode de fonctionnement MANUAL AUTO si la télécommande est inutilisable ou si elle n’est pas disponible.
Utilisation des commandes de l’appareil principal
Appuyez sur la touche MANUAL AUTO (Fig. 2 2) sur le panneau
des commandes de l’appareil principal.
Pour arrêter le fonctionnement, appuyez à nouveau sur la touche MANUAL AUTO
(Fig.2 2).
(Les commandes se trouvent derrière la Panneau d’accès.)
Fr-9
9315345363_OM.indb 99315345363_OM.indb 9 9/16/2010 2:48:57 PM9/16/2010 2:48:57 PM
● Quand le climatiseur est contôlé par
les commandes de l’unité principale, il
fonctionne selon le même mode AUTO
que celui qui a été sélectionné par la
télécommande. (cf. page 7)
● La vitesse de ventilation sélectionnée
sera “AUTO” et le réglage du thermostat sera standard. (76 °F)
Page 27

RÉGLAGE DE LA DIRECTION DU FLUX D’AIR
● Réglez le fl ux d’air vertical (haut/bas) et horizontal (droite/gauche) à l’aide des touches de direction du fl ux d’air (AIR DIREC-
TION) de la télécommande.
●
Utilisez les touches de direction du fl ux d’air (AIR DIRECTION) après la mise en marche de l’appareil intérieur et l’arrêt des
volets de direction du fl ux d’air.
Réglage de la direction verticale du fl ux d’air
Appuyez sur la touche SET (vertical) (Fig. 6 R).
À chaque pression sur la touche, le fl ux d’air se modifi e comme suit:
1
Positions de réglage de direction du fl ux d’air:
1,2,3 : En mode Refroidissement/Déshumidifi cation
1,2,3,4,5,6 : En mode Ventilation
L’affi chage de la télécommande
ne change pas.
● Servez-vous du réglage de la direction de l’air dans la plage indiquée ci-dessus.
● La direction verticale du fl ux d’air sera réglée automatiquement comme indiqué,
en fonction du type de fonctionnement sélectionné.
En mode refroidissement/déshumidifi cation/ventilateur : Flux horizontal 1
● Lors d’un fonctionnement en mode AUTO, le fl ux d’air sera horizontal 1 pendant
la première minute et la direction de l’air ne peut pas être ajustée pendant cette
période.
● Direction 1 2
Seule la direction du volet de direction du fl ux d’air change ; celle du redresseur
de puissance ne change pas.
2 3 4 5 6
1
2
3
4
5
6
DANGER!
● N’introduisez jamais les doigts ou des
objets étrangers dans les orifi ces de sortie car le ventilateur interne fonctionne
à grande vitesse et il pourrait provoquer
des blessures.
● Utilisez toujours la touche SET de la
télécommande pour ajuster les volets
de fl ux d’air vertical. Un déplacement
manuel de ces volets pourrait entraîner
un fonctionnement inadéquat. Dans ce
cas, arrêtez l’appareil et remettez-le en
marche; les volets devraient à nouveau
fonctionner correctement.
●
En mode Refroidissement et Déshumidifi cation, ne déplacez pas les volets
de direction verticale au-delà de leur
plage de fonctionnement correct pour
le mode (1 - 3) ou dans la plage de
ventilation (4 - 6). L’emploi des volets
dans la plage de ventilation provoquera
une condensation d’humidité près
de la sortie d’air et de l’eau pourrait
s’égoutter sur le plancher. En mode
Refroidissement/Déshumidifi cation, si
les volets sont utilisés en dehors de la
plage (1 - 3)pendant plus de 20 minutes, ils reviennent automatiquement
au niveau
● Lorsque l’appareil est installé dans une
pièce où se trouvent des nourrissons,
des enfants, des personnes âgées ou
alitées, tenez compte de leur position
en réglant la température et la direction du fl ux d’air.
3
.
Réglage de la direction horizontale du fl ux d’air
Appuyez sur la touche SET (horizontal) (Fig. 6 S).
● À chaque pression sur la touche, le fl ux d’air se modifi e comme suit :
1
2 3 4 5
L’affi chage de la télécommande ne change pas.
1
2
3
5
4
Fr-10
9315345363_OM.indb 109315345363_OM.indb 10 9/16/2010 2:48:57 PM9/16/2010 2:48:57 PM
Page 28

FONCTIONNEMENT OSCILLANT
Mettez le climatiseur en marche avant de procéder aux démarches suivantes.
Sélection du fonctionnement oscillant (SWING)
Appuyez sur la touche d’oscillation (SWING) (Fig. 6 T).
L’affi chage d’oscillation (Fig. 7 b) s’allume.
Chaque fois que vous appuyez sur la touche d’oscillation (SWING), l’oscillation
change comme suit.
Oscillation horizontale (haut/bas) Oscillation verticale (gauche/droite)
Arrêt de l’oscillation Oscillation horizontale/verticale
Arrêt du fonctionnement oscillant (SWING)
Appuyez sur la touche d’oscillation (SWING), puis sélectionnez
Arrêter (STOP).
Le réglage de la direction du fl ux d’air précédant la sélection du mode oscillant est
rétabli.
À propos du mode oscillant (Swing)
● Oscillation verticale : le fonctionnement oscillant commence dans la plage suivante en fonction de la direction
actuelle du fl ux de l’air.
Flux de l’air entre 1 et 4 (refroidissement, déshumidifi cation).
Lorsque le volet de direction du fl ux d’air supérieur
est placé à l’horizontale, le volet de direction du fl ux
d’air inférieur bouge (oscille) pour diriger le fl ux d’air
dans une grande pièce.
● Oscillation horizontale : les volets de direction du fl ux
d’air bougent (oscillent) dans la direction horizontale du
fl ux d’air.
● Oscillation verticale/horizontale : les volets de direction du
fl ux d’air bougent (oscillent) dans les directions verticale
et horizontale du fl ux d’air.
● Le fonctionnement oscillant s’arrête parfois temporairement lorsque le ventilateur du climatiseur ne fonctionne
pas ou lorsqu’il tourne à une vitesse très lente.
● Si vous appuyez sur la touche SET (vertical) pendant le
fonctionnement oscillant vertical, celui-cis’arrête. Si vous
appuyez sur la touche SET (horizontal) pendant le fonctionnement oscillant horizontal, celui-ci s’arrête.
Fr-11
9315345363_OM.indb 119315345363_OM.indb 11 9/16/2010 2:48:57 PM9/16/2010 2:48:57 PM
Page 29

1
NETTOYAGE ET ENTRETIEN
ATTENTION!
● Avant de nettoyer le climatiseur, prenez soin de le mettre hors tension et de déconnecter l’alimentation.
● Vérifi ez que la grille d’admission (Fig. 1 8) est fermement installée.
● Lors du retrait et du remplacement des fi ltres d’air, ne touchez pas l’échangeur thermique.
Nettoyage de la grille d’admission
1. Déposez la grille d’admission.
1 Placer les doigts aux deux extrémités inférieures du
panneau de calandre, et soulever vers l’avant; si la
calandre semble s’accrocher à mi-chemin au cours de
son déplacement, continuer de la lever vers le haut
pour l’enlever.
2
Tirer au-delà du crochet intermédiaire et ouvrir tout grand
la calandre jusqu’à ce qu’elle soit àl’horizontale.
Grille d’admission
2
1
Grille d’admission
2
Axe de
montage
Bouton
2. Nettoyez à l’eau.
Enlevez poussière avec un aspirateur; frottez l’appareil
avec de l’eau chaude, puis séchez avec un linge doux et
propre.
Nettoyage du fi ltre à air
1. Ouvrez la grille d’admission et déposez le
fi ltre à air.
Soulevez la poignée du fi ltre à air, débloquez les deux
taquets inférieurs et tirez vers l’extérieur.
Poignée du fi ltre à air
Crochets (deux)
2. Nettoyez la poussière avec un aspirateur
ou en lavant.
Après le lavage, laissez sécher convenablement dans un
endroit à l’ombre.
3. Remettez le fi ltre à air en place et refermez
la grille d’admission.
1 Alignez les côtés du fi ltre à air avec le panneau et
enfoncez à fond en vérifi ant que les deux taquets inférieurs sont revenus correctement dans leurs orifi ces
sur le panneau.
3. Remettez la grille d’admission.
1 Tirer à fond sur les boutons.
2 Maintenir la calandre à l’horizontale et disposer les
axes de montage droit et gauche dans les portages
situés en haut du panneau.
3 Appuyez à l’endroit indiqué par la fl èche sur le schéma
et fermez la grille d’admission.
Grille
d’admission
Grille
d’admission
Axe de
montage
Bouton
● Quand l’appareil est utilisé pendant longtemps, de la poussière s’accumule à l’intérieur et ceci réduit ses performances.
Il est conseillé de le faire inspecter régulièrement en plus de l’entretien que vous faites vous-même. Pour les détails,
consultez le personnel de service agréé.
● Pour nettoyer le coffret de l’appareil, n’utilisez pas d’eau plus chaude que 104°F, de détergents abrasifs ou de produits
volatils comme de la benzine ou un diluant.
● Ne soumettez pas le coffret de l’appareil à des insecticides ou des vaporisateurs pour cheveux.
● Avant une inutilisation de plus d’un mois, faites fonctionner pendant une demi journée par beau temps pour faire sécher
complètement ses organes internes.
2
1
Axe de montage
Portage
Bouton
2 Refermez la grille d’admission.
(Pour la facilité, la grille d’admission n’est pas installée sur
cette illustration.)
● La poussière peut être éliminée du fi ltre à air soit par un
aspirateur, soit en le lavant dans une solution de détergent
doux et d’eau chaude. Si vous lavez le fi ltre, veillez à le
laisser sécher complètement dans un endroit à l’ombre
avant de l’installer à nouveau.
● Si de la poussière s’accumule sur le fi ltre à air, le fl ux d’air
sera réduit, ce qui abaissera l’effi cacité du fonctionnement
et augmentera le bruit du climatiseur.
● Pendant une période de fonctionnement normal, le fi ltre
à air doit être nettoyé toutes le deux semaines.
Crochets (deux)
Fr-12
9315345363_OM.indb 129315345363_OM.indb 12 9/16/2010 2:48:57 PM9/16/2010 2:48:57 PM
Page 30

NETTOYAGE ET ENTRETIEN
Installation du fi ltre de nettoyage d’air
1. Ouvrez la grille d’admission et déposez les
fi ltres à air.
Filtre à air
(droit et gauche)
2.
Installez le kit du fi ltre de nettoyage d’air (2).
1 Fixez le fi ltre de nettoyage d’air sur le cadre prévu à
cet effet.
Kit du fi ltre de nettoyage d’air
Cadre du fi ltre de nettoyage d’air
Filtre de nettoyage d’air
2 Enclenchez l’ergot aux deux extrémités du fi ltre dans
les deux crochets à l’arrière du cadre du fi ltre de nettoyage d’air.
Crochet (deux à l’arrière)
Remplacement de fi ltres de nettoyage
d’air sales
Pour remplacer les fi ltres, utilisez les composants suivants
(achetés séparément).
● FILTRE DE NETTOYAGE D’AIR À LA CATÉCHINE :
UTR-FA13-1
● Filtre désodorisant d’ions négatifs d’air : UTR-FA13-2
1. Ouvrez la grille d’admission et déposez
les fi ltres à air.
Filtre à air
(droit et gauche)
2. Remplacez-les par deux nouveaux fi ltres
de nettoyage d’air.
1 Déposez les anciens fi ltres de nettoyage d’air dans
l’ordre inverse de leur installation.
2 L’installation est identique à celle du kit du fi ltre de
nettoyage d’air.
3. Réinstallez les deux fi ltres à air et refer-
mez la grille d’admission.
Ergot (deux)
Veillez à ce que le fi ltre de nettoyage d’air ne dépasse
pas du cadre.
3 Enclenchez les quatre emplacements de fi xation en
haut et en bas du fi ltre de nettoyage d’air dans les
crochets du fi ltre à air.
Arrière du fi ltre
Emplacement de fi xation, crochets (6)
3. Réinstallez les deux fi ltres à air et refermez
la grille d’admission.
Filtre à air
(droit et gauche)
● Lors de l’utilisation des fi ltres de nettoyage d’air, aug-
mentez leur effet en réglant la vitesse du ventilateur sur
“Élevé”.
Fr-13
Filtre à air (droit et gauche)
Remarques sur les fi ltres de nettoyage d’air
FILTRE DE NETTOYAGE D’AIR À LA CATÉCHINE (une feuille)
● Les fi ltres de nettoyage d’air sont jetables (ils ne peuvent
pas être lavés ni réutilisés).
● En ce qui concerne leur conservation, utilisez-les dès que
possible après l’ouverture de l’emballage
(l’effet du nettoyage d’air diminue si les fi ltres restent
dans l’emballage ouvert)
● En général, les fi ltres doivent être changés environ tous
les trois mois.
Achetez les fi ltres de nettoyage d’air appropriés (UTRFA13-1) (vendus séparément) pour remplacer les fi ltres
sales usagés.
[Filtre désodorisant d’ions négatifs d’air (une feuille) — bleu clair]
● Les fi ltres doivent être changés environ tous les trois ans
pour conserver l’effet désodorisant.
● Le cadre du fi ltre n’est pas un produit à usage unique.
Achetez le fi ltre désodorisant approprié (UTR-FA13-2)
(vendu séparément) pour remplacer les fi ltres.
Entretien des fi ltres désodorisants
Pour conserver l’effet désodorisant, nettoyez le fi ltre de la
manière suivante une fois tous les trois mois.
1 Déposez le fi ltre désodorisant.
2 Nettoyez-le à l’eau et séchez-le à l’air.
1) Lavez les filtres à l’eau chaude haute pression
jusqu’à ce que leur surface soit recouverte d’eau.
Lavez-les avec un détergent neutre soluble.
ne les frottez jamais sous peine d’endommager
l’effet désodorisant.
2) Rincez-les abondamment à l’eau.
3) Séchez-les à l’ombre.
3 Réinstallez le fi ltre désodorisant.
9315345363_OM.indb 139315345363_OM.indb 13 9/16/2010 2:48:57 PM9/16/2010 2:48:57 PM
Page 31

GUIDE DE DÉPANNAGE
AVERTISSEMENT!
Avant de faire appel à un technicien, vérifi ez les points suivants:
FONCTIONS
NORMALES
L’appareil ne fonctionne
pas immédiatement:
Un bruit se fait entendre:
Odeurs:
Du brouillard ou de la
vapeur est émis:
En cas de dysfonctionnement (odeur de brûlé, etc.), mettez immédiatement l’appareil hors tension, coupez l’alimentation électrique via le disjoncteur ou le cordon d’alimentation et contactez
un centre de réparation agréé.
Il ne suffi t pas d’éteindre l’appareil. Assurez-vous toujours de couper le disjoncteur ou de débrancher le cordon d’alimentation secteur pour couper l’alimentation de l’appareil.
Symptôme
● Si l’appareil est arrêté, puis immédiatement remis en marche, le
compresseur ne fonctionne pas pendant 3 minutes environ, pour
éviter que le fusible ne soit grillé.
● Quand l’alimentation est déconnectée et reconnectée, le circuit de
protection agit pendant 3 minutes environ pour arrêter l’appareil
pendant cette durée.
● Pendant le fonctionnement ou sitôt après l’arrêt de l’appareil, on
peut entendre le bruit du fl uide dans les canalisations climatiseur.
Un bruit peut aussi être constaté 2 à 3 minutes après la mise en
marche (écoulement du réfrigérant).
● Pendant le fonctionnement, un très léger craquement est parfois
audible. Il provient du dilatement ou de la contraction des matériaux par suite du changement de température.
● Une certaine odeur est émise par l’appareil intérieur. Elle peut
provenir des odeurs de la pièce (mobilier, tabac, etc.) qui ont
pénétré dans l’appareil.
● Pendant le Refroidissement ou la Déshumidifi cation, un léger
brouillard peut être émis par l’unité intérieure. Il provient d’un
refroidissement subit de l’air ambiant par l’air provenant du climatiseur, ce qui provoque une condensation.
Problème
Voyez
page
—
—
—
—
Le courant d’air est faible
ou nul:
● Le ventilateur fonctionne à très basse vitesse en mode Déshumidifi cation ou quand l’appareil vérifi e la température de la
pièce.
● Pendant le fonctionnement super silencieux, le ventilateur agit à
vitesse très lente.
● En mode de surveillance AUTO, le ventilateur fonctionne à très
basse vitesse.
6
6
6
Fr-14
9315345363_OM.indb 149315345363_OM.indb 14 9/16/2010 2:48:58 PM9/16/2010 2:48:58 PM
Page 32

GUIDE DE DÉPANNAGE
Symptôme
VÉRIFIEZ À
NOUVEAU
Si le problème persiste après ces vérifi cations, ou si vous remarquez des odeurs de combustion, ou si le voyant de fonctionnement (OPERATION) (Fig. 3 5) et le voyant de minuterie (TIMER) (Fig. 3 6) clignotent, ou si seul ce dernier clignote, arrêtez
immédiatement le fonctionnement de l’appareil, débranchez-le et consultez un technicien agréé.
L’appareil ne fonctionne
pas du tout:
Mauvaises performances
de refroidissement (ou
chauffaqe):
L’appareil n’exécute pas
les fonctionnement réglé
par la télécommande:
● La fi che du cordon est débranchée de la prise secteur?
● Il s’est produit une panne de courant?
● Le fusible a sauté ou le dijoncteur s’est déclenché?
● La minuterie fonctionne-t-elle?
● Le fi ltre à air est-il sale?
● La grille d’admission d’air et/ou la fente de sortie sont-elles obs-
truées?
● A-t-on correctement ajusté la température de la pièce (sur le
thermostat)?
● Y a-t-il une porte ou une fenêtre ouverte?
● En cas de Refroidissement, une fenêtre est-elle exposée en plein
soleil? (Fermez les rideaux.)
● En cas de Refroidissement, y a-t-il des appareils de chauffage ou
des ordinateurs en service dans la pièce ou trop de monde dans
la salle?
● L’appareil est-il réglé pour le fonctionnement SUPER SILENCIEUX?
● Les piles de la télécommande sont-elles épuisées?
● Les piles de la télécommande sont-elles bien installées.
Problème
Voyez
page
—
8 à 9
—
6
5
CONSEILS D’UTILISATION
Remise en marche automatique
En cas de coupure de courant
● Si l’alimentation a été interrompue par une panne de
courant, le climatiseur se remettra automatiquement en
marche selon le mode utilisé au moment de la panne
quand le courant sera rétabli.
● Actionné selon les réglages d’avant la panne de courant.
● Si une panne de courant se produit pendant le fonctionnement de la minuterie, celle-ci sera réinitialisée et l’appareil commencera (arrêtera) le fonctionnement au niveau
réglage horaire. Si ce genre d’erreur de la minuterie se
produit, le voyant TIMER clignote (cf. page 4).
● L’emploi d’autres appareils électriques (rasoir électrique,
etc.) ou la présence d’un émetteur radio sans fi l peut entraîner un mauvais fonctionnement du climatiseur. Dans
ce cas, débranchez temporairement la fi che du cordon
d’alimentation, rebranchez-la et servez-vous de la télécommande pour remettre l’appareil en service.
Fr-15
9315345363_OM.indb 159315345363_OM.indb 15 9/16/2010 2:48:58 PM9/16/2010 2:48:58 PM
Page 33
CONSEILS D’UTILISATION
Plage de température et d’humidité
Mode Refroidissement
Température extérieure
Température intérieure
● Si le climatiseur doit fonctionner par une température plus haute que celles indiquées ci-dessus, il se peut que le circuit
de protection incorporé entre en service pour protéger les circuits internes. En revanche, en mode Refroidissement et Déshumidifi cation, si le climatiseur doit fonctionner par une température inférieure à celles indiquées ci-dessus, l’échangeur
thermique risque de geler et de provoquer une fuite d’eau ou d’autres dégâts.
● N’utilisez pas ce climatiseur pour autre chose que la Refroidissement, le Chauffage, la Déshumidifi cation et la ventilation
de pièces d’habitations ordinaires.
● Si l’appareil est utilisé pendant de longues périodes dans des milieux très humides, de la condensation pourrait se former
à la surface de l’appareil intérieur et des gouttes pourraient tomber sur le sol ou sur d’autres objets situés au-dessous de
l’appareil. (ca. 80 % ou plus).
● Si la température extérieure est inférieure à la plage de température dans la liste ci-dessus, afi n de garantir une utilisation
en toute sécurité de l’appareil, il est possible que l’appareil extérieur arrête de fonctionner pendant un certain temps.
Environ 14 à 115 °F
Environ 64 à 90 °F
Mode Déshumidifi cation
Environ 14 à 115 °F
Environ 64 à 90 °F
SPÉCIFICATIONS
TYPE MODÈLE À REFROIDISSEMENT
MODÈLE
APPAREIL D’INTÉRIEUR
APPAREIL EXTÉRIEUR AOU30CLX1 AOU36CLX1
ALIMENTATION 208/230 V 60 Hz
REFROIDISSEMENT
CAPACITÉ 30.700 Btu/h 33.000 Btu/h
PUISSANCE D’ENTRÉE 3,24 kW 3,88 kW
INTENSITÉ 14,2 A 17,0 A
ASU30CLX1 ASU36CLX1
Fr-16
9315345363_OM.indb 169315345363_OM.indb 16 9/16/2010 2:48:58 PM9/16/2010 2:48:58 PM
Page 34

ÍNDICE
PRECAUCIONES DE SEGURIDAD ...................... Es-1
CARACTERÍSTICAS Y FUNCIONES .....................Es-2
DENOMINACIÓN DE LOS COMPONENTES ...... Es-3
PREPARATIVOS .................................................... Es-5
FUNCIONAMIENTO .............................................Es-6
FUNCIONAMIENTO CON TEMPORIZADOR .......Es-8
FUNCIONAMIENTO DEL TEMPORIZADOR
(SLEEP) DE DESCONEXIÓN AUTOMÁTICA....... Es-9
FUNCIONAMIENTO MANUAL Y AUTOMÁTICO
AJUSTE DE LA DIRECCIÓN DE CIRCULACIÓN
DEL AIRE ............................................................. Es-10
FUNCIONAMIENTO DE VAIVÉN.........................Es-11
LIMPIEZA Y MANTENIMIENTO ......................... Es-12
LOCALIZACIÓN DE AVERÍAS ............................ Es-14
CONSEJOS PARA EL FUNCIONAMIENTO ....... Es-15
ESPECIFICACIÓN ............................................... Es-16
........ Es-9
PRECAUCIONES DE SEGURIDAD
Antes de utilizar el aparato, lea cuidadosamente estas “PRECAUCIONES” y utilice correctamente el equipo.
●
Las instrucciones en esta sección están relacionadas con la seguridad; asegúrese de mantener condiciones de funcionamiento seguras.
●
Las indicaciones “PELIGRO”, “ADVERTENCIA”, y “PRECAUCIÓN” inherentes a estas instrucciones tienen el siguiente signifi cado:
●
¡PELIGRO!
¡ADVERTENCIA!
¡PRECAUCIÓN!
¡PELIGRO!
Esta marca indica procedimientos que, si se realizan incorrectamente, pueden ocasionar la muerte o serias heridas al usuario o al personal de servicio.
Esta marca indica procedimientos que, de ser realizados incorrectamente, podrían
ocasionar la muerte o serias lesiones al usuario o al personal de servicio.
Esta marca indica procedimientos que, si se realizan incorrectamente, posiblemente
podrían ocasionar heridas personales al usuario, o daño a la propiedad.
● No intente instalar este acondicionador de aire usted mismo.
● Este aparato no tiene componentes que pueda reparar el usuario. Consulte siempre
al personal de servicio autorizado para las reparaciones.
●
Cuando se traslade, consulte siempre al personal de servicio autorizado para la desconexión y la instalación.
●
No se enfríe excesivamente quedándose demasiado tiempo en el paso directo del aire de refrigeración.
●
No inserte los dedos u otros objetos dentro del orifi cio de salida o la rejilla de entrada
● No debe poner en funcionamiento el acondicionador de aire ni pararlo enchufando y
desenchufando el cable de la alimentación.
● Tenga cuidado de no dañar el cable de alimentación.
●
En el caso de un mal funcionamiento (olor a quemado, etc.), detenga inmediatamente el funcionamiento, desconecte la clavija de alimentación y consulte al personal de servicio autorizado.
●
En caso de fuga de refrigerante, asegúrese de mantenerlo lejos del fuego o cualquier producto infl amable. (Consulte a una persona de servicio autorizado)
●
Si se daña el cable de alimentación de este aparato, sólo deberá reemplazarlo el personal de servicio
autorizado, porque se requieren herramientas de aplicaciones especiales y el cable especifi cado.
.
¡PRECAUCION!
Es-1
● Proporcione de vez en cuando ventilación durante el funcionamiento.
● No dirija el aire a hogares de fuego ni a estufas.
● No se suba sobre el acondicionador de aire ni ponga objetos encima.
● No cuelgue nada de la unidad interior.
● No ponga fl oreros ni recipientes de agua encima de los acondicionadores de aire.
● No exponga el acondicionador de aire directamente al agua.
● No ponga en funcionamiento el acondicionador de aire con las manos mojadas.
● No tire del cable de alimentación.
● Desconecte la fuente de la alimentación cuando no tenga la intención de utilizar el
aparato durante períodos prolongados.
● Compruebe si hay daños en el soporte de instalación.
●
La exposición prolongada al aire directo puede tener efectos adversos en las plantas y animales.
● No beba el agua que se drena del acondicionador de aire.
● No lo utilice para aplicaciones relacionadas con almacenaje de comestibles, plantas ni
animales, equipos de precisión, ni obras de arte.
● No aplique presión a las aletas del radiador.
● Siempre deberá funcionar con los fi ltros de aire instalados.
● No bloquee ni cubra la rejilla de entrada ni el orifi cio de salida.
Asegúrese de que no haya ningún equipo electrónico a menos de un metro de la unidad interior y de la exterior.
●
●
No instale el acondicionador de aire cerca de hogares de fuego ni de otros aparatos de calefacción.
●
Cuando instale la unidad interior y la unidad exterior, tenga cuidado de evitar el acceso a los niños.
● No emplee gases infl amables cerca del acondicionador de aire.
Este aparato no está diseñado para el uso de las personas (incluyendo niños) con capacidades men-
●
tales, sensoriales o físicas reducidas, o con falta de experiencia y conocimiento, a menos que una
persona responsable de su seguridad les haya dado supervisión o capacitación respecto al uso del
aparato. Los niños deberán ser supervisados para asegurar que no jueguen con el aparato.
9315345363_OM.indb 19315345363_OM.indb 1 9/16/2010 2:48:58 PM9/16/2010 2:48:58 PM
Page 35

CARACTERÍSTICAS Y FUNCIONES
INVERSOR
Al inicio del funcionamiento, la potencia utilizada es elevada
para que la sala adquiera rápidamente la temperatura deseada. Luego, la unidad pasa automáticamente al ajuste de
baja potencia para que el funcionamiento resulte adecuado
cómodo y económico.
CAMBIO AUTOMÁTICO
(AUTO CHANGEOVER)
El modo de funcionamiento (refrigeración, deshumectación)
cambiará automáticamente para mantener la temperatura
ajustada y dicha temperatura se mantendrá constante en
todo momento.
TEMPORIZADOR PROGRAMABLE
El temporizador programable le permite integrar las funciones del temporizador de desconexión y del temporizador
de conexión en una sola secuencia. La secuencia puede ser
de una transición del temporizador de desconexión al de
conexión, o desde el temporizador de conexión al de desconexión, dentro de un período de veinticuatro horas.
TEMPORIZADOR (SLEEP) DE
DESCONEXIÓN AUTOMÁTICA
Si durante el funcionamiento de refrigeración se pulsa el
botón SLEEP, el ajuste del termostato irá subiendo gradualmente durante el periodo de funcionamiento. Cuando
llegue la hora ajustada, la unidad se desconectará automáticamente.
PANEL DE ENTRADA EXTRAÍBLE
La Panel de entrada de la unidad interior puede extraerse
para facilitar la limpieza y el mantenimiento.
FILTRO RESISTENTE A LA CONDENSACIÓN
DE HUMEDAD
El fi ltro de aire se ha tratado para poder resistir una ligera
condensación de humedad, para facilitar el empleo y los
cuidados del fi ltro.
FUNCIONAMIENTO SUPERSILENCIOSO
Cuando se usa el botón de control del ventilador (FAN CONTROL) para seleccionar el funcionamiento supersilencioso
(QUIET), la unidad inicia el funcionamiento supersilencioso;
se reduce el fl ujo de aire de la unidad interior, permitiendo
una refrigeración más silenciosa.
FILTRO DE LIMPIEZA DE AIRE DE
POLIFENOL CATEQUINA
El fi ltro de limpieza de aire de polifenol catequina utiliza la
electricidad estática para eliminar del aire partículas fi nas y
polvo, como las del humo del tabaco y el polen de las plantas,
que resultan demasiado fi nas para ser visibles.
El fi ltro contiene catequina, un compuesto de gran efi cacia
contra diversas bacterias que actúa deteniendo el crecimiento de las bacterias que ha absorbido el fi ltro.
Debe tenerse en cuenta que cuando se instala el fi ltro de aire,
la cantidad de aire producida disminuye y provoca un ligero
descenso en el rendimiento del acondicionador de aire.
UNIDAD DE TELEMANDO INALÁMBRICO
La unidad del telemando inalámbrico permite el control de
todas las funciones del acondicionador de aire.
FLUJO DE AIRE HORIZONTAL
Para la refrigeración, utilice un fl ujo de aire horizontal de
modo que el aire frío no se proyecte directamente sobre
los ocupantes de la sala.
FLUJO DE AIRE OMNIDIRECCIONAL
(FUNCIONAMIENTO DE VAIVÉN (SWING))
Si se utilizan simultáneamente los modos de distribución
de aire arriba/abajo (UP/DOWN) y derecha/izquierda (RIGHT/
LEFT) se puede tener un control tridimensional sobre la
distribución. Es posible ajustar la distribución del aire según
el modo de funcionamiento del aparato, ya que las lamas
defl ectoras (arriba/abajo (UP/DOWN)) de la dirección del fl ujo
del aire funcionan automáticamente según dicho modo.
FILTRO DESODORIZANTE DE IONES
NEGATIVOS DEL AIRE
Consta de micropartículas de cerámica que pueden producir
iones negativos, tienen un efecto desodorizante y pueden
absorber y reducir los olores desagradables del hogar.
MANDO A DISTANCIA CABLEADO
(OPCIÓN)
Se puede utilizar el telemando cableado opcional (No. de
modelo: UTY-RNBYU).
La utilización del mando a distancia presenta las siguientes
diferencias con respecto al uso del mando a distancia
inalámbrico.
[Las funciones adicionales para los cableados]
• Temporizador semanal
• Temporizador para prórroga de temperatura
[Las funciones restringidas para los cableados]
• MANTENIMIENTO (CAMBIO DE FILTRO) (MAINTENANCE
(FILTER RESET))
• SENSOR TÉRMICO (THERMO SENSOR)
Y no se puede utilizar tanto el mando a distancia cableado
como el inalámbrico de forma simultánea. (Se puede
seleccionar únicamente uno de ellos)
Es-2
9315345363_OM.indb 29315345363_OM.indb 2 9/16/2010 2:48:58 PM9/16/2010 2:48:58 PM
Page 36

DENOMINACIÓN DE LOS COMPONENTES
Fig. 1
Fig. 5
Fig. 6
=
F
G
I
A
BC
M
H
E
8
9
1
3
D
X
1
Fig. 2
3
Fig. 3
8
Fig. 4
MANUAL
AUTO
OPERATION
TIMER
SUPER QUIET
2
5
6
7
4
K
L
J
N
W
P
Q
R
S
T
U
O
V
^
[
Y
]
b
a
\
Z
Fig. 7
Para facilitar la explicación, se ha dibujado la ilustración adjunta para mostrar todos los indicadores posibles; durante el funcionamiento real, sin embargo, la
pantalla mostrará únicamente aquellos indicadores
apropiados para el funcionamiento real.
Es-3
9315345363_OM.indb 39315345363_OM.indb 3 9/16/2010 2:48:58 PM9/16/2010 2:48:58 PM
Page 37

Fig. 1 Unidad interior
1
Panel de control del funcionamiento (Fig. 2)
2
Botón de funcionamiento manual/automático
(MANUAL AUTO)
● Si mantiene pulsado el botón de funcio-
namiento manual / automático (MANUAL
AUTO) durante más de 10 segundos, se
activará la refrigeración forzada.
● La refrigeración forzada se usa en el mo-
mento de la instalación.
Sólo debe utilizarla el personal de servicio
autorizado.
● Si la refrigeración forzada se inicia de
forma fortuita, pulse el botón de marcha /
paro (START / STOP) para detenerla.
3 Indicador(Fig.3)
4 Receptor de señal de control remoto
5 Indicador de funcionamiento
(OPERATION) (rojo)
6 Indicador del temporizador (TIMER)
(verde)
●
Si parpadea la lámpara indicadora del temporizador (TIMER) cuando el temporizador
está funcionando, indica que ha ocurrido
una falla en el ajuste del temporizador (vea
el Reinicio automático en la página 15).
7 Lámpara indicadora de funcionamiento
SUPERSILENCIOSO (naranja)
8 Rejilla de entrada (Fig.4)
9 Panel frontal
0 Filtro de aire
A Lama defl ectora del aire orientable
B Difusor de potencia
C Lamas defl ectoras de izquierda-derecha
(detrás de la lama deflectora del aire
orientable)
D Manguera de drenaje
E Filtro de limpieza de aire
Fig. 5 Unidad exterior
F Orifi cio de entrada
G Orifi cio de salida
H Unidad de tubo
I Orifi cio de drenaje (parte inferior)
Fig. 6 Unidad de telemando
J Botón el temporizador de desconexión
automática (SLEEP)
K Botón de control de funciones
(MASTER CONTROL)
L Botón de ajuste de la temperatura
(SET TEMP.) (
/ )
M Emisor de señal
N Botó de modo de temporizador
(TIMER MODE)
O Botones de ajuste del temporizador
(TIMER SET) ( / )
P Botón de control del ventilador
(FAN CONTROL)
Q Botón de marcha/paro (START/STOP)
R Botón de ajuste vertical (SET)
S Botón de ajuste horizontal (SET)
T Botón de vaivén (SWING)
U Botón de reposición (RESET)
V Botón de prueba del funcionamiento
(TEST RUN)
● Este botón se usa para probar el acondi-
cionador de aire después de su instalación y no debe usarse bajo condiciones
normales porque causará que la función
del termostato del acondicionador de aire
actuar incorrectamente.
● Si se presiona este botón durante el fun-
cionamiento normal, el aparato cambiará
al modo de funcionamiento de prueba y la
lámpara de funcionamiento de la unidad
de la sala y la lámpara del temporizador
parpadearán simultáneamente.
● Para detener el modo de funcionamiento
de prueba, presione otra vez el botón TEST
RUN o presione el botón START/STOP para
que se pare el acondicionador de aire.
W
Botón de ajuste de reloj (CLOCK ADJUST)
X Pantalla del telemando (Fig. 7)
Y Indicador de transmisión
Z Reloj
[ Modo de funcionamiento
\ Modo de temperización
] Velocidad del ventilador
` Temperatura de ajuste
a Pantalla de temporizador de desconexión
automática (SLEEP)
b Pantalla de vaivén (SWING)
Es-4
9315345363_OM.indb 49315345363_OM.indb 4 9/16/2010 2:48:59 PM9/16/2010 2:48:59 PM
Page 38

PREPARATIVOS
Cargue las pilas (AAA/R03/LR03 × 2)
Presione y deslice la tapa del compartimiento de las
1
pilas del lado opuesto para abrirla.
Deslice en la dirección de la fl echa mientras presiona la marca .
Inserte las pilas.
2
Asegúrese de hacer corresponder bien las polaridades
(
) de las pilas.
Cierre la tapa del compartimiento de las pilas.
3
Ajuste la hora actual
Presione el botón de ajuste de reloj (CLOCK ADJUST)
1
(Fig. 6 W).
Emplee la punta de un bolígrafo u otro pequeño objeto para presionar el botón.
Utilice los botones / de ajuste del temporizador
2
(TIMER SET) (Fig. 6 O) para poner el reloj en la hora
actual.
Botón : Presiónelo para hacer avanzar la hora.
Botón
(Cada vez que se presionan los botones, la hora avanzará/retrocederá
en incrementos de un minuto; mantenga los botones presionados para
cambiar con rapidez la hora en incrementos de diez minutos.)
Presione el botón de ajuste de reloj (CLOCK ADJUST)
3
(Fig. 6 W) otra vez.
De este modo se completa el ajuste y el reloj se pone en funcionamiento.
: Presiónelo para hacer retroceder la hora.
¡PRECAUCION!
● Tome precauciones para evitar que los niños se traguen accidentalmente las pilas.
● Saque las pilas de la unidad del telemando
cuando no lo utilice durante períodos prolongados con el fi n de evitar problemas en
la unidad causados por fugas del líquido
de las pilas.
● Si el líquido de las pilas se pone en contacto con la piel o entra en los ojos o la boca,
lávese inmediatamente con mucha agua,
y vaya enseguida al médico.
● Las pilas gastadas deben sacarse con
rapidez y deben tirarse de forma correcta,
tirándolas a un receptáculo de recolección
de pilas público o devolviéndolas a una
autoridad apropiada.
● No intente recargar las pilas.
No mezcle nunca pilas nuevas y usadas,
ni pilas de tipos distintos.
Las pilas deben durar aproximadamente
un año en condiciones normales de utilización. Si el alcance de funcionamiento
de la unidad de telemando se reduce
apreciablemente, reemplace las pilas y
presione el botón RESET con la punta de
un bolígrafo u otro pequeño objeto.
Empleo de la unidad del telemando
● La unidad del telemando debe dirigirse al receptor de la señal (Fig. 3 4) para que
funcione correctamente.
● Alcance de funcionamiento: Dentro de unos 7 metros.
● Cuando una señal se recibe correctamente en el acondicionador de aire, sonará
un pitido de confi rmación.
● Si no se oye el pitido, presione de nuevo el botón de la unidad del telemando.
Soporte de la unidad del telemando
Deslice hacia arriba
Saque
3 Para sacar la unidad del
telemando (para usarla en la
mano).
Tornillos
1 Monte el soporte.
Inserte
Presione
2 Coloque la unidad del
telemando.
Es-5
9315345363_OM.indb 59315345363_OM.indb 5 9/16/2010 2:49:00 PM9/16/2010 2:49:00 PM
Page 39

FUNCIONAMIENTO
Para seleccionar el modo de funcionamiento
Presione el botón de marcha/paro (START/STOP) (Fig. 6 Q).
1
Se encenderá la lámpara de funcionamiento (OPERATION) de la unidad
interior (roja) (Fig. 3 5).
El acondicionador de aire se pondrá en funcionamiento.
Presione el botón de control de funciones (MASTER CON-
2
TROL) (Fig. 6 K) para seleccionar el modo deseado.
Cada vez que presione el botón, el modo cambia en el orden siguiente:
AUTO COOL DRY FAN
(Automático) (Refrigeración) (Deshumectación) (Ventilación)
Después de unos tres segundos, reaparecerá toda la visualización.
▲
▲
▲
▲
Para ajustar el termostato
Pulse el botón de ajuste de la temperatura (SET TEMP.) (Fig. 6 L).
Botón : Presiónelo para subir el ajuste del termostato.
Botón
: Presiónelo para bajar el ajuste del termostato.
● Margen de ajuste del termostato:
Automático ...................................... 64-88 °F
Refrigeración/Deshumectación ...... 64-88 °F
El termostato no puede emplearse para ajustar la temperatura de la sala durante el
modo de ventilación (FAN) (la temperatura no aparecerá en la pantalla de la unidad
del telemando).
Unos tres segundos después, reaparecerá toda la visualización.
El ajuste del termostato deberá considerarse un valor estándar, y puede ser algo
distinto de la temperatura real de la sala.
Ajuste de la velocidad del ventilador
Presione el botón de control del ventilador (FAN CONTROL)
(Fig. 6 P).
Cada vez que presione el botón, la velocidad del ventilador cambia en el orden
siguiente:
AUTO HIGH MED LOW QUIET
(Automático) (Alta) (Media) (Baja) (Silencioso)
Después de unos tres segundos, reaparecerá toda la visualización.
Cuando se ajusta a automático (AUTO):
Refrigeración : Así que la temperatura de la habitación se aproxima al ajuste del
Ventilación : El ventilador funciona a velocidad media (MED).
▲
termostato, se aminora la velocidad del ventilador.
▲
▲
▲
▲
Ejemplo: Cuando se ajusta a COOL
(refrigeración).
Ejemplo: Cuando se ajusta a 80 °F.
Funcionamiento supersilencioso (SUPER QUIET)
Cuando se ajusta a silencioso (Quiet):
La lámpara indicadora de funcionamiento SUPERSILENCIOSO (naranja) (Fig. 3 7)
se iluminará.
Se inicia el funcionamiento supersilencioso (SUPER QUIET). El fl ujo de aire de la
unidad interior se reducirá para conseguir un funcionamiento más silencioso.
● El funcionamiento supersilencioso no puede usarse durante el modo de deshu-
mectación. (Lo mismo se aplica cuando se selecciona el modo de deshumectación
durante el funcionamiento en el modo automático (AUTO).)
● Durante el funcionamiento Supersilencioso, el rendimiento del modo de Refrige-
ración se verá ligeramente reducido. Si la sala no se refrigera durante el funcionamiento SUPERSILENCIOSO, ajuste la Velocidad del Ventilador del acondicionador
de aire.
Ejemplo:
Cuando se ajusta a automático
(AUTO).
Es-6
9315345363_OM.indb 69315345363_OM.indb 6 9/16/2010 2:49:00 PM9/16/2010 2:49:00 PM
Page 40

Para detener el funcionamiento
Presione el botón de marcha/paro (START/STOP) (Fig.6 Q).
La lámpara de funcionamiento (OPERATION) de la unidad interior (roja) (Fig.3 5) se
apagará.
Notas sobre el funcionamiento de cambio automático (AUTO CHANGEOVER)
AUTO: ●
Si la diferencia entre el ajuste del termostato y la temperatura real de
Si la diferencia entre el ajuste del termostato y la temperatura real de
● Cuando el acondicionador de aire ha ajustado la temperatura de la sala
(El margen de funcionamiento del monitor es +4 °F relativo al ajuste
● Si el modo seleccionado automáticamente por el aparato no es el
Cuando se inicia el funcionamiento de cambio automático (AUTO CHANGEOVER), el ventilador funciona a velocidad muy lenta durante un minuto
más o menos y durante este tiempo el aparato detecta las condiciones de
la sala y selecciona el modo de funcionamiento adecuado.
la sala es superior a +4 °F → Funcionamiento de refrigeración o deshumectación
la habitación es de menos de +4 °F→ Funcionamiento de monitor.
de acuerdo con el ajuste del termostato, se iniciará el funcionamiento
del monitor. En el modo de funcionamiento del monitor, el ventilador
funcionará a velocidad baja. Si la temperatura de la sala cambia posteriormente, el acondicionador de aire seleccionará nuevamente el
funcionamiento adecuado (refrigeración) para ajustar la temperatura
al valor establecido en el termostato.
del termostato.)
deseado, seleccione un modo de funcionamiento (Refrigeración, Deshumectación, Ventilación.)
Notas sobre el funcionamiento de los modos
Refrigeración:
● Se emplea para refrigerar la sala.
Deshumectación:
● Se emplea para enfriar un poco mientras se deshumecta la sala.
● No podrá calentar la sala durante el modo de deshumectación.
● Durante el modo de deshumectación, el aparato funcionará a baja
velocidad; para poder ajustar la humedad de la sala, es posible que el
ventilador de la unidad interior se pare de vez en cuando. Además, el
ventilador puede funcionar a velocidad muy baja cuando se ajusta la
humedad de la sala.
● La velocidad del ventilador no puede cambiarse manualmente cuando
se ha seleccionado el modo de deshumectación.
Ventilación:
● Se emplea para hace circular el aire por la sala.
Durante el modo refrigeración/deshumectación:
Ajuste el termostato a un ajuste de la
temperatura que sea más bajo que la
temperatura actual de la sala. Los modos
de refrigeración y deshumectación no
funcionarán si se ajusta el termostato
más alto que la temperatura actual de la
sala (en el modo de refrigeración, sólo
funcionará el ventilador).
Durante el modo de ventilación:
No podrá emplear el aparato para la calefacción ni refrigeración de la sala.
Es-7
9315345363_OM.indb 79315345363_OM.indb 7 9/16/2010 2:49:02 PM9/16/2010 2:49:02 PM
Page 41

FUNCIONAMIENTO CON TEMPORIZADOR
Antes de utilizar la función del temporizador, asegúrese de que la unidad del telemando esté ajustado a la hora correcta (vea la página 5).
Para emplear el temporizador de conexión (ON) y de desconexión (OFF)
Presione el botón de marcha/paro (START/STOP) (Fig. 6 Q)
1
(Si el aparato ya está funcionando, pase al paso 2).
Se encenderá la lámpara de funcionamiento (OPERATION) roja de la
unidad interior (Fig. 3 5).
Presione el botón del temporizador (TIMER MODE)
2
(Fig. 6 N) para seleccionar el funcionamiento de temporizador de conexión (ON) o de desconexión (OFF).
Cada vez que se presione el botón, la función del temporizador cambiará
en el orden siguiente:
CANCEL OFF ON
(cancelación) (desconexión) (conexión)
PROGRAM (OFF → ON, OFF ← ON)
(programa)
El indicador verde del temporizador (TIMER) de la unidad interior (Fig. 3 6)
se encenderá.
Utilice los botones de ajuste del temporizador (TIMER
3
SET) (Fig. 6 O) para ajustar la hora de desconexión
▲
▲
▲
▲
(OFF) y conexión (ON) deseada.
Ajuste la hora mientras parpadea la visualización de la hora (el parpadeo
continuará durante cinco segundos).
Botón
Botón
Unos cinco segundos después, reaparecerá toda la visualización.
: Presiónelo para hacer avanzar la hora.
: Presiónelo para hacer retroceder la hora.
Empleo del temporizador programable
Presione el botón de marcha/paro (START/STOP) (Fig. 6 Q)
1
(Si el aparato ya está funcionando pase al paso 2).
Se encenderá la lámpara de funcionamiento (OPERATION) roja (Fig. 3 5)
de la unidad interior.
Ajuste las horas deseadas del temporizador de desco-
2
nexión (OFF) y del de conexión (ON).
Vea la sección de “Para emplear el temporizador de conexión (ON) y de
desconexión (OFF)” para ajustar el modo y las horas deseadas.
Unos tres segundos después, reaparecerá toda la visualización.
Se encenderá la lámpara del temporizador (TIMER) verde (Fig. 3 6) de la
unidad interior.
Presione el botón del temporizador (TIMER MODE) (Fig. 6 N) para
3
seleccionar el funcionamiento con temporizador programado
(PROGRAM) (se visualizará OFF → ON u OFF ← ON)
La visualización mostrará alternadamente “OFF-timer” (temporizador de
desconexión) y “ON-timer” (temporizador de conexión), y cambie entonces
para que se muestre el ajuste de la hora de la primera función.
● El temporizador programable iniciará el funcionamiento. (Si se ha seleccionado el temporizador de conexión (ON) para funcionar primero,
Unos cinco segundos después, reaparecerá toda la visualización.
Notas sobre el temporizador programable
●
El temporizador programable le permite integrar las funciones del temporizador de desconexión y del temporizador de conexión en una sola secuencia. La secuencia puede ser de
una transición del temporizador de desconexión al de conexión, o desde el temporizador
de conexión al de desconexión, dentro de un período de veinticuatro horas.
● La primera función del temporizador será la que se ha ajustado más próxima a la
hora actual. El orden de funcionamiento se indica con la fl echa de la visualización
de la unidad del telemando. (OFF → ON, u OFF ← ON).
● Un ejemplo del temporizador programable podría ser para que el acondicionador
de aire se pare automáticamente (temporizador de desconexión) después de irse
a dormir, y se ponga en funcionamiento (temporizador de conexión) automáticamente por la mañana antes de levantarse.
el aparato dejará de funcionar en este punto.)
.
Para cancelar el temporizador
Utilice el botón de modo del temporizador (TIMER MODE) para seleccionar “CANCELAR”.
El acondicionador de aire retornará al funcionamiento normal.
Para cambiar el ajuste del temporizador
Lleve a cabo los pasos 2 y 3.
Para detener el funcionamiento del
acondicionador de aire mientras el temporizador está funcionando
Presione el botón de marcha/paro (START/
STOP).
Para cambiar las condiciones de funcionamiento
Si desea cambiar las condiciones de funcionamiento (modo, velocidad del ventilador,
ajuste del termostato) después de haber
hecho el ajuste del temporizador, espere a
que reaparezca toda la visualización, y presione los botones apropiados para cambiar
el funcionamiento como desee.
Para cancelar el temporizador
Utilice el botón de modo del temporizador (TIMER MODE) para seleccionar “CANCELAR”.
El acondicionador de aire retornará al funcionamiento normal.
Para cambiar los ajustes del temporizador
1. Siga las instrucciones dadas en la sección
“Para emplear el temporizador de conexión (ON) y de desconexión (OFF)” para
seleccionar el ajuste del temporizador que
desee cambiar.
2. Presione el botón del temporizador (TIMER MODE) para seleccionar OFF → ON
u OFF ← ON.
Para detener el funcionamiento del
acondicionador de aire mientras el temporizador está funcionando
Presione el botón de marcha/paro (START/STOP).
Para cambiar las condiciones de funcionamiento
Si desea cambiar las condiciones de funcionamiento (modo, velocidad del ventilador,
ajuste del termostato), después de realizar el
ajuste del temporizador, espere a que reaparezca toda la visualización, y presione entonces los botones apropiados para cambiar la
condición de funcionamiento deseada.
Es-8
9315345363_OM.indb 89315345363_OM.indb 8 9/16/2010 2:49:02 PM9/16/2010 2:49:02 PM
Page 42

FUNCIONAMIENTO DEL TEMPORIZADOR (SLEEP) DE DESCONEXIÓN AUTOMÁTICA
A diferencia de otras funciones del temporizador, el temporizador de desconexión automática (SLEEP) se usa para ajustar la
duración del tiempo hasta que se para el funcionamiento del acondicionador de aire.
Empleo del temporizador (SLEEP) de desconexión automática
Mientras el acondicionador de aire está en funcionamiento o
parado, presione el botón de desconexión automática (SLEEP)
(Fig. 6 J).
Se encienden la lámpara de funcionamiento (OPERATION) roja (Fig. 3 5) de la unidad
interior y la lámpara del temporizador (TIMER) verde (Fig. 3 6).
Para cambiar los ajustes del tiempo
Pulse el botón del temporizador de desconexión automática
(SLEEP) (Fig. 6 J) una vez más y fi je la hora con los botones
+/- de ajuste del temporizador (TIMER SET) (Fig. 6 O).
Ajuste el tiempo mientras parpadea la visualización de la hora (el parpadeo continuará durante cinco segundos).
Para cancelar el temporizador
Utilice el botón de modo del temporizador (TIMER MODE) para seleccionar “CANCELAR”.
El acondicionador de aire retornará al funcionamiento normal.
Para detener el funcionamiento del
acondicionador de aire mientras el temporizador está funcionando:
Presione el botón de marcha/paro (START/
STOP).
Botón
Botón
Unos cinco segundos después, reaparecerá toda la visualización.
: Presiónelo para hacer avanzar la hora.
: Presiónelo para hacer retroceder la hora.
Notas sobre el temporizador de desconexión automática (SLEEP)
Para evitar calor o frío excesivos mientras está durmiendo, la función del temporizador de desconexión automática (SLEEP)
modifi ca automáticamente el ajuste del termostato de acuerdo con el ajuste del tiempo. Cuando ha transcurrido el tiempo
ajustado, el acondicionador de aire se para por completo.
Durante el funcionamiento de refrigeración/deshumectación:
Una vez seleccionada la función “SLEEP” la temperatura de
ajuste (termostato) sube automáticamente 2 °F cada 60 min.
Cuando la temperatura de ajuste (termostato) ha ascendido un
total de 4 °F, ésta se mantiene hasta que transcurre el tiempo
programado y la unidad se desconecta.
Ajuste del temporizador (SLEEP) de desconexión automática
Tiempo
ajustado
1 hora
2 °F
4 °F
FUNCIONAMIENTO MANUAL Y AUTOMÁTICO
Emplee el funcionamiento manual/automático (MANUAL AUTO) en el caso de que se pierda el mando a distancia o de que no pueda utilizarse.
Cómo emplear los controles de la unidad principal
Presione el botón de funcionamiento manual/automático
(MANUAL AUTO) (Fig. 2 2) del panel de control de la unidad
principal.
Para detener el funcionamiento, presione de nuevo el botón de funcionamiento
manual/automático(MANUAL AUTO) (Fig.2 2).
(Los controles están situados dentro de la Panel de entrada.)
● Cuando se haga funcionar el acondicionador de aire con los controles
de la unidad principal, funcionará en
el mismo modo que el modo AUTO
seleccionado en el telemando (vea la
página 7).
● La velocidad del ventilador seleccionada será la de “AUTO”, y el ajuste del
termostato será el estándar. (76 °F)
Es-9
9315345363_OM.indb 99315345363_OM.indb 9 9/16/2010 2:49:02 PM9/16/2010 2:49:02 PM
Page 43

AJUSTE DE LA DIRECCIÓN DE CIRCULACIÓN DEL AIRE
●
Ajuste del dirección del aire en los sentidos arriba, abajo e izquierda y derecha con los botones AIR DIRECTION (DIRECCIÓNDEL
AIRE) del mando a distancia.
● Utilice los botones AIR DIRECTION (DIRECCIÓN DEL AIRE) después de que la unidad interior haya empezado a funcionar y
las lamas defl ectoras hayan dejado de moverse.
Ajuste de la dirección vertical del aire
Presione el botón SET (vertical) (Fig. 6 R).
Cada vez que se presiona el botón, el margen de dirección del aire cambia de la
forma siguiente:
1
Tipos de ajustes de la dirección del fl ujo de aire:
1,2,3 : Durante los modos de refrigeración deshumectación
1,2,3,4,5,6 : Durante el modo de ventilación
La visualización del
telemando no cambia.
●
Emplee los ajustes de la dirección del aire dentro de los márgenes arriba mostrados.
● La dirección del fl ujo de aire vertical se ajusta automáticamente, de acuerdo con
el tipo de funcionamiento seleccionado.
Durante el modo de Refrigeración/Deshumectación/Ventilación: Flujo horizontal
●
Durante el funcionamiento en el modo automático (AUTO), el primer minuto después
de haberse puesto en funcionamiento, el fl ujo de aire será horizontal 1; la dirección
del aire no podrá ajustarse durante este período.
● Dirección 1 2
Sólo cambia la dirección de la lama defl ectora del aire orientable; la dirección
del difusor de potencia no cambia.
2 3 4 5 6
1
2
3
4
5
6
1
¡PELIGRO!
●
No ponga nunca los dedos ni otros objetos
dentro de los orifi cios de salida, porque el
ventilador interno funciona a alta velocidad
y puede causar daños personales.
● Emplee siempre el botón de la dirección del fl ujo de aire (SET) para
ajustar las lamas defl ectoras del fl ujo
del aire vertical. Si se intenta moverlas
manualmente, puede producirse una
operación incorrecta; en este caso,
pare el funcionamiento y vuelva a comenzarlo. Las lamas defl ectoras deben
empezar a funcionar correctamente
otra vez.
● Durante el funcionamiento de refrigeración y de deshumectación, no
mueva las lamas defl ectoras fuera de
su margen correcto de funcionamiento
para el modo (1 - 3) ni a la región
de ventilación (4 - 6); el empleo de
las lamas defl ectoras en el margen de
ventilación causará la condensación
de la humedad cerca de la salida del
aire, y es posible que gotee agua al
suelo. Durante el funcionamiento de
refrigeración y de deshumectación,
si funciona con las lamas defl ectoras
durante del margen de (1 - 3) durante más de 20 minutos, retornarán
automática mente al margen 3.
● Cuando se utiliza en una sala con niños, ancianos, o enfermos, la dirección
del aire y la temperatura de la sala
deben ajustarse teniendo en cuenta
las circunstancias.
Ajuste horizontal de la dirección del aire
Presione el botón SET (horizontal) (Fig. 6 S).
● Cada vez que pulse el botón, la dirección del fl ujo de aire cambiará como se indica
a continuación:
2 3 4 5
1
La pantalla de la unidad del
telemando no cambia.
1
2
3
5
4
Es-10
9315345363_OM.indb 109315345363_OM.indb 10 9/16/2010 2:49:03 PM9/16/2010 2:49:03 PM
Page 44

FUNCIONAMIENTO DE VAIVÉN
Inicie el funcionamiento del acondicionador de aire antes de efectuar este procedimiento.
Para seleccionar el funcionamiento de vaivén (SWING)
Pulse el botón SWING (VAIVÉN) (Fig. 6 T).
Aparecerá en pantalla la indicación SWING (Fig. 7 b).
Cada vez que pulse el botón SWING (VAIVÉN), el funcionamiento de vaivén irá
cambiando en el orden siguiente:
Arriba/abajo Izquierda/Derecha
Parada Arriba/abajo/Izquierda/Derecha
Para detener el funcionamiento de vaivén (SWING)
Pulse el botón SWING (VAIVÉN) y seleccione STOP.
La dirección de la corriente de aire volverá a la posición anterior al funcionamiento
de vaivén.
Observaciones sobre el funcionamiento del vaivén
● Vaivén arriba/abajo: El funcionamiento de vaivén sigue
el margen indicado a continuación, de acuerdo con la
dirección de la corriente de aire de ese momento.
La dirección de la corriente de aire es 1–4 (para refrigeración, deshumidifi cación).
Con la lama defl ectora superior en posición horizontal, la inferior se mueve (en vaivén) para repartir la
corriente de aire a una zona más amplia.
● Vaivén izquierda/derecha: Las lamas deflectoras se
mueven (en vaivén) en la dirección del aire izquierda/
derecha.
● Vaivén arriba/abajo/izquierda/derecha: Las lamas defl ectoras se mueven (en vaivén) en las direcciones arriba/abajo
e izquierda/derecha.
● El funcionamiento de vaivén puede detenerse temporalmente cuando el ventilador del aparato no está en
funcionamiento o cuando gira a velocidad muy baja.
● Si se pulsa el botón SET (vertical) durante el funcionamiento de vaivén hacia arriba/abajo, éste
se detendrá y, si se pulsa el botón SET (horizontal) durante
el funcionamiento de vaivén hacia la derecha/izquierda,
el funcionamiento de vaivén se detendrá.
Es-11
9315345363_OM.indb 119315345363_OM.indb 11 9/16/2010 2:49:03 PM9/16/2010 2:49:03 PM
Page 45
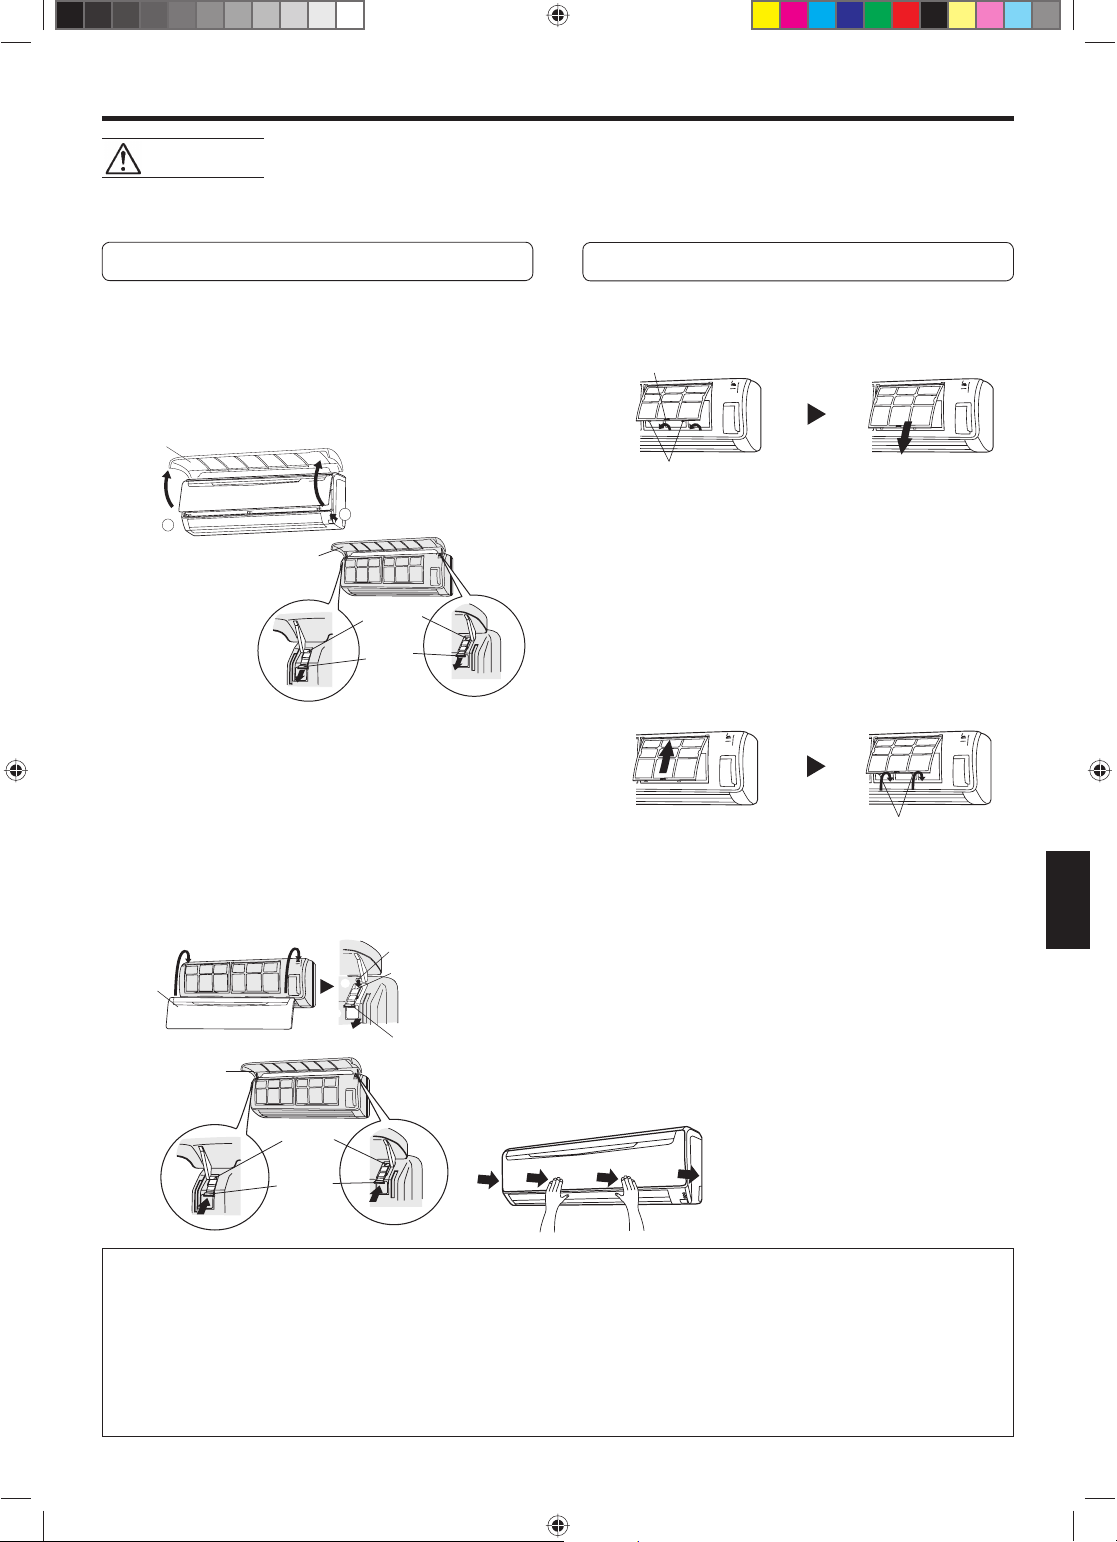
LIMPIEZA Y MANTENIMIENTO
1
¡PRECAUCIÓN
● Antes de limpiar la unidad, asegúrese de parar el funcionamiento del acondicionador de aire y
!
de desconectar la alimentación.
● Asegúrese de que la rejilla de entrada (Fig. 1 8) esté bien instalada.
● Cuando extraiga y reemplace los fi ltros de aire, asegúrese de no tocar el intercambiador de calor,
porque podrían producirse daños personales.
Limpieza de la rejilla de entrada
1. Extraiga la rejilla de entrada
1 Coloque sus dedos en ambos extremos inferiores
del panel de la rejilla, y levántelo hacia arriba; si la
rejilla parece engancharse en el medio del camino al
moverse, continúe levantándolo para sacarlo.
2 Tire pasando el enganche intermedio y abra la rejilla
amplia de modo que quede vertical.
Rejilla de entrada
2
1
Rejilla de entrada
2
Eje de
montaje
Perilla
2. Limpie con agua
Emplee una aspiradora para sacar el polvo acumulado, y
frote la unidad con un paño limpio humedecido en agua
tibia.
Limpieza del fi ltro de aire
1. Abra la rejilla de entrada y extraiga el fi ltro
de aire.
Asa del fi ltro de aire
Ganchos (dos lugares)
2. Saque el polvo con una aspiradora o laván-
dolo.
Si lo ha lavado, séquelo bien en un lugar a la sombra.
3. Reinstale el fi ltro de aire y la rejilla de en-
trada.
1 Alinee los lados del fi ltro de aire con el papel y pre-
siónelo con cuidado hasta el fondo, asegurándose de
que las dos lengüetas de retención inferiores retornan
correctamente a sus orifi cios del panel.
3. Colocación de la rejilla de entrada
1 Tire de las perillas en toda su extensión.
2 Sostenga la rejilla horizontalmente y ajuste los ejes
de montaje izquierdo y derecho en los cojinetes en la
parte superior del panel.
3 Presione el lugar indicado por la fl echa en el diagrama
y cierre la rejilla de entrada.
Eje de montaje
Rejilla de
entrada
Rejilla de entrada
● Cuando se usa durante períodos prolongados de tiempo, puede acumularse suciedad en el interior de la unidad, reduciendo su rendimiento. Recomendamos inspeccionar regularmente la unidad además de la limpieza y cuidados regulares.
Para más información, consulte al personal de servicio autorizado.
● Cuando limpie el exterior de la unidad, no emplee nunca agua que esté más caliente de 104 °F, agentes abrasivos fuertes
o agentes volátiles como por ejemplo bencina o disolventes.
● No exponga el cuerpo de la unidad a insecticidas ni rociadores para el cabello líquidos.
● Cuando no se proponga emplear el aparato durante períodos prolongados (un mes o más), haga funcionar el aparato
durante medio día aproximadamente para asegurarse de que las partes internas quedan bien secas.
1
Eje de
montaje
Perilla
2
Alojamientos
Perilla
2 Cierre la rejilla de entrada.
(A modo de ejemplo, la ilustración muestra la unidad sin la
rejilla de entrada instalada.)
● Emplee una aspiradora para sacar el polvo acumulado
del fi ltro de aire, o lávelo con una solución de detergente
suave y agua tibia. Si lo ha lavado, séquelo bien en un
lugar a la sombra antes de volverlo a instalar en el acondicionador de aire.
● Si se deja acumular el polvo en el fi ltro de aire, se reducirá
el fl ujo de aire, reduciendo la efi cacia del funcionamiento
y aumentando el ruido.
● Durante los períodos de empleo normal, los fi ltros de aire
deberán limpiarse cada dos semanas.
Ganchos (dos lugares)
Es-12
9315345363_OM.indb 129315345363_OM.indb 12 9/16/2010 2:49:03 PM9/16/2010 2:49:03 PM
Page 46

LIMPIEZA Y MANTENIMIENTO
Instalación del fi ltro de limpieza del aire
1. Abra la rejilla de entrada y extraiga los
fi ltros de aire.
Filtro de aire
(derecho e izquierdo)
2. Instale el conjunto del fi ltro de limpieza de
aire (formado por 2 fi ltros).
1 Coloque el fi ltro de limpieza de aire en el marco del
fi ltro de limpieza de aire.
Conjunto del fi ltro de limpieza de aire
Marco del fi ltro de limpieza de aire
Filtro de limpieza de aire
2 Acople el pestillo en ambos lados del fi ltro a los gan-
chos que hay en la parte posterior del marco del fi ltro
de limpieza de aire.
Ganchos (en 2 sitios de la parte posterior)
Pestillos (en dos lugares)
Tenga cuidado para que el fi ltro de limpieza de aire no
sobresalga del marco.
3 Acople los ganchos del fi ltro de aire en los cuatro
lugares de fi jación que hay en la parte superior y en
la inferior del marco del fi ltro de limpieza de aire.
Parte posterior del fi ltro
Lugar de fi jación, ganchos (6 sitios)
3. Instale los dos fi ltros de aire y cierre la
rejilla de entrada.
Filtro de aire
(derecho e izquierdo)
● Cuando se emplean fi ltros de limpieza de aire, se puede
aumentar su efecto colocando la velocidad del ventilador
en la posición “Alta”.
Es-13
Sustitución de los fi ltros de limpieza de
aire sucios
Sustituya los fi ltros con los siguientes componentes (se
compran por separado).
●
FILTRO DE LIMPIEZA DE AIRE DE POLIFENOL CATEQUINA: UTR-FA13-1
●
Filtro desodorizante de iones negativos del aire: UTR-FA13-2
1. Abra la rejilla de entrada y extraiga los
fi ltros de aire.
Filtro de aire
(derecho e izquierdo)
2. Sustitúyalos dos fi ltros de limpieza de
aire nuevos.
1 Extraiga los fi ltros de limpieza de aire antiguos siguien-
do el orden inverso al de la instalación.
2 Instálelos de la misma manera en que instaló el con-
junto del fi ltro de limpieza de aire.
3. Instale los dos fi ltros de aire y cierre la
rejilla de entrada.
Filtro de aire (derecho e izquierdo)
Acerca de los fi ltros de limpieza de aire
FILTRO DE LIMPIEZA DE AIRE DE POLIFENOL CATEQUINA (una hoja)
● Los fi ltros de limpieza de aire son fi ltros desechables. (no
pueden lavarse y volver a utilizarse).
Para almacenamiento de los fi ltros de limpieza de aire, use
●
los fi ltros cuanto antes una vez que haya abierto el paquete.
(en los fi ltros que se dejan en un paquete abierto dismi-
nuye el efecto de limpieza del aire)
● Por lo común, los fi ltros deben cambiarse cada tres meses
aproximadamente.
Cuando sustituya los fi ltros sucios por otros nuevos,
compre fi ltros de limpieza de aire específi cos para este
fi n (UTR-FA13-1) (se venden por separado).
[Filtro desodorizante de iones negativos del aire (una hoja) — azul claro]
● Los fi ltros deben sustituirse cada tres años aproximadamente,
para que sigan teniendo un efecto desodorizante.
● El marco del fi ltro no es un producto de un solo uso.
Cuando cambie los fi ltros, compre un fi ltro desodorizante específi cos para este fi n (UTR-FA13-2) (se vende por separado).
Mantenimiento de los fi ltros desodorizantes
Para que se mantenga el efecto desodorizante, limpie el fi ltro
una vez cada tres meses como se indica a continuación.
1 Extraiga el fi ltro desodorizante.
2 Lávelo con agua y déjelo secar al aire.
1) Límpielo con agua caliente de alta presión hasta
que la superfi cie de los fi ltros quede cubierta de
agua. Límpielo con un detergente neutro.
al lavarlo, no rasque ni frote el fi ltro, pues reper-
cutirá en su efecto desodorizante.
2) Aclárelo bajo el chorro de agua.
3) Déjelo secar a la sombra.
3 Vuelva a instalar el fi ltro desodorizante.
9315345363_OM.indb 139315345363_OM.indb 13 9/16/2010 2:49:03 PM9/16/2010 2:49:03 PM
Page 47

LOCALIZACIÓN DE AVERÍAS
¡ADVERTENCIA
Antes de solicitar el servicio técnico, efectúe las comprobaciones siguientes:
FUNCIONES
NORMALES
!
No se pone inmediatamente en funcionamiento:
Se oye ruido:
Olores:
Se emite humedad o
vapor:
En caso de producirse un mal funcionamiento (por ejemplo, olor a quemado), detenga inmediatamente el funcionamiento, desenchufe la clavija de alimentación o desconecte el enchufe de la fuente
de alimentación y póngase en contacto con el personal de servicio autorizado.
Si sólo desconecta el interruptor de alimentación del aparato, no se desconectará por completo de la fuente
de alimentación. Asegúrese siempre de desenchufar la clavija de alimentación o desconectar el enchufe de
la fuente de alimentación para asegurarse de que la alimentación se ha desconectado por completo.
Síntoma
● Si se para el aparato y se pone inmediatamente en funcionamiento
otra vez, el compresor no funcionará durante unos 3 minutos para
evitar que se quemen los fusibles.
● Siempre que se desenchufa la clavija de alimentación y se vuelve
a enchufar a una toma de corriente, se activa el circuito de protección durante unos 3 minutos evitando el funcionamiento del
aparato durante este período de tiempo.
●
Durante el funcionamiento inmediatamente después de haberlo parado,
puede oírse sonido de agua circulando por los tubos del acondicionador
de aire. Además, puede notarse ruido durante 2 a 3 minutos después de
la puesta en funcionamiento (sonido de circulación del refrigerante).
● Durante el funcionamiento, es posible que se oiga un pequeño
chirrido. Este sonido se debe a una pequeña expansión y contracción de la cubierta frontal debido a los cambios de temperatura.
● Es posible que la unidad interior emita ciertos olores. Se deben
a los olores de la sala (muebles, tabaco, etc.) que ha absorbido
el acondicionador de aire.
●
Durante el funcionamiento de refrigeración y deshumectación, es posible que se aprecie un poco de neblina saliendo de la unidad interior.
Se debe al enfriamiento súbito del aire de la sala por el aire emitido
por el acondicionador de aire, produciendo condensación y niebla.
Problema
Vea la
página
—
—
—
—
El fl ujo de aire es débil o
se para:
●
Es posible que el ventilador funcione a velocidad muy lenta durante el modo de deshumectación o cuando el aparato está monitorizando la temperatura de la sala.
● Durante el funcionamiento supersilencioso, el ventilador operará
a velocidad muy baja.
● Durante el funcionamiento automático (AUTO) de monitorización,
el ventilador funcionará a velocidad muy lenta.
6
6
6
Es-14
9315345363_OM.indb 149315345363_OM.indb 14 9/16/2010 2:49:04 PM9/16/2010 2:49:04 PM
Page 48

LOCALIZACIÓN DE AVERÍAS
COMPRUEBE
OTRA VEZ
Síntoma
No funciona:
Refrigeración
insufi ciente:
La unidad funciona de forma diferente del ajuste del
ajuste del telemando:
Puntos a comprobar
● ¿Se ha desenchufado la clavija de alimentación de la toma de
corriente?
● ¿Ha ocurrido un fallo de la red de alimentación?
● ¿Se ha quemado un fusible o se ha disparado un disyuntor?
● ¿Funciona el temporizador?
● ¿Está sucio el fi ltro de aire?
● ¿Están obstruidos el orifi cio de salida o la rejilla de entrada del
acondicionador de aire?
● ¿Realizó correctamente los ajustes de la temperatura de la sala
(termostato)?
● ¿Hay alguna puerta o ventana abierta?
● En el caso de refrigeración, ¿hay alguna ventana que deja entrar
la luz del sol? (Cierre las cortinas.)
● En el caso del funcionamiento de refrigeración, ¿hay aparatos y
computadoras dentro de la habitación o hay demasiada gente en
la habitación?
● ¿Se ha ajustado la unidad a funcionamiento supersilencioso?
● ¿Se han agotado las pilas del telemando?
● ¿Se han insertado correctamente las pilas del telemando?
Vea la
página
—
8 a 9
—
6
5
Si el problema persiste después de efectuar estas comprobaciones, si nota olor a quemado o so parpadean la lámpara indicadora de funcionamiento (OPERATION) (Fig. 3 5) y del temporizador (TIMER) (Fig. 3 6) o sólo la del temporizador (Fig. 3 6),
pare inmediatamente el funcionamiento, desenchufe la alimentación y consulte al personal de servicio cualifi cado.
CONSEJOS PARA EL FUNCIONAMIENTO
Reinicio automático
En el caso de una interrupción de la alimentación
● La alimentación del acondicionador de aire ha estado
interrumpida debido a un corte de la red de alimentación.
Luego, el acondicionador de aire se reiniciará automáticamente en su modo anterior al reponerse la alimentación.
● Funcionamiento en el ajuste de ante del corte de la red
de alimentación.
● Si el corte de la red de alimentación ocurre mientras
el temporizador está funcionando, el temporizador se
repondrá y la unidad empezará a funcionar (o dejará de
funcionar) al ajuste nuevo del temporizador. En el caso
de ocurrir este tipo de falla del temporizador, el indicador
TIMER parpadeará (vea la página 4).
● El empleo de otros electrodomésticos (máquina de afeitar,
etc.) o el empleo cercado de un transmisor de radio inalámbrico puede causar mal funcionamiento en el acondicionador de aire. En este caso, desenchufe temporalmente
la clavija de alimentación y vuélvala a enchufar, y emplee
el telemando para reanudar el funcionamiento.
Es-15
9315345363_OM.indb 159315345363_OM.indb 15 9/16/2010 2:49:04 PM9/16/2010 2:49:04 PM
Page 49

CONSEJOS PARA EL FUNCIONAMIENTO
Margen de temperatura y humedad
Modo de refrigeración
Temperatura exterior
Temperatura interior
● Si se hace funcionar el aparato con temperaturas más altas que las indicadas, el circuito automático de protección puede
activarse para evitar daños del circuito interno. Además, en el modo de refrigeración y deshumectación, si el aparato se
utiliza con temperaturas más bajas que las indicadas, el intercambiador de calor térmico puede congelarse causando fugas
de agua u otros problemas en el funcionamiento.
● No utilice el acondicionador de aire para ningún otro propósito que no sea el de Refrigeración, Calefacción, Deshumectación
o ventilación de habitaciones y estancias domésticas y apines.
● Si se utiliza la unidad durante periodos prolongados de tiempo en condiciones de elevado índice de humedad, es probable
que se produzca una condensación en la superfi cie de la unidad interior y el consecuente goteo del agua sobre el suelo u
objetos que se encuentren debajo de la unidad. (Aproximadamente el 80% o más).
● Si la temperatura exterior es menor que el rango de temperatura indicado en la lista anterior, para que el aparato funcione
de forma segura, la unidad exterior podrá permanecer detenida durante cierto tiempo.
Aprox. 14 a 115 °F
Aprox. 64 a 90 °F
Funcionamiento de deshumectación
Aprox. 14 a 115 °F
Aprox. 64 a 90 °F
ESPECIFICACIÓN
TIPO MODELO DE REFRIGERACIÓN
MODELO UNIDAD DE INTERIOR ASU30CLX1 ASU36CLX1
UNIDAD DE EXTERIOR AOU30CLX1 AOU36CLX1
ALIMENTACIÓN ELÉCTRICA 208/230 V 60 Hz
REFRIGERACIÓN
CAPACIDAD 30.700 Btu/h 33.000 Btu/h
ENERGÍA DE ENTRADA
CORRIENTE 14,2 A 17,0 A
3,24 kW 3,88 kW
Es-16
9315345363_OM.indb 169315345363_OM.indb 16 9/16/2010 2:49:04 PM9/16/2010 2:49:04 PM
Page 50

9315345363_OM.indb 179315345363_OM.indb 17 9/16/2010 2:49:04 PM9/16/2010 2:49:04 PM
Page 51
9315345363_OM.indb 189315345363_OM.indb 18 9/16/2010 2:49:04 PM9/16/2010 2:49:04 PM
Page 52
9315345363_OM.indb 199315345363_OM.indb 19 9/16/2010 2:49:04 PM9/16/2010 2:49:04 PM
 Loading...