

Page 1
Consumer Notebook
Copyright
© Fujitsu Technology Solutions 2009
Published by
Fujitsu Technology Solutions GmbH
Mies-van-der-Rohe-Straße 8
80807 München, Germany
Contact
http://ts.fujitsu.com
All rights reserved, including intellectual property rights.
Technical data subject to modifi cations and delivery subject
to availability. Any liability that the data and illustrations are
complete, actual or correct is excluded. Designations may be
trademarks and/or copyrights of the respective manufacturer,
the use of which by third parties for their own purposes may
infringe the rights of such owner. For further information see
http://ts.fujitsu.com/terms_of_use.html
1
2
First-time setup
AMILO Notebook Xi 3670
English
Deutsch
Français
Español
Italiano
Nederlands
Português
SAP: 10601078868
FSP: 440N00764
AMILO-Notebook-Cover_s-w.indd 1 01.03.2009 15:32:44
Page 2
3
4
5
6
Video
Audio-R
Audio-L
in
in
in
w
w
w
1
2
2x
AMILO-Notebook-Cover_s-w.indd 2 01.03.2009 15:32:46
Page 3

English
Deutsch
AMILO Notebook Xi 3670
First-time setup
Français
Español
Italiano
Nederlands
Português
Page 4

Microsoft, MS
Windows and Windows Vista are registered trademarks o f the Microsoft Corporation.
Adobe Reade r is
MultiMediaCard
Sony and Memory
All other tradem
respective own
Copyright © Fuji
All rights reserv
or similar method
Non-compliance i
All rights reserv
Subject to availa
a trade mark of Adob e Systems Incorporated.
is a reg istered trademark of Infineon Technologies AG
Stick are registered trademarks of Sony Electronics, Inc.
arks referenced are trademarks or registered trademarks of their
ers, whose protected rights are acknowledged.
tsu Technology Solutions GmbH 2009
ed, including rights of translation, reproduction by printing, copying
s, either in part or in whole.
s subject to compensation for damages.
ed, including rights created by patent grant or registration of a utility model or design.
bility and technical modifications.
Page 5

Contents
English
Contents
Innovativetechnology ................................................................. 1
High DefinitionAudio .................................................................... 2
Connecting a loudspeaker system ................................................... 3
Hybridgraphics ......................................................................... 5
Changing graphics mode . ........................................................... 5
SecondharddriveinRAID group ........................................................ 6
Furtherinformation ...................................................................... 7
Ports and Operating Elements ......................................................... 8
Importantnotes ........................................................................ 10
Help ifproblems occur ................................................................... 10
®
Call upMatrixStorageManagerand Help function ............................... 6
Intel
"AMILO Notebook" Operating Manual . . . . . ............................................ 7
Preparingyour notebook foruse ....................................................... 11
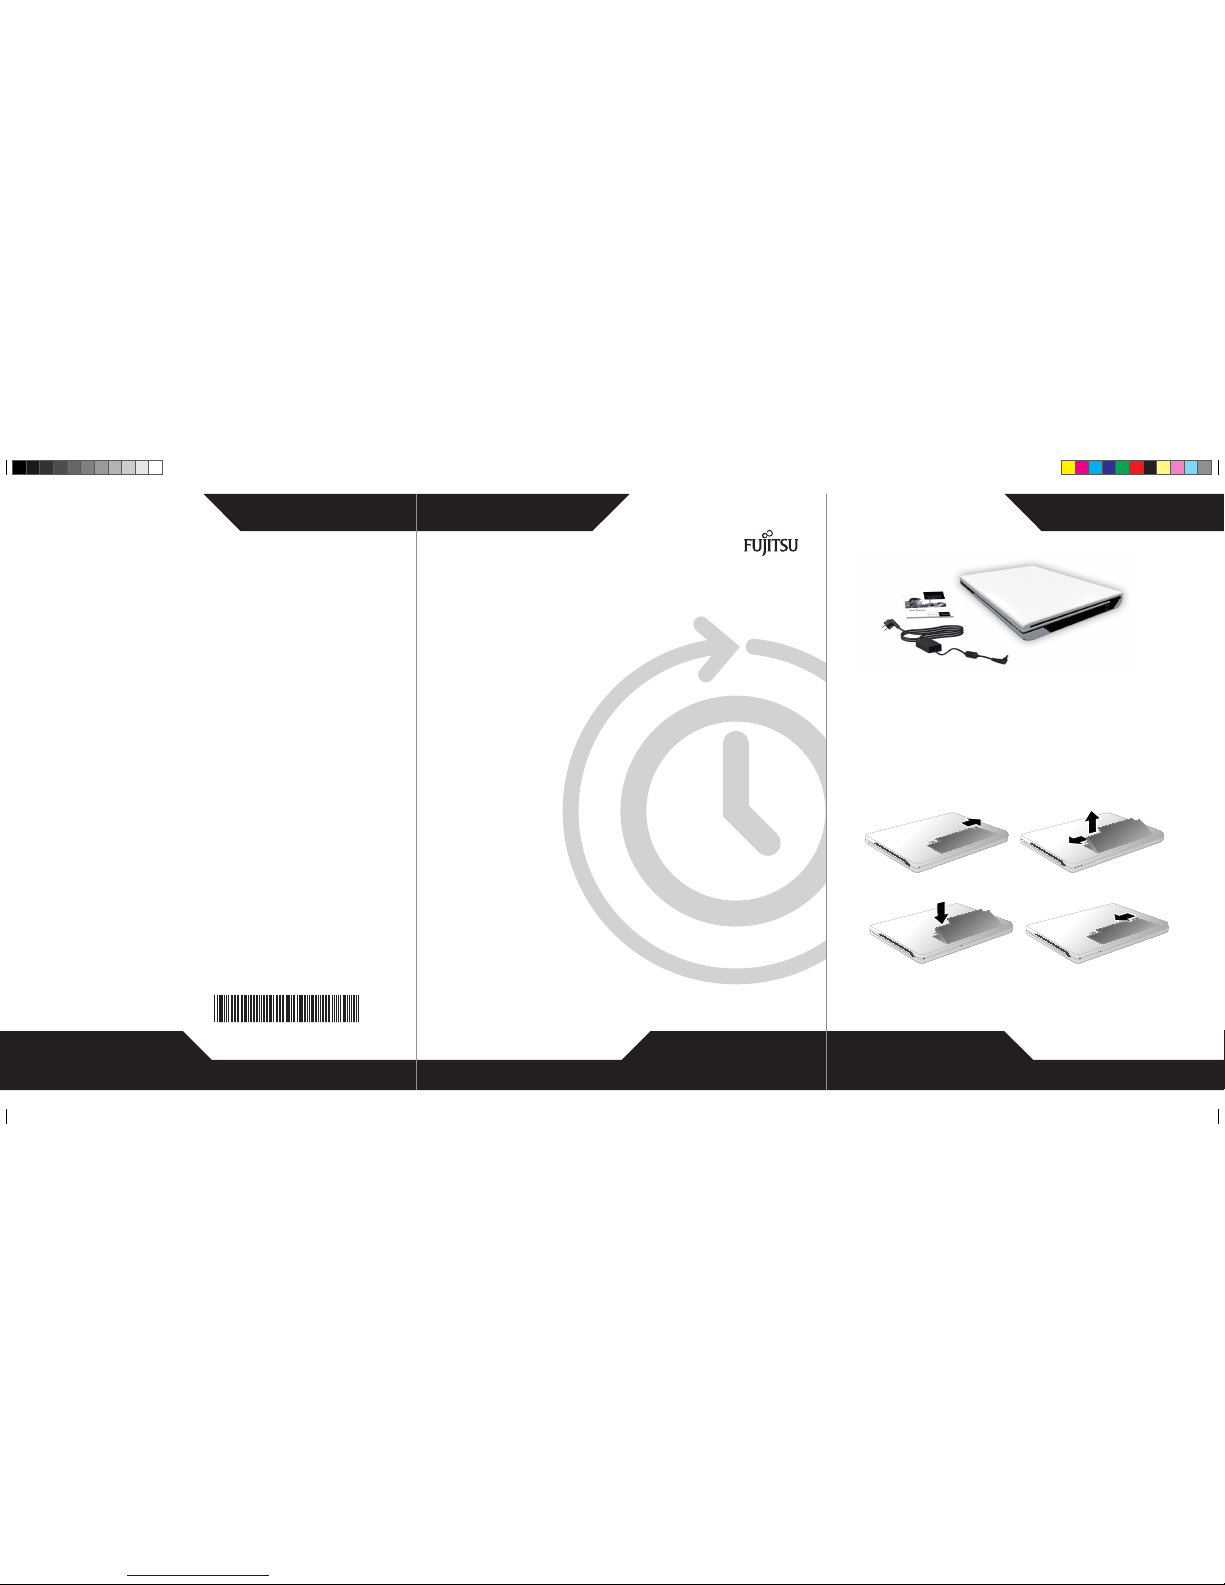
Unpacking and checking your notebook ................................................... 11
Selectingthe location ................................................................... 12
Connecting the mains adapter ........................................................... 12
Switching the notebook on for the firsttime ................................................ 13
Technical specification ................................................................. 14
Notebook . . . . . .......................................................................... 14
Mains adapter .......................................................................... 14
10601078868, edition 1 English
Page 6

Contents
English 10601078868, edition 1
Page 7

Innovative technology
Innovative technology
... and ergonomic design make your AMILO Notebook Xi 3670 a user-friendly and reliable notebook.
If you have pu rchased a notebook with a Microsoft Windows operating syst em, this
is already pre-installed and optimally con figured for you. The notebook is immediately
ready to use, as soon as you switch it on for the first time.
Your notebook features the very latest technology, so that you get the best
performance from your computing experience.
• a drive for reading and writing CDs/DVDs and, depending on device
configuration, for reading Blu-ray disks
• three USB ports, providing simple expansion options for game pads, printers and other equipment
• a combined eSATA/USB port, enabling an external SATA hard disk or a
further USB device to be connected
• a Wireless USB (WUSB) interface (optional, cannot be retrofitted), for fast data transfer
according to the USB standard, without the nee d for a troub lesome cable
• LAN and Wireless LAN for Internet and network access
• depending on the device, a second hard disk, e nabling your notebook to be
operated with two hard disks in a RAID group
• a FireWire port for fast data exchange with multimedia devices
• a HDMI port for fully digital transfer of audio and video data
• an integrated webcam and digital microphones fo r the widest variety of multimedia applications
• a multi-format card reader for rapid transfer of digital photos, music and
video clips onto your notebook
• Surround sound (high definition audio, Dolby digital) by connection of an
active loudspeaker system with subwoofer
• a built-in sound card, stere o loudspeakers and a subwoofer for your audio enjoyment
• Bluetooth® 2.1 for wireless operation of a variety of accessories
• in addition, input and output ports for high-quality audio accessories
TM
• a multimedia LightTouch
for convenient operation of the multimedia functions of your notebook
• a built-in TV tuner (optional, cannot be retrofitted), for receiving terrestrial television programmes
• a keyboard with separate numeric keypad
• an on-screen display for visually checking the most importan t settings of your notebook
• hybrid graphics for full performance and a battery-saving working mode
for less demanding applications
• a multi-connector interface (optional, only in conjunction with the TV Tuner) to receive audio and
video signals from external m ultimedia devices. Further software is needed to prepare this for use.
With the user-friendly "BIOS Setup Utility", y ou can control your notebook’s hardware and better
protect your system against unauthorised access by using the powerful password properties.
operation bar with touch-sensitive buttons and a remote control
This Operating Manual tells you how to get your AMILO Notebook up and
running and how to operate it in daily use.
10601078868, edition 1 English - 1
Page 8

Innovative technology
High Definition Audio
You can connect an active loudspea ker system consisting of up to eight loudspeakers
to th e digital audio output (SPDIF port) of your device (7.1).
Loudspeaker systems supported by High Definition Audio:
Loudspeaker system Power
2 loudspeakers
4 loudspeakers
5 loudspeakers + 1 subwoofer 5.1 surround sound (Dolby Digital)
7 loudspeakers + 1 subwoofer 7.1 surround sound (Dolby Digital EX)
Stereo sound
Quadro sound
2 - English 10601078868, edition 1
Page 9
Innovative technology
Connecting a loudspeaker system
Proceed as follows to connect a loudspeak er system to your device and configure it:
► Connect one of the loudspeaker systems listed above to the SPDIF/Line-ou t port of your device.
You will find further information in the chapter "Ports and Operating Elements", Page 8 and in
the "AMILO Notebook" operating manual in the chapter "Connecting an external device".
The Realtek HD Audio Manager will be started:
10601078868, edition 1 English - 3
Page 10
Innovative technology
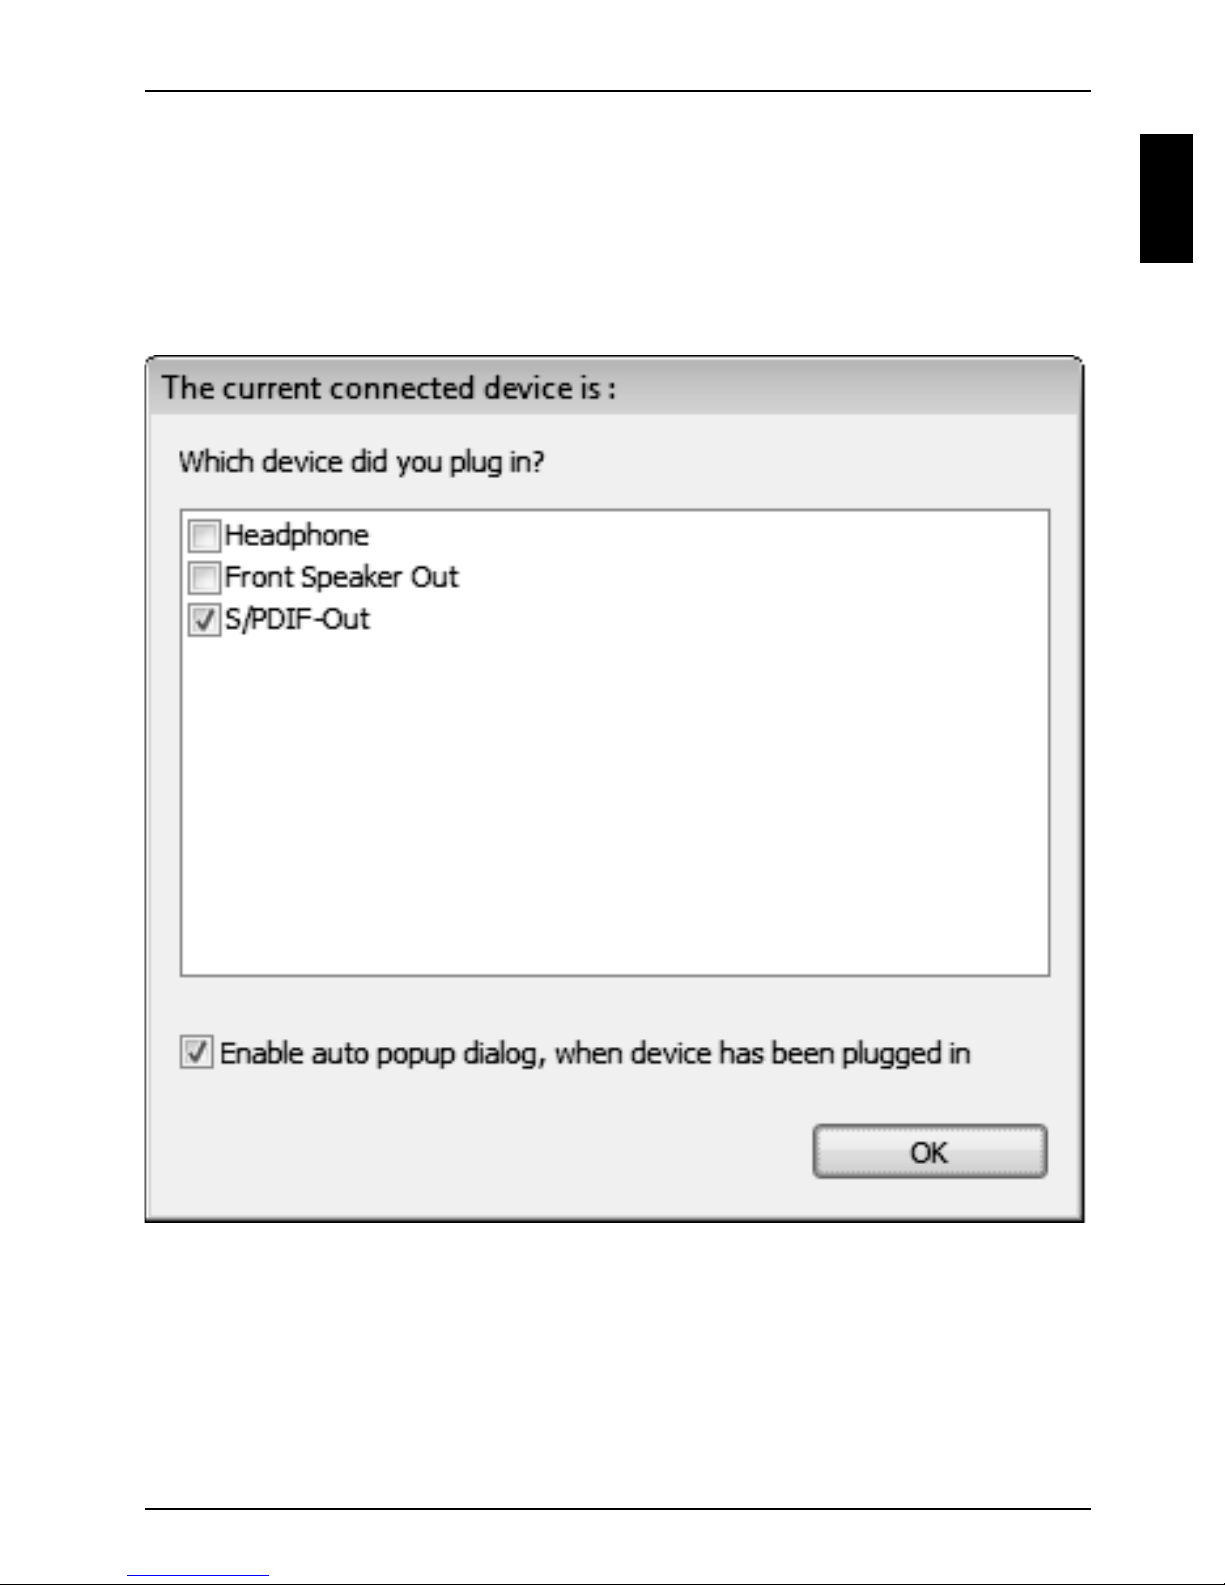
► Select S/PDIF-out and confirm with OK.
The loudspeaker syste m is now ready for operation.
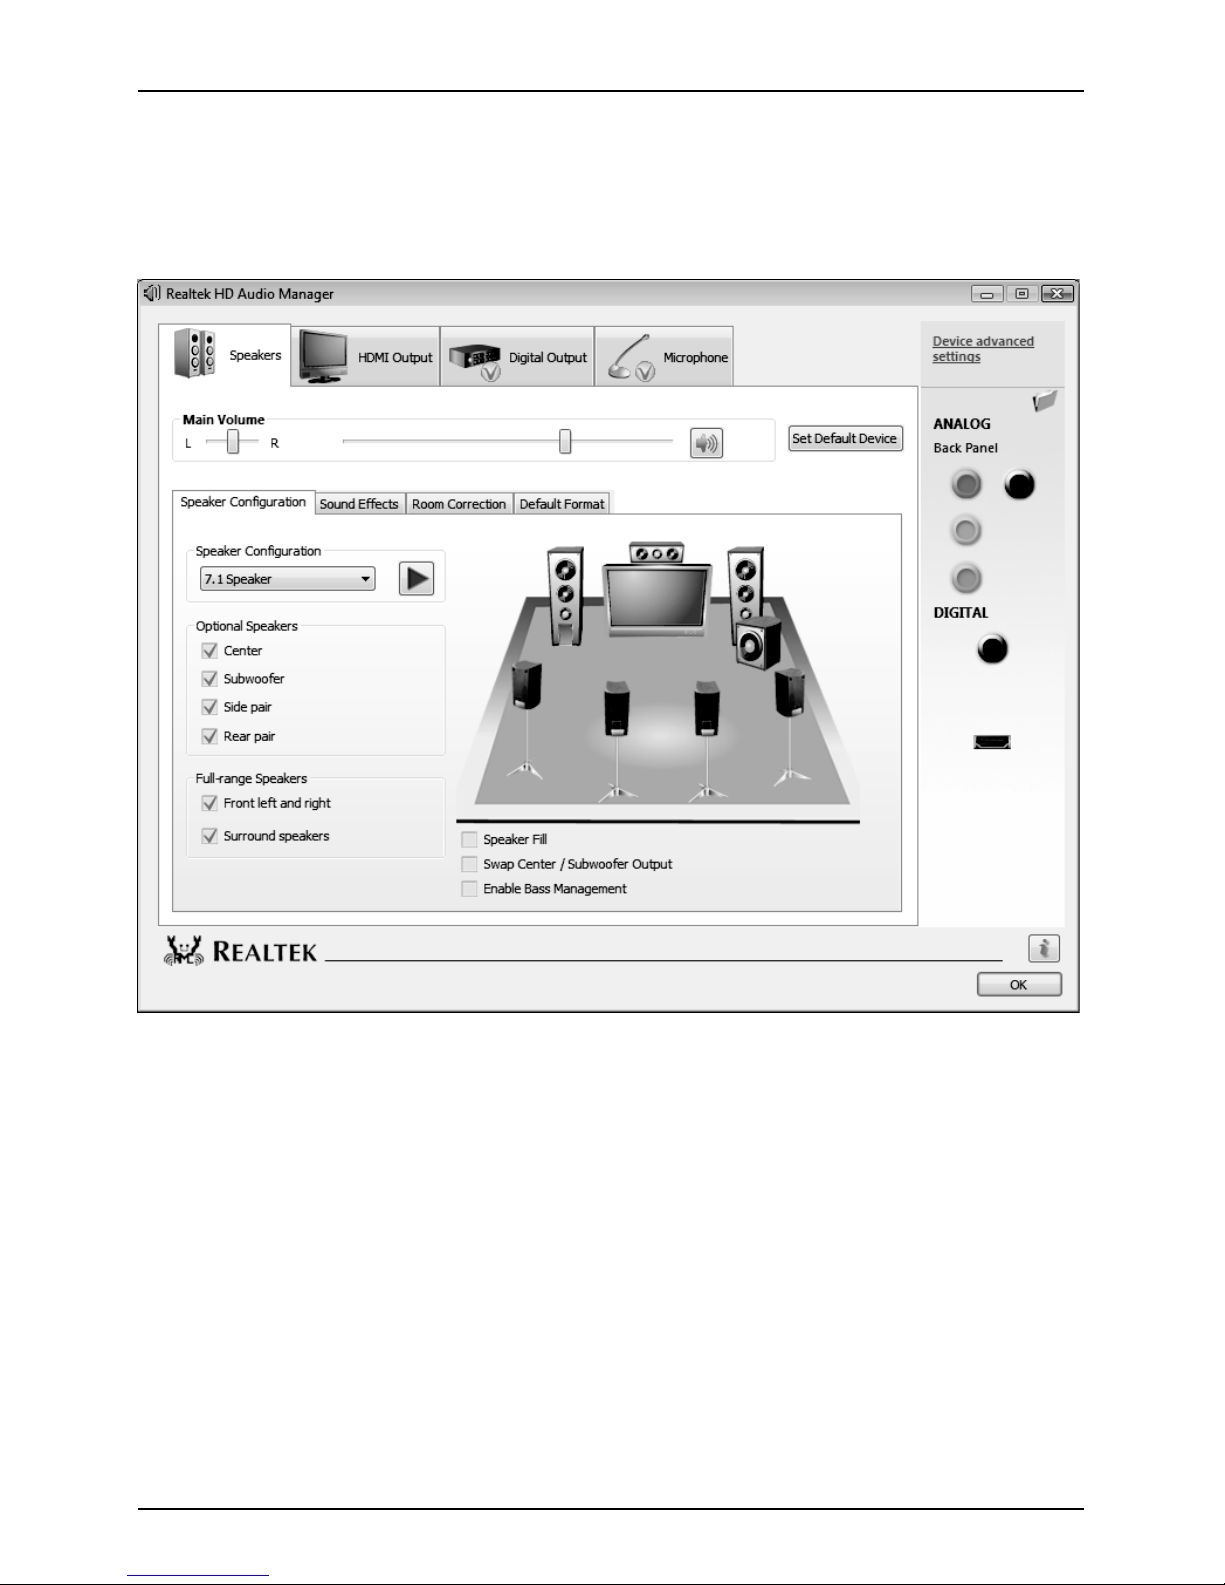
You can further configu re your loudspeaker system in the Realtek HD Audio
Manager loudspeaker configuration facility:
4 - English 10601078868, edition 1
Page 11
Innovative technology
Hybrid graphics
Your notebook is equipped with a hybrid graphics system. By clicking the Quick Sta rt
button, you can switch between battery-saver and performance m ode.
Use the graphics unit integrated in the chip set for applications which are
less graphics-intensive, such as video playback, e-mail and Internet surfing.
This reduces heat generation, noise levels and power consumption. As a
result, battery life is increased (battery saver mode).
If you requ ire a high level of performance, for example, for games, you can
switch to the external graphics unit (performance mode).
Changing graphics mode
In your notebook, the external graphics mode is preconfigured ex works (performance mode).
A device connected to an HDMI port of your notebook (FullHD resolution) can only be
activated in performance mode via the external graphics unit.
If there are programs active which influence graphics output (e.g. games
or TV software), then it may not always be possible to switch between the
modes. End all the prog rams concerned before switching.
The process of switching between graphics modes may take longer than ten seconds.
► Click the Quick Start button
The graphics display switches to battery-saver mode.
► Click the
The graphics disp lay switches to performance mode.
Hybrid VGA
Hybrid VGA
quick-start button again.
on the Multimedia Board of your notebook:
10601078868, edition 1 English - 5
Page 12

Innovative technology
Second hard drive in RAID group
RedundantArrayofIndepe ndentDisksRAID
The upgrade level of your device governs whether or not you can use a second hard disk.
Removal and installation of a second hard disk must only be performed by
authorised service partners of Fujitsu Technology Solutions GmbH. Unauthorised
removal and installation will invalidate your warranty.
You will find further information and the addresses of our service partners
on the Internet under "http://ts.fujitsu.com/support".
RAID (R edundant Array of Independent Disks, also: Disk Array) is a procedure for
combining two hard disks to creat e a logical unit.
A Disk Array can be used advantageously to improve the data access rate or
alternatively to improve the error tolerance (data protection).
Error tolerance is facilitated by means of data redundancy. If one drive malfunctions,
a different drive contains an exact copy of the data. This can prevent an operating
system from malfunctioning or data from being lost.
The operating system detects all hard disks in a disk array as a single physical
hard disk. The individual disk drives in a disk array are called "members". Member
configuration information is recorded in the reserved sector of the hard disk. With this
information the hard disk can be identified as a member.
There are usually a few methods by which hard disks can be combined. These methods
are referred to as different RAI D levels. The different RAID levels represent different
performance and security levels as well as implementation costs.
If you have bought a device with two hard disks, please note that in the
delivery state a RAID group is not already set up.
Depending on the size of the hard disk, the process for combining two
hard drives to create a RAID group can take several hours. During this
time period, your screen will turn black.
For further information regarding the configuration of your RAID systems, please
see the Help function of your Intel® Matrix Storage Manager Program.
Intel®Call up Matrix Storage Manager and Help functio n
To c a ll up th e Intel®Matrix Storage Manager progra m and the Help function, proceed as follows:
► Select Start - All Programs - Intel
The programme is started.
► In the upper menubar, click on Help.
► Select Contents and Index.
The Help function for the Intel®Matrix Storage Manager program is called up.
®
Matrix Storage Manager - Intel®Matrix Storage Manager Console.
6 - English 10601078868, edition 1
Page 13

Innovative technology
Further information
General information about your AMILO Notebook can be fo und in the
"AMILO Notebook" operating manual.
If there is ever a problem with your computer, please refer to the chapter "Help if
problems occur", Page 10, which contains troubleshooting information.
You will find the Windows drivers for your AMILO Notebook on our Internet website. In
the factory, this device did not support all versions of the Windows operating system.
Fujitsu Technology Solutions does not accept any liability whatsoever if other versions of
the Windows operating system or operating systems from other producers are used.
Software oriented components of th ese inst ruct ions refer to Microsoft products, if
they come within the scope of the delivery of your AMILO Notebook.
If you install other software products, pay attention to the operating
instructions of the producer.
"AMILO Notebook" Operating Manual
The operating instructions for the "AMILO Notebook" will be found in the Windows Start
menu or on the Internet under "http://ts.fujitsu.com/support".
10601078868, edition 1 English - 7
Page 14
Ports and Operating Elements
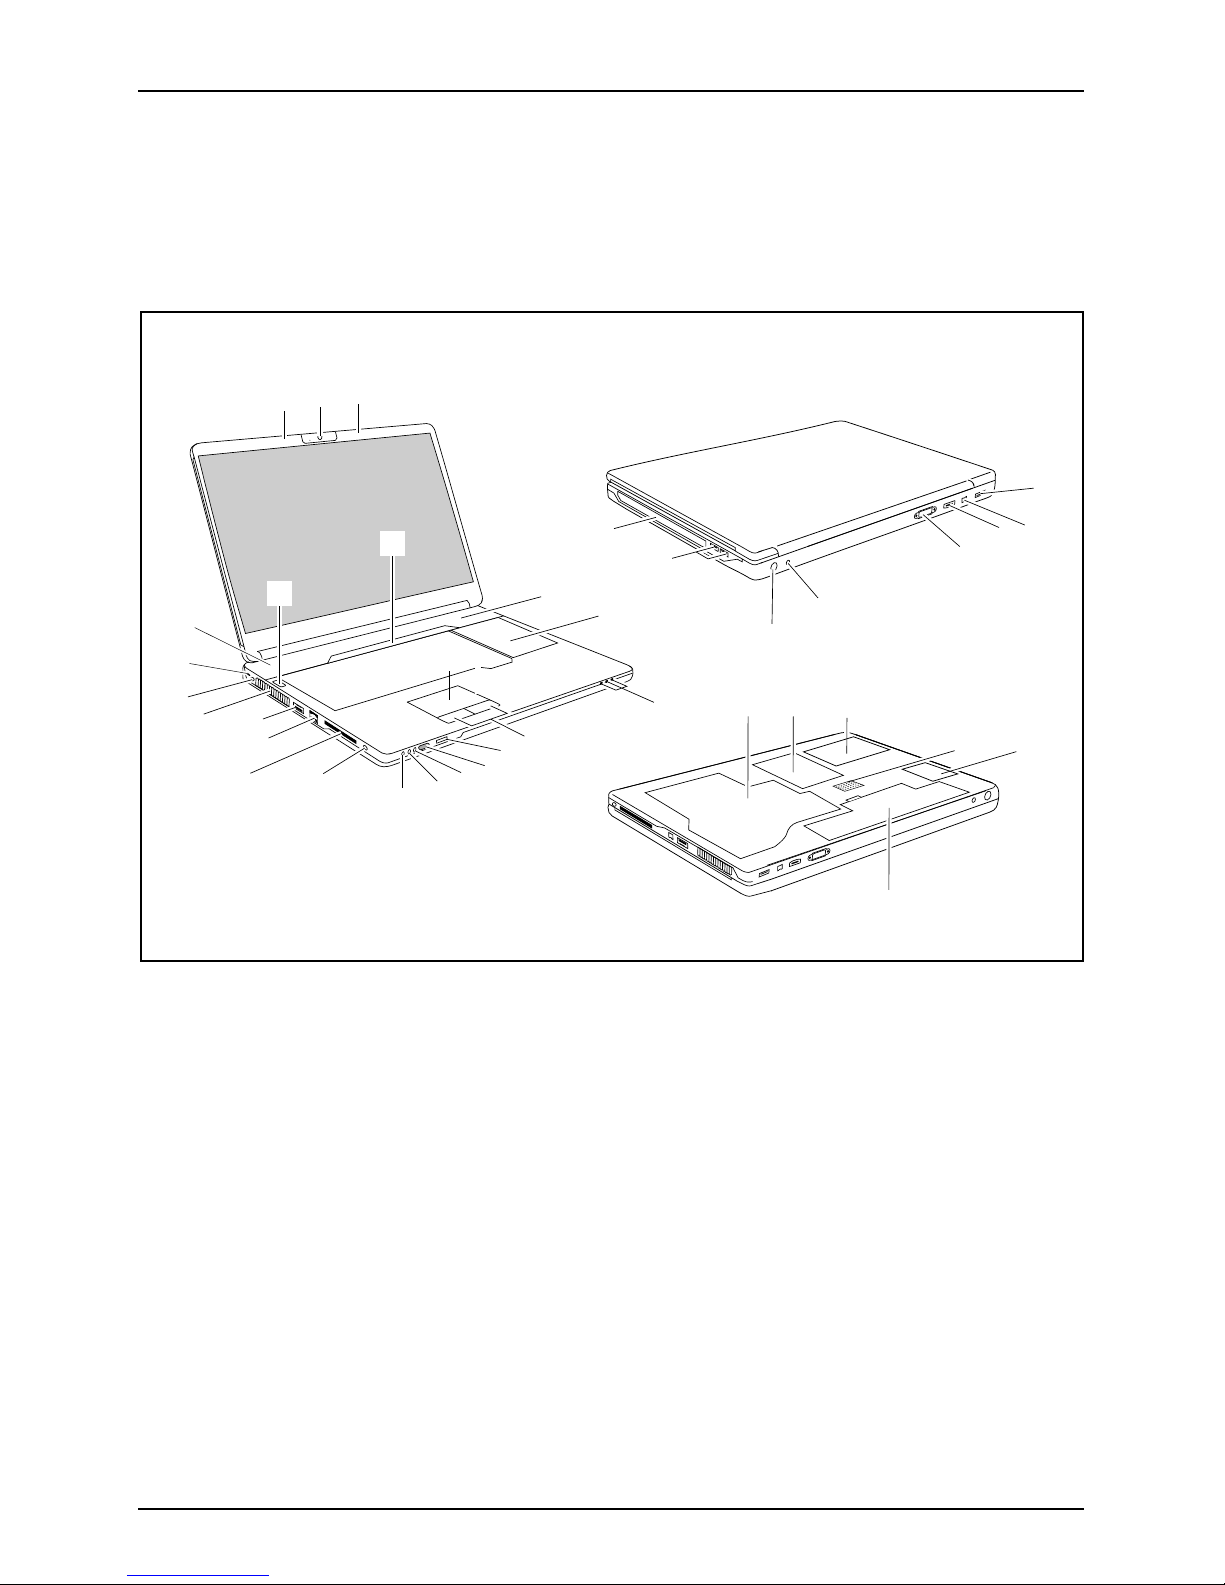
Ports and Operating Elements
This chapter presents the individual hardware components of your notebook. You can
obtain an overview of the displays and connections of the notebook. Please familiarise
yourself with these items before you start to work with your notebook.
WebcamMultimediaboardTouchpad
SeparatenumerickeypadKeyboardStatusindicatorsTouchpadbuttonsMulti-formatcardreaderInfraredinterfaceforremotecontrolLine-inportMicrophoneportHeadphoneportLine-outportSPDIFportExpressCardslotMultimediaremotecontrolFireWireporteSATA/USBcombinationportLoudspeakersON/OFFswitchUSBportsAntennacabl eportHDMIportMonitorport(VGA)NetworkportDCinputconnector(DCIN)MemoryservicecompartmentHarddiskservicecompartmentRechargeablebatteryMulti-connectorportSubwooferAntennacablep ort
1
2
1
29
3
21
4
4
20
6
19
17
18
16
5
1
14
13
12
11
10
8
9
1 = Microphones
2 = Webcam
3 = Multimedia board
4 = Loudspea kers
5 = Keyboard with separate numeric keypad
and application butto ns
6 = Touchpad
7 = Status indicators
8 = Touchpad buttons
9 = Infrared interface for remote control
10 = Multi-format card reader
11 = Line-in port
12 = Microphone port
13 = Headphones/Line-out port
14 = SPDIF/Line-out port
22
23
5
25
24
31
7
30
32
35
15 = ExpressCard slot with multimedia
remote control
16 = LAN port
17 = eSATA/USB combination port
18 = Ventilation slots
19 = DC input connector (DC IN)
20 = Kensington Lock
21 = ON/OFF switch
22 = CD/DVD drive
23 = USB ports
24 = Antenna cable port (option al)
25 = Multi-connector port (optional)
26 = Monitor port (VGA)
27 = HDMI port
28 = FireWire port
26
33
27
28
34
8 - English 10601078868, edition 1
Page 15

Ports and Operating Elements
29 = USB port
30 = Memory service compartment
31 = Service compartment, hard disk 2
32 = Service compartment, hard disk 1
33 = Subwoofer
34 = Service compartment, TV tuner
35 = Rechargeable battery
10601078868, edition 1 English - 9
Page 16

Important notes
Important notes
Please read and observe the safety instructions in the "Safety" manual
and in the "AMILO Notebook" operating manual.
Replacement of a processor must only be performed by a uthorised service partners
of Fujitsu Technology Solutions GmbH. Unauthorised removal and installation will
invalidate your warra nty. You will find further information and the addresses of our
service partners on the Internet under "h ttp://ts.fujitsu.com/support".
If using a TV tuner card, ensure that it complies with standard IEC 60950-1: 2005, paragraph 7.2.
Only ever connect an external TV tuner to a TNV-1 circuit.
When connecting a coaxial cable to an external TV tuner, e nsu re that it is correctly
connected to the building’s earthing system.
Help if problems occur
Should you ever have a problem with your computer that you cannot solve yourself, in many cases
you can solve it quickly using the SystemDiagnostics program pre-installed on your computer.
► To sta r t the SystemDiagnostics programme, click on Startsymbol - Program -
Fujitsu Siemens Computers - SystemDiagnostics
or
► To start the SystemDiagnostics programme, click on Startsymbol - Program
- Fujitsu - SystemDiagnostics.
► If a problem is detected during the test run, the SystemDiagnostics program outputs
a code (e.g. D IFS code YXXX123456789 123).
► Take a note of this DIF S code and the ID number of your device. The ID number can
be found on the type rating plate on the back of the casing.
► For further clarification of the p roblem, contact the Help Desk for your country (see the
Help Desk list or visit the Internet at "http://ts.fujitsu.com/support"). For this, please have
ready the ID number & serial number of your system and the DIFS code.
10 - English 10601078868, edition 1
Page 17
Preparing your notebook for use
Preparing your notebook for use
First-timesetupNotebookGettingstartedNotebook
If your notebook comes with a Windows operating system then all of the necessary
hardware drivers and the supplied software will already be pre-installed.
Depending on the hardware and software configuration, the first-time setup for the
Microsoft Windows operating system can take up to 20 minutes.
When you switch on the notebook for the first time it will perform a system
check. A number of different messages may be displayed. In the process,
the display may flicker or darken temporarily.
Please follow the instructions on the screen.
It is very important that you do not switch the notebook off during this initial set-u p process.
Before you can use your notebook for the first time you will need to charge the battery.
On delivery, the battery can be found in the battery compartment or in the accessories kit. The
battery must be charged if you want to o perate your notebook with t he battery.
When not plugged into a mains socket, the notebook runs on its built-in battery. You can
increase the battery’s life by e nabling the syste m’s energy saving functions.
If you use the notebook at home or in an office, we recommend you use the
mains adapter instead of the battery.
Please refer to the "AMILO Notebook" operating manual for instructions on how to connect
external de vices (e.g. a mouse or a printer) to the notebook..
Unpacking and checking your notebook
Should you discover any damage incurred during transportation, notify
your local sales outlet immediately!
► Unpack all the individual part s.
PackagingTransport
► Check your notebook for damage incurred during transportation.
We recommend that you keep the original packaging material.
You may need the packaging in the future if you need to transport your device.
10601078868, edition 1 English - 11
Page 18
Preparing your notebook for use
Selecting the location
Location,selectingtheNotebookPoweradapter
Select a suitable location for the notebook before setting it up. Consider
the following points when selecting a location:
• Never place the notebook and the mains adapter on a heat-sensitive
surface. T his could damage the surface.
• Never place the notebook on a soft surface (e.g. carpeting, u pholstered furniture,
bed). This can block the air vents and cause damage due to overheating.
• Do not place the notebook directly on your legs for extended periods. The
underside of the notebook heats up during normal operation. Extended contact
with the skin can become unpleasant or even result in burns.
• Place the notebook on a stable, flat, non-slip surface. Please note that
the rubber feet may mark certain types of surfaces.
• Keep other objects 100 mm away from the notebook and its mains
adapter to ensure adequate ventilation.
• Never cover the ventilation slots on the notebook.
• Do not expose the notebook to extreme environmental conditions. Protect
the notebook against dust, humidity and heat.
Connecting the mains adapter
PreparingforoperationMainsadapter
Please observe the safety precau tions in the enclosed "Safety" manual.
The supplied mains cable conforms to the requirements of the country in which
you purchased your notebook. Make sure that the mains cable is approved
for use in the co untry in which you intend to use it.
The mains cable of the mains adapter must only be connected to a mains
socket if the notebook is connected to the mains adapter.
Make sure tha t the rated current of the mains adapter is not higher than that
of the power system to which you connect the mains adapter (refer to the
"Technical Data" section, "Mains adapter", Page 14).
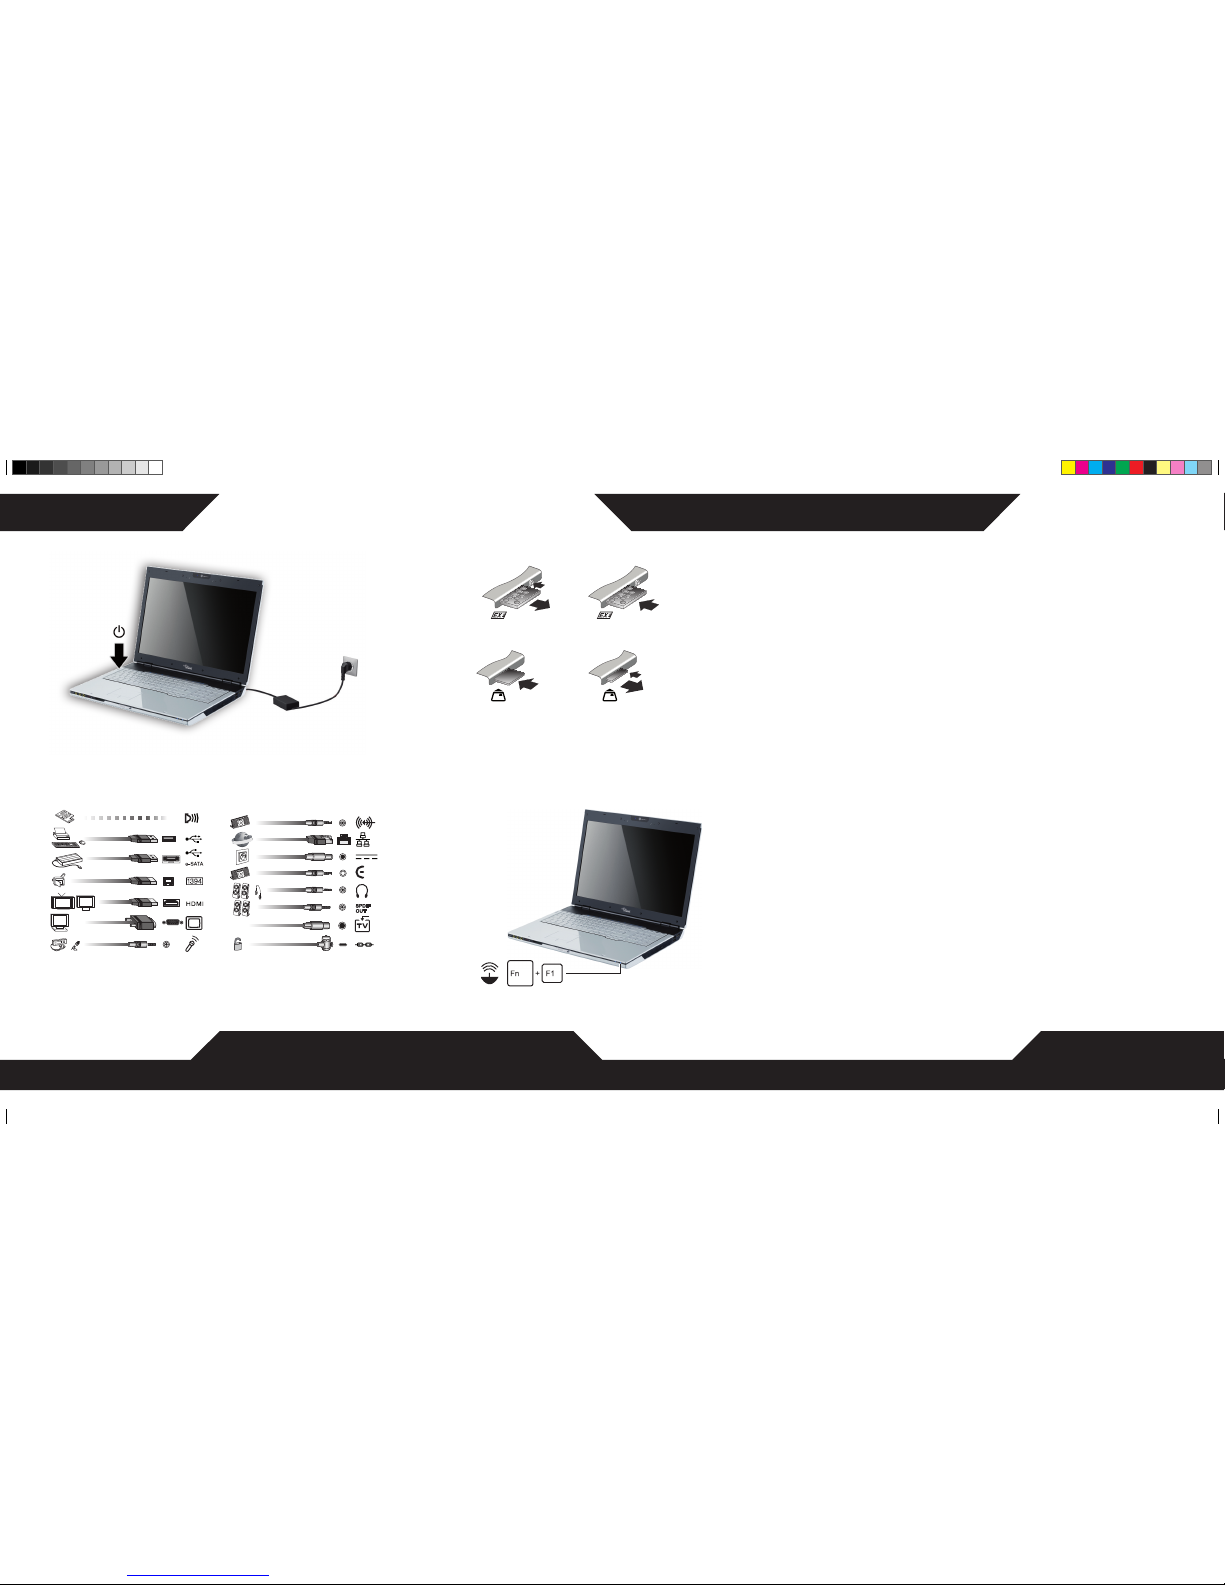
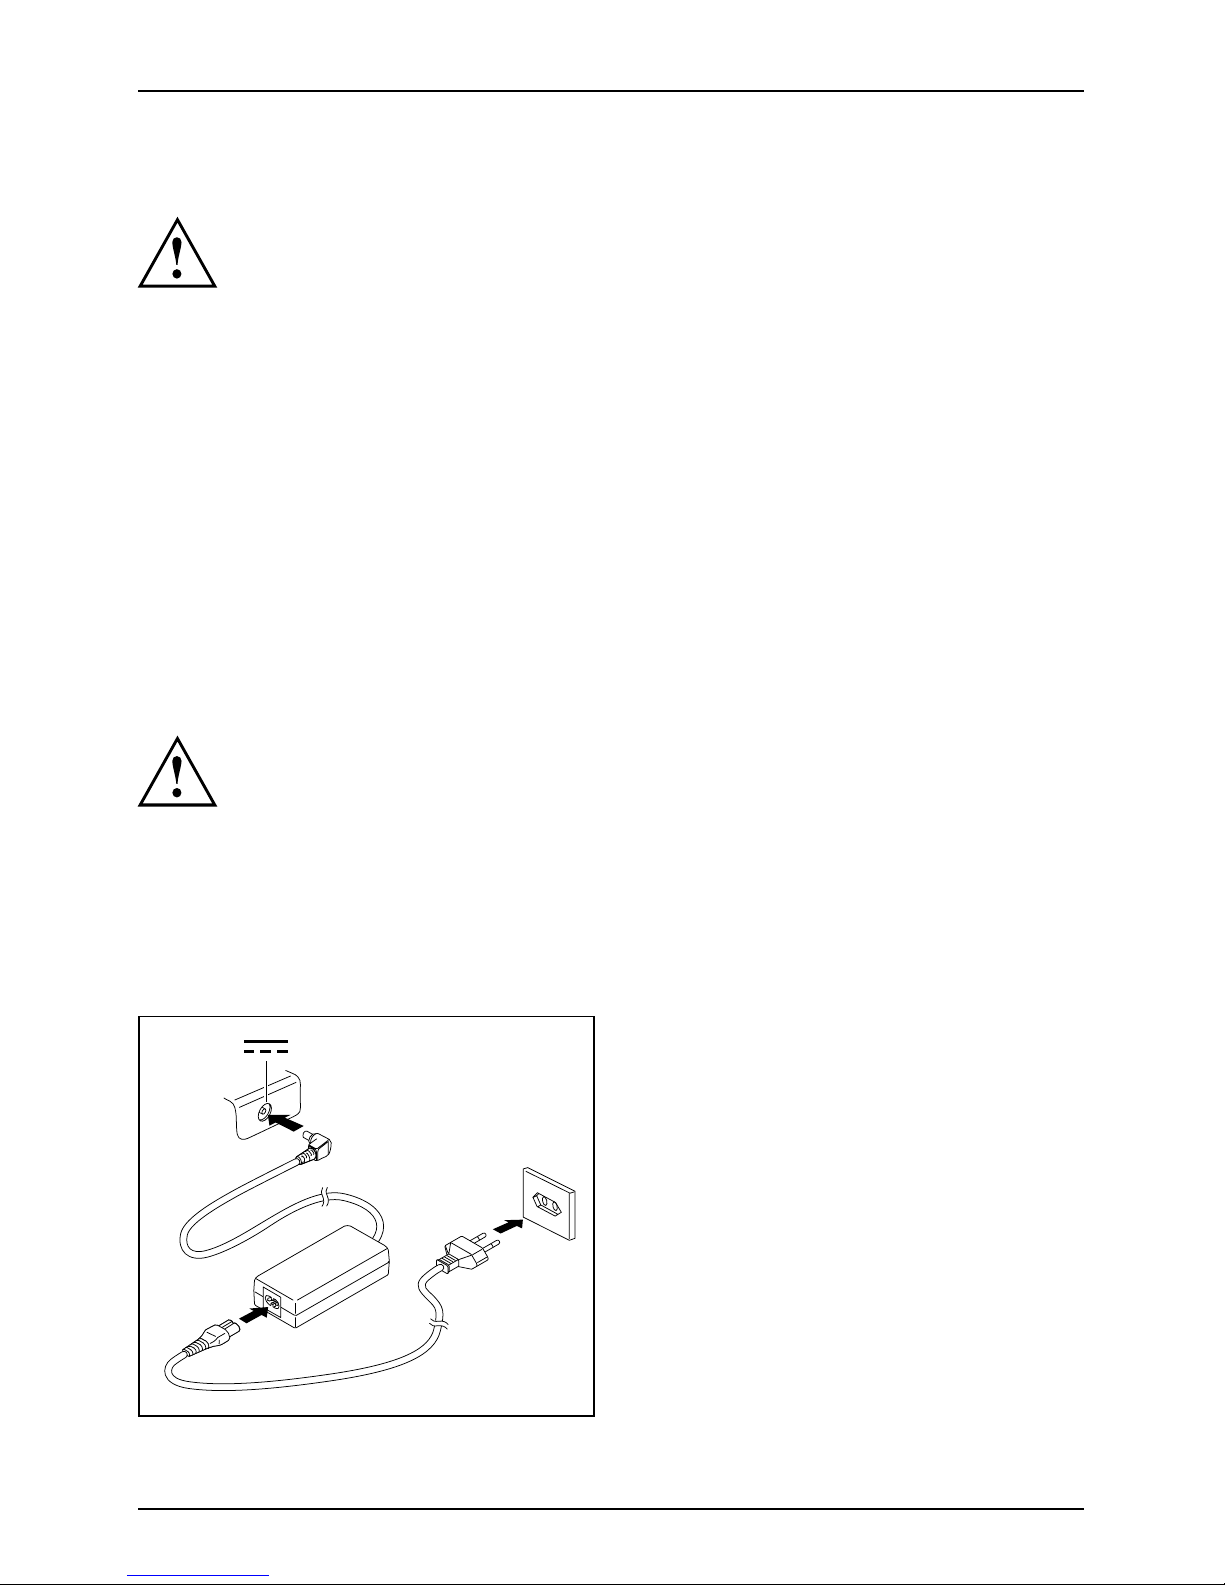
► Connect the mains adapt er cable (1) to the
DC jack (DC IN) on the notebook.
► Connect the mains cable (2) to the
mains adapter.
1
3
► Plug t he mains cable (3) into a m ains outlet.
2
12 - English 10601078868, edition 1
Page 19
Preparing your notebook for use
Switching the notebook on for the first time
Switchingonforthefirsttime
We recommend that the notebook is supplied with power through
the mains adapter during this procedure.
When you switch your notebook on for the first time, the supplied software
is installed and configured. Because this installation procedure must not be
interrupted, you should set aside enough time for it to be fully completed and
connect the notebook to the mains outlet using the mains adapter.
During installation, the notebook must only be rebooted when you are requested to do so!
You will be prompted to create a backup copy of the pre-installed operating system. This
backup copy can be used later to restore your notebook to its delivery confi guration.
We strongly recommend that, as soon as possible after purchasing
your equipment, you create a backup copy on DVD of the pre-installed
operating system in its delivery configuration.
If you have forgotten an operating system password which has been assigned, without
previously having saved the operating system, recreation of the nece ssary data
media and return to the factory default setup will no longer be possible.
You can find further information on how to restore the operating system, drivers,
manuals and special software in t he "Recovery Process" manual.
Your operating system is pre-installed on the hard disk to help you when you
start using your notebook for the first time.
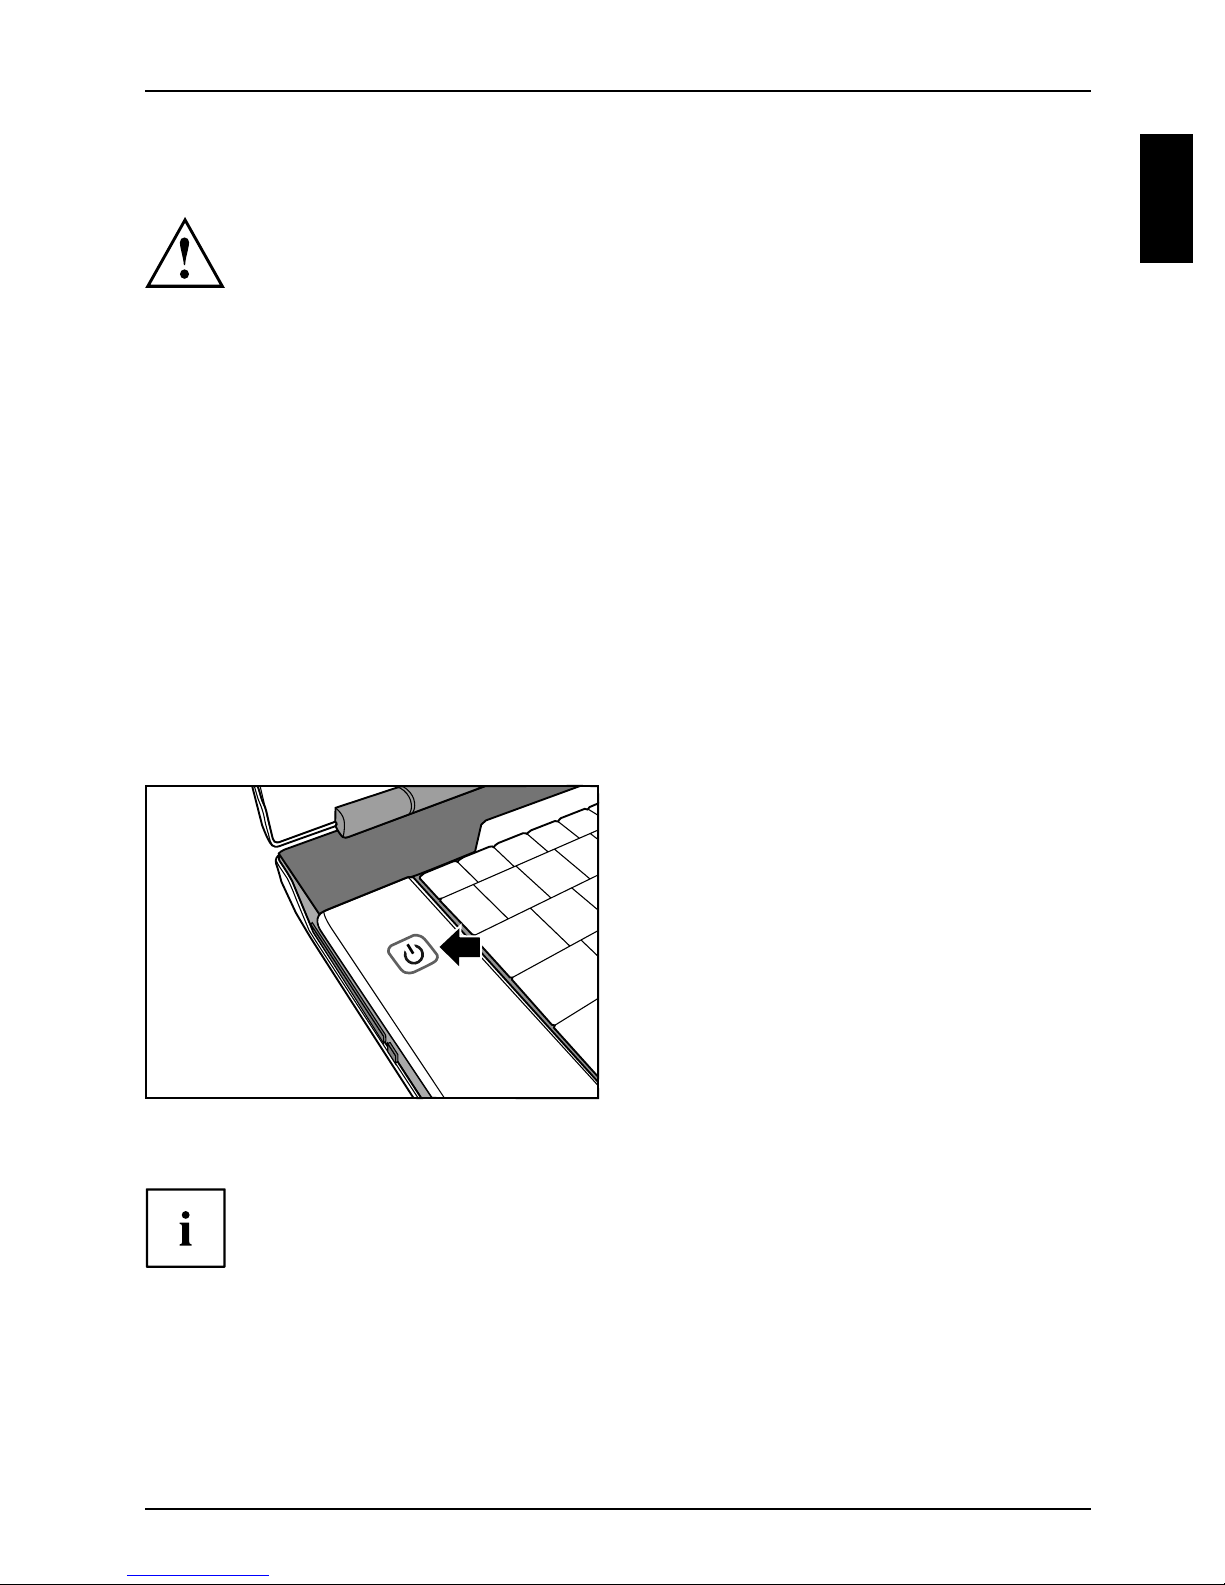
► Switch the notebook on (1).
1
► During installation, follow the on-screen instructions.
Consult the op erating system manual if anything is unclear about the requested input data.
If a Windows operating system is installed on your notebook, you will find more
information on the system and drivers, help programs, updates, manuals etc. on
the notebook or on the Internet under "http://ts.fujitsu.com/support".
10601078868, edition 1 English - 13
Page 20

Technical specification
Technical specification
Technicalspecification
Notebook
Technicalspecification
Environmental conditions
Operating temperature 5 °C – 35 °C
Dimensions
Width x Depth x Height (front/back) 440 mm x 303 mm x 39/51 mm
Weight (including 8-cell rechargeable battery
and 2 hard disks)
The processor must only be replaced by Fujitsu Technology Solutions. Please
contact your sales office or our customer service centre.
The warranty is invalidated if you cause faults in the device by installing
or replacing system expansions.
The data sheet for this notebook contains further technical data. You will find the data
sheet on your notebook or on the Internet under "http://ts.fujitsu.com/support".
Approx. 4.0 kg
Mains adapter
Technicaldata
Mains adap ter for Intel® Core™2 Duo Notebook processor:
Electrical data
Primary (device-dependent)
Rated voltage
Rated frequency 50 Hz – 60 Hz (automatic)
Sub
Rated voltage 20 V
Max. rated current (device-dependent)
Mains ad apter for Intel® Core™2 Quad Notebook processor:
Electrical data
Primary (device-dependent)
Rated voltage
Rated frequency 50 Hz – 60 Hz (automatic)
Sub
Rated voltage 20 V
Max. rated current (device-dependent)
90 W
100 V – 240 V (automatic)
4.5 A
120 W
100 V – 240 V (automatic)
6.0 A
An additional mains adapter or power cable can be o rdered at any time.
14 - English 10601078868, edition 1
Page 21

English
Deutsch
AMILO Notebook Xi 3670
Erstinbetriebnahme
Français
Español
Italiano
Nederlands
Português
Page 22

Microsoft, MS
, Windows, Windows Vista sind eingetragene Warenzeichen der Microsoft Corporation.
Adobe Reader is
MultiMediaCard
Sony und Memory
Alle anderen War
jeweiligen Inh
Copyright © Fuji
Alle Rechte vorbe
Nachdrucks, der W
Zuwiderhandlung
Alle Rechte vorbe
Liefermöglichke
t ein Warenzeichen der Adobe Systems Incorporated .
ist ein eingetragenes Warenzeichen der Infineon Technologies AG.
Stick sind Warenzeichen der Sony Electronics, Inc.
enzeichen sind Warenzeichen o der eingetragene Warenzeichen der
aber und werden als geschützt anerkannt.
tsu Technology Solutions GmbH 2009
halten, insbesondere (auch auszugsweise) die der Übersetzung, des
iedergabe durch Kopieren oder ähnliche Verfahren.
en verpflichten zu Schadenersatz.
halten, insbesondere für den Fall der Patenterteilung oder GM-Eintragung.
iten und technische Änderungen vorbehalten.
Page 23

Inhalt
Deutsch
Inhalt
InnovativeTechnologie ................................................................ 1
High DefinitonAudio .................................................................... 2
Lautsprechersystem anschließen . . ................................................... 3
Hybrid-Grafik ........................................................................... 5
Grafikmodus wechseln ............................................................... 5
Zweite Festplatteim RAID-Verbund ...................................................... 6
WeitereInformationen ................................................................... 7
Anschlüsseund Bedienelemente ....................................................... 8
WichtigeHinweise ..................................................................... 10
Hilfe imProblemfall ..................................................................... 10
®
Matrix Storage Manager u nd Hilfe-Funktion aufrufen . ............................. 6
Intel
Betriebsanleitung "AMILO Notebook" . . . . . ............................................ 7
Erstinbetriebnahme des Notebook ..................................................... 11
Notebook auspacken und üb erprüfen . . ................................................... 11
Stellplatzauswählen .................................................................... 12
Netzadapter anschließen . . . . . ........................................................... 12
Notebook zum ersten Mal einschalten . ................................................... 13
TechnischeDaten ...................................................................... 15
Notebook . . . . . .......................................................................... 15
Netzadapter . . .......................................................................... 15
10601078868, Ausgabe 1 Deutsch
Page 24

Inhalt
Deutsch 106 0107886 8, Ausgabe 1
Page 25

Innovative Technologie
Innovative Technologie
... und ergonomisches Design machen Ihr A MILO Notebook Xi 3670 zu einem
benutzerfreundlichen und zuverlässigen Notebook.
Wenn Sie ein Notebook mit einem Microsoft Windows-Betriebssystem gekauft haben,
ist dieses bereits vorinstalliert und für Sie optimal konfiguriert. Das Notebook ist sofort
startbereit, wenn Sie es zum ersten Mal einschalten.
Ihr Notebook ist mit neuester Technologie ausgestattet, damit Sie Ihre
Computer-Erfahrung optimal umsetzen können.
• ein Laufwerk zum Lesen und Beschreiben von CDs/DVDs und je nach
Geräteausstattung, zum Lesen von Blu-ray-Discs
• drei USB-Anschlüsse für eine einfache Erweiterung durch Game-Pads, Drucker und mehr
• ein eSATA-/USB-Kombinationsanschluss, um eine externe SATA-Festplatte oder
ein weiteres USB-Gerät anschließen zu können
• eine Wireless USB (WUSB) Sch nittstelle (optional, nicht nachrüstbar) für schnelle
Datenübertragung nach dem USB-Standard ohne störende Kabel
• LAN un d Wireless LAN für Internet- und Netzwerkzugang
• geräteabhängig eine zweite Festplatte, um ihr Notebook mit zwei Festplatten
im RAID-Verbund betreiben zu können
• ein Firewire-Anschluss für den schnellen Datenaustausch mit Multimedia-Geräten
• ein HDMI -Anschluss für die volldigitale Übertragung von Audio- und Video-Daten
• eine integrierte Webcam und digitale Mikrofone für die verschiedensten Multimedia-Anwendungen
• ein Multi-Format-Kartenleser, um digitale Fotos, Musik und Videoclips schnell
auf Ihr Notebook zu übertragen
• Surround-Sound (High Definition Audio, Dolby Digital) bei Anschluss eines
aktiven Lautsprecher-Systems mit Subwoofer
• ein integrierter Audio-Controller, Stereo-Lautsprecher und ein Subwoofer für echten Hörgenuss
• Bluetooth® 2.1 für den drahtlosen Betrieb von verschiedenem Zubehör
• zusätzliche Ein- und Ausgänge für hochwertiges Audio-Zubehör
TM
• eine Multimedia LightTouch
Fernbedienung für die bequeme Bedienung der Multimedia-Funktionen Ihres N otebook.
• ein integrierter TV-Tuner (optional, nicht nachrüstbar) für den Empfang
terrestrischer Fernsehprogramme
• eine Tastatur mit separatem Ziffernblock
• ein On-Screen-Display zur visuellen Kontrolle der wichtigsten E instellungen Ihres Notebooks
•Hybrid-Grafik für volle Leistung und akkuschonende Arbeitsweise bei weniger
anspruchsvollen Anwendungen
• eine Multi-Con nect or-Schnittstelle als Eingang für A u dio- und Video-Signale von
externen Multimedia-Geräten (optional, nur in Verbindung mit dem TV-Tuner).
Zur Inbetriebnahme ist weitere Software notwendig.
Mit dem benutzerfreundlichen "BIOS-Setup-Utility" können Sie die Hardware Ihres
Notebook steuern und Ihr System besser vor unbefugtem Zugriff schützen, indem
Sie die leistungsfähigen Passwort-Eigenschaften nutzen.
-Bedienleiste mit berührungsempfindlichen Tasten und eine
Diese Betriebsanleitung zeigt Ihnen unter anderem, wie Sie Ihr AMILO Notebook
in Betrieb nehmen und bedienen.
10601078868, Ausgabe 1 Deutsch - 1
Page 26

Innovative Technologie
High Definiton Audio
An den digitalen Audio-Ausgang (SPDIF-Anschluss) Ihres Gerä tes können Sie ein aktives
Lautsprechersystem mit bis zu acht Lautsprechern (7.1) anschließen.
Von High Definition Audio unterstützte Lautsprechersysteme:
Lautsprechersystem Leistung
2 Lautsprecher
4 Lautsprecher
5 Lautsprecher + 1 Subwoofer 5.1 Surround-Sound (Dolb y Digital)
7 Lautsprecher + 1 Subwoofer 7.1 Surround-Sound (Dolby Digital EX)
Stereo-Sound
Quadro-Sound
2 - Deutsch 10601078868, Ausgabe 1
Page 27

Innovative Technologie
Lautsprechersystem anschließen
Um ein Lautsprechersystem an Ihr Gerät anzuschließen und zu konfigurieren, gehen Sie wie folgt vor:
► Schließen Sie eines der oben genannten Lautsprechersysteme an den
SPDIF/Line-Out-Anschluss Ihres Geräts an.
Weitere Informationen erhalten Sie im Kapitel "Anschlüsse und Bedienelemente", Seite 8 und
in der Betriebsanleitung "AMILO Notebook" im Kapitel "Anschließen externer Geräte".
Der Realtek HD Audio Manager wird gestartet:
10601078868, Ausgabe 1 Deutsch - 3
Page 28

Innovative Technologie
► Wählen Sie S/PDIF-Out und bestätigen Sie mit OK.
Das Lautsprechersystem ist jetzt betriebsbereit.
In der Lautsprecherkonfiguration des Realtek HD Audio Manager können Sie Ihr
Lautsprechersystem zusätzlich konfigurieren:
4 - Deutsch 10601078868, Ausgabe 1
Page 29
Innovative Technologie
Hybrid-Grafik
Ihr Notebook ist mit einer Hybrid-Grafik-Lösung ausgestattet. Per Schnellstart-Taste können
Sie zwischen Batteriespar- und Performance-Modus wechseln.
Verwenden Sie bei weniger grafikintensiven Anwendungen, z. B. beim
Abspielen von Videos, E-Mail oder beim Internet-Surfen die im Chipsatz
integrierte Grafikeinheit. Dies senkt Hitzeentwicklung, Geräuschpegel und
Stromverbrauch. Die Akkulaufzeit steigt (Batteriesparmodus).
Wenn Sie eine hohe Performance benötigen, z. B. für Spiele, kann auf die
externe Grafikeinheit gewechselt werden (Performance-Modus).
Grafikmodus wechseln
Bei Ihrem Notebook ist ab Werk der externe Grafikmodus (Performance-Modus) voreingestellt.
Ein Gerät am HDMI-Anschluss Ihres Notebooks (FullHD-Auflösung) kann nur im
Performance-Modus über die externe Grafikeinheit angesteuert werden.
Sind Programme aktiv, die die Grafikausgabe beeinflussen (z. B. Spiele oder
TV-Software), kann ggf. nicht zwischen den Modi umgeschaltet werden. Beenden
Sie vor dem U mschalten die betreffenden Programme.
Der Umschaltvo rgang zwischen den Gra fik-Modi kann länger als zehn Sekunden dauern.
► Tippen Sie auf die Schnell-Start-Taste
Die Grafik-Ausgab e wechselt in den Batteriespar-Modus.
► Tippen Sie erneut auf die Schnell-Start-Taste
Die Grafik-Ausgabe wechselt in den Performance-Modus.
Hybrid VGA
Hybrid VGA
auf dem Multimedia-Board Ihres Notebooks:
.
10601078868, Ausgabe 1 Deutsch - 5
Page 30

Innovative Technologie
Zweite Festplatte im RAID-Verbund
RedundantArrayofIndepe ndentDisksRAID
Ob Sie eine zweite Festplatte nutzen können, hängt von der Ausbaustufe Ihres Geräts ab.
Der Aus- und Einbau der zweiten Festplatte darf nur von autorisierten Servicepartnern
der Fujitsu Technology Solutions GmbH durchgeführt werden. Durch unbefugten
Aus- und Einbau erlischt der Garantieanspruch.
Weitere Informationen und Adressen unserer Servicepartner finden Sie
im Internet unter "http://ts.fujitsu.com/support".
RAID (Redundant Array of Independent Disks, auch: Disk-Array) ist ein Verfahren zur
Kombination von zwei Festplatten zu einer logischen Einheit.
Ein so genannter Disk-Array lässt sich vorteilhaft zur Verbesserung der Datenzugriffsrate oder
alternativ zu Verbesserung der Fehlertoleranz (Datenschutz) einsetzen.
Fehlertoleranz wird mittels Datenredundanz ermöglicht . Bei Ausfall eines Laufwerks
enthält ein anderes Laufwerk eine gespiegelte Kopie der Daten. Dadurch können Ausfall
des Betriebssystems oder Datenverlust verhindert werden.
Das Betriebssystem erkennt alle Festplatten in einem Disk-Array als eine einzige physikalische
Festplatte. Die einzelnen Festplatten in einem Disk-Array werden als "Mem ber" (Mitglieder)
bezeichnet. Angaben zur Konfiguration eines Members werden im reservierten Sektor der Festplatte
aufgezeichnet. Durch diese A ng aben kann die Festplatte als ein Member identifiziert werden.
Gewöhnlich lassen sich Festplatten durch verschiedene Verfahren miteinander kombinieren. Diese
Verfahren werden als unterschiedliche RAID-Level s bezeichnet. Die unterschiedlichen RAID-Levels
verkörpern verschiedene Performance- und Sicherheitsstufen sowie Implementierungskosten.
Wenn Sie ein Gerät mit zwei Festplatten erworben haben, ist im
Auslieferungszustand kein RAID-Verbund eingerichtet.
Abhängig von der Festplattengröße kann die Kombination von zwei
Festplatten zu einem RAID-Verbund mehrere Stunden dauern. Während
dieses Zeitraumes wird Ihr Display schwarz.
Weitere Informationen über da s Konfigurieren Ihres RAID-Systems, finden Sie in
der Hilfe-Funktion Ihres Intel® Matrix Storage Ma nager Programms.
Intel®Matrix Storage Manager und Hilfe-Funktion aufrufen
Um das Programm Intel®Matrix Storage Manager und die Hilfe-Funktion
aufzurufen, gehen Sie wie folgt vor:
► Wählen Sie Startmenü - Alle Programme - Intel
► Klicken Sie in der oberen Menüleiste auf Hilfe.
► Wählen Sie Inhalt und Verzeichnis.
®
Intel
Das Prog ramm wird gestartet.
Die Hilfe-Funktion zum Programm Intel®Matrix Storage Manager wird aufgerufen.
Matrix Storage Manager Console.
®
Matrix Storage Manager -
6 - Deutsch 10601078868, Ausgabe 1
Page 31

Innovative Technologie
Weitere Informationen
Allgemeine Informationen zu Ihrem AMILO Notebook finden Sie in
der Betriebsanleitung "AMILO Notebook".
Sollten Sie mit Ihrem Rechner einmal ein Problem haben, finden Sie im Kapitel
"Hilfe im Problemfall", Seite 10 Informationen zur Problemlösung.
Die W indows-Treiber für Ihr AMILO Notebook finden Sie auf unserer Internetseite.
Werkseitig unterstützten diese Geräte nicht alle Windows-Betriebssystem-Versionen.
Fujitsu Technology Solutions übernimmt keine Haftung bei der Verwendung anderer
Windows-Betriebssystem-Versionen oder von Betriebssystemen anderer Hersteller.
Softwarebezogene Teile dieser Anleitung beziehen sich auf Microsoft-Produkte,
falls sie zum Lieferumfang Ihres AMILO Notebook gehören.
Beachten Sie bei der Installation von anderen Softwareprodukten die
Bedienungsanleitungen des Herstellers.
Betriebsanleitung "AMILO Notebook"
Die Betriebsanleitung "AMILO Notebook" finden Sie im Windows-Startmenü oder
im Internet unter "http://ts.fujitsu.com/support" .
10601078868, Ausgabe 1 Deutsch - 7
Page 32

Anschlüsse und Bedienelemente
Anschlüsse und Bedienelemente
In diesem Kapitel werden die einzelnen Hardware-Komp onenten Ihres Notebook vorgestellt.
Sie erhalten eine Übersicht über die Anzeigen und die Anschlüsse des Notebook. Machen
Sie sich mit diesen Elementen vertraut, bevor Sie mit dem N otebook arbeiten.
WebcamMultimedia-BoardTouchpadSeparater ZiffernblockTastaturStatusanzeigenTouchpad-TastenMulti-Format-KartenleserInfrarotschnittstellefürFernbedienungLine-In-AnschlussMikrofonanschlussKopfhöreranschlussLine-Out-AnschlussSPDIF-AnschlussExpr essCard-SteckplatzMultimedia-FernbedienungFirewire-AnschlusseSATA-/USB-KombinationsanschlussLautsprecherEin-/ AusschalterUSB-AnschlüsseAntennenkabel-Anschl ussHDMI-AnschlussVGA-BildschirmanschlussNetzwerkanschlussGleichspannungsbuchse(DCIN )ServicefachSpeicherServicefachFestplatteAkkuMulti-Connector-AnschlussSubwooferAntennenkabel-Ans chl uss
1
2
1
29
3
21
4
20
6
19
17
18
16
5
1
1 = Mikrofone
2 = WebCam
3 = Multimedia-Board
4 = Lautsprecher
5 = Tastatur mit separatem Ziffernblock
und Applikationstasten
6 = Touchpad
7 = Statusanzeigen
8 = Touchpad-Tasten
9 = Infrarotschnittstelle für Fernbedienung
10 = Multi-Format-Kartenleser
11 = Line-In-Anschluss
12 = Mikrofonanschluss
13 = Kopfhörer-/Line-O ut-Anschluss
14 = SPDIF/Line-O ut-Anschluss
14
13
12
11
10
8
9
22
23
26
27
28
4
5
25
24
31
7
30
32
33
34
35
15 = ExpressCard-Steckplatz mit
Multimedia-Fernbedienung
16 = LAN-Anschluss
17 = eSATA-/USB-Konbinationsanschluss
18 = Lüftungsschlitze
19 = Gleichspannungsbuchse (DC IN)
20 = Kensington Lock-Vorrichtung
21 = Ein-/Ausschalter
22 = CD/DVD -Laufwerk
23 = USB-Anschlüsse
24 = Antennenkabel-Anschluss (optional)
25 = Multi-Connector-Anschluss (optional)
26 = VGA-Bildschirmanschluss
27 = HDMI-An schluss
28 = Firewire-Anschluss
8 - Deutsch 10601078868, Ausgabe 1
Page 33

Anschlüsse und Bedienelemente
29 = USB-Anschluss
30 = Servicefach Speicher
31 = Servicefach Festplatte 2
32 = Servicefach Festplatte 1
33 = Subwoofer
34 = Servicefach TV-Tuner
35 = Akku
10601078868, Ausgabe 1 Deutsch - 9
Page 34

Wichtige Hinweise
Wichtige Hinweise
Beachten Sie die Sicherheitshinweise im Handbuch "Sicherheit" und in
der Betriebsanleitung "AMILO Notebook".
Der Austausch eines Prozessors darf nur von autorisierten Servicepartnern der Fujitsu
Technology Solutions G m bH durchgeführt werden. Durch unbefugten Aus- und
Einbau erlischt der Garantieanspruch. Weitere Informationen und Adressen unserer
Servicepartner finden Sie im Internet un ter "http://ts.fujitsu. com/s upport".
Stellen Sie bei der Verwendung einer TV-Tuner-Karte sicher, dass diese der Norm
IEC 60950-1: 2005, Absatz 7.2, entspricht.
Schließen Sie einen externen TV-Tuner ausschließlich an einen TNV-1-Kreis an.
Vergewissern Sie sich beim Anschließen eines Koaxialkabels an den externen TV-Tuner,
dass es richtig mit dem Erdungssystem des Gebäudes verbunden ist.
Hilfe im Problemfall
Sollten Sie mit Ihrem Rechner einmal ein Problem haben, das Sie nicht se lbst lösen
können, können Sie dieses in vielen Fällen schnell mit dem auf Ihrem Rechner
vorinstallierten Programm SystemDiagnostics lösen.
► Um das Programm SystemDiagnostics zu starten, klicken Sie Startsymbol - Programme
- Fujitsu Siemens Computers - SystemDiagnostics
oder
► Um das Programm SystemDiagnostics zu starten, klicken Sie Startsymbol -
Programme - Fujitsu - SystemDiagnostics.
► Wenn beim Testlauf ein Problem festgestellt wird, gibt das Programm SystemDiagnostics
einen Code aus (z. B. DIFS-Code YXXX123456789123).
► Notieren Sie den ausgegebenen DIFS-Code und die Identnummer Ihres Geräts. Sie finden
die Id entnummer auf dem Typenleistungsschild an der Rückseite des Gehäuses.
► Kontaktieren Sie zur weiteren Abklärung des Problems den für Ihr Land zuständigen Help
Desk (siehe Help Desk-Liste oder im Internet unter "http://ts.fujitsu.com/support"). Halten
Sie dazu die Ident-/Serien-Nr. Ihr es Systems und den DIFS-Code bereit.
10 - Deutsch 10601078868, Ausgabe 1
Page 35

Erstinbetriebnahme des Notebook
Erstinbetriebnahme des Notebook
ErstinbetriebnahmeNotebookInbetriebnahmeNotebook
Wenn Ihr Notebook mit einem Windows-Betriebssystem ausgestattet ist, sind die
notwendigen Hardwaretre iber und die mitgelieferte Software bereits vorinstalliert.
Der Erstinbetriebnahme-Prozess kann beim Betriebsystem Microsoft Windows, je nach
Hard- und Softwareausstattung, bis zu 20 Minuten in Anspruch nehmen.
Beim erstmaligen Einschalten Ihres Notebook wird eine Systemprüfung
durchgeführt. Unterschiedliche Meldungen können erscheinen. Das Display
kann kurzzeitig dunkel bleiben oder flackern.
Befolgen Sie die Anweisungen am Bildschirm.
Schalten Sie Ihr Notebook während des Erstinbetriebnahme-Prozesses auf keinen Fall
aus.
Bevor Sie zum ersten Mal mit Ihrem Notebook arbeiten können, müssen Sie den Akku aufladen.
Bei der Lieferung befindet sich der Akku im Akkufach oder im Beipack. Der Akku m uss
aufgeladen sein, wenn Sie Ihr Notebook im Akkubetrieb benutze n wollen.
Im mobilen Einsa tz versorgt der eingebaute Akku das Notebook mit der erforderlichen Energie. Die
Betriebszeit können Sie erhöhen, wenn Sie die verfügbaren Energiesparfunktionen nutzen.
Wenn Sie das Notebook zu Hause oder im Büro benutzen, sollten Sie es über den
Netzadapter betreiben und nicht über den Akku.
Wie Sie externe Geräte (z. B. Maus, Drucker) an das Notebook anschließen, ist in
der Betriebsanleitung "AMILO Notebook" beschrieben.
Notebook auspacken und überprüfen
Wenn Sie Transportschäden feststellen, informieren Sie unverzüglich Ihre Verkaufsstelle!
► Packen Sie alle Teile aus.
VerpackungTransport
► Prüfen Sie das Notebook auf sichtbare Transportschäden.
Wir empfehlen Ihnen, die Originalverpackung des Geräts nicht wegzuwerfen.
Bewahren Sie die Originalverpackung für einen eventuellen Wiederversand auf.
10601078868, Ausgabe 1 Deutsch - 11
Page 36

Erstinbetriebnahme des Notebook
Stellplatz auswählen
StellplatzauswählenNo te bookNetzadapter
Bevor Sie Ihr Notebook aufstellen, sollten Sie einen geeigneten Platz für das
Notebook auswählen. Befolgen Sie dabei die folgenden Hinweise:
• Stellen Sie das Notebook und den Netzadapter niemals auf eine hitzeempfindliche
Unterlage. Als Folge kann die Unterlage beschädigt werden.
• Stellen Sie das Notebook niemals auf eine weiche Unterlage (z. B. Teppich,
Polstermöbel, Bett). Dadurch kann die Belüftung blockiert werden und
als F olg e können Überhitzungsschäden entstehen.
• Stellen Sie das Notebook nicht über längere Zeit unmittelbar auf Ihren
Beinen ab. Während des normalen Betriebs erhitzt sich die Unterseite
des Notebook. Ein längerer Hautkontakt kann unangenehm werden
oder sogar zu Verbrennungen führen.
• Stellen Sie das Notebook auf eine stabile, ebene und rutschfeste
Unterlage. Beachten Sie, dass die Gummifüße des Notebook Abdrücke
auf empfindlichen Oberflächen hinterlassen können.
• Der Freiraum um das Notebook und den Netzadapter m uss mindestens 100 mm
betragen, damit eine ausreichende Belüftung gegeben ist.
• Verdecken Sie niemals die Lüftungsschlitze des Notebook.
• Das Notebook sollte keinen extremen Umgebungsbedingungen ausgesetzt werden.
Schützen Sie das Notebook vor Staub, Feuchtigkeit und Hitze.
Netzadapter anschließen
BetriebsbereitschaftherstellenNe tz adapter
Beachten Sie die Sicherheitshinweise im beigefügten Handbuch "Sicherheit".
Die mitgelieferte Netzleitung entspricht den Anforderungen des Landes, in dem
Sie das Notebook gekauft haben. Achten Sie darauf, dass die Netzleitung für
das L and zugelassen ist, in dem sie verwendet wird.
Die Netzleitung des Netzadapters darf nur dann an eine Steckdose angeschlossen
sein, wenn das Notebook am Netzadapter angeschlossen ist.
Versichern Sie sich, dass die Stromaufnahme des Netzadapters nicht höher
ist als die des Stromnetzes, an das Sie den Netzadapter anschließen (siehe
Kapitel "Technische Daten", "Netzadapter", Seite 15).
12 - Deutsch 10601078868, Ausgabe 1
Page 37

Erstinbetriebnahme des Notebook
► Schließen Sie die Netzadapterleitung (1)
an die Gleichspannungsbuchse (DC IN)
des Notebook an.
► Schließen Sie die Netzleitung (2) an
den Netzadapter an.
1
► Schließen Sie die Netzleitung (3) an
eine Steckdose an.
3
2
Notebook zum ersten Mal einschalten
ErstesEinschalten
Bei diesem Vorgang muss das Notebook über den Netzadapter
mit Strom versorgt werden.
Wenn Sie das Notebook zum ersten Ma l einschalten, wird die mitgelieferte
Software installiert und konfiguriert. Da dieser Vorgang nicht unterbrochen
werden darf, sollten Sie einige Zeit dafür einplanen und das Notebook über
den Netzadapter an die Netzspannung anschließen.
Während der Installation darf das Notebook nur bei Aufforderung neu g estartet werden!
Sie werden aufgefordert, eine Sicherungskopie des vorinstallierten Betriebssystems
zu erstellen. Mit Hilfe der Sicherungskopie können Sie später den
Auslieferungszustand Ihres Notebook wiederherstellen.
Wir empfehlen Ihnen dringend, den Auslieferungszustand möglichst unmittelbar
nach Kauf Ihres Geräts au f DVD zu sichern.
Falls Sie ein vergebenes Betriebssystem-Passwort vergessen haben, ohne vorher
das Betriebssystem zu sichern, ist eine Erstellung der notwendigen Datenträger und
die Wiederherstellung des Auslieferungszustands nicht mehr möglich.
Weitere Informationen zum Wiederherstellen des Betriebssystems, der
Treiber, Handbücher und von Spezialsoftware finden Sie im Handbuch
zur Wiederherstellung installierter Software.
Um Ihnen die Inbetriebnahme Ihres Notebook zu erleichtern, ist das Betriebssystem
auf der Festplatte vorinstalliert.
10601078868, Ausgabe 1 Deutsch - 13
Page 38

Erstinbetriebnahme des Notebook
► Schalten Sie das Notebook ein (1).
1
► Befolgen Sie während der Installation die Anweisungen am Bildschirm.
Bei Unklarheiten bezüglich der angeforderten Eingabedaten lesen Sie das
Handbuch des Betriebssystems.
Wenn auf Ihrem Notebook ein Windows-Betriebssystem installiert ist, finden Sie weitere
Informationen zum System sowie Treiber, Hilfsprogramme, Updates, Handbücher usw.
auf Ihrem Notebook oder im I nterne t unter "http://ts.fujitsu.com/support".
14 - Deutsch 10601078868, Ausgabe 1
Page 39

Technische Daten
TechnischeDaten
Notebook
TechnischeDaten
Umgebungsbedingungen
Betriebstemperatur
Abmessungen
Breite x Tiefe x Höhe (Vorderseite/Rückseite) 440 mm x 303 mm x 39/51 mm
Gewicht (inklusive 8-Zellen-Akku und 2
Festplatten)
Eine Austausch des Prozessors darf nur von Fujitsu Technology Solutions durchgeführt
werden. Wenden Sie sich bitte an Ihre Verkaufsstelle oder an unseren Service.
Die Gew ährleistung erlischt, wenn Sie durch Einbau oder Austausch von
Systemerweiterungen Defekte am Gerät veru rsach en.
Das Datenblatt zu diesem Notebook bietet we itere technische Daten. Sie finden das
Datenblatt auf Ihrem Notebook oder im Internet unter "http://ts.fujitsu.com/support".
5°C–35°C
etwa 4,0 kg
Technische Daten
Netzadapter
TechnischeDaten
Netzadapter für Intel® Core™2 Duo Notebook-Prozessor :
Elektrische Daten
Primär (geräteabhängig)
Nennspannung
Nennfrequenz 50 Hz – 60 Hz (automatisch)
Sekundär
Nennspannung 20 V
Maximaler Nennstrom (geräteabhängig)
Netzadapter für Intel® Core™2 Quad Notebook-Prozessor:
Elektrische Daten
Primär (geräteabhängig)
Nennspannung
Nennfrequenz 50 Hz – 60 Hz (automatisch)
Sekundär
Nennspannung 20 V
Maximaler Nennstrom (geräteabhängig)
90 W
100 V – 240 V (automatisch)
4,5 A
120 W
100 V – 240 V (automatisch)
6,0 A
Sie können jederzeit einen zusätzlichen Netzadapter und eine zusätzliche Netzleitung bestellen.
10601078868, Ausgabe 1 Deutsch - 15
Page 40

Technische Daten
16 - Deutsch 10601078868, Ausgabe 1
Page 41

English
Deutsch
AMILO Notebook Xi 3670
Première utilisation
Français
Español
Italiano
Nederlands
Português
Page 42

Microsoft, MS
, Windows et Windows Vista son t des marques déposées de Microsoft Corporation.
Adobe Reader es
MultiMediaCard
Sony et Memory S
Toutes les autre
déposées par le
Copyright © Fuji
Tous droits réser
(même partielles
Tout manquement à
Tous droits réser
Sous réserve de di
t une marque commerciale d’Adobe Systems Incorporated.
est une marque déposée d’Infineon Technologies AG.
tick sont des marques commerciales de Sony Electronics, Inc.
s marques commerciales citées sont des marques commerciales ou des marques
urs propriétaires respectifs et sont protégé es comme telles.
tsu Technology Solutions GmbH 2009
vés, y compris celui de traduction, de reproduction, de duplication
) par photocopie ou procédé analogue.
cette règle expose son auteur au versem ent de dommages et intérêts.
vés, y compris en cas d’octroi de brevet ou d’enregistrement comme modèle d’utilité.
sponibilité et de modifications techniques.
Page 43

Sommaire
Français
Sommaire
Grâce àune technologienovatrice… ................................................... 1
High DefinitionAudio .................................................................... 2
Raccordement du système de haut-parleurs . . . ........................................ 3
Système graphique hybride . . . ........................................................... 5
Changement du mode graphique . . ................................................... 5
Deuxième disque durenRAID .......................................................... 6
Appeler le programme Intel
Autres informations ..................................................................... 7
Manuel d’utilisation "AMILO Noteboo k" . . . . ............................................ 7
Ports etélémentsdecommande ....................................................... 8
Remarques importantes ............................................................... 10
Aide encasde problème ................................................................ 10
®
MatrixStorage Manager etsafonctiond’aide ............... 6
Premièremise enservicedu notebook ................................................. 11
Déballage et contrôle du Notebook ....................................................... 11
Choix d’un emplacement ................................................................ 12
Raccorder l’adaptateur d’alimentation . . ................................................... 12
Première mise sous tension du Notebook . . . . . ............................................ 13
Caractéristiques techniques ........................................................... 15
Notebook . . . . . .......................................................................... 15
Adaptateurd’alimentation ................................................................ 15
10601078868, édition 1 Français
Page 44

Sommaire
Français 10601078868, édition 1
Page 45

Grâce à un e technologie novatrice…
Grâce à une technologie novatrice…
... et à son design ergonomique, votre AMILO Xi 3670 est un notebook convivial et fiable.
Si vous avez acheté un notebook avec un système d’exploitation Microsoft Windows, celui-ci
est déjà installé et configuré de manière optimale pour vous. Vous pouvez commencer à
travailler avec votre notebook dès la première mise sous tension.
Votre notebook intègre la technologie la plus réce nte pour permettre une mise en œ uvre
optimale de vos connaissances en bureautique et informatique.
• un lecteur permettant de lire et de graver les CD/D VD et selon l’équipement
de l’appareil, de lire les disques Blu-ray
• trois ports USB pour ajoute r très facilement des consoles de jeu, des imprimantes et autres
• un port combiné eSATA/USB pour pouvoir brancher un disque dur SATA
externe ou un autre périphérique USB
• une interface USB sans fil (WUSB) (en option, non disponible en post-équipement) pour une
transmission rapide des donnée s en conformité avec la norme USB sa ns câble gênant
• LAN et Wireless LAN pour l’accès Internet et réseau
• selon les caractéristiques de l’appareil, un deuxième disque dur vous permettant
d’utiliser vo tre notebook avec deux disques durs en RAID
• un port FireWire pour l’échange rapide de données avec des appareils multim édia
• un port HDMI pour la transmission totalement numérique des données audio et vidéo
• une Webcam intégrée et des microphones numériques pour les applications
multimédia les plus diverses
• un lecteur de cartes multi-format pour transférer rapidement sur votre notebook
des pho tos numériques, de la musique et des vidéoclips
• Son Surround (High Definition Audio, Dolby Digital) en cas de raccordement d’un
système de haut-parleurs actifs avec subwoofer
• un contrôleur audio intégré, des haut-parleurs stéréo et un subwoofer pour le plaisir des oreilles.
• Bluethooth® 2.1 pour l’utilisation sans fil de différents accessoires
• des entrées et sorties supplémentaires pour des accessoires audio haut de gamme
TM
• une barre de commande Multimedia LightTouch
une télécommande pour utiliser en toute simplicité les fonctions multimédia de votre notebook.
• un tuner TV intégré (en option, non disponible en post-équipement) pour la
réception de chaînes de télévision terrestres
• un clavier avec pa vé numérique séparé
•unaffichage sur écran (On -Screen-Display) pour le contrôle visuel des
paramètres essentiels de votre notebook
• un système graphique hybride pour une puissance optimale et un fonctionnement en
mode économie d’énergie avec les applications moins exigeantes
• une interface à connecteurs m ultiples faisant office d’entrée pour les signaux audio et vidéo
de périphériques multimédia (en option, uniquement en combinaison avec le tuner TV).
Des logiciels supplémentaires s ont nécessaires pour la mise en s ervice .
Grâce à l’"utilitaire BIOS Setup" convivial, vous pouvez commander les composants
matériels de votre notebook et mieux protéger votre systè me contre l’accès non autorisé
en utilisant la puissance de la protection par mot de passe.
avec des touches sensibles au toucher et
10601078868, édition 1 Français - 1
Page 46

Grâce à un e technologie novatrice…
Ce manuel d’utilisation vous montre comment, entre autres, mettre en service
et utiliser votre notebook AMILO.
High Definition Audio
Vous pouvez raccorder un système de haut-parleurs actifs comprenant jusqu’à 8 haut-parleurs
(7.1) à la sortie audio numérique (port SPDIF) de votre appareil.
Systèmes d e haut-parleurs compatibles High De finition Audio :
Système de haut-parleurs Puissance
2 haut-parleurs
4 haut-parleurs
5 haut-p arleurs + 1 subwoofer Son Surround 5.1 (Dolby Digital)
7 haut-parleurs + 1 s ubwoo fer S on Surround 7 .1 (Dolby Digital EX)
Son stéréo
Son quadro
2 - Français 10601078868, édition 1
Page 47

Grâce à un e technologie novatrice…
Raccordement du système de haut-parleurs
Pour raccorder un système de haut-parleurs à votre app areil et le configurer, procédez comme suit :
► Branchez un des systèmes de haut-parleurs ci-dessus sur le port
SPDIF/Line Out de votre appareil.
Pour plus de renseignements, reportez-vous au chapitre "Ports et éléments de commande", Page
8 et au manuel d’utilisation « AMILO Notebook », chapitre « Raccordement de périphériques ».
Le Realtek HD Audio Manager est lancé :
10601078868, édition 1 Français - 3
Page 48

Grâce à un e technologie novatrice…
► Sélectionnez S/PDIF-Out et confirmez en cliquant sur OK.
Le système de haut-parleurs est à présent opérationnel.
Dans la configuration de haut-parleurs du Realtek HD Audio Manager, vous pouvez
configurer comme suit votre système de haut-parleurs :
4 - Français 10601078868, édition 1
Page 49

Grâce à un e technologie novatrice…
Système graphique hybride
Votre notebook est équipé d’un système graphique hybride. La touche de démarrage rapide vous
permet de sélectionner alternativement les modes économie d’énergie et performance.
Pour les applications avec un contenu graphique moins important, telles que le
visionnage de vidéos, la messagerie électronique ou encore la navigation sur Internet,
utilisez la carte graphique intégrée au jeu de puces. Ceci permettra une réduction
du dégagement de chaleur, du niveau de bruit et de la consommation électrique.
Augmentation de l’autonomie de l’accumulateur (mode économie d’énergie).
Si vous avez besoin de performances élevées, notamment pour les applications de
jeux, v ous pouvez passer sur la carte graphique externe (mode performance).
Changement du mode graphique
Le mode graphique externe (mode performance) est pré-réglé par défaut sur votre Notebook.
Un appareil racco rdé au port HDMI de votre Notebook (résolution FullHD) ne peut être
commandé qu’en mode performance via la carte graphique externe.
Si des programmes qui influencent la sortie graphique (p. ex. des jeux ou un
logiciel TV), sont actifs, il peut ê tre impossible de changer de mode. Quittez
les programmes concernés avant de changer de mode.
Le processus de changement de mode graphique peut durer plus de 10 secondes.
► Appuyez sur la touche de démarrage rapide
multimédia de votre Notebook :
La sortie graphique passe en mode d’économie d’énergie.
► Appuyez à nouveau sur la touche de démarrage rapide
La sortie graphique passe en mode performance.
Hybrid VGA
sur le panneau
Hybrid VGA
10601078868, édition 1 Français - 5
Page 50

Grâce à un e technologie novatrice…
Deuxième disque dur en RAID
RedundantArrayofIndepe ndentDisksRAID
La possibilité d’utiliser un deuxième disque dur dépend de la version de votre appareil.
La dépose et la pose du deuxième disque dur ne doivent être effectuées que par
des partenaires service autorisés de Fujitsu Technology Solutions GmbH. Toute
dépose ou pose non autorisée annule le d roit à la garantie.
Pour obtenir de plus amples informations et les adresses de nos partenaires
service, consultez notre site internet "http://ts.fujitsu.com/support".
RAID (Redundant Array of Independent Disks, ou : Disk-Array) est une méthode consistant à
combiner deux ou plusieurs disques durs pour n’en faire qu’une unité logique.
Ce que l’on a ppelle un « disk array », ou pile de disques, peut être utilisé pour améliorer la
vitesse d’a ccès aux données ou la tolérance aux pannes (prot ection des données).
La tolérance aux pannes s’obtient grâce à la redondance des données. En cas de défaillance
d’un lecteur, elle met à la disposition d’un autre lecteur une copie miroir des d onnées. On
empêche ainsi les défaillances du système d’exploitation ou les pertes de données.
Le système d’exploitation reconnaît tous les disques durs d’un disk array comme formant un seul
et même disque dur physique. Chacun des disques durs d’un disk array est appelé "Member"
(membre). Les données de configuration d’un membre sont enregistrées dans un secteur réservé
du disque dur. Ces données servent à identifier le disque dur comme membre.
Habituellement, les disques durs peuvent être combinés selon différentes méthodes. Ces méthodes
sont désignées comme autant de niveaux RAID. Les différents niveaux RAID correspondent à
des nive aux de performances et de sécurité et à des coûts d’implémentation différents.
Si vous avez acquis un appareil à deux disques durs, celui-ci n’est
pas équipé d’un système RAID d’origine.
En fonction de la taille des disq ues durs, le regroupement de deux
disques durs pour former un RAID peut durer plusieurs heures. Pendant
cette période, votre écran restera noir.
Pour obtenir de plus amp les informations sur la configuration de votre système RAID,
consultez l’aide de votre programme Intel® Matrix Storage Manager.
Appeler le programme Intel®Matrix Storage Manager
et sa fonction d’aide
Pour appeler le programme Intel®Matrix Storage Manager et sa fonction d’aide, procédez comme suit :
► Sélectionnez le menu Démarrer - Programmes - Intel
► Cliquez dans la barre de menus supérieure sur Aide.
► Sélectionnez Sommaire et index.
®
- Intel
Le programme démarre.
La fonction d’aide du programme Intel®Matrix Storage Manager est appelée.
Matrix Storage Manager Console.
®
Matrix Storage Manager
6 - Français 10601078868, édition 1
Page 51

Grâce à un e technologie novatrice…
Autres informations
Vous trouverez des informations générales sur votre AMILO Notebook
dans le manuel d’utilisation "AMILO Notebook".
En cas de problème avec votre ordinateur, reportez-vous au chapitre "Aide en cas
de problème", Page 10 Informations pour la résolution des problèmes.
Les pilotes Windows pour votre notebook AMILO sont dispon ibles sur notre page
Internet. Ces appareils ne sont pas d’origine compatibles avec toutes les versions
du système d’exploitation W indows. Fujitsu Technology Solutions rejette toute
responsabilité en cas d’utilisation d’autres versions du système d’exploitation
Windows ou de systèmes d’exploitation d’une autre origine.
Les parties relatives au logiciel de ce manuel font référence aux produits Microsoft, sous
réserve toutefois qu’ils fassent partie de la fourniture de votre notebook Amilo.
En cas d’installation de logiciels d’une autre origine, veuillez suivre
les instructions du fabricant.
Manuel d’utilisation "AMILO Notebook"
Vous trouverez le manuel d’utilisation "AMILO Notebook" dans le menu de démarrage de
Windows ou sur Internet à l’adresse "http://ts.fujitsu.com/support".
10601078868, édition 1 Français - 7
Page 52

Ports et éléments de commande
Ports et éléments de commande
Dans ce chapitre seront présentés les différents composants matériels de votre n otebook.
Vous y trouverez un aperçu des voyants et des ports du notebook. Familiarisez-vous
avec ces éléments avant de travailler avec le notebook.
WebcamPanneaumultimédiaSurface tactilePavénumériqueséparéClavierVoyan tsd’étatTouchesdelasurfacetactileLecteurdec artesmulti-formatInterfaceinfrarougepourlatélécommandePortLineInPortmicrophonePortécouteursP ortLineOutPortSPDIFLogementpourExpressCardTélécommandemultimédiaPo rtFireWirePortcombinéeSATA/USBHaut-parleursInterrupteurMarche/ArrêtPortsUSBPrisepourcâble d’antennePortHDMIPortécra nVGAPo rtréseauPrisedetensioncontinue(DCIN)CompartimentdeservicemémoireCompartimentdeservicedisquedurBatteriePrisemulti-connecteursSubwooferPrisepourcâbled’antenne
1
2
1
29
3
21
4
4
20
6
19
17
18
16
5
1
1 = Microphones
2 = Webcam
3 = Panneau multimédia
4 = Haut-parleurs
5 = Clavier avec pavé numérique séparé
et touches d’application
6 = Surface tactile
7 = Voyants d’état
8 = Touches de la surface tactile
9 = Interface infrarouge pour la télécommande
10 = Lecteur de cartes multi-format
11 = Port Line In
12 = Port microphone
13 = Port casque/Line Out
14 = Port SPDIF/Line Out
14
13
12
11
10
8
9
22
23
5
25
24
31
7
30
32
35
15 = Logement pour ExpressCard avec
télécommande multimédia
16 = Port LAN
17 = Port combiné eSATA/USB
18 = Ouïes de ventilation
19 = Prise de tension continue (DC IN)
20 = Dispositif Kensington Lock
21 = Interrupteur Marche/Arrêt
22 = Lecteur de CD/DVD
23 = Ports USB
24 = Prise pour câble d’antenne (option)
25 = Prise multi-connecteurs (en option)
26 = Port écran VGA
27 = Port HDMI
28 = Port FireWire
26
33
27
28
34
8 - Français 10601078868, édition 1
Page 53

Portsetélémentsdecommande
29 = Fiche USB
30 = Compartiment de service mémoire
31 = Compartiment de service disque dur 2
32 = Compartiment de service disque dur 1
33 = Subwoofer
34 = Compartiment de service syntoniseur TV
35 = Batterie
10601078868, édition 1 Français - 9
Page 54

Remarques importantes
Remarques importantes
Respectez les consignes de sécurité reprises dans le manue l "Sécurité" et
dans le manue l d’utilisation "AMILO Notebook".
Le remplacement d’un processeur doit impérativement être effectué par des
partenaires service autorisés de Fujitsu Technology Solutions GmbH. Toute
dépose ou pose non autorisée annule le droit à la garantie. Pour obtenir
de plus amples informations et les adresses de nos partenaires service,
consultez notre site internet "http://ts.fujitsu.com/support".
Si vous utilisez une carte TV-Tuner, assurez-vous qu’elle répond à la norme
IEC 60950-1 : 2005, par. 7.2.
Raccordez une carte TV-Tuner externe à un circuit TNV-1 uniquement.
Lors du raccordement d’un câble coaxial sur la carte TV-Tuner externe, assurez-vous qu’il
est correctement relié au systèmedemiseàlaterredubâtiment.
Aide en cas de problème
Si vous rencontrez avec votre ordinateur un problème que vous ne parvenez pa s à
résoudre, vous pourrez dans bien des cas tro uver rapidement une solution à l’aide du
programme SystemDiagnostics pré-installé sur votre ordinateur.
► Pour démarrer le programme SystemDiagnostics, cliquez sur Icône de démarrage
- Programmes - Fujitsu Computers - SystemDia gno s tics.
ou
► Pour démarrer le programme SystemDiagnostics, cliquez sur Icône de démarrage
- Programmes - Fujitsu - SystemDiagnostics.
► Lorsqu’un problème est constaté pendant le test, le programme SystemDiagnostics
génère un code (p. ex. le code DIFS YXXX123456789123).
► Notez le code D IF S généré et le numéro d’identifi cat ion de votre appareil. Vous trouverez
le numéro d’identification sur la plaque signalétique sur la face arrière du boîtier.
► Pour obtenir une aide supplémentaire, contactez le Help Desk compétent pour votre pays
(reportez-vous à la liste des Help Desks ou rendez-vous sur le site "http://ts.fujitsu.com/support").
Veillez à avoir à disposition le nu méro de série/d’identification de votre système et le code DIFS.
10 - Français 10601078868, édition 1
Page 55
Première mise en service du notebook
Première mise en service du notebook
PremièremiseenserviceNotebookMiseenserviceNotebook
Si votre Notebook est équipé d’un système d’exploitation Windows, les pilotes
matériels nécessaires et les logiciels fournis sont déjà préinstallés.
La pre m ière mise en service sur le système d’exploitation Microsoft Window s peut
demander jusqu’à 20 minutes, selon la configuration matérielle et logicielle de l’appareil.
Lors de la première mise sous tension, un autodiagnostic s’exécuté. Différents
messages peuvent apparaître. L’écran peut rester sombre ou scintiller brièvement.
Suivez les indications données à l’écran.
En aucun cas, ne mettez l’appareil hors tension pendant la première mise en service.
Avant de pouvoir travailler avec votre Notebook pour la première fois, vous
devez charger l’accumulateur.
A la livraison, l’accumulateur se trouve dans le logement pour accumulateur ou dans l’emballage. Pour
que vous puissiez utiliser votre Notebook e n mode accumulateur, l’accumulateur doit être chargé.
Lorsque le Note book est utilisé en déplacement, l’accumulateur intég ré lui fournit l’énergie nécessaire.
Vous pouvez augmenter l’autonomie en tirant profit des fonctions d’économie d’énergie disponibles.
Lorsque vous utilisez le Notebook à la maison ou au bureau, nous vo us conseillons de le
raccorder à l’adaptateur d’alimentation plutôt que d’utiliser l’accumulateur.
La connexion des périphériques (p. ex. imprimante, souris) au Notebook est e xpliquée
dans le Manuel d’utilisation "AMILO Notebook".
Déballage et contrôle du Notebook
Si vous constatez des domm ages dus au transport, nous vous prions d’en
informer immédiatement le point de vente compétent !
► Déballez les différents éléments.
EmballageTr ansport
► Vérifiez si le Notebook présente des dommages apparents dus au transport.
Nous vous conseillons de ne pas jeter l’emballage d’origine de l’appareil.
Conservez l’emballage d’origine, il pourra vous servir lors d’un transport ultérieur.
10601078868, édition 1 Français - 11
Page 56

Première mise en service du notebook
Choix d’un emplacement
Choixd’unemplacementNotebookAdaptateurd’alimentation
Avant de mettre votre notebook en place, choisissez un emplacement
adéquat. Suivez pour cela les consignes suivantes :
• Ne posez jamais le Notebook et l’adaptateur d’alimentation sur une surface sensible
à la chaleur. Dans le cas contraire, la surface risque d’être endommagée.
• Ne posez jamais votre note book sur une surface non rigide (p. ex. sur
la moquette, des meubles rembourrés). Vous risquez ainsi d’entraver la
ventilation et de provoquer des dégâts dus à une surchauffe.
• Ne posez pas le notebook directement sur vos jambes pen dant une trop
longue période. Pendant le fonctionne ment normal, la face inférieure
du notebook se réchauffe. Un contact prolongé avec la p eau peut être
désagréable, voire provoquer des brûlures.
• Posez le notebook sur une surface plane, stable et anti-dérapante.
N’oubliez pas que les pieds en caoutchouc du notebook peuvent laisser
des marques sur les surfaces fragiles.
• L’espace libre autour du notebook et de l’adaptateur d’alimentation d oit être
d’au moins 100 mm pour permettre une ventilation suffisante.
• Ne couvrez jamais les ouïes de ventilation de votre Notebook.
• Evitez d’exposer votre notebook à des conditions d’environnement extrê mes.
Protégez le notebook de la poussière, de l’humidité et de la chaleur.
Raccorder l’adaptateur d’alimentation
Miseenservicedu NotebookAd aptateurd’alimentation
Respectez également les consignes de sécurité figurant dans le manuel "Sécurité" ci-joint.
Le câble secteur livré avec l’appareil répond aux exigences du pays dans
lequel vous avez acheté le Notebook. Assurez-vous que ce câble secteur
est autorisé dans le pays dans lequel vous l’utilisez.
Ne branchez pas le câble s ect eur de l’adaptateur d’alimentation sur une prise de
courant avant d’avoir raccordé le Notebook à l’adaptateur d’alimentation.
Assurez-vous que la puissance absorbée de l’adaptateur d’alimentation ne dépasse
pas celle du circuit électrique sur lequel vous branchez l’adaptateur d’alimentation (voir
chapitre "Caracté ristiques techniques", "Adaptateur d’alimentation", Page 15).
12 - Français 10601078868, édition 1
Page 57

Première mise en service du notebook
► Raccordez le câble de l’adaptateur
d’alimentation (1) à la prise de tension
continue (DC IN) du Notebook.
► Raccordez le câble secteur (2) à
l’adaptateur d’alimenta tion.
1
► Branchez le câble secteur (3) sur
une prise de courant.
3
2
Première mise sous tension du Notebook
Premièremisesous tension
Lors de cette opération, le Notebook doit être alimenté par l’intermédiaire
de l’adaptateur d’alimentation.
A la première mise sous tension du Noteb ook, l’installation et la configuration du
logiciel fourni sont lancées. Cette procédure ne peut pas être interrompue ; prévoyez
par conséquent un certain temps pou r s on exécution et raccordez le Notebook
à la tension secteur par l’intermédiaire de l’adaptateur d’alimentation.
Pendant l’installation, vou s pouvez redémarrer le Notebook uniquement
si le système vous y invite !
Vous serez invité à créer une copie de sauvegarde du système d’exploitation préinstallé.
La copie de sauvegarde vous permettra de réinitialiser votre N otebook à l’état de livraison.
Nous recommandons d’enregistrer sur DVD l’état de livraison de votre
appareil immédiatement après son achat.
Si vous avez oublié le mo t de passe du système d’exploitation sans avoir préalablement
enregistré le système d’exploitation, vous ne pourrez pas créer les supports de
données nécessaires ni restaurer l’état de livraison de votre appareil.
Pour plus d’informations sur la restauration du système d’exploitation, des pilotes, des
manuels et des logiciels spéciaux, voir le m an uel sur la restauration des logiciels installés.
Le système d’exploitation est déjà installé sur le disque dur pour faciliter la
mise en service de votre Notebook.
10601078868, édition 1 Français - 13
Page 58

Première mise en service du notebook
► Mettez le Notebook sous tension (1).
1
► Pendant l’installation, suivez les indications données à l’écran.
En cas de doute sur les données que le système vous demande de saisir,
lisez le manuel du système d’exploitation.
Si un système d’exploitation Windows est installé sur votre notebook, vous trouverez
plus d’informations sur le système, les pilotes, les programmes d’aide, les mises à jour,
les manuels, etc. sur votre notebook ou sur Internet sous "http://ts.fujitsu.com/support".
14 - Français 10601078868, édition 1
Page 59
Caractéristiques techniques
Caractéristiquestechniques
Notebook
Caractéristiquestechniques
Conditions d’environnement
Température de fonctionnement 5 °C – 35 °C
Dimensions
Largeur x pro fondeur x hauteur
(face avant/arrière)
Poids (incl. batterie à 8 éléments et 2 disques
durs)
Un remplacement du p rocesseur doit impérativemen t être effectué par Fujitsu
Technology Solutions. Adressez-vous pour cela à votre point de vente ou à notre S.A.V.
La garantie est annulée si de s défectuosités apparaissent sur l’appareil après
que vous ayez installé ou remplacé des extensions système.
440 mm x 303 mm x 39/ 51 mm
environ 4,0 kg
Caractéristiques techniques
La fiche technique de ce notebook contient d’autres caractéristiques
techniques. Vous trouverez la fiche technique sur votre notebook ou sur
Internet à l’adresse "http://ts.fujitsu.com/support".
Adaptateur d’alimentation
Caractéristiquestechniques
Adaptateur d’alimentation pour processeur notebook Intel® Core™2 Duo :
Caractéristiques électriques
Primaire (selon l’appareil)
Tension nominale
Fréquence nominale
Secondaire
Tension nominale 20 V
Courant nominal maximum (selon l’appareil)
Adaptateur d’alimentation pour processeur notebook Intel® Co re™2 Q uad :
Caractéristiques électriques
Primaire (selon l’appareil)
Tension nominale
Fréquence nominale
Secondaire
Tension nominale 20 V
Courant nominal maximum (selon l’appareil)
90 W
100 V – 240 V (automatique)
50 Hz – 60 Hz (automatique)
4,5 A
120 W
100 V – 240 V (automatique)
50 Hz – 60 Hz (automatique)
6,0 A
Vous po uve z à tout moment commander un adaptateur d’alimentation et un
câble secteur supplémentaires.
10601078868, édition 1 Français - 15
Page 60

Caractéristiques tech niq ues
16 - Français 10601078868, édition 1
Page 61

English
Deutsch
AMILO Notebook Xi 3670
Primera puesta en servicio
Français
Español
Italiano
Nederlands
Português
Page 62

Microsoft, MS,
Windows, W i ndows Vista so n marcas registradas de Microsoft Co rporation.
Adobe Reade r es u
MultiMediaCard e
SonyyMemoryStic
Todas las demás ma
respectivos pro
Copyright © Fujit
La divulgación y re
no están au toriza
Los infractores qu
Reservados todos lo
patente o de mode l
Reservada la posi
na marca de Ado be Systems Incorporated.
s una marca registrada de Infineon Technologies AG.
k son marcas de Sony Electronics, Inc.
rcas mencionadas son marcas o marcas registradas de los
pietarios y se consideran protegidas.
su Technology Solutions GmbH 2009
producción de este documento, así com o el aprovechamiento de su contenido
dos, a no ser que se obtenga el consentimiento expreso para ello.
edan obligados a la compensación por daños y perjuicios.
s derechos, en particular para el caso de concesión de
odeutilidad.
bilidad de suministro y de mod ificaciones técnicas.
Page 63

Contenido
Español
Contenido
Una tecnologíainnovadora ............................................................. 1
High Definition Audio (sonido de alta definición) ........................................... 2
Conexión del sistema de altavoces ................................................... 3
Tecnología gráfica híbrida ............................................................... 5
Cambio de modo gráfico ............................................................. 5
Segundo disco duro en una matriz RAID . . . . . . ............................................ 6
Inicio de Intel
Informaciónadicional .................................................................... 7
Manual de instrucciones "AMILO Notebook" . . . ........................................ 7
Puertos yelementosdemando ........................................................ 8
Indicaciones importantes . . . ........................................................... 10
Soluciónde problemas .................................................................. 10
®
Matrix Storage Manager y la función de ayuda . . ......................... 6
Primera puesta enservicio delordenadorportátil ...................................... 11
Desembalaje y verificación del ordenador portátil . . ........................................ 11
Seleccióndel emplazamiento ............................................................ 12
Conexión del adaptador de red ........................................................... 12
Primera conexión del orden ador portátil ................................................... 13
Características técnicas ............................................................... 15
Ordenador portátil . ...................................................................... 15
Adaptador de red . ...................................................................... 15
10601078868, edición 1 Español
Page 64

Contenido
Español 10601078868, edición 1
Page 65

Una t ecno logía innovadora
Una tecnología innovadora
... junto con un diseño ergonómico hacen de su AMILO Notebook Xi 3670
un ordenador portátil fiable y fácil de usar.
Si ha comprado un ordenador portátil con un sistema operativo Microsoft Windows, este
ya se encuentra preinstalado y configurado de forma óptima. Podrá com enza r a trabajar
inmediatamente la primera vez que encienda su ordenado r portátil.
Su ordenador portátil viene equipado con la última tecnología para que así pueda
aprovechar al máximo su experiencia en informática.
• una unidad para la lectura y escritura de CD/DVD y, según el equipamiento,
para la lectura de discos Blu-ray
• tres puertos USB para una sencilla ampliación mediante gamepads, impresoras y demás
• un puerto eSATA/USB combinado para poder conectar un disco duro SATA
externo u otro dispositivo USB
• una interfaz USB inalámbrica (WUSB) (opcional, no instalable como accesorio) para una
transmisión de datos rápida según el estándar USB sin cables molestos
• LAN y Wireless LAN para acceder a una red local y a Internet
• según el equipo, llevará un segundo disco duro que le permitirá utilizar el ordenador
portátil con dos discos duros en una matriz RAID
• un pue rto Firewire para un i ntercambio de datos rápido con dispositivos multimedia
• un pu erto HDMI para la transmisión en alta definición de datos de audio y vídeo
• una webcam integrada y micrófonos digitales para distintas aplicaciones multimedia
• un lector de tarjetas multiformato para transferir rápidamente a su ordenador
portátil fotos, música y vídeos
• sonido envolvente (High Definition Audio, Dolby Digital) mediante la conexión
de un sistema de altavoces activo con subwoofer
• un controlador de audio integrado, dos altavoces estéreo y un subwoofer que le
permiten disfrutar de una excelente calidad de sonido
• Bluethooth® 2.1 para el funcionamiento inalámbrico de distintos accesorios
• entradas y salidas adicionales para accesorios de audio de alta calidad
TM
• una barra de mando multimedia LightTouch
distancia para manejar cómodamente las fun ciones multimedia de su ordenador portátil.
• un sintonizador de TV integrado (opcional, no instalable como accesorio) p ara
la recepción d e programas de televisión terrestres
• un teclado con bloque numérico extendido
• un On-Screen Display para el control visual de los ajustes más importantes de su ordenador
portátil
• tecnología gráfica híbrida para un rendimiento máximo o modo de ahorro de
batería con aplicaciones menos exigentes
• una interfaz de conexión múltiple para la entrada de señales de audio y vídeo de
dispositivos multimedia externos (opcional, solo en conjunción con el sintonizador de TV)
Para la puesta en funcionamiento se necesita software adicional.
Con la sencilla utilidad "BIO S Setup Utility" podrá controlar el hardwa re de su ordenador
portátil y proteger mejor su sistema de un acceso no autorizado, siempre y cuando
utilice las potentes prestaciones de la contraseña.
con teclas sensibles al tacto y un mando a
10601078868, edición 1 Español - 1
Page 66

Una tecnología innovadora
Estas instrucciones de servicio describen, entre otras cosas, cómo poner en
marcha y manejar su ordenador portátil AMILO.
High Definition Audio (sonido de alta definición)
A la salida de audio digital de su equipo (conexión SPDIF) se puede conectar un
sistema de altavoces activo de hasta och o altavoces (7.1).
Sistemas de altavoces compatibles con High Definition Audio (sonido de alta definición):
Sistema de altavoces Potencia
2 altavoces
4 altavoces
5 altavoces + 1 subwoofer Sonido envolvente 5.1 (Dolby Digital)
7 altavoces + 1 subwoofer Sonido envolvente 7.1 (Dolby Digital EX)
Sonido estéreo
Sonido cuadrofónico
2 - Español 10601078868, edición 1
Page 67
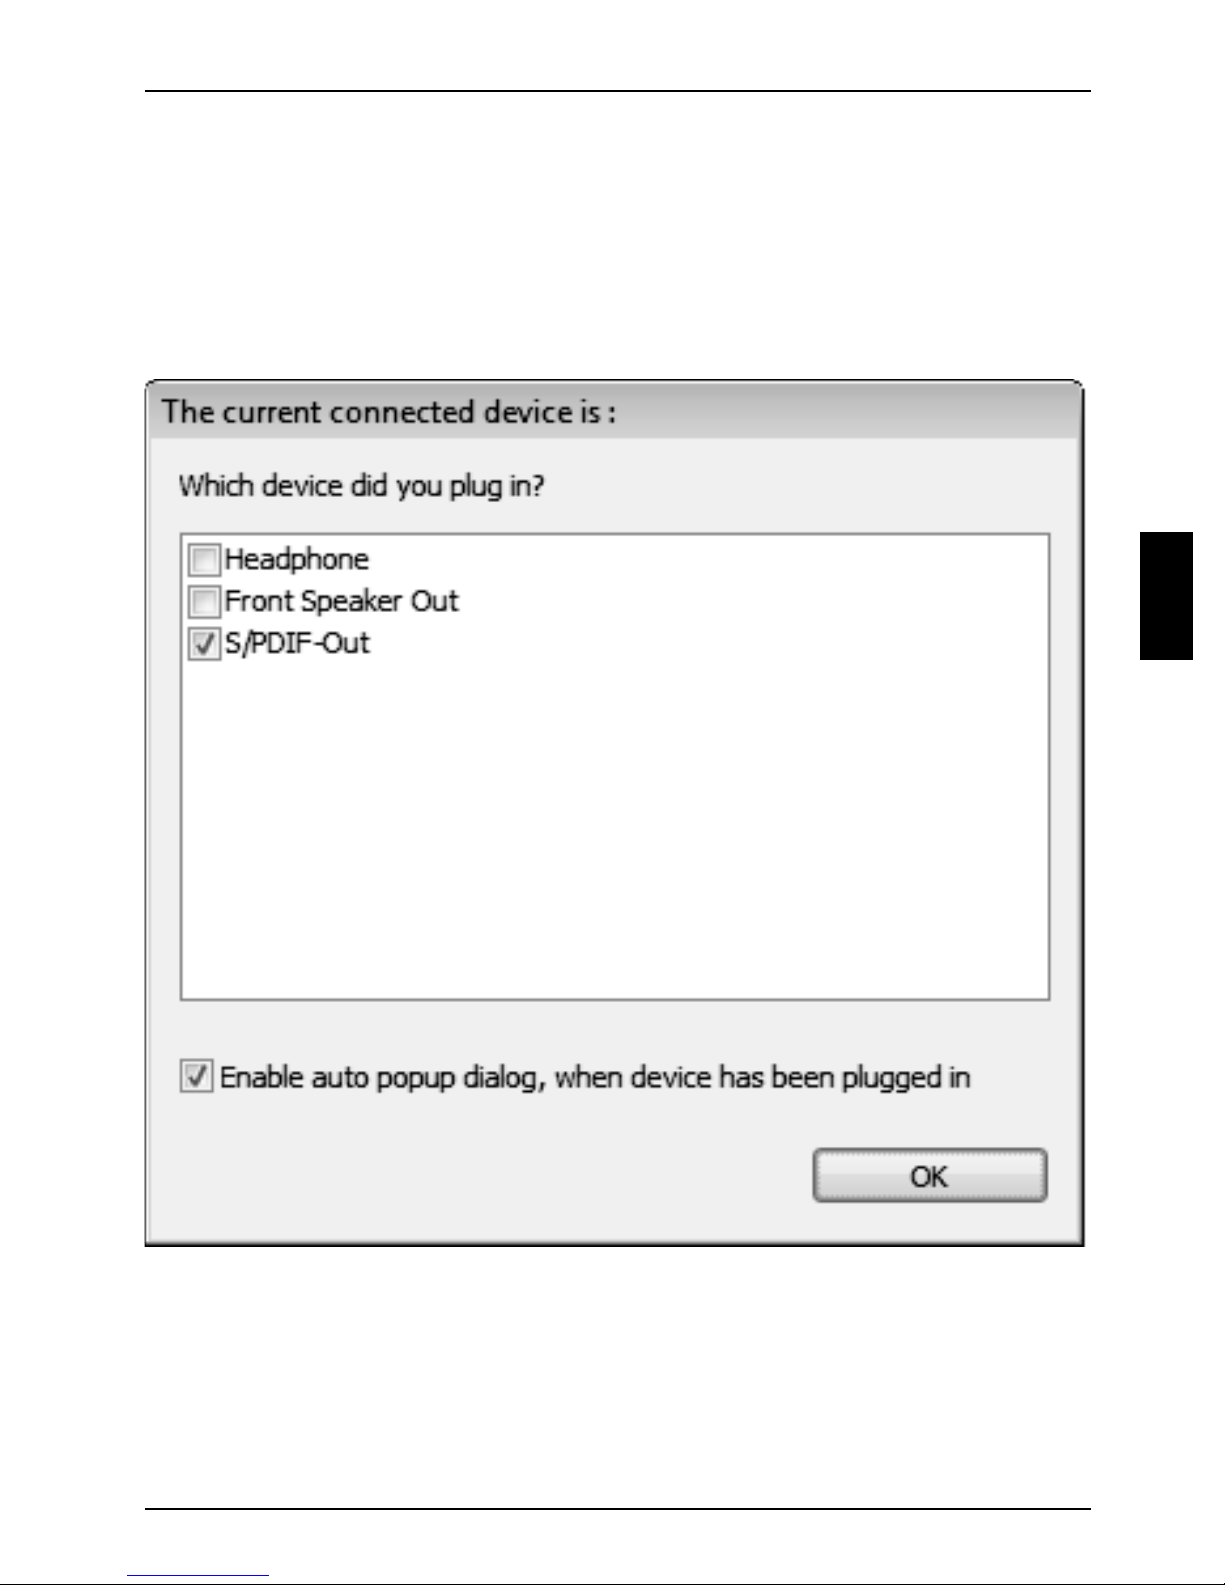
Una t ecno logía innovadora
Conexión del sistema de altavoces
Para conectar un sistema de altavoces a su equipo y configurarlo, proceda de la siguiente manera:
► Conecte uno de los sistemas de altavoces anteriormente mencionados a
la conexión SPDIF/Line-Out de su equipo.
Encontrará más información en el capítulo "Puertos y elementos de mando", Página 8 y en el
Manual de instrucciones "AMILO Notebook", en el capítulo "Conexión de dispositivos externos".
Se inicia el programa Realtek HD Audio Manager:
10601078868, edición 1 Español - 3
Page 68
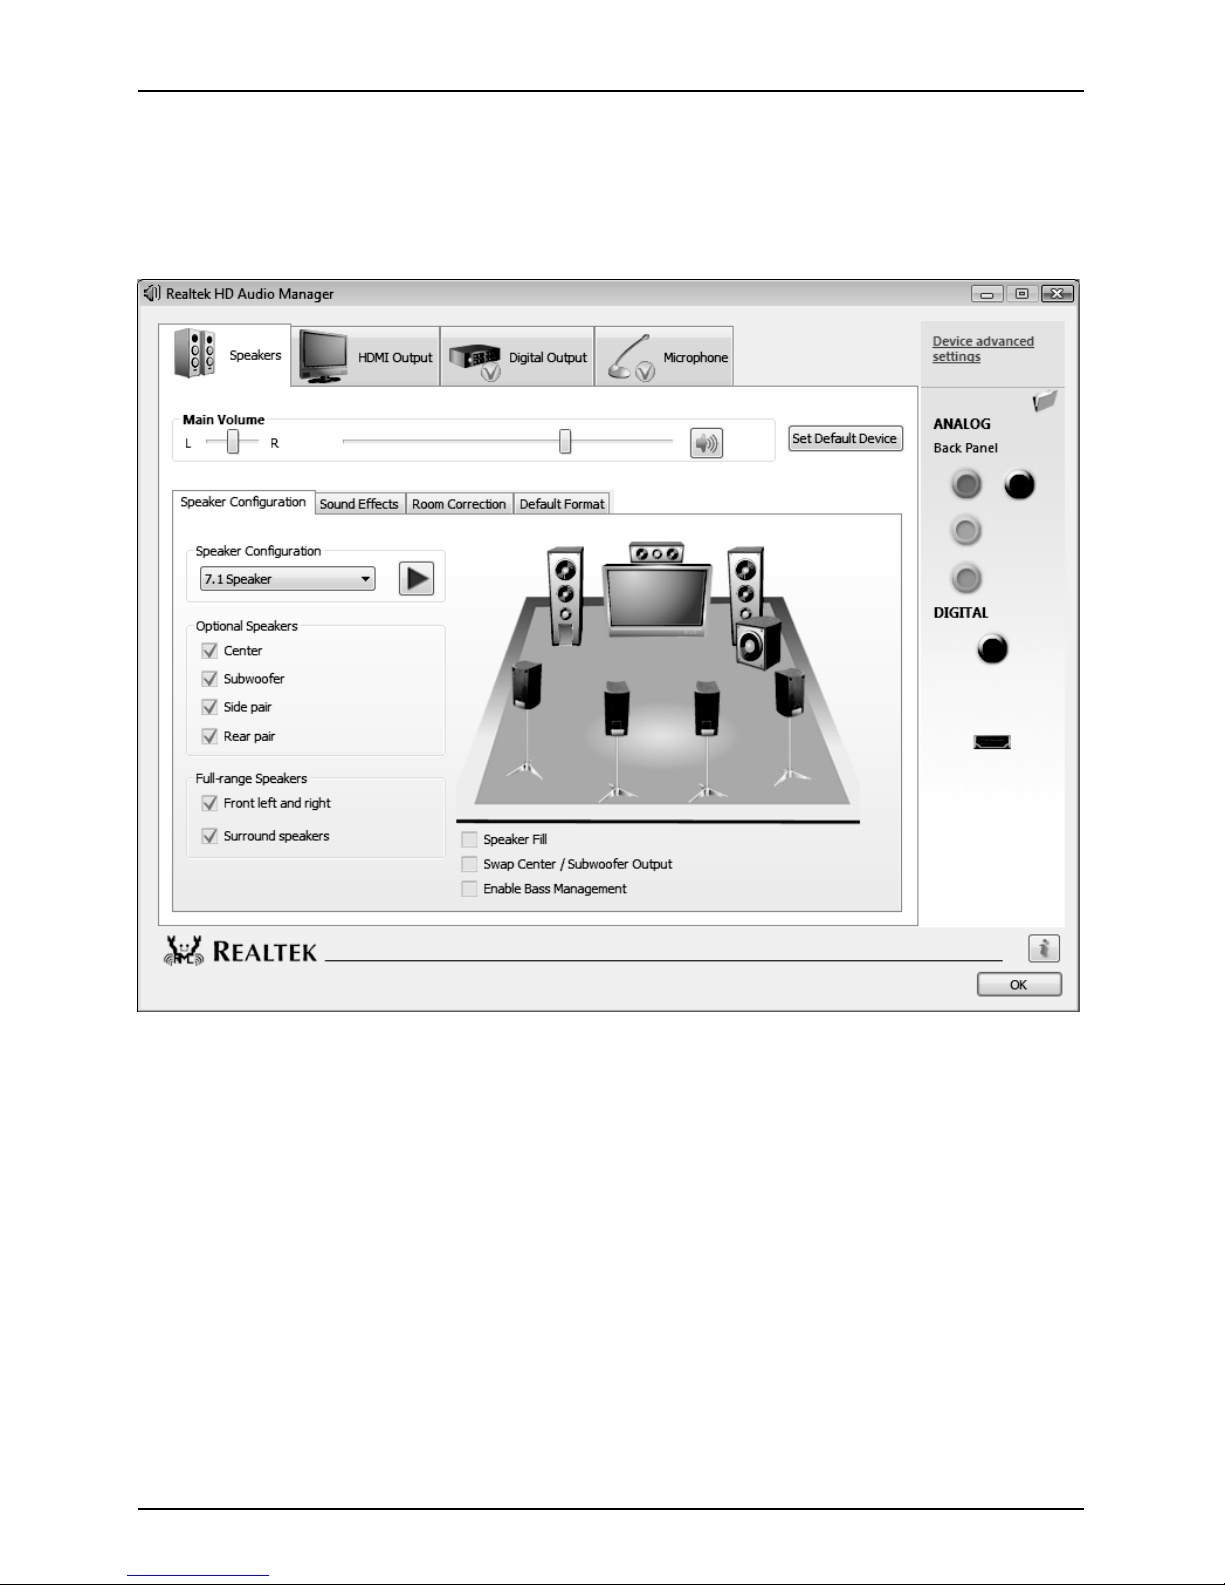
Una tecnología innovadora
► Seleccione S/PDIF-Out yconfirme con Aceptar.
El sistema de altavoces ya está listo para funcionar.
En la configuración de altavoces del programa Realtek HD Audio Manager se puede
configurar adecuadamente el sistema de altavoces:
4 - Español 10601078868, edición 1
Page 69
Una t ecno logía innovadora
Tecnología gráfica híbrida
Su ordenador portátil dispone de tecnología gráfica híbrida. Con la tecla de inicio rápido se
puede cambiar entre los modos de ahorro de energía y de rendimiento.
Utilice la unidad gráfica integrada en el chipset para aplicaciones que no
contienen muchos gráficos, por ejemplo, al reproducir vídeos, utilizar el correo
electrónico o navegar por Internet. De este modo se disminuye la generación
de calor, el nivel de ruido y el consumo de corriente. La autonomía de la
batería aumenta (modo de ahorro de la batería).
Cambie a la unidad gráfica externa cuando requiera un rendimiento alto,
p. ej. para juegos (modo de rendimiento).
Cambio de modo gráfico
El ordenador portátil se entrega de fábrica con el modo externo de gráficos
(modo de rendimiento) activado.
Los dispositivos conectados al puerto HDMI del ordenador portátil (resolución Full HD) solo
funcionan mediante la unidad de gráfi cos externa en el modo de rendimiento.
Si hay programas activos que afecten a la edición gráfica (p. ej., juegos
o software de TV), no s e puede cambiar de modo. Cierre los programas
correspondientes antes de realizar el cambio.
El proceso de cambio entre los modos gráficos puede durar más de diez segundos.
► Pulse la tecla de inicio rápido
Se ca mbia al modo de ahorro de energía de los gráficos.
► Pulse de nuevo la tecla de inicio rápido
Se cambia al modo de rendimiento de los gráficos.
Hybrid VGA
del Multimedia-Board del ordenador portátil:
Hybrid VGA
.
10601078868, edición 1 Español - 5
Page 70
Una tecnología innovadora
Segundo disco duro en una matriz RAID
RedundantArrayofIndepe ndentDisksRAID
La utilización de un segundo disco duro depende del equipam iento de su equipo.
La instalación y desmontaje del segund o disco duro solo debe llevarse a cabo
en un se rvicio técnico autorizado de Fujitsu Technology Solutions GmbH. En
caso con trario se e xtinguen los derechos de garantía.
Encontrará más informa ción y las direcciones de nuestros servicios técnicos
en Internet en "http://ts.fujitsu.com/support".
RAID (Redundant Array of Independent Disks, también: Disk-Array) es un procedimiento
mediante el que se agrupan dos discos duros en una unidad lógica.
Un Disk-Array aporta beneficios en lo que se refiere a la mejora de la velocidad de acceso
a los datos o, alternativamente, la tolerancia a errores (protección de datos).
La tolerancia a errores se logra gracias a la redundancia de los datos. En caso de que
una unidad falle, otra unidad contiene una copia e spejo de los datos. De este modo puede
evitarse una pérdida de datos o la caída del sistema operativo.
El sistema operativo identifica todos los discos duros en un Disk-Array como un único disco du ro
físico. Cada uno de los discos duros en un Disk-Array se designa como "Member" (miembro).
En el sector reservado del disco duro se graban los datos referidos a la configuración de un
miembro. A través de estos datos, el disco duro puede identificarse como miembro.
Por lo general, los discos duros se agru pan mediante distintos procedimientos. Estos
procedimientos se designan como diferentes niveles RAID. Los diferentes niveles RAID representan
los distintos niveles de rendimiento y seguridad, así como los costes de implementación.
Los equipos adquiridos con dos discos duros no se entregan con
losdiscosdispuestosenRAID.
Dependiendo del tamaño de los discos duros la combinación de dos
discos duros en una matriz RAID puede tardar varias horas. Durante este
periodo de tiempo su pantalla se volverá negra.
Encontrará más información sobre la configuración de su sistema RAID en la
función de ayuda del programa Intel® Matrix Storage Manager.
Inicio de Intel®Matrix Storage Manager y la función de ayuda
Para abrir el programa Intel®Matrix Storage Manager ylafuncióndeayuda
proceda de la siguiente forma:
► Seleccione Inicio - Todos los programas - Intel
► Haga clic en Ayuda en la barra de menús superior.
► Seleccione Contenido e índice.
®
- Intel
A continuación se abre el programa.
A continuación se abre la ayuda del programa Intel®Matrix Storage Manager.
Matrix Storage Manager.
®
Matrix Storage Manager
6 - Español 10601078868, edición 1
Page 71

Una t ecno logía innovadora
Información adicional
En el Manual de instrucciones "AMILO Notebook" encontrará información
general sobre su ordenador p ortátil AMILO.
Si tiene algún problema con el ordenador, en el capítulo "Solución de problemas",
Página 10 encontrará información sobre la solución de problemas.
Los controladores de Windows para su ordenador portátil AMILO se encuentran en
nuestra página de Internet. Estos equipos no son compatibles con todos los sistemas
operativos de Windows. Fujitsu Technology Solutions no se hace responsable si
se utilizan otros sistemas operativos de Window s o de otros fabricantes.
Las partes de este ma nual relativas al software se refieren a los p roductos de
Microsoft, si forman parte del suministro de su ordenador portátil AMILO.
Tenga en cuenta las instrucciones del fabricante al instalar otros productos de software.
Manual de instrucciones "AMILO Notebook"
Encontrará el Manual de instrucciones "AMILO Noteboo k" en el menú de inicio de
Windows o en Internet en "http://ts.fujitsu.com/support".
10601078868, edición 1 Español - 7
Page 72

Puertos y elementos de mando
Puertos y elementos de mando
En este capítulo se muestran los diferentes componentes de hardware de su ordenador portátil.
Aquí obtendrá una visión ge neral de los indicadores y los puertos del ordenador portátil.
Familiarícese con estos elementos antes de trabajar con el ord enador portátil.
WebcamMultimedia-BoardAlmohadilladetacto
BloquenuméricoextendidoTecladoIndicador esdeestadoTeclasde laalmohadilladetactoLectordetarjetasmultiformatoInterfazdeinfrarrojos paraelmandoadistan ciaPuertoLineInPuertoparamicrófonoPuertoparaauricularesPuertoLineO utPuertoSPDIFRanuraparatarjetasExpressCardMandoa distanciamultimediaPuertoFirewirePuertoeSATA/USBcom binadoAltavocesInterrupto rdeconexión/desconexiónPuertosUSBPuertodecabledeantenaPuertoHDMIPuertoparamonitorVGAConexiónderedConectorhembradetensión continua(DCIN)CompartimentodeserviciodememoriaCompartimentodeserviciodeldiscoduroBateríaPuertodeconexiónmúltipleSubwooferPuertodecabledeantena
1
2
1
29
3
21
4
20
6
19
17
18
16
5
1
14
13
12
11
10
1 = Micrófonos
2 = Webcam
3 = Multimedia-Board
4 = Altavoces
5 = Teclado con bloque numérico
independiente y teclas de aplicación
6 = Almohadilla de tacto
7 = Indicadores de estado
8 = Teclas de la almohadilla de tacto
9 = Interfaz de infrarrojos pa ra el
mando a distancia
10 = Lector de tarjetas multiformato
11 = Puerto Line In
12 = Puerto para micrófono
13 = Puerto para auriculares/Line Ou t
14 = Puerto SPDIF/Line Out
22
23
26
27
28
4
5
25
24
31
7
8
9
30
32
33
34
35
15 = Ranura para tarjetas ExpressCard con
mando a distancia multimedia
16 = Puerto para LAN
17 = Puerto eSATA/USB combinado
18 = Ranuras de ventilación
19 = Conector hembra de tensión
continua (DC IN)
20 = Dispositivo Kensington Lock
21 = Interruptor de conexión/desconexión
22 = Unidad de CD/DVD
23 = Puertos USB
24 = Puerto de cable de antena (opcional)
25 = Puerto de conexión múltiple (opcional)
26 = Pu erto para monitor VGA
27 = Puerto HDMI
28 = Puerto Firewire
8 - Español 10601078868, edición 1
Page 73

Puertos y elementos de mando
29 = Puerto USB
30 = Compartimento de servicio de memoria
31 = Compartimento de servicio de disco duro 2
32 = Compartimento de servicio de disco duro 1
33 = Subwoofer
34 = Compartimento de servicio del
sintonizador de TV
35 = Batería
10601078868, edición 1 Español - 9
Page 74

Indicaciones importantes
Indicaciones importantes
Tenga en cuenta las indicaciones de seguridad incluidas en el manual "Seguridad"
y en el Manual de instrucciones "AMILO Notebook".
La sustitución del procesador solo puede ser realizada en un servicio técnico
autorizado de Fujitsu Technology Solutions GmbH. En caso contrario se extinguen
los derechos de ga rantía. Encontrará más información y las direcciones de nuestros
servicios técnicos en Internet en "http://ts.fujitsu.com/support".
Al utilizar una tarjeta sintonizadora de TV se debe comproba r qu e cumpla
la norma IEC 60950-1: 2005, apartado 7.2.
Conecte la sintonizadora de TV externa solo a un circuito TNV-1.
Al conectar una cable coaxial a la sintonizadora de TV externa asegúrese de que la
conexión con la toma a tierra del edificio es correcta.
Solución de problemas
Si tiene algún problema con el ordenador qu e no puede solucionar por sí mismo, en muchos casos
podrá solucionarlo rápidamente con el program a SystemDiagnostics preinstalado en su ordenador.
► Para iniciar el programa SystemDiagnostics haga clic en Inicio - Programas -
Fujitsu Siemens Computers - SystemDiagnostics.
o
► Para iniciar el programa SystemDiagnostics,hagaclicenInicio - Programas
- Fujitsu - SystemDiagnostics.
► Si durante la comprobación se produce una anomalía, el programa SystemDiagnostics
proporcionará un código (p. ej. código DIFS YXXX1234567 89123).
► Anote el código DIFS proporcionado y el nº de identificación de su equipo.
Encontrará este número de identificación en la placa o adhesivo de características
que se encuentra en la parte posterior de la ca ja.
► Para más información sobre el problema identificado, póngase en contacto
con el Help Desk correspondiente para su país (véase la lista Help Desk o
en Internet "http://ts.fujitsu.com/support"). Te nga también preparados el nº de
identificación/serie de su sistema y el código DIFS.
10 - Español 10601078868, edición 1
Page 75

Primera puesta en servicio del ordenador portátil
Primera puesta en servicio del
ordenador portátil
PrimerapuestaenservicioOrdenadorportátilPuestaenservicioOrdenadorportátil
Si su ordenador portá til incluye un sistema operativo de Windows, los controladores
de hardware necesarios y el software suministrado ya están preinstalados.
La primera p u esta en servicio con el sistema operativo Microsoft Windows puede
tardar hasta 20 minutos, según el hardware y el software instalados.
La primera vez que se enciende el ordenado r portátil se ejecuta una
comprobación del sistema. Pueden aparecer distintos mensajes. La pantalla
puede apagarse o parpadear brevemente.
Siga las instrucciones en pantalla.
No apague en ningún caso el ordenador portátil durante la primera puesta en servicio.
Es necesario cargar la batería antes de pode r trabajar por primera vez con el ordenador portátil.
El ordenador se suministra con la batería en el compartimento de la batería o en los accesorios. La
batería deb erá estar cargada si quiere utilizar el ordenador portátil en el modo de servicio con ba tería.
La batería se encarga de abastecer el ordenador portátil con la energía necesaria cuando
este se utiliza en el modo de servicio móvil. La autonomía puede aumentarse si se
aprovechan las funciones disponibles para el ahorro de energía.
Cuando utilice el ordenador portátil en casa o en la oficina, debería alimentarlo con
energía m ediante el adaptador de red y no mediante la batería.
La información sobre la conexión de dispositivos externos (p. ej., ratón, impresora) se
encuentra en el manual de instrucciones "AMILO Notebook".
Desembalaje y verificación del ordenador portátil
Si detecta daños causados por el transpo rte, informe inmediatamente a su distribuidor.
► Desembale todos los elementos.
EmbalajeTran sporte
► Verifique el ordenador portátil y cerciórese de que no se han producido
daños visibles debidos al transporte.
Le recomendamos que guarde el material de embalaje original por si
lo necesitara para un futuro transporte.
Guarde el material de embalaje original por si lo necesita para
transportar nuevamente el equipo.
10601078868, edición 1 Español - 11
Page 76

Primera puesta en servicio del ordenador portátil
Selección del emplazamiento
SeleccióndelemplazamientoOrdenadorportátilAdaptadordered
Antes de instalar el ordenador portátil, se debe elegir un lugar adecuado para el
ordenador portátil. A tal efecto, siga las indicaciones siguientes:
• No coloque bajo ninguna circunstancia ni el ordenador portátil ni el adaptador de red
sobre una superficie sensible al calor. De lo contrario la superficie podría sufrir daños.
• El ordenado r portátil no debe colocarse nunca sobre una superficie blanda (p.
ej., alfombras, muebles tapizados o camas). Esto puede bloquear la ventilación
y consecuentemente o riginar daños por sobrecalentamiento.
• No coloque el ordenador portátil por mucho tiempo directamente sobre
las piernas. La parte inferior del ordenador portá til se calienta durante
el servicio normal. Un contacto prolongado con la piel puede llegar a
ser desagradable o incluso provocar quemaduras.
• Coloque el ordenador portátil sobre una superficie plana, estable y
antideslizante. Tenga en cuenta que los pies de goma del ordenador
portátil pueden dejar marcas en superficies delicadas.
• Para que el equipo pueda ventilarse adecuadamente, debe guardar un espacio libre
mínimo de 100 mm alrededor del ordenador portátil y del adaptador de red.
• No cubra nunca las ranuras de ventilación del ordenador portátil.
• No exponga el ordenador portátil a condicion es ambientales extremas. Proteja
el ordenador portátil de la humedad, el polvo y el calor excesivo.
Conexión del adaptador de red
PreparaciónparaelservicioAdaptadordered
Tenga en cuenta las indicaciones de seguridad incluidas en el
manual adjunto "Seguridad".
El cable de alimentación adjunto satisface las normas del país donde se ha
comprado el ordenador portátil. Asegúrese de que el cable de alimentación
está homologado en el país donde desea utilizarlo.
El cable de alimentación del adaptador de red solo puede enchufarse a una toma de
corriente cuando el ordenador portátil esté ya conectado al adaptador de red.
Asegúrese de que el consumo de energía del adaptador de red no supere al de
la red eléctrica donde piensa conectar el adaptador de red (véase el capítulo
"Características técnicas","Adaptador de red", Página 15).
12 - Español 10601078868, edición 1
Page 77

Primera puesta en servicio del ordenador portátil
► Conecte el cable del adaptador de red (1)
al conector hembra de tensión continua
(DC IN) del ordenador portátil.
► Enchufe el cable de alimentación (2)
al adaptador de red.
1
► Enchufe el cable de alimentación (3)
a una toma de corriente.
3
2
Primera conexión del ordenador portátil
Primeraconexión
Durante este proceso es necesario alimentar el ordenador po rtátil
con el adaptador de red.
Cuando conecte por primera vez el ordenador portátil, el software preinstalado se
instalará y configurará. Como esta operación no de be interrumpirse, debería calcular un
tiempo suficiente y conectar el ordenador portátil a la red mediante el adaptador de red.
¡Durante la instalación, el ordena dor portátil solo debe arrancarse de
nuevo cuando sea requerido explícitamente!
Se le pedirá que haga una copia de seguridad del sistema operativo
preinstalado. Esta copia de seguridad le permitirá restablecer en un momento
posterior el estado original del ordenador portátil.
Recomendamos encarecidamente hacer una copia de seguridad en DVD de los ajust es
de fábrica del equipo inmediatamente después de su adquisición si es posible.
En caso de olvidarse la contrase ña del sistema operativo asignada, sin haber hecho
una copia de seguridad del sistema operativo de antemano, no será posible la creación
del soporte de datos necesario ni la recuperación de los ajustes de fábrica.
Para obtener más información sobre el restablecimiento del sistema
operativo, controladores, manuales y software especial, consulte el manual
de recuperación del software instalado.
Para facilitarle la puesta en servicio del ordenador portátil, el sistema operativo
está preinstalado en el disco duro.
10601078868, edición 1 Español - 13
Page 78

Primera puesta en servicio del ordenador portátil
► Conecte el ordenador portátil (1).
1
► Durante la instalación siga las instrucciones que aparecerán en la pantalla.
Lea el manual del sistema operativo cuando ten ga dudas con respecto
a los datos de entrada solicitados.
Si en su ordenador portátil hay instalado un sistema operativo Windows,
puede encontrar má s información sobre el sistema, así como controladores,
programas de ayuda, actualizaciones, manuales, etc., en el ordenador portátil
o en Internet en "http://ts.fujitsu.com/support".
14 - Español 10601078868, edición 1
Page 79

Características técnicas
Característicastécnicas
Ordenador portátil
Característicastécnicas
Condiciones ambientales
Temperatura de funcionamiento 5 °C – 35 °C
Dimensiones
Anchura x fondo x altura (parte delantera/parte
posterior)
Peso (con una batería de 8 células y 2 discos
duros)
La sustitución del procesador solo puede llevarla a cabo Fujitsu Technology Solutions.
Póngase en contacto con el punto de venta o con nuestro servicio técnico.
La garantía se anula, si Ud. daña el equipo al instalar o substituir
módulos de expansión del sistema.
440 mm x 303 mm x 39/ 51 mm
aprox. 4,0 kg
Características técnicas
La ficha técnica de este ordenador portátil contiene más características
técnicas. Encontrará la ficha técnica en el ordenador portátil o en
Internet en "http://ts.fujitsu.com/support".
Adaptador de red
Característicastécnicas
Adaptador de red para procesador de Notebook Intel® Core™2 Duo:
Datos eléctricos
Principal (según equipo)
Tensión nominal
Frecuencia nominal
Secundario
Tensión nominal 20 V
Corriente nominal máxima (según equipo)
Adaptador de red para procesador de Notebook Intel® Core™2 Quad:
Datos eléctricos
Principal (según equipo)
Tensión nominal
Frecuencia nominal
Secundario
Tensión nominal 20 V
Corriente nominal máxima (según equipo)
90 W
100 V – 240 V (automático)
50Hz–60Hz(automático)
4,5 A
120 W
100 V – 240 V (automático)
50Hz–60Hz(automático)
6,0 A
Si lo desea, puede solicitar un adaptador de red y un cable de alimentación adicionales.
10601078868, edición 1 Español - 15
Page 80

Características técnicas
16 - Español 10601078868, edición 1
Page 81

English
Deutsch
AMILO Notebook Xi 3670
Prima messa in funzione
Français
Español
Italiano
Nederlands
Português
Page 82

Microsoft, MS
, Windows, Windows Vista sono marchi registrati di Microsoft Corporation.
Adobe R eader è u
MultiMediaCard
Sony e Memory St
Tutti gli altri m
dei singoli pro
Copyright © Fuji
Tutti i diritti ri
la tra duzione, la
Eventuali violaz
Tutti i diritti ri
Fornitura e conte
n marchio di Adobe Systems Incorporated.
è un marchio registrato di Infin eon Technologies AG .
ick sono marchi registrati di Sony Electronics, Inc.
archi sono marchi di proprietà o marchi registrati di proprietà
duttori e come tali sono protetti.
tsu Technology Solutions GmbH 2009
servati per tutta l’opera (o parti di essa), in particolare per ciò che riguarda
copia, la riproduzione o procedimenti simili.
ioni di q ueste disposizioni possono dare luogo a richieste di risarcimento danni.
servati, in particolare quelli derivanti da brevetti e modelli.
nuto soggetti a variazioni.
Page 83

Contenuto
Italiano
Contenuto
Grazie alla tecnologiainnovativa ....................................................... 1
High DefinitionAudio .................................................................... 2
Collegamentosistemaaltoparlanti .................................................... 3
Grafica ibrida ........................................................................... 5
Modifica della modalità grafica ....................................................... 5
Secondo disco rigido nelcomplesso RAID ................................................ 6
Richiamare Intel
Ulterioriinformazioni .................................................................... 7
Istruzioni per l’uso "AMILO No tebook" . . . . . ............................................ 7
Collegamentie comandi ............................................................... 8
Istruzioniimportanti ................................................................... 10
Risoluzionedeiproblemi ................................................................. 10
®
Matrix Storage Manager e la funzione di guida . . . ..................... 6
Prima messa in funzione del notebook . . . . . ............................................ 11
Disimballaggio e verifica del notebook . ................................................... 11
Scelta della posizione ................................................................... 12
Collegamento dell’adattatore di rete . . . ................................................... 12
Prima accensionedel notebook .......................................................... 13
Dati tecnici ............................................................................ 14
Notebook . . . . . .......................................................................... 14
Adattatoredi rete ....................................................................... 14
10601078868, edizione 1 Italiano
Page 84

Contenuto
Italiano 10601078868, edizione 1
Page 85

Grazie alla tecnologia innovativa
Grazie alla tecnologia innovativa
... e alla struttura ergonomica, i notebook AMILO Xi 3670 sono dispositivi affidabili e di facile utilizzo.
Se è stato acquistato un notebook con un sistema operativo Microsoft Windows,
quest’ultimo è preinstallato e configurato in modo ottimale. Il notebook è pronto
per il funzionamento alla prima accensione.
Il noteb ook è dotato della tecnologia più recente e garantisce all’utente prestazioni
ottimali e funzionalità all’avanguardia.
• un’unità per leggere e scrivere su CD/DVD e, a seconda del dispositivo, per leggere dischi Blu-ray;
• tre porte USB per una semplice espansione tramite game pad, stampanti e altro;
• un connettore combinato eSATA/USB per consentire il collegamento di un disco
rigido SATA esterno o di una periferica USB aggiuntiva;
• un’interfaccia Wireless USB (WUSB) (opzionale, non modificabile) per la trasmissione rapida
di dati in base allo standard USB senza cavi che potrebbero essere di intralcio;
• LAN e Wireless LAN per l’accesso a Internet o di rete;
• un secondo disco rigido, dipendente dal dispositivo, per consentire il funzionamento
del notebook con due dischi rigidi in un sistema RAID;
• un collegamento FireWire per uno scambio di dati veloce con i dispositivi multimediali;
• un connettore HDMI per la trasmissione completamente digitale di fileaudioevideo;
• una webcam integrata e un microfono digitale per le applicazioni multimediali più svariate;
• un lettore schede multiformato per trasferire rapidamente foto digitali, file
musicali e video sul notebook;
• Surround-Sound (High Definition Audio, Dolby Digital) con il collegamento di
un sistema di altoparlanti a ttivo con subwoofer;
• un controller audio integrato, altoparlanti stereo e un altoparlante subwoofer
per il massimo piacere di ascolto;
• Bluetooth® 2.1 pe r l’azionamento senza cavo di diverse periferiche;
• ingressi e uscite ausiliarie per periferiche audio di alta qualità;
TM
• una barra comandi LightTouch
telecomando per il facile controllo delle funzioni multimediali del notebook;
• un sintonizzatore T V integrato (opzionale, non modificabile) per la ricezione
di programmi televisivi terrestri;
• una tastiera con blocco numerico separato;
• un On-Screen-Display per la visualizzazione d elle impostazioni principali del notebook;
•grafica ibrida per ottenere prestazioni ottimali a consumo ridotto della batteria
nelle applicazioni meno esigenti;
• un’interfaccia a connettore multiplo come entrata per i segnali audio e video di dispositivi
multimediali esterni (opzionale, solo in abbinamento con il sintonizzatore TV). Per
la messa in esercizio è richiesto un software aggiuntivo.
Conla"BIOSSetupUtility"difacileutilizzoèpossibileconfigurare l’hardware del
notebook e proteggere meglio il sistema da accessi non autorizzati, utilizzando le
potenti funzionalità della protezione tramite password.
funzioni multimediali con tasti a sfioramento e un
In queste istruzioni per l’uso viene descritto tra l’altro come mettere in funzione
e utilizzare il note book AMILO.
10601078868, edizione 1 Italiano - 1
Page 86

Grazie alla tecnologia innovativa
High Definition Audio
All’uscita audio d igitale (uscita SPDIF) del dispositivo è possibile collegare un sistema
di altoparlanti attivo con un massimo di otto altoparlanti (7.1).
Sistema altoparlanti supportato da High Definition Audio:
Sistema altoparlanti Prestazioni
2 altoparlanti
4 altoparlanti
5 altoparlanti + 1 subwoof er 5.1 Surround Sound (Dolby Digital)
7 altoparlanti + 1 subwoof er 7.1 Surround Sound (Dolby Digital EX)
Stereo Sound
Quadro Sound
2 - Italiano 10601078868, edizione 1
Page 87

Grazie alla tecnologia innovativa
Collegamento sistema altoparlanti
Per collegare un sistema altoparlanti al dispositivo e configurarlo, attenersi alle istruzioni seguenti:
► Collegare uno dei sistemi di altoparlanti indicati sopra all’uscita SPDIF/Line Out del dispositivo.
Per ulteriori informazioni, fare riferimento al capitolo "Collegamenti e coman di", Pagina 8 e alle
istruzioni per l’uso del "Notebook AMILO" nel capitolo "Collegamento di periferiche esterne".
Il programma Realtek HD A udio Manager viene avviato:
10601078868, edizione 1 Italiano - 3
Page 88

Grazie alla tecnologia innovativa
► Selezionare S/PDIF-Out e confermare con OK.
Il sistema di altoparlanti è ora pronto per l’uso.
Nella configurazione altoparlanti del pro gramma Realtek HD Audio Manager è possibile
eseguire altre configurazione del sistema di altoparlanti:
4 - Italiano 10601078868, edizione 1
Page 89

Grazie alla tecnologia innovativa
Grafica ibrida
Il notebook è provvisto di una soluzione a grafica ibrida. Tramite i tasti di avvio rapido è possibile
passare dalla modalità di risparmio batteria alla modalità prestazioni e viceversa.
Se si utilizzano applicazioni con grafica meno intensa, ad esempio durante
la riproduzione di video, o durante l’utilizzo della email o la navigazione in
Internet, usare l’unità grafica integrata nel chipset. In tal modo si riducono la
produzione di calore, il livello di rumo rosità e il consumo di carburante. La
durata della batteria aumenta (modalità di risparmio batteria).
Se si necessita di prestazioni più elevate, ad esempio per giochi, è po ssibile
passare all’unità grafica esterna (modalità prestazioni).
Modifica della modalità grafica
Sul proprio notebook la modalità grafica esterna (modalità prestazioni) viene preimpostata in fabbrica.
Un dispositivo sul connettore HDMI del notebook (risoluzione piena HD) può essere
azionato dall’unità grafica esterna solo in modalità prestazioni.
Se sono in esecuzione programmi che possono influenzare le prestazioni
della scheda grafica, ad esempio giochi o software per TV, potrebbe non
essere possibile commutare tra una modalità e l’altra. Prima del passaggio
da una modalità all’altra, chiudere tali programmi.
Il passaggio da una modalità grafica all’altra può richiedere oltre dieci secondi.
► Premere il tasto di avvio rapido
L’immagine grafica cambia in modalità di risparmio batteria.
► Premere nuovamente il tasto di avvio rapido
L’immagine grafica cambia in modalità prestazioni.
VGA ibrido
sulla scheda multimediale del notebook:
VGA ibrido
.
10601078868, edizione 1 Italiano - 5
Page 90

Grazie alla tecnologia innovativa
Secondo disco rigido nel complesso RAID
RedundantArrayofIndepe ndentDisksRAID
La possibilità di utilizzo di un secondo disco rigido dipende dalla
fase di espansione del dispositivo.
Lo smontaggio e il monta ggio del secondo disco rigido può essere eseguito solo
da un centro di assistenza autorizzato da Fujitsu Technology Solutions GmbH. In
caso di montaggio o smontaggio non autorizzato, la garanzia decade.
Ulteriori informazioni e gli indirizzi dei nostri centri di assistenza sono disponibili
su Internet all’indirizzo "http://ts.fujitsu.com/support".
RAID (Re dundant Array of Independent Disks, anche: Disk-Array) è una procedura
per la combinazione di due dischi rigidi in un’unità logica.
Per migliorare la velocità di accesso ai dati o, in alternativa, la tolleranza di errore
(protezione dati), si può utilizzare un cosiddetto array di dischi.
La tolleranza di errore s i realizza tramite la ridondanza dei dati, facendo in modo che in
caso di guasto di un’unità, l’altra unità riceva una copia ‘specchiata’ dei dati. Si evitano
in questo modo un guasto del sistema operativo o la perdita dei dati.
Il sistema operativo riconosce tutti i dischi rigidi di un disk array c ome un un unico disco rigido
fisico. In un disk array i singoli dischi rigidi vengono definiti come "member" (membri) . I dati
per la configurazione di un membro vengono registrati in un settore riservato del disco rigido.
Grazie a questi dati è possibile identificare il disco rigido come un membro.
Generalmente i dischi rigidi si possono combinare r eciprocamente con diverse procedure.
Queste procedure vengono definite come diversi RAID level. I diversi RAID level identificano
diversi livelli di performance e di sicurezza, nonché diversi costi di implementazione.
Se è stato acquistato un dispositivo con due dischi rigidi, il sistema RAID
non è configurato nello stato di fornitura.
A seconda delle dimensioni del disco rigido, la combinazione di due dischi
rigidi in un complesso RAID può durare diverse ore. Durante questo
lasso di tempo, lo schermo diventa nero.
Ulteriori informazioni sulla configurazione del sistema RAId sono riportate nella
funzione di guida del programma Intel® Matrix Storage Manager.
Richiamare Intel®Matrix Storage Manager e la funzione di guida
Per richiamare il programma Intel®Matrix Storage Manager e la funzione di
guida, procedere come indicato di seguito:
► Selezionare Menu di avvio - Tutti i programmi - Intel
► Fare clic su Guida sulla barra dei menu superiore.
► Selezionare Sommario e Indice.
®
- Intel
Il programma viene avviato.
Viene richiamata la Guida del prog ramma Intel®Matrix Storage Manager.
Matrix Storage Manager Console.
®
Matrix Storage Manager
6 - Italiano 10601078868, edizione 1
Page 91

Grazie alla tecnologia innovativa
Ulteriori informazioni
Per informazioni generali sul notebook AMILO vedere le istruzioni
per l’uso "AMILO Notebook".
Se si riscontrano anomalie di funzionamento del notebook, consultare le informazioni
sulla risoluzione dei problemi nel capitolo "Risoluzione dei problemi", Pagina 10.
I driver Windows per il notebook AMILO si trovano sul nostro sito Web. Questi dispositivi
non supportano di fabbrica tutte le versioni di sistema operativo Windows. Fujitsu
Technology Solutions non si assume alcuna responsabilità in caso di utilizzo di altre
versioni di sistema operativo Wi ndows o di sistemi operativi di altri produttori.
I componenti software di queste istruzioni si riferiscono a prodotti Microsoft
forniti in dotazione con il notebook AMILO.
In caso di installazione di prodotti software diversi, attenersi alle
istruzioni per l’uso fornite dal produttore.
Istruzioni per l’uso "AMILO Notebook"
Le istruzioni per l’uso del "notebook AMILO" sono disponibili dal menu Start di Windows
oppure in Internet sul sito "http://ts.fujitsu.com/support" .
10601078868, edizione 1 Italiano - 7
Page 92

Collegamenti e comandi
Collegamenti e comandi
In questo capitolo vengono descritti i singoli componenti hardware del notebo ok. Viene fornita
una pan oramica delle spie e de i collegamenti del notebook. Prima di iniziare a lavorare con il
notebook, è consigliabile acquisire f amiliarità con i singoli elementi che lo compongono.
WebcamSchedamultimedialeTouchpad
BlocconumericoseparatoTastieraSpiedistatoTastideltouchpadLettores chedemultiformatoInterfacciaainfrarossipe riltelecomandoUscitaLine-InUscita microfonoUs citacuffieUscitaLine-OutConnettoreSPDIFSlotperExpressCardTelecomandomultimedialeCollegamentoFireWirePortacombinataeSATA/USBAltoparlanteInterruttoreON/OFFPorteUSBConnettor e cavoantennaConnettoreHDMIConnettoreschermoVGAConnettoredire tePresadicorrentecontinua(DCIN)AlloggiamentodiserviziomemoriaAlloggiament odiserviziodiscorigidoBatteriaPresa connettoremultiploSubwooferConnettorecavoantenna
1
2
1
29
3
21
4
4
20
6
19
17
18
16
5
1
14
13
12
11
10
8
9
1 = Microfono
2 = Webcam
3 = Scheda multimediale
4 = Altoparlante
5 = Tastiera con blocco numerico separato
e tasti applicazione
6 = Touchpad
7 = Spie di stato
8 = Tasti del tou chpa d
9 = Interfaccia a infrarossi per il telecomando
10 = Lettore schede multiformato
11 = Uscita Line-In
12 = Uscita microfono
13 = Uscita cuffie/Line Out
14 = Uscita SPDIF/Line Out
22
23
5
25
24
31
7
30
32
35
15 = Slot per ExpressCard con telecomando
multimediale
16 = Porta LAN
17 = Porta combinata eSATA/USB
18 = Fessu re di ventilazione
19 = Presa di corrente continua (DC IN)
20 = Dispositivo Kensington Lock
21 = Interr u ttore ON/OFF
22 = Unità CD/DVD
23 = Porte USB
24 = Collegamento cavo antenna (opzionale)
25 = Presa connettore multiplo (opzionale)
26 = Connetto re schermo VGA
27 = Connetto re HDMI
28 = Collegamento FireWire
26
33
27
28
34
8 - Italiano 10601078868, edizione 1
Page 93

Collegamenti e comandi
29 = Porta USB
30 = Alloggiamento di servizio memoria
31 = Alloggiamento di servizio disco rigido 2
32 = Alloggiamento di servizio disco rigido 1
33 = Subwoofer
34 = Sintonizzatore TV di servizio
35 = Batteria
10601078868, edizione 1 Italiano - 9
Page 94

Istruzioni importanti
Istruzioni importanti
Attenersi alle norme di sicurezza nel manuale "Sicurezza" e alle istruzioni
per l’uso del "AMILO Notebook".
La sostituzione del processore può essere eseguita solo da un centro di assistenza
autorizzato Fujitsu Technology Solutions GmbH. In caso di montaggio o smontaggio non
autorizzato, la garanzia decade. Ulteriori informazioni e gli indirizzi dei nostri centri di
assistenza sono disponibili su Internet all’indirizzo"http://ts.fujitsu.com/support".
In caso di utilizzo di una scheda sintonizzatore TV, assicurarsi che sia conforme
alla norma IEC 60950-1: 2005, paragrafo 7.2.
Collegare un sintonizzatore TV esterno solo ad un circuito TNV-1.
Quando si collega un cavo coassiale al sintonizzatore TV esterno, assicurarsi che sia
collegato correttamente all’impianto di messa a t erra dell’edificio.
Risoluzione dei problemi
Qualora si presenti un problema del computer che non si è in grado di risolvere da soli, in molti casi
è possibile rettificarlo velocemente con il programma SystemDiagnostics preinstallato sul computer.
► Per avviare il programma SystemDiagnostics,fareclicsuIcona Start - Programmi
- Fujitsu Siemens Computers - SystemDiagnostics.
o
► Per avviare il programma SystemDiagnostics, fare clic su Icona Start - Programmi
- Fujitsu Siemens Computers - SystemDiagnostics.
► Se viene rilevato un problema durante il corso della prova, il programma SystemD iagnostics
emette un codice (ad esempio Codice DIFS YXXX123456789123).
► Prendere nota del numero del codice DIFS emesso e del numero di identificazione del dispositivo.
Il numero di identificazione è riportato sulla targhetta d’identificazione applicata al retro de l telaio.
► Per ulteriori chiarificazioni sull’inconveniente, contattare l’Help Desk competente
del proprio paese (consultare l’elenco dei recapiti Help Desk o la pagina
Web "http://ts.fujitsu.com/support"). Occorre avere a disposizione il numero di
identificazione/numero di serie del sistema e il codice DIFS.
10 - Italiano 10601078868, edizione 1
Page 95

Prima messa in fun zione del notebook
Prima messa in funzione del notebook
PrimamessainfunzioneNo tebookMessainfunzioneNotebook
Se sul notebook è installato un sistema operativo Windows, gli elementi di
hardware e softw are necessari sono già installati.
La prima messa in funzione del sistema operativo Microsoft Windows può richiedere
fino a 20 minuti, a seconda della versione di hardware e softw are.
La prim a volta che il notebook viene attivato, viene e ffettuata una prova
del sistema. Possono essere visualizzati diversi messaggi. Il display
potrebbe oscurarsi o sfarfallare per alcuni istanti.
Seguite le istruzioni riportate sul monitor.
Durante la procedura di prima messa in funzione non spegnere il
notebook per alcun motivo.
Prima di utilizzare per la prima volta il notebook, è necessario caricare la batteria.
Alla consegna la batteria è inse rita nel relativo alloggiamento oppure è acclusa. Se si intende
utilizzare il notebook nel modo batteria, la batteria deve essere carica.
Se il notebook viene utilizzato come computer portatile, l’alimentazione viene fornita dalla batteria
integrata. Tramite l’uso delle funzioni di risparmio energetico è possibile prolungare i tempi di lavoro.
Se si utilizza il notebook a casa o in ufficio, è consigliabile utilizzare l’adattatore di rete e non la batteria.
Per il collegamento di periferiche esterne (ad esempio mouse, stampante) al notebook,
attenersi alle istruzioni per l’uso "AMILO Notebook".
Disimballaggio e verifica del notebook
Se vengono rilevati danni da trasporto, informare immediatamente il rivenditore.
► Rimuovere tutti i componenti dall’imballaggio.
ImballaggioTrasp orto
► Verificare che il notebook non abbia subito danni visibili durante il trasporto.
Si consiglia di non buttare via l’imballaggio originale del dispositivo.
Conservare l’imballaggio originale per un’eventuale spedizione.
10601078868, edizione 1 Italiano - 11
Page 96

Prima messa in funzione del notebook
Scelta della posizione
SceltadellaposizioneNotebookAdattatoredir ete
Il notebook va posizionato in un luogo adeguato. Attenersi alle istruzioni seguenti:
• Non posizionare mai il notebook e l’adattatore di rete su una superficie sensibile
al calore. In caso contrario, la superficie potrebbe subire dei danni.
• Non collocare mai il notebook su una superficie morbida (ad esempio
tappeti, divani oppure letti). In caso contrario, sussiste il rischio di bloccare
la ventilazione con possibili danni da surriscaldamento.
• Non tene re poggiato il notebook direttamente sulle gambe per un periodo prolungato.
Durante i l funzionamento normale la parte inferiore del notebook si riscalda. Un
contatto prolungato con la pelle può essere spiacevole o addirittura provocare ustioni.
• Posizionare il notebook su un a superficie stabile, piana e non
sdrucciolevole. Assicurarsi che i piedini di gomma del notebook non
lascino tracce sulle superfici sensibili.
• Lo spazio libero intorno al notebook e all’adattatore deve essere almeno di
10 cm in modo che sia garantita un a ventilazione sufficiente.
• Non coprire mai le fessure di ventilazione del notebook.
• Il notebook non deve essere esposto ad agent i atmosferici estremi. È necessario
proteggere il notebook dalla po lvere , dall’umidità e dal calore.
Collegamento d ell’adattatore di rete
Predisposizioneperl’usoA dattatored irete
Attenersi alle norme di sicurezza riportate nel manuale "Sicurezza" fornito.
Il cavo di alimentazione fornito con il notebook è c onforme alla normativa in
vigore nel paese in cui il notebook è stato acquistato. Assicurarsi che il cavo di
alimentazione sia omologato anche per il paese in cui viene utilizzato.
Il cavo di alimentazione dell’adattatore di rete deve essere collegato a una
presa solo se il notebook è collegato all’adattatore di rete.
Verificare che la potenza assorbita dall’adattatore di rete non sia superiore
a quella della rete alla quale esso è collegato (vedere il capitolo "Dati
tecnici", "Adattatore di rete", Pagina 14).
► Collegare il cavo de ll’adattatore di rete
(1) alla presa d i corrente continua
(DC IN) del notebook.
► Collegare il cavo di alimentazione (2)
1
3
all’adattatore di rete.
► Collegare il cavo di alimentazione (3)
alla presa di corrente.
2
12 - Italiano 10601078868, edizione 1
Page 97

Prima messa in fun zione del notebook
Prima accensione del notebook
Primaaccensione
Per questa procedura il no tebook deve essere alimentato tramite l’adattatore.
Alla prima accensione del notebook, il software fornito viene installato e
configurato. Questo proce sso non de ve essere interrotto , pertanto, è necessario
prevedere un certo intervallo di tempo per questa operazione e collegare il
notebook alla tensione di rete tramite l’adattatore di rete.
Durante l’installazione il notebook può essere riavviato solo su richiesta.
Viene richiesta la creazione di una copia di backup del sistema operativo
precedentemente installato. La copia di backup permette di ripristinare successivamente
le impostazioni predefinite in fabbrica del notebook.
Si consiglia vivamente di salvare lo stato del dispositivo al momento della consegna
su D VD immediatamente dopo l’acquisto se possibile.
Se si dimentica la password del sistema operativo assegnata, senza a vere salvato
precedentemente il sistema operativo, non sarà più possibile creare i supporti di
dati richiesti né ripristinare lo stato al momento della consegna.
Per ulteriori informazioni sul ripristino del sistema operativo, dei driver, dei manuali e del
software speciale, fare riferimento al manuale relativo al ripristino dei software installati.
Per facilitarVi la m essa in funzione del Vostro notebook, il sistema operativo
è già preinstallato sul disco fisso.
► Accendere il notebook (1).
1
► Durante l’installazione attenersi alle istruzioni su schermo.
In caso di dubbio sui dati richiesti, fare riferimento al manuale del sistema operativo.
Se è installato un sistema operativo Windows, ulteriori informazioni relative al
sistema, i driver, le utilità, gli aggiornamenti, i manuali ecc. sono disponibili nel
notebook stesso o in Internet all’indirizzo "http://ts.fujitsu.com/support").
10601078868, edizione 1 Italiano - 13
Page 98

Dati tecnici
Dati tecnici
Datitecnici
Notebook
Datitecnici
Condizioni ambientali
Temperatura di esercizio
Dimensioni
Larghezza x profondità x altezza (lato
anteriore/lato posteriore)
Peso(inclusilabatteriaa8fotocellulee2dischi
rigidi)
La sostituzione del processore può essere eseguita solo da Fujitsu Technology
Solutions. Rivolgersi al rive nditore o al nostro servizio tecnico.
In caso di guasto provocato durante l’installazione o la sostituzione di
espansioni di sistema, la garanzia non sarà più valida.
5°C – 35°C
440 mm x 303 mm x 39/51 mm
circa 4,0 kg
La scheda tecnica di questo notebook offre ulteriori dati tecnici. La scheda tecnica
è disponibile sul notebook o all’indirizzo Web "http://ts.fujitsu.com/support".
Adattatore di rete
Datitecnici
Adattatore di rete per processore Intel® Core™2 Duo per notebook:
Dati elettrici
Primario (variabile in funzione del dispositivo
utilizzato)
Tensione nominale
Frequenza nominale
Secondario
Tensione nominale 20 V
Corrente nominale massima (variabile in
funzione del dispositivo utilizzato)
90 W
100 V – 240 V (commutazione automatica)
50 Hz – 60 Hz (commut azione automatica)
4,5 A
14 - Italiano 10601078868, edizione 1
Page 99

Dati tecnici
Adattatore di rete per processore Intel® Core™2 Quad per notebook:
Dati elettrici
Primario (variabile in funzione del dispositivo
120 W
utilizzato)
Tensione nominale
Frequenza nominale
100 V – 240 V (commutazione automatica)
50 Hz – 60 Hz ( commutazione automatica)
Secondario
Tensione nominale 20 V
Corrente no minale massima (variabile in
6,0 A
funzione del dispositivo utilizzato)
È sempre possibile ordinare un ulteriore adattatore di rete e un ulteriore cavo di alimentazione.
10601078868, edizione 1 Italiano - 15
Page 100

Dati tecnici
16 - Italiano 10601078868, edizione 1
 Loading...