

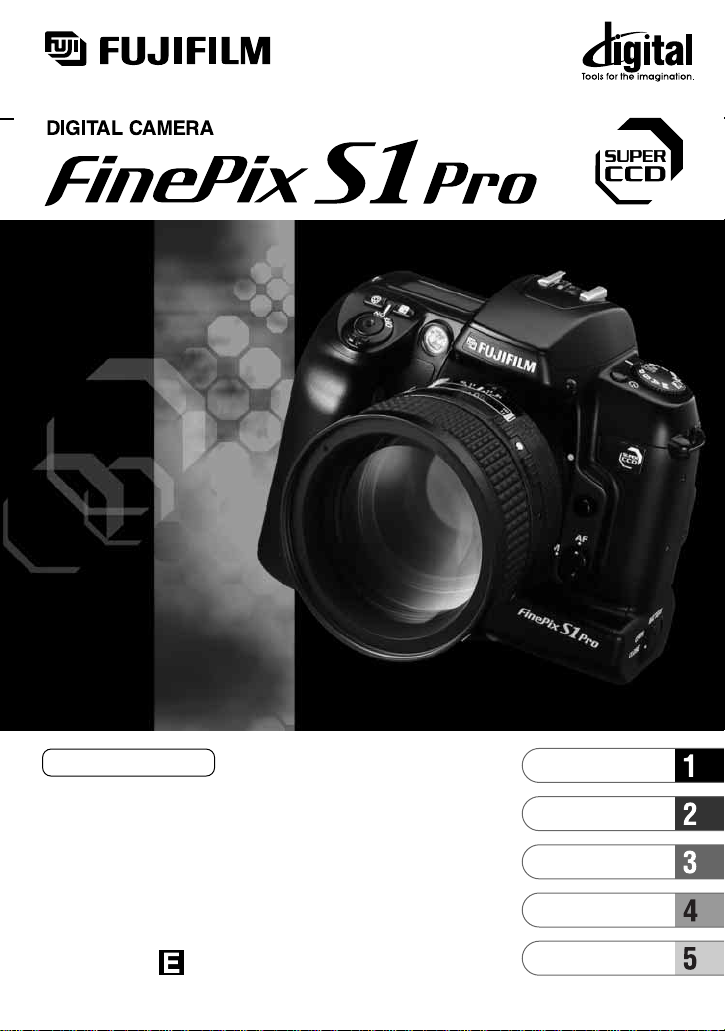
OWNER’S MANUAL
This manual will show you how to use your FUJIFILM DIGITAL CAMERA
FinePix S1 Pro correctly.
Please follow the instructions carefully.
Basic Photography
Setup
Advanced Photography
Advanced Photography
(Playback)
BB11378-200(1
)
Preference
Warning
CAUTION: TO REDUCE THE RISK OF ELECTRIC SHOCK.
DO NOT REMOVE COVER (OR BACK).
NO USER-SERVICEABLE PARTS INSIDE.
REFER SERVICING TO QUALIFIED SERVICE PERSONNEL.
The graphical symbols are located on the bottom
of the case.
To prevent fire or shock hazard, do not expose the unit to rain or
moisture.
This symbol is intended to alert the user to the presence of uninsulated
“dangerous voltage” within the product’s enclosure that may be of sufficient
magnitude to constitute a risk of electric shock to persons.
This symbol is intended to alert the user to the presence of important operating
and maintenance (servicing) instructions in the literature accompanying the
appliance.
For customers in the U.S.A.
FCC Statement
This device complies with part 15 of the FCC Rules. Operation is subject to the following
two conditions:(1) This device may not cause harmful interference, and (2) this device
must accept any interference received, including interference that may cause undesired
operation.
CAUTION
This equipment has been tested and found to comply with the limits for a Class B digital
device, pursuant to Part 15 of the FCC Rules. These limits are designed to provide
reasonable protection against harmful interference in a residential installation. This
equipment generates, uses, and can radiate radio frequency energy and, if not installed and
used in accordance with the instructions, may cause harmful interference to radio
communications. However, there is no guarantee that interference will not occur in a
particular installation. If this equipment does cause harmful interference to radio or television
reception, which can be determined by turning the equipment off and on, the user is
encouraged to try to correct the interference by one or more of the following measures:
—
Reorient or relocate the receiving antenna.
—
Increase the separation between the equipment and receiver.
—
Connect the equipment into an outlet on a circuit different from that to which the
receiver is connected.
—
Consult the dealer or an experienced radio/TV technician for help.
You are cautioned that any changes or modifications not expressly approved in this
manual could void your warranty.
2

For customers in Canada
CAUTION
This Class B digital apparatus complies with Canadian ICES-003.
EC Declaration of Conformity
We
:
Name
:
Address
declare that the product
Product Name : FUJIFILM DIGITAL CAMERA FinePix S1 Pro
Manufacture’s Name : Fuji Photo Film Co., Ltd.
Manufacture’s Address : 26-30, Nishiazabu 2-chome, Minato-ku,
is in conformity with the following Standards
following the provision of the EMC Directive (89/336/EEC, 92/31/EEC and 93/68/EEC)and
Low Voltage Directive (73/23/EEC).
Dusseldorf,Germany June 1,2000
Safety :EN60065
EMC :EN55022 :1998 Class B
Place Date Signature/Managing Director
Fuji Photo Film (Europe)G.m.b.H.
Heesenstrasse 31
40549 Dusseldorf, Germany
Tokyo 106-8620, Japan
EN55024 :1998
EN61000-3-2 :1995 + A1:1998 + A2:1998
Bij dit produkt zijn batterijen geleverd. Wanneer deze leeg zijn, moet u ze niet
weggooien maar inleveren als KCA
Please read the Safety Notes
(
☞P.129
)
and make sure you
understand them before using the camera.
3

Contents
Warning.............................................................................................................. 2
Contents............................................................................................................. 4
Preface ............................................................................................................... 8
Camera Features and Accessories.................................................................. 9
Features ..................................................................................................................9
Accessories ............................................................................................................9
Nomenclature .................................................................................................. 10
Rear Display Panel Screens................................................................................. 13
Top Display Panel ................................................................................................ 14
Viewfinder Display................................................................................................ 15
1 Basic Photography
1 Attaching the Shoulder Strap...................................................................... 16
Using the Shoulder Strap ..................................................................................... 16
2 Loading the Camera Batteries .................................................................... 17
Loading the Lithium Batteries............................................................................... 17
Loading the Button Cell ........................................................................................17
Loading the AA Batteries...................................................................................... 18
Using the AC Power Adapter AC-5VH (optional) ................................................. 19
3 Mounting the Camera Lens.........................................................................20
4 Switching the Camera On and Off..............................................................22
5 Setting the Date and Time........................................................................... 23
6 Loading Media.............................................................................................. 24
7 Removing Media........................................................................................... 25
8 Exposure Modes on the FinePix S1 Pro..................................................... 26
9 Setting the Exposure Mode Dial ................................................................. 27
10 Holding the Camera and Focusing........................................................... 28
11 Releasing the Shutter ................................................................................ 30
12 Playing Back Photographed Images........................................................ 31
To View Images (Playback).................................................................................. 31
Playback Zoom..................................................................................................... 32
Multi-frame Playback............................................................................................ 33
Erasing Single Recorded Images......................................................................... 35
Viewing Images on a TV....................................................................................... 36
Background: A Brief Guide Focusing and Exposure .................................. 37
2 Setup
Setup Functions.............................................................................................. 38
Rear Display Panel
Setting the White Balance..............................................................................40
Setting the Sensitivity..................................................................................... 42
.............................................................................................. 40
4

Setting the Image Quality............................................................................... 43
Setting the Image Size (Number of Pixels) ................................................... 44
Setting the Color ............................................................................................. 45
Setting the Tone.............................................................................................. 46
Setting the Sharpness .................................................................................... 47
Setting Multi-exposure.................................................................................... 48
SET-UP Menu Part 1
Preview............................................................................................................. 49
Specifying a Custom WB Setting....................................................................50
Hi MODE/MEDIA .............................................................................................. 51
Hi MODE .............................................................................................................. 51
MEDIA ..................................................................................................................51
SELF TIMER/AUTO POWER OFF................................................................... 52
SELF TIMER ........................................................................................................ 52
AUTO POWER OFF............................................................................................. 52
SET-UP Menu Part 2
FRAME No. ...................................................................................................... 53
PC MODE/BEEP............................................................................................... 54
PC MODE............................................................................................................. 54
BEEP.................................................................................................................... 54
LANGUAGE/RESET......................................................................................... 55
LANGUAGE.......................................................................................................... 55
RESET.................................................................................................................. 55
Camera Reset .................................................................................................. 56
Camera Reset ...................................................................................................... 56
............................................................................................ 49
............................................................................................ 53
3 Advanced Photography
Focusing Modes.............................................................................................. 57
When the Focusing Mode is Set to AF (auto focus)............................................. 57
Auxiliary AF Light.................................................................................................. 57
When M (manual focus) is Selected..................................................................... 58
Focus Lock Photography............................................................................... 59
Shooting Using Exposure Modes...................................................................60
z : AUTO .......................................................................................................... 60
P : Programmed Auto........................................................................................61
S : Shutter-priority Auto .................................................................................... 62
A : Aperture-priority Auto.................................................................................. 63
M : Manual......................................................................................................... 64
Shooting Using 5-Vari Programs................................................................... 66
5-Vari Programs ................................................................................................... 66
Taking Pictures Using 5-Vari Programs ............................................................... 66
5-Vari Program Types and Features ....................................................................67
1
2
3
4
5
5

Contents - continued
x : Portrait mode ...............................................................................................67
c : Landscape mode......................................................................................... 67
v : Close-up mode............................................................................................ 67
b : Sport mode (continuous shooting) .............................................................. 68
n : Night scene mode ....................................................................................... 68
Metering Modes............................................................................................... 69
Multi-pattern Metering and 3D 6-zone Multi-pattern Metering.............................. 69
Center-weighted Metering ....................................................................................69
AE Lock Photography..................................................................................... 70
Exposure Compensation................................................................................ 71
Self-timer Photography................................................................................... 72
Diopter Adjustment Function/Eyepiece Cap ................................................ 73
Flash Photography.......................................................................................... 74
Built-in Flash and TTL-BL Flash Control .............................................................. 74
Flash Control Range (Effective Flash range) ....................................................... 74
Synchro Mode Types and Features ..................................................................... 75
K : Red-eye reduction mode............................................................................. 75
L : Slow synchro mode..................................................................................... 75
Taking Pictures Using the Built-in Flash............................................................... 76
Flash Intensity ...................................................................................................... 77
Lenses that Can Be Used with the Built-in Flash ................................................. 77
Nikon Flash Units that Can Be Used.................................................................... 78
Notes on Using Nikon Flash Units........................................................................ 79
Combining Modes........................................................................................... 80
Shooting and Recording Previews................................................................ 81
Standard Chart Display................................................................................... 82
Histogram Display........................................................................................... 83
Multi-exposure................................................................................................. 84
4 Advanced Photography (Playback)
Playback Functions......................................................................................... 85
Erase/Format ................................................................................................... 86
Erase All/Format................................................................................................... 86
Protection Settings ......................................................................................... 88
Protecting and Unprotecting Individual Image...................................................... 88
Protecting and Unprotecting All Images ...............................................................89
DPOF Settings................................................................................................. 91
DPOF.................................................................................................................... 91
Setting or Cancelling Date/Time Imprinting.......................................................... 92
Specifying DPOF Settings for Single Frame ........................................................ 93
Checking and Cancelling DPOF Settings for Single Frame
(REVIEW/CANCEL) .......................................................................................... 95
Setting DPOF Settings for All the Images (SET ALL)........................................... 97
Cancelling DPOF Settings for All Frames (CANCEL ALL)................................... 99
6

Auto Play (Automatic Playback).................................................................. 101
Auto Play Settings ..............................................................................................101
Adjusting the Color LCD Monitor Brightness............................................. 103
5 Reference
System Expansion Options.......................................................................... 105
Lenses that Can Be Used with this Camera ............................................... 106
Types of Nikkor Lenses with a Built-in CPU and Other Lenses that Can Be Used
Optional Accessories Guide ........................................................................ 108
Explanation of Terms.................................................................................... 110
Using the USB Cable and the Software Included....................................... 111
Notes on Using the FinePix S1 Pro ............................................................. 113
Cleaning the CCD.......................................................................................... 114
Determining Whether Cleaning is Required .......................................................115
Cleaning the CCD............................................................................................... 116
Power Supply Notes...................................................................................... 117
Batteries that Can Be Used.................................................................................117
Notes on Handling the Batteries......................................................................... 117
Notes on Using the AC Power Adapter (AC-5VH) (sold separately).................. 118
Notes on Media.............................................................................................. 119
Warning Displays.......................................................................................... 121
Troubleshooting............................................................................................ 124
Specifications................................................................................................ 126
Standard Number of Available Shots (Recorded Images)...................................128
Compatible Media............................................................................................... 128
Batteries Uses and Symptoms When Batteries are Depleted............................ 128
Safety Notes................................................................................................... 129
.. 107
1
2
3
4
5
7

Preface
■ Preparatory Trial Shots
When you are taking particularly important photographs (at a wedding or on holiday, for
example), always take a trial photograph first to check that the camera is functioning normally.
* Fuji Photo Film Co., Ltd. accepts no liability for any incidental losses (including any costs
incurred in the course of the photography and any loss of income obtained from the
photography) incurred as a result of any fault in this product.
■ Notes on Copyright
Images recorded using your digital camera cannot be used in ways that infringe copyright laws
without the consent of the owner, unless intended only for personal pleasure. Note also that
some restrictions apply to the photographing of stage performances, entertainments and
exhibits, even when intended purely for personal use. Users are also asked to note that the
transfer of memory cards (SmartMedia or microdrives) containing images or data protected
under copyright laws is only permissible within the restrictions imposed by those copyright
laws.
■ Liquid Crystal
If the LCD panel is damaged, take particular care with the liquid crystal contained in the panel.
If any of the following situations arise, take the urgent action indicated.
● If liquid crystal comes in contact with your skin
Wipe the area with a cloth and then wash thoroughly with running water and soap.
● If liquid crystal gets into your eye
Flush the affected eye with clean water for at least 15 minutes and then seek medical
assistance.
● If liquid crystal is swallowed
Flush your mouth thoroughly with water. Drink large quantities of water and induce vomiting.
Then seek medical assistance.
■ Notes on Electrical Interference
If the camera is needed be used in hospitals or aircrafts, please note that this camera may
cause interference to other equipment in the hospital or aircraft.
For details, please check with the applicable regulations in that place.
■ Handling Your Digital Camera
This camera contains precision electronic components. To ensure that images are recorded
correctly, do not subject the camera to impacts or shocks while image data is being recorded.
■ Trademark Information
● iMac and Macintosh are registered trademarks of Apple Computer, Inc.
● Windows is a trademark of the Microsoft Corporation of the U.S. registered in the USA and
other countries.
Windows is an abbreviated term referring to the Microsoft Windows Operating System.
● SmartMedia is a trademark of Toshiba Corporation.
● All other company or product names used in this document are trademarks or registered
trademarks of their respective holders.
■ Explanation of Color Television System
NTSC: National Television System Committee, color television telecasting specifications
PAL: Phase Alternation by Line, a color television system adopted mainly by European
adopted mainly in the U.S.A., Canada and Japan.
countries and China.
8
Camera Features and Accessories
Features
• The newly developed large-size 3.4 million “Super CCD” built into the FinePix S1 Pro provides ultrahigh resolution of 6.13 million output, high sensitivity, a wide dynamic range and an excellent signalto-noise ratio.
• Quick, responsive operation with only 0.7 seconds between shots (6.13-million output pixels)
• 5-vari programs and an AUTO photography mode that make it easy to select the right camera
settings for your subject
• Exposure programs and manual photography modes let you fine tune your photography settings
• Built-in flash and support for external flash units
• Dot-matrix LCD panel (backlit) lets you to check your camera settings as you shoot
• Equipped with 2 different recording media slots (slot 1: SmartMedia, slot 2: CF type II)
• Select any of 3 image recording resolutions as needed (6.13 million, 3.54 million or 1.38 million
recorded pixels)
• Histogram display function lets you check the image exposure right after you shoot
• Allows you to set the ISO sensitivity, tint, tone and sharpness individually just as if you were selecting
the film
• 2-inch 200,000-pixel low-temperature polysilicon TFT LCD monitor
• Color and grayscale screen display function for checking colors and highlights/shadows
• USB connection lets you take pictures from your PC and transfer image data quickly and easily
(supplied accessory)
• Supports DPOF (Digital Print Order Format) for simple print ordering
• Conforms to the Design rule for Camera File system.
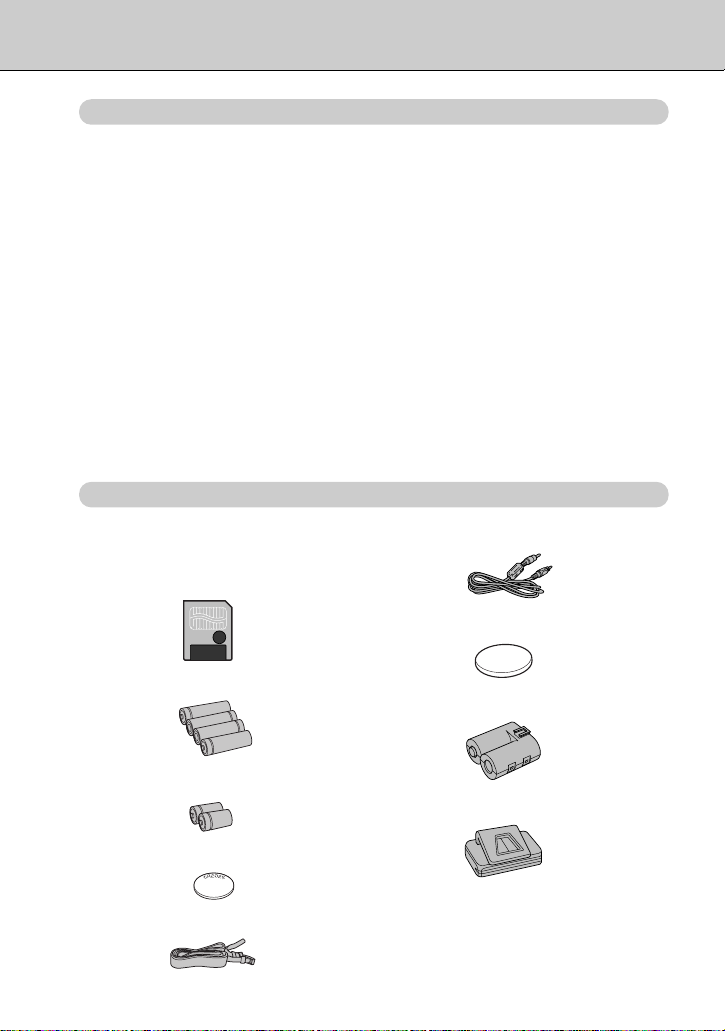
Accessories
● SmartMedia (1)
(16MB, 3.3V)
Supplied with:
• Anti-static case (1)
• Index labels (1 set)
● Video Cable (approx. 1.5 m (4.9ft.), mini-
plug (3.5 mm-dia.) to pin-plug cable) (1)
● Camera Body Cap (1)
● AA-size Alkaline Batteries (4)
● Lithium batteries CR123A (2)
● Button Cell Lithium Battery CR2025 (1)
● Shoulder Strap (1)
● Battery Adapter (1)
● Eyepiece Cap (1)
● CD-ROM (1)
● USB Cable (1)
●
Manuals
• Owner’s Manual (this document) (1)
• Quick Start Guide (1)
•
Quick Start Guide for Camera Shooting Software (1)
9
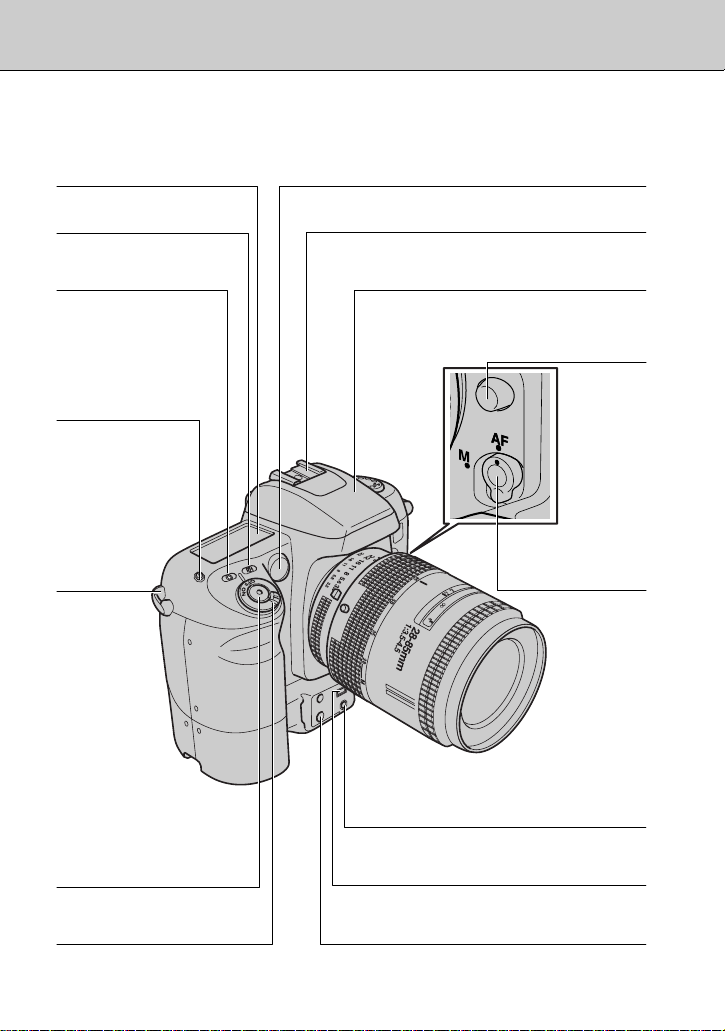
Nomenclature
VIDEO OUT socket (☞ P.36)
Focus mode
selecter switch
(☞ P.27, 57)
Power switch (☞ P.22)
Strap mount
(☞ P.16)
Aperture button (☞ P.64)
Exposure compensation
button (☞ P.71)
Top display panel (☞ P.14)
Synchro mode
button (☞ P.76)
Shutter button (☞ P.30)
Built-in flash (☞ P.74)
Auxiliary AF light (☞ P.57)
Self-timer lamp (☞ P.72)
Red-eye reduction lamp (☞ P.75)
Accessory shoe (☞ P.78)
Digital (USB) socket (☞ P.111)
DC IN 5V socket (☞ P.19)
Lens detaching
button (☞ P.21)
10
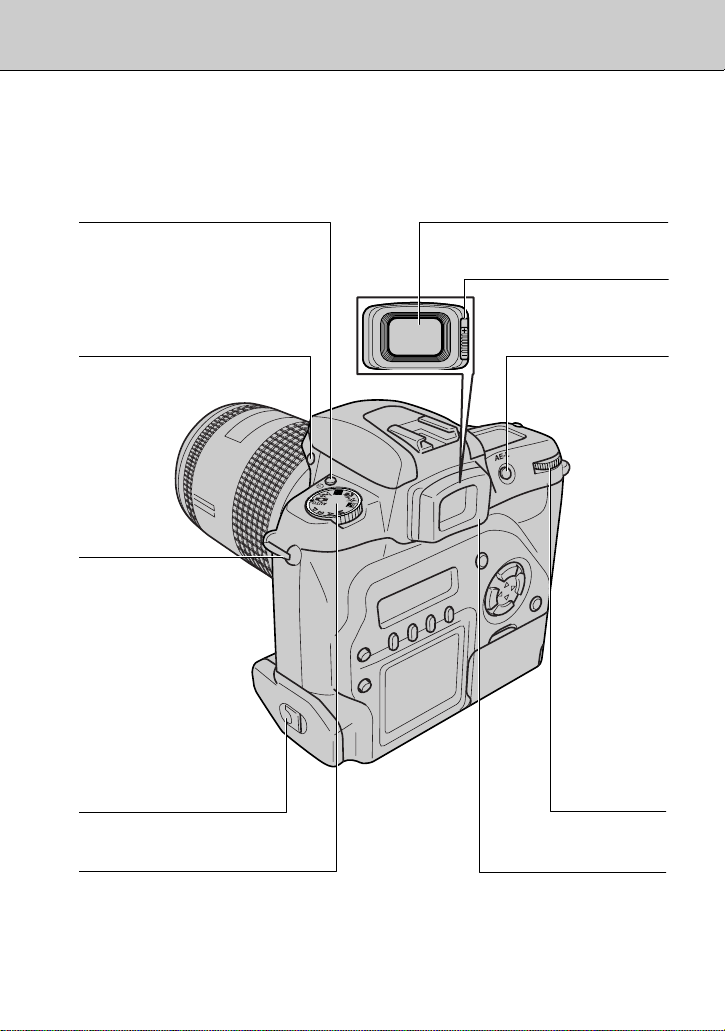
Self-timer button (☞ P.72)
Flash lock release button
(☞ P.76)
Strap mount
(☞ P.16)
Viewfinder window (☞ P.73)
Diopter adjustment
knob (☞ P.73)
AE lock button (☞ P.70)
AA battery compartment
cover release catch (☞ P.18)
Exposure mode dial (☞ P.60)
Command dial
(☞ P.61)
Eyepiece surround
(☞ P.73)
11
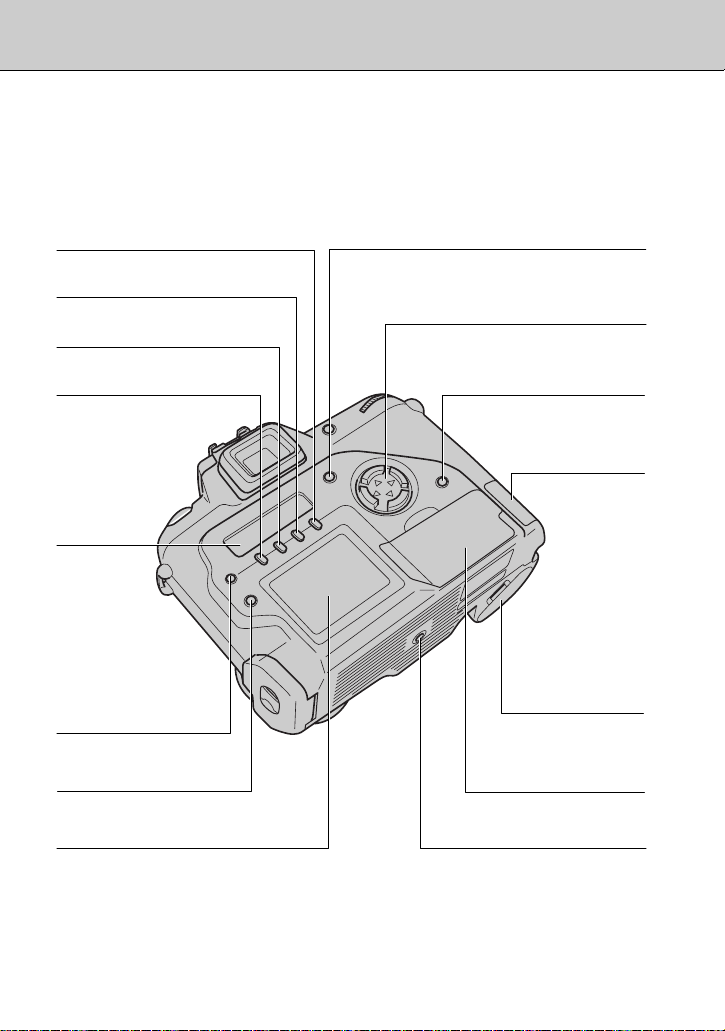
Nomenclature - continued
Lithium battery
compartment cover
(☞ P.17)
Button cell holder
(☞ P.17)
Slot cover (☞ P.24)
Tripod mount
MENU/EXE button (☞ P.33)
CANCEL button
4-driection button
PLAY button (☞ P.31)
FUNC button (☞ P.40)
Function button [1]
Function button [2]
Function button [3]
Function button [4]
Color LCD monitor
Rear display
panel (☞ P.13)
12
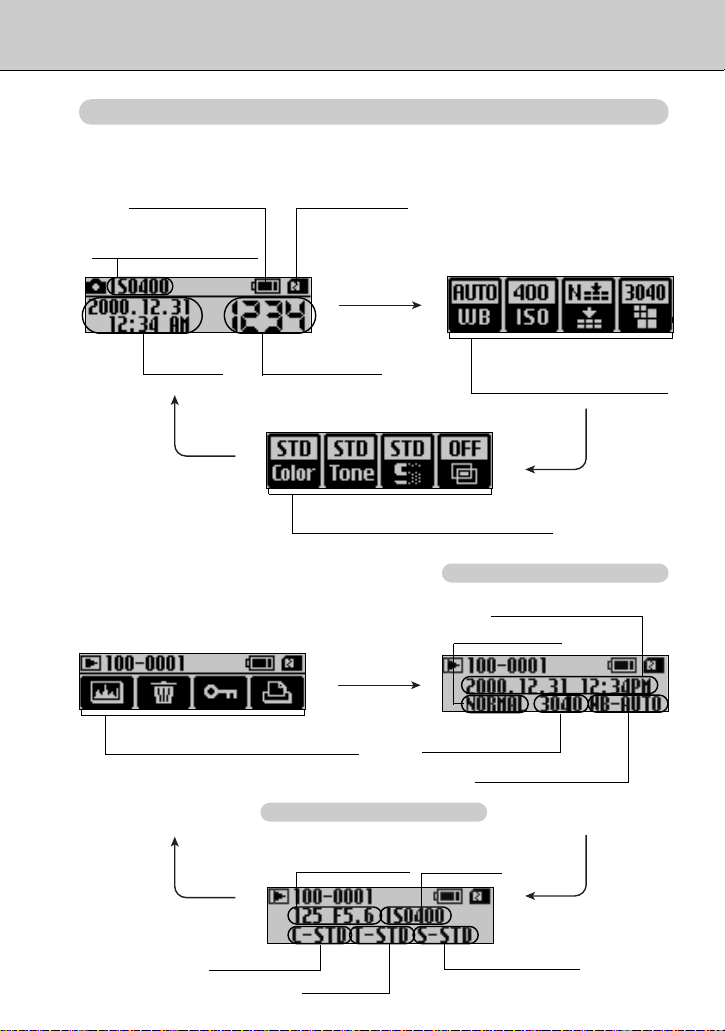
Rear Display Panel Screens
• Display during photography
AA-size battery icon
Sensitivity setting display
☞P.42)
(
☞P.22)
(
Media icon
(for SmartMedia)
“FUNC” button
Date/time
display
“FUNC”
button
No. of remaining
standard shots
• Display during playback
Functions that can be accessed from
the rear display panel (
“FUNC”
button
☞P.85)
Menu of settings that can
be specified from the rear
display panel (
Menu of settings that can be specified
from the rear display panel (
“FUNC” button
Image size (number
of pixels) setting
Photography information (2)
Shutter speed,
aperture
Sensitivity
setting
☞P.38)
Photography information (1)
Quality settings
White balance setting
☞P.38)
“FUNC”
button
Date/time information
“FUNC”
button
Color setting
Sharpness setting
Tone setting
13
Nomenclature - continued
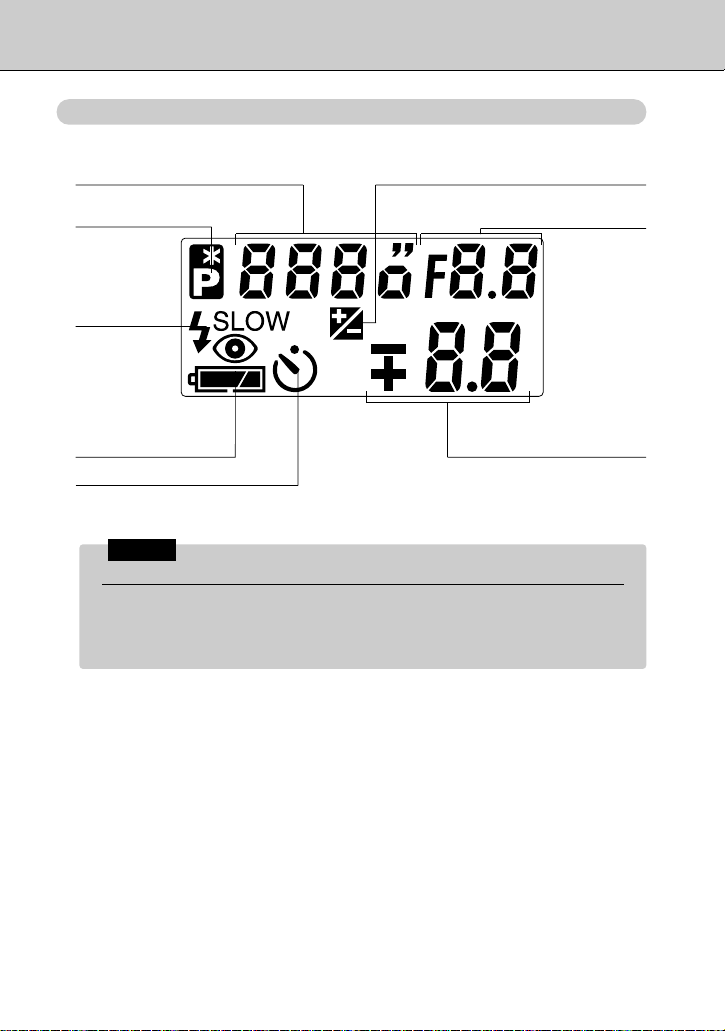
Top Display Panel
Shutter speed display
Program shift icon
(☞ P.61)
Synchro
mode icon
(☞ P.76)
Lithium battery check
icon (☞ P.22)
Self-timer icon (☞ P.72)
☞
Note
Liquid crystal in the display panels and viewfinder display
The LCDs (liquid-crystal displays) used in the display panels and viewfinder
display darken at high temperatures. At low temperatures the display
responses slow down slightly. In either case, the display will return to normal at
room temperature.
Exposure compensation icon (☞ P.71)
Aperture setting display
Exposure compensation
amount display (☞ P.71)
14
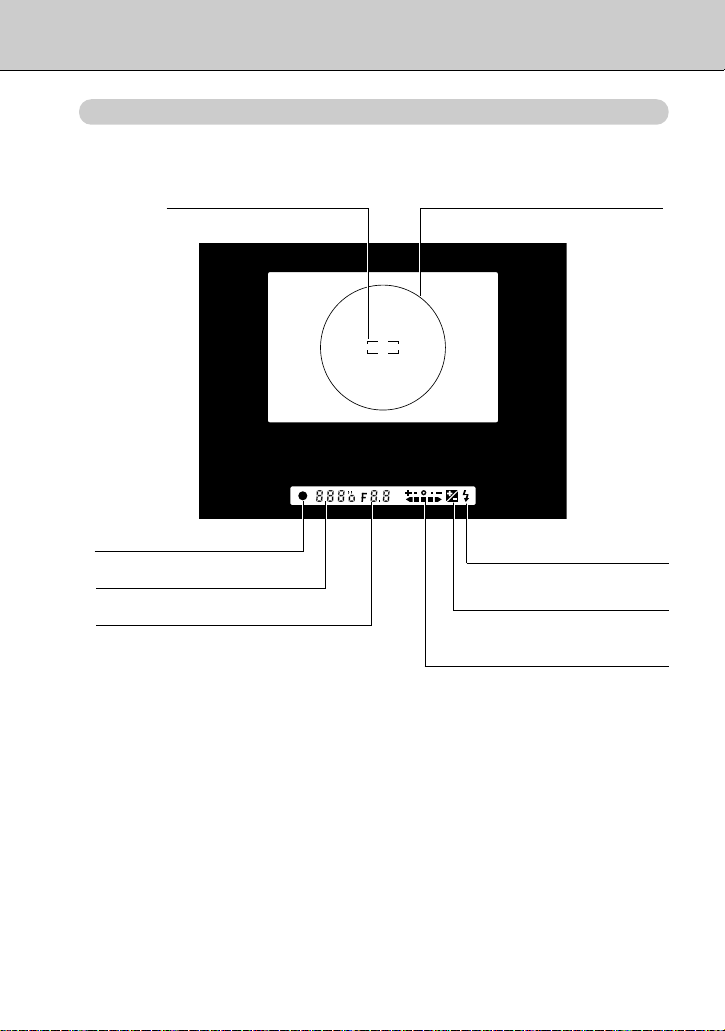
Viewfinder Display
Focusing frame (☞ P.59)
Center-weighted metering area
(12 mm-dia.) (☞ P.69)
Focus indicator (☞ P.28)
Shutter speed display
Aperture setting display
Flash recommended icon/
Ready icon (☞ P.30, 77)
Exposure compensation
icon (☞ P.71)
Exposure indicator (☞ P.65)
15

1 Basic
Photography
■ Use the shoulder strap to ensure that you do not drop the camera
while taking pictures.
1
2
1 Attaching the Shoulder Strap
Pass the end of the shoulder strap through the strap
mount on the camera body.
Pass the end of the strap through the fastener A and
loop B as shown in the figure below.
• Check that the strap is pulled tight after it is attached.
Using the Shoulder Strap
Put the shoulder strap over your shoulder.
1
• To ensure that you do not drop the camera while taking pictures, slip the
strap over your shoulder before you grip the camera body.
16
A
B
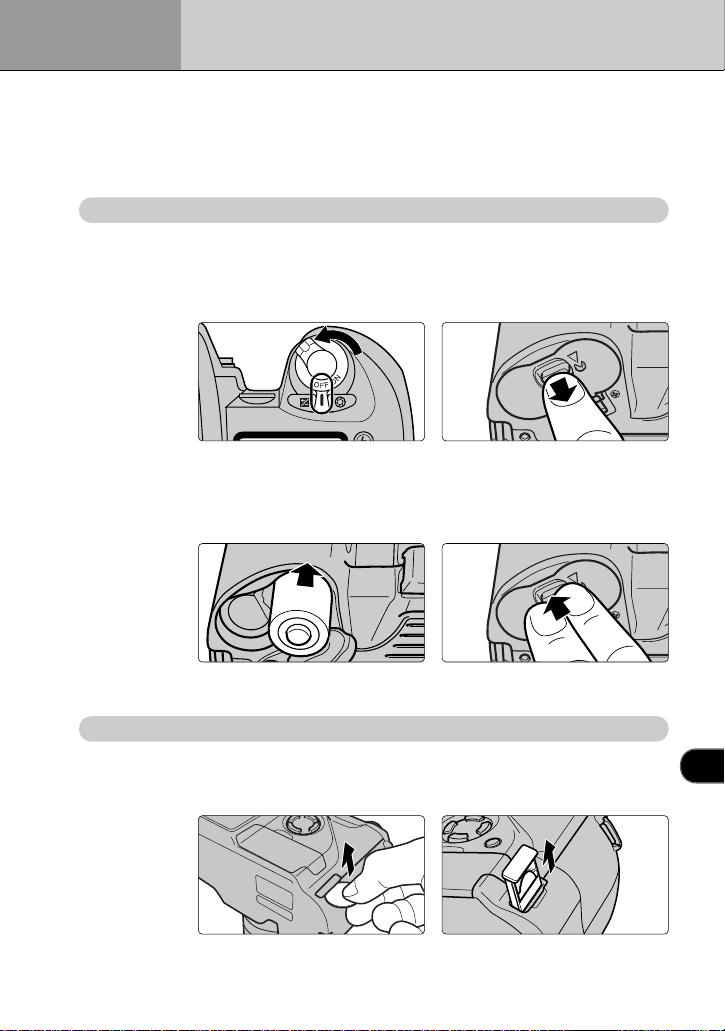
2 Loading the Camera Batteries
■ The FinePix S1 Pro Digital Camera uses 2 lithium batteries (CR123A
type), 1 button cell and 4 AA batteries. It can also be run from an
ordinary power socket using the optional AC power adapter AC-5VH.
(See P.128 for information on using the batteries.)
Loading the Lithium Batteries
Switch the camera “OFF”, slide the open/close catch
1
on the lithium battery compartment cover in the
direction indicated and open the cover.
Load the lithium batteries in the direction indicated by
2
the +and -labels on the battery compartment cover.
Then firmly close the battery compartment cover.
• Loading the batteries in the wrong direction could cause a camera fault.
Loading the Button Cell
Switch the camera “OFF” and then use a coin to pull
1
out the button cell holder.
1
17
Loading the Camera Batteries - continued
Load the button in the direction indicated by the +and
2
-
labels on the button cell holder. Then firmly close
the holder.
• Loading the button cell in the wrong direction could cause a camera fault.
Loading the AA Batteries
Batteries
• AA-size alkaline batteries (provided), AA-size Ni-Cd batteries or AA-size
nickel metal hydride (Ni-MH) batteries can be used.
Switch the camera “OFF”, lift up the AA battery
1
compartment cover release catch and open the cover
downwards.
18
Load the AA batteries in the direction indicated by the
2
+
and -labels on the battery compartment cover.
Then firmly close the battery compartment cover.
• Loading the batteries in the wrong direction could cause a camera fault.
• If you switch the camera “ON” without loading AA-size batteries, the
“‹” warning appears on the top display panel and the camera will not
take pictures.
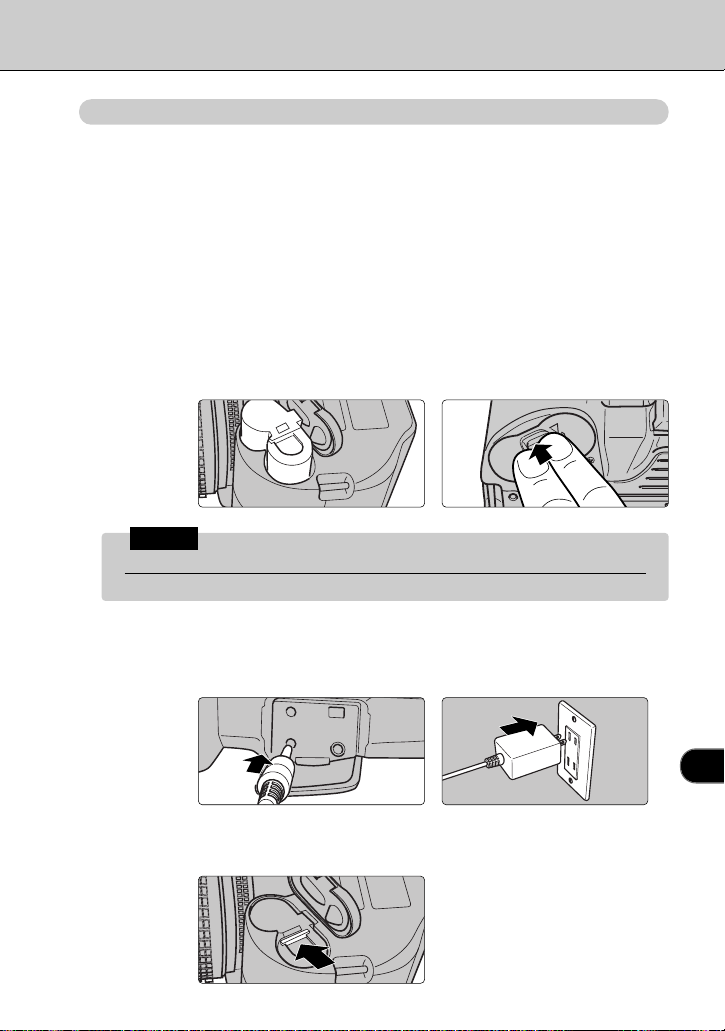
Using the AC Power Adapter AC-5VH (optional)
Open the lithium battery compartment cover as
1
described in step 1 in “Loading the Lithium Batteries”.
• When the camera is connected to a personal computer or you are
viewing recorded images on a TV so that the camera is switched on for
an extended period, you should use the AC-5VH.
When you use the AC-5VH, you can load the battery adapter (supplied)
instead of the lithium batteries to prevent the lithium batteries being
depleted.
However, bear in mind that you cannot use the built-in flash when you
are using the battery adapter.
Insert the battery adapter as shown in the figure and
2
firmly close the battery compartment cover.
☞
Note
Notes on using the battery adapter
When you use the battery adapter, use the AC-5VH or AA-size Ni-MH batteries.
Insert the connection plug for the AC-5VH into the DC IN
3
5V socket on the camera and plug the AC-5VH into the
power socket.
• To remove the battery adapter, grasp
the catch with your fingers and lift the
adapter out.
1
• The socket-outlet shall installed
near the equipment and shall
be easily accessible.
• The shapes of the AC-5VH,
plug and socket-outlet depends
on the country of use.
• You cannot charge the
batteries by connecting the AC5VH.
19

3 Mounting the Camera Lens
■ Switch the camera “OFF” to mount the camera lens. Always leave the
aperture ring set to the smallest aperture (the aperture setting with the
highest number).
Switch the camera off and mount the camera lens.
1
• Align the mounting marks on the lens and the camera body and then turn
the lens slowly in the direction of the arrow until it clicks into place. (Do
not press the lens detaching button.)
• If you switch the camera on when there is no lens mounted or when the
lens mounted is not a Nikkor lens with a built-in CPU (☞ P.107), the “°”
warning appears blinking on the top display panel and in the viewfinder
display and the shutter will not release (If the exposure mode is set to
Manual, the shutter will release when the “°” warning is displayed.)
(☞ P.121).
☞
Note
Notes on Changing the Lens
• Take care not to mount the lens when it is at an angle to the camera as this
can damage the lens mount on the camera.
• Always change the lens in an area free of dirt and dust.
20
Set the aperture ring to the smallest aperture and lock
2
the aperture ring.
• If you switch the camera “ON” when the aperture ring is not set to the
smallest aperture, “‡” appears blinking on the top display panel and in
the viewfinder display and the shutter will not release (☞ P.121).
• Always lock the aperture ring. If the aperture ring slips, the shutter may
not release when you press the shutter button.

To detach the lens from the camera body.
3
• Hold down the lens detaching button and turn the lens in the direction of
the arrow.
Important
✎
When the camera is stored with the lens detached
While the lens is detached from the
camera, fit the camera body cap provided
onto the camera to protect the inside of the
camera and prevent soiling of the mirror
and viewfinder screen.
(You can also use the Nikon BF-1A Body
Cap.)
21
1
1
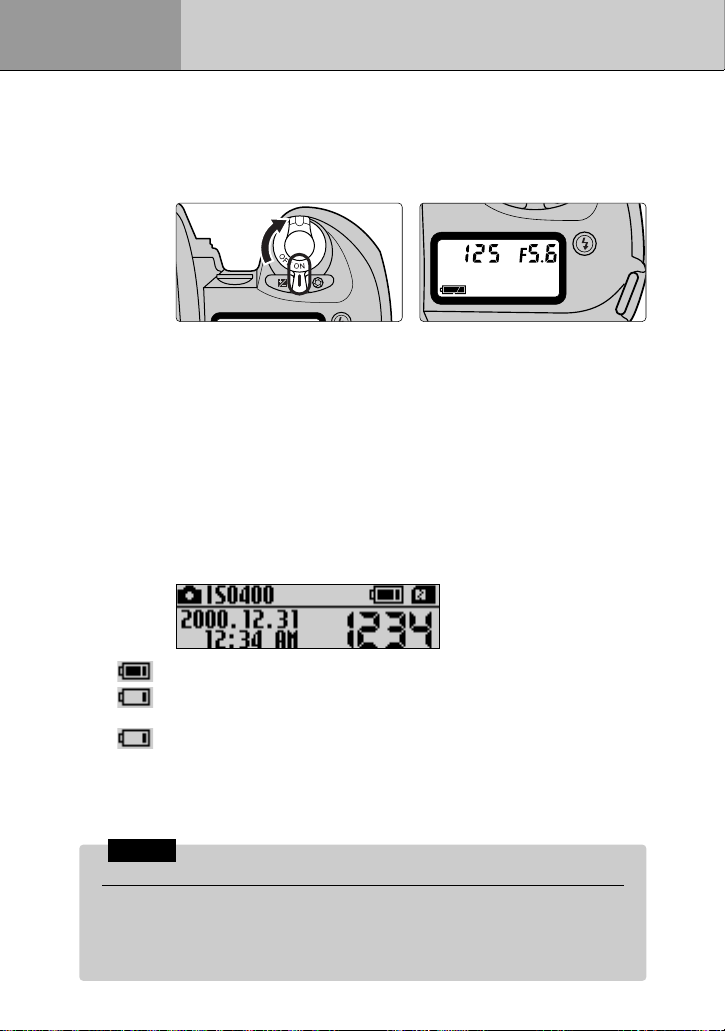
4 Switching the Camera On and Off
To switch the camera on or off, set the power switch to
“ON” or “OFF” respectively. When you switch the
camera on, the battery check icon “I” appears.
• Top display panel display
I (lit): Ample charge in the CR123A lithium batteries
O (lit): Charge in the CR123A lithium batteries is low. Have
replacement batteries ready.
O (blinking): Replace the CR123A lithium batteries.
The battery check icon blinks for about 3 seconds and
then the Auto Power Off function switches the camera off.
The battery icon then stops blinking and remains lit.
The viewfinder display switches off and the shutter will
not release.
If this occurs when you are using the battery adapter,
replace the AA-size batteries.
• Rear display panel display
22
(lit): Ample charge in the AA-size batteries
(lit): Charge in the AA-size batteries is low. Have replacement
(blinking): Replace the AA-size batteries.
• If the date and time are not set, the date/time display on the rear display
panel blinks.
☞
Note
Notes on the Batteries
• Do not use depleted batteries.
• If you take pictures or play back images when the battery charge is low, you
may find that you can no longer take pictures or play back images regardless
of which battery check icon is lit. If this occurs, switch the camera “OFF” and
replace the batteries.
batteries ready.
The battery check icon blinks for about 3 seconds and
then the Auto Power Off function switches the camera off.
5 Setting the Date and Time
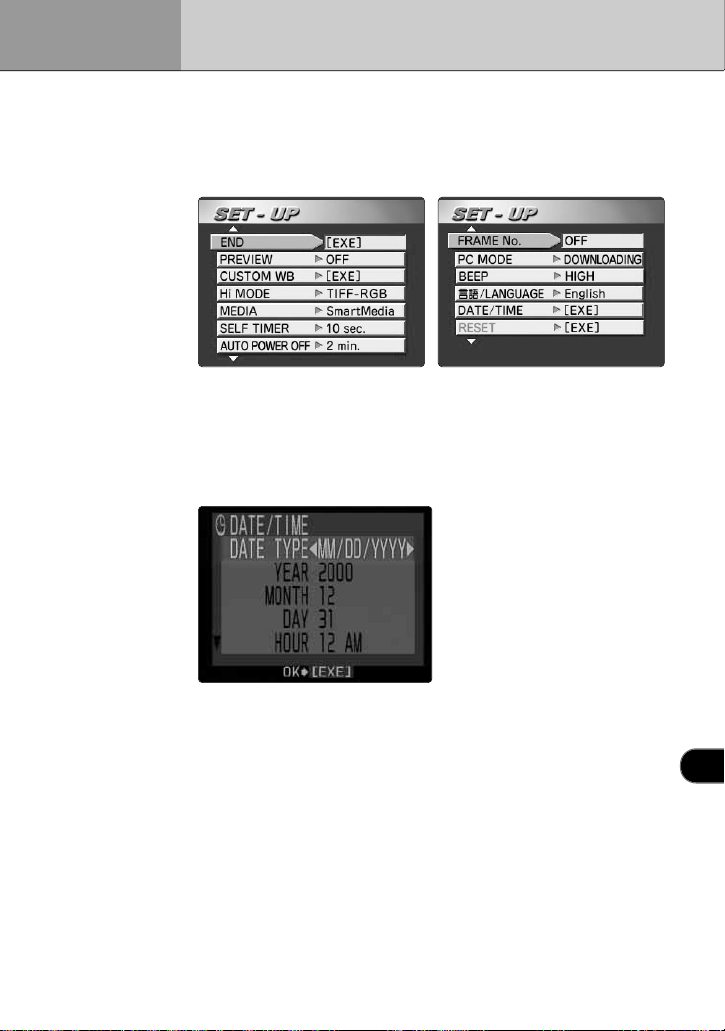
■ Use the procedure below to set the date and time.
Press the “MENU/EXE” button. The “SET-UP” menu
1
appears on the color LCD monitor.
Press “a” or “b ” on the 4-direction button to select
2
“DATE/TIME” and press the”MENU/EXE” button.
Press “a” or “b ” on the 4-direction button to select the
3
desired setting and then press the “d” or “c” button.
• Select “DATE TYPE” to set “MM/DD/YYYY” (month/day/year),
“DD/MM/YYYY” (day/month/year) or “YYYY.MM.DD” (year.month.day) as
the display format for the date.
• You can also set the “YEAR”, “MONTH”, “DAY”, “HOUR” and “MINUTE”.
Press “ c” on the 4-direction button to increase the number and “d ” to
decrease the number.
• Default setting
USA/Canada model: MM/DD/YYYY
Europe model: DD/MM/YYYY
Press the “MENU/EXE” button.
4
Press “a” or “b ” on the 4-direction button to select
5
“END” and then press the “MENU/EXE” button.
1
23
1
2
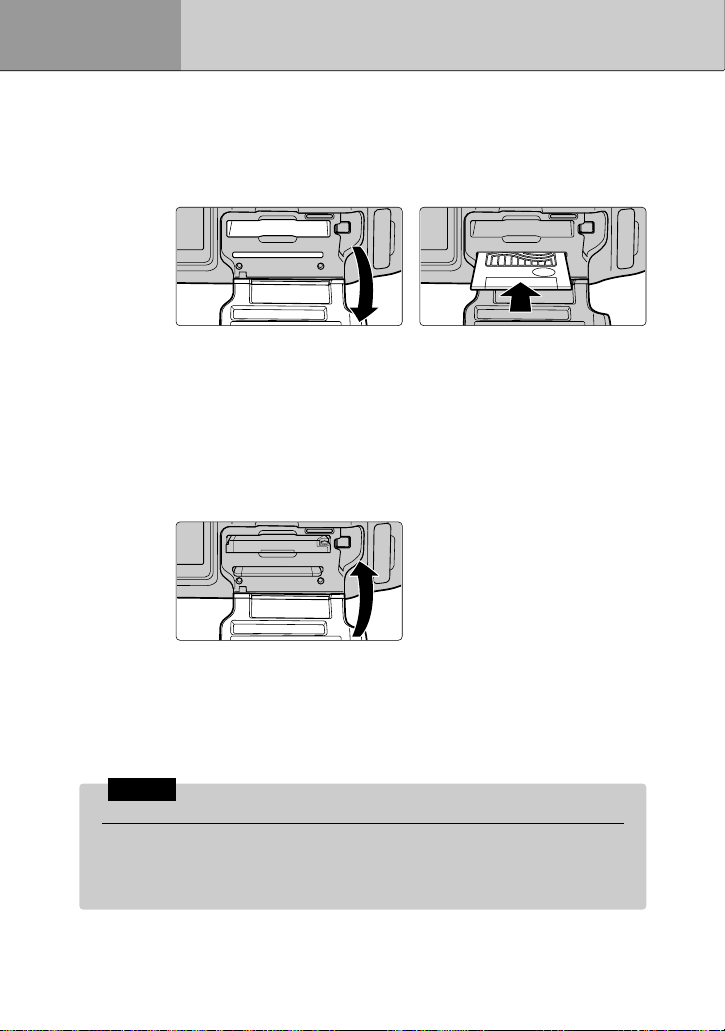
6 Loading Media
Switch the camera “OFF”, open the slot cover and
insert the media. Load a Microdrive or a CompactFlash
card into the upper slot and a SmartMedia into the
lower slot.
For a SmartMedia
• Insert a SmartMedia with the contact area (gold-colored area) facing
upwards.
• Insert a Microdrive or a CompactFlash card in the correct direction and
push it smoothly all the way into the slot.
Close the slot cover.
24
• If there is a write-protect sticker on the SmartMedia, data cannot be
recorded onto or deleted from the SmartMedia.
• Compatible Media (☞P.128).
• Back up your data at regular intervals. Fuji Photo Film Co., Ltd. accepts
no liability for any losses incurred as a result of data being erased or
corrupted.
☞
Note
Notes on Taking Pictures
You can release the shutter of the FinePix S1 Pro when there is no media
installed in the camera. In this event, the image appears on the color LCD
monitor but is not recorded. Always check that there is a media card installed in
the camera before taking pictures.
1
2
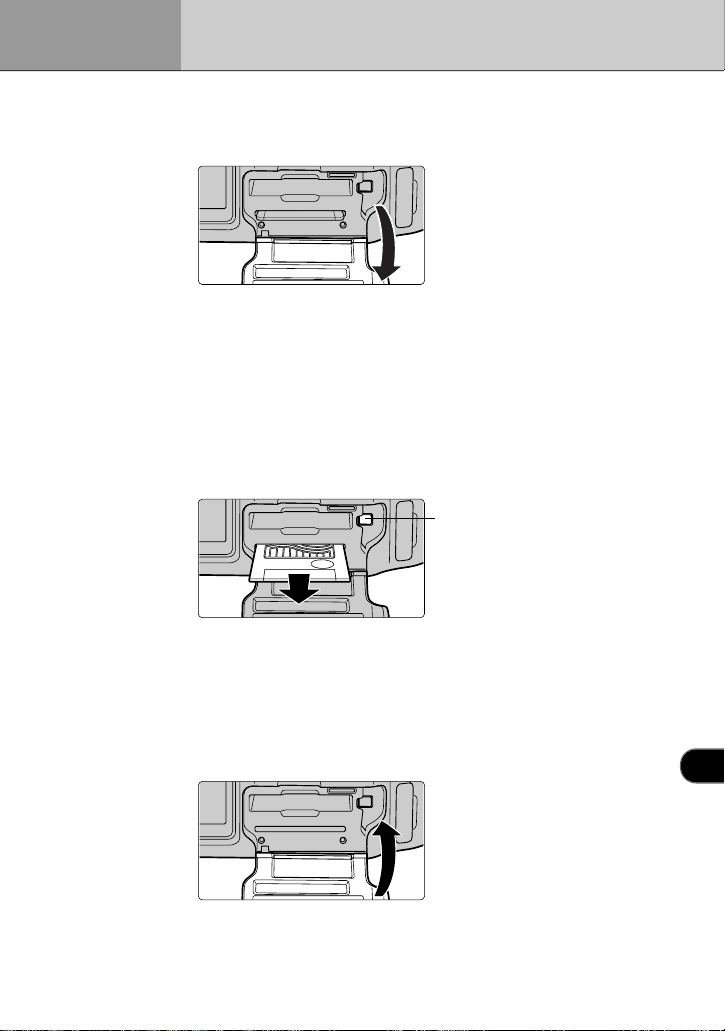
7 Removing Media
Switch the camera “OFF” and open the slot cover.
• If you open the slot cover when the camera is switched on, the “‹”
warning appears on the top display panel. Switch the camera “OFF” first.
• Do not open the slot cover while data is being recorded as this can result
in data loss or corruption.
• If you open the slot cover during a shot taken with a long shutter speed,
the top display panel continues to operate until the picture is taken.
Eject the media.
Microdrive eject button
• To remove a SmartMedia, push the SmartMedia in gently. The
SmartMedia then pops out slightly for easy removal.
• To remove a Microdrive or a CompactFlash card, press the eject button
beside the slot.
Close the slot cover.
3
1
25

8 Exposure Modes on the FinePix S1 Pro
Symbol Name Features and Typical Uses
Exposure is controlled entirely by the camera. This
P.60
P.61
P.62
P.63
P.64
5-Vari Programs P.66
z
P
S
A
M
x
P.67
c
P.67
v
P.67
b
P.68
n
P.68
AUTO mode
Programmed
Auto
Shutter-priority
Auto
Aperture-priority
Auto
Manual
Portrait mode
Landscape
mode
Close-up mode
Sport mode
Night Scene
mode
mode is ideal for snapshots and other situations where
you need to take the picture quickly to avoid missing the
moment.
The camera controls the exposure but the photographer
can also influence the outcome using the program shift
(☞ P.61) and exposure compensation (☞ P.71)
features.
You set the shutter speed and the camera controls the
exposure. This mode lets you set fast shutter speeds to
freeze fast-moving subjects or slow shutter speeds to
emphasize the subject’s motion.
You set the aperture and the camera controls the
shutter speed. This mode is ideal for shots where you
want to control the depth of field (the range of focus in
front of and behind the subject) for focusing, such as
shots where you want the foreground and background
both in clear focus or shots where you want the
background deliberately out of focus.
This mode lets you set both the shutter speed and the
exposure. Use this mode when none of the other modes
give quite the effect you are looking.
This mode uses a shallow depth of field (the range of
focus in front of and behind the subject) to give portrait
shots that have a soft, blurred backdrop and a feeling of
depth.
This mode uses a very large depth of field (the range of
focus in front of and behind the subject) to give
landscape shots in which both nearby and distant
scenery is in focus.
This mode uses a relatively shallow depth of field to
make the subject stand out and give a soft, blurred
background for beautiful close-up shots.
This mode uses a fast shutter speed to freeze the
action, allowing you to take sports shots that capture the
feeling of rapid motion.
This mode uses exposure control specially tailored to
dimly lit subjects to allow you to take pictures in the
evening or at night. (When you take a picture of a
subject against a night scene background, you can use
the flash to capture both your subject and the
background as they appear naturally.)
26
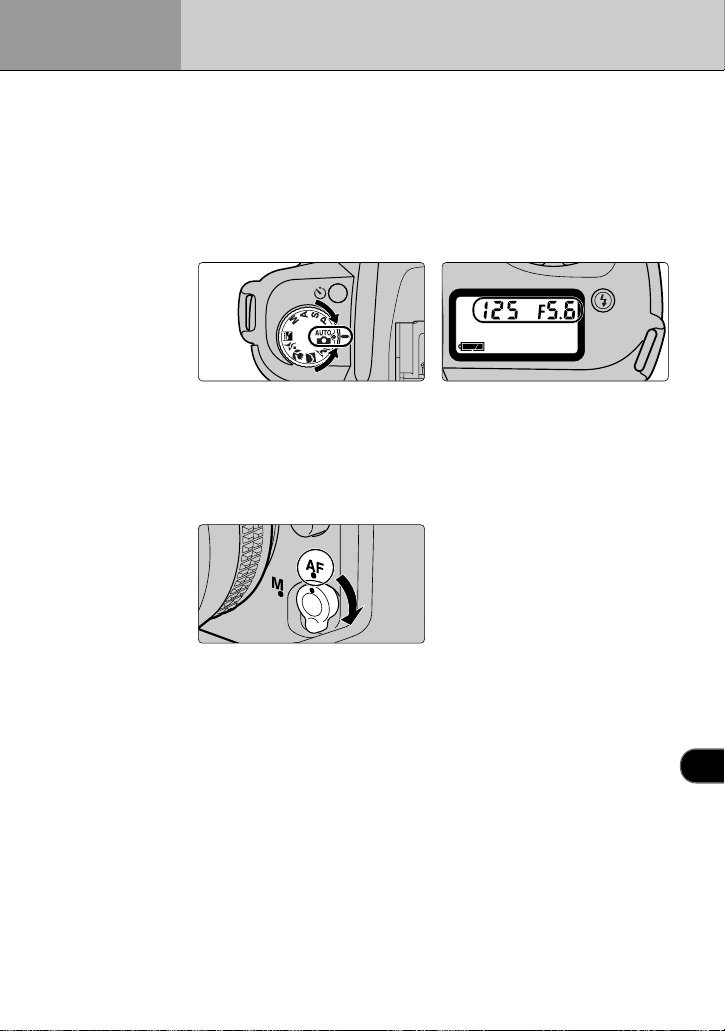
9 Setting the Exposure Mode Dial
■ By setting the exposure mode dial to z (AUTO mode), you can leave
the exposure settings to the camera when you take pictures.
Switch the camera “ON”.
1
Set the exposure mode dial to “z” (AUTO mode).
2
• The shutter speed and aperture settings are shown on the top display
panel.
Set the focus mode selector switch to “AF” (auto
3
focus).
• Make sure that the focus mode selector switch clicks when you select the
setting.
• To focus on your subject, hold the shutter button halfway (☞P.28).
1
27
10
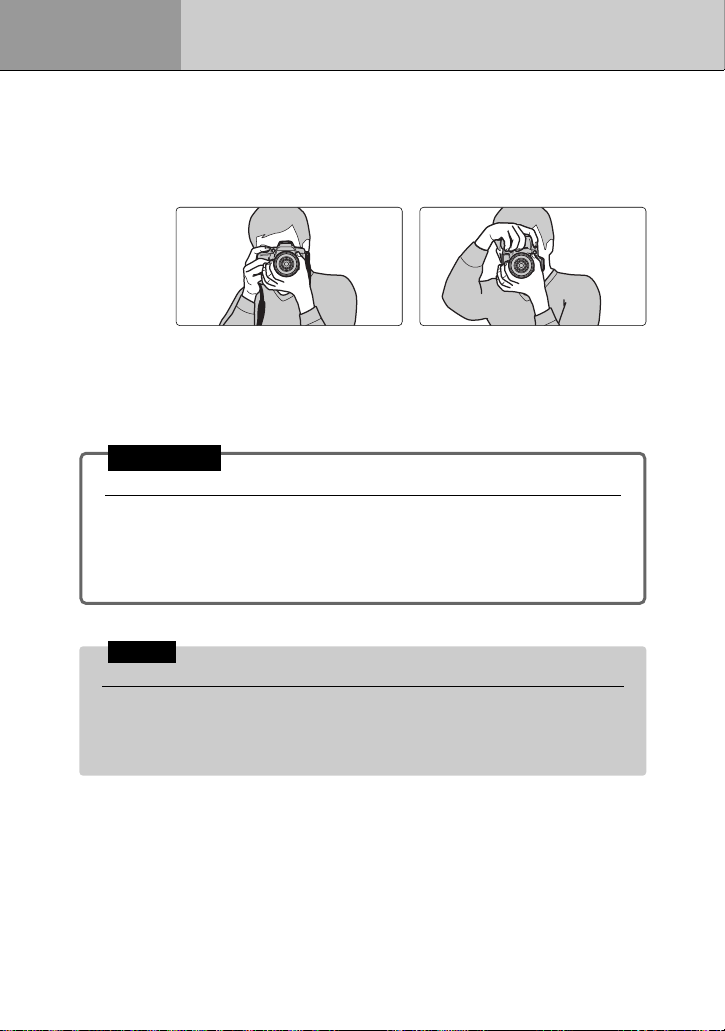
Holding the Camera and Focusing
■ Hold the shutter button halfway to focus the camera. When your
subject is in focus, the focus indicator “●” appears in the viewfinder.
Hold the camera correctly.
1
• Hold your body straight and brace your elbows lightly against your sides.
• Put one foot forward slightly to keep your upper body steady.
• Hold the camera so that your right hand is firmly around the grip and use
your left hand to support the lens.
Important
✎
Camera shake and shutter speed
Camera shake is something to be avoided when taking pictures. As a general
guide when taking pictures, the shutter speed should be faster than [1/focal
length of the lens mounted] seconds. For example, with a 50 mm lens, you
should use a shutter speed faster than 1/50 sec. Use a tripod for slow shutter
speeds.
28
☞
Note
Notes on Composing Your Shot
As a percentage of the actual image photographed, the image area visible
through the viewfinder of the FinePix S1 Pro (the viewfinder coverage) is about
90% vertically and about 93% horizontally. In other words, the picture actually
taken is slightly larger than the field of view in the viewfinder.
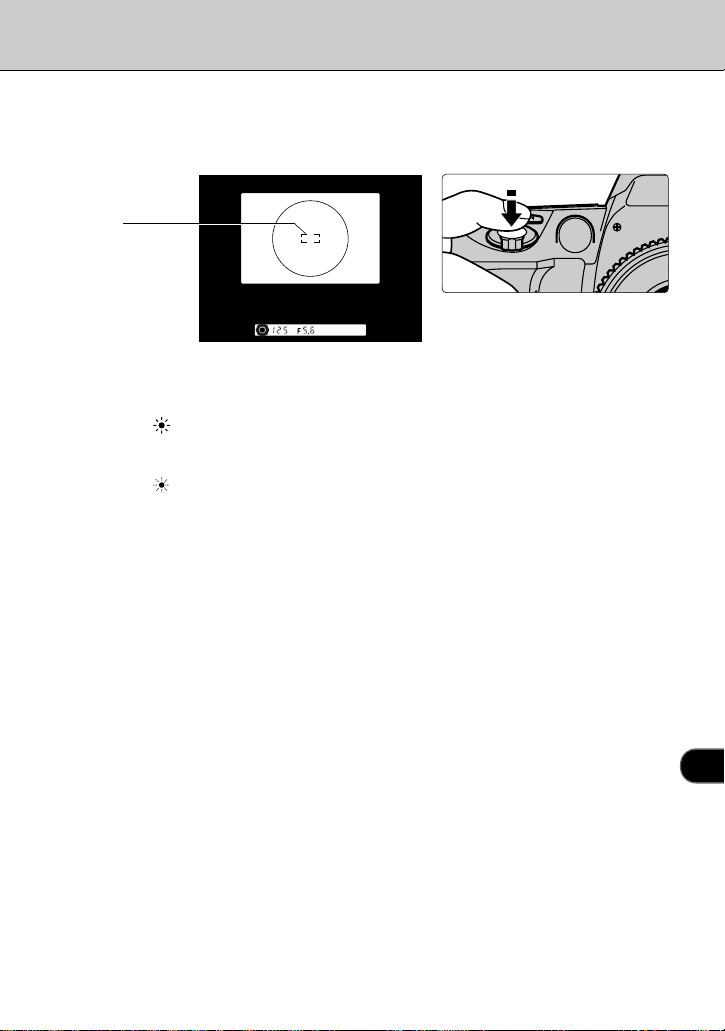
Compose your shot and press the shutter button
2
halfway to set the focus.
Focusing
frame
• When you position the focusing frame on the object you want to focus on
and press the shutter button halfway, the camera automatically focuses
on the object and one of the following appears in the viewfinder:
Lit The camera has focused on the subject. If the subject is
Blinking The camera cannot focus on the subject.
If the subject is dark, the auxiliary AF light automatically operates so that
the camera can focus. See P.57 for more information on focusing.
• If the object you want to focus on is outside the focusing frame, use
focus lock to take the picture (☞ P.59).
moving, the camera adjusts the focus so that it follows the
movements of the subject.
29
1
11
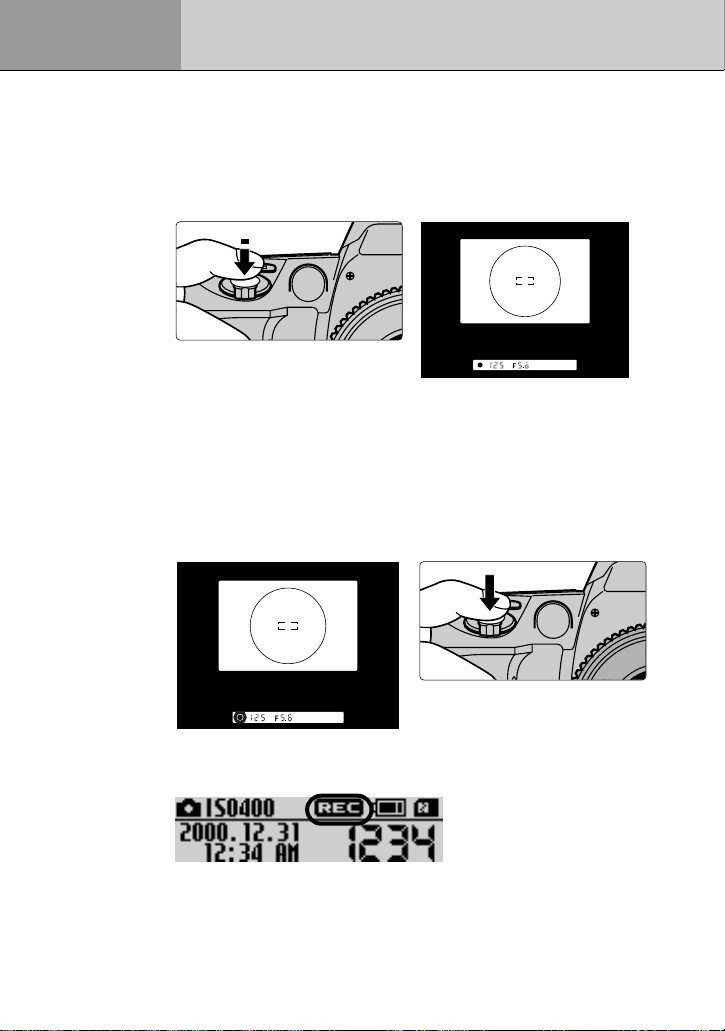
Releasing the Shutter
■ Check that the focus indicator “●” is lit and then slowly press the
shutter button down fully to release the shutter.
Press the shutter button halfway and check the
1
viewfinder display.
• If the flash recommended icon “j” is flashing in the viewfinder display,
use the built-in flash (☞ P.74, 76).
• If a warning is displayed on the top display panel or viewfinder display,
refer to P.121 and P.122 for information on how to respond.
Check that the focus indicator “●” is lit and then gently
2
press the shutter button fully.
30
• The “REC” icon flashes on the rear display panel while the image is
being recorded.
• The shutter does not release during recording when Preview mode is set
to ON.
• If the number of prints display is highlighted, the shutter will not release
even when the focus indicator “●” is lit.
• When there is no media loaded, you can display and review an image
but you can not record it.
 Loading...