

FujiFilm Printpix CX-400 Owner's Manual
Try to print!
Enjoy various
printing!
Other methods of use/
When trouble occurs
Page 1
READ THE
SAFETY NOTE
Page 7
Page 10
PREPARING
THE PRINTER
FOR USE
Page 15
SELECTING THE
PHOTOGRAPHS
AND PRINTING
CHECKING
THE CONTENTS
OF THE CARTON
OWNER’S MANUAL
Thank you for purchasing this FUJIFILM product.
This manual explains how to use your FUJIFILM Printpix Digital Photo Printer CX-400.
Before using your printer, thoroughly read the “OWNER'S MANUAL”.
After reading, store the “OWNER’S MANUAL” in a safe place.
Using with a PC Windows Macintosh
BL00141-200(1)
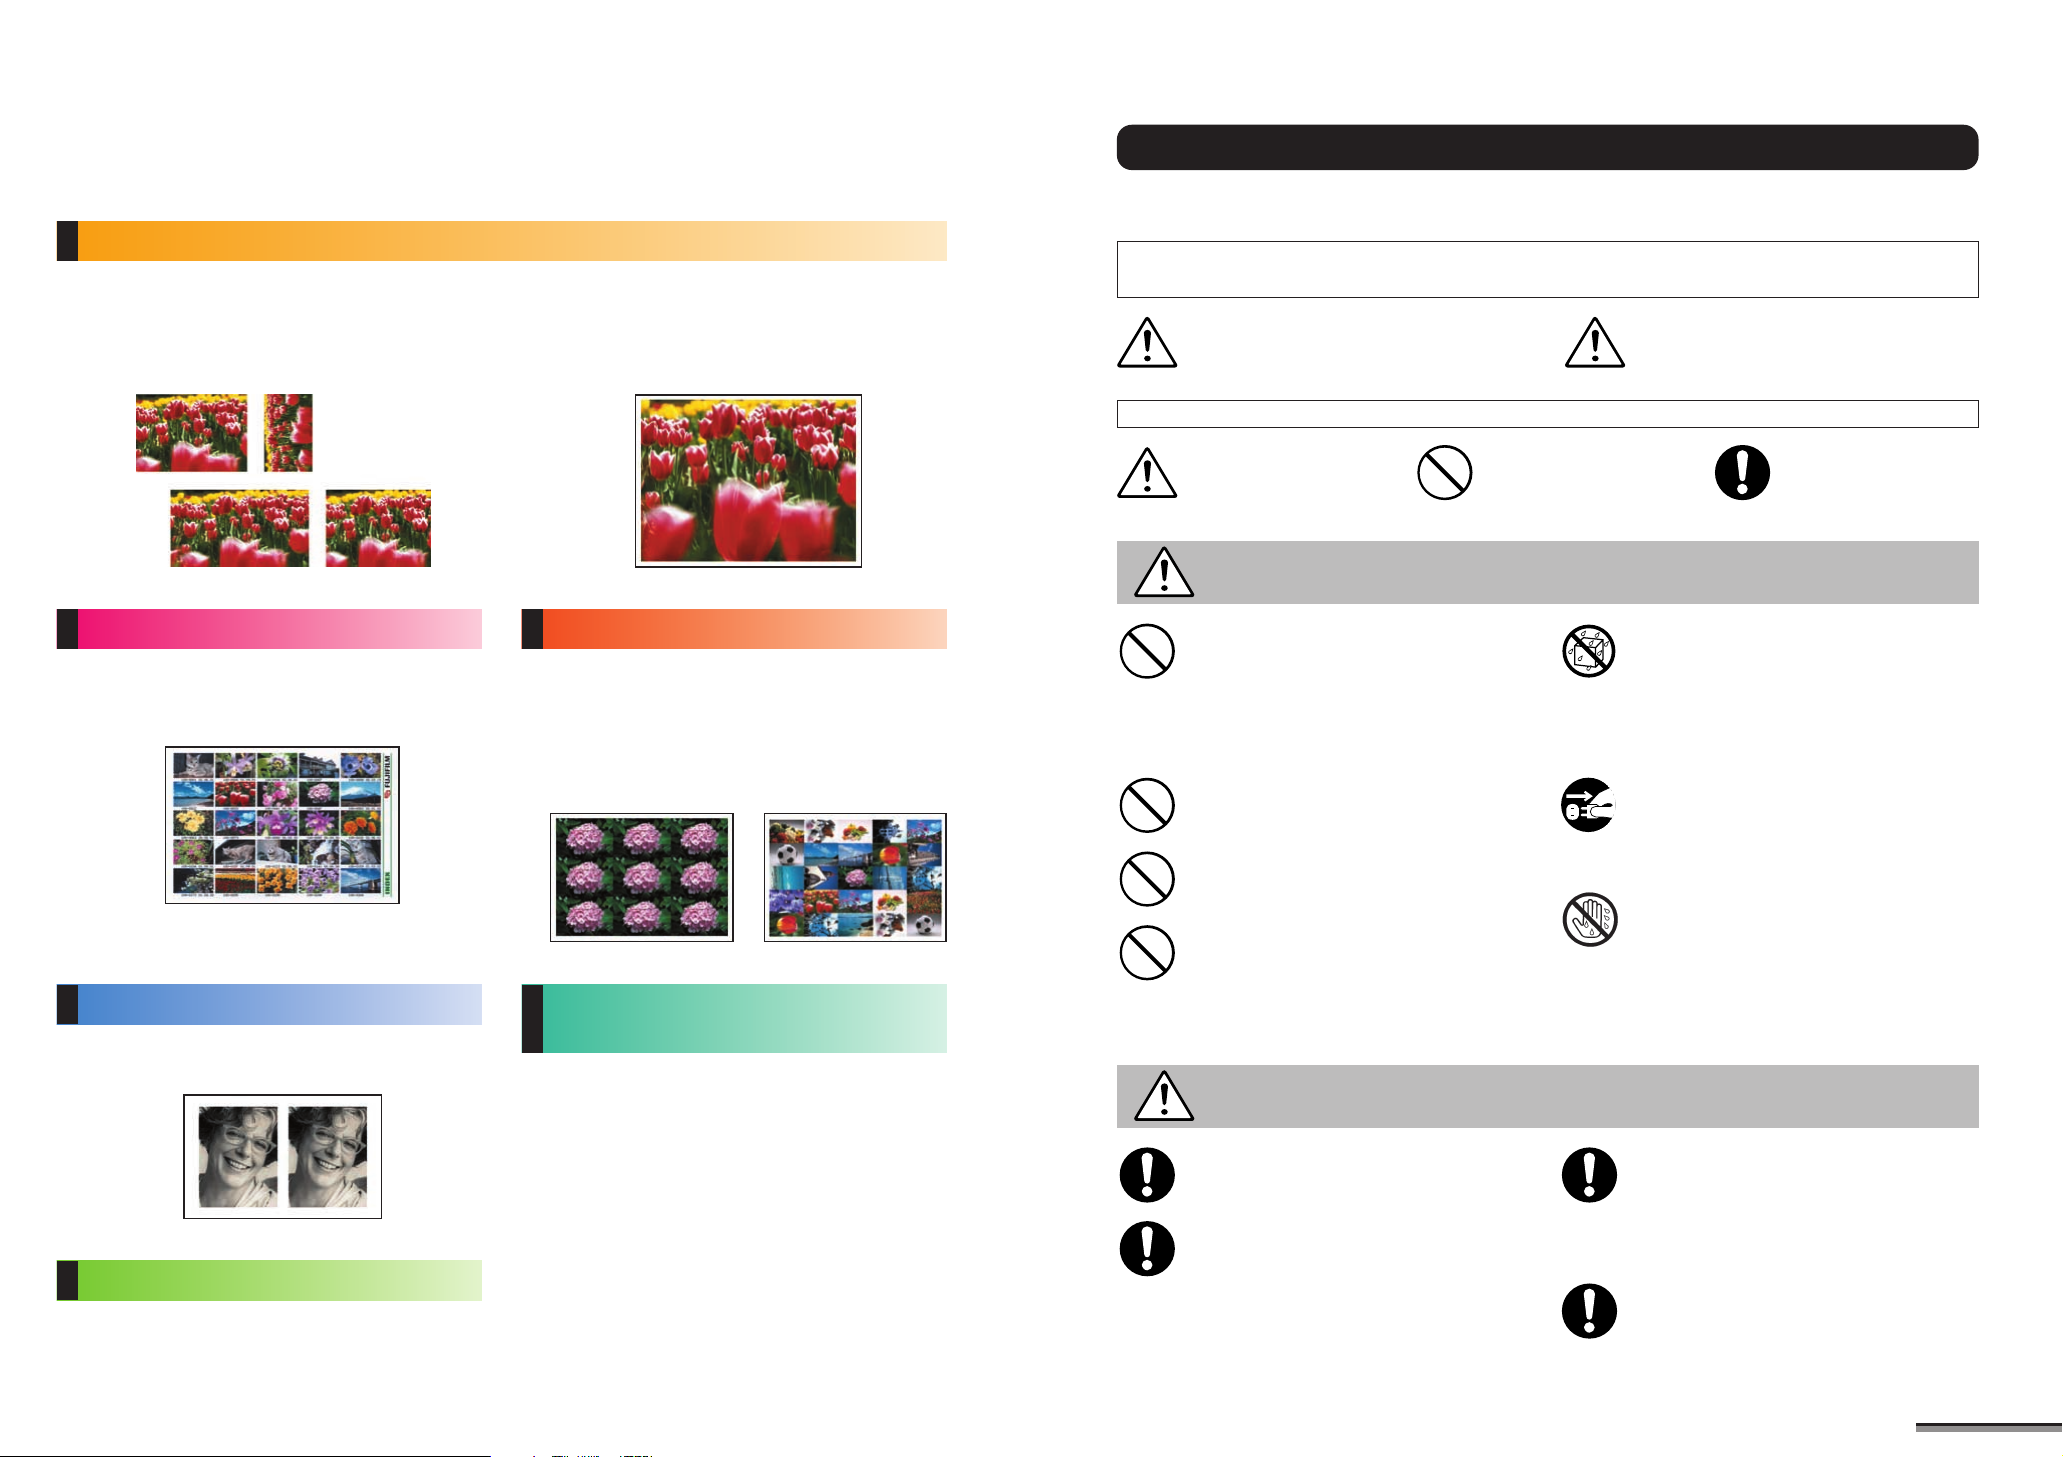
● Kinds of printing
The following printings can be enjoyed with this printer.
Check page 101 for the print size.
Full Print
Prints full print (one picture on one sheet of
printing paper). This is the most basic printing
method. The picture to be printed can be
specified, or all the pictures on the memory card
can be printed.
Index Print ➔
P. 27
Prints the pictures of 25 frames on one sheet of
paper. This is very convenient when checking
the pictures on the memory card.
ID Print ➔
P. 30
Prints up to 24 frames of the picture of the
chosen size on one sheet of paper.
DPOF Print ➔
P. 34
Prints according to the DPOF information on the
memory card.
Print with border can also be selected.
Printing of border and border less prints can be
enjoyed by selecting this setting at printing.
Multiple Print ➔
Prints the desired number of frames (2UP, 4UP,
9UP, 16UP, 25UP) on one sheet of paper. The
positions of the pictures to be printed can be
specified in the multiple frame.
✽ The specifiable number of frames varies
depending on the print size.
Finish Photo/
Manual Adjustment Print
Photo finishing can be enjoyed by using such
functions as “ZOOM/MOVE” that magnifies the
picture, “ROTATION” that changes the vertical
and horizontal direction of the picture, and
“EFFECT” that produces a sepia or monochrome
picture.
➔
➔
➔
P. 15
P. 39
P. 22
P. 35
SAFETY NOTES
Thank you for purchasing this FUJIFILM product. Before using your new product, thoroughly read the “Owner’s
Manual” and use the product correctly. After reading the “Owner’s Manual” store it in a safe place.
The warning types explained below indicate the severity of the injury or damage
that can result if a warning is ignored or the product is used incorrectly.
Indicates that the subject of this
WARNING CAUTION
warning may cause death or
serious injury.
Indicates that the subject of this
warning may cause personal
injury or material damage.
The icons shown below indicate the type of warning to be observed.
Triangular icons notify
the user that care is
required.
Circular icons with a
diagonal bar notify the
user that the action
indicated is prohibited.
Filled circles with an
exclamation mark notify
the user that an action
must be performed.
WARNING
Do not use this product if the power cable is not
plugged incorrectly.
Do not damage or modify the power cord.
Do not bend, twist or pull the power cord excessively.
Do not place heavy objects on the power cord or lay the power
cord under objects with corners.
Do not place the power cord near heating appliances or expose
the power cord to heat.
A short-circuit or heat discharge can cause an electric shock or fire.
Do not place the printer in an unstable location.
If the printer looses its balance and tips over or falls, it could
cause injury.
Do not use voltages other than the specified power
supply voltage.
This can cause a fire or electric shock.
Never attempt to disassemble or modify the printer
(remove the casing, etc.).
Do not use the printer when it has been dropped or the
casing is damaged.
This can cause fire or electric shock.
● Contact your FUJIFILM dealer or authorized FUJIFILM service
facility.
Do not get wet.
Unplug from the
power outlet.
Wet hands
prohibited.
Do not place metal objects or receptacles containing
liquids on or near the printer.
Do not let water or foreign objects enter the printer.
If water or foreign objects enters the printer, turn off the power
switch and unplug the power cable from the power outlet.
Continued use of the printer in these circumstances can result in
short-circuit and cause a fire or electric short.
● Contact your FUJIFILM dealer or authorized FUJIFILM service
facility.
If an abnormality occurs, turn off the power switch and
unplug it from the power outlet.
Continued use when smoke or abnormal odor emanates from
the printer can cause a fire or electric shock.
● Contact your FUJIFILM dealer or authorized FUJIFILM service
facility.
Do not plug in or unplug the printer with wet hands.
This can cause electric shock.
CAUTION
Do not place the printer in location where oily smoke,
steam, moisture, or dust is prevalent.
This could cause a fire or electric shock.
Keep out of the reach of small children.
Small children may stick their hand into the printer (paper
compartment cover, trash box slot, etc.) and be injured.
Do not block the ventilation slits.
Any blockage of the ventilation slits during use could result in a
buildup of heat inside the printer, causing a fire or other
damaged.
■ Never do the following:
● Push the printer into a place that is narrow and poorly
ventilated.
● Use the printer on a carpet or blanket.
Do not place heavy objects on the printer.
The object or the printer could loose its balance and tip over or
fall, causing injury.
1

Always grasp the plug itself when unplugging the
printer.
Pulling on the cord could damage the cord and cause a fire or
electric shock.
Unplug the printer when cleaning it or not used for an
extended period.
Unplug the printer for safety.
Request routine inspection and cleaning of the interior
of the printer.
Accumulated dust inside the printer can cause fire or other
trouble.
● Request your FUJIFILM dealer or authorized FUJIFILM
service facility to clean the interior of the printer about once
every three years.
Do not move the printer while it is still plugged in.
This could damage the cord and cause a fire or electric shock.
Do not stare for a long time at the light emitting from the
printer.
Looking for short periods should not cause any harm, but
staring at the light for lengthy periods could result in impaired
eyesight.
MISCELLANEOUS NOTE
Installation site
● Do not use or store the printer where the temperature and
humidity are high, where vibrations are present, where the
printer will be in direct sunlight, where it is dusty or sandy, or
where the printer may be exposed to rain.
● If the printer interferes with radio or television reception,
install it away from the radio or television set.
Transporting
● Store the original packing material. It is needed when
repacking and shipping the printer later.
● When moving the printer, always remove the memory card.
Data
● The memory contents cannot be compensated. If data
cannot be written or read due to hardware or software
trouble, FUJIFILM is not responsible for memory contents
compensation.
Use
● Do not cover the printer with a cloth or blanket while it is in
use. It may cause erroneous operation or a serious accident.
● Use the printer on a firm and flat surface.
● Do not move the printer while it is operating. It may cause
trouble.
● Do not subject the printer to shock or vibration while it is
operating. It may cause an error or destroy the data.
Safety
● If foreign matter or a liquid gets into the printer, immediately
stop use, unplug the power cord, and contact your FUJIFILM
dealer or nearest FUJIFILM service facility.
■ These specifications are subject to change without notice. FUJIFILM shall not be held liable for damages
resulting from errors in this Owner's Manual.
Copyright
● The use of prints other than those created or photographed
by you without the permission of the copyright holder is
prohibited by copyright law, except when the prints are for
personal use.
Cooling Fan Operation
● When the temperature inside the printer rises to a certain
level, a cooling fan automatically begins to operate.
Similarly, when the temperature inside the printer drops
below a certain level, the cooling fan automatically stops.
Thermal Head Wear
● The thermal head will wear out, which results in diminished
print quality. When this occurs, the thermal head must be
replaced. Contact your FUJIFILM dealer.
Condensation
● Note that the following can result in the formation of
condensation in the printer:
• Placing the printer in very humid or steamy locations
• Moving the printer from a cold outdoor location into a warm
room.
• Moving the printer suddenly from an air-conditioned room
into a very warm and humid environment.
● Using the printer when condensation has formed inside the
printer can cause faults or abnormal operation, such as
impaired image quality, uneven color distribution and paper
jams.
● To dispel any condensation inside the printer, plug the
printer power cord into a power outlet, turn on the power by
pressing the POWER button, and leave the printer for
approximately 2 hours. The inside of the printer will warm-up
and dry out.
IMPORTANT
Be sure to read this page before using the Software.
NOTICE
BEFORE OPENING THE PACKAGE OF CD-ROM PROVIDED BY
FUJI PHOTO FILM CO., LTD., (“FUJIFILM”) PLEASE READ THIS
END USER LICENSE AGREEMENT CAREFULLY. ONLY IF YOU
DO AGREE TO THIS AGREEMENT, YOU WILL BE ABLE TO USE
THE SOFTWARE RECORDED ON THE CD-ROM. BY OPENING
THE PACKAGE, YOU ACCEPT AND AGREE TO BE BOUND BY
THIS AGREEMENT.
End User License Agreement
This End User License Agreement (“Agreement”) is an agreement
between Fuji Photo Film Co., Ltd. and you, which sets forth the
terms and conditions of the license granted for you to use the
software provided by FUJIFILM.
The CD-ROM contains third party software. In case a separate
agreement is provided by a third party supplier for its software, the
provisions of such separate agreement shall apply to the use of
such third party software, prevailing over those of this Agreement.
1. Definitions.
(a) “Media” means the CD-ROM titled “Software for Printpix Digital
Photo Printer CX-400” which is provided to you together with this
Agreement.
(b) “Software” means the software which is recorded on Media.
(c) “Documentation” means the operation manuals of Software and
other related written materials which are provided to you together
with Media.
(d) “Product” means Media (including Software) and Documentation
collectively.
2. Use of Software.
FUJIFILM grants to you a nontransferable, nonexclusive license:
(a) to install one copy of Software onto one computer in binary
machine executable form;
(b) to use Software on the computer onto which Software is installed;
and
(c) to make one backup copy of Software.
3. Restrictions.
3.1 You shall not distribute, rent, lease or otherwise transfer all or
any part of Software, Media or Documentation to any third party
without FUJIFILM’s prior written consent. You also shall not
sublicense, assign or otherwise transfer all or any part of the
rights granted to you by FUJIFILM under this Agreement without
FUJIFILM’s prior written consent.
3.2 Except as expressly granted by FUJIFILM hereunder, you shall
not copy or reproduce all or any part of Software or
Documentation.
3.3 You shall not modify, adapt or translate Software or
Documentation. You also shall not alter or remove copyright and
other proprietary notices that appear on or in Software or
Documentation.
3.4 You shall not, or shall not have any third party, reverse-engineer,
decompile, or disassemble Software.
4. Ownership.
All copyrights and other proprietary rights to Software and
Documentation are owned and retained by FUJIFILM or the third
party suppliers as indicated on or in Software or Documentation.
Nothing contained herein shall be construed, expressly or implicitly,
as transferring or granting any right, license, or title to you other than
those explicitly granted under this Agreement.
5. Limited Warranty.
FUJIFILM warrants to you that Media is free from any defect in
material and workmanship under normal use for ninety (90) days
from the date of your receipt of Media. Should Media not meet the
foregoing warranty, FUJIFILM shall replace such defective Media
with other Media bearing no defect. FUJIFILM’s entire liability and
your sole and exclusive remedy with regard to any defect in Media
shall be expressly limited to such FUJIFILM’s replacement of Media
as provided herein.
6. DISCLAIMER OF WARRANTY.
EXCEPT AS PROVIDED IN SECTION 5 HEREIN, FUJIFILM
PROVIDES PRODUCT “AS IS” AND WITHOUT WARRANTIES OF
ANY KIND, EXPRESS OR IMPLIED. FUJIFILM SHALL MAKE NO
WARRANTY, EXPRESS, IMPLIED OR STATUTORY, AS TO ANY
OTHER MATTERS, INCLUDING, BUT NOT LIMITED TO NONINFRINGEMENT OF ANY COPYRIGHT, PATENT, TRADE
SECRET, OR ANY OTHER PROPRIETARY RIGHTS OF ANY
THIRD PARTY, MARCHANTABILITY, OR FITNESS FOR ANY
PARTICULAR PURPOSE.
7. LIMITATION OF LIABILITY.
IN NO EVENT SHALL FUJIFILM HAVE ANY LIABILITY FOR ANY
GENERAL, SPECIAL, DIRECT, INDIRECT, CONSEQUENTIAL,
INCIDENTAL, OR OTHER DAMAGES (INCLUDING DAMAGES
FOR LOSS OF PROFITS OR LOST SAVINGS) INCURRED FROM
THE USE OF OR INABILITY TO USE PRODUCT EVEN IF
FUJIFILM HAS BEEN ADVISED OF THE POSSIBILITY OF SUCH
DAMAGES.
8. No export.
You acknowledge that neither Software nor any part thereof, will be
transferred, or exported to any country or used in any manner in
violation of any export control laws and regulations to which
Software is subject.
9. Termination.
In case you breach any of the terms and conditions hereof,
FUJIFILM may immediately terminate this Agreement without any
notice.
10. Term.
This Agreement is effective until the date when you cease to use
Software, unless earlier terminated in accordance with Section 9
hereof.
11. Obligation upon termination.
Upon termination or expiration of this Agreement, you shall, at your
own responsibility and expense, delete or destroy immediately all
Software (including its copies), Media and Documentation.
12. Governing Law.
This Agreement shall be governed by and construed in accordance
with laws of Japan.
Do not attempt to play the CD-ROM enclosed
with this product on an audio CD player.
Doing so could damage your hearing or
could damage your speakers or headphones.
Please note that this Guide is written on the assumption that you
already have a basic understanding of how to use your PC
(personal computer), Windows and Macintosh.
For basic information on using your PC, Windows and Macintosh,
refer to the respective manuals supplied with your PC.
• Microsoft and Windows are trademarks of the Microsoft
Corporation of the U.S. registered in the U.S. and other
countries. Windows is an abbreviated term referring to the
Microsoft Windows Operating System.
• Macintosh, iMac and Mac OS are registered trademarks of
Apple Computer, Inc.
• QuickTime and the QuickTime logo are trademarks used
under license. The QuickTime logo is registered in the U.S.
and other countries.
• Adobe Acrobat
®
Reader™, ActiveShare™ and PhotoDeluxe
are trademarks of Adobe Systems Incorporated of the U.S.
• SmartMedia™ is a trademark of Toshiba Corporation.
• All other company or product names are trademarks or
registered trademarks of the respective companies.
32

Contents
■ SAFETY NOTES . . . . . . . . . . . . . . . . . . . . . . . . . . . . 1
■ MISCELLANEOUS NOTE . . . . . . . . . . . . . . . . . . . . . 2
■ IMPORTANT (End User License Agreement) . . . . . . 3
■ Contents . . . . . . . . . . . . . . . . . . . . . . . . . . . . . . . . . . 4
Try to print! . . . . . . . . . . . . . . . . . . . . . . . . . . . . . . . . . . . . . . . . . . . . . . . . . . . . . . . . . . . . . . . . . . . . . . 10
1
PREPARING THE PRINTER FOR USE . . . . . . . . . . . 10
Procuring the necessary materials . . . . . . . . . . . . . . . . . . . 10
Usable paper . . . . . . . . . . . . . . . . . . . . . . . . . . . . . . . . . . . 10
Installing the printer . . . . . . . . . . . . . . . . . . . . . . . . . . . . . . . 11
Language . . . . . . . . . . . . . . . . . . . . . . . . . . . . . . . . . . . . . . 11
LOAD THE PRINTING PAPER . . . . . . . . . . . . . . . . . . 12
Loading the paper . . . . . . . . . . . . . . . . . . . . . . . . . . . . . . . . 12
TURN ON THE POWER AND LOAD THE MEMORY
■ Introduction . . . . . . . . . . . . . . . . . . . . . . . . . . . . . . . . 6
Feature/System Configuration . . . . . . . . . . . . . . . . . . . . . . . . 6
CHECKING THE CONTENTS OF THE CARTON . . . . . . . . . 7
Name and Operation of Each Part . . . . . . . . . . . . . . . . . . . . 8
SELECTING THE PHOTOGRAPHS AND PRINTING
Select the picture to be printed . . . . . . . . . . . . . . . . . . . . . . 15
Setting the print quantity . . . . . . . . . . . . . . . . . . . . . . . . . . . 15
Printing . . . . . . . . . . . . . . . . . . . . . . . . . . . . . . . . . . . . . . . . 15
AT THE END OF PRINTING . . . . . . . . . . . . . . . . . . . . 16
Removing the memory card . . . . . . . . . . . . . . . . . . . . . . . . 16
Turning off the printer power . . . . . . . . . . . . . . . . . . . . . . . . 16
Removing and storing the paper . . . . . . . . . . . . . . . . . . . . 16
CARD . . . . . . . . . . . . . . . . . . . . . . . . . . . . . . . . . . . . . 13
Turning on the printer power . . . . . . . . . . . . . . . . . . . . . . . . 13
Loading SmartMedia™ . . . . . . . . . . . . . . . . . . . . . . . . . . . . 13
Loading a PC card . . . . . . . . . . . . . . . . . . . . . . . . . . . . . . . 14
Enjoy various printing! . . . . . . . . . . . . . . . . . . . . . . . . . . . . . . . . . . . . . . . . . . . . . . . . . . . . . . . . . . . . 18
2
DISPLAY OF PICTURE SWITCHING/PRINT SIZE
SETTING . . . . . . . . . . . . . . . . . . . . . . . . . . . . . . . . . . . 18
Switching the display of picture. . . . . . . . . . . . . . . . . . . . . . 18
Setting print size by printer button . . . . . . . . . . . . . . . . . . . 18
Setting print size by window operation . . . . . . . . . . . . . . . . 18
ALL FRAMES PRINT . . . . . . . . . . . . . . . . . . . . . . . . . 20
Print setting . . . . . . . . . . . . . . . . . . . . . . . . . . . . . . . . . . . . . 20
Setting print sets . . . . . . . . . . . . . . . . . . . . . . . . . . . . . . . . 21
MULTIPLE PRINT . . . . . . . . . . . . . . . . . . . . . . . . . . . . 22
Setting multiple print . . . . . . . . . . . . . . . . . . . . . . . . . . . . . . 22
Multiple print (same picture) . . . . . . . . . . . . . . . . . . . . . . . . 23
Multiple print (random picture - each frame) . . . . . . . . . . . 24
Multiple print (random picture - layout) . . . . . . . . . . . . . . . . 25
Multiple print (random picture - all frames) . . . . . . . . . . . . . 26
INDEX PRINT . . . . . . . . . . . . . . . . . . . . . . . . . . . . . . . 27
Setting index print . . . . . . . . . . . . . . . . . . . . . . . . . . . . . . . . 27
Index print (all frames) . . . . . . . . . . . . . . . . . . . . . . . . . . . . 28
Index print (set range) . . . . . . . . . . . . . . . . . . . . . . . . . . . . . 29
ID PRINT . . . . . . . . . . . . . . . . . . . . . . . . . . . . . . . . . . . 30
Setting ID print . . . . . . . . . . . . . . . . . . . . . . . . . . . . . . . . . . 30
Other methods of use . . . . . . . . . . . . . . . . . . . . . . . . . . . . . . . . . . . . . . . . . . . . . . . . . . . . . . . . . . . . . 40
3
OTHERS SETTINGS . . . . . . . . . . . . . . . . . . . . . . . . . 40
Startup mode . . . . . . . . . . . . . . . . . . . . . . . . . . . . . . . . . . . . 40
Various settings . . . . . . . . . . . . . . . . . . . . . . . . . . . . . . . . . . 40
Auto quality adjustment . . . . . . . . . . . . . . . . . . . . . . . . . . . . 41
ID SETTINGS . . . . . . . . . . . . . . . . . . . . . . . . . . . . . . . 32
ID settings . . . . . . . . . . . . . . . . . . . . . . . . . . . . . . . . . . . . . . 32
Set paper size . . . . . . . . . . . . . . . . . . . . . . . . . . . . . . . . . . . 32
Set frame size . . . . . . . . . . . . . . . . . . . . . . . . . . . . . . . . . . . 32
Set number of frame . . . . . . . . . . . . . . . . . . . . . . . . . . . . . . 33
Setting check . . . . . . . . . . . . . . . . . . . . . . . . . . . . . . . . . . . 33
Try printing at the registered settings . . . . . . . . . . . . . . . . . 33
DPOF PRINT . . . . . . . . . . . . . . . . . . . . . . . . . . . . . . . . 34
DPOF print . . . . . . . . . . . . . . . . . . . . . . . . . . . . . . . . . . . . . . 34
EDIT/PRINT QUALITY . . . . . . . . . . . . . . . . . . . . . . . . 35
Setting the Edit/Print Quality menu . . . . . . . . . . . . . . . . . . . 35
Zoom rate/Move position . . . . . . . . . . . . . . . . . . . . . . . . . . . 35
Rotation . . . . . . . . . . . . . . . . . . . . . . . . . . . . . . . . . . . . . . . . 36
Effect . . . . . . . . . . . . . . . . . . . . . . . . . . . . . . . . . . . . . . . . . . 36
Cancel edit . . . . . . . . . . . . . . . . . . . . . . . . . . . . . . . . . . . . . 37
Print quality . . . . . . . . . . . . . . . . . . . . . . . . . . . . . . . . . . . . . 37
OTHER PRINT SETTINGS . . . . . . . . . . . . . . . . . . . . . 38
Print settings . . . . . . . . . . . . . . . . . . . . . . . . . . . . . . . . . . . . 38
Set data print . . . . . . . . . . . . . . . . . . . . . . . . . . . . . . . . . . . . 39
Set border . . . . . . . . . . . . . . . . . . . . . . . . . . . . . . . . . . . . . . 39
Image display order . . . . . . . . . . . . . . . . . . . . . . . . . . . . . . 42
Setting slide show . . . . . . . . . . . . . . . . . . . . . . . . . . . . . . . . 42
LCD monitor brightness adjustment . . . . . . . . . . . . . . . . . . 43
Initialize settings . . . . . . . . . . . . . . . . . . . . . . . . . . . . . . . . . 43
. . 15
Installation on a Windows PC . . . . . . . . . . . . . . . . . . . . . . . . . . . . . . . . . . . . . . . . . . . . . . . . . . . . . . . 57
6
PRE-INSTALLATION CHECKLIST . . . . . . . . . . . . . . . 57
Hardware and software requirements (Windows) . . . . . . . . 57
LOAD THE CD-ROM INTO YOUR PC . . . . . . . . . . . . 58
FROM FinePixViewer INSTALLATION
TO RESTART . . . . . . . . . . . . . . . . . . . . . . . . . . . . . . . 59
INSTALL THE PRINTER DRIVER . . . . . . . . . . . . . . . 60
DISCONNECTING THE PRINTER . . . . . . . . . . . . . . . 62
CONNECTING THE PRINTER AS A CARD READER
Windows 98/98 SE/Me . . . . . . . . . . . . . . . . . . . . . . . . . . . . 63
Windows XP . . . . . . . . . . . . . . . . . . . . . . . . . . . . . . . . . . . . 64
DISCONNECTING THE CARD READER . . . . . . . . . . 65
Acrobat Reader INSTALLATION . . . . . . . . . . . . . . . . . 66
CONNECTING THE PRINTER . . . . . . . . . . . . . . . . . . 61
Windows 98/98 SE/Me . . . . . . . . . . . . . . . . . . . . . . . . . . . . 61
Windows XP . . . . . . . . . . . . . . . . . . . . . . . . . . . . . . . . . . . . 62
Printing from Windows . . . . . . . . . . . . . . . . . . . . . . . . . . . . . . . . . . . . . . . . . . . . . . . . . . . . . . . . . . . . 67
7
PRINTING FROM FinePixViewer . . . . . . . . . . . . . . . . 67
Uninstalling the software . . . . . . . . . . . . . . . . . . . . . . . . . . . . . . . . . . . . . . . . . . . . . . . . . . . . . . . . . . 70
8
UNINSTALLING FinePixViewer AND USB MASS
UNINSTALLING THE PRINTER DRIVER . . . . . . . . . . 71
STORAGE DRIVER . . . . . . . . . . . . . . . . . . . . . . . . . . 70
Troubleshooting (Windows) . . . . . . . . . . . . . . . . . . . . . . . . . . . . . . . . . . . . . . . . . . . . . . . . . . . . . . . . 72
9
TROUBLESHOOTING TABLE . . . . . . . . . . . . . . . . . . 72
INSTALLATION PROBLEMS . . . . . . . . . . . . . . . . . . . 73
PRINTER PROBLEMS . . . . . . . . . . . . . . . . . . . . . . . . 75
Installation on a Mac OS . . . . . . . . . . . . . . . . . . . . . . . . . . . . . . . . . . . . . . . . . . . . . . . . . . . . . . . . . . . 80
10
PRE-INSTALLATION CHECKLIST . . . . . . . . . . . . . . . 80
Hardware and software requirements (Macintosh) . . . . . . . 80
CHECKING THE OS SETTINGS . . . . . . . . . . . . . . . . 81
Macintosh Windows
Enable File Exchange . . . . . . . . . . . . . . . . . . . . . . . . . . . . . 81
FROM FinePixViewer INSTALLATION
TO RESTART . . . . . . . . . . . . . . . . . . . . . . . . . . . . . . . 82
MEMORY CARD PROBLEMS . . . . . . . . . . . . . . . . . . 76
APPLICATION PROBLEMS . . . . . . . . . . . . . . . . . . . . 78
INTERNET PROBLEMS . . . . . . . . . . . . . . . . . . . . . . . 79
CONNECTING THE PRINTER . . . . . . . . . . . . . . . . . . 84
DISCONNECTING THE PRINTER . . . . . . . . . . . . . . . 84
CONNECTING THE PRINTER AS A CARD READER
DISCONNECTING THE CARD READER . . . . . . . . . . 86
Acrobat Reader INSTALLATION . . . . . . . . . . . . . . . . . 87
FROM PRINTER DRIVER INSTALLATION
TO RESTART . . . . . . . . . . . . . . . . . . . . . . . . . . . . . . . 83
Printing from the Macintosh . . . . . . . . . . . . . . . . . . . . . . . . . . . . . . . . . . . . . . . . . . . . . . . . . . . . . . . . 88
11
PRINTING FROM FinePixViewer . . . . . . . . . . . . . . . . 88
Setting the printer . . . . . . . . . . . . . . . . . . . . . . . . . . . . . . . . 88
Uninstalling the software . . . . . . . . . . . . . . . . . . . . . . . . . . . . . . . . . . . . . . . . . . . . . . . . . . . . . . . . . . 91
12
UNINSTALLING THE SOFTWARE . . . . . . . . . . . . . . . 91
Uninstalling Mass Storage Driver . . . . . . . . . . . . . . . . . . . . 91
Printing from the Macintosh . . . . . . . . . . . . . . . . . . . . . . . . 88
Uninstalling Exif Launcher and FinePixViewer . . . . . . . . . . 91
Uninstalling printer driver . . . . . . . . . . . . . . . . . . . . . . . . . . 92
. . . 63
. . . 85
When trouble occurs . . . . . . . . . . . . . . . . . . . . . . . . . . . . . . . . . . . . . . . . . . . . . . . . . . . . . . . . . . . . . . 44
4
HEAD CLEANING . . . . . . . . . . . . . . . . . . . . . . . . . . . . 44
Executing head cleaning . . . . . . . . . . . . . . . . . . . . . . . . . . 44
PRINTER BODY . . . . . . . . . . . . . . . . . . . . . . . . . . . . . 45
WHEN DATA IS DISPLAYED ON THE LCD MONITOR
Definition of terms . . . . . . . . . . . . . . . . . . . . . . . . . . . . . . . . . . 51
Maintenance . . . . . . . . . . . . . . . . . . . . . . . . . . . . . . . . . . . . . . . 51
WHEN AN ERROR IS DISPLAYED ON THE LCD
MONITOR . . . . . . . . . . . . . . . . . . . . . . . . . . . . . . . . . . 46
Using with a PC . . . . . . . . . . . . . . . . . . . . . . . . . . . . . . . . . . . . . . . . . . . . . . . . . . . . . . . . . . . . . . . . . . 52
5
INSTALLATION WORKFLOW . . . . . . . . . . . . . . . . . . 52
GLOSSARY OF TERMS . . . . . . . . . . . . . . . . . . . . . . . 54
INTRODUCTION TO ACCESSORY SOFTWARE . . . 53
. . 48
Troubleshooting (Macintosh) . . . . . . . . . . . . . . . . . . . . . . . . . . . . . . . . . . . . . . . . . . . . . . . . . . . . . . . 93
13
TROUBLESHOOTING TABLE . . . . . . . . . . . . . . . . . . 93
INSTALLATION PROBLEMS . . . . . . . . . . . . . . . . . . . 94
PRINTER PROBLEMS . . . . . . . . . . . . . . . . . . . . . . . . 94
Specifications . . . . . . . . . . . . . . . . . . . . . . . . . . . . . . . . . . . . . . 98
MEMORY CARD PROBLEMS . . . . . . . . . . . . . . . . . . 95
APPLICATION PROBLEMS . . . . . . . . . . . . . . . . . . . . 96
INTERNET PROBLEMS . . . . . . . . . . . . . . . . . . . . . . . 97
54
Introduction
TV monitor
Video cable
✽
Personal Computer with USB
as a standard feature
Digital Camera
Notebook PC SmartMedia
PC card PC card
adapter
Windows®98/98 SE/Me/XP
Mac OS 8.6 to 9.2
OS
USB
Card reader
USB
Printer
✽ Use a video cable less
than 3.0 m long.
USB cable
✽
✽ Use a USB cable less than 3.0 m long.
Introduction
Feature/System Configuration
The CX-400 is equipped with a LCD (liquid crystal) monitor. By merely operating the printer in accordance with the
directions displayed on the monitor screen, you can enjoy the following:
■ Easily print digital camera picture data!
Memory card picture data can be directly printed.
When full-size prints are printed, borderless printing is
possible.
When printing, various photo finishing can also be performed.
For more information, see page 10.
■ Use as a printer by connecting to a PC!
Use the CX-400 as a printer by connecting it to a PC using a
USB cable.
For more information, see page 52.
● System Configuration
■ Connect the CX-400 to a PC and read the
memory card data!
The CX-400 can be connected to a PC using a USB cable and
the data of SmartMedia or PC card can be read.
For more information, see page 52.
■ All your family can enjoy pictures by
connecting the CX-400 to a television set!
Picture data can be viewed on a big screen by connecting the
CX-400 to a television set.
The viewing area may be different from that displayed on the
LCD monitor depending on the television set.
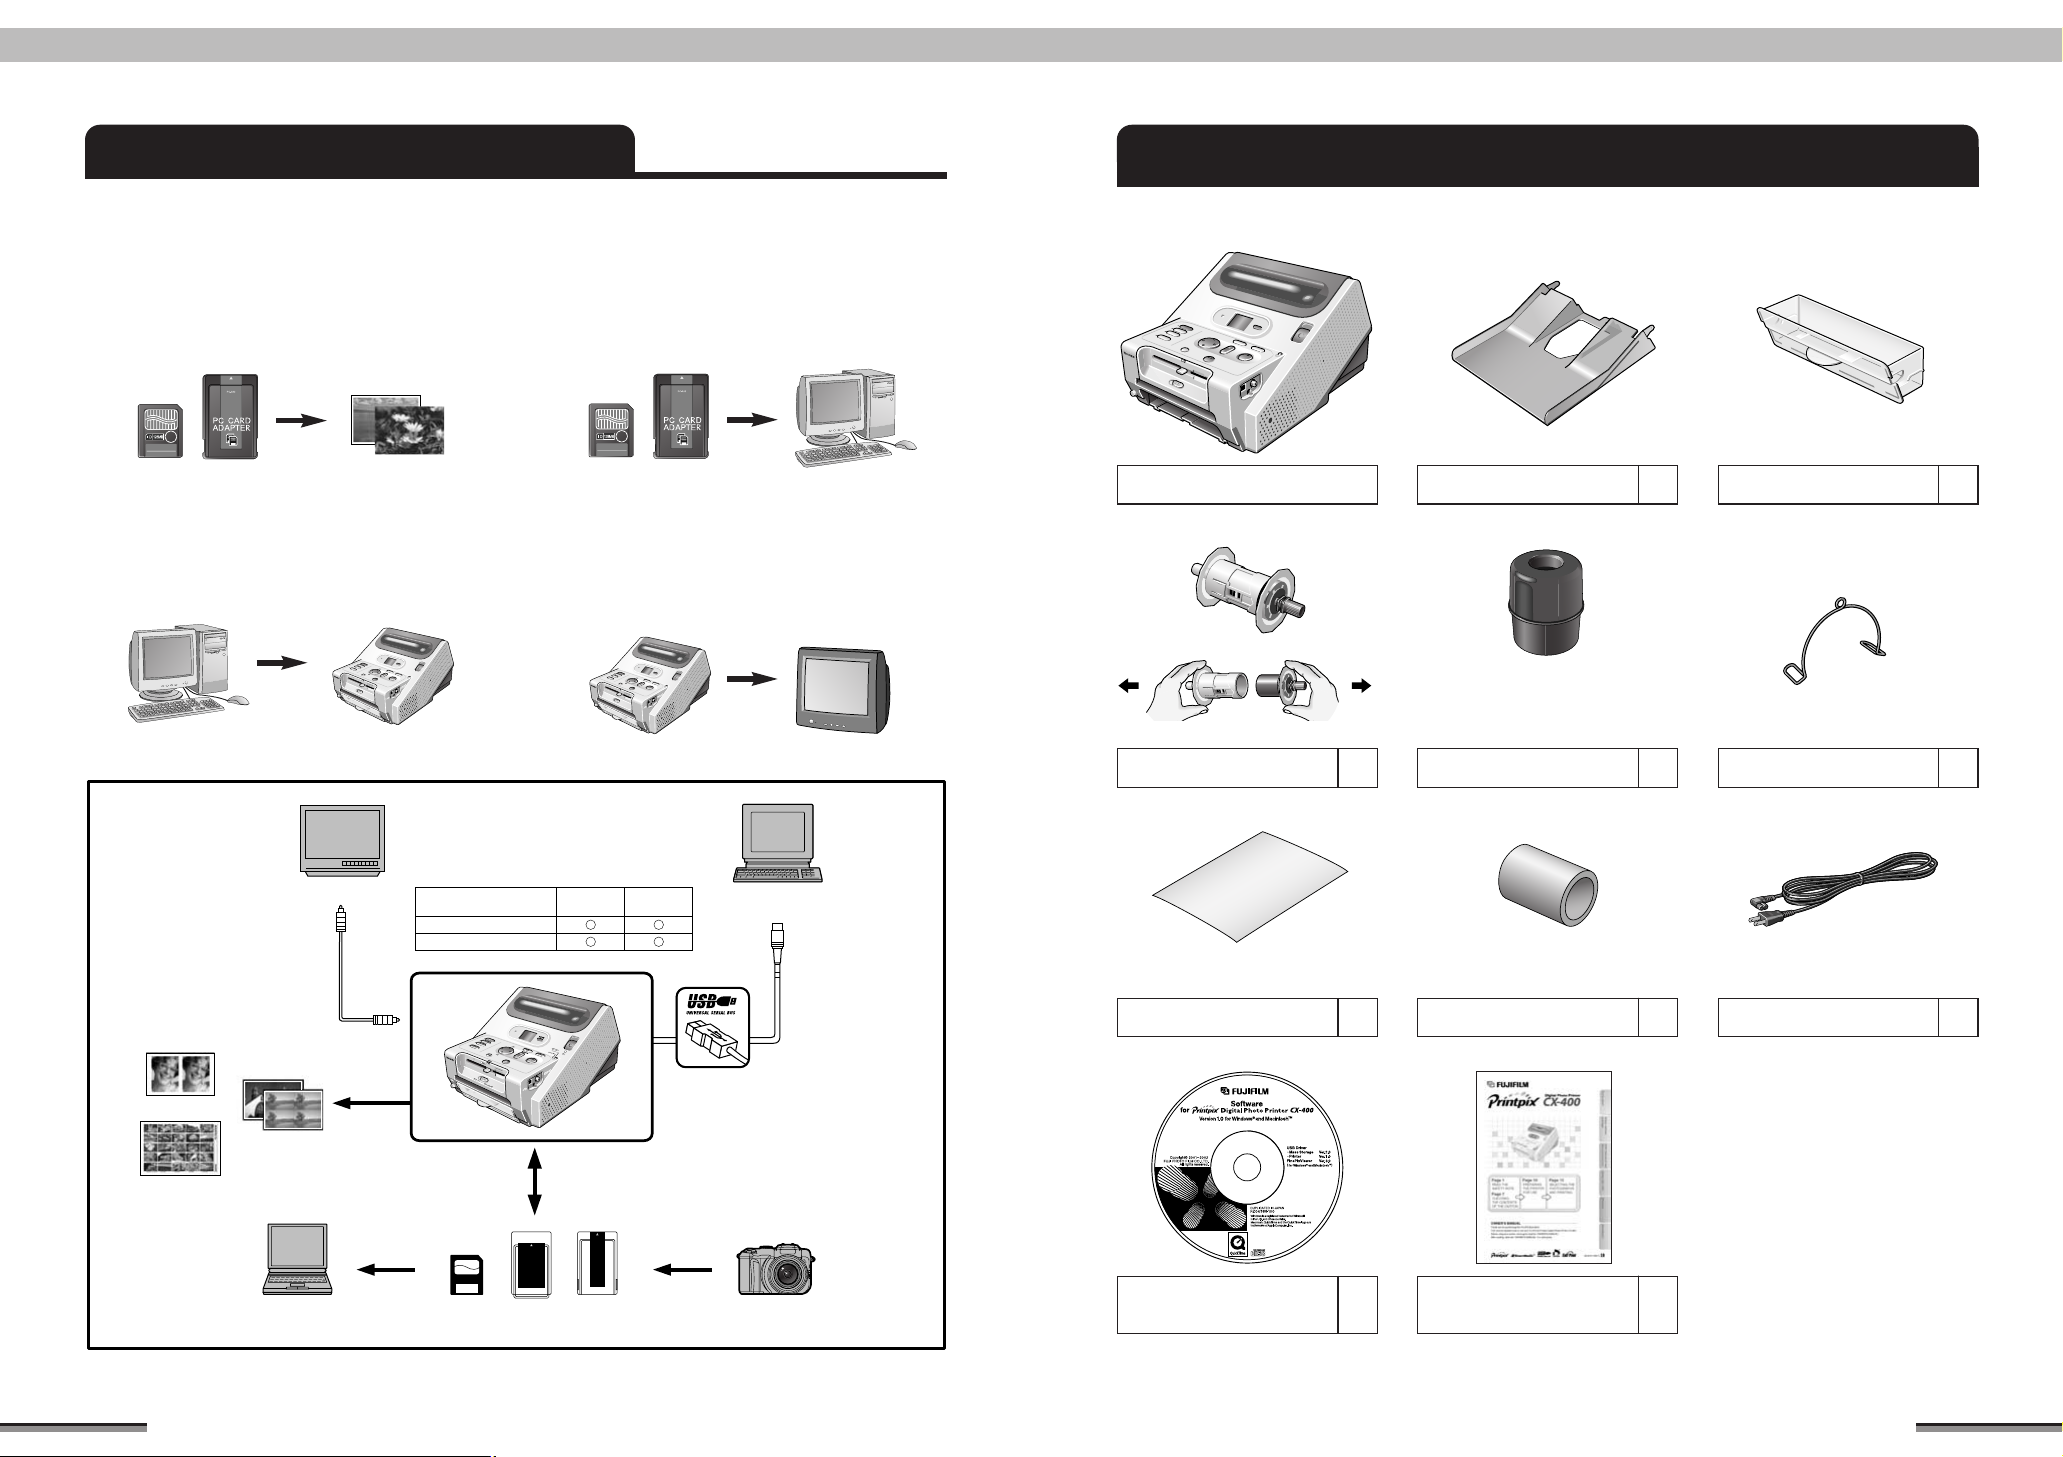
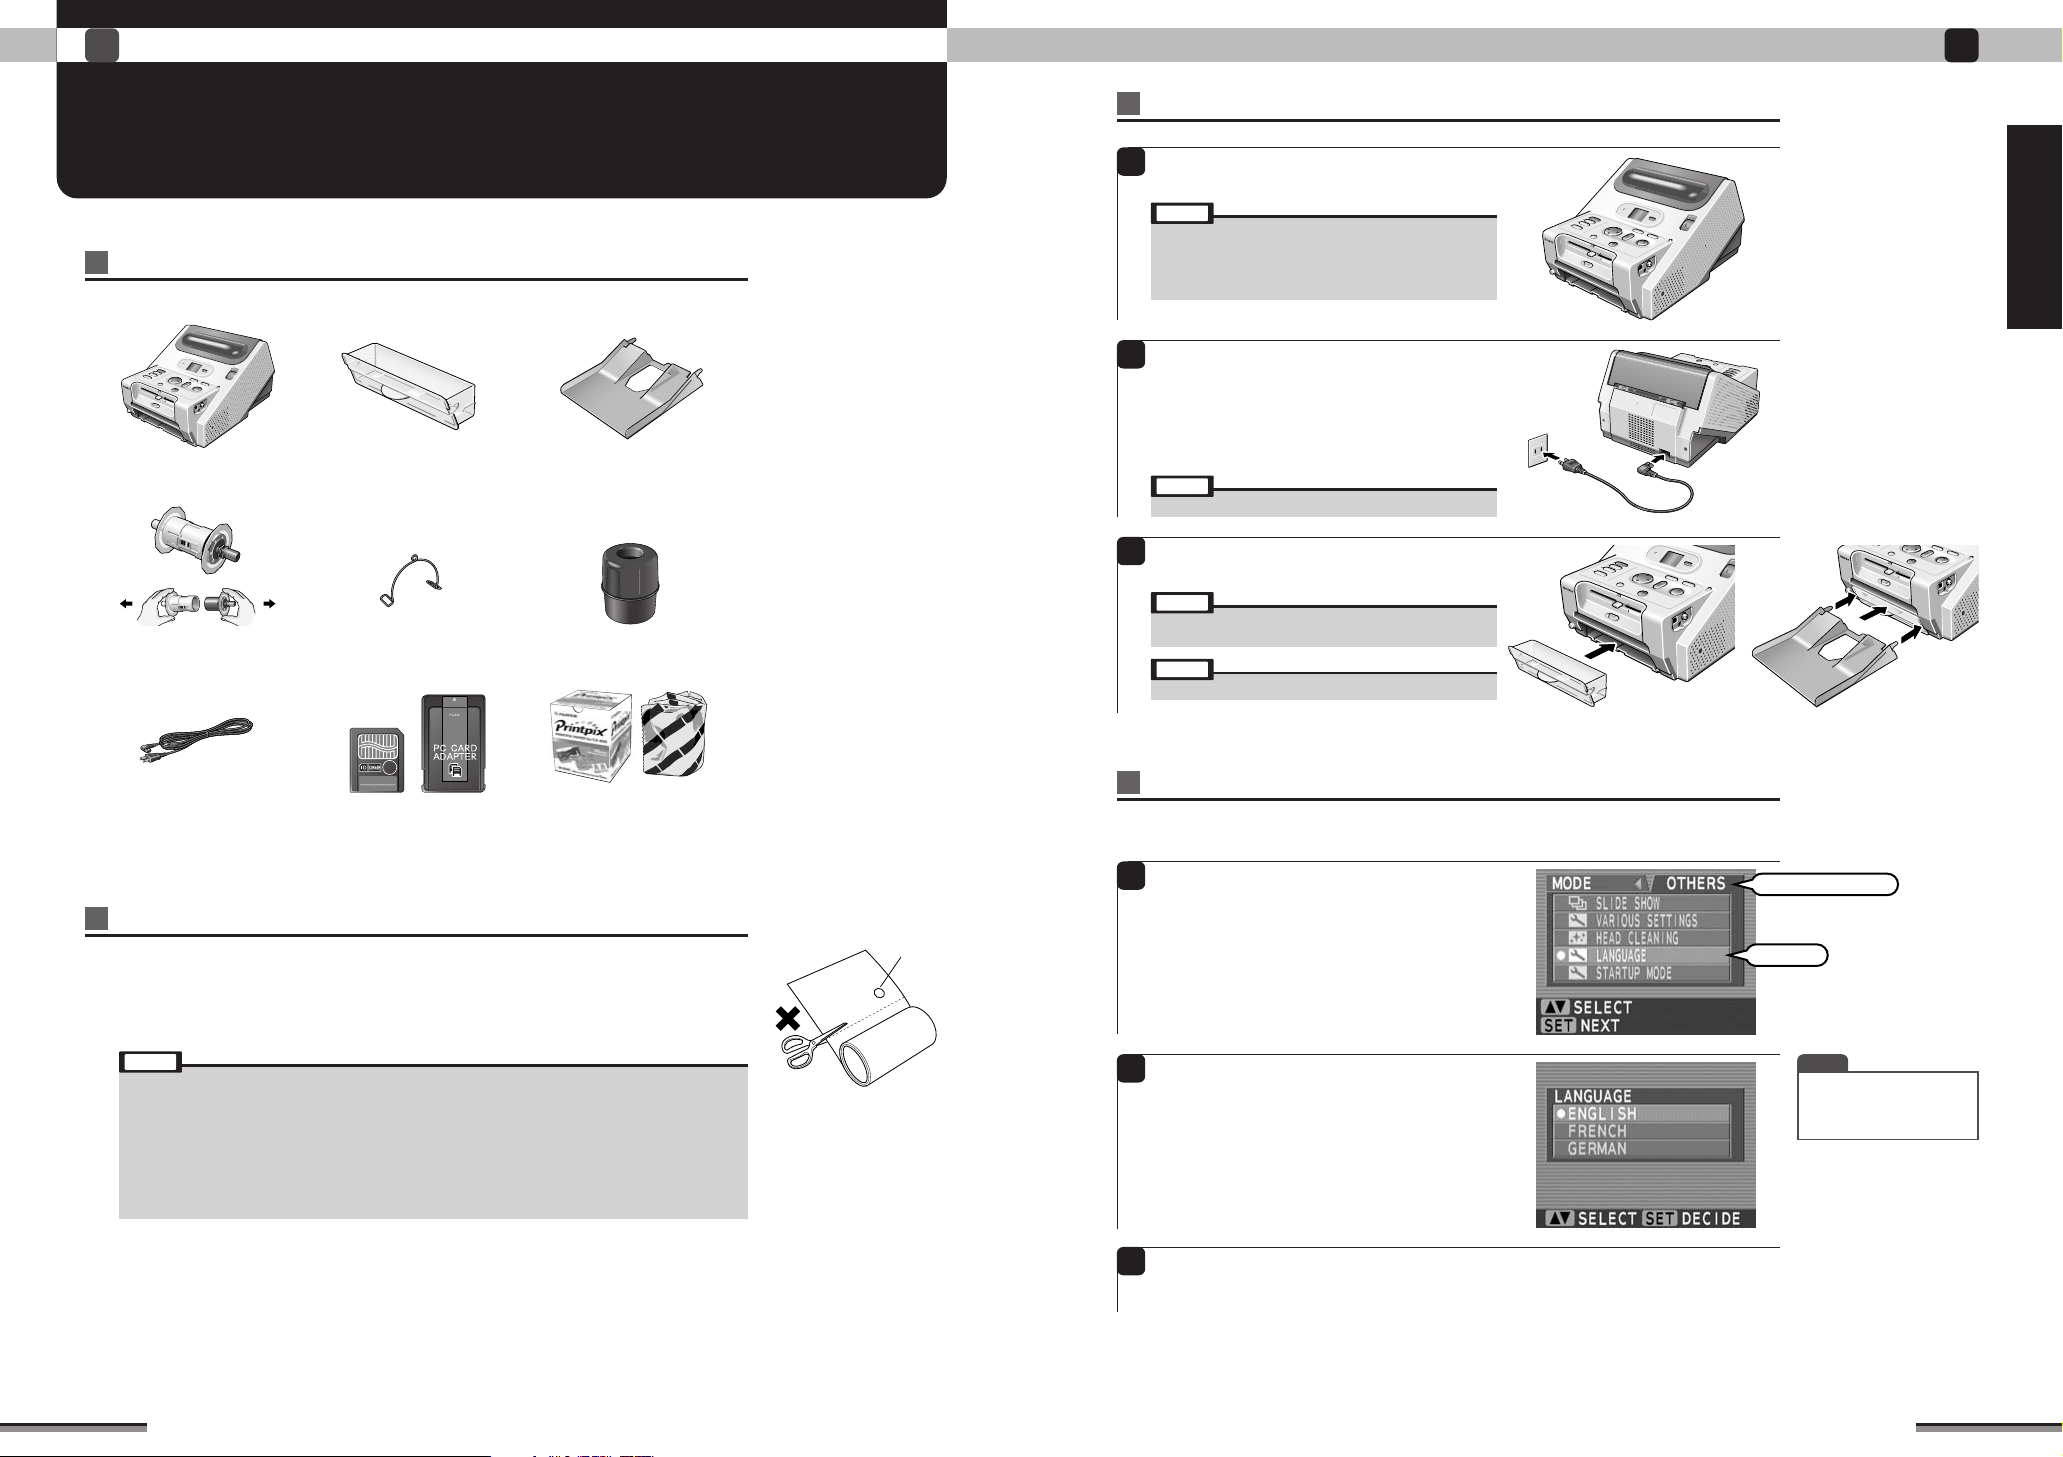
CHECKING THE CONTENTS OF THE CARTON
If there are any missing or damaged parts, please contact your dealer.
Always install the trash box.
Printer Paper tray 1 Trash box 1
After printing, always place the
paper into the paper case and
store it (→P. 17).
Paper holder 1 Paper case 1 Retaining ring 1
6
Use when cleaning the head (→P. 44).
Cleaning paper 1
CD-ROM
Software for Printpix Digital Photo
Printer CX-400
1
Cleaning paper core
Owner’s Manual
(this manual)
✽ The type of power cord and plug
depends on the country.
1 Power cord 1
1
7
Introduction
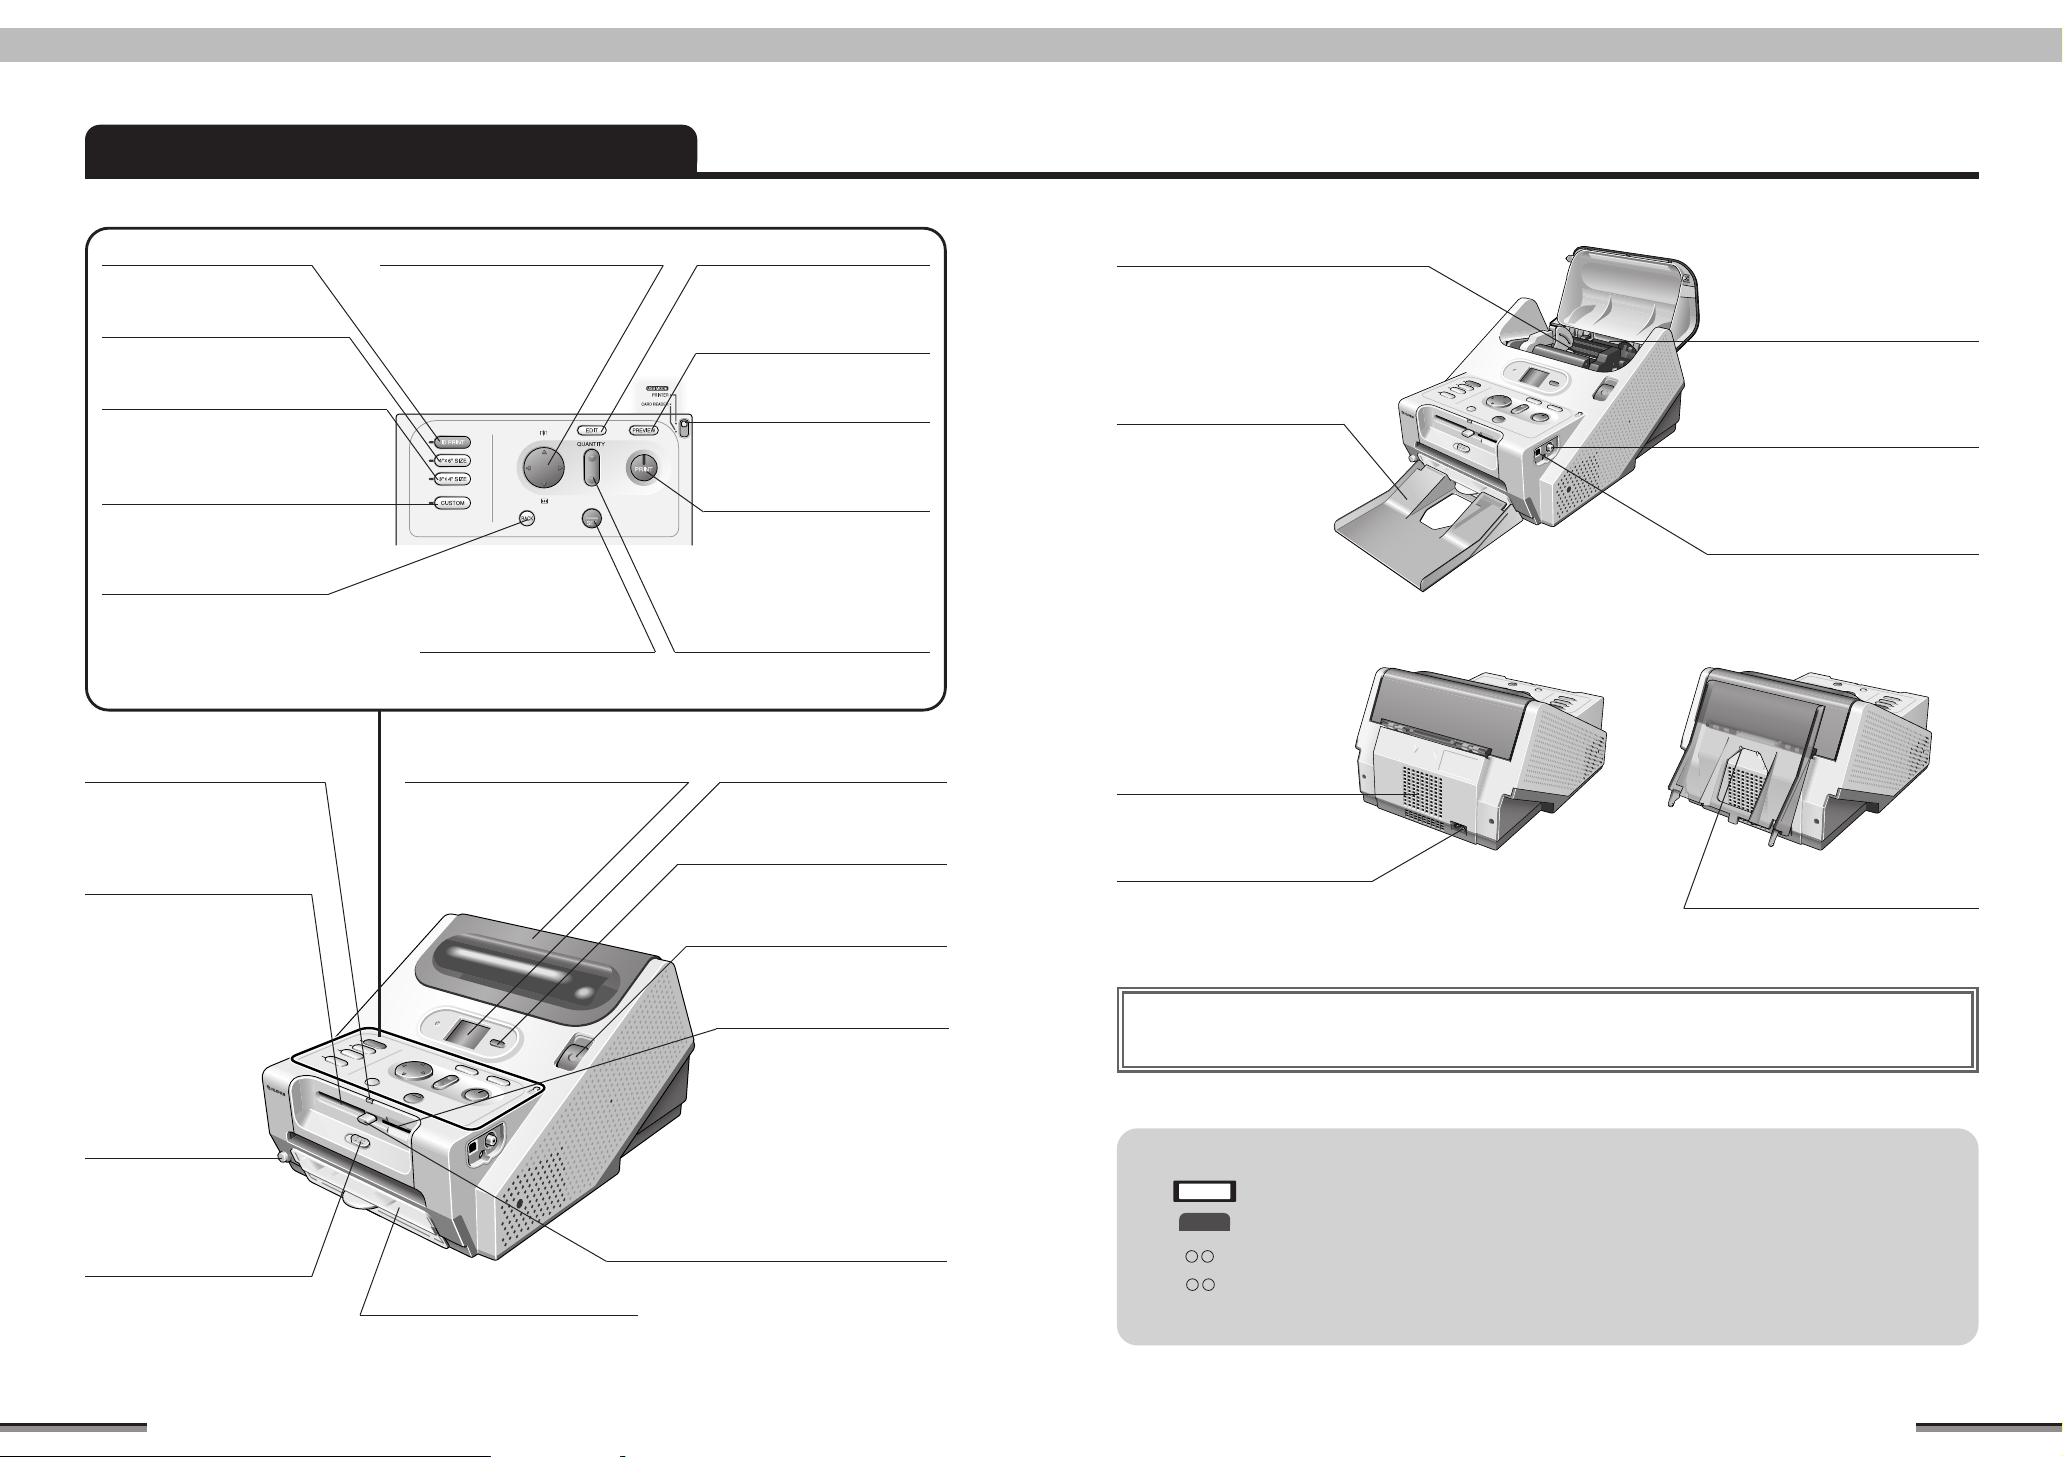
Name and Operation of Each Part
Introduction
● [ID PRINT] button
Press to switch print to [ID
print].
● [4” × 6” SIZE] button
Press to switch the print size
×
6” size].
to [4”
● [3” × 4” SIZE] button
Press to switch the print
size to [3” × 4” size].
● [CUSTOM] button
Press when specifying the print
mode and when making various
settings.
● [BACK] button
Press to return to the last
picture and to interrupt
operation.
● [BUSY] lamp
Blinks or lights when the
SmartMedia or PC card is
operating.
● PC card slot
A PC card inserts into this slot.
This slot can be used when the
card select lever is in the [PC
CARD] position.
✽ Insert the PC card until it
clicks.
● [POWER] button
Press to turn the
printer power on and
off.
● Card select lever
Switch this lever when loading
a SmartMedia or PC card into
the printer.
● Direction buttons: abdc
Use to select the menu and picture
and to change the picture zoom rate.
● [SET] button
Press to set the setting
contents and picture.
● Paper compartment cover
Open when loading and
unloading the paper roll.
Make sure to use the
printer with this cover
closed.
● Trash box
Receives the cuttings while
printing.
● [EDIT] button
Press to perform the photo
finish and print quality
functions.
● [PREVIEW] button
Press to check the print
contents.
● [USB MODE] switch
Switch according to the
function when the printer is
connected to a PC.
● [PRINT] button
Press to perform printing.
When the picture, quantity
of prints, etc. are set and
printing is possible, the
lamp lights steadily. During
printing, the lamp blinks.
● [QUANTITY] button : [+] [-]
Use to set the print number (set
number).
●
LCD (Liquid crystal monitor)
Displays the operation menus
and the pictures in the memory
card.
● [DISPLAY] button
Press to switch the Display of
picture between 1 frame display
and 9 frames display.
● [OPEN] button
Press to open the paper
compartment cover.
● SmartMedia slot
A SmartMedia card inserts into
this slot.
This slot can be used when the
card select lever is in the
[SmartMedia] position.
✽ Insert the SmartMedia card
until it clicks.
● [EJECT] button
Press to remove the SmartMedia
or PC card.
✽ Press this button until the
SmartMedia or PC card is
completely ejected.
● Paper holder slot
The paper holder fits here.
● Paper alignment position
Use to align the top edge of the
paper when loading the paper.
● Paper tray
Holds the printed paper.
● Picture output terminal
(video output)
Connects to a television set
using a video cable.
● USB terminal
(PC connection)
Connects the USB cable
(commercial part) when
connecting the printer to a PC.
● Ventilation holes
Exhaust the printer heat.
Do not block these holes.
● Power input terminal
Connects the power cable.
● Paper tray hook
■ Screen saver : This function prevents burning of the LCD monitor screen. When the display does
not change within 20 minutes, the monitor enters the screen saver mode. When any
button is pressed, the monitor returns to the original window.
■ Owner’s Manual symbols
: Precautions to be observed during operation.
Note
: More suitable usage method and operation points.
TIP
“ ” : Represents the name of the menu or window displayed on the LCD monitor.
[ ] : Represents the name of a printer button.
✽ In this manual, “memory card” refers to both SmartMedia and PC card.
8
9
1
Use c to select
Select
Try to print!
Try to print!
1
PREPARING THE PRINTER FOR USE
Use the printer after checking the accessories (→P. 7).
Procuring the necessary materials
Before starting to print, always procure the following items:
Printer Trash box Paper tray
Paper holder Retaining ring
Paper case
Installing the printer
Install the printer.
1
Set the printer on a flat, wide surface.
Note
• Place the printer far enough from a wall so that the
ventilation holes are not blocked.
• When the paper is loaded, the paper compartment cover
opens upward. Therefore, provide a free space of far enough
above the printer.
Connect the power cord to the printer.
2
Connect one end of the accessory power cord to
the power input terminal on the back of the
printer.
Plug the other end of the power cord into a
power outlet.
Note
• Do not turn on the printer power yet.
Install the trash box and paper tray to the printer.
3
Note
• Always install the trash box.
• Do not turn on the printer power yet.
Note
• Do not obstruct the paper outlet or grab the paper.
Try to print!
✽ The type of power cord and
plug depends on the country.
Power cord
Memory card
(Sold separately)
(SmartMedia™ (PC card))
Paper
(Sold separately)
Usable paper
Printpix Paper (Sold separately)
This printer uses roll type paper.
● Photo Type (100 mm/4 in. wide): RK-SD40
This is normal photo type paper.
Note
• Be sure that the paper retaining ring is installed.
• After use, always place the paper into the paper case.
• After using the printer, always place the paper into the paper case and store it avoiding the following locations:
- Where it is dry, where the humidity is high, or where it is dusty.
- In a vehicle in the summer, near heating equipment, and other places where the temperature is high.
- Near a window or other places where the paper will be exposed to direct sunlight or strong light.
• Paper with the protective bag unsealed cannot be stored for a long time. Use it as quickly as possible.
• Do not use paper whose effective date is expired.
• When the paper curls immediately after printing, it will flatten naturally if left alone.
• Do not drop the paper and damage the corners. It will cause the paper to jam.
Paper end hole
● Paper
When the printer detects the
paper end holes, it judges
that there is no more paper
and does not print any
farther. Do not cut off and use
this part. It will cause paper
jamming and printer trouble.
Language
The language displayed on the LCD monitor can be switched among “ENGLISH”, “FRENCH” and
“GERMAN”. The language display setting is saved even when the printer power is turned off. (→P. 40)
Press the [CUSTOM] button at the top of the
1
printer.
After using c to select “OTHERS”, use ab to
select “LANGUAGE” and press the [SET] button.
Use ab to select the desired language.
2
ENGLISH: English language display
FRENCH: French language display
GERMAN: German language display
When the [SET] button is pressed at the end of
3
setting, the monitor returns to the “OTHERS”
window.
TIP
• Initial setting is “ENGLISH”.
• The language display setting
is saved even when the
printer power is turned off.
10
11
1
Try to print!
1
Try to print!
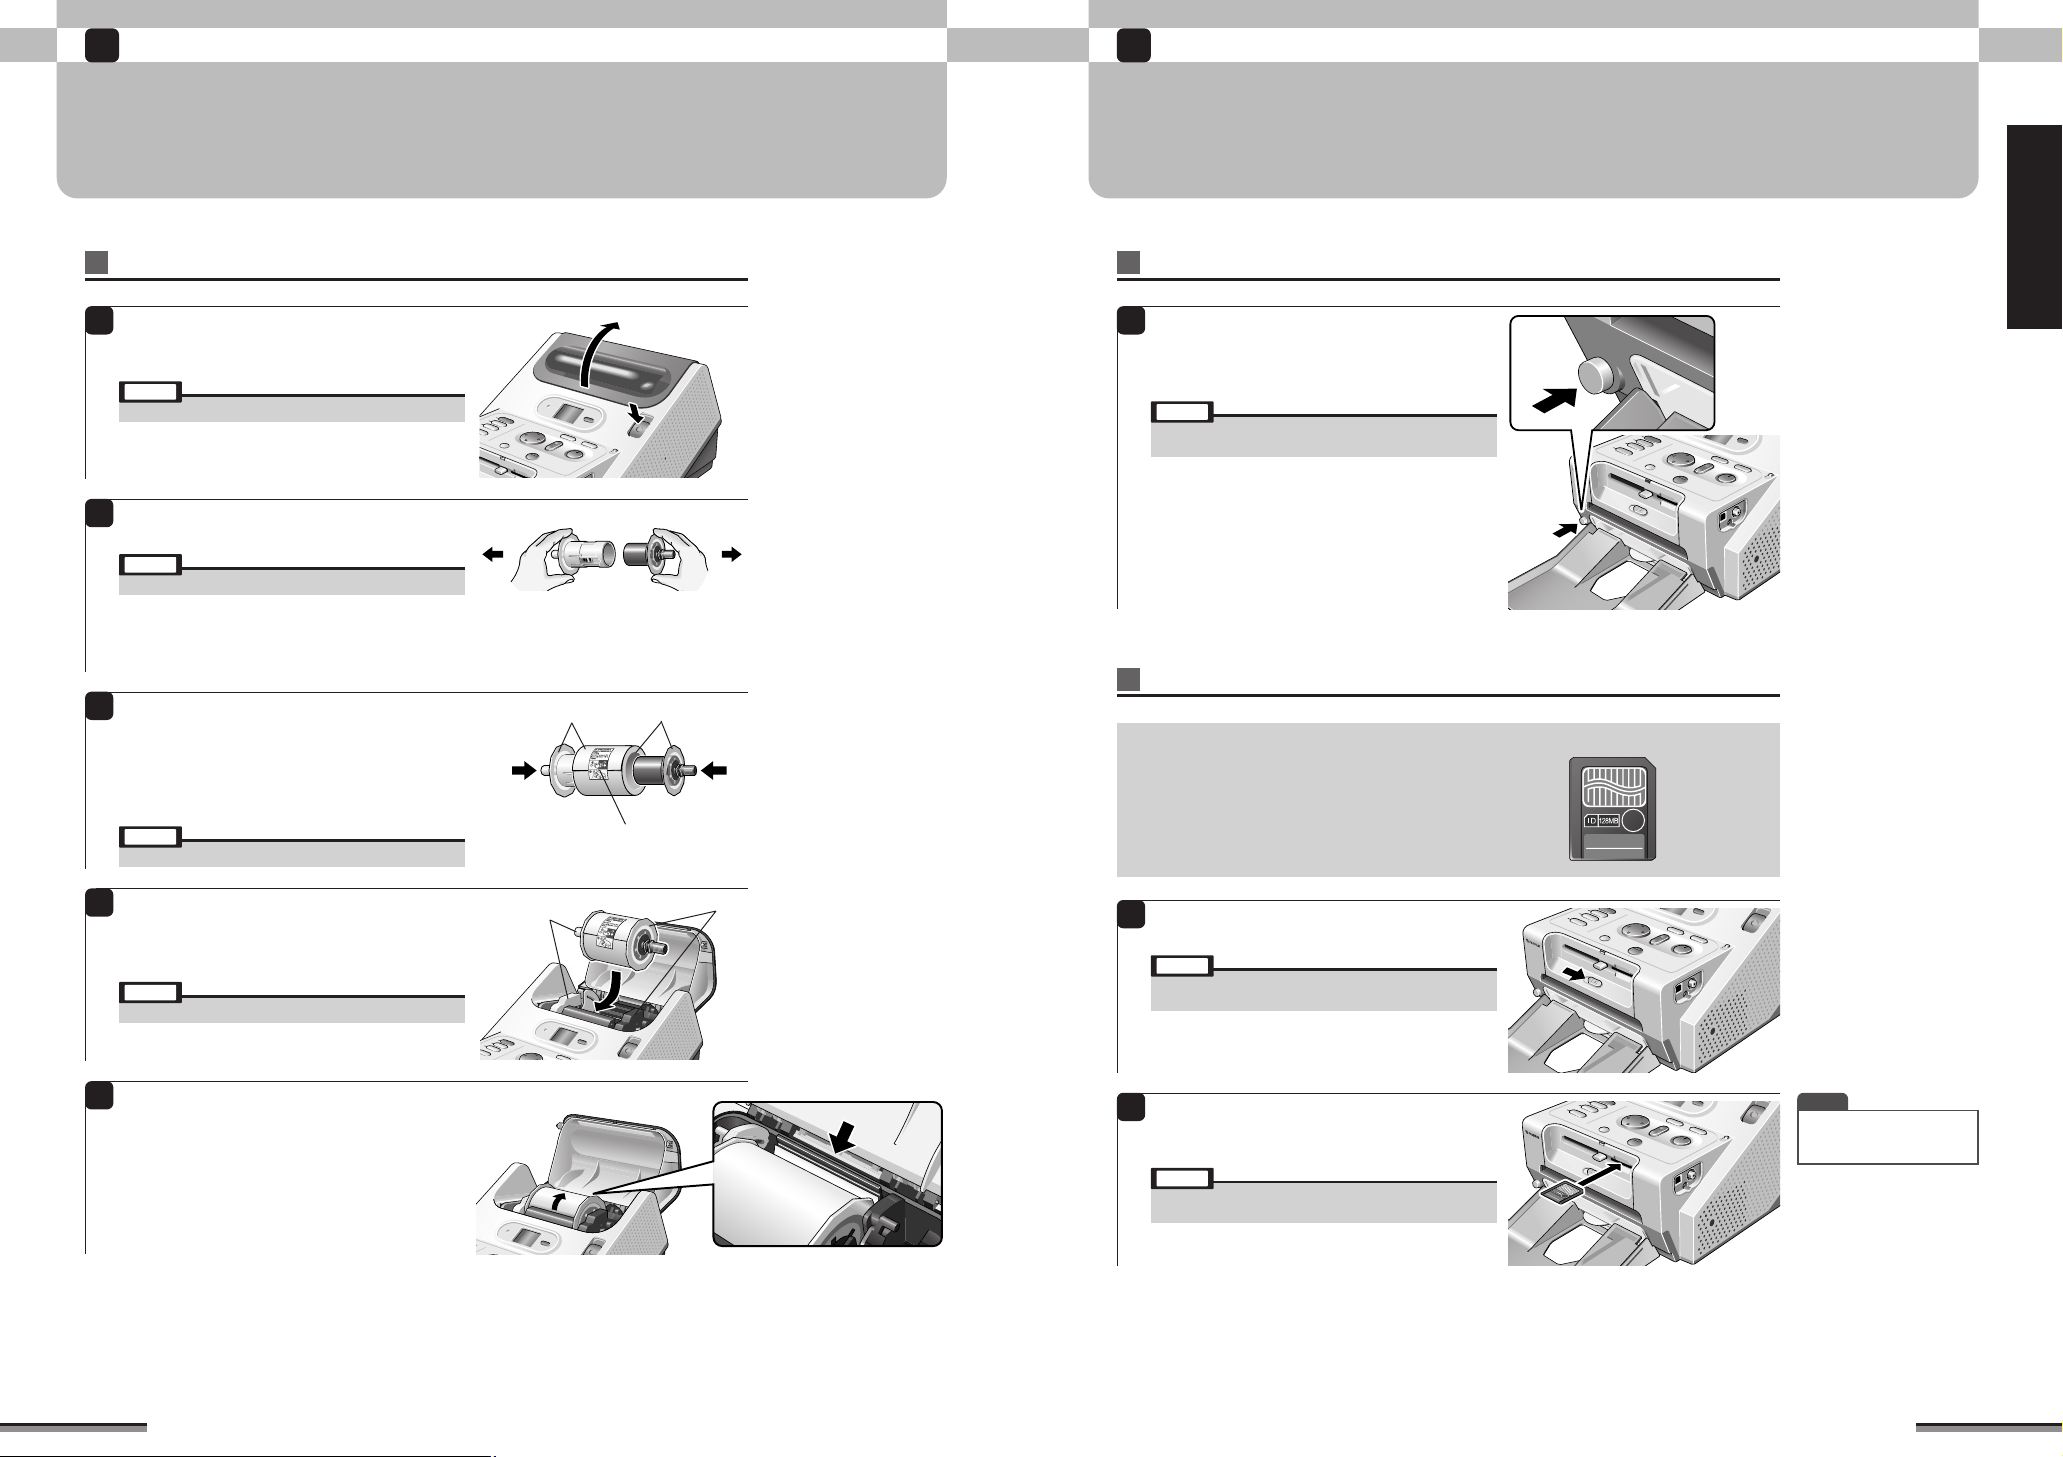
LOAD THE PRINTING PAPER
Place the roll type paper onto the paper holder before loading the paper into the printer.
The printer automatically recognizes the type of paper.
Loading the paper
Open the paper compartment cover.
1
Press the [OPEN] button at the upper right-hand
side of the printer.
Note
• Do not turn on the printer power yet.
Separate the paper holder to two parts, white
2
and black.
Note
• Do not turn on the printer power yet.
Remove the printing paper from the moisture-
3
proof bag and insert the paper holders.
q Insert the white paper holder into the white end of
the paper core.
w Insert the black paper holder into the black end of
the paper core.
Note
• Do not peel the paper holding sticker from the paper yet.
White
qw
Paper holding sticker
Black
TURN ON THE POWER AND LOAD THE MEMORY CARD
Insert the memory card after turning on the printer power. The CX-400 can print the data of
SmartMedia and PC card. Insert the memory card to be used.
Turning on the printer power
Press the [POWER] button at the bottom front
1
left-hand corner of the printer.
The printer power comes on and a window
appears on the LCD monitor screen.
Note
• Do not disconnect the power cord or remove the memory
card during printing.
Loading SmartMedia
Usable SmartMedia
Capacity: 2 MB, 4 MB, 8 MB, 16 MB, 32 MB,
64 MB, 128 MB
Voltage: 3.3 V
• The printer will not allow 5 V SmartMedia cards to be inserted
into the SmartMedia slot. Use a PC card adapter.
• Use a digital camera to format the SmartMedia.
TM
Try to print!
Grasp the paper holder knob and place the
4
paper holder into the printer.
Insert the paper holder into the printer from the
top and pull it gently to the front.
Note
• Do not peel the paper holding sticker from the paper yet.
Peel the paper holding sticker from the paper
5
and adjust the paper position.
Turn the paper in the arrow direction, and align
the top edge of the paper to the paper alignment
position.
After loading the paper, close the paper
compartment cover.
12
White
Black
Select [SmartMedia] by sliding the card select
1
lever at the front center of the printer to the right.
Note
• SmartMedia and PC card cannot be loaded into the printer at
the same time
Insert the SmartMedia into the SmartMedia slot
2
with the power supply section (gold-colored area)
upwards and push it in until it clicks.
Note
• Do not touch the power supply section (gold-colored area) of
the SmartMedia card.
TIP
• When the [BUSY] lamp is
off, the memory card can be
removed at any time.
13
1
Select
Try to print!
1
Try to print!
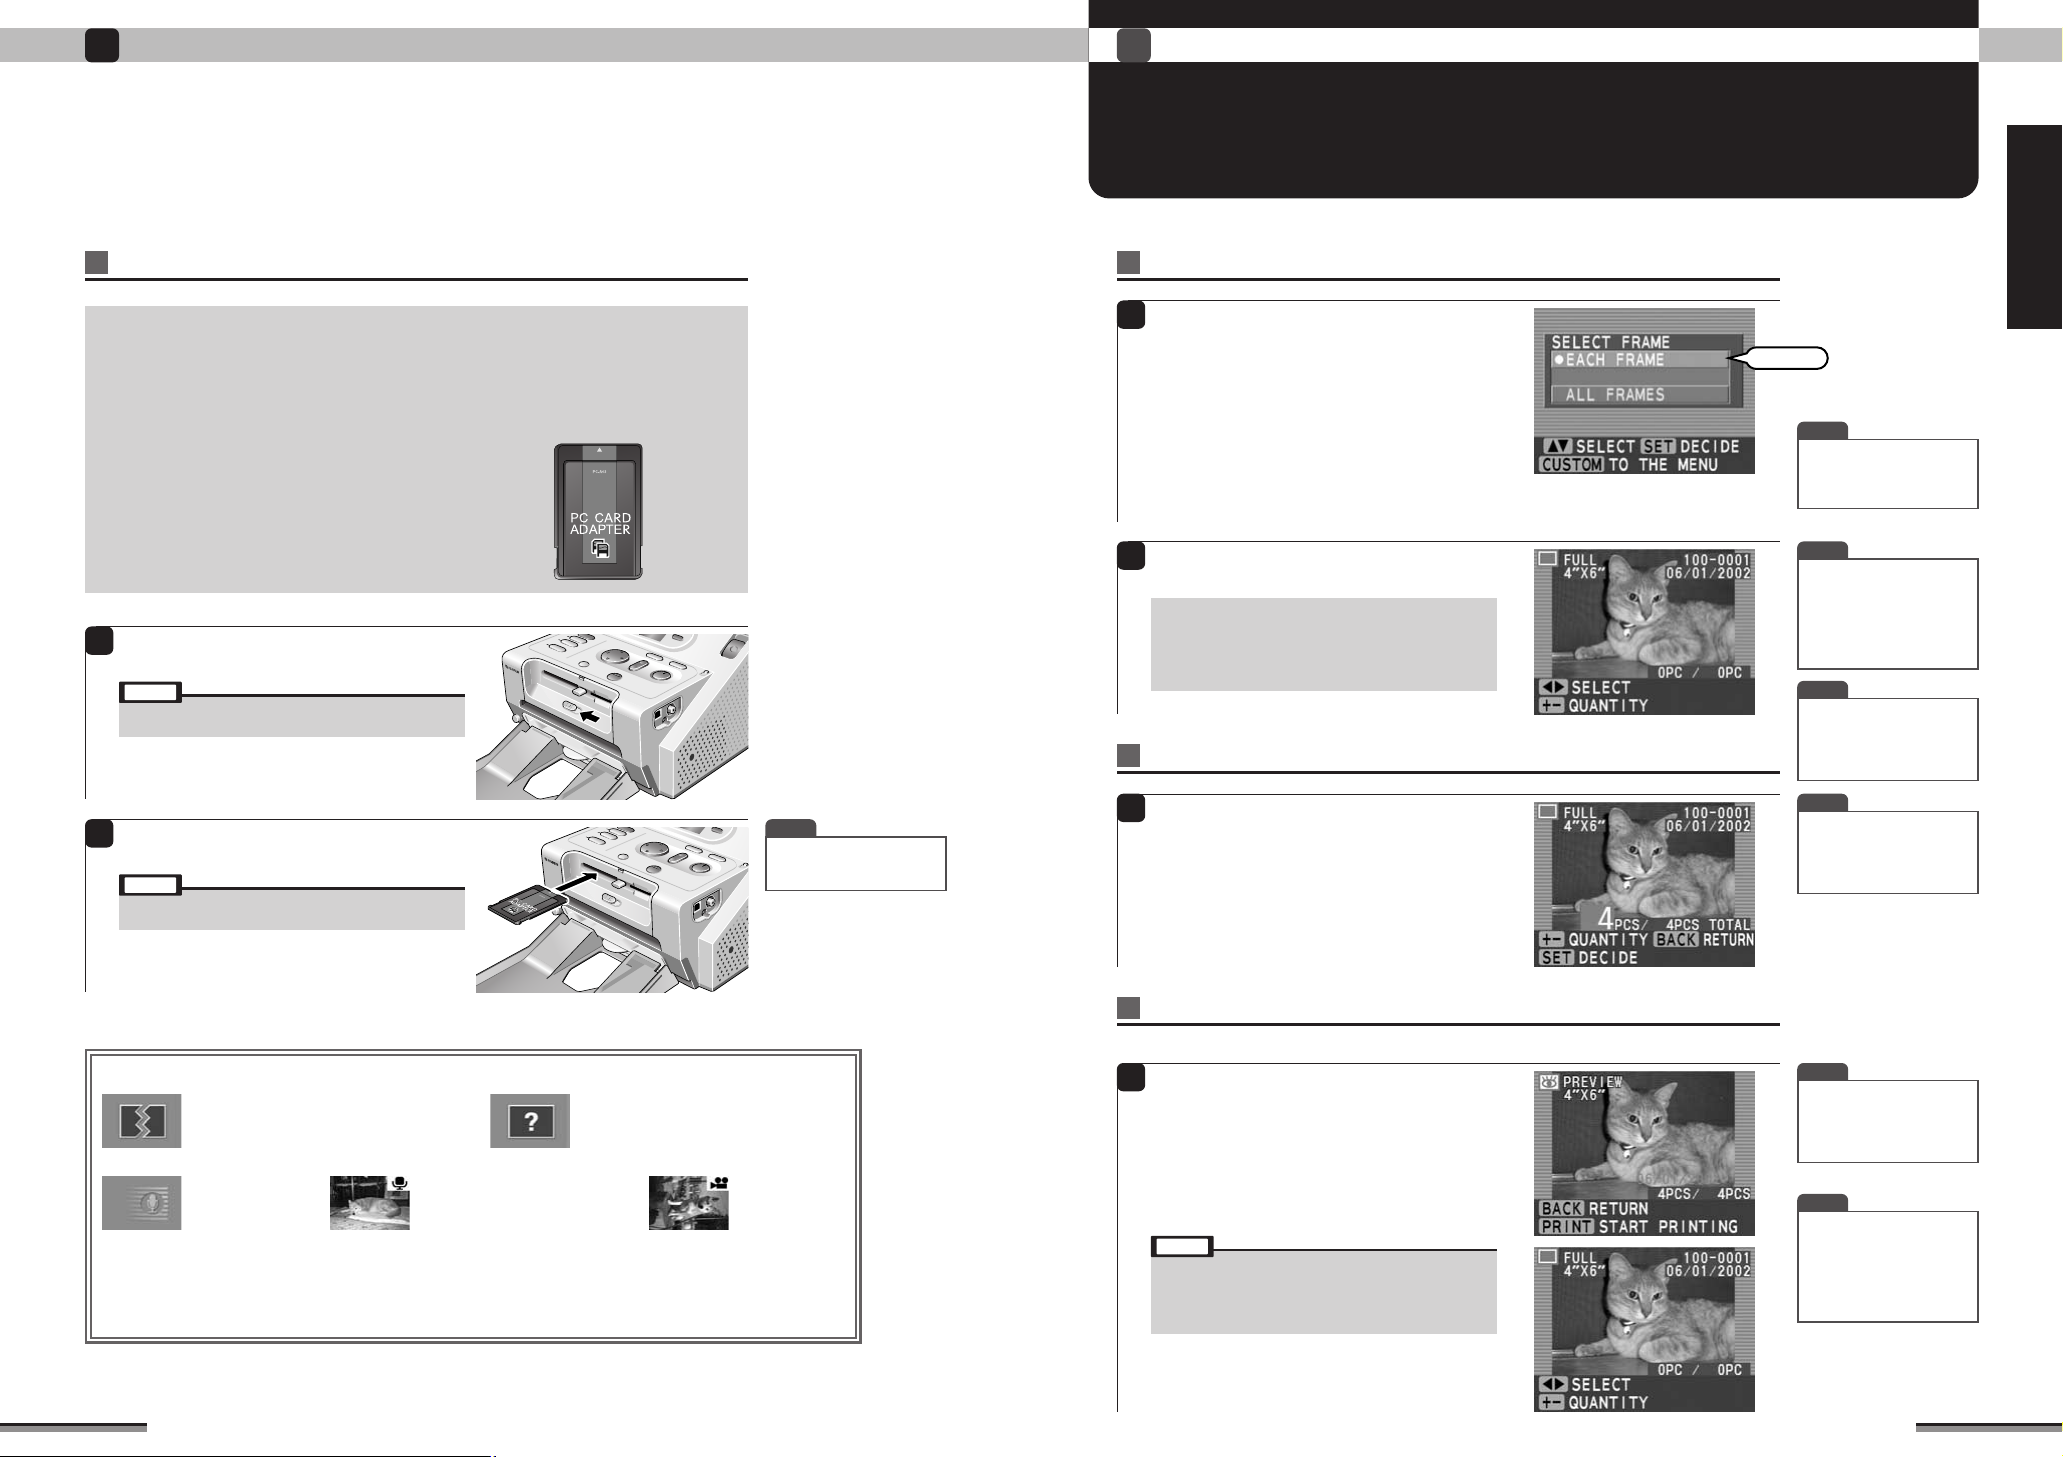
Usable PC cards
Always use a PC card corresponding to PCMCIA TYPE I/II Standard compliant
ATA.
The following cards are automatically recognized.
Various memory cards can be used by using a PC card adapter matched to the
memory card.
• Microdrive only PC card adapter (IBM, MELCO, FUJIFILM)
• PC card adapter MSAC PC2 for memory stick (SONY)
• PC card adapter for CompactFlash (SUNTEX)
• PC card adapter for SD card (MATSUSHITA ELECTRIC)
• PC card adapter PC-AD3 for SmartMedia (FUJIFILM)
✽ Use a PC to format SmartMedia.
• Windows 98/98 SE/Me: Normal format
• Windows XP: FAT
• Macintosh: DOS format
Select [PC card] by sliding the card select lever
1
at the front center of the printer to the left.
Note
• SmartMedia and PC card cannot be loaded into the printer at
the same time.
SELECTING THE PHOTOGRAPHS
AND PRINTING
Select the picture to be printedLoading a PC card
When a memory card is loaded, the “SELECT
1
FRAME” window is displayed. Use ab to select
“EACH FRAME”, and press the [SET] button.
EACH FRAME:
The pictures on the memory card are displayed on
the monitor screen one frame at a time. Each frame
can be selected.
ALL FRAMES:
The pictures on the memory card are displayed on
the monitor screen in batches of 9 frames each. All
the frames can be selected (→P. 20).
The picture window is displayed. Use dc to
2
select the picture you want to print.
When the “STARTUP MODE” setting is “FULL”
(→P. 40), the monitor can be returned to this
window by pressing the [BACK] button for 3
seconds or longer.
Setting the print quantity
TIP
• When there is DPOF data,
pictures are printed in
accordance with the DPOF
data (→P. 34).
TIP
•
When the image is 4 frames or
more, and dcis pressed for
1 second or longer, the image
is quick scrolled. However, for
files other than Exif (JPEG,
TIFF-YC/RGB), only image
type characters are displayed.
TIP
• When the LCD monitor is
difficult to view, adjust the
brightness by pressing the
[DISPLAY] button for 2
seconds.
Try to print!
Insert the PC card fully into the slot with the front
2
of the card facing upward.
Note
• When using a PC card adapter, install the memory card to
the adapter in advance.
TIP
• When the [BUSY] lamp is
off, the memory card can be
removed at any time.
■ The following files cannot be printed in the full print, multi print and ID print modes:
Destroyed file
Files of supportable format, but since the picture
was destroyed, they cannot be displayed.
Supportable formats : Page 98 (Specifications)
Voice file
Cannot be printed.
PRINT ALL PICTURES (→P. 20):
The number of prints is counted for files that cannot be printed, but the files are not printed.
INDEX PRINT (→P. 27):
Icons are printed depending on the kind of picture. See page 27.
Picture file with voice memory
Can be printed.
Unknown file
File other than supportable format.
Cannot be displayed.
Supportable formats : Page 98 (Specifications)
Picture file (AVI)
Cannot be printed.
Use the [QUANTITY] [+] [-] buttons to set the
1
print quantity.
After setting the print quantity, press the [SET]
button.
Printing
Note: Do not pull out the trash box while printing.
Press the [PREVIEW] button and check the
1
pictures to be printed and the quantity of prints.
If the preview contents are correct, press the
[PRINT] button.
The Printing window is displayed and printing is
started. At the end of printing, the paper ejects from
the printer and the monitor returns to the picture
window.
Note
• Do not touch the moving paper while printing.
• Do not remove the memory card while printing.
• Do not pull out the trash box while printing.
• When an error window or information window is displayed,
refer to pages 46 to 50.
TIP
•
You can specify any quantity
of pictures to be printed. If
you want to print more
pictures, select consecutive
pictures and set print quantity.
TIP
• When the [BACK] button is
pressed before printing is
executed, the monitor is
returned to the picture
window.
TIP
• When dc is pressed when
plural pictures were selected,
only the picture being printed
is displayed.
• To halt printing during multipicture printing, press the
[BACK] button.
14
15

1
Retaining ring
click
Try to print!
Try to print!
1
AT THE END OF PRINTING
Removing and storing the printing paper.
Removing the memory card
Press the [EJECT] button and remove the
1
memory card.
Note
• Do not remove the memory card while the [BUSY] lamp is lit
or blinking.
• Do not touch the power supply section (gold colored area) of
the SmartMedia card.
• When using a PC card adapter, always remove it by pressing
the [EJECT] button. (Do not remove only the memory card in
the PC card adapter.)
Turning off the printer power
Press the [POWER] button at the front bottom
1
left-hand corner of the printer.
The LCD monitor and the printer power are
turned off.
Note
• When the printer power is off and when the memory card is
removed, the quantity and edit settings are cleared.
Removing and storing the paper
Remove the paper from the printer and store it in the paper case.
When the paper is not in use, always store it in the paper case.
Press the [OPEN] button at the top right-hand
1
side of the printer.
Open the paper compartment cover.
Grasp the paper holder knobs with both hands
3
and remove the holder from the printer.
Remove the paper holder after gently pushing it
to the back.
Note
• Be sure the retaining ring does not become detached from
the paper.
Remove the printing paper from the paper
4
holders.
q Remove the black paper holder.
w Remove the white paper holder.
Note
• Be sure the retaining ring does not become detached from
the paper.
Store the paper in the paper case.
5
Completely close the cover of the paper case
until it clicks and store it in a cool, dark place.
Note
• Be sure that the paper retaining ring is installed.
• After use, always place the paper into the paper case.
• After using the printer, always place the paper into the paper
case and store it while avoiding the following locations:
- Where it is dry, where the humidity is high, or where it is
dusty.
- In a vehicle in the summer, near heating equipment, and
other places where the temperature is high.
- Near a window or other places where the paper will be
exposed to direct sunlight or strong light.
• Paper with the protective bag sealed cannot be stored for a
long time. Use it as quickly as possible.
• Do not use paper whose effective date is expired.
After removing the paper, close the printer paper
compartment cover.
TIP
White Black
wq
• Leave the paper holder in
the printer in preparation for
the next use.
TIP
• Empty the scraps in the trash
box in preparation for the
next use.
✽ Close the cover of the
paper case completely.
Try to print!
Installing the retaining ring to the paper.
2
Install the retaining ring by pressing it firmly onto
the paper so that it will not become detached.
Note
• Always use the retaining ring to prevent the paper from
becoming loose. If the retaining ring is not used, the paper
will come loose and cause jamming the next time the printer
is used.
• Do not remove the paper holder yet.
16
Retaining ring
From the second printing, remove the retaining ring after loading the paper into the
6
printer.
This completes the basic operation.
To enjoy various printing, refer to page 18 to 39.
• How to open
Open while pressing the
bottom of the case with
your finger.
17

2
Typeof
Paper
Photo
Typ e
4” × 6” Size
100mm
×
148mm/3.9in.
×
5.8in.
74mm
×
100mm/2.9in.
×
3.9in.
100mm
×
120mm/3.9in.
×
4.7in.
100mm
×
133mm/3.9in.
×
5.2in.
100mm
×
148mm/3.9in.
×
5.8in.
100mm
×
178mm/3.9in.
×
7.0in.
3” × 4” Size
CD Jacket Size
4” × 5.2” OR 6”
4” × 7” Size
PrintSize
(Units mm/in.)
Button
4” × 6” SIZE
100mm
×
148mm/4in.
×
6in.
74mm
×
100mm/3in.
×
4in.
3” × 4” SIZE
Photo Type
100 mm wide
(Units mm/in.)
1 frame displayed
No text displayed
9 frames displayed
Select
Select
Enjoy various printing!
DISPLAY OF PICTURE SWITCHING/PRINT SIZE SETTING
This section introduces the Display of picture switching function. Enjoy printing of various sizes using
this printer.
Enjoy various printing!
2
Switching the display of picture
When the [DISPLAY] button is pressed, the
Display of picture is switched to 1 frame or 9
frames.
Setting print size by printer button
The print size can be changed by pressing the
1
printer buttons.
Setting print size by window operation
Various print sizes can be set by window operation.
Load the paper and memory card into the
1
printer, and press the [CUSTOM] button at the
top of the printer.
Use ab to select the preferred print mode, and
press the [SET] button.
The set print mode window is displayed.
2
Use ab to select “SIZE”, and press the [SET]
button.
Note
• The items that are displayed vary depending on the print
mode.
Use ab to select the preferred print size, and
3
press the [SET] button.
Note
• The items that are displayed vary depending on the print
mode and the type of paper loaded into the printer.
Note
• When the picture is to be photo finished, the message
“EDITING SPECIFIED FOR FRAME. CANCEL THE EDIT
SETTINGS?” is displayed.
The display returns to the Set print window.
4
Select “FINISH SETTINGS” and press the [SET]
button. The Selection of picture window of each
mode is displayed.
Note
• The items that are displayed vary dispending on the print
mode.
Enjoy various printing!
18
19
2
Select
Select
Select
Select
Enjoy various printing!
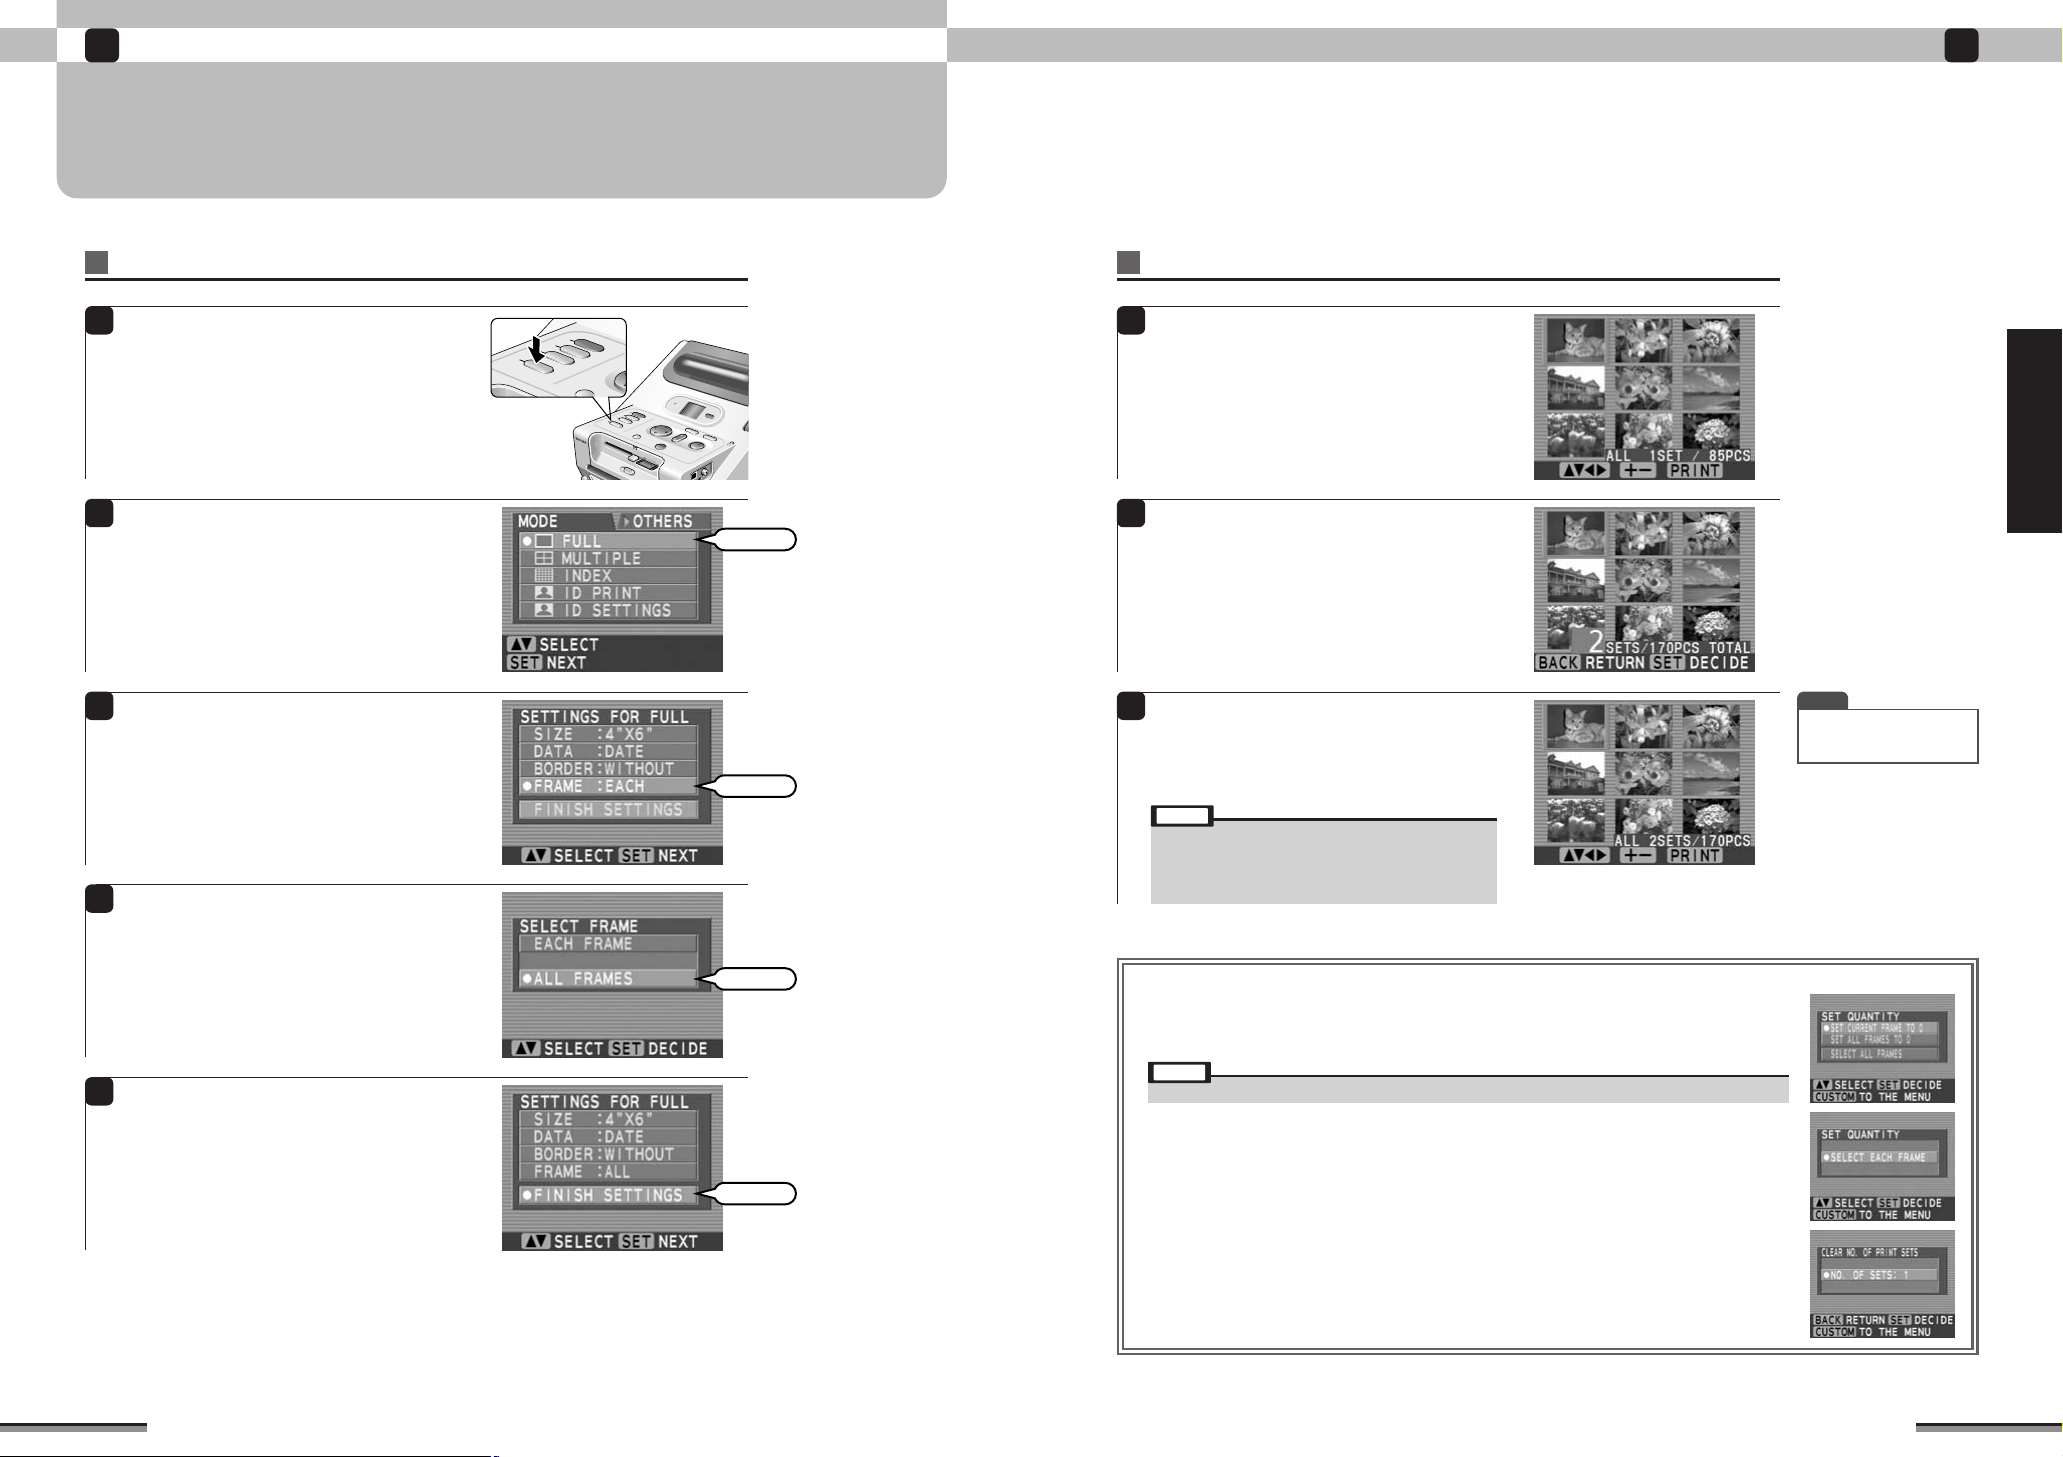
ALL FRAMES PRINT
Enjoy various printing!
2
Print setting
Load the paper and memory card into the
1
printer, and press the [CUSTOM] button at the
top of the printer.
Use ab to select “FULL”, and press the [SET]
2
button.
Use ab to select “FRAME”, and press the [SET]
3
button.
Use ab to select “ALL FRAMES”, and press the
4
[SET] button.
Setting print sets
The picture (9 frame) is displayed. Use abd c
6
to select the picture in the memory card.
Use the [QUANTITY] [+] [-] buttons to set the
7
print sets quantity.
After setting the sets quantity, press the [SET]
button.
Press the [PRINT] button.
8
The Printing window is displayed and printing is
started. At the end of printing, the paper ejects from
the printer and the monitor returns to the picture
window.
Note
• Do not touch the moving paper while printing.
• Do not remove the memory card while printing.
• Do not pull out the trash box while printing.
• When an error window or information window is displayed,
refer to pages 46 to 50.
TIP
• To halt printing while printing
multiple prints, press the
[BACK] button.
Enjoy various printing!
Use ab to select “ FINISH SETTINGS”, and
5
press the [SET] button.
20
■ Cancelling the print quantity (set quantity)
When the [BACK] button is pressed at the “after print quantity setting” window, the “SET
QUANTITY” window is displayed.
Use ab to the select the desired item, and press the [SET] button.
Note
• The item that is displayed varies depending on the print mode.
SET CURRENT FRAME TO 0: Sets the number of prints of the selected frame to 0.
SET ALL FRAMES TO 0: Sets the number of prints of all the frames to 0.
SELECT ALL FRAMES: Switches from the “EACH FRAME” mode to the “ALL FRAMES” mode.
SET EACH FRAME: Switches from the current “ALL FRAMES” mode to the “EACH FRAME” mode.
DESELECT THIS FRAME: Cancels the selected frame from the specification.
DESELECT ALL FRAMES: Cancels all the frames from the specification.
NO. OF SET: 1: Sets the quantity of print sets to be printed to 1.
DESELECT CHOSEN FRAME: Cancels the selected frames from the specification.
EXIT AND BACK TO MENU: Finishes frame selection and returns to menu.
BACK TO RANGE SETTING: Returns to frame selection zone determining.
21
2
Select
Select
Select
Enjoy various printing!
Enjoy various printing!
2
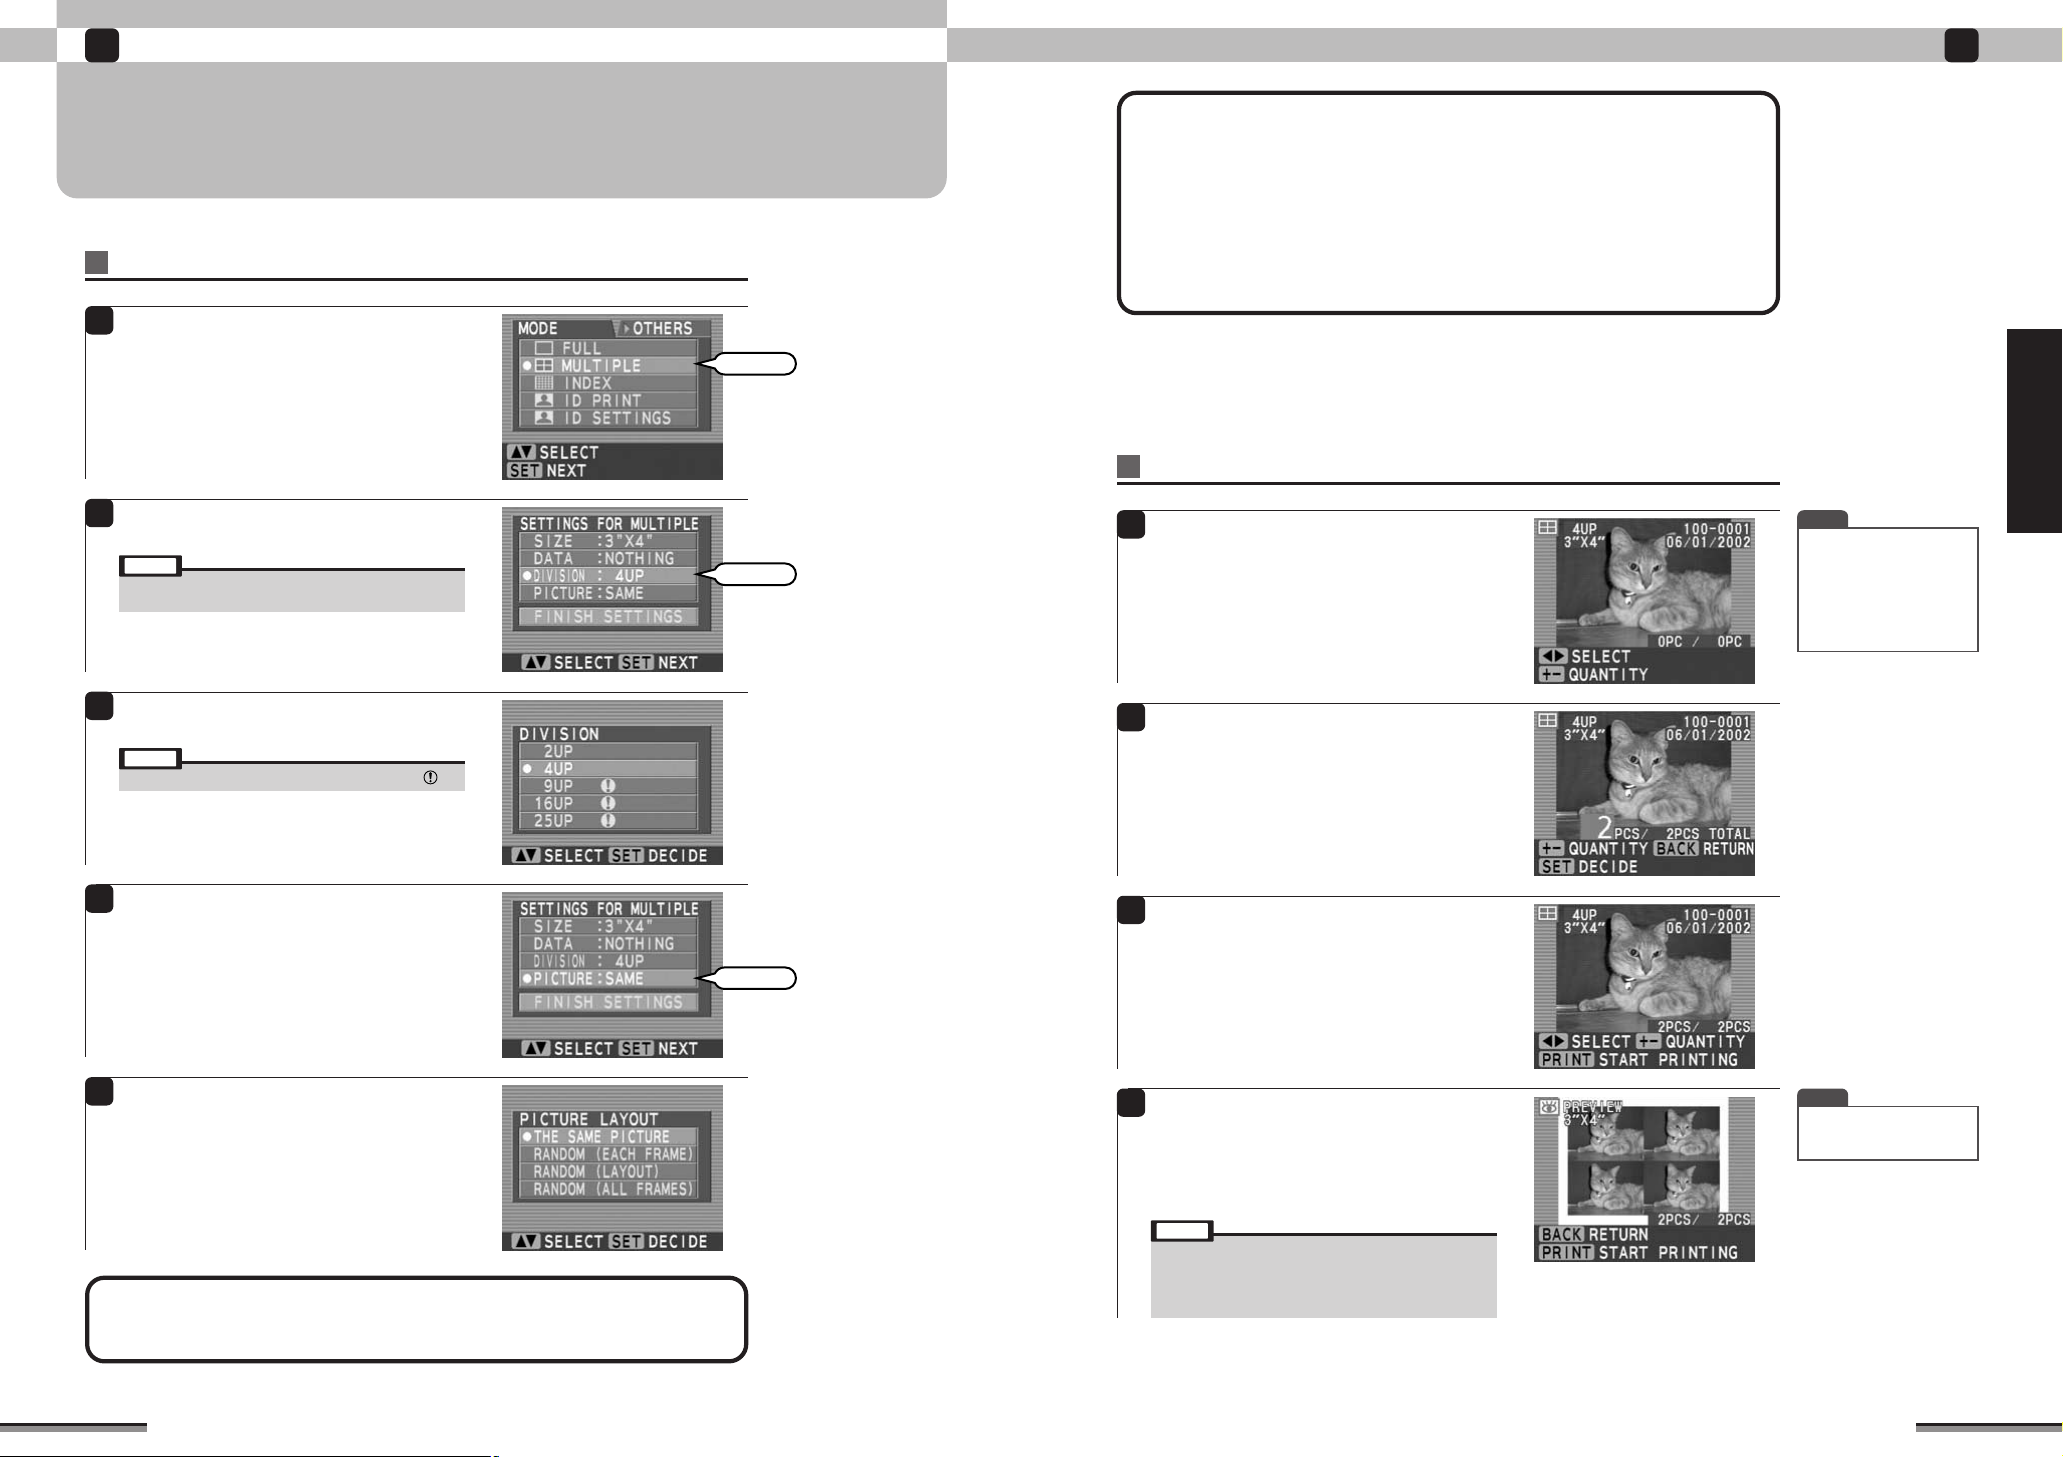
MULTIPLE PRINT
Multiple print prints the preferred number of frames (2UP, 4UP, 9UP, 16UP, 25UP) on one sheet of
paper. When the print size is [3” × 4” Size], only 2UP and 4UP multiple printing are possible.
Setting multiple print
1
Load the paper and memory card into the
printer, and press the [CUSTOM] button at the
top of the printer.
Use ab to select “MULTIPLE”, and press the
[SET] button.
Use ab to select “DIVISION”, and press the
2
[SET] button.
Note
•“BORDER” cannot be set in the multiple print mode. Pictures
are printed with a border.
The following steps vary depending on the picture
arrangement type.
SAME: Prints the same picture at all frames (Page 23).
RANDOM (EACH FRAME):
Sequentially prints the pictures beginning from the top left (Page 24).
RANDOM (LAYOUT): Selects and prints the picture for each frame (Page 25).
RANDOM (ALL FRAMES):
Sequentially prints all the pictures on the memory card beginning from the top left (Page 26).
eee
MULTIPLE PRINT (➔P. 22) continued
Multiple print (same picture)
At the “SETTINGS FOR MULTIPLE” window,
6
use ab to select “ FINISH SETTINGS”, and
press the [SET] button.
The picture is displayed.
Use dc to select the picture to be printed.
TIP
• When the image is 4 frames
or more, and dc is pressed
for 1 second or longer, the
image is quick scrolled.
However, for files other than
Exif (JPEG, TIFF-YC/RGB),
only image type characters
are displayed.
Enjoy various printing!
Use ab to select the preferred number of
3
frames, and press the [SET] button.
Note
•
At this time, the number of frames cannot be selected for .
Use ab to select “PICTURE”, and press the
4
[SET] button.
Use ab to select the preferred picture layout,
5
and press the [SET] button.
The following steps vary depending on the picture
arrangement type. See the next page.
Use the [QUANTITY] [+] [-] buttons to set the
7
print quantity.
After setting the print quantity, press the [SET]
button.
Press the [PREVIEW] button, and check the
8
pictures to be printed and the quantity of prints.
If the preview contents are correct, press the
9
[PRINT] button.
The Printing window is displayed and printing is
started. At the end of printing, the paper ejects from
the printer and the monitor returns to the picture
window.
Note
• Do not touch the moving paper while printing.
• Do not remove the memory card while printing.
• Do not pull out the trash box while printing.
• When an error window or information window is displayed,
refer to pages 46 to 50.
TIP
• To halt printing while printing
multiple prints, press the
[BACK] button.
22
23
2
766
Enjoy various printing!
Enjoy various printing!
2
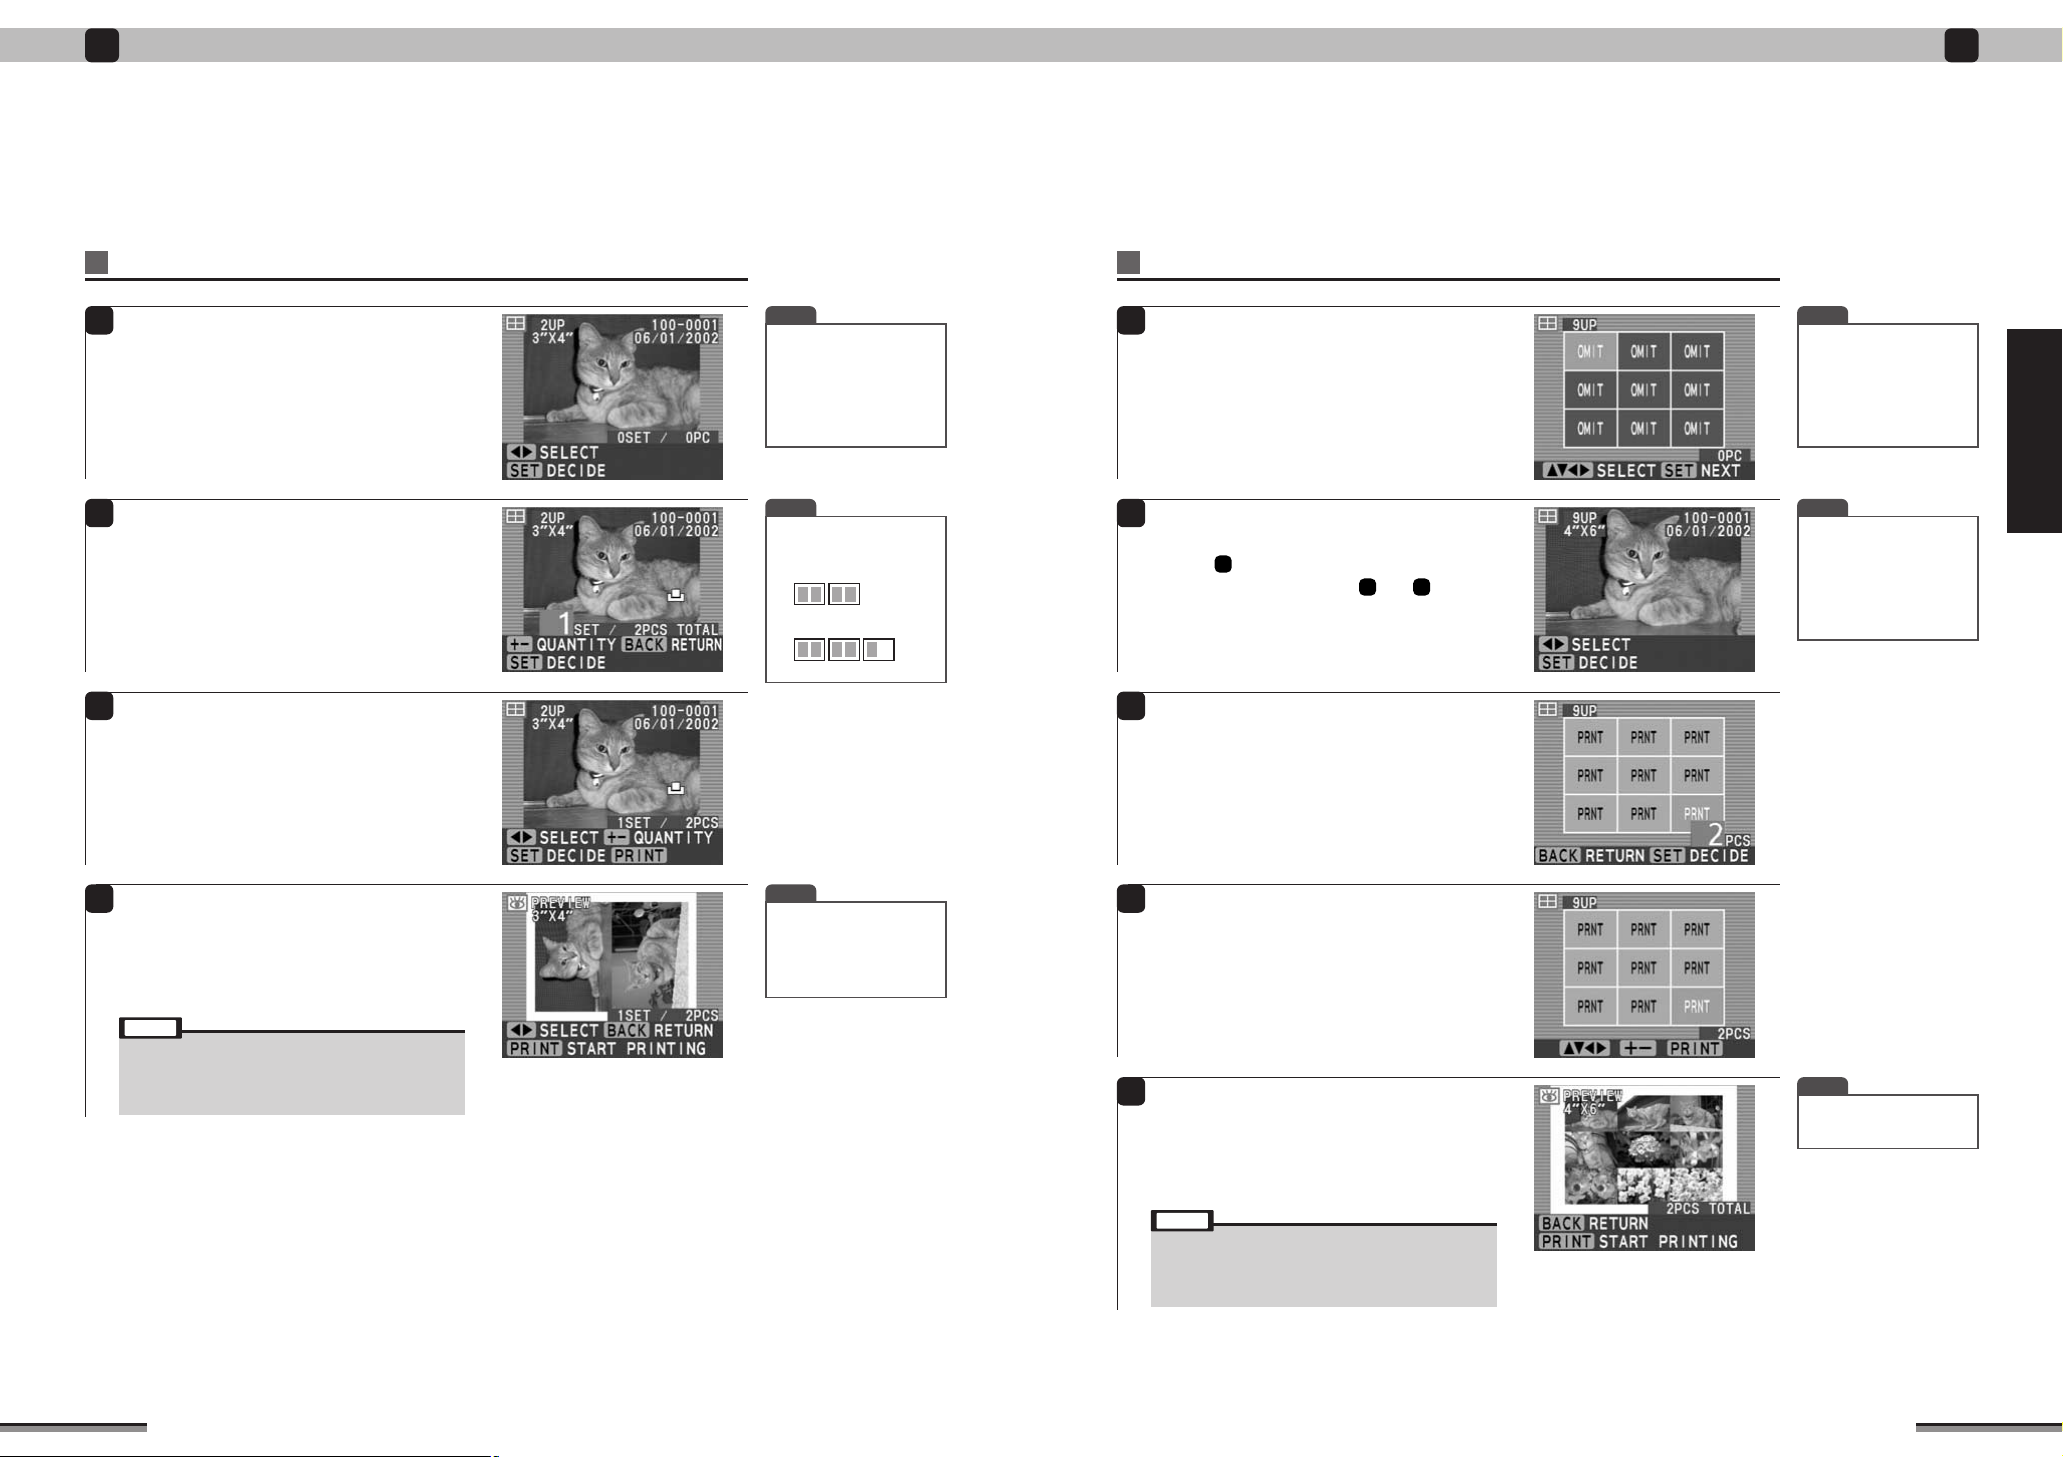
eee
MULTIPLE PRINT (➔P. 22) continued
Multiple print (random picture - each frame)
At the “SETTINGS FOR MULTIPLE” window,
6
use ab to select “ FINISH SETTINGS”, and
press the [SET] button.
The picture is displayed.
Use dc to select the picture to be printed, and
press the [SET] button.
Repeat selecting frame multiple times as you like.
Use the [QUANTITY] [+] [-] buttons to set the
7
print sets quantity.
After setting the sets quantity, press the [SET]
button.
TIP
• When the image is 4 frames
or more, and dc is pressed
for 1 second or longer, the
image is quick scrolled.
However, for files other than
Exif (JPEG, TIFF-YC/RGB),
only image type characters
are displayed.
TIP
• Example of number of sets
The number of sets for 2UP
is shown below.
- When 4 pictures selected
- When 5 pictures selected
=1 SET/2 PCS
=1 SET/3 PCS
eee
MULTIPLE PRINT (➔P. 22) continued
Multiple print (random picture - layout)
At the “SETTINGS FOR MULTIPLE” window,
6
use ab to select “ FINISH SETTINGS”, and
press the [SET] button.
The Select frame window is displayed.
Use abdc to arrange the pictures, and press
the [SET] button.
Use dc to select the picture to be printed, and
7
press the [SET] button.
The step window is displayed. Select the pictures
to be printed by repeating steps and .
TIP
•
The picture of all frames
does not have to be selected.
Unselected frames are
displayed as a white space
on a colored background.
Therefore, you can enjoy
various forms of multiple
printing.
TIP
• When the image is 4 frames
or more, and dc is pressed
for 1 second or longer, the
image is quick scrolled.
However, for files other than
Exif (JPEG, TIFF-YC/RGB),
only image type characters
are displayed.
Enjoy various printing!
Press the [PREVIEW] button and check the
8
pictures to be printed and the quantity of print
sets.
If the preview contents are correct, press the
9
[PRINT] button.
The Printing window is displayed and printing is
started. At the end of printing, the paper ejects from
the printer and the monitor returns to the picture
window.
Note
• Do not touch the moving paper while printing.
• Do not remove the memory card while printing.
• Do not pull out the trash box while printing.
• When an error window or information window is displayed,
refer to pages 46 to 50.
TIP
• When Preview is displayed,
frames can be fed using d
c for 1SET/2 PCS, or more.
• To halt printing while printing
multiple prints, press the
[BACK] button.
Use the [QUANTITY] [+] [-] buttons to set the
8
print quantity.
After setting the print quantity, press the [SET]
button.
Press the [PREVIEW] button and check the
9
pictures to be printed and the quantity of prints.
If the preview contents are correct, press the
10
[PRINT] button.
The Printing window is displayed and printing is
started. When printing is finished, the paper is ejected
from the printer and the Setting frame window is
displayed.
Note
• Do not touch the moving paper while printing.
• Do not remove the memory card while printing.
• Do not pull out the trash box while printing.
• When an error window or information window is displayed,
refer to pages 46 to 50.
TIP
• To halt printing while printing
multiple prints, press the
[BACK] button.
24
25
2
Select
Select
Enjoy various printing!
2
Enjoy various printing!
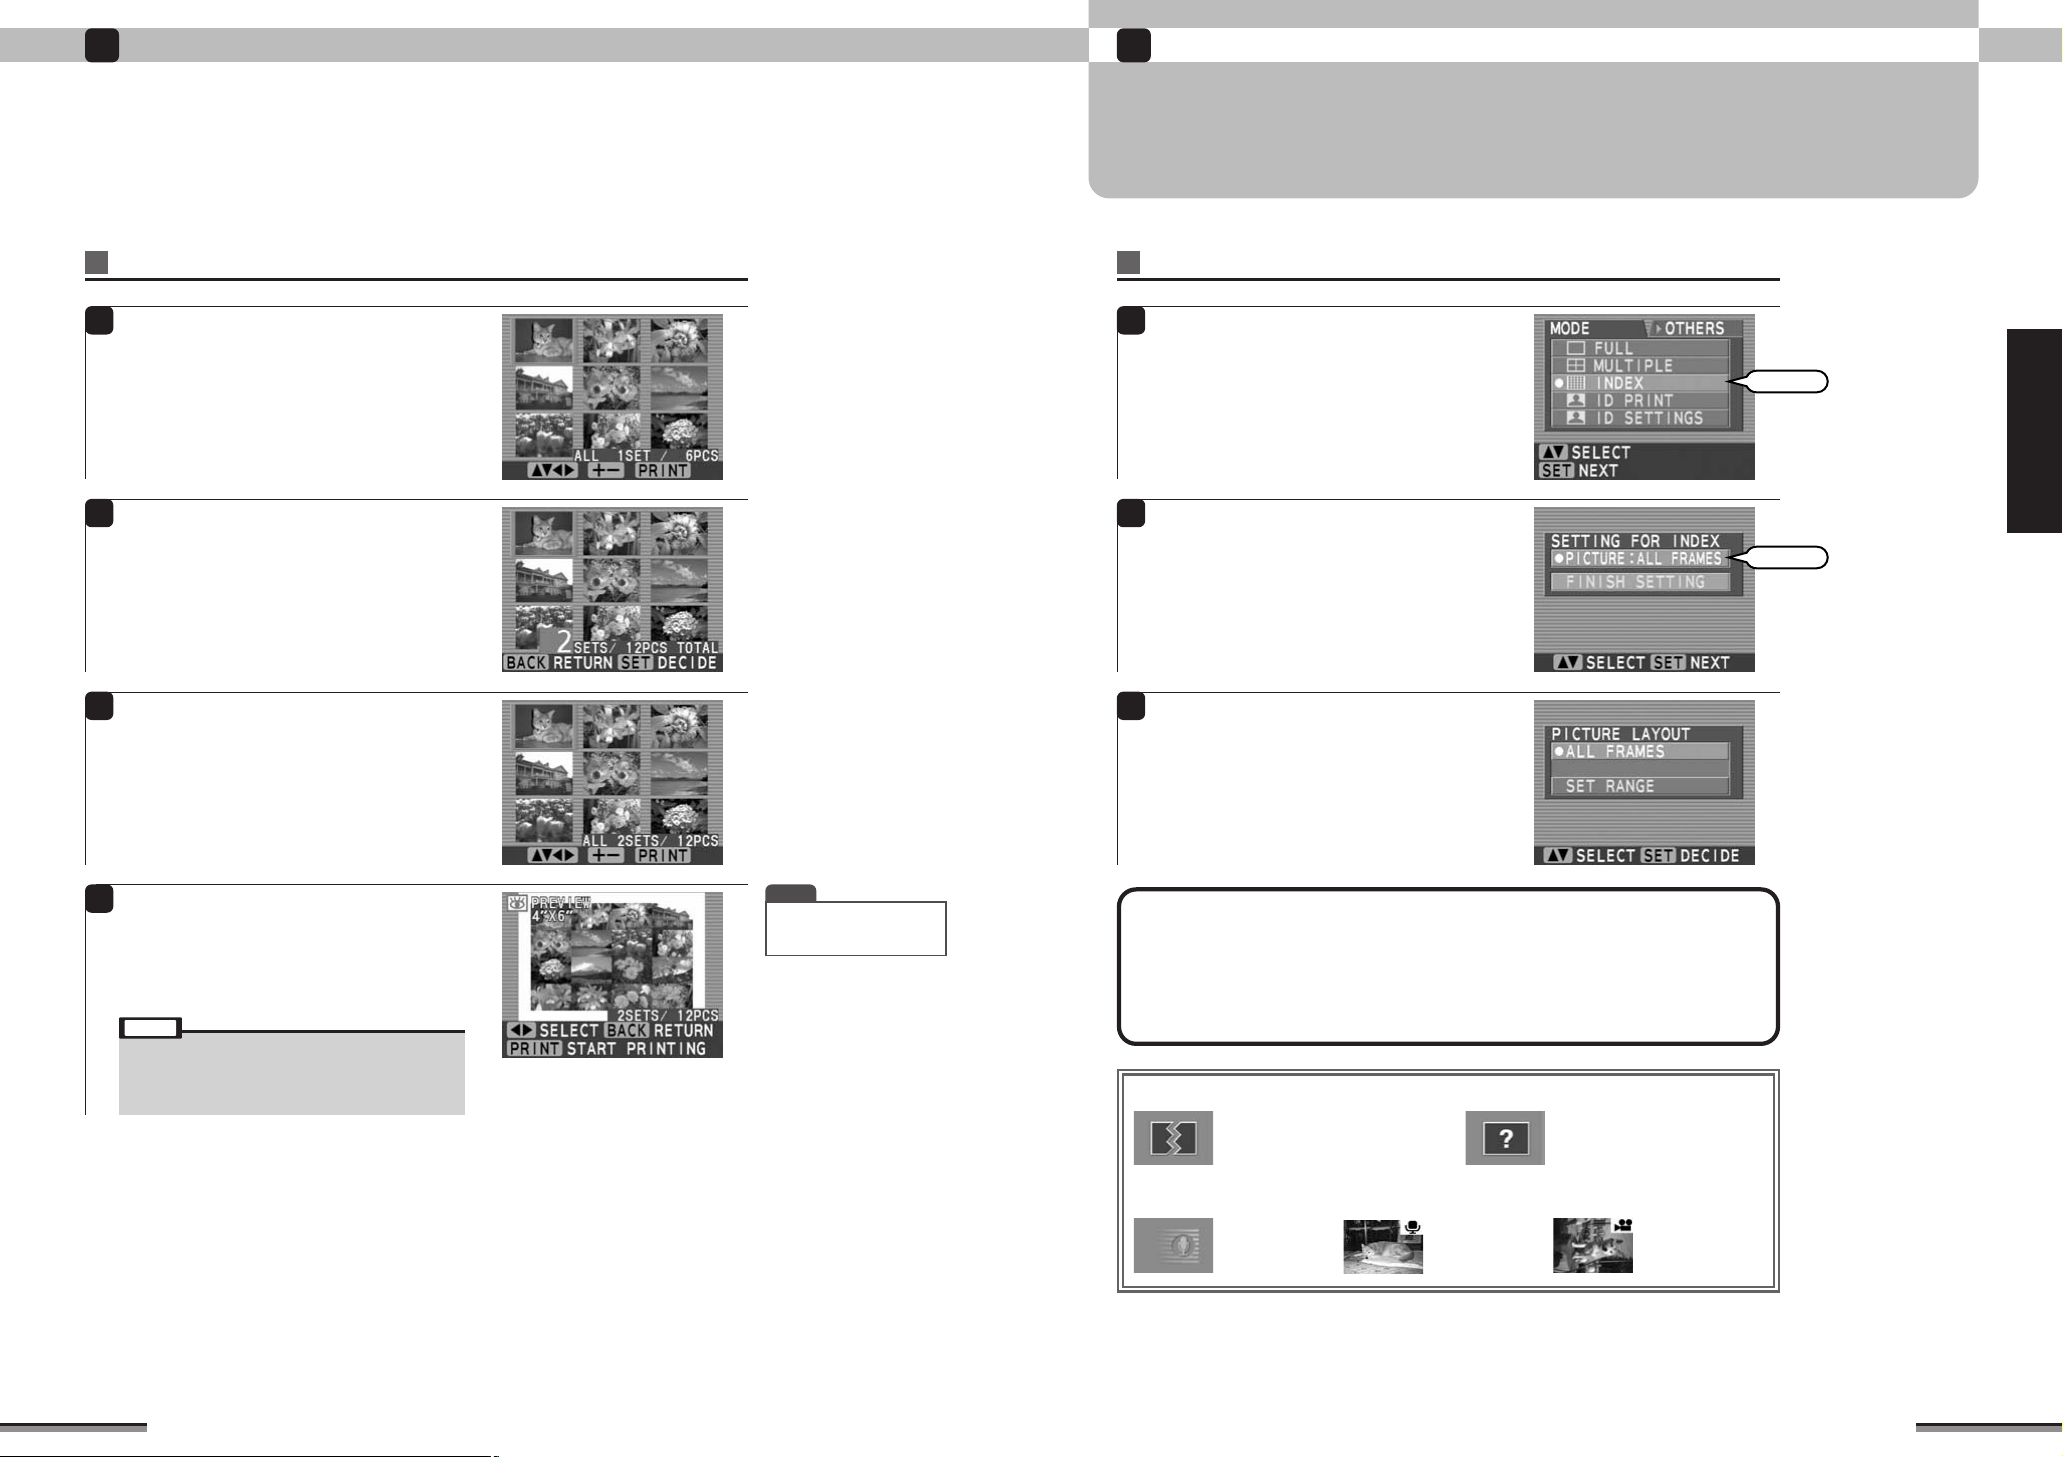
eee
MULTIPLE PRINT (➔P. 22) continued
Multiple print (random picture - all frames)
At the “SETTINGS FOR MULTIPLE” window,
6
use ab to select “ FINISH SETTINGS”, and
press the [SET] button.
The picture is displayed.
Use abd c to check the pictures on the
memory card.
Use the [QUANTITY] [+] [-] buttons to set the
7
print sets quantity.
After setting the sets quantity, press the [SET]
button.
INDEX PRINT
Index print prints the pictures of 25 frames on one sheet of paper. It is very convenient in checking
the pictures on the memory card. Print size is [4” × 6” Size].
Setting index print
Load the paper and memory card into the
1
printer, and press the [CUSTOM] button.
Use ab to select “INDEX”, and press the [SET]
button.
Use ab to select “PICTURE”, and press the
2
[SET] button.
Enjoy various printing!
Press the [PREVIEW] button, and check the
8
picture to be printed and the quantity of print
sets.
If the preview contents are correct, press the
9
[PRINT] button.
The Printing window is displayed and printing is
started. At the end of printing, the paper ejects from
the printer and the monitor returns to the picture
window.
Note
• Do not touch the moving paper while printing.
• Do not remove the memory card while printing.
• Do not pull out the trash box while printing.
• When an error window or information window is displayed,
refer to pages 46 to 50.
TIP
• To halt printing while printing
multiple prints, press the
[BACK] button.
Use ab to select the printing zone, and press
3
the [SET] button.
The following steps vary depending on the
printing zone.
ALL FRAMES: Index prints all the frames on the memory card (Page 28).
SET RANGE:
Index prints by determining the zone of the frames to be printed (Page 29).
■ Index print icons
Destroyed file
Files of supportable format, but since
the picture was destroyed, they cannot
be displayed.
Supportable formats: Page 98
Voice file
(Specifications)
Picture file with
voice memory
Unknown file
File other than supportable format.
Cannot be displayed.
Supportable formats: Page 98
(Specifications)
Picture file (AVI)
26
27
2
Enjoy various printing!
Enjoy various printing!
2
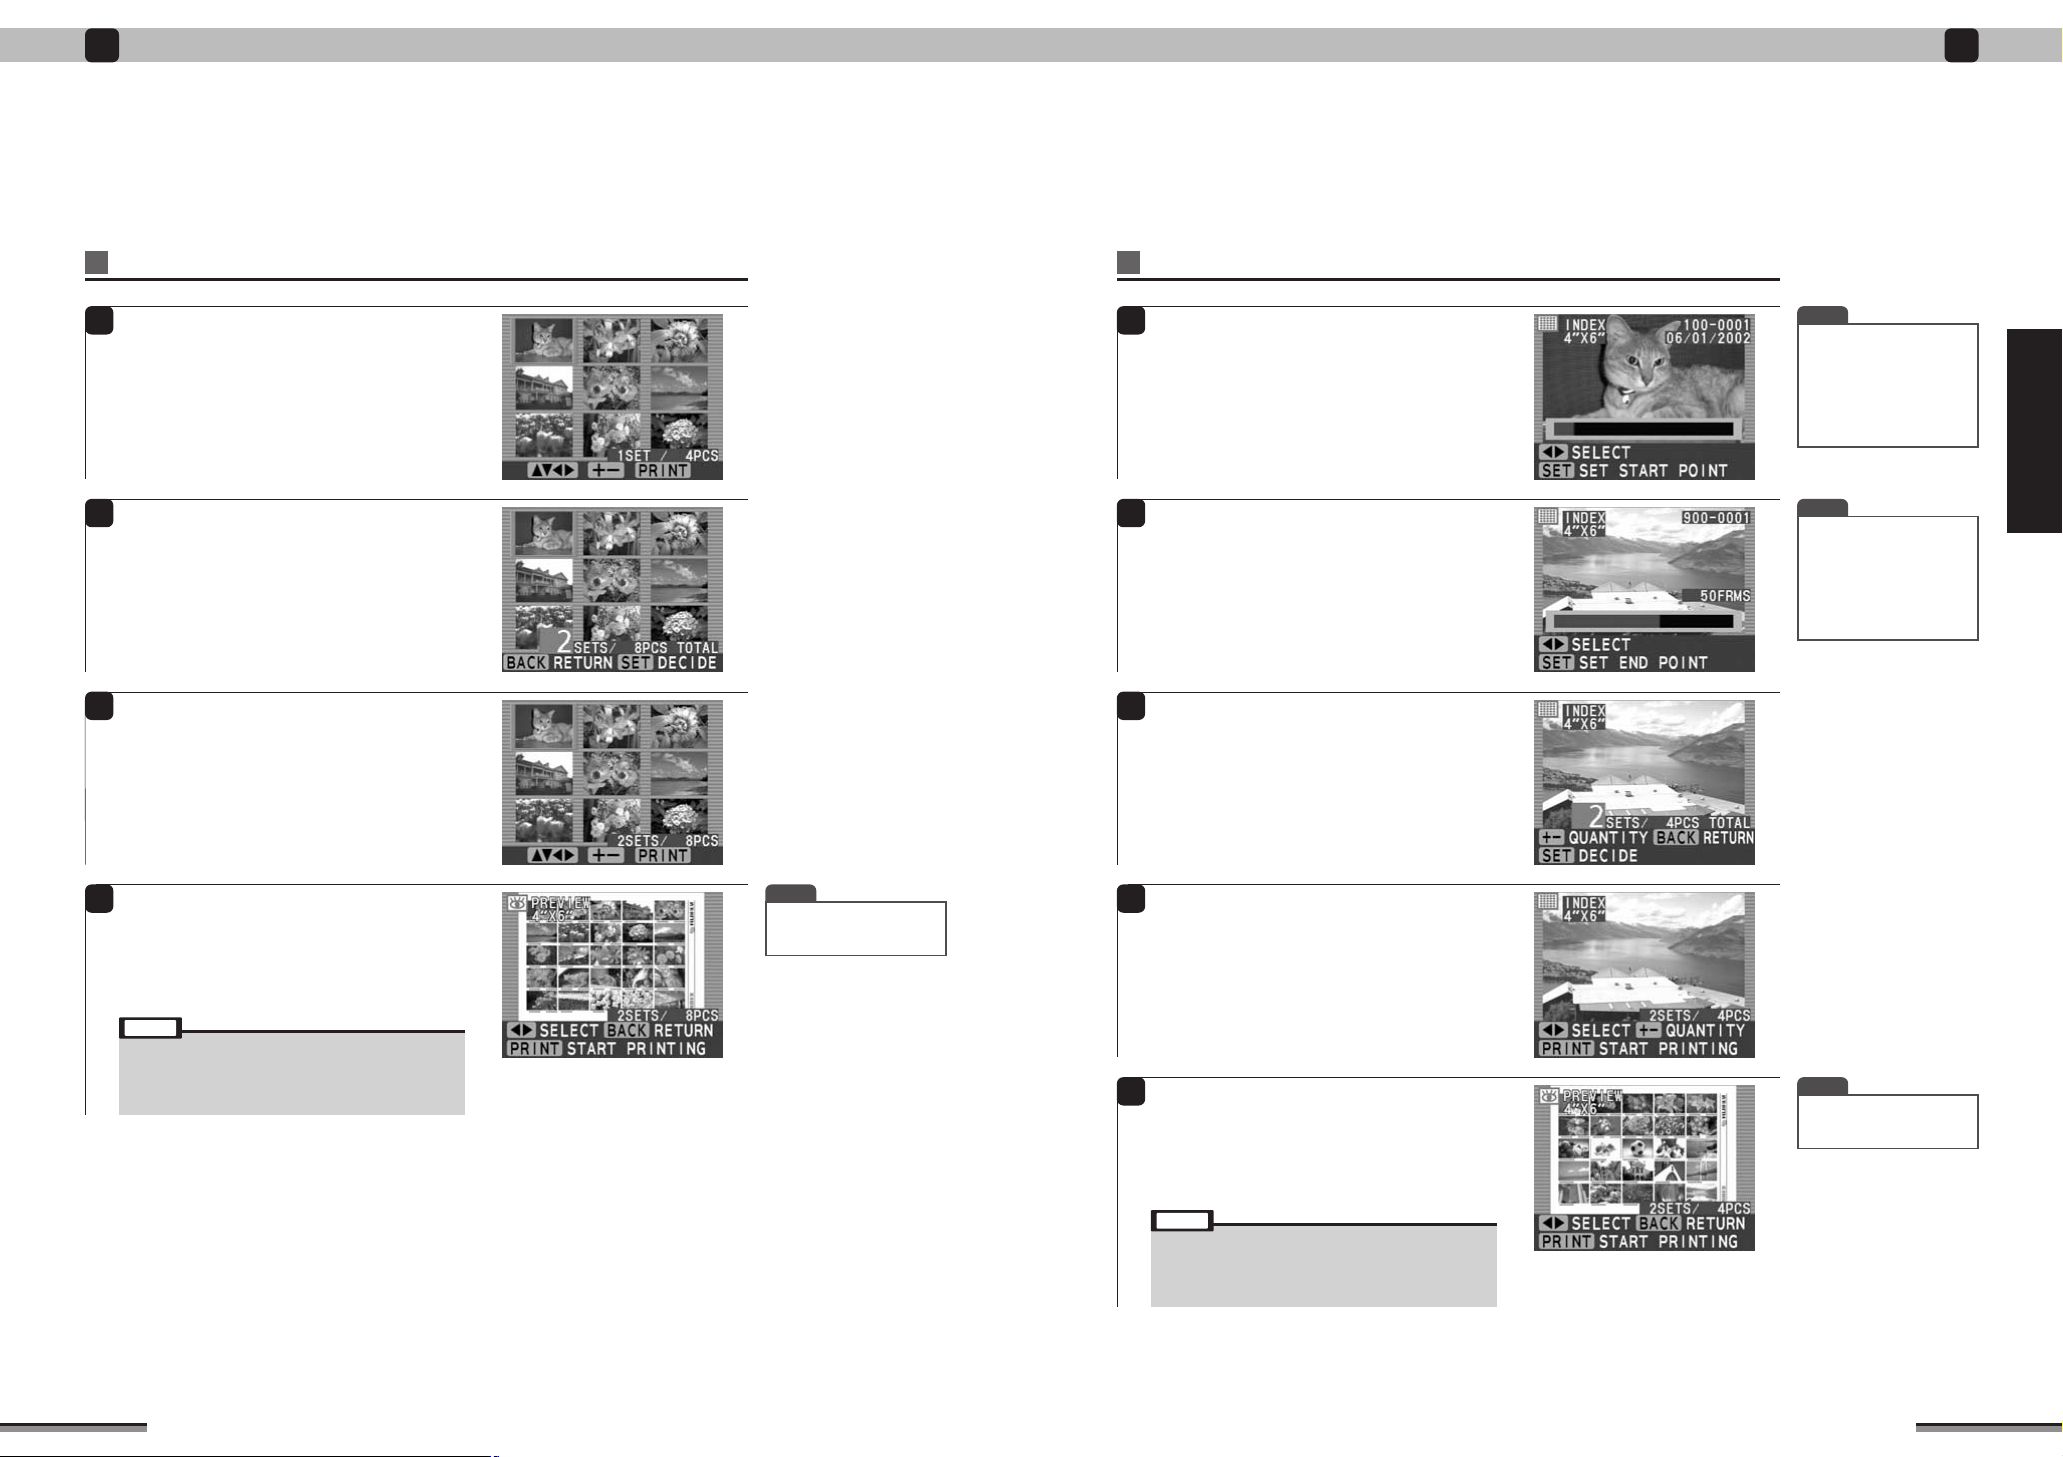
eee
INDEX PRINT (➔P. 27) continued
Index print (all frames)
At the “SETTING FOR INDEX” window, use ab
4
to select “FINISH SETTING”, and press the
[SET] button.
The picture is displayed.
Use abd c to check the pictures on the
memory card.
Use the [QUANTITY] [+] [-] buttons to set the
5
print sets quantity.
After setting the sets quantity, press the [SET]
button.
eee
INDEX PRINT (➔P. 27) continued
Index print (set range)
At the “SETTING FOR INDEX” window, use ab
4
to select “FINISH SETTING”, and press the
[SET] button.
Use dc to select the picture at which index
printing is to start, and press the [SET] button.
Use dc to select the picture at which index
5
print is to end, and press the [SET] button.
TIP
• When the image is 4 frames
or more, and dc is pressed
for 1 second or longer, the
image is quick scrolled.
However, for files other than
Exif (JPEG, TIFF-YC/RGB),
only image type characters
are displayed.
TIP
• When the image is 4 frames
or more, and dc is pressed
for 1 second or longer, the
image is quick scrolled.
However, for files other than
Exif (JPEG, TIFF-YC/RGB),
only image type characters
are displayed.
Enjoy various printing!
Press the [PREVIEW] button, and check the
6
picture to be printed and the quantity of print
sets.
If the preview contents are correct, press the
7
[PRINT] button.
The Printing window is displayed and printing is
started. At the end of printing, the paper ejects from
the printer and the monitor returns to the picture
window.
Note
• Do not touch the moving paper while printing.
• Do not remove the memory card while printing.
• Do not pull out the trash box while printing.
• When an error window or information window is displayed,
refer to pages 46 to 50.
TIP
• To halt printing while printing
multiple prints, press the
[BACK] button.
Use the [QUANTITY] [+] [-] buttons to set the
6
print sets quantity.
After setting the sets quantity, press the [SET]
button.
Press the [PREVIEW] button, and check the
7
picture to be printed and the quantity of print
sets.
If the preview contents are correct, press the
8
[PRINT] button.
The Printing window is displayed and printing is
started. At the end of printing, the paper ejects from
the printer and the monitor returns to the picture
window.
Note
• Do not touch the moving paper while printing.
• Do not remove the memory card while printing.
• Do not pull out the trash box while printing.
• When an error window or information window is displayed,
refer to pages 46 to 50.
TIP
• To halt printing while printing
multiple prints, press the
[BACK] button.
28
29
 Loading...