

Page 1
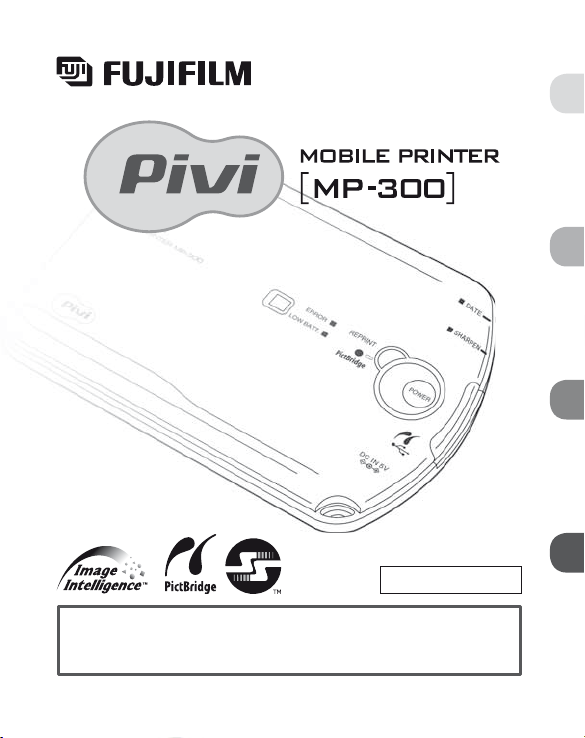
The owner’s manual
Getting Ready
Printing
Advanced Printing
Error
en: The owner’s manual in English and French is available at “http://home.fujifilm.
com/products/dmp.”
fr: Le manuel d’utilisation en Anglais et en Français est disponible sur le site
“http://home.fujifilm.com/products/dmp.”
FPT-608106-FP-01
Getting Ready
Printing
Advanced Printing
Error
Page 2

Features
The MP-300 Mobile Printer is a compact portable printer you can take
with you anywhere, making it easy for you to print out photos from
your digital camera or camera phone.
1. You can print from your digital camera or camera phone anywhere
you are.
Images from a digital camera or a camera phone can be printed directly without using
a computer.
Small enough to carry anywhere.
PictBridge-compatible (P.28)
Easy to print from a PictBridge-compatible digital camera or camera phone using a
USB cable.
Supports high-speed infrared communications (P.24)
You can send images at high speed directly to the MP-300 from a digital camera
or camera phone that supports the high-speed infrared communications standard
(IrSimple/FIR).
c Also supports the previous infrared communications standard (IrDA/SIR).
Uses compact primary batteries (P.18)
The MP-300 will print around 100 photos on one set of primary batteries (two CR-2 cells)
(using infrared communication).
You can also run the printer on AC power using the optional AC-5VX AC power adapter
(P.19).
2. Easy printing of beautiful prints
Make additional prints. (P.36)
The REPRINT button lets you print as many copies as you like of the last image you
printed.
Put the date on your prints. (P.39)
The MP-300 lets you insert the date on your print.
Enhance your images to make them even sharper. (P.38)
The SHARPEN button gives you a quick and simple way to produce crisper, sharper
images.
Incorporates FUJIFILM’s own “Image Intelligence™.” digital image
processing technology for superior image quality.
Image Intelligence™ is digital image software technology that produces superb
image quality by automatically analyzing the photographic and subject conditions
and then optimizing the image quality for the desired application and medium. The
MP-300 incorporates this technology, enabling it to deliver the best image quality for
printing.
Uses “FUJIFILM Mobile Printer Photo Pack” designed specifically for
FUJIFILM mobile printers.
FUJIFILM has developed a film specifically for FUJIFILM mobile printers to ensure the
best print quality. The card-size of the film also makes it convenient for storage.
2 3
Page 3

Getting Ready
Printing
Advanced Printing
Error
Contents
Features . . . . . . . . . . . . . . . . . . . . . . . . . . . . . . . . . . . . . . . . . . . . 2
Quick Start Guide - Infrared communication - . . . . . . . . . . . . . . . . 6
zInfrared communication / PictBridge
Quick Start Guide - PictBridge - . . . . . . . . . . . . . . . . . . . . . . . . . . 7
Introduction . . . . . . . . . . . . . . . . . . . . . . . . . . . . . . . . . . . . . . . . . . 8
zContents of package
About IrSimple™ . . . . . . . . . . . . . . . . . . . . . . . . . . . . . . . . . . . . . . 9
Safety Precautions . . . . . . . . . . . . . . . . . . . . . . . . . . . . . . . . . . . 10
Handling & Care . . . . . . . . . . . . . . . . . . . . . . . . . . . . . . . . . . . . . 13
zPrinter care / Using USB interface / Using the AC power adapter /
Photo pack and print care
Notes on Handling Films and Finished Prints . . . . . . . . . . . . . . . 16
zFinishing prints / Caution
Restrictions . . . . . . . . . . . . . . . . . . . . . . . . . . . . . . . . . . . . . . . . . 17
Getting Ready
Necessary Items . . . . . . . . . . . . . . . . . . . . . . . . . . . . . . . . . . . . . 18
zBatteries / Photo pack
Optional AC Power Adapter . . . . . . . . . . . . . . . . . . . . . . . . . . . . 19
zThe AC power adapter AC-5VX (sold separately)
Part Names . . . . . . . . . . . . . . . . . . . . . . . . . . . . . . . . . . . . . . . . . 20
Getting Ready to Print . . . . . . . . . . . . . . . . . . . . . . . . . . . . . . . . . 21
zLoading the batteries / Loading the photo pack / Photo pack confirmation window
Printing
PRINTING - Infrared communication - . . . . . . . . . . . . . . . . . . . . 24
zSetting up for infrared transmissions / Printing / Sending images from a camera
phone / Examples of camera phone infrared port locations / Guide to image sizes
and transmission times
PRINTING - PictBridge - . . . . . . . . . . . . . . . . . . . . . . . . . . . . . . . 28
zSetting up for USB transmissions / Printing / If 2 or more prints are set at the camera
/ PictBridge print specification compatibility table / Guide to image sizes and
transmission times
4 5
Additional Information and Notes on Printing . . . . . . . . . . . . . . . 33
zPrintable image sizes and formats / Printing exceptions
When the Film Runs Out . . . . . . . . . . . . . . . . . . . . . . . . . . . . . . . 34
zWhen the film runs out while printing
Advanced Printing
REPRINT . . . . . . . . . . . . . . . . . . . . . . . . . . . . . . . . . . . . . . . . . . . 36
zErasing the stored image
SHARPEN Mode . . . . . . . . . . . . . . . . . . . . . . . . . . . . . . . . . . . . . 38
DATE Mode . . . . . . . . . . . . . . . . . . . . . . . . . . . . . . . . . . . . . . . . . 39
z When via infrared communication and reprint function is used / When PictBridge is
used / Date printing position
Error
ERROR - ERROR lamp - . . . . . . . . . . . . . . . . . . . . . . . . . . . . . . 41
zLit (Approx. 7 sec. → Power off) / Blinking (3 times)
ERROR -
LOW BATTERY lamp - . . . . . . . . . . . . . . . . . . . . . . . . . . . . . 42
zLit / Blinking
Troubleshooting . . . . . . . . . . . . . . . . . . . . . . . . . . . . . . . . . . . 43
zTroubleshooting printer problems / Troubleshooting infrared communication
problems / Troubleshooting USB communication problems / Troubleshooting
problems with finished prints
Glossary . . . . . . . . . . . . . . . . . . . . . . . . . . . . . . . . . . . . . . . . . 49
Specification . . . . . . . . . . . . . . . . . . . . . . . . . . . . . . . . . . . . . . 50
Getting Ready
Printing
Advanced Printing
Error
Page 4
Blinking
Lit
Turquoise mark on
the photo pack
Turquoise mark inside
the printer
Lit (PictBridge lamp)
Lit (POWER button)
LitLit
Hold down for
1 second or more.
1
2
3
4
5
6
Turquoise mark on
the photo pack
Turquoise mark inside
the printer
15˚
15˚
20cm (7.9 in.)
Slow Blinking (POWER button)
LitLit
Hold down for
1 second or more.
Quick Start Guide - Infrared communication -
Lit (POWER button)
1
2
3
4
5
Quick Start Guide - PictBridge -
Loading the batteries.
1
(P.21)
Turning on the power.
3
Take the film out when film
5
output ends. (P.25)
6 7
Loading the photo pack.
2
(P.22)
Send the image.
4
(P.24)
Loading the batteries.
1
(P.21) (P.22)
Connect the printer to the
3
digital camerac. (P.28)
c Before connecting the printer, select PictBridge mode in the camera’s USB
setting, if needed.
Send the image from the
5
digital camera. (P.29)
Loading the photo pack.
2
Turning on the power.
4
Take the film out when film
6
output ends. (P.25)
Page 5
Getting Ready
Printing
Advanced Printing
Error
Introduction
About IrSimple™
Contents of package
The owner’s manual
c
Getting Ready
Printing
Advanced Printing
Error
3, Mobile Printer
MP-300
1, Lithium Batteries
2, Owner’s Manual
(CR2)
(P.18)
en: The owner’s manual in English and French is available at “http://home.fujifilm.
com/products/dmp.”
fr: Le manuel d’utilisation en Anglais et en Français est disponible sur le site
“http://home.fujifilm.com/products/dmp.”
FPT-608106-FP-01
c The design of the cover page of Owner’s manual may differ depending on the regions.
■ What is IrSimple™?
IrSimple™ is a high-speed infrared communication protocol that
permits high-speed data transfer. It was adopted in August 2005 as an
international standard by the IrDA
is the standardization body for infrared technology.
®
(Infrared Data Association®), which
IrSimple uses the same physical interfaces (SIR/FIR) as the existing
IrDA standard and has the following 2 communication modes:
zUnidirectional
In this mode, data is only sent in one direction: from the sending device (primary
node). Problems that arise during communication cannot be corrected.
zBidirectional
This is a bidirectional mode in which the receiving device (secondary node)
responds to data sent from the sending device (primary node) by sending
the outcome of the data reception or requesting a resend, etc. This allows
problems that arise during communication to be corrected.
■ What is IrSimpleShot™ (IrSS™)?
This is a generic name given to unidirectional IrSimple™ communication.
■ IrSimple™ compatibility on the MP-300
The MP-300 supports both IrSimpleShot communication mode and
bidirectional communication mode.
■ Restrictions on IrSimple™ on the MP-300
zThe MP-300 can only operate as a receiving device (secondary node).
zThe MP-300 will only receive IrSimpleShot communication from a sending
device equipped with a high-speed infrared communication function (FIR).
(The MP-300 does not support IrSimpleShot communication using SIR.)
zWhen a sending device equipped with a high-speed infrared
z
IrSimple™, IrSimpleShot™ and IrSS™ are trademarks of the Infrared Data
Association
z“ ” and Image Intelligence™ are trademarks of Fuji Photo Film Co., Ltd.
zAll other company, organization or product names used in this document are
trademarks or registered trademarks of their respective holders in Japan or other
countries. Note that the ™ and
this document.
8 9
®
.
®
symbols may be omitted in some instances in
communication function (FIR) uses FIR to make an IrSimpleShot
transmission to the MP-300, the MP-300 can only receive data up to 1 MB
in size. (It cannot receive fi les larger than 1 MB.)
Note also that, depending on the transmission conditions (transmitted
packet size, etc.), the MP-300 may be unable to receive data from a
sending device even if it meets the above requirements.
■ IrSimple™ transmission speed
zSee “Guide to image sizes and transmission times” on P.27.
Page 6
Safety Precautions
This product has been made to be as safe as possible. This product will
provide long, safe service when handled correctly. It is important that
this product is handled properly and used only to print pictures. For your
ease and safety, please follow what is written in this manual. It is also
a good idea to keep this manual in a safe, easy to find place where you
can refer to it if needed.
WARNING
CAUTION
WARNING
This symbol indicates danger, which could result in
injury or death. Please follow these instructions.
This symbol indicates possible damage, which could
result in injury to other people or damage to an object.
Please follow these instructions. Please handle the
product properly.
If the printer (or batteries) becomes
hot, emits smoke or a burnt smell
or otherwise seems abnormal,
immediately remove the batteries and
disconnect the AC power adapter.
V
Faults of this nature could start a fire and
cause burns. (Take particular care to avoid
burns when removing the batteries or
disconnecting the AC power adapter.)
If the printer is dropped into water or if
water or metal or other foreign objects
get inside the printer, immediately
remove the batteries, disconnect the
V
AC power adapter and unplug the AC
power adapter from the power outlet.
Faults of this nature could cause the printer
to overheat or catch fire.
WARNING
10 11
Do not use this printer in places where
there is flammable gas or near open
gasoline, benzine, paint thinner or other
unstable substances which can give off
B
dangerous vapors.
Faults of this nature could cause the printer
to explode or catch fire and cause burns.
Store your printer out of the reach of
Z
infants and young children.
Do not look directly into the infrared
port.
Z
May harm your eyes.
Never take apart the batteries. Do not
subject them to heat, throw them into
an open fire, attempt to recharge them
B
or short-circuit them.
Doing so could cause the batteries to
explode.
Use only the type of batteries specified
in your printer’s owner’s manual.
V
Faults of this nature could cause the printer
to overheat or catch fire.
Make sure batteries are stored in a safe,
secure place and well out of the reach
of any infants, young children or pets.
Z
The batteries could be accidentally
swallowed by young children or pets. If this
occurs, immediately seek medical treatment.
Only use the special AC power adapter
designated for use with the printer.
V
The use of other AC power adapters could
cause the printer to overheat or catch fire.
Page 7
Safety Precautions
Handling & Care
CAUTION
Never attempt to take this product
apart.
X
You may be injured.
If this product is dropped or damaged
so that the inside is showing, do not
Z
touch it.
You may be injured.
Do not touch any projecting parts inside
the photo pack door.
Z
You may be injured.
Never get this product wet or handle it
with wet hands.
C
Doing so may result in an electric shock.
Do not mix new and old batteries or
batteries of different types.
Also make sure that the battery = and -
Z
polarities are correct. A damaged battery or
electrolyte leakage may cause a fire, injury,
and contaminate the environment.
If the printer will be left unused for a long
period (because you are traveling, etc),
remove the batteries, disconnect the AC
V
power adapter and unplug the AC power
adapter from the power outlet.
Failing to do so could cause a fire.
Do not move the printer while the AC
power adapter is still connected to it.
C
Doing so could damage the power cord and
cause a fire or electric shock.
■ Printer care
1. Your printer is a precision instrument. Do not get it wet or drop it. Also,
do not expose to sand.
2. If you are not using your printer for a long period, unload the batteries
and keep them where they will be safe from heat, dust, and moisture.
3. Do not use solvent such as thinner and alcohol to remove dirt.
4. Keep the printer interior clean as dust or dirt may affect print quality.
5. In hot weather, do not leave your printer in hot places such as in a car
or on the beach. Do not leave it in damp places for long periods.
6. Moth repellent gas such as naphthalene may affect your printer and
prints. Be careful to keep your printer or prints in a chest or bureau.
7. Because your printer is software-controlled, there is the chance that
on rare occasions malfunction. If you experience incorrect operation,
reset by removing the batteries and then reloading them.
8. Note that the temperature range within which your printer can be used
is +5˚C to +40˚C (+41˚F to +104˚F).
9. Do not dispose of batteries by throwing them in the ordinary garbage
as this may start a fi re or cause environmental damage.
10. Do not use the printer in aircraft, hospitals or other locations where the
use of mobile phones is prohibited.
11. If the printer causes problems with radio or TV reception, move the
printer further away from the radio or TV.
12. When using infrared communication to print images, carefully read
the owner’s manual for the sending device being used and ensure
that the device’s operating requirements are met.
13. Take great care to ensure that printed materials do not violate
copyright, image rights, privacy or other personal rights and do
not offend public decency. Actions that violate the rights of others,
are contrary to public decency or constitute a nuisance may be
punishable by law or otherwise legally actionable.
12 13
Page 8

Handling & Care
■ Using USB interface
1. Use the USB cable suitable for the digital camera or camera phone.
2. Ensure that the USB cable is no more than 3 meters (9.8 ft.) long.
■ Using the AC power adapter
Use the FUJIFILM AC Power Adapter AC-5VX (sold separately).
The use of an AC Power Adapter other than AC-5VX may result in
damage to your printer.
1. Use the AC power adapter indoors only.
2. Plug the power cord securely into the DC input terminal of the printer.
3. Turn off the printer before disconnecting the power cord from the
printer’s DC input terminal. To disconnect, pull out the plug gently. Do
not pull on the cord.
4. Do not use the AC power adapter with any device other than your
printer.
5. During use, the AC power adapter may become warm to the touch.
This is normal.
6. Do not disassemble the AC power adapter. Doing so could be
dangerous.
7. Do not use the AC power adapter in a hot and humid place.
8. Do not subject the AC power adapter to strong shocks.
9. The AC power adapter may emit a humming. This is normal.
10. If used near a radio, the AC power adapter may cause static. If this
happens, move the printer away from the radio.
■ Photo pack and print care
1. Keep a photo pack in a cool and dry place. Do not leave a photo
pack in a place where the temperature is extremely high (e.g. in a
closed car) for long periods.
2. When you load a photo pack, use all the fi lms as soon as possible.
3. If a photo pack has been kept in a place where the temperature is
extremely high or low, leave it at normal room temperature for a while
before starting to print.
4. Be sure to use the photo pack within the validity period.
5. Avoid airport checked luggage inspection and other strong X-ray
illumination. The effect of fogging, etc. may appear on unused fi lms.
We recommend that you carry the printer onto the aircraft as carry-on
luggage (Check with each airport for more information).
6. Avoid strong light, keep the prints in a cool and dry place.
14 15
Page 9

Notes on Handling Films and Finished Prints
■ Finishing prints
zWhile the printer can be used at temperatures between 5˚C and 40˚C (+41
˚F and +104˚F), to get the best possible print quality it should be used at
temperatures between 15˚C and 30˚C (+59˚F and +86˚F).
zIn cold conditions, quickly place the print in a warm place such as a roomy
jacket pocket for around 30 seconds to warm up the image.
zDo not leave the print in extremely hot locations (such as on hot sand or
concrete or close to a heating appliance).
zAvoid exposing freshly produced prints to direct sunlight before the image has
stabilized. Also, do not wave prints around, do not bend, fold or scratch prints
and avoid touching the middle of the print surface.
■ Caution
The film contains black alkaline fluide. The alkalinity weakens about 10
minutes after printing, but the following precautions should be observed
when handling prints:
Do not put in the mouth.
(Take particular care with
young children and pets.)
If any of the fl uid gets onto skin or clothing, quickly rinse the affected area with
plenty of water. If any fl uid gets into the eyes or mouth, immediately fl ush the
affected area with large amounts of water and then seek medical treatment.
16 17
Do not cut. Do not pull apart. Do not pierce.
Restrictions
1. This device was designed and built essentially to print still
images that were photographed on the device that is sending
the data. (It may not be able to print still images that have been
exchanged between sender devices via a media or some form of
communication.)
Depending on the device security settings, restrictions may apply to
the printing of downloaded content and images.
2. Data other than images (address book or schedule entries, etc.)
cannot be printed.
3. Restrictions apply to infrared transmissions on some sending devices
so it may not be possible to transfer large images.
4. The number of recorded pixels and the number of pixels that can be
sent via infrared vary depending on the sending device.
5. Some sending devices may convert images to a smaller size for
transmission.
6. Some sending devices may not be able to transmit from a memory
card via infrared.
7. The appearance of the fi nished print (sharpness, resolution, etc.) and
the printing time varies depending on the image size.
8. The infrared transmission time depends on the fi le size and the
sending device with camera model.
9. The quality of the fi nished print (color, image quality, etc.) is affected
by the photographic conditions and the sending device used.
10. The fi nished print may not appear as it does on the sending device’s
LCD screen.
11. Depending on the type of device used to send the data, the
orientation of the printed image may differ from that of the displayed
image.
12. The printer may be unable to communicate with some devices due to
differences in protocols (communication standards) or image formats
used.
13. This printer does not support Progressive JPEG.
Page 10

Necessary Items
Batteries
Two CR2 lithium batteries
●! All batteries must be new and be the same
size and type.
Use following fi ve manufacturers.
1. FUJIFILM 2. PANASONIC 3. SANYO
CAUTION
Risk of explosion if battery is replaced by an incorrect type. Dispose of used
batteries according to the instruction.
x With new batteries, the MP-300 will print around 100 photos
communication is used and around 70 photos
is used (under FUJIFILM test conditions).
c Print numbers may vary depending on image (fi le) size, operating temperature,
etc.
Photo pack
4. DURACELL 5. Energizer
c
when only USB communication
c
Purchase the “FUJIFILM Mobile
Printer Photo Pack” or the
“FUJIFILM instax digital film
(pivi)”.
●! No other type of photo can be used.
xEach photo pack contains 10 sheets
of fi lm.
< Front > < Back >
when only infrared
Optional AC Power Adapter
The AC power adapter AC-5VX
Connection
(sold separately)
The AC power adapter AC-5VX
(AC100 to 240V, 50/60Hz)
x Recommended for use when sending
images from a digital camera via
USB cable.
(P.14)
Getting ReadyGetting Ready
18 19
Unused check window
Page 11

Getting Ready
Print eject slot
Photo pack confirmation window (P.23)
Photo pack
door
Photo pack door knob
Release button for
the photo pack
door knob
DATE button
(P.39)
SHARPEN button
(P.38)
USB socket
DC IN 5V
socket
Battery cover
ERROR lamp
(P.41)
PictBridge lamp
Low Battery lamp (P.42)
POWER button
REPRINT button (P.36)
Film counter
DATE lamp
SHARPEN lamp
Infrared port
Part Names
1
2
3
Getting Ready to Print
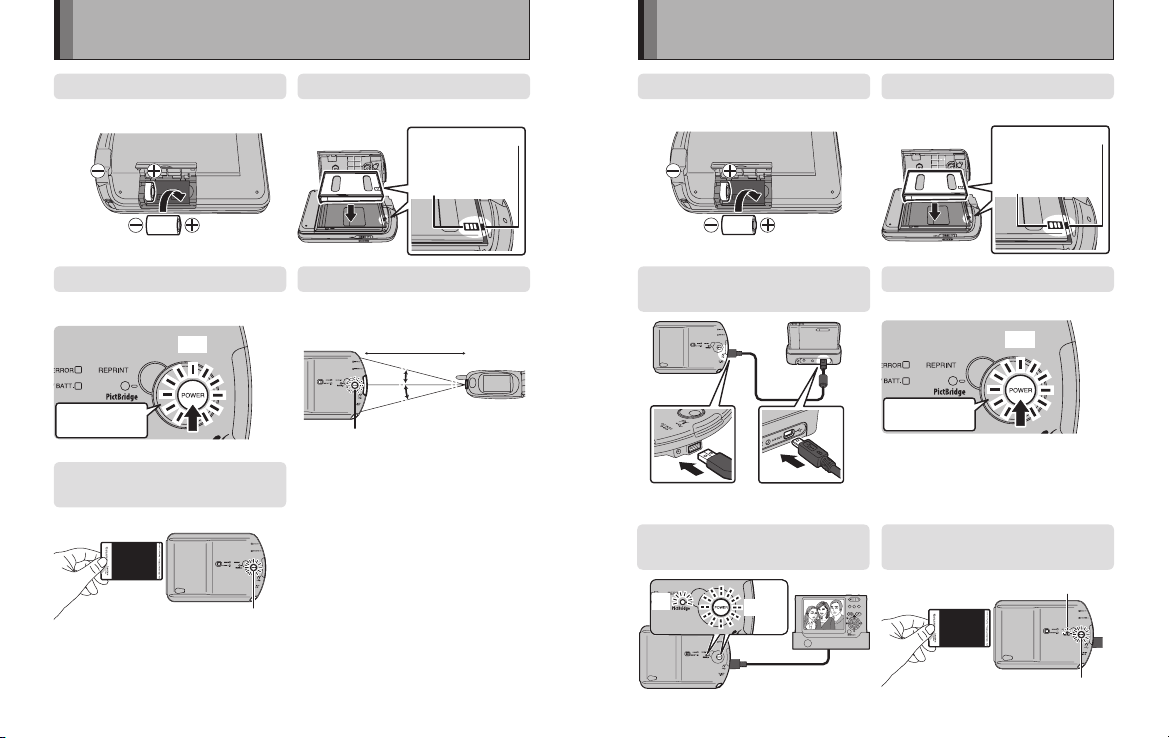
Loading the batteries
Open the battery cover.
1
Getting Ready
Loading the batteries.
2
Match the = and - on the batteries to
the markings in the battery case.
Insert the batteries - end fi rst.
Close the battery cover.
3
When closing the battery cover, press
the door until click shut.
20 21
Page 12

Getting Ready
Getting Ready to Print
1
2
3
4
●
●
Photo pack loaded
No photo pack
Loading the photo pack
12
Open the photo pack door.
1
While holding down button 1, slide
knob 2 in the direction of the arrow.
Photo pack confi rmation window
This window allows you to check
whether there is a photo pack loaded
into the printer.
Getting Ready
Turquoise mark inside
the printer
Turquoise mark on
the photo pack
Lit (POWER button)
Blinking
Blinking
(5 sec.)
(5 sec.)
Turn off
(11 sec.)
22 23
Loading the photo pack.
2
Hold the pack by the sides and drop
it straight in. Never press on the 2
rectangular holes in the back.
Close the photo pack door.
3
When closing the photo pack door,
press the door until click shut.
Turning on the power.
4
Hold down the POWER button (one
second or more) to turn the printer on.
The fi rst time the printer is turned
x
on after photo pack is loaded, the
printer performs internal printing
preparations. The printer receives data
while the motor is running and printing
starts when preparation is completed.
x When the POWER button lights and
“10” appears on the fi lm counter, the
printer is ready to print.
◆ Photo pack care ◆
The fi lm is sensitive to light and dust. Light inside the photo pack may
expose the fi lm, causing incorrect printing of images. Also, any dust
inside the photo pack or printer may scratch the fi lm. Always observe
the following precautions when using photo packs.
●! Avoid exposure to light.
zAvoid exposure to direct sunlight when loading
the photo pack.
z Never press on the 2 rectangular holes in the
back.
z Stopping midway or re-opening the door before it
is fully closed risks exposing the photos.
●! Avoid exposure to dust.
z Avoid exposure to dust when loading the photo
pack.
z Do not remove the photo pack’s inner packaging
until just before loading it directly into the printer.
Page 13

Printing
2
LitLit
15°
15°
20cm (7.9 in.)
PRINTING - Infrared communication -
1
2
4
Lit (POWER button)
Slow Blinking (POWER button)
Rapid Blinking (POWER button)
3
4
Setting up for infrared transmissions
On the sending device, select
the image to be printed.
(P.26)
Printing
2 Precautions during data transfer
z Do not place objects between the sending device and the printer.
z Leaving the printer in direct sunlight or directly under fl uorescent lighting may
prevent data transfer.
z The sending device and printer may be unable to communicate successfully
z
24 25
if they are close to equipment that generates interference or close to other
infrared communications devices such as remote controls for TVs or VCRs.
Do not move the sending devise’s infrared port or the printers infrared receptor
until data transfer ends.
Turning on the power.
1
Hold down the POWER button (one
second or more) to turn the printer on.
x The POWER button lights.
x
If you leave the printer on, it automatically
turns off (after 3 minutes when using
batteries and after 10 minutes when
using the AC power adapter).
Check the fi lm counter to ensure that a
fi lm remains in the printer.
Align the infrared ports.
2
Point the infrared port on the sending
device directly at the printer’s infrared
port. (P.27)
Images can be transmitted up to 20
x
cm (7.9 in.) at an angle of up to 15˚
up, down, left or right.
When the printer is connected to a digital camera (when the PictBridge
lamp is lit), images cannot be printed using infrared communication. To
use infrared communication to print, first disconnect the USB cable.
4 Notes on taking out film
z Never pull the fi lm out before the printer has fi nished feeding the fi lm out.
z Grip the leading edge of the fi lm and pull it straight out, taking care not to bend
the fi lm.
z Always take the print out when printing is complete.
Send the image from the sending
3
device using infrared communication.
x The POWER button blinks slowly
during image transfer.
x See P.26 for information on infrared
transmission from a mobile phone.
The film is fed out roughly 20 seconds
after the printer receives the image.
x The POWER button blinks rapidly
during printing.
x Printing of a VGA-size (FUJIFILM
standard) image takes 20 seconds
once the infrared signal is received.
x Printing may take longer for images
larger than VGA-size.
Take the film out when film
4
output ends.
Take the print out when the POWER
button stops blinking and stays lit.
x When the POWER button stops
blinking and stays lit, the next image
can be transferred.
Printing
Page 14

Printing
PRINTING - Infrared communication -
Infrared
transmission
Rotate image
Delete image
1
2
3
Sending images from a camera phone
Select the image on the
1
mobile phone.
x On some models, the image cannot
be sent if it is displayed at full size.
If so, return to the thumbnail or
list mode and then select infrared
transmission.
Select infrared transmission.
2
Confirm the transmission (YES)
3
Send infrared
transmission?
YES
/NO
x The location of the mobile phone’s infrared port, its operation procedure and
the text displayed on the screens all differ depending on the particular model
used. Refer to the owner’s manual for your phone.
x Refer to the owner’s manual for your mobile phone for information on how to
send images from the mobile phone.
26 27
Sending
to begin sending the image.
c Sample mobile phone screens.
Examples of camera phone infrared port locations
Guide to image sizes and transmission times
The MP-300 supports IrDA high-speed communication (IrSimple/FIR). This
provides faster connection speeds and shorter transmission times when the image
is sent from a compatible device.
Main image
sizes (pixels)
VGA (640×480)
1M (1280×960)
3M (2048×1536)
5M (2592×1944)
c The MP-300 cannot print ordinary images with a file size larger than 1 MB.
x The times given here are purely a guide. Actual times differ depending on the
performance of the sending device (primary node).
x Transmission times vary depending on the fi le size and the type of sending
device used.
x The transmission time will be longer if an image with a large fi le size is sent.
◆ Recommended image sizes for transmission ◆
For the best balance between data transmission times and image quality,
images should be photographed at VGA-size (640
x Depending on the model of the sending device, it may not be possible to
shoot images at VGA-size and then send the images via infrared.
x For information on the location of the infrared port on the sending device (digital
camera, PC, PDA, etc.) and on the image transmission procedure, refer to the
owner’s manual for the sending device.
High-speed infrared communication (IrSimple/FIR)
Unidirectional Bidirectional
Approx. 0.3 sec. Approx. 0.3 sec. Approx. 19 sec.
Approx. 1.3 sec. Approx. 1.4 sec. Approx. 75 sec.
Approx. 1.7 sec. Approx. 1.8 sec. Approx. 100 sec.
- (c) Approx. 4.7 sec. Approx. 160 sec.
× 480).
Infrared
communication
(IrDA / SIR)
Printing
Page 15

Printing
PRINTING - PictBridge -
LitLit
PICTBRIDGEP I C TB R I D G E
ENGLISHEN GL ISH
SETSE T
NTSCNT SC
1
3
2
OKO K
1
Lit (POWER button)
Lit (PictBridge lamp)
Rapid Blinking (POWER button)
Lit (PictBridge lamp)
2
3
Setting up for USB transmissions
Select PictBridge in the digital
On some digital camera models, the digital camera should be turned on
at this point. Check the owner’s manual for your digital camera.
camera’s USB setting.
Select the image on the digital
x For information on using your digital
camera, refer to the owner’s manual
supplied with the camera.
BlinkingLit
Connect the digital camera to the
printer.
x
When the printer and the digital camera
are correctly connected, the PictBridge
lamp will light after MP-300 power on.
x Use the USB cable supplied with
the digital camera. Do not use an
extension cable or USB hub.
x
The location of the USB socket varies
depending on the digital camera used.
On some digital camera models, the digital camera should be turned off
at this point. Because the transmission method varies depending on the
model used, check the owner’s manual for your digital camera.
Printing
Turning on the power.
1
Hold down the POWER button (one
second or more) to turn the printer on.
x The POWER button lights.
x
If you leave the printer on, it automatically
28 29
turns off (after 3 minutes when using
batteries and after 10 minutes when
using the AC power adapter).
Check the fi lm counter to ensure that
there is still fi lm in the printer.
2
camera and then print the image.
x The POWER button blinks slowly
during image transfer.
x For information on using your digital
camera, refer to the owner’s manual
supplied with the camera.
x If multiple prints have been specifi ed,
refer to P.31.
The film is fed out roughly 20 seconds
after the printer receives the image.
x The POWER button blinks rapidly
during printing.
x Printing of a VGA-size (FUJIFILM
standard) image takes 20 seconds
once the infrared signal is received.
x Printing may take longer for images
larger than VGA-size.
Take the film out when film
3
output ends.
Take the print out when the POWER
button stops blinking and stays lit.
x When the POWER button stops
blinking and stays lit, the next image
can be transferred.
x See “Notes on taking out fi lm”. (P.25)
Printing
Page 16

Printing
PRINTING - PictBridge -
4
5
Turn off
BlinkingBlinking
LitLit
LitLit LitLit
Lit (POWER button)
1
2
3
Turn the digital camera off
4
and then disconnect the USB
cable.
Turn the printer off.
5
x If you are using the AC power
adapter, turn the printer off before
disconnecting the adapter.
◆ Recommended ◆
The use of an AC power adapter (optional AC-5VX) is recommended for
printing via USB communication. (P.19)
x Do not disconnect the USB cable or AC power adapter or turn the power off
until printing has fi nished.
x The location of the digital camera’s USB socket, its image transmission
procedures and operation procedures all differ depending on the camera
model used. Refer to the owner’s manual for your camera.
30 31
If 2 or more prints are set at the camera
If 2 or more prints have been specified, take the film out after the first
image has been printed and then proceed as described below.
Check that the POWER
1
button is lit and that the
PictBridge lamp is blinking.
Press the REPRINT button.
2
x When the PictBridge lamp is blinking,
pressing the REPRINT button prints
the next selected image.
Take the film out when film
3
output ends.
x If the fi lm counter decrements to “0”
while the specifi ed images are being
printed, see “When the fi lm runs out
while printing”. (P.35)
Repeat steps 1 to 3 until all the images have been printed.
When all the specified images
have been printed, the PictBridge
lamp stops blinking and stays lit.
x Do not disconnect the USB cable or AC power adapter or turn the digital
camera off until all the images have been printed.
Printing
Page 17

Printing
●
PRINTING - PictBridge -
●
●
●
●
●
Additional Information and Notes on Printing
PictBridge print specifi cation compatibility table
Supported print
specifications
Multiple copies for
multiple images
Date and file name
printing
Automatic printing of
images with DPOF
settings
Printing of trimmed
images
Index prints Prints 4 frames on 1 sheet of film. If any of the
Layout printing Single-frame, 2-frame and 4-frame layouts are
!
●
Do not cut
prints.
x Different digital camera models are equipped with different print setting
functions.
Guide to image sizes and transmission times
Main image sizes (pixels) USB transmission time
VGA (640 × 480) Approx. 7 sec.
1M (1280 × 960) Approx. 13 sec.
3M (2048 × 1536) Approx. 23 sec.
5M (2592 × 1944) Approx. 32 sec.
32 33
If one or more of the selected images cannot be
processed, printing ends at that point. Printing
cannot be resumed mid-way through.
Supports up to 12 alphanumeric characters and
symbols.
If the USB cable is disconnected before printing
of the last of the specified number of images is
completed, printing ends at that point. Printing
cannot be resumed mid-way through.
The specified portion of the image is printed.
specified images are incompatible or damaged, the
index print will not be printed correctly.
supported.
If any of the specified images are incompatible
or damaged, the layout print will not be printed
correctly.
USB transmission times differ
depending on the image size.
x Transmission times vary
depending on the fi le size
and the type of sending
device used.
x
The transmission time will
be longer if an image with a
large fi le size is sent.
Printable image sizes and formats
Image size Format
60 × 60 to 6400 × 6400 (pixels) JPEG
●! When images with a large fi le size are sent, there may be a delay before
printing starts.
Printing exceptions
With some image sizes, white margins may appear on the print.
Example
120 × 120 (pixels)
Depending on the aspect ratio, parts of some images may not be printed.
Example
288 × 352 (pixels)
◆ Precautions during printing ◆
●! Never touch the print while it is being fed out of the printer.
●! Do not shake, strike or vibrate the printer during printing.
●! Ensure that your fi ngers or other objects do not block the print eject slot.
●! Ensure that there are no obstructions within 10 cm (3.9 in.) of the print
eject slot.
Printing
Page 18

Printing
When the Film Runs Out
1
2
●
●
1
LitLit LitLit
2
3
Check that the film counter
1
Check for “0”!
shows “0”.
When the printer runs out of fi lm, the
POWER button goes dark and “0”
appears on the fi lm counter.
x Each time a new image is sent to the
printer, or each time the POWER or
REPRINT button is pressed, the fi lm
counter blinks (5 times) to indicate
that the printer is out of fi lm.
Remove the photo pack.
2
12
◆ Notes on reloading photo pack ◆
UsedUnused
On an unused photo
pack, the unused check
window is closed all the
way to the “■” mark.
●! Do not take out a photo pack until using up all 10 fi lms.
zThe films will be exposed.
z The film counter is reset when a photo pack is removed and may not
show the correct number of remaining films.
●! Take care not to load a used photo pack.
z Always check the unused check window on the photo pack before
replacing the fi lm.
z If you mistakenly load a used photo pack, the printer will run normally
but will not print images.
On a used photo pack,
the unused check
window is open to the
“▲” mark.
34 35
When the fi lm runs out while printing
Check that the film counter
1
Check for “0”!
1 2
3 4
x When you replace the fi lm while printing a specifi ed number of prints, leave the
printer turned on. Turning the printer off while replacing the fi lm will delete the
digital camera print settings.
shows “0”.
If the printer runs out of fi lm while it is
printing a specifi ed number of images,
the POWER button and the PictBridge
lamp blink rapidly and “0” appears on
the fi lm counter.
Load a new photo pack.
2
(P.22)
x Leave the printer turned on.
Restart printing of the
3
specified images.
When the POWER button and
PictBridge lamp stays lit, press the
REPRINT button.
Printing
Page 19

Advanced Printing
LitLit
Lit (POWER button)
REPRINT
1
2
3
BlinkingBlinking LitLit
Turn off
1
+
2
1
2
Simply by pressing the REPRINT button, you
can print as many copies as you like of the last
image printed.
x If the power is cut, the last image is stored.
x Transferring a new image overwrites the stored image.
x This function cannot be used with USB communication.
Check that the printer is
1
turned on.
x If the printer is turned off, turn it on.
Press the REPRINT button.
2
x If there is no image stored in the
printer’s memory, the ERROR lamp
blinks 3 times. (P.41)
Take the film out when film
3
output ends.
x When the printer is connected to a digital camera (when the PictBridge lamp
is lit), you cannot use the reprint function. Disconnect the USB cable and wait
until the PictBridge lamp is off before using this function.
Color tones may change slightly in continuous printing.
x
36 37
Erasing the stored image
When the printer is turned off, hold
down the REPRINT button as you
turn the printer on. This erases the
stored image.
Check that the printer is
1
turned off.
x If the printer is turned on, turn it off.
x When the printer is turned off, all the
lamps are off.
Hold down the REPRINT button
2
as you press the POWER button.
When the POWER button lights
and the ERROR lamp blinks
once, erasing is completed.
Advanced Printing
Page 20

Advanced Printing
LitLit
Lit (POWER button)
SHARPEN Mode
LitLit
1
2
3
4
2006.06. 062006.06.06
2006.06.06
LitLit
Lit (POWER button)
LitLit
1
2
3
4
DATE Mode
This mode prints images sharper and
crisper.
x This can be used with the infrared communication,
USB communication and reprint functions.
Turning on the power.
1
x The POWER button lights.
x During USB communication, the
PictBridge lamp also lights.
Press the SHARPEN button.
2
x The SHARPEN lamp lights.
x
Pressing the SHARPEN button alternately
turns sharpen mode on and off.
x Sharpen processing is only applied
with the SHARPEN lamp is lit.
Send the image.
3
To use reprint funciton, press the
REPRINT button.
x Sharpen processing starts when
the image is received (approx. 10
seconds).
Take the film out when film
4
output ends.
x Turning the printer off cancels
sharpen mode.
x The effects of sharpen mode may not be suited to some transmitted images.
(E.g. The printed image may appear jagged or artifi cial.)
38 39
When via infrared communication and reprint function is used
2006.06.06
This mode inserts the date on printed
images.
x This can be used with the infrared communication
and reprint functions.
Turning on the power.
1
x The POWER button lights.
Press the DATE button.
2
x The DATE lamp lights.
x Pressing the DATE button alternately
turns date mode on and off.
x The date is only printed on images
when the DATE lamp is lit.
Send the image.
3
To use reprint funciton, press the
REPRINT button.
Take the film out when film
4
output ends.
x Turning the printer off cancels date
mode.
Advanced Printing
Page 21

Error
Blinking (3 times)
Blinking (7 times)
DATE Mode
2006.06.06
2006.06.062006. 06.062006.06.06
2006.0 6.062006.06.06
2006.06.06
ERROR - ERROR lamp -
When PictBridge is used
Set date mode on the digital camera.
x For information on setting date mode on your digital camera, refer to the
owner’s manual for the camera.
Date printing position
2006.06.06
◆ When an image with no date information is sent ◆
If date mode is selected and the image
(Approx. 7 sec. → Power off)
Lit
Blinking
(3 times)
Blinking
Blinking
(3 times)
(3 times)
Operating temperature too high or too low.
Only use between +5°C and +40°C (+41°F and +104°F).
LitLit
◆ When the ERROR lamp lights ◆
Take the measures described below to restore printer operation.
<Operating temperature too low>
Use the printer at +5°C (+41°F) or higher or warm the
printer at body temperature for around 10 minutes.
<Operating temperature too high>
Use the printer at +40°C (+104°F) or lower or
move the printer to a cool location.
Case 1. Cannot print transferred data.
Check image size/format. (P.9, 33)
x If a Progressive JPEG image is sent, the
POWER button may blink.
sent has no date information or has date
information that is not EXIF data, the
ERROR lamp blinks 3 times, the DATE
lamp blinks 7 times at the same time
and the image cannot be printed.
Cancel date mode and then resend the
image or send a different image.
Blinking
Blinking
(3 times)
(3 times)
Blinking
Blinking
(7 times)
(7 times)
Case 2. No stored image for “Reprint”.
Transfer an image.
Date mode error
See “When an image with no date information is
sent”. (P.40)
x The date printed is the date included in the transmitted data.
x If the image has been edited (such as by adding a frame after the picture was
taken), the image’s recorded date may be overwritten.
x Date mode supports EXIF-format data.
x The printed date may be diffi cult to see against some backgrounds. The date
color cannot be changed.
x Date information that was added by a sending device may not be printed
correctly.
40 41
Blinking
Blinking
(3 times)
(3 times)
LitLit
PictBridge communication error
See “Troubleshooting USB communication
problems”. (P.46)
Error
Page 22

ERROR -
LOW BATTERY lamp -
Troubleshooting
Lit
LitLit
Blinking
LitLit
BlinkingBlinking
The batteries are about to run out.
Have new batteries ready. (P.18)
LitLit
Case 1. Battery low.
Load new batteries. (P.21)
●! When replacing the batteries, turn the printer
off beforehand.
●! Do not reload batteries while the printer
(motor) is running as this could cause printer
malfunctions.
Case 2. You are using the wrong AC
power adapter.
Only use the FUJIFILM AC-5VX AC Power
Adapter. (P.14, 19)
Case 3. The AC power adapter may be
faulty.
Refer to the owner’s manual of the AC power
adapter.
The printer may be faulty.
Complete the enclosed service card and contact
your nearest FUJIFILM authorized distributor.
■ Troubleshooting printer problems
Problems Possible Causes Solutions
The photo pack
won’t load into your
printer, or won’t load
into your printer
smoothly.
POWER button was
pressed but nothing
happened.
1 The photo pack is not
for your printer.
2 The photo pack is
loaded incorrectly.
1 The batteries are
dead.
2 The batteries are
loaded incorrectly.
3 You released the
POWER button too
soon.
4 The AC power
adapter is not
connected correctly.
1 Use the “FUJIFILM
2 Align the turquoise
1 Load new batteries.
2 Load the batteries
3 Hold the POWER
4 -1 Ensure that the AC
4-2 Ensure that the AC
Mobile Printer
Photo Pack” or the
“FUJIFILM instax
digital film (pivi)” (No
other photo pack can
be used). (P.18)
mark on the photo
pack with the locating
mark (turquoise)
on the printer when
loading the pack.
(P.18)
correctly. (P.21)
button down until
the POWER button
lights (one second or
more).
power adapter is
connected to the
printer correctly.
power adapter is
plugged into the
mains power outlet
correctly.
42 43
Page 23

Troubleshooting
Problems Possible Causes Solutions
The sending device
sent the image, but
it won’t
communicate with
the printer (also, the
POWER button is
not lit).
Data transfer ended
and nothing was
printed.
The ERROR lamp
blinked (for about 7
seconds) and then
the printer turned
off.
1 You left the printer
on for some time
without using it at
all (3 minutes when
using batteries and
10 minutes when
using the AC power
adapter).
2 The film counter
shows “0”.
1 No photo pack is
loaded.
2 A used photo pack
was loaded by
mistake.
3 The image or text
data sent is not
compatible with the
printer.
The ambient air
temperature is either
very low or very high
and the printer became
too cold or too hot
(outside the printer’s
operating range of 5°C
to 40°C (+41°F to +104°
F)).
1 Press the POWER
button to turn the
printer back on.
2 Remove the photo
pack and load a new
pack. (P.34)
1 Load a new photo
pack. (P.22)
2 Load a new photo
pack. (P.22)
3 Send a printable
image format. (P.33)
Use your body heat
to warm the printer
or place it in a cool
location. Once the
printer’s temperature is
back inside its operating
range, the error will clear
and the printer will be
ready to use. (P.41)
■ Troubleshooting infrared communication problems
Problems Possible Causes Solutions
Data was sent from
your mobile phone
but it can’t contact
the printer (The
POWER button does
not blink).
The POWER button
changed from
blinking to lit during
data transfer and
nothing was printed.
1 The sending device
is not compatible with
the printer.
2 The infrared port on
the sending device
is not pointed at the
infrared port on the
printer.
3 Communication
was prevented by
a problem with the
angle, distance or
intervening obstacles.
4 There is a problem
with the infrared
communication.
1 Communication with
the sending device
timed out (due to
a problem with the
angle, distance
or intervening
obstacles).
2 Data transfer
was affected by
interference from
another appliance or
signals from another
infrared device (TV or
video remote, etc.).
1 Send the data from a
compatible device.
2 Check the location of
the infrared port on
the sending device
and then send the
data again from
within the effective
image transmission
range. (P.27)
3 Check the image
transfer conditions
and try again. (P.24)
4 Try turning the printer
off and on again.
1 Check the image
transfer conditions
and try again. (P.24)
2 Try again in a location
away from other
infrared devices.
44 45
Page 24

Troubleshooting
Problems Possible Causes Solutions
The POWER button
changed from
blinking to lit during
data transfer and
nothing was printed.
3 The sending device
is not compatible with
the printer.
3 Send the data from a
compatible device.
■ Troubleshooting USB communication problems
Problems Possible Causes Solutions
The print menu does
not appear on the
digital camera.
The PictBridge lamp
does not light.
The printer won’t
start printing. (The
POWER button
doesn’t start blinking
rapidly.)
The POWER button
changed from
blinking to lit during
data transfer and
nothing was printed.
1 The digital camera
is not a PictBridge
supported model.
2 PictBridge is not
selected in the
digital camera’s USB
setting.
3 The USB cable is not
connected correctly.
4 The power of MP-300
is off.
The USB cable is not
connected correctly.
Data reception from the
digital camera takes
some time because the
image is large.
The device sending the
data is not compatible
with the printer.
1 Use a PictBridge
supported digital
camera.
2 Change the digital
camera’s USB setting
to PictBridge mode.
3 Check the USB cable
connections.
4 Power on MP-300.
Check the USB cable
connections.
To shorten data transfer
times, use small image
sizes (around 640 × 480
pixels) for your shots.
(P.32)
Send the data from a
compatible device.
Problems Possible Causes Solutions
Error sign appears
on the camera.
The ERROR lamp
blinks (3 times).
When I send multiple
images one at a
time, the second and
subsequent images
are not printed. (The
PictBridge lamp is
blinking.)
1 There was a fault of
some kind during
USB communication.
2 The printer is not
turned on.
3 The printer is out of
film.
1 An error occurred
during data transfer.
2 The image sent
exceeds the
maximum number of
pixels supported by
the printer.
The interval between
transmissions is 5
seconds or less.
1 Turn the digital
camera and the
printer off and then
back on again.
2 Turn the printer on.
3 Load a new photo
pack.
1 Resend the images.
2 The maximum
number of pixels
(image size)
supported by the
printer is [6400 ×
6400 pixels].
1 Press the REPRINT
button.
2 When sending
images one at a time,
leave an interval of
at least 5 seconds
between images.
46 47
Page 25

Troubleshooting
Glossary
■ Troubleshooting problems with finished prints
Problems Possible Causes Solutions
The corners of the
finished print are
dark.
There are smudges
on the image.
The photo pack door
was opened before the
film was used and the
film was exposed to the
light.
1 Pressure was
applied to the print
immediately after it
was fed out.
2 The print was not fed
out smoothly.
Use a new photo pack.
(P.22)
1 Do not wave prints
around and do not
bend, fold or apply
pressure to prints.
(P.16)
2 Do not block the print
eject slot. (P.33)
DPOF:
Exif:
JPEG:
PictBridge:
DPOF stands for Digital Print Order Format and refers to a format
that is used for recording printing specifications for images shot
using a digital camera on media such as an xD-Picture Card.
The recorded specifications include information on which frames
are to be printed.
Exif (abbreviation of Exchangeable image file format) is a
specification for the image file format used by digital cameras
and camera phones.
It was created by the Japan Electronic Industry Development
Association (JEIDA).
The metadata tags defined in the Exif file cover a broad
spectrum such as date and time, camera settings.
Joint Photographic Experts Group. A file format used for
compressing and saving color images. The higher the
compression rate, the greater the loss of quality in the
decompressed (restored) image.
PictBridge is an industrial standard for connecting digital
cameras to printers.
It allows easy direct printing regardless of brands of cameras
and printers.
48 49
Page 26

Specifi cation
Photo pack used
Image size
Display
Control buttons
Interface
Recording method
Printing levels 256 levels per color (RGB)
Supported image
format
Printable image
sizes
Max. supported file
size
FUJIFILM Mobile Printer Photo Pack
FUJIFILM instax digital film (pivi)
61 × 46 mm (2.4 × 1.8 in.)
(Film size: 86 × 54 mm (3.4 × 2.1in.))
Film counter (shows remaining shots)
Power supply (POWER button)
ERROR lamp
LOW BATTERY lamp
SHARPEN lamp
DATE lamp
PictBridge lamp
POWER button (power supply)
REPRINT button (reprints the last image)
SHARPEN button (SHARPEN Mode/Image
editing)
DATE button (DATE Mode/Date printing)
IrDA (IrSimple/FIR, SIR)
USB (PictBridge)
3-color (RGB) LED exposure with liquidcrystal
shutter
JPEG
60 × 60 to 6400 × 6400 pixels
IrDA (FIR, SIR/IrSimple bidirectional mode) and
USB: Unrestricted
IrDA (FIR IrSimpleShot): Up to 1 MB (c)
Image enhancement
functions
Printing time
Possible number of
prints
Power supply
Power consumption 3.0 W (writing/feeding)
Auto Power Off
delay
Operating
temperature
Dimensions 146 × 102 × 29 mm (5.7 × 4.0 × 1.1 in.)
Weight (without
batteries and photo
pack)
c SIR IrSimpleShot is not supported.
x Specifi cations are subject to change without notice.
FUJIFILM shall not be held liable for damages resulting from errors in this
owner’s manual.
Image Intelligence™
SHARPEN Mode
Image recording - photo output (fed out):
Approx. 20 sec.
Using infrared communication only: Approx. 100
prints (under FUJIFILM test conditions)
Using PictBridge communication only: Approx.
70 prints (under FUJIFILM test conditions)
Two CR2 lithium batteries
AC power adaper (optional: AC-5VX)
Using batteries as the power supply: 3 minutes
Using the AC power adapter as the power
supply: 10 minutes
+5°C to +40°C (no condensation)
(+41°F to +104°F)
225 g
50 51
Page 27

Specifi cation
– About Mobile Printing Ready Products –
This “Mobile Printing Ready” product is designed to provide easy
printing from mobile phones. This product follows Mobile Imaging and
Printing Consortium (MIPC) Implementation Guitelines for Printing with
Mobile Terminals Version 2.0 for (Select)
About MIPC (Mobile Imaging and Printing Consortium)
The MIPC is a non-profit industry association founded in 2004 by
leading companies in photo printing and the mobile phone industry. Its
mission is to promote and support the development of interoperability
guidelines enabling printing of images and other content between
mobile phones and printing devices. The guidelines are promoted for
use internationally to ensure a broad spectrum of products and services
for mobile phone consumers.
www.mobileprinting.org
52 53
 Loading...