

FujiFilm nexiaQ1 Owner's Manual
LOADING THE BATTERY
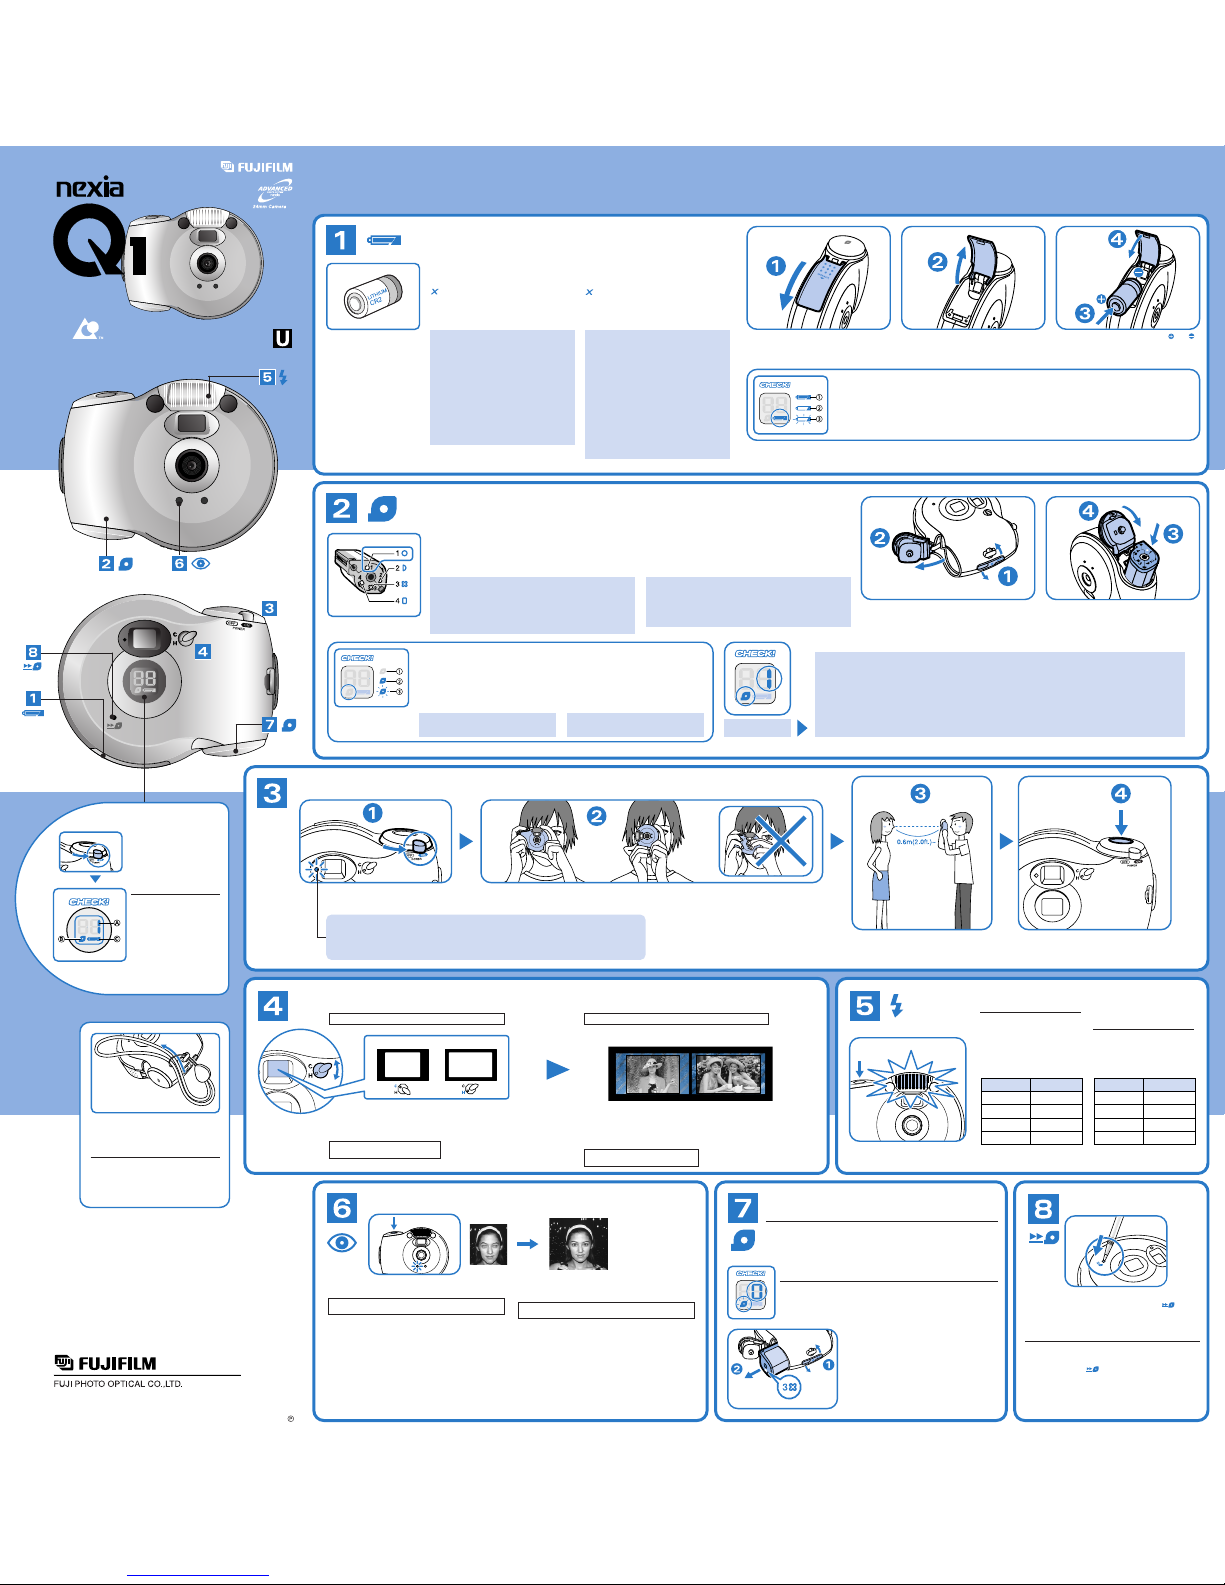
Your camera requires one 3V lithium
battery, type CR2/DL CR2.
•
One new lithium battery should be enough for
about 250 pictures (based on our test conditions.)
Load the battery before loading the film
cartridge.
COLOCACIÓN DE LA PILA
Su cámara utiliza una pila de litio de 3V
CR2/DL CR2.
•
Una pila de litio nueva es suficiente para realizar
250 fotografías aproximadamente (dato basado
en nuestras condiciones de prueba).
Inserte la pila antes el chasis con la
película.
CHECKING THE BATTERY
햲 Lit : Battery is OK.
햳 Lit : Battery is low. Replace with the new battery.
햴 Blinks : The shutter cannot be released because bat-
tery is dead. Replace with new battery.
Owner’s Manual / Manual de Instrucciones
USING THE CAMERA / UTILIZACIÓN DE LA CÁMARA
Flash Ready Lamp
Lit : Flash charging complete
Blinks : Flash charging
∗
When the shutter release button is pressed
down halfway.
SELECCIÓN DEL FORMATO DE COPIA
Esto le permite seleccionar un formato de copia (C-
4×6, H-4×7)
.
Gire el selector para seleccionar el fomato de copia.
C
H
4×7 COPIAS
(9:16)
4×6 COPIAS
(2:3)
C
H
a Slide over the battery cover in the direction of
the arrow.
b Flip open the battery cover in the direction of
the arrow.
c Load the battery, observe polarity ( and ).
d Close the battery cover until it snaps into place.
b Hold it firmly using both hands.
∗
Make sure that nothing is in
front of the lens.
c Compose the picture.
∗
Keep at least 0.6m (2.0ft.) from your subject.
d Press the shutter release button.
COMPROBACIÓN DE LA PILA
햲 Iluminado : La carga de la pila es correcta.
햳 Iluminado : La carga de la pila es insuficiente. Coloque
una pila nueva.
햴 Parpadea : El obturador no dispara porque la pila está
agotada. Sustitúyala.
a Turn the camera on by sliding the
switch in the direction of the arrow.
Check that the flash ready lamp lights up.
훽
: Picture Counter
훾
: Film Cartridge Mark
훿
: Battery Status
∗ When the camera is not used for
5 minutes while the power is on,
the LCD is turned off to save
power. The power-comes back on
if the shutter release button is
pressed down halfway.
훽
: Contador de exposiciones
훾
: Indicador del chasis de película
훿
: Indicador de capacidad de la pila
∗ Cuando la cámara no se utiliza
durante aproximadamente 5 minutos mientras que la alimentación
está activada, el panel LCD se
apaga para ahorrar energía. El
estado de encendido se reestablece
cuando se pulsa hasta la mitad el
disparador.
SELECTING THE PRINT FORMAT
This permits you to select prints format (C-4×6, H-4×7).
Turn the format selector to select the print format.
The print format is recorded on the film for each photo and is printed as
shown in the figure above. However, since the size of the area used
when the picture is taken is constant (16.7 × 30.2 mm), the print format
can be changed when more prints are made.
C : About. 16 × 23 mm 4 × 6 prints
H : About. 16 × 28 mm 4 × 7 prints
El formato de copia se graba en la película para cada toma y se imprime en la
zona indicada en la ilustraci. Sin embargo, como el tamaño del área expuesto
cuando se toma una fotografía es constante, (16,7 × 30,2 mm), independientemente
del formato de copia selecccionado inicialmente, cada vez que se realiza una
nueva copia se puede cambiar el formato de la misma.
C : Aprox. 16 × 23 mm 4 × 6 copias
H : Aprox. 16 × 28 mm 4 × 7 copias
Piloto de flash preparado
Iluminado : La carga del flash ha acabado
Parpadea : Flash cargándose
∗
Cuando se pulsa el disparador hasta la mitad.
The flash lamp fires when the
brightness of the subject is low.
The flash distance will vary depending upon the film speed (sensitivity
to light or ISO rating). When using
flash, keep the subject within the
flash range in the chart below.
Film speed
Effective
flash range
ISO 100
ISO 200
ISO 400
ISO 800
0.6
-
2.0 m
2.0
-
6.6 ft.
0.6
-
3.0 m
2.0
-
9.8 ft.
0.6
-
4.0 m
2.0
-
13.1 ft.
0.9
-
6.0 m
3.0
-
19.7 ft.
(Using color negative film)
La lámpara del flash se dispara
automáticamente cuando la
iluminación del motivo es inferior
a un nivel predeterminado.
La distancia de alcance del flash varía
según la sensibilidad de la película.
Cuando haga fotografías en un luger
oscuro, mantenga al sujeto dentro del
alcance de la luz del flash.
Sensibilidad de
la película
Gama de alcance
del flash
ISO 100
ISO 200
ISO 400
ISO 800
0,6
-
2,0m
2,0
-
6,6ft.
0,6
-
3,0m
2,0
-
9,8ft.
0,6
-
4,0m
2,0
-
13,1ft.
0,9
-
6,0m
3,0
-
19,7ft.
(Utilizando película negativo color)
FGS-305101- -01
Thank you for purchasing a FUJIFILM nexia Q1 camera. We hope you enjoy the design and size of the
Q1. Before taking pictures, please read this manual for proper use and care. If you have any questions
call FUJIFILM's Consumer Information Services Department @ 1-800-800-FUJI (3854
).
Gracias por comprar la cámara FUJIFILM nexia Q1. Esperamos que disfrute el diseño de la Q1. Antes
de tomar fotos, por favor lea este manual minuciosamente, ya que contiene importante información
sobre su uso y cuidado apropiados. Si tiene alguna preguntas, por favor llame al Departamento de
Información al Cliente de FUJIFILM en el 1-800-800-FUJI (3854
).
Note 1:
If the battery is loaded after loading a new film
cartridge, the camera will not detect the film cartridge and will not allow you to take pictures with
that film cartridge. If this happens, check that the
motor has stopped and open the film cartridge
compartment cover.
• If the film cartridge compar tment cover opens,
remove and reload your film cartridge, so that it
can be used.
• If the film cartr idge compartment cover does
not open, rewind the film, then remove the film
cartridge. Since
ii
ii
i is displayed on the cartridge
and the film can not be used, load a new film
cartridge.
Nota 1:
Si se inserta la pila inmediatamente después de
cargar un nuevo chasis de película, la cámara
podría no detectar el chasis de película y no se
podrán sacar fotografías con ese chasis de película.
Si esto ocurre, verifique que el motor se ha detenido
y luego trate de abrir la tapa del compartimento
del chasis de película.
• Si la tapa del compartimento del chasis de
película se abre, el chasis de película puede
ser utilizado si se quita y se coloca nuevamente.
• Si la tapa del compartimento del chasis de
película no se abre, quite el chasis de película
luego de rebobinar la película. Ya que
ii
ii
i se
visualiza en el chasis y la película no puede
ser utilizada, coloque un chasis de película
nuevo.
LOADING THE FILM CARTRIDGE
Your FUJIFILM nexia Q1 is an Advanced Photo System (APS) camera
that uses a new size film in a special cartridge. This film is designated as
IX240 APS. The cartridge is designed to tell you that status of the film as
follows:
uu
uu
u1. Film is unused
oo
oo
o 2. Film is partly used
ii
ii
i3. Film is completely used
pp
pp
p4. Film in the cartridge has been processed
COLOCACIÓN DEL CHASIS DE PELÍCULA
Utilice “Película con chasis IX240 para fotografías color”.
uu
uu
u1. Sin exponer
oo
oo
o 2. Parcialmente expuesto
ii
ii
i3. Expuesto
pp
pp
p4. Procesado
When loading a cartridge, make sure that
uu
uu
u (1) indicator on the car-
tridge is white.
If our cartridge shows
oo
oo
o (2),
ii
ii
i (3) and
pp
pp
p (4) in white, this shows that
the film has been partly used or has been processed and the cartridge
cannot be used again. This valuable APS feature stops you from using
the same film more than one time.
Compruebe que la marca
uu
uu
u (1) en el chasis sea de color blanco.
Si el chasis nuestra las marcas
oo
oo
o (2),
ii
ii
i (3) ó
pp
pp
p (4) en color blanco,
indica que el rollo ha sido expuesto ó procesado y el chasis no puede
ser usado nuevament. Ésta característica valiosa de esta cámara
previene exposiciones dobles.
a Unlock the film cartridge compartment cover by twisting
the lever in the direction shown by the arrows.
b Open the film cartridge compartment cover.
c Load the film cartridge.
d Close the film cartridge compartment cover until it
snaps into place.
Check that the film cartridge mark ". "
does not appear on the LCD.
햲 No display : There is no film cartridge in the
camera.
햳 Lit : There is a film cartridge in the camera.
햴 Blinks : There is a fully used film cartridge in
the camera. Remove the film cartridge.
Compruebe que el indicador de chasis de película
". " no aparece en el panel LCD.
햲 Sin indicación : No hay un chasis de película
en la cámara.
햳 Iluminado : Hay un chasis de película en la
cámara.
햴 Parpadea : Hay un chasis de película comple-
tamente expuesto en la cámara. Extraiga el
chasis de película.
If "
. " is displayed on the LCD, the cartridge
compartment cover cannot be opened (Safety
lock function).
Si en el panel LCD iluminado la indicación ". ",
la tapa del compartimento del chasis no se puede
abrir (función de bloqueo de seguridad).
Please
see note.
Note 2: Picture Counter
The nexia Q1's picture counter will count the number of used
frames as you take pictures. If the battery is replaced while a
partly used cartridge is in the camera (Mid Roll), the camera
will not resume counting from the last used frame. The picture
counter will be reset to zero (
` ) and correct the number of
pictures is not displayed. When the last frame in the film has
been exposed, the film rewinds into the cartridge.
Nota 2: Contador de Exposiciones
El contador de exposiciones de la nexia Q1ís contará
automáticamente el número de fotogramas expuestos cuando
usted toma fotos. Si se reemplaza la pila cuando hay un chasis
parcialmente expuesto en la cámara (a mitad de rollo), la camará
no seguirá contando a partir del último fotograma expuesto. El
contador de exposiciones volverá automáticamente a indicar cero
(
`). Usted debe observar el número de fotogramas expuestos
antes de cambiar la pila. Cuando se haya expuesto el último
fotograma de la película, ésta se rebobinará automáticamente
dentro del chasis.
Unas palabras sobre el efecto “ojos rojos”
Cuando se realiza una fotografía con flash, de una persona en
un lugar con poca luz, a veces los ojos aparecen rojos. Esto
ocurre cuando la luz del flash entra en los ojos y se vuelve a
reflejar en el objetivo. Con el modo de reducción del efecto
“ojos rojos”, la pupila del sujeto se contrae antes de que el
flash se dispare. Cuando use este modo, tome las siguientes
precauciones:
•
Procure que la persona fotografiada centre su mirada
directamente en el objetivo de la cámara.
•
Tome la fotografía acercándose lo más posible a la persona
que desea fotografiar.
Dealing with Red-eye
When you photograph a person in dim light using flash, the
eye will appear red in the finished photo. Under low light, the
pupils of the eye get bigger for better vision. Red-eye is caused
by light from the flash entering the eye and being reflected
back to the camera lens. Red-eye reduction causes an early
flash to fire before the actual picture is taken. This causes the
eye to get smaller, reducing the red-eye effect for the final flash.
When using red-eye reduction mode:
•
Ask your subject to look directly into the camera.
•
Approach as closely as possible to make your exposure.
1-324 UETAKE, KITA-KU, SAITAMA CITY, SAITAMA 330-8624, JAPAN
ATTACHING THE STRAP
∗ Do not use a strap made for cellular phones or
other products. These straps are usually too weak
to hold your camera. For safety, use only straps
made for cameras.
COLOCACIÓN DE LA CORREA
∗ Al usar una correa de tipo convencional, confirme
que esté en buenas condiciones y compruebe su
resistencia. Tenga mucho cuidado al utilizarla
porque generalmente son usadas para artículos
de bajo peso.
a Abra la tapa del compar-
timiento del chasis de
pelìcula girando la
palanca en la dirección
indicada por las fleshas.
b Extraiga el chasis de la
película.
∗
El signo 3
ii
ii
i que aparece
en la parte inferior del
chasis de la película debe
haberse puesto blanco.
AUTOMATIC
FLASH
Si se pulsa el disparador hasta la mitad en un lugar
oscuro, se ilumina el piloto de reducción del efecto
“ojos rojos”.
Pulse el disparador hasta la mitad durante aproximadamente
1 segundo. A continuación, pulse el disparador hasta el fondo.
If the shutter button is pressed halfway down in a dark
place, the red-eye reduction lamp lights.
Press down the shutter release button halfway for 1 second.
After that press the shutter release button down completely.
If you need to remove the film cartridge before you
have taken all the pictures, press the
button
with the point of a pen or something similar.
∗
When a film cartridge is rewound without taking any pictures or when the film is rewound mid-roll,
ii
ii
i is displayed
on the film cartridge, and re-exposure cannot be made.
EXTRACCIÓN DE LA
PELÍCULA A MITAD DE ROLLO
Presione el botón con la punta de un boligrafo o
objeto similar.
∗
Cuando se rebobina la película sin haber tomado ninguna
fotografía o cuando la película se rebobina hasta la mitad,
el signo
ii
ii
i también se visualizará en el chasis de película.
En ese caso el chasis no se puede exponer otra vez.
TAKING OUT THE FILM CARTRIDGE
When the last frame in the film has been used, the film rewinds into
the cartridge.
EXTRACCIÓN DEL CHASIS DE PELÍCULA
Una vez expuesto el último fotograma de la película, ésta se rebobina
automáticamente en el chasis.
∗
Take out the film cartridge after the motor has stopped turning and ". " is
blinking.
∗
Extraiga el chasis de película después de comfirmar que ha dejado de
girar y está prapadeando "
. ".
RED-EYE REDUCTION
PHOTOGRAPHY
FOTOGRAFÍA CON REDUCCIÓN DE
OJOS ROJOS
TAKING OUT THE FILM IN
MID-ROLL
a Open the film cartridge
compartment cover by
twisting the lever in the
direction shown by the
arrows.
b Take out the film car-
tridge.
∗
Symbol 3
ii
ii
i on the bot-
tom of the film cartridge
should have turned white.
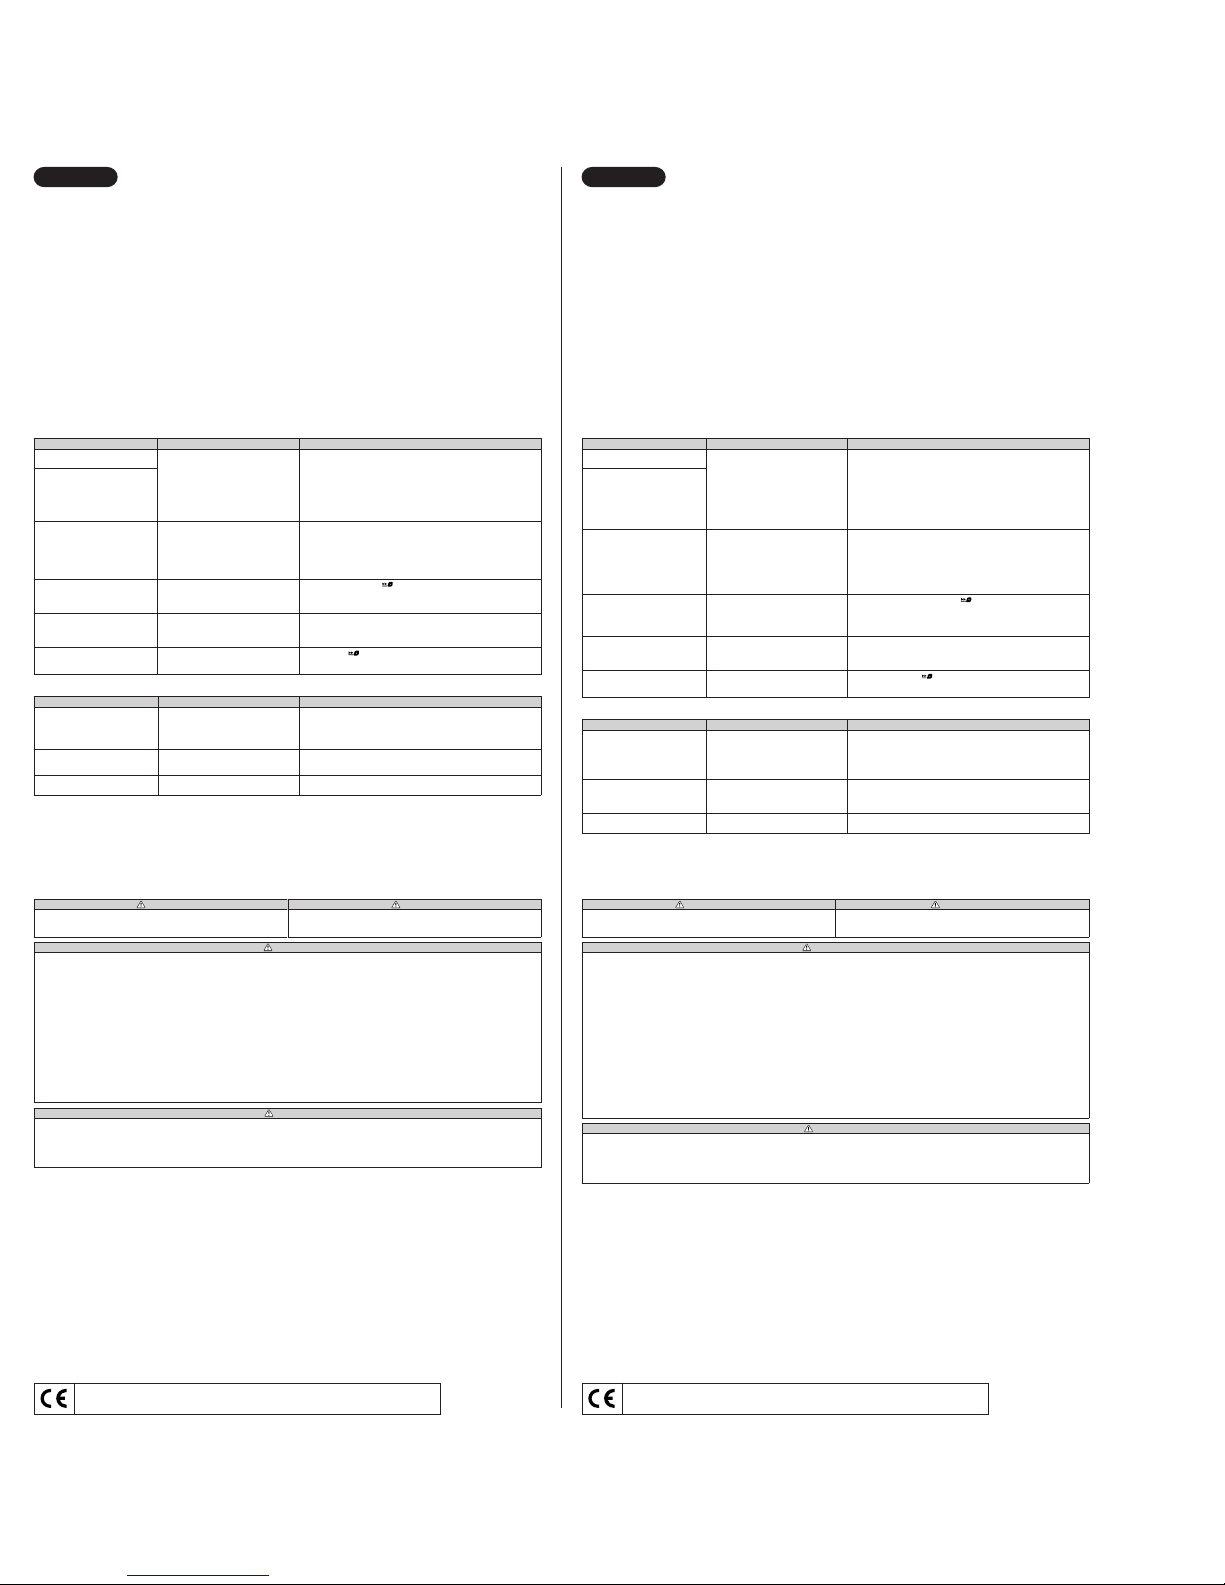
SPECIFICATIONS
•
Film
IX240 cartridge film for color prints
•
Picture Size
16.7 mm × 30.2 mm
•
Print Format
C/H switchable
•
Lens
Fujinon lens, 2 components, 2 elements, f=22 mm 1:8
•
Viewfinder
Inverted Galilean finder, 0.34 × magnification, C and H formats switchable,
with flash ready lamp
•
Focusing
Active type auto focus: 0.6 m/2.0 ft. – ∞
•
Shutter Release
Electronic shutter release, Fixed at 1/100 sec.
•
Exposure Control
Fixed
•
Film Loading
One touch drop-in loading system, film safety lock system, with mechanical
double exposure prevention
•
Film Advance
Automatic (motorized), film wind and rewind system, provision for mid-roll
rewinding
•
Flash
Automatic flash, 6 seconds recycle time, with red-eye reduction (LED preflash, when shutter release button is pressed halfway down)
Effective flash range:
ISO 100 0.6 - 2.0 m / 2.0 - 6.6 ft.
ISO 200 0.6 - 3.0 m / 2.0 - 9.8 ft.
ISO 400 0.6 - 4.0 m / 2.0 - 13.1 ft.
ISO 800 0.9 - 6.0 m / 3.0 - 19.7 ft.
(Using color negative film)
•
Liquid Crystal Display
Picture counter, film cartridge mark, battery status
•
Data Recording
Optical recording system, recordable on each frame, print format
•
Power Supply
One CR2/DL CR2 lithium battery
•
Others
When the power is turned off, the lens cover is closed and the shutter release
safety lock is activated.
•
Dimensions & Weight
96.0 × 75.0 × 34.0 mm/3.8 × 3.0 × 1.3 in. (main unit),
110 g/3.9 oz. (Without battery)
∗
Specifications are subject to change without notice.
CARACTERÍSTICAS TÉCNICAS
•
Película
Película con chasis IX240 para fotografías en color
•
Tamaño del fotograma
16,7 mm × 30,2 mm
•
Formato de copia
C/H seleccionables
•
Objetivo
Objetivo Fujinon, 2 componentes, 2 elementos, f=22 mm 1:8
•
Visor
Visor Galileo invertido, aumento 0,34 ×, formatos C y H seleccionables, piloto
de flash preparado
•
Enfoque
Enfoque autofocus activo: 0,6 m/2,0 ft. – ∞
•
Obturador
Obturador electrónico, fijado a 1/100 seg.
•
Control de la exposición
Fija
•
Carga de la película
Carga fácil tipo drop-in, bloqueo de seguridad de la película, con prevención
mecánica de doble exposición
•
Avance de la película
Sistema automático motorizado para bobinar y rebobinar de la película.
Posibilidad de rebobinar a mitad de rollo.
•
Flash
Flash automático con tiempo de recarga de 6 seg., con reducción del efecto
“ojos rojos” (Predestello LED, cuando se pulsa hasta la mitad el disparador)
Gama de alcance del flash:
ISO 100 0,6 - 2,0 m / 2,0 - 6,6 ft.
ISO 200 0,6 - 3,0 m / 2,0 - 9,8 ft.
ISO 400 0,6 - 4,0 m / 2,0 - 13,1 ft.
ISO 800 0,9 - 6,0 m / 3,0 - 19,7 ft.
(Utilizando pelicula negativo color)
•
Panel LCD
Contador de exposiciones, indicador del chasis de película, indicador de
capacidad de la pila
•
Grabación de datos
Sistema de grabación óptica, grabación posible en cada fotograma, formato
de copia
•
Alimentación
Una pila de litio CR2/DL CR2
•
Varios
Cuando se apaga la cámara, la tapa del objetivo se cierra y se activa un
cierre de seguridad para el obturador.
•
Dimensiones y peso
96,0 × 75,0 × 34,0 mm/3,8 × 3,0 × 1,3 in. (unidad principal),
110 g/3,9 oz. (sin pila)
∗
Las características técnicas están sujetas a posibles cambios sin previo aviso.
TROUBLE SHOOTING
During operation
FALLOS, CAUSAS POSIBLES Y SOLUCIONES
Durante el funcionamiento
Copias impresas
Fallo Causa posible Solución
La fotografía está borrosa.
La fotografía es demasiado oscura.
Hay objetos inesperados en la
fotografíá (dedos, etcetera).
햲 ¿Tomó la fotografía desde una distancia
inferior a 0,6 m (2,0 ft.)?
햳 ¿Está es sujeto en el centro del visor?
햴 ¿Está sucio el objetivo?
햵 ¿Se movió la cámara?
햲 El sujeto estaba demasiado lejos de la
cámara cuando utilizó el flash en un
lugar oscuro.
햳 ¿Cubr ía el flash con el dedo?
•
¿Cubría el objetivo con el dedo?
햲 Tome la fotografía a una distancia mínima de 0,6 m (2,0 ft.).
햳 Componga la fotografía de manera que el sujeto se encuentre en el
centro del visor.
햴 Limpie el objetivo.
햵 Sostenga la cámara fir memente y pulse suavemente el disparador.
햲 Realice las fotografías observando las distancias de alcance
especificadas para el flash electrónico.
햳 No cubra el flash con el dedo.
•
Mantenga los dedos alejados del objetivo y sostenga la cámara
firmemente. No deje que sus dedos se alejen de la cámara.
IMPORTANT SAFETY NOTICE
This camera has been made to be as safe as possible. This camera will provide long, safe service when handled correctly. It is important that this product is handled
properly and used only to take pictures. For your ease and safety, please follow what is written in this manual. It is also a good idea to keep this manual in a safe, easy
to find place where you can refer to it if needed.
CAMERA CARE AND CAUTIONS
쪧
Although your camera is designed for many years of service, it is electronic and requires careful handling. Avoid exposing it to shock, moisture or physical abuse.
햲
If you use your camera at the beach or in a light rain, protect it from moisture. Do not let your camera get wet. Be careful to avoid sand and salt spray at the
beach.
햳
Dropping your camera or letting it strike a hard surface could result in damage even if the camera was in a case. Never subject the camera to damage caused
by vibration or overheating by leaving it in a car.
쪨
If you will not be using your camera, store it where it will be safe from heat, moisture, dust and harmful gases such as those caused by moth balls and moth flakes.
쪩
It is recommended that undeveloped film and cameras containing film be carried as hand luggage when flying. If included in checked-in baggage, X-ray
inspections may cause overprinting or other effects.
쪪
Remove soil and dust from the lens, the AF window and the viewfinder with an air blower and by wiping lightly with a piece of soft cloth. Do not use organic
solvents such as alcohol and benzene.
쪫
The operating temperature range of the camera is from –5°C to +40°C (23°F – 104°F).
쪬
Since batteries do not work well in cold weather, warm the batteries by placing it inside your garments, etc. before use. A battery that is not working well due to
cold will work again when the temperature is return to normal.
With a few common sense precautions, your camera will give you years of faithful service, great pleasure and wonderful pictures.
CAUTION
2
Never get this product wet or handle it with wet hands. Doing so may result in electric shock.
1
Never take flash photographs of people riding bicycles, driving cars or riding a horse. The flash can distract the driver and frighten the animal, possibly
causing an accident.
1
Observe correct polarity when loading batteries. Never load batteries with the = and - poles the wrong way. Failure to load them correctly could result in the
batteries splitting open and leaking. This could result in fire, burns or damage.
ADVERTENCIAS Y PRECAUCIONES
Este producto ha sido desarrollado para ser lo más seguro posible cuando es utilizado como es debido. Bajo circunstancias normales, este producto le brindará un
servicio prolongado y seguro, siempre y cuando se utilice correctamente. De todas maneras es importante que este producto sea manipulado debidamente y utilizado
solamente con propósitos fotográficos. Para su conveniencia y seguridad, por favor siga las recomendaciones que se especifican a continuación. Recomendamos
guardar este manual en un lugar seguro y conveniente, donde pueda consultarlo con facilidad.
CONSERVACIÓN DE LA CÁMARA Y PRECAUCIONES
쪧
Su cámara es un equipo de precisión que requiere un cuidadoso manejo. Evite los choques, los líquidos y no la deje caer.
햲
Si utiliza la cámara en la playa o bajo la lluvia, procure no mojarla. Asimismo tenga cuidado de no colocar la cámara en lugares en los que podría entrar arena
o agua salada.
햳
Aunque la cámara se encuentre dentro de su estuche, podría no funcionar correctamente si se cae al suelo o si se le golpea con algún objeto duro.
Asimismo, no deje la cámara en lugares sujetos a vibraciones (como el maletero de un coche). No deje la cámara en un coche cerrado durante mucho
tiempo.
쪨
Si deja de utilizar la cámara durante un período prolongado, guárdela en un lugar que la proteja del calor, de la humedad, del polvo y de gases nocivos (tales
como naftalina).
쪩
Cuando se viaje en avión, se recomienda llevar las películas sin revelar y la cámara que contenga película, como equipaje de mano. Si se incluye entre el
equipaje a facturar, las inspecciones de rayos X podrían provocar sobreimpresión u otros defectos.
쪪
Limpie la suciedad y el polvo del objetivo, de la ventanilla AF y del visor con un soplador de aire y pasando un paño suave. No utilice solventes orgánicos tales
como alcohol o benceno.
쪫
La gama de temperaturas de funcionamiento de la cámara está entre –5°C y +40°C (23°F – 104°F).
쪬
Puesto que el rendimiento de las pilas se reduce en ambientes fríos, caliéntela colocándola dentro de su ropa, etc. antes de su uso. El rendimiento de una pila
que se ha reducido temporalmente puede ser recuperado devolviendol las pilas una temperatura normal.
Si toma las debidas precauciones, la cámara puede proporcionarle un servicio seguro durante años y permitirle efectuar excelentes fotografías.
PRECAUCION
2
No moje el producto, ni lo toque con las manos mojadas. Existe el peligro de descarga eléctrica.
1
No tome fotografías con flash a personas que conducen un vehículo (bicicleta, coche, tren, etc.) o monten un animal. El flash podría distraer al conductor o
asustar al animal y causar un grave accidente.
1
Tenga cuidado de no colocar las pilas con los polos = y - intercambiados. El incumplimiento de esta recomendación podría hacer que las pilas se abriesen
y goteasen provocando un incendio, quemaduras o daños materiales.
Printed pictures
Problems Possible Causes Solutions
Picture is not sharp.
Picture is too dark.
Unexpected objects (fingers etc.) are
in the picture.
햲 Did you take the picture from a distance
less than 0.6 m (2.0 ft.)?
햳 Is the subject in the center of the finder?
햴 Is the lens dir ty?
햵 Is the camera moving?
햲 Was subject too far from the camera for
flash photography in a dark place?
햳 Was your finger over the flash?
•
Did you have a finger or other object
blocking the lens?
햲 Move more than 0.6 m (2.0 ft.) away and take the picture.
햳 Compose the picture so that the subject is in the center of the finder.
햴 Clean the lens.
햵 Hold the camera fir mly and press the shutter release button gently.
햲 Take pictures within the effective flash range.
햳 Do not cover the flash with your finger.
•
Be careful to keep your fingers and other objects away from the lens.
Fallo Causa posible Solución
Se ha cargado un chasis de película
pero la película no rebobina.
Se ha insertado un chasis de película
pero el disparador no funciona.
El disparador no funciona.
La tapa del compartimento del chasis
de película no se puede abrir.
La película fué rebobinada antes de
que el contador de exposiciones haya
llegado al número de exposiciones que
tiene el chasis de película.
Se cambiaron la pila mientras la
cámara estaba rebobinando la película
y ésta se dejó de rebobinar.
•
Puede que la pila se hayan colocado
después del chasis.
햲 ¿ Parpadea el símbolo “ k ” ?
햳 El conmutador de alimentación no está
en la posición ON.
햴 ¿ Parpadea el piloto de flash preparado?
햵 ¿ Parpadea el símbolo “ . ” ?
•
¿ Está intentando abrir la tapa del compartimento del chasis de película a mitad
del rollo?
•
Usted cargó una película nueva antes de
insertar la pila.
•
¿Cambió la pila mientras había un
chasis de película a medio exponer en
la cámara?
•
Si la pila se cambian mientras la cámara
está rebobinando la película, se detiene
el rebobinado.
•
La foto no se realizará si se hizo funcionar el obturador en este estado.
Si la pila se inserta después de cargar un nuevo chasis de película,
verifique que el motor se ha detenido y luego trate de abrir la tapa del
compartimento del chasis de película.
• Si la tapa del compartimento del chasis de película se abre, el chasis
de película puede ser utilizado si se quita y se coloca nuevamente.
• Si la tapa del compartimento del chasis de película no se abre, quite
el chasis de película luego de rebobinar la película. Ya que i se
visualiza en el chasis y la película no puede ser utilizada, coloque un
chasis de película nuevo.
햲 Sustituya la pila por otra nueva. Insertar la pila nueva con un rollo parcialmente
expuesto provocará que el contador LCD vuelva a "`", cero.
햳 Active la cámara y ajuste la cámara al modo “ready to shoot” (listo para
desparar).
햴 El flash se está cargando. Pulse el disparador hasta la mitad y espere
hasta que el piloto de flash preparado deja de parpadeal. (El flash tarda
aproximadamente 6 segundos en cargarse.)
햵 Extraiga el chasis de película e cargue uno nuevo.
•
Rebobine la película con el botón . Extraiga el chasis de película después
de compruebe que el motor se haya detenido y está parpadeando “ . ”.
•
Si cambia la pila cuando hay un chasis de película a medio exponer en
la cámara, el contador de exposiciones vuelve a “ ` ” y no muestra el
número correcto de exposiciones.
•
Presione el botón (Rebobinar).
WARNING
6
Never attempt to take this camera apart. There is a danger of an electric shock.
2
If this camera is dropped or damaged so that the inside is showing, do not touch it. There is danger of electric shock.
3
If the camera or the batteries inside become hot, begin to smoke, make a burning smell or show any sign of unusual condition, remove the batteries right
away. Use gloves to keep from burning your hands. Not removing batteries could result in burns or fire.
5
Using a flash too close to a person’s eyes may effect the eyesight for a short time. Take care when taking picture of infants, young children and animals.
3
If your camera gets wet or if something gets inside, remove the batteries right away to avoid heat buildup or a fire starting inside the camera.
4
Do not use this camera in places where there is flammable gas or open gasoline, Benzine, paint thinner or other unstable substances. Failure to do this could
result in explosion or fire.
1
Store your camera out of the reach of infants and young children. Failure to do this could result in serious injury. (For example, the strap could become
wrapped around a child’s neck and cause choking.)
4
Never take apart the batteries. Do not subject them to heat, throw them into fire, attempt to recharge them or short-circuit them. Doing so could result in the
batteries exploding or splitting open causing burns or fire.
3
Use only the type of batteries specified in your camera’s instructions. Failure to do this may result in excessive heat buildup or fire.
1
Make sure batteries are stored in a safe, secure place well out of the reach of infants, young children or pets. Improper storage could result in a child
swallowing a battery. (If a child does swallow a battery, poison control or your local emergency number right away.)
WARNING
This symbol warns you of danger, which could result in injury or death. Please
follow these instructions.
CAUTION
This symbol warns you of possible damage, which could result in injury to people
or damage to an object. Please follow these instructions. Please handle the product properly.
ADVERTENCIA
Este icono indica situacions que podrían ocasionar la muerte o heridas graves a
personas que no tuvieran en cuenta estas instrucciones y manipulasen el
producto de forma incorrecta.
PRECAUCION
Este icono indica situacions que podrían ocasionar heridas a personas o daños
físicos o materiales si no se tuvieran en cuenta estas instrucciones y se
manipulase el producto de forma incorrecta.
ADVERTENCIA
6
No intente desmontar el producto. Existe el peligro de descarga eléctrica.
2
No toque el interior del producto si éste ha quedado descubierto, por ejemplo, en una caida. Existe el peligro de descarga eléctrica.
3
Si la cámara o las pilas se calientan en exceso, despiden humo, olor a quemado o muestran cualquier otra anomalía, extraiga las pilas de la cámara
inmediatamente. El incumplimiento de esta recomendación puede provocar fuego o quemaduras. (Tenga cuidado de no quemarse al extraer las pilas.)
5
Utilizar un flash demasiado cerca de los ojos de una persona puede afectar su vista momentáneamente. Tenga especial cuidado al fotografiar a niños
pequeños.
3
Extraiga las pilas inmediatamente si la cámara ha entrado en contacto con el agua o la humedad, o si han entrado en su interior objetos de metal u otros
cuerpos extraños. El incumplimiento de esta recomendación podría provocar una acumulación de calor o un conato de incendio.
4
No utilice la cámara en lugares con alta concentración de gases inflamables o cerca de gasolina, benceno, diluyente de pintura u otros químicos inflamables.
El incumplimiento de esta recomendación podría provocar explosiones o un conato de incendio.
1
Guarde la cámara en un lugar seguro, lejos del alcance de los niños pequeños. La mala colocación o el uso indebido de la correa en el cuello podría
causarles asfixia.
4
No intente desmontar las pilas, ni las exponga al calor, ni las arroje al fuego, ni las recargue, ni provoque un corto circuito. El incumplimiento de esta
recomendación podría hacer que las pilas se abrieran.
3
No utilice pilas que no sean las especificadas. El incumplimiento de esta recomendación podría provocar una acumulación de calor o un conato de incendio.
1
Guarde las pilas en un lugar seguro, bien lejos del alcance de los niños pequeños, para que éstos no corran el peligro de ingerirlas. Si esto ocurriese, acuda
al médico inmediatamente.
La marca “CE” certifica que este producto cumple los requisitos de la UE (Unión Europea) en lo que se refiere a la seguridad,
la salud pública y la protección del medio ambiente y del consumidor. (“CE” es la abreviatura de Conformité Européenne).
Producto conforme con la Normativa 89/336/EEC.
The “CE” mark certifies that this product satisfies the requirements of the EU (European Union) regarding safety, public
health, environment and consumer protection.(“CE” is the abbreviation of Conformité Européenne.)
This product is in conformity with Directive 89/336/EEC.
ENGLISH ESPAÑOL
Problems Possible Causes Solutions
A film cartridge has been loaded but
the film will not wind.
A film cartridge has been loaded but
the shutter release button will not work.
The shutter release won’t work.
The film cartridge compartment cover
cannot be opened.
The film was rewound before the number on the picture counter reached the
number of pictures for the film cartridge.
I replaced the battery while the camera was rewinding the film and it
stopped rewinding the film.
•
Check if the battery has been loaded
after the cartridge.
햲 Is “ k ” blinking?
햳 Does the power tur n on?
햴 Is the flash ready lamp blinking?
햵 Is “ . ” blinking?
•
Are you attempting to open the film cartridge cover in the middle of a roll?
•
Did you load a new roll of film before
the battery?
•
Did you replace the battery while there
was a half-used film cartridge in the
camera?
•
If the battery is replaced while the camera is rewinding, the rewinding is
stopped.
•
The shot will not be taken if the shutter was released in this condition. If
the battery is loaded after a new film cartridge is loaded, check that the
motor has stopped and then try opening the film cartridge compartment
cover.
• If the film cartridge compartment cover opens, remove and reload your
film cartridge, so that it can be used.
• If the film cartridge compartment cover does not open, rewind the film,
then remove the film cartridge. Since “i” is displayed on the cartridge
and the film can not be used, load a new film cartridge.
햲 Replace with the new one. Loading a new battery with a partly used roll of film
will cause the picture counter to be reset to "`" zero.
햳 Turn the camera on and set the camera to the ready-to-shoot state.
햴 The flash is charging. Press down the shutter release halfway and wait
until the flash ready lamp stops blinking and is displayed. (The flash
takes 6 seconds to charge.)
햵 Take out the film cartridge and load an unused film cartridge.
•
Rewind the film with button. After checking the motor has stopped
and “ . ” is blinking, take out the film cartridge.
•
If you replace the battery while there is a half-used film cartridge in the
camera, the picture counter is reset to “ ` ” and the correct number of
pictures is not displayed.
•
Press the button.
 Loading...