

Page 1
CERTIFIED PHOTOFINISHING SERVICE
● Have your film processed by a Photo Finisher which displays the above sign.
● Different Photo Finishers may provide different services.
Consult them for details of their services.
Owner’s Manual
The “CE” mark certifies that this product satisfies the requirements of the EU (European Union) regarding safety, public
health, environment and consumer protection. (“CE” is the
abbreviation of Conformité Euroéepnne.)
This product conforms with Directive 89/336/EEC.
Page 2

CONTENTS
FEATURES . . . . . . . . . . . . . . . . . . . . . . . . . . . . 2
PART NAMES . . . . . . . . . . . . . . . . . . . . . . . . . . 3
1. PRELIMINARY STEPS
ATTACHING THE STRAP . . . . . . . . . . . . . . . . . 5
LOADING THE BATTERY . . . . . . . . . . . . . . . . 6
POWER ON/OFF . . . . . . . . . . . . . . . . . . . . . . . . 7
SETTING AND CORRECTING THE DATE
(YEAR : MONTH : DAY/HOUR : MINUTE) . . . . . 8
SELECTING THE DATE MODE . . . . . . . . . . . 10
2. BASIC PROCEDURES
LOADING THE FILM CARTRIDGE . . . . . . . . . 11
SELECTING THE PRINT FORMAT . . . . . . . . 14
TAKING PICTURES . . . . . . . . . . . . . . . . . . . . . 17
USING THE AUTO-FOCUS LOCK . . . . . . . . . 21
UNLOADING THE FILM CARTRIDGE . . . . . . 23
CARTRIDGE MID-ROLL CHANGE
FUNCTION . . . . . . . . . . . . . . . . . . . . . . . . . . . . 25
3. ADVANCED TECHNIQUES
PRINT QUANTITY . . . . . . . . . . . . . . . . . . . . . . . 39
CHANGING THE PRINT QUANTITY . . . . . . . 42
USING THE SELF-TIMER . . . . . . . . . . . . . . . . 43
MULTI PROGRAM FLASH . . . . . . . . . . . . . . . . 45
CAMERA CARE AND CAUTIONS . . . . . . . . . 47
ERRORS, POSSIBLE CAUSES, AND REMEDIES
SPECIFICATIONS . . . . . . . . . . . . . . . . . . . . . . . 52
LIST OF AVAILABLE TITLES . . . . . . . . . . . . . 54
. . 49
FEATURES
• 23 – 50 mm Autofocus Zoom
• Mid-Roll Change
• Super EBC Fujinon Lens
• Multi-Programmed Retractable Flash
• Error-Free Drop-in Loading
• 3 Selectable Prints Formats
• User Select Title with Language Selection
• Print Quantity Pre-Setting Capability
• Print Quality Enhancement Through
SELECTING THE EXPOSURE MODE . . . . . . . 29
THE “USER TITLE” SELECTION . . . . . . . . . . 35
CHANGING THE “USER TITLE” SELECTION
. . . . . 38
Information Exchange System
• Red Eye Reduction
• Film Safety Lock
2
Page 3
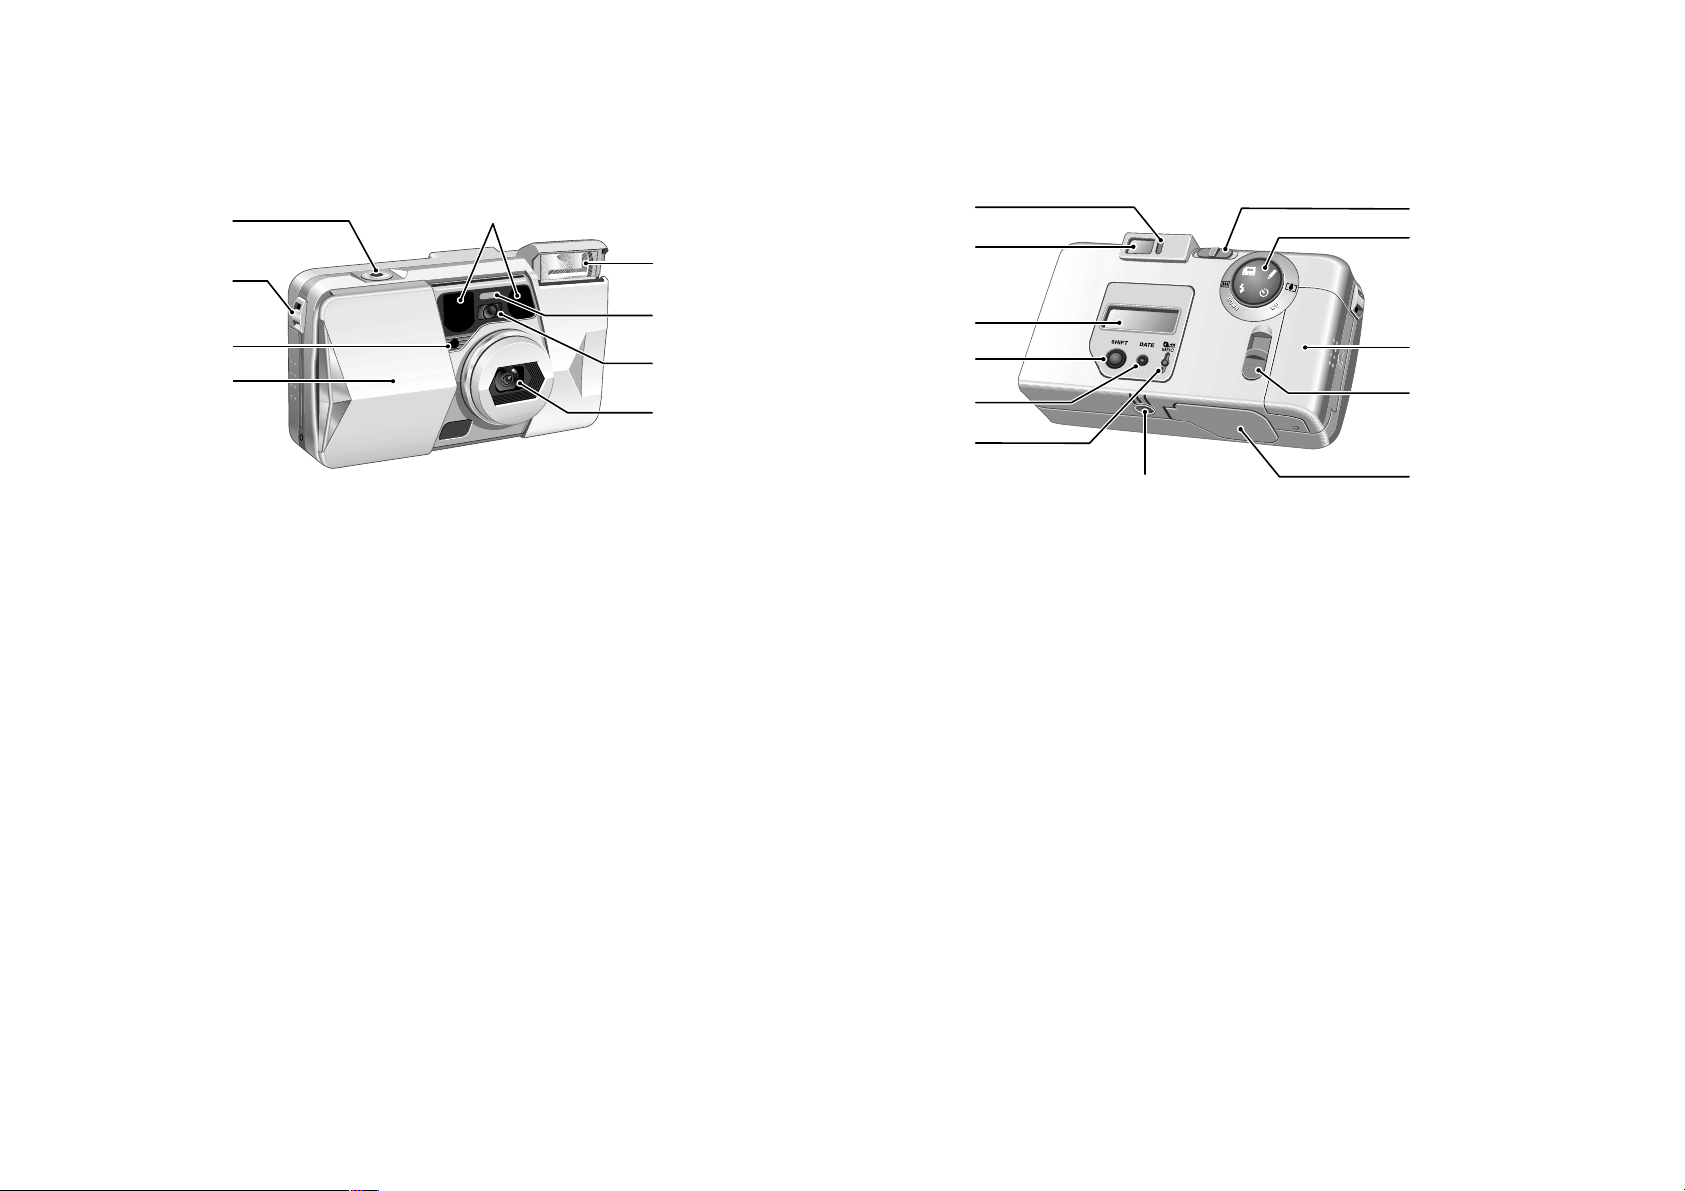
PART NAMES
q
t
y
u
i
o
w
e
r
!0
!1
!2
!3
!4
!5
!6
!7
!8
!9
@0
@1
(See the illustrations while you read this manual.)
q Shutter Release Button
w Strap Lug
e AE Light Sensor
r Slide Cover
t AF (Autofocus) Window
y Flash
u Self-Timer Lamp
i Viewfinder Window
o Super EBC Fujinon Lens
!0 AF Lamp
!1 Viewfinder Eye-piece
!2 Liquid Crystal Display
!3 SHIFT Button
!4 DATE Button
!5 Mid-Roll Change Button
!6 Tripod Socket
!7 Format Selector
!8 Multi-Operation Button
!9 Battery Compartment Cover
@0 Film Cartridge Compartment Cover Release
Knob
@1 Film Cartridge Compartment Cover
3
Page 4
SHIFT
DATE
@2
@3
@4
@5 @6 @7 @8
@9
#0 #1 #2 #3
#4
#5 #6 #7
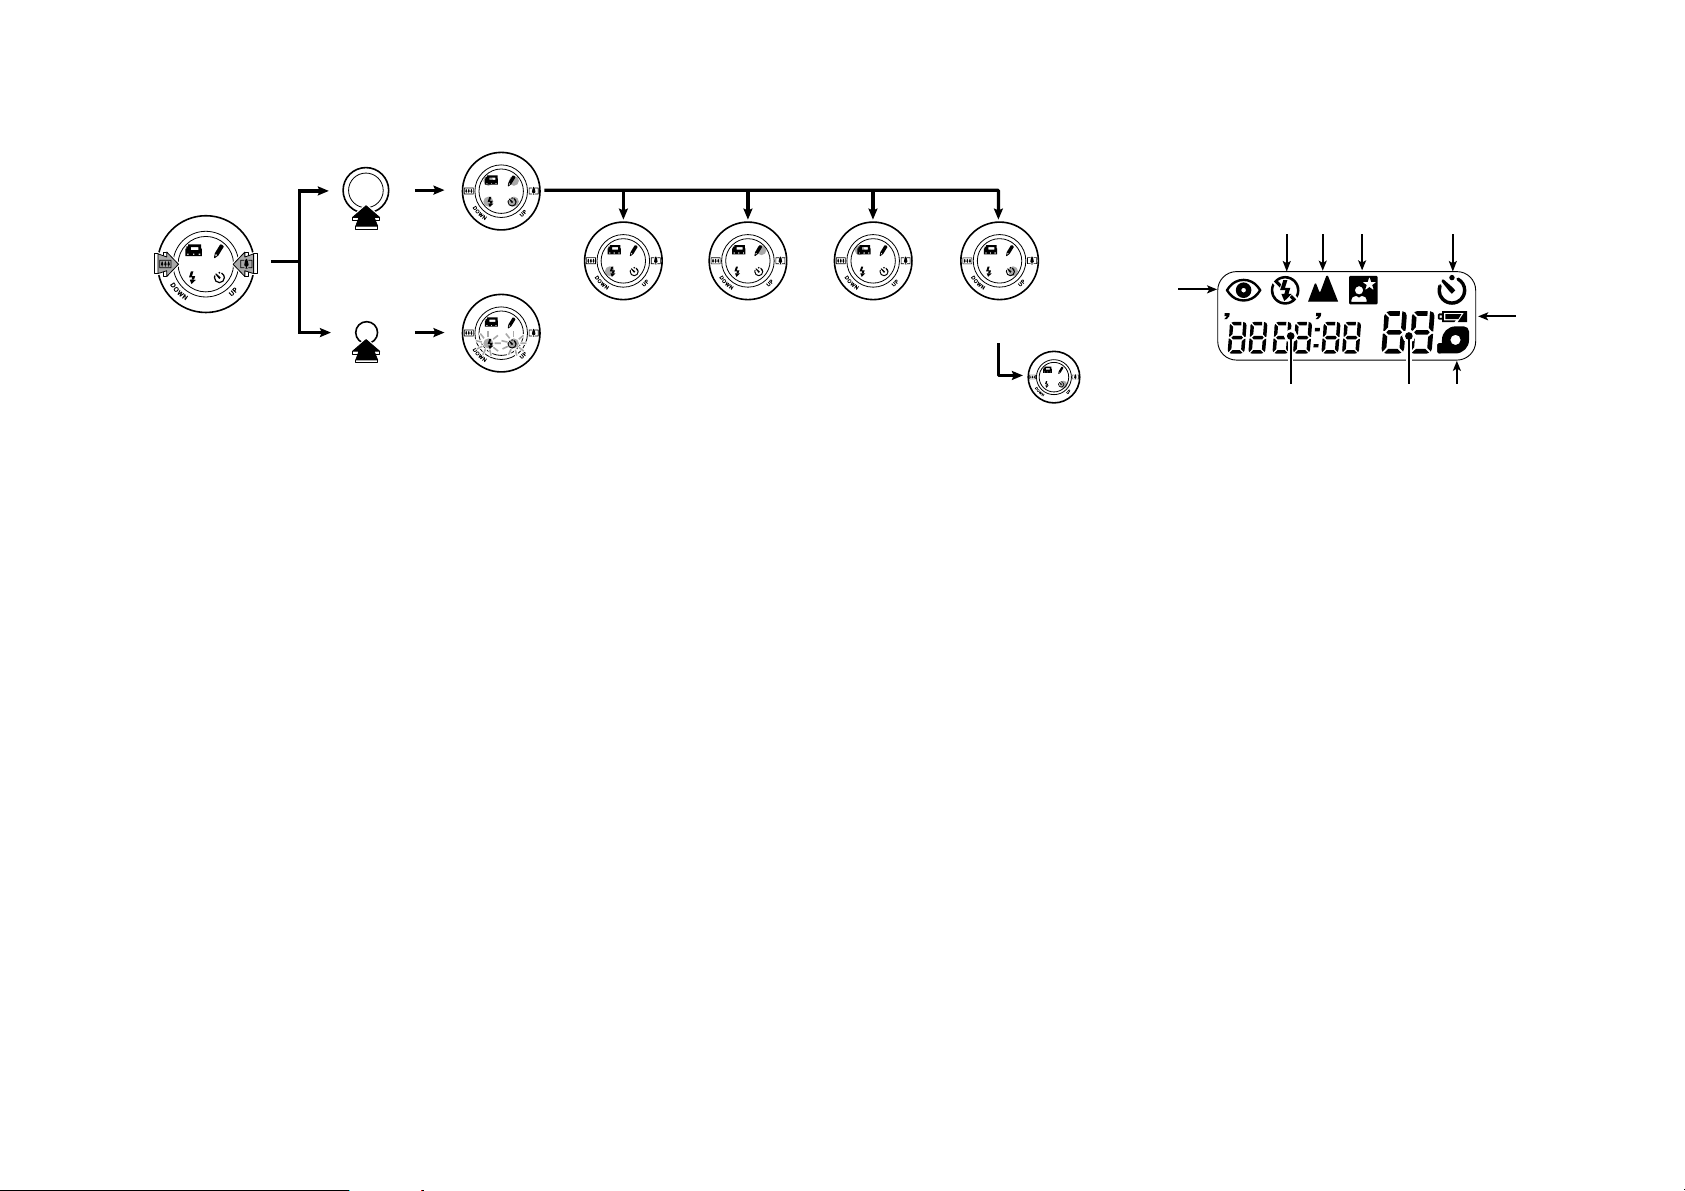
Muiti-operation button
Multi-Operation Button
Liquid crystal display
A multi-function button that enables the selection
and setting of all modes. It is usually used as the
zoom button, but the functions for the various
modes can be selected when it is used in
combination with the SHIFT/DATE button.
@2 Zoom Mode
@3 Mode Selection
@4 Date Correction Mode
@5 Exposure Mode
@6 Title Selection
@7 Print Quantity
@8 Self-Timer Mode
✻ Refer to the relevant sections for further details.
✻ The zoom function may not be used during
mode selection.
Liquid Crystal Display
The diagram shows all crystal displays in the “on”
state.
@9 Red-eye Reduction Flash Mode
#0 Fill-in Flash Mode/Flash off Mode
#1 Landscape Mode
#2 Night Portrait Mode
#3 Self-Timer Mode
#4 Battery Capacity
#5 Date Display (Also serving as User Title
Selection/Print Quantity/Type of Film
Cartridge/Camera ISO Display)
#6 Exposure Counter/Self-timer Count
#7 Film Cartridge Mark
4
Page 5
1. PRELIMINARY STEPS
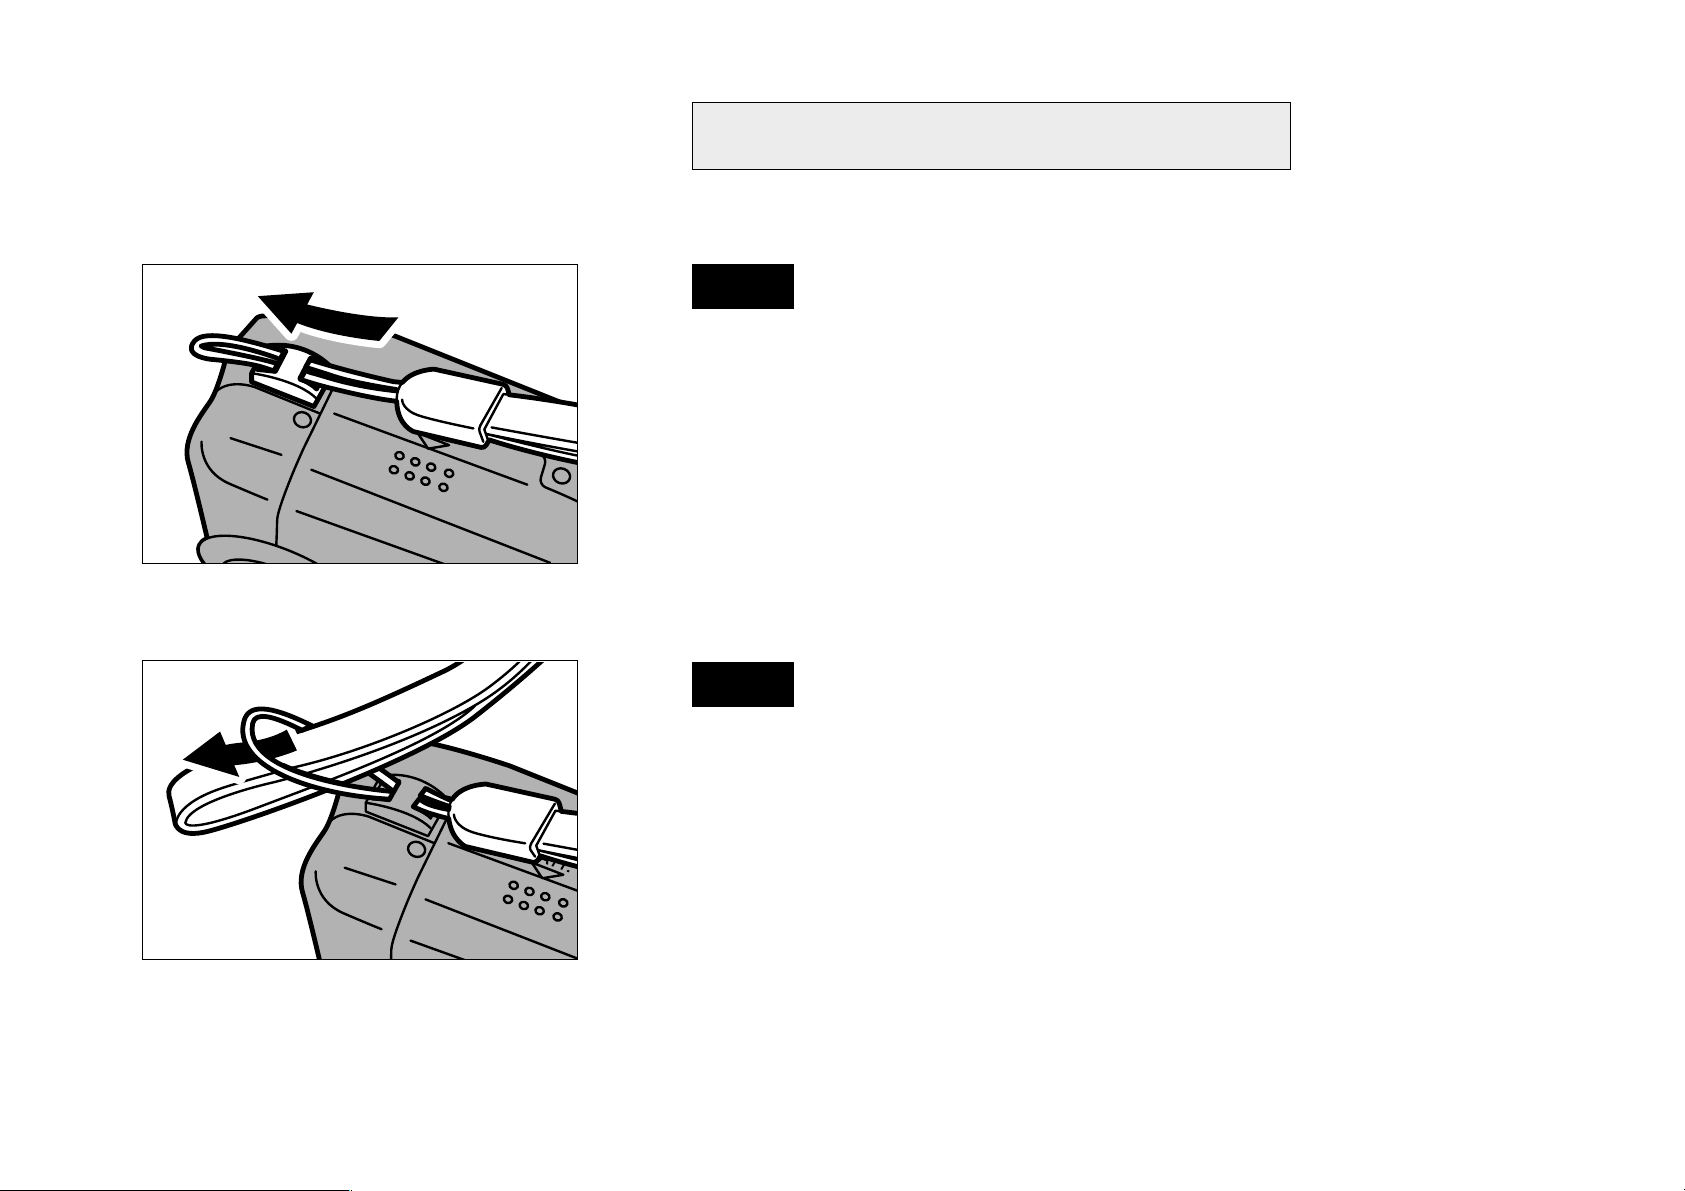
ATTACHING THE STRAP
Fig. 1
Fig. 2
Pass the smaller loop end of the strap through the
camera’s strap lug.
Next, pass the longer loop end of the strap through
the smaller loop, and pull the longer loop end.
✻ When using a commercial strap, check the
strength and other properties of the strap.
Because straps for cellular telephones, PHS, etc.
are for light devices, be especially careful when
using them.
5
Page 6

q
w
LOADING THE BATTERY
Use the following lithium battery.
★ CR123A/DL123A 3V (one)
✻ One lithium battery has enough power for taking
approximately 300 shots (Based on our test
conditions).
Fig. 3
✻ If many rolls of film are used, when travelling, for
example, it is desirable to take spare batteries
(particular in areas where it may be difficult to
obtain batteries).
✻ Do not load the cartridge before inserting the
battery.
Slide the battery compartment cover toward the
arrow q, then open the cover in the direction of the
arrow w.
Fig. 4
Insert the – side of the battery first then the + side
according to the sign, then close the battery
compartment cover.
✻ After changing the battery, be sure to set the date
again. (The method for setting the date is shown
on Fig.8.)
6
Page 7
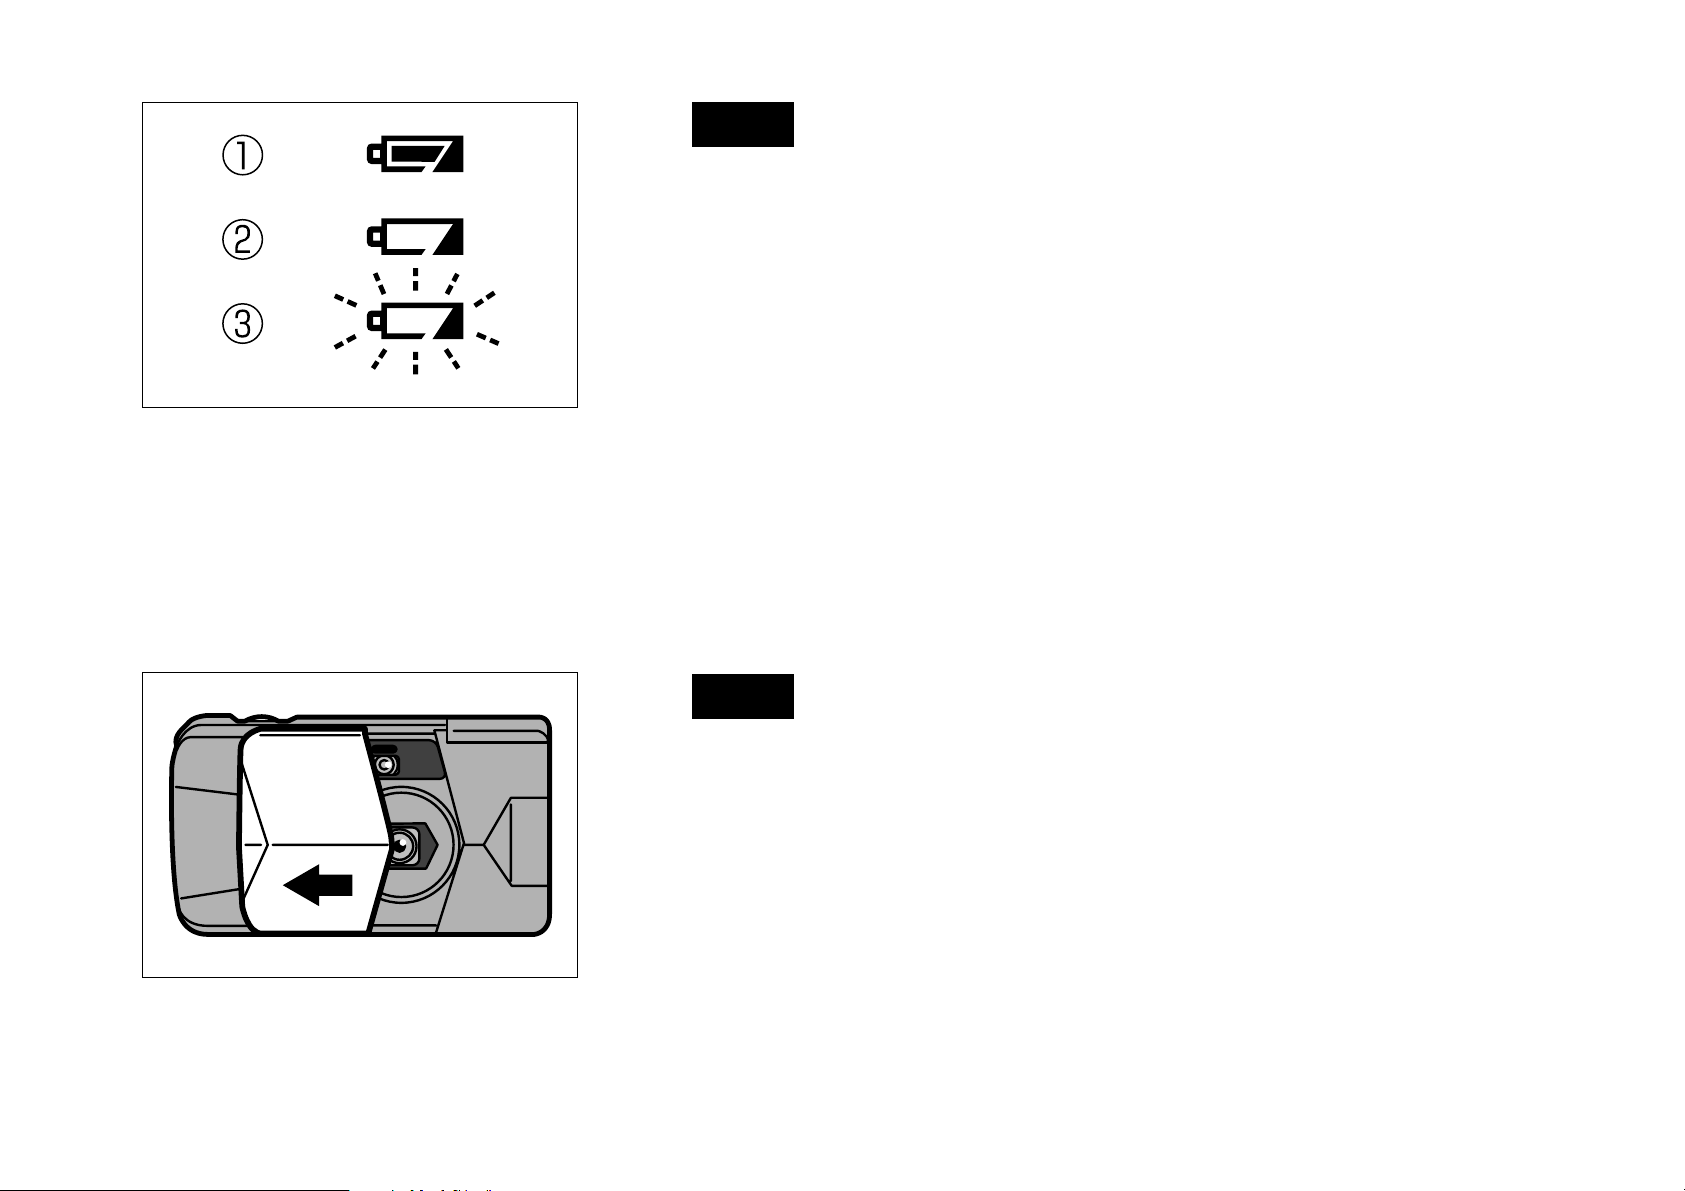
Fig. 5
Check the battery capacity sign on the LCD.
q on: Battery capacity is OK.
w on: Battery capacity is insufficient; provide a
new battery.
e blink: Shutter release will not trip because the
battery has no charge; change the battery.
✻ Check the battery capacity sign before using the
camera.
✻ The battery can be replaced even when there is a
film cartridge in the camera.
POWER ON/OFF
Fig. 6
Slide the slide cover all of the way in the direction of
the arrow to switch on the power.
7
Page 8
Fig. 7
The lens assembly will slide out and be set in a
position to enable exposure. Close the slide cover to
switch off the power.
✻ If the camera is left to stand for approximately 5
minutes with the slide cover open, the lens
assembly will automatically be retracted and the
power will be switched off. Close the slide cover
and then open it again to enable exposure.
✻ The camera may be damaged if the slide cover is
closed before the lens assembly has been fully
retracted.
SETTING AND CORRECTING THE DATE
(YEAR:MONTH:DAY/HOUR:MINUTE)
SHIFT
Fig. 8
Switch on the power and press the DATE button for 2
or more consecutive seconds. The UP and DOWN
guide lamps will blink and the camera will enter the
date correction mode. Continue to press the DATE
button to select the blinking numeral in the sequence
of year → month → day → hour → minutes.
8
Page 9
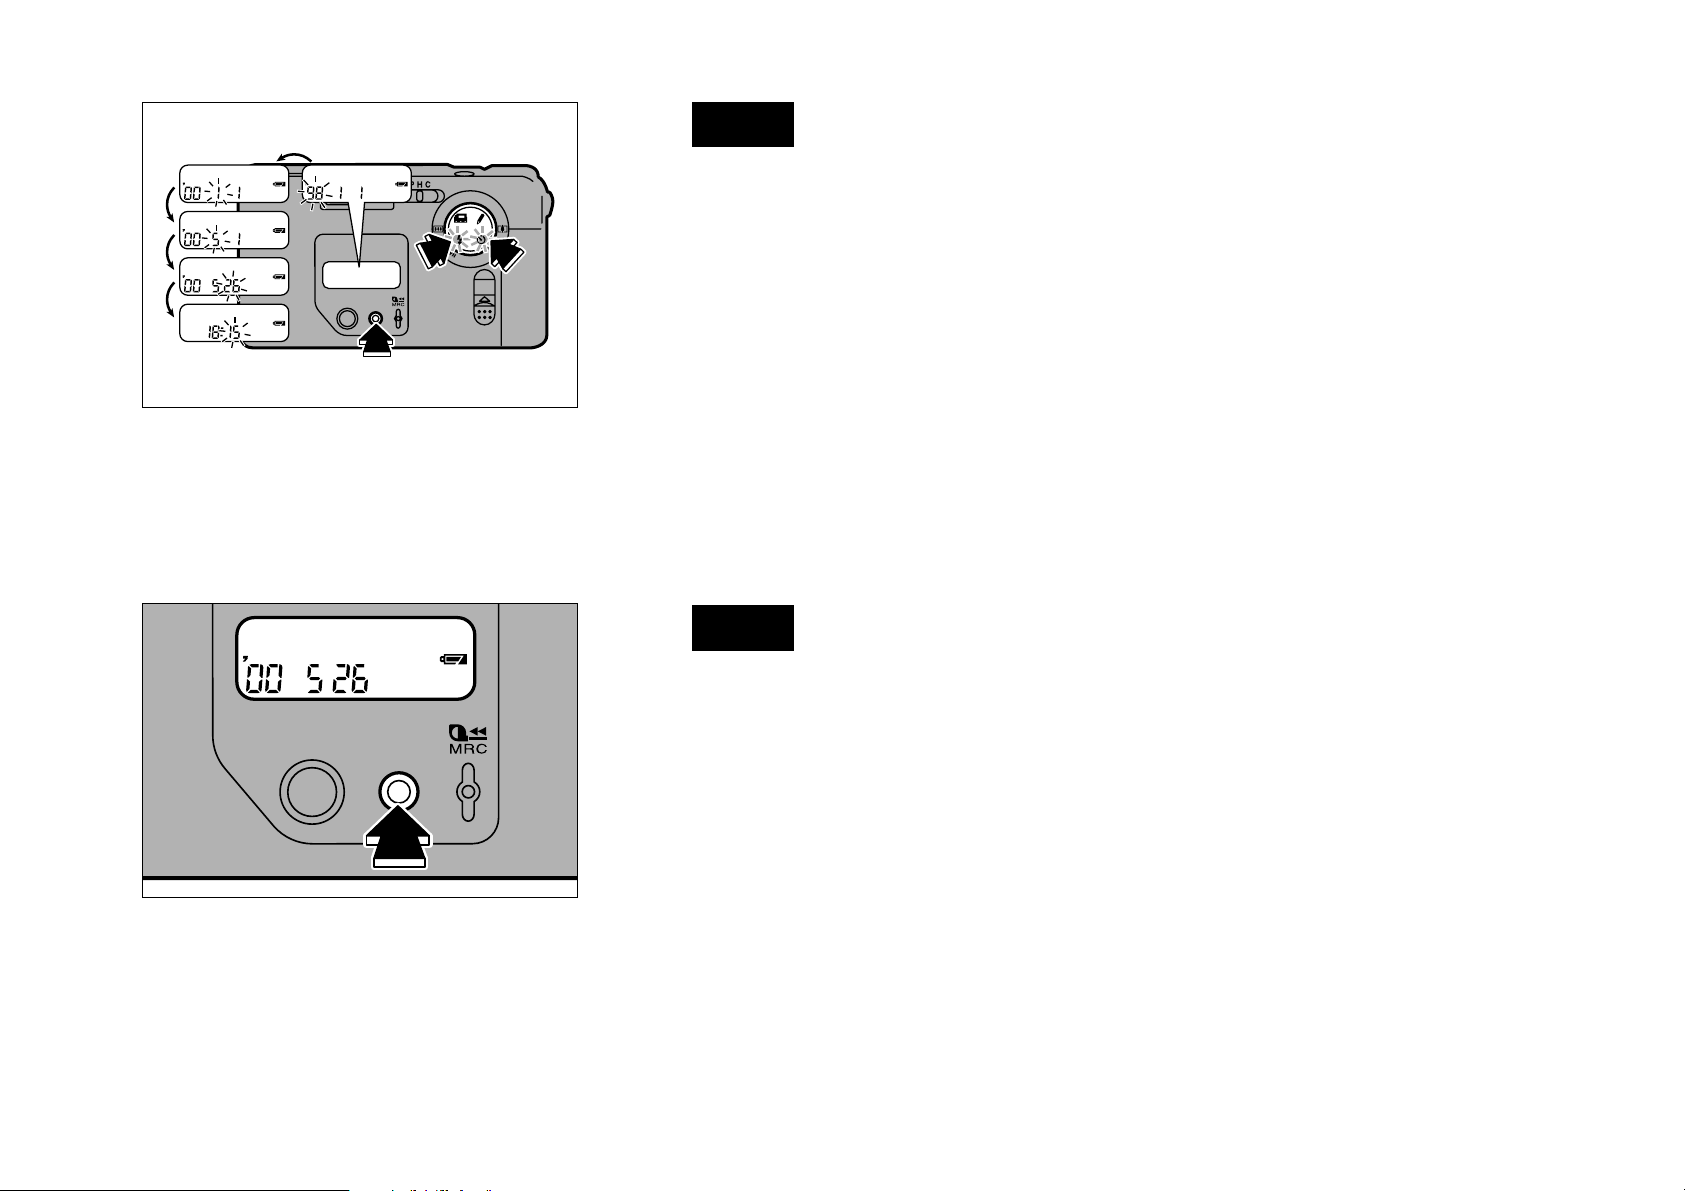
Fig. 9
SHIFT
DATE
Press the multi-operation button’s UP or DOWN
button to correct the numeral blinking on the LCD.
Adjustable items are as follows.
Year : ’98 – ’28 (1998 – 2028)
Month : 1 – 12 Day : 1 – 31
Hour : 0 – 23 Minute : 00 – 59
Fig. 10
Press the DATE button after correcting the year,
month, day, hour and minutes to extinguish the guide
lamp and complete the date correction procedure.
SHIFT
DATE
✻ To set the hour or minute by the radio, press the
DATE button when the time signal announces
zero.
✻ The year, month, and day change together with
the hour and minute.
9
Page 10
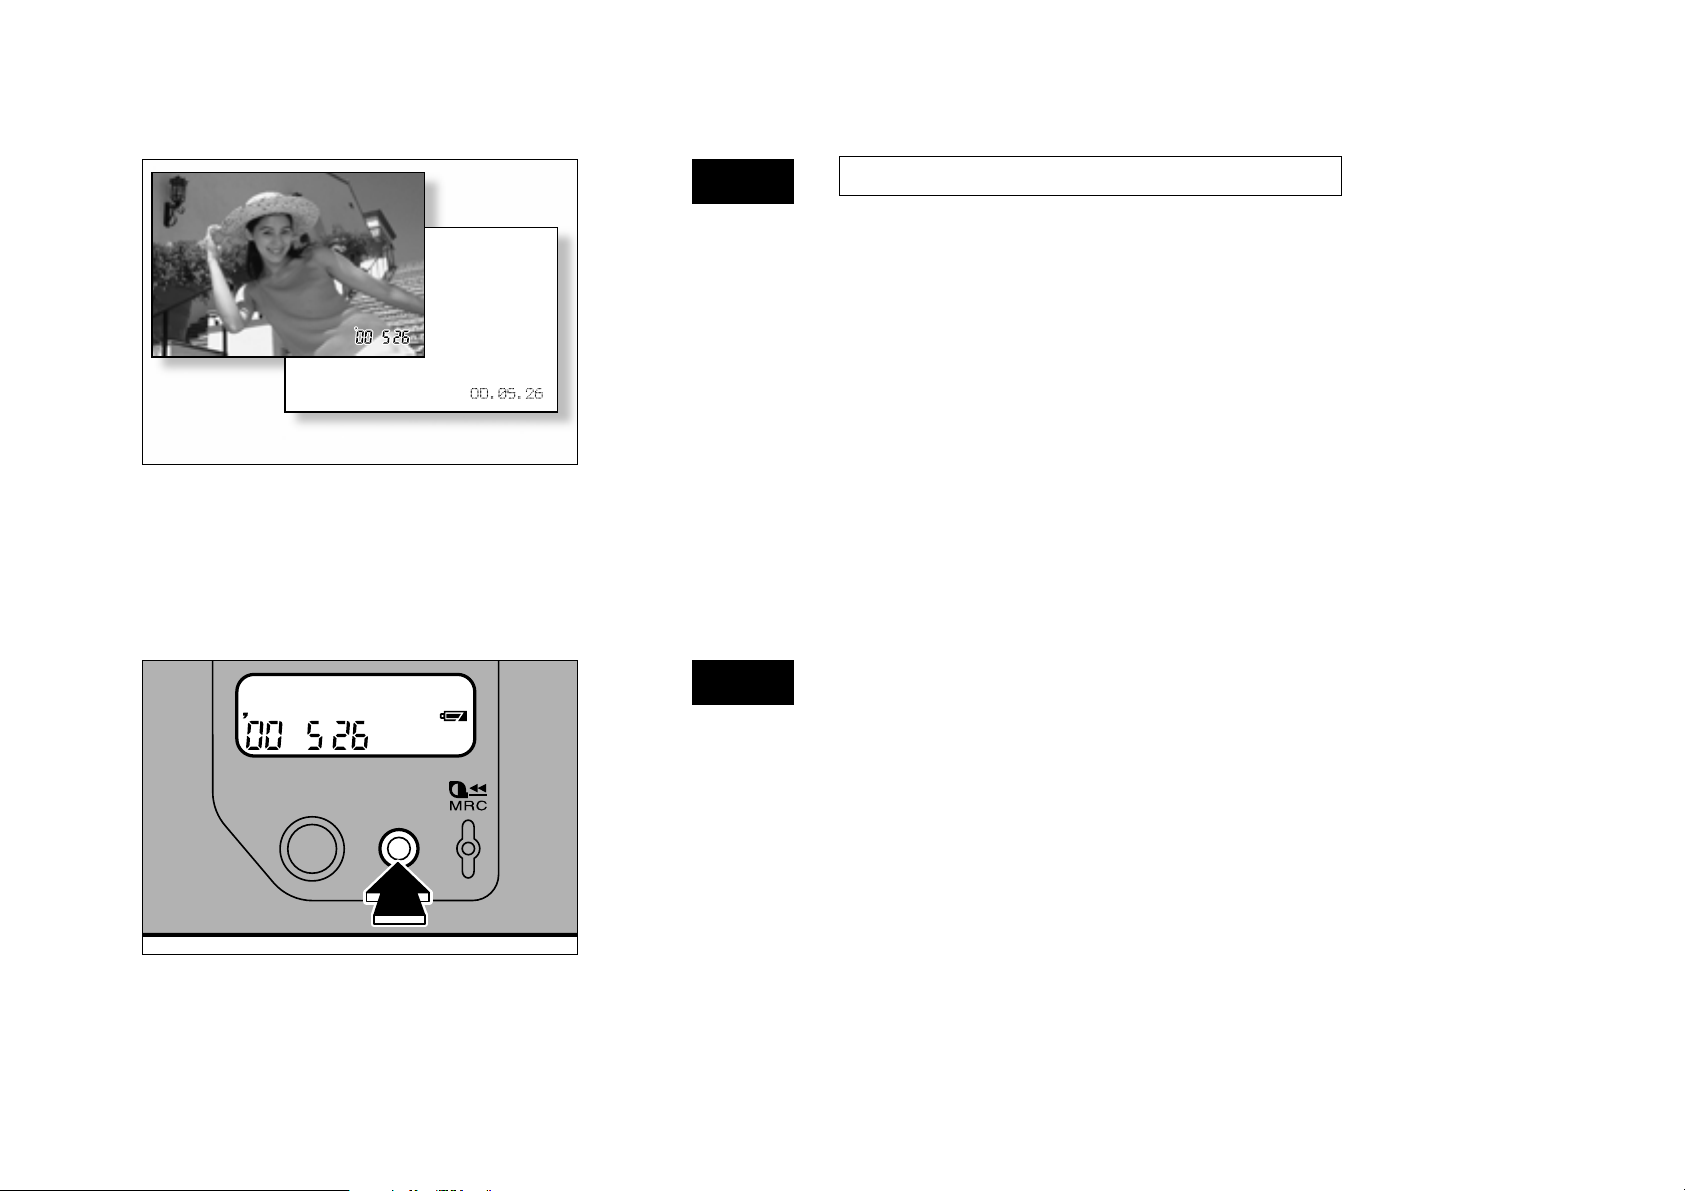
SELECTING THE DATE MODE
SHIFT
DATE
Fig. 11
Fig. 12
With the Advanced Photo System
The date (year:month:day/hour:minute) can be
printed on the front and back of the print.
Frontprinting, which can be seen when inserted in an
album, and backprinting, which is convenient for
cataloging. Either can be used depending on the
purpose.
✻ Some photo finishers may not support the feature
for printing on the surface.
✻ Changes, such as eliminating the date, are
possible when re-printing. (Some photo finisher’s
may not support this feature.)
Switch on the power and press the DATE button to
enable selection of the date mode. The mode display
will be recorded during exposure and printed during
processing.
✻ With some backgrounds, the date display on the
front may be difficult to see.
✻ The front print surface will not be printed when
“-- -- --” is displayed. The date [year, month, day]
will be printed on the rear surface.
10
Page 11
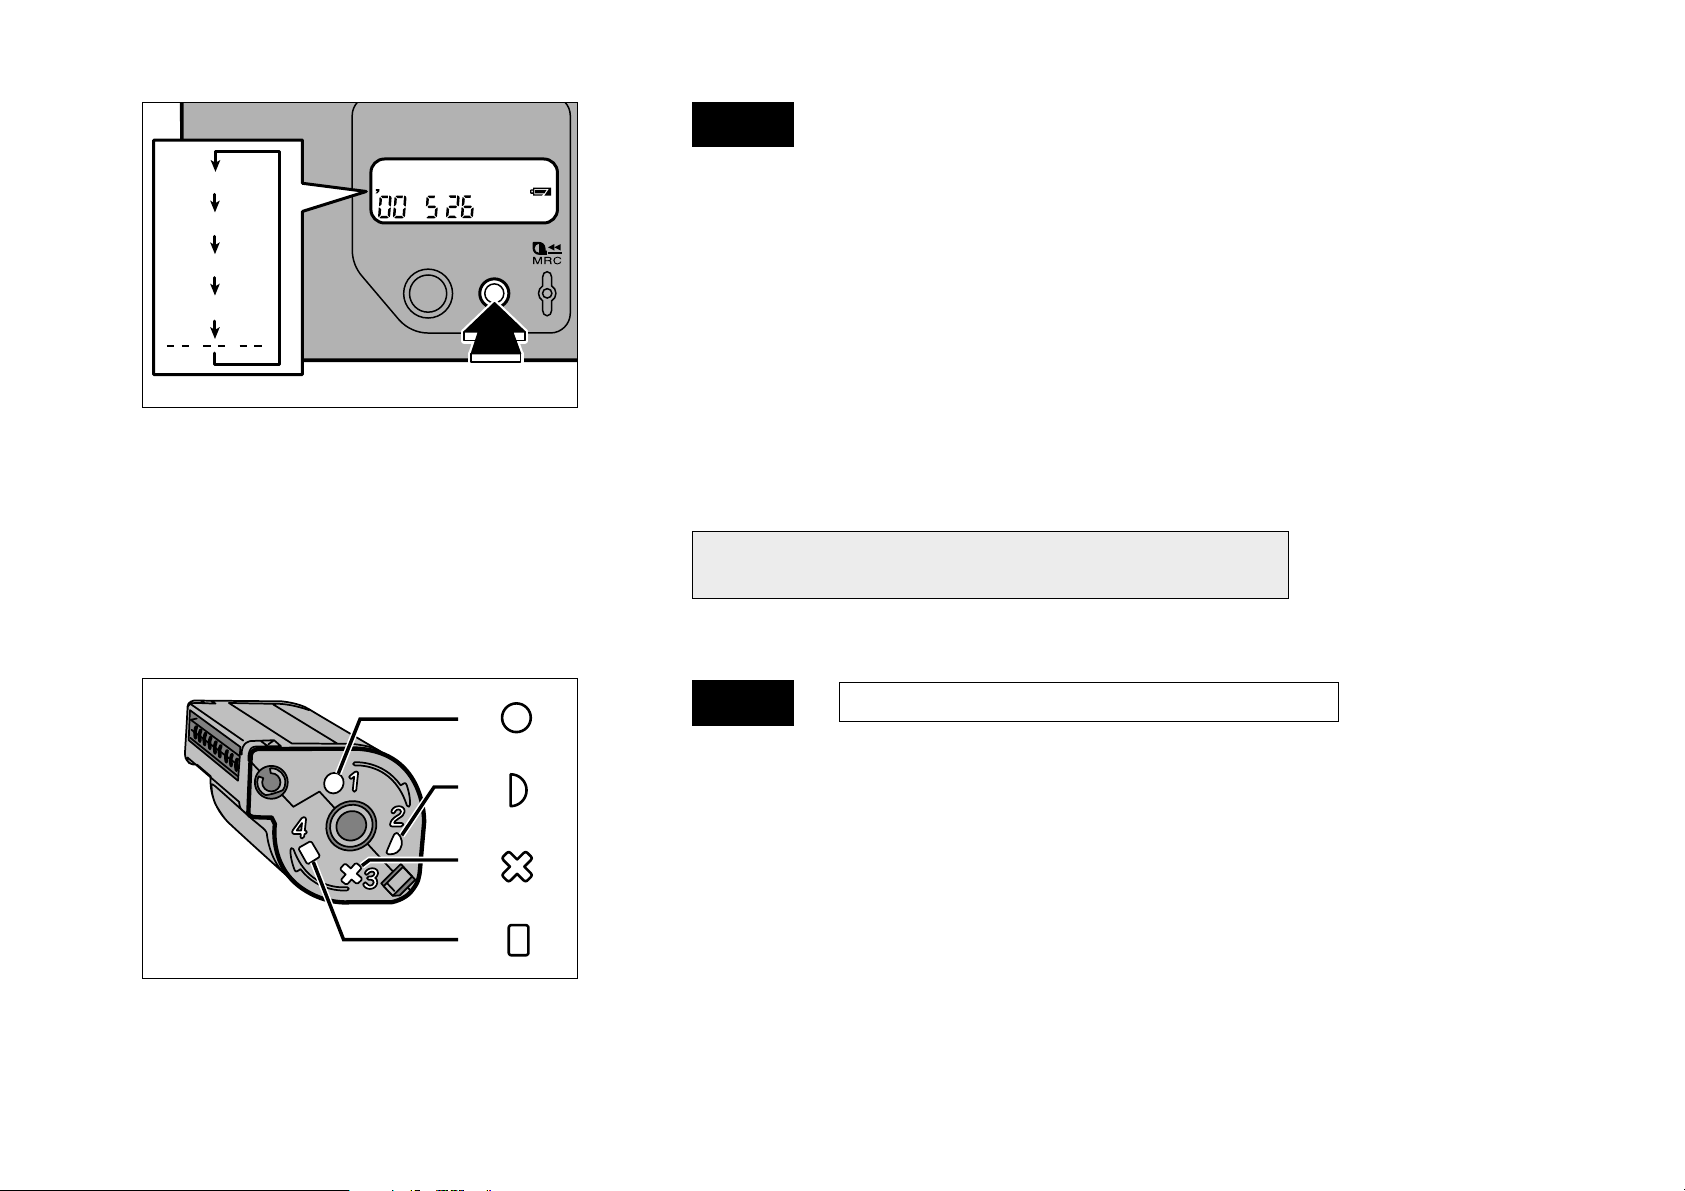
Fig. 13
SHIFT
DATE
Y M D
M D Y
D M Y
T
The date mode will alternate as shown in the
diagram whenever the DATE button is pressed.
✻ The date mode will be displayed in the [year,
month, day] sequence when the date is realigned
even when a date mode other than [year, month,
day] has been selected. Select the date mode
every time the date has been realigned if a setting
other than [year, month, day] is required.
(Y : Year M : Month D : Day T : Time)
2. BASIC PROCEDURES
LOADING THE FILM CARTRIDGE
1
2
3
4
Fig. 14
With the Advanced Photo System
IX240 cartridge film is used.
✻ Confirm that the i sign or j sign on the film
cartridge is white. Cartridges in which the k and
l signs are white cannot be used. (Optical
double exposure prevention.)
(1 unexposed 2 partial 3 exposed 4 processed)
11
Page 12
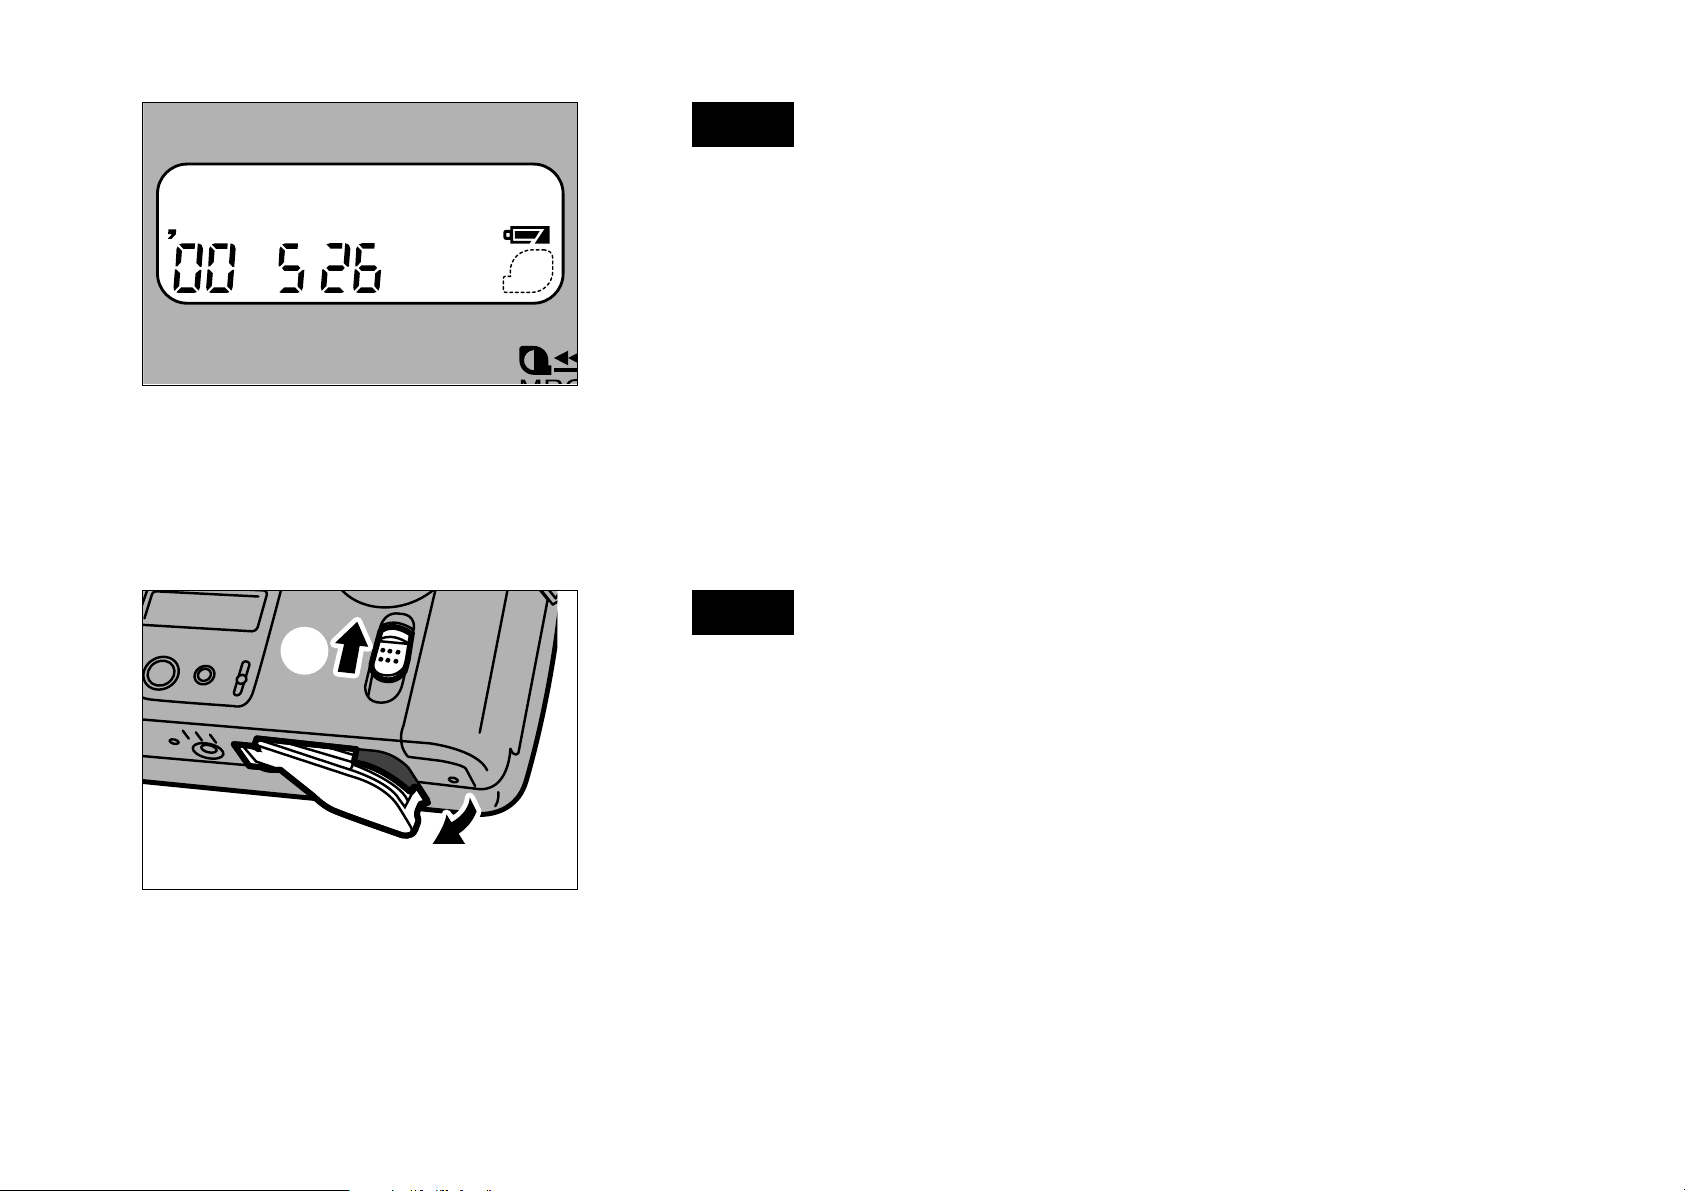
Fig. 15
SHIFT
DATE
A
Make sure that the film cartridge mark “ H ” is not
displayed in area A of the LCD.
✻ If “ H ” and “ B ” are lit on the LCD, your camera
contains a film cartridge already exposed.
Remove the film cartridge, following the
instructions on Fig. 34 – 36.
q
w
Fig. 16
Move the cartridge cover released knob in the
direction of q and open the cartridge cover slightly.
Open the cartridge cover in the direction of w.
✻ Do not apply unnecessary force to the film
cartridge compartment cover.
12
Page 13
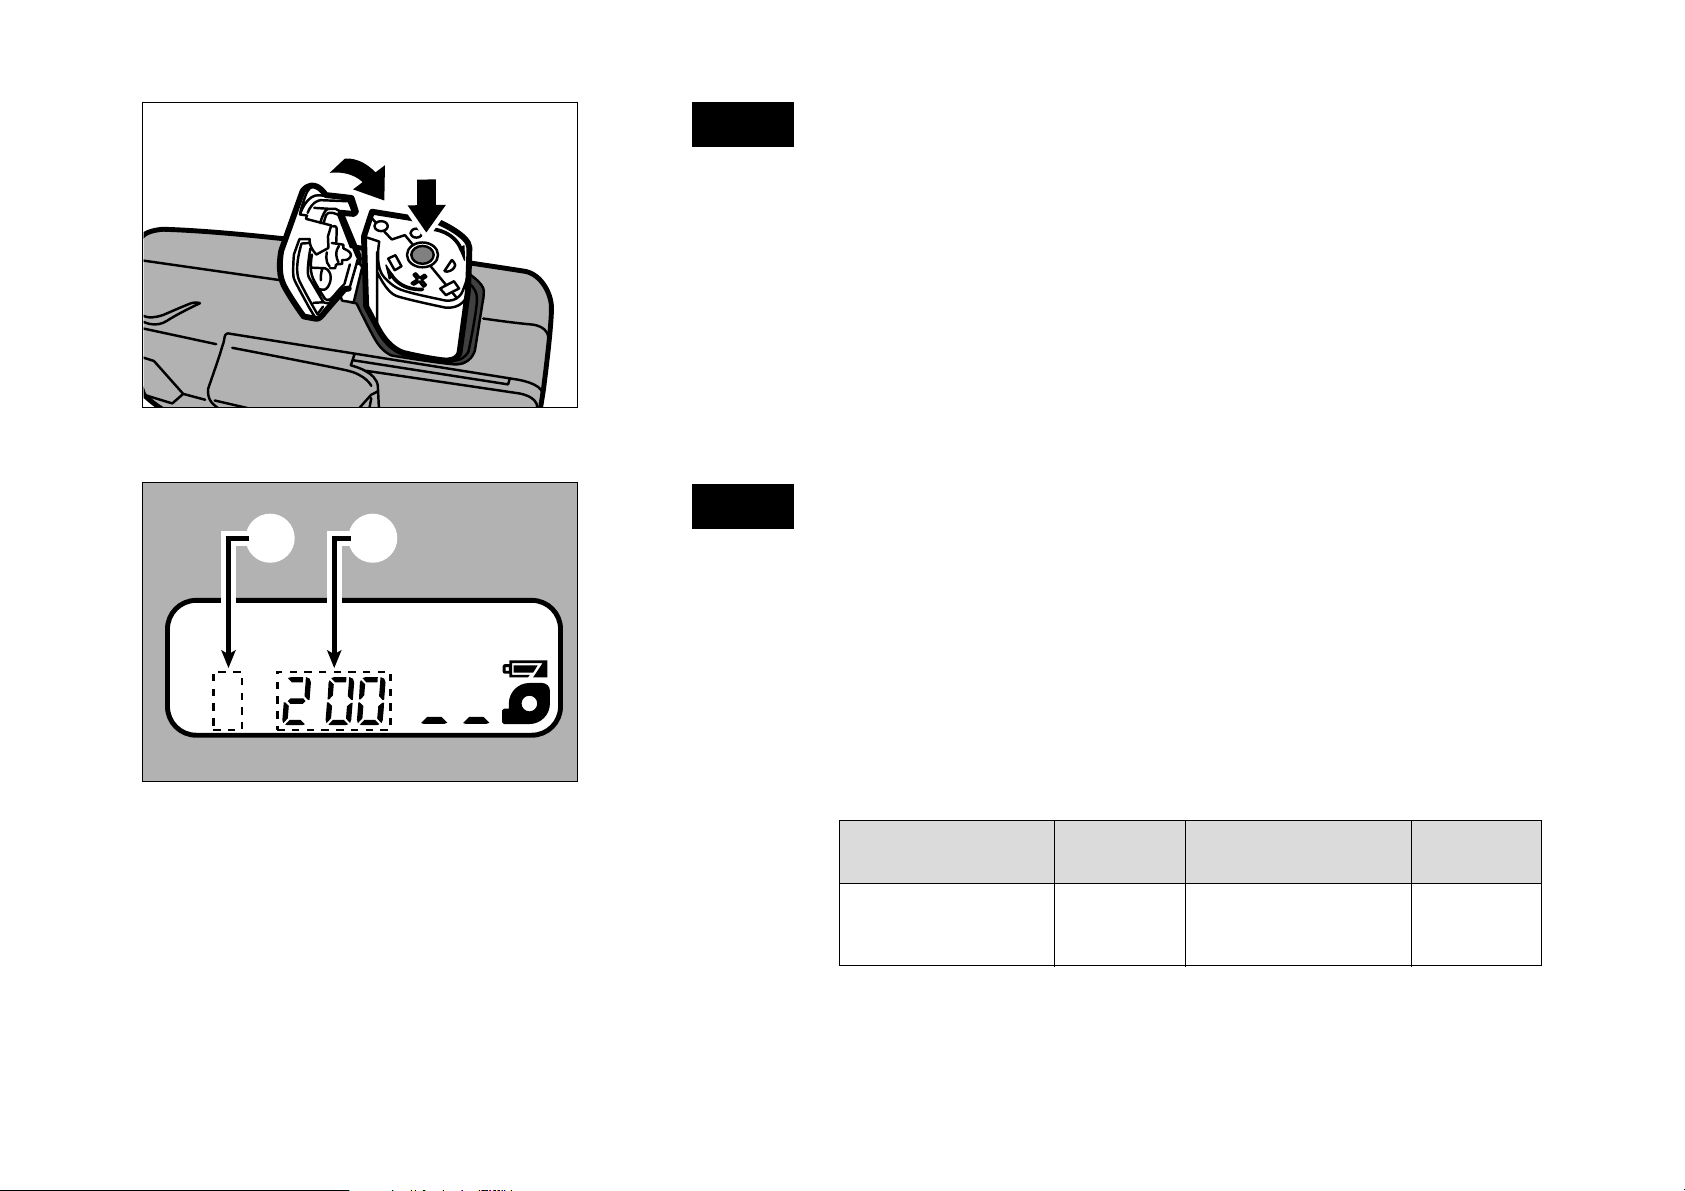
Fig. 17
q
w
Drop the cartridge q into place and then close the
cartridge cover w.
✻ Insert the battery before inserting the film
cartridge.
AB
Fig. 18
When the film cartridge compartment cover is
closed, the film is automatically advanced and “ H ”
is displayed on the LCD. While the film is being
advanced to the first frame, the film type and speed
are displayed.
(A : Film type)
(B : Film speed)
Type of film cartridge
Color Negative Positive Black and White Other
No display mno
13
Page 14
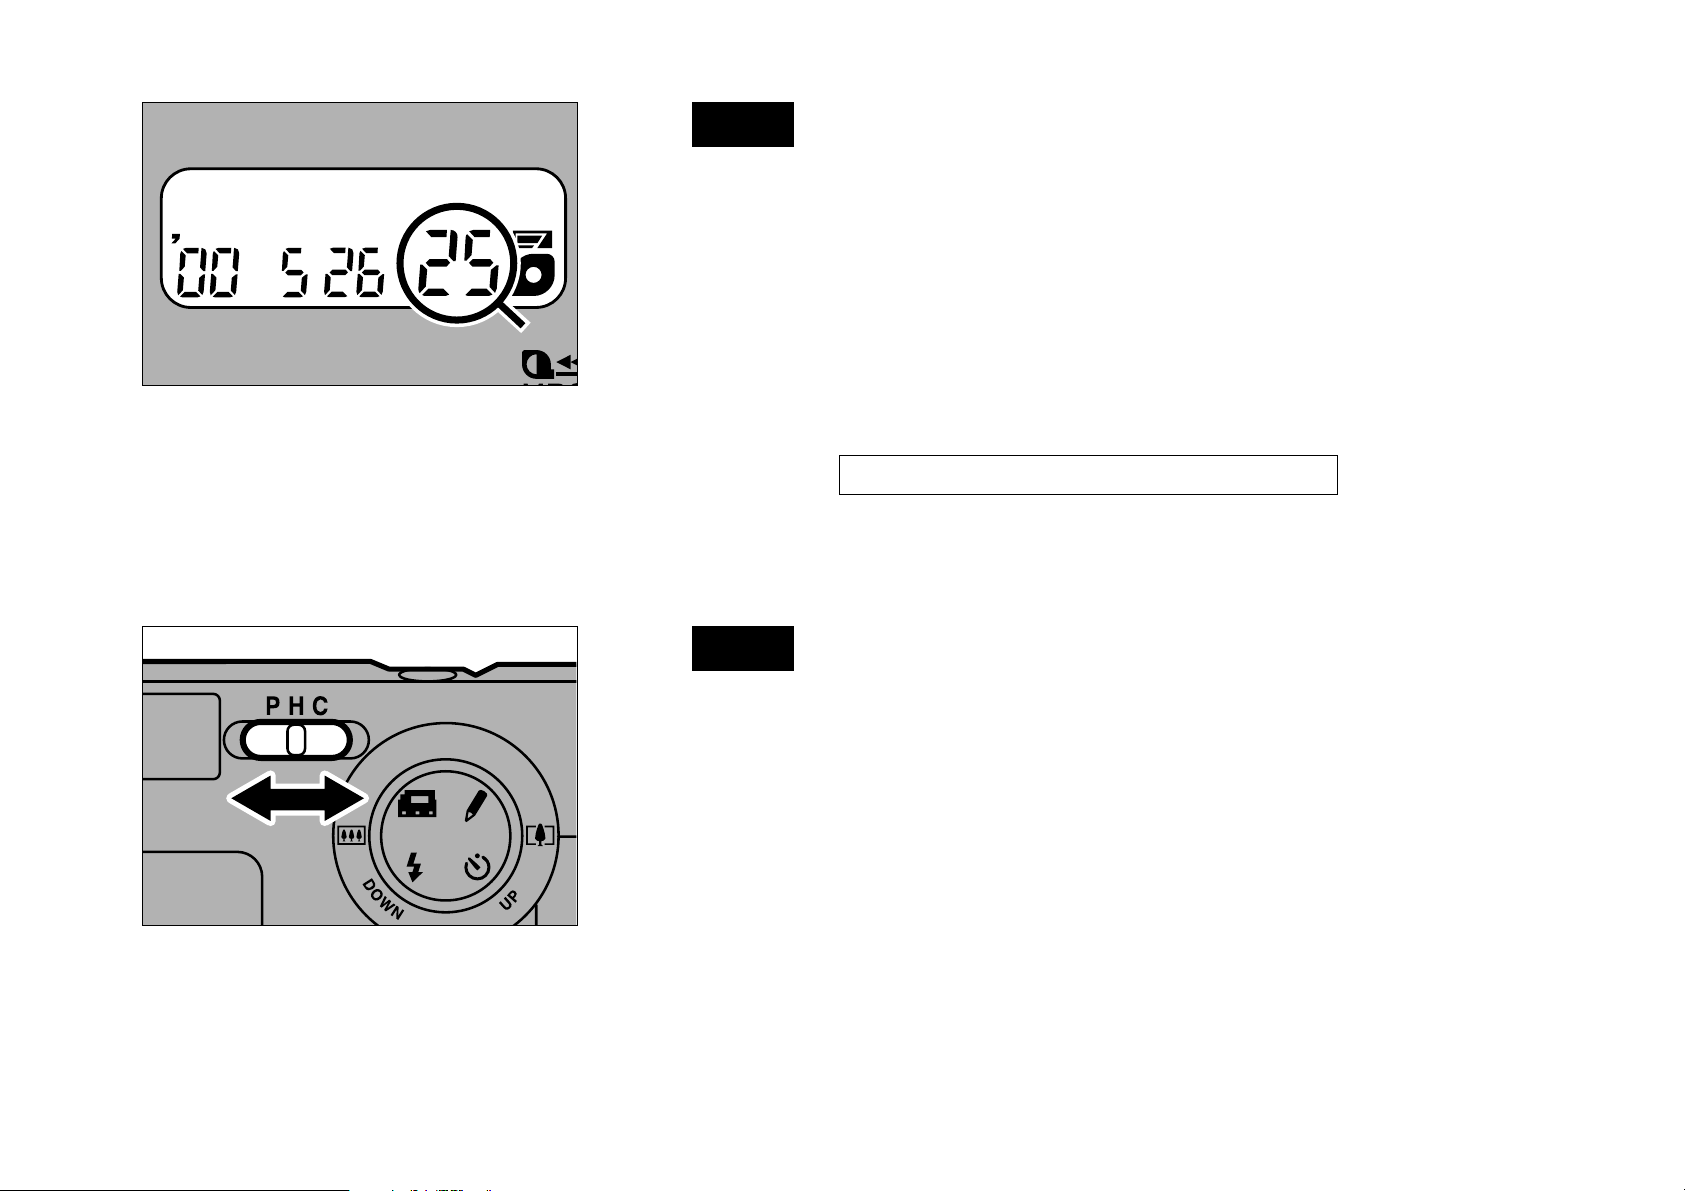
Fig. 19
SHIFT
DATE
When the first frame of the film is set, the usable
number of frames (the number of frames specified
on the film cartridge) is displayed in the exposure
counter.
✻ The number indicated in the exposure counter
decreases by one each time a picture is taken.
SELECTING THE PRINT FORMAT
With the Advanced Photo System
3 print formats - P, H and C can be chosen. Use the
format selector to select the format you want.
Fig. 20
Select the print format with the format selector
located on the rear of the camera.
14
Page 15
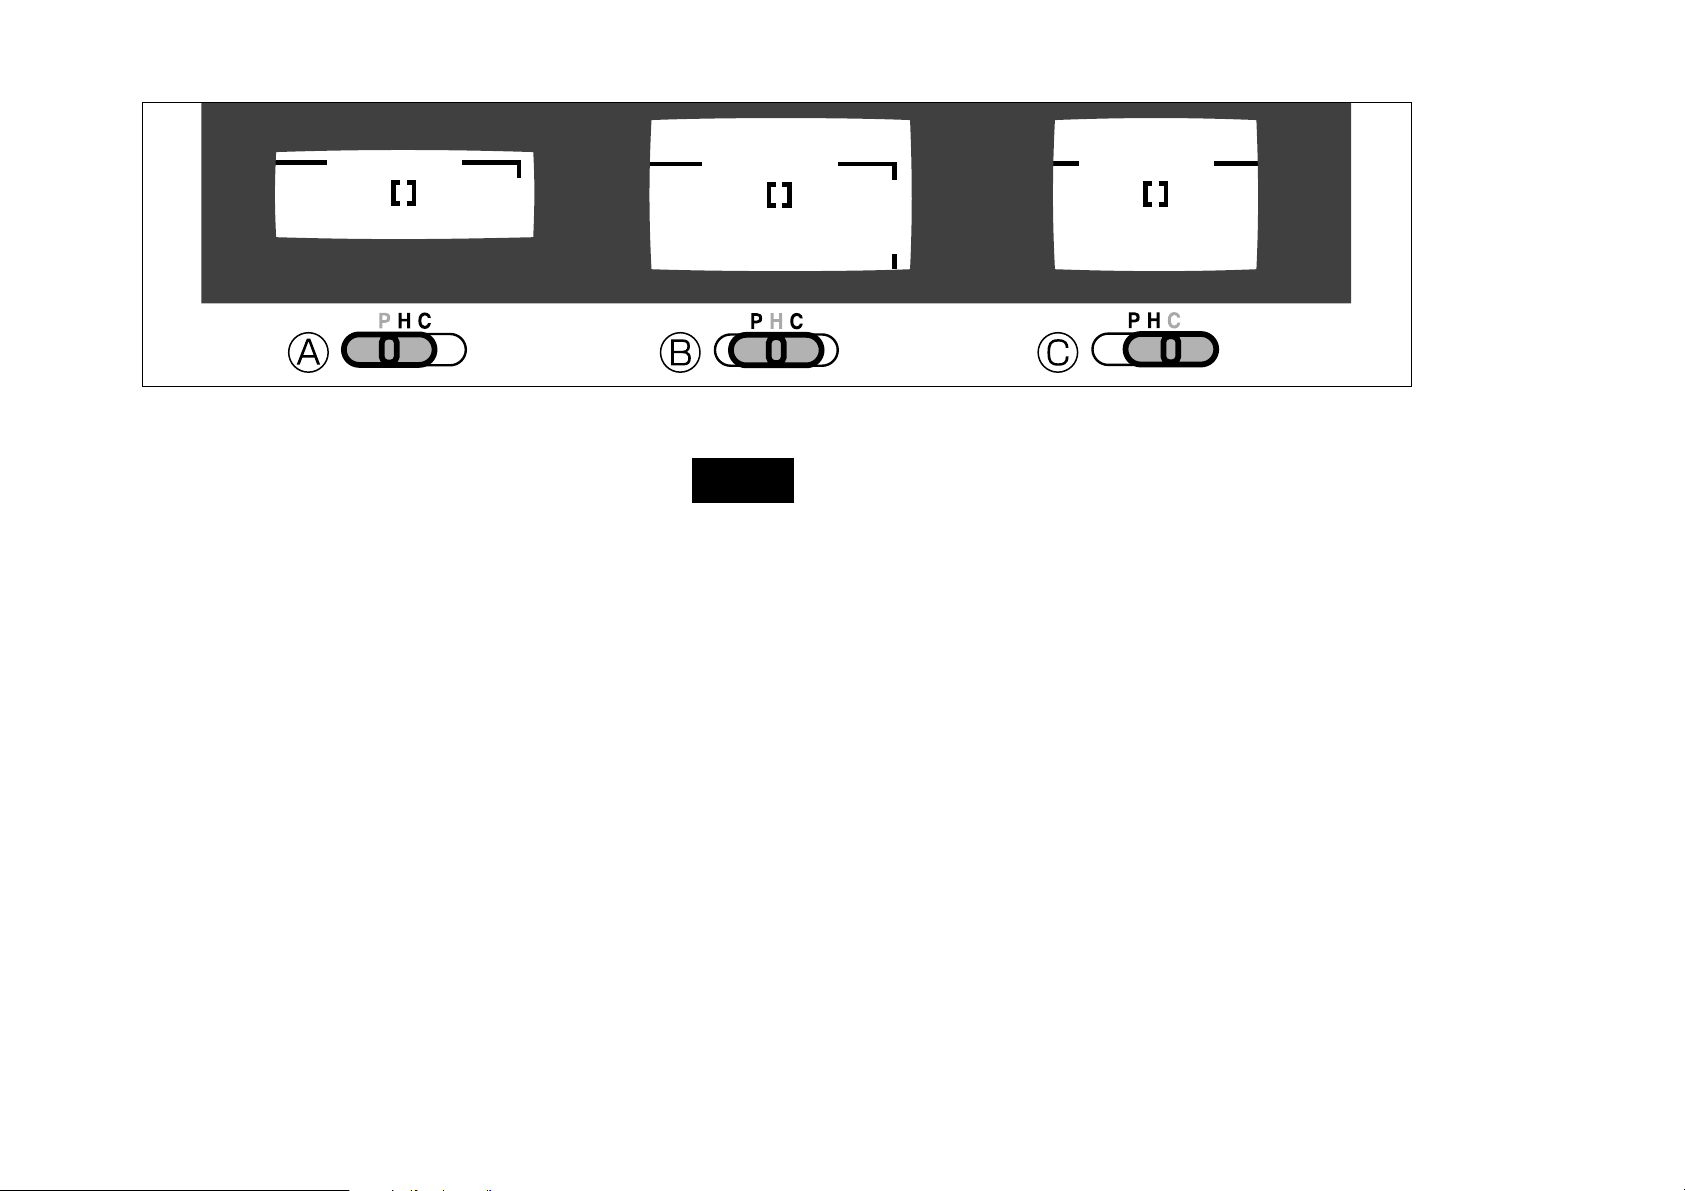
Fig. 21
The view through the finder will change to the style
of photographs shown when the format selector is
operated. The angle of the exposure will not change.
A : P Print (1 : 3)
B : H Print (9 : 16)
C : C Print (2 : 3)
✻ Figures in ( ) represent the aspect ratio.
15
Page 16
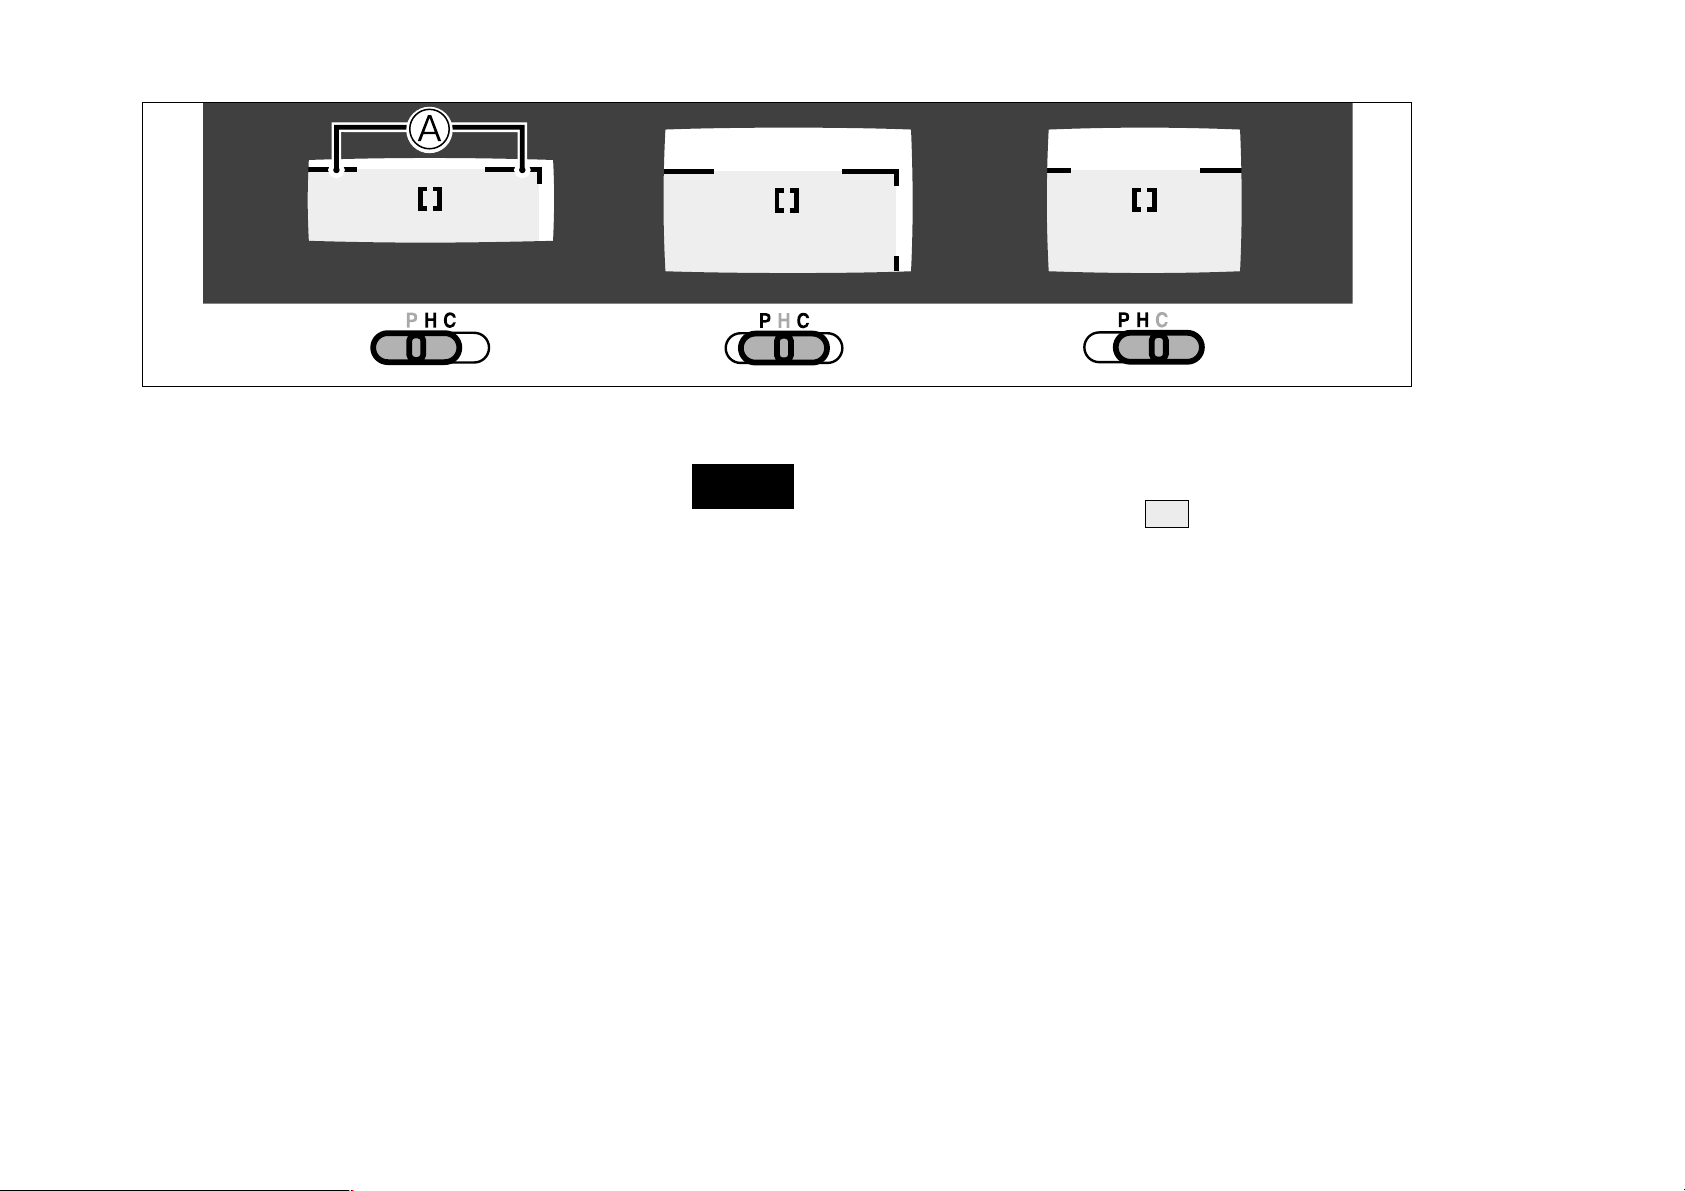
Fig. 22
●
With the close-up picture
The area visible in the part shown will be printed
when an exposure closer than approximately 1.5 m
is taken.
✻ When taking close ups, the area seen through the
viewfinder and the area actually photographed will
be different. (Because the viewfinder and the lens
are in different locations.) The parallax correction
mark is the criteria for the difference between the
area seen through the viewfinder and the area
actually photographed.
(A : Parallax correction mark)
16
Page 17
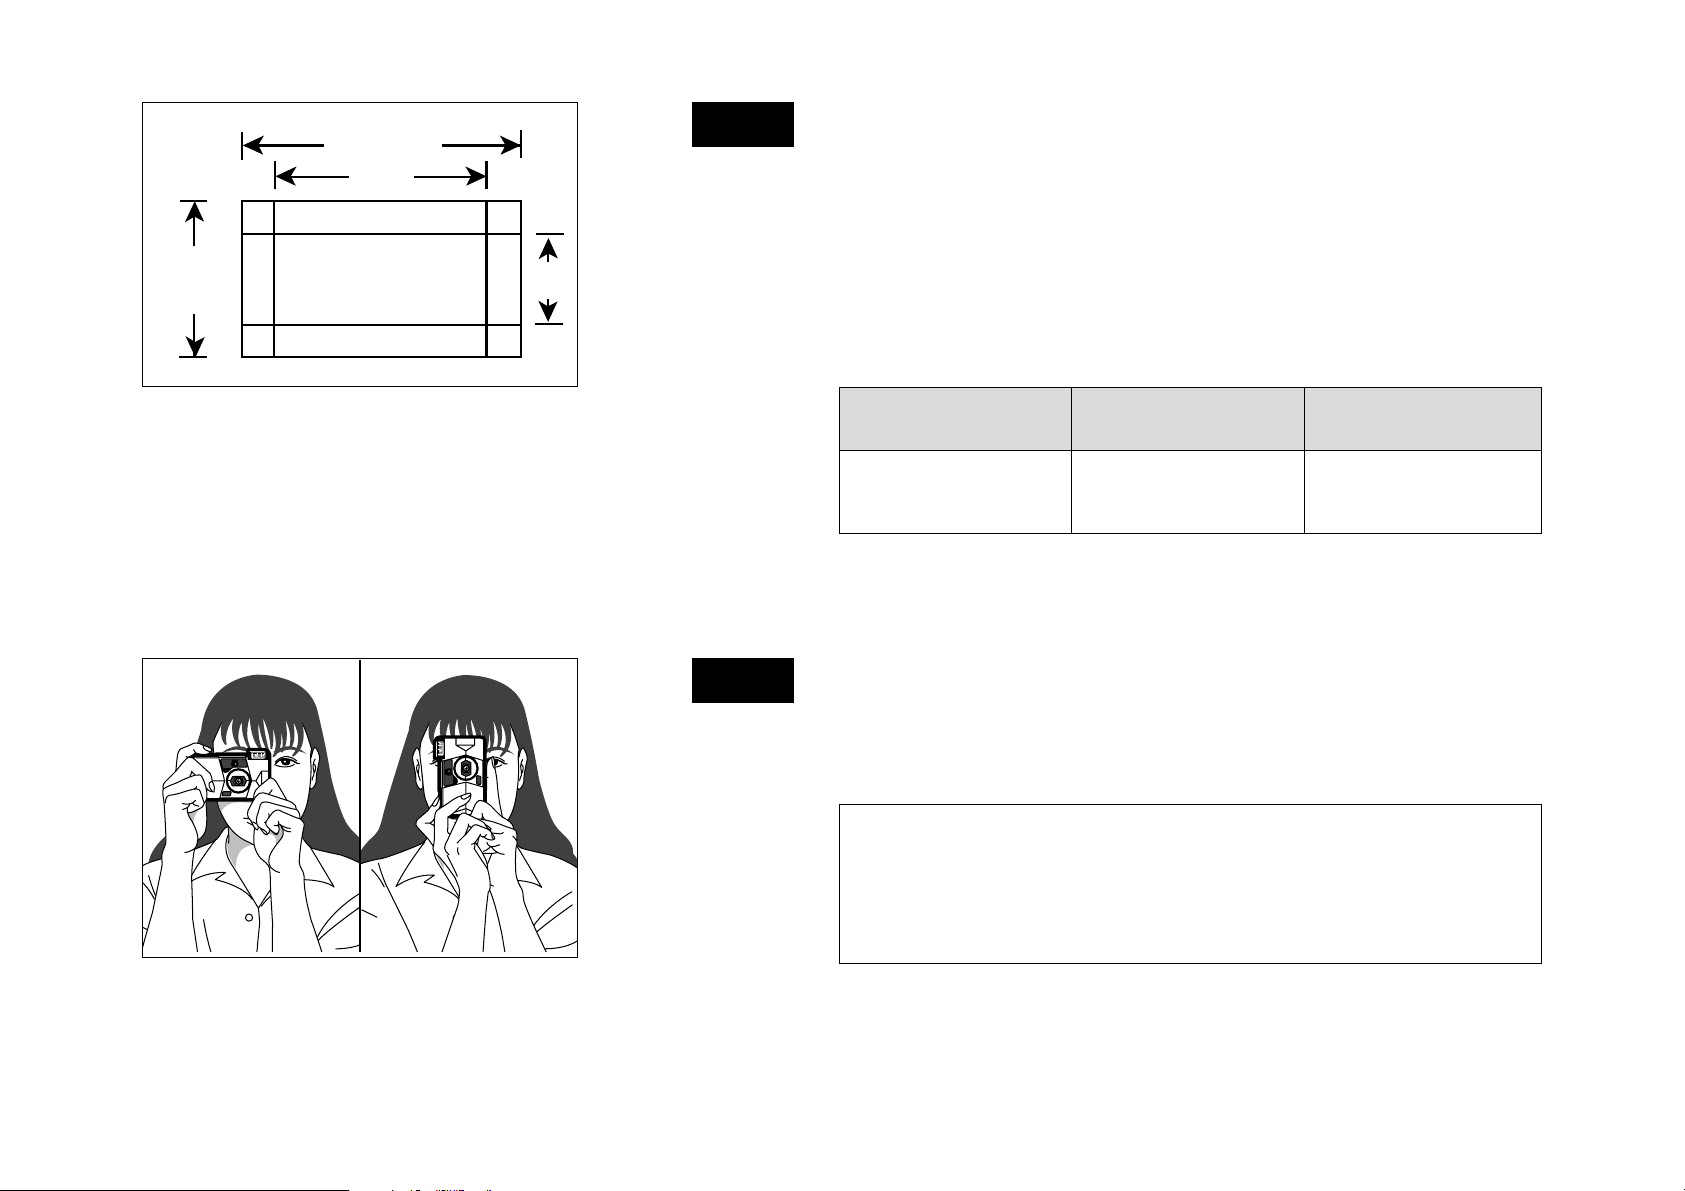
Fig. 23
H & P
H & C
P
C
Even when anyone of the P/H/C print format has
been selected, the size of the photograph on the film
remains the same (16.7 x 30.2 mm). Print format
selection will record the print format for each frame
and the exposure will be printed within the ranges
shown in the above illustrations.
✻ The print format can be changed when reprinting.
PHC
about 10 x 28 mm about 16 x 28 mm about 16 x 23 mm
TAKING PICTURES
Fig. 24
Open the slide cover to switch on the power, and
then hold the camera firmly with both hands.
When holding vertically, keep the flash lamp upward.
Take a test exposure prior to taking important
photographs (weddings, overseas travel, businessrelated, etc.,) to ensure that the camera is
functioning correctly.
17
Page 18

Fig. 25
Ensure that fingers or the camera strap are not
obscuring the lens of flash assembly.
Fig. 26
Press the multi-operation button’s s mark until the
required level of zoom has been acquired when the
subject is to be magnified. Press the t mark to
obtain the wide-angle zoom.
✻ The minimum distance for exposure is 0.6 m.
18
Page 19

Fig. 27
A
Aim at the subject so that it fills the whole AF frame.
(A : AF (Autofocus) frame)
Fig. 28
When the shutter release button is pressed halfway
and the AF lamp (green) turns on, focusing is
complete.
✻ While the shutter release button is pressed
halfway, the film speed and type of film is
indicated in the LCD.
✻ When you are too close to the subject, the AF
lamp (green) will start blinking.
✻ Note that when you are closer than about 20 cm,
the AF lamp turns on but focusing will not be
sharp.
19
Page 20

Fig. 29
When the shutter trips, the flash fires and the film
advances to the next frame.
✻ For bright remote scenes, the flash does not fire.
✻ The AF lamp will go off once and reappear
immediately after the shutter is released.
✻ During the charging time of the flash (when the
alarm sign is blinking “ c ”) the shutter cannot be
released.
●
In dark places, photos should be taken within the
following flash lamp ranges.
Effective flash lamp range
Film speed
Wide angle (23mm)
Telephoto (50mm)
ISO 100 0.6 - 3.5 0.6 - 1.8
ISO 200 0.6 - 5.0 0.6 - 2.6
ISO 400 0.6 - 7.0 0.6 - 3.7
(Using color negative film; units; m)
20
Page 21

●
In the following cases, the camera may not be
able to focus on the subject. Such subjects must
be shot using the “AF-lock” or “Landscape Mode”.
(Refer to Fig.30 – 33 and 50.)
q A bright light source such as the sun is near the
subject or there is reflected light (from the
windscreen of a vehicle, waves, etc.) near the
subject.
w A mirror or light-reflecting surfaces such as
metals are near the center of the picture.
e When shooting black light-absorbing subjects
such as hair.
r There are gaseous substances such as flame or
smoke.
t Taking pictures through glass.
USING THE AUTO-FOCUS LOCK
Fig. 30
In the composition shown above, the AF frame is off
the subject (in this case, the people). In this state
the lens will not focus on the subject.
21
Page 22

Fig. 31
Move the camera slightly so that the subject is inside
the AF frame.
Fig. 32
Press the shutter release button halfway down and
confirm that the AF lamp lights without moving the
camera. (Focus is locked on your subject in this
condition.)
22
Page 23

Fig. 33
SHIFT
DATE
While holding the shutter release button halfway
down to keep the Auto-Focus lock on, move the
camera back to the original position to recompose
your picture, then press the shutter release button all
the way down.
✻ The Auto-Focus lock operation can be repeated
any number of times before the shutter trips.
UNLOADING THE FILM CARTRIDGE
Fig. 34
When the last frame has been exposed, the film is
rewound. The exposure counter shows the number
of frames remaining after subtracting the exposed
frames from number of frames specified on the film
cartridge. When rewinding of the film is finished, an
B ” sign will appear in the exposure counter.
“
23
Page 24

Fig. 35
q
w
When the exposure counter shows “ B ” and the
motor stops, move the film cartridge compartment
cover release knob as indicated in q, in the direction
indicated in w, and open the film cartridge
compartment cover.
✻ Always stop the motor and check that “ B ” is
displayed before moving the film cartridge
compartment cover release knob. If you try to
open the film cartridge compartment cover before
“ B ” is displayed, the camera may be damaged,
or the film may be exposed.
Fig. 36
Take out the film cartridge after opening the
cartridge compartment cover.
✻ k is displayed on the cartridge.
✻ Do not apply unnecessary force to the cartridge
compartment cover.
24
Page 25

Fig. 37
SHIFT
DATE
Press the mid-roll change button to rewind the film
when the cartridge is to be ejected in the middle of
the roll. Do not remove the cartridge until “ B ” is
displayed in the exposure counter and the rewind
motor has ceased to operate.
✻ When rewinding a roll of film which is only partially
exposed. Refer to CARTRIDGE MID-ROLL
CHANGE FUNCTION.
CARTRIDGE MID-ROLL CHANGE FUNCTION
Fig. 38
With the Advanced Photo System
The cartridge can be replaced even in mid-roll. This
convenient feature makes it possible for family
members to alternate using one camera, to keep
hobby pictures separate from photographs for work,
and to interchange cartridges with different film
speeds.
25
Page 26

Fig. 39
SHIFT
DATE
Press in the mid-roll change button. The film counter
will display as it subtracts from the number of
exposed frames. When rewinding is completed, “ B ”
will be displayed by the film counter.
q
w
Fig. 40
When “ B ” appears in the film counter and the motor
has stopped, raise the cartridge compartment cover
release knob as shown in illustration q, move it in
the direction shown in illustration w and open the
cartridge compartment cover. The number of
unexposed frames will be displayed by the film
counter at this time.
26
Page 27

Fig. 41
2
A
Remove the cartridge and sign sure the sign j
appears white.
(A : Film cartridge with unexposed frames)
SHIFT
DATE
Fig. 42
When a new cartridge is loaded i, the film will be
advanced to the first frame and the number of
available exposures will be displayed.
27
Page 28

Fig. 43
When a cartridge that was removed in mid-roll j is
reloaded, the film will automatically be advanced to
the first unexposed frame. After that, operation is as
before.
✻ Even if you forget how many frames were exposed
on a cartridge that was removed in mid-roll, just
reload the cartridge. The camera will
automatically set the remaining number of
unexposed frames and display that number on the
LCD.
●
Cautions Concerning the Mid-roll Change Function
✻ When a cartridge that has been removed in mid-roll ( j is
displayed) is reloaded into the camera, if “ B ” blinks in the
film counter, reload the cartridge once more, avoiding the
following locations.
• Anywhere near a drier, fan, vacuum cleaner, etc., which
has a rotating motor.
• Near an active TV or personal computer display.
✻ If a cartridge is removed in mid-roll j and then loaded into a
camera which does not have the MRC function, the cartridge
will be set to exposed k and can no longer be used.
✻ A cartridge removed in mid-roll k from a camera which does
not have the MRC function cannot be used even if loaded
into this camera.
28
Page 29

✻
SHIFT
DATE
If a cartridge is removed in mid-roll j and sent to the
processor, all frames on the entire roll will be developed.
Expose all frames on the roll before sending the cartridge to
the processor for development.
✻ Mid-Roll change of cartridge is guaranteed only among our
FOTONEX/ENDEAVOR series and nexia series of cameras
with MRC functions. If a cartridge exposed with another
make of camera with an MRC function is used, operation may
not be normal.
3. ADVANCED TECHNIQUES
SELECTING THE EXPOSURE MODE
Fig. 44
Switch on the power and press the SHIFT button to
illuminate the four guide lamps ( c / / / r ).
29
Page 30

Fig. 45
SHIFT
DATE
q
w
Hold down the SHIFT button q and press the c
mark on the multi-operation button w to illuminate
only the c guide lamp. Continue pressing the c
mark to enable sequential selection of the exposure
mode.
The mode displayed in the LCD will be selected
when the SHIFT button is released, and the guide
lamp will be extinguished.
Fig. 46
No display : Multi program flash mode
Used during normal exposures
The amount of flash released will be automatically
adjusted in accordance with the brightness, distance
and magnification of the subject.
✻ For bright remote scenes, the flash does not fire.
✻ Refer to pages 31 to 32 for further details on the
Multi Program flash.
30
Page 31

Fig. 47
b : Red-eye reduction flash mode
Reduces red-eye
The flash lamp will fire briefly 5 times (pre-flash),
then fire the 6 time for taking your picture.
✻ The AF lamp sign in the viewfinder eyepiece stays
on from pre-flash to exposure. Do not move the
camera while the AF lamp is on.
●
About red-eye
When a person is photographed with flash in dim
light, the eyes will sometimes turn out red. This is
because the light from the flash lamp is reflected
back into the lens from the back (retina) of the
person’s eyes.
In addition to using the red-eye reduction mode,
observance of the following is effective in reducing
red-eye.
• Have the person being photographed look
directly at the camera lens.
• Take pictures by approaching as close as
possible to the subject.
31
Page 32

Fig. 48
c : Fill-in flash mode
Used when taking against-the-light pictures of a
person standing by a window or under the shade of
a tree.
Takes flash exposures even in bright locations.
Fig. 49
d : Flash off mode
Use when taking pictures using interior light or for
taking distant subjects which the flash lamp light
cannot reach, such as in a theater or stadium.
The flash lamp will not flash.
✻ When taking pictures in a dark place, we
recommend the use of a tripod to prevent the
camera from shaking.
32
Page 33

Fig. 50
e : Landscape mode
This is used for taking clear landscape pictures or
photographing remote (night) scenes through
glass.
Set the focus in the distance. The flash will not
operate.
✻ This feature will be canceled after every exposure.
✻ When taking pictures in a dark place, we
recommend the use of a tripod to prevent the
camera from shaking.
Fig. 51
: Night portrait (slow sync) mode
This is used for taking photographs of people at
night.
The camera will enter the slow-shutter red-eye
reduction mode (flash emitted after 5 pre-flashes) to
enable the clear exposure of both night scenes and
human subjects.
33
Page 34

✻
This feature will be canceled after every exposure.
✻ As a slow shutter speed is used with the night
portrait mode, ensure that a tripod is used to
prevent camera-shake. It is also important that the
subject remains motionless during the exposure.
✻ The fill-in flash mode, the flash off flash mode,
and landscape mode and the night portrait (slow
shutter) mode will be canceled when the power is
switched off.
To enable the continual use of the landscape
•
mode and night portrait mode, press the multioperation button’s c mark for 2 or more
consecutive seconds when selecting the mode
until the mark changes from being illuminated to
blinking. The mode will then remain in place after
exposure to enable continual use. This feature
will be canceled automatically when the power is
switched off.
34
Page 35

Happy Birthday
THE “USER TITLE” SELECTION
Fig. 52
Fig. 53
With the Advanced Photo System
Messages or titles can be printed on the back of
prints when taking pictures.
✻ User title selection can be changed when
reprinting. (Some photo finisher’s may not support
this feature.)
Press the SHIFT button to illuminate the 4 guide
lamps ( c / / / r ).
✻ 3 guide lamps ( c / / r ) will be illuminated
during title selection.
DATE
SHIFT
✻ When you want to select both user title selection
and print quantity, set either of the functions after
taking the photograph. (Refer to Fig.65 – 67.)
35
Page 36

Fig. 54
SHIFT
SHIFT
DATE
q
w
q
w
Language selection:
Hold down the SHIFT button q and press the
mark on the multi-operation button w for 2 or more
consecutive seconds to illuminate the guide lamp
and set the UP and DOWN guide lamps blinking.
The language number will blink on the LCD.
Title selection:
Hold down the SHIFT button q and press the
mark on the multi-operation button w to illuminate
the guide lamp and set the UP and DOWN guide
lamps blinking. The title number will blink on the
LCD.
36
Page 37

Fig. 55
SHIFT
DATE
q
w
Continue to press the SHIFT button q and select
the number with the UP and DOWN w buttons. The
number displayed in the LCD will be selected when
the SHIFT button is released. (Refer to page 54 for
details on the numbers.)
✻ Language and titles cannot be amended
simultaneously. Make all necessary amendments
independently.
✻ The title number is the number “30” followed by
“_ _”. No title will be printed if you set the title
number to “_ _”.
Fig. 56
Press the shutter release button to take a picture.
The film is advanced and the selected title is
recorded.
✻ To cancel the select title mode, reset the power
switch.
✻ Although the date is not displayed, it is imprinted
on the photograph.
✻ The user select title is cancelled after every
exposure (shutter release). When the self-timer is
used, it is cancelled after the set number of
exposures are finished.
37
Page 38

SHIFT
DATE
SHIFT
DATE
q
w
CHANGING THE “USER TITLE” SELECTION
The title of the last exposed frame can be changed
any number of times before the next frame is
exposed. This is convenient when one has forgotten
to set the title before exposure, or when changing
the title.
✻ Overwriting is not possible if the cartridge is
Fig. 57
removed midway or the batteries are removed
after exposure.
Select the required title from the sequence available
in [THE “USERTITLE” SELECTION] and then
continue to press the SHIFT button. (Refer to Fig.52
– 56.)
Fig. 58
Hold down the SHIFT button q (with the title number
blinking on the LCD) and press the mark on the
multi-operation button w for 1 or more consecutive
seconds.
38
Page 39

Fig. 59
SHIFT
DATE
The exposure film is rewound once (the exposure
counter also counts back 1 frame) then returned to
the last position. The exposure counter also returns
to its original value, and the title is changed.
PRINT QUANTITY
Fig. 60
With the Advanced Photo System
The desired print quantity for each frame can be set
when taking pictures. The necessary print quantity
is simultaneously printed at the first printing so
troublesome reprinting is not necessary. 0 to 10
prints can be specified for every frame.
39
Page 40

Fig. 61
SHIFT
DATE
q
w
Press the SHIFT button to illuminate the 4 guide
lamps ( c / / / r ).
✻ 3 guide lamps ( c / / r ) will be illuminated
during print quantity specification.
SHIFT
DATE
Fig. 62
✻ When you want to select both user title selection
and print quantity, set either of the functions after
taking the photograph. (Refer to Fig.57 – 59.)
Hold down the SHIFT button q and press the
mark on the multi-operation button w to illuminate
the guide lamp and set the UP and DOWN
guide lamps blinking. The print quantity will blink on
the LCD.
40
Page 41

Fig. 63
Continue to press the SHIFT button q and select
the quantity with the UP and DOWN w buttons.
The quantity displayed in the LCD will be selected
q
SHIFT
w
DATE
when the SHIFT button is released.
✻ If you want to cancel the specified print quantity,
reset the power switch.
✻ Although the date is not displayed, it is imprinted
on the photograph.
Fig. 64
Press the shutter release button to take a picture.
The film is advanced and print quantity is recorded.
✻ Print quantity is cleared automatically after each
exposure, or when a new film cartridge is loaded.
The self-timer exposure feature will be canceled
after the preset number of exposures have been
41
taken.
Page 42

CHANGING THE PRINT QUANTITY
SHIFT
DATE
SHIFT
DATE
q
w
This is convenient when one has forgotten to set the
print quantity before exposure, or when one does not
want a print because of an exposure failure.
✻ Overwriting is not possible if the cartridge is
removed midway or the batteries are removed
after exposure.
Fig. 65
Fig. 66
Select the required print quantity from the sequence
available in [PRINT QUANTITY] and then continue to
press the SHIFT button. (Refer to Fig.60 – 64.)
Hold down the SHIFT button q (with the print
quantity blinking on the LCD) and press the
mark on the multi-operation button w for 1 or more
consecutive seconds.
42
Page 43

Fig. 67
SHIFT
DATE
SHIFT
DATE
The film is first rewound (the counter is reset to
frame 1), then advanced to its original position (the
counter is also advanced), and the print quantity is
changed.
USING THE SELF-TIMER
Fig. 68
Press the SHIFT button to illuminate the 4 guide
lamps ( c / / / r ).
43
Page 44

Fig. 69
SHIFT
DATE
q
w
Hold down the SHIFT button q and press the r
mark on the multi-operation button w to illuminate
only the r guide lamp. Continue to press the r
mark to select the number of required self-timer
exposures (maximum of 3.) The self-timer exposure
count displayed in the LCD will be selected when the
SHIFT button is released, and the guide lamp will be
extinguished.
Fig. 70
When the shutter release is depressed, the camera
focuses on the subject in the AF frame and the selftimer starts. The self-timer lamp (or multi-operation
button’s guide lamp) will begin to blink approximately
7 seconds after being illuminated, and the shutter
will be released approximately 3 seconds after that.
Subsequent self-timer exposures will be taken at
intervals of between 3 to 6 seconds when 2 or 3
consecutive self-timer exposures have been set.
✻ Do not press the shutter release button while
standing in front of the camera. This may cause a
focusing error or underexposure.
44
Page 45

✻
To cancel an activated self-timer exposure, press
the r mark on the multi-operation button and
extinguish the guide lamp.
✻ The self-timer mode will be automatically
canceled after the exposure has been taken and
when the power is switched off.
MULTI PROGRAM FLASH
A word on multi program flash
A new function which allows the camera photographing
conditions and automatically adjusting the quantity of light
emitted by the flash by analyzing the brightness of the subject,
the distance, and the focal length of the lens.
The flash always fires automatically unless the subject is bright
or too far. This programmed flash allows anyone to take clean
pictures simply.
Some practical examples are introduced to explain the effects.
45
Page 46

Fig. 71
Fig. 72
●
Close-up photography in a room or night scene
When close-up pictures are taken in a dim place with
an ordinary flash, it fires in 100%. As a result, the
subject is blurred in white. The multi program flash
reduces the light quantity down to 12.5%, preventing
pictures to be blurred in white.
●
Portrait photography at high brightness
When a person is photographed in bright daylight,
his (her) face is likely to be spotted with the shades
of hair and nose. Even in such a case, the multi
program flash automatically fires to reduce the
shades. It seems unnecessary to use the flash in a
bright place. However, you will understand the effect
by comparing a picture taken with the flash used and
a picture taken without using the flash.
46
Page 47

●
Fig. 73
Photography against the sun
When photographing a person who is backlit or
standing by a window, the subject appears as a
shadow. As a result, the features will be too dark to
distinguish. In this case also, the multi-program
flash automatically provides the correct amount of
light so that you can take beautiful pictures.
CAMERA CARE AND CAUTIONS
z Your camera is a precision instrument which requires careful
handling. Do not expose it to shock, liquid, or drop it on the
floor.
q If you use the camera at the seaside or in light rain, be
careful not to get it wet. Also be careful not to put the
camera in places where it will be easily exposed to sand.
w Dropping the camera on the floor or striking it against
hard objects sometimes causes trouble even though it
may be in the camera case. Also do not put the camera
in places where it is exposed to vibrations (such as the
trunk of a car).
x If you are not using your camera for a long time, keep it
where it will be safe from heat, moisture, dust, and harmful
gases (such as naphthalene which is used in drawers).
47
Page 48

c Since this camera is computer-controlled, it almost never operates
erroneously. If erroneous operation should occur, remove and then
reload the battery.
v This advanced photo system magnetically records the information on
the film. Therefore, do not expose film cartridges or a film cartridge
loaded camera to strong magnetic fields.
b Do not put the camera in a closed car for a long time.
n It is recommended that undeveloped film and cameras containing film
are carried as hand luggage when using aircraft. If included in
checked-in baggage, X-ray inspections may cause overprinting or
other effects.
m Remove soil and dust from the lens, the AF window and the finder
with an air blower and by wiping lightly with a piece of soft cloth. If
that is not enough, wipe off gently with Lens Cleaning Paper,
moistened slightly with Lens Cleaning Liquid. Do not use organic
solvents such as alcohol and benzene.
, The operating temperature range of the camera is from –10°C to
+40°C.
. Since the performance of the battery will drop in cold district, warm
the battery by placing it inside your garments, etc. before use. The
performance of a battery whose performance has temporarily
dropped can be recovered by returning the battery to normal
temperature.
48
Page 49

ERRORS, POSSIBLE CAUSES, AND REMEDIES
During operation
Error Possible Causes Remedies Page
The LCD shows “B” and
H” blinking though a film
“
cartridge has been loaded
and the film cartridge
compartment cover has
been closed.
A cartridge has been
inserted, but the counter is
not displayed on the LCD.
The film will not wind on.
The shutter release won’t
trip.
●
Open the film cartridge
compartment cover and check
the film cartridge status mark.
Are you using a film cartridge
with a white i mark or j.
●
Check to ascertain that the
batteries have been inserted
after the cartridge.
q “ D ” symbol is blinking
w Power switch is not on.
e “ B ” is lit on the exposure
counter.
●
Use a film cartridge with a white
i mark or j.
●
The shot will not be taken if the
shutter was operated in this
condition. Remove the cartridge
without rewinding, and then
reload it again.
q Replace the battery with a new
one.
w Turn on the power by opening
the slide cover and set the
camera to the ready-to-shoot
state.
e Remove the film cartridge and
load an unused film cartridge or
a film cartridge with unexposed
frames remaining.
11
11
6
7
12
The film cartridge
compartment cover cannot
be opened.
●
Are you attempting to open
the film cartridge cover in the
middle of a roll?
49
●
Rewind the film with the mid-roll
change button. When “ B ”
appears in the exposure counter,
unload the film cartridge.
23
Page 50

Printed pictures
Error Possible Causes Remedies Page
Picture is not sharp.
Picture is dark.
q Was your finger on the AF
windows when shooting?
w Did you aim the subject
properly?
e Is the lens dirty?
r Is the camera shaking?
t You selected e mode when
shooting at a close distance.
q Subject was too far from the
camera for flash photography
q When shooting a picture, hold
your camera correctly so that
your finger is not on the AF
windows.
w Compose the picture in the AF
frame and shoot, or shoot using
AF Lock.
e Clean the lens.
r Hold the camera firmly and press
the shutter release button gently.
Use a tripod for slow shutter
speeds.
t Select a mode other than e
mode.
q Shoot within specified coverage
distance of electronic flash.
17
21
47
17
33
20
in a dark place.
w Was your finger over the
flash?
50
w Do not cover the flash with your
finger.
18
Page 51

Error Possible Causes Remedies Page
Printed date/time is
incorrect.
The date is not printed on
the front.
●
You didn’t set correct date and
time after replacing battery.
q Wasn’t “- - - - - -” selected
before taking pictures ?
w Some print service shops do
not support frontprinting.
●
Set date and time after replacing
battery.
q Select a date mode other than
“- - - - - -” before taking pictures.
w Please consult your nearest
photo finisher.
8
10
51
Page 52

SPECIFICATIONS
●
Film
IX240 Cartridge film
●
Picture Size
16.7 mm x 30.2 mm
●
Print Format
P/H/C switchable
●
Lens
Super EBC Fujinon zoom lens, 5 components,
5 elements, f=23 – 50 mm 1:5.0 – 1:8.8
●
Viewfinder
Super EBC zoom finder, 0.36 – 0.69X
magnification, P, H and C formats switchable
with AF frame, parallax correction mark, AF
Lamp
●
Focusing
Active type auto focus: 0.6 m – ∞, with AF lock,
landscape mode (long distance lens position
setting, flash off setting), AF lamp (on: range
OK, blinking: over range alarm)
●
Shutter Release
●
Exposure Control
Automatic
Interlocking range (ISO 200), EV (wide angle):
10 (✻7) – 17, EV (telephoto): 12 (✻7) – 18
(✻ = values for the flash off mode)
●
Film Speed Setting
Automatic (data disk system) for ISO 25 – 3200
●
Film Loading
One touch drop-in loading system, film safety
lock system, with optical double exposure
prevention
●
Film Advance
Automatic (motorized) wind and rewind system,
provision for mid-roll rewinding, cartridge midroll change function
●
Flash
Multi program flash, 1 – 5 seconds recycle
time, multi program flash mode, red-eye
reduction flash mode, fill-in flash mode, flash
off mode, night portrait (slow sync) mode
Programmed electronic shutter release, 1 –
1/400 sec. shutter release speeds
52
Page 53

●
Self-Timer
Electronically controlled, up to 3 consecutive
exposures approximately 10 second delay, can
be stopped mid-run, self-timer on lamp
●
Liquid Crystal Display
Exposure counter, exposure mode index,
cartridge loaded/unloaded sign, self-timer
mode sign, battery capacity sign, flash
charging sign, date sign, print quantity sign,
user title selection sign, type of film cartridge
sign, film speed sign
●
Data Recording
Magnetic recording system, recordable on
each frame, print quantity, user select title,
print format, BASIC PQI (print quality
improvement) information
●
Power Supply
One CR123A/DL123A lithium battery or
comparable battery
●
Others
Tripod socket
●
Dimensions & Weight
109 x 62 x 39 mm, 175 g (without battery)
✻ Specifications are subject to change without
notice.
53
Page 54

LIST OF AVAILABLE TITLES
GBR USA
12 – 0 Christmas
12– 1 Birthday
12– 2 Vacation
12– 3 Honeymoon
12– 4 Wedding
12– 5 Hanukkah
12– 6 Graduation
12– 7 Family
12– 8 Party
12– 9 Holiday
12–10 Anniversary of
12–11 Friends
12–12 School Event
British English American English
Marriage
12–15 Thank You
12–16 Season’s Greetings
12–17 Happy Birthday
12–18 Congratulations
12–19 Merry Christmas
12– 20 Festival
12– 21 First day of School
12– 22 Tour
12– 23 New Year’s
12– 24 Easter
12– 25 Happy New Year
12– 26 Reunion
12– 27 Father’s Day
12– 28 Mother’s Day
13 – 0 Christmas
13 – 1 Birthday
13 – 2 Vacation
13 – 3 Honeymoon
13 – 4 Wedding
13 – 5 Hanukkah
13 – 6 Graduation
13 – 7 Family
13 – 8 Party
13 – 9 Holiday
13 –10 Anniversary
13 –11 Friends
13 –12 School Event
13 –13 Trip
13 –16 Season’s Greetings
13 –17 Happy Birthday
13 –18 Congratulations
13 –19 Merry Christmas
13 – 20 Festival
13 – 21 First day of School
13 – 22 Tour
13 – 23 New Year’s
13 – 24 Easter
13 – 25 Happy New Year
13 – 26 Reunion
13 – 27 Father’s Day
13 – 28 Mother’s Day
13 – 29 Memories
12–13 Trip
12–14 I Love You
12– 29 Memories
12– 30 Baptism
13 –14 I Love You
13 –15 Thank You
54
13 – 30 Baptism
Page 55

26-30, Nishiazabu 2-chome, Minato- ku, Tokyo 106-8620, Japan.
<FUJIFILM ABROAD>
In North America FUJI PHOTO FILM U.S.A., INC.
In Europe FUJI PHOTO FILM (EUROPE) G.m.b.H.
In South America FUJI PHOTO FILM DO BRAZIL LTDA.
In Asia FUJI PHOTO FILM CO., LTD., HONG KONG OFFICE
In Oceania FUJI PHOTO FILM CO., LTD., SYDNEY REPRESENTATIVE OFFICE
In Middle East FUJI PHOTO FILM CO., LTD., DUBAI OFFICE
555 Taxter Road, Elmsford, N.Y. 10523, U.S.A.
FUJI PHOTO FILM CANADA INC.
275 Britannia Road East, Mississauga, Ontario , L4Z 2E7, Canada
FUJI PHOTO FILM HAWAII, INC.
1650 Kalakaua Avenue, Honolulu, Hawaii 96826, U.S.A.
Heesenstrasse 31, 40549 Dusseldorf, Germany
FUJI PHOTO FILM (U.K.) LTD.
Fuji Film House, 125 Finchley Road, Swiss Cottage, London NW3 6JH, England
FUJI FILM ESPAÑA, S.A.
Aragon, 180, 08011-Barcelona, Spain
Avenida Vereador Jose Diniz No. 3.400, Campo Belo- CEP 04.604
Cx. Postal 9.959., Sao Paulo-SP, Brazil
Room 916, Sun Plaza, 28 Canton Road, Tsim Sha Tsui, Kowloon, Hong Kong
FUJI PHOTO FILM (SINGAPORE) PTE. LTD.
10 New Industrial Road, Singapore 536201
FUJI PHOTO FILM (THAILAND) LTD.
S.P. Building, 8th Floor, 388 Phaholyothin Road, Bangkok 10400, Thailand
FUJI PHOTO FILM (MALAYSIA) SDN. BHD.
Letter Box 3, 3rd Floor Office Block 1, Crystal Plaza Lot 4, Jalan 51A/223, 46100 Petaling Jaya Selangor Darul Ehsan Malaysia
FUJI PHOTO FILM CO., LTD., TAIPEI OFFICE
Rm. 601, Hung Chong Bldg., No.38, Sec. 6, Min Chuan E. Road, Taipei 11412, Taiwan, Republic of China
FUJI PHOTO FILM CO., LTD., SEOUL OFFICE
Samduck Bldg. 6F., 144-1, Samsung-Dong, Kang Nam-ku, Seoul 135-090, Korea
FUJI PHOTO FILM CO., LTD., BEIJING REPRESENTATIVE OFFICE
Beijing Fortune Bldg. No. 817, 5, Dong Sanhuan Bei-lu, Chaoyang District, Beijing, China 100004
FUJI PHOTO FILM CO., LTD., HO CHI MINH OFFICE
29-31 Ton That Thiep St., Q.I Ho Chi Minh City, Vietnam
FUJI PHOTO FILM CO., LTD., NEW DELHI OFFICE
Le Meridian Commercial Tower 8F Janpath, New Delhi 110001, India
c/o Hanimex Pty. Limited, Old Pittwater Road, Brookvale, N.S.W. 2100, Australia
No. 4G-17, L.O.B. No. 4, P.O. BOX 17212, Jebel Ali, Dubai, U.A.E.
Printed in Indonesia FGS-991112-Ci-01
 Loading...