

Page 1
BL00835-200
EN
Before You Begin
First Steps
Basic Photography and Playback
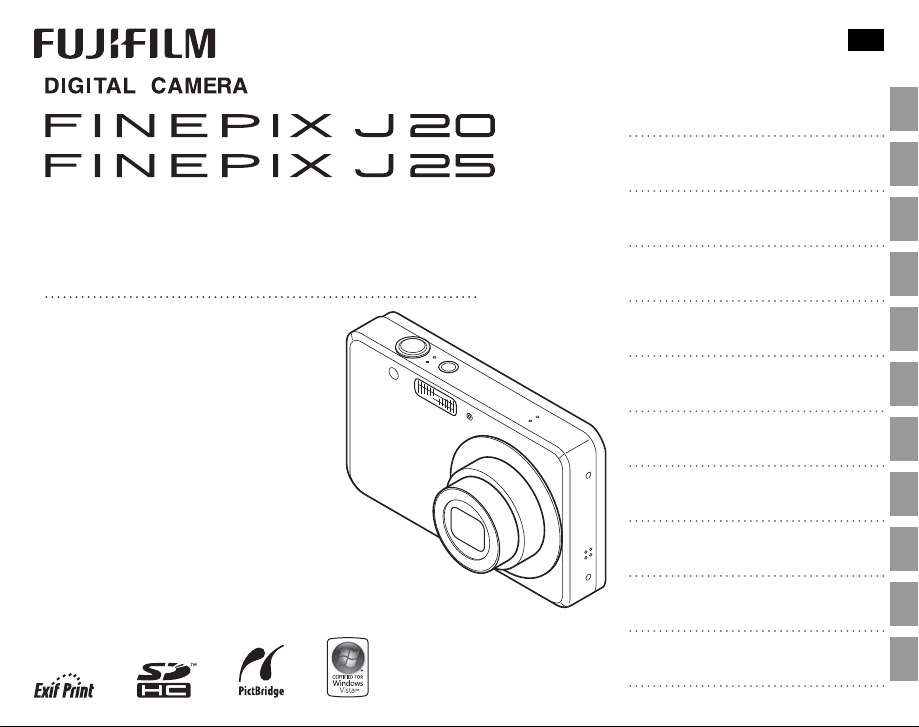
Owner’s Manual
Thank you for your purchase of this
product. This manual describes
how to use your FUJIFILM FinePix
J20 or J25 digital camera and the
supplied software. Be sure that
you have read and understood its
contents before using the camera.
For information on related products, visit our website at
http://www.fujifilm.com/products/index.html
More on Photography
More on Playback
Movies
Connections
Menus
Technical Notes
Tro ubl esh oot ing
Appendix
Page 2
Camera Q & A
Camera Setup
Question
Key phrase
See page
Tak ing Pictures
Question
Key phrase
See page
Find items by task.
Camera Setup
Question
How do I set the camera clock? Date and time 12
Can I set the clock to local time when I travel? Time di erence 77
How do I keep the monitor from turning o automatically? Auto power o 76
How do I stop the camera beeping and clicking?
What are the parts of the camera called? Parts of the camera 2
What do the icons in the monitor mean? Monitor 3
How do I use the menus? Menus 55
What’s behind that ashing icon or error message in the monitor? Messages and displays 86
How much charge is left in the battery? Battery level 13
Tak ing Pictures
Question
How many pictures can I take? Memory capacity 91
Is there a quick and easy way to take snapshots?
How can I make good portraits? Intelligent Face Detection 18
Can the camera automatically select the most suitable mode?
Is there a simple way to adjust settings for di erent scenes? Shooting mode 28
How do I shoot close-ups? Macro mode (Close-ups) 23
How do I keep the ash from ring?
How do I “ ll-in” shadows on back-lit subjects?
How do I take a group portrait that includes the photographer? Self-timer mode 26
Operation and shutter volume 72
ii
Key phrase
Silent mode 25
Key phrase
k mode
G mode
Flash mode 24How do I stop my subjects’ eyes glowing red when I use the ash?
See page
See page
13
29
Page 3
Camera Q & A
Question
Key phrase
See page
Viewing Pictures
Question
Key phrase
See page
Sharing Pictures
Question
Key phrase
See page
Question
How do I frame pictures with the subject o to one side? Focus lock 21
How do I shoot movies? Recording movies 38
Viewing Pictures
Question
How do I view my pictures? Single-frame playback 32
Is there a simple way to delete one image? Deleting pictures 17
How do I delete one or all images at once? Erase 36
Can I zoom in on pictures during playback? Playback zoom 33
How do I view a lot of pictures at once? Multi-frame playback 34
How do I view all pictures taken on the same day? Sort by date 35
Can I protect my pictures from accidental deletion? Protect 66
Can I hide the icons in the monitor when viewing my pictures? Choosing a display format 32
How do I view my pictures on TV? Viewing pictures on TV 41
Sharing Pictures
Question
Can I print pictures on my home printer? Printing pictures 42
Can I copy my pictures to my computer? Viewing pictures on a computer 48
Key phrase
Key phrase
Key phrase
See page
See page
See page
iii
Page 4

Before You Begin
First Steps
Basic Photography and Playback
More on Photography
More on Playback
Movies
Connections
Table of Contents
Camera Q & A ..................................................................................... ii
Camera Setup ............................................................................... ii
Taking Pictures ............................................................................. ii
Viewing Pictures .........................................................................iii
Sharing Pictures ..........................................................................iii
About This Manual ......................................................................... vi
Before You Begin
Introduction .......................................................................................1
Symbols and Conventions ..........................................................1
Supplied Accessories .................................................................... 1
Parts of the Camera .......................................................................2
The Monitor ................................................................................... 3
First Steps
Charging the Batter y ..................................................................... 4
Inserting the Battery...................................................................... 6
Inserting a Memory Card ............................................................. 8
Turning the Camera on and O ............................................... 11
Shooting Mode .............................................................................11
Playback Mode .............................................................................. 11
Basic Setup ....................................................................................... 12
Basic Photography and Playback
Taking Pictures in k (Auto) Mode ........................................ 13
Viewing Pictures ............................................................................17
More on Photography
Intelligent Face Detection and Red-Eye Removal .......... 18
Focus Lock ........................................................................................ 21
L Macro mode (Close-ups) ......................................................23
K Using the Flash ...........................................................................24
iv
J Using the Self-Timer ...............................................................26
a Shooting Mode .........................................................................28
Selecting a Shooting Mode......................................................28
Shooting Modes ...........................................................................29
G SCENE RECOGNITION ........................................................29
More on Playback
Single-Frame Playback ...............................................................32
Playback Zoom ..............................................................................33
Multi-Frame Playback .................................................................34
Sort by Date .....................................................................................35
A Deleting Pictures .....................................................................36
Movies
A Recording Movies ...................................................................38
D Viewing Movies .......................................................................40
Connections
Viewing Pictures on T V ............................................................... 41
Printing Pictures via USB ........................................................... 42
Connecting the Camera ............................................................42
Printing Selected Pictures ........................................................42
Printing the DPOF Print Order ................................................43
Creating a DPOF Print Order ....................................................45
Viewing Pictures on a Computer ............................................4 8
Installing FinePixViewer ............................................................48
Installing FinePixViewer S: Windows .................................48
Installing FinePixViewer: Macintosh .................................. 51
Connecting the Camera ............................................................53
Page 5

Table of Contents
Menus
Technical Notes
Tro ub les hoo ti ng
Appendix
Menus
The Shooting Menu ...................................................................... 55
Using the Shooting Menu .........................................................55
Shooting Menu Options ............................................................56
g ISO .............................................................................................57
k QUALITY ..................................................................................58
d EXP. COMPENSATION .........................................................59
e WHITE BALANCE ..................................................................60
c CONTINUOUS (Continuous shooting) .........................61
The Playback Menu.......................................................................62
Using the Playback Menu .........................................................62
Playback Menu Options .............................................................63
b RED EYE REMOVAL ..............................................................64
B SLIDE SHOW ..........................................................................65
E PROTECT .................................................................................66
F COPY.........................................................................................67
D IMAGE ROTATE ......................................................................69
H TRIMMING ..............................................................................70
The Setup Menu .............................................................................71
Using the Setup Menu ...............................................................71
Setup Menu Options ...................................................................72
a IMAGE DISP. ..........................................................................73
b FRAME NO. ............................................................................ 74
c DIGITAL ZOOM .................................................................... 75
a LCD POWER SAVE ...............................................................75
f PLAYBACK VOLUME ........................................................... 75
g LCD BRIGHTNESS................................................................75
m FORMAT ................................................................................. 76
o AUTO POWER OFF ..............................................................76
p TIME DIFFERENCE ...............................................................77
Technical Notes
Optional Accessories ...................................................................78
Accessories from Fuji lm .......................................................... 79
Tro ub les hoo ti ng
Tro ub les ho oti ng ............................................................................8 0
Warning Messages and Displays ............................................8 6
Appendix
Glossary .............................................................................................90
Internal Memory/Memory Card Capacity ..........................91
Speci cations ..................................................................................92
Caring for the Camera ................................................................. 97
v
Page 6
About This Manual
✔✔ Troubleshooting
..............................................
pg. 80
✔✔ Glossary
..........................................................
pg. 90
✔✔ Table of Contents
..............................................
pg. iv
✔✔ Warning Messages and Displays
.......................
pg. 86
✔✔ Camera Q & A
....................................................
pg. ii
✔✔ Restrictions on Camera Settings
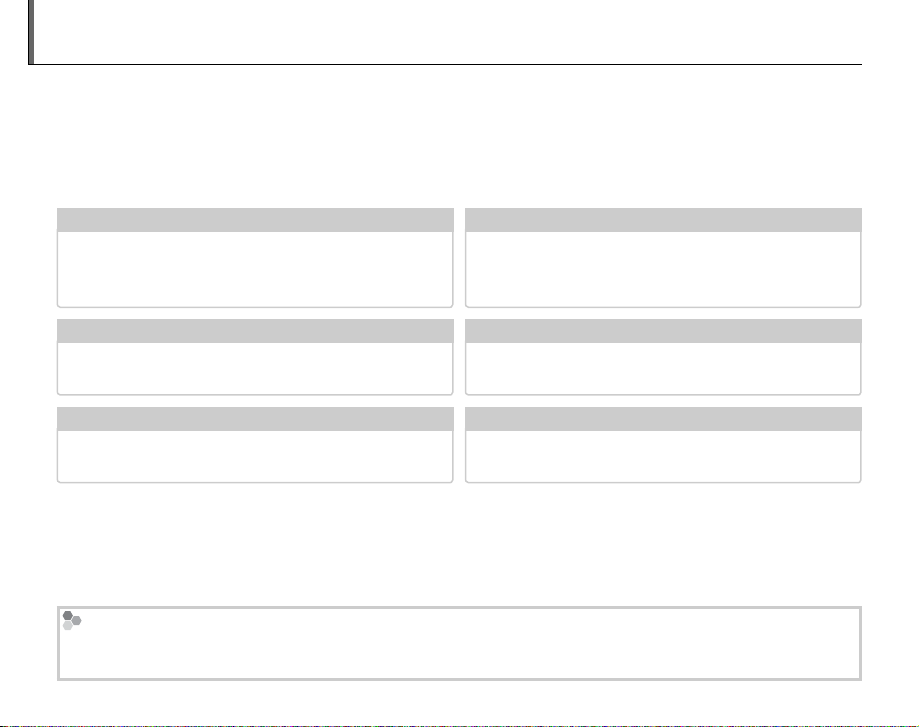
This manual is for use with the following FinePix cameras: the J20 and J25. The J20 has a 2.7-inch
monitor; the J25 has a 3.0-inch monitor. All operations are identical; save where otherwise noted, the
illustrations in this manual show the J25. Before using the camera, read this Owner’s Manual and the
other supplied documents. For information on speci c topics, consult the sources below.
Camera Q & A
Know what you want to do but don’t know the
name for it? Find the answer in “Camera Q & A.”
Troubleshooting
Having a speci c problem with the camera?
Find the answer here.
Glossary
The meanings of some technical terms may be
found here.
Memory Cards
Pictures can be stored in the camera’s internal memory or on optional SD and SDHC memory cards. In this
manual, SD memory cards are referred to as “memory cards.” For more information, see page 8.
vi
....................................................
..............................................
..........................................................
pg. ii
pg. 80
pg. 90
Table of Contents
The “Table of Contents” gives an overview of the
entire manual. The principal camera operations
are listed here.
Warning Messages and Displays
Find out what’s behind that ashing icon or
error message in the monitor.
Restrictions on Camera Settings
See another supplied document for restrictions
on the options available in each shooting mode.
..............................................
.......................
pg. iv
pg. 86
Page 7
Introduction
Symbols and Conventions
Supplied Accessories
Symbols and Conventions
The following symbols are used in this manual:
C Caution: This information should be read before use to ensure correct operation.
A Note: Points to note when using the camera.
B Tip: Additional information that may be helpful when using the camera.
Menus and other text in the camera monitor are shown in bold. In the illustrations in this manual, the
monitor display may be simpli ed for explanatory purposes.
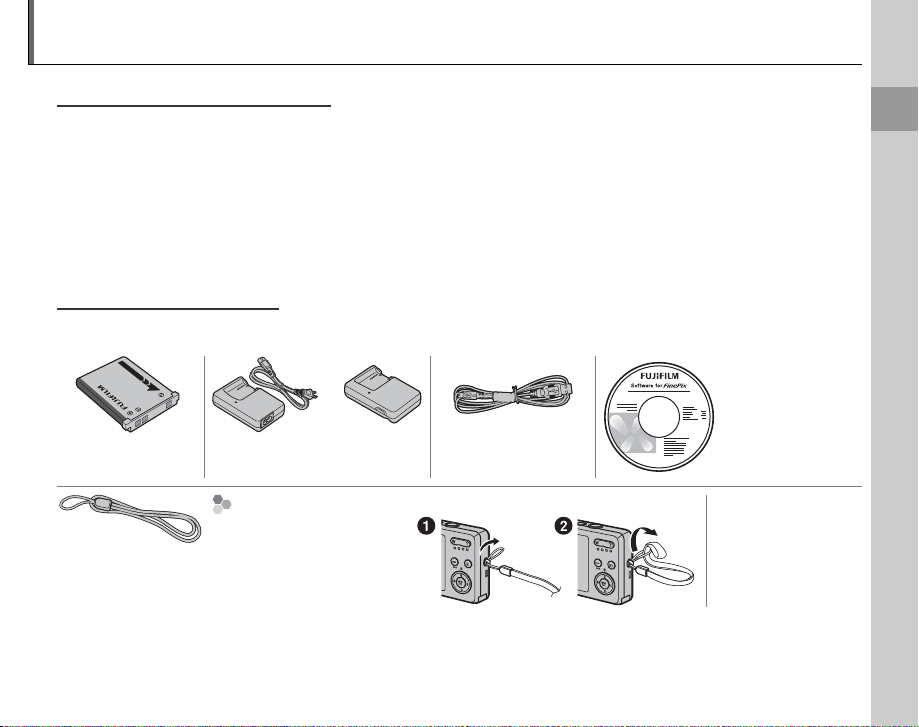
Supplied Accessories
The following items are included with the camera:
FinePix software CD
(IMPORTANT: read
the End User License
Agreement before
opening.)
(may be distributed
on CD in some
countries or regions)
NP-45 rechargeable
battery
Strap
or
BC-45A battery charger (with
power cable or built-in plug)
Att aching the Strap Owner’s Manual
Attach the strap as shown.
USB cable
Before You Begin
1
Page 8
Parts of the Camera
Parts of the Camera
18
19
20
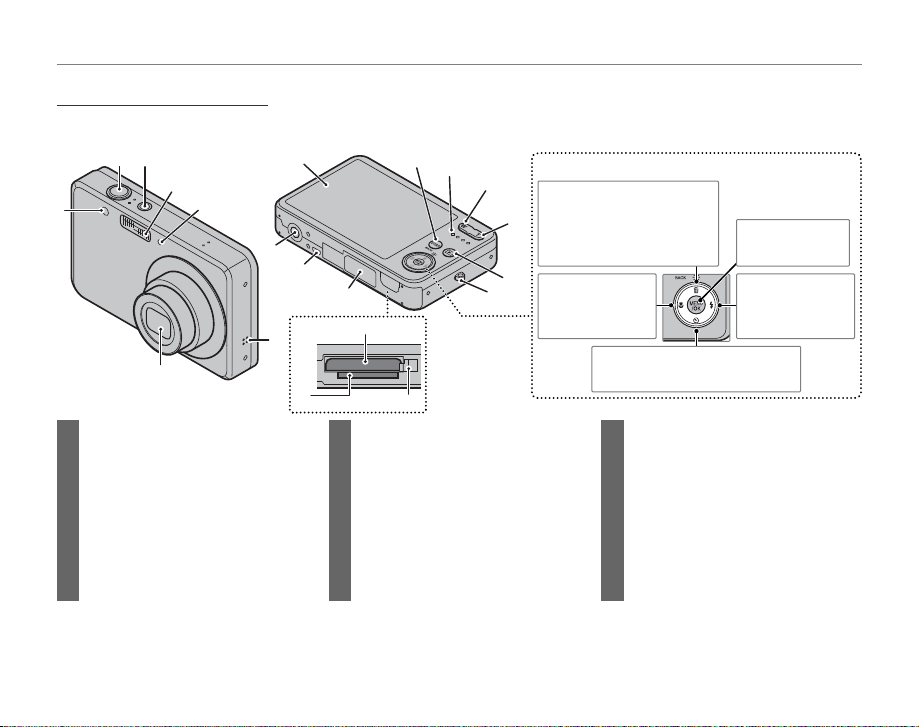
For more information, refer to the page listed to the right of each item.
1
2
3
7
4
6
8
17
16
15
5
9
10
11
Selector button
Move cursor up
o (monitor brightness)
12
button (see below)
I (delete) button (pg. 17)
13
Move cursor left
14
L (macro)
button (pg. 23)
Introduction
MENU/OK button
(pg. 12)
Move curs or right
K ( ash) button
(pg. 24)
Move cursor down
J (self-timer) button (pg. 26)
1 Shutter button ...................................15–16
2 ON/OFF button .............................................11
3 Flash ..................................................................24
4 Microphone .................................................38
5 Speaker ...........................................................4 0
6 Lens and lens cover
7 Self-timer lamp ..........................................26
8 Monitor ............................................................. 3
B Tip: Monitor Brightness
Pressing the o button brie y increases monitor brightness, making the display easier to see in bright light.
9 DISP (display)/BACK button .......... 15, 32
( (silent mode) button ....................25
10 Indicator lamp ............................................16
11 W (zoom out) button .....................14, 34
12 T (zoom in) button ........................... 14, 33
13 D (playback) button ............................32
14 Strap eyelet .................................................... 1
15 Battery-chamber cover .......................... 6
16 Connector for USB cable .............42, 53
Connector for A/V cable ..................... 41
17 Tripod mount
18 Battery chamber ......................................... 6
19 Battery latch .................................................. 6
20 Memory card slot ....................................... 8
Normal brightness is restored when a photograph is taken.
2
Page 9
The Monitor
The Monitor
■■ Shooting
10 : 00
AM
2
3
-
1
ISO
100
NN9
12/ 31/ 2050
■■ Playback
ISO
100
100-0001
12/ 31/ 2050
10 : 00
AM
250
F
3.3
N
2
3
-
1
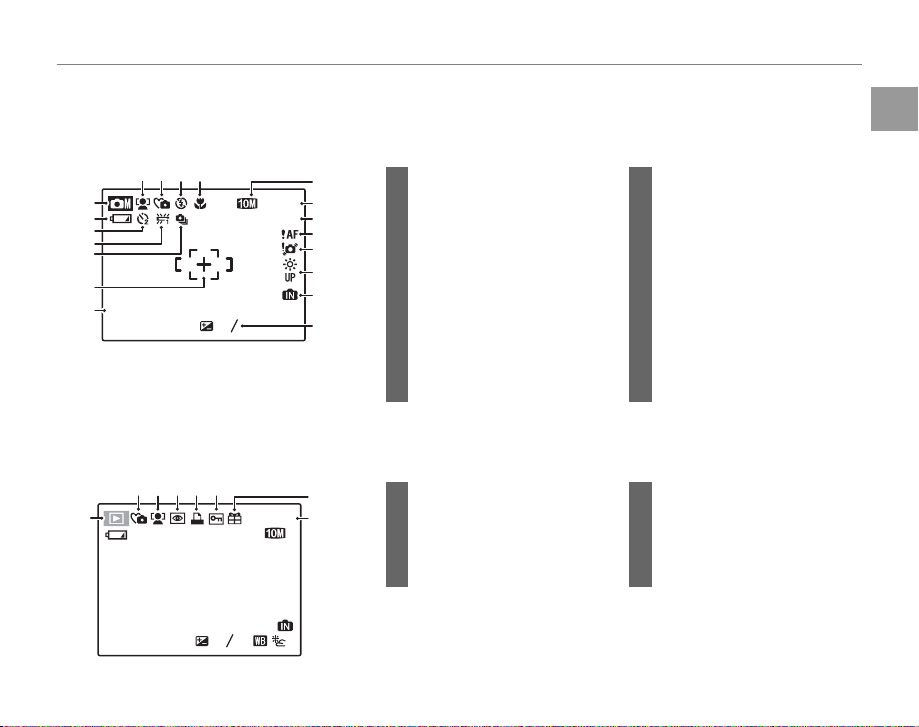
The following indicators may appear in the monitor during shooting and playback:
Shooting
5
6
7
8
9
10
12/ 31/ 2050
11
Playback
6
12/ 31/ 205012/ 31/ 2050
250
F
3.3
1234
10 : 00
21345
10 : 00
AM
-
1
AM
-
1
2
3
2
3
ISO
100
100-0001
ISO
100
12
13
9
14
15
16
17
18
19
1 Macro (close-up) mode............. 23
2 Flash mode.........................................24
3 Silent mode ...................................... 25
4 Intelligent Face Detection
indicator ...............................................18
5 Shooting mode ...............................28
6 Battery level .......................................13
7 Self timer indicator ........................26
8 White balance ................................. 60
11 Date and time...................................12
12 Quality ...........................................38, 58
13 Number of available frames ....91
14 Sensitivity ............................................57
15 Focus warning .................................15
16 Blur warning ......................................24
17 Bright monitor indicator .............. 2
18 Internal memory indicator * ....... 8
19 Exposure compensation ...........59
9 Continuous mode .........................61
10 Focus frame .......................................15
* Indicates that no memory card is inserted and that pictures will be
stored in the camera’s internal memory (pg. 8).
7
8
N
1 Protected image ............................ 66
2 DPOF print indicator ....................45
3 Red-eye removal indicator .....64
4 Intelligent Face Detection
5 Silent mode indicator ................. 25
6 Playback mode indicator ..........32
7 Gift image ...........................................32
8 Frame number .................................74
indicator .......................................18, 6 4
Introduction
Before You Begin
3
Page 10
Charging the Battery
Charging indicator
Battery status
Action
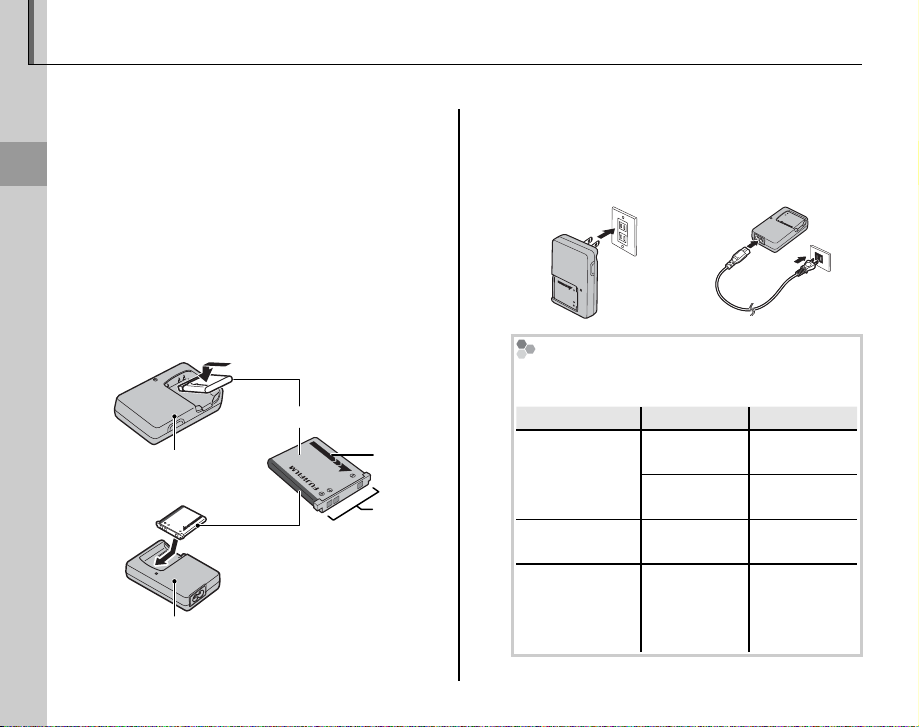
The battery is not charged at shipment. Charge the battery before use.
Place the battery in the charger.
1
Insert the battery into the supplied battery
charger as shown, making sure that the
First Steps
battery is in the correct orientation. The
battery charger comes in one of two types,
depending on the country or region of sale:
one with a built-in plug that plugs directly
into the power outlet (A), and another that
connects to the power outlet via a power
cable (B).
Battery charger
(type A)
Battery charger
(type B)
4
Rechargeable battery
Arrow
Ter mi nal s
Plug the charger in.
2
Plug the charger into a power outlet. The
charging indicator will light.
Type A Type B
The Charging Indicator
The charging indicator shows battery charge
status as follows:
Charging indicator
O
Glows
Blinks Battery fault.
Battery status
Battery not
inserted.
Battery fully
charged.
Battery
charging.
Action
Insert the
battery.
Remove the
battery.
—
Unplug the
charger and
remove the
battery.
Page 11

Charge the battery.
3
C Cautions: Caring for the Batter y
• Do not a x stickers or other objects to the battery.
Failure to observe this precaution could make it
impossible to remove the battery from the camera.
• Do not short the battery terminals. The battery
could overheat.
• Use only NP-45 batteries. Failure to observe this
precaution could result in product malfunction.
• Do not remove the labels from the battery or
attempt to split or peel the outer casing.
• The battery gradually loses its charge when not in
use. Charge the battery one or two days before use.
• Read the supplied documentation for additional
cautions concerning battery use.
C Caution: Bat tery Life
A noticeable decrease in the length of time the
battery will hold a charge indicates that it has reached
the end of its service life and should be replaced.
C Cautions: Using the Battery Charger
• Unplug the charger when it is not in use.
• Remove dirt from the battery terminals with a clean,
dry cloth. Failure to observe this precaution could
prevent the battery from charging.
• Charging times increase at low temperatures.
Charging the Battery
First Steps
5
Page 12
Inserting the Battery
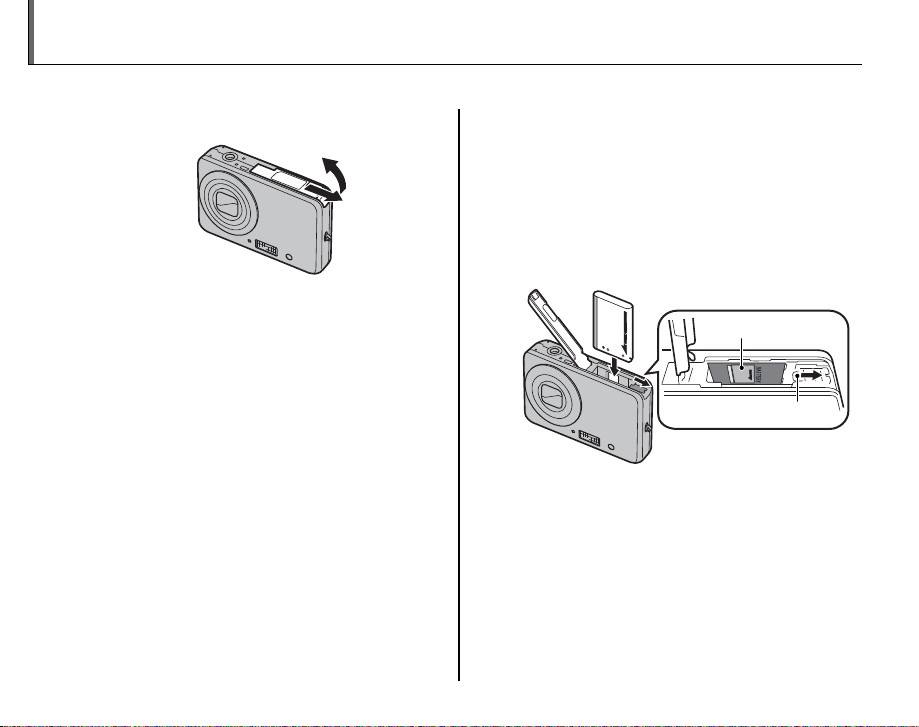
After charging the battery, insert it in the camera as described below.
Open the battery-chamber cover.
1
A Note
Be sure the camera is o before opening the
battery-chamber cover.
C Cautions
• Do not open the battery-chamber cover
when the camera is on. Failure to observe this
precaution could result in damage to image
les or memory cards.
• Do not use excessive force when handling the
battery-chamber cover.
6
Insert the battery.
2
Check the label in the battery-chamber.
Face the gold contacts downward and
insert the battery into the battery-chamber,
pressing the battery latch with the battery
in the direction shown below. Con rm that
the battery is securely latched.
Label
Battery latch
C Caution
Insert the battery in the correct orientation. Do
NOT use force or attempt to insert the battery
upside down or backwards. The camera will not
function if the battery is inserted backwards or
upside down.
Page 13
Inserting the Battery
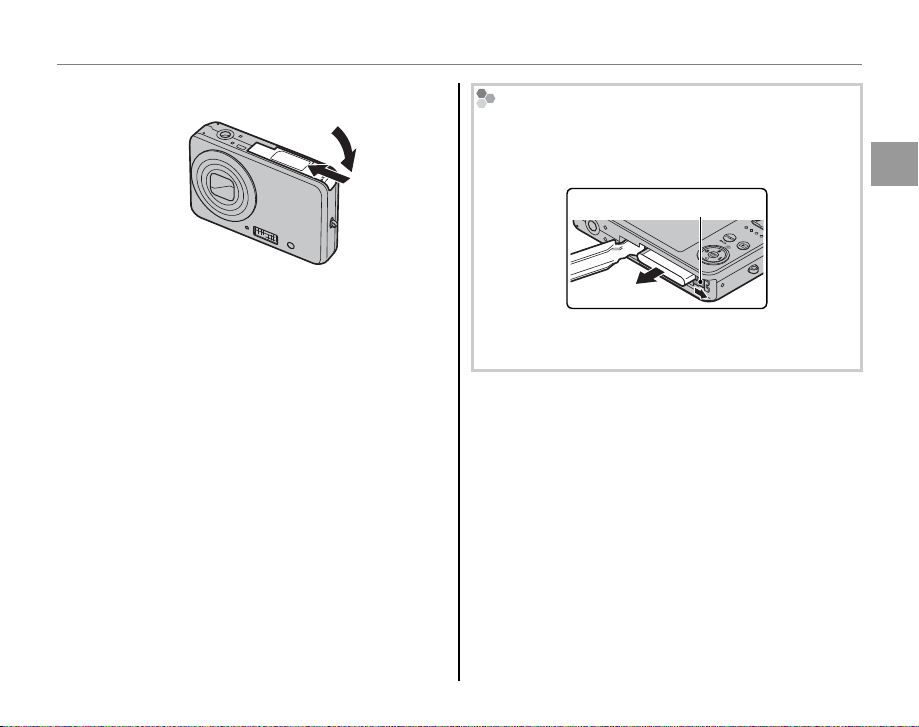
Close the battery-chamber cover.
3
Removing the Battery
After turning the camera o , open the batterychamber cover, press the battery latch to the top,
and slide the battery out of the camera as shown.
Battery latch
C Caution
Turn the camera o before removing the battery.
First Steps
7
Page 14
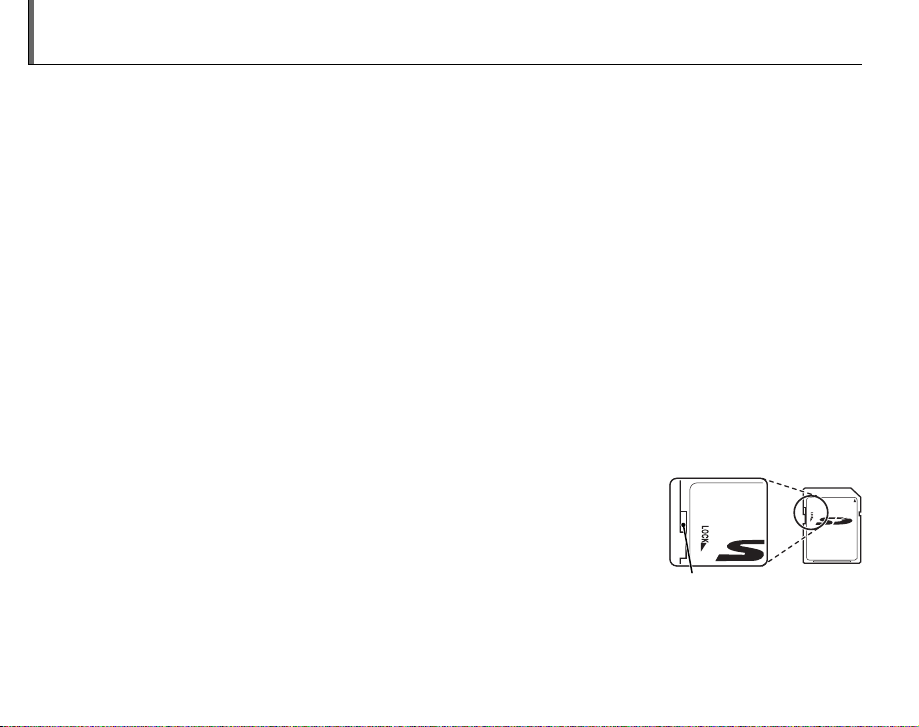
Inserting a Memory Card
■
Compatible Memory Cards
Write-protect switch
Although the camera can store pictures in internal memory, SD memory cards (sold separately) can
be used to store additional pictures.
When no memory card is inserted, d appears in the monitor and internal memory is used for recording
and playback. Note that because camera malfunction could cause internal memory to become
corrupted, the pictures in internal memory should periodically be transferred to a computer and
saved on the computer hard disk or on removable media such as CDs or DVDs. The pictures in
internal memory can also be copied to a memory card (see page 67). To prevent internal memory
from becoming full, be sure to delete pictures when they are no longer needed.
When a memory card is inserted as described below, the card will be used for recording and playback.
■
Compatible Memory Cards
SanDisk SD and SDHC memory cards have been tested and approved for use in the camera. A
complete list of approved memory cards is available at http://www.fujifilm.com/products/digital_
cameras/index.html. Operation is not guaranteed with other cards. The camera can not be used with
MultiMediaCard (MMC) or xD-Picture cards.
C Caution
Memory cards can be locked, making it impossible to format the card or to record
or delete images. Before inserting a memory card, slide the write-protect switch to
the unlocked position.
Write-protect switch
8
Page 15
Inserting a Memory Card
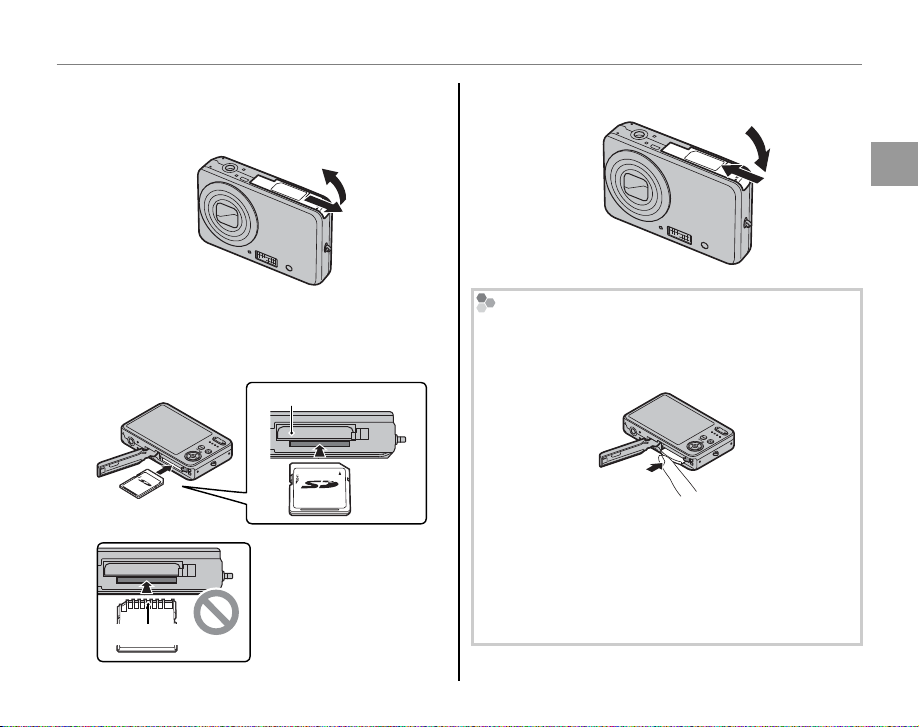
■■ Inserting a Memory Card
Inserting a Memory Card
Open the battery-chamber cover.
1
Insert the memory card.
2
Holding the memory card in the orientation
shown below, slide it all the way in.
Battery
Be sure card is in correct
orientation; do not insert
at an angle or use force.
Gold contacts
Close the battery-chamber cover.
3
Removing Memory Cards
Be sure the camera is o before opening the batterychamber cover. Press the card in and then release it
slowly. The card can now be removed by hand.
C Cautions
• The memory card may spring out if you remove
your nger immediately after pushing the card in.
• Memory cards may be warm to the touch after
being removed from the camera. This is normal
and does not indicate a malfunction.
First Steps
9
Page 16

Inserting a Memory Card
C Cautions
• Format memory cards before rst use, and be sure to reformat all memory cards after using them in a
computer or other device. For more information on formatting memory cards, see page 76.
• Memory cards are small and can be swallowed; keep out of reach of children. If a child swallows a memory
card, seek medical assistance immediately.
• Do not use miniSD or microSD adapters that expose the back of the card. Failure to observe
this precaution may cause damage or malfunction. Adapters that are larger or smaller than
the standard dimensions of an SD card may not eject normally; if the card does not eject,
take the camera to an authorized service representative. Do not forcibly remove the card.
• Do not turn the camera o or remove the memory card while the memory card is being formatted or data are
being recorded to or deleted from the card. Failure to observe this precaution could damage the card.
• Do not a x labels to memory cards. Peeling labels can cause camera malfunction.
• Movie recording may be interrupted with some types of memory card.
• The data in internal memory may be erased or corrupted when the camera is repaired. Please note that the
repairer will be able to view pictures in internal memory.
• Formatting a memory card or internal memory in the camera creates a folder in which pictures are stored.
Do not rename or delete this folder or use a computer or other device to edit, delete, or rename image
les. Always use the camera to delete pictures from memory cards and internal memory; before editing or
renaming les, copy them to a computer and edit or rename the copies, not the originals.
10
Page 17
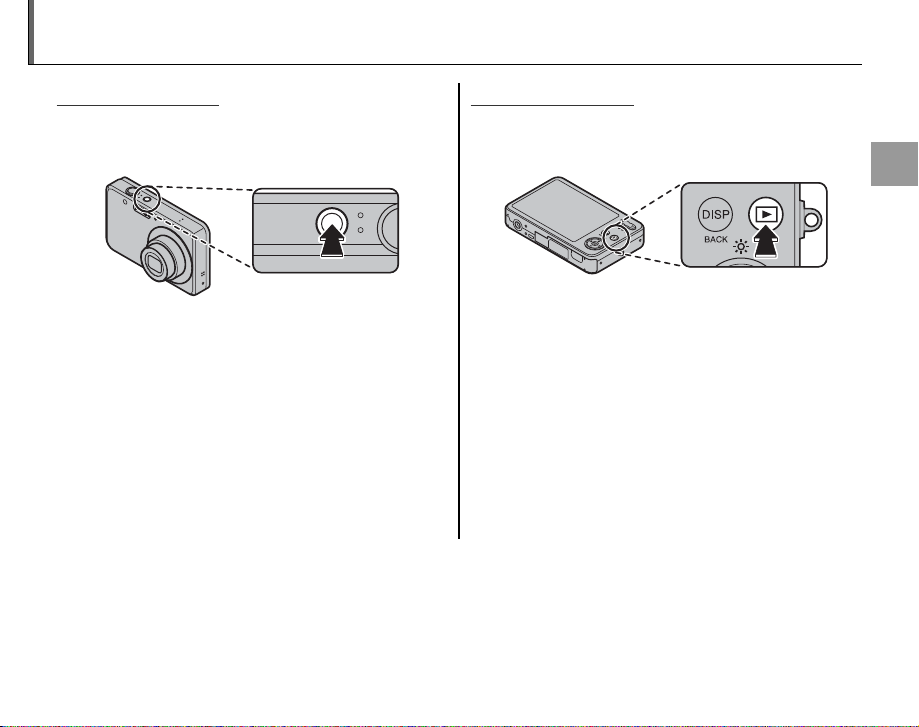
Turning the Camera on and O
Shooting Mode
Playback Mode
Shooting Mode
Press the n button to turn the camera on.
The lens will extend and the lens cover will open.
Playback Mode
To turn the camera on and begin playback, press
the D button for about a second.
Press the D button again to turn the camera o .
Press n again to turn the camera o .
B Tip: Switching to Playback Mode
Press the D button to start playback. Press the
shutter button halfway to return to shooting mode.
C Cautions
• Pictures can be a ected by ngerprints and other
marks on the lens. Keep the lens clean.
• The n button does not completely disconnect
the camera from its power supply.
Tip: Auto Powe r O
B
The camera will turn o automatically if no operations are performed for the length of time selected in the
AUTO POWER OFF menu (see page 76).
B Tip: Switching to Shooting Mode
To exit to shooting mode, press the shutter button
halfway. Press the D button to return to playback.
First Steps
11
Page 18
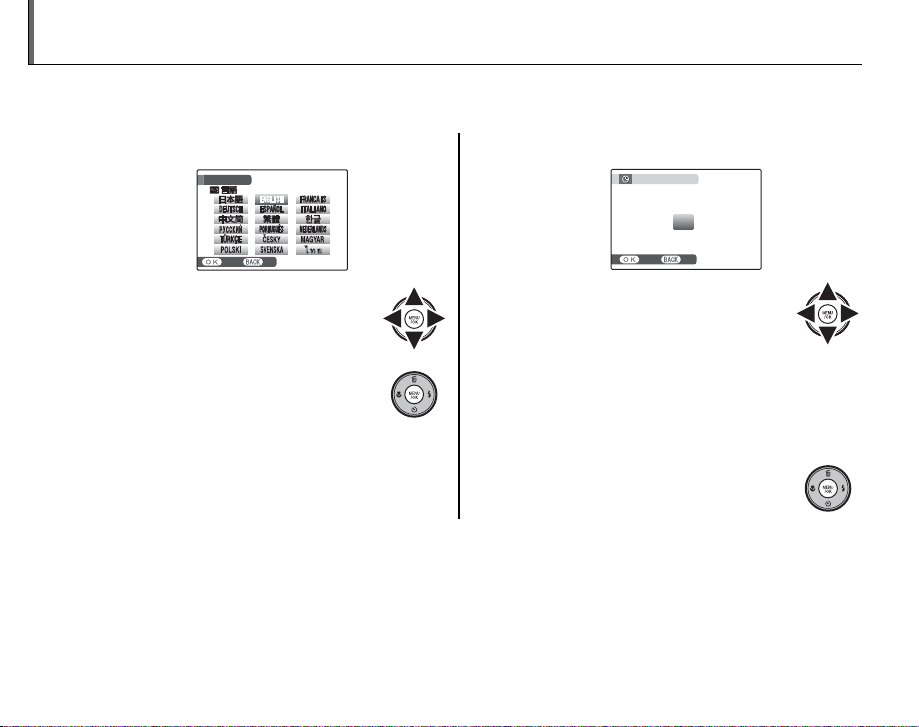
Basic Setup
SETNONO
STARTRT
MENU
/ LANG.
A language-selection dialog is displayed the rst time the camera is turned on. Set up the camera as
described below (for information on resetting the clock or changing languages, see page 71).
Choose a language.
1
MENU
/ LANG.
SE
1.1 Press the selector up, down,
left, or right to highlight a
language.
1.2 Press MENU/OK.
Set the date and time.
2
DATE / TIME NOT SET
YY.MM.DD 1. 1 12
SET NO
2.1 Press the selector left or right
to highlight the year, month,
day, hour, or minute and press
up or down to change. To change the
order in which the year, month, and day
2011
2010
2009
2008
2007
:
00
AM
are displayed, highlight the date format
and press the selector up or down.
2.2 Press MENU/OK.
Tip: The Camera Clock
B
If the battery is removed for an extended period, the camera clock will be reset and the language-selection
dialog will be displayed when the camera is turned on. If the battery is left in the camera for about 30 minutes,
the battery can be removed for about 24 hours without resetting the clock or language selection.
12
Page 19
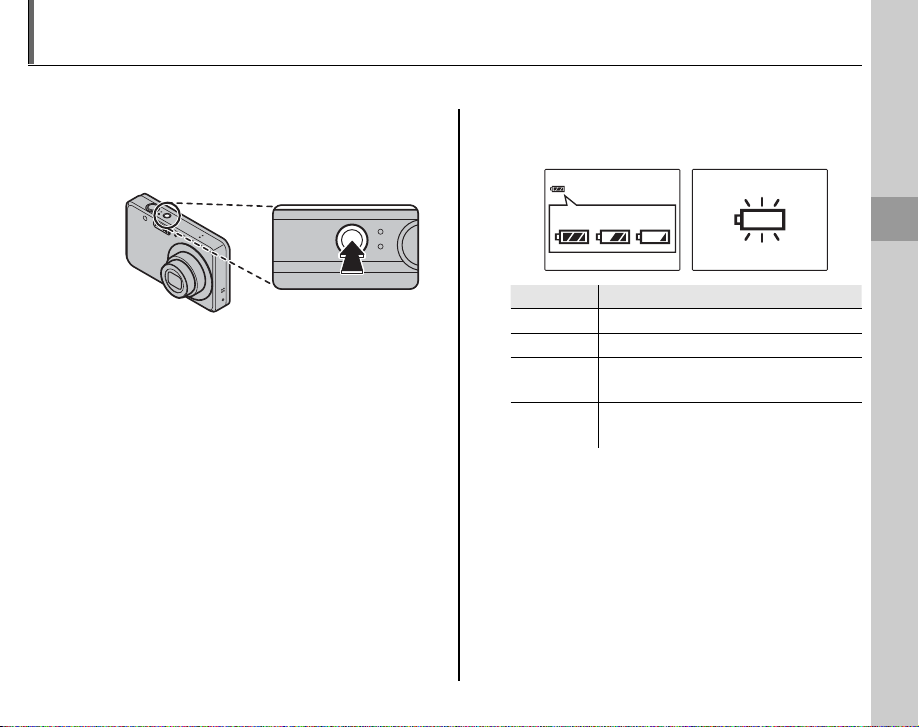
Taking Pictures in k (Auto) Mode
Indicator
Description
This section describes how to take pictures in k mode.
Turn the camera on.
1
Press the n button to turn the
camera on.
B Tip: Intelligent Face Detection
The rst time the camera is turned on, Intelligent Face
Detection is automatically activated and the camera is
optimized for taking portrait photographs. For more
information on using Intelligent Face Detection, see
page 18.
Check the battery level.
2
Check the battery level in the monitor.
qw e
Indicator
(whit e)
q
(whit e)
w
(red ) Low battery. Charge as soon as
e
(blinks red) Battery exhausted. Turn camera o
r
Battery partially discharged.
Battery more than half discharged.
possible.
and charge battery.
Description
r
Basic Photography and Playback
13
Page 20
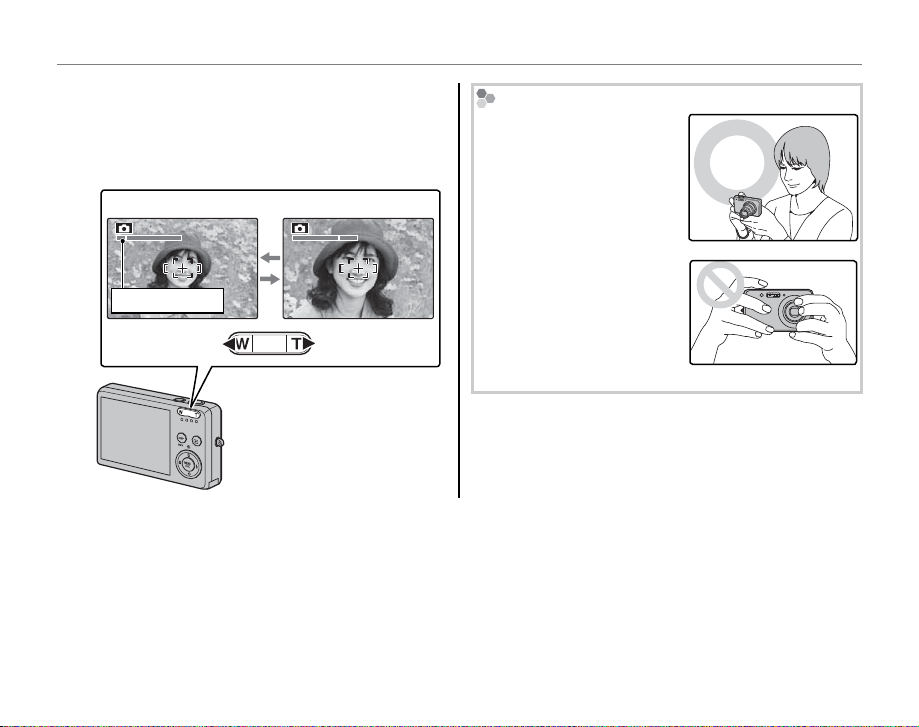
Taking Pictures in k (Auto) Mode
Frame the picture.
3
Position the main subject in the focus area
and use the zoom buttons to frame the
picture in the monitor.
Press W to zoom out Press T to zoom in
Zoom indicator
Holding the Camera
Hold the camera steady
with both hands and brace
your elbows against your
sides. Shaking or unsteady
hands can blur your shots.
To prevent pictures that
are out of focus or too dark
(underexposed), keep your
ngers and other objects
away from the lens and
a s h .
Zoom in using optical
zoom, or use digital zoom
(pg. 75) to zoom in closer.
B Tip: Focus Lock
Use focus lock (pg. 21) to focus on subjects that are not in the focus frame.
14
Page 21
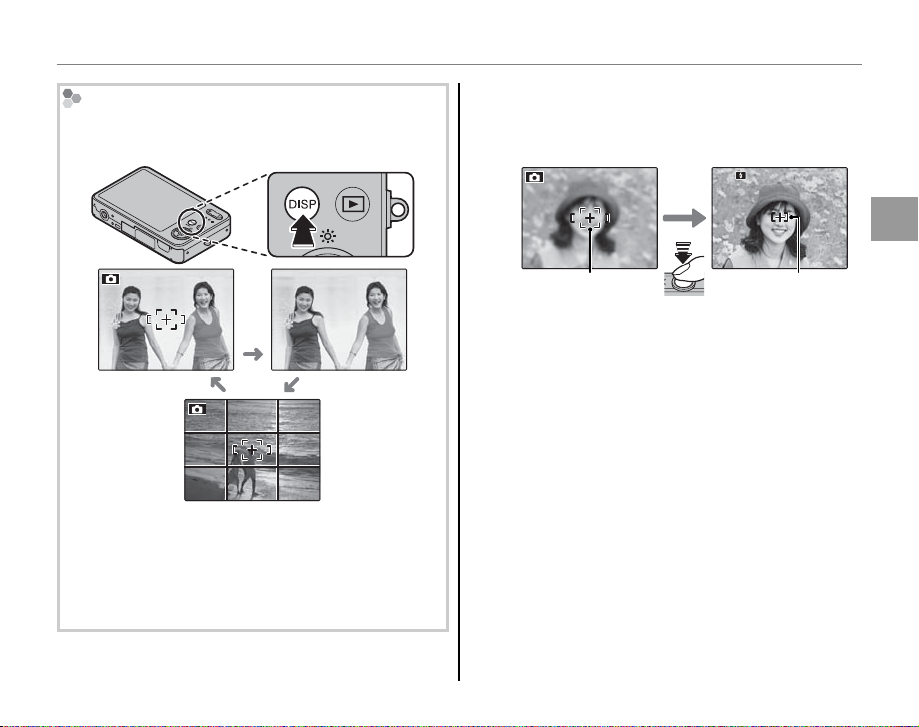
Taking Pictures in k (Auto) Mode
1/250
F
3.3
Framing Guideline
The images change as shown below if you press the
DISP/BACK button.
Indicators
displayed
Indicators
hidden
Best framing
To use the best framing, position the main subject
at the intersection of two lines or align one of the
horizontal lines with the horizon. Use focus lock (pg.
21) to focus on subjects that will not be in the center
of the frame in the nal photograph.
Focus.
4
Press the shutter button halfway to focus on
the main subject in the focus frame.
1/250
F
3.3
Focus frame
halfway
Camera selects small
Press
focuses on subject
focus frame and
If the camera is able to focus, it will beep twice
and the indicator lamp will glow green.
If the camera is unable to focus, the focus frame
will turn red, a R indicator will appear
in the monitor, and the indicator lamp will
blink green. Change the composition or
use focus lock (pg. 21).
A Note
The lens may make a noise when the camera focuses.
This is normal.
Basic Photography and Playback
15
Page 22

Taking Pictures in k (Auto) Mode
Indicator lamp
Camera status
Shoot.
5
Smoothly press the shutter
button the rest of the way down
to take the picture.
B Tip: The Shutter Button
The shutter button has
two positions. Pressing the
shutter button halfway (q)
sets focus and exposure;
to shoot, press the shutter
button the rest of the way
down (w).
A Note
If the subject is poorly lit, the ash may re when the
picture is taken. To take pictures without the ash,
choose another ash mode (pg. 24).
Double
Double
beep
beep
qw
qw
CLICK
CLICK
The Indicator L amp
Indicator lamp
The indicator lamp shows camera status as follows:
Indicator lamp
Glows green Focus locked.
Blinks green
Blinks green
and orange
Glows
orange
Blinks orange
Blinks red Recording or lens error.
B Tip: Warnings
Detailed warnings appear in the monitor. See pages
86–89 for more information.
Camera shake warning, AF warning,
or AE warning (ready to shoot)
Recording pictures. Additional
pictures can be taken.
Recording pictures. No additional
pictures can be taken at this time.
Flash charging; ash will not re when
picture is taken.
Camera status
16
Page 23
Viewing Pictures
ISO
100
100-0001
12/ 31 /2050
10: 00
AM
N
250
F
3.3
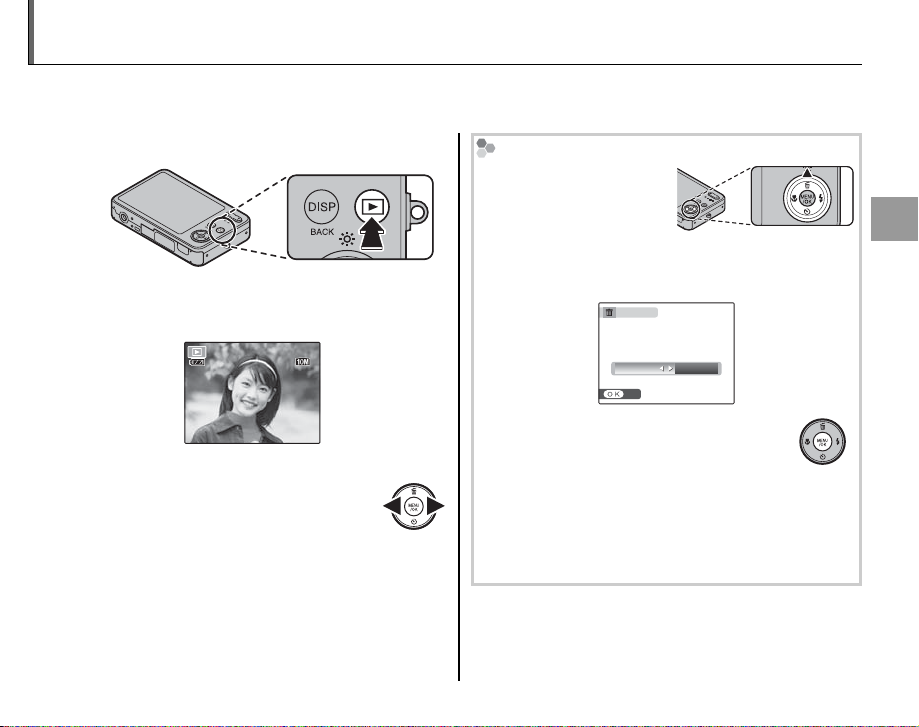
Pictures can be viewed in the monitor. When taking important photographs, take a test shot and
check the results.
Press the D button.
1
The most recent picture will be displayed in
the monitor.
100-0001
N
ISO
100
12/ 31 /2050
10: 00
AM
250
View additional pictures.
2
Press the selector right to view
F
3.3
pictures in the order recorded,
left to view pictures in reverse
order.
Press the shutter button to exit to shooting
mode.
Deleting Pictures
To delete the picture
currently displayed in
the monitor, press the
selector up (
A). The
following dialog will be
displayed.
ERASE OK?
OK CANCEL
SET
To delete the picture, press the selector
left to highlight OK and press MENU/OK.
To exit without deleting the picture,
highlight CANCEL and press MENU/OK.
B Tip: The Playback Menu
Pictures can also be deleted from the playback
menu (pg. 36).
Basic Photography and Playback
17
Page 24
Intelligent Face Detection and Red-Eye Removal
Option
Description
Intelligent Face Detection allows the camera to automatically detect human faces and set focus and
exposure for a face anywhere in the frame for shots that emphasize portrait subjects. Choose for
group portraits to prevent the camera from focusing on the background. Intelligent Face Detection
also o ers a red-eye removal option for removing “red-eye” e ects caused by the ash.
18
Turn Intelligent Face Detection on.
1
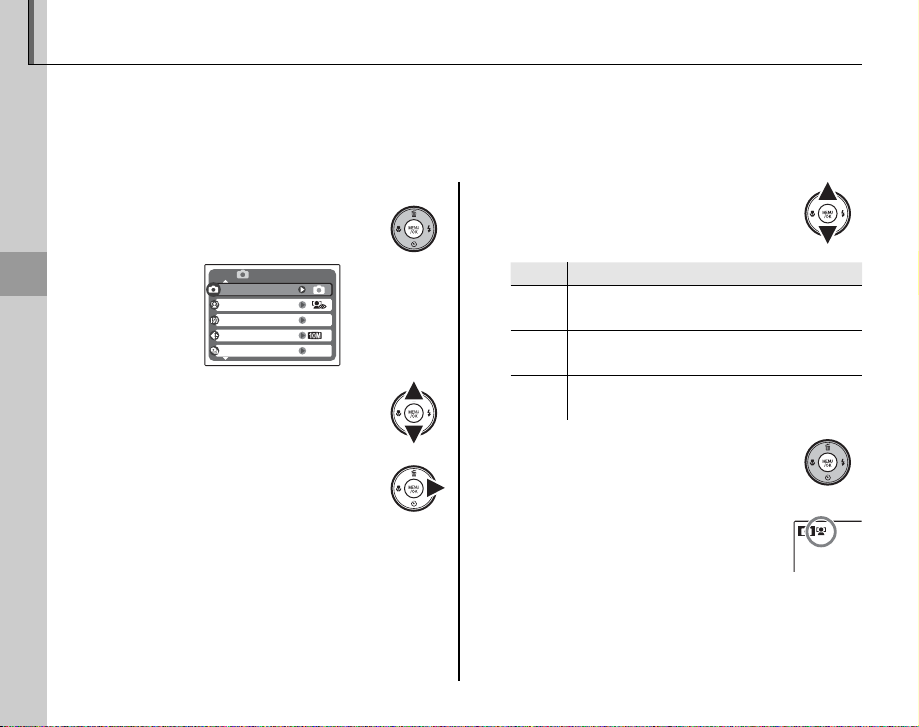
1.1 Press MENU/OK to display the
shooting menu.
More on Photography
SHOOTING MODE
FACE DETECTION
ISO
QUALITY
CONTINUOUS
1.2 Press the selector up or
down to highlight c FACE
DETECTION.
1.3 Press the selector right
to display Intelligent Face
Detection options.
SHOOTING MENU
AUTO
OFF
1.4 Press the selector up or down
to highlight the desired option.
Option
B ON
Intelligent Face Detection and red-eye
S ON
N
removal on. Use with the ash.
B ON
Intelligent Face Detection on; red-eye
S OFF
removal o .
Intelligent Face Detection and red-eye
OFF
removal o .
Description
1.5 Press MENU/OK to select the
highlighted option and return
to shooting mode.
B icon appears in monitor
when Intelligent Face
Detection is on.
Page 25
Intelligent Face Detection and Red-Eye Removal
Frame the picture.
2
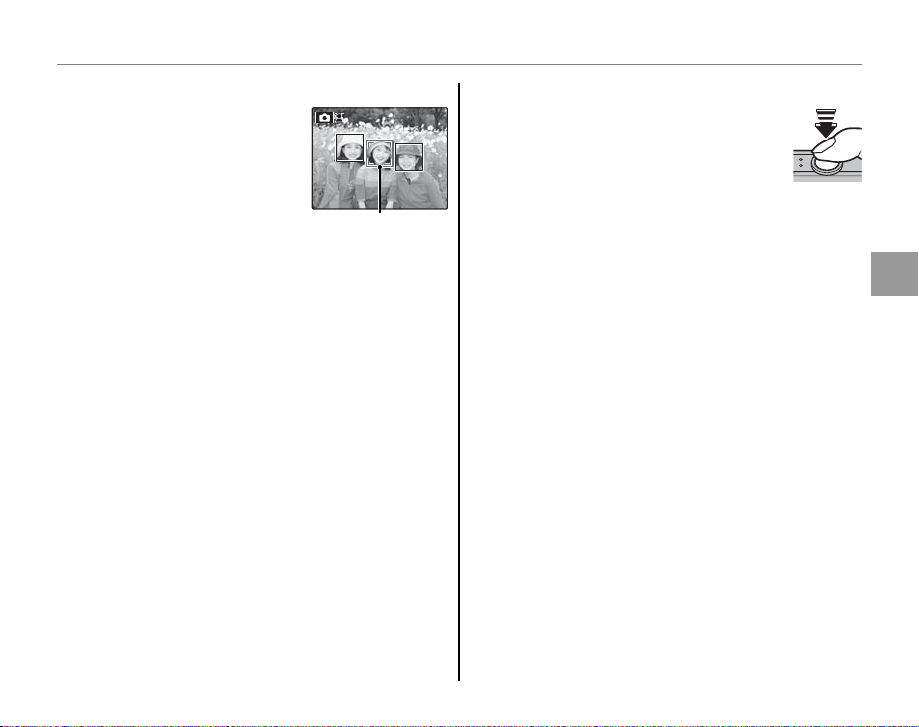
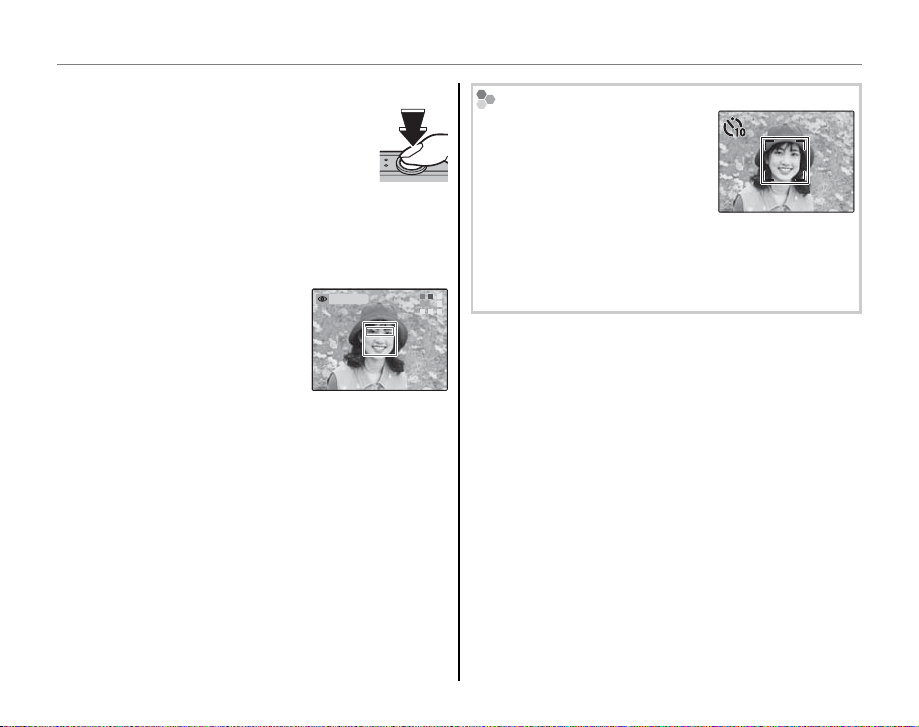
If a face is detected, it will
be indicated by a green
border. If there is more
than one face in the
frame, the camera will
select the face closest
to the center; other faces are indicated by
white borders.
Green borderGreen border
Focus.
3
Press the shutter button halfway
to set focus and exposure for the
subject in the green border.
C Cautions
• If no face is detected when the shutter button
is pressed halfway (pg. 82), the camera will
focus on the subject at the center of the
monitor and red-eye will not be removed.
• In each shooting mode, the camera will detect
and focus on faces but exposure will be
optimized for the entire scene rather than the
selected portrait subject.
More on Photography
19
Page 26
Intelligent Face Detection and Red-Eye Removal
77
Shoot.
4
Press the shutter button all the
way down to shoot.
C Caution
If the subject moves as the shutter button is
pressed, their face may not be in the area
indicated by the green border when the picture
is taken.
If B ON/S ON is
REMOVINGREMOVING
selected, the picture
will be processed to
reduce red-eye before it
is recorded (the b RED-
EYE REMOVAL option in the playback
menu can also be used to reduce red-eye;
pg. 64).
Intelligent Face Detection
Intelligent Face Detection is
recommended when using the
self-timer for group- or selfportraits (pp. 26–27).
The camera can zoom in on pictures taken with
Intelligent Face Detection during slide shows (pg.
65) and when pictures are displayed automatically
after shooting (pg. 73).
7
20
Page 27
Focus Lock
250
F
3.3
250
F
3.3
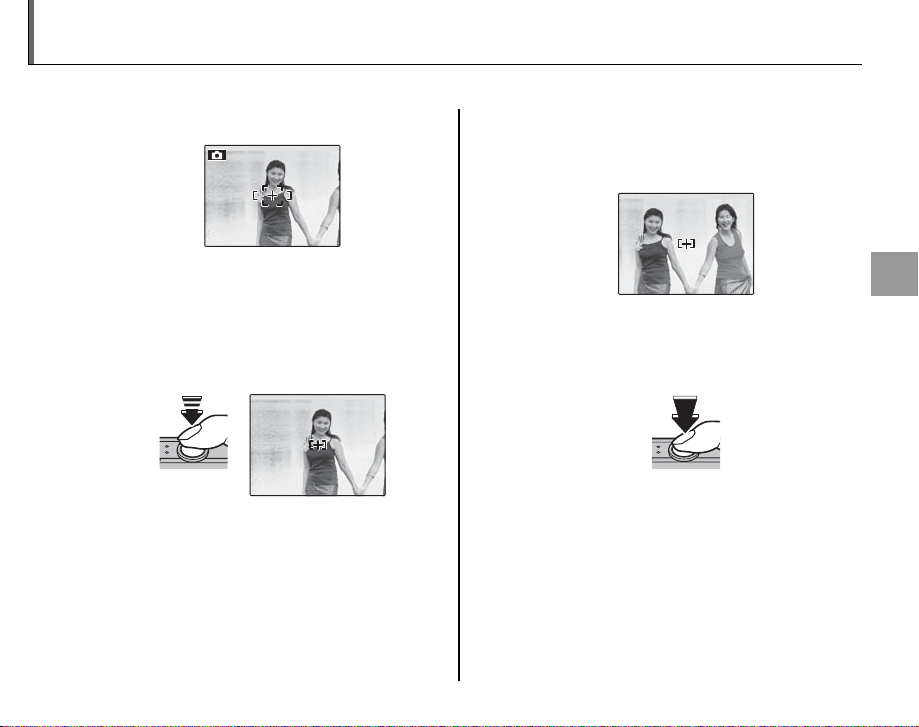
To compose photographs with o -center subjects:
Position the subject in the focus frame.
1
Recompose the picture.
3
Keeping the shutter button pressed
halfway, recompose the picture.
Focus.
2
Press the shutter button halfway to set
focus and exposure. Focus and exposure
will remain locked while the shutter button
is pressed halfway (AF/AE lock).
Press
halfway
250
F
3.3
Shoot.
4
Press the shutter-release button the rest of
the way down to take the picture.
250
F
3.3
Press the rest of
the way down
More on Photography
Repeat steps 1 and 2 as desired to refocus
before taking the picture.
21
Page 28
Focus Lock
Autofocus
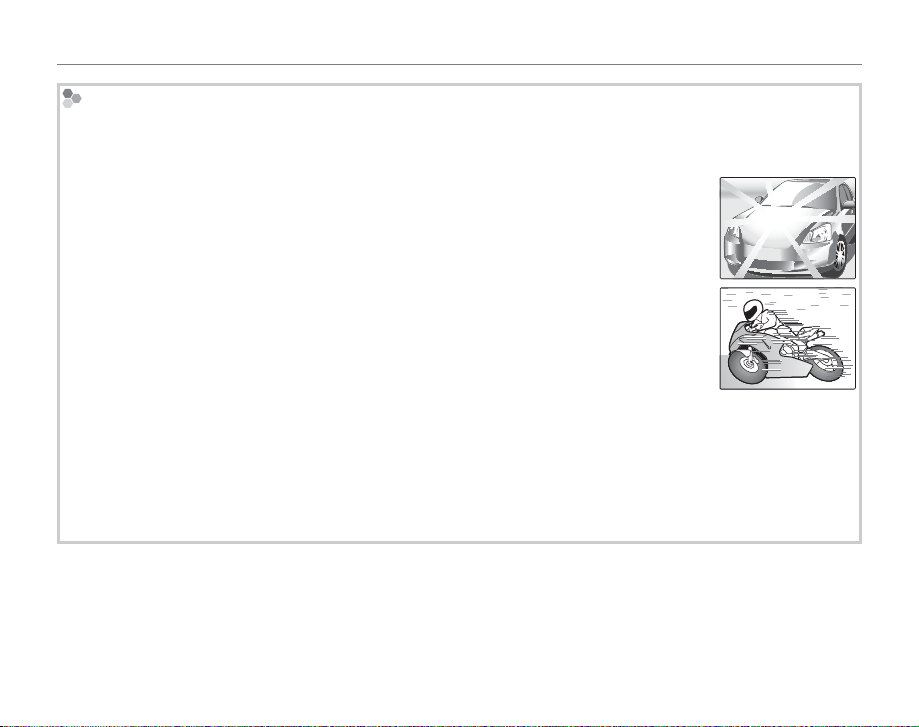
Although the camera boasts a high-precision autofocus system, it may be unable to focus on the subjects
listed below. If the camera is unable to focus using autofocus, use focus lock (pg. 21) to focus on another
subject at the same distance and then recompose the photograph.
• Very shiny subjects such as mirrors or car bodies.
• Fast-moving subjects.
• Subjects photographed through a window or other re ective object.
• Dark subjects and subjects that absorb rather than re ect light, such as hair or fur.
• Insubstantial subjects, such as smoke or ame.
• Subjects that show little contrast with the background (for example, subjects in clothing that is the same
color as the background).
• Subjects positioned in front of or behind a high-contrast object that is also in the focus frame (for example, a
subject photographed against a backdrop of highly contrasting elements).
22
Page 29
L Macro mode (Close-ups)
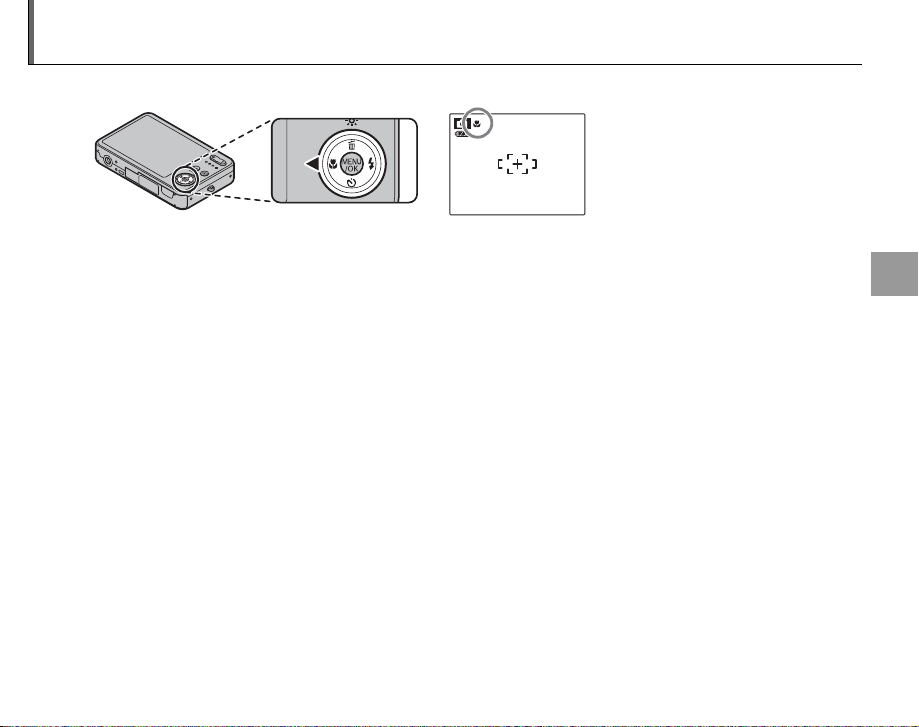
To select macro mode, press the selector left (L).
L icon appears in monitor when
camera is in macro mode
When macro mode is in e ect, the camera focuses on subjects near the center of the monitor. Use
the zoom buttons to frame pictures.
To exit macro mode, press the selector left (L). Macro mode can also be cancelled by turning the
camera o or selecting another shooting mode.
A Note
Use of a tripod is recommended to prevent blur caused by camera shake.
More on Photography
23
Page 30
K Using the Flash
Mode
Description
Use the ash when lighting is poor, for example when shooting at night or indoors under low light.
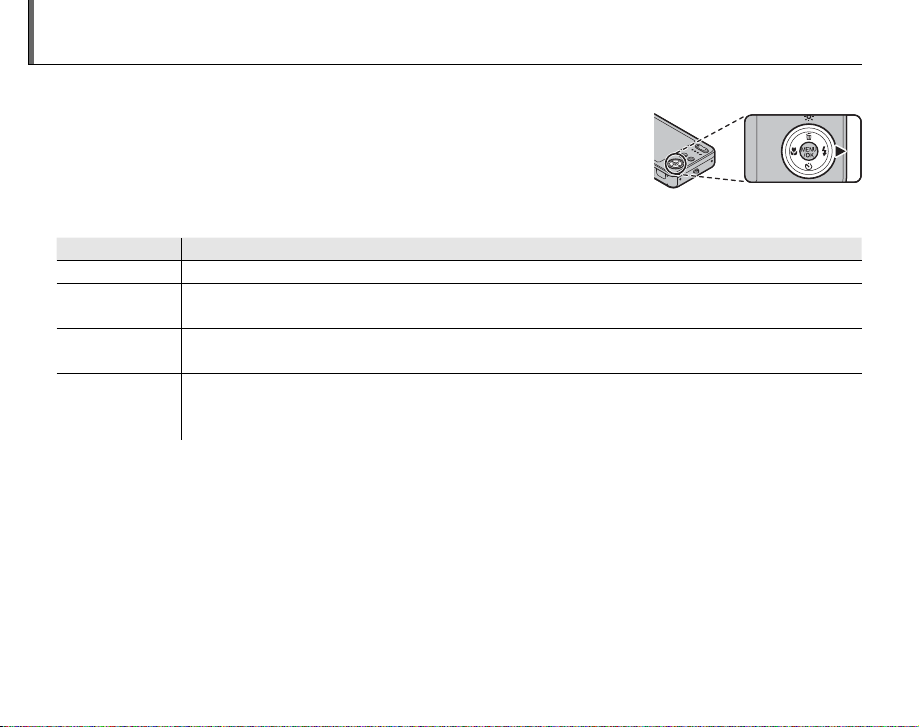
To choose a ash mode, press the selector right (K). The ash mode
changes each time the selector is pressed; in modes other than AUTO, the
current mode is indicated by an icon in the monitor. Choose from the
following options (some options are not available in all shooting modes;
see the restrictions in another supplied document):
Mode
AUTO (no icon) The ash res when required. Recommended in most situations.
K ( ll ash)
W (suppressed
a s h )
T (slow sync)
The ash res whenever a picture is taken. Use for backlit subjects or for natural coloration
when shooting in bright light.
The ash does not re even when the subject is poorly lit. 0 will appear in the monitor at
slow shutter speeds to warn that pictures may be blurred. Use of a tripod is recommended.
Capture both the main subject and the background when shooting at night (note that
brightly lit scenes may be overexposed). If U is selected for a SHOOTING MODE, shutter
speed may be slow. Use a tripod.
Description
If the ash will re, X will be displayed in the monitor when the shutter button is pressed halfway.
C Caution
The ash may re several times with each shot. Do not move the camera until shooting is complete.
24
Page 31
K Using the Flash
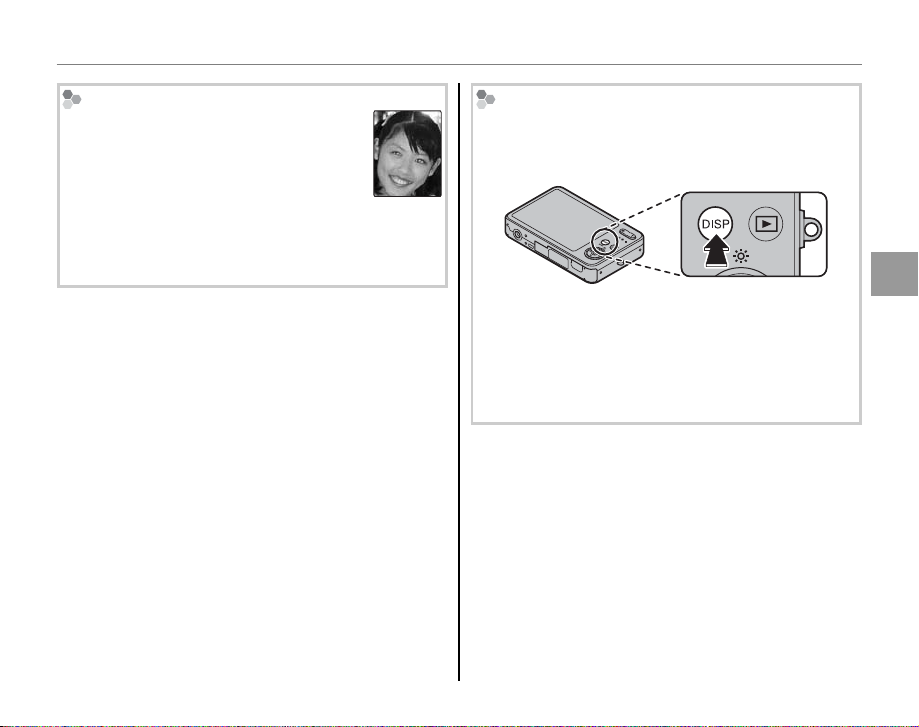
Red-Eye Removal
When B ON/S ON is selected for
Intelligent Face Detection (pg. 18), redeye removal (
(
V), ll ash (U), and slow sync (Z)
S) is available in AUTO
modes. Red-eye removal minimizes “redeye” caused when light from the ash
is re ected from the subject’s retinas as
shown in the illustration at right.
( Silent Mode
In situations in which camera sounds or light from
the ash may be unwelcome, press the DISP/BACK
button until ( is displayed in the monitor.
The camera speaker, shooting indicator, ash, and
indicator and self-timer lamps turn o . Flash and
volume settings (pg. 75) can not be adjusted while
silent mode is in e ect. To restore normal operation,
press the DISP/BACK button until the ( icon is no
longer displayed.
More on Photography
25
Page 32
J Using the Self-Timer
9
The camera o ers a ten-second timer that allows photographers to appear in their own photographs,
and a two-second timer that can be used to avoid blur caused by the camera moving when the
shutter button is pressed.
Set the timer.
1
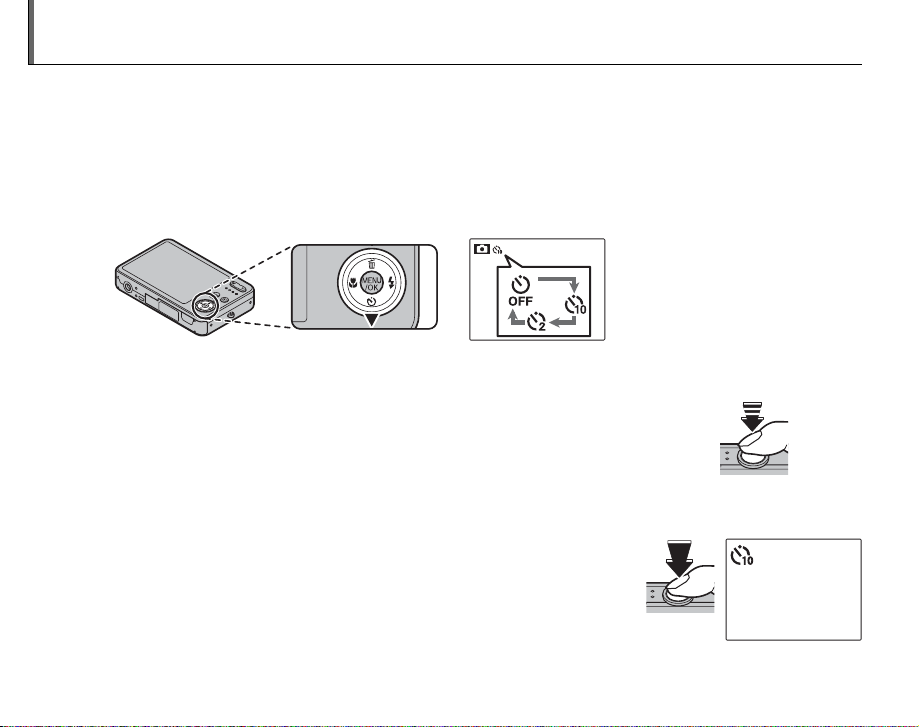
The current self-timer mode is displayed in the monitor. To choose a di erent setting, press the
selector down (J). The selection changes each time the selector is pressed.
The current self-timer mode is
displayed in the monitor.
c : The picture is taken after 10
seconds.
b : The picture is taken after 2
seconds.
Focus.
2
Press the shutter button halfway to focus.
C Caution
Stand behind the camera when using the shutter button. Standing in front
of the lens can interfere with focus and exposure.
Start the timer.
3
Press the shutter button the rest of the way down to start the timer.
The display in the monitor shows the number of seconds remaining
until the shutter is released. To stop the timer before the picture is
taken, press DISP/BACK.
26
Page 33
J Using the Self-Timer
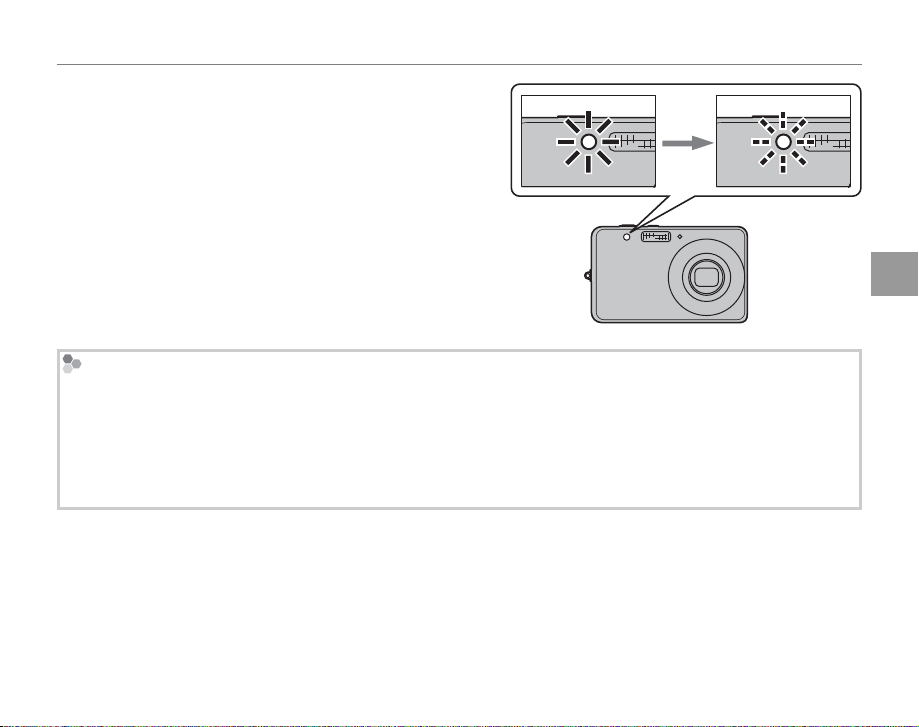
The self-timer lamp on the front of the camera will
blink immediately before the picture is taken. If
the two-second timer is selected, the self-timer
lamp will blink as the timer counts down.
Intelligent Face Detection
Because it ensures that the faces of portrait subjects will be in focus, Intelligent Face Detection (pg. 18) is
recommended when using the self-timer for group portraits or self-portraits. To use the self-timer with
Intelligent Face Detection, set the timer as described in Step 1 and then press the shutter button all the way
down to start the timer. The camera will detect faces while the timer is counting down and adjust focus
and exposure immediately before the shutter is released. Be careful not to move until the picture has been
recorded.
More on Photography
27
Page 34
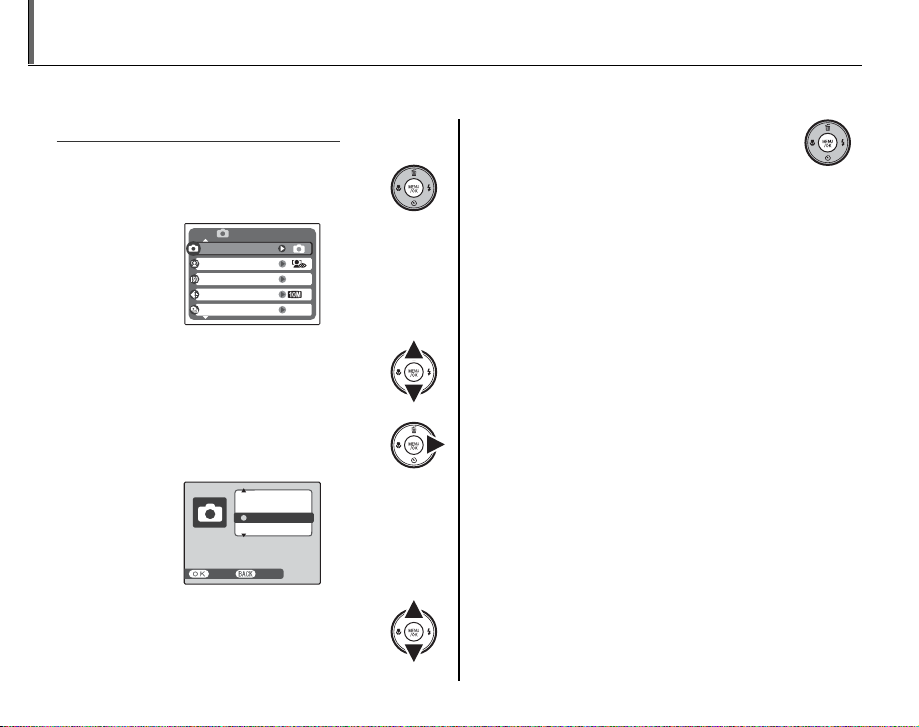
a Shooting Mode
Selecting a Shooting Mode
Choose a shooting mode according to the scene or type of subject.
Selecting a Shooting Mode
Press MENU/OK to display the
1
shooting menu.
SHOOTING MENU
SHOOTING MODE
FACE DETECTION
ISO
QUALITY
CONTINUOUS
Press the selector up or down to
2
highlight a SHOOTING MODE.
Press the selector right to display
3
shooting mode options.
MANUAL
SCENE RECOGNITION
AUTO
BABY MODE
Automatic mode
setting according to
shooting conditions.
Press the selector up or down to
4
highlight the desired mode.
CANCELSET
28
AUTO
OFF
Press MENU/OK to select the
5
highlighted option.
A Note
See the restrictions in another supplied document for
ash mode setting.
N
Page 35
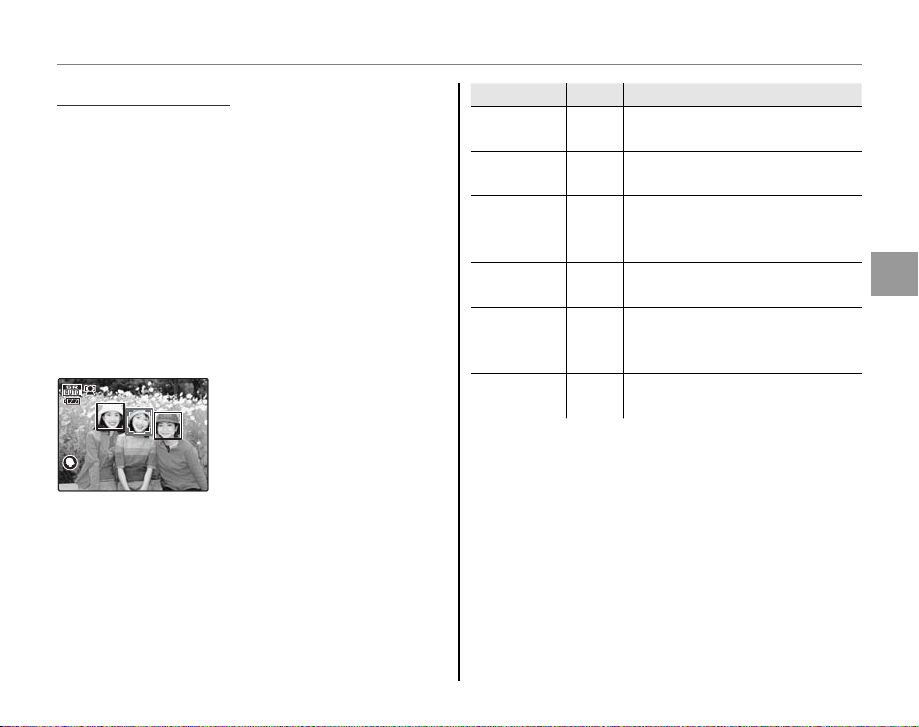
Shooting Modes
MM MANUAL
GG SCENE RECOGNITION
Subject
Icon
Description
a Shooting Mode
Shooting Modes
MANUAL
Choose this mode for complete control
of shooting settings, including exposure
compensation (pg. 59) and white balance (pg.
60).
SCENE RECOGNITION
Simply by pointing the camera to the subject,
the camera automatically analyzes and selects
the most appropriate setting using scene
recognition.
The camera analyzes a
subject based on scene
recognition, then an icon
appears in the bottom
left of the monitor (The
illustration shows when the
camera analyzed subject(s) in portrait.).
Subject
PORTRAIT
LANDSCAPE
NIGHT
MACRO
BACKLIGHT
PORTRAIT
NIGHT
PORTRAIT
Tip
B
When a subject can not be analyzed by the camera,
LAUTO mode will be set.
A Notes
• B Intelligent Face Detection is turned on
automatically.
• The camera continuously adjusts focus on a face, or
the center area of the monitor.
• Continuous auto focus will be audible and will
increase battery drain.
• Macro mode is set when K is set.
Icon
For soft-toned portraits with
H
natural skin tones.
For crisp, clear daylight shots of
I
buildings and landscapes.
For night and twilight scenes, a
using high sensitivity setting to
J
minimize blurring.
For clear close-ups of owers,
K
etc.
For a subject backlit against the
sun, preventing the background
T
from becoming dim.
For a subject in a dim place,
Z
reducing blur.
Description
More on Photography
29
Page 36

kk AUTO
AUTO
pp BABY MODE
CC PICTURE STABILIZATION
UU PORTRAIT
KK LANDSCAPE
LL SPORT
DD NIGHT
UU NIGHT (TRIPOD)
BB NATURAL LIGHT
GG BEACH
Choose for crisp, clear snapshots (pg. 13). This
mode is recommended in most situations.
BABY MODE
Choose for natural skin tones when taking
portraits of infants. The ash turns o
automatically.
PICTURE STABILIZATION
Choose this mode for fast shutter speeds that
reduce blur caused by camera shake or subject
movement.
PORTRAIT
Choose this mode for soft-toned portraits with
natural skin tones.
LANDSCAPE
Choose this mode for crisp, clear daylight shots
of buildings and landscapes.
a Shooting Mode
SPORT
Choose this mode when photographing moving
subjects. Priority is given to faster shutter
speeds.
NIGHT
A high sensitivity setting is selected
automatically to minimize blurring for recording
night and twilight scenes.
NIGHT (TRIPOD)
Slow shutter speeds are used to record night
scenes. Use of a tripod is recommended to
prevent camera shake.
NATURAL LIGHT
Capture natural light indoors, under low light, or
where the ash can not be used. The ash turns
o and sensitivity is raised to reduce blur.
BEACH
Choose for crisp, clear shots that capture the
brightness of sunlit beaches.
30
Page 37

FF SNOW
WW FIREWORKS
EE SUNSET
O
FLOWER
II PARTY
HH MUSEUM
PP TEXT
a Shooting Mode
SNOW
Choose for crisp, clear shots that capture the
brightness of scenes dominated by shining white
snow.
FIREWORKS
Slow shutter speeds are used to capture the
expanding burst of light from a rework. Press
the selector left or right to choose a shutter
speed. Use of a tripod is recommended to
prevent blur. The ash turns o automatically.
SUNSET
Choose this mode to record the vivid colors in
sunrises and sunsets.
O
FLOWER
Choose for vivid close-ups of owers. The
camera focuses in the macro range and the ash
turns o automatically.
PARTY
Capture indoor background lighting under lowlight conditions.
MUSEUM
Choose where ash photography is prohibited
or the sound of the shutter may be unwelcome.
The ash, speaker, and self-timer lamp turn o
automatically.
A Note
Photography may be prohibited altogether in some
settings. Obtain permission before shooting.
TEXT
Take clear pictures of text or drawings in print.
The camera focuses in the macro range.
More on Photography
31
Page 38
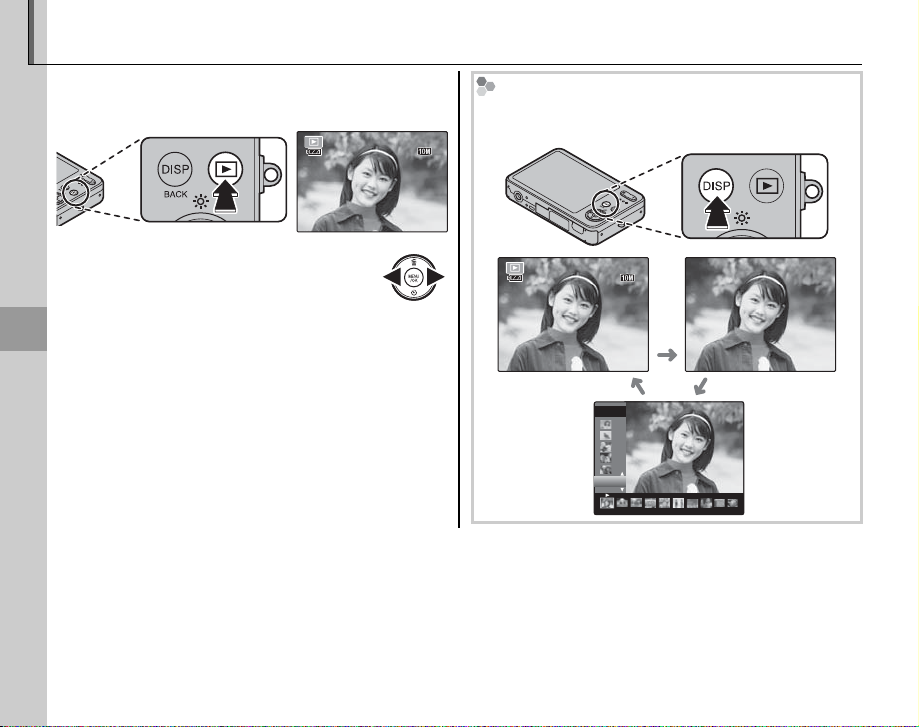
Single-Frame Playback
12 / 31 / 2050
10:00 AM
ISO 100
100-
0001
250
F4.2
N
1/13
2050
12 / 31 / 2050
250
F4.2
ISO 100
100-
0001
N
10 : 00 AM
To view the most recent picture in the monitor,
press the D button.
100-0001
ISO 100
ISO 100
12 / 31 / 2050
10:00 AM
12 / 31 / 2050 10:00 AM
F4.2
250 F4.2
Press the selector right to view pictures
in the order recorded, left to view
0001
N
Choosing a Display Form at
Press the DISP/BACK button to cycle through playback
display formats as shown below.
100
0001
100-0001
N
ISO 100
ISO 100
pictures in reverse order. Keep the
selector pressed to scroll rapidly to the desired
12 / 31 / 2050
12 / 31 / 2050
10 : 00 AM
10 : 00 AM
More on Playback
frame.
F4.2
250 F4.2
Indicators
displayed
A Note
Pictures taken using other cameras are indicated by a e (“gift image”) icon during playback.
2050
12/31
32
1/13
Indicators
hidden
Sort by date
Page 39
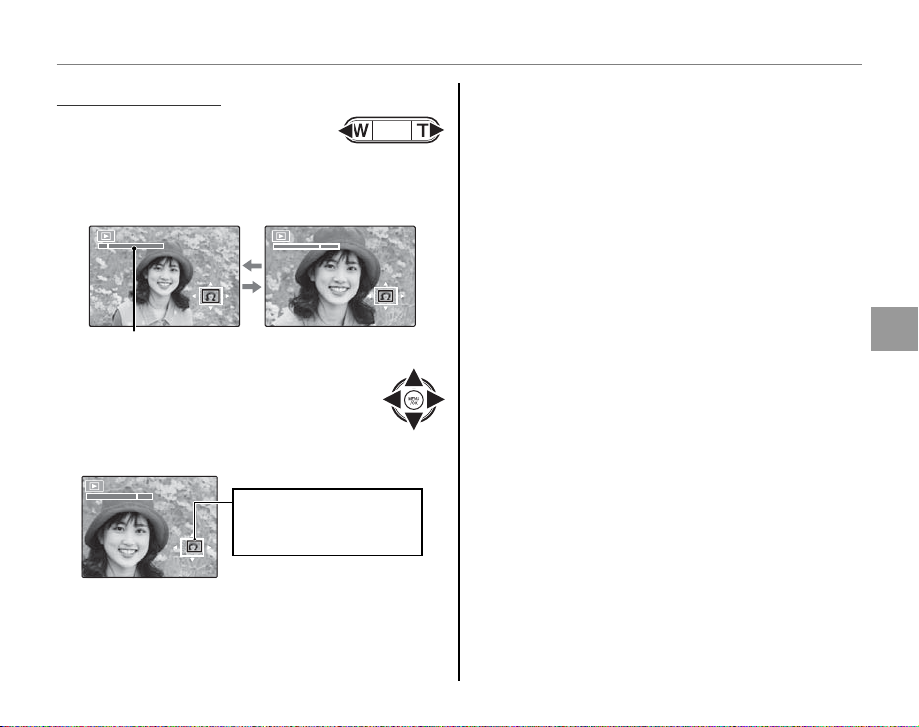
Single-Frame Playback
Playback Zoom
Playback Zoom
Press T to zoom in on images
displayed in single-frame
playback; press W to zoom out.
Press W to zoom out Press T to zoom in
Zoom indicator
When the picture is zoomed in, the
selector can be used to view areas of
the image not currently visible in the
display.
Navigation window shows
portion of image currently
displayed in monitor
Press DISP/BACK to exit zoom.
A Note
The maximum zoom ratio varies with image size.
Playback zoom is not available with pictures taken at
an image size of p.
More on Playback
33
Page 40
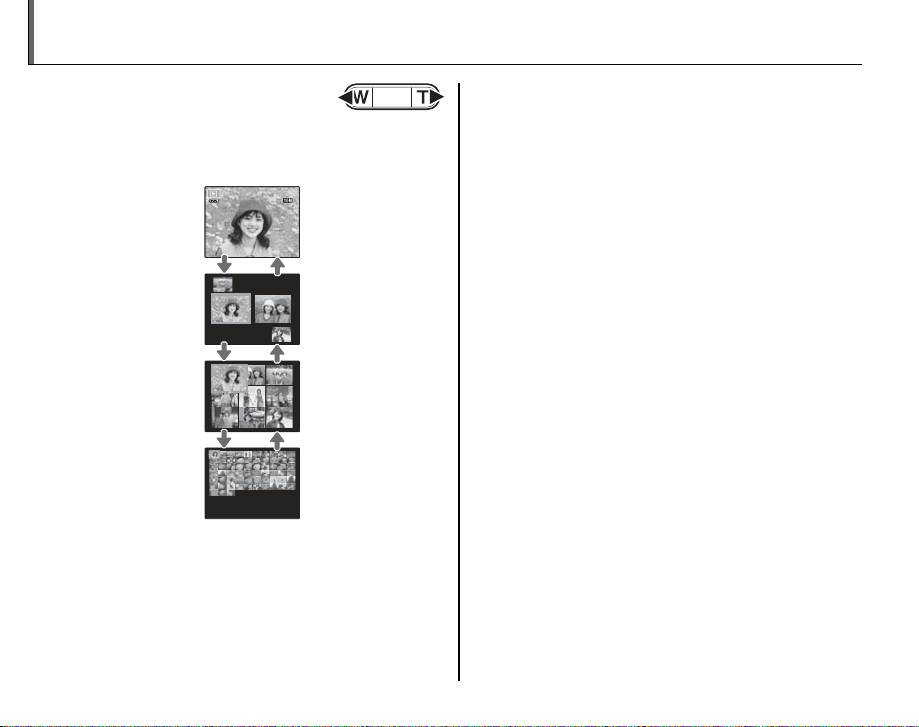
Multi-Frame Playback
ISO
100
100-0001
12/ 31/ 2050
10: 00
AM
N
To change the number of images
displayed, press W when a
picture is shown full-frame in the
monitor.
100-0001
N
ISO
100
12/31/2050
10: 00
AM
Press the
W button
to increase
the number
of pictures
displayed to
two, nine, or a
hundred.
Use the selector to highlight images and press
MENU/OK to view the highlighted image full frame.
In the nine- and hundred-frame displays, press
the selector up or down to view more pictures.
Press T to reduce
the number
of images
displayed.
34
Page 41
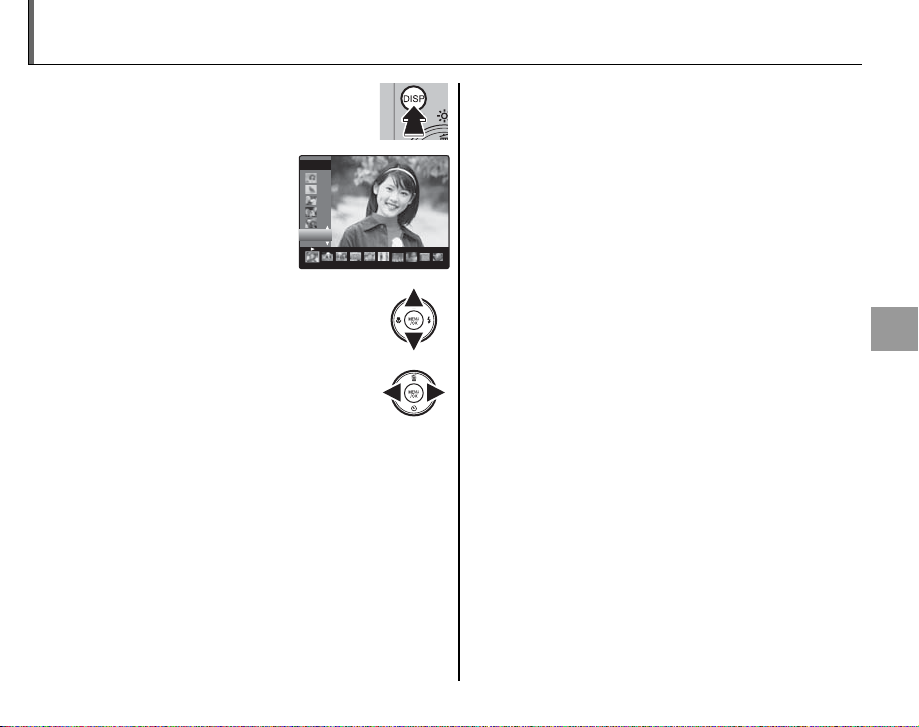
Sort by Date
1/13
2050
In single-frame playback, press DISP/
1
BACK until the sort-by-date screen is
displayed.
The picture displayed in
the single-frame playback
remains selected.
Press the selector up or down to
2
select a date.
Press the selector left or right to
3
select a picture.
B Tips: Rapid Scroll
• Press and hold the selector up or down to scroll
dates rapidly.
• Press and hold the selector left or right to rapidly
scroll pictures taken on the same date.
2050
12/31
1/13
More on Playback
35
Page 42
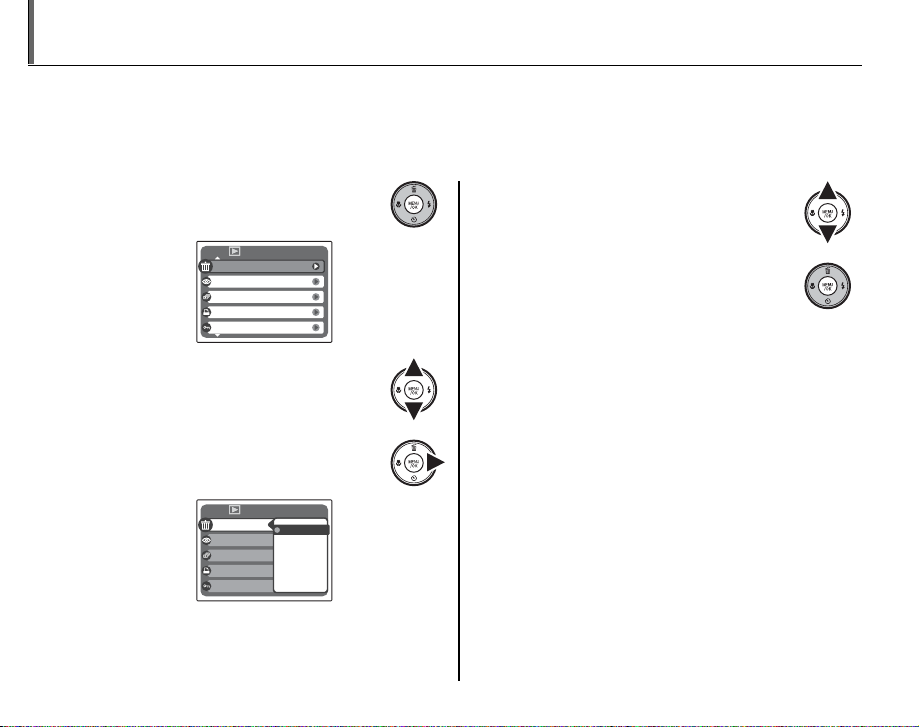
A Deleting Pictures
The ERASE option in the playback menu can be used to delete still pictures and movies, increasing
the amount of space available on the memory card or in internal memory (for information on
deleting pictures in single-frame playback, see page 17). Note that deleted pictures can not be
recovered. Copy important pictures to a computer or other storage device before proceeding.
Press MENU/OK to display the
1
playback menu.
ERASE
RED EYE REMOVAL
SLIDE SHOW
PRINT ORDER (DPOF)
PROTECT
Press the selector up or down to
2
highlight ERASE.
Press the selector right to display
3
delete options.
ERASE
RED EYE REMOVAL
SLIDE SHOW
PRINT ORDER (DPOF
PROTECT
36
PLAYBACK MENU
PLAYBACK MENU
BACK
FRAME
ALL FRAMES
)
Press the selector up or down to
4
highlight FRAME or ALL FRAMES.
Press MENU/OK to display options for
5
the selected item (see pg. 37).
B Tips: Deleting Pictures
• When a memory card is inserted, pictures will be
deleted from the memory card; otherwise, pictures
will be deleted from internal memory.
• Protected pictures can not be deleted. Remove
protection from any pictures you wish to delete (pg.
66).
• If a message appears stating that the selected
images are part of a DPOF print order, press MENU/OK
to delete the pictures.
Page 43
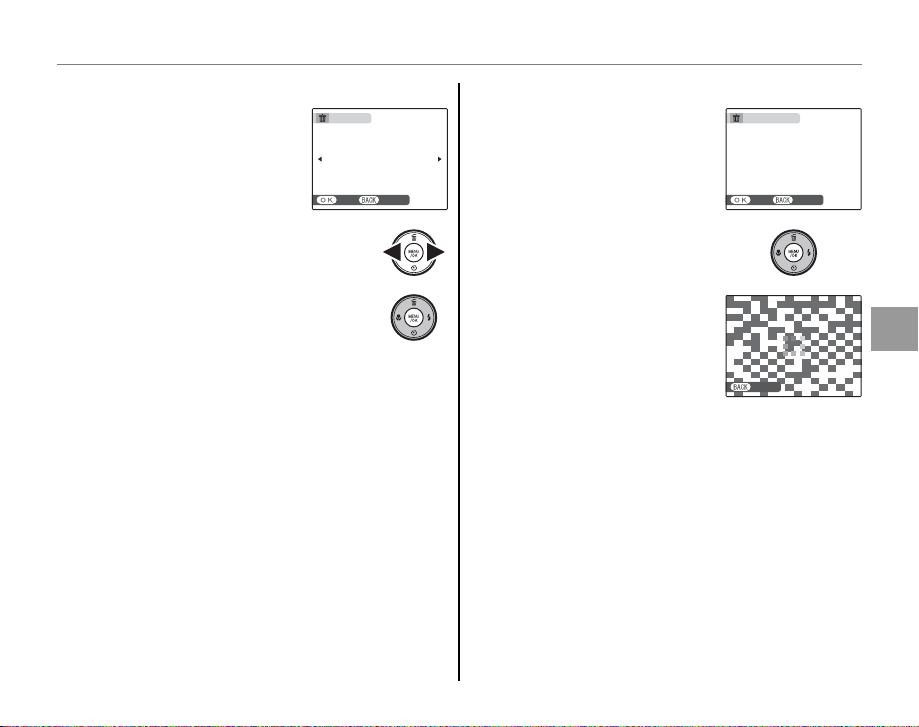
■■ FRAME
: Deleting Selec ted Images
■■ ALL FRAMES
: Deleting All Images
A Deleting Pictures
FRAME
Selecting FRAME displays the
: Deleting Selected Images
ERASE OK?
dialog shown at right.
YES CANCEL
Press the selector left or right to scroll
through pictures and press MENU/OK to
delete the current picture (the picture
is deleted immediately; be careful not
delete the wrong picture).
Press DISP/BACK to exit when all the desired
pictures have been deleted.
ALL FRAMES
: Deleting All Images
Selecting ALL FRAMES
displays the con rmation
shown at right.
Press MENU/OK to delete all
unprotected pictures.
The dialog shown at right is
displayed during deletion.
Press DISP/BACK to cancel
before all pictures have been
deleted (any pictures deleted
before the button was pressed
can not be recovered).
ERASE ALL OK?
IT MAY TAKE A WHILE
YES CANCEL
CANCEL
More on Playback
37
Page 44
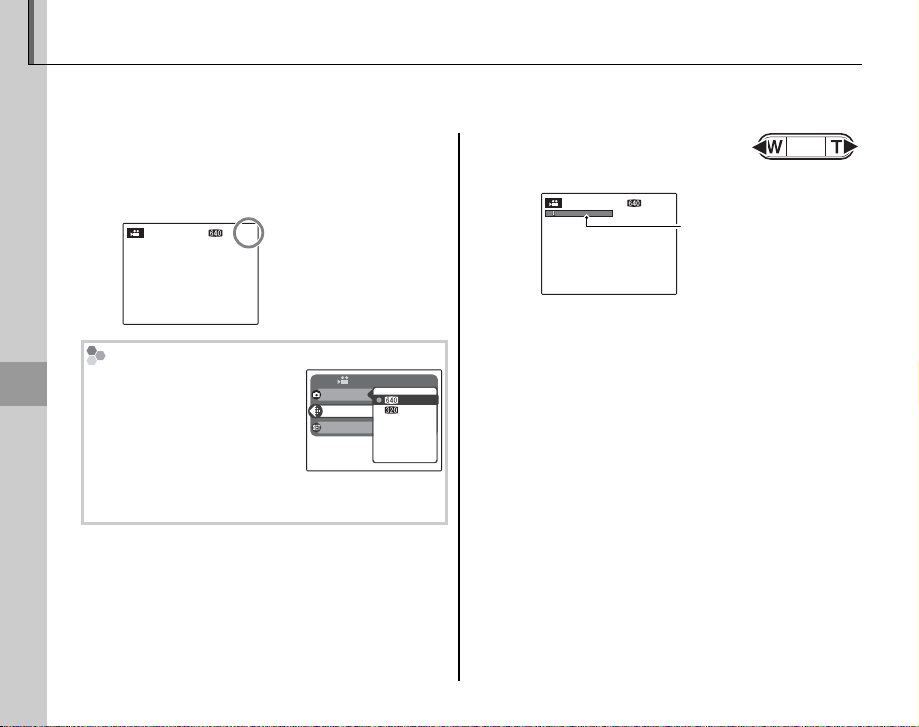
A Recording Movies
STANDBY
12
s
12
s
STANDBY
Shoot short movies at 30 frames per second. Sound is recorded via the built-in microphone; do not
cover the microphone during recording.
Press MENU/OK to display the shooting menu
1
and select A MOVIE for a SHOOTING
MODE (pg. 28).
12
s
Time available
STANDBY
is displayed in
monitor
Choosing the Frame Size
To choose the frame size,
press MENU/OK and select
Movies
k QUALITY. Choose t
SHOOTING MODE
QUALITY
SET-UP
(640 × 480 pixels) for better
quality, s (320 × 240
pixels) for longer movies. Press MENU/OK to return
to movie recording mode.
38
SHOOTING MENU
99m59
999m59
Frame the scene using the
2
zoom buttons.
Zoom can not be adjusted once recording
begins.
s
s
12
STANDBY
s
Zoom indicator
Page 45
12
s
A Recording Movies
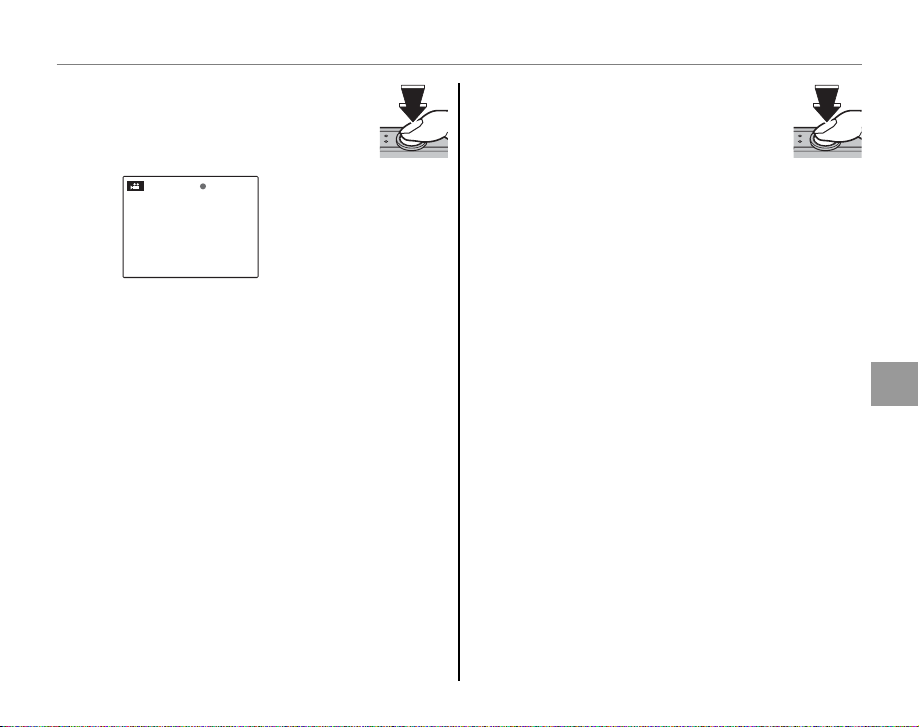
Press the shutter button all the way
3
down to start recording.
12
s
REC
REC and time
remaining are
displayed in monitor
A Note
Focus is set when recording begins; exposure and
white balance are adjusted automatically throughout
recording. The color and brightness of the image may
vary from that displayed before recording begins.
Press the shutter button to end
4
recording. Recording ends
automatically when the movie
reaches maximum length or
memory is full.
B Tip
There is no need to keep the shutter button pressed
during recording.
Movies
39
Page 46
D Viewing Movies
100-006
12/ 31 /2050
10: 00
AM
Operation
Description
15
s
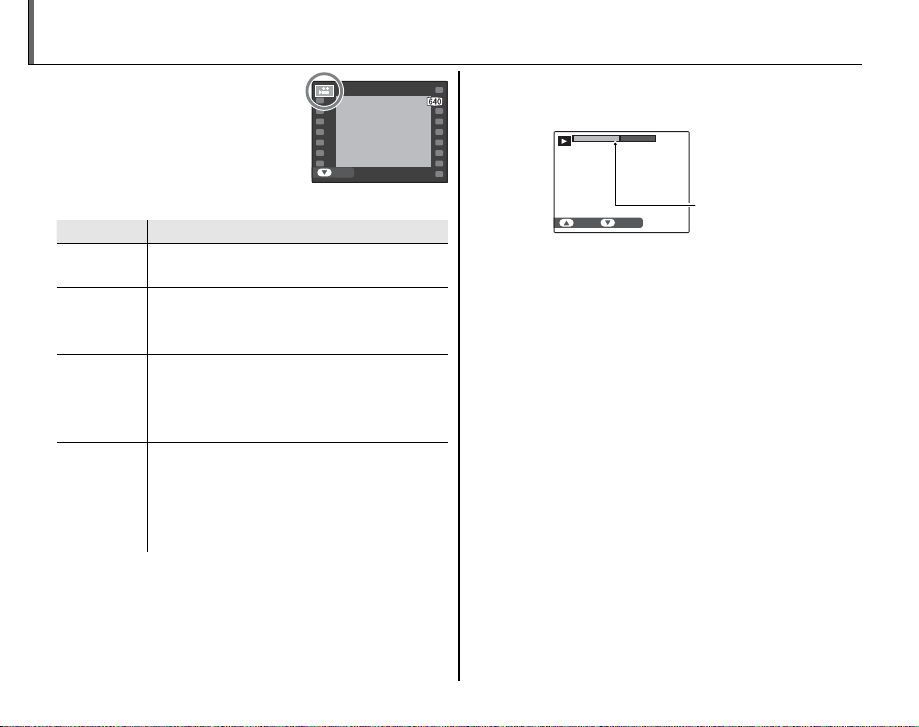
During playback (pg. 32),
movies are displayed in the
monitor as shown at right.
The following operations can
be performed while a movie
is displayed:
Operation
Start/pause
playback
End
playback/
delete
Advance/
rewind
Adjust
volume
Press the selector down to start playback.
Press again to pause.
Press the selector up to end playback. If
playback is paused, pressing the selector
up will delete the current movie.
Press the selector right to advance, left to
rewind. If playback is paused, the movie
will advance or rewind one frame each
time the selector is pressed.
Press MENU/OK to pause playback and
display volume controls. Press the
selector up or down to adjust the
volume; press MENU/OK again to resume
playback.
Description
12/ 31 /2050
PLAY
10: 00
AM
Progress is shown in the monitor during
100-006
playback.
15
s
STOP PAUSE
C Cautions
• Do not cover the speaker during playback.
• Vertical or horizontal streaks may appear in movies
containing very bright subjects. This is normal and
does not indicate a malfunction.
Progress bar
40
Page 47
Viewing Pictures on TV
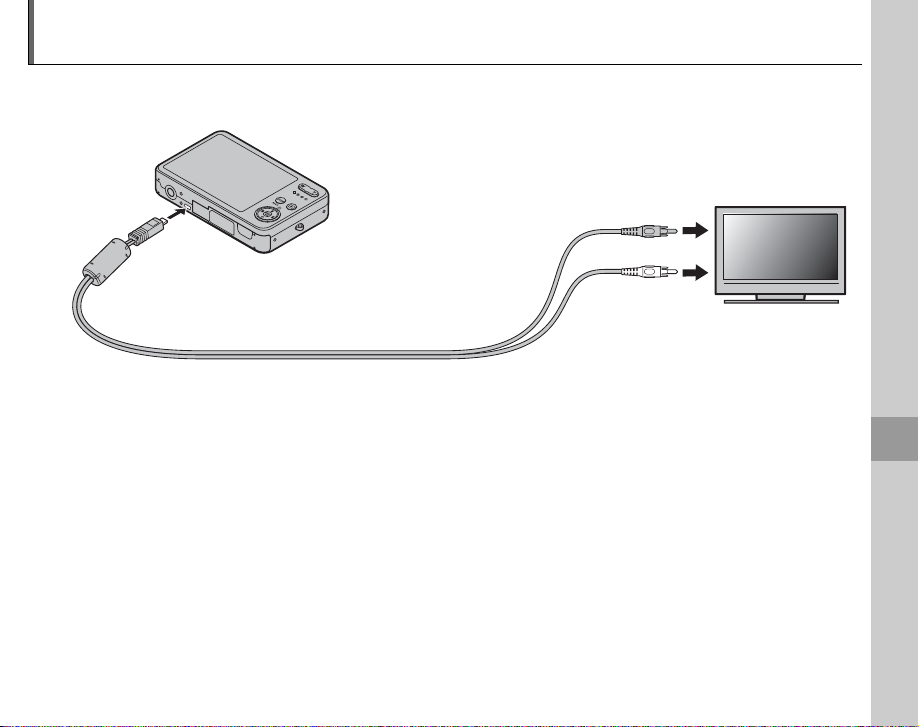
Connect the camera to a TV and tune the television to the video channel to show pictures to a group.
Connect an A/V cable (optional), as shown below.
Connect yellow plug
to video-in jack
Insert into A/V cable
connec tor
Press D for about a second to turn the camera on. The camera monitor turns o and pictures and
movies are played back on the TV. Note that the camera volume controls have no e ect on sounds
played on the TV; use the television volume controls to adjust the volume.
A Note
Image quality drops during movie playback.
C Caution
When making the A/V cable connection, be sure the connectors are fully inserted.
Connect white plug
to audio-in jack
Connections
41
Page 48
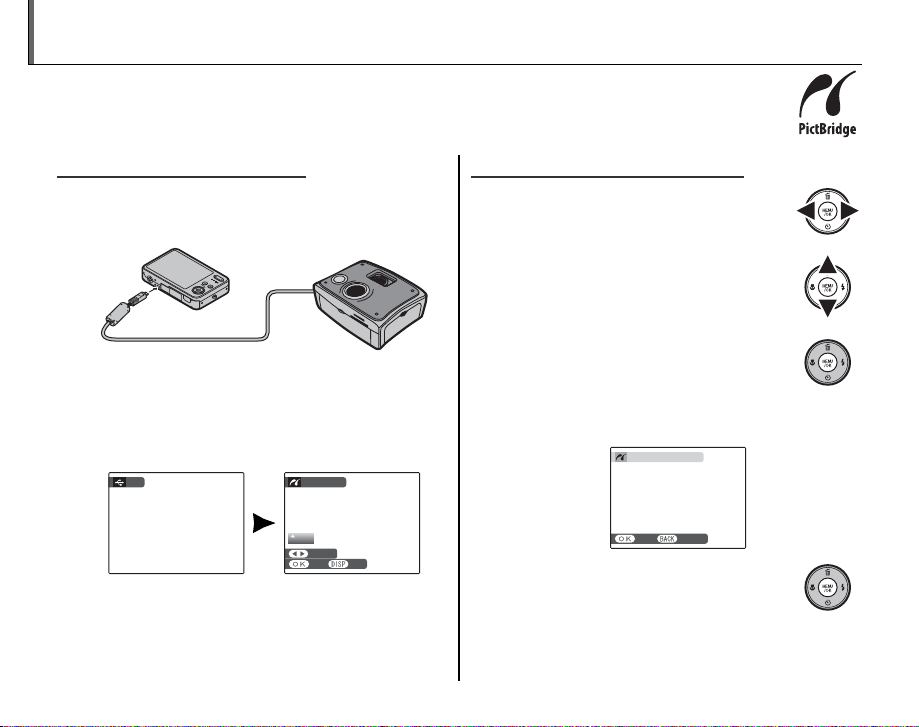
Printing Pictures via USB
Connecting the Camera
Printing Selected Pictures
If the printer supports PictBridge, the camera can be connected directly to the printer and
pictures can be printed without rst being copied to a computer. Note that depending on
the printer, not all the functions described below may be supported.
Connecting the Camera
Connect the supplied USB cable as shown
1
and turn the printer on.
Press the D button for about a second to
2
turn the camera on. w USB will be displayed
in the monitor, followed by the PictBridge
display shown below at right.
USB
PICTBRIDGE
TOTAL:
00
FRAME
OK SET
00000
SHEETS
42
Printing Selected Pictures
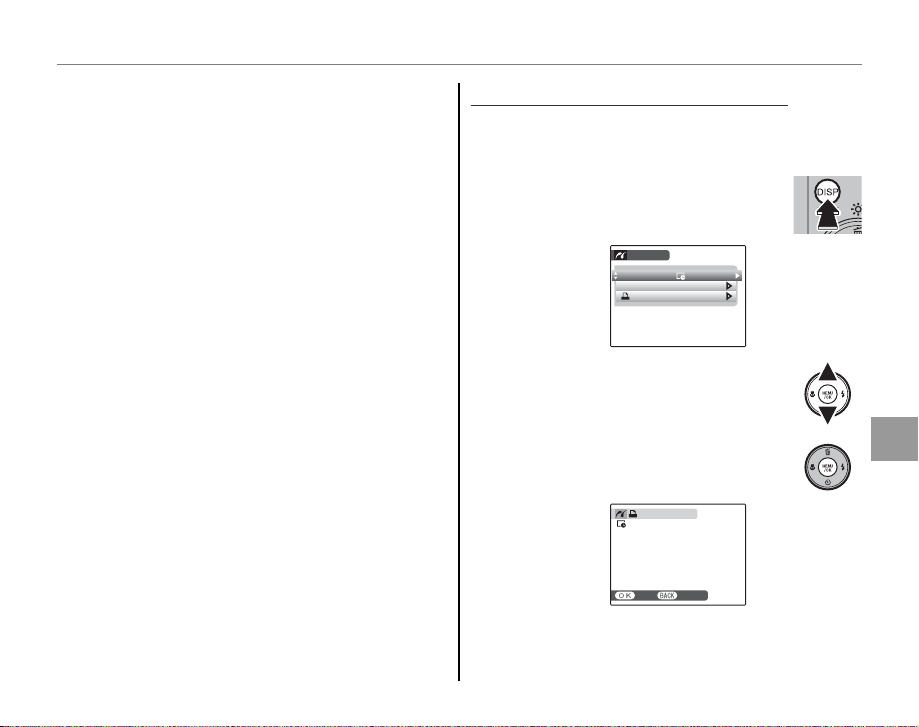
Press the selector left or right to
1
display a picture you wish to print.
Press the selector up or down to
2
choose the number of copies (up to
99).
Repeat steps 1–2 to select
3
additional pictures. Press MENU/OK
to display a con rmation dialog
when settings are complete.
PRINT THESE FRAMES
TOTAL:
9
SHEETS
YES CANCEL
Press MENU/OK to start printing.
4
Page 49
Printing Pictures via USB
Printing the DPOF Print Order
B Tip: Printing the Date of Recording
To print the date of recording on pictures, press
DISP/BACK in steps 1–2 to display the PictBridge
menu (see “Printing the DPOF Print Order,” below).
Press the selector up or down to highlight PRINT
WITH DATE y and press MENU/OK to return to the
PictBridge display (to print pictures without the date
of recording, select PRINT WITHOUT DATE). The
date will not be printed if the camera clock was not
set when the picture was taken.
A Note
If no pictures are selected when the MENU/OK button is
pressed, the camera will print one copy of the current
picture.
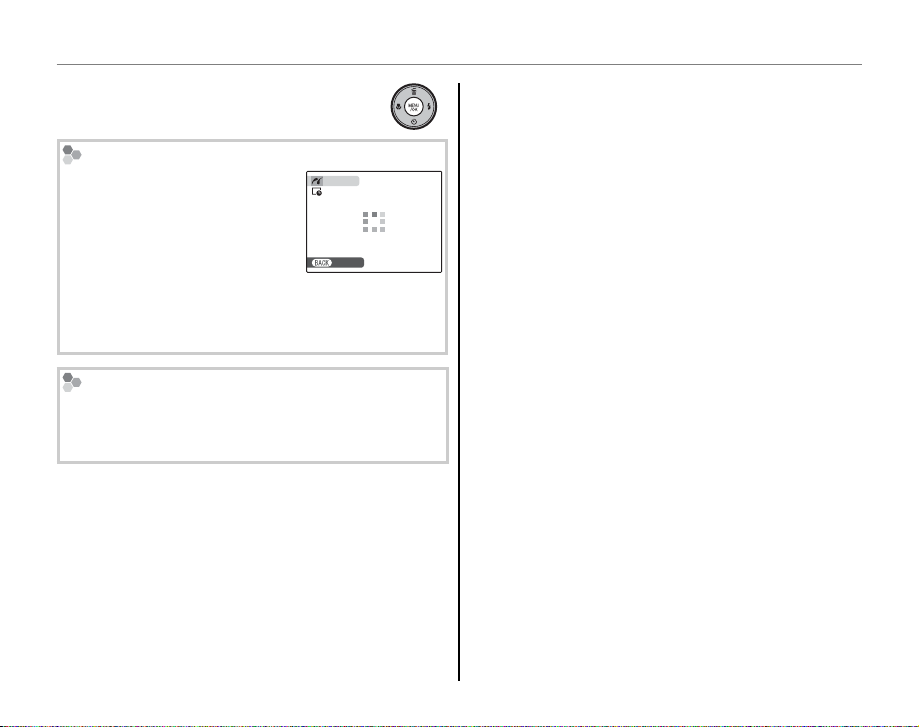
Printing the DPOF Print Order
To print the print order created with C PRINT
ORDER (DPOF) in the playback menu (pg. 62):
In the PictBridge display, press DISP/
1
BACK to open the PictBridge menu.
PICTBRIDGE
PRINT WITH DATE
PRINT WITHOUT DATE
PRINT DPOF
Press the selector up or down to
2
highlight x PRINT DPOF.
Press MENU/OK to display a
3
con rmation dialog.
PRINT DPOF OK?
TOTAL: 9 SHEETS
YES CANCEL
Connections
43
Page 50
Printing Pictures via USB
Press MENU/OK to start printing.
4
During Printing
The message shown at right is
displayed during printing. Press
DISP/BACK to cancel before all
pictures are printed (depending
on the printer, printing may end
before the current picture has printed).
If printing is interrupted, press D to turn the camera
o and then on again.
Disconnec ting the Camera
Con rm that “PRINTING” is not displayed in the
monitor and press D to turn the camera o .
Disconnect the USB cable.
PRINTING
CANCEL
A Notes
• Print pictures from internal memory or a memory
card that has been formatted in the camera.
• If the printer does not support date printing, the
PRINT WITH DATE y option will not be available
in the PictBridge menu and the date will not be
printed on the pictures in the DPOF print order.
• Default printer page size and print quality settings
are used when printing via direct USB connection.
44
Page 51
■■ WITH DATE
/ WITHOUT DATE
Creating a DPOF Print Order
Creating a DPOF Print Order
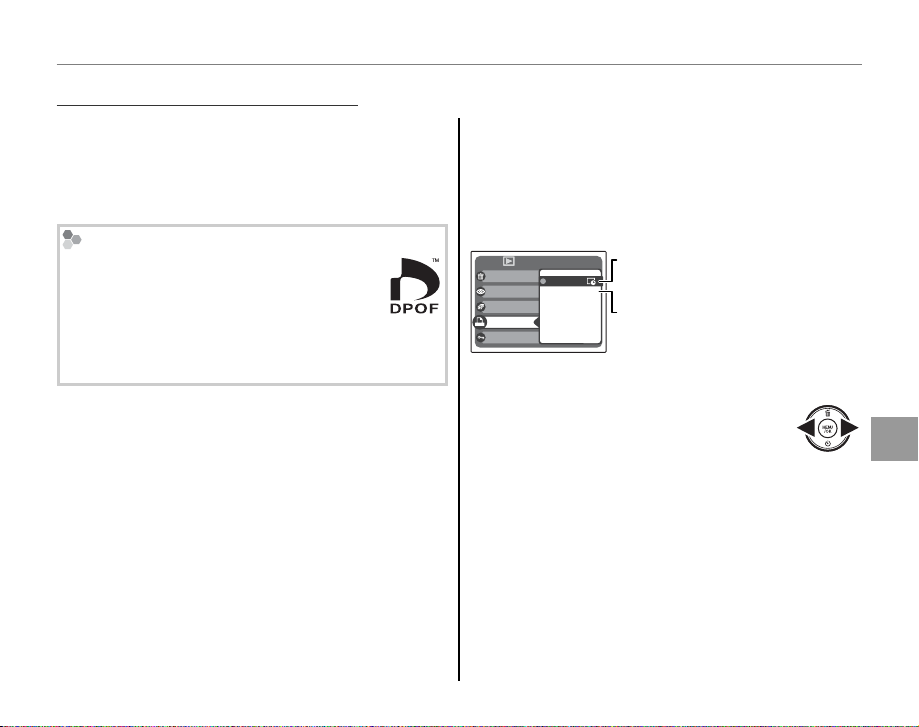
The CC PRINT ORDER (DPOF) option in the
playback menu can be used to create a digital
“print order” for PictBridge-compatible printers
(pg. 42) or devices that support DPOF.
DPOF
DPOF (Digital Print Order Format) is
standard that allows pictures to be printed
from “print orders” stored in internal
memory or on a memory card. The information in
the order includes the pictures to be printed and the
number of copies of each picture.
Printing Pictures via USB
WITH DATE y
/ WITHOUT DATE
To modify the DPOF print order, select CC PRINT
ORDER (DPOF) in the playback menu and press
the selector up or down to highlight WITH
DATE y or WITHOUT DATE.
PLAYBACK MENU
ERASE
RED EYE REMOVAL
SLIDE SHOW
PRINT ORDER (DPOF
PROTECT
WITH DATE
WITHOUT DATE
RESET ALL
)
WITH DATE y: Print date of
recording on pictures.
WITHOUT DATE: Print pictures without
date.
Press MENU/OK and follow the steps below.
Press the selector left or right
1
to display a picture you wish to
include in or remove from the print
order.
Connections
45
Page 52
Printing Pictures via USB
ISO
100
100-0001
12/ 31 /2050
10: 00
AM
N
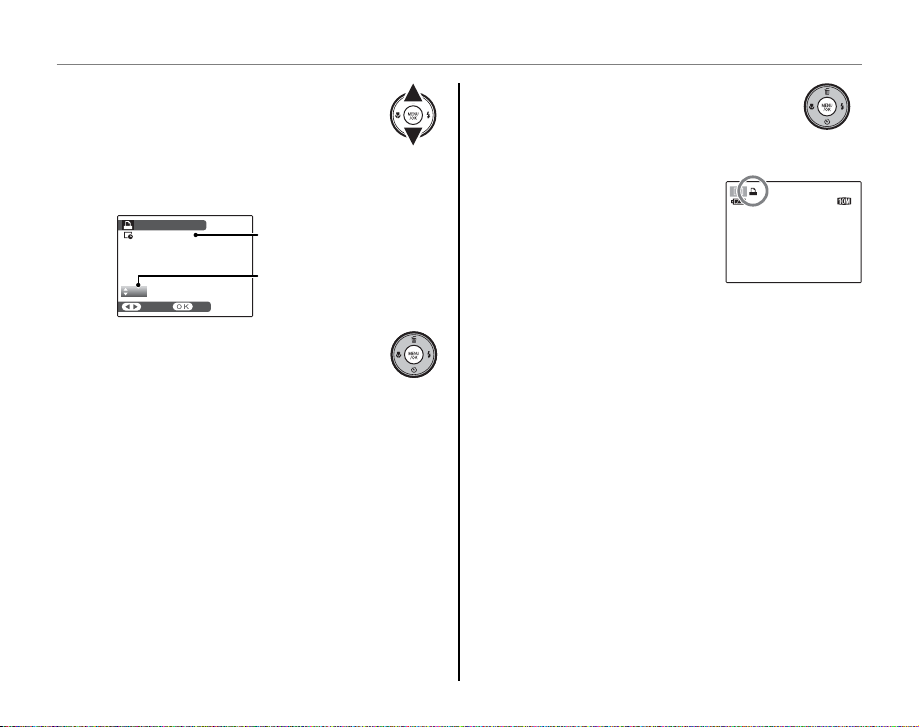
Press the selector up or down to
2
choose the number of copies (up to
99). To remove a picture from the
order, press the selector down until
the number of copies is 0.
00001
SHEETS
FRAME
SET
)
Total number of prints
Number of copies
PRINT ORDER (DPOF
DPOF:
01
Repeat steps 1–2 to complete the
3
print order. Press MENU/OK to save
the print order when settings
are complete, or DISP/BACK to exit without
changing the print order.
The total number of prints is
4
displayed in the monitor. Press
MENU/OK to exit.
The pictures in the current
print order are indicated by a
x icon during playback.
12/ 31 /2050
10: 00
AM
100-0001
ISO
N
100
46
Page 53
Printing Pictures via USB
■■ RESET ALL
RESET ALL
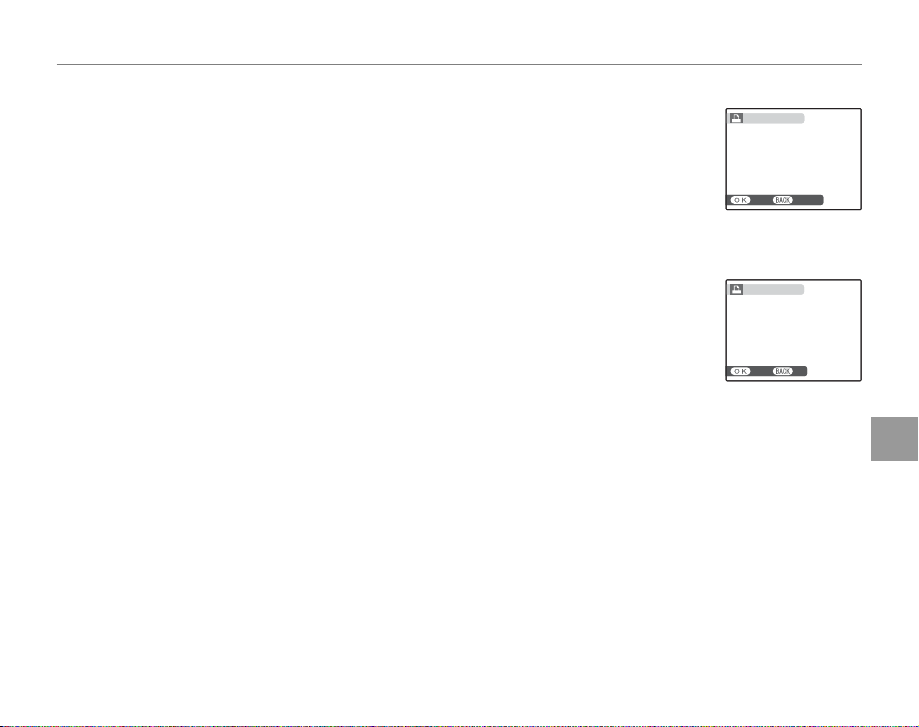
To cancel the current print order, select RESET ALL in the C PRINT ORDER
(DPOF) menu. The con rmation shown at right will be displayed; press MENU/OK to
remove all pictures from the order.
A Notes
• Remove the memory card to create or modify a print order for the pictures in internal
memory.
• Print orders can contain a maximum of 999 pictures.
• If a memory card is inserted containing a print order created by another camera, the
message shown at right will be displayed. Pressing MENU/OK cancels the print order; a new
print order must be created as described above.
RESET DPOF OK?
RESET DPOF OK?
YES CANCEL
YES CANCEL
RESET DPOF OK?
RESET DPOF OK?
YES NO
YES NO
Connections
47
Page 54
Viewing Pictures on a Computer
Installing FinePixViewer
Installing FinePixViewer S: Windows
OS
CPU
RAM
Free di sk
space
Video
Other
The supplied FinePixViewer software can be used to copy pictures to a computer, where they can be
stored, viewed, organized, and printed. Before proceeding, install FinePixViewer as described below.
The latest FinePixViewer is available at http://www.fuji lm.com/. Do NOT connect the camera to the
computer until installation is complete.
Installing FinePixViewer
FinePixViewer is available in a Windows version (FinePixViewer S) and a Macintosh version
(FinePixViewer). Installation instructions for Windows are on pages 48–50, those for the Macintosh on
pages 51–52.
Installing FinePixViewer S: Windows
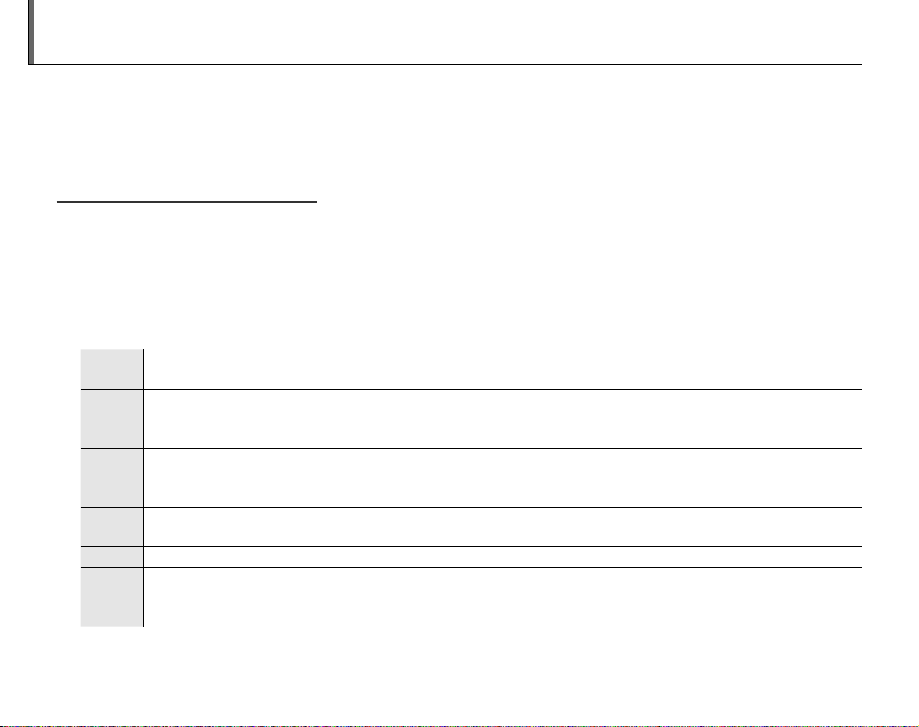
Con rm that the computer meets the following system requirements:
1
Free dis k
Preinstalled versions of Windows Vista, Windows XP Home Edition (Service Pack 2), Windows XP Professional
OS
(Service Pack 2), or Windows 2000 Professional (Service Pack 4)
• Win dows Vista: 800 MHz Pentium 4 or better (3 GHz Pentium 4 or better recommended)
CPU
• Windows XP: 800 MHz Pentium 4 or better (2 GHz Pentium 4 or better recommended)
• Windows 2000: 200 MHz Pentium or better
• Win dows Vista: 512 MB or more (1 GB or more recommended)
RAM
• Windows XP: 512 MB or more
• Windows 2000: 128 MB or more
A minimum of 450 MB required for installation with 600 MB available when FinePixViewer is running (15 GB or
space
more recommended under Windows Vista, 2 GB or more recommended under Windows XP)
Video 800 × 600 pixels or more with 16-bit color or better (1,024 × 768 pixels or more with 32-bit color recommended)
• Built-in USB port recommended. Operation is not guaranteed other USB por ts.
Other
• Internet connection (56 kbps or faster recommended) required to use FinePix Internet Service; Internet
connection and e-mail software required to use e-mail option
48
Page 55
Viewing Pictures on a Computer
C Caution
Other versions of Windows are not supported. Operation is not guaranteed on home-built computers or
computers that have been upgraded from earlier versions of Windows.
Start the computer. Log in to an account with administrator privileges before proceeding.
2
Exit any applications that may be running and insert the installer CD in a CD-ROM drive.
3
Windows Vista
If an AutoPlay dialog is displayed, click SETUP.exe. A “User Account Control” dialog will then be displayed;
click Allow.
The installer will start automatically; click Installing FinePixViewer and follow the on-screen
instructions to install FinePixViewer S. Note that the Windows CD may be required during
installation.
If the Installer Does Not St art Automatically
If the installer does not start automatically, select Computer or My Computer from the Start menu
(Windows Vista/XP) or double-click the My Computer icon on the desktop (Windows 2000), then doubleclick the FINEPIX CD icon to open the FINEPIX CD window and double-click SETUP or SETUP.exe.
Connections
49
Page 56

Viewing Pictures on a Computer
If prompted to install Windows Media Player or DirectX, follow the on-screen instructions to
4
complete installation.
When prompted, remove the installer CD from the CD-ROM drive and click Restart to restart the
5
computer. Store the installer CD in a dry location out of direct sunlight in case you need to reinstall the software. The version number is printed at the top of the CD label for reference when
updating the software or contacting customer support.
Installation is now complete. Proceed to “Connecting the Camera” on page 53.
50
Page 57
Viewing Pictures on a Computer
Installing FinePixViewer: Macintosh
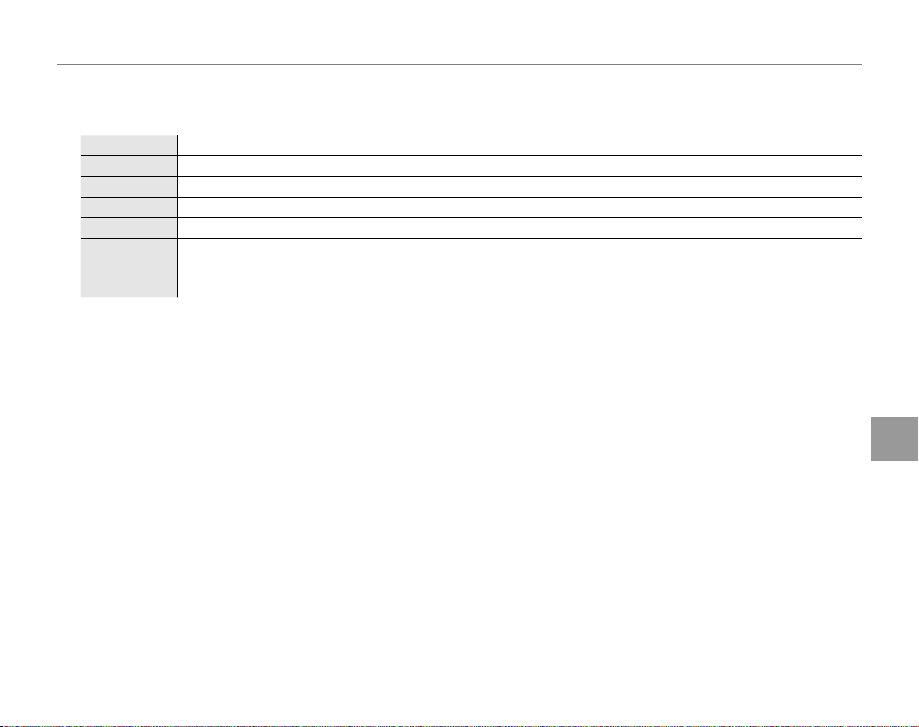
CPU
OS
RAM
Free dis k space
Video
Other
Installing FinePixViewer: Macintosh
Con rm that the computer meets the following system requirements:
1
2
CPU PowerPC or Intel
OS Preinstalled versions of Mac OS X 10.3.9-10.5 (visit http://www.fujifilm.com/ for more information)
RAM 256 MB or more
Free dis k space A minimum of 200 MB required for installation with 400 MB available when FinePixViewer is running
Video 800 × 600 pixels or more with thousands of colors or better
Other
• Built-in USB port recommended. Operation is not guaranteed other USB ports.
• Internet connection (56 kbps or faster recommended) required to use FinePix Internet Service; Internet
connection and e-mail software required to use e-mail option
After starting the computer and quitting any applications that may be running, insert the installer
CD in a CD-ROM drive. Double-click the FinePix CD icon on the desktop and double-click
Installer for Mac OS X.
An installer dialog will be displayed; click Installing FinePixViewer to start installation. Enter
3
an administrator name and password when prompted and click OK, then follow the on-screen
instructions to install FinePixViewer. Click Exit to quit the installer when installation is complete.
Connections
51
Page 58
Viewing Pictures on a Computer
Remove the installer CD from the CD-ROM drive. Note that you may be unable to remove the CD
4
if Safari is running; if necessary, quit Safari before removing the CD. Store the installer CD in a dry
location out of direct sunlight in case you need to re-install the software. The version number
is printed at the top of the CD label for reference when updating the software or contacting
customer support.
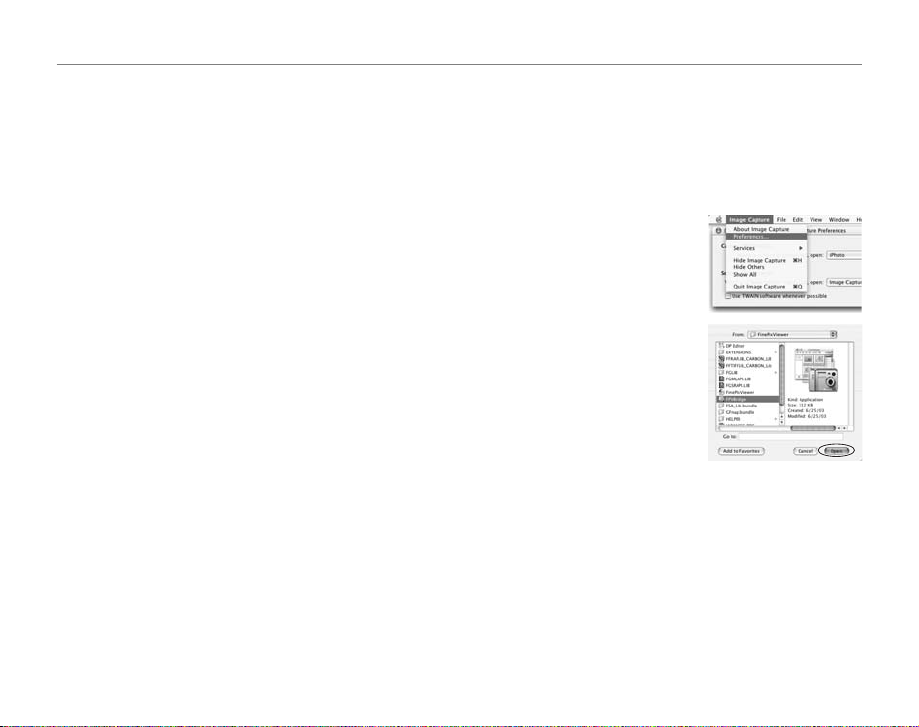
Select Applications in the Finder Go menu to open the applications folder.
5
Double-click the Image Capture icon and select Preferences… from the
Image Capture application menu.
The Image Capture preferences dialog will be displayed. Choose Other… in
the When a camera is connected, open menu, then select FPVBridge in
the “Applications/FinePixViewer” folder and click Open.
Select Quit Image Capture from the Image Capture application menu.
Installation is now complete. Proceed to “Connecting the Camera” on page 53.
52
Page 59
Connecting the Camera
Connecting the Camera
If the pictures you wish to copy are stored
1
on a memory card, insert the card into the
camera (pg. 8). If no card is inserted, pictures
will be copied from internal memory.
C Caution
Loss of power during transfer could result in loss
of data or damage to internal memory or the
memory card. Check the battery level.
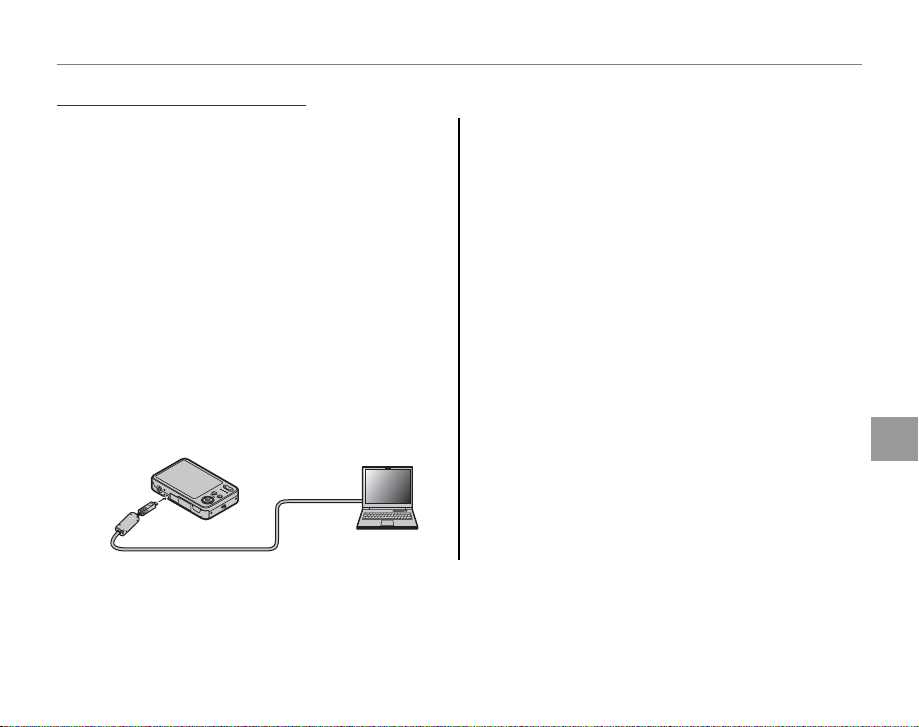
Turn the camera o and connect the supplied
2
USB cable as shown, making sure the
connectors are fully inserted. Connect the
camera directly to the computer; do not use a
USB hub or keyboard.
Viewing Pictures on a Computer
Press the D button for about a second to
3
turn the camera on. FinePixViewer will start
automatically and the “Save Image Wizard”
will be displayed. Follow the on-screen
instructions to copy pictures to the computer.
To exit without copying pictures, click
CANCEL.
C Caution
If FinePixViewer does not start automatically,
the software may not be correctly installed.
Disconnect the camera and reinstall the software.
For more information on using FinePixViewer,
select How to Use FinePixViewer in the
FinePixViewer Help menu.
Connections
A Note
The camera will not turn o automatically while connected to a computer.
53
Page 60
Viewing Pictures on a Computer
C Cautions
• Use only memory cards that have been formatted
in the camera and contain pictures taken with
the camera. If a memory card containing a large
number of images is inserted, there may be a delay
before FinePixViewer starts and FinePixViewer may
be unable to import or save images. Use a memory
card reader to transfer pictures.
• Make sure the indicator lamp is out before turning
the camera o , disconnecting the USB cable or
pulling the memory card out. Failure to observe this
precaution could result in loss of data or damage to
internal memory or the memory card.
• Disconnect the camera before inserting or removing
memory cards.
• In some cases, it may not be possible to access
pictures saved to a network server using
FinePixViewer in the same way as on a standalone
computer.
• The user bears all applicable fees charged by the
phone company or Internet service provider when
using services that require an Internet connection.
Disconnec ting the Camera
After con rming that the indicator lamp is out,
follow the on-screen instructions to turn the camera
o and disconnect the USB cable.
Uninstalling FinePixViewer
Only uninstall FinePixViewer before reinstalling
the software or when it is no longer required.
After quitting FinePixViewer and disconnecting
the camera, drag the “FinePixViewer” folder from
“Applications” into the Trash and select Empty Trash
in the Finder menu (Macintosh), or open the control
panel and use “Programs and Features” (Windows
Vista) or “Add/Remove Programs” (other versions
of Windows) to uninstall FinePixViewer. Under
Windows, one or more con rmation dialogs may be
displayed; read the contents carefully before clicking
OK.
54
Page 61
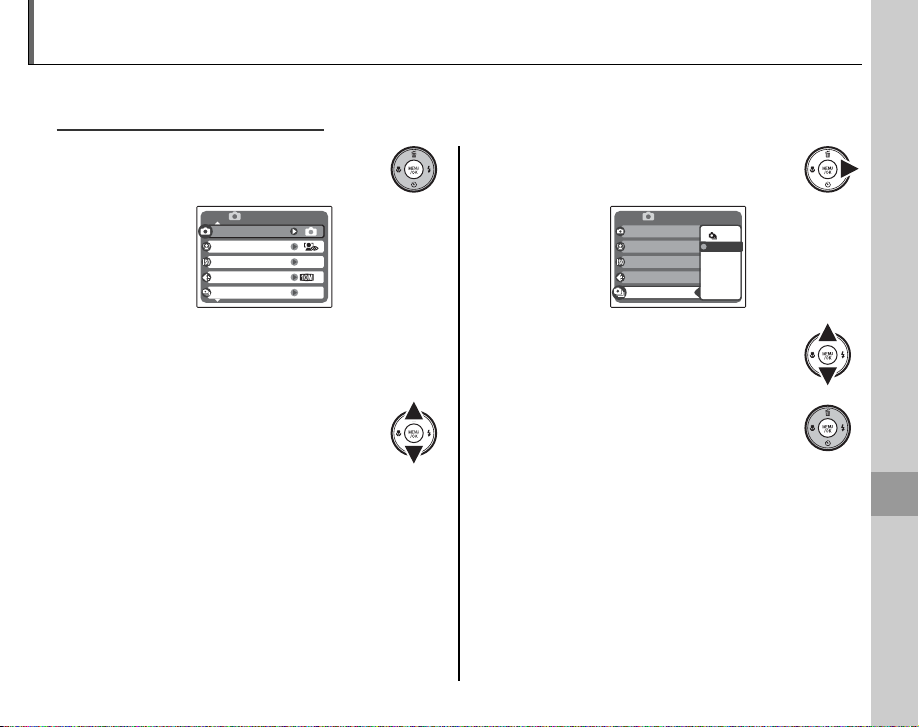
The Shooting Menu
Using the Shooting Menu
The shooting menu is used to adjust settings for a wide range of shooting conditions.
Using the Shooting Menu
Press MENU/OK to display the
1
shooting menu.
SHOOTING MENU
SHOOTING MODE
FACE DETECTION
ISO
QUALITY
CONTINUOUS
AUTO
OFF
N
A Note
The options displayed in the shooting menu vary
depending on the shooting mode.
Press the selector up or down to
2
highlight the desired menu item.
Press the selector right to display
3
options for the highlighted item.
SHOOTING MENU
SHOOTING MODE
FACE DETECTION
ISO
QUALITY
CONTINUOUS
Press the selector up or down to
4
highlight the desired option.
Press MENU/OK to select the
5
highlighted option.
OFF
AUTO
TOP
AUTO
AUTO
OFF
OFF
3
N
N
Menus
55
Page 62
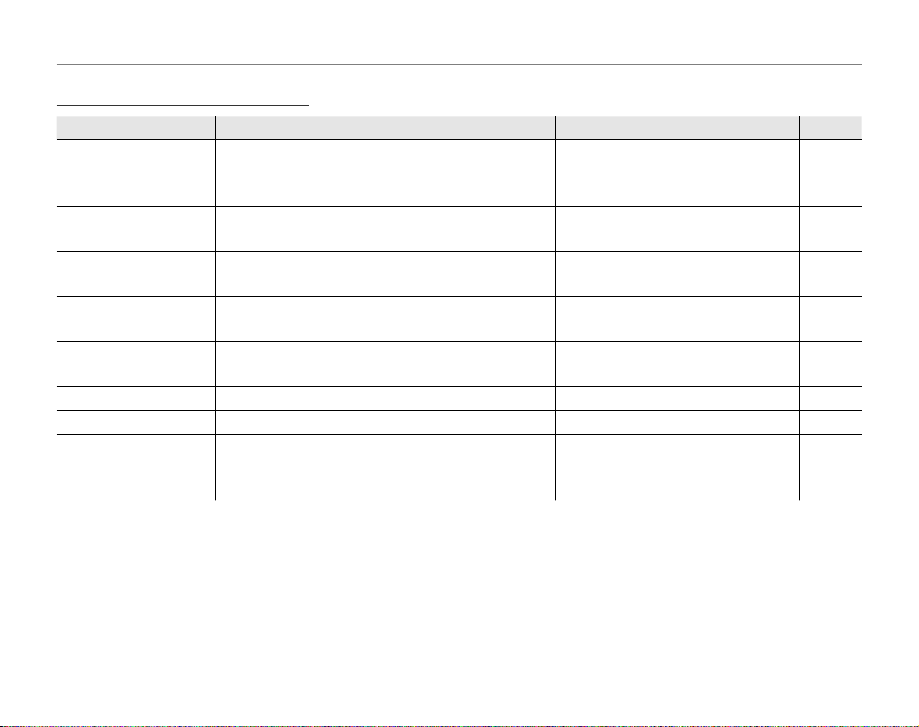
Shooting Menu Options
Shooting Menu Options
Menu item
Description
Options
Default
Menu item
SHOOTING MODE
a
FACE DETECTI ON
c
ISO
g
QUALITY Choose image size and quality (pg. 58).
k
EXP. COMPENSATION
d
WHITE BALANCE Adjust color for di erent light sources (pg. 60).
e
CONTINUOUS Shoot a series of pictures (pg. 61).
c
Choose a shooting mode according to the
type of subject (pg. 28).
Turn Intelligent Face Detection and red-eye
removal on or o (pg. 18).
Adjust ISO sensitivity (pg. 57). Choose higher
values when the subject is poorly lit.
Adjust exposure for bright, dark, or highcontrast scenes (pg. 59).
Description
Perform basic camera setup such as choosing
j
SET-UP
a language and setting the time and date (pg.
71).
The Shooting Menu
Options
M/G/k/p/C/U/K/L/
D/U/B/G/F/W/E/O/
I/H/P/A
B ON S ON / B ON S OFF /
OFF
AUTO/ 1600 / 800 / 400 / 200 /
100
3:2
rF/rN/g
/o/n/
m/p
–2 EV to +2 EV in increments of
1
/
3 EV
AUTO/p/q/s/t/u/r
m/OFF
A/K/L/M
Default
k
B ON
S ON
AUTO
rN
±0
AUTO
OFF
—
56
Page 63
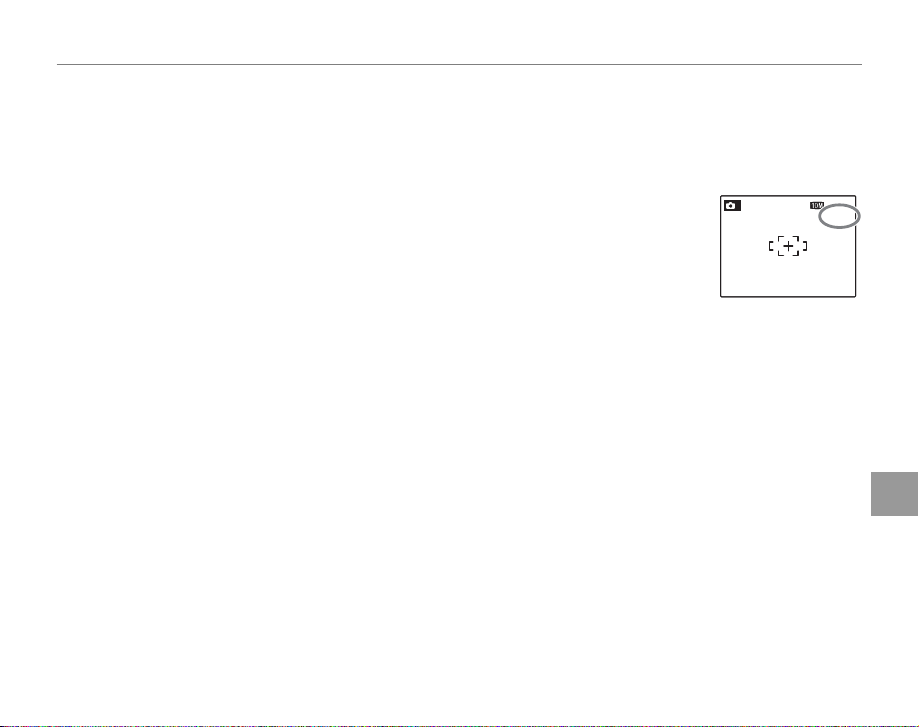
The Shooting Menu
gg ISO
17
N
ISO
100
17
17
N
ISO
100
17
ISO
Control the camera’s sensitivity to light with M. Higher values can be used to reduce blur when
lighting is poor; note, however, that mottling may appear in pictures taken at high sensitivities. If
AUTO is selected, the camera will adjust sensitivity automatically in response to shooting conditions.
Settings other than AUTO are shown by an icon in the monitor if you use M.
M
M
17
17
N
N
ISO
ISO
100
100
17
17
Menus
57
Page 64
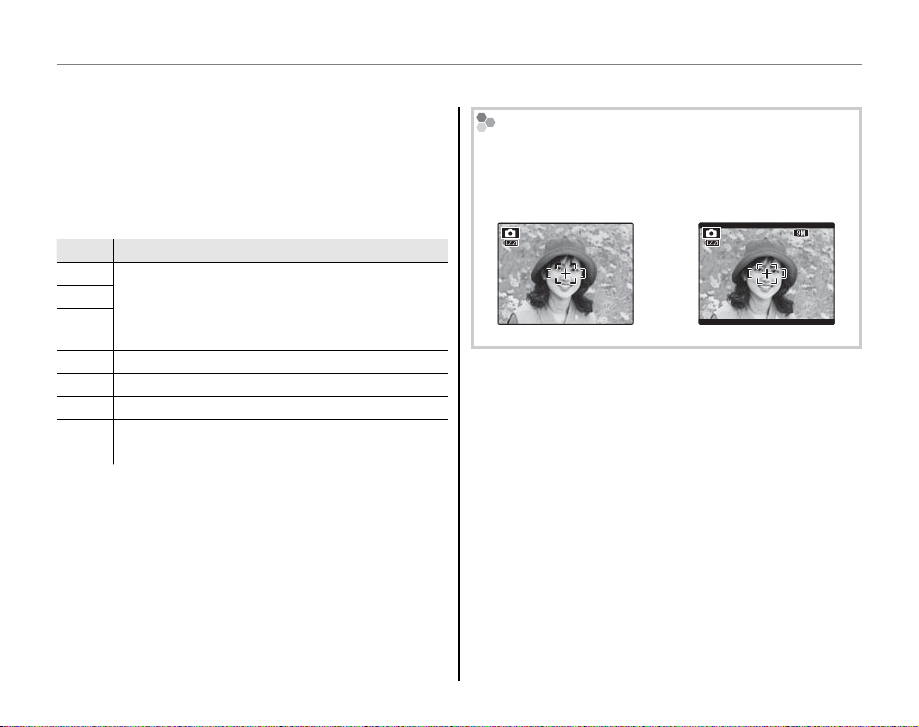
Option
Prints at sizes up to
3: 2
kk QUALITY
QUALITY
Choose the size and quality at which still pictures
are recorded. Large pictures can be printed at
large sizes with no drop in quality; small pictures
require less memory, allowing more pictures to
be recorded.
Option
rF 31 × 23 cm/12 × 9 in. (r) or 31 × 21 cm/
12 × 8 in. (g
rN
quality prints, g
g
3:2
3 : 2.
o
22 × 16 cm (8.5 × 6. 5 in.)
n
17 × 13 cm (7 × 5 in.)
m
14 × 10 cm (5.3 × 4 in.)
5 × 4 cm (2 × 1.5 in.). Suited to e-mail or the
p
web.
Prints at sizes up to
3:2
). Choose rF for high-
3:2
for an aspect ratio of
The number of pictures that can be taken at
current settings (pg. 91) is displayed to the right
of the image quality icon in the monitor.
The Shooting Menu
Aspect Ratio
Pictures taken at an image quality setting of g
have an aspect ratio of 3 : 2, the same as a frame of
35-mm lm. Pictures taken at other settings have an
aspect ratio of 4 : 3.
4 : 3 3 : 2
A Note
Image quality is not reset when the camera is turned
o or another shooting mode is selected.
3:2
3:2
58
Page 65
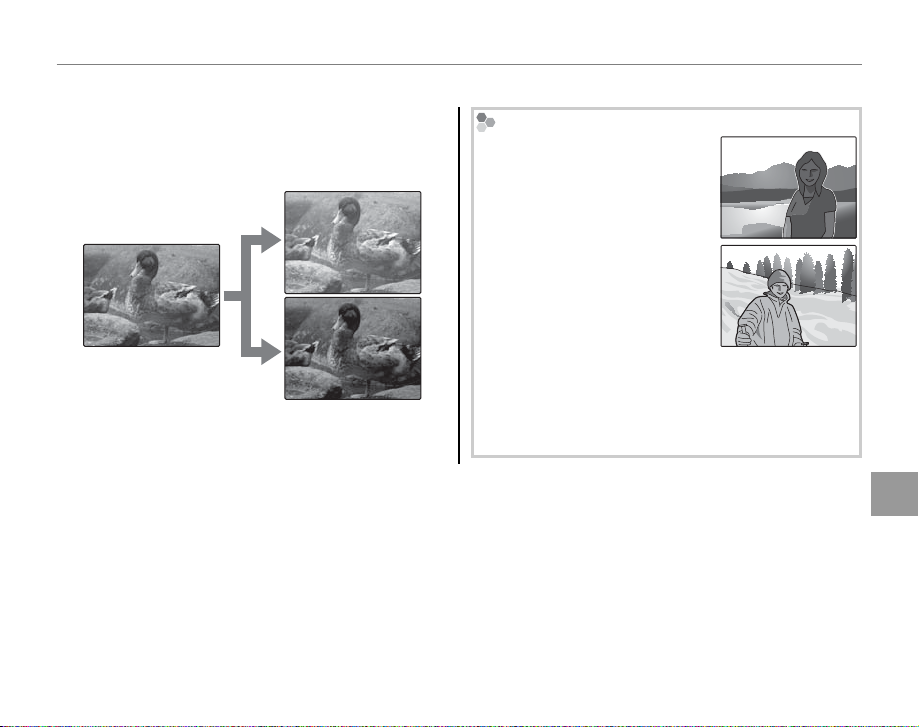
dd EXP. COMPENSATION
EXP. COMPENSATION
Use exposure compensation when
photographing very bright, very dark, or highcontrast subjects.
Choose positive (+) values
to increase exposure
Choosing an Exposure Compensation Value
• Backlit subjects: choose values
from +
2
/
3 EV to +1
2
/
3 EV (for an
explanation of the term “EV”,
see the Glossary on page 90)
• Highly re ective subjects or very
bright scenes (e.g., snow elds):
+1 EV
The Shooting Menu
Choose negative (–) values
to reduce exposure
• Scenes that are mostly sky: +1 EV
• Spotlit subjects (particularly if photographed against
2
dark backgrounds): –
/
3 EV
• Subjects with low re ectivity (pine trees or dark-
2
colored foliage): –
/
3 EV
A Note
At settings other than ±0, a 5 icon is displayed in the monitor. Exposure compensation is not reset when the
camera is turned o ; to restore normal exposure control, choose a value of ±0.
Menus
59
Page 66
ee WHITE BALANCE
WHITE BALANCE
Option
Description
For natural colors, choose a setting that matches
the light source (for an explanation of “white
balance,” see the Glossary on page 90).
The Shooting Menu
Option
AUTO White balance adjusted automatically.
For subjects in direct sunlight.
p
For subjects in the shade.
q
Use under “daylight” uorescent lights.
s
Use under “warm white” uorescent lights.
t
Use under “cool white” uorescent lights.
u
Use under incandescent lighting.
r
Description
If AUTO does not produce the desired results
(for example, when taking close-ups), choose the
option that matches the light source.
A Note
Results vary with shooting conditions. Play pictures
back after shooting to check colors in the monitor.
60
Page 67
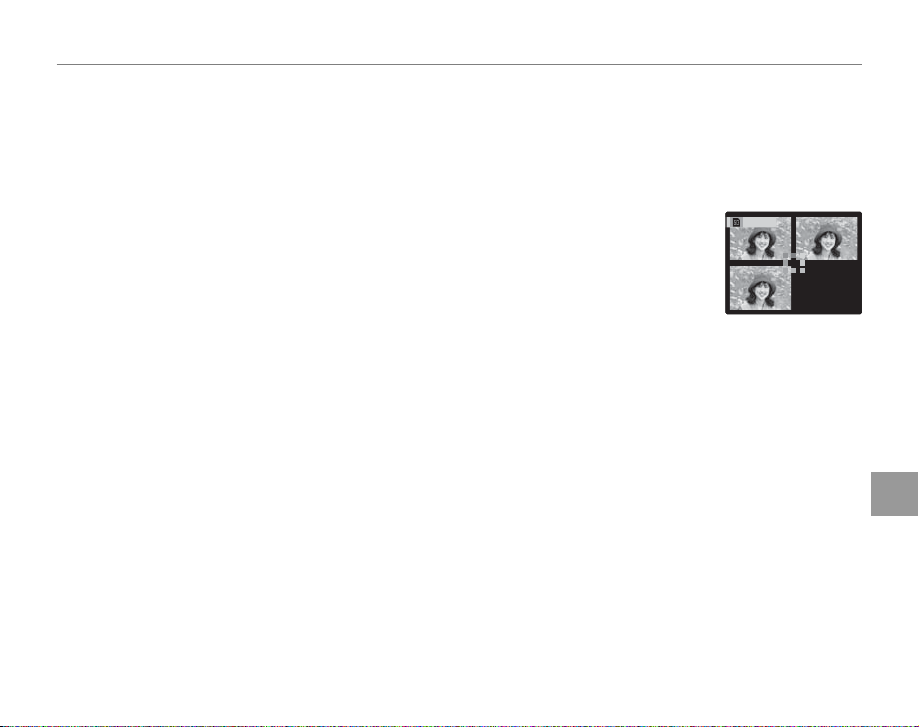
The Shooting Menu
cc CONTINUOUS (Continuous shooting)
CONTINUOUS (Continuous shooting)
Select m TOP 3 to capture motion in a series of pictures. The camera takes up to three pictures
while the shutter-release button is pressed.
A Notes
• Frame rate varies with shutter speed.
• Focus and exposure are determined by the rst frame in each series.
• The number of pictures that can be recorded depends on the memory available.
Additional time may be required to record pictures when shooting ends. The pictures are
displayed in the monitor while recording is in progress.
STORINGSTORING
Menus
61
Page 68
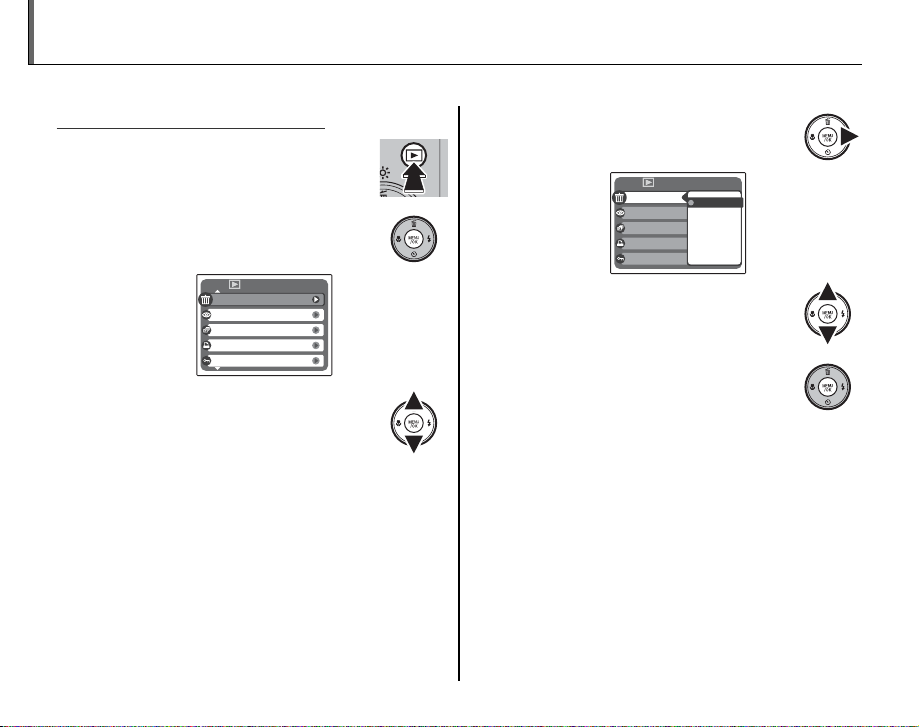
The Playback Menu
Using the Playback Menu
The playback menu is used to manage the pictures in internal memory or on the memory card.
Using the Playback Menu
Press D to enter playback mode
1
(pg. 32).
Press MENU/OK to display the
2
playback menu.
PLAYBACK MENU
ERASE
RED EYE REMOVAL
SLIDE SHOW
PRINT ORDER (DPOF)
PROTECT
Press the selector up or down to
3
highlight the desired menu item.
Press the selector right to display
4
options for the highlighted item.
PLAYBACK MENU
ERASE
RED EYE REMOVAL
SLIDE SHOW
PRINT ORDER (DPOF
PROTECT
Press the selector up or down to
5
highlight the desired option.
Press MENU/OK to select the
6
highlighted option.
BACK
FRAME
ALL FRAMES
)
62
Page 69
The Playback Menu
Playback Menu Options
Option
Description
Playback Menu Options
The following options are available:
Option
ERASE Delete all or selected pictures (pg. 36).
A
RED-EYE REMOVAL Create copies with reduced red eye (pg. 64).
b
SLIDE SHOW View pictures in a slide show (pg. 65).
B
PRINT ORDER (DPOF) Select pictures for printing on DPOF- and PictBridge-compatible devices (pg. 45).
C
PROTECT Protect pictures from accidental deletion (pg. 66).
E
COPY Copy pictures between internal memory and a memory card (pg. 67).
F
IMAGE ROTATE Rotate pictures (pg. 69).
D
TRIMMING Create cropped copies of pictures (pg. 70).
H
SET-UP Perform basic camera setup (pg. 71).
j
Description
Menus
63
Page 70
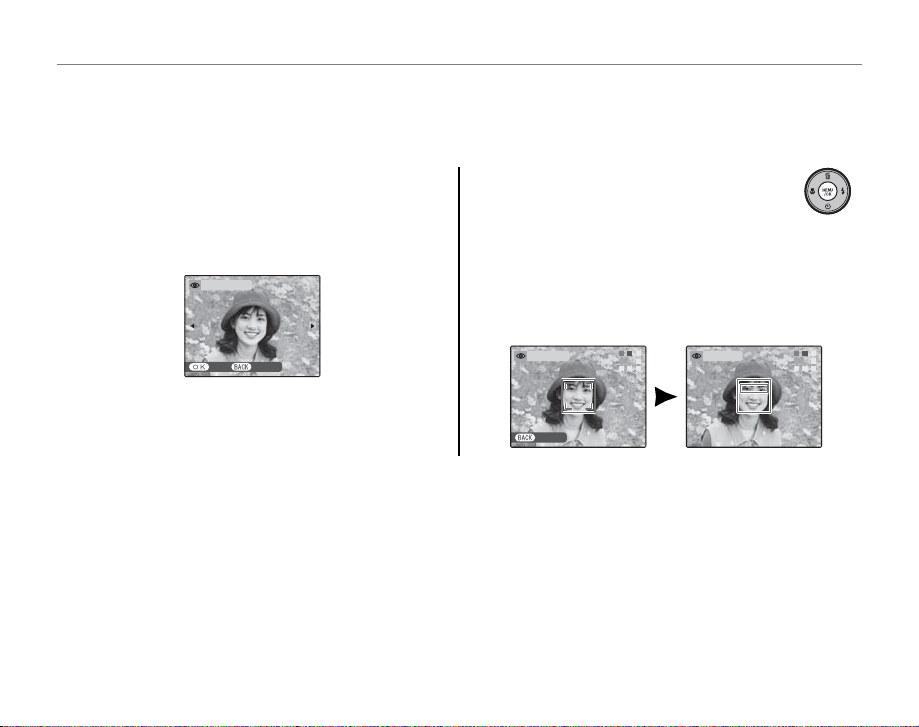
The Playback Menu
bb RED EYE REMOVAL
RED EYE REMOVAL
This option is used with pictures taken using Intelligent Face Detection to create copies that have
been processed to remove red eye.
Play the picture back in the monitor (pictures
1
taken with Intelligent Face Detection are
indicated by a B icon) and select b RED
EYE REMOVAL in the playback menu (pg. 62).
REMOVAL OK?
Press MENU/OK. The message shown
2
below at left will be displayed while
the camera analyses the image;
if red-eye is detected, the message shown
below at right will be displayed while the
camera processes the image to create a copy
with reduced red-eye.
YES CANCEL
A Notes
• Red eye may not be removed if the camera is unable to detect a face or the face is in pro le. Results may di er
depending on the scene. Red eye can not be removed from pictures that have already been processed using
red-eye removal or pictures created with other devices.
• The amount of time needed to process the image varies with the number of faces detected.
• Copies created with b RED EYE REMOVAL are indicated by a l icon during playback.
DETECTING
CANCEL
REMOVING
64
Page 71
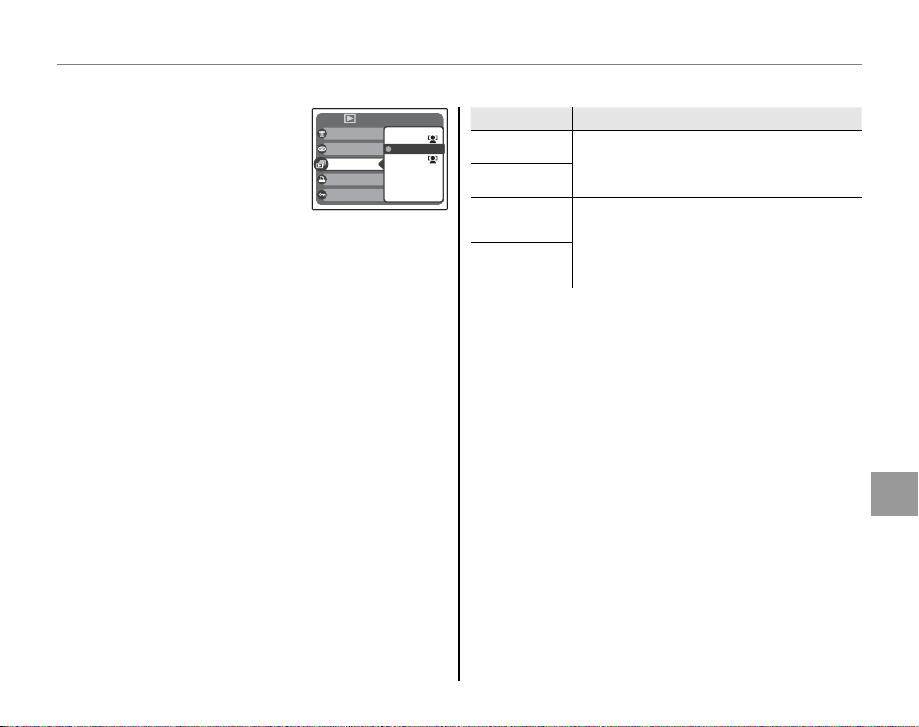
BB SLIDE SHOW
SLIDE SHOW
Option
Description
PLAYBACK MENU
View pictures in an automated
slide show. Choose the type
of show and press MENU/OK
to start. Press DISP/BACK at
PLAYBACK MENU
ERASE
ERASE
RED EYE REMOVAL
RED EYE REMOVAL
SLIDE SHOW
SLIDE SHOW
PRINT ORDER (DPOF)
PRINT ORDER (DPOF)
PROTECT
PROTECT
NORMAL
NORMAL
NORMAL
NORMAL
WIPE
WIPE
WIPE
WIPE
any time during the show to
view on-screen help. When a movie is displayed,
movie playback will begin automatically, and the
slide show will continue when the movie ends.
The show can be ended at any time by pressing
MENU/OK.
A Note
The camera will not turn o automatically while a
slide show is in progress.
Option
NORMAL
WIPE
NORMAL B
WIPE B
The Playback Menu
Description
Press selector left or right to go back or
skip ahead one frame. Select WIPE for
wipe transitions between frames.
As above, except that camera
automatically zooms in on faces
selected with Intelligent Face detection
(pg. 18).
Menus
65
Page 72
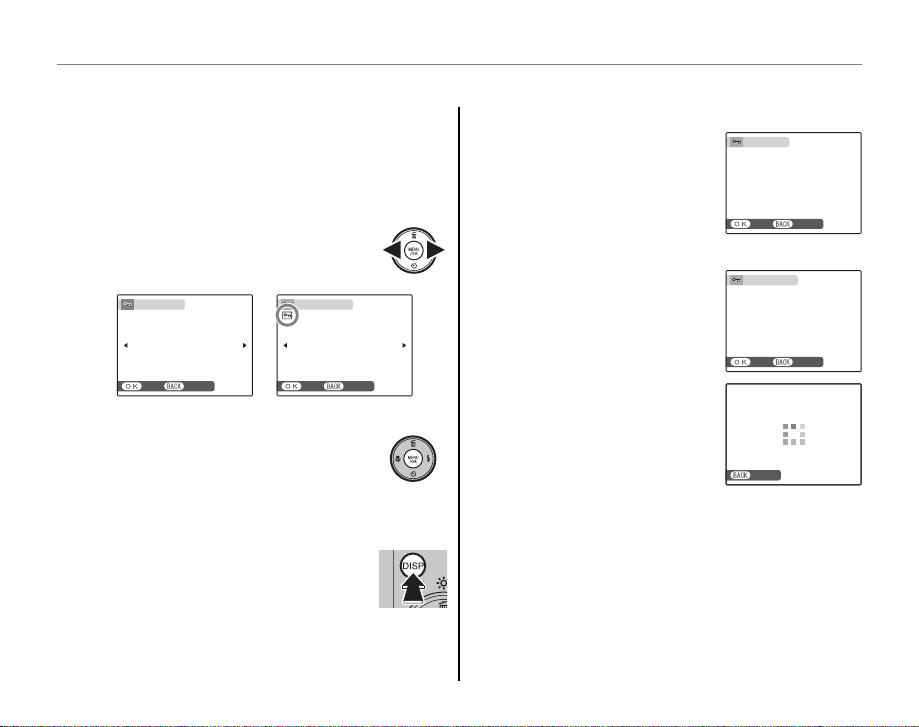
EE PROTECT
PROTECT
■■ FRAME
■■ SET ALL
■■ RESET ALL
Protect pictures from accidental deletion. The
following options are available.
FRAME
Protect selected pictures.
Press the selector left or right to
1
display the desired picture.
PROTECT OK?
YES CANCEL
Picture not protected Protected picture
Press MENU/OK to protect the
2
picture. If the picture is already
UNPROTECT OK?
YES CANCEL
protected, pressing MENU/OK will
remove protection from the image.
Repeat steps 1–2 to protect
3
additional images. Press DISP/BACK
to exit when the operation is
complete.
The Playback Menu
SET ALL
Press MENU/OK to protect all
SET ALL OK?
IT MAY TAKE A WHILE
pictures, or press DISP/BACK to
exit without changing picture
status.
RESET ALL
Press MENU/OK to remove
YES CANCEL
RESET ALL OK?
IT MAY TAKE A WHILE
protection from all pictures, or
press DISP/BACK to exit without
changing picture status.
YES CANCEL
If the number of pictures
a ected is very large, the
display at right will appear
in the monitor while the
CANCELCANCEL
operation is in progress.
Press DISP/BACK to exit before the operation is
complete.
C Caution
Protected pictures will be deleted when the memory
card or internal memory is formatted (pg. 76).
66
Page 73
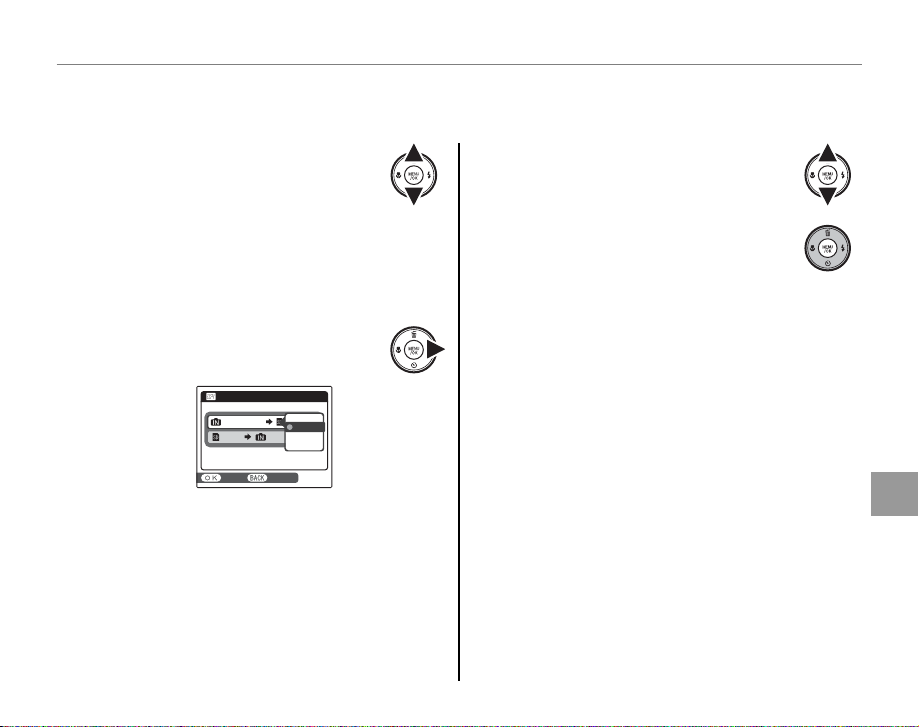
F
COPY
COPY
Copy pictures between internal memory and a memory card.
The Playback Menu
Press the selector up or down to
1
highlight d INTERNAL MEMORY
g x CARD (copy pictures from
internal memory to the memory card) or
x CARD g d INTERNAL MEMORY (copy
pictures from a memory card to internal
memory).
Press the selector right to display
2
options for the highlighted item.
COPY
INTERNAL MEMORY
CARD
YES CANCEL
CARD
CARD
INTERNAL MEMORY
FRAME
ALL FRAMES
Press the selector up or down to
3
highlight FRAME or ALL FRAMES.
Press MENU/OK.
4
B Tip: Copying Pictures Between Memor y Cards
To copy pictures between two memory cards, insert
the source card and copy the pictures to internal
memory, then remove the source card, insert the
destination card, and copy the pictures from internal
memory.
Menus
67
Page 74
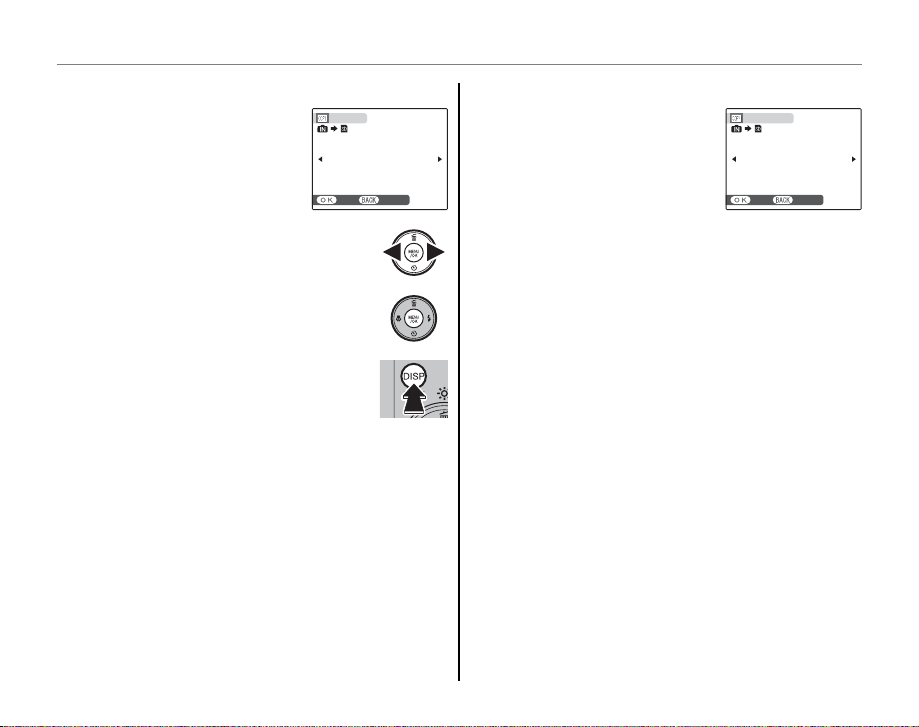
The Playback Menu
■■ FRAME
100-0001
■■ ALL FRAMES
100-0001
FRAME
Copy selected frames.
Press the selector left or right to
1
display the desired picture.
Press MENU/OK to copy the picture.
2
Repeat steps 1–2 to copy additional
3
images. Press DISP/BACK to exit
when the operation is complete.
COPY OK?
YES CANCEL
ALL FRAMES
Press MENU/OK to copy all
100-0001
pictures, or press DISP/BACK to
exit without copying pictures.
C Cautions
• Copying ends when the destination is full.
• DPOF print information is not copied (pg. 45).
COPY ALL OK?
IT MAY TAKE
A WHILE
YES CANCEL
100-0001
68
Page 75
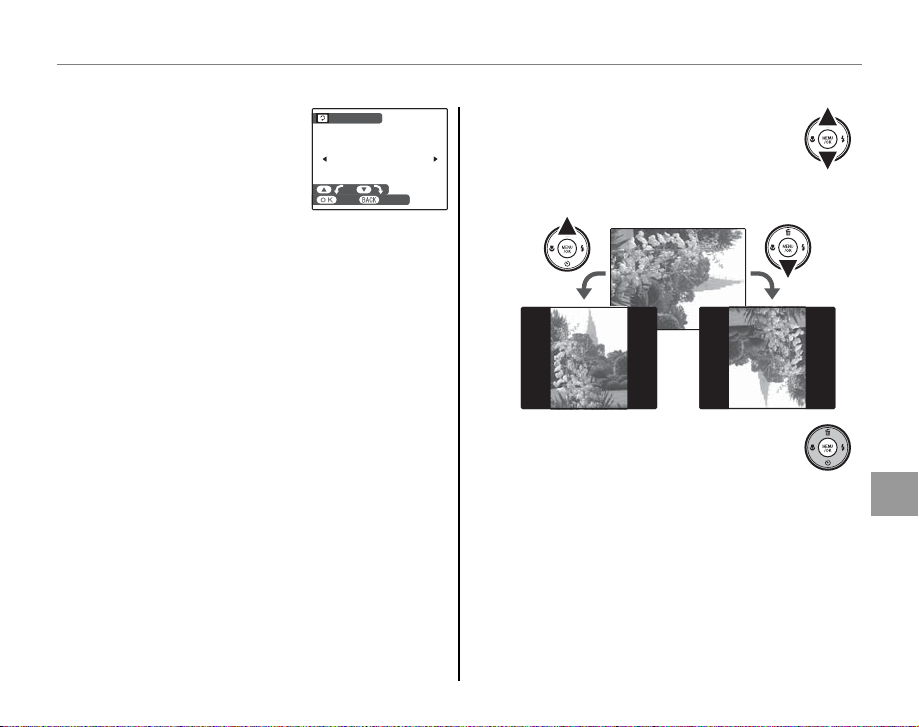
DD IMAGE ROTATE
IMAGE ROTATE
IMAGE ROTATE
By default, pictures taken in
IMAGE ROTATE
tall orientation are displayed
in wide orientation. Use this
option to display pictures in
CANCELSET
CANCELSET
the correct orientation in the
monitor. It has no e ect on pictures displayed
on a computer or other device.
A Notes
• Protected pictures can not be rotated. Remove
protection before rotating pictures (pg. 66).
• The camera may not be able to rotate pictures
created with other devices.
Press the selector down to
1
rotate the picture 90 ° clockwise,
up to rotate the picture 90 °
counterclockwise.
The Playback Menu
To rotate a picture, play the picture back and
select D IMAGE ROTATE in the playback menu
(pg. 62).
Press MENU/OK to con rm the
2
operation (to exit without rotating
the picture, press DISP/BACK).
The next time the picture is played back, it will
automatically be rotated.
Menus
69
Page 76
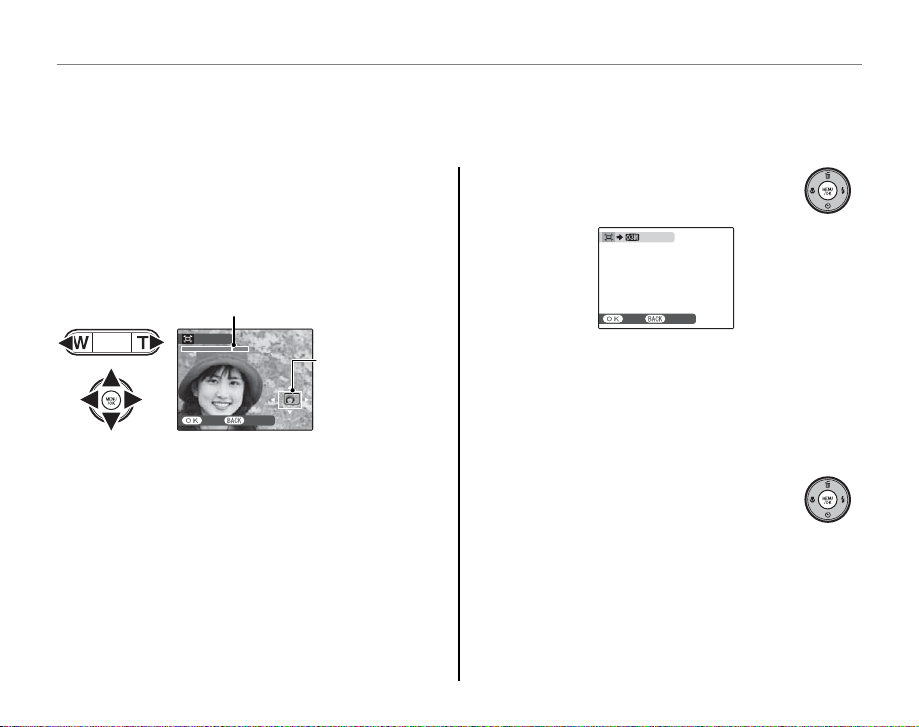
The Playback Menu
TRIMMING
H
TRIMMING
To create a cropped copy of a picture, play the picture back and select H TRIMMING in the playback
menu (pg. 62).
Press the zoom buttons to zoom in and out
1
and use the selector to scroll the picture
until the desired portion is displayed (to exit
to single-frame playback without creating a
cropped copy, press DISP/BACK).
Zoom indicator
TRIMMING
YES CANCEL
Navigation
window shows
portion of image
currently displayed
in monitor
70
Press MENU/OK. A con rmation
2
dialog will be displayed.
REC OK?
CANCELREC
Copy size (o, n, m, or p; see page
58) is shown at the top; if the size is p, OK
is displayed in yellow. Larger crops produce
larger copies; all copies have an aspect ratio
of 4 : 3.
Press MENU/OK to save the cropped
3
copy to a separate le.
Page 77
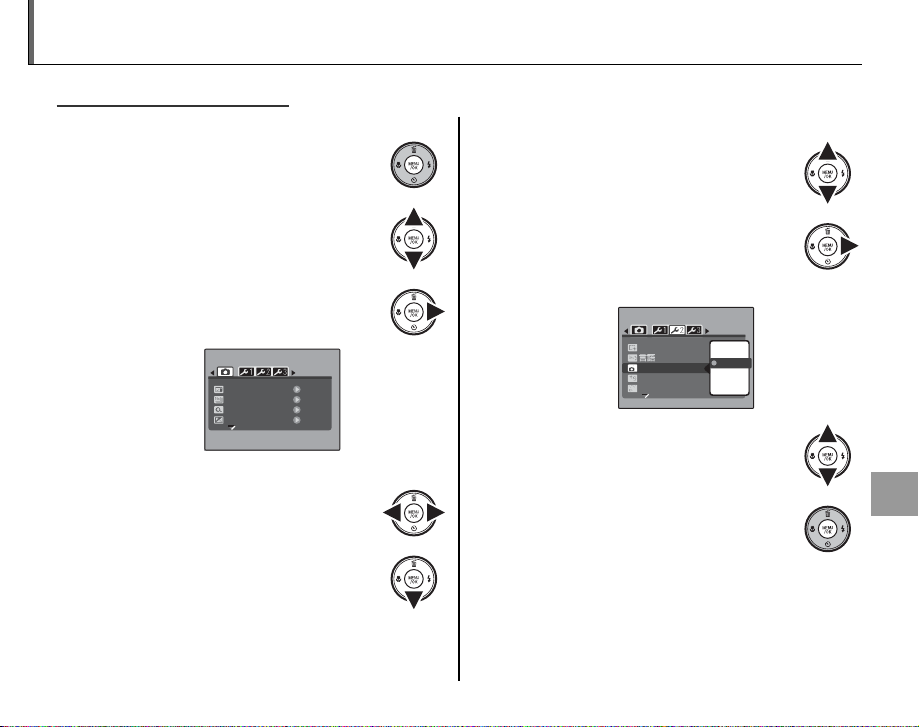
The Setup Menu
Using the Setup Menu
Using the Setup Menu
Display the setup menu.
1
1.1 Press MENU/OK to display the
menu for the current mode.
Adjust settings.
3
3.1 Press the selector up or down
to highlight a menu item.
1.2 Press the selector up or down
to highlight j SET-UP.
1.3 Press the selector right to
display the setup menu.
SET-UP
IMAGE DISP.
FRAME NO.
DIGITAL ZOOM
LCD POWER SAVE
Choose a page.
2
2.1 Press the selector left or right
to choose a page.
2.2 Press the selector down to
enter the menu.
1.5 SEC
CONT.
OFF
3.2 Press the selector right
to display options for the
highlighted item.
SET-UP
FORMATFORMAT
/LANG
AUTO POWER OFF
TIME DIFFERENCETIME DIFFERENCE
VIDEO SYSTEMVIDEO SYSTEM
ON
5
MIN
ENGLISH
2
MIN
2 MIN
OFF
NTSC
3.3 Press the selector up or down
to highlight an option.
3.4 Press MENU/OK to select the
Menus
highlighted option.
71
Page 78
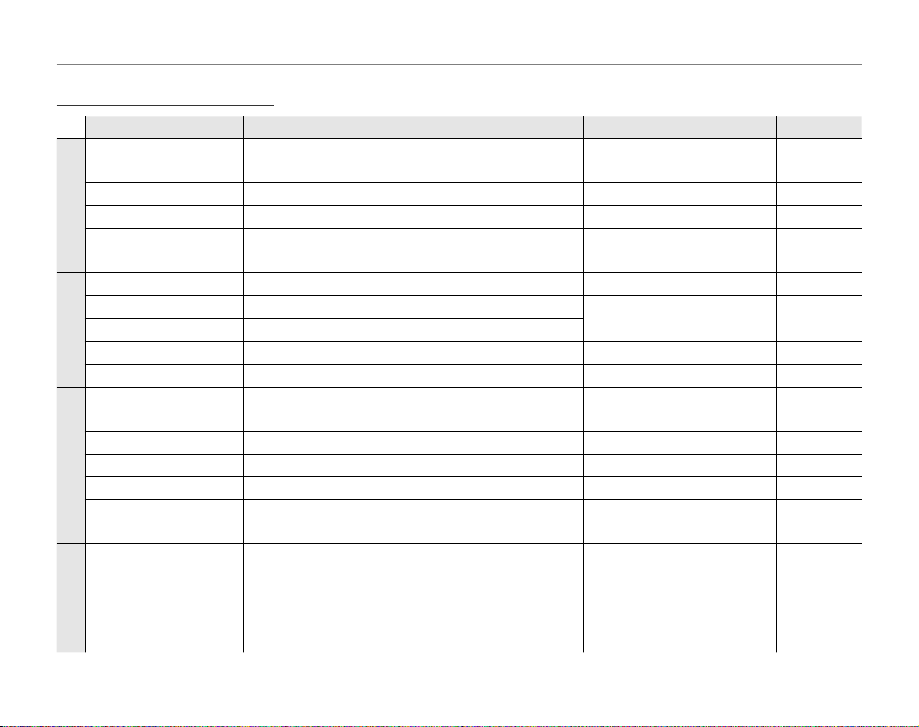
Setup Menu Options
Setup Menu Options
Menu item
Description
Options
Default
A
K
L
M
Menu item
IMAGE DISP.
a
FRAME NO. Choose how les are named (pg. 74). CONTINUOUS / RENEW
b
A
DIGITAL ZOOM Enable or disable digital zoom (pg. 75). ON / OFF OFF
c
LCD POWER SAVE
a
DATE/TI ME Set the camera clock (pg. 12). — —
e
OPERATION VOL. Adjust the volume of camera controls.
d
K
SHUTTER VOLUME Adjust the volume of the shutter sound.
e
PLAYBACK VOLUME Adjust the volume for movie playback (pg. 75). — 7
f
LCD BRIGHTNESS Control the brightness of the monitor (pg. 75). — 0
g
FORMAT
m
nw
L
AUTO POWER OFF Choose the auto power o delay (pg. 76). 5 MIN / 2 MIN / OFF 2 MIN
o
TIME DIFFE RENCE Set the clock to local time (pg. 77). k/j
p
VIDEO SYSTEM
r
Choose how long pictures are displayed after
shooting (pg. 73).
Enable or disable monitor power saving (pg.
75).
Format internal memory or memory cards
(pg. 76).
Choose a language (pg. 12). See page 93 ENGLISH
Choose a video mode for connection to a TV
(pg. 41).
Reset all settings except Frame number,
DATE/TI ME, TIME DIFFERENCE, and VIDEO SYSTEM
M
s
RESET
to default values. A con rmation dialog will
be displayed, press the selector left or right to
highlight OK and press MENU/OK.
Description
The Setup Menu
Options
CONTINUOUS / 3 SEC / 1.5 SEC /
ZOOM (CONTINUOUS) / OFF
ON / OFF ON
q (high) / m (mid) /
n (low) / o (mute)
——
NTSC / PAL —
——
Default
1.5 SEC
CONTINUOUS
m
k
72
Page 79

The Setup Menu
aa IMAGE DISP.
IMAGE DISP.
Choose an option other than OFF to display pictures in the monitor after shooting. Pictures can
be displayed for 1.5 s (1.5 SEC), 3 s (3 SEC), or until the MENU/OK button is pressed (CONTINUOUS
and ZOOM (CONTINUOUS)). If ZOOM (CONTINUOUS) is selected, photos taken at qualities larger
than p can be zoomed in to check focus and other ne details (see page 33). If Intelligent Face
Detection is on (pg. 18), the camera will automatically zoom in on the face used to set focus and
exposure; press the selector down to cycle through the other faces detected. Note that ZOOM
(CONTINUOUS) is disabled during continuous shooting (pg. 61), and that the colors displayed at
settings of 1.5 SEC and 3 SEC may di er from those in the nal picture.
Menus
73
Page 80
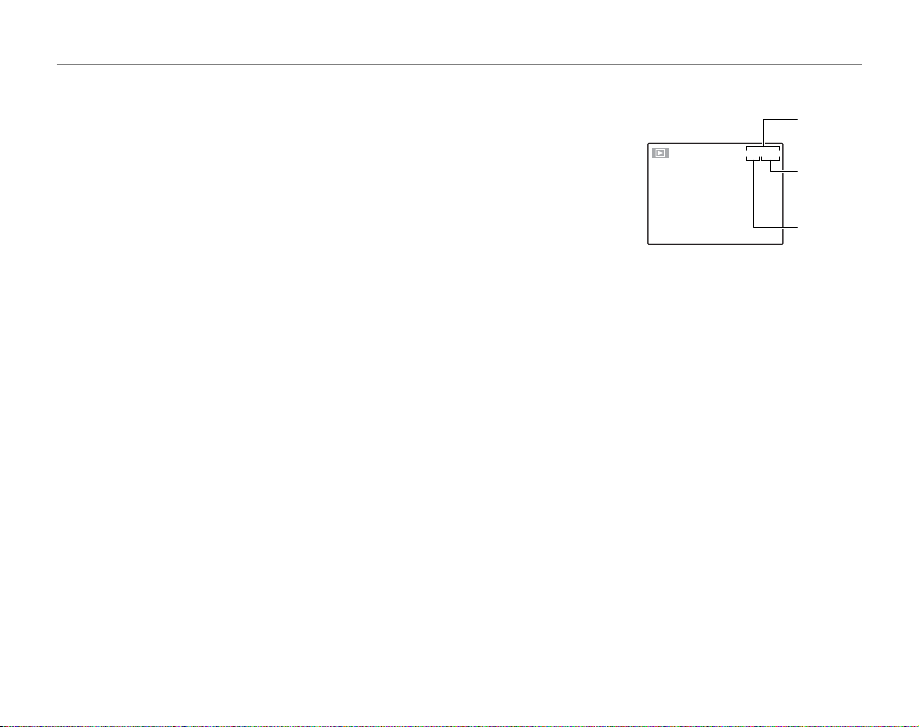
The Setup Menu
bb FRAME NO.
100-0001
100-0001
FRAME NO.
New pictures are stored in image les named using a four-digit le
number assigned by adding one to the last le number used. The le
number is displayed during playback as shown at right. FRAME NO.
controls whether le numbering is reset to 0001 when a new memory
card is inserted or the current memory card or internal memory is
formatted.
• CONTINUOUS: Numbering continues from the last le number used or the
100-0001
100-0001
Frame
Frame
number
number
File
File
number
number
Directory
Directory
number
number
rst available le number, whichever is higher. Choose this option to reduce the number of pictures
with duplicate le names.
• RENEW: Numbering is reset to 0001 after formatting or when a new memory card is inserted.
A Notes
• If the frame number reaches 999-9999, the shutter release will be disabled (pg. 88).
• Selecting s RESET (pg. 72) does not reset frame numbering.
• Frame numbers for pictures taken with other cameras may di er.
74
Page 81
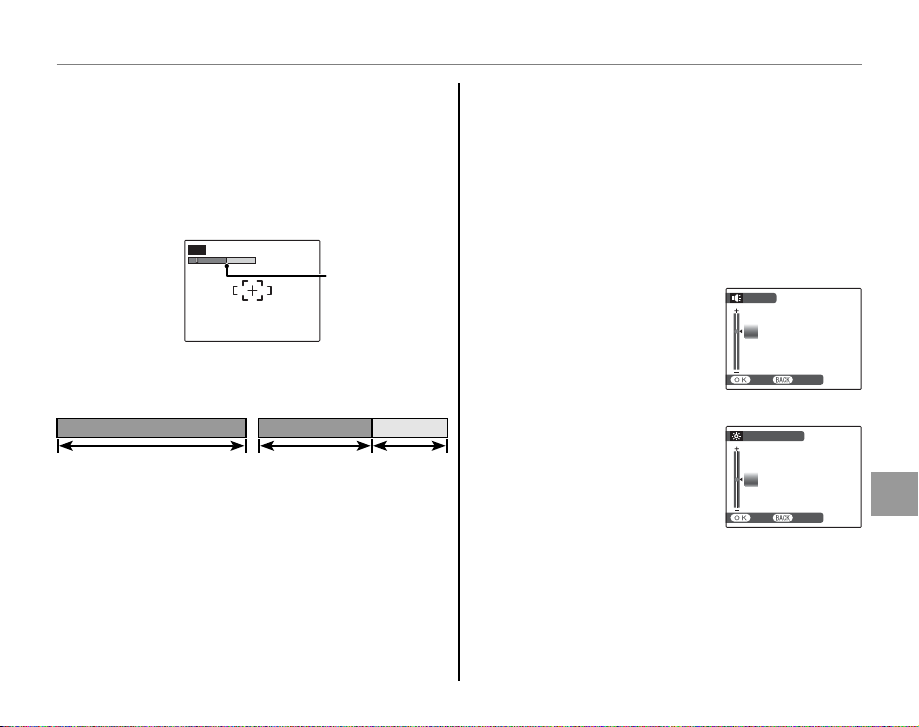
cc DIGITAL ZOOM
aa LCD POWER SAVE
LCD POWER SAVE
ff PLAYBACK VOLUME
gg LCD BRIGHTNESS
DIGITAL ZOOM
If ON is selected, pressing T at the maximum
optical zoom position will trigger digital zoom,
further magnifying the image. To cancel digital
zoom, zoom out to the minimum digital zoom
position and press W.
AUTO
Zoom
indicator
If ON is selected, the monitor will dim to save
power if no operations are performed for
several seconds. Full brightness can be restored
by pressing the shutter button halfway. The
monitor does not dim in movie mode or during
playback.
PLAYBACK VOLUME
Press the selector up or down
to choose volume for movie
Zoom indicator,
DIGITAL ZOOM o
WWT
T
Zoom indicator,
DIGITAL ZOOM on
playback and press MENU/OK to
select.
LCD BRIGHTNESS
Press the selector up or down
Optical zoomOptical zoom
Digital
zoom
C Caution
Digital zoom produces lower quality images than
optical zoom.
to choose monitor brightness
and press MENU/OK to select.
The Setup Menu
VOLUME
7
SET CANCEL
LCD BRIGHTNESS
0
SET
CANCEL
Menus
75
Page 82
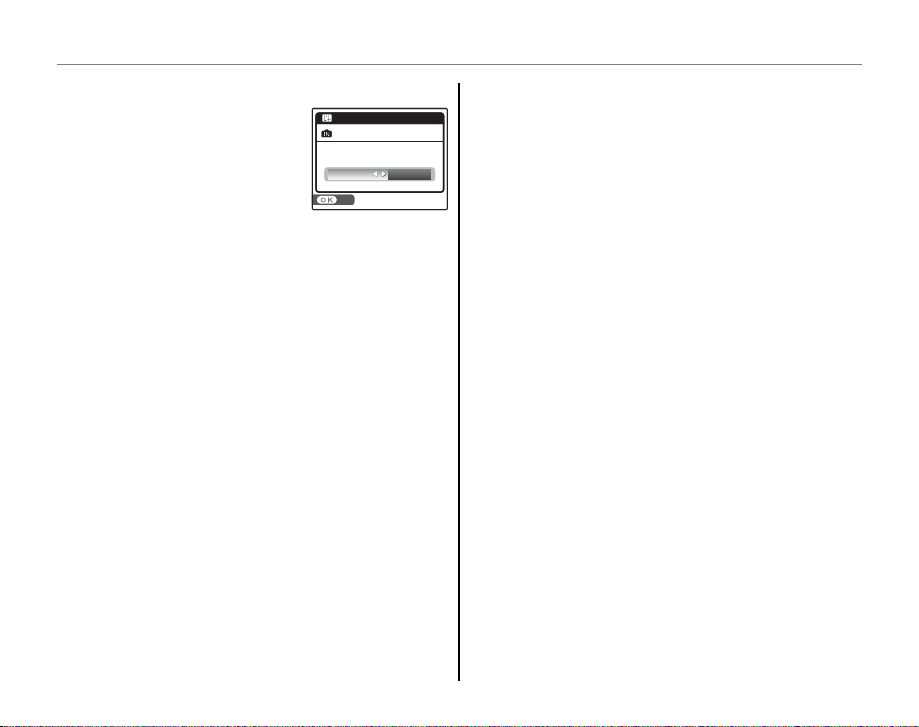
m
FORMAT
oo AUTO POWER OFF
FORMAT
FORMAT
Format internal memory or a
memory card. If a memory
card is inserted in the camera,
x will be displayed in the
FORMAT
FORMAT OK?
FORMAT OK?
ERASE ALL DATA
ERASE ALL DATA
OK CANCEL
OK CANCEL
SET
SET
dialog shown at right and
this option will format the memory card. If no
memory card is inserted, d will be displayed
and this option will format internal memory.
Press the selector left to highlight OK and press
MENU/OK to begin formatting.
C Cautions
• All data—including protected pictures—will be
deleted. Be sure important les have been copied to
a computer or other storage device.
• Do not open the battery cover during formatting.
The Setup Menu
AUTO POWER OFF
Choose the length of time before the camera
turns o automatically when no operations
are performed. Shorter times increase battery
life; if OFF is selected, the camera must be
turned o manually. Note that regardless of the
option selected, the camera will not turn o
automatically when connected to a printer (pg.
42) or computer (pg. 53) or when a slide show is
in progress (pg. 65).
B Tip: Reactivating the Camera
To reactivate the camera after it has turned o
automatically, press the n button or press the
D button for about a second (pg. 11).
76
Page 83
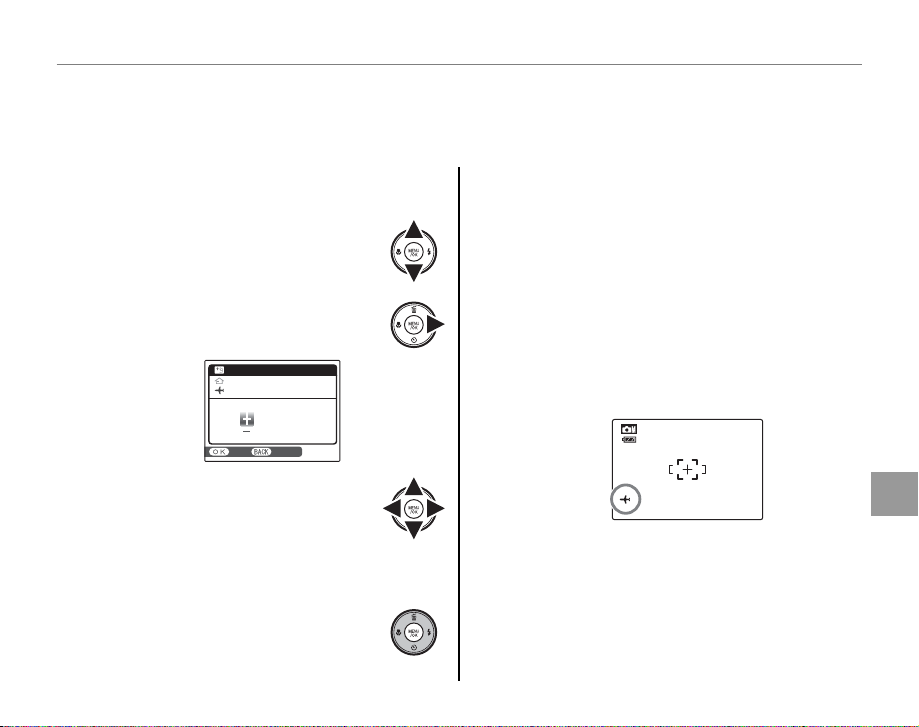
The Setup Menu
pp TIME DIFFERENCE
TIME DIFFERENCE
When travelling, use this option to switch the camera clock instantly from your home time zone to
the local time at your destination.
Specify the di erence between local time
1
and your home time zone.
1.1 Press the selector up or down
to highlight j LOCAL.
1.2 Press the selector right to
display the time di erence.
TIME DIFFERENCE
12/ 31 /2050
10: 00 AM
12/ 31 /2050
10: 00 AM
00 : 00
SET CANCEL
1.3 Press the selector left or right
to highlight +, –, hours, or
minutes; press up or down to
edit. The minimum increment
is 15 minutes.
1.4 Press MENU/OK when settings
are complete.
Switch between local time and your
2
home time zone.
To set the camera clock to local time,
highlight j LOCAL and press MENU/OK.
To set the clock to the time in your home
time zone, select k HOME. If j LOCAL
is selected, j will be displayed in the
monitor for three seconds after the camera
enters shooting mode, and the date will be
displayed in yellow.
12 / 31 / 2050 10 : 00 AM
After changing time zones, check that the
date and time are correct.
Menus
77
Page 84
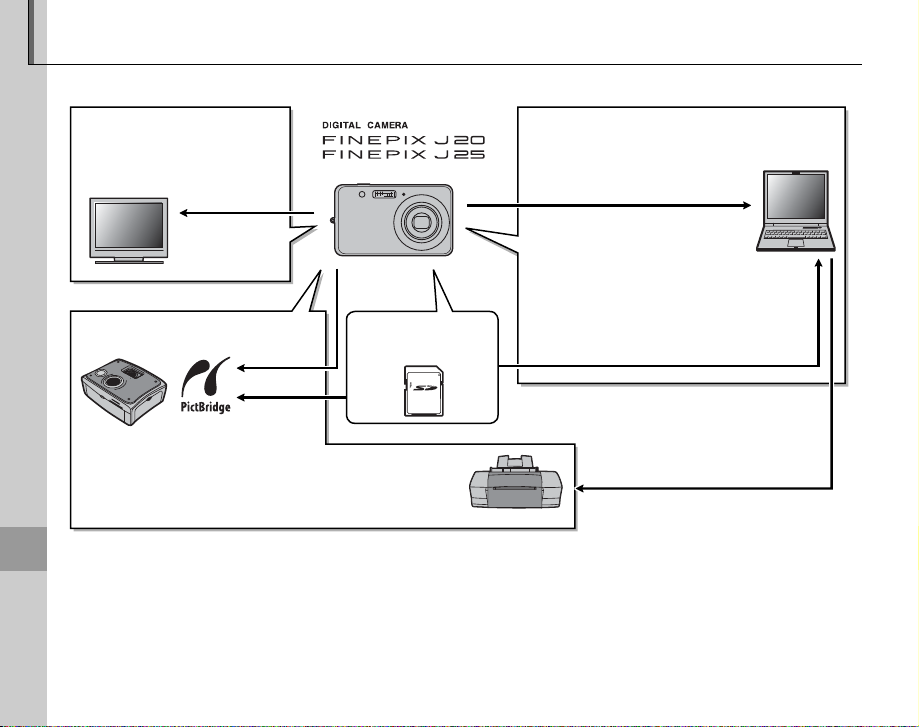
Optional Accessories
■■ Printing
■■ Audio/Visual
■■ Computer Related
The camera supports a wide range of accessories from FUJIFILM and other manufacturers.
Computer Related
Audio/Visual
TV (available from
third-party suppliers)
Audio/visual
output
USB
Computer (available from
third-party suppliers)
Printing
Tec hni cal Not es
PictBridge-compatible printer
(available from third-party
suppliers)
78
USB
SD/SDHC
memory card
Printer (available
from third-party
suppliers)
SD card slot or card reader
Page 85
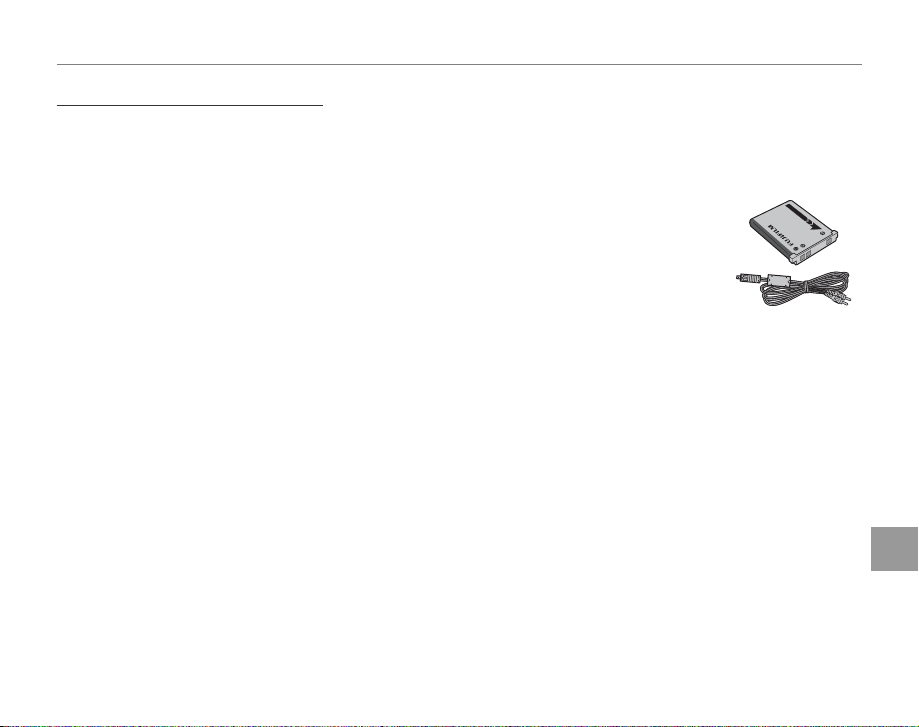
Optional Accessories
Accessories from Fuji lm
Accessories from Fuji lm
The following optional accessories were available from FUJIFILM. For the latest information on the
accessories available in your region, check with your local Fuji lm representative or visit http://www.
fujifilm.com/products/digital_cameras/index.html.
• NP-45 rechargeable Li- ion battery (sup plied): Additional NP-45 slimline batteries can be
purchased as required.
• AV-C1 A/V cable: Connects the camera and a TV.
Tec hni cal Not es
79
Page 86
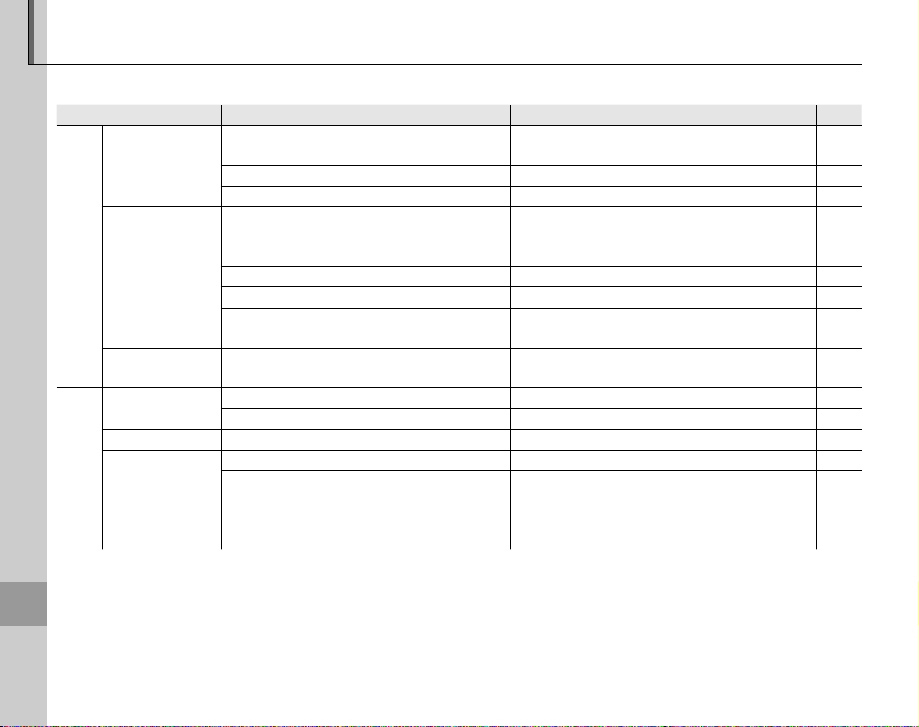
Troub les hoot ing
Problem
Possibl e cause
Solution
Page
Power and Battery
Problem
The camera does
not turn on.
Power
supply
The battery runs
down quickly.
The camera turns
o suddenly.
Charging does
Troubleshooting
not start.
Charging is slow. The temperature is low. Charge the battery at room temperature. 5
Battery
The charging
charger
lamp lights, but
the battery does
not charge.
Possibl e cause
The battery is exhausted.
The battery is not in the correct orientation. Re-insert the battery in the correct orientation. 6
The battery-chamber cover is not latched. Latch the battery-chamber cover. 7
The battery is cold.
There is dirt on the battery terminals. Clean the terminals with a soft, dry cloth. —
The camera is in G mode.
The battery has been charged many times.
The battery is exhausted.
The battery is not correctly inser ted. Re-insert the battery in the charger. 6
The battery is not in the correct orientation. Re-insert the battery in the correct orientation. 6
There is dirt on the battery terminals. Clean the terminals with a soft, dry cloth. —
The battery has been charged many times.
Charge the battery or insert a fully-charged
spare battery.
Warm the battery by placing it in a pocket
or other warm place and re-insert it in the
camera immediately before taking a picture.
Choose a di erent shooting mode. 29
The battery has reached the end of its
charging life. Purchase a new battery.
Charge the battery or insert a fully-charged
spare battery.
The battery has reached the end of its
charging life. Purchase a new battery. If
the battery still fails to charge, contact your
FUJIFILM dealer.
Solution
Page
4, 6
—
—
4, 6
—
80
Page 87
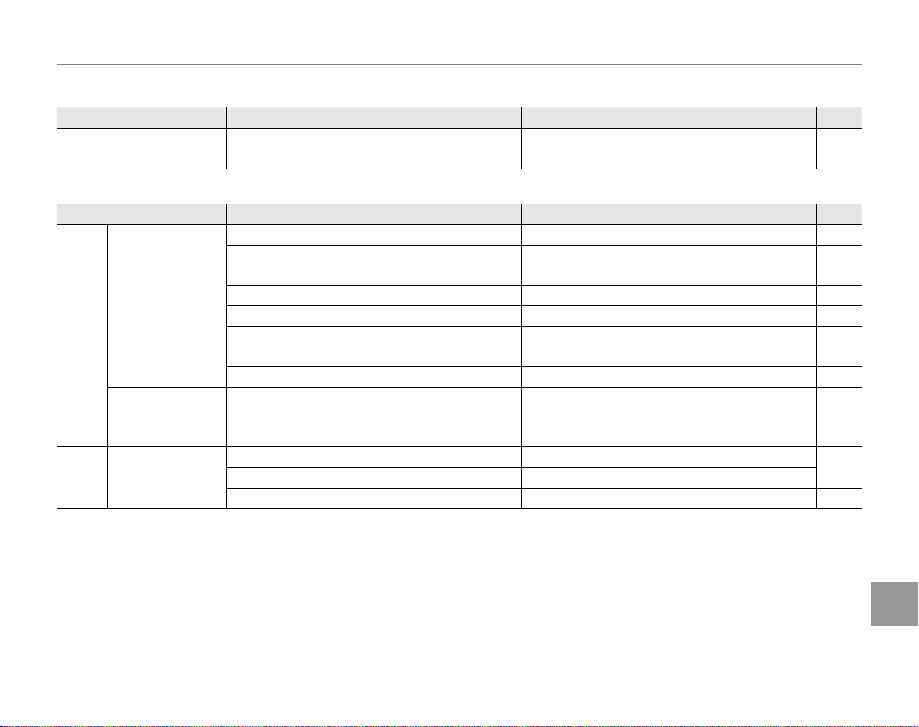
Menus and Displays
Problem
Possibl e cause
Solution
Page
Problem
Possibl e cause
Solution
Page
Problem
Menus and displays are
not in English.
Shooting
Problem
No picture is
taken when the
shutter button is
Tak ing
pressed.
pictures
The monitor
goes dark after
shooting.
The camera does
Focus
not focus.
Tro ub le sho ot in g
Possibl e cause
English is not selected for the n w
option in the setup menu.
Possibl e cause
Memory is full. Insert a new memory card or delete pictures. 8, 36
Memory is not formatted.
There is dirt on the memory card contacts. Clean the contacts with a soft, dry cloth. 9
The memory card is damaged. Insert a new memory card. 8
The battery is exhausted.
The camera has turned o automatically. Turn the camera on. 11, 76
The ash has red.
The subject is close to the camera. Select macro mode.
The subject is far away from the camera. Cancel macro mode.
The subject is not suited to autofocus. Use focus lock. 21
Select ENGLISH.12
Format the memory card or internal
memory.
Charge the battery or insert a fully-charged
spare battery.
The monitor may darken while the ash
charges. Wait for the ash to charge.
Solution
Solution
Page
Page
76
4, 6
24
23
Tro ubl esh oot in g
81
Page 88
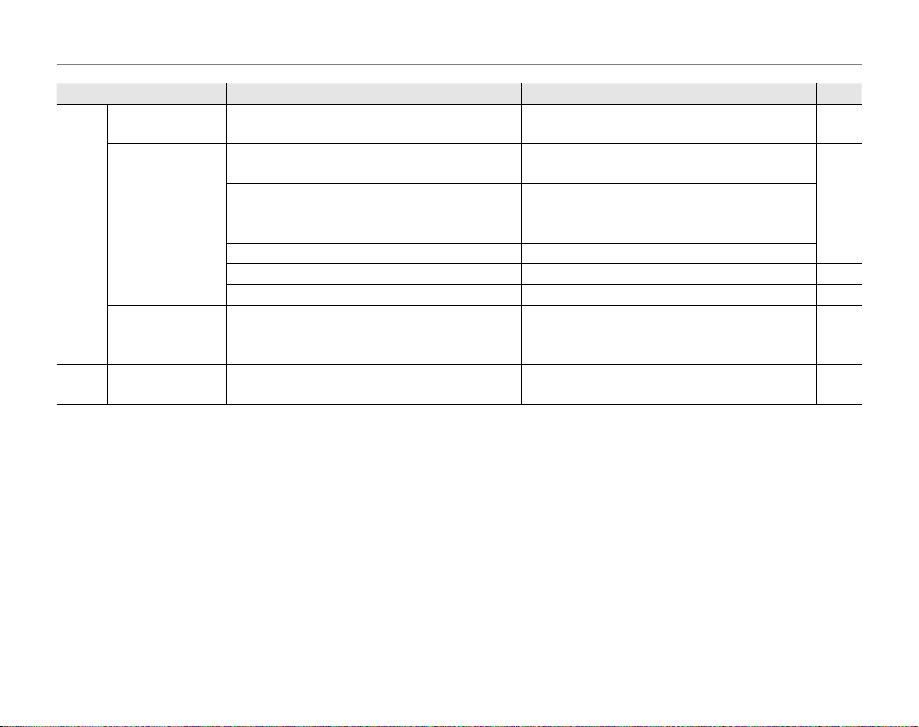
Tro ub le sho ot in g
Problem
Possibl e cause
Solution
Page
Intelligent
Face
Detection
Close-ups
Problem
Face detection
not available.
No face is
detected.
Wrong subject
selected.
Macro mode is
not available.
Possibl e cause
The camera is in a shooting mode which
makes Intelligent Face Detection unavailable.
The subject’s face is obscured sunglasses, a
hat, long hair, or other objects.
of the frame.
The subject’s head is tilted or horizontal. Ask the subject to hold their head straight.
The camera is tilted. Hold the camera straight. 14
The subject’s face is poorly lit. Shoot in bright light. —
The selected subject is closer to the center
of the frame than the main subject.
The camera is in a shooting mode which
makes macro (close-up) mode unavailable.
Choose a di erent shooting mode. 28
Remove the obstructions.
Change the composition so that the
subject’s face occupies a larger area of the
frame.
Recompose the picture or turn face
detection o and frame the picture using
focus lock.
Choose a di erent shooting mode. 28
Solution
Page
18The subject’s face occupies only a small area
21
82
Page 89
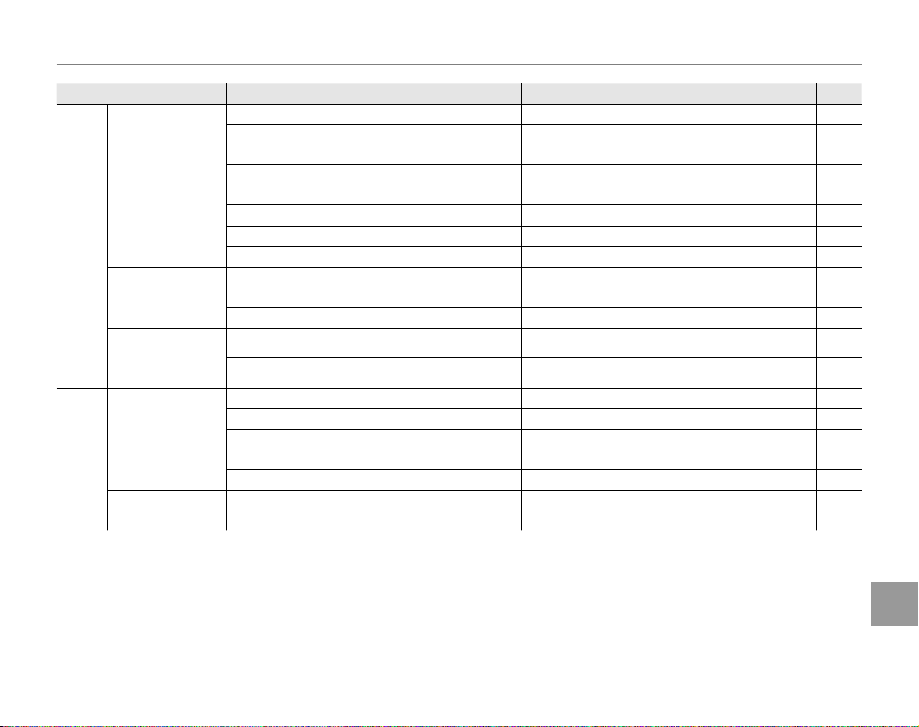
Tro ub le sho ot in g
Problem
Possibl e cause
Solution
Page
Flash
Problem
images
Problem
The ash does
not re.
Some ash
modes are not
available.
The ash does
not fully light the
subject.
Pictures are
blurred.
Pictures are
mottled.
Possibl e cause
The ash is charging. Wait for the ash to charge. 16
The camera is in a shooting mode in which
the ash does not re.
The battery is exhausted.
The camera is in continuous mode.
The camera is in silent mode. Turn silent mode o .25
The ash is o (W). Choose a di erent ash mode. 24
The camera is in a shooting mode which
makes some ash modes unavailable.
The camera is in silent mode. Turn silent mode o .25
The subject is not in range of the ash. Position the subject in range of the ash. 93
The ash window is obstructed. Hold the camera correctly. 14
The lens is dirty. Clean the lens. 97
The lens is blocked. Keep objects away from the lens. 14
R is displayed during shooting and the
focus frame is displayed in red.
0 is displayed during shooting. Use the ash or a tripod. 24
The ambient temperature is high and the
subject is poorly lit.
Choose a di erent shooting mode. 28
Charge the battery or insert a fully-charged
spare battery.
Select OFF for c CONTINUOUS.
Choose a di erent shooting mode. 28
Check focus before shooting.
This is normal and does not indicate a
malfunction. Choose a lower sensitivity.
Solution
Page
4, 6
61
15, 21,
86
57
Tro ubl esh oot in g
83
Page 90
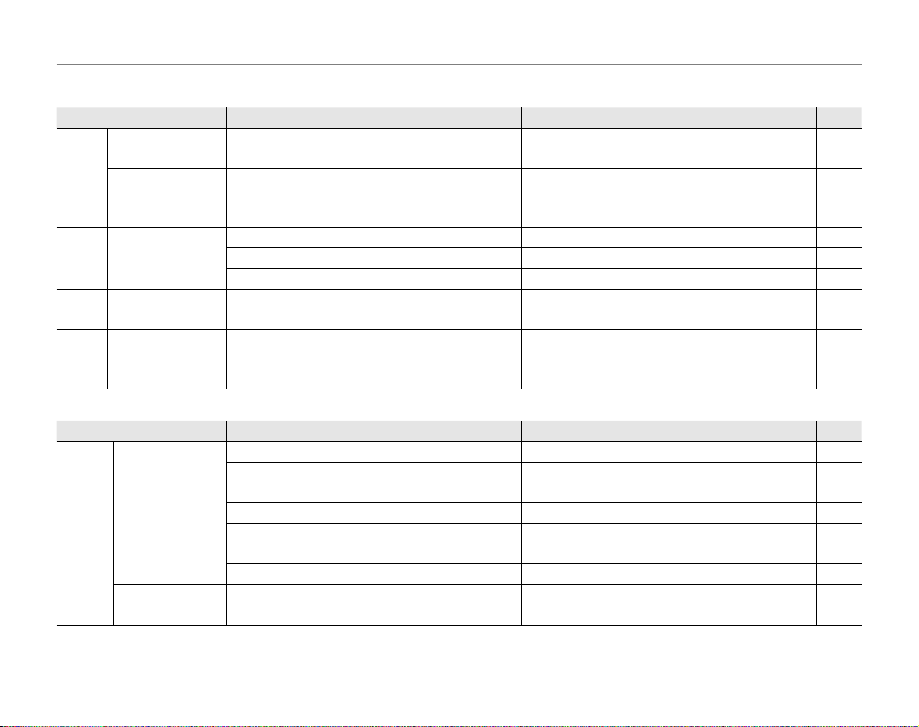
Playback
Problem
Possibl e cause
Solution
Page
Problem
Possibl e cause
Solution
Page
Problem
Pictures are
grainy.
Pictures
Playback zoom
unavailable.
No sound in
Audio
movie playback.
Selected pictures
Deletion
are not deleted.
File numbering
Frame no.
is unexpectedly
reset.
Connections
Problem
No picture or
sound.
TV
No color.
Tro ub le sho ot in g
Possibl e cause
The pictures were taken with a di erent
make or model of camera.
The pictures were taken at an image size of
p or with a di erent make or model of
camera.
Playback volume is too low. Adjust playback volume. 40, 75
The microphone was obstructed. Hold the camera correctly during recording. 38
The speaker is obstructed. Hold the camera correctly during playback. 40
Some of the pictures selected for deletion
are protected.
The battery-chamber cover was opened
while the camera was on.
Possibl e cause
The camera is not properly connected. Connect the camera correctly. 41
The supplied A/V cable was connected
during movie playback.
Input on the television is set to “TV”. Set input to “VIDEO”. —
The camera is not set to the correct video
standard.
The volume on the television is too low. Adjust the volume. —
The camera is not set to the correct video
standard.
Remove protection using the device with
which it was originally applied.
Turn the camera o before opening the
battery-chamber cover to replace the
battery or insert a memor y card.
Connect the camera once movie playback
has ended.
Match the camera r VIDEO SYSTEM
setting to the TV.
Match the camera r VIDEO SYSTEM
setting to the TV.
Solution
——
——
Solution
Page
66
11, 74
Page
40, 41
41, 72
41, 72
84
Page 91
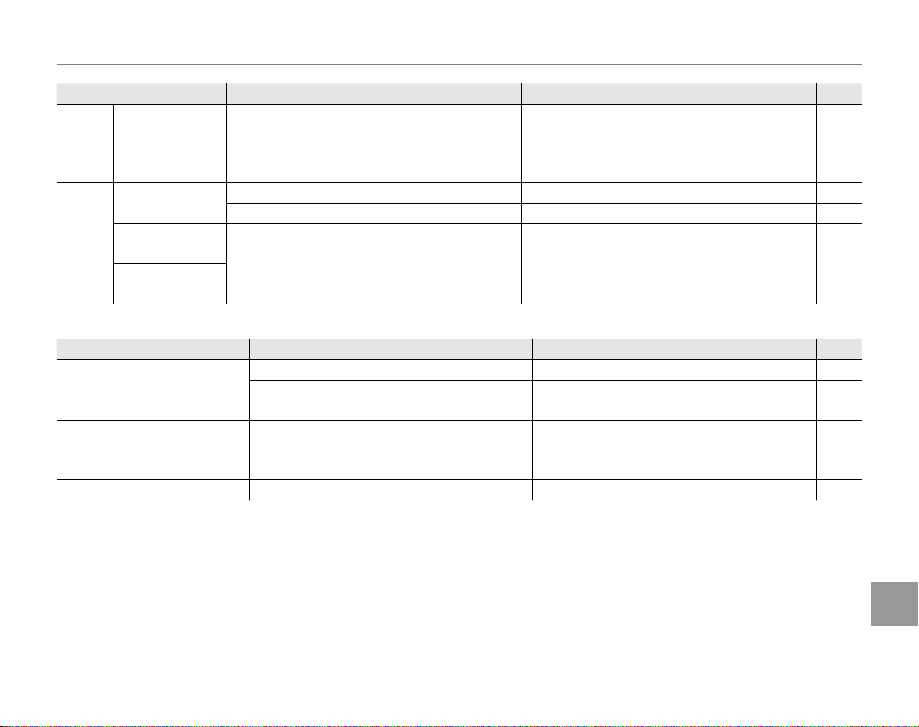
Tro ub le sho ot in g
Problem
Possibl e cause
Solution
Page
Problem
Possibl e cause
Solution
Page
Computer
PictBridge
Problem
The computer
does not
recognize the
camera.
Pictures can not
be printed.
Only one copy is
printed.
The date is not
printed.
The camera is not properly connected. Connect the camera correctly. 53
The camera is not properly connected. Connect the camera correctly. 42
The printer is o . Turn the printer on. —
The printer is not PictBridge-compatible. — —
Possibl e cause
Solution
Page
Miscellaneous
Problem
Nothing happens when the
shutter button is pressed.
The camera does not
function as expected.
No sound. The camera is in silent mode. Turn silent mode o .25
Temporary camera malfunction. Remove and reinsert the battery. 6
The battery is exhausted.
Temporary camera malfunction.
Possibl e cause
Solution
Charge the battery or insert a fullycharged spare battery.
Remove and reinsert the battery. If the
problem persists, contact your FUJIFILM
dealer.
Page
4, 6
6
Tro ubl esh oot in g
85
Page 92
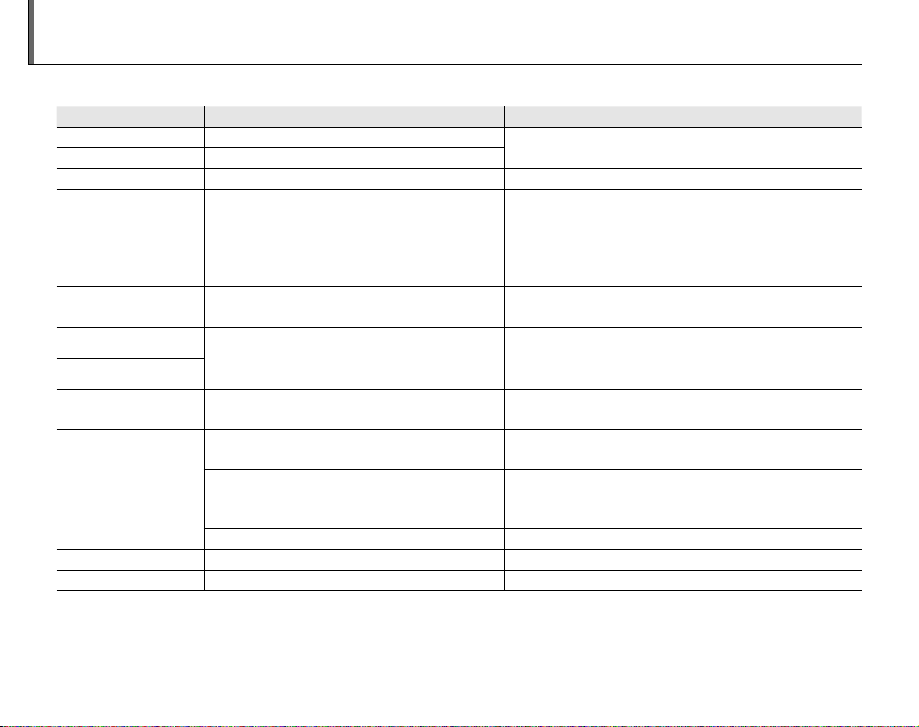
Warning Messages and Displays
Warni ng
Description
Solution
The following warnings are displayed in the monitor:
Warni ng
O (red) Low battery.
N (blinks red) Battery exhausted.
0
R
(displayed in red with
red focus frame)
j
(blinks red)
FOCUS ERROR
ZOOM ERROR
NO CARD
CARD NOT INIT IALIZED
PROTECTED CARD The memory card is locked. Unlock the memory card (pg. 8).
BUSY The memor y card is incorrectly formatted. Use the camera to format the memory card (pg. 76).
Slow shutter speed. Picture may be blurred. Use the ash or mount the camera on a tripod.
The camera can not focus.
The subject is too bright or too dark. The
picture will be over- or under-exposed.
Camera malfunction.
No memory card inserted when COPY is
selected in the playback menu.
The memory card or internal memory is not
formatted.
The memory card contacts require cleaning.
Camera malfunction. Contact a FUJIFILM dealer.
Description
Solution
Charge the battery or insert a fully-charged spare
battery.
• Use focus lock to focus on another subject at the
same distance, then recompose the picture (pg. 21).
• If the subject is poorly lit, try focusing at a distance of
about 2 m (6 ft. 7 in.).
• Use macro mode to focus when taking close-ups.
If the subject is dark, use the ash.
Turn the camera o and then on again, taking care not
to touch the lens. If the message persists, contact a
FUJIFILM dealer.
Insert a memor y card.
Format the memory card or internal memory (pg. 76).
Clean the contacts with a soft, dry cloth. If the
message is repeated, format the memory card (pg. 76).
If the message persists, replace the memory card.
86
Page 93
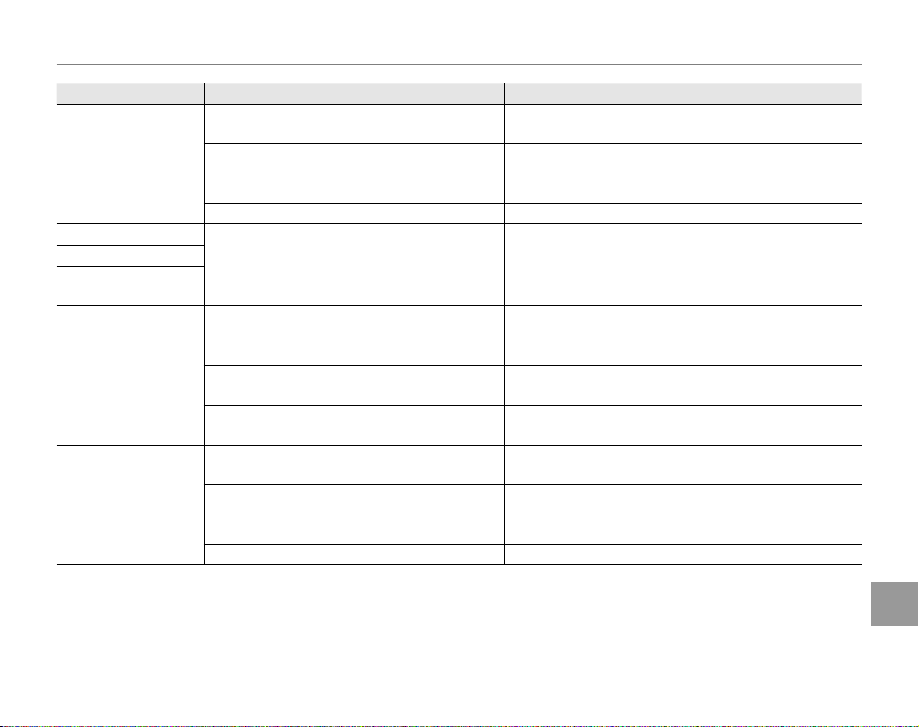
Warning Messages and Displays
Warni ng
Description
Solution
Warni ng
CARD ERROR
x MEMORY FULL
d MEMORY FULL
INTERNAL MEMORY IS FUL L
INSERT A NEW CARD
WRITE ERROR
READ ERROR
Description
The memory card is not formatted for use in
the camera.
The memory card contacts require cleaning
or the memory card is damaged.
Camera malfunction. Contact a FUJIFILM dealer.
The memory card or internal memory is full;
pictures can not be recorded or copied.
Memory card error or connection error.
Not enough memory remaining to record
additional pictures.
The memory card or internal memory is not
formatted.
The le is corrupt or was not created with the
camera.
The memory card contacts require cleaning.
Camera malfunction. Contact a FUJIFILM dealer.
Format the memor y card (pg. 76).
Clean the contacts with a soft, dry cloth. If the
message is repeated, format the memory card (pg. 76).
If the message persists, replace the memory card.
Delete pictures or insert a memory card with more
free space.
Re-insert the memory card or turn the camera o
and then on again. If the message persists, contact a
FUJIFILM dealer.
Delete pictures or insert a memory card with more
free space.
Format the memory card or internal memory (pg. 76).
The le can not be played back.
Clean the contacts with a soft, dry cloth. If the
message is repeated, format the memory card (pg. 76).
If the message persists, replace the memory card.
Solution
Troubleshooting
87
Page 94
Warning Messages and Displays
Warni ng
Description
Solution
Warni ng
FRAME NO. FULL
TOO MANY FRAM ES
CAN NOT EXE CUTE
A CAN NOT EXE CUTE
PROTECTED FRAME
x NO IMAGE
d NO IMAGE
p CAN NOT TRIM An attempt was made to crop a p picture.
CAN NOT TRIM
DPOF FILE ERROR
CAN NOT SET DP OF The picture can not be printed using DPOF. —
A CAN NOT SET DP OF Movies can not be printed using DPOF. —
CAN NOT ROTATE The picture can not be rotated. —
A CAN NOT ROTATE Movies can not be rotated. —
PRESS AND HOLD THE D ISP
BUTTON TO D EACTIVATE
SILENT MODE
COMMUNICATION ER ROR
The camera has run out of frame numbers
(current frame number is 999-9999).
Date for which more than 4,999 pictures exist
selected in sort-by-date view.
Red-eye reduction can not be applied to the
selected picture or movie.
An attempt was made to delete or rotate a
protected picture.
The source device selected in the playback
COPY menu contains no pictures.
The picture selected for cropping is damaged
or was not created with the camera.
The DPOF print order on the current memory
card contains more than 999 images.
An attempt was made to choose a ash
mode or adjust the volume with the camera
in silent mode.
A connection error occurred while pictures
were being printed or copied to a computer
or other device.
Description
Solution
Format the memory card and select RENEW for the
b FRAME NO. option in the j SETUP menu. Take
a picture to reset frame numbering to 100-0001,
then return to the b FRAME NO. menu and select
CONTINUOUS.
Choose a di erent date.
Remove protection before deleting or rotating
pictures.
Select a di erent source.
These pictures can not be cropped.
Copy the pictures to internal memory and create a
new print order.
Exit silent mode before choosing a ash mode or
adjusting the volume.
Con rm that the device is turned on and that the USB
cable is connected.
—
88
Page 95
Warning Messages and Displays
Warni ng
Description
Solution
Warni ng
PRINTER ERROR
PRINTER ERROR
RESUME?
CAN NOT BE PRINTE D
Description
Printer out of paper or ink, or other printer
error.
An attempt was made to print a movie, a
picture not created with the camera, or a
picture in a format not supported by the
printer.
Solution
Check printer (see printer manual for details). To
resume printing, turn the printer o and then turn it
back on.
Check printer (see printer manual for details). If printing
does not resume automatically, press MENU/OK to resume.
Movies and some pictures created with other devices
can not be printed. If the picture was created with the
camera, check the printer manual to con rm that the
printer supports the JFIF-JPEG or Exif-JPEG format. If it
does not, the pictures can not be printed.
Tro ubl esh oot in g
89
Page 96
Glossary
Digital zoom: Unlike optical zoom, digital zoom does not increase the amount of visible detail. Instead, details
visible using optical zoom are simply enlarged, producing a slightly “grainy” image.
DPOF (Digital Print Order Format): A standard that allows pictures to be printed from “print orders”
stored in internal memory or on a memory card. The information in the order includes the pictures to
be printed and the number of copies of each picture.
EV (Exposure Value): The exposure value is determined by the sensitivity of the image sensor and the amount
of light that enters the camera while the image sensor is exposed. Each time the amount of light doubles, EV
increases by one; each time the amount of light is halved, EV decreases by one. The amount of light entering
the camera can be controlled by adjusting aperture and shutter speed.
Exif Print: A standard that allows information stored with pictures to be used for optimal color reproduction
during printing.
JPEG (Joint Photographic Experts Group): A compressed le format for color images. The higher the compression
rate, the greater the loss of information and more noticeable drop in quality when the picture is displayed.
Motion JPEG: An AVI (Audio Video Interleave) format that stores images and sound in a single le, with the images
recorded in JPEG format. Motion JPEG les can be played in QuickTime 3.0 or later.
Smear: A phenomenon speci c to CCDs which causes white streaks to appear when very bright light sources,
such as the sun or re ected sunlight, appear in the frame.
WAV (Waveform Audio Format): A standard Windows audio le format. WAV les have the extension “*.WAV” and
may be compressed or uncompressed. The camera uses uncompressed WAV. WAV les can be played using
Appendix
Windows Media Player or QuickTime 3.0 or later.
White bala nce: The human brain automatically adapts to changes in the color of light, with the result that objects
that appear white under one light source still appear white when the color of the light source changes. Digital
cameras can mimic this adjustment by processing images according to the color of the light source. This
process is known as “white balance.”
90
Page 97
Internal Memory/Memory Card Capacity
rr F Frr N
gg3:2
o
n
m
p
t
s
Image size (pixels)
File size
Internal memory
(approx. 20 MB)
SD card
512 MB
1 GB
2 GB
SDHC card
4 GB
8 GB
16 GB
32 GB
The following table shows the recording time or number of pictures available at di erent image
qualities. All gures are approximate; le size varies with the scene recorded, producing wide
variations in the number of les that can be stored. The number of exposures or length remaining
may not diminish at an even rate.
o
Image size (pixels) 3648 × 2736 3648 × 2432 2592 × 1944 204 8 × 1536 1600 × 1200 640 × 480 640 × 4 80 320 × 240
File size 4.9 MB 2.5 MB 2.2 MB 1.2 MB 780 KB 630 KB 130 KB — —
Internal memory
(approx. 20 MB)
SD card
512 MB 95 19 0 210 350 480 6 40 2220 6 min. 12 min.
1 GB 190 380 420 700 960 1280 4420 12 min. 28 min.
2 GB 390 760 860 1400 1930 2580 8850 25 min. 57 min.
SDHC card
4 GB 790 1520 1720 2810 3870 5160 17720 50 min. *116 min.
8 GB 1590 3060 3450 5650 7780 10370 35560 100 min. *229 min.
16 GB 3190 6140 6930 11340 15600 20800 71310 204 min. *467 min.
32 GB 6340 12190 13760 22610 30970 41290 99990 406 min. *927 min.
* Total length of all movie les. Individual movies can not exceed 2 GB in size.
3 7 8 13 19 26 90 13 s 31 s
N
3:2
n
m
p
t
s
*
*
*
*
Appendix
91
Page 98

Speci cations
System
Model FinePix J25/FinePix J20 digital camera
E ective pixels 10 mil li on
CCD ½
Storage me dia • Internal memory (approx. 20 MB) • SD/SDHC memory cards (see page 8)
File sys tem Compliant with Design Rule for Camera File System (DCF), Exif 2.2, and Digital Print Order Format
File form at • Still pict ures: Exif 2.2 JPEG (compressed) • Movies: Motion JPEG AVI
Image si ze (pixels) • rF: 3,648 × 2,736 • rN: 3,64 8 × 2,736
File size See page 91
Lens Fujinon 3 × optical zoom lens, F/3.1 (wide angle) – 5.6 (telephoto)
Focal len gth
Digital zoom Approx. 5.7 × (up to 17.1 × when combined with optical zoom)
Aperture Two steps
Focus ra nge (distance fr om
front o f lens)
Sensitivity Equivalent to ISO 100, 200, 400, 800, 1600; AUT O (Standard Output Sensitivity)
Metering 256-segment through-the-lens (T TL) metering
Exposure control Programmed autoexposure
Exposure compensation
Scene mo des
Image Sta bilization Available
Intelligent Face Detection Available
.3 -in., square-pixel CCD with primary color lter
(DPOF)
• g
3:2
: 3,648 × 2,432
• o : 2,592 × 1,9 44
• n : 2,048 × 1,536 • m : 1,600 × 1,200 • p : 640 × 48 0
f=6.3 mm–18.9 mm (35-mm format equivalent: 35.5 mm–106.5 mm)
Approx. 40 cm (1.3 ft.) - in nity (wide angle); 4 0 cm (1.3 ft.) - in nit y (telephoto)
Macro mode: approx. 10 cm-80 cm/3.9 in.-2.6 ft. (wide angle); 40 cm-80 cm/1.3 ft.-2.6ft. (telephoto)
1
–2 EV – +2 E V in increments of
/
3 EV (M mode)
p(BABY MODE), C(ANTI-BLUR), U(PORTRAIT ), K(LANDSCAPE), L(SPORT ), D(NIGHT),
U(NIGHT(TRIPOD)), B(NATURAL LIGHT), G(BEACH), F(SNOW), W(FIREWORKS), E(SUNSET),
O(FLOWER), I(PARTY), H(MUSEUM), P(TEXT)
92
Page 99
Speci cations
System
Shutte r speed ¼ s–
1
/
2,000 s (AUTO mode); 8 s–
1
/
2,000 s (other modes); combined mechanical and electronic shutter
Continuous Up to three frames at a maximum of approximately 1 fps
Focus • Mode: Single AF • Autofocu s system: Contrast-detect TTL AF
• Focu s-area selec tion: AF CENTER
White bal ance Automatic scene detection; six manual preset modes for direct sunlight, shade, daylight
uorescent, warm white uorescent, cool white uorescent, and incandescent lighting
Self-timer Approx. 2 s and approx. 10 s
Flash Flash type: Auto ash
E ective range: (g: AUTO)
Wide-angle: approx. 50 cm - 3.2 m (1.6 ft. - 10.5 ft.)
Telephoto: approx. 50 cm - 1.8 m (1.6 ft. - 5.9 ft.)
Macro: approx. 30 cm - 80 cm (11.8 in. - 2.6 ft.)
Flash mod es Auto, ll ash, o , slow sync (red-eye removal o ); auto with red-eye reduction, ll ash with red-
eye reduction, o , slow sync with red-eye reduction (red-eye removal on)
Monito r (FinePix J20) 2.7-in., 230k-dot amorphous silicon TFT color LCD monitor; frame coverage approx. 96%
Monitor (Fi nePix J25) 3.0-in., 230k-dot amorphous silicon TFT color LCD monitor; frame coverage approx. 96%
Movies Camera can record movies with monaural sound and a frame size of 640 × 480 (t) or 320 × 240
(s) at a frame rate of 30 fps
Shooting options Scene recognition, Intelligent Face Detection with red-eye removal, best framing, and frame
number memory
Playback options Intelligent Face Detection with red-eye removal, micro thumbnail, multi-frame playback, sort-by-
date, cropping (still pictures only), slide show, and image rotation
Other o ptions PictBridge, Exif Print, language selection (Simplified Chinese, Traditional Chinese, Czech, Dutch,
English, French, German, Hungarian, Italian, Japanese, Korean, Polish, Portuguese, Russian, Spanish,
Swedish, and Turkish), time difference
Appendix
93
Page 100

Speci cations
Input/output terminals
A/V O UT (audio/video output) NTSC or PAL with monaural sound
Digital input/output USB 2.0 High Speed with MTP/PTP connection
Power supp ly/other
Power sour ces NP-45 rechargeable battery
Batter y life (NP-45) Approx. 165 frames, based on CIPA (Camera and Imaging Products Association) standard; measured at 23 °C
Camera dimensions 91.0 mm × 56.0 mm × 17.4 mm/3.6 in. × 2.2 in. × 0.7 in. (W × H × D), excluding projections
Camera weight
(FinePix J20)
Camera weight
(FinePix J25)
Shooting weight
(FinePix J20)
Shooting weight
(FinePix J25)
Operating conditions • Tem pe rat ure : 0 °C – + 40 °C/+32 °F – +104 °F • Humidity: 85% or less (no condensation)
(73 °F) with the monitor on, pictures recorded to an SD memory card, the camera zoomed from
widest angle to maximum zoom and back once every 30 s, the ash red at full power with ever y
other shot, and the camera turned o and then on again every 10 shots. Note that the number
of shots that can be taken with a fully-charged battery varies with temperature and shooting
conditions.
Approx. 96.5 g/3.4 oz., excluding battery, accessories, and memory cards
Approx. 100.0 g/3.5 oz., excluding battery, accessories, and memory cards
Approx. 113.1 g/4.0 oz., including battery and memory card
Approx. 116.6 g/4.1 oz., including battery and memory card
94
 Loading...