

User's Guide (Full version)
WW_EN
instax mini Link1

Table of Contents
Before Use ����������������������������������������������������������������������������������� 3
Notes on Disposing of the Printer ������������������������������������������ 3
Part Names ����������������������������������������������������������������������������������3
Installing the App ���������������������������������������������������������������������� 4
Charging the Battery ����������������������������������������������������������������4
Battery Status Indication with the LED �����������������������������������������4
Charging Status Indication with the LED �������������������������������������4
Loading/Unloading the instax mini Film Pack ���������������������5
Loading the Film Pack ����������������������������������������������������������������������5
Unloading a Used Film Pack �����������������������������������������������������������5
Turning on/off the Printer �������������������������������������������������������� 6
Checking the Printer Status with the LED ����������������������������� 6
Connecting and Printing ���������������������������������������������������������� 6
When Connecting to the Printer for the First Time ��������������������6
When the Printer and Smartphone Are Already Connected ����8
Reprinting an Image ����������������������������������������������������������������� 9
Controlling the App with the Orientation of the Printer
and the Power Button �������������������������������������������������������������10
Changing the App Mode When the Home Screen Is
Selected on the App ���������������������������������������������������������������������� 10
Controlling Zoom and Shutter When Using the instax
Camera on the App ������������������������������������������������������������������������ 10
Specifications ���������������������������������������������������������������������������11
Troubleshooting ����������������������������������������������������������������������11
IMPORTANT SAFETY NOTICE �������������������������������������������������12
Simple Printer Care ������������������������������������������������������������������������ 13
Bluetooth® Devices: Cautions ������������������������������������������������������ 13
Independent JPEG Group (IJG) Licenses
This software is based in part on the work of the Independent
JPEG Group.
© 2019 FUJIFILM Corporation. All rights reserved.
2
WW_EN
Before Use
Before using the printer, check the following has been included.
Supplied Accessories
• USB cable for charging (1)
(BOD700)
• User's Guide (1)
Notes on Disposing of the Printer
A built-in lithium ion battery is used for this printer.
When you dispose of the printer, follow your local regulations.
Please refer to the supplied CONTACT INFORMATION sheet for
queries.
If your country or region is not included in the sheet, please
contact your local distributor.
CAUTION
Do not attempt to remove the built-in battery, this may cause
injury.
This symbol on the product, or in the manual and in the warranty,
and/or on its packaging indicates that this product shall not be
treated as household waste. Instead it should be taken to an
applicable collection point for the recycling of electrical and
electronic equipment.
By ensuring this product is disposed of correctly, you will help
prevent potential negative consequences to the environment and
human health, which could otherwise be caused by inappropriate
waste handling of this product.
The recycling of materials will help to conserve natural resources.
For more detailed information about recycling of this product,
please contact your local city office, your household waste
disposal service or the shop where you have purchased the
product.
In Countries outside of EU: If you wish to discard this product,
please contact your local authorities and ask for the correct way of
disposal.
For customers in Turkey:
EEE Complies with Directive�
Disposal of Electric and Electronic Equipment in
Private Households
Disposal of used Electrical & Electronic Equipment
(Applicable in the European Union and other
European countries with separate collection
systems)
This Symbol on the batteries or accumulators
indicates that those batteries shall not be treated as
Household waste.
Part Names
When using the printer for the first time, ensure that the battery
is fully charged.
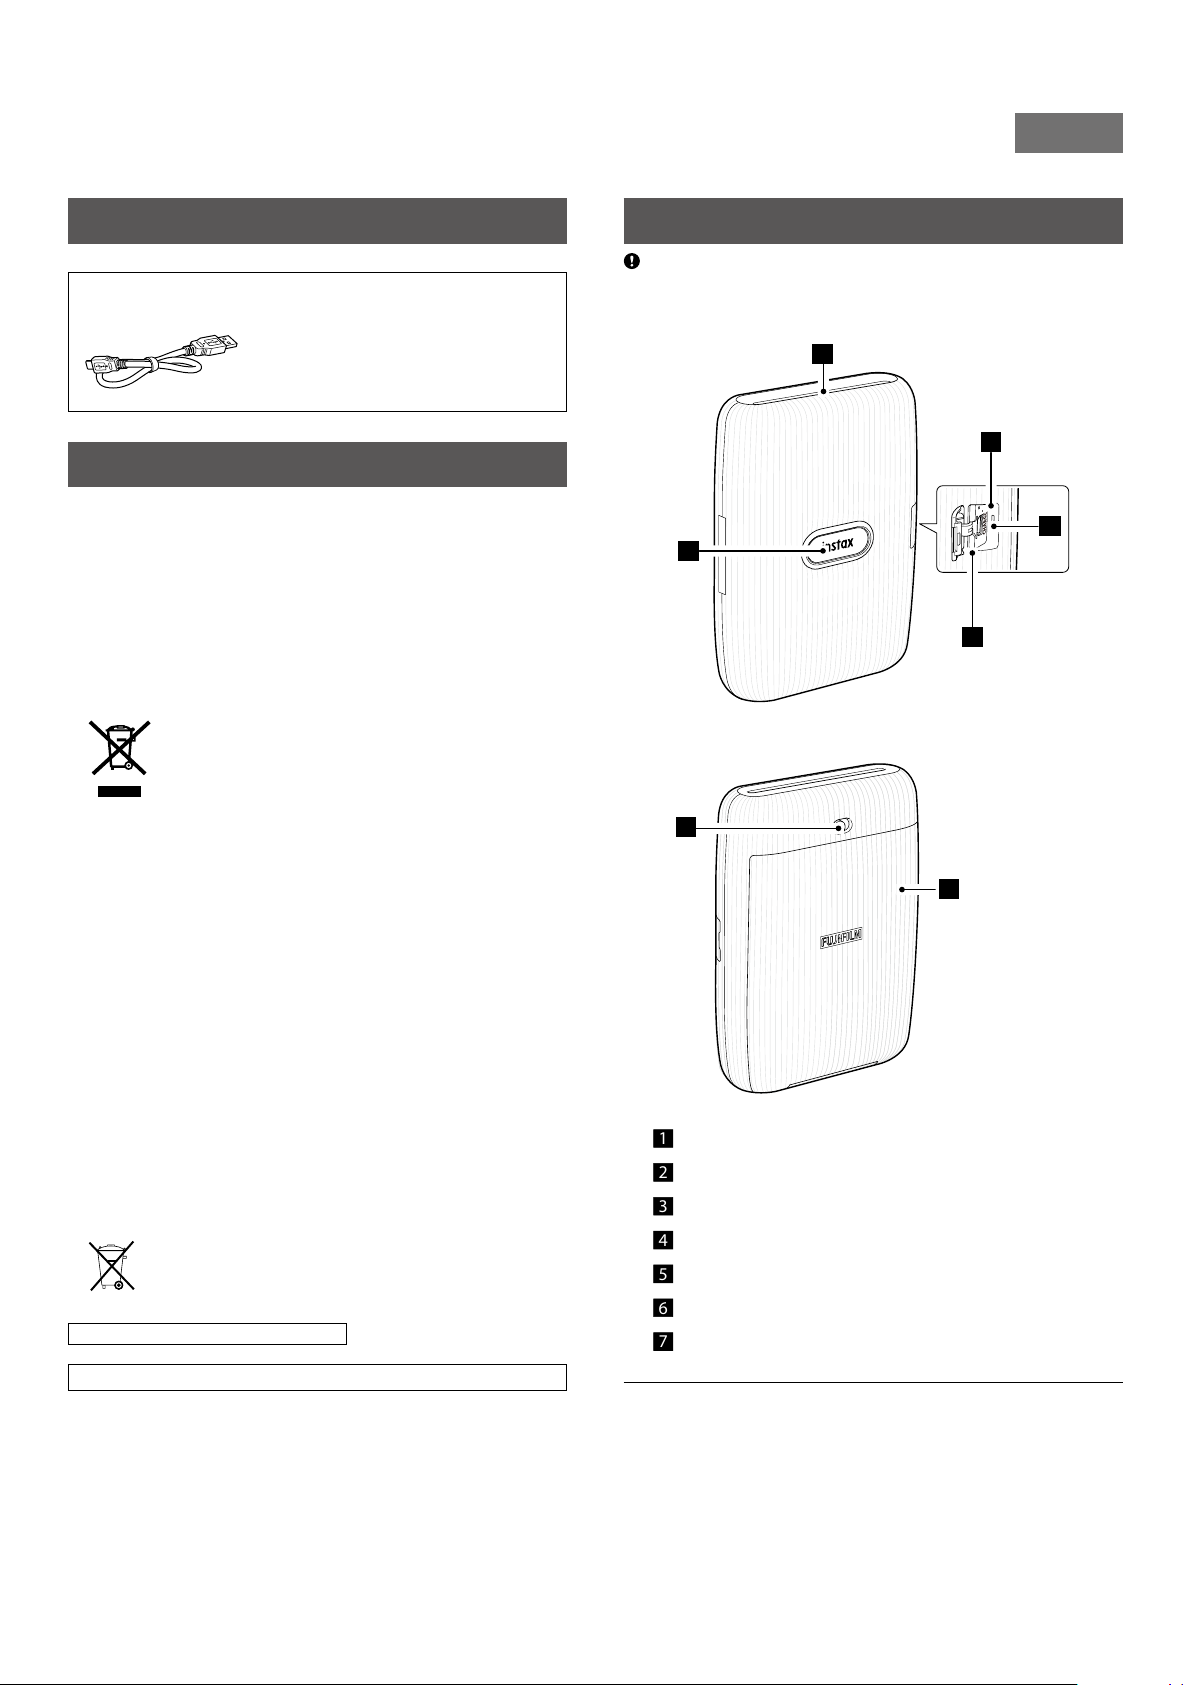
Front
1
5
4
2
3
Rear
6
7
1 Film ejection slot
2 Power button/LED*
3 USB port cover
4 USB port
5 Reset button*
6 Film door lock
7 Film door
1
2
Read “IMPORTANT SAFETY NOTICE” (p. 12) for safety use.
*1 For details on the LED indication, see pages 4 and 6.
*2 If the printer does not work properly, press the reset button to
reset the printer.
3
Installing the App
Charging the Battery
Please install the mini Link Smartphone App before using the
printer.
• If you are using an Android OS smartphone, please search for
the mini Link Smartphone App in Google Play Store and install
it.
*Requirements for Android OS smartphones: Android Ver. 5.0
or higher with Google Play Store installed
• If you are using an iOS smartphone, please search for the
mini Link Smartphone App in the App Store and install it.
*Requirements for iOS smartphones: iOS Ver. 10.0 or higher
• Even if you have downloaded the app and your smartphone
meets the above requirements, you may not be able to use the
mini Link Smartphone App. This is dependent upon your
smartphone model.
Access instax mini Link app download site for the latest
information on system requirements�
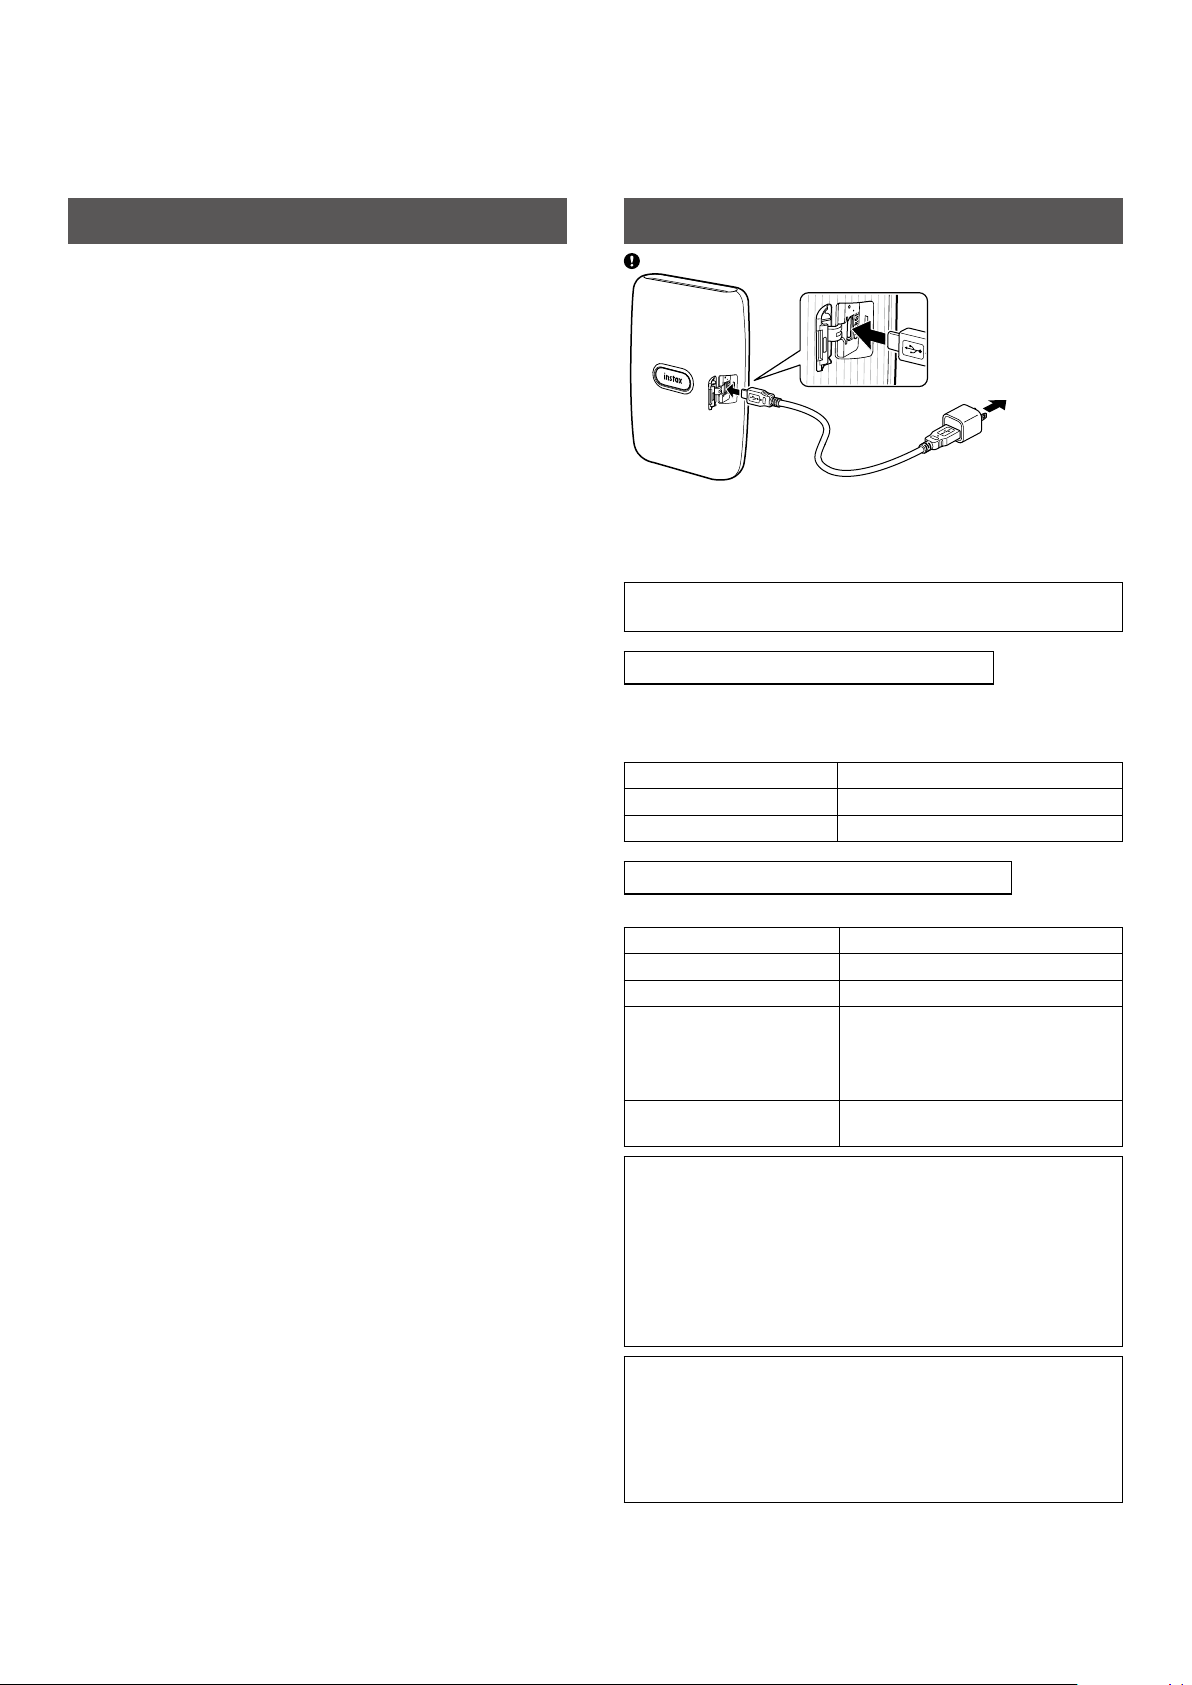
Ensure USB is correctly attached as indicated.
To an indoor power
outlet
Connect the printer using the supplied USB cable to a USB AC
adapter then connect the USB AC adapter to an indoor power
outlet.
• You can print an image while charging is in progress.
• Charging time is approximately 80 to 120 minutes.
Battery Status Indication with the LED
Battery status can be determined whilst the printer is not
connected to the app. Battery status can also be checked whilst
the printer is connected to your smartphone via the app.
Indication Battery status
LED lights up in red Low battery remaining
LED lights up in green Battery is over halfway charged
Charging Status Indication with the LED
Battery status can be checked with the LED.
Indication Charging status
LED flashes in red Charging
LED flashes in green Charging almost complete
LED lights up in green
(When the printer is turned
on and not connected to
the app)
LED goes off (When the
printer is turned off)
Charging from a PC:
• Connect the printer and PC directly. Do not connect via a USB
hub or keyboard.
• If the PC goes into sleep mode while charging, charging is
discontinued. To continue charging, exit sleep mode and then
reconnect the USB cable.
• The battery may not be able to charge depending on the
specifications, settings or conditions of the PC .
Notes
• The battery cannot be removed.
• The battery is not fully charged when shipped. Be sure to
charge the battery before use.
• For notes about the battery, see “Common Sense Printer Care”.
(p.12)
Charged
Charged
4
Loading/Unloading the instax mini Film Pack
Caution
Do not open the film door until you have used up the film;
otherwise, the rest of the film will become exposed and turn
white� The film can no longer be used�
• When you load the film pack, never press the two rectangular
holes on the back of the film pack.
• Never use a film pack beyond its shelf life; otherwise, it may
damage the printer.
Use FUJIFILM instax mini Instant Film only. The instax SQUARE
film or instax WIDE film cannot be used.
Notes on the film pack
• Each FUJIFILM instax mini film pack contains one black film
protective cover and 10 film sheets.
• Do not remove the film pack from its inner foil packaging
until you are ready to load the film into the printer.
• The film cover is ejected automatically when the film door is
closed.
For details, refer to the instructions and warnings on FUJIFILM
instax mini Instant Film.
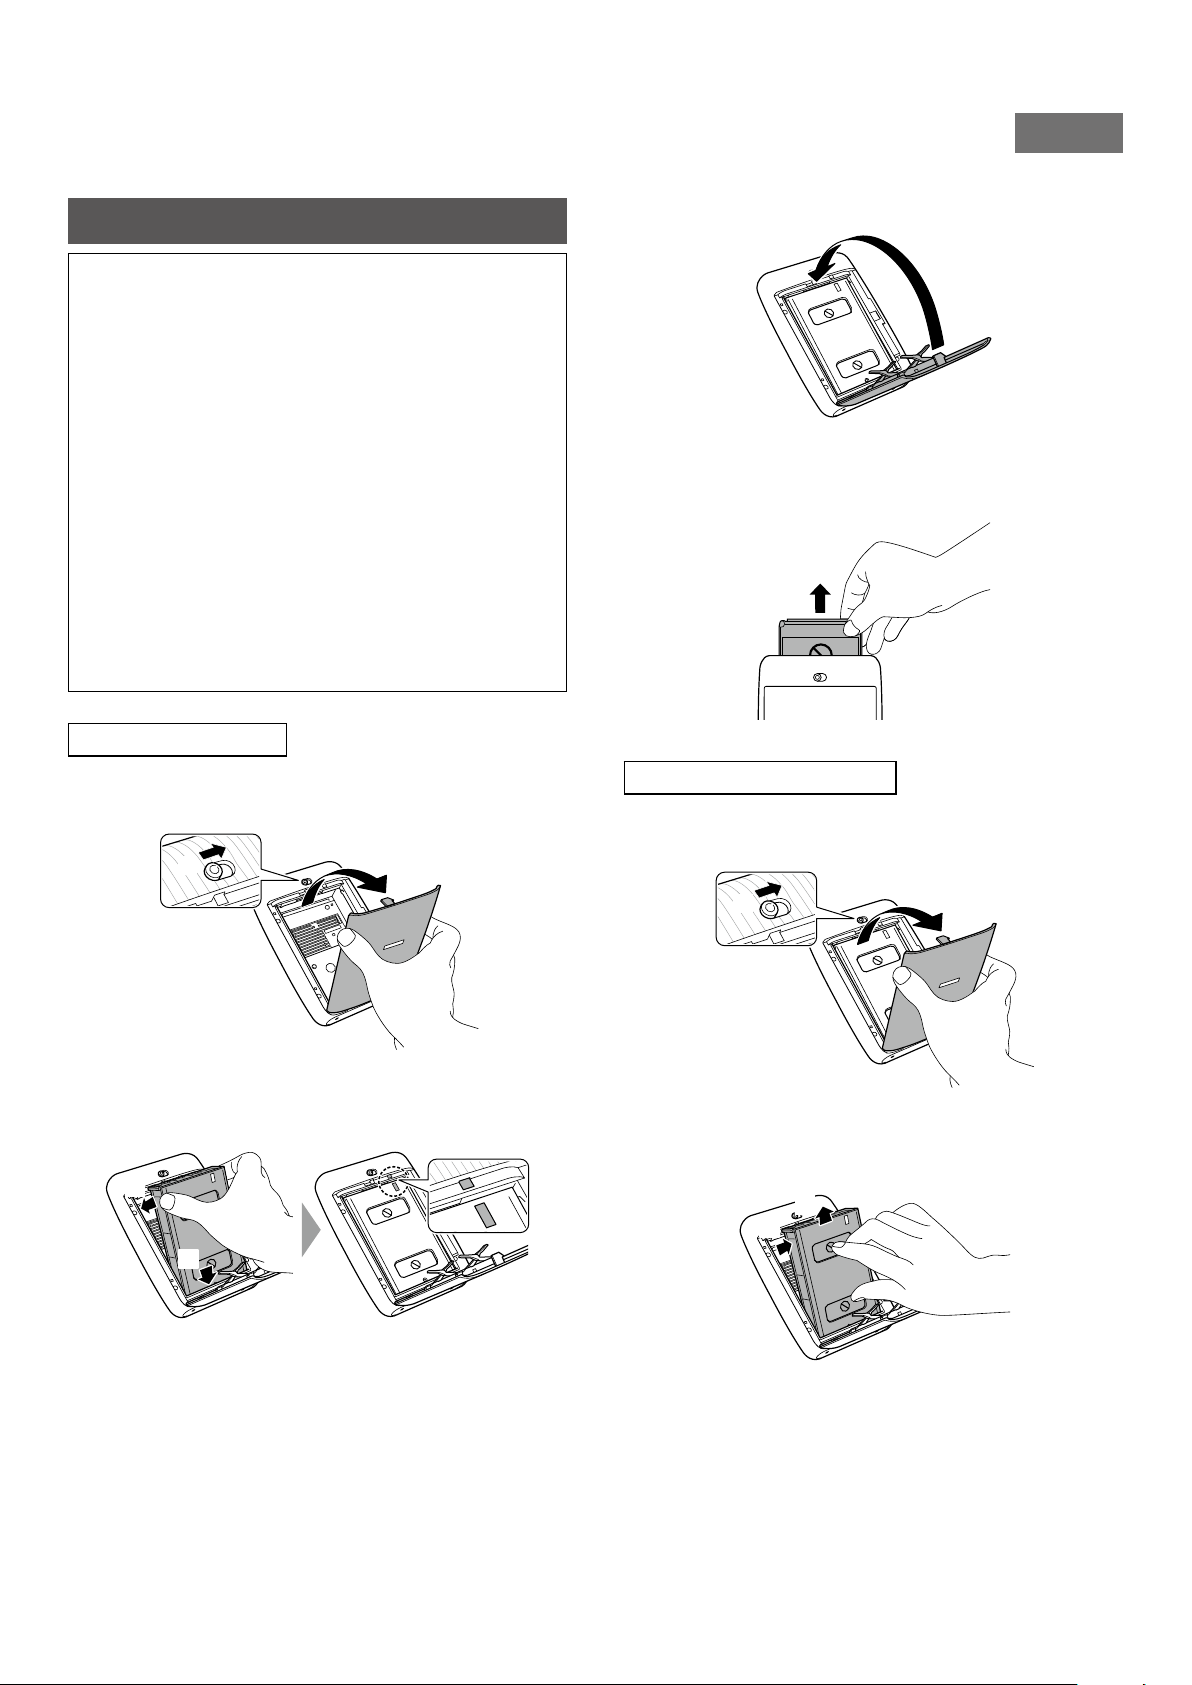
Loading the Film Pack
WW_EN
Close the film door�
3
The black film protective cover will automatically be
4
ejected� This can be removed and disposed of�
.
Slide and hold the film door lock, then open the film
1
door.
1
Insert film pack by aligning the yellow marks on the
2
film pack and body of the printer�
2
1
2
Unloading a Used Film Pack
Slide and hold the film door lock, then open the film
1
door�
1
Grasp the rectangular holes on the film pack and
2
remove the empty film cartridge�
2
1
2
Note
Be sure to align the yellow marks on the printer and on the
film pack.
5

Turning on/off the Printer
Press and hold the Power button for approximately 1 second to
turn the printer on or off.
Turning the printer on lights up the LED.
If no operation occurs for roughly 10 minutes, the printer turns off
automatically.
Checking the Printer Status with the LED
The following LED activity will indicate the following printer status.
Color LED status Status
Blue Lit-solid Connecting with the app/
Print mode
Orange Lit-solid Connecting with the app/
Fun mode
Pink Lit-solid Connecting with the
app/instax Camera mode
White Flashing wave-
like form
White Flashing Firmware is being updated
Purple Lit-solid Reprinting
Rainbow color Flashing Transferring an image
–* Flashing* Printing
Yellow Lit-solid Critical error occurred
Yellow Flashing quickly Non-critical error occurred
Yellow Flashing slowly Minor error occurred
Red Flashing Charging
Green Flashing Charging almost complete
Green Lit-solid Charged (When the printer
Connecting with the app/
Operation screen
is turned on and not
connected with the app)
Connecting and Printing
When Connecting to the Printer for the First Time
Press and hold the Power button for approximately
1
1 second to turn the printer on�
The LED lights up.
Open the “mini Link” app�
2
Read the terms of use, then put a checkmark in the
3
[Agree to this content] box, and tap [Agree to this
content →]�
*During printing, the color of the flashing LED changes depending
on the main colors of the image being transferred.
6

Quick instructions are displayed� Read the
4
instructions and tap [I Understood →]�
Set the [Bluetooth Connection] to [Later].
[Bluetooth Connection] can also be set in the process of
printing.
Tap or swipe up on the screen�
6
Before tapping , tapping on the lower right adjusts
the image and tapping on the lower left filters the
image.
Note
If your Bluetooth settings are switched off, the following
screen appears.
Tapping [Please turn on Bluetooth] opens the Bluetooth
settings screen. Set the Bluetooth settings on.
WW_EN
Select an image that you wish to print�
5
When a printer is detected, tap [Connect]�
7
If multiple printers are detected, select the printer to
connect from the list.
The printers identifier (device name) is located on the
bottom of the printer.
7
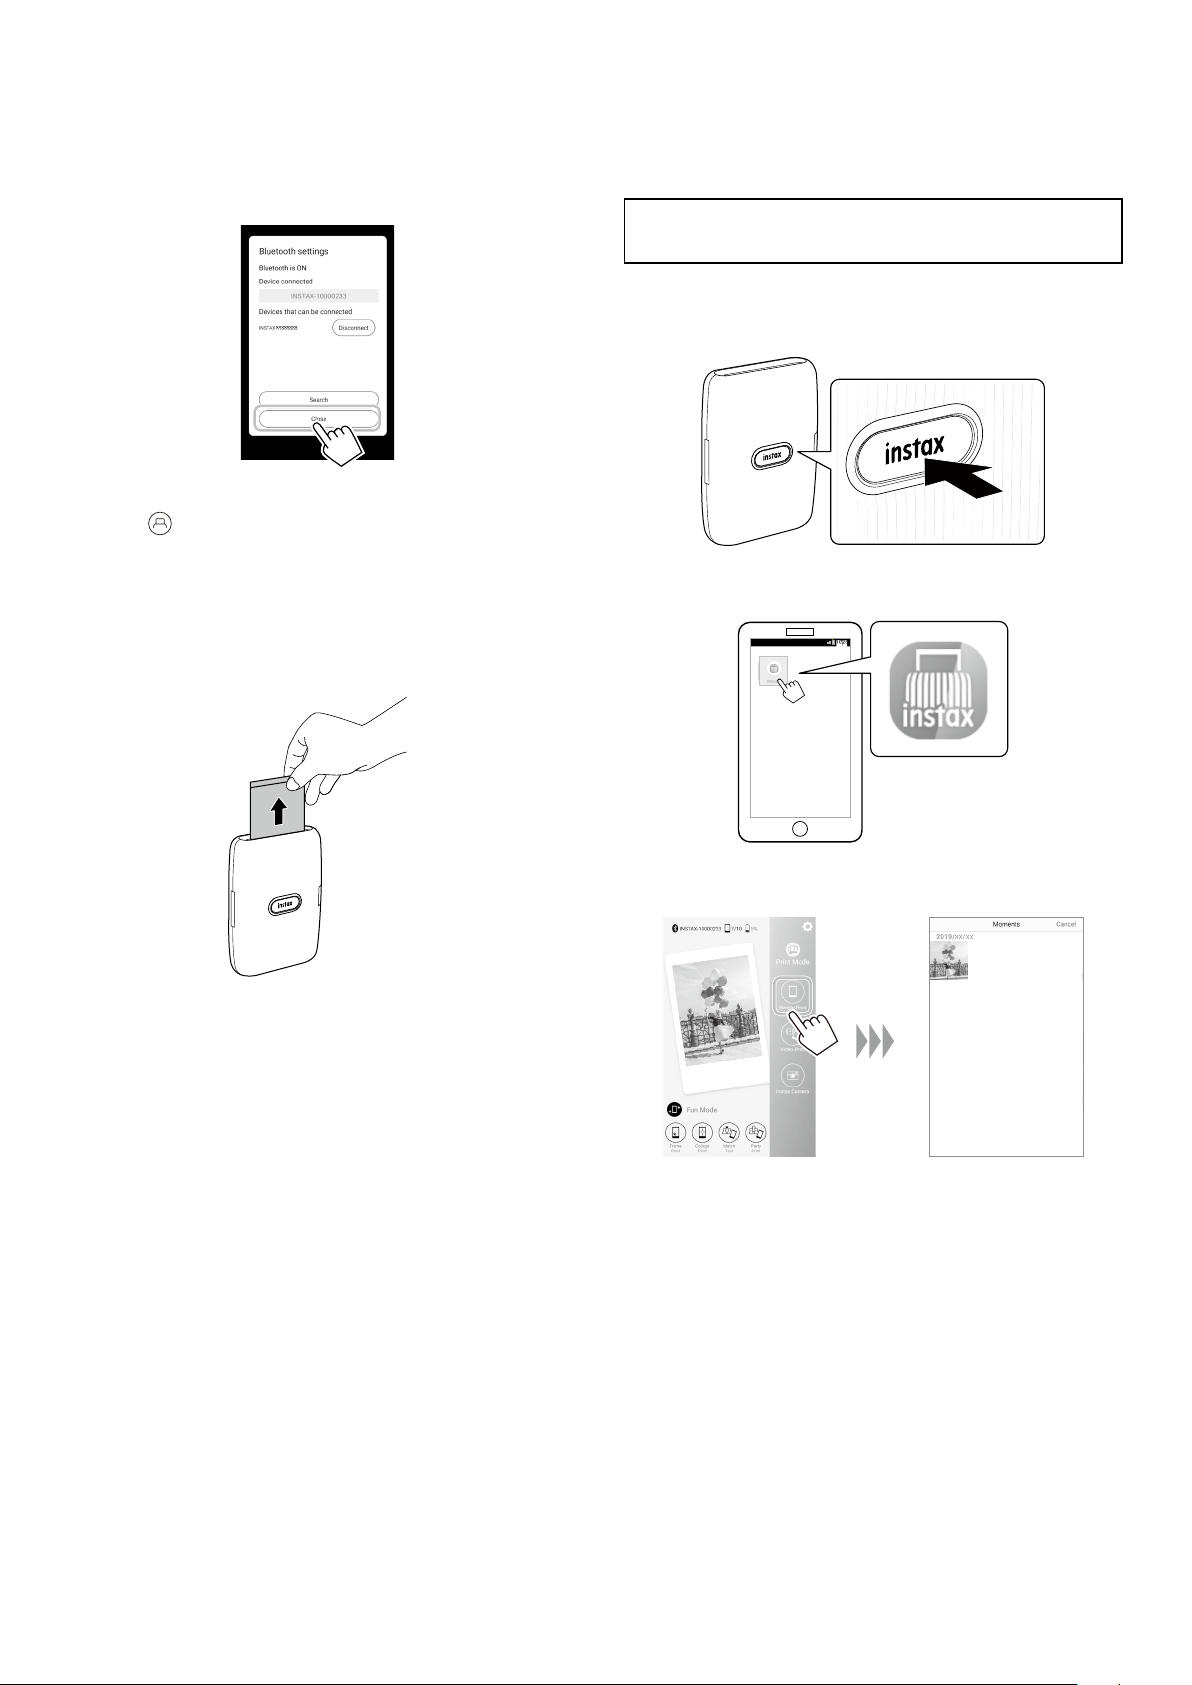
When a printer is connected, tap [Close]�
8
Tap again�
9
The printer starts printing.
When the film has been ejected (the printer stops
10
making a sound), hold the edge of the film and
remove from the printer�
You can view the number of films remaining on the app.
When the Printer and Smartphone Are Already Connected
Press and hold the Power button for approximately
1
1 second to turn the printer on�
The LED lights up.
Open the “mini Link” app�
2
Select an image that you wish to print�
3
8

Tap or swipe up on the screen�
4
The printer starts printing.
Before tapping , tapping on the lower right adjusts
the image and tapping on the lower left filters the
image.
When the film has been ejected (the printer stops
5
making a sound), hold the edge of the film and
remove from the printer�
You can view the number of films remaining on the app.
WW_EN
Reprinting an Image
The last image printed can be reprinted by turning the printer over
with the film ejection slot facing downwards and pressing the
power button.
Notes
• When the printer is connected with the app and the app is in
instax Camera mode, you cannot use the reprint function.
• The last stored image that has been printed is deleted when the
printer is turned off. In this case, you are able to print the image
from the app.
• When reprinting with the film ejection slot facing downwards,
keep at least 10 cm distance between the printer and other
objects.
9
Controlling the App with the Orientation of the Printer and the Power Button
When this printer is linked to the app on your smartphone or
tablet, you can control the app by tilting the printer. (Smartphone
app linked function)
For details, refer to the FAQ of the mini Link app.
Note
Make sure that [Camera operation settings] is set to [ON] on the
mini Link app. When it is set to [OFF], this function is unavailable.
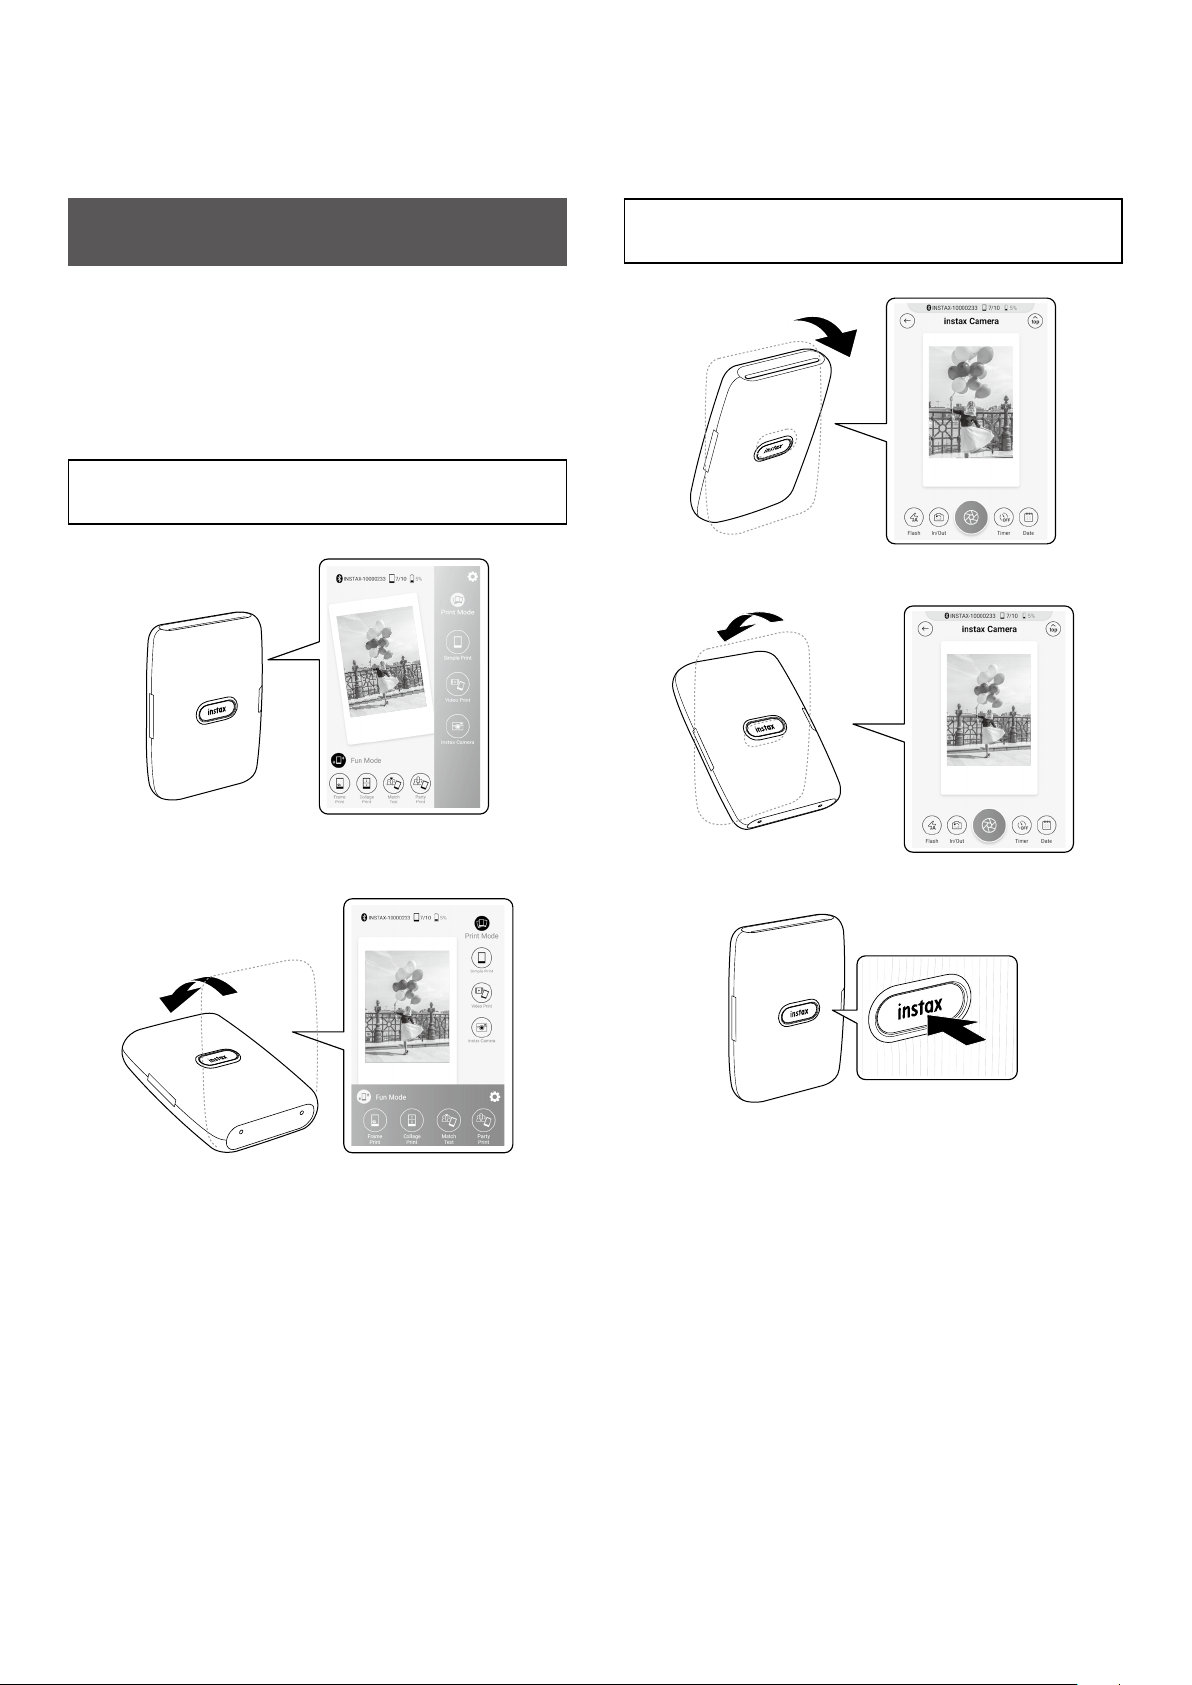
Changing the App Mode When the Home Screen Is Selected on the App
Stand the printer up to switch to Print mode.
Controlling Zoom and Shutter When Using the instax Camera on the App
Tilt the printer forward to zoom in.
Tilt the printer backward to zoom out.
Lay the printer down with the Power button facing upwards to
switch to Fun mode.
Notes
• You can change the app mode using the printer only when the
home screen is selected.
• The Fun mode and Print mode buttons can be used regardless
of the selected mode.
Press the Power button to release the shutter.
10

WW_EN
Specifications
Recording method 3-color exposure with OLED
Film used FUJIFILM instax mini Instant Film (sold
separately)
Number of films 10 films/pack
Image size 62 mm × 46 mm
Supported image
size
Printing resolution 12.5 dots/mm (318 dpi, 80 μm dot pitch)
Printing levels 256 levels per color (RGB)
Interface Standard compliance: Bluetooth Ver. 4.2
Supported image
format
Printing time Image recording - photo output (fed out):
Approximate
printing capacity
Power supply Lithium ion battery (internal type: not
Charging time Approximately 80 to 120 minutes
Power consumption Approximately 3 W
Operating
environment
Main unit
dimensions
Main unit mass Approximately 209 g (excluding film
Supplied accessory USB cable (BOD700, Length: 30 cm)
*The above specifications are subject to change for performance
improvement.
800 × 600 dots
(BLE)
JPEG, PNG, HEIF
Approximately 12 sec.
Approximately 100 prints (from full
charge)
* The number of prints depends on the
usage conditions.
removable)
(Charging time depends on the
temperature and battery remaining level)
Temperature: +5 ºC to +40 ºC
Humidity: 20% to 80% (no condensation)
90.3 mm × 34.6 mm × 124.5 mm
(excluding projecting parts)
pack)
Troubleshooting
Please check the following items before considering a problem to
be a malfunction. If the problem persists even after taking action,
please contact the FUJIFILM service center for repair in your
country or visit the website below.
FUJIFILM website: http://www.fujifilm.com/
If the following problem occurs���
Problem Possible causes and solutions
I cannot turn on
the printer.
The battery
loses its charge
quickly.
The power cut
off during use.
Charging does
not start.
The printer takes
too long to
charge.
Charging stops
during charging.
The printer does
not function
normally.
The film pack
does not load or
does not load
correctly.
The film does
not unload.
Some or all of
the finished
prints are white.
• The battery may not be charged. Please
charge the printer.
• You did not press the Power button for
long enough. Press and hold the Power
button for approximately 1 second.
If you use the printer in a very cold
environment, the battery will drain quickly.
Please keep the printer warm before
printing.
The battery level may be low. Please charge
the printer.
Make sure that the USB power adapter plug
is properly connected to the power outlet.
At low temperatures, charging may take
longer.
Charge the battery in a temperature range of
+5 °C to +40 °C. If you cannot charge the
printer in this range, contact your FUJIFILM
dealer or support center.
• There may be a temporary malfunction.
Please press the reset button. If the printer
still does not function normally, please
contact our repair service center for repair.
• The battery may not be charged. Please
charge the printer.
• Please use FUJIFILM instax mini Instant
Film (other films cannot be used).
• Align the yellow mark on the film pack
with the yellow alignment marker on the
printer body, once aligned load the film
into the printer.
• The film may be misaligned due to shock
such as vibration or dropping. Please load
a new film pack.
• If the film is jammed, turn the printer off
and turn it on again. If the problem
persists, remove the jammed film and
then load a new film pack.
Do not open the film door until the film has
been used up. If the film door is opened with
film remaining, the film will be exposed and
become white.
11

Problem Possible causes and solutions
The print is
uneven.
I cannot reprint
images.
I cannot change
the app mode
even when
operating the
mini Link app.
The function
that is used by
tilting the
printer does not
work.
• Do not shake, bend, fold or hold the print
immediately after it is printed.
• Do not obstruct the film ejection slot.
The last stored image that has been printed
is deleted when the printer is turned off.
Setting [Camera operation settings] on the
mini Link app to [ON] enables the
smartphone app linked function to work.
Check the orientation of the printer.
Confirm that [Camera operation settings] on
the mini Link app is set to [ON].
IMPORTANT SAFETY NOTICE
This product has been designed with safety in mind and to also
provide safe service when handled correctly in accordance with
the User’s Guide and the instructions provided. It is important that
both the product and the “instax mini” film are handled properly
and used only to print pictures as instructed in the User’s Guide
and in the “instax mini” film instructions. For your ease and safety,
please follow what is written in the User’s Guide. It is also a good
idea to keep the User’s Guide in a safe, easy to find place where
you can refer to it if needed.
WARNING
This symbol indicates danger, which could result in injury or death.
Please follow these instructions.
WARNING
If any of the following instances occur, immediately unplug the
USB cable, turn the printer off and cease use.
• The printer becomes hot, emits smoke, emits a burnt smell or is
functioning abnormally.
• The printer is dropped into water or any foreign objects enter
the printer.
This device contains a built-in battery. Do not subject to heat,
throw it into an open fire, drop or subject to impact. Doing so
could cause the printer to explode.
WARNING
Never attempt to take this product apart. You may be injured.
If the printer is not functioning correctly, to avoid injury do not
attempt to repair yourself. You may be injured.
If this product is dropped or damaged so that the internals are
visible, do not touch it. Contact your FUJIFILM dealer.
Do not touch any parts within the inside of the back cover. This
may cause injury.
Never get this product wet or handle it with wet hands. Doing so
may result in an electric shock.
Promptly unplug the USB cable once battery is fully charged.
Keep out of the reach of small children. This product could cause
injury in the hands of a child.
Do not cover or wrap the printer or the AC power adapter in a
cloth or blanket. This can cause heat to build up and distort the
casing or cause a fire.
The “CE” mark certifies that this product satisfies the
requirements of the EU (European Union) regarding
safety, public health, environment and consumer
protection. (“CE” is the abbreviation of Conformité
Européenne.)
Hereby, FUJIFILM declares that the radio equipment type
“instax mini Link1” is in compliance with Directive 2014/53/EU.
For more information, access the website below.
https://www.fujifilm.com/products/instant_photo/printers/
instax_mini_link/
12
Simple Printer Care
■ Printer Care
1.
Do not open the film door until all film exposures have
been used, doing so will prematurely expose the remaining
film and render it unusable.
2.
Your printer is a fragile object. Do not expose it to water, sand
or gritty materials.
3.
Do not use solvent such as thinner or alcohol to remove dirt.
4.
Keep the film chamber and printer interior clean to avoid
damaging films.
5.
Do not leave your printer in direct sunlight or hot places such
as the inside of a car. Do not leave the printer in damp places
for prolonged periods.
6.
Moth repellent gas such as naphthalene may affect your
printer and prints. Take care to keep your printer and prints in a
safe, dry place.
7.
Note that the temperature range within which your printer can
operate is +5°C to +40°C.
8.
Take great care to ensure that printed materials do not violate
copyright, image rights, privacy or other personal rights and
do not offend public decency. Actions that violate the rights of
others, are contrary to public decency or constitute a nuisance
may be punishable by law or otherwise legally actionable.
9.
This printer is designed for household use. It is not suitable for
commercial use.
■ Charging the Battery
The battery has not been charged during manufacture. Please
charge the battery fully before use.
Charge the battery using the supplied USB cable. Charging
times will increase at ambient temperatures below +10 °C or
above +35 °C. Do not attempt to charge the battery at
temperatures above +40 °C or at temperatures below +5 °C as
the battery will not charge.
■ Battery Life
At normal temperatures, the battery can be recharged about
300 times. A noticeable decrease in the length of time the
battery will hold a charge indicates that it has reached the end
of its service life.
■ Cautions: Handling the Battery
The battery and printer body may become warm to the touch
after extended use. This is normal.
■ Certification marks acquired by the printer are located inside
the film chamber�
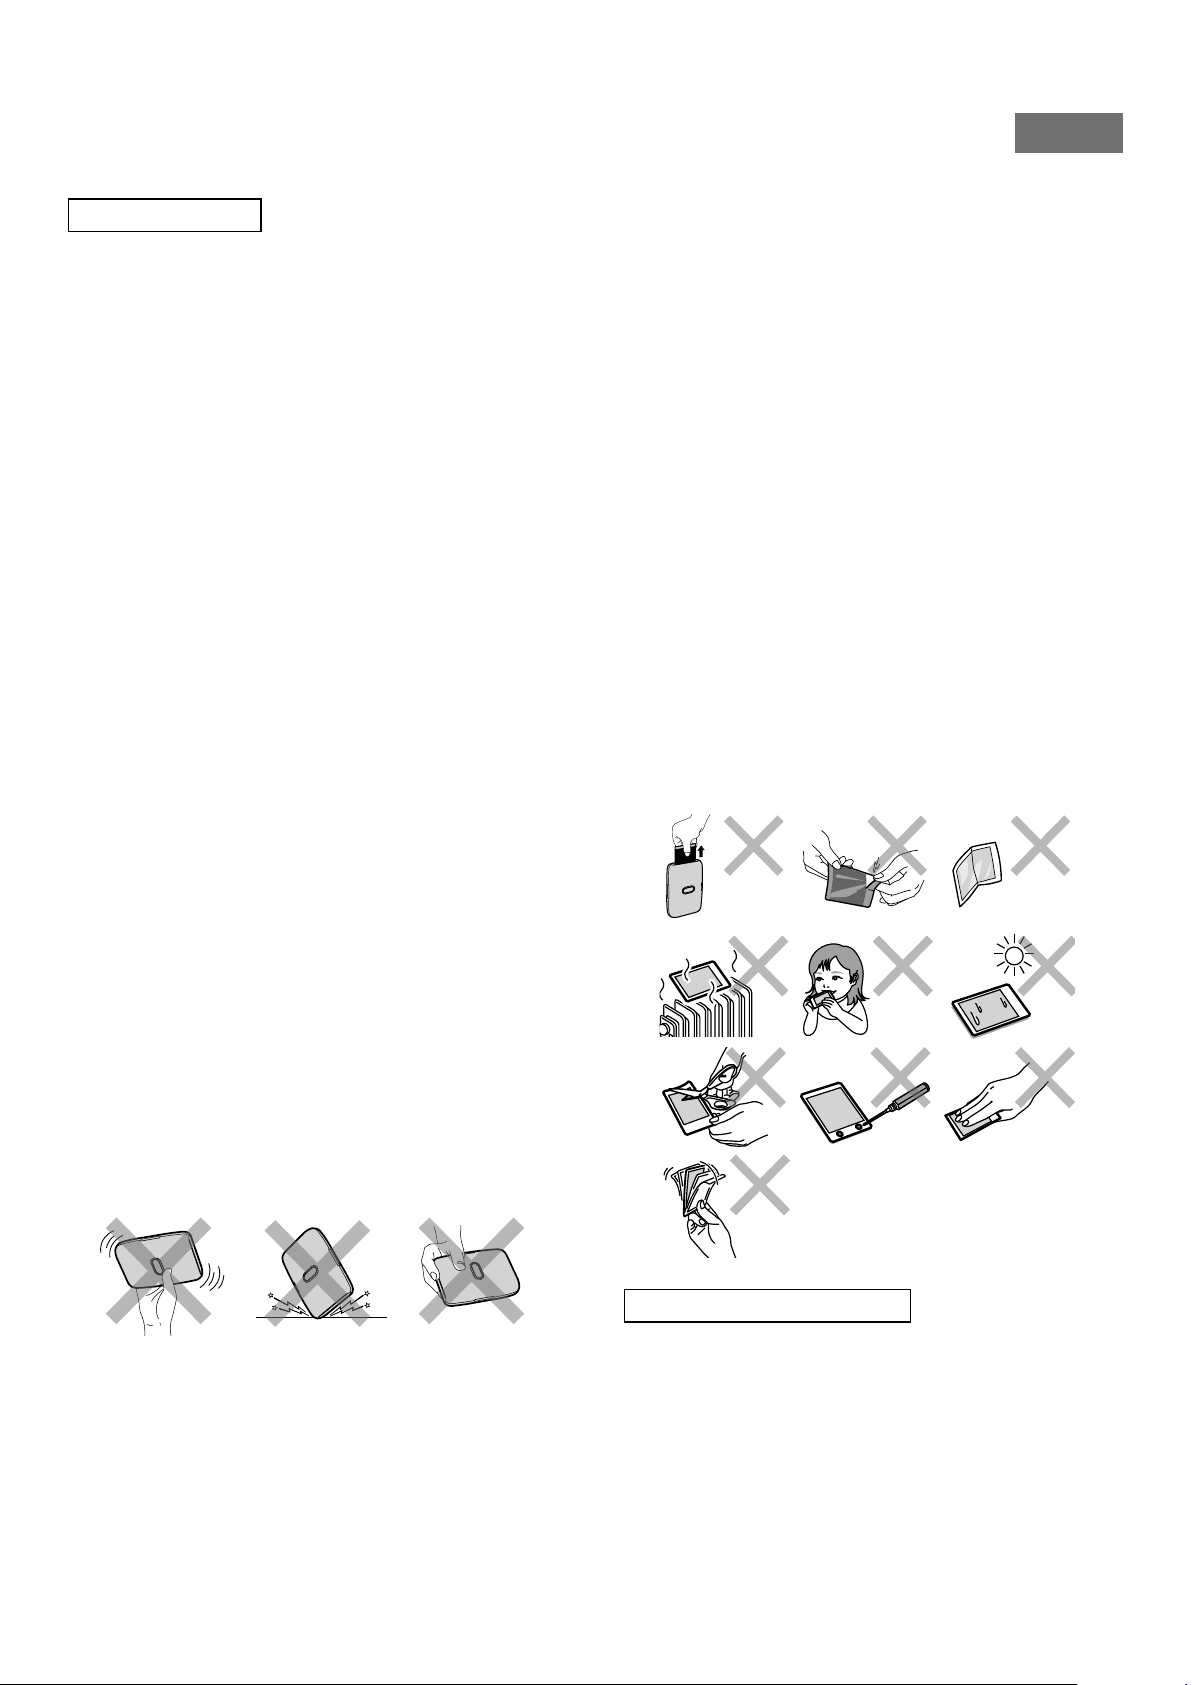
■ Cautions During Printing
WW_EN
2.
Do not puncture, tear, or cut “instax mini” film. If film becomes
damaged, do not use.
3.
When you load a film pack, use the film as soon as possible.
4.
If the film has been kept in a place where the temperature is
extremely high or low, bring it to room temperature before
starting to print pictures.
5.
Be sure to use the film before the expiration or “Use Before” date.
6.
Avoid airport checked luggage inspection and other strong
X-ray illumination. The effect of fogging, etc. may appear on
unused film. We recommend that you carry the printer and/or
the film onto the aircraft as carry-on luggage. (Check with each
airport for more information.)
7.
Avoid strong light, and keep the developed prints in a cool and
dry place.
8.
Do not puncture or cut this film as it contains a small amount
of caustic paste (high alkaline). Never let children or animals
put the film into their mouth. Also pay attention so that the
paste does not come into contact with skin or clothes.
9.
Should the paste inside the film come into contact with skin or
clothes, immediately wash off with plenty of water. If the paste
comes into contact with the eyes or mouth, immediately wash
the area with plenty of water and contact a doctor. Note that
the alkaline inside the film remains active for about 10 minutes
after the picture has been printed.
■ Cautions on Handling the Film and Prints
For details, refer to the instructions and warnings on FUJIFILM
Instant Film “instax mini”.
Do not shake the
printer while
printing.
■ “instax mini” Film and Print Care
See FUJIFILM Instant Film “instax mini” for film use instructions.
Follow all instructions for safe and proper use.
1.
Keep the film in a cool place. Do not leave the film in a place
where the temperature is extremely high (e.g., in a closed car)
for many hours.
Do not drop the
printer while
printing.
Do not cover the
film ejection slot
while printing.
Bluetooth® Devices: Cautions
IMPORTANT: Read the following notices before using the
product’s built-in Bluetooth transmitter�
■ Use only as part of a Bluetooth network�
FUJIFILM Corporation and its affiliates do not accept liability for
damages resulting from unauthorized use. Do not use in
applications requiring a high degree of reliability, for example in
medical devices or other systems that may directly or indirectly
impact human life. When using the device in computer and
other systems that demand a greater degree of reliability than
13

Bluetooth networks, be sure to take all necessary precautions to
ensure safety and prevent malfunction.
■ Use only in the country in which the device was purchased�
This device conforms to regulations governing Bluetooth
devices in the country in which it was purchased. Observe all
location regulations when using the device. FUJIFILM
Corporation and its affiliates do not accept liability for problems
arising from use in other jurisdictions.
■ Wireless data (images) may be intercepted by third parties�
The security of data transmitted over wireless networks is not
guaranteed.
Do not use the device in locations subject to magnetic fields,
static electricity, or radio interference.
■ Do not use the transmitter in the vicinity of microwave ovens
or in other locations subject to magnetic fields, static
electricity, or radio interference that may prevent reception of
wireless signals� Mutual interference may occur when the
transmitter is used in the vicinity of other wireless devices
operating in the 2�4 GHz band�
■ The Bluetooth transmitter operates in the 2�4 GHz band� The
standard output is approximately 3�16 mW�
■ This device operates on the same frequency as commercial,
educational, and medical devices and wireless transmitters�
It also operates on the same frequency as licensed transmitters
and special unlicensed low-voltage transmitters used in radiofrequency identification tracking systems for assembly lines and
in other similar applications.
■ To prevent interference with the above devices, observe the
following precautions�
Confirm that the radio-frequency identification transmitter is
not in operation before using this device. If you notice that this
device causes interference in low-voltage radio-frequency
identification tracing systems, contact a FUJIFILM
representative.
■ The following may be punishable by law:
– Disassembly or modification of this device.
– Removal of device certification labels.
■ Trademark Information
The Bluetooth® word mark and logos are registered trademarks
owned by the Bluetooth SIG, Inc., and any use of such marks by
FUJIFILM is under license.
Information for traceability in Europe
Manufacturer: FUJIFILM Corporation
Address, City: 7-3, Akasaka 9-Chome, Minato-ku, Tokyo
Country: JAPAN
Authorized representative in Europe:
FUJIFILM EUROPE GMBH
Address, City: Dusseldorf Heesenstrasse 31, 40549
Country: Germany
If you have any inquiries about this product, please contact a
FUJIFILM authorized dealer, or access the website below.
http://www.fujifilm.com/
14
 Loading...