

FujiFilm HA19x7.4BERD-S6, HA19x7.4bBERM-M6, HA22x7.3BERD-S6, HA18x7.6BEZD-T58, HA23x7.6BERD-S6 Operation Manual
...
HA19x7.4BERD‐S6
202B12490860
A
LP690A-S6 2311
安全にお使いいただくために FOR YOUR SAFETY USE
f
f
想定される内容を示します。
安全にお使いいただくために FOR YOUR SAFETY USE
ここでは、製品を安全に正しくご使用いただくために、重
要な注意事項を説明しています。必ずご使用前に読
み、記載内容に従って正しくご使用ください。
文章中の
△警告や△注意は次のことを表しています。
△警告 誤った取り扱いをしたときに、人が
死亡または重傷を負う可能性が想
定される内容を示します。
△注意 誤った取り扱いをしたときに、人が
傷害を負ったり、物的損害の発生
が
△警 告
◆ 製品の内部に水が入らないようにしてください。火災
や感電の原因となります。
万一水が入ったときは、すぐにレンズに供給している
電源を切ってください。
◆ 取り付け・締め付けは確実に行ってください。高所使
用時の落下は重大な事故の原因となります。
◆ 太陽や高輝度の光源をレンズを通して見ないでくだ
さい。目に障害を負う原因となります。
△注 意
◆ 運搬中の落下は、怪我の原因となります。落とさない
ように注意してください。
◆ ご使用になるカメラが、レンズシステム(レンズとそれ
に接続されるアクセサリ)の駆動に必要な消費電力を
供給することが可能か、ご使用の前に確認してくださ
い。必要な電力を供給できないカメラを使用した場
合、レンズの動作不良またはカメラの破損の原因とな
ります。レンズおよびアクセサリの消費電力は、取扱
説明書の「仕様」欄に記載されています。
◆ レンズに供給する電源は、各機器が正しく接続され
ていることを確認した後に入れてください。
◆ ケーブルを着脱するときは、必ずコネクタ部分を持っ
てください。ケーブルを傷つけると、火災や感電の原
因となります。
◆ 発煙・異常音・異臭・異物混入などの異常のときは、
すぐにレンズに供給している電源を切ってからレンズ
をカメラから取り外してください。その後、購入先販売
店にご連絡ください。
◆ 分解・改造を行わないでください。製品の機能を損
ねたり、感電の原因となります。
This content explains important notices for all the users
to use this product safely. Read the content carefully
before using, and follow the instructions.
The following signs of
show:
△WARNING and △CAUTION
△ WARNING
Indicates the possibility of causing death or
serious injury when misused.
△ CAUTION
Indicates the possibility of causing injury or
substantial damage when misused.
△ WARNING
◆ Do not moisten inside of the appliances. It may cause
fire or electric shock. If the incident occurs, shut of
the power supplied to the lens immediately.
◆ Be sure to attach all the parts securely. Dropping
any parts from a height may cause severe accidents.
◆ Do not look at any sorts of strong illuminant such as
the sun through the lens. Eyes could be harmed.
△ CAUTION
◆ Take care when carrying the lens. Dropping the lens
while carrying may cause injury.
◆ Be sure to confirm that the camera to be used with
the lens system (lens and accessories) is able to
supply sufficient electric power to the lens system. I
not, the lens system may not work normally and the
camera will be damaged. The values of the power
consumption of the lens and the accessories are
described in “Specifications” section of their
operation manuals.
◆ Before supplying the power to the lens, make sure all
the parts are connected correctly.
◆ In order to install or release a cable, be sure to hold
the joint part. Do not damage the cable by gripping.
It may cause fire or electric shock.
◆ If any sorts of incidents such as unusual smoke,
noise, smell or obstacles are found, shut off the
power supplied to the lens and detach the lens from
the camera immediately. Please notify the sales
agent from which you purchased the product.
◆ Do not remodel the instrument: it may impair the
functions of product or cause electric shock.
E1464/R3

安全にお使いいただくために FOR YOUR SAFETY USE
一般的な注意
25
◯
◆ レンズおよびその付属品は精密機械です。決して強
い衝撃を与えないでください。
レンズマウントのフランジ面より後方にレンズ部分が
突き出ているレンズの場合、取り付け・取り外しの際、
レンズ部分に衝撃を与えないよう十分に注意してくだ
さい。
◆ レンズを寒いところから急に、気温と湿気が高いとこ
ろに持ち込むと、レンズが曇ることがあります。上記の
ような環境へレンズを持ち込むときは、前もってレン
ズを使用環境温度へ適合させるなどの曇り対策を講
じてください。
◆ カメラを操作するときは、レンズの前部に衝撃を与え
ないよう十分に注意してください。
◆ カメラを使用しないときは、レンズにはレンズキャップ
を取り付けてください。
◆ 駆動伝達部がある付属品を取り付ける場合、かみ合
い部分の形状に異常はないか、異物の付着はない
か十分に点検してください。異物があるときは確実に
取り除いてください。形状に異常があるときは、購入
先販売店にご相談ください。
◆ 濃霧・降雨・降雪などの環境で使用するときは、覆い
をするなどの対策をして、製品に水分がかからないよ
うにしてください。
◆ 輸送時のレンズへの衝撃を最小限にするために、レ
ンズをカメラから取り外す前にズームはワイド端に、フ
ォーカスは無限遠側一杯の位置になるように設定し
てください。
NOTICE
◆ Lens and its accessories are extremely precise
instrument, then be sure not to apply the strong
impacts to them. If the lens is of a type in which the
rear lens protrudes from the flange surface of the lens
mount, be sure not to apply impact to the lens part
when installing or releasing.
◆ There may be a case that the glasses of the lens mist
when the lens is carried from a cool place to a place
of high temperature and high humidity. To avoid a
mist on the glasses, before moving the lens, let the
lens adjust to the ambient temperature of the place
where the lens will be used.
◆ Be sure not to apply impact to the front part of the
lens when operating the camera.
◆ Put the cap on the lens while the camera is not used.
◆ If an accessory to be attached to the lens is equipped
with a mechanical drive relaying part, before
attaching it, check the joint part and get rid of all
obstacles. If there are any unusual conditions, please
contact the sales agent from which you purchased the
product.
◆ When the lens is used in the weather of fog, raining,
or snowing, cover up the lens to prevent it from the
water.
◆ To minimize the impact to the lens in transportation,
set the zoom to the wide end and the focus to the
infinity side end before releasing the lens from the
camera.
E1464/R3

目 次
・ レンズの概要...........................................................................2
・ カメラへの取り付け ...............................................................2
・ フランジバックの調整...........................................................3
・ アイリス操作 ............................................................................5
・ フォーカス操作........................................................................6
・ ズーム操作...............................................................................7
(1) ズームシーソーコントロールレバー
による操作......................................................................8
(2) クイックズーム操作 .....................................................8
(3) オートクルージングズーム操作 .......................... 10
(4) マニュアル操作.......................................................... 11
・ マクロ操作 ............................................................................. 12
・ その他の機能....................................................................... 13
・ 機能&モード切替スイッチについて............................ 15
・ アイリスの調整 .................................................................... 20
・ レンズフードの着脱............................................................ 21
・ 保 守・点 検..................................................................... 22
・ オプショナルアクセサリ .................................................... 23
・ 仕 様 ................................................................................... 29
■ 付 図
Fig. 1 外観図
2 結線図
TABLE OF CONTENTS
・ General Description..............................................................2
・ Installation onto Camera.....................................................2
・ Adjustment of Flange Focal Length ...............................3
・ Iris Operation...........................................................................5
・ Focus Operation.....................................................................6
・ Zoom Operation......................................................................7
(1) Operation by Zoom Seesaw Control Lever.......8
(2) QuikZoom Operation...................................................8
(3) Auto Cruising Zoom Operation............................ 10
(4) Manual Operation...................................................... 11
・ Macro Operation.................................................................. 12
・ Other Functions .................................................................. 13
・ About Function & Mode Select Switches.................15
・ Iris Adjustment..................................................................... 20
・ Detaching/Attaching Lens Hood.................................. 21
・ Maintenance..........................................................................22
・ Optional Accessories ........................................................ 23
・ Specifications....................................................................... 29
■ ILLUSTRATIONS
Fig. 1 Outline drawing
2 Wiring diagram
注. 本説明書内の説明図は、お手持ちの製品の形
状と異なる場合があります。
RD-S47-T1 - 1 -
Note. The products shown in the illustrations in this
manual may differ from their actual shapes.
レ ン ズ の 概 要 GENERAL DESCRIPTION
このレンズは、カラーテレビカメラ用に開発された、バヨネ
ットマウントタイプのズームレンズです。
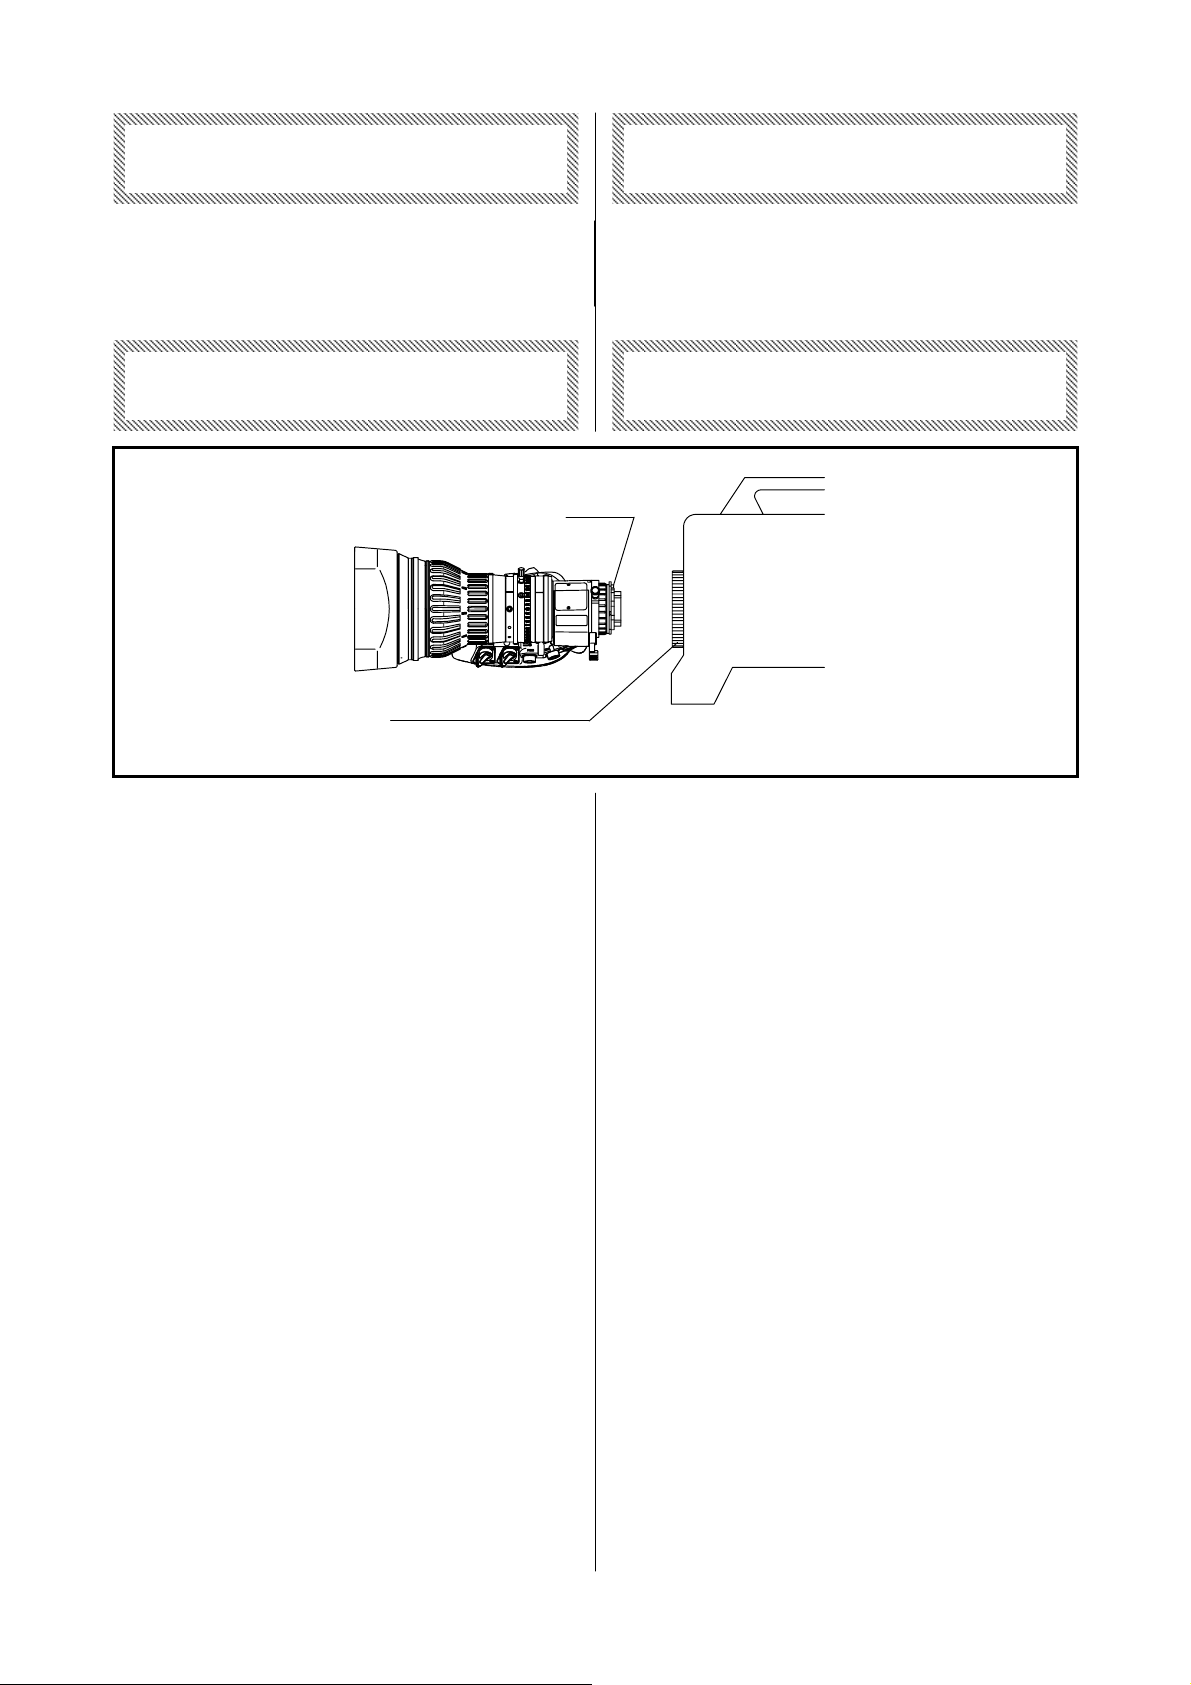
カ メ ラ へ の 取 り 付 け INSTALLATION ONTO CAMERA
マウントクランプリング
MOUNT CLAMP RING
注. レンズをカメラに取り付ける前に、必ずカメラの電源
をOFF にしてください。
This lens is a bayonet mount type zoom lens developed
for a 2/3” format color TV Camera.
ピン
PIN
M
A
O
C
R
カメラ
CAMERA
Note. Prior to installation of the lens, turn off the power
of the camera.
△警 告
取り付け・締め付けは確実に行ってください。高所使
用時の落下は重大な事故の原因となります。
a. 後レンズキャップを外します。
b. カメラのマウントクランプリングを、反時計方向一杯に
回します。
c. レンズのマウント面にあるピンが、カメラのマウント面に
ある穴、または切り欠きに確実に入るように位置を合
わせてから、レンズとカメラのマウント面を合わせま
す。
d. マウントクランプリングを時計方向一杯に回します。
e. レンズのケーブルをカメラのレンズ用コネクタに接続し
ます。
注. レンズを最初にカメラに取り付けたとき、または異なる
カメラに取り付けたときには、必ずフランジバックの調
整(次ページ参照)を行ってください。
△WARNING
Be sure to attach all the parts securely. Dropping
any parts from a height may cause severe accidents.
a. Take the rear lens cap off.
b. Rotate the mount clamp ring on the camera fully
counterclockwise.
c. Fit the mounting surface of the lens to that of the
camera aligning the pin on the lens with the slot in the
camera.
d. Rotate the mount clamp ring fully clockwise.
e. Connect the cable of the lens to the connector,
provided for the lens, on the camera.
Note. Make sure to adjust the flange focal length when
installing the lens on a camera for the first time or
installing it on another camera (refer to the next
page for details).
RD-S47 - 2 -

フランジバックの調整
f
ADJUSTMENT OF
FLANGE FOCAL LENGTH
フランジバックとは、レンズの取付基準面(フランジ)から
結像面までの距離をいいます。
レンズの結像面とカメラの撮像面が一致していないと、ズ
ームの操作中に被写体の焦点がずれてしまいます。こ
れを防ぐために、フランジバックの調整が必要となりま
す。レンズを最初にカメラに取り付けたとき、または異なる
カメラに取り付けたときには、必ずこの調整を行ってくだ
さい。
取付基準面
The flange focal length is the distance from the flange
(mounting surface) of a lens to the focal plane.
If the focal plane of the lens does not coincide with the
image plane of the camera, the object will be out of focus
during a zoom operation. To prevent this from
happening, the adjustment of the flange focal length is
required. Make sure to carry out the adjustment when
installing the lens to a camera for the first time or
installing it to another camera.
Flange
結像面
Focal Plane
フランジバック
Flange Focal Length
■ 被写体および絞りの条件
1. 被写体: 巻末に掲載してあります白黒の放射縞
模様チャート“ジーメンススター” を、切
り取ってご使用ください
2. 被写体距離: 約 3 m
3. 絞 り: 開放またはできるだけ開放に近い位置
注.絞りを開放にすることで被写界深度が浅くなり、より
確実に焦点を合わせることが出来ます。フランジバッ
クを正確に調整するために、出来るだけ丁寧な焦点
合わせ操作を行ってください。
■ CONDITIONS OF OBJECT AND DIAPHRAGM
1. Object: cut off the Siemens Star (the chart made up
of radial black and white lines) at the end o
this manual and use it as an object
2. Distance of Object: about 3 meters
3. Diaphragm: open or as near to open as possible
Note. The depth of field decreases by opening the
aperture of the lens, and it becomes possible to
focus on an object more precisely. To precisely
adjust the flange focal length, carefully adjust the
focus as much as possible.
RD-S47 - 3 -
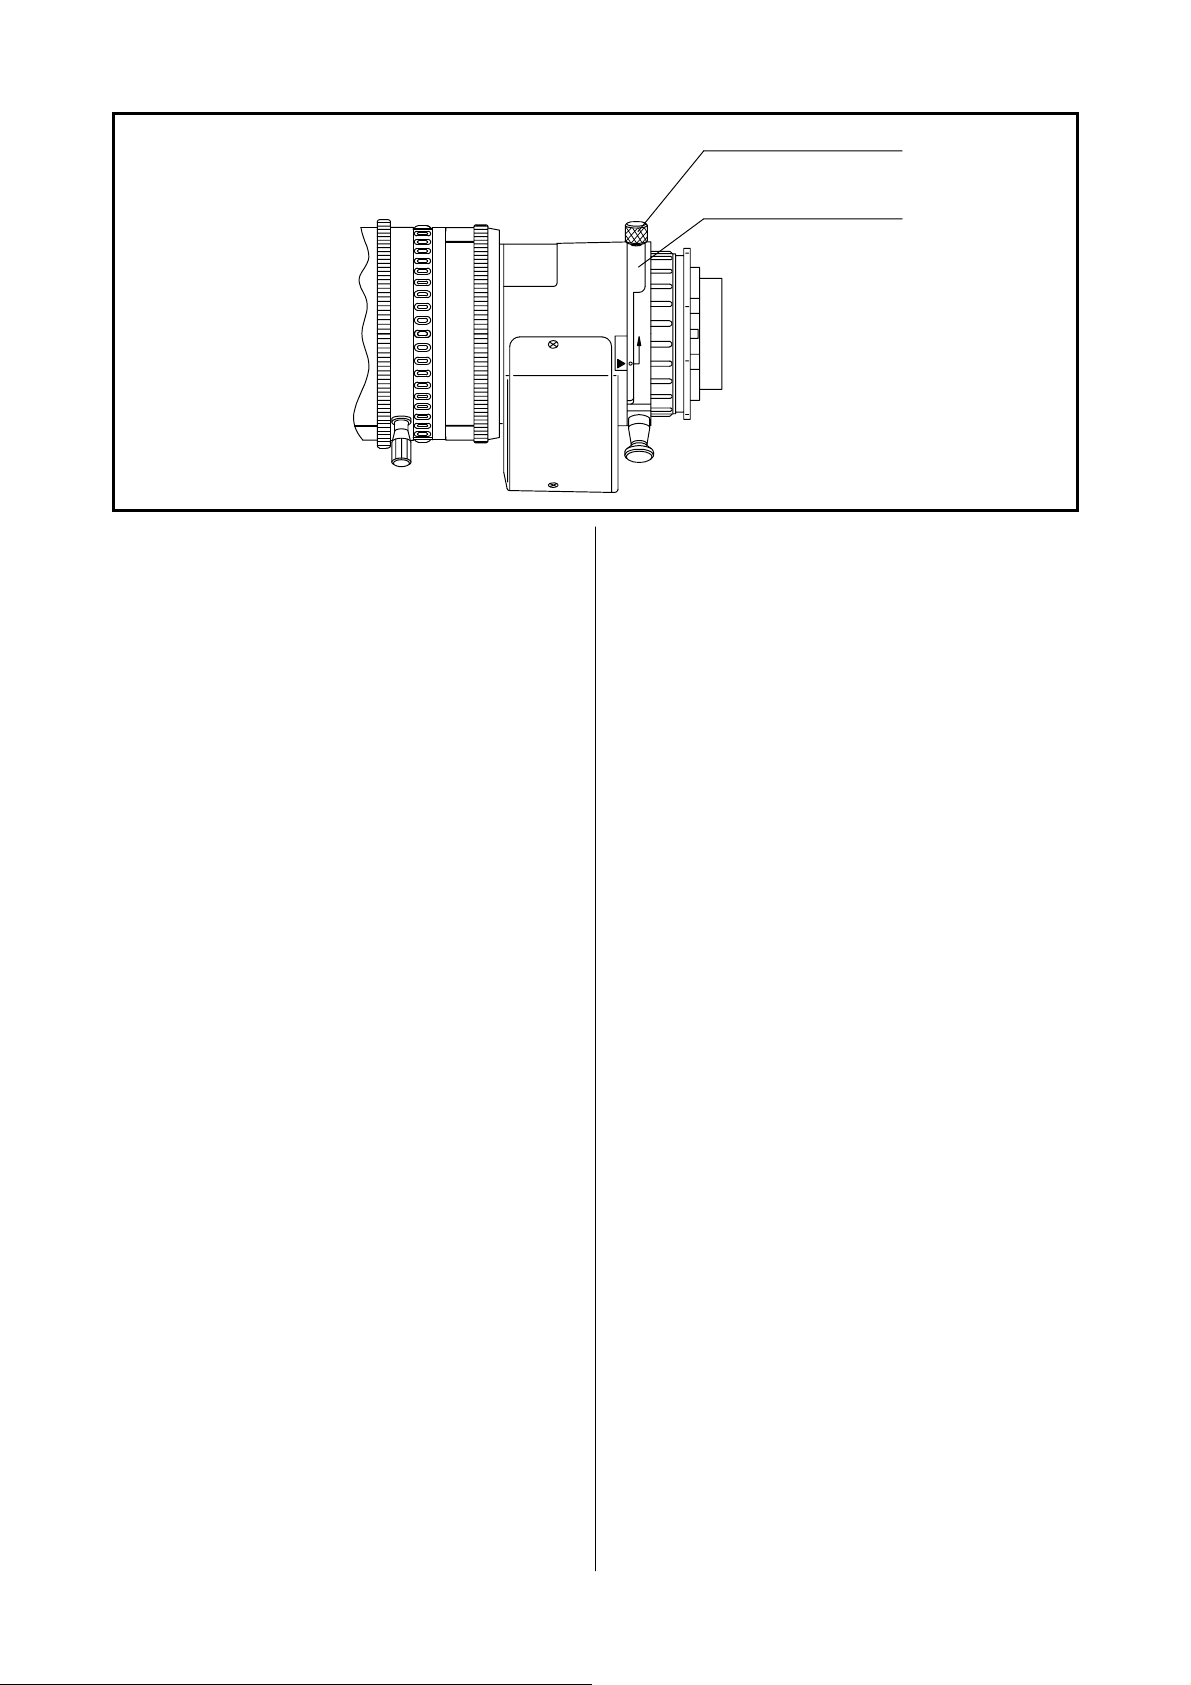
F.f 固定つまみ
F.f LOCKING KNOB
F.f 調整リング
F.f ADJUSTING RING
F.f
MACRO
M
A
O
R
C
■ 調 整
調整は、レンズをカメラに取り付けた後カメラの電源を入
れ、カメラのモニタを見ながら行います。フォーカス、ズー
ムの操作方法については、「フォーカス操作」「ズーム操
作」の項(6、7ページ)を参照してください。
a. F.f 固定つまみを反時計方向に回してゆるめます。
b. ズームを操作してワイド端にします。
c. F.f 固定つまみを使用してF.f 調整リングを回し、約3m
離れた距離に置いたジーメンススターに焦点を合わ
せます。白黒の放射縞模様が最もはっきり見える位置
が最適な焦点位置です。
d. ズームを操作してテレ端にします。
e. フォーカスを操作して、ジーメンススターに焦点を合わ
せます。
f. ズームをワイド端に戻して、手順 ‘c’ で合わせた最適
な焦点位置が保たれているか確認します。
■ ADJUSTMENT
After installing the lens to the camera and turning it ON,
perform adjustment by watching the monitor of the
camera. For the operation of focusing and zooming,
refer to “Focus Operation” and “Zoom Operation”
(pages 6 and 7).
a. Loosen the F.f locking knob by rotating it
counterclockwise.
b. Operate the zoom to set it to the wide end.
c. Rotate the F.f adjusting ring using the F.f locking
knob to focus on the Siemens Star located
approxi-mately 3 meters away. The position where
the radial black and white lines become sharpest is the
optimum focus position.
d. Operate the zoom to set it to the telephoto end.
e. Operate the focus to bring the object into focus.
f. Operate the zoom to set it to the wide end again, and
check that the optimum focus position adjusted in
step ‘c’ is kept.
g. 上記の手順 ‘b’ ~ ‘f’ を2、3回繰り返します。
(ズーム全域で常に最適な焦点位置が保たれるように
なれば、正確にフランジバックが調整されました。焦
点がずれてしまう場合は、フランジバックの調整が不
十分です。そのときは、再度手順 ‘b’ から調整を行っ
てください。)
h. 最後に、F.f 固定つまみを確実に締め付けます。
RD-S47 - 4 -
g. To adjust precisely, repeat the above steps ‘b’
through ‘f’ several times.
(If the most optimum focus position usually holds in all
zoom areas, the flange focal length is adjusted
precisely. If it is not focused, the flange focal length is
not adjusted sufficiently. In this case, start adjusting
again from step ‘b.’)
h. Finally tighten the F.f locking knob firmly.
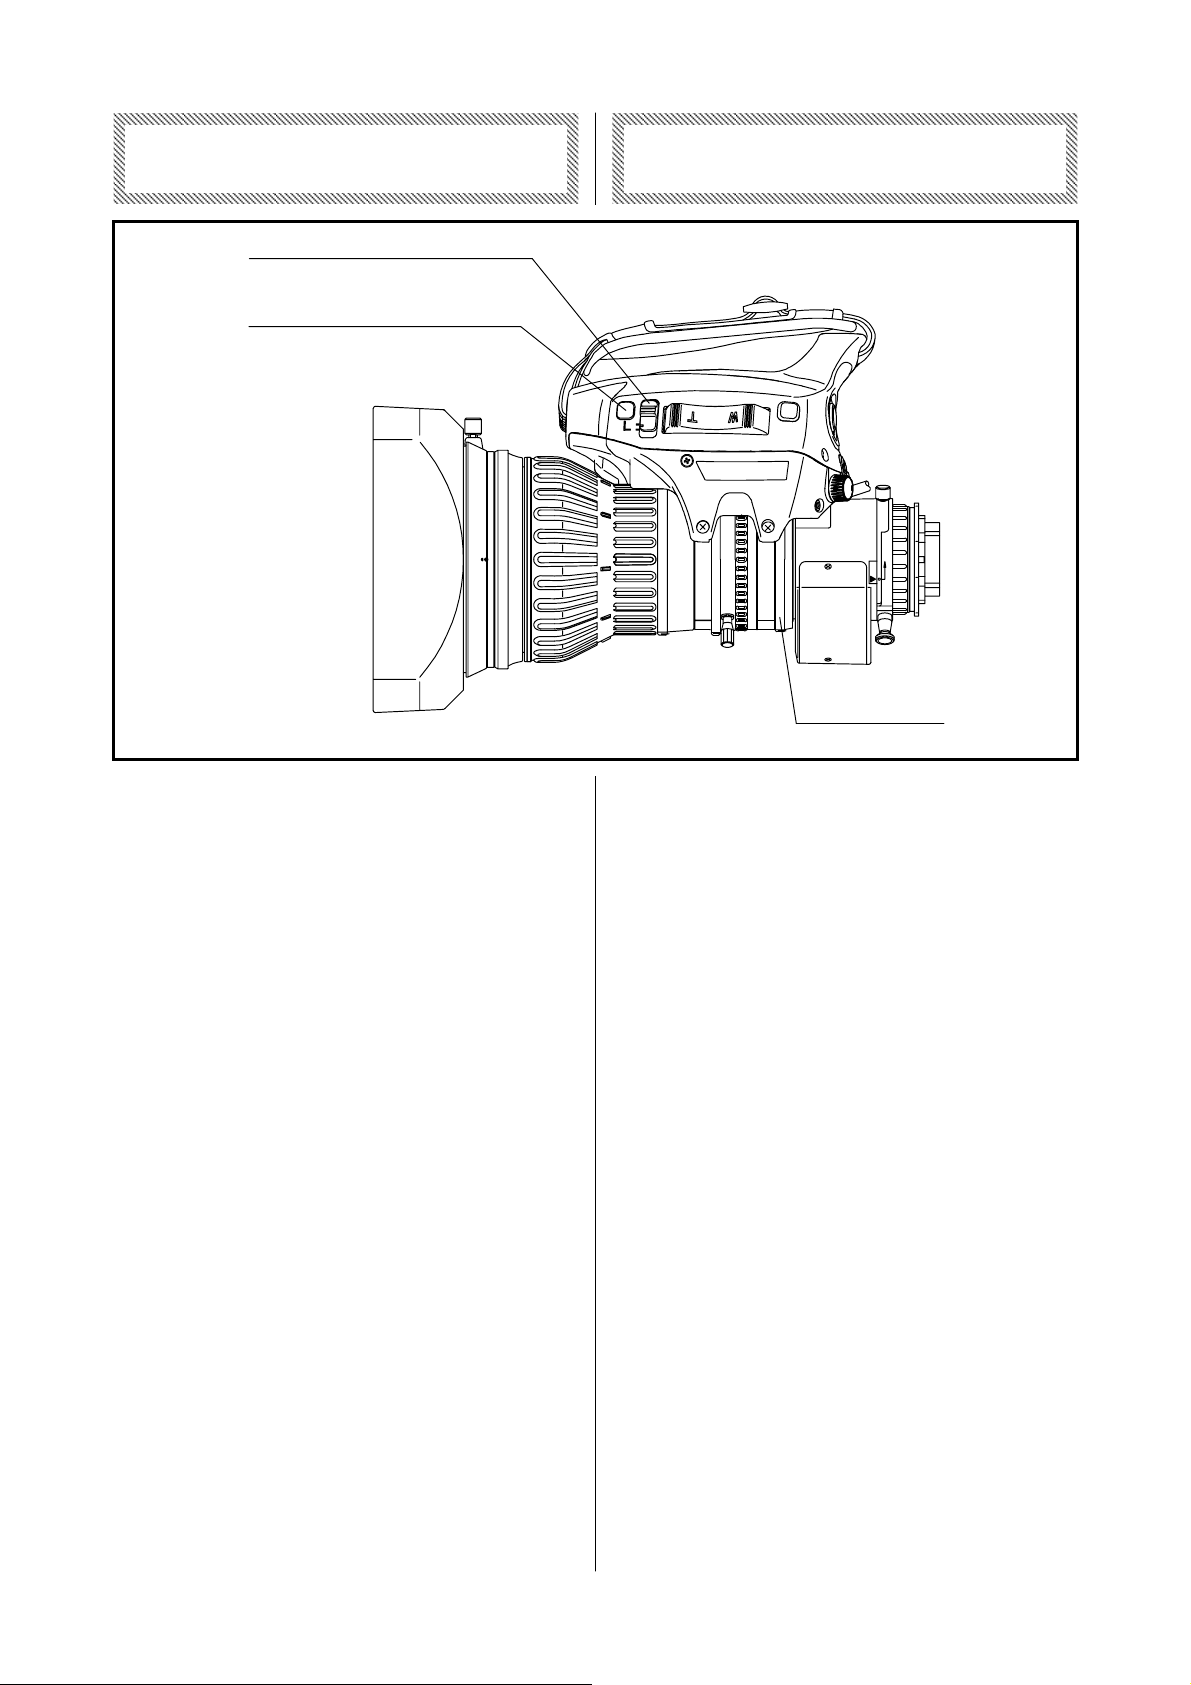
ア イ リ ス 操 作 IRIS OPERATION
アイリスモード切替スイッチ
IRIS MODE SELECT SWITCH
アイリスモーメンタリスイッチ
IRIS MOMENTARY SWITCH
アイリスの操作方式には、オートアイリスモードとマニュア
ルモードがあります。各方式の操作方法については、そ
れぞれの項目を参照してください。
T
E
A
S
I
M
R
I
R
F.f
MACRO
M
A
O
C
R
アイリスリング
IRIS RING
There are two iris operation modes: auto iris mode and
manual mode. For the operating instruction in each
mode, refer to the description on each mode.
■ オートアイリスモード
アイリスモード切替スイッチを『A』に設定します。アイリス
は、カメラからの信号により、被写体の明るさに応じて自
動的に調整されます。
■ マニュアルモード
a. アイリスモード切替スイッチを『M』に設定します。
b. アイリスリングを直接手で回して、アイリスを調整しま
す。リングを時計方向に回すと、クローズ側になり、反
時計方向に回すと、オープン側になります。
注1. マニュアルモードの時でも、アイリスモーメンタリス
イッチを押すと、押している間はオートアイリスにな
ります。
注2. アイリスA-M位置切替スイッチ(16ページ参照)を
ONにすると、アイリスモード切替スイッチのオートア
イリスモードとマニュアルモードの位置を逆にする
ことができます。逆にした場合には、混乱を防ぐた
めに、レンズに同梱してありますモード表示シール
を、レンズのモード表示の上に貼ってご使用くださ
い。
■ AUTO IRIS MODE
Set the iris mode select switch to “A.” The iris of the
lens will automatically be adjusted responding to the
object brightness.
■ MANUAL MODE
a. Set the iris mode select switch to “M.”
b. Rotate the iris ring by hand to adjust the iris.
Clockwise rotation of the ring causes the iris to move
toward the closed side and counterclockwise rotation
toward the open side.
Note 1. Although the iris operation mode is in Manual,
the iris is adjusted automatically while the iris
momentary switch is being pressed.
Note 2. The positions of the auto iris mode and the
manual mode in the iris mode select switch can
be interchanged by setting the iris A-M
position change switch (refer to page 16) to
ON. When the positions are interchanged,
apply the mode indication label, enclosed with
the lens, onto the mode indication part of the
lens so as not to cause confusion.
RD-S47 - 5 -
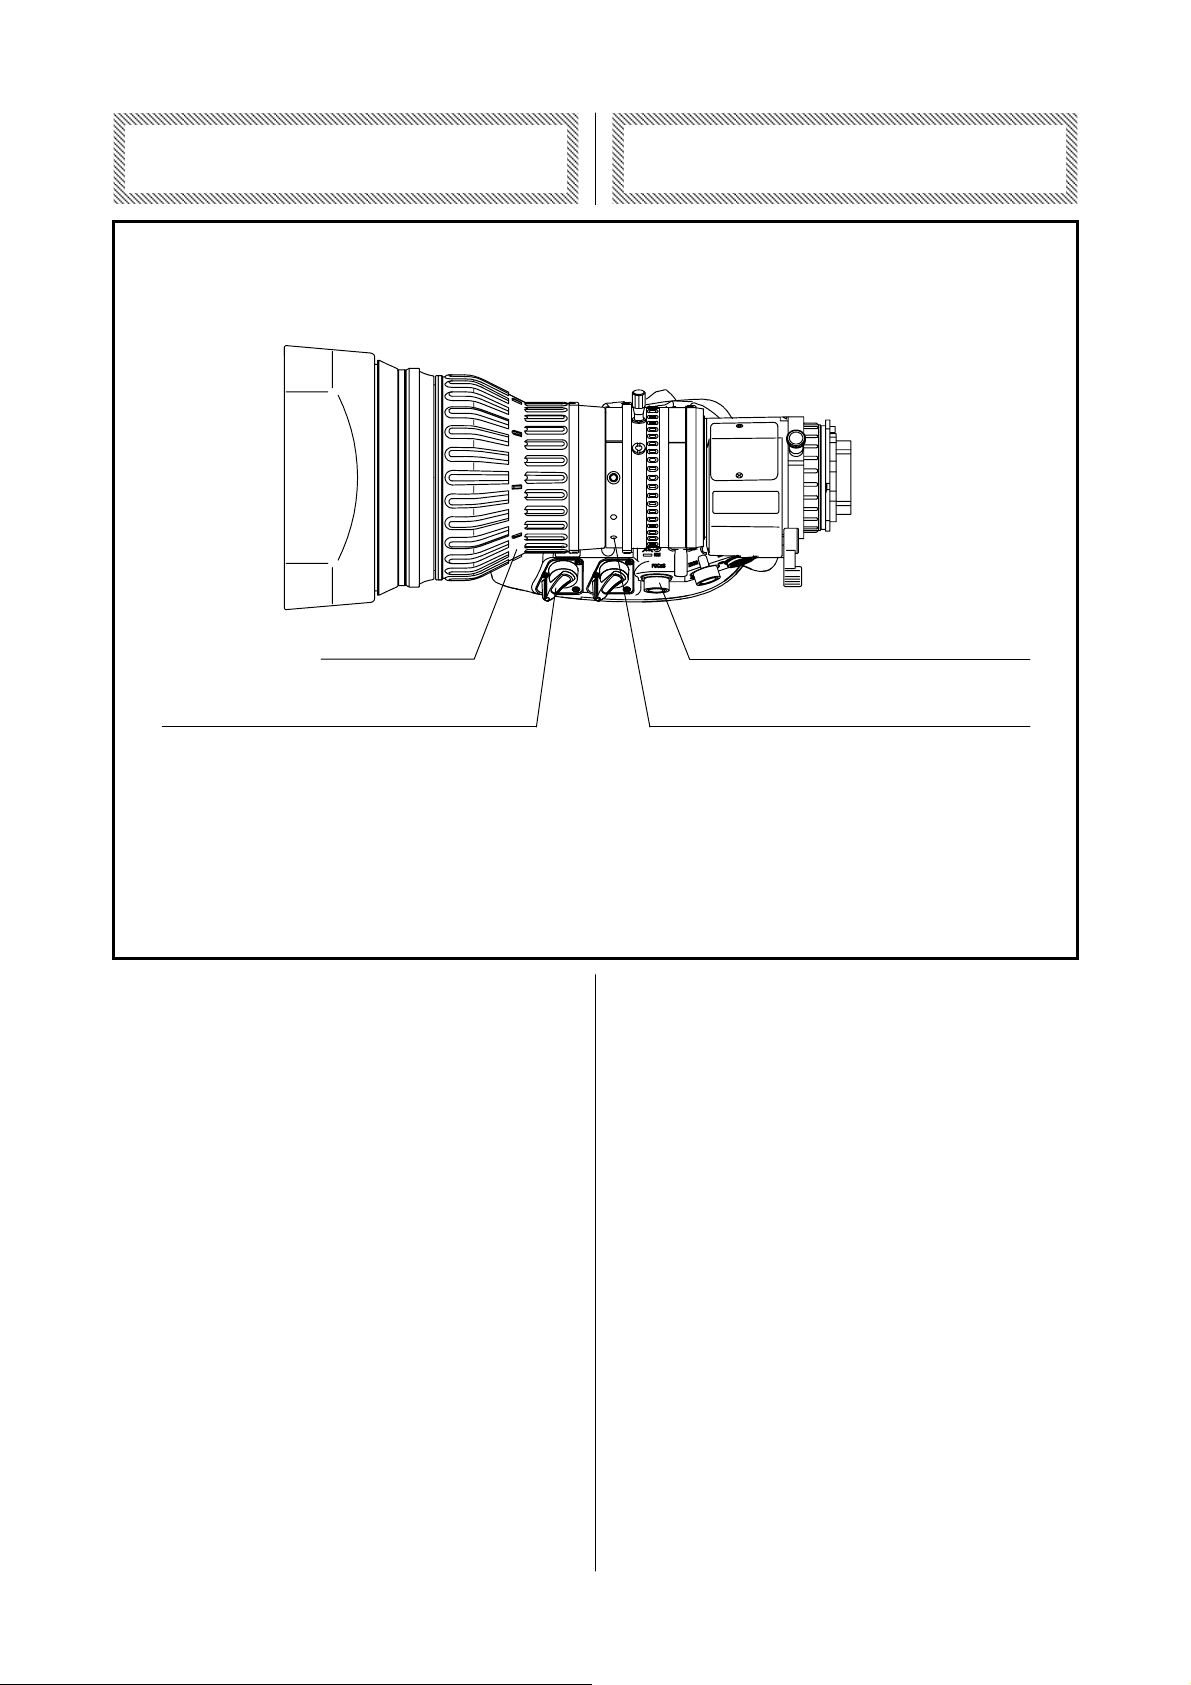
フ ォ ー カ ス 操 作 FOCUS OPERATION
M
O
A
R
C
フォーカスリング
FOCUS RING
フォーカスサーボ/マニュアル切替つまみ
FOCUS SERVO/MANUAL SELECT KNOB
フォーカスリングを直接手で回して、焦点を合わせます。
カメラ側より見て時計方向に回すと焦点は至近側に合
い、反時計方向に回すと無限遠側に合います。
別売りのアクセサリを使用すると、遠隔操作を行うことも
できます。サーボ操作用のアクセサリを使用するときは、
フォーカスサーボ/マニュアル切替つまみを『S』に設定
してください。
フォーカスコントロール用コネクタ
CONNECTOR FOR FOCUS CONTROL
フォーカスマニュアルモジュール用取付穴
ATTACHING HOLE
FOR FOCUS MANUAL MODULE
Focusing can be done by directly rotating the focus ring
by hand. Rotate the focus ring clockwise from the
camera side to focus on an object on the near side.
The remote control operation is also available with
optional accessories. Set the focus servo/manual select
knob to “S,” when using a servo control accessory.
RD-S47 - 6 -
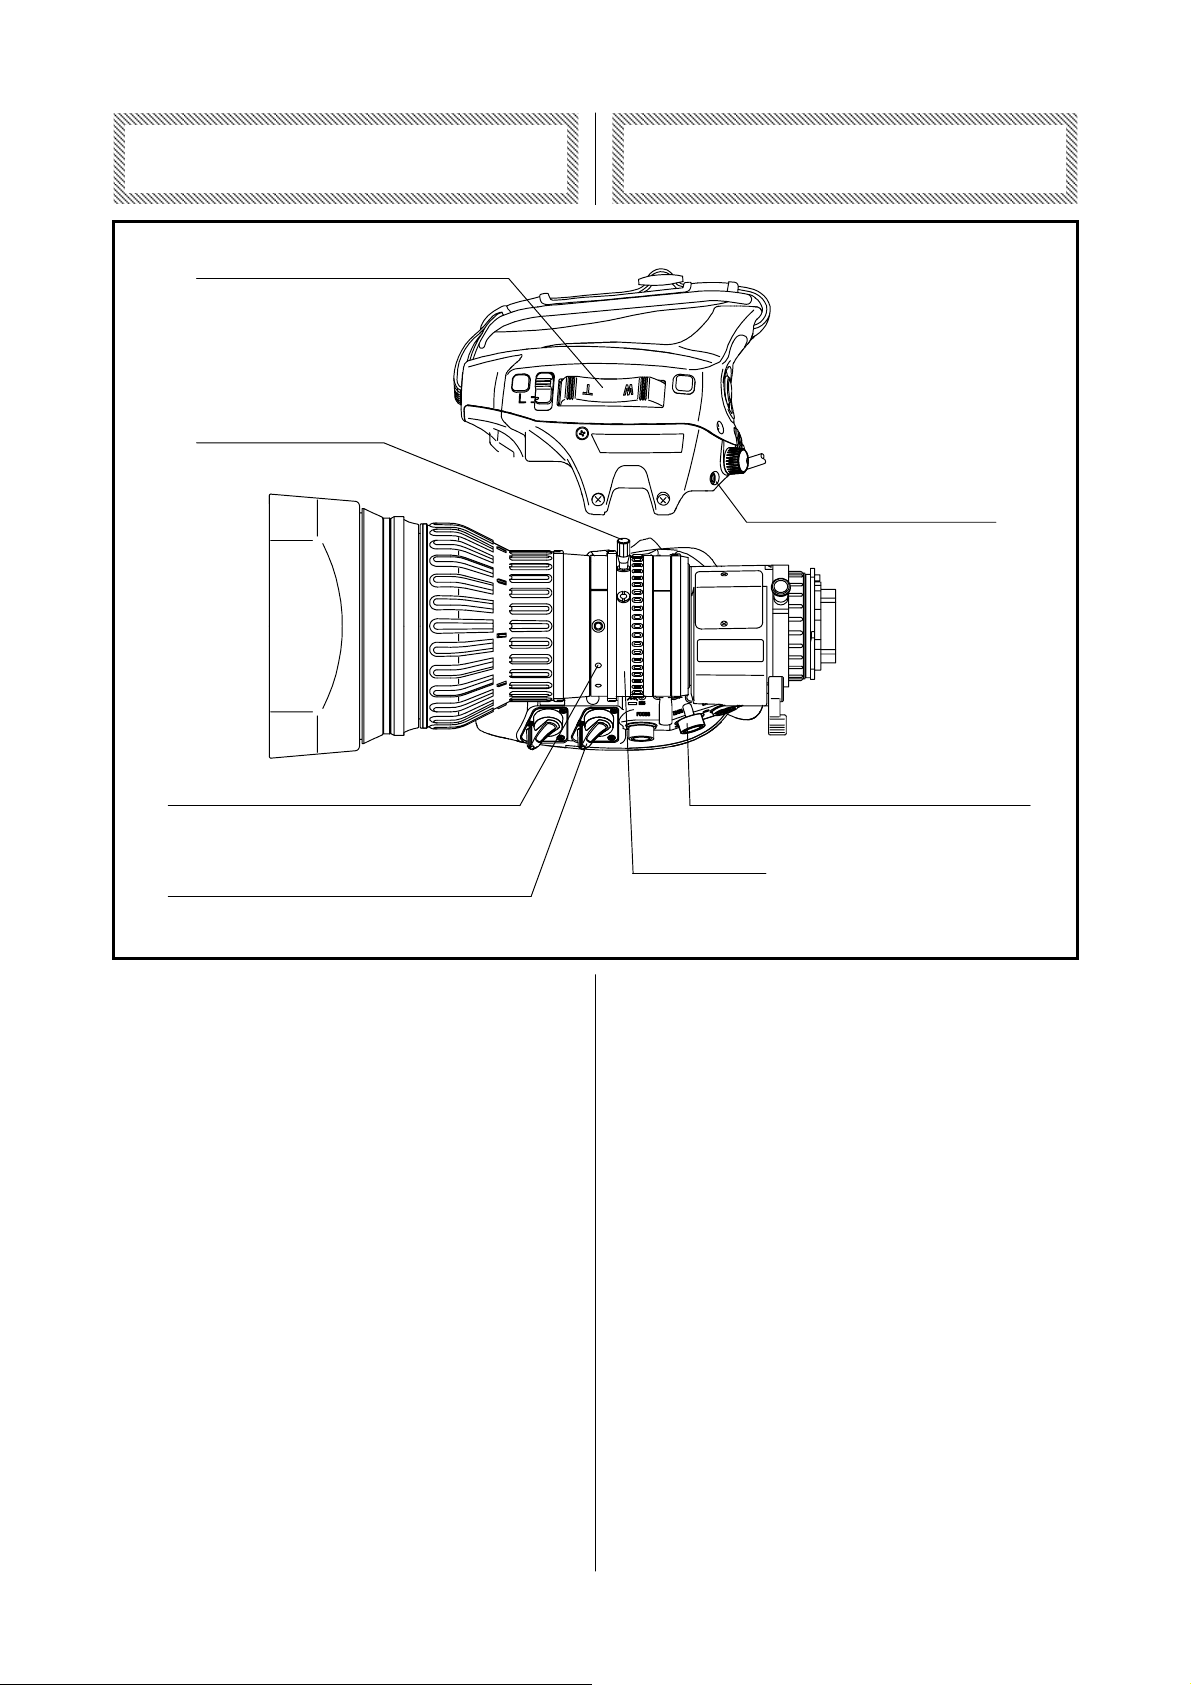
ズ ー ム 操 作 ZOOM OPERATION
ズームシーソーコントロールレバー
ZOOM SEESAW CONTROL LEVER
T
E
R
ズームレバーホルダ
ZOOM LEVER HOLDER
M
O
A
R
C
ズームレバー
ZOOM LEVER
A
S
I
M
R
I
ズームマニュアルモジュール用取付穴
ATTACHING HOLE
FOR ZOOM MANUAL MODULE
ズームサーボ/マニュアル切替つまみ
ZOOM SERVO/MANUAL SELECT KNOB
ズーム操作は、次の5通りの方式で行うことができます。
ページ
(1) ズームシーソーコントロールレバー
による操作 ····························································· 8
(2) クイックズーム操作 ·············································· 8
(3) オートクルージングズーム操作 ·····················10
(4) マニュアル操作··················································11
各方式での操作方法については、それぞれの項目を参
照してください。なお、別売りのアクセサリを使用すると、
遠隔操作を行うこともできます。
ズームコントロール用コネクタ
CONNECTOR FOR ZOOM CONTROL
ズームリング
ZOOM RING
The zoom can be operated in the following five operation
modes.
Page
(1) Operation by Zoom Seesaw
Control Lever ·······················································8
(2) QuickZoom Operation········································8
(3) Auto Cruising Zoom Operation ···················· 10
(4) Manual Operation ············································· 11
For the operating instruction in each mode, refer to the
description on each mode.
The remote control operation is also available with
optional accessories.
RD-S47 - 7 -

f
(1) ズームシーソーコントロールレバーによる操作
(1) Operation by Zoom Seesaw Control Lever
a. ズームサーボ/マニュアル切替つまみを『S』に設定し
ます。
b. ズームシーソーコントロールレバーを押します。レバ
ーのT側を押すとズームはテレ側に、W側を押すとワ
イド側に作動します。レバーを押す深さを変えるとズ
ームスピードが変化します。深く押すと速くなり、浅く
押すと遅くなります。
<ズーム最大スピードの調節>
ズーム最大スピード調節つまみ (下図参照) を操作する
と、ズームの最大スピードを7段階の間で、任意に調節
することができます。つまみを時計方向に回すと、スピー
ドは速くなります。
(2) クイックズーム操作
a. Set the zoom servo/manual select knob to “S.”
b. Press the zoom seesaw control lever. Press T-side o
the lever to zoom to the tele side, and the W-side to
zoom to the wide side. For the speed control, adjust
the strength to press the lever. Pressing the lever
deeply makes the zoom speed faster, and shallowly
makes slower.
<Control of Zoom Maximum Speed>
By means of the zoom maximum speed control knob (see
the illustration below), the zoom maximum speed can be
changed in seven steps. Rotate the knob clockwise to
increase the speed.
(2) QuickZoom Operation
ZOOM MAXIMUM SPEED CONTROL KNOB
O
O
M
Z
S
F
Q・Z
2
.
2
X
1
X
クイックズーム&オートクルージングズームスイッチ
QUICKZOOM & AUTO CRUISING ZOOM SWITCH
クイックズーム操作では、ズームを素早くテレ端まで作動
させることができます。次のようなときに、有効に活用す
ることができます。
• 正確な焦点合わせをするために、ズームを素早くテレ
端にしたいとき。
ズーム最大スピード調節つまみ
In quickzoom operation, pressing a switch moves the
zoom to the tele end quickly. The operator can use this
function in such occasions listed below.
• When rapid zooming to the tele end is required to focus
on the object precisely.
• ズームアップしたときの構図を、素早く確認したいとき。
• To confirm, in a moment, the composition of the image
in the extreme closeup shot.
RD-S47 - 8 -
 Loading...