

Fujifilm GFX 100S User Manual
FF200003
Basic Manual
Thank you for your purchase of this product. Be sure that you have read
this manual and understood its contents before using the camera. Keep the
manual handy for future reference once you have nished.
The latest versions of the product manuals are available at the site below.
http://fujifilm-dsc.com/en/manual/
The site above, which provides detailed instructions and material not covered in this guide, can be
accessed from a computer, smartphone, or tablet.
It also contains information on the software license.
BL00005120-201
EN

MEMO
ii

Chapter Index
P
1 Before You Begin
2 First Steps
3 Taking and Viewing Photos
4 Movie Recording and Playback
5 Menu List
6 Connections
7 Notices
1
33
49
79
85
103
121
iii

Table of Contents
Before You Begin 1
P
Supplied Accessories ...............................................................................viii
About This Manual .......................................................................................ix
Symbols and Conventions ..................................................................................ix
Terminology .................................................................................................................ix
Before You Begin 1
1
Parts of the Camera ......................................................................................2
The Serial Number Plate ........................................................................................5
The Memory Card Slot Cover (Detachable) ..............................................5
The Focus Stick (Focus Lever) .............................................................................5
The Mode Dial .............................................................................................................6
The STILL/MOVIE Mode Switch .........................................................................7
The DRIVE Button ....................................................................................................... 7
The Command Dials ................................................................................................8
The Indicator Lamp ..................................................................................................9
The LCD Monitor .....................................................................................................10
The Eye Cup ...............................................................................................................11
Focusing the View nder..................................................................................... 11
Camera Displays..........................................................................................12
The Electronic View nder ..................................................................................12
The LCD Monitor .....................................................................................................14
Choosing a Display Mode .................................................................................16
Adjusting Display Brightness ........................................................................... 17
Display Rotation ......................................................................................................17
The DISP/BACK Button ........................................................................................ 18
The Dual Display......................................................................................................19
Customizing the Standard Display .............................................................. 20
The Secondary LCD Monitor ...........................................................................22
Using the Menus .........................................................................................25
The Menus ..................................................................................................................25
Selecting a Menu Tab ........................................................................................... 26
Touch Screen Mode ................................................................................... 27
Shooting Touch Controls ................................................................................... 27
Playback Touch Controls ....................................................................................31
iv

Table of Contents
First Steps 33
Taking and Viewing Photos 49
First Steps 33
2
Attaching the Strap ...................................................................................34
Attaching a Lens .........................................................................................35
Inserting the Battery .................................................................................36
Inserting Memory Cards ..........................................................................38
Using Two Cards ...................................................................................................... 39
Charging the Battery ................................................................................. 40
Turning the Camera On and O ............................................................43
Basic Setup.................................................................................................... 44
Choosing a Di erent Language ....................................................................47
Changing the Time and Date .......................................................................... 47
Taking and Viewing Photos 49
3
P, S, A, and M Modes ..................................................................................50
Mode P: Program AE .............................................................................................50
Mode S: Shutter-Priority AE ..............................................................................51
Mode A: Aperture-Priority AE .......................................................................... 53
Mode M: Manual Exposure ............................................................................... 55
Custom Modes ......................................................................................................... 58
Autofocus ...................................................................................................... 60
Focus Mode ................................................................................................................ 61
Autofocus Options (AF Mode) ........................................................................ 62
Focus-Point Selection .......................................................................................... 64
Manual Focus ............................................................................................... 67
Checking Focus........................................................................................................68
Sensitivity ...................................................................................................... 70
AUTO...............................................................................................................................71
Metering ........................................................................................................ 72
Exposure Compensation .........................................................................73
Focus/Exposure Lock ................................................................................74
Other Controls .......................................................................................................... 75
Viewing Pictures .........................................................................................76
Deleting Pictures ........................................................................................77
v

Movie Recording and Playback 79
Movie Recording and Playback 79
Menu List 85
4
Recording Movies ....................................................................................... 80
Adjusting Movie Settings ..................................................................................83
Viewing Movies ........................................................................................... 84
Menu List 85
5
The Shooting Menus (Still Photography)...........................................86
IMAGE QUALITY SETTING ..................................................................................86
AF/MF SETTING ........................................................................................................ 87
SHOOTING SETTING .............................................................................................. 89
FLASH SETTING ........................................................................................................90
The Shooting Menus (Movies) ............................................................... 91
MOVIE SETTING ........................................................................................................ 91
IMAGE QUALITY SETTING ..................................................................................92
AF/MF SETTING ........................................................................................................ 93
AUDIO SETTING .......................................................................................................94
TIME CODE SETTING .............................................................................................95
The Playback Menu .................................................................................... 96
The Setup Menus ........................................................................................97
USER SETTING ...........................................................................................................97
SOUND SET-UP .........................................................................................................97
SCREEN SET-UP.........................................................................................................98
BUTTON/DIAL SETTING.......................................................................................99
POWER MANAGEMENT .................................................................................... 101
SAVE DATA SET-UP ............................................................................................... 101
CONNECTION SETTING .................................................................................... 102
vi

Table of Contents
Connections 103
Notices 121
Connections 103
6
HDMI Output..............................................................................................104
Connecting to HDMI Devices ......................................................................104
Shooting .................................................................................................................... 105
Playback ..................................................................................................................... 105
Wireless Connections (Bluetooth®, Wireless LAN/Wi-Fi) ............106
Smartphones and Tablets: FUJIFILM Camera Remote .................. 106
Tethered Shooting: Capture One Pro Fuji lm/
Adobe® Photoshop® Lightroom® Classic CC + FUJIFILM Tether
Shooting Plug-in PRO for GFX/FUJIFILM X Acquire ..................... 108
Connecting via USB .................................................................................109
Tethered Shooting: Capture One Pro Fuji lm/
Adobe® Photoshop® Lightroom® Classic CC + FUJIFILM Tether
Shooting Plug-in PRO for GFX/FUJIFILM X Acquire ..................... 112
Copying Pictures to a Computer ...............................................................113
Converting RAW Images: FUJIFILM X RAW STUDIO ....................... 114
Backing up and Restoring Camera Settings
(FUJIFILM X Acquire) ....................................................................................... 114
Connecting to Smartphones .......................................................................115
instax SHARE Printers ..............................................................................118
Establishing a Connection .............................................................................118
Printing Pictures....................................................................................................119
Notices 121
7
For Your Safety ...........................................................................................122
vii

Supplied Accessories
The following are included with the camera:
NP-W235 rechargeable battery
•
AC-5VJ AC power adapter
•
Plug adapter
•
USB cable
•
Body cap (comes attached to camera)
•
Shoulder strap
•
Cable protector
•
Hot shoe cover (comes attached to hot shoe)
•
Basic Manual (this manual)
•
The battery is not charged at shipment. Charge the battery before use
O
(P 40).
• The plug adapter supplied varies with the country or region.
N
Visit the site below for information on the software available for your
•
camera.
https://fujifilm-x.com/support/compatibility/cameras/
viii

About This Manual
This manual contains instructions for your FUJIFILM GFX100S
digital camera. Be sure you have read and understood its
contents before proceeding.
Symbols and Conventions
The following symbols are used in this manual:
Information that should be read to prevent damage to the
O
product.
Additional information that may be helpful when using the
N
product.
Pages on which related information may be found.
P
Menus and other text in the displays are shown in bold. Illustrations
are for explanatory purposes only; drawings may be simpli ed,
while photographs are not necessarily taken with the model of
camera described in this manual.
Terminology
The optional SD, SDHC, and SDXC memory cards the camera uses
to store pictures are referred to as “memory cards”. The electronic
view nder may be referred to as the “EVF” and the LCD monitor
as the “LCD”.
ix

MEMO
x

Before You Begin
1
Parts of the Camera
1
Before You Begin
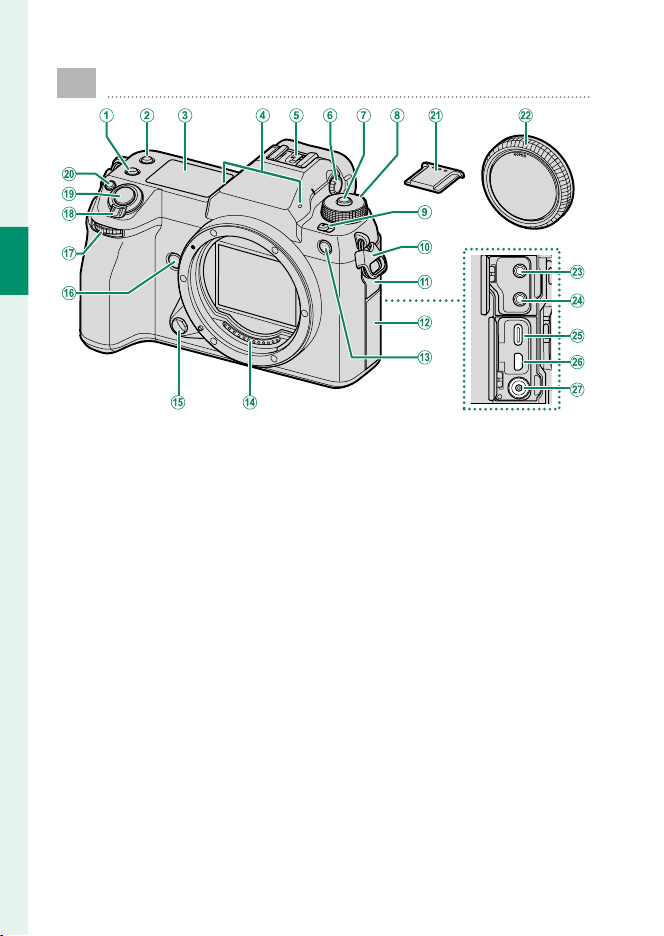
Fn2 button
A
Fn3 button
B
Secondary LCD monitor................................22
C
Microphone ......................................................81
D
Hot shoe
E
Diopter adjustment control .........................11
F
Dial lock release .......................................50, 80
G
Mode dial ............................................................6
H
STILL/MOVIE mode switch ......................7, 80
I
Strap clip............................................................34
J
Connector cover 1
K
Connector cover 2
L
AF-assist illuminator
M
Self-timer lamp
Tally light
2
Lens signal contacts
N
Lens release button ........................................35
O
Fn4 button
P
Front command dial ........................................8
Q
ON/OFF switch .................................................43
R
Shutter button
S
Fn1 button
T
d (exposure compensation) button ......73
Hot shoe cover
U
Body cap ............................................................35
V
Microphone jack .............................................81
W
Headphone jack
X
USB connector (Type-C) ...............................40
Y
HDMI Micro connector (Type D)
Z
Sync terminal
a
Parts of the Camera
1
Before You Begin
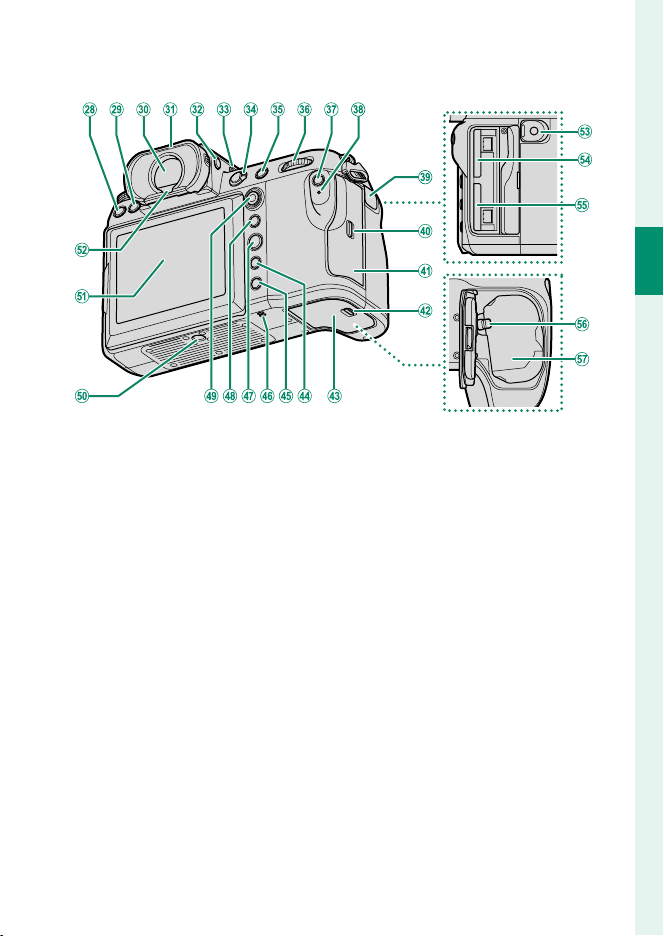
DRIVE button ...................................................... 7
b
b (delete) button ...........................................77
c
Electronic viewfi nder (EVF)
d
.....................................................12, 16, 17, 27
Eye cup (lockable) ...........................................11
e
VIEW MODE button .........................................16
f
Secondary monitor backlight button .......24
g
Focus mode selector ......................................61
h
AFON button .....................................................75
i
Rear command dial .........................................8
j
Q (quick menu) button
k
Indicator lamp ................................................... 9
l
Tally light
Remote release connector cover ................57
m
Memory card slot cover latch ......................38
n
Memory card slot cover (detachable)
o
..................................................................... 5, 38
Battery-chamber cover latch ......................36
p
Battery-chamber cover .................................36
q
DISP (display)/BACK button .........................18
r
a (playback) button ...................................76
s
Speaker ..............................................................84
t
MENU/OK button .............................................25
u
AEL (exposure lock) button ..........................75
v
Focus stick (focus lever)............................5, 64
w
Tripod mount
x
LCD monitor ....................................... 10, 14, 16
y
Touch screen ....................................................27
Eye sensor ..........................................................16
z
Remote release connector ............................57
0
Memory card slot2 ........................................38
1
Memory card slot1 ........................................38
2
Battery latch ....................................................37
3
Battery chamber .............................................36
4
3

The Cable Protector
Attach the protector as shown to prevent accidental disconnection.
Insert the tab on the connector into the matching slot on the camera.
A
Position the protector on the camera.
B
Tighten the lock screw.
C
Connect the cable and pass it through the protector as shown.
D
1
Before You Begin
4
The Serial Number Plate
Do not remove the serial number plate,
which provides the CMIITID, serial number, and other important information.
Parts of the Camera
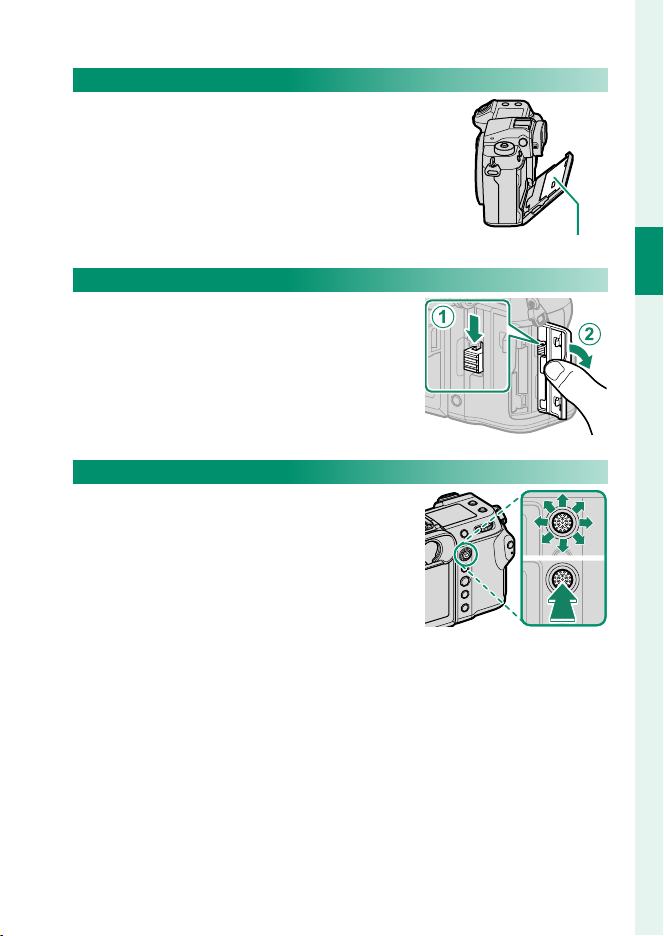
The Memory Card Slot Cover (Detachable)
The memory card slot cover can be removed by lowering the interior latch. Remove the cover for ease of access when
a camera rig is attached or in other situations that make it di cult to open or
close the cover.
The Focus Stick (Focus Lever)
Tilt or press the focus stick to select the focus area. The focus stick can also be used
to navigate the menus.
Serial number plate
1
Before You Begin
5

The Mode Dial
Mode
Description
P
To select a shooting mode, rotate the dial until
the icon for the desired mode aligns with the
index.
1
Before You Begin
A
P (PROGRAM AE) Aperture and shutter speed can be ad-
B
S (SHUTTER PRIORITY AE)
A (APERTURE PRIORITY AE)
M (MANUAL)
C
C1/C2/C3/C4/C5/C6
(CUSTOM 1/2/3/4/5/6)
Rotate the mode dial only after pressing the dial lock release to release
O
the dial.
Mode
Description
justed using program shift.
Select for full control over camera settings, including aperture (M and A)
and/or shutter speed (M and S).
Take pictures using previously-stored
settings.
P
50
51
53
55
58
6
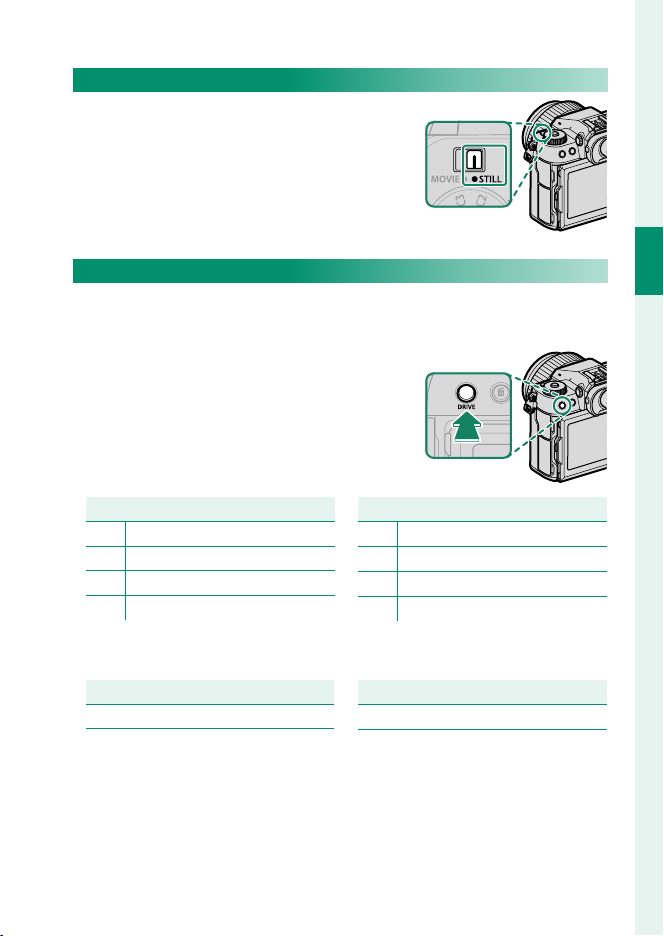
The STILL/MOVIE Mode Switch
Mode
Mode
Option
Option
Slide the STILL/MOVIE mode switch to STILL
to take photographs or to MOVIE to record
movies.
Parts of the Camera
The DRIVE Button
Press the DRIVE button to adjust shooting settings. The options
displayed vary with the position of the STILL/MOVIE mode switch.
Pressing the button when STILL is select-
•
ed displays drive mode options.
Mode
Single frame
B
CH High-speed burst
CL Low-speed burst
ISO BKT
W
Pressing the button when MOVIE is selected displays movie re-
•
WHITE BALANCE BKT
V
BKT Bracketing
Multiple Exposure
j
PIXEL SHIFT MULTI SHOT
p
Mode
cording options.
Option
Frame size
Aspect ratio
Option
Frame rate
Bit rate
1
Before You Begin
7

The Command Dials
Rotate
Press
Rotate or press the command dials to:
Front command dial Rear command dial
1
Before You Begin
Select menu tabs or page
•
through menus
Choose the desired combina-
•
tion of shutter speed and aperture (program shift)
Adjust aperture
•
View other pictures during
Rotate
1 Can be changed using D BUTTON/DIAL SETTING> COMMAND DIAL SETTING.
2 If the lens is equipped with an aperture ring with a “C” position, the camera command
dials can be used to adjust aperture when the aperture ring is rotated to C.
3 Available only if FOCUS CHECK is assigned to a function button.
4 Only if a value other than auto is selected for shutter speed.
The rotation direction for the command dials can be selected using
N
•
playback
Switch between aperture and
•
ISO sensitivity
Press and hold to choose the op-
•
tion selected for D BUTTON/
Press
D BUTTON/DIAL SETTING> COMMAND DIAL DIRECTION.
DIAL SETTING> COMMAND
DIAL SETTING in the D(setup)
menu
1, 2
2
Highlight menu items
•
Choose the desired combina-
•
tion of shutter speed and aperture (program shift)
Choose a shutter speed
•
Adjust exposure compensation by
•
pressing the d button and rotating the dial
Adjust settings in the quick menu
•
Choose the size of the focus frame
•
Zoom in or out in full frame play-
•
back
Zoom in or out in multi-frame
•
playback
Zoom in on the active focus point
•
Press and hold to choose the
•
manual focus mode focus display
Zoom in on the active focus
•
point during playback
1
1, 4
3
3
8

The Indicator Lamp
Indicator lamp
Camera status
Camera status is shown by the indicator
lamp.
Parts of the Camera
Indicator lamp
Glows green Focus locked.
Blinks green Focus or slow shutter speed warning. Pictures can be taken.
Camera on: Recording pictures. Additional pictures can be
Blinks green and
orange
Glows orange
Blinks orange Flash charging; fl ash will not fi re when picture is taken.
Blinks red Lens or memory error.
* Displayed only if pictures are selected for upload.
• Warnings may also appear in the display.
N
The indicator lamp remains o while your eye is to the view nder.
•
The B MOVIE SETTING> TALLY LIGHT option can be used to
•
choose the lamp (indicator or AF-assist) that lights during movie recording and whether the lamp blinks or remains steady.
•
taken.
Camera o : Uploading pictures to a smartphone or tablet.
•
Recording pictures. No additional pictures can be taken at
this time.
Camera status
1
Before You Begin
*
9

The LCD Monitor
The LCD monitor can be tilted for easier viewing, but be careful not to touch
the wires or trap ngers or other objects
behind the monitor. Touching the wires
could cause camera malfunction.
1
The LCD monitor also functions as a touch screen that can be used for:
N
Before You Begin
Touch photography (P 28)
•
Focus area selection (P 27)
•
Function selection (P 30)
•
Movie optimized control oL (P 29)
•
Playback (P 31)
•
“Tall” (Portrait) Orientation
The display can also be tilted to take pictures from high or low angles when
the camera is rotated to take pictures in “tall” (portrait) orientation.
Press the tilt lock release and tilt the display as shown in Figure 1.
•
To take high-angle shots, hold the camera in the orientation shown in
•
Figure 2.
10
Figure 1 Figure 2
The Eye Cup
To remove the eye cup, hold the buttons
on either side and slide eye cup up.
Parts of the Camera
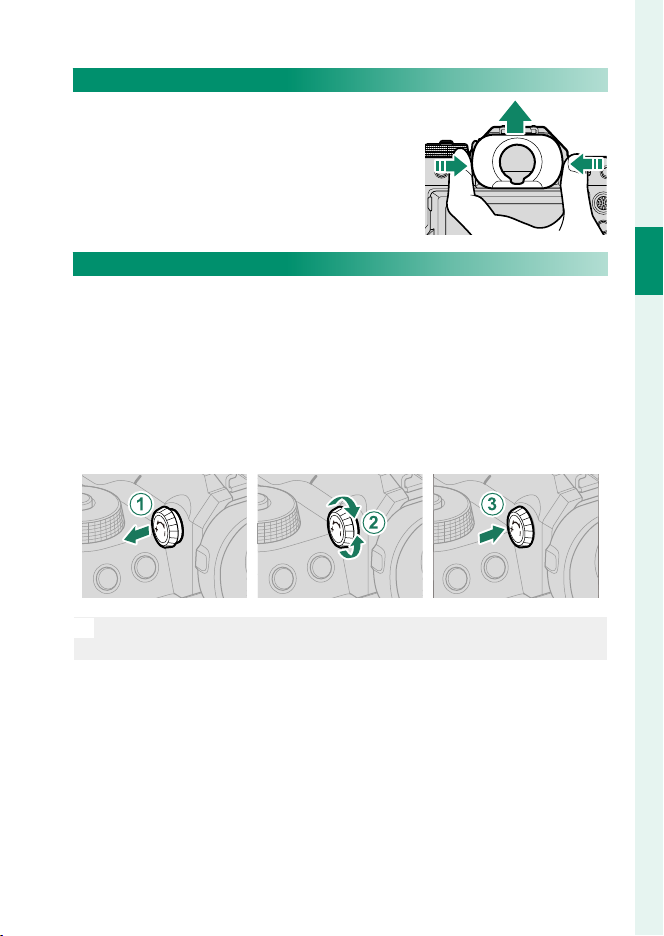
Focusing the View nder
If the indicators displayed in the view nder are blurred, put your
eye to the view nder and rotate the diopter adjustment control
until the display is in sharp focus.
To focus the view nder:
Lift the diopter adjustment control.
A
Rotate the control to adjust view nder focus.
B
Return the control to its original position and lock it in place.
C
Lift the control before use. Failure to observe this precaution could
O
cause product malfunction.
1
Before You Begin
11
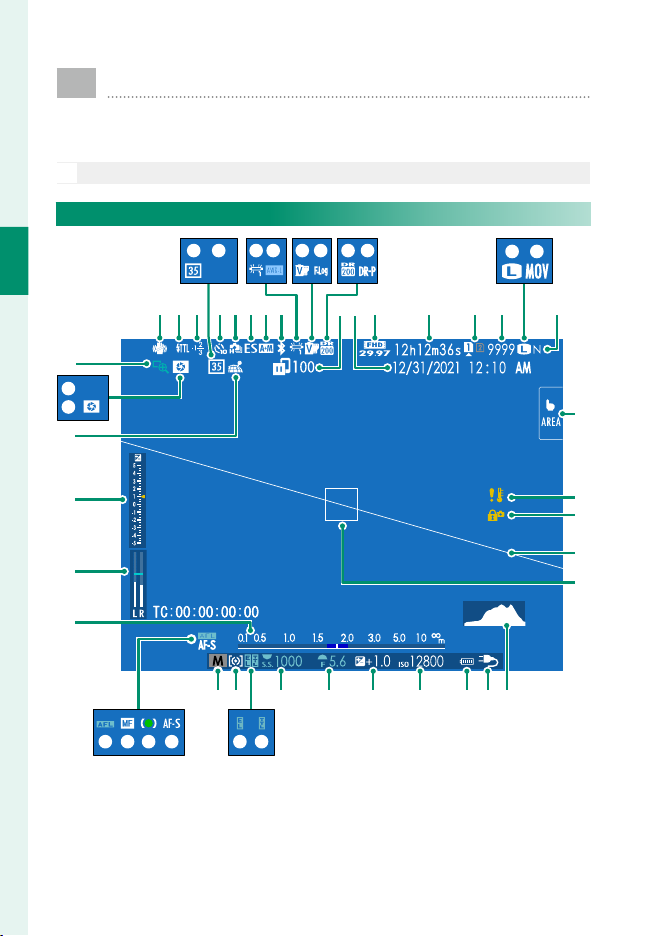
Camera Displays
This section lists the indicators that may be displayed
during shooting.
For illustrative purposes, displays are shown with all indicators lit.
O
The Electronic View nder
1
Before You Begin
H.264
y
x
w
v
u
t
K LD E M N O P
ALL-Intra
CABzFGHIJ
lmpqrs
QR S T U V Y
W X
Z
a
b
c
d
egfhijkno
12

Camera Displays
2
IS mode
A
B
C
D
E
F
G
H
I
J
K
L
M
N
O
P
Q
R
S
T
U
V
W
X
Y
Z
1 Shows “9999” if there is space for over 9999 frames.
2 Not displayed when ON is selected for D SCREEN SET-UP> LARGE INDICATORS
MODE(EVF).
3 Displayed during movie recording only.
4 Displayed when controls have been locked by pressing and holding the MENU/OK button.
Control lock can be ended by pressing and holding the MENU/OK button again.
............................................................90
Flash (TTL) mode
Flash compensation
35mm format mode ......................................90
Movie compression ........................................91
Self-timer indicator ........................................89
Continuous mode
Shutter type ......................................................89
AF+MF indicator
Bluetooth ON/OFF ....................................... 102
White balance .................................................86
AWB lock ........................................................100
Film simulation ...............................................86
F-Log/HLG/RAW recording ..........................91
Dynamic range ...............................................86
D-range priority ..............................................86
Image transfer status ........................102, 106
Date and time .................................... 44, 47, 97
Movie mode
Recording time available/
elapsed recording time
Card slot options ................................... 39, 101
Number of available frames
Image size .........................................................86
File format .........................................................91
Image quality...................................................86
Touch screen mode ................................. 27, 88
2
...........................................88
3
.............................................80, 91
3
............................81
1
Temperature warning
a
Control lock
b
Virtual horizon .................................................21
c
Focus frame ............................................... 64, 74
d
Histogram .........................................................21
e
Power supply ....................................................42
f
Battery level
g
Sensitivity ..........................................................70
h
Exposure compensation ...............................73
i
Aperture ......................................................53, 55
j
Shutter speed ............................................51, 55
k
TTL lock ..............................................................90
l
AE lock ...................................................... 75, 100
m
Metering ............................................................72
n
Shooting mode ...............................................50
o
Focus mode
p
Focus indicator
q
Manual focus indicator
r
AF lock ...................................................... 75, 100
s
Distance indicator
t
Recording level
u
Exposure indicator ...................................55, 73
v
Location data download status .....102, 106
w
Depth-of-fi eld preview ..................................68
x
H.265(HEVC)/H.264 .......................................91
y
Focus check ...............................................69, 88
z
4
..................................................100
2
....................................................61
2
2
........................61, 67
2
........................................68
2, 3
............................................94
1
Before You Begin
13
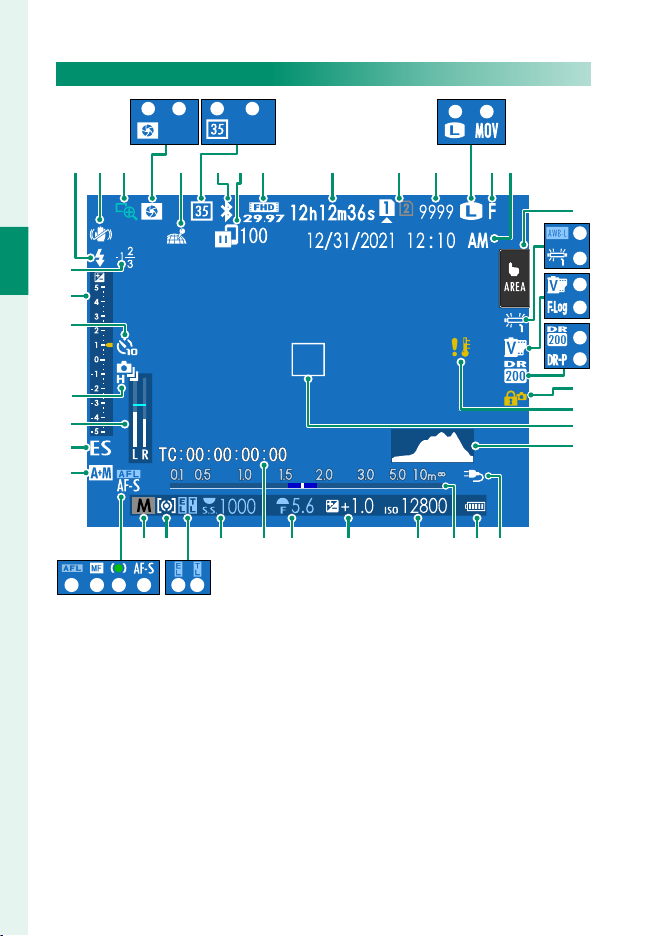
The LCD Monitor
D E G H
H.264
CFBAKLMNQ
1
z
Before You Begin
y
x
w
v
u
t
ALL-Intra
lmpqrs
O P
RIJ
S
T
U
V
W
X
Y
Z
a
b
c
edfghikjno
14

Camera Displays
Flash (TTL) mode
A
B
C
D
E
F
G
H
I
J
K
L
M
N
O
P
Q
R
S
T
U
V
W
X
Y
Z
1 Shows “9999” if there is space for over 9999 frames.
2 Not displayed when ON is selected for D SCREEN SET-UP> LARGE INDICATORS
3 Displayed during movie recording only.
4 Camera functions can also be accessed via touch controls.
5 Displayed when controls have been locked by pressing and holding the MENU/OK button.
2
IS mode
............................................................90
Focus check ...............................................69, 88
Depth-of-fi eld preview ..................................68
H.265(HEVC)/H.264 .......................................91
Location data download status .....102, 106
35mm format mode ......................................90
Movie compression ........................................91
Bluetooth ON/OFF ....................................... 102
Image transfer status ........................102, 106
Movie mode
Recording time available/
Card slot options ................................... 39, 101
Number of available frames
Image size .........................................................86
File format .........................................................91
Image quality...................................................86
Date and time .................................... 44, 47, 97
Touch screen mode
AWB lock ........................................................100
White balance .................................................86
Film simulation ...............................................86
F-Log/HLG/RAW recording ..........................91
Dynamic range ...............................................86
D-range priority ..............................................86
Control lock
MODE(LCD).
Control lock can be ended by pressing and holding the MENU/OK button again.
3
.............................................80, 91
elapsed recording time
4
...............................27, 88
5
..................................................100
3
............................81
1
Temperature warning
a
Focus frame ............................................... 64, 74
b
Histogram .........................................................21
c
Power supply ....................................................42
d
Battery level
e
Distance indicator
f
Sensitivity ..........................................................70
g
Exposure compensation ...............................73
h
Aperture ......................................................53, 55
i
Time code ..........................................................95
j
Shutter speed ............................................51, 55
k
TTL lock ..............................................................90
l
AE lock ...................................................... 75, 100
m
Metering ............................................................72
n
Shooting mode ...............................................50
o
Focus mode
p
Focus indicator
q
Manual focus indicator
r
AF lock ...................................................... 75, 100
s
AF+MF indicator
t
Shutter type ......................................................89
u
Recording level
v
Continuous mode
w
Self-timer indicator ........................................89
x
Exposure indicator ...................................55, 73
y
Flash compensation
z
2
........................................68
2
....................................................61
2
2
........................61, 67
2
...........................................88
2, 3
............................................94
1
Before You Begin
15

Choosing a Display Mode
Option
Description
EE EYE SENSOR
QQ EVF ONLY
LCD ONLY
QQ EVF ONLY +
EE EYE SENSOR + LCD
IMAGE DISP.
Press the VIEW MODE button to cycle
through the following display modes.
Option
1
Before You Begin
Putting your eye to the viewfi nder turns the viewfi nder
EYE SENSOR
EVF ONLY
LCD ONLY LCD monitor on, viewfi nder off .
EVF ONLY + EE
EYE SENSOR + LCD
IMAGE DISP.
The Eye Sensor
The eye sensor may respond to objects other
•
than your eye or to light shining directly on
the sensor.
The eye sensor is disabled while the LCD mon-
•
itor is tilted.
on and the LCD monitor off ; taking your eye away turns
the viewfi nder off and LCD monitor on.
Viewfi nder on, LCD monitor off .
Putting your eye to the viewfi nder turns the viewfi nder
on; taking it away turns the viewfi nder off . The LCD monitor remains off .
Putting your eye to the viewfi nder during shooting turns
the viewfi nder on, but the LCD monitor is used for the
display of images once you remove your eye from the
viewfi nder after shooting.
Description
Eye sensor
16

Camera Displays
Adjusting Display Brightness
The brightness and hue of the view nder and LCD monitor can
be adjusted using the items in the D SCREEN SET-UP menu.
Choose EVF BRIGHTNESS or EVF COLOR to adjust view nder
brightness or hue, LCD BRIGHTNESS or LCD COLOR to do the
same for the LCD monitor.
Display Rotation
When ON is selected for D SCREEN SET-UP> AUTOROTATE
DISPLAYS, the indicators in the view nder and LCD monitor au-
tomatically rotate to match camera orientation.
1
Before You Begin
17
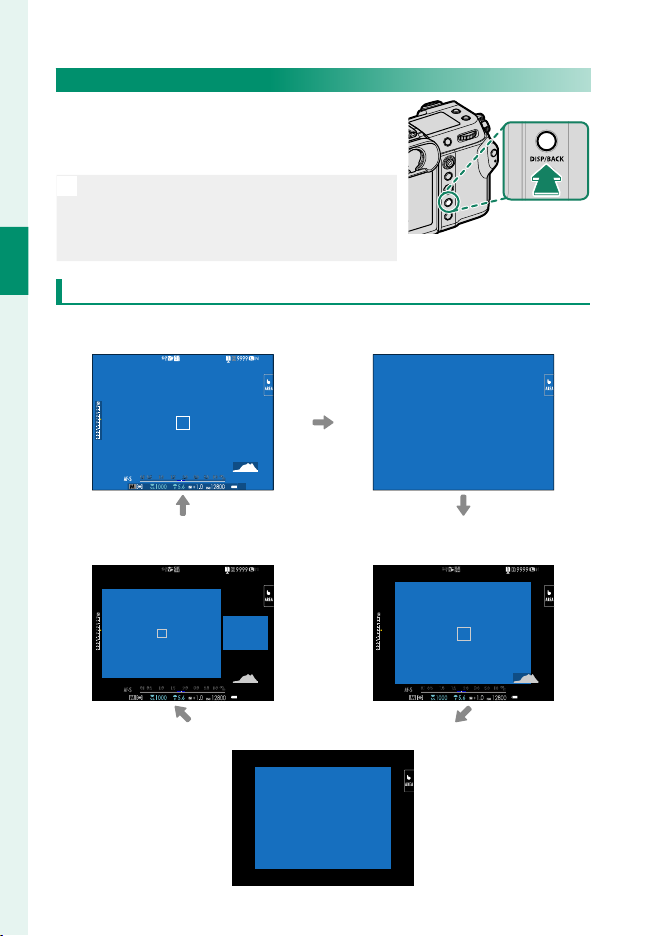
The DISP/BACK Button
The DISP/BACK button controls the display
of indicators in the view nder and LCD
monitor.
Indicators for the EVF and LCD must be
N
selected separately. To choose the EVF display, place your eye to the view nder while
1
Before You Begin
using the DISP/BACK button.
Viewfi nder
Full screen
Full screen
(no indicators)
Dual display
(manual focus mode only)
18
Standard indicators
Standard (no indicators)
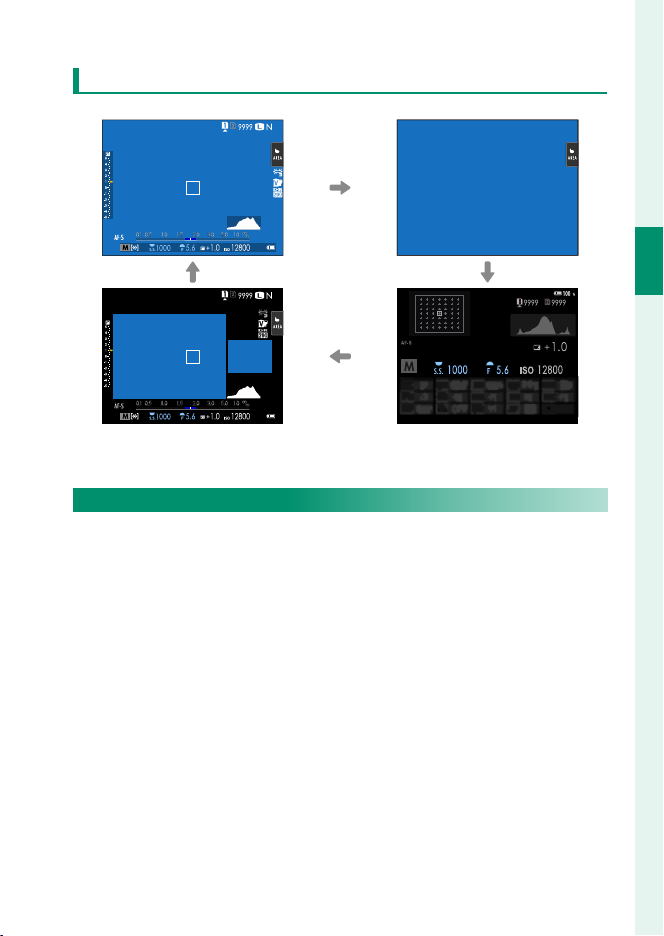
LCD Monitor
Standard indicators No indicators
Camera Displays
1
Before You Begin
Dual display
(manual focus mode only)
Info display
The Dual Display
The dual display consists of a large full-frame window and a
smaller close-up of the focus area.
19

Customizing the Standard Display
Item
Default
STILL
MOVIE
Item
Default
STILL
MOVIE
To choose the items shown in the standard indicator display:
Display standard indicators.
1
Use the DISP/BACK button to display standard indicators.
Select DISP. CUSTOM SETTING.
2
Select D SCREEN SET-UP> DISP. CUSTOM SETTING in the
1
Before You Begin
setup menu.
Choose items.
3
Highlight items and press MENU/OK to select or deselect.
Default
Item
FRAMING GUIDELINE
ELECTRONIC LEVEL
FOCUS FRAME
AF DISTANCE INDICATOR
MF DISTANCE INDICATOR
HISTOGRAM
LIVE VIEW HIGHLIGHT ALERT
SHOOTING MODE
APERTURE/S-SPEED/ISO
INFORMATION BACKGROUND
Expo. Comp. (Digit)
Expo. Comp. (Scale)
FOCUS MODE
PHOTOMETRY
SHUTTER TYPE
FLASH
STILL
MOVIE
RR
RR
RR
RR
RR
RR
RR
RR
RR
RR
RR
RR
RR
RR
−
R
−
R
Item
CONTINUOUS MODE
DUAL IS MODE
TOUCH SCREEN MODE
WHITE BALANCE
FILM SIMULATION
DYNAMIC RANGE
BOOST MODE
FRAMES REMAINING
IMAGE SIZE/QUALITY
MOVIE MODE & REC. TIME
35mm FORMAT MODE
IMAGE TRANSFER ORDER
MIC LEVEL
GUIDANCE MESSAGE
BATTERY LEVEL
FRAMING OUTLINE
Default
STILL
MOVIE
−
R
RR
RR
RR
RR
RR
RR
−
R
−
R
−
R
−
R
RR
−
R
RR
RR
RR
Press DISP/BACK to save changes.
4
Press DISP/BACK as needed to exit the menus and return to the
5
shooting display.
20
 Loading...