

Page 1
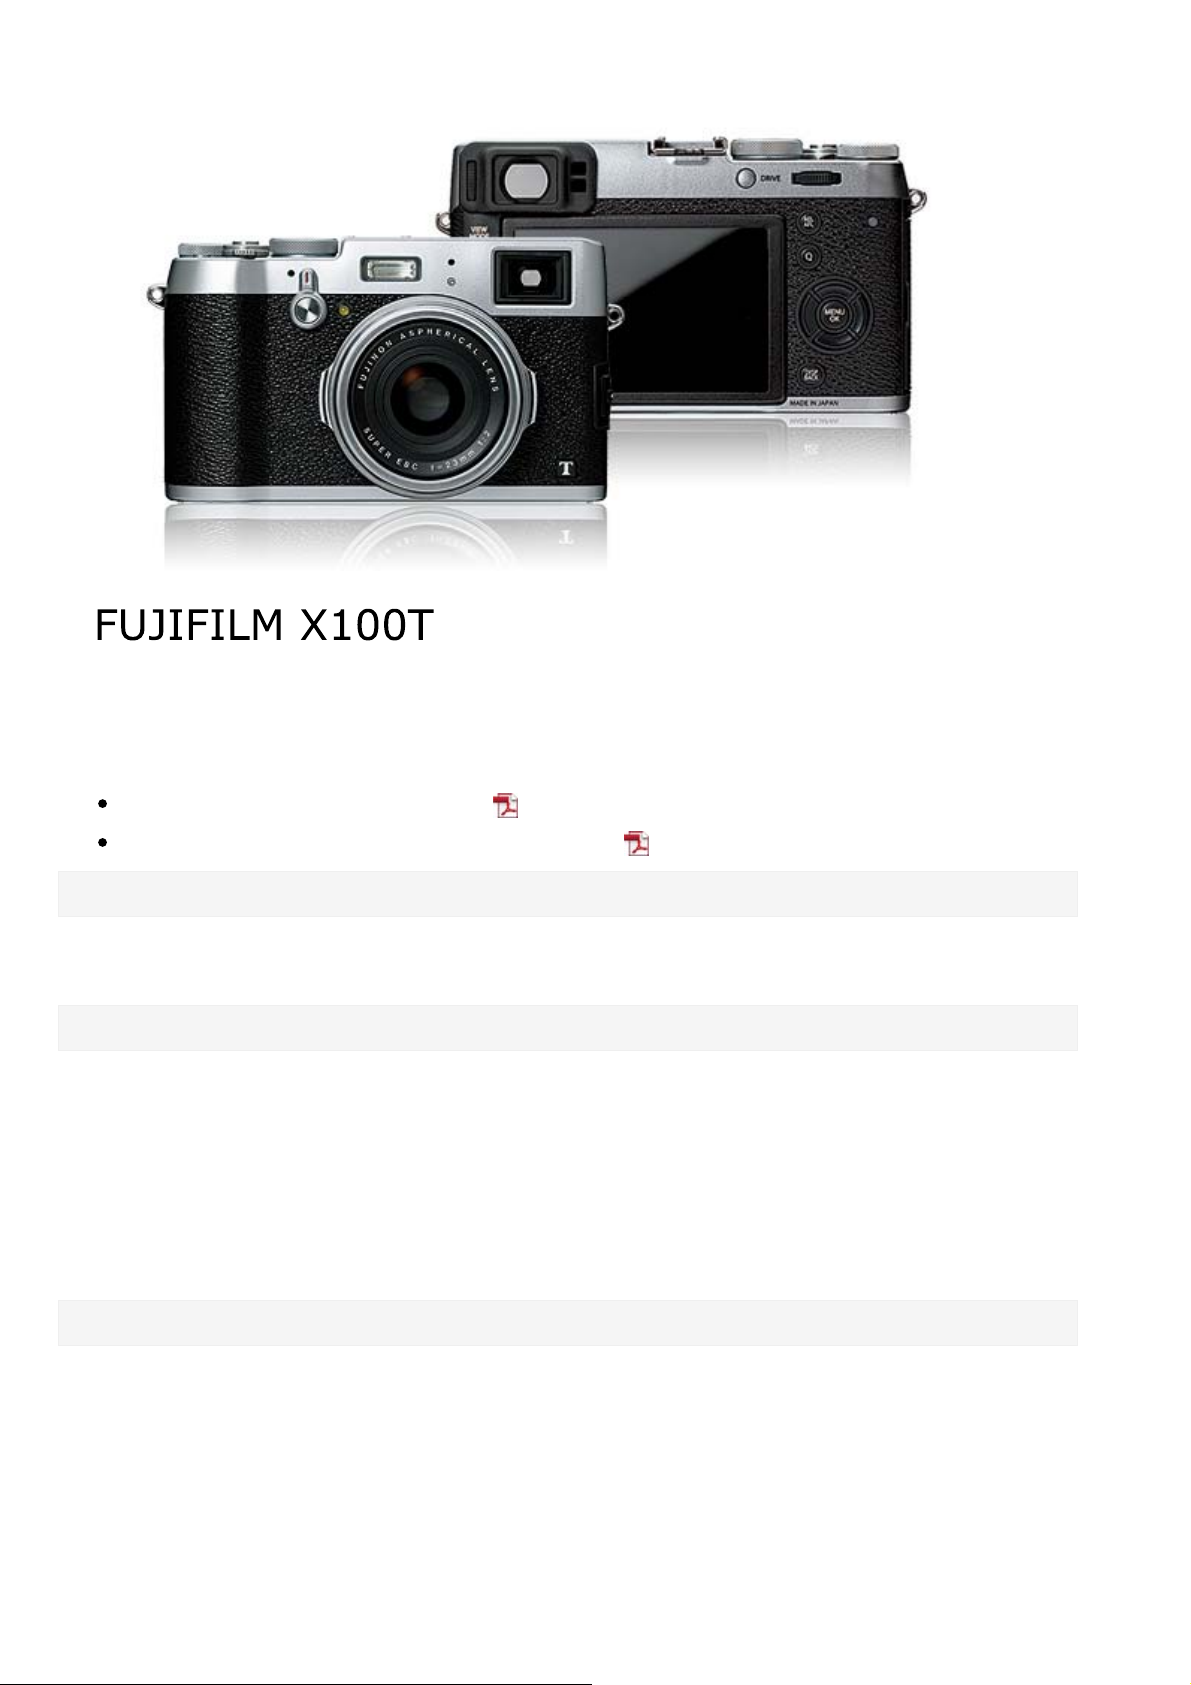
FUJIFILM X100T Owner’s Manual
-1-
Owner’s Manual
Owner’s Manual (Basic Operations: )
Owner’s Manual (pdf, available on this website: )
About This Manual
Introduction Viewing This Manual
Parts of the Camera
Parts of the Camera
The Selector
The Command Dial
The Aperture Ring and Shutter Speed Dial
The [VIEW MODE] Button
The Viewfinder Selector
The [DISP/BACK] Button
Diopter Adjustment
The Indicator Lamp
The [DRIVE] Button
Camera Displays
Shooting: Optical Viewfinder
Shooting: Electronic Viewfinder/LCD Monitor
Playback: Electronic Viewfinder/LCD Monitor
Page 2

FUJIFILM X100T Owner’s Manual
-2-
First Steps
Attaching the Strap
Charging the Battery
Inserting the Battery and a Memory Card
Turning the Camera on and Off
Basic Setup
Basic Photography and Playback
Taking Photographs
Viewing Pictures
Deleting Pictures
Basic Movie Recording and Playback
Recording Movies Viewing Movies
Shooting Mode
Program AE
Shutter-Priority AE
Aperture-Priority AE
Manual Exposure
[Q] (Quick Menu) Button
Using the [Q] Button
[Fn] (Function) Buttons
The Function Buttons
More on Photography
Bracketing
Continuous Shooting (Burst Mode)
Multiple Exposures
Panoramas
Macro Mode (Close-ups)
Using the Self-Timer
Interval Timer Photography
Using the Flash
Focus/Exposure Lock
Focus Mode
Manual Focus (Focus Mode M)
Metering
Recording Pictures in RAW Format
Long Time-Exposures (T/B)
Film Simulation
White Balance
Focus-Frame Selection
Exposure Compensation
Advanced Filters
Page 3

FUJIFILM X100T Owner’s Manual
-3-
The Shooting Menu
Using the Shooting Menu
Factory Defaults—Shooting Menu
[AUTOFOCUS SETTING]
[ISO]
[IMAGE SIZE]
[IMAGE QUALITY]
[DYNAMIC RANGE]
[FILM SIMULATION]
[FILM SIMULATION BKT]
[ND FILTER]
[COLOR]
[SHARPNESS]
[HIGHLIGHT TONE]
[SHADOW TONE]
[NOISE REDUCTION]
[FUNCTION (Fn) SETTING]
[DISP. CUSTOM SETTING]
[CONVERSION LENS]
[MF ASSIST]
[ADVANCED FILTER]
[INTERVAL TIMER SHOOTING]
[SELF-TIMER]
[AE/AF-LOCK MODE]
[AE/AF-LOCK BUTTON]
[PHOTOMETRY]
[INTERLOCK SPOT AE & FOCUS AREA]
[RED EYE REMOVAL]
[SAVE ORG IMAGE]
[FLASH MODE]
[FLASH COMPENSATION]
[LONG EXPOSURE NR]
[WHITE BALANCE]
[SELECT CUSTOM SETTING]
[EDIT/SAVE CUSTOM SETTING]
The Playback Menu
Using the Playback Menu
[RAW CONVERSION]
[ERASE]
[CROP]
[RESIZE]
[PROTECT]
[IMAGE ROTATE]
[RED EYE REMOVAL]
[SLIDE SHOW]
[SHUTTER TYPE]
[MOVIE SET-UP]
[WIRELESS COMMUNICATION]
[PHOTOBOOK ASSIST]
[MARK FOR UPLOAD TO]
[IMAGE SEARCH]
[COPY]
[PRINT ORDER (DPOF)]
[instax PRINTER PRINT]
[DISP ASPECT]
[WIRELESS COMMUNICATION]
[PC AUTO SAVE]
Page 4

FUJIFILM X100T Owner’s Manual
-4-
The Setup Menu
Using the Setup Menu
Factory Defaults—Setup Menu
[DATE/TIME]
[TIME DIFFERENCE]
[]
[RESET]
[SILENT MODE]
[FRAME NO.]
[FOCUS RING]
[FOCUS CHECK]
[SOUND SET-UP]
[SCREEN SET-UP]
Connections
Wireless Transfer
[SELECTOR BUTTON SETTING]
[EDIT/SAVE QUICK MENU]
[POWER MANAGEMENT]
[SHUTTER COUNT]
[EDIT FILE NAME]
[WIRELESS SETTINGS]
[PC AUTO SAVE SETTING]
[GEOTAGGING SET-UP]
[instax PRINTER CONNECTION SETTING]
[COLOR SPACE]
[FORMAT]
Printing Pictures via USB
Copying Pictures to a Computer
Accessories
Shoe-mounted flash units
Power Supplies
Remote Releases
Conversion Lens
For Your Safety
For Your Safety
Appendix
Troubleshooting/FAQ
Warning Messages and Displays
Viewing Pictures on TV
Stereo microphones
Other
Website of the country or region of purchase
Links
Restrictions on Camera Settings
Specifications
Page 5

About This Manual
-5-
Introduction
Viewing This Manual
Page 6

Introduction
-6-
All pages of this manual may be subject to change or deletion without notice.
This manual may not be reproduced in whole or in part without prior permission, except
for individual use. Redistribution is prohibited.
Page 7

Viewing This Manual
-7-
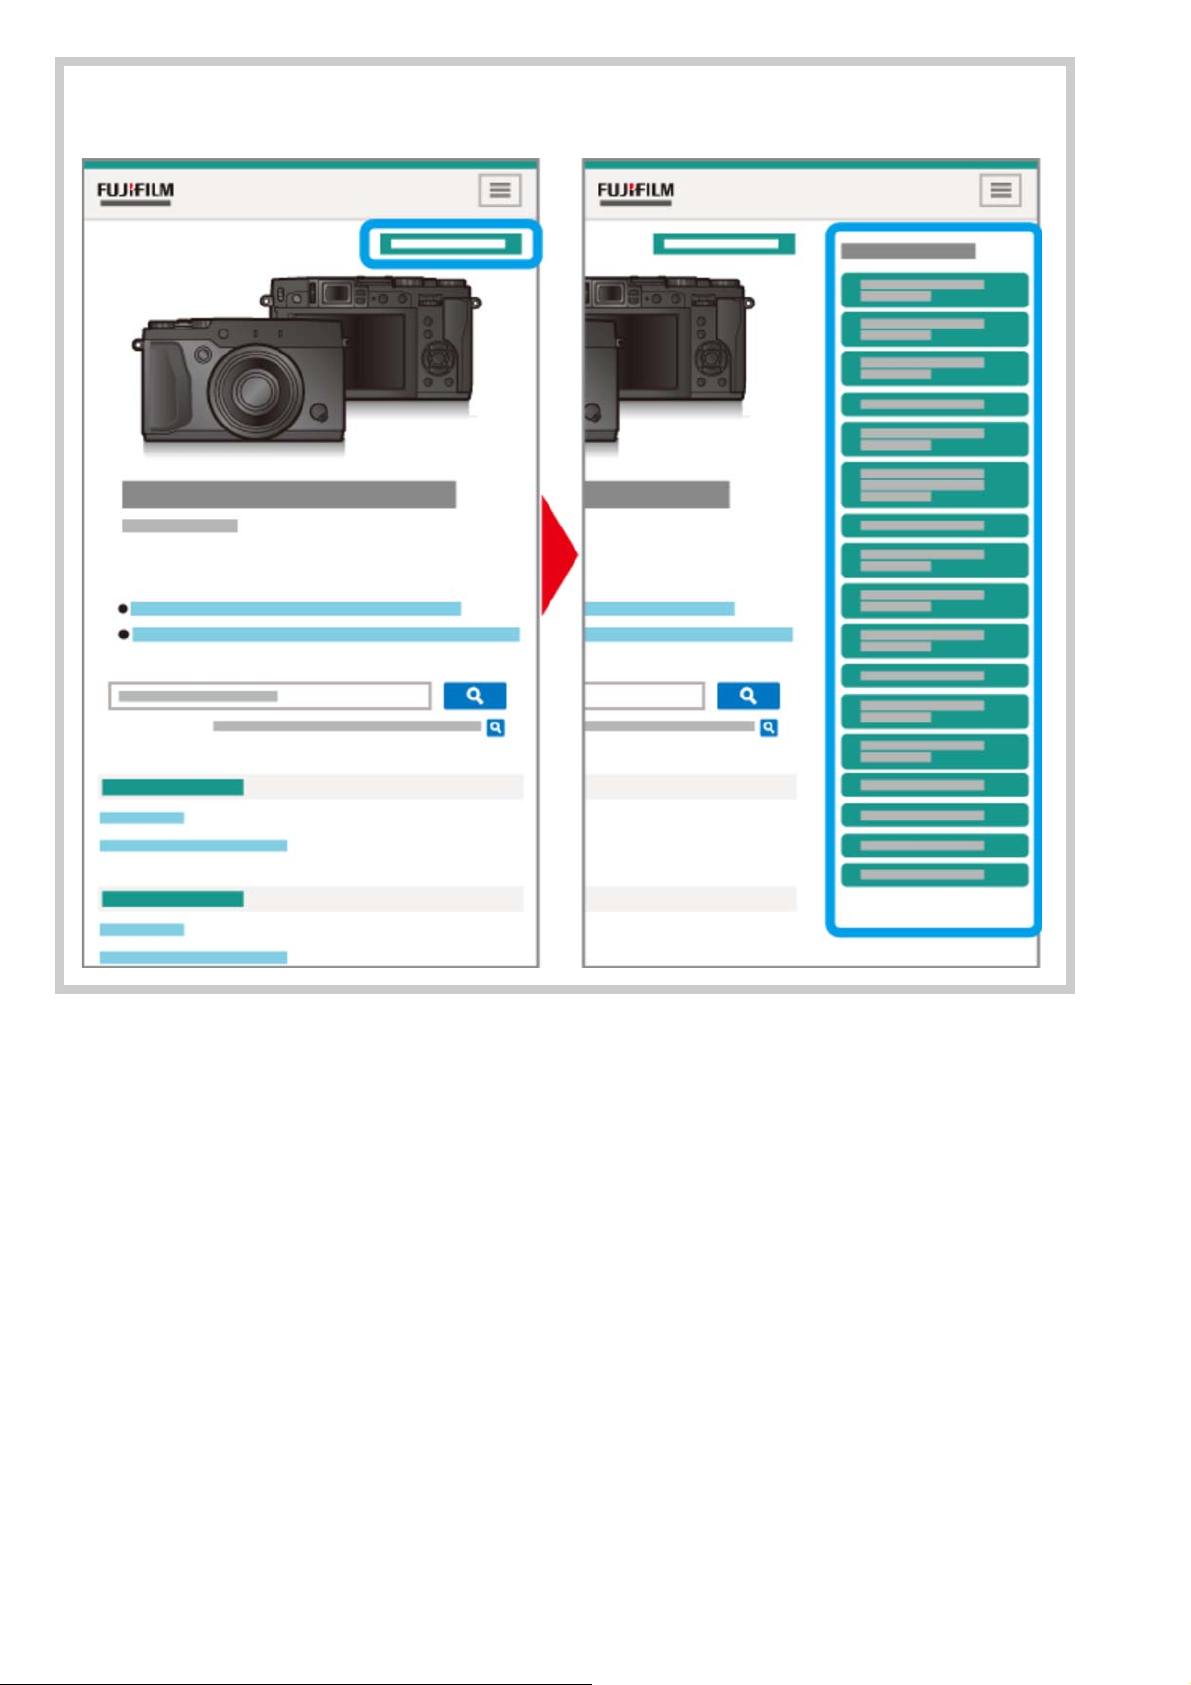
The Home Page
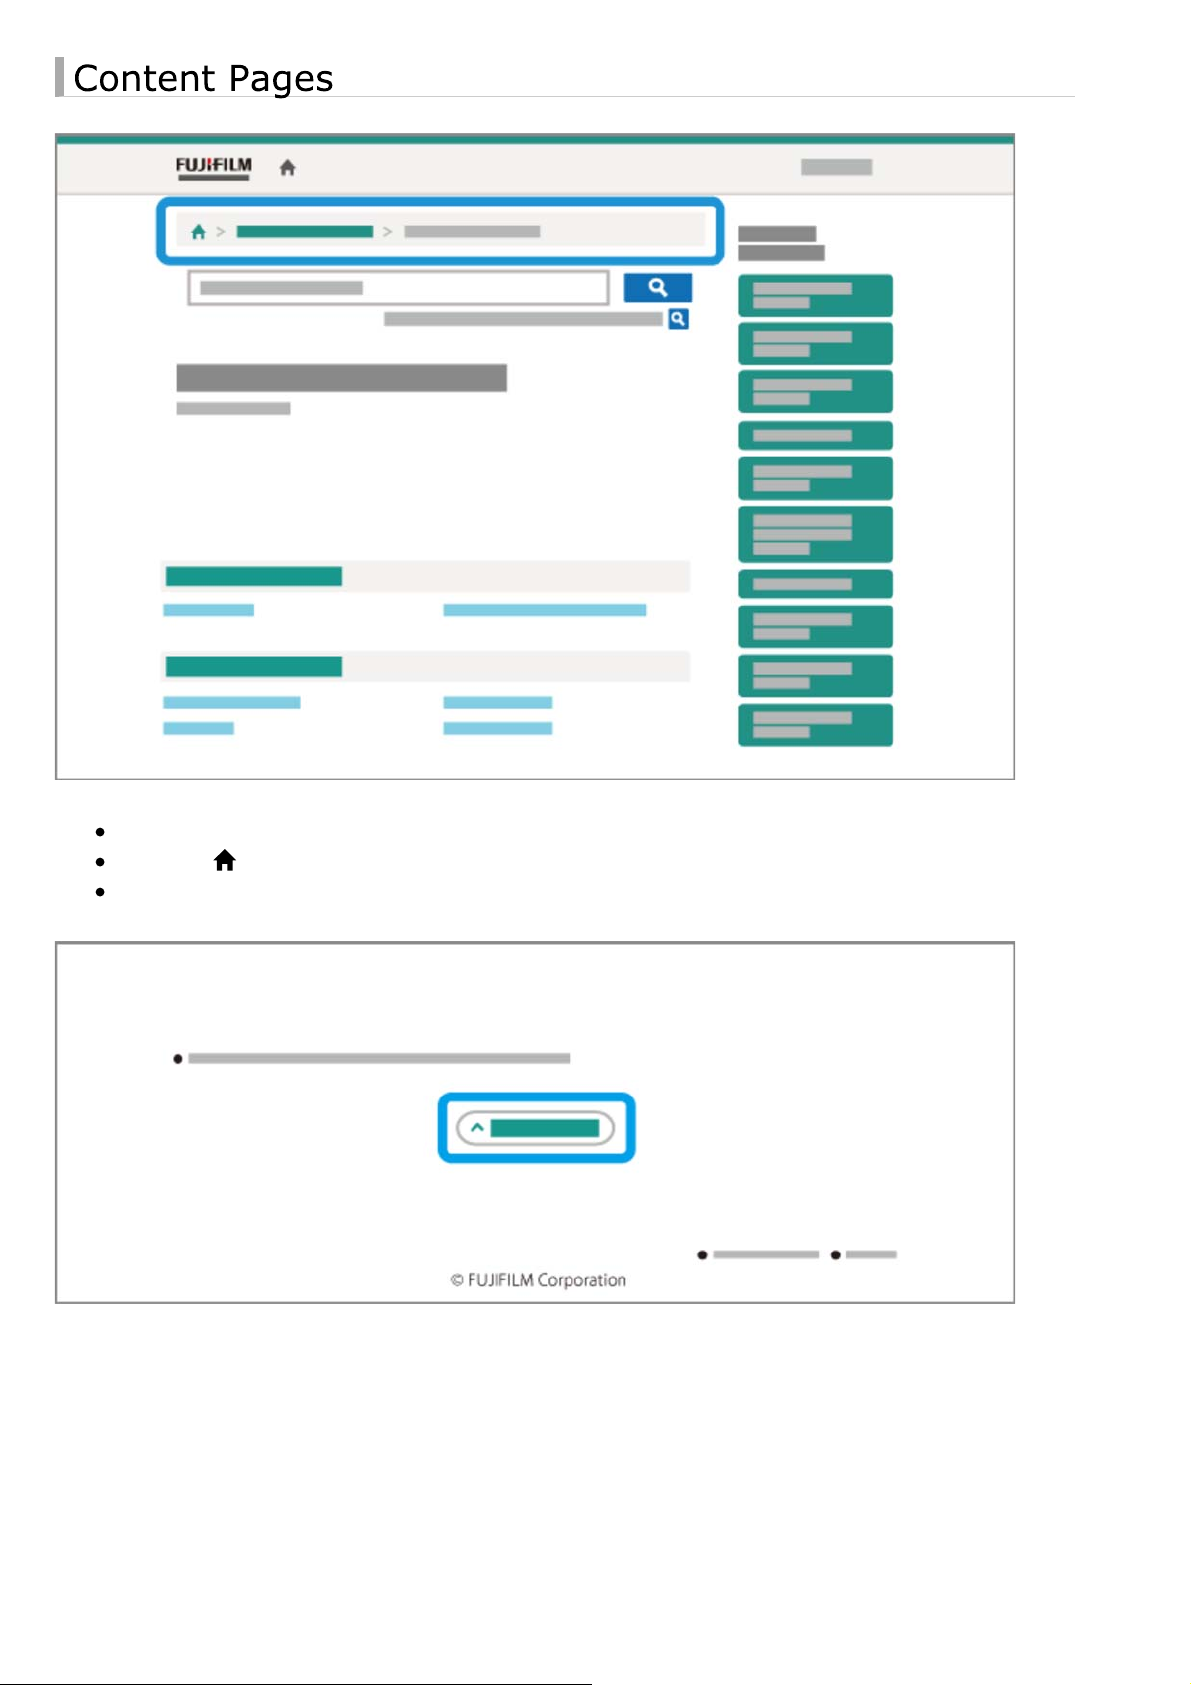
Content Pages
Searching the Manual
Choose a language.
A table of contents listing the main headings. Click a heading to view sub-headings and click
a sub-heading to view the page for that item.
The complete table of contents. Click a sub-heading to view the page for that item.
Page 8
Viewing This Manual
-8-
The table of contents listing may not display on smartphones and other mobile devices.
Click the button to view the table of contents and again to hide it.
Page 9
Viewing This Manual
-9-
The breadcrumb bar shows your current position in the manual.
Click the button to return to the table of contents.
You can also navigate by clicking headings in the breadcrumb bar.
Click the button at the bottom of the page to jump to the top.
Page 10

Viewing This Manual
-10-
Enter a search term and click to search the manual.
Page 11

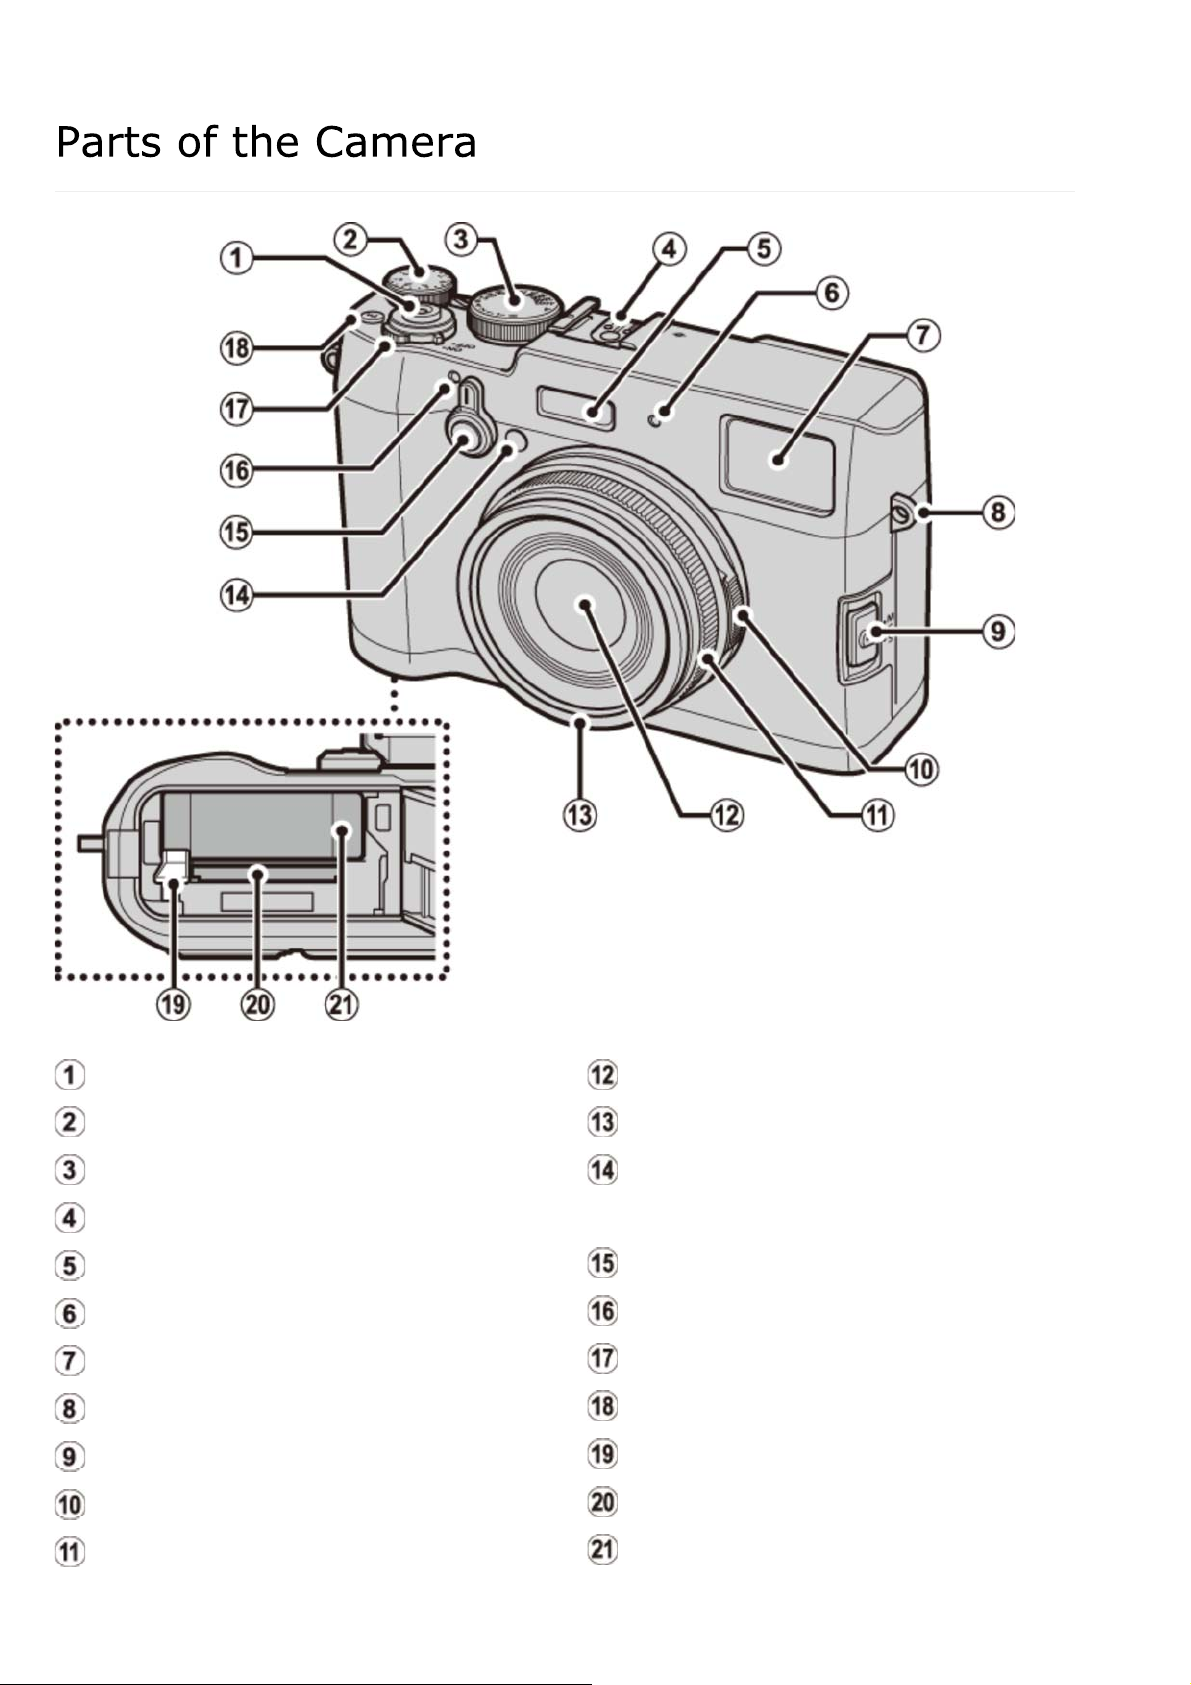
Parts of the Camera
-11-
Parts of the Camera
The Selector
The Command Dial
The Aperture Ring and Shutter Speed Dial
The [VIEW MODE] Button
The Viewfinder Selector
The [DISP/BACK] Button
Diopter Adjustment
The Indicator Lamp
The [DRIVE] Button
Page 12
Parts of the Camera
-12-
Shutter button
Exposure compensation dial
Shutter speed dial
Hot shoe
Flash
Microphone (L)
Viewfinder window
Strap eyelet
Focus mode selector
Aperture ring
Focus ring
1 Remove when attaching lens accessories.
Lens
Front ring
1
AF-assist illuminator
Self-timer lamp
Viewfinder selector
Microphone (R)
[ON/OFF] switch
[Fn] button (function button 1)
Battery latch
Memory card slot
Battery chamber
Page 13
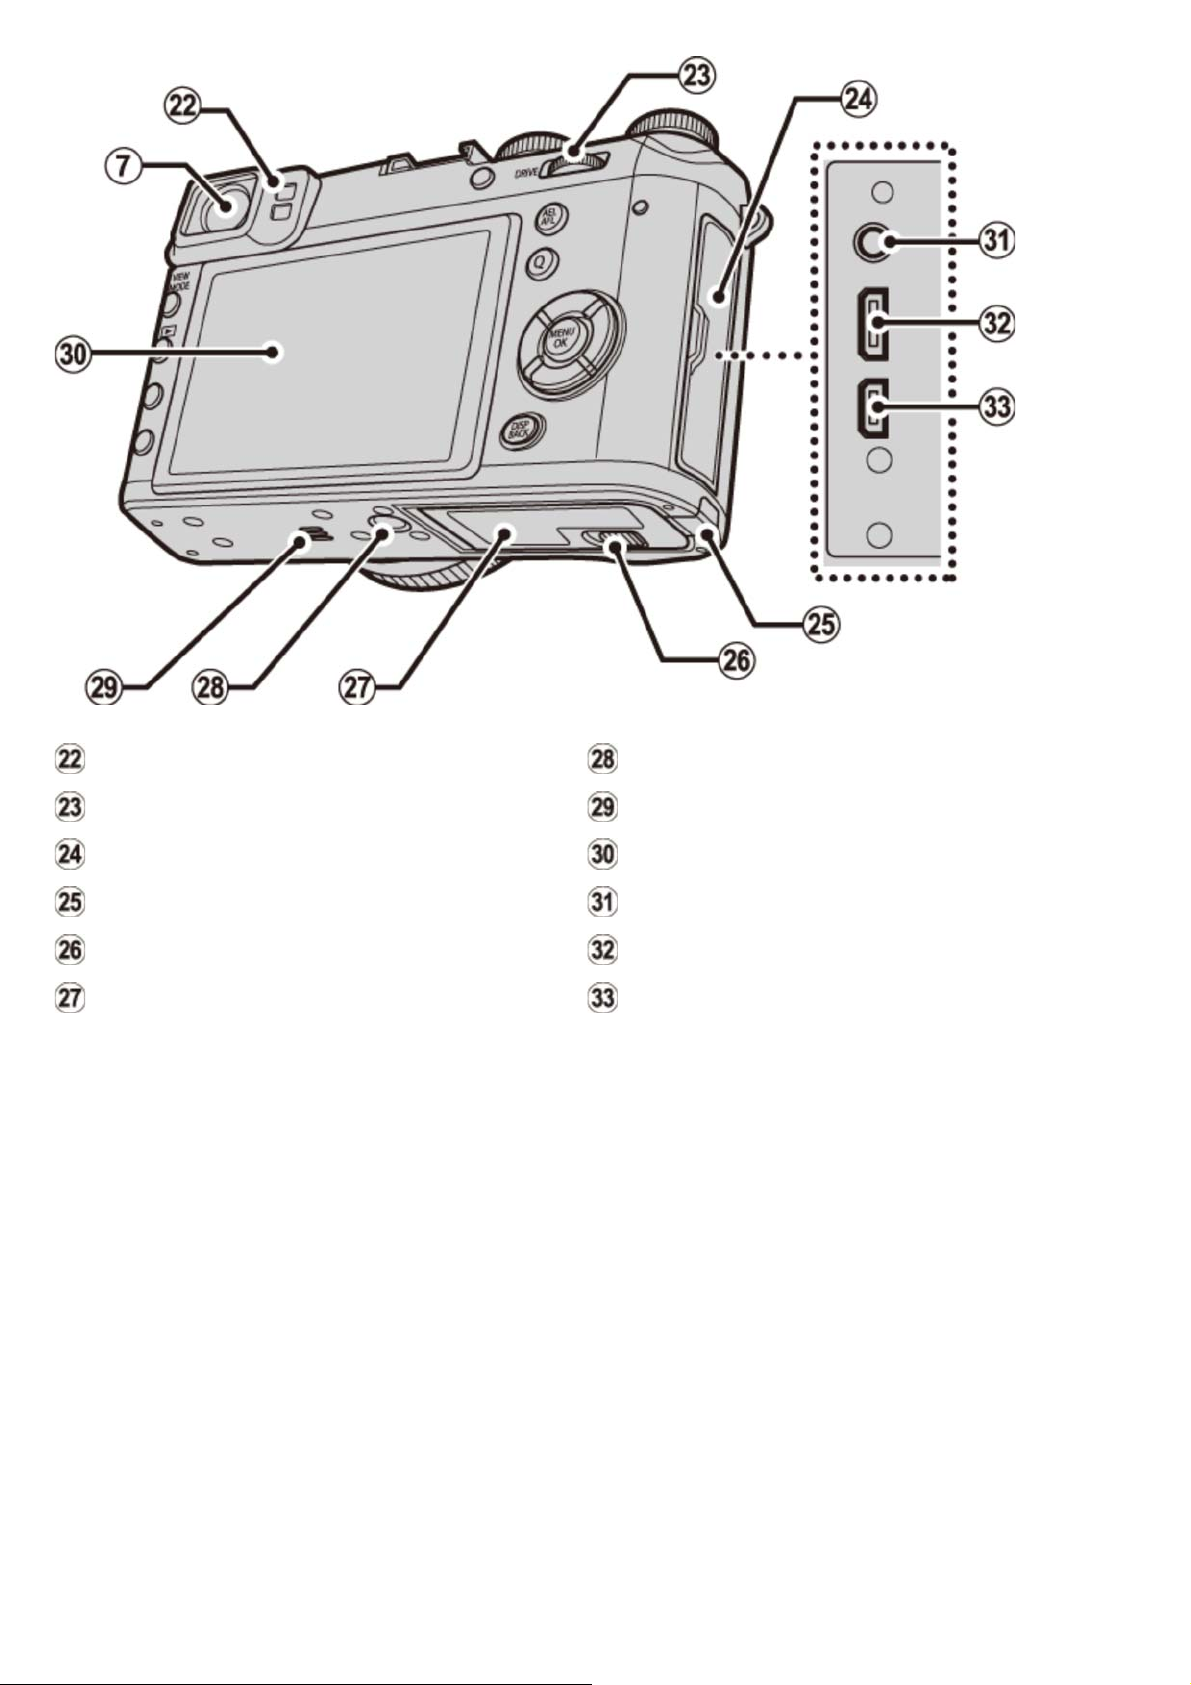
Parts of the Camera
-13-
Eye sensor
Command dial
Connector cover
DC coupler cable cover
Battery-chamber cover latch
Battery-chamber cover
Tripod mount
Speaker
LCD monitor
Microphone/remote release connector
Micro USB connector
Micro HDMI connector
2 Use an HDMI cable no more than 1.5 m (4.9 ft.) long.
2
Page 14
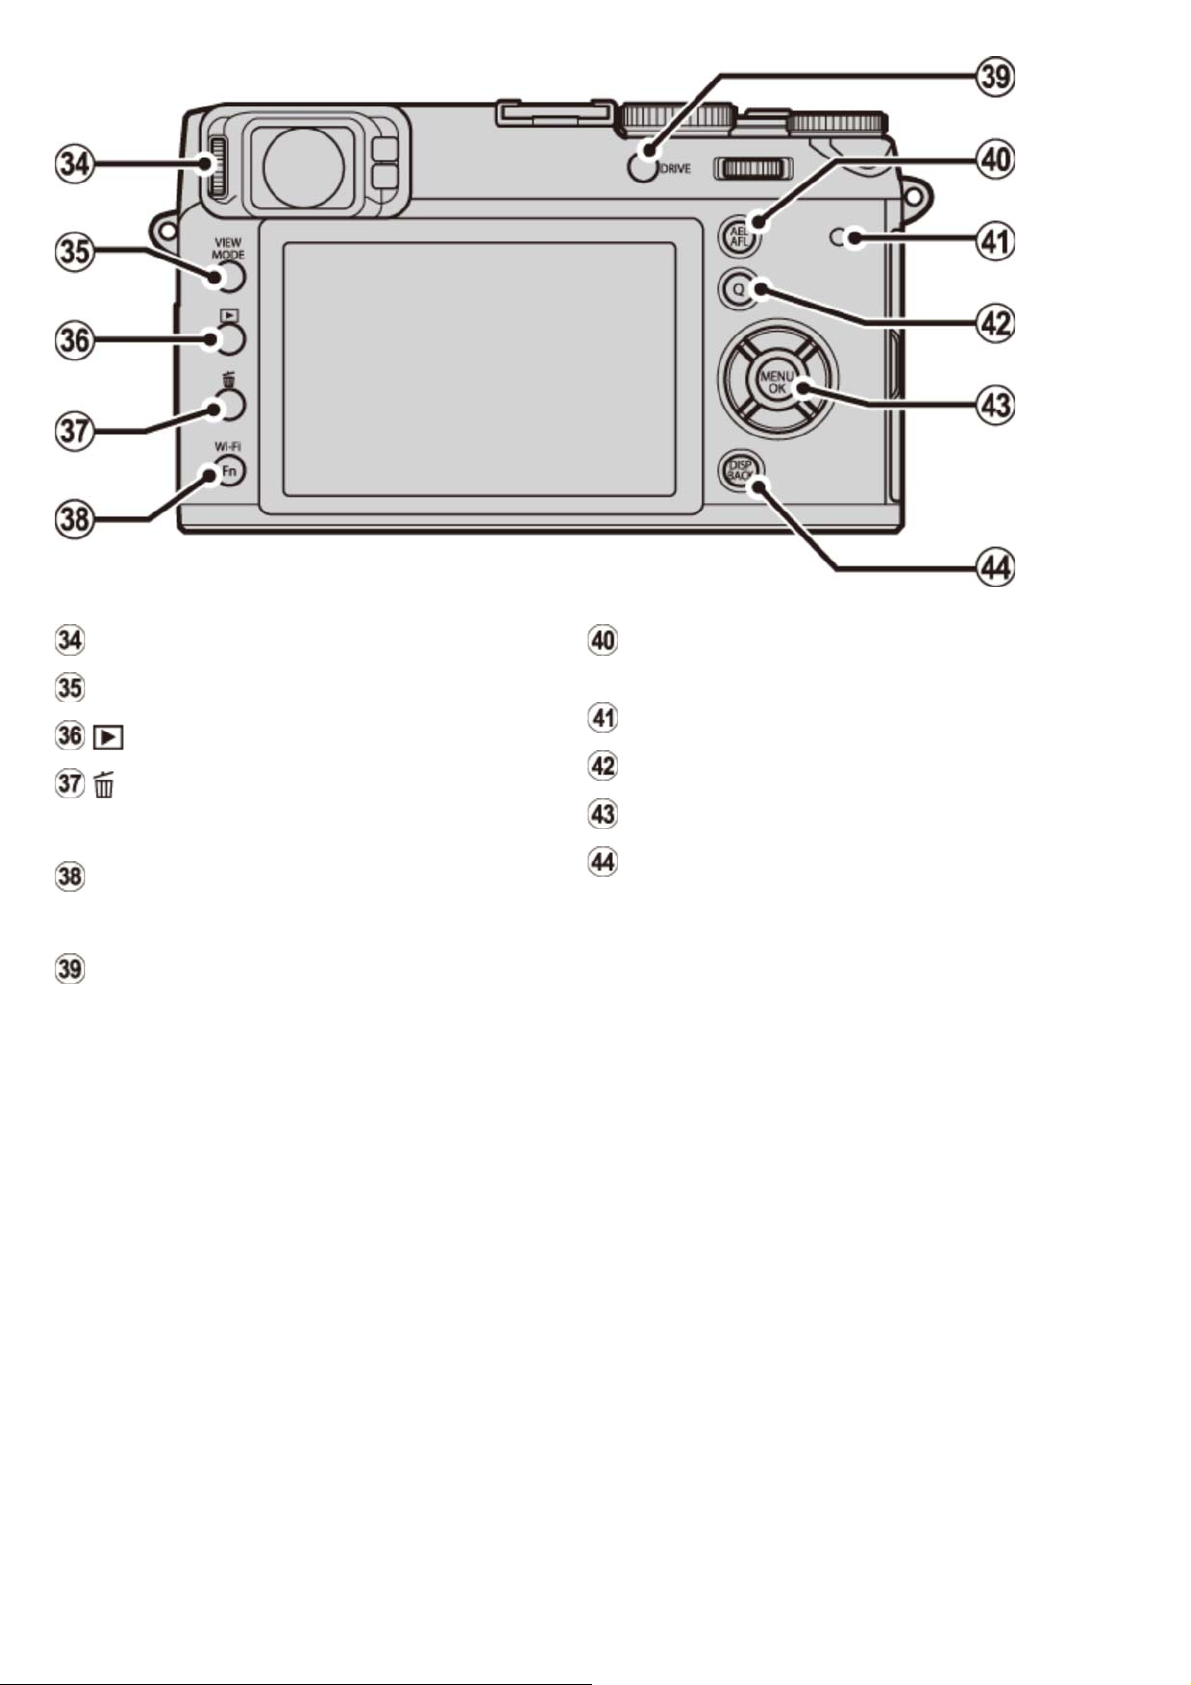
Parts of the Camera
-14-
Diopter adjustment control
[VIEW MODE] button
(playback) button
(delete) button (playback mode)
[Fn] button (function button 6)
[Wi-Fi] button
[Fn] button (function button 7)
[DRIVE] button
[AEL/AFL] (autoexposure/autofocus
lock) button
Indicator lamp
[Q] (quick menu) button
Selector/functio n b u t tons
[DISP] (display)/[BACK] button
Page 15
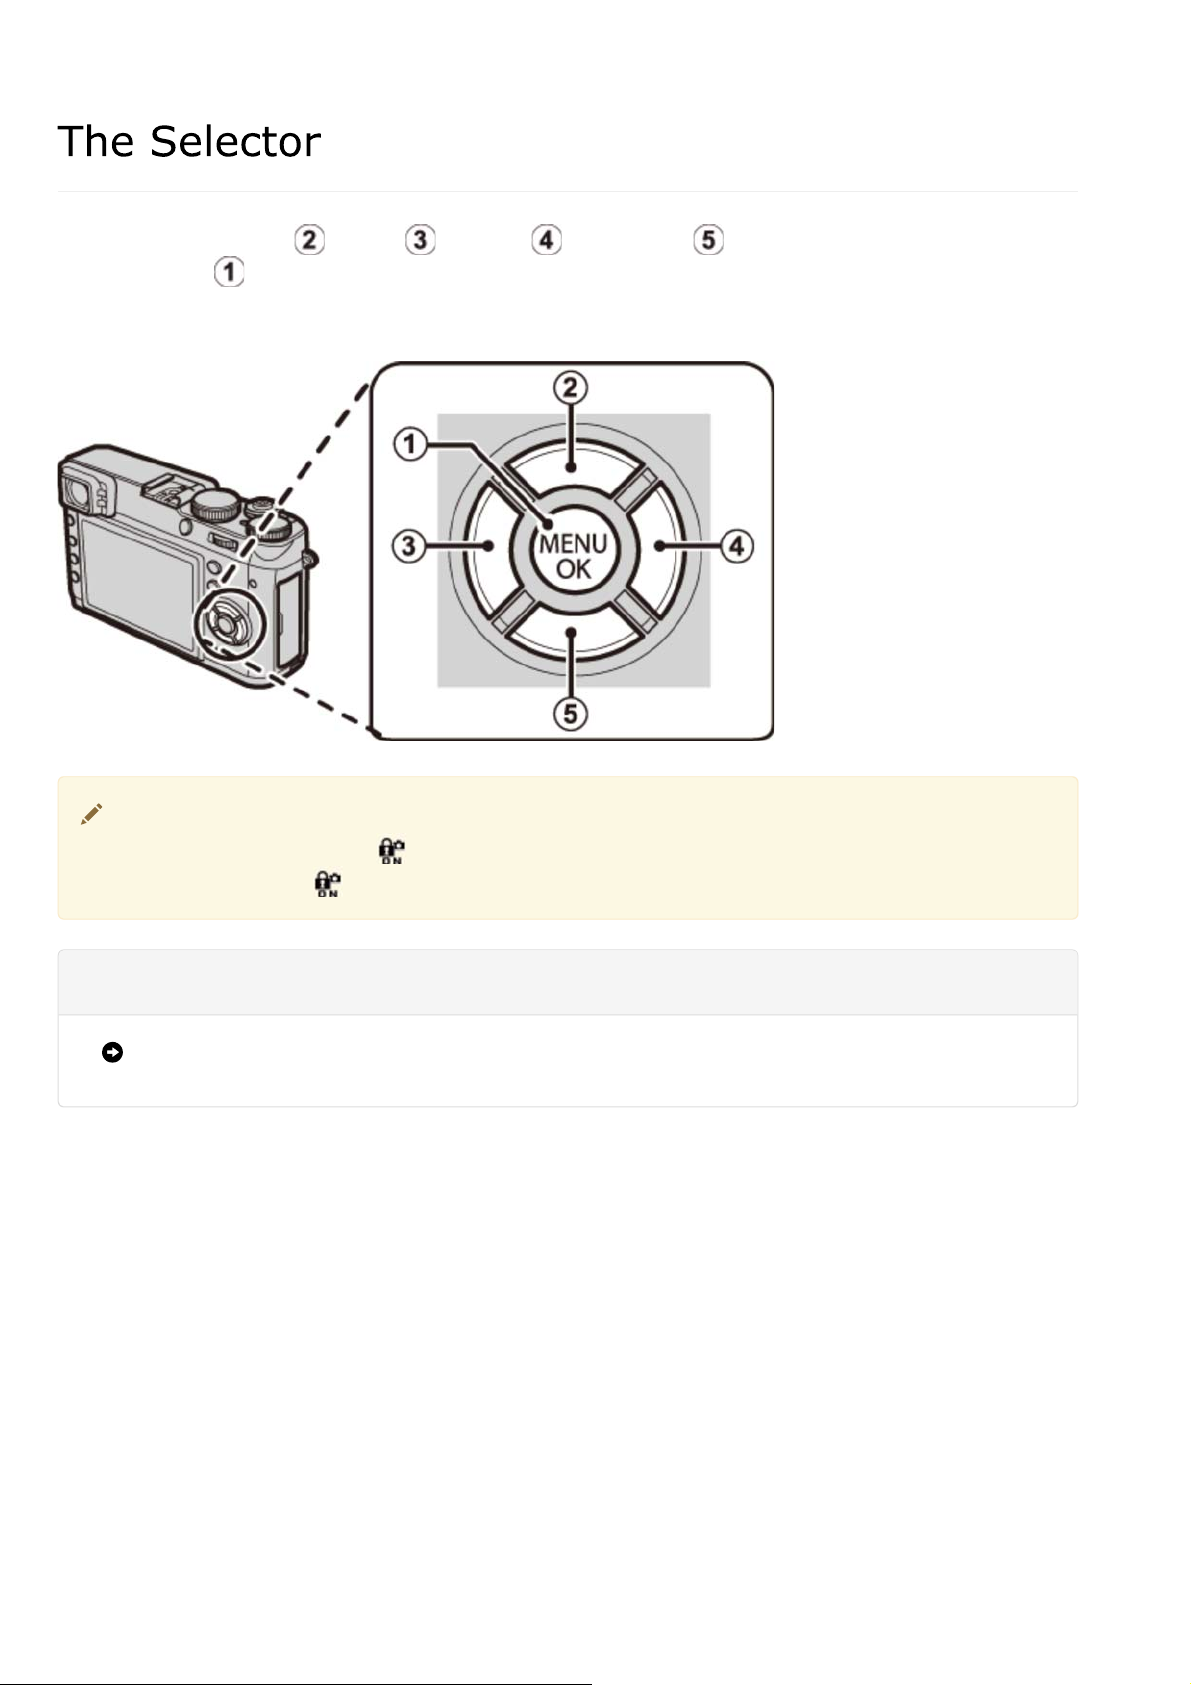
The Selector
-15-
Press the selector up ( ), left ( ), right ( ), or down ( ) to highlight items and press
[MENU/OK] ( ) to select. The up, left, right, and down buttons also double as the macro,
film simulation, white balance, and focus-area selection buttons, respectively, and as function
buttons 2 through 5.
To prevent accidental operation of the selector and the [Q] button during shooting,
press [MENU/OK] until is displayed. The controls can be unlocked by pressing
[MENU/OK] until is no longer displayed.
See Also
The Function Buttons ([Fn] (Function) Buttons)
Page 16

The Command Dial
-16-
The command dial can be used to navigate the menus, to zoom in and out and choose the
number of pictures displayed during playback, and to select options in the quick menu display.
Press the center of the command dial to zoom in on the active focus area during shooting or
playback.
Page 17
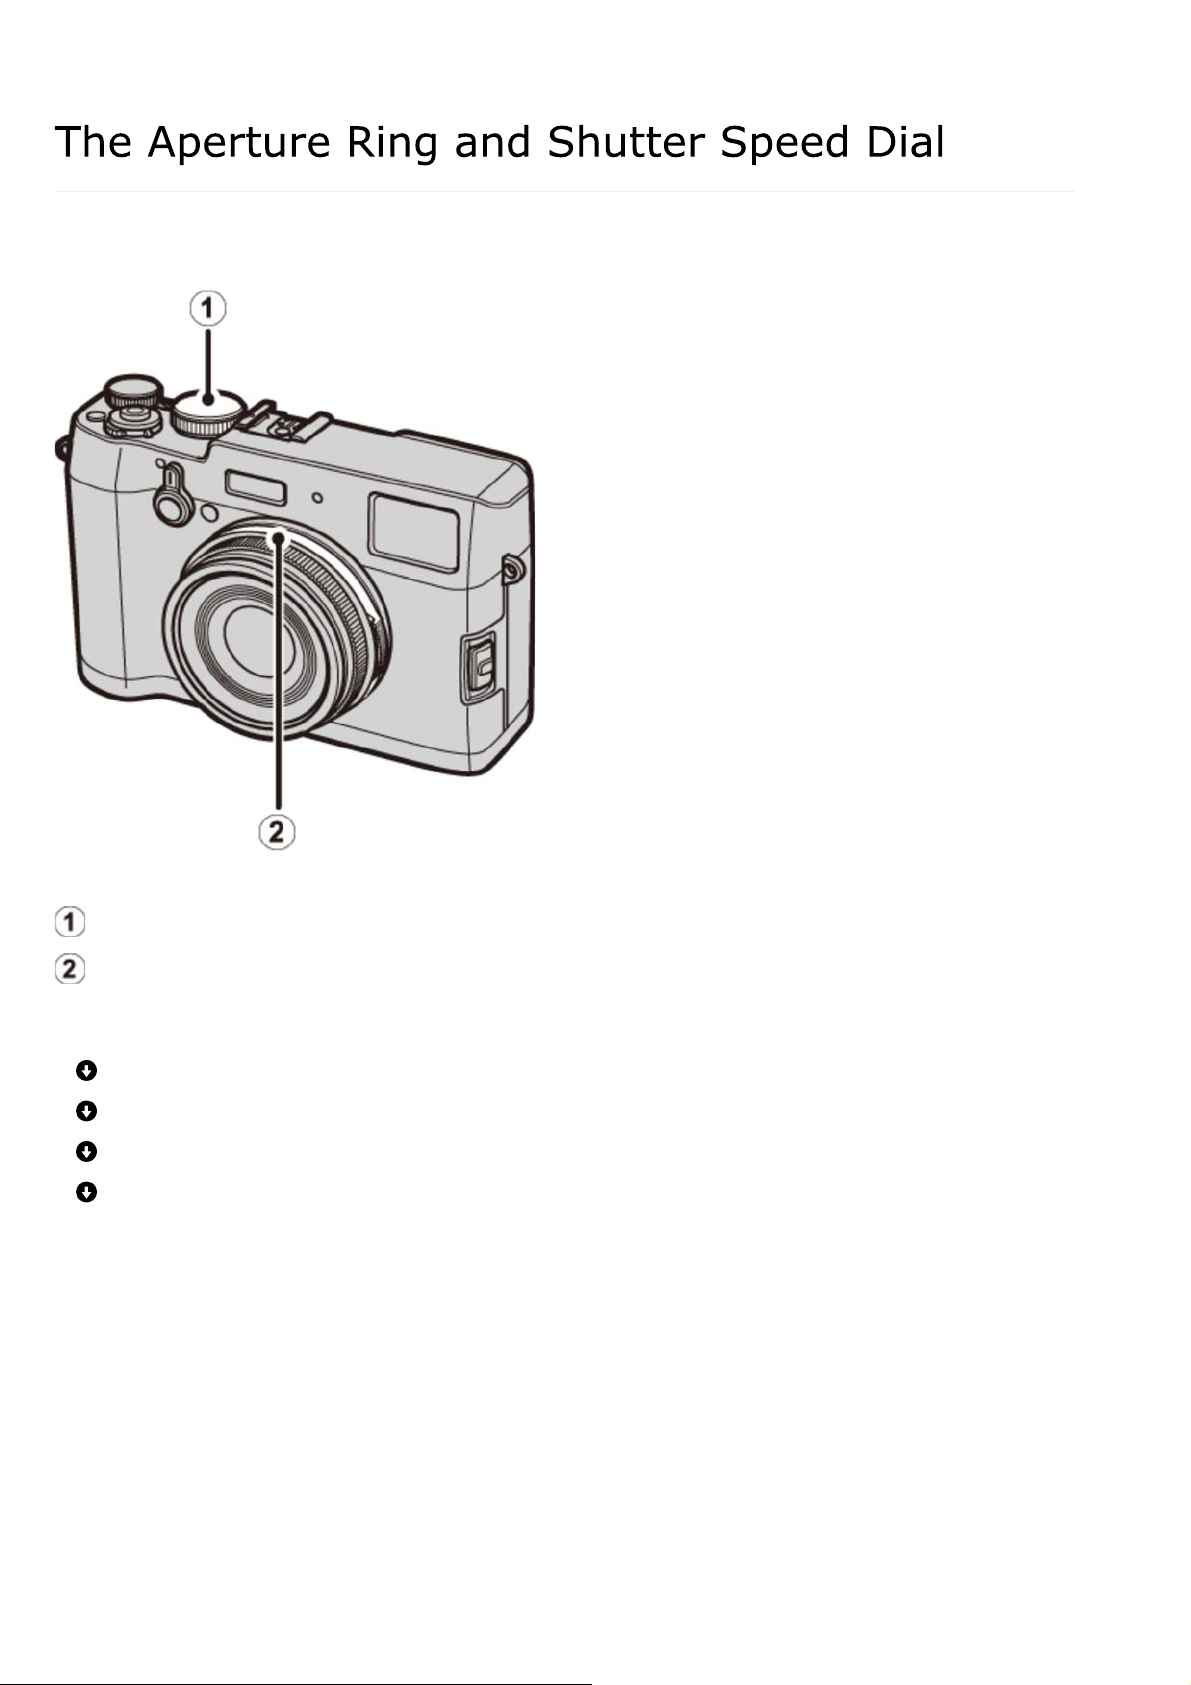
The Aperture Ring and Shutter Speed Dial
-17-
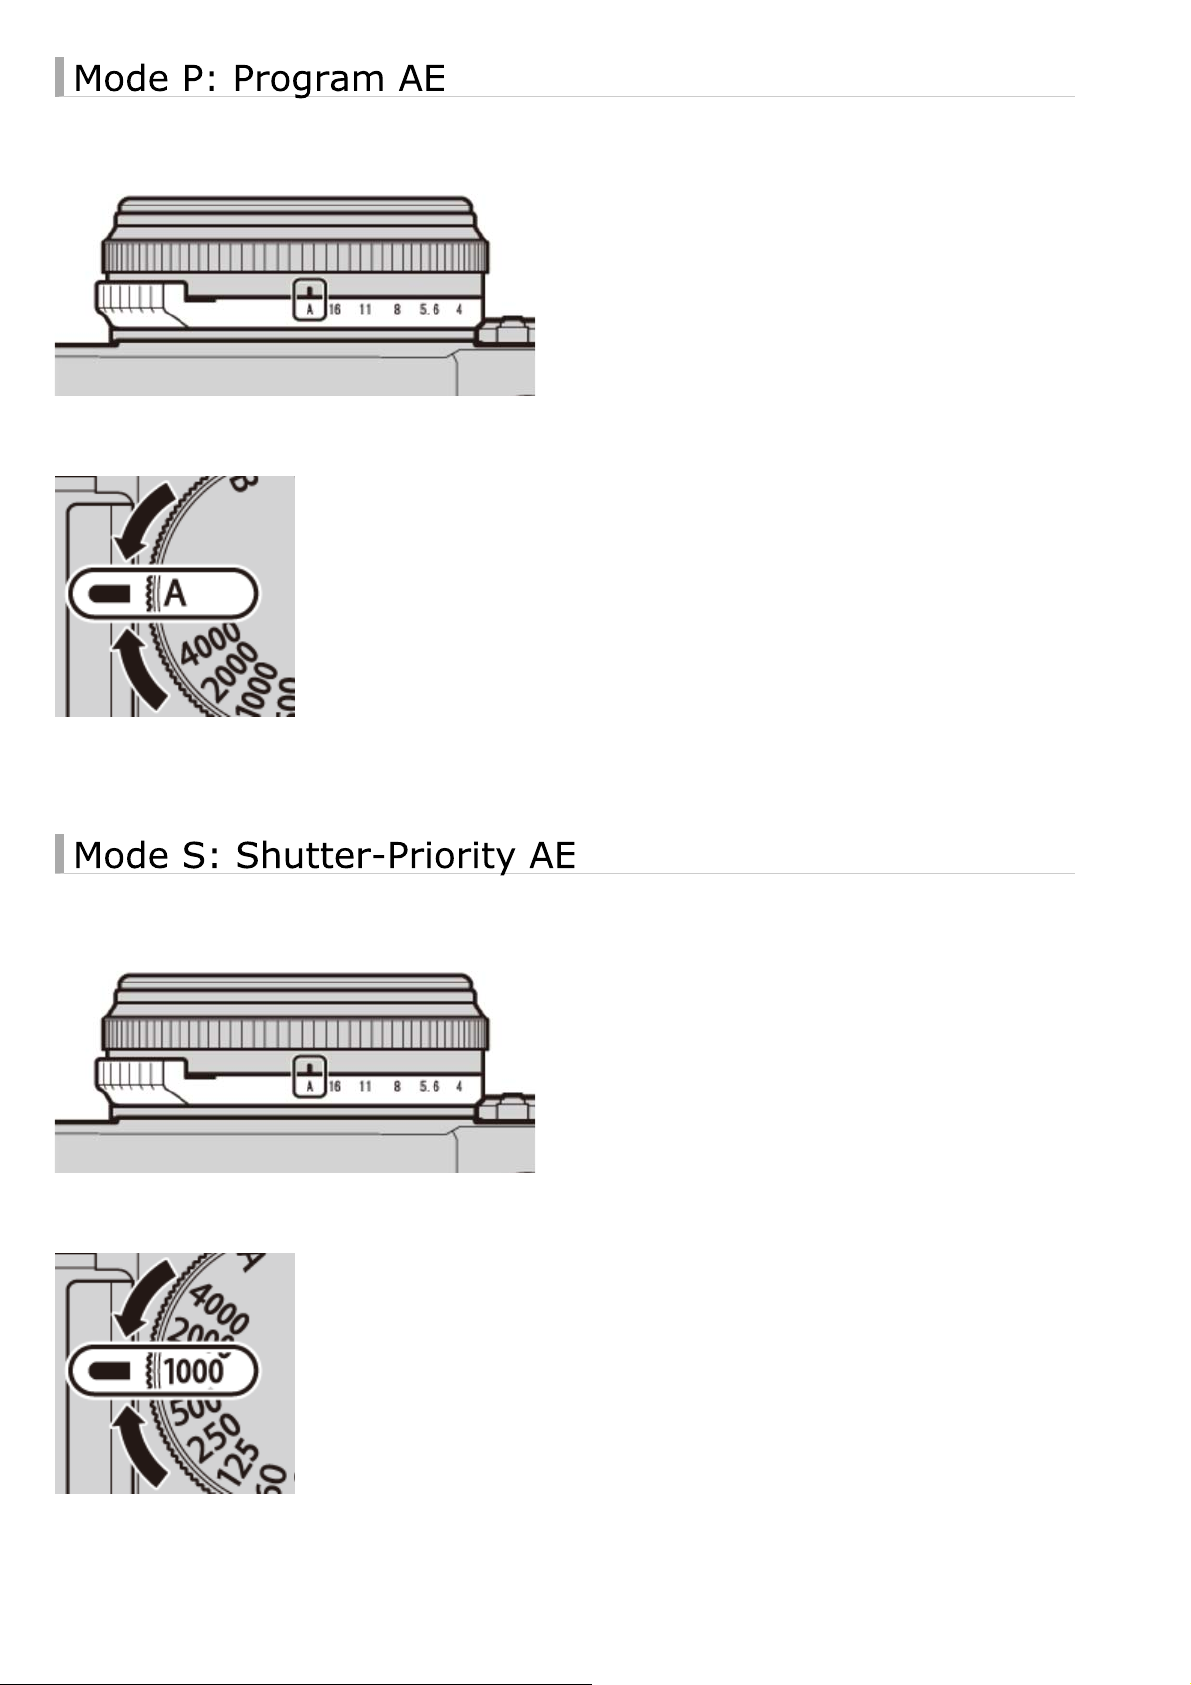
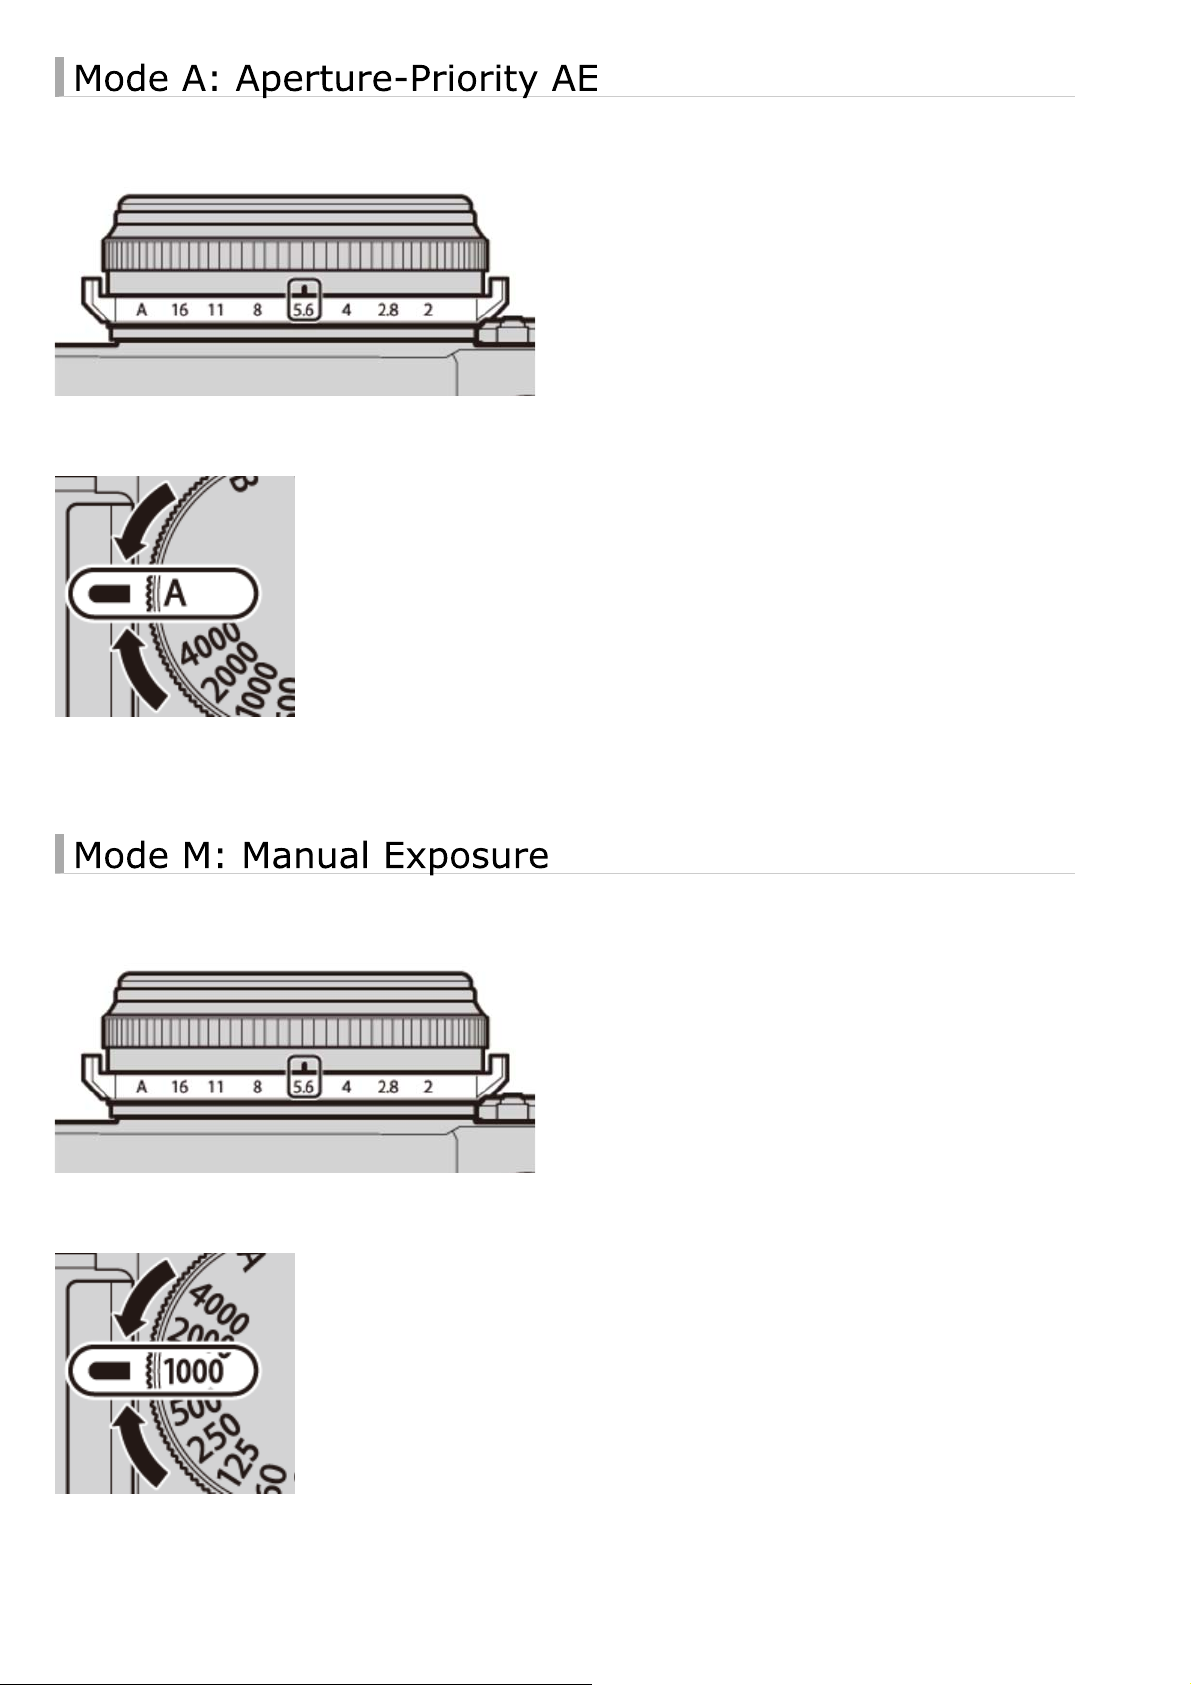
Use the aperture ring and shutter speed dial to choose from modes [P], [S], [A], and [M].
Shutter speed dial
Aperture ring
Mode P: Program AE
Mode S: Shutter-Priority AE
Mode A: Aperture-Priority AE
Mode M: Manual Exposure
Page 18
The Aperture Ring and Shutter Speed Dial
-18-
Aperture and shutter speed can be adjusted using program shift.
Aperture: [A]
Shutter speed: [A]
Take pictures at the selected shutter speed. The camera adjusts aperture automatically.
Aperture: [A]
Shutter speed: 1/1000 s
Page 19
The Aperture Ring and Shutter Speed Dial
-19-
Take pictures at the selected aperture. The camera adjusts shutter speed automatically.
Aperture: f/5.6
Shutter speed: [A]
Take pictures at the selected aperture and shutter speed.
Aperture: f/5.6
Shutter speed: 1/1000 s
Page 20
The [VIEW MODE] Button
-20-
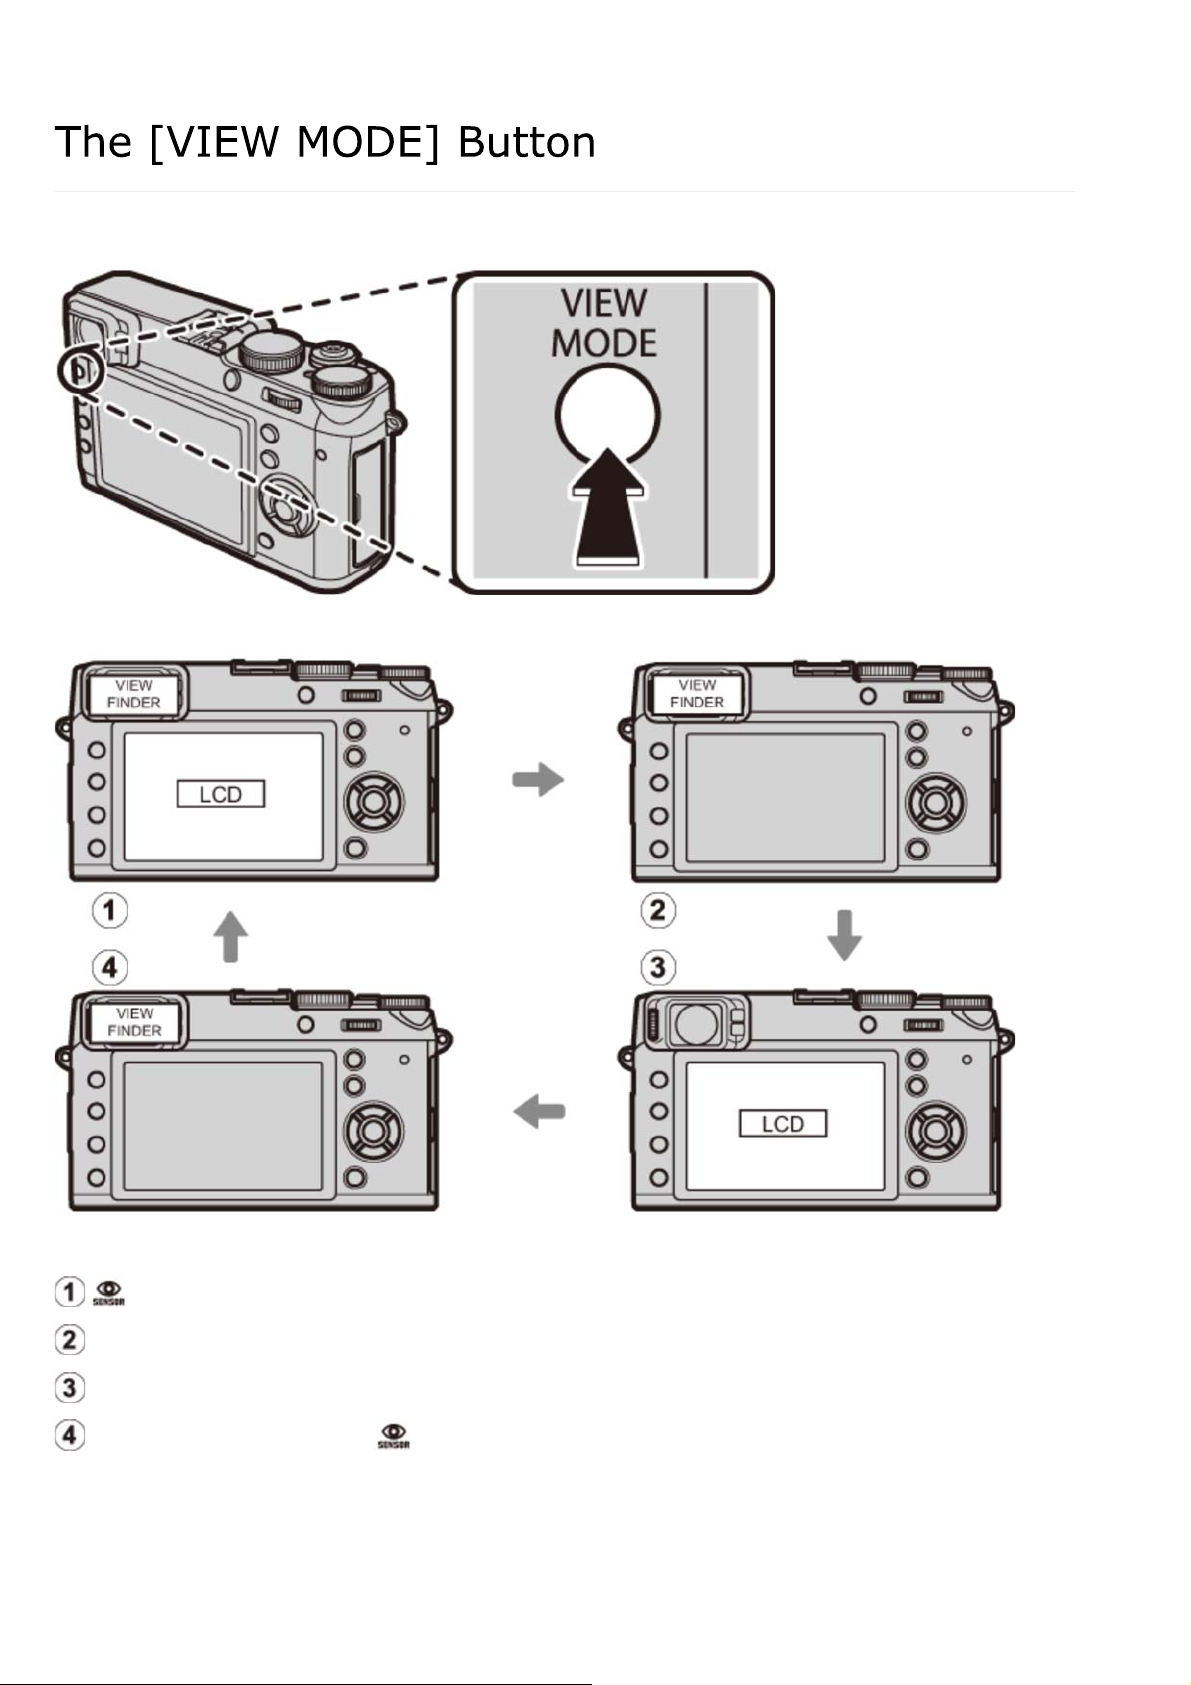
Press the [VIEW MODE] button to cycle through displays as shown below.
[EYE SENSOR]: Automatic display selection using eye sensor
[VIEWFINDER ONLY]: Viewfinder only
[LCD ONLY]: LCD monitor only
[VIEWFINDER ONLY] + : Viewfinder only; eye sensor turns display on or off
Page 21
The [VIEW MODE] Button
-21-
The Eye Sensor
The eye sensor turns the viewfinder on when you put your eye to the viewfinder and turns
it off when you take your eye away (note that the eye sensor may respond to objects
other than your eye or to light shining directly on the sensor). If automatic display
selection is enabled, the LCD monitor will turn on when the viewfinder turns off.
Page 22
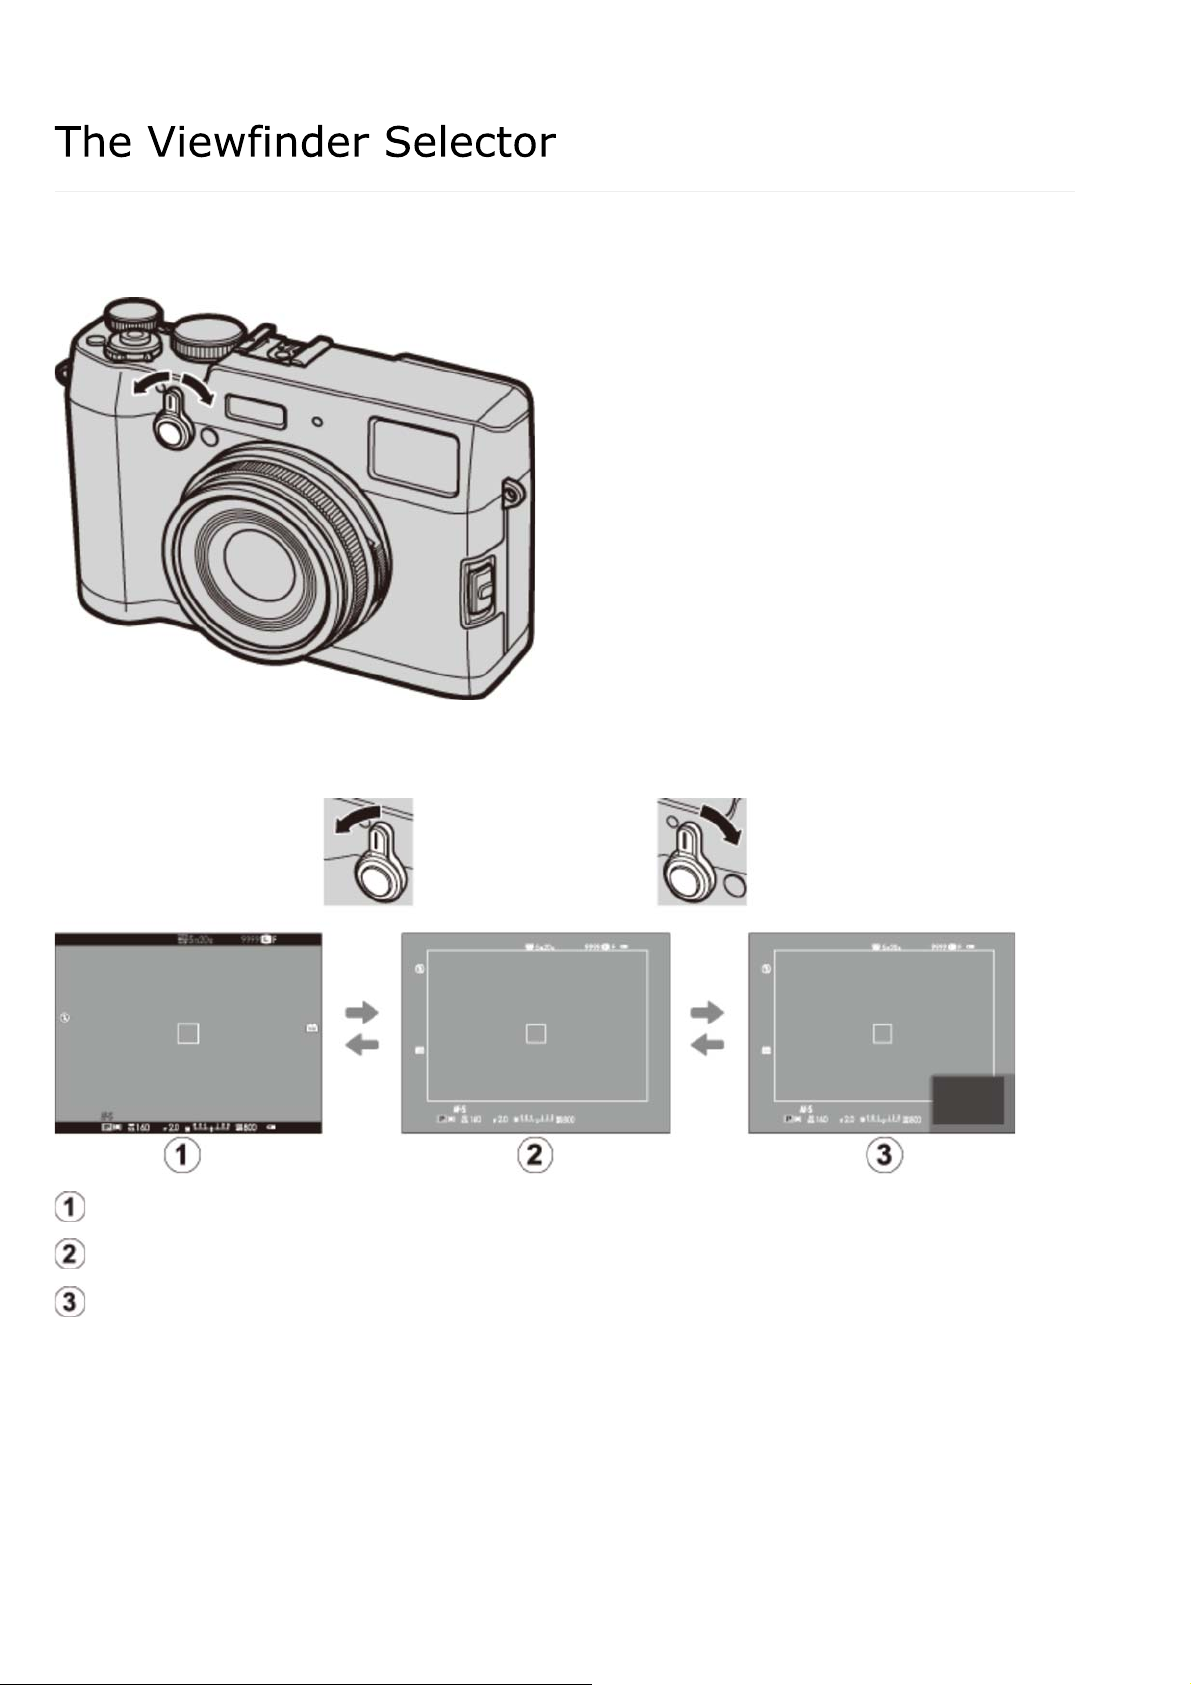
The Viewfinder Selector
-22-
Use the viewfinder selector to switch between the electronic viewfinder (EVF), the optical
viewfinder (OVF), and a dual optical viewfinder/electronic range finder (ERF) display.
Rotate the selector as shown to choose from the following displays:
EVF
OVF
ERF (dual display)
Page 23
The Viewfinder Selector
-23-
The Hybrid (EVF/OVF/ERF) Viewfinder
The features of the different displays are described below.
Display Description
OVF
EVF
The optical display is sharp and free of blur so that your subject’s
expression is always visible. In addition, the OVF shows the area just
outside the frame, making it easier to compose shots on the fly.
Because the viewfinder window is a slight distance from the lens, the
area visible in photographs may however differ slightly from the
display in the viewfinder due to parallax.
The live view display gives you a preview of the final picture (including
depth of field, focus, exposure, and white balance) with exactly the
same frame coverage.
ERF
(dual display)
The brightness and clarity of the EVF and LCD monitor can be adjusted using the
[SCREEN SET-UP] options in the setup menu.
As for the optical viewfinder but with a focus preview. A magnified
view of the current focus position is shown at the bottom right corner
of the display.
See Also
[SCREEN SET-UP] (The Setup Menu)
Page 24
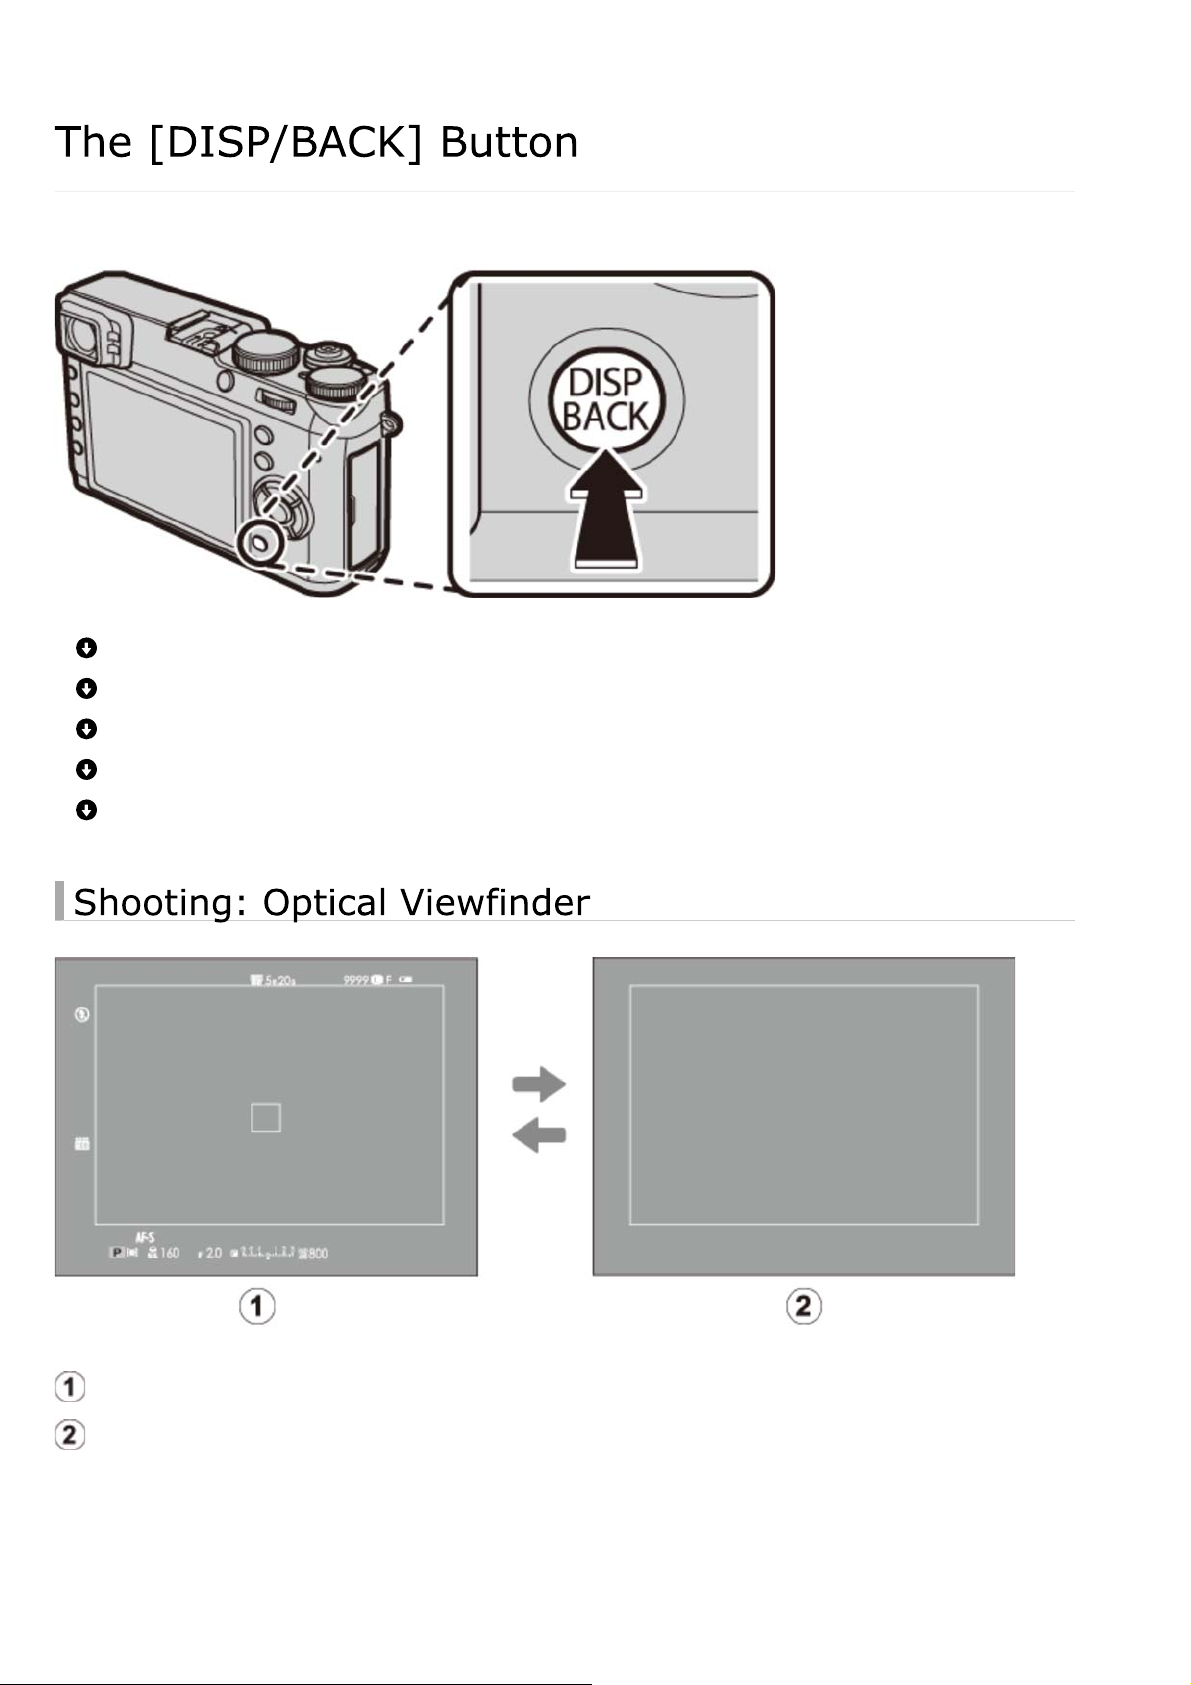
The [DISP/BACK] Button
-24-
The [DISP/BACK] button controls the display of indicators in the viewfinder and LCD monitor.
Shooting: Optical Viewfinder
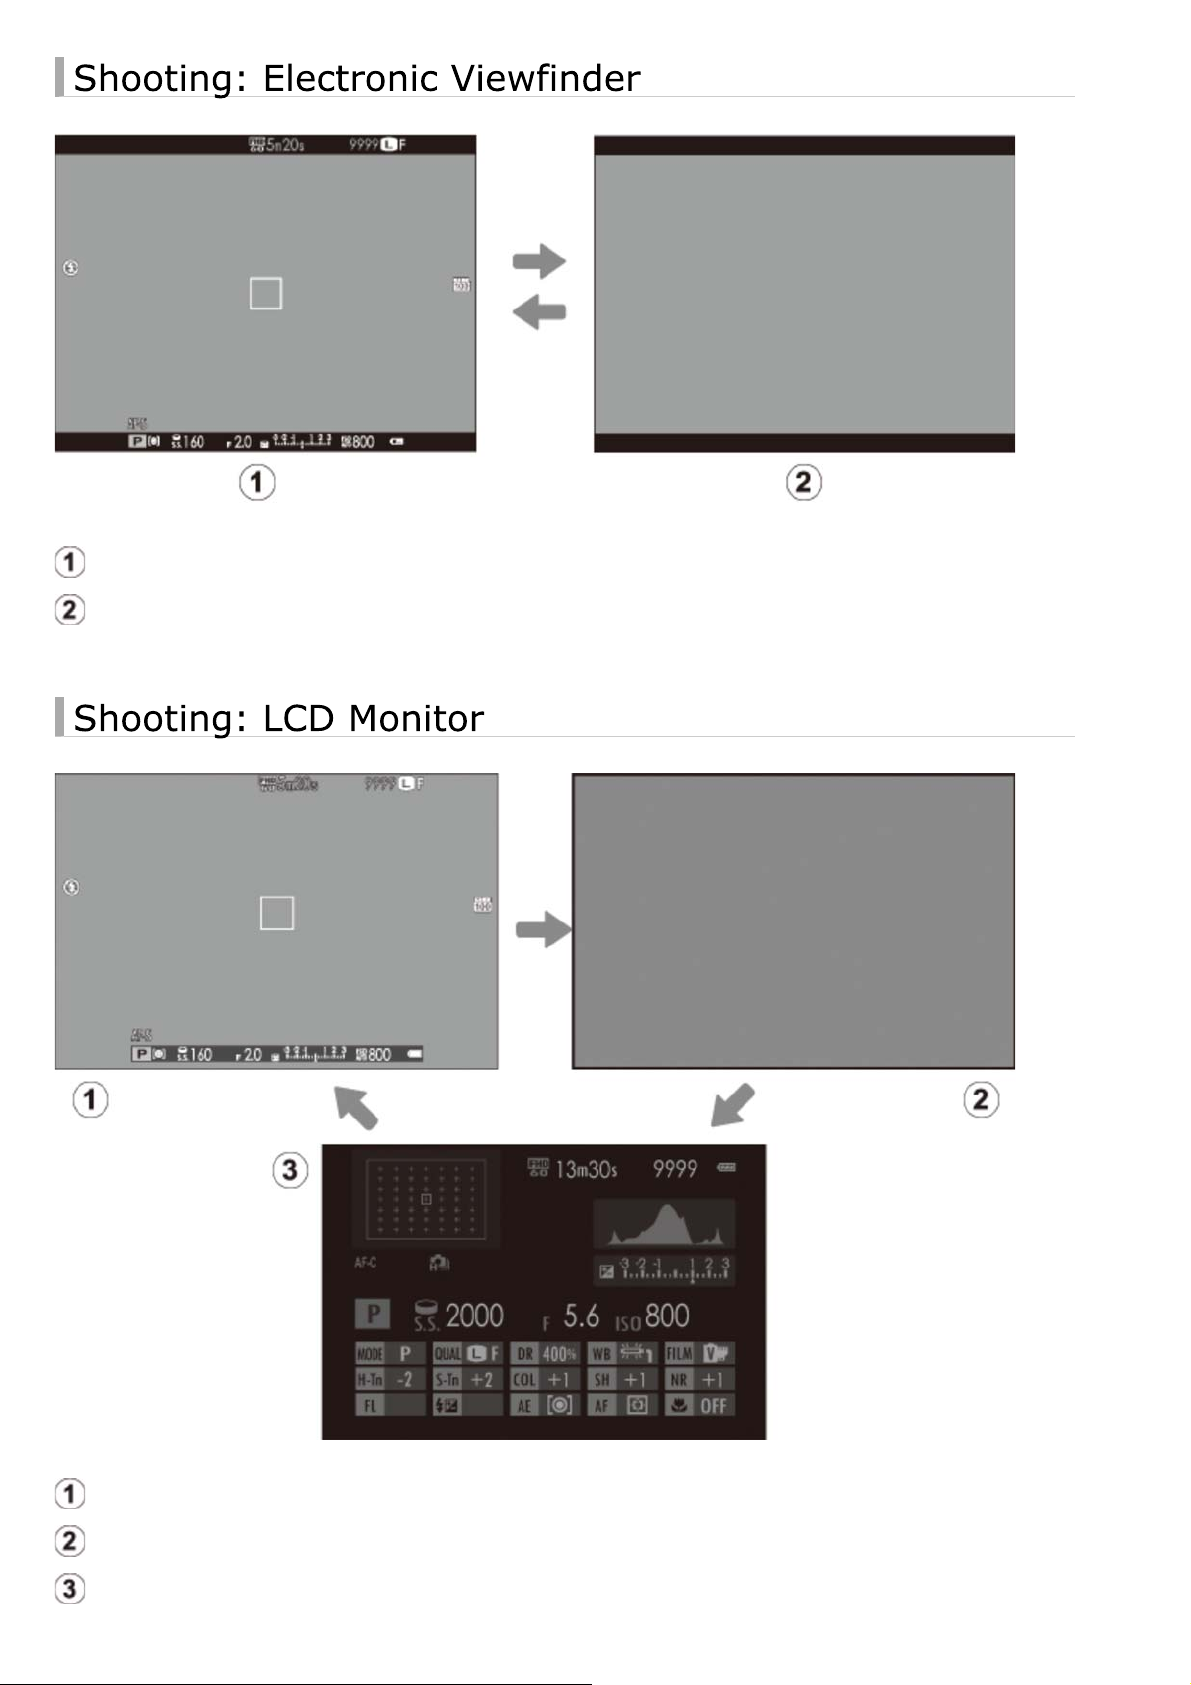
Shooting: Electronic Viewfinder
Shooting: LCD Monitor
Playback: Electronic Viewfinder/LCD Monitor
Standard Display
Standard
Information off
Page 25
The [DISP/BACK] Button
-25-
Standard
Information off
Standard
Information off
Info display
Page 26
The [DISP/BACK] Button
-26-
Standard
Information off
Info display
Favorites
The optical viewfinder can not be used for playback.
Page 27
The [DISP/BACK] Button
-27-
The items shown in the standard optical viewfinder and electronic viewfinder/LCD monitor
displays (display ) can be selected as described below.
1.
Select [DISP. CUSTOM SETTING] in the shooting menu.
Highlight [OVF] or [EVF/LCD] and press [MENU/OK].2.
Highlight items and press [MENU/OK] to select or deselect. Selected items are indicated
3.
by a check mark.
[FRAMING GUIDELINE]
[ELECTRONIC LEVEL]
[AF DISTANCE INDICATOR]
[MF DISTANCE INDICATOR]
[HISTOGRAM]
[APERTURE/S-SPEED/ISO]
[EXP. COMPENSATION]
[PHOTOMETRY]
Press [DISP/BACK] to exit when settings are complete.4.
[FLASH]
[WHITE BALANCE]
[FILM SIMULATION]
[DYNAMIC RANGE]
[FRAMES REMAINING]
[IMAGE SIZE/QUALITY]
[MOVIE MODE & REC. TIME]
[BATTERY LEVEL]
ELECTRONIC LEVEL
Selecting [ELECTRONIC LEVEL] displays a virtual horizon. The camera is level when the
two lines overlap.
The virtual horizon may not be displayed if the camera lens is pointed up or down.
Page 28
The [DISP/BACK] Button
-28-
Histograms
Histograms show the distribution of tones in the image. Brightness is shown by the
horizontal axis, the number of pixels by the vertical axis.
No. of pixels
Pixel brightness
Shadows
Highlights
Optimal exposure
Overexposed
Underexposed
Pixels are distributed in an even curve throughout the tone
range.
Pixels are clustered on the right side of the graph.
Pixels are clustered on the left side of the graph.
Page 29
Diopter Adjustment
-29-
The camera is equipped with diopter adjustment to accommodate individual differences in
vision. Rotate the diopter adjustment control until the viewfinder display is in sharp focus.
Page 30

The Indicator Lamp
-30-
The indicator lamp shows camera status as follows:
Glows green
Blinks green
Blinks green and orange
Glows orange
Blinks orange
Blinks red
Warnings may also appear in the display.
The indicator lamp turns off when the viewfinder is in use.
Focus locked.
Blur, focus, or exposure warning. Picture can be taken.
Recording pictures. Additional pictures can be taken.
Recording pictures. No additional pictures can be taken at this
time.
Flash charging; flash will not fire when picture is taken.
Lens or memory error.
Battery Charging Status
If the camera is connected to a computer to charge the battery, the indicator lamp will
show charging status when the camera is off.
Indicator lamp Battery status
On Battery charging.
Off Charging complete.
Blinks Battery fault.
Page 31

The [DRIVE] Button
-31-
Use the [DRIVE] button to choose drive mode (burst and bracketing) options.
[STILL IMAGE]
[CONTINUOUS SHOOTING]
[AE BKT]
[ISO BKT]
[FILM SIMULATION BKT]
[WHITE BALANCE BKT]
[DYNAMIC RANGE BKT]
[MULTIPLE EXPOSURE]
[MOTION PANORAMA]
In Advanced Filter mode, drive options are unavailable and only one shot will be taken
each time the shutter button is pressed.
Page 32

Camera Displays
-32-
Shooting: Optical Viewfinder
Shooting: Electronic Viewfinder/LCD Monitor
Playback: Electronic Viewfinder/LCD Monitor
Page 33

Shooting: Optical Viewfinder
-33-
The following types of indicator may be displayed during shooting.
In the description that follows, all available indicators are shown for illustrative
purposes; the indicators actually displayed vary with camera settings.
ND (Neutral Density) filter indicator
Depth-of-field preview
Conversion lens
Location data download status
Monitor sunlight mode
Movie mode
Time remaining
Internal memory indicator *
Number of available frames
Image size/quality
Battery level
Shutter speed
AE lock indicator
Metering
Shooting mode
Focus indicator
Manual focus indicator
Focus mode
Histogram
Silent mode indicator
Control lock
Dynamic range
Page 34

Shooting: Optical Viewfinder
-34-
Bright frame
Focus frame
Focus warning
Temperature warning
Electronic level
Distance indicator
Sensitivity
Exposure indicator
Film simulation
White balance
Shutter type
Continuous mode
Self-timer indicator
Macro (close-up) mode
Microphone/remote release
Flash mode/Flash compensation
Aperture
* : indicates that no memory card is inserted and that pictures will be stored in the
camera’s internal memory.
Page 35

Shooting: Optical Viewfinder
-35-
The Electronic Range Finder (ERF)
To view the electronic range finder (ERF), rotate the viewfinder selector as shown when
the optical viewfinder is displayed.
Page 36

Shooting: Electronic Viewfinder/LCD Monitor
-36-
The following types of indicator may be displayed during shooting.
In the description that follows, all available indicators are shown for illustrative
purposes; the indicators actually displayed vary with camera settings.
ND (Neutral Density) filter indicator
Focus check
Depth-of-field preview
Conversion lens
Location data download status
Monitor sunlight mode
Movie mode
Time remaining
Internal memory indicator *
Number of available frames
Histogram
Distance indicator
Battery level
Sensitivity
Exposure indicator
Aperture
Shutter speed
AE lock indicator
Metering
Shooting mode
Page 37

Shooting: Electronic Viewfinder/LCD Monitor
-37-
Image size/quality
Date and time
Focus frame
White balance
Film simulation
Dynamic range
Focus warning
Temperature warning
Control lock
Silent mode indicator
* : indicates that no memory card is inserted and that pictures will be stored in the
camera’s internal memory.
Focus indicator
Manual focus indicator
Focus mode
Shutter type
Continuous mode
Self-timer indicator
Macro (close-up) mod
Microphone/remote release
Flash mode/Flash compensation
Electronic level
The Viewfinder Display
When [ON] is selected for [SCREEN SET-UP] > [EVF AUTOROTATE DISPLAYS] in the
setup menu, the indicators in the viewfinder automatically rotate to match camera
orientation.
The display in the LCD monitor is unaffected.
The brightness and clarity of the EVF and LCD monitor can be adjusted using the
[SCREEN SET-UP] options in the setup menu.
Page 38

Shooting: Electronic Viewfinder/LCD Monitor
-38-
See Also
[SCREEN SET-UP] (The Setup Menu)
Page 39

Playback: Electronic Viewfinder/LCD Monitor
-39-
The following types of indicator may be displayed during playback.
In the description that follows, all available indicators are shown for illustrative
purposes; the indicators actually displayed vary with camera settings.
The optical viewfinder can not be used for playback.
Date and time
Intelligent face detection indicator
Red-eye removal indicator
Pro focus mode, pro low-light mode
Location data
Protected image
Image size/quality
Film simulation
Dynamic range
White balance
Sensitivity
Exposure compensation
Page 40

Playback: Electronic Viewfinder/LCD Monitor
-40-
Silent mode indicator
Internal memory indicator
Frame number
Gift image
Photobook assist
DPOF print indicator
Battery level
Aperture
Shutter speed
Playback mode indicator
Mark for upload to
Favorites
Page 41

First Steps
-41-
Attaching the Strap
Charging the Battery
Inserting the Battery and a Memory Card
Turning the Camera on and Off
Basic Setup
Page 42

Attaching the Strap
-42-
Attach the strap clips to the camera and then attach the strap.
Open a strap clip.
1.
Use the clip attaching tool to open a strap clip, making sure that the tool and clip are in
the orientations shown.
Keep the tool in a safe place. You will need it to open the strap clips when
removing the strap.
Place the strap clip on an eyelet.
2.
Hook the strap eyelet in the clip opening. Remove the tool, using the other hand to keep
the clip in place.
Page 43

Attaching the Strap
-43-
Pass the clip through the eyelet.
3.
Rotate the clip fully through the eyelet until it clicks closed.
Attach a protective cover.
4.
Place a protective cover over the eyelet as shown, with the black side of the cover toward
the camera. Repeat Steps 1–4 for the second eyelet.
Insert the strap.
5.
Insert the strap through a protective cover and strap clip.
Page 44

Attaching the Strap
-44-
Fasten the strap.
6.
Fasten the strap as shown. Repeat Steps 5–6 for the second eyelet.
To avoid dropping the camera, be sure the strap is correctly secured.
Page 45

Charging the Battery
-45-
The battery is not charged at shipment. Charge the battery before use.
The camera uses an NP-95 rechargeable battery.
The battery takes about 4 hours to fully charge.
Place the battery in the charger.
1.
Insert the battery in the orientation indicated by the labels.
Charge lamp
Arrow
label
Page 46

Charging the Battery
-46-
Attach the supplied adapter before charging the battery (the adapter is attached at
shipment).
Adapter
The supplied AC cord is for use exclusively with the supplied battery charger. Do
not use the supplied charger with other cords or the supplied cord with other
devices.
Plug the charger in.
2.
Plug the charger into an indoor power outlet. The charging indicator will light.
Charge the battery.
3.
Remove the battery when charging is complete.
The Charging Indicator
The charging indicator shows battery charge status as follows:
Charging
indicator
Off
On Battery charging. —
Blinks Battery fault.
Battery status Action
Battery not inserted. Insert the battery.
Battery fully
charged.
Remove the battery.
Unplug the charger and remove the
battery.
Page 47

Charging the Battery
-47-
Unplug the charger when it is not in use.
Remove dirt from the battery terminals with a clean, dry cloth. Failure to observe this
precaution could prevent the battery from charging.
Do not affix stickers or other objects to the battery. Failure to observe this precaution
could make it impossible to remove the battery from the camera.
Do not short the battery terminals. The battery could overheat.
Read the cautions in “The Battery and Power Supply”.
Use only battery chargers designated for use with the battery. Failure to obse rve this
precaution could result in product malfunction.
Do not remove the labels from the battery or attempt to split or peel the outer casing.
The battery gradually loses its charge when not in use. Charge the battery one or two
days before use.
Charging times may increase at very low or very high temperatures.
Page 48

Charging the Battery
-48-
Charging via a computer
The battery can be charged by connecting the camera to a computer. Connect the supplied USB
cable as shown, making sure the connectors are fully inserted.
Connect the camera directly to the computer; do not use a USB hub or keyboard.
If the computer goes into sleep mode while charging, charging will stop. To continue
charging, disable sleep mode on the computer, and disconnect and connect the USB
cable.
Charging may be impossible depending on computer specifications, settings or
conditions.
The battery status icons show battery charge status when the camera is turned on, and
the indicator lamp shows it when the camera is turned off.
Battery status icon when
camera on
(yellow)
(green)
(red)
Indicator lamp when
camera off
On Battery charging.
Off
Blinks Battery fault.
Battery status
Charging
complete.
Page 49

Inserting the Battery and a Memory Card
-49-
Insert the battery and memory card as described below.
1.
Open the battery-chamber cover.
Slide the battery-chamber latch as shown and open the battery-chamber cover.
Do not open the battery-chamber cover when the camera is on. Failure to observe
this precaution could damage image files or memory cards.
Do not use excessive force when handling the battery-chamber cover.
Page 50

Inserting the Battery and a Memory Card
-50-
Insert the battery.
2.
Using the battery to keep the battery latch pressed to one side, insert the battery
contacts first in the direction shown by the arrow. Confirm that the battery is securely
latched.
Arrow
Battery latch
Insert the battery in the orientation shown. Do not use force or attempt to
insert the battery upside down or backwards. The battery will slide in easily
in the correct orientation.
Page 51

Inserting the Battery and a Memory Card
-51-
Insert the memory card.
3.
Holding the memory card in the orientation shown, slide it in until it clicks into place at
the back of the slot.
Be sure card is in the correct orientation; do not insert at an angle or use force. If
the memory card is not correctly inserted or no memory card is inserted, will
appear in the LCD monitor and internal memory will be used for recording and
playback.
Close the battery-chamber cover.4.
Page 52

Inserting the Battery and a Memory Card
-52-
Removing the Battery and Memory Card
Before removing the battery or memory card, turn the camera off and open the batterychamber cover.
To remove the battery, press the battery latch to the side, and slide the battery out of the
camera as shown.
To remove the memory card, press it in and release it slowly. The card can then be
removed by hand. When a memory card is removed, the card could come out of the slot
too quickly. Use your finger to hold it and gently release the card.
Page 53

Turning the Camera on and Off
-53-
Rotate the [ON/OFF] switch to [ON] to turn the camera on. Select [OFF] to turn the camera
off.
Press the button to start playback. Press the shutter button halfway to return to
shooting mode.
The camera will turn off automatically if no operations are performed for the length of
time selected for [POWER MANAGEMENT] > [AUTO POWER OFF] in the setup
menu. To reactivate the camera after it has turned off automatically, press the shutter
button halfway or turn the [ON/OFF] switch to [OFF] and then back to [ON].
Fingerprints and other marks on the lens or viewfinder can affect pictures or the view
through the viewfinder. Keep the lens and viewfinder clean.
Page 54

Turning the Camera on and Off
-54-
Battery Level
After turning the camera on, check the battery level in the display.
Battery close to fully charged.
(red)
Battery about two-thirds charged.
Battery about one-third charged. Charge as soon as possible.
Battery exhausted. Turn camera off and recharge battery.
Page 55

Basic Setup
-55-
A language-selection dialog is displayed the first time the camera is turned on. Set up the
camera as described below (you can reset the clock or change languages at any time using the
[DATE/TIME] or [] options in the setup menu).
Using the Selector
Press the selector up, down, left, or right to highlight items and press [MENU/OK] to
select.
Move cursor up
Move cursor right
Move cursor down
Move cursor left
Select highlighted item
Page 56

Basic Setup
-56-
Turn the camera on.1.
Highlight a language and press [MENU/OK].
2.
Press [DISP/BACK] to skip the current step. Any steps you skip will be displayed
the next time the camera is turned on.
The date and time will be displayed. Press the selector left or right to highlight the year,
3.
month, day, hour, or minute and press up or down to change. To change the order in
which the year, month, and day are displayed, highlight the date format and press the
selector up or down. Press [MENU/OK] when settings are complete.
If the battery is removed for an extended period, the camera clock will be reset
and the language-selection dialog will be displayed when the camera is turned on.
Page 57

Basic Photography and Playback
-57-
Taking Photographs
Viewing Pictures
Deleting Pictures
Page 58

Taking Photographs
-58-
This section describes how to take pictures using program AE (mode [P]).
1.
Adjust settings for program AE.
Shutter speed: Select [A] (auto)
Exposure compensation: Select [±0]
Focus mode: Select [S] (single AF)
Aperture: Select [A] (auto)
Page 59

Taking Photographs
-59-
Confirm that [P] appears in the display.
OVF
EVF/LCD
Viewfinder Display Selection
Use the viewfinder selector to switch between the optical viewfinder (OVF) and
electronic viewfinder (EVF) displays.
Page 60

Taking Photographs
-60-
Ready the camera.
2.
Hold the camera steady with both hands and brace your elbows against your sides.
Shaking or unsteady hands can blur your shots.
To prevent pictures that are out of focus or too dark (underexposed), keep your fingers
and other objects away from the lens and flash.
Page 61

Taking Photographs
-61-
Focus.
3.
Frame the picture with your subject in the center of the display and press the shutter
button halfway to focus.
If the camera is able to focus, it will beep twice and focus area will glow green. Focus
and exposure will lock while the shutter button is pressed halfway.
If the camera is unable to focus, the focus frame will turn red, will be displayed.
If the subject is close to the camera, select macro mode and try again.
OVF
EVF/LCD
If the subject is poorly lit, the AF-assist illuminator may light.
Page 62

Taking Photographs
-62-
Shoot.
4.
Smoothly press the shutter button the rest of the way down to take the picture.
The flash may fire if lighting is poor. Camera settings can be changed to prevent
the flash firing.
Page 63

Viewing Pictures
-63-
Viewing Pictures Full Frame
Viewing Photo Information
Zooming in on the Focus Point
Playback Zoom
Multi-Frame Playback
To view pictures full frame, press .
Additional pictures can be viewed by pressing the selector left or right or rotating the focus
ring. Press the selector or rotate the ring right to view pictures in the order recorded, left to
view pictures in reverse order. Keep the selector pressed to scroll rapidly to the desired frame.
Pictures taken using other cameras are indicated by a (“gift image”) icon during
playback. These pictures may not display correctly and may not be viewable using
playback zoom.
Page 64

Viewing Pictures
-64-
To rate the current picture, press [DISP/BACK] and press the selector up and down to
select from zero to five stars.
Favorites: Rating Pictures
Page 65

Viewing Pictures
-65-
The photo information display changes each time the selector is pressed up.
Basic data
Info display 1
Info display 2
Press the selector left or right or rotate the focus ring to view other images.
Page 66

Viewing Pictures
-66-
Press the center of the command dial to zoom in on the focus point. Press the center of the
command dial again to return to full-frame playback.
Page 67

Viewing Pictures
-67-
Rotate the command dial right to zoom in on the current picture, left to zoom out (to view
multiple images, rotate the command dial left when the picture is displayed full frame). Press
[DISP/BACK] or [MENU/OK] to exit zoom.
Zoom indicator
Rotate right
Rotate left
The maximum zoom ratio varies with image size. Playback zoom is not available with
cropped or resized copies saved at a size of .
Page 68

Viewing Pictures
-68-
When the picture is zoomed in, the selector can be used to view areas of the image not
currently visible in the display.
Navigation window shows portion of image currently displayed.
The Navigation Window
Page 69

Viewing Pictures
-69-
To change the number of images displayed, rotate the command dial left when a picture is
displayed full frame.
Rotate left to view more images.
Rotate right to view fewer images.
Use the selector to highlight images and press [MENU/OK] to view the highlighted image full
frame (to zoom in on the selected image, rotate the command dial right when the picture is
displayed full frame). In the nine- and hundred-frame displays, press the selector up or down to
view more pictures.
Page 70

Deleting Pictures
-70-
To delete individual pictures, multiple selected pictures, or all pictures, press the button
when a picture is displayed full frame and choose from the options on the following pages.
Note that deleted pictures can not be recovered. Copy important pictures to a
computer or other storage device before proceeding.
If a message appears stating that the selected images are part of a DPOF print order,
press [MENU/OK] to delete the pictures.
If a memory card is inserted, pictures will be deleted from the memory card. Otherwise
pictures will be deleted from internal memory.
[FRAME]
[SELECTED FRAMES]
[ALL FRAMES]
Page 71

Deleting Pictures
-71-
Delete pictures one at a time.
1.
Press the button in full-frame playback and select [FRAME].
Press the selector left or right to scroll through pictures and press [MENU/OK] to delete
2.
(a confirmation dialog is not displayed). Repeat to delete additional pictures.
Delete multiple selected pictures.
Press the button in full-frame playback and choose [SELECTED FRAMES].1.
Highlight pictures and press [MENU/OK] to select or deselect (pictures in photobooks or
2.
print orders are shown by ).
When the operation is complete, press [DISP/BACK] to display a confirmation dialog.3.
Highlight [OK] and press [MENU/OK] to delete the selected pictures.4.
Page 72

Deleting Pictures
-72-
Delete all unprotected pictures.
1.
Press the button in full-frame playback and choose [ALL FRAMES].
A confirmation dialog will be displayed; highlight [OK] and press [MENU/OK] to delete
2.
all unprotected pictures. Pressing [DISP/BACK] cancels deletion; note that any pictures
deleted before the button was pressed can not be recovered.
If a memory card is inserted, only the pictures on the memory card will be affected; the
pictures in internal memory are only deleted if no memory card is inserted.
If a message appears stating that the selected images are part of a DPOF print order,
press [MENU/OK] to delete the pictures.
Page 73

Basic Movie Recording and Playback
-73-
Recording Movies
Viewing Movies
Page 74

Recording Movies
-74-
Follow the steps below to record movies with sound.
1.
Press the [Fn] button (function button 1) to start recording.
At default settings, movie recording is assigned to the Fn1 button. For information
on choosing the roles played by the function buttons, see “The Function Buttons”.
Recording indicator
Time remaining
Page 75

Recording Movies
-75-
Press the button again to end recording. Recording ends automatically when the
2.
maximum length is reached or the memory card is full.
Sensitivity and frame size and rate can be selected using the [MOVIE SET-UP] option
in the shooting menu.
Movies shot in [S], [A], and [M] modes are recorded at the settings currently selected
for photographs; shutter speed and/or aperture can be adjusted during shooting. In
other modes, settings are adjusted automatically.
The optical viewfinder display automatically switches to the electronic viewfinder/LCD
monitor during movie recording. The electronic range finder (ERF) at the bottom right
corner of the screen mirrors the electronic viewfinder.
The indicator lamp lights while movies are being recorded.
See Also
The Function Buttons ([Fn] (Function) Buttons)
[MOVIE SET-UP] (The Shooting Menu)
Page 76

Recording Movies
-76-
The camera can be used with external microphones.
A 2.5 mm adapter is required when connecting microphones with a 3.5 mm diameter
plug.
A confirmation dialog will be displayed when a microphone is connected to the
microphone/remote release connector. Press [MENU/OK] and select [MIC/REMOTE
RELEASE] > [MIC].
Page 77

Viewing Movies
-77-
Movies are indicated by a icon during full-frame playback.
Press to begin playback. Progress is shown in the display.
Page 78

Viewing Movies
-78-
Use the selector to control playback.
Playback in progress ( )
Playback paused ( )
End playback
Adjust speed
Pause playback
End playback
Single-frame advance/rewind
Playback
Press the selector up or down to adjust the volume; press [MENU/OK] again to resume
playback. Volume can also be adjusted from the setup menu.
Page 79

Viewing Movies
-79-
Press the selector left or right to adjust playback speed during playback. Speed is shown
by the number of arrows ( or ).
Do not cover the speaker during playback.
Sound is not played back in silent mode.
Playback Speed
Page 80

Shooting Mode
-80-
Program AE
Shutter-Priority AE
Aperture-Priority AE
Manual Exposure
Page 81

Program AE
-81-
In this mode, the camera sets exposure automatically. If desired, you can choose different
combinations of shutter speed and aperture that will produce the same exposure (program
shift).
To select program AE, set shutter speed and aperture to [A].
Aperture: [A]
Shutter speed: [A]
If the subject is outside the metering range of the camera, the shutter speed and
aperture displays will show “– – –”.
Page 82

Program AE
-82-
Program Shift
If desired, you can rotate the command dial to select other combinations of shutter speed
and aperture without altering exposure (program shift).
Shutter speed
Aperture
The new values for shutter speed and aperture are shown in yellow.
To cancel program shift, turn the camera off.
Program shift will also be cancelled if a flash mode other than off is selected.
Program shift is not available when a flash mode other than off is selected or
[AUTO] is selected for [DYNAMIC RANGE].
Page 83

Shutter-Priority AE
-83-
In shutter-priority AE (mode S), you select the shutter speed and let the camera choose the
aperture. Set aperture to [A] and rotate the shutter speed dial to the desired setting.
Aperture: [A]
Shutter speed: 1/1000 s
Shutter speed
Page 84

Shutter-Priority AE
-84-
Shutter speed can also be adjusted in increments of 1/3 EV by rotating the command
dial.
If the correct exposure can not be achieved at the selected shutter speed, aperture will
be displayed in red when the shutter button is pressed halfway.
If the subject is outside the metering range of the camera, the aperture display will
show “– – –”.
Page 85

Aperture-Priority AE
-85-
In aperture-priority AE (mode A), you select the aperture and let the camera choose the shutter
speed. Rotate the shutter speed dial to [A] and select the desired aperture.
Aperture: f/5.6
Shutter speed: [A]
Aperture
Page 86

Aperture-Priority AE
-86-
If the correct exposure can not be achieved at the selected aperture, the shutter speed
will be displayed in red when the shutter button is pressed halfway. Adjust aperture
until the correct exposure is achieved.
If the subject is outside the metering range of the camera, the shutter speed display will
show “– – –”.
The slowest shutter speed available when [ON] is selected for [POWER
MANAGEMENT] > [OVF POWER SAVE MODE] in the setup menu is 1/4 s.
When [PREVIEW DEPTH OF FIELD] is assigned to a function button using the
[FUNCTION (Fn) SETTING] option in the shooting menu, pressing the button stops
aperture down to the selected setting, allowing depth of field to be previewed in the
viewfinder or LCD monitor.
Previewing Depth of Field
See Also
The Function Buttons ([Fn] (Function) Buttons)
Page 87

Manual Exposure
-87-
In this mode, you choose both shutter speed and aperture. The resulting exposure is shown by
an indicator in the display; if desired, exposure can be altered from the value suggested by the
camera.
Aperture: f/5.6
Shutter speed: 1/1000 s
Shutter speed
Aperture
Exposure indicator
Page 88

Manual Exposure
-88-
Shutter speed can also be adjusted in increments of 1/3 EV by rotating the command
dial.
Exposure Preview
To preview exposure in the LCD monitor, select [ON] for [SCREEN SET-UP] >
[PREVIEW EXP. IN MANUAL MODE].
Select [OFF] when using the flash or on other occasions on which exposure may
change when the picture is taken.
Page 89

[Q] (Quick Menu) Button
-89-
Using the [Q] Button
Page 90

Using the [Q] Button
-90-
Use the [Q] button to view and adjust camera settings.
1.
Press [Q] to display the quick menu during shooting.
The options displayed in the quick menu can be selected using the [EDIT/SAVE
QUICK MENU] option in the setup menu. Quick menu edit options can also be
displayed by pressing and holding the [Q] button.
Page 91

Using the [Q] Button
-91-
Use the selector to highlight items.
2.
The [Q] button can not be used to adjust custom white balance, choose a color
temperature, or adjust settings for auto ISO sensitivity. These settings can be
adjusted using a function button or from the menus.
Rotate the command dial to change the highlighted item.3.
Press [Q] to exit when settings are complete.4.
For quick access to custom settings banks, press and hold the [Q] button while the
quick menu is displayed.
See Also
[EDIT/SAVE QUICK MENU] (The Setup Menu)
Page 92

[Fn] (Function) Buttons
-92-
The Function Buttons
Page 93

The Function Buttons
-93-
Each of the function buttons can be assigned any one of the roles listed below. Options fo r the
selected item can then be displayed by pressing the button. To choose the roles played by the
function buttons, press the [DISP/BACK] button until function settings options are displayed,
then highlight the desired button and press the selector right.
[ADVANCED FILTER]
[MULTIPLE EXPOSURE]
[MACRO]
[PREVIEW DEPTH OF FIELD]
[ISO]
[SELF-TIMER]
[IMAGE SIZE]
[IMAGE QUALITY]
[DYNAMIC RANGE]
[FILM SIMULATION]
[WHITE BALANCE]
[ND FILTER]
[PHOTOMETRY]
[AF MODE]
[FOCUS AREA]
[CORRECTED AF FRAME]
[FLASH MODE]
[FLASH COMPENSATION]
[SELECT CUSTOM SETTING]
[MOVIE]
[FACE DETECTION]
[PREVIEW PIC. EFFECT]
[HIGH PERFORMANCE]
[RAW]
[WIRELESS COMMUNICATION]
[CONVERSION LENS]
[SHUTTER TYPE]
Page 94

The Function Buttons
-94-
You can also use the [FUNCTION (Fn) SETTING] option in the shooting menu to
choose the roles played by the function buttons.
You can also display options for any of the function buttons by pressing and holding the
button.
See Also
[FUNCTION (Fn) SETTING] (The Shooting Menu)
Page 95

More on Photography
-95-
Bracketing
Continuous Shooting (Burst Mode)
Multiple Exposures
Panoramas
Macro Mode (Close-ups)
Using the Self-Timer
Interval Timer Photography
Using the Flash
Focus-Frame Selection
Exposure Compensation
Focus/Exposure Lock
Focus Mode
Manual Focus (Focus Mode M)
Metering
Recording Pictures in RAW Format
Long Time-Exposures (T/B)
Film Simulation
White Balance
Advanced Filters
Page 96

Bracketing
-96-
Automatically vary settings over a series of pictures. Bracketing options can be displayed by
pressing the [DRIVE] button.
[AE BKT]
[ISO BKT]
[FILM SIMULATION BKT]
[WHITE BALANCE BKT]
[DYNAMIC RANGE BKT]
Page 97

Bracketing
-97-
Press the selector left or right to highlight a bracketing amount. Each time the shutter button is
pressed, the camera will take three shots: one using the metered value for exposure, the
second overexposed by the selected amount, and the third underexposed by the same amount.
The camera may not be able to use the selected bracketing increment if the amount of
over- or under- exposure exceeds the limits of the exposure metering system.
Press the selector left or right to highlight a bracketing amount. Each time the shutter-release
button is pressed, the camera will take a picture at the current sensitivity and process it to
create two additional copies, one with the sensitivity raised and the other with the sensitivity
lowered by the selected amount.
This option can not be used if [RAW] is selected for [IMAGE QUALITY].
Each time the shutter is released, the camera takes one shot and processes it to create copies
with the film simulation settings selected for [FILM SIMULATION BKT] in the shooting menu .
This option can not be used if [RAW] is selected for [IMAGE QUALITY].
See Also
[FILM SIMULATION BKT] (The Shooting Menu)
Page 98

Bracketing
-98-
Press the selector left or right to highlight a bracketing amount. Each time the shutter button is
pressed, the camera takes three shots: one at the current white balanced setting, one with
fine-tuning increased by the selected amount, and another with fine-tuning decreased by the
selected amount.
This option can not be used if [RAW] is selected for [IMAGE QUALITY].
Each time the shutter button is pressed, the camera takes three shots at different dynamic
range settings: 100% for the first, 200% for the second, and 400% for the third.
Sensitivity is restricted to a minimum of ISO 800; the sensitivity previously in effect is
restored when bracketing ends.
This option can not be used if [RAW] is selected for [IMAGE QUALITY].
Page 99

Continuous Shooting (Burst Mode)
-99-
Capture motion in a series of pictures. Burst shooting options can be displayed by pressing the
[DRIVE] button.
Press the selector left or right to choose a frame rate. The camera takes photographs while the
shutter button is pressed.
Focus and Exposure
To vary focus and exposure with each shot, select focus mode [C]; in other modes, focus
and exposure are determined by the first shot in each series.
Focus tracking performance varies with aperture, sensitivity, and shooting
conditions.
Page 100

Multiple Exposures
-100-
Create a photograph that combines two exposures.
1.
Press the [DRIVE] button to display drive options.
Highlight [MULTIPLE EXPOSURE] and press [MENU/OK] to select the highlighted
2.
option and return to shooting mode.
 Loading...