

Fujifilm FinePix S2 Pro User Manual

BL00164-200(1)
Quick Start Guide
Thank you for purchasing this FUJIFILM product.
This Quick Start Guide explains how to connect the FUJIFILM Digital Camera
FinePix S2 Pro to a personal computer and how to install the software. It also
describes the basic operation of the software. Read this guide carefully to
ensure that you use this product correctly.
For detailed information on using the Hyper-Utility Software, refer to the PDFformat manuals that are installed with the software.
E
Hyper-Utility Software

32
IMPORTANT
Be sure to read this page before using the Software.
This Quick Start Guide is intended for users who already have a basic grasp of their computer and
its operating system (Windows or Mac OS). If you encounter unfamiliar terms or procedures while
reading this Quick Start Guide, refer to the manuals supplied with your computer or its operating
system.
• Microsoft and Windows are trademarks of the Microsoft Corporation of the U.S. registered in the
U.S. and other countries.
Windows is an abbreviated term referring to the Microsoft Windows Operating System.
• Macintosh, iMac and Mac OS are registered trademarks of Apple Computer, Inc.
• QuickTime and the QuickTime logo are trademarks used under license. The QuickTime logo is
registered in the U.S. and other countries.
• Adobe, Adobe Photoshop and Adobe Acrobat are trademarks of Adobe Systems Incorporated or
trademarks of Adobe Systems Incorporated registered within particular jurisdictions.
• Pentium and Celeron are trademarks of the Intel Corporation of the U.S.
• All other company or product names are trademarks or registered trademarks of the respective
companies.
a
Do not attempt to play the CD-ROM enclosed with this product on
an audio CD player. Doing so could damage your hearing or could
damage your speakers or headphones.
This End User License Agreement (“Agreement”) is an agreement between Fuji Photo Film Co., Ltd.
(“FUJIFILM”) and you, which sets forth the terms and conditions of the license granted for you to use
the software provided by FUJIFILM.
The CD-ROM contains third party software. In case a separate agreement is provided by a third
party supplier for its software, the provisions of such separate agreement shall apply to the use of
such third party software, prevailing over those of this Agreement.
1. Definitions.
(a) “Media” means the CD-ROM titled “Hyper-Utility Software” which is provided to you together with this
Agreement.
(b) “Software” means the software which is recorded on Media.
(c) “Documentation” means the operation manuals of Software and other related written materials which are
provided to you together with Media.
(d) “Product” means Media (including Software) and Documentation collectively.
2. Use of Software.
FUJIFILM grants to you a nontransferable, nonexclusive license:
(a) to install one copy of Software onto one computer in binary machine executable form;
(b) to use Software on the computer onto which Software is installed; and
(c) to make one backup copy of Software.
3. Restrictions.
3.1 You shall not distribute, rent, lease or otherwise transfer all or any part of Software, Media or Documentation
to any third party without FUJIFILM’s prior written consent. You also shall not sublicense, assign or otherwise
transfer all or any part of the rights granted to you by FUJIFILM under this Agreement without FUJIFILM’s
prior written consent.
3.2 Except as expressly granted by FUJIFILM hereunder, you shall not copy or reproduce all or any part of
Software or Documentation.
3.3 You shall not modify, adapt or translate Software or Documentation. You also shall not alter or remove
copyright and other proprietary notices that appear on or in Software or Documentation.
3.4 You shall not, or shall not have any third party, reverse-engineer, decompile, or disassemble Software.
4. Ownership.
All copyrights and other proprietary rights to Software and Documentation are owned and retained by FUJIFILM
or the third party suppliers as indicated on or in Software or Documentation. Nothing contained herein shall be
construed, expressly or implicitly, as transferring or granting any right, license, or title to you other than those
explicitly granted under this Agreement.
5. Limited Warranty.
FUJIFILM warrants to you that Media is free from any defect in material and workmanship under normal use for
ninety (90) days from the date of your receipt of Media. Should Media not meet the foregoing warranty, FUJIFILM
shall replace such defective Media with other Media bearing no defect. FUJIFILM’s entire liability and your sole
and exclusive remedy with regard to any defect in Media shall be expressly limited to such FUJIFILM’s
replacement of Media as provided herein.
6. DISCLAIMER OF WARRANTY.
EXCEPT AS PROVIDED IN SECTION 5 HEREIN, FUJIFILM PROVIDES PRODUCT “AS IS” AND WITHOUT
WARRANTIES OF ANY KIND, EXPRESS OR IMPLIED. FUJIFILM SHALL MAKE NO WARRANTY, EXPRESS,
IMPLIED OR STATUTORY, AS TO ANY OTHER MATTERS, INCLUDING, BUT NOT LIMITED TO NONINFRINGEMENT OF ANY COPYRIGHT, PATENT, TRADE SECRET, OR ANY OTHER PROPRIETARY
RIGHTS OF ANY THIRD PARTY, MARCHANTABILITY, OR FITNESS FOR ANY PARTICULAR PURPOSE.
NOTICE
BEFORE OPENING THE PACKAGE OF CD-ROM PROVIDED BY FUJI PHOTO FILM CO., LTD.,
PLEASE READ THIS END USER LICENSE AGREEMENT CAREFULLY. ONLY IF YOU DO
AGREE TO THIS AGREEMENT, YOU WILL BE ABLE TO USE THE SOFTWARE RECORDED
ON THE CD-ROM. BY OPENING THE PACKAGE, YOU ACCEPT AND AGREE TO BE BOUND
BY THIS AGREEMENT.
End User License Agreement
7. LIMITATION OF LIABILITY.
IN NO EVENT SHALL FUJIFILM HAVE ANY LIABILITY FOR ANY GENERAL, SPECIAL, DIRECT, INDIRECT,
CONSEQUENTIAL, INCIDENTAL, OR OTHER DAMAGES (INCLUDING DAMAGES FOR LOSS OF PROFITS
OR LOST SAVINGS) INCURRED FROM THE USE OF OR INABILITY TO USE PRODUCT EVEN IF FUJIFILM
HAS BEEN ADVISED OF THE POSSIBILITY OF SUCH DAMAGES.
8. No export.
You acknowledge that neither Software nor any part thereof, will be transferred, or exported to any country or
used in any manner in violation of any export control laws and regulations to which Software is subject.
9. Termination.
In case you breach any of the terms and conditions hereof, FUJIFILM may immediately terminate this Agreement
without any notice.
10. Term.
This Agreement is effective until the date when you cease to use Software, unless earlier terminated in
accordance with Section 9 hereof.
11. Obligation upon termination.
Upon termination or expiration of this Agreement, you shall, at your own responsibility and expense, delete or
destroy immediately all Software (including its copies), Media and Documentation.
12. Governing Law.
This Agreement shall be governed by and construed in accordance with laws of Japan.

5
1 Introduction
Thank you for purchasing this FUJIFILM product.
The Hyper-Utility Software comprises the following products for professional
users of the Digital Camera FinePix S2 Pro (referred to hereafter simply as
the “camera”).
h RAW FILE CONVERTER EX
h CAMERA SHOOTING SOFTWARE
RAW FILE CONVERTER EX is software that converts CCD-RAW data shot on the
camera to TIFF image files.
The CAMERA SHOOTING SOFTWARE allows you to connect the camera to your
computer and then take pictures and specify the photography settings from the
computer.
This Guide briefly describes how to install and use the Hyper-Utility Software.
For detailed information on using the software, refer to the “User's Guide” (PDF file)
✽
installed on your computer.
✽ To read the “User’s Guide” (PDF file), Adobe Systems' Acrobat Reader must be
installed on your computer.
Package Contents
Before using this product, check that your package contains all the items
listed below.
h Hyper-Utility Software CD-ROM (1)
h Hyper-Utility Software Quick Start Guide (1)
Main Features
■ RAW FILE CONVERTER EX
h Can be used to convert CCD-RAW files to 16-bit TIFF files with ICC profiles or Exif-
TIFF(RGB) files.
h Allows you to specify parameters such as the tone curve, white balance, sharpness,
saturation and brightness during the conversion.
h Allows you to preview the image converted using the specified conversion
parameters.
■ CAMERA SHOOTING SOFTWARE
Allow you to connect the camera to your computer’s IEEE1394 interface and
do the following:
h Set the camera’s photography settings and take pictures from the computer.
h Select the desired image size and file format, and save photographed images as files.
h Check photographed images in a window on your computer before saving them as
files.
h Use your computer’s hard disk as a storage media for the camera.
4
Symbols Used in This Guide
The symbols listed below are used throughout this guide.
q Indicates a camera operation must be performed. Refer to the Owner’s
Manual for your camera.
Indicates important precautions to follow when using the software.
✽
Indicates important information.
☞ Indicates notes or additional information.
Indicates useful tips.
TIP
NOTE
IMPORTANT .........................................................................................2
1 Introduction.......................................................................................5
Package Contents .....................................................................................5
Main Features............................................................................................5
System Requireme ....................................................................................6
2 Hyper-Utility Software ......................................................................7
3 Installing the Software .....................................................................8
3-1 For Windows PCs................................................................................8
3-2 Macintosh Computers........................................................................13
4 Reading the User’s Guide ..............................................................17
5 Software Basics ..............................................................................18
5-1 Using RAW FILE CONVERTER EX ..................................................18
1. Operation Flow ..............................................................................19
2. Viewing Converted Images ...........................................................20
3. Selecting Images for Conversion and
Launching RAW FILE CONVERTER EX ......................................20
4. Specifying the Conversion Color Space........................................21
5.
Setting the Conversion Parameters in RAW FILE CONVERTER EX
......21
6. Converting Image Files with RAW FILE CONVERTER EX...........23
7. Exiting RAW FILE CONVERTER EX ............................................23
5-2 CAMERA SHOOTING SOFTWARE Basics ......................................24
1. Camera connection .......................................................................24
2. Launching the software .................................................................25
3. PC Control Mode...........................................................................26
4. Camera Control (Normal) mode ....................................................29
5. Camera Control (Auto Acquire) mode ...........................................30
6. Disconnecting the camera............................................................ 31
6 Uninstalling the Software...............................................................32
7 Appendix .........................................................................................34
Color Spaces Supported by RAW FILE CONVERTER EX .....................34
To ensure that color space information selected by
RAW FILE CONVERTER EX is recognized correctly by
Adobe Photoshop, the profile must be specified correctly in Adobe Photoshop
....35
8 When you have a problem .............................................................39
RAW FILE CONVERTER EX ..................................................................39
CAMERA SHOOTING SOFTWARE........................................................41
9 Glossary of Terms ..........................................................................44
Contents

7
2 Hyper-Utility Software
6
System Requirements
Check that your computer system meets the hardware and software
requirements listed below for using the Hyper-Utility Software.
■ Windows PCs
Model: PC with a Pentium III, 4, Celeron or later processor with
Windows Millennium Edition, Windows 2000 Professional or
Windows XP Home/Professional pre-installed
✽1
Hard disk: Min. 1 GB available space
RAM: 256 MB (512 MB or better recommended)
Screen resolution: 1024 × 768 or better
16-bit color (65536 colors) or better
Operating System: Windows Millennium Edition, Windows 2000 Professional SP2 or
later, or Windows XP Home/Professional
IEEE1394 board: OHCI-compliant IEEE1394 interface board (required for using the
CAMERA SHOOTING SOFTWARE)
✽2
IEEE1394 cable: IEEE1394 cable bundled with the camera
CD-ROM drive: Required for software installation
✽
1 This software is not guaranteed to run on home-made PCs or PCs running updated
operating system software.
✽
2 Operation is not guaranteed for connections via an IEEE1394 (FireWire) hub.
✽
This software cannot be used via a USB connection.
■ Macintosh Computers
Model: Power Macintosh G3, Power Macintosh G4, PowerBook G3,
PowerBook G4 or iBook with an IEEE1394 (FireWire) interface as a
standard feature
✽1
Hard disk: Min. 1 GB available space
RAM: 256 MB (512 MB or better recommended)
✽2
Screen resolution: 1024 × 768 or better
32000 color or better
Operating system: Mac OS 9.1 to 9.2
✽3
IEEE1394 cable: IEEE1394 cable bundled with the camera
CD-ROM drive: Required for software installation
✽
1 This software is not guaranteed to run when used via an IEEE 1394 (FireWire) hub
or with an added IEEE 1394 port.
✽
2 Allocate at least 400 MB of virtual memory for RAW FILE CONVERTER. If other
applications are to be used with RAW FILE CONVERTER, allocate sufficient
memory capacity for the other applications also.
✽
3 This software does not run correctly in the Mac OS X Classic environment.
✽
CAMERA SHOOTING SOFTWARE cannot be used with a USB connection.
FinePixS2Pro
Computer
Hyper-UtilitySoftware
xAllows the camera to be controlled and shots to be taken from a computer.
xImages photographed with the camera can be automatically saved on the computer.
Special USB cable
USB driver
Shooting driver
IEEE 1394 cable
CAMERASHOOTING
SOFTWARE
xConverts CCD-RAW
images to TIFF files
RAWFILECONVERTEREX
FinePixViewer
AdobeRPhotoshop
R
✽
✽
Adobe Photoshop is not included in the Hyper-Utility Software.
PCPCMODEMODE 1394 SHOOTING1394 SHOOTING
8 9
3 Installing the Software
3-1 For Windows PCs
1. Switch on your PC and start up Windows.
✽
If you have already switched on your PC, restart your PC at this point.
Users of Windows 2000 or Windows XP should log in using a system administrator
account (e.g. “Administrator”).
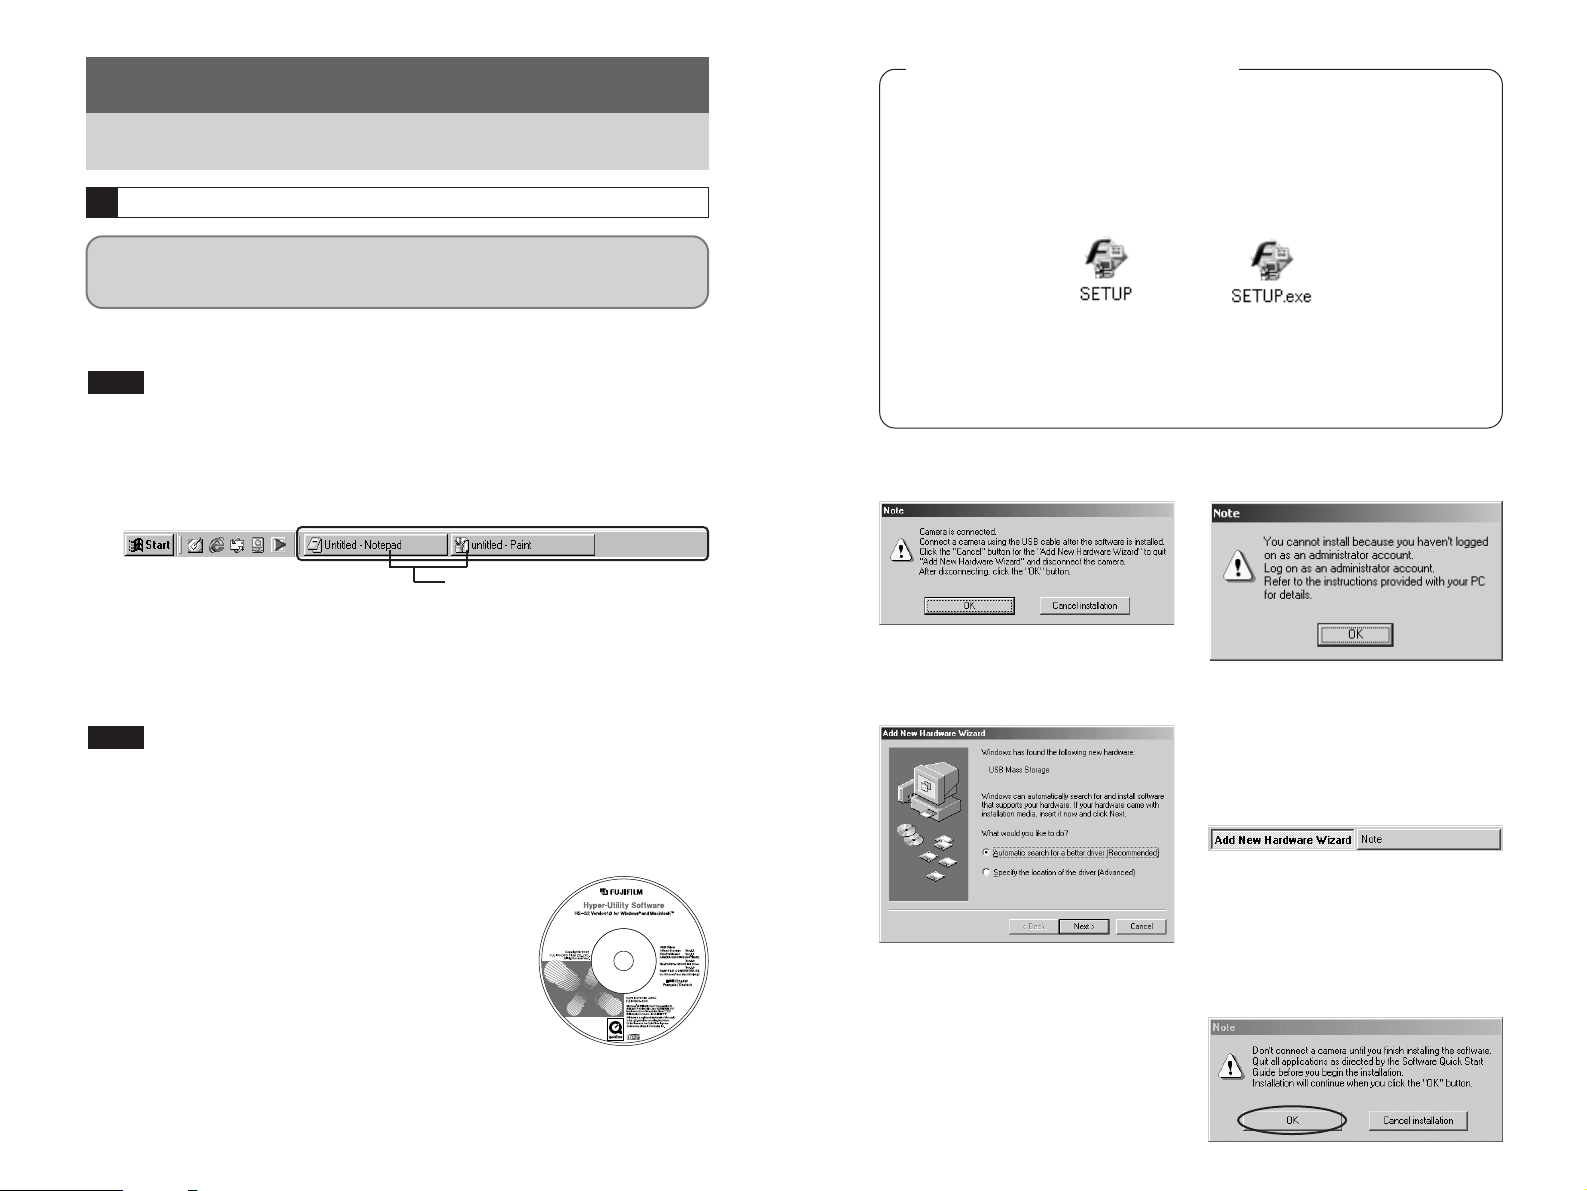
2. Quit all other active applications until no applications are
shown in the taskbar.
1 Click the right mouse button on the application icon in the taskbar.
2 Click “Close” in the menu that appears to quit the application.
✽
For more information, refer to the instructions provided with your PC and
applications (antivirus software, etc.).
If a “----.dll file not found.” message appears during installation, there is another
application running in the background. Forcibly shut down the application. Refer to your
Windows manuals for information on how to forcibly shut down an application.
3. Load the Hyper-Utility Software CD-ROM into the CD-ROM
drive. The installer starts up automatically.
NOTE
NOTE
Load the CD-ROM into your PC
<Taskbar>
Applications to be shut down
(the icons shown vary depending on
the applications that are running)
Do not connect the camera to your PC until the software
installation is completed.
1
Launching the Installer Manually
1. Double-click the “My Computer” icon.
✽
Windows XP users should click “My Computer” in the “Start” menu.
2. Right-click “HS-S2” (CD-ROM drive) in the “My Computer”
window and select “Open”.
3. Double-click “SETUP” or “SETUP.exe” in the CD-ROM
window.
✽
The way file names are displayed differs as described below depending on your
computer settings.
• File extensions (3-letter suffixes indicating the file type) may be shown or
hidden. (e.g. Setup.exe or Setup)
• Text may be shown normally or all in uppercase (e.g. Setup or SETUP).
4. Pre-installation checking begins. If any warning messages
appear, follow the instructions given on the screen.
✽
The “Add New Hardware Wizard” may be hidden behind the “Note” message.
Check the taskbar, move the message window and then click the [Cancel] button.
5. A confirmation message appears asking whether you want to
continue with the installation. Click the [OK] button.
10 11
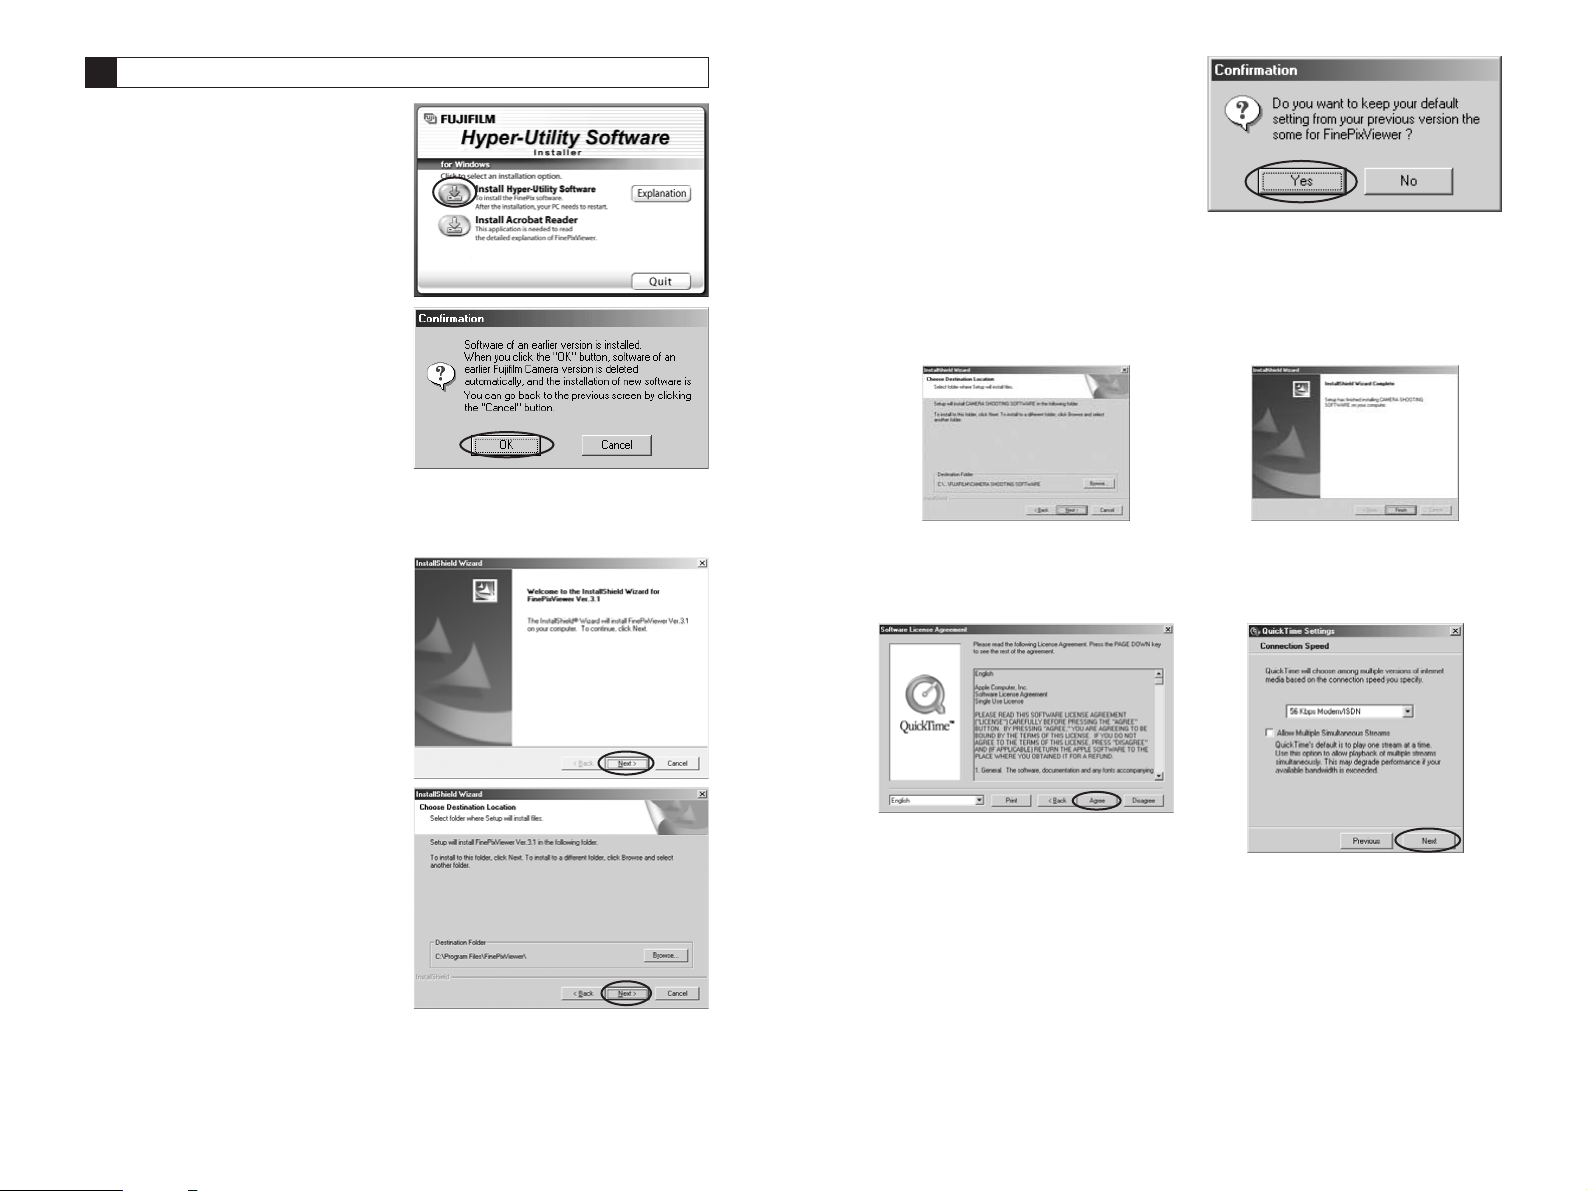
3 The screen shown at right may
appear. To continue with the
settings, click the [Yes] button.
6. The RAW FILE CONVERTER LE is installed.
7. The RAW FILE CONVERTER EX is installed.
8. Install CAMERA SHOOTING SOFTWARE as directed by the
on-screen instructions.
9. Install QuickTime as directed by the on-screen instructions.
✽
If you have already installed QuickTime version 5.0.2 or later, this installation is
not performed.
From Hyper-Utility Software installation to restart
1. The Setup screen appears.
Click the [Install Hyper-Utility
Software] button.
✽ For more information on what is
installed, click the [Explanation]
button.
2. The software version is
checked. If the window
shown at right appears, click
the [OK] button to uninstall
the software.
3. The USB drivers are installed.
4. The FinePix S2 Pro shooting driver is installed.
5. Install FinePixViewer.
1 Hyper-Utility Software installation
begins and notes and warnings are
displayed. When you have
confirmed these, click the [Next >]
button.
2 Check the installation destination
folder and then click the [Next >]
button.
2
If the “Connection speed” window
appears, set the correct speed for your
environment of connection and then click
the [Next] button.
✽
If you do not know your connection
speed, simply click the [Next] button.
Click [Agree] button in the “Software
License Agreement” window.
12 13
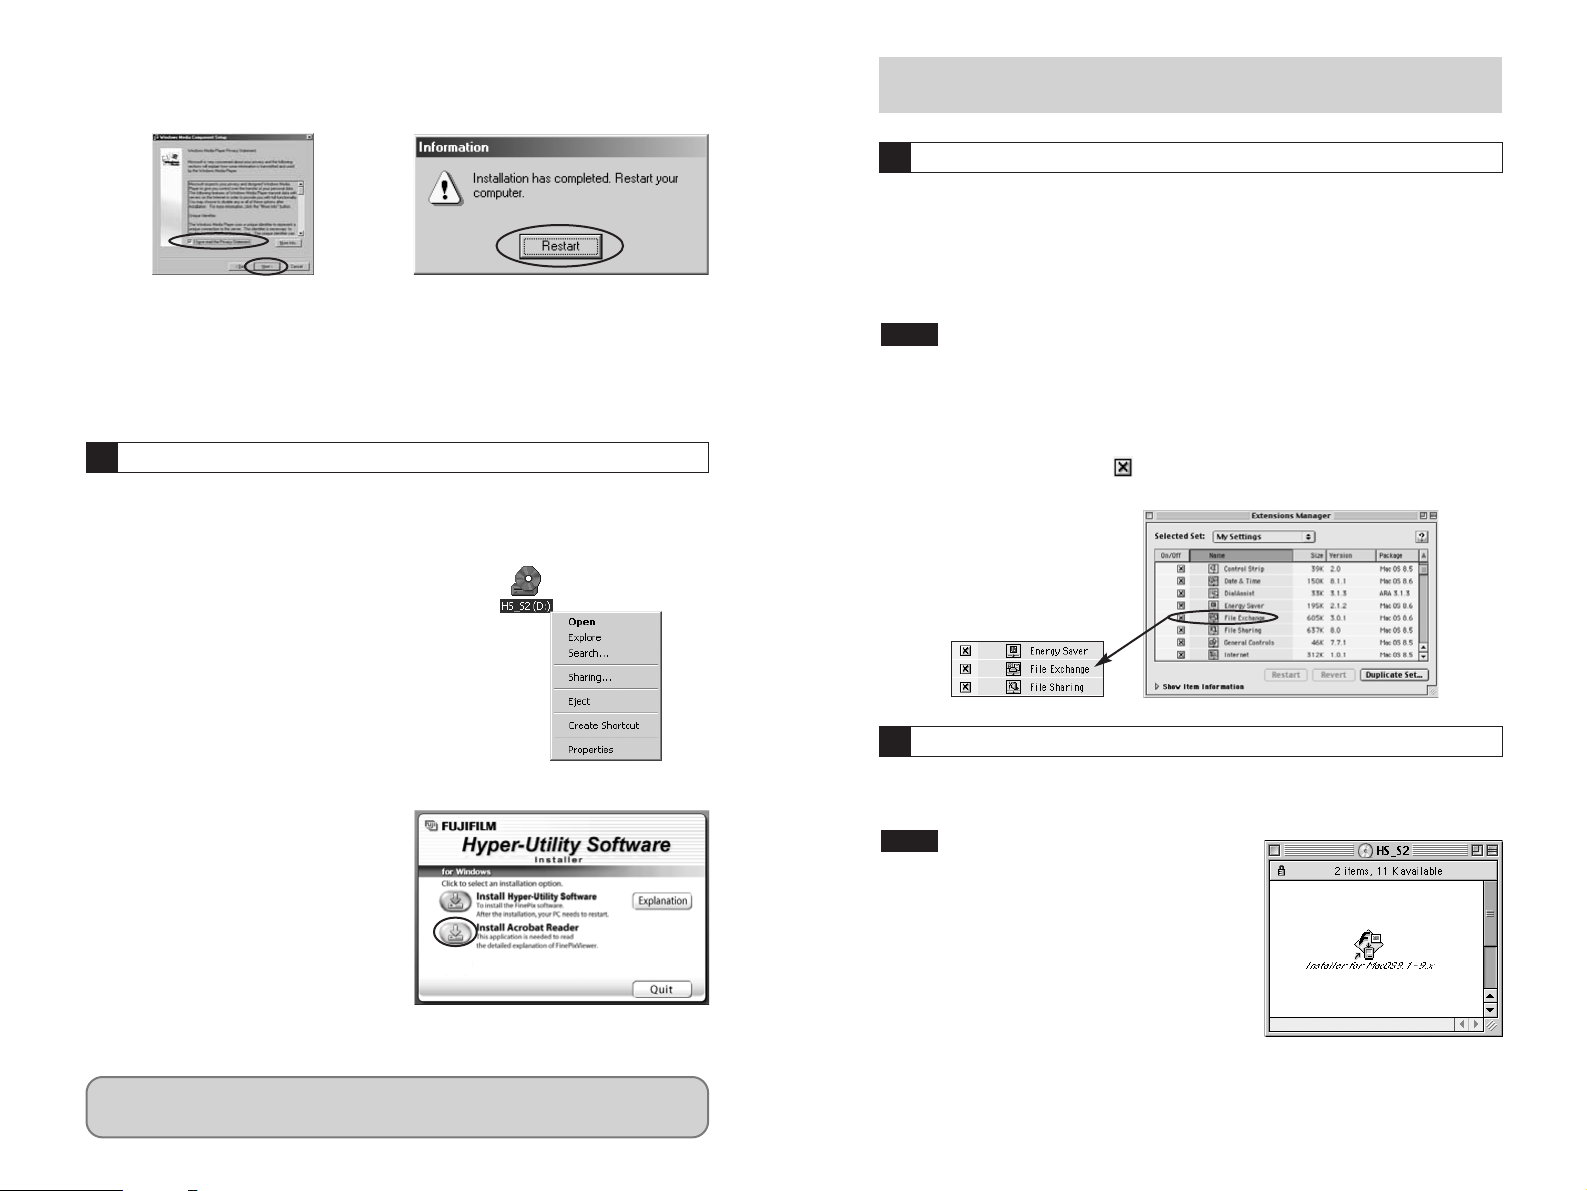
10. Install Windows Media Player as directed by the on-screen
instructions and then restart your PC.
✽
If the latest version of the software is already installed on your PC, this installation
is not performed. When next screen appears, click the [Restart] button.
11. After you restart your PC, the “How to use FinePixViewer”
page appears in the web browser window. Check the details
before closing the window and proceeding with the
installation.
You must install Adobe Systems’ Acrobat Reader software to read the
FinePixViewer User’s Guide (PDF).
If you already have the latest version installed, this step is not required.
1. Open the “My Computer”
window, right-click the CDROM icon and select “Open”
to view the contents of the
CD-ROM.
2. Double-click “SETUP” or “SETUP.exe”.
3. In the installer window, click
the [Install Acrobat Reader]
button.
4. Proceed with the installation as directed by the on-screen
instructions.
Acrobat Reader installation
3
This completes the installation of all the software
components.
3-2 Macintosh Computers
■ Enable File Exchange
Check whether File Exchange is active.
To use a Media that is supported by the camera, the File Exchange utility
supplied with Mac OS must be running.
1. Switch on your Macintosh and start up Mac OS 9.1 to 9.2.
Do not connect the camera to your Macintosh until the software installation is
completed.
2. Select the Extensions Manager in the Control Panels and
check that the File Exchange check box is ticked. If not, click
in the box so that an appears and then restart your
Macintosh.
NOTE
Check the system software settings
From Hyper-Utility Software installation to restart
1. When you load the Hyper-Utility Software CD-ROM into the
CD-ROM drive, the “HS_S2” window automatically opens.
If the “HS_S2” window does not open automatically,
double-click the CD-ROM icon.
NOTE
1
2
In this window, tick the “I have read the
Privacy Statement” checkbox and then
click the [Next >] button.
When you click the [Restart] button, your
PC is restarted.
14 15
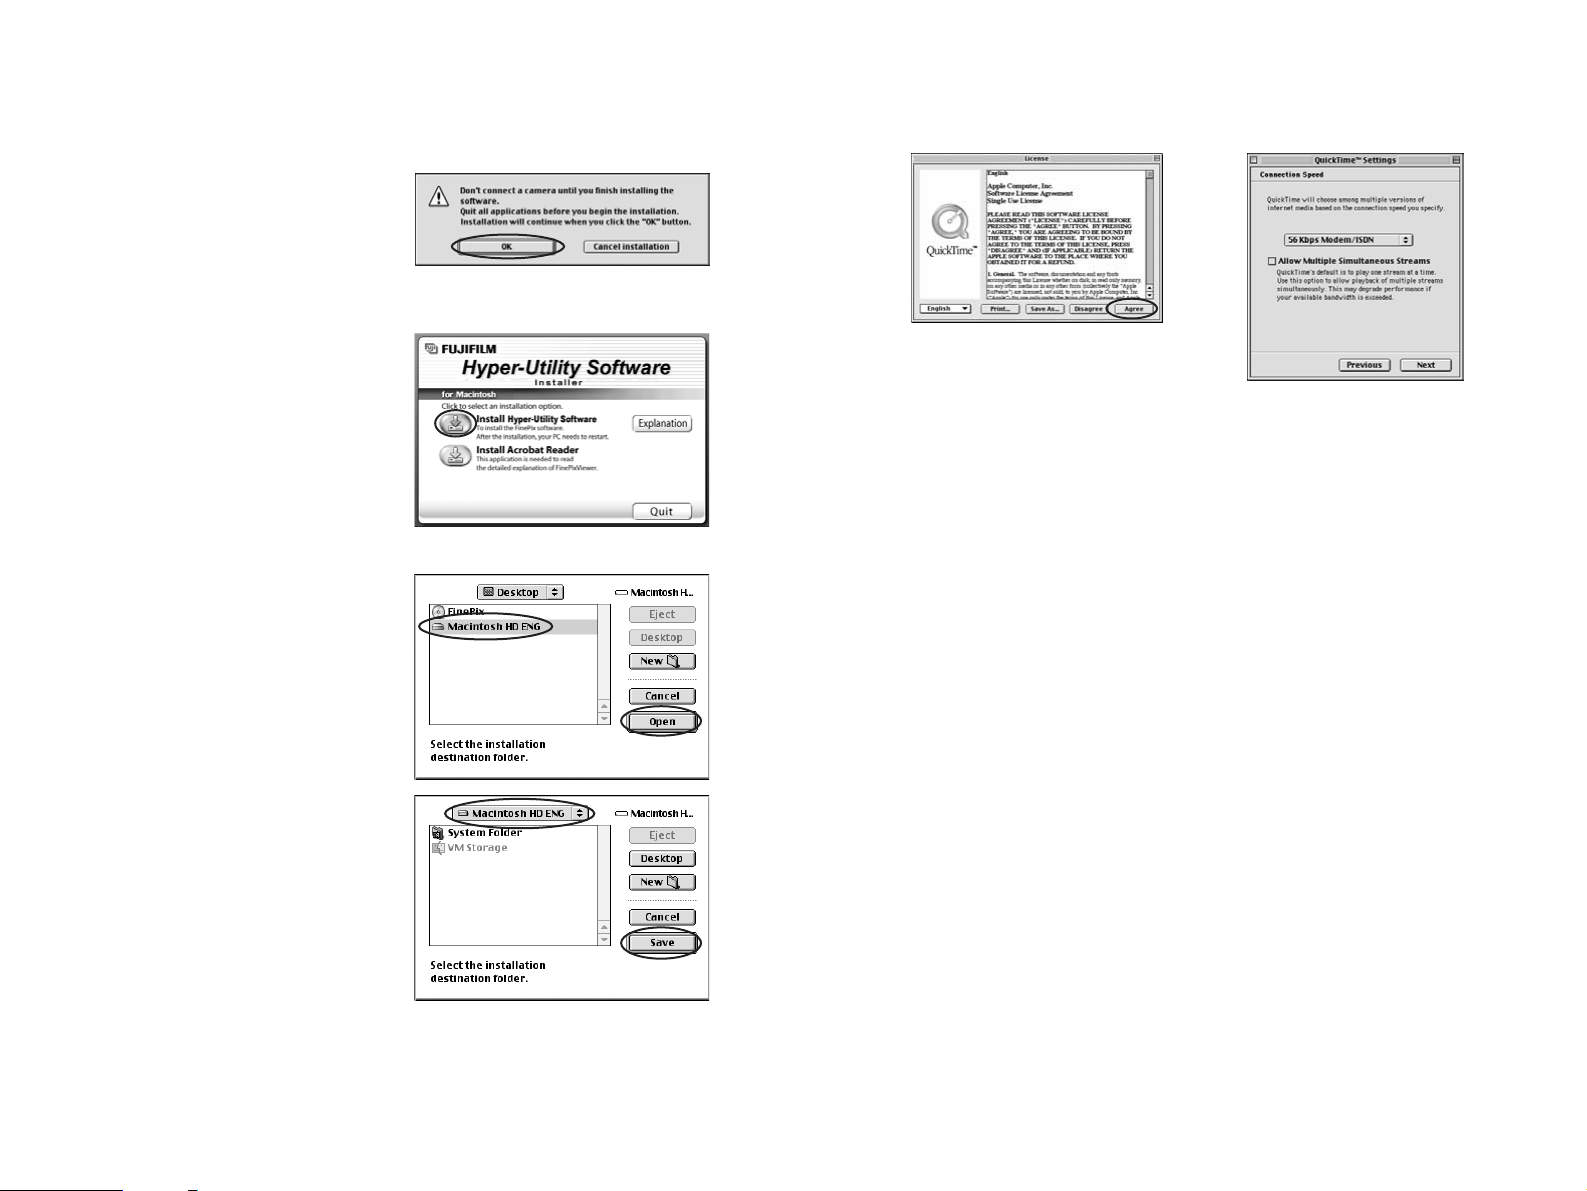
2. Double-click “Installer for MacOS9.1-9.x” to launch the
Installer.
3. A confirmation message appears asking whether you want to
continue with the installation. Click the [OK] button.
4. The Installer setup screen appears.
Click the [Install Hyper-Utility Software] button.
✽
For more information on what is
installed, click the [Explanation]
button.
5. Select the installation destination for Hyper-Utility Software.
1 Click the [Open] button to open the
installation destination folder.
2 Click the [Save] button.
Click [Agree] button in the “License”
window.
6. Install QuickTime as directed by the on-screen instructions
and then restart your Macintosh.
✽
If you have already installed QuickTime version 5.0.2 or later, this installation is
not performed.
7. After you restart your Macintosh, the “How to use
FinePixViewer” alias is created on the desktop. Use your
browser software to check the details and then proceed with
the installation.
If the “Connection Speed” window appears
after your restart your Macintosh, set the
correct speed for your environment of
connection and then click the [Next] button.
✽
If you do not know your connection
speed, simply click the [Next] button.
 Loading...