

Page 1

FUJI COMPUTED RADIOGRAPHY
CR Console
BLACKENING PROCESSING SOFTWARE
OPERATION MANUAL
1st Edition
July 2005
CR Console Operation Manual
897N0522 Fuji Photo Film Co., Ltd.
2005. 07
MADE IN JAPAN
FUJI PHOTO FILM CO., LTD.
TOKYO 106-8620
Page 2

Page 3

END-USER SOFTWARE LICENSE AGREEMENT
Fuji Photo Film Co., Ltd.
The license of the Software (as defined below) granted hereunder is contingent upon the Licensee’s acceptance of
all the terms provided herein, and any use of the Software by the Licensee shall be deemed as such acceptance.
This Product contains software ("Software") and related written materials ("Documentation"). The term "Software"
shall include any updates, upgrades, modified versions, additions and copies of the Software licensed to you by
Fuji Photo Film Co., Ltd. ("FUJI").
1. License. Subject to the terms and conditions of this Agreement, you are granted a limited, non-exclusive, non-transferable and non-
sublicensable license to use the Software and the Documentation only on a single computer until such rights are terminated according to
Section 8 below.
2. Ownership. It is acknowledged and agreed that FUJI retains all title and rights to the Software the Documentation and all copies
thereof, and no title or rights to the Software or the Documentation is transferred or licensed to you except as expressly set forth herein.
3. Restriction on Use. You may: (i) make and retain one extra copy of the Software for backup purposes only; and (ii) copy the
Documentation only as reasonably necessary for user reference and backup purposes. Each copy of the Software and Documentation
made by you shall contain the same proprietary notices, labels, and marks as the original thereof without any alteration. You shall not: (i)
sell, sublicense, assign, lease, encumber or otherwise transfer the Software or the Documentation or the rights granted hereunder; (ii)
reverse engineer, decompile, disassemble or create derivative works of the Software; (iii) remove or alter any proprietary notices, labels or
marks on or contained in any part of the Software or the Documentation; (iv) make any copies of the Software or the Documentation
except as permitted above; or (v) install the Software on any computer other than as permitted by this Agreement. As a condition of the
use of the Software by you, you hereby represent and warrant that you shall not use the Software for any purpose that is unlawful or
prohibited by this Agreement. You agree to abide by all applicable laws and regulations in your use of the Software.
4. Export Control. You shall comply with all export and re-export restrictions and regulations imposed by the government of the United
States and other re levant countries or regions (“Export Restrictions”). You shall not knowingl y transfer, directly or indirectly, any restricted
software or technical data received hereunder or the direct product of such data, to any country or region identified as an embargoed
destination or country in the Export Restrictions, unless prior written authorization is obtained from FUJI and each appropriate United
States or other government agencies. This Section shall survive the expiration or termination of this license agreement.
5. Update and Upgrade. FUJI may, at its sole discretion, make any update or upgrade of the Software available; however, FUJI shall
have no obligations to make any update or upgrade of the Software available.
6. Limited Warranty. FUJI hereby warrants that the Software shall operate in substantial conformity with the then current Documentation,
when used in strict compliance with such Documentation. This warranty shall be effective only for one year following your receipt of the
Software (hereinafter referred to as “Warranty Period”). This warranty is conditioned upon the installation and use of the latest version of
the Software released by FUJI in strict compliance with the then current Documentation. If the Software fails to perform as warranted in the
Warranty Period, FUJI shall use commercially reasonable efforts to correct such Software. THE FOREGOING STATES THE SOLE AND
EXCLUSIVE REMEDIES TO WHICH YOU AR E ENTIT LE D FOR FU J I'S BR EACH OF W ARRA NT Y. FUJI HER EB Y DISC L AIMS AN Y
OTHER WARRANTIES WITH RESPECT TO THE SOFTWARE AND DOCUMENTATION, EXPRESS OR IMPLIED, INCLUDING
WITHOUT LIMITATION ALL WARRANTIES REGARDING MERCHANTABILITY, FITNESS FOR A PARTICULAR PURPOSE AND NONINFRINGEMENT.
7. Limitation of Liability. TO THE FULLEST EXTENT PERMITTED BY APPLICABLE LAW, FUJI SHALL NOT BE LIABLE FOR ANY
INDIRECT, SPECIAL, EXEMPLARY, PUNITIVE, INCIDENTAL, OR CONSEQUENTIAL DAMAGES OF ANY KIND (INCLUDING
WITHOUT LIMITATION, LOST PROFITS OR LOST DATA), WHETHER SUCH DAMAGES ARE BASED ON CONTRACT, TORT
(INCLUDING NEGLIGENCE), PRODUCT LIABILITY OR OTHERWISE (INCLUDING ANY DAMAGES WHICH ARE IN ANY WAY
CONNECTED WITH ANY USE OF THE SOFTWARE OR DOCUMENTATION), EVEN IF IT HA S BEEN AD VI SE D OF THE P O SSI BIL I TY
OF SUCH DAMAGES.
8. General Provisions. This Agreement shall be governed by and construed according to the laws of Japan, excluding its conflict of laws
rules. You consent to the exclusive jurisdiction of Japanese courts and agree that the venue shall lie exclusively in Japan, in all disputes
arising out of or relating to this Agreement. The use of the Software or Documentation is not authorized in any jurisdiction that does not
give effect to all provisions of the terms and conditions of this Agreement, including without limitation this Section 8.
9. Termination. All the rights granted to you hereunder shall automatically terminate upon your breach of any provision herein, and you
must cease the use of the Software and Documentation and destruct all copies of the Software and Documentation in your possession,
including any of backup copy, upon such termination. Any provision herein that by its nature survives shall survive the termination of the
rights granted to you hereunder.
_______________________________________________________________________________________________________________________________________
Page 4

CR Console Operation Manual
CONTENTS
INTRODUCTION __________________________________________ 3
OPERATIONS ____________________________________________ 4
1. Automatic Blackening Processing ........................................................................ 5
Updating the Parameters by Exposure Menu......................................... 5
Updating the Parameters for All Exposure Menus................................. 12
2. Manual Blackening Processing.............................................................................. 14
3. Menus to Which Automatic Blackening Processing is Applicable....................... 23
2 897N0522 Fuji Photo Film Co., Ltd.
2005. 07
Page 5

INTRODUCTION
This Operation Manual explains how to operate the Blackening Processing Software on
the CR Console.
For other functions/operations, refer to “CR Console OPERATION MANUAL” and
“CR Console OPERATION MANUAL, THE USER UTILITY OPERATIO NS”.
CR Console Operation Manual
897N0522 Fuji Photo Film Co., Ltd. 3
2005. 07
Page 6

CR Console Operation Manual
OPERATIONS
Blackening Processing is used to blacken the region out of irradiated field (unnecessary white
region) on an image with arbitrary density.
There are two processing methods: “Automatic Blackenin g Proce ssing ” and “ Ma nu al
Blackening Processing”. Automatic Blackening Processing automatically detects/blackens
regions outside the irradiated field on read images, requiring thus no user operations for this
purpose. Parameters necessary for perfor ming Automatic Blackening Processin g can be
updated as required at the User Utility.
For details of menus to which Automatic Blackening Processing is applicable, see “3. Menus
to Which Automatic Blackening Processing is Applicable”.
When images are subjected to verification on the QA window, Manual Blackening Processing
detects/blackens regions outside the irradiated field by user operations for any image you wish.
Manual Blackening Processing can be applied to an image displayed being targeted for
verification purposes. In addition, it is possible with this processing method to reprocess
correct/ redo) an image that has been subjected to Automatic Blackening Processing.
Automatic Blackening Processing and Manual Blackening Processing can be used either
individually or simultaneously. Select a proper processing method according to what the target
image requires.
4 897N0522 Fuji Photo Film Co., Ltd.
2005. 07
Page 7
1 Automatic Blackening Processing
Automatically detects and blackens the region out of irradiated field of read images. (Any
operation is not required by users.)
The parameters for the Automatic Blackening Processing can be updated at the User Utility.
Perform the following operation if necessary.
(Notes for performing exposures
Caution to be observed when using Automatic Blackening Processing
Because this processing method uses the pattern recognition technology,
an effective image can be lost, though in a minimal way, depending on whether it was
recognized successfully or not.
For this reason, make sure when you are using this processing that an image area
available on the CR Console is not painted out being retained appropriately.
Use Manual Blackening Processing as necessary to correct or redo the image
appropriately.
• When an effective image area has been painted out:
Clear the blackened area and then re-input an area to be painted.
• When an effective image area has not been painted out completely with a certain
area remaining unpainted:
Clear the blackened area and then re-input an area to be painted or re-input an
area to be painted black additionally without clearing it off once.
→
page 8)
CR Console Operation Manual
Updating the Parameters by Exposure Menu
Updates the Automatic Blackening Processing parame ter s by each exposure menu.
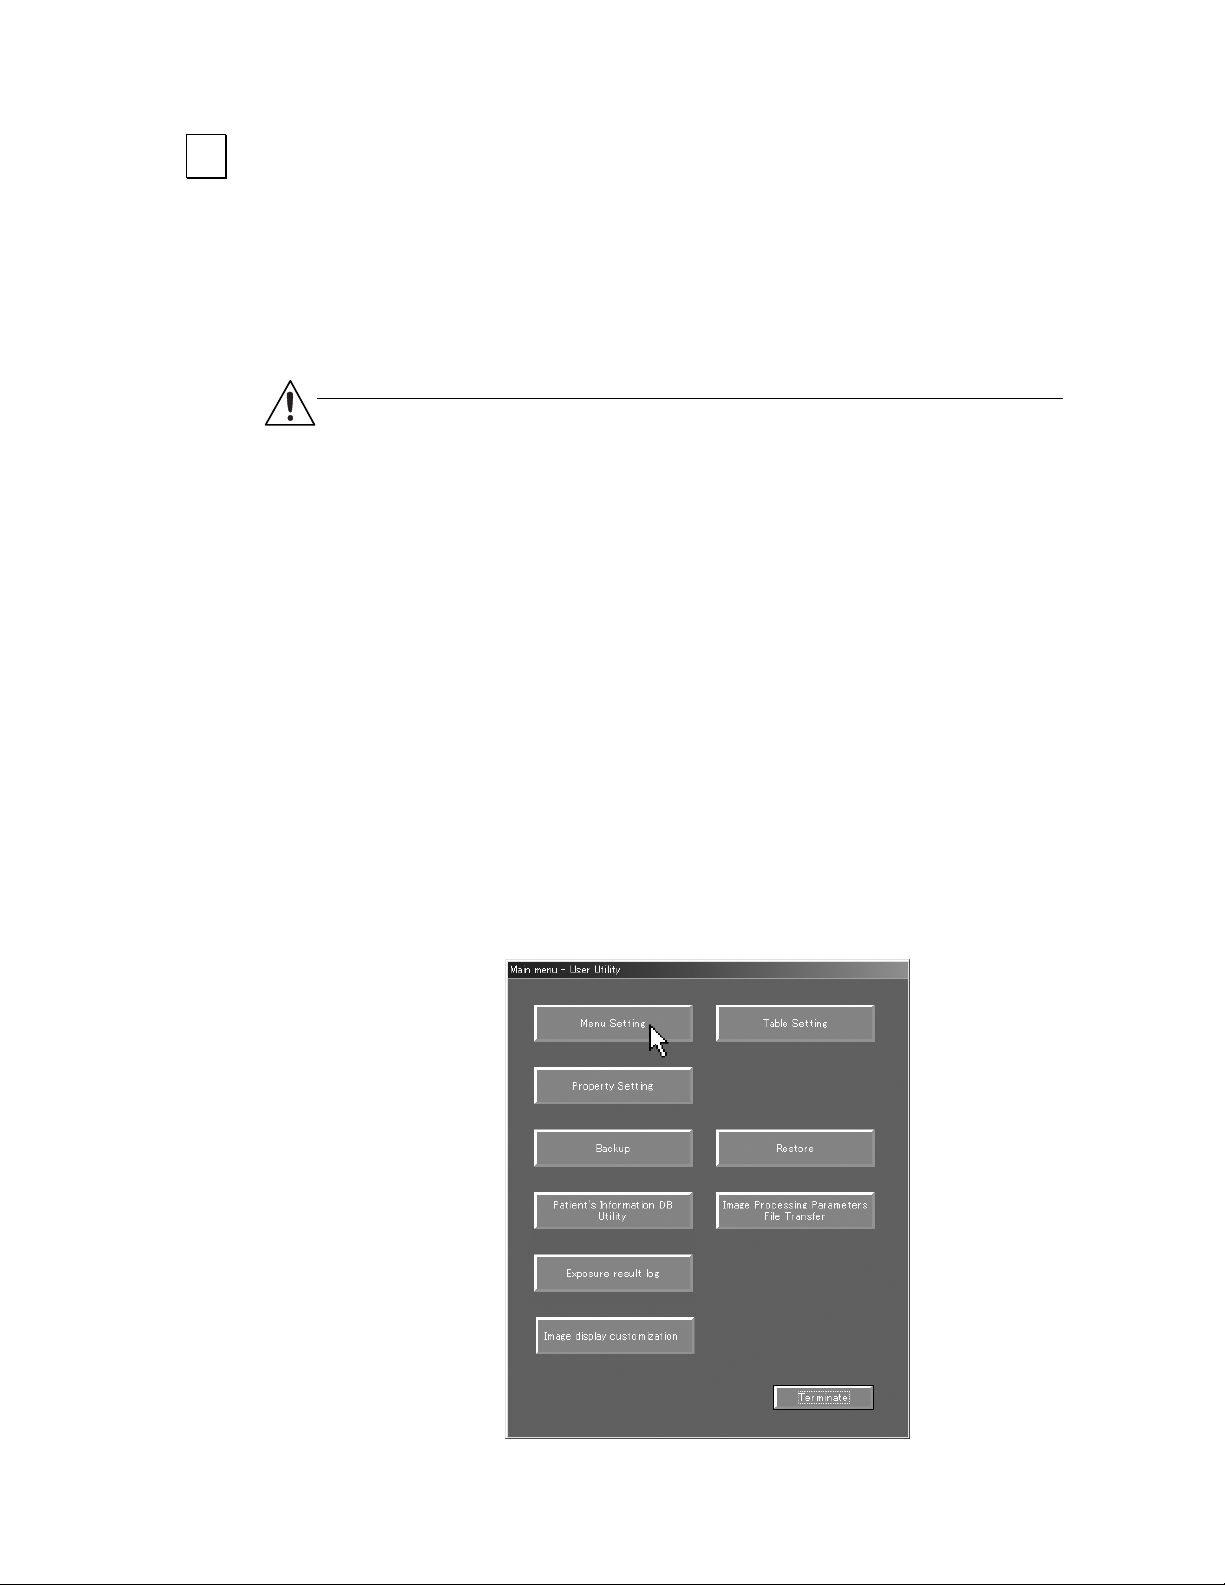
(1) Starting up the User Utility → Selecting “Menu Setting”
Start up the User Utility and then select “Menu Setting”.
897N0522 Fuji Photo Film Co., Ltd. 5
2005. 07
Page 8
CR Console Operation Manual
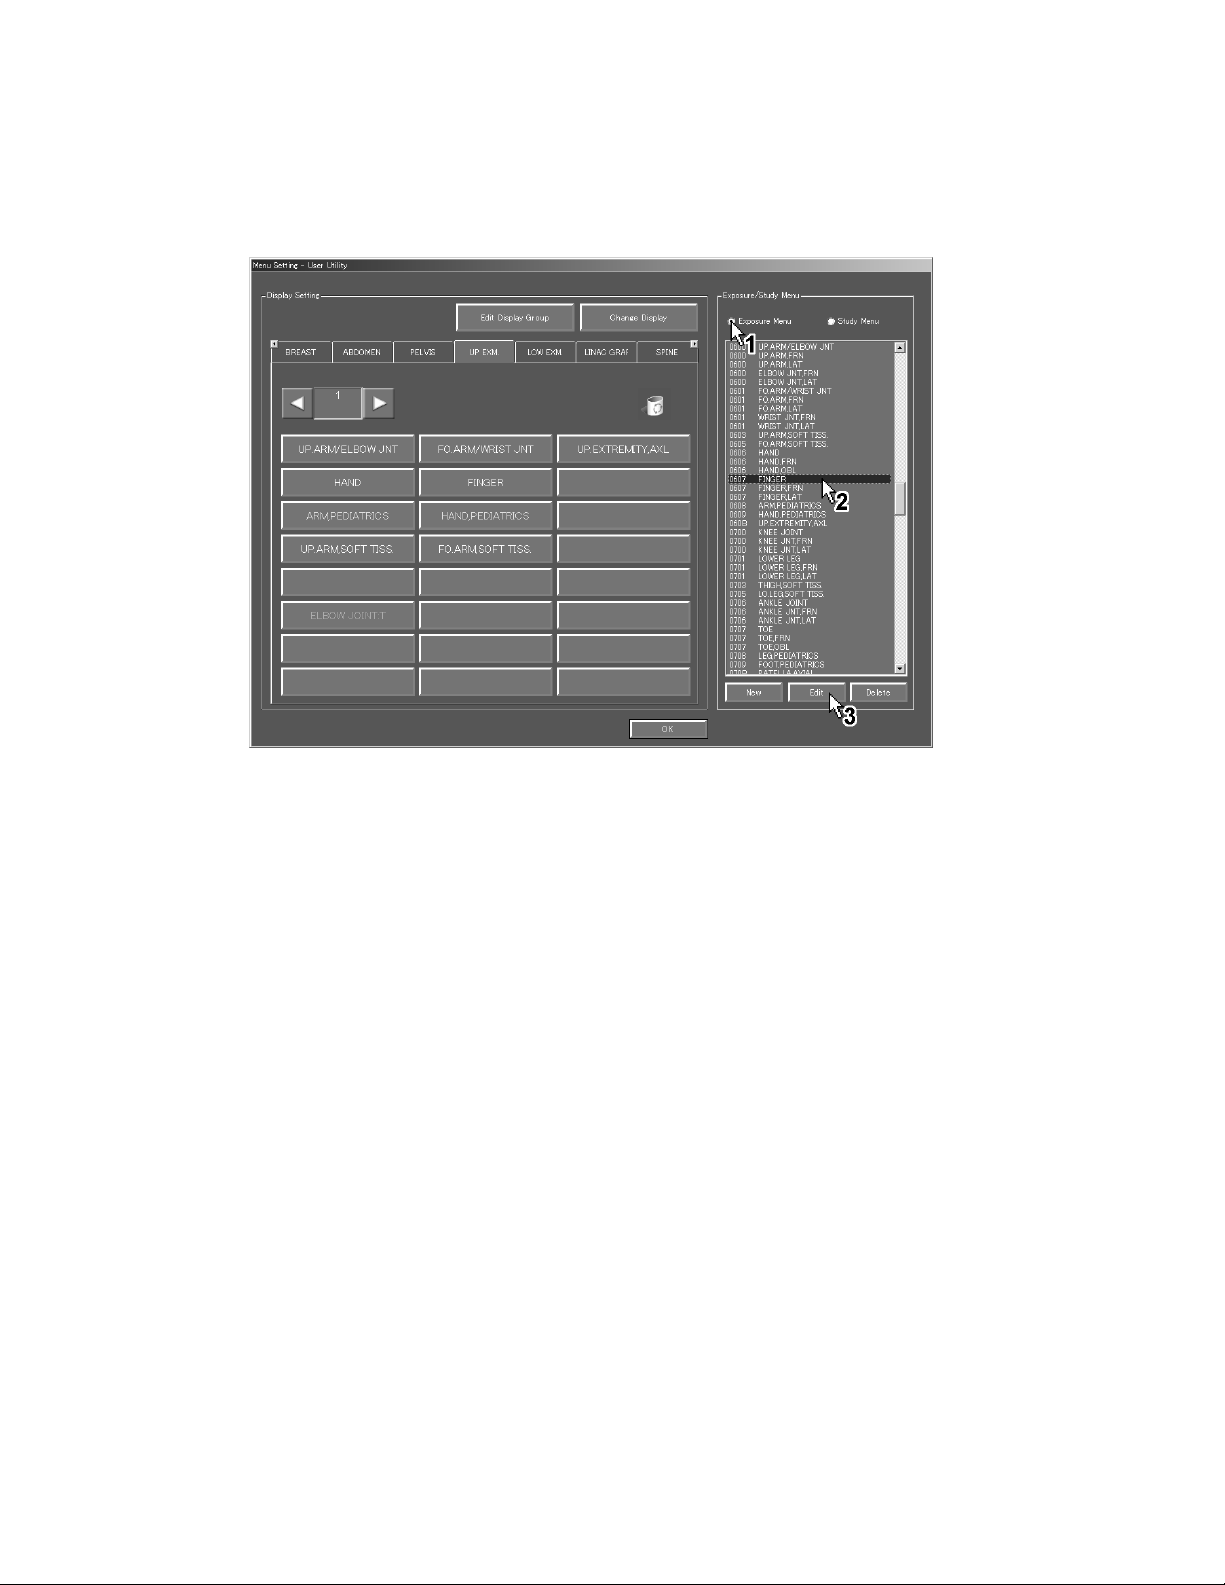
(2) Selecting exposure menu → Selecting processing
The “Menu Setting - User Utility” is displayed.
List up the exposure menus, select the desired exposure menu, and then select “Edit”.
This section explains how to update the parameters for the existing exposure menus.
If creating a new exposure menu (selecting “New”), the following operation can be performed
as well as the existing exposure menus.
6 897N0522 Fuji Photo Film Co., Ltd.
2005. 07
Page 9
CR Console Operation Manual
(3) Setting the parameters
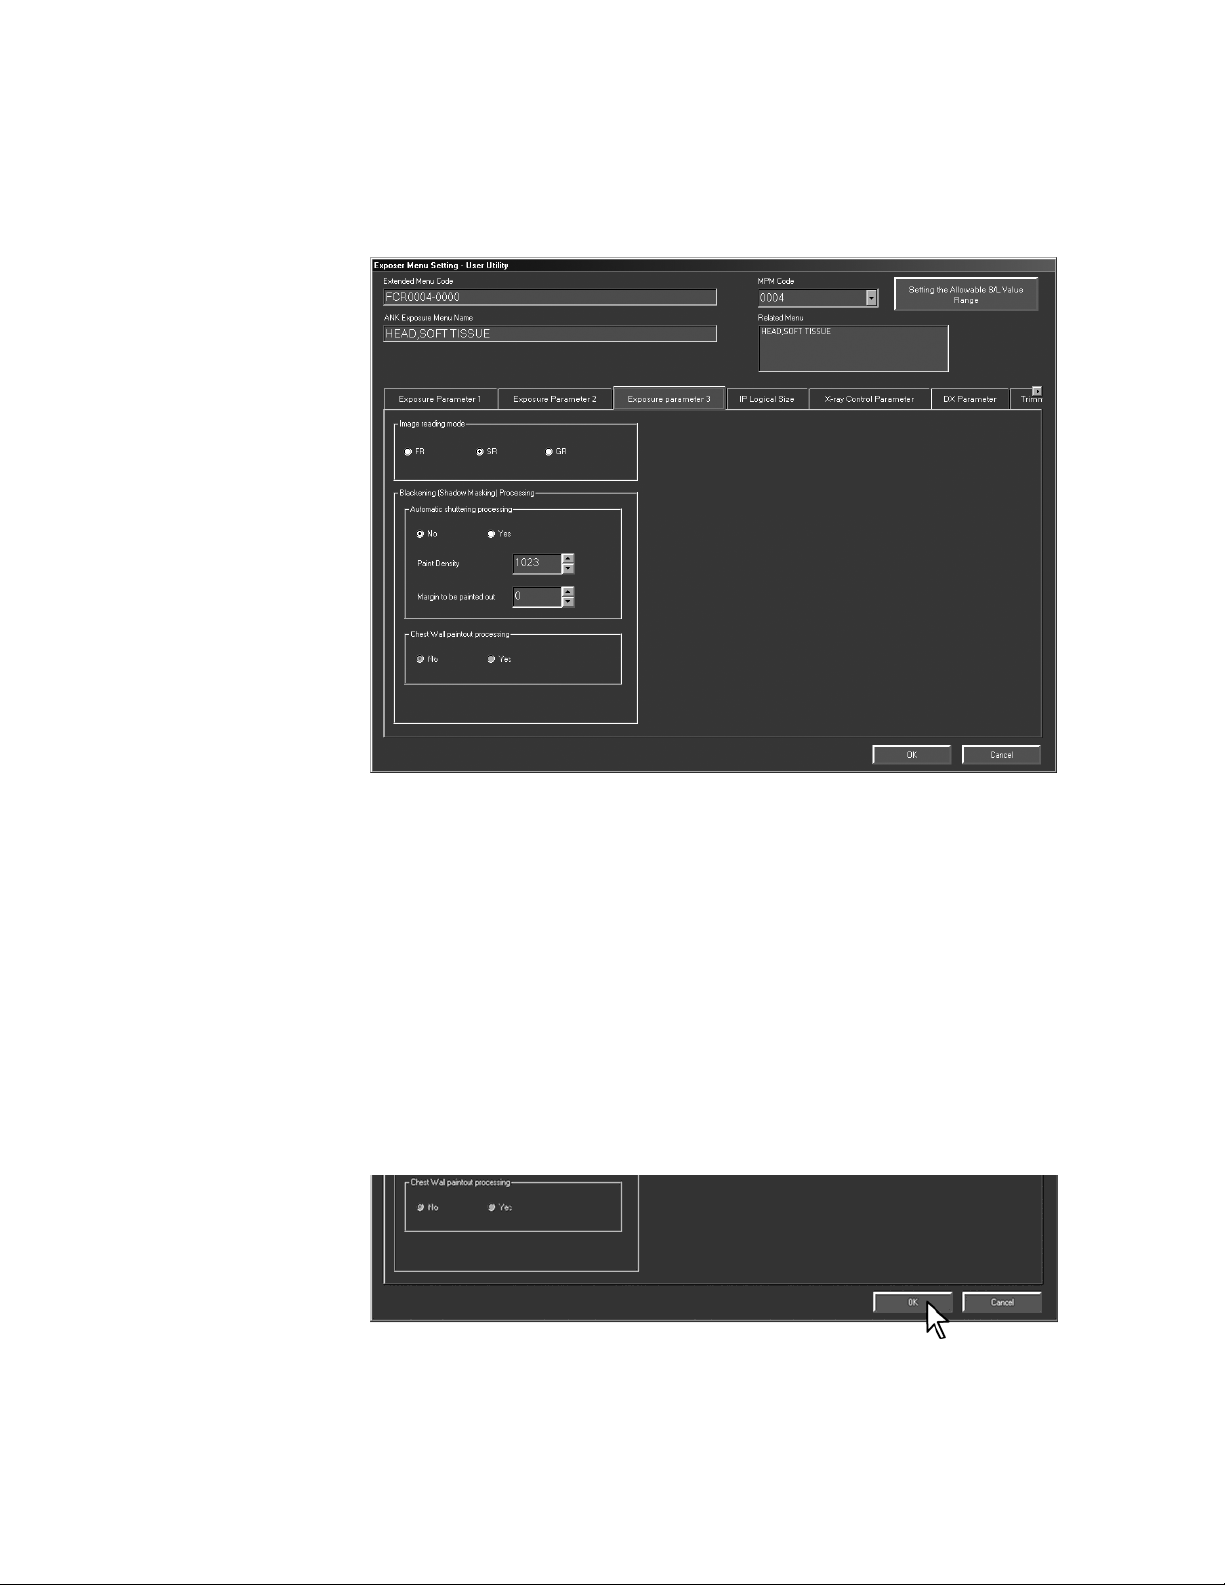
“Exposure Menu Setting - User Utility” is displayed.
Set the parameters at the “Blackening (Shadow Masking) Processing” field of “Exposure
Parameter 3” folder.
No/Yes : Selecting “No” does not perform the Automatic Blackening Processing.
Selecting “Yes” performs it.
Paint Density : Set Paint Density for the Automatic Blackening Processing. The density can
be set in 5 steps: 0 (lightest) → 255 → 511 → 767 → 1023 (darkest). The
density set here will reflect the Manual Blackening Processing.
Margin to be painted:
Select an object paint width for the Automatic Blackening process
recognition result.
Default value: 0 mm.
Setting range: -20 mm to +20 mm (variable in 1 mm increments).
Chest Wall paintout processing:
If you select “Yes”, the system automatically recognizes the white clear
portion of a chest wall image at the time of image input and paints it out.
After setting the above parameters, select “OK”.
(“Cancel”
→
Cancels operation.)
897N0522 Fuji Photo Film Co., Ltd. 7
2005. 07
Page 10
CR Console Operation Manual
(4) Completing the update
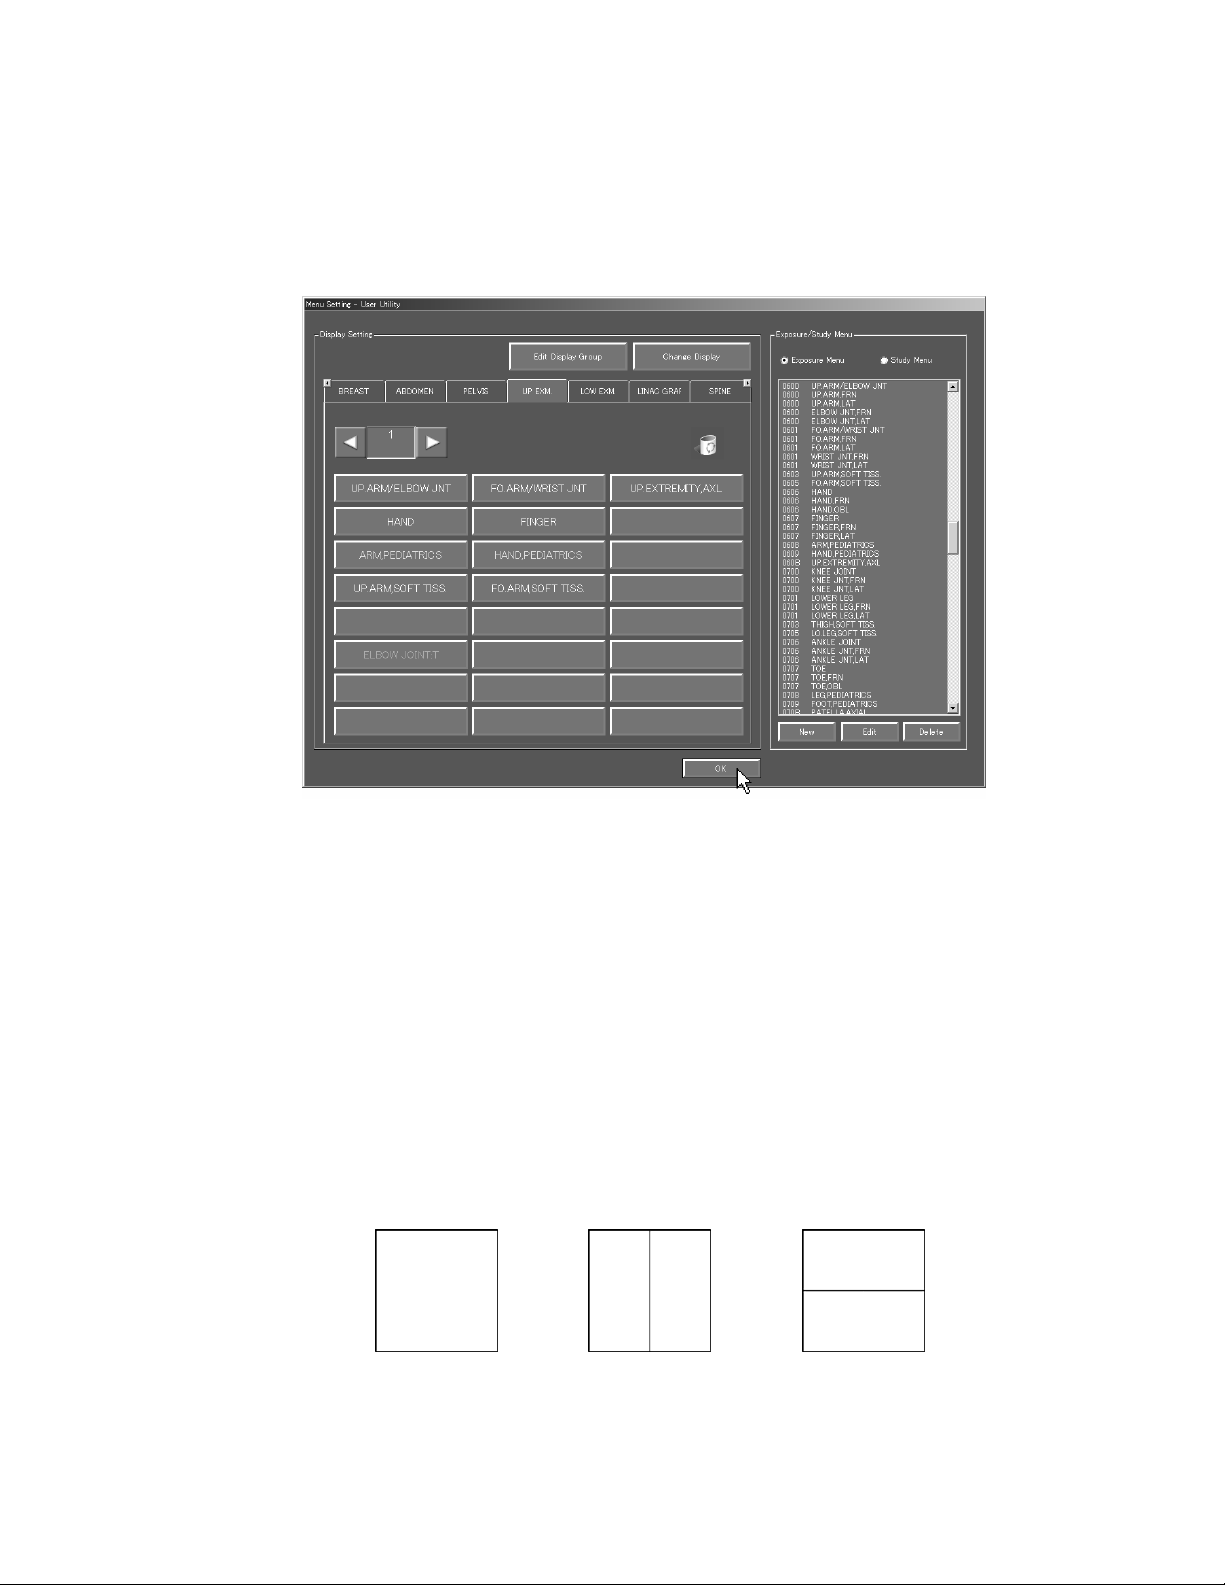
“Menu Setting - User Utility” is redisplayed.
To update the parameters for another exposure menu, repeat the operation steps from (2).
To complete the update of parameters, select “OK” and then end the User Utility.
– Notes for performing exposures –
Be cautious for the following points when performing exposures to take the target images for
the Automatic Blackening Processing:
{ General notes
• When performing exposures, refer to no tes desc ribed in the Operation Manual (Chapter
Z) of the FCR Image Reader.
• This processing does not apply to an exposure menu that involves energy subtraction or
image stitching.
{ Note for split exposure
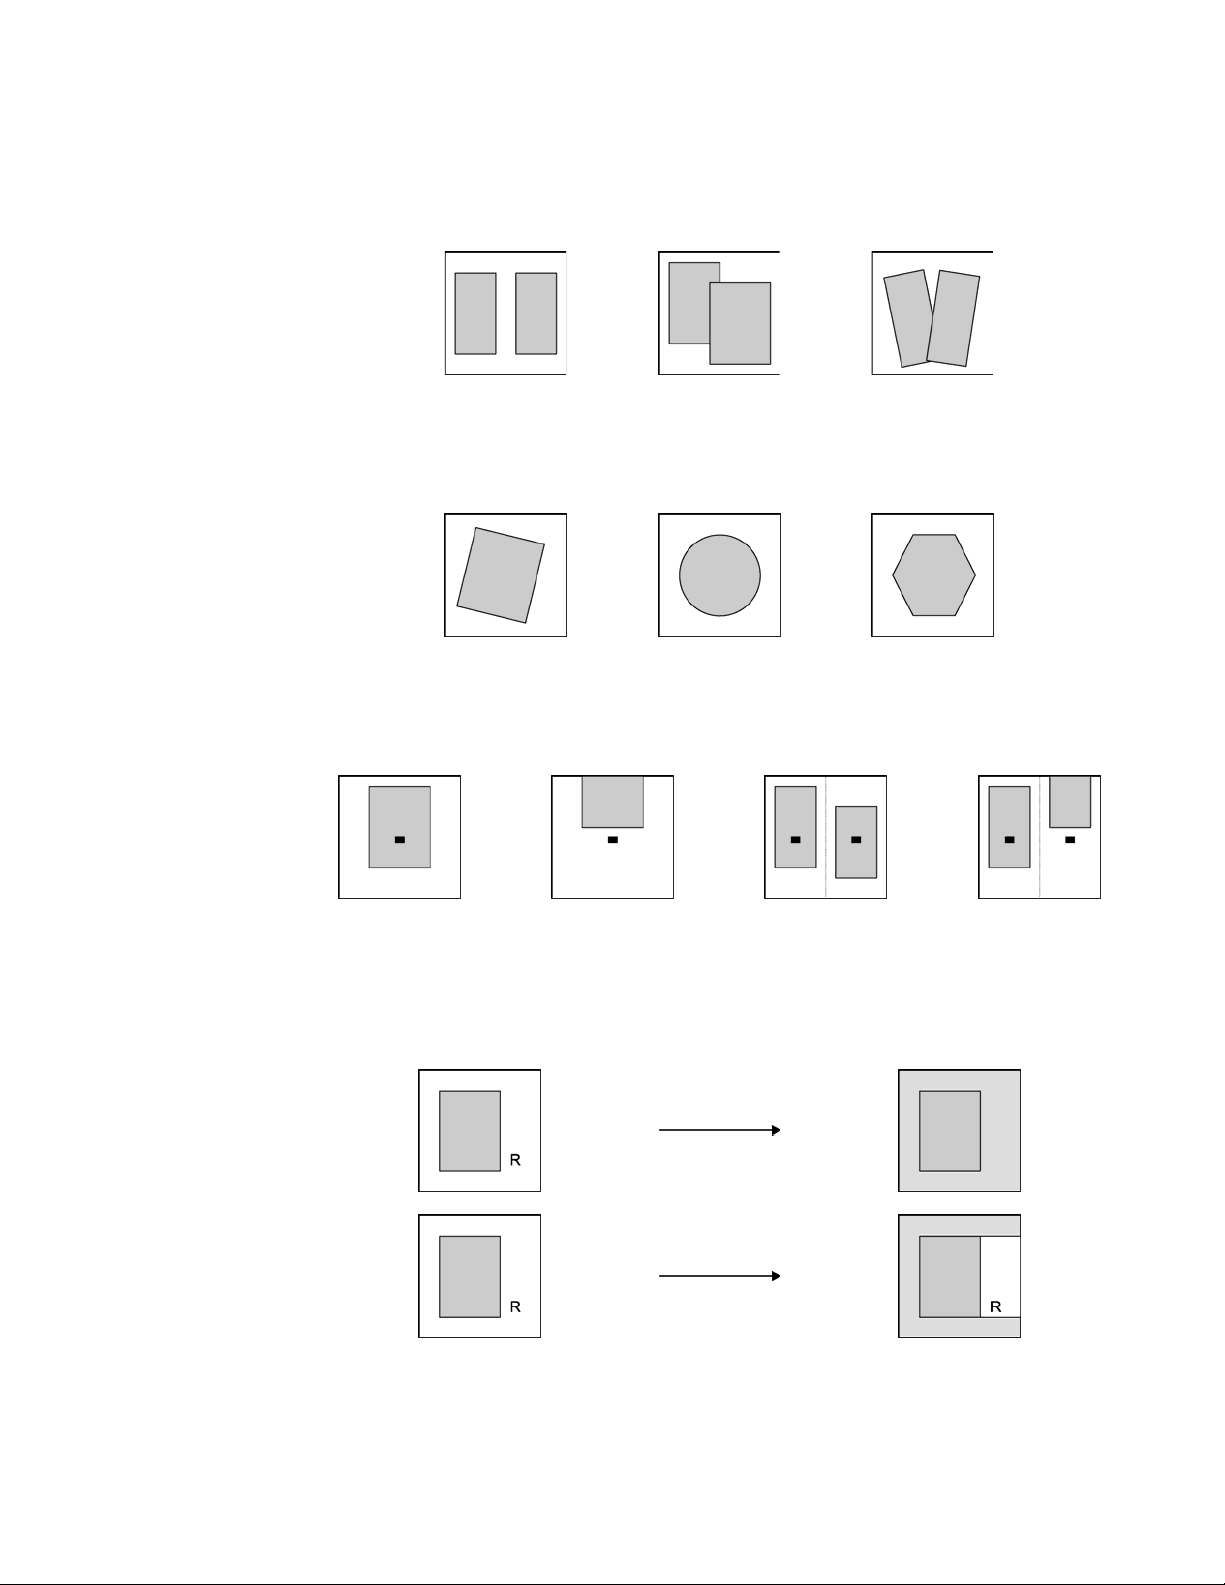
• Automatic Blackening Processing provides support to split exposure in the following
patterns.
No splits Two vertical splits Two horizontal splits
8 897N0522 Fuji Photo Film Co., Ltd.
2005. 07
Page 11
CR Console Operation Manual
{ Notes on the irradiated field
• When performing split exposures, separate irradiated fields appropriately so that they do
not overlap with each other.
(Good) (Not good) (Not good)
• Collimation applies only to rectangles. Therefore, do not set collimation to irradiated field
other than rectangles, such as circle, ellipse, semi-circle, polygon and others.
(Good) (Not good) (Not good)
• Make sure that the IP center is inside the irradiated field. For split exposures, make sure
that the center of each split area is inside the irradiated field.
(Good) (Not good) (Good) (Not good)
• A lead character or marker should be located within the irradiated field. If a lead character
or marker is outside the irradiated field, it will be painted out by this processing or will
not be recognized appropriately or will be recognized incorrectly.
Automatic Blackeni n g Pr ocessing
Automatic Blackeni n g Pr ocessing
897N0522 Fuji Photo Film Co., Ltd. 9
2005. 07
Page 12
CR Console Operation Manual
{ Other notes
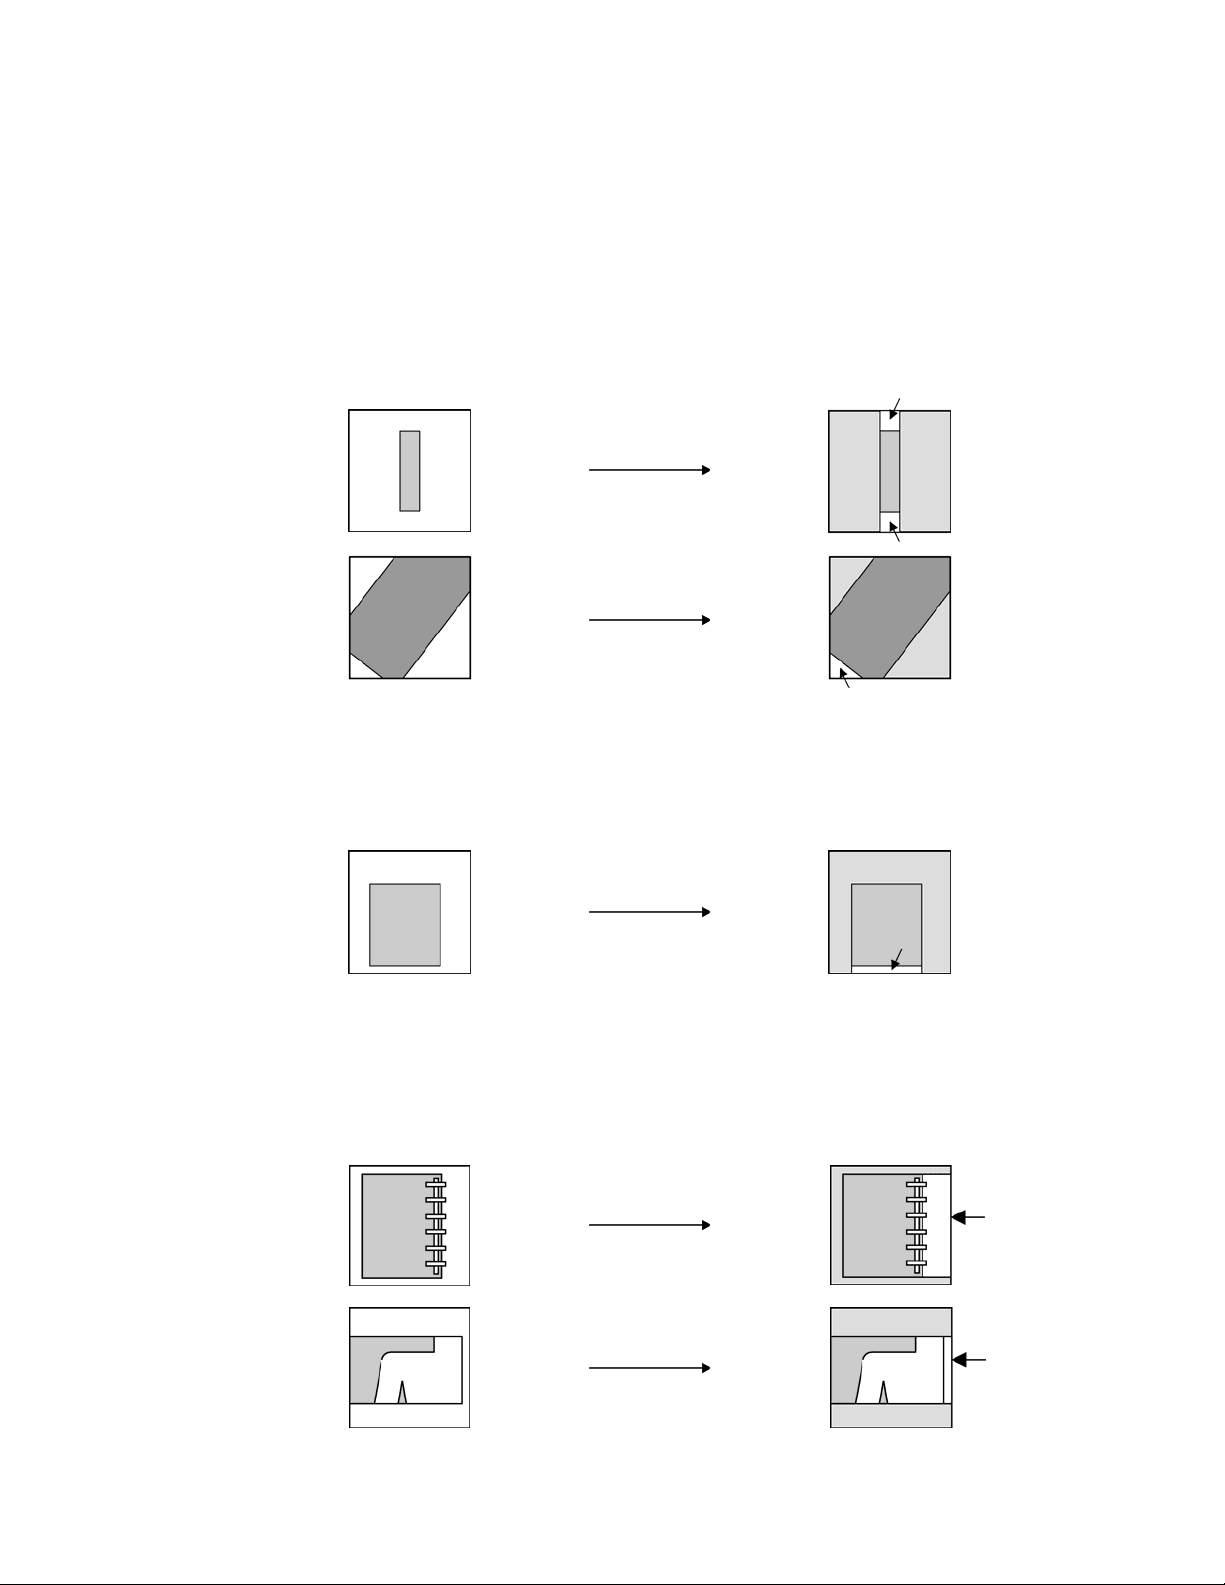
In the cases shown below, an image area may not be painted out as it is not recognized
correctly or it is recognized incorrectly by Automatic Blackening Processing. In such an
instance, devise a proper exposure metho d as nec ess ar y or correct the image appropriately
by using Manual Blackening Processing.
• Do not set the side of the irradiated field too short, otherwise it is highly probable that the
excessively short side may not be recognized properly remaining then unpainted. (White
portions marked with arrows in the illustration below represent those that were recognized
erroneously or those that might not be recognized properly remaining then unpainted.)
Automatic Blackening Processing
Automatic Blackening Processing
• Do not approximate the side of the irradiated field too close to one end of the IP. It is
highly probable that the side of the irradiated field positioned too close to one end of the
IP will not be recognized remaining unpainted. (The white portion marked with an arrow
in the illustration below represents a portion that might not be recognized remaining then
unpainted.)
Automatic Blackening Processing
• Position the side of the irradiated field so that it does not overlap with an artificial object,
such as a protector, or any thick subject. It is highly possible that the side of the irradiated
field that appears unclear, as it overlaps with an artificial object, such as a protector, or
any thick subject, will not be recognized remaining then unpainted. (The white portion
marked with an arrow in the illustration below represents a portion that might not be
recognized remaining then unpainted.)
10 897N0522 Fuji Photo Film Co., Ltd.
2005. 07
Automatic Blackening Processing
Automatic Blackening Processing
Page 13
CR Console Operation Manual
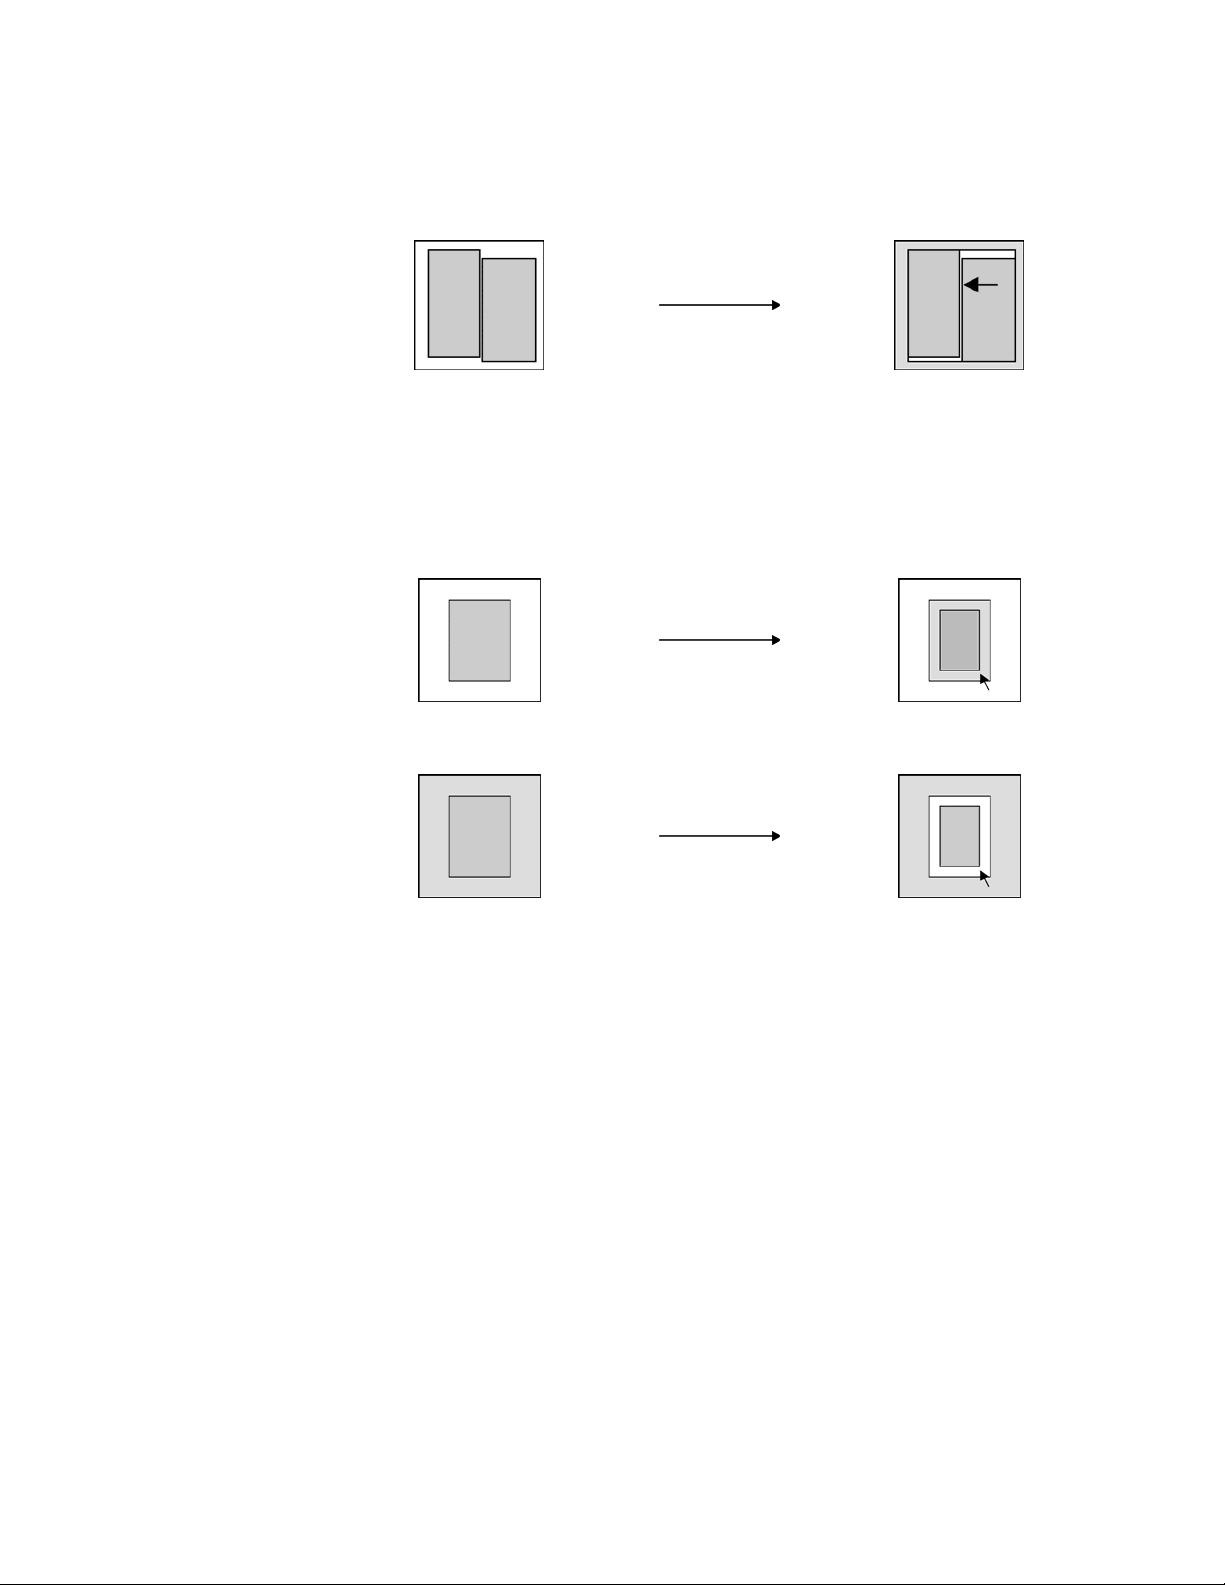
• When performing split exposures, be sure to keep sufficient space between irradiated
fields. If not, probability of occurrence of failure may increase when recognizing split
processing.
Automatic Blackeni n g Pr ocessing
Depending on whether Blackening Processing was applied or not, image processing, such as
DR compression and others, performed around the irradiated field will result in different
outputs. Use Manual Blackening Processing as necessary to change the frame to be painted out
slightly larger than the irradiated field.
When no Blackening Processing was applied:
•
Image Processing
When Blackening Processing was applied:
•
Image Processing
897N0522 Fuji Photo Film Co., Ltd. 11
2005. 07
Page 14
CR Console Operation Manual
Updating the Parameters for All Exposure Menu
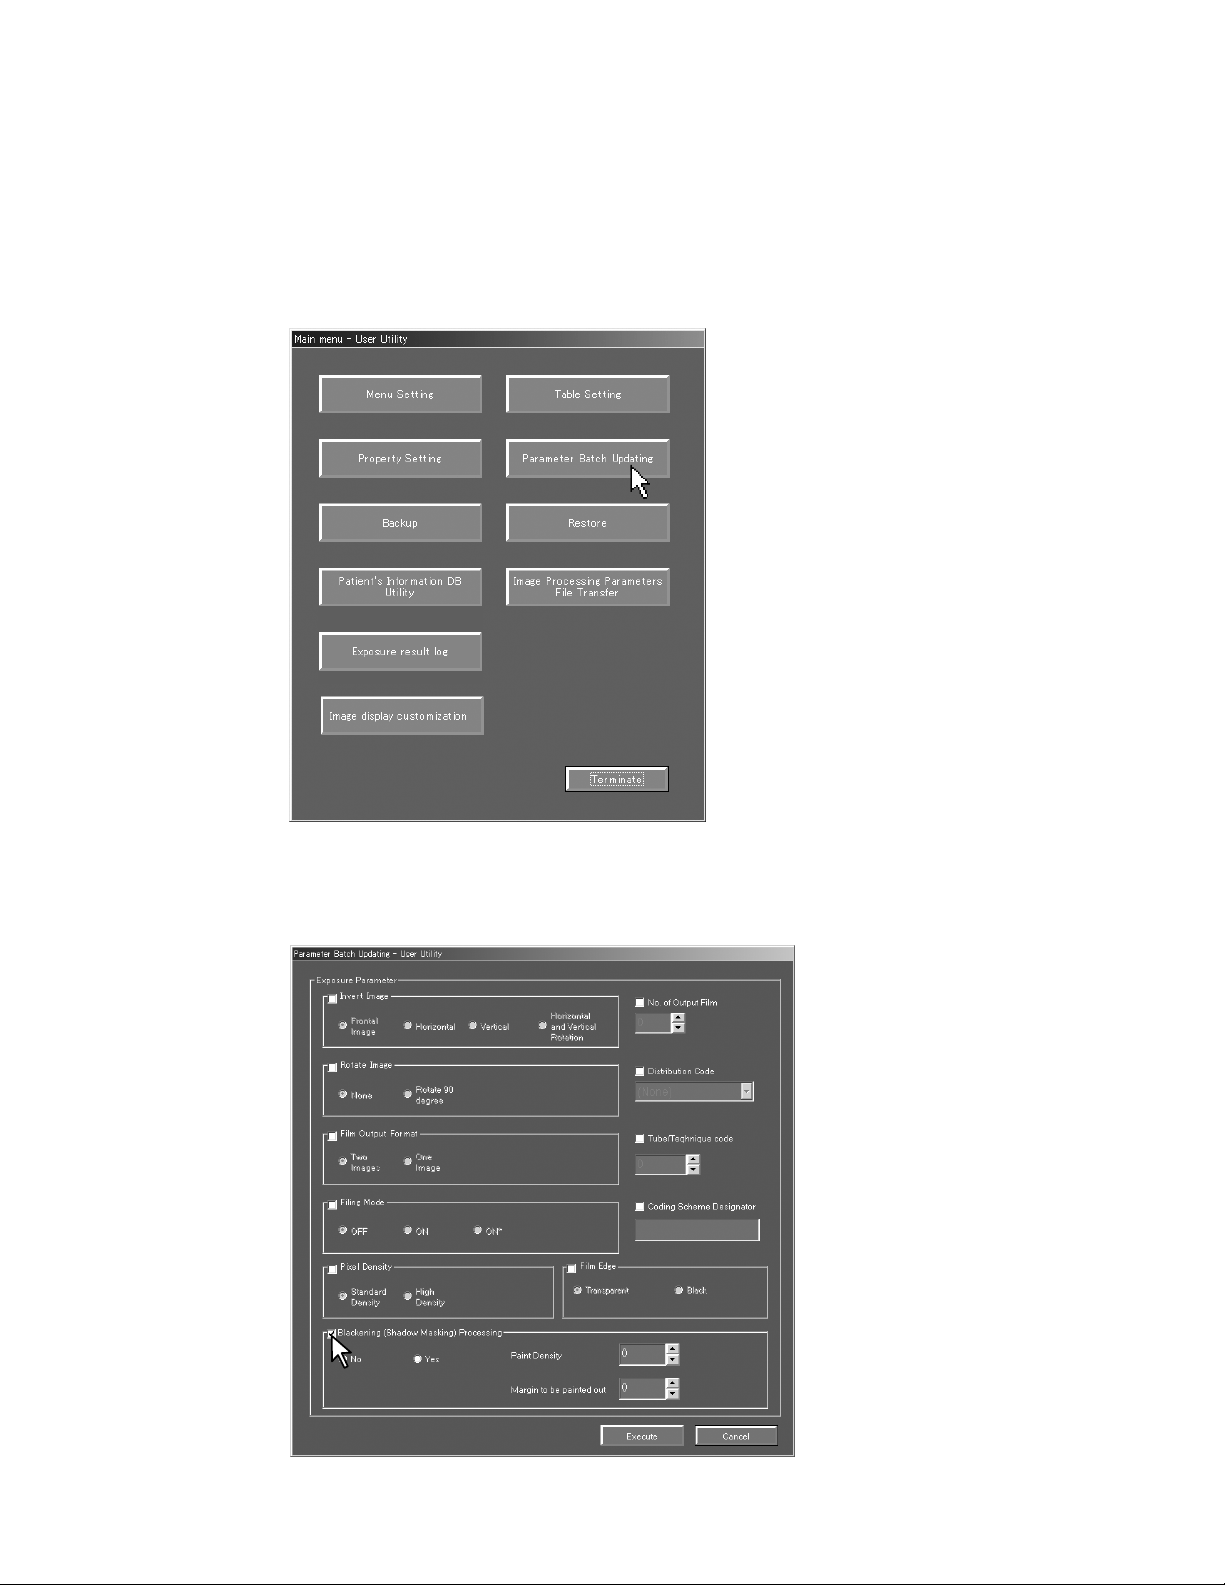
Updates the Automatic Blackening Processing parameters for all exposure menus at once. This
function is only for super users, so that general users can not operate it.
(1) Starting up the User Utility → Selecting “Parameter Batch Updating”
Start up the User Utility for super users, and then select “Parameter Batch Updating”.
(2) Selecting parameter
“Parameter Batch Updating - User Utility” is displayed.
Put a checkmark in the checkbox of the “Blackening (Shadow Masking) Processing” field.
12 897N0522 Fuji Photo Film Co., Ltd.
2005. 07
Page 15
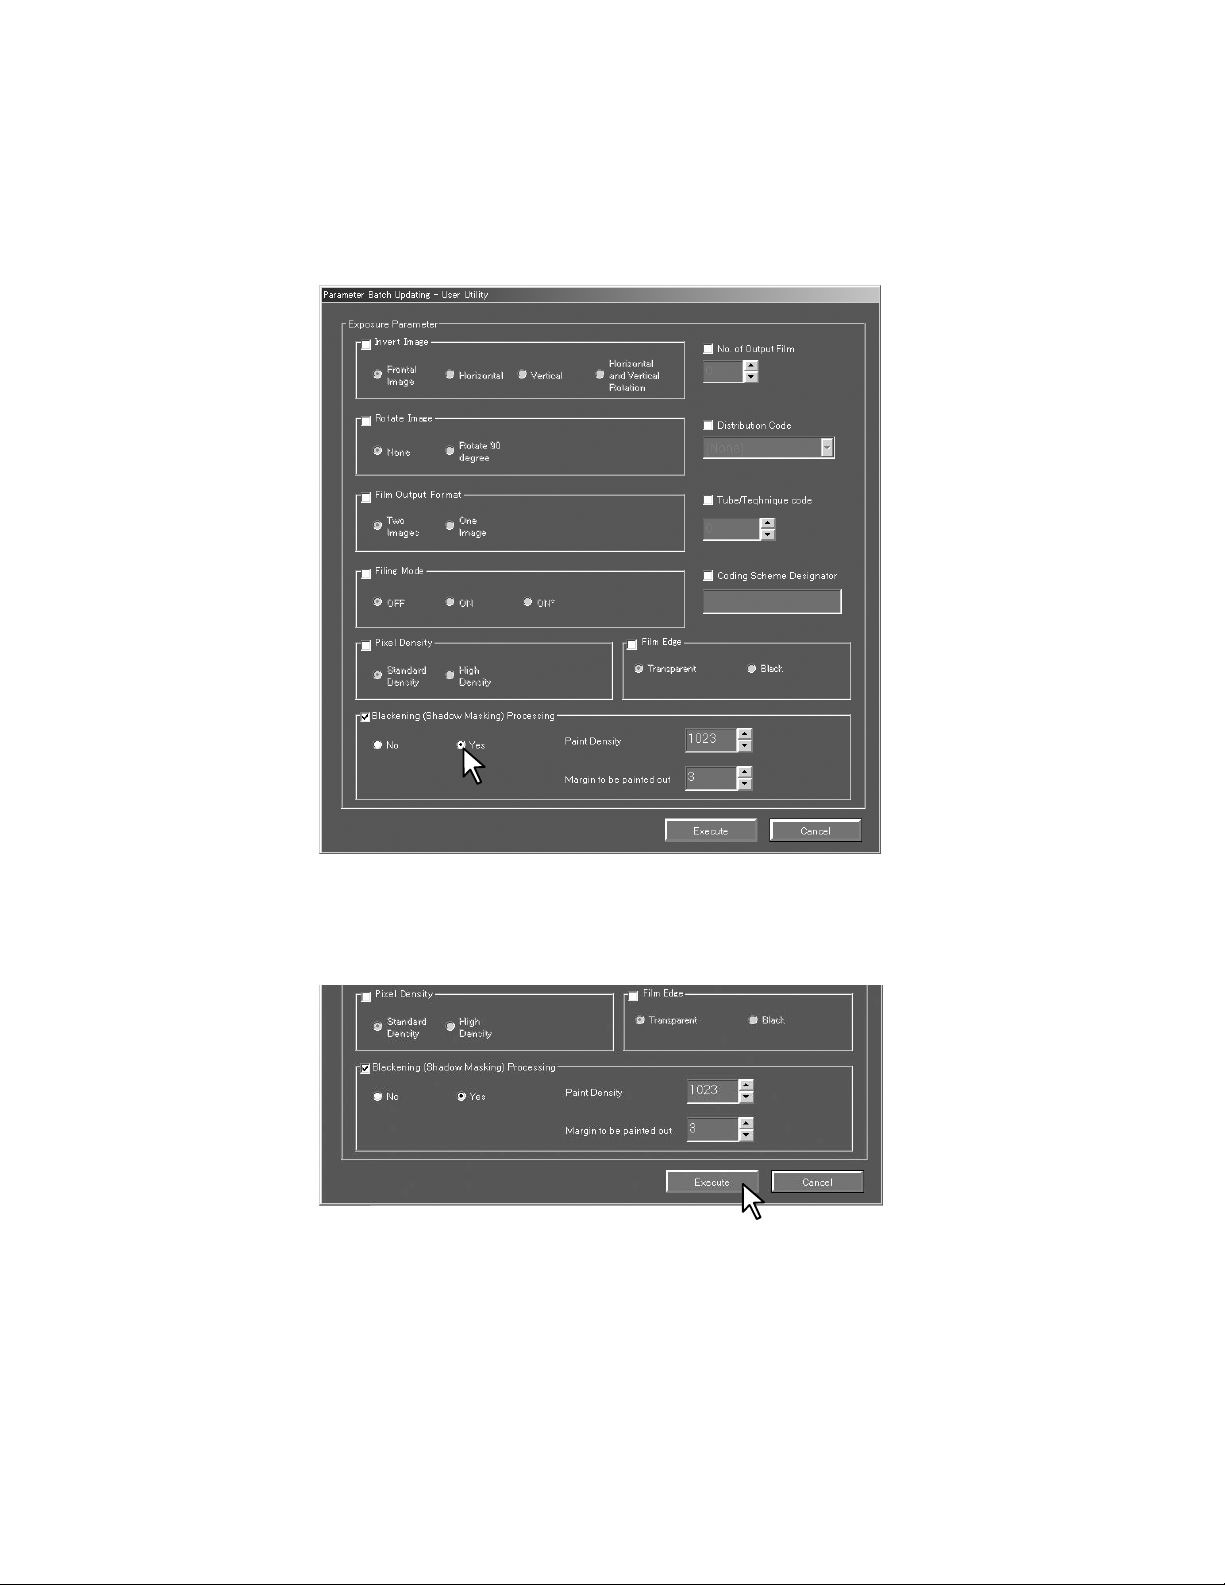
(3) Executing the update
Set the parameters.
→
(Details of parameters
page 7)
CR Console Operation Manual
Select “Execute” after the above parameter setting.
(“Cancel”
→
Cancels operation.)
897N0522 Fuji Photo Film Co., Ltd. 13
2005. 07
Page 16
CR Console Operation Manual
2 Manual Blackening Processing
Performs differentiation/blackening of the region out of irradiated field on the specific image
through operation by users. It is also possible to reprocess (correct or redo) the image to which
the Automatic Blackening Processing has been performed.
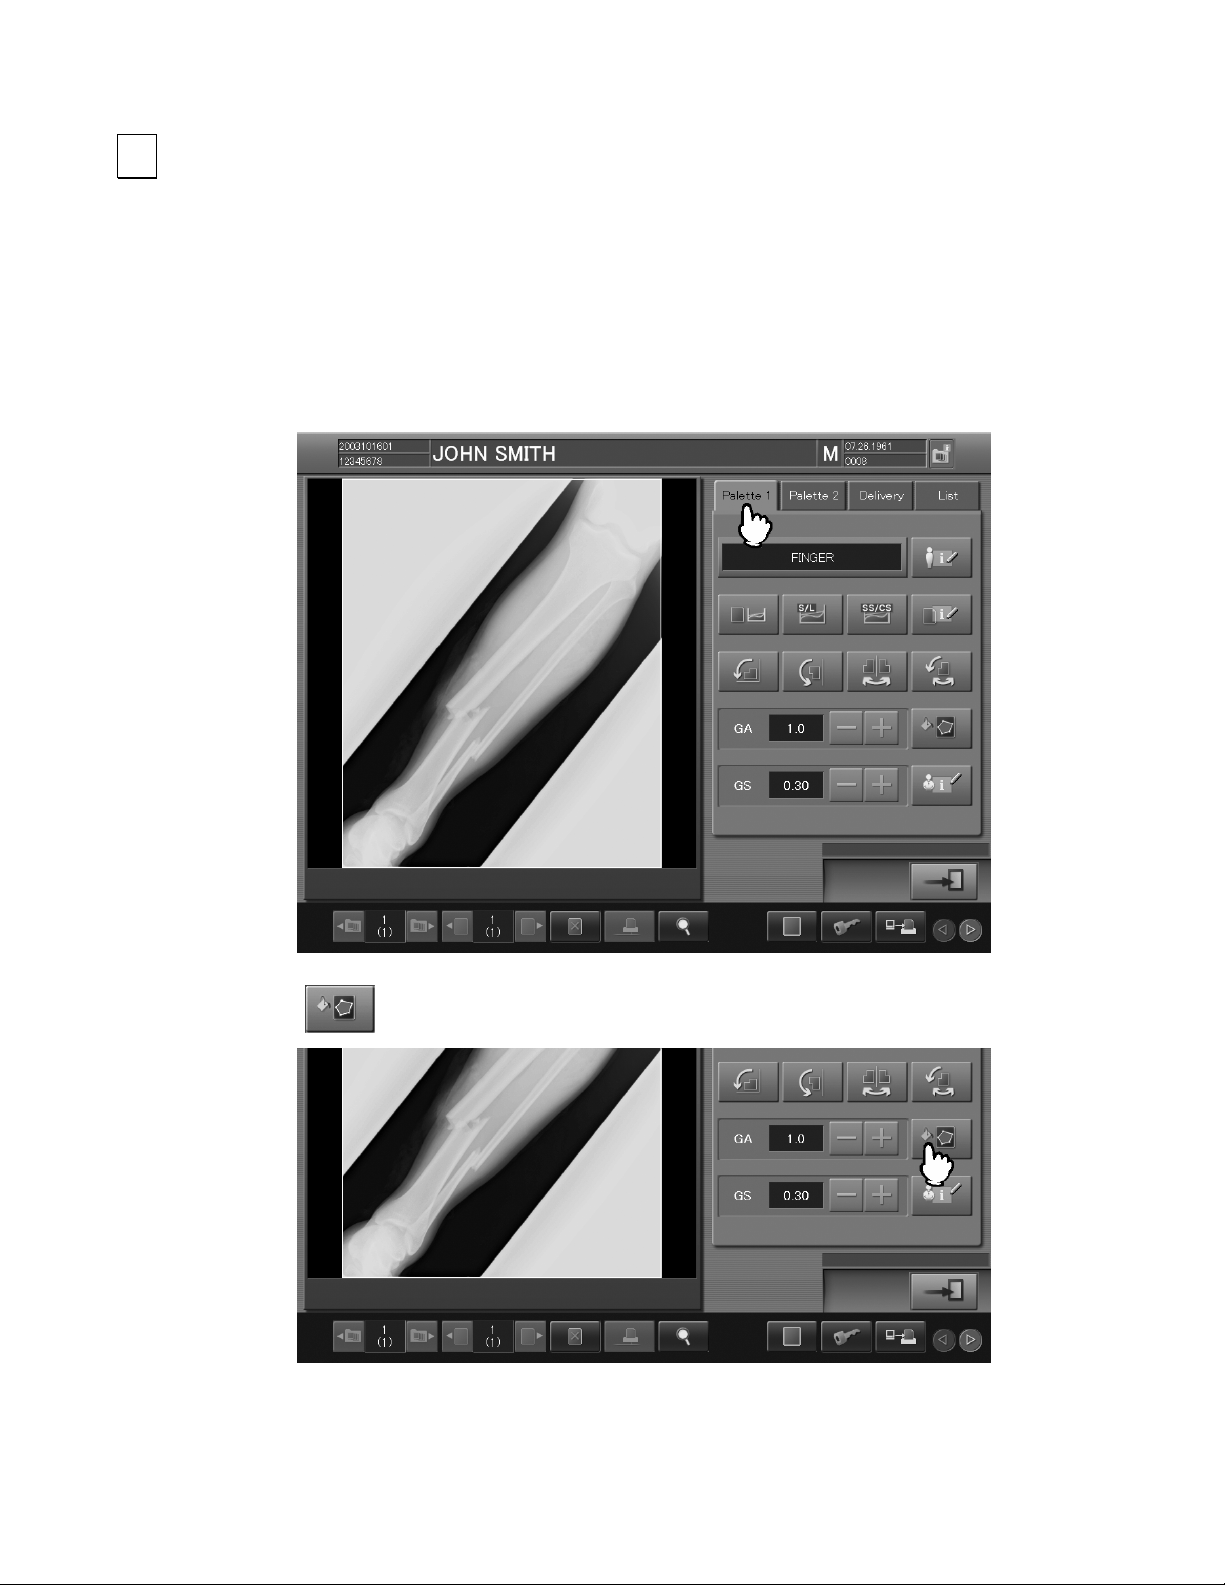
(1) Displaying screen → Switching processing mode
Select the target image to be processed, display the Image Edit Screen (by image/by study),
and then select “Palette 1” folder tab.
Select
. The processing mode is switched.
14 897N0522 Fuji Photo Film Co., Ltd.
2005. 07
Page 17
CR Console Operation Manual
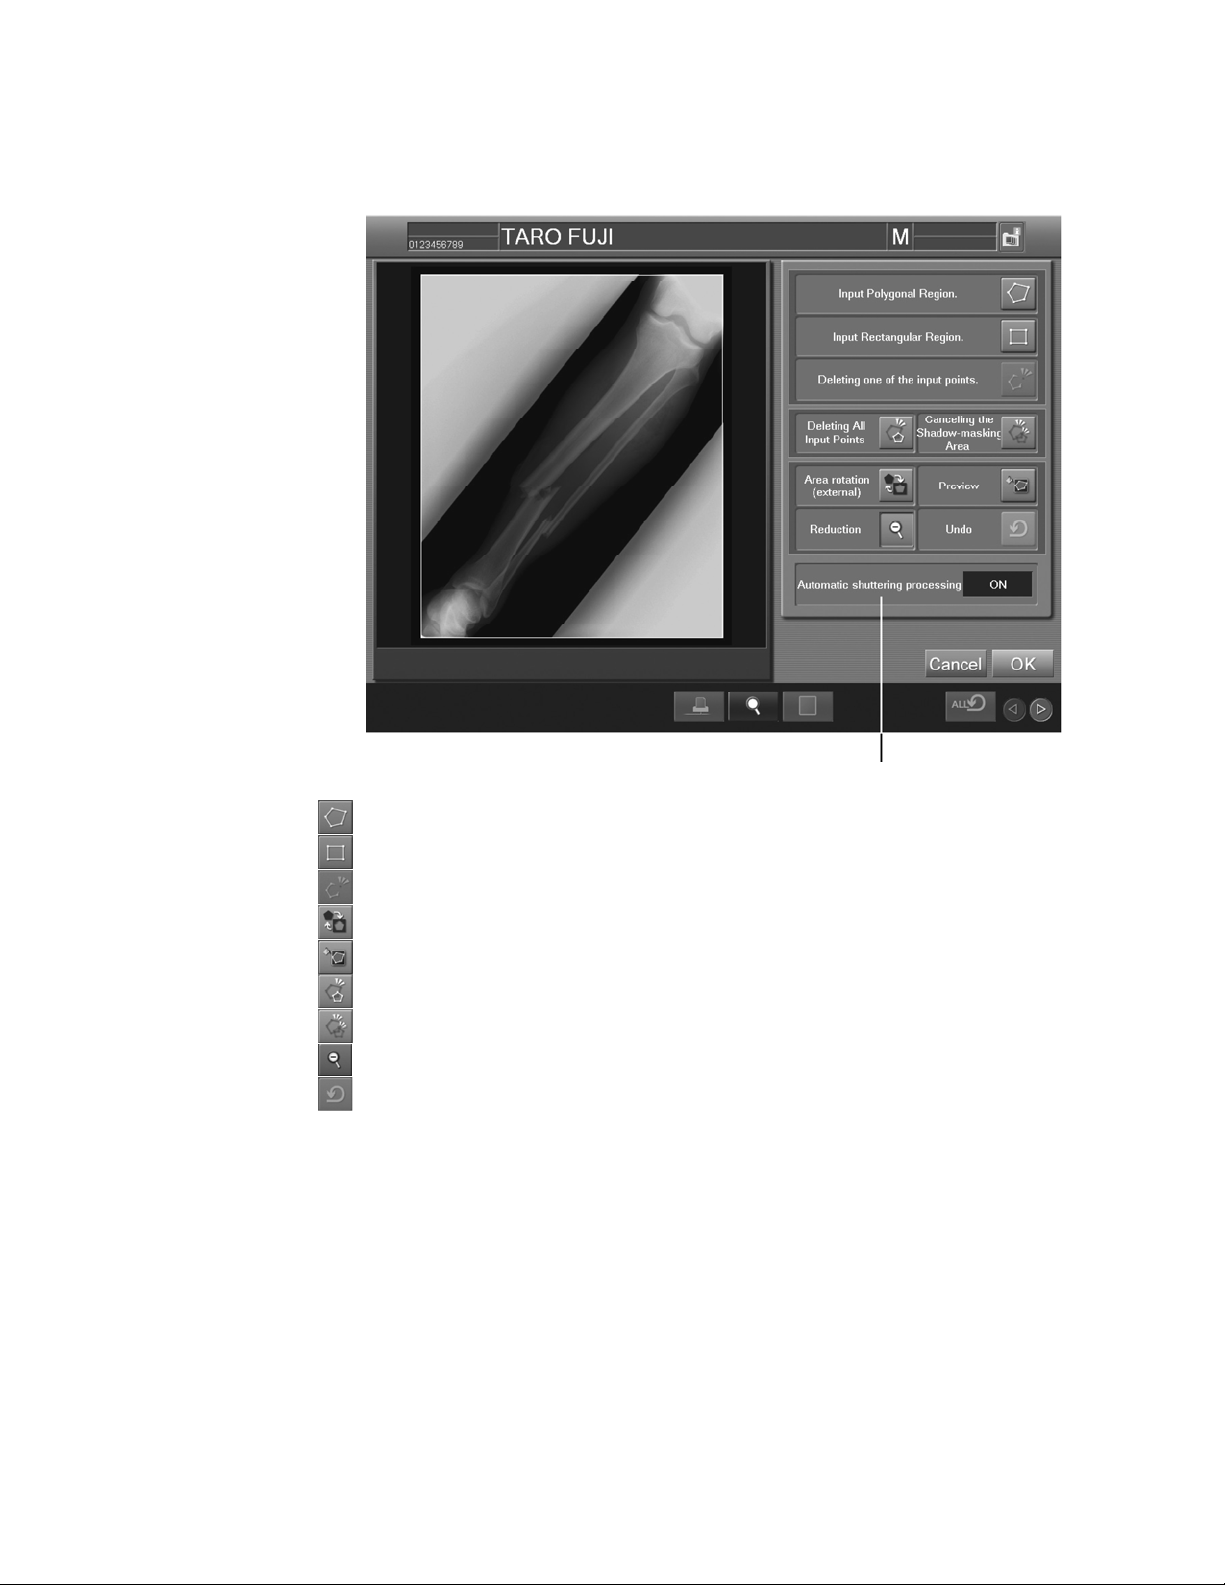
When the processing mode is switche d, the obj ects f or the Blackening Proc essing are
displayed.
Status display field
:
:
:
:
:
:
:
:
:
Inputs polygon region. (page 16)
Inputs rectangle region. (page 18)
Deletes an input point. (page 16, 18)
Inverts the blackened region. (page 20)
Switches the preview display. (page 20)
Deletes all input points. (page 16, 18)
Clears the blackened region. (page 21)
Reduces the image region. (page 16)
Restore previous status for the operation to change the polygon region
and rectangle region. (page 17, 19)
Status display field : When selecting as a target the image to which the Automatic
Blackening Processing has been performed, “ON” is displayed at this
field. (When no Automatic Blackening Processing has been
performed, “OFF” is displayed here.)
When performing the Manual Blackening Processing with the result of
the Automatic Blackening Processing, move to the next section’s
operation.
When performing the Manual Blackening Processing after clearing the
result of the Automatic Blackening Processing, clear the blackened
region first (page 21) and then move to the next section’s operation.
(performing this operation clears the status display.)
897N0522 Fuji Photo Film Co., Ltd. 15
2005. 07
Page 18
CR Console Operation Manual
(2) Inputting region
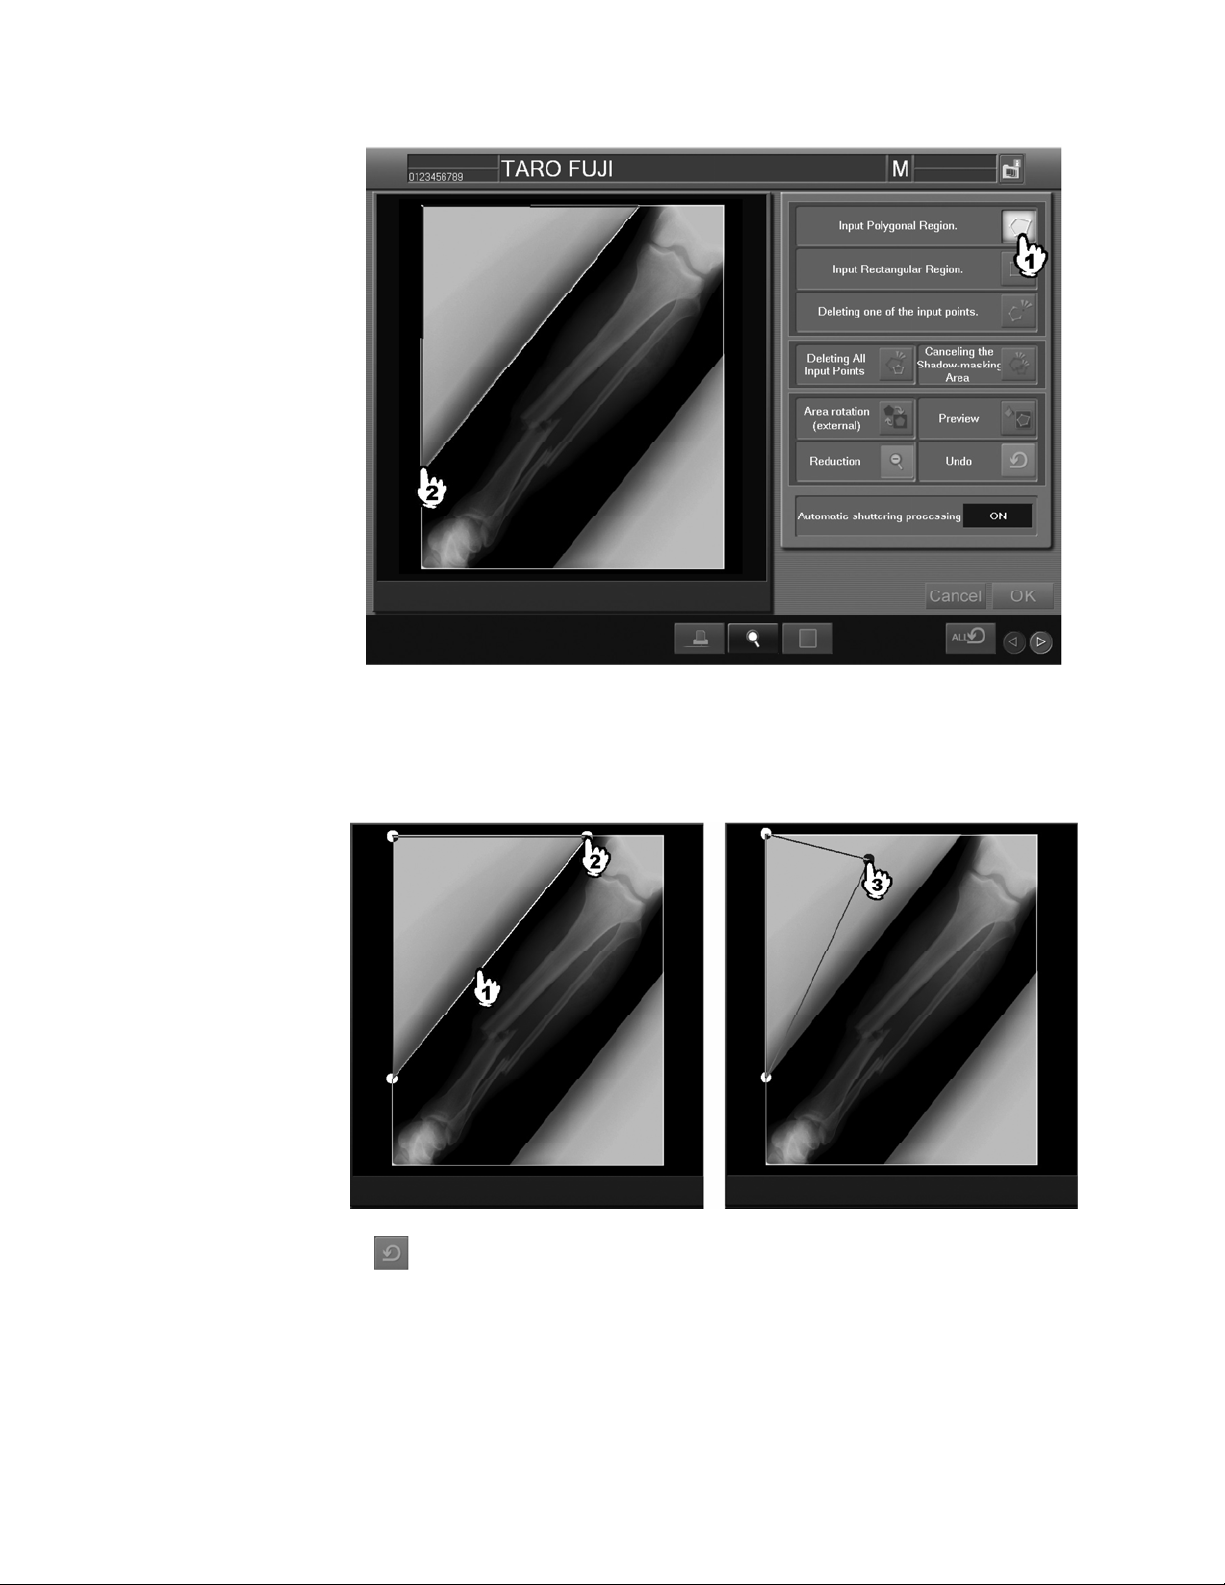
To differentiate the blackening region from other region, input polygon region or rectangle
region. Perform the following operations.
The number of regions that can be input for one image are maximum eight totaling polygon
regions and rectangle regions.
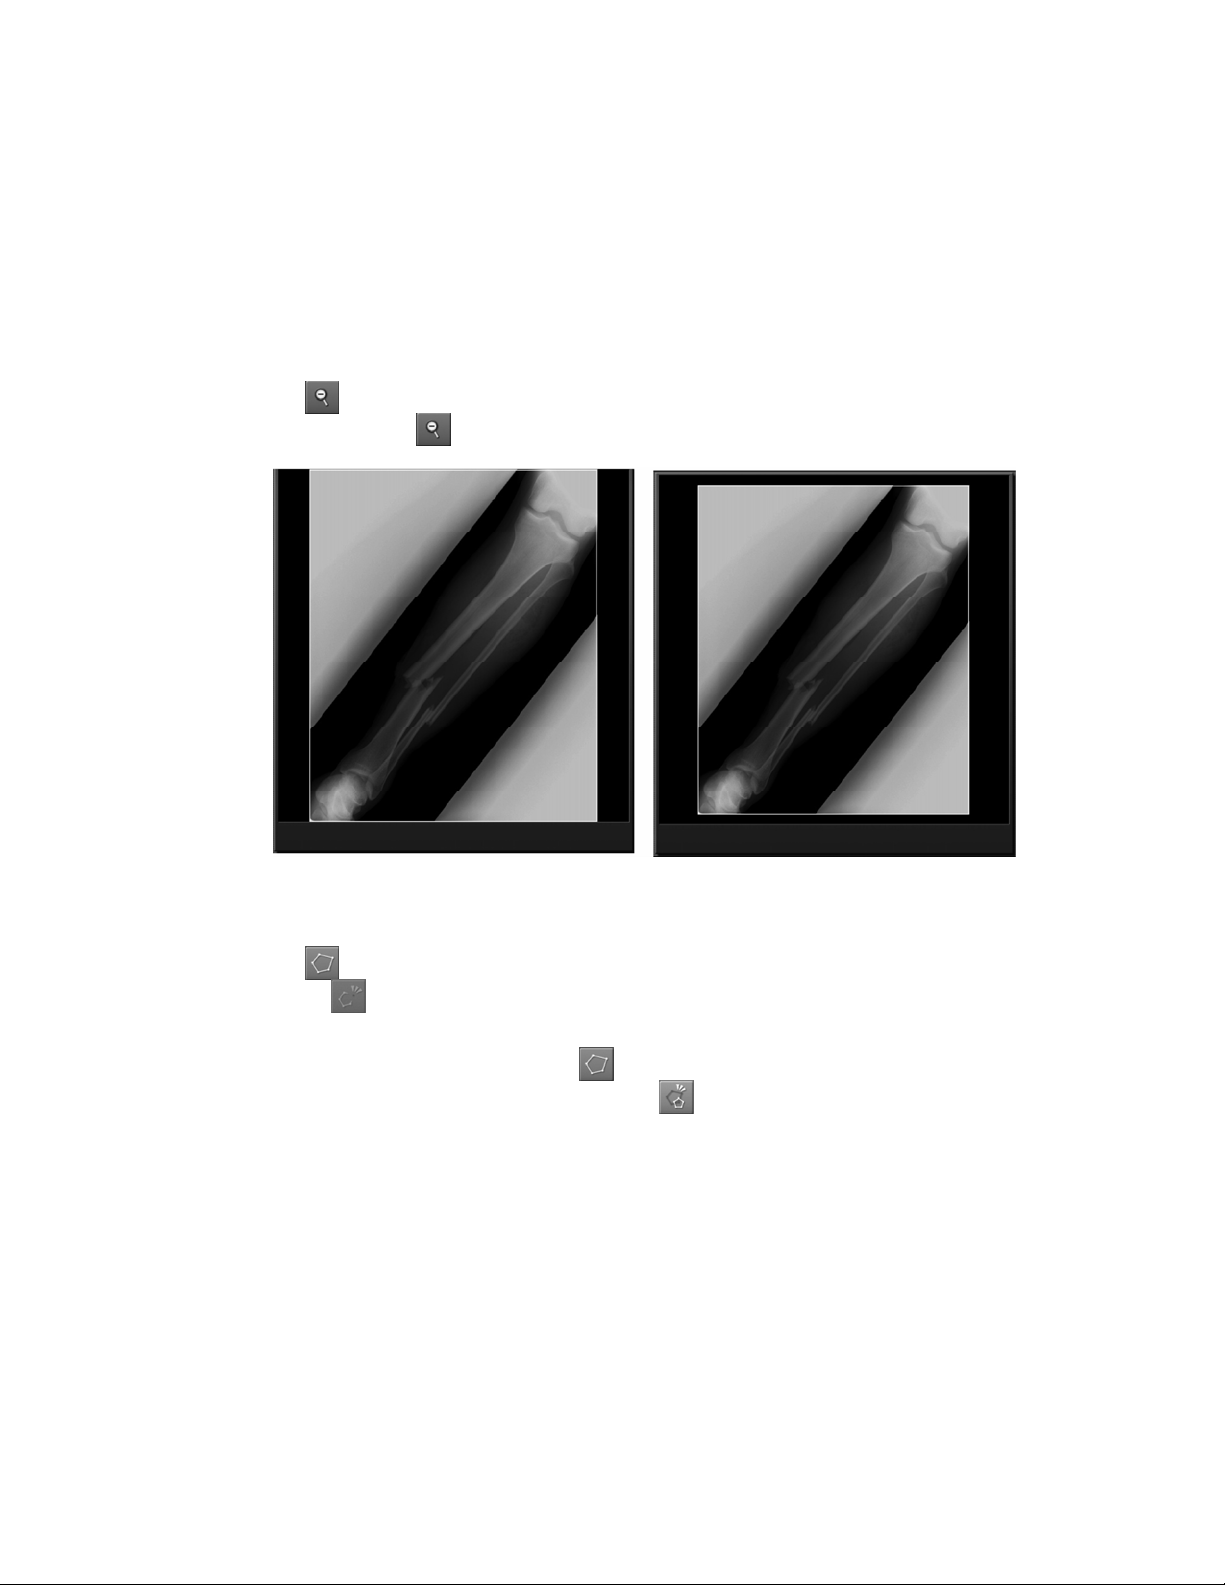
- Reducing an image -
Select
specified. Selecting
when you wish to reduce the image region so that one end of an image is easily
with an image reduced accordingly will restore the original size.
Polygon region :
Select
Selecting
and then select vertexes of the polygon (maximum 64 points) in order on the image.
during this operation deletes the prior input point, and selecting the starting point
at last determines the polygon region. (Points cannot be input outside of the image region.)
To input more than one polygon, select
To delete all input points of this operation, select
again and repeat the operation.
. (The region that has been blackened is
not deleted.)
16 897N0522 Fuji Photo Film Co., Ltd.
2005. 07
Page 19
CR Console Operation Manual
Changing the polygon region :
Select the polygon region you wish to change. Select any vertex and then move it so that the
selected polygon region is changed to form a different shape.
Select
897N0522 Fuji Photo Film Co., Ltd. 17
2005. 07
to restore previous status for the operation to change the poly gon re gio n.
Page 20
CR Console Operation Manual
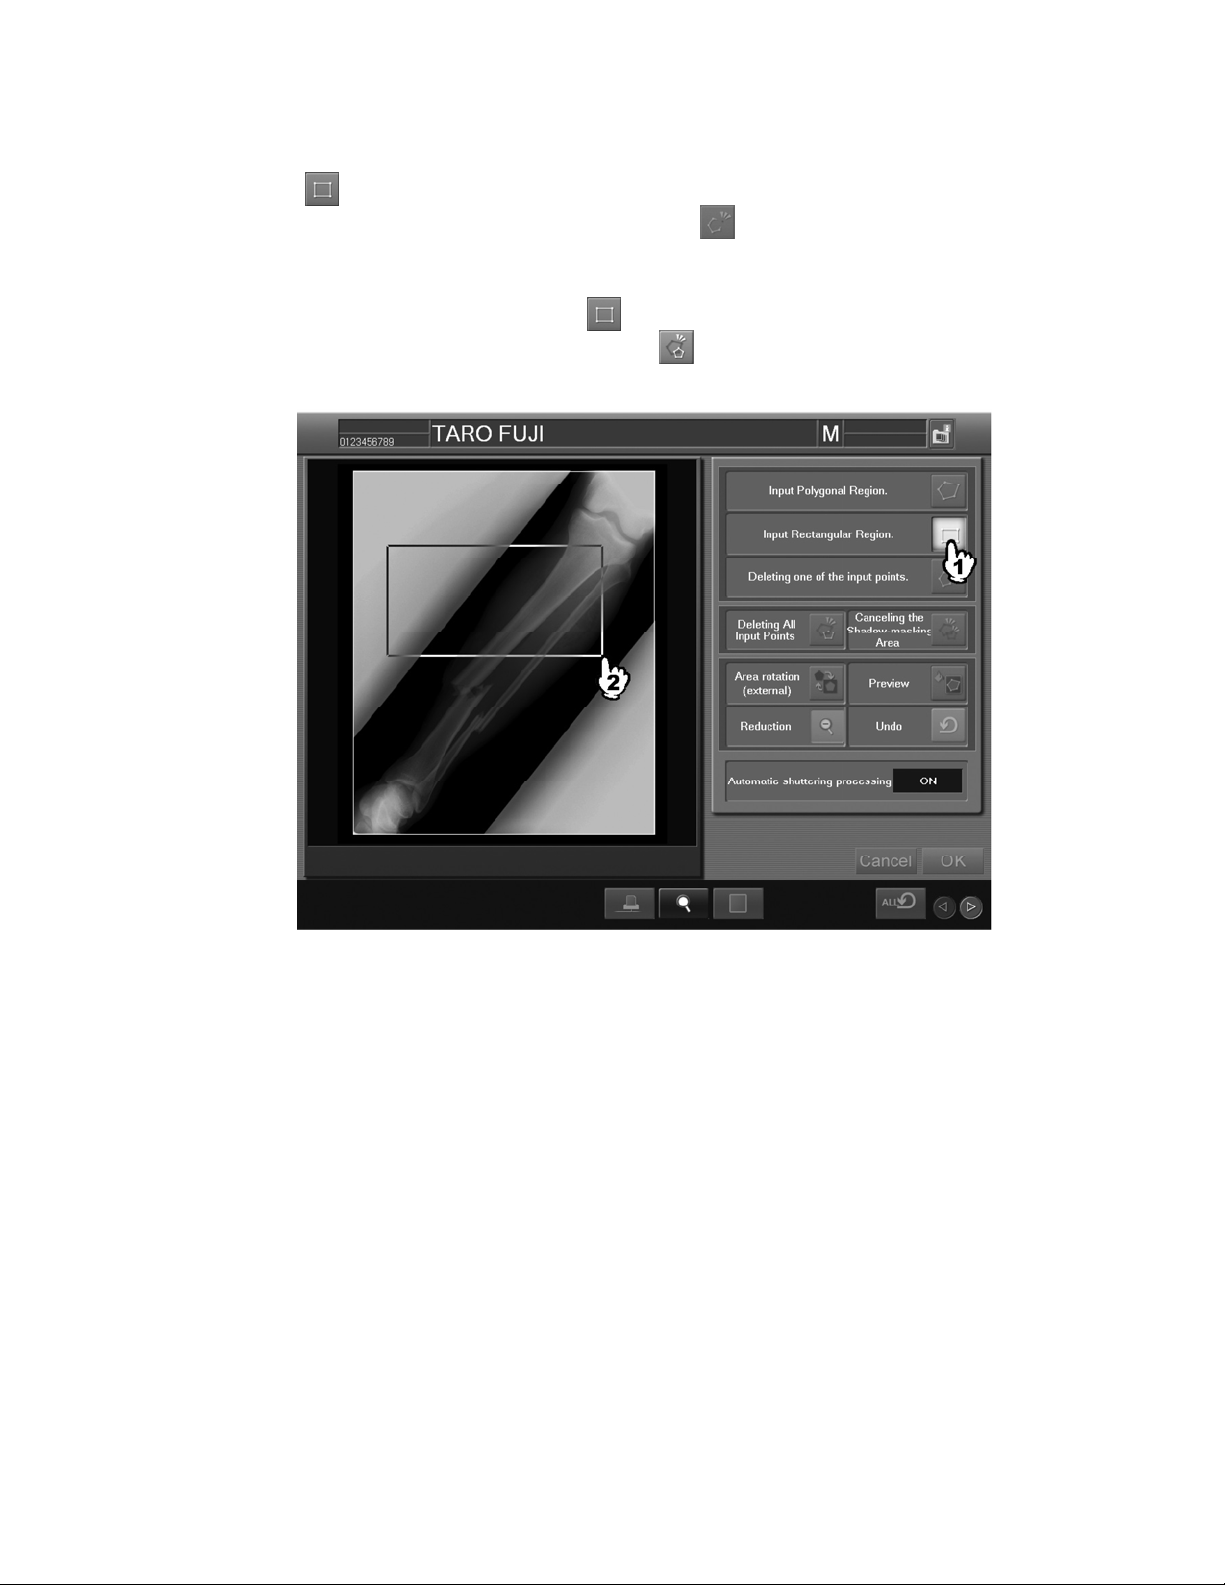
Rectangle region :
Select
image. After the starting point input is done, selecting
and then select the starting and ending points of the rectangle diagonal on the
deletes the starting point, and
selecting the ending point determines the rectangle region. (Points cannot be input outside of
the image region.)
To input more than one rectangle, select
To delete all input points of this operation, select
again and repeat the operation.
. (The region that has been blackened is
not deleted.)
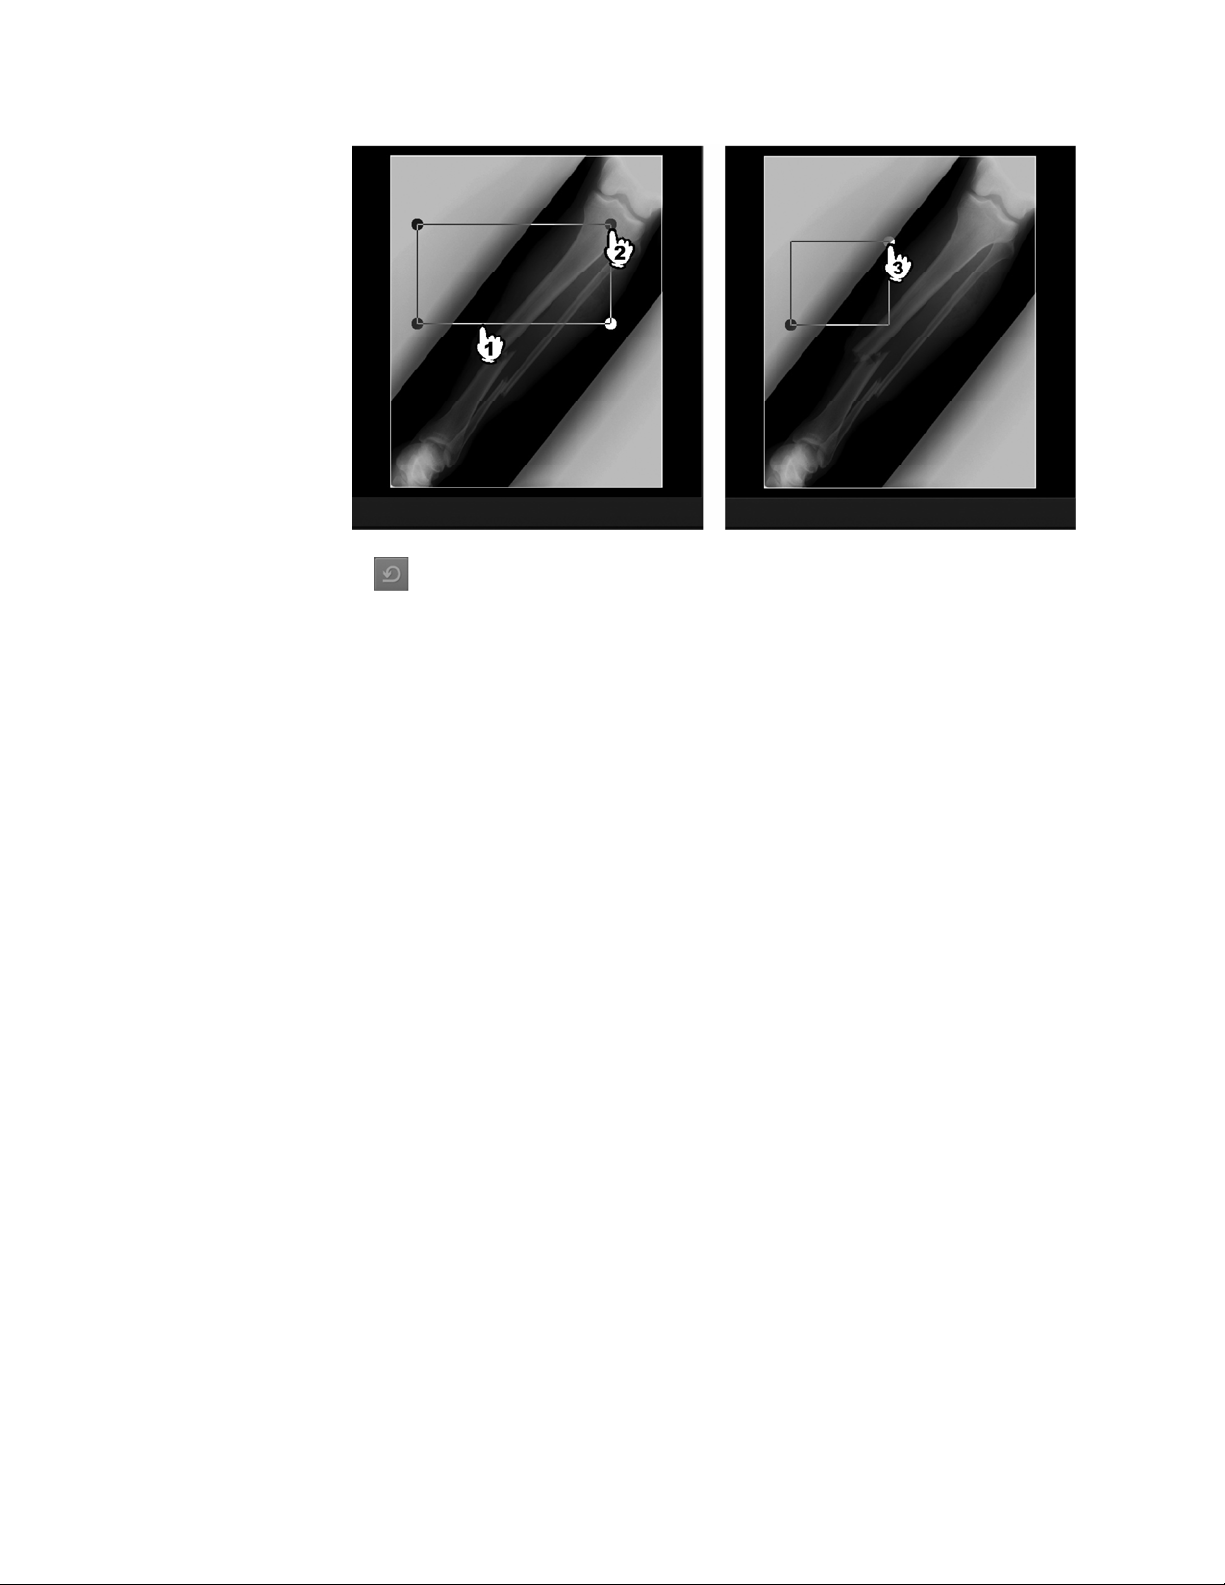
Changing the rectangle region :
Select the rectangle region you wish to change. Select any vertex and then move it so that the
selected rectangle region is changed to form a different shape.
18 897N0522 Fuji Photo Film Co., Ltd.
2005. 07
Page 21
CR Console Operation Manual
Select
to restore previous status for the operation to change the rec t an gle regi on.
897N0522 Fuji Photo Film Co., Ltd. 19
2005. 07
Page 22
CR Console Operation Manual
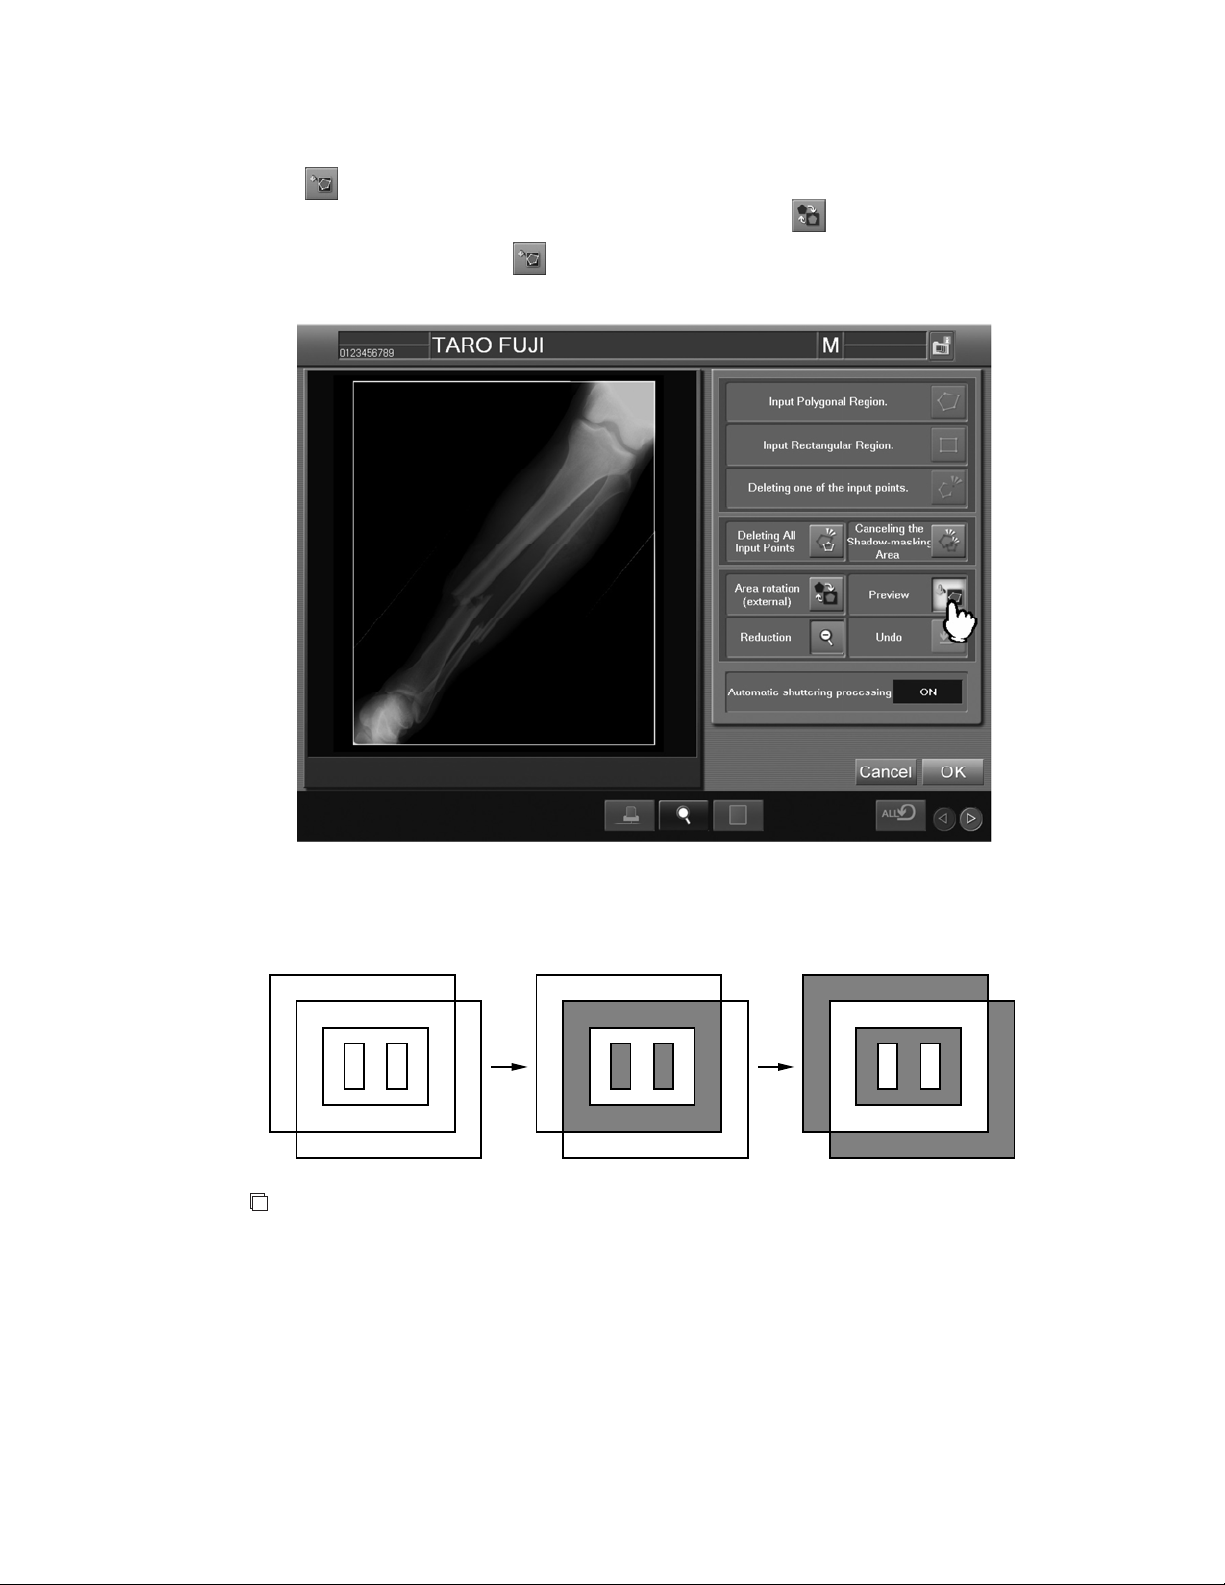
(3) Displaying preview
Select
. The outside of input region is blackened with the default setting. To invert the
region to be blackened (outside/inside of the input region), select
To redo the region input, select
again to release the preview display and then re pe at the
operation steps from (2).
.
When polygons overlap with each other, the processing result will become as shown in the
example below:
Outside of region is blackened. Inside of region is blackened.
NOTE
• The paint density is reflected by the density setting (page 7) with which the image is read.
Although the paint density setting is changed, this new setting does not affect read images
before change. Therefore, the paint density for the same exposure menu may differ
depending on the timing of image reading.
20 897N0522 Fuji Photo Film Co., Ltd.
2005. 07
Page 23
CR Console Operation Manual
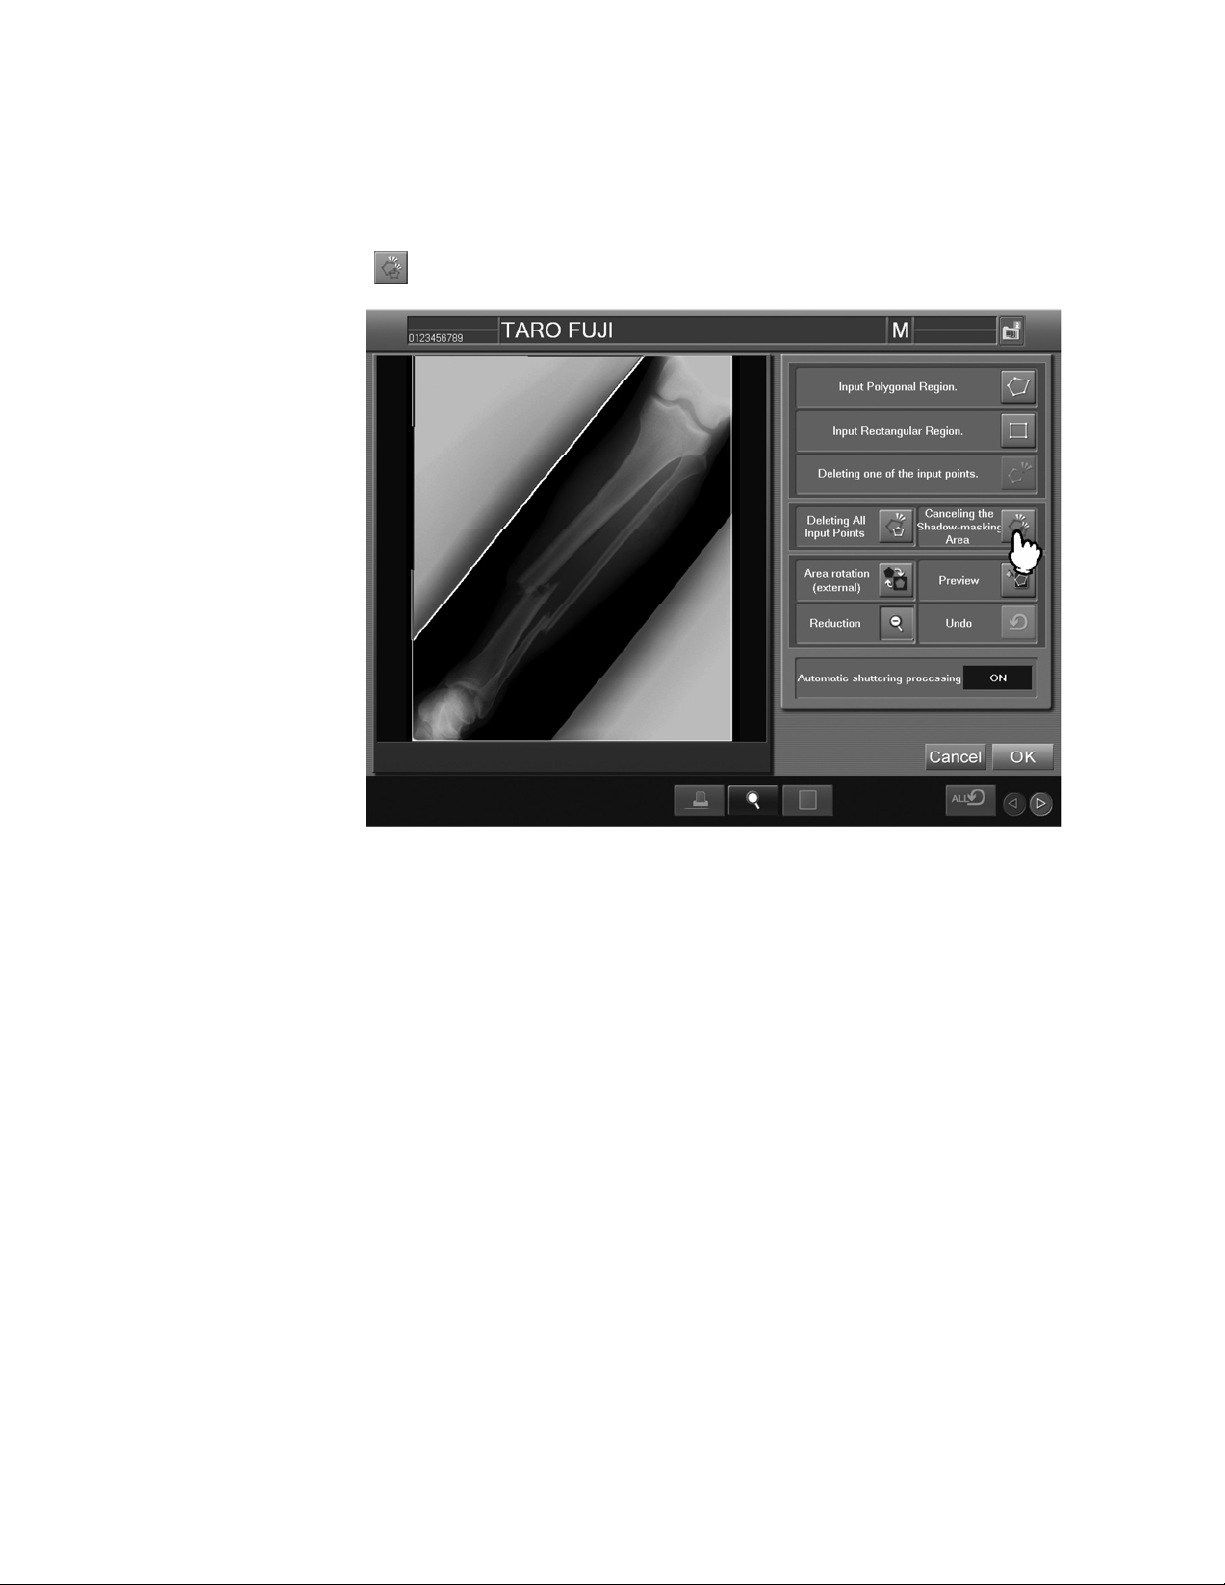
– Clearing blackened region –
When reprocessing images to which the Blackening Processing has been performed, the
blackened region can be cleared and restored to the original image.
Select
.
897N0522 Fuji Photo Film Co., Ltd. 21
2005. 07
Page 24
CR Console Operation Manual
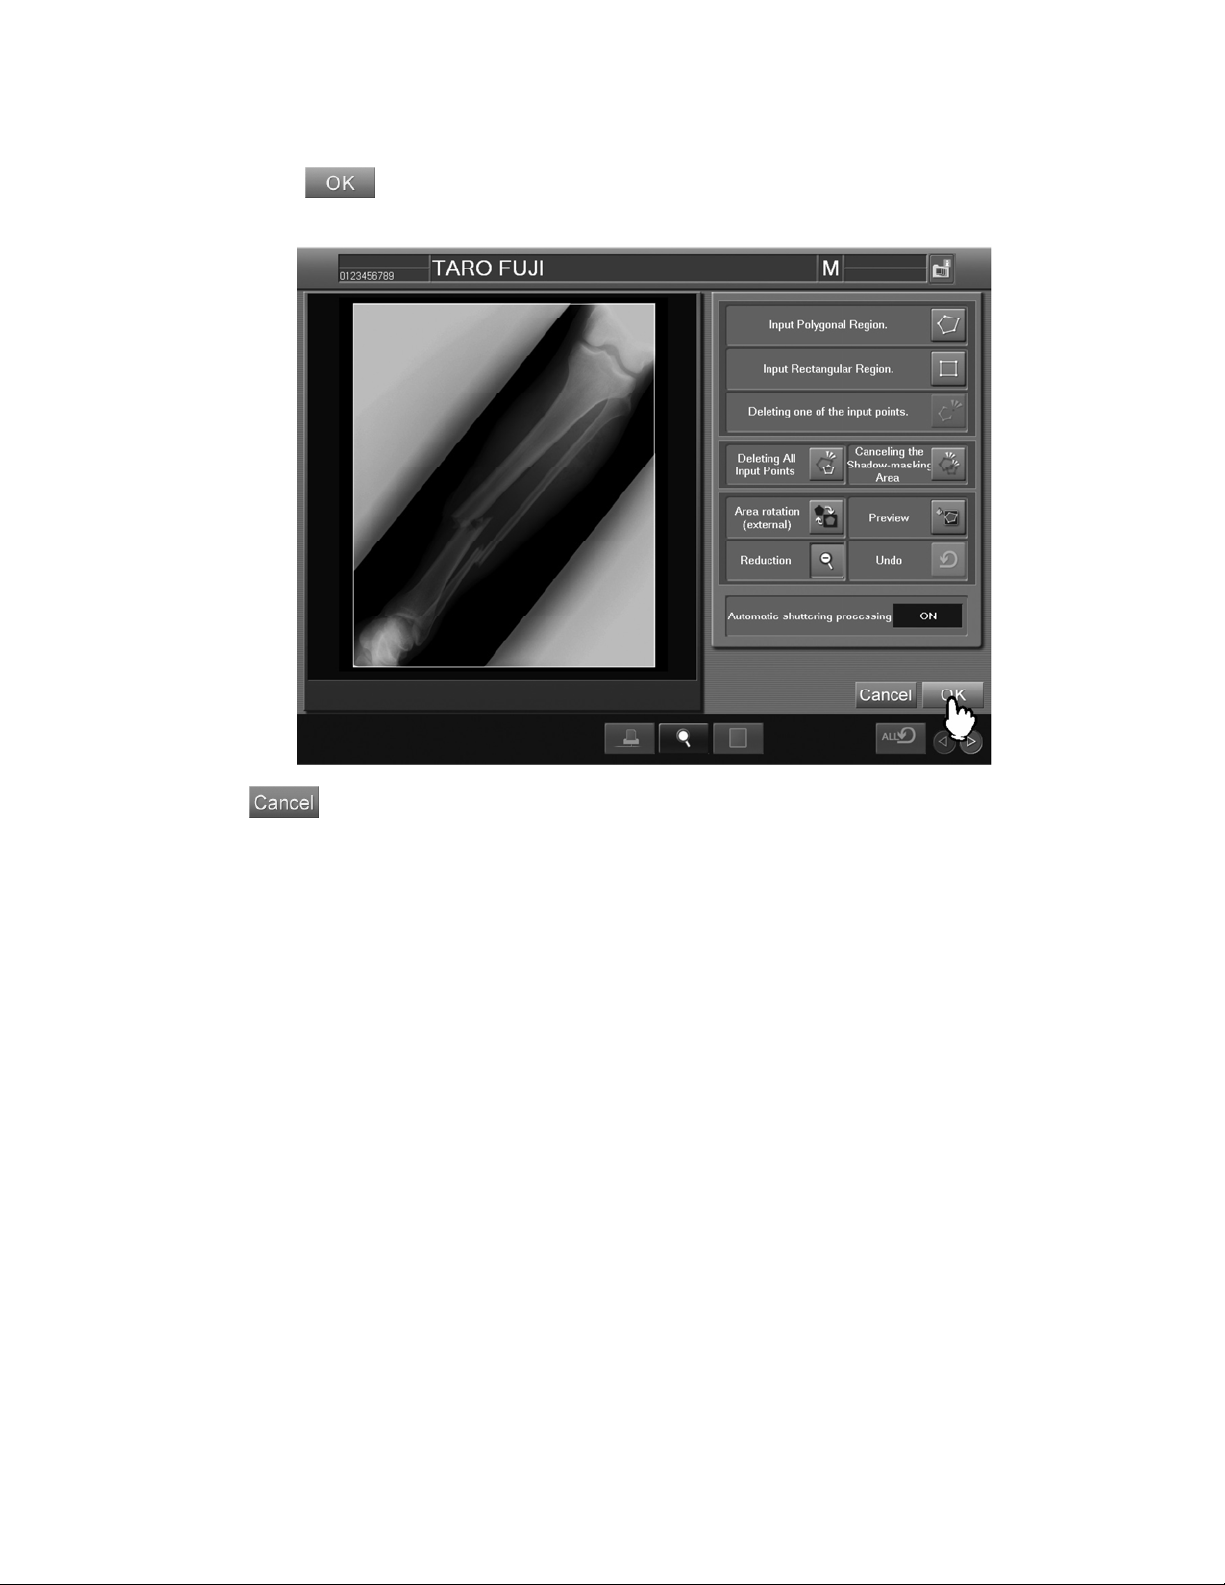
(4) Completing processing
Select
the previous mode.
. The result of the processing is saved and the processing mode is returned to
Cancels operation.
:
22 897N0522 Fuji Photo Film Co., Ltd.
2005. 07
Page 25
CR Console Operation Manual
3 Menus to Which Automatic Blackening Processing is
Applicable
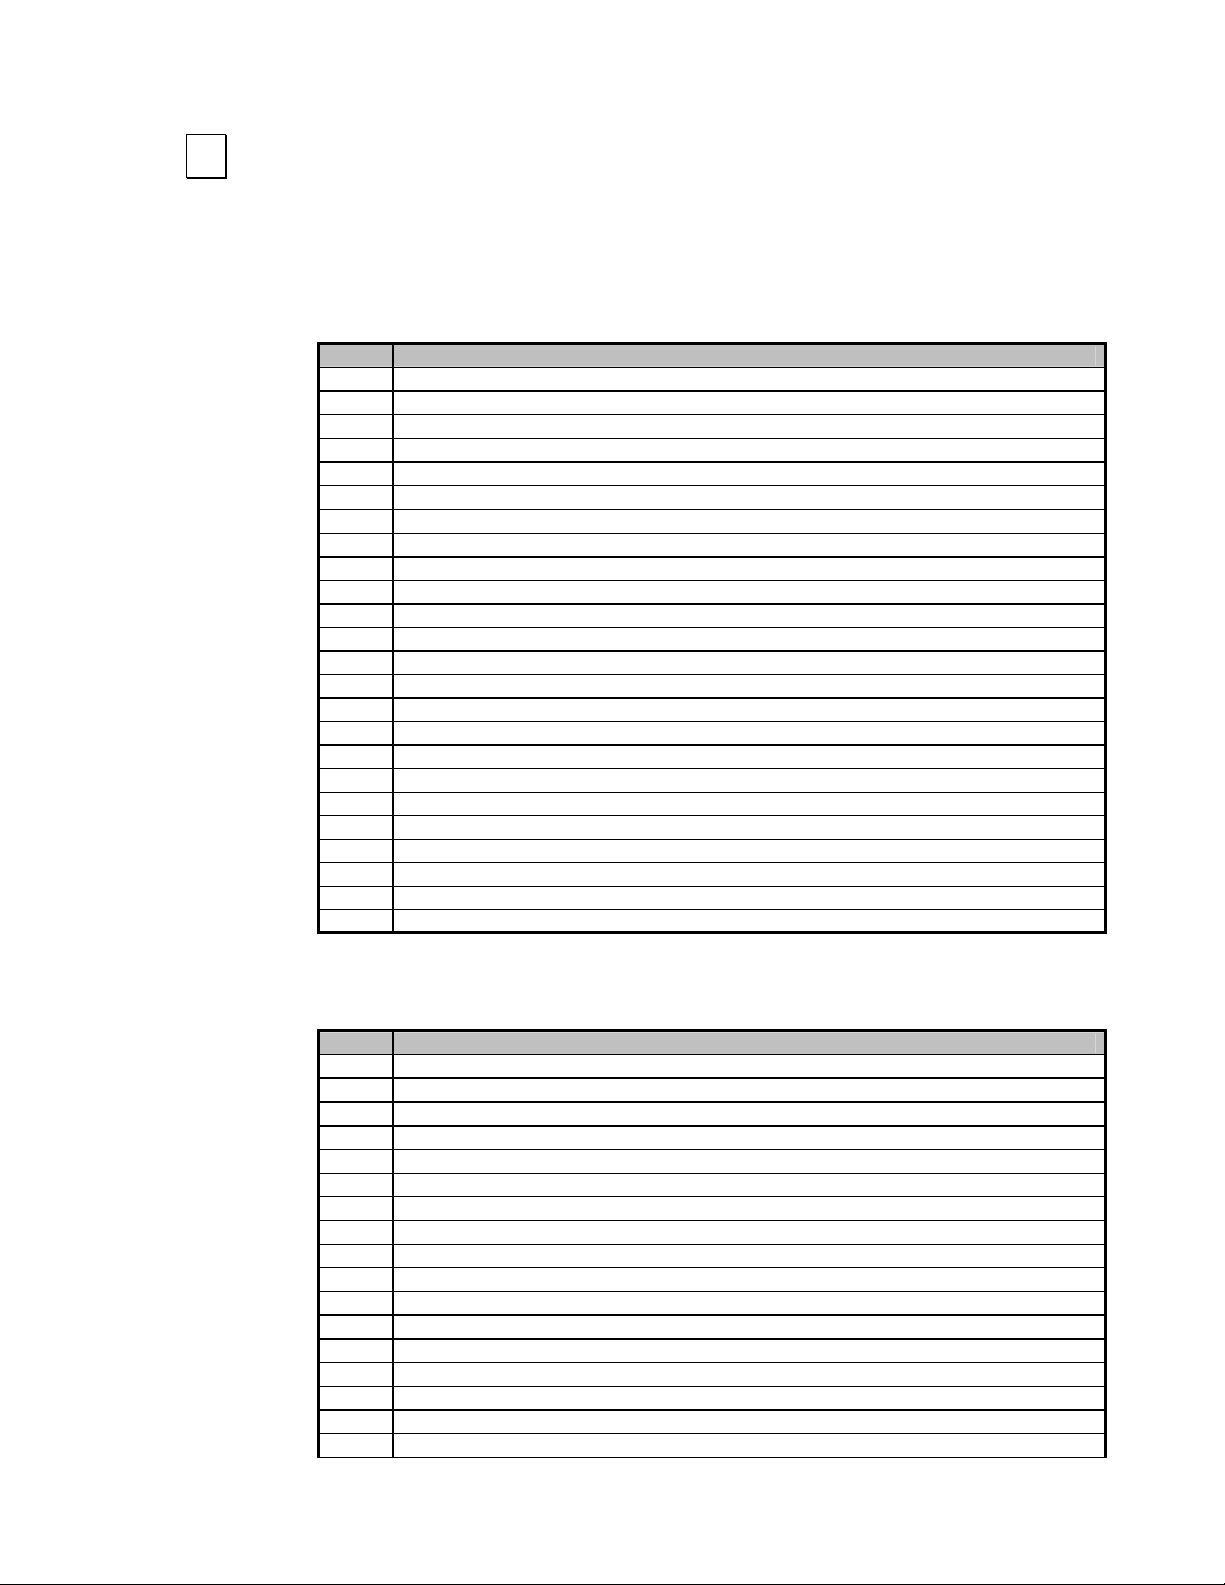
Automatic Blackening Processing can be applied to various menus. The table below presents
menus on which the Automatic Blackening Processing can be executed, being available for
providing support to the split exposure processing.
MPM MENU
0001 SINUS, WATER‘S/CALD
000B MASTOIDS
0011 SINUS, LATERAL
0021 FACIAL BONES
0031 FACIAL BONES, LAT.
0041 PRE-MRI ORBITS
0204 CLAVICLE/AC JNTS
0600 HUMERUS
0601 FOREARM
0606 HAND
0607 FINGER
0610 ELBOW
0611 WRIST
0616 HAND, LATERAL
0620 UPPER EXT. CAST
0700 FEMUR, DISTAL
0701 TIB/FIB
0706 FOOT
0710 KNEE, AP/OBL
0711 ANKLE
0716 FOOT, LATERAL
0720 KNEE, LATERAL
0730 LOWER EXT. CAST
0731 CALCANEOUS, AXIAL
The table below presents menus on wh ich the Automatic Blackening Processing can be
executed. Note, however, that these menus do not provide support to split exposure processing.
MPM MENU
0000 SKULL, AP/PA
0002 MANDIBLE, OBLIQUE
0003 ORBIT
0006 SKULL, PEDIATRICS
000C SKULL, S.M.V.
000D CEPHALOGRAPHY
000E ZYGOMATIC ARCHES
0010 SKULL, LATERAL
0016 SKULL, PED.-1
001E NASAL BONES, LAT.
0020 SKULL,TOWNES
0101 C-SPINE, AP/OBL
0111 C-SPINE, LAT.
0121 C-SPINE LAT.FIXED
0131 SWIMMERS FIXED
0200 CHEST, PA
0201 T-SPINE, AP
897N0522 Fuji Photo Film Co., Ltd. 23
2005. 07
Page 26

CR Console Operation Manual
0207 CHEST,PED(0-3YRS)
0209 T-SPINE,LAT.
020B SHOULDER
020E CHEST, GENERAL-2
0210 CHEST, SPECIAL-1
0211 SHOULDER, “Y” VIEW
0217 CHEST, PED.-1
0220 CHEST, SPECIAL-2
0227 CHEST, NEONATE
0230 CHEST, LATERAL
0237 CHEST, PED PORT.
0240 CHEST, AP NON-GRID
0250 CHEST, PORTABLE
0260 CHEST, DECUB.
0270 CHEST, PED(4-10YRS)
0280 CHEST, AP(GRID)
02A0 CHEST, PA X-WISE
02B0 CHEST PORT X-WISE
0400 ABDOMEN, GENERAL
0402 ABDOMEN, PEDS
0410 ABDOMEN, UPRIGHT
0412 ABDOM., PED.-1
0420 ABDOMEN,DECUB.
0422 ABDOMEN,PED. PORT
0430 ABDOMEN, PORTABLE
0432 ABDOMEN, NEONATE
0440 U.G.I.
0442 PEDIATRIC G.I.
0450 B.E.
0460 S.B.F.T.
0501 L-SPINE AP/OBL
0508 HIP JOINT
050A HIP J., PEDIATRICS
050C HIP, X-TABLE LAT.
0511 LUMBAR, LATERAL
0518 FEMUR,PROXIMAL
051A HIP J., PED.-1
0521 SWIMMERS
0528 HIP X-TABLE FIXED
0531 L-SPINE LAT. FIXED
070B KNEE, SUNRISE
071B PATL.AXL.,ARTHRO:C
1403 I.V.P.
1404 G.B./PANCREATIC DUCT
24 897N0522 Fuji Photo Film Co., Ltd.
2005. 07
Page 27

CR Console Operation Manual
897N0522 Fuji Photo Film Co., Ltd. 25
2005. 07
Page 28

CR Console Operation Manual
FUJIFILM MEDICAL SYSTE MS U.S.A., INC.
419 WEST AVENUE, STAMFORD CT 06902, U.S.A.
897N0522 Fuji Photo Film Co., Ltd.
2005. 07
 Loading...