

Page 1

OWNER’S MANUAL
Page 2
CONTENTS
FEATURES ............................................................................... 2
PART NAMES ........................................................................... 3
QUICK START GUIDE ............................................................. 6
Menus and modes .................................................................. 9
Finder .................................................................................... 11
AF Lamp................................................................................ 12
1. PRELIMINARY STEPS
ATTACHING THE STRAP ...................................................... 14
LOADING THE BATTERY ...................................................... 15
TURNING ON YOUR CAMERA ............................................. 16
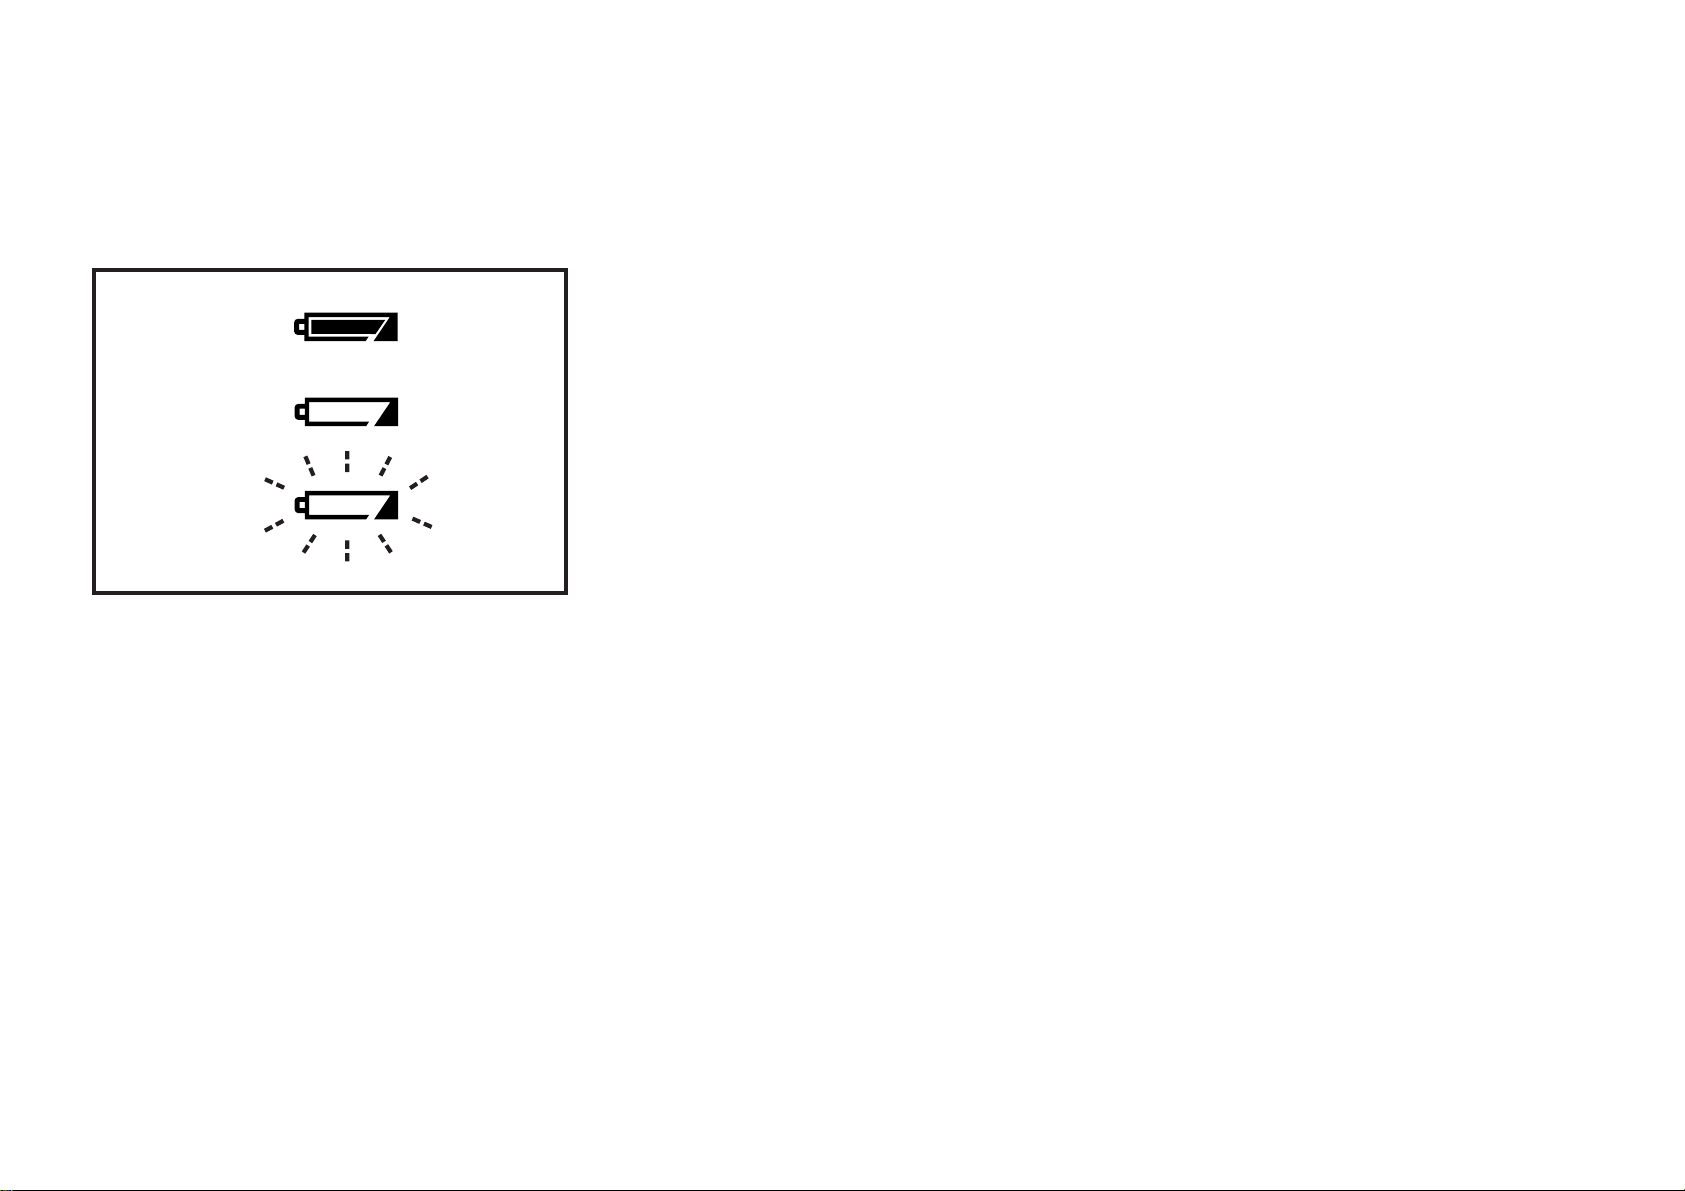
CHECKING YOUR BATTERY ................................................ 17
SETTING THE DATE (YEAR-MONTH-DAY/HOUR-MINUTE) ..
SELECTING THE DATE MODE............................................. 21
2. USING YOUR CAMERA
LOADING THE CAMERA ....................................................... 23
USING YOUR CAMERA ......................................................... 27
USING THE AUTO-FOCUS LOCK ........................................ 33
UNLOADING THE FILM OR REMOVING FILM
IN MID-ROLL........................................................................... 35
3. ADVANCED TECHNIQUES
SELECTING THE FLASH MODE........................................... 39
2
18
SELECTING THE SELF-TIMER MODE................................. 46
SELECTING THE REMOTE CONTROLLER MODE............. 49
SELECTING THE FOCUS MODE.......................................... 53
MULTI PROGRAM FLASH ..................................................... 57
TROUBLE SHOOTING ........................................................... 59
COMMON SENSE CAMERA CARE ...................................... 61
SPECIFICATIONS ..................................................................62
IMPORTANT SAFETY NOTICE ............................................. 64
FEATURES
• Super EBC Fujinon 28-100mm Auto Focus Zoom Lens
• Large LCD Panel with Back Light
• Multi-Programmed Flash
• Aluminum Body
• Self-Timer and Remote Controller
• Red-Eye Reduction
• Date/Time Imprinting
The “CE” mark certifies that this product satisfies the
requirements of the EU (European Union) regarding
safety, public health, environment and consumer
protection.(“CE” is the abbreviation of Conformité
Européenne.)
This product is in conformity with Directive 89/336/EEC .
Page 3
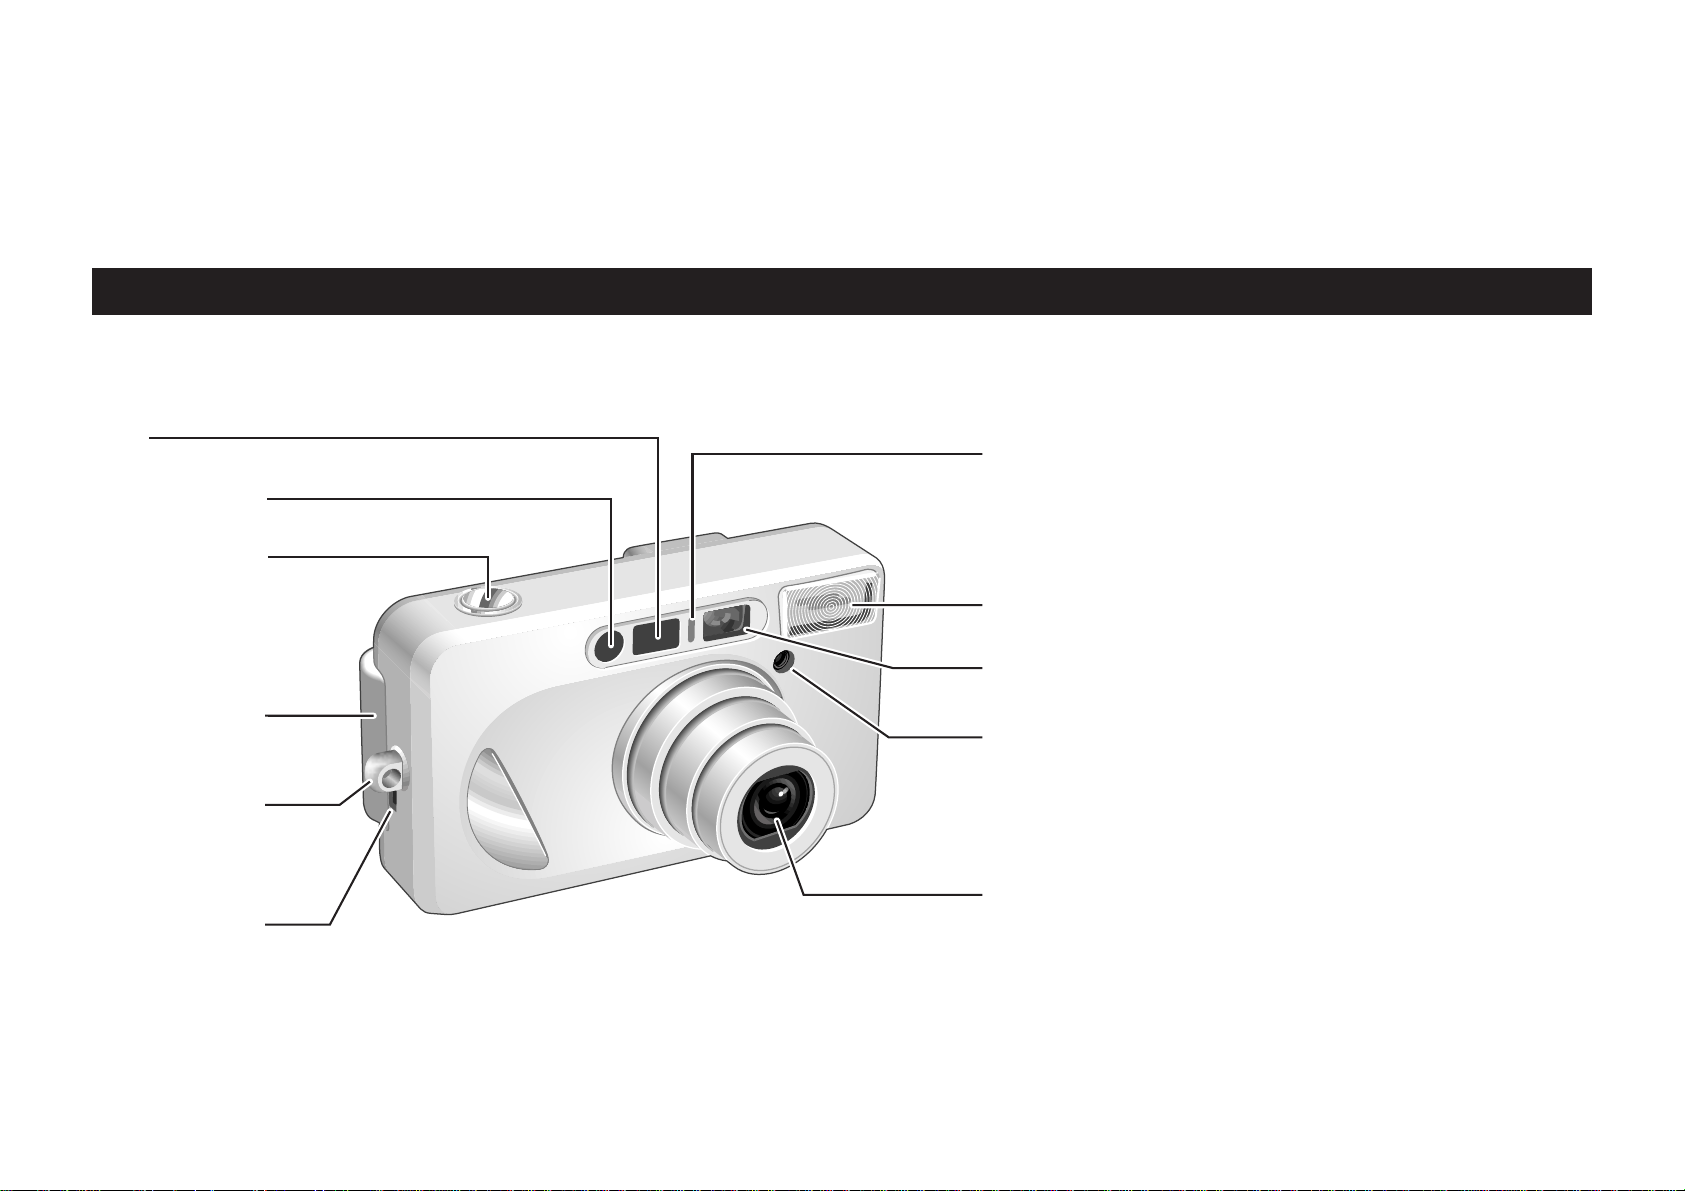
PART NAMES
1
2(→p.51)
3(→p.30)
4(→p.15)
5(→p.14)
7(→p.48,51)
8(→p.39)
9
0
1 AF (Autofocus) Window
2 Remote Controller
Sensor
3 Shutter Release Button
4 Battery Compartment
Cover
5 Strap Lug
6 Battery cover release
knob
7 Self-Timer/Remote
Controller Lamp
8 Flash
9 Viewfinder Window
0 AE Light Sensor
A Super EBC Fujinon Lens/
Lens Cover
6(→p.15)
A(→p.16)
3
Page 4

B(→p.12)
C(→p.11)
D(→p.25)
E(→p.25)
F(→p.37)
J
G(→p.24)
I
B AF Lamp (green)
C Viewfinder Eye-piece
D Film Leader Mark
E Film T ake-up Spool
F Mid-Roll Rewind Button
G Film Confirmation
Window
H Camera Back
I Film Pressure Plate
J Tripod Socket
H(→p.24,36)
4
Page 5
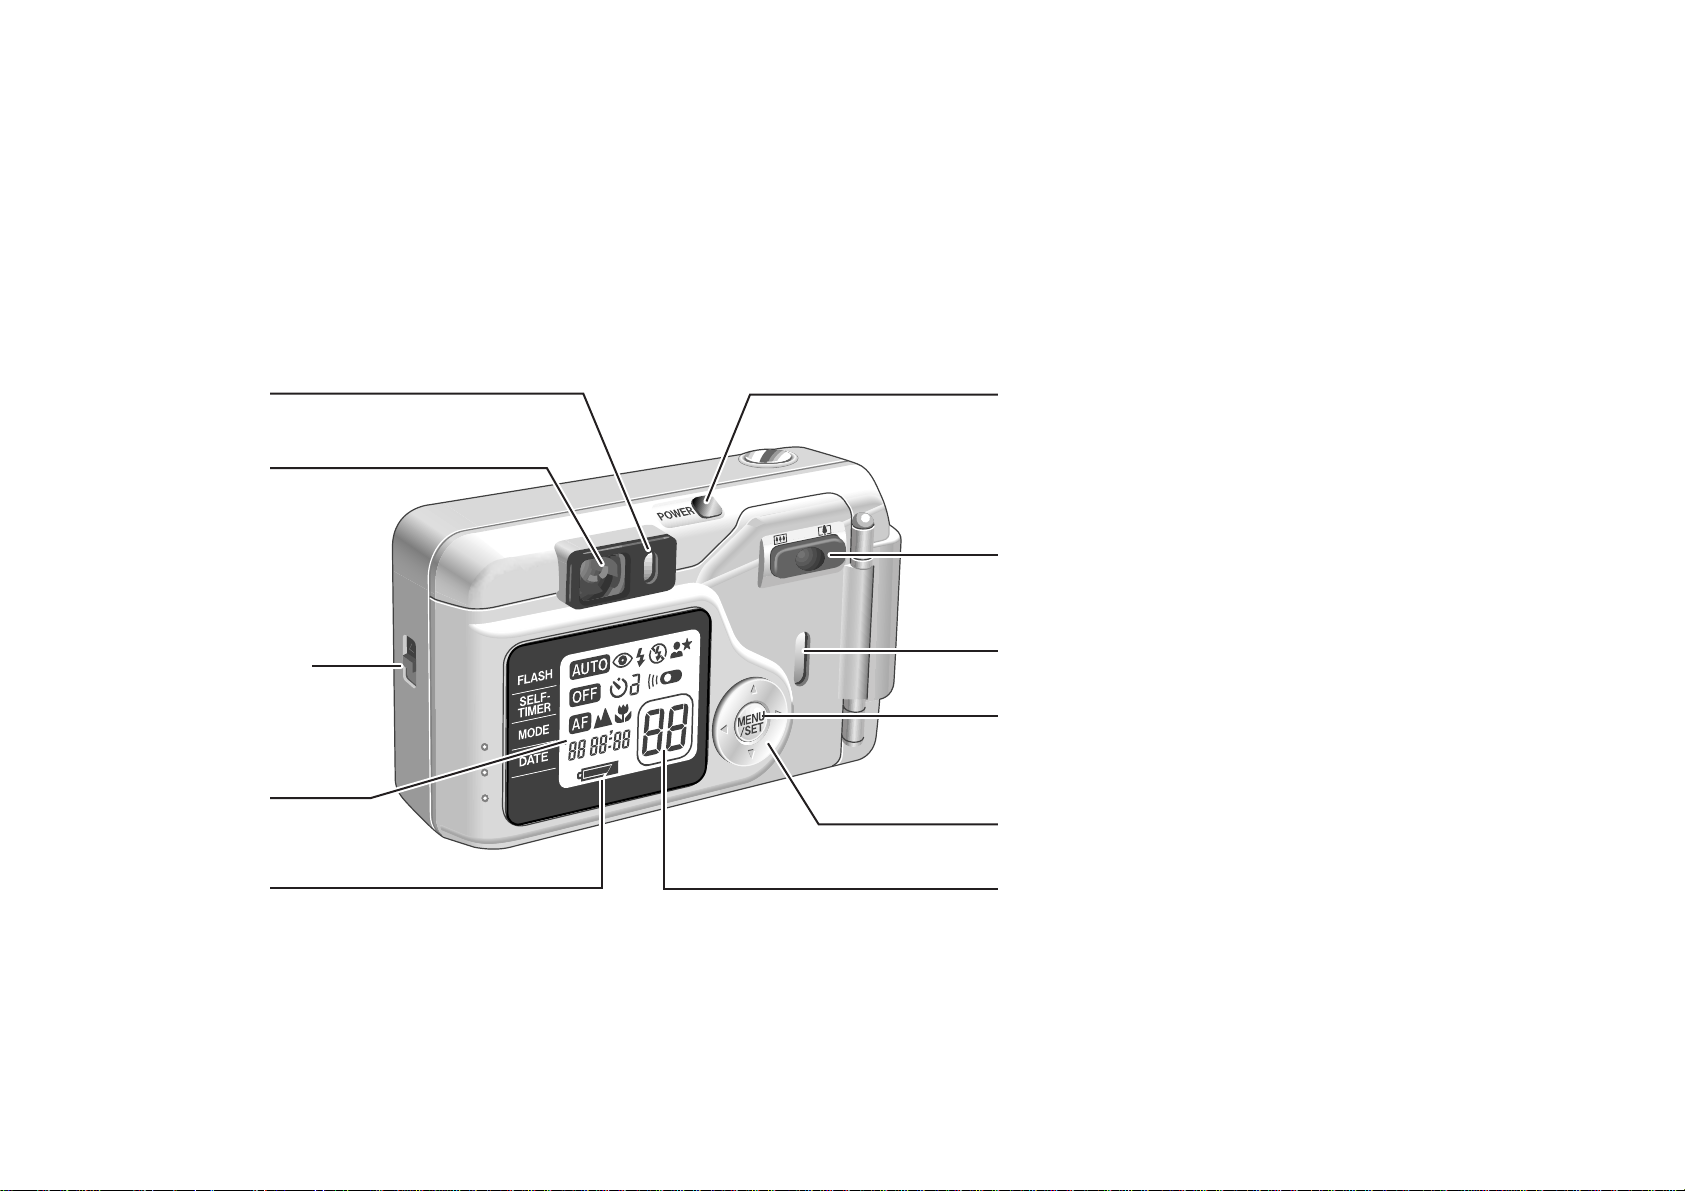
K(→p.12)
L(→p.11)
M(→p.24,36)
N(→p.9)
P(→p.16)
Q(→p.29)
R(→p.24)
S(→p.8)
T(→p.8)
K AF Lamp (green)
L Viewfinder Eye-piece
M Camera Back Lock
N Liquid Crystal Display
O Battery Status
P Power Button
Q Zoom Button
R Film Confirmation
Window
S MENU/SET Button
T Four-direction Button
U Exposure Counter
O(→p.17)
U(→p.26)
5
Page 6
1
2
QUICK START GUIDE
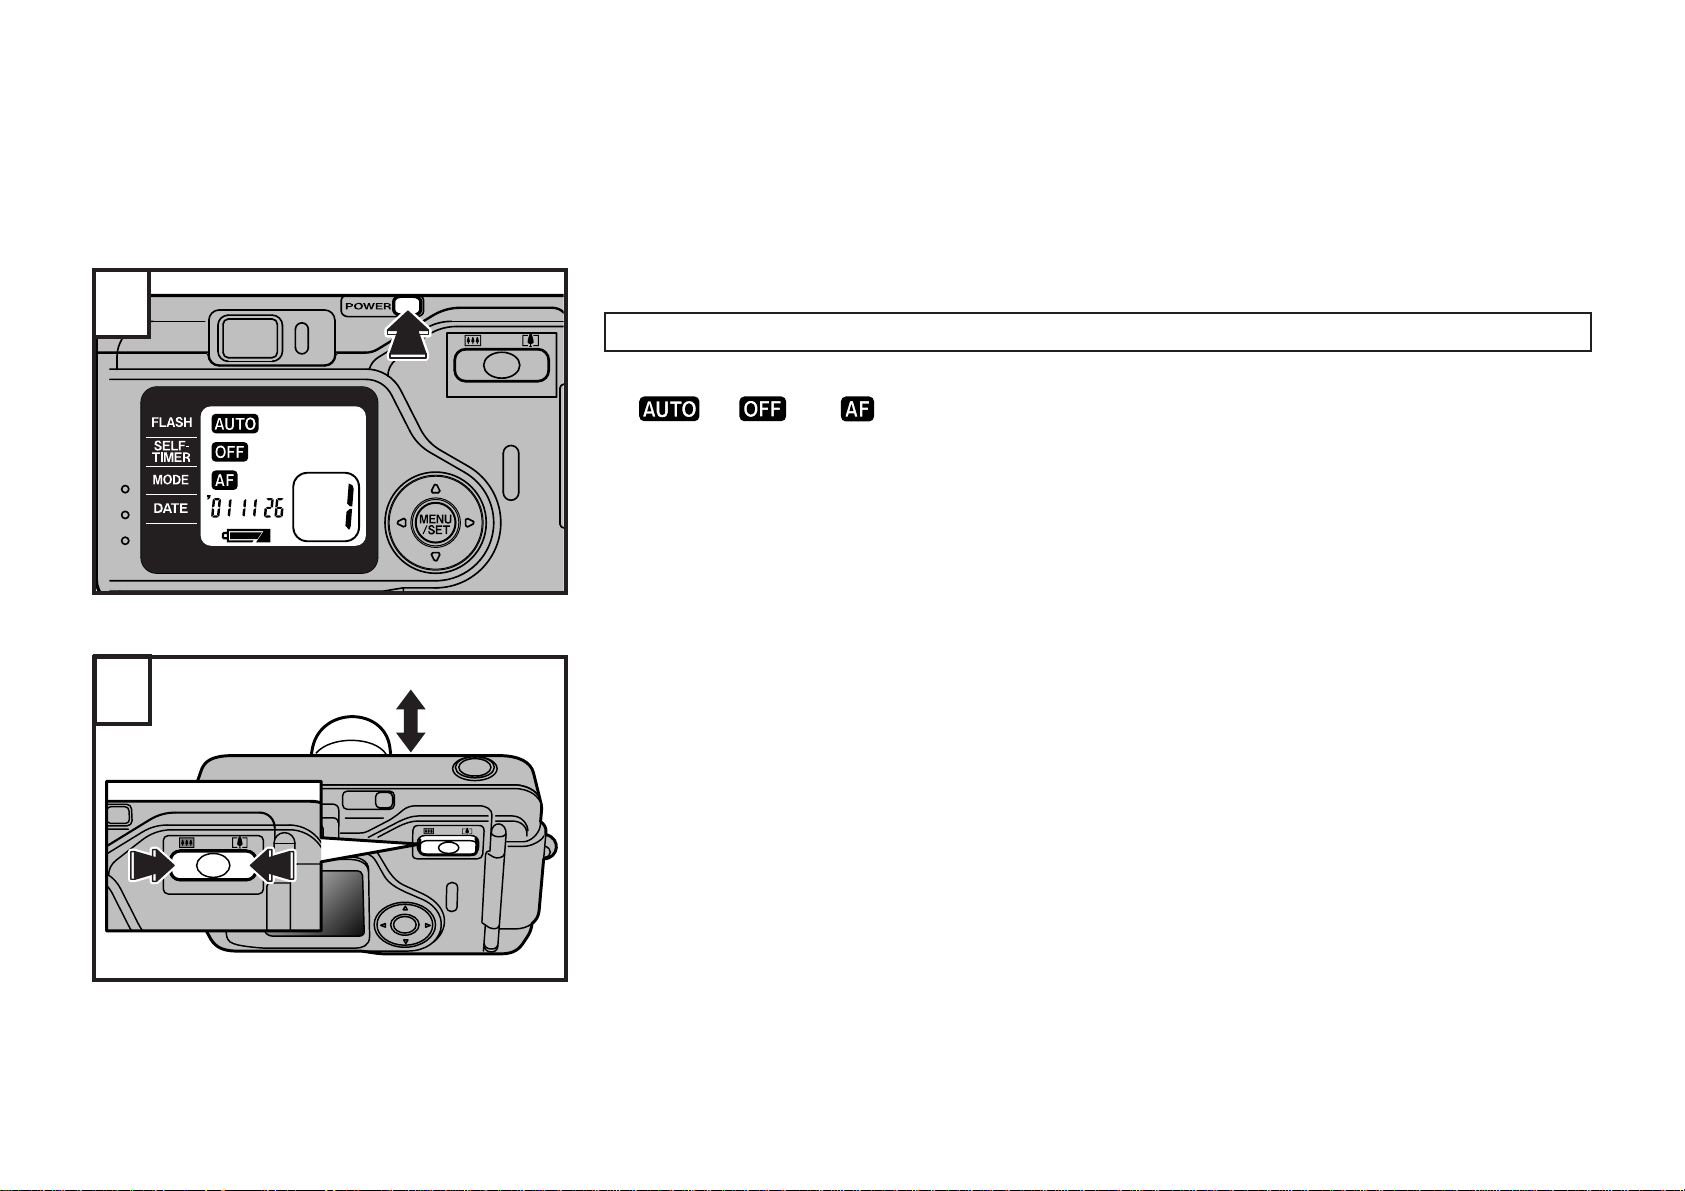
An easy introduction to automatic photography with your FUJIFILM camera.
Press the power button to turn the power on.
, and are displayed on the LCD and the camera is set for automatic mode
☞
photography.
Adjust the zoom.
6
Page 7
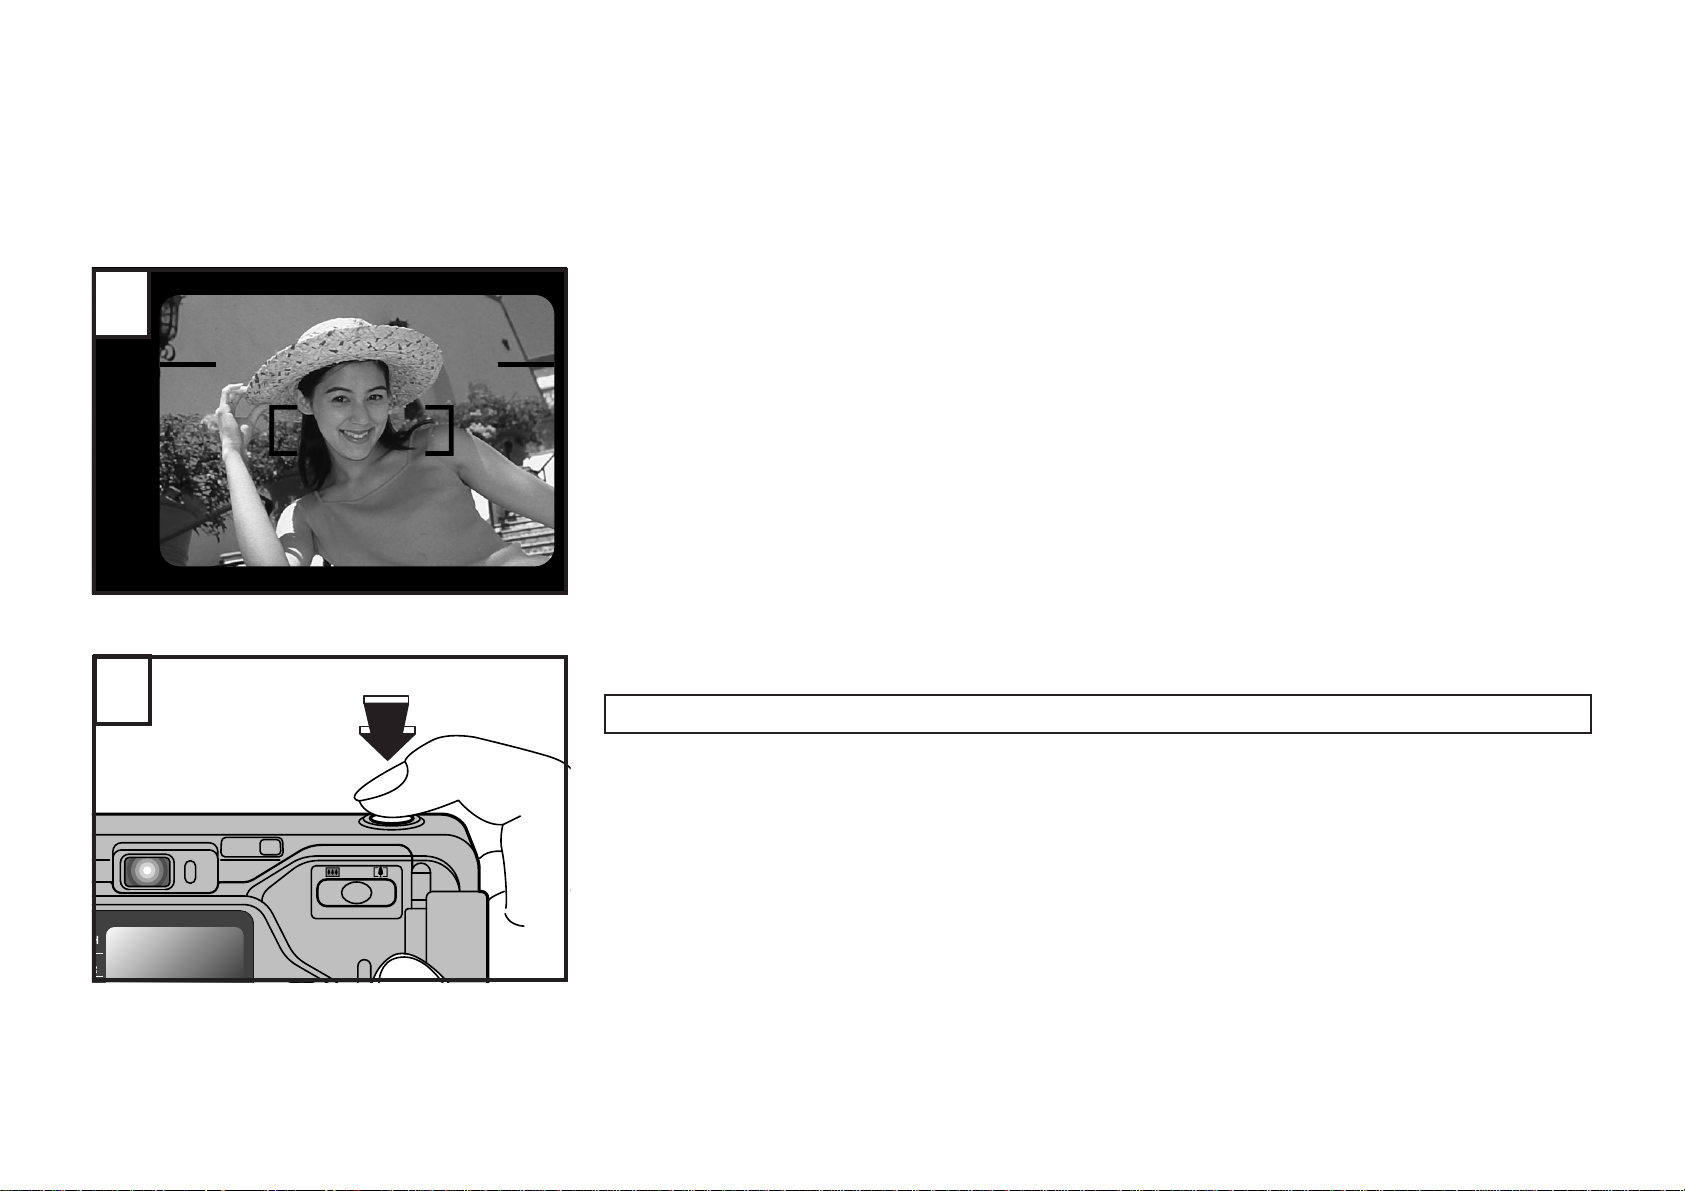
3
Compose the picture.
Press the shutter button down completely.
4
Excellent pictures can be taken with just the operations described from page 27 on.
7
Page 8
1
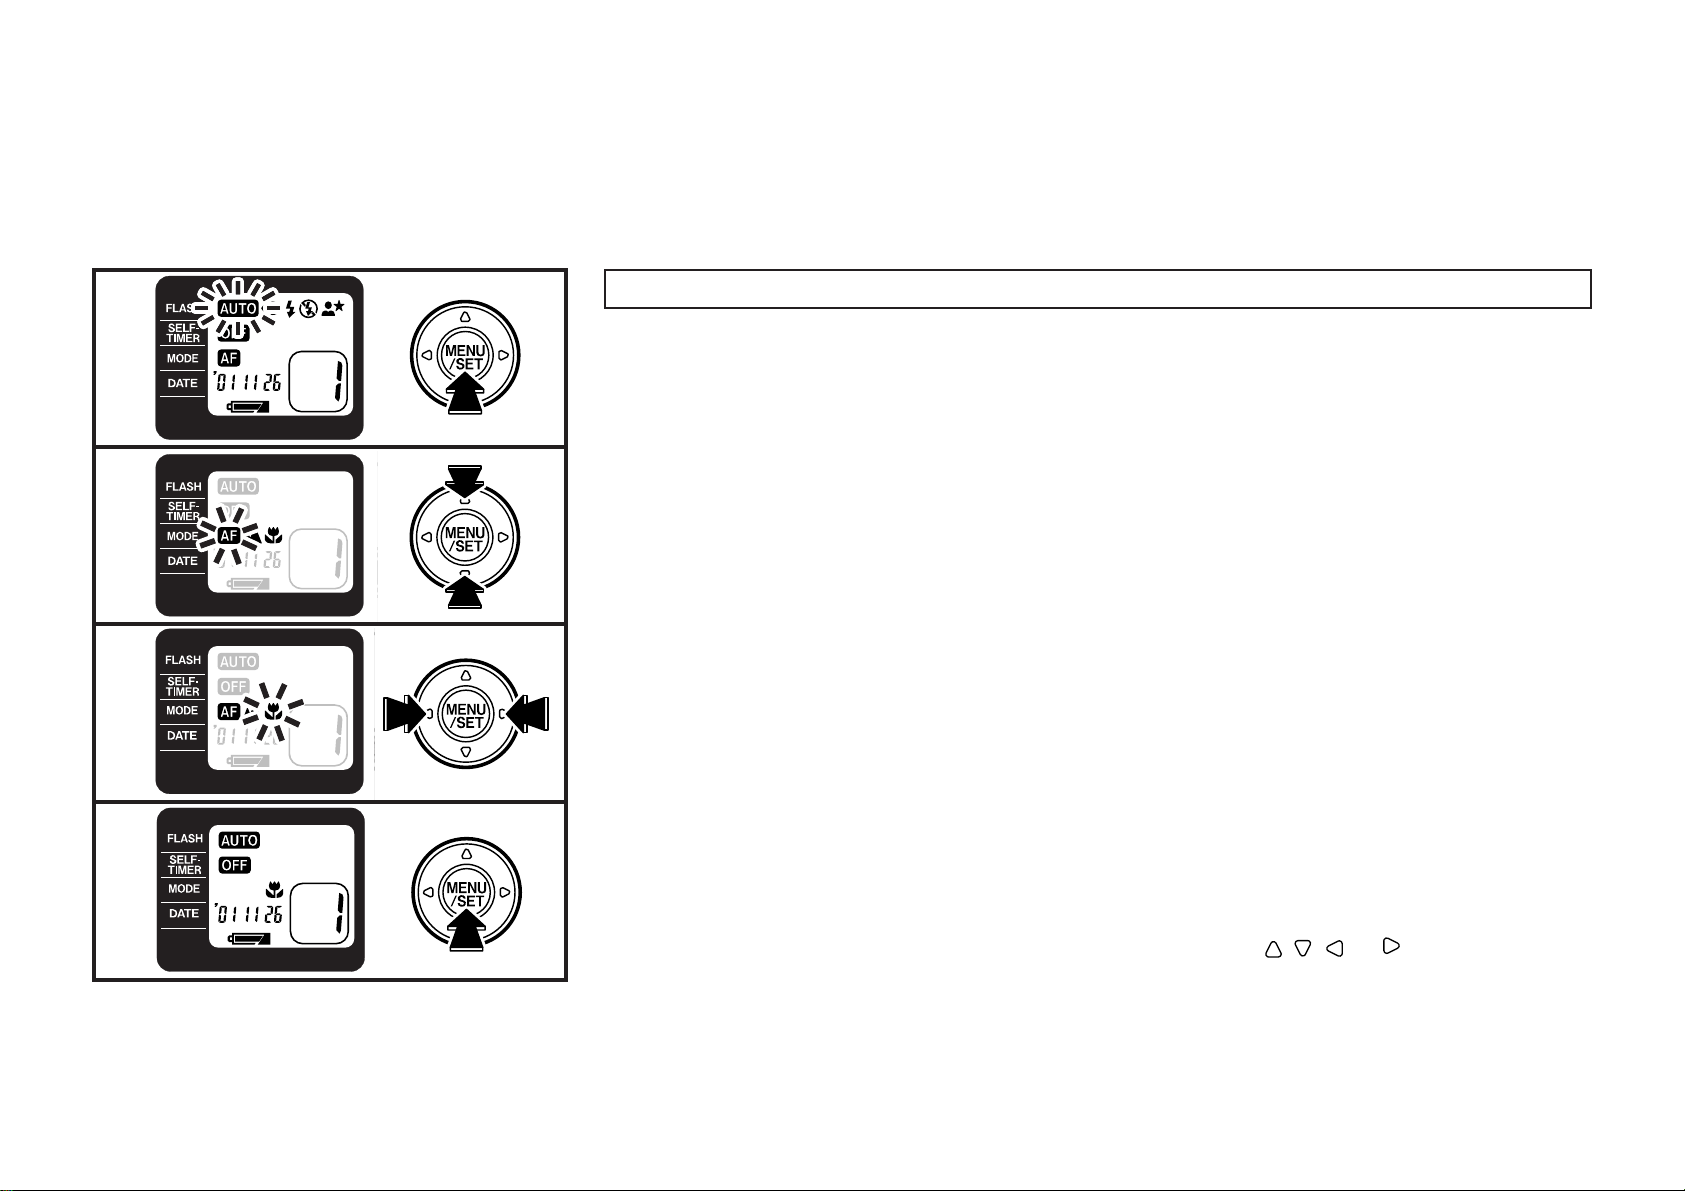
How to use the MENU/SET button and four-direction button
1 Selecting the menu and mode
2 Selecting the menu
2
3
4
8
Make the menu you want to change blink/light.
☞
3 Selecting the mode
The current mode blinks.
☞
4 Setting the mode
The set mode is displayed.
☞
The LCD backlight is green (mode set) when the power is turned on and when a mode has
∗
been set (goes out after 10 seconds).
The LCD backlight is orange (mode selection) while the mode is being selected (goes out after
10 seconds of no operation).
When the LCD is difficult to read at night etc, press any of the , , or buttons to turn the
∗
backlight (green) on.
Page 9
Menus and modes
1
6
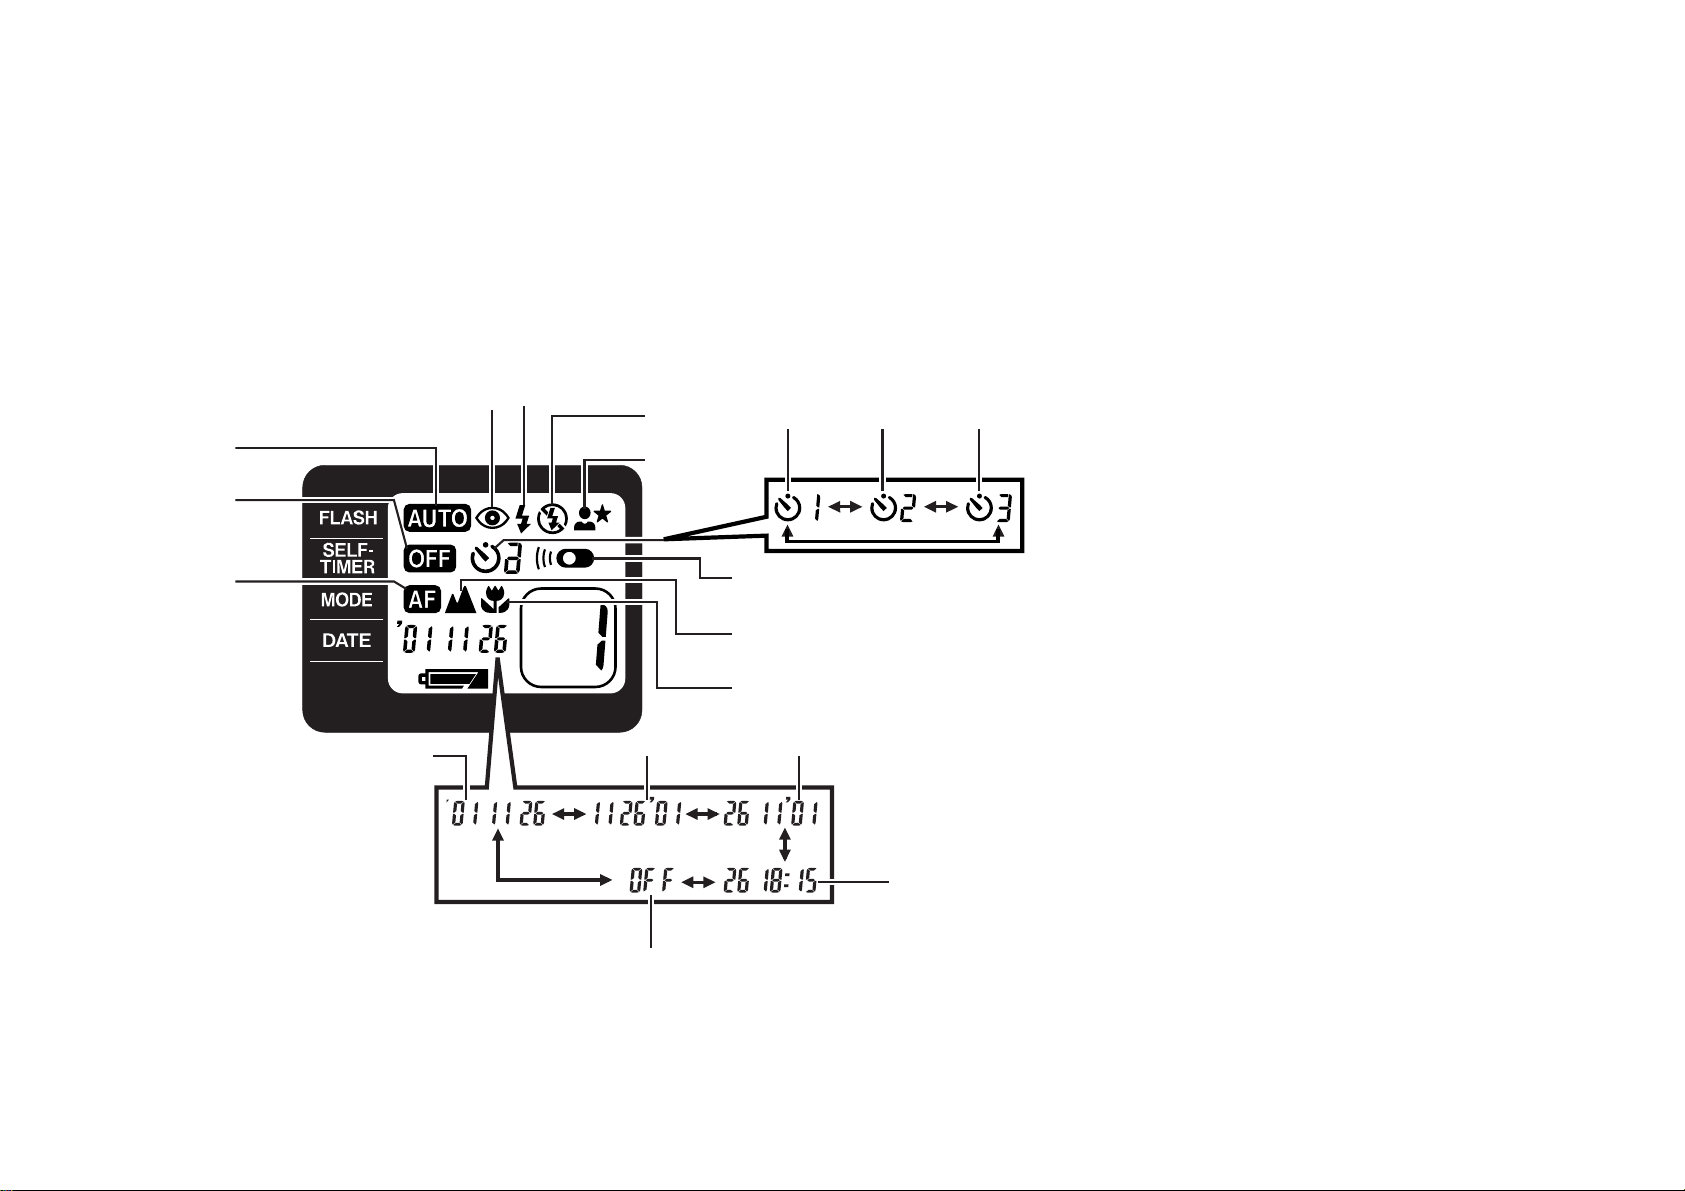
■FLASH (→p.39)
1 Multi program flash mode
2 Red-eye reduction flash
mode
32
4
789
5
3 Back light compensation
flash mode
4 Flash-off mode
5 Night portrait (slow sync)
mode
A
D
0
B
C
EF
G
H
■SELF-TIMER (→p.46,49)
6 Self-timer/Remote control
off mode (normal mode)
7 Self-timer mode (1 shot)
8 Self-timer mode
(2 continuous shots)
9 Self-timer mode
(3 continuous shots)
0 Remote control mode
9
Page 10
1
6
A
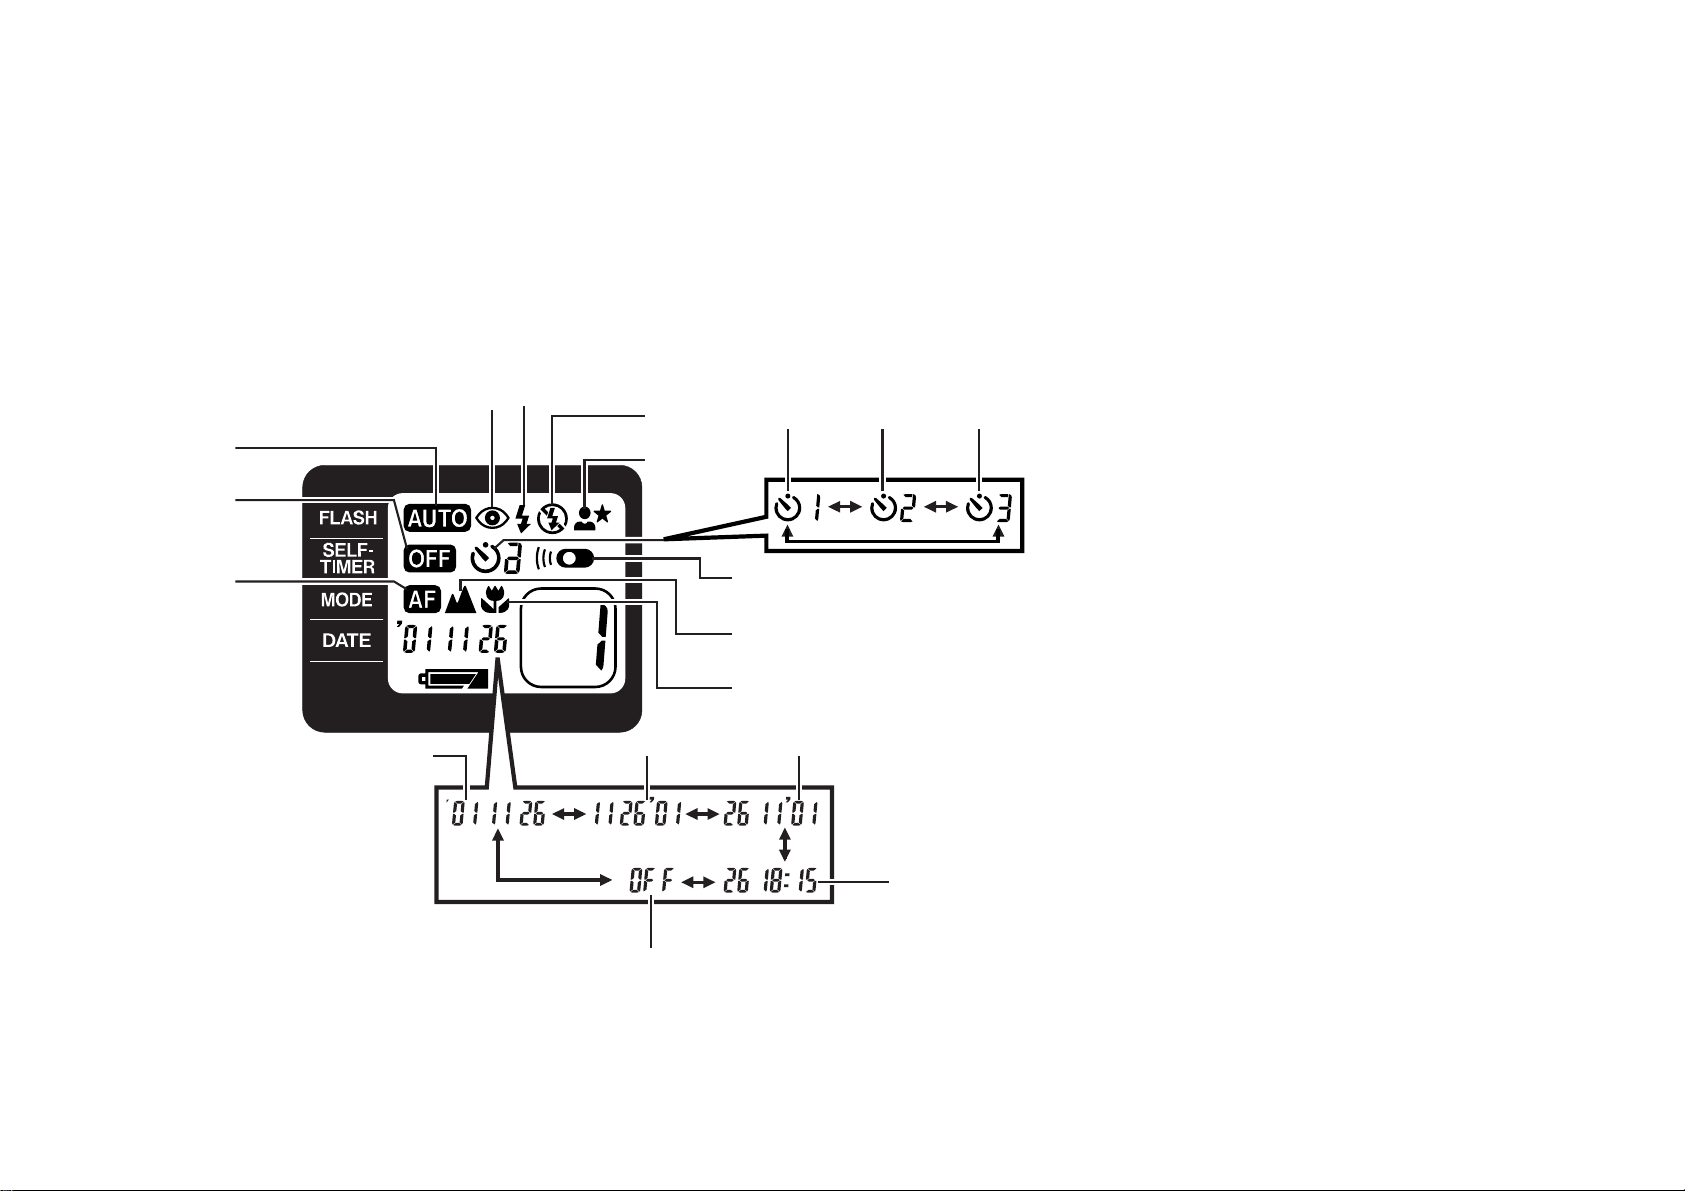
■FOCUS (→p.53)
A AF (Auto focus) mode
B Landscape mode
C Macro mode
32
4
5
789
0
B
■DATE (→p.21)
D Year-Month-Day
E Month-Day-Year
F Day-Month-Year
G Day-Hour-Minute
H Nothing printed
Examples shown are for 18:15
∗
on the 26th November 2001.
C
10
D
EF
G
H
Page 11
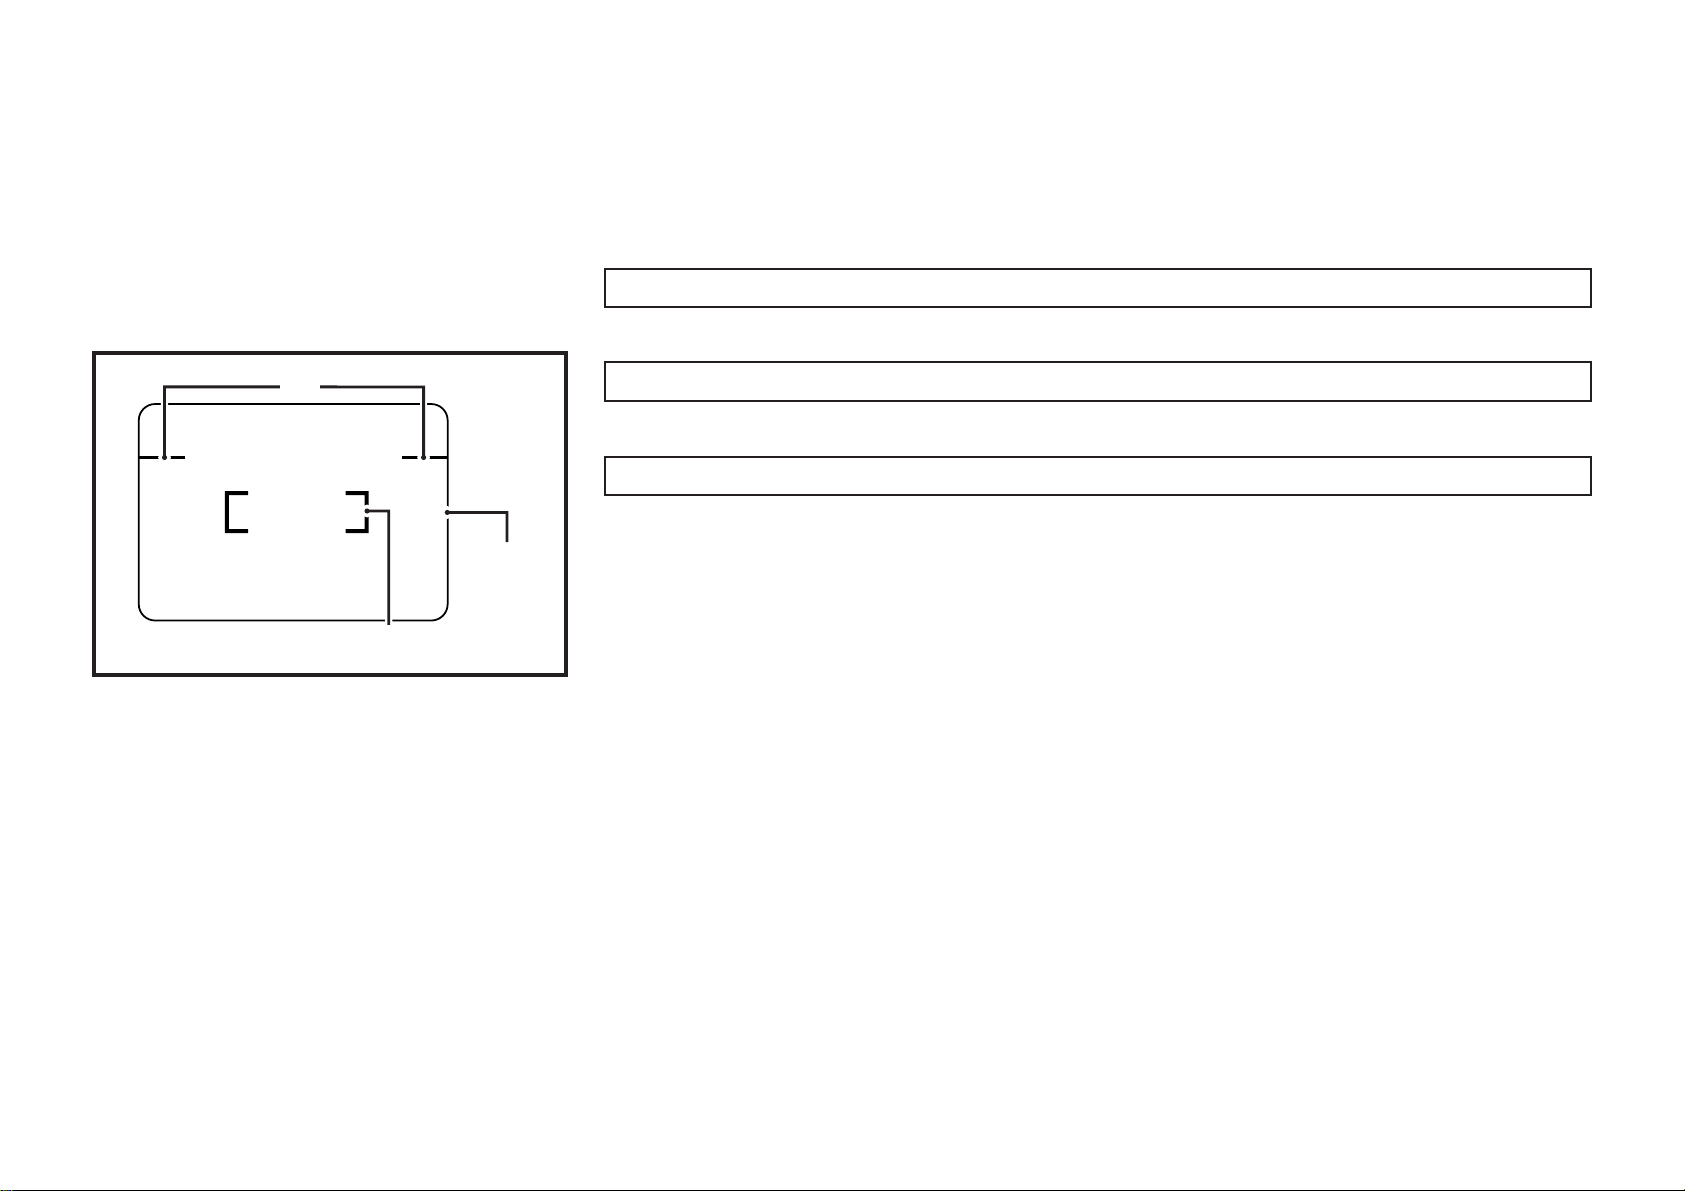
Finder
A : Framing area
Compose the image within this area.
C
B
A
B : AF (auto-focus) spot
Position this spot over the main subject in your picture.
C : Close-up Frame
When taking close-ups, use these marks as a guide when composing the picture.
(→p.31)
11
Page 12
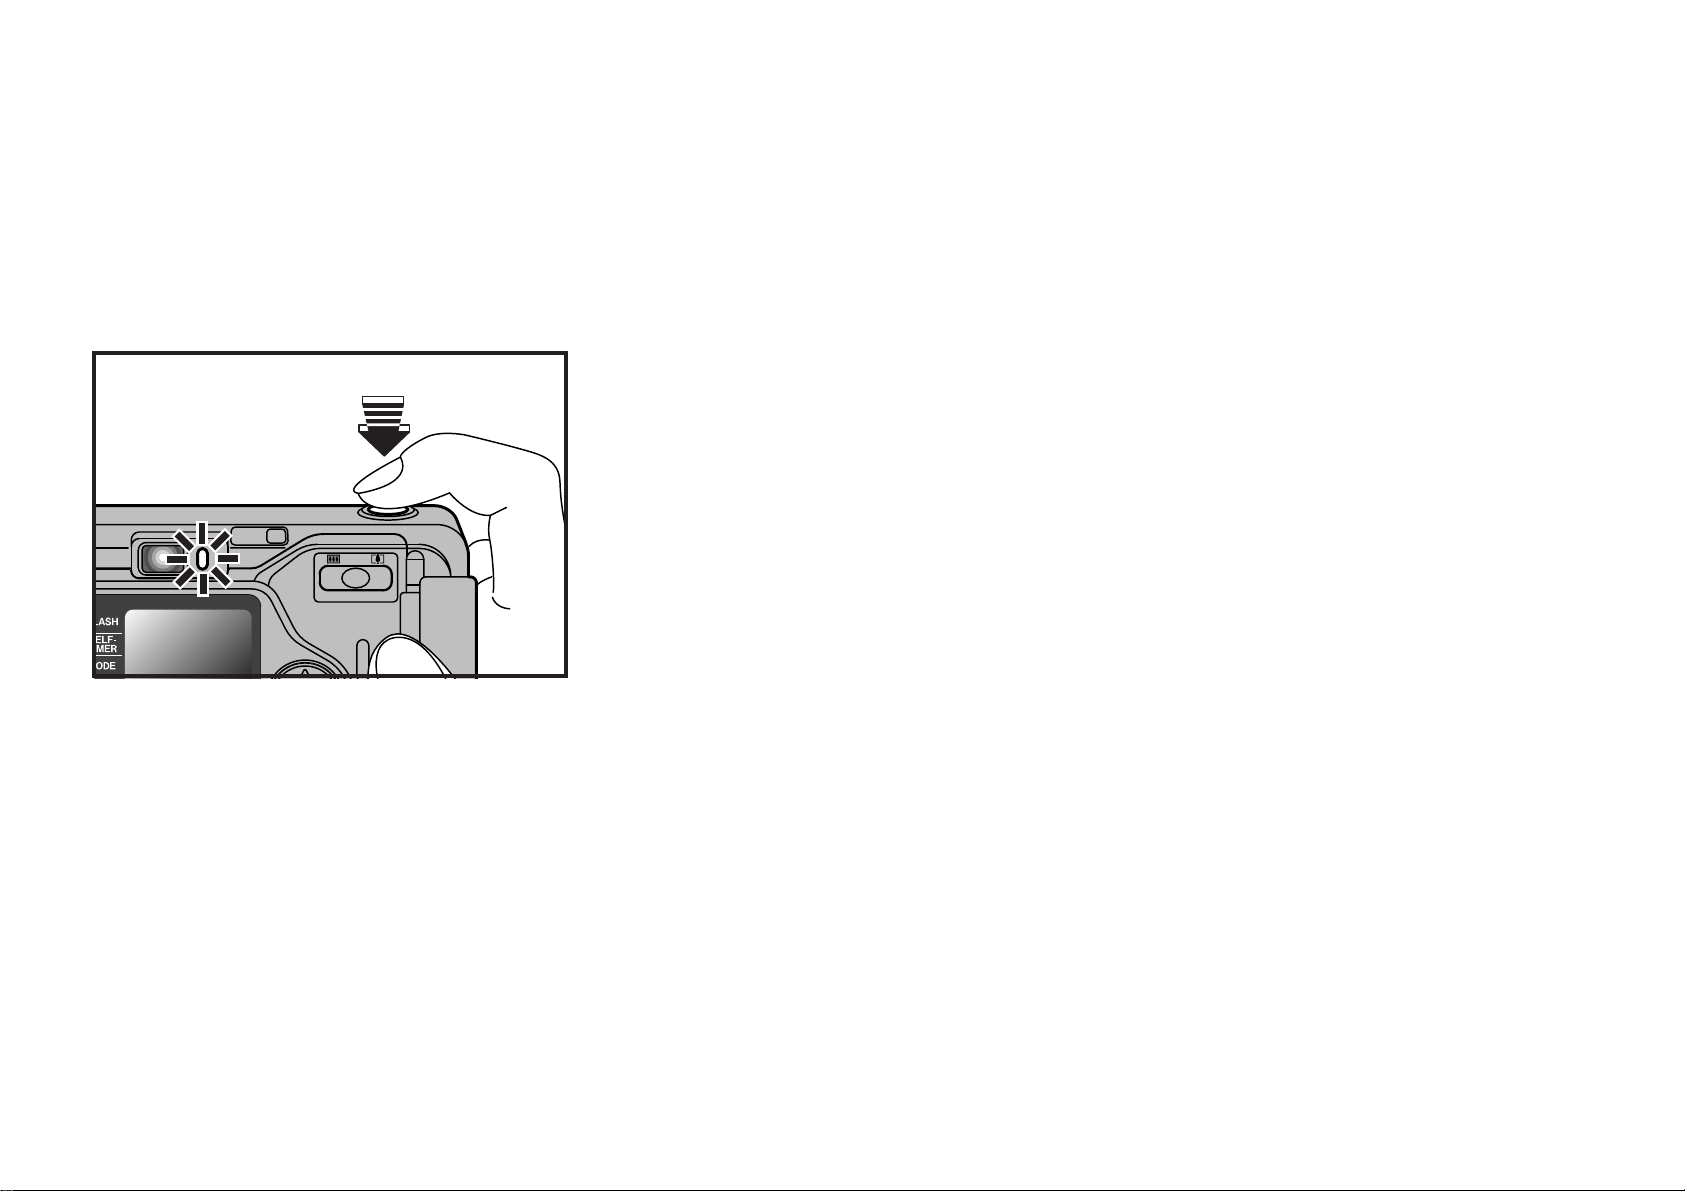
AF Lamp
When the shutter button is pressed down halfway, the AF lamp (green) lights or
blinks.
12
Page 13

AF lamp status and meaning
When the shutter button is pressed down halfway.
∗
Status
Lit
Rapid blinking
Slow blinking
Meaning
Photography is possible. (Focus and exposure settings complete.)
Out of focal range.
Ensure that the subject is at least 0.65 m (0.65 m/2.1 ft. - ∞) from the camera.
The shutter lock operates in the mode. Ensure that the subject is 0.5 - 1.0 m (1.6 - 3.3 ft.) from the camera
∗
Out of focus.
• Ensure that the subject is within the AF frame.
• AF can not focus on the subject. F ocus on an object of the same brightness and at the same distance as the subject you w ant to
photograph and use the AF lock.
The shutter lock operates in the mode.
∗
13
Page 14
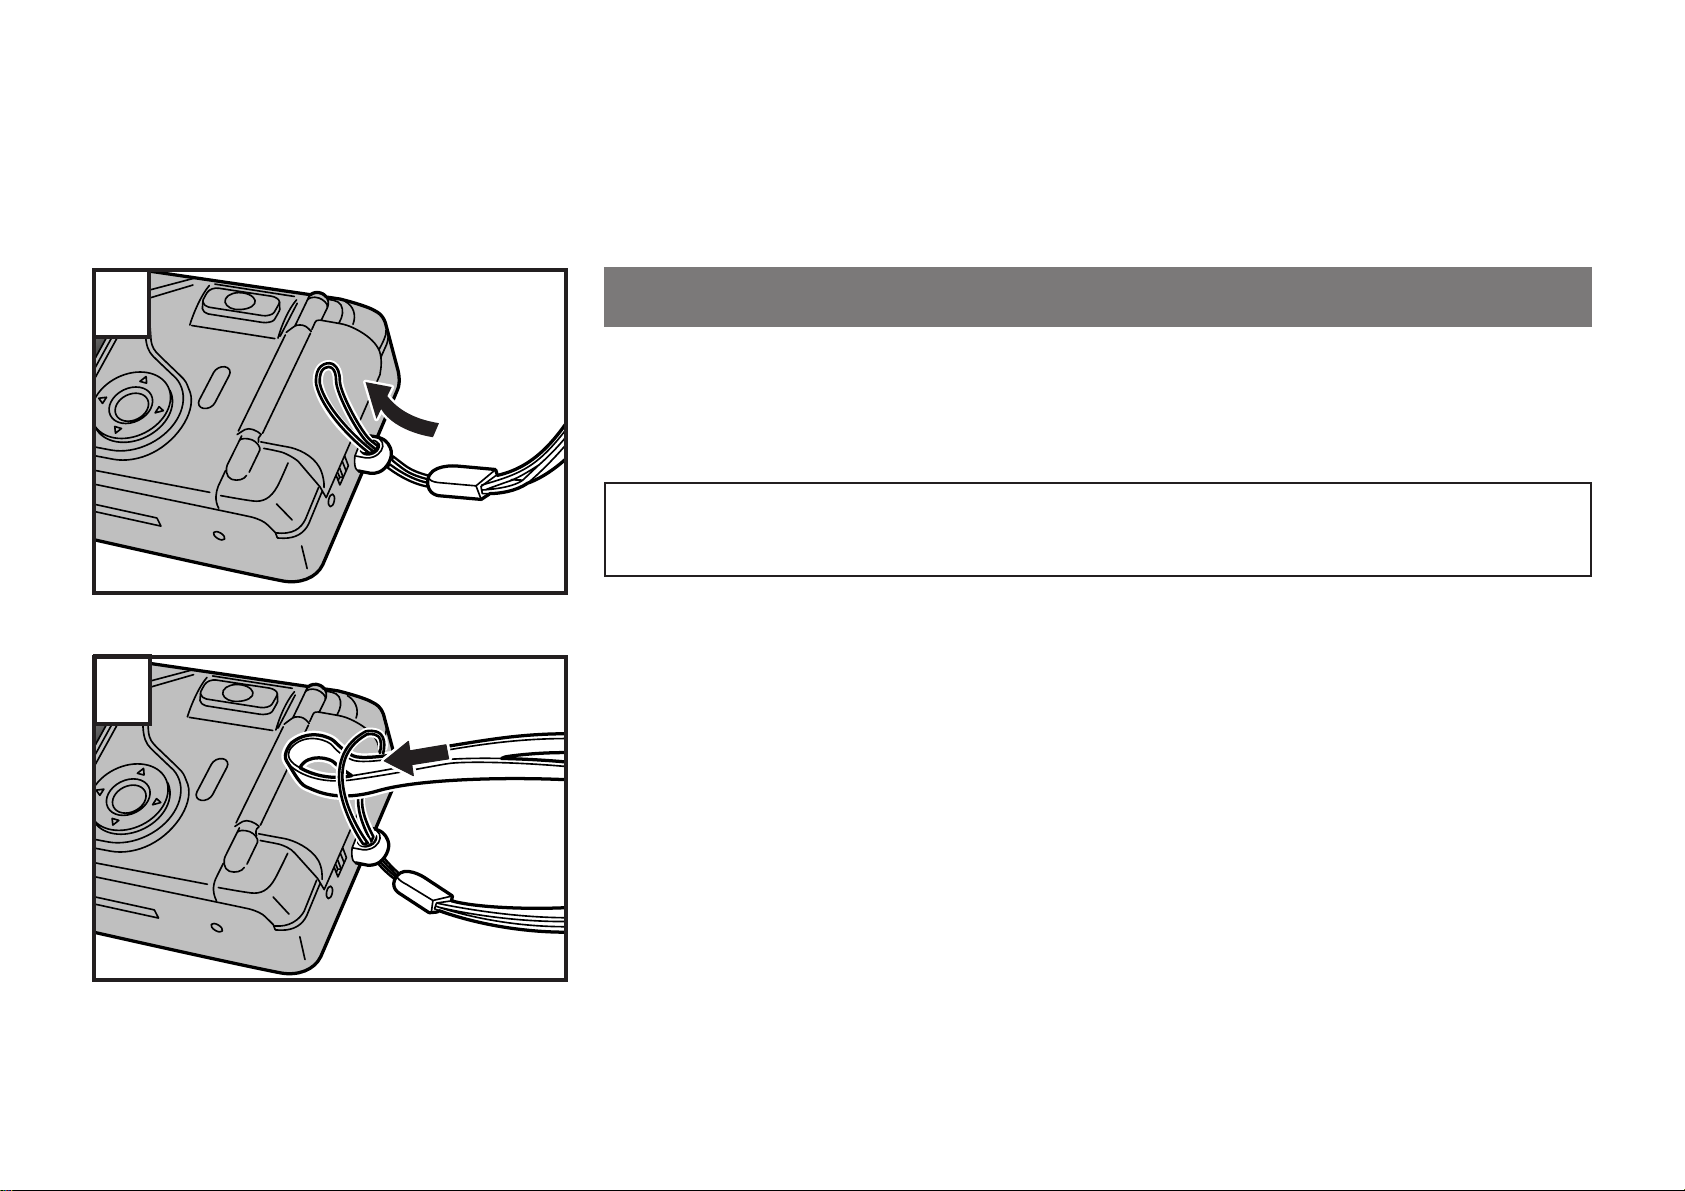
1
2
1. PRELIMINARY STEPS
A TT ACHING THE STRAP
Slip the thin cord on the carrying strap through the strap lug on the side of the
camera leaving a loop. Slide the thick part of the strap through this loop and pull
tight. Take up any slack to make sure the strap is securely attached to the camera.
Do not use a strap made for cellular phones or similar electronic products. These straps are
usually too light or weak to hold your camera securely. For safety, use only straps designed for
cameras.
14
Page 15

2
1
4
3
CHINESE
LOADING THE B ATTER Y
Your camera uses one 3V lithium battery,
To load the battery.
1 Move the battery cover release knob.
2 Open the battery cover.
3 Insert the batter y following instruction in the diagram on the inside of the battery
cover paying particular attention to the position of the , and . poles of the battery. The battery must be inserted the right way or the camer a will not function.
4 When the batter y is inser ted correctly, close the battery compartment cover by
pressing it until it snaps into place.
Do not apply excessive force when opening or closing the battery cover.
∗
One fresh lithium battery should be sufficient for approximately 250 exposures (based on our
∗
test conditions).
When traveling, take extra batteries to provide power for extra exposures. This is particularly
∗
important if you visit areas where fresh batteries may be difficult to obtain.
Check the battery capacity symbol before using your camera. (→p.17)
∗
After changing the batteries, reset the date to assure accurate date/time recording. (→p.18)
∗
type CR2/DL CR2.
15
Page 16
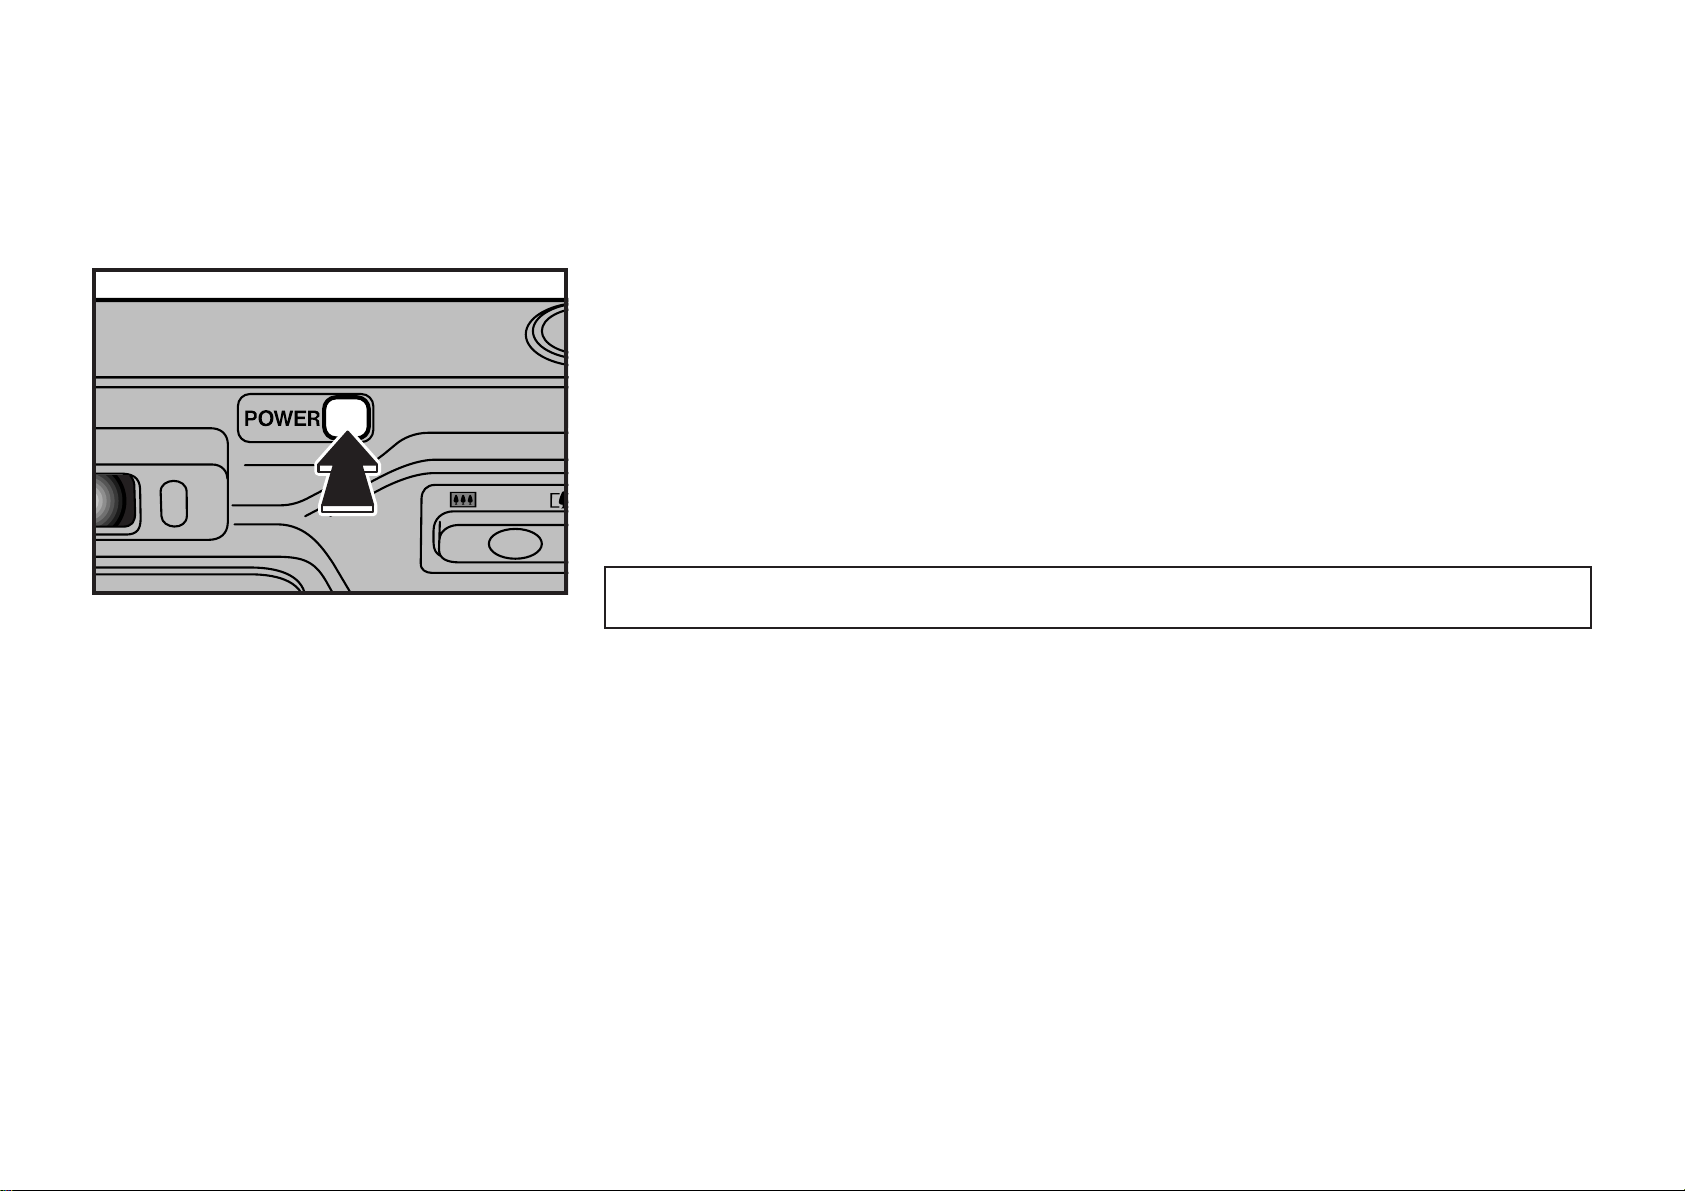
TURNING ON YOUR CAMERA
Before y ou can use your camera, y ou must turn the power on. First press the po wer
supply button which turns on the power . Pressing this button a second time will turn
the power off.
When you turn your camera on, the lens cover will open and the initial display will appear in the
☞
LCD.
When the power is turned on, the camera is set for automatic mode photography. (→p.27)
☞
When you are finished using your camera, turn the power off to conserve your battery. If the
∗
power supply is left on for more than 7 minutes without the camera being used, the camera will
automatically turn itself off.
Before you turn the camera on, make sure that the lens is not blocked to avoid any interference
with the lens extending into its picture taking position.
16
Page 17
CHECKING Y OUR BA TTERY
CHINESE
1
2
3
To determine the condition of the batter y in your camera, turn the power on and
check the battery capacity indicator on the LCD panel.
1 Lit : Battery capacity is OK.
2 Lit : Battery capacity is low. Replace with a new battery.
3
Blinks
Check the battery capacity before you start to use your camera.
∗
The battery can be replaced even while there is a partially-exposed film in the camera.
∗
When the battery is replaced immediately after loading a new film, the camera may not recog-
∗
nize that a film has been loaded. If this happens, open and close the camera back. (→p.59)
: Shutter cannot be released because battery is exhausted. Replace with
a fresh battery.
17
Page 18
1
2
3
4
SETTING THE D A TE
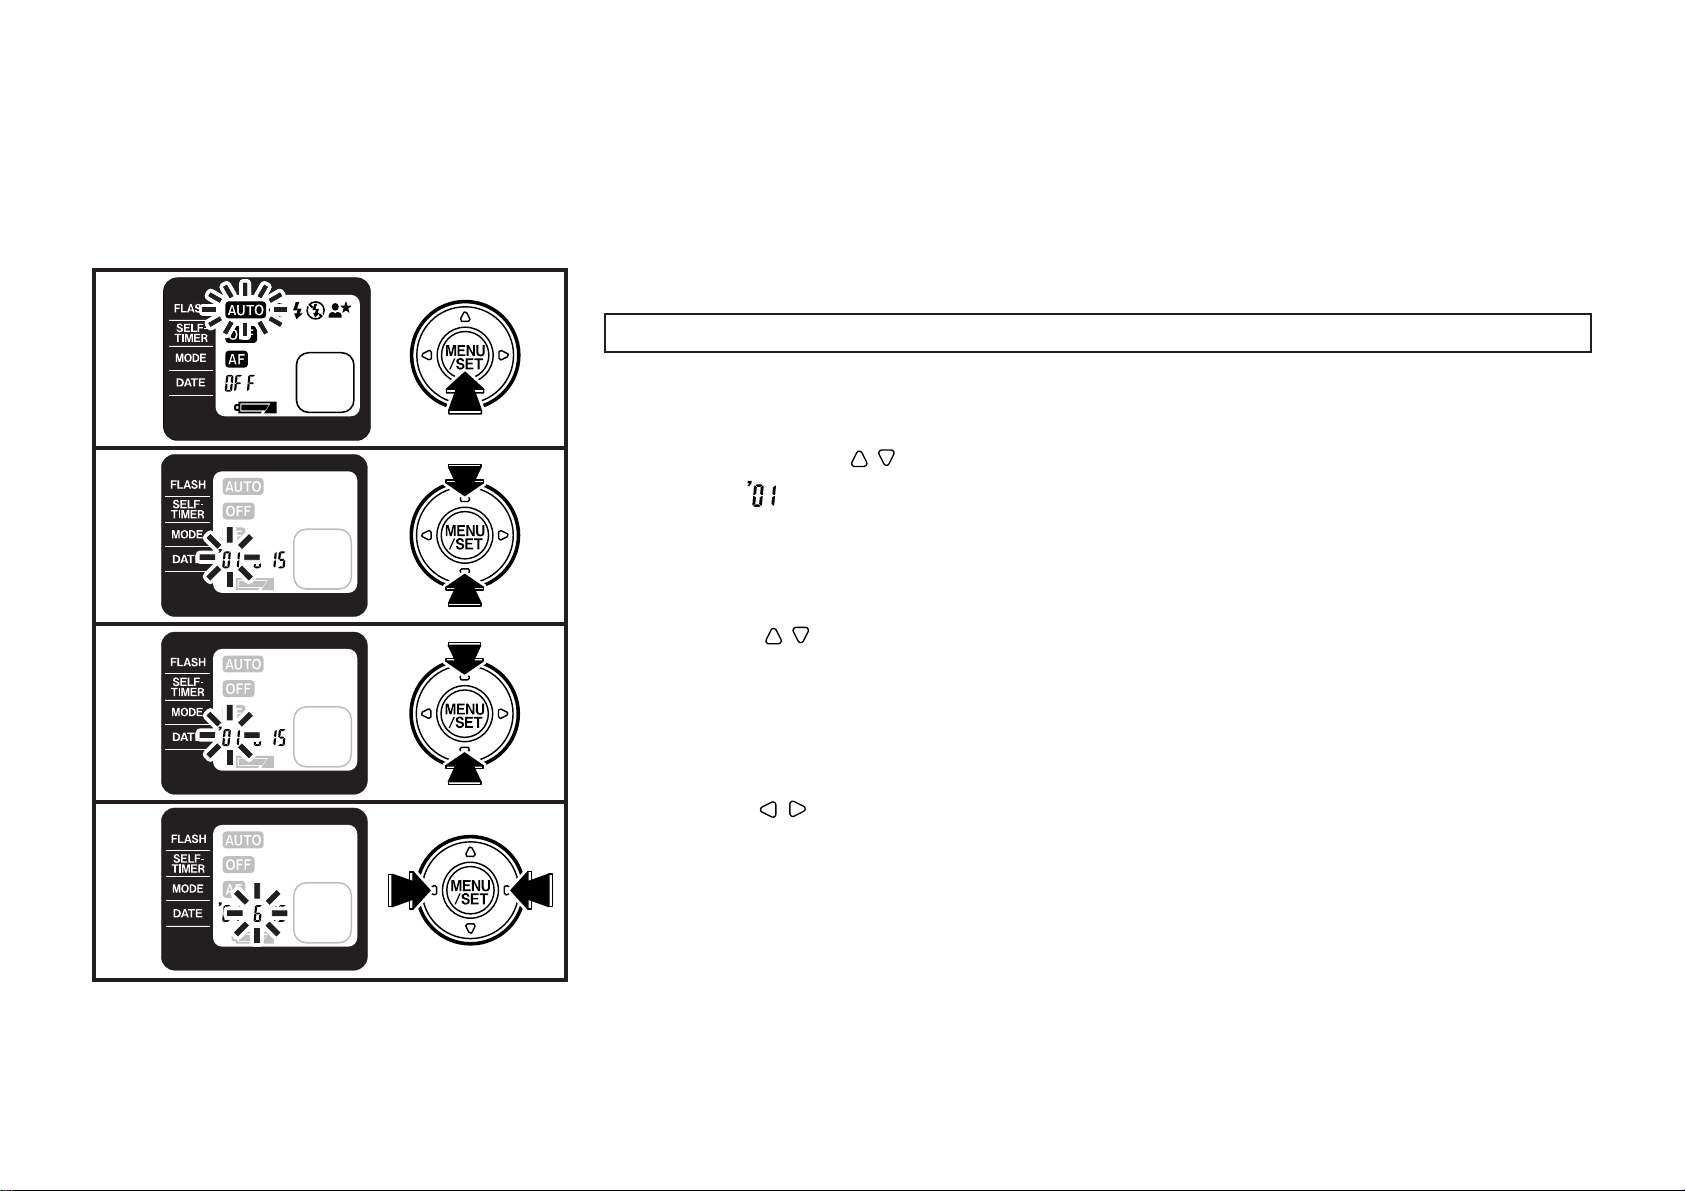
Setting the date
1 Turn the camera on and press the MENU/SET button.
The LCD lights orange and the menu selection mode is entered.
☞
2 Press any of the buttons to the make the DATE menu blink.
The year “ ” blinks and the date setting mode is entered.
☞
3 Press the buttons to change the numbers which are blinking.
4 Press the buttons to change the item to be set.
The selected item blinks.
☞
(YEAR-MONTH-DA Y/HOUR-MINUTE)
18
Page 19
5
CHINESE
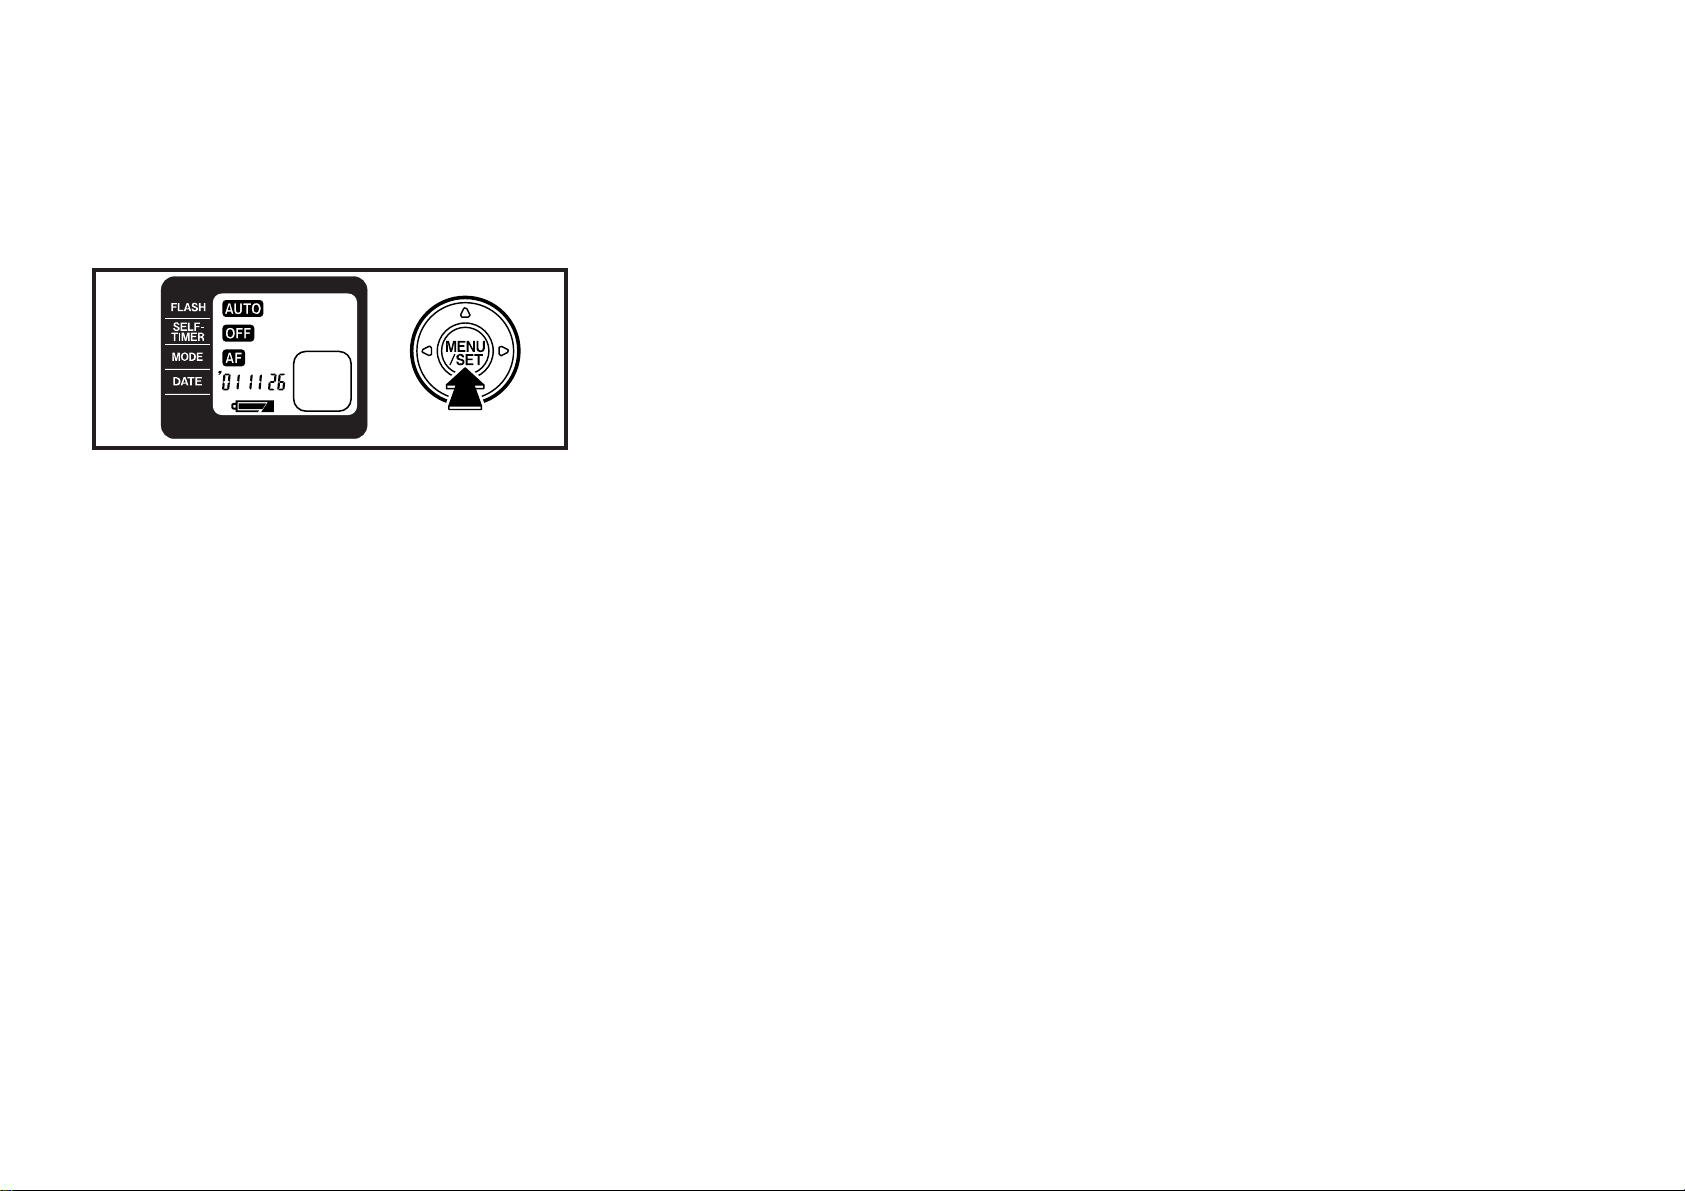
5 When the date has been set, press the MENU/SET button.
The LCD changes to green and the date which has been set is displayed.
☞
To set the time (hour or minute) by the radio, press in the MENU/SET button when the time
☞
signal indicates zero.
The year, month, and day will change together with the hour and minute.
∗
● You can set:
Year : ’01 to ’31 (2001 to 2031)
Month : 1 to 12 Day : 1 to 31
Time : 0 to 23 hours; 00 to 59 minutes
19
Page 20
1
2
3
4
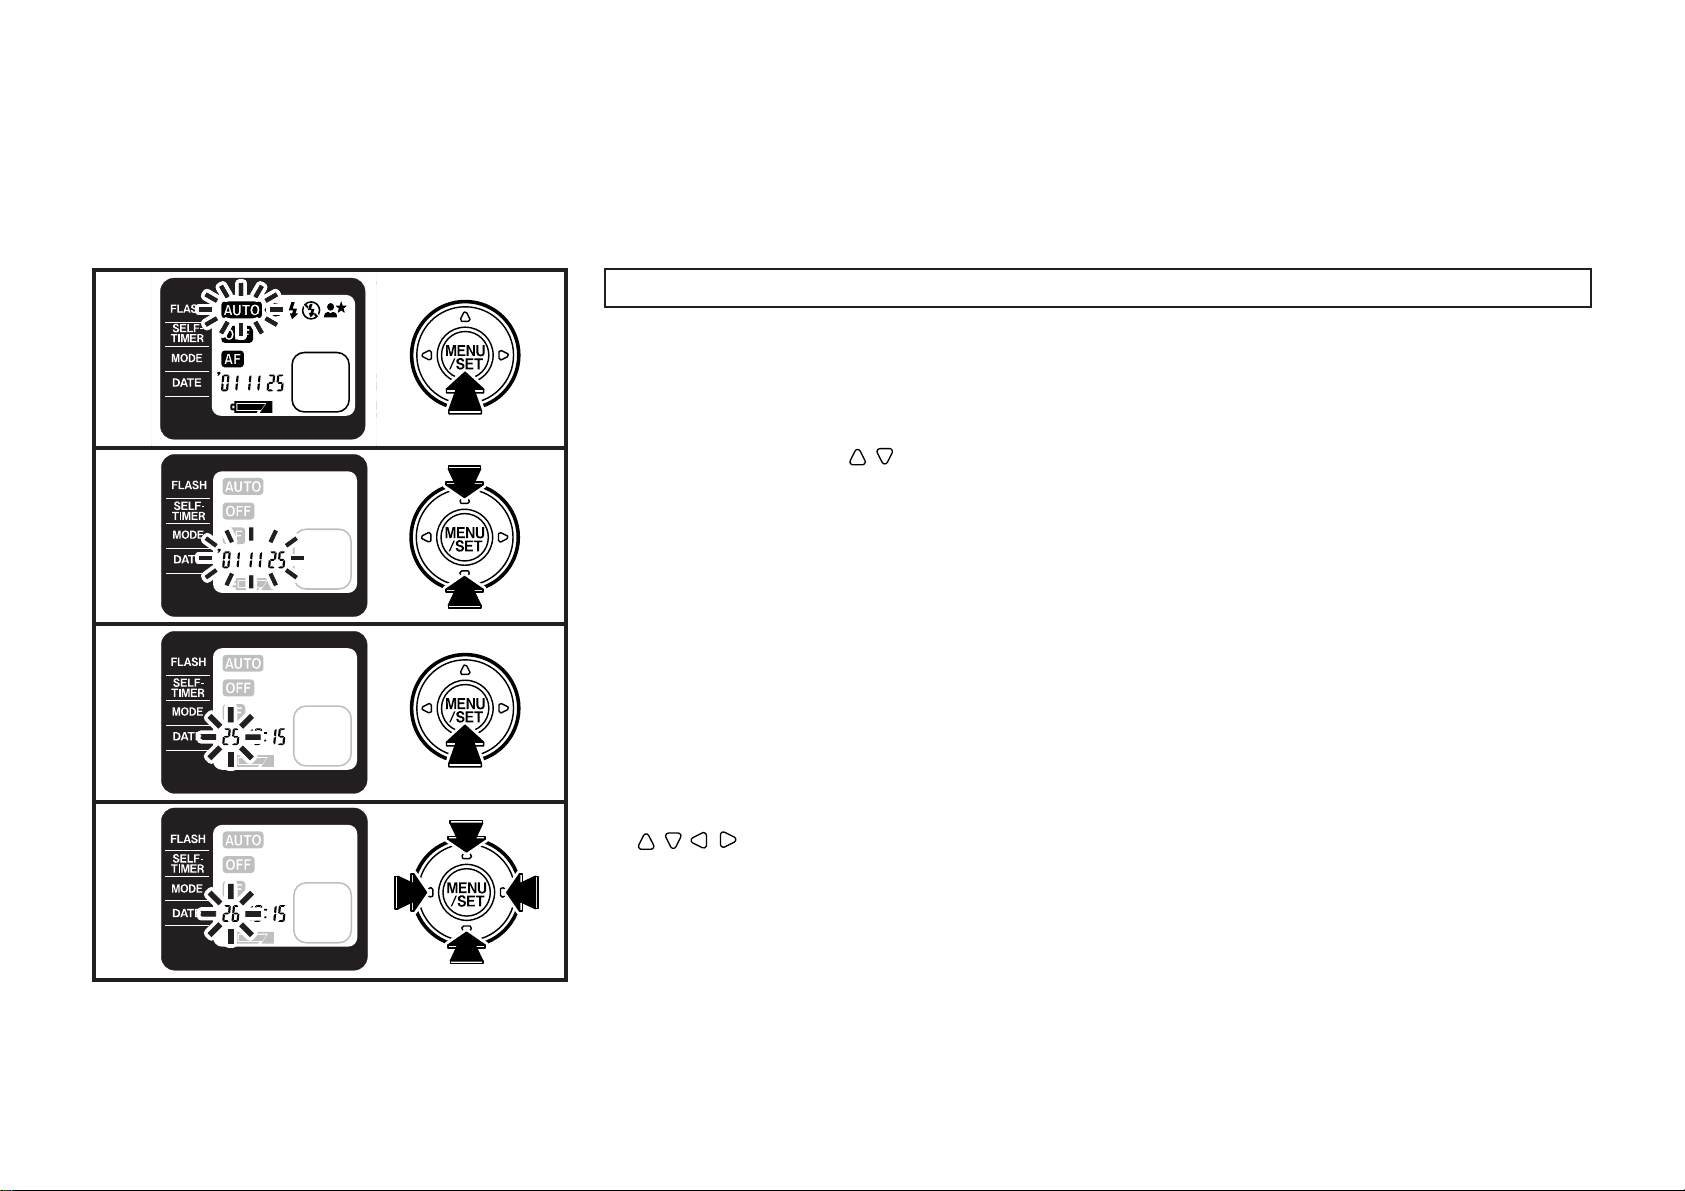
Changing the date
1 Turn the camera on and press the MENU/SET button.
The LCD lights orange and the menu selection mode is entered.
☞
2 Press any of the buttons to make the DATE menu blink.
The date section blinks.
☞
3 Hold the MENU/SET button down for 2 seconds or longer.
The “Day” blinks and the date change mode is entered.
☞
4 Using the procedure described in steps 3 to 4 on page 18, set the date with the
buttons.
When the date has been set, press the MENU/SET button.
☞
20
Page 21
CHINESE
SELECTING THE DATE MODE
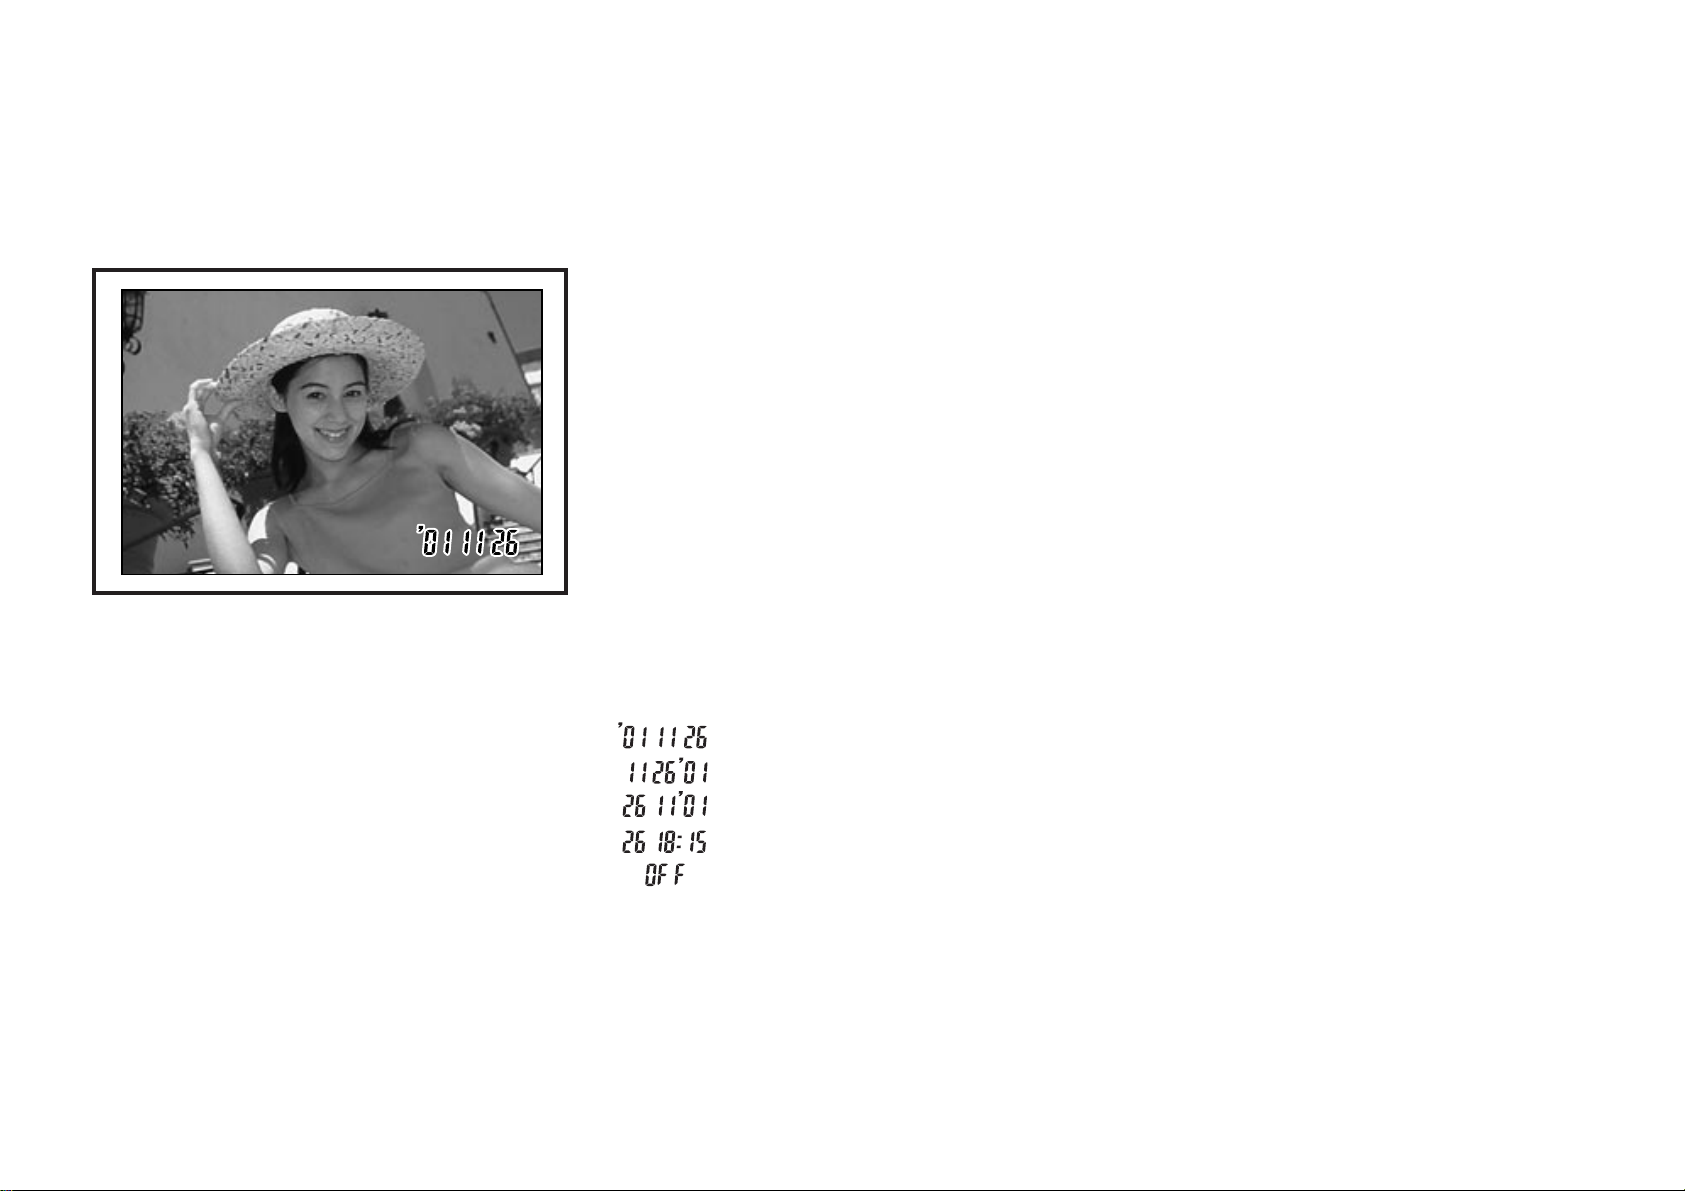
The date and time (year-month-da y/ hour-minute) will be imprinted at the lower right
of the photograph.
The date display printed on the front of the picture may not be clearly visible against a dark
∗
background.
Since the date is printed on the film when the film is wound on, the date may not be printed on
∗
the last frame when more than the standard number of frames are taken.
The following DATE modes can be selected.
■DATE modes
( )Year-Month-Day
( )Month-Day-Year
( )Day-Month-Year
( )Day-Hour-Minute
( )Nothing printed
Examples shown are for 18:15 on the 26th November 2001.
∗
21
Page 22
1
2
3
4
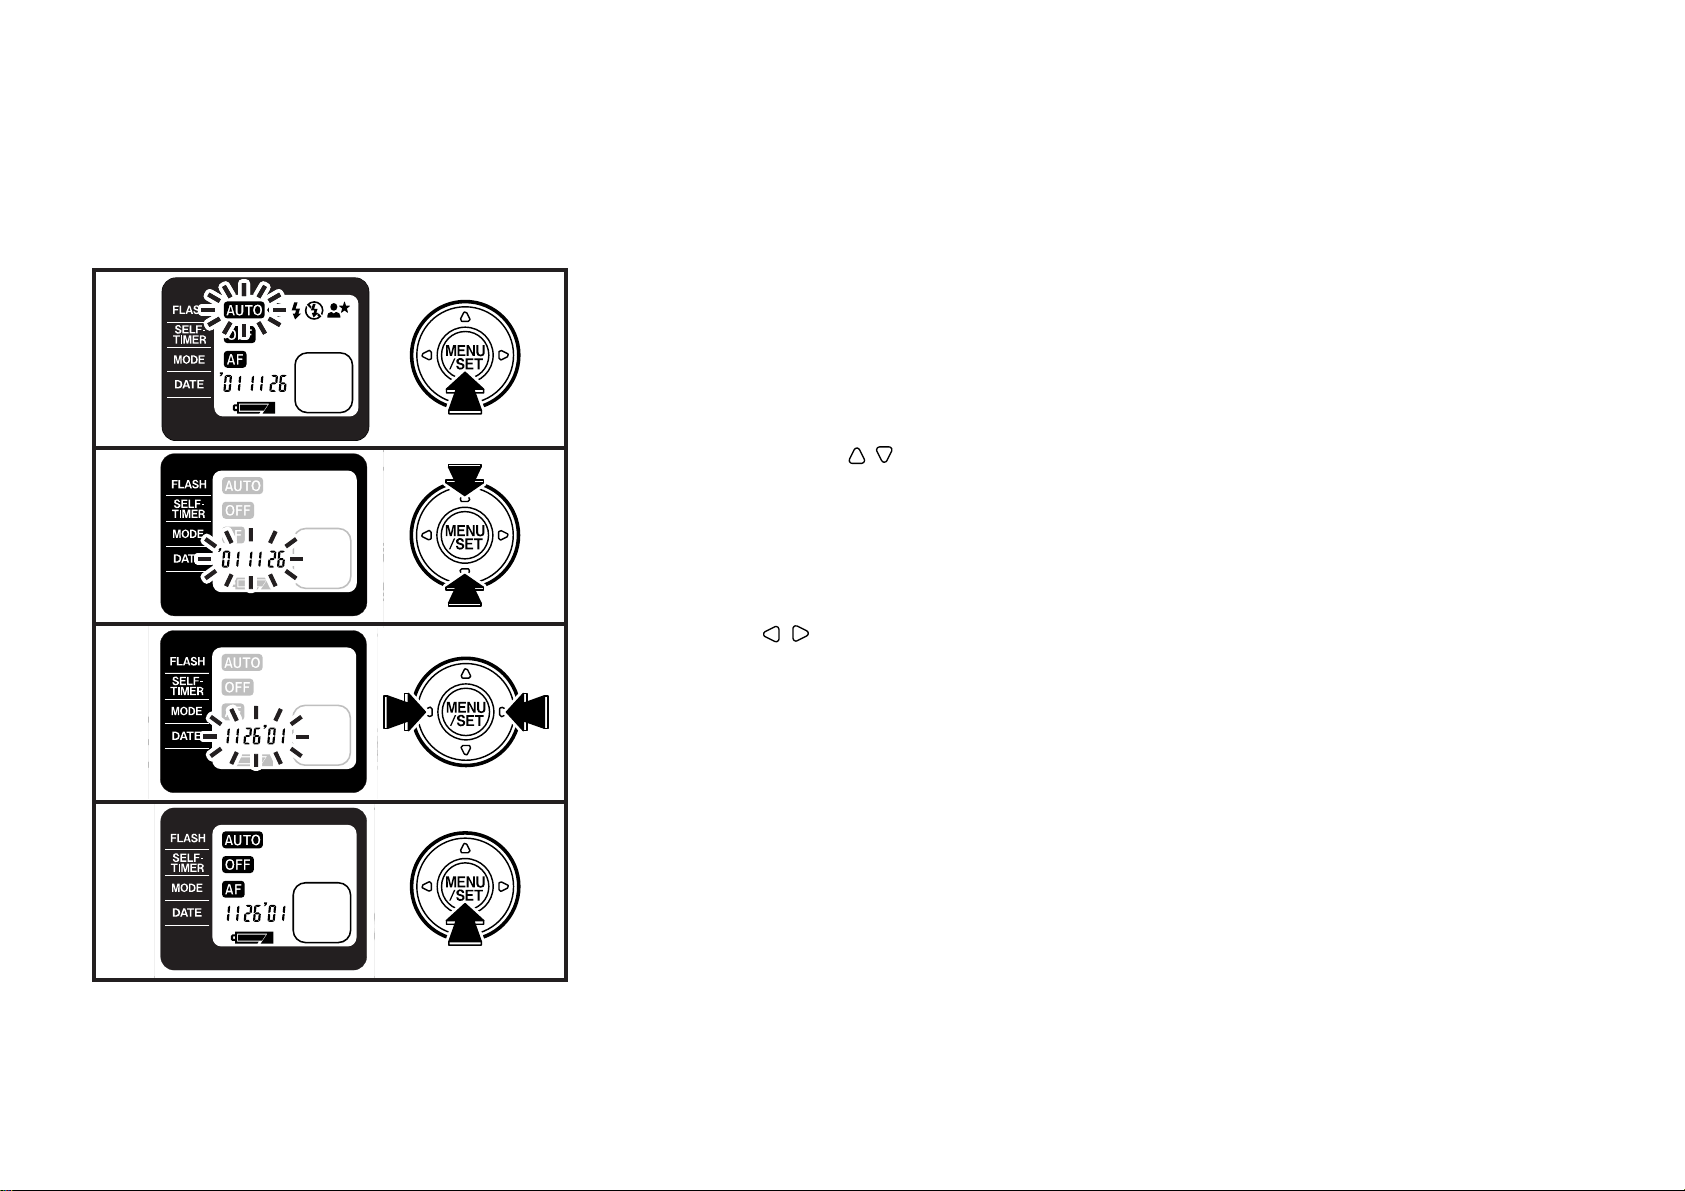
1 Turn the camera on and press the MENU/SET button.
The LCD lights orange and the menu selection mode is entered.
☞
2 Press any of the buttons to make the DATE menu blink.
The date mode selection mode is entered.
☞
3 Press the buttons and select the DATE mode.
The selected mode blinks.
☞
4 Press the MENU/SET button to complete the setting.
The LCD changes to green and the mode which has been set is displayed.
☞
22
Page 23
A
B
2. USING YOUR CAMERA
LO ADING THE CAMERA
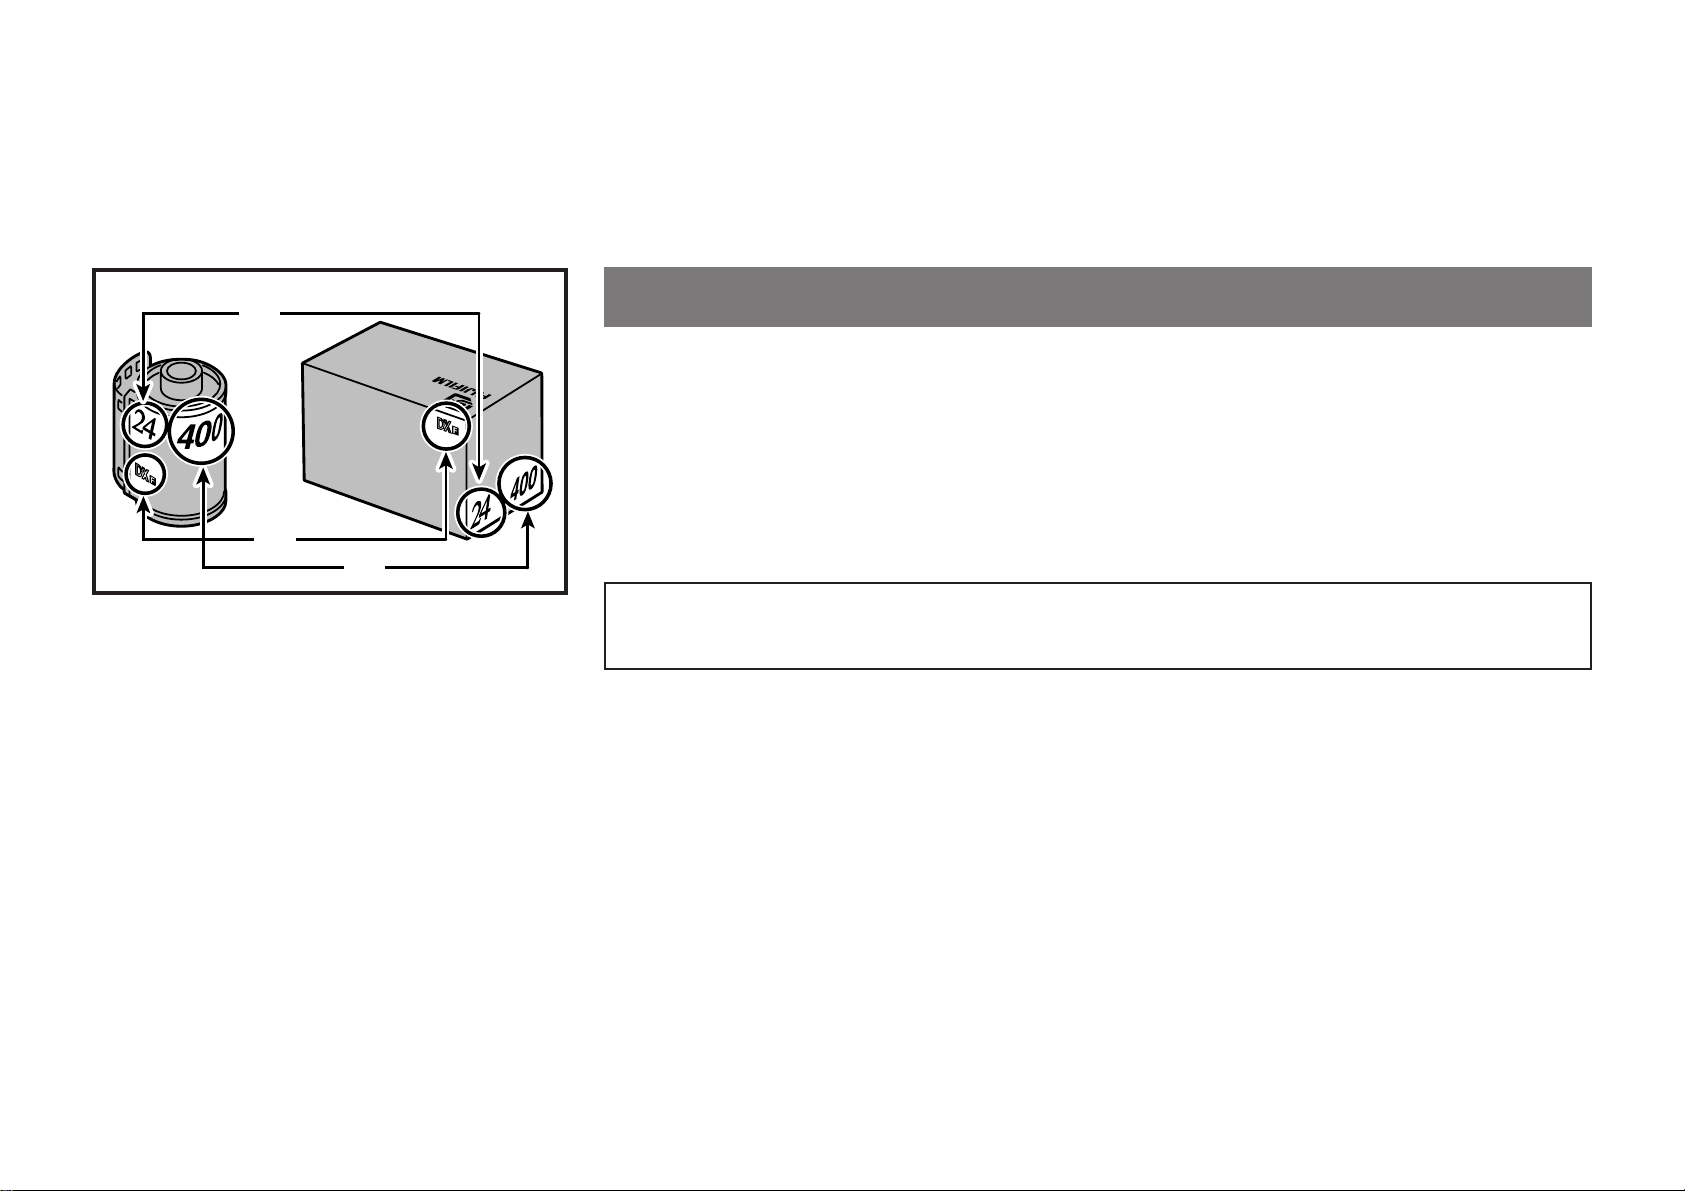
Your camera uses standard 35mm film available anywhere. Almost all 35mm films
will have a DX coding symbol on the film box and on the cassette itself . Information
you will see includes:
A : Number of Exposures
B : DX Code symbol
C : Film Speed (sensitivity to light or ISO rating)
C
•If non-DX coded film is used, the camera’ s automatic e xposure system automatically sets itself
to ISO 100.
•Always load and remove film from your camera away from direct sunlight.
23
Page 24
1
2
2
Check the film check window to make sure no film is loaded into the camera.
Never open the camera back while film is in your camera.
∗
Do not load a film immediately before inserting the battery.
When the battery is replaced immediately after loading a new film, the camera may not recog-
∗
nize that a film has been loaded. (→p.59)
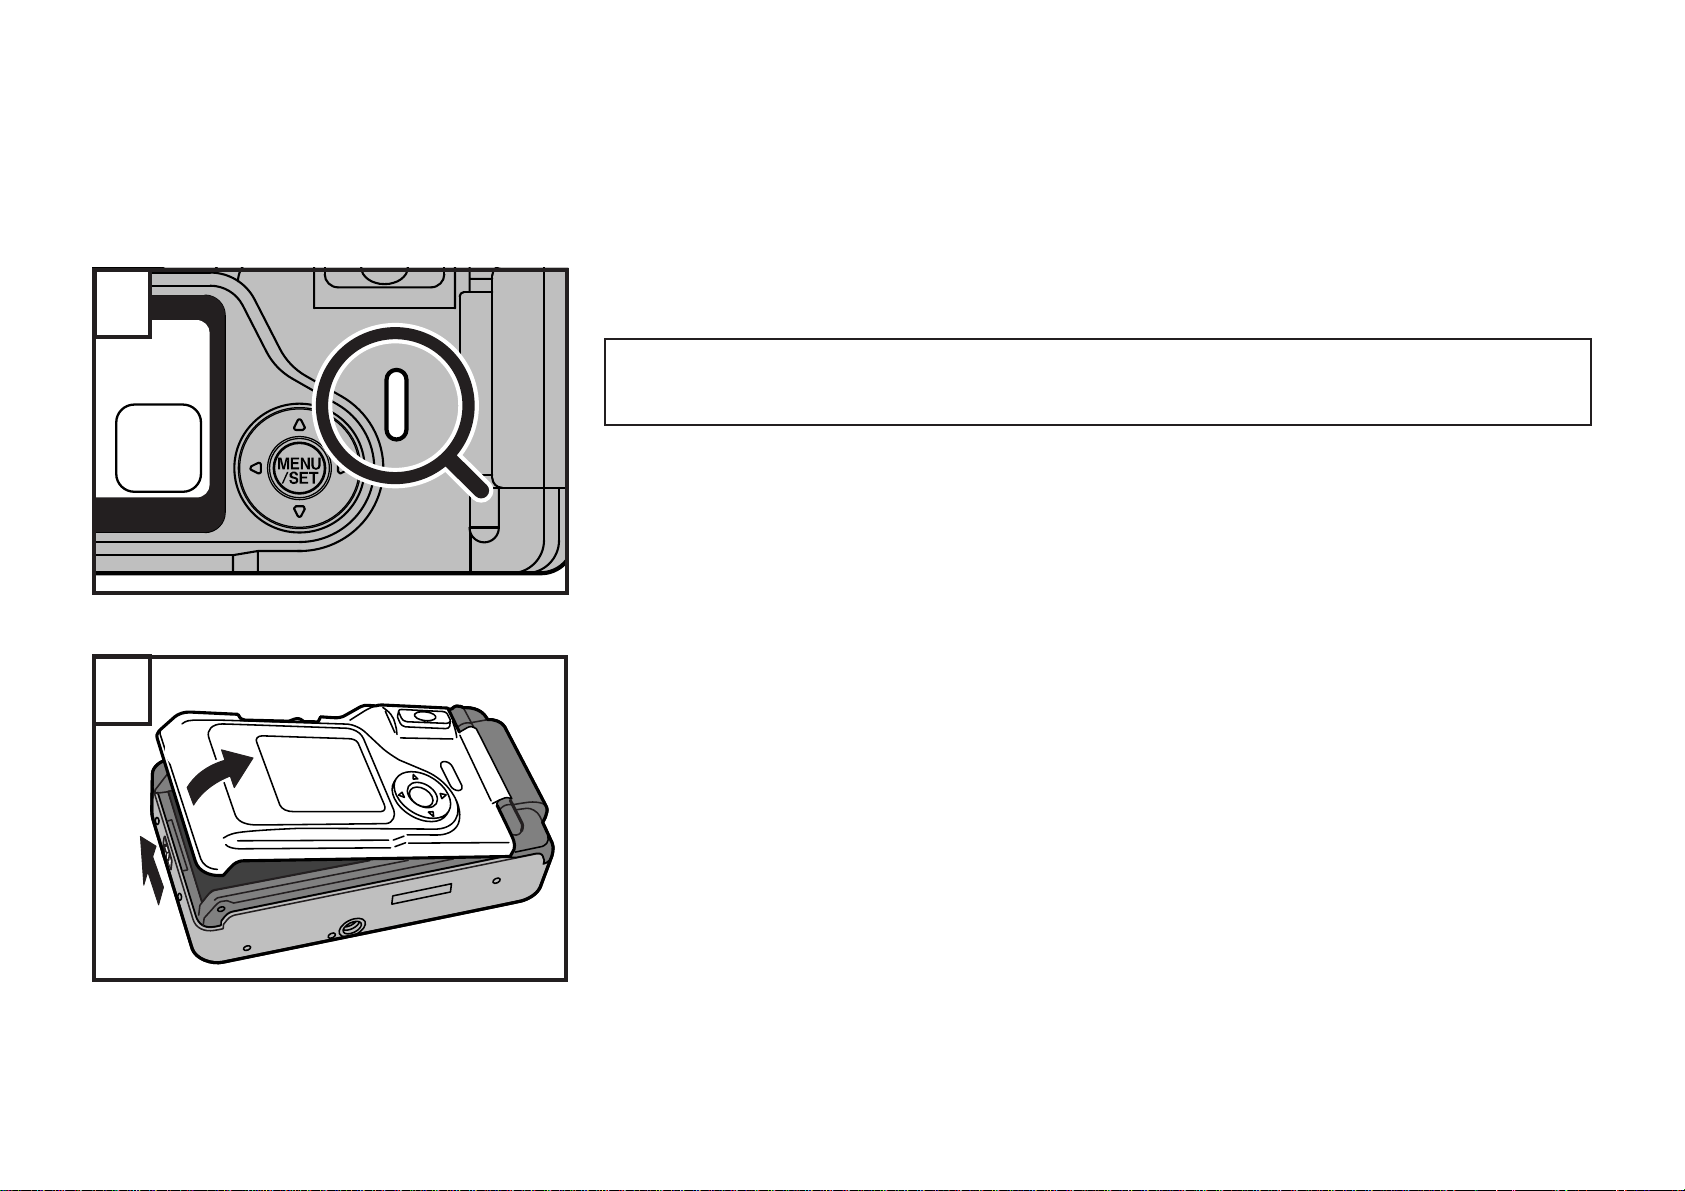
1 To load the film, slide camera back lock in the direction of the arrow as sho wn in
the picture at left.
2 Open the back as shown.
Never apply excessive force when opening or closing the camera back.
∗
24
1
Page 25
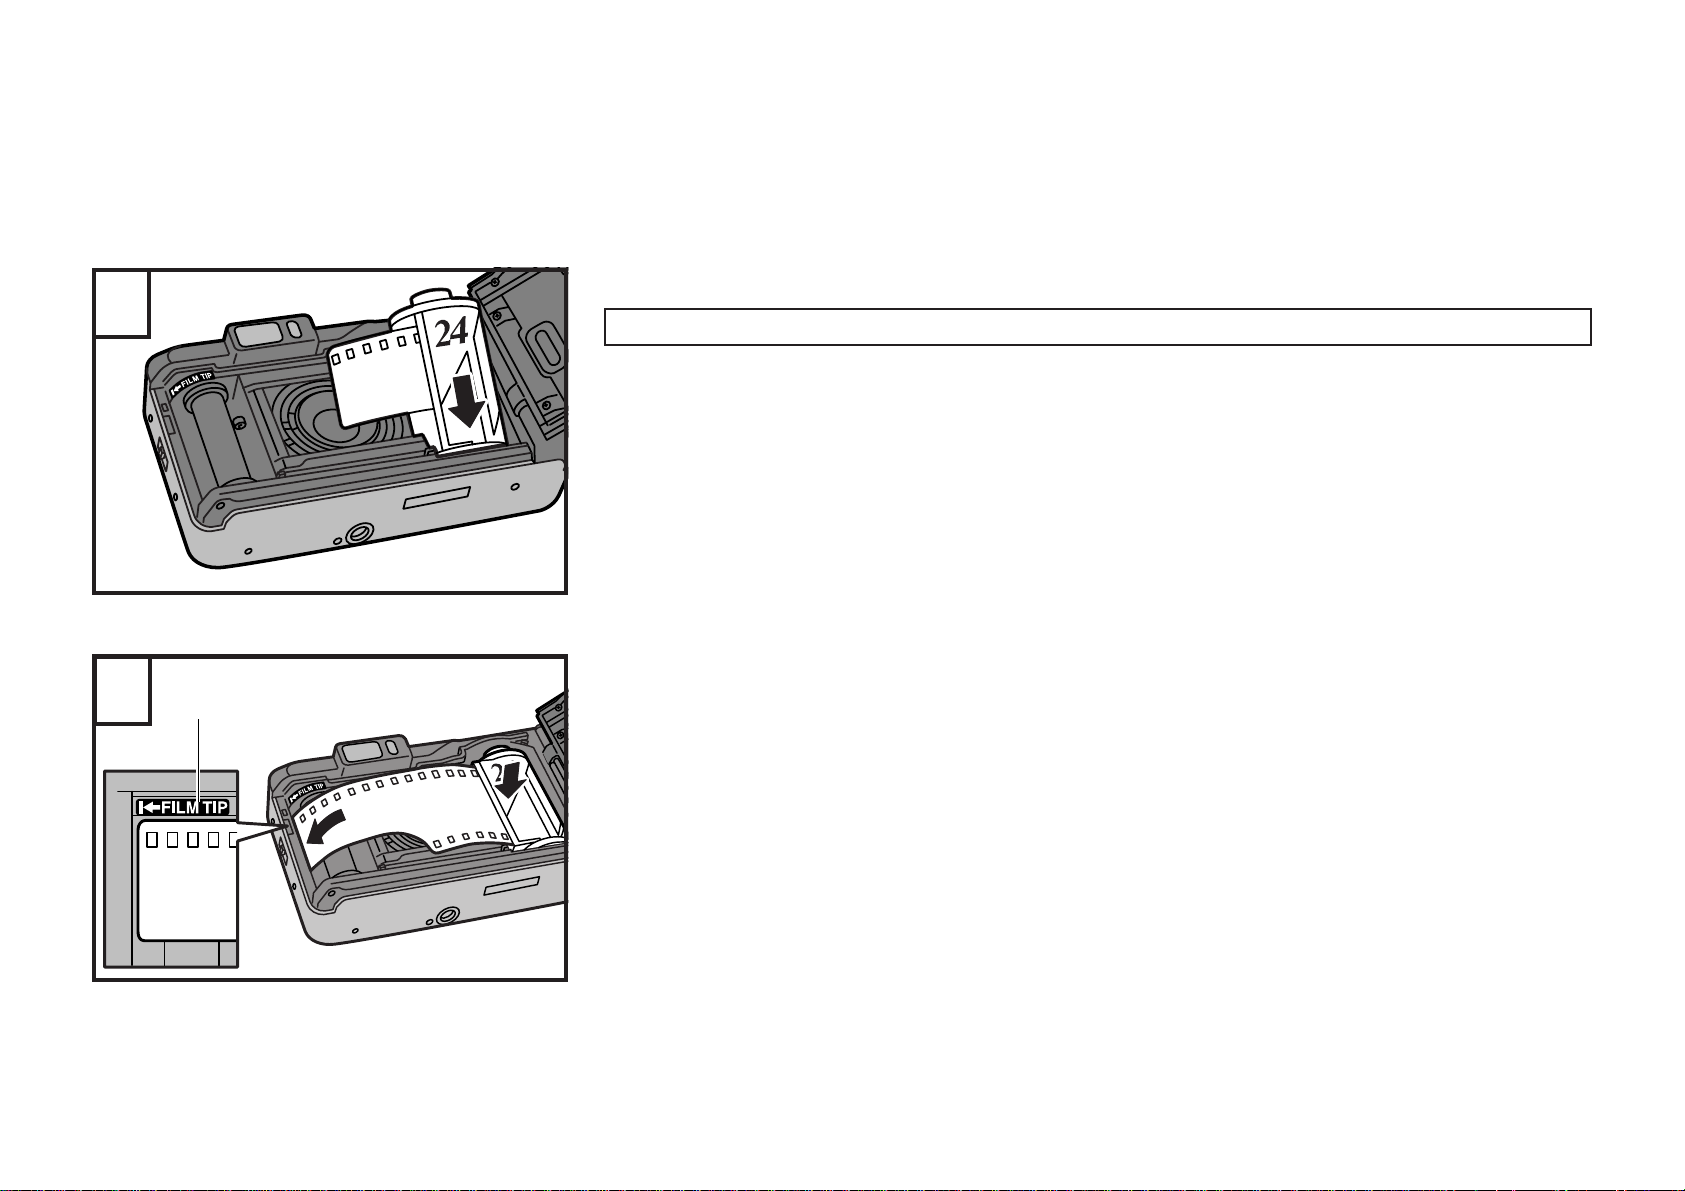
Insert the roll of film.
3
4
A
Be careful not to touch the lens section.
A : FILM TIP mark
While holding the film cassette in place, gently pull the end of the film leader out as
far as the FILM TIP mark in the camera.
Hold the film cassette down so that it does not pop out of the film compartment.
∗
Make sure the end of the film is correctly threaded onto the spool.
∗
If you should pull the film out too far, remove the film cassette and rotate the longer end of the
∗
spool slowly to rewind some of the exposed film and adjust the leader to the correct length to
reach the FILM TIP mark. Be careful not to rewind the leader completely into the cassette.
25
Page 26
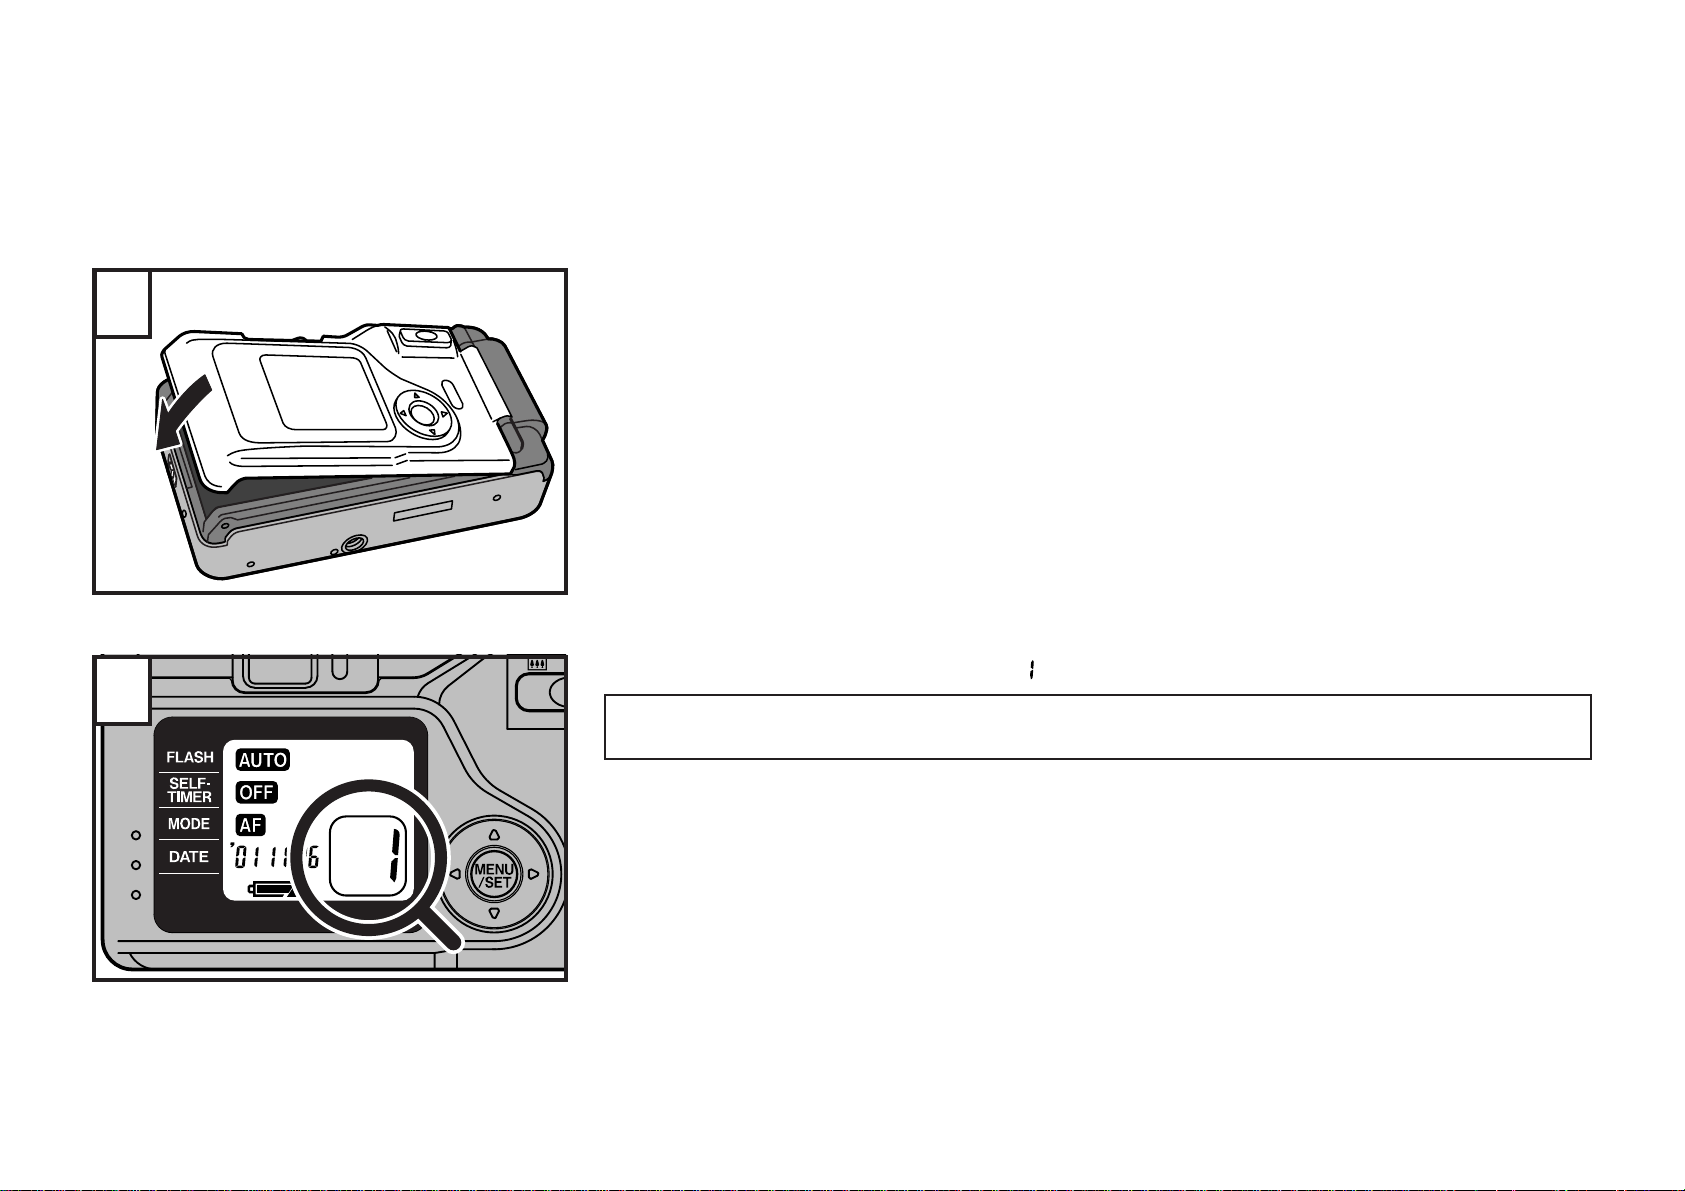
5
Close the camera back.
The film advances automatically.
☞
The type, number of exposures, and speed of the film that has been loaded may be checked
∗
with the film check window.
Check that the exposure counter (“ ”) appears in the LCD.
26
6
If the film is not loaded correctly, the film counter is not displayed in the LCD. In this case, insert
the film again making sure sits is loaded correctly to permit taking pictures.
Page 27
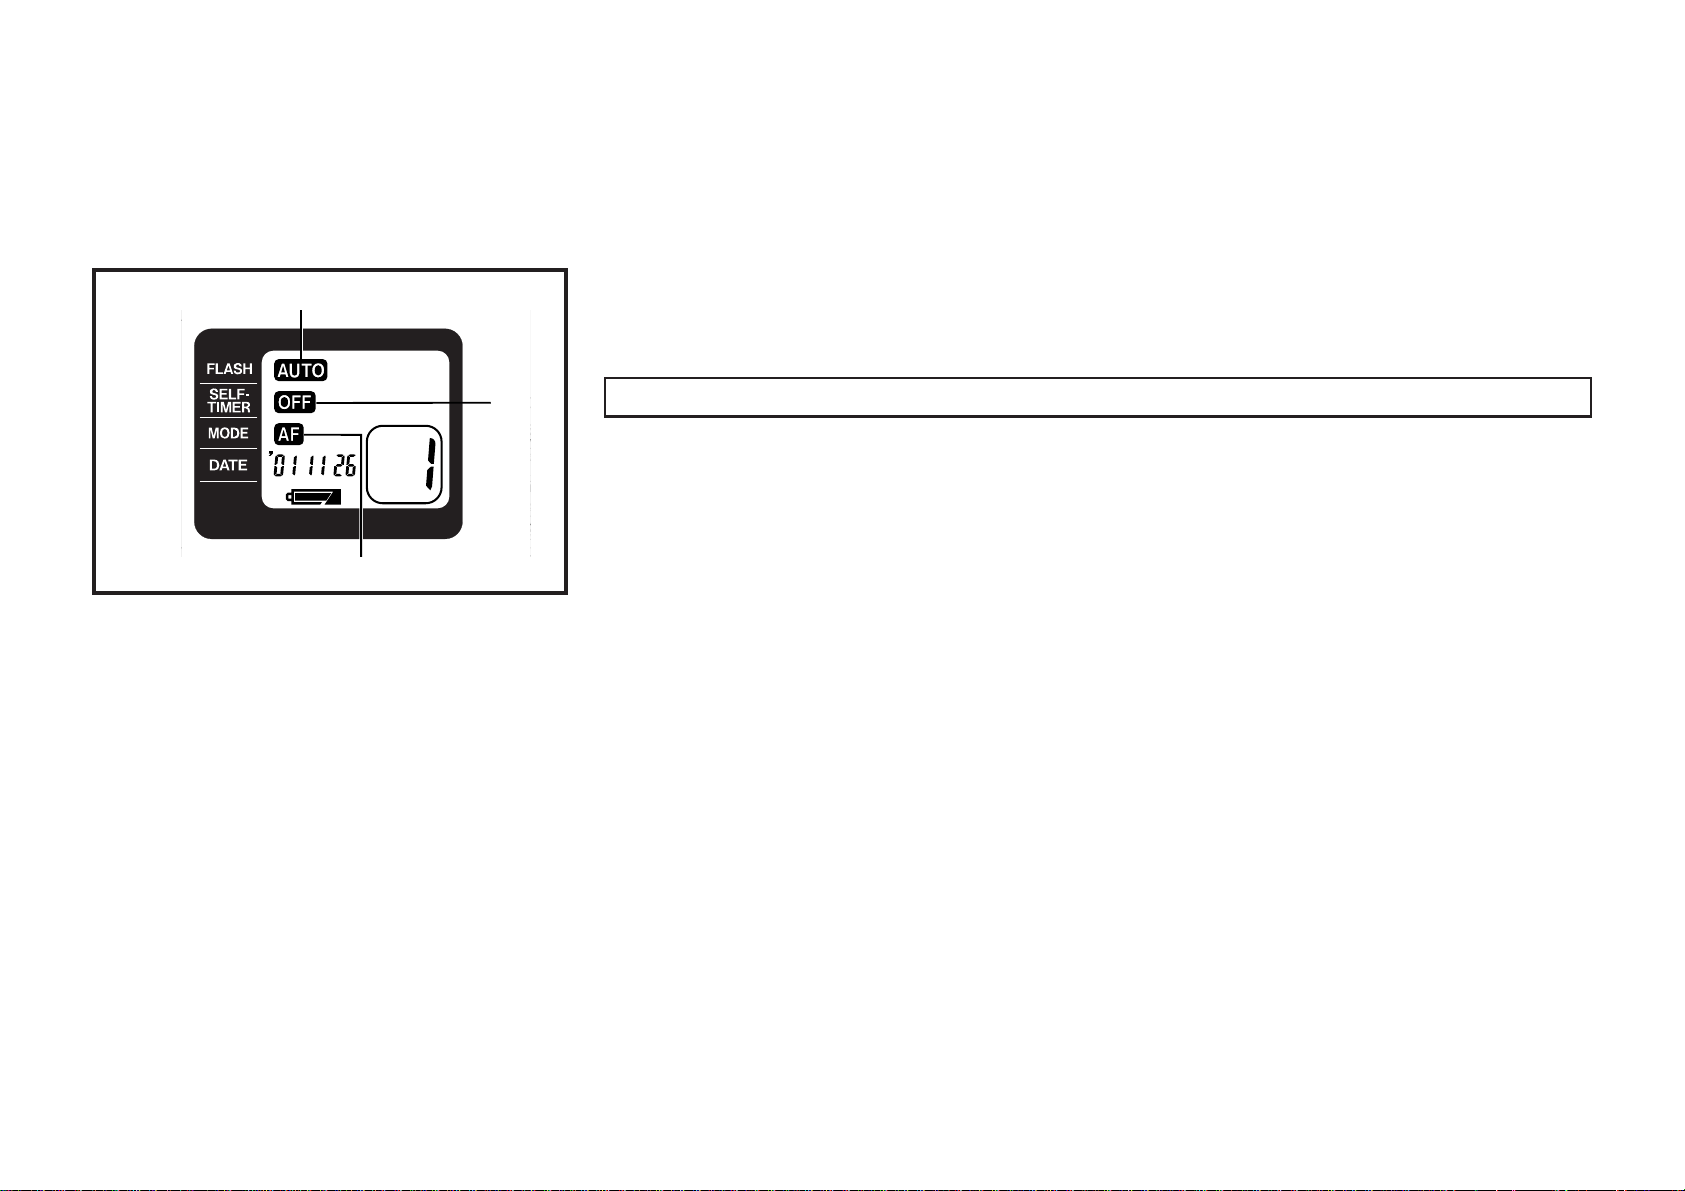
A
USING YOUR CAMERA
When the camera is turned on, the camera is set for automatic mode photography.
How to take pictures with the automatic mode is explained here.
C
B
Automatic mode settings
A : Multi program flash mode
B : Self-timer/Remote control off mode (normal mode)
C : AF (Auto focus) mode
For details of how to use the other photography modes, refer to “3.ADVANCED TECHNIQUES”.
∗
(→p.39)
27
Page 28
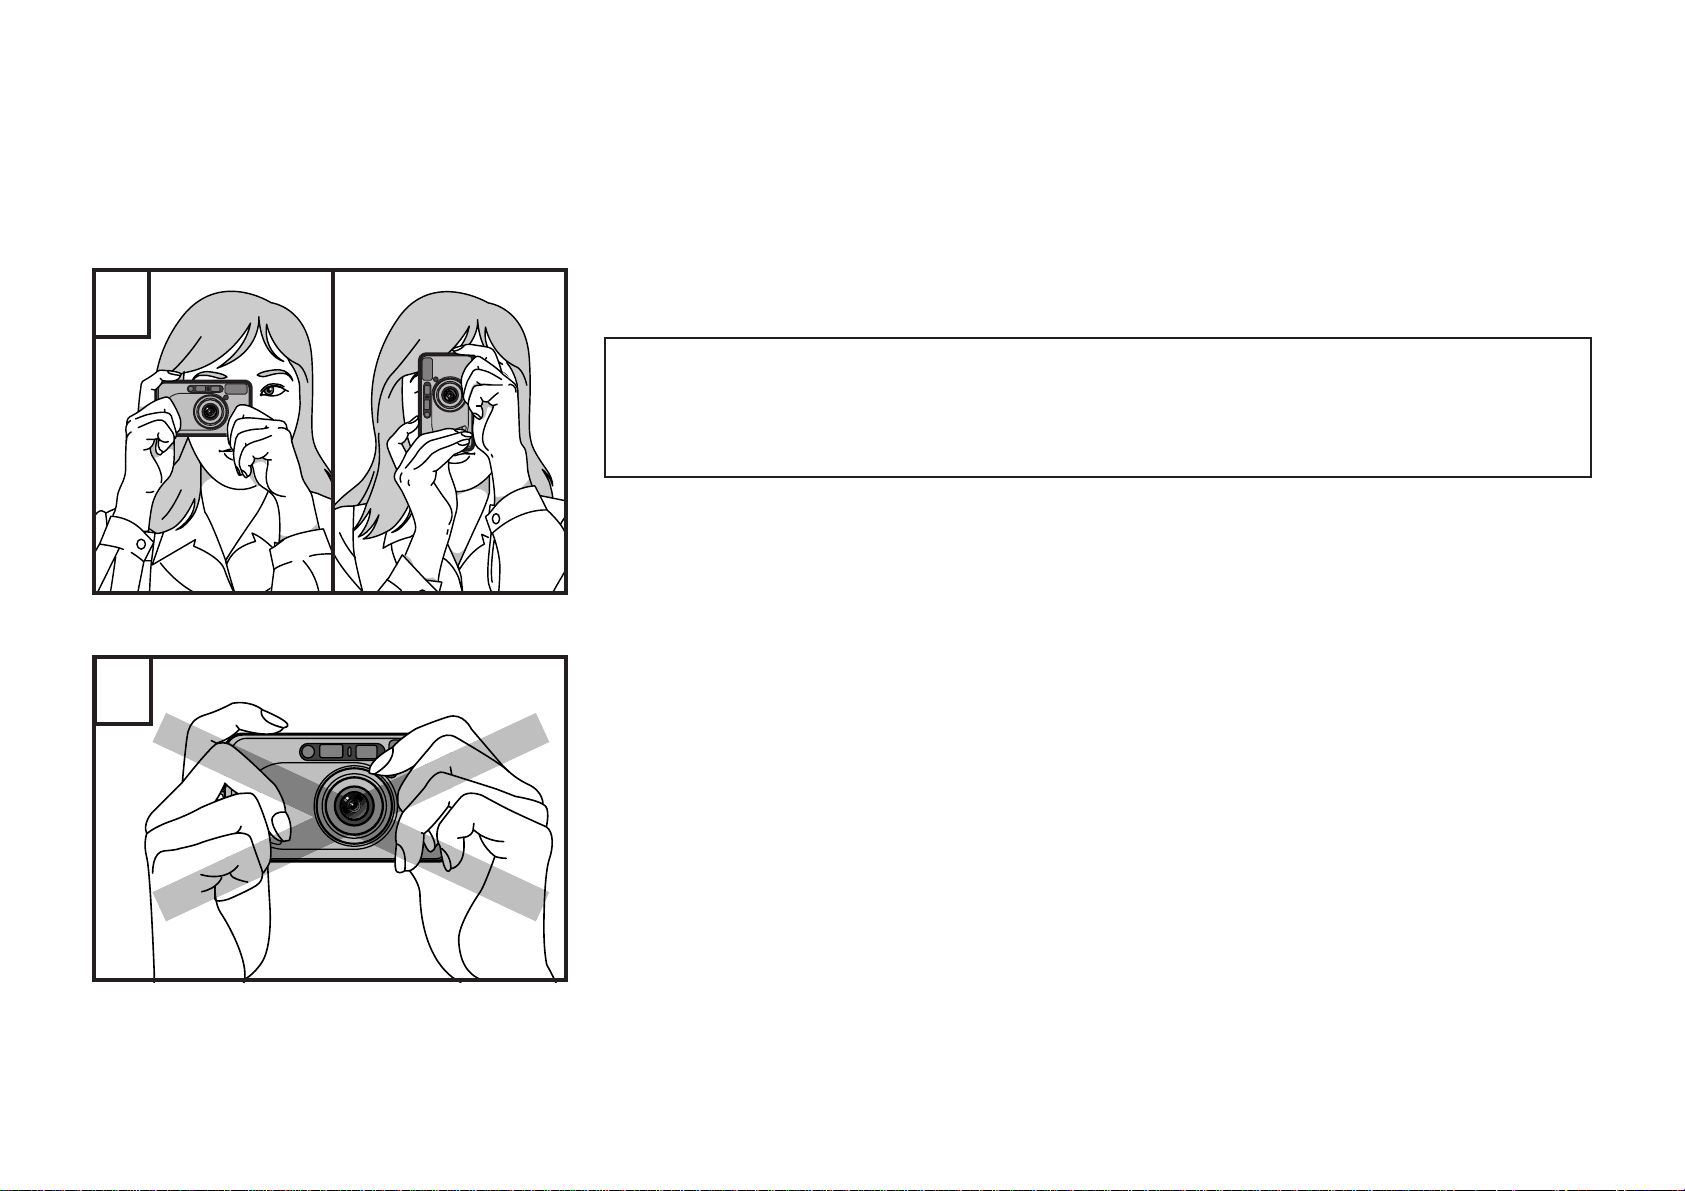
1
2
Turn the camera on and hold it firmly using both hands as shown in the illustration.
When taking vertical pictures, hold the camera with the flash unit at the top.
☞
Before taking important, once-in-a-lifetime pictures such as weddings or special events, take a
few test shots to make sure your camera is functioning correctly. If you purchased your camera
before going on a trip, shoot a roll or tw o to f amiliarize y ourself with the operation of the camera.
And don’t forget to get an extra set of batteries. You should also keep this instruction book with
you for handy reference.
Make sure that nothing is in front of the lens, the flash, the autof ocus windows or the
automatic exposure light sensor.
28
Page 29
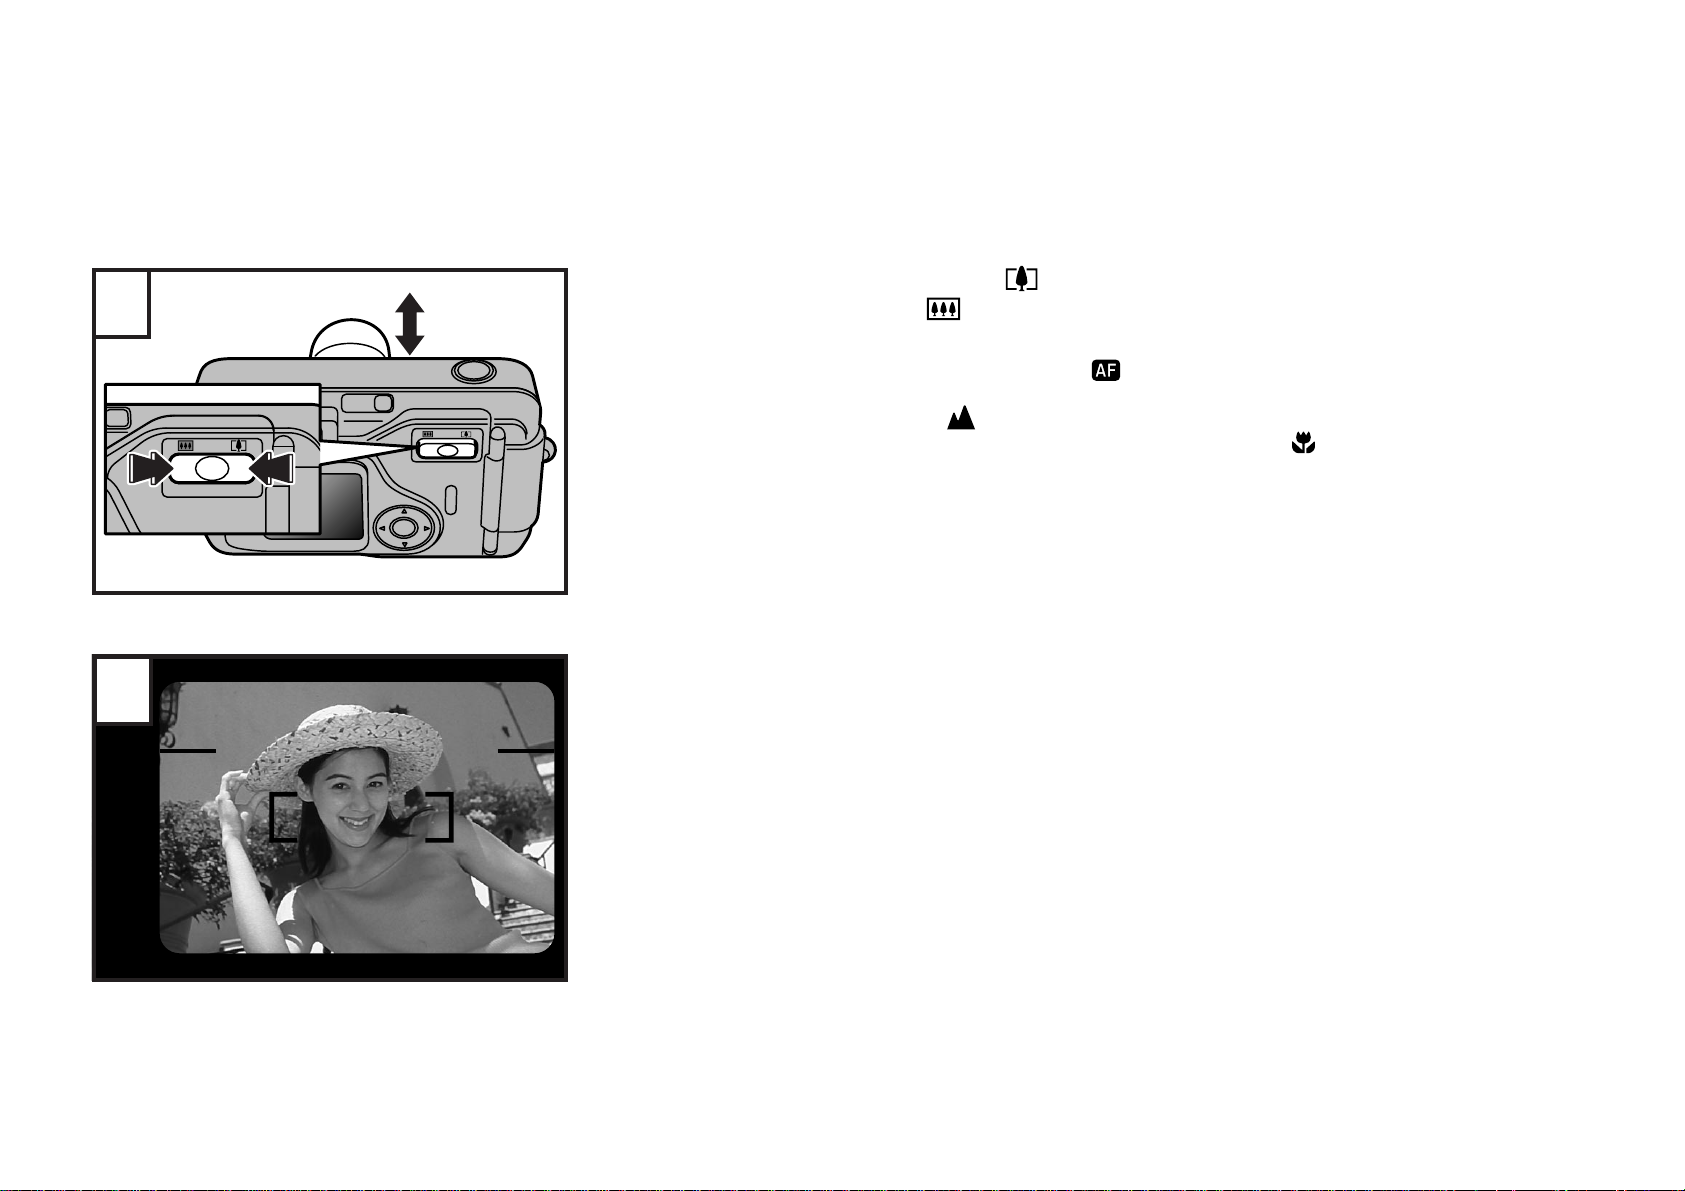
3
4
To use the zoom lens, press the mark until you see the composition you want
in the finder. Pressing the mark will set the lens at the shor ter focal lengths to
obtain wide-angle coverage.
The focusing range for sharp pictures in the mode is from 0.65 m (2.1 ft.) to ∞.
∗
Change the focus mode in the following cases.
• Long distance photography: mode (→p.55)
• Macro photography (Focal distance 0.5 - 1.0 m (1.6 - 3.3 ft.)): mode (→p.56)
Aim at your subject so that it is covered by the whole AF frame.
29
Page 30
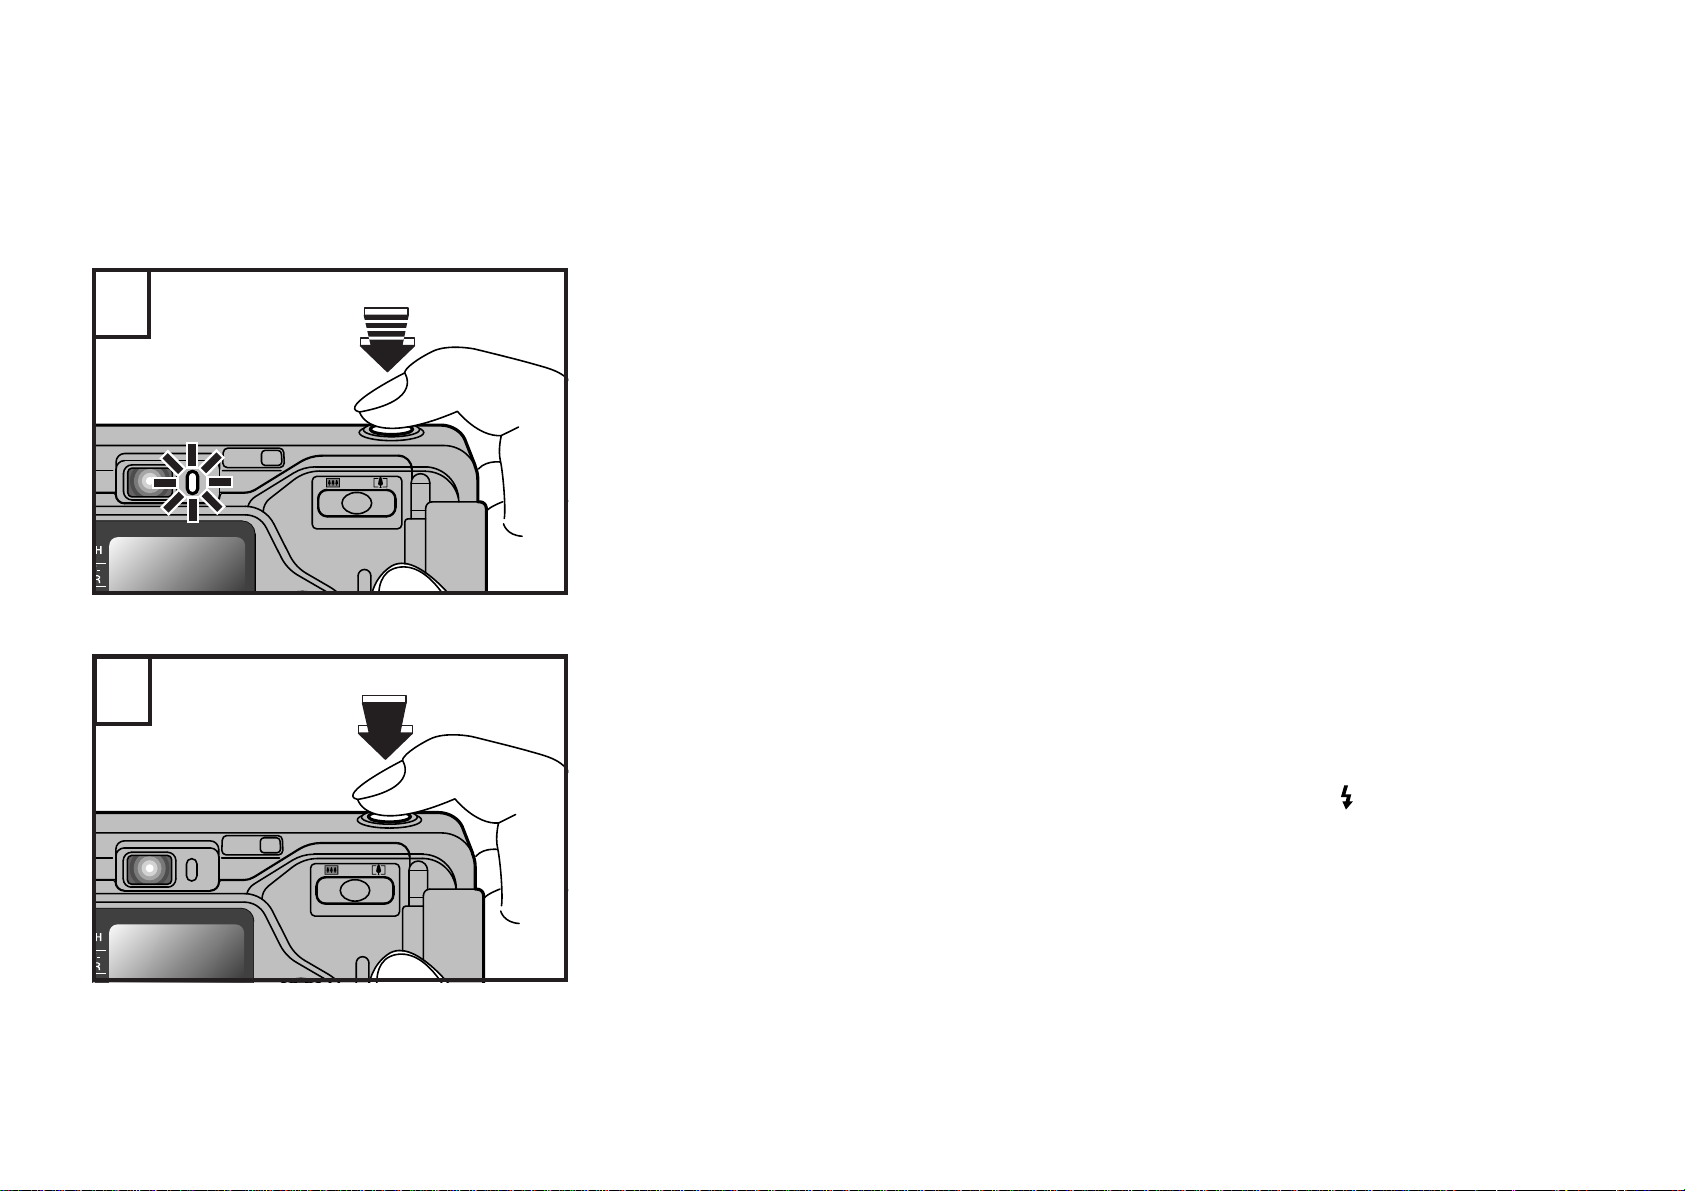
5
6
Press down the shutter release halfway.
Focusing is complete when the AF lamp (green) lights up.
☞
If you are closer than 65 cm (26 in.) to the subject, the AF lamp will start blinking to warn you
∗
that the subject cannot be focused. Note that if you are closer than 30 cm (12 in.) to the subject,
the AF lamp turns on but the subject cannot be focused.
Although the shutter can be released while the AF lamp is blinking slowly, the picture may be
∗
out of focus. (→p.13)
Press the shutter button down completely.
The film is advanced to the next frame.
☞
The number shown in the exposure counter will increase by 1 with each frame exposed.
☞
The AF lamp and self-timer/remote controller lamp will go off once and reappear immediately
∗
after the shutter is released.
During the charging time of the flash (when the alarm sign is blinking “ ”) the shutter cannot be
∗
released.
30
Page 31
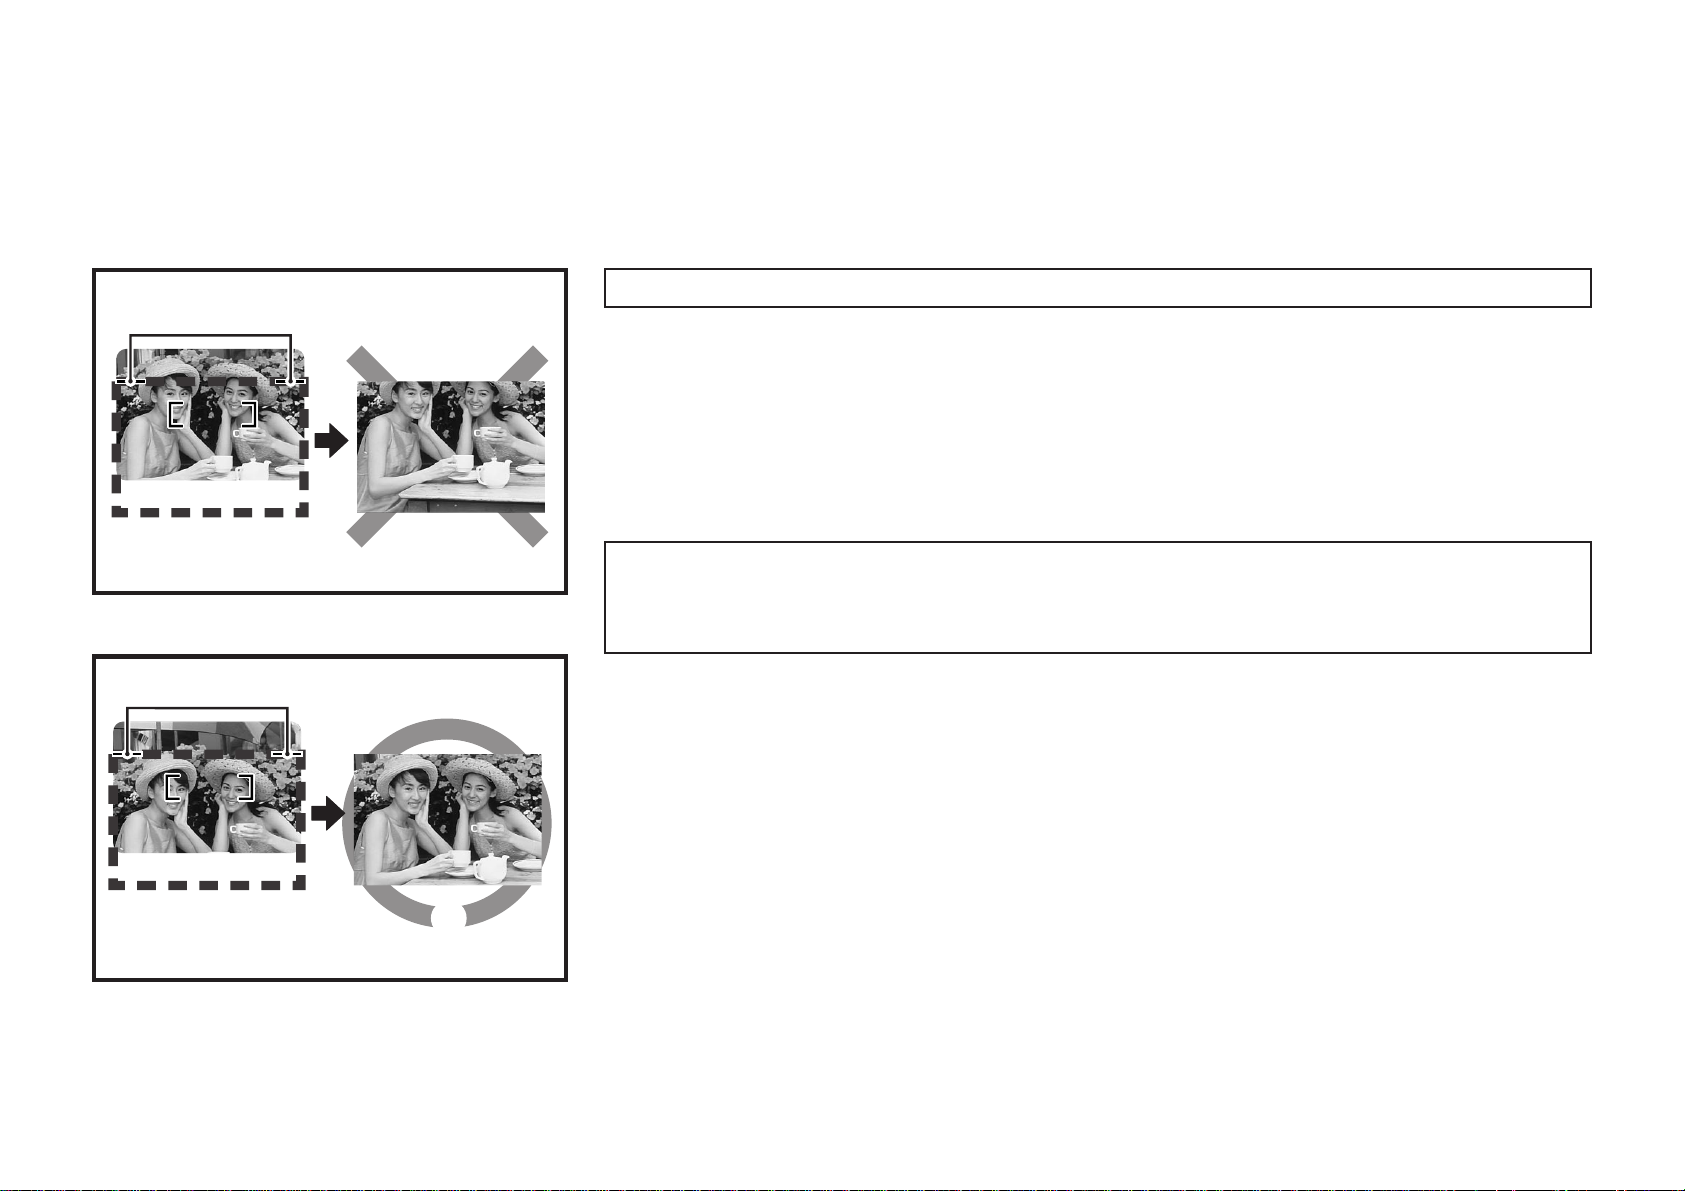
C
Close-up photography
A : Viewfinder
B : Print finishing
C : Parallax correction mark
When photographing a subject that is closer than about 1.0 m (3.3 ft.) from the
camera, the area within the frame shown in the diagram on the left will be in the
picture. Compose the picture so that the subject that you want to photograph is
within the frame.
A
C
A
B
B
When taking close ups, an area seen through the viewfinder and the area seen b y the lens and
actually photographed will be different. This is because the viewfinder and lens are not in the
same position, a difference known as “parallax”. The par allax correction mark indicates the difference between what the viewfinder sees and what the lens sees when the picture is taken.
31
Page 32
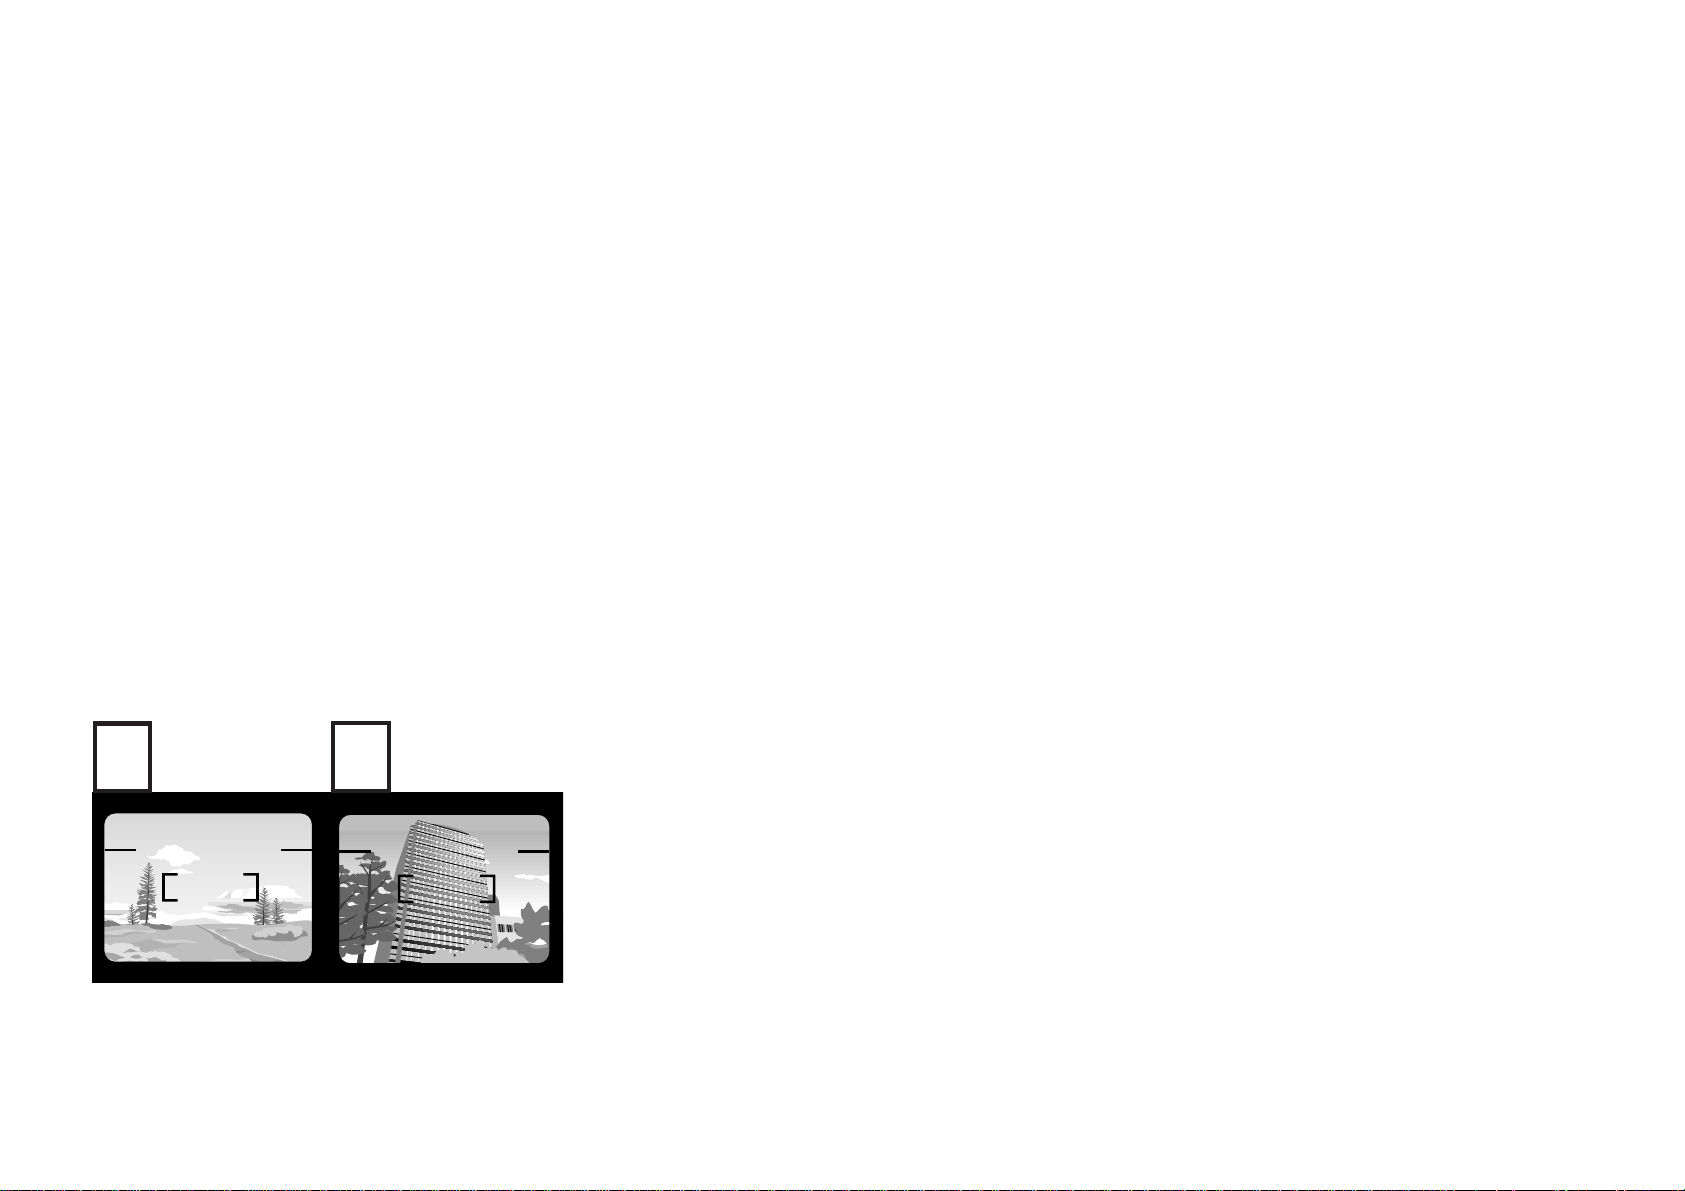
A
B
There are a few conditions when the camera’s autofocus system may not function
accurately. At these times, you should use the “Auto-Focus Lock” settings (→p.33)
or the “Landscape Mode” setting (→p.55). Conditions requiring these settings include:
• A bright light source within the picture such as the sun near your subject, a strong light reflection such as from water or from the windshield of a car;
• A mirror or other strongly reflective surface near the center of the picture;
• When the subject is only composed of vertical lines.
• When the subject is moving at high speed.
• When the background is much brighter than the subject.
In the following cases, the AF lamp blinks slowly to warn you that the picture is out
of focus.The focal distance is fixed at 3.0 m (9.8 ft.) -
Å When the contrast of the subject is very low.
ı When the subject is composed of a repetitive pattern.
∞
.
32
Page 33
1
2
USING THE AUTO-FOCUS LOCK
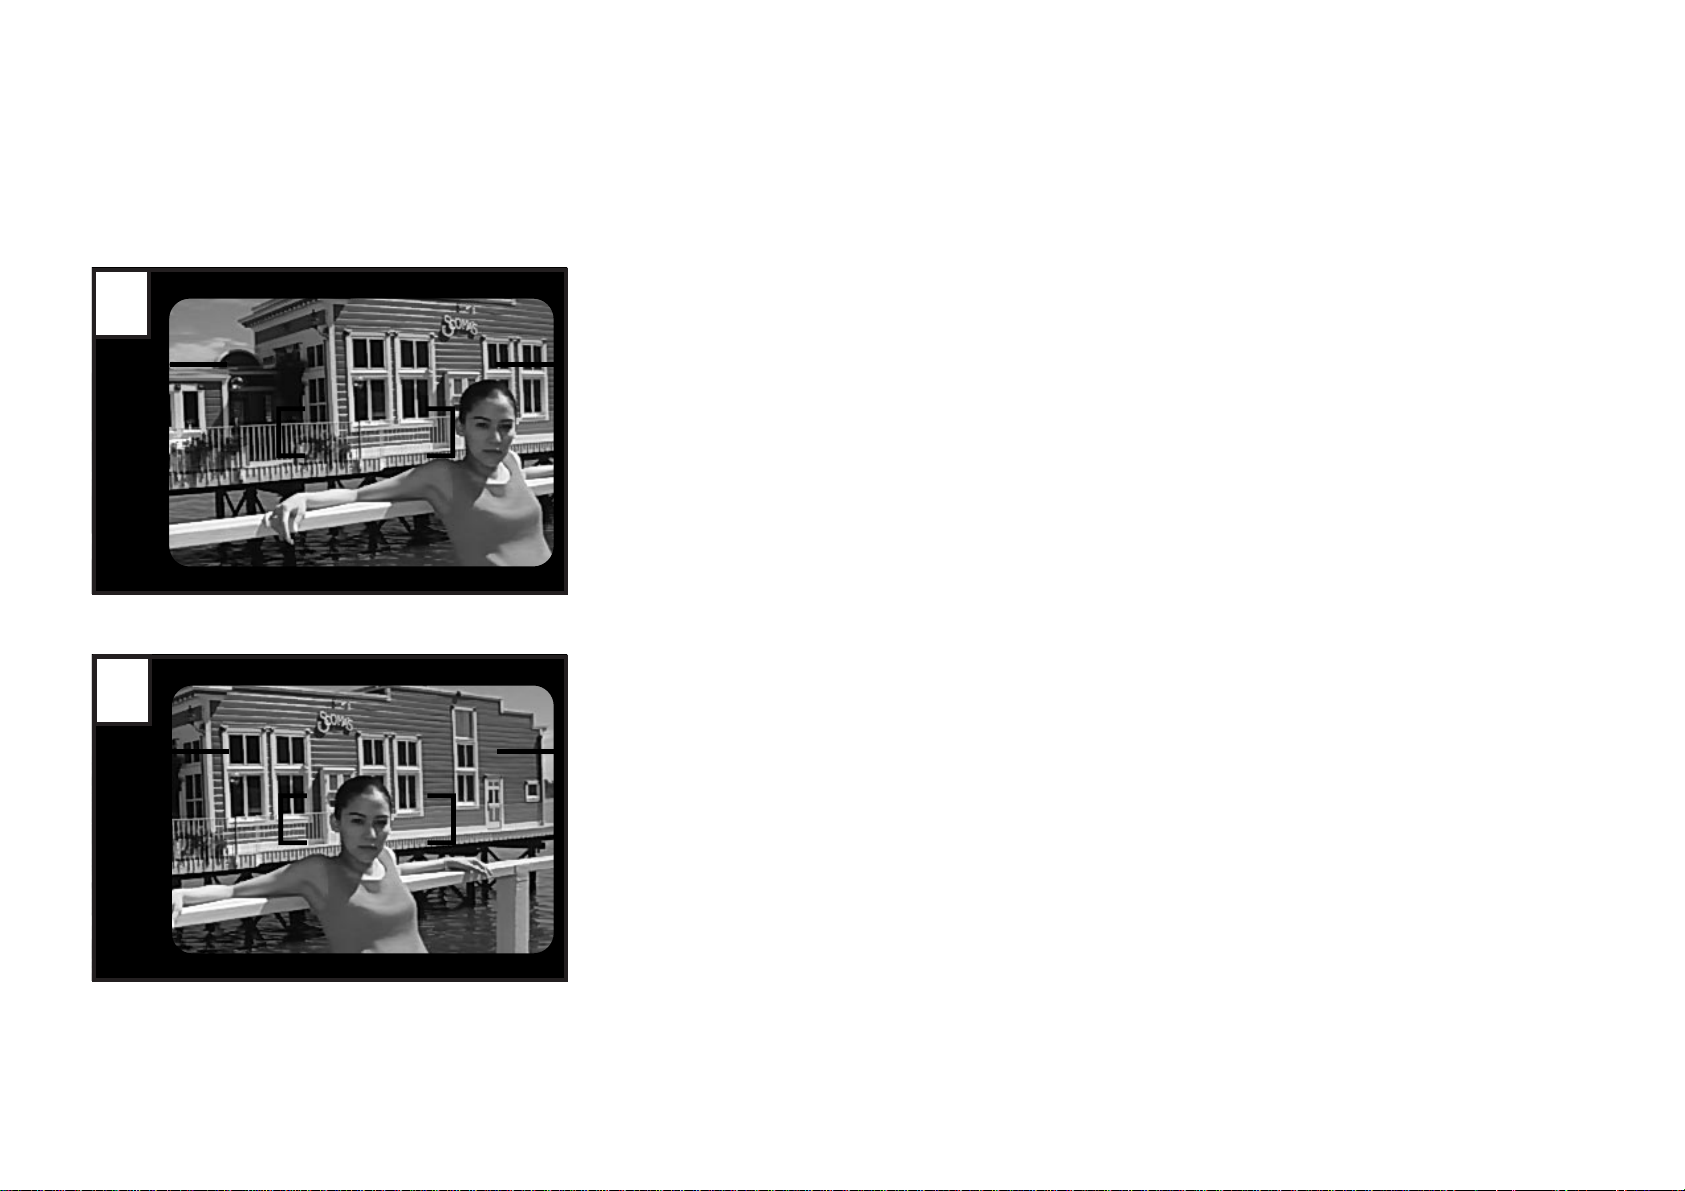
In the composition shown at left, the AF frame is off the subject (in this case, the
people). In this case the lens will not focus on the subject.
Move the camera to position the AF frame over the subject.
33
Page 34
3
4
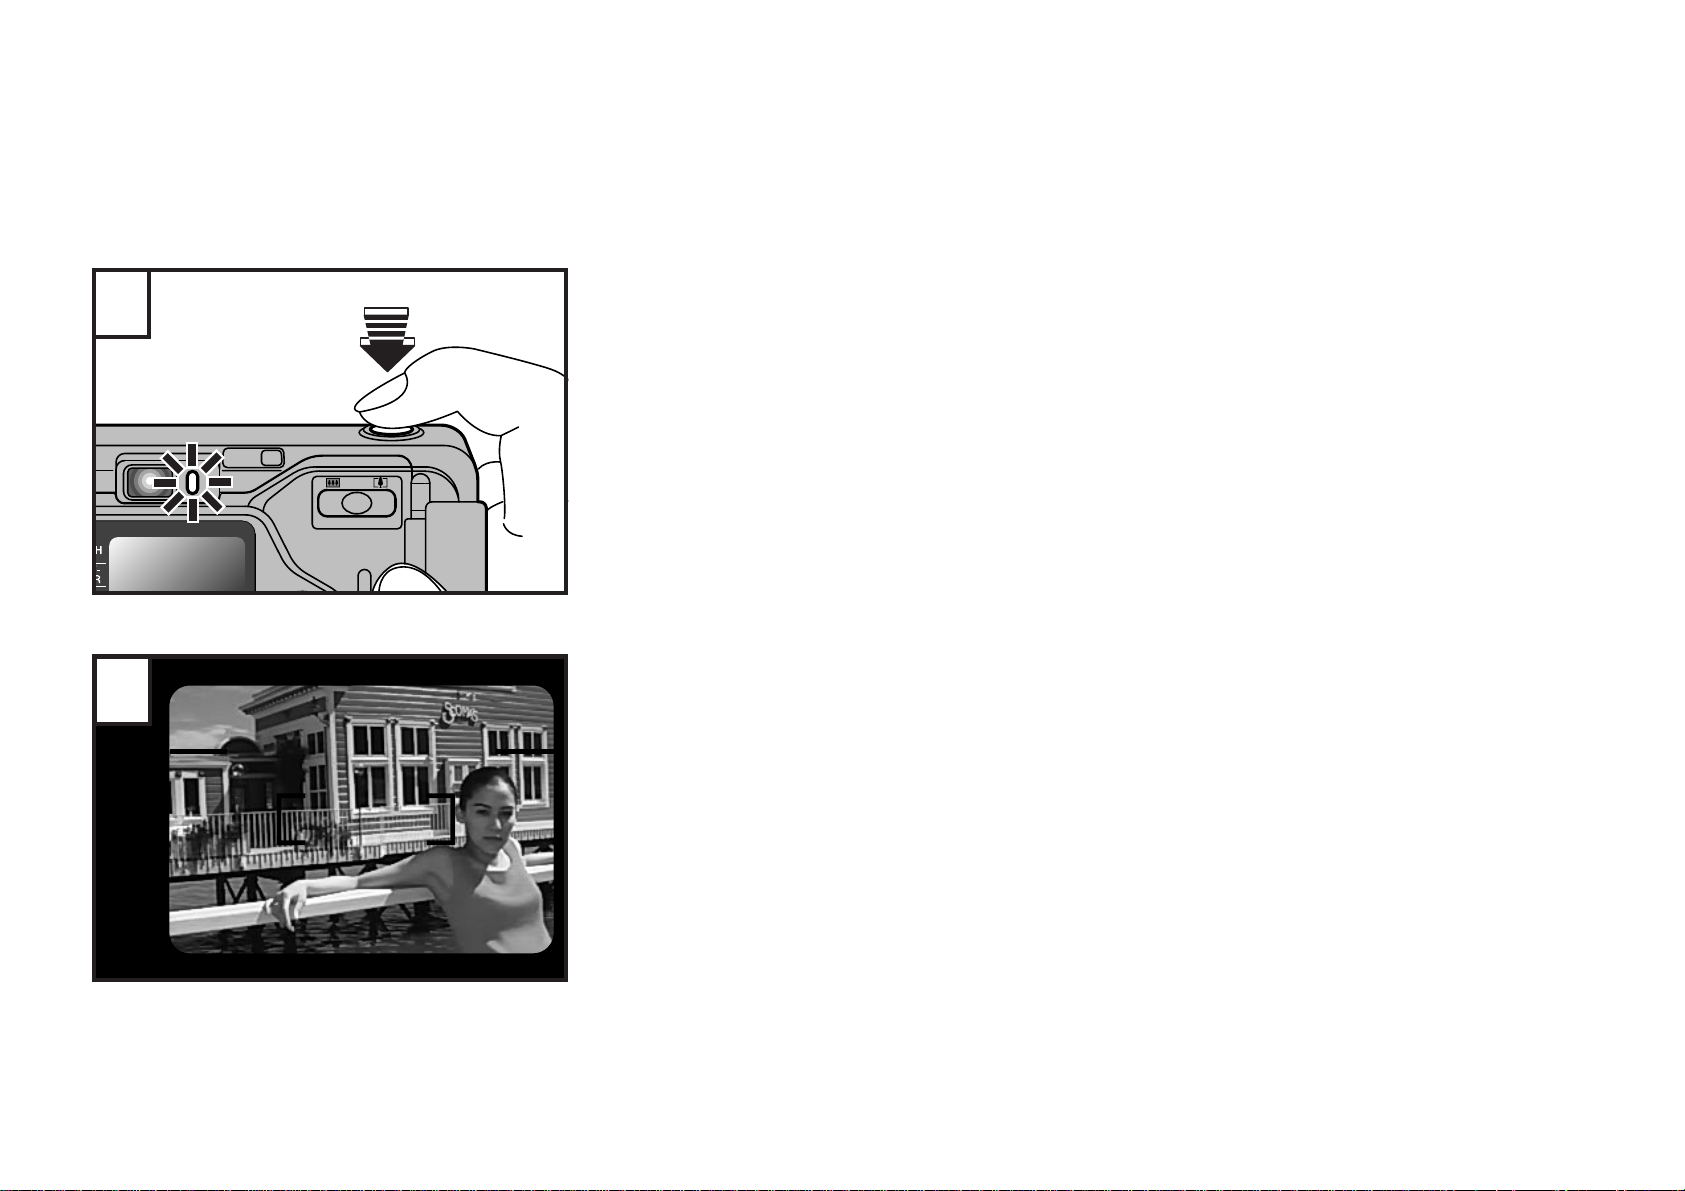
With the AF frame positioned ov er the subject, press down the shutter release button halfway to set the auto-focus lock.
Check that the AF lamp (green) lights up.
☞
While holding the shutter release button halfwa y do wn to k eep the A uto-F ocus loc k
on, move the camera back to the original position to recompose your picture, then
press the shutter release button all the way down.
The Auto-Focus lock operation can be repeated any number of times before the shutter trips.
∗
34
Page 35
1
UNLOADING THE FILM OR REMOVING FILM IN MID-ROLL
To Unload the Film
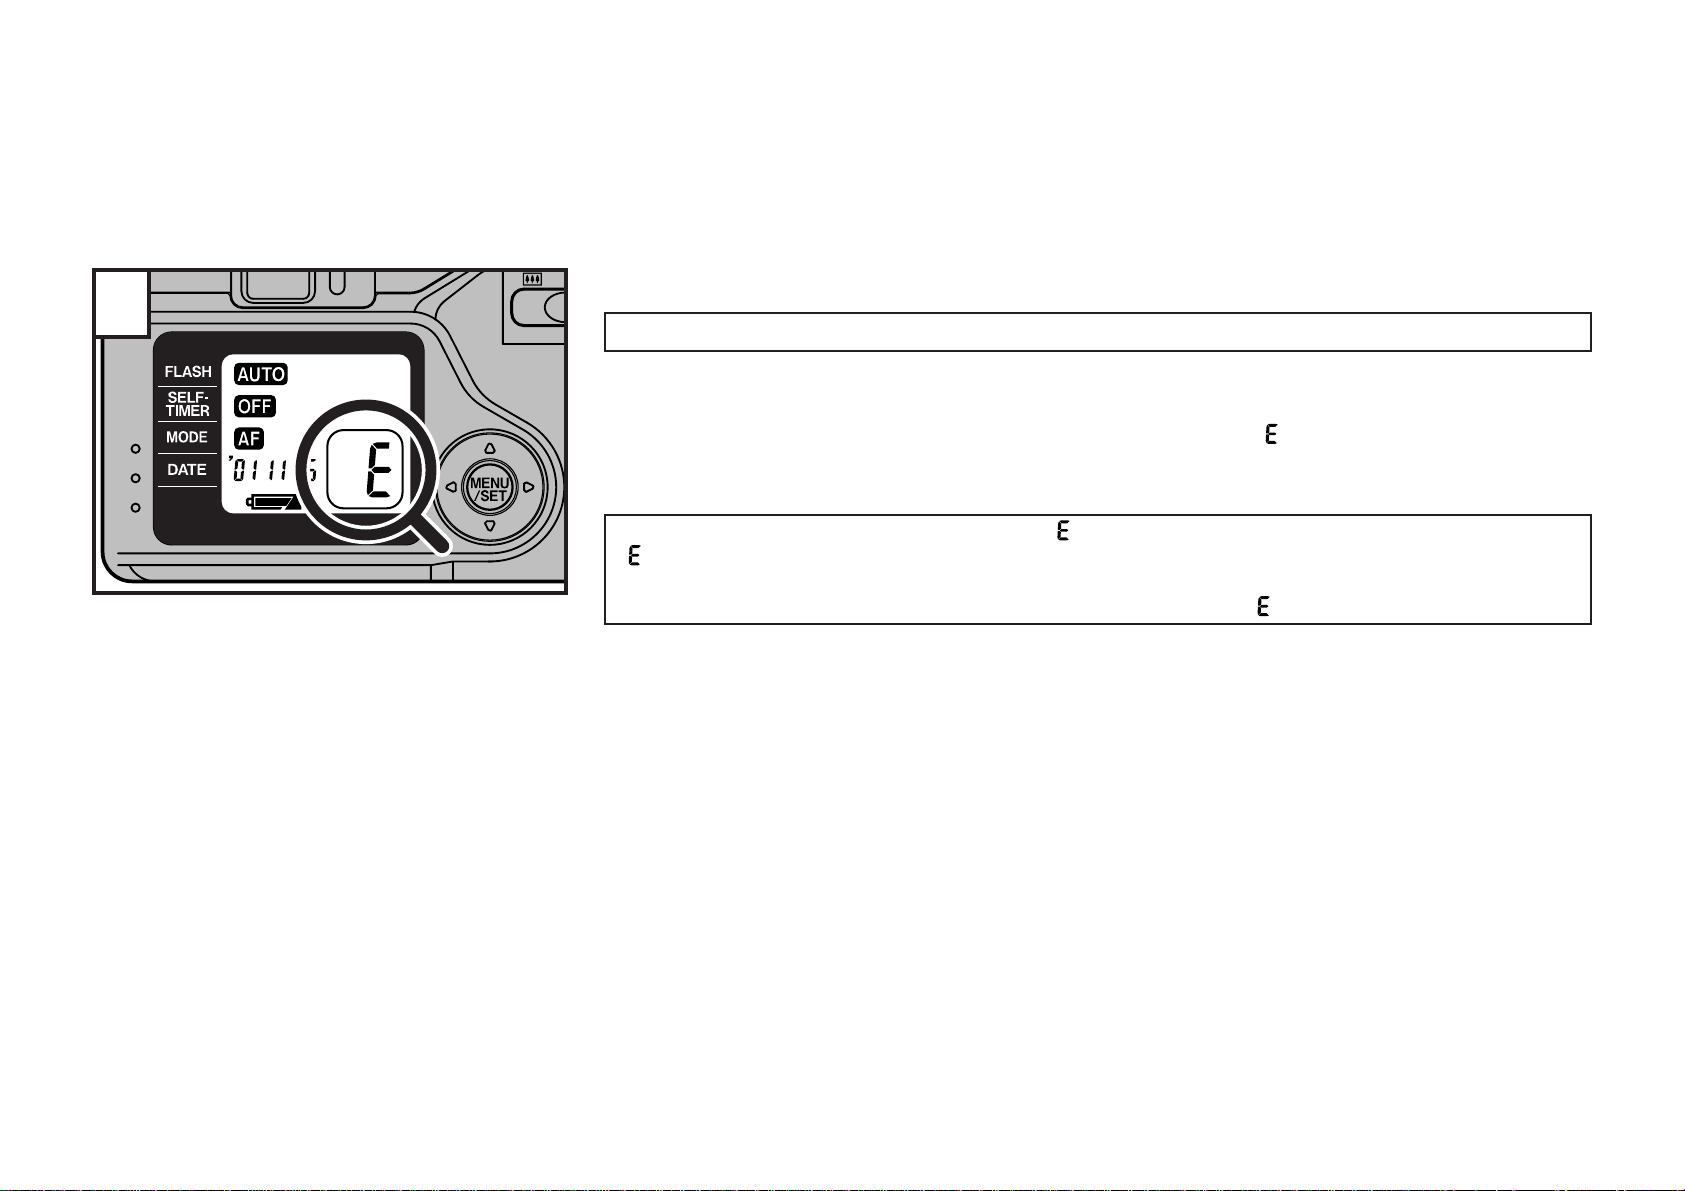
When the last frame in the film has been exposed, the film automatically rewinds
into the film cassette which can then be removed for processing.
When rewinding is complete, the exposure counter will read “ ”.
☞
Sometimes more photographs can be taken than the stated number of exposures, but the final
∗
frame may not be printed.
Check that the motor has stopped and that “ ” is displa yed. If the camer a back is opened bef ore
“ ” is displayed, the following may occur. (→p.38)
• The film is exposed to the light.
• When the next film is loaded, it is immediately rewound and “ ” blinks.
35
Page 36
2
1
3
2
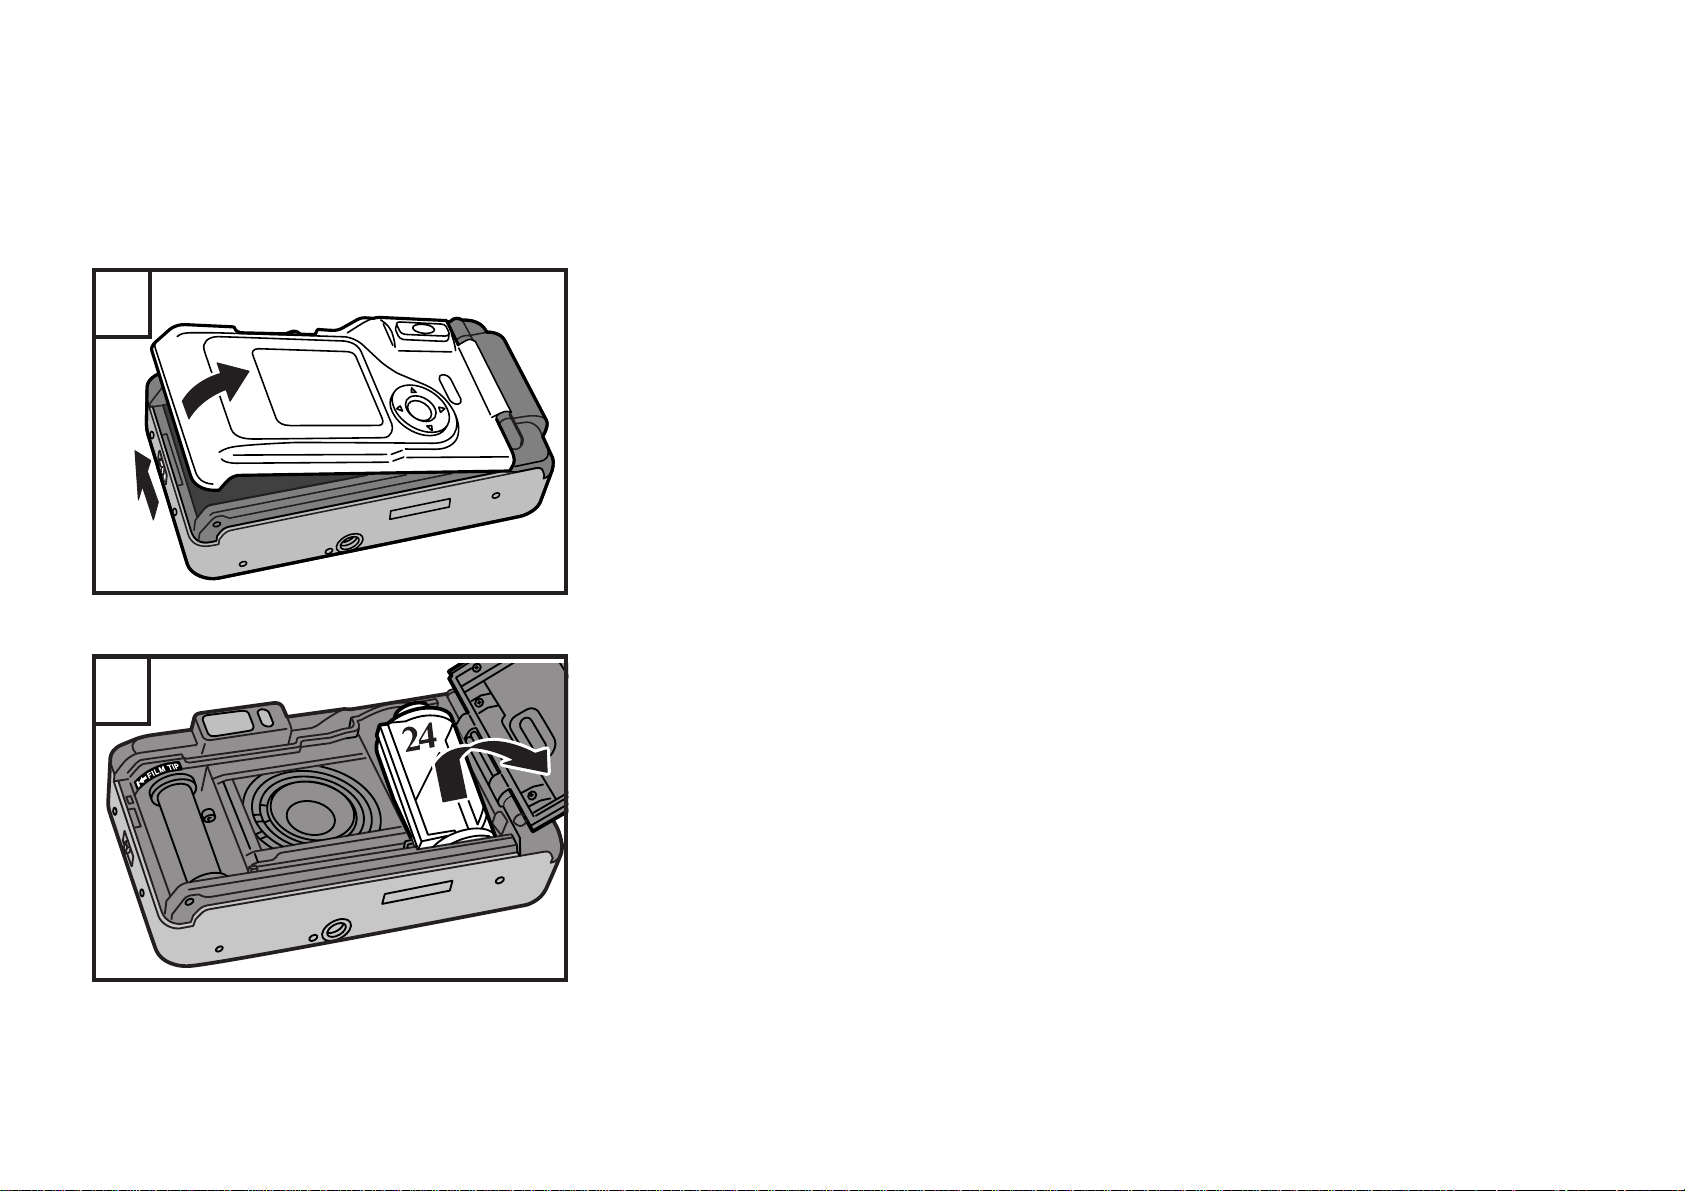
1 Slide the camera back lock in the direction indicated by the arrow.
2 Open the camera back in the direction indicated by the arrow.
Do not apply unnecessary force to the camera back.
∗
Remove the film.
36
Page 37
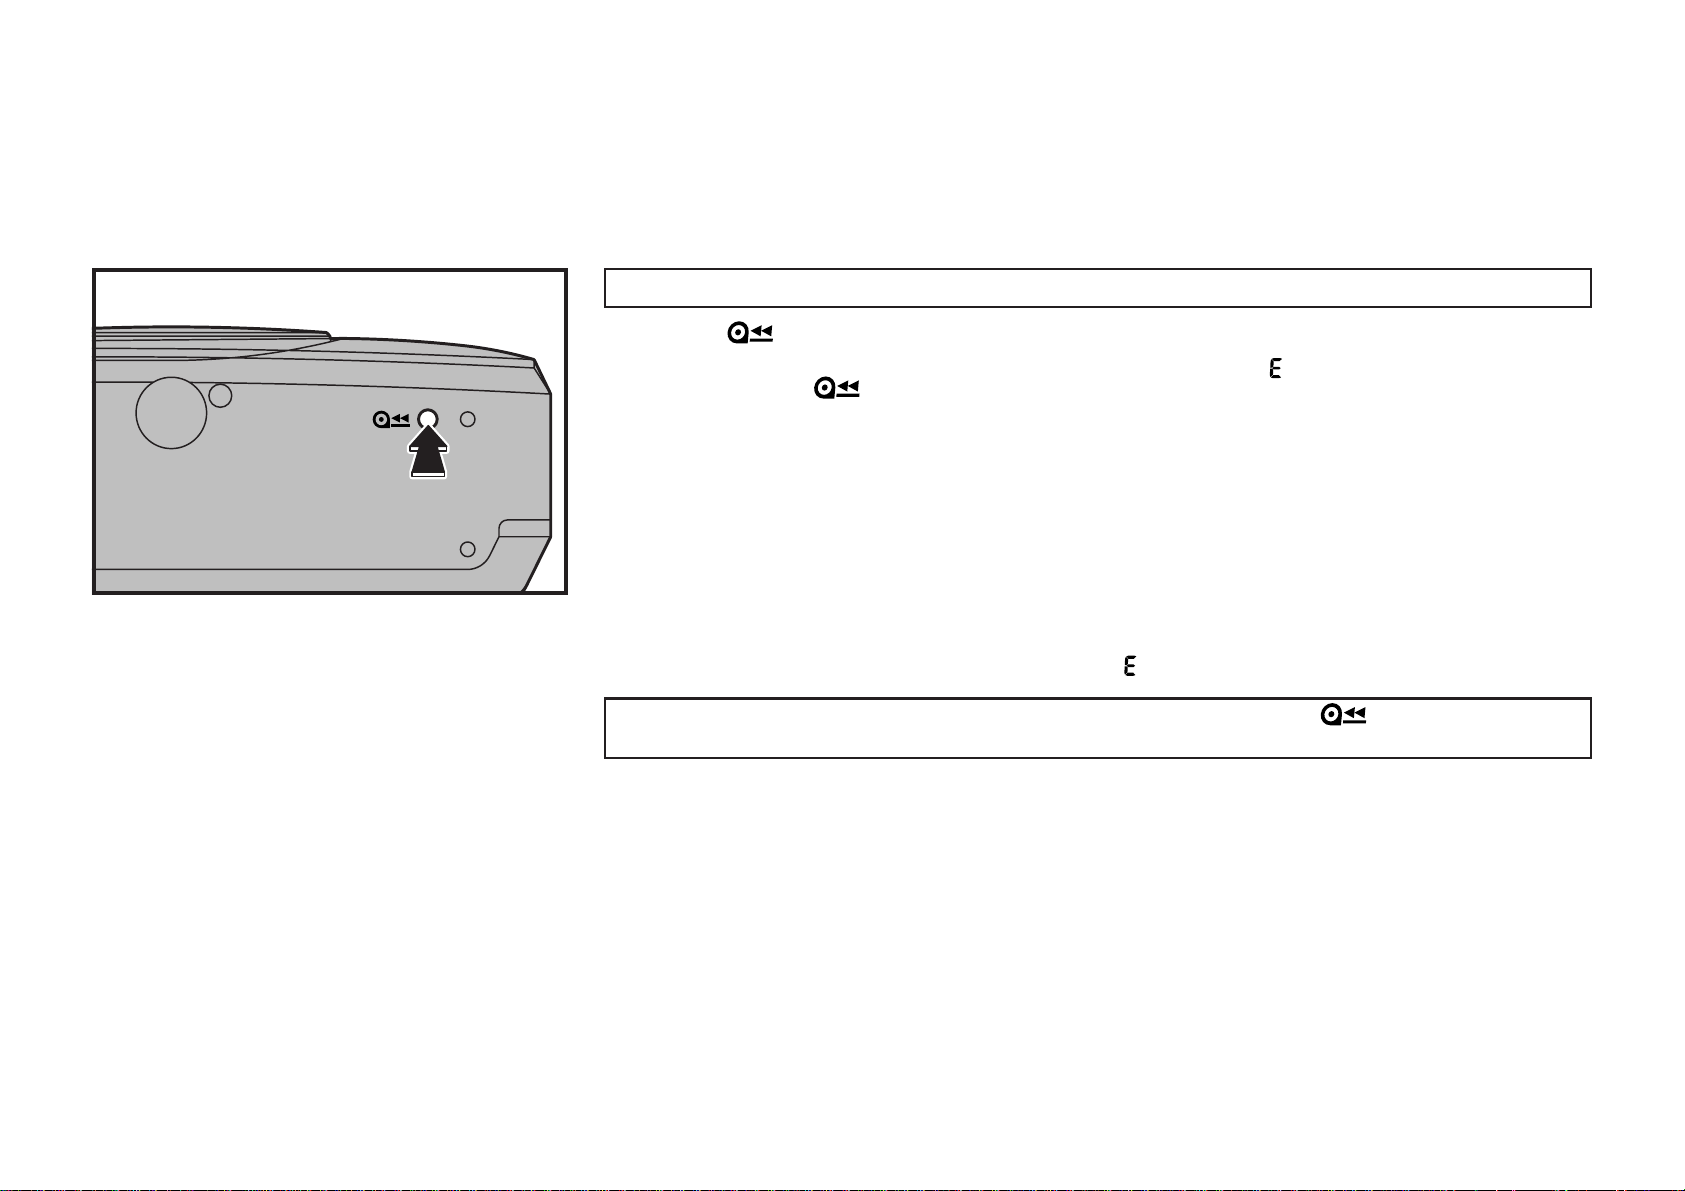
Removing film in mid-roll
Press the button with the point of a pen or something similar.
When rewinding is complete, the exposure counter will read “ ”.
☞
Do not press the button with any object that tapers to a sharp point.
∗
Check that the motor has stopped and that “ ” is displa yed before remo ving the film.
Film cannot be reused once it has been rewound. Do not press the button except when
removing the film for developing.
37
Page 38

◆ Do not open the camera back while there is a film in mid-roll in the camera.
If the camera back is opened while there is a film in mid-roll in the camera, the film may be exposed to the light.
☞
The exposure counter is reset to “ ”.
☞
If the camera back is opened by mistake:
1 Close the camera back without removing the film.
2 The remaining frames can be used.
Since the exposure counter is reset to “ ” when the camera back is opened, the correct film count is not displayed. However, you can continue to
∗
make exposures until the roll is finished at which time you will feel a resistance in the film transport. At this point, rewind the film into the cassette
and remove it from the camera. DO NOT TRY TO ADVANCE THE FILM ONCE THIS RESISTANCE IS FELT.
38
Page 39
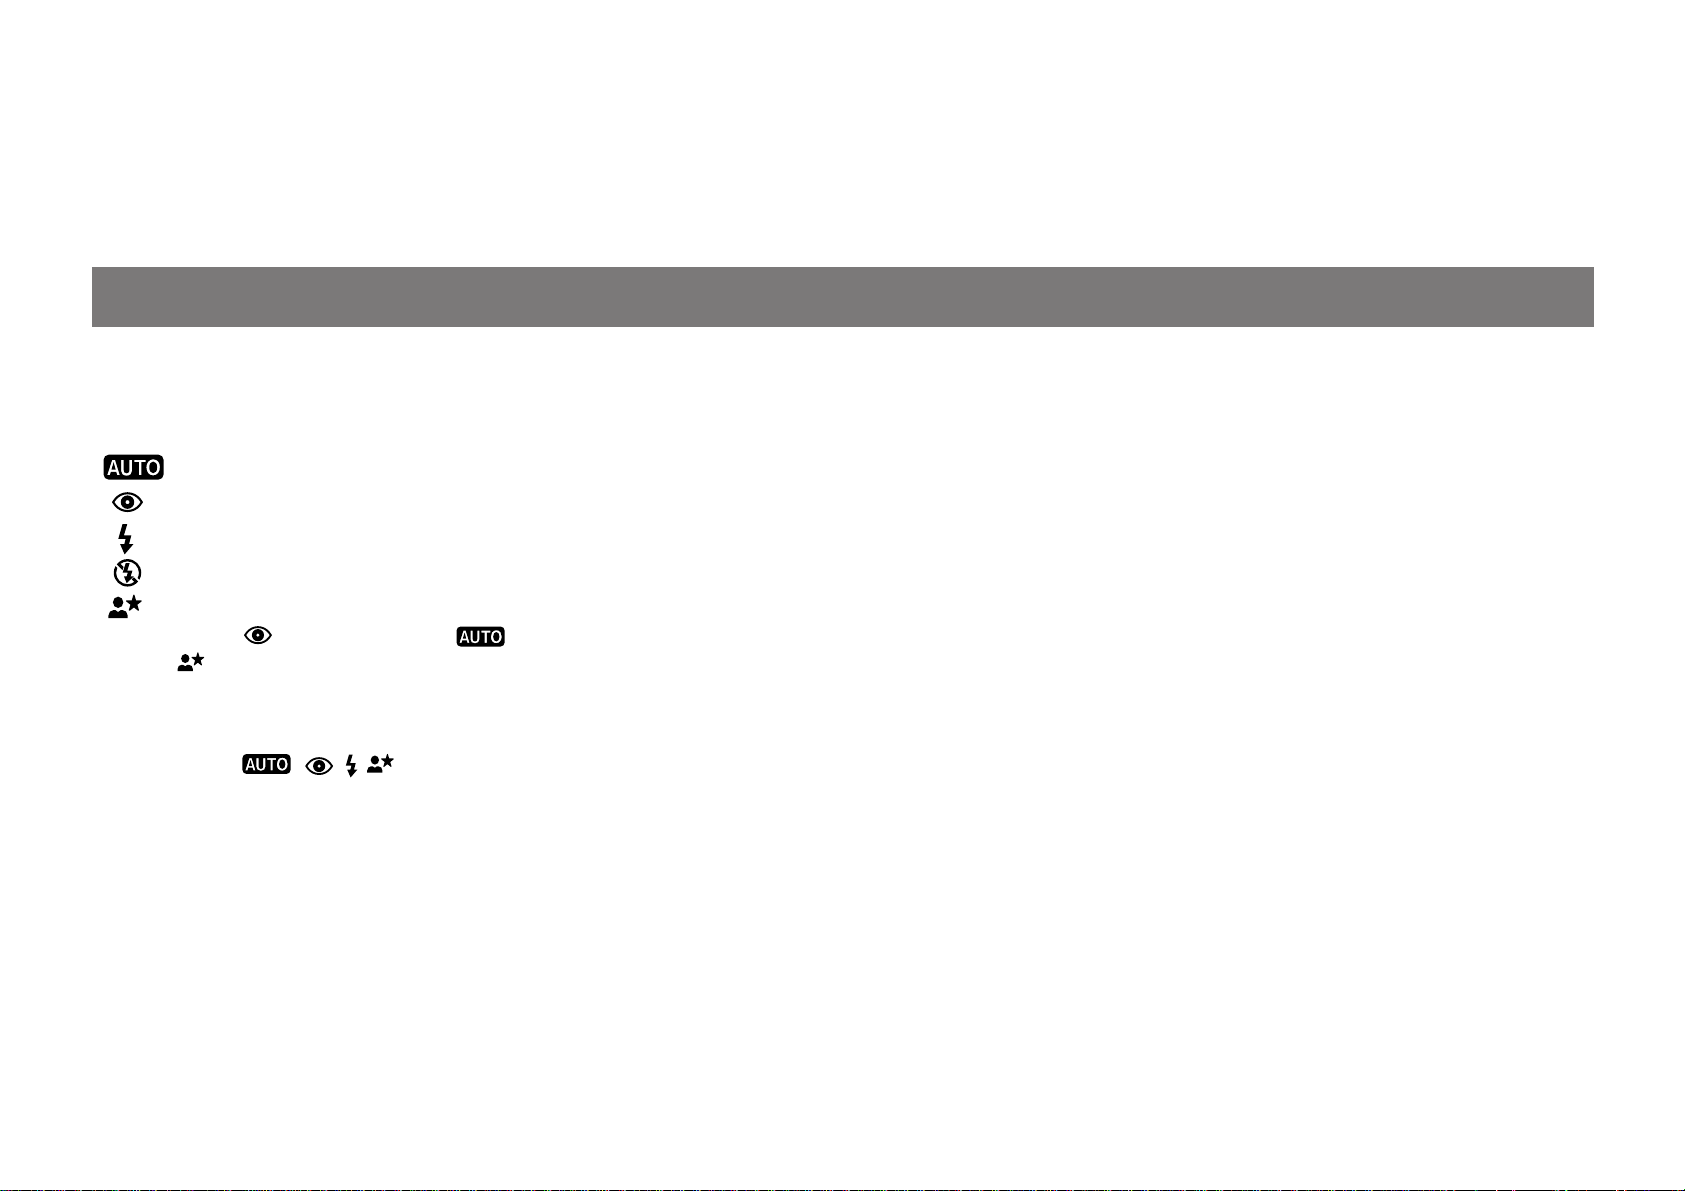
3. ADVANCED TECHNIQUES
SELECTING THE FLASH MODE
The following flash modes can be selected.
■ FLASH modes
( )Multi program flash mode
( )Red-eye reduction flash mode
( )Back light compensation flash mode
( )Flash-off mode
( )Night portrait (slow sync) mode
Unless the mode is set, the mode is set when the power is turned off.
∗
The mode is automatically cancelled per shot.
∗
When you want to use this mode continuously, hold the MENU/SET button down for 2 seconds or longer after selecting the mode. (The selected
mode will continue to blink even after it is set.) The mode is maintained so that a number of pictures can be taken. The mode is canceled when the
power is turned off.
When the modes are selected and it is very dark, the flash will fire 1 – 4 times when the shutter button is pressed down halfway
∗
in order to illuminate the subject and assist the auto focus.
39
Page 40
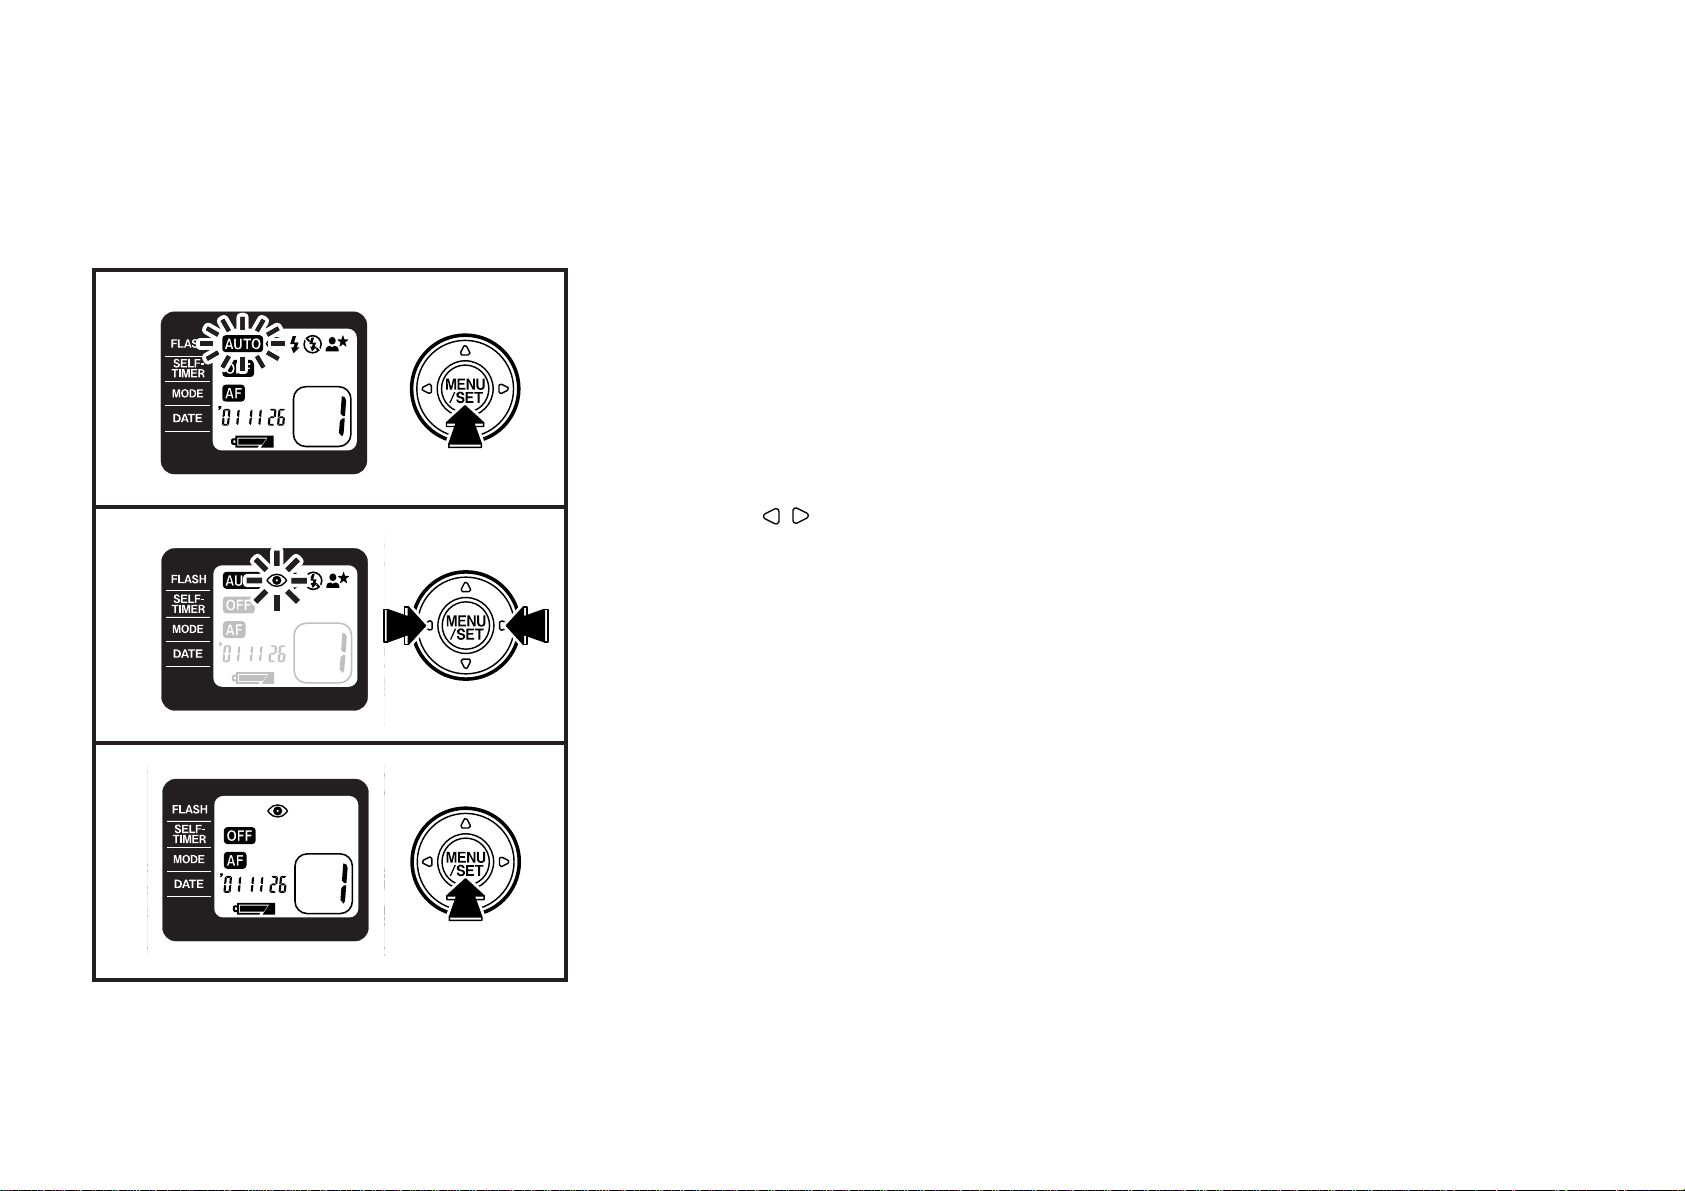
1
2
3
1 Turn the camera on and press the MENU/SET button.
The LCD lights orange, the flash menu blinks/lights and the flash mode selection mode is
☞
entered.
2 Press the buttons and select the FLASH mode.
The selected mode blinks.
☞
3 Press the MENU/SET button to complete the setting.
The LCD changes to green and the mode which has been set is displayed.
☞
40
Page 41
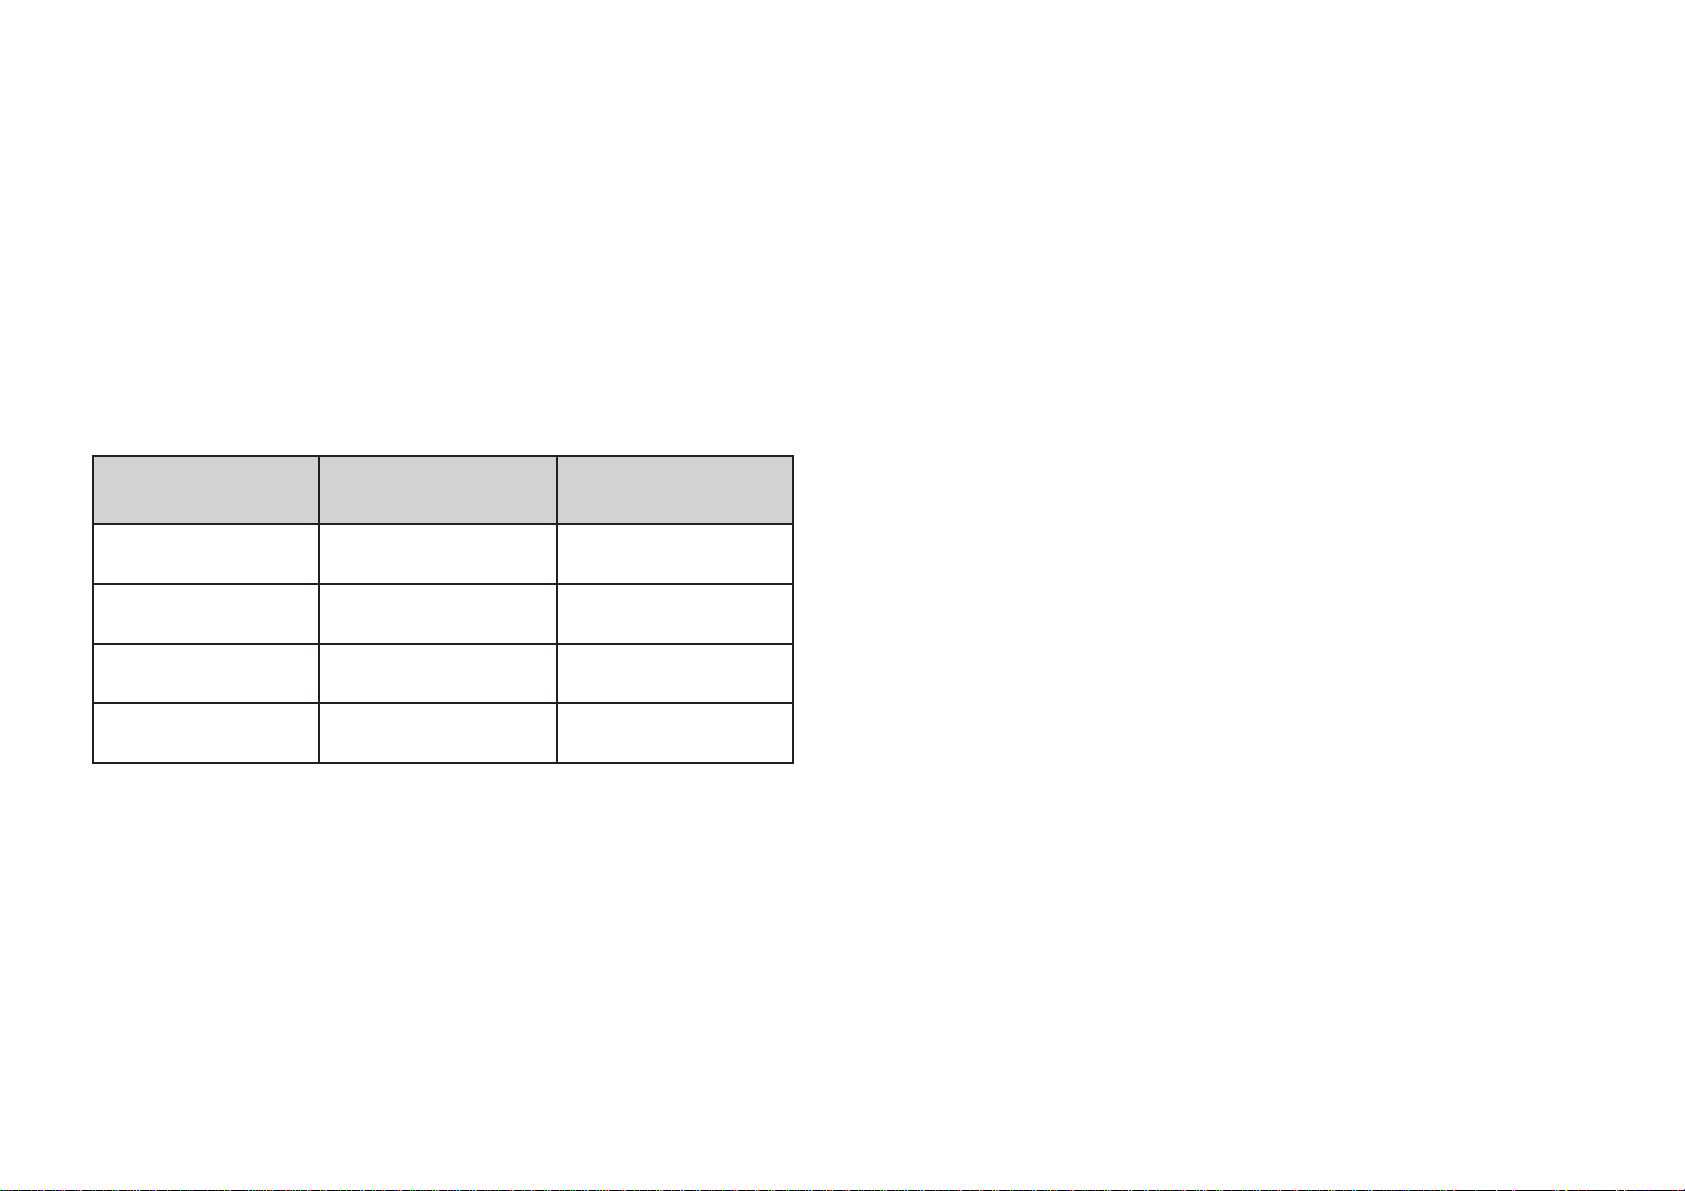
The operating range of the film (flash distance) will vary depending upon the film’s sensitivity (ISO speed). When using flash,
keep your subject within the range of the effective flash illumination as indicated in the chart below.
Effective flash range
Film speed Wide angle Telephoto
(28 mm) (100 mm)
ISO 100
ISO 400
ISO 800
ISO 1600
0.65 – 2.9 m 0.65 – 2.0 m
2.1 – 9.5 ft. 2.1 – 6.6 ft.
0.65 – 5.8 m 0.65 – 4.0 m
2.1 – 19.0 ft. 2.1 – 13.1 ft.
0.65 – 8.1 m 0.65 – 5.6 m
2.1 – 26.6 ft. 2.1 – 18.4 ft.
0.65 – 11.6 m 0.65 – 8.0 m
2.1 – 38.1 ft. 2.1 – 26.2 ft.
(Using color negative film)
41
Page 42
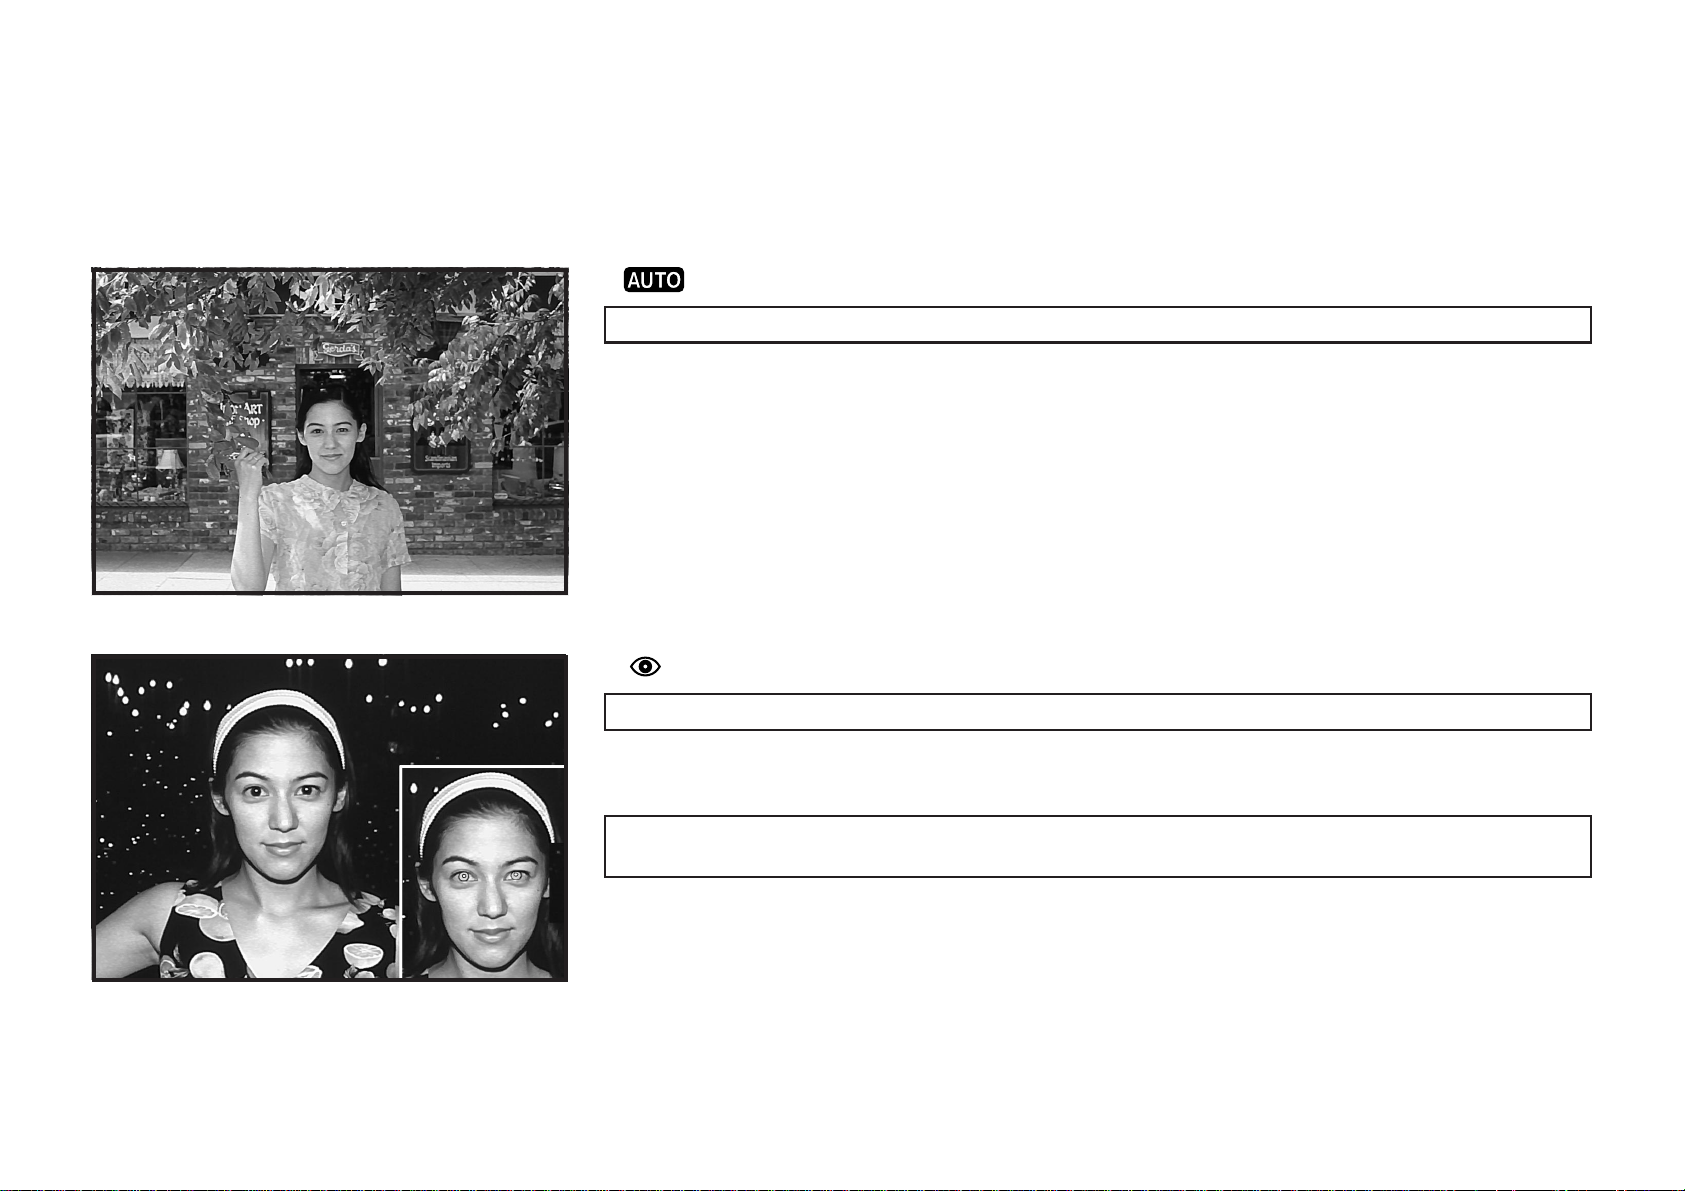
( ) Multi program flash mode
Used for general photography.
The quantity of light emitted by the flash is adjusted automatically according to the
brightness of the subject, the distance, and the zoom magnification.
For bright remote scenes, the flash does not fire.
∗
( ) Red-eye reduction flash mode
Reduce red-eye.
The flash will fire briefly 10 times (pre-flash), then fire the 11th time for taking a
picture.
The AF lamp lights up during the 10 brief flashes (pre-flashes), then goes off when the flash fires
for taking the photo. Do not move the camera while the AF lamp is lit.
42
Page 43

Dealing with red-eye
When you photograph a person in dim light using flash, the pupil of the eye will sometimes appear red. Under low light, the
pupils of the eye dilate f or better vision. Red-e ye is caused by light from the flash entering the dilated pupils and being reflected
back to the lens. Red-e y e reduction causes a preliminary flash to fire before the actual picture is taken. This causes the pupil to
contract, reducing this reflection. When the actual flash exposure is made, the degree of reflection is minimized, thus reducing
red-eye .
When using red-eye reduction mode
• Ask your subject to look directly into the camera.
• Approach as closely as possible to make your exposure.
43
Page 44
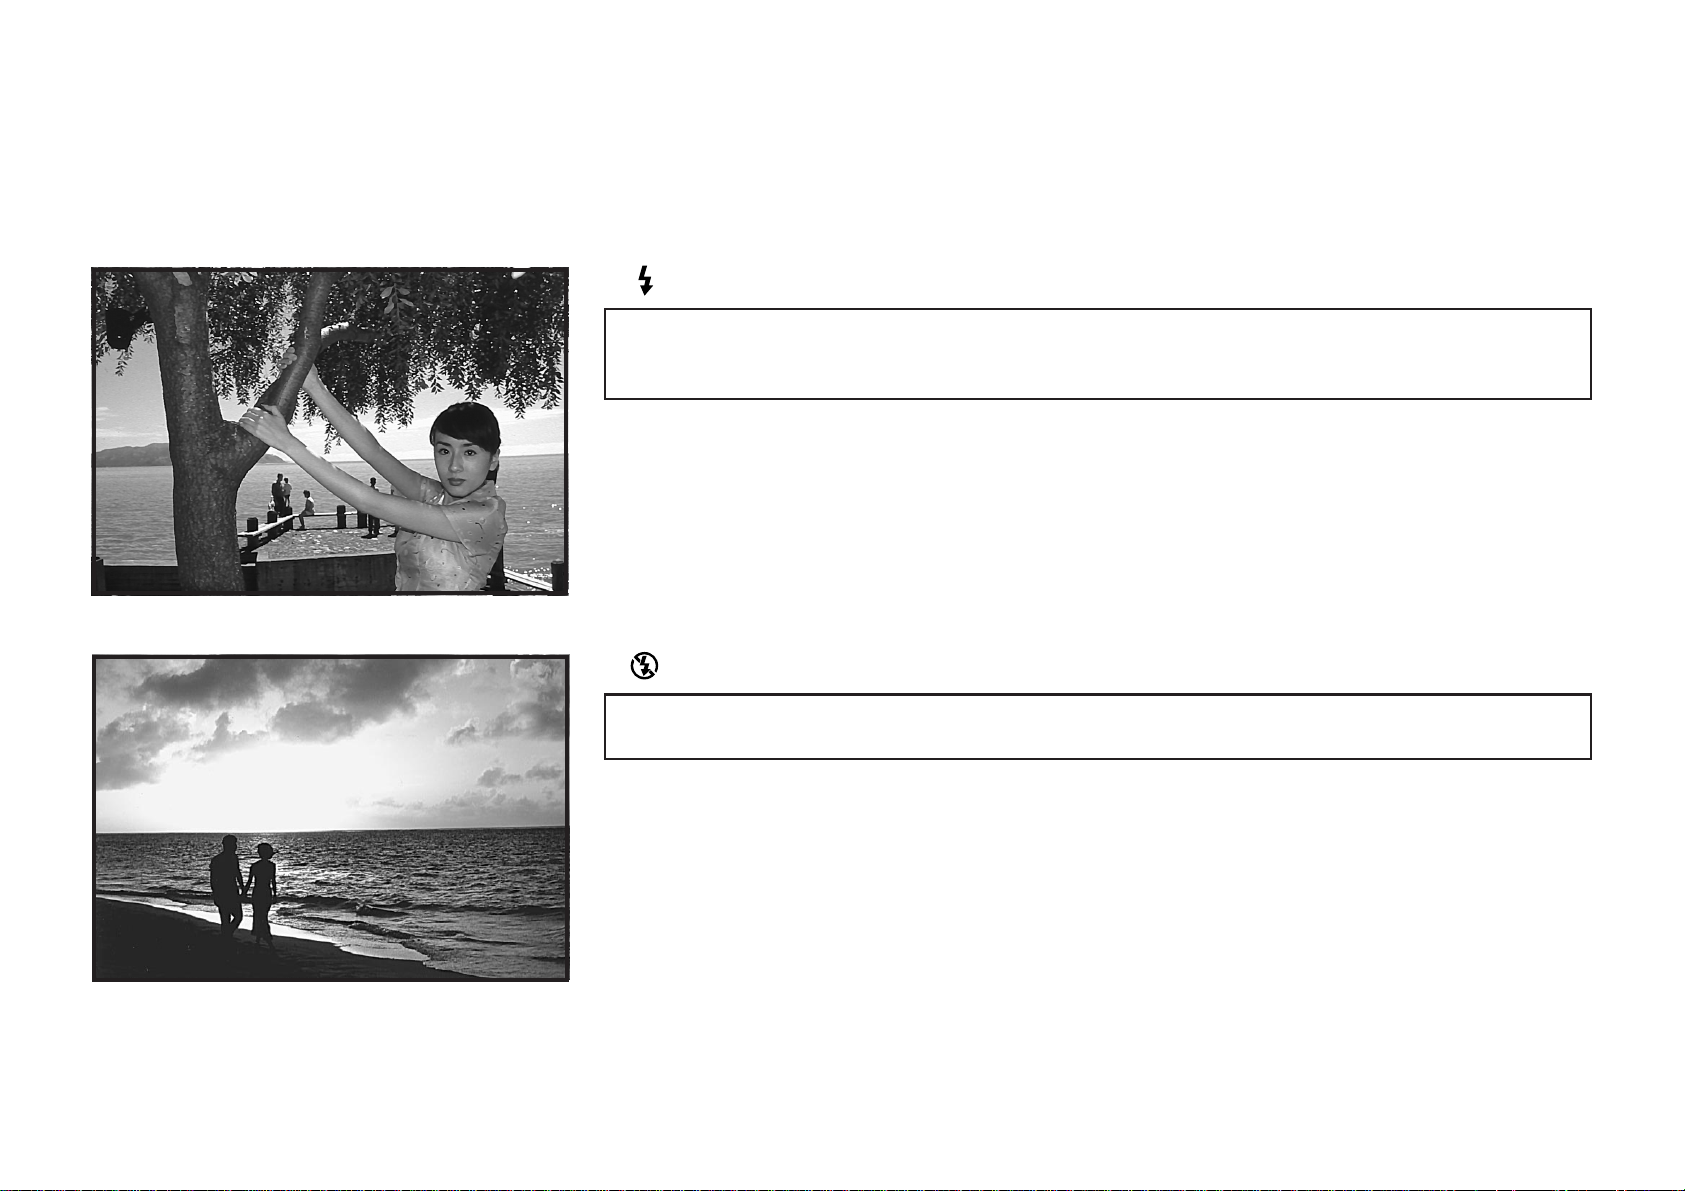
( ) Back light compensation flash mode
Use this mode to avoid deep shadows when photographing against the light such as a person
standing in front of a window or under a tree with a very bright background. This produces more
natural looking flash photographs.
Unlike the multi program flash mode, the flash fires even in bright places.
( ) Flash-off mode
Used when taking pictures under normal room lighting or taking pictures of subject beyond flash
range such as in a theatre or a stadium.
The flash stops firing.
When taking pictures under low light, use a tripod whenever possible to avoid unsharp pictures
∗
resulting from camera shake.
44
Page 45
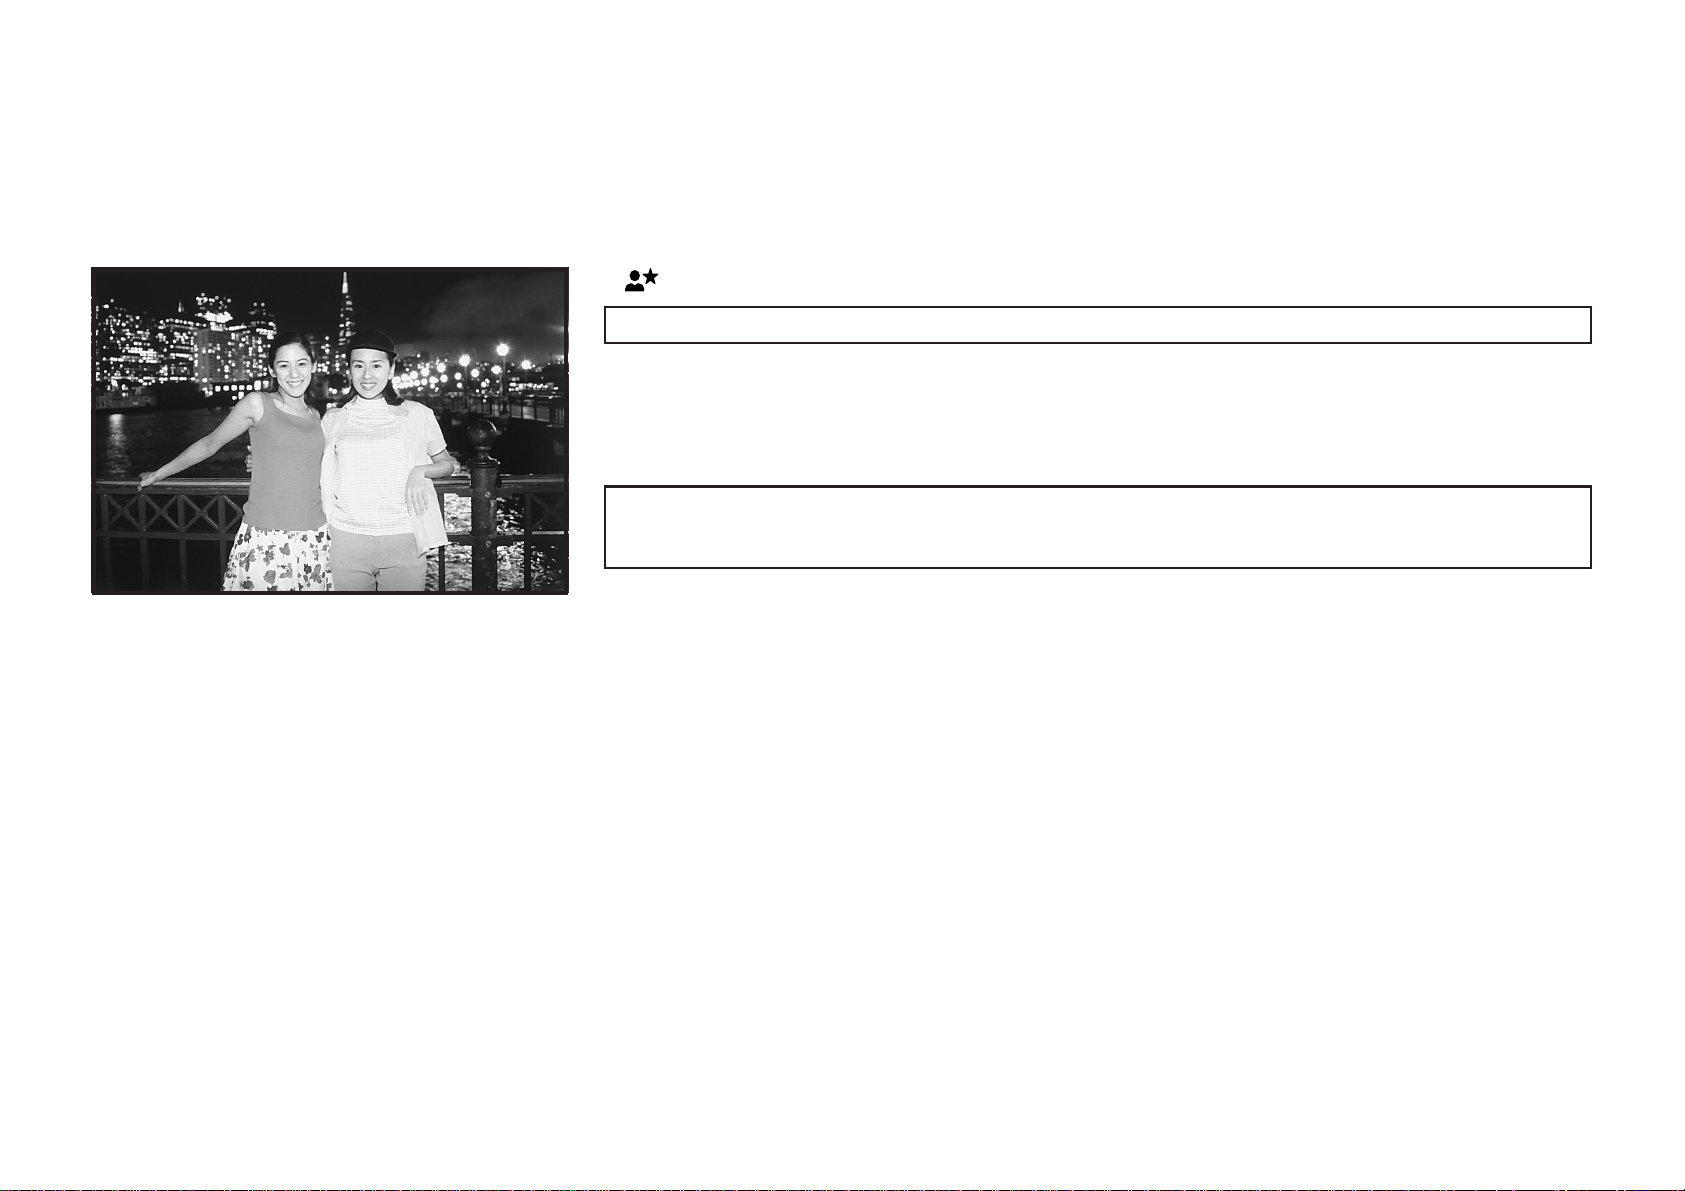
()
Used when taking portraits to record the background in a night scene.
Night portrait (slow sync) mode
Your camera will be placed in the slow shutter speed/red-eye reduction mode (The
flash fires briefly 10 times (pre-flash), then fires the 11th time for taking a picture.),
allowing you to take both the night scene and your subject clearly.
This mode is automatically cancelled per shot.
∗
As a slow shutter speed is used with the night portrait mode, ensure that a tripod is used to
prevent camera-shak e . It is also important that the subject remains motionless during the exposure.
45
Page 46
SELECTING THE SELF-TIMER MODE
The following self-timer/remote control modes can be selected.
■ SELF-TIMER modes
( )Self-timer/Remote control off mode (normal mode)
( )Self-timer mode (1 shot)
( )Self-timer mode (2 continuous shots)
( )Self-timer mode (3 continuous shots)
( )Remote control mode (→p.49)
The mode is automatically set when the power is turned off.
∗
The mode is automatically cancelled per shot.
∗
The mode is not cancelled after shooting.
∗
46
Page 47
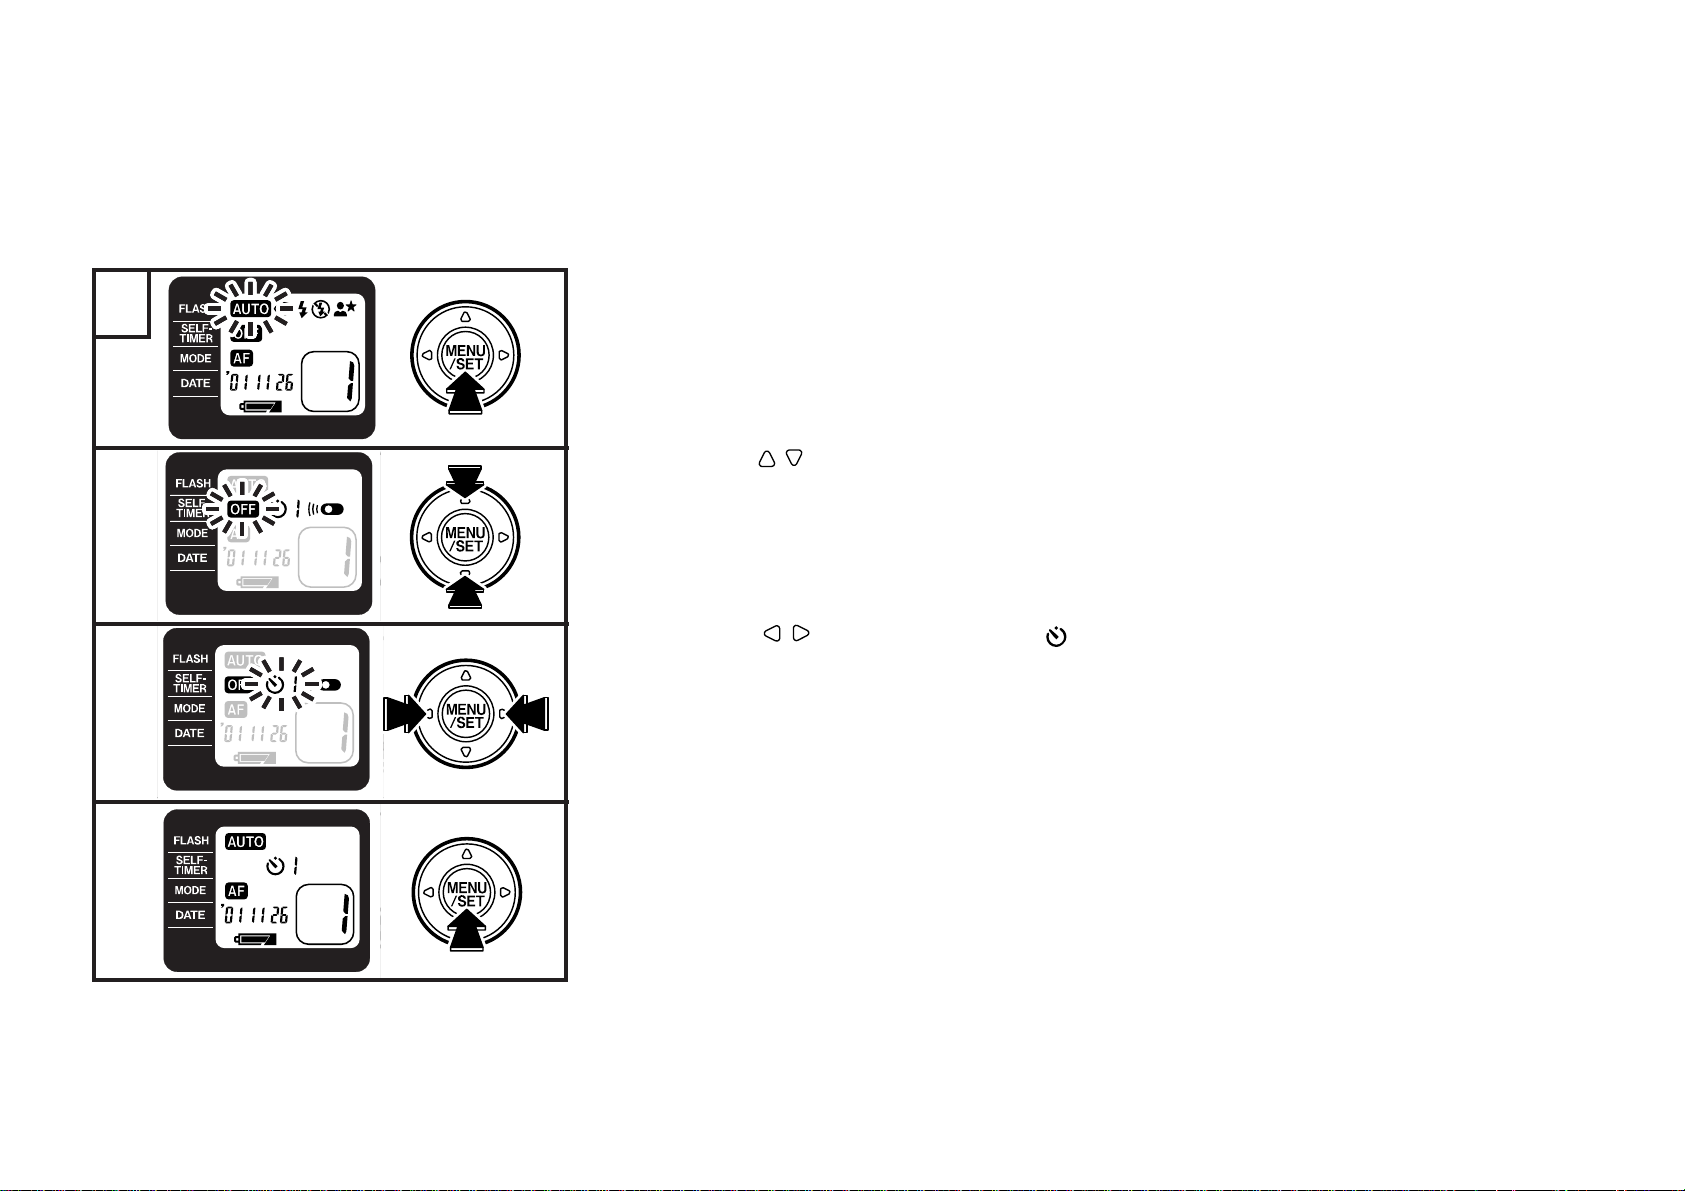
1
1
2
3
4
1 Turn the camera on and press the MENU/SET button.
The LCD lights orange and the menu selection mode is entered.
☞
2 Press the buttons to make the SELF-TIMER menu blink/light.
The self-timer mode selection mode is entered.
☞
3 Press the buttons to select “ ” and the number of continuous shots.
Up to 3 continuous shots can be selected.
☞
4 Press the MENU/SET button to complete the setting.
The LCD changes to green and the mode which has been set is displayed.
☞
47
Page 48
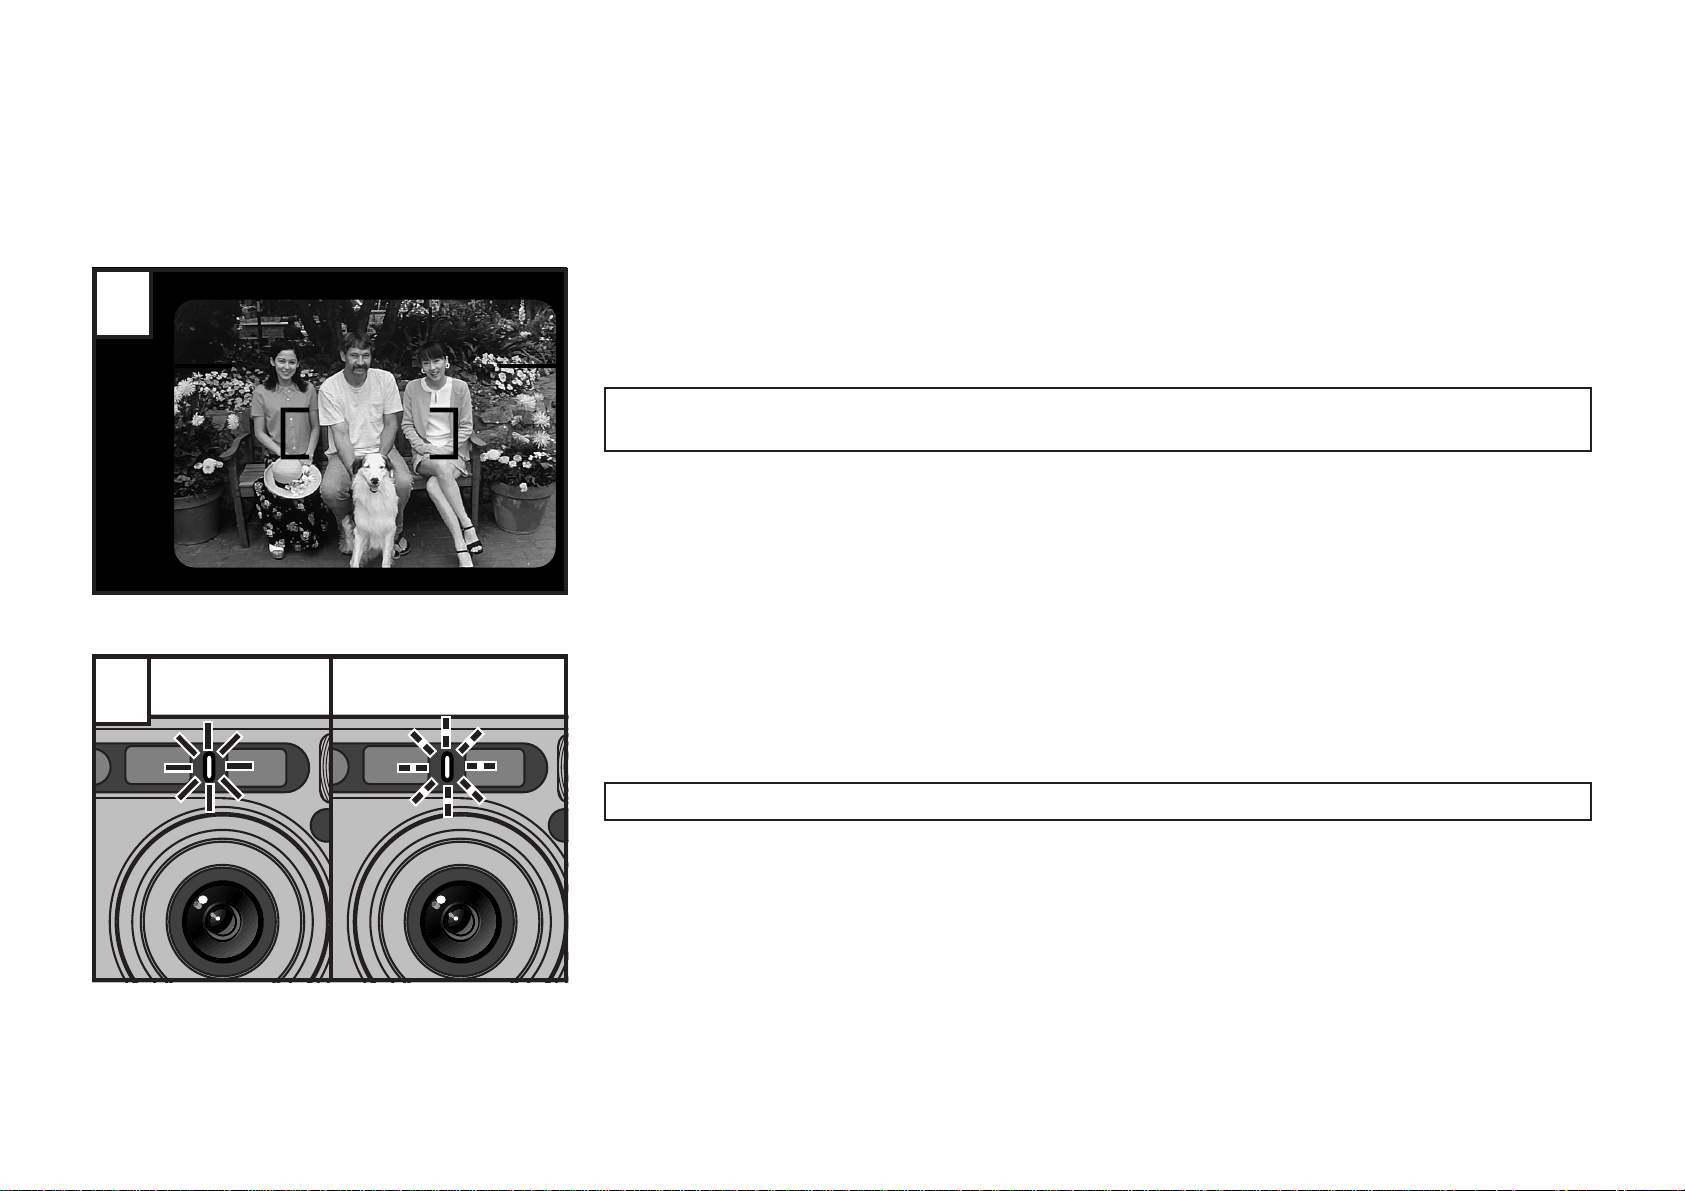
2
3
Compose the picture and press the shutter release button.
The camera focuses on the subject that the AF frame is positioned over, and then the self-timer
☞
starts.
You can select the Auto-Focus lock mode also. (→p.33)
∗
When pressing the shutter release button, do not stand in front of the camera. This may cause a
focusing error or underexposure.
After the self-timer lamp remains lit for about 7 seconds, it blinks for about 3 seconds, and then the shutter is released. When taking consecutive exposures, the
shutter is released the set number of times at an interval of between 3 and 9 seconds.
To cancel the self-timer mode after the self-timer has started, press the MENU/SET button.
48
Page 49
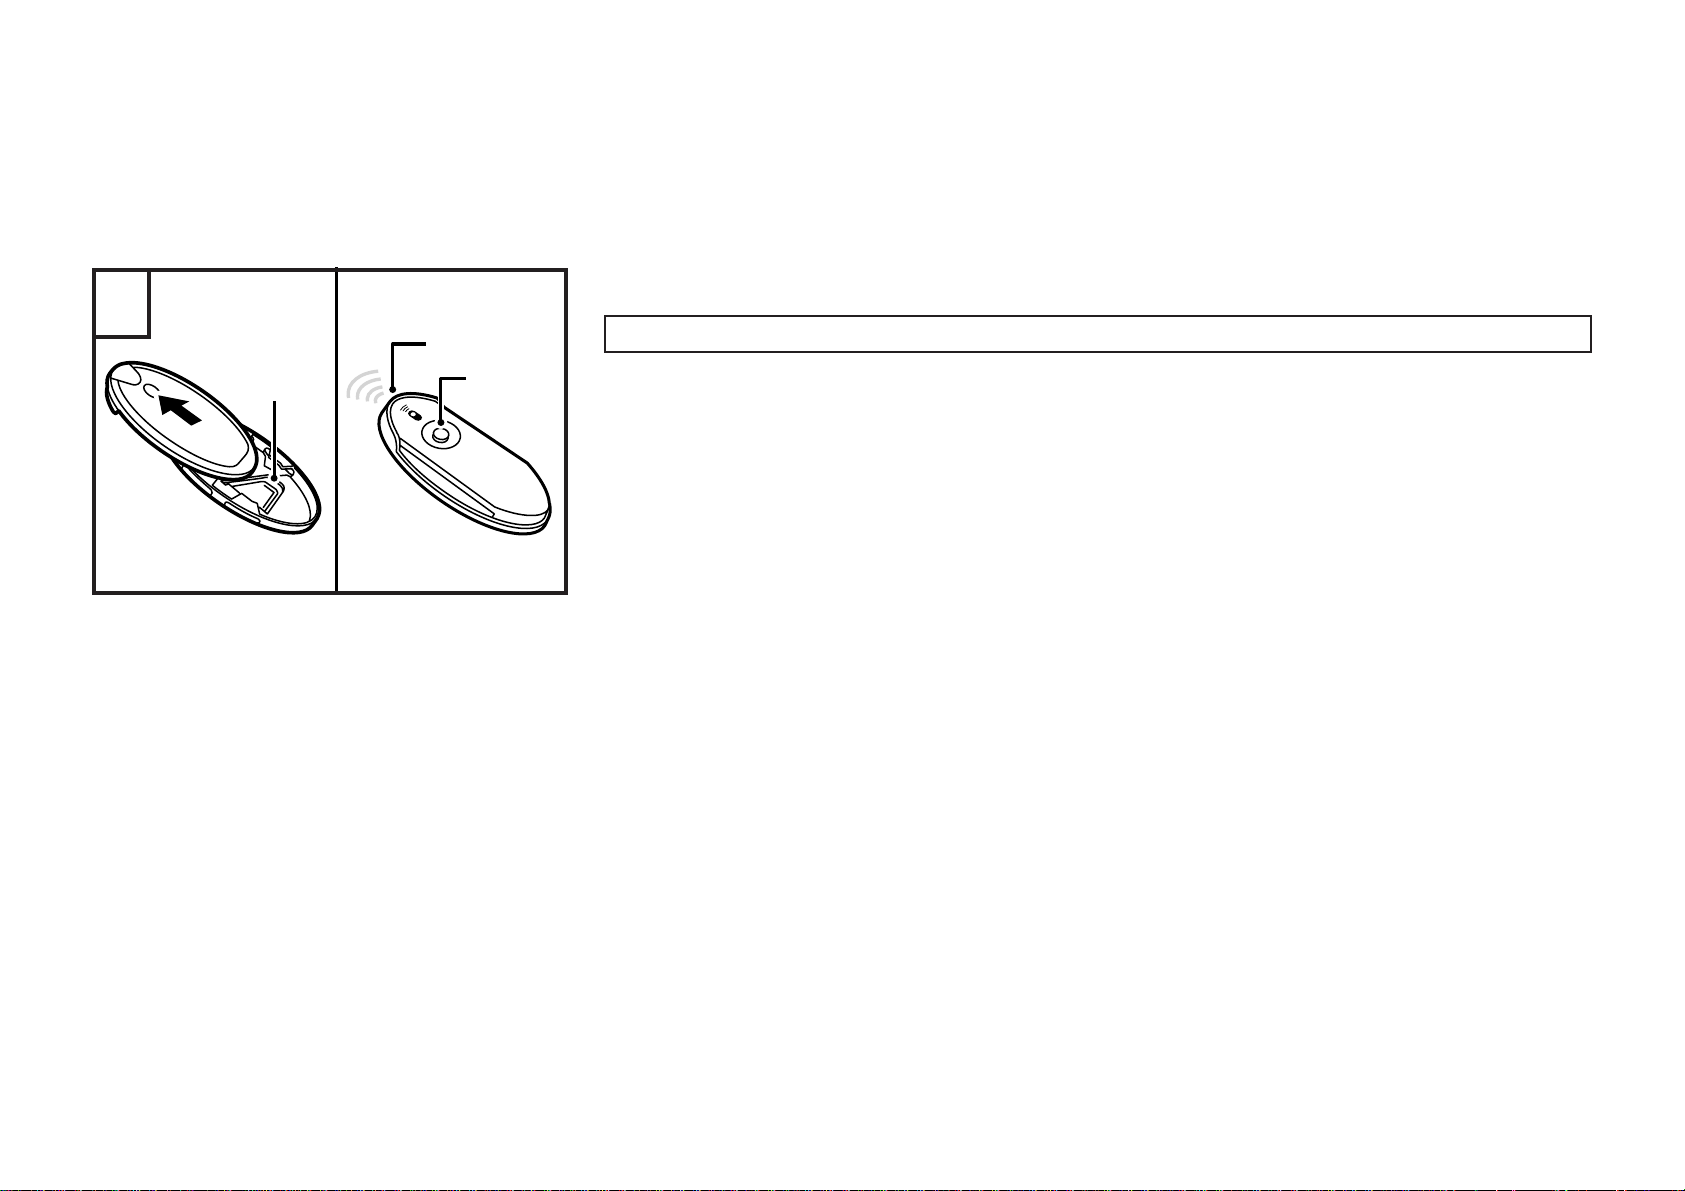
1
A
B
C
SELECTING THE REMOTE CONTROLLER MODE
A remote controller of the proper type is required.
Remove the remote controller from its holder by sliding it in the direction of the
arrow.
A : Remote controller holder
B : Transmitter
C : Shutter release button
To replace the remote controller in the holder, slide the remote controller in the direction oppo-
∗
site to the arrow until it clicks into position.
The specific remote controller may be different from the one shown in the illustration.
∗
49
Page 50
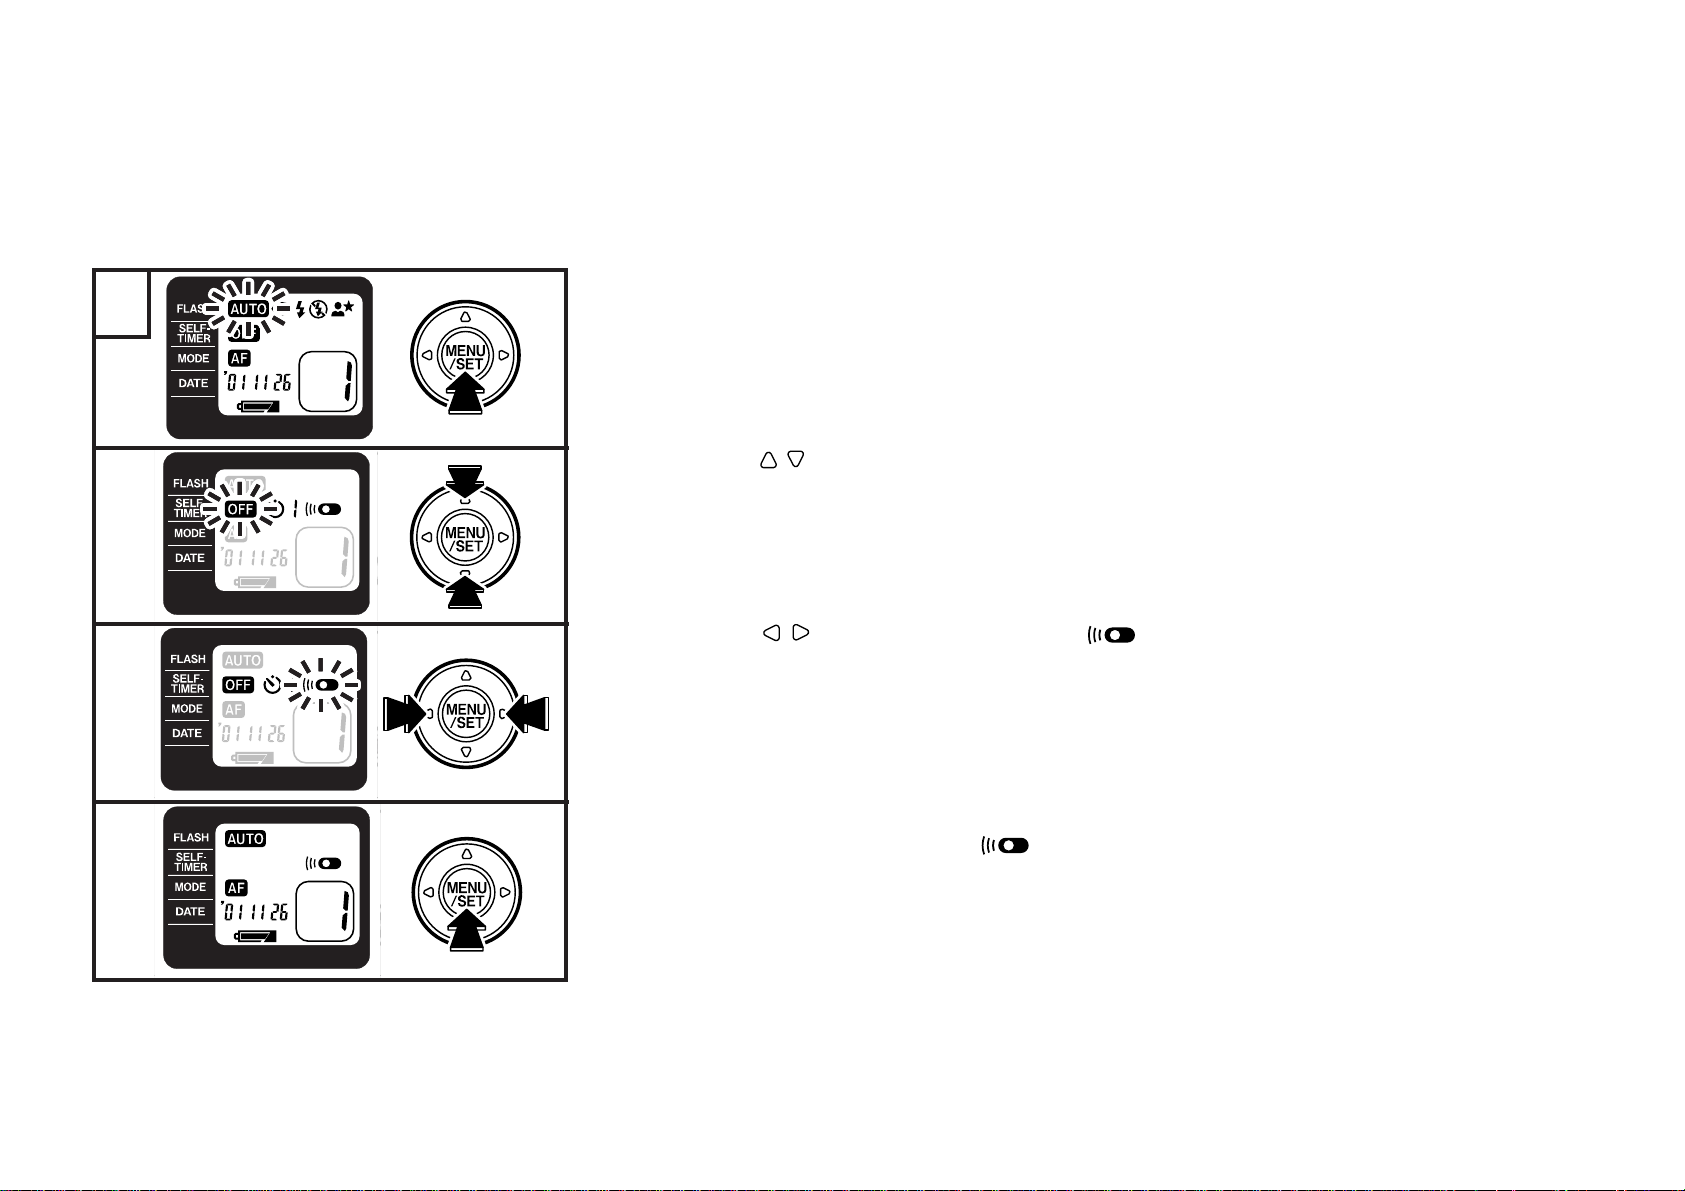
1
1
2
3
4
1 Turn the camera on and press the MENU/SET button.
The LCD lights orange and the menu selection mode is entered.
☞
2 Press the buttons to make the SELF-TIMER menu blink/light.
The self-timer/remote controller mode selection mode is entered.
☞
3 Press the buttons and select the mode.
The selected mode blinks.
☞
4 Press the MENU/SET button to complete the setting.
The LCD changes to green and “ ” is displayed.
☞
50
Page 51
3
4
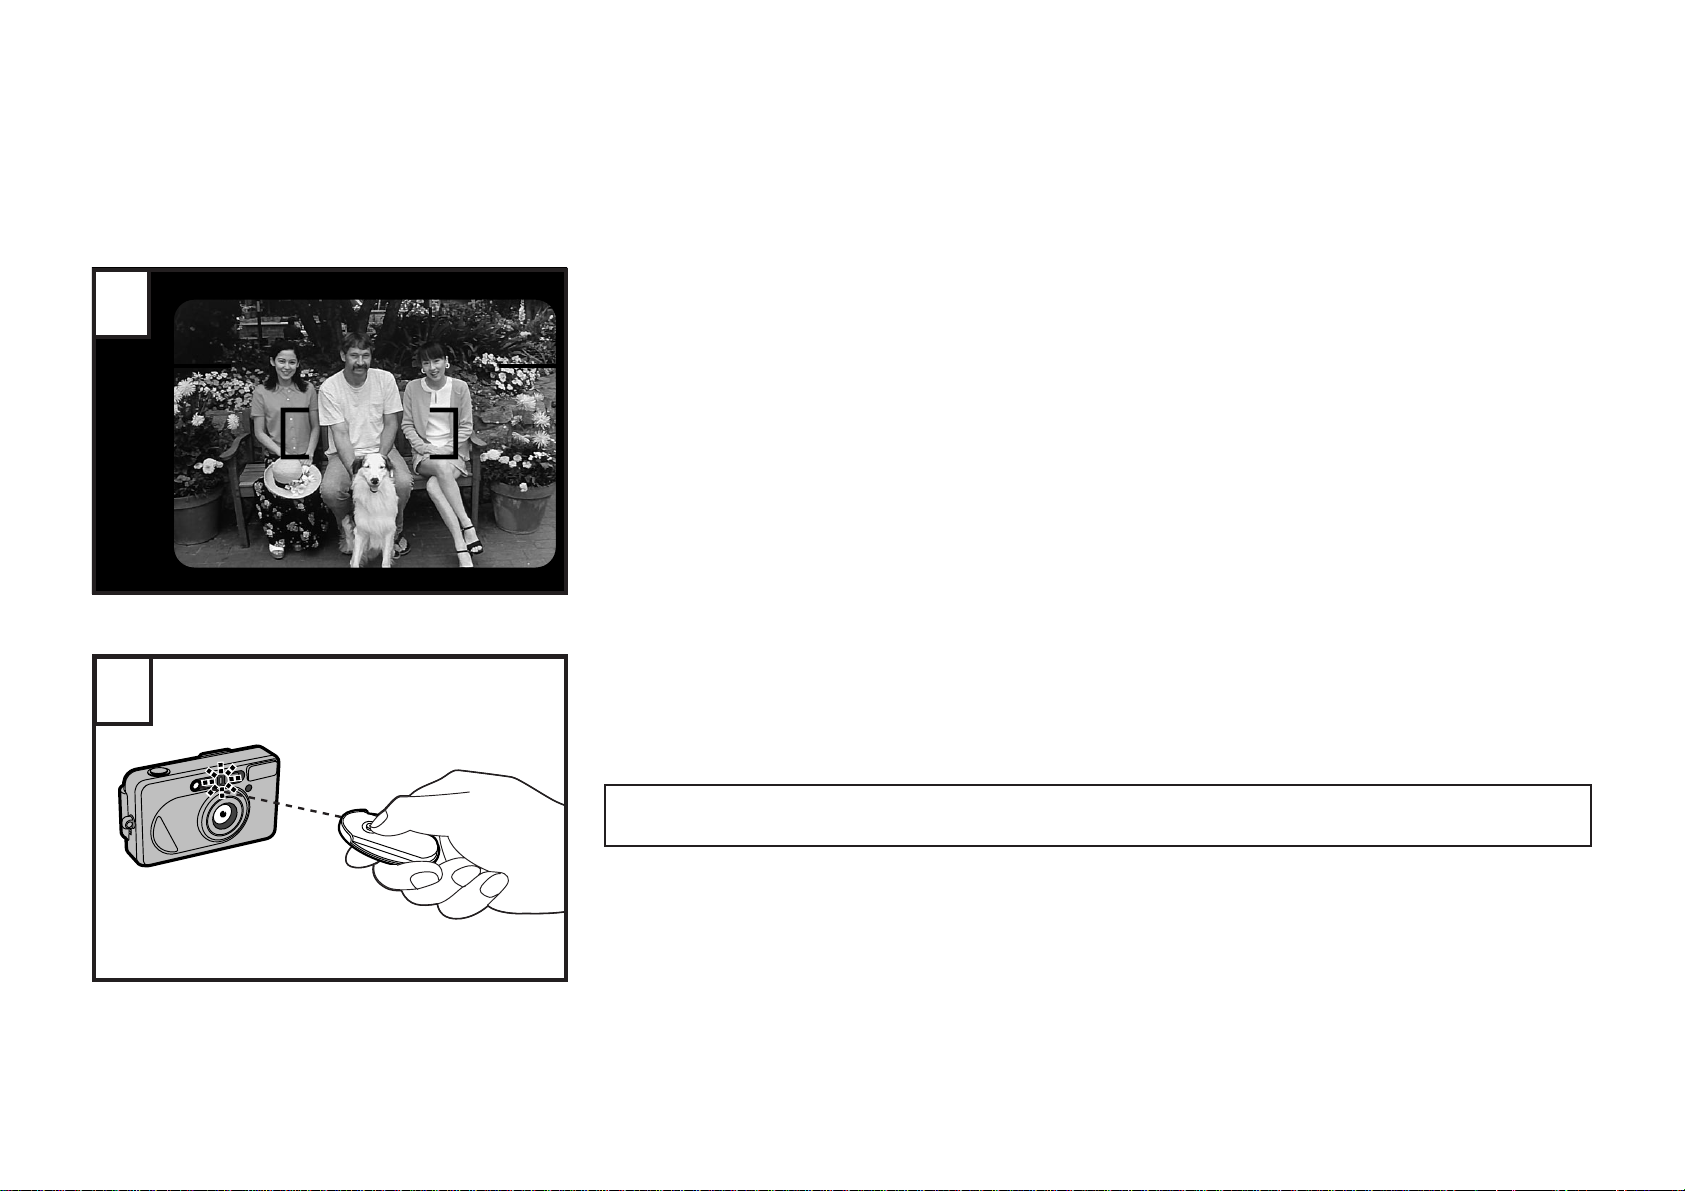
Aim the AF Frame at your subject and compose your picture.
1 Point the remote controller toward the camera’s remote controller sensor, and
then press the remote controller’s shutter release button.
2 After the self-timer/remote controller lamp blinks for about 2 seconds, the shutter
is released.
The remote controller mode is not cancelled after shooting. It is automatically cancelled when the
power is turned off.
51
Page 52
20°
20°
3.5 m
(11.5 ft.)
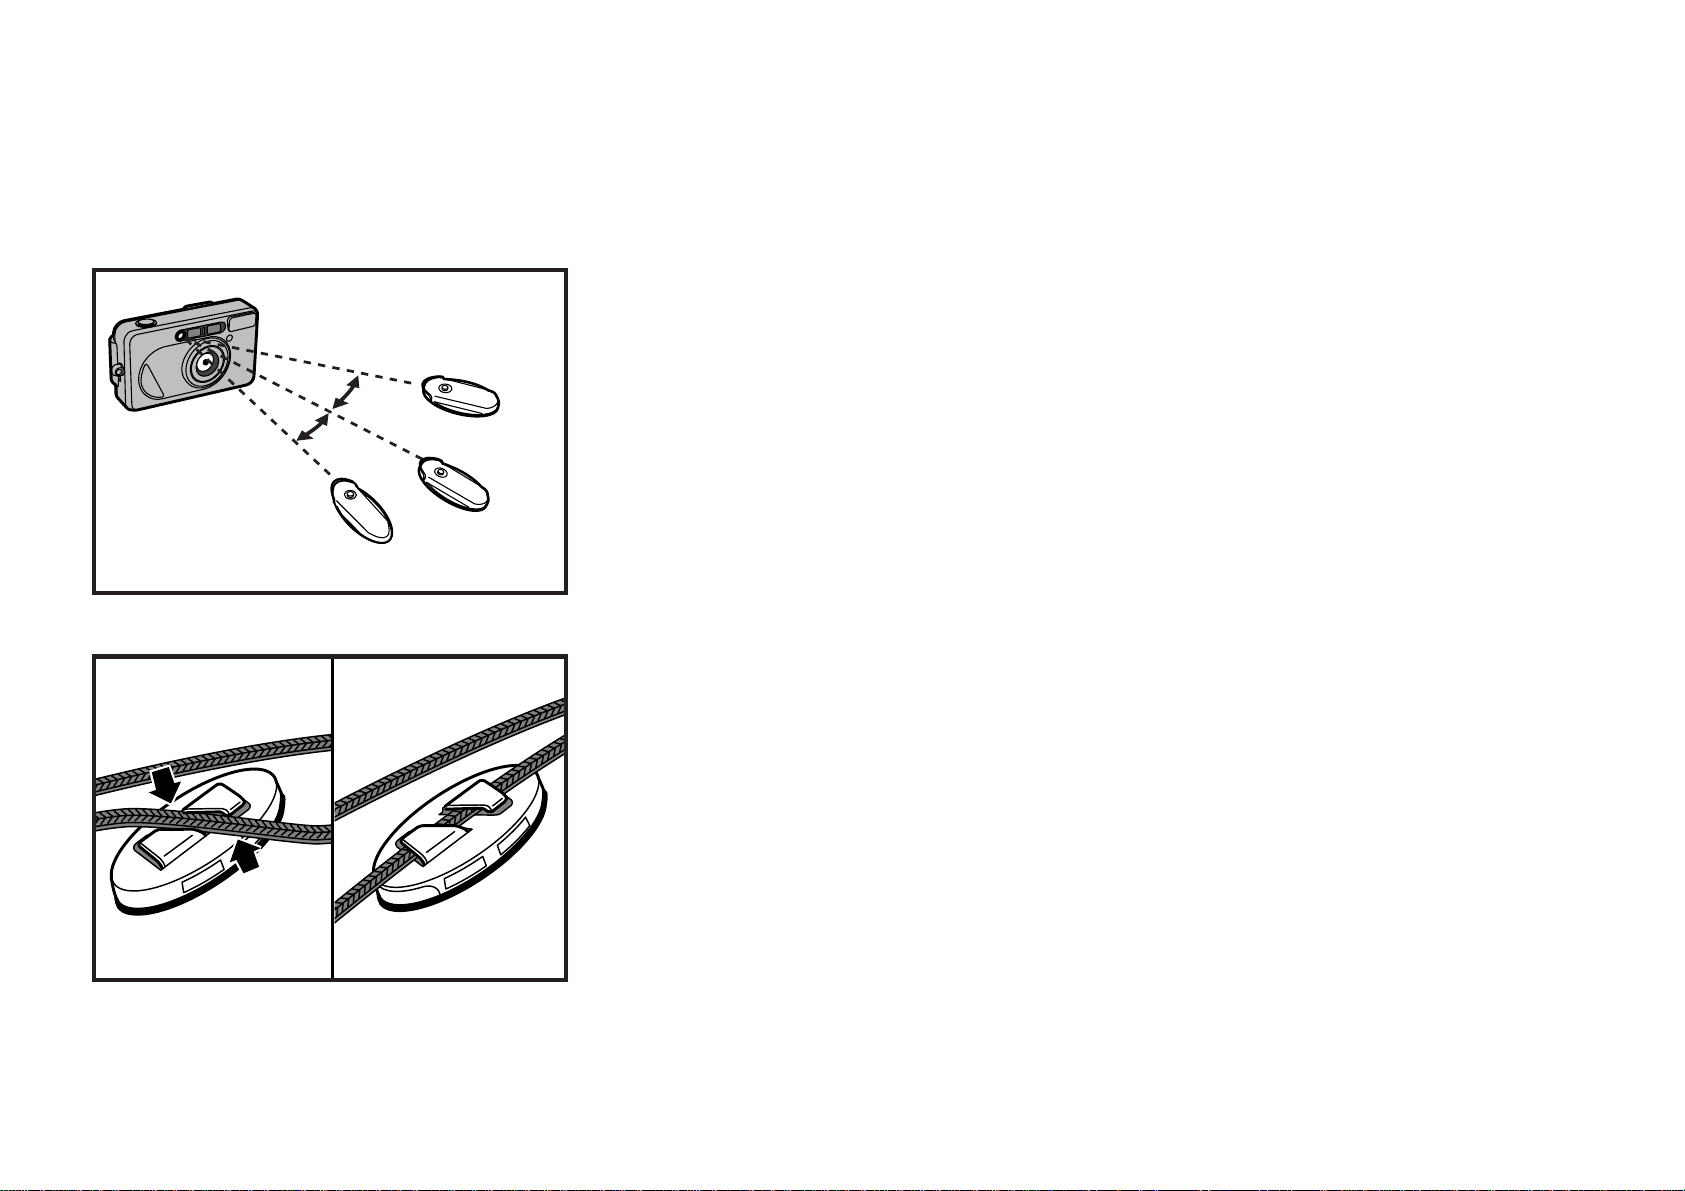
The coverage of the remote controller is up to about 5 m (16.4 ft.) when used directly in front of the camera, and up to about 3.5 m (11.5 ft.) when used at a vertical
or horizontal angle of 20°.
A tripod is recommended when taking pictures by remote control.
∗
The remote controller may not work properly when direct sunlight enters the camera’s light
∗
sensor from behind your subject. Use the self-timer in such a case.
52
3.5 m (11.5 ft.)
5 m
(16.4 ft.)
Fit the remote controller holder to the camera strap for more convenient handling.
The battery life is about three years (tested according to standard test conditions). If the remote
∗
controller no longer operates, contact your local retailer where you purchased your camera or
our service center. A replacement battery will be available at nominal cost.
Page 53
SELECTING THE FOCUS MODE
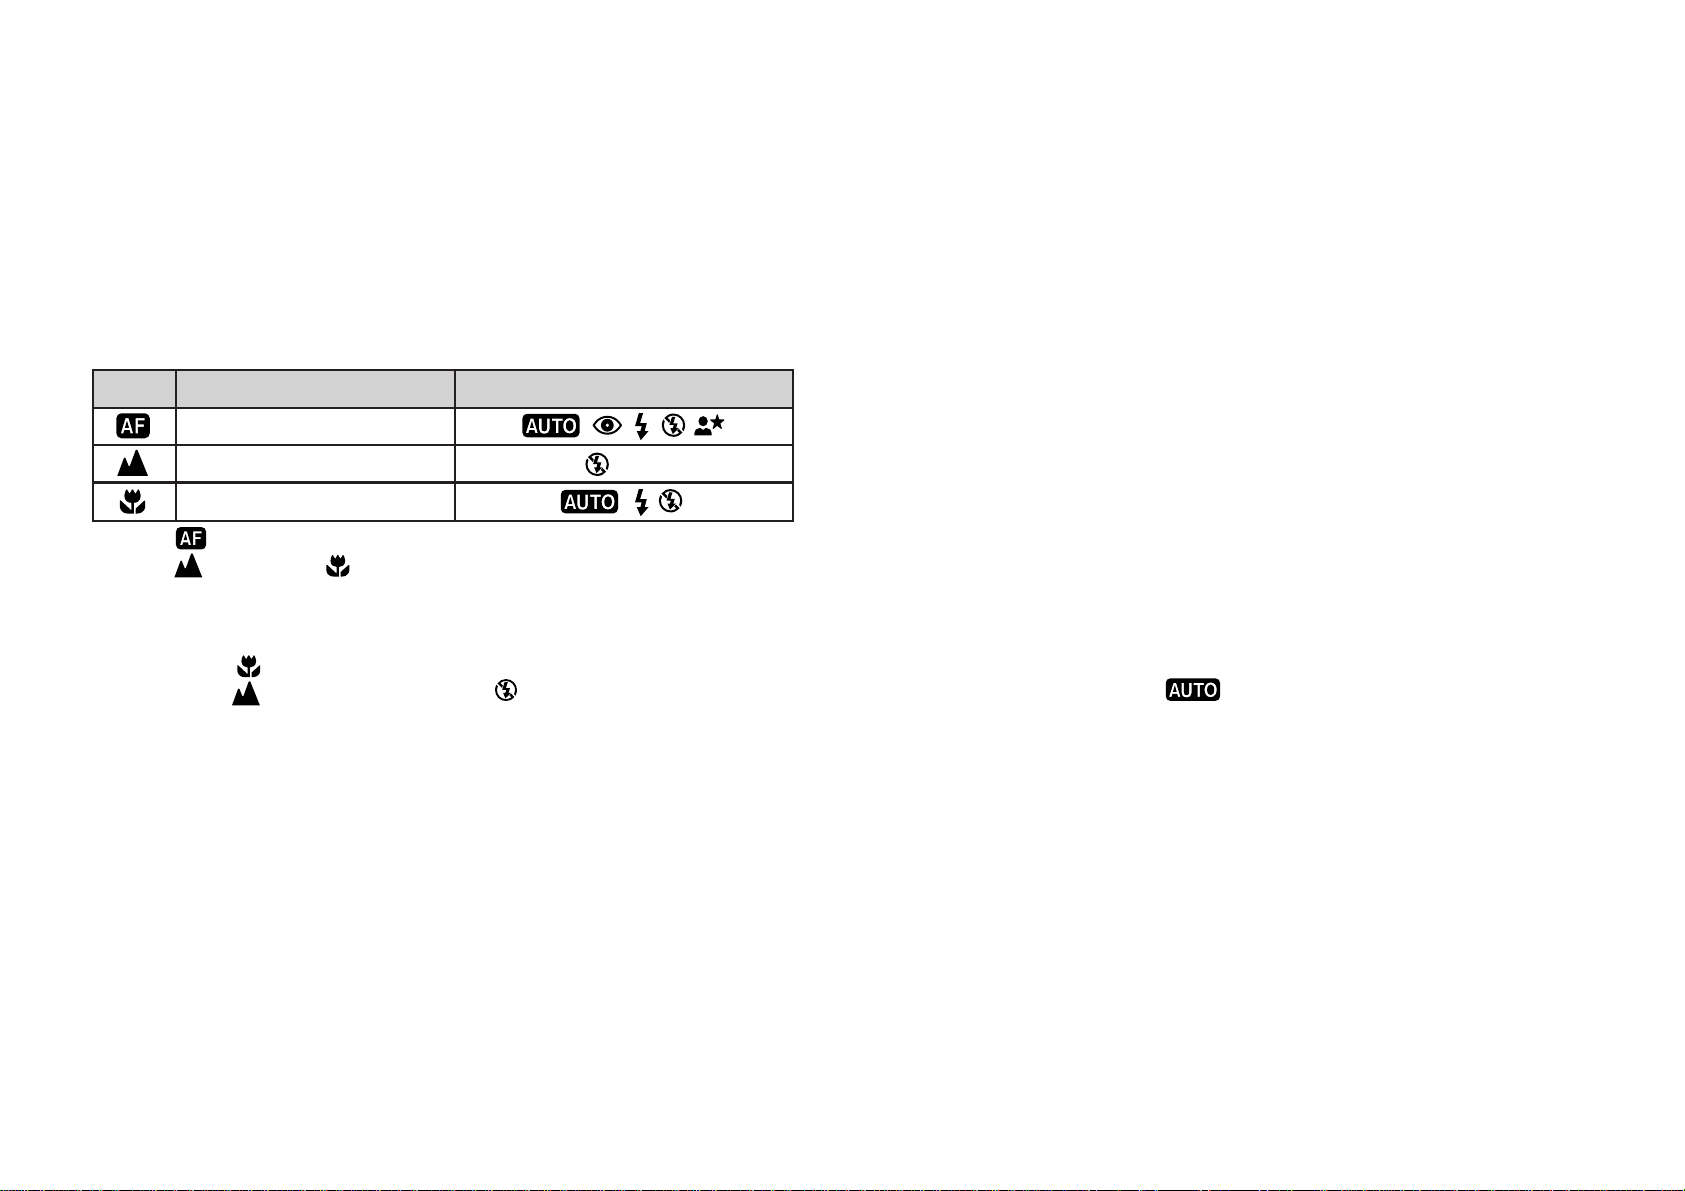
The following focus modes can be selected.
■FOCUS modes
LCD Available flash modesMode
AF (Auto focus) mode
Landscape mode
Macro mode
The mode is set when the power is turned off.
∗
The mode and mode are automatically cancelled per shot.
∗
When you want to use these mode continuously, hold the MENU/SET button down for 2 seconds or longer after selecting the mode. (The selected
mode will continue to blink even after it is set.) The mode is maintained so that a number of pictures can be taken. The mode is canceled when the
power is turned off.
When the mode is set, the focal distance is fixed at 100 mm.
∗
★1 When the mode is selected, the mode is automatically set. After the picture has been taken, the mode is automatically set.
★1
53
Page 54
1
2
3
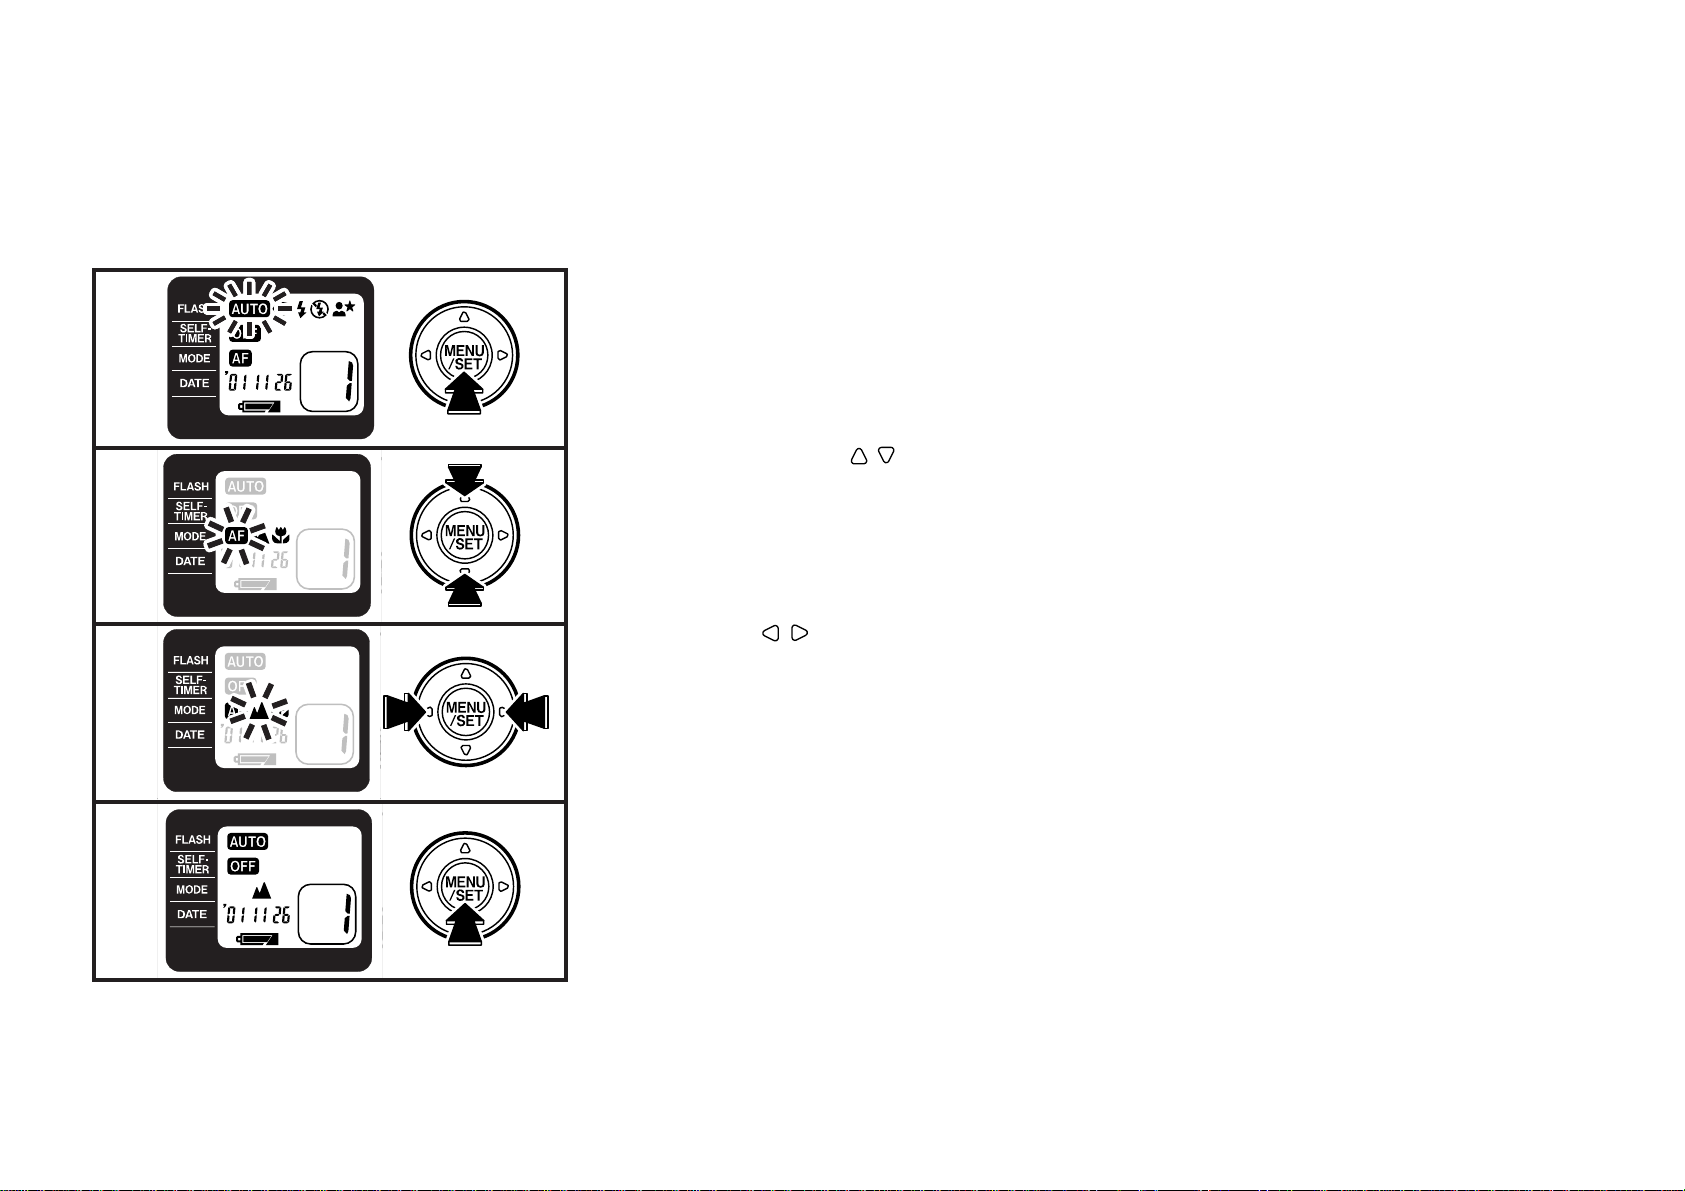
4
1 Turn the camera on and press the MENU/SET button.
The LCD lights orange and the menu selection mode is entered.
☞
2 Press any of the buttons to make the FOCUS menu blink.
The focus mode selection mode is entered.
☞
3 Press the buttons and select the FOCUS mode.
The selected mode blinks.
☞
4 Press the MENU/SET button to complete the setting.
The LCD changes to green and the mode which has been set is displayed.
☞
54
Page 55
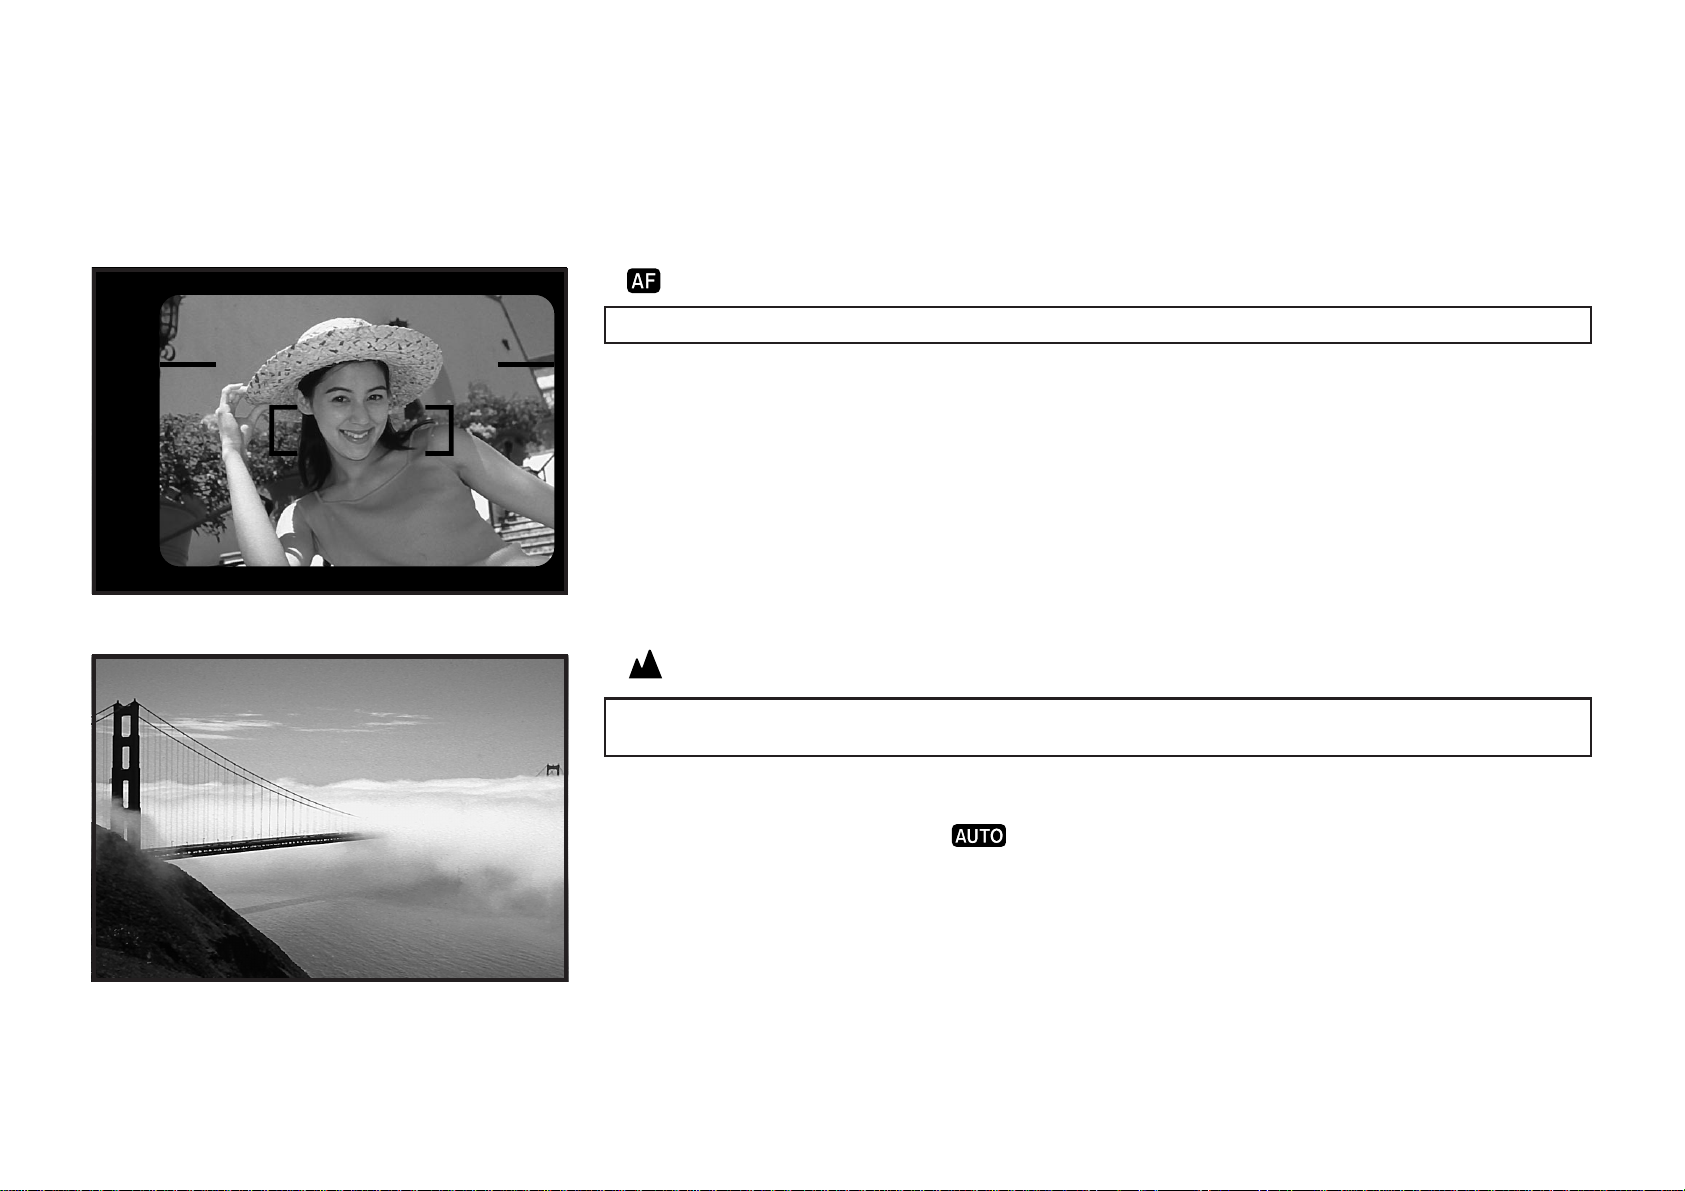
( ) AF (Auto focus) mode
Used for normal photography.
Compose the picture so that the subject is within the AF frame. (→p.28)
( ) Landscape mode
Used when taking landscape pictures or photographing remote (night) scenes through window
glass.
The lens is focused for the distant subjects. The flash does not fire in this mode.
This mode is automatically cancelled per shot. After the picture has been taken, the flash mode
∗
is also automatically set to the mode.
When taking pictures under low light, use a tripod whenever possible to avoid unsharp pictures
∗
resulting from camera shake.
55
Page 56
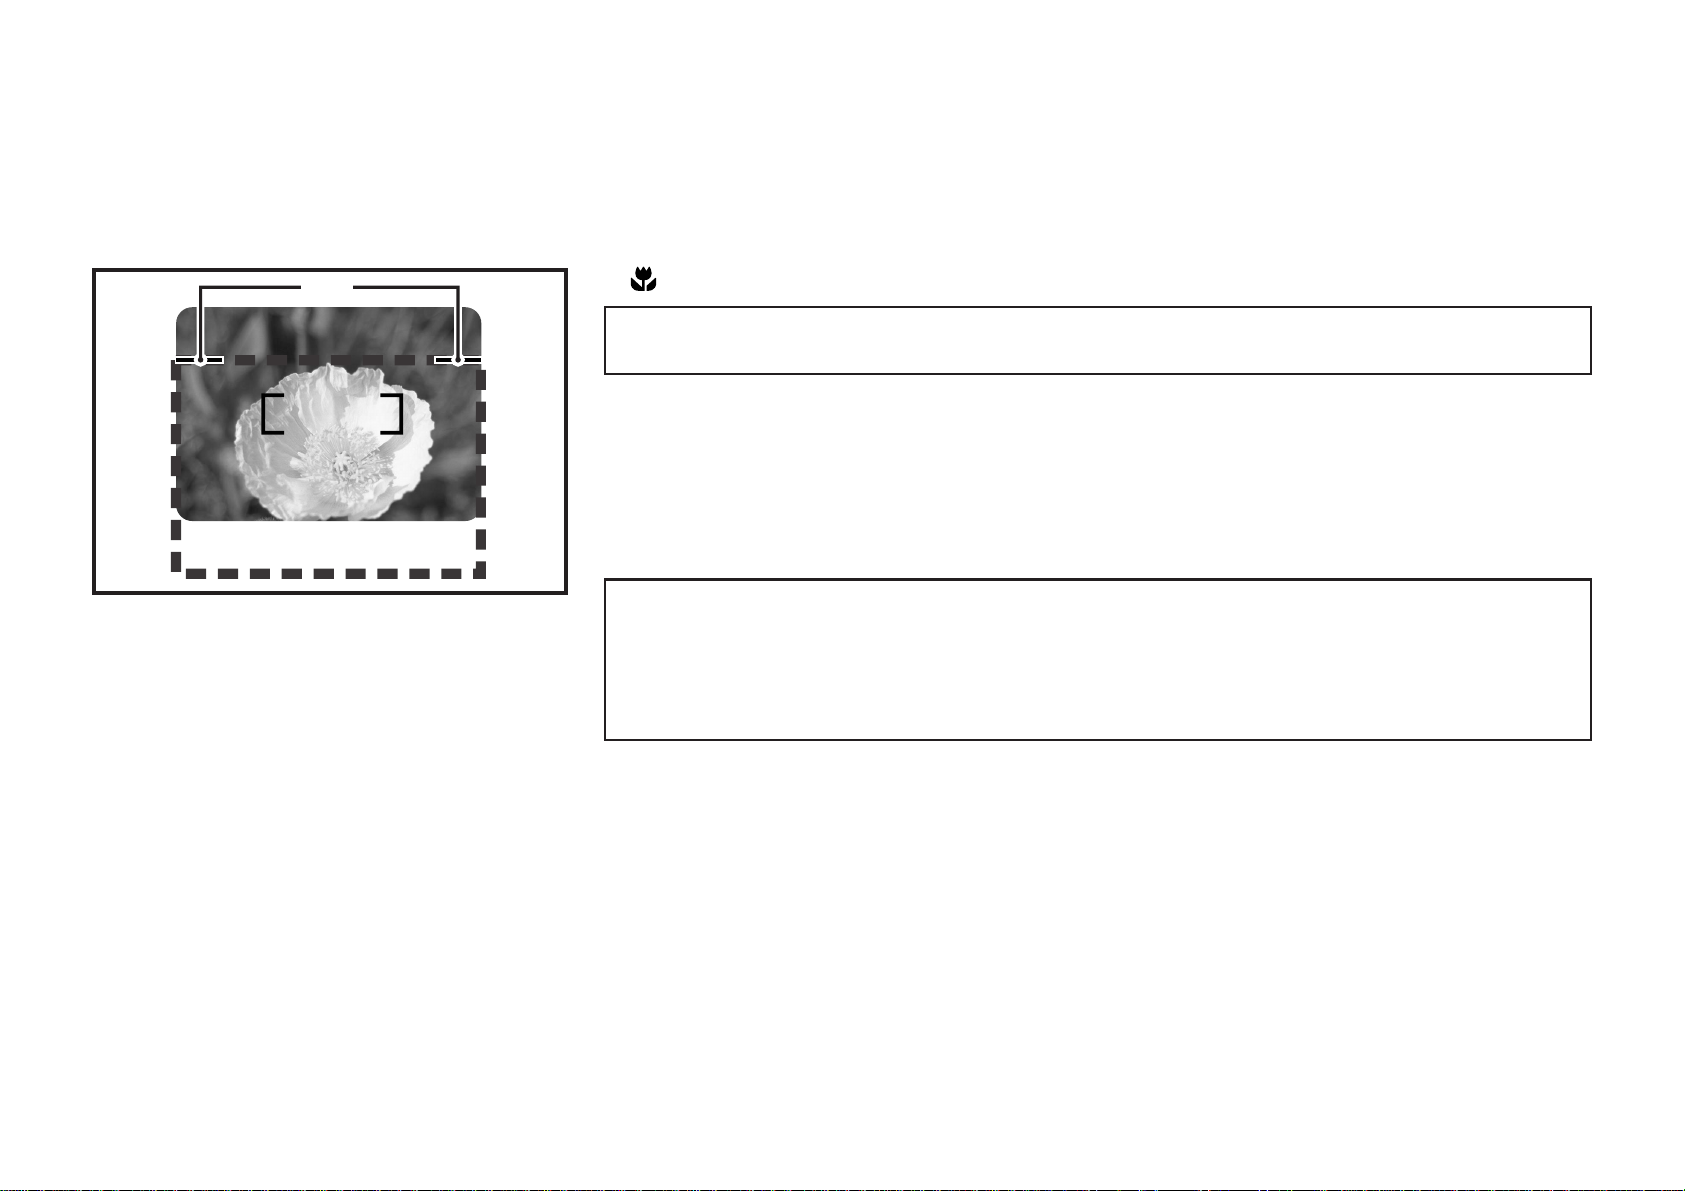
A
( ) Macro mode
The macro mode is used when you want to take large pictures of small subjects such as flo wers
and insects.
A : Parallax correction marks
The focal distance is fixed at 100 mm.
Compose the picture so that the subject that you want to photograph is within the
frame.
The focusing range for sharp pictures is from 0.5 m (1.6 ft.) to 1.0 m (3.3 ft.).
∗
∗ This mode is automatically cancelled per shot.
•Since this is close-up photograph y, compose the picture so that the subject is within the paral-
lax correction marks.
•When the subject is outside of the focal range, the AF lamp blinks rapidly and the shutter can
not be released. (→p.13)
•When the subject is out of focus, the AF lamp b links slowly and the shutter can not be released.
(→p.13) Refer to page 32 and use the AF lock.
56
Page 57
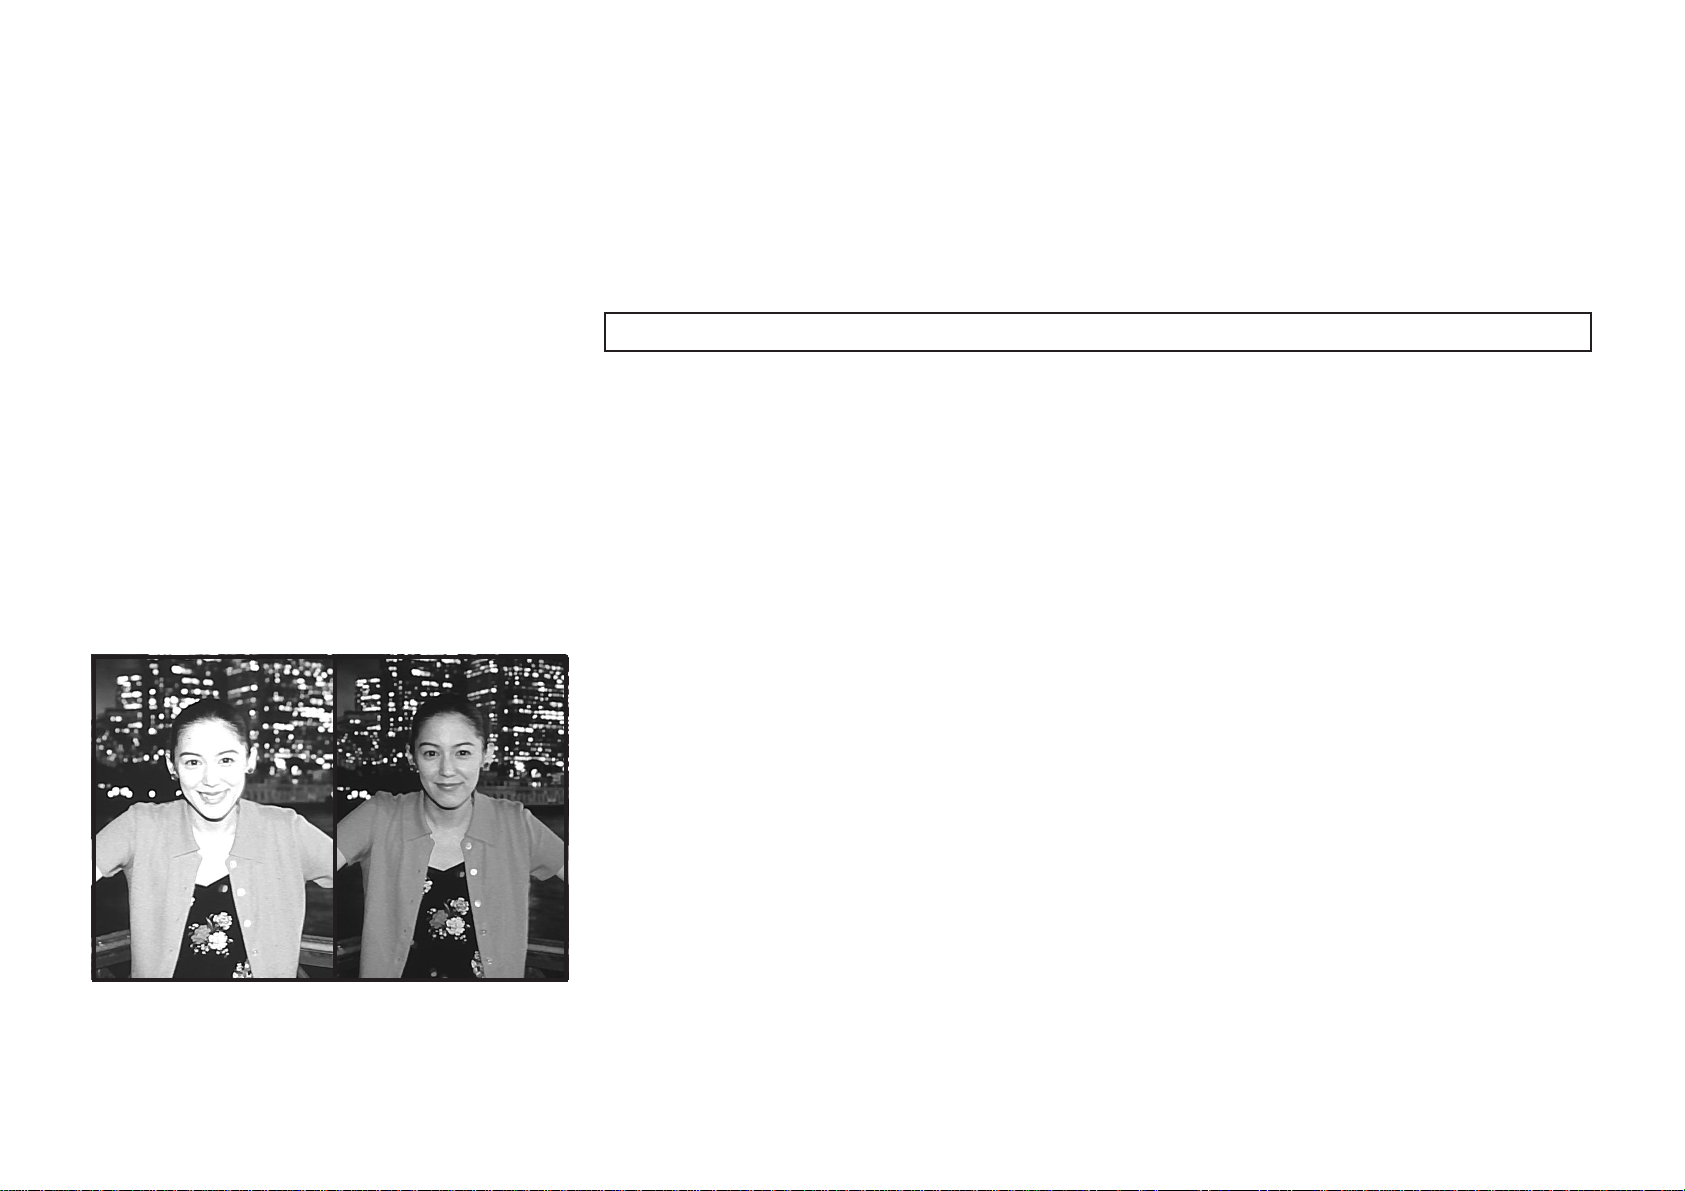
MULTI PROGRAM FLASH
A word on multi program flash
A new function which allows the camera to automatically adjust the quantity of light
emitted by the flash by analyzing the brightness of the subject, the distance, and the
focal length of the lens. The flash always fires automatically unless the subject is
bright or too far . This programmed flash allows anyone to tak e clear pictures simply.
Some practical examples are introduced to explain the effects.
◆ Close-up photography in a room or night scene
When close-up pictures are taken in a dim place with an ordinary flash, it fires at
100%. As a result, the subject is washed out by overexposure. The multi program
flash reduces the light quantity down to 12.5%, preventing overexposure.
57
Page 58
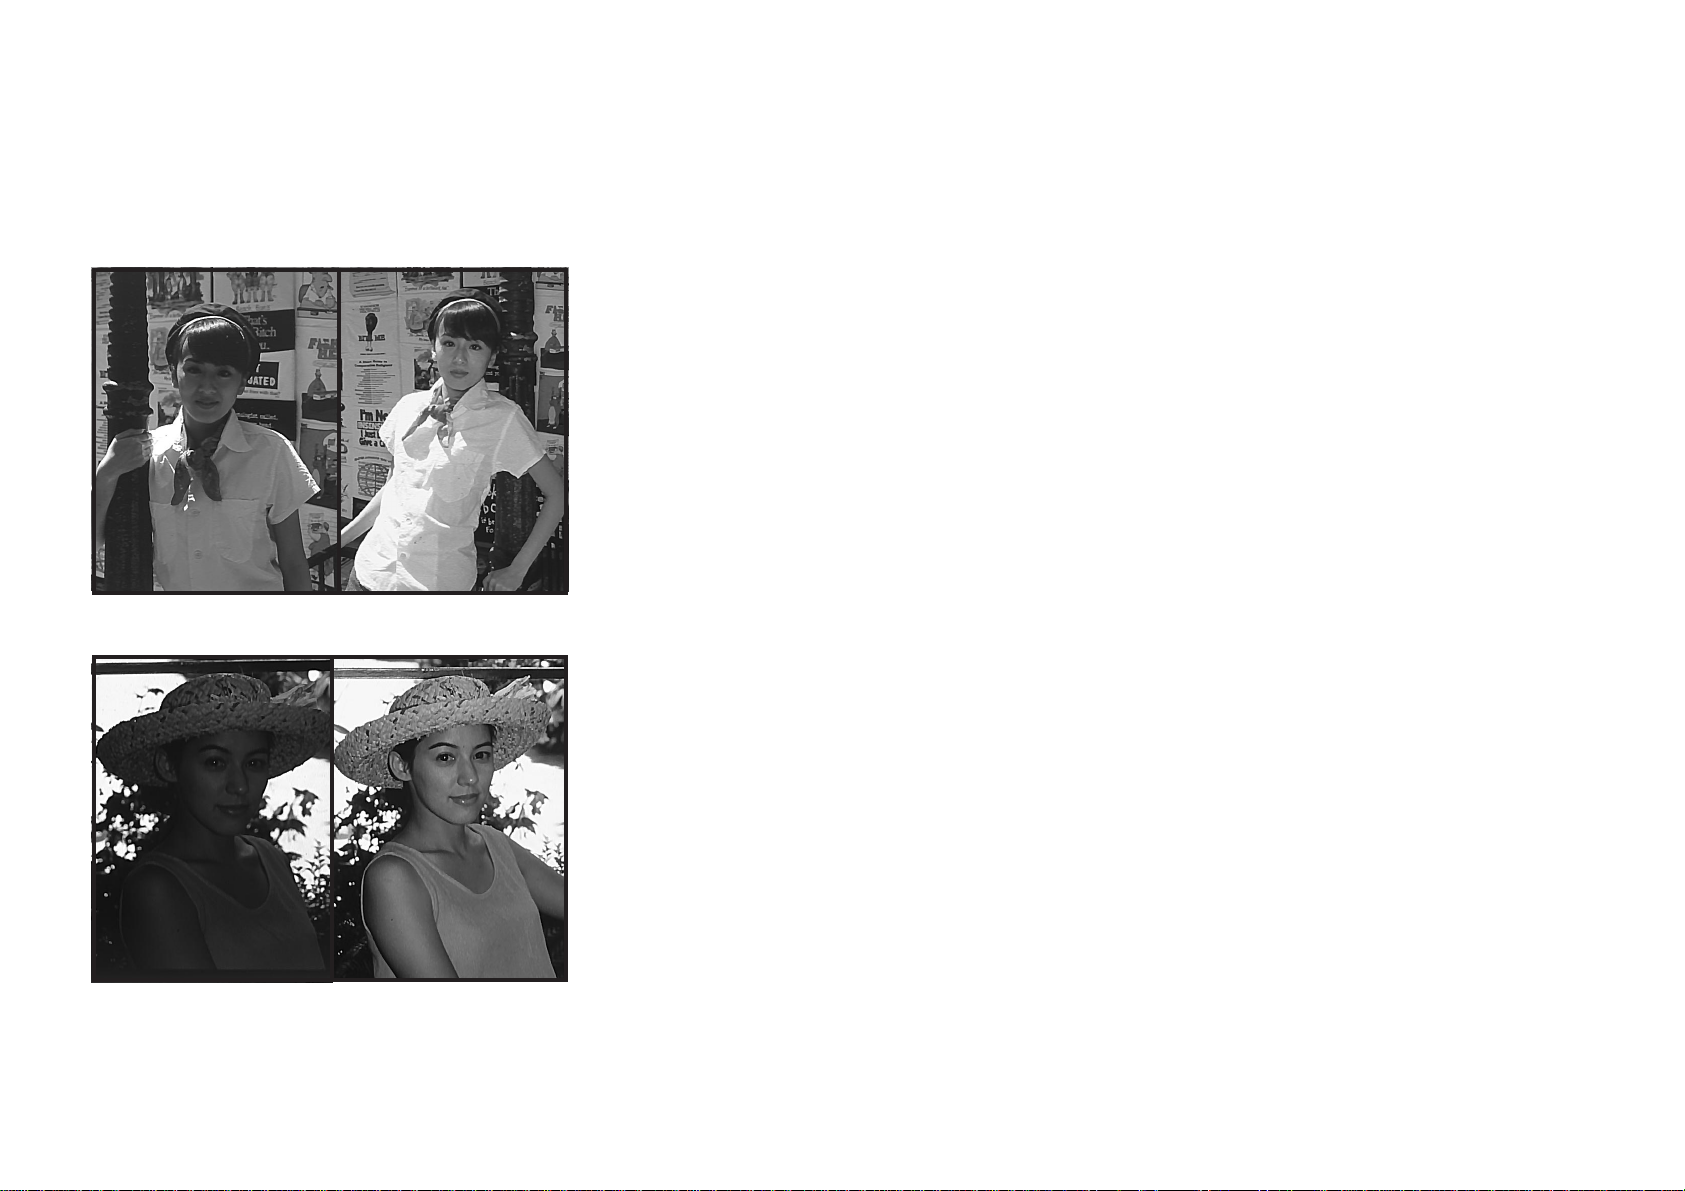
◆ Portrait photography under very bright light
When a person is photographed in bright daylight, his (her) f ace is lik ely to be spotted with the shadows of hair and nose. Even in such a case, the multi program flash
automatically fires to reduce the shadows. It seems unnecessary to use the flash in
a bright place. Howe ver , y ou will understand the effect by comparing a picture tak en
with the flash used and a picture taken without using the flash.
◆ Photography against the sun
When photographing a person who is backlit or standing by a window, the subject
appears as a shadow . As a result, the f eatures will be too dark to distinguish. In this
case also, the multi-prog ram flash automatically provides the correct amount of light
so that you can take beautiful pictures .
58
Page 59
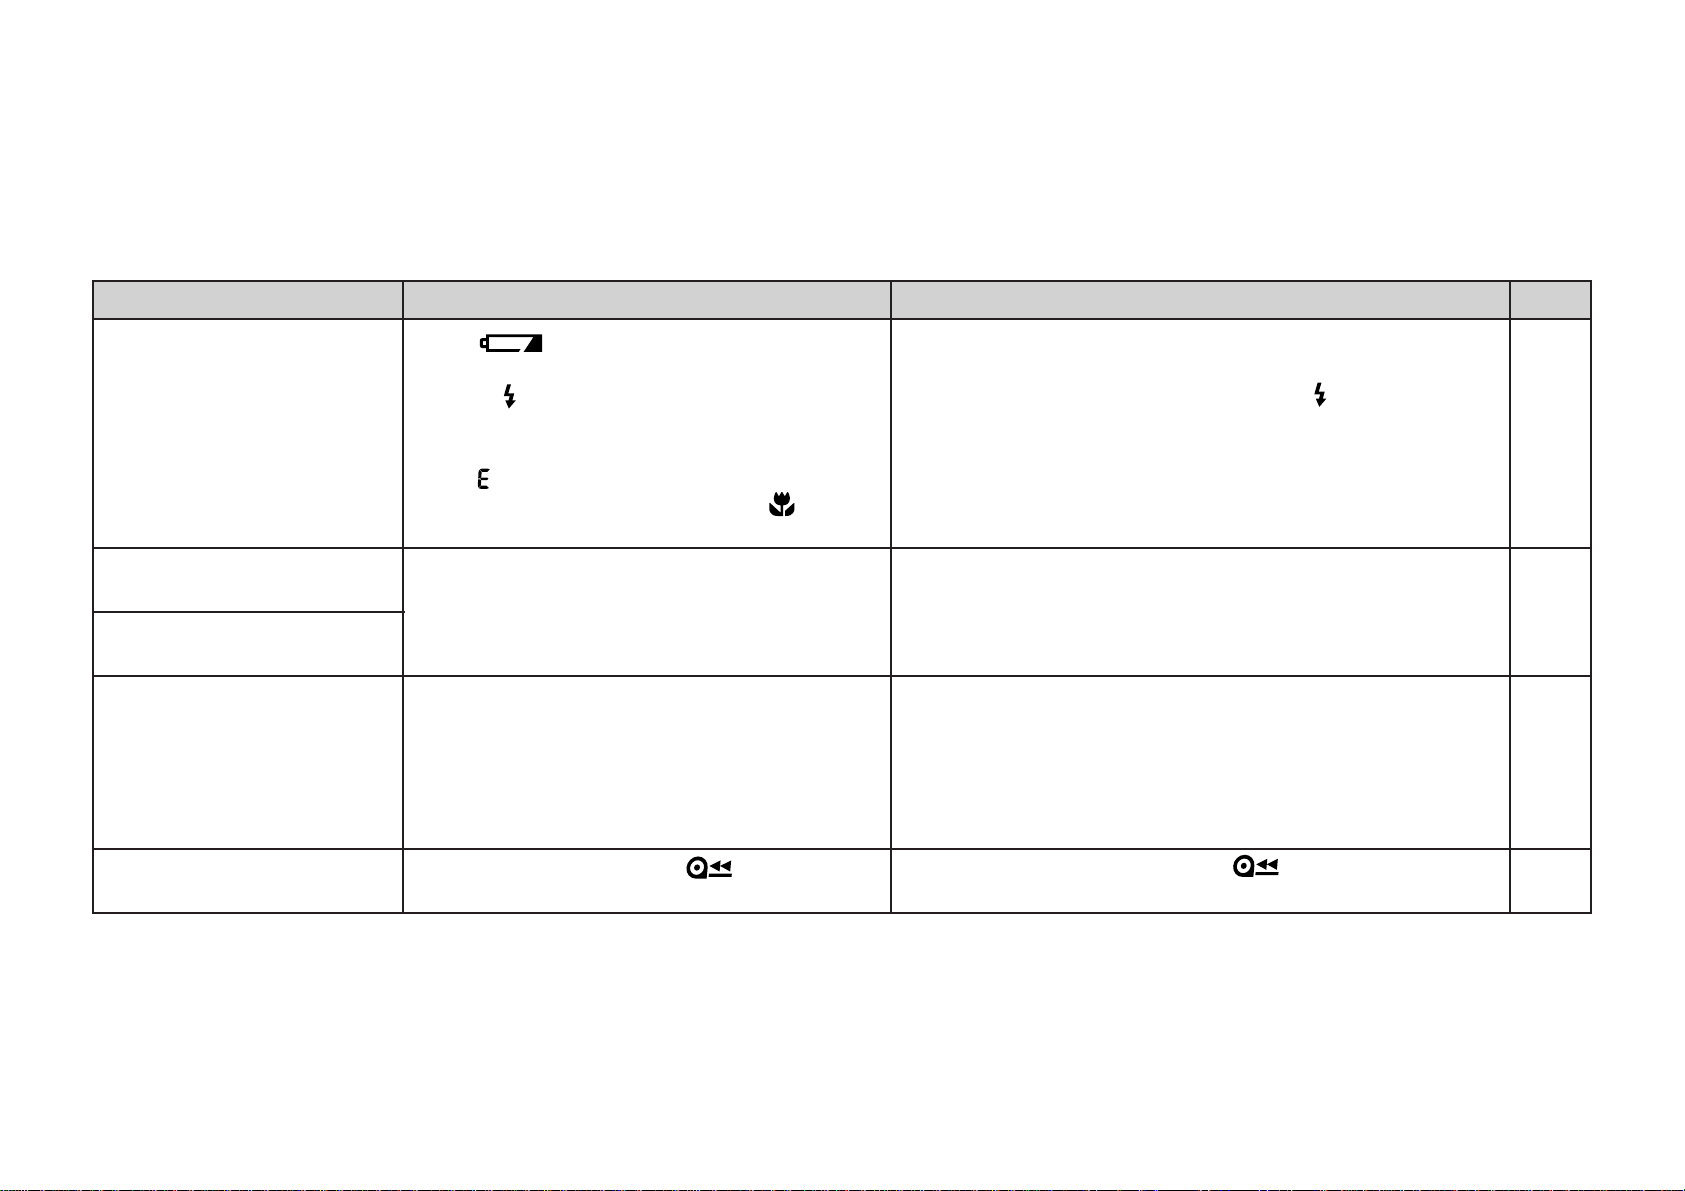
TROUBLE SHOOTING
During operation
Problems Possible Causes Solutions Page
The shutter release won’t
trip.
The numerals on the exposure counter blink.
After loading the film it rewound immediately.
After loading the film and
closing the camera back,
the exposure counter does
not advance.
The film rewound during
photographing.
1 “
” symbol is blinking.
2 Power switch is not on.
3 Is “
4 “
5 Is the AF lamp blinking in the
● Did you remove film without re winding
” blinking on the LCD?
” is lit on the exposure counter .
mode?
it after you began photographing?
1 Did you pull the end of the film out to
the FILM TIP mark when loading the
film?
2 Did you insert the battery after loading
the film?
● Did you operate the button in the
middle of the film?
1 Replace the battery with a new one.
2 Press the POWER button.
3 The flash is charging. W ait until “
” stops b linking
and is displayed. (The flash takes approximately 6
seconds to charge.)
4 Remove the film, and load an unexposed roll.
5 Photograph at 0.5 - 1.0 m (1.6-3.3 ft.) or use the
AF lock so that the AF lamp is lit.
● Remove the battery momentarily, then reload it.
1 Pull the end of the film out to the FILM TIP mark
and correctly load the film.
2 A picture can not be taken by pressing the shutter
release button in that condition. Open the camera
back a little and close it again.
● Be sure not to move the button while film is
loaded in the camera.
17
16
30
23
56
35
23
17,24
37
59
Page 60
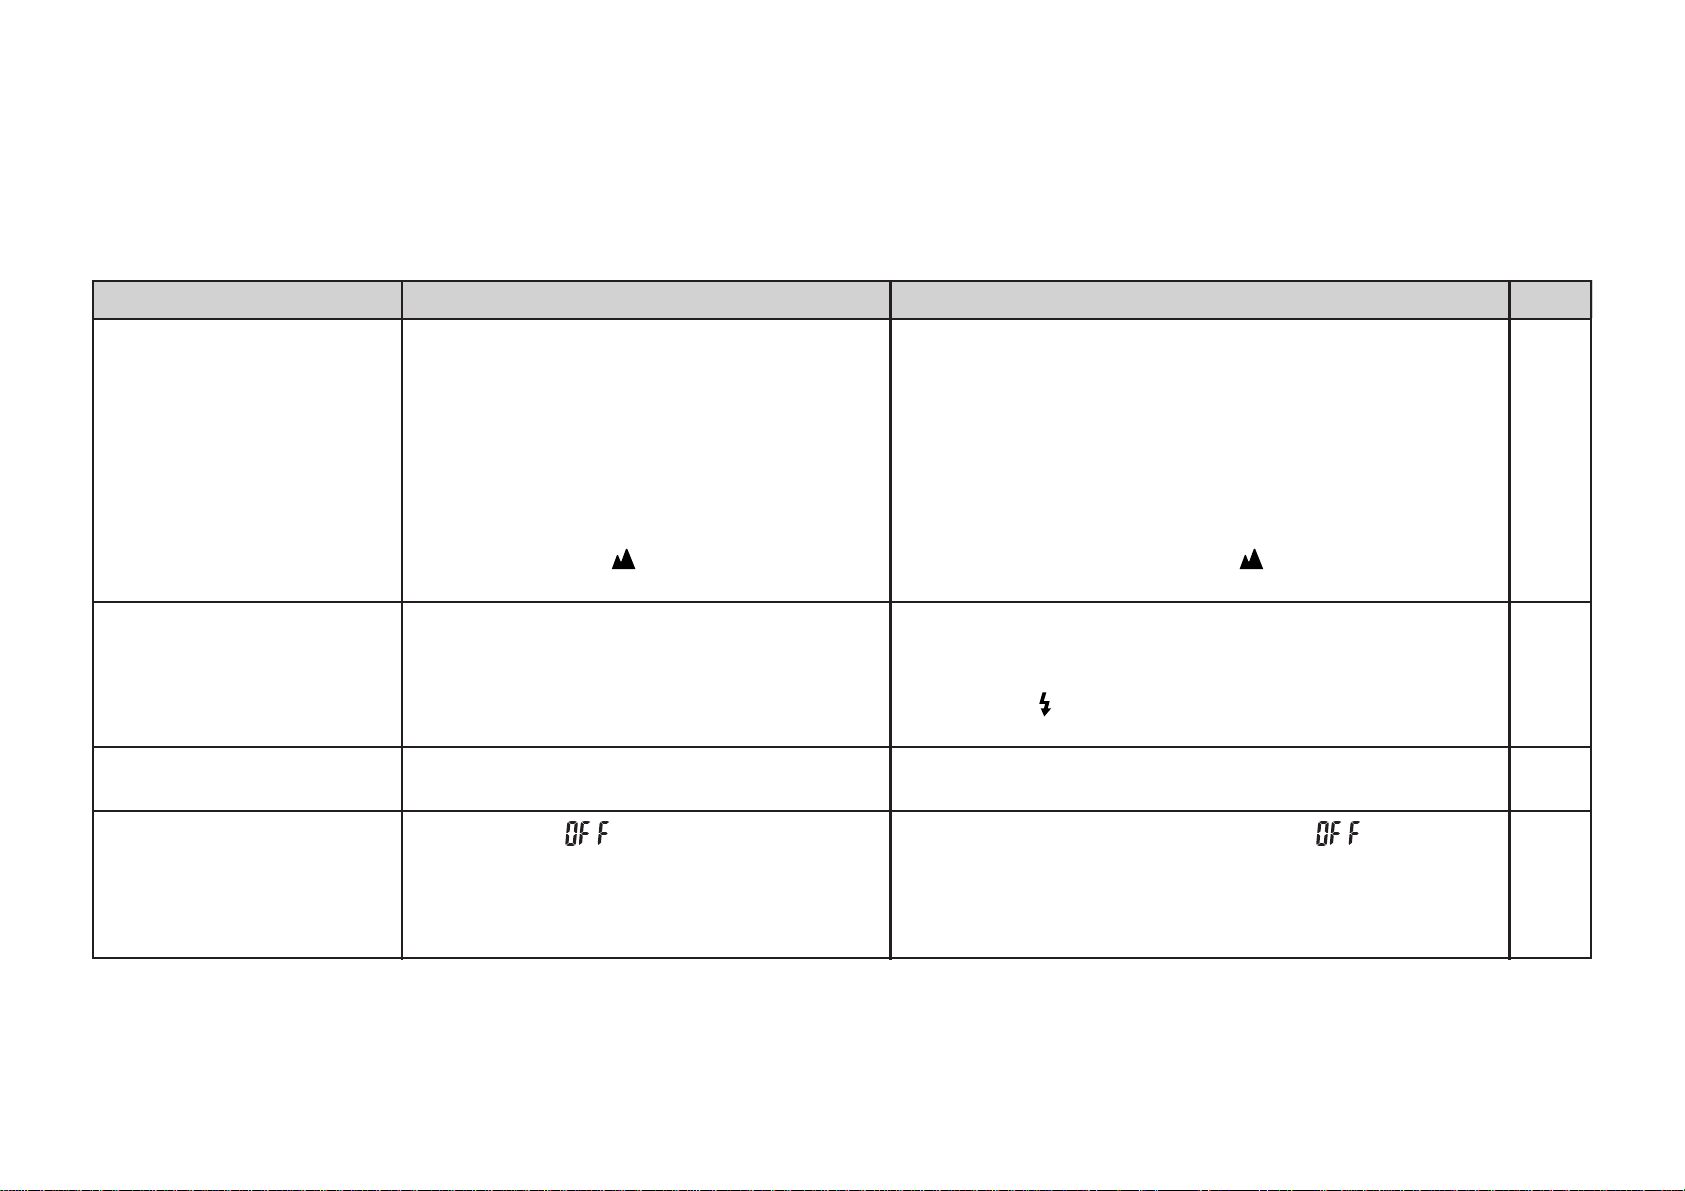
Printed pictures
Problems Possible Causes Solutions Page
Picture is not sharp.
Picture is too dark.
Printed date/time is incorrect.
The date is not printed on
the front.
1 Was your finger on the AF windows
when shooting?
2 Did you aim the subject properly?
3 Is the lens dirty?
4 Is the camera moving?
5 You selected
mode when shooting
at a close distance.
1 Subject was too far from the camera
for flash photography in a dark place.
2 Was your finger over the flash?
3 Was the subject backlit from being
taken next to a window, etc.?
● You didn’t set correct date and time af-
ter replacing battery.
1 Wasn’t “
” selected before taking
pictures?
2 Is there something light-colored (white,
yellow, orange) where the date appears?
1 When shooting a picture, hold your camera cor-
rectly so that your finger is not on the AF windows.
2 Compose the picture in the AF frame and shoot,
or shoot using AF Lock.
3 Clean the lens.
4 Hold the camera fir mly and press the shutter re-
lease button gently. Use a tripod for slow shutter
speeds.
5 Select a mode other than
mode.
1 Shoot within specified coverage distance of elec-
tronic flash.
2 Do not cover the flash with your finger.
3 T urn on
mode and press the shutter release but-
ton.
● Set date and time after replacing battery.
1 Select a date mode other than “
” before tak-
ing pictures.
2 Try to arrange that there is nothing light-colored
where the date appears.
28
33
61
28
53
41
28
44
18
21
21
60
Page 61

COMMON SENSE CAMERA CARE
Although your camera is designed f or many y ears of service,
1
it is a precision instrument and requires thoughtful handling.
In particular, avoid exposing it to shock, moisture or physical
abuse such as dropping it on the floor.
1 If you use your camera at the beach or in a light rain, pro-
tect it from moisture. Do not let your camera get wet. Be
particularly careful to avoid sand and salt spray at the
beach.
2 Dropping your camera or letting it strike a hard surface
could result in damage even though the camera was in a
case. Ne ver subject the camera to vibr ation such as in the
trunk of a car. Never keep y our camera in the trunk or the
glove compartment of a car: the heat build-up can damage it.
Your camera is computer-controlled so it seldom, if ever, will
2
operate erroneously. If you should experience erroneous operation, remove the battery and then reload it.
If you will not be using your camera for some time, store it
3
where it will be safe from heat, moisture, dust and harmful
gases such as napthalene (moth balls and moth flakes).
Never store the camera in a closed automobile for an ex-
4
tended period.
It is recommended that undeveloped film and cameras con-
5
taining film be carried as hand luggage when flying. If included
in checked-in baggage, X-ray inspections may cause overprinting or other effects.
Remove soil and dust from the lens, the AF window and the
6
finder with an air blower and by wiping lightly with a piece of
soft cloth. If that is not enough, wipe off gently with Lens Cleaning Paper, moistened slightly with Lens Cleaning Liquid. Do
not use organic solvents such as alcohol and benzene.
Dust and debris in the film compartment can scratch the film.
7
Use a blower brush to clean it.
Load and remove film away from direct sunlight.
8
The operating temperature range of the camera is from –10°C
9
to +40°C.
Since the performance of the battery will drop in cold weather,
0
warm the battery by placing it inside your garments, etc. before use. The performance of a battery whose performance
has temporarily dropped can be restored by returning the battery to normal temperature.
With a fe w common sense precautions, your camera will giv e you
years of faithful service, great pleasure and wonderful pictures.
61
Page 62

SPECIFICATIONS
•Film
135 (35 mm) DX roll film
•Picture Size
24 mm × 36 mm
•Lens
Super EBC Fujinon zoom lens, 6 components, 6 elements , f=28
– 100 mm 1:5.8 – 1:10.5
•Viewfinder
Real image zoom finder, 0.32 – 1.00 × magnification, with AF
frame, parallax correction mark, AF lamp
•Focusing
Passive auto focus, 0.65 m/2.1 ft. – ∞, with AF lock,
landscape mode (long distance lens position setting, flash off
setting), macro mode (f=100 mm fixed, focal distance: 0.5 - 1.0
m /1.6 - 3.3 ft), AF lamp
•Shutter Release
Programmed electronic shutter release, 1 – 1/500 sec. shutter
speeds
•Exposure Control
Automatic
Interlocking range (ISO 100), EV (wide angle): 10.4 (∗6) – 17,
EV (telephoto): 13.6 (∗7.1) – 17
(∗ = values for the flash off mode)
•Film Speed Setting
Automatic (DX roll film) for speeds from ISO 50-3200
•Film Loading
Automatic
•Film Advance
Automatic (motorized), film wind and rewind system, provision
for mid-roll rewinding
•Flash
Multi program flash, 6 seconds recycle time, multi progr am flash
mode, red-eye reduction flash mode, back light compensation
flash mode, flash-off mode, night portrait (slow sync) mode
•Self-Timer
Electronically controlled, up to 3 consecutive exposures
approximately 10 second delay, can be stopped mid-r un, selftimer on lamp
62
Page 63

•Liquid Crystal Display
Exposure counter, flash mode, self-timer/remote control mode,
focus mode, date mode, battery capacity sign, flash charging
sign.
•Power Supply
One CR2/DL CR2 lithium battery
•Others
Tripod socket, Remote controller (compatible)
•Dimensions & Weight
107.0 × 60.0 × 36.0 mm/4.2 × 2.4 × 1.4 in. (main unit),
175 g/6.2 oz. (without battery)
∗ Specifications are subject to change without notice.
63
Page 64
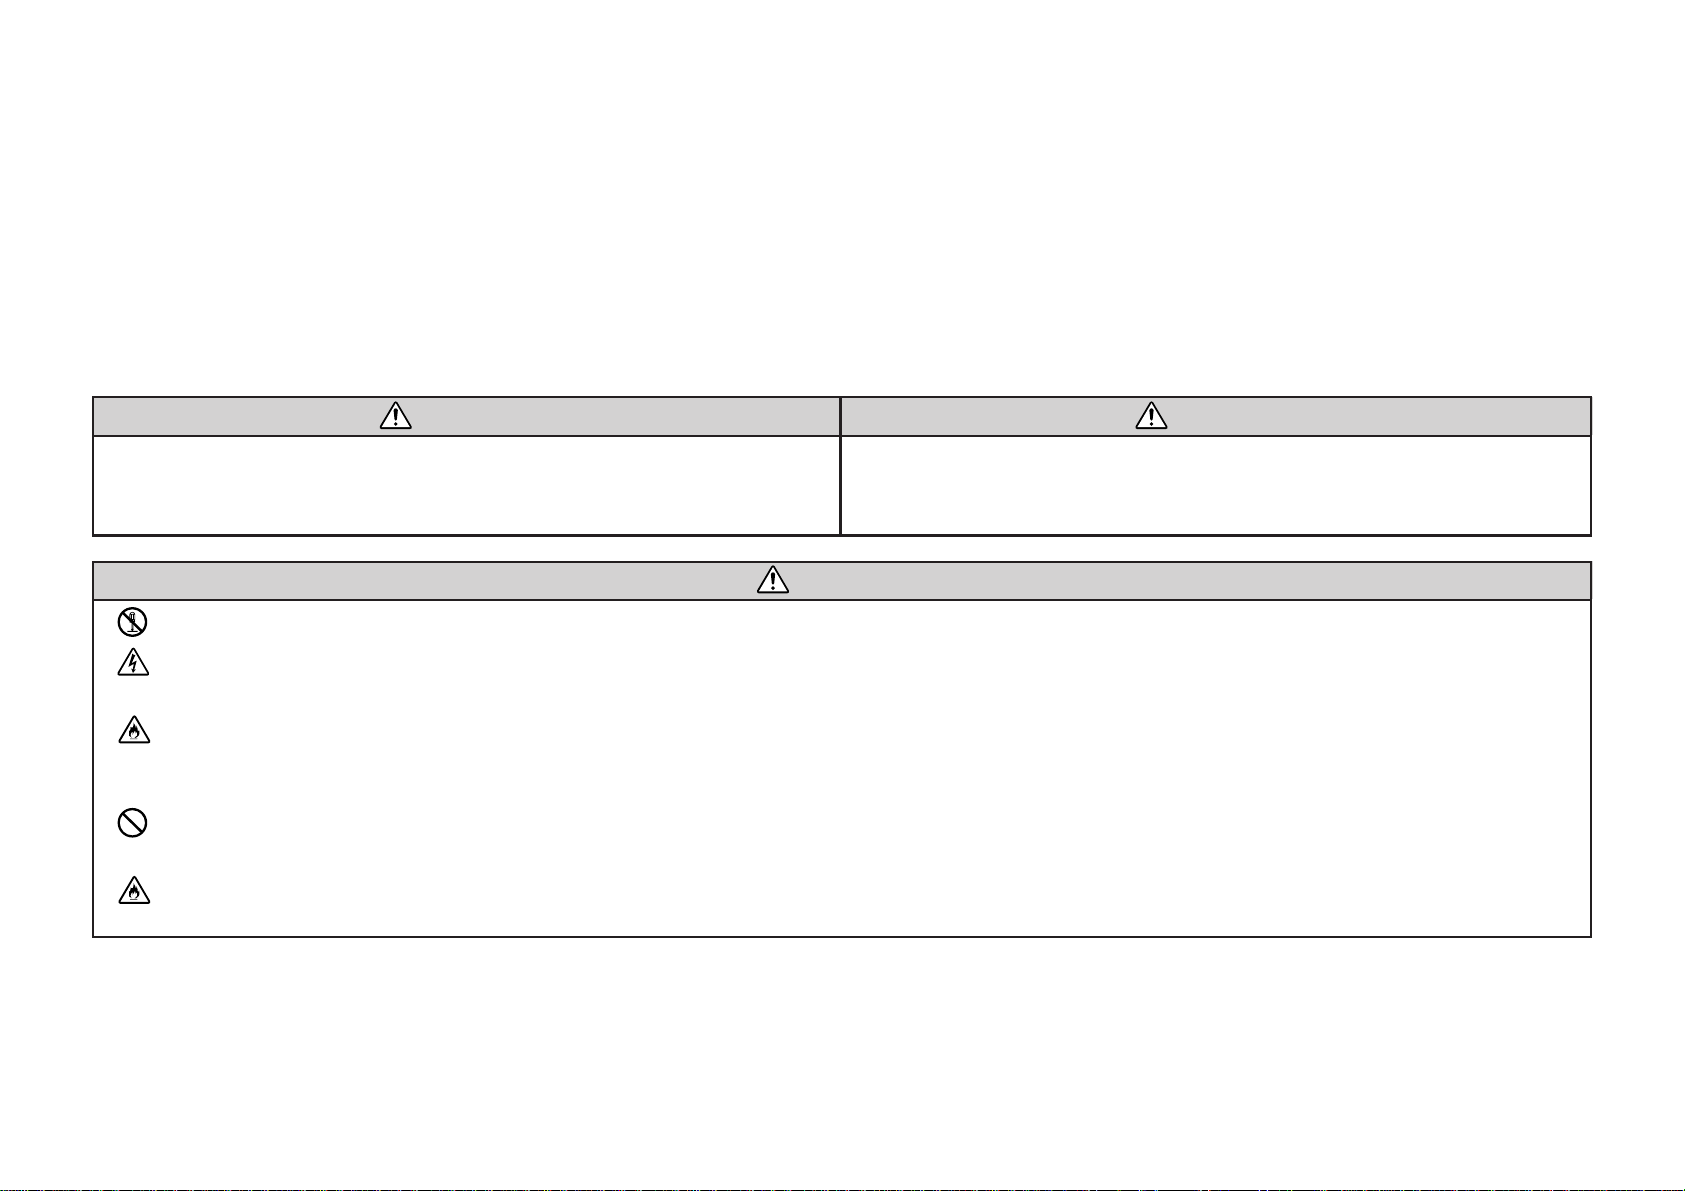
IMPORTANT SAFETY NOTICE
This product has been developed to be as safe as possib le when used for its designed purposes. Under normal circumstances, this product
will provide long, safe service when handled correctly. It is important, however, that this product is handled properly and used only for
photographic purposes. For your convenience and safety, please follow the recommendations listed below. It is also a good idea to keep
this manual in a safe, convenience place where you can refer to it easily if necessary.
W ARNING
This symbol indicates a potentially dangerous situation which could
result in serious injury or even death if these instructions are not
followed.
Never attempt to take this part apart. There is a serious danger of a powerful electric shock.
If this product is dropped or damaged so that the interior is exposed, do not touch anything. There is danger of a severe electric
shock.
If the camera or the batteries within become hot, begin to smoke, produce a burning smell or display any sign of abnormal or
unusual condition, remove the batteries immediately. Use glo ves to pre vent the possibility of burning your hands. F ailure to remove
batteries under these conditions could result in burns or even fire.
Using a flash too close to a person’s eyes may temporarily affect the eyesight. Take par ticular care when photographing infants
and young children.
If your camera gets wet or if foreign objects such as pieces of metal get inside, remove the batteries immediate to avoid any
possible heat buildup or of fire starting inside the camera.
64
CAUTION
This symbol indicates a potentially damaging situation which could
result in injury to other people or damage to object, if these instructions are not followed and the product is handled improperly.
W ARNING
Page 65
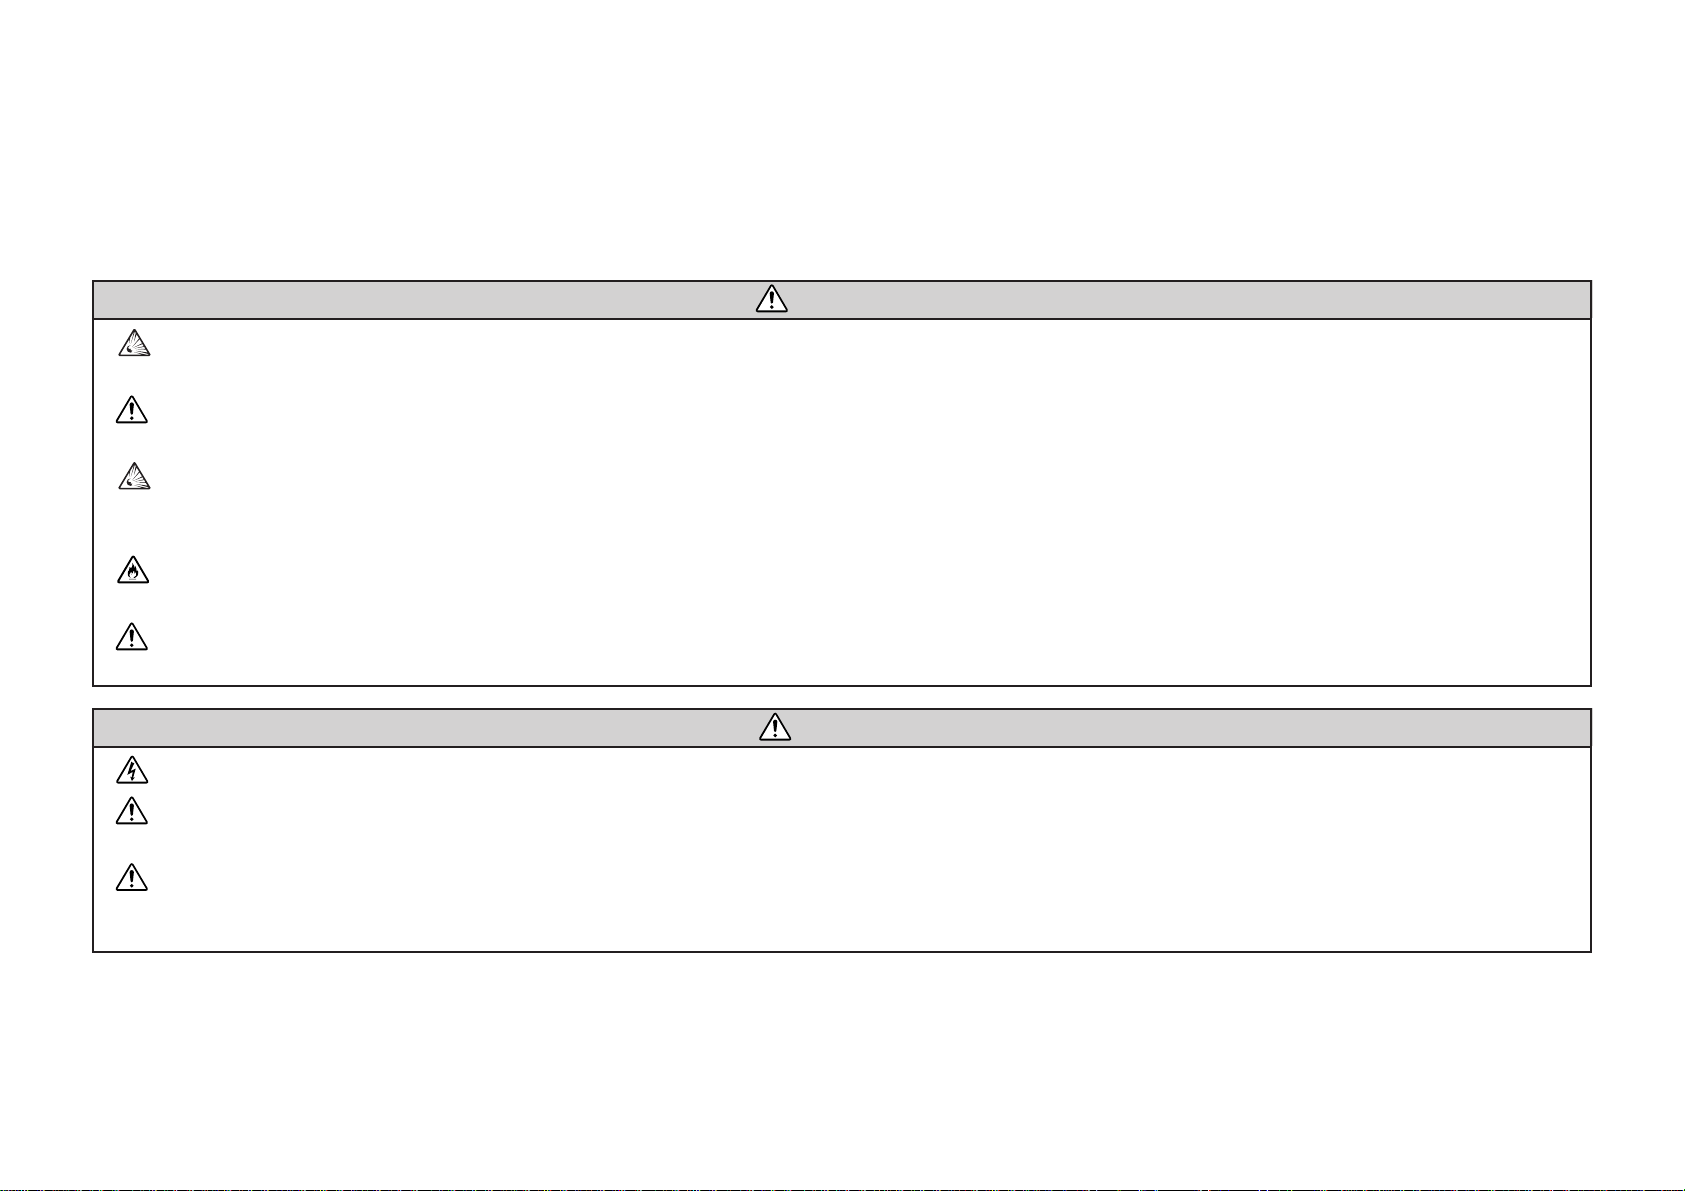
W ARNING
Do not use this camera in locations with a high concentration of inflammable gas or near open gasoline , Benzine, paint thinner or
other volatile substances which can give off dangerous v apors . Failure to observe this precaution could result in explosion or fire.
Store your camera out of the reach of small children. Failure could follow this recommendation could result in serious injury. (For
example, the str ap could become entwined around their necks with potentially serious consequences.)
Nev er dismantle the batteries when they are remov ed from the camera. Do not subject them to heat, thro w them into an open fire,
attempt to recharge them or to short circuit them. Failure to follow this recommendation could result in the batteries exploding or
splitting open.
Use only the type of batteries specified in your camera’ s instructions. F ailure to do so ma y result in e xcessive heat buildup or e ven
in a fire.
Make sure batteries are stored in a safe, secure place well out of the reach of any small children or pets. Improper store coul d
result in a child swallowing a battery. (If a child does swallow a battery, call a doctor or nearest hospital immediately.)
CAUTION
Never get this product wet or handle it with wet hands. Doing so may result in an electric shock.
Nev er take flash photographs of people riding bicycles, driving cars or riding a horse. The flash can distract the driver and frighten
the animal, possibly causing a serious accident.
Observe correct polarity when inserting batteries. Never insert batteries with the + and - poles back to front. Failure to observe
correct handling might result in the batteries splitting open and leaking, possibly resulting in fire, burns or damage to surrounding
objects.
65
Page 66

26-30, Nishiazabu 2-chome, Minato- ku, Tokyo 106-8620, Japan.
<FUJIFILM ABROAD>
In North America FUJI PHOTO FILM U.S.A., INC.
555 Taxter Road, Elmsford, N.Y. 10523, U.S.A.
FUJI PHOTO FILM CANADA INC.
275 Britannia Road East, Mississauga, Ontario , L4Z 2E7, Canada
FUJI PHOTO FILM HAWAII, INC.
1650 Kalakaua Avenue, Honolulu, Hawaii 96826, U.S.A.
In Europe FUJI PHOTO FILM (EUROPE) G.m.b.H.
Heesenstrasse 31, 40549 Dusseldorf, Germany
FUJI PHOTO FILM (U.K.) LTD.
Fuji Film House, 125 Finchley Road, Swiss Cottage, London NW3 6JH, England
FUJI FILM ESPAÑA, S.A.
Aragon, 180, 08011-Barcelona, Spain
In South America FUJI PHOTO FILM DO BRAZIL LTDA.
Avenida Vereador Jose Diniz No. 3.400, Campo Belo- CEP 04.604
Cx. Postal 9.959., Sao Paulo-SP, Brazil
In Asia FUJI PHOTO FILM CO., LTD., HONG KONG OFFICE
Room 916, Sun Plaza, 28 Canton Road, Tsim Sha Tsui, Kowloon, Hong Kong
FUJI PHOTO FILM (SINGAPORE) PTE. LTD.
10 New Industrial Road, Singapore 536201
FUJI PHOTO FILM (THAILAND) LTD.
S.P. Building, 8th Floor, 388 Phaholyothin Road, Bangkok 10400, Thailand
FUJI PHOTO FILM (MALAYSIA) SDN. BHD.
Letter Box 3, 3rd Floor Office Block 1, Crystal Plaza Lot 4, Jalan 51A/223, 46100 Petaling Jaya Selangor Darul Ehsan Malaysia
FUJI PHOTO FILM CO., LTD., TAIPEI OFFICE
Rm. 601, Hung Chong Bldg., No.38, Sec. 6, Min Chuan E. Road, Taipei 11412, Taiwan, Republic of China
FUJI PHOTO FILM CO., LTD., SEOUL OFFICE
Samduck Bldg. 6F., 144-1, Samsung-Dong, Kang Nam-ku, Seoul 135-090, Korea
FUJI PHOTO FILM CO., LTD., BEIJING REPRESENTATIVE OFFICE
Beijing Fortune Bldg. No. 817, 5, Dong Sanhuan Bei-lu, Chaoyang District, Beijing, China 100004
FUJI PHOTO FILM CO., LTD., HO CHI MINH OFFICE
29-31 Ton That Thiep St., Q.I Ho Chi Minh City, Vietnam
FUJI PHOTO FILM CO., LTD., NEW DELHI OFFICE
Le Meridian Commercial Tower 8F Janpath, New Delhi 110001, India
In Oceania FUJI PHOTO FILM CO., LTD., SYDNEY REPRESENTATIVE OFFICE
c/o Hanimex Pty. Limited, Old Pittwater Road, Brookvale, N.S.W. 2100, Australia
In Middle East FUJI PHOTO FILM CO., LTD., DUBAI OFFICE
No. 4G-17, L.O.B. No. 4, P.O. BOX 17212, Jebel Ali, Dubai, U.A.E.
Printed in Indonesia
FGS-103106-Ci-01
 Loading...