

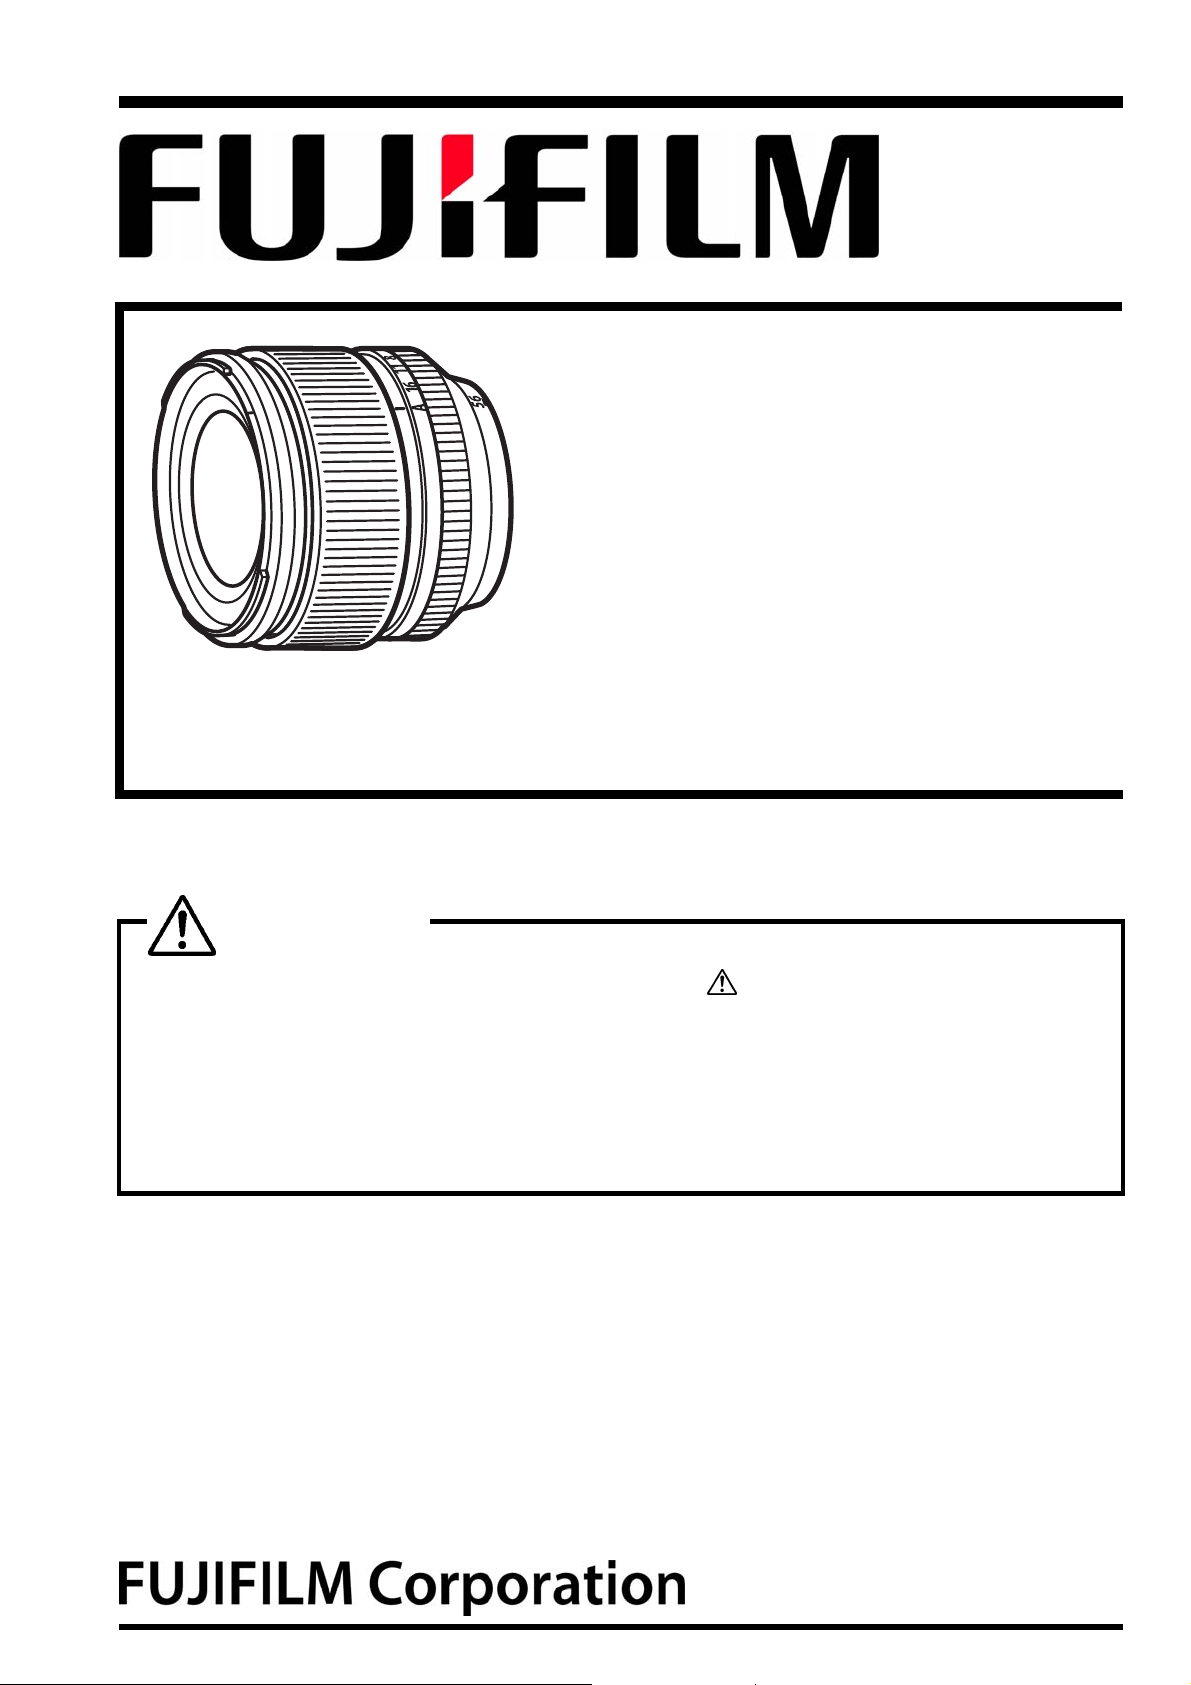
DIGITAL CAMERA
XF56mmF1.2 R
SIMPLE MANUAL
-For Repair Centers without the Lens Repair Training-
z THE COMPONENTS IDENTIFIED WITH THE MARK “ ” IN THE SCHEMATIC DIAGRAM
z REPLACE THOSE COMPONENTS ONLY WITH THE COMPONENTS SPECIFIED IN THE
z IF YOU USE PARTS NOT SPECIFIED, IT CAN RESULT IN A FIRE AND AN ELECTRICAL
WARNING
AND THE PARTS LIST ARE CRITICAL FOR SAFETY.
SCHEMATIC DIAGRAM AND THE PARTS LIST.
SHOCK.
Ref.No.: ZM01118-600
Released on 20 Feb 2014
Confidential: FUJIFILM Service Center Use Only
A
XF56mmF1.2 R Simple Manual
-For Repair Centers without the Lens Repair Training-
SAFETY CHECK-OUT
During repair and safety checking, conduct the followings.
1. Check if there are unsoldered or poorly
soldered connections. Check the entire
board surface for solder splasher and
bridges.
2. Check the inter-board wiring to ensure that
no wires are “pinched” or contact highwattage resistors.
3. Look for unauthorized replaced parts,
particularly transistors that were installed in
a previous repair. Point this out to a
customer and recommend replacing with
authorized parts.
4. Look for parts which, though functioning,
signs of deterioration. Point this out to a
customer and recommend replacing with
new parts.
5. Check the B + voltage to see if it is the
correct value.
6. Check leakage current see if exposed parts
are insulated from power supply before
returning a camera to a customer.
7.
2.5A 125V
2.5A 125V
RISK OF FIREREPLACE FUSE
S MARKED
8.
CAUTION:
FOR PROTECTION
AGAINST FIRE HAZARD,
REPLACE ONLY WITH
SAME TYPE 2.5 AMPERES
125V/250V FUSE.
ATTENTION:
AFIN D’ASSURER UNE
PROTECTION
PERMANENTE CONTRE
LES RISQUES D'INCENDIE,
REMPLACER
UNIQUEMENT PAR UN
FUSIBLE DE MEME, TYPE
2.5 AMPERES, 125/250
VOLTS.
WARNING:
TO AVOID THE ELECTRIC
SHOCK, BE CAREFUL TO
TOUCH THE PARTS.
WARNING!
HIGH VOLTAGE
2

Confidential: FUJIFILM Service Center Use Only
XF56mmF1.2 R Simple Manual
-For Repair Centers without the Lens Repair Training-
CONTENTS
1. List of Jigs······································································································ 4
2. Inspection······································································································· 5
3. Parts List·······································································································13
4. Appendix·······································································································15
3
Confidential: FUJIFILM Service Center Use Only
XF56mmF1.2 R Simple Manual
-For Repair Centers without the Lens Repair Training-
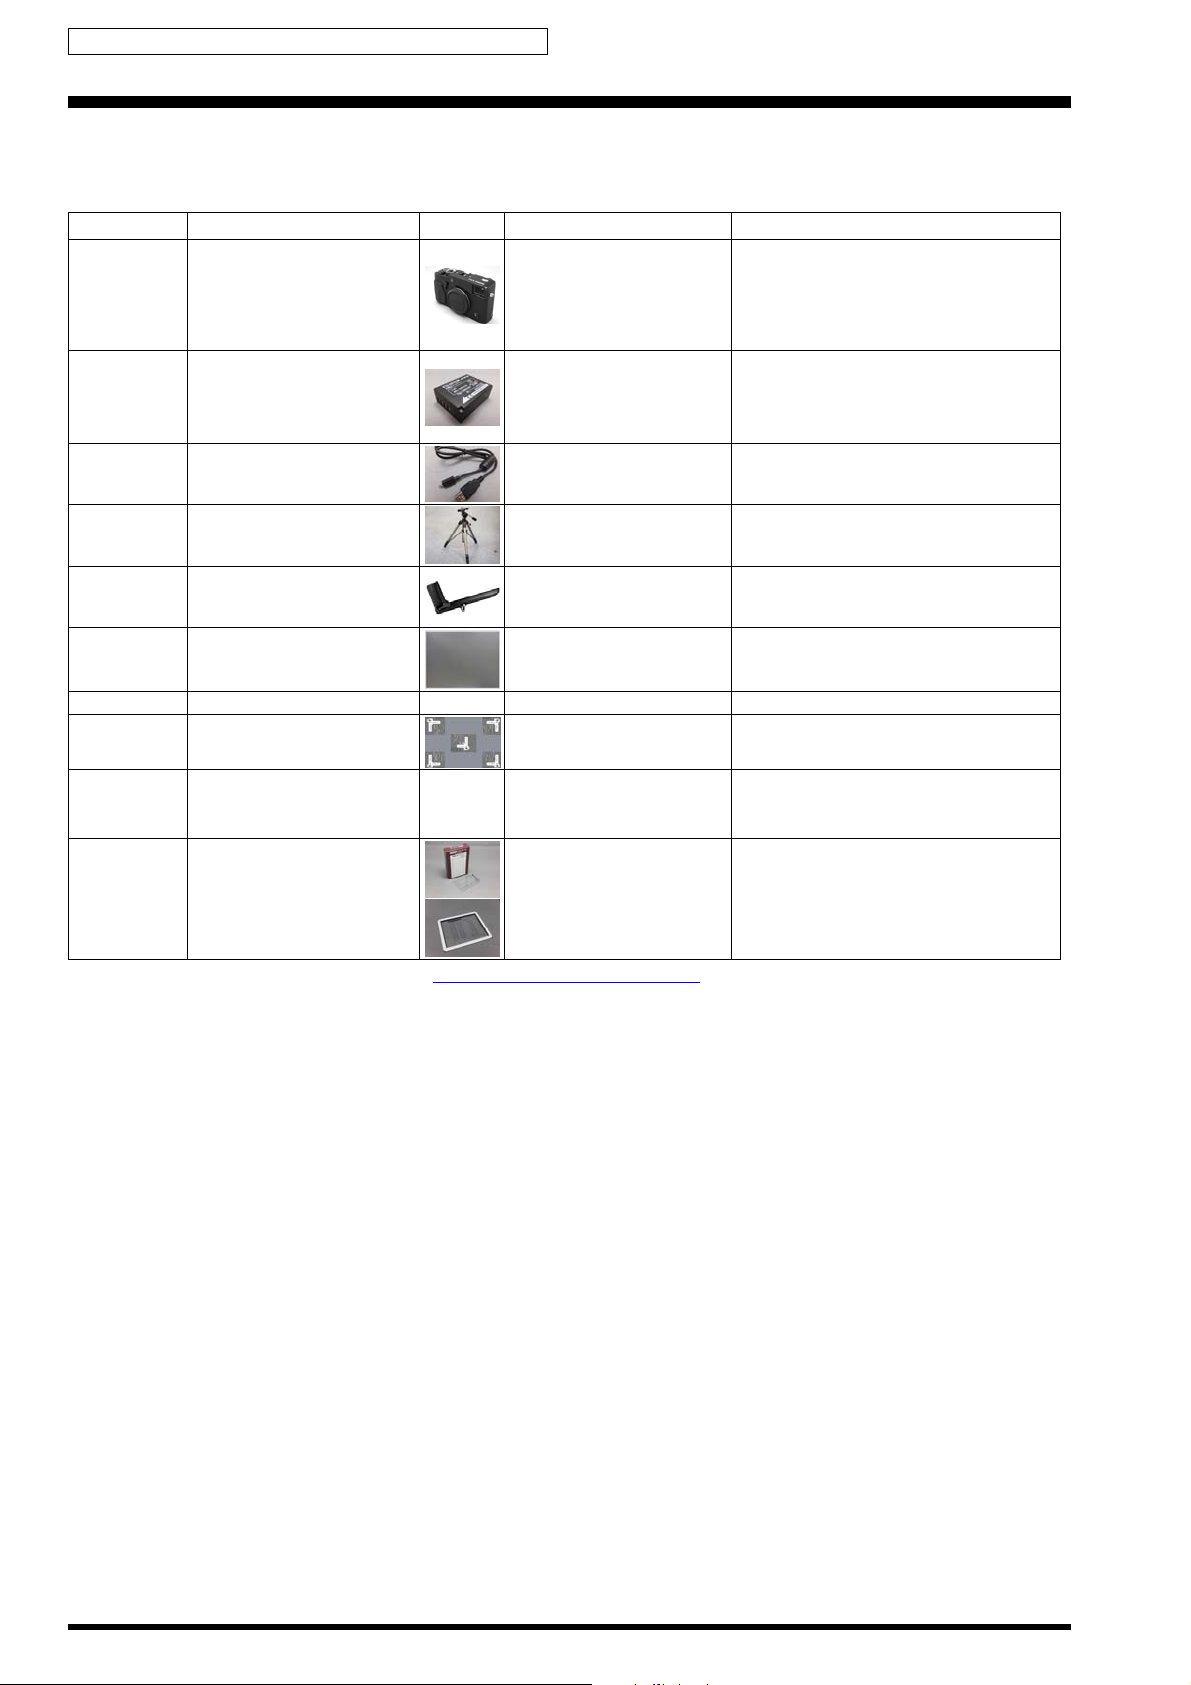
1. List of Jigs
1-1. Inspection
Parts No. Name Image Comment Remarks
• MAIN PWB Initialize
• LENS Repair Firmware
---- FUJIFILM X-Pro1
FZ09206-100
---- USB cable This is bundled to the product (X-Pro1)
---- Tripod Commercially available item
---- Hand Grip HG-XPro1 Commercially available item
or
FZ09206-200
or
FZ09206-300
BATTERY PACK NP-W126J
BATTERY PACK NP-W126U
BATTERY PAC K NP-W126W
Ver3.45 Download
• Lens Set Serial
• LENS Firmware Update
• Resolution Inspection
This is bundled to the product (X-Pro1)
Standard camera
Prepare the product.
* Do not use the user's X-Pro1 camera body
for lens repair. Always use a standard
camera (product).
ZJ00254-100 Gray Chart (Reflective type) Common with the 8mmVTR/FinePix 700
---- SD CARD
ZJ02018-100 XF60 CIPA Resolution Chart Resolution Inspection Common with the XF60mmF2.4 R Macro
ZJ02286-100
ZJ01898-100
or
ZJ01899-100
XF56MM RESOLUTION
CHECK SOFTWARE
DUST CHART
DUST CHART 2
----
To check Inspection SD recording
*1
---- Resolution Inspection
Lens dust for inspection
New jig
*1: Please download them from Web server (https://cs-support-eid.fujifilm.co.jp).
4
XF56mmF1.2 R Simple Manual
2. Inspection
2-1. Inspection and Factory Settings
<Applies only to general cameras for repair>
Sequence
1 Appearance check (1) Check lens visually and by
2 Appearance check (1) Check lens visually and by
3 Lens attach and
release check
4 Focus operation
check
Item Mode
(1) Attach the lens to a camera
P mode
Focus
mode [M]
Preparations for adjustment
(measurement points, subject, other)
touching.
* Check parts replaced.
touching.
* All of exterior.
* Check the lens compared to the
condition when you received it.
(2) Remove the lens.
(3) Attach the lens again.
(1) Turn the camera on.
(2) Turn the Focus ring.
(3) Focus moving noise.
(4) Focus operation.
Confidential: FUJIFILM Service Center Use Only
-For Repair Centers without the Lens Repair Training-
Method of adjustment
(VRs, waveforms, required values)
(1) There are no noticeable
scratches, cracks, or smudges,
or noticeable abnormalities with
coating.
There is no mistaken lettering,
noticeably out of place, or
abnormal coloring.
(1) • There are no defects in parts.
• There is no looseness in
screws.
• There is no leak of oil.
• There is no extra glue.
• There are no rough edges on
surface that could hurt
fingers.
• Be sure the letter “H” on the
name plate comes under the
indicator.
• There are no noticeable gaps
or unevenness compared to a
product.
• There are no stains and
smudges.
(1) Lens can be attached smoothly.
(2) Lens can be removed smoothly.
(1) Check the LCD monitor.
(2) Check if the zoom moves
smoothly.
(3) Check if there is no abnormal
noise.
(4) Check if the zoom moves
smoothly.
Measuring
equipment
and jigs
Standard
camera
X-Pro1
Standard
camera
X-Pro1
5

Confidential: FUJIFILM Service Center Use Only
XF56mmF1.2 R Simple Manual
-For Repair Centers without the Lens Repair Training-
Sequence
5 Aperture operation
check
6 Shooting check P mode
Item Mode
A(Aperture
Priority)
Focus
mode[S]
Preparations for adjustment
(measurement points, subject, other)
(1) Turn the Aperture ring.
(2) Set the aperture to the [f/16].
(3) Press the shutter button halfway
(S1).
(4) Turn aperture a 1/3-step in the
direction of [f/1.2].
(5) Press the shutter button halfway
(S1).
(6) Repeat (4) to (5) until aperture
position reaches [f/1.2] (23
positions in all).
(1) Set an SD card to the camera.
(2) Shoot a subject with appropriate
brightness and at an
appropriate distance.
(3) Set the camera to Playback
mode.
Method of adjustment
(VRs, waveforms, required values)
(1) Check if there is no abnormal
noise.
Check if the zoom moves
smoothly.
Check if there is clicking, and
there is no stopping other than
at defined positions.
(2) Check if the Aperture value is
displayed.
(3) Check if there is no abnormal
noise (aperture blades).
Check if the zoom moves
smoothly (aperture blades).
Check if aperture blades open
with the smallest setting seen
from the front.
(4) Check if each aperture value is
displayed on the monitor.
(5) Check if there is no abnormal
noise (aperture blades).
Check if the zoom moves
smoothly (aperture blades).
Check if aperture blades open
with a little wider than (3) (or
(5)) seen from the front.
(3) Check if there is no noticeable
abnormality with exposure.
* If a customer points out other things, check the thing additionally compared to a product.
Measuring
equipment
and jigs
Standard
camera
X-Pro1
Standard
camera
X-Pro1
6

2-2. Lens Dust Check
r
<Settings for Lens dust check>
(1) Prepare a DUST CHART (ZJ01898-100) o
DUST CHART2 (ZJ01899-100).
(2) Wiped off dusts of lens surface.
(3) Compared to “DUST CHART”, measure the
sizes of dusts.
(4) Determine pass or fail referring to Figure. 1
and Table 1.
Confidential: FUJIFILM Service Center Use Only
XF56mmF1.2 R Simple Manual
-For Repair Centers without the Lens Repair Training-
A
B
D/2
D
Figure. 1
[Specification of front lens]
A range(Center) B range(Outside)
0.15mm or less ~
0.1mm or more
Less than 0.1mm ~
0.08mm or more
Less than 0.08mm OK
Out of spec Less than 2
Less than 2
[Specification of rear side lens]
A/B range
0.2mm or less ~
0.15mm or more
Less than 0.15mm ~
0.1mm or more
Less than 0.1mm OK
However, it must not be in a noticeable
Less than 2.
position.
Less than 3
Table. 1
Including range A,
Less than 3.
7

Confidential: FUJIFILM Service Center Use Only
XF56mmF1.2 R Simple Manual
-For Repair Centers without the Lens Repair Training-
2-3. Resolution Inspection
<Resolution Inspection operation flow>
Resolution Inspection Start
Resolution Inspection
PASS
FAIL
Resolution Inspection End Repair operation flow
* Be sure there are no problems
with repair work
8

<Step 1>
w
[Settings for Resolution Inspection]
(1) Cut XF60 CIPA Resolution Chart (ZJ02018-
100) like figure 2, and stick it on a Gray Chart
of 917mm X 606.9mm.
(2) Referring to figure 1 on the right, prepare a
camera and the resolution chart.
(3) Light the resolution chart to make the
luminance of chart surface 500-850 lx at the
center of the chart and 0 to +400 lx in the
periphery compared to the center.
[Example]
In case that the luminance of center is 600LX,
the luminance of the periphery should be set to
600 ~ 1000LX.
Confidential: FUJIFILM Service Center Use Only
XF56mmF1.2 R Simple Manual
-For Repair Centers without the Lens Repair Training-
Brightness of the resolution chart
Center: 500~850LX
Light source
Gray Chart
ZJ00254-100
Resolution Chart
ZJ02018-100
Periphery: 0~+400LX
(Compared to the center)
Chart
The center of the chart
<Step 2>
[Preparation of Resolution Inspection]
(1) Set an SD card to the camera.
(2) Turn the camera on.
(3) Carry out the reset of camera from MENU.
(4) Set the camera as follows:
1. Focus mode: S
2. Shutter speed: A
3. Aperture value: F1.2
4. Self-timer: 2sec
5. Other: Default
(5) Fix the camera on a tripod, and point it to the
resolution chart.
(6) Set the resolution chart with the angle of vie
of LCD like figure 2.
(7) Take an image.
(8) Turn the camera off.
(9) Take the camera from the tripod.
(10) Take out battery and SD card.
(11) Close the cover of battery.
From imaging plane 2205 ± 3mm
Figure. 1
Figure. 2
9

Confidential: FUJIFILM Service Center Use Only
XF56mmF1.2 R Simple Manual
-For Repair Centers without the Lens Repair Training-
<Step 3>
[Resolution Inspection]
(1) Download the software from the WEB and install the software to the PC.
We have uploaded the “XF56MM RESOLUTION CHECK SOFTWARE (ZJ02286-100.zip)” on our website:
(https://cs-support-eid.fujifilm.co.jp).
(2) Decompress the “ZIP type” file of “ZJ02286-100”.
(3) Copy the “FFRes_XF56mm” folder to the “C” drive on the PC.
(4) Copy shot images in the SD card to “FFRes_XF56mm” folder.
(5) Launch FFRes.exe.
(6) Use [File]-[Picture reading] to open shot images.
(7) When the window shown on the right appears,
click [Yes].
Figure. 3
(8) The screen below will appear. If there is no error (in red) in [brightness] in [Measurement condition check] on the right,
press the [Enter] key to start measurement.
* Example error display
*
*
If brightness for [Measurement condition check] shows an error (in red).
D
o the followings and shoot the chart again so that brightness in [Measurement condition check] becomes a
value
within the [Standard] brightnessrange.
•
Adjust the position of the light source (lighting).
•
Adjust the camera’s exposure compensation.
R
egarding exposure and lighting
•
Be sure that the illuminances where measured in each of center and periphery are well-balanced. (refer to
<S
ettings for Resolution Check>)
•
Adjust overall image’s brightness level by using the camera’s exposure compensation.
10

Confidential: FUJIFILM Service Center Use Only
XF56mmF1.2 R Simple Manual
-For Repair Centers without the Lens Repair Training-
(9) The center of the chart will appear.
The chart and values determined by [Center resolution analysis] are displayed.
By pressing the [Enter] key, the measurement continues in the order of “upper left” → “lower left” →”upper right” → “lower
right”.
Green lines indicate the measured resolution
determined by the software.
* Example error display
If blue lines are not displayed at both ends of the chart, the Software has not detected the chart correctly.
If it is the case, adjust the lighting and camera’s exposure, and conduct shooting again.
The blue line is away from the
“wedge”.
11

Confidential: FUJIFILM Service Center Use Only
XF56mmF1.2 R Simple Manual
-For Repair Centers without the Lens Repair Training-
(10) The measurement has been completed once “OK” is displayed for all of [Resolution measurement].
[Completing Resolution Inspection]
<Resolution criteria>
Center H: 2,500 lines or more
Center V: 2,500 lines or more
Periphery H: 1,500 lines or more
Periphery V: 1,500 lines or more
• If failed, conduct shooting 3 times. If one image at least meets the criteria, it will be OK.
• If failed with values determined automatically by the software, read visually the number of resolution lines.
If it meets the criteria, it will be OK.
12

Confidential: FUJIFILM Service Center Use Only
A
XF56mmF1.2 R Simple Manual
-For Repair Centers without the Lens Repair Training-
A111
A113
A112
A104
A108 A109
A102
A105
3. Parts List
3-1. Packing and Accessories
Ref No. Parts No. Description Common
A101 F012B013260720 TRAY
A102 F100A12447A10 REAR CAP
A103 F27B13249820 LENS HOOD
A104 F100A13215A10 CLOTH L
A105 F202B013260780 MANUAL FOR LENS
A106 F203B013260740 UNITARY BOX
A107 F205B013260770 U.PAD
A108 F206K1271950 LENS BAG
A109 F100A12473A10 FRONT CAP
A110 F58B12870430 SERIAL NUMBER LABEL
A111 F999K1272000 SILICA GEL
A112 FBB23334-100
A113 FBB23781-100
PRG_ACC_CDSIZE_01
(WARRANTY BOOKLET)
WWN_PRINT CD-SIZE2
(WORLDWIDE NETWORK)
103
A107
A101
A106
A110
13

Confidential: FUJIFILM Service Center Use Only
XF56mmF1.2 R Simple Manual
-For Repair Centers without the Lens Repair Training-
MEMO
14

Confidential: FUJIFILM Service Center Use Only
XF56mmF1.2 R Simple Manual
-For Repair Centers without the Lens Repair Training-
4. Appendix
4-1. List of Related Technical Updates Issued
To ensure that after-sales service is performed accurately, keep a record here of the technical updates issued that cov er this
device.
Technical Update No. Date Title Details/Other
15

Confidential: FUJIFILM Service Center Use Only
FinePix JX420 / JX430 Service Manual
Midtown West, 7-3, Akasaka 9-chome, Minato-ku, Tokyo 107-0052, Japan
2
 Loading...