

Page 1
CF SERIES GAS FRYERS
Return to Cover
CHAPTER 3: OPERATING INSTRUCTIONS
3.1 Start-Up Procedure
CAUTION
If this is the first time the fryer is being
used after installation, refer to Section
3.2, Boil-Out Procedure.
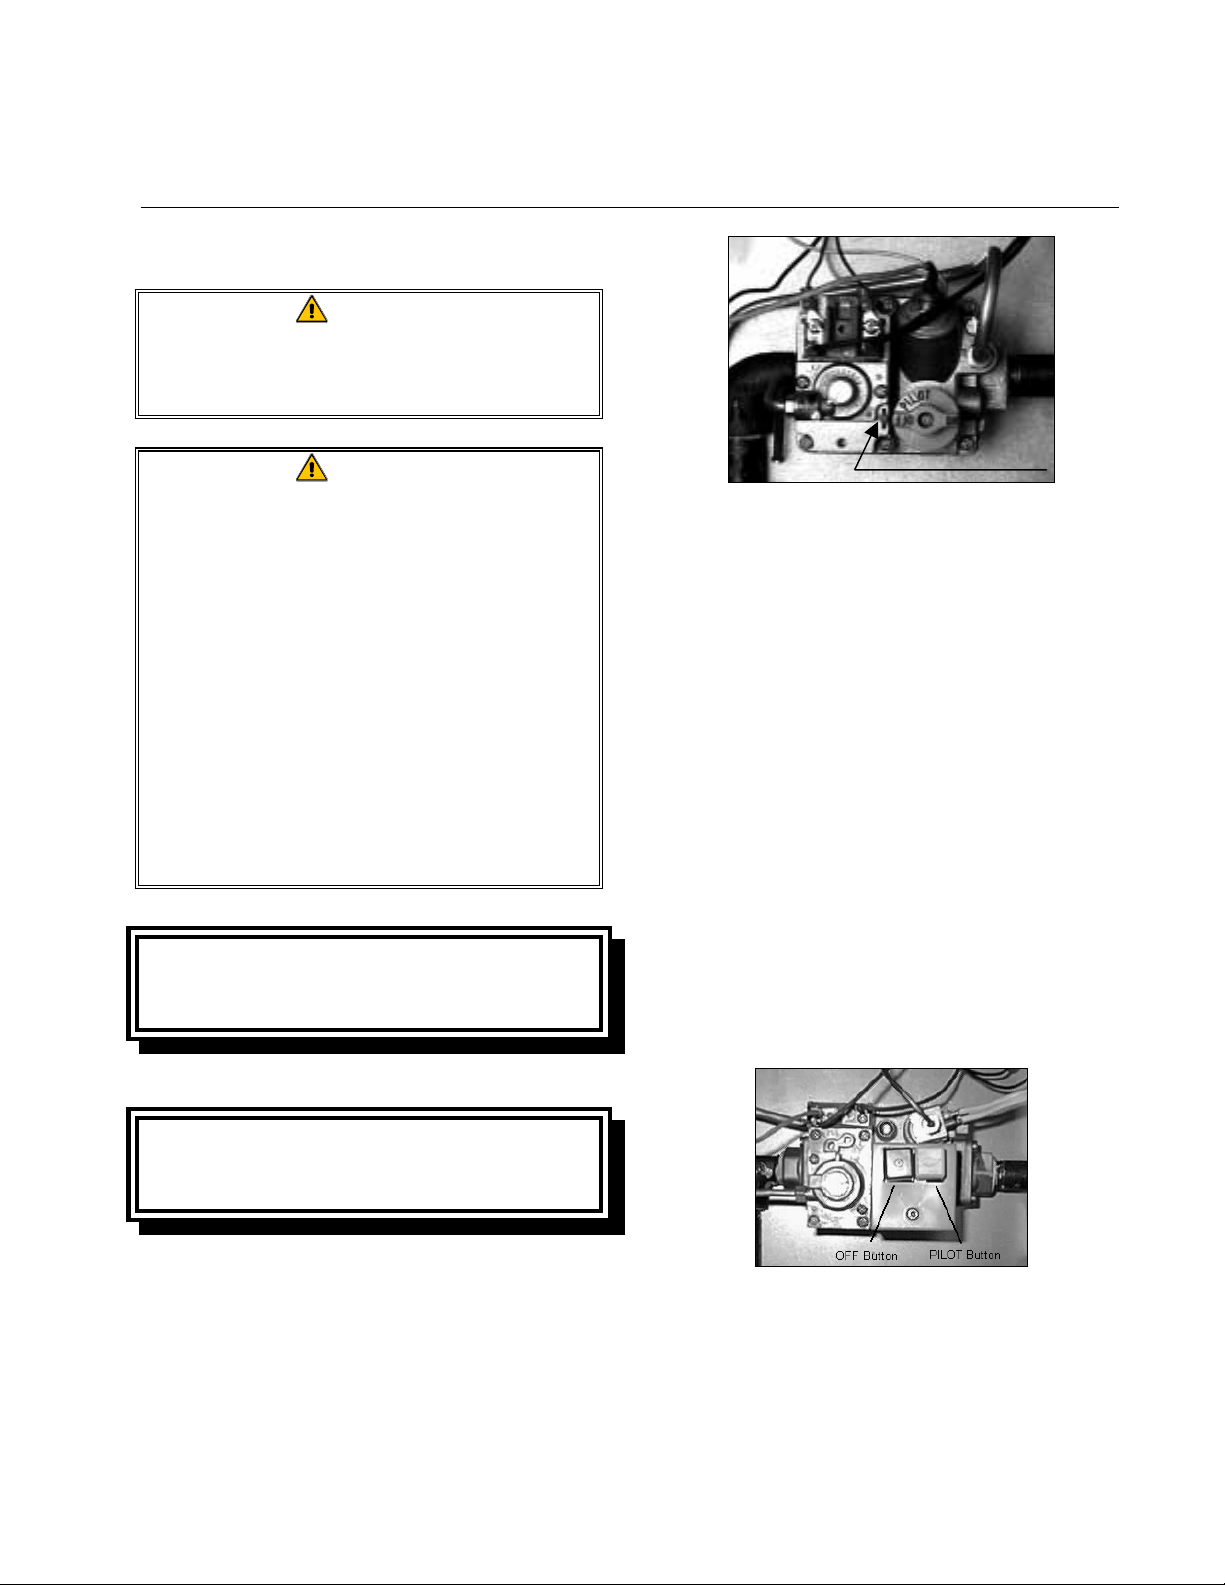
Knob is shown in
OFF position.
CAUTION
The cooking oil/shortening capacity of
the 45 Series fryer is 80 lbs (43 liters)
at 70ºF (21ºC).
Before lighting the fryer, make sure the
fryer is OFF and the frypot drain valve
is closed. Remove the basket support
rack, if installed, and fill the frypot to
the bottom OIL-LEVEL line.
To prevent scorching, if solid
shortening is being used, make sure it
is tightly packed down into the bottom
of the frypot.
Non-CE Standard
Units configured to Non-CE standards are
equipped with Robertshaw valves.
Note index mark.
3. Place a flame near the pilot assembly, push
and hold the knob in, light the pilot, and
continue to depress the knob for at least 60
seconds after the pilot lights. Failure to
hold the knob in long enough will cause
the pilot to go out when the knob is released. If the pilot goes out when the knob
is released, wait at least 5 minutes then repeat this step.
4. Turn the gas valve knob to the ON position.
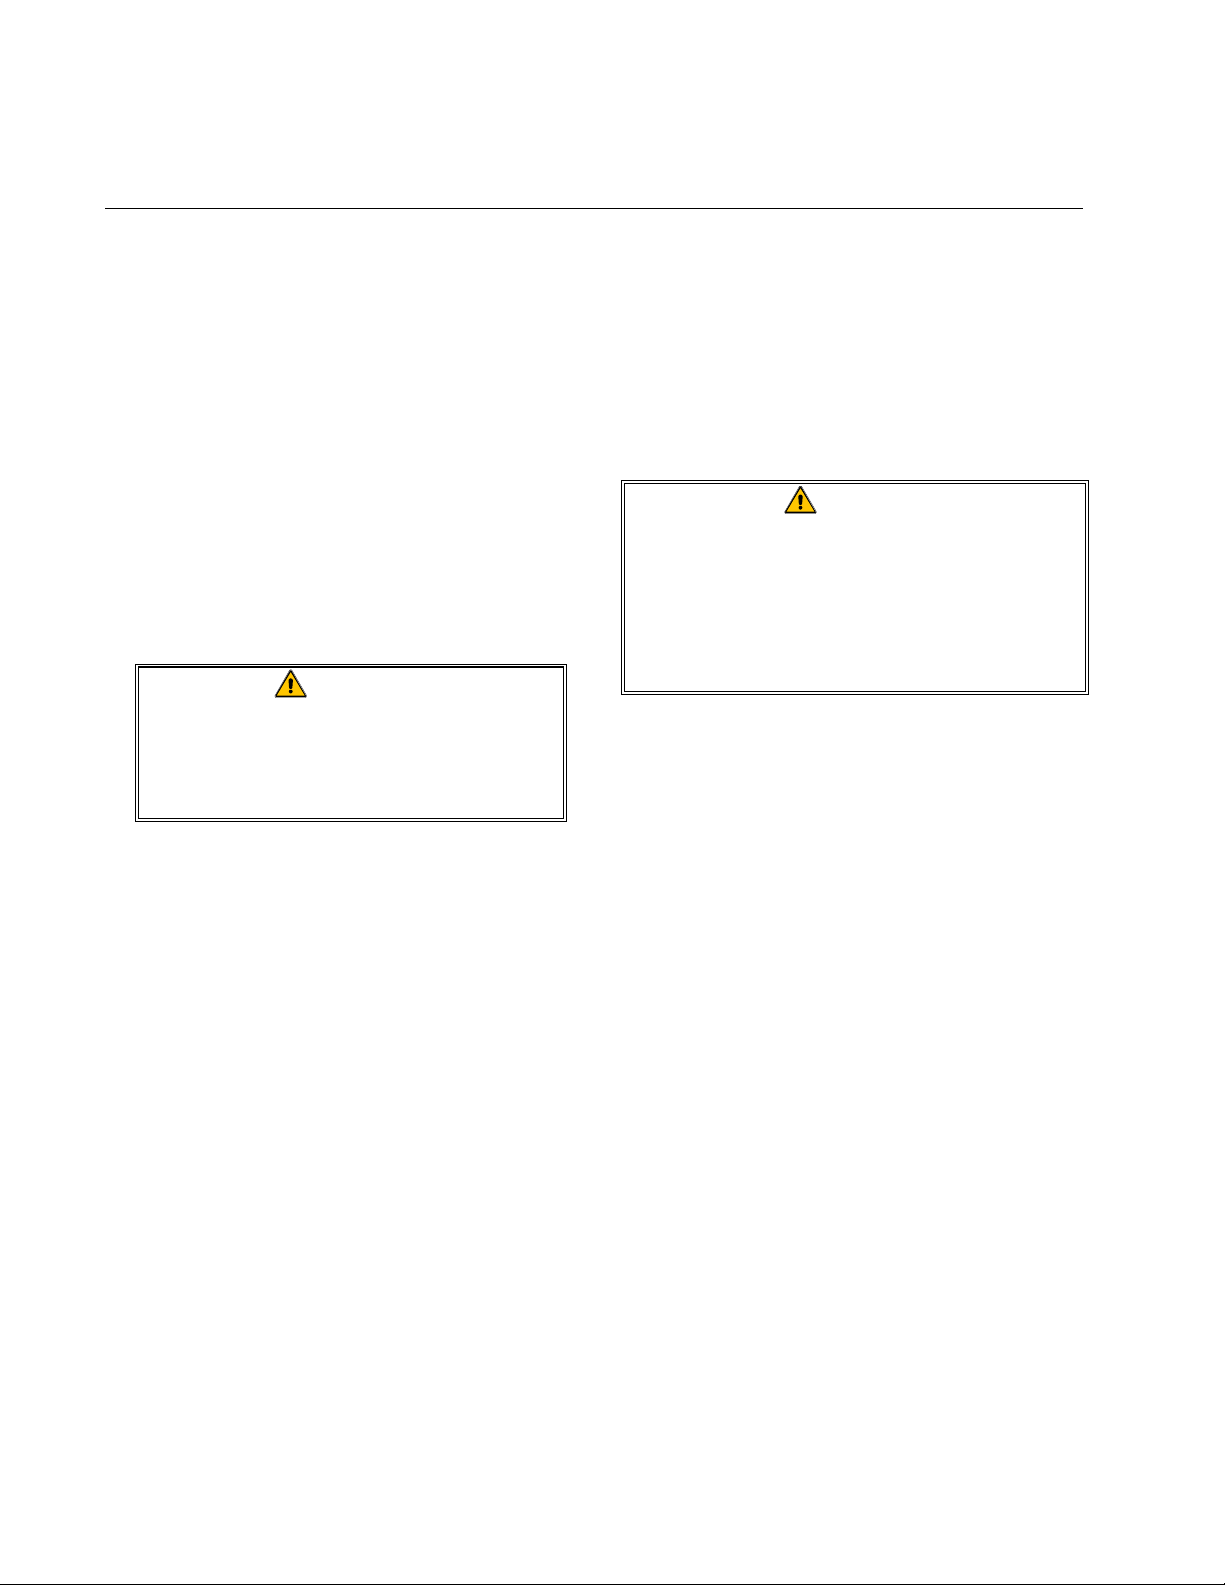
Lighting the Pilot on Honeywell Valves:
1. Ensure power to the unit is OFF.
2. Press the OFF (red) button. Wait 5 minutes.
CE Standard
Units configured to CE standards are
equipped with Honeywell valves.
Lighting the Pilot on Robertshaw Valves:
1. Ensure power to the unit is OFF.
2. Turn the gas valve knob to the OFF position. Wait 5 minutes, then turn the knob
to the PILOT position.
3. Place a flame near the pilot assembly, push
and hold the PILOT (white) button in,
light the pilot, and continue to depress the
button for at least 60 seconds after the
pilot lights. Failure to hold the button in
long enough will cause the pilot to go out
3-1
Page 2
CF SERIES GAS FRYERS
CHAPTER 3: OPERATING INSTRUCTIONS
when the button is released. If the pilot
goes out when the button is released, wait
at least 5 minutes then repeat this step.
Placing the Fryer into Operation.
For units equipped with Thermostat
Controls:
Place the Melt Cycle switch (if equipped)
to the ON position. Set the thermostat
knob to the desired cooking temperature.
The U-shaped burner should “light-off”
and burn with a strong, blue flame.
CAUTION
Thermostat-controlled fryers will
stay in the Melt Cycle mode until
the Melt Cycle switch is placed in
the OFF position.
For units equipped with other than
Thermostat Controls:
Place the computer/controller ON/OFF
switch in the ON position and set the controller to—or program the computer for—
the desired cooking temperature, referred
to as the setpoint. The U-shaped burner
should “light off” and burn with a strong,
blue flame. The unit automatically enters
the Melt Cycle mode if the frypot temperature is below 180ºF (82ºC). (NOTE:
During the melt cycle, the burner will repeatedly fire for a few seconds, then go out
for a longer period.) When the frypot
temperature reaches 180ºF (82ºC), the unit
will automatically switch to the Heating
mode. The burner will remain lit until the
frypot temperature reaches the programmed cooking temperature (setpoint).
3.2 Boiling-Out the Frypot
To ensure that the frypot is free of any contamination resulting from its manufacture,
shipping, and handling during installation, the
frypot must be boiled out before first use.
Frymaster recommends boiling out the frypot
each time the oil or shortening is changed.
DANGER
Never leave the fryer unattended
during the boil-out process. If the boil-
out solution boils over, turn off power
to the fryer immediately and let the
solution cool for a few minutes before
resuming the process.
1. Before lighting the burner, close the fryer
drain valve(s) and fill the frypot to the
bottom OIL-LEVEL line with a mixture of
cold water and Frymaster™ FRYER ‘N’
GRIDDLE cleaner or detergent.
2. For units equipped with thermostat con-
trollers, set the thermostat to 280ºF
(140ºC).
For units equipped with analog or digital
°°°°
controllers, set the setpoint to 200
(93
°°°°
C).
F
For units equipped with Computer Magic
III computers, select the Boil-Out feature
in accordance with the procedure Using
the Boil-Out Feature on page 3-7.
3. Place the fryer into operation in accor-
dance with Section 3.1.
4. Simmer the solution for 1 hour.
5. After the solution simmers for 1 hour, turn
the fryer off, allow the solution to cool,
3-2
Page 3

CF SERIES GAS FRYERS
CHAPTER 3: OPERATING INSTRUCTIONS
then add 2 gallons (7.75 liters) of cold
water and stir. Drain the solution into a
suitable container and clean the frypot
thoroughly.
WARNING
Do not drain boil-out solution into
the built-in filtration system. Doing
so may cause damage to the
filtration pump.
6. Rinse the frypot at least twice by filling the
frypot with clean water and draining. Dry
the frypot thoroughly with a clean, dry
towel.
DANGER
Remove all drops of water from the
frypot before filling with cooking
oil/shortening. Failure to do so may
cause spattering of hot liquid when
the oil/shortening is heated to
cooking temperature.
3.3 Shutting the Fryer Down
For short-term shut down during the work day,
place the fryer power switch in the OFF position and put the frypot covers in place (if the
fryer is so equipped).
When shutting the fryers down at closing time,
place the fryer power switch in the OFF position, place the gas valve in the OFF position,
and put the frypot covers in place (if the fryer
is so equipped).
3.4 Controller Operation and
Programming
Fryers in the 45 Series can be equipped with
any of the following types of controlling devices:
• Computer Magic III
• Thermostat Controller
• Analog Controller
• Digital Controller
Each type is discussed in detail in the following pages.
3-3
Page 4

N
OTE:
Some computers
may have this
earlier style
ON/OFF switch:
ON
OFF
CF SERIES GAS FRYERS
CHAPTER 3: OPERATING INSTRUCTIONS
1 234 5
c y c l c y c l
Frymaster
L1 23445
6 78
1 Left LED Display 5 Right Power Switch
2 Right LED Display 6 Left Product Selection & Coding Keys
3 Temperature Check/Program Lock 7 Right Product Selection & Coding Keys
4 Left Power Switch 8 Program Mode Switch
6
COMPUTER MAGIC
78
9
0R
COMPUTER MAGIC III CONTROLLER
COMPUTER OPERATING INSTRUCTIONS
Turn the computer on by pressing the Power
switch (or ON/OFF switch
ON
OFF
). NOTE:
A decimal between digits 1 and 2 in either
LED Display indicates that the burner is on.
1. One of the following will be displayed:
a. cycl, indicating that the fryer is op-
erating in the melt cycle mode. The
fryer will remain in the melt cycle
mode until it reaches 180ºF (82ºC) or
is canceled manually by pressing the R
key.
CAUTION
Do not cancel the melt cycle mode
until solid shortening is completely
melted!
b. hi, indicating that the frypot tem-
perature is 21ºF (12ºC) higher than the
setpoint.
c. LO, indicating that the frypot tem-
perature is 21ºF (12ºC) lower than the
setpoint.
d. “- - - -”, indicating that the frypot tem-
perature is in the cooking range.
NOTE: For best results, cooking
should not be attempted unless the display indicates “- - - -”.
e. help, indicating a heating problem.
f. hot, indicating the frypot tempera-
ture is in excess of 410ºF (210ºC).
g. prob, indicating that the computer
temperature probe circuit is open.
3-4
Page 5

CF SERIES GAS FRYERS
CHAPTER 3: OPERATING INSTRUCTIONS
2. Press a product switch to initiate a cook
cycle.
a. The display will indicate the previ-
ously programmed cook time and begin countdown.
b. If shake time is programmed, the op-
erator will be notified of the need to
shake the product “X” seconds after
the cook cycle has begun (X = amount
of time programmed). An alarm will
sound, and the display will read SH####,
where “#” will be the switch number.
If no shake time has been programmed,
sh#### will not appear during the cook
cycle. The alarm is self-canceling.
c. At the end of the cooking cycle, an
audible alarm will sound, cooc will
be displayed, and the associated product switch indicator will flash. To
cancel the cook alarm, press the appropriate switch.
d. At this time, the hold time will be dis-
played (if programmed greater than
zero), and the countdown will begin.
When the countdown reaches zero,
hD_
hD_ will be displayed and an alarm
hD_hD_
will sound. The blank will be the
switch number. The hold alarm is canceled by pressing the Programming
switch
. NOTE: If the display is in
use, the hold time countdown will not
be displayed.
3. To check the frypot temperature at any
time, press the Temperature Check switch
once. To check the setpoint, press the
switch twice. If you suspect the temperature probe is defective, check the temperature of the frypot with a thermometer
or pyrometer to verify that the computer
readout is reasonably close to the measured reading.
4. During idle periods when the fryer is on
but not in use, “- - - -” should appear in
both displays. If not, check the actual
temperature and setpoint.
CAUTION
The electronic circuitry in your
computer can be affected adversely by
current fluctuations and electrical
storms. Should it fail to function or
program properly for no apparent
reason, the computer should be reset
by unplugging the computer and
plugging it back in. This could prevent
a service call.
COMPUTER PROGRAMMING INSTRUCTIONS
1. Turn the computer on by pressing the
Power switch (or ON/OFF
ON
OFF
switch).
2. Enter the programming mode by pressing
the Program Mode switch . Code
appears in the left display. If you enter the
programming mode by mistake, press the
switch again to exit the programming
mode. NOTE: If you try to enter the programming mode while the computer is
cooking, the display will flash busy
busy.
busybusy
3. Enter the number 1650 by pressing the
number keys.
4. sp----r (Setpoint) will appear in the left
display. Any previously programmed
temperature setpoint will appear in the
right display. To change the setpoint, enter the desired setpoint temperature using
the number keys. For CE units, the highest
setpoint allowed is 370ºF (188ºC). For
Non-CE units the number is 375ºC
3-5
Page 6

CF SERIES GAS FRYERS
CHAPTER 3: OPERATING INSTRUCTIONS
(191ºC). Press the Program Mode switch
to lock in the new setpoint (or the old
setpoint, if it was not changed). If the unit
is a dual vat fryer, sp-L will appear, allowing the setpoint for the left vat to be
adjusted or confirmed.
5. selp (Select Product) will appear in the
left display. Press the product button to be
programmed (or press
normal operating mode).
6. sens (Sensitivity) appears in the left
display. Any previously programmed sensitivity setting will appear in the right display. To change the sensitivity setting,
enter the new setting and press to lock
it in. If the setting was not changed,
pressing accepts the previous setting.
Sensitivity is a built-in feature that adjusts
cooking time to compensate for the drop in
frypot temperature when a basket of product is placed into it. Different food products will vary in density, basket load size,
and initial temperature. Food products
will also vary in how well cooked a product is required to be. A proper sensitivity
setting for each product will assure a
high-quality product each time. For example: four ounces of fries can be programmed to be cooked to the same quality
as two and one-half pounds. Some experimenting with the range of 0 - 9 (0 being least sensitive and 9 being most sensitive) may be required to obtain the desired
quality to meet your specifications, but
setting 5 is the recommended starting
point.
7. cooc (Cook Time) will now show in the
left display. Any previously programmed
time will appear in the right display.
to return to the
Pressing will accept the current cooking time. To change the cooking time,
enter the new time using the number keys.
Press to lock in the new time.
8. sh____ (Shake Time) appears in the left dis-
play. If your product requires shaking
during the cooking process, set the number
of seconds to cook before shaking using
the number keys.
For example, entering “30” means the
product needs to be shaken after it has
been cooking for 30 seconds. At the end
of 30 seconds, an alarm will sound and the
product switch will flash for 3 seconds. If
your product does not require shaking,
enter “0”. The number entered will appear
in the right display. Press to lock in the
programmed time.
9. hd____ (Hold Time) will appear in the left
display. Set the time the product may be
held before serving, anything from 13 seconds to 60 minutes. If you do not wish to
use the hold time feature, enter 0. Press
to lock in the time.
In the event the same product is being
cooked in more than one basket, any product button can be programmed to use the
hold timer normally used with a different
product button. Example: Program button 3 for 7:00 minutes hold time. Then,
when programming button R for hold time,
press address 4. Both product button 3
and product button R will then use the
same hold time of 7:00 minutes. The button numbers and their assigned address
numbers are:
Button: L 1 2 3 4 5 6 7 8 9 0 R
Address: 1 2 3 4 5 6 7 8 9 10 11 12
3-6
Page 7

CF SERIES GAS FRYERS
CHAPTER 3: OPERATING INSTRUCTIONS
10. selp (Select Product) will again appear
in the left display. If more products are to
be programmed, return to Step 5 and follow all instructions to this point, repeating
for each product.
11. When you complete your programming,
lock in the whole program by pressing the
Temperature Check/Program Lock switch
.
USING THE BOIL-OUT FEATURE
CAUTION
Before using this feature, ensure the
frypot is filled with a mixture of cold
water and
Frymaster
FRYER ‘N’
GRIDDLE cleaner or detergent.
1. To program the fryer for boil-out, press the
Power switch (or ON/OFF
ON
OFF
switch)
followed by the Program Mode switch .
Code will appear in the left display.
no more than 2 minutes and 30 seconds. If the
recovery time is greater, call your FASC.
1. To check recovery time, press the Program
Mode switch . Code will appear in
the left display.
2. Enter the code number 1652 on the
number keypad. The recovery time will
appear in both displays for 5 seconds.
SELECTING FAHRENHEIT– CELSIUS DISPLAY
MODE
1. The computer can display temperatures in
either Fahrenheit or Celsius. To change
from one to the other, press the Program
Mode switch . Code will appear in
the left display.
2. Enter the code number 1658 on the
number keypad. The computer will toggle
the temperature display from Celsius to
Fahrenheit or from Fahrenheit to Celsius.
2. Enter the code number 1653. The right
display will read boil
boil. The temperature is
boilboil
automatically set for 195ºF (91ºC). The
fryer will attain this temperature and remain there until the Power (or ON/OFF
ON
OFF
) switch is pressed, which cancels the
boil-out mode. In high-altitude locations,
the fryer must be monitored constantly for
boil-over conditions. If boil-over occurs,
turn off the fryer immediately, allow it to
cool, then re-enter the boil-out mode to
continue the boil-out process.
FRYER RECOVERY TIME CHECK FEATURE
“Recovery time” is the amount of time it takes
the fryer to increase the temperature from
275
°
F (135°C) to 325°F (163°C). It is a
measure of the fryer’s efficiency. It should be
3. Press the Temperature Check/Program
Lock switch
to display the temperature
in the newly selected mode.
SELECTING FRYPOT TEMPERATURE DISPLAY
MODE
1. To display the actual frypot temperature at
all times, press the Program Mode switch
. Code will appear in the left display.
2. Enter code 165L on both number key-
pads. The computer will display the actual
frypot temperature. NOTE: During the
product cooking process, the cooking time
will not be displayed, but timing is taking
place.
3. To return to setpoint display, repeat Steps
1 and 2.
3-7
Page 8

CF SERIES GAS FRYERS
CHAPTER 3: OPERATING INSTRUCTIONS
Heat
Mode
Light
3
Frymaster
ON/OFF
Switch
2
ON
OFF
C
F
Temperature
THERMOSTAT CONTROLLER
.
THERMOSTAT CONTROLLER
The Thermostat Controller utilizes a frypot
thermostat that is directly connected to a temperature knob mounted on the control panel.
Rotating the knob to the desired cooking temperature (setpoint) directly adjusts the thermostat control to that temperature. Placing the
ON/OFF switch in the ON position supplies power to the fryer’s components and
causes the switch to illuminate. Placing the
Melt Cycle switch in the ON position
causes the fryer burner to repeatedly cycle on
for a few seconds and off for a longer period.
The purpose is to gradually melt solid shortening to prevent scorching, and to prevent
1
Knob
4
Melt Cycle
Switch
creation of “hot spots” on the frypot. The
switch is illuminated when in the ON position.
CAUTION
The fryer remains in the Melt Cycle
mode until the Melt Cycle switch is
placed in the OFF position.
The Heat Mode Indicator illuminates when
the frypot is below setpoint.
The Thermostat Controller requires no programming, but it may require calibration from
time to time. To determine if it requires calibration, refer to Check Thermostat Controller
Thermostat Calibration on page 5-4.
3-8
Page 9

CF SERIES GAS FRYERS
CHAPTER 3: OPERATING INSTRUCTIONS
Power
Light
Frymaster
Power
Switch
ANALOG CONTROLLER
Heat
On
Mode
Light
Temperature
ANALOG CONTROLLER
In units equipped with analog controllers, the
frypot thermostat has been replaced with a
solid-state temperature probe and solid-state
electronics mounted on the control panel, reducing the number of moving parts and eliminating the need to calibrate the thermostat.
The temperature probe is connected to the
control circuitry via an interface board behind
the control panel.
The cooking temperature setpoint is set by rotating the Temperature Knob to the desired
temperature.
When the Power switch is placed in the ON
position, electrical current is supplied to the
Trouble
C
F
Knob
Melt
Cycle
Light
Light
?
SOLID STATE
Melt Cycle
Switch
fryer’s components and the Power On Light
illuminates.
Placing the Melt Cycle switch in the ON
position causes the burner to cycle on for a
few seconds and off for a longer period until
the temperature in the frypot reaches 180ºF
(82ºC). At that time the unit automatically
enters the heat mode, causing the burner to
remain lit until the setpoint is reached. When
in the melt cycle, the Melt Cycle Light
alternately illuminate and go out as the burner
cycles on and off. When the unit enters the
heat mode, the Heat Mode Light
illuminate and remain on until the setpoint is
reached. The Trouble Light indicates probe
circuit or high limit circuit problems.
will
will
3-9
Page 10

CF SERIES GAS FRYERS
CHAPTER 3: OPERATING INSTRUCTIONS
Celcius or
ON/OFF
Switch
Frymaster
Digital
Display
9 . 9 9 9
Fahrenheit
Display Switch
T emperature
or Setpoint
Display Switch
DIGITAL CONTROLLER
DIGITAL CONTROLLER
This controller uses a temperature probe and
solid-state electronics. Pressing the ON/OFF
switch supplies electrical power to the
fryer, and causes the controller software version number to display for 4 seconds in the
Digital Display.
Following the software version number display, the SETPOINT TEMPERATURE
WILL DISPLAY CONSTANTLY. Pressing
the Temperature/Setpoint Display switch will
display the actual frypot temperature.
The fryer will automatically enter the melt
cycle mode and will continue to cycle on for a
few seconds and off for a longer period until
the temperature in the frypot reaches 180ºF
(82ºC). At that time, it will enter the heat
mode. The purpose of the melt cycle is to
gradually melt solid shortening to prevent
Setpoint
Adjustment
Arrows
Melt
Cycle
Switch
Heating
Mode
Indicator
scorching, and to prevent creation of “hot
spots” on the frypot. To cancel the melt cycle,
press the Melt Cycle switch .
The fryer will remain in the heat mode until
the setpoint is reached. The Heat Mode Indicator is a decimal point that appears between
the first two numbers of the digital display to
indicate the unit is heating. When the setpoint
is reached, the decimal will go out; indicating
the fryer is ready for cooking.
To enter or change the setpoint, press an arrow
key to raise or lower the temperature setting.
The display will change at a rate of about 1degree per second for approximately the first
12 degrees, then change to a faster rate if an
arrow is continuously pressed.
The temperature can be displayed in either
Fahrenheit or Celsius. To change from one to
the other, press the C/F switch .
3-10
 Loading...