

FrSky TARANIS Q X7 Instruction
www.frsky-rc.com
FrSky Electronic Co., Ltd.
Website: www.frsky-rc.com E-mail: frsky@frsky-rc.com Technical Support: sales4tech@gmail.com
FrSky 2.4GHz ACCST Taranis Q X7 Manual
Introduction
Thank you for purchasing the FrSky 2.4GHz ACCST TARANIS Q X7 digital telemetry radio system. In order to make the best
use of your system and to fly safely, please read this manual carefully. If you have any difficulties while using your system,
please consult the manual, your hobby dealer, or FrSky technical support.
Due to unforeseen changes in production, the information contained in this manual is subject to change without notice.
Meanings of Special Markings
Pay special attention to safety where indicated by the following marks:
△
! DANGER - Procedures which may lead to dangerous conditions and cause death/serious injury if not carried out properly.
△
! WARNING - Procedures which may lead to a dangerous condition or cause death or serious injury to the user if not
carried out properly or procedures where the probability of superficial injury or physical damage is high.
△
! CAUTION - Procedures where the possibility of serious injury to the user is small, but there is a danger of injury, or
physical damage, if not carried out properly.
= Mandatory = Prohibited
△
! Warning: Always keep electrical components away from small children.
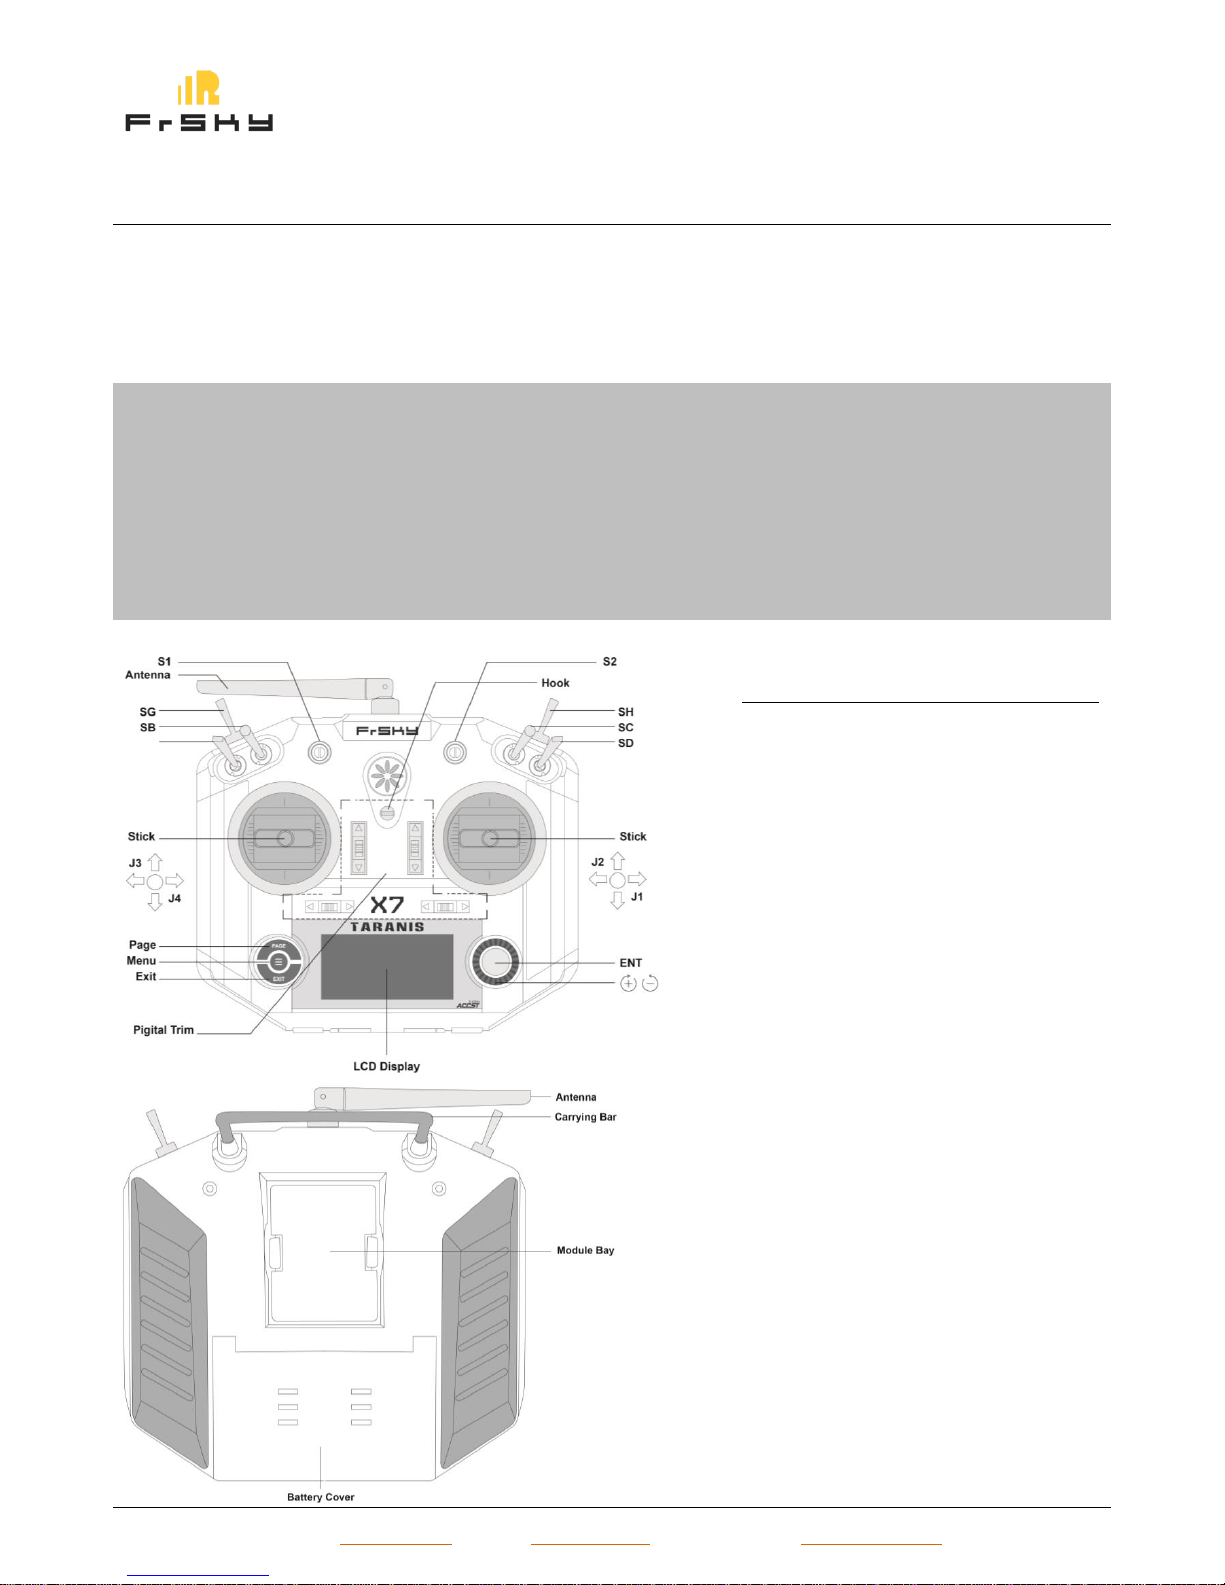
Overview
(Switch Default Settings)
● SA: 3 positions; Short Lever
● SB: 3 positions; Long Lever
● SC: 3 positions; Long Lever
● SD: 3 positions; Short Lever
● SF: 2 positions; Short Lever
● SH: 2 positions; Momentary; Long lever
You can choose the Switch and define its
positions in the Mixer menu.
www.frsky-rc.com
FrSky Electronic Co., Ltd.
Website: www.frsky-rc.com E-mail: frsky@frsky-rc.com Technical Support: sales4tech@gmail.com
Specifications
Model Name: Taranis Q X7
Operating Voltage Range: 6~15V (2S, 3S Lipos are acceptable)
Operating Current: 210mA maximum (both RF module and backlit are on)
Operating Temperature: -10~45℃
Backlight LCD Screen: 128*64 outdoor readable LCD
Model Memories: 60 (extendable by SD card)
Compatibility: FrSky X series, D series and V8-II series receivers (plus other receivers if an external module is used)
Features
● Quad Ball Bearing Gimbals
● Receiver Match
● Audio Speech Outputs (values, alarms, settings, etc.)
● Antenna Status Detection and Adjustment
● Real-time Flight Data Logging
● Receiver Signal Strength Indicator (RSSI) Alerts
● Super Low Latency
● Smart Port Supported
● Vibration Alerts
△! Cautions on handling antenna
Do not touch the antenna during operation. Doing so could interfere with transmission, causing a crash.
Do not carry the transmitter by the antenna. The antenna wire could break and prevent transmission.
Do not pull the antenna forcefully. The antenna wire could break and prevent transmission.
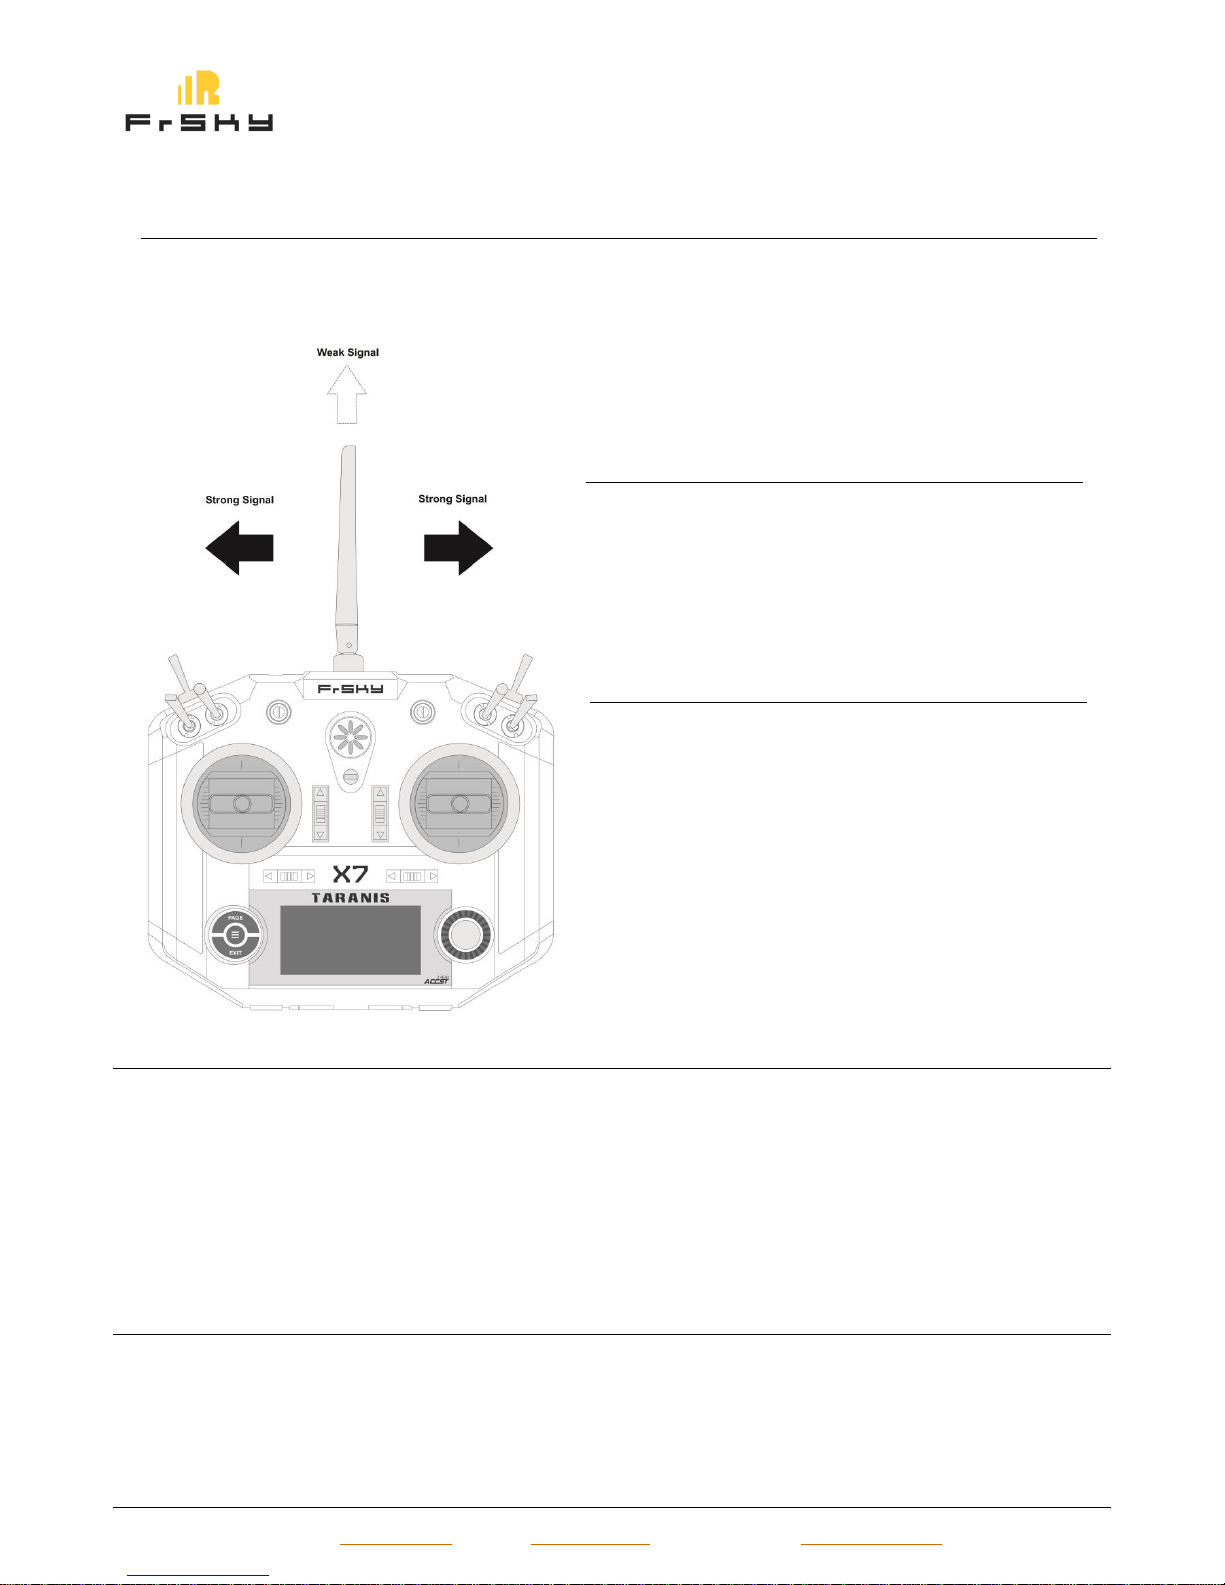
Rotating Antenna
The antenna can be rotated 180 degrees and angled 90
degrees. Forcing the antenna further than this can cause
damage to the antenna. The antenna is not removable.
Angle adjustment of the antenna
The antenna rotation and angle can be adjusted. The
antenna features week radio signal in the forward direction
and strong radio signal in the sideways directions. Adjust the
antenna angle to match your flying style.
www.frsky-rc.com
FrSky Electronic Co., Ltd.
Website: www.frsky-rc.com E-mail: frsky@frsky-rc.com Technical Support: sales4tech@gmail.com
△! Notes and Warnings for Battery (Not provided)
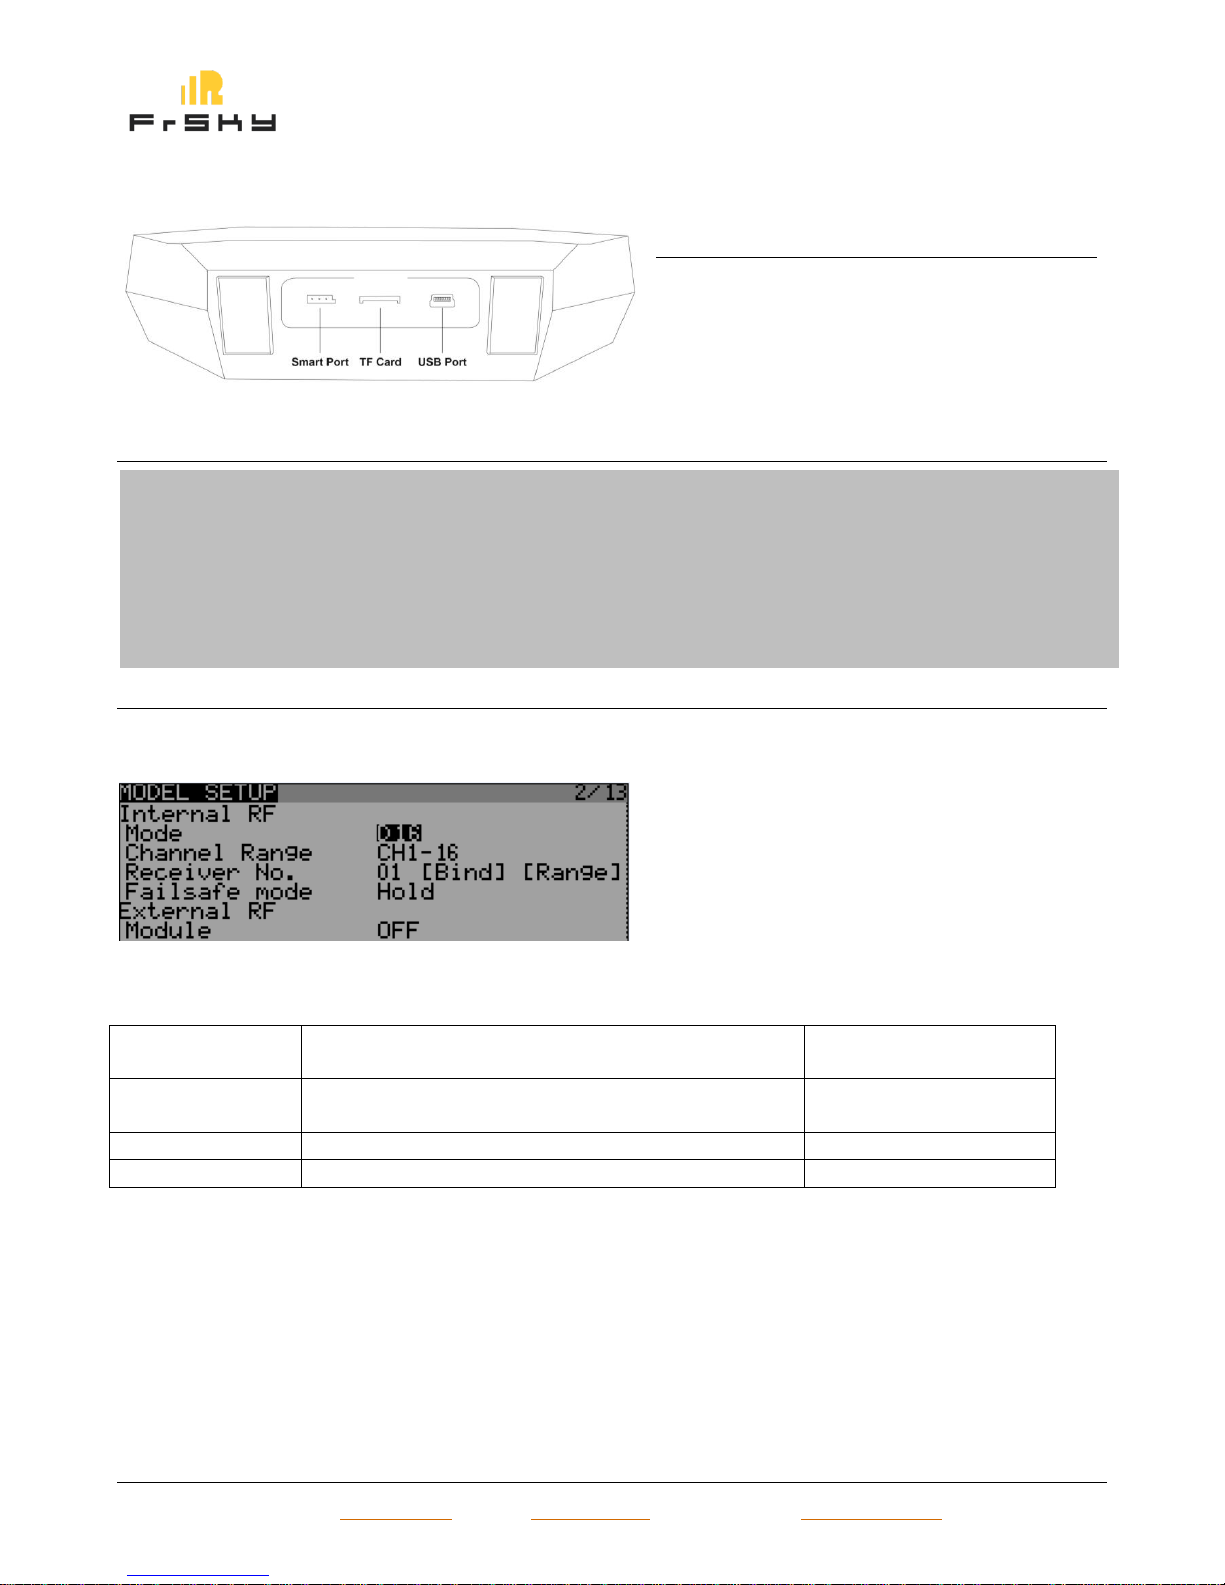
Model Setup for Taranis Q X7 Internal RF Module
The internal RF module of FrSky Taranis Q X7 is newly developed by FrSky under the name of XJT.
Enter the MODEL SETUP menu (for details, refer to the Guide included on the SD card, or download it from FrSky website).
Step 1: Set the Mode for Taranis Q X7 Internal RF
Refer to the table below and set the Taranis Q X7 to the mode corresponding to your receiver (D8, D16 or LR12 ).
Mode of Taranis Q
X7
Compatible Receivers
Number of Output servo
Channels
D8
V8-II series in D mode (V8FR-II, V8R7-II, V8R4-II, VD5M, etc.)
D series (D8R-II plus, D8R-XP, D6FR, D4R-II, etc.)
8
D16
X series (X8R, etc.)
Up to 16
LR12
L series (L9R, etc.)
12
Note: older V8 receivers are not supported by the internal module but can be used with an external DJT module in V8
mode.
Step 2: Set the Channel Range
The internal RF module of Taranis Q X7 supports up to 16 output servo channels. The channel range is configurable, and
needs double check before use.
Step 3: Set the Receiver Number
When you create a new model, the system will assign you a receiver number automatically, but this can be easily changed.
The range of the receiver number is 00-63, with the default number being 01 (use 00 is not recommended). Once the
receiver is set to the desired number and is bound to the Taranis Q X7, the bind procedure will not need to be repeated
Please connect a battery in the battery compartment before use.
The voltage range should be DC 6-15V.
Be careful not to drop the battery.
Don't pull the battery wires as this could produce, short-circuits and cause the battery to explode.
Do not remove the battery from the TARANIS Q X7 transmitter while the voltage warning is blinking as this could
cause iinternal settings and memories to be destroyed.
Do not use the transmitter if a “Backup Error” warning occurs.
Battery Connector Polarity
Ensure that the battery connector polarity is correct
when connecting batteries into the battery
compartment, otherwise the Taranis Q X7 might not
be powered on.
 Loading...