

Page 1

AlphaTrack™ User’s Guide
Version 1.0
This User’s Guide provides detailed information about installing and using the AlphaTrack DAW
controller from Frontier Design Group. The included AlphaTrack CD-ROM contains additional
information, including guides for using AlphaTrack with specific computer applications.
IMPORTANT: The AlphaTrack CD-ROM contains setup guides for some applications. Updated
guides, and additional setup guides for other applications will be added to our web site as they
become available. Please check our web site (www.frontierdesign.com) for AlphaTrack updates.
WARNING: Avoid excessive heat, moisture, vibration, shock, dust, or other conditions that could
damage the AlphaTrack. There are no user serviceable parts. Do not attempt to open the unit.
Contents
Overview..................................................................2
Installing Drivers in Windows 2000/XP/Vista........3
Updating Drivers in Windows 2000/XP/Vista ........3
Removing Drivers in Windows 2000/XP/Vista.......4
Installing Drivers in Macintosh OS X .....................5
Updating Drivers in Macintosh OS X......................5
Removing Drivers in Macintosh OS X....................5
Local Controls..........................................................6
Control Modes .........................................................7
Troubleshooting.......................................................8
Declaration of Conformity.....................................11
FCC Statements .....................................................12
Trademark Notices.................................................12
Limited Warranty...................................................13
AlphaTrack User’s Guide v1.0 Page 1 of 14
Page 2

Overview
The AlphaTrack features a variety of controls, as well as an LCD display and LED’s for feedback,
organized into four basic groups:
• Fader and Encoder group. This group consists of the 100mm, touch-sensitive, motorized
fader, the adjacent SOLO, MUTE, and REC illuminated buttons, the 3 touch-sensitive
encoders, the LCD display, and the 5 mode buttons (PAN, SEND, EQ, PLUG-IN, AUTO).
This set of controls typically provides comprehensive access to the DAW parameters one
track at a time.
• Programmable Function buttons. The buttons labeled F1 through F4 are often userprogrammable, although this depends on the particular application being used. They also
have alternate functions (F5-F8), which are accessed by pressing SHIFT in combination
with the F1-F4 button.
• Transport controls, including the scroll/shuttle touch strip. A set of standard transport
buttons (REW, FFWD, STOP, PLAY, and RECORD) provide quick and familiar time line
controls. The touch strip below these buttons is typically used to also control the time
line. This strip can detect both 1- and 2-finger moves as well as left, middle, and right
taps. These operations are usually used to control time line scroll or shuttle moves, and
actions like time line marker creation and navigation.
• Other miscellaneous controls:
o < TRACK and TRACK > buttons for navigating to the previous and next tracks in
a DAW project.
o The LOOP button, which typically toggles loop operations on and off.
o The FLIP button. In many applications this is used to flip parameter assignments
between an encoder and the high-resolution fader.
o The SHIFT button. SHIFT can be used with many controls to provide additional
functionality. The SHIFT button itself can often be used in a “sticky” mode to
permit one-handed access to the alternate button and encoder functionality.
o Footswitch input allows hands-free punch-in recording on many applications.
AlphaTrack User’s Guide v1.0 Page 2 of 14
Page 3

Installing Drivers in Windows 2000/XP/Vista
1. IMPORTANT: Make sure that your AlphaTrack is NOT connected to your computer to begin
this installation!
2. Insert the AlphaTrack CD-ROM into your computer’s CD-ROM drive. In a few moments, the
AlphaTrack menu will appear. (If it does not, use Windows Explorer to navigate to the top
folder of the CD-ROM, and double-click the “autorun.exe” file.)
3. Select ‘Install Driver and Plugins’ from the menu to run the automatic installer. Follow the
on-screen prompts, making sure to select any application specific plug-ins you want to install.
(These can be added at a later time if needed).
4. When the Windows Logo warning appears, select “Continue Anyway.”
5. Once the installer has run connect AlphaTrack to any available USB port on your computer.
AlphaTrack will be detected automatically, and the “New Hardware Wizard” will appear.
6. When asked if Windows can connect to Windows Update, select “No” and then click “Next.”
7. Select “Install the software automatically” and then click “Next.”
8. When the Windows Logo warning appears, select “Continue Anyway.”
9. When the Wizard finishes this part of the AlphaTrack software installation, click “Finish.”
10. After a few seconds, another “New Hardware Wizard” will open automatically. Repeat steps
5–7 to install the AlphaTrack WDM Interface.
11. It is recommended that you restart your computer to complete the installation process.
The AlphaTrack icon should appear in the Task Bar on the desktop (usually at the bottom right
of the screen).
Updating Drivers in Windows 2000/XP/Vista
1. Disconnect AlphaTrack from your computer.
2. Download and copy the latest AlphaTrack installer from www.frontierdesign.com to your
computer.
3. Double click on the installer to launch, and follow the steps 3-9 of “Installing Drivers in
Windows 2000/XP/Vista” above. Driver files will be replaced by the posted version.
AlphaTrack User’s Guide v1.0 Page 3 of 14
Page 4
Removing Drivers in Windows 2000/XP/Vista
1. Open the Windows Task Manager by simultaneously pressing Ctrl, Alt, and Delete.
2. Select the “Processes” tab, and select “AlphaTrack Applet.exe” in the list.
3. Click “End Process” and then “Yes”. Then close the “Windows Task Manager” window.
4. Navigate to your WINDOWS\SYSTEM32 folder, and delete the “AlphaTrack Applet.exe” file.
5. Navigate to your WINDOWS\SYSTEM32\DRIVERS folder, and delete the “AlphaTrack.sys”
and “AlphaTrackWdm.sys” files.
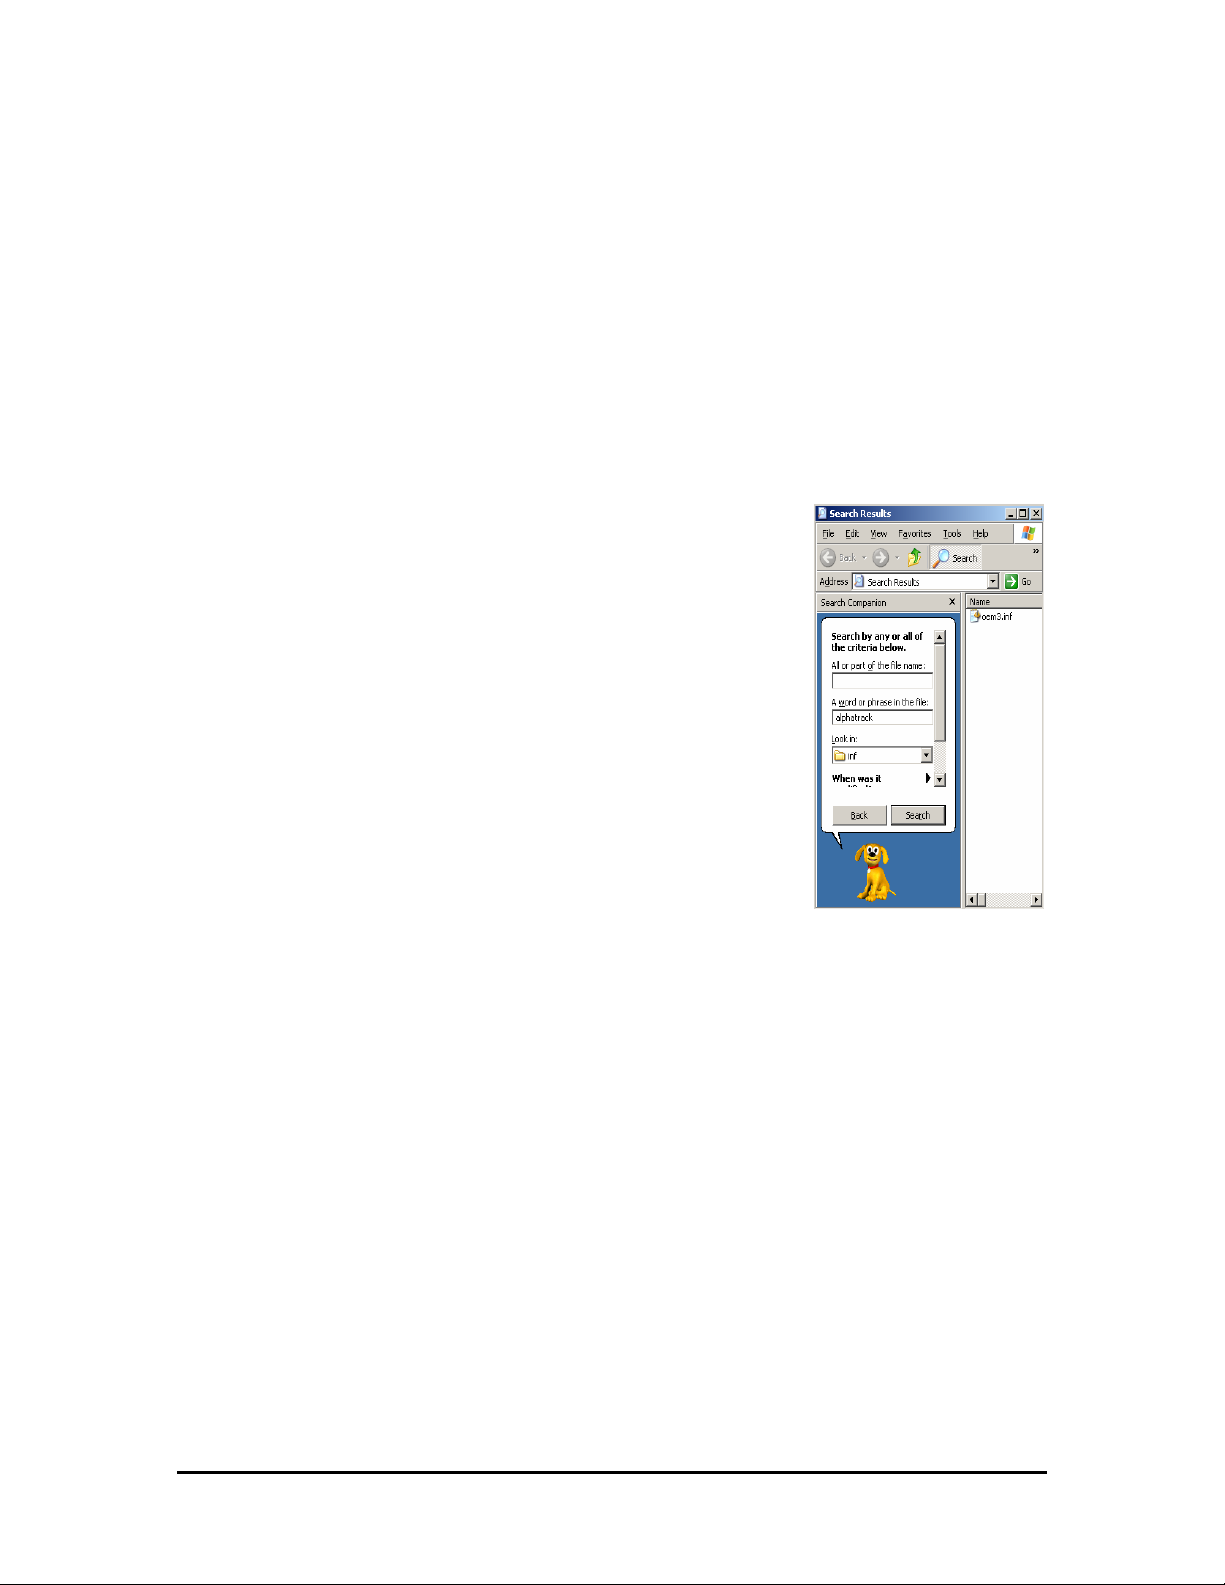
6. In the WINDOWS\INF folder, search for all files containing the
string “AlphaTrack” In Windows Explorer, you can navigate to the
WINDOWS\INF folder, click the Search button, and enter text in
the dialog boxes as shown in this picture. You should find the
“AlphaTrack” string within a file of the form “oem#.inf” where “#” is
a number. Delete that file and also delete any “oem#.PNF” files
that have the same “#” number.
7. Open the Start menu (in the bottom left of the desktop) and click
“Run…” to open the “Run” dialog box. In the “Open” field of the
“Run” dialog box, type “regedit” and then click “OK” to start the
Registry Editor.
8. Navigate to this entry:
HKEY_LOCAL_MACHINE\SYSTEM\CurrentControlSet\Enum\FDG_WDM\*FDG000C
9. Click on the *FDG000C folder to select it.
10. Go to the Edit menu, and select Permissions.
11. In the “Permissions for Everyone” area, click to place a check mark in “Allow” for “Full Control”
and then click “OK.”
12. Make sure the *FDG000C folder is still selected.
13. Go to the Edit menu again, and select Delete.
14. Repeat steps 8 through 13 to delete this entry also:
HKEY_LOCAL_MACHINE\SYSTEM\CurrentControlSet\Enum\USB\Vid_165b&Pid_fad1
15. Restart the computer. The Windows driver has now been completely removed.
AlphaTrack User’s Guide v1.0 Page 4 of 14
Page 5

Installing Drivers in Macintosh OS X
1. IMPORTANT: Make sure that your AlphaTrack is NOT connected to your computer during this
installation!
2. Insert the AlphaTrack CD-ROM into your computer’s CD-ROM drive. The “AlphaTrack Installer”
window will open with a picture of the AlphaTrack in its background.
3. Double-click the file called “AlphaTrack Installer” to start the installer.
4. Follow the prompts to install the driver. (Note: you will need the computer administrator’s
password to install the AlphaTrack drivers.)
5. Restart your computer to complete the driver installation process.
6. Connect AlphaTrack to any available USB port on your computer. The AlphaTrack icon (an
image of the AlphaTrack) should appear in the Status Bar (usually at the top right of the
screen).
Updating Drivers in Macintosh OS X
1. Disconnect the AlphaTrack from your computer.
2. Download and copy the latest AlphaTrack Macintosh installer from
your computer.
www.frontierdesign.com to
3. Repeat steps 3-6 of “Installing Drivers in Macintosh OS X” above. Driver files will be replaced by
the posted version.
Removing Drivers in Macintosh OS X
1. IMPORTANT: Make sure that your AlphaTrack is NOT connected to your computer during this
installation!
2. Insert the AlphaTrack CD-ROM into your computer’s CD-ROM drive. The “AlphaTrack Installer”
window will open.
3. Double-click the file called “AlphaTrack Remover” to start the remove procedure.
4. Follow the prompts to remove the driver. This process is much like an installation, but driver
components are being removed instead of installed.
5. Restart your computer to complete the driver removal process.
AlphaTrack User’s Guide v1.0 Page 5 of 14
Page 6

Local Controls
Some AlphaTrack functions are always available, whether a computer application is running or not.
For example, you can always adjust AlphaTrack’s display features.
To access the local controls, hold down both the SHIFT and STOP buttons. The LCD will display
the local control menu:
Hit F4>Calibrate
LCD Light Sleep
While holding SHIFT+STOP down, you can turn the encoders to:
• Adjust the LCD’s contrast
• Adjust the LCD backlight (Hi or Lo)
• Adjust the sleep timeout (from 1 to 60 minutes, or Never)
(Note: when you touch an encoder, the LCD screen changes to show more details about the
corresponding parameter.)
To calibrate the fader and touch sensors, press F4 (while pressing SHIFT+STOP) and then release
all the buttons. While it is calibrating, do not touch any part of the AlphaTrack. (Calibration is
finished when the LCD screen clears.) You should calibrate your AlphaTrack if any of the touch
sensors seem to be malfunctioning, or if the fader only moves much less than its full vertical range.
The sleep timer is reset whenever you touch an encoder, the fader, or the touch strip, or press a
button, or receive an LCD, LED, or fader update from the computer. If none of these happen (the
AlphaTrack is idle) and the sleep timeout time is reached, then the LCD back light is dimmed and
all the LED’s are turned off. To wake up the unit just press a button or touch an encoder, fader, or
touch strip and the unit.
Note: Since any user input or computer update resets the sleep timer, any regular update from the
computer, like a blinking LED, will prevent AlphaTrack from going to sleep since it is constantly
being updated.
AlphaTrack User’s Guide v1.0 Page 6 of 14
Page 7

Control Modes
The AlphaTrack appears as a MIDI input/output device within DAW applications. You can change
AlphaTrack’s control mode to specify which types of MIDI messages it will send and receive
depending on the DAW software that you are using. Some control plug-ins will automatically
change AlphaTrack to the native control mode when started
Currently, the available control modes include:
• AlphaTrack Native
• Pro Tools (HUI)
To determine which control mode to use and how to set up your recording application with
AlphaTrack, please refer to the appropriate Application Guide on the AlphaTrack CD-ROM or on
the Frontier Design Group web site (www.frontierdesign.com).
Control Mode Selection (Windows)
When the AlphaTrack is recognized by
Windows, the AlphaTrack icon appears in the
Task Bar (usually at the bottom right of the
desktop). Right click this icon to see the list
of available control modes. The selected one
is checked. When the list is visible you can
left click a control mode to select it.
Control Mode Selection (Macintosh)
When the AlphaTrack is recognized by the
Macintosh, the AlphaTrack icon appears in
the Status Bar (usually at the top right of the
desktop). Click this icon to see the list of
available control modes. Click a control mode
to select it. (If the AlphaTrack status bar icon
does not appear, start the AlphaTrack
Manager program (usually found as
“Applications/AlphaTrack Manager “) by
double-clicking on its icon. You can select
the control mode with this program. You can
also enable and disable the automatic
launching of the AlphaTrack status bar icon.
AlphaTrack User’s Guide v1.0 Page 7 of 14
Page 8

Troubleshooting
When I connect the AlphaTrack to a USB port on my computer, the AlphaTrack icon in the
system tray (Windows)/status bar (Mac) does not appear.
This is an indication that AlphaTrack is not connecting to a valid software driver. Most
likely an AlphaTrack driver is not properly loaded on this computer.
o If you haven’t loaded an AlphaTrack driver on this computer, follow the
instructions earlier in this document.
o If you have tried to load an AlphaTrack driver on this computer, do a complete
driver reinstall as described earlier in this document.
o Try connecting AlphaTrack to a different USB port, or bypassing a USB hub if
you are currently connected to one.
When I connect the AlphaTrack to a USB port nothing happens and the LCD backlight
does not turn on.
Upon connecting the AlphaTrack to an active USB port the AlphaTrack’s LCD should light
up and momentarily display “AlphaTrack.” The AlphaTrack icon may also appear on your
desktop at this time. If it does not check the following:
o Ensure that you are using a good USB cable and that the host computer is
already powered on.
o If you are connecting via a shared USB Hub, it may need to be powered by its
own dedicated power supply to ensure the AlphaTrack receives suff icient power.
The AlphaTrack appears to be on, but my DAW application does not recognize it.
The AlphaTrack appears to your DAW as a MIDI device. Make sure it is enabled in your
DAW’s MIDI setup for both input and output, and as a control device. For more
information on configuring your DAW for remote control consult the appropriate
application guide on the AlphaTrack CD-ROM, or
Some applications require additional plug-in software to fully utilize the AlphaTrack.
Check the AlphaTrack CD-ROM, or
www.frontierdesign.com for any additional files
www.frontierdesign.com.
needed for your application.
AlphaTrack User’s Guide v1.0 Page 8 of 14
Page 9

The AlphaTrack remote might be in the wrong control mode. Verify and set the correct
control mode according to the procedure described on page
document specific to your application.
7, and the AlphaTrack setup
On Windows machines, go to Control Panels\Administrative Tools\Services and make
sure that ‘Windows Audio’ is indicating “Started” under the Status column. This is
necessary for MIDI operation in Windows.
The touch strip does not work consistently, or is not smooth.
Try recalibrating the touch sensors using the procedure described in the Local Controls
section on page
Make sure that you are making solid contact with the strip, pressing down more firmly if
necessary.
A note especially for guitarists: Be aware that the calluses on your fingers are not
detected by the touch sensors. To get better touch sensor sensitivity you can try rotating
your finger down to make contact with the finger’s pad rather than the finger’s tip.
6.
AlphaTrack User’s Guide v1.0 Page 9 of 14
Page 10

Specifications
• Requirements: Windows 2000, Windows XP, Windows Vista, or Mac OS X (10.3.9+)
operating system; one available USB port
• Buttons/Controls:
100mm, touch-sensitive, motorized fader
3 touch-sensitive encoders
touch-sensitive scroll strip
22 Buttons including: 5-button transport, 8 function buttons, 5 encoder mode buttons,
Record Arm, Solo, Mute, and Shift.
¼” footswitch jack
• Indicators:
17 discrete LED’s
Backlit LED’s in Record Arm, Solo, Mute and Shift buttons
32-character backlit multifunction LCD display
• Power: supplied via USB connection, no external power required
• Included Items: AlphaTrack controller, USB cable, CD-ROM, Quick Start Guide
• Size: Approximately 8.5" x 6" x 3"
• Weight: Approximately 1 lb. (0.5 kg)
AlphaTrack User’s Guide v1.0 Page 10 of 14
Page 11

Declaration of Conformity
Declaration of Conformity
Konformitätserklärung
Déclaration de conformité
Declaración de Confomidad
Verklaring de overeenstemming
Dichiarazione di conformità
We/Wir/Nous/WIJ/Noi: Frontier Design Group
240 Mechanic St.
Lebanon, NH 03755
USA
declare under our sole responsibility that the product,
erklären, in alleniniger Verantwortung,daß dieses Produkt,
déclarons sous notre seule responsabilité que le produit,
declaramos, bajo nuestra sola responsabilidad, que el producto,
verklaren onder onze verantwoordelijkheid, dat het product,
dichiariamo sotto nostra unica responsabilità, che il prodotto,
AlphaTrack
to which this declaration relates is in conformity with the following standard(s) or other normative documents.
auf das sich diese Erklärung bezieht, mit der/den folgenden Norm(en) oder Richtlinie(n) übereinstimmt.
auquel se réfère cette déclaration est conforme à la (aux) norme(s) ou au(x) document(s) normatif(s).
al que se refiere esta declaración es conforme a la(s) norma(s) u otro(s) documento(s) normativo(s).
waarnaar deze verklaring verwijst, aan de volende norm(en) of richtlijn(en) beantwoordt.
a cui si riferisce questa dichiarazione è conforme alla/e seguente/ i norma/o documento/i normativo/i.
EC Directive 89/336/EEC
(EN55021:1998, EN55024:1998 /A1:2001 /A2:2003)
Charles Y. Hitchcock November 27, 2006
Member
Frontier Design Group
AlphaTrack User’s Guide v1.0 Page 11 of 14
Page 12

FCC Statements
Note: This equipment has been tested and found to comply with the limits for a Class B digital
device, pursuant to part 15 of the FCC Rules. These limits are designed to provide reasonable
protection against harmful interference in a residential installation. This equipment generates,
uses, and can radiate radio frequency energy and, if not installed and used in accordance with
the instructions, may cause harmful interference to radio communications. However, there is no
guarantee that interference will not occur in a particular installation. If this equipment does cause
harmful interference to radio or television reception, which can be determined by turning the
equipment off and on, the user is encouraged to try to correct the interference by one or more of
the following measures:
• Reorient or relocate the receiving antenna.
• Increase the separation between the equipment and receiver.
• Connect the equipment into an outlet on a circuit different from that to which the receiver
is connected.
• Consult the dealer or an experienced radio/TV technician for help.
Trademark Notices
AlphaTrack is a trademark of Frontier Design Group, LLC. All other trademarks and registered
trademarks are the property of their respective holders. Copyright © 2007 Frontier Design Group,
LLC. All rights reserved.
AlphaTrack User’s Guide v1.0 Page 12 of 14
Page 13

Limited Warranty
Frontier Design Group warrants for a period of one (1) year from your date of purchase that this
product will be free from defects in materials and workmanship under normal use, provided that
(i) the product is owned by the original purchaser, with proof of purchase, and (ii) the product has
been registered with Frontier Design Group by the original purchaser. The warranty period is not
extended if we repair or replace a warranted product or any parts
Frontier Design Group’s entire liability and your sole and exclusive remedy for any breach of the
foregoing limited warranty will be, at Frontier Design Group’s option, either refund of the purchase
price or repair or replacement of the Product.
THIS WARRANTY GIVES YOU SPECIFIC LEGAL RIGHTS, AND YOU MAY ALSO HAVE
OTHER RIGHTS WHICH VARY FROM STATE TO STATE (OR JURISDICTION TO
JURISDICTION). FRONTIER DESIGN RESPONSIBILITY FOR MALFUNCTIONS AND
DEFECTS IS LIMITED TO REPAIR AND REPLACEMENT AS SET FORTH IN THIS
WARRANTY STATEMENT. ALL EXPRESS AND IMPLIED WARRANTIES FOR THE PRODUCT,
INCLUDING BUT NOT LIMITED TO ANY IMPLIED WARRANTIES AND CONDITIONS OF
MERCHANTABILITY AND FITNESS FOR A PARTICULAR PURPOSE, ARE LIMITED IN TIME
TO ONE YEAR. NO WARRANTIES, WHETHER EXPRESS OR IMPLIED, WILL APPLY AFTER
THE LIMITED WARRANTY PERIOD HAS EXPIRED. SOME STATES DO NOT ALLOW
LIMITATIONS ON HOW LONG AN IMPLIED WARRANTY LASTS, SO THIS LIMITATION MAY
NOT APPLY TO YOU.
WE DO NOT ACCEPT LIABILITY BEYOND THE REMEDIES PROVIDED FOR IN THIS LIMITED
WARRANTY OR FOR CONSEQUENTIAL OR INCIDENTAL DAMAGES, INCLUDING,
WITHOUT LIMITATION, ANY LIABILITY FOR THIRD-PARTY CLAIMS AGAINST YOU FOR
DAMAGES, FOR PRODUCTS NOT BEING AVAILABLE FOR USE, OR FOR LOST DATA OR
LOST SOFTWARE. OUR LIABILITY WILL BE NO MORE THAN THE AMOUNT YOU PAID FOR
THE PRODUCT THAT IS THE SUBJECT OF A CLAIM. THIS IS THE MAXIMUM AMOUNT FOR
WHICH WE ARE RESPONSIBLE.
SOME STATES DO NOT ALLOW THE EXCLUSION OR LIMITATION OF INCIDENTAL OR
CONSEQUENTIAL DAMAGES, SO THE ABOVE LIMITATION OR EXCLUSION MAY NOT
APPLY TO YOU.
AlphaTrack User’s Guide v1.0 Page 13 of 14
Page 14

What do I do if I need warranty service?
Before the warranty expires, please contact the product distributor in your country, or if in the
USA, send us e-mail at
experiencing. If the problem is determined to be with the parts or workmanship of the product,
you will be sent information regarding how to get your product repaired or replaced. If you need to
send material to us, please first obtain an RMA number from Frontier Design Group, then send it
with the RMA number clearly marked inside and outside the shipping box to:
Frontier Design Group
240 Mechanic St.
Lebanon, NH 03766
USA
[email protected] with a description of the problem you are
AlphaTrack User’s Guide v1.0 Page 14 of 14
 Loading...