

Page 1

FiOS® Residential User Guide
Indiana, Washington & Oregon 2016
Page 2

2
Welcome to FiOS.
®
This is going to be exciting.
And easy.
In this handy guide, you’ll find everything you need. Simple, step-by-step
directions. Handy tips and hints. Answers to Frequently Asked Questions.
Plus, a number of video demonstrations and tools we’ve created for you on
your TV.
We even made the guide easy to navigate with color-coded sections to
ensure you quickly find just the ones you need.
FiOS® TV starts on page 3
FiOS® Internet starts on page 17
FiOS® Equipment starts on page 21
FiOS Digital Voice starts on page 23
Page 3

3
All You Need to Know About
FiOS® Service
FiOS TV
FiOS Remote ....................................................... 3
Your Remote = Digital Video Recorder ................................ 7
Frontier’s DVR Service ...............................................8
Here’s How to Record Live TV .......................................10
All About Video On Demand (VOD) ..................................13
Frequently Asked Questions ........................................14
FiOS Internet
Home Network Connections ........................................17
Support ............................................................18
Frequently Asked Questions ........................................19
FiOS Equipment
FiOS Equipment ...................................................21
Battery Backup (BBU) Audible Alarms ...............................21
FiOS Router ....................................................... 22
BBU Indicator Signals .............................................22
FiOS Digital Voice
FiOS Digital Voice ................................................. 23
Feature Access Summary .......................................... 27
Voicemail Telephone Menu Maps ...................................28
Calling Features—Telephone Star Codes ............................30
Page 4

4
FiOS® remote—
everything you need to do it all.
This is FiOS TV. It’s so easy, all you have to do is “Press the button.”
These are the buttons and what they do.
Guide
accesses
the TV
listing
Menu shows the
Main Menu
Widgets provides
instant access to
local weather, traffic
updates and more
On Demand
provides access
to Video On
Demand
Exit closes any on-screen
display and returns you
to regular viewing
Last returns to last
selected channel;
press again to return
to current channel
FiOS TV returns
to live TV
programming
Favorites displays
your favorite
channel listings
CH +/- changes
channels or moves up/
down through menu
screens and TV listings
Options provides
service options
OK selects item
highlighted in blue
Info displays description
of show you are watching
STB activates
set-top box
Power turns
devices on
or off
Page 5

5
(CC) switches between
closed-caption options
Stops media
DVR launches DVR menu
Plays or Pauses current
DVD, VOD or DVR media
Skip Back activates
instant replay
Rewinds media and also
jumps back to previous
day’s TV listings
Size changes
display aspect
A/V selects video
source for some TV,
DVD, VCR or home
theater systems
Fast Forward fast-forwards
media and also advances to
next day’s TV listings
Records to DVR
Skip Forward jumps
forward in recorded TV
Page 6

6
Pay-Per-View
The latest hit shows and events, such as concerts and wrestling matches, are
yours at the push of a button with your FiOS remote. To see what’s playing
and to order, press the
Menu
button on your remote and:
• Select Pay-Per-View.
• Highlight a title in Upcoming Shows.
• Press OK.
• Follow the instructions to purchase.
If you’ve pre-purchased a presentation, you can easily set a reminder so you
don’t miss a minute of it. Just go to the Main Menu and:
• Select the event through Search or with the
Guide
button.
• Select Set Reminder on the event information screen.
FiOS TV Global Search
What was the comedy with the two mismatched roommates? Or the name
of the guy who played Igor? Find that movie, show, favorite actor, play or
presentation in seconds. Simply use either the on-screen keypad, scroll wheel
or cell phone pad. Type in a keyword (or just initials, if that’s all you know). Our
Global Search will tear through TV DVR listings, HD VOD and Pay Per View*
and give you results by:
• Category (movies, children, sports, music).
• Keyword (program title, actor, topic).
• Content type (TV listings, PPV, DVR, HDTV and VOD).
* Your search may find programming to which you are not subscribed.
Favorite Channels
You can easily create and use a list of your Favorite Channels:
• Select Menu on your remote.
• Select Settings from the Main Menu.
• Select System, then Favorite Channels.
• Highlight them using the and buttons.
• Press OK to add or remove channels.
To access your favorite channels, press the button. Scroll using the
and buttons and click OK after highlighting the channel you
want to watch.
Set Flip by Favorites to only scroll through the channels you set in your
Favorites folder.
Page 7

7
To access Flip by Favorites:
• Go to Settings > Favorites > Flip by Favorites.
• Select which Favorites folder you would like to use.
After this, you will only be able to scroll through channels in that particular
Favorites folder.
Message Center
The Message Center keeps you informed about important information that
affects your TV service such as upcoming changes, new features and channel
information. If there are messages in the Message Center, the Message
Waiting icon will be flashing. To access your messages, press the Menu
button on the remote control, select Messages and then OK/Select. Here you
can save messages, go back and review or simply delete them.
Parental Controls
Want to make sure your kids watch only the programming you want them
to? No problem. Creating a PIN (Personal Identification Number) will help
you block their access to channels, ratings, programs and things you’ve
recorded, as well as their ability to purchase. Putting it in place takes just a
few minutes.
Using Your FiOS TV Remote to Learn About Parental Controls:
• Press Menu.
• Select Help.
• Select Help Videos.
• Scroll across to Settings folder.
• Select the Parental Controls Video.
To create your PIN:
• Press Menu.
• Scroll down to Settings on the Main Menu.
• Select Parental Controls.
Please note: You will need to create a PIN on each set-top box that you
would like to have Parental Controls on.
Tips:
• You can set up two separate PINs, one to block
programming, the other to block purchases for VOD,
PPV, packages or premiums.
• You can temporarily disable the blocks by using the
On/Off quick setting. Your settings will be saved.
• You can record shows/movies on your DVR set-top box
using a PIN, but you’ll need the PIN to play them back.
Page 8

8
Widgets
These handy little windows can give you up-to-the-minute information in your
area—weather, community events and more. Setting them up is easy:
• Press the button on your remote to launch the Main Menu.
• Enter your Zip Code using the remote’s buttons.
• Press OK.
• Choose the Widgets you want the first time you use them.
• Press button or button to turn the Widgets on or off.
Audible Navigation on FiOS Quantum TV
To enable Audible Navigation on FiOS Quantum from the remote:
• Select Menu button.
• Press up arrow to select Settings.
• Press right arrow three time to select System.
• Press down arrow twice to select Accessibility.
• Press right arrow to select Audible Navigation.
• Press down arrow to select On.
• Press OK button to save.
• Press Exit button.
• To turn audible navigation off, follow same steps above.
Your Remote = Digital Video Recorder
Record
Skip Back
Pause
Rewind
Stop
Play
Fast Forward
Skip Forward
DVR
Page 9

9
Frontier’s DVR Service
Digital Recording service for one to ten* rooms
Frontier offers a DVR service that can provide recording capability for 1 to 10
rooms with the capability of recording 2 to 12 shows at a time.
You can select from the following DVR services:
Frontier’s Standard DVR service with 500GB of storage can record 2 shows
at one time on a single TV.
Frontier’s Multi-Room DVR service with 500GB of storage can record 2
shows at one time and view on up to 6 additional TVs.
Frontier’s Multi-Room service has all the features of our standard DVR, but
lets you view what you’ve recorded in multiple rooms.
With the Multi-Room DVR, you can:
• Watch what you’ve recorded on up to 2 additional set-top boxes at the
same time.
• Watch the same program in up to 3 different rooms.
• Watch different live programs in 3 different rooms.
• Two set-top boxes at most can access recorded content from the
DVR at the same time. An error message will flash after 2 tries.
• Remote set-top boxes cannot pause or rewind live TV.
Step up to one of Frontier’s FiOS Quantum DVR Services and
Advanced Interactive Media Guide
Frontier’s FiOS Quantum TV Enhanced DVR service or FiOS Quantum TV
Premium DVR service act as a video services gateway, providing connectivity
to the recording and playback capabilities for all the other TVs connected to
the home network.
• Record up to 12 shows at once.
• Enjoy up to 200 hours of HD storage capacity.
• Pause, play and rewind live TV on up to 10 screens.
Frontier’s FiOS Quantum TV Enhanced DVR service with 1 TB of storage can
record up to 6 shows at one time on up to 5 TVs.
Frontier’s Premium DVR service with 2 TBs of storage can record up to 12
shows at one time on up to 10 TVs.
With Frontier Enhanced and Premium DVR services, you can:
• Pause, play, rewind and playback live TV on any connected TV.
• Have up to 200 hours of HD recording capacity.*
*200 hours of HD recording capacity, up to 12 simultaneous recordings; homes with more than 5 TVs require
additional equipment.
Page 10

10
Accessing What You’ve Recorded
It’s easy to spread the fun and entertainment around. After you’ve recorded
on your Multi-Room DVR, simply:
• Choose DVR from the Menu.
• Select a program using the arrow keys.
• Press OK.
You’ll be able to use your normal DVR playback controls (Pause, Rewind, Fast
Forward) on your remote. When you’re done watching a recorded program,
just press the button.
Multi-Room DVR Parental Controls
Parental Controls for remote set-top boxes only manage live TV viewing.
Parental Controls for watching recorded programs on remote set-top boxes
are set up on the DVR by creating a PIN. A PIN must be set up for each settop box.
Good to Remember
• Program recordings cannot be set from remote set-top boxes, only from
the DVR.
• You cannot delete content from the DVR while another set-top box is
accessing that content.
Quick Tip #1
How to reboot your router.
• Press power button or unplug the power cord to your router.
• Plug it back into the electrical outlet and wait 30 seconds.
• Always reboot your router first since it might be all that is
required to correct the problem.
Quick Tip #2
How to reboot your set-top box.
• Just unplug the power cord from the wall outlet for 30
seconds and plug it back in.
• If you still have the problem, disconnect the power
cord from your router and wait a few minutes before
reconnecting it.
Quick Tip #3
Where do I go for on-screen TV help?
• For on-screen help, look at the TV Help Videos—just press
Menu on the remote and scroll down to Help. Also check
out Channel 131 to see what’s new!
Page 11
11
Here’s How to Record Live TV
Recording TV Shows
To record a show that’s currently playing:
• Press the
REC
button on the remote.
To schedule recording of an upcoming show or series:
• Press Menu on your remote.
• Go to TV listings or use Search to find the show.
• Use the and buttons to highlight the show you want to record.
• Press
REC
and a green check will appear next to the show.
• Press
REC
a second time to record a series.
• Press
REC
a third time to cancel a scheduled recording.
Series Manager
This smart feature ensures that all the shows are recorded, even if the
show’s time slot or length is changed by the broadcaster. The folder with a
red dot on your screen tells you the Series Manager has been scheduled. It
will enable you to:
• Record only first-run episodes.
• Add extra time before and after a show.
• Permanently save a show.
• Rank the series you want to record.
Recording Pay-Per-View Programs
This is an option available on some Pay-Per-View programs. Just press
REC
when the Pay-Per-View program begins. If you’d prefer to automatically
record future Pay-Per-View shows, choose the Purchase and Record option
when you select a show. Then, enjoy it any time you’d like.
Tips:
• Your Digital Video Recorder (DVR) recording hours are
dependent on the model and definition of programming.
• Programs recorded in Hi-Def can only be played back
on High-Definition DVRs or High-Definition Set-Top Boxes.
Reviewing Scheduled Recordings
Simply press the
DVR
button on your remote or select DVR from the Main
Menu. You’ll see the list of shows you’ve scheduled to be recorded under View
Schedule. If you’ve scheduled to record a series, choose Series Manager to
view listing. As a helpful reminder, you’ll also see how much recording time
you have left.
Page 12

12
Canceling Scheduled Recordings
It’s easy to undo what you’ve done. Just:
• Select View Schedule from the DVR menu.
• Highlight the program you want to cancel.
• Press OK.
• Then press Cancel.
Playing a Recorded Show
Here’s all you have to do:
• Select Recorded Programs from the DVR menu.
• Highlight the program you want to watch.
• Press OK.
• Then press Play.
Deleting a Recorded Show
To delete, select Recorded Programs from the DVR menu. Highlight the
program you want to delete and select Remove.
Once the recording space is full, the DVR will automatically delete the oldest
shows to make room for new recordings. If there’s a show you want to be
sure isn’t deleted, select Recorded Programs from the DVR menu, highlight a
program you want to save, then select Protect.
Controlling Live TV
With FiOS TV, you can control live TV in some cool new ways:
• Pause the current channel viewed.
• Switch to another channel.
• Go back to the previous channel.
• Resume viewing the program that was previously paused.
You can continuously switch between two channels, pausing, fast-forwarding
and rewinding on both channels. FiOS TV lets you control live TV in the ways
described below.
Pausing or Resuming Live TV
Press the button once to freeze the action. Press Play to resume
the show.
Rewinding Live TV
Press the button to go back to any part of a show already stored. Then
press Play and resume watching the show. While you’re doing this, you won’t
miss a thing because the DVR will continue to store the show.
Fast-Forwarding Live TV
Press the button to skip past a previously viewed portion of a live TV
show. Then press Play to resume watching.
Page 13
13
Watching in Slow Motion
Want to see all the detail of that car chase crash? Or catch something you
missed in the background? Press then or to see the action in
slow-motion, frame by frame.
Instant Replay
Why should the sports broadcasters have all the fun? With FiOS TV, you can
do your own instant replay. Press the button to view the previous 10
seconds of a show you’re watching live or have recorded.
Resume Watching Live TV
If you’re watching a live program delayed by pausing or rewinding live
TV, press the
FiOS
TV
button and you’ll jump forward to the point in the show
currently being broadcast.
Status Bar
Whenever you pause, fast-forward or rewind a live or recorded program, this
helpful feature appears. It shows you how much of a current show is stored
in memory, what point of the show you’re watching now and how far behind
the live broadcast you are.
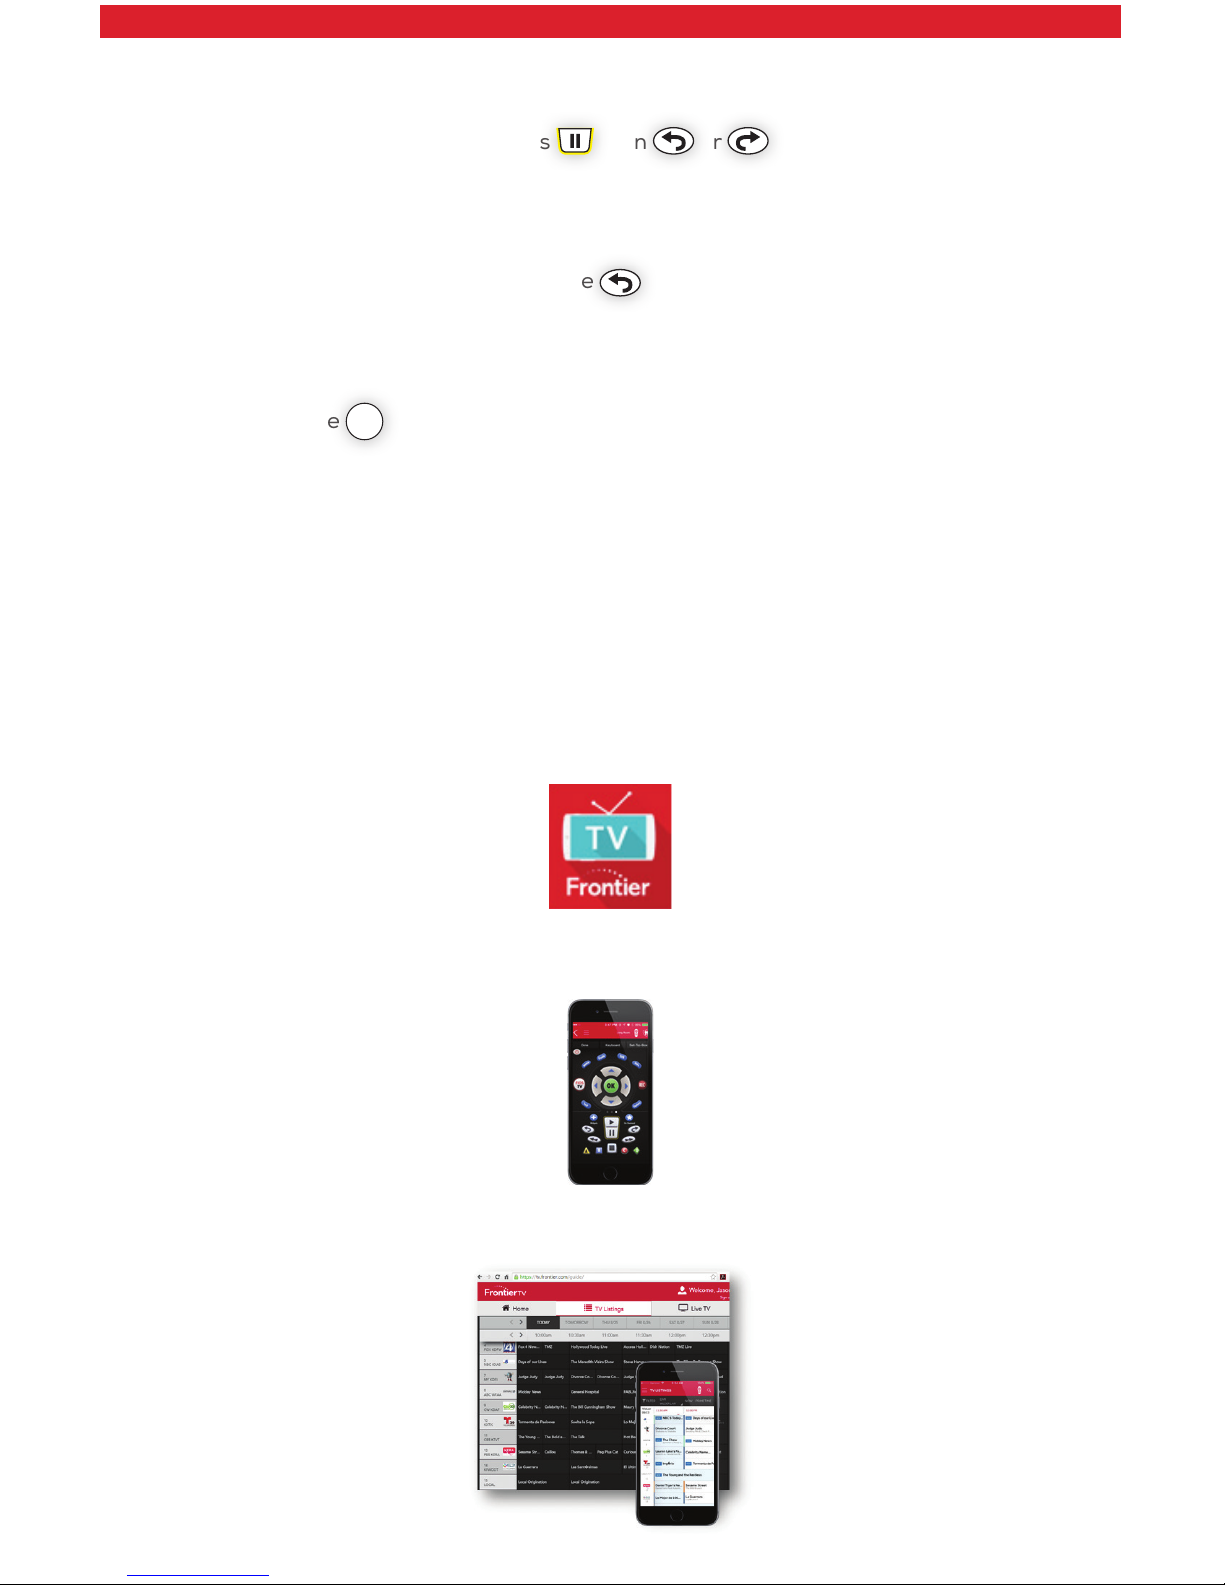
FrontierTV Mobile
FrontierTV: Control your DVR—don’t let it control you. To install FrontierTV on
your smartphone or tablet, go to the Apple App Store or the Google Play
Store and download at no charge.
With the FrontierTV app, you can set your DVR from the office, the street or
anywhere else you have Internet access or a mobile device.
Browse TV listings, record shows, search On Demand—all for free with your
DVR service.
Page 14

14
All About Video On Demand (VOD)
VOD
Customers will be able to choose from a vast library of thousands of a la carte
features and again be in complete control of their TV viewing experience with the
convenience of selecting any available program, any time they want.
As with subscription options, they will also have the ability and flexibility to pause,
resume play, fast-forward and rewind as many times as they like within a
24-hour period.
There are several categories of VOD available including:
• Free
• Premium
• Transactional
• HD
Free On Demand
Free On Demand allows customers to choose from thousands of titles and
programs, including sports, home and leisure, music, pop culture and more with
our FiOS TV library.
Frontier’s selection of Free On Demand programs and films crosses many genres
and touches all age groups and interests, including one of the largest selections of
children’s programming in the industry.
Free On Demand channels include Disney, Discovery, ESPN, Home & Garden, MTV
and many others. Available content is controlled by the network providing the content
and not Frontier.
Premium VOD
When you subscribe to FiOS TV Premium with options like HBO, Cinemax or the
Movie Package, you automatically have access to many past and present episodes
of original programming and shows. Not to mention, the hottest movie releases—any
time you want.
The Premium or Subscription On Demand options provide for even greater value and
flexibility for subscribers, at no additional cost beyond the monthly package rate.
Transactional VOD
Transactional On Demand provides for even more exciting a la carte features,
including Movies, Events and Adult Entertainment, for a minimal one-time fee.
With Movies On Demand, you can find the hottest blockbuster movies, in addition
to old favorites, at the press of a button, for a fraction of the cost of a movie ticket.
Hundreds of titles are available every month, including studio movies from Sony, Fox,
Universal, Paramount, MGM, DreamWorks, Artisan, New Line, Disney and WB.
With Event VOD, programming varies every month, offering access to special
concerts or sporting events at a designated cost. Rates will vary and are accessible
through the IMG.
Adult VOD offers adult programming and is available from several content providers.
The content varies monthly and each selection has a designated cost.
Rates vary and are accessible through the IMG. Mature content can be blocked
if desired.
Please note that all rates quoted are subject to change.
HD VOD
FiOS TV now brings together the best of both worlds by joining two exciting
entertainment options—High Definition and Video On Demand.
With FiOS TV, customers have the ability to get many of their favorite titles, offered
with crystal-clear picture and sound quality that is unparalleled.
Page 15

15
Frequently Asked Questions
There is no display on my TV. What can I do?
• Check to make sure your TV and set-top box are powered on. Make sure
your TV has proper input settings (e.g., HDMI 1, Video 1 or channel 3 or 4).
• Your installation technician determined the proper input or channel your
TV should be tuned to when the service was installed; if those settings
were changed, they must be restored.
• After you have verified you are on the correct input settings on your
TV, check the cable from your STB to your TV—make sure it’s plugged in
correctly and that it’s securely fastened.
• Make sure that your batteries are charged.
I am seeing a blue screen. How can I remedy this?
Change your DVD or VCR’s channel to 3 or 4. If changing the DVD or VCR’s
channel did not change your TV screen, make sure the TV is not in Video
mode. Try one of the following to correct:
• Press the Input button.
• Scroll through the options and select TV.
• Press the Video button to change your TV’s mode from Video to TV.
• Or press the Menu button and locate the mode for Audio/Video setup and
select the TV option.
• Make sure that your remote control batteries are charged.
My remote is not working. What may be causing this?
Your remote needs a clear visual path to the sensor on the home
entertainment equipment you are trying to operate. Make sure:
• There are no obstacles between you and the remote.
• You are trying to use the remote from within 25 feet of the device.
• You are pointing the device directly at the sensor on your
entertainment device.
• That your remote control batteries are charged.
What if I can’t power on and off from my TV and set-top box using the
remote after I have programmed it?
It may be because either your TV or set-top box isn’t receiving the infrared
signal from the remote.
Page 16

16
How can I program the button to turn on both the TV and STB?
Your remote has separate power buttons for the TV and STB. You can
program the key to turn on/off both your TV and STB at the same time.
1. Turn both your TV and STB on.
2. Press and hold the OK and buttons together, then release both.
• The RED LED will blink twice and then stay on.
3. Press 9 – 7 – 7.
• The RED LED will blink twice and remain on.
4. Press .
• The RED LED will blink three times and then turn off.
5. Test that the button now turns on the TV and STB at the same time.
6.
If you want to reset the remote so that the button controls only the
STB, follow the same steps as above but press OK in Step 4.
What if the Power button on the remote doesn’t always turn my TV on
and off?
Try the following steps:
• Make sure the TV and set-top box are near each other.
• Make sure nothing is blocking the front of either device.
• If your TV is plugged into the power outlet on the back of the set-top box,
try plugging your TV directly into a wall outlet.
• Press the button to control the TV alone.
Control TV Volume through STB
If the volume control keys don’t work with your TV, you can program the
remote so that the STB will control the volume.
1. Press and hold the and OK buttons together, then release both.
• The RED LED will blink twice and then stay on.
2. Press 9 – 5 – 5.
3. The RED LED light will blink twice and remain on.
4. Press .
5. The RED LED will blink three times and then turn off.
6. If you want to change it back again so that volume buttons control the TV,
follow the same steps as above but press in Step 5.
Page 17

17
Key Fix
If your remote control is programmed for your TV, but the , or the
keys do not work correctly, then you can try using the Key Fix feature to fix
the buttons.
1. Press and hold the and OK buttons simultaneously.
• The RED LED will blink twice and then stay on.
2. Press and hold the key that does not work correctly. The remote control
will try a new code every second.
3. Once the TV responds correctly, release the button.
4. Press OK to save the current settings and finish programming your
remote control.
Reset the Remote Control Original Settings
1. Press and hold the and OK buttons together, and release.
2. The RED LED will blink twice and then stay on.
3. Press 9 – 0 – 0.
4. The RED LED will blink three times and then turn off to indicate original
settings are restored.
5. CAUTION, all previous programming in the remote control will be lost if
you follow this procedure.
What if I see the message “Press MENU to watch FiOS TV?”
• This means that your TV is on and your STB is off.
• You can either power off the TV individually or press MENU on the remote
to turn the STB back on.
• When MENU is pressed, if the set-top box does not turn on, press STB on
the remote, then press MENU.
I don’t see any Guide information or I’m unable to access Video On Demand.
What should I do?
• Make sure your router is powered on.
• If your router is on and you still don’t see the Guide, try rebooting your
router. See Quick Tip #1 on Page 9.
Help! Just press Menu on the remote and scroll down to Help for further
assistance with any features of the remote.
Page 18

18
Welcome to FiOS Internet
Home Network Connections
As part of your FiOS service, you received a router. Your router lets you
create a home network, so that multiple devices can be online at the same
time. This can be done on either a wired or a wireless connection. Before
connecting any device, confirm your router is plugged in, powered on and all
cables are firmly connected.
Adding a device to a wireless network:
1. Connect your device using your Wi-Fi Settings. On a computer, this
can be typically found with a stacking bar icon in the lower right
corner of your screen that will take you to the Network and Sharing
Center. On a wireless phone or tablet, this is usually found under
Settings > Wi-Fi.
2. Select your wireless network. The name of your wireless network is the
five-digit ESSID located on the back or side of your router.
3. Enter your password. Your password (unless you have changed it
to something else) is your WPA2 KEY or WEP KEY, also located on
your router.
4. On a computer, you will see connected next to the stacking bars and on a
wireless phone, your 3G or LTE symbol will change to a Wi-Fi symbol
to indicate you are connected to your wireless network.
Adding an additional computer to a wired network:
1. Connect one end of an Ethernet cable (an Ethernet cable looks similar to
a regular phone jack, but is slightly larger) to the back of your computer
and the other end to the Yellow port on the back of your router (tip—
make sure it’s in the Yellow port).
2. Once connected, wait 60 seconds—now you’re ready to open up your
Internet connection.
Page 19

19
Support
Need Help?
You can always find help by visiting www.Frontier.com/helpcenter.
Quick Tip #1
How to reboot your router.
• Unplug the power cord to your router.
• Plug it back into the electrical outlet and wait
30 seconds.
• Always reboot your router first since it might be all
that is required to correct the problem.
Quick Tip #2
How to factory reset your router.
If rebooting your router did not fix the issues, you can
try a factory reset.
Note: Any settings you may have changed to the router will be lost.
• Hold down the Reset button on the back of the
router for approximately three to five seconds.
• You will see the lights on the router flicker.
• Once the lights come back to normal, try to access
the Internet as you usually would.
Page 20

20
Frequently Asked Questions
My computer occasionally loses its connection to the Internet.
How can I fix it?
• Check the coaxial or Ethernet connections between your computer
and router.
• Check the connections between your router and wall jack.
• Make sure your router power cord is properly plugged in.
• Disconnect your power cord, wait a few minutes, then plug it in again.
• If you have a wireless connection, make sure there is no interference
(2.4 GHz phones, microwaves, fluorescent lights) between your computer
and router.
• Try moving your computer closer to the router for a stronger signal.
• If none of this restores your connection, please contact our help desk.
I forgot my Frontier Online username and password. What should I do?
For your protection, Frontier requires that you contact us directly for
assistance in obtaining this information so we may verify your identity.
Please call 1.877.462.0488 so we may assist you.
My service seems slow. What can I do?
• Clear your temporary Internet files by clearing the cache on your browser.
Here’s how to do it for Microsoft Internet Explorer:
1. Select Tools.
2. Select Internet Options, Delete Files, click OK in the Delete Files box.
3. Click OK to close the Internet Options window.
• Reboot your computer. You can do this by unplugging its power cord for a
few minutes and then plugging it in again.
• Make sure your anti-virus software is running and that it has the most
recent updates.
Page 21

21
How can I optimize my wireless home network?
Does your Wi-Fi ever seem slow? Your router uses radio waves called Wi-Fi
to connect your devices to the Internet and there are a number of factors
that can impact performance including age of your computer or device, the
number of devices connected, the distance from your router and household
items that may cause interference. Here are some tips that may help.
• Place your wireless router at least 10 feet from other items that use
radio waves such as cordless phones, baby monitors, refrigerators and
microwaves to avoid potential interference.
• Place the wireless router as high as possible and to the center of
your home.
• Keep the wireless router away from any large metal objects, as these will
hinder its range.
• Turn off or disconnect devices from your Wi-Fi network that are not in use.
• Just like cell phones and TVs, routers have improved over time. If you
have had your current router for longer than three years, you may want
to consider upgrading to a newer router. Newer routers are better with
overcoming interference than older ones.
• If you are experiencing dead spots or limited range, you may want to
consider adding a wireless bridge or extender to create a larger,
stronger network.
• Contact us to discuss router and extender options.
Page 22

22
Welcome to FiOS Equipment
FiOS Equipment
Optical Network Terminal (ONT)
Think of this as a kind of electronic translator. FiOS sends signals over our
state-of-the-art network using laser-generated pulses of light. The ONT,
installed either outside or inside your home, converts those pulses into
electric signals.
ONT Power Supply Unit (OPSU)
This unit connects the ONT directly to a grounded electrical outlet in your
home or garage. The OPSU’s green indicator light tells you it’s receiving
power. Make sure it’s plugged in at all times and that the green light is on.
The ONT requires very little power to operate. In fact, it’s as little as what it
would take to operate a couple of night lights.
Battery Backup Unit (BBU)
In case the OPSU is accidentally unplugged, or there’s a commercial power
failure, the BBU is here to help. Depending on the type of ONT installed, your
ONT may have an internal Sealed Lead Acid battery or an external optional
PowerReserve battery backup device. It will give you power for voice service
(not Internet or TV) for up to eight hours (or approximately 20-hour battery
backup time if the PowerReserve is used). It’s installed in a location in your
home or garage where you can easily monitor it. Its audible alarms and
indicator lights tell you whether your service is being powered by your home’s
electricity or the battery.
Good to remember:
• When your BBU needs to be replaced, you can purchase a battery
at most major electronic outlets and home-improvement stores or by
calling Frontier.
Note: If you have the Frontier supplied Sealed Lead Acid battery, it is designed specifically for use with
the FiOS Network. Use of a battery other than a 12-Volt 7.2 Ah SLA Sealed Lead Acid battery is not
recommended since other battery types may impact the performance of your FiOS services. Frontier is
not responsible for damages that result from use of an improper battery.
• Batteries need to be disposed of properly. Visit www.epa.gov/osw or call
the EPA at 1.202.272.0167 for instructions.
Battery Backup (BBU) Audible Alarms
If there’s a problem with your BBU, an alarm will sound intermittently for a
predefined interval. This will be repeated until you press the Alarm Silence
button. Once you do, be sure to check the lights on the BBU to find the issue.
On the next page are two of the most common reasons for the alarm to
sound—and how you’ll know:
Page 23

23
Low Battery—the alarm is silenced after electrical power returns, or when
the battery is fully discharged or removed from the BBU.
Replace Battery—the alarm is silenced when the battery is removed.
FiOS Router
This unit enables more than one device in your home to be online at the same
time. It’s been designed specifically to work with the FiOS network. Using
routers not supplied by Frontier may impact the performance of your FiOS
services.
Your router comes with diagnostic software that can help you troubleshoot
and correct problems with your FiOS service.
Page 24

24
FiOS Digital Voice
Advanced Calling Features and Voicemail
Your new FiOS Digital Voice service comes with many easy-to-use features
that can be managed by phone, via the Internet, from your mobile device or
from your FiOS TV. You can turn on features like Call Forwarding and Do Not
Disturb, set up voicemail notification by email or text message, listen to your
voicemail messages and review call logs. You can sign up with the Nomorobo
service to block unwanted, robocalls. It’s free at www.nomorobo.com/signup.
To get started, review the following information to get an idea of all the new
and exciting features of your FiOS Digital Voice service. Detailed information
about FiOS Digital Voice is in the Digital User Guide at www.frontier.com. Set
up your voicemail, then check out your FiOS Digital Voice Web Portal at www.
frontier.com from any Internet connection. Log in using your Frontier Online
username and password. If you don’t have a Frontier Online logon, you’ll be
able to create a new one.
Important 911 Information
As a reminder, your FiOS Digital Voice requires electrical power to function.
In the event of a power outage, you will not be able to make or receive calls,
including calls to 911, unless you have a functioning backup battery or an
alternative means, such as a cellphone. In the case of an electrical outage, the
optional Battery Backup Unit (BBU) will power your basic FiOS Digital Voice
services, including 911 dialing, for a minimum of eight hours if a fully charged
battery is inserted in the unit. In the welcome kit provided by the technician
during installation, you will find stickers with this information. We strongly
recommend you apply them to your phones so all users are aware of this
possible limitation.
Out-of-Service Backup Phone Number
FiOS Digital Voice allows you to choose a number where your calls can be
forwarded in the case of an outage (e.g., a network-wide outage in your area
or you’ve lost power and do not have battery backup). Once service has been
restored, the forwarding will automatically be stopped. Backup numbers can
be set up using your FiOS Digital Voice Web Portal under Account Settings.
FiOS Digital Voice Features Management
You can manage your features anywhere, anytime! Experience a whole new
level of control over your voice communications from your computer, FiOS TV
or mobile device.
• To turn on Do Not Disturb while you watch Video On Demand on FiOS, use
your set-top box remote control.
• To share the voicemail, you can forward a message as an
email attachment.
• Turn on/off Call Forwarding or Simultaneous Ring using your
smartphone or tablet.
Page 25
25
From the Web
You can access your Web Portal from any computer with a broadband
Internet connection that meets the following system requirements:
• Internet Explorer 11 (or higher), or a recent version of the Chrome, Firefox
or Safari browsers.
Go to www.frontier.com. Log in with your Frontier online username and
password. If you have not yet established a username and password or have
forgotten it, simply click on the appropriate link to get started.
Once you have logged in, you can access and control your Call Log, Voicemail,
Calling Features and more:
• View the Call Log (Call Back using your FiOS Digital Voice line,
Block, Delete).
• View Voicemail Inbox (Play messages, Call Back using your FiOS Digital
Voice line, Block, Delete).
• Call Forwarding (Turn On/Off and change settings).
• Do Not Disturb (Turn On/Off and change settings).
• Simultaneous Ring (Turn On/Off and change settings).
• Call Block (Turn On/Off and change settings).
• Search for Businesses using Frontier Pages.
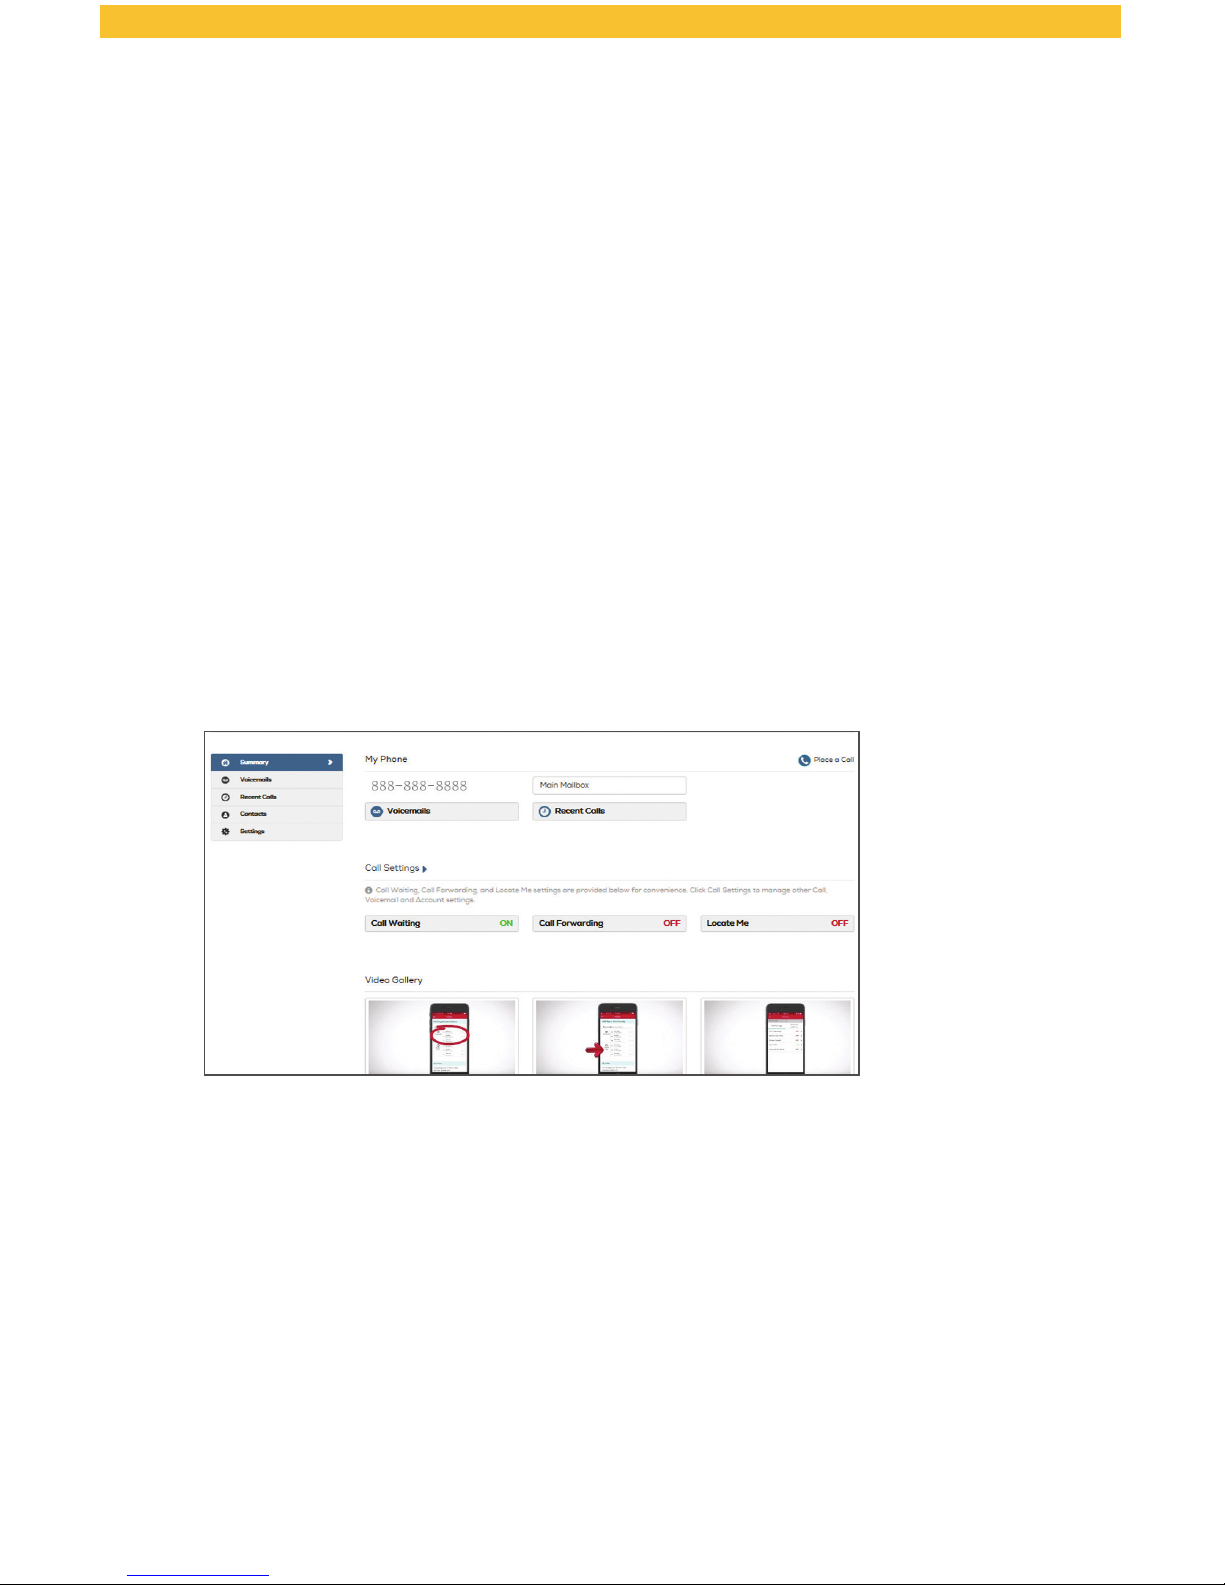
FiOS Digital Voice Web Portal Summary Page
Page 26
26
From Your FiOS TV
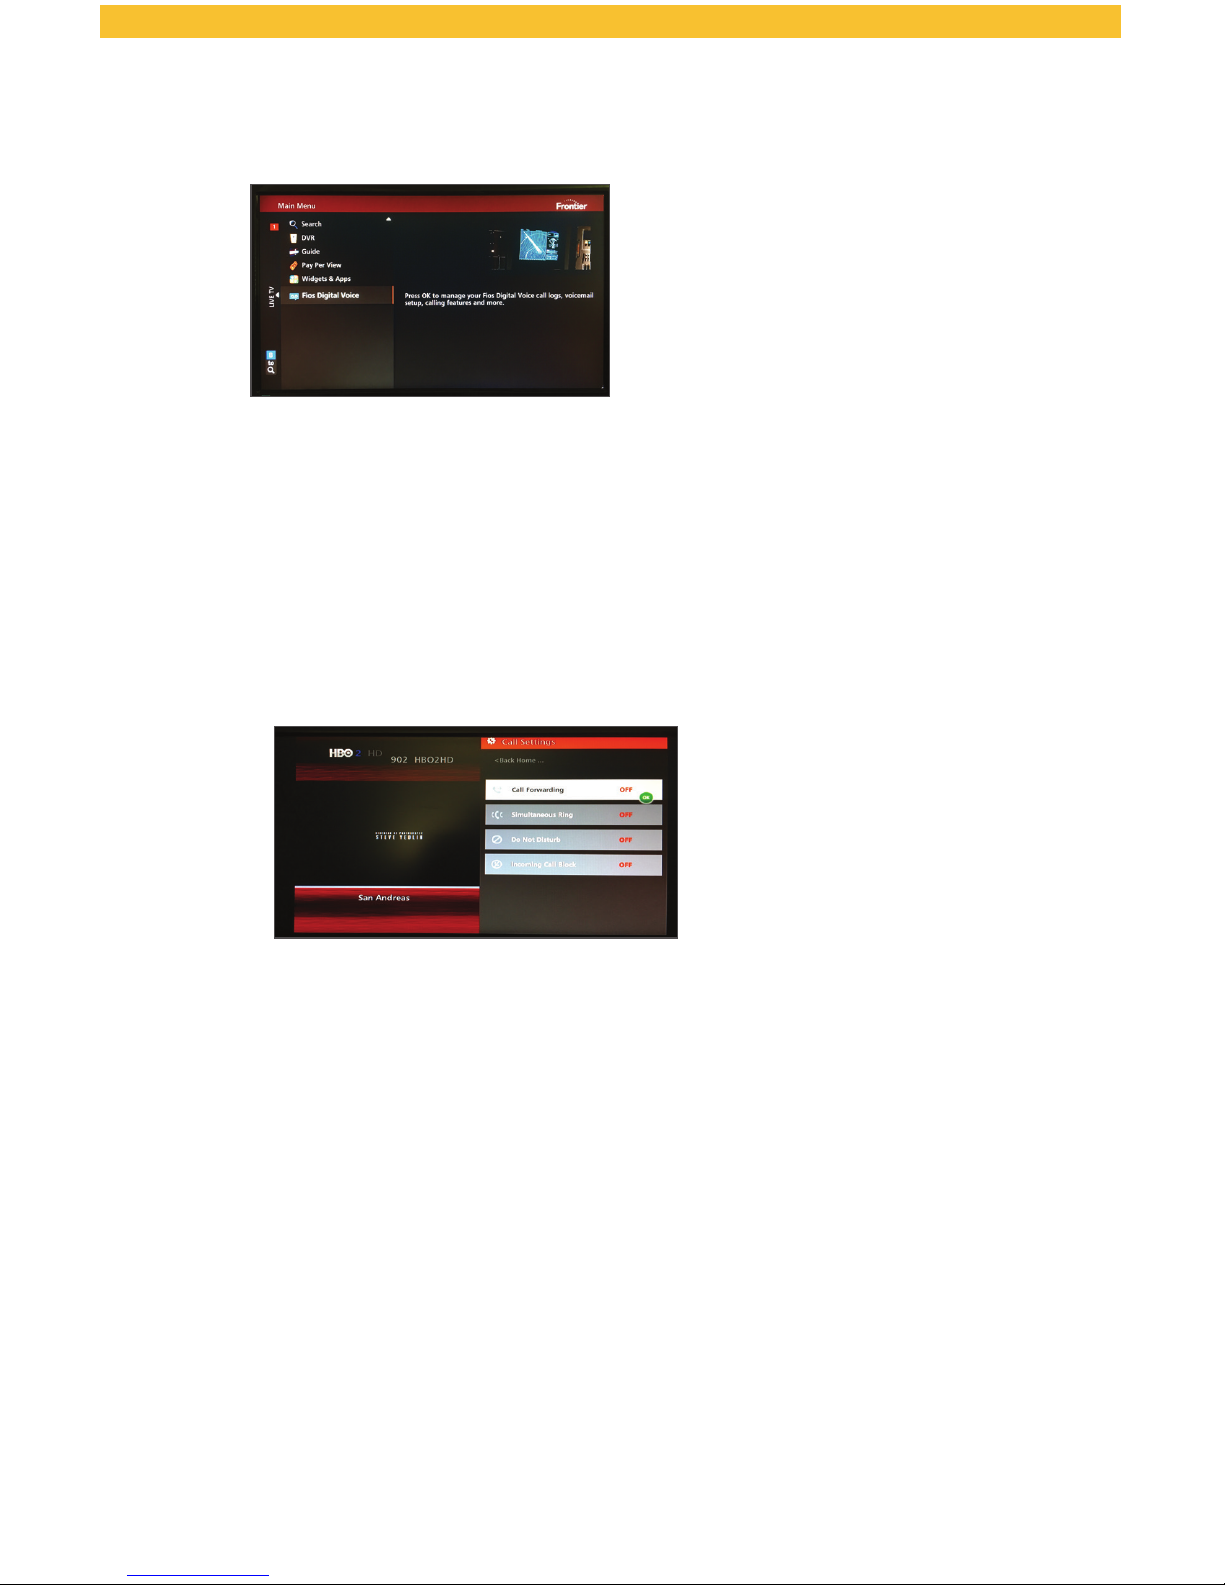
To access your FiOS Digital Voice account on your FiOS TV:
1. From the Main Menu, go to FiOS Digital Voice.
2. You’re ready to access your Call Logs, Voicemail and some Calling
Features using your set-top box remote control.
• Enable Caller ID on your TV.
• View the Call Log (Call Back using your FiOS Digital Voice line,
Block, Delete).
• View Voicemail Inbox (Play messages, Call Back using your FiOS Digital
Voice line, Block, Delete).
• Call Forwarding (Turn On/Off and change settings).
• Simultaneous Ring (Turn On/Off and change settings).
• Do Not Disturb (Turn On/Off and change settings).
• Incoming Call Block (Turn On/Off and change settings).
Page 27
27
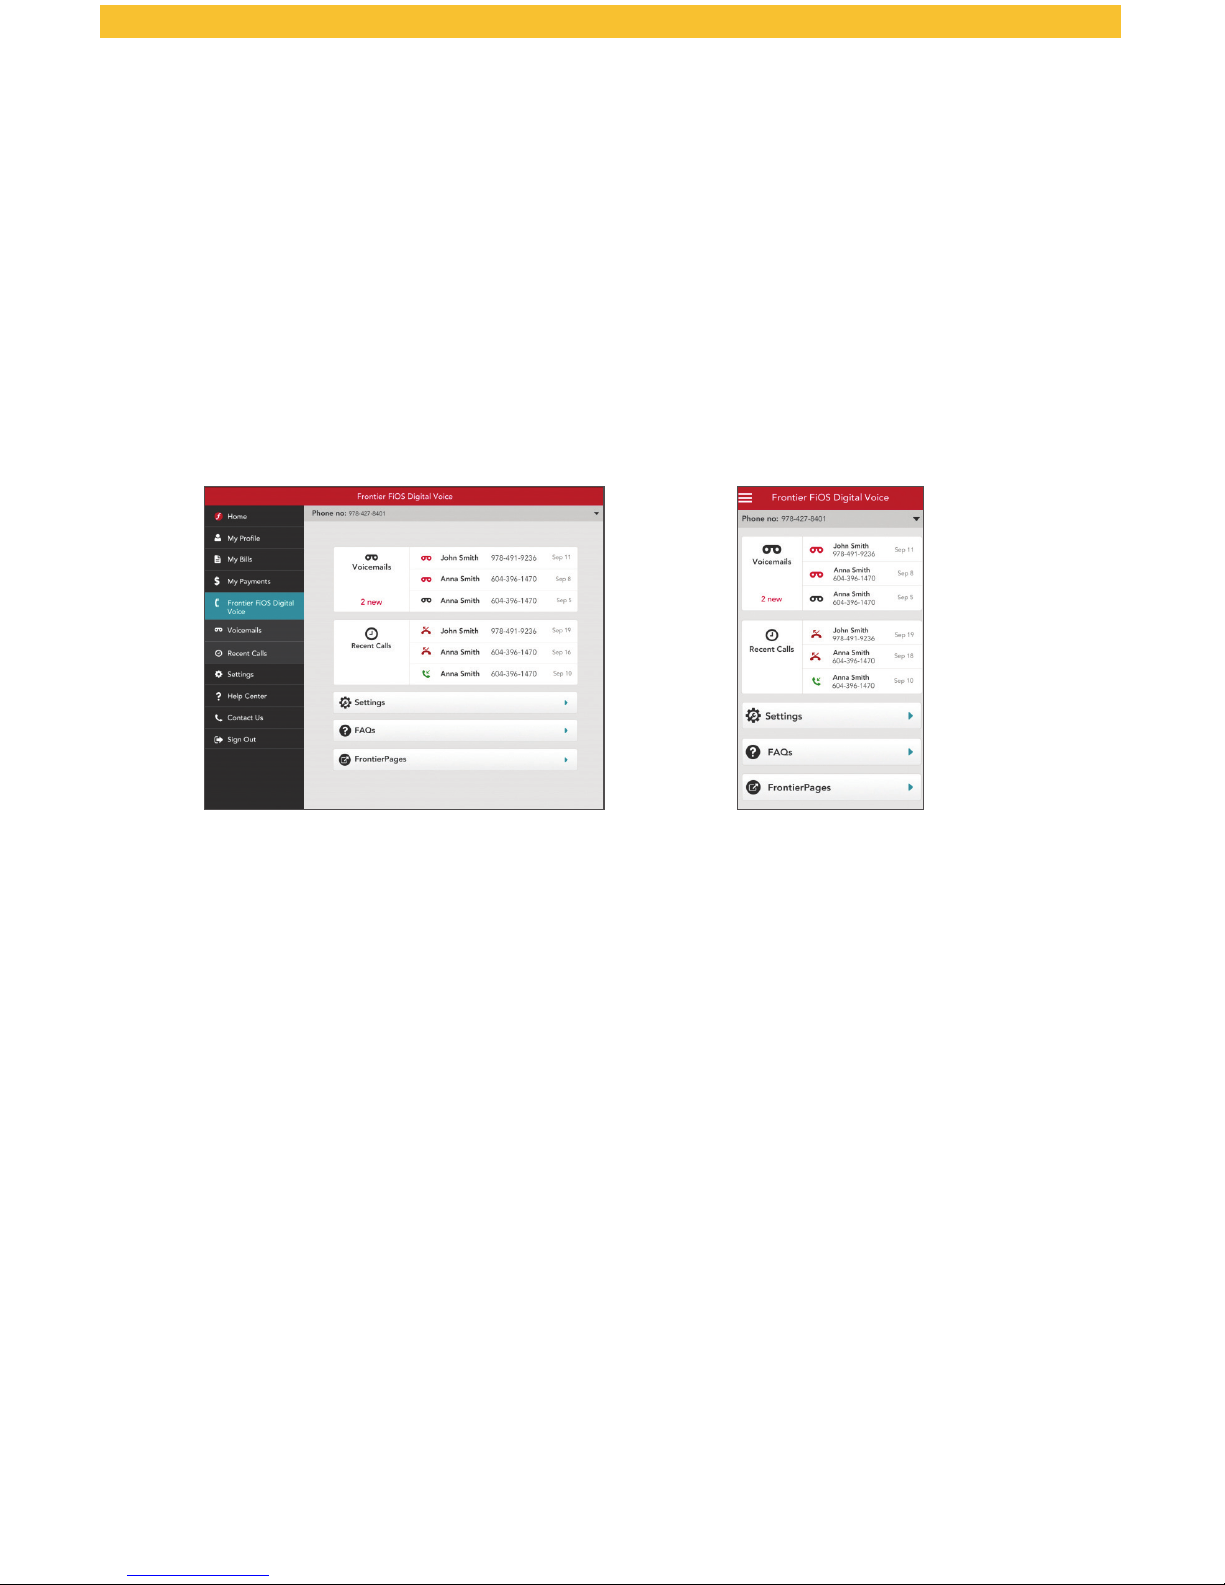
From Your Smartphone or Tablet
If you have an Android or iOS smartphone or tablet, you can download the
MyFrontier app through your app store. With the app, you can access the
following features:
• View the Call Log (Call/Text Back using your mobile service carrier,
Block, Delete).
• View Voicemail Inbox (Play messages, Call/Text Back using your mobile
service carrier, Block, Delete).
• Call Forwarding (Turn On/Off and change settings).
• Do Not Disturb (Turn On/Off and change settings).
• Simultaneous Ring (Turn On/Off and change settings).
• Incoming Call Block (Turn On/Off and change settings).
Smartphone Tablet
Page 28
28
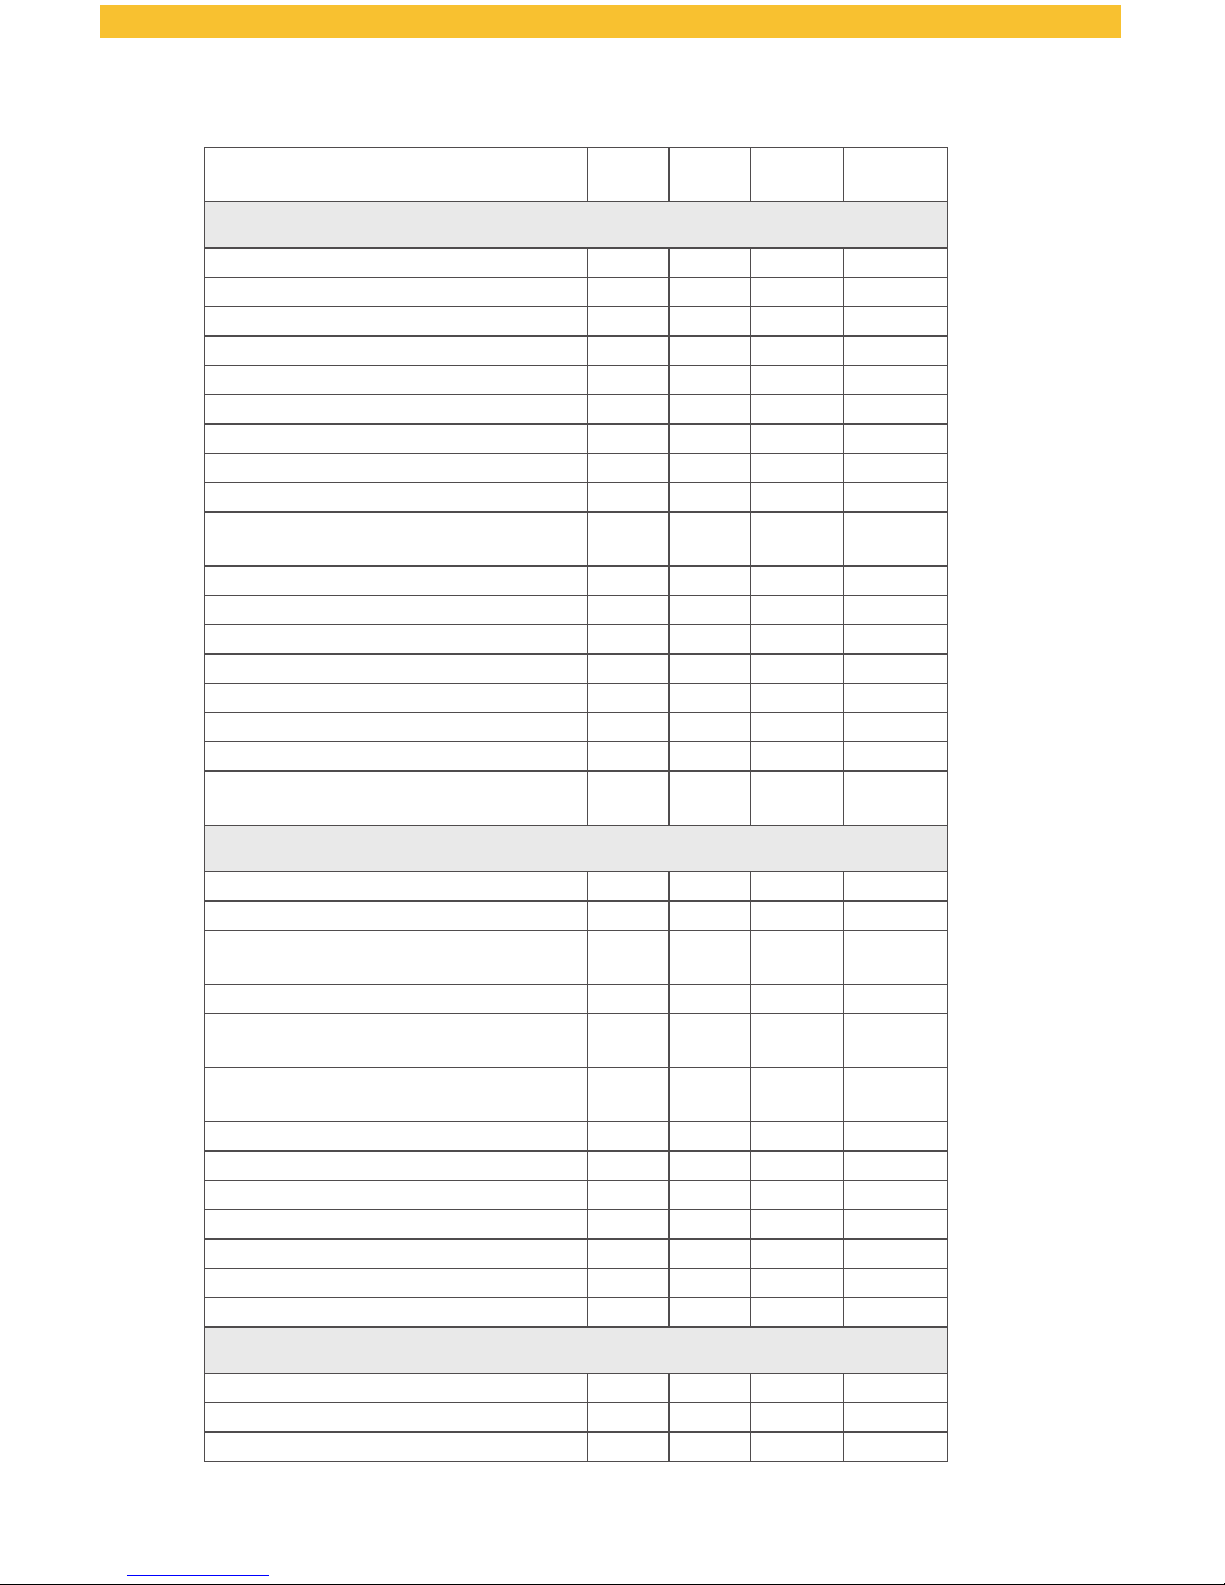
Feature Access Summary
Feature Phone
Web
Portal
Mobile
Devices
TV SetTop Box
Calling Features
Call Forwarding X X X X
Call Logs X X X
Call Notification X
Call Return/Call Back X X X* X
Call Trace X
Call Waiting X X
Caller ID X
Caller ID Block X X X
Do Not Disturb X X X X
Incoming Call Block/
Anonymous Call Rejection
X X X X
International Call Block X
International Calling Rates X
Locate Me X X
Simultaneous Ring X X X
Speed Dial X
Text Back X*
Three-Way Calling X
Virtual Telephone Numbers
with Distinctive Ring
X
Voicemail Features
Autoplay X
Caller Invitation X
Envelope Information (time stamp
before each message)
X X
Greetings X X
Language Options (English/Spanish,
Gender, Quick/Full Prompts)
X X
Notification Options (MWI, Special
Delivery, Email, SMS Text, Pager)
X X X
Passcode X X X
Retrieve Messages X X X X
Ring Count X X
Send Messages X
Set Up Main and Individual Mailboxes X
Sort Order of Messages X
Voicemail Screening X
Other Service Features
FrontierPages Business Search X X
Time Zone X
Wake Up Call/Reminder Message X
*Uses your mobile service carrier for outgoing calls and text messages.
Page 29
29
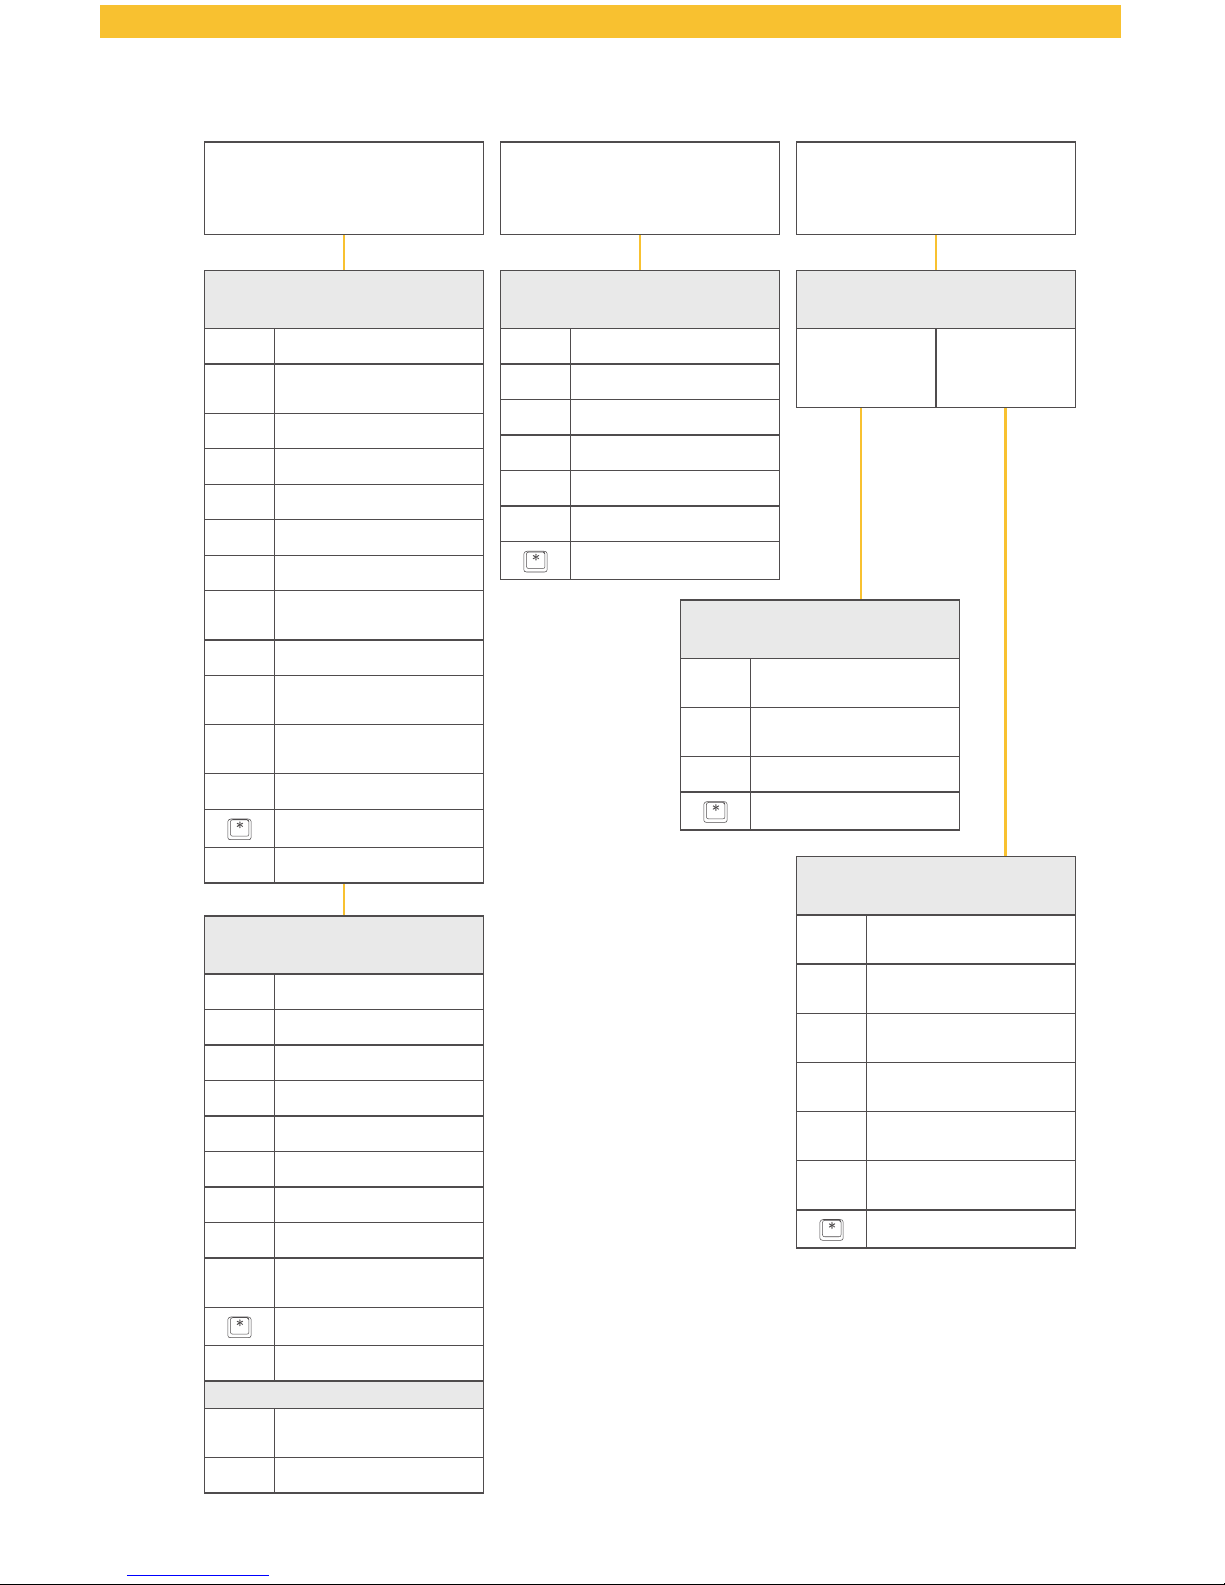
Voicemail Telephone Menu Maps
Message Play
(During Playback)
1
Play Again
2
Save (n/a for expired
messages)
3
Delete
4
Slower
5
Louder
6
Faster
7
Rewind Five Seconds
77
Rewind to the
Beginning of Message
8
Pause
9
Fast Forward Five
Seconds
99
Fast Forward to End
of Message
0
Softer
Exit Messaging
#
Next Message
Post Playback
(Function) Menu
1
Play Again
2
Save
3
Delete
4
Reply to Sender
5
Forward Message
6
Date, Time and Sender
7
Mark as New
8
Return Call
9
Renew (Expired
Message Only)
Exit Messaging
0
Replay Menu
If Last Message Played:
1
Save Deleted
Message
2
Main Menu
Post Record
#
Send
1
Mark Private
2
Future Delivery
3
Return Receipt
4
Mark Urgent
5
Hear Message
Record
Reminder Message Menu
1
Schedule One-Time
Reminder
2
Schedule Daily
Reminder
3
Schedule Weekday
Reminder
4
Schedule Weekend
Reminder
5
Schedule Reminder
of Specific Day
6
Review Reminder
Messages
Previous Menu
Wake Up Menu
1
Schedule Weekday
Wake Up Call
2
Schedule Weekend
Wake Up Call
3
Review Wake Up Call
Previous Menu
Reminder and Wake Up
1
Schedule
Wake Up
2
Schedule
Reminder
1
Listen to Message
2
Send Message to
Another Subscriber
3
Wake Up and
Reminder Messages
Page 30
30
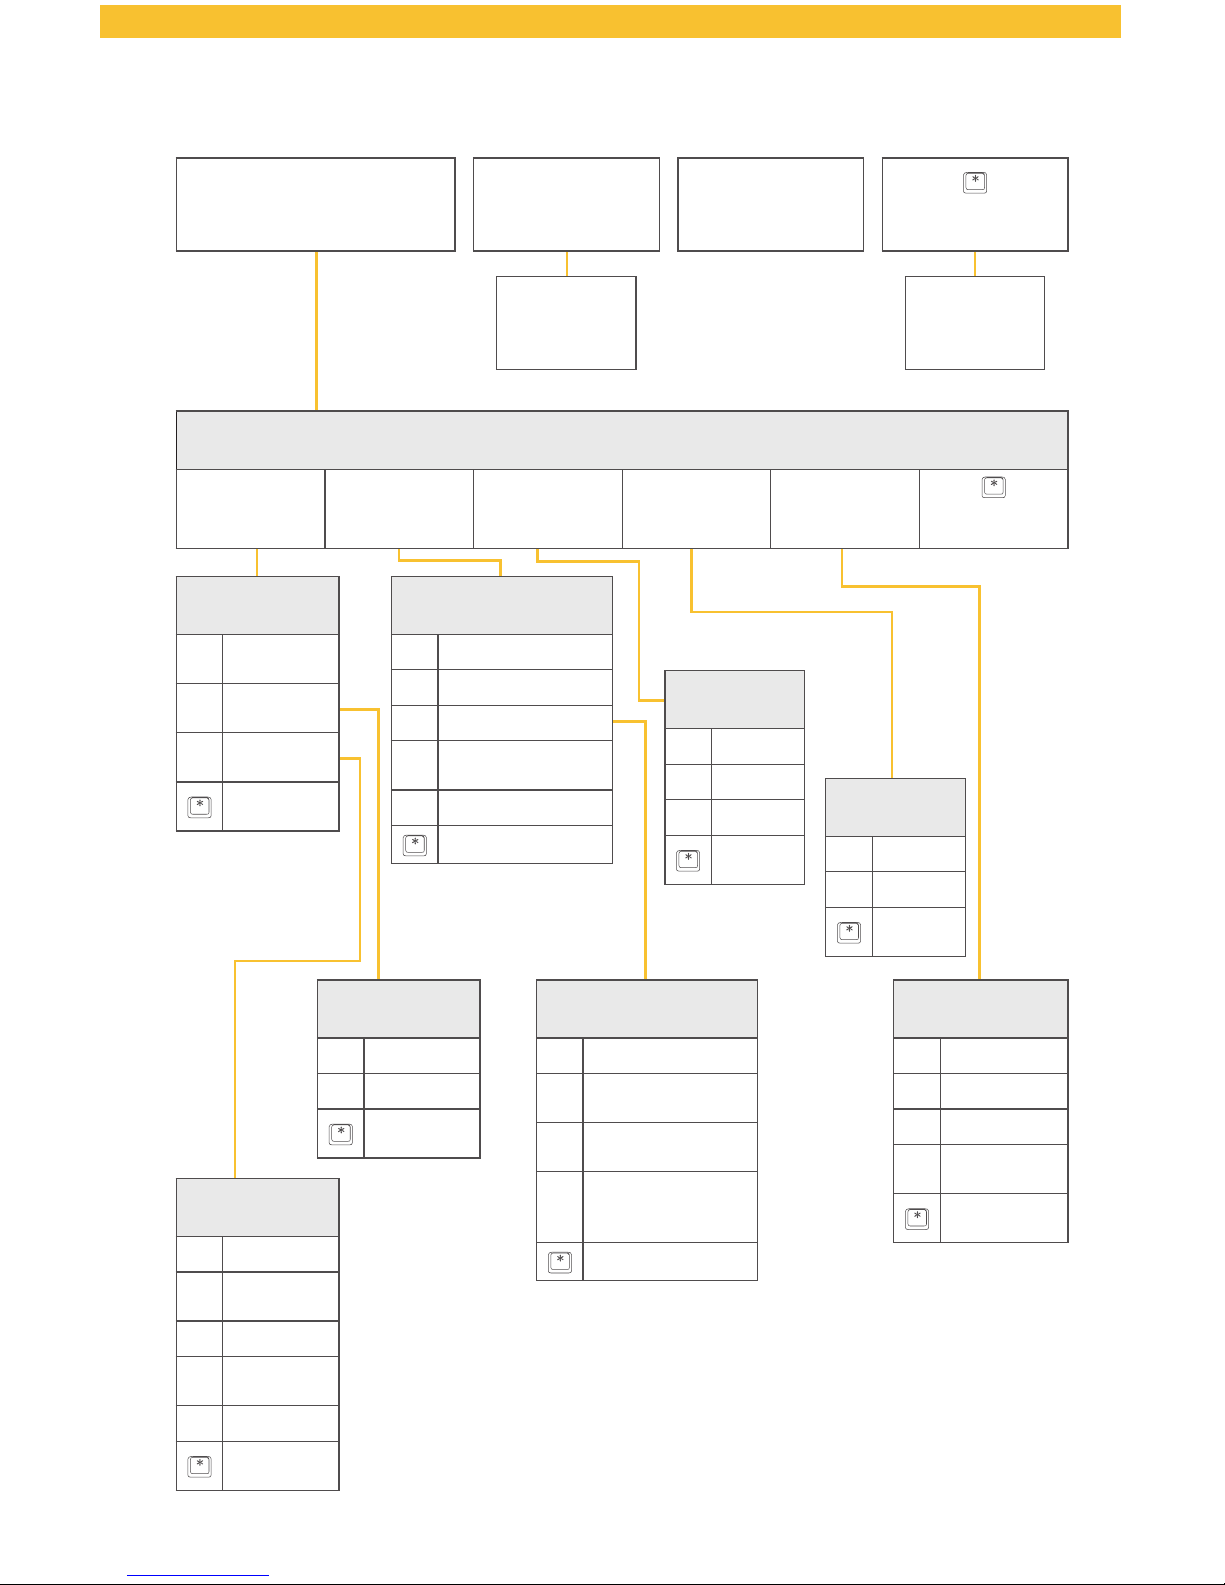
Voicemail Telephone Menu Maps
(Continued)
Personal Options
1
Personal
Profile
2
Greetings
3
Group Lists
4
Individual
Mailbox
5
Message
Preferences
Previous
Menu
4
Personal Options
6
Direct Sub-Mailbox
Transfer
Log in to
Another
Member’s
Sub-mailbox
Log in to
Another
Member’s
Mailbox
0
Global MENU HELP
(On All Menus)
Access Another
Mailbox (Not Voiced)
Personal Profile
1
Change
Passcode
2
Change
Language
3
Notification
Options
Previous
Menu
Greetings
1
Name Recording
2
Busy Greeting
3
Personal Greeting
4
Extended
Absence Greeting
5
Caller Invitation
Previous Menu
Group Lists
1
Create
2
Change
3
Delete
Previous
Menu
Individual
Inbox
1
Create
2
Delete
Previous
Menu
Personal Greeting
Select
1
Personal Greeting
2
System Greeting
“Name”
3
System Greeting
“Number”
4
System Greeting
“W/O Number or
Name”
Previous Menu
Message
Preferences
1
Envelope
2
Autoplay
3
Sort Order
4
Hear Caller’s
Number
Previous
Menu
Language Select
1
English
2
Spanish
Previous
Menu
Notification
Option
1
MWI
2
Special
Delivery
3
Email
4
Wireless
(SMS)
5
Pager
Previous
Menu
Page 31
31
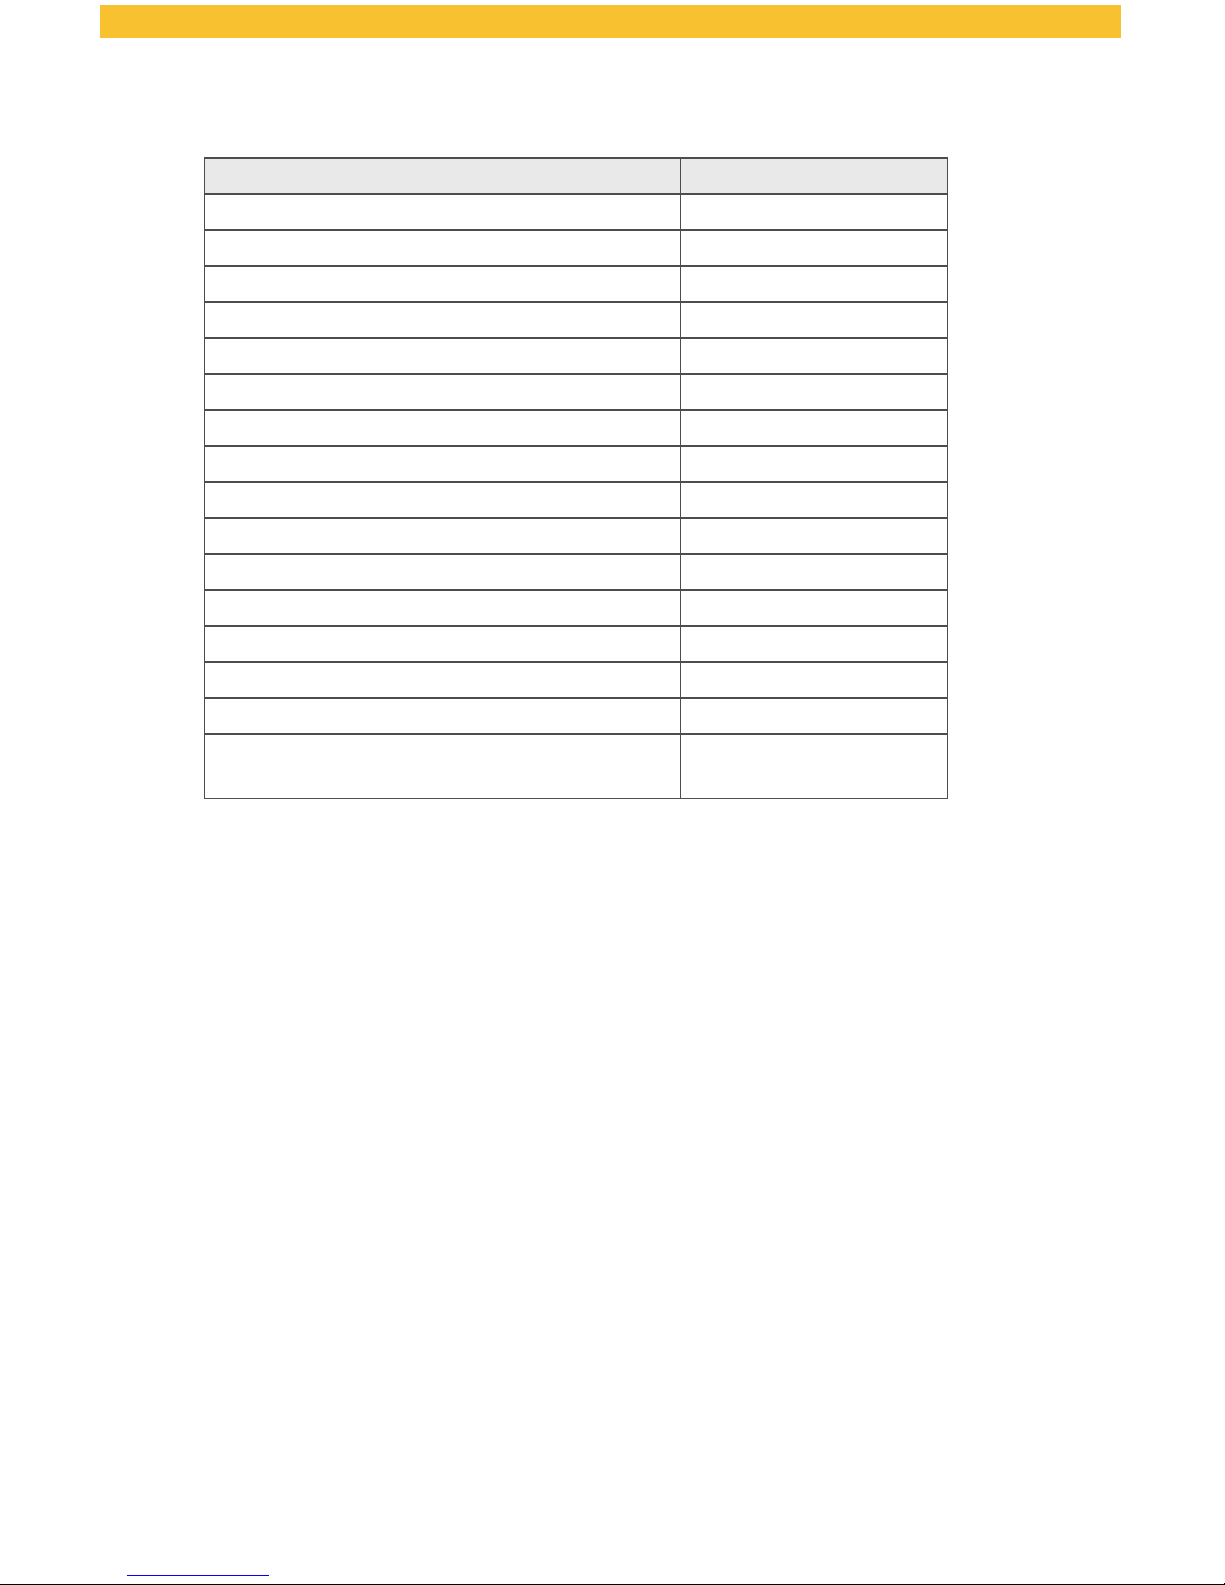
Calling Features—Telephone Star Codes
FiOS Digital Voice Feature Telephone Access Code
Anonymous Call Reject—Activate *77
Anonymous Call Reject—Disable *87
Call Forwarding—Activate *72
Call Forwarding—Disable *73
Call Return *69
Call Trace *57
Call Waiting—Activate *4 3
Call Waiting—Disable *4 4
Call Waiting—Disable per Call Activate *70
Do Not Disturb—Activate *78
Do Not Disturb—Disable *79
Outgoing Caller ID—Allow Per Call Activate *82
Outgoing Caller ID Block—Activate *3 1
Outgoing Caller ID Block—Disable *32
Outgoing Caller ID—Block Per Call Activate *6 7
Speed Dial 100 program—to use, dial # +
two-digit speed dial code
*75
Page 32

32
©2016 Frontier Communications Corporation. All Rights Reserved.
The FiOS marks are owned by Verizon Trademark Services LLC and used under license.
Contact Information
HELP BY PHONE
FiOS Repair/Support 1.877.600.1511
Customer Service/Billing 1.800.921.8101
Frontier Secure Support 1.888.620.3663
HELP ONLINE
Go to http://frontier.com/helpcenter to access
the following information:
• Account and Billing
• Using Your Email
• Calling Features
• Troubleshooting
03352_FiOS_UG_IOW_1116_O
 Loading...