

Page 1

Fronius prints on elemental chlorine free paper (ECF) sourced from certified sustainable forests (FSC).
/ Perfect Charging / Perfect Welding / Solar Energy
MagicCleaner 300
Operating instructions
EN-US
42,0426,0396,EA 002-20012022
Page 2

Page 3

Table of contents
Safety Instructions 5
Explanation of Safety Instructions 5
General 5
Intended use 5
Environmental conditions 6
Obligations of the Operating Company 6
Obligations of Personnel 6
Personal protection and protection of others 6
Notes on the correct handling of the cleaning and Print electrolytes 8
Risks from grid current and cleaning current 9
EMC measures 9
Particular hazard areas 10
Safety measures at the setup location and during transport 10
Safety measures in normal operation 11
Commissioning, maintenance and repair 11
Safety inspection 11
Safety Symbols 11
Copyright 12
General information 13
General information 15
Device concept 15
Intended use 15
Transport information 15
Setup regulations 16
Warning notices on the device 16
Scope of Supply and Options 17
Scope of supply 17
Options for the blow-off torch 19
Options for the small cleaning torch 20
Print set 22
EN-US
Operating controls, connections and mechanical components 23
Operating controls, connections and mechanical components 25
Safety 25
Controls, connections, and mechanical components - front, blow-off torch, and rear 25
Controls, connections, and mechanical components - small cleaning torch 26
Control Panel 27
Control panel 27
Before commissioning 29
Safety Instructions for commissioning, operation, and maintenance 31
Read and follow the Safety Instructions! 31
Safety Instructions for commissioning, operation, and maintenance 31
Preparing the workstation 34
Preparing the workstation 34
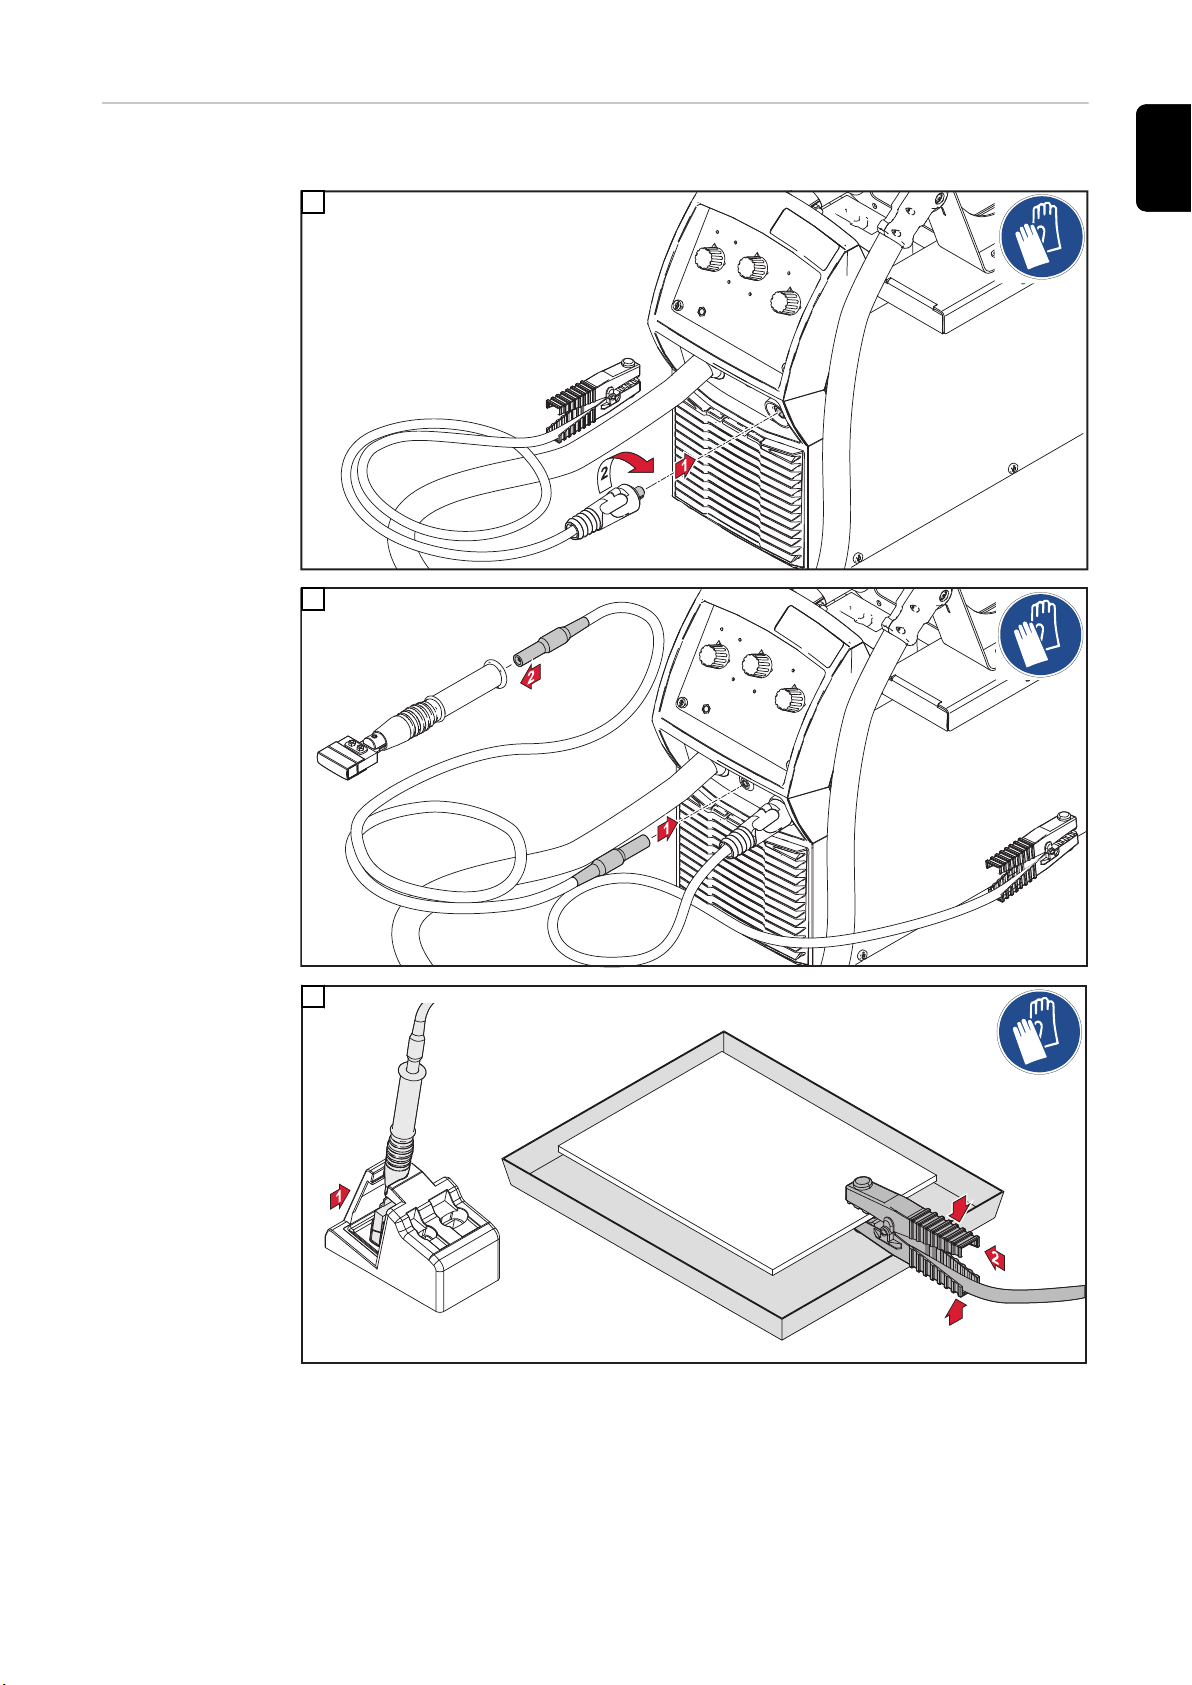
Connecting the grounding cable 34
Before using the blow-off torch and the small cleaning torch for the first time 34
Cleaning 37
Cleaning with the blow-off torch - preparation 39
Overview 39
Mounting the cleaning electrode on the blow-off torch 39
Aligning the cleaning electrode 40
Mounting cleaning felt by means of O-ring on 45 mm / 1.77 inch cleaning electrode 40
Attaching supplied cleaning felt to cleaning electrode 22 mm / 0.87 inch 41
Fitting the optionally available cleaning felts to the blow-off torch 42
3
Page 4

Mounting cleaning felt by means of felt mounting tool - 22 mm / 0.87 inch cleaning electrode 42
Fitting the large cleaning brush to the blow-off torch 43
Fitting the large cleaning brush to the blow-off torch 43
Re-adjusting the large cleaning brush 44
Cleaning with the blow-off torch 45
Filling with cleaning electrolyte 45
Connecting to the compressed air 47
Cleaning with the blow-off torch 47
After cleaning 50
Cleaning with the small cleaning torch 52
Overview 52
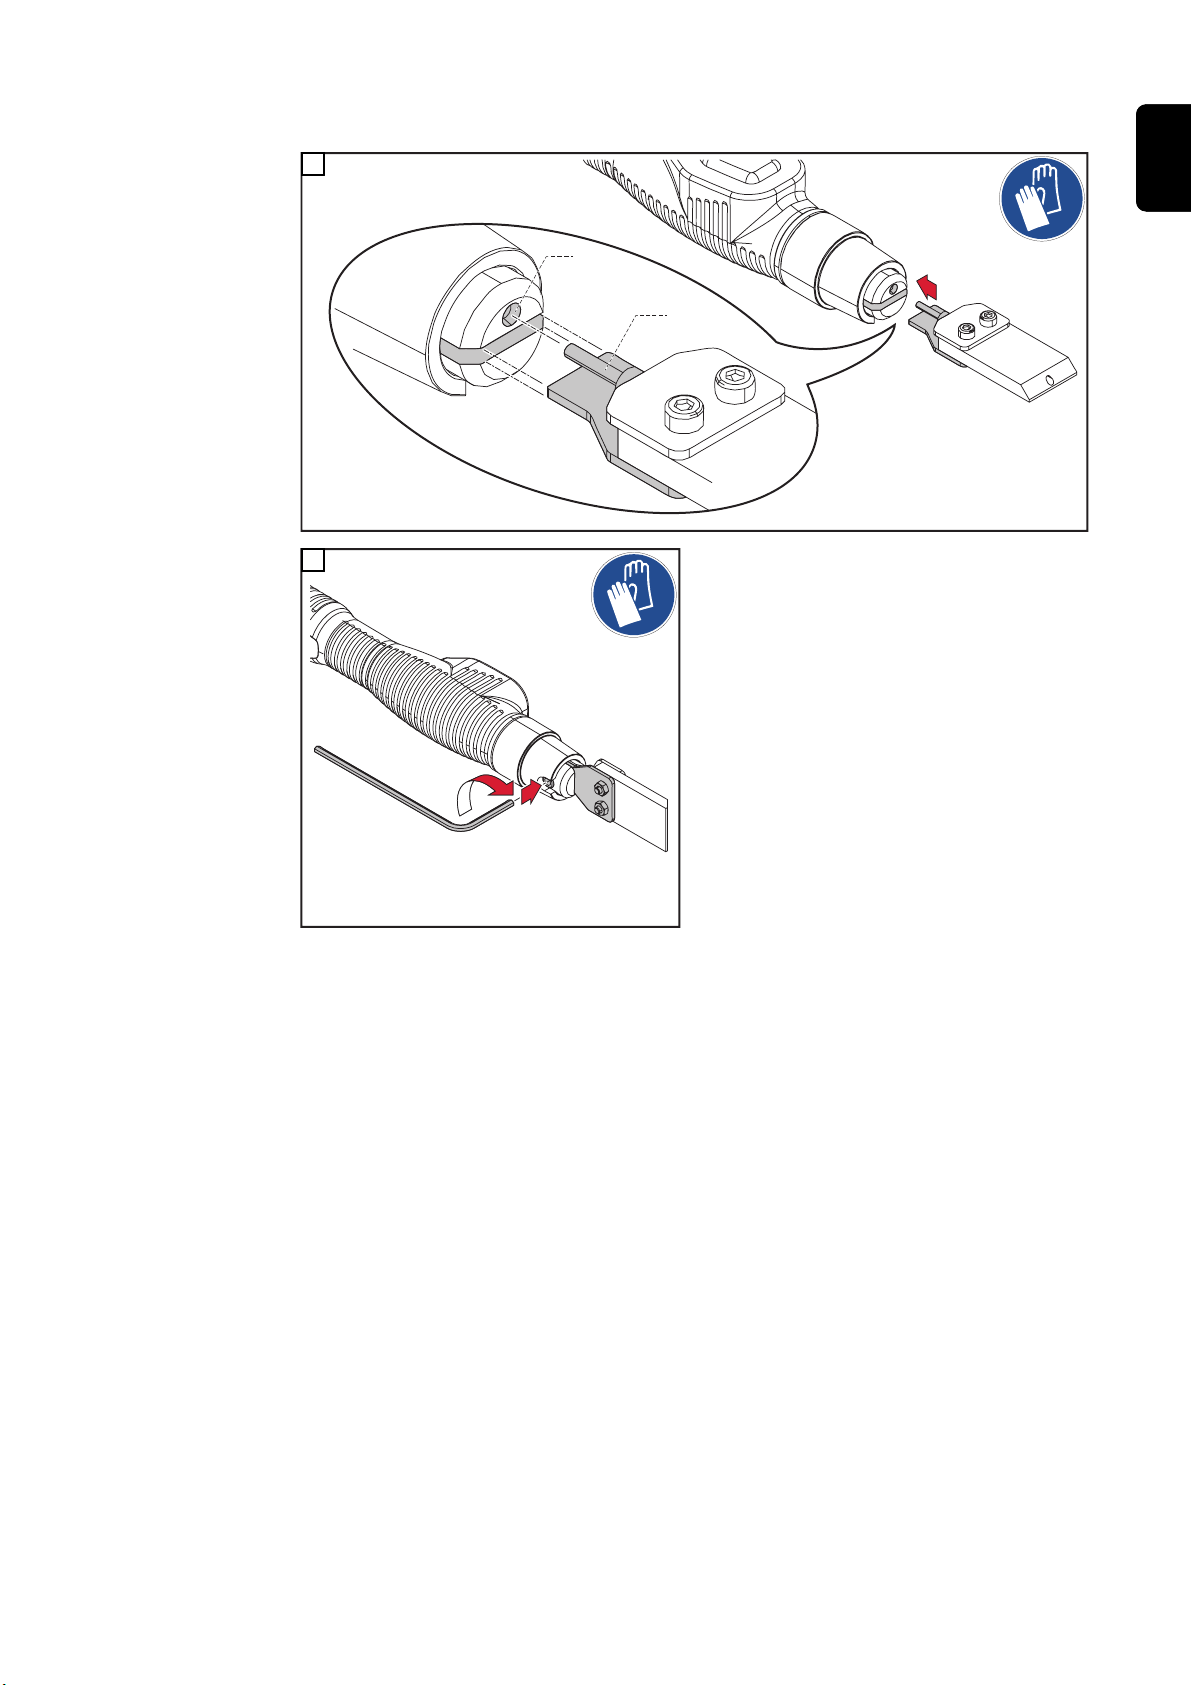
Mounting the cleaning electrode 52
Attaching the supplied cleaning felt to the cleaning electrode 54
Mounting cleaning felt by means of torch holder - 10 mm / 0.39 inch cleaning electrode 54
Mounting the cleaning brush 55
Readjusting the cleaning brush 56
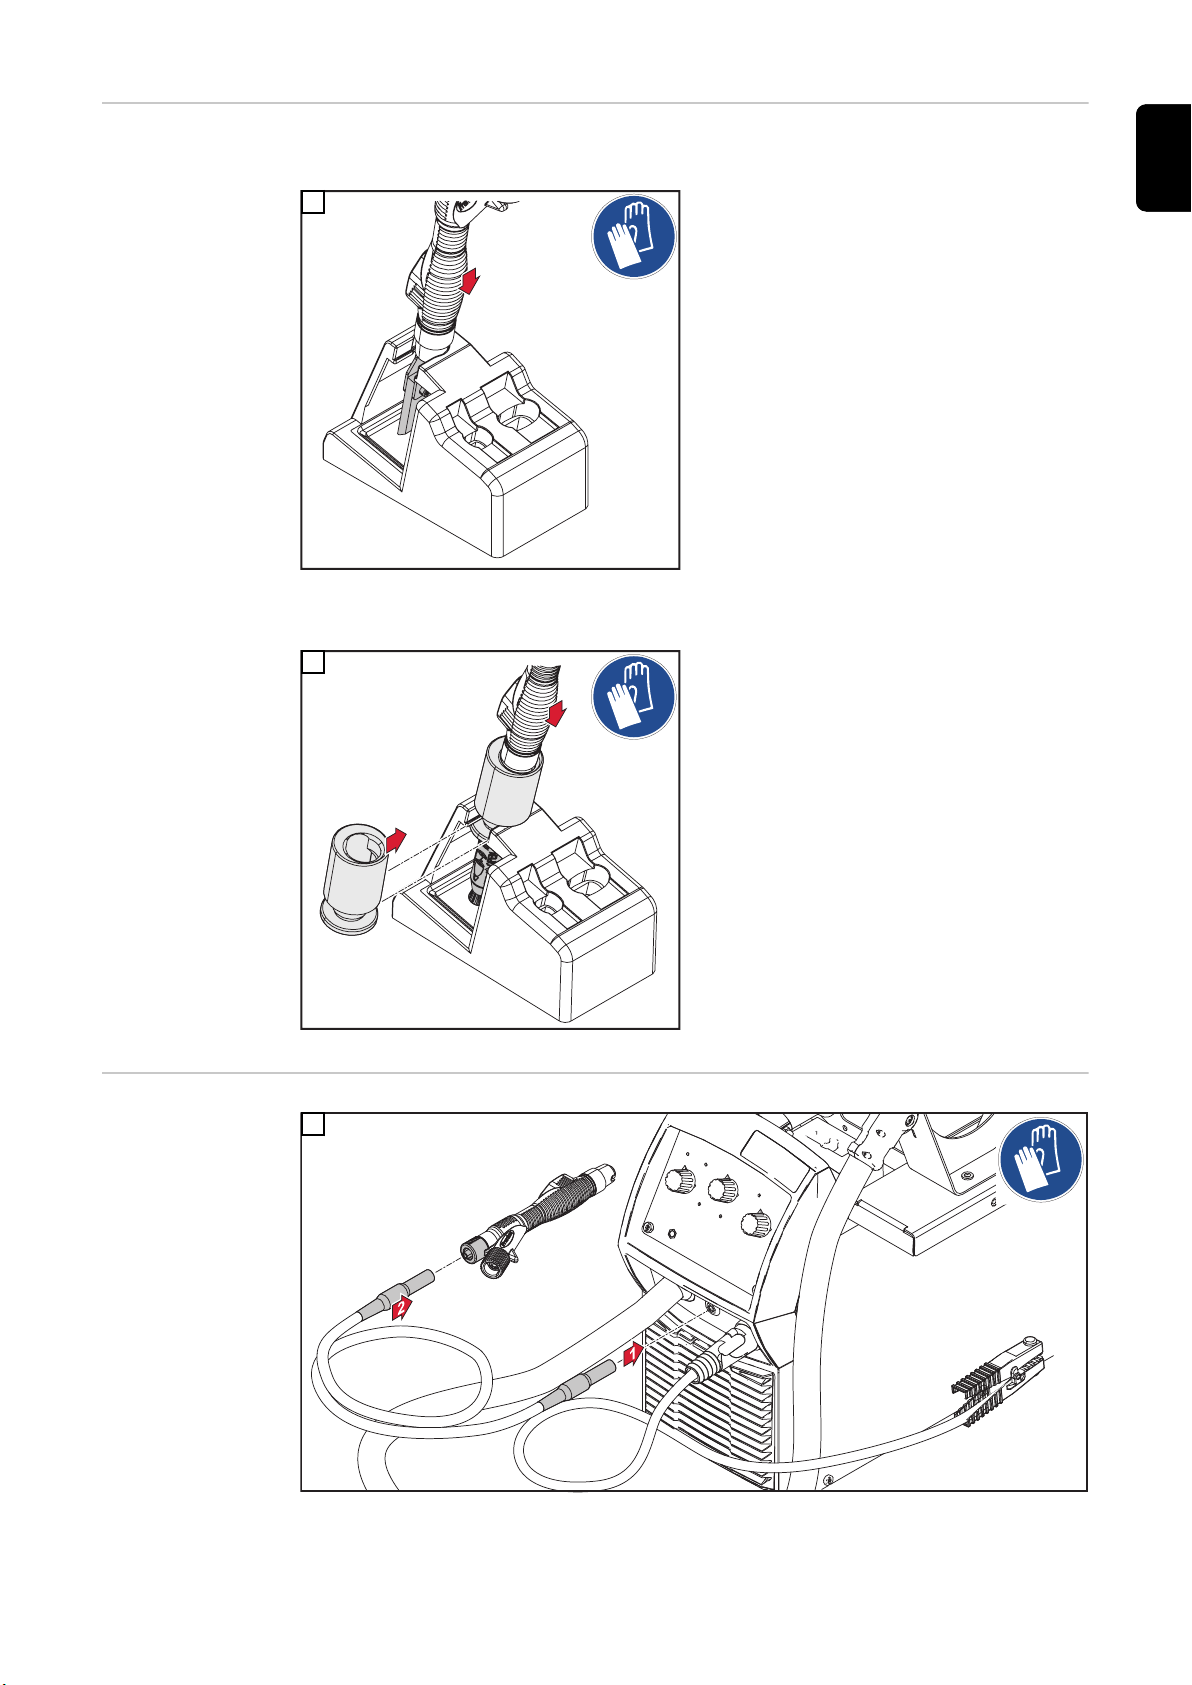
Placing the cleaning torch in the cleaning torch holder 57
Connecting the small cleaning torch 57
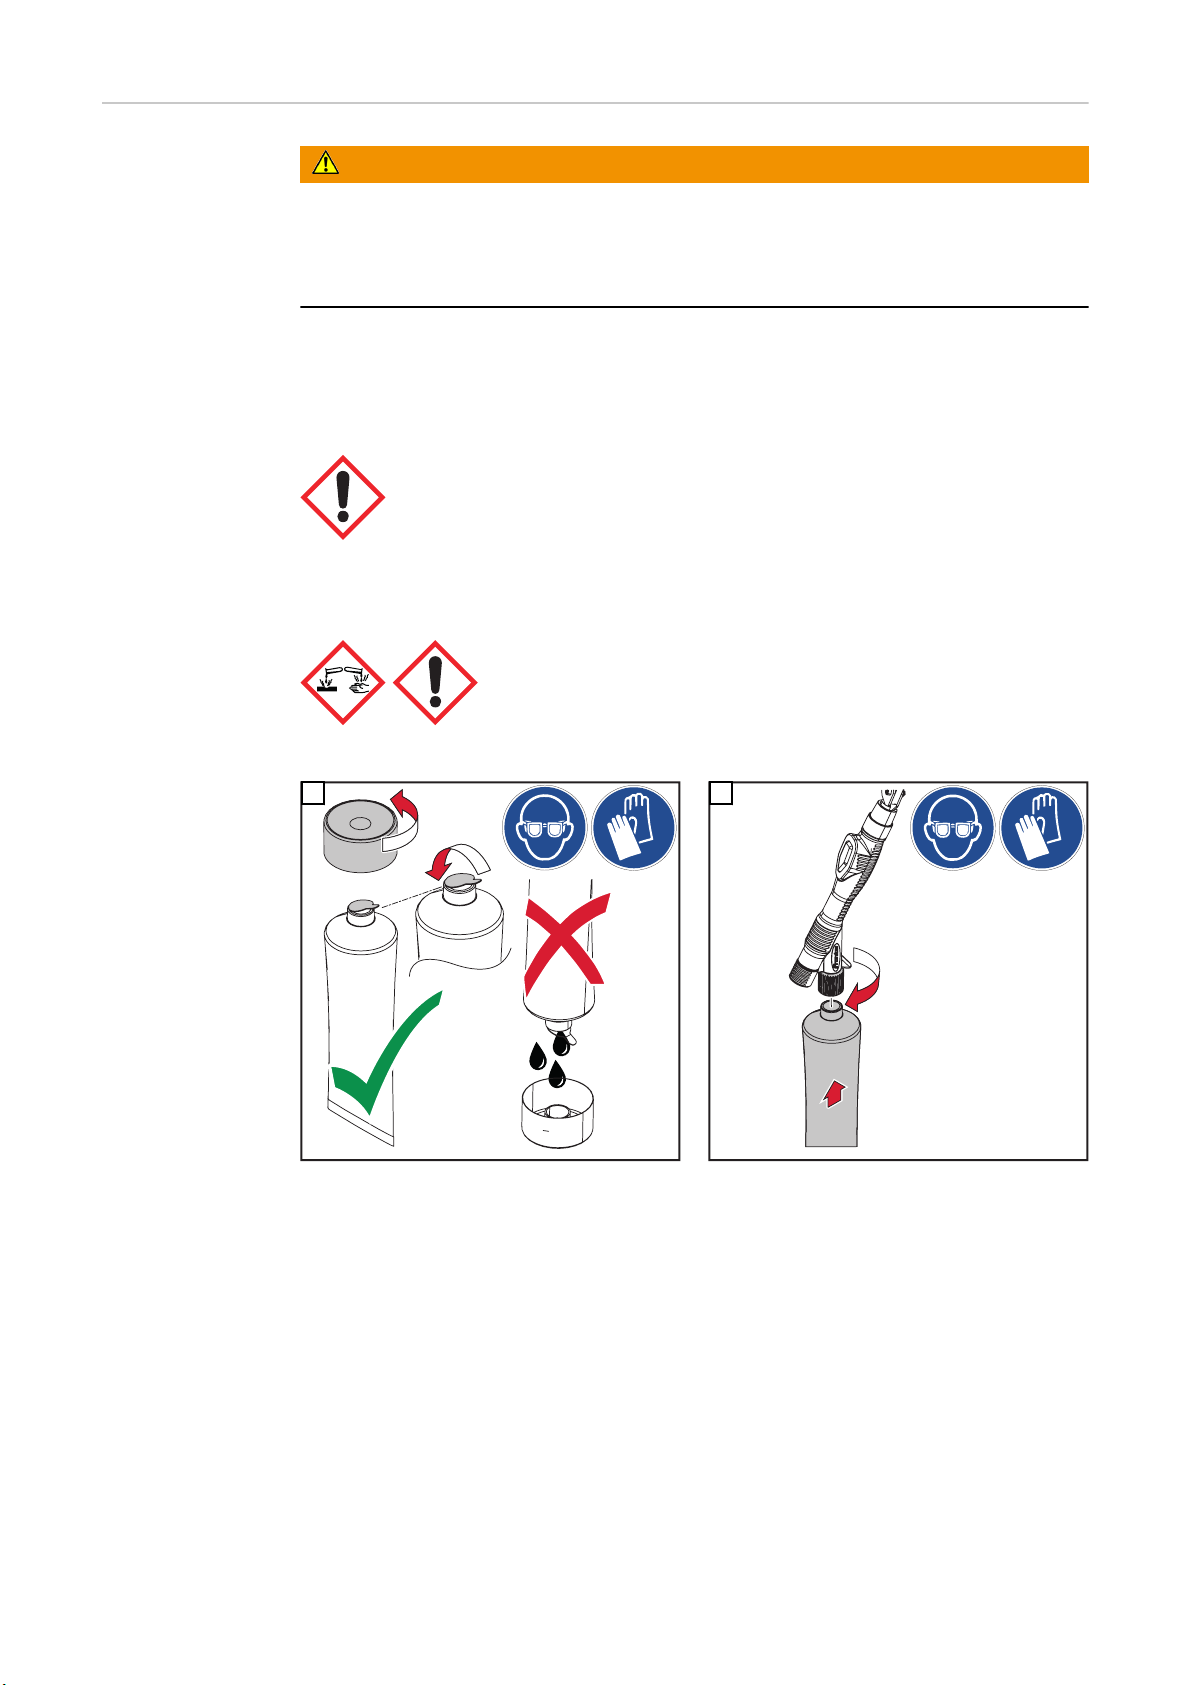
Screwing the cleaning electrolyte onto the cleaning torch 58
Cleaning with the small cleaning torch 59
After cleaning 61
Polishing 63
Polishing with the blow-off torch 65
General 65
Preparing for polishing with the blow-off torch 65
Polishing with the blow-off torch 66
After polishing 68
Polishing with the small cleaning torch 70
General 70
Preparing for polishing 70
Polishing 71
After polishing 73
Printing 75
Printing 77
General 77
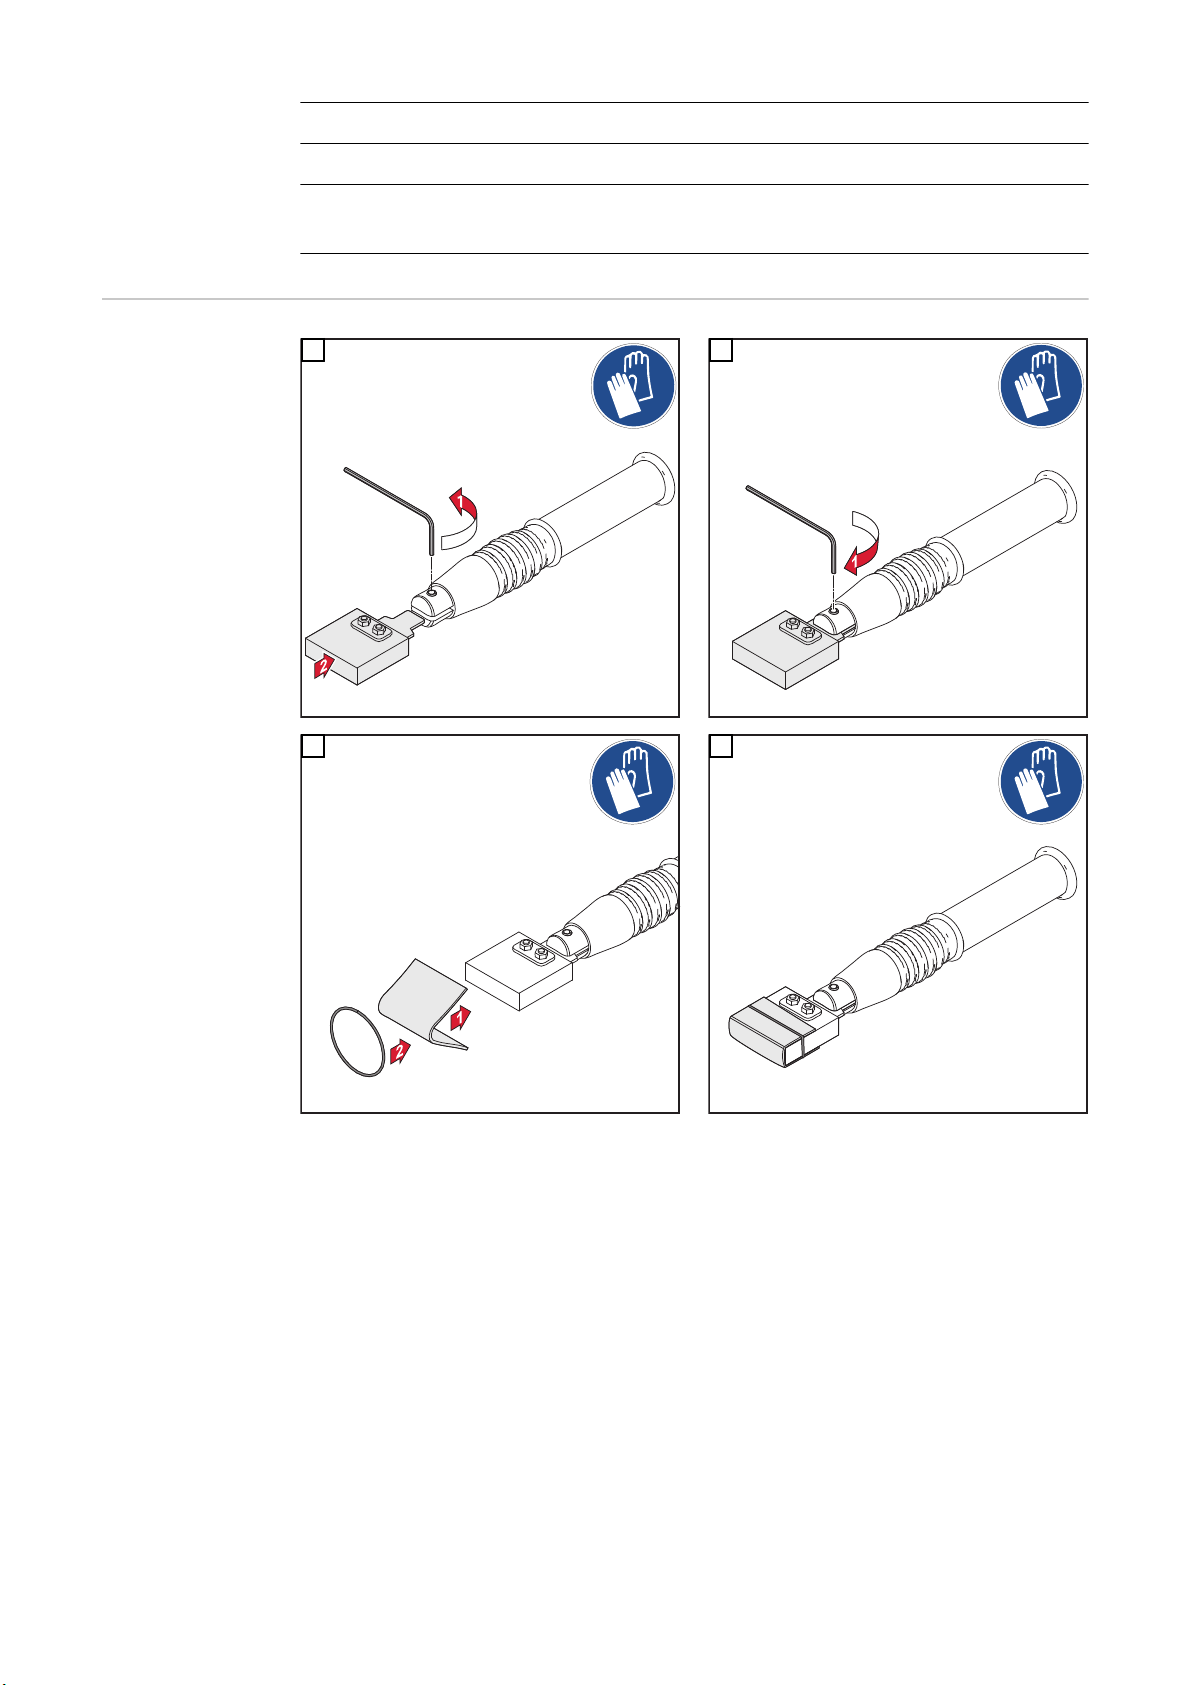
Mounting the Print electrode and Print felt 78
Preparing the workstation for Printing 79
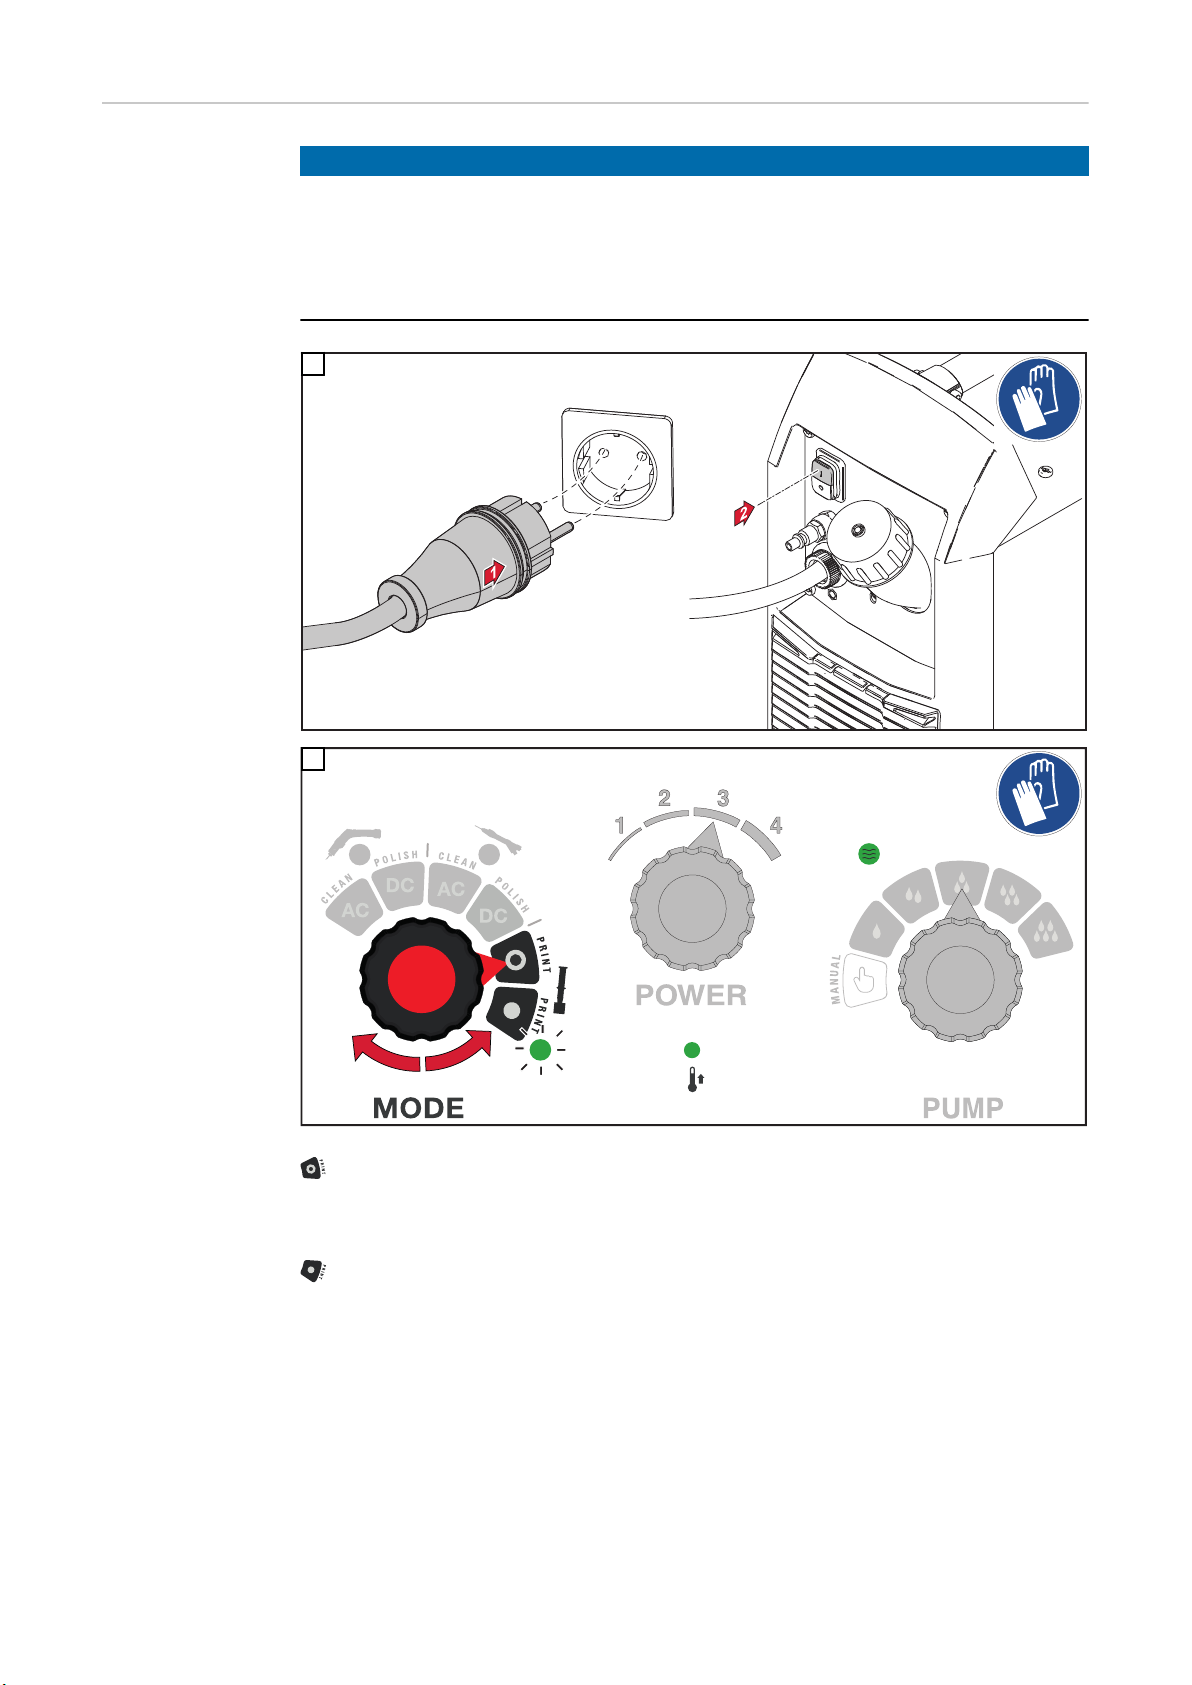
Printing 80
After the Print process 82
Service, maintenance and disposal 85
Care, maintenance 87
General 87
At every start-up 87
At the end of each shift 87
Disposal 88
Disposal 88
Technical data 89
Technical data 91
MagicCleaner 300 /EF 300 /CN 300 /np 91
MagicCleaner 300 MV/B 300 MV/np 92
4
Page 5

Safety Instructions
EN-US
Explanation of
Safety Instructions
DANGER!
Indicates an immediate danger.
Death or serious injury may result if appropriate precautions are not taken.
▶
WARNING!
Indicates a possibly dangerous situation.
Death or serious injury may result if appropriate precautions are not taken.
▶
CAUTION!
Indicates a situation where damage or injury could occur.
Minor injury or damage to property may result if appropriate precautions are not
▶
taken.
NOTE!
Indicates the possibility of flawed results and damage to the equipment.
General The device has been manufactured in line with the state of the art and according to re-
cognized safety standards. If used incorrectly or misused, however, it can cause:
- Serious or fatal injury to the operator or third parties
- Damage to the device and other material assets belonging to the operating company
- Inefficient operation of the device
All persons involved in the commissioning, operation, maintenance, and servicing of the
device must
- Be suitably qualified
- Have fully read and precisely followed these Operating Instructions
The Operating Instructions must always be kept to hand wherever the device is being
used. In addition to the Operating Instructions, all applicable local rules and regulations
regarding accident prevention and environmental protection must also be followed.
All safety and danger notices on the device:
- Must be kept in a legible state
- Must not be damaged/marked
- Must not be removed
- Must not be covered, pasted, or painted over
Before starting up the device, remedy any faults that could compromise safety.
Your personal safety is at stake!
Intended use The device is to be used exclusively for its intended purpose.
The manufacturer shall not be liable for any damage resulting from any other use or use
beyond the scope of this manual.
5
Page 6

Intended use also means
- Reading and adhering to all instructions in the Operating Instructions
- Carefully reading and obeying all safety instructions and danger notices
- Carrying out all the specified inspection and maintenance work.
The device is designed for operation in industry and business. The manufacturer shall
not be liable for any damage resulting from use in a living area.
The manufacturer shall also not be liable for faulty or incorrect work results.
Environmental
conditions
Obligations of the
Operating Company
Operation or storage of the device outside the stipulated area will be deemed as not in
accordance with the intended purpose. The manufacturer accepts no liability for any
damage resulting from improper use.
Temperature range of ambient air:
- During operation: 0 °C to +40 °C (32 °F to 104 °F)
- During transport and storage: -20 °C to +55 °C (-4 °F to 131 °F)
NOTE!
The minus temperature range for transport and storage refers only to the device
and accessories, not to the cleaning and Print electrolytes.
Relative humidity:
- up to 50% at 40 °C (104 °F)
- up to 90% at 20 °C (68 °F)
Ambient air: free of dust, acids, corrosive gases or substances.
Altitude above sea level: up to 2000 m (6561 ft. 8.16 in.)
The operating company must only allow persons to work with the device if they
- Are familiar with the basic occupational safety and accident prevention regulations
and are trained in handling the device
- Have read and understood these Operating Instructions, especially the section
"Safety Rules," and have confirmed this with their signature
- Are trained according to the requirements for the work results
Obligations of
Personnel
Personal protection and protection of others
6
The safety-conscious work of the personnel must be checked regularly.
All persons who are assigned to work with the device must do the following before beginning the work:
- Follow the basic regulations for occupational safety and accident prevention
- Read these Operating Instructions, especially the section "Safety Rules," and confirm that they have understood and will follow them by signing
Before leaving the workplace, ensure that no personal injury or property damage can occur in one's absence.
You are exposed to numerous hazards while working with the device, for example:
Page 7

- Irritation or burning of the skin due to contact with cleaning electrolyte or Print electrolyte
- Danger of serious eye damage due to contact with cleaning electrolyte or Print electrolyte
- General hazards when handling chemicals
Observe the safety data sheets of the cleaning and Print electrolytes!
- Electrical risks from grid current and cleaning current
- Harmful vapors
Individuals working on the workpiece during the cleaning process must wear suitable
work clothing with the following properties:
- Resistant against acids and chemicals
- Insulating and dry
- Covering the entire body and in good condition with no damage
Work clothing includes the following:
- Tightly fitting safety goggles (eye protection)
- Rigid, wet-insulating footwear
- Protective gloves (hand protection): impermeable, resistant to acids and chemicals
- Breathing protection
- Protective apron (for example when decanting chemicals)
EN-US
The required condition of work clothing and protective measures are indicated on the
safety data sheet of the cleaning and Print electrolytes.
Immediately remove work clothing contaminated with cleaning agent!
- Do not eat or drink when working with the device
- Keep cleaning and Print electrolytes away from food, beverages, and feedstuffs
- Wash hands before breaks and at the end of work
Keep persons, especially children, and those who are pregnant or unwell, away during
the operation of the devices and during the working process. However, if persons are in
the vicinity:
- Inform them of all risks
- Provide suitable protective equipment
or
- Construct suitable protective walls or curtains.
7
Page 8

Notes on the correct handling of
the cleaning and
Print electrolytes
The following points must be observed when handling the cleaning and Print electrolytes.
For exact data, please refer to the respective safety data sheets. For current safety data
sheets, use the following link:
www.fronius.com/magiccleaner
First aid measures
- After inhalation provide fresh air. Consult a physician if complaints persist.
- After skin contact, wash immediately with soap and water, and rinse thoroughly.
Consult a physician if skin irritation persists.
- If swallowed, do not induce vomiting, rinse mouth and drink plenty of water, seek
medical advice immediately.
- After eye contact, rinse opened eye for several minutes under running water (eye
wash) and seek medical advice.
If present, remove contact lenses and continue rinsing.
Storage
- Only use containers specifically approved for the cleaning agents
- Keep container tightly closed
- Do not store together with alkalis (lyes) and metals
- Store in a cool and dry place
- Provide acid resistant floor
- Keep under lock and key and out of reach of children
Other notes
- To avoid thermal decomposition, do not heat (danger of toxic gases being produced)
- Provide emergency cooling in the event of a fire in the environment
- Avoid contact with skin, eyes, and mucous membranes
- Use only in well ventilated areas, use respiratory protection or adequate exhaust
ventilation.
- When diluting, always add acid to water - not vice versa!
- Dispose of cleaning agents or uncleaned packaging in accordance with national regulations. Do not dispose of with household waste!
- Do not allow to enter drains, watercourses or groundwater (e.g., via the soil)
8
Page 9

Risks from grid
current and
cleaning current
An electric shock can be fatal. Every electric shock poses a risk of death.
Do not touch voltage-carrying parts inside or outside the device.
Ensure suitable personal protection with dry temporary backing or cover with sufficient
insulation against the ground potential. The temporary backing or cover must completely
cover the entire area between the body and the ground potential.
All cables and leads must be secured, undamaged, insulated, and adequately dimensioned. Replace loose connections and scorched, damaged, or inadequately dimensioned cables and leads immediately.
Do not wrap cables or leads around your body or parts of the body.
Have the mains and device supply lead regularly inspected by an electrician to ensure
that the ground conductor is functioning properly.
Only operate the device on a grid with a ground conductor and a socket with a ground
conductor contact.
Operating the device on a grid without a ground conductor and on a socket without a
ground conductor contact is considered gross negligence. The manufacturer accepts no
liability for any damage resulting from improper use.
Use suitable equipment to ensure that the workpiece is sufficiently grounded if necessary.
EN-US
Switch off unused devices.
Before working on the device, switch off the device and unplug the mains plug.
Secure the device to prevent the mains plug from being connected and switched on
again by applying a clearly legible and understandable warning sign.
The device may only be opened by professionally trained service technicians.
EMC measures It is the responsibility of the operator to take care to ensure that there is no electromag-
netic interference with electrical and electronic equipment.
If electromagnetic interference is identified, then the operator is obliged to take action to
rectify the situation
Check and evaluate possible problems and the interference immunity of equipment in
the vicinity according to national and international regulations:
- Safety devices
- Mains power lines, signal lines, and data transfer lines
- IT and telecommunications equipment
- Devices for measuring and calibrating
- The health of persons close by, e.g., those with pacemakers and hearing aids
- Persons with pacemakers must seek advice from their doctor before staying in the
immediate vicinity of the device and the cleaning process
Electromagnetic fields may cause health problems that are not yet known.
9
Page 10

Supporting measures to avoid EMC problems:
1. Mains power supply
- If electromagnetic interference occurs despite a mains connection that complies
with regulations, take additional measures (e.g., use a suitable mains filter).
2. Equipotential bonding
3. Workpiece grounding
- If necessary, establish grounding using suitable capacitors.
4. Shield, if necessary
- Shield other devices in the vicinity
- Shield entire system
Particular hazard
areas
Safety measures
at the setup location and during
transport
Special regulations apply in areas at risk of fire or explosion
- Follow the appropriate national and international regulations.
Devices for work in areas with increased electrical hazard (such as boilers) must be
labeled with the symbol [S] (Safety).
Measurements of toxic emissions when working with the device showed values below
permissible "average workplace concentrations" (MAK).
Nevertheless:
- Ensure there is a sufficient supply of fresh air.
- Keep your face away from any vapors that arise.
- Do not inhale vapors, or extract vapors from the work area by suitable means.
During operation
- Ensure that all covers are closed, and all side parts have been mounted properly.
- Keep all covers and side parts closed.
If the device is equipped with a carrier belt or handle, then this is used exclusively for
transport by hand. The carrier belt is not suitable for transport by crane, counterbalanced
lift truck or other mechanical lifting tools.
A toppling device can be deadly! Set up the device securely on an even, solid surface
- The maximum permitted tilt angle is 10°.
Special regulations apply in areas at risk of fire or explosion
- Follow the appropriate national and international regulations.
10
Use instructions and checks within the company to ensure that the vicinity of the workplace is always clean and organized.
Only set up and operate the device in accordance with the protection class shown on the
rating plate.
When setting up the device, ensure that there is an all-round clearance of 0.5 m (1 ft.
7.69 in.) to allow cooling air to circulate unhindered.
Take care to ensure that the applicable national and regional guidelines and accident
prevention regulations are observed when transporting the device, especially guidelines
concerning hazards during transport and shipment.
Before transporting the device, always completely drain the cleaning electrolyte.
It is essential to conduct a visual inspection of the device to check for damage after it has
been transported but before commissioning. Have any damage repaired by trained service technicians before commissioning the device.
Page 11

Safety measures
in normal operation
Only operate the device when all safety devices are fully functional. If the protection
devices are not fully functional, there is a danger of:
- Serious or fatal injury to the operator or third parties
- Damage to the device and other material assets belonging to the operating company
- Inefficient operation of the device
Safety devices that are not fully functional must be repaired before the device is switched
on.
Never bypass or disable protection devices.
Before switching on the device, ensure that no one can be put in danger.
The device must be examined at least once a week for externally detectable damage
and functionality of the safety devices.
Only Fronius cleaning and Print electrolytes are suitable for use in our devices.
Do not mix Fronius cleaning and Print electrolytes with other cleaning agents.
If damage occurs due to the use of other cleaning agents, the manufacture is not liable
for this and all warranty claims are forfeited.
Transport the cleaning and Print electrolytes in closed original containers exclusively.
EN-US
Commissioning,
maintenance and
repair
Safety inspection The manufacturer recommends that a safety inspection of the device be performed at
It is impossible to guarantee that externally procured parts are designed and manufactured to meet the demands made on them, or that they satisfy safety requirements.
- Use only original spare and wearing parts (also applies to standard parts).
- Do not carry out any alterations, installations, or modifications to the device without
first obtaining the manufacturer's permission.
- Components that are not in perfect condition must be changed immediately.
- When ordering, specify the exact name and part number according to the Spare
Parts List, as well as the serial number of your device.
In addition to a cable connection, the housing screws provide the protective conductor
connection for grounding the housing parts.
Always use original housing screws in the appropriate number with the specified torque.
least every 12 months.
A safety inspection by a certified electrician is recommended:
- After changes
- After alterations
- After repair, service and maintenance
- At least every twelve months.
For the safety inspection, follow the appropriate national and international standards and
guidelines.
Safety Symbols
You can obtain more information about the safety inspection from your service center.
The service center will provide the necessary documents upon request.
Devices with the CE mark satisfy the essential requirements of the low-voltage and electromagnetic compatibility directives (e.g., relevant product standards of the EN 60974
series).
11
Page 12

Devices marked with the CSA test mark satisfy the requirements of the relevant standards for Canada and the USA.
Copyright Copyright of these Operating Instructions remains with the manufacturer.
Text and illustrations were accurate at the time of printing. Fronius reserves the right to
make changes. The contents of the Operating Instructions shall not provide the basis for
any claims whatsoever on the part of the purchaser. If you have any suggestions for improvement, or can point out any mistakes that you have found in the Operating Instructions, we will be most grateful for your comments.
12
Page 13

General information
13
Page 14

14
Page 15

General information
EN-US
Device concept
The MagicCleaner 300 is a device for the
electrochemical surface treatment of stainless steel.
The following surface treatments can be
carried out:
- Cleaning of temper coloration and restoration of the oxide layer after welding and cutting
- Polishing of welds
- Printing - electrochemical surface
printing
(optional)
MagicCleaner 300
The MagicCleaner 300 is equipped with an automatic blow-off torch. If compressed air is
connected to the rear of the device, the vapors produced are blown out of the working
area when working with the blow-off torch.
The MagicCleaner 300 also has a pump with which the cleaning electrolyte can be
pumped manually or automatically.
Intended use The MagicCleaner 300 is intended exclusively for the electrochemical cleaning of stain-
less steel. Any other use is deemed to be "not in accordance with the intended purpose."
The manufacturer shall not be liable for any damage resulting from such improper use.
Intended use also means
- Reading and understanding these Operating Instructions,
- Reading and understanding all safety data sheets of the cleaning and Print electrolytes
- Carrying out all the specified inspection and maintenance work
Transport information
Danger due to improper use!
This can result in serious personal injury, damage to property and the environment.
▶
▶
IMPORTANT! Before transport:
- Empty the cleaning electrolyte tank completely (if necessary, tilt or turn the unit over)
- Empty the blow-off torch:
- Unscrew the cleaning electrolyte from the small cleaning torch
- Empty hand pump
- Empty small cleaning torch
- Remove used cleaning felt
- Clean cleaning electrodes
WARNING!
Observe the safety data sheets of the cleaning electrolytes!
Observe Safety Instructions from page 31!
Switch the pump to manual mode and press the Start key on the blow-off torch
15
Page 16

Setup regulations Operation outdoors
Model No.
Part No.
Ser. No.
FRONIUS INTERNATIONAL GMBH
Froniusplatz 1, A-4600 Wels, Austria
Phone: +43 (0)7242 241-0
MAGIC CLEANER MC 300
.........................
.........................
CAN/CSA-E60974-1: 2012
ANSI/IEC 60974-1:2008
1~
50/60Hz
IP23
U0 = 30V AC Rms - 30V DC peak
U1 = 85-260V
U2 = 0 to 30V AC/DC
P1max = 900W
L1 max = 10A
L2 = 0 to 30A
Duty (%) = 0 to 80%
The device can be installed and operated outdoors in accordance with its degree of protection IP 23. However, the installed electrical parts must be protected from direct exposure to moisture, e.g. external wet cleaning.
Ambient temperature
IMPORTANT! The operating and storage temperature must not fall below the following
temperatures:
- without cleaning electrolyte: -25 °C / -13 °F
- with cleaning electrolyte: 0 °C / 32 °F
Install the device in such a way that it is not additionally heated by heat sources such as
radiators, heaters or annealing furnaces, direct sunlight, etc.
Warning notices
on the device
The device is equipped with warning notices and a rating plate.
The warning notices and rating plate must not be removed or painted over.
Rating plate and warnings on the device
Wear tightly sealed eye protection / tightly sealed safety goggles
16
Wear half-mask facepiece with filters as respiratory protection
Use gloves
Use protective equipment according to the safety data sheet of the cleaning
electrolyte used!
Caution! Corrosive liquids
Page 17

Scope of Supply and Options
(1)
(2)
(3)
(4)
(5)
(6)
(20)
(19)
(18)
(17)
(16)
(15)
(14)
(13)
(12)
(11)
(8)
(9)
(7)
(10)
Scope of supply
(1) MagicCleaner 300 with blow-off torch and torch holder
(2) Adapter for the large cleaning brush
EN-US
(3) Large cleaning brush
(4) Grounding cable with bayonet connector, 10 mm², 3 m / 9 feet 10.11 inch
(5) Tungsten cleaning electrode, 22 mm / 0.87 inch
(6) Mounting ring 19 x 23 x 10 mm / 0.75 x 0.91 x 0.39 inch
(7) Cleaning felt 22 mm / 0.87 inch (2 pcs.)
(8) Graphite cleaning electrode, 45 mm / 1.77 inch
(9) Mounting ring 36.81 x 3.53 mm / 1.45 x 0.13 inch
(10) Cleaning felt 45 mm / 1.77 inch
(11) Graphite cleaning electrode, 22 mm / 0.87 inch
(for the small cleaning torch)
(12) Cleaning felt 22 mm / 0.87 inch, 2 pcs.
(for the small cleaning torch)
(13) Graphite cleaning electrode, 10 mm / 0.39 inch
(for the small cleaning torch)
(14) Cleaning felt 10 mm / 0.39 inch, 3 pcs.
(for the small cleaning torch)
(15) Small cleaning torch
(16) Power cable
for the small cleaning torch
(17) Cleaning torch holder
for the small cleaning torch
(18) Adapter for the small cleaning brush
17
Page 18

(19) Small cleaning brush
(20) Brush insert
(for the small cleaning brush)
Not shown:
- 2.5 mm / 0.10 inch Allen key
- These Operating Instructions
- Small parts boxes
The cleaning electrolytes are not included in the scope of supply.
18
Page 19

Options for the
(1) (2)
(3) (4)
(5) (6)
(7) (17)(16)
(15)(14)(13)
(12)
(11)(10)
(8)
(9)
blow-off torch
EN-US
(1) 10 x cleaning felt
22 mm / 0.87 inch
42,0510,0501
(2) Tungsten cleaning electrode
22 mm / 0.87 inch
42,0510,0520
(3) 10 x cleaning felt
22 mm / 0.87 inch / 70°
42,0510,0503
(4) Tungsten cleaning electrode
22 mm / 0.87 inch / 70°
42,0510,0522
(5) 10 x cleaning felt
10 mm / 0.39 inch
42,0510,0507
(6) Tungsten cleaning electrode
10 mm / 0.39 inch
42,0510,0526
(7) 10 x cleaning felt
10 mm / 0.39 inch / 70°
42,0510,0509
(10) 10 x cleaning felt
45 mm / 1.77 inch
42,0510,0525
(11) Graphite cleaning electrode
45 mm / 1.77inch
42,0510,0524
(12) 5 x large cleaning brushes
42,0510,0530
(13) Adapter for the large cleaning
brush
42,0510,0531
(14) Cleaning electrolyte red 5 l
42,0510,0384
(15) Cleaning electrolyte blue 5 l
42,0510,0388
(8) Tungsten cleaning electrode
10 mm / 0.39 inch / 70°
42,0510,0528
(9) Mounting ring
D=36.81 x d=29.75 mm /
D=1.45 x d=1.17 inch
42,0510,0532
(16) Neutralizer
1 l spray bottle
42,0510,0385
(17) Neutralizer
5 l canister
42,0510,0386
19
Page 20

Options for the
(1) (2)
(3) (4)
(5)
(7) (8)
(9)
(6) (13)
(12)
(11)
(10) (14) (15)
+
red
b
lue
(16)
small cleaning
torch
(1) Adapter for the small cleaning
brush
42,0510,0511
(2) 5 x small cleaning brushes
42,0510,0510
(3) Graphite cleaning electrode
22 mm / 0.87 inch
42,0510,0500
(4) 10 x cleaning felt
22 mm / 0.87 inch
42,0510,0501
(5) Graphite cleaning electrode
10 mm / 0.39 inch
42,0510,0506
(6) 10 x cleaning felt
10 mm / 0.39 inch
42,0510,0507
(7) Graphite cleaning electrode
22 mm / 0.87 inch / 70°
42,0510,0502
(8) 10 x cleaning felt
22 mm / 0.87 inch / 70°
42,0510,0503
(9) Graphite cleaning electrode
10 mm / 0.39 inch / 70°
42,0510,0508
(10) 10 x cleaning felt
10 mm / 0.39 inch / 70°
42,0510,0509
(11) Graphite cleaning electrode
35 mm / 1.38 inch
42,0510,0504
(12) 10 x cleaning felt
35 mm / 1.38 inch
42,0510,0505
+
1 x mounting ring
D=27.08 x d=23.52 mm /
D=1.07 x d=0.93 inch
20
Page 21

(13) 6 x cleaning electrolyte blue 0.1 l
42,0510,0381
(14) 6 x cleaning electrolyte red 0.1 l
42,0510,0380
(15) Neutralizer
1 l spray bottle ... 42,0510,0385
(16) Neutralizer
5 l canister ... 42,0510,0386
EN-US
21
Page 22

Print set
(1)
(2)
(3) (4)
(5) (6)
(7)
(9)
(8)
(10)
ABC- 123
(11)
Print set 42,0510,0540
(1) Print film with Fronius logo
(for testing)
(2) Print electrolyte black 0.1 l
42,0510,0390
(3) Print electrolyte white 0.1 l
42,0510,0391
(4) Print torch holder
(5) Print torch
(6) Allen key
WAF 2.5 mm
(7) Power cable 2 m / 6 feet 6.74 inch
for the Print torch
(8) Graphite Print electrode, 35 x 10 mm / 1.38 x 0.39 inch
(9) 5 x mounting ring
(for attaching the Print felt to the Print electrode)
(10) 20 x Print felt 40 x 60 mm / 1.57 x 2.36 inch
(11) Print film
(option, to be ordered separately from Fronius)
22
Page 23

Operating controls, connections and
mechanical components
23
Page 24

24
Page 25

Operating controls, connections and mechanical
(1) (2) (3)
(4)
(5)
(6)
(7)
(11)
(8)
(9) (10)
components
Safety
Danger from incorrect operation and work that is not carried out properly.
This can result in serious personal injury and damage to property.
▶
▶
▶
Controls, connections, and mechanical components - front, blowoff torch, and
rear
EN-US
WARNING!
All the work and functions described in this document must only be carried out by
technically trained and qualified personnel.
Read and understand this document in full.
Read and understand all safety rules and user documentation for this equipment
and all system components.
(1) Mounting device
for mounting the cleaning felt
(2) Collection tray
(3) Blow-off torch
fixed cleaning torch with automatic blow-off function
(4) Torch holder
for holding the blow-off torch
The torch holder can also be attached to the other side of the device.
(5) Control panel
(6) (+) current socket
for connecting the grounding cable
(7) Connection of small cleaning torch
(8) Cleaning electrode
(9) Start key
to switch on the pump and activate the cleaning current
25
Page 26

(10) Stop key
(15)
(14)
(13)
(12)
(7)
(6)
(5)
(4)
(3)
(2)
(1)
to switch off the pump and deactivate the cleaning current
(11) Allen screws
(12) Power switch
(13) Compressed air connection
(14) Mains cable
(15) Cleaning electrolyte tank
Controls, connections, and mechanical components - small
cleaning torch
(1) Cleaning electrolyte 0.1 l
for screwing onto the small cleaning torch
(2) Small cleaning torch
or
Print torch
(3) Holder for the small cleaning
torch
or
Print torch holder
(4) Hand pump
for conveying the cleaning electrolyte (only on the small cleaning
torch)
(5) Fixing screw
(6) Cleaning electrode
(7) Cleaning felt
26
Page 27

Control Panel
(1) (2)
(3) (4)
(5)(6)(7)(8)
EN-US
Control panel
(1) Blow-off torch LED
lights up when blow-off torch is
active
(2) Small torch LED
lights up when the small torch is
activated
(3) Cleaning power control knob
1 ... low cleaning power
4 ... high cleaning power
The cleaning power cannot be set
in Print mode.
(4) Tank capacity LED
lights up when the liquid in the tank falls below a defined limit value
(5) Pump power control knob
specifies the supply rate of the cleaning electrolyte
MANUAL: The cleaning electrolyte is delivered when the Start key is pressed and
held on the blow-off torch.
Automatic mode - lowest supply rate
Automatic mode - largest supply rate
Automatic mode is started by pressing the Start key on the blow-off torch and
ended by pressing the Stop key.
If there is no cleaning current, the pump switches off automatically after 20
seconds.
(6) Overtemperature LED
lights up if the device overheats.
Operation is interrupted and can only be continued after the device has cooled
down
(7) Print LED
lights up when Print mode is activated
27
Page 28

(8) Operating mode control knob
to set the following operating modes:
Blow-off torch
AC - CLEAN ... for cleaning welds
DC - POLISH ... for polishing welds
Small torch
AC - CLEAN ... for cleaning welds
DC - POLISH ... for polishing welds
Printing
• - PRINT ... dark print
o - PRINT ... light print
28
Page 29

Before commissioning
29
Page 30

30
Page 31

Safety Instructions for commissioning, operation,
and maintenance
Read and follow
the Safety Instructions!
Safety Instructions for commissioning, operation, and maintenance
The following Safety Instructions provide information about dangers that occur when
working with and on the device.
IMPORTANT! Read and follow these Safety Instructions carefully before and during all
installation, cleaning, polishing, printing, and maintenance activities!
Follow the safety rules below when carrying out all tasks described in this document!
WARNING!
Danger due to incorrect operation.
This can result in severe personal injury and damage to property.
Do not use the functions described here until you have fully read and understood the
▶
Operating Instructions.
Do not use the functions described here until you have fully read and understood all
▶
of the Operating Instructions for the system components, especially the safety rules
and the safety data sheets for the cleaning electrolyte.
EN-US
WARNING!
Danger from electrical current!
This can result in serious personal injury and damage to property.
Before starting the installation work, switch off the device and disconnect it from the
▶
grid.
Secure the device to prevent it from being switched back on again.
▶
WARNING!
Danger due to harmful vapors!
When working with the device, vapors are produced which are severely harmful to the
human body and can cause respiratory problems, respiratory diseases, and further personal injury.
Do not breathe in vapors produced
▶
While working with the device, keep your head away from the working area and the
▶
vapors produced
Use extraction and respiratory protection
▶
31
Page 32
CAUTION!
Danger from escaping cleaning or Print electrolyte!
Personal injury and damage to property may result.
Observe the safety data sheets of the cleaning and Print electrolytes
▶
Always screw the cleaning electrolyte onto the small cleaning torch with the opening
▶
facing upwards
Use protective equipment according to the safety data sheet of the cleaning or Print
▶
electrolytes used
Make sure that the cleaning or Print electrolyte does not come into contact with
▶
clothing or body parts
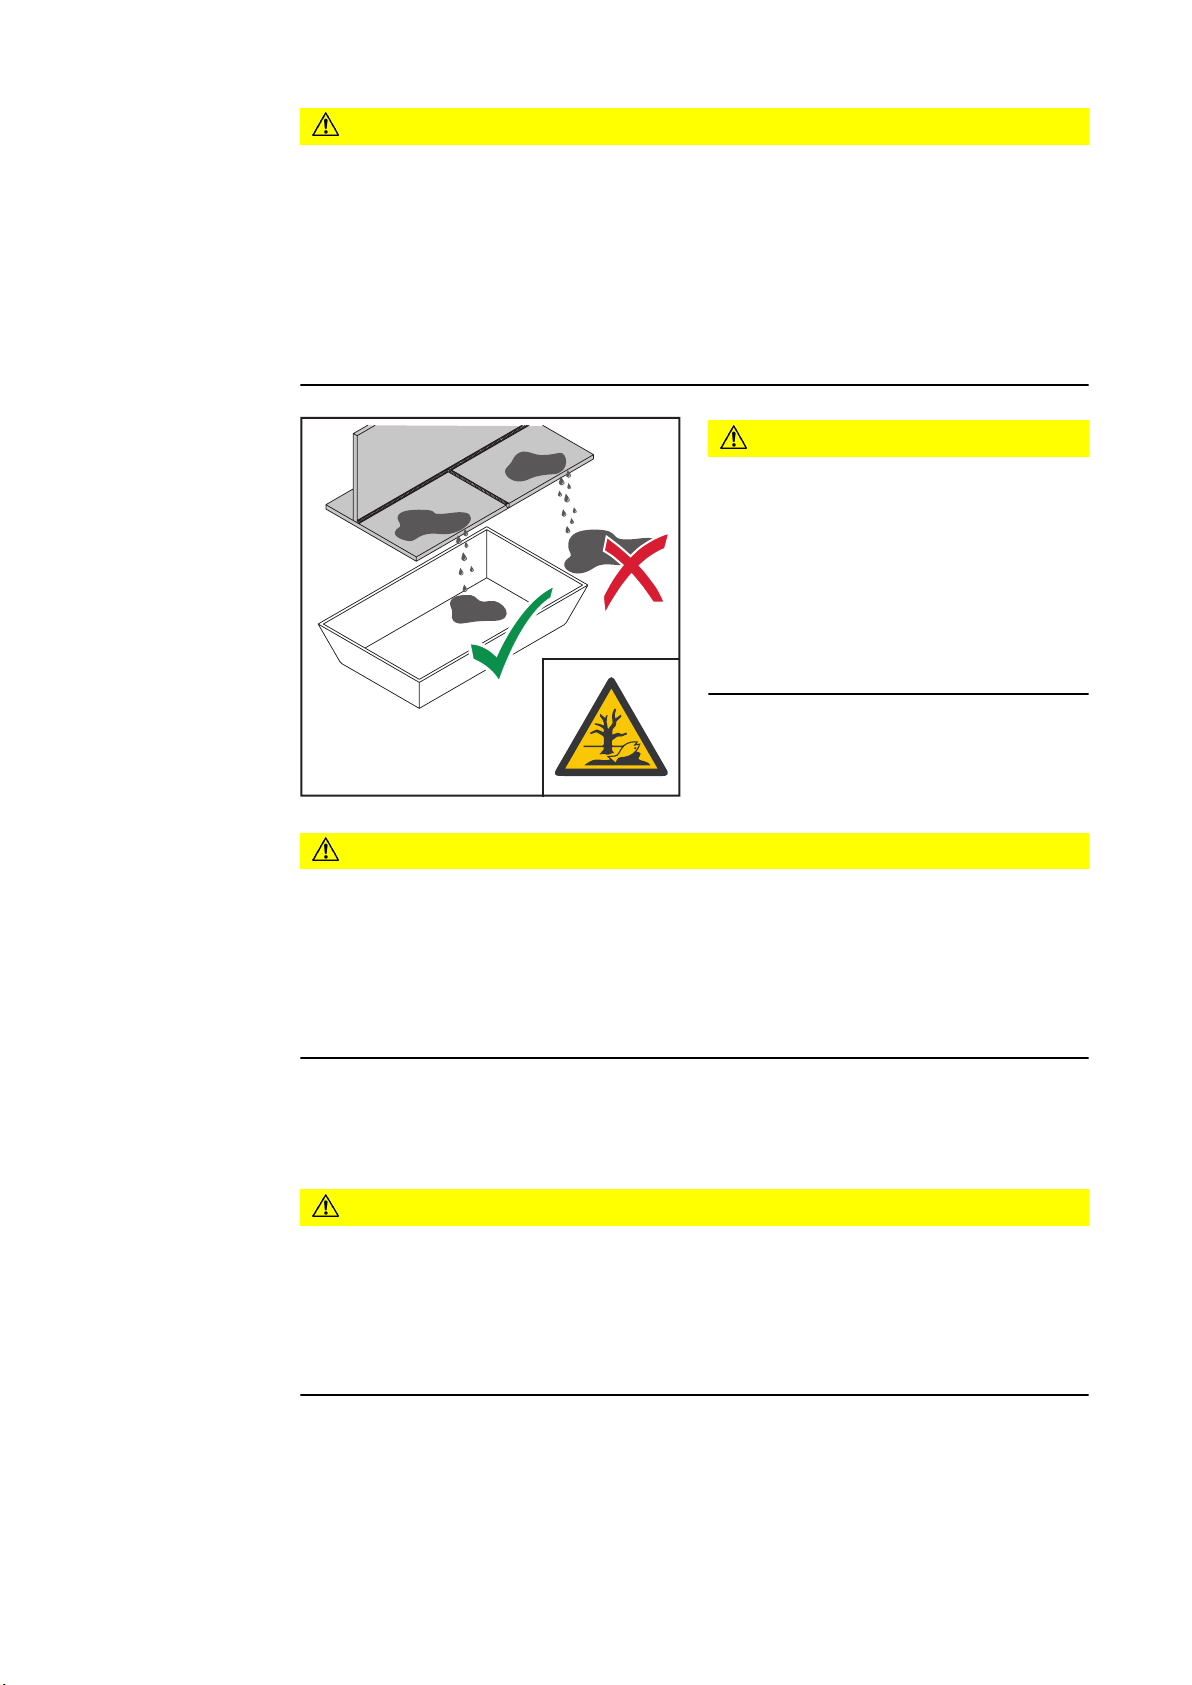
CAUTION!
Danger from spilled, leaked or uncollected chemicals!
Personal injury and damage to property or
the environment may result.
For cleaning, polishing or Print work,
▶
provide an acid-resistant drip tray.
Make sure that cleaning or Print elec-
▶
trolytes cannot escape in an uncontrolled manner.
CAUTION!
Danger from live cleaning electrodes, cleaning brushes, and Print electrodes!
Damage to the workpiece and cleaning or Print electrode may result.
As soon as the device's power cable is connected to the grid, the device is switched on.
As soon as the small cleaning torch or the Print torch is connected to the device, current
flows through the cleaning electrode, cleaning brush, or Print electrode.
Store the small cleaning torch or Print torch in an insulated place, e.g., in the clean-
▶
ing torch holder!
With the blow-off torch, cleaning current only flows when the device mains cable is connected to the grid, the device is switched on, and the Start key on the blow-off torch is
pressed.
CAUTION!
Risk of injury from hot workpiece surfaces and hot cleaning or print electrodes!
Workpiece surfaces, cleaning electrodes, and Print electrodes can reach temperatures of
over 100 °C / 212 °F during operation. This can result in burns.
Do not touch workpiece surfaces, cleaning and Print electrodes during operation
▶
Only touch workpiece surfaces, cleaning and Print electrodes when they have
▶
cooled down
32
Page 33

NOTE!
A short circuit between the bare cleaning or print electrode and the workpiece can
impair the cleaning result, the print result, and/or the surface of the workpiece!
Make sure that the cleaning or Print felt does not have any holes or chafed areas
▶
Push the cleaning or Print felt completely onto the cleaning or print electrode
▶
Make sure that the tip of the cleaning or Print electrode is completely covered by the
▶
cleaning or print felt
If necessary, always fix the cleaning or Print felt in place with a mounting ring (see
▶
also from page 42 onwards)
NOTE!
Cleaning felt or cleaning brush must always be soaked with cleaning electrolyte,
otherwise the service life will be reduced.
If burns or cracks are visible on the cleaning felt or cleaning brush, replace them.
▶
Do not make contact between cleaning electrode and workpiece without cleaning
▶
felt.
NOTE!
To prevent damage to the workpiece to be treated and burning of the cleaning felt
due to excessive cleaning power:
Perform preliminary tests on material samples
▶
Always use sufficient cleaning electrolyte
▶
EN-US
NOTE!
An improper Print procedure can result in damage to the workpiece surface!
During the Print process, make sure that the Print electrode is not in direct contact
▶
with the workpiece.
The Print electrode may only be moved on the Print film.
Do not mix Print electrolytes.
▶
After performing the Print process, do not place the Print torch with the Print elec-
▶
trode on the workpiece - place the Print torch on the Print torch holder or switch off
the device beforehand!
33
Page 34
Preparing the workstation
Preparing the
workstation
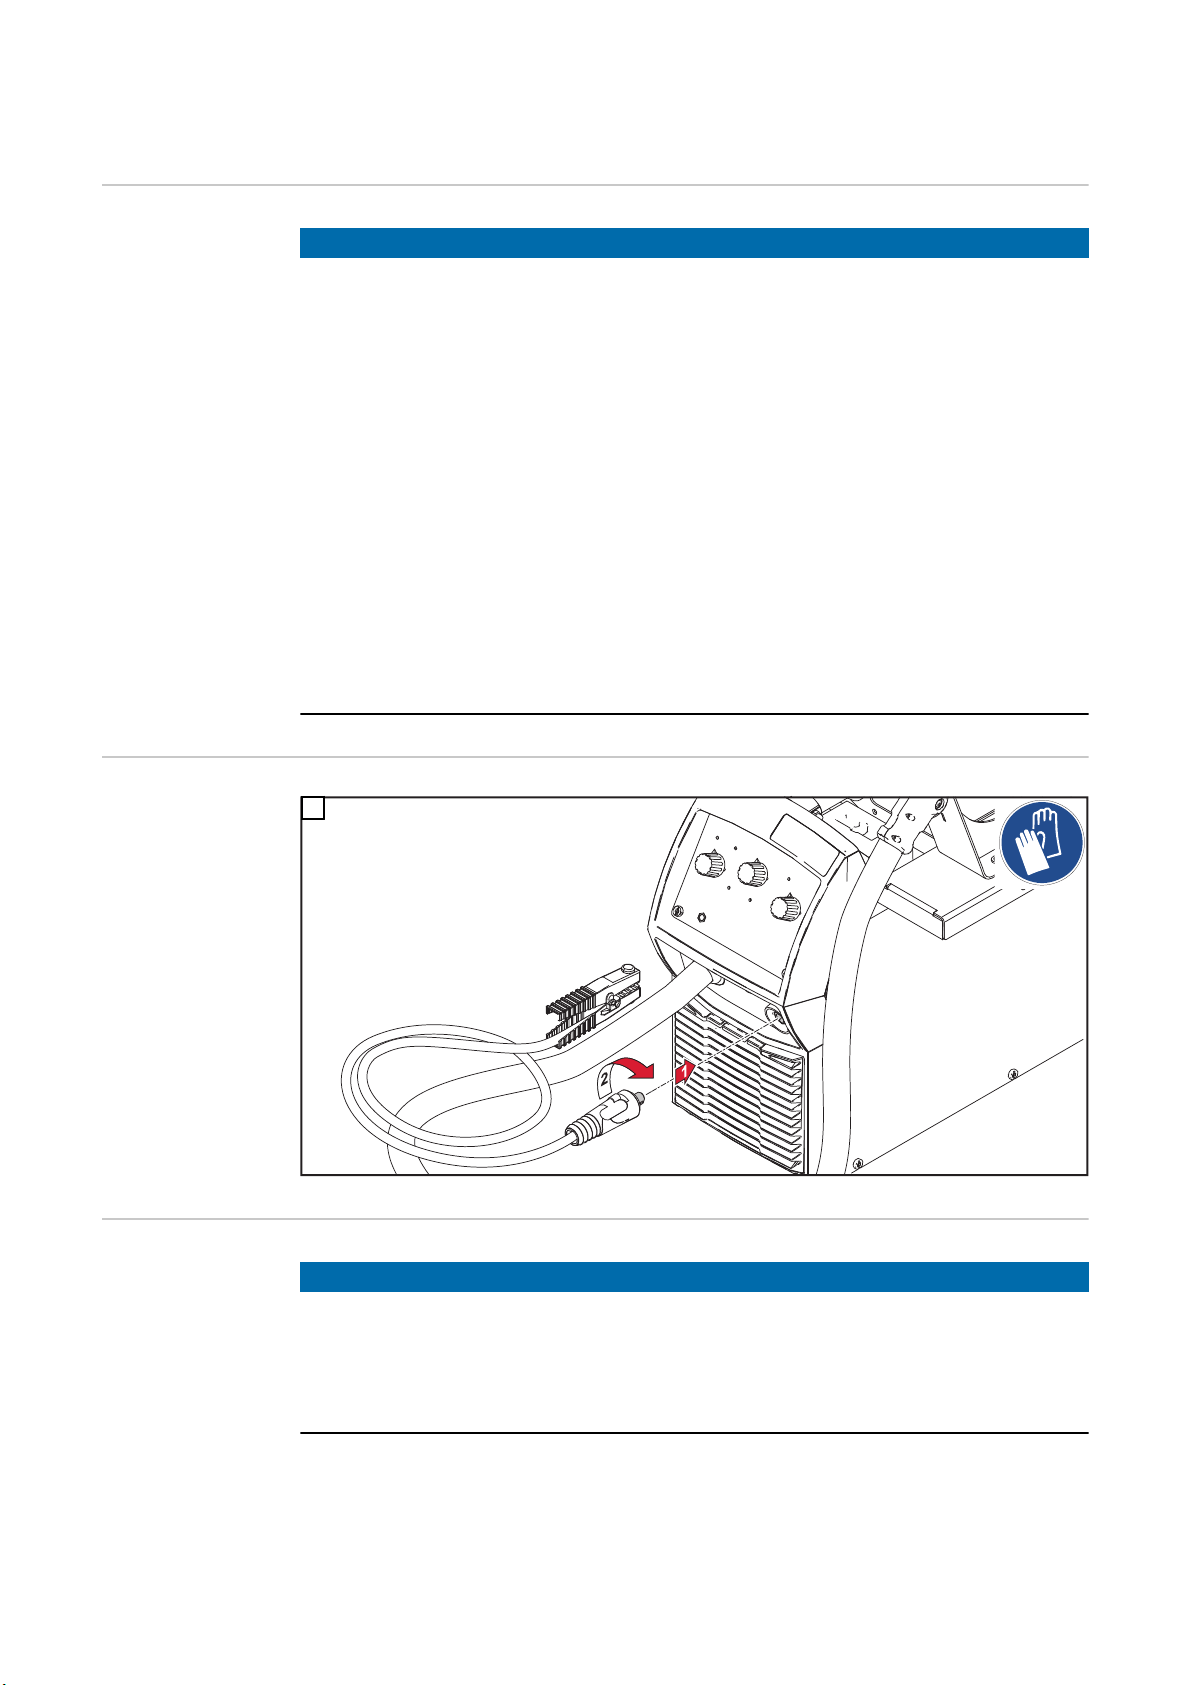
Connecting the
grounding cable
NOTE!
Prepare the workstation in such a way that the cleaning, polishing or Print process
and the final operations do not have to be interrupted.
Prepare an acid-resistant collection tray for excess or dripping cleaning or Print elec-
▶
trolyte
Provide / put on protective equipment
▶
Provide cleaning or Print electrolyte, also for changing
▶
Ensure that cleaning or Print electrolytes cannot escape in an uncontrolled manner
▶
Provide suitable cleaning felt or Print felt, also for changing
▶
Keep neutralizer within easy reach
▶
Prepare cloths (for removing excess cleaning or Print electrolyte as well as for the
▶
final cleaning)
Prepare containers for the disposal of the cloths wetted with cleaning or Print elec-
▶
trolyte and the used cleaning or Print felt
Set up the extraction system
▶
Mount the cleaning electrode and cleaning felt or Print electrode and Print felt
▶
Make sure there is an active power supply, check distance to mains socket (provide
▶
extension cable if necessary)
1
Before using the
blow-off torch
and the small
cleaning torch for
the first time
34
NOTE!
The device pumps are tested with a specific green test liquid before delivery.
Before starting the blow-off torch for the first time, press the Start key and let the
▶
pump run for 1 - 2 minutes to remove any test liquid residues.
Only use the blow-off torch for cleaning or polishing once red or blue cleaning elec-
▶
trolyte comes out.
Page 35

NOTE!
The small cleaning torches are tested and filled with glycol before delivery.
Before using for the first time, pump out the small cleaning torch well with the hand
▶
pump to remove any glycol residues.
EN-US
35
Page 36

36
Page 37

Cleaning
37
Page 38

38
Page 39
Cleaning with the blow-off torch - preparation
22 mm / 0.87 inch
22 mm / 0.87 inch / 70°
45 mm / 1. 77inch
10 mm / 0.39 inch
10 mm / 0.39 inch / 70°
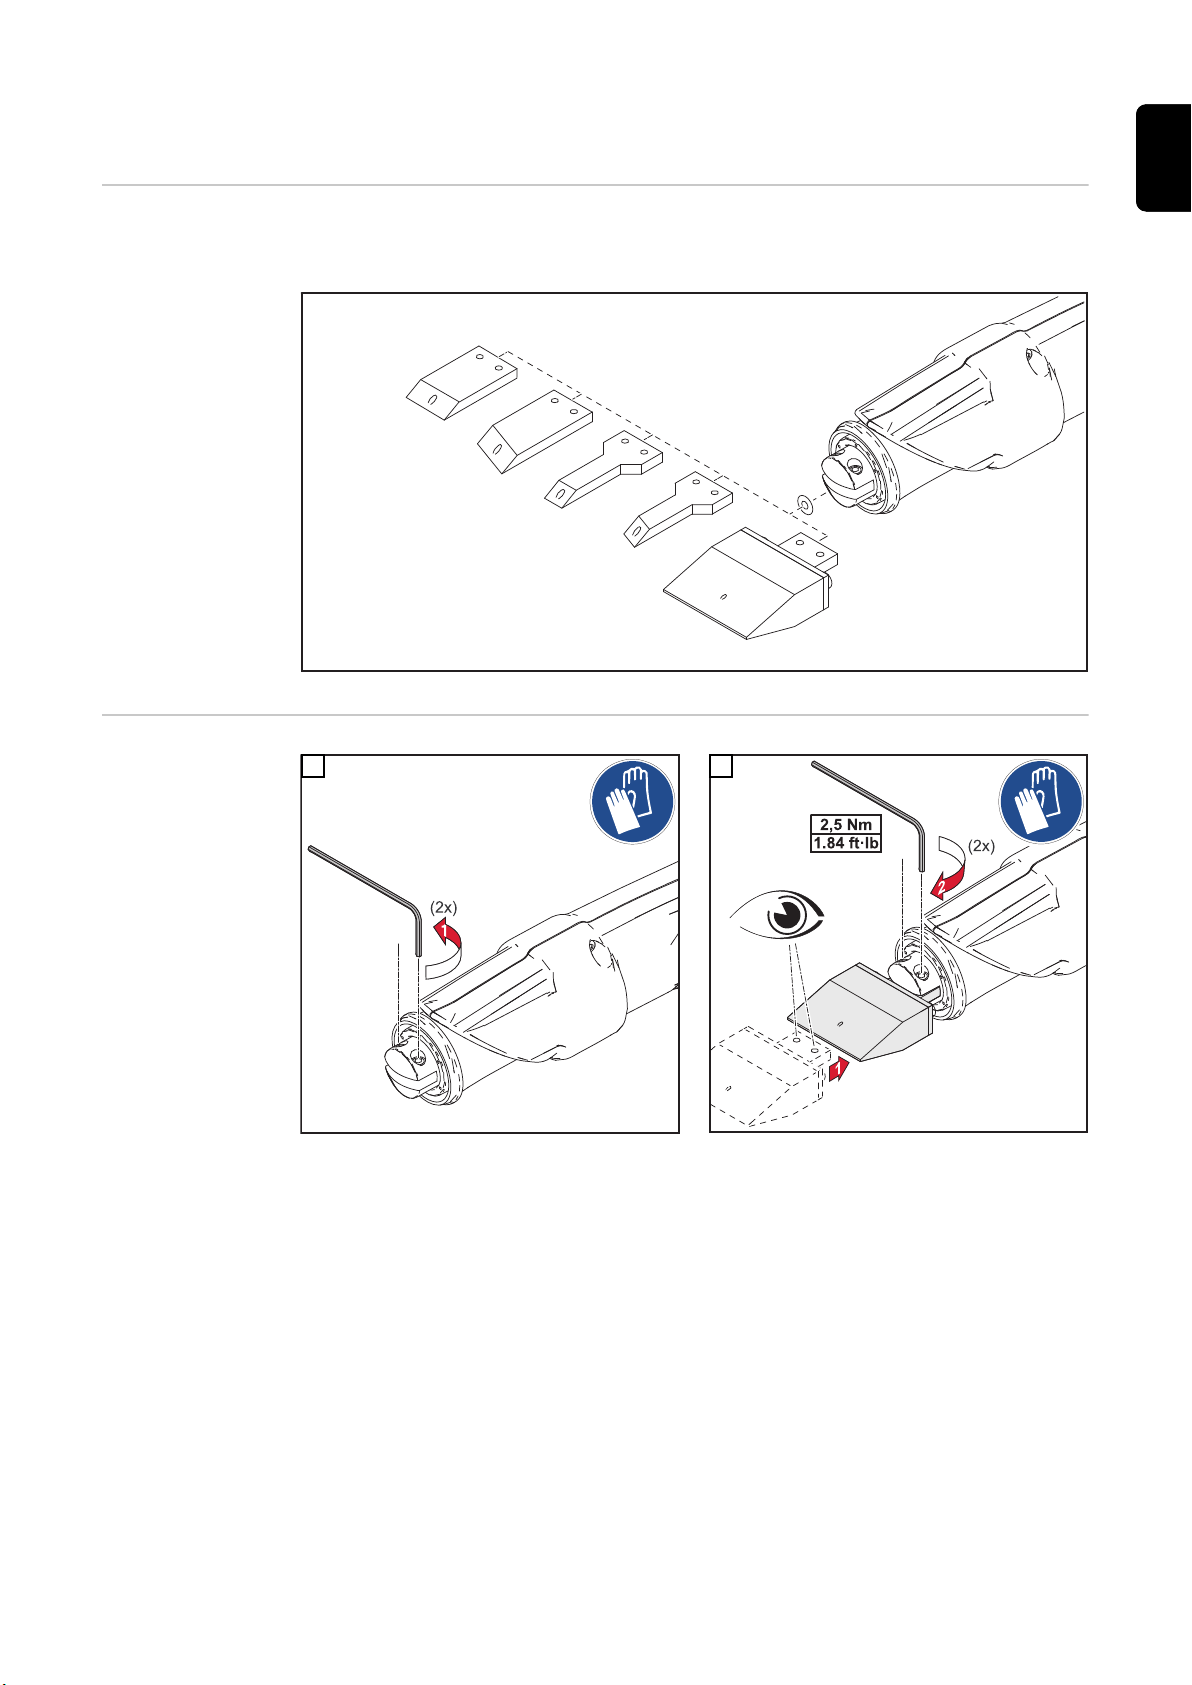
Overview The following cleaning electrodes are available for cleaning and polishing with the blow-
off torch:
EN-US
Mounting the
cleaning electrode on the
blow-off torch
1 2
39
Page 40
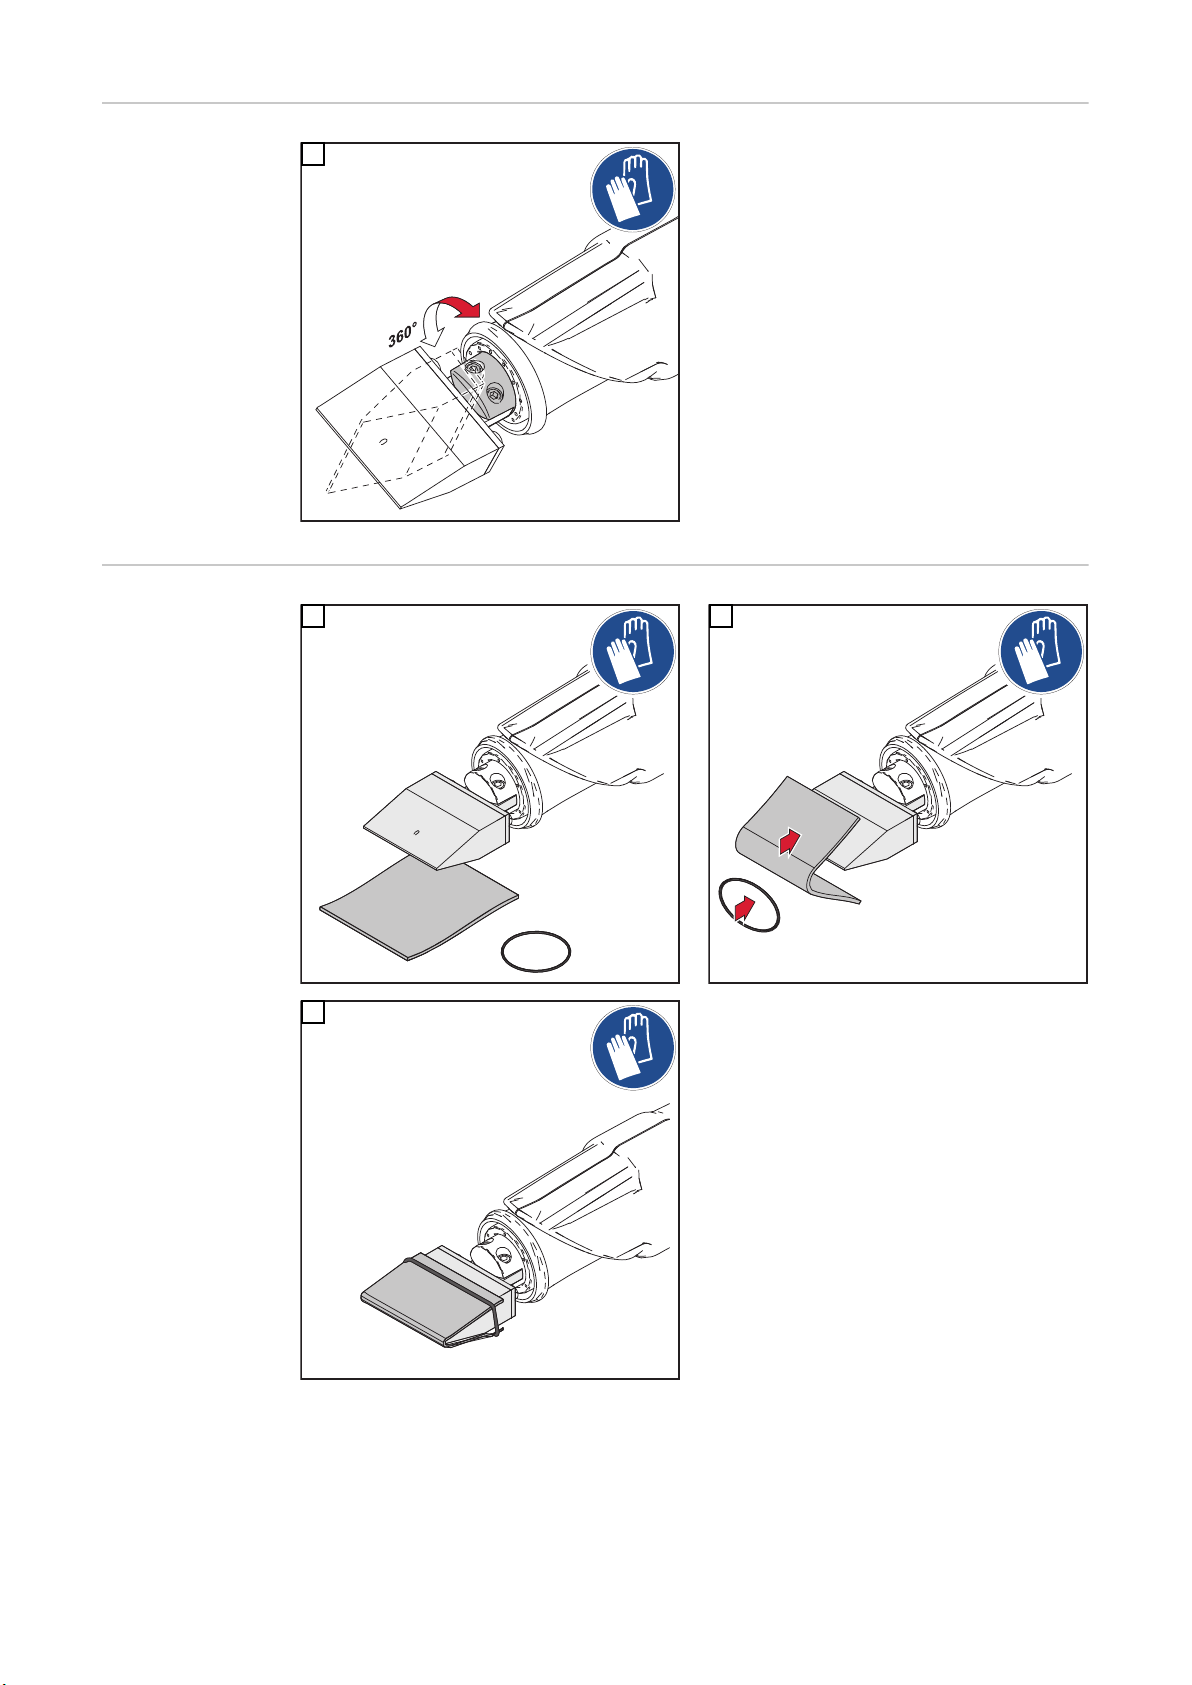
Aligning the
2
1
cleaning electrode
1
Mounting cleaning felt by means
of O-ring on 45
mm / 1.77 inch
cleaning electrode
1
3
2
40
Page 41
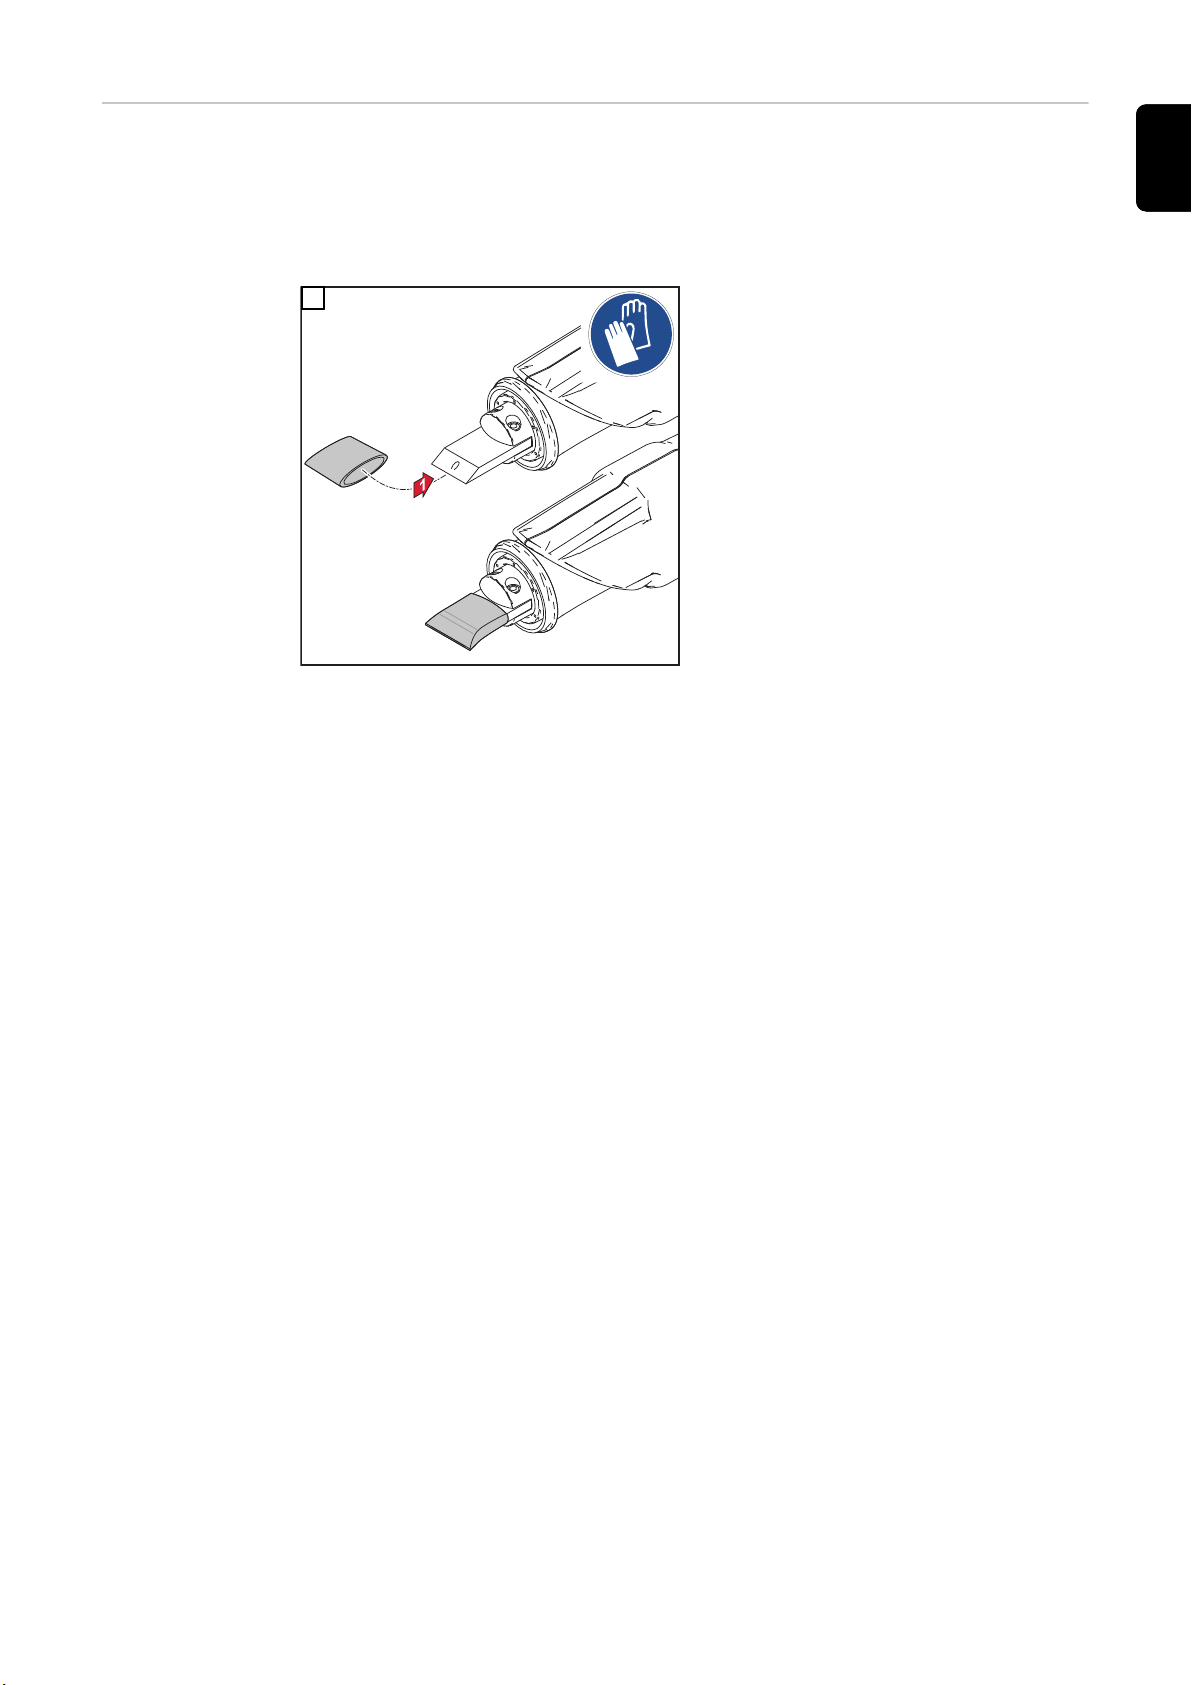
Attaching supplied cleaning felt
to cleaning electrode 22 mm /
0.87 inch
The MagicCleaner 300 is supplied with 2 cleaning felts for the cleaning electrode in size
22 mm / 0.87 inch.
These cleaning felts are manufactured in the form of a pocket and are slid over the
cleaning electrode. Fixing by means of an O-ring or rubber ring is not necessary.
EN-US
1
Attaching cleaning felt to cleaning electrode 22 mm /
0.87 inch
The cleaning felt is attached to the optional 10 mm / 0.39 inch cleaning electrode in
the same way.
41
Page 42
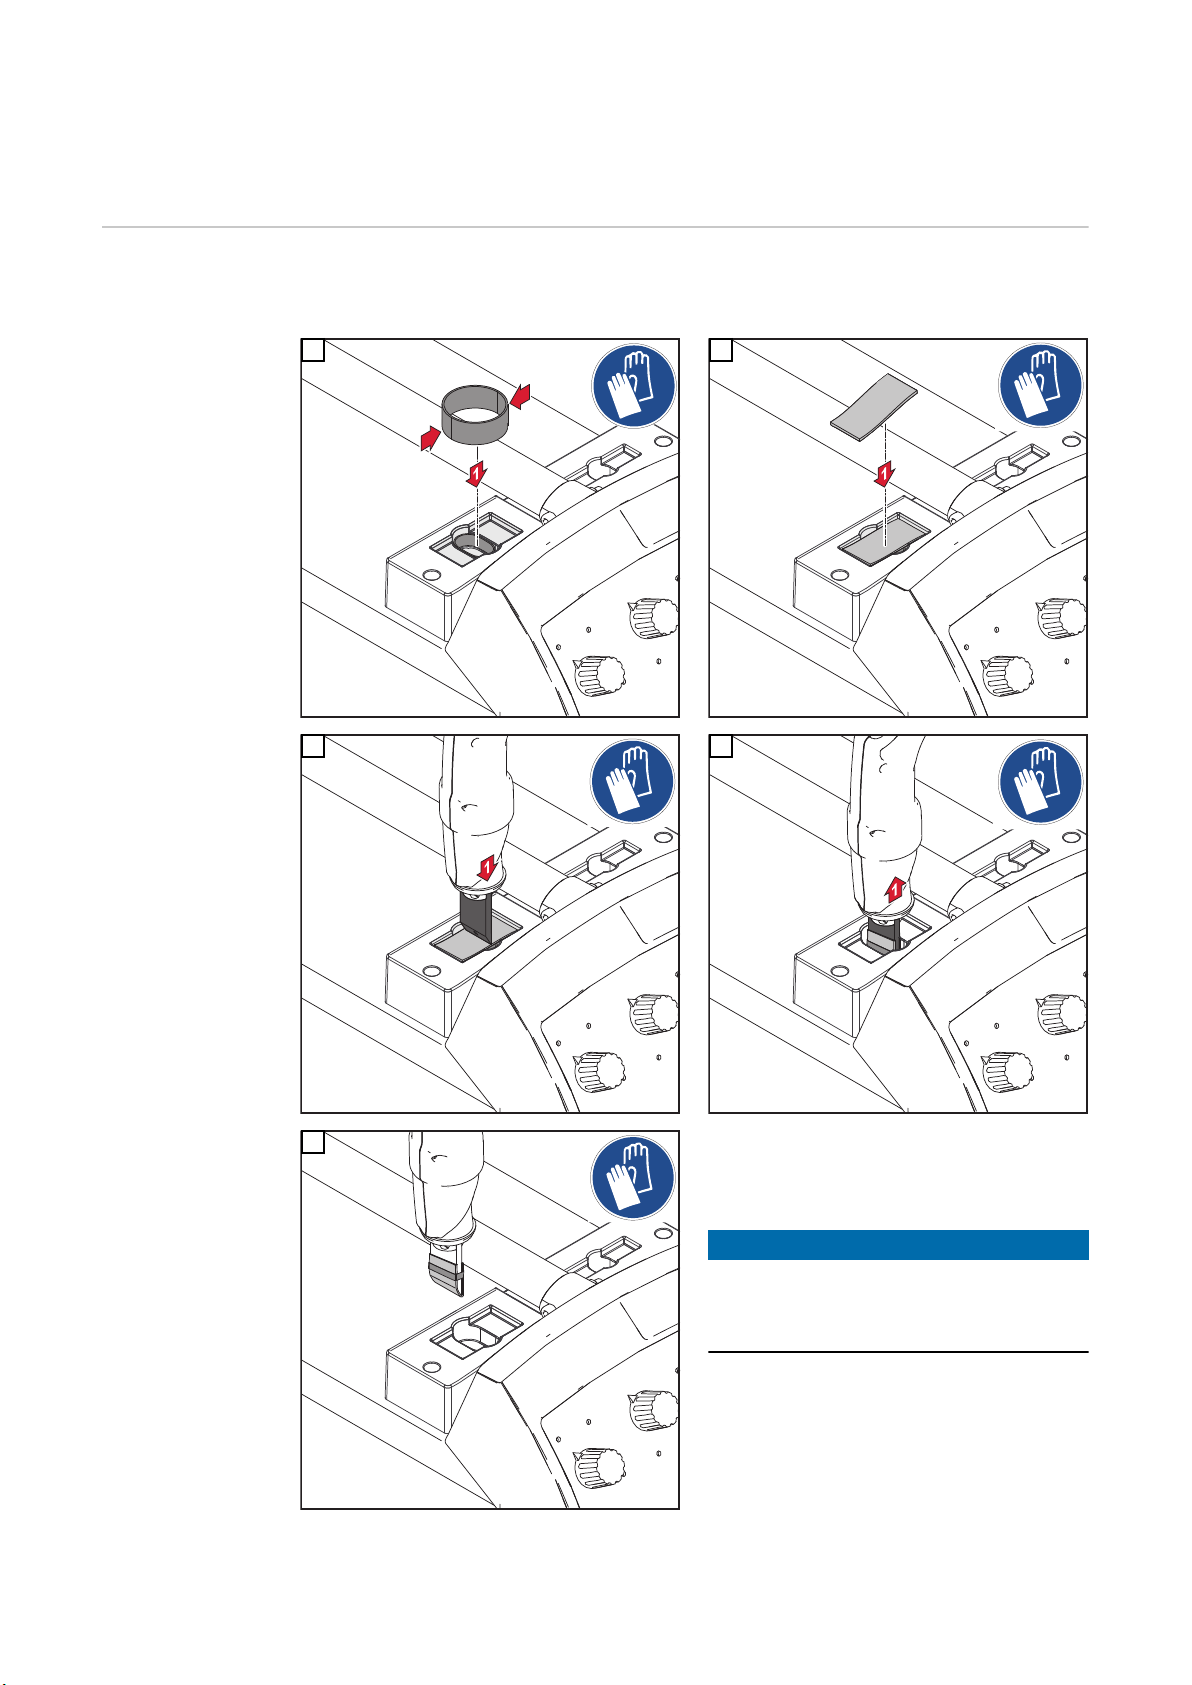
Fitting the optionally available cleaning felts to the
blow-off torch
Mounting cleaning felt by means
of felt mounting
tool - 22 mm /
0.87 inch cleaning electrode
Alternative mounting option if cleaning felt other than the felt supplied is used for the 22
mm / 0.87 inch cleaning electrode.
1 2
3 4
42
5
Other cleaning felt and mounting rings are
optionally available from Fronius.
NOTE!
The alternative mounting of the cleaning felt on the 10 mm / 0.39 inch cleaning electrode is done in the same way.
Page 43
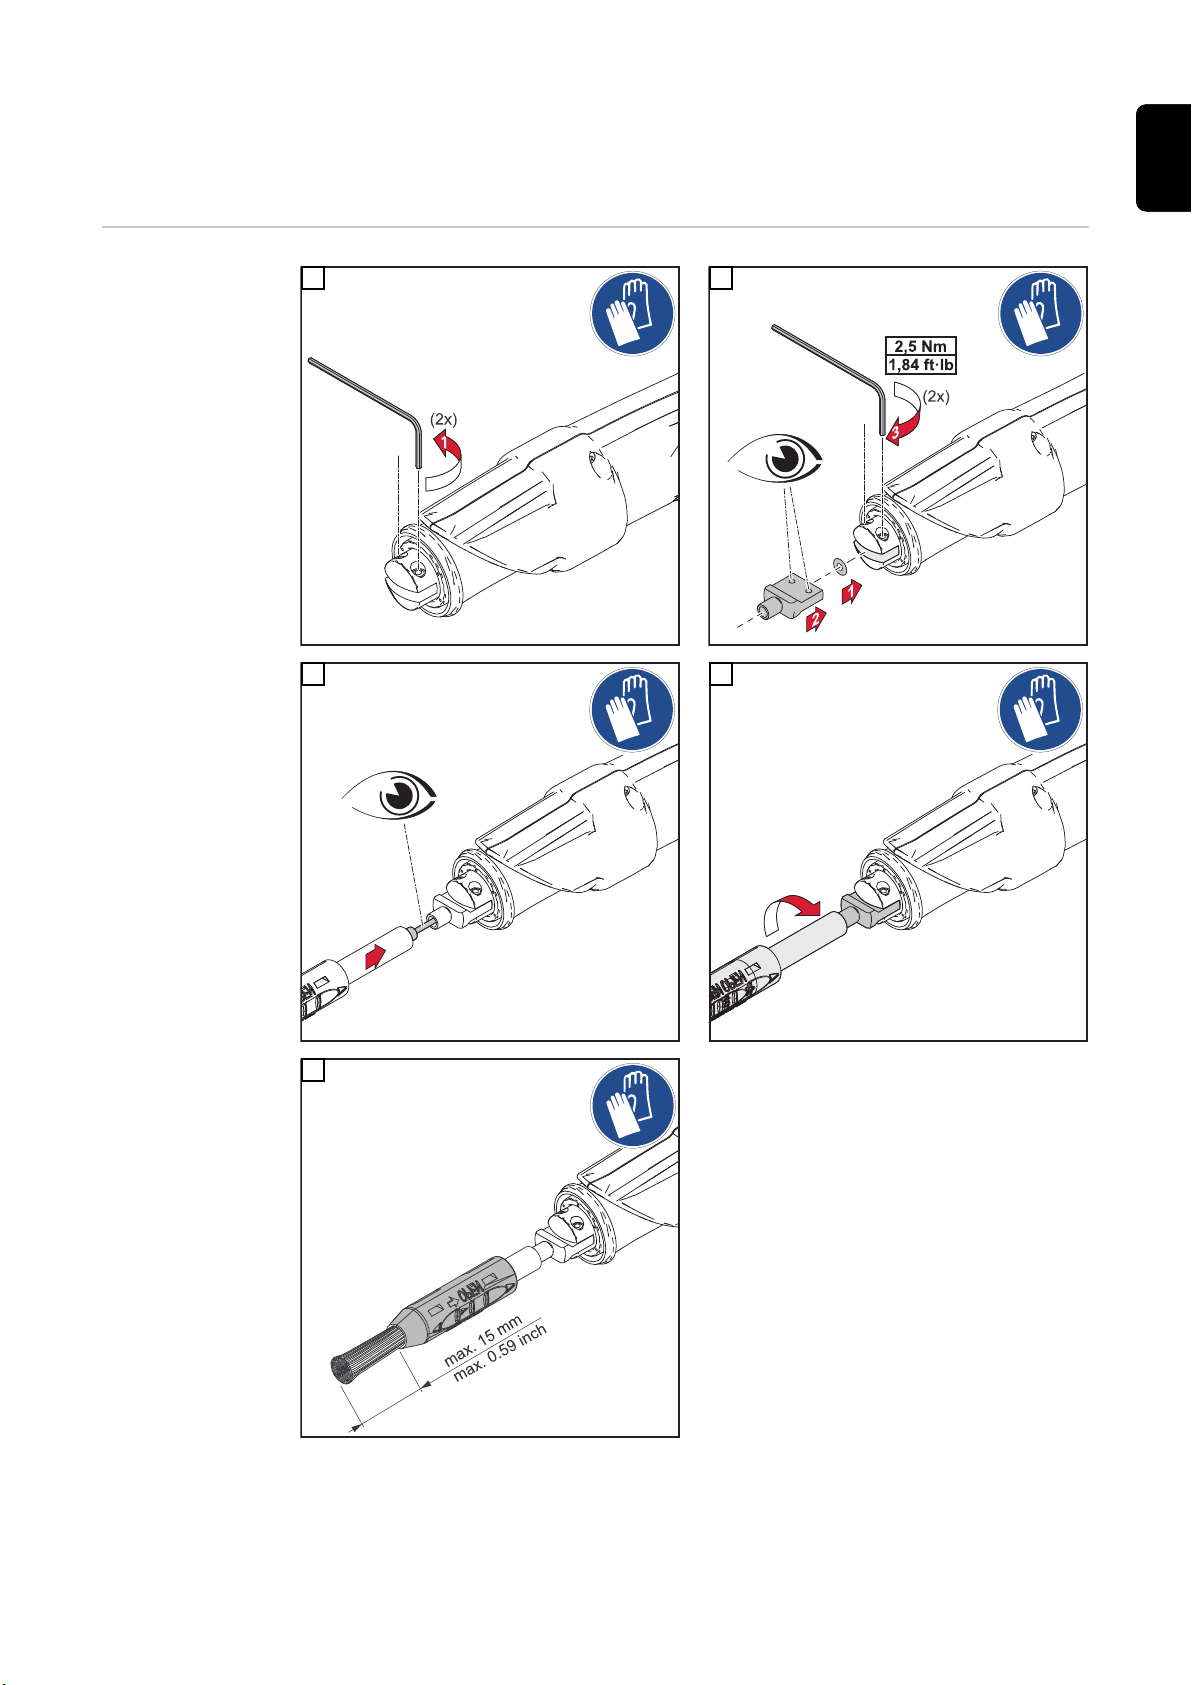
Fitting the large cleaning brush to the blow-off
torch
Fitting the large
cleaning brush to
the blow-off torch
EN-US
1 2
3 4
5
IMPORTANT! The fibers of the cleaning
brush must not protrude more than 15
mm / 0.59 inch from the brush housing.
43
Page 44
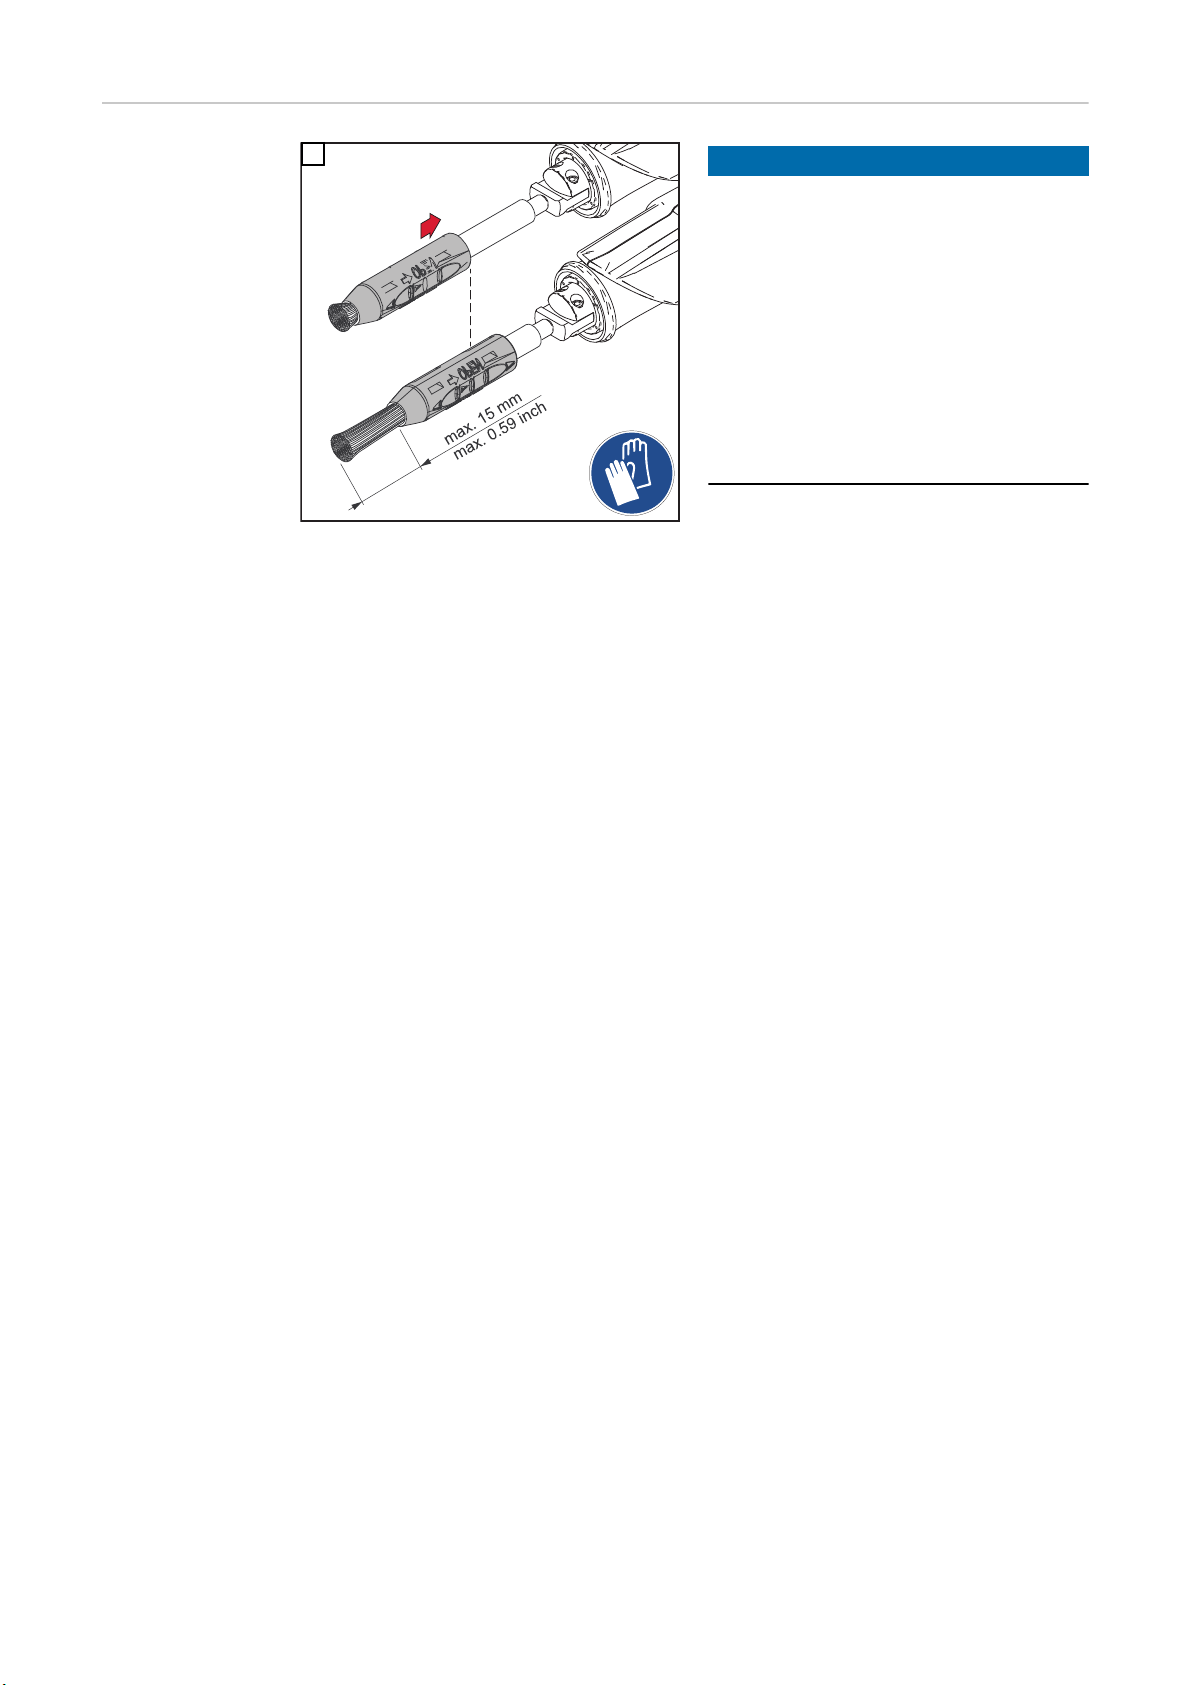
Re-adjusting the
large cleaning
brush
1
NOTE!
If the fibers are worn or short, push the
brush housing towards the cleaning
torch.
Only push the brush housing back
▶
when the cleaning brush is mounted
on the cleaning torch.
The first few times you push the brush
▶
housing back this may require more
force.
The fibers of the cleaning brush must
▶
not protrude more than 15 mm / 0.59
inch from the brush housing.
44
Page 45
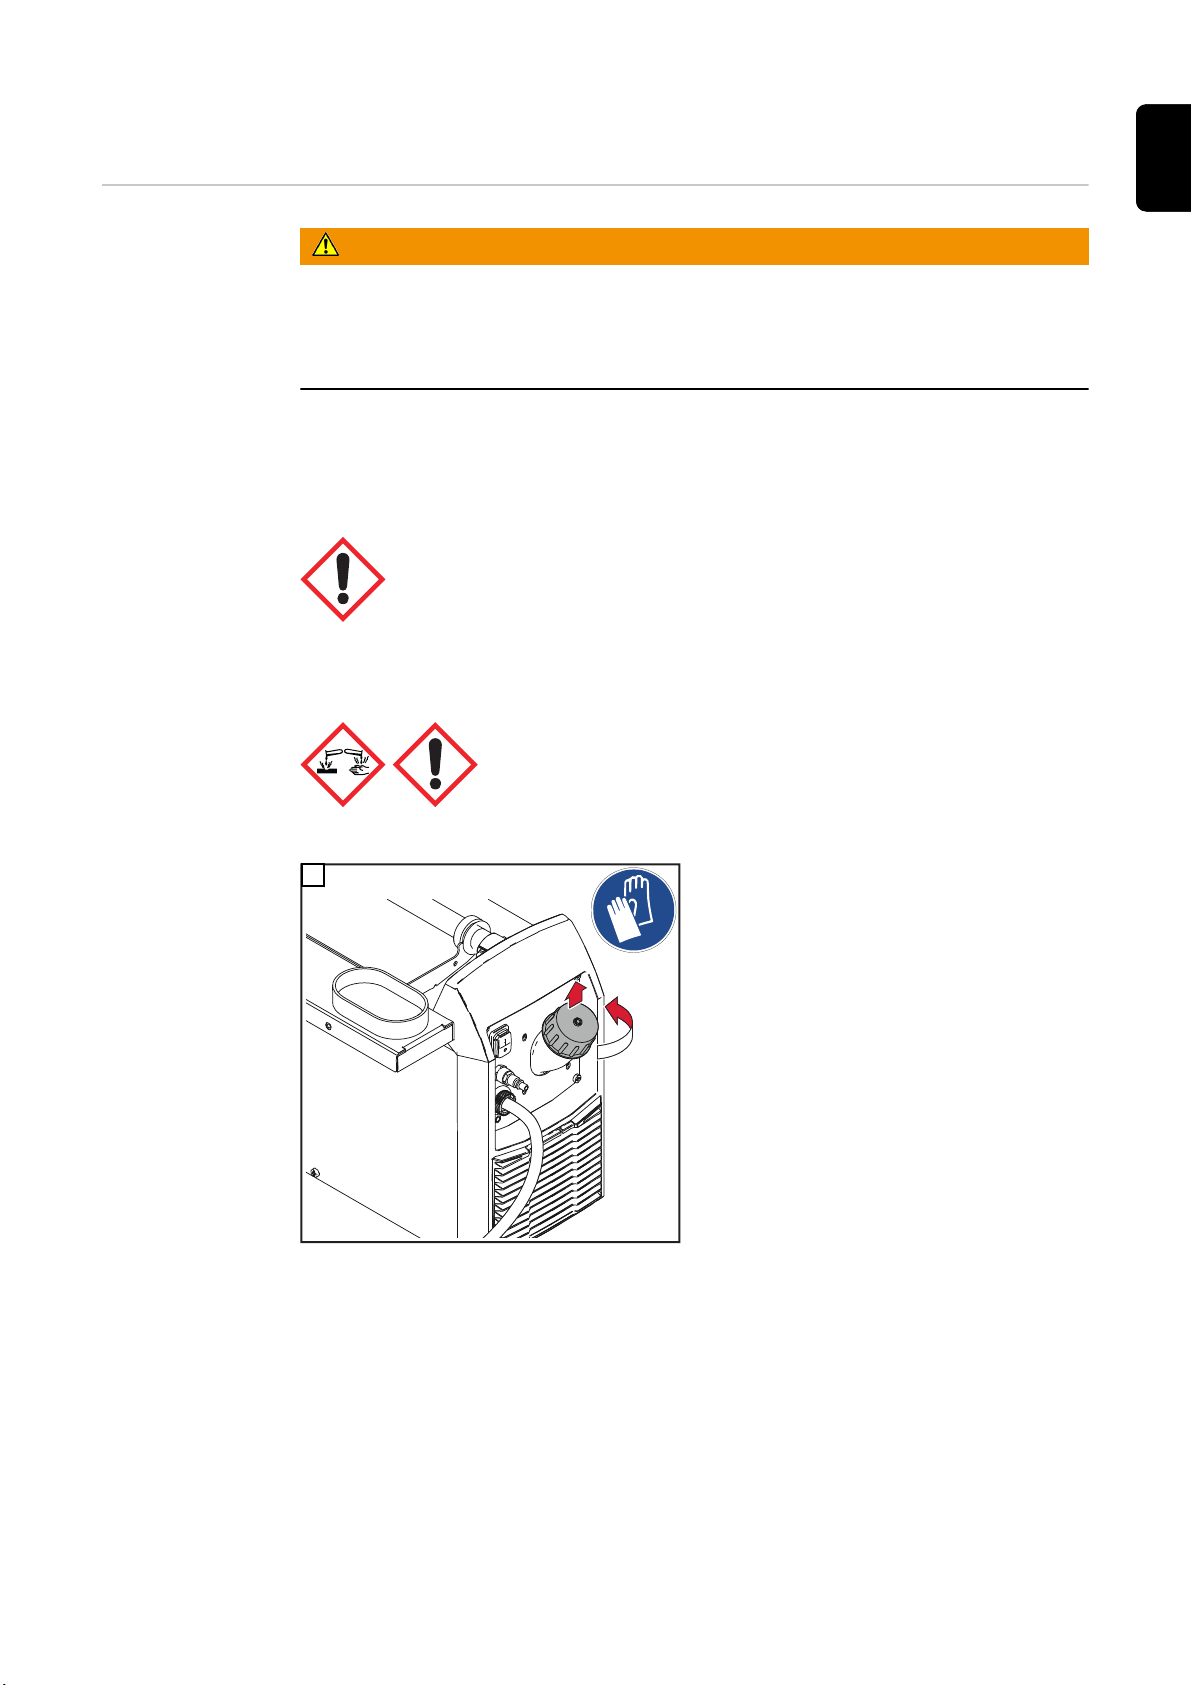
Cleaning with the blow-off torch
2
1
EN-US
Filling with cleaning electrolyte
WARNING!
Danger due to improper use!
This can result in serious personal injury, damage to property and the environment.
Observe the safety data sheets of the cleaning electrolytes!
▶
Observe Safety Instructions from page 31!
▶
The following cleaning electrolytes are available for cleaning with the blow-off torch:
Cleaning electrolyte blue 5 l
for cleaning welds
Cleaning electrolyte red 5 l
for cleaning welds at higher cleaning speeds
1
45
Page 46
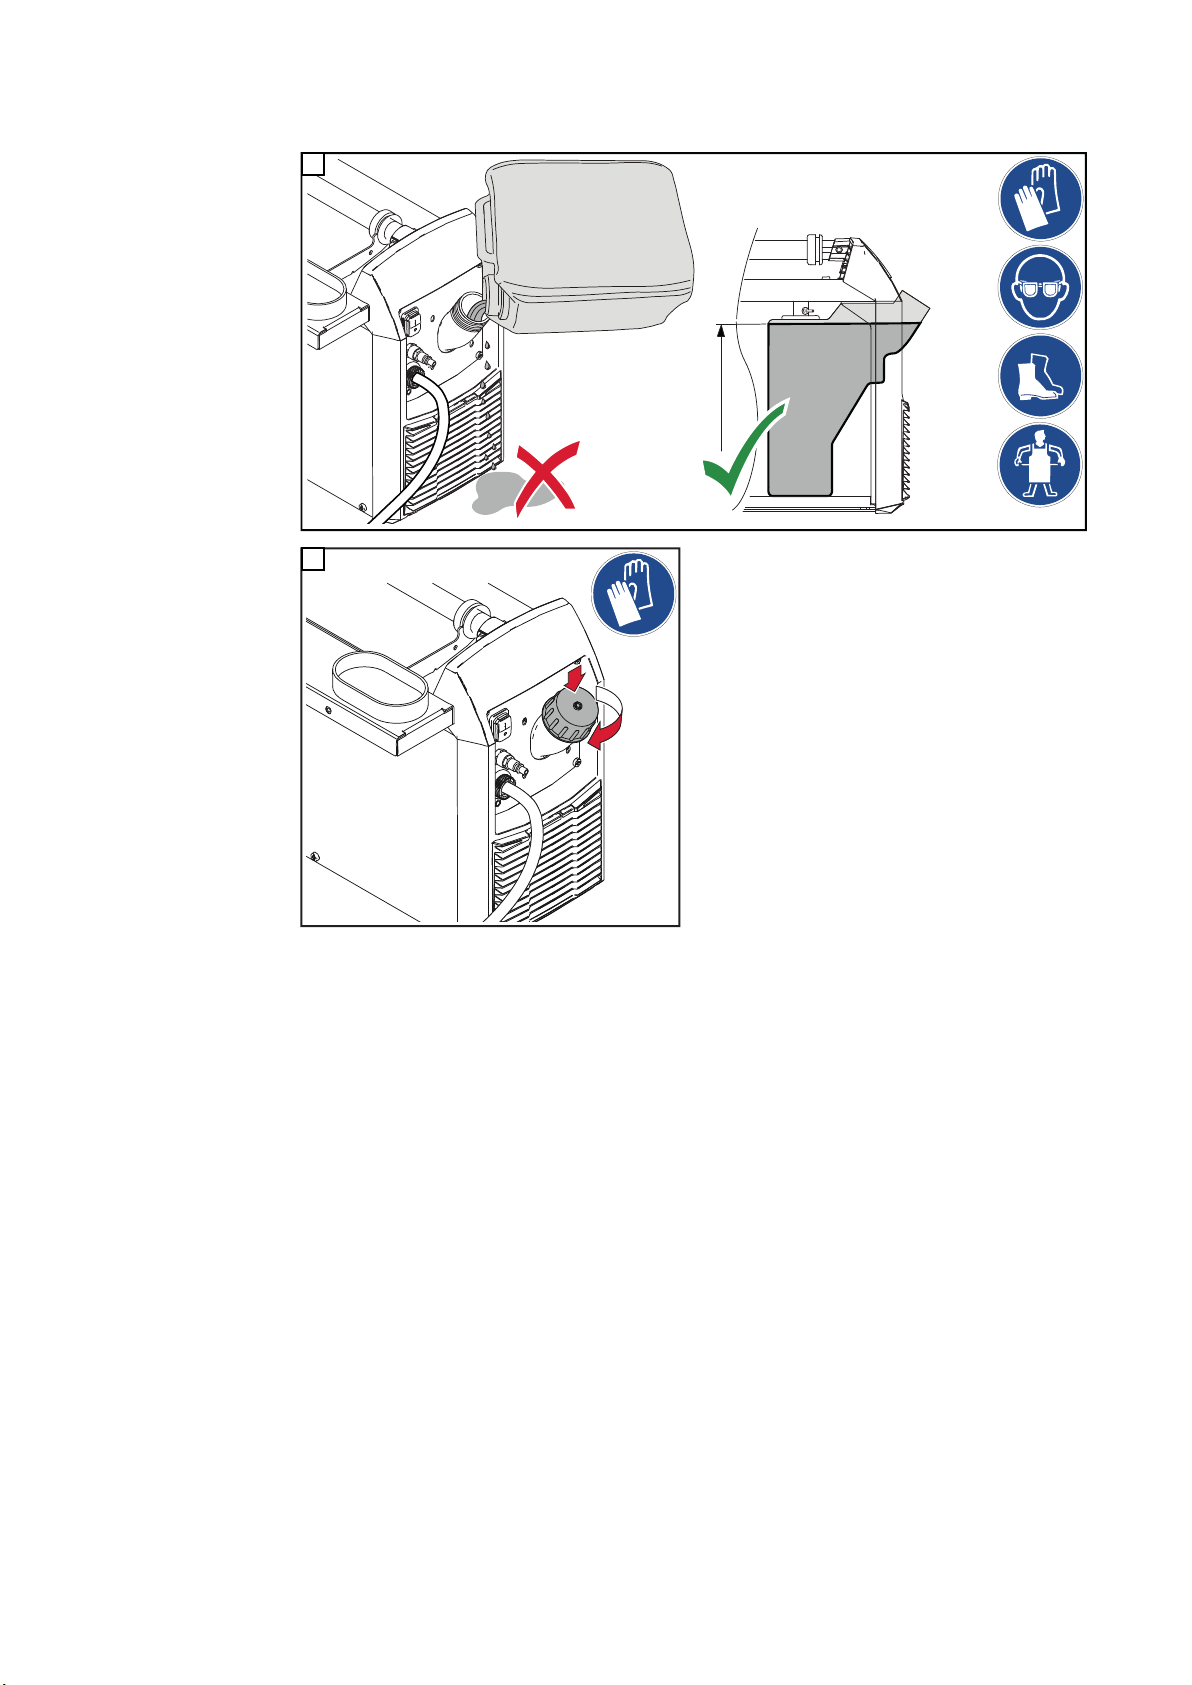
IMPORTANT! Do not mix cleaning electrolytes!
Cleaning
electrolyte
Cleaning
electrolyte
max.
Level
2
1
2
3
46
Page 47
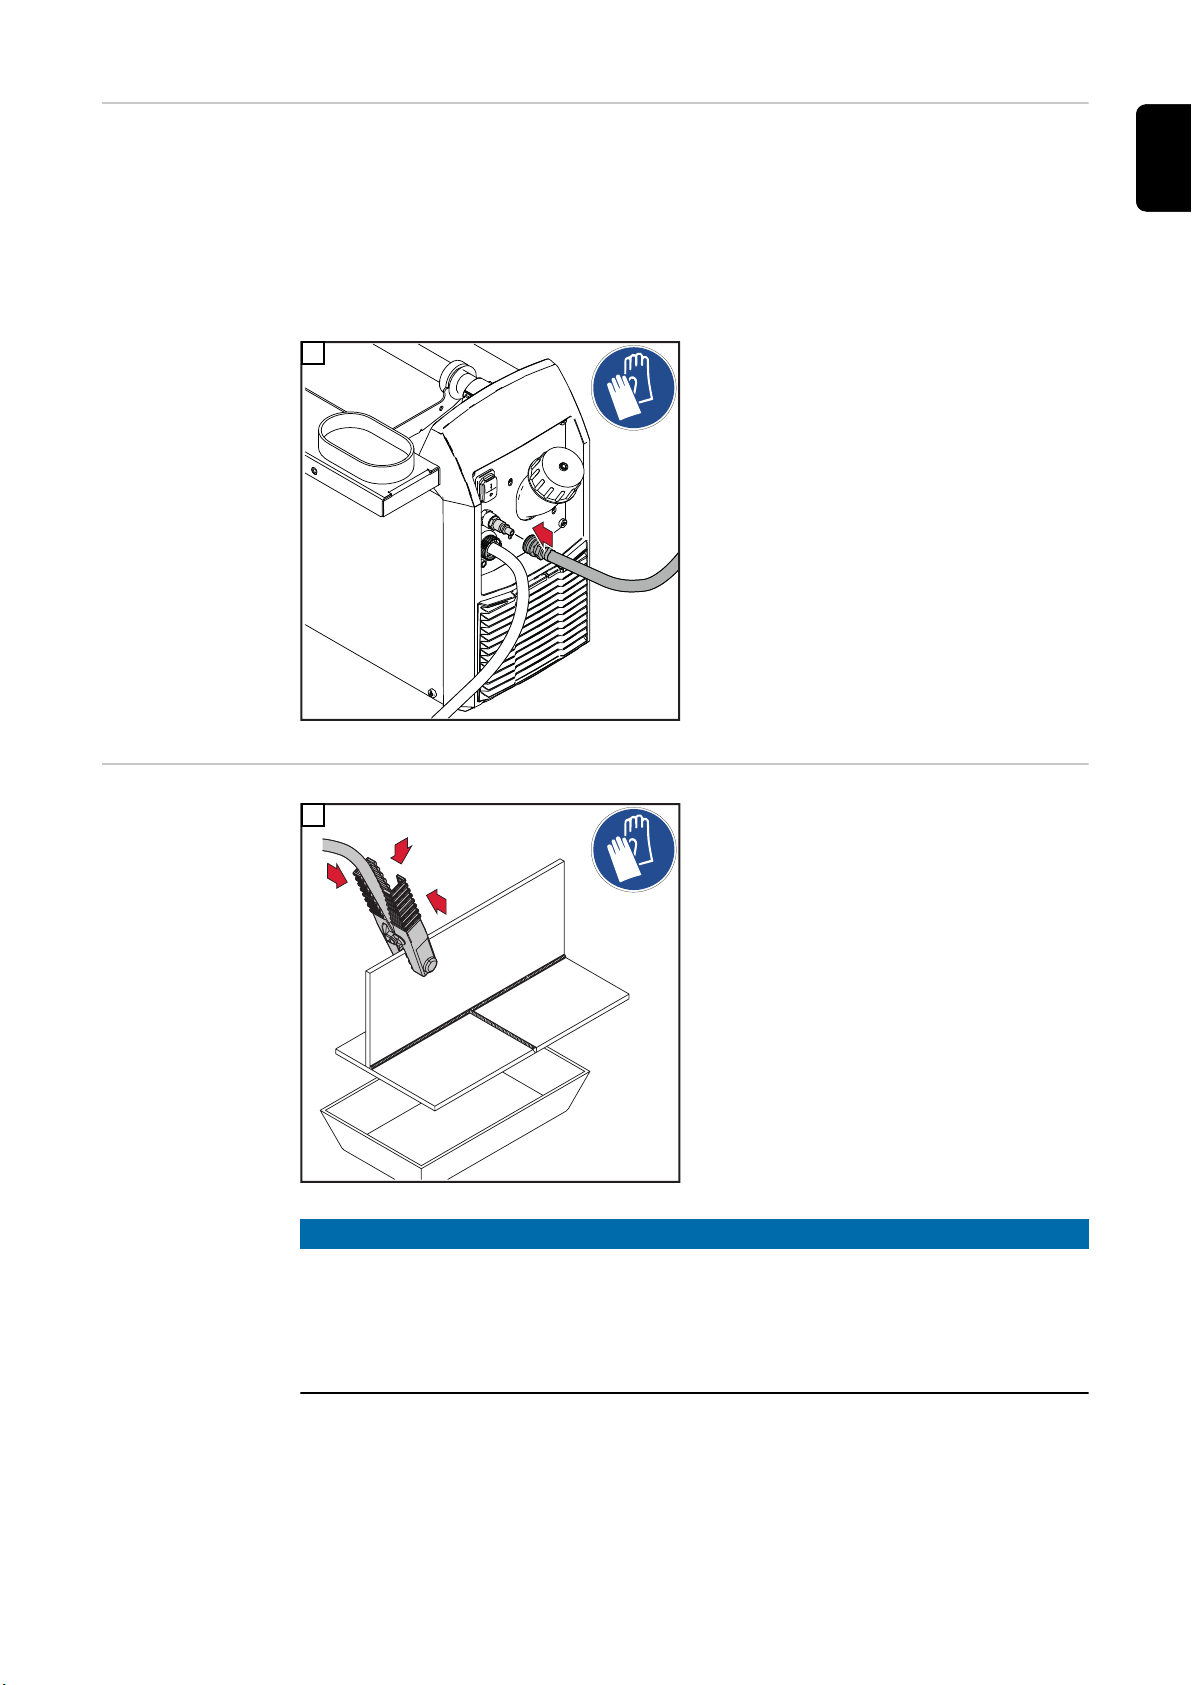
Connecting to the
max.
6 bar
1
1
compressed air
For cleaning and polishing with the blow-off torch, a compressed air supply with the following specifications is required:
- 6 bar compressed air supply with pressure relief valve and compressed air filter
- Compressed air quality according to ISO 8573-1:2001, class 7 4 3, instrument air
Solid particle concentration ≤ 10 mg/m
Pressure dew point steam ≤ + 3°C
Oil concentration ≤ 1 mg/m
1
3
3
EN-US
Cleaning with the
blow-off torch
1
NOTE!
To avoid possible electrical interference:
Connect the device only to power lines to which no other devices such as welding
▶
systems, electric motors, or similar are connected,
or
Ground the device.
▶
47
Page 48
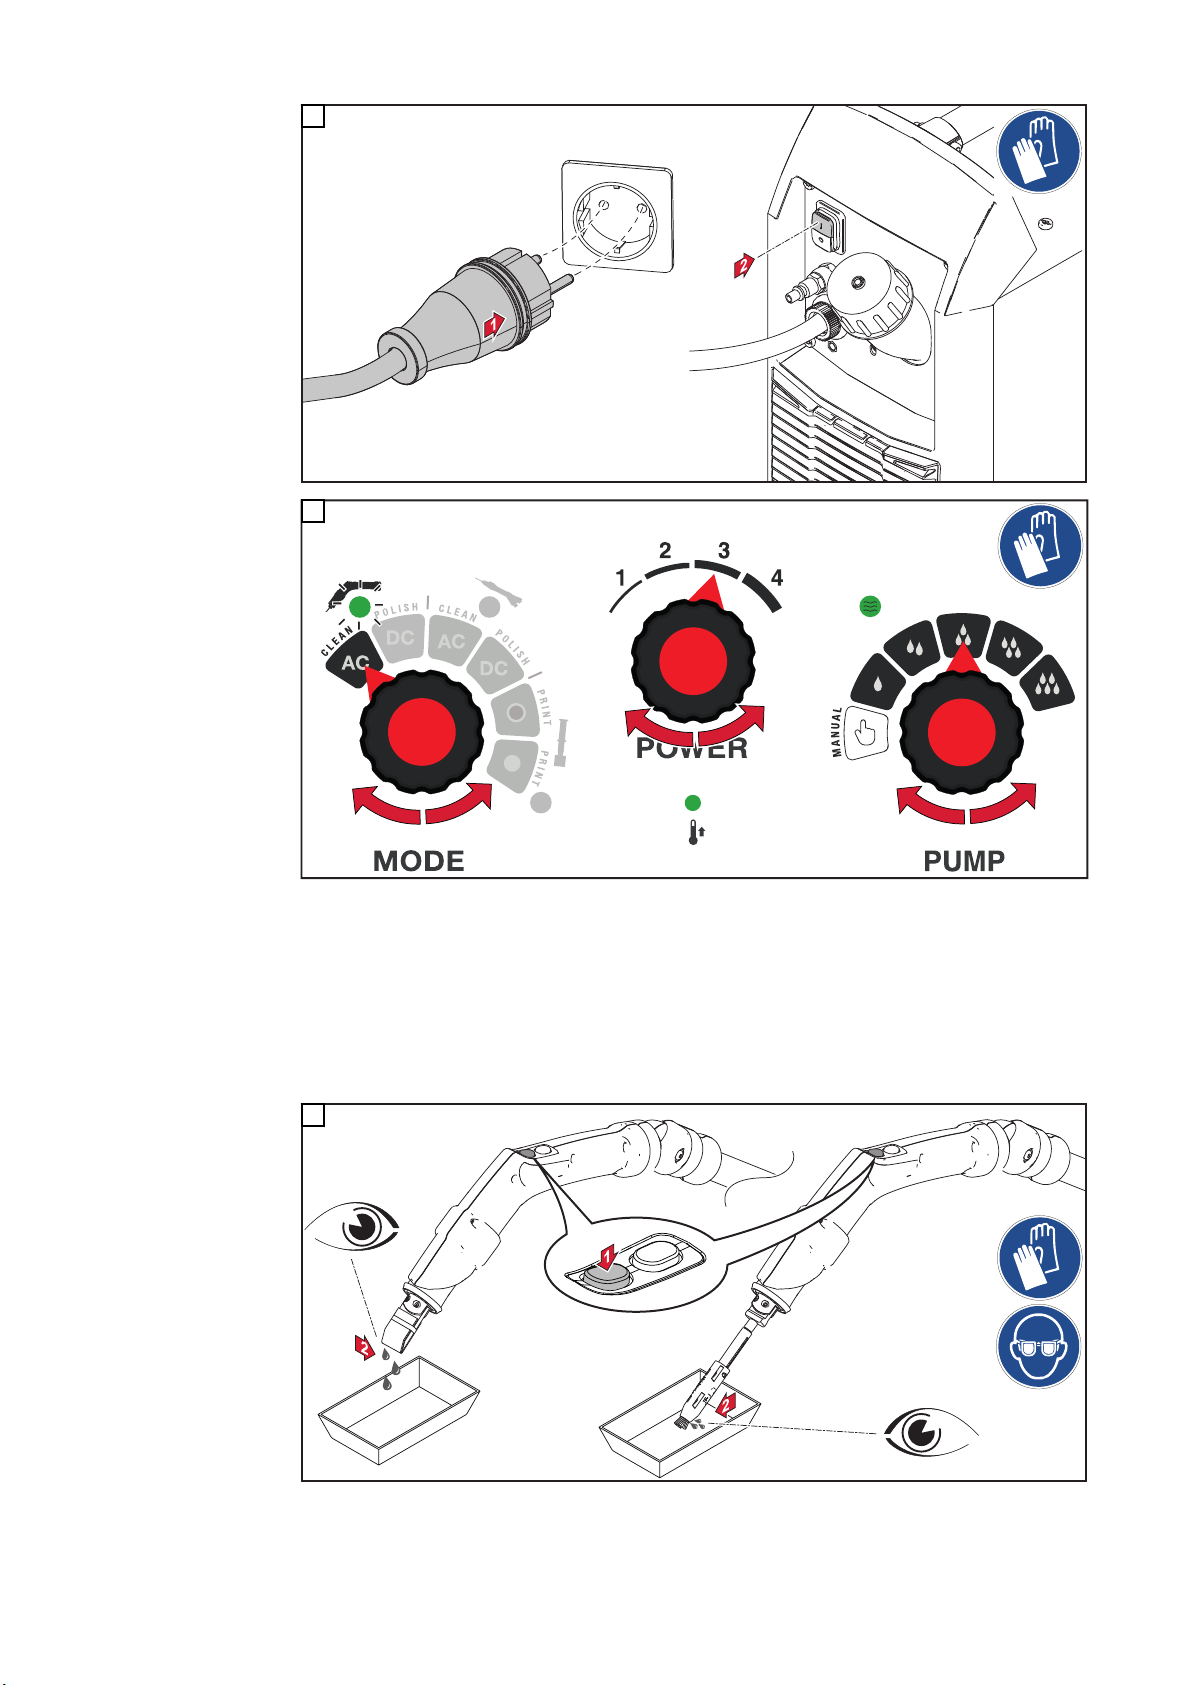
2
1
1
2
2
3
3
3
Cleaning power standard values (POWER):
- Cleaning electrode 10 mm / 0.39 inch: 1 - 2
- Cleaning electrode 22 mm / 0.87 inch: 1 - 3
- Cleaning electrode 45 mm / 1.77 inch: 3 - 4
- Large cleaning brush: 1 - 3
As the cleaning power increases, higher cleaning speeds are possible.
4
In manual mode, press and hold the Start key to start the cleaning electrolyte supply.
48
Page 49
1
1
5
1
1
Cleaning electrode
EN-US
Large cleaning brush
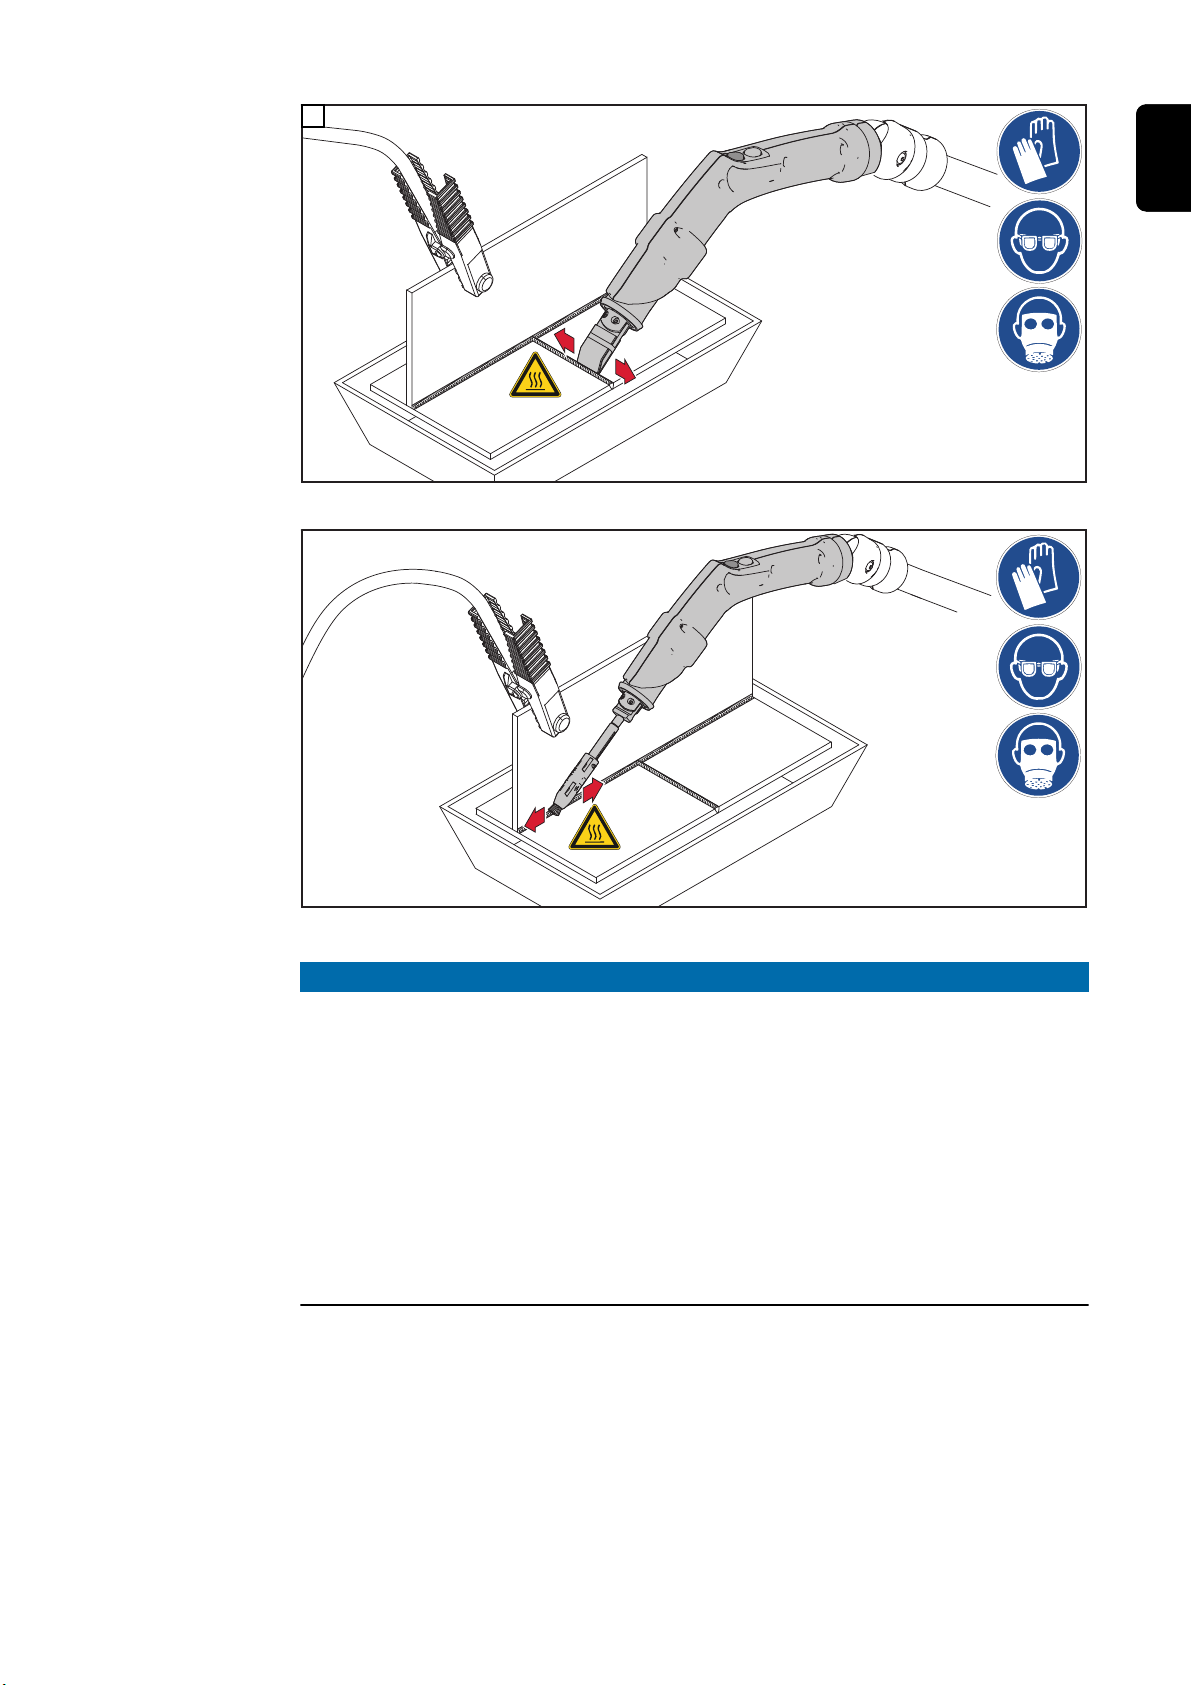
NOTE!
Observe the following points for smooth cleaning operation:
With higher cleaning performance, more cleaning electrolyte is required because the
▶
cleaning electrode and workpiece become hotter and the cleaning electrolyte evaporates more quickly.
When cleaning with the cleaning felt, apply slight pressure to the weld.
▶
If the operating noise ("crackling") is increased, insufficient cleaning electrolyte is be-
▶
ing used; it is better to clean in a puddle than too dry.
Always hold the cleaning brush perpendicular to the weld, and always moistened
▶
with cleaning electrolyte.
Apply light pressure to the area to be cleaned.
When cleaning with the cleaning brush, sparking, foaming, and increased operating
▶
noise may occur - this is normal.
49
Page 50
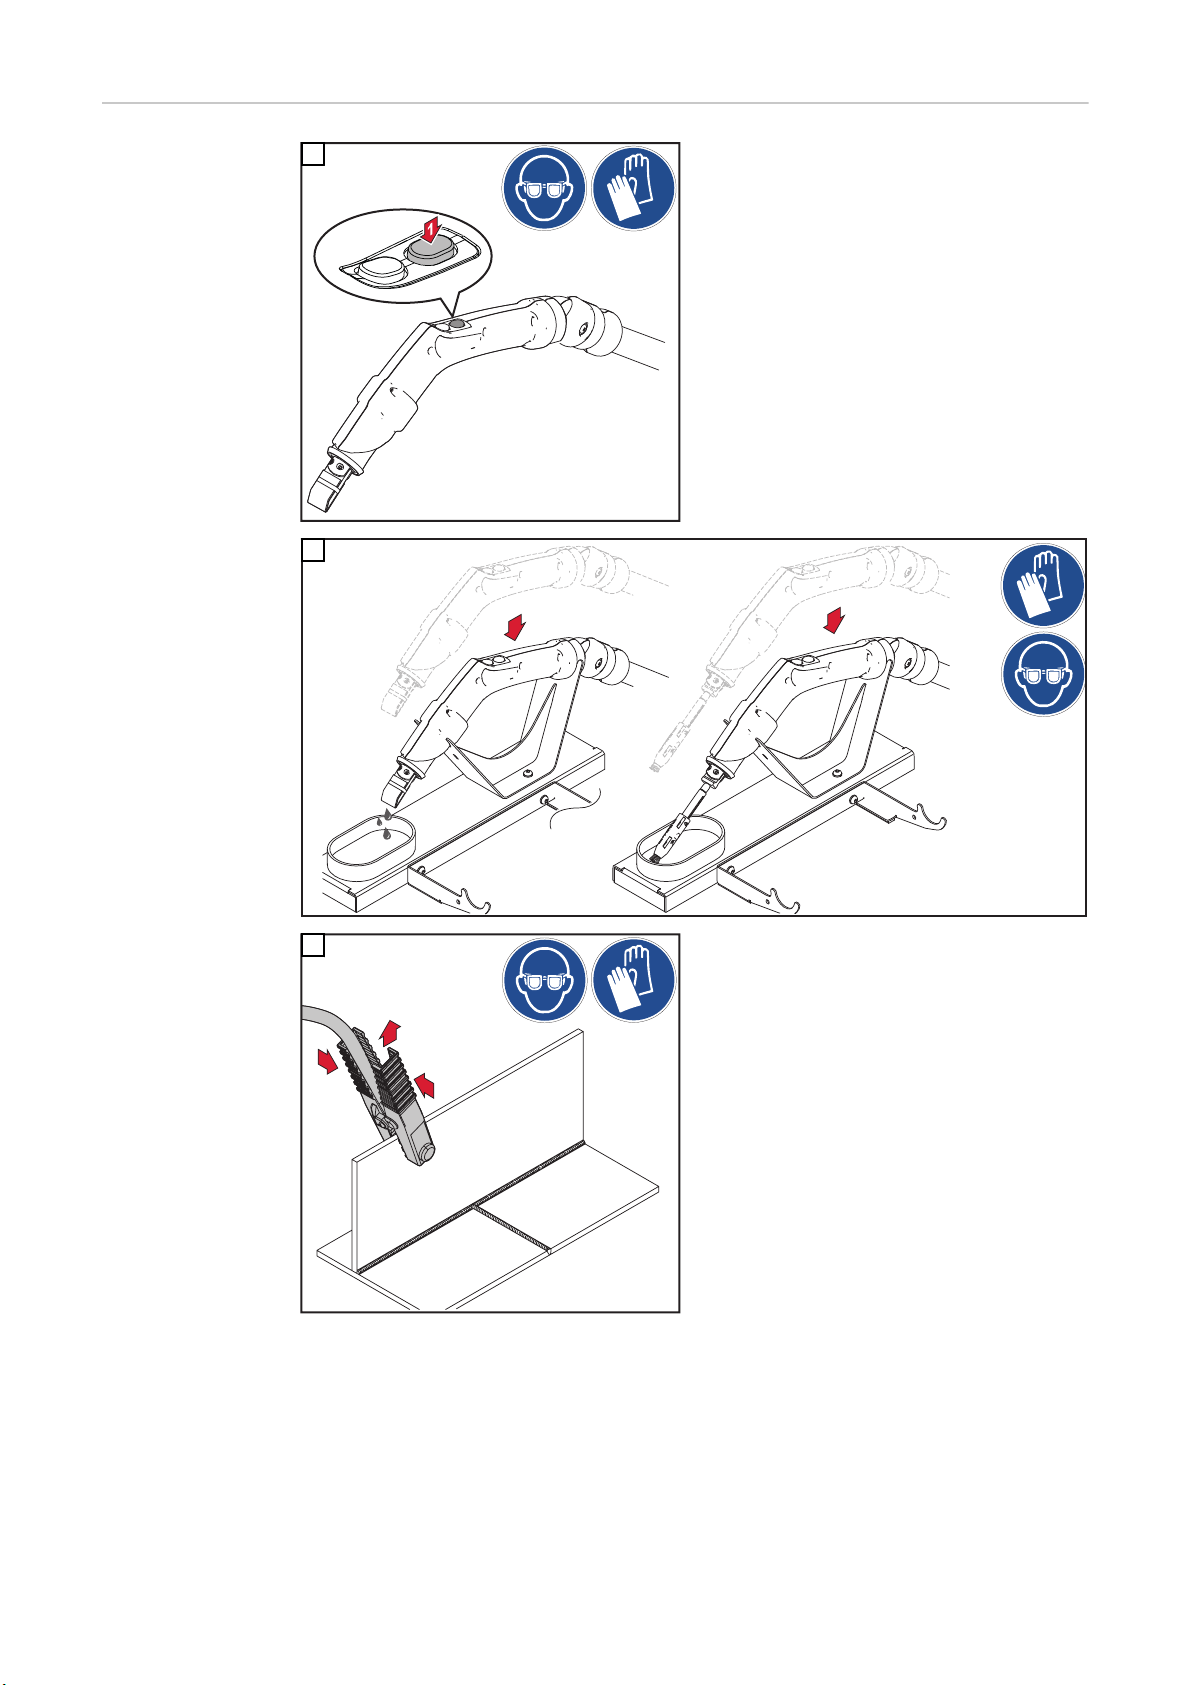
After cleaning
1
1
1
1
2
3
50
Page 51
4
1
2
*
**
1
2
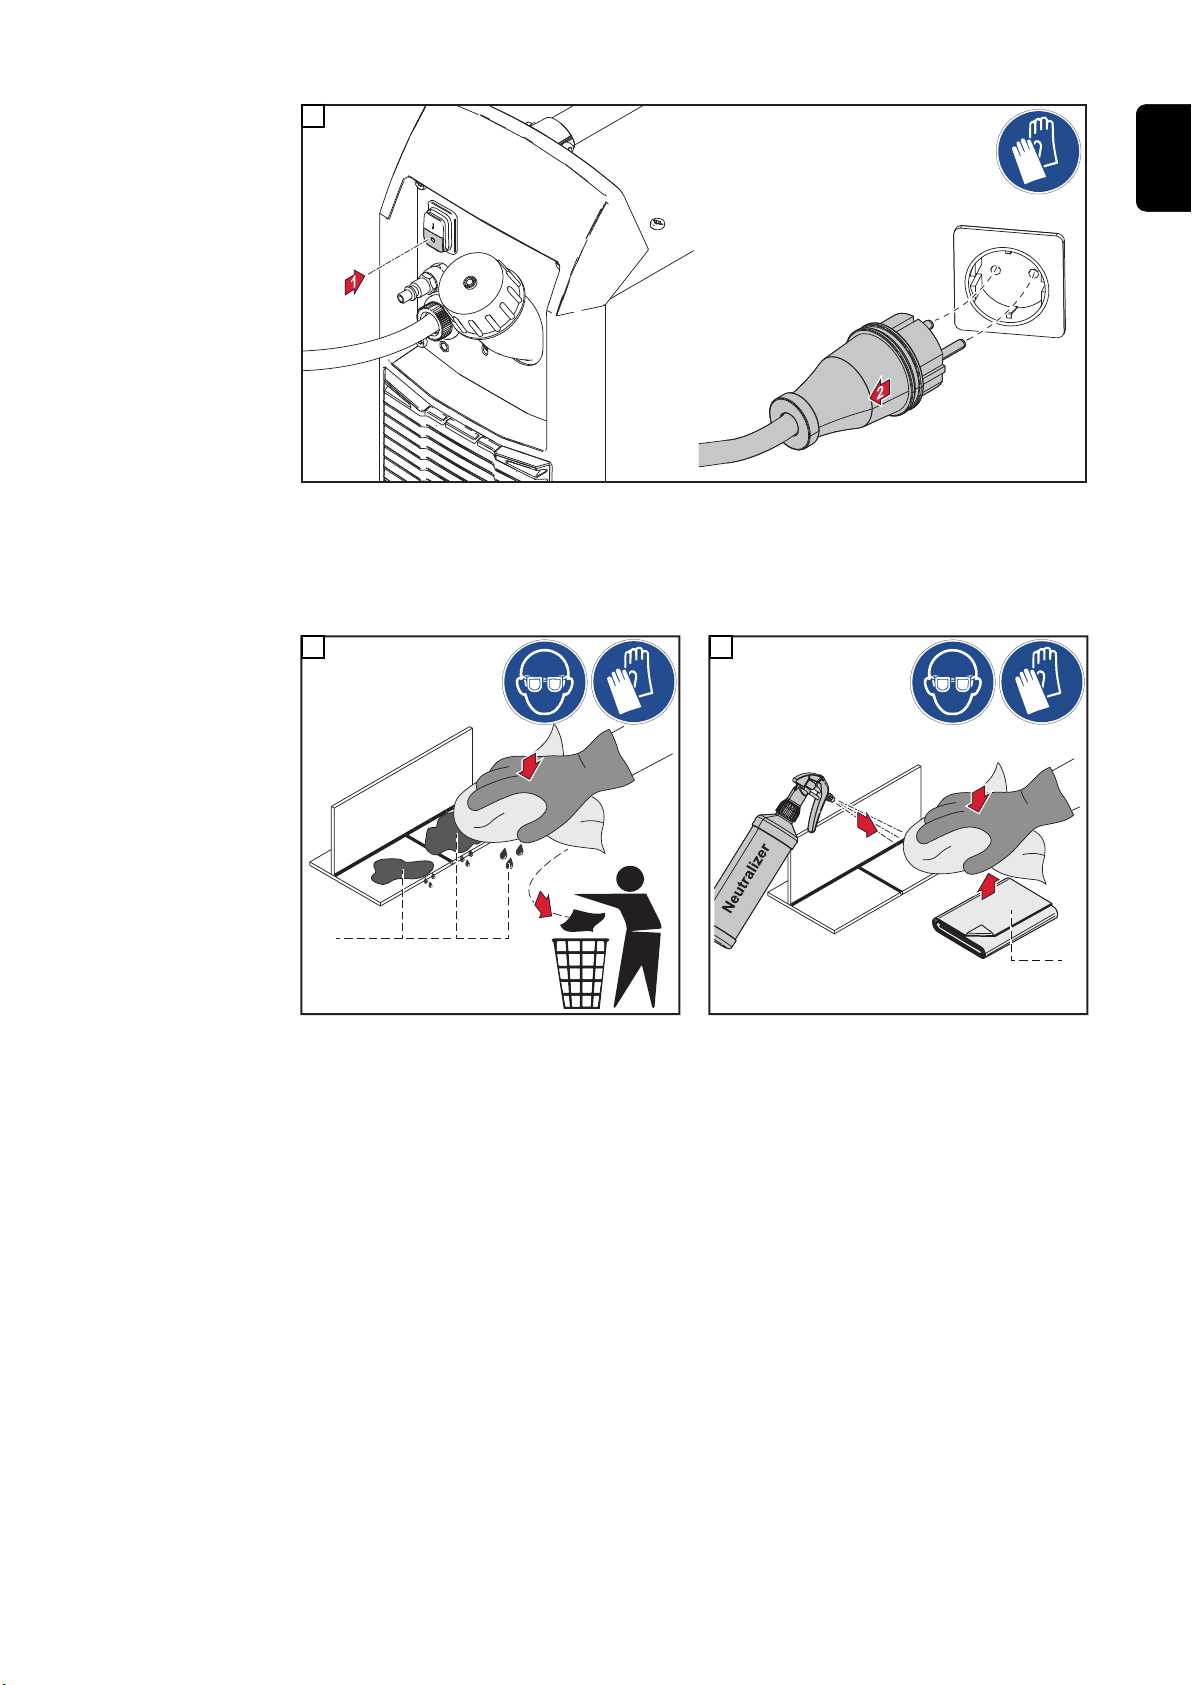
IMPORTANT! For an optimal cleaning result, remove the excess cleaning electrolyte to
avoid white spots due to cleaning electrolyte residues.
Subsequently clean the surface with the neutralizer.
EN-US
5
* Excess cleaning electrolyte
6
** New microfiber cloth
IMPORTANT!
- Do not dispose of cloths wetted with cleaning electrolyte in household waste!
- Dispose of cloths wetted with cleaning electrolyte in accordance with regional regulations!
Observe the safety data sheets of the cleaning electrolytes!
- After you have finished working with the device, remove the cleaning felt from the
cleaning electrode or dismantle the cleaning brush from the blow-off torch;
rinse the cleaning brush under running water.
51
Page 52
Cleaning with the small cleaning torch
22 mm / 0.87 inch
22 mm / 0.87 inch / 70°
35 mm / 1.38 inch
10 mm / 0.39 inch
10 mm / 0.39 inch / 70°
1
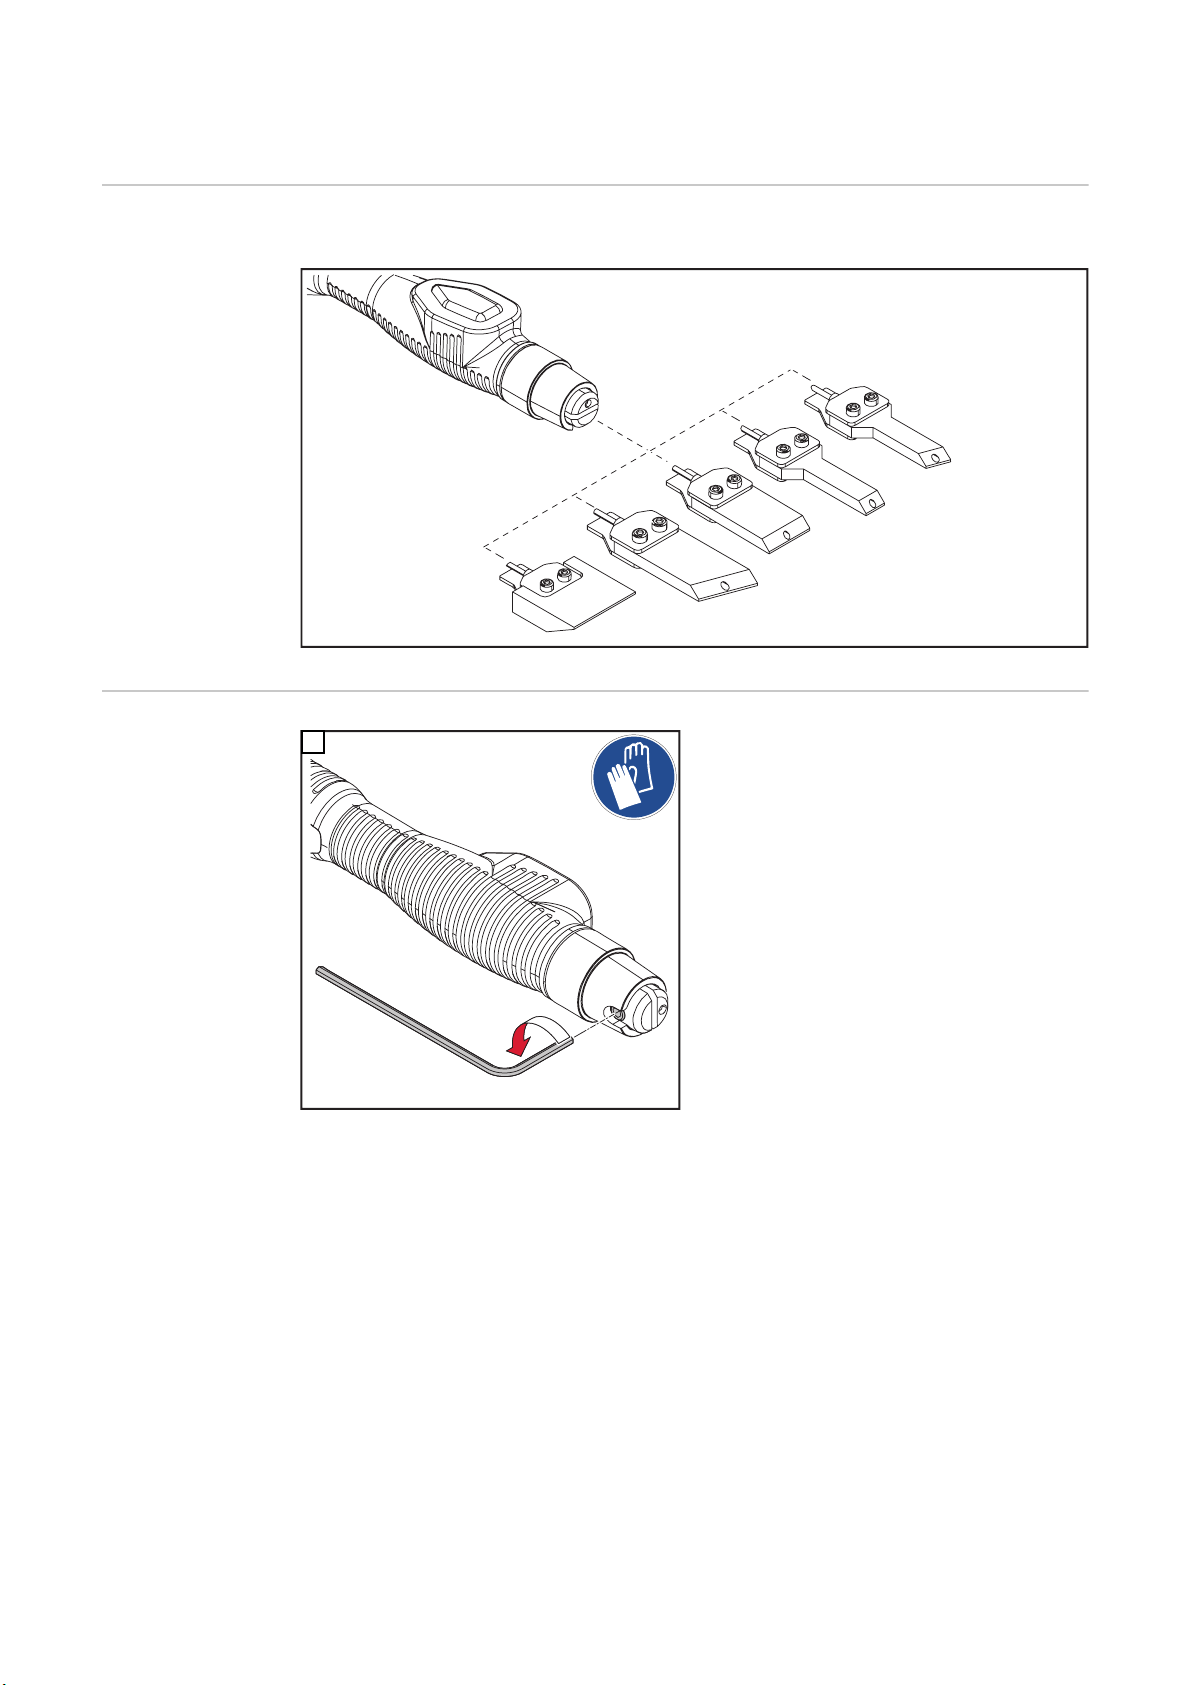
Overview The following cleaning electrodes are available for cleaning and polishing:
Mounting the
cleaning electrode
1
IMPORTANT! When inserting the cleaning electrode, make sure that the plastic tube (*)
is inserted into the hole (**) on the cleaning torch.
52
Page 53
1
*
**
2
1
2
2,5 Nm
1.84 lb-ft
EN-US
3
53
Page 54
Attaching the
1
1
supplied cleaning
felt to the cleaning electrode
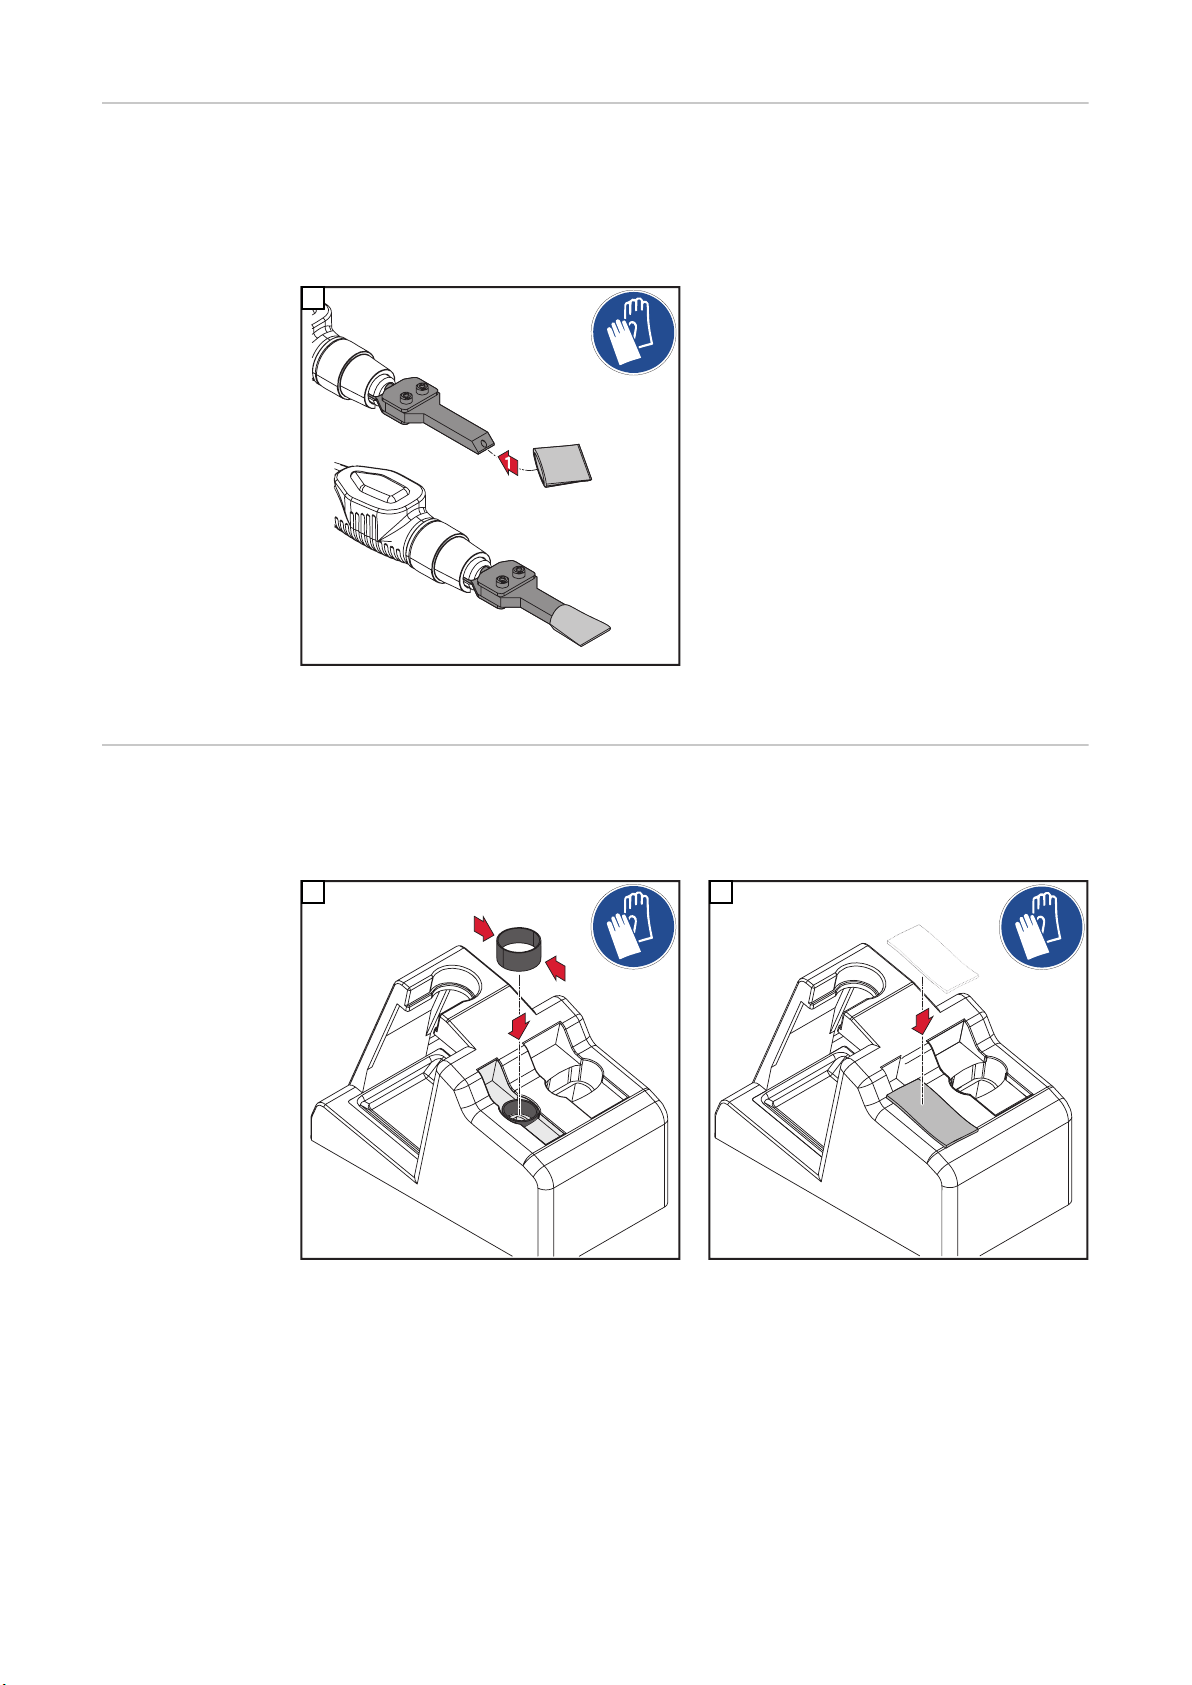
The MagicCleaner 150 is supplied with 3 cleaning felts each for the two cleaning electrodes in sizes 10 mm / 0.39 inch and 22 mm / 0.87 inch.
These cleaning felts are manufactured in the form of a pocket and are slid over the
cleaning electrodes. Fixing by means of a mounting ring is not necessary.
Mounting cleaning felt by means
of torch holder 10 mm / 0.39 inch
cleaning electrode
1
The cleaning felt is attached to the 22
mm / 0.87 inch cleaning electrode in the
same way.
Attaching cleaning felt to cleaning electrode 10 mm /
0.39 inch
Alternative mounting option if cleaning felt other than the felt supplied is used for the 10
mm / 0.39 inch cleaning electrode.
1
2
54
Page 55
1
3
1
1
1
2
4
EN-US
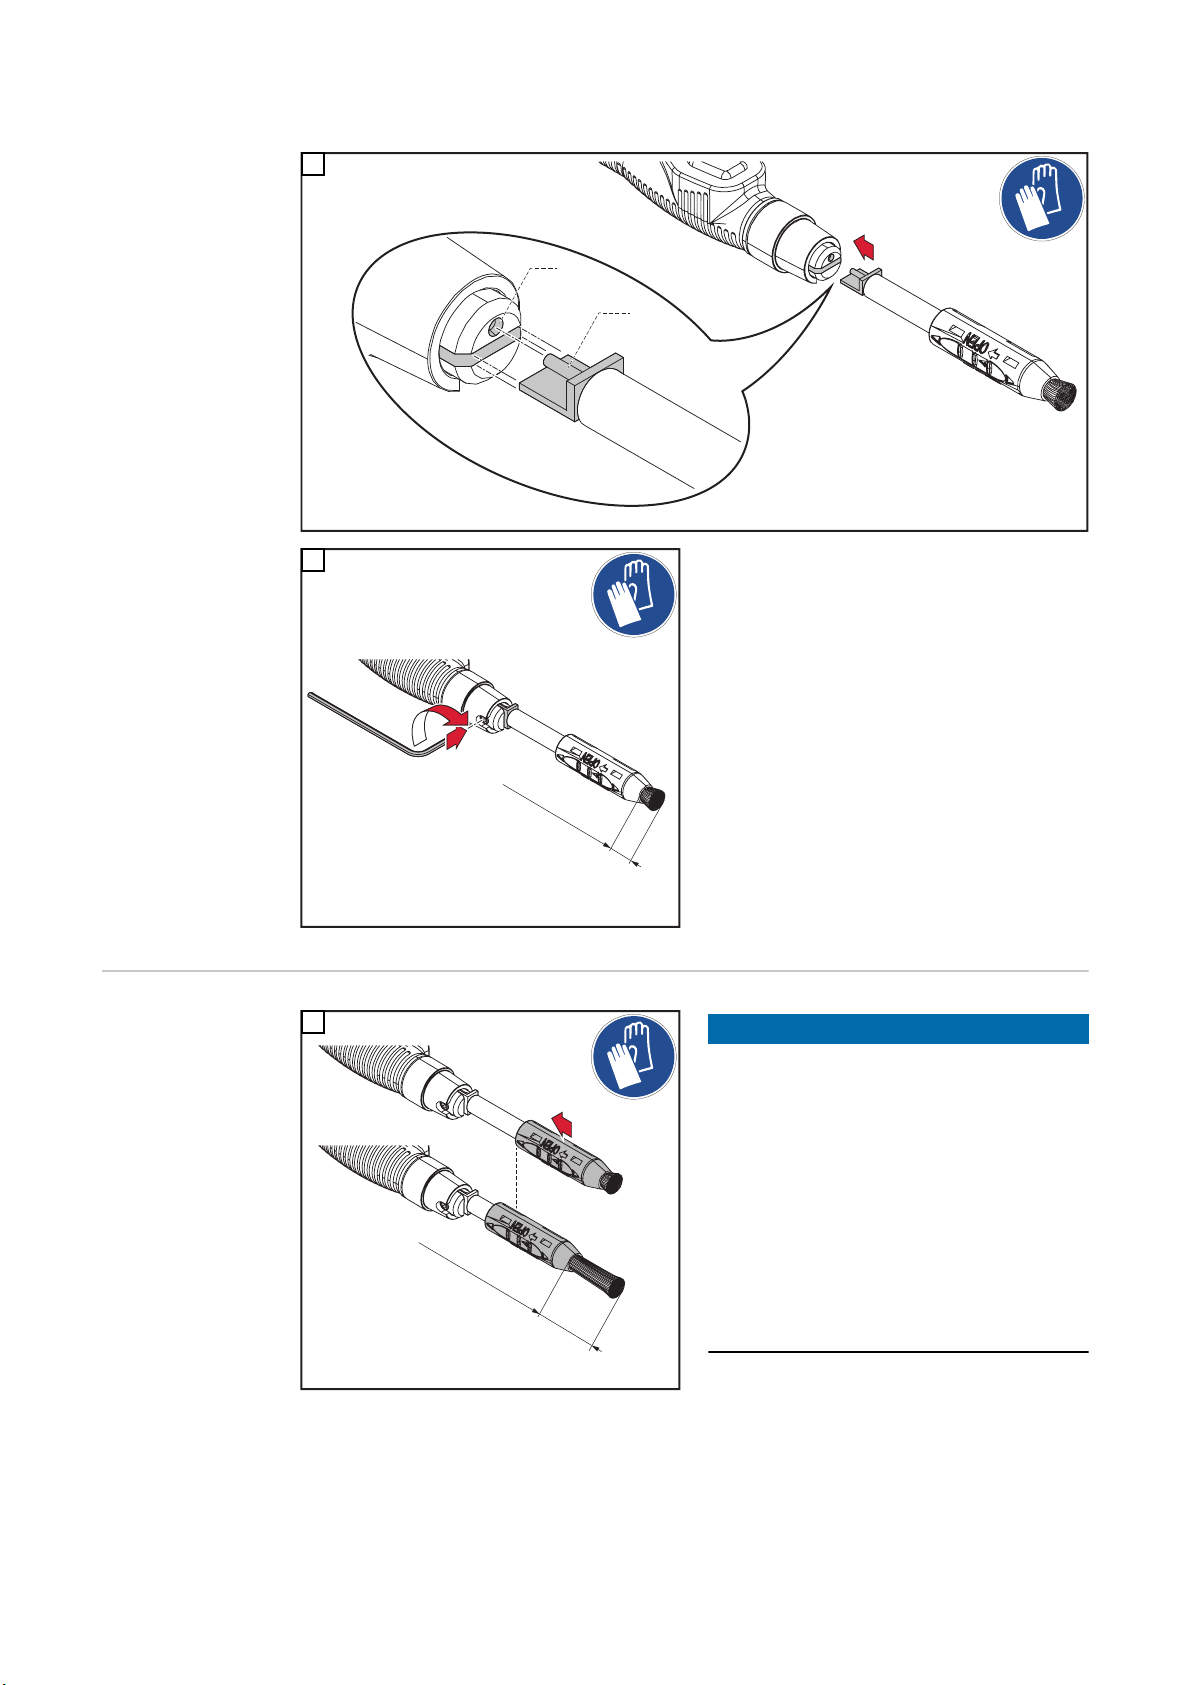
Mounting the
cleaning brush
5
Other cleaning felt and mounting rings are
optionally available from Fronius.
1
2
IMPORTANT! When inserting the cleaning brush, make sure that the plastic tube (*) is
inserted into the hole (**) on the cleaning torch.
55
Page 56
1
*
**
3
1
2
max. 15 mm
max. 0.59 inch
2,5 Nm
1.84 lb-ft
max. 15 mm
max. 0.59 inch
1
Readjusting the
cleaning brush
4
1
IMPORTANT! The fibers of the cleaning
brush must not protrude more than 15
mm / 0.59 inch from the brush housing.
NOTE!
If the fibers are worn or short, push the
brush housing towards the cleaning
torch.
Only push the brush housing back
▶
when the cleaning brush is mounted
on the cleaning torch.
The first few times you push the brush
▶
housing back this may require more
force.
The fibers of the cleaning brush must
▶
not protrude more than 15 mm / 0.59
inch from the brush housing.
56
Page 57
Placing the clean-
1
1
2
ing torch in the
cleaning torch
holder
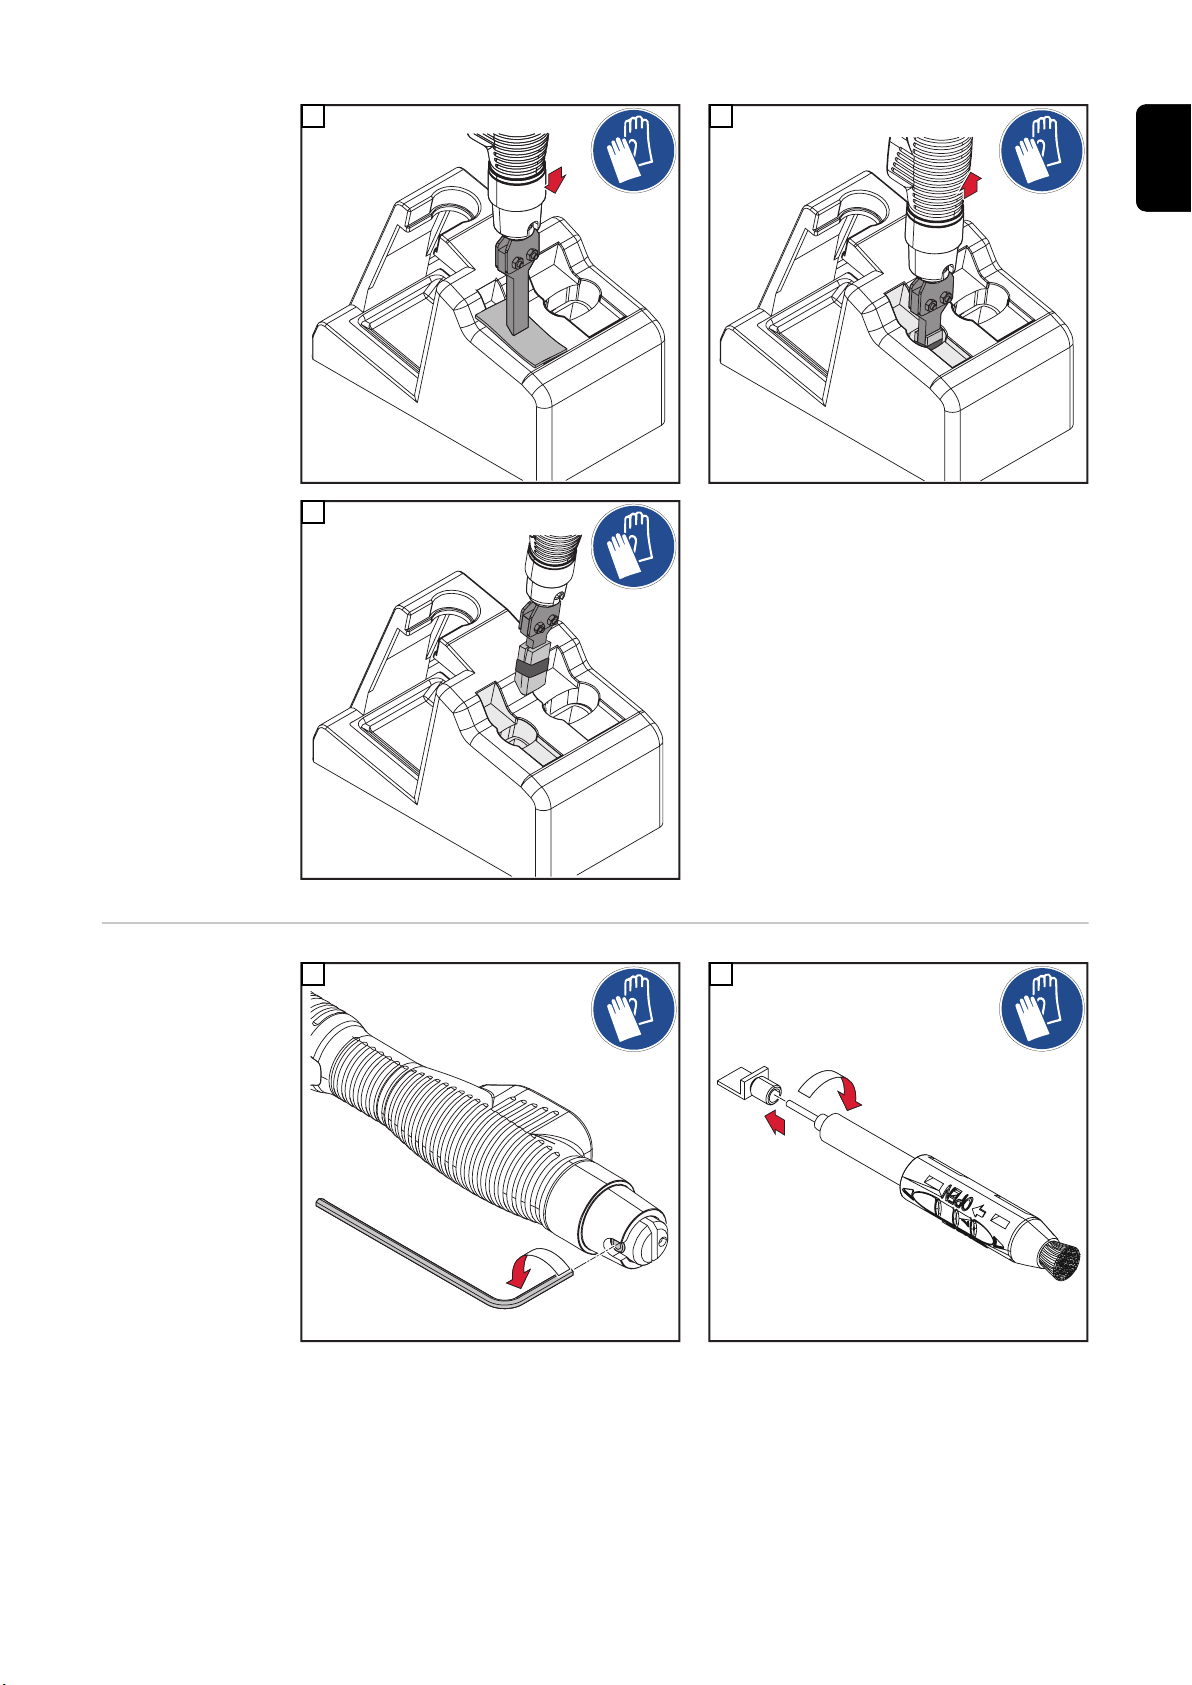
Place the cleaning torch with mounted cleaning electrode in the cleaning torch holder
EN-US
1
Place cleaning torch with mounted cleaning brush in cleaning torch holder
1
Connecting the
small cleaning
torch
1
57
Page 58
Screwing the
2
1
2
1
cleaning electrolyte onto the
cleaning torch
WARNING!
Danger due to improper use!
This can result in serious personal injury, damage to property and the environment.
Observe the safety data sheets of the cleaning electrolytes!
▶
Observe Safety Instructions from page 31!
▶
The following cleaning electrolytes are available for cleaning purposes:
Cleaning electrolyte blue 0.1 l
for cleaning welds
Cleaning electrolyte red 0.1 l
for cleaning welds at higher cleaning speeds
1
2
58
Page 59
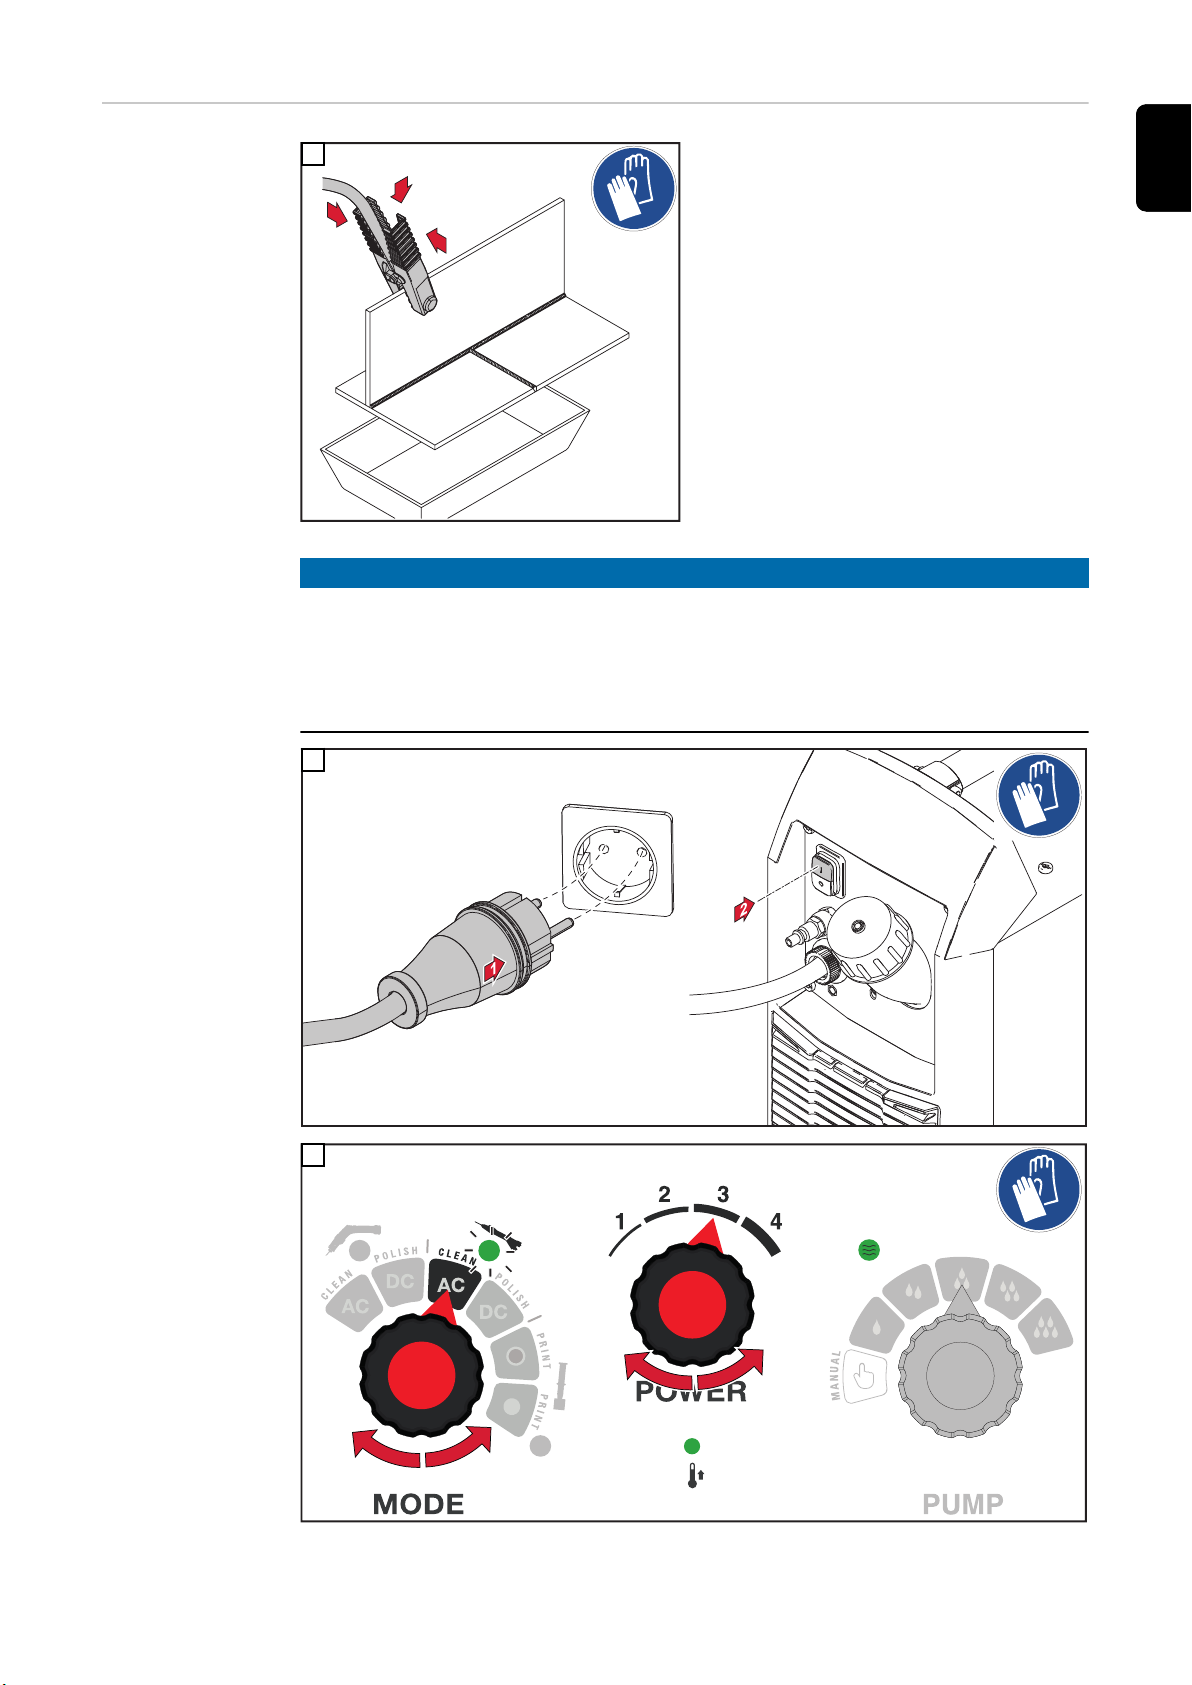
Cleaning with the
1
1
1
2
2
small cleaning
torch
1
NOTE!
To avoid possible electrical interference:
Connect the device only to power lines to which no other devices such as welding
▶
systems, electric motors, or similar are connected,
or
Ground the device.
▶
EN-US
2
3
59
Page 60
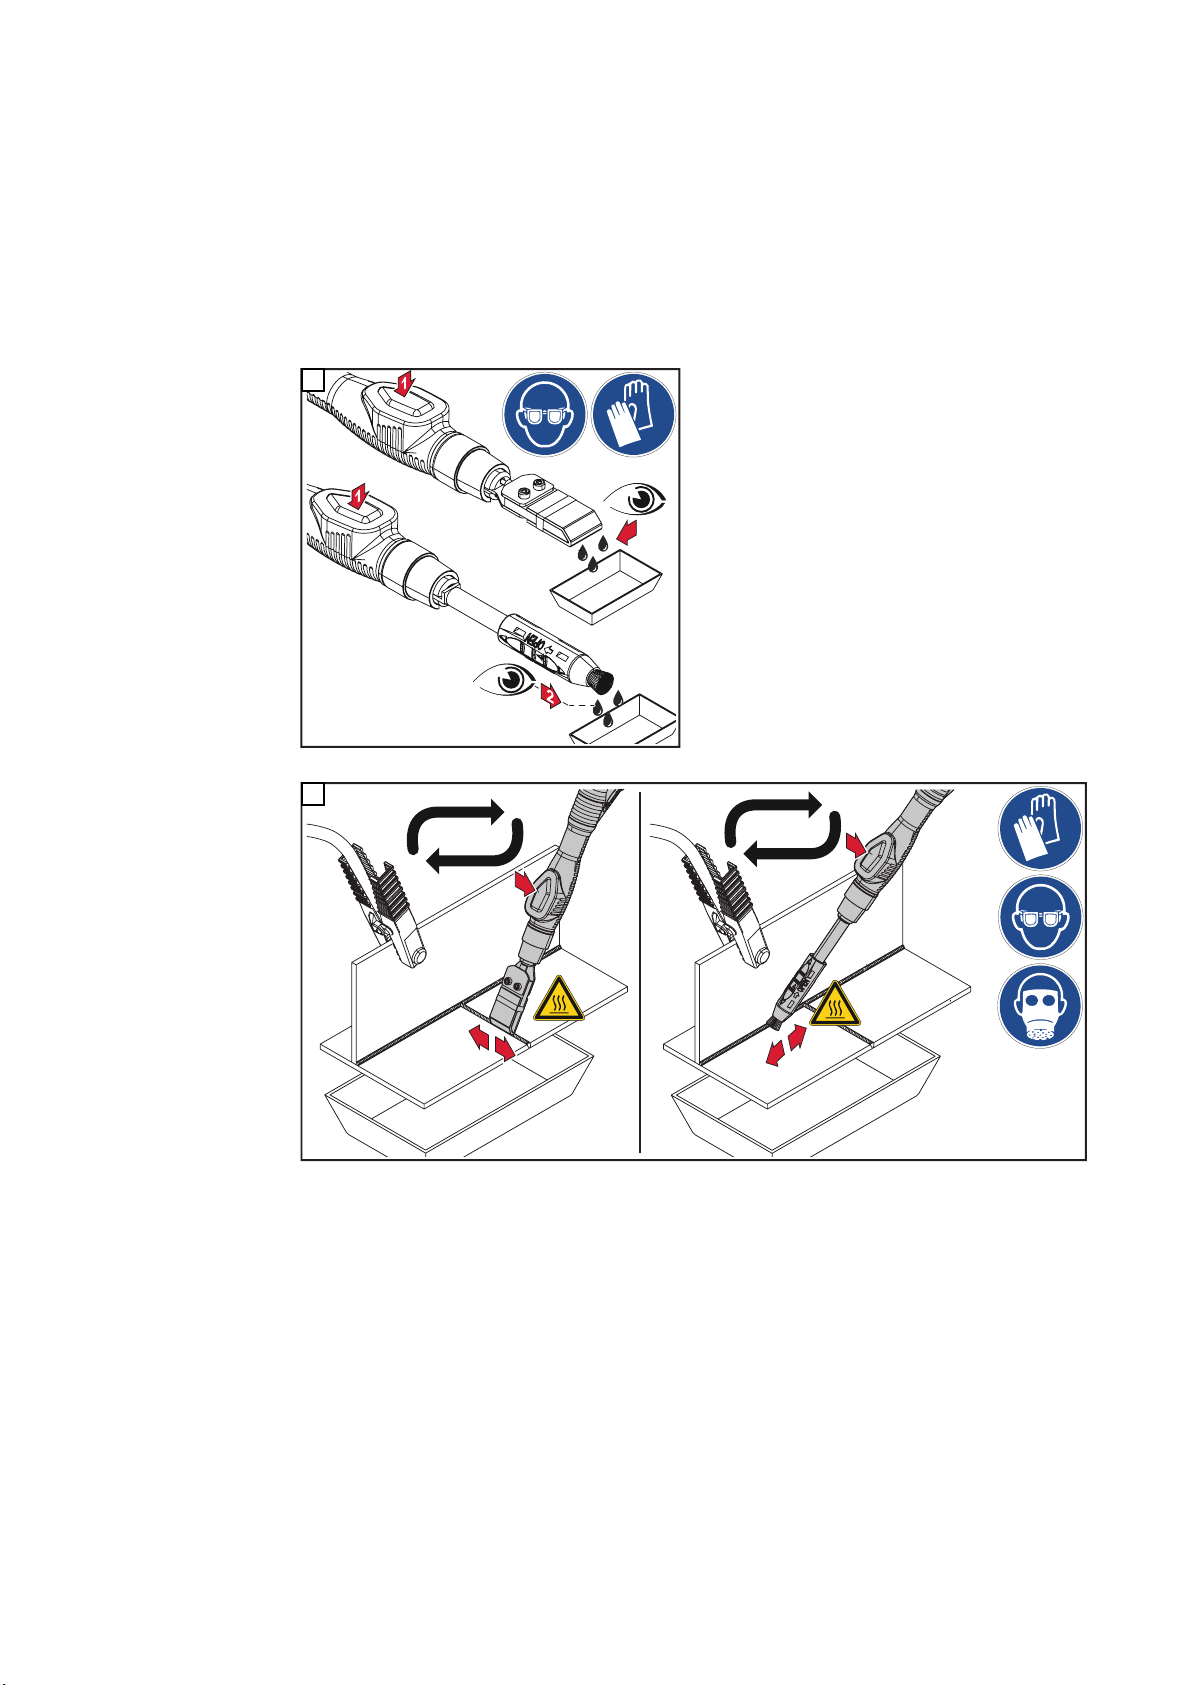
If the operating mode (MODE) is set to 'No cleaning torch', the blow-off function of the
2
4 - 5 x / 2 - 3 se
c.
2 - 3 sec.
2
1
2
2
1
2
2 - 3 sec.
blow-off torch and the pump are deactivated.
Cleaning power standard values (POWER):
- Cleaning electrode 10 mm / 0.39 inch: 1 - 2
- Cleaning electrode 22 mm / 0.87 inch: 1 - 3
- Cleaning electrode 35 mm / 1.38 inch: 3 - 4
- Small cleaning brush: 1 - 3
As the cleaning power increases, higher cleaning speeds are possible.
4
Press the hand pump 4 to 5 times at intervals of 2 to 3 seconds each time it is used for the first time
5
Cleaning electrode | Cleaning brush
60
Page 61
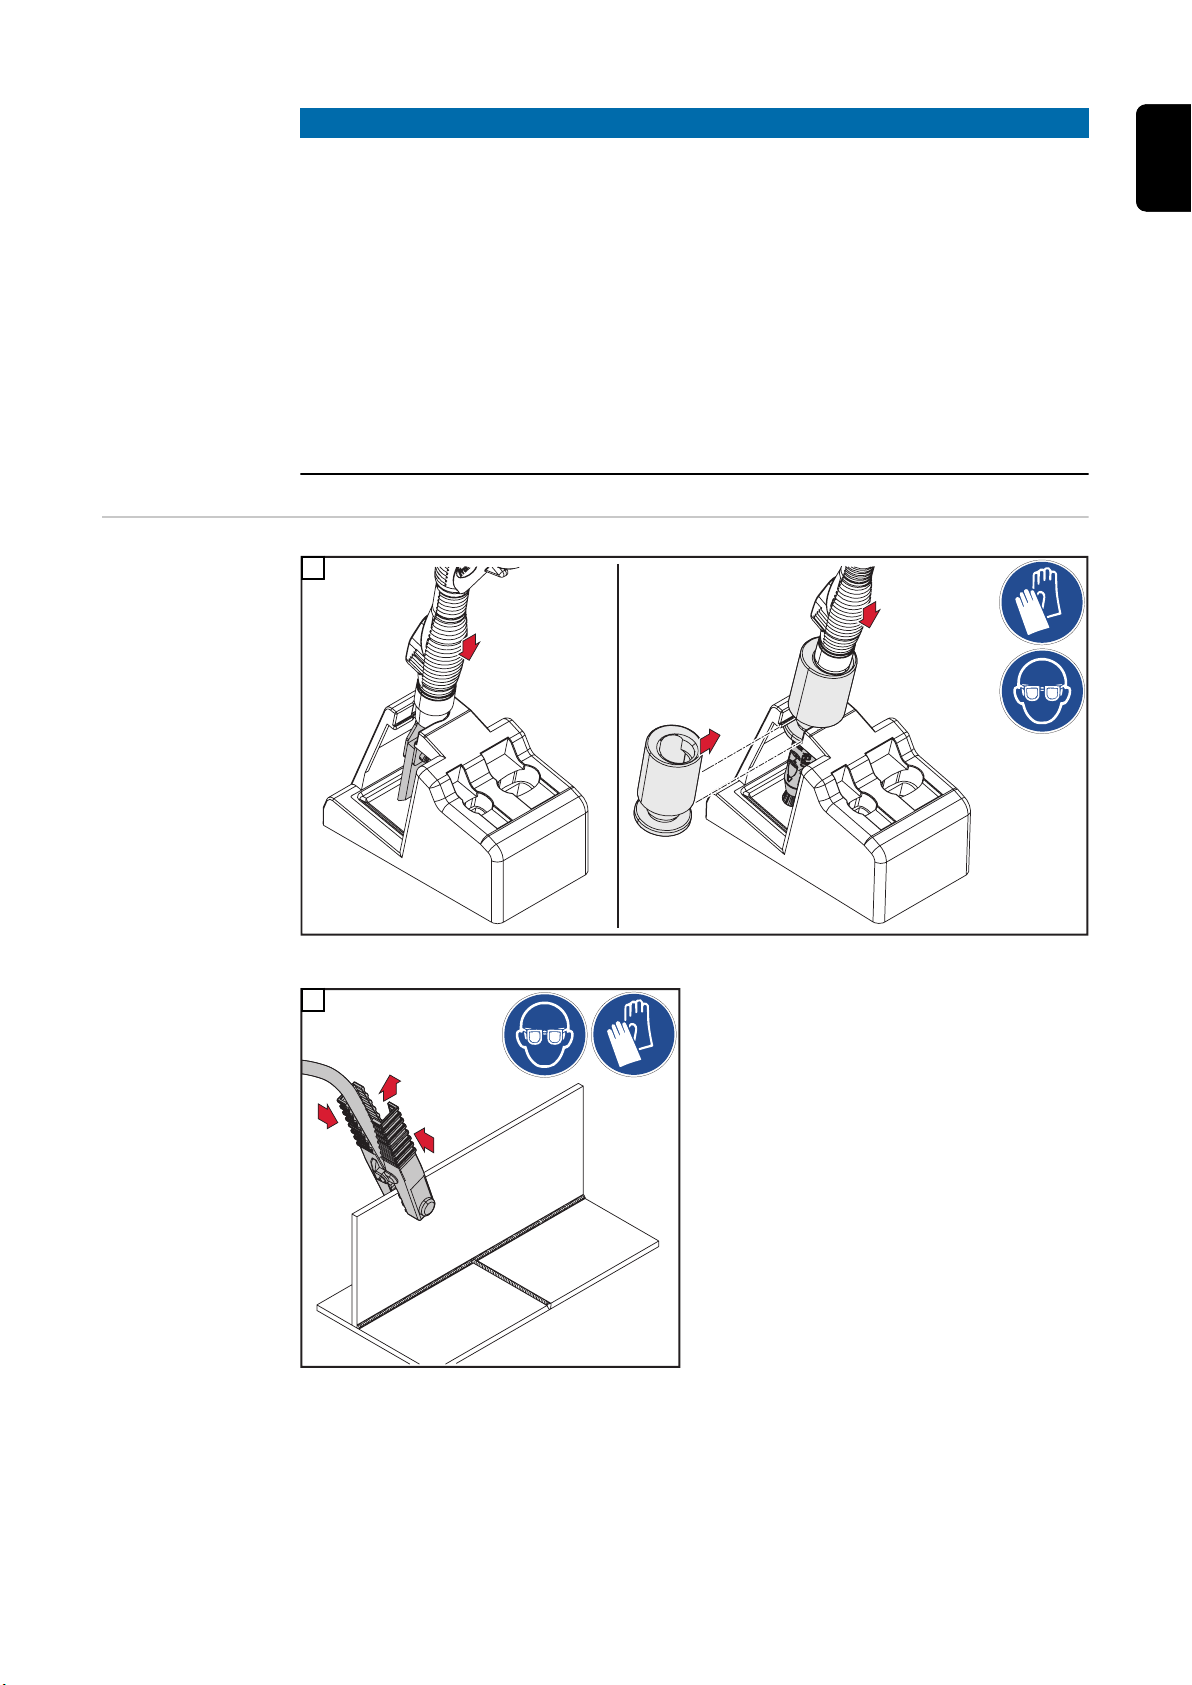
NOTE!
1
1
2
1
Observe the following points for smooth cleaning operation:
Press the hand pump every 2 to 3 seconds to deliver cleaning electrolyte.
▶
More cleaning electrolyte is required with a higher cleaning power, because the
cleaning electrode and workpiece become hotter and the cleaning electrolyte evaporates more quickly.
When cleaning with the cleaning felt, apply slight pressure to the weld.
▶
If the operating noise ("crackling") is increased, insufficient cleaning electrolyte is be-
▶
ing used; it is better to clean in a puddle than too dry.
Always hold the cleaning brush perpendicular to the weld, and always moistened
▶
with cleaning electrolyte.
Apply light pressure to the area to be cleaned.
When cleaning with the cleaning brush, sparking, foaming, and increased operating
▶
noise may occur - this is normal.
EN-US
After cleaning
1
Place cleaning electrode | cleaning brush ...
in the cleaning torch holder
2
61
Page 62
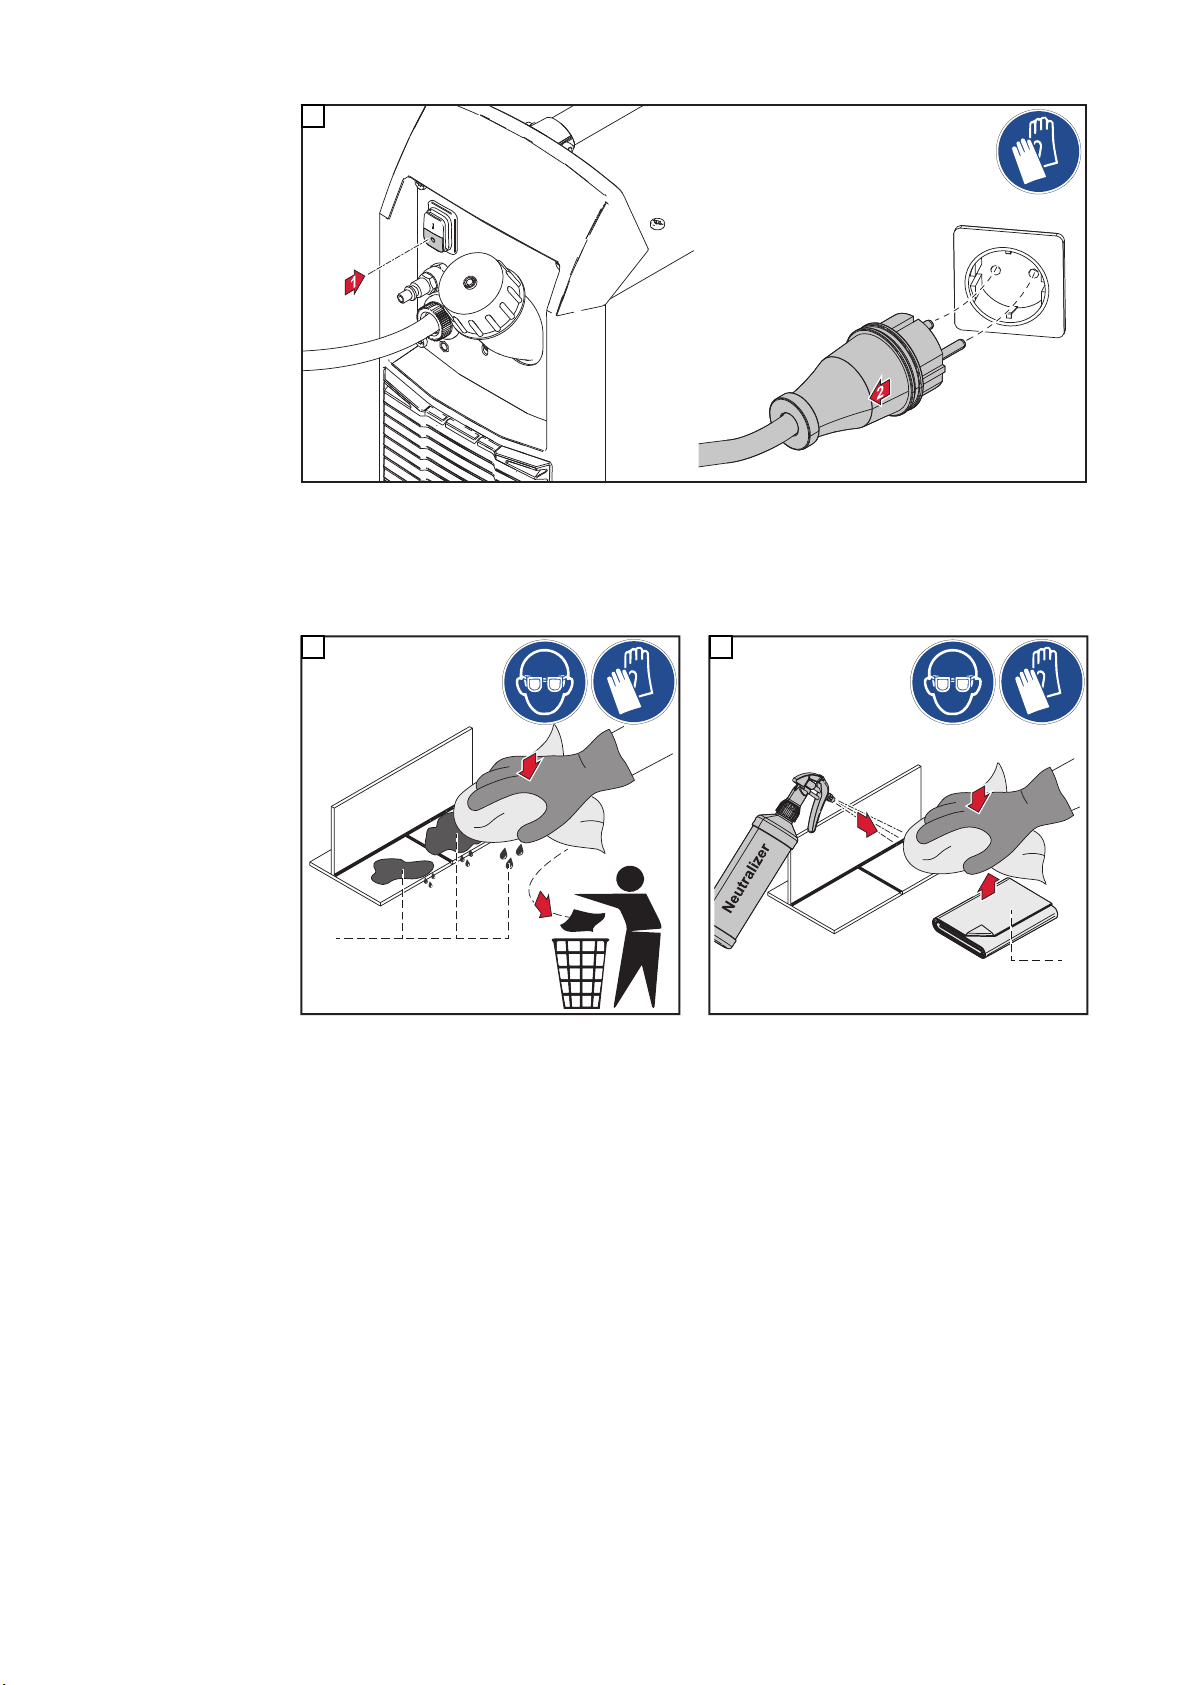
3
1
2
*
**
1
2
IMPORTANT! For an optimal cleaning result, remove the excess cleaning electrolyte to
avoid white spots due to cleaning electrolyte residues.
Subsequently clean the surface with the neutralizer.
4
* Excess cleaning electrolyte
5
** New microfiber cloth
IMPORTANT!
- Do not dispose of cloths wetted with cleaning electrolyte in household waste!
- Dispose of cloths wetted with cleaning electrolyte in accordance with regional regulations!
Observe the safety data sheets of the cleaning electrolytes!
- Do not refill empty cleaning electrolyte tubes!
- Unscrew the cleaning electrolyte tubes from the cleaning torch after use, close them
such that they are airtight, and label the container.
- After you have finished working with the device, remove the cleaning felt from the
cleaning electrode or dismantle the cleaning brush from the small cleaning torch;
rinse the cleaning brush under running water.
62
Page 63

Polishing
63
Page 64

64
Page 65
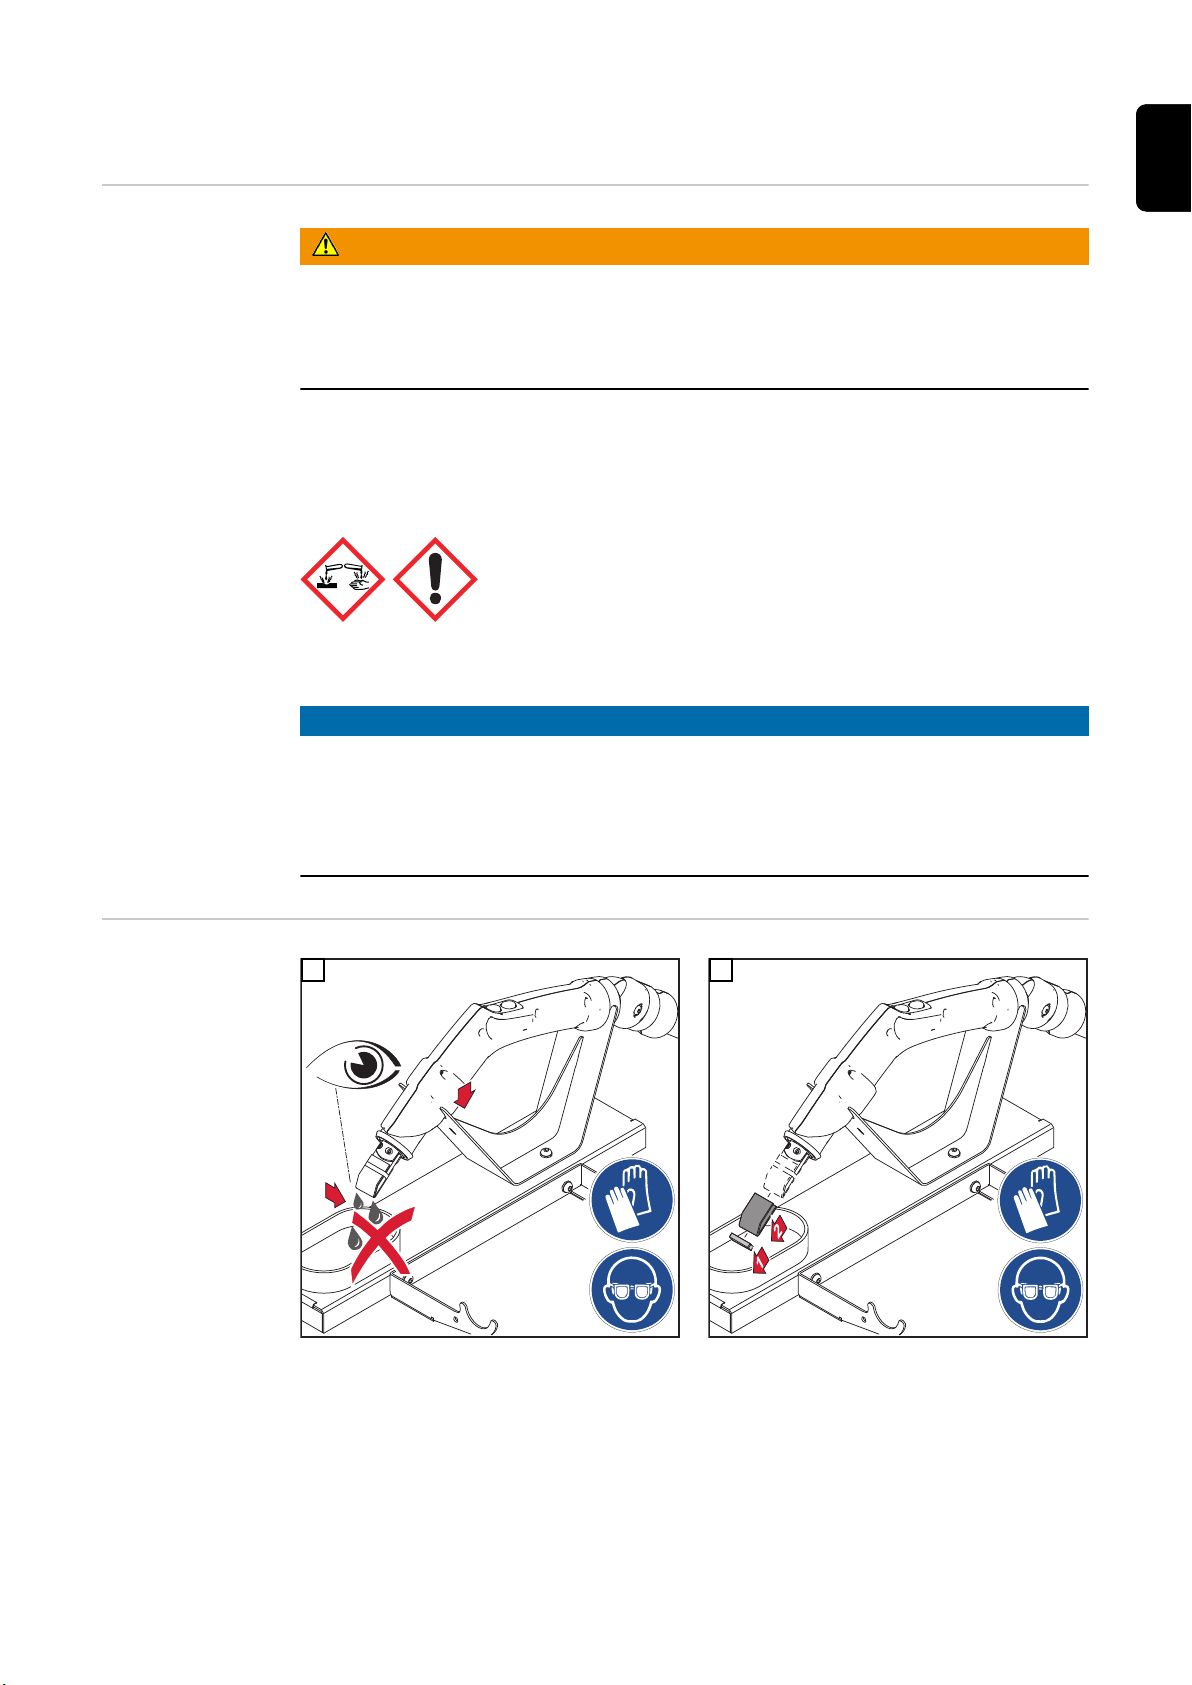
Polishing with the blow-off torch
2
1
EN-US
General
WARNING!
Danger due to improper use!
This can result in serious personal injury, damage to property and the environment.
Observe the safety data sheets of the cleaning electrolytes!
▶
Observe Safety Instructions from page 31!
▶
Electrochemical polishing of welds is carried out with:
Cleaning electrolyte red 5 l
42,0510,0384
Cleaning electrolyte is supplied via the blow-off torch and device pump.
NOTE!
The same cleaning electrodes are used for polishing as for cleaning.
The cleaning electrode and cleaning felt are mounted as described from page 39
▶
onwards.
Preparation of the workstation for polishing is the same as for cleaning (see page
▶
34).
Preparing for polishing with the
blow-off torch
1 2
65
Page 66
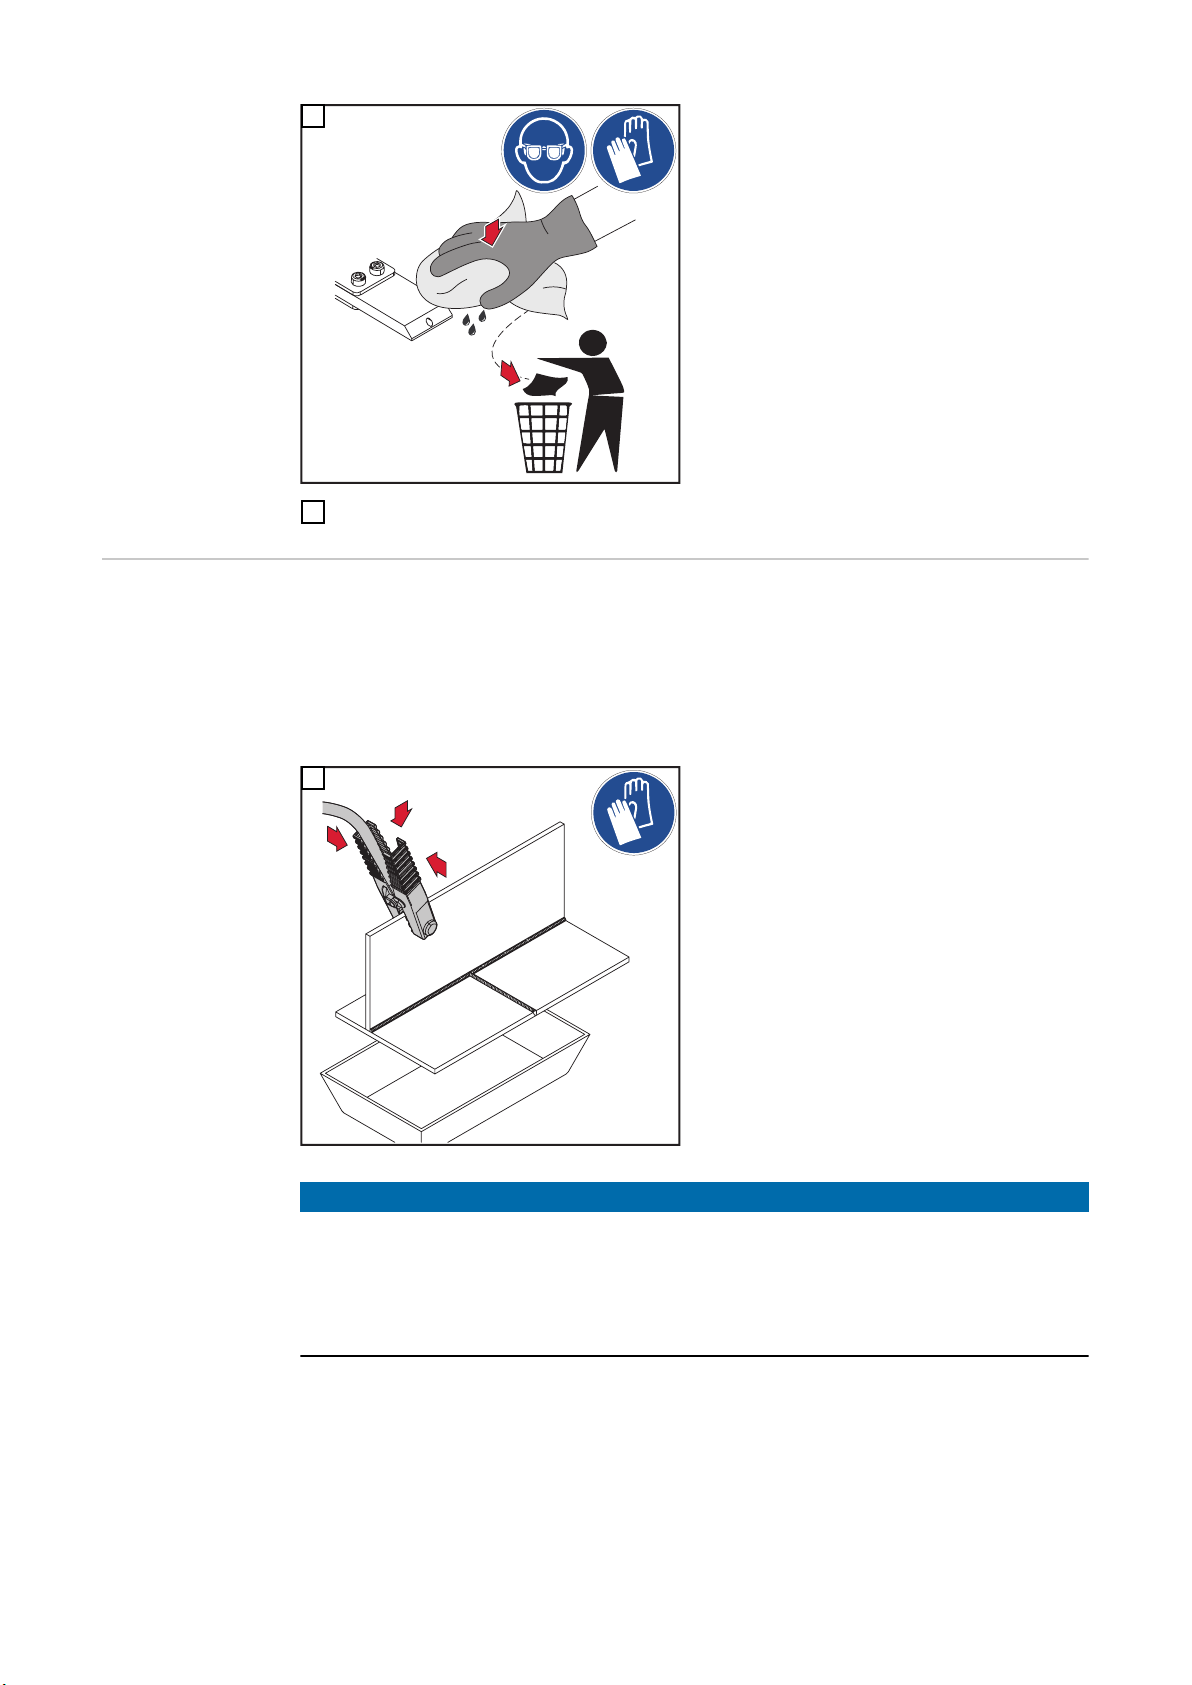
1
2
3
1
For polishing, place a fresh cleaning felt on the cleaning electrode (see page 41)
4
Polishing with
the blow-off torch
Requirement:
- Cleaning electrode and cleaning felt mounted on the blow-off torch
(see from page 39)
- Tank filled with cleaning electrolyte red
(see from page 45)
1
66
NOTE!
To avoid possible electrical interference:
Connect the device only to power lines to which no other devices such as welding
▶
systems, electric motors, or similar are connected,
or
Ground the device.
▶
Page 67
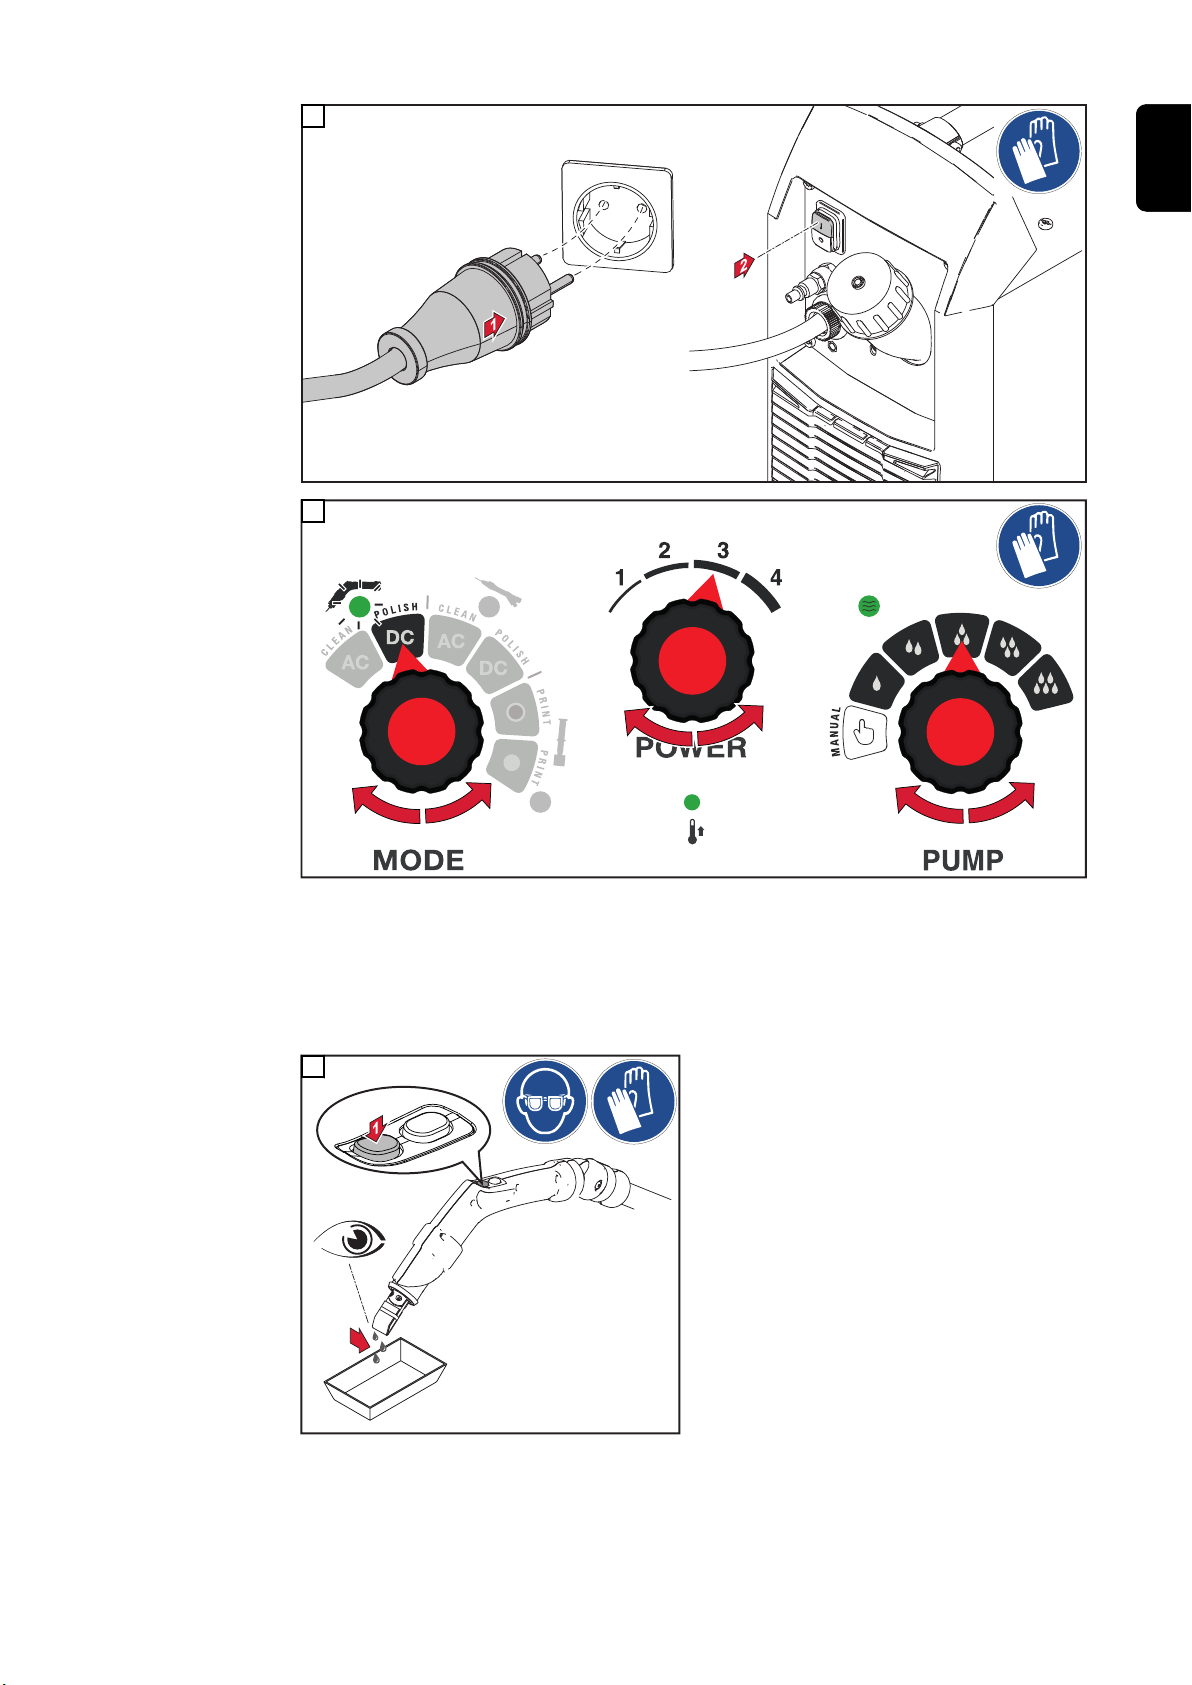
2
1
1
2
2
3
3
2
EN-US
3
Cleaning power standard values (POWER):
- Cleaning electrode 10 mm / 0.39 inch: 1 - 2
- Cleaning electrode 22 mm / 0.87 inch: 1 - 3
IMPORTANT! The cleaning electrode 45 mm / 1.77 inch is not suitable for polishing.
4
In manual mode, press and hold the Start
key to start the cleaning electrolyte supply.
67
Page 68
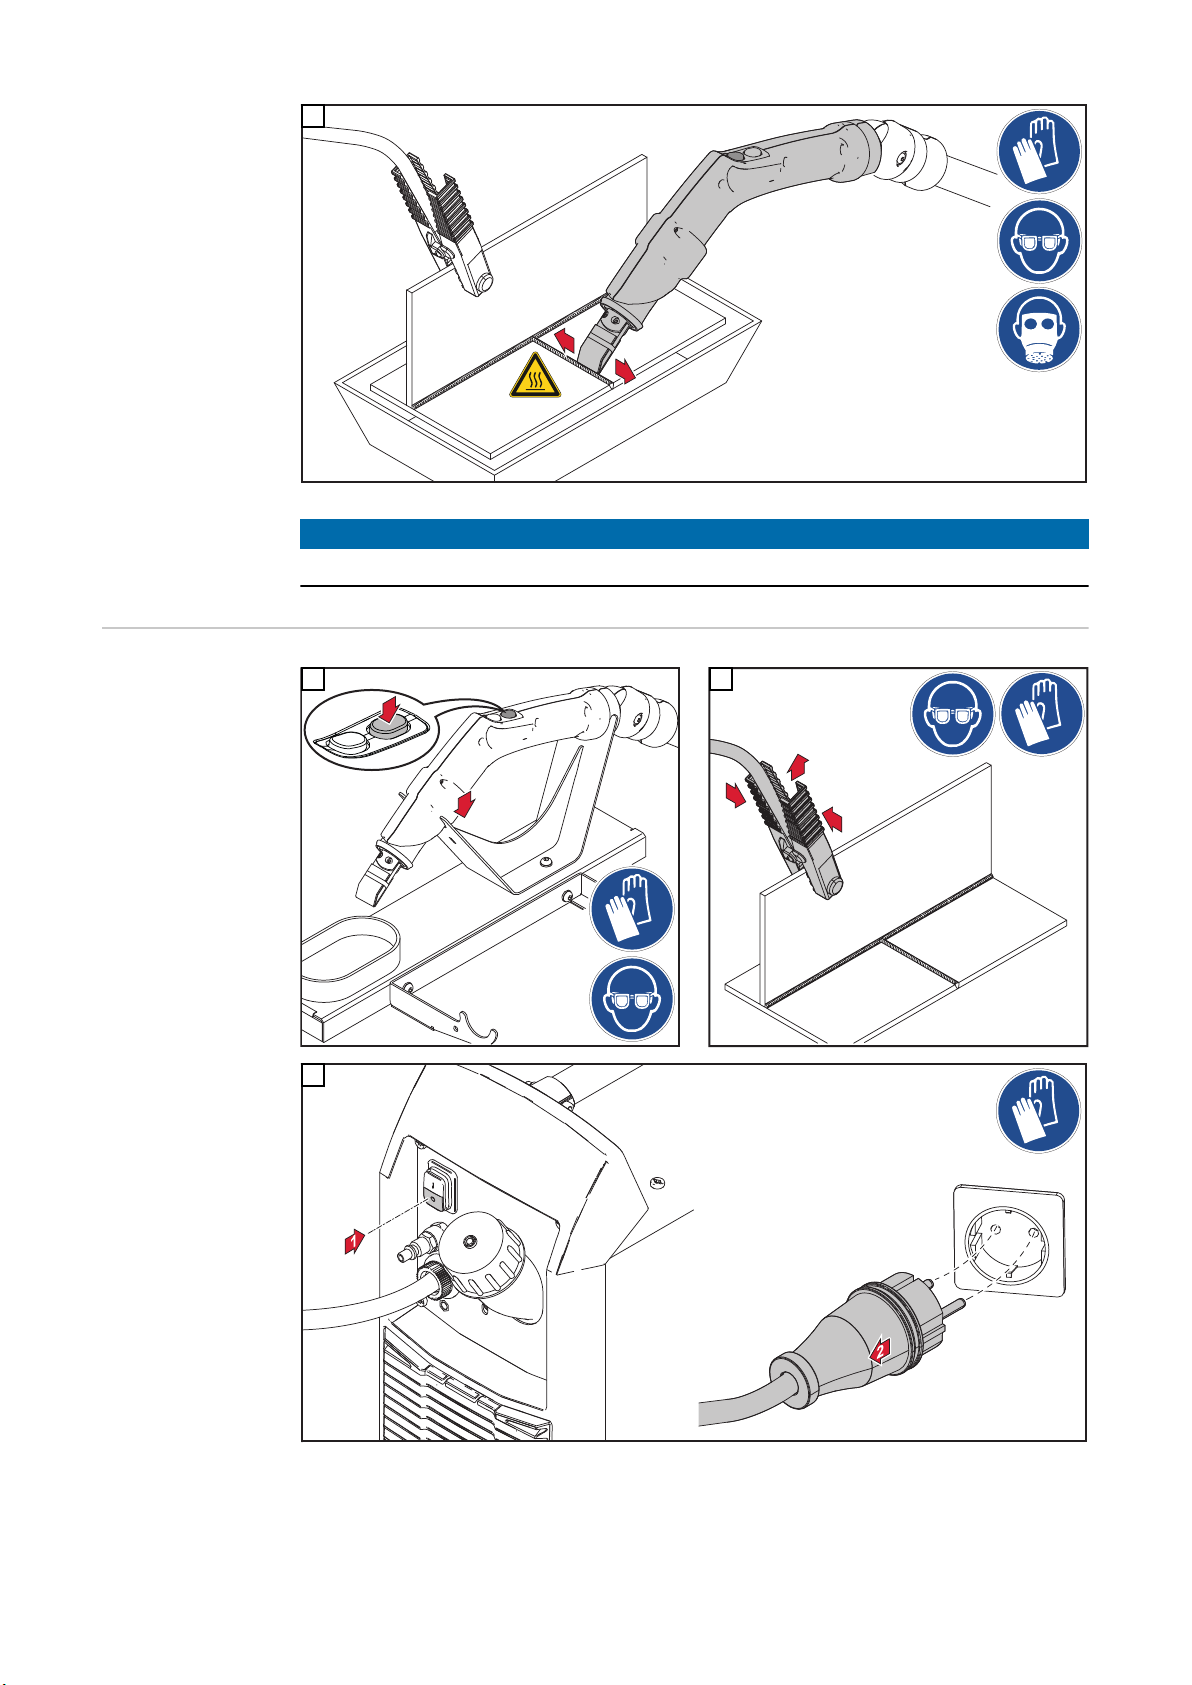
1
1
5
2
1
1
NOTE!
When polishing with the cleaning electrode, apply slight pressure to the weld.
▶
After polishing
1
3
2
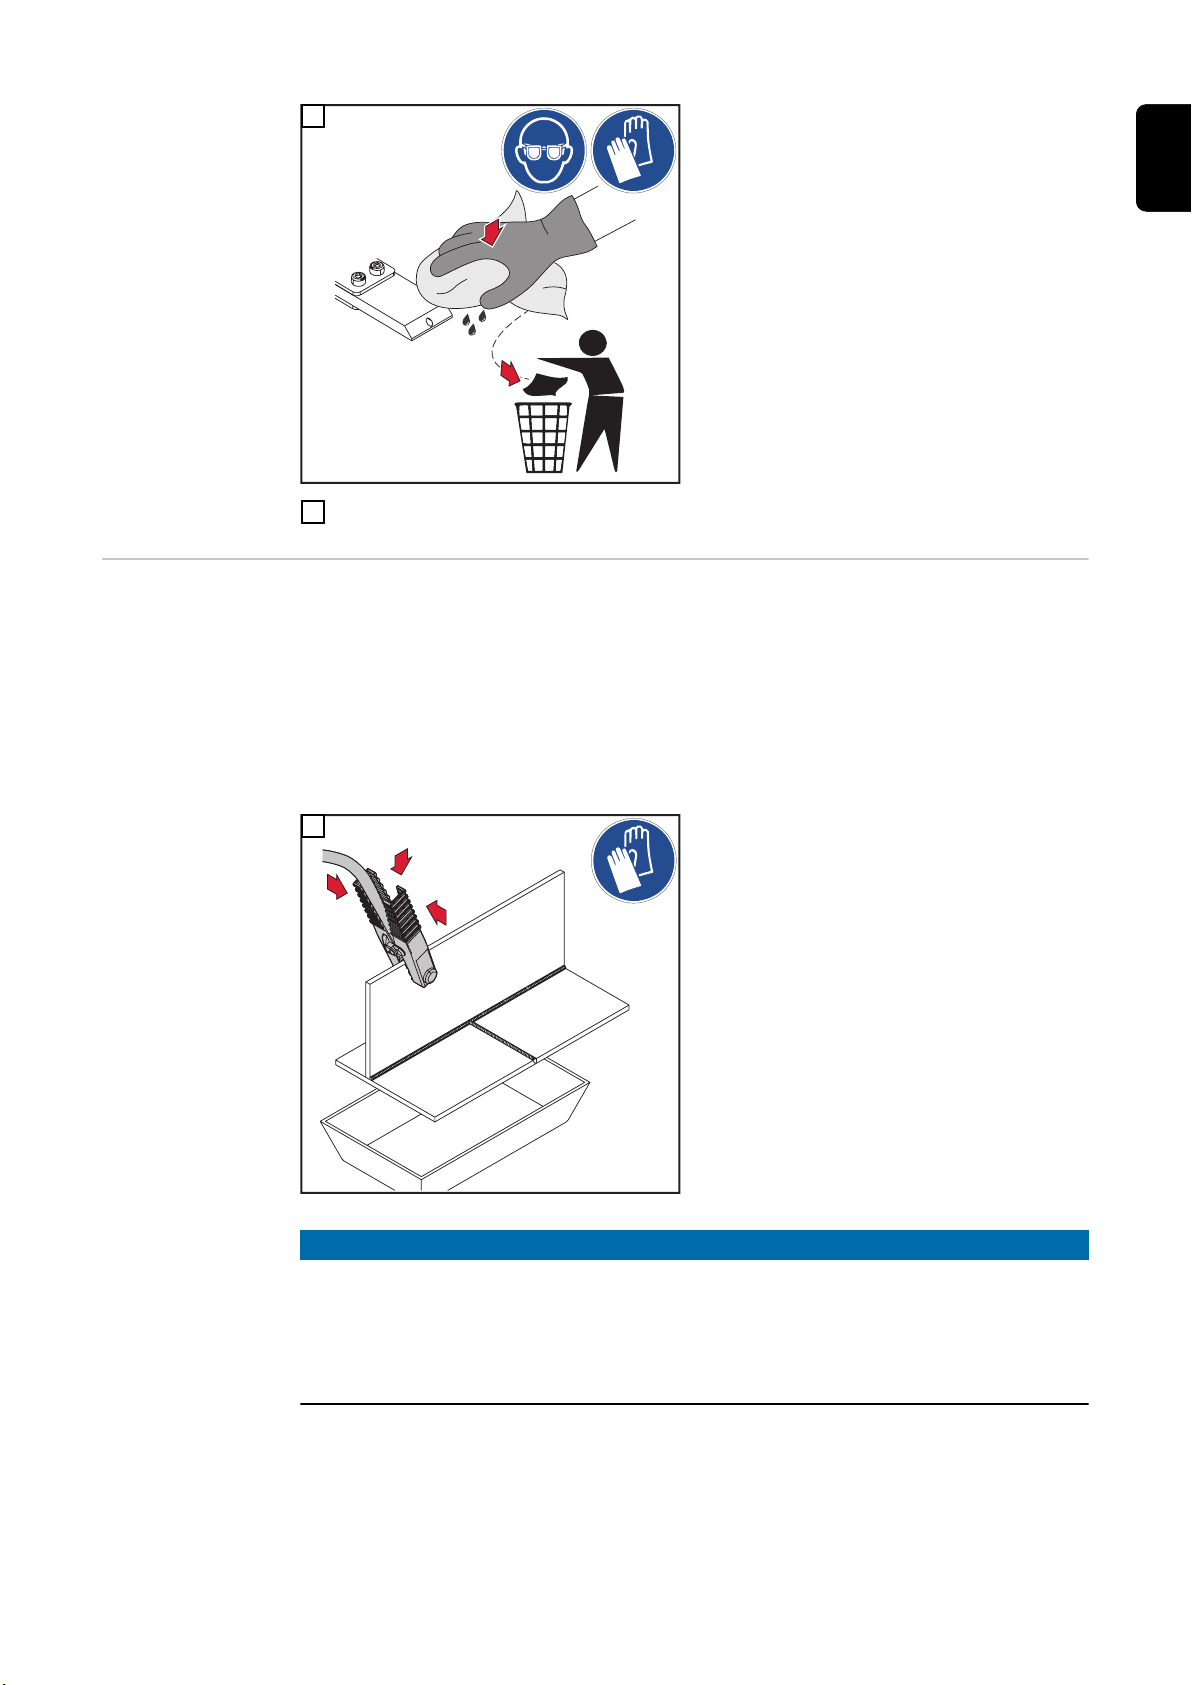
IMPORTANT! For an optimal cleaning result, remove the excess cleaning electrolyte to
avoid white spots due to cleaning electrolyte residues.
Subsequently clean the surface with the neutralizer.
68
Page 69
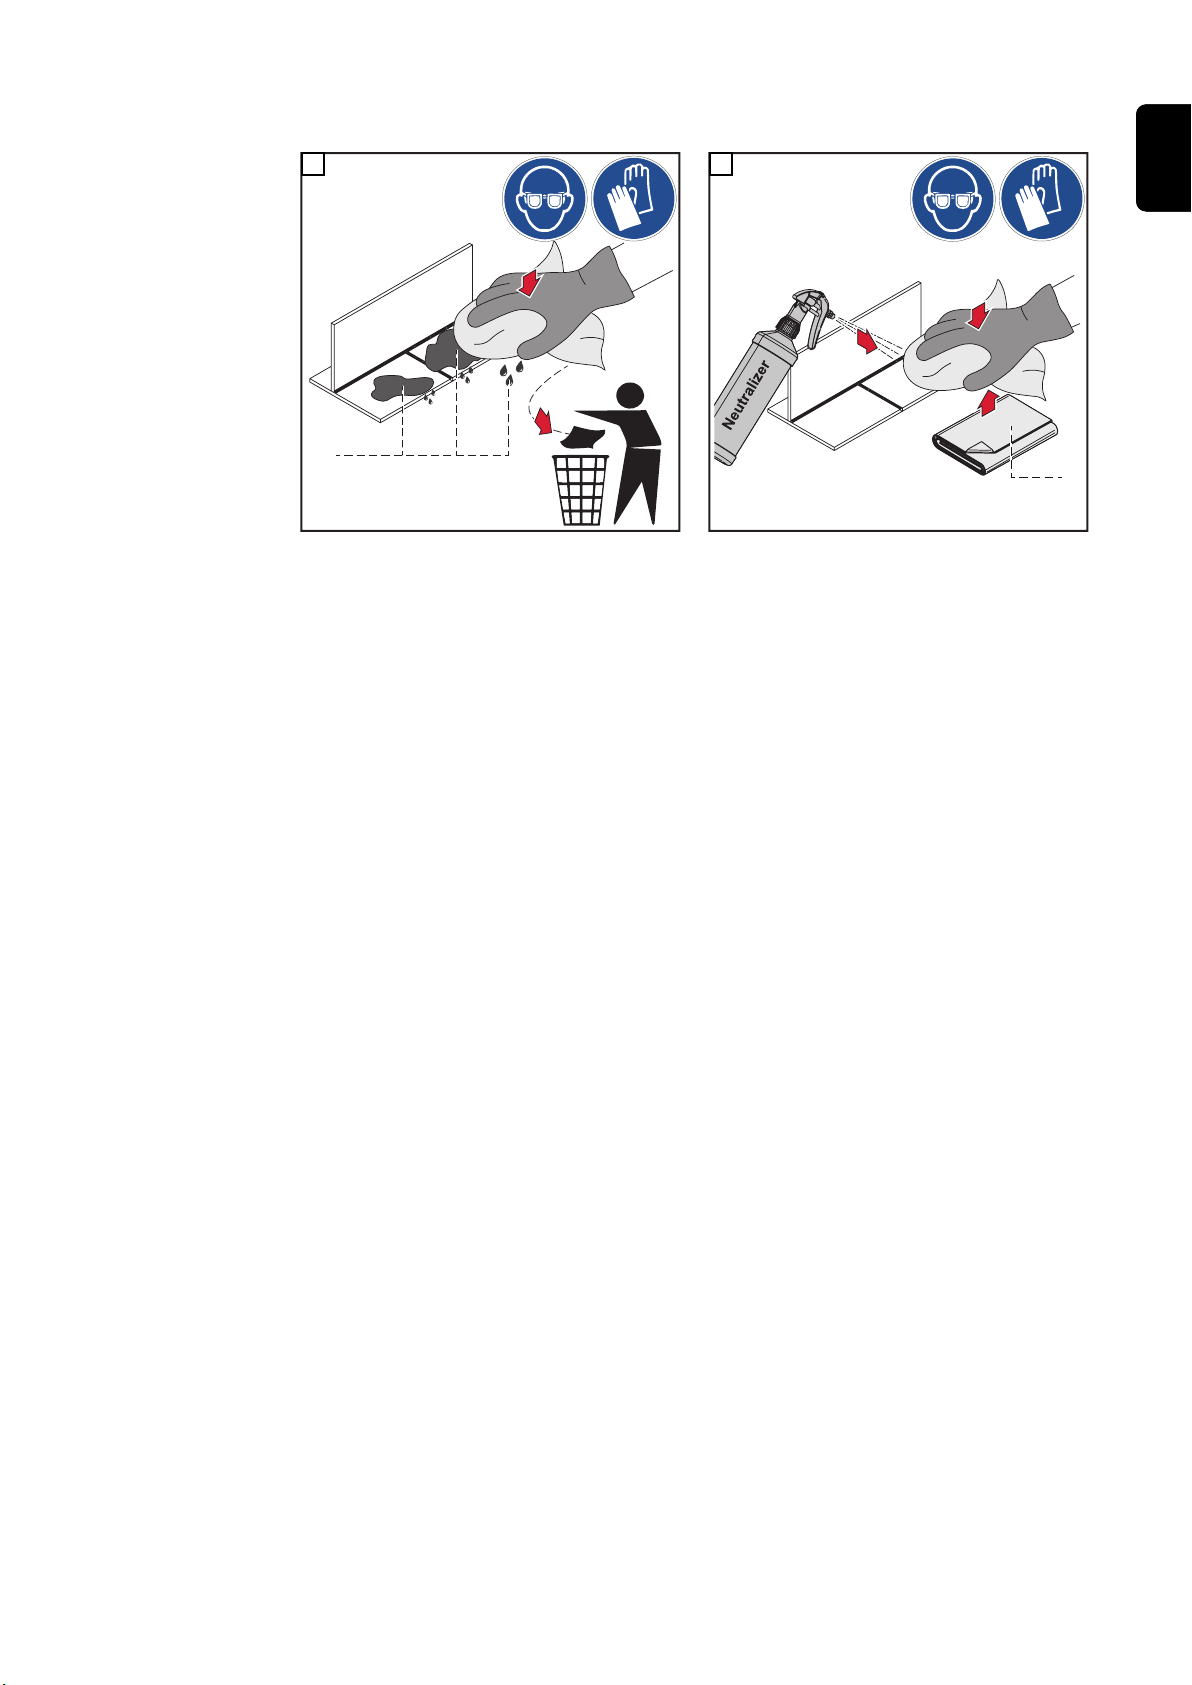
1
2
*
4
**
1
2
5
EN-US
* Excess cleaning electrolyte
** New microfiber cloth
IMPORTANT!
- Do not dispose of cloths wetted with cleaning electrolyte in household waste!
- Dispose of cloths wetted with cleaning electrolyte in accordance with regional regulations!
Observe the safety data sheets of the cleaning electrolytes!
- After finishing work, remove the cleaning felt used for polishing from the cleaning
electrode.
69
Page 70
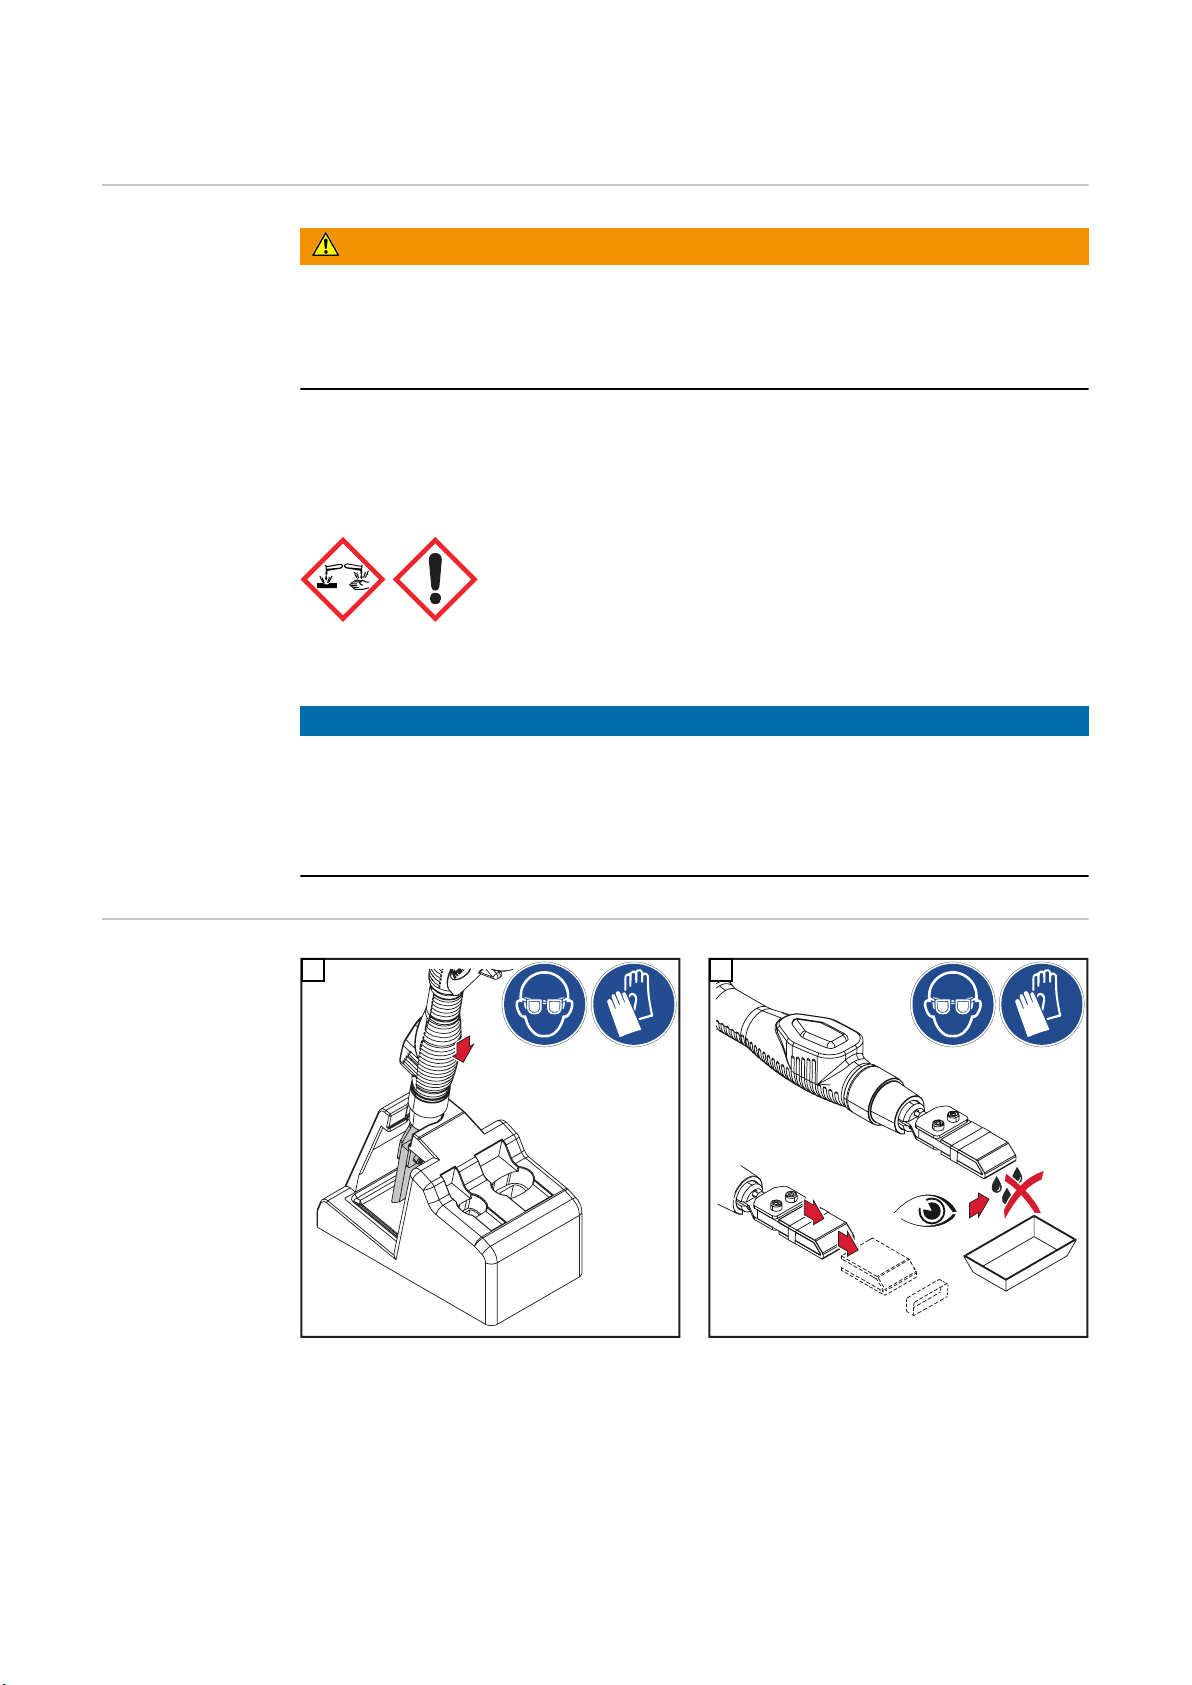
Polishing with the small cleaning torch
1
2
3
1
General
WARNING!
Danger due to improper use!
This can result in serious personal injury, damage to property and the environment.
Observe the safety data sheets of the cleaning electrolytes!
▶
Observe Safety Instructions from page 31!
▶
Electrochemical polishing of welds is carried out with:
Cleaning electrolyte red 0.1 l
42,0510,0380
Supply of the cleaning electrolyte via the cleaning torch and the hand pump.
NOTE!
The same cleaning electrodes are used for polishing as for cleaning.
The cleaning electrode and cleaning felt are mounted as described from page 52
▶
onwards.
Preparation of the workstation for polishing is the same as for cleaning (see page
▶
34).
Preparing for polishing
1
2
70
Page 71
1
2
3
1
For polishing, place a fresh cleaning felt on the cleaning electrode (see page 54)
4
Polishing Requirement:
- Small cleaning torch connected to the MagicCleaner 300
(see from page 57)
- Cleaning electrode and cleaning felt mounted on the cleaning torch
(see from page 52)
- Cleaning electrolyte red 0.1 l screwed onto the cleaning torch
(see from page 58)
EN-US
1
NOTE!
To avoid possible electrical interference:
Connect the device only to power lines to which no other devices such as welding
▶
systems, electric motors, or similar are connected,
or
Ground the device.
▶
71
Page 72
2
1
1
2
2
2 - 3 sec.
1
2
2
2 - 3 sec.
1
2
2
3
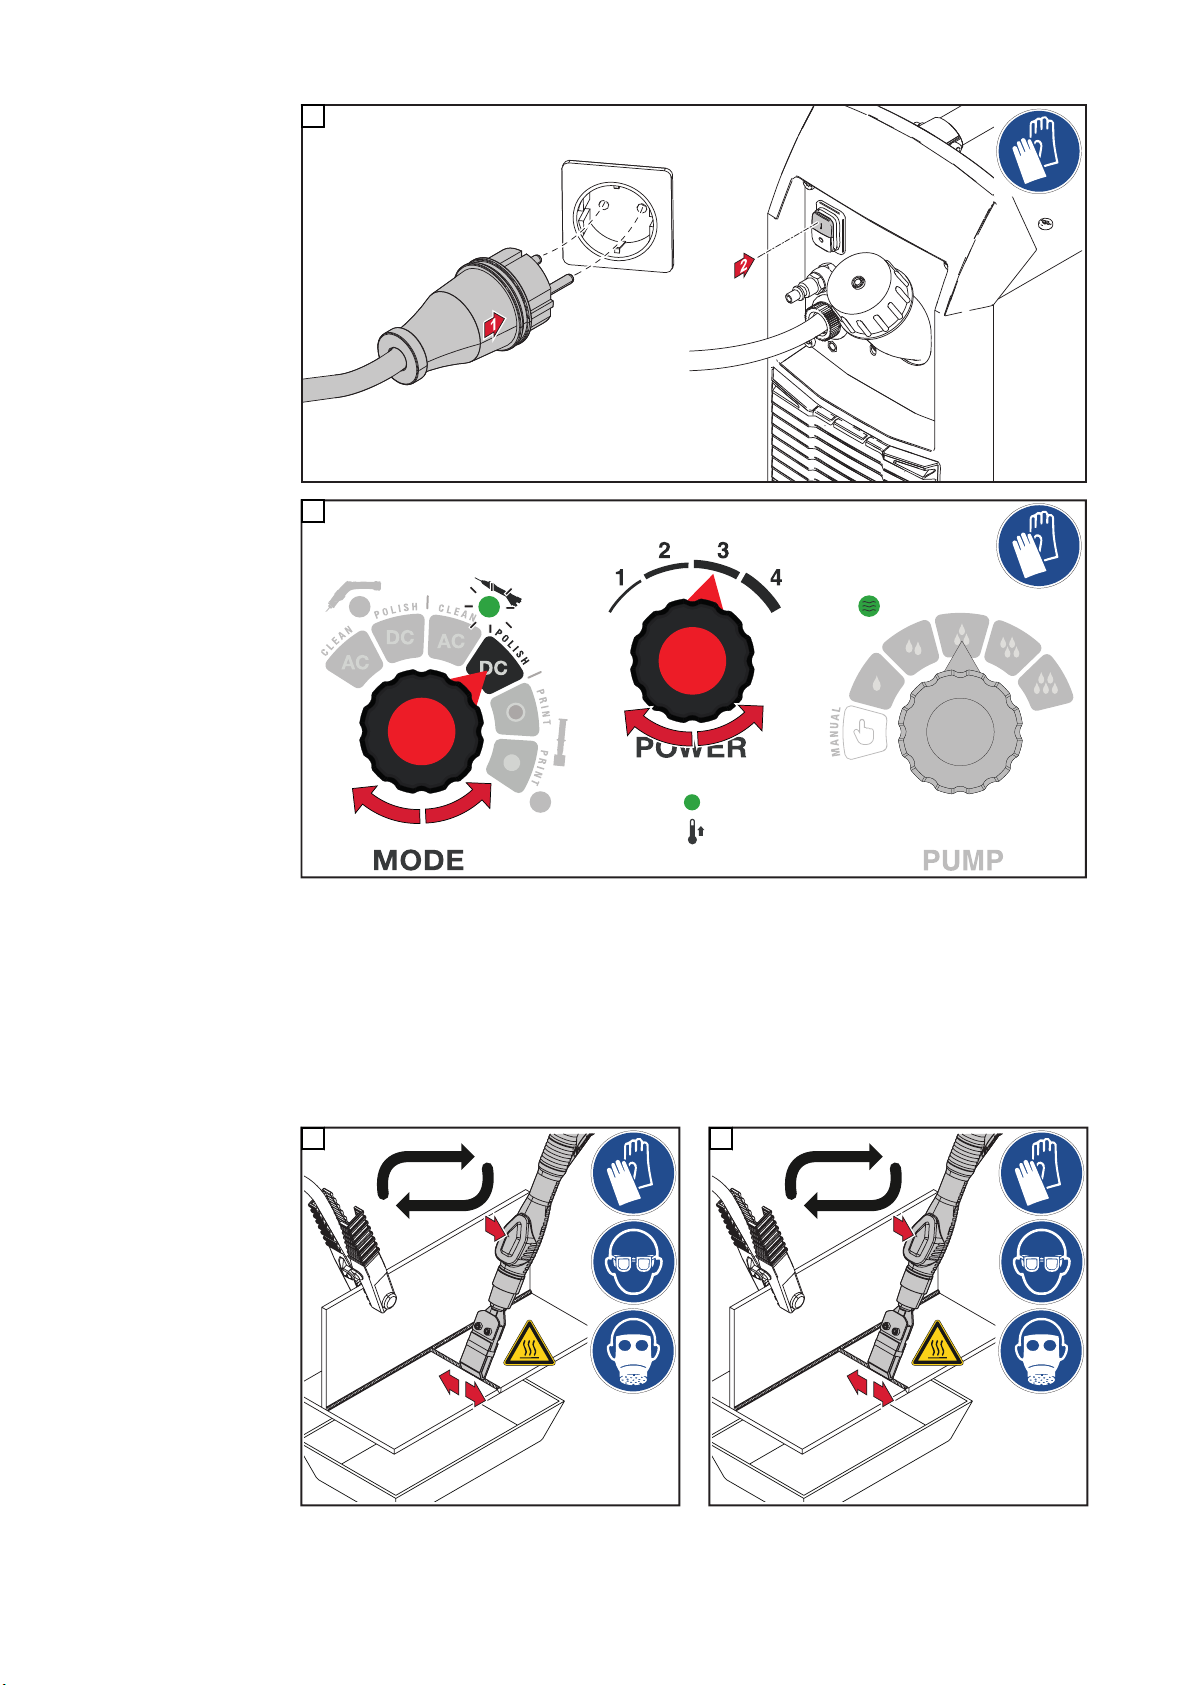
If the operating mode (MODE) is set to 'No cleaning torch', the blow-off function of the
blow-off torch and the pump are deactivated.
Cleaning power standard values (POWER):
- Cleaning electrode 10 mm / 0.39 inch: 1 - 2
- Cleaning electrode 22 mm / 0.87 inch: 1 - 3
- Cleaning electrode 35 mm / 1.38 inch: 3 - 4
4
5
72
Page 73
NOTE!
1
1
1
2
*
**
1
2
When polishing with the cleaning electrode, apply slight pressure to the weld.
▶
EN-US
After polishing
1
Switching off the device
3
2
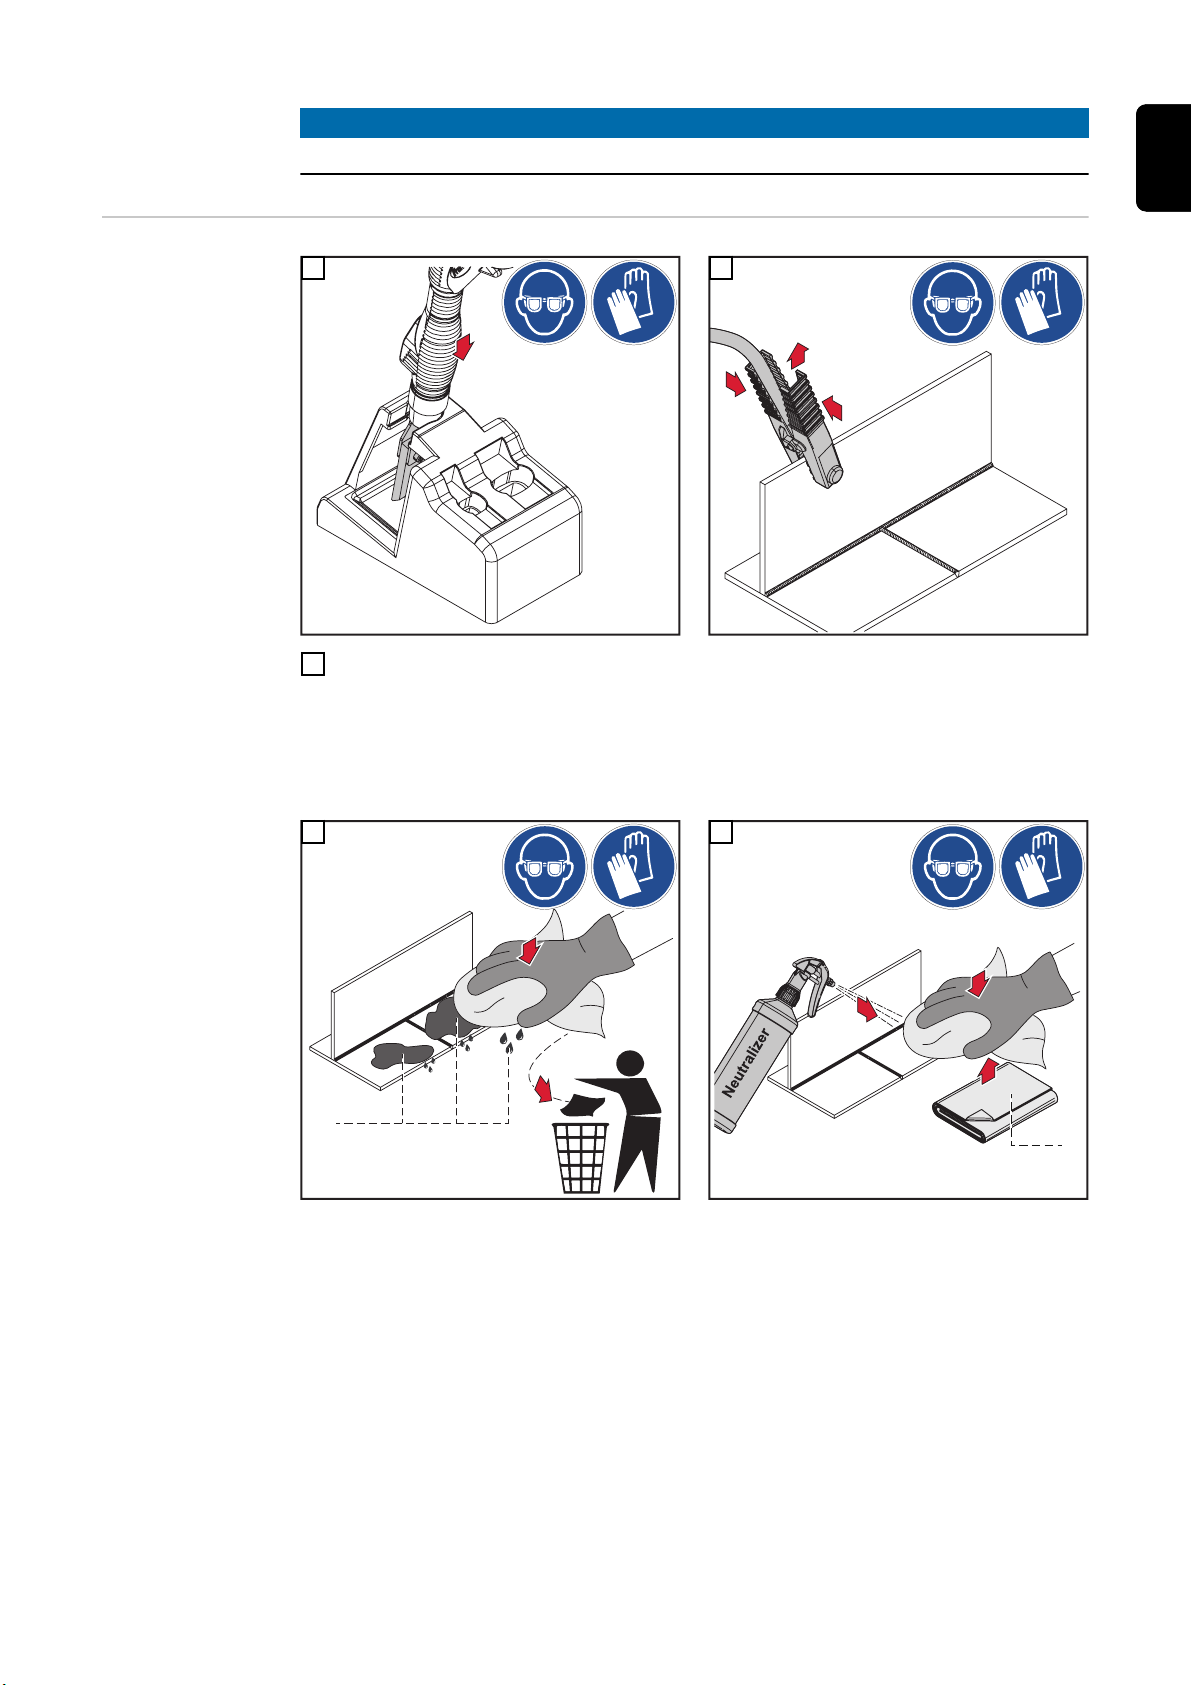
IMPORTANT! For an optimal cleaning result, subsequently remove the excess cleaning
electrolyte to avoid white spots due to cleaning electrolyte residues.
Finally, clean the surface with the neutralizer.
4
5
* Excess cleaning electrolyte
** New microfiber cloth
IMPORTANT!
- Do not dispose of cloths wetted with cleaning electrolyte in household waste!
- Dispose of cloths wetted with cleaning electrolyte in accordance with regional regulations!
Observe the safety data sheets of the cleaning electrolytes!
- After finishing work, remove the cleaning felt used for polishing from the cleaning
electrode.
73
Page 74

74
Page 75

Printing
75
Page 76

76
Page 77
Printing
(1)
(2)
(3) (4)
(5) (6)
(7)
(9)
(8)
(10)
ABC- 123
(11)
EN-US
General
WARNING!
Danger due to improper use!
This can result in serious personal injury, damage to property and the environment.
Observe the safety data sheets of the print electrolytes!
▶
Observe Safety Instructions from page 31!
▶
It is also possible to apply electrochemical surface prints to stainless steel with this
device. Logos, graphics, texts, numbers, etc., can be printed on the surface using a customizable Print film.
The print on stainless steel can be either light or dark.
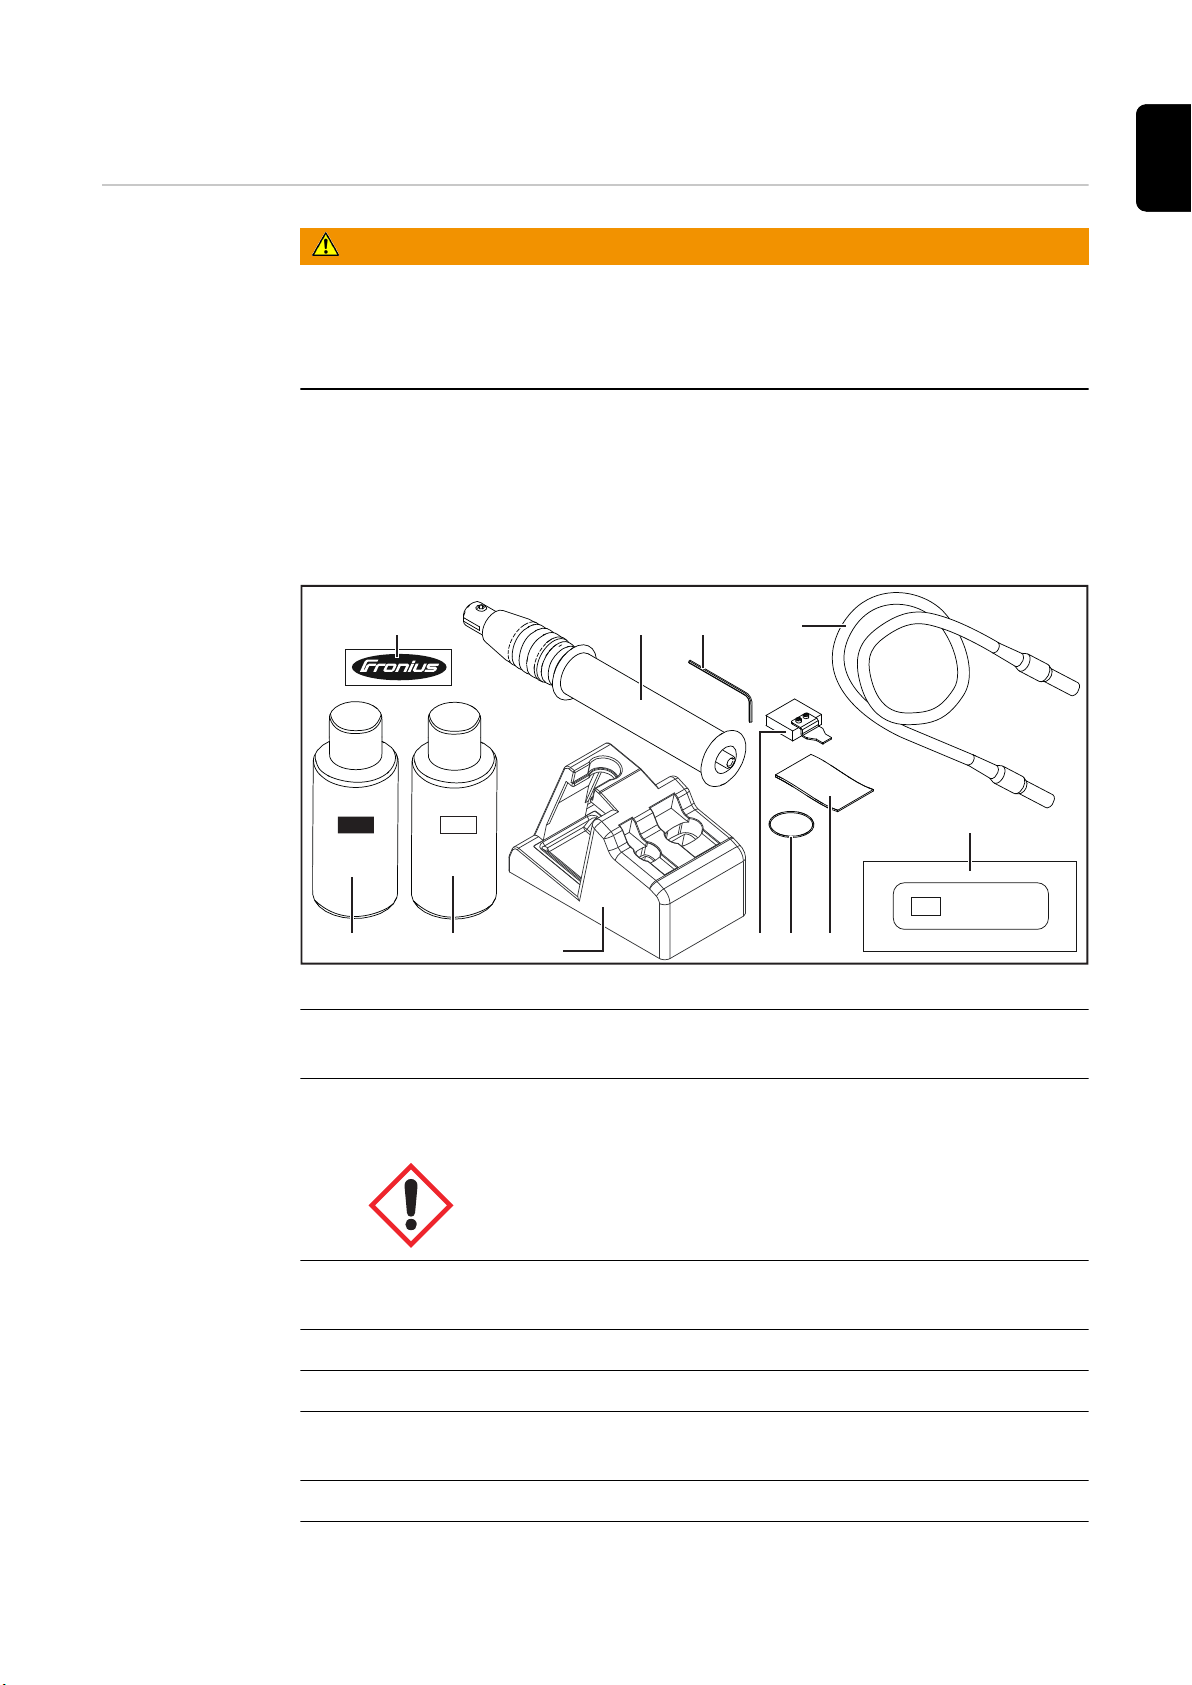
For printing on stainless steel, the Print set is required:
Print set 42,0510,0540
(1) Print film with Fronius logo
(for testing)
(2) Print electrolyte black 0.1 l
42,0510,0390
(3) Print electrolyte white 0.1 l
42,0510,0391
(4) Print torch holder
(5) Print torch
(6) Allen key
WAF 2.5 mm
(7) Print torch cable
(8) Print electrode
77
Page 78
(9) O-ring
(10) 20 x Print felt
(11) Print film
(option, to be ordered separately from Fronius)
Mounting the
Print electrode
and Print felt
1 2
3 4
78
Page 79
Preparing the
workstation for
Printing
For further preparation steps, see "Preparing the workstation" from page 34.
EN-US
1
2
3
79
Page 80
Printing
1
1
NOTE!
To avoid possible electrical interference:
Connect the device only to power lines to which no other devices such as welding
▶
systems, electric motors, or similar are connected,
or
Ground the device.
▶
1
2
Print - dark print
Print - light print
The power for the Print process is automatically preset by the device, the settings on the
cleaning power control knob have no influence on the Print process.
If the operating mode (MODE) is set to PRINT, the blow-off function of the blow-off torch
and the pump are deactivated.
IMPORTANT! Use the correct Print electrolyte depending on the Print process:
80
Page 81
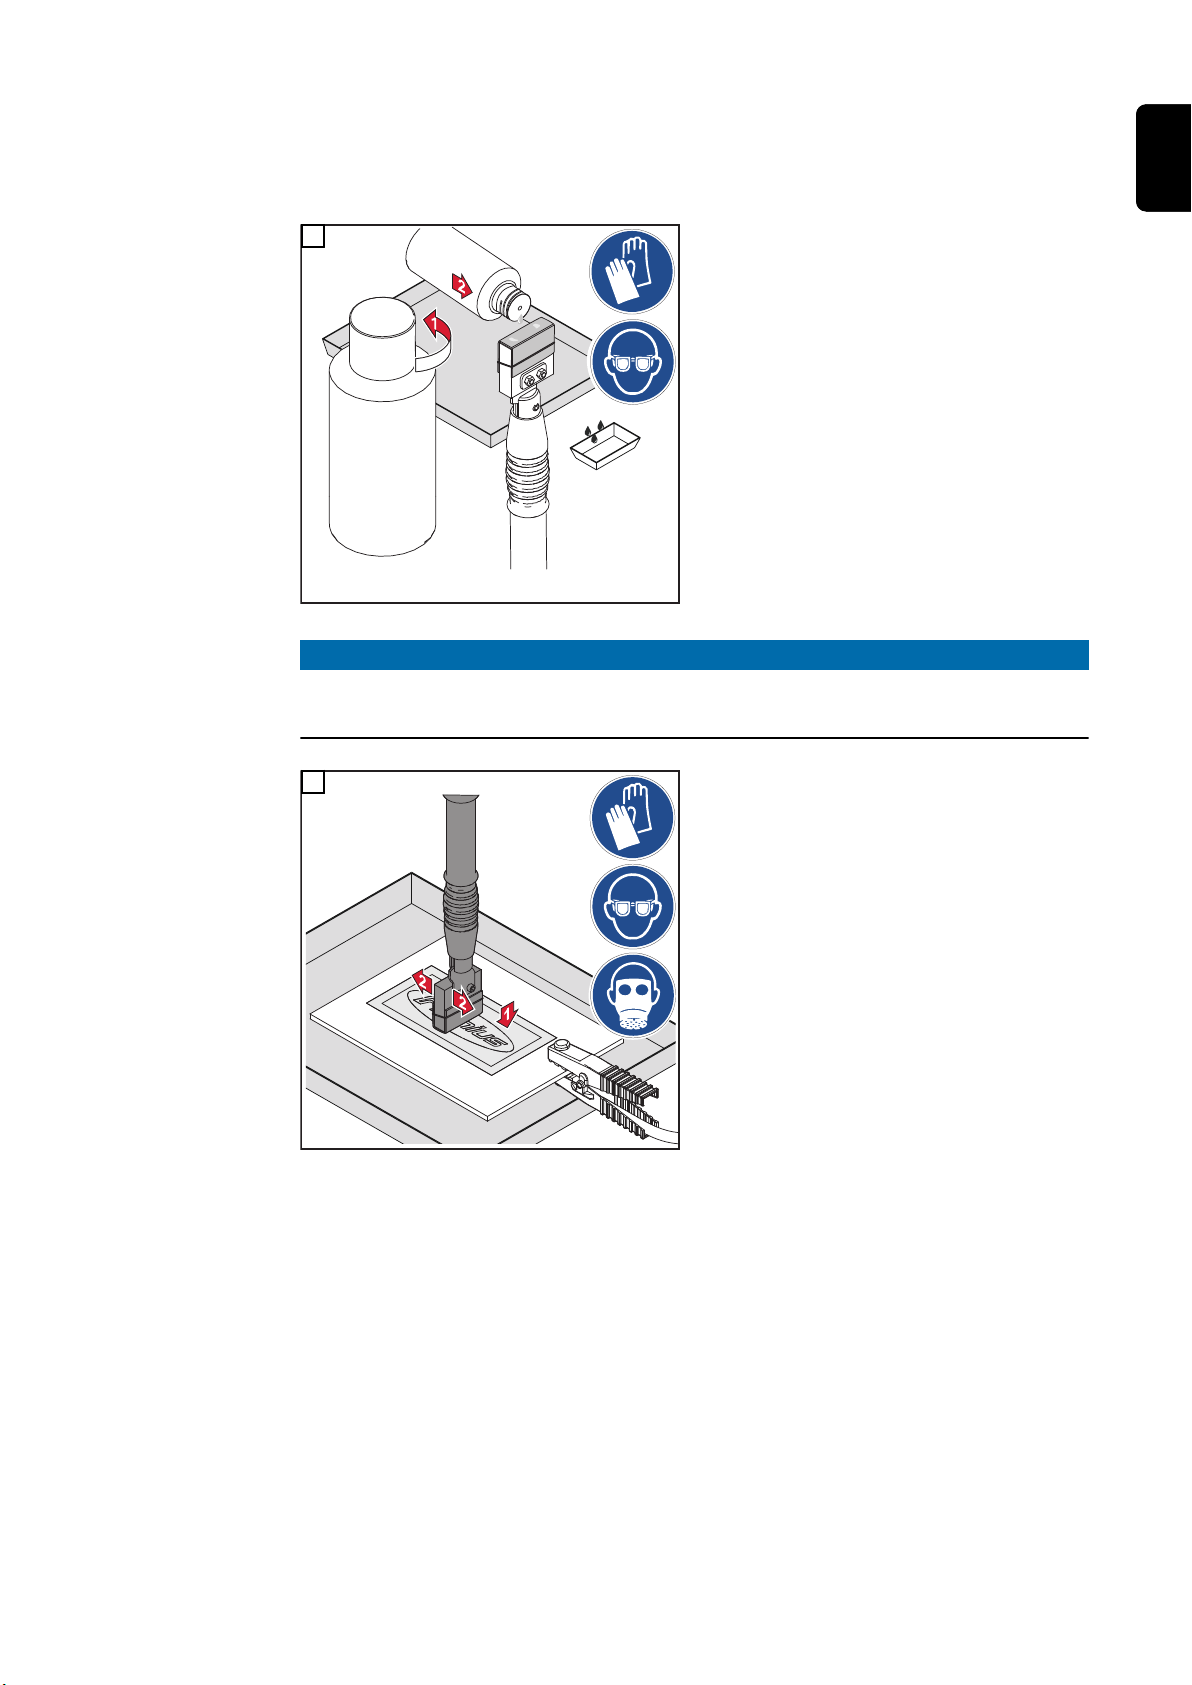
- Print electrolyte black 0.1 l ... for dark printing
Printing
electrolyte
- Print electrolyte white 0.1 l ... for light printing
- Do not mix Print electrolytes
EN-US
3
Wetting the Print felt once is sufficient for a
maximum of 15 Print operations in succession.
NOTE!
When using a new Print film or when changing the Print operating mode, carry out
a test print!
4
Position and secure the Print film on the
workpiece to be printed
Pass the Print electrode with Print felt several times over the Print film
81
Page 82
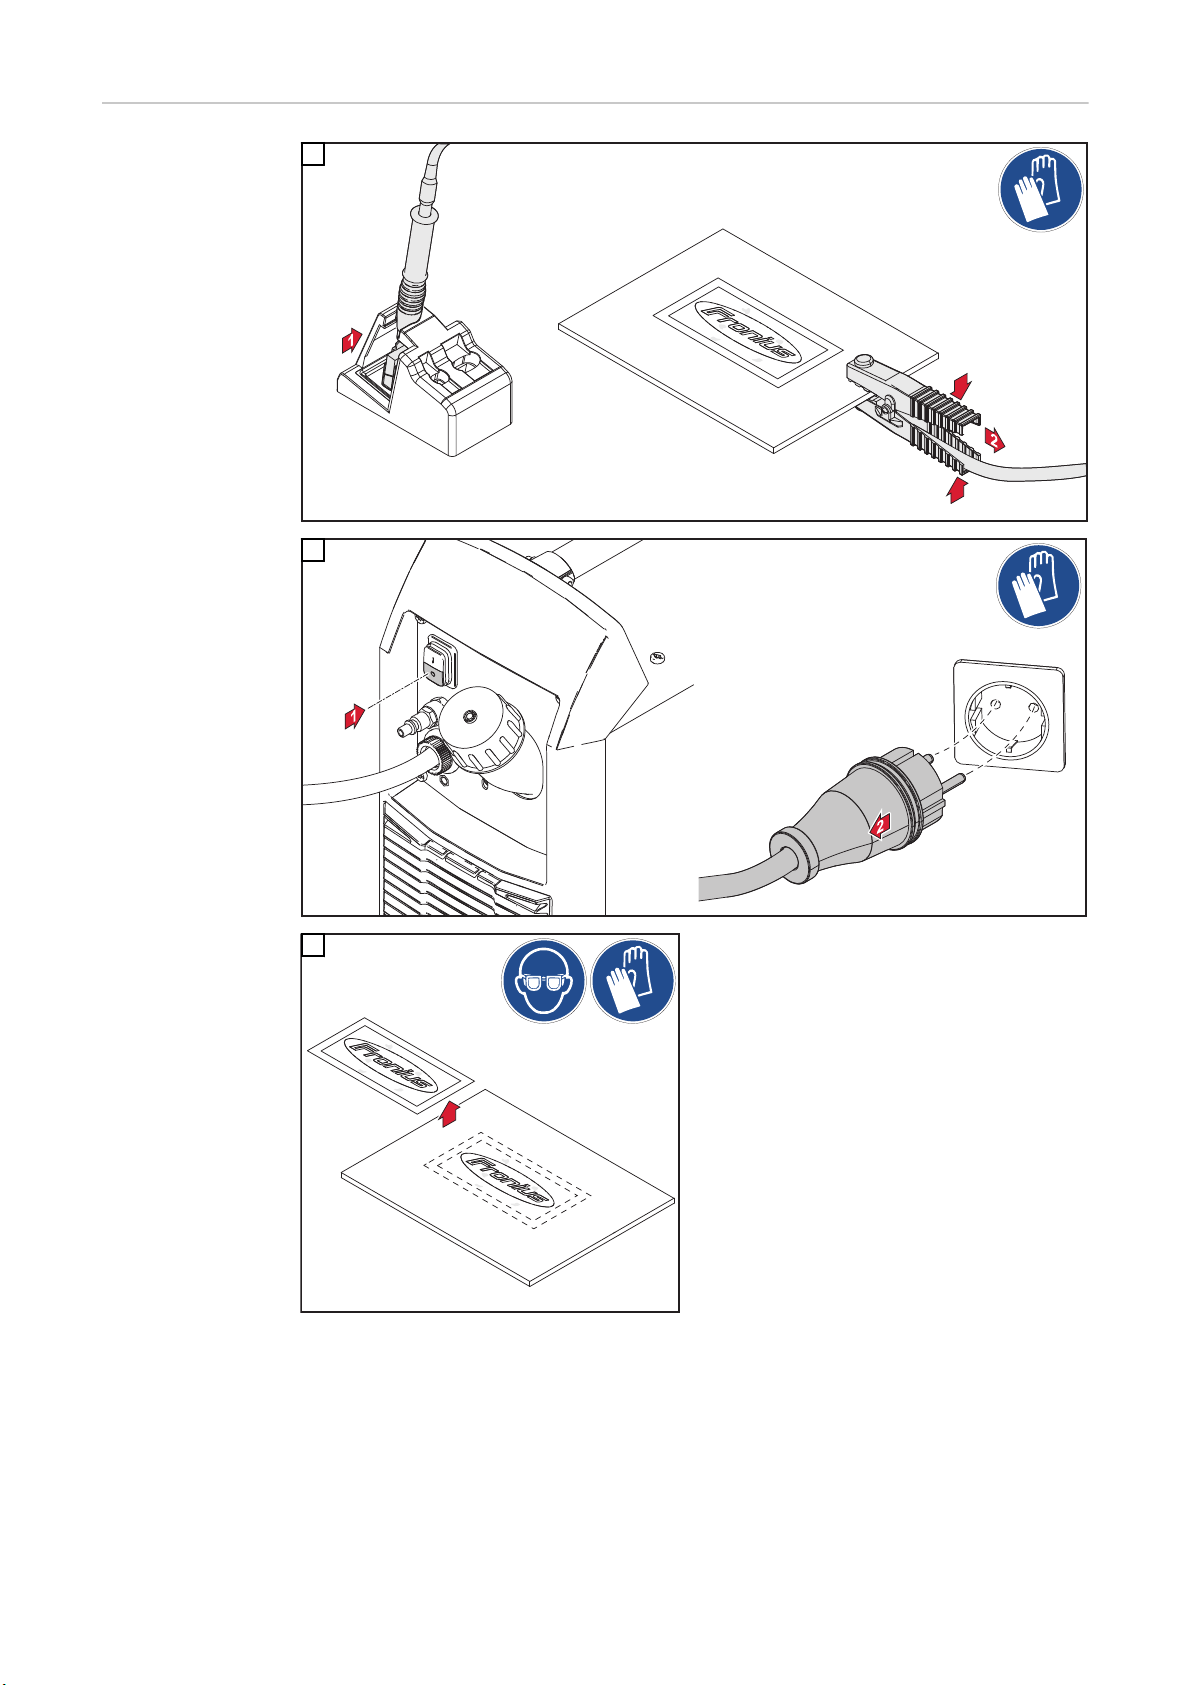
After the Print
1
process
1
2
3
82
Page 83
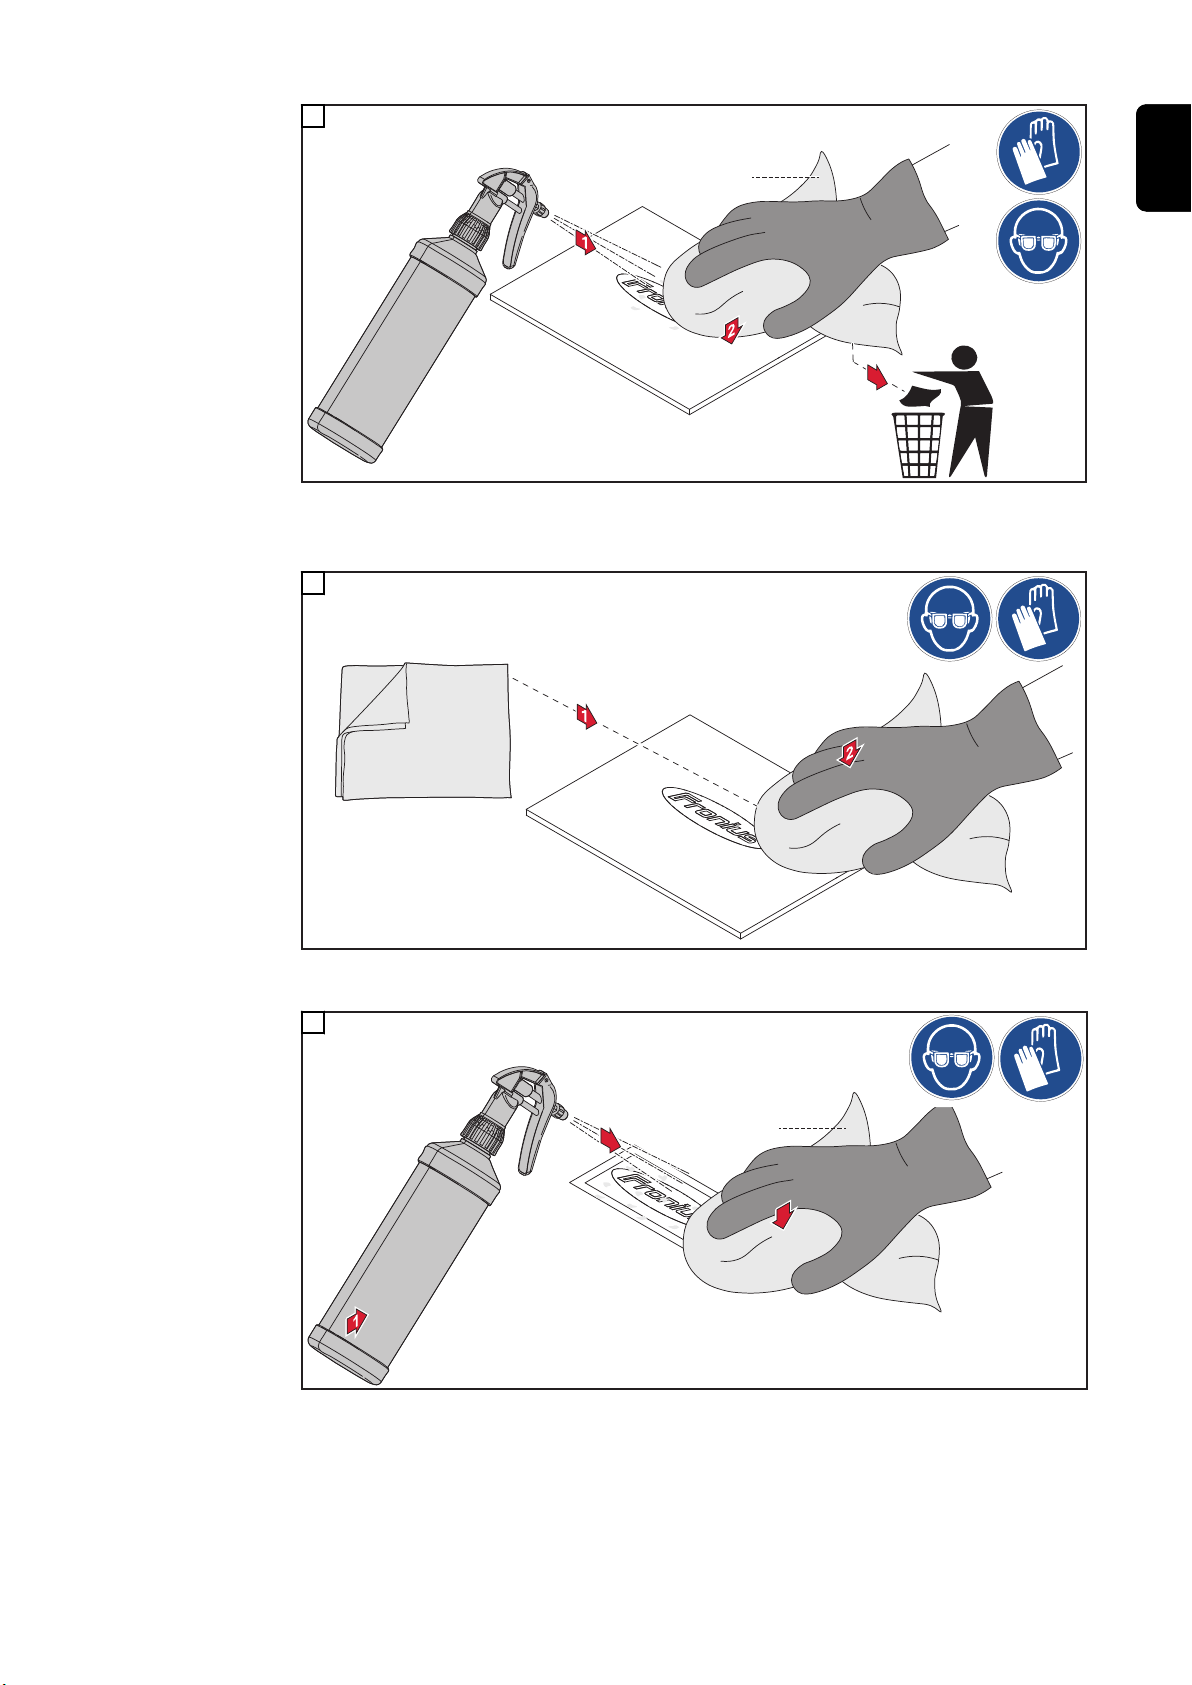
3
Neutr
a
lizer
*
4
**
2
Neutralizer
**
* As an alternative to the neutralizer, a microfiber cloth moistened with clear water
can be used.
5
EN-US
** New, dry microfiber cloth
6
** New, dry microfiber cloth - clean both sides of the Print film;
clear water can be used as an alternative to the neutralizer.
83
Page 84

84
Page 85

Service, maintenance and disposal
85
Page 86

86
Page 87

Care, maintenance
General The MagicCleaner 300 requires minimal service and maintenance under normal operat-
ing conditions. However, several points must be observed in order for the device to remain operational for years to come.
WARNING!
Danger due to improper use!
This can result in serious personal injury, damage to property and the environment.
Observe the safety data sheets of cleaning and/or Print electrolytes!
▶
Observe Safety Instructions from page 31!
▶
WARNING!
Danger from electrical current.
An electric shock can be fatal. Before any maintenance activities
Set the power switch to - O -
▶
Unplug the device from grid power
▶
Attach a clear warning sign advising others not to switch the power source back on
▶
EN-US
At every start-up - Check mains cable, grounding cable, and torch cable for damage
- Check cleaning electrodes and cleaning felt, cleaning brushes as well as Print electrodes and Print felt for wear and burns and replace if necessary;
only use original spare parts and accessories from the manufacturer.
NOTE!
The air inlet and outlet openings on the device must not be blocked or even partially covered.
At the end of
each shift
- In case of residues of cleaning agent or Print electrolyte, clean the device with neutralizer and clean cloths
- Remove cleaning felt, cleaning brushes or Print felt and rinse with clean water;
replace worn or burnt cleaning felt / cleaning brushes / Print felt
- After cooling down, rinse the cleaning and Print electrodes with clear water
- Unscrew the cleaning electrolyte from the cleaning torch and close it
- Pump the small cleaning torch empty
87
Page 88

Disposal
Disposal Used cleaning felts are considered hazardous waste.
During cleaning and polishing, heavy metals are deposited in the cleaning electrolyte
used. Used cleaning electrolytes are therefore considered hazardous waste.
Materials should be disposed of according to valid local and national regulations.
Waste electrical and electronic equipment must be collected separately and recycled in
an environmentally sound manner in accordance with the European Directive and national law. Used equipment must be returned to the distributor or through a local authorized
collection and disposal system. Proper disposal of the used device promotes sustainable
recycling of material resources. A failure to observe this may lead to potential health/
environmental impacts
88
Page 89

Technical data
89
Page 90

90
Page 91
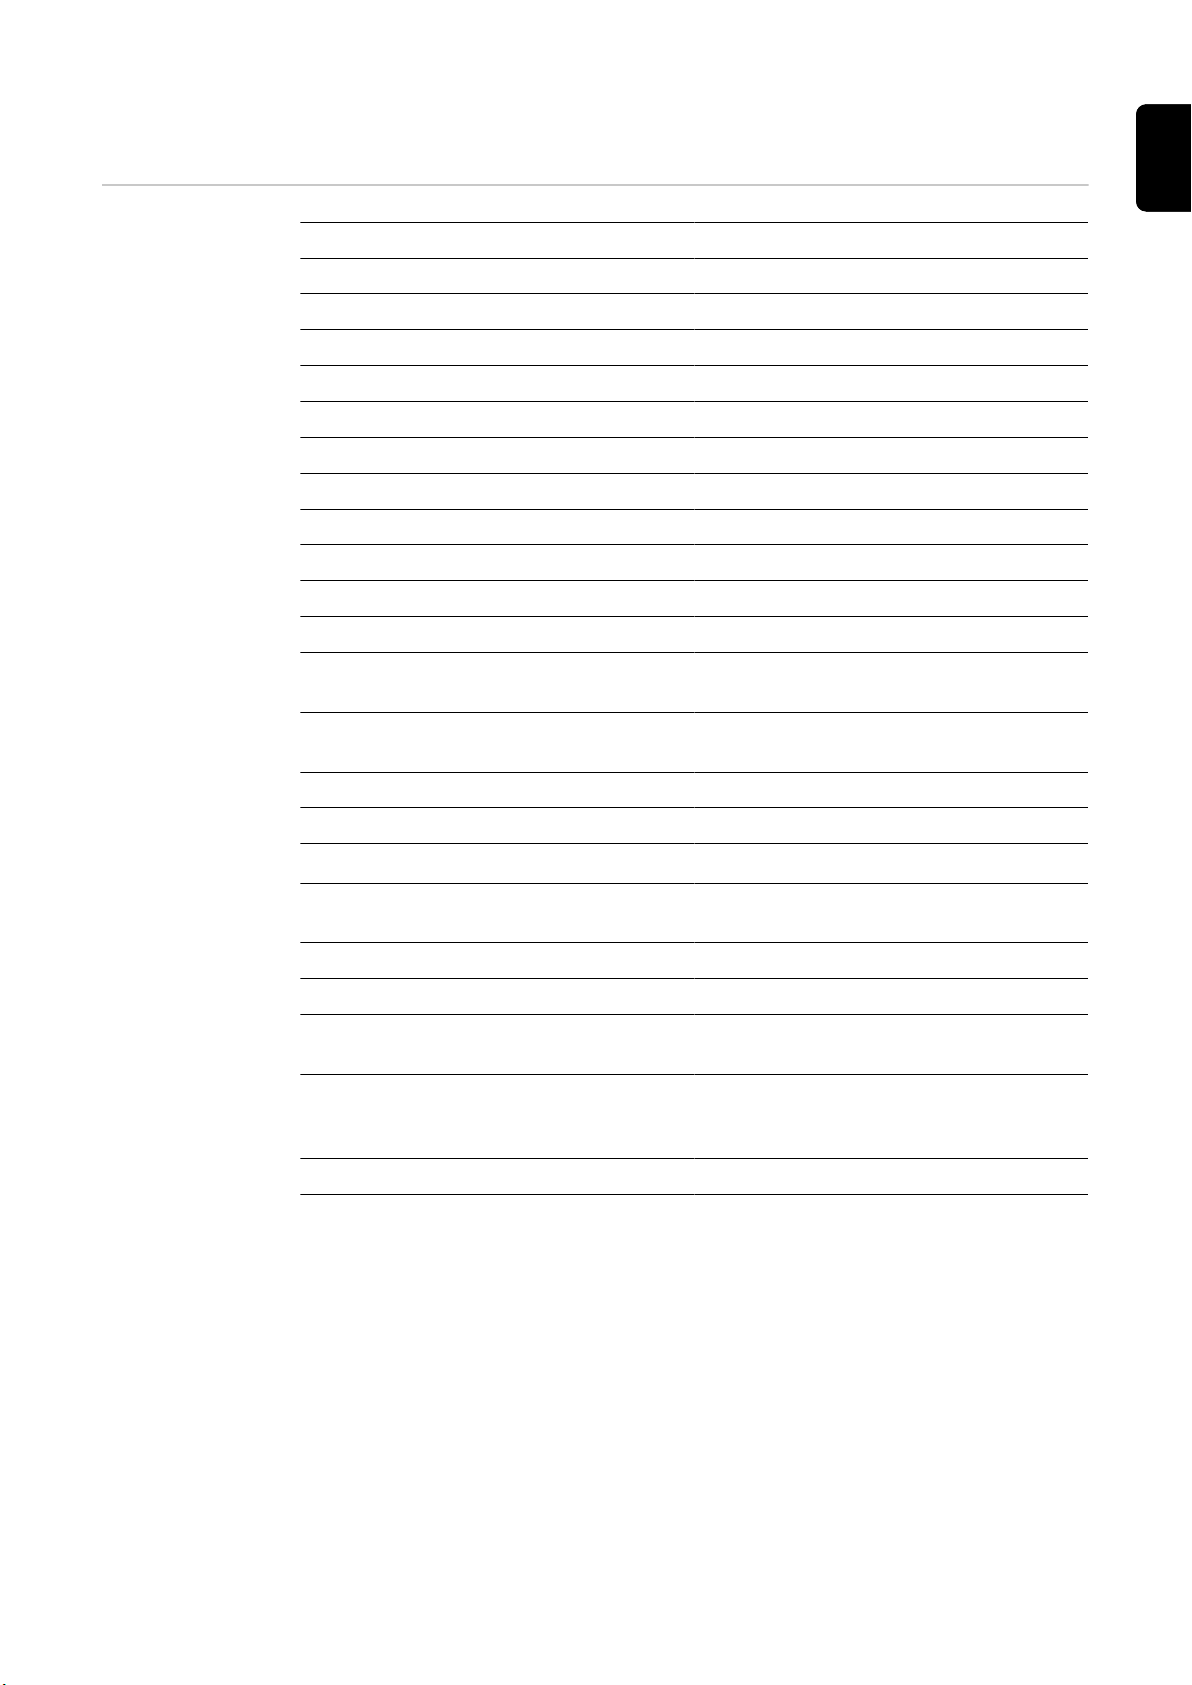
Technical data
EN-US
MagicCleaner
300 /EF
300 /CN
300 /np
Mains voltage ~ 1 x 230 V
Mains voltage tolerance -15 / +10 %
Mains frequency 50/60 Hz
Mains fuse protection 10 A slow-blow
Max. primary power 1000 VA
Output current 0 - 30 A
Output voltage 0 - 30 V
Output power 900 W
Open circuit voltage 30 V
Delivery rate 1 - 3.6 l/hrs
Detergent content 1.8 l
Protection class IP 23
Dimensions l / w / h 558 / 210 / 369 mm
21,97 / 8,26 / 14,52 inch
Weight 14 kg
30.86 lb.
Noise generation > 10 dB (A)
Ambient temperature 0 - +40 °C / 32 - 104 °F
Bearing temperature
Max. altitude above sea level 2000 m
Overvoltage category III
Pollution degree according to IEC60664 3 3
EMC emission class A
Toxic emissions during operation
(measured according to UNI EN 689/97
part 5)
Safety symbols CE, S, CCC
(1)
without cleaning electrolyte
(1)
Standard MAK 1 mg/m³ < 0.042 mg/m³
-20 - +55 °C / -4 - 131 °F
6561 feet 8.16 inch
Industry
91
Page 92

MagicCleaner
300 MV/B
300 MV/np
Mains voltage ~ 1 x 100 - 110 V
Mains voltage tolerance -15 / +10 %
Mains frequency 50/60 Hz
Mains fuse protection 6.3 A slow-blow
Max. primary power 500 VA
Output current max. 15 A
Output voltage
AC
DC
10 V
30 V
Output power 450 W
Open circuit voltage 30 V
Delivery rate 1 - 3.6 L/h
Detergent content 1.8 L
Protection class IP 23
Dimensions l / w / h 558 / 210 / 369 mm
21.97 / 8.26 / 14.52 inch
Weight 14 kg
30.86 lb.
Noise generation > 10 dB (A)
Ambient temperature 0 - +40 °C / 32 - 104 °F
Bearing temperature
(1)
-20 - +55 °C / -4 - 131 °F
Max. altitude above sea level 2000 m
6561 feet 8.16 inch.
Overvoltage category III
Pollution degree according to IEC60664 3 3
EMC emission class A
Industry
Toxic emissions during operation
Standard MAK 1 mg/m³ < 0.042 mg/m³
(measured according to UNI EN 689/97
part 5)
Safety symbols CE, S, CCC
(1)
without cleaning electrolyte
92
Page 93

EN-US
93
Page 94

94
Page 95

EN-US
95
Page 96
Fronius International GmbH
Froniusstraße 1
4643 Pettenbach
Austria
www.fronius.com
Under www.fronius.com/contact you will find the adresses
of all Fronius Sales & Service Partners and locations.
spareparts.fronius.com
SPAREPARTS
ONLINE
 Loading...